

Users manual 4 - 140
GB
Gebruikershandleiding 27 - 37
NL
Gebrauchsanweisung 15 - 26
DE
Mode d’emploi 38 - 48
Manual de usuario 60 - 70
Instrukcja obsługi 49 - 59
FR
PL
ES
RM218 - 10.006.74
-1-
LED
1
Activate - Aktivieren - Activar = 5sec.
Test - Prüfung - Prueba = 1x

-2-
Lock - Fixierstift
Fijación pin
2
4
3
5
a
b

-3-
Test - Prüfung - Prueba
Test - Prüfung - Prueba
Entree
50cm
MINIMUM
EXTRA
MINIMUM
EXTRA
10
0cm
GROUND/ERDGESCHOSS/BEGANEGROND/Pr.ETAGE/PARTER/PLANTA BAJA
ATTIC/BODEN/ZOLDER/MANSARD/PODDASZE/ÁTICO

-4-
IMPORTANT INFORMATION
1. General product information:
The smoke alarm device, if properly installed and maintained,
sounds the alarm at an early stage of the fire. This can give
you those extra valuable seconds to evacuate your home and
call the fire department. The smoke alarm device works with
an 3V lithium battery. Under normal conditions the service life
of the battery is up to 10 years. When the battery is (almost)
empty, the smoke detector indicates this by an audible “beep”.
This indicator sounds every 30-40 seconds during minimum 30
days. End of life, replace complete smoke alarm device!
2. Make/model number: Smartwares RM218
3. Power supply: 3V DC CR123A Lithium
(not replaceable battery)
4. Certification marks:
5. Scope of application: Smoke alarm device for buildings with
residential function.
GB
SMOKE ALARM DEVICE
0786
RM218-001CPR
14
EN14604:2005/AC:2008
Smartwares RM218
G214064

-5-
6. Function: Gives a warning when smoke caused by a fire is
detected.
7. Description: Smoke alarm device based on the photocell
principle, which means that the alarm monitors the air for
smoke caused by fire. smoke alarm device does not detect
heat, gas or fire.
8. Advice: Keep these instructions in a safe,
easily accessible place.
9. Caution: The alarm is designed in order to detect smoke; it
cannot prevent a fire.
10.Caution: The smoke alarm device should not be painted.
Protect the smoke alarm device from dust during renovation
work.
11.Caution: The smoke alarm device should not be
taped/covered (this causes loss of functionality).
12.Caution: Keep the smoke alarm device out of the reach of
children.
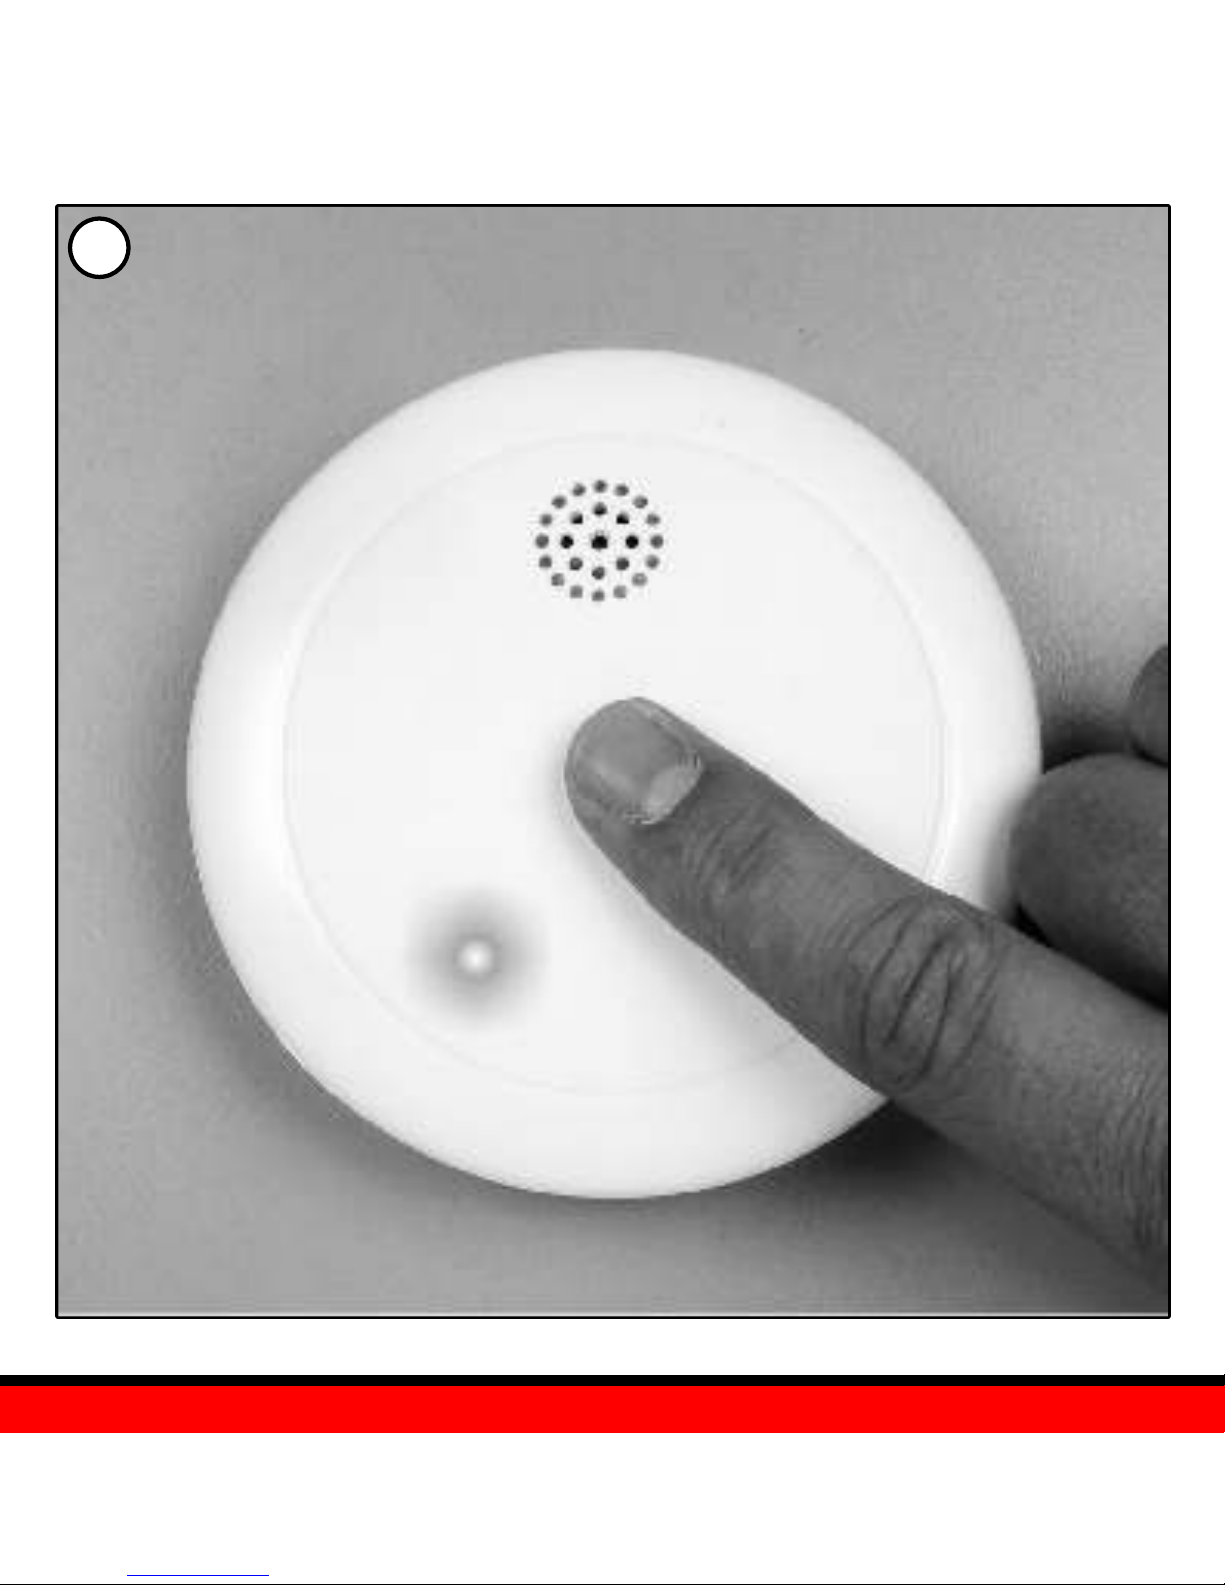
Press test button (1) and hold it for above 5 seconds until LED
lights, and release it within 1 second, the unit will generate a
“beep” indicates that it is activated and goes into work status.
CAUTION: Activate smoke alarm first or else there is no function
for this unit.
Test the unit to ensure proper operation by pressing the test
button, this will sound the alarm if the electronic circuitry, horn,
and battery are working. If no alarm sounds, there is a defective
battery or other failure.
ACTIVATION
TESTING

-6-
NOTE: WEEKLY TESTING IS REQUIERED
DO NOT: Use an open flame to test your alarm, you could
damage the alarm or ignite combustible materials and start a fire.
CAUTION: Due to the loudness (85 decibels) of the alarm.
Always stand an arms-length always from the unit when testing.
Test the alarm weekly to ensure proper operation. Erratic or low
sound coming from your alarm may indicate a defective alarm.
1. What is the best place to mount a smoke alarm device
* In the middle of the ceiling but at least 50cm from every edge.
* At least one on each floor.
* In every bedroom.
* In the hallway and stairwell.
* On the landing.
* In the living room.
* In the storage room or rooms with electrical appliances.
2. The alarm should not be installed in:
* A space where the temperature can drop below 4
and above 40°C
* In humid areas.
* Right next to doors or windows and not near a fan or radiator.
Do not install smoke alarm device on the Wall !
INSTALATION

-7-
Do not install the alarm in a place with difficult access, which could
make it difficult to operate the test button and maintenance. The
alarm can be installed quickly and easily. Install the base plate on the
selected location using the provided screws.
3. Mounting
* Take the fixation pin out of the ground plate
* Screw the mounting plate with 2 screws on the celling
* Activate the smoke alarm device before mounting
* Fix the smoke alarm device on the mounting plate by turning,
till you hear a “click”
* Put the fixation pin in the hole
* Test the smoke alarm device by pushing the test button
4. Caution
* Do not cover the smoke alarm device with tape! When SMOKE
is detected, you will hear a loud intermittent sound (85dB).
5. Recommendation
* Increase the detection area by installing several smoke alarm
devices
During the smoke alarm is alarming, you push the test button, it will
be paused the smoke alarm alarming for approx. 10 minutes. The
red LED will flash every 8 seconds, it indicates the smoke alarm
device is running into the hush mode. >>>
ALARM SILENCE (hush mode)

-8-
Smoke alarm devices are designed to minimize nuisance alarms.
Combustion particles from cooking may set off the alarm if the alarm
is located close to the cooking area. Large quantities of combustible
particles are generated from spills or when grilling/frying. Using the
fan on a range hood that vents to outside (non-recirculating type)
will also help remove these combustible particles from the kitchen.
The alarm silence (test button) is extremely useful in a kitchen area
or other areas prone to nuisance. The hush feature is to be used only
when a known alarm condition, such as smoke from cooking
activates the alarm. The smoke alarm device is desensitized by push
the alarm silence (hush mode) on the smoke alarm device cover, if
the smoke is not too dense, the alarm will silence to indicate that the
alarm is in a temporarily desensitized condition. The smoke alarm
device will automatically reset after approximately 10 minutes, if
after this period, particles of combustion are still present, the alarm
will sound again. The alarm silencer (hush mode) can be repeatedly
until the air has been cleared of the condition causing the alarm.
NOTE: Dense smoke will override the alarm silencer and sound a
continuous alarm, the smoke alarm goes back to normal work
status from hush mode
CAUTION: Before using the alarm silence (hush), identify the
source of the smoke and be certain a safe condition exists.

-9-
PREVENTIVE MAINTENANCE
IMPORTANT INSTRUCTIONS IN CASE OF FIRE ALARM
Testing
The smoke alarm device is provided with a test button. Push it in
until the alarm sounds. The signal stops when the button is
released. Test the alarm at least once a week.
Cleaning
For the best performance, the smoke alarm device must be
dusted once a month and vacuumed every 6 months. Remove the
detector from the ceiling plate and carefully vacuum the detector.
Do not touch the inside with the nozzle of the vacuum cleaner.
Then test the alarm.
Caution : The smoke detector loses its effectiveness if it is
covered.
Warning : The smoke alarm device should not be painted /
taped. Do not test the smoke alarm device with
candles, flames, cigarettes, etc.
A smoke alarm device is part of your fire protection together with fire
extinguishers, escape ladders, ropes as well as your choice of
building materials during renovations. Also make sure that there is
an escape route; discuss this with your children, make sure any room
can be evacuated without opening the door, >>>

-10-
for example through a window. If the smoke alarm device is not
working properly, consult the instructions of the supplier. Keep the
manual within reach. The local fire department can provide more
information about fire prevention. Keep the smoke detector away
from children.
Warning
If there is any doubt about the cause of the alarm, assume that there
really is a fire and carry out your emergency plan. Please do not
assume that it is a false alarm. Dust can cause excessive sensitivity.
Vacuum as indicated above. Do not paint the smoke alarm device.
False alarm
Unusual atmospheric conditions may be the cause that the very
sensitive smoke detector gives a false alarm. If there is no fire,
ventilate the room and / or blow clean air in the smoke alarm device,
for example, by waving a newspaper under the smoke alarm device
until the alarm stops. Once it is clean, there is an automatic reset.
Recommendation
We recommend that you do not use smoke alarm devices that are
older than 10 years in order to limit the risk of defects. The smoke
alarm device is not a substitute for insurance for furniture, home,
life, or other form of insurance.

-11-
SMARTWARES SAFETY & LIGHTING
Can never be held liable for loss and / or damages of any kind,
including incidental and / or consequential damages arising out of
the fact that the signal from the smoke alarm device is not triggered
by smoke or fire.
Errors are indicated by the following:
1. The alarm does not sound when pressing the test button.
* Carefully vacuum the smoke alarm device (see Cleaning), test
afterwards. Still no reaction; replace smoke detector
2. The smoke alarm device “chirp” with red LED flashes once
every 40 sec.
* The battery is under low battery status, please replace the
smoke alarm device; battery is not replaceable.
3. Smoke alarm device “chirp” occurs every 40 seconds
(alarm goes into fault mode)
* Clean smoke alarm device. Please refer to maintenance
section. When problem is not solved replace smoke alarm
device.
4. Smoke alarm device sounds unwanted alarms intermittently or
when resident are cooking or taking showers.
* Press test button to pause alarm.
* Clean smoke alarm device (maintenance section)
* Move smoke alarm device to other place and press test button
>>>
TROUBLESHOOTING
-12-
If these actions do not solve the problem, do not try to repair it
yourself. If the problems occur within the warranty period and are
under warranty conditions, return the smoke alarm device plus valid
proof of purchase with a clear description of the complaints to:
SPECIFICATIONS
Power : 3V DC CR123A Lithium
(not replaceable battery)
Operating temperature : 4 ~ 38°C
Operating humidity : 25 ~ 85%
Smoke sensor : Optical
Alarm volume : > 85db(a) at 3 meters.
Pause time : approx. 10 minutes
: For indoor use only.
: Read the manual before use, and keep it in a safe
place for future use and for product maintenance.
-13-
This product has factory warranty according to EU regulations. Guarantee lasts for
the number of years shown on the packaging, starting from the date of purchase.
Keep the receipt - proof of purchase is required in order to rely on guarantee. In
the case of problems, please contact with the store where you purchased the
product. For further product information visit our website: www.smartwares.eu.
You can also register your product there.
GB PRODUCT GUARANTEE
Correct Disposal of This Product (Waste Electrical & Electronic Equipment)
(Applicable in the European Union and other European countries with
separate collection systems)
This marking shown on the product or its literature, indicates that it should
not be disposed with other household wastes at the end of its working life. To
prevent possible harm to the environment or human health from uncontrolled
waste disposal, please separate this from other types of wastes and recycle it
responsibly to promote the sustainable reuse of material resources.Household users
should contact either the retailer where they purchased this product, or their local
government office, for details of where and how they can take this item for
environmentally safe recycling. Business users should contact their supplier and
check the terms and conditions of the purchase contract. This product should not be
mixed with other commercial wastes for disposal.
* Always throw empty batteries to the battery recycling bin.
* If the battery is built-in inside the product, open the product and
remove the battery.
DISPOSAL
-14-
MAINTENANCE
The devices are maintenance-free, so never open them. The guarantee
becomes void when you open the appliance.Only clean the outside of the
devices with a soft, dry cloth or a brush. Prior to cleaning, remove the
devices from all voltage sources. Do not use any carboxylic cleaning
agents or petrol, alcohol or similar. These attack the surfaces of the devices. Besides,
the vapors are hazardous to your health and explosive. Do not use any sharp edged
tools, screw drivers, metal brushes or similar for cleaning. Warning: Protect the
battery against fire, too much heat and sunshine.
* Make sure that all electric connections and connection cables meet the pertaining
regulations and are in conformity with the operating instructions.
* Do not overload electrical outlets or extension cords, fire or electric shocks can
be the result
* Please contact an expert in case you have any doubts about the mode of
operation, the safety or connecting the appliances.
* Keep all parts away from young children’s reach
* Do not store this item on wet, very cold or warm places, this can damage the
electronic circuit boards.
* Avoid dropping or shocks, this can damage the electronic boards
* Never replace damaged power cables yourself! In such a case, remove them
from the net and take the devices to a workshop.
* Repairs or opening of this item may only be performed by an authorised
workshop.
* Wireless systems are subject to interference from cordless phones, microwaves,
and other wireless devices operating in the 2.4GHz range. Keep the system AT
LEAST 10 ft away from the devices during installation and operation.
* Do not swallow batteries. Keep batteries out of the reach of children.
SAFETY
DE
BEDIENUNGSANLEITUNG
1. Allgemeine Produktinformationen:
Der Rauchwarnmelder, wenn ordnungsgemäß installiert und
gewartet, schlägt in einer frühen Phase des Feuers Alarm.
Dies kann Ihnen diese besonders wertvollen Sekunden geben,
um Ihr Haus zu evakuieren und die Feuerwehr zu rufen. Der
Rauchwarnmelder wird mit einer 3V Lithiumbatterie betrieben.
Unter normalen Bedingungen beträgt die Lebensdauer der
Batterie bis zu 10 Jahre. Wenn die Batterie (fast) leer ist,
weist der Rauchwarnmelder mit einem hörbaren “Piep” darauf
hin. Dieser Hinweis ertönt alle 30-40 Sekunden, mindestens
30 Tage lang. Beim Ertönen des Batterie-leer-Signals sollte
der Rauchwarnmelder schnellstmöglich ersetzt werden.
2. Fabrikat-/Modellnummer: Smartwares RM218
3. Stromversorgung: 3V DC CR123A Lithium
(nicht austauschbare Batterie)
4. Prüfzeichen:
5. Anwendungsbereich: Rauchmelder für Gebäude mit
Wohnfunktion.
RAUCHWARNMELDER
-15-
0786
RM218-001CPR
14
EN14604:2005/AC:2008
Smartwares RM218
G214064

-16-
6. Funktion: Gibt eine Warnung bei der Erkennung von
Brandrauch.
7. Beschreibung: Der Rauchwarnmelder basiert auf dem
Fotozellenprinzip, was bedeutet, dass der Rauchwarnmelder
die Luft auf Rauch überwacht. Der Rauchwarnmelder erkennt
keine Hitze, Gas oder Feuer.
8. Hinweis: Bitte diese Anleitung sorgfältig aufbewahren.
9. Achtung: Der Rauchwarnmelder wurde entwickelt, um Rauch
zu erkennen. Der Rauchwarnmelder kann kein Feuer
verhindern.
10. Achtung: Der Rauchwarnmelder darf nicht angestrichen
werden. Schützen Sie den Rauchwarnmelder vor Staub
während Renovierungsarbeiten.
11. Achtung: Der Rauchwarnmelder darf nicht abgeklebt /
abgedeckt werden (dies verursacht Funktionsverlust).
12. Achtung: Halten Sie den Rauchwarnmelder außerhalb der
Reichweite von Kindern.
Drücken Sie die Prüftaste (1) und halten Sie diese mehr als 5
Sekunden lang gedrückt, bis die LED leuchtet und lassen Sie sie
innerhalb von 1 Sekunde wieder los, der Rauchwarnmelder wird
einen “Piep” erzeugen, der darauf hinweist, dass er aktiviert ist
und in den Betriebsstatus übergeht. ACHTUNG: Der Rauchwarnmelder muss zuerst aktiviert werden, andernfalls ist dieser nicht
funktionsbereit.
AKTIVIERUNG

-17-
PRÜFUNG
INSTALLATION
Prüfen Sie den Rauchwarnmelder durch Drücken der Prüftaste, um
den ordnungsgemäßen Betrieb zu gewährleisten. Durch die
Prüfung wird der Alarm ausgelöst, der die Funktionsbereitschaft
des Rauchwarnmelders anzeigt. Wenn kein Alarm ertönt, ist ein
Fehler aufgetreten.
ANMERKUNG:
Eine wöchentliche Prüfung wird empfohlen.
SIE DÜRFEN NICHT:
Eine offene Flamme verwenden, um den Rauchwarnmelder zu
prüfen. Sie könnten den Rauchwarnmelder dadurch beschädigen,
oder brennbare Stoffe entzünden und ein Feuer entfachen.
ACHTUNG:
Aufgrund der Lautstärke (85 Dezibel) des Rauchwarnmelders,
sollten Sie beim Prüfen des Rauchwarnmelders eine Armlänge
Abstand von dem Gerät halten. Ein unregelmäßiger oder niedrigen
Ton Ihres Rauchwarnmelders weist auf einen Defekt hin.
1. In Wohnungen müssen Schlafräume und Kinderzimmer sowie
Flure, über die Rettungswege von Aufenthaltsräumen führen,
jeweils mindestens einen Rauchwarnmelder haben. Dieser
muss so eingebaut oder angebracht und betrieben werden,
dass Brandrauch frühzeitig erkannt und gemeldet wird.
* An der Decke, möglichst in der Raummitte. >>>

-18-
* mind. 50 cm von Wänden, Einrichtungsgegenständen und
Lampen entfernt.
Rauchwarnmelder nicht an der Wand montieren!
Wir empfehlen die Einhaltung der Anwendungsnorm DIN 14676
für Rauchwarnmelder, da in dieser Norm die Anforderungen zu
Montage, Wartung und Austausch von Rauchwarnmeldern
präzisiert sind.
Die Landesbauordnungen der jeweiligen Bundesländer geben
Aufschluss über die gesetzliche Verpflichtung der Verwendung von
Rauchwarnmeldern.
2. Der Rauchwarnmelder sollte an folgenden Standorten nicht
installiert werden:
* Einem Ort, wo die Temperatur auf unter 4°C sinken und über
38°steigen kann
* In Räumen mit hoher Luftfeuchtigkeit (z.B. Badezimmer).
* Direkt neben Türen oder Fenstern und nicht in der Nähe eines
Ventilators oder einer Heizung.
Installieren Sie den Rauchwarnmelder möglichst nicht an einem
schwer zugänglichen Ort, an dem es schwierig sein könnte, die
Prüftaste zu bedienen.
3. Montage
* Nehmen Sie den Fixierstift von der Bodenplatte ab.
* Befestigen Sie die Montageplatte mit 2 Schrauben an der
Decke. >>>

-19-
* Aktivieren Sie den Melder vor der Montage.
* Befestigen Sie den Melder auf der Montageplatte durch drehen,
bis Sie einen “Klick” hören.
* Stecken Sie den Fixierstift in das Loch.
* Prüfen Sie den Rauchmelder durch Drücken der Prüftaste.
4. Alarmierung
* Wenn Rauch erkannt wird, werden Sie einen lauten
unterbrochenen Ton hören (85dB).
5. Empfehlung
* Erhöhen Sie den Erkennungsbereich, indem Sie mehrere
Rauchmelder installieren.
Hinweis:
Setzen Sie den Rauchmelder nicht in Räumen ein, in denen unter
normalen Bedingungen starker Dampf, Staub oder Rauch
entsteht. Bedingt durch das Streulichtprinzip kann durch
ungünstige Umgebungsfaktoren, wie z.B. Staub, Kondenswasser
oder Zugluft, der Alarm ausgelöst werden.
Ungewöhnliche Witterungsbedingungen können ebenfalls ein
Grund dafür sein, dass der sehr sensible Rauchwarnmelder einen
Störalarm gibt (kondensierte Luftfeuchtigkeit).
Im Falle eines Störalarmes, der offensichtlich nicht durch
Brandrauch ausgelöst wurde, können Sie den >>>
ALARMSTUMMSCHALTUNG (verstummter Modus)

-20-
Rauchwarnmelde rstummschalten. Drücken Sie während des
Alarms die Prüftaste, dadurch stoppt der Alarm für etwa 10
Minuten. Die rote LED wird alle 8 Sekunden blinken, sie weist
darauf hin, dass sich der Rauchwarnmelder im verstummten
Modus befindet. Der Rauch-warnmelder wird sich automatisch
nach etwa 10 Minuten in den Normalmodus zurücksetzen. Wenn
nach diesem Zeitraum immer noch Partikel in der Messkammer
vorhanden sind, wird der Alarm wieder ertönen.
Anmerkung: Dichter Rauch wird die Stummschaltung
deaktivieren der Alarm wird ertönen.
Der Rauchwarnmelder ist mit einer Prüftaste versehen. Drücken
Sie die Taste bis der Alarm ertönt. Das Signal stoppt, wenn die
Taste losgelassen wird. Prüfen Sie den Rauchwarnmelder
wöchentlich.
Um die einwandfreie Funktion des Rauchwarnmelders sicherzustellen, müssen die Raucheintrittsöffnungen frei von Staub und
Schmutz gehalten werden.
Achtung : Der Rauchwarnmelder verliert seine Effektivität,
wenn er bedeckt ist.
PRÜFUNG
REINIGUNG

-21-
Warnung : Der Rauchwarnmelder darf nicht angestrichen /
abgeklebt werden. Prüfen Sie den Rauchwarnmelder
nicht mit Kerzen, Flammen, Zigaretten etc.
Verständigen Sie sofort die Feuerwehr. Bleiben Sie ruhig und
antworten Sie deutlich auf die Fragen die Ihnen gestellt werden.
Retten Sie sich und gefährdete Personen aus dem Gefahrenbereich. Halten Sie sich bei starker Rauchentwicklung in
Bodennähe auf und pressen Sie sich ein feuchtes Tuch vor Mund
und Nase. Benutzen Sie keine Aufzüge. Verschließen Sie die Türen
und Fenster brennender Räume, um eine Ausweitung von Feuer
und Rauch zu verhindern. Ist eine Flucht ins Freie nicht möglich,
suchen Sie sich einen sicheren Raum, schließen Sie die Tür und
machen Sie sich am Fenster bemerkbar. Dichten Sie die Spalten
an der Tür mit nassen Laken oder Handtüchern ab, um ein
Eindringen des Rauchs zu verhindern.
Warnung
Wenn es Zweifel über die Ursache des Alarms gibt, gehen Sie
davon aus, dass es wirklich Feuer ist und führen Sie Ihren
Notfallplan durch. Bitte gehen Sie nicht davon auf, dass es ein
Fehlalarm ist.
WICHTIGE ANWEISUNGEN
IM FALLE EINES BRANDALARMES

-22-
Empfehlung
Verwenden Sie keine Rauchwarnmelder, die älter als 10 Jahre alt
sind. Der Rauchwarnmelder ist kein Ersatz für eine Versicherung.
Rauchwarnmelder sind so zu montieren, dass sie frühzeitig vor
Brandrauch warnen können. Rauchwarnmelder verhindern weder
die Entstehung von Bränden noch bekämpfen sie diese selbsttätig.
Bitte bewahren Sie die Bedienungsanleitung zu Ihrem Rauchwarnmelder sorgfältig auf.
Smartwares Safety & Lighting
Kann niemals für einen Verlust und / oder Schäden jeglicher Art
haftbar gemacht werden, einschließlich mittelbaren und / oder
Folgeschäden, die aus der Tatsache heraus entstehen, dass das
Signal vom Rauchwarnmelder nicht durch Rauch oder Feuer
ausgelöst wird.
Fehler können folgendermaßen angezeigt werden:
1. Der Alarm ertönt nicht bei Drücken der Prüftaste.
* Ersetzen Sie den Rauchwarnmelder.
2. Der Melder “piept” und die rote LED blinkt einmal alle 40 Sek.
* Der Batteriestatus ist niedrig, ersetzen Sie bitte den
Rauchwarnmelder. Die Batterie ist fest eingebaut und nicht
auswechselbar.
>>>
FEHLERBEHEBUNG

-23-
3. Der Rauchwarnmelder schlägt ungewollt Alarm (Fehlalarm).
* Drücken Sie die Prüftaste, um den Rauchwarnmelder
stummzuschalten.
* Montieren Sie den Rauchwarnmelder an einen anderen Ort,
wenn die Störquelle bestehen bleibt (Kondensfeuchtigkeit,
Staub, Kochdämpfe etc.).
Führen Sie nach einer Störung oder Wiedermontage einen Test
des Rauchwarnmelders durch drücken der Prüftaste durch.
Wenn diese Maßnahmen das Problem nicht lösen, versuchen Sie
nicht den Melder selbst zu reparieren. Wenn die Probleme
innerhalb des Garantiezeitraums auftreten und unter Garantiebedingungen sind, geben Sie den Rauchwarnmelder zurück, plus
eines gültigen Kaufbelegs mit einer klaren Fehlerbeschreibung an:

-24-
Technische Daten
Strom : 3V DC CR123A Lithium
(nicht austauschbare Batterie)
Betriebstemperatur : 4 ~ 38°C
Betriebsluftfeuchtigkeit : 25 ~ 85%
Rauchsensor : Optisch
Alarmlautstärke : > 85db(a) bei 3 Metern
Stummschaltzeit : etwa 10 Minuten
: Nur für den Hausgebrauch
: Lesen Sie das Handbuch vor der
Verwendung und bewahren Sie es an
einem sicher Ort für zukünftige
Verwendung und zur Produktwartung
auf.

-25-
Dieses Produkt hat Werksgarantie gemäß den EU-Vorschriften. Die Garantie gilt für
die Anzahl der Jahre, die auf der Verpackung angegeben ist, beginnend vom
Kaufdatum. Bewahren Sie den Kaufbeleg auf - er ist erforderlich, um die Garantie
geltend zu machen. Für den Fall von Problemen, kontaktieren Sie bitte das
Geschäft, wo Sie das Produkt gekauft haben. Für weitere Produktinformationen
besuchen Sie unsere Webseite: www.smartwares.eu. Sie können Ihr Produkt auf
der Seite auch registrieren.
DE PRODUKTGARANTIE
Richtige Entsorgung dieses Produkts (Elektro- und Elektronik-Altgeräte)
(Anwendbar in der Europäischen Union und anderen europäischen
Ländern mit separaten Sammelsystemen)
Die Kennzeichnung auf dem Produkt bzw. auf der dazugehörigen
Dokumentation gibt an, dass es nach seiner Lebensdauer nicht zusammen
mit dem normalen Haushaltsmüll entsorgt werden darf. Um mögliche
Umwelt- oder Gesundheitsschäden durch unkontrollierte Abfallentsorgung
zuvermeiden, sollten Sie dieses Gerät von anderen Abfällen trennen und es
verantwortungsbewusst recyceln, damit die darin enthaltenen Rohstoffe nachhaltig
wiederverwertet werden können. Private Nutzer wenden sich an den Händler, bei
dem das Produkt gekauft wurde, oder kontaktieren die zuständigen Behörden, um
in Erfahrung zu bringen, wie Sie das Gerät auf umweltfreundliche Weise recyceln
können. Gewerbliche Nutzer sollten sich an Ihren Lieferanten wenden und die
Bedingungen des Verkaufsvertrags konsultieren. Dieses Produkt darf nicht
zusammen mit anderem Gewerbemüll entsorgt werden.
* Werfen Sie leere Batterien immer in den Recyclingbehälter für Batterien.
* Wenn die Batterie in das Produkt eingebaut ist, öffnen Sie das Produkt
und entfernen Sie die Batterie.
ENTSORGUNG

WARTUNG
Die Geräte sind wartungsfrei, also öffnen Sie sie niemals Die Garantie
erlischt, wenn Sie das Gerät öffnen. Reinigen Sie nur das Äußere des
Geräts mit einem weichen, trockenen Tuch oder einer Bürste. Vor der
Reinigung, entfernen Sie das Gerät von allen Spannungsquellen.
Verwenden Sie keine Carbon-Reinigungsmittel oder Benzin, Alkohol oder ähnliches.
Diese greifen die Oberflächen der Geräte an. Außerdem sind die Dämpfe gefährlich
für Ihre Gesundheit und explosiv. Verwenden Sie keine scharfkantigen Werkzeuge,
Schraubenzieher, Metallbürsten oder ähnliches für die Reinigung. Warnung:
Schützen Sie die Batterie vor Feuer, zu viel Hitze und Sonnenschein
* Stellen Sie sicher, dass alle elektrischen Verbindungen und Verbindungskabel die
Vorschriften einhalten und mit der Betriebsanleitung übereinstimmen.
* Überladen Sie keine Steckdosen oder Verlängerungskabel, dies kann zu Feuer
oder Stromschlägen führen
* Bitte kontaktieren Sie einen Fachmann für den Fall, dass Sie Zweifel haben über
den Betriebsmodus, die Sicherheit oder die Verbindung der Geräte.
* Bewahren Sie alle Teile außerhalb der Reichweite von Kleinkindern auf.
* Lagern Sie diesen Artikel nicht an feuchten, sehr kalten oder warmen Orten, dies
kann die elektronischen Leiterplatten beschädigen.
* Lassen Sie das Gerät möglichst nicht fallen und vermeiden Sie Stöße, dies kann
die Elektronikplatine beschädigen
* Ersetzen Sie niemals selbst Stromkabel! In so einem Fall entfernen Sie diese
vom Netz und bringen Sie das Gerät zu einer Werkstatt.
* Reparaturen oder Öffnungen dieses Artikels dürfen nur von einer autorisierten
Werkstatt durchgeführt werden.
* Drahtlose Systeme unterliegen einer Störung durch kabellose Telefone,
Mikrowellen und anderen drahtlosen gerät, die im 2,4GHz Bereich betrieben
werden. Halten Sie das Gerät MINDESTENS 3 m von den Geräten während der
Installation und des Betriebs entfernt.
* Verschlucken Sie keine Batterien. Halten Sie die Batterien außerhalb der
Reichweite von Kindern.
SICHERHEIT
-26-

-27-
BELANGRIJKE INFORMATIE
1. Algemene productinformatie:
De rookmelder gaat, indien correct geïnstalleerd en
onderhouden, af in het beginstadium van een brand. Dit kan u die
waardevolle, extra seconden opleveren om uw huis te evacueren
en de brandweer te bellen. De rookmelder werkt op een 3V
lithiumbatterij. Onder normale condities is de levensduur van de
batterij tot 10 jaar. Als de batterij (bijna) leeg is, dan maakt de
rookmelder dit kenbaar door een hoorbare “piep”. Deze indicatie
klinkt iedere 30-40 seconden gedurende minimaal 30 dagen.
Vervang de gehele rookmelder aan het einde van de levensduur!
2. Merk/modelnummer: Smartwares RM218
3. Voeding: 3V DC CR123A Lithium
(batterij kan niet worden vervangen)
4. Certificeringen:
5. Gebruik: Rookmelder voor gebouwen met een
woonbestemming.
NL
ROOKMELDER
0786
RM218-001CPR
14
EN14604:2005/AC:2008
Smartwares RM218
G214064

-28-
6. Functie: Geeft een waarschuwing af als door brand
veroorzaakte rook wordt gedetecteerd.
7. Beschrijving: De werking van de rookmelder is gebaseerd op
het fotocel principe, wat betekent dat de melder de lucht
controleert op door brand veroorzaakte rook. De rookmelder
detecteert geen hitte, gas of vuur.
8. Advies: Bewaar deze instructies op een veilige, gemakkelijk
bereikbare plaats (bijv. de meterkast).
9. Let op: Het alarm is ontworpen voor het detecteren van rook,
het kan geen brand voorkomen.
10. Let op: Er mag niet over de rookmelder heen geschilderd
worden. Bescherm de rookmelder tegen stof tijdens
renovatiewerkzaamheden.
11. Let op: Over de rookmelder mag geen tape geplakt worden
of bedekt worden (hierdoor werkt hij niet goed meer).
12. Let op: Houd de rookmelder uit de buurt van kinderen.
Druk op de testknop (1) en houd deze langer dan 5 seconden vast tot
de LED-lampjes gaan branden, en laat de knop dan binnen 1 seconde
los, er klinkt een pieptoon ten teken dat de melder is geactiveerd en
nu in werking is.
LET OP: Activeer het alarm eerst, want anders functioneert het
apparaat niet.
ACTIVEREN

-29-
TESTEN
INSTALLATIE
Test het apparaat op correcte werking door op de testknop te
drukken, het alarm gaat af als de elektronica, de pieper en de batterij
naar behoren werken. Als u geen alarm hoort dan is de batterij
defect, of er is een ander defect.
OPMERKING: WEKELIJKS TESTEN IS NODIG
NIET DOEN: Met een open vlam het alarm testen, dit kan de melder
beschadigen of brandbare materialen doen ontvlammen en brand
veroorzaken.
LET OP: Vanwege het geluidsniveau (85 decibel) van het alarm,
dient u altijd op een armlengte afstand van het apparaat te staan
tijdens het testen. Test het alarm wekelijks om zeker te zijn dat het
werkt. Een alarm dat een vreemd of zacht geluid maakt kan defect
zijn.
1. Wat is de beste plek om een rookmelder te monteren
* Aan het plafond, 50cm van iedere rand.
* Tenminste één op iedere verdieping.
* In iedere slaapkamer.
* In de hal en het trapportaal.
* Op de overloop.
* In de woonkamer.
* In de pantry, of kamers met elektrische apparatuur.
>>>

-30-
2. Het alarm moet niet worden geplaatst in:
* Een ruimte waar de temperatuur kan zakken onder de 4 of
stijgen boven de 40°C
* In vochtige ruimten.
* Pal naast deuren of ramen, of in de buurt van een ventilator of
radiator.
Monteer de rookmelder niet op de muur!
Monteer het alarm niet op een plek die moeilijk te bereiken is,
waardoor het lastig is om de testknop te bedienen, de batterijen te
vervangen en onderhoud te plegen. Het alarm kan snel en eenvoudig
geplaatst worden. Monteer de basisplaat op de gekozen plek met de
meegeleverde schroeven.
3. Montage
* Haal de fixatiepen uit de basisplaat
* Schroef de basisplaat met 2 schroeven aan het plafond
* Activeer de melder vóór de montage
* Plaats de melder op de basisplaat door deze te draaien, totdat
u een “klik” hoort
* Plaats de fixatiepen terug in het gat
* Test de rookmelder door een druk op de testknop
4. Let op
* Plak geen tape over de rookmelder! Als rook wordt
gedetecteerd hoort u een hard onderbroken geluid (85dB).
5. Aanbeveling
* Vergroot het detectiegebied door installatie van diverse
rookmelders.

-31-
ALARM UITZETTEN (stille modus)
Als het alarm afgaat en u op de testknop drukt, dan wordt het alarm
ongeveer 10 minuten lang onderbroken. Het rode LED-lampje
knippert elke 8 seconden, dit geeft aan dat de rookmelder in
stiltemode functioneert. Rookmelders zijn ontworpen om het aantal
valse meldingen laag te houden. Verbrandingsdeeltjes van het koken
kunnen het alarm doen afgaan als het alarm dichtbij een kookgedeelte is geplaatst. Er komen grote hoeveelheden verbrandingsdeeltjes vrij als er geknoeid wordt, of tijdens grillen/frituren. Gebruik
van een afzuigkap boven het fornuis die de lucht naar buiten afvoert
(niet hercirculeert) helpt ook om deze verbrandingsdeeltjes uit de
keuken te verwijderen. De stille modus (testknop) is erg handig in de
keuken, of andere ruimtes waar vals alarm veel kan voorkomen. De
stiltemode mag alleen worden gebruikt als een bekende oorzaak,
zoals rook als gevolg van koken, het alarm doet afgaan. De rookmelder wordt minder gevoelig door een druk op de testknop (stille
modus), als de rook niet te dicht is zal het alarm uitgaan, wat
aangeeft dat de rookmelder tijdelijk in een minder gevoelige stand
staat. De rookmelder wordt na ongeveer 10 minuten automatisch
gereset. Als hierna nog steeds verbrandingsdeeltjes aanwezig zijn
dan zal het alarm opnieuw afgaan. Het uitzetten van het alarm (stille
modus) kan herhaaldelijk worden uitgevoerd totdat er in de lucht
geen verbrandingsdeeltjes meer voorkomen die het alarm doen
afgaan.
OPMERKING: Dichte rook heeft prioriteit over de stillemodus, en
zal nog steeds tot een continu alarm leiden, het apparaat schakelt
van stille modus over in de normale werking.

-32-
LET OP: Voordat u de testknop indrukt (stille modus), zorg er dan
eerst voor dat u de bron van de rook kunt vinden, en zeker weet
dat alles veilig is.
Testen
Dit alarm is uitgerust met een testknop. Druk het in totdat het alarm
afgaat. Het alarm stopt als de knop wordt losgelaten. Test het alarm
tenminste eens per week.
Reinigen
Voor de beste werking dient de rookmelder eens per maand worden
afgestoft, en eens per 6 maanden worden gestofzuigd. Verwijder de
detector van de plafondplaat en stofzuig voorzichtig het binnenste
van de detector. Raak het binnenwerk niet aan met de zuigmond van
de stofzuiger. Test daarna het alarm.
Let op: De rookmelder is minder effectief als deze wordt afgedekt.
Waarschuwing: Er mag niet over de rookmelder heen geschilderd
of geplakt worden. Test de rookmelder niet met
kaarsen, vlammen, sigaretten, etc.
Een rookmelder is onderdeel van uw brandbeveiliging, samen met
brandblussers, ladders, touwen en uw keuze van bouwmaterialen
tijdens renovaties. Zorg er ook voor dat u een vluchtroute heeft:
bespreek dit met uw kinderen, zorg ervoor dat iedere ruimte >>>
PREVENTIEF ONDERHOUD
BELANGRIJK INSTRUCTIES IN GEVAL VAN BRANDALARM

-33-
geëvacueerd kan worden zonder de deur te openen, bijvoorbeeld
door een raam. Als het alarm niet goed werkt, raadpleeg dan de
instructies van de leverancier. Bewaar de handleiding binnen bereik
(bijv. in de meterkast of een gereedschapskist). De lokale brandweer
kan meer informatie verschaffen over het voorkomen van brand.
Houd de rookmelder uit de buurt van kinderen.
Waarschuwing
Als er ook maar enige twijfel is over de reden van het alarm, neem
dan aan dat er echt brand is en voer uw noodplan uit. Ga er niet
vanuit dat het een vals alarm is. Stof kan extreme gevoeligheid
veroorzaken. Stofzuig zoals hierboven is aangegeven. Verf de
rookmelder niet.
Vals alarm
Ongewone atmosferische omstandigheden kunnen de oorzaak zijn,
dat de zeer gevoelige rookmelder een vals alarm afgeeft. Als er geen
brand is, ventileer dan de ruimte en/of blaas schone lucht in de
rookmelder, bijvoorbeeld door met een krant onder de rookmelder te
wapperen tot het alarm stopt. Zodra de lucht schoon is volgt
automatisch een reset.
Aanbeveling
Wij bevelen aan geen rookmelders te gebruiken die ouder zijn dan 10
jaar, om het risico op defecten te voorkomen. De rookmelder is geen
vervanger voor het verzekeren van meubels, huis, leven of andere
vormen van verzekering.

-34-
SMARTWARES BEVEILIGING & VERLICHTING
Kan nooit aansprakelijk gesteld worden voor welk verlies en/of welke
schade dan ook, inclusief incidentele en/of gevolgschade als gevolg
van het feit dat de rookmelder niet afging door rook of vuur.
Fouten worden als volgt aangegeven:
1. Het alarm gaat niet af na het indrukken van de testknop.
* Stofzuig voorzichtig de rookmelder (zie Reiniging). Nog geen
reactie: vervang de rookmelder
2. De melder “tjilpt” met een knipperend LED-lampje elke 40 sec.
* De batterij is bijna leeg, vervang de rookmelder
3. Rookalarm “tjilpt” iedere 40 seconden
(alarm schakelt in foutmodus)
* Maak de rookmelder schoon. Raadpleeg de het hoofdstuk
onderhoud. Als het probleem niet is opgelost, vervang dan de
rookmelder.
4. Het rookalarm geeft willekeurig vals alarm af, of als bewoners
koken of aan het douchen zijn.
* Druk op de testknop om het alarm te pauzeren.
* Maak de rookmelder schoon (hoofdstuk onderhoud)
* Breng de rookmelder naar een andere plaats en druk op de
testknop
PROBLEMEN OPLOSSEN

-35-
Als deze acties het probleem niet oplossen, probeer het dan niet zelf
te repareren. Als het probleem optreedt tijdens de garantieperiode
en volgens de garantievoorwaarden, stuur dan de rookmelder terug
met een bewijs van aankoop en een duidelijke beschrijving van de
klachten aan:
SPECIFICATIES
Stroomvoorziening : 3V DC CR123A Lithium
(batterij kan niet worden vervangen)
Bedrijfstemperatuur : 4 ~ 38°C
Bedrijfsluchtvochtigheid : 25 ~ 85%
Rooksensor : Optisch
Alarmvolume : > 85db(a) bij 3 meter.
Pauzetijd : Ca. 10 minuten
: Alleen voor gebruik binnenshuis.
: Lees de handleiding voor gebruik door,
en bewaar deze voor toekomstig gebruik
en onderhoud op een veilige plaats.
Broekakkerweg 15
5126 BD Gilze
The Netherlands
www.smartwares.eu
smartwares
safety & lighting b.v.

-36-
Dit product heeft een fabrieks garantie volgens de EU richtlijnen. De Garantie
termijn duurt het aantal jaren zoals is aangegeven op de verpakking, starten op de
aankoop-datum. Bewaar de kassabon – bewijs van aankoop is nodig om aanspraak
te kunnen maken op de garantie. In geval van problemen kunt u contact opnemen
met de winkel waar u het product heeft gekocht. Voor verdere product informatie
kunt u bellen met onze Hotline of bezoek onze website: www.smartwares.eu.
Hier kunt u ook uw product registreren.
NL PRODUCT GUARANTIE
Correcte verwijdering van dit product (elektrische & elektronische
afvalapparatuur)
Dit merkteken op het product of het bijbehorende informatiemateriaal duidt
erop dat het niet met ander huishoudelijk afval verwijderd moet worden aan
het einde van zijn gebruiksduur. Om mogelijke schade aan het milieu of de
menselijke gezondheid door ongeontroleerde afvalverwijdering te voorkomen
moet u dit product van andere soorten afval scheiden en op een verantwoorde manier
recyclen, zodat het duurzame hergebruik van materiaalbronnen wordt bevorderd.
Huishoudelijke gebruikers moeten contact opnemen met de winkel waar ze dit
product hebben gekocht of met de gemeente waar ze wonen om te vernemen waar en
hoe ze dit product milieuvriendelijk kunnen laten recyclen. Zakelijke gebruikers
moeten contact opnemen met hun leverancier en de algemene voorwaarden van de
koopovereenkomsten nalezen. Dit product moet niet worden gemengd met ander
bedrijfsafval voor verwijdering.
* Lever lege batterijen altijd in bij een van de daarvoor
bestemde inzamelpunten.
* Als de batterij is ingebouwd in het product, open het en
verwijder de batterij.
VERWIJDERING

-37-
ONDERHOUD
De toestellen zijn onderhoudsvrij, dus maak ze niet open. De garantie
vervalt als je het apparaat opent. Reinig enkel de buitenkant van de
toestellen met een zachte, droge doek of borstel. Vóór u ze reinigt, haal de
toestellen uit alle spanningsbronnen. Gebruik geen carboxylisch
schoonmaakmiddelen of benzine, alcohol of gelijkaardige producten. Deze werken
agressief op het oppervlak van de toestellen. Bovendien zijn de dampen gevaarlijk
voor je gezondheid en ontbrandbaar. Gebruik geen scherpe instrumenten,
schroevendraaiers, metalen borstels of gelijkaardige dingen om te reinigen.
Waarschuwing: Bescherm batterijen tegen vuur, hitte en zon.
* Alle elektrische verbindingen en verbindingskabels moeten voldoen aan de juiste
regels en overeenkomen met de bedieningsinstructies.
* Overbelast de elektrische stopcontacten of verlengsnoeren niet; dit kan anders
leiden tot brand of elektrische schok.
* Neem contact op met een expert in geval je twijfels hebt over de
bedieningswijze, de veiligheid of de aansluiting van de apparaten.
* Hou alle delen uit het bereik van kinderen.
* Zet dit voorwerp niet op natte, erg koude of warme plaatsen; dit kan de
elektronische circuitborden beschadigen.
* Vermijd vallen of schokken; dit kan de elektronische borden beschadigen.
* Vervang beschadigde stroomkabels nooit zelf! In dit geval verwijder ze uit het
net en breng de toestellen naar de winkel.
* Herstellingen of openen van dit voorwerp mag enkel gebeuren door
een erkende hersteller.
* Draadloze systemen kunnen gestoord worden door draadloze telefoons,
microgolfovens en andere draadloze toestellen die werken op het bereik van
2,4GHz. Hou het systeem MINSTENS op 3m afstand van de toestellen tijdens
installatie en bediening.
* Batterijen niet inslikken. Houd batterijen buiten het bereik van kinderen.
VEILIGHEID

-38-
INFORMATIONS IMPORTANTES
1. Informations générales concernant le produit:
Le détecteur de fumée, à condition d’être correctement installé
et entretenu, émet un signal d’alarme de manière précoce en
cas d’incendie. Ceci permet de gagner de précieuses secondes
pour évacuer votre maison et alerter les pompiers. Le
détecteur de fumée fonctionne avec une pile au lithium. Dans
des conditions normales, la durée de vie de la pile peut
atteindre jusqu’à 10 ans. Lorsque la pile est (quasiment) usée,
le détecteur de fumée émet un « bip » audible. Cette
indication sonore est répétée toutes les 30-40 secondes,
pendant au moins 30 jours. Lorsque ce signal indiquant que la
pile est presque usée retentit, il convient de remplacer le
détecteur de fumée au plus vite.
2. Numéro de fabrication/modèle: Smartwares RM218
3. Alimentation électrique: 3V DC CR123A Lithium
(pile non remplaçable)
4. Marquage de certification:
FR
DÉTECTEUR DE FUMÉE
0786
RM218-001CPR
14
EN14604:2005/AC:2008
Smartwares RM218
G214064

-39-
5. Domaine d’application: Détection de fumée pour
bâtiments à fonction d’habitation.
6. Fonction: Emet un signal d’alarme en cas de détection de
fumée d’un incendie.
7. Description: Le détecteur de fumée fonctionne selon le
principe de la cellule photoélectrique, c.à.d. qu’il détecte si de
la fumée est présente dans l’air. Il ne détecte pas la chaleur,
le gaz ou les flammes.
8. Indication: Veuillez conserver soigneusement ce mode
d’emploi.
9. Attention: Ce détecteur de fumée est conçu pour la
détection de fumée. Il ne peut pas empêcher un incendie.
10. Attention: Ne pas recouvrir le détecteur de fumée de
peinture. Le cas échéant, protéger le détecteur de fumée de
la poussière pendant les travaux de rénovation.
11. Attention: Ne pas masquer/recouvrir le détecteur de
fumée (ceci peut inhiber son bon fonctionnement).
12. Attention: Tenir le détecteur de fumée hors de la portée
des enfants.
Appuyer sur la touche de test (1) pendant env. 5 secondes jusqu’à ce
que la diode lumineuse s’allume puis relâcher la touche en une
seconde. Le détecteur de fumée émet alors un « bip » indiquant qu’il
est activé et en mode de fonctionnement.
ATTENTION: Le détecteur de fumée doit être activé pour être
opérationnel.
ACTIVATION

-40-
VÉRIFICATION
INSTALLATION
Tester le détecteur de fumée en appuyant sur la touche de test afin
de s’assurer de son bon fonctionnement. Le test déclenche l’alarme
indiquant ainsi que le détecteur de fumée est opérationnel. Si aucun
signal ne retentit, cela signifie qu’une erreur est survenue.
REMARQUE: Il est conseillé d’effectuer une vérification une fois par
semaine.
NE PAS: Exposer le détecteur de fumée à une flamme nue pour le
tester. Vous risqueriez de l’endommager ou d’enflammer des
matières combustibles et de provoquer un feu.
ATTENTION: En raison de la puissance sonore du signal émis par le
détecteur de fumée (85 décibels) il est conseillé de se tenir à une
distance d’au moins une longueur de bras lors du test. Si le son émis
est irrégulier ou faible, l’appareil est défectueux.
1. Dans les habitations, les chambres à coucher et les
chambres d’enfants ainsi que les couloirs servant de voie de
secours à partir des pièces d’habitation doivent être munis
respectivement d’au moins un détecteur de fumée. Celui-ci
doit être installé ou disposé de façon à ce que la fumée d’un
incendie puisse être détectée et signalée précocement.
* Au plafond, si possible au centre de la pièce.
* À une distance d’au moins 50 cm des murs, des éléments
d’ameublement et des lampes. >>>

-41-
Nous recommandons de se conformer à la norme d’application
DIN 14676 pour les détecteurs de fumée, car cette norme précise
les exigences en matière d’installation, d’entretien et de remplacement des détecteurs de fumée. Les règles relatives à la construction
des Länder respectifs (Landesbauordnungen) donnent des indications sur l’obligation légale d’utilisation de détecteurs de fumée.
2. Ne pas installer le détecteur de fumée aux
emplacements suivants:
* Les endroits exposés à des températures inférieures à 4°C
ou supérieures à 38°C
* Dans les pièces avec une humidité de l’air importante
(p.ex. salle de bains)
* A proximité directe des portes ou fenêtres et à proximité
d’un ventilateur ou d’un radiateur.
Ne pas installer d'alarme de fumée sur le mur!
Dans la mesure du possible, ne pas installer le détecteur de fumée
dans un endroit difficile d’accès afin de permettre l’activation de la
touche test.
3. Montage
* Retirer la broche de fixation du socle.
* Fixer le socle de montage au plafond à l’aide de deux vis
* Activer le détecteur avant montage.
* Fixer le détecteur sur le socle de montage en le tournant
jusqu’à entendre un « clic ».
* Placer la broche de fixation dans le trou.
* Tester le détecteur en appuyant sur la touche de test. >>>

-42-
4. Alarme
* En cas de détection de fumée, un signal sonore puissant
retentit par intermittence (85dB).
5. Recommandation
* Elargissez la zone de détection en installant plusieurs
détecteurs de fumée.
Indication:
Ne pas disposer de détecteurs de fumée dans les pièces dans
lesquelles un fort dégagement de vapeur, de poussière ou de fumée a
lieu dans des conditions normales. En raison du principe de la
lumière diffusée, des conditions environnementales défavorables
telles que la poussière, l’eau de condensation ou un courant d’air
peuvent déclencher l’alarme. Des conditions atmosphériques
inhabituelles peuvent également être à l’origine d’une fausse alerte
du détecteur de fumée très sensible (humidité ambiante
condensée).
Dans le cas d’une fausse alerte n’ayant manifestement pas été
déclenchée par la fumée d’un incendie, vous pouvez couper le
détecteur de feu. Pendant que l’alarme retentit, appuyer sur la
touche de test. L’alarme s’arrête alors pendant env. 10 minutes et la
diode lumineuse rouge clignote toutes les 8 secondes pour indiquer
que le détecteur de fumée est en mode muet. Au bout d’env. 10
minutes, celui-ci se remettra automatiquement en mode normal. Si
des particules sont toujours présentes dans la cellule de mesure
après ce laps de temps, l’alarme retentira à nouveau.
DÉSACTIVATION DE L’ALARME (mode muet)

-43-
Remarque: La présence de fumée dense désactive le mode muet et
l’alarme retentit.
Le détecteur de fumée est équipé d’une touche de test. Appuyer sur
la touche de test jusqu’à ce que l’alarme retentisse. Le signal sonore
s’arrête lorsque vous relâchez la touche. Vérifier le détecteur de
fumée une fois par semaine.
Afin de garantir le bon fonctionnement du détecteur de fumée, les
orifices d’entrée de la fumée doivent être exempts de poussière et
de saletés.
Attention: Le détecteur de fumée perd son efficacité lorsqu’il est
recouvert.
Avertissement: Ne pas recouvrir le détecteur de fumée de
peinture ou le masquer. Ne pas tester le détecteur à l’aide d’une
bougie, d’une flamme, d’une cigarette etc.
Alerter immédiatement les pompiers. Rester calme et donner des
réponses claires aux questions posées. Se mettre en sécurité ainsi
que les personnes en danger. En cas de dégagement de fumée
importante, rester à proximité du sol et presser un linge humide sur
la bouche et le nez. Ne pas utiliser les ascenseurs. Fermer toutes les
portes et les fenêtres des pièces en flammes pour éviter la
propagation de l’incendie et de la fumée. S’il n’est pas possible de
sortir du bâtiment, se réfugier dans une pièce sûre, >>>
TEST
NETTOYAGE
INSTRUCTIONS IMPORTANTES EN CAS D’ALARME

-44-
fermer la porte et signaler sa présence à la fenêtre. Calfeutrer les
portes à l’aide de draps ou de serviettes mouillés, afin d’éviter que la
fumée ne pénètre dans la pièce.
Avertissement
Si vous avez des doutes sur l’origine de l’alarme, partez du principe
qu’il s’agit d’un incendie réel et exécutez votre plan d’urgence. Ne
comptez pas sur le fait qu’il s’agit d’une fausse alerte.
Recommandation
Ne pas utiliser de détecteurs de fumée ayant plus de 10 ans. Le
détecteur de fumée ne remplace pas une assurance. Les détecteurs
de fumée doivent être installés de façon à pouvoir donner l’alarme
précocement en cas de présence de fumée d’un incendie. Les
détecteurs de fumée ne permettent pas d’empêcher ou de lutter
contre un incendie. Veuillez conserver soigneusement le mode
d’emploi de votre détecteur de fumée.
Smartwares Safety & Lighting
ne peut à aucun moment être tenu responsable des préjudices et/ou
dommages d’aucune sorte, y compris les préjudices ou/et dommages indirects et/ou consécutifs causés par le fait que le signal du
détecteur de fumée ne soit pas déclenché par la fumée ou le feu.

-45-
RÉSOLUTION DES PROBLÈMES
Les erreurs peuvent être indiquées de la façon suivante:
1. L’alarme ne retentit pas en appuyant sur la touche de test.
* Remplacer le détecteur de fumée.
2. Le détecteur de fumée émet un « bip » et la diode rouge
clignote une fois toutes les 40 secondes.
* La pile est faible, veuillez remplacer le détecteur de fumée. La
pile est intégrée à l’appareil et ne peut pas être remplacée.
3. L’alarme se déclenche intempestivement (fausse alerte).
* Appuyer sur la touche de test pour couper le détecteur de
fumée.
* Changer le détecteur de fumée d’emplacement si la source
de perturbation persiste (humidité condensée, poussière,
vapeurs de cuisson etc.).
Après une fausse alerte ou le remontage d’un détecteur de fumée,
effectuer un test en appuyant sur la touche de test. Si ces mesures
ne suffisent pas pour remédier au problème, n’essayez pas de
réparer le détecteur vous-même.

-46-
Si les problèmes surviennent pendant le délai de garantie et
répondent aux conditions requises pour l’application de la garantie,
renvoyez le détecteur de fumée accompagné d’une preuve d’achat
valable et d’une description précise du problème à:
CARACTERISTIQUES TECHNIQUES
Alimentation électrique : 3V DC CR123A Lithium
(pile non remplaçable)
Température de service : 4 ~ 38°C
Humidité de service : 25 ~ 85%
Capteur de fumée : optique
Niveau sonore alarme : > 85db(a) à 3 mètres Durée mode
muet : env. 10 minutes
: Uniquement pour les habitations
: Veuillez lire attentivement le manuel
avant utilisation et le conserver à un
endroit sûr pour toute consultation
future ainsi que pour l’entretien du
produit.

-47-
Ce produit est garanti par le constructeur selon les lois de l'Union Européenne. La
durée de garantie est indiquée sur l’emballage, et débute à partir de la date
d’achat. Conservez le ticket de caisse - la preuve d'achat sera exigée pour faire
valoir la garantie. En cas de problèmes, merci de contacter le magasin dans lequel
vous avez acheté le produit. Pour plus d’informations sur ce produit, vous pouvez
contacter notre ligne d'assistance ou visiter notre site Web: www.smartwares.eu.
Vous pouvez aussi enregistrer votre produit sur notre site web.
FR GARANTIE DU PRODUIT
Comment éliminer ce produit (déchets d’équipements électriques et
électroniques) (Applicable dans les pays de l’Union Européen et aux autres
pays européens disposant de systémes de collecte sélective)
Ce symbole sur le produit ou sa documentation indique qu’il ne doit pas être
éliminé en fin de vie avec les autres déchets ménagers. L’élimination
incontrôlée des déchets pouvant porter préjudice à l’environnement ou à la
santé humaine, veuillez le séparer des autres types de déchets et le recycler
de façon responsable. Vous favoriserez ainsi la réutilisation durable des ressources
matérielles. Les particuliers sont invités à contacter le distributeur leur ayant vendu le
produit ou à se renseigner auprès de leur mairie pour savoir où et comment ils
peuvent se débarrasser de ce produit afin qu’il soit recyclé en respectant l’environnement. Les entreprises sont invitées à contacter leurs fournisseurs et à consulter les
conditions de leur contrat de vente. Ce produit ne doit pas être éliminé avec les autres
déchets commerciaux.
* Merci de jeter les piles vides dans les emplacements de recyclage
prévus à cet effet.
* Si la pile est encastré à l'intérieur du produit, ouvrez le produit et
retirez la pile.
ELIMINER

-48-
MAINTENANCE
Les appareils sont en libre utilisation, ne jamais les ouvrir. La garantie
n'est plus valide si les appareils sont ouverts. Ne nettoyer que l'extérieur
des appareils avec un chiffon doux et sec ou une brosse. Avant de nettoyer,
débrancher les appareils. Ne pas utiliser d'agents nettoyant à l'acide
carboxylique ni d'essence, d'alcool ou autre produit de ce type. Ces produits attaquent
la surface des appareils. Par ailleurs, les vapeurs sont dangereuses pour la santé et
explosives. Ne pas utiliser d'ustensile à bout tranchant, de tournevis, de brosse
métallique ou autre élément semblable pour le nettoyage. ATTENTION: protéger la
batterie contre les rayons du soleils, les chaleurs élevées et les feux.
* Vérifier que toutes les connexions électriques et câbles sont conformes aux
règlements afférents et aux instructions d'utilisation.
* Ne pas créer de surtension sur les prises électriques ou les rallonges, cela peut
être cause de feu ou d'électrocution.
* Contacter un expert en cas de doute sur le mode d'utilisation, de sécurité ou la
connexion des appareils.
* Placer hors de portée des enfants.
* Ne pas disposer dans un endroit humide, très froid ou très chaud, cela pourrait
endommager le tableau de circuits électroniques.
* Eviter de faire tomber ou de cogner les appareils ; cela pourrait endommager le
tableau de circuits électroniques
* Ne jamais remplacer soi-même des fils électriques endommagés! Si les fils
électriques sont endommagés, les retirer du réseau et les apporter dans un
magasinspécialisé.
* La réparation et l'ouverture des différents éléments ne peuvent être effectuées
que par un magasin spécialisé.
* Les systèmes sans fil sont sujets aux interférences des téléphones sans fil, des
micro-ondes, et autres appareils sans fil utilisant la fréquence 2.4GHz. Placer le
système AU MOINS à 3 mètres de ces appareils au cours de l'installation et au
moment de l'utiliser.
* N'avalez pas les batteries. Gardez les batteries hors de la portée des enfants.
SÉCURITÉ

-49-
WAŻNE INFORMACJE
1. Ogólne informacje o produkcie:
Czujnik dymu, jesli zostanie poprawnie zainstalowany i
serwisowany, zaalarmuje Cie o pozarze w jego poczatkowych
stadiach. Da Ci to te wazne dodatkowe sekundy, aby móc
opuscic dom i zadzwonic po straz pozarna. Czujnik dymu
wymaga baterii litowej 3 V. W normalnych warunkach
zywotnosc baterii wynosi do 10 lat. Gdy bateria bedzie
(prawie) wyczerpana, czujnik dymu zasygnalizuje to sygnalem
dzwiekowym. Bedzie on sie rozlegal co 30 - 40 sekund przez
co najmniej 30 dni. Pod koniec okresu uzywalnosci wymien
caly czujnik dymu!
2. Marka/numer modelu: Smartwares RM218
3. Zasilanie: Bateria alkaliczna 3 V DC CR123A
(niewymienialna)
4. Certyfikaty:
5. Zakres uzycia: Czujnik dymu dla budynków mieszkalnych.
PL
CZUJNIK DYMU
0786
RM218-001CPR
14
EN14604:2005/AC:2008
Smartwares RM218
G214064

-50-
6. Funkcja: Alarmuje w razie wykrycia dymu spowodowanego
pozarem.
7. Opis: Czujnik dymu oparty o zasade dzialania fotodetektora,
co oznacza, iz czujnik monitoruje powietrze i wykrywa dym
wywolany pozarem. Urzadzenie nie wykrywa goraca, gazu ani
ognia.
8. Rada: Przechowuj te instrukcje obslugi w bezpiecznym i latwo
dostepnym miejscu (np.: skrzynka z licznikiem pradu).
9. Uwaga: Alarm zostal zaprojektowany z mysla o wykrywaniu
dymui nie moze on zapobiec pozarowi.
10. Uwaga: Czujnika dymu nie mozna malowac. Podczas
remontu chron czujnik dymu przed pylem.
11. Uwaga: Czujnik dymu nie powinien byc zaklejany
tasma/zaslaniany (powoduje to utrate funkcjonalnosci)
12. Uwaga: Trzymaj czujnik dymu poza zasiegiem dzieci.
Nacisnij na dluzej niz 5 sekund przycisk testowy (1), az zapali sie
dioda; zwolnij przycisk w przeciagu 1 sekundy; urzadzenie wyda
sygnal dzwiekowy, wskazujacy na aktywacje urzadzenia i jego
przejscie w stan roboczy. OSTROZNIE: Najpierw aktywuj czujnik, w
przeciwnym razie nie bedzie dzialal.
Przetestuj urzadzenie, aby zapewnic jego wlasciwa prace - nacisnij
przycisk testowania, rozlegnie sie sygnal dzwiekowy, jesli obwód
elektroniczny, alarm i bateria beda dzialac. Jesli nie rozlegnie sie
sygnal dzwiekowy, oznacza to, ze bateria jest uszkodzona lub
wystapila inna usterka.
AKTYWACJA
TESTOWANIE

-51-
UWAGA: WYMAGANE JEST COTYGODNIOWE TESTOWANIE
NIE: Uzywac otwartego plomienia w celu testowania alarmu - mozna
uszkodzic alarm lub podpalic palne materialy i wywolac pozar.
OSTROZNIE: Uwazaj na glosnosc alarmu (85 decybeli). Podczas
testowania urzadzenia zawsze stawaj w odleglosci wyciagnietej reki.
Aby zapewnic jego poprawne dzialanie, cotygodniowo testuj alarm.
Nieregularne lub niskie dzwieki dochodzace z alarmu moga
swiadczyc o jego uszkodzeniu.
1. Gdzie najlepiej umiescic czujnik dymu?
* Na suficie, 50 cm od sciany.
* Przynajmniej jeden na kazdym pietrze.
* W kazdej sypialni.
* Na korytarzu i klatce schodowej.
* Na pólpietrze.
* W pokoju dziennym.
* W magazynie podrecznym lub pomieszczeniach ze sprzetem
elektronicznym.
2. Alarmu nie nalezy montowac:
* W miejscach gdzie temperatura moze spasc ponizej 4°C lub
przekroczyc 40°C.
* W miejscach wilgotnych.
* Bezposrednio obok drzwiami lub okien i nie w poblizu
wentylatora lub kaloryfera.
Czujki dymu nie zamontować go na ścianie!
INSTALACJA

-52-
Nie montuj alarmu w miejscach trudno dostepnych, co mogloby
utrudnic nacisniecie przycisku testowego, wymiane baterii i
serwisowanie. Alarm mozna szybko i latwo zamontowac. Zamontuj
plyte bazowa w wybranym miejscu uzywajac dolaczonych do
zestawu wkretów.
3. Montaz
* Wyjmij bolec mocujący z podstawy
* Przykrec plytke montazowa do sufitu 2 wkretami
* Przed zamontowaniem aktywuj czujnik
* Przymocuj czujnik do plyty montazowej przekrecajac go, az
zaskoczy i uslyszysz klikniecie.
* Umiesc bolec mocujacy w otworze
* Przetestuj czujnik dymu, naciskajac przycisk testujacy
4. Ostroznie
* Nie zaklejaj czujnika dymu tasma! Po wykryciu DYMU,
uslyszysz glosny przerywany sygnal dzwiekowy (85 dB).
5. Zalecenia
* Powieksz obszar wykrywania dymu montujac kilka czujników.
Podczas alarmu nacisnij przycisk testowy, aby wyciszyc sygnal
alarmowy na okolo 10 minut. Czerwona dioda bedzie migac co 8
sekund, wskazujac na wyciszony aktywny alarm. Czujnik dymu
zostal zaprojektowany tak, aby zminimalizowac uciazliwosc alarmu.
Spalone czasteczki bedace efektem gotowania moga uruchomic
alarm, jesli czujnik bedzie zamontowany zbyt blisko miejsca gdzie
gotujesz. >>>
PRZYCISK WYCISZANIA ALARMU (tryb cichy)

-53-
Duza ilosc spalonych czasteczek zostaje wytworzona, gdy jedzenie
wykipi lub podczas grillowania/ smazenia. Uzywanie okapu
kuchennego z wylotami spalin umieszczonymi na zewnatrz (wyciag)
takze pomoze usunac te czasteczki z kuchni. Wyciszanie alarmu
(przycisk testowy) jest niezwykle przydatne w kuchni i innych
miejscach, gdzie alarm bylby uciazliwy. Funkcji wyciszania mozna
uzywac tylko wtedy, gdy znana jest przyczyna alarmu, np.: gdy dym
podczas gotowania uruchomi alarm. Alarm jest wylaczany
przyciskiem testowym (wyciszania), znajdujacym sie na obudowie;
jesli dym nie jest zbyt gesty, alarm wyciszy sie, wskazujac na
tymczasowe wylaczenie Czujnik dymu automatycznie zresetuje sie
po okolo 10 minutach; jesli czasteczki dymu beda nadal obecne w
powietrzu, alarm ponownie sie wlaczy. Przycisku wyciszania alarmu
mozna uzywac wielokrotnie, do momentu, az powietrze oczysci sie z
dymu wywolujacego alarm.
UWAGA: Gesty dym spowoduje dezaktywacje wyciszania i rozlegnie
sie ciagly alarm, a urzadzenie powróci do normalnego trybu pracy.
OSTROZNIE: Przed wyciszeniem alarmu sprawdz, co jest zródlem
dymu i upewnij sie, ze jest bezpiecznie.
Testowanie
Alarm jest wyposazony w przycisk testowy. Nacisnij go, az rozlegnie
sie sygnal alarmowy. Umilknie on po zwolnieniu przycisku. Testuj
alarm przynajmniej raz w tygodniu.
KONSERWACJA ZAPOBIEGAWCZA

-54-
Czyszczenie
W celu jak najwydajniejszej pracy czujnik dymu powinno sie
wycierac z kurzu przynajmniej raz w miesiacu i odkurzac
odkurzaczem, co pól roku. Zdejmij czujnik z plyty bazowej i
delikatnie odkurz jego wnetrze. Nie dotykaj niczego w srodku
koncówka odkurzacza. Przetestuj alarm.
Uwaga: Gdy zakryty, czujnik dymu jest mniej efektywny.
Ostrzezenie: Czujnika dymu nie mozna malowac / zaklejac tasma.
Nie testuj czujnika dymu przy pomocy swieczki, plomienia,
papierosów, itp.
Czujnik dymu jest czescia ochrony przeciwpozarowej wraz z
gasnicami, drabinami ewakuacyjnymi, linami oraz wybranymi
materialami budowlanymi uzytymi podczas remontu. Upewnij sie, ze
posiadasz trase ewakuacyjna; omów ja z dziecmi, upewnij sie, ze
kazdy pokój mozna opuscic nie otwierajac drzwi, np.: przez okno.
Jesli alarm nie dziala wlasciwie, skonsultuj sie z jego dostawca.
Przechowuj te instrukcje obslugi w latwo dostepnym miejscu (np.:
skrzynka z licznikiem pradu lub skrzynka z narzedziami). Miejscowa
jednostka strazy pozarnej moze dostarczyc wiecej informacji na
temat zapobiegania pozarom. Trzymaj czujnik dymu z daleka od
dzieci.
WAZNE WSKAZÓWKI NA WYPADEK ALARMU
PRZECIWPOZAROWEGO

-55-
Ostrzezenie
W razie jakichkolwiek watpliwosci, co do przyczyny alarmu, nalezy
zalozyc, ze to naprawde pozar i postepowac zgodnie ze swoim
planem ewakuacyjnym. Prosze nie zakladac, ze to falszywy alarm.
Kurz moze spowodowac nadmierna czulosc. Odkurz tak, jak opisano
powyzej. Nie maluj czujnika dymu.
Falszywy alarm
Niezwykle warunki atmosferyczne moga byc powodem wywolania
alarmu przez bardzo czuly czujnik dymu. Jesli nie ma pozaru,
przewietrz pomieszczenie i / lub przedmuchaj czujnik dymu czystym
powietrzem, np.: wachlujac gazeta pod czujnikiem dymu, az
falszywy alarm umilknie. Czujnik automatycznie sie wtedy
zresetuje.
Zalecenia
Zalecamy niekorzystanie z czujników dymu starszych niz 10 lat w
celu zmniejszenia ryzyka usterek. Czujnik dymu nie zastepuje
ubezpieczenia mebli, domu, zycia lub innych form ubezpieczen.
Czujnik dymu powinien zostac wymieniony w dniu wskazanym na
jego obudowie przez producenta.
FIRMA SMARTWARES SAFETY & LIGHTING
nie moze ponosic odpowiedzialnosci za jakiekolwiek straty i/lub
zniszczenia, wlaczajac w to straty przypadkowe i/lub te wynikajace z
niezadzialania czujnika dymu podczas zadymienia lub pozaru.

-56-
ROZWIAZYWANIE PROBLEMÓW
Bledy moga byc zasygnalizowane w nastepujacy sposób:
1. Po nacisnieciu przycisku testowego nie rozlega sie sygnal
alarmowy.
* Dokladnie odkurz czujnik dymu (patrz: czyszczenie), a
nastepnie przetestuj. Nadal brak reakcji; wymien czujnik dymu
2. Czujnik „cwierka”, a czerwona dioda miga co 40 sekund.
* Niski poziom baterii, wymien czujnik dymu
3. Czujnik „cwierka” co 40 sekund (alarm w trybie awaryjnym)
* Wyczysc czujnik dymu. Patrz takze: czesc dotyczaca
konserwacji. Gdy problemu nie uda sie rozwiazac, wymien
czujnik dymu.
4. Z czujnik dymu rozlega sie sporadycznie niechciany alarm lub
gdy mieszkancy gotuja lub biora prysznic.
* Nacisnij przycisk testowy, aby wyciszyc alarm.
* Wyczysc czujnik dymu (czesc dot. konserwacji)
* Przenies czujnik dymu w inne miejsce i nacisnij przycisk
testowy
>>>

-57-
Jesli te czynnosci nie rozwiaza problemu, nie próbuj naprawiac
czujnika samodzielnie. Jesli problem wystapi w okresie gwarancji,
w warunkach okreslonych w gwarancji, zwróc czujnik dymu wraz z
dowodem zakupu i jasnym opisem reklamacji do:
SPECYFIKACJE
Zasilanie : Bateria alkaliczna 3 V DC CR123A
(niewymienialna)
Temperatura robocza : 4 ~ 38°C
Wilgotnosc robocza : 25 ~ 85%
Czujnik dymu : Optyczny
Glosnosc alarmu : > 85 db(a) w odleglosci 3 m.
Dlugosc wyciszania : Ok. 10 minut
: Tylko do uzytku wewnatrz pomieszczen.
: Przed uzyciem zapoznaj sie z instrukcja
obslugi i przechowuj ja w bezpiecznym
miejscu na przyszlosc oraz jako pomoc w
serwisowaniu urzadzenia.

-58-
Prawidłowe usuwanie produktu (zuzyty sprzet elektryczny i elektroniczny )
(Dotyczy Unii Europejskiej i innych krajów europejskich z wydzielonymi
systemami zbierania odpadów)
Oznaczenie umieszczone na produkcie lub jego dokumentacji oznacza, ze nie
nalezy wyrzucac razem z innymi odpadami gospodarstwa domowego po
zakonczeniu jego eksploatacji . Aby uniknac szkodliwego wplywu na
srodowisko naturalne i zdrowie ludzi wskutek niekontrolowanego usuwania
odpadów, prosimy o oddzielenie produktu od innego typu odpadów oraz odpowiedzialny
recykling w celu promowania ponownego wykorzystania materialów uzytkowników
resources.Household powinni skontaktowac sie z punktem sprzedazy detalicznej, w którym
dokonali zakupu produktu, lub organem wladz lokalnych, do informacji na temat miejsca i
sposobu poddania tego produktu procesowi recyklingu. Uzytkownicy w firmach powinni
skontaktowac sie ze swoim dostawca i sprawdzic warunki umowy zakupu. Produkt nie
powinien byc mieszany z innymi odpadami komercyjnymi.
* Zuzyte baterie nalezy zawsze wrzucac do kosza na baterie.
* Jesliakumulator jest wbudowany wewnatrz urzadzenia,
otworzyc urzadzenie i wyjmij baterie.
Produkt ten, zgodnie z przepisami UE, posiada gwarancję fabryczną. Gwarancja jest
ważna przez okres czasu określony na opakowaniu, począwszy od daty zakupu. Zachowaj
rachunek - dowód zakupu potrzebny jest do zgłoszenia gwarancji. W przypadku
problemów, skontaktuj się ze sklepem, w którym produkt został zakupiony. Aby uzyskać
więcej informacji na temat urządzenia zadzwoń na naszą gorącą linię lub odwiedź naszą
stronę internetową: www.smartwares.eu. Możesz tam również zarejestrować swój
produkt.
PL GWARANCJA PRODUKTU
LIKWIDACJA

-59-
* Dopilnować, by wszelkie połączenia elektryczne oraz kable połączeniowe spełniały wymogi
stosownych przepisów oraz były zgodne z zaleceniami zawartymi w instrukcji obsługi.
* Nie przeciążać elektrycznych gniazd zasilających lub przedłużaczy, gdyż grozi to
pożarem lub porażeniem prądem elektrycznym.
* W przypadku wątpliwości dotyczących trybu pracy urządzenia, bezpieczeństwa lub
sposobu podłączenia urządzeń prosimy zasięgnąć porady osoby biegłej w tej dziedzinie.
* Wszystkie elementy urządzeń przechowywać w miejscu niedostępnym dla małych dzieci.
* Nie przechowywać urządzenia w wilgotnych, bardzo zimnych lub gorących
miejscach, gdyż może to prowadzić do uszkodzenia elektronicznych płytek drukowanych.
* Urządzenia nie rzucać i nie narażać na wstrząsy, gdyż grozi to uszkodzeniem
układów elektronicznych.
* Nie podejmować prób samodzielnej wymiany przewodów zasilających! W przypadku
uszkodzenia przewodu należy wyjąć wtyczkę z gniazda zasilającego i zanieść urządzenie
do warsztatu naprawczego.
* Napraw urządzenia, i co za tym idzie otworzenia jego obudowy, może dokonywać
wyłącznie autoryzowany warsztat serwisowy.
* Na układy bezprzewodowe mogą oddziaływać telefony komórkowe, kuchenki mikrofalowe
i inne urządzenia emitujące promieniowanie elektromagnetyczne w zakresie 2,4GHz.
System montować i z niego korzystać w odległości CO NAJMNIEJ 3 metrów od takich
urządzeń.
* Nie połykac baterii. Baterie nalezy przechowywac w miejscu niedostepnym dla dzieci.
BEZPIECZENSTWO
UTRZYMANIE
Urządzenia nie wymagają żadnych czynności obsługowych, więc nie należy
otwierać ich obudowy. Z chwilą otwarcia obudowy urządzenia przez
użytkownika gwarancja zostaje unieważniona. Obudowę urządzenia czyścić
miękką, suchą ściereczką lub pędzelkiem. Przed przystąpieniem do czyszczenia
należy\ odłączyć urządzenie od źródła zasilania. Do czyszczenia nie stosować żadnych
karboksylowych środków czyszczących jak benzyna, alkohol czy podobnych, gdyż
uszkadzają powierzchnię obudowy urządzeń. Poza tym ich opary są szkodliwe i grożą
wybuchem. Do czyszczenia nie stosować również narzędzi o ostrych krawędziach,
śrubokrętów, metalowych szczotek i tym podobnych.

-60-
0786
RM218-001CPR
14
EN14604:2005/AC:2008
Smartwares RM218
G214064
ES
DETECTOR DE HUMO
INFORMACIÓN IMPORTANTE
1. Información general de producto:
El detector de humo, si se instala y mantiene correctamente,
emite una alarma en un estadio temprano del incendio. Así puede
tener unos segundos adicionales muy valiosos para evacuar la
casa y llamar a los bomberos. El detector de humo funciona con
corriente directa de 3V de litio. En condiciones normales la vida
útil de la batería es de hasta 10 años. Cuando la batería esté
(casi) gastada, el detector de humo lo indica con un pitido. Este
indicador suena cada 30-40 seg. durante un mínimo de 30 días.
Al finalizar su vida útil, sustituya el detector de humo completo.
2. Fabricante/número de modelo: Smartwares RM218
3. Fuente de alimentación: 3V CC CR123A Litio
(batería no sustituible)
4. Marcas de certificado:
5. Ámbito de aplicación: Detector de humo para edificios con
fines residenciales.

-61-
6. Función: Emite una advertencia cuando se detecta el humo
causado por fuego.
7. Descripción:uego. Detector de humo basado en principio de
célula fotosensible, lo que implica que la alarma monitoriza el
aire buscando el humo causado por el fuego. El detector de
humo no detecta calor, gas ni fuego.
8. Recomendación: Conserve estas instrucciones en un lugar
seguro de fácil acceso (como la caja del contador de la luz).
9. Precaución: La alarma ha sido diseñada para detectar humo;
no puede evitar un incendio.
10. Precaución: El detector de humo no debe pintarse. Proteja el
detector de humo del polvo durante cualquier reforma.
11. Precaución: El detector de humo no debe encintarse/cubrirse
(perdería su función).
12. Precaución: Mantenga el detector de humo fuera del alcance
de los niños.
Pulse el botón de prueba (1) y manténgalo pulsado aproximadamente 5 segundos hasta que se encienda el LED; suéltelo antes de
que pase un segundo, y la unidad emitirá un pitido, indicando que
está activada y pasa a estado operativo. PRECAUCIÓN: Active
primero la alarma o la unidad no funcionará.
Pruebe la unidad para garantizar un correcto funcionamiento
pulsando el botón de prueba, sonará la alarma y funcionan el circuito
electrónico, el timbre y la batería. Si no suena ninguna alarma, la
batería está defectuosa o existe otro problema.
ACTIVACIÓN
PRUEBA

-62-
NOTA: ES NECESARIA UNA COMPROBACIÓN SEMANAL
NO: Use una llama para probar la alarma, puede dañarla o
encender materiales combustibles e iniciar un incendio.
PRECAUCIÓN: Debido a la sonoridad de la alarma (85
decibelios). Manténgase a una distancia prudencial en todo
momento de la unidad cuando la pruebe. Pruebe la alarma
semanalmente para garantizar su correcto funcionamiento. Un
sonido errático o débil procedente de la alarma puede indicar que
está defectuosa.
1. El mejor lugar para montar un detector de humo
* En el techo, a 50cm de cualquier borde.
* Al menos uno en cada planta.
* En cada habitación.
* En el recibidor y el hueco de la escalera.
* En el rellano.
* En el salón.
* En la despensa o en salas con electrodomésticos.
2. La alarma no debe instalarse en:
* Un espacio en el que la temperatura pueda caer por debajo de
4ºC y subir por encima de 40ºC
* En lugares húmedos.
* Al lado de puerta so ventanas y cerca de un ventilador o
radiador.
INSTALACIÓN
>>>

-63-
No instale la alarma en lugares de difícil acceso, lo que puede
dificultar el uso del botón de prueba, la sustitución de la batería y el
mantenimiento. La alarma puede instalarse rápida y fácilmente.
Instale la placa base en la ubicación deseada con los tornillos
incluidos.
3. Montaje
* Saque la punta de fijación de la placa base
* Atornille la placa de montaje con 2 tornillos al techo
* Active el detector antes de montarlo
* Fije el detector a la placa de montaje girándolo hasta escuchar un
chasquido
* Ponga la punta de fijación en el agujero
* Pruebe la alarma de humo pulsando el botón de prueba
4. Precaución
* No cubra el detector de humo con cinta. Cuando se detecte HUMO
escuchará un sonido alto intermitente (85dB).
5. Recomendación
* Aumente la zona de detección instalando varios detectores de
humo.
Cuando la unidad esté sondando, si pulsa el botón de prueba pausará
la alarma durante aproximadamente 10 minutos. El LED rojo
parpadeará cada 8 segundos, indicando que está funcionando en
modo silencioso.
SILENCIAR LA ALARMA (modo silencioso)
>>>

-64-
Las alarmas de humo se han diseñado para minimizar las alarmas
molestas. Las partículas en combustión de la cocina pueden activar
la alarma si se encuentra cerca de la zona de la cocción. Los
derrames o las parrillas/frituras generan gran cantidad de partículas
combustibles. Usar un ventilador o campana que expulse los humos
al exterior (de tipo sin recirculación) también ayudará a eliminar
estas partículas combustibles de la cocina. El silenciado de alarma
(botón de prueba) es muy útil en una cocina u otras zonas con
probabilidad de molestias. La función de silencio debe usarse
solamente con una condición de alarma conocida, como cuando el
humo de la cocina activa la alarma. La alarma de humo pierde la
sensibilidad al pulsar el silenciado de alarma (modo silencioso) en la
cubierta de la alarma; si el humo no es demasiado denso, la alarma
se silenciará para indicar que está en estado temporalmente
insensible. La alarma de humo se restablecerá automáticamente
pasados aproximadamente 10 minutos; si, tras este tiempo, siguen
existiendo partículas en combustión, la alarma sonará de nuevo. El
silenciado de alarma (modo silencio) puede repetirse hasta que se
aclare el aire de las condiciones que han causado la alarma.
NOTA: Un humo denso anulará el silenciado de la alarma y
emitirá una alarma continua; la unidad volverá al modo operativo
normal.
PRECAUCIÓN: Antes de usar el silenciado de alarma (silencio),
identifique la fuente del humo y asegúrese de que las condiciones
sean seguras

-65-
MANTENIMIENTO PREVENTIVO
INSTRUCCIONES IMPORTANTES EN CASO DE
ALARMA DE INCENDIO
por ejemplo por la ventana. Si la alarma no funciona correctamente,
consulte las instrucciones del proveedor. Conserve el manual. La
alarma incluye un botón de prueba. Púlselo hasta que suene la
alarma. La señal se detiene al soltar el botón. Pruebe la alarma al
menos una vez por semana.
Limpieza
Para obtener el mejor rendimiento posible, debe sacarse el polvo del
detector de humo una vez al mes y pasarle la aspiradora cada 6
meses. Saque el detector de la placa del techo y aspire
cuidadosamente el interior del detector. No toque el interior con la
boquilla de la aspiradora. A continuación, pruebe la alarma.
Recomendación : Cubra el detector de humo en caso de reformas.
Precaución : El detector de humo pierde efectividad
si se cubre.
Advertencia : El detector de humo no debe pintarse/
encintarse. No pruebe el detector de humo con
velas, llamas, cigarrillos, etc.
Un detector de humo es parte de su protección contra incendios
junto con extintores, escaleras de emergencia, correas y su elección
de materiales de construcción durante las reformas. Asegúrese
también de tener una ruta de escape; coméntela con sus hijos y
asegúrese de que cualquier habitación pueda evacuarse sin abrir la
puerta, accesible (p.ej., en la caja del contador eléctrico o en >>>

-66-
una caja deherramientas). El departamento de bomberos local
puede ofrecerle más información sobre prevención de incendios.
Mantenga el detector de humo lejos de los niños.
Advertencia
Si tiene dudas sobre la causa de la alarma, asuma que realmente hay
un incendio y lleve a cabo su plan de emergencia. No asuma que es
una falsa alarma. El polvo puede causar un exceso de sensibilidad.
Pase la aspiradora del modo indicado anteriormente. No pinte el
detector de humo.
Falsa alarma
Las condiciones atmosféricas inusuales pueden provocar que el
detector de humo, muy sensible, emita una falsa alarma. Si no hay
fuego, ventile la sala y/o proyecte aire limpio en el detector de humo,
por ejemplo agitando un periódico bajo el detector hasta que se
detenga la alarma. Cuando esté limpio se producirá un reinicio
automático.
Recomendación
Recomendamos no usar detectores de humo de más de 10 años de
edad, para limitar el riesgo de defectos. El detector de humo no es un
sustituto del seguro de muebles, hogar, vida ni otros tipos. El
detector de humo debe sustituirse en la fecha indicada por el
fabricante en el mismo detector.

-67-
SMARTWARES SAFETY & LIGHTING
Nunca se responsabilizará de pérdidas y/o daños de ningún tipo,
incluyendo daños incidentales y/o consiguientes causados por el
hecho de que la señal del detector de humo no sea activada por humo
o fuego.
Los errores se indican con las siguientes condiciones:
1. La alarma no suena cuando se pulsa el botón de prueba.
* Pase cuidadosamente la aspiradora por el detector de humo
(consulte Limpieza) y pruébelo a continuación. Si sigue sin
reaccionar, sustituya el detector
2. El detector emite un sonido con el LED rojo parpadeando cada 40
segundos.
* La batería se está gastando, sustituya el detector de humo
3. La alarma de humos emite un sonido cada 40 segundos (la alarma
pasa a modo de fallo)
* Limpie el detector de humo. Consulte la sección de
mantenimiento. Cuando no solucione el problema, sustituya la
alarma.
4. La alarma de humos emite alarmas innecesarias de forma
intermitente o cuando los residentes están cocinando o
duchándose.
* Pulse el botón de prueba para pausar la alarma.
* Limpie la alarma de humos (sección de mantenimiento)
* Cambie de lugar el detector de humo y pulse el botón de prueba
SOLUCIÓN DE PROBLEMAS

-68-
Si estas acciones no solucionan el problema, no intente repararlo
usted mismo. Si el problema se produce en el periodo de garantía y
está en condiciones de garantía, devuelva el detector de humo junto
con una prueba de compra válida con una descripción detallada del
problema a:
ESPECIFICACIONES
Alimentación : 3V CC CR123A Litio
(batería no sustituible)
Temperatura de funcionamiento : 4 ~ 38°C
Humedad de funcionamiento : 25 ~ 85%
Sensor de humo : Óptico
Volumen de alarma : > 85dB(a) a 3 metros.
Tiempo de pausa : aprox. 10 minutos
: Exclusivamente para
uso en interiores.
: Lea el manual antes del uso, y
consérvelo en un lugar seguro
para usarlo en el futuro y para el
mantenimiento del producto.

-69-
Este producto tiene una garantía de fábrica acorde con la normativa de la UE. La
garantía dura los años indicados en el embalaje, a partir de la fecha de compra.
Conserve el recibo – es necesaria la prueba de compra para ejercer la garantía. En
caso de problemas, contacte con el comercio en el que adquirió el producto. Para
obtener más información del producto visite nuestro sitio web:
www.smartwares.eu. En esta dirección también podrá registrar el producto.
ES GARANTÍA DEL PRODUCTO
Eliminación correcta de este producto (equipo eléctrico y electrónico de
desecho) (Aplicable en la Unión Europea y otros países europeos con
sistemas de recogida selectiva)
Esta indicación en el producto o su documentación indica que no debe
desecharse con otros residuos domésticos al final de su vida útil. Para evitar
posibles daños al medioambiente o la salud humana por una eliminación de
residuos sin control, separe este producto de otros tipos de residuos y recíclelo
de forma responsable para promover la reutilización sostenible de recursos
materiales. Los usuarios residenciales deberán contactar con el comercio en el que
adquirieron este producto o su oficina de gobierno local para obtener detalles sobre el
modo y lugar al que pueden llevar este producto para su reciclaje respetuoso con el
medioambiente. Los usuarios comerciales deberán contactar con su proveedor y
comprobar los términos y condiciones de su contrato de adquisición. Este producto no
debe mezclarse con otros residuos comerciales para su eliminación.
* Deseche siempre las baterías gastadas en recipientes para
reciclaje de baterías.
* Si la batería está integrada en el producto, abra el producto y
saque la batería.
ELIMINACIÓN

-70-
MANTENIMIENTO
Los dispositivos no precisan mantenimiento, no los abra nunca. La
garantía queda anulada si abre el aparato. Limpie exclusivamente el
exterior de los dispositivos con una gamuza suave y seca o un pincel.
Antes de limpiar, desconecte los dispositivos de cualquier fuente de
tensión. No use agentes limpiadores carboxílicos ni gasolina, alcohol o similares.
Atacarían las superficies de los dispositivos. Además los vapores son peligrosos para
su salud y explosivos. No use herramientas afiladas, destornilladores, cepillos
metálicos ni similares para limpiar. Advertencia: Proteja la batería del fuego, el calor
excesivo y la luz solar.
* Asegúrese de que todas las conexiones eléctricas y cables de conexión
cumplan con la normativa aplicable y las instrucciones de uso.
* No sobrecargue las tomas eléctricas ni los cables alargadores, puede provocar
incendio o electrocución.
* Contacte con un experto si tiene dudas sobre el modo de uso, la seguridad o la
conexión del aparato.
* Mantenga todas las piezas lejos del alcance de niños pequeños.
* No guarde este producto en lugares húmedos, muy fríos ni muy cálidos, podría
dañar el circuito electrónico.
* Evite las caídas y los impactos, podrían dañar los circuitos electrónicos.
* No cambie nunca los cables de alimentación dañados usted mismo. En caso de
ser necesario, desconéctelos de la red y lleve el dispositivo a un taller
autorizado.
* Las reparaciones o la apertura de este producto solamente pueden ser
realizadas por un taller autorizado.
* Los sistemas inalámbricos son susceptibles de interferencias por teléfonos
inalámbricos, microondas y otros dispositivos inalámbricos que funcionen en la
frecuencia de 2,4 GHz. Mantenga el sistema AL MENOS a 10 ft (3 m) de
distancia de los dispositivos durante la instalación y uso.
* No tragar las baterías. Mantenga las baterías fuera del alcance de los niños.
SEGURIDAD

 Loading...