

Page 1
TM
Operating Instructions
Smart Temp
Thermostats
24 Volt Multistage Heat / Cool & Heat Pump thermostat
1 Speed “Smart Fan” Fan Control
Auto Changeover - 7 day Start Stop Programmable
Congratulations on the purchase of your new
Electronic Thermostat!
Your new Smart Temp SMT - 310 thermostat has been built using the best
components and design philosophy. As a consequence of this, if properly
installed your new electronic programmable thermostat will provide you with
many years of trouble free and reliable service.
The Smart Temp SMT has been designed to be attractive, highly reliably and
simple to use. Please take the time to read these simple instruction to
familiarise yourself with the function and features offered in this product.
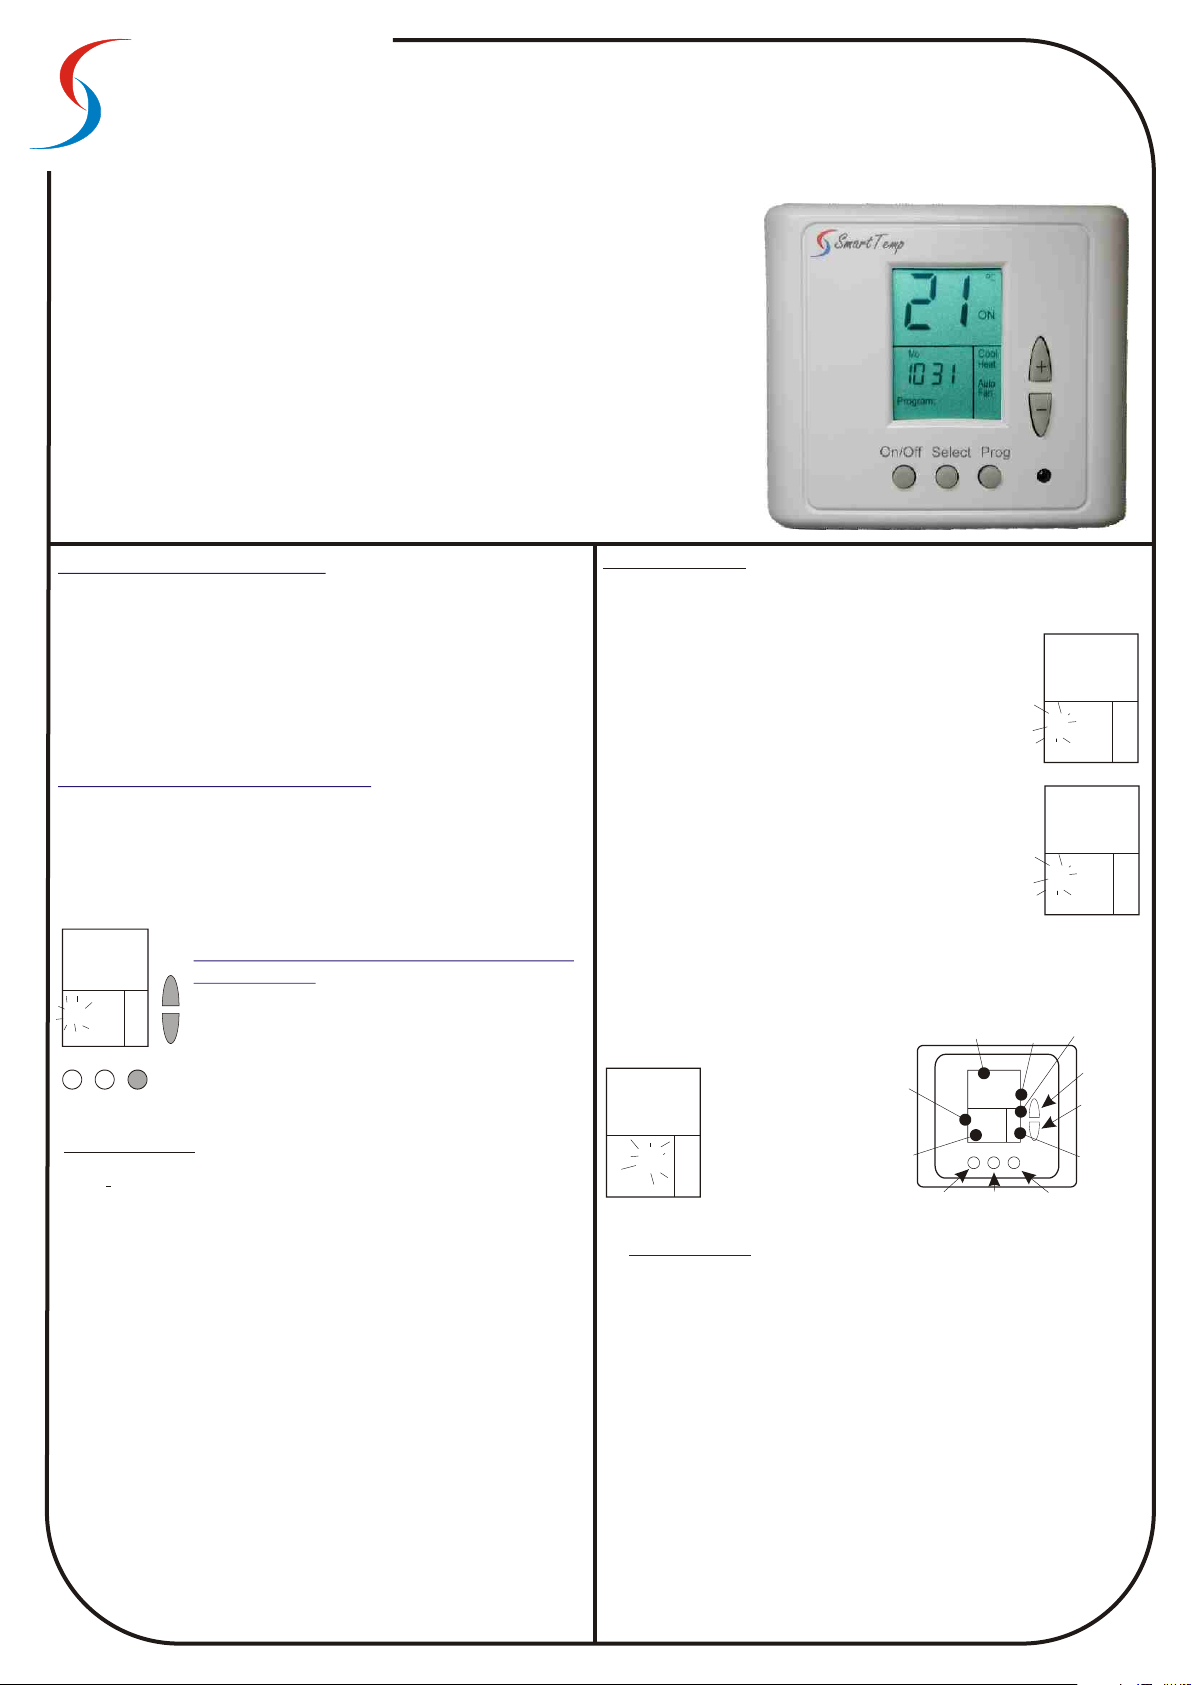
SMT-310
Slimline Thermostat
To turn the System On & Off
Tap the On/Off button to turn the SMT 310 on, Press and hold the On/Off
button for 5 seconds to turn the SMT 310 off. The LCD will Show the word
“ON” or “OFF” to reflect the current mode. When OFF, there will be no heating
or cooling system control regardless of the room temperature. When On the
SMT 310 will run its pre set schedules as described below.
When ON, the SMT 310 will control your room temperature to your desired set
points only while displaying the word “START” in the LCD. When the word
“STOP” is shown there the thermostat will not control the Air conditioning
system regardless of the room temperature.
Setting The Desired Temperature
When ever you Tap the Temp “+” or Temp “-” buttons the SMT will LCD will
flash and show the word “COOL” and the current “COOLING” Set temperature
(the value you wish the cooling to commence at). This value can be adjusted
with the Temp “+” and Temp “-” button. After a few seconds the SMT display
will change and show the word “HEAT” and the current Heating Set
temperature (the value you wish the heating to commence at). This value can
be adjusted with the Temp “+” and Temp “-” button. After a few seconds the
LCD will stop flashing. Your heating and cooling values are now set .
C
Programming your SMT Automatic Start
22
We
AM
01:00
Clock
Select
On/Off
“-” buttons to adjust the necessary Start & Stop times for the 7 days.
Setting the Clock
Step 1: Press the “Prog” button once and the display will change as in Diag
1. The word “CLOCK” will show (to indicate that we are now setting the real
time clock to the current time and day). The hour will be flashing to indicate
that this value can be adjusted if necessary by using the “+” & “-” buttons. Set
the hours value to the correct time.
Step 2: Press the “Prog” button again and now the minutes display will flash
indicating that if necessary the minutes value can be adjusted by using the “+”
& “-” buttons. Set the minutes value to the correct time.
Step 3: Press the “Prog” button again and now the Day display will flash
indicating that if necessary the current Day can be adjusted with the “+” & “-”
buttons. Set the Day value.
The Real time clock was just set using just 3 buttons. The “Prog” button to
advance us through the programming process, and the Temp “+” and Temp “-”
Prog
Diag 1
Note: Your SMT thermostat will automatically resume normal function if there
are no buttons pressed for approximately 30 seconds. It is recommended that
once you start to programme your SMT that you do not pause or you may
have to commence the programming procedure from the beginning.
buttons to adjust the value that was flashing to a new value.
Programming the SMT to automatically adjust the Start & Stop time is as
equally a simple process. Simply press the “Prog” button to select the
value that requires adjustment (if necessary) and then the “+” & “-”
& Stop times
Your SMT-310 thermostat will automatically turn the
+
heating and cooling system On & Off at the times you
-
require and control the room temperature to your
previously set comfort levels.
Programming the SMT “Start” and “Stop” times is an
extremely simple process and requires the use of the
“Prog” button (used to start the Programming process and
advance through the various steps) and the Temp “+” and
buttons to adjust flashing digit to the desired value.
Setting the Program
Step 1: If you have not just set the clock or do not need to set the clock - press
the “Prog” button 3 times to move past the “Clock” set section of the
programming procedure (Being the Hours, minutes and day
adjustments).
Step 2: The SMT display will be as shown in Diag 2 indicating
that this “Start” Hour adjustment for Monday (as indicated by the
Hour segments flashing) as well as the Mo (Monday) display
being shown. Pressing the “+” or “-” button adjust the hours that
you wish the Monday Start time to commence.
Step 3: Press the “Prog” button again and now the Minutes
Mo
7:30
START
Diag 2
AM
segments will be flashing, indicating this is the adjustment for
minutes for the “Start” program for Mo (Monday). By pressing the
“+” or “-” button adjust the minutes to time that you wish the
“Start” time to commence.
Step 4: Again pressing the “Prog” button will advance you to,
setting the “Stop” time Hours for MO (Monday). That is, the time
Mo
5:00
STOP
PM
you wish the Air Conditioning System to shut down on Monday.
Again, by using the “+” & “-” buttons this value can be set.
Diag 3
Step 5: Pressing the “Prog” button again, the SMT will permit adjustment for
the Monday “STOP” Minutes Adjustment of this value is done with the “+” or “-”
buttons - Diag 4.
The remainder of the programming
process is completed by simply
repeating this
procedure, pressing
the “Prog” button to
advances you through
Mo
5:30
STOP
Hours & Minutes for
Tuesday “Start, then,
PM
Hours & minutes for
Tuesdays “STOP” etc.
Diag 4
Time
Display
Program
Indicator
Room & Set
Temperature
Display
Thermostat
ON / OFF
Button
Thermostat
Indication
22
Su Mo Tu We Th Fr Sa
AM
PM
10:22
Clock
START STOP
Select
On/Off
Thermostat
Mode Select
Button
Status
C
Set
ON
OFF
Heat
Cool
Auto
Fan
Prog
+
-
Program
Button
Mode
Indication
Temperature
Up Button
Temperature
Down Button
Auto or Cont
Fan Status
Display
Specifications
Control Range: 5° to 30°c.
Set points: 1 heat 1 Cool
Override Time: 2 hours (Fixed)
Resolution: 1.0°c
Program Type: Individual - 7 day start / stop
Default Program: Mon ~ Fri Start 8:00am Stop 6:00pm.
Temp Cont Limits: Adjustable (Default Cool 5 - Heat 30 )
Fan Control: Smart Fan* or Auto fan
Back light: Electro luminescent (5 sec)
Accuracy: 0.3°c
Calibration: +/- 3
Max Load rating: 3 Amps.
Load per relay: 1 Amp resistive @ 24v.(40v max)
Memory Backup: 14 hours
Voltage: 24VAC +/- 20%.
Connectors: Screw type.
Material: PC/ABS
Size: 80 x 90 x 22mm
Weight: 145g
Warranty: 1 years RTB
*Smart Fan runs the fan continuously between the “Start” & “Stop” programs
Sat ~ Sun Start 8:00am - Stop 8:00am (off)
°c (Default 0°c)
°c
Page 2
Understanding the Mode of Operation
Advanced Functions
Your SMT thermostat will automatically control your Heating system,
your cooling system and the fan for the heating and cooling system.
Most users will prefer to let the SMT operate fully automatically, switching
between heating and cooling modes to maintain the comfort levels you
have previously set. Some uses however may wish to manually switch
between heating and cooling modes.
By using the “Select” button, the various operational modes such as
Heating only or Cooling only or Auto mod can be simply adjusted.
The various modes are described below
To Adjust the Set (or desired) Room Temperature
When no buttons are pressed, the LCD indicates the current room
temperature. When the up (+) or down (-) buttons is first pressed the LCD
will flash rapidly and indicate the Set (or desired) room temperature. The
word “SET” will also be displayed in the LCD to confirm the set temperature
is being adjusted.
Heat Only Mode: In heat mode, the thermostat will only activate
the system heating when the room temperature falls below the
set (or desired) room temperature. Heat will be displayed in the
LCD to indicate this mode is set. When the SMT is calling for the
system to heat, the word “HEAT” will flash slowly in the LCD. In
this mode, the SMT will not turn on the cooling system regardless
of how warm the room becomes.
Cool Only Mode: In cool mode the thermostat will only activate
the system cooling when the room temperature raises above the
set (or desired) temperature. Cool will be displayed in the LCD.
When the SMT is calling for the system to cool, the word “COOL”
will flash slowly in the LCD. In this mode, the SMT will not turn on
the heating system regardless of how cool the room becomes.
Auto Season Change over Mode: In Auto mode the thermostat
will automatically activate the system heating or cooling to
maintain the set (or desired) heating and cooling temperatures.
The LCD will indicate Auto Season Mode by displaying both
“Heat & Cool” in the LCD. When the SMT is calling for the system
to heat or cool the appropriate word will flash slowly in the LCD.
Fan only Mode: In fan only mode the SMT will only run the
system fan regardless of the set and room temperature. The SMT
will not attempt to control the Air Conditioning System heating or
cooling functions.
Fan only mode is typically used to improve building ventilation
and not to control room temperature.
Continuous Fan Mode
In Continuous Fan mode the system fan will run continiosly when
the Start time has been reached, and remain running until the
Stop time is reached. Unlike the Fan Only mode described above
the SMT will also control the room temperature as dictated by the
Heating, Cooling or Auto modes set above. The SMT will indicate
that this mode is active by displaying the word “Fan” in the LCD.
Auto Fan Mode
In Auto Fan mode the SMT will only turn on the system fan on
when there is a call for system heating or cooling and off again
when the room is at the desired temperature. The LCD will
indicate that this mode is active by displaying the words “Auto
Fan” in the LCD.
Setting the Mode of Operation
Like the programming steps previously explained, adjusting the various
operational modes are accomplished equally as simply and with a minimum
of button presses.
Step 1: Pressing the “Select Button” once will enter the
mode selection menu. The LCD will look similar that shown
in Diag 5.
Pressing the “+” or “-” buttons will permit you to toggle
between Fan only mode, cool only mode, Heat only mode
or Auto Mode ( Heat/Cool Displayed).
Step 2: Pressing the “Select Button” again will permit you
to select either Fan or Auto Fan modes with the “+” & “-”
buttons. Diag 6 shows a typical LCD.
Pressing the “select” button again returns the SMT to
normal mode. The new settings will now take effect.
22
23
Diag 5
Cool
Heat
Auto
Fan
C
C
After Hours 2 Hour Timer
The SMT-310 has an inbuilt after hours timer fitted, tapping the On/Off button
will activate the 2 Hour after hours run on time period.
When the timer is active, the word “STOP” will slowly flash in the LCD to
indicate this function is set.
Key Board Lock
Your SMT-310 has the ability to lock the keyboard from un authorised
tampering. Pressing and holding the mode button for 15~20 seconds will result
in the SMT LCD to show the word “UNLOC”. Continuing to hold the mode
button will change this to read “LOC”. At this stage the thermostat key board
will be locked ( EXCEPT the ability to activate run on timer).
To unlock repeat this process.
Manual Mode
Pressing and Holding the PROG button for 20 seconds will toggle the SMT-310
between Programmable mode (as previously described) and Manual Mode
(No time clock control)
Advanced Installer Functions
The SMT-310 also has a number of software options that can be set by
accessing the installer menu. To enter the installer menu set the HEATING
temperature to 10c and then press and hold the select button for 10 seconds.
Temperature Control limits
Once in the installer menu the LCD will change and show the word “COOL”
and a number, such as “COOL 05” (default). This is a control value that
overrides the user set temperature and is the lowest temperature the
thermostat will control too. Adjust this value if necessary with the temp + or -
buttons. Tap the select button and now the LCD will change and display the
word “HEAT” and a number, such as “HEAT 30 (default). This is a control value
that overrides the user set temperature and is the Highest temperature the
thermostat will control too. Adjust this value if neccessary with the temp + or buttons.
(For example, by setting a COOL value of 19, and a HEAT value of 24 regardless of
where the user sets there preferred heating and cooling set temperatures, the SMT
will limit the control range of the Air Conditioning system to between 19 & 24c).
Tap the select button again to move to the next option.
Calibration Offset
Once you have set the temperature control limits above (if required), the next
option permits the adjustment (calibration) of the temperature sensor. The LCD
will show “OFFS 0” (default). This value can be adjusted +/- 3c. Permitting you
to add or subtract up to 6 deg from the temperature sensor.
Tap the select button to exit this menu.
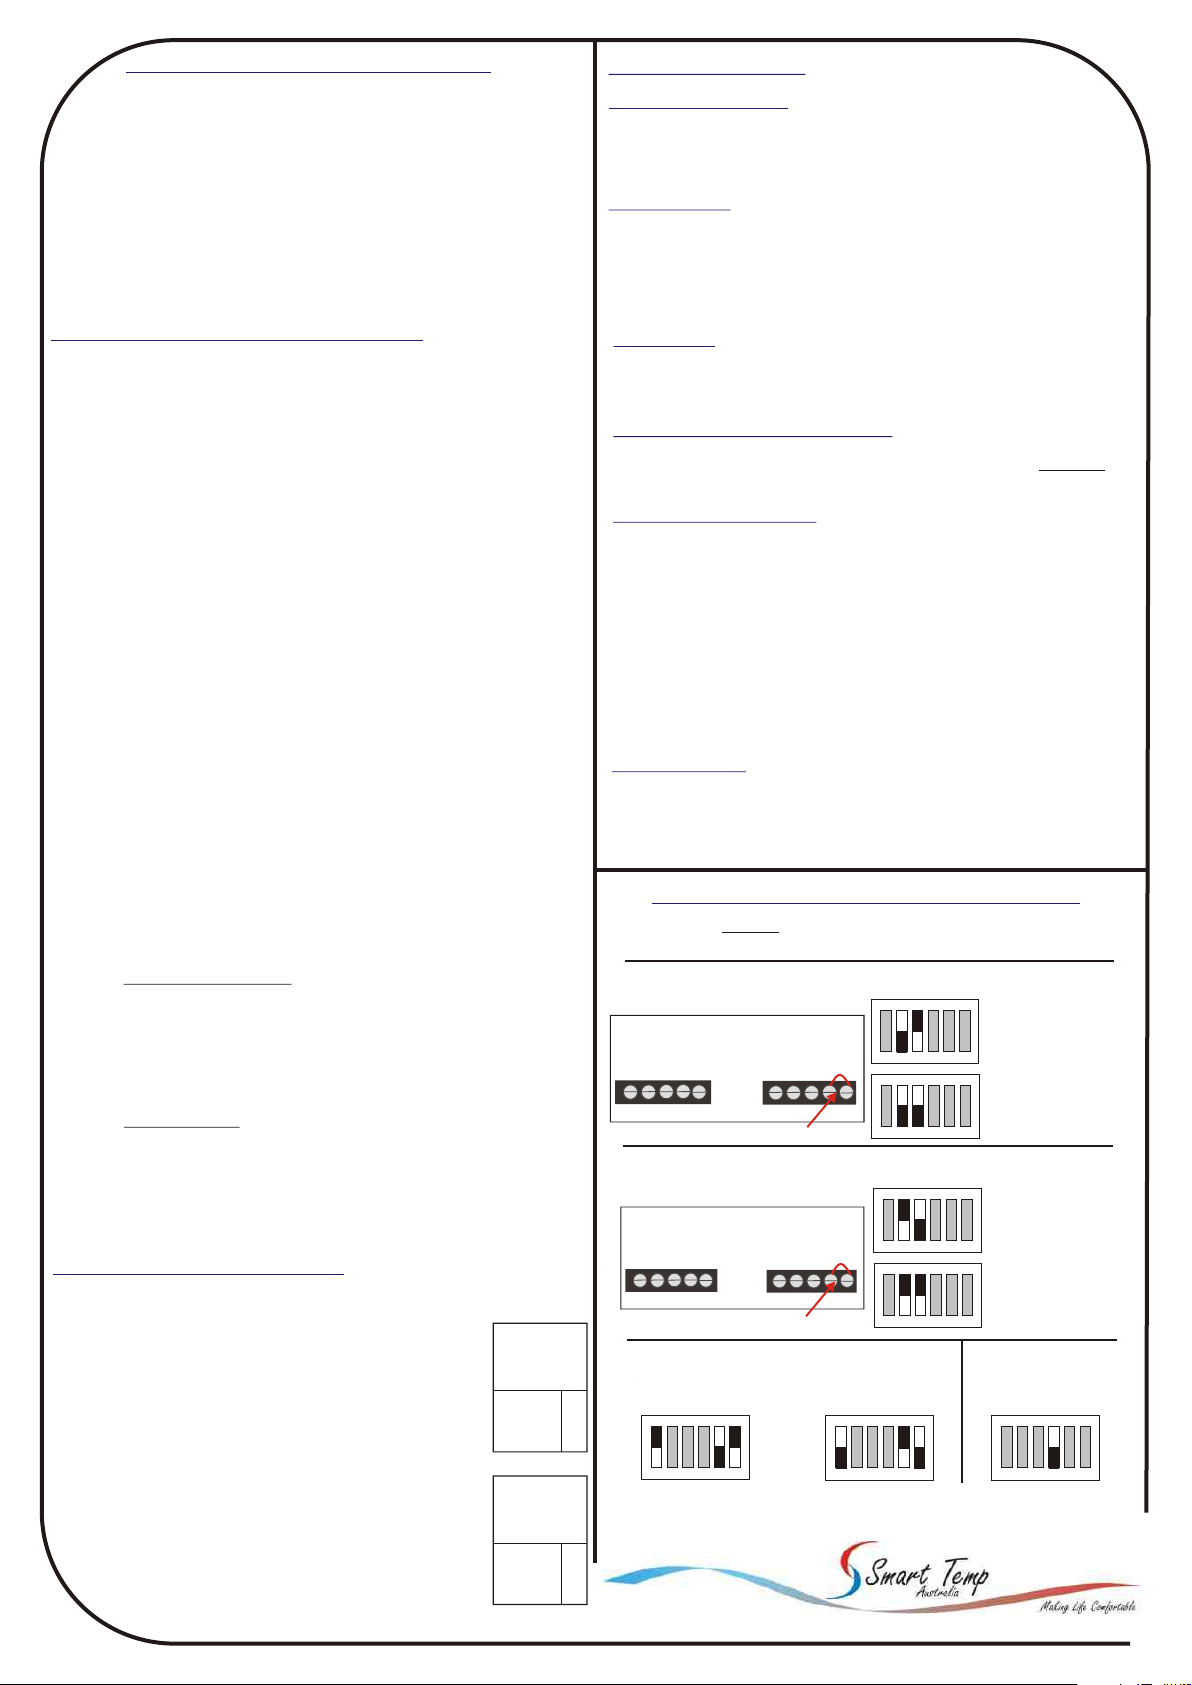
Wiring Diagrams and Dip Switch Configuration
NOTE: Black Denotes Switch Position.
Switches shown in grey do not apply to the function described
Heat Cool Connection
24Vac
Supply
Remote
Cool 1
Cool 2
Fan
Sensor
Y2
TTT
GGY1
Link must be installed for 24V Switching
Heat 2
Heat 1
W2W2C
W1
Neutral
R
Active
Com
On
1 2 3 4 5 6
Relay Common
On
1 2 3 4 5 6
Gas Heat
Fan On by Plenum
Sw 2 OFF - Sw 3 ON
Electric Heat
Fan On with Heat Call
Sw 2 OFF - Sw 3 OFF
Heat Pump Connection
On
24Vac
Supply
Remote
Compressor 1
Compressor 2
Fan
Sensor
Y2
Y1
Link must be installed for 24V Switching
T
Auxiliary Heat
Reversing Valve
Neutral
C
R
B/O
Active
Com
Relay Common
1 2 3 4 5 6
On
1 2 3 4 5 6
Sensor Configuration
Internal Temp Sensor
Sw 1 & 6 On - Sw5 Off
On
1 2 3 4 5 6
Remote Temp Sensor
Sw 1 & 6 Off -Sw 5 On
On On
1 2 3 4 5 6 1 2 3 4 5 6
Smart Temp Australia Pty Ltd
19 Indra Road Blackburn South 3130 Phone:(03) 9899 6455 Fax (03) 9899 6454
www.thermostat.com.au
Reversing Valve
In Cooling
Sw 2 ON - Sw 3 OFF
Reversing Valve
In Heating
Sw 2 ON - Sw 3 ON
3 Min Comp Delay
Sw4 OFF = Delay On
Sw4 On = Delay OFF
REV0705PS
Diag 6
Due to continual product improvement, these specifications are subject to change without notice
 Loading...