

Page 1
Configuration Guide
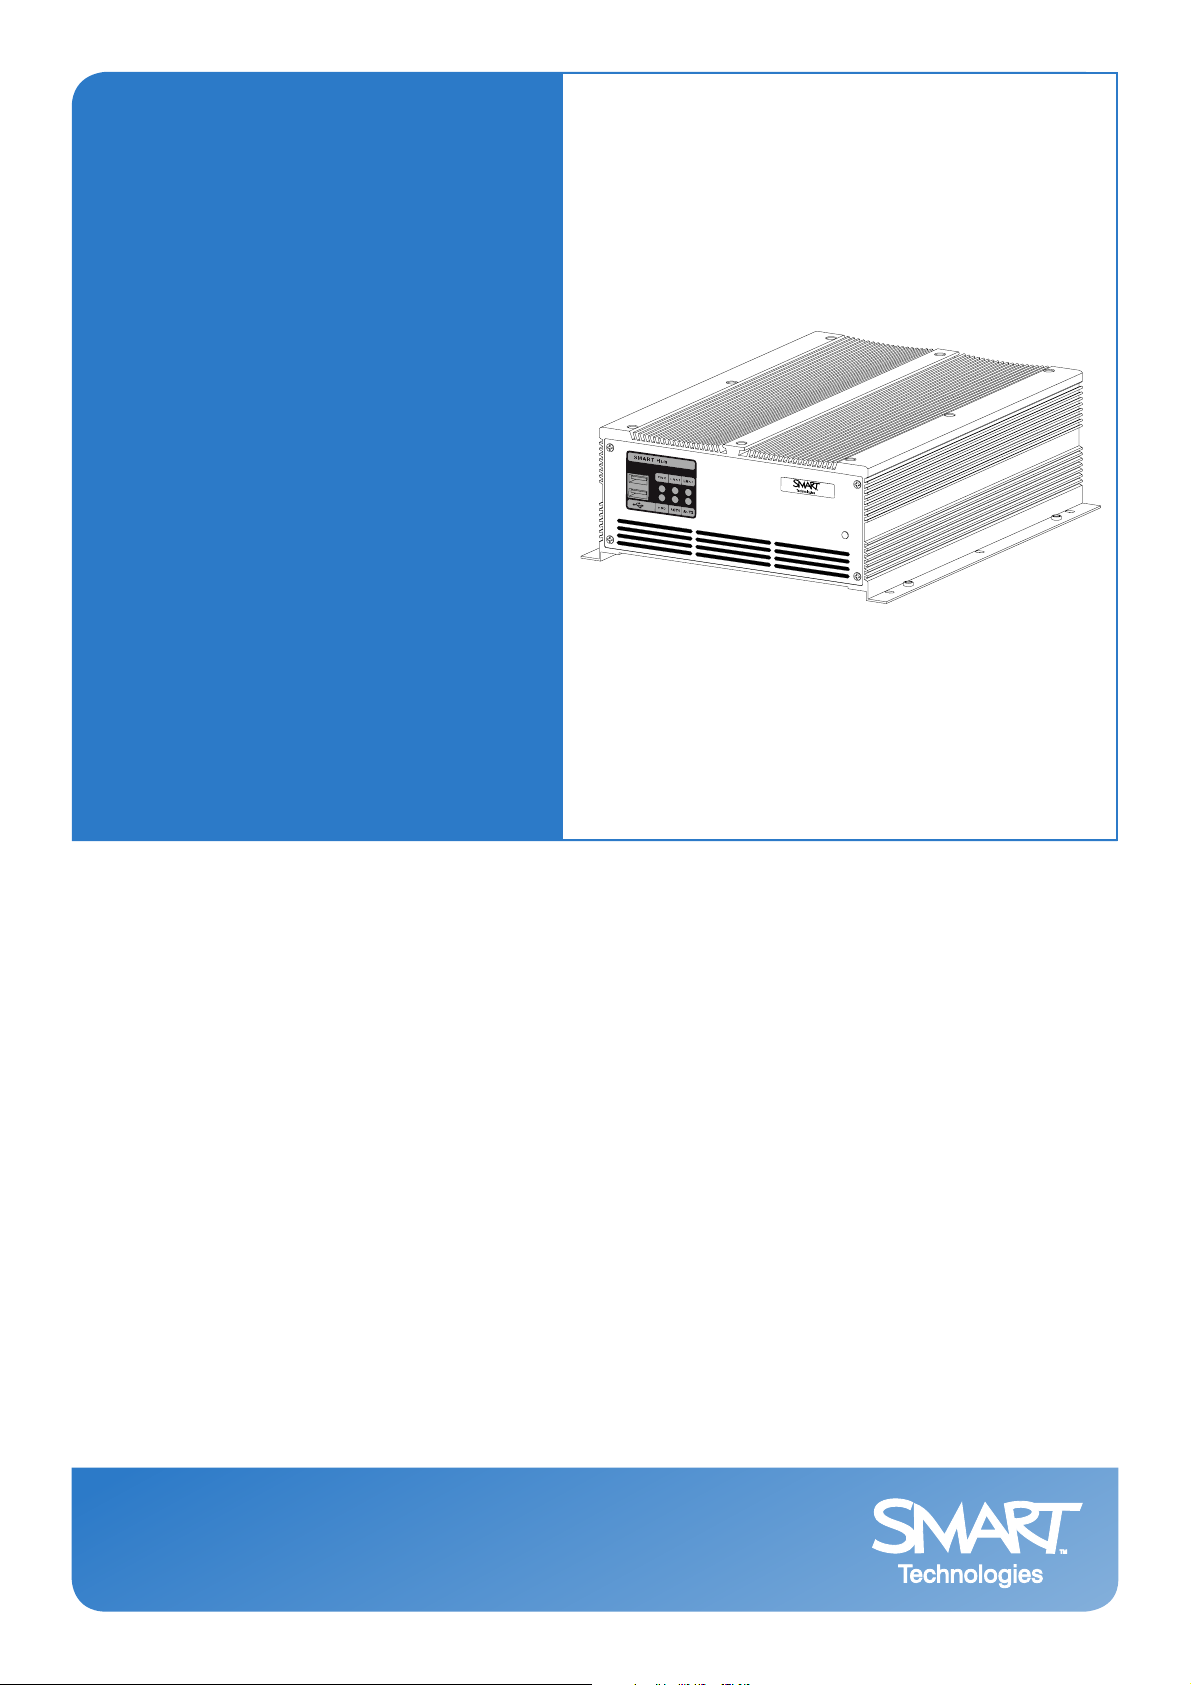
SMART Hub PE260
Page 2

Product Registration
If you register your SMART product, we’ll notify you of new features and
software upgrades.
Register online at www.smarttech.com/registration.
Keep the following information available, in case you need to contact
Technical Support:
Serial Number: _______________________________________
Date of Purchase: _____________________________________
FCC Warning
This equipment has been tested and found to comply with the limits for a Class A digital device, pursuant to Part 15 of the FCC Rules.
These limits are designed to provide reasonable protection against harmful interference when the equipment is operated in a commercial
environment. This equipment generates, uses and can radiate radio frequency energy and, if not installed and used in accordance with the
manufacturer’s instructions., may cause harmful interference to radio communications. Operation of this equipment in a residential area is
likely to cause harmful interference in which case the user will be required to correct the interference at his own expense.
Trademark Notice
SMART Board, Sympodium, Actalyst, Bridgit, the SMART logo and smarttech are trademarks or registered trademarks of SMART
Technologies ULC in the U.S. and/or other countries. Microsoft and Windows are either registered trademarks or trademarks of Microsoft
Corporation in the U.S. and/or other countries. All other third-party product and company names may be the trademarks of their
respective owners.
Copyright Notice
© 2008 SMART Technologies ULC. All rights reserved. No part of this publication may be reproduced, transmitted, transcribed, stored in a
retrieval system or translated into any language in any form by any means without the prior written consent of SMART Technologies ULC.
Information in this manual is subject to change without notice and does not represent a commitment on the part of SMART.
Patent No. US5448263; US6141000; US6326954; US6337681; US6540366; US6741267; US6747636; US6803906; US6919880;
US6947032; US6954197; US6972401; US7151533; US7184030; US7236162; US7283126; US7289113; CA2058219; CA2453873;
EP1297488; ES2279823; DE60124549; and ZL0181236.0. Other patents pending.
08/2008
Page 3
Important Information
IMPORTANT
Record information about your SMART Hub’s installation on this page, and then store the
guide in a place where it can be easily accessed. SMART Technical Support requires this
information to provide you with appropriate assistance.
SMART Technologies frequently updates this document to provide accurate
support. For the most recent version of this document, see document 127260
on the SMART technical support website.
SMART Hub PE260
Network Name/
Collaboration ID
Room/Location
Name
Hardware
Serial Number
Software
Activation Key
Bridgit™ Software
Server URL
SMTP Mail
Server URL
Connected Projectors and Displays
No. Manufacturer Model Hardware Serial Number
1
2
3
4
Connected SMART Interactive Products
No. Model Hardware Serial Number
1
2
3
4
99-00898-20 REV B0 Important Information i
Page 4
Warnings and Cautions
WARNING
Failure to follow the installation instructions shipped with the SMART Hub
PE260 could result in personal injury and damage to the product.
WARNING
Ensure that any cables extending across the floor to the SMART Hub PE260
are properly bundled and marked to avoid a trip hazard.
WARNING
Make sure an electrical socket is near the SMART Hub PE260 and remains
easily accessible during use.
WARNING
To reduce the risk of fire or electric shock, do not expose the SMART Hub
PE260 to rain or moisture.
CAUTION
CAUTION
Install the SMART Hub in a well ventilated area to allow proper cooling.
Do not open or disassemble the SMART Hub PE260. Opening the casing voids
your warranty.
ii Important Information 99-00898-20 REV B0
Page 5

Table of Contents
Important Information i
SMART Hub PE260................................................................................................................... i
Connected Projectors and Displays........ ... ... ... ... .... ... ... ... .... .......................................... ... ... ... ... i
Connected SMART Interactive Products ................................................................................... i
Warnings and Cautions............................................................................................................. ii
About the SMART Hub PE260 1
Configuring the SMART Hub PE260 3
Before Configuring the SMART Hub PE260.............................................................................3
Getting Started..........................................................................................................................3
Understanding User and Configuration Modes.........................................................................4
Using the SMART Configuration Tools......................................................................................4
Entering the Activation Key for Multiple Projectors and Displays..............................................5
Configuring the Projectors and Displays....... ... ... .... ... ... ... .... ... ... ... .... ... ... ... ... .... ... ... ... .... ... ... ... ..6
Configuring the SMART Interactive Products ...........................................................................8
Configuring the Display Controller ............................................................................................9
Configuring Networking Features............................................................................................12
Setting the Date and Time ......... ... ... ... .... ... ... ... ... .... ... ... ... ....................................... ... .... ... ... ...14
Installing Printers.....................................................................................................................14
Switching to User Mode..........................................................................................................15
Updating the SMART Hub PE260’s Software 17
Troubleshooting 19
Regulatory Compliance 21
Waste Electrical and Electronic Equipment Regulations ........................................................21
Restriction of Certain Hazardous Substances (RoHS) Directives...........................................21
Customer Support 23
Online Support........................................... ... ... ... .... ... ....................................... ... ... ... .... .........23
Training...................................................................................................................................23
Contacting SMART Technical Support....................................................................................23
General Inquiries........................................ ... ... ... .... ... ... ....................................... ... ... .... .........23
Warranty..................................................................................................................................23
Registration.............................................................................................................................23
99-00898-20 REV B0 Table of Contents iii
Page 6

iv Table of Contents 99-00898-20 REV B0
Page 7

About the SMART Hub PE260
The SMART Hub PE260 allows you to use up to four SMART interactive products, such as
SMART Board™ interactive whiteboards, Sympodium™ interactive pen displays and
Actalyst™ interactive overlays, without a computer.
IMPORTANT
The SMART Hub PE260 includes SMART Meeting Pro software. This software allows you to
create interactive meetings in which you can use your SMART interactive products as
whiteboards to present information, write notes and brainstorm. If you have access to a Bridgit
software server, others in remote locations with a SMART Hub, SMART Meeting Pro or a
Bridgit software client can participate in your meetings.
The SMART Hub PE260 also includes viewers that allow you to open and view common
Microsoft® Office file formats:
• Microsoft Word 2003 (.doc) and 2007 (.docx)
• Microsoft Excel® 2003 (.xls) and 2007 (.xslx)
• Microsoft PowerPoint® 2003 (.ppt)
This guide is for system administrators with extensive knowledge of configuring Windows®
operating systems. Please refer this guide to the individual or department in your organization
responsible for IT setup and operations.
If you intend to use your SMART Hub with two or more SMART Board
interactive display frames, do not place the interactive display frames side by
side. The pens may interfere with each other.
99-00898-20 REV B0 About the SMART Hub PE260 1
Page 8

2 About the SMART Hub PE260 99-00898-20 REV B0
Page 9

Configuring the SMART Hub PE260
This chapter explains how to configure your SMART Hub after mounting and connecting it as
instructed in the SMART Hub PE260 Textless Installation Guide (document 127261
Before Configuring the SMART Hub PE260
Complete the steps below before configuring your SMART Hub:
1. If you’re connecting your SMART Hub to two, three or four projectors or displays, purchase
an activation key for multiple projectors or displays from SMART Technologies.
2. Locate the serial number on your SMART Hub, and reco rd it on th e first p age o f this guide
or another safe place.
If you need to contact SMART Technical Support regarding an issue with your
SMART Hub, the representative may ask for the serial number.
3. Mount and connect your SMART Hub as instructed in the SMART Hub PE260
Textless Installation Guide (document 127261
4. Connect the SMART Hub to a network with Internet access.
NOTE: Several steps in this guide require you to type text. You can do this by connecting a
keyboard to the PS/2 or USB connectors on your SMART Hub, or by pressing the
keyboard button in the user interface or on your SMAR T inter active pr od uct’s pen tray to open
SMART Keyboard.
).
).
Getting Started
After completing the previous steps, you can turn on your SMART Hub and log on as
Administrator in Configuration mode.
To get started
1. Turn on all projectors and displays connected to your SMART Hub.
2. Press the Power button on the front of your SMART Hub.
Your SMART Hub completes its startup sequence, and a log on dialog box appears.
3. In the User name box, type Administrator.
4. In the Password box, type RandomPwd.
NOTE: Passwords are case sensitive.
5. Press OK.
The SMART Hub PE260 End License User Agreement dialog box appears.
6. Read the license agreement, and then press Accept.
Whiteboard, the Welcome Center and the SMART Configuration Tools dialog box appear.
7. Close the Welcome Center.
99-00898-20 REV B0 Configuring the SMART Hub PE260 3
Page 10
Understanding User and Configuration Modes
Your SMART Hub has two modes: User and Configuration. In the previous procedure, you
turned on your SMART Hub and logged on as Administrator in Configuration mode.
The key difference between User and Configuration modes is that File Based Write Filter
(FBWF) is on in User mode but off in Configuration mode. When FBWF is on, your
SMART Hub saves configuration changes to RAM rather than the hard disk. Therefore, you
must make configuration changes in Configuration mode rather than User mode.
IMPORTANT
Because the SMART Hub PE260 is a collaboration appliance rather than a
computer, it does not save any changes users make while in User mode after
the unit turns off or restarts. (Your SMART Hub restarts every day at midnight.
See page 14 for details.)
There are three ways to determine if you’re in Configuration mode:
• The login dialog box appears when you turn on your SMART Hub.
•The SMART Configuration Tools dialog box appears after you log on.
• In the Welcome Center, the button to the right of the Orient button is labelled
Exit Configuration Mode rather than Enter Configuration Mode.
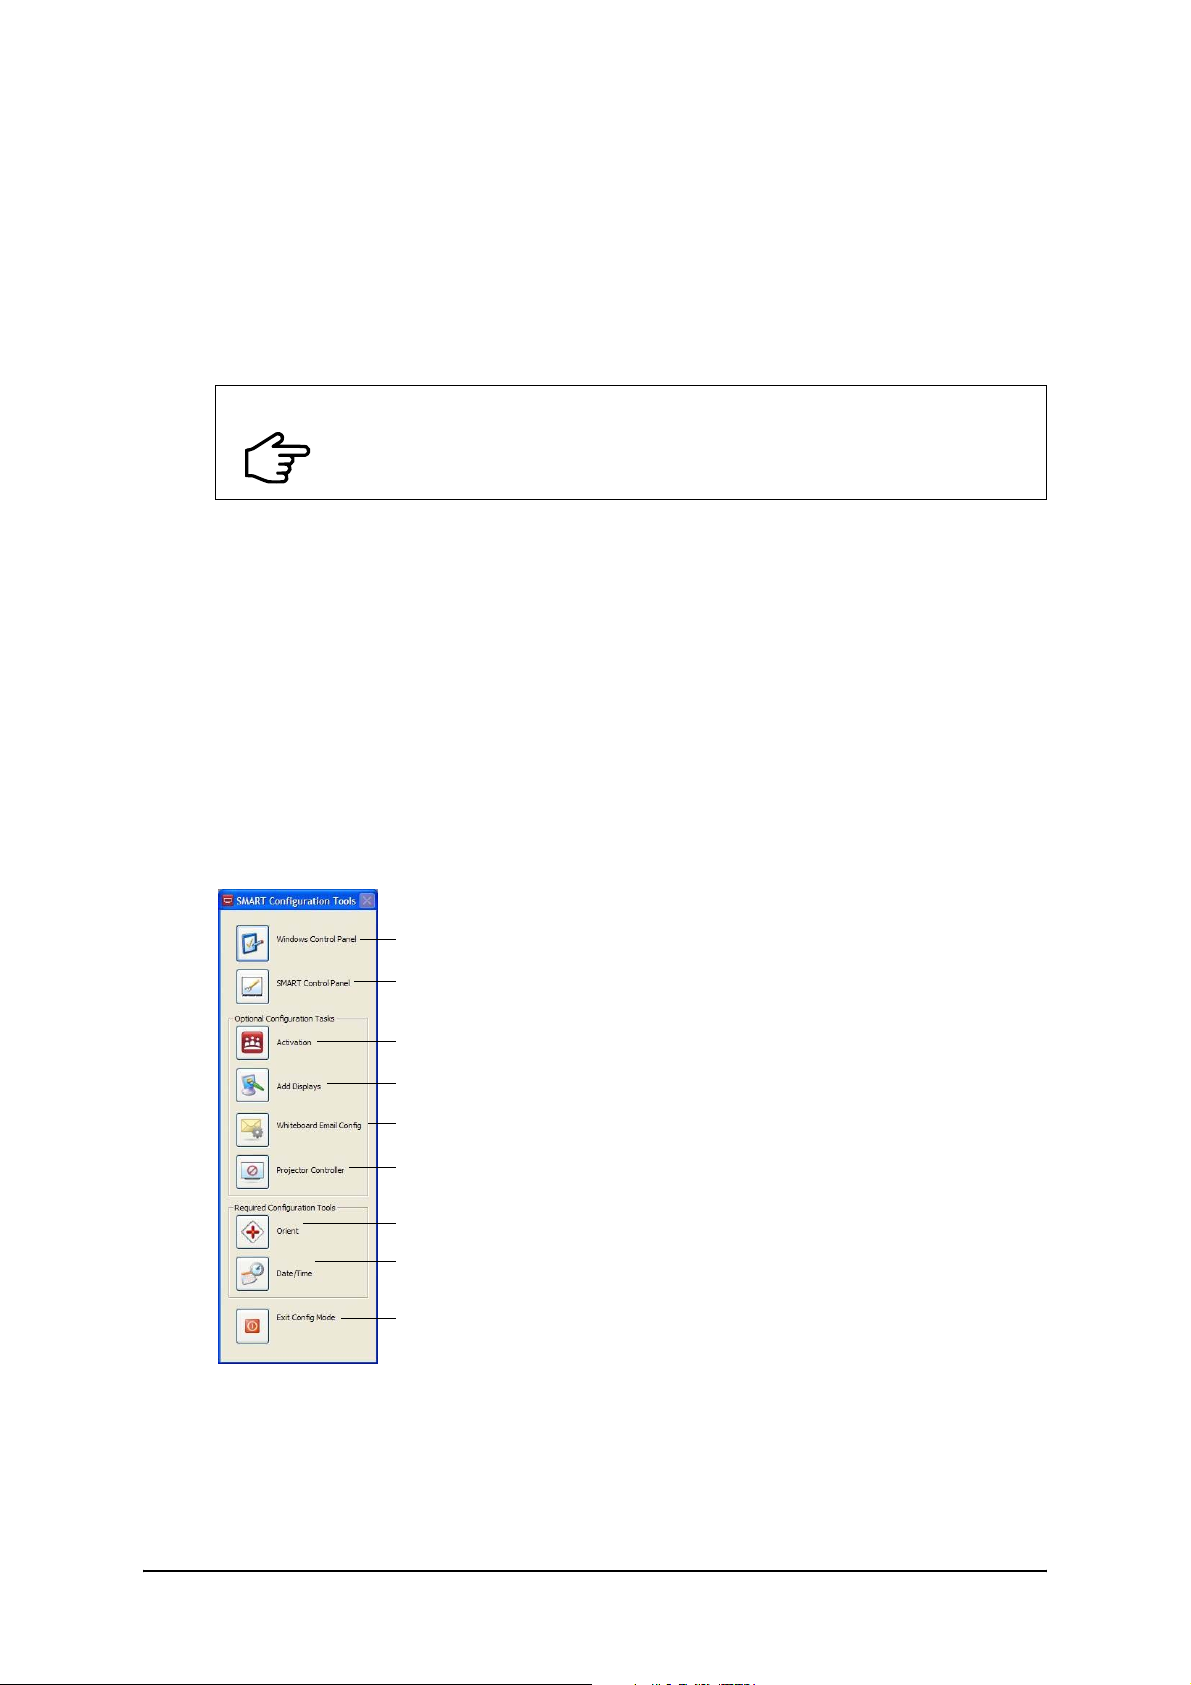
Using the SMART Configuration Tools
The SMART Configuration Tools dialog box appears on the display when you’re in
Configuration mode.
Press the buttons in this dialog box to open the Windows Control Panel, SMART contro l pa nel
and related tools for configuring and administering your SMART Hub.
Open the Windows Control Panel.
Open the SMART control panel.
Entering an activation key for multiple projectors and displays (see page 5).
Configure projectors and displays (see page 6).
Configure the Whiteboard e-mail feature (see page 13).
Configure the display controller (see page 9).
Orient the SMART interactive products.
Set the date and time (see page 14).
Exit Configuration mode and return to User mode (see page 15).
4 Configuring the SMART Hub PE260 99-00898-20 REV B0
Page 11

NOTES
•The SMART Configuration Tools dialog box only appears in Configuration mode.
•The SMART Configuration Tools dialog box appears above other windo ws an d
dialog boxes and can’t be closed, so that you always have access to the configuration
tools.
• If you close the SMART Configuration Tools dialog box by mistake, it reappears
automatically.
Entering the Activation Key for Multiple Projectors and Displays
Your SMART Hub supports one projector or display by default but can support up to four
projectors or displays.
If you’ve connected more than one projector or display to your SMART Hub, enter the
activation key for multiple projectors or displays that you purchased from SMART T echnologies
in the SMART Software Activation: Meeting Pro dialog box.
To enter the activation key
1. In the SMART Configuration Tools dialog box, press Activation.
The SMART Software Activation: Meeting Pro dialog box appears.
2. In the Product Key box, enter the activation key.
3. Press Next.
4. Select the Activate automatically option.
5. Press Next.
6. Press Finish.
99-00898-20 REV B0 Configuring the SMART Hub PE260 5
Page 12
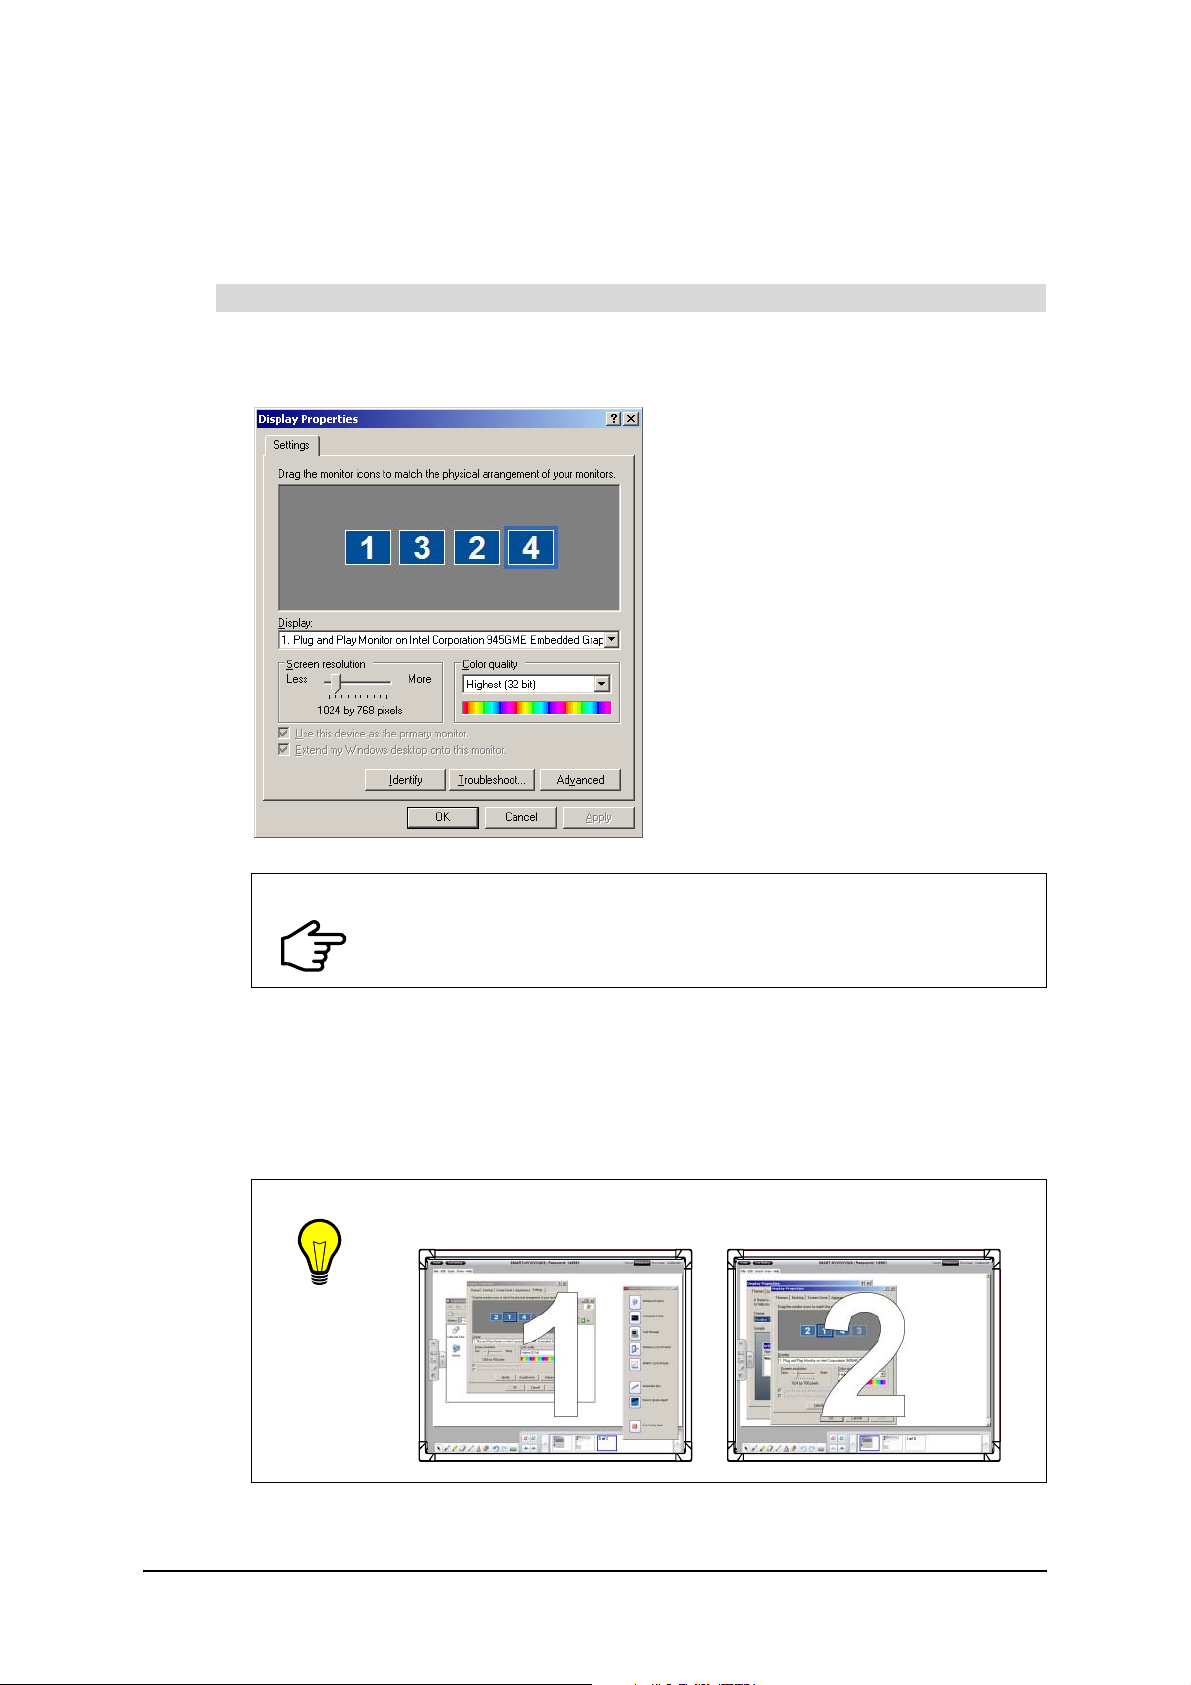
Configuring the Projectors and Displays
The next step in the configuration process is to configure the projecto rs and displays. If yo u’ve
connected multiple projectors and displays, configure each one, and then arrange the
projector’s and display’s outputs to represent the actual configuration of your room.
To configure the projectors and displays
1. In the SMART Configuration Tools dialog box, press Add Displays.
The Display Properties dialog box appears.
IMPORTANT
2. Move the Screen resolution slider to the left or right to change the resolution.
3. Select the appropriate value in the Color quality list.
4. If you’ve connected your SMART Hub to more than one p rojector or disp lay, press the icon
that represents the next projector or display, select the Extend my Windows desktop
onto this monitor check box, and then repeat steps 2 to 3.
TIP
If the Display Properties dialog box does n ot include an icon for each of the
projectors or displays connected to your SMART Hub, reconnect the
projectors or displays and then restart your SMART Hub.
To determine which projector or display is which, press Identify. Each
projector or display shows its number for approximately three second s.
6 Configuring the SMART Hub PE260 99-00898-20 REV B0
Page 13

NOTE: If the projector or display connected to the third or fourth video o utput conne ctor is
disabled in the Display Properties dialog box, complete the procedure below.
Display 4 Display 3
5. If you’ve connected your SMART Hub to more than one projecto r or display, rearrange the
icons to represent the actual configuration of your room.
6. Press Apply, and then close the Display Properties dialog box.
To configure the third or fourth projector or display
1. Complete steps 1 to 4 in the previous procedure, select the third or fourth display’s icon,
and then press Advanced.
The Default Monitor and NVIDIA GeForce FX 5200 Properties dialog box appears.
2. Press the GeForce FX 5200 tab, and then press Start the NVIDIA Control Panel.
The NVIDIA Control Panel window appears.
3. In the Select a Task frame, select Display > Set up multiple displays.
4. Select the Configured independently from each other (Dualview) option button.
5. Select the display types you want to use in the Select the display s you would like to use
drop-down list.
Select a display type that does not include a TV component.
99-00898-20 REV B0 Configuring the SMART Hub PE260 7
Page 14

6. Press Apply.
7. Close the NVIDIA Control Panel window and Default Monitor and NVIDIA GeForce
FX 5200 Properties dialog box.
Configuring the SMART Interactive Products
After configuring the projectors and displays, configure the SMART interactive products.
To configure the SMART Interactive Products
1. In the SMART Configuration Tools dialog box, press SMART Control Panel.
The SMART control panel appears.
2. Press SMART Board Settings.
The SMART Board Settings dialog box appears.
3. Ensure all interactive products connected to your SMART Hub appear in the
Select a SMART product list.
If an interactive product doesn’t appear in the Select a SMART product list and its status
light is red, disconnect and then reconnect the USB cable from your SMART Hub to the
interactive product. If the interactive product doesn’t appear in the list and its status light
remains red, contact SMART Technical Support for assistance.
4. In the Select a SMART product list, select the first interactive product.
5. Configure the interactive product using the dialog box’s controls.
For information on these controls, press Help.
6. Press Orient, and then orient the interactive product.
NOTE: If the orientation screen doesn’t appear on the correct display, press SPACEBAR
on the keyboard or the two buttons on the pen tray to move the screen.
7. Repeat steps 4 to 6 for each of the remaining interactive products.
8. Close the SMART Board Settings dialog box.
8 Configuring the SMART Hub PE260 99-00898-20 REV B0
Page 15

Configuring the Display Controller
The display controller allows you to centrally control projectors and displays connected to your
SMART Hub. With the display controller, you can:
• Specify a period of inactivity before each projector or display enters standby mode.
NOTE: The default period is five minutes.
• If your SMART interactive product includes a control module, turn on all projectors or
displays by pressing the Power button on the control module.
Power Button
NOTE: Pressing the Power button on the control module turns on the projectors and
displays connected to your SMART Hub. It doesn’t turn on your SMART Hub itself.
To use the display controller, connect your SMART Hub to the projectors or displays with the
RS-232 connectors as instructed in the SMART Hub PE260 Textless Installation Guide
(document 127261
).
To configure the display controller
1. In the SMART Configuration Tools dialog box, press Projector Controller.
The display controller dialog box appears.
2. Press the icon labeled 1.
NOTE: This icon represents the first projector or display connected to your SMART Hub.
3. Select the Enable Control for this Display check box.
99-00898-20 REV B0 Configuring the SMART Hub PE260 9
Page 16

4. Press the Communication Control tab, and then enter the appropriate information.
Port List
Control Action
Port Select the COM port for the projector or display.
NOTE: Use the correct COM port for the RS-232 cable that
connects your SMART Hub to the projector or display:
• Projector or display: 1 COM port: 1 RS-232 cable: A
• Projector or display: 2 COM port: 2 RS-232 cable: B
• Projector or display: 3 COM port: 3 RS-232 cable: C
• Projector or display: 4 COM port: 4 RS-232 cable: D
Manufacturer Select the manufacturer of the projector or display (for example,
SMART).
Model Select the model of the projector or display (for example,
Unifi45).
10 Configuring the SMART Hub PE260 99-00898-20 REV B0
Page 17

5. If you want to change the period of inactivity before the projector or displa y enters st andby
mode, press Automatic Standby, and then enter the appropriate information.
Control Action
seconds Type the number of seconds of inactivity before the projector or
display enters standby mode.
Activate standby
when the computer
shuts down
6. Repeat steps 2 to 5 for each of the remaining projectors or displays.
7. Close the display controller dialog box.
NOTE: During this procedure, a Windows Security Alert dialog box may appear. Press
Unblock to close this dialog box.
Select this check box to start standby mode when your
SMART Hub shuts down.
99-00898-20 REV B0 Configuring the SMART Hub PE260 11
Page 18

Configuring Networking Features
Your SMART Hub’s network features allow you to:
• Save and open Whiteboard files on network shares that do not require a logon.
• E-mail Whiteboard files.
• Create an online collaborative conference (or “meeting”) every time you start a new
session. Other users in other locations can join and contribute to the meeting.
IMPORTANT
To use the collaboration feature in the SMART Hub PE260, you need
access to a Bridgit software server.
To use these features, you need to complete the following configuration procedures:
1. Configure the collaboration feature.
2. Prevent the Password Required dialog box from appearing when logged on as SmartUser.
3. Configure the e-mail feature.
To configure the collaboration feature
1. In the SMART Configuration Tools dialog box, press SMART Control Panel.
The SMART control panel appears.
2. Press Collaboration Settings.
The Collaboration Settings dialog box appears.
3. In the Room or meeting name box, type the name of your SMART Hub or the room in
which it is located.
4. In the Conference server address box, type the URL of the Bridgit software server.
5. Press OK.
A message appears, stating that your SMART Hub will end the current meeting and start a
new meeting.
6. Press OK.
A message appears, asking if you want to participate in the SMART customer feedback
program.
7. Press Yes or No.
If the Bridgit software server requires a password to create meetings , the
Password Required dialog box appears.
8. Type the password for creating meetings in the Creation Password box, select the
Remember Password check box, and then press OK.
You’ve entered and saved the password for creating meetings.
The Password Required dialog box no longer appears when you are logged on as
Administrator. However, it appears when you are logged on as the default user (SmartUser).
12 Configuring the SMART Hub PE260 99-00898-20 REV B0
Page 19

To prevent the Password Required dialog box from appearing when
logged on as SmartUser
1. Press the Power button on the front of you SMART Hub to turn off the unit.
2. Press the Power button to turn on the unit.
Your SMART Hub completes its startup sequence, and a log on dialog box appears.
3. In the User name box, type SmartUser.
4. In the Password box, type hubpe260.
NOTE: Passwords are case sensitive.
5. Press OK.
A warning message appears, asking you to log on as an administrator.
6. Move the warning message aside and do not press OK.
The Password Required dialog box appears.
7. Type the password for creating meetings in the Creation Password box, select the
Remember Password check box, and then press OK.
You’ve entered and saved the password for creating meetings.
8. In the warning message, press OK.
9. Log on as Administrator (password: RandomPwd).
To configure the e-mail feature
1. In the SMART Configuration Tools dialog box, press Whiteboard Email Config.
The Whiteboard Email Settings dialog box appears.
2. In the From box, type the “from” e-mail address (for example,
boardroom@yourcompany.com).
3. In the SMTP Mail Server box, type the URL of the e-mail server (for example,
mail.yourcompany.com).
4. Press OK.
99-00898-20 REV B0 Configuring the SMART Hub PE260 13
Page 20

Setting the Date and Time
Your SMART Hub restarts every day at midnight. Therefore, it is important to set the date
and time.
To set the date and time
1. In the SMART Configuration Tools dialog box, press Date/Time.
The Date and Time Properties dialog box appears.
2. In the Date & Time tab, set the date and time.
3. In the Time Zone tab, select the time zone.
4. In the Internet Time tab, select an Internet time server if you want to synchronize your
SMART Hub with the time server and are connected to a network with Internet access.
5. Press OK.
Installing Printers
If you install printers on your SMART Hub, users can print Whiteboard, Microsoft Word,
Microsoft Excel and Microsoft PowerPoint files.
IMPORTANT
To install a printer
1. In the SMART Configuration Tools dialog box, press Windows Control Panel.
The Windows Control Panel appears.
2. Double-press Printers and Faxes.
If you’re installing a local printer (in other words, a printer connected directly to
your SMART Hub), ensure Windows XP Embedded can automatically
recognize the printer and has drivers for it.
The Printers and Faxes window appears.
14 Configuring the SMART Hub PE260 99-00898-20 REV B0
Page 21

3. Double-press Add Printer.
The Add Printer wizard appears.
4. Follow the instructions in the wizard to install the printer.
Switching to User Mode
After completing all procedures in this chapter , switch from Configuration mode to User mode
so that your organization’s users can begin using the SMART Hub PE260.
To switch to User mode
1. Press Home to open the Welcome Center and then press Exit Configuration Mode.
OR
In the SMART Configuration Tools dialog box, press Exit Config Mode.
A warning message appears, stating that your SMART Hub must restart to enter
User mode.
2. Press Yes.
Your SMART Hub restarts, and the Welcome Center appears.
99-00898-20 REV B0 Configuring the SMART Hub PE260 15
Page 22

16 Configuring the SMART Hub PE260 99-00898-20 REV B0
Page 23

Updating the SMART Hub PE260’s Software
SMART Technologies periodically releases updates to your SMART Hub’s software. Some
updates address issues with the software, and SMART provides these updates for free. Other
updates introduce new features or enhance existing features, and SMAR T provides these
updates for a fee.
This chapter explains how to download and install updates to your SMART Hub’s software.
To update the SMART Hub PE260’s software
1. On a computer with Internet access, download the latest software update from
www.smarttech.com/support
2. Turn on your SMART Hub and switch to Configuration mode.
IMPORTANT
You can’t update your SMART Hub in User mode (see page 4).
3. Connect the USB storage device to your SMART Hub.
to a USB storage device.
4. Navigate to the location on the USB storage device where you saved the latest software
update’s file, and then double-press it.
The software update wizard appears.
5. Follow the instructions in the wizard to update your SMART Hub’s software.
99-00898-20 REV B0 Updating the SMART Hub PE260’s Software 17
Page 24

18 Updating the SMART Hub PE260’s Software 99-00898-20 REV B0
Page 25

Troubleshooting
If your SMART Hub, SMART interactive products or projectors or displays are not working
properly, complete the following procedure to troubleshoot them.
To troubleshoot your SMART Hub and connected products
1. Check the status indicator lights of the projectors or displays and interactive products
connected to your SMART Hub.
See those products’ user guides for information on their status indicators and the
appropriate actions to take for each status.
2. Check the cables between your SMART Hub and connected products. Ensure the cables
are properly connected and in good working condition.
NOTE: If you’re extending a USB cable connection between your SMART Hub and an
interactive product, ensure your solution is compliant with document 99641
3. If you’re experiencing a problem with touch or digital ink (in other words, when you touch
an interactive product’s surface with your finger, a pen or an eraser, it doesn’t respond or
responds incorrectly), orient the effected SMART products. See page 8.
4. If you’re experiencing a problem with display (in other words, a projector or display isn’t
showing an image or is showing a distorted image), complete the setup procedure for the
effected projector or display. See page 6.
NOTE: If you’re experiencing a problem with the projector or display connected to video
connector 4 (see the previous diagram), complete the procedure in document 127914
99-00898-20 REV B0 Troubleshooting 19
.
.
Page 26

5. If the issue appears to be with a single projector, display or interactive product, disconnect
the product from your SMART Hub and connect it to a computer with SMART interactive
software and drivers to verify that the issue is with the product and not with your SMART
Hub.
6. If you're unable to resolve the issue, contact SMART Technical Support for assistance.
See page 23.
Record the serial number of your SMART Hub and the manufacturers, models, and
serial numbers of the connected products and record them on the first page of this guide.
The SMART Technical Support representative may ask you for this information.
20 Troubleshooting 99-00898-20 REV B0
Page 27

Regulatory Compliance
Waste Electrical and Electronic Equipment Regulations
Waste Electrical and Electronic Equipment regulations apply to all electrical and electronic
equipment sold within the European Union.
When you dispose of any electrical or electronic equipment, including SMART products, we
strongly encourage you to contact your local WEEE recycling agency for recycling and
disposal advice.
Your SMART product required the extraction and use of natural resources for its production. It
may contain hazardous substances. By disposing of electrical and electronic equipment
appropriately, you lower the impact of these substances upon health and the environ ment and
reduce the pressure on natural resources. Recycling agencies can reuse or recycle most of
the materials from your product.
Please think about how you intend to dispose of any product that has a WEEE symbol or
accompanying WEEE guidelines.
If you need more information on the collection, reuse and recycling of electrical and electronic
equipment, please contact your local WEEE recycling agency.
Alternatively, contact your local reseller or SMART Technologies for information on the
environmental performance of our products.
Restriction of Certain Hazardous Substances (RoHS) Directives
SMART Technologies supports global efforts to ensure that electronic equipment is
manufactured, sold and disposed of in a safe and environmentally friendly manner.
This product meets the requirements of the European Union's Restriction of Certain
Hazardous Substances (RoHS) Directive 2002/95/EC, as well as the People's Republic of
China's Control of Pollution Caused by Electronic Information Products (China RoHS).
Subsequently, this product also complies with other, less stringent directives that have arisen
in various geographical areas, and that incorporate the Euro pean Union's RoHS d irective as a
basis.
For more information, refer to your local regulations or visi t www.smarttech.com
.
99-00898-20 REV B0 Regulatory Compliance 21
Page 28

22 Regulatory Compliance 99-00898-20 REV B0
Page 29

Customer Support
Online Support
Visit www.smarttech.com/support to view and download user’s guides, “how-to” and
troubleshooting articles, software and more.
Training
Visit www.smarttech.com/trainingcenter for training materials and information about our
training services.
Contacting SMART Technical Support
SMART Technical Support welcomes your call. However, if you experience difficulty with your
SMART product, you may want to contact your local reseller first. Your local reseller may be
able to resolve the issue without delay.
All SMART products include online, telephone, fax and e-mail support:
Online: www.smarttech.com/contactsupport
Te lephone: +1.403.228.5940 or
Toll Free 1.866.518.6791 (U.S./Canada)
(Monday to Friday, 5 a.m. – 6 p.m. Mountain Time)
Fax: +1.403.806.1256
E-mail: support@smarttech.com
General Inquiries
Address: SMART Technologies
1207 – 11 Ave SW, Suite 300
Calgary, AB T3C 0M5
CANADA
Switchboard: +1.403.245.0333 or
Toll Free 1.888.42.SMART (U.S./Canada)
Fax: +1.403.228.2500
E-mail: info@smarttech.com
Warranty
Product warranty is governed by the terms and conditions of SMART’s “Limited Equipment
Warranty” that shipped with the SMART product at the time of purchase.
Registration
To help us serve you, register online at www.smarttech.com/registration.
99-00898-20 REV B0 Customer Support 23
Page 30

24 Customer Support 99-00898-20 REV B0
Page 31

Page 32

SMART Technologies
1207 – 11 Avenue SW, Suite 300
Calgary, AB T3C 0M5
CANADA
www.smarttech.com/support
wwww.smarttech.com/contactsupport
Support +1.403.228.5940 or Toll Free 1.866.518.6791
99-00898-20 REV B0
 Loading...