

Page 1

SMART Podium
ID422w Interactive
Pen Display
Installation and
User Guide
Page 2

Product Registration
If you register your SMART product, we’ll notify you of new features and Software
upgrade.
Register online as www.smarttech.com/registration
.
Keep the following information available in case you need to contact SMART
Technical Support.
Serial Number: ___________________________________________________
Date of Purchase: ___________________________________________________
FCC Warning
This equipment has been tested and found to comply with the limits for a Class A digital device, pursuant to Part 15 of the
FCC Rules. These limits are designed to provide reasonable protection against harmful interference when the equipment is
operated in a commercial environment. This equipment generates, uses and can radiate radio frequency energy and, if not
installed and used in accordance with the manufacture’s instructions, may cause harmful interference to radio
communications. Operation of this equipment in a residential area is likely to cause harmful interference, in which case the
user will be required to correct the interference at his own expense.
Trademark Notice
The SMART logo, SMART Board and smarttech are trade-marks or registered trade-marks of SMART Technologies ULC in
the US and/or other countries. Microsoft, Windows, Windows Vista and Excel are either registered trade-marks or trademarks of Microsoft Corporation in the US and/or other countries. Mac is a registered trade-mark of Apple Computer, Inc.,
registered in the US and other countries. VESA is a registered trade-mark of the Video Electronics Standards Association.
All other third-party product and company names may be trade-marks of their respective owners.
Copyright Notice
©2010 SMART Technologies ULC. All rights reserved. No part of this publication may be reproduced, transmitted,
transcribed, stored in a retrieval system or translated into any language in any form by any means without the prior written
consent of SMART Technologies ULC. Information in this manual is subject to change without notice and does not
represent a commitment on the part of SMART.
Patent No. US5448263; US6141000; US6320597; US6326954; US6337681; US6741267; US6747636; US6803906;
US6947032; US6954197; US6972401; US7151533; US7184030; US7236162; US7411575; US7499033; CA2058219;
CA2252302; CA2453873; EP1297488; ES2279823; ZL0181236.0; and DE60124549. Other patents pending.
08/2009
Page 3

Important Information
Read This Section First
For proper installation, read this guide carefully and observe the following precautions.
WARNINGS
• If the screen is damaged, do not touch any liquid that leaks from it. This liquid
is an irritant. If the liquid makes contact with your skin, eyes or mouth,
immediately rinse the area with running water for at least 15 minutes.
Consult a doctor if the liquid makes contact with your eyes or mouth.
• Do not open or disassemble the interactive pen display. You risk electrical
shock from the high voltage inside the casing. Opening the casing also voids
your warranty.
• Do not let children play with the tethered pen. They may accidentally remove
the small tip, which can be a choking hazard.
• If the screen is damaged, be careful of glass fragments that can cut or injure.
• Do not disassemble the stand. You risk physical injury or damage to the
stand. Disassembling the stand also voids your warranty.
• Do not operate the display stand incline adjustment levers when the interactive
pen display is not mounted on the stand and do not lift the stand by the
adjustment levers. The stand is spring-loaded and without the weight of the
interactive pen display, you risk injury or damage to the stand.
Page 4

ii | – IMPORTANT INFORMATION
CAUTIONS
• Avoid excessive vibration of the interactive pen display or the tethered pen.
Hitting or dropping the interactive pen display can damage the protective plate
or other components.
• Do not touch the screen with sharp, metallic objects that could scratch the
screen’s coating.
• Use only a damp cloth to clean the screen. Do not apply glass cleaner,
organic solvents (such as alcohol), or even a mild detergent to the screen.
If you use these cleaners, you may damage the screen’s finish or the unit’s
electronics. Using such cleaners also voids the warranty.
• Use only a damp cloth or a cloth dampened with very mild detergent to clean
the unit casing or tethered pen. Do not apply paint thinner, benzene, alcohol
or other solvents to the casing. If you use these cleaners, you may damage
the finish. Using such cleaners also voids the warranty.
• Use only the power adapter that came with the interactive pen display.
Other adapters will not work properly, can damage the interactive pen display
and can create a fire hazard. Using a different power adapter also voids
the warranty.
• Use only the tethered pen that came with the interactive pen display. Tethered
pens or styluses from other products can damage the screen’s protective
coating. In addition, they may not work properly.
• Do not use the interactive pen display in a facility control system or any other
environment that requires extremely high reliability; the interactive pen display
can interfere with or cause other electronic devices to malfunction, or other
devices can interfere with or cause the interactive pen display to malfunction.
Where use is prohibited, turn off the interactive pen display to prevent the
possibility of it interfering with or causing other electronic devices to malfunction.
SMART does not accept any liability for direct or consequential damages.
• If you transport the interactive pen display over a distance, we strongly urge
you to completely repackage it using the original carton. We designed this
packaging with optimal shock and vibration protection. If the original carton is
no longer available, pack all components with as much padding as reasonably
possible to protect the components from excessive vibration or shock. Do not
include loose components in the packaging that could mark, scratch or
otherwise damage the screen during the journey.
• Put the interactive pen display down carefully to ensure that you do not
damage the buttons.
• Do not place the interactive pen display on a surface that will mark, scratch or
damage the screen.
Page 5

iii | – IMPORTANT INFORMATION
CAUTIONS – INTERACTIVE PEN DISPLAY
• Do not place sharp or heavy objects on the interactive pen display.
• Do not connect or disconnect the video or power cable if the interactive pen
display or your computer is on. If you do, you can damage the screen and/or
the computer video card.
• Do not block the interactive pen display’s ventilation holes, as this can cause
it to overheat.
• If you move the interactive pen display, adjust the display stand to its full
upright position, and then use both hands to hold the display unit and the
stand separately. Use the rotation lock screws to ensure that the stand will not
separate from the display unit.
• Do not expose your interactive pen display to high voltage electrostatic
discharges or to a build-up of electrostatic charge on the screen. This can
cause discoloration and blotches on the screen.
• If the interactive pen display is damaged, turn off the display, disconnect the
power adapter in order to prevent further damage or personal injury.
CAUTIONS – TETHERED PEN
• The tethered pen is a sealed unit that contains electronics but no batteries.
If you attempt to open the tethered pen, you will damage these electronics.
This will make the tethered pen unusable and void the warranty.
• Do not touch the screen with any instrument other than the supplied pen
because other instruments may damage the screen’s protective coating.
• Do not use a pen that has worn down to a sharp or angular tip, as it may
damage the screen.
• Do not apply excessive pressure that can shorten the life of the pen.
• Do not immerse the pen in water.
CAUTIONS – ENVIRONMENT
• Avoid setting up and using the interactive pen display in an area with
excessive levels of dust, humidity and smoke or where it is exposed to direct
sunlight, severe temperature changes, heat from other appliances, water or
any other liquid. Operate the interactive pen display within a temperature
range of 5°C and 35°C (41°F 5°C to 95°F) and a humidity range of 20% to
80% (non-condensing). However, you can store the interactive pen display
within a temperature range of -10°C to 60°C (14°F to 140°F) and a humidity
range of 20% to 90% (non-condensing).
Page 6

iv | – IMPORTANT INFORMATION
• Do not modify the power cord. Handle it carefully and avoid bending it
excessively. Do not place the power cord in an area where it is likely to be
stepped on or pinched by items placed on or against it. If you must run a cable
over the floor, lay it in a flat, straight line and secure it to the floor with tape or
a cable management strip of contrasting colour.
• The interactive pen display comes with a three-pronged, grounding-type
power plug (designed to fit into a grounding-type power outlet). If you can not
insert the plug into a power outlet, contact an electrician to replace the power
outlet. Do not modify the power plug.
• Place the interactive pen display in a location where users will have clear and
direct access to the mains power plug, as they must be able to disconnect
the unit at all times. Always disconnect the interactive pen display before you
install any devices or perform any maintenance.
• If possible, disconnect the interactive pen display before any thunderstorms.
However, do not touch the unit or the unit’s power plug during a thunderstorm,
as there is a risk of electrical shock.
• Disconnect the interactive pen display if you will not use it for an
extended period.
• If the interactive pen display requires replacement parts, use parts that
are specified by SMART Technologies.
• Do not expose the interactive pen display to rain or moisture.
Page 7

Contents
Important Information ..............................................................................................i
Read This Section First........................................................................................ i
1 Overview ............................................................................................................... 1
The Interactive Screen ........................................................................................1
The Tethered Pen ...............................................................................................2
The Pen Tool, Function and Display Control Buttons.........................................2
Connection Panel ................................................................................................2
Power...................................................................................................................3
Power Saving ........................................................................................... 3
Cables..................................................................................................................3
Optional Accessories...........................................................................................4
Active USB Extension Cables (USB-XT).................................................. 4
Cat 5 to USB Extender (CAT5-XT)........................................................... 4
2 Installing the SMART Podium ID422w .................................................................. 5
System Requirements.........................................................................................6
For Windows operating systems .............................................................. 6
For Mac operating system software ......................................................... 6
Video Cards ............................................................................................. 6
Monitors and Projectors ........................................................................... 7
Setting Up the Interactive Pen Display ...............................................................7
Determining the Best Location for the Interactive Pen Display ................ 7
Setting Up Your Work Area ...................................................................... 8
Changing the Angle of the Interactive Pen Display .................................. 8
Installing the Interactive Pen Display ..................................................................9
Connecting the Interactive Pen Display and Your Computer................... 9
Installing the Interactive Pen Display ..................................................... 11
Page 8

vi | CONTENTS
Connecting the USB Cable .................................................................... 12
Integrating a Monitor or a Projector...................................................................13
Attaching the Pen .............................................................................................. 14
Installing SMART Board Drivers and SMART Notebook Software .................. 15
Matching the Resolution.................................................................................... 17
Adjusting the Screen .........................................................................................18
The Auto-Sync Function......................................................................... 18
Manual Synchronization ......................................................................... 18
On-Screen Display (OSD) Options......................................................... 19
Adjusting the Display.............................................................................. 21
Adjusting Phase and Pitch (VGA Only) .................................................. 22
Orienting the Screen .........................................................................................23
Securing the Interactive Pen Display ................................................................24
Removing and Installing the Interactive Pen Display’s Stand ..........................24
Other Integrations..............................................................................................25
3 Using the Interactive Pen Display ....................................................................... 27
Touching the Interactive Screen .......................................................................28
Using the Pen....................................................................................................28
Pen Components ................................................................................... 28
Basic Pen Operation .............................................................................. 30
Using the Pen Tool Buttons ................................................................... 31
Writing and Saving Notes....................................................................... 32
Using the Eraser Button ......................................................................... 33
Using the Function Buttons ...............................................................................33
Storing the Pen..................................................................................................34
4 Maintaining the Interactive Pen Display .............................................................. 35
Cleaning the Screen..........................................................................................35
Cleaning the Unit Casing and the Pen.............................................................. 36
Replacing the Pen Nib.......................................................................................36
Page 9

vii | CONTENTS
5 Troubleshooting .................................................................................................. 37
Checking the Interactive Pen Display’s Power .................................................38
Power Indicator Problems ...................................................................... 39
Checking the Interactive Pen Display’s Status ................................................. 40
Status Indicator Problems ...................................................................... 40
Pen Problems....................................................................................................41
Image Problems ................................................................................................42
General Display Problems...................................................................... 42
VGA Display Problems........................................................................... 44
Control and Writing Problems ...........................................................................45
Windows Computer Specific Problems.............................................................46
Mac Computer Specific Problems.....................................................................46
A Hardware Environmental Compliance................................................................. 49
Waste Electrical and Electronic Equipment Regulations (WEEE Directive) ....49
Restriction of Certain Hazardous Substances (RoHS Directive)......................49
Packaging..........................................................................................................50
Covered Electronics Devices ............................................................................50
China’s Electronic Information Products Regulations.......................................50
B Customer Support ............................................................................................... 51
Online Information and Support ........................................................................51
Training..............................................................................................................51
Technical Support .............................................................................................51
Dispatch and Repair Status ..............................................................................51
General Inquiries ...............................................................................................52
Warranty ............................................................................................................52
Registration .......................................................................................................52
Index ................................................................................................................... 53
Page 10

viii |
Page 11

Chapter 1
Function Buttons
Indicators
Power Button
Pen Tool Buttons
Display Control Buttons
Interactive Screen
USB Port
USB Ports
Overview
The SMART Podium ID422w interactive pen display works with your computer and
SMART Board™ drivers to create an interactive presentation environment. The
SMART Podium ID422w includes dynamic and interactive tools for creating
presentations and lessons. When you connect a projector or another monitor to the
interactive pen display, you can control applications and create notes using the
tethered pen, all whilst facing the audience.
The Interactive Screen
The ID422w interactive pen display is a 56cm (22") liquid crystal display (LCD)
interactive screen that acts as an input and output device. The native aspect ratio is
16:9 with flexible scaling options to support 4:3 and 16:10.
Connect it to a computer with a video card that supports full HD resolution
(1920 × 1080) and a refresh rate no higher than 76 Hz.
NOTE
For the interactive pen display to function properly, connect it to a computer with
an appropriate video card. An inappropriate video card may damage the
interactive screen.
Page 12

2 | CHAPTER 1 – OVERVIEW
The Tethered Pen
By using the tethered pen on the interactive pen display, you can control and
manipulate items on your screen and write and erase digital ink. You can store the pen
in the compartment on the top of the unit.
The Pen Tool, Function and Display Control Buttons
Using the buttons on the interactive pen display, you can set the current function of
the pen, instantly start software programs and configure the display settings.
Use the pen tool buttons to control the function of the pen tool. You can select from
different digital ink colours and an eraser button.
Use the function buttons to right-click and to access specific SMART Board tools,
such as SMART Notebook software, the Screen Capture toolbar, and the
SMART Keyboard.
Use the on-screen display control buttons to configure the display’s settings.
Connection Panel
The interactive pen display connection panel has four ports:
• a USB port for connecting the supplied USB cable
• a DVI-I video input port for a video cable from your computer
• a DVI-I video output port for a video cable to a projector or a Monitor
• a power port for the power cable.
IMPORTANT
Set the DVI/VGA switch for the video connection that you are using.
The interactive pen display also includes three USB A ports on the frame.
Page 13

3 | CHAPTER 1 – OVERVIEW
Power
The interactive pen display uses a single 12V DC power supply, which comes with
the unit.
NOTE
The interactive pen display switches to the appropriate voltage automatically.
Power Saving
The SMART Podium ID422w conforms to the Video Electronics Standards
Association (VESA®) power saving guidelines.
When you use the SMART Podium ID422w with a Display Power Management
Signaling (DPMS) compliant computer and video card, the display automatically
complies with the following power saving parameters.
When these power saving functions are in effect, the screen display is darker
than usual.
Maximum
Computer Mode H-sync V-sync Video
Power ON Yes Yes Active 54 W Green
Standby mode No Yes Blanked 2 W Green/Amber*
Suspend mode Yes No Blanked 2 W Green/Amber*
Power OFF No No Blanked 1 W Amber
* epending on the specifications and settings of your computer and video card,
the power light may only change to amber when in standby and suspend modes.
Power
Consumption
Power Lamp
Cables
The interactive pen display comes with four cables:
• DVI-D to DVI-D
• DVI-A to VGA
• USB A-B
• AC power cable
Page 14

4 | CHAPTER 1 – OVERVIEW
Optional Accessories
For more information on optional accessories, contact your
authorised SMART reseller
Active USB Extension Cables (USB-XT)
You can connect up to four 5m (16') active USB extension cables to extend your
interactive pen display’s USB connection to a maximum of 20m (64').
Cat 5 to USB Extender (CAT5-XT)
Use the SMART Cat 5 to USB extender to extend your interactive pen display’s USB
connection up to 36.6m (120') using RJ45 Cat 5 cable (not included). The extender
includes two 1.8m (6') USB cables to connect your computer and your interactive pen
display to the extender units.
.
Page 15

Chapter 2
Installing the SMART Podium ID422w
This chapter tells you how to:
• determine the computer system requirements (page 6)
• set up the interactive pen display (page 7)
• install the interactive pen display (page 9)
• integrate a monitor or a projector (page 13)
• attach the pen (page 14)
• install SMART Board drivers and SMART Notebook software (page 15)
• match your computer’s and interactive screen’s resolutions (page 17)
• adjust the screen (page 21)
• orientate the screen (page 23)
• secure the interactive pen display (page 24)
• remove and install the interactive pen display’s stand (page 24)
• integrate the interactive pen display with other devices (page 25)
Page 16

6 | CHAPTER 2 – INSTALLING THE SMART PODIUM ID422w
System Requirements
Before installing the SMART Podium ID422w, make sure that your computer meets
the following minimum system requirements.
For Windows operating systems
• Windows Vista®, Windows Vista 64-bit, Windows® XP, or Windows XP 64-bit
operating system
• DVI or VGA video port
• available USB port
For Mac operating system software
• Mac OS X operating system software 10.4 or later
• DVI or VGA video port
• available USB port
NOTE
ADC connectors require an ADC to DVI adapter (not included).
Video Cards
The SMART Podium ID422w supports both digital (DVI) and analogue (VGA) video
signals. If you are updating your video card, complete the video card hardware and
software installation before connecting the interactive pen display. If you have another
display that is compatible with your video card, you can connect that display to the
card in order to verify that the video card is operating correctly.
Although you can quickly connect the interactive pen display to a video card with
either DVI or VGA signals, a DVI signal generally results in better performance.
NOTE
Depending on the capabilities of your video card and operating system, you may
be able to set up the interactive pen display as a mirrored, extended, or
independent display. For more information, see your video card documentation.
Page 17

7 | CHAPTER 2 – INSTALLING THE SMART PODIUM ID422w
Monitors and Projectors
You can use the SMART Podium ID422w alone or with another display. You may
connect a second device, such as an LCD projector or a monitor, to the SMART
Podium ID422w DVI OUT port. When using this port, the second device mirrors the
image on the interactive pen display. Complete the SMART Podium ID422w
installation before connecting a second device.
NOTE
When you are working with more than one monitor, the SMART Podium ID422w
maps to the monitors based on your system configuration. By default, if you are in
mirror mode, the pen tablet maps to the entire space on each monitor. For more
information on configuring your computer and operating system for use with
multiple monitors, see your hardware and operating system documentation.
Setting Up the Interactive Pen Display
This section tells you how to:
• determine the best location for the interactive pen display (this page)
• set up your work area (page 8)
• change the angle of the interactive pen display (page 8)
Determining the Best Location for the Interactive Pen Display
Install the interactive pen display in a cool, dry location without excessive levels of
dust, humidity and smoke. Operate the interactive pen display in an environment
within a temperature range of 5°C to 45°C (41°F and 115°F) and within a humidity
range of 20% to 85% (non-condensing). You can store the interactive pen display
within a temperature range of -10°C to 60°C (14°F to 140°F) and a humidity range of
20% to 90% (non-condensing).
Take into consideration that the interactive pen display itself will generate heat
whenever it is turned on. To maintain a consistent operating temperature, do not block
or cover any of the ventilation holes on the back of the unit. Other external factors can
affect the interactive pen display, such as the heat generated by control systems or
other electronic equipment. Make sure that there is adequate airflow around the unit.
Keep the computer keyboard and the mouse close to the interactive pen display
because the pen will not have full functionality and maximum performance until you
install SMART Board drivers and then open the SMART Board tools. You should also
keep your computer within 5m (16’) of the unit. This distance protects against signal
degradation that occurs with a longer USB cable. The video cable also has length
limitations, so you should not use an RGB video cable longer than 15m (50').
Page 18

8 | CHAPTER 2 – INSTALLING THE SMART PODIUM ID422w
Locking
Mechanism
To alleviate glare, you can use the attached tilt stand to angle the interactive pen
display. Alternatively, use a tilt stand that conforms to the standard sizes set by VESA.
When installing a VESA compliant stand, use M4 screws (4mm or 1/16" wide with a
0.7mm or 1/32" pitch) that are no longer than 15mm (1/4").
Setting Up Your Work Area
To minimise fatigue, organise your work area so that you can work comfortably.
Position your interactive pen display, the pen and your keyboard for easy access
without unnecessary reaching. You should be able to comfortably view the pen display
and any other displays with a minimum of eye strain.
Because the interactive pen display surface will be a little higher than your desk, you
can adjust the height of your desk or chair to ensure comfortable use of the device.
You can also mount the SMART Podium ID422w onto articulated arms or other
third-party stands meeting the VESA 100 specification for display stands.
Changing the Angle of the Interactive Pen Display
You can adjust the stand to change the angle of the interactive pen display.
To change the angle of the
interactive pen display
NOTE
For information on how to remove or install the stand, see page 24.
1. Hold the interactive pen display to support its weight whilst you adjust the stand.
2. Push the stand’s locking mechanism towards the top of the interactive pen
display, adjust the angle of the stand and then release the locking mechanism.
Page 19
9 | CHAPTER 2 – INSTALLING THE SMART PODIUM ID422w
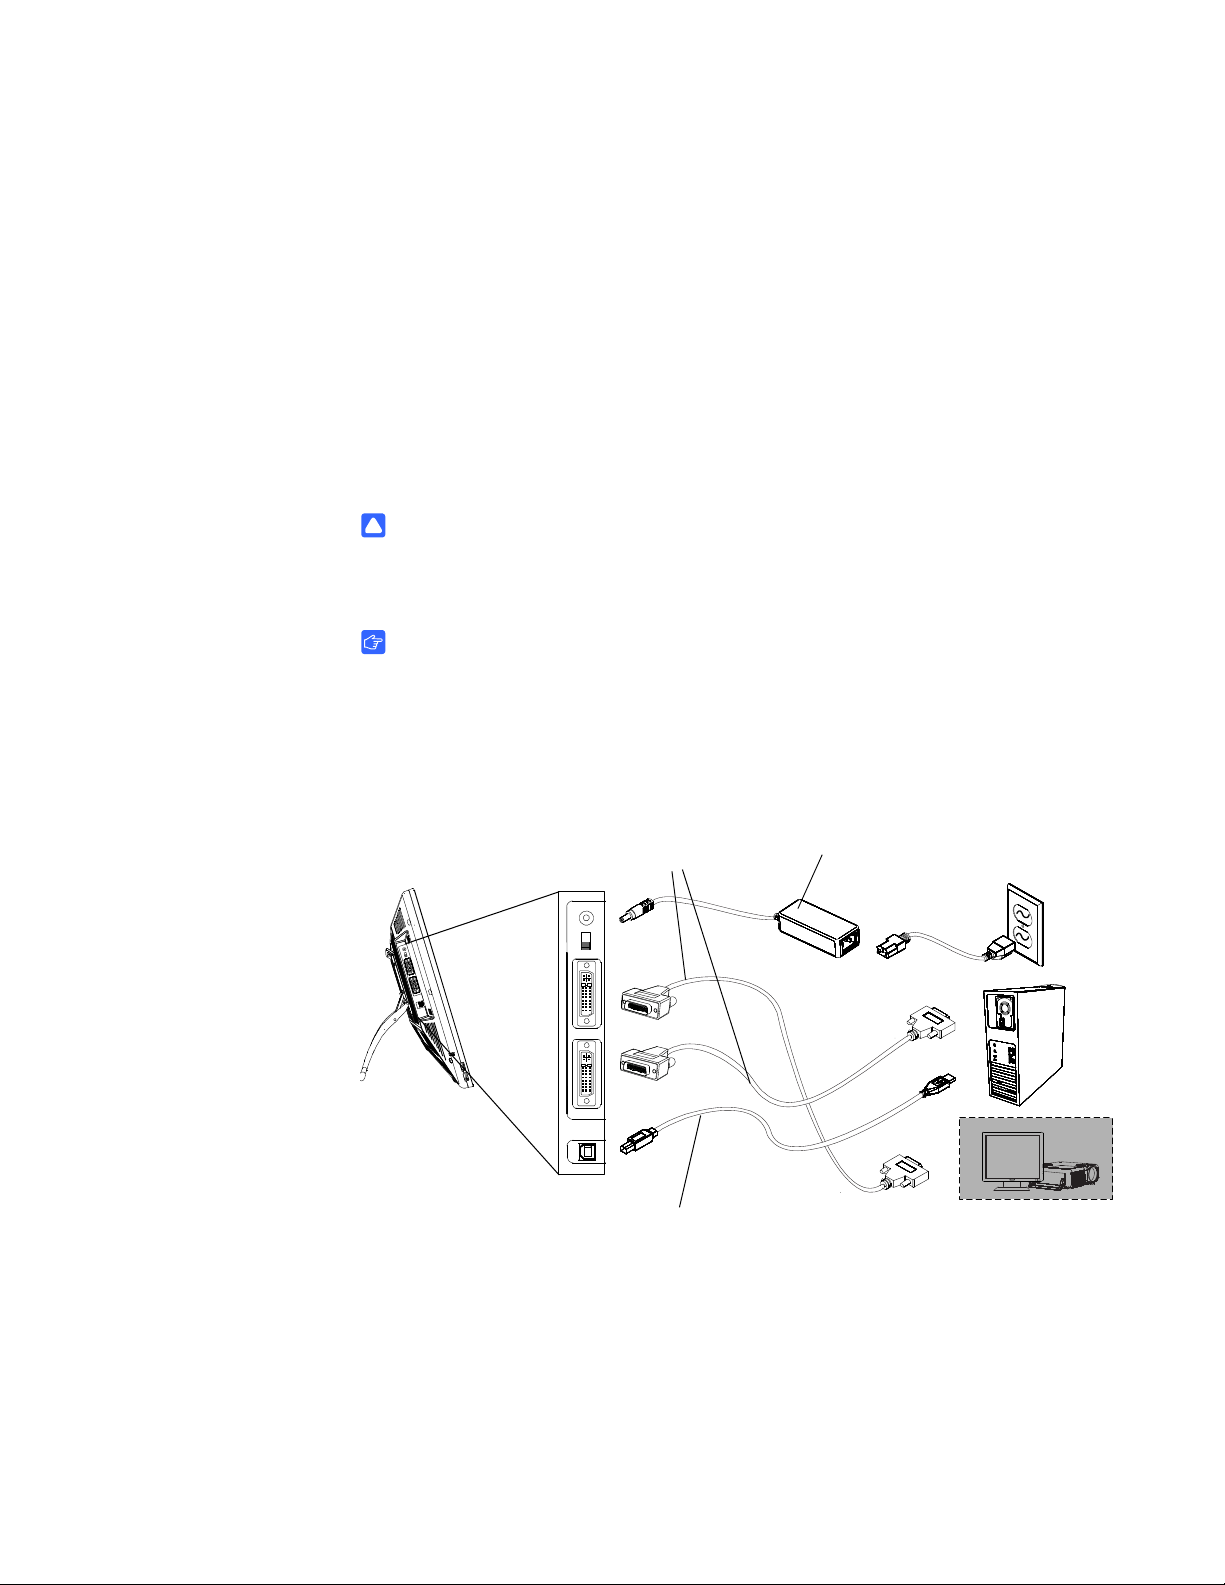
-+
DVI to DVI
OR
DVI to VGA
Power Adapter
USB to USB
Installing the Interactive Pen Display
There are three primary stages to the installation process:
• Connecting the interactive pen display and your computer (this page)
• Installing the interactive pen display (page 11)
• Connecting the interactive pen display and your computer using the USB cable
(page 12)
Connecting the Interactive Pen Display and Your Computer
CAUTION
Use only the cables provided with your interactive pen display. Other cables can
damage the interactive pen display.
IMPORTANT
• Make sure that your video card has a DVI or VGA connector and that you
correctly set the DVI/VGA switch for the video connector you are using.
• Do not attach the USB data cable until instructed to do so.
Page 20

10 | CHAPTER 2 – INSTALLING THE SMART PODIUM ID422w
To connect the interactive
pen display and your
computer video card
1. Turn off your computer.
CAUTION
Do not connect or disconnect the video or power cable if the interactive pen
display or your computer is on. If you do, you can damage the screen and/or
the computer video card.
2. If your computer has only one video connector, disconnect your monitor or add a
second video card.
3. Determine whether your computer has a digital (DVI) connector or an analogue
(VGA) connector and then set the DVI/VGA switch on the connection panel for the
video connection that you are using.
4. Ensuring that you tighten the thumbscrews on the connectors, follow the
instructions below for your video connector.
– For DVI operation, connect the DVI to DVI video cable to the DVI-I IN port on
the interactive pen display and the DVI-D or DVI-I connector on your
computer’s video card.
– For VGA operation, connect the VGA to DVI-A video cable to the DVI-I IN port
on the interactive pen display and the VGA connector on your computer’s
video card.
To connect the interactive
pen display and an AC
power outlet
– For ADC operation, connect one end of the DVI to DVI video cable to the ADC
to DVI adapter, connect the other end of the cable to the DVI-I IN port on the
interactive pen display, and then connect the ADC adapter end to the ADC
connector on your computer’s video card.
NOTE
If you are connecting the unit to an Apple ADC or mini-VGA connection,
you must obtain an appropriate adapter. Adapters are available at retail
outlets.
– For an Apple mini-VGA connector, connect the VGA end of the analogue
RGB cable to the mini-VGA adapter. Connect the DVI end of the cable to the
DVI-I IN port on the interactive pen display and then connect the mini-VGA
port end to the mini-VGA on your computer’s video card.
1. Connect the power adapter to the interactive pen display, connect the adapter’s
power cable, and then connect the adapter to an AC outlet.
2. Turn on the interactive pen display.
The Power indicator is amber.
Page 21

11 | CHAPTER 2 – INSTALLING THE SMART PODIUM ID422w
Installing the Interactive Pen Display
IMPORTANT
Do not connect the USB data cable until instructed to do so.
To install the interactive
pen display
1. If you are using a second device, such as a projector or a monitor, follow the
instructions on page 13 to connect the interactive pen display to the second
device.
CAUTIONS
– Do not connect or disconnect the video or power cable if the interactive
pen display or your computer is on. If you do, you can damage the screen
and/or the computer video card.
– Use only the power adapter that came with the SMART Podium ID422w.
Other adapters will not work properly, can damage the interactive pen
display and can create a fire hazard. Using a different power adapter also
voids the warranty.
– Make sure that the display refresh rate does not exceed 76 Hz.
IMPORTANT
– Fully install the SMART Podium ID422w hardware (page 9) and software
(page 15) before connecting a projector or monitor to the unit.
2. Turn on the computer and the interactive pen display.
The SMART Podium ID422w automatically installs as a default monitor.
3. If necessary, configure the display control panel settings for the proper size and
colour resolution. The maximum (native) resolution of the SMART Podium
ID422w is 1920 × 1080 pixels. The display size and colour resolution may be
constrained by the capabilities of your video card. For more information, see the
video card manufacturer’s documentation.
NOTE
If your computer supports a second display and you are using the interactive
pen display as a second display, you may need to enable the SMART Podium
ID422w as your second display in your Display Properties (Windows
computers) or Display preferences (Mac computers).
4. If necessary, adjust the screen display settings (see page 19).
IMPORTANT
To extend the life of the backlight, set your computer’s power management
settings to turn off the display when it is not in use for extended periods.
Page 22

12 | CHAPTER 2 – INSTALLING THE SMART PODIUM ID422w
NOTES
• If an image has fine striping (such as screen stripes), it may appear to flicker
or display a wavy pattern.
• Do not apply excessive pressure on the display surface. It may cause the
appearance of a wavy or pooling pattern. If this occurs, use less pressure on
the interactive screen when working with the pen.
• When a still image is displayed for a long period of time, an after-image may
remain for a short time. To prevent this, use a screen saver or other power
management feature.
TIP
For troubleshooting tips, see page 37.
Connecting the USB Cable
To connect the interactive
pen display and computer
using the USB cable
Once you have connected the hardware and install the software and the interactive
pen display, you can connect the supplied USB cable to the USB port on the
interactive pen display and an available USB port on your computer.
NOTE
If you must install drivers not provided by SMART Technologies, search for them
in your operating system folders.
Page 23

13 | CHAPTER 2 – INSTALLING THE SMART PODIUM ID422w
Integrating a Monitor or a Projector
You can connect a projector or another monitor directly to the interactive pen display.
With this setup, whatever you view on the interactive pen display also appears on the
other display. When you connect a projector or a monitor, the video signal from the
computer is automatically sent to the projector or monitor. Other integration options
are available if you amplify the video signal.
Use a SMART approved projector, such as the UF55w or UX60 projectors.
Alternatively, use a projector that can support VGA resolution and change the display
resolution of the connected computer.
NOTE
The display resolution of the connected computer must be set to a resolution
supported by the projector.
To connect a projector
or monitor
1. Turn off the computer and the interactive pen display.
2. For DVI operation, connect a second DVI to DVI video cable (not included) to the
DVI-I OUT port located on the interactive pen display and the DVI-D or DVI-I
Video Input connector on your projector or monitor.
For VGA operation, connect a second VGA to DVI-A cable (not included) to the
DVI-I OUT port located on the interactive pen display and the VGA Video Input
connector on your projector or monitor.
NOTE
For details about the projector’s connectors, read the instructions that came
with your projector.
Page 24

14 | CHAPTER 2 – INSTALLING THE SMART PODIUM ID422w
Attaching the Pen
Use the tether to attach the pen to the interactive pen display, so the pen is always
within reach.
NOTE
When you are not using the pen, put it in the storage compartment on the top of
the interactive pen display (see page 34).
To attach the tether to the
pen and the interactive
pen display
1. Thread one loop through the opening at the end of the pen, slip the rest of the
cord through the loop and then carefully pull the cord until the loop is snug.
2. Thread the other loop through the opening on the back of the interactive pen
display. Use either the left or the right opening.
3. Slip the pen and the rest of the tether through the loop. Carefully pull the pen until
the loop is snug.
Page 25

15 | CHAPTER 2 – INSTALLING THE SMART PODIUM ID422w
Installing SMART Board Drivers and SMART Notebook Software
Your interactive pen display comes with a SMART Product drivers CD and SMART
Notebook software CD, which you can use to install the software you need.
You can also download and install the complete installation of SMART Board drivers
and SMART Notebook software from the SMART Support website
NOTE
You will need to use the computer’s keyboard or mouse to perform the
installation,because the pen does not work until the SMART Board tools
are running.
.
To install SMART Board
drivers and SMART
Notebook software
1. Turn on the computer and the interactive pen display.
2. Close all open applications on the computer.
3. To install SMART Board drivers, insert the SMART Products drivers CD into the
CD drive.
4. For most systems, the CD is self-starting. If the CD does not start automatically:
On Windows computers, select Start > Run, and then type x:\autorun.exe
(where x: is your CD drive).
OR
On Mac computers, open Finder, browse to your CD drive and then double-click
the install file.
5. Follow the on-screen instructions.
IMPORTANT
Select the option to start the SMART Board tools automatically each time you
start your computer. The SMART Board tools must be running for you to have
full functionality and maximum performance when you use the interactive pen
display. You will know that the SMART Board tools are open if you can see
the SMART Board icon in the notification area (Windows computers) or
the Dock (Mac computers).
6. Repeat steps 3–5 with the SMART Notebook software CD to install SMART
Notebook software.
Page 26

16 | CHAPTER 2 – INSTALLING THE SMART PODIUM ID422w
7. Once you have installed SMART Board drivers and SMART Notebook software,
select the SMART Board icon in the notification area (Windows computers)
or the SMART Board Tools icon in the Dock (Mac computers). Select Check for
Updates and then update to the latest SMART software.
8. Once the software is installed and running, touch the pen to the interactive screen.
The cursor should appear under the tip of the pen. If it does not, you may need to
orientate the screen (see page 23) or read the section entitled Troubleshooting
on page 37.
NOTES
• If the SMART Board tools do not recognise the interactive pen display,
disconnect and connect the USB connector manually, or use another USB
port on your computer.
• If the interactive pen display is your secondary monitor, you may need to
enable it. Select Control Panel > Display Properties (Windows computers)
or Apple menu > System Preferences > Displays (Mac computers).
For more details, read the SMART Notebook software online Help.
Page 27

17 | CHAPTER 2 – INSTALLING THE SMART PODIUM ID422w
Matching the Resolution
Before the image output of the computer can display properly on the interactive
screen, you must set the computer’s resolution to the interactive screen’s
native resolution.
Set the resolution of the display to 1920 × 1080 pixels (full HD) and set the refresh
rate to between 56 Hz and 76 Hz.
IMPORTANT
Do not set the Refresh Rate to higher than 76 Hz.
If the Refresh Rate is higher than 76 Hz, you see a black screen.
NOTES
• If you need to change the display settings on the computer, you must use
the mouse.
• This procedure may vary depending on the version of your operating system,
and your system preferences.
To set the resolution
(Windows computers)
To set the resolution
(Mac computers)
• Some Mac computers transmit video signals outside the 56 Hz to 76 Hz
synchronization range. These models should not be used with the
SMART Podium ID422w.
1. Open the Windows Control Panel.
2. Click Display.
The Display Properties dialogue box appears.
3. Click the Settings tab.
4. Move the slider to 1920 × 1080.
5. Click OK.
1. Select Apple menu > System Preferences > Displays.
2. On the Display tab, select 1920 × 1080.
3. Close the dialog box.
Page 28

18 | CHAPTER 2 – INSTALLING THE SMART PODIUM ID422w
Adjusting the Screen
SMART Board drivers adjust your screen automatically. However, you can use the
On-Screen Display (OSD) menu to change the screen.
The Auto-Sync Function
If the interactive screen receives a signal with appropriate vertical and horizontal
frequencies, it automatically synchronizes to the incoming signal. This auto-sync
function adjusts the vertical and horizontal position and the phase and pitch settings.
Auto-sync functions when the vertical frequency is between 56 and 76 Hz and the
horizontal frequency is between 30 and 80 kHz.
NOTES
• For optimal display quality, set your video card to the SMART Podium
ID422w’s native resolution of 1920 × 1080 pixels (full HD) (see page 17).
• If the SMART Podium ID422w does not automatically synchronize with the
incoming signal, you can use the Auto Adjust (VGA Only) OSD option
(see page 22).
Manual Synchronization
Press the Menu button on the interactive pen display to open the OSD menu and then
use the OSD menu to fine-tune the screen display settings manually.
Page 29

19 | CHAPTER 2 – INSTALLING THE SMART PODIUM ID422w
On-Screen Display (OSD) Options
The following table provides a detailed description of the OSD options menu.
OSD Options Functions
Language • Language selects a language for the OSD menu.
OSD Position • Vertical adjusts the vertical position of the OSD menu.
• Horizontal adjusts the horizontal position of the
OSD menu.
• Transparency changes the opacity of the OSD
menu background.
Display • Contrast increases or decreases image contrast.
• Brightness increases or decreases image brightness.
• Backlight increases or decreases the backlight
brightness level.
Color • 5000K, 6500K and 9300K adjust the pen display
colour temperature, in degrees Kelvin.
• Direct displays the colours directly from the video card
without any adjustment.
• Custom independently adjusts the red, green and blue
display colours.
Scaling • Full resizes the image to fill the whole screen.
• Aspect resizes the image to fill as much of the screen
as possible whilst maintaining the correct aspect ratio.
• 1:1 displays the image at the actual resolution.
Page 30

20 | CHAPTER 2 – INSTALLING THE SMART PODIUM ID422w
OSD Options Functions
Other • Phase (VGA only) synchronizes the signal timing of
the interactive pen display to your graphics card.
Use this adjustment when you experience an unstable
or flickering image, or horizontal distortion lines.
• Pitch (VGA only) changes the display data frequency
to match your graphics card. Use this adjustment when
you experience an unstable or flickering image,
or vertical distortion lines.
NOTE
When you adjust the phase and pitch in VGA
mode, some computers and video cards may not
allow the auto-sync function to work when you
connect the interactive pen display. If some
portion of text appears blurred, use the Auto
Adjust option to automatically synchronize to
the incoming signal.
• Vertical (VGA only) changes the vertical position of
the image. To automatically adjust the vertical position,
use the Auto Adjust option.
• Horizontal (VGA only) changes the horizontal position
of the image. To automatically adjust the horizontal
position, use the Auto Adjust option.
• Auto Adjust automatically optimizes the interactive
display image.
Reset • Reset returns the current display parameters to the
factory default settings.
Exit • Exit closes the OSD menu without making changes.
Page 31

21 | CHAPTER 2 – INSTALLING THE SMART PODIUM ID422w
Display Control Buttons
Adjusting the Display
The OSD options enable you to optimize a variety of display settings at the touch of
a button. Make adjustments using the display control buttons located on the upper
left-hand edge of the unit.
Display Control Buttons Functions
Menu button Press the Menu button to open or exit the OSD menu.
– and +
selection buttons
Enter button Press the Enter button to save your changes.
To adjust the screen 1. Press the Menu button on the interactive pen display to open the OSD menu.
2. Press the – and + buttons to select the option you want to adjust and then press
the Enter button.
NOTES
– You can use the interactive pen display’s – and + buttons to scroll.
– The available display options are described on page 19.
Use these buttons to select an option and adjust the
option settings. Press the – button to decrease a
selected item value. Press the + button to increase it.
When the option you want to adjust is selected, press
the Enter button, and the current settings and
adjustment sub-menu for that option appears.
NOTE
Some settings may not be available when you are
in DVI mode.
3. Press the – and + buttons to alter the settings for the option.
4. Press the Enter button to save your changes.
5. Repeat steps 2–4 to perform more adjustments.
6. Press the Menu button to exit the OSD menu.
The menu for the option you chose appears.
Page 32

22 | CHAPTER 2 – INSTALLING THE SMART PODIUM ID422w
To use the
Auto Adjust (VGA only)
option
1. Press the Menu button on the interactive pen display to open the OSD menu.
2. Press the – and + buttons to select the Other option , and then press the
Enter button.
The Other menu appears.
3. Press the – and + buttons to select Auto Adjust.
4. Press the Enter button to save your changes and select another option.
OR
Press the Menu button to exit the OSD menu.
NOTES
• The OSD menu closes automatically after a few moments of inactivity.
• You can also press the Menu button to close the OSD menu.
• Your settings are saved automatically when the OSD menu closes and
appear the next time the unit receives a similar video signal. This is applicable
to all display modes. If you change your settings, you can select Reset to
return the SMART Podium ID422w to its original factory defaults.
To adjust the phase and
pitch (VGA only)
Adjusting Phase and Pitch (VGA Only)
Some computers and graphics cards may not allow Auto Adjust to function correctly
when you first connect the screen. If the display does not fit within the LCD panel
border, or if some portion of the text appears blurred, adjust the phase and pitch.
1. Press the Menu button on the interactive pen display to open the OSD menu.
2. Press the – and + buttons to select the Other option and then press the
Enter button.
The Other menu appears.
3. Select the Phase option and then use the – and + buttons to make the adjustment
pattern show clearly.
4. Select the Pitch option and then use the – and + buttons to evenly display the
pattern of vertical stripes on the screen.
5. Press the Enter button to save your changes and select another option.
OR
Press the Menu button to exit the OSD menu.
Page 33

23 | CHAPTER 2 – INSTALLING THE SMART PODIUM ID422w
Keyboard Button
Right-Click Button
Orienting the Screen
To ensure that the pointer appears directly beneath the tethered pen when you touch
the interactive screen, the computer needs to know the exact location of the image on
the screen. You can ensure the accuracy of the pointer by orientating the screen,
a procedure in which you use the tethered pen to touch a grid of red targets.
NOTE
If the image on the screen is distorted, match the resolution (page 17) and adjust
the screen (page 18) before you orient the screen.
To orient the screen 1. For Windows computers: Press the SMART Board icon in the notification
area and then press Orientate.
OR
For Mac computers: Press and hold the SMART Board Tools icon in the Dock
and then press Open Orientate.
NOTES
– You can also open the orientation screen by pressing and holding the
Keyboard and Right-Click buttons on the interactive pen display for
several seconds.
– If the interactive pen display is your secondary monitor, you may need to
press the SPACE BAR to move the orientation screen to your interactive
pen display.
Targets appear on the screen.
2. Press the centre of each target in the order indicated on the screen.
The computer registers the point on the screen where you remove your pen from
the display surface.
Page 34

24 | CHAPTER 2 – INSTALLING THE SMART PODIUM ID422w
Security Slot
NOTES
– To effectively orientate the interactive screen, press an area near each
target and then slide your pen to the centre of each target’s cross hairs
before removing it. Keep your pen at a right angle to the screen.
– You can re-orientate a target by pressing a function button or the
LEFT ARROW key on the keyboard.
– If you want to close the orientation screen before finishing the orientation
procedure, press the ESC key on the keyboard. Otherwise, the
orientation screen closes once you have pressed the last target.
Securing the Interactive Pen Display
You can secure the interactive pen display by attaching a cable (not supplied) to
the security slot that is in the back of the unit and an immovable object.
Removing and Installing the Interactive Pen Display’s Stand
If you want to, you can remove the interactive pen display from its stand.
CAUTION
• Set the interactive pen display down carefully to ensure that you do not
damage the buttons.
• Do not place the interactive pen display on a surface that will mark, scratch or
damage the
Page 35

25 | CHAPTER 2 – INSTALLING THE SMART PODIUM ID422w
Top Edge of
the Stand
Top Edge of
the Interactive
Pen Display
Holes in the Stand
To remove the interactive
pen display’s stand
To install the interactive
pen display on the stand
1. Place the interactive pen display facedown on a flat surface.
2. Remove the four screws that attach the stand to the interactive pen display and
then remove the stand.
1. Place the interactive pen display facedown on a flat surface.
2. Align the four holes in the stand with the four holes in the back of the interactive
pen display.
3. Insert and tighten the four screws.
4. Place the interactive pen display faceup, with its weight on the stand and the
bottom edge of the interactive pen display.
Other Integrations
Depending on the equipment and your expertise, you may want to integrate the
interactive pen display with other devices. You can easily adapt the interactive pen
display to expand the multimedia capabilities of the equipment in the room.
For example, you can integrate your interactive pen display with a projector and a
SMART Board interactive whiteboard.
NOTE
If you want to use a video cable longer than 15m (50'), you must boost the video
signal with a video distribution amplifier.
Page 36

26 | CHAPTER 2 – INSTALLING THE SMART PODIUM ID422w
Page 37

Chapter 3
Using the Interactive Pen Display
This chapter tells you how to:
• touch the interactive screen (page 28)
• use the pen (page 28)
• use the function buttons (page 33)
• store the pen (page 34)
The interactive pen display is as easy to use as a pen on paper. By touching the
tethered pen to the screen, you can interact with computer applications intuitively.
You can also access additional tools and features using the pen tool buttons and
function buttons.
CAUTION
Use only the tethered pen that came with the interactive pen display. Pens or
styluses from other products can damage the protective coating of the display.
In addition, they may not work properly.
NOTE
You can use SMART Notebook software to make your presentations interactive
and dynamic. For more details on what you can accomplish with SMART
Notebook, see the SMART Notebook software online Help. Whilst reading
the online Help, keep in mind that:
• a pen touch on the interactive pen display is equivalent to a touch on the
interactive whiteboard surface with a finger.
• the tethered pen and pen tool buttons function in the same way as the
SMART Pen Tray tools on the interactive whiteboard.
Page 38

28 | CHAPTER 3 – USING THE INTERACTIVE PEN DISPLAY
Eraser End
Pen Nib
Pen Side Switch
Upper Button
Lower Button
Touching the Interactive Screen
You can manipulate objects, select items, and write and erase digital ink by touching
the interactive screen with the tethered pen.
Using the Pen
The pen for the SMART Podium ID422w is an enhanced pen that senses the amount
of pressure that you apply to the tip. It is cordless and battery-free.
Hold the pen as you would a normal pen or pencil. As you work with the SMART
Podium ID422w, you can rest your hand lightly on the display screen, just as if it were
a drawing board or sheet of paper. You can tilt the pen in any way that feels most
comfortable for drawing.
Pen Components
Page 39

29 | CHAPTER 3 – USING THE INTERACTIVE PEN DISPLAY
Pen nib • The pen activates as soon as it is within 5mm (3/16”) of the
display surface; you do not need to touch the pen tip to the
display surface. This allows you to position the screen cursor
without touching the pen tip to the interactive screen.
When pressure is applied to the pen nib, the pen simulates
a mouse click.
Eraser • When you place the eraser end of the pen within 5mm (3/16")
of the display surface, the interactive pen display senses the
pen location.
Pen side switch • The pen is equipped with a side switch that has two
programmable functions. You can rock the switch in either
direction to activate the button functions. You can use the
switch whenever the pen nib is within 5mm (3/16") of the
display surface. By default, the lower button is set to pen and
the upper button is set to right-click (Windows only).
NOTE
Make sure that the programmable side switch is in a
convenient location where you can toggle the switch
with your thumb or forefinger and where you will not
accidentally press it whilst writing or drawing.
CAUTION
Replace the pen nib when it wears down. If a pen nib wears down too far,
you might scratch or damage the display surface.
NOTES
• To customize the side switch functions and to change the eraser function,
press the SMART Board icon in the notification area (Windows
computer) or the SMART Board Tools icon in the Dock (Mac computers).
Select the Control Panel > SMART Hardware Settings > Pen and Button
Settings and then select the functions that you want from the drop-down
menus.
• When the pen is not in use, place it in the pen storage compartment, or lay it
flat on your desk. To maintain the sensitivity of your pen, do not store the pen
in a container where it will rest on its tip.
Page 40

30 | CHAPTER 3 – USING THE INTERACTIVE PEN DISPLAY
Basic Pen Operation
Pointing and
selecting
Clicking • Tap the display surface once with the pen tip, or touch the pen
• Move the pen slightly above the interactive screen to position
the screen cursor. You do not need to touch the display surface.
The cursor jumps to the location where you place the pen.
Press the pen tip on the display surface to make a selection.
NOTE
If the screen cursor does not jump to a position close to
the pen tip when you place the pen on the display
surface, SMART Board drivers may not be installed or
they may not be loading.
to the display surface with enough pressure to register a click.
TIP
To make navigating with the pen easier, configure the
Windows operating system to select when the pen is over
an icon and to launch the icon with a single click. To turn
on this feature, open any folder, and then perform one of
the following procedures:
– On the Windows Vista operating system, select
Organise > Folder and Search Options and then
select Single-click to open an item (point to
select) on the General tab.
– On the Windows XP operating system, select Tools >
Folder Options and then select Single-click to
open an item (point to select) on the General tab.
Double-clicking • Quickly tap the display surface twice in the same place with the
pen tip. Double-clicking is easier when the pen is perpendicular
to the interactive screen. For information on fine-tuning the
double-click area, see SMART Notebook software online Help.
Dragging • Select an object, and then slide the pen tip across the display
surface to the location that you want.
Writing or
Drawing
Erasing • The pen’s eraser works like the eraser on a pencil to remove
• Use the pen tip like a pen to write or draw in digital ink.
digital ink.
Page 41

31 | CHAPTER 3 – USING THE INTERACTIVE PEN DISPLAY
Status Indicator
Using the Pen Tool Buttons
Use the pen tool buttons to control how the interactive pen display responds to your
interactive screen touches. You can use the pen tool buttons to select an object,
right-click, write digital ink (in black, blue or red) or erase when you touch the screen.
To select and
use mouse modes
Press the Select button and then press the tip of the tethered pen to the interactive
screen. To double-click, press twice with the pen. To drag an object, press and hold
the object with the tip of the pen and drag it to its new location.
NOTE
When you press the Select pen tool button, each screen press is interpreted as
a left-click until you press a different pen tool button.
TIP
If the pointer does not appear directly under the tip of the tethered pen, orientate
the interactive pen display to improve the accuracy (see page 23).
The interactive pen display’s Status indicator glows green when you press a pen tool
button or a function button on the interactive pen display, or when the pen touches
the interactive screen.
Page 42

32 | CHAPTER 3 – USING THE INTERACTIVE PEN DISPLAY
Writing and Saving Notes
To write on the screen
and save your notes
Press one of the digital ink pen tool buttons and then write or draw on the interactive
screen, just as you would write or draw on paper. A line of digital ink in the colour that
you chose follows the tethered pen.
NOTES
• You can customize the pen tool buttons to adjust the colour, thickness,
line end and line style, and the transparency. For details on customizing these
buttons, see the SMART Notebook software online Help.
• You can write notes over computer applications only if the SMART Board
tools are running on the computer. You will know that the SMART Board tools
are running if you can see the SMART Board icon in the notification area
(Windows computers) or the SMART Board Tools icon in the Dock
(Mac computers).
When you write over an application, you can save your notes. However, the available
save options depend on whether that program is Ink Aware. An Aware application
recognises your notes as a program component, but a non-Aware application does
not. SMART Notebook is an example of an Aware application.
To save your notes as part of the file in an Aware application, save the file as you
normally would. In some Windows applications, such as Microsoft® Word and Excel®,
you can select additional toolbar options, such as saving your notes into a .notebook
file or saving your notes as text.
If the interactive pen display is connected to a Windows computer, you can capture
your notes and the application background and then you can save them into a
.notebook file for both Aware and non-Aware applications. For more details, see the
SMART Notebook software online Help.
If your interactive pen display is connected to a Mac computer, you can capture the
entire screen. For more details, see the SMART Notebook software online Help.
Page 43

33 | CHAPTER 3 – USING THE INTERACTIVE PEN DISPLAY
Using the Eraser Button
When you press the Eraser button, you can use the tethered pen to erase your notes.
To erase a note 1. Press the Eraser button.
2. Drag the pen over the note that you want to erase.
NOTE
You can change the size of the eraser. For more details, see the
SMART Notebook software online Help.
Using the Function Buttons
You can press the function buttons to launch:
• Screen Capture Toolbar – a set of tools that you can use to capture an on-screen
image and insert it into SMART Notebook.
• SMART Notebook – an application that helps you to organise, save and share
your notes.
• SMART Keyboard – a virtual keyboard that floats over your active application and
lets you enter typed text at the cursor location.
• Right-click function – when you press the Right-Click function button, the next
pen contact with the interactive screen is interpreted as a right-click.
NOTE
You can reconfigure each of the function buttons to perform other functions.
For details on customizing these buttons, see the SMART Notebook software
online Help.
Page 44

34 | CHAPTER 3 – USING THE INTERACTIVE PEN DISPLAY
Storage Compartment
Storing the Pen
When you are not using the pen, put it in the storage compartment on the top of
the unit.
Page 45

Chapter 4
Maintaining the Interactive Pen Display
This chapter tells you how to:
• clean the interactive screen (this page)
• clean the unit casing and the pen (page 36)
• replace the pen nib (page 36)
Cleaning the Screen
You should clean the interactive screen once a week because dirt and dust can stick
to the screen.
To clean the screen Use an antistatic cloth. If necessary, slightly moisten the cloth with water. Apply only
light pressure and avoid making the surface wet.
CAUTION
Use only a damp cloth to clean the screen. Do not apply glass cleaner, organic
solvents (such as alcohol), or even a mild detergent to the screen. If you use
these cleaners, you may damage the screen’s finish or the unit’s electronics.
Using such cleaners also voids the warranty.
Page 46

36 | CHAPTER 4 – MAINTAINING THE INTERACTIVE PEN DISPLAY
O-Ring Tool
Stylus Tip
Pen Nib
Pen Nib
Cleaning the Unit Casing and the Pen
To clean the unit casing
and the pen
Use only a damp cloth or a cloth dampened with very mild detergent to clean the unit
casing and tethered pen.
CAUTIONS
• Do not apply paint thinner, benzene, alcohol or other solvents to the casing.
If you use these cleaners, you may damage the finish. Using such cleaners
also voids the warranty.
• The tethered pen is a sealed unit that contains electronics but no batteries.
If you attempt to open the tethered pen, you will damage these electronics.
This will make the tethered pen unusable and void the warranty.
• Do not immerse the pen in liquid.
• Do not use a pen if the nib has worn down to a sharp or angular tip, as it may
damage the screen. Replace the nib when you notice it becoming short
or angular.
Replacing the Pen Nib
Your interactive pen display comes with five replacement pen nibs and an o-ring tool
to assist in nib replacement. If you require more replacement nibs, contact your
authorised SMART reseller
.
NOTE
If you misplace your o-ring tool, use a pair of tweezers or pliers to remove the nib.
To replace the pen nib 1. Using the o-ring tool, grab the pen nib and slide it straight out of the pen.
2. Insert a new nib straight into the barrel of the pen. Push the nib firmly until it stops.
3. a
Page 47

Chapter 5
Troubleshooting
This chapter tells you how to:
• check the interactive pen display’s power (page 38)
• check the interactive pen display’s status (page 40)
• troubleshoot pen problems (page 41)
• troubleshoot image problems (page 42)
• troubleshoot control and writing problems (page 45)
• troubleshoot Windows computer specific problems (page 46)
• troubleshoot Mac computer specific problems (page 46)
SMART designed this interactive pen display to work reliably, but if you are having
trouble, we recommend that you do the following:
• If the device driver failed to load properly, first perform the recommended action in
any error message that may appear on your screen. If that does not solve the
problem, review the troubleshooting procedures in this chapter.
• If you try the suggestions in this guide and are unable to resolve the problem,
contact SMART Technical Support
(see page 51).
Page 48

38 | CHAPTER 5 – TROUBLESHOOTING
Power Indicator
Checking the Interactive Pen Display’s Power
The Power indicator shows whether power is reaching the interactive pen display.
If the Power indicator is... this indicates the interactive pen display is...
green turned on and receiving a video signal from
your computer.
amber turned on, but is not receiving a video signal from
your computer.
off turned off, or the power cable is not properly
connected to the power adapter or to an active
AC outlet.
Page 49

39 | CHAPTER 5 – TROUBLESHOOTING
Power Indicator Problems
If you encounter problems with the interactive pen display’s Power indicator, refer to
the following table:
Symptom Solution
The Power indicator is green
but you are unable to see an
image on the display.
The Power indicator is
amber, the computer is on,
and it is not in Sleep or
Power Management mode.
•See Image Problems on page 42.
• Make sure that the length of the video cable does
not exceed 15m (50').
• Turn off your computer and make sure that:
– the video cable is correctly connected to the
interactive pen display and the computer.
– the video cable is not bent or broken and
does not have bent or broken pins in either
connector.
NOTE
If you are using a video cable adapter,
check those connections as well.
– the video card in your computer is installed
correctly and is operating properly.
• If the problem persists, see Image Problems on
page 42.
The Power indicator is off. • Make sure that the interactive pen display is
turned on.
• Make sure that the interactive pen display’s power
cable is connected properly.
• If the Power indicator still does not illuminate,
contact SMART Technical Support
(see page 51).
Page 50

40 | CHAPTER 5 – TROUBLESHOOTING
Status Indicator
Checking the Interactive Pen Display’s Status
The Status indicator shows whether the pen is interacting with the display.
If the Status indicator is... this indicates that the tethered pen...
green is touching the interactive screen or you are pressing
a pen tool button and the interactive pen display is
communicating correctly with your computer.
off is not touching the interactive screen or the interactive
pen display is not communicating correctly with
your computer.
Status Indicator Problems
If you encounter problems with the interactive pen display’s Status indicator, refer to
the following table:
Symptom Solution
The Status indicator does
not turn green when you
touch the pen to the
interactive pen display.
• Make sure that the USB cable is properly
connected to an active port on the computer and
to the interactive pen display.
• Make sure that the computer’s USB interface is
not disabled.
• Make sure that the display is registered in your
computer as a USB device.
• Make sure that you are using the correct pen
(not one from another display).
• • If you touch the pen to the interactive screen and
the Status indicator still is not green, contact
SMART Technical Support
(see page 51).
Page 51

41 | CHAPTER 5 – TROUBLESHOOTING
Pen Problems
If you encounter problems with the tethered pen, refer to the following table:
Symptom Solution
You are unable to use the
pen to select or write on the
interactive pen display.
OR
When you write or draw with
the pen, you see a pointer
instead of digital ink.
You are unable to
double-click.
The switch does not work. • Make sure that the lower and upper buttons on the
• Adjust the pen’s Tip Feel. In the SMART Control
Panel, select SMART Hardware Settings >
Pen and Button Settings and then move the
Tip Feel slider.
• Adjust the double-click zone. In the SMART Control
Panel, select SMART Hardware Settings >
Mouse Settings and then adjust the mouse setting.
switch are set to the functions you want. In the
SMART Control Panel, select SMART Hardware
Settings > Pen and Button Settings and then
select the functions from the drop-down menus.
• If the problem persists, contact
SMART Technical Support
(see page 51).
Page 52

42 | CHAPTER 5 – TROUBLESHOOTING
Image Problems
If you encounter problems with the SMART Podium ID422w interactive pen display,
refer to the following tables. For additional information about colour issues, see the
documentation that came with your operating system or applications.
General Display Problems
If you encounter problems with the display, refer to the following table:
Symptom Solution
The display does not appear
and the Power indicator
is off.
The display does not appear
and the Power indicator
is green.
The Power indicator is
amber and the “No Input
Signal Go to Power Saving
Mode” message appears.
• Make sure that the AC power cable is connected.
• Make sure that the SMART Podium ID422w power
switch is turned on.
• Use the Display OSD option to adjust the contrast,
brightness and backlight controls (see page 19).
•Use the Reset OSD option to return the current
display parameters to the factory default settings.
• Make sure that your computer is not in Power
Management mode. To bring it out of Power
Management mode, touch the pen tip to the display
screen, move the mouse, or press any key on
your keyboard.
• Turn your computer and the interactive pen display
off and then make sure that:
– the video cable’s connector pins are not bent
or broken.
– the DVI/VGA switch is set correctly.
NOTE
Restart your computer after changing the
position of the switch.
The cable disconnect
“No Input Signal Go to
Power Saving Mode”
message appears.
– the video card is installed correctly.
• Make sure that your computer is turned on.
• Make sure that you are using the video cable
included with the SMART Podium ID422w.
• Turn your computer and the interactive pen display
off and then make sure that the video cable’s
connector pins are not bent or broken.
Page 53

43 | CHAPTER 5 – TROUBLESHOOTING
Symptom Solution
The “OUT OF SCAN
RANGE” message appears.
• Make sure that the input video signal frequency
setting is 60Hz which is compatible with the
SMART Podium ID422w.
• Make sure that the video card’s resolution is
1920 × 1080 or lower.
• Make sure that the refresh rate (horizontal
frequency) is 30 to 80 Hz.
TIP
On a single monitor system, connect a
second monitor to change the refresh rate.
• Make sure that the refresh rate (vertical frequency)
is 56 to 76 Hz.
• Set the display properties to detect plug and
play monitors.
The screen flashes
multiple times.
• Make sure that the refresh rate (vertical frequency)
is 56 to 76 Hz.
• Make sure that you are not using an input selector
switch box.
Colour quality is inaccurate. • Use the Reset OSD option to return the current
display parameters to the factory default settings.
When an image appears for
a long time without
refreshing the screen, an
after-image remains.
• Use a screen saver or other power management
feature.
Page 54

44 | CHAPTER 5 – TROUBLESHOOTING
VGA Display Problems
If you encounter problems with your interactive pen display with a VGA connection,
refer to the following table:
Symptom Solution
The display ripples
or flickers.
The display ripples or shows
a wavy pattern.
OR
The display colour is not even.
The display is not clear and
text or other portions of the
screen appear blurred.
•Use the Reset OSD option to return the current
display parameters to the factory default settings.
•Use the Other OSD option to adjust the phase and
pitch (VGA only) (see page 22).
• Make sure that the display adapter or video card
matches the specifications for the SMART Podium
ID422w.
• Adjust the refresh rate in the Display Properties
control panel.
•Select Auto Adjust in the Other OSD option to
automatically optimize the display screen image
(VGA only) (see page 22). If necessary, use the
Other OSD option to adjust the phase and pitch
(VGA only) (see page 22).
•Use the Reset OSD option to return the current
display parameters to the factory default settings.
• Make sure that the video card’s resolution is
1920 ×1080 or lower.
•Select 1:1 in the Scaling OSD option to display the
image at the actual resolution.
•Select Auto Adjust in the Other OSD option to
automatically optimize the display screen image
(VGA only) (see page 22). If necessary, use the
Other OSD option to adjust the phase and pitch
(VGA only) (see page 22).
• Turn off the SMART Podium ID422w and then turn
it on.
Page 55

45 | CHAPTER 5 – TROUBLESHOOTING
Symptom Solution
The display and LCD panel
are not lined up.
OR
The display size is not correct.
•Select 1:1 in the Scaling OSD option to display the
image at the actual resolution.
•Select Auto Adjust in the Other OSD option to
automatically optimize the display screen image
(VGA only) (see page 22). If necessary, use the
Other OSD option to adjust the phase and pitch
and the vertical and horizontal positions (VGA only)
(see page 22).
NOTE
Some video cards may not show the size of the
display correctly.
Control and Writing Problems
If you encounter problems with writing and drawing on your interactive pen display,
refer to the following table:
Symptom Solution
The pointer does not
accurately follow the
movement of the pen.
• Orientate the interactive pen display (see page 23).
You are unable to write
in digital ink.
Digital ink does not appear
as you expect.
• Make sure that SMART Board drivers are installed.
• Make sure that the SMART Board tools are running.
You know that the SMART Board tools are running
when the SMART Board icon is in the notification
area (Windows computers) or the Dock
(Mac computers).
• Check the customizable pen settings in
SMART Notebook software. For more information
on setting digital ink properties, for example, colour,
line thickness, line style and transparency, refer to
the SMART Notebook software online Help.
Page 56

46 | CHAPTER 5 – TROUBLESHOOTING
Windows Computer Specific Problems
If you encounter problems with your Windows operating system, refer to the
following table:
Symptom Solution
Once you have changed
the computer’s mouse
right-hand and left-hand
settings, the pen does
not function properly.
• Change the computer’s mouse to the default
right-hand and left-hand settings and then restart
Windows (for your tool settings to be correctly
recognised.)
Mac Computer Specific Problems
If you encounter problems with your Mac operating system software, refer to the
following table:
Symptom Solution
At startup, a message states
that the SMART Board
drivers failed to load or that
the interactive pen display
preferences are not created.
• Make sure that the Power indicator is on and the
USB interface cable is securely connected to an
active USB port on your computer or to a USB hub.
For details, see General Display Problems on
page 42.
• Connect the interactive pen display to a different
USB port.
Handwriting Recognition
does not work correctly.
•Select Finder > Utilities > System Profiles >
Content > Hardware > USB and make sure that
your USB pen display model is listed.
•Select Finder > Utilities. Start the Disk Utility
program and run Repair Disk Permissions from the
First Aid tab. If this does not resolve the problem,
contact SMART Technical Support
• Ink preferences may be damaged. Remove the
damaged Ink preference files (see page 47).
(see page 51).
Page 57

47 | CHAPTER 5 – TROUBLESHOOTING
To remove Ink files 1. Start your computer in Administration mode.
2. Select the Apple menu > System Preferences > Ink and then select to disable
handwriting recognition.
3. Select Finder > Home > Library > Preferences and then remove the
following files:
com.apple.ink.framework.plist
com.apple.ink.inkpad.plist
com.apple.ink.inkpad.sketch
NOTE
You recreate these files when you enable handwriting recognition.
4. Select the Apple menu > System Preferences > Ink and then enable
handwriting recognition.
If Ink still does not work correctly, contact Apple Support.
Page 58

48 | CHAPTER 5 – TROUBLESHOOTING
Page 59

Appendix A
Hardware Environmental Compliance
SMART Technologies supports global efforts to ensure that electronic equipment is
manufactured, sold and disposed of in a safe and environmentally friendly manner.
Waste Electrical and Electronic Equipment Regulations (WEEE Directive)
Waste Electrical and Electronic Equipment regulations apply to all electrical and
electronic equipment sold within the European Union.
When you dispose of any electrical or electronic equipment, including SMART
Technologies products, we strongly encourage you to properly recycle the electronic
product when it has reached end of its life. If you require further information, please
contact your reseller or SMART Technologies for information on which recycling
agency to contact.
Restriction of Certain Hazardous Substances (RoHS Directive)
This product meets the requirements of the European Union’s Restriction of Certain
Hazardous Substances (RoHS) Directive 2002/95/EC.
Consequently, this product also complies with other regulations that have arisen in
various geographical areas and that make reference to the European Union’s RoHS
directive.
Page 60

50 | APPENDIX A – HARDWARE ENVIRONMENTAL COMPLIANCE
Packaging
Many countries have regulations restricting the use of certain heavy metals in product
packaging. The packaging used by SMART Technologies to dispatch products
complies with applicable packaging laws.
Covered Electronics Devices
Many US states classify monitors as Covered Electronic Devices and regulate their
disposal. Applicable SMART Technologies products meet the requirements of the
Covered Electronic Devices regulations.
China’s Electronic Information Products Regulations
China regulates products that are classified as EIP (Electronic Information Products).
SMART Technologies products fall under this classification and meet the requirements
for China’s EIP regulations.
Page 61

51 | APPENDIX B – CUSTOMER SUPPORT
Appendix B
Customer Support
Online Information and Support
Visit www.smarttech.com/support to view and download user guides, how-to and
troubleshooting articles, software and more.
Training
Visit www.smarttech.com/trainingcenter for training materials and information about
our training services.
Technical Support
If you experience difficulty with your SMART product, please contact your local
reseller before contacting SMART Technical Support. Your local reseller can resolve
most issues without delay.
NOTE
To locate your local reseller, visit www2.smarttech.com/st/en-US/Where+to+Buy
All SMART products include Online, telephone, fax and Email Support:
Online www.smarttech.com/contactsupport
Telephone +1 403 228 5940 or
Freephone 1 866 518 6791 (US/Canada)
(Monday to Friday, 5am – 6pm Mountain Time)
Fax +1 403 806 1256
Email support@smarttech.com
Dispatch and Repair Status
Contact SMART’s Return of Merchandise Authorization (RMA) group, Option 4,
+1 866 518 6791, for shipping damage, missing part and repair status issues.
.
Page 62

52 | APPENDIX B – CUSTOMER SUPPORT
General Inquiries
Address SMART Technologies
3636 Research Road NW
Calgary, AB T2L 1Y1
CANADA
Switchboard +1 403 245 0333 or
Freephone +1 888 42 SMART (US/Canada)
Fax +1 403 228 2500
Email info@smarttech.com
Warranty
Product warranty is governed by the terms and conditions of SMART’s “Limited
Equipment Warranty” sent with the SMART product at the time of purchase.
Registration
To help us serve you, register online at www.smarttech.com/registration.
Page 63

Index
A
airborne toxic controls, 51
C
California Air Resource Board, 51
Changing the Angle, 8
Chinese regulations, 50
Cleaning the Display Surface, 35
Cleaning the Tethered Pen, 36
Connecting, 9
connection panel, 2
Consumer Product Safety Improvement
Act, 50
contact information, 52
covered electronic devices, 50
customer support, 51–52
D
Determining the Best Location, 7
documentation, 51
E
EIP regulations, 50
Erasing your Notes, 33
European Union regulations, 49
F
Function Buttons, 33
G
general inquiries, 52
H
hardware environmental compliance,
49–50
I
inquiries, 52
Installing, 5
Interactive Screen, 1
Cleaning, 35
Touching, 28
L
Limited Equipment Warranty, 52
O
online support, 51
on-screen display (OSD), 19
orienting the screen, 23
P
packaging, 50
Pen, 29
pen
attaching, 14
nib, 29
using, 28
Pen Tool Buttons, 31
Page 64

54 | INDEX
R
registration, 52
Replacing the Pen Nib, 36
RoHS directive, 49
S
security, 24
SMART Technical Support, 51
Status Indicator, 31, 40
Problems, 40
Storing the Tethered Pen, 34
support, 51–52
T
Technical Support, 51
Tethered Pen
Cleaning, 36
Replacing the Pen Nib, 36
Storing, 34
Touching the Interactive Screen, 28
training, 51
troubleshooting articles, 51
U
U.S. regulations, 50
user guides, 51
Using the Eraser, 33
Using the Function Buttons, 33
Using the Pen Tool Buttons, 31
W
warranty, 52
WEEE directive, 49
WEEE regulations, 49
Page 65

Page 66

Contact SMART Technologies
Freephone 1 866 518 6791 (US/Canada)
or +1 403 228 5940
 Loading...