

Page 1
SMARTBoard® 8055i,
8055i-SMP and
8055ie-SMP
Interactive flat panels
User’s guide
Page 2

Product registration
If you register your SMART product, we’ll notify you of new features and software upgrades.
Register online at smarttech.com/registration.
Keep the following information available in case you need to contact SMARTSupport.
Serial number:
Date of purchase:
FCC warning
This equipment has been tested and found to comply w ith the li mits for a Class A digital device, pursuant to Part 15 of the FCC Rules. T heselimits are designed to provide
reasonable protection against harmful interference w henthe equipment is operatedin a commercial environment. This equipment generates, uses and can radiateradio
frequency energy and,if not installedand used in accordance with the manufacturer’s i nstructions, m ay cause harmful i nterference to radio comm unications. Operation of
this equipment in a residential area is li kely to causeharmful interference in which case the user will be required to correct thei nterference at his own expense.
Trademark no tice
SMARTBoard, SMART Ink, SMARTNotebook, SMARTMeetingPro, DViT, SMARTGoWire, sm arttech, theSMART logo and all SMART taglines are trademarks or
registered trademarks of SMARTTechnologiesULC in the U.S. and/or other countries. Mac and Macintosh are trademar ks of Apple Inc., registered in the U.S. and other
countries. Windows is either a registered trademark or a trademark of Microsoft Corporationin the U.S. and/or other countri es. All third-party product and company nam es
may betr ademarks of their respective owners.
Copyright notice
© 2012 SMARTTechnologiesULC. All rights r eserved. No part of this publication may be reproduced, transmitted, transcr ibed, storedi n a retrieval system or translated
into any languagein any for m by any means withoutthepri or written consent of SMARTTechnologiesULC. Information in this m anual is subject to change w ithout notice
and does not represent a commitment on the part of SMART.
Patent No. US6320597; US6326954; US6741267; U S6803906; US6947032; US6954197; U S6972401; US7151533; US7236162; U S7411575; US7619617; US7643006;
US7692625; US7755613; US7757001; USD612396; US6563491; U S6829372; US7880720; USD612396;USD616462; USD617332; and USD636784. Other patents pending.
06/2012
Page 3

Important information for your interactive flat panel
W A R N I N G
l Failure to follow the installation instructions shipped with your SMART product could result in
personal injury and product damage which may not be covered by your warranty.
l Do not open or disassemble the SMART product. You risk electrical shock from the high
voltage inside the casing. Opening the casing also voids your warranty.
l Do not stand (or allow children to stand) on a chair to touch the surface of your SMART
product. Rather, mount the product at the appropriate height.
l To reduce the risk of fire or electric shock, do not expose the SMART product to rain or
moisture.
l If your SMART product requires replacement parts, make sure the service technician uses
replacement parts specified by SMARTTechnologies or parts with the same characteristics
as the original.
l Ensure that any cables extending across the floor to your SMART product are properly
bundled and marked to avoid a trip hazard.
l Do not insert objects inside the cabinet ventilation holes, because they could touch
dangerous voltage points and cause electric shock, fire or product damage which may not be
covered by your warranty.
l Do not place any heavy objects on the power cable. Damage to the cable could cause shock,
fire or product damage which may not be covered by your warranty.
l Useonly extension cords and outlets into which this product’s polarized plug can be fully
inserted.
l Use the power cable provided with this product. If a power cable is not supplied with this
product, please contact your supplier. Use only power cables that match the AC voltage of
the power outlet and that comply with your country’s safety standards.
l If the glass is broken, do not touch the liquid crystal. To prevent injury, handle glass
fragments with care when disposing of them.
i
Page 4

I M P O R T A N T I N F O R M A T I O N F O R Y O U R I N T E R A C T I V E F L A T P A N E L
l Do not move or mount the interactive flat panel by connecting rope or wire to its handles.
Because the interactive flat panel is heavy, rope, wire or handle failure could lead to personal
injury.
l Use only VESA®-approved mounting hardware.
l Disconnect all power cables for your interactive flat panel from the wall outlet and seek
assistance from qualified service personnel when any of the following occurs:
o
The power cable or plug is damaged
o
Liquid is spilled into the interactive flat panel
o
Objects fall into the interactive flat panel
o
The interactive flat panel is dropped
o
Structural damage such as cracking occurs
o
The interactive flat panel behaves unexpectedly when you follow operating
instructions
C A U T I O N
l Before you clean your SMART product, shut down or disconnect the computer. Otherwise,
you may scramble the desktop icons or inadvertently activate applications when you wipe
the screen.
l Avoid setting up and using the SMART product in an area with excessive levels of dust,
humidity and smoke.
l Make sure an electrical socket is near your SMART product and remains easily accessible
during use.
l For SMARTBoard 8055ie-SMPinteractive flat panel only: The external power supply needs
to meet the Limited Power Source (LPS) requirements of CSA/UL/IEC/EN 60950-1, when
required.
l This SMART product should be used only with European TN and TT power distribution
systems.
It is not suitable for older, IT-type power distribution systems found in some European
countries. "This system (IT-type) is widely used isolated from earth, in some installations in
France, with impedance to earth, at 230/400V, and in Norway, with voltage limiter, neutral
not distributed, at 230V line-to-line." (IEC 60950:1999)
Contact qualified personnel if you’re uncertain of the type of power system available where
you’re installing your SMART product.
ii
Page 5

I M P O R T A N T I N F O R M A T I O N F O R Y O U R I N T E R A C T I V E F L A T P A N E L
l You must connect the USB cable that came with your SMARTBoard® interactive flat panel
to a computer that has a USB compliant interface and that bears the USB logo. In addition,
the USB source computer must be compliant with CSA/UL/EN 60950 and bear the CE mark
and CSA and/or UL Mark(s) for CSA/UL 60950. This is for operating safety and to avoid
damage to the SMARTBoard interactive flat panel.
iii
Page 6

Page 7

Contents
Important information for your interactive flat panel i
Chapter 1: About your interactive flat panel 1
Feature highlights 2
Interactive flat panel components 3
Chapter 2: Installing your interactive flat panel 9
Environmental requirements 9
Wall-mounting your interactive flat panel 10
Chapter 3: Connecting computers and peripheral devices 13
Installing the speakers 14
Connecting a room control system 15
Connecting computers to your interactive flat panel 16
Connecting to power and computer 1 17
Installing computer 2 connection 18
Disabling the USB receptacle on the side terminal panel 20
Connecting peripheral devices to your interactive flat panel 21
Chapter 4: Installing SMART software 23
Installing SMARTMeetingPro software 24
Installing SMARTNotebook software 24
Chapter 5: Using your interactive flat panel 27
Turning on and turning off your interactive flat panel 28
Understanding presence detection 29
Using the infrared remote control 30
Getting started with your SMARTBoard interactive flat panel 34
Playing audio files on your interactive flat panel 45
Using the USB receptacle 46
Chapter 6: Using guest laptops with your interactive flat panel 47
Connecting a guest laptop 47
Using a SMARTGoWire cable 48
Connecting computer 2 50
Chapter 7: Maintaining your interactive flat panel 51
Updating your SMART software and firmware 51
Calibrating your interactive flat panel 54
Orienting your interactive flat panel 55
v
Page 8

C O N T E N T S
Replacing a pen nib 55
Cleaning the screen 56
Cleaning the presence detection sensors 56
Cleaning the camera windows and reflective tape 57
Maintaining ventilation 57
Preventing condensation 58
Checking the interactive flat panel installation 58
Removing your interactive flat panel 58
Transporting your interactive flat panel 60
Chapter 8: Troubleshooting for your interactive flat panel 61
Resolving image issues 61
Resolving touch control and digital ink issues 66
Resolving audio issues 69
Resolving remote control issues 70
Troubleshooting presence detection 70
Resolving issues using the SMART Connection Wizard 72
Resolving issues using SMART Board Diagnostics 73
Appendix A: Adjusting video settings with the on-screen display menu 75
Changing settings in the OSD menu 75
Main menu settings 76
Appendix B: Hardware environmental compliance 81
Waste Electrical and Electronic Equipment regulations (WEEE directive) 81
Restriction of Certain Hazardous Substances (RoHS directive) 81
Batteries 81
Packaging 82
Index 83
vi
Page 9

Chapter 1
Feature highlights 2
Commercial-grade, touch-enabled flat panel 2
Elegant, sophisticated design 2
Software 2
Presence detection 2
Dual sketch capabilities 2
SMARTInk™ 2
Touch and gestures 3
Durable surface 3
Interactive flat panel components 3
Front view 3
LCD screen 3
Presence detection 4
Camera and reflective tape channel 4
Pen and eraser holders 4
Color select module 5
Front control panel 5
Infrared remote control 5
Left side view 6
Menu control panel 6
USB receptacle 6
Side terminal panel 6
Back view 7
Bottom terminal panel 7
Inside terminal panel 8
Speaker wire connections 8
1
Page 10

C H A P T E R 1
About your interactive flat panel
Feature highlights
Commercial-grade, touch-enabled flat panel
Your SMARTBoard 8055i interactive flat panel features SMART’s proprietary DViT® (Digital Vision
Touch) technology on an LCD screen which enables you to select, write and erase on the interactive
surface. It enables you to do everything you can do at your computer—open and close applications,
conference with others, create new documents or edit existing ones, visit websites, play and
manipulate video clips and more—just by touching the interactive surface. Two users can also draw
on the interactive surface at the same time, and you can use an array of gestures within applications.
Elegant, sophisticated design
The professional design and crisp, eye-catching visuals of the SMARTBoard 8055i interactive flat
panel make it perfect for any high-end workspace.
Software
To use all the features of your interactive flat panel described in this guide, go to
smarttech.com/downloads and ensure that you have the latest version of SMART software and
SMART Product Drivers installed on your computer.
Presence detection
The interactive flat panel has two presence detection sensors on its frame that can detect people up
to 16' (5 m) away. When the sensors detect people in the room, the interactive flat panel turns on.
When the sensors no longer detect people in the room, the interactive flat panel turns off.
Dual sketch capabilities
Two people can each pick up a pen and draw on the interactive surface at the same time, providing a
higher degree of interactivity.
SMARTInk™
SMARTInk enables you to write and draw in digital ink over open applications, files, folders,
websites and any other open window on your computer. When you write outside the open windows on
your computer, a SMARTInk Note appears and you can write inside the note.
When you open an application that has its own ink tools, you can turn off SMARTInk, and then use
the application's ink tools to write in the content.
2
Page 11
C H A P T E R 1
About your interactive flat panel
For more information, see the SMARTInk user’s guide for Windows® operating systems
(smarttech.com/kb/170191) or SMARTInk user's guide for MacOSX operating system software
(smarttech.com/kb/170192).
Touch and gestures
You can perform mouse functions with your finger, and write and erase digital ink with a pen tray pen
or the eraser. The object awareness feature enables you to pick up a pen, and then write, select or
erase without replacing the pen.
Durable surface
The SMARTBoard 8055i interactive flat panel features a hardened glass screen.
Interactive flat panel components
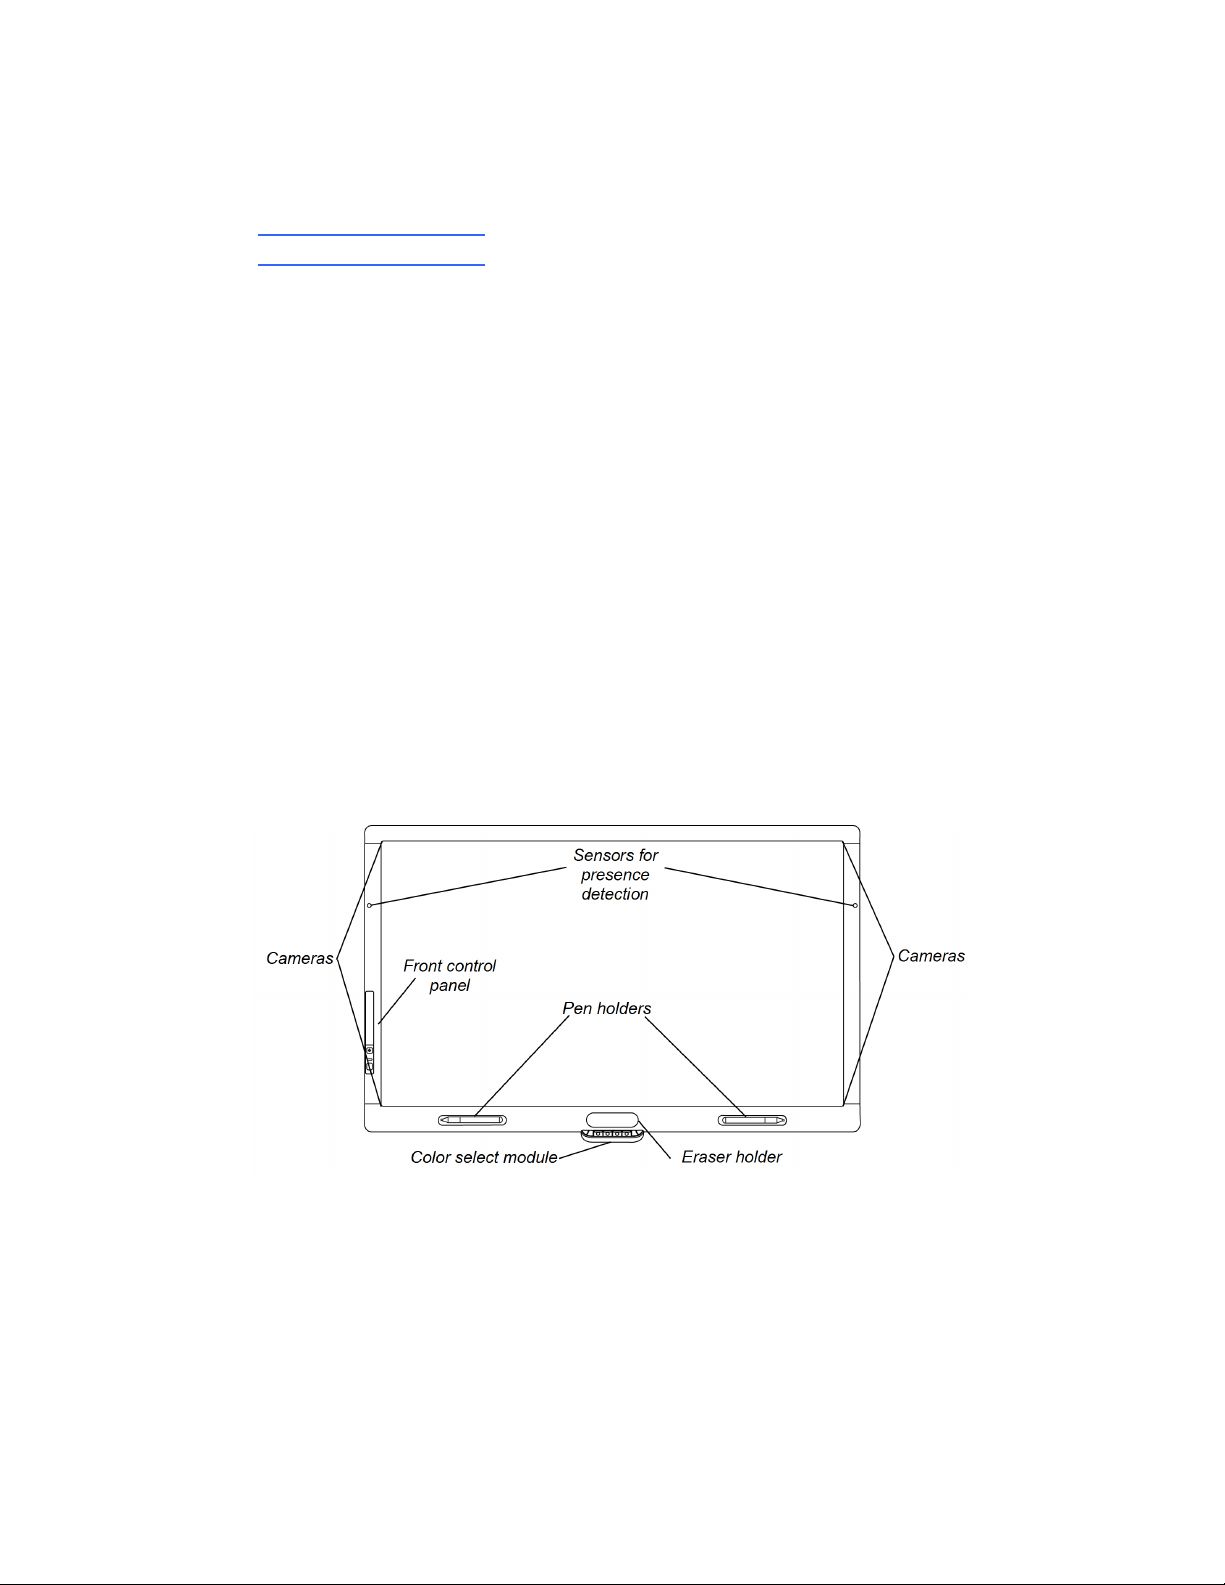
Front view
The front of your interactive flat panel includes the LCD screen, the cameras and reflective tape
channel, sensors for presence detection, the pen holders with the pens, the eraser holder with an
eraser and the color select module.
LCD screen
The screen is 52 3/8" W × 32 5/16" H (133 cm × 82 cm), with a 55" (140 cm) diagonal, 16:9 format.
For information on cleaning your LCD screen, see Cleaning the screen on page 56.
3
Page 12
C H A P T E R 1
About your interactive flat panel
Presence detection
The interactive flat panel has two presence detection sensors on its frame that can detect people up
to 16' (5 m) away. When the sensors detect people in the room, the interactive flat panel turns on.
When the sensors no longer detect people in the room, the interactive flat panel turns off.
For information on cleaning your sensors, see Cleaning the presence detection sensors on page 56.
For more information on presence detection settings, see Proximity control settings on page 79.
N O T E
If ECOSTANDBY is enabled, presence detection functionality is limited. For more information, see
Setup settings on page 78
Camera and reflective tape channel
The interactive flat panel screen is bordered by a channel that contains reflective tape. Each corner
has a camera that tracks finger and pen positions across the screen. For information on cleaning your
camera windows and reflective tape, see Cleaning the screen on page 56.
C A U T I O N
l Do not damage or remove the reflective tape.
l Keep the reflective tape dry.
I M P O R T A N T
l Do not attach items such as adhesive notes to the screen because they will interfere with the
cameras.
l Do not place anything in the channel because it will interfere with the cameras.
Pen and eraser holders
The bottom bezel contains magnetic holders for two pens and an eraser. Removing a pen or the
eraser from the holders activates it and enables you to either draw or erase digital ink.
C A U T I O N
When returning the pen or eraser to the magnetic holder, ensure that it is centered on the holder to
prevent the pen or eraser from falling and potentially being damaged.
4
Page 13

C H A P T E R 1
About your interactive flat panel
Color select module
The color select module enables you to access the help function, open the on-screen keyboard,
select pen color, activate the right-click and orient the interactive flat panel.
Front control panel
The front control panel contains the volume
control, mute, input and power buttons, as
well as the status light and infrared remote
control sensor.
I M P O R T A N T
Do not cover or block this area or you could
have reduced use of the infrared remote
control.
In normal use
The volume, mute and input buttons
l
are blue.
The power button is green.
l
The status light is green.
l
For information on diagnosing issues using
the front control panel lights, see Diagnosing
blank screen issues using the front control
panel lights on page 61.
Infrared remote control
The infrared remote control enables you to turn on and turn off your interactive flat panel, change the
input source, adjust the volume, access the on-screen menu and more. For more information on the
infrared remote control, see Using the infrared remote control on page 30.
5
Page 14

C H A P T E R 1
About your interactive flat panel
Left side view
The left side of your interactive flat panel has the
menu control panel and the side terminal panel.
Menu control panel
The menu control panel enables you to access the on-screen display menu to adjust display and
audio settings. For more information on the on-screen display menu, see Adjusting video settings
with the on-screen display menu on page 75.
USB receptacle
The USB receptacle takes a USB type A connector, such as a USB memory drive. For more
information on this receptacle, see Using the USB receptacle on page 46.
N O T E
You can disable this USB receptacle so a computer cannot access it. For instructions, see
Disabling the USB receptacle on the side terminal panel on page 20.
Side terminal panel
The side terminal panel has USB and HDMI receptacles for connecting a guest laptop. For more
information on the side terminal panel, see Connecting a guest laptop on page 47.
6
Page 15
C H A P T E R 1
About your interactive flat panel
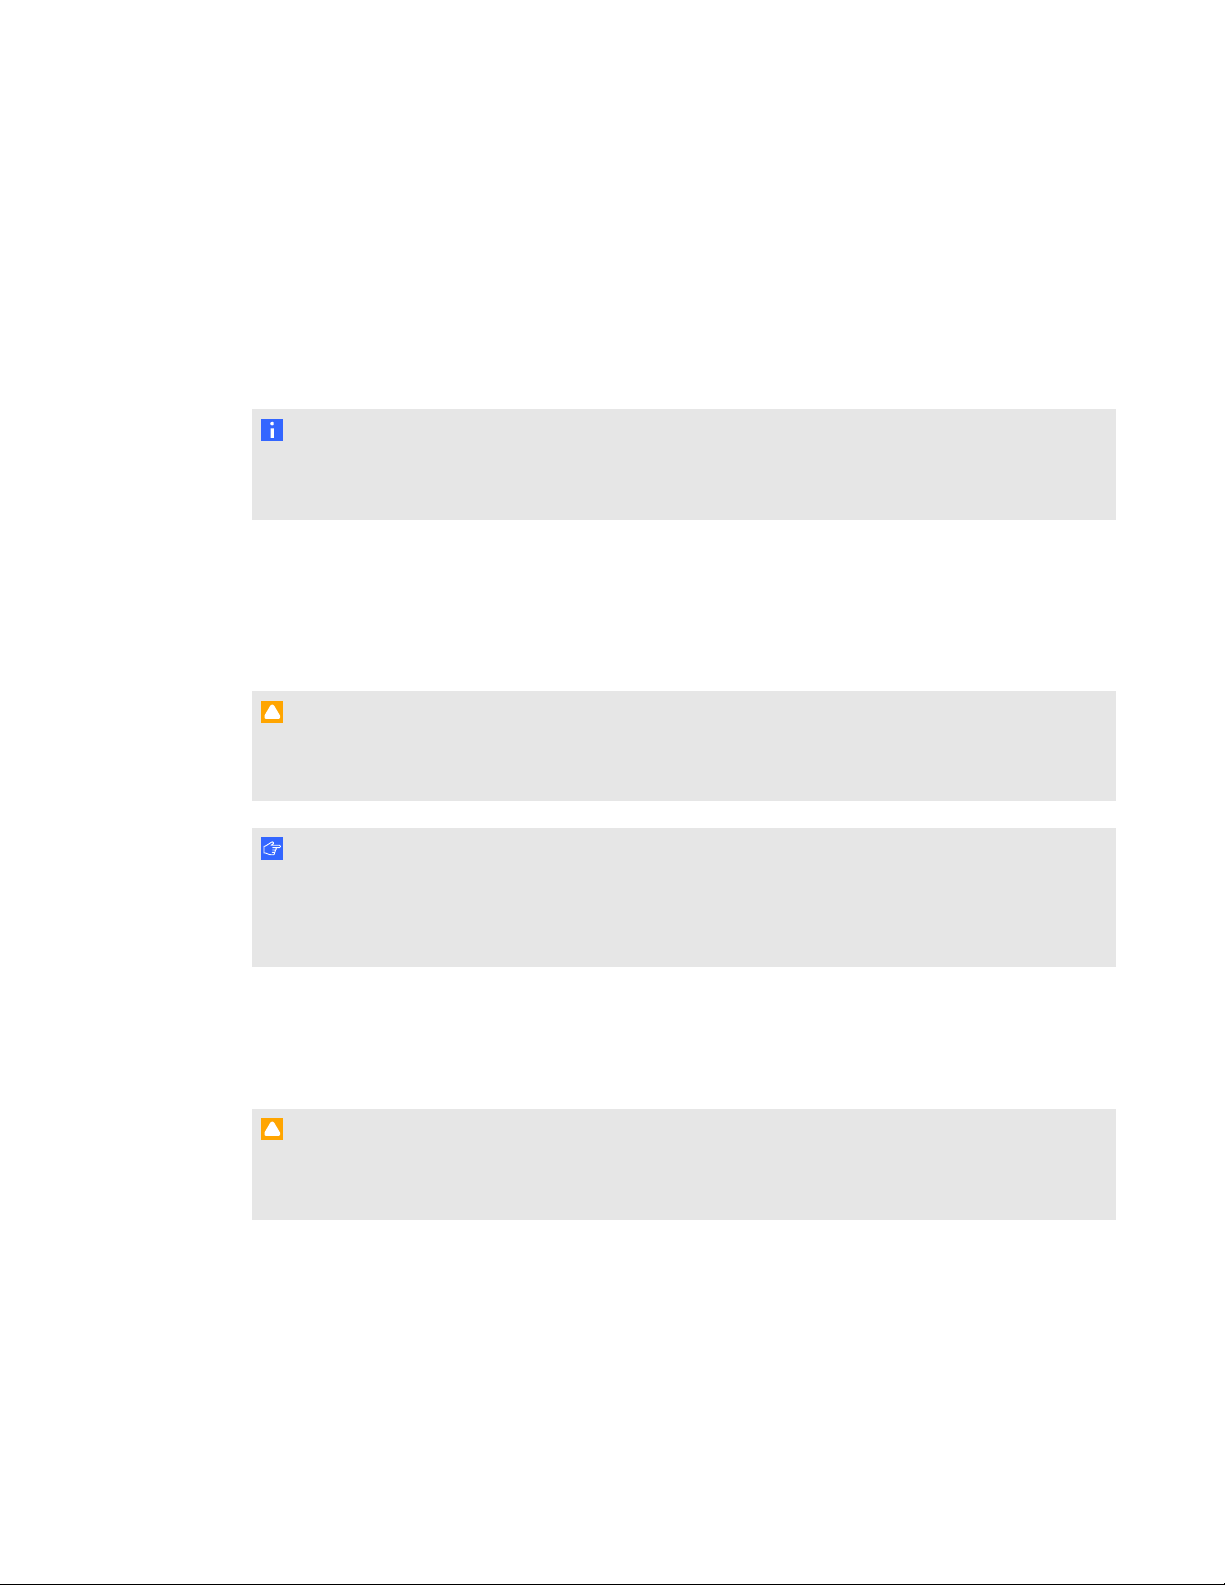
Back view
The back of the interactive flat panel includes the bottom terminal panel, the inside terminal panel and
the speaker wire connections.
I M P O R T A N T
Connect all required cables before you wall-mount your interactive flat panel. Some connectors
could be inaccessible after wall mounting.
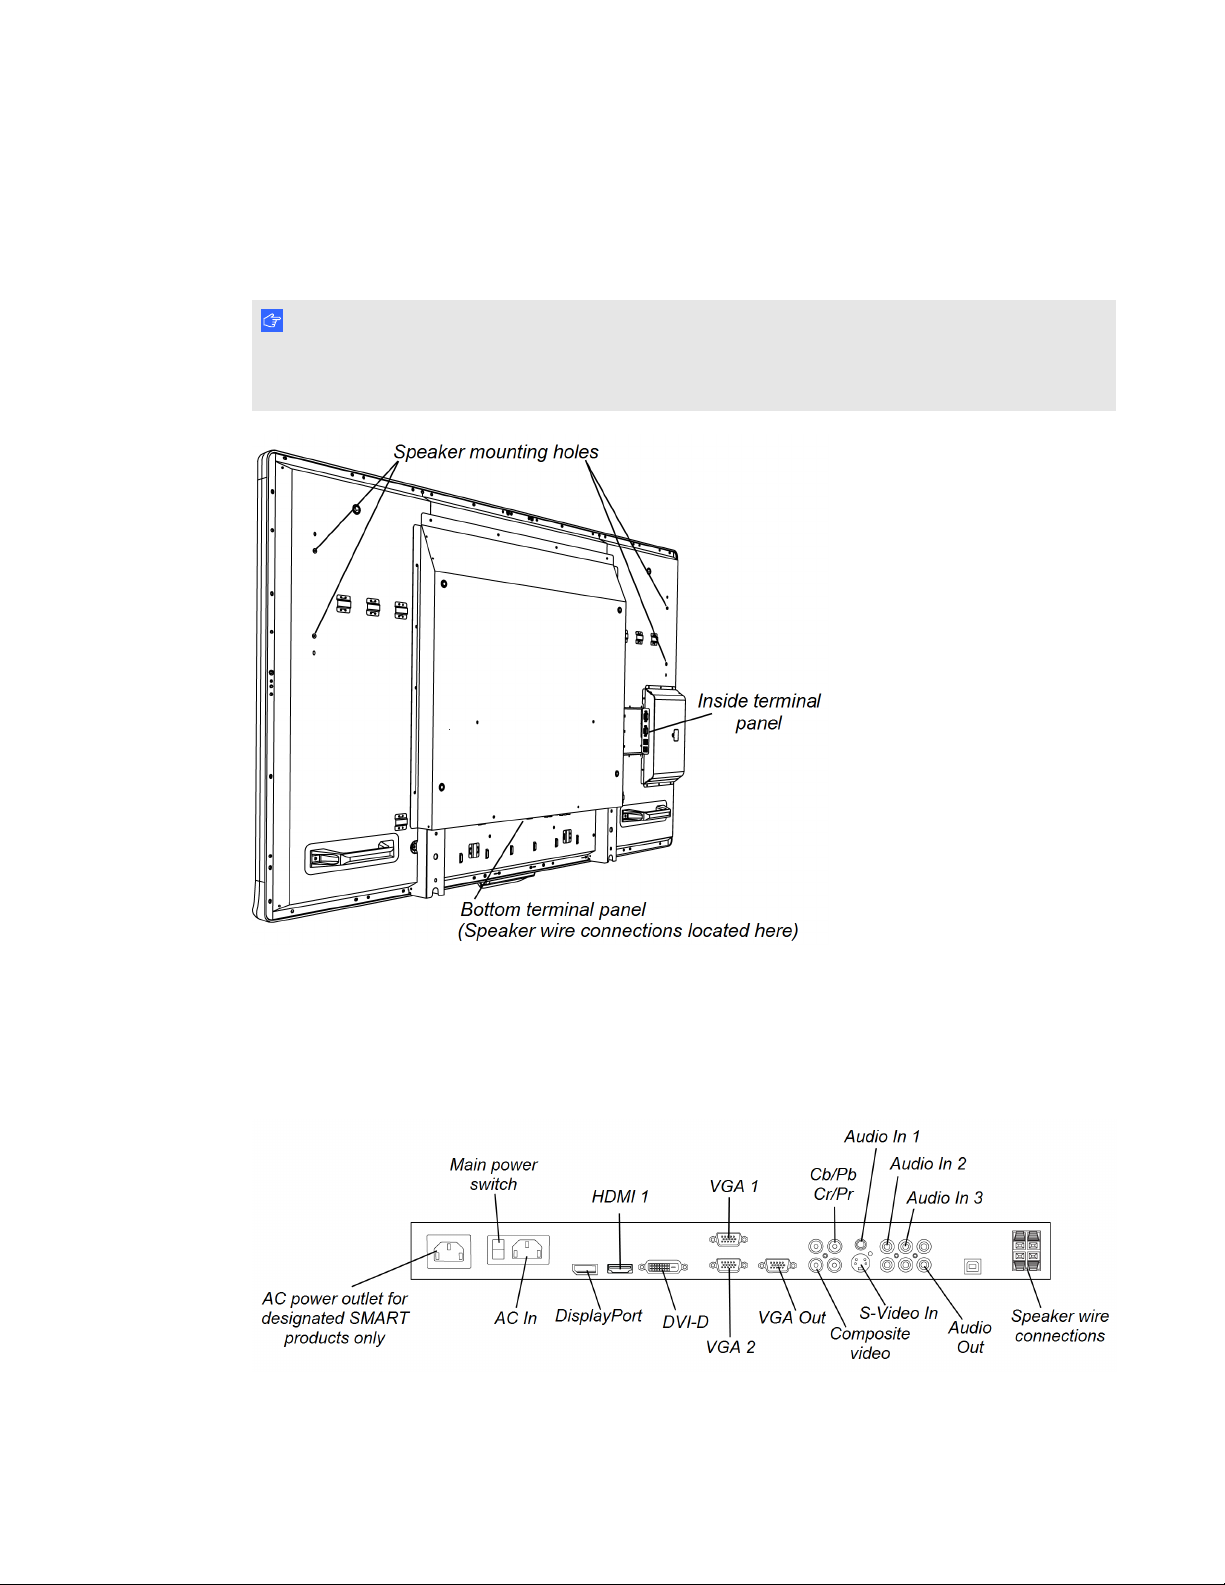
Bottom terminal panel
The bottom terminal panel contains the main power switch and several connections, including both
touch control connections and connections for auxiliary input and output devices, such as DVD
players, Blu-ray™ players and VCRs.
7
Page 16
C H A P T E R 1
About your interactive flat panel
C A U T I O N
The AC power outlet is designated for a component of the SMART Board 8055ie-SMP interactive
flat panel with appliance. See Replacing the appliance on your SMART product (FRU - Appliance -
SB8) (smarttech.com/kb/170062).
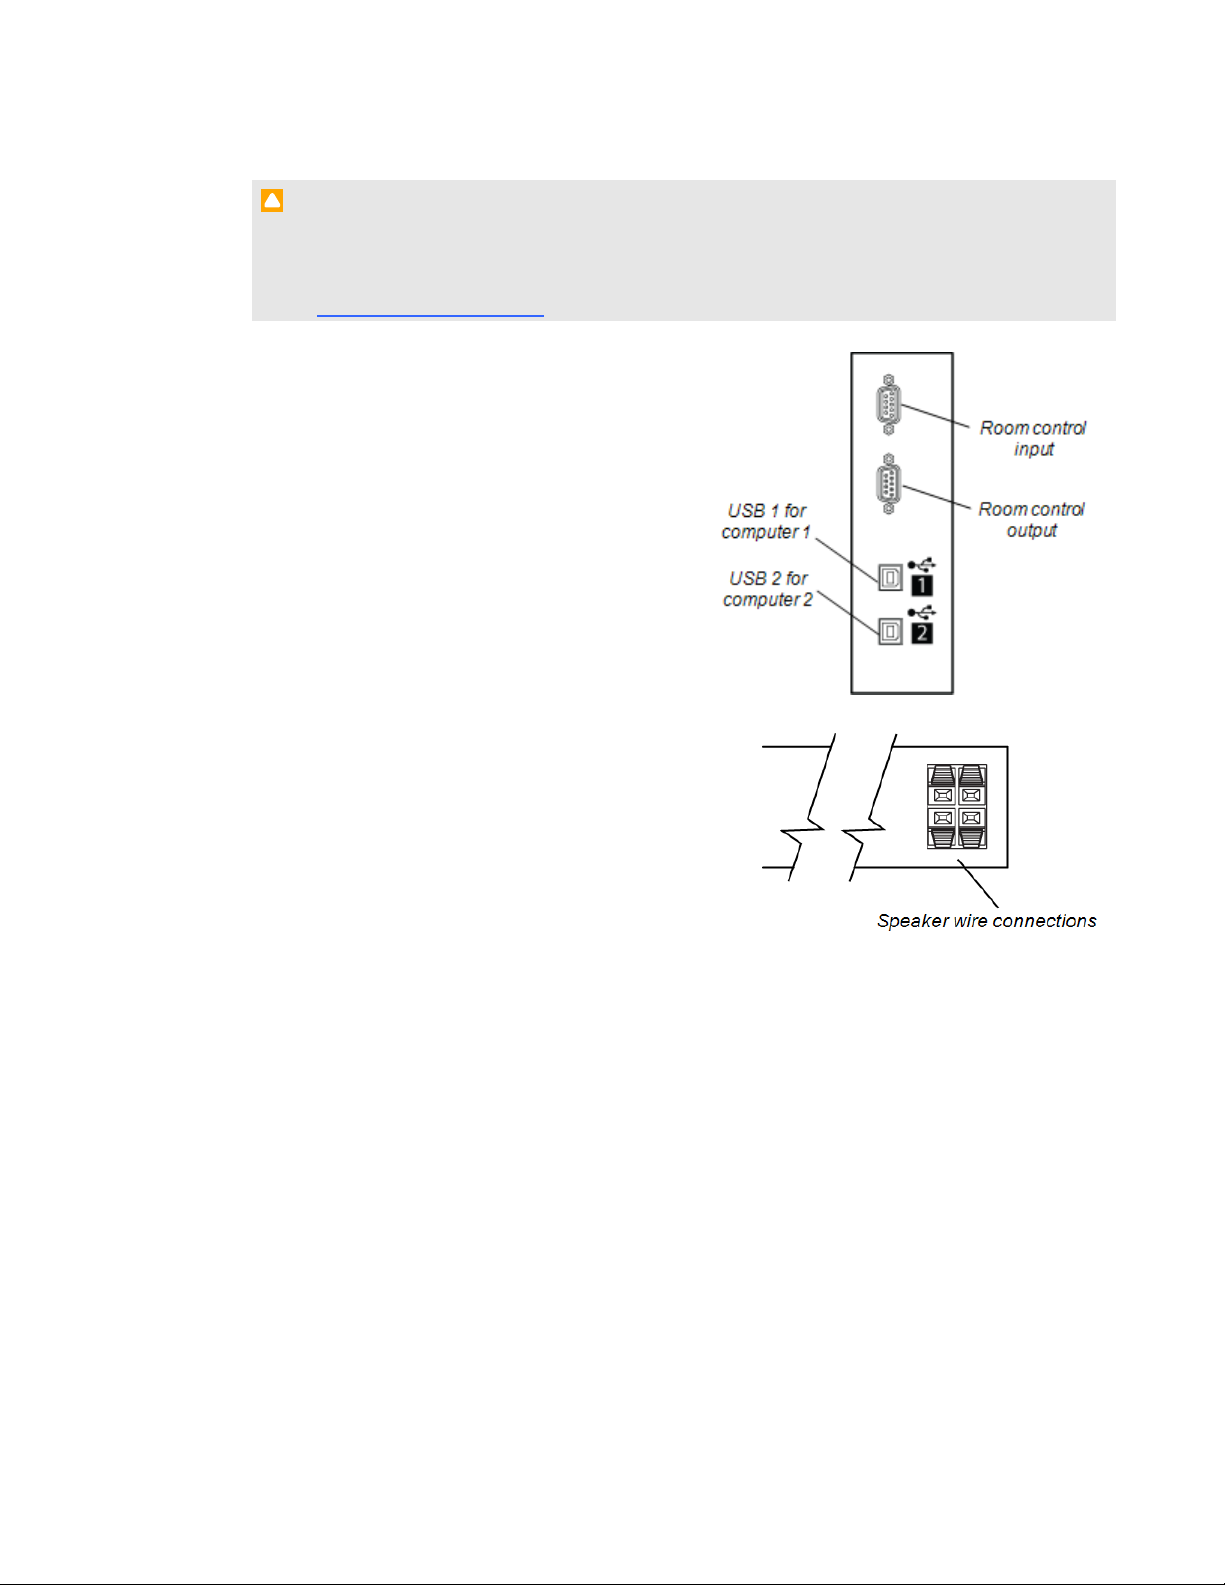
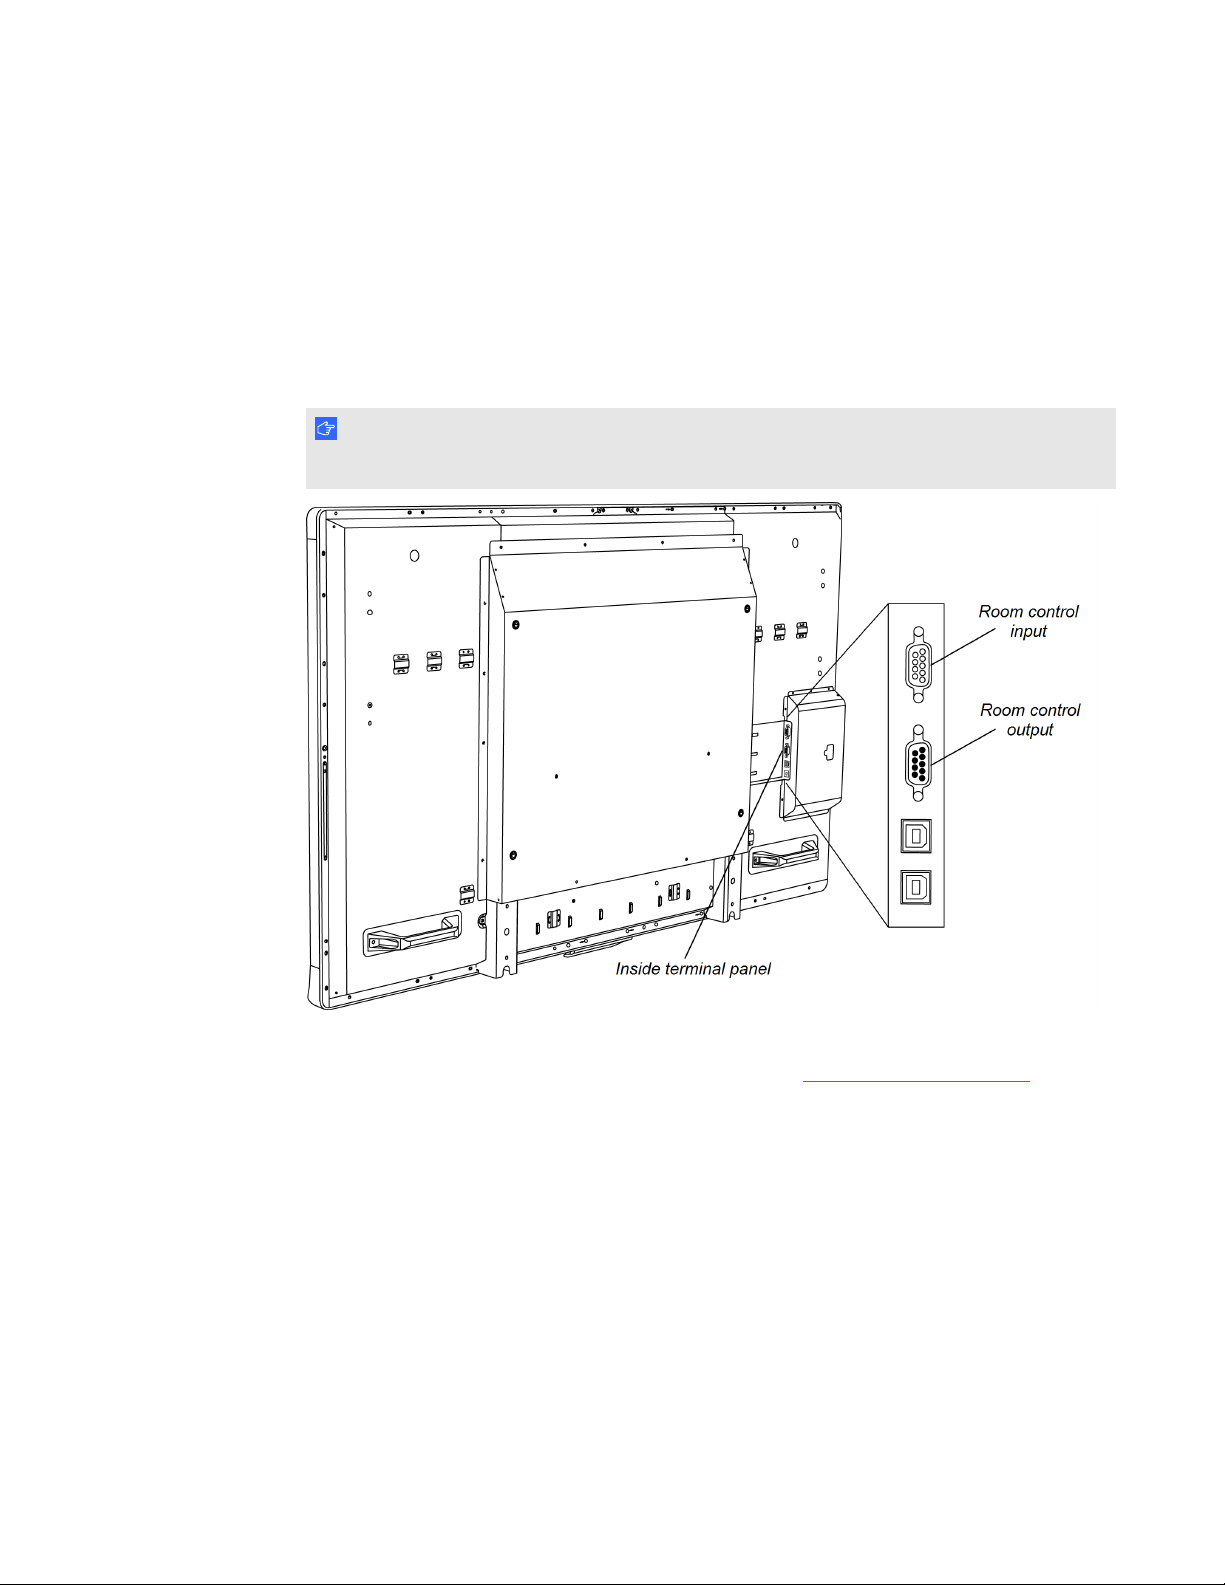
Inside terminal panel
The inside terminal panel is on the left side of the
interactive flat panel and contains the touch
control USB connections and the room control
input and output.
Speaker wire connections
The speaker wire connections are located in the bottom
terminal panel.
8
Page 17
Chapter 2
panel
Environmental requirements 9
Wall-mounting your interactive flat panel 10
Important mounting considerations for trained installers 11
Choosing a mounting location 11
Choosing a mounting height 12
You need a team of professional installers to install your SMARTBoard 8055i interactive flat panel.
This chapter provides additional considerations and details for installing your interactive flat panel.
I M P O R T A N T
Because the receptacles might not be accessible after wall-installation, consider connecting cables
for speakers, computers and peripheral devices while the interactive flat panel is still in its
packaging or is suspended from a lifting device. For more information, see Connecting computers
and peripheral devices on page 13.
Environmental requirements
Before installing your interactive flat panel, review the following environmental requirements. For
more detailed information, see SMART Board 8055i and 8055i-SMPinteractive flat panel
specifications (smarttech.com/kb/170179) or SMART Board 8055ie-SMPinteractive flat panel with
appliance specifications (smarttech.com/kb/170178).
Environmental requirement Parameter
Power requirements 0.8A to 1.8A at 100V to 240V AC, 50 Hz to 60 Hz
Power consumption at 77ºF
(25ºC)
Operating temperature 41°F to 95°F (5°C to 35°C)
Typically up to 148 W (brightness at 80% and volume at 50),
maximum 178 W (brightness and volume at maximum)
9
Page 18
C H A P T E R 2
Installing your interactive flat panel
Environmental requirement Parameter
Storage temperature -4°F to 140°F (-20°C to 60°C)
Humidity 5% to 80% relative humidity, non-condensing
Ventilation Maintain a 4" (10 cm) ventilation area around your interactive flat
panel to enable its cooling fans to operate. Do not store or
operate your interactive flat panel in dusty environments
because dust could interfere with the product’s ventilation and
cooling.
Water and fluid resistance l Intended for indoor use only. Doesn’t meet any salt-spray
or water ingress requirements.
l Don’t pour or spray liquids directly onto the interactive flat
panel or any of its sub-components. These liquids might
get into areas where they could damage sensitive
electronic components. Refer to page 56 for detailed
instructions on cleaning your interactive flat panel.
Wall-mounting your interactive flat panel
Use a team of trained, professional installers to install your interactive flat panel.
W A R N I N G
l Improper installation can result in personal injury or product damage.
l Your interactive flat panel weighs 98 lb. (44.5 kg). Refer to local building codes to ensure your
installation area can support this weight.
C A U T I O N
Do not allow the weight of the interactive flat panel to rest on the color select module because it is
not designed to support product weight. Attach other components while the interactive flat panel is
either still in its packaging or suspended from a lifting device to prevent the weight of the interactive
flat panel from damaging the color select module.
I M P O R T A N T
l Save all product packaging so that it is available if you need to transport your interactive flat
panel. If your original packaging is not available, you can purchase new product packaging
from your authorized SMART reseller (smarttech.com/where).
10
Page 19
C H A P T E R 2
Installing your interactive flat panel
l Attach the speakers and connect the speaker wires to the interactive flat panel before you
wall-mount it. For more information, see Installing the speakers on page 14.
Important mounting considerations for trained installers
Consider the following when mounting the interactive flat panel on a wall:
ll Plan your workflow to include cabling because some cable connection points might not be
accessible after installation.
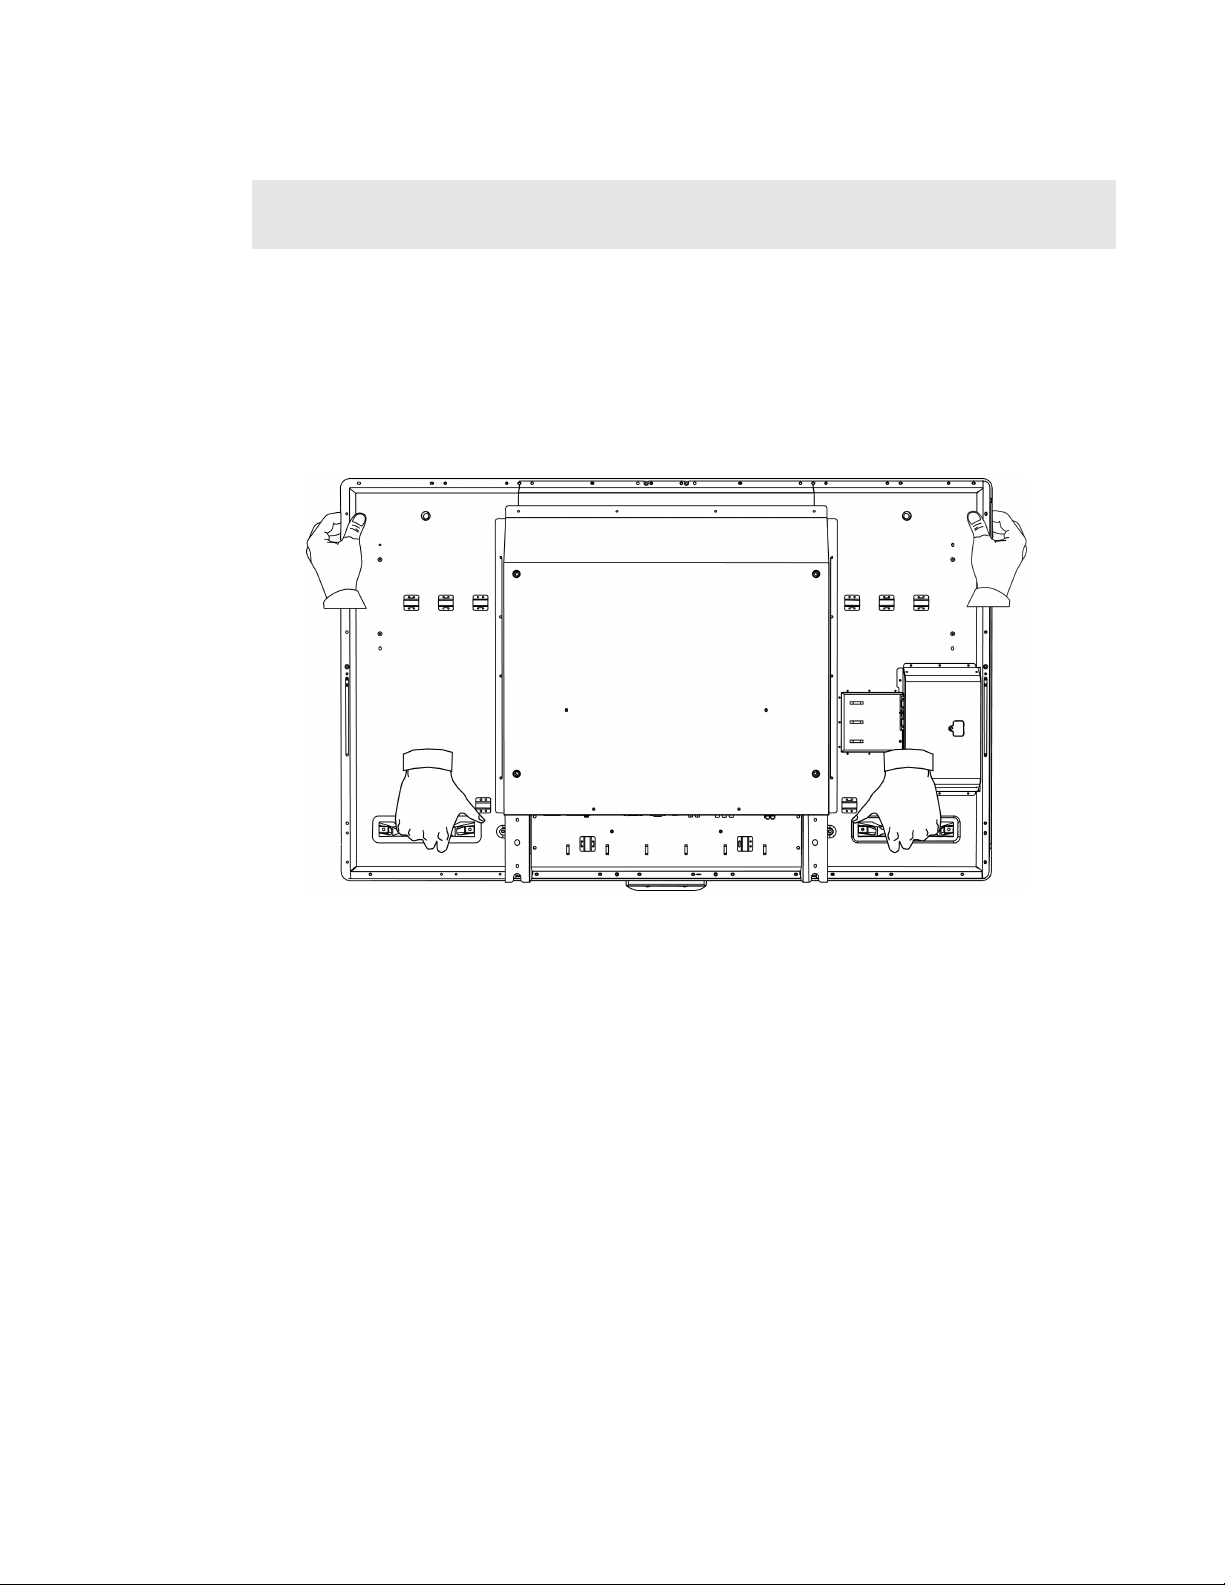
l Carry and lift the interactive flat panel by gripping the handles and sides.
l To mount the interactive flat panel on a wall, you require a standard VESA 600 mm × 400 mm
compatible wall mount bracket (not included). The wall mount bracket must have minimum
depth of 14 mm to ensure sufficient space for the speakers.
l Use M8 screws to fasten the wall bracket. The screws must be 14–15 mm long plus the
thickness of the bracket and the washer.
l The recommended fasten force is 99.57–121.70 in-lb. (11.25–13.75 N·m).
l Refer to the instructions included with the mounting equipment for more detailed information.
Choosing a mounting location
Consider the following when you select a location for the interactive flat panel:
l The wall must be strong enough to support the interactive flat panel and the mounting
equipment. The interactive flat panel weighs 98 lb. (44.5 kg).
l Do not install the interactive flat panel in a location where a door or gate could hit it.
11
Page 20
C H A P T E R 2
Installing your interactive flat panel
l Do not install the interactive flat panel in an area where it will be subjected to strong vibrations
or dust.
l Do not install the interactive flat panel near where the main power supply enters the building.
l Ensure adequate ventilation or provide air conditioning around the interactive flat panel so that
heat can flow away from the unit and the mounting equipment.
l If you mount the interactive flat panel in a recessed area, leave at least 4" (10 cm) of space
between the interactive flat panel and the recess walls to enable ventilation and cooling.
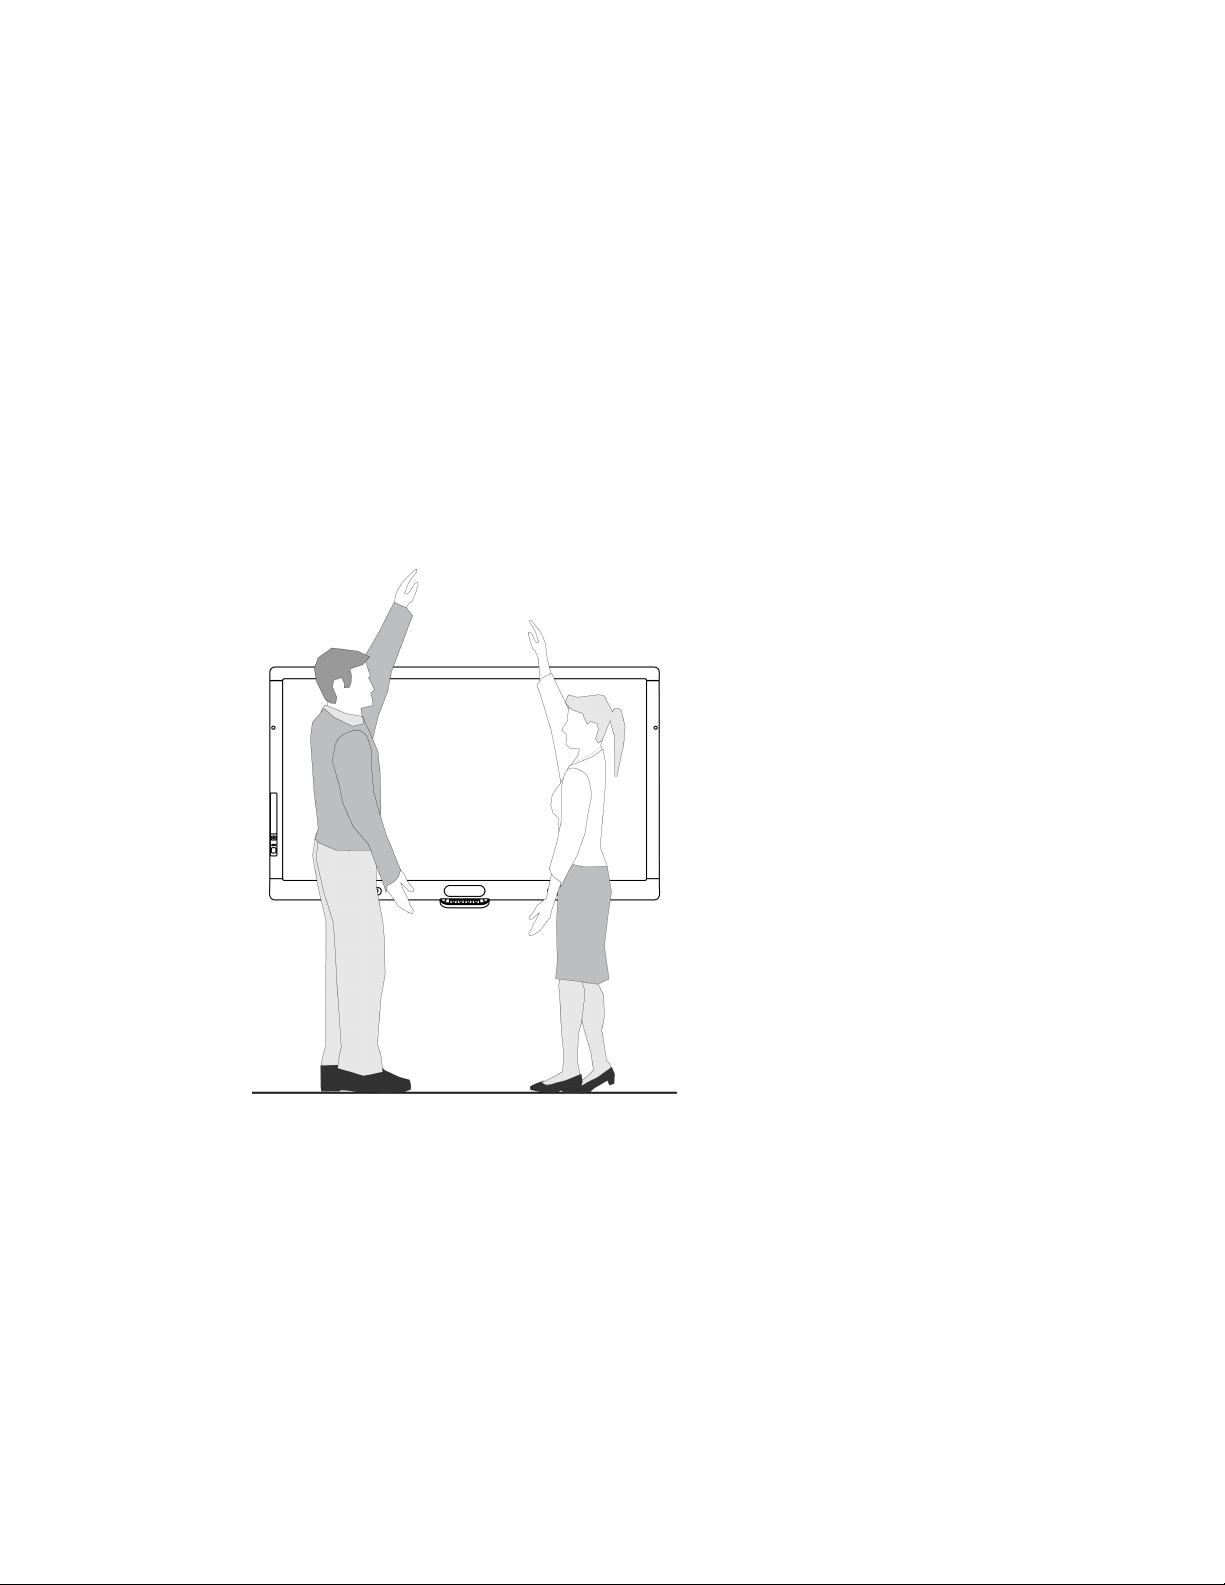
Choosing a mounting height
Consider the general height of your user community when your choose the mounting height for the
interactive flat panel.
12
Page 21

Chapter 3
peripheral devices
Installing the speakers 14
Connecting a room control system 15
Connecting computers to your interactive flat panel 16
Interactive flat panel touch control and video input connections 17
Connecting to power and computer 1 17
Computer 1 connection diagram 17
Installing computer 2 connection 18
Computer 2 connection diagram 19
Disabling the USB receptacle on the side terminal panel 20
Connecting peripheral devices to your interactive flat panel 21
Bottom terminal panel 21
This chapter includes information on connecting your interactive flat panel to computers and other
peripheral devices.
I M P O R T A N T
Because the cable connection points might not be accessible after wall-mounting, consider
connecting these devices before wall-mounting your interactive flat panel.
13
Page 22
C H A P T E R 3
Connecting computers and peripheral devices
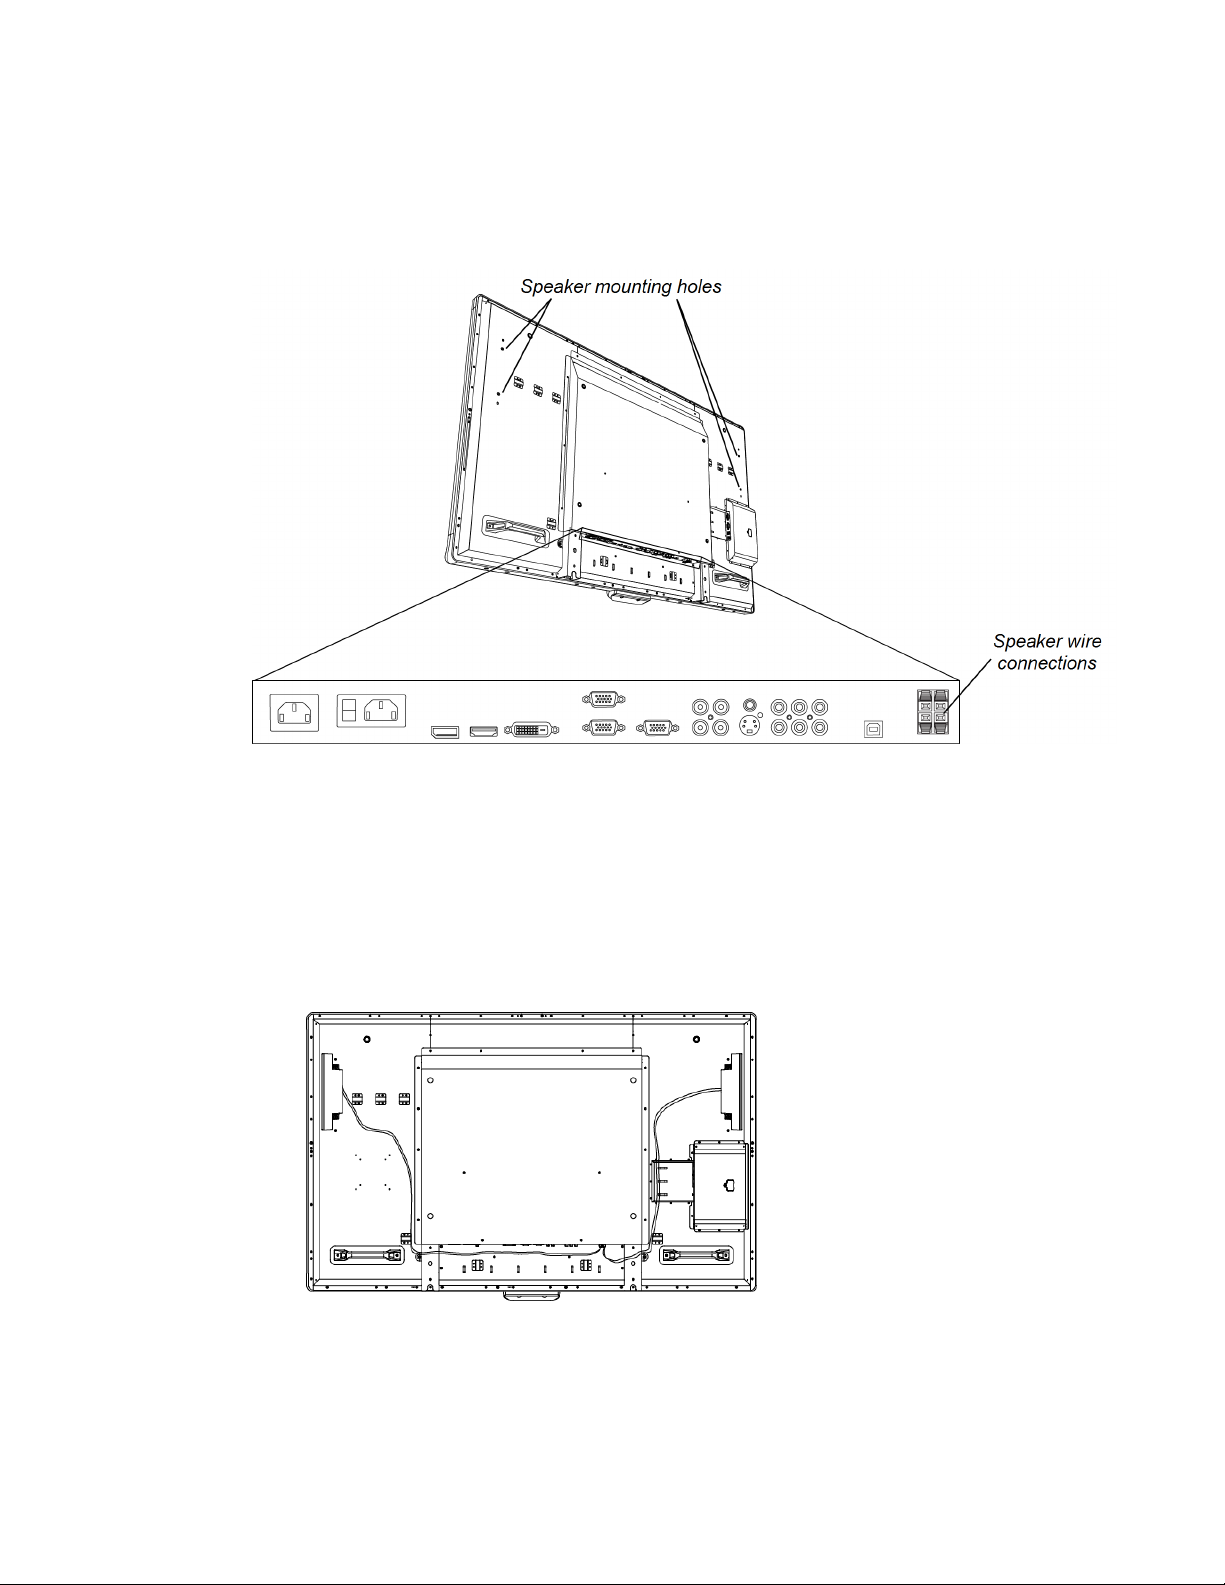
Installing the speakers
Your interactive flat panel comes with two 15 W speakers.
g To install the speakers
1. Attach the speakers to the speaker mounting holes on the side of the interactive flat panel with
the included screws.
2. Connect the speaker wires to the speaker wire connections on the bottom terminal panel.
3. Run the speaker wire for the left speaker (when viewed from the back of the interactive flat
panel) below the bottom terminal panel and secure it with the included small clamps.
14
Page 23
C H A P T E R 3
Connecting computers and peripheral devices
Connecting a room control system
You can control your interactive flat panel from a room control system.
g To connect your interactive flat panel to a room control system
Connect an RS-232 cable from the room control input on the inside terminal panel of the
interactive flat panel to the serial output on your computer or room control system.
I M P O R T A N T
Do not use a null modem cable. Use only a standard RS-232 cable.
For more information about setting up and programming a room control system, see Remotely
managing your SMARTBoard 8055i interactive flat panel (smarttech.com/kb/170189).
15
Page 24
C H A P T E R 3
Connecting computers and peripheral devices
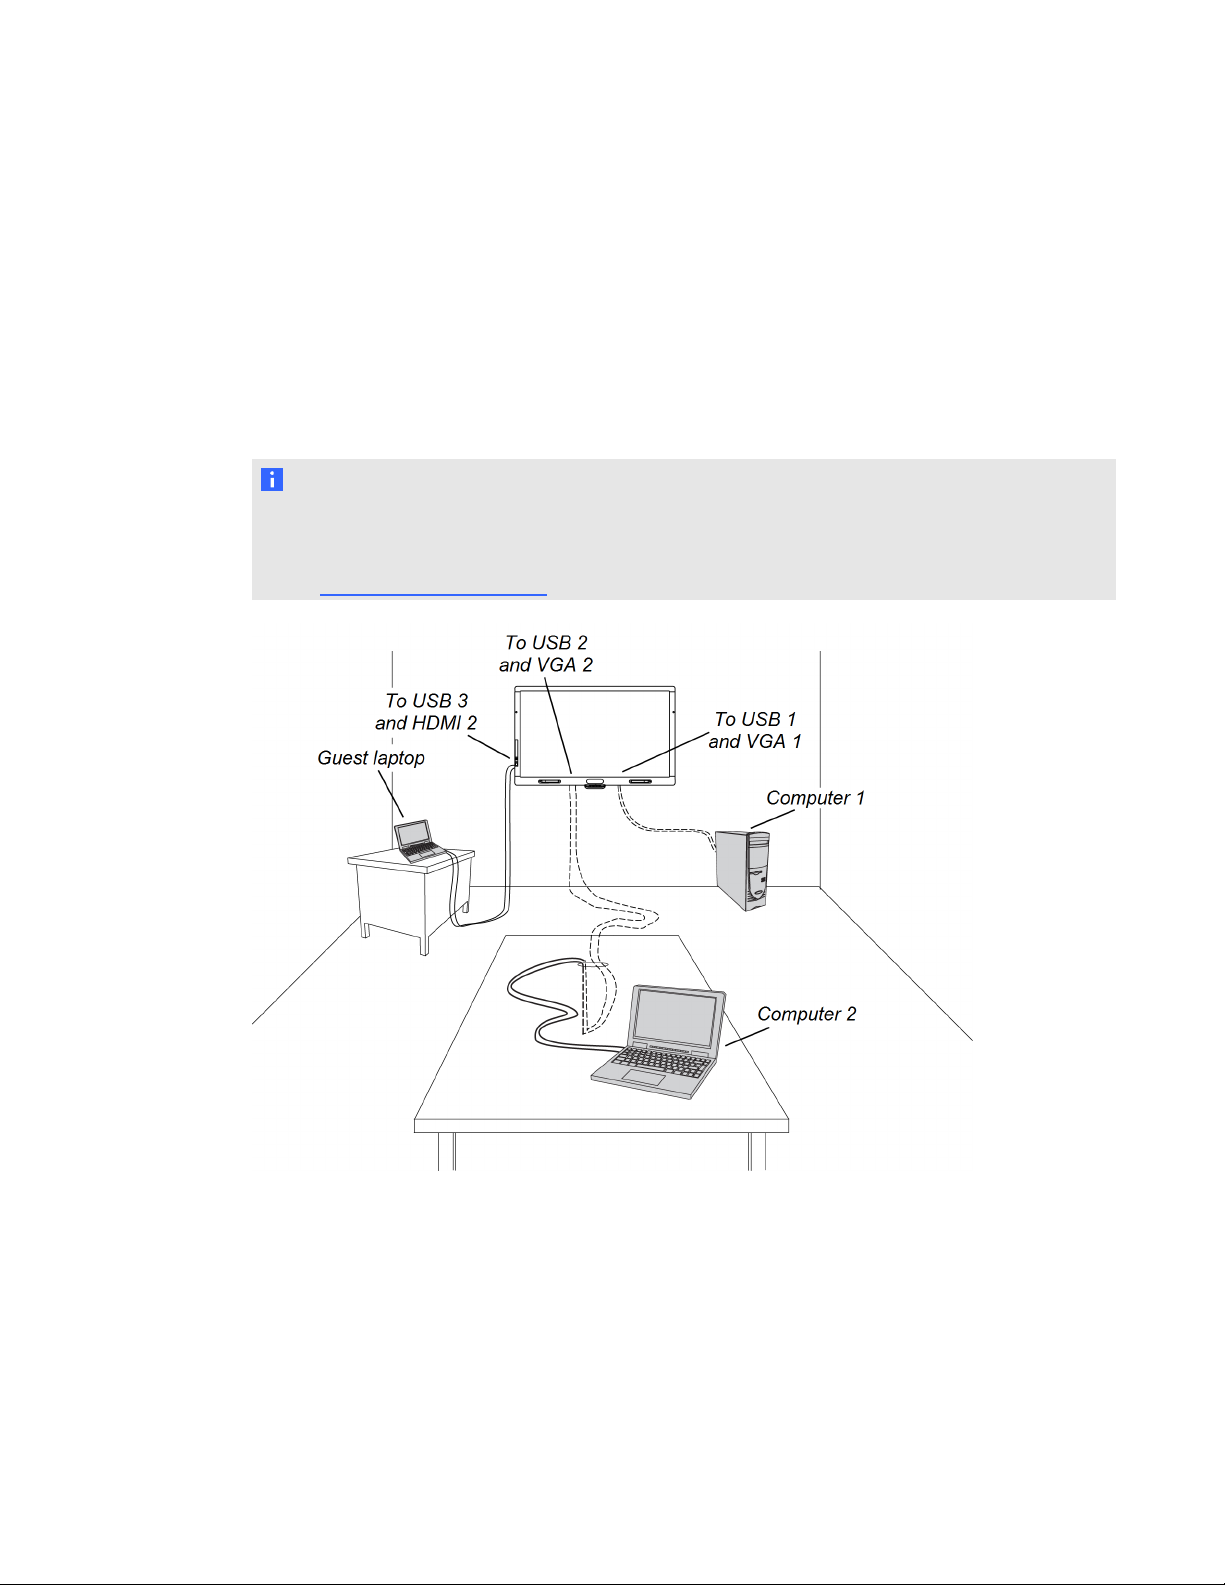
Connecting computers to your interactive flat panel
You can connect up to three computers simultaneously to your interactive flat panel:
l Computer 1 (an installed room computer) connected to USB 1 and VGA1
l Computer 2 (a guest computer) connected to USB 2 and VGA2
l A guest laptop connected to USB 3 and HDMI 2 connector
N O T E
This document describes the default USB and video connections. To customize the USB and video
mapping, see Configuring the video and touch input for your SMART Board 8055i interactive flat
panel (smarttech.com/kb/170190).
16
Page 25

C H A P T E R 3
Connecting computers and peripheral devices
Interactive flat panel touch control and video input connections
The following table shows which touch control USB connection corresponds with which video input
for each computer connection.
Touch control Video input
Computer 1
Computer 2 USB 2 (inside terminal
Guest laptop
USB 1 (inside terminal
panel)
panel)
USB 3 (side terminal panel)
VGA 1 page 17
VGA 2 page 18
HDMI 2 page 47
Installation steps
Connecting to power and computer 1
Computer 1 (the room computer) is the default computer for your interactive flat panel. Connect this
computer to your interactive flat panel with a VGA cable and a USB cable.
Computer 1 connection diagram
17
Page 26
C H A P T E R 3
Connecting computers and peripheral devices
g To connect your interactive flat panel to power and computer 1
1. Connect the included VGA cable from computer 1 to the VGA 1 receptacle on the bottom
terminal panel.
2. Connect the included USB cable from the USB 1 receptacle on the inside terminal panel of the
interactive flat panel to a USB receptacle on the computer.
3. Connect the included power cable from the AC IN connector on the bottom terminal panel to a
power outlet.
4. Connect the power cable from your computer to a power outlet.
5. Turn on your computer.
6. Turn on the main power switch on the bottom terminal panel, and then press the Power button
on the front control panel.
7. Press the VGA 1 button on the remote control.
OR
Press the Input button on the front control panel until the input source is VGA1.
Installing computer 2 connection
You can install cabling that enables you to connect a second computer to your interactive flat panel
from another location in the room, such as on a conference table. By installing this connection, you
make use of connection points that might not be accessible when your interactive flat panel is
wall-mounted.
You require a USB cable and a VGA cable to install the computer 2 connection. You may install these
cables and run them through floors or walls to a nearby table.
Alternatively, your users can connect a laptop to the side terminal panel using the more accessible
USB receptacle and HDMI input. For more information, see Connecting a guest laptop on page 47.
For a diagram of the various computer options, see Connecting computers to your interactive flat
panel on page 16.
W A R N I N G
Ensure that any cables extending across the floor to your SMART product are properly bundled and
marked to avoid a trip hazard.
N O T E
You do not require a laptop to install this cabling.
18
Page 27
C H A P T E R 3
Connecting computers and peripheral devices
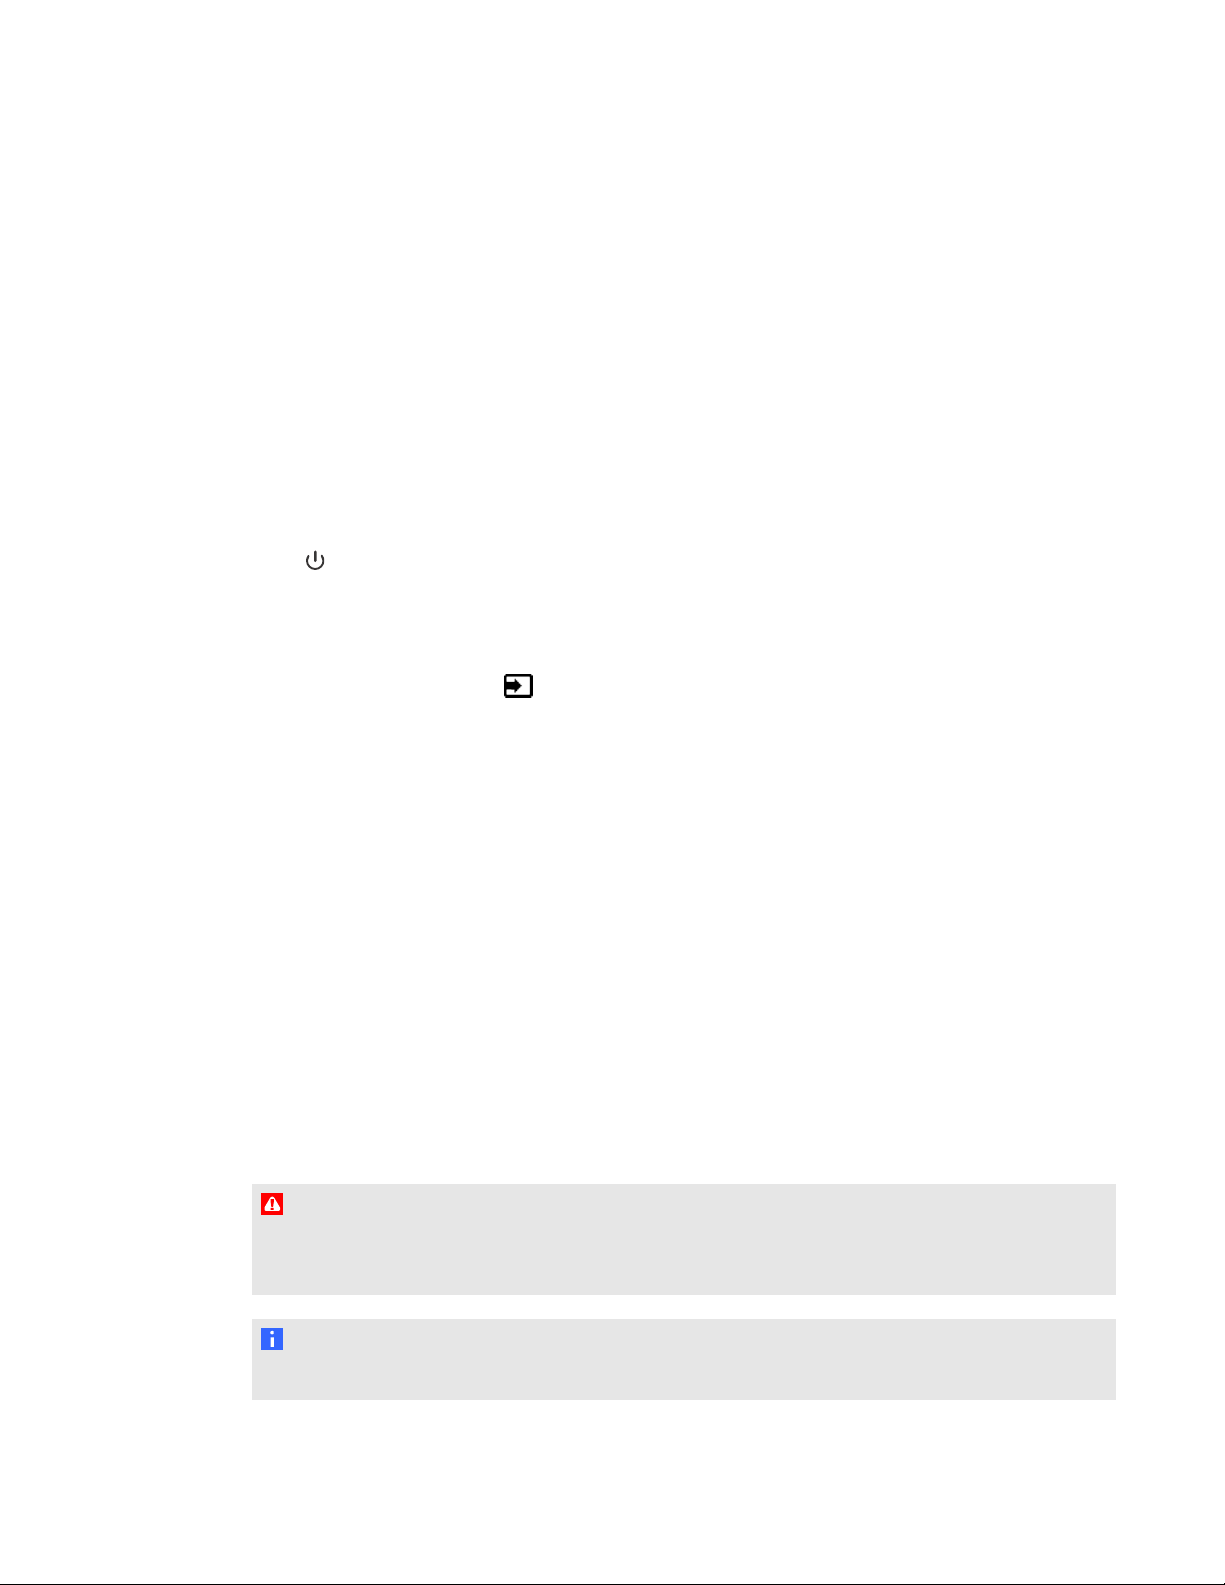
Computer 2 connection diagram
g To setup the computer 2 connection location
1. Connect a USB cable to the USB 2 receptacle on the inside terminal panel, and then run the
cable to the laptop connection location, such as beside the interactive flat panel or on a
conference table.
2. Connect a VGA video cable to the VGA2 interactive flat panel receptacle on the bottom
terminal panel, and then run the cable to the computer 2 connection location as above.
3. Bundle and cover the cables as appropriate to avoid a trip hazard.
To connect and use a computer using this installed connection, see Connecting computer 2 on page
50.
19
Page 28
C H A P T E R 3
Connecting computers and peripheral devices
Disabling the USB receptacle on the side terminal panel
You can connect a USB drive or other USB device to the USB receptacle on the side terminal panel
of your interactive flat panel, and then access the device from computer 1. For more information, see
Using the USB receptacle on page 46.
You can also disable this USB receptacle so that it doesn’t access any of the computers connected
to your interactive flat panel.
C A U T I O N
Disconnect the power supply for your interactive flat panel before you disable the USB receptacle.
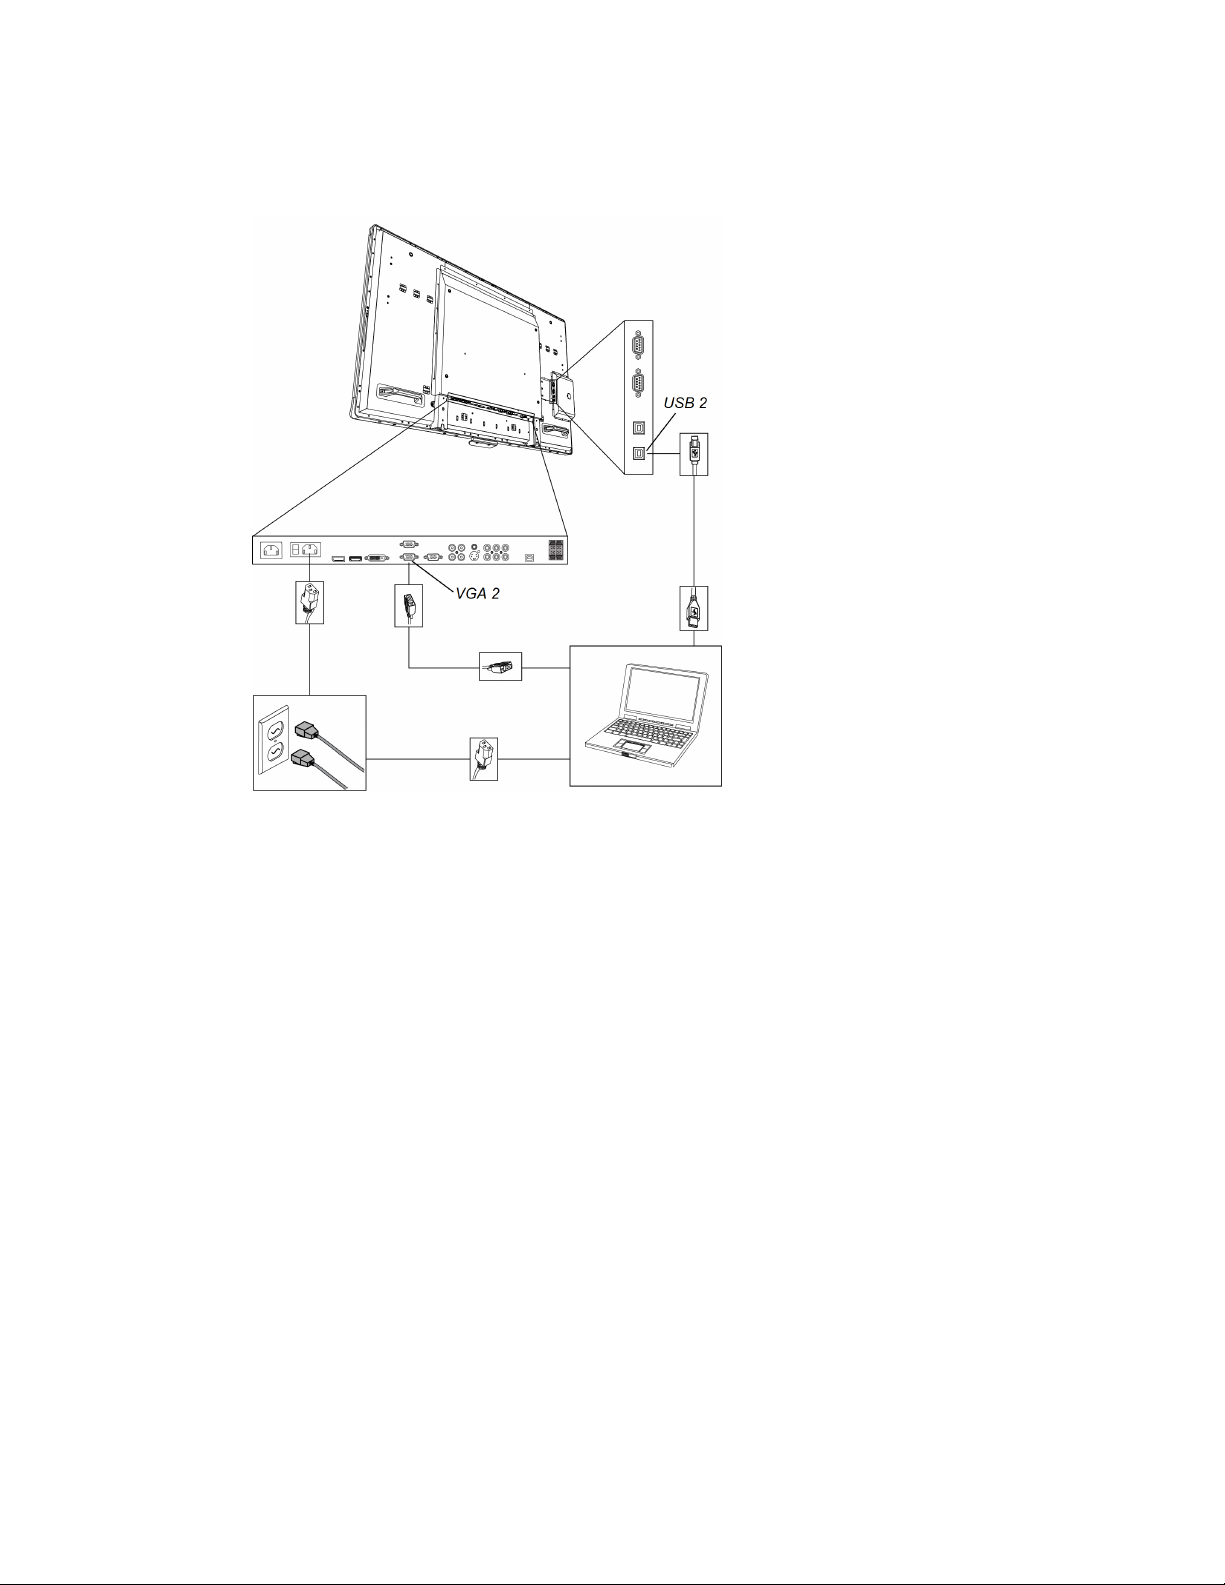
g To disable the USB receptacle
Locate the rectangular cut-out on the back of your interactive flat panel.
1.
Remove the screw securing the cut-out with a Phillips screwdriver. Retain the screw and cut-
2.
out.
3. Locate the black jumper on the circuit board inside the panel.
20
Page 29
C H A P T E R 3
Connecting computers and peripheral devices
4. Pull the black jumper off of the circuit board with the pliers.
C A U T I O N
To prevent damage to the circuit board, do not touch the circuit board with the pliers.
I M P O R T A N T
You can install the jumper again to enable the USB receptacle.
Connecting peripheral devices to your interactive flat panel
Connect peripheral devices to the bottom terminal panel.
C A U T I O N
The AC power outlet is designated for a component of the SMART Board 8055ie-SMP interactive
flat panel with appliance. See Replacing the appliance on your SMART product (FRU - Appliance -
SB8) (smarttech.com/kb/170062).
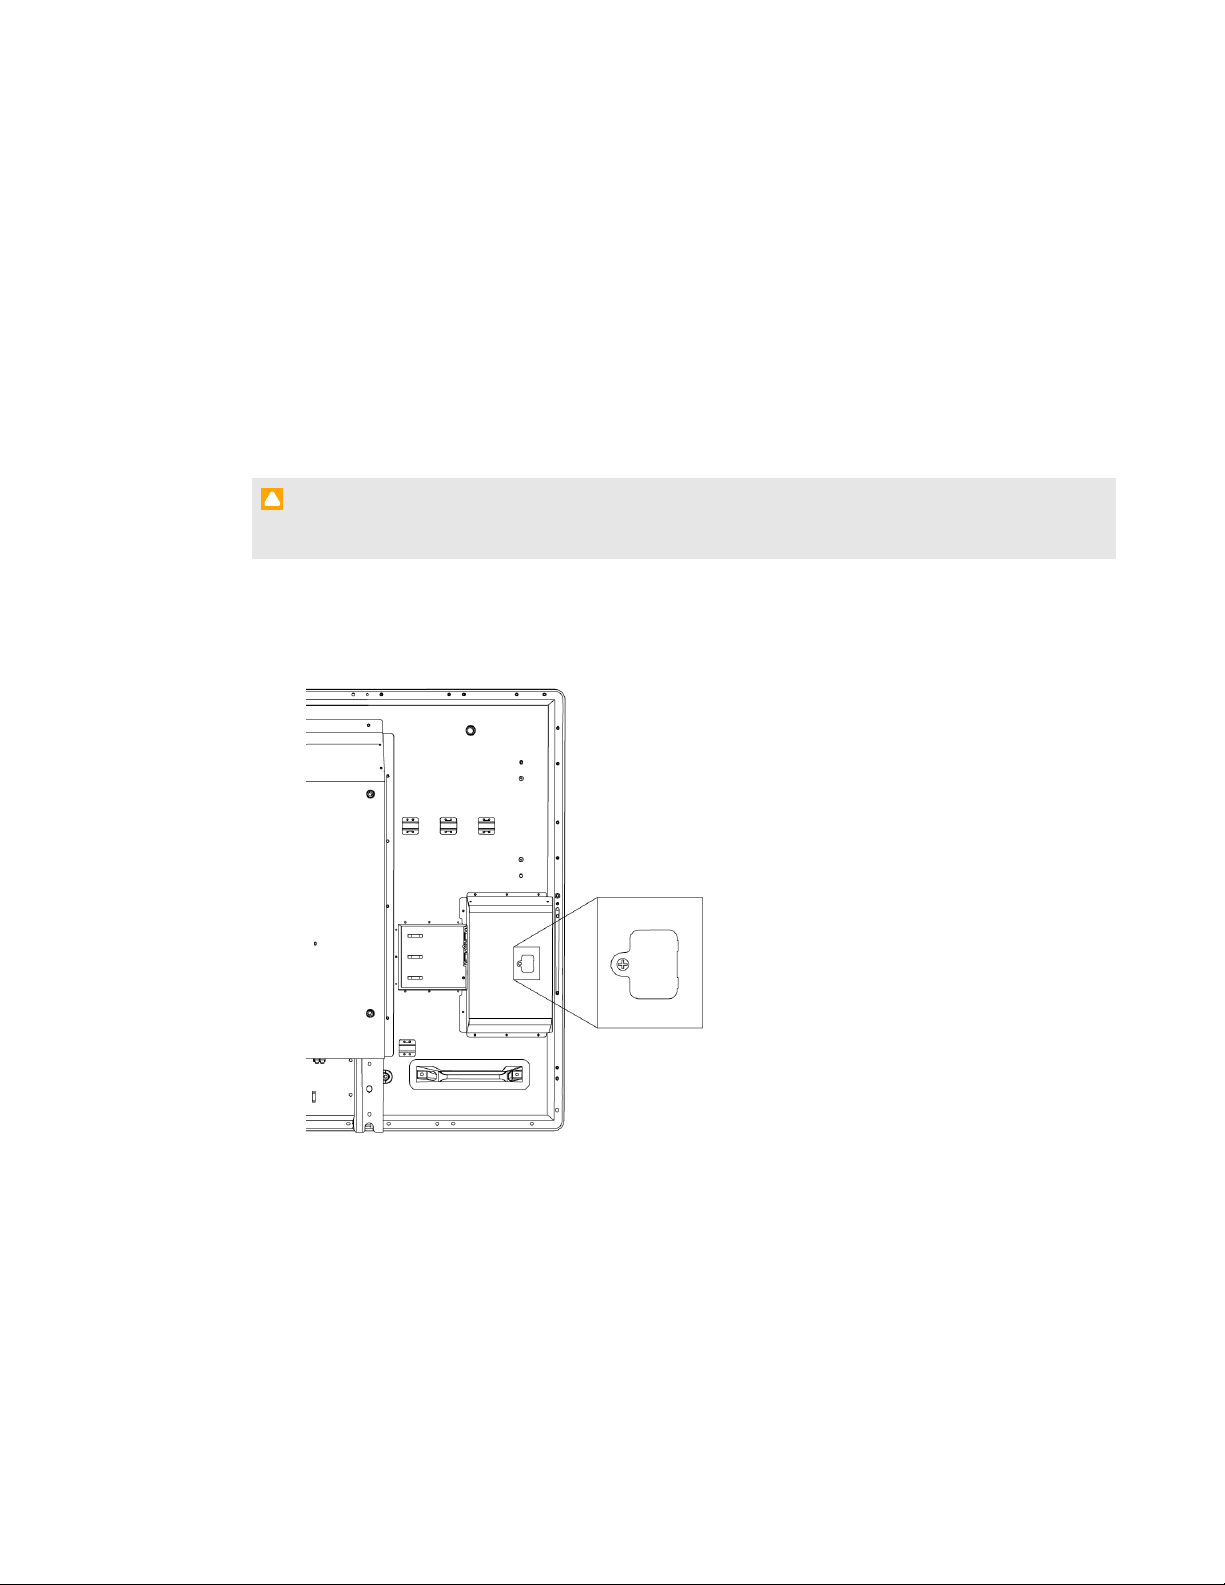
Bottom terminal panel
g To connect a peripheral device
1. Turn off the interactive flat panel and the peripheral device.
2. Connect the peripheral device’s input cables to the appropriate connectors on the bottom
terminal panel.
N O T E
You can secure these cables with the included large clamps.
3. Turn on the interactive flat panel, and then turn on the peripheral device.
21
Page 30

Page 31

Chapter 4
Installing SMARTMeetingPro software 24
Installing SMARTNotebook software 24
I M P O R T A N T
If you already have SMARTMeetingPro software or SMARTNotebook™ collaborative learning
software installed on your computer, ensure your computer has SMARTProductDrivers 11 or later
installed. For more information, see Updating SMART Product Drivers on page 53.
You need to install SMART software on the computer that’s connected to your interactive flat panel in
order to use the interactive flat panel. You can install either SMARTMeetingPro software or
SMARTNotebook software.
SMARTBoard 8055i-SMP interactive flat panels also include a SMARTGoWire auto-launch cable
that provides the features of SMARTMeetingPro software without installing the software on your
computer. For more information about using the SMARTGoWire auto-launch cable, see Using a
SMARTGoWire cable on page 48.
N O T E
For laptops that are only occasionally used for your interactive flat panel, you can use a
SMARTGoWire cable instead of installing SMARTMeetingPro software.
Once you install SMARTNotebook software or SMARTMeetingPro software on the computer that's
connected to your interactive flat panel, you have touch control of that computer's desktop. You can
open files, move icons and write or erase digital ink using the included pens and eraser.
23
Page 32

C H A P T E R 4
Installing SMART software
Installing SMARTMeetingPro software
You can download and install SMARTMeetingPro software from the SMART website.
I M P O R T A N T
Register your product at smarttech.com/registration so that you can obtain a software product key
which is required for activation.
g To download SMARTMeetingPro software
1. Go to smarttech.com/downloads.
2. Scroll to the SMARTMeetingPro software section.
3. Click Choose a version, and then select the version that you require.
4. Follow the on-screen instructions to save the executable file to your desktop.
g To install SMARTMeetingPro software
1. Double-click the executable file.
2. Follow the on-screen instructions.
Installing SMARTNotebook software
Install SMARTNotebook software from the included DVD (SMARTBoard 8055i interactive flat
panels only) or from smarttech.com/downloads.
I M P O R T A N T
Connect to the Internet before you install SMART software so that you can obtain a software
product key (smarttech.com/registration) and download software updates.
g To install SMARTNotebook software
1. Place the included software DVD in your computer’s DVD tray.
The installation wizard appears.
2. Follow the on-screen instructions. You’ll be prompted to enter your product key. You can
register your interactive flat panel at smarttech.com/registration to receive your product key.
24
Page 33

C H A P T E R 4
Installing SMART software
Click the SMART Board icon in the notification area (Windows operating systems) or the
3.
Dock (MacOSX operating system software), and then select Check for Updates and
Activation.
The SMART Product Update window appears.
4. Follow the on--screen instructions to update your SMARTNotebook software to the latest
version.
25
Page 34

Page 35

Chapter 5
Turning on and turning off your interactive flat panel 28
Understanding presence detection 29
Using the infrared remote control 30
Installing batteries in the remote control 30
Infrared remote control sensor 31
Infrared remote control buttons 32
Getting started with your SMARTBoard interactive flat panel 34
About SMART Ink 34
SMART Ink Notes 34
SMART Ink Document Viewer 34
SMART Ink Toolbar 34
About your SMART software 35
SMART Product Drivers 35
SMARTNotebook software 35
SMARTMeetingPro software 35
Writing or drawing in digital ink 35
Entering text on the interactive flat panel 36
Changing pen settings 36
Using Locked Ink mode 37
Erasing digital ink 37
Changing eraser settings 38
Manipulating objects 38
Browsing 42
Playing audio files on your interactive flat panel 45
Using the USB receptacle 46
This chapter includes information on how to use your interactive flat panel, turn on and turn off your
interactive flat panel, control your computer by touching the screen, use the remote control and more.
27
Page 36

C H A P T E R 5
Using your interactive flat panel
Turning on and turning off your interactive flat panel
g To turn on your interactive flat panel
N O T E
If presence detection is enabled, the interactive flat panel turns on and the welcome screen appears
automatically when people enter the room. Dismiss the welcome screen by touching the interactive
flat panel screen. For more information, see Understanding presence detection on the next page
1. Turn on your computer.
Press the Power button on the front control panel.
2.
You can also press the POWER ON button on the remote control.
Your computer’s logon screen or desktop appears on your interactive flat panel.
I M P O R T A N T
If the power button light on the front control panel is off, either the interactive flat panel is not
plugged in or the main power switch on the bottom terminal panel is turned off. To find the
main power switch, see Back view on page 7.
g To turn off your interactive flat panel
1. Turn off your computer.
Press the Power button on the front control panel.
2.
You can also press the STANDBY button on the remote control.
N O T E
If presence detection is enabled, the interactive flat panel turns off automatically when the
sensors no longer detect people in the room. For more information on presence detection
settings, see Proximity control settings on page 79
28
Page 37

C H A P T E R 5
Using your interactive flat panel
Understanding presence detection
N O T E
If ECOSTANDBY is enabled, presence detection functionality is limited. For more information, see
Setup settings on page 78
The interactive flat panel has two presence detection sensors on its frame that can detect people up
to 16' (5 m) away. When the sensors detect people in the room, the interactive flat panel turns on.
When the sensors no longer detect people in the room, the interactive flat panel turns off.
For information on cleaning your sensors, see Cleaning the presence detection sensors on page 56.
For more information on presence detection settings, see Proximity control settings on page 79.
29
Page 38

C H A P T E R 5
Using your interactive flat panel
Using the infrared remote control
The infrared remote control enables you to turn on and turn off your interactive flat panel, change the
input source, change the volume and more. You can also use the remote control to open the on-
screen menu and then change the interactive flat panel’s settings.
If the remote control doesn’t respond, see Resolving remote control issues on page 70.
C A U T I O N
l Do not subject the remote control to strong shock.
l Keep the remote control away from liquids. If it gets wet, wipe it dry immediately.
l Do not expose the remote control to heat or steam.
l Do not open any part of the remote control other than the battery compartment and
picture-in-picture compartment.
I M P O R T A N T
The remote control system does not function when strong light strikes the remote control sensor or
when there is an object between the remote control and its sensor.
Installing batteries in the remote control
Your remote control requires two 1.5V AA batteries.
W A R N I N G
To reduce the risk associated with leaking batteries:
l use only AA type batteries
l do not mix used and new batteries
l orient the battery’s plus (+) and minus (-) terminals according to the markings found on the
remote control
l do not leave the batteries in the remote control for an extended period
l do not heat, disassemble, short or recharge the batteries, or expose them to fire or high
temperature
l avoid eye and skin contact if batteries have leaked
l dispose of exhausted batteries and product components in accordance with applicable
regulations
30
Page 39

C H A P T E R 5
Using your interactive flat panel
g To install batteries in the remote control
1. Press the tab on the underside of the remote control, and then open the cover.
2. Remove the batteries if they are present.
3. Insert two new 1.5V AA batteries in the remote control. Ensure the + and - markings on the
batteries align with the markings in the remote control.
4. Replace the cover.
Infrared remote control sensor
The infrared remote control sensor is
located on the front control panel. It
enables you to control your interactive flat
panel from an angle of 30º and within a
distance of 23' (7 m) using the included
remote control.
I M P O R T A N T
The remote control might not function
when the infrared remote control sensor
is blocked or when it is in direct sunlight
or strong lighting.
31
Page 40

C H A P T E R 5
Using your interactive flat panel
Infrared remote control buttons
The remote control enables you to access on-screen menus and change
display and input settings.
Use the remote control’s POWER ON button turn on your interactive flat
panel and the STANDBY button to turn it off.
Use the remote control’s input buttons to change input sources when
switching between the connected computers.
Number Function Description
1
POWER ON
STANDBY
Turns on your interactive flat panel
Turns off your interactive flat panel
2 ASPECT Selects picture aspect
3
STILL Turns on or turns off the still picture mode
4 Number pad Press buttons on the number pad to set and change passwords,
change channels or to customize or change settings
5 DISPLAY Turns on and turns off the on-screen display menu
6 SET Makes selection
7 Left/Right Increases or decreases the adjustment level within the
on-screen display menu
8 AUTO SET UP Enters auto setup menu
9 VOL +/- Increases or decreases audio output level
32
Page 41

C H A P T E R 5
Using your interactive flat panel
Number Function Description
10 AUDIOINPUT Selects audio input source
11 Input buttons Selects input signal for the interactive flat panel
12 SLEEP Sets a timer to turn off the interactive flat panel
13
PIP buttons Not in use
14 OPTION Not in use
15 INPUT Toggles between the different input signals for the interactive
flat panel
16 SOUND Selects artificial surround sound
17 MUTE Mutes audio inputs for your interactive flat panel
18 EXIT Returns to previous menu
19 Up/Down Moves the highlighted area up or down to select items within the
on-screen display menu
20 MENU Turns on and turns off the menu mode
21 * Not in use
22 PICTURE MODE Selects picture mode
23 MTS Not in use
33
Page 42

C H A P T E R 5
Using your interactive flat panel
Getting started with your SMARTBoard
interactive flat panel
Using your SMARTBoard interactive flat panel, you can write, draw and erase digital ink, manipulate
objects and browse content on the screen.
About SMART Ink
SMART Ink enables you to write and draw in digital ink over open applications, files, folders,
websites and any other open window on your computer.
You can write over an Internet browser window, highlight content on your screen and write over a
video without pausing the video and without interfering with your ability to interact with the video.
When you move, resize or minimize a window, the ink stays with the window.
You can convert your digital ink notes to text. You can also move, erase and capture your notes as an
image and save it to your SMART software.
When you open an application that has its own ink tools, you can turn off SMART Ink, and then use
the application's ink tools to write.
For more information see SMART Ink for Windows (smarttech.com/SupportInk1Windows) or
SMART Ink for Mac (smarttech.com/SupportInk1Mac) on the SMARTSupport website.
SMART Ink Notes
SMART Ink Notes enable you to write in digital ink anywhere on your desktop. When you write
outside of the open windows on your computer, a SMART Ink Note appears and you can write inside
the note.
SMART Ink Document Viewer
If you’re using a Windows operating system, the SMART Ink Document Viewer enables you to view
your PDF files and to write in digital ink over your files.
SMART Ink Toolbar
If your computer is connected to a SMART interactive product, SMART Ink starts automatically
when you start your computer and the SMART Ink toolbar appears in the title bar of each open
window on your computer.
Use the toolbar to select ink properties for that window and to perform common tasks such as
capturing your notes.
34
Page 43

C H A P T E R 5
Using your interactive flat panel
About your SMART software
SMART Ink and SMART Product Drivers are included with SMART Notebook collaborative learning
software and SMART Meeting Pro software.
SMART Product Drivers
SMART Product Drivers enables your computer to detect input from your interactive flat panel.
SMART Ink works with SMART Product Drivers to enable you to write on your screen in digital ink
using your interactive flat panel’s pen or your finger.
N O T E
In most cases, SMART Product Drivers installs automatically when you install your SMART
software. To ensure you have the most recent version of SMARTProductDrivers installed, see
Updating SMART Product Drivers on page 53.
SMARTNotebook software
You can write in SMART Notebook software using your SMART interactive product’s pen or your
finger. The ink becomes part of your .notebook file. For more information, see the SMARTNotebook
software support page for Windows (smarttech.com/SupportNotebook11Windows) or SMART
Notebook software support page for MacOSX operating system software
(smarttech.com/SupportNotebook11Mac).
SMARTMeetingPro software
You can write in SMART Meeting Pro software’s Whiteboard mode using your SMART interactive
product’s pen or your finger. The ink becomes part of your .notebook file. For more information, see
the SMARTMeetingPro support page (smarttech.com/SupportMeetingPro3Windows).
Writing or drawing in digital ink
Using the pen supplied with your interactive flat panel, you can write or draw digital ink over SMART
software and other programs.
g To write or draw digital ink
1. Pick up the pen.
2. Write or draw on the screen.
T I P
Don’t rest your elbow or the palm of your hand on the screen while you’re writing.
35
Page 44

C H A P T E R 5
Using your interactive flat panel
Entering text on the interactive flat panel
You can enter text in text boxes on the interactive flat panel using the on-screen keyboard or a
keyboard attached to your computer.
g To enter text
1. Select the area where you want to enter text using your finger or a mouse connected to the
computer.
2. Type on a connected keyboard or on-screen keyboard.
T I P
Press the keyboard button on the interactive flat panel to open the on-screen keyboard.
Changing pen settings
You can change your pen settings, including line size and fill effects.
g To change pen settings
Press the SMART Board icon in the notification area (Windows operating systems) or the
1.
Dock (MacOSX operating system software).
OR
Press the SMART Meeting Pro icon in the notification area.
2. Press SMART Settings.
3. Select Pen and Button Settings in the drop-down list.
Press Black Pen Settings to customize the black pen.
4.
Press Blue Pen Settings to customize the blue pen.
Press Red Pen Settings to customize the red pen.
Press Green Pen Settings to customize the green pen.
The Properties dialog box appears.
5. Press Line Style.
6. Adjust the color, thickness, line end and line style.
7. Press Fill Effects.
8. Adjust the transparency.
36
Page 45

C H A P T E R 5
Using your interactive flat panel
9. Press Save Tool Settings to save your settings.
10. Optionally, repeat steps 4 through 9 to customize other pens.
11. Press OK to close SMARTSettings.
Using Locked Ink mode
Locked Ink mode enables you to write or draw digital ink using large objects, including eraser-sized
objects.
g To use Locked Ink mode
Press and hold a color button on the color select module until the light flashes.
g To end Locked Ink mode
Press any color button that isn't flashing on your color select module.
Erasing digital ink
g To erase digital ink
Pick up the eraser, and then press the eraser on the screen and move it over the digital ink you
want to erase.
OR
Using your flattened fist, press the screen and move your hand over the digital ink you want to
erase.
37
Page 46

C H A P T E R 5
Using your interactive flat panel
Changing eraser settings
You can change the eraser size for either a larger or smaller eraser area.
g To change eraser settings
Press the SMART Board icon in the notification area (Windows operating systems) or the
1.
Dock (MacOS operating system software), and then select SMARTSettings.
OR
Press the SMART Meeting Pro icon in the notification area, and then select
SMARTSettings.
2. Press SMART Hardware Settings.
3. Select Pen and Button Settings in the drop-down list.
Press Eraser Settings .
4.
5. Select an eraser size.
6. Press OK to save your settings.
7. Press OK to close SMARTSettings.
Manipulating objects
Objects include icons, buttons, links and other components of programs that appear on your screen.
You can manipulate these objects on your interactive flat panel as described below.
g To select or clear the selection of an object
Quickly press and release the object.
38
Page 47

C H A P T E R 5
Using your interactive flat panel
N O T E S
o
This gesture performs a standard mouse click.
o
This gesture starts programs if your operating system is set to start applications on a
single click.
g To double-click an object
Quickly press and release the object twice in the same spot.
N O T E
This gesture starts programs if your operating system is set to start applications on a double-
click.
g To right-click or Control-click an object
Press and hold the object.
OR
39
Page 48

C H A P T E R 5
Using your interactive flat panel
Using two fingers on the same hand, press and hold the object with your left finger, and then
press the screen once with your right finger.
OR
Press the Right-Click button on the pen tray, and then press the object.
g To move an object
1. Press and hold the object.
2. Keeping your finger on the screen, slowly move the object.
3. When you reach the position you want to move the object to, release your finger.
40
Page 49

C H A P T E R 5
Using your interactive flat panel
g To resize an object
1. Using one finger on each hand, press the screen at opposite ends of the object.
2. Drag your fingers in opposite directions to enlarge the object.
OR
Drag your fingers toward each other to reduce the object.
41
Page 50

C H A P T E R 5
Using your interactive flat panel
g To rotate an object
1. Using one finger on each hand, press the screen at opposite ends of the object.
2. Rotate your fingers in the direction you want to rotate the object.
3. When you reach the angle you want to rotate the object to, release your fingers.
Browsing
In addition to manipulating objects, you can browse content on your screen.
g To display the next page
Press the screen, and then quickly press again directly to the right of that point.
OR
42
Page 51

C H A P T E R 5
Using your interactive flat panel
Quickly flick your finger right across the screen.
g To display the previous page
Press the screen, and then quickly press again directly to the left of that point.
OR
Quickly flick your finger left across the screen.
43
Page 52

C H A P T E R 5
Using your interactive flat panel
g To zoom in or out
1. Using one finger on each hand, press the screen at opposite ends of the object.
2. Drag your fingers in opposite directions to zoom in.
OR
Drag your fingers toward each other to zoom out.
44
Page 53

C H A P T E R 5
Using your interactive flat panel
g To pan horizontally or vertically
1. Using two fingers on the same hand, press and hold the screen.
2. Keeping your fingers on the screen, move up, down, left or right.
3. When you reach the area you want to view, release your fingers.
Playing audio files on your interactive flat panel
Your interactive flat panel includes two speakers that play audio files or the audio portion of a video
file.
When you play an audio file or a video file on a computer connected to your interactive flat panel, the
file is streamed through the USB connection between your computer and your interactive flat panel,
not through the video connection.
I M P O R T A N T
If your computer uses MacOSX operating system software, you must set the audio output to
USB.
g To switch your Mac computer to USB audio output
1.
Press the Apple menu , and then select System Preferences.
2. Press Sound under the Hardware section.
3. Press the Output tab.
4. Select SBID 8055i/USB.
5. Close System Preferences.
45
Page 54

C H A P T E R 5
Using your interactive flat panel
Using the USB receptacle
You can connect a USB drive or device to the USB A receptacle on the side terminal panel on your
interactive flat panel, and then access it from computer 1 connected to VGA 1 and USB1.
N O T E
To disable the USBAreceptacle on the side terminal panel, see Disabling the USB receptacle on
the side terminal panel on page 20.
g To use the USB receptacle
1. Press the VGA 1 button on the remote control.
Press the Input button on the front control panel until the input source is VGA1.
2. Connect a USB device to the USB receptacle.
3. Use computer 1 to access the content on your USBdevice.
46
Page 55

Chapter 6
interactive flat panel
Connecting a guest laptop 47
Using a SMARTGoWire cable 48
Connecting computer 2 50
Connecting a guest laptop
You can connect a guest laptop to the side terminal panel of the interactive flat panel. When a guest
laptop is connected, the laptop’s desktop is displayed on the interactive flat panel and touch
interactivity is enabled. For a diagram of the various computer options, see Connecting computers to
your interactive flat panel on page 16.
I M P O R T A N T
The guest laptop must have SMARTProductDrivers installed. If it does not, you will need to
connect the laptop to the interactive flat panel using a SMARTGoWire cable. If you purchased an
SBID8055i-SMP or SBID8055ie-SMP model, you can use the supplied SMARTGoWire cable to
connect your guest laptop to the interactive flat panel. For more information, see Using a
SMARTGoWire cable on the next page.
47
Page 56

C H A P T E R 6
Using guest laptops with your interactive flat panel
g To connect a guest laptop
1. Connect an HDMI cable from the guest laptop’s HDMI input to your interactive flat panel’s side
terminal panel.
2. Connect a USB cable from the laptop's USB receptacle to your interactive flat panel’s side
terminal panel.
I M P O R T A N T
The USB A receptacle is for USB devices only. Do not connect the guest laptop to this
receptacle.
3. Turn on the laptop.
4. Press the HDMI 2 input button on the remote control.
OR
Press the Input button on the front control panel until the input source is HDMI 2.
g To return to using computer 1
1. Press the VGA 1 button on the remote control.
OR
Press the Input button on the front control panel until the input source is VGA.
Press the Input button on the front control panel until the input source is VGA1.
2. Disconnect the guest laptop from the interactive flat panel if required.
Using a SMARTGoWire cable
Any computer connected to your interactive flat panel requires SMART software. Typically, you
install this software on your room computer so that it’s always ready to use.
However, if you want to connect a laptop that doesn’t have SMARTsoftware installed, you can
connect a SMARTGoWire cable from the laptop to the USB cable for your interactive flat panel. The
SMARTGoWire cable enables you to have touch control of your laptop and use SMARTMeetingPro
software without installing the software on your laptop.
A SMARTGoWire cable is included with SMARTBoard 8055i-SMP and 8055ie-SMP interactive flat
panels.
48
Page 57

C H A P T E R 6
Using guest laptops with your interactive flat panel
I M P O R T A N T
Your interactive flat panel supports the SMARTGoWire cable with SMARTMeetingPro software
only. It does not support the SMARTGoWire cable with SMARTNotebook software.
g To use a SMARTGoWire cable
1. Connect a video cable from your interactive flat panel to your laptop.
2. Connect the USB cable from the USB receptacle on your interactive flat panel to your laptop.
3. Change the video input to your laptop's video connection using the remote control or the front
control panel.
4. Disconnect the USB cable from your laptop, and then connect it to the SMARTGoWire cable’s
USB A receptacle.
I M P O R T A N T
If the SMARTGoWire cable is not connected to your interactive flat panel through a USB
cable, you have access to SMARTMeetingPro software on your laptop for five minutes, and
then the software closes.
5. Connect the SMARTGoWire cable’s USB connector to your laptop.
The AutoPlay dialog box appears.
6. Select Start SMART Meeting Pro.
SMARTMeetingPro software starts. You have touch control of your laptop on your interactive
flat panel and can use SMARTMeetingPro software while your laptop is connected to your
interactive flat panel.
g To disconnect a SMARTGoWire cable
1. If required, save your SMARTMeetingPro software file to your laptop. You can save the file as
a .ppt, .pdf or .notebook file.
I M P O R T A N T
You can open a .notebook file on a computer that has SMARTMeetingPro software or
SMARTNotebook software installed or that is connected to a SMART product through a
SMARTGoWire cable only.
Press the SMARTMeetingPro icon in the notification area, and then select Exit.
2.
3. Disconnect the SMARTGoWire cable from your laptop and the USB cable.
49
Page 58

C H A P T E R 6
Using guest laptops with your interactive flat panel
Connecting computer 2
You can connect a second laptop to the installed USB cable and video cable that is connected to the
back terminal panel of your interactive flat panel. If those cables aren't installed, connect the laptop to
the side terminal panel (see Connecting a guest laptop on page 47). For a diagram of the various
computer options, see Connecting computers to your interactive flat panel on page 16.
I M P O R T A N T
The laptop must have SMARTProductDrivers installed. If it doesn’t, you need to connect the
laptop to the interactive flat panel using a SMARTGoWire cable. If you purchased an
SBID8055i-SMP or SBID8055ie-SMP model, you can use the supplied SMARTGoWire cable to
connect your laptop to the interactive flat panel. For more information, see Using a SMARTGoWire
cable on page 48.
g To connect computer 2
1. Place the laptop beside the ends of the cables at the computer 2 connection.
2. Connect the installed USB cable to a USB receptacle on the laptop.
3. Connect the VGA cable connector to the laptop.
4. Turn on the computer.
5. Press the VGA2 button on the remote control.
OR
Press the Input button on the front control panel until the input source is VGA2.
g To return to using computer 1
Press the VGA 1 button on the remote control.
OR
Press the Input button on the front control panel until the input source is VGA1.
50
Page 59

Chapter 7
panel
Updating your SMART software and firmware 51
Updating SMART software 51
Updating your interactive flat panel firmware 52
Updating SMART Product Drivers 53
Calibrating your interactive flat panel 54
Orienting your interactive flat panel 55
Replacing a pen nib 55
Cleaning the screen 56
Cleaning the presence detection sensors 56
Cleaning the camera windows and reflective tape 57
Maintaining ventilation 57
Preventing condensation 58
Checking the interactive flat panel installation 58
Removing your interactive flat panel 58
Transporting your interactive flat panel 60
If you properly maintain your interactive flat panel, it will provide years of use.
Updating your SMART software and firmware
To use touch control and digital ink on your interactive flat panel, you require SMARTsoftware on
your computer and up-to-date firmware on your interactive flat panel.
Updating SMART software
Once you have SMARTsoftware installed on your computer, you can check for software updates
with SMART Product Update by selecting Help > Check for Updates in the software or by browsing
to smarttech.com/downloads.
51
Page 60

C H A P T E R 7
Maintaining your interactive flat panel
g To check for software updates
1. Start your SMART software program.
2. Click Help > Check for Updates.
I M P O R T A N T
If you do not see the Check for Updates option, contact your network administrator.
3. Click the Update button beside the software you want to update.
SMART software updates.
I M P O R T A N T
When you update SMARTsoftware on your computer, a firmware update for your interactive flat
panel could download to your computer. The next time you connect your computer to your
interactive flat panel you are informed that there is a firmware update for the processor in the
interactive flat panel. For more information, see Updating your interactive flat panel firmware
below.
Updating your interactive flat panel firmware
C A U T I O N
Only a system administrator should update interactive flat panel firmware.
Your interactive flat panel uses firmware on its processor. After you update SMART software, a new
firmware executable file could save on your computer. When you connect a computer with this file to
your interactive flat panel, your interactive flat panel detects this executable file, and then prompts
you to run the file to update the firmware.
C A U T I O N
l Only one interactive flat panel can be connected to the computer during the firmware update
process.
l Do not disconnect your interactive flat panel from your computer during the firmware update
process.
l Do not touch your interactive flat panel’s screen or input button during the firmware update
process.
l Do not turn off your computer or your interactive flat panel during the firmware update
process.
52
Page 61

C H A P T E R 7
Maintaining your interactive flat panel
g To update your interactive flat panel firmware
1. Ensure your interactive flat panel is connected to your computer.
2. Launch the firmware updater at the following location:
Windows computers: C:\Program Files\SMART Technologies\SMART Product
Drivers\SMARTFirmwareUpdater.exe.
Mac computers: HD\Applications\SMART Product
Drivers\SMARTFirmwareUpdater.app.
3. Follow the on-screen instructions using your computer’s mouse and keyboard. Don’t touch the
interactive flat panel screen.
4. Select the check box for the SMART interactive product you want to update, and then click
Next.
A progress bar appears.
N O T E
SC14 refers to the SMARTBoard 8000 series interactive flat panel’s serial controller.
5. When the installation is complete, calibrate your interactive flat panel. See Calibrating your
interactive flat panel on the next page
Updating SMART Product Drivers
To use touch control and digital ink on your interactive flat panel, you require SMARTProductDrivers
11 or later on your computer.
g To update SMARTProductDrivers
Click the SMART Board icon in the notification area (Windows operating systems) or the
1.
Dock (MacOSX operating system software), and then select Check for Updates and
Activation.
OR
Click the SMART Meeting Pro icon in the notification area and then select Check for
Updates and Activation.
The SMART Product Update window appears.
2. If your version of SMARTProductDrivers is up-to-date, click OK.
If your version of SMARTProductDrivers needs to be updated, click Update.
3. Follow the on--screen instructions to update SMARTProductDrivers to the latest version.
53
Page 62

C H A P T E R 7
Maintaining your interactive flat panel
Calibrating your interactive flat panel
Digital cameras in the corners of the interactive flat panel track the position of the pens, eraser and
your finger on the interactive surface, and then send the information to the SMART software, which
interprets this information as mouse clicks, digital ink or ink removal in the appropriate location.
Calibration determines the position and angles of the cameras to accurately identify the location of
touches on your interactive flat panel.
I M P O R T A N T
If an error message appears while you are calibrating your interactive flat panel, contact SMART
Support (smarttech.com/contactsupport).
g To calibrate your interactive flat panel
Press the SMART Board icon in the notification area (Windows operating systems) or the
1.
Dock (MacOSX operating system software).
OR
Press the SMART Meeting Pro icon in the notification area.
2. Select SMARTSettings.
SMARTSettings appears.
3. Press SMART Hardware Settings.
4. If you have more than one SMART product connected, select the interactive flat panel.
5. Select Advanced Settings from the drop-down list.
6. Press Calibrate.
The calibration screen appears. This can take a few moments.
7. Press the red target with the tip of an interactive flat panel pen. Hold the tip at the center of the
target until the target turns green, and then lift the pen.
The target moves to the next location.
N O T E
You can calibrate a target again by pressing the LEFT ARROW key on your keyboard, or the
Keyboard button or Right-click button on the color select module.
8. Continue pressing targets until the calibration is complete.
A message appears stating that the calibration was successful, and then the orientation screen
appears.
9. Orient your interactive flat panel.
54
Page 63

C H A P T E R 7
Maintaining your interactive flat panel
Orienting your interactive flat panel
When the location of your touch is misinterpreted (a pointer appears a distance from the actual
contact), orient your interactive flat panel.
g To orient the interactive flat panel
1.
Press the orientation button on the color select module.
The orientation window opens.
2. Use an interactive flat panel pen to press the red targets as they appear. Hold the tip of the pen
at the center of each target, and then lift the pen. When you lift the pen, the target moves to the
next orientation point.
I M P O R T A N T
Hold the pen perpendicular to the screen.
3. Continue until you’ve pressed all the targets.
The orientation window closes.
If this doesn’t correct inaccurate touch control, calibrate your interactive flat panel. For more
information, see Calibrating your interactive flat panel on the previous page.
Replacing a pen nib
To prevent damage to your interactive flat panel’s anti-glare coating, replace your pen nib if it
becomes worn. Four replacement pen nibs are included with your pens, and you can purchase
additional replacements from your authorized SMART reseller (smarttech.com/where).
g To replace a pen nib
1. Grasp the worn nib on your pen with a pair of pliers, and then pull and twist the nib loose.
2. Press the replacement nib into the pen.
55
Page 64

C H A P T E R 7
Maintaining your interactive flat panel
Cleaning the screen
Follow these instructions to clean the interactive flat panel screen without damaging its anti-glare
coating or other product components.
C A U T I O N
l Do not use permanent or dry-erase markers on the screen. If dry-erase markers are used on
the screen, remove the ink as soon as possible with a lint-free, non-abrasive cloth.
l Do not rub the screen with a dense or rough material.
l Do not apply pressure to the screen.
l Do not use cleaning solution or glass cleaner on the interactive flat panel screen, as they can
deteriorate or discolor the screen.
l Avoid touching the silver reflective tape between the screen and the bezel and ensure that it
stays dry. Damage to this strip affects touch interactivity.
g To clean the interactive flat panel screen
1. Shut off your computer, and then disconnect the power sources for your computer and your
interactive flat panel.
2. Wipe the screen with a lint-free, non-abrasive cloth.
Cleaning the presence detection sensors
The interactive flat panel has two presence detection sensors on its frame.The sensors should be
inspected annually for dust and should be cleaned if any obvious dust buildup has occurred.
C A U T I O N
Do not use compressed air, water, chemical agents or cleaning agents to clean the sensors.
g To clean the sensors
Gently wipe the sensors using a clean lint-free cloth.
56
Page 65

C H A P T E R 7
Maintaining your interactive flat panel
Cleaning the camera windows and reflective tape
The DViT technology in your interactive flat panel uses four cameras in the corners of the frame and
the reflective material between the screen and the bezels. Excessive dust buildup on the camera
windows or reflective tape can impair touch performance.
These areas should be inspected annually for dust and should be cleaned if any obvious dust buildup
has occurred.
C A U T I O N
l Do not use compressed air to clean the camera windows or borders.
l Do not use water, chemicals or cleaning agents.
g To clean the camera windows and reflective tape
1. With a clean lint-free cloth, gently wipe the camera windows in the top corners and the
reflective tape along the top of your interactive flat panel screen using the cloth.
2. Gently wipe the reflective tape along the sides of your interactive flat panel screen.
3. Gently wipe the camera windows in the bottom corners and the reflective strip across the
bottom of your interactive flat panel screen.
Maintaining ventilation
Your interactive flat panel requires ventilation to enable the cooling fans to function. Dust buildup in
the ventilation holes compromises cooling and leads to product failure.
C A U T I O N
Avoid setting up or using your interactive flat panel in an area with excessive levels of dust,
humidity or smoke.
l Clean accessible ventilation holes monthly with a dry cloth.
l Use a vacuum cleaner with a narrow hose end fitting to clear the back ventilation holes
annually. You might have to remove the interactive flat panel from your wall. For more
information on removing your interactive flat panel see Removing your interactive flat panel on
the next page.
57
Page 66

C H A P T E R 7
Maintaining your interactive flat panel
Preventing condensation
Your interactive flat panel screen contains layers of glass that can collect condensation, especially in
the following conditions:
l Temperature extremes with high humidity
l Rapid changes in humidity, which can occur when you operate the product near water, such as
a sink, pool, kettle or air conditioner ventilator
l Direct exposure to sunlight
g To evaporate condensation from your interactive flat panel
1. Remove the humidity source from the interactive flat panel, if possible.
2. Adjust the room temperature to normal operating ranges.
3. Turn on the interactive flat panel for 2–3 hours.
If the screen condensation doesn’t evaporate, contact SMART Support
(smarttech.com/contactsupport).
Checking the interactive flat panel installation
Inspect your interactive flat panel installation frequently to ensure that it remains securely installed.
l Check the mounting location for signs of damage or weakness that can occur over time.
l Check for loose screws, gaps, distortions or other issues that could occur with the mounting
apparatus.
If you find an issue, refer to a professional installer.
Removing your interactive flat panel
To safely remove your interactive flat panel, use two or more professional installers.
I M P O R T A N T
Follow the instructions included with the floor stand or mounting apparatus.
58
Page 67

C H A P T E R 7
Maintaining your interactive flat panel
g To remove the interactive flat panel
1. Turn off your interactive flat panel and unplug the power cable from the wall outlet.
2. Remove all accessible cables and connectors.
W A R N I N G
o
Do not move the interactive flat panel by connecting a rope or wire to the handles on
the back. The interactive flat panel can fall and cause personal injury and product
damage.
3. There are two lifting handles on the back of the interactive flat panel, one on each side. With
one person on each end, use one hand each on the handle to support the weight of the
interactive flat panel and the other hand on the upper side to balance it during lifting. The
interactive flat panel weighs about 98 lb. (44.5 kg).
4. Lift your interactive flat panel from its mounting location.
C A U T I O N
o
Do not allow the weight of the interactive flat panel to rest on the color select module
because it is not designed to support product weight.
o
Do not leave the interactive flat panel face up, face down or upside down for an
extended period of time as it could cause permanent damage to the screen.
59
Page 68

C H A P T E R 7
Maintaining your interactive flat panel
o
Do not place the interactive flat panel on a sloping or unstable cart, stand or table,
because the interactive flat panel could fall, resulting in injury or severe product
damage.
Transporting your interactive flat panel
Save your original packaging so that you can repack your interactive flat panel with as much of the
original packaging as possible. This packaging was designed with optimal shock and vibration
protection. If your original packaging isn’t available, you can purchase the same packaging directly
from your authorized SMART reseller (smarttech.com/where).
C A U T I O N
Transport your interactive flat panel only in original or replaced packaging. Transporting your
interactive flat panel without correct packaging voids your warranty and could lead to product
damage.
60
Page 69

Chapter 8
interactive flat panel
Resolving image issues 61
Diagnosing blank screen issues using the front control panel lights 61
Resolving poor image quality 63
Resolving touch control and digital ink issues 66
Resolving audio issues 69
Resolving remote control issues 70
Troubleshooting presence detection 70
Resolving issues using the SMART Connection Wizard 72
Resolving issues using SMART Board Diagnostics 73
Checking the camera view 73
This chapter provides you with the information necessary to solve simple issues that can occur with
your interactive flat panel. If issues persist, or aren’t covered in this chapter, contact SMARTSupport
(smarttech.com/contactsupport).
Resolving image issues
Complete the following steps if your interactive flat panel doesn’t display an image correctly or
doesn’t display any image at all.
Diagnosing blank screen issues using the front control panel lights
Use the following troubleshooting table when your computer is turned on, but you don’t see an image
on the interactive flat panel screen.
Begin by looking at the interactive flat panel system status light and the power light in the front control
panel.
61
Page 70

C H A P T E R 8
Troubleshooting for your interactive flat panel
Power
light
Status
light
Causes Solutions
Off Off The interactive flat panel isn’t
connected to a power source.
The main power switch is off. Turn on the main power switch on the
Solid red Off The interactive flat panel is turned
off.
Solid
Red The computer is off. Turn on your computer.
amber or
red
The computer isn’t connected to
your interactive flat panel.
The interactive flat panel isn’t set
to the correct video input source.
Connect your interactive flat panel’s power
cable to a power outlet (see page 17).
terminal panel (see page 7).
Press the power button on the front control
panel or the remote control.
Connect your computer to your interactive
flat panel with the required cable (see page
16).
Select your computer’s input source
(typically VGA 1, VGA 2 or HDMI 2) using
the remote control.
OR
Press the Power button until the Input
button is blue, and then press the
Input source button until your computer’s
desktop appears.
Solid
green
Solid
green
Solid
green
Flashing
amber
Flashing
green
Solid
green
The interactive flat panel is
updating firmware.
The interactive flat panel detects
a computer, but SMART Product
Drivers isn’t installed or isn’t
running. (For more information,
see page 66).
The interactive flat panel detects
a computer with SMARTProduct
Drivers installed.
Do not touch the interactive flat panel. For
more information, see page 51.
Install SMART software on your computer
(see page 23) or install a SMARTGoWire
cable (see page 48).
Normal operation.
62
Page 71

C H A P T E R 8
Troubleshooting for your interactive flat panel
Resolving poor image quality
Symptom Causes Solution
The image is too
large, too small or
doesn’t
completely fill the
screen.
The screen
resolution is
correct, but the
image is
surrounded by
black bars.
The computer’s video
resolution settings don’t
match your interactive flat
panel’s native resolution.
The computer’s video card
is underscanning the
image.
You have a poor quality
video cable.
The interactive flat panel’s native resolution is
1920×1080 at 60Hz.
If your computer can’t support this resolution,
consider one of the following 16:9 resolutions as
an alternative:
l 1600 × 900
l 1366 × 768
l 1280 × 720
Other resolutions could result in image distortion or
black bars around the desktop.
Turn off or adjust the overscan/underscan feature
in the video card driver software until the image fits
the screen resolution. Refer to your computer’s
video card help for more information.
N O T E
If available, select the HDTV setting (ideally
1080p) from your video card driver’s advanced
menu. This should provide a pixel-perfect image
for your interactive flat panel.
Replace your video cable with a better
1.
quality video cable.
Press the AUTO SET UP button on your
2.
remote control to reset your interactive flat
panel.
OR
Press MENU on the menu control panel and
then select ADJUST > AUTO SETUP in
the on-screen display menu using the
buttons on the menu control panel. (For
more information, see page 75)
63
Page 72

C H A P T E R 8
Troubleshooting for your interactive flat panel
Symptom Causes Solution
The image isn’t
centered on the
screen.
You connected two video
cables together.
Replace your two cables with one longer
1.
cable.
OR
Move your computer so that it’s within a
single cable length of your interactive flat
panel.
Press the AUTO SET UP button on your
2.
remote to reset your interactive flat panel.
OR
Press MENU on the menu control panel and
then select ADJUST > AUTO SETUP in
the on-screen display menu using the
buttons on the menu control panel. (For
more information, see page 75)
Press the AUTO SET UP button on the remote
control.
OR
Press MENU on the menu control panel and then
select ADJUST > AUTO SETUP in the onscreen display menu using the buttons on the
menu control panel. (For more information, see
page 75)
The image is
unstable or
unfocused.
The video connection is
loose.
You have a poor quality
video cable
Secure the video cable to both your computer and
your interactive flat panel.
Replace your video cable with a better
1.
quality video cable.
Press the AUTO SET UP button on the
2.
remote control to reset your interactive flat
panel.
OR
Select MENU > ADJUST > AUTO
ADJUST on the menu control panel. (For
more information, see page 75.)
64
Page 73

C H A P T E R 8
Troubleshooting for your interactive flat panel
Symptom Causes Solution
The image is too
light, too dark or
has poor image
quality issues.
There is a
persistent image
on the screen.
You connected two video
cables together.
Your computer’s video
display card is defective.
You might have incorrect
video settings.
An image was displayed for
too long.
Replace your two cables with one longer
1.
cable.
OR
Move your computer so that it’s within a
single cable length of your interactive flat
panel.
Press the AUTO SET UP button on your
2.
remote to reset your interactive flat panel.
OR
Press MENU on the menu control panel and
then select ADJUST > AUTO SETUP in
the on-screen display menu using the
buttons on the menu control panel. (For
more information, see page 75)
Connect a different computer to your interactive
flat panel. If this improves the image quality,
consider replacing the video card in the original
computer.
Press MENU on the menu control panel and then
select PICTURE > AUTO ADJUST in the onscreen display menu using the buttons on the
menu control panel. (For more information, see
page 75.)
Turn off your interactive flat panel and leave it
turned off for as long as the image was on the
screen.
T I P
Other display
quality issues
65
Use a screen saver to avoid persistent images.
Press MENU on the menu control panel and then
select SETUP > FACTORYPRESET in the
on-screen display menu using the buttons on the
menu control panel. (For more information, see
page 75.)
Page 74

C H A P T E R 8
Troubleshooting for your interactive flat panel
Resolving touch control and digital ink issues
Use the following troubleshooting table if you can see your computer desktop on your interactive flat
panel, but you do not have touch control over the desktop.
For more information, see SMARTInk user’s guide for MacOSX operating system software
(smarttech.com/kb/170192) or SMARTInk user’s guide for Windows operating system
(smarttech.com/kb/170191).
Symptom Causes Solution
When you touch the screen,
no pointer appears and you
can’t move icons. The status
light is red.
The SMARTMeetingPro
icon or the
SMARTNotebook icon
doesn’t appear.
The
SMARTProductDrivers
on your computer are
not current.
No USB connection
from the computer to the
interactive flat panel.
Your USB connection
doesn’t correspond with
the selected video input.
SMARTProductDrivers
isn’t installed.
SMART software isn’t
running.
Update your SMARTProductDrivers (see
Updating SMART Product Drivers on
page 53).
Verify your connections (see page 16).
Connect the USB to the correct receptacle
that corresponds to your computer’s video
input. (For more information, see page 17.)
Download and install SMART software
from smarttech.com/downloads.
OR
Connect your computer or laptop to your
interactive flat panel with a
SMARTGoWire cable. (For more
information, see page 48.)
Open the SMART Product Drivers folder
in your list of programs, and then select
SMART Board Tools.
The SMARTBoard icon or
SMARTMeetingPro icon
is crossed out in red.
66
Your computer can’t find
your interactive flat
panel.
Either the SMART
Board Diagnostics
window or SMART
Settings is open.
Start SMART software, and then run the
SMART Connection Wizard’s
troubleshooting procedures.
Close the SMART Board Diagnostics
window and the SMART Settings panel.
Page 75

C H A P T E R 8
Troubleshooting for your interactive flat panel
Symptom Causes Solution
Touch interactivity is slow or
sluggish.
When you touch the screen
the pointer appears in the
wrong location.
Your computer is
running too many
applications.
Your computer doesn’t
meet system
requirements.
You haven’t used a USB
2.0 cable to connect
your interactive flat
panel to your computer.
You aren’t touching the
screen at right angles.
Your interactive flat
panel isn’t oriented.
Close some open applications.
Upgrade your computer or replace it with a
more powerful computer.
Use a USB 2.0 cable and ensure it is
connected to a USB 2.0 receptacle on
your computer.
For more information, see Touching and
drawing on your SMART Board interactive
whiteboard is Inaccurate
(smarttech.com/kb/131299).
Orient your interactive flat panel. Press
the orient button on the color select
module, and then follow the on-screen
instructions. (For more information, see
page 55.)
An area of the screen doesn’t
respond to your touch or
when you draw digital ink, the
lines are broken.
Your desktop isn’t
centered on the screen.
Something is blocking
the cameras.
Something is on the
reflective tape channel.
Press the AUTO SET UP button on your
remote control to reset your interactive flat
panel.
OR
Press MENU on the menu control panel
and then select ADJUST > AUTO
SETUP in the on-screen display menu
using the buttons on the menu control
panel. (For more information, see page 75)
I M P O R T A N T
You might have to do this more than
once.
Ensure nothing is taped to the screen.
Remove items from the reflective tape
channel.
67
Page 76

C H A P T E R 8
Troubleshooting for your interactive flat panel
Symptom Causes Solution
You try to erase using
something other than the
eraser, but you draw more
digital ink. One of the color
select button lights is
flashing.
You try to erase with the
eraser, but you draw more
digital ink. You don’t see a
flashing light on the color
select module.
Your finger or pen is
skipping as you draw.
This is most common on
the upstroke.
Bright lights are
interfering with the
cameras.
Your cameras require
calibration, possibly due
to temperature change
in the room.
You’re in Locked Ink
mode and all objects are
interpreted as pens.
You’re using an edge of
the eraser.
Use consistent pressure while drawing
digital ink.
Close blinds or shades or dim all halogen
lights and LEDs.
Calibrate your interactive flat panel. (See
page 54.)
Press a color select button that isn’t
flashing to exit Locked Ink mode.
OR
Remove the eraser from the eraser holder
to enable erasing while in Locked Ink
mode.
Increase the contact area of your eraser.
You’re trying to draw digital
ink, but you see a circle
beneath your pointer and
you’re erasing digital ink.
68
Your interactive flat
panel is interpreting an
eraser.
Lift other fingers and the heel of your hand
from the interactive flat panel while you
write because the interactive flat panel is
interpreting them as an eraser.
OR
Use a smaller pointer, such as the pen.
Page 77

C H A P T E R 8
Troubleshooting for your interactive flat panel
Resolving audio issues
I M P O R T A N T
Ensure you can see your computer’s desktop and have touch control and digital ink before using
this table. If not, resolve those issues before completing the following steps in the table below.
Symptom Causes Solution
Sound doesn’t play
when you play a
sound file.
Your computer is muted. Turn off the mute setting.
Your computer’s volume is too low. Turn up the volume on your
computer.
Your interactive flat panel is muted. Turn off the mute setting using the
remote control or the front control
panel.
Your interactive flat panel’s volume is too
low.
The wrong audio input is selected for the
video input.
Your computer uses MacOSX operating
system software and is not set to Audio
USB output.
Use the remote control to turn up
the volume on your interactive flat
panel.
OR
Use the volume control on the
front control panel.
Select the correct audio input.
Press AUDIOINPUT on the
remote control.
Set your computer’s audio output
to USB. (For more information,
see page 45.)
69
Page 78

C H A P T E R 8
Troubleshooting for your interactive flat panel
Resolving remote control issues
Your remote control provides control of your interactive flat panel up to 23' (7 m) from the front control
panel of your interactive flat panel.
Symptom Causes Solution
The remote control
behaves unexpectedly.
The front control panel
power button light is
off.
Your interactive flat
panel isn’t receiving
power.
You are outside the
range of the infrared
remote control
sensor.
The remote control
batteries needs to
be replaced.
The remote control
is damaged.
Ensure your interactive flat panel is plugged in and
that the power switch on the bottom terminal panel is
in the ON position. (For more information, see page
7.)
Move to within 23' (7 m) and a 30º arc of your infrared
remote control sensor.
Replace the batteries. (For more information, see
page 30.)
Contact your authorized SMART reseller
(smarttech.com/where) to inquire about a
replacement remote control.
Troubleshooting presence detection
The sensors for presence detection can detect when people are within 16' (5 m) of the interactive flat
panel and automatically turn on or off the interactive flat panel.
Symptom Causes Solution
Your interactive flat
panel isn’t turning on.
70
The sensors aren’t enabled. Enable presence detection.
See Proximity control
settings on page 79.
There isn’t enough of a temperature
difference between the ambient temperature
and human body temperature.
You aren’t within 16' (5 m) of the interactive
flat panel.
Glass, acrylic or other similar material is
between the person and the sensors.
Reduce the room
temperature.
Move closer to the
interactive flat panel or make
bigger motions.
Remove the material.
Page 79

C H A P T E R 8
Troubleshooting for your interactive flat panel
Symptom Causes Solution
Your interactive flat
panel isn’t turning off
when people have left
the room.
Your interactive flat
panel is turning on after
it has been turned off.
Your interactive flat
panel is turning on
when people are not
present.
The sensors aren’t enabled. Enable presence detection.
See Proximity control
settings on page 79.
There isn’t enough of a temperature
difference between the ambient temperature
Reduce the room
temperature.
and human body temperature.
The re-enable time is too short for you to
exit the room before the sensors start
detecting motion again.
Increase the
RE-ENABLETIME setting.
See Proximity control
settings on page 79.
There isn’t a large enough temperature
difference between the ambient temperature
Reduce the room
temperature.
and human body temperature.
Sunlight is hitting the sensors. Close any blinds or shades.
Glass, acrylic or other similar material is
Remove the material.
between the person and the sensors.
There’s a sudden temperature change in the
room (humidifier emission, air conditioning,
Remove the source of major
temperature fluctuation.
heating system).
Sunlight is hitting the sensors. Close any blinds or shades.
Your interactive flat
panel is turning off
when people are
present.
Over time, the sensors average the room
temperature so people's body temperature
becomes part of the ambient temperature.
Increase the AUTO POWER
OFF setting. See Proximity
control settings on page 79.
71
Page 80

C H A P T E R 8
Troubleshooting for your interactive flat panel
Resolving issues using the SMART Connection Wizard
You can resolve a variety of issues using the SMART Connection Wizard found in SMART Settings.
g To start the SMART Connection Wizard
1. Press the Help button on the color select module.
The Help and Support for Your SMART Board Interactive Whiteboard window opens.
2. Press Connection Wizard.
The SMART Connection Wizard opens.
N O T E
You can also access the SMART Connection Wizard by pressing the SMART Board icon
in the notification area (Windows operating systems) or the Dock (MacOSX operating
system software), and then selecting SMARTSettings > Connection Wizard.
OR
Click the SMART Meeting Pro icon in the notification area, then select
SMARTSettings > Connection Wizard.
3. Select SMART Board 8000 series interactive flat panel, and then press Next.
4. Select the option that best describes the issue you’re encountering, and follow the on-screen
instructions to troubleshoot your interactive flat panel.
72
Page 81

C H A P T E R 8
Troubleshooting for your interactive flat panel
Resolving issues using SMART Board Diagnostics
If you touch the interactive flat panel’s surface and nothing happens, or if there is no digital ink or the
ink appears in some locations and not in others, use SMART Board Diagnostics to help identify and
resolve these issues.
I M P O R T A N T
Do not change diagnostic settings unless asked to do so by SMART Support.
Checking the camera view
If nothing happens when you touch the interactive flat panel’s surface, check to make sure that
nothing is blocking one of the cameras.
g To check camera views
Press the SMART Board icon in the notification area (Windows operating systems) or the
1.
Dock (MacOSX operating system software).
OR
Press the SMART Meeting Pro icon in the notification area.
2. Press SMARTSettings.
SMART Settings opens.
3. Select About Software and Product Support > Tools > Diagnostics.
SMART Board Diagnostics opens.
4. In the View menu, select SBX800/SBID8070i/SBID8055i Bar.
The SBX800 group box appears in the SMART Board Diagnostics screen.
5. Press View.
The camera view screen appears.
6. Click Update to display the four camera views. This could take a few moments.
If one of the camera views remains black, the camera is blocked or can’t locate the reflective
tape on the interactive flat panel’s inner frame.
7. Check the camera lens and ensure that nothing is blocking its view and that nothing is affixed
to the interactive surface.
73
Page 82

Page 83

Appendix A
on-screen display menu
Changing settings in the OSD menu 75
Main menu settings 76
Picture settings 76
Adjustment settings 77
Audiosettings 77
OSD settings 77
Setup settings 78
Proximity control settings 79
You can access the on-screen display (OSD) menu using either the remote control (see Infrared
remote control buttons on page 32) or the menu control panel on the left side of the interactive flat
panel (see Left side view on page 6).
Changing settings in the OSD menu
N O T E
You can adjust many of the interactive flat panel screen settings using the remote control.
g To change settings in the OSD menu
1. Press the MENU button on the menu control panel or the remote control.
The on-screen menu appears.
2. Press the up and down arrows to select a menu.
3. Press SET.
4. Press the up and down arrows to select the setting you want to change.
5. Press SET.
75
Page 84

A P P E N D I X A
Adjusting video settingswith the on-screen display menu
6. Press the right arrow to select the setting you want to change and enter a setting sub-menu.
OR
Press the left arrow to decrease or the right arrow to increase the value.
OR
Press the left arrow or right arrow to select a value.
7. Press SET.
8. To change another setting in the menu, press the MENU button and then repeat steps 2–4.
9. When you finish changing settings, press the MENU button twice to close the on-screen
display menu.
Main menu settings
Picture settings
Menu item Function
PICTURE MODE Sets picture mode to STANDARD, sRGB, SPORT, GAME, USER,
AMBIENT and DYNAMIC.
BRIGHTNESS
CONTRAST
SHARPNESS Adjusts the sharpness of the image.
BLACK LEVEL
TINT Adjusts the tint of the screen.
COLOR Adjusts the color depth of the screen.
COLOR TEMPERATURE Sets color temperature to NORMAL, WARM, USER or COOL.
AMBIENT Adjusts the AMBIENT settings when it is selected in
NOISEREDUCTION Adjusts the amount of noise reduction on the image.
PICTURE RESET Restores the picture settings to their default values.
Adjusts the overall brightness of the image and background.
Adjusts the brightness of the image in relation to the background. The
sRGB picture mode is standard and cannot be changed.
Adjusts the brightness of the image in relation to the background. The
sRGB picture mode is standard and cannot be changed.
PICTUREMODE.
76
Page 85

A P P E N D I X A
Adjusting video settingswith the on-screen display menu
Adjustment settings
Menu item Function
AUTO SETUP Sets H Position, V Position and Clock Phase to adjust automatically
when your interactive flat panel is turned on.
H POSITION Controls the horizontal position of the image within the screen area.
V POSITION Controls the vertical position of the image within the screen area.
CLOCK Adjusts the width of the image.
PHASE Adjusts the visual noise on the image.
INPUT RESOLUTION Displays the signal at the desired resolution. After selecting this, use
the AUTO SETUP option above.
LONG CABLE COMP Adjusts the video signal for VGA video inputs if a long VGA cable is
used.
ASPECT Sets picture aspect to FULL, NORMAL, TRIM or ZOOM.
ADJUST RESET Restores the adjustment settings to their default values.
Audiosettings
Menu item Function
BALANCE Adjust the balance of left and right volume.
TREBLE Adjusts the high frequency sound.
BASS Adjusts the low frequency sound.
LINE OUT Selects FIXED or VARIABLE audio line out.
AUDIO INPUT Sets audio input source to IN1, IN2, IN3, HDMI or TV.
AUDIO RESET Restores the audio settings to their default values.
OSD settings
Menu item Function
LANGUAGE Selects the language used by the OSD menu.
OSD TURN OFF Turns off the OSD menu after a period of inactivity. The preset choices
are 5–240 seconds.
OSD H-POSITION Sets the horizontal position of the OSD menu.
OSD V-POSITION Sets the vertical position of the OSD menu.
INFORMATION OSD Selects if the Information OSD menu is displayed.
MONITOR INFO Displays the interactive flat panel’s model number and serial number.
77
Page 86

A P P E N D I X A
Adjusting video settingswith the on-screen display menu
Menu item Function
CARBON SAVINGS Displays the estimated carbon saving information in kilograms.
OSD RESET Restores the OSD settings to their default values.
Setup settings
Menu item Function
POWER SAVE
When enabled, and there isn't a video input, the interactive flat panel
displays No Signal for 25 seconds before turning off.
N O T E
When you connect a DVI video cable, the video card might not stop
sending digital data even if there is no image. In this case, the
interactive flat panel doesn’t enter Power Save mode.
STANDBY MODE
Lowers power consumption. Select either NORMALor
ECOSTANDBY.
I M P O R T A N T
When ECOSTANDBYmode is enabled, presence detection is
disabled and you cannot wake the computer by touching the
interactive flat panel’s screen.
N O T E
You can’t use RS-232C Functions in ECOSTANDBY mode.
DDC CI ENABLE/DISABLE: turns on or off the two-way communication and
control of the interactive flat panel.
SCANMODE Sets the scanning mode. Some video formats might require different
modes to display the best image.
PROXIMITY CONTROL Sets the proximity sensor settings. See Proximity control settings on
the next page.
HEAT STATUS Displays the FAN, BRIGHTNESS and TEMPERATURE settings.
FAN CONTROL Sets the cooling fan to protect the interactive flat panel from
overheating. When selected, you can adjust the start temperature of the
cooling fan and its speed.
USBSETTING Configures the video and touch input. See Configuring the video and
touch input for your SMARTBoard 8055i interactive flat panel
(smarttech.com/kb/170190).
SETUP PRESET Restores the setup settings to their default value.
FACTORYRESET Restores OSD menu options to default values for all items, except for
LANGUAGE.
78
Page 87

A P P E N D I X A
Adjusting video settingswith the on-screen display menu
Proximity control settings
The interactive flat panel has two presence detection sensors on its frame that can detect people up
to 16' (5 m) away. When the sensors detect people , the interactive flat panel turns on. When the
sensors no longer detect people, the interactive flat panel turns off.
The settings for the proximity sensors are a sub-menu in the Setup menu.
Menu item Function
PROXIMITY Turns on or turns off the proximity sensors on the interactive flat panel.
If ECO STANDBY in the Setupmenu is enabled, this feature is
disabled.
RE-ENABLETIME Sets how long (1–10 minutes) the interactive flat panel will wait before
detecting motion again. The default is 1 minute.
AUTOPOWEROFF Sets when (15–240 minutes) the interactive flat panel automatically
turns off. The default is 60 minutes.
BRIGHTNESS Sets the brightness of the welcome screen.
79
Page 88

Page 89

Appendix B
compliance
SMARTTechnologies supports global efforts to ensure that electronic equipment is manufactured,
sold and disposed of in a safe and environmentally friendly manner.
Waste Electrical and Electronic Equipment regulations (WEEE directive)
Electrical and electronic equipment and batteries contain substances that can be harmful to the
environment and to human health. The crossed-out wheeled bin symbol indicates that products
should be disposed of in the appropriate recycling stream and not as regular waste.
Restriction of Certain Hazardous Substances (RoHS directive)
This product meets the requirements of the European Union’s Restriction of Certain Hazardous
Substances (RoHS) directive 2011/65/EU.
Consequently, this product also complies with other regulations that have arisen in various
geographical areas, and that reference the European Union’s RoHS directive.
Batteries
The remote contains a CR 2025 lithium battery. Recycle or dispose of batteries properly.
Perchlorate Material
Contains perchlorate material. Special handling may apply. See
dtsc.ca.gov/hazardouswaste/perchlorate.
81
Page 90

A P P E N D I X B
Hardware environmental compliance
Packaging
Many countries have regulations restricting the use of certain heavy metals in product packaging. The
packaging used by SMARTTechnologies to ship products complies with applicable packaging laws.
82
Page 91

Index
A
Adjust settings See alsoAdjustment
settings
Adjustment settings 77
audio files
playing 45
Audio settings 77
B
batteries 81
bottom terminal panel
computer 1 video input 18
computer 2 video input 19
connecting a peripheral device 21
connections 7
speaker wire connections 8
C
calibration 54
cleaning
camera windows 57
proximity sensors 56
reflective tape 57
screen 56
condensation 58
connection
computer 1 17
computer 2 50
guest laptop 47
peripheral devices 21
room control system 15
D
digital ink
drawing 35
erasing 37
writing 35
disabling
USB receptacle 20
double-clicking 39
E
European Union regulations 81
G
gestures
next page 42
panning 45
previous page 43
resizing 41
rotating 42
zooming in and out 44
GoWire SeeSMART GoWire cable
H
HDMI connections 6-7
I
Ink SeeSMART Ink
Ink Aware SeeSMART Ink
inside terminal panel
computer 1 USB input 18
83
Page 92

I N D E X
computer 2 USB input 19
connections 8
room control system 15
installation
choosing a location 11
choosing a mounting height 12
computer 2 connection 18
important information 10
SMART Notebook software 24
SMARTMeeting Pro software 24
speakers 14
interactive flat panel
about 2
indicators and controls of 5
maintaining 51
using 27
L
laptop
computer 2 connection 18
guest laptop connection 47
left-clicking 38
P
packaging 82
panning 45
pen nib
replacing 55
Picture settings 76
proximity sensors
about 29
cleaning 56
troubleshooting 70
R
remote control
about 30
buttons 32
installing batteries 30
sensor 31
right-clicking 39
RoHS directive 81
S
M
Mac OS X USB audio output 45
menu control panel 6
O
objects
resizing 41
rotating 42
on-screen display SeeOSD
on-screen display menu settings SeeOSD
Settings
orientation
about 55
OSD
changing settings 75
OSD settings 77
Setup settings 78
side terminal panel 6
SMART Board interactive flat panels 34
SMART GoWire cable 48
SMART Ink 34
SMART Ink Document Viewer 34
SMART Ink Toolbar 34
speaker wire connections 8, 14
speakers
install 14
T
transportation 60
84
Page 93

I N D E X
U
updating
interactive flat panel firmware 52
SMART Product Drivers 53
SMART software 51
USB receptacle
disable 20
V
video connections 17
W
WEEE directive 81
Z
zoom 44
85
Page 94

Page 95

Page 96

SMARTTechnologies
smarttech.com/support
smarttech.com/contactsupport
 Loading...