

Page 1

SmartRG™ Residential Gateways
April 30, 2012 Version 2.0
Page 2

Table of Contents
Introduction ........................................................................................................................................................ 6
Who Should Read This User’s Manual ....................................................................................................... 6
Additional Information ................................................................................................................................. 6
Contacting SmartRG Inc. ............................................................................................................................. 6
SmartRG™ Residential Gateways .................................................................................................................. 7
Advanced Features ....................................................................................................................................... 7
Connect-and-Surf (Automatic WAN Configuration) ............................................................................. 7
Activation (Automatic ACS Connection Configuration) ...................................................................... 7
Cisco™ Prime Home™ TR-069 Client .................................................................................................... 8
Prime Home™ Gateway Resident Advanced Applications ................................................................ 8
SmartRG™ Product Family .......................................................................................................................... 9
Front Panel LEDs ......................................................................................................................................... 10
Rear Panel Connectors .............................................................................................................................. 11
SR10 ......................................................................................................................................................... 11
SR-100 ..................................................................................................................................................... 11
SR-350N ................................................................................................................................................... 12
SR-350NE ................................................................................................................................................ 12
SR-500N/SR-500NE .............................................................................................................................. 13
Connecting a Computer to Your SmartRG™ Gateway .......................................................................... 14
Navigating Your SmartRG Gateway’s Web UI ........................................................................................ 14
Configuring Your SmartRG™ - Common Use Cases .................................................................................. 16
Use Case: Creating WAN Connections for Internet Access and Remote Management .................. 16
Configuring the Layer 2 Interface (Ethernet) ...................................................................................... 17
Configuring the Layer 2 Interface (Ethernet with VLAN Tags) ......................................................... 18
Configuring the Layer 2 Interface (ADSL) ........................................................................................... 19
Configuring the Layer 2 Interface (VDSL/PTM) ................................................................................. 20
Configuring the Layer 2 Interface (VDSL/PTM with VLAN Tags) ..................................................... 21
Creating the WAN Service ..................................................................................................................... 22
Use Case: Provisioning Your SmartRG for Remote ACS Management .............................................. 28
Use Case: Setting Up the LAN ................................................................................................................... 29
Use Case: Setting Up Wireless .................................................................................................................. 31
Use Case: Setting Up Wireless Distribution System (WDS) .................................................................. 33
Use Case: Creating IPTV Service Configurations .................................................................................... 35
Bridged IPTV Configuration ................................................................................................................... 36
Creating Bridged WAN Connections ................................................................................................ 37
Routed IPTV Configuration (Single WAN Connection) ...................................................................... 43
Routed IPTV Configuration (Multiple WAN Connections) ................................................................. 44
Use Case: Applying Quality of Service (QoS) to VoIP and IPTV LAN Traffic ........................................ 45
Page | ii SmartRG © 2012
Page 3

Managing Your SmartRG™ Gateway ........................................................................................................... 52
Save, Restore or Default Configurations ................................................................................................. 52
Update Software ......................................................................................................................................... 52
Configure Time Settings ............................................................................................................................ 53
Configure Access Controls (HTTP, Telnet, SSH, etc.) ............................................................................. 54
Configure User Logins ................................................................................................................................ 55
Reset the Gateway ...................................................................................................................................... 56
Hardware Reset ...................................................................................................................................... 56
Hardware Reset (to Factory Default Settings) ................................................................................... 56
Software Reset........................................................................................................................................ 56
Troubleshooting ............................................................................................................................................... 57
Accessing System Logs .............................................................................................................................. 57
Executing Diagnostics ................................................................................................................................ 58
Technical Support ........................................................................................................................................... 59
Page | iii
Page 4

SmartRG™ Residential Gateways
List of Figures
Figure 1 SmartRG Front Panel LEDs ............................................................................................................ 10
Figure 2 SR10 Rear Panel Connectors ........................................................................................................ 11
Figure 3 SR100 Rear Panel Connectors ..................................................................................................... 11
Figure 4 SR350N Rear Panel Connectors ................................................................................................... 12
Figure 5 SR350NE Rear Panel Connectors ................................................................................................ 12
Figure 6 SR500N/NE Rear Panel Connectors ............................................................................................ 13
Figure 7 Login Username and Password..................................................................................................... 14
Figure 8 Device Info Page .............................................................................................................................. 15
Figure 9 Internet / TR-069 Management WAN Connection ................................................................... 17
Figure 10 Ethernet Layer 2 Interface Configuration (Default) ................................................................. 17
Figure 11 Ethernet Layer 2 Interface Configuration (VLAN Tagged)....................................................... 18
Figure 12 ADSL Layer 2 Interface Configuration ....................................................................................... 19
Figure 13 VDSL Layer 2 Interface Configuration ....................................................................................... 20
Figure 14 WAN Service Configuration (With or Without VLAN Tagging Support) ................................. 22
Figure 15 PPP Username and Password .................................................................................................... 23
Figure 16 WAN IP Settings ............................................................................................................................ 24
Figure 17 WAN NAT, Firewall and IGMP Settings ...................................................................................... 27
Figure 18 TR-069 Management Settings .................................................................................................... 28
Figure 19 LAN Settings .................................................................................................................................. 29
Figure 20 Adding DHCP Static IP Leases .................................................................................................... 30
Figure 21 Wireless - Basic Settings .............................................................................................................. 31
Figure 22 Wireless - Security Settings ......................................................................................................... 32
Figure 23 Wireless Distribution System ...................................................................................................... 33
Figure 24 Bridged IPTV Configuration ......................................................................................................... 35
Figure 25 Routed IPTV Configuration .......................................................................................................... 35
Figure 26 Multi-WAN Connection Bridged IPTV Configuration ................................................................ 36
Figure 27 Selecting a Bridged WAN Service’s Layer 2 Interface ............................................................ 37
Figure 28 Creating a Bridged WAN Service ................................................................................................ 38
Figure 29 IPTV Layer 2 Interface Summary (Multi-WAN Bridge Group) ................................................. 39
Figure 30 IPTV WAN Service Summary (Multi-WAN Bridge Group) ........................................................ 40
Figure 31 Creating an IPTV Bridge Interface Group .................................................................................. 40
Figure 32 Defining an IPTV Bridge Interface Group .................................................................................. 41
Figure 33 Typical IPTV Bridge Interface Group........................................................................................... 42
Figure 34 Routed IPTV Configuration (Single WAN Connection) ............................................................. 43
Figure 35 Routed IPTV Configuration (Multiple WAN Connections) ....................................................... 44
Figure 36 Typical QoS configuration to support VoIP and IPTV services ............................................... 45
Figure 37 Enable the SmartRG's QoS Processing ..................................................................................... 46
Figure 38 QoS: VoIP Queue Configuration .................................................................................................. 46
Figure 39 QoS: IPTV Queue Configuration .................................................................................................. 47
Figure 40 QoS Queue Enable ........................................................................................................................ 48
Figure 41 QoS VoIP Classifier Configuration .............................................................................................. 49
Figure 42 QoS IPTV Classifier Configuration .............................................................................................. 50
Page | 4 Confidential SmartRG © 2012
Page 5

Introduction
Figure 43 QoS VoIP and IPTV Classifier Config .......................................................................................... 51
Figure 44 Time Zone and NTP Server Settings .......................................................................................... 53
Figure 45 Enabling/Disabling HTTP, Telnet, SSH ... Access ..................................................................... 54
Figure 46 Configuring the System Log for Use In Troubleshooting......................................................... 57
SmartRG © 2012 Confidential Page | 5
Page 6

SmartRG™ Residential Gateways
Introduction
This document describes the features, functions and administration of SmartRG™ residential
gateways.
Who Should Read This User’s Manual
The information in this document is intended for Network Architects, NOC Administrators, Field
Service Technicians and other networking professionals responsible for deploying and managing
broadband access networks.
Additional Information
You may find the following documents to be helpful during your access network deployment:
SmartRG Data Sheets
SmartRG Product Release Notes
Deployment and Provisioning Presentation
Cisco™ Prime Home™ Modules List
Contacting SmartRG Inc.
Contact SmartRG Inc. for further assistance.
Hours of operation: Monday – Friday, 5am-6pm Pacific Time (UTC-8:00)
Support
1-360-859-1780
1-877-486-6210 (Toll free from the US & Canada)
support@smartrg.com
Sales
1-360-859-1780
1-877-486-6210 (Toll free from the US & Canada)
sales@smartrg.com
Page | 6 Confidential SmartRG © 2012
Page 7

SmartRG™ Residential Gateways
NOTE
If you prefer to configure your SmartRG’s WAN interface manually, connect a laptop to
any of the LAN ports and follow the instructions in the “Connecting a Computer to Your
SmartRG™ Gateway” and “Use Case: Creating WAN Connections for Internet Access and
Remote Management” sections. Do NOT connect the WAN interface cable until after the
configuration is completed.
NOTE
Activation server support is provided for ALL SmartRG gateways at no additional cost.
SmartRG Inc. enters gateway MAC addresses into the activation server prior to
shipment.
SmartRG™ Residential Gateways
Advanced Features
Connect-and-Surf (Automatic WAN Configuration)
The Connect-and-Surf feature automatically establishes a WAN connection for default configured
gateways obviating the need for manual or custom configurations. The active physical layer is
detected (ADSL, VDSL or GigE) and layer 3 connectivity is established using PPP authentication or
DHCP.
Activation (Automatic ACS Connection Configuration)
SmartRG gateways are designed to discover their service provider specific ACS management
settings without the use of custom firmware. SmartRG Inc. maintains an activation server that
associates a device’s MAC address with its service provider’s ACS settings. SmartRG gateways
contact the activation server to have their ACS settings modified upon initial power up (or after
being reset to factory default settings).
SmartRG © 2012 Confidential Page | 7
Page 8

SmartRG™ Residential Gateways
Cisco™ Prime Home™ TR-069 Client
SmartRG residential gateways are equipped with the Cisco™ Prime Home™ TR-069 client. Prime
Home is the premier CPE resident TR-069 client in the managed access market. It incorporates a
TR-069 protocol stack, a fully developed TR-098 data model and a growing list of gateway resident
applications. Prime Home enabled residential gateways ensure the highest level of TR-069
compliance providing maximum remote manageability and the greatest visibility into the
connected home behind the residential gateway yielding:
shorter integration times and lower system integration costs
improved customer support –and-
reduced operational expenses
Prime Home™ Gateway Resident Advanced Applications
Prime Home™ applications serve to enhance device manageability, increase visibility into the
connected home and provide revenue generating applications enabling service providers to further
monetize the broadband connection. The table below compares a standard TR-069 client against
the Prime Home enabled TR-069 client.
* This list reflects the potential support based on the standard data model. Results will vary as not
all TR-069 clients support the same level of functionality.
Page | 8 Confidential SmartRG © 2012
Page 9

SmartRG™ Residential Gateways
SR10
SR100
SR350N
SR350NE
SR500N
SR500NE
Models
Broadband
Connection
ADSL2+
ADSL2+
ADSL2+
Ethernet
Tri-mode:
ADSL2+, VDSL,
GigE
Tri-mode:
ADSL2+, VDSL,
GigE
10/100
Mbps LAN
Ports
1 4 4 3 5
4
LAN Device
Discovery
Managed
Firewall
Managed
WiFi
802.11N
802.11N
802.11N
802.11N
WiFi Signal
Monitor
IPv6
Control
Panel
Time
Blocking
Dynamic
Content
Filtering
IPTV Ready
SmartRG™ Product Family
SmartRG residential gateways combine WAN connectivity with a firewall protected router and
industry leading TR-069 remote management support. Most variants provide 802.11, Wi-Fi
connectivity, as well. See the SmartRG feature details below:
Contact SmartRG Support for detailed descriptions and management of the features listed above.
SmartRG © 2012 Confidential Page | 9
Page 10

Power
ON: Power is on. OFF: Power is off.
WAN (SR500N/NE)
ON: Ethernet WAN Active. OFF: No link.
DSL
ON: Link established and active. OFF: No link. Blinking: Training mode.
Internet
ON: Internet connection established OFF: No Internet connection Blinking:
Data transfer on WAN Internet connection
LAN 1-4
ON: LAN link established and active OFF: No LAN link. BLINKING: Data
transfer on LAN port.
WLAN
ON: WLAN enabled. OFF: WLAN disabled. Blinking: data transfer currently
occurring over the WiFi interface.
SmartRG™ Residential Gateways
Front Panel LEDs
The SmartRG’s front panel LEDs can be useful for troubleshooting and diagnostic purposes. The
typical SmartRG front panel is shown below.
Figure 1 SmartRG Front Panel LEDs
The SmartRG front panel LEDs are defined as follows:
Page | 10 Confidential SmartRG © 2012
Page 11

Rear Panel Connectors
SR10
DSL(WAN) LAN Reset On/Off Power
Figure 2 SR10 Rear Panel Connectors
SmartRG™ Residential Gateways
SR-100
DSL(WAN) LAN1 - 4 Reset Power On/Off
Figure 3 SR100 Rear Panel Connectors
SmartRG © 2012 Confidential Page | 11
Page 12
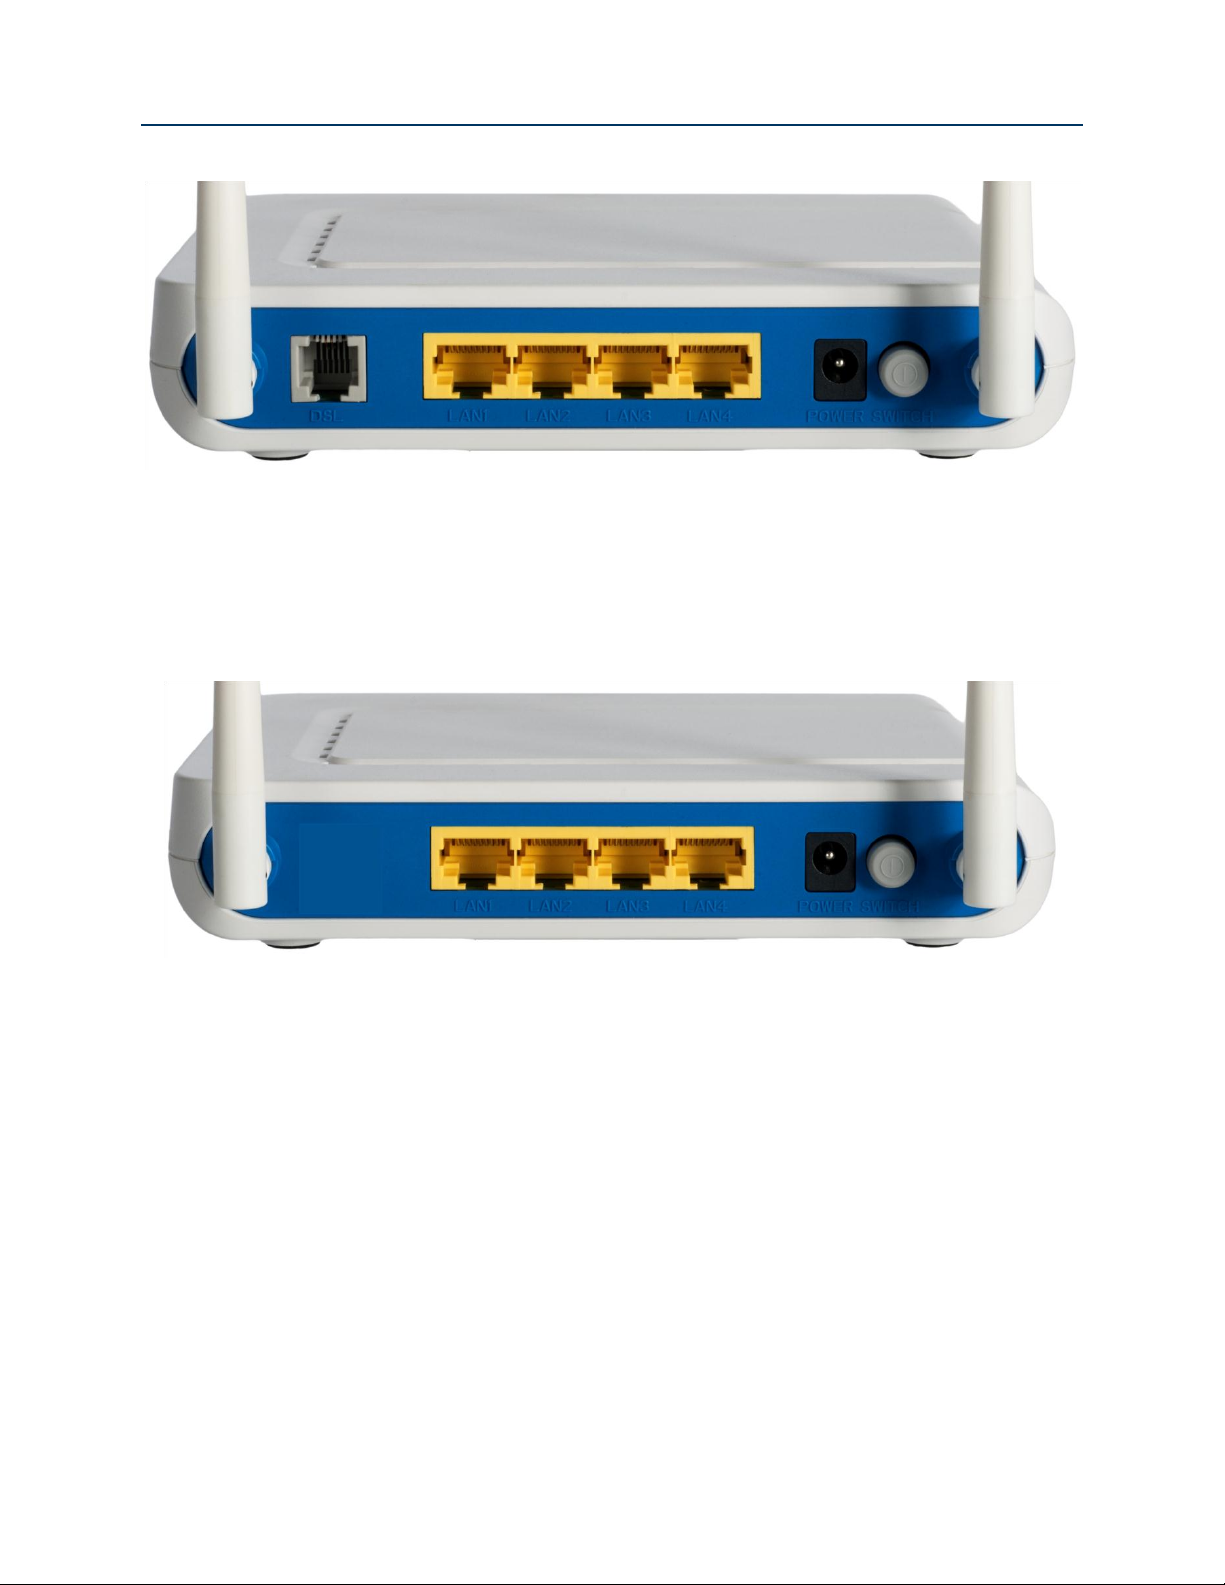
SmartRG™ Residential Gateways
SR-350N
DSL(WAN) LAN1 - 4 Power On/Off
(Reset on bottom)
Figure 4 SR350N Rear Panel Connectors
SR-350NE
Ethernet(WAN) LAN1 - 3 Power On/Off
(Reset on bottom)
Figure 5 SR350NE Rear Panel Connectors
Page | 12 Confidential SmartRG © 2012
Page 13
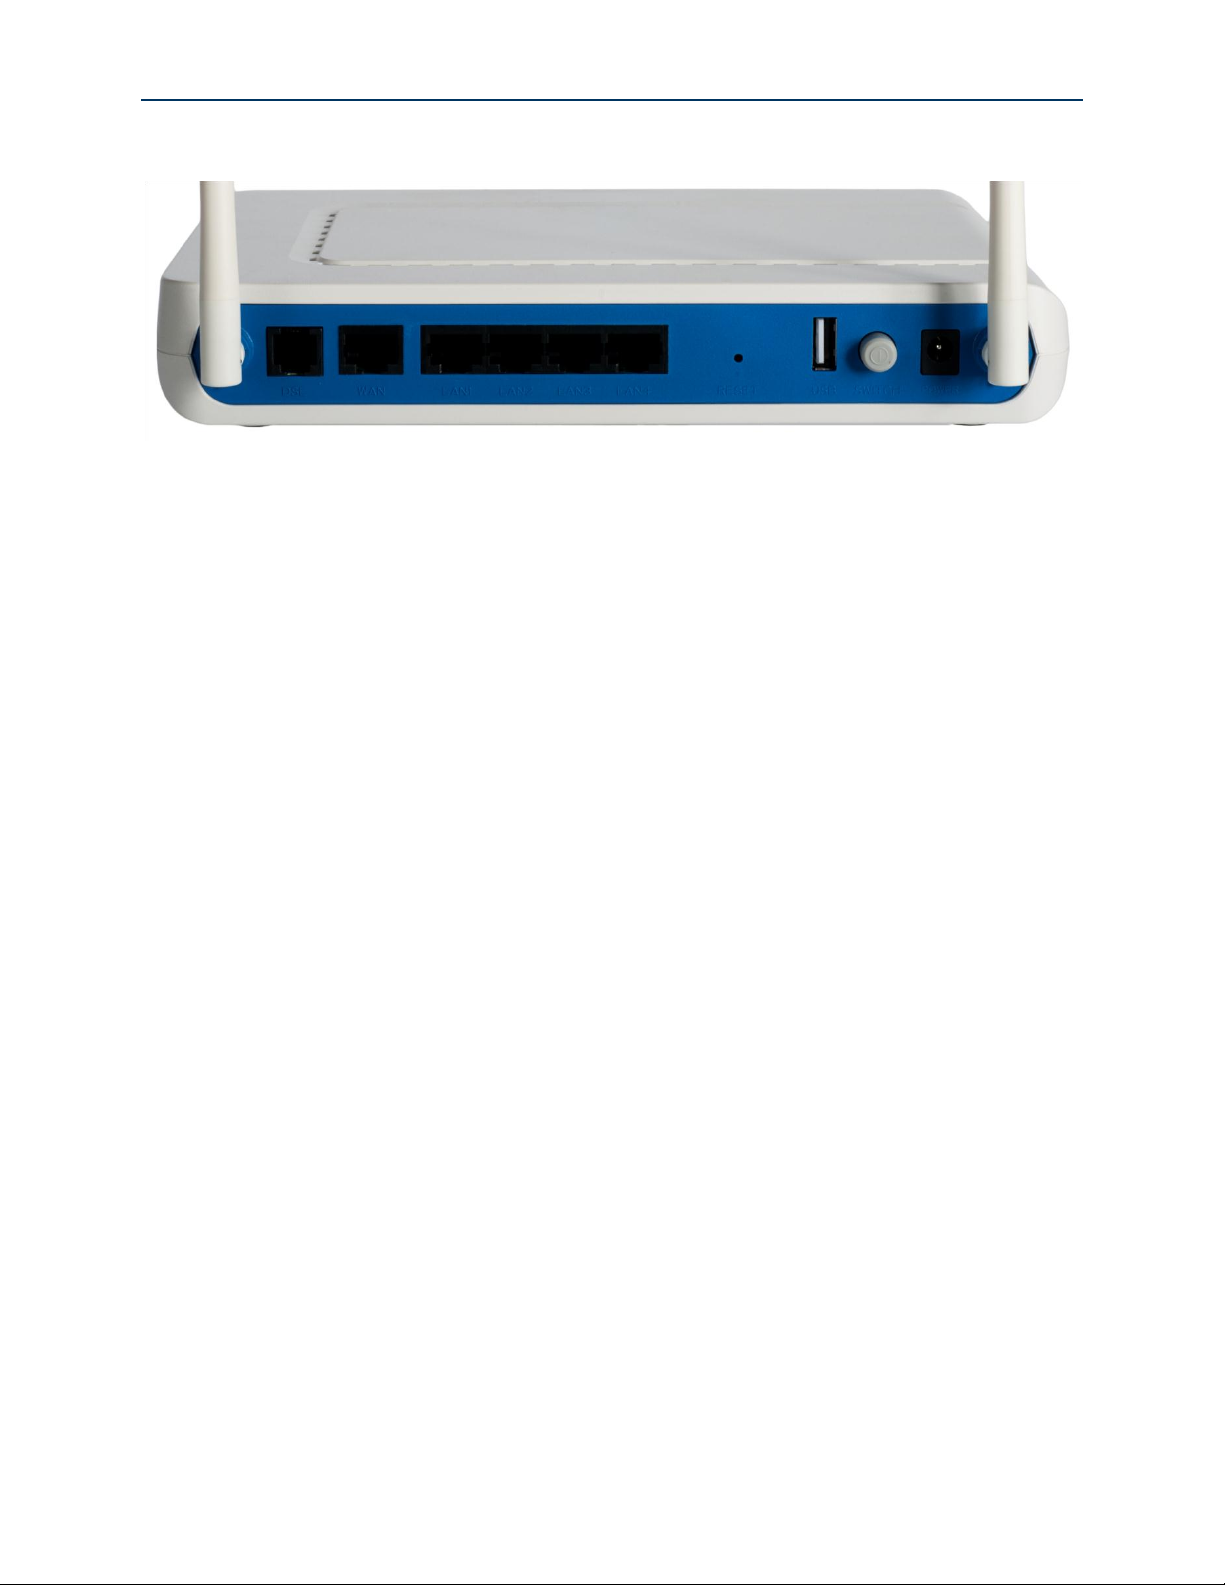
SR-500N/SR-500NE
DSL(WAN) GigE(WAN) LAN1 - 4 Reset USB On/Off Power
Figure 6 SR500N/NE Rear Panel Connectors
SmartRG™ Residential Gateways
SmartRG © 2012 Confidential Page | 13
Page 14

SmartRG™ Residential Gateways
Connecting a Computer to Your SmartRG™ Gateway
To manually configure the SmartRG access the gateway’s embedded web UI:
1. attach your computer’s RJ45 connection to any of the SmartRG’s LAN ports (1-4)
2. configure your computer’s IP interface to acquire an IP address using DHCP
3. open a browser and enter the gateway’s default address http://192.168.1.1/admin in the
address bar
Figure 7 Login Username and Password
4. Enter the default user name and password: admin/admin and click OK to display the
Device Info page.
Navigating Your SmartRG Gateway’s Web UI
At login the Device Info page will appear. In addition to the basic identification info shown, the
Device Info menu item can be expanded (by clicking the text) to reveal:
WAN connection information
WAN and LAN statistics
Routing table entries
ARP table entries –and-
LAN host DHCP lease information
Page | 14 Confidential SmartRG © 2012
Page 15

SmartRG™ Residential Gateways
Figure 8 Device Info Page
The remainder of the left menu bar items can be navigated in a similar fashion. Configure the
following features and functions by expanding:
Advanced Setup – WAN & LAN interfaces, routing, interface groupings, QoS, security, etc.
Wireless – wireless access point and detailed radio settings
Diagnostics – execute LAN & WAN interface diagnostics
Management – backup/restore/default configurations, update device software, TR-069
ACS management settings, time zone & NTP settings and device reboot
SmartRG © 2012 Confidential Page | 15
Page 16

SmartRG™ Residential Gateways
Configuring Your SmartRG™ - Common Use Cases
To simplify your deployment of SmartRG gateways this document is structured around specific use
cases designed to illustrate meaningful, service supporting configurations like:
Creating WAN interfaces for Internet data access and remote gateway management
Provisioning the SmartRG for remote management via TR-069
Setting up the LAN
Managing wireless
Creating IPTV service configurations (bridged and routed)
Classifying LAN traffic and applying QoS to support IPTV and VoIP applications
Enabling secure communications (IPSec)
Given the breadth of a SmartRG residential gateway’s features and the diversity of applications,
only the most common use cases are detailed here. Please contact SmartRG Support to inquire
about additional use cases.
Use Case: Creating WAN Connections for Internet Access and Remote
Management
SmartRG residential gateways are commonly deployed to provide Internet access for LAN hosts
such as workstations, gaming consoles, IP cameras and myriad other IP enabled devices
increasingly found in the home or office. Packets routed between LAN hosts and the Internet pass
through the gateway’s routed WAN connection. Remote management (via TR-069) is also
performed through this connection. The typical Internet access/remote management connection
configuration is diagramed below.
Page | 16 Confidential SmartRG © 2012
Page 17

Configuring Your SmartRG™ - Common Use Cases
Figure 9 Internet / TR-069 Management WAN Connection
WAN connection creation is a two-step process beginning with the configuration of a layer 2
interface (Ethernet or DSL) followed by the creation of a layer 3, WAN service. Common WAN
services include PPPoE, DHCP and Static IP.
Configuring the Layer 2 Interface (Ethernet)
To configure an Ethernet layer 2 interface:
1. Select Advanced Setup -> Layer2 Interface. The default Ethernet WAN interface
(eth0.5/LAN4) will be displayed.
Figure 10 Ethernet Layer 2 Interface Configuration (Default)
No further configuration is necessary.
SmartRG © 2012 Confidential Page | 17
Page 18

NOTE
802.1P (priority) and 802.1Q (VLAN tag) values will be set at the time of WAN Service
creation as detailed in, “Creating the WAN Service.”
SmartRG™ Residential Gateways
Configuring the Layer 2 Interface (Ethernet with VLAN Tags)
In some applications it may be necessary to segment the Ethernet WAN interface into separate
VLANs. A common application for a VLAN segmented WAN interface is bridged IPTV as detailed in
the “Bridged IPTV Configuration” section. To configure the layer 2 Ethernet interface to support
VLAN tagged traffic:
1. Select Advanced Setup -> Layer2 Interface. The default Ethernet WAN interface
(eth0.5/LAN4) will be displayed.
2. Check the “Remove” box and click Remove.
3. Click Add.
4. Select “VLAN MUX Mode.”
Figure 11 Ethernet Layer 2 Interface Configuration (VLAN Tagged)
5. Click Apply/Save.
Page | 18 Confidential SmartRG © 2012
Page 19

Configuring Your SmartRG™ - Common Use Cases
Configuring the Layer 2 Interface (ADSL)
To configure an ADSL layer 2 interface:
1. Select Advanced Setup -> Layer2 Interface and click Add.
Figure 12 ADSL Layer 2 Interface Configuration
2. Enter the PVC’s identifier (VPI/VCI).
3. Select the “DSL Link Type” – Ethernet over ATM (RFC 2684) is typical.
4. Select the “Encapsulation Mode” – LLC/SNAP-BRIDGING is typical.
5. Select the “Service Category” (upstream ATM shaping) – “UBR Without PCR” (Unspecified
Bit Rate Without Peak Cell Rate) is typical.
6. Select the “Connection Mode” – Choose Default Mode for non-VLAN tagged traffic. Choose
VLAN MUX Mode if you intend to segment LAN traffic into separate VLAN tagged WAN
services.
SmartRG © 2012 Confidential Page | 19
Page 20

NOTE
Enabling QoS for routed IPTV service configurations will improve channel change
performance.
SmartRG™ Residential Gateways
7. IMPORTANT - Check “Enable Quality of Service” if you intend to support QoS classified
traffic through the WAN service.
8. Click Apply/Save.
Configuring the Layer 2 Interface (VDSL/PTM)
To configure a VDSL / PTM layer 2 interface:
1. Select Advanced Setup -> Layer2 Interface -> PTM Interface and click Add.
Figure 13 VDSL Layer 2 Interface Configuration
2. Select the “DSL Latency” – Path0 is typical.
3. Select the “PTM Priority” – Normal Priority is typical.
4. Select the “Connection Mode” – Default Mode is typical (when VLAN segmentation is not
required).
5. IMPORTANT - Check “Enable Quality of Service” if you intend to support QoS classified
traffic through the WAN service.
Page | 20 Confidential SmartRG © 2012
Page 21

Configuring Your SmartRG™ - Common Use Cases
NOTE
Enabling QoS for routed IPTV service configurations will improve channel change
performance.
NOTE
802.1P (priority) and 802.1Q (VLAN tag) values will be set at the time of WAN Service
creation as detailed in, “Creating the WAN Service.”
6. Click Apply/Save.
Configuring the Layer 2 Interface (VDSL/PTM with VLAN Tags)
In some applications it may be necessary to segment the PTM WAN interface into separate VLANs.
A common application for a VLAN segmented WAN interface is bridged IPTV as detailed in the
“Bridged IPTV Configuration” section. To configure the layer 2 PTM interface to support VLAN
tagged traffic select “VLAN MUX Mode” for “Connection Mode” in step 4 of the “Configuring the
Layer 2 Interface (VDSL/PTM)” section.
SmartRG © 2012 Confidential Page | 21
Page 22

NOTE
If VLAN tagging support is desired, set the 802.1p and 802.1q values appropriately.
802.1P: 0 is lowest priority, 7 is highest priority, -1 is unused
802.1Q: -1 indicates no VLAN tagging
NOTE
The SR-350N/NE and SR-500N/NE gateways support mixed VLAN tagged/untagged
traffic on the same WAN interface. Set the untagged WAN connection’s VLAN ID to -1.
SmartRG™ Residential Gateways
Creating the WAN Service
WAN Services are created on top of previously created Layer 2 interfaces. To create a WAN service:
1. Select Advanced Setup -> WAN Service and click Add.
2. Select a previously created layer 2 interface from the drop down list and click Next.
3. Select the “WAN Service type” – “PPP over Ethernet” or “IP over Ethernet” are appropriate
choices for routed WAN services. Bridged WAN services will be covered later in the “Bridged
IPTV Configuration” section.
Figure 14 WAN Service Configuration (With or Without VLAN Tagging Support)
4. Click Next.
Page | 22 Confidential SmartRG © 2012
Page 23

Configuring Your SmartRG™ - Common Use Cases
5. For PPP WAN services enter the “PPP Username” and “PPP Password”. If desired, enable
the firewall, NAT and IGMP Proxy. Click Next.
Figure 15 PPP Username and Password
-OR-
SmartRG © 2012 Confidential Page | 23
Page 24
IMPORTANT
For IPTV configurations (either bridged or routed) as detailed in, “Use Case: Setting
Up Wireless Distribution System (WDS)
When deployed in a larger home or office, a single wireless access point may not be
able to provide adequate Wi-Fi coverage. Wireless Distribution Systems (WDS)
provides a solution for this problem. WDS combines multiple gateways to act as a
single larger wireless access point allowing Wi-Fi clients to seamlessly roam all
access points plus provides wired access to the entire network.
Two or more SmartRG gateways can be configured for WDS operation. The example
below depicts a WDS deployment with three SmartRG gateways in a large home or
office – one primary gateway in the center of the building and one remote gateway
at either end of the building.
SmartRG™ Residential Gateways
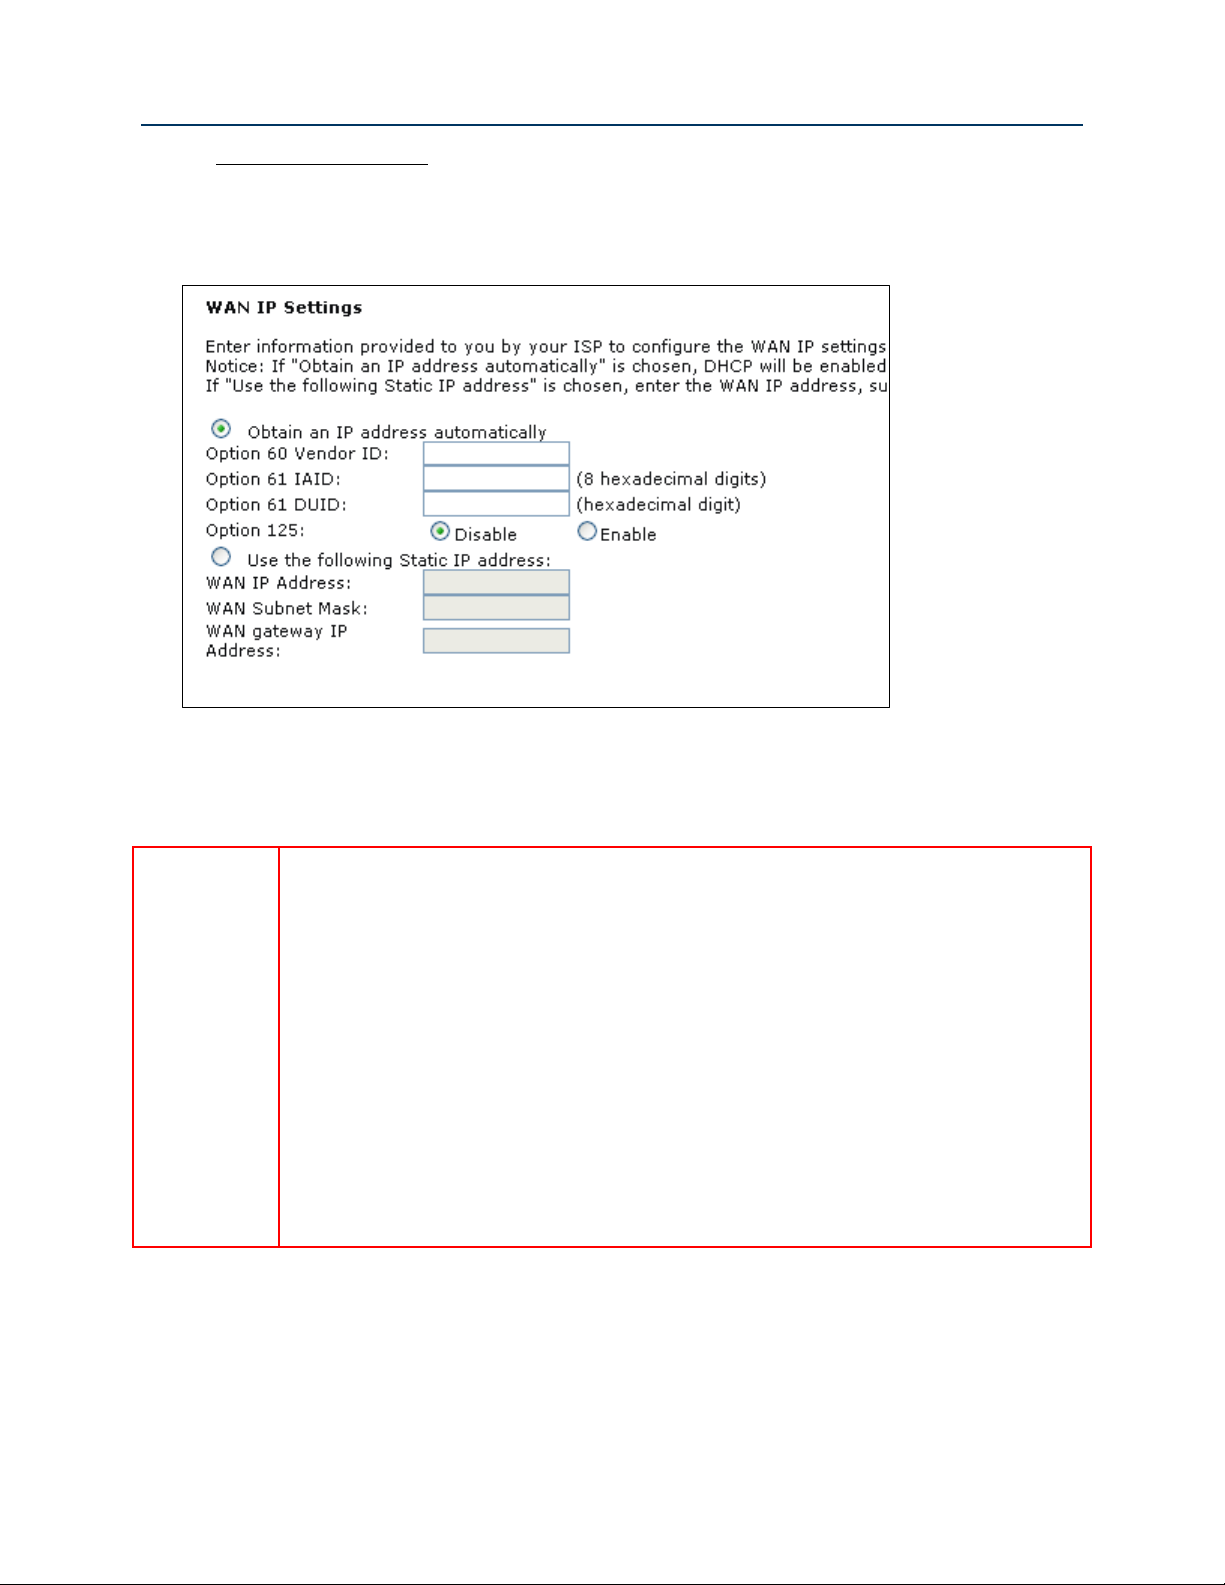
6. For IPoE WAN services select “Obtain an IP address automatically” (DHCP) or select “Use
the following Static IP address” and enter the “WAN IP Address”, “WAN Subnet Mask” and
“WAN gateway IP.” Click Next.
Figure 16 WAN IP Settings
7. If desired enable the firewall, NAT and IGMP Multicast.
Page | 24 Confidential SmartRG © 2012
Page 25

Configuring Your SmartRG™ - Common Use Cases
Figure 23 Wireless Distribution System
Configuring the SmartRG gateways for WDS operation requires the setting of WAN,
LAN and WIRELESS parameters on all gateways included in the WDS system.
To configure the WAN connections…
1. On the primary SmartRG gateway: configure the routed WAN connection
following the instructions in the “Use Case: Creating WAN Connections for
Internet Access and Remote Management” section.
2. On the remote SmartRG gateway(s): no WAN configuration is required as the
WAN connection is unused.
To configure the LAN interfaces…
3. On the primary SmartRG gateway:
a) configure the LAN interface following the instructions in the “Use Case:
Setting Up the LAN” section.
b) ensure the DHCP Server is ENABLED and set the End IP Address such that
enough LAN IP addresses are left for static allocation to the remote
gateway(s) included in the WDS system.
4. On the remote SmartRG gateway(s):
a) configure the LAN interface following the instructions in the “Use Case:
Setting Up the LAN” section.
b) ensure the LAN IPaddress(es) are assigned from the remaining IP addresses
SmartRG © 2012 Confidential Page | 25
Page 26

not included in the DHCP server pool on the primary SmartRG gateway.
IMPORT
ANT
At this point your web browser session will terminate as the LAN IP address has changed
from 192.168.1.1 to 192.168.1.x. Reconnect your web browser to the remote SmartRG
referencing the new LAN IP address.
To configure the WIRELESS interfaces…
5. On the primary SmartRG gateway: configure the WIRELESS interface following
the instructions in the “Use Case: Setting Up Wireless” section. Do NOT select
“Auto” for the Channel value.
6. On the remote SmartRG gateway(s): configure the WIRELESS interface
following the instructions in the “Use Case: Setting Up Wireless” section. Select
the same SSID, Security settings and Channel configured on the primary
gateway.
7. On the primary and remote SmartRG gateways:
1. select Wireless -> Wireless Bridge and set “AP Mode” to Access Point
2. set “Bridge Restrict” to Enabled(SCAN)
3. click Apply/Save and wait for the page to refresh
4. select the partner gateway (which has the same SSID as the primary
gateway) by checking the box next to the SSID.
5. Click Apply/Save
IMPORT
ANT
When more than two gateways are configured for WDS operation, the remote gateways
MUST NOT be partnered together to avoid creating an Ethernet loop.
Use Case: Creating IPTV Service Configurations” you MUST enable IGMP.
SmartRG™ Residential Gateways
Page | 26 Confidential SmartRG © 2012
Page 27

Configuring Your SmartRG™ - Common Use Cases
Figure 17 WAN NAT, Firewall and IGMP Settings
8. Select the WAN interface to be used by this WAN service. Click Next.
9. Select “Obtain DNS info from a WAN interface” and select the desired WAN interface from
the drop down list (a single WAN interface is common unless you are creating bridged IPTV
configurations) –or- select “Use the following Static DNS IP address” and enter the IP
addresses of your network’s primary and secondary DNS servers. Click Next.
10. Review the WAN service summary. If you are satisfied click Apply/Save.
SmartRG © 2012 Confidential Page | 27
Page 28
NOTE
This step is not required for production SmartRG gateways. SmartRG maintains an
“Activation Server” that associates MAC addresses with service providers’ ACS
management URLs. After the SmartRG has established its WAN connection (using the
Connect-and-Surf algorithm) it connects to the SmartRG Activation Server and reports its
MAC. The Activation Server changes the ACS management URL to point to the service
provider’s ACS.
NOTE
Configure less and deploy more. Manage subscriber services and your entire gateway
fleet with the ClearVision® management system. Contact SmartRG to start your trial
today. See us at www.smartrg.com.
SmartRG™ Residential Gateways
Use Case: Provisioning Your SmartRG for Remote ACS Management
To manually provision your SmartRG for management by a TR-069 enabled Automated
Configuration Server:
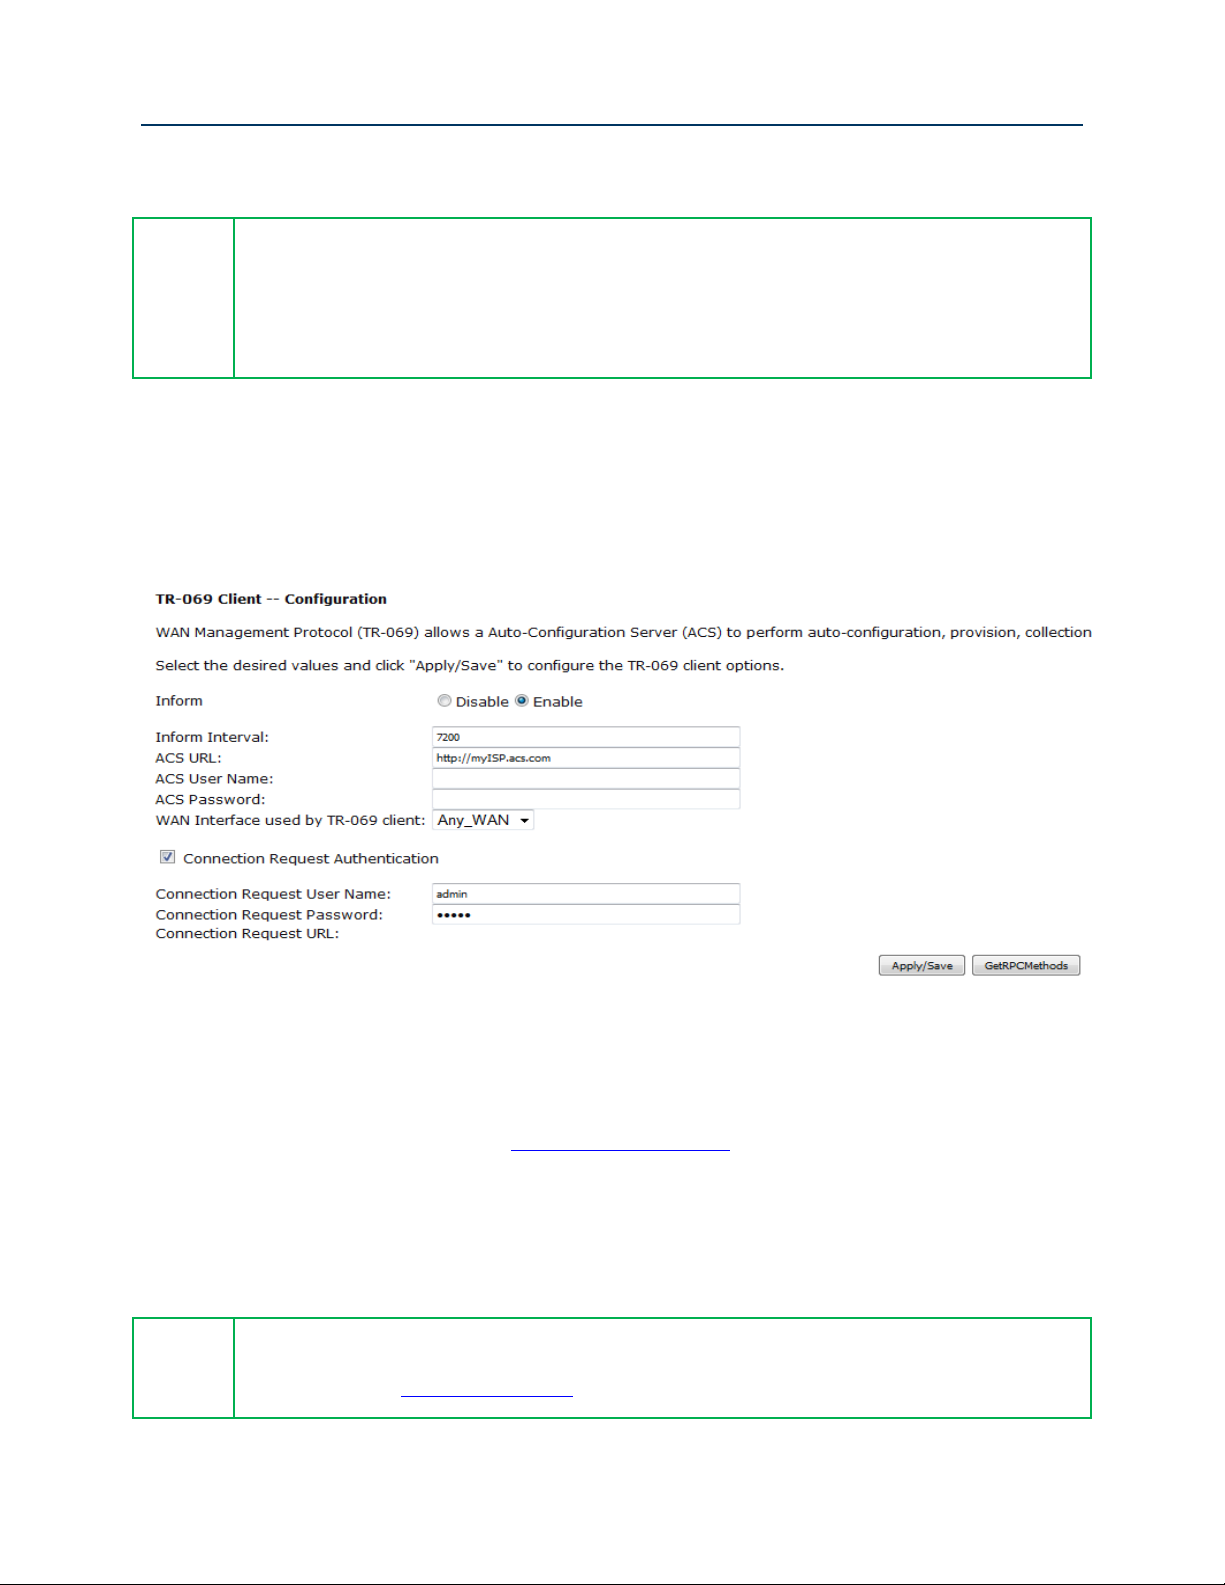
1. Select Management -> Management Server -> TR-069 Client.
Figure 18 TR-069 Management Settings
2. Enter the following parameter values:
Enable “Informs”
Set the “Inform Interval” to 7200 seconds
Set the “ACS URL” (e.g. http://myISP.acs.com/)
Leave the “ACS User Name” and “ACS Password” blank
Enable “Connection Request Authentication”
Set the “Connection Request User Name and Password” to admin/admin
3. Click Apply/Save.
Page | 28 Confidential SmartRG © 2012
Page 29

Use Case: Setting Up the LAN
To configure the SmartRG’s LAN interface:
1. Select Advanced Setup -> LAN
Configuring Your SmartRG™ - Common Use Cases
Figure 19 LAN Settings
2. Leave the “GroupName” as Default.
3. Set the LAN interface’s “IP Address” and “Subnet Mask” – Default values are:
192.168.1.1/255.255.255.0.
4. IMPORTANT – If you intend to support IPTV (either bridged or routed), you MUST select
“Enable IGMP Snooping.” Select “Blocking Mode.”
5. Select “Enable DHCP Server” and set the DHCP address pool’s start and end IP addresses.
6. Set the DHCP “Leased Time” in hours.
7. If you would like to create static DHCP leases for specific LAN hosts, click Add Entries.
SmartRG © 2012 Confidential Page | 29
Page 30

SmartRG™ Residential Gateways
Figure 20 Adding DHCP Static IP Leases
8. Enter the LAN host’s “MAC Address” and the desired “IP Address.”
9. Click Apply/Save and repeat steps 7 and 8 for all static IP LAN hosts.
Page | 30 Confidential SmartRG © 2012
Page 31

Use Case: Setting Up Wireless
NOTE
The SmartRG provides support for 3 additional guest/virtual wireless access points.
To configure the SmartRG’s Wireless interface:
1. Select Wireless -> Basic
Configuring Your SmartRG™ - Common Use Cases
Figure 21 Wireless - Basic Settings
2. Select “Enable Wireless.”
3. Set the wireless access point’s “SSID.”
4. Select the “Country” from the dropdown list.
5. Click Apply/Save.
SmartRG © 2012 Confidential Page | 31
Page 32

SmartRG™ Residential Gateways
6. If you would like to select a specific Wi-Fi channel (1-11), select Wireless -> Advanced and
change the Channel setting. The default value is “Auto.”
7. Select Wireless -> Security
Figure 22 Wireless - Security Settings
8. Select the “SSID” configured in step 3 above.
9. Select the “Network Authentication” – WPA2 with a Pre-Shared Key is common
10. Enter the “WPA Pre-Shared Key.” Click the link to display the private key value.
11. Click Apply/Save.
Page | 32 Confidential SmartRG © 2012
Page 33

Configuring Your SmartRG™ - Common Use Cases
Use Case: Setting Up Wireless Distribution System (WDS)
When deployed in a larger home or office, a single wireless access point may not be able to provide
adequate Wi-Fi coverage. Wireless Distribution Systems (WDS) provides a solution for this
problem. WDS combines multiple gateways to act as a single larger wireless access point allowing
Wi-Fi clients to seamlessly roam all access points plus provides wired access to the entire network.
Two or more SmartRG gateways can be configured for WDS operation. The example below depicts
a WDS deployment with three SmartRG gateways in a large home or office – one primary gateway
in the center of the building and one remote gateway at either end of the building.
Figure 23 Wireless Distribution System
Configuring the SmartRG gateways for WDS operation requires the setting of WAN, LAN and
WIRELESS parameters on all gateways included in the WDS system.
SmartRG © 2012 Confidential Page | 33
Page 34

IMPORTANT
At this point your web browser session will terminate as the LAN IP address has
changed from 192.168.1.1 to 192.168.1.x. Reconnect your web browser to the
remote SmartRG referencing the new LAN IP address.
IMPORTANT
When more than two gateways are configured for WDS operation, the remote
gateways MUST NOT be partnered together to avoid creating an Ethernet loop.
SmartRG™ Residential Gateways
To configure the WAN connections…
3. On the primary SmartRG gateway: configure the routed WAN connection following the
instructions in the “Use Case: Creating WAN Connections for Internet Access and Remote
Management” section.
4. On the remote SmartRG gateway(s): no WAN configuration is required as the WAN connection
is unused.
To configure the LAN interfaces…
5. On the primary SmartRG gateway:
a) configure the LAN interface following the instructions in the “Use Case: Setting Up the LAN”
section.
b) ensure the DHCP Server is ENABLED and set the End IP Address such that enough LAN IP
addresses are left for static allocation to the remote gateway(s) included in the WDS
system.
6. On the remote SmartRG gateway(s):
a) configure the LAN interface following the instructions in the “Use Case: Setting Up the LAN”
section.
b) ensure the LAN IPaddress(es) are assigned from the remaining IP addresses not included in
the DHCP server pool on the primary SmartRG gateway.
To configure the WIRELESS interfaces…
8. On the primary SmartRG gateway: configure the WIRELESS interface following the instructions
in the “Use Case: Setting Up Wireless” section. Do NOT select “Auto” for the Channel value.
9. On the remote SmartRG gateway(s): configure the WIRELESS interface following the
instructions in the “Use Case: Setting Up Wireless” section. Select the same SSID, Security
settings and Channel configured on the primary gateway.
10. On the primary and remote SmartRG gateways:
1. select Wireless -> Wireless Bridge and set “AP Mode” to Access Point
2. set “Bridge Restrict” to Enabled(SCAN)
3. click Apply/Save and wait for the page to refresh
4. select the partner gateway (which has the same SSID as the primary gateway) by checking
the box next to the SSID.
5. Click Apply/Save
Page | 34 Confidential SmartRG © 2012
Page 35

Configuring Your SmartRG™ - Common Use Cases
Use Case: Creating IPTV Service Configurations
The SR350N, SR350NE, SR500N and SR500NE SmartRG gateways are designed to meet the
demands of IPTV service deployments.
Typically IPTV services have been deployed using bridged architectures with public IP addresses
assigned to the IPTV Set-top-boxes (STBs) connected to the gateway’s LAN ports. A typical bridged
IPTV service configuration is shown below.
Figure 24 Bridged IPTV Configuration
Recently service providers have begun deploying routed IPTV services with STBs being assigned
private LAN IP addresses by the gateway. A typical routed IPTV service configuration is shown
below.
Figure 25 Routed IPTV Configuration
SmartRG © 2012 Confidential Page | 35
Page 36

SmartRG™ Residential Gateways
SmartRG gateways are designed to exceed the high bandwidth demands of either IPTV service
architecture. Refer to the appropriate section below to configure the SmartRG gateway for your
particular IPTV deployment architecture.
Bridged IPTV Configuration
A bridged IPTV configuration is comprised of:
one (or more) WAN connections
one (or more) LAN connections –and-
an interface grouping structure to bind all of the connections together
The more generalized bridged IPTV service configuration with multiple WAN connections is shown
below.
Figure 26 Multi-WAN Connection Bridged IPTV Configuration
Page | 36 Confidential SmartRG © 2012
Page 37

Configuring Your SmartRG™ - Common Use Cases
Creating Bridged WAN Connections
To configure the SmartRG for bridged IPTV service deployments (with one or more WAN
connections) start by creating the bridged WAN connections:
1. Create a Layer 2 interface following the instructions detailed in:
a. “Configuring the Layer 2 Interface (Ethernet)”
b. “Configuring the Layer 2 Interface (ADSL)” or
c. “Configuring the Layer 2 Interface (VDSL/PTM)”
as appropriate for your particular SmartRG (Ethernet or DSL).
2. Select Advanced Setup -> WAN Service.
Figure 27 Selecting a Bridged WAN Service’s Layer 2 Interface
3. Select the Layer 2 Interface (created in step 1 above) from the drop down list and click
Next.
SmartRG © 2012 Confidential Page | 37
Page 38
NOTE
Some DSLAMs require multiple WAN connections to support IPTV services. Contact
your DSLAM vendor for IPTV configuration details.
IMPORTANT
NOTE
The IGMP bridged WAN connection MUST be the last bridged WAN connection
created.
SmartRG™ Residential Gateways
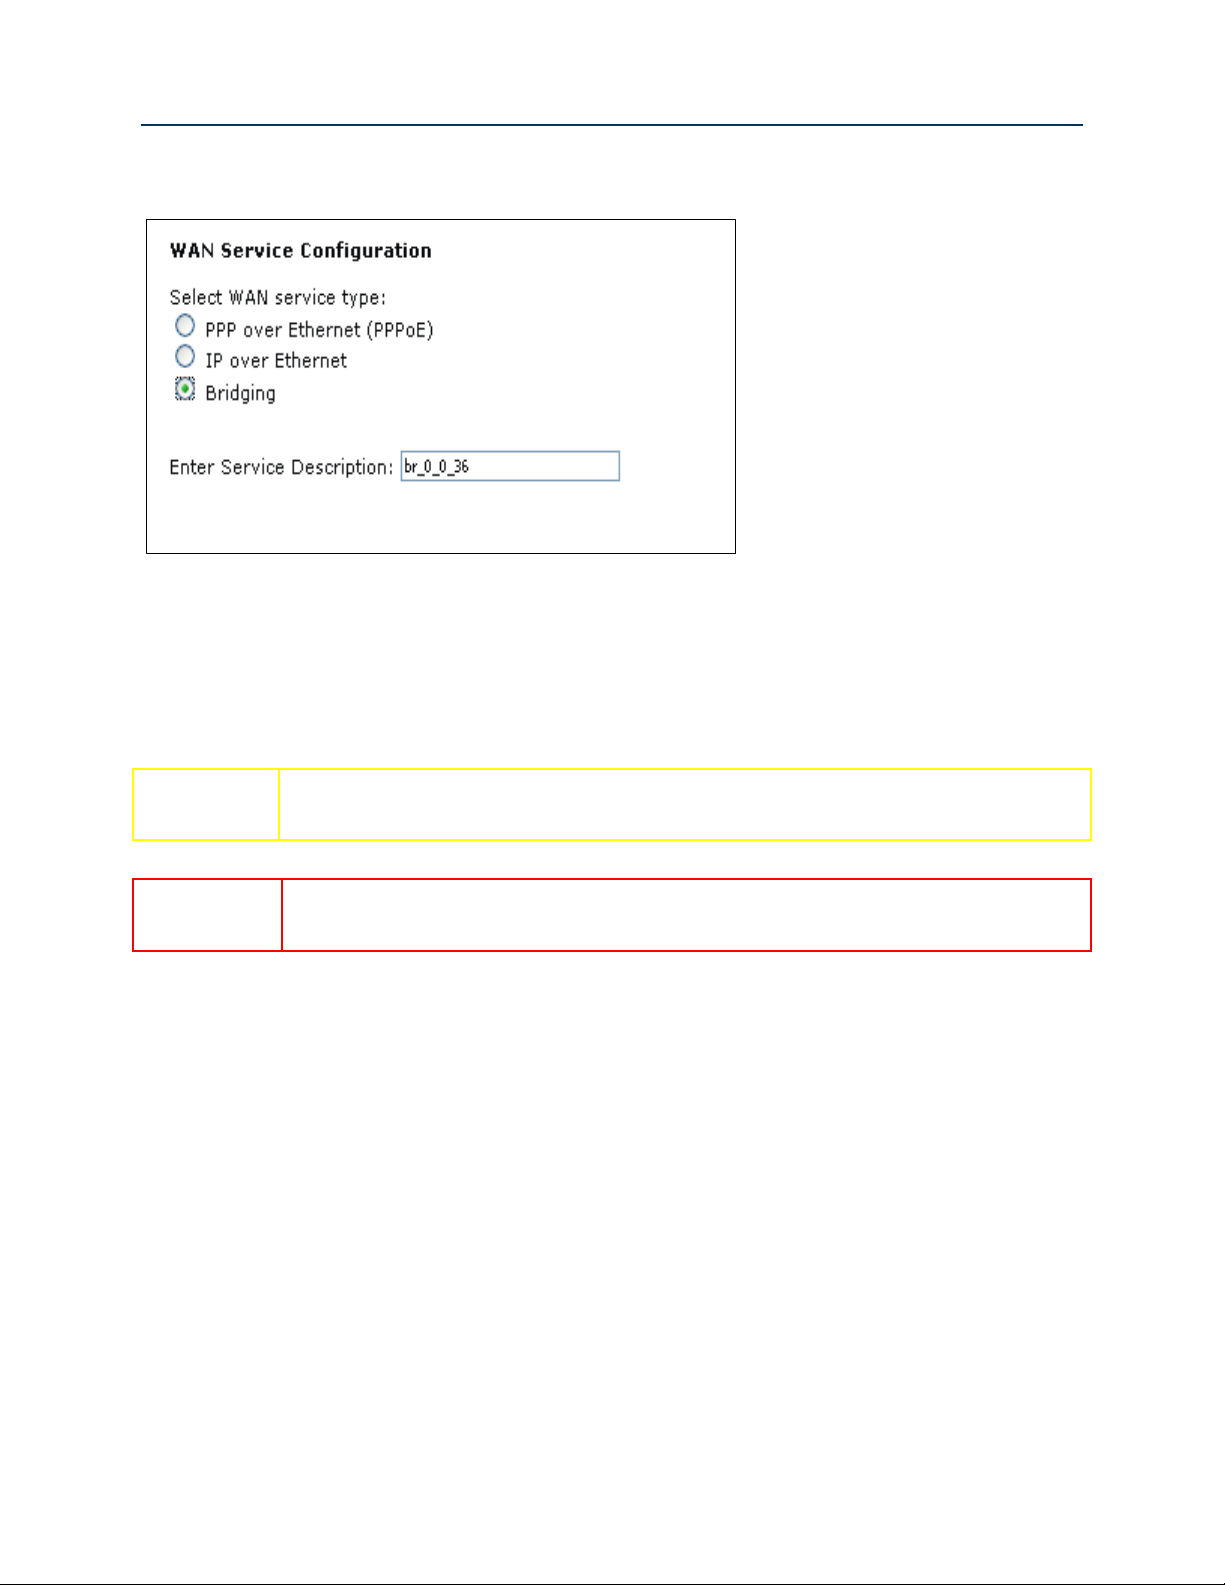
4. Select “Bridging” and click Next.
Figure 28 Creating a Bridged WAN Service
5. Review the bridged WAN service summary and click Apply/Save if you are satisfied.
6. Repeat steps 1-5 as necessary to support your particular IPTV configuration (i.e. single or
multi-WAN connection).
7. Ensure “IGMP Snooping” has been enabled on the LAN as detailed in the “Use Case: Setting
Up the LAN” section.
8. Check “LAN(1-4)” – (This segments the four LAN ports into separate interfaces instead of a
single switched block of ports).
9. Click Apply/Save.
Page | 38 Confidential SmartRG © 2012
Page 39

Configuring Your SmartRG™ - Common Use Cases
NOTE
The generalized (more complex) IPTV bridge group is detailed here. The majority of
DSLAMs require only a single WAN connection to support IPTV services. In that typical
case:
The “atm0” interface would provide routed WAN access for Internet services and
remote management –and-
The “atm1” interface would provide bridged WAN access for all IPTV related
services (multi-cast streams, middleware server access and IGMP signaling)
At the conclusion of step 9 your Layer 2 Interface summary (Advanced Setup -> Layer 2 Interface)
will look similar to:
Figure 29 IPTV Layer 2 Interface Summary (Multi-WAN Bridge Group)
SmartRG © 2012 Confidential Page | 39
Page 40

SmartRG™ Residential Gateways
Your WAN Service summary (Advanced Setup -> WAN Service) will look similar to:
Figure 30 IPTV WAN Service Summary (Multi-WAN Bridge Group)
10. Select Advanced Setup -> Interface Grouping.
Figure 31 Creating an IPTV Bridge Interface Group
Page | 40 Confidential SmartRG © 2012
Page 41

11. Click Add.
Configuring Your SmartRG™ - Common Use Cases
Figure 32 Defining an IPTV Bridge Interface Group
SmartRG © 2012 Confidential Page | 41
Page 42

SmartRG™ Residential Gateways
12. Enter the “Group Name.”
13. Highlight the bridged “WAN Interfaces” to be included in the bridge group and click <-.
14. Highlight the LAN Interfaces to be included in the bridge group and click <-.
Figure 33 Typical IPTV Bridge Interface Group
15. Click Apply/Save.
Page | 42 Confidential SmartRG © 2012
Page 43

Configuring Your SmartRG™ - Common Use Cases
NOTE
The SmartRG family of gateways employs “Differentiated Services” (RFC 2474) to
provide IP traffic QoS. When configuring QoS for various traffic categories the following
Differentiated Services Code Point (DSCP) values or suggested:
Internet data – Best Effort (DSCP 0)
IPTV – AF21 (DSCP 18)
VoIP – Expedited Forwarding (DSCP 46)
Routed IPTV Configuration (Single WAN Connection)
The common routed IPTV configuration is virtually identical to the WAN connection configuration
for Internet data services with one notable exception; the addition of quality of service (QoS).
While not an absolute requirement, applying QoS to LAN traffic (with higher priority given to STBs)
ensures the timely and deterministic delivery of IPTV related uni-cast requests and IGMP signaling
through the gateway. This provides repeatable, shortest time possible channel changes in the
presence of other LAN traffic. A typical routed IPTV service configuration with only one WAN
connection is shown below.
Figure 34 Routed IPTV Configuration (Single WAN Connection)
To configure the SmartRG for routed IPTV service deployments:
1. Ensure “IGMP Snooping” has been enabled on the LAN as detailed in, “Use Case: Setting Up
the LAN.”
2. Create a routed WAN connection as detailed in, “Use Case: Creating WAN Connections for
Internet Access and Remote Management.”
3. (Optional) Create traffic classifiers and priority queues for the various traffic categories on
your LAN (e.g. Internet data, IPTV and VoIP) as detailed in, “Use Case: Applying Quality of S.”
SmartRG © 2012 Confidential Page | 43
Page 44

NOTE
Some STBs pre-mark their IP traffic making classification a relatively straightforward
task for the gateway. If your STB pre-marks its traffic, passing the DSCP mark through
unchanged is suggested.
SmartRG™ Residential Gateways
Routed IPTV Configuration (Multiple WAN Connections)
It is also possible to create routed IPTV configurations with multiple WAN connections. The notable
difference to typical routed IPTV configurations is the addition of one or more bridged WAN
connections to support multiple multicast IPTV streams. Again QoS is suggested. A typical multiWAN connection, routed IPTV service configuration is shown below.
Figure 35 Routed IPTV Configuration (Multiple WAN Connections)
To configure the SmartRG for multi-WAN connection, routed IPTV service deployments, follow the
single WAN connection, routed IPTV configuration instructions above –plus- add bridged WAN
connections using the instructions detailed in, “Creating Bridged WAN Connections.”
Page | 44 Confidential SmartRG © 2012
Page 45
Configuring Your SmartRG™ - Common Use Cases
NOTE
The residential gateway plays no part in the prioritization of downstream traffic.
NOTE
Mediaroom based IPTV STBs place the DSCP18 mark on all upstream traffic.
Use Case: Applying Quality of Service (QoS) to VoIP and IPTV LAN Traffic
When deploying time critical services such as VoIP and IPTV comingled with common data services,
it becomes necessary to prioritize the time critical, upstream LAN traffic over common data traffic
(e.g Internet data and file transfers). Time critical traffic commonly includes SIP signaling (VoIP call
setup/teardown) and IGMP signaling (IPTV channel change). The SmartRG line of gateways
prioritizes time critical traffic using the “Differentiated Services Code Point” field in the IP header
as defined by RFC 2474.
Traffic generated by LAN hosts such as VoIP phones, IPTV STBs and PCs is identified by “classifiers”
and placed into prioritization “queues.” Queues are emptied through the routed WAN connection
based on queue priority. Classifiers can identify traffic based on a number of criteria including:
source/destination MAC address, source/destination IP address, protocol, DSCP mark, etc. This
section describes a typical QoS configuration to prioritized upstream VoIP and IPTV traffic.
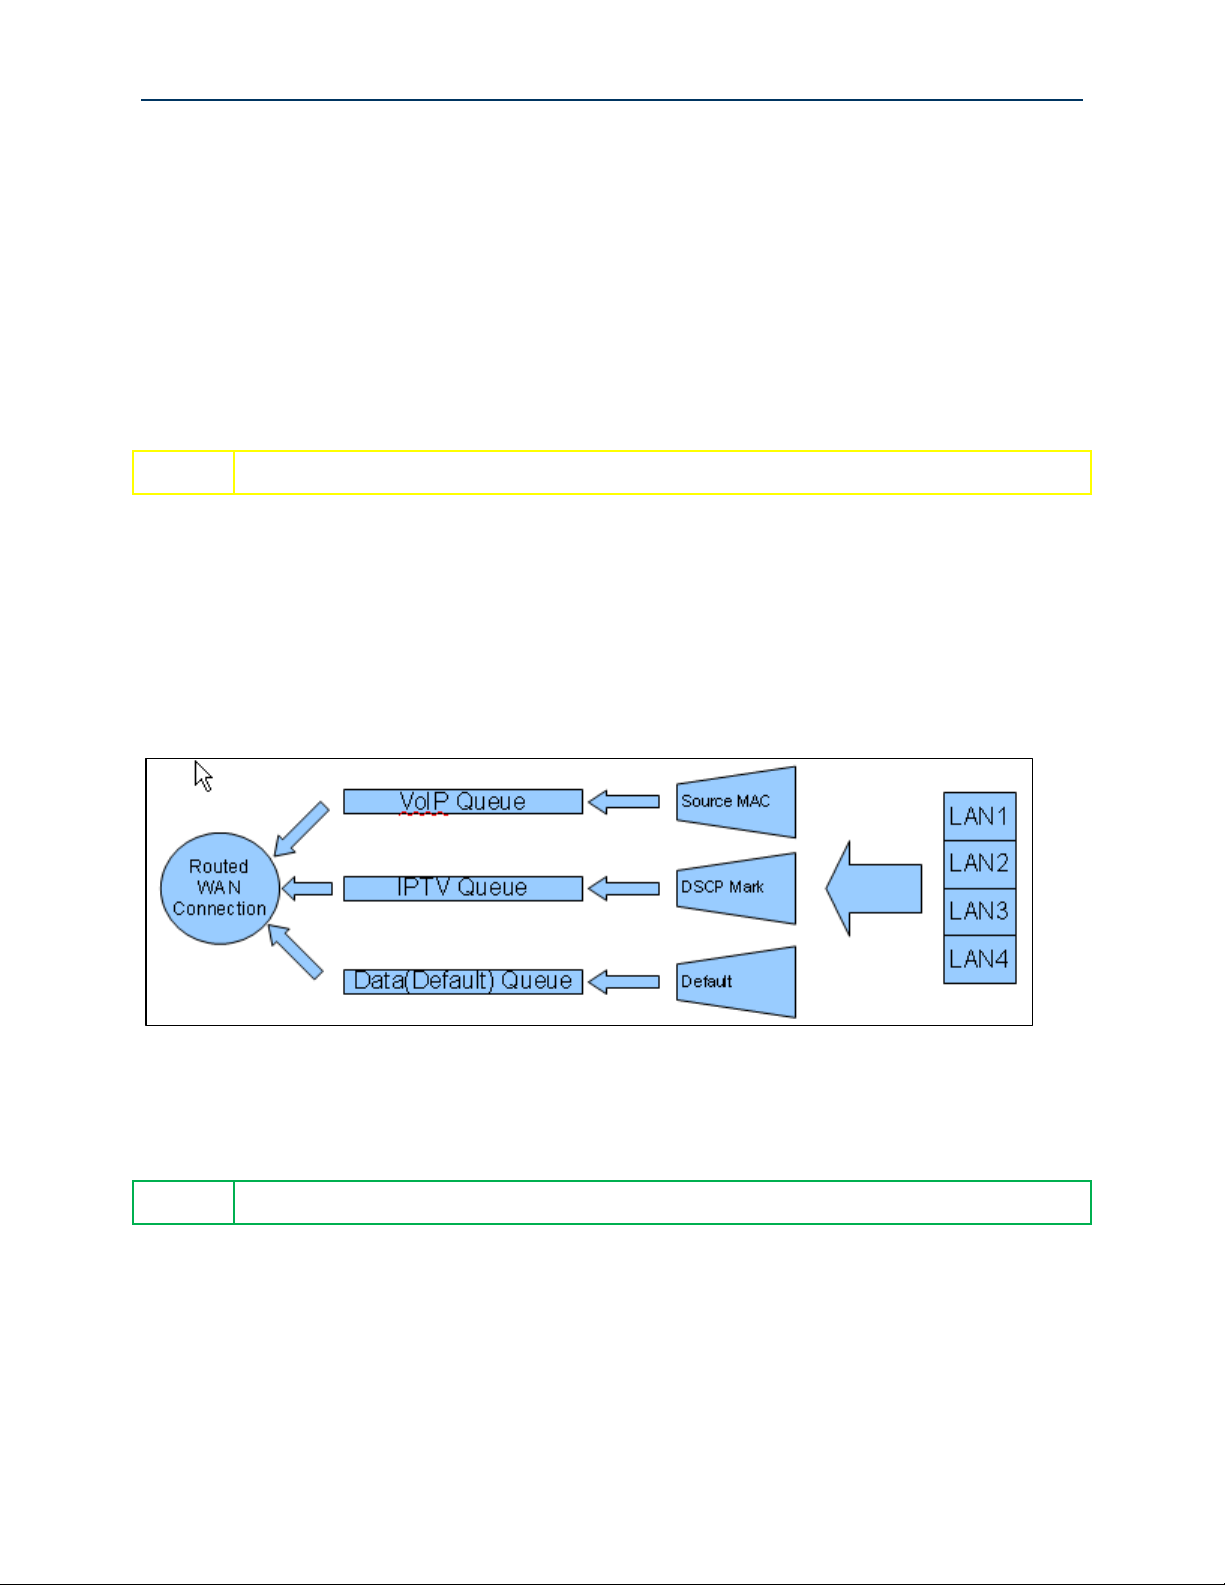
A typical VoIP/IPTV/data QoS configuration is shown below:
Figure 36 Typical QoS configuration to support VoIP and IPTV services
VoIP traffic is identified by its source MAC/Mask (VoIP user agent OUI) and IPTV traffic is identified
by the DSCP mark in its IP header. All remaining traffic is placed in the data (default) queue.
The QoS configuration process is comprised of three main steps:
Enable QoS on the routed WAN connection and enable QoS processing
Create traffic queues to prioritize the different types of traffic –and-
Create traffic classifiers to identify the different types of traffic
SmartRG © 2012 Confidential Page | 45
Page 46
SmartRG™ Residential Gateways
To configure the SmartRG’s QoS feature:
1. Ensure the layer 2 WAN interface “Enable Quality of Service” check box is checked as
detailed in the Layer 2 Interface configuration sections.
2. Select Advanced Setup -> Quality of Service -> QoS Config
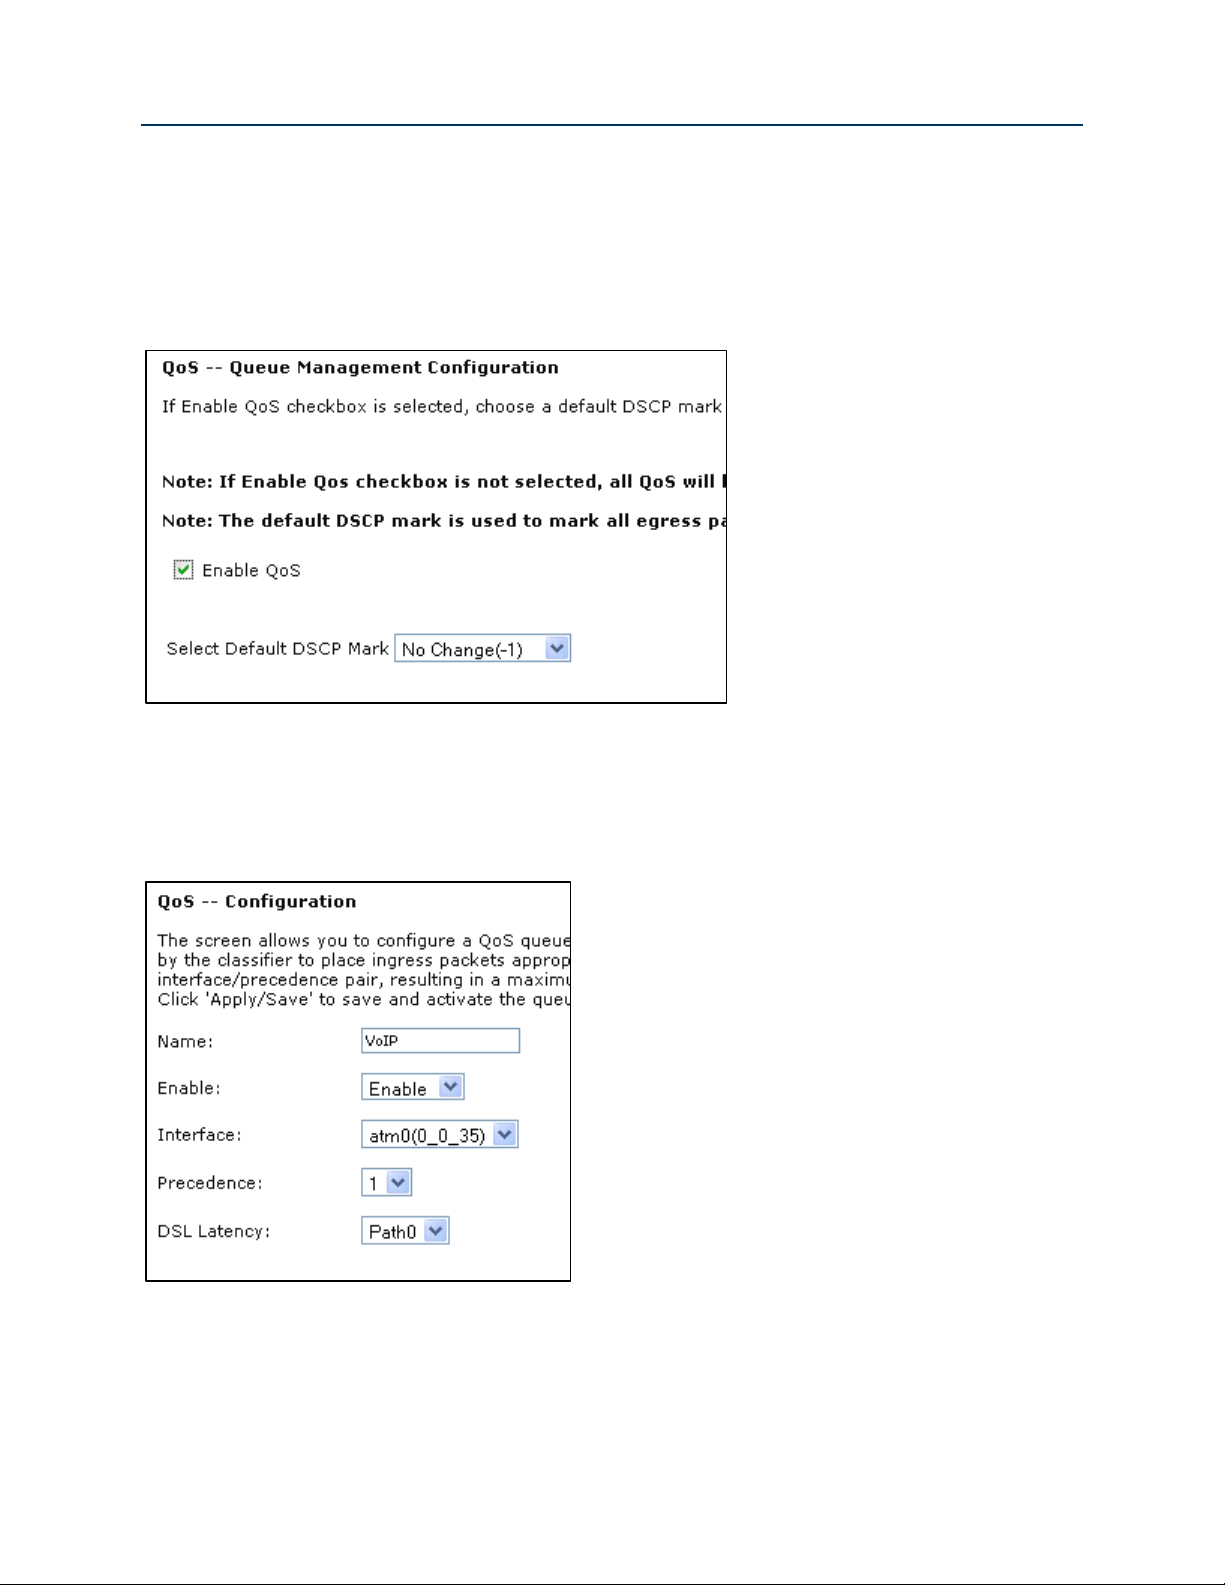
Figure 37 Enable the SmartRG's QoS Processing
3. Check “Enable QoS”, set the “Default DSCP Mark” to “No Change(-1)” and click Apply/Save.
4. Create the VoIP queue by selecting Advanced Setup -> Quality of Service -> QoS Queue
Config and click Add.
Figure 38 QoS: VoIP Queue Configuration
Page | 46 Confidential SmartRG © 2012
Page 47
Configuring Your SmartRG™ - Common Use Cases
IMPORTANT
NOTE
Select the routed WAN interface created in the “Creating the WAN Service” section.
NOTE
Lower values of “Precedence” indicate HIGHER priority.
IMPORTANT
NOTE
Again, select the routed WAN interface created in the “Creating the WAN Service”
section.
NOTE
IPTV traffic should be of LOWER priority (HIGHER Precedence value) than VoIP traffic.
5. Name, enable and select the WAN interface to be fed by this queue.
6. Select a “Precedence” of 1.
7. Leave the “DSL Latency” value set to Path0 and Click Apply/Save.
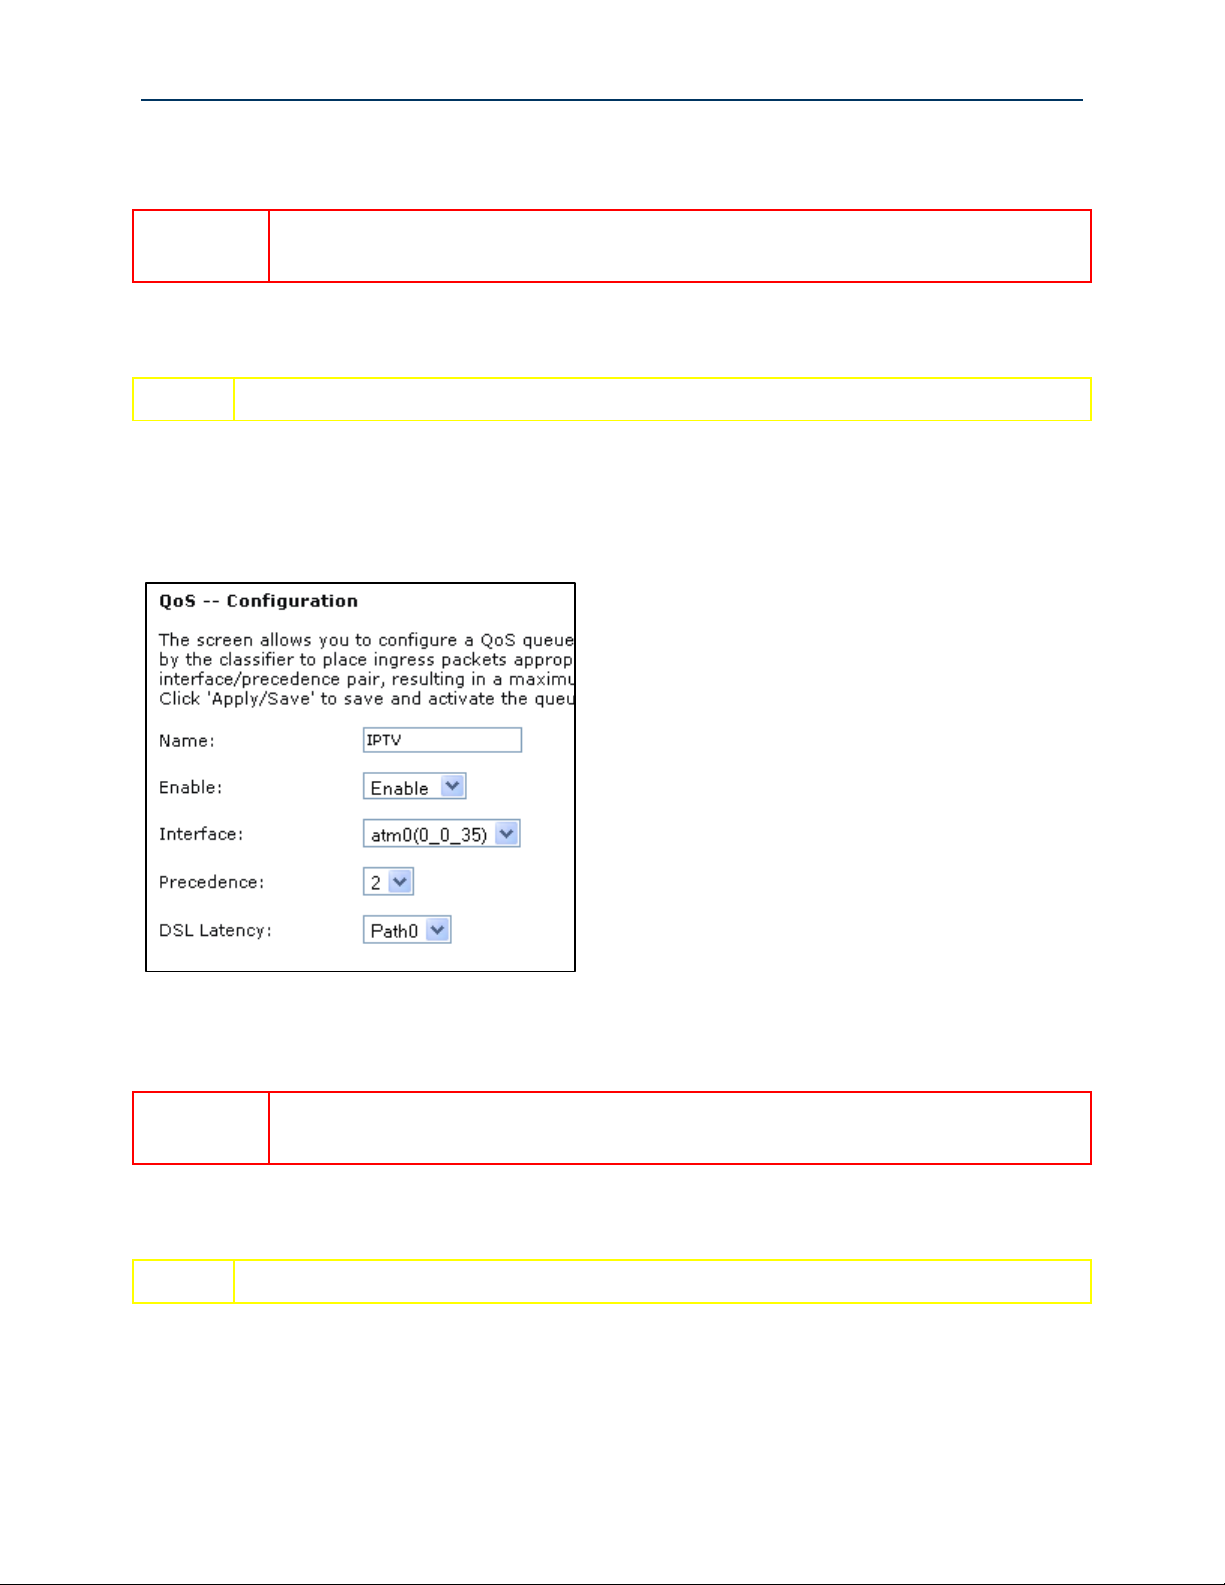
8. Create the IPTV queue by selecting Advanced Setup -> Quality of Service -> QoS Queue
Config and click Add.
Figure 39 QoS: IPTV Queue Configuration
9. Name, enable and select the WAN interface to be fed by this queue.
10. Select a “Precedence” of 2.
SmartRG © 2012 Confidential Page | 47
Page 48
NOTE
The default data queue depicted in the QoS architecture diagram above does not need
to be specifically created.
SmartRG™ Residential Gateways
11. Leave the “DSL Latency” value set to Path0 and Click Apply/Save.
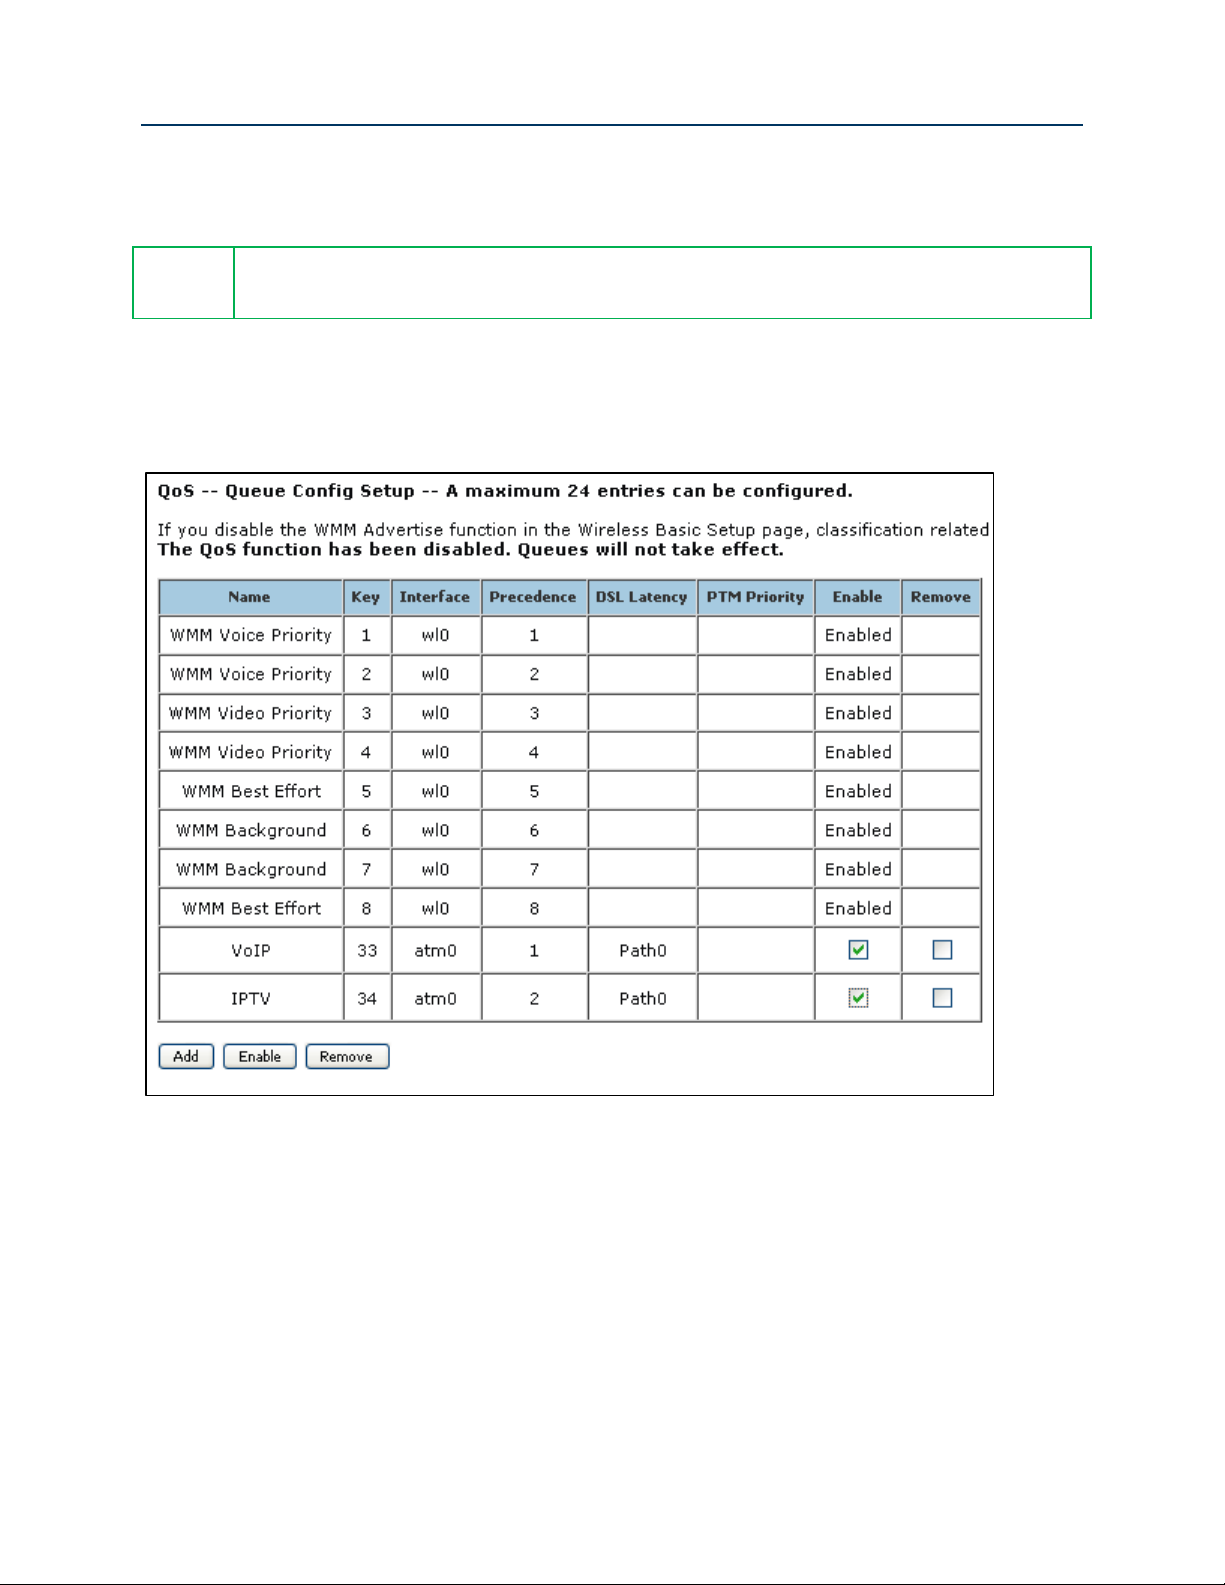
12. Enable the newly created queues by selecting Advanced Setup -> Quality of Service -> QoS
Queue Config, check the “Enable” boxes for the new queues and click Enable. The correct
queue configuration for VoIP and IPTV services should look like:
Figure 40 QoS Queue Enable
Page | 48 Confidential SmartRG © 2012
Page 49

Configuring Your SmartRG™ - Common Use Cases
IMPORTANT
NOTE
If you create the classifier rules in priority order (VoIP then IPTV), you may leave the
“Rule Order” set to “Last.” Each successive classifier rule created will become the
last one checked in the traffic identification process.
13. Create the VoIP traffic classifier by selecting Advanced Setup -> Quality of Service -> QoS
Classification and click Add.
Figure 41 QoS VoIP Classifier Configuration
14. Set the Name, Rule Order, and enable the classifier rule.
15. Select an “Ether Type” of IP (0x800).
16. Enter the source MAC and Mask values in 01:02:03:04:05:06/FF:FF:FF:00:00:00 format.
17. Assign the Classification Queue (identified by WAN interface&Precedence&Path).
18. Click Apply/Save.
SmartRG © 2012 Confidential Page | 49
Page 50

IMPORTANT
NOTE
If you create the classifier rules in priority order (VoIP then IPTV), you may leave the
“Rule Order” set to “Last.” Each successive classifier rule created will become the
last one checked in the traffic identification process.
NOTE
AF21 (DSCP18) is common for Mediaroom STBs.
SmartRG™ Residential Gateways
19. Create the IPTV traffic classifier by selecting Advanced Setup -> Quality of Service -> QoS
Classification and click Add.
Figure 42 QoS IPTV Classifier Configuration
20. Set the Name, Rule Order, and enable the classifier rule.
21. Select an “Ether Type” of IP (0x800).
22. Enter the “Differentiated Service Code Point (DSCP) Check” value.
Page | 50 Confidential SmartRG © 2012
Page 51
Configuring Your SmartRG™ - Common Use Cases
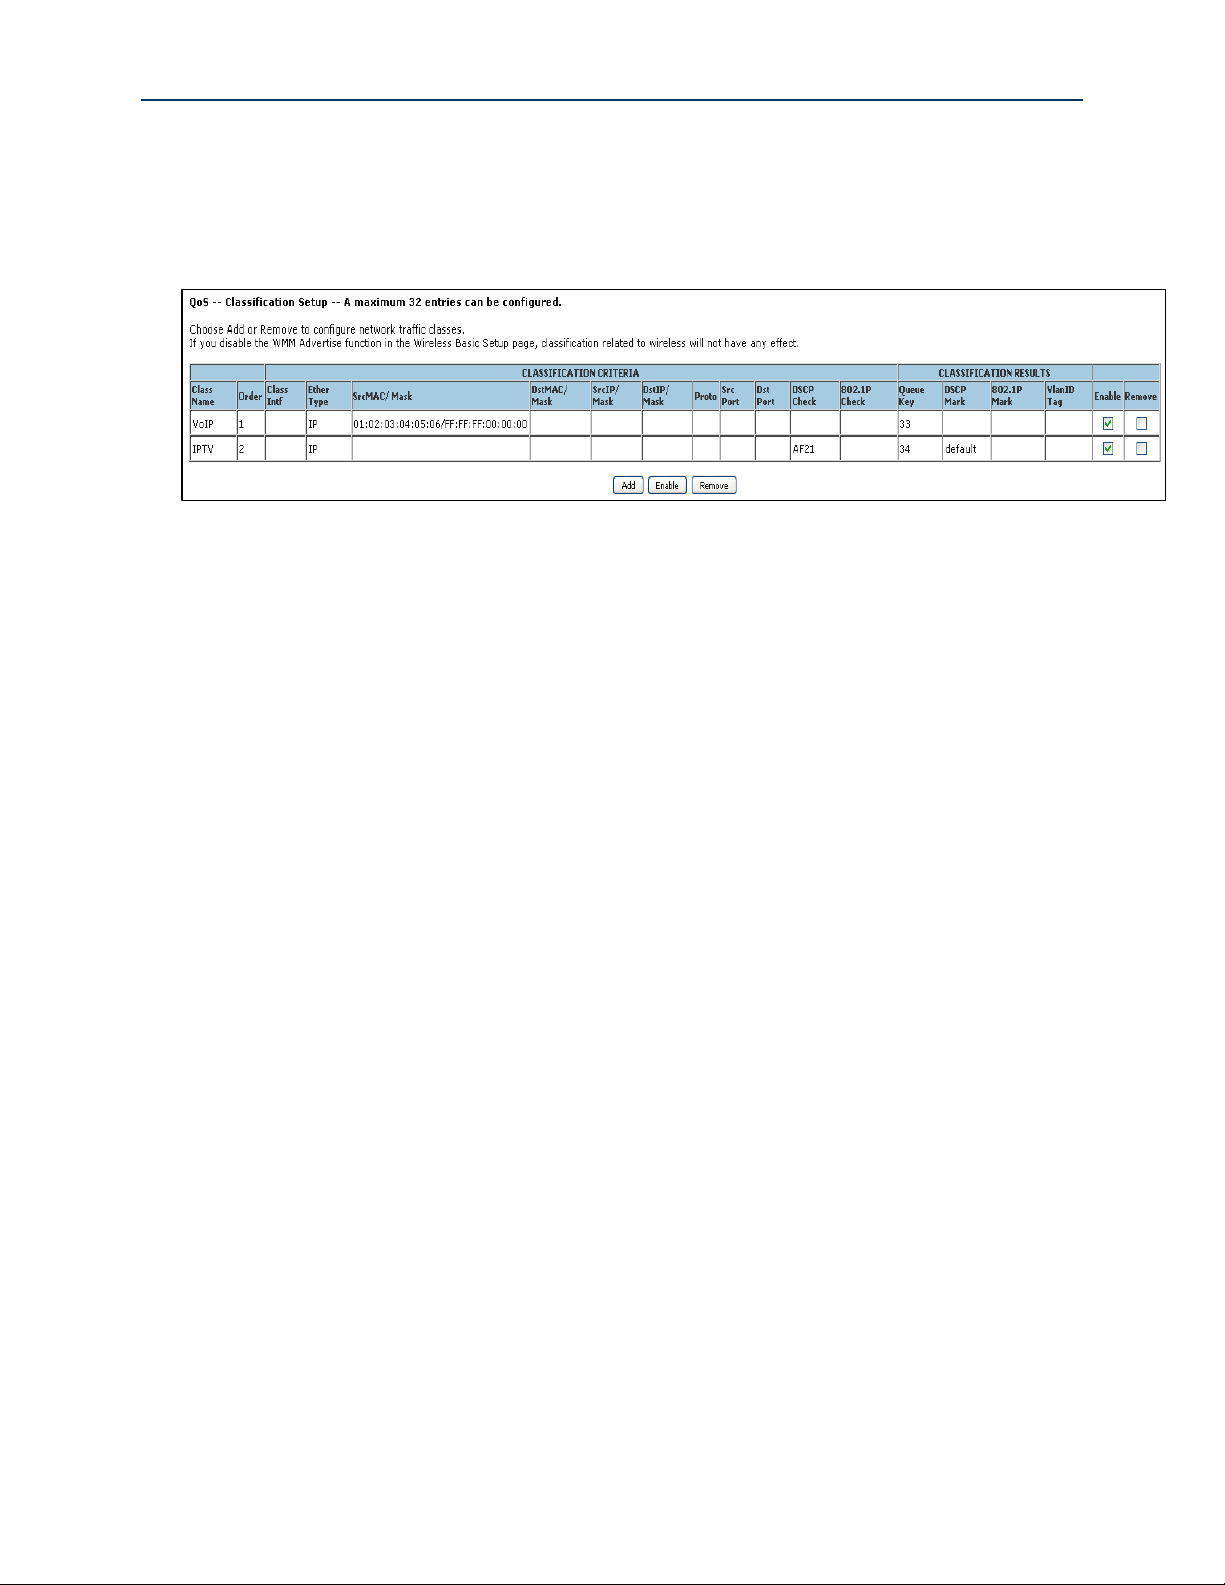
23. Assign the Classification Queue (identified by WAN interface&Precedence&Path).
24. Click Apply/Save. The correct classifier configuration for VoIP and IPTV services should look
like:
Figure 43 QoS VoIP and IPTV Classifier Config
The QoS configuration is now complete.
SmartRG © 2012 Confidential Page | 51
Page 52

NOTE
The software update process takes approximately 2 minutes to complete. Do NOT power
cycle the gateway until the software update process has completed.
SmartRG™ Residential Gateways
Managing Your SmartRG™ Gateway
Save, Restore or Default Configurations
To save the existing gateway configuration to your hard drive:
1. Select Management -> Settings -> Backup.
2. Click Backup Settings.
To restore a previously saved gateway configuration:
1. Select Management -> Settings -> Update.
2. Browse to find the saved config file on your hard drive (e.g. mySmartRGConfig.conf)
3. Click Update Settings.
To reset the gateway to factory default settings:
1. Select Management -> Settings -> Restore Defaults.
2. Click Restore Default Settings.
Update Software
To update the gateway’s software:
1. Select Management -> Update Software.
2. Browse to find the new gateway software on your hard drive (ex:
CA_D2.3.0.2010_04_12_09_07_16_SR300N_fs_kernel)
3. Click Update Software.
Page | 52 Confidential SmartRG © 2012
Page 53

Managing Your SmartRG™ Gateway
Configure Time Settings
To set the gateway’s time zone and NTP server settings:
1. Select Management -> Internet Time.
2. Select your time zone from the drop down list.
3. (Optional) Select the first, second … NTP servers from the drop down lists. (A custom NTP
server can be configured by selecting “Other” from the drop down list and entering the
custom URL.)
Figure 44 Time Zone and NTP Server Settings
4. Click Apply/Save.
SmartRG © 2012 Confidential Page | 53
Page 54

NOTE
For security reasons it is strongly recommended that WAN access to all services be
disabled accept during deployment or when troubleshooting.
SmartRG™ Residential Gateways
Configure Access Controls (HTTP, Telnet, SSH, etc.)
To enable/disable gateway management services such as HTTP, Telnet and SSH:
1. Select Management -> Access Control -> Services.
Figure 45 Enabling/Disabling HTTP, Telnet, SSH ... Access
2. Enable/disable LAN and/or WAN access to the various management services as desired .
3. Click Save/Apply.
Page | 54 Confidential SmartRG © 2012
Page 55

Managing Your SmartRG™ Gateway
Configure User Logins
SmartRG gateways support the following user roles:
- admin – unrestricted access by a PC connected to a LAN port
- support – unrestricted access by an ISP technician connected through the managed WAN
interface
To change user passwords:
1. Select Management -> Access Control -> Services.
2. Enter the username (admin/support).
3. Enter the old password and the new password.
4. Click Apply/Save.
SmartRG © 2012 Confidential Page | 55
Page 56

IMPORTANT
Pressing the reset switch for more than 6 seconds causes the SmartRG gateway to
reset into its boot image rendering the gateway non-functional. This condition can be
detected by:
the inability to access the SmartRG gateway’s user interface using your
web browser –and-
the inability to properly establish a WAN connection
To correct this condition simply cycle power on the gateway.
NOTE
Software resets, hardware resets and power cycles behave identically.
SmartRG™ Residential Gateways
Reset the Gateway
Hardware Reset
Reset the gateway by inserting a paper clip or similar tool into the reset switch hole located on
either the rear or the bottom of the gateway (depending upon model). Press the switch briefly to
reset the device.
Hardware Reset (to Factory Default Settings)
To reset the gateway to its factory default settings press the reset switch for 4 to 5 seconds starting
at power up. After releasing the reset switch the gateway will continue booting with a factory
default configuration.
Software Reset
To reset the gateway using the SmartRG gateway’s web UI:
1. Select Management -> Reboot.
2. Click Reboot.
Page | 56 Confidential SmartRG © 2012
Page 57

Troubleshooting
NOTE
Gateway logs can be sent to a remote server for storage. To configure the remote
“Mode” select “Remote” from the drop down list and configure the remote server’s IP
address and UDP port number.
Accessing System Logs
To configure the System Log for use during troubleshooting efforts:
1. Select Management -> System Log.
2. Click Configure System Log.
Troubleshooting
Figure 46 Configuring the System Log for Use In Troubleshooting
3. Select the “Log Level” from the drop down list. “Debugging” provides the greatest level of
log detail.
4. Select the “Display Level” from the drop down list. “Debugging” provides the greatest level
of display detail.
5. Click Apply/Save.
SmartRG © 2012 Confidential Page | 57
Page 58

SmartRG™ Residential Gateways
Executing Diagnostics
To execute the SmartRG’s interface diagnostics:
1. Select Diagnostics.
Page | 58 Confidential SmartRG © 2012
Page 59

Technical Support
For technical support contact:
Support
Monday – Friday, 5am-6pm Pacific Time (UTC-8:00)
1-360-859-1780
1-877-486-6210 (Toll free from the US & Canada)
support@smartrg.com
Technical Support
SmartRG © 2012 Confidential Page | 59
 Loading...