

Page 1

USB BlueOpal Adapter
User Guide
Version Number: 2.1
Page 2

Page 3

BluePC User Manual
Copyright
©Copyright 2002 SMART Modular Technologies, Inc. All right reserved..
No part of this work may be reproduced, copied, (electronically, me chanically or otherwise), stored in a retrieval syste m, or transmitted in
any form or by any means, mechanical, electronic, photocopying, recording, or used to make a derivative work (such as translation,
transformation, or adaptation) or otherwise, without the permission of SMART Modular Technologies, Inc. except as permitted by the
amended United States Copyright Act of 1976.
Trademarks
SMART and SMART Modular logo are trademarks of SMART Modular Technologies
Impulsesoft, Impulsesoft logo, BluePC, BlueConfig, BlueTransfer, and BlueExplore are trademarks of Impulsesoft.
Microsoft, Windows, Windows NT, and Windows for Workgroups are registered trademarks of Microsoft Corporation.
Bluetooth is a trademark owned by Bluetooth SIG, Inc. and is used by SMART Modular Technologies under license.
All other products or name brands are trademarks of their respective holders.
Page 4

BluePC User Manual
Contents
ABOUT THIS BOOK...............................................................................................................6
D
OCUMENT CONVENTIONS......................................................................................................................6
CHAPTER 1 INTRODUCTION.............................................................................................7
CHAPTER 2 INSTALLING BLUEPC....................................................................................8
2.1 S
YSTEM REQUIREMENTS....................................................................................................................8
2.2 I
NSTALLING BLUEPC.........................................................................................................................8
CHAPTER 3 GETTING STARTED......................................................................................16
CCESSING BLUEPC.........................................................................................................................16
3.1 A
3.1.1 Post Installation.........................................................................................................................16
LEMENTS OF BLUEPC....................................................................................................................17
3.2 E
3.2.1 BluePC Wizard.........................................................................................................................17
3.2.2 Bluetooth-enabled Windows Explorer.........................................................................................19
3.2.3 Bluetooth Manager.....................................................................................................................20
3.2.4 BluePC Preferences.....................................................................................................................21
ETUP PREFERENCES .......................................................................................................................22
3.3 S
3.3.1 BluePC Preferences Wizard.......................................................................................................23
3.3.2 General tab................................................................................................................................27
3.3.3 Services Tab...............................................................................................................................28
3.3.4 Security Tab...............................................................................................................................40
3.3.5 Advanced Tab ...........................................................................................................................42
CHAPTER 4 USING BLUEPC..............................................................................................43
4.1 A
CCESS THE NETWORK ...................................................................................................................43
4.1.1 Locate the Network Access Service.............................................................................................43
4.1.2 Set up Connection ......................................................................................................................53
4.2 T
RANSFER FILES................................................................................................................................58
4.2.1 Using the Transfer File Menu Option........................................................................................58
Page 5

BluePC User Manual
4.2.2 Using the Bluetooth-enabled Windows Explorer.........................................................................61
XCHANGE BUSINESS CARDS.........................................................................................................66
4.3 E
4.3.1 Send Business Cards..................................................................................................................66
4.3.2 Receive Business Cards...............................................................................................................67
RINT FILES........................................................................................................................................69
4.4 P
4.4.1 Using BluePC Wizard..............................................................................................................69
4.4.2 Using Bluetooth-enabled Windows Explorer ..............................................................................74
4.4.3 Print to a Standalone Printer.....................................................................................................75
4.5 S
YNCHRONIZE PDAS WITH YOUR PC...........................................................................................81
4.5.1 Add a Serial Port Service...........................................................................................................81
4.5.2 Setup the PDA to use the Serial Port Service.............................................................................81
4.5.3 Synchronize your PDA..............................................................................................................81
4.6 W
IRELESS CONFERENCING SCENARIO.........................................................................................86
4.6.1 Setup the Host Computer...........................................................................................................86
4.6.2 Set up the Guest Computer ........................................................................................................90
4.6.3 Use an already setup Wireless Conference Scenario.....................................................................97
4.7 S
END A FAX........................................................................................................................................99
ISTEN TO MUSIC........................................................................................................................... 104
4.8 L
4.8.1 Setup your Computer as a Audio Gateway.............................................................................. 104
4.8.2 Connect to the Audio Device................................................................................................... 109
CHAPTER 5 TROUBLESHOOTING BLUEPC.................................................................110
APPENDIX A UNINSTALLING BLUEPC........................................................................115
APPENDIX B BLUEEXPLORE ICONS............................................................................117
APPENDIX C DISABLING “DIGITAL SIGNATURE NOT FOUND”...........................118
APPENDIX D SUPPORTED OS, PROFILES, AND PROTOCOLS ................................120
APPENDIX E REGULATORY INFORMATION .............................................................121
APPENDIX F DECLARATION OF COMPLIANCE........................................................123
Page 6

BluePC User Manual
About this Book
The BluePC user manual contains instructions on how to configure and use BluePC. It has the
following sections:
• Chapter 1 Introduction – This section gives an introduction to BluePC, and describes the key
features.
• Chapter 2 Installing BluePC – This section lists the minimum system requirements, and
describes the installation procedure.
• Chapter 3 Getting Started – This section describes the elements of B luePC, the methods of
accessing BluePC, and the procedures for configuring BluePC preferences.
• Chapter 4 Using BluePC – This section is a tutorial on how BluePC can be used to set up
wireless connections to access the network, browse the Internet, fax information.
• Appendix – This section lists the supported OS, profiles, protocols, and icons used.
Document Conventions
This document uses the following conventions.
Appearance Description
Option
Screen name Screen/dialog name
Means that this is an option that needs to be selected.
Means reader take note. Notes contain helpful suggestions or references to
material not covered in the guide.
Means caution. These are caveats to users that you need to be carefu l of the
response that you give, or the action that you perform. For example, if an
option is not selected the required action will not be performed.
It is a tip for saving time. Means the action describes an operation that the
reader can perform to save time.
About this Book 6
Page 7

BluePC User Manual
Chapter 1 Introduction
Impulsesoft's BluePC™ is a high-performance, versatile Bluetooth solution for Windows. It helps
end-users to seamlessly transition from a wired experience to a wireless experience. BluePC has been
certified for Bluetooth specification version 1.1.
BluePC™ enables a wireless connection between your computer and other Bluetooth devices. For
example, BluePC will help you:
• Transfer files
• Print information
• Browse the Internet
• Send or receive a fax
• Synchronize mobile and hand-held computer devices
Every MS-Windows Legacy Application, be it Direct Cable Connection or Dial-up Networking or
NetMeeting, can now be used with the Bluetooth device connected to your computer.
Before you begin using BluePC, review the following terms that will be used through out the manual.
Term Definition
Bluetooth Address Unique identifier of a Bluetooth device.
Device Name This is the name used by BluePC to identify your device in the Bluetooth
Neighborhood.
Service Is the capability of a Bluetooth device through which the other Bluetooth
devices can access the Internet, local area network, or other resources.
Host The device that acts as a “source of services” and provides guests with the ability
to use these services.
Guest The device that utilizes services provided by the host.
Introduction 7
Page 8
BluePC User Manual
Chapter 2 Installing BluePC
2.1 System Requirements
This section lists the requirements that need to be met before you install BluePC.
• Pentium class personal computer
• 64 MB RAM
• 16 MB of free disk space
• Bluetooth Hardware
• Windows 2000, Windows XP, Windows Millennium Edition, Windows 98 Second Edition
Note: Th e user needs to have administrator p rivileges on the system to in stall and
use BluePC.
2.2 Installing BluePC
1. Insert BluePC™ CD-ROM into the CD-ROM drive.
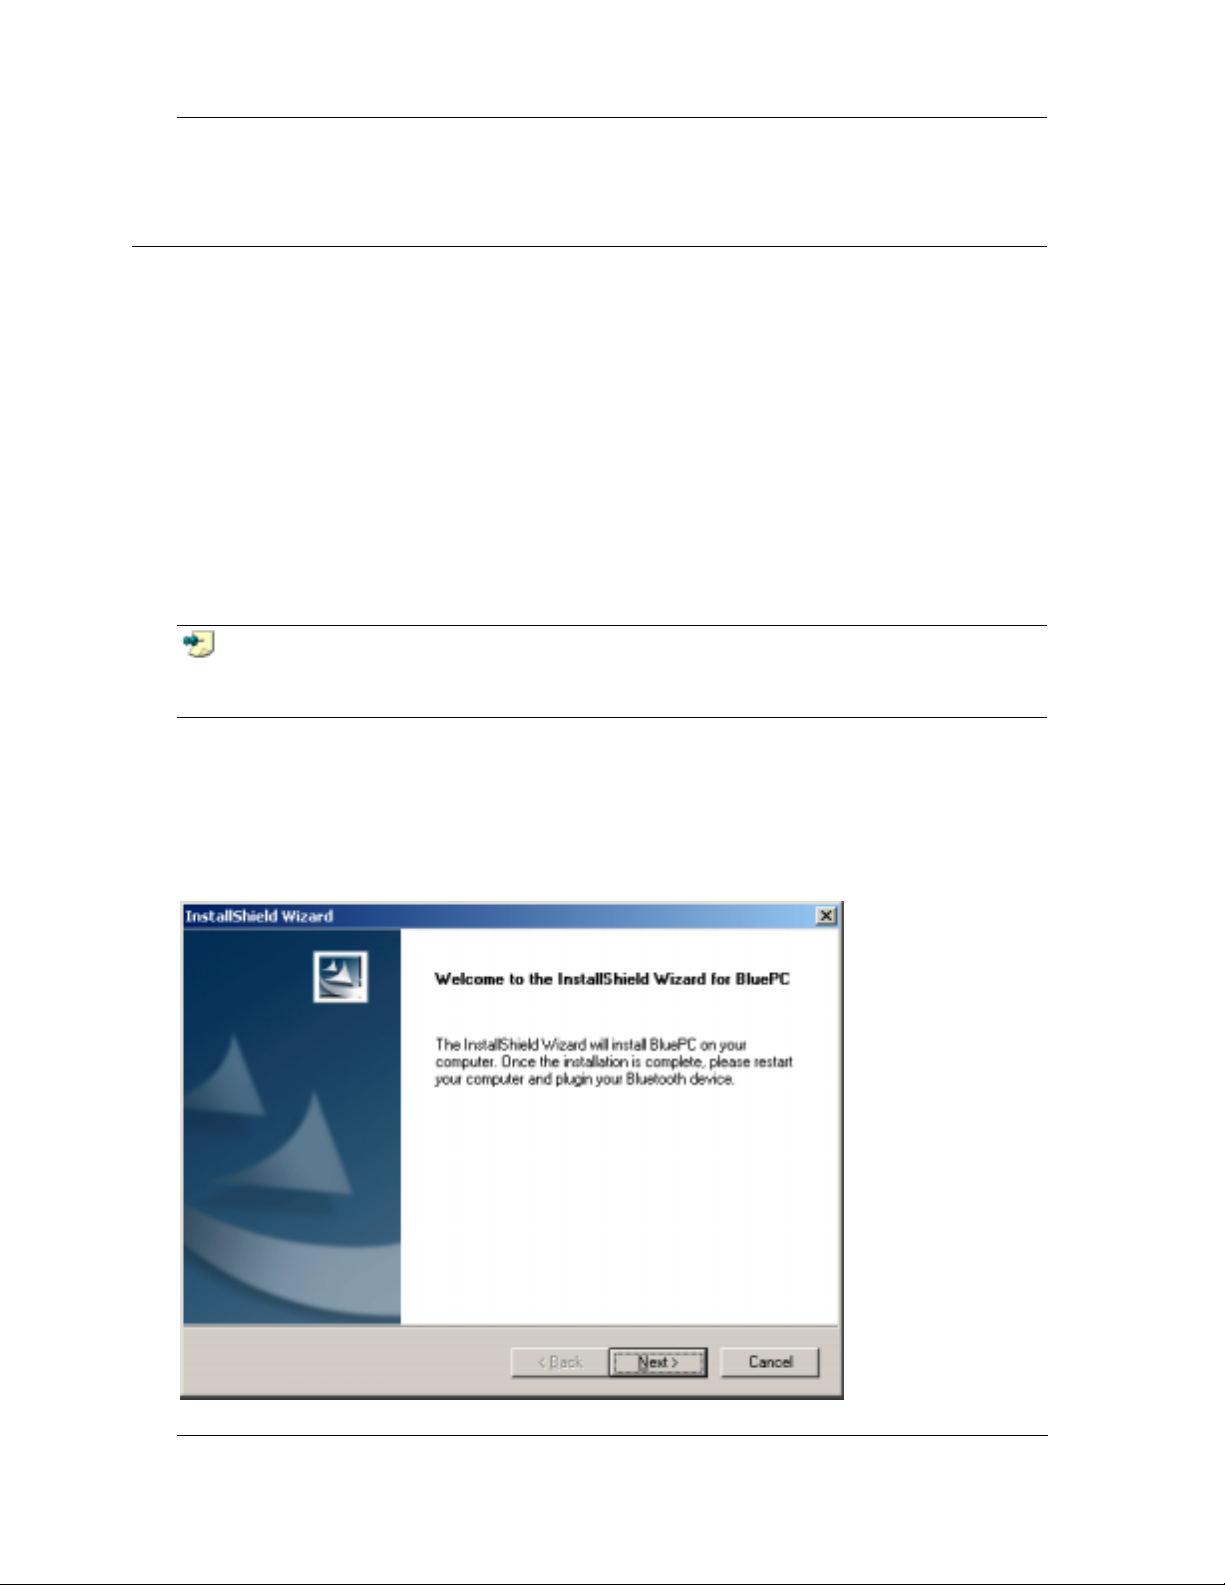
2. Execute the BluePC.exe file that is present on the BluePC CD-ROM. The Welcome window is
displayed.
Figure 1. Welcome screen
Installing BluePC 8
Page 9
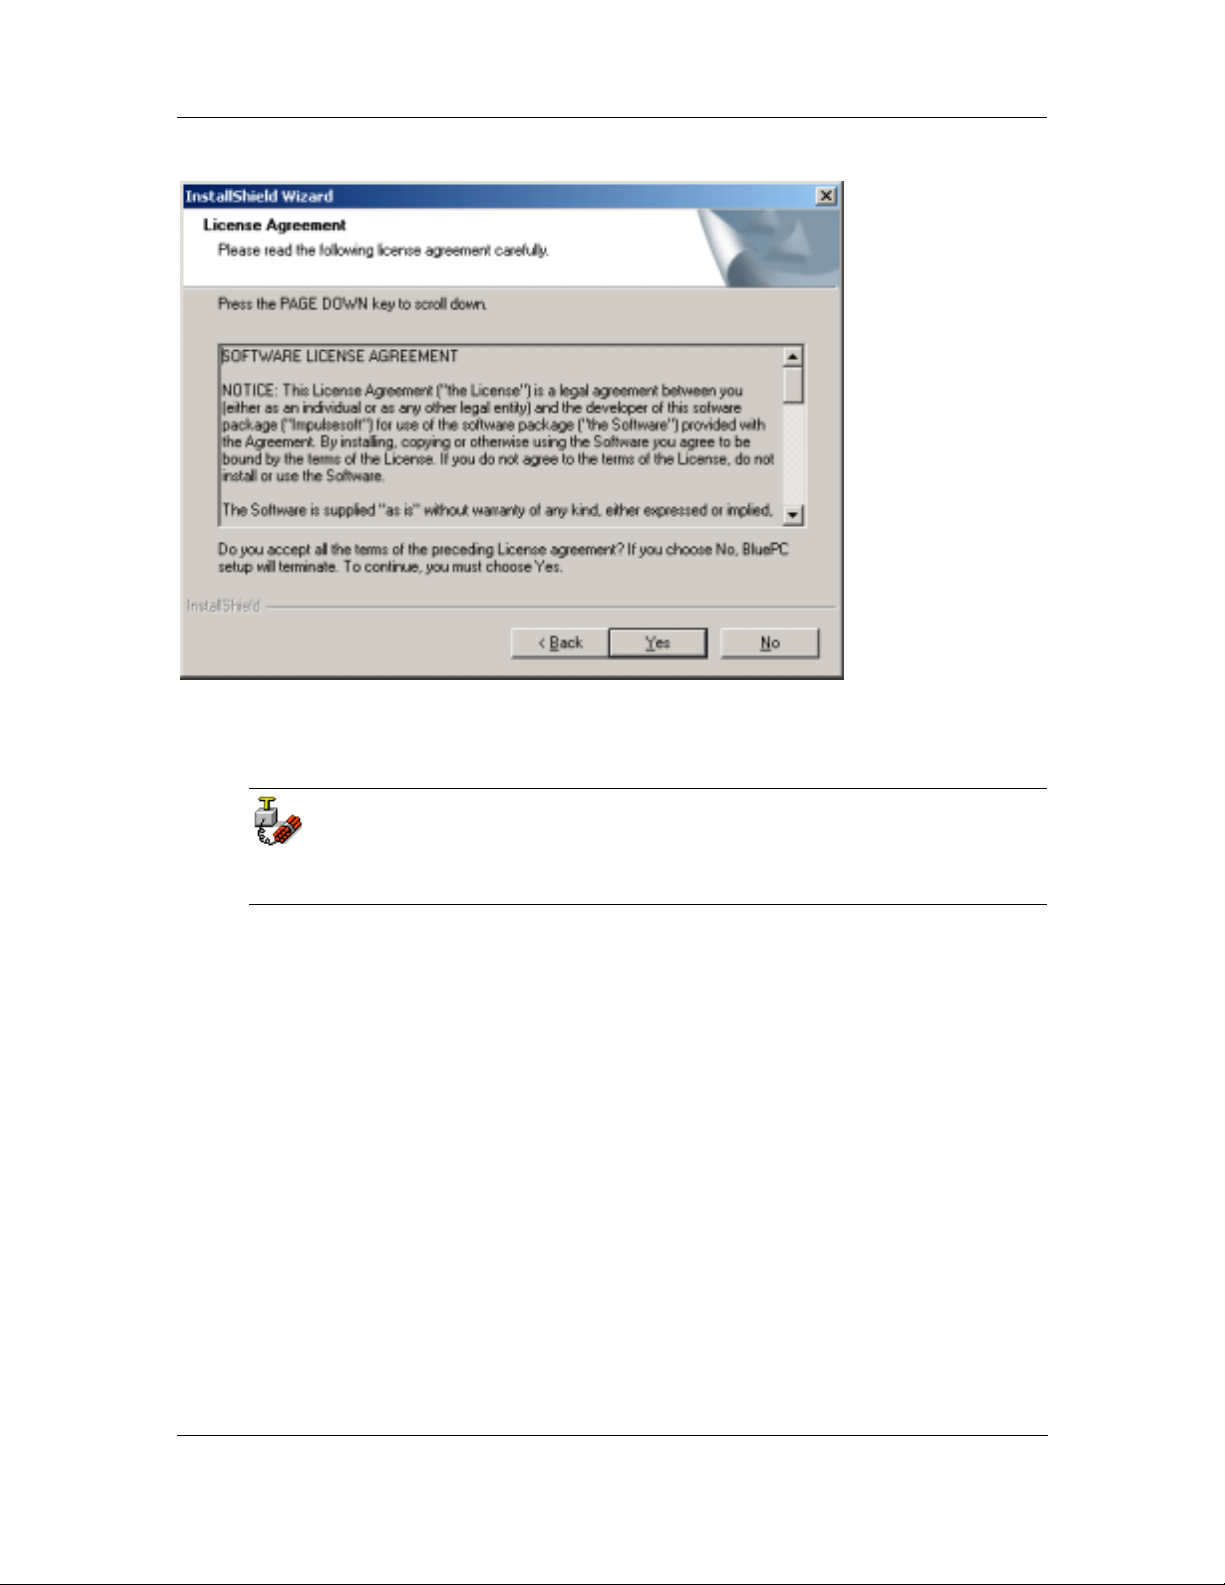
3. Click Next. The License Agreement screen is displayed.
BluePC User Manual
Figure 2. License Agreement
4. If you accept all the terms of the license agreement, click Yes to proceed. If you do not accept
all the terms of the license agreement, click
No.
Caveat: To continue installation, it is mandatory to agree to the terms of the L icense
Agreement.
Installing BluePC 9
Page 10
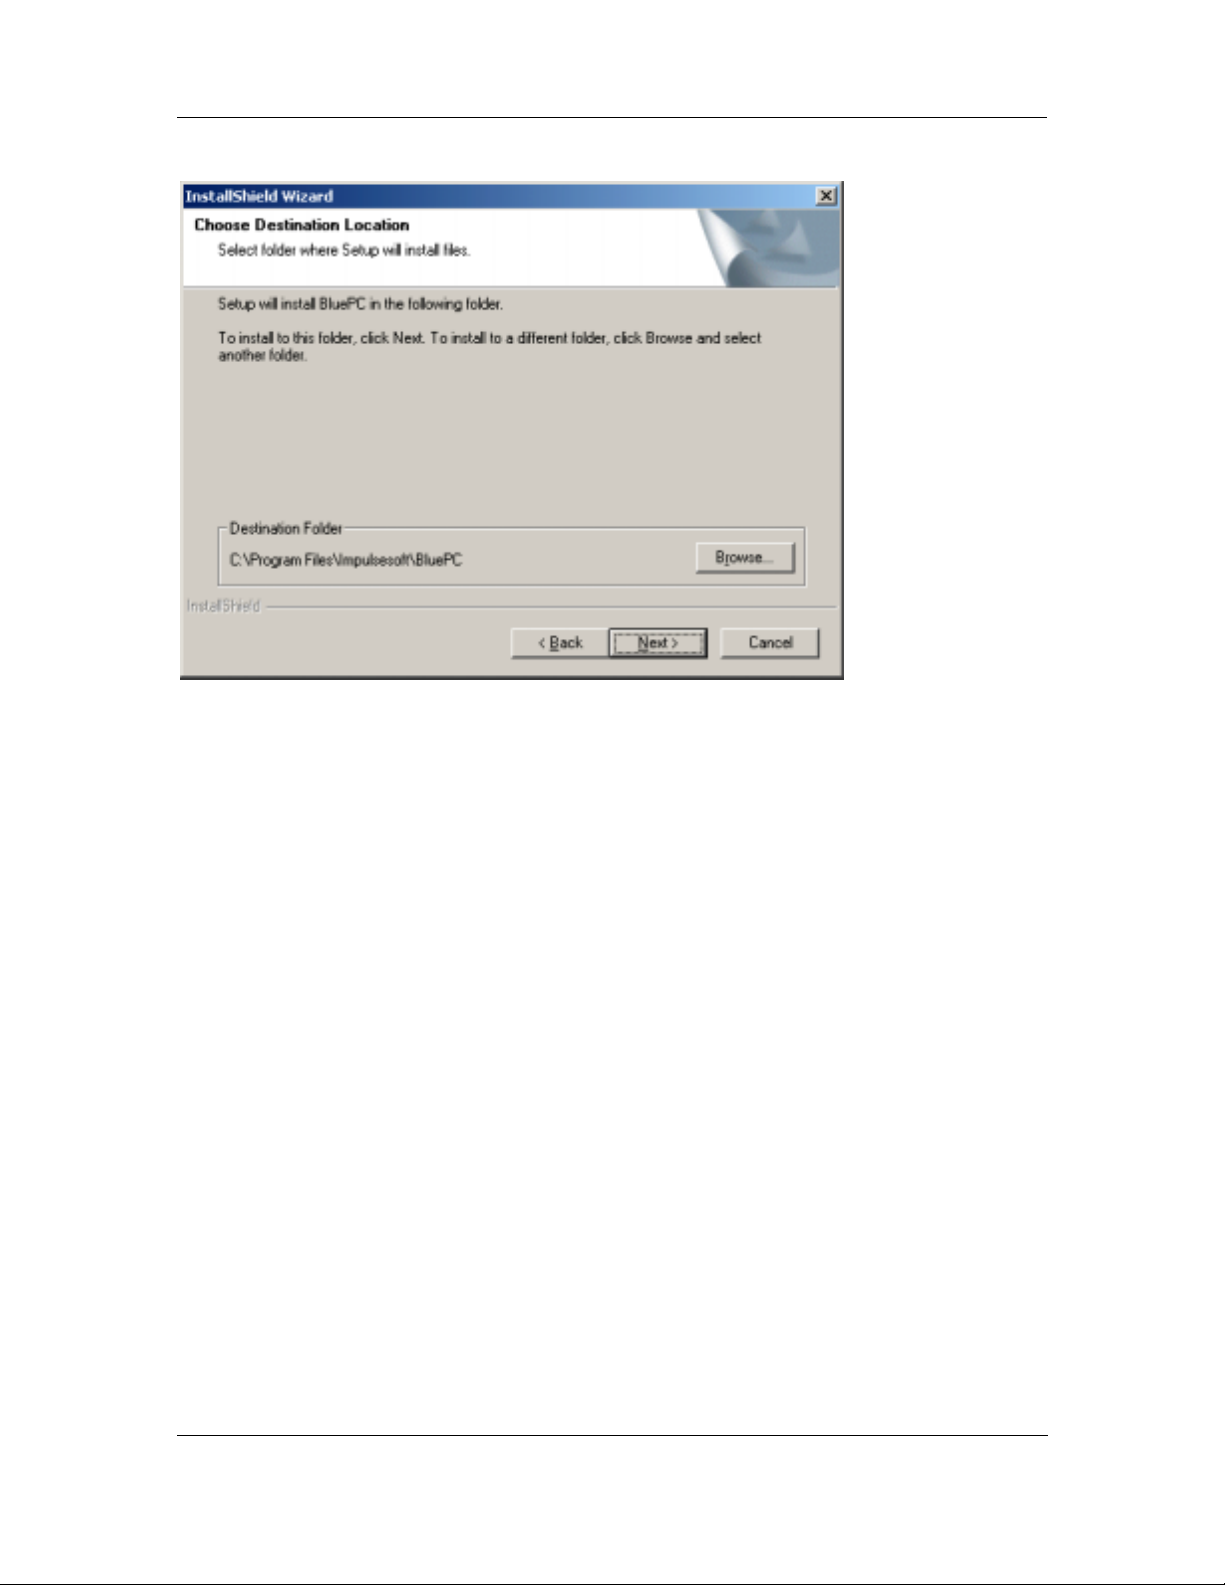
5. Click Next. The Choose Destination Location window appears.
BluePC User Manual
Figure 3. Destination Folder
Installing BluePC 10
Page 11
BluePC User Manual
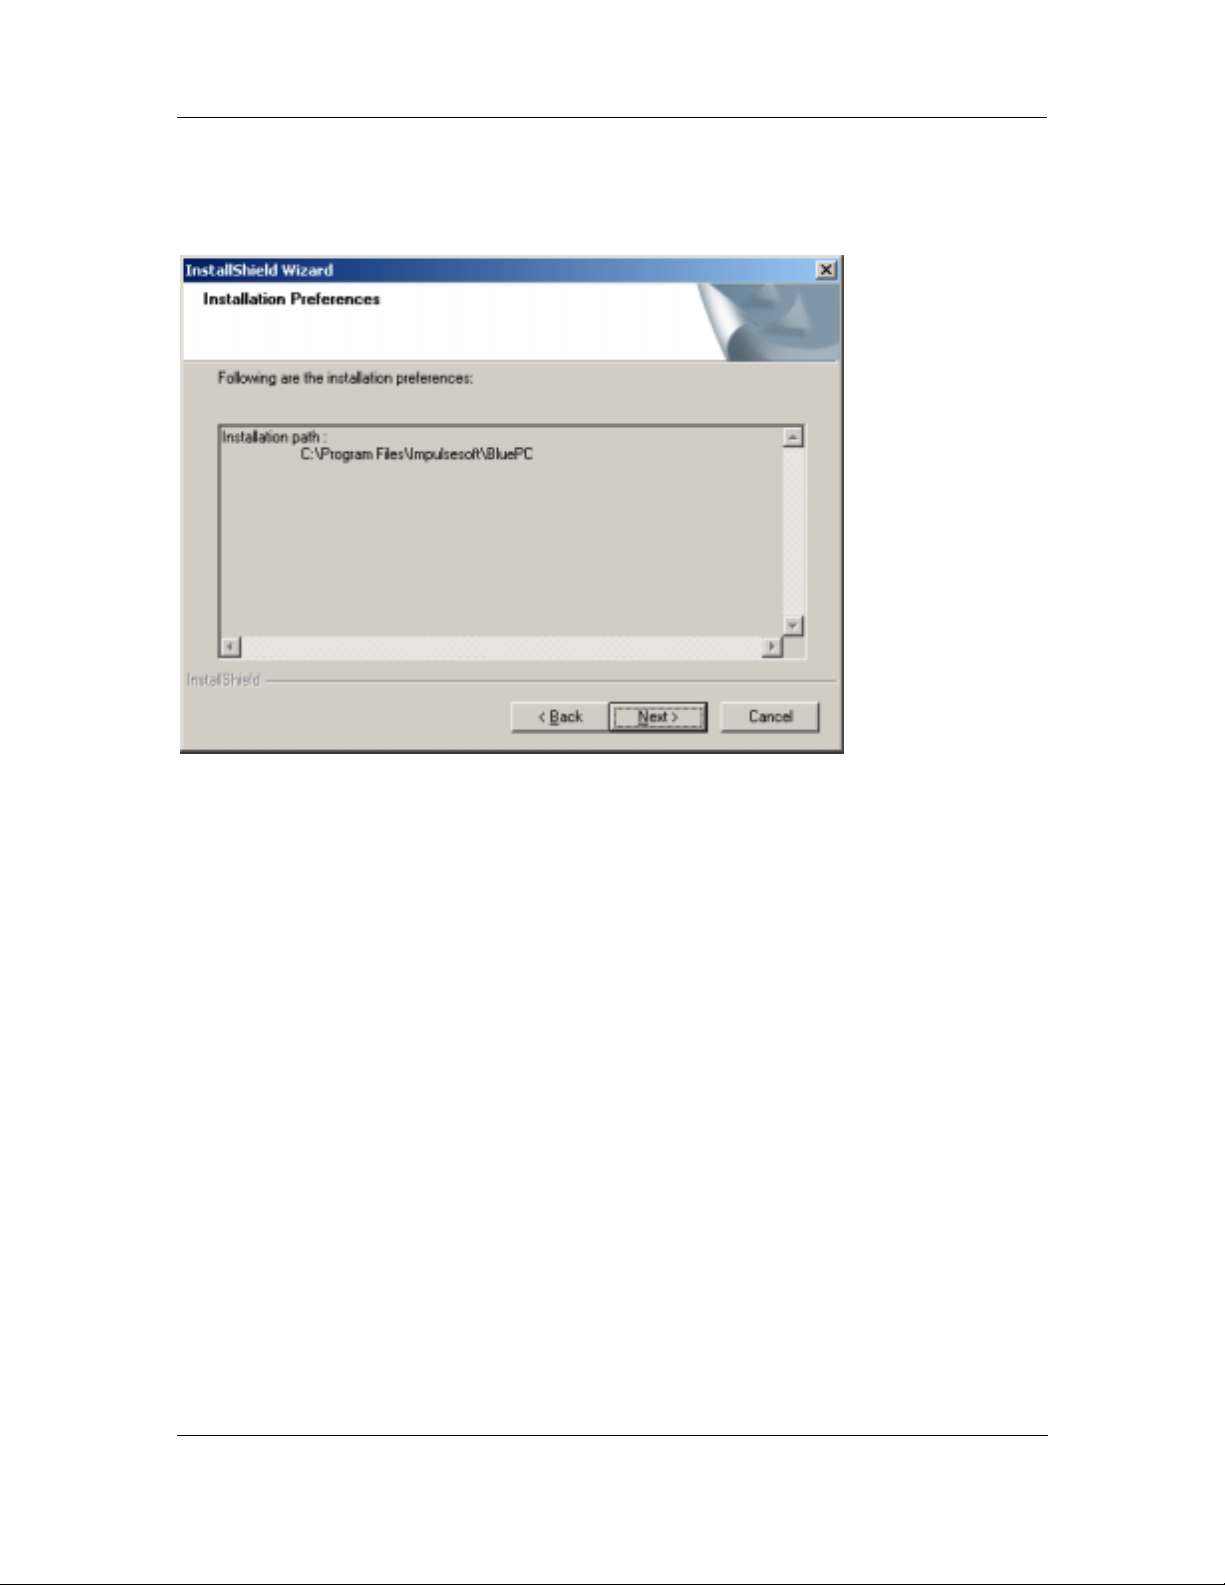
6. By default, BluePC is installed in the Program Files\Impulsesoft\BluePC folder. To change
the destination folder, click
Browse and select the required folder. Click Next to proceed. The
Installation Preferences window appears.
Figure 4. Installation Preferences
Installing BluePC 11
Page 12
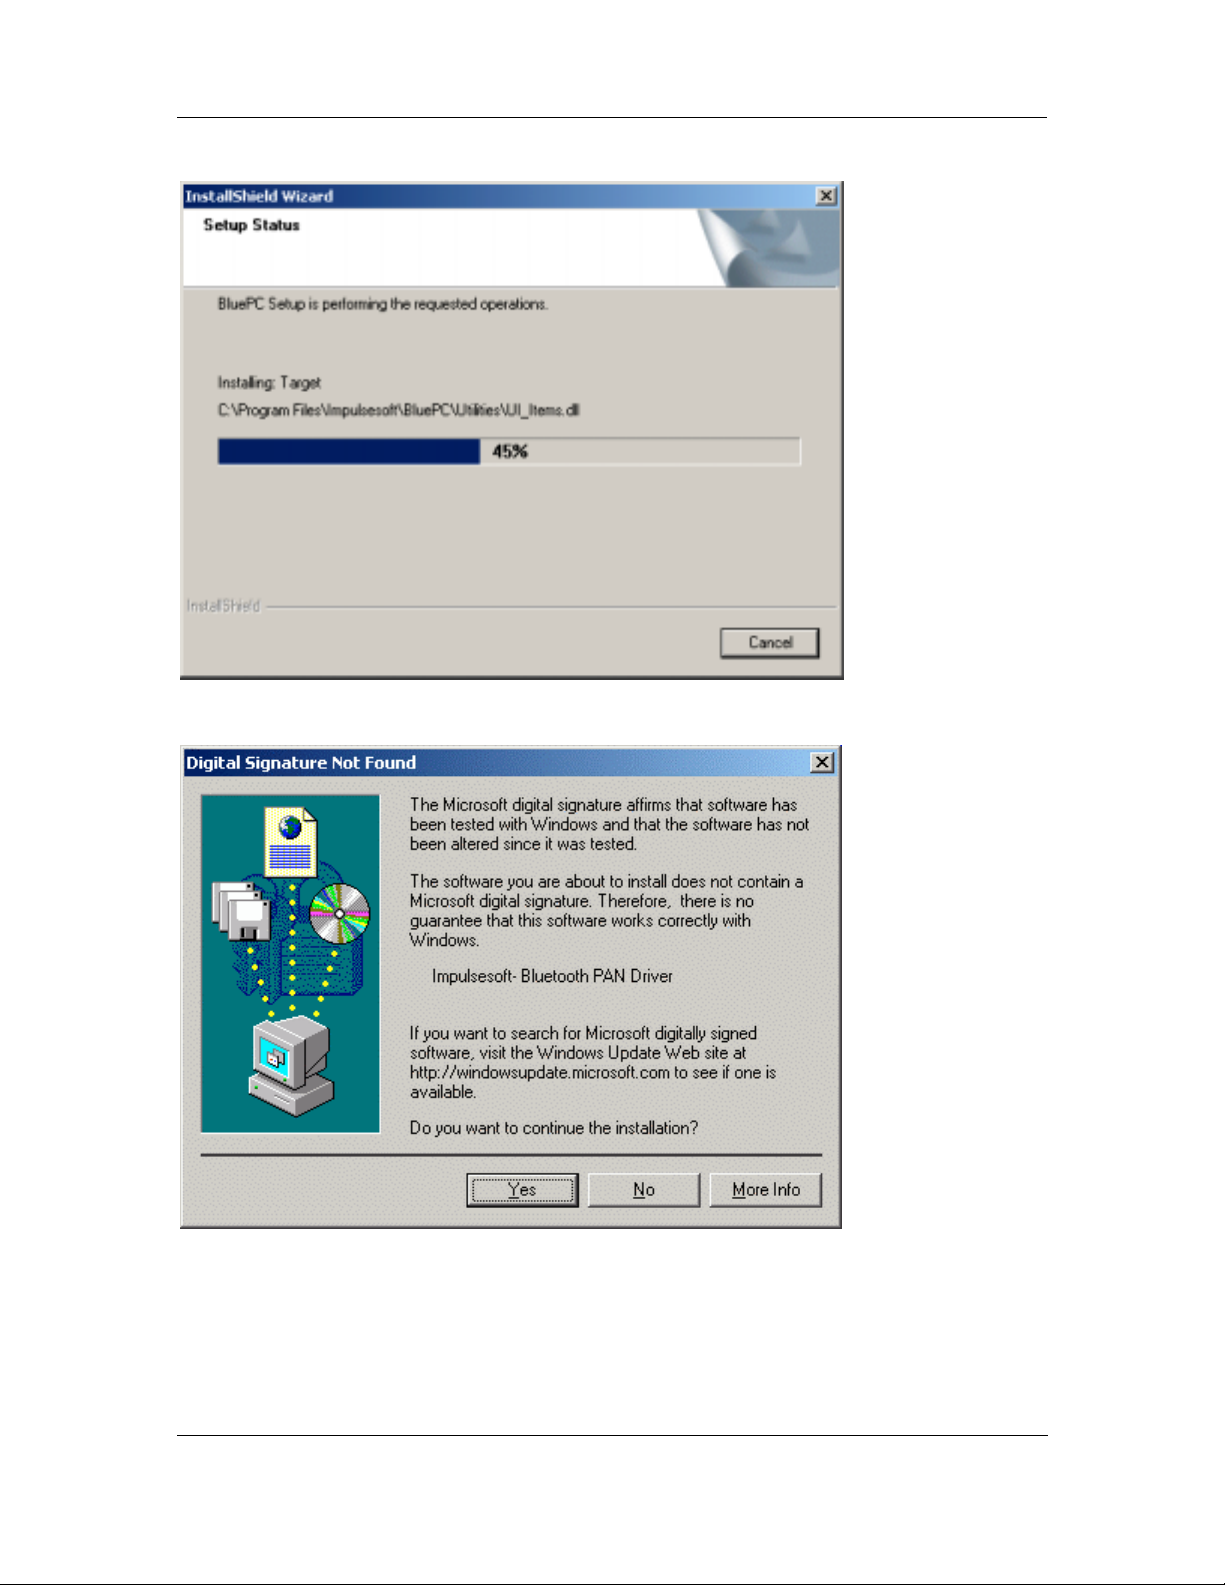
7. Click Next to proceed. The Setup Status windows appears.
BluePC User Manual
Figure 5. Setup Status
8. After all the files are copied, the following screen is displayed:
Figure 6. Digital Signature Not Found
Installing BluePC 12
Page 13
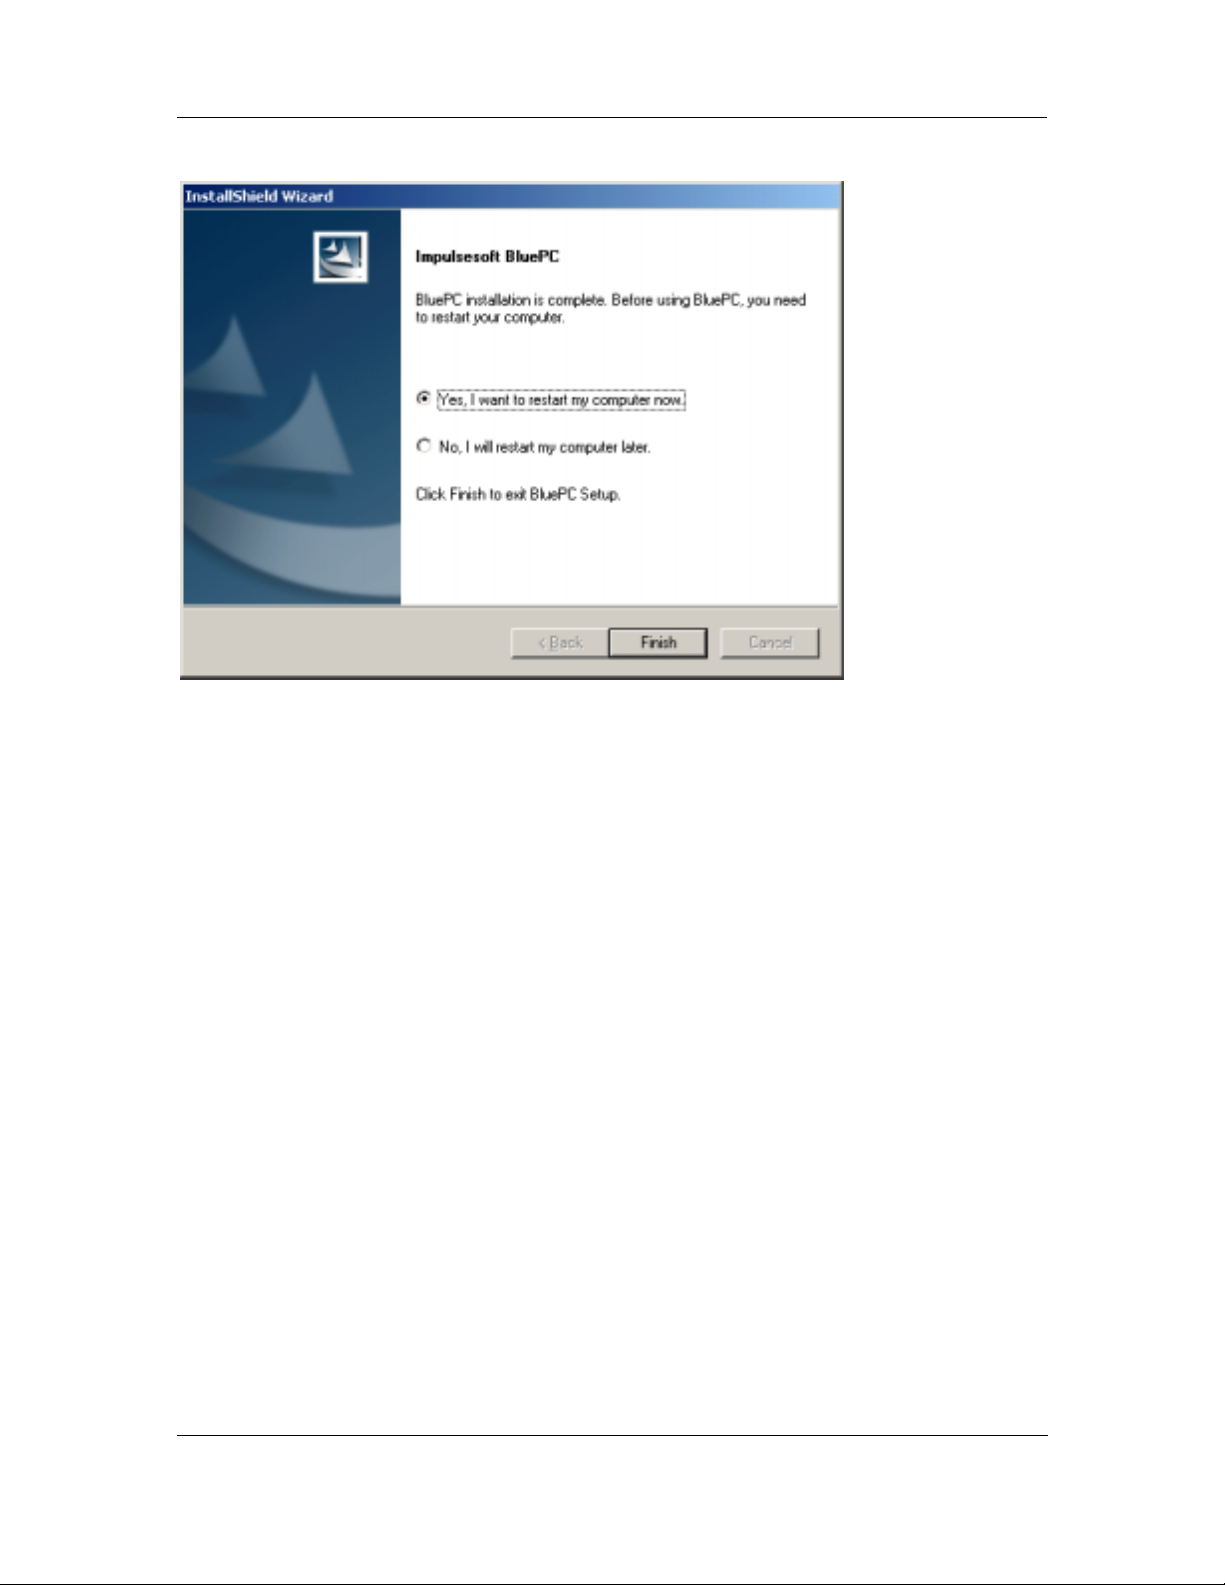
9. Click Yes. The Installation Complete screen is displayed.
BluePC User Manual
Figure 7. Installation Complete
10. If you want to start using BluePC immediately, you need to restart your computer. Select the Yes, I
want to restart my computer now
restart my computer later
option and click Finish.
option and click Finish. Or, you can choose the No, I will
After you have restarted the computer, plug-in your Bluetooth device.
Installing BluePC 13
Page 14
BluePC User Manual
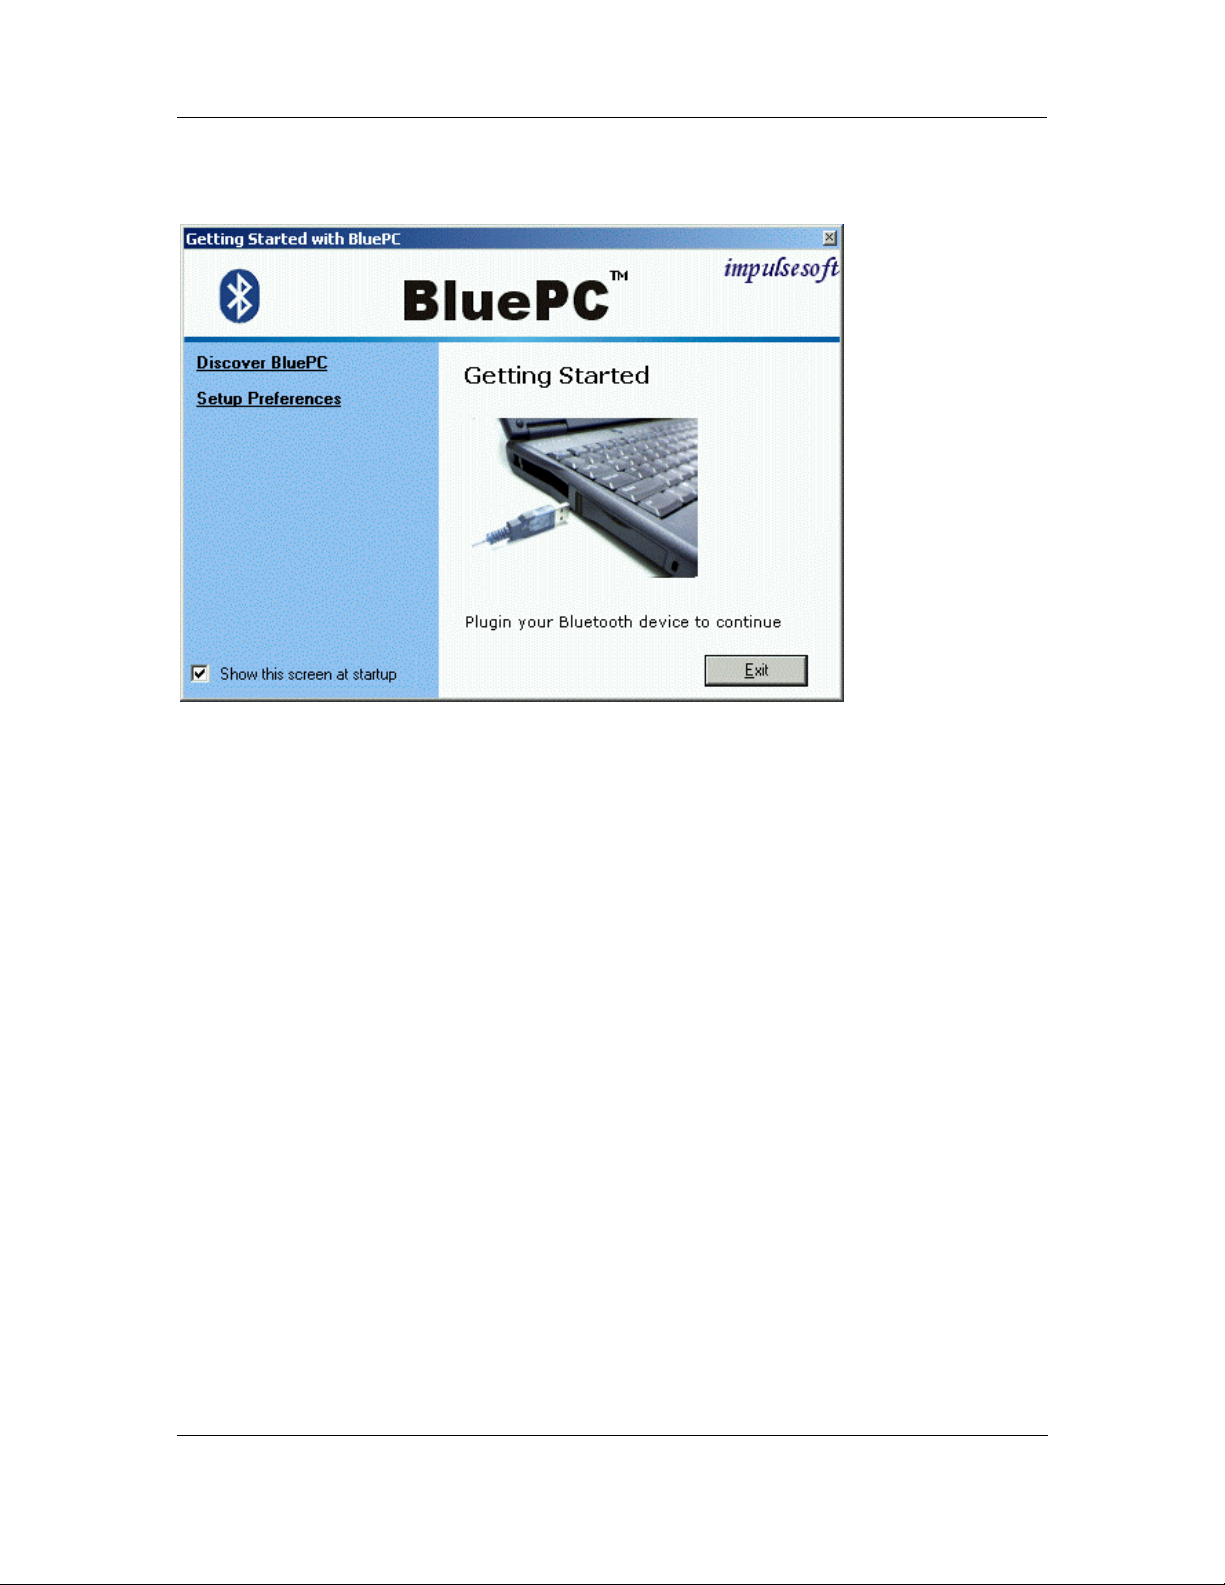
If you are using a USB Bluetooth device and it has not been plugged in, the following screen is
displayed:
Figure 8. Getting Started
1. Locate the USB Port.
2. Plug in the Bluetooth device.
Installing BluePC 14
Page 15
BluePC User Manual
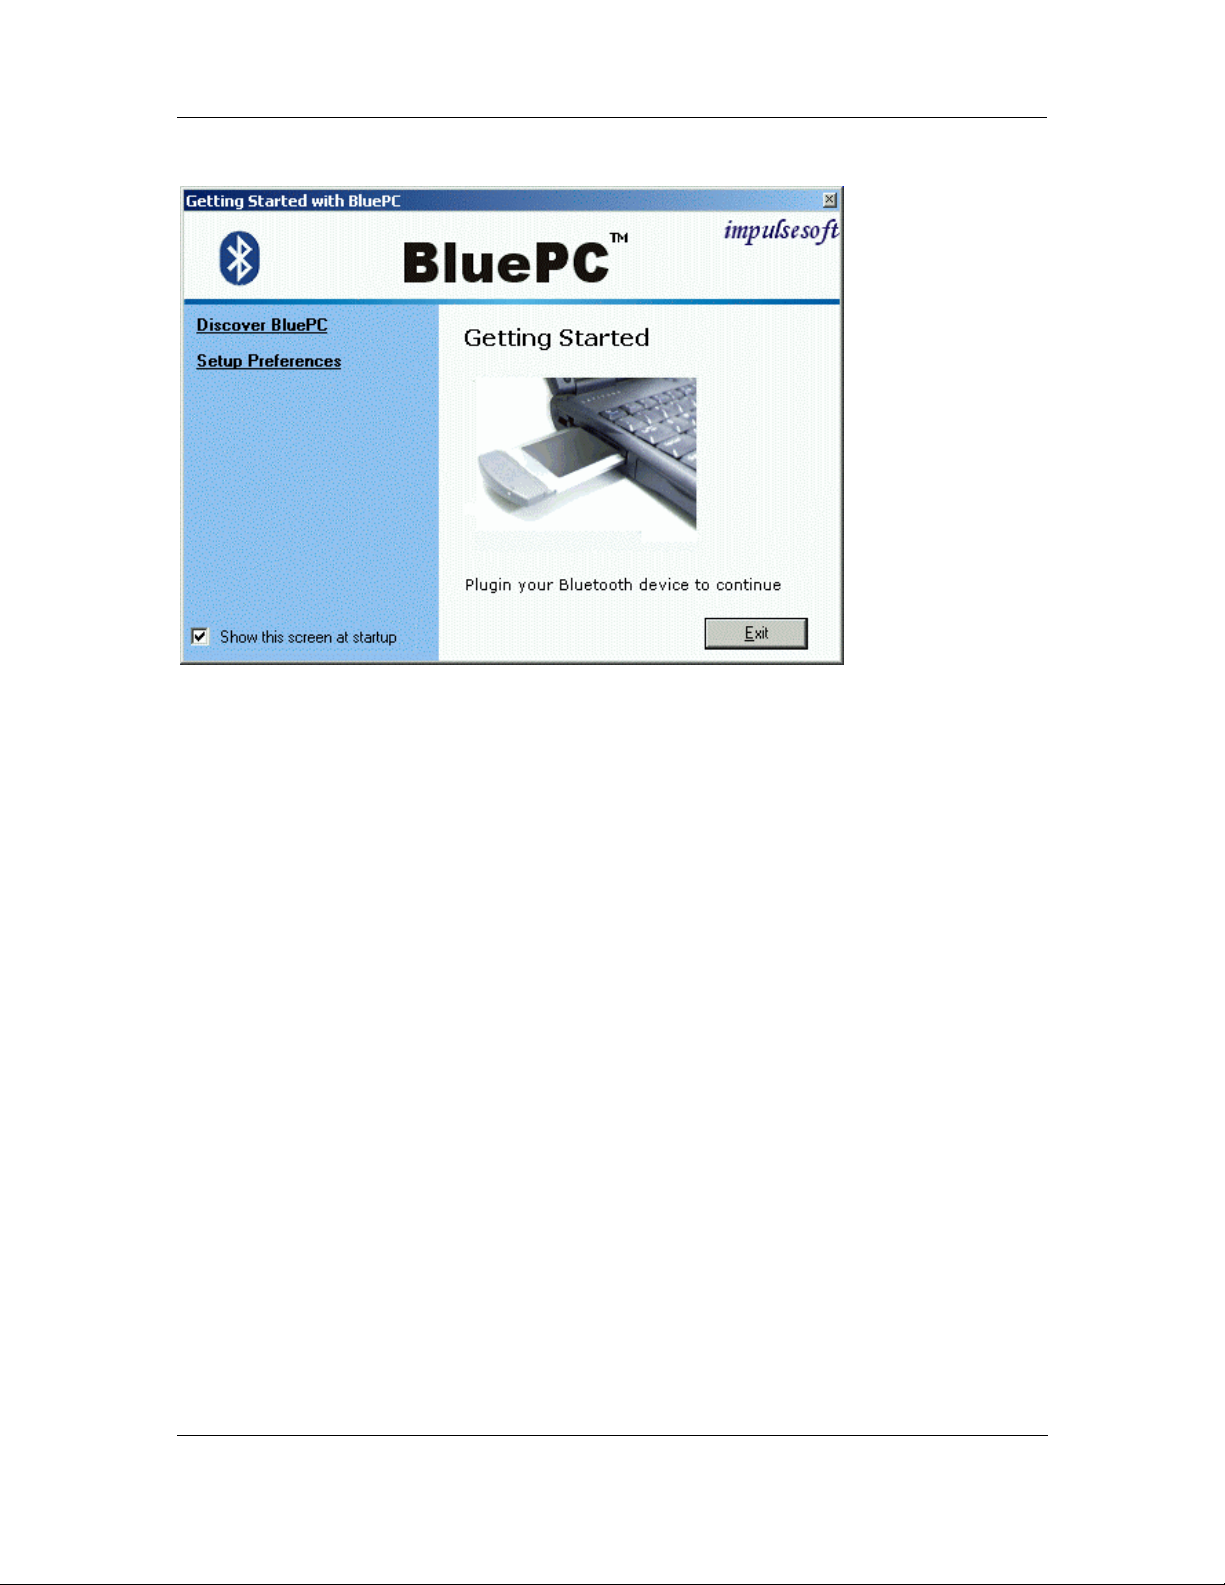
If you are using a Bluetooth PC card and it has not been inserted, the following screen is displayed:
Figure 9. Getting Started
1. Locate the PC card slot.
2. Plug in the Bluetooth device.
Installing BluePC 15
Page 16
BluePC User Manual
Chapter 3 Getting Started
This chapter describes the following:
• Accessing BluePC
• Elements of BluePC
• Setting BluePC Preferences
3.1 Accessing BluePC
You can access BluePC in more than one ways. The simplest way is to use th e BlueP C wizard, or th e
(Bluetooth icon) in the system tray. This section describes how you can access the various
elements of BluePC.
3.1.1 Post Installation
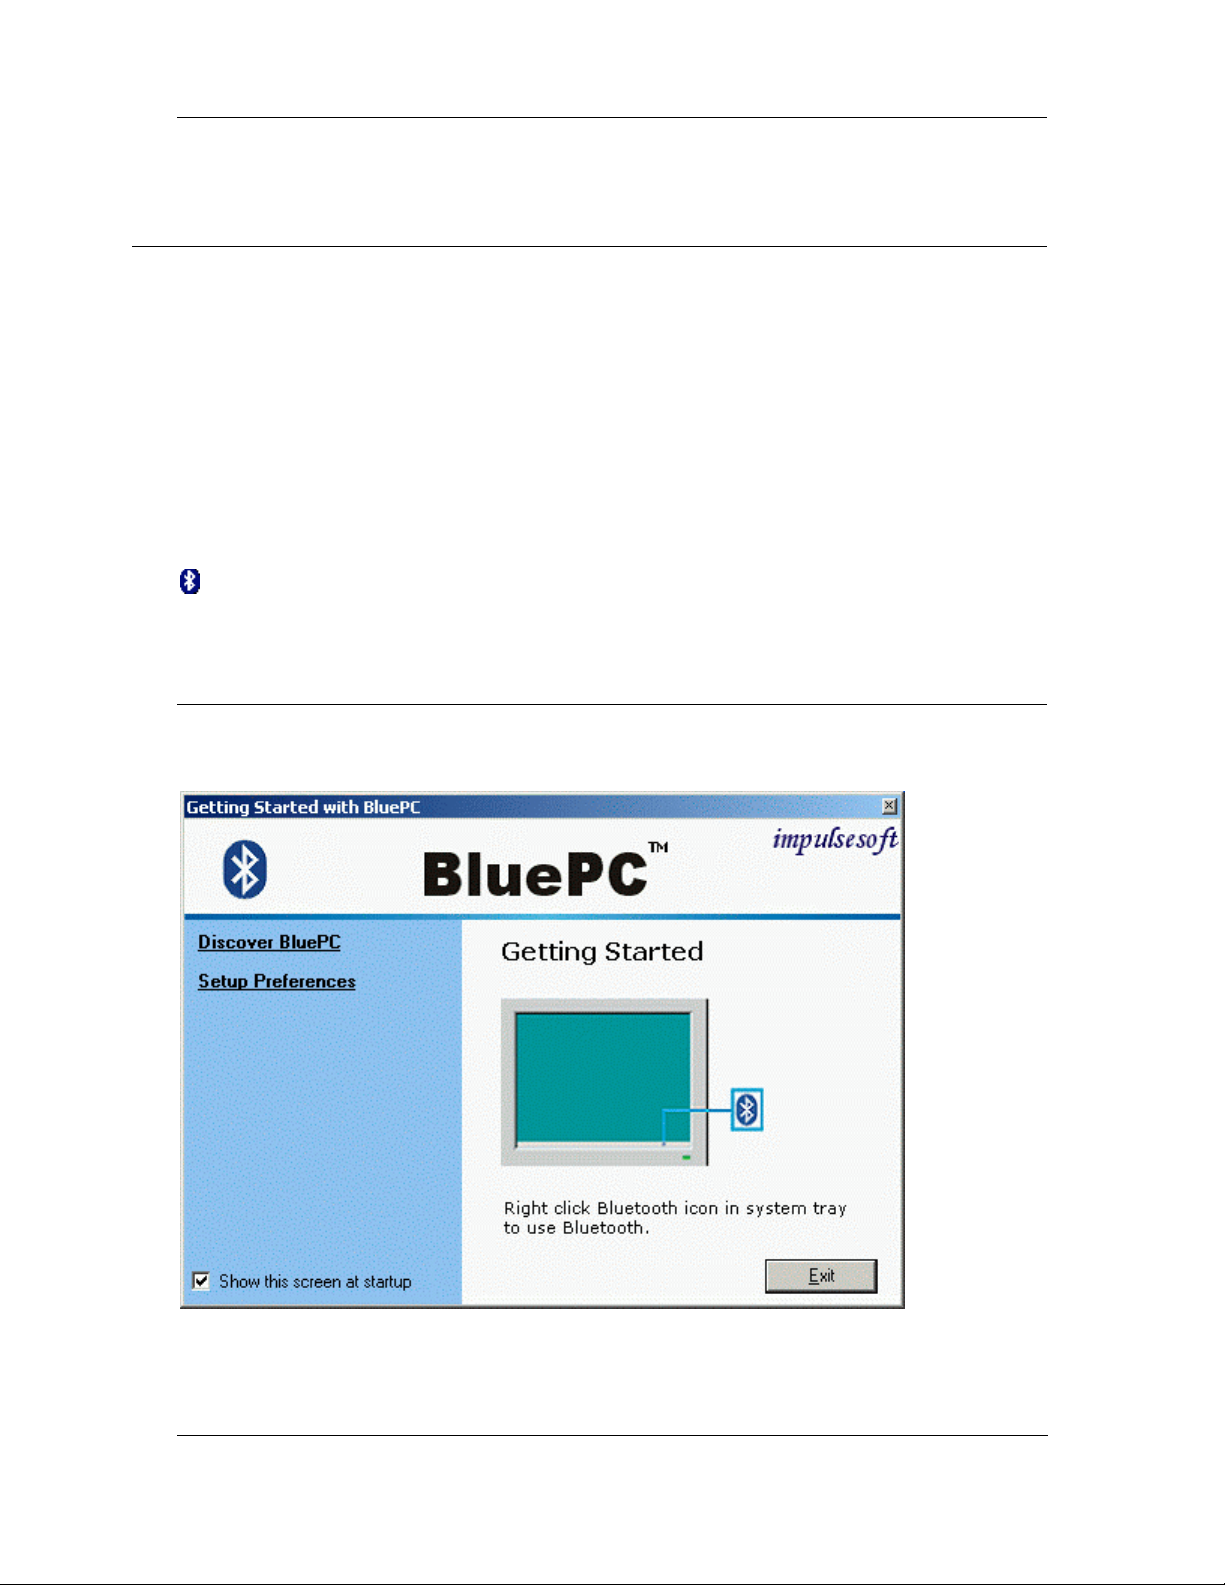
After you install BluePC and restart your machine, the BluePC Getting Started screen is displayed as shown in the figure.
Figure 10. Getting Started
Getting Started 16
Page 17
BluePC User Manual
Through this screen you can:
•
Discover BluePC - Click this option to view the user manual
•
Setup Preferences – Click this option to configure the BluePC preferences such as, device
name, accessibility, services offered by your device, file transfer, and business card options.
If you select the option
BluePC (at restart or Plug in of device). When you click
PC, the Bluetooth icon is displayed in the system tray.
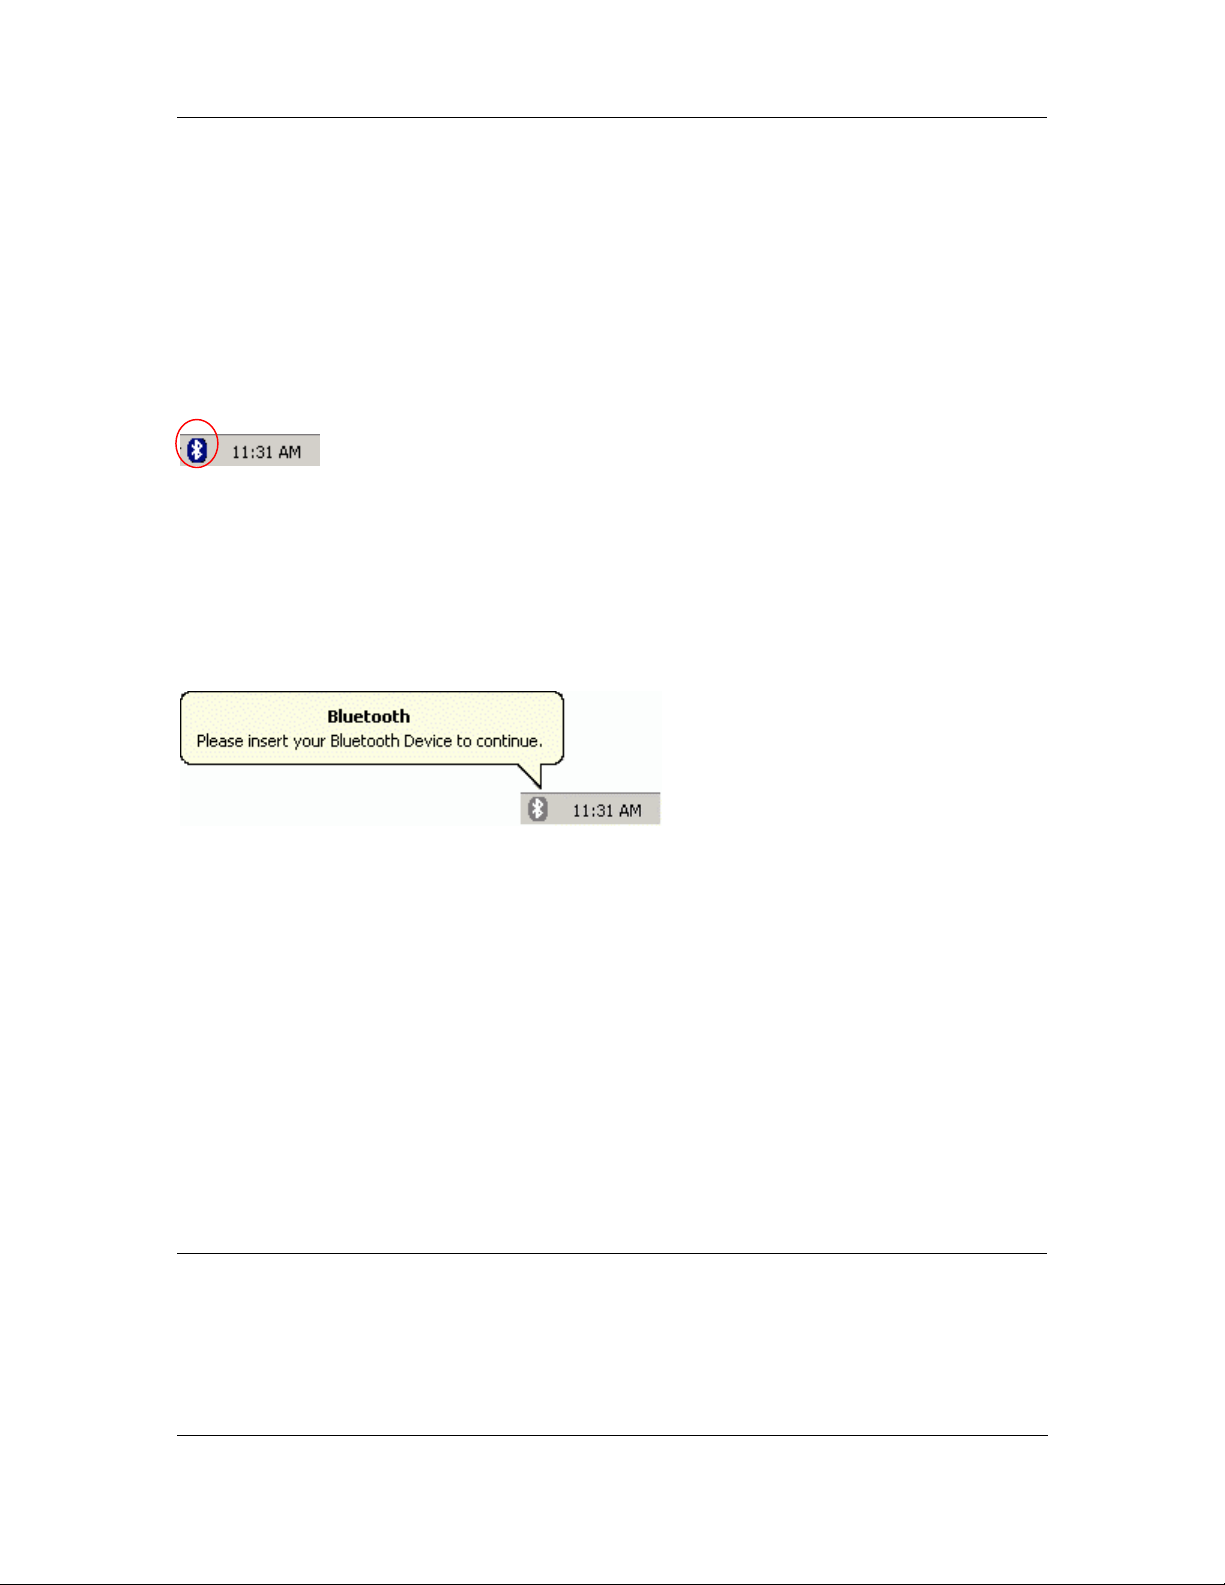
Figure 11. Bluetooth Icon
Right-click the Bluetooth icon to view the menu. If you double-click on the icon, the Bluetooth
Preferences Wizard is displayed. Through this you can configure the B luePC preferences. Refer to
section 3.3 Setup Preferences on page 22 for more information.
If the Bluetooth device has not been inserted into you PC and you start your system, the
appears as shown in the figure below with the message:
icon
Figure 12. Insert Bluetooth device
The message will disappear if you double-click the icon.
Show this screen at start up, this screen is displayed every ti me you start
Exit with Bluetooth device inserted in your
Bluetooth
3.2 Elements of BluePC
BluePC comprises the following:
• BluePC Wizard
• Bluetooth-enabled Windows Explorer
• Bluetooth Manager
• BluePC Preferences
3.2.1 BluePC Wizard
The BluePC wizard helps you perform your tasks using Bluetooth. The wizard automatically
discovers the Bluetooth devices and the services offered by them. It presents the right choice of
device and service through which you can accomplish your task. Through the wizard, you can:
• Browse the Internet
Getting Started 17
Page 18
• Print files
• Setup Preferences
BluePC User Manual
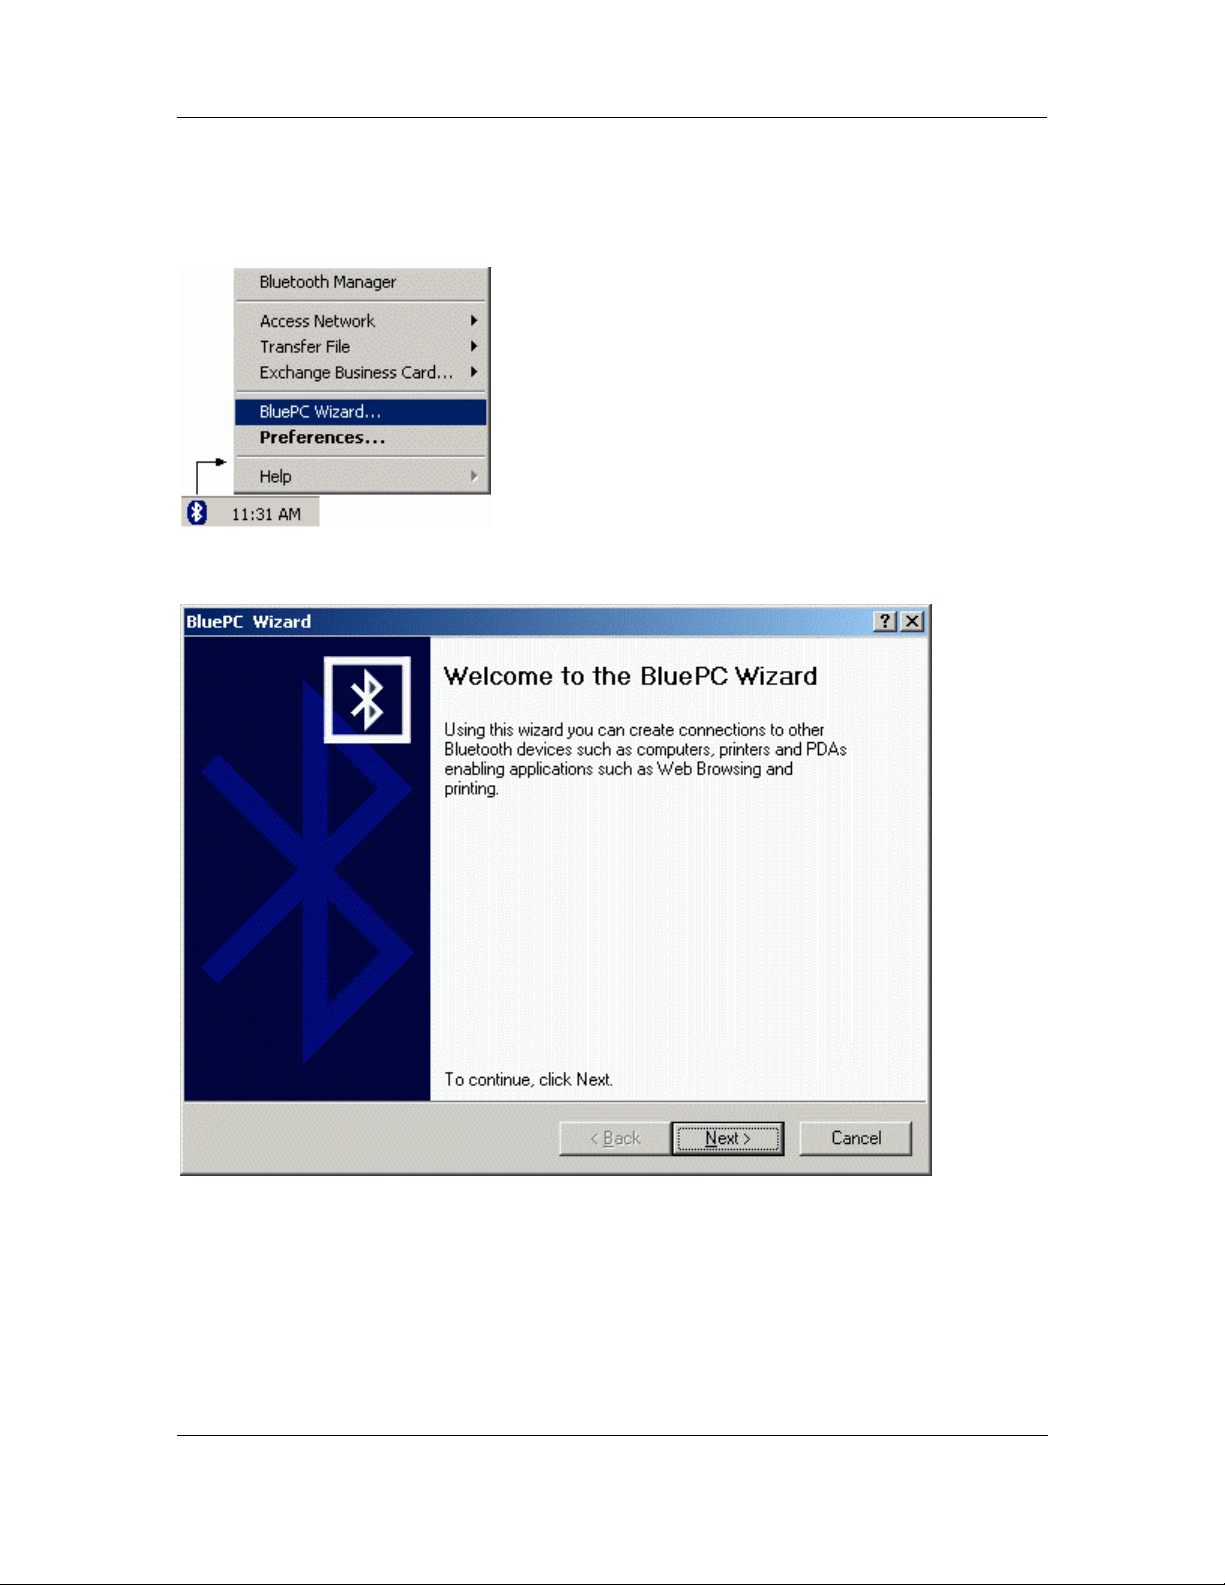
To access the wizard, right-click the Bluetooth icon in the system tray and select
Figure 13. Bluetooth Wizard menu
The following screen is displayed:
BluePC Wizard.
Figure 14. BluePC Wizard
Please refer to Chapter 4 Using BluePC on page 43, for details on how to print files or access the
network.
Getting Started 18
Page 19
BluePC User Manual
3.2.2 Bluetooth-enable d Windows Explorer
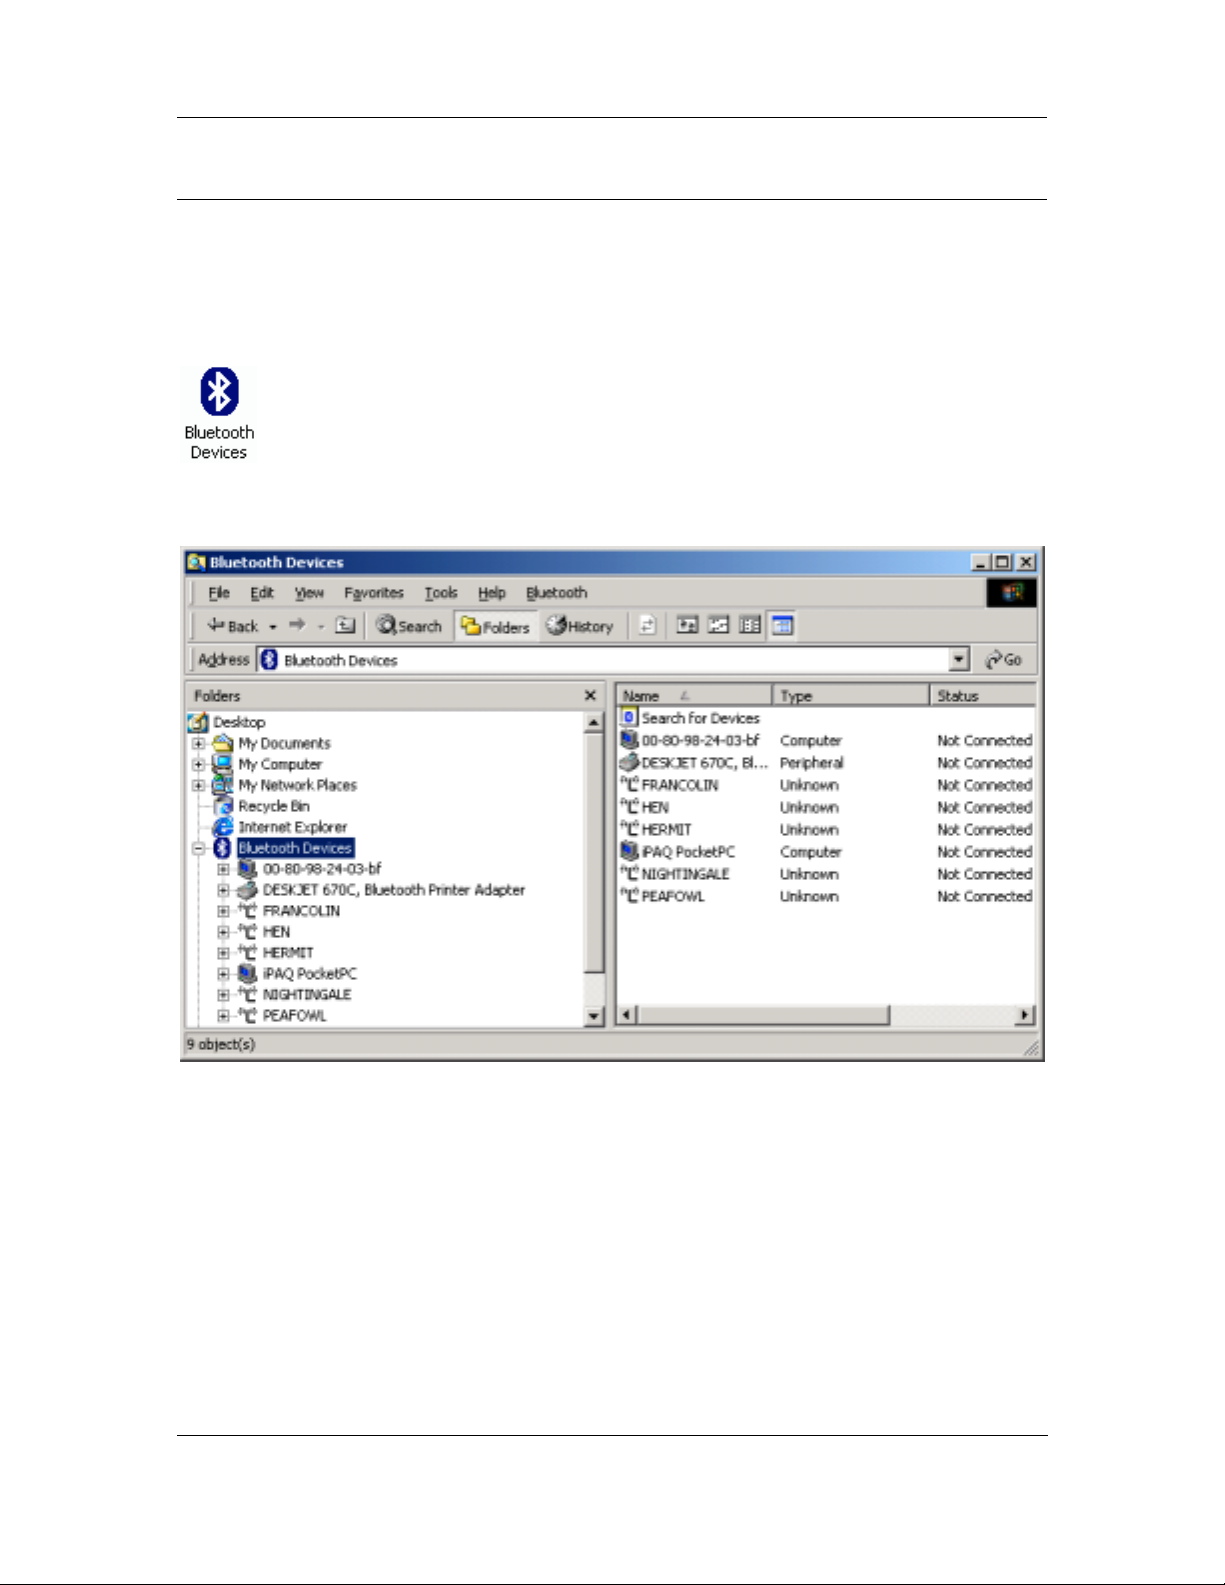
The Bluetooth-enabled Windows Explorer is an enhanced Windows Explorer that allows you to
quickly discover other Bluetooth devices within the range, identify services, and configure the
required services as well. To access the Bluetooth-enabled Windows explorer, double-click the
Bluetooth Devices icon on your desktop or launch the Windows Explorer from the
Figure 15. Bluetooth device icon
The following screen is displayed.
Start menu.
Figure 16. Bluetooth-enabled Windows Explorer
Getting Started 19
Page 20
BluePC User Manual
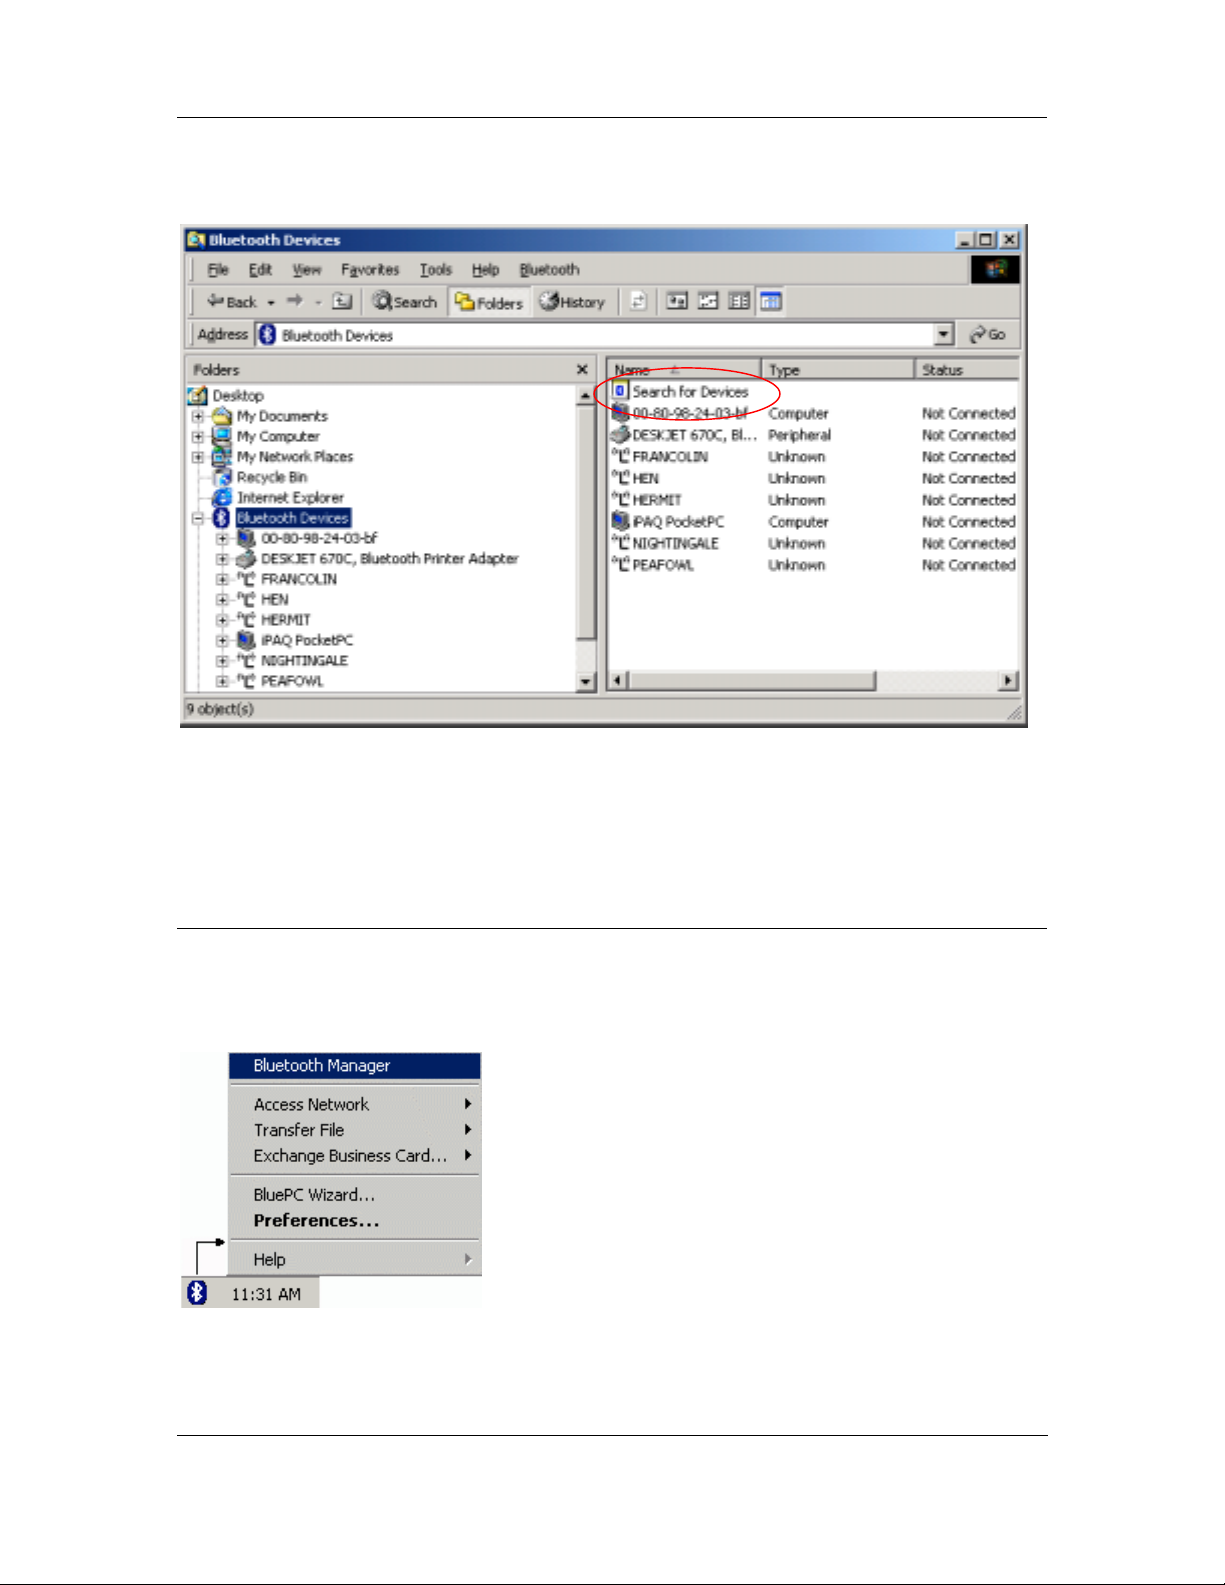
You can also access Bluetooth devices through Windows Explorer. The Bluetooth Devices list
displayed in the left pane as shown in the figure below:
Figure 17. Bluetooth Devices
To search for Bluetooth devices in the vicinity, right click Bluetooth Devices and select the option
Search for Devices . You can also double-click the Search for devices icon in the right pane as
shown in Figure 17.
3.2.3 Bluetooth Manager
The Bluetooth Manager helps you organize the Bluetooth devices and services available. To acces s
the Bluetooth Manager:
1. Right-click the Bluetooth icon in the system tray. The following menu is displayed:
Figure 18. Bluetooth Manager Menu
Getting Started 20
Page 21
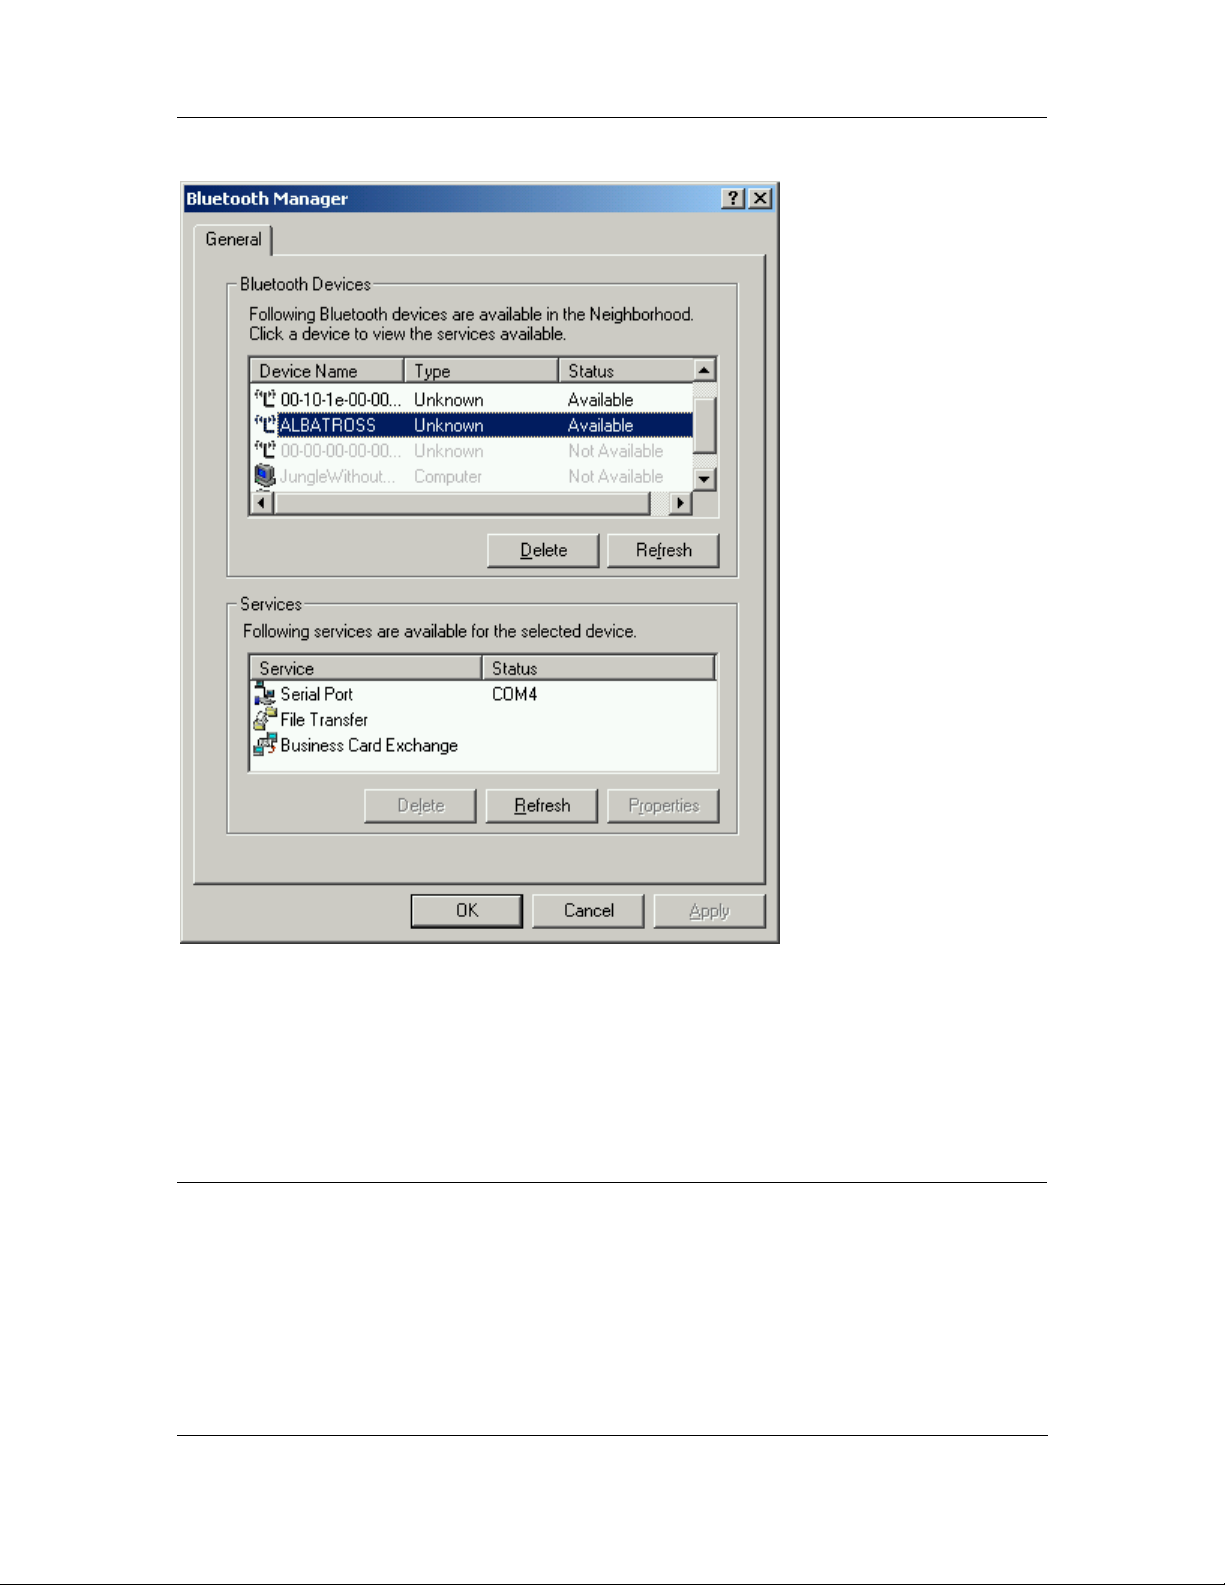
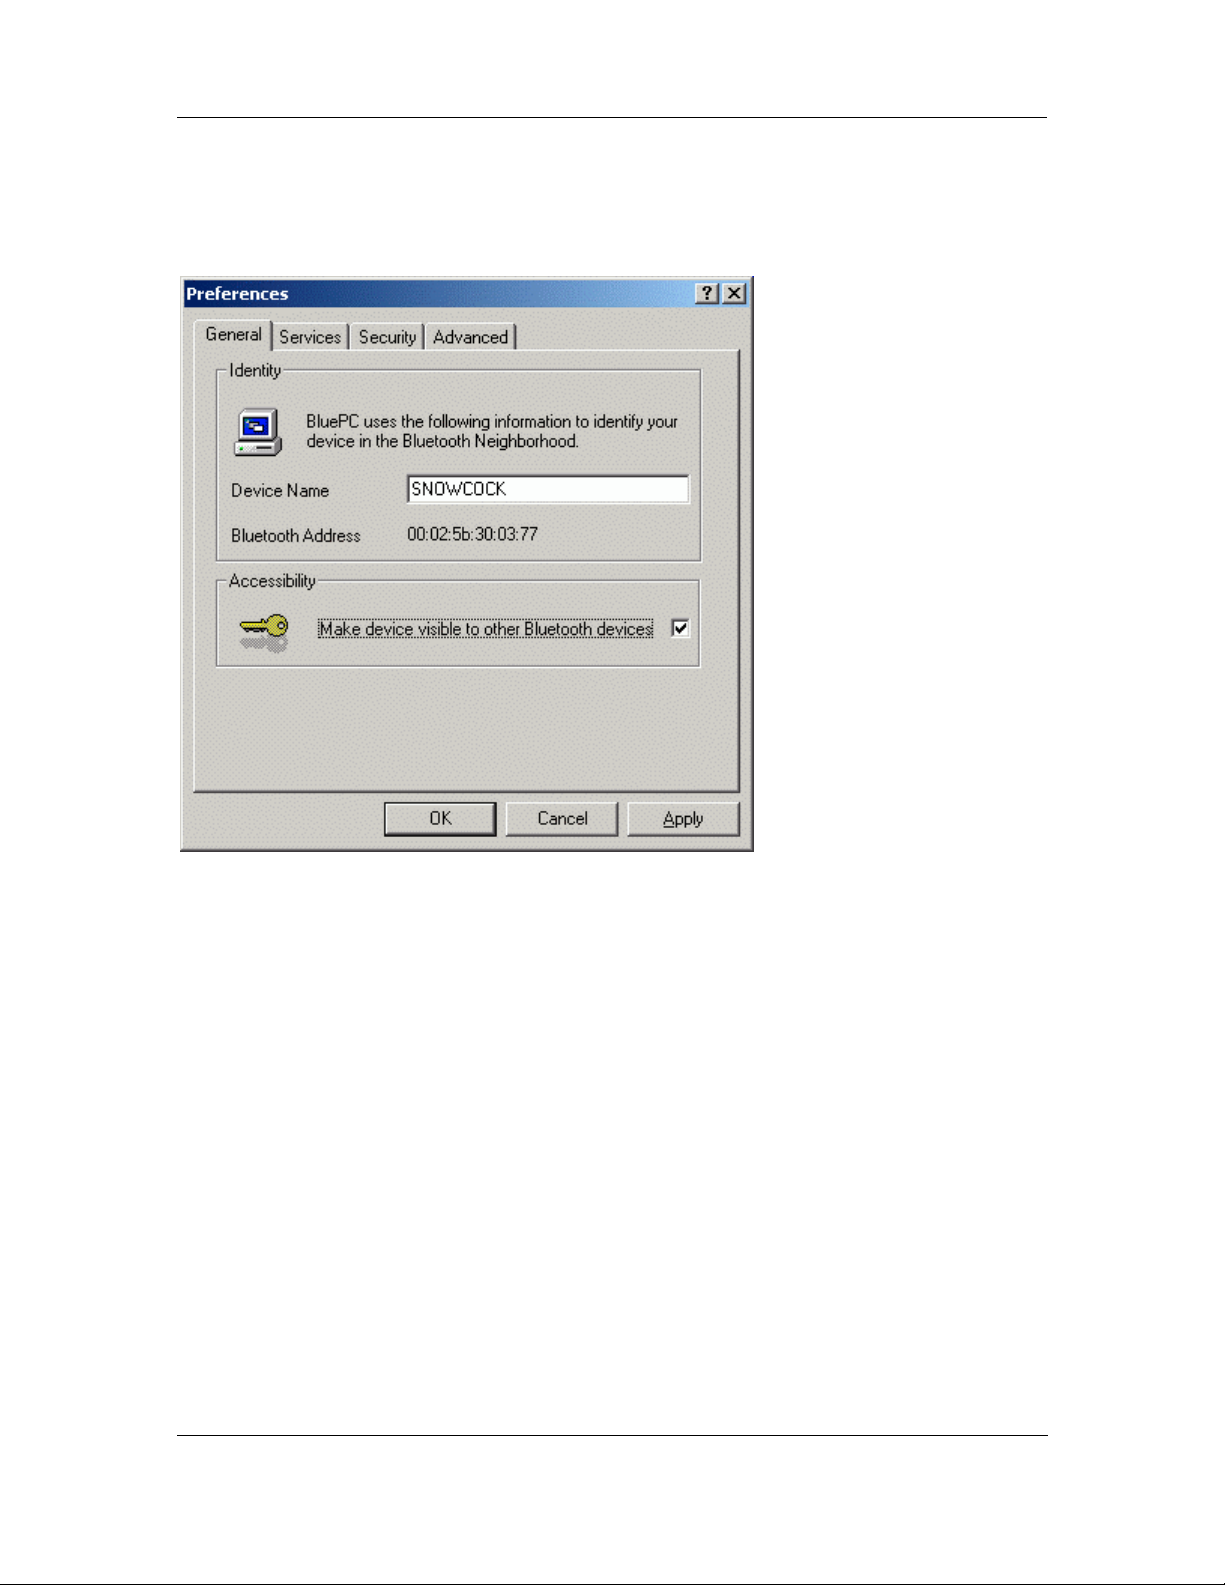
2. Select Bluetooth Manager. The following screen is displayed:
BluePC User Manual
Figure 19. Bluetooth Manager
Bluetooth Manager remembers devices that you have discovered in the past. These devices are listed
by Bluetooth Manager in gray if they are not currently available. Click
Devices to remove an old device from the list. Click
Delete under Service to remove the
Delete under Bluetooth
corresponding setup in BluePC.
3.2.4 BluePC Preferences
Use BluePC Preferences to configure Bluetooth settings. When you use BluePC the first time after
installation, the BluePC Preferences wizard guides you through the process. You can access the
BluePC Preferences in the following ways:
• Click the
• Right-click the Bluetooth icon in the system tray and select the option
Getting Started 21
Setup Preferences option in the Welcome screen
Preferences
Page 22
• Double-click the Bluetooth icon in the system tray
BluePC User Manual
• Double-click the
• Select the
Setup Preferences option in the BluePC Wizard
BluePC Preferences icon in the Control Panel
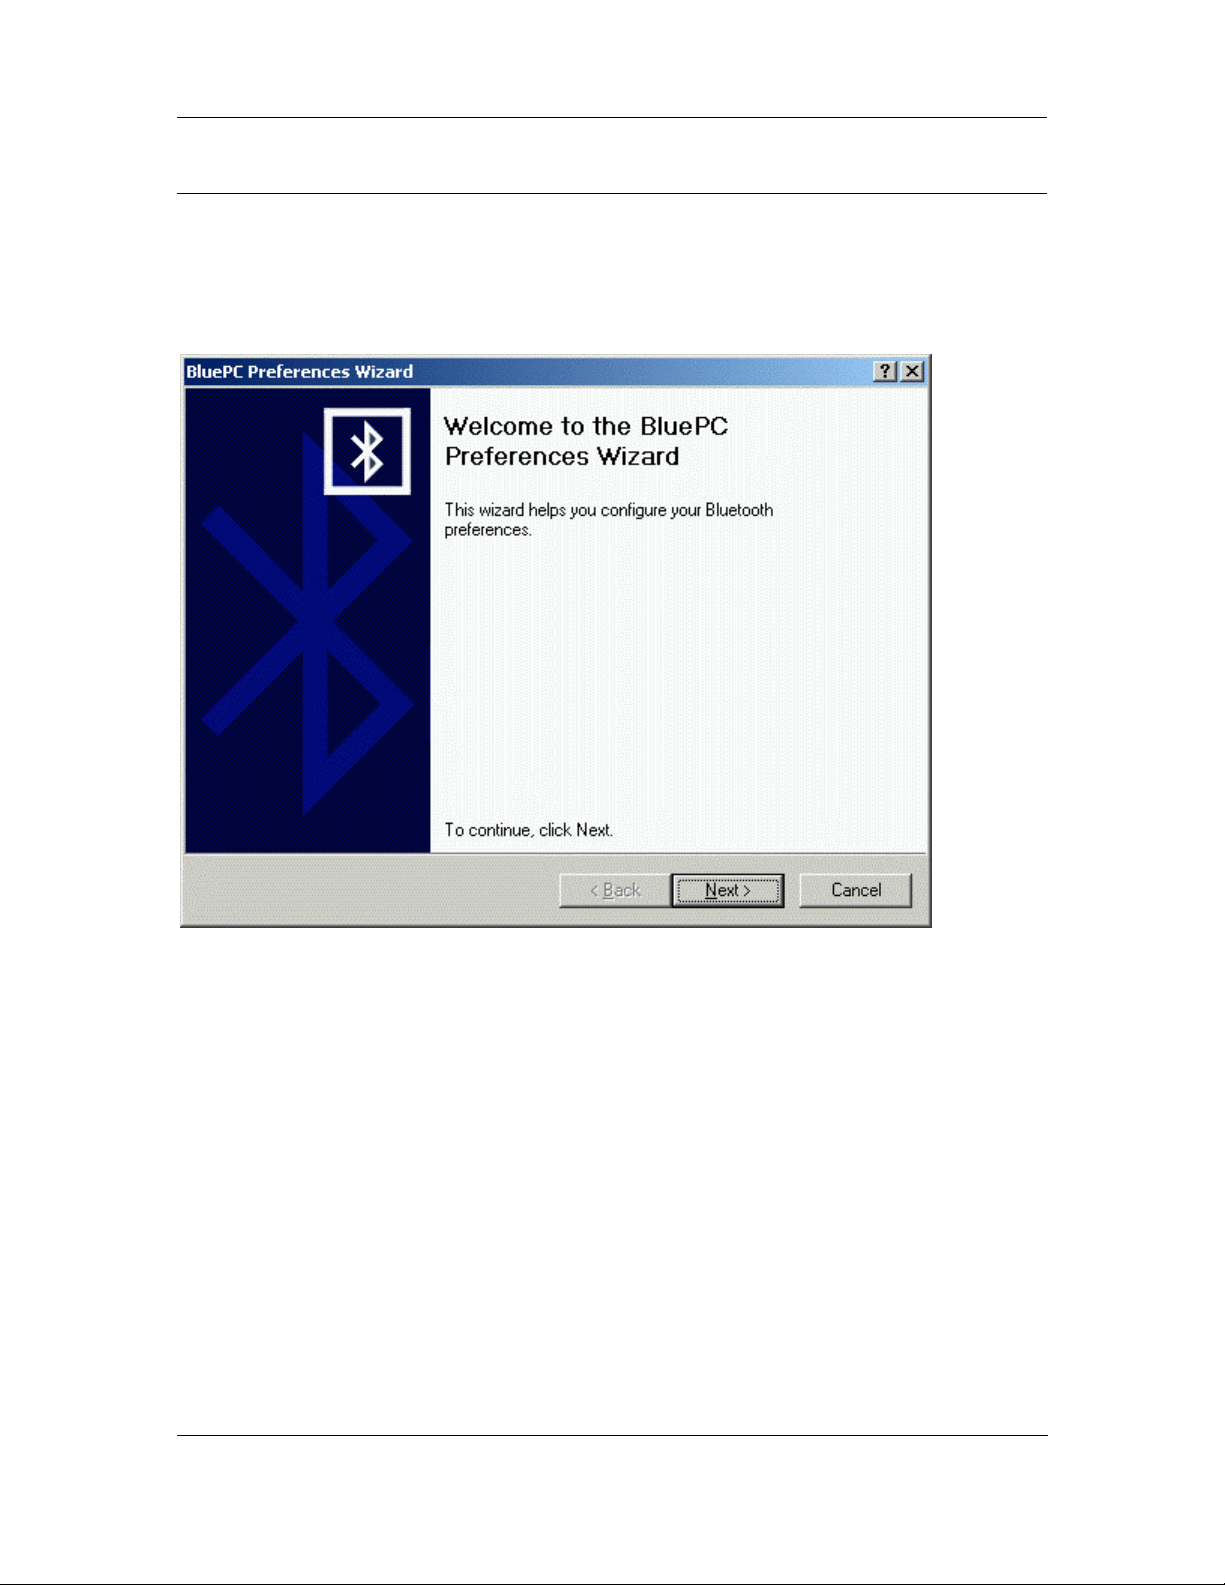
Figure 20. Preferences
Refer to section 3.3 Setup Preferences on page 22 for more information on how to set preferences.
3.3 Setup Preferences
You need to configure your Bluetooth preferences before proceeding further. You can access the
Preferences screen in the following ways.
• After you install BluePC and restart the machine, the Getting Started screen is displayed as
shown in Figure 10. Select the option
• Double-click the Bluetooth icon in the system tray.
• Right-click the icon and select the option
• Double-click the
• Select the
BluePC Preferences icon in the Control Panel
Setup Preferences option in the BluePC Wizard
Setup Preferences.
Preferences from the menu.
Getting Started 22
Page 23
BluePC User Manual
3.3.1 BluePC Preferences Wizard
When you use the utility the first time after installation, the BluePC Preferences wizard guides you
through the various preferences that have to be set. Subsequently, this can also be invoked through
Setup Preferences option in BluePC Wizard.
the
1. The BluePC Preferences Wizard welcome screen is displayed.
Figure 21. BluePC Preferences Wizard
Getting Started 23
Page 24
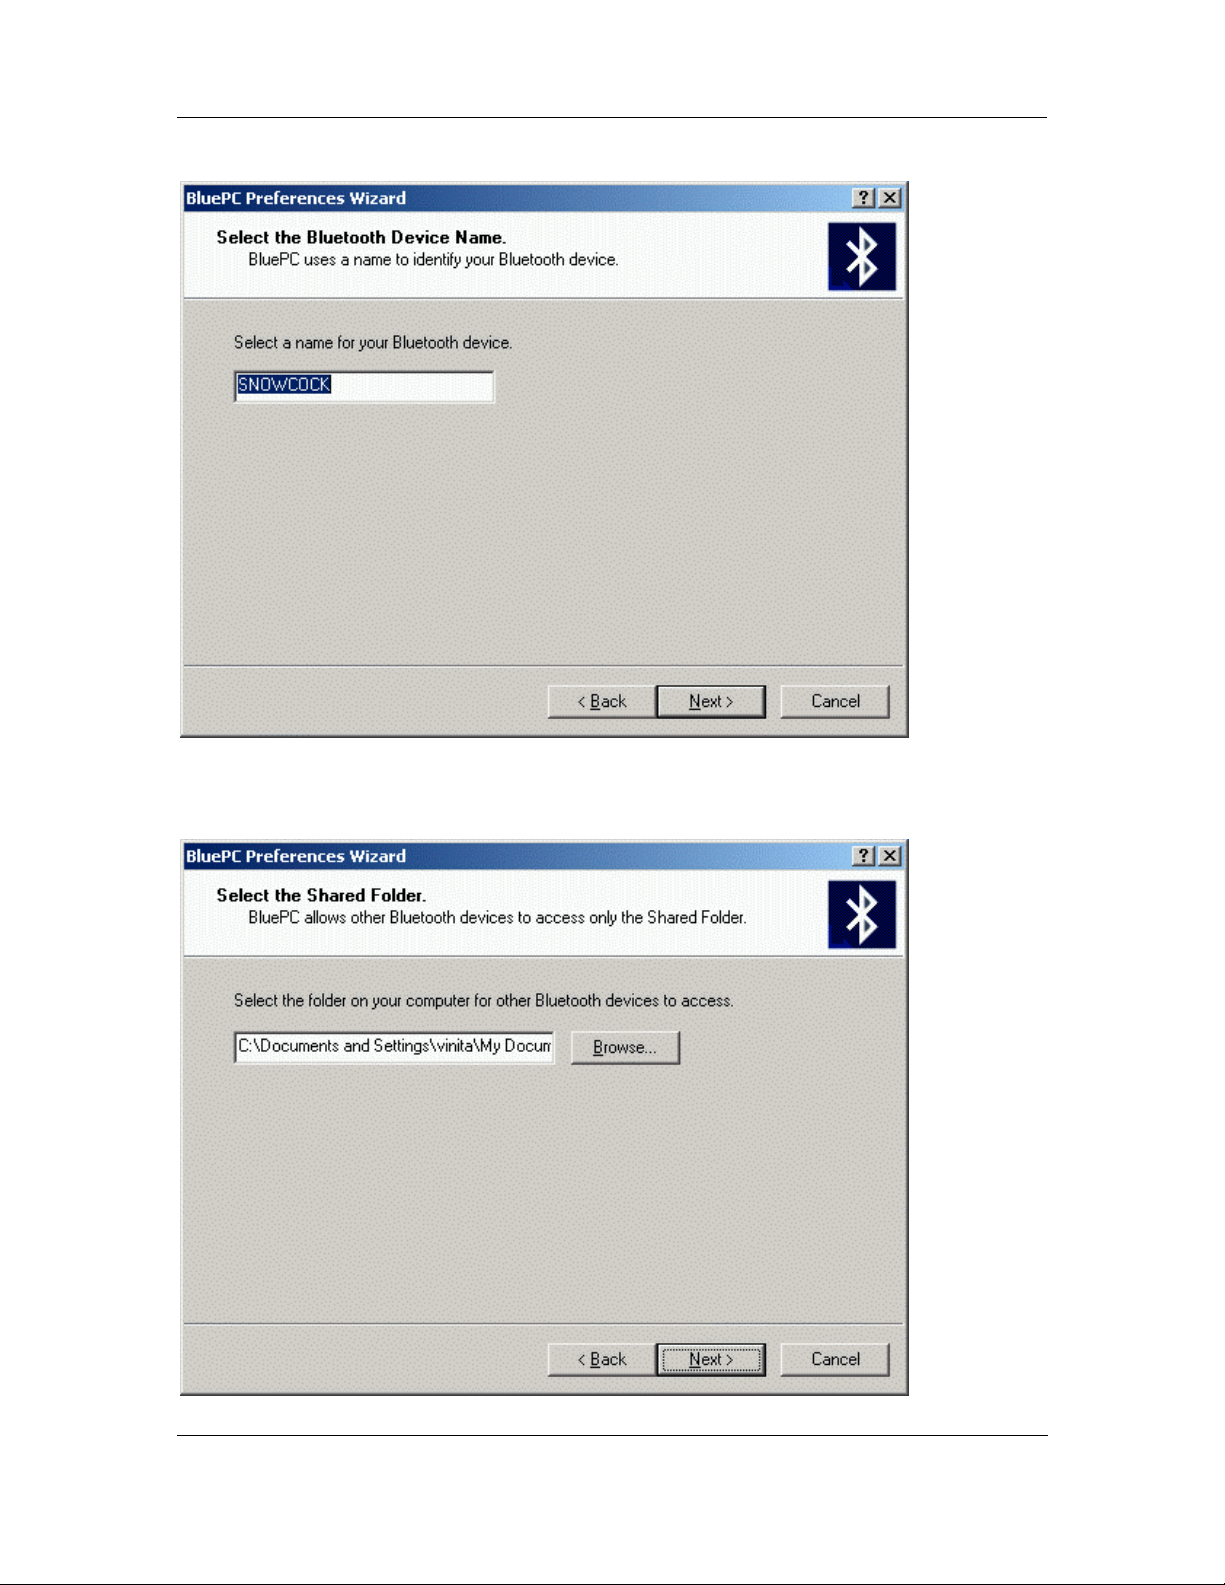
2. Click Next. The Bluetooth Device Name screen is displayed.
BluePC User Manual
Figure 22. Bluetooth Device Name
3. Enter a name by which the local device will be identified. Click Next. The Select the Shared
Folder screen is displayed.
Figure 23. Select Shared Folder
Getting Started 24
Page 25
BluePC User Manual
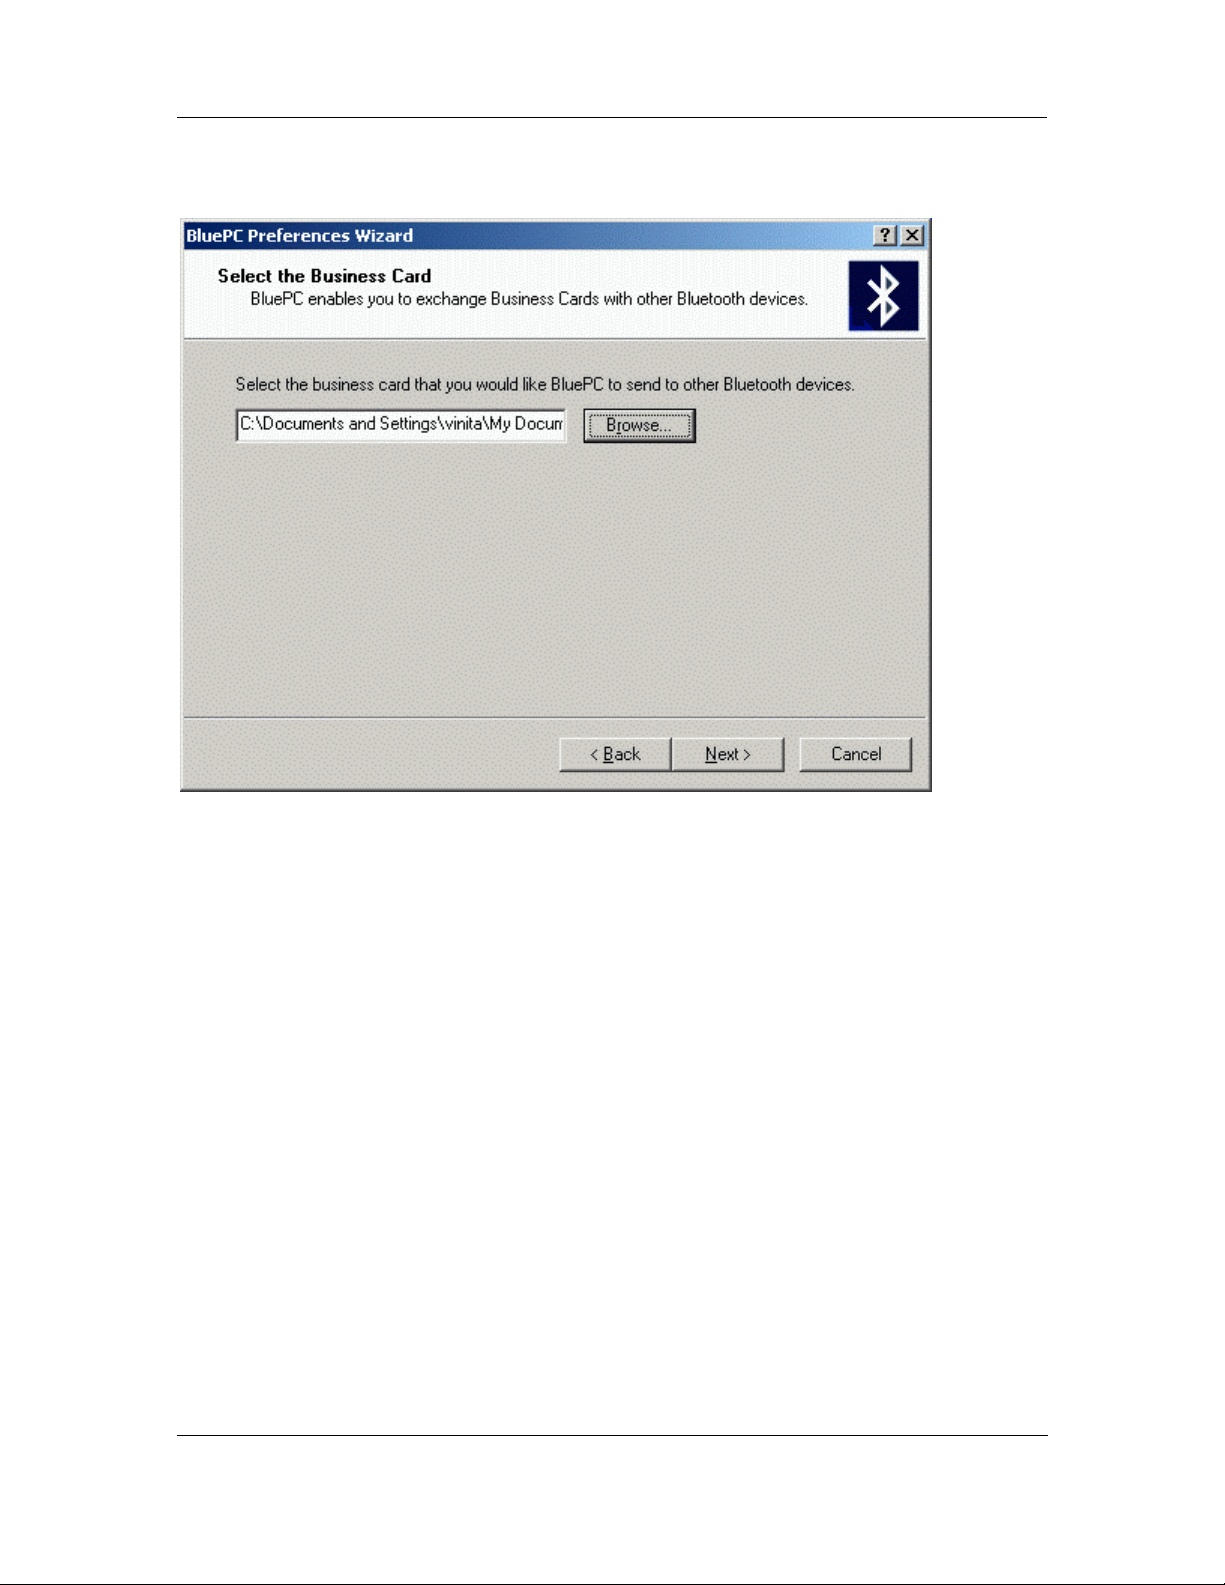
4. Select a folder on your system which can be accessed by other devices in the vicinity. Click Next.
The Select the Business Card screen is displayed.
Figure 24. Select Business Card
5. Select the business card that you would like BluePC to send to other Bl uetooth devices. Click
Next.
Getting Started 25
Page 26
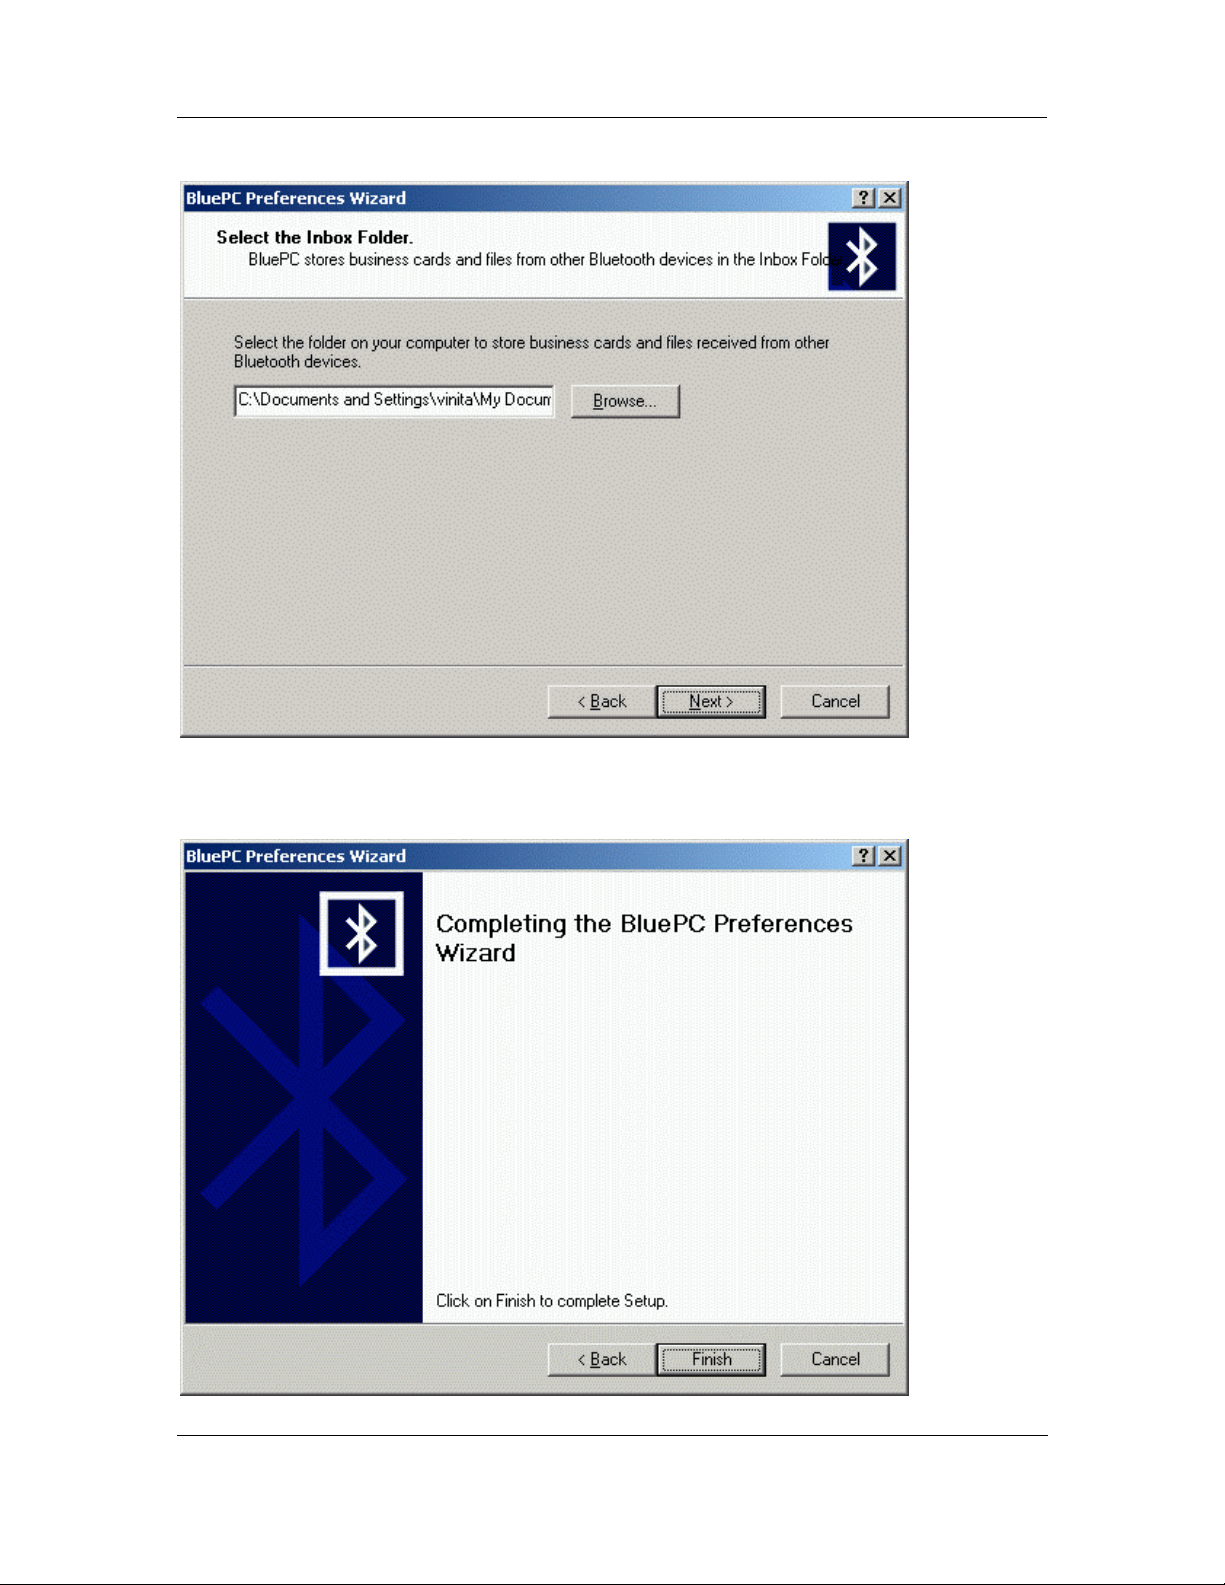
6. The Select the Inbox Folder screen is displayed.
BluePC User Manual
Figure 25. Select Inbox Folder
7. Select the folder on your computer to store business cards and files received from other
Bluetooth devices. Click
Next.
Figure 26. Final Screen
Getting Started 26
Page 27
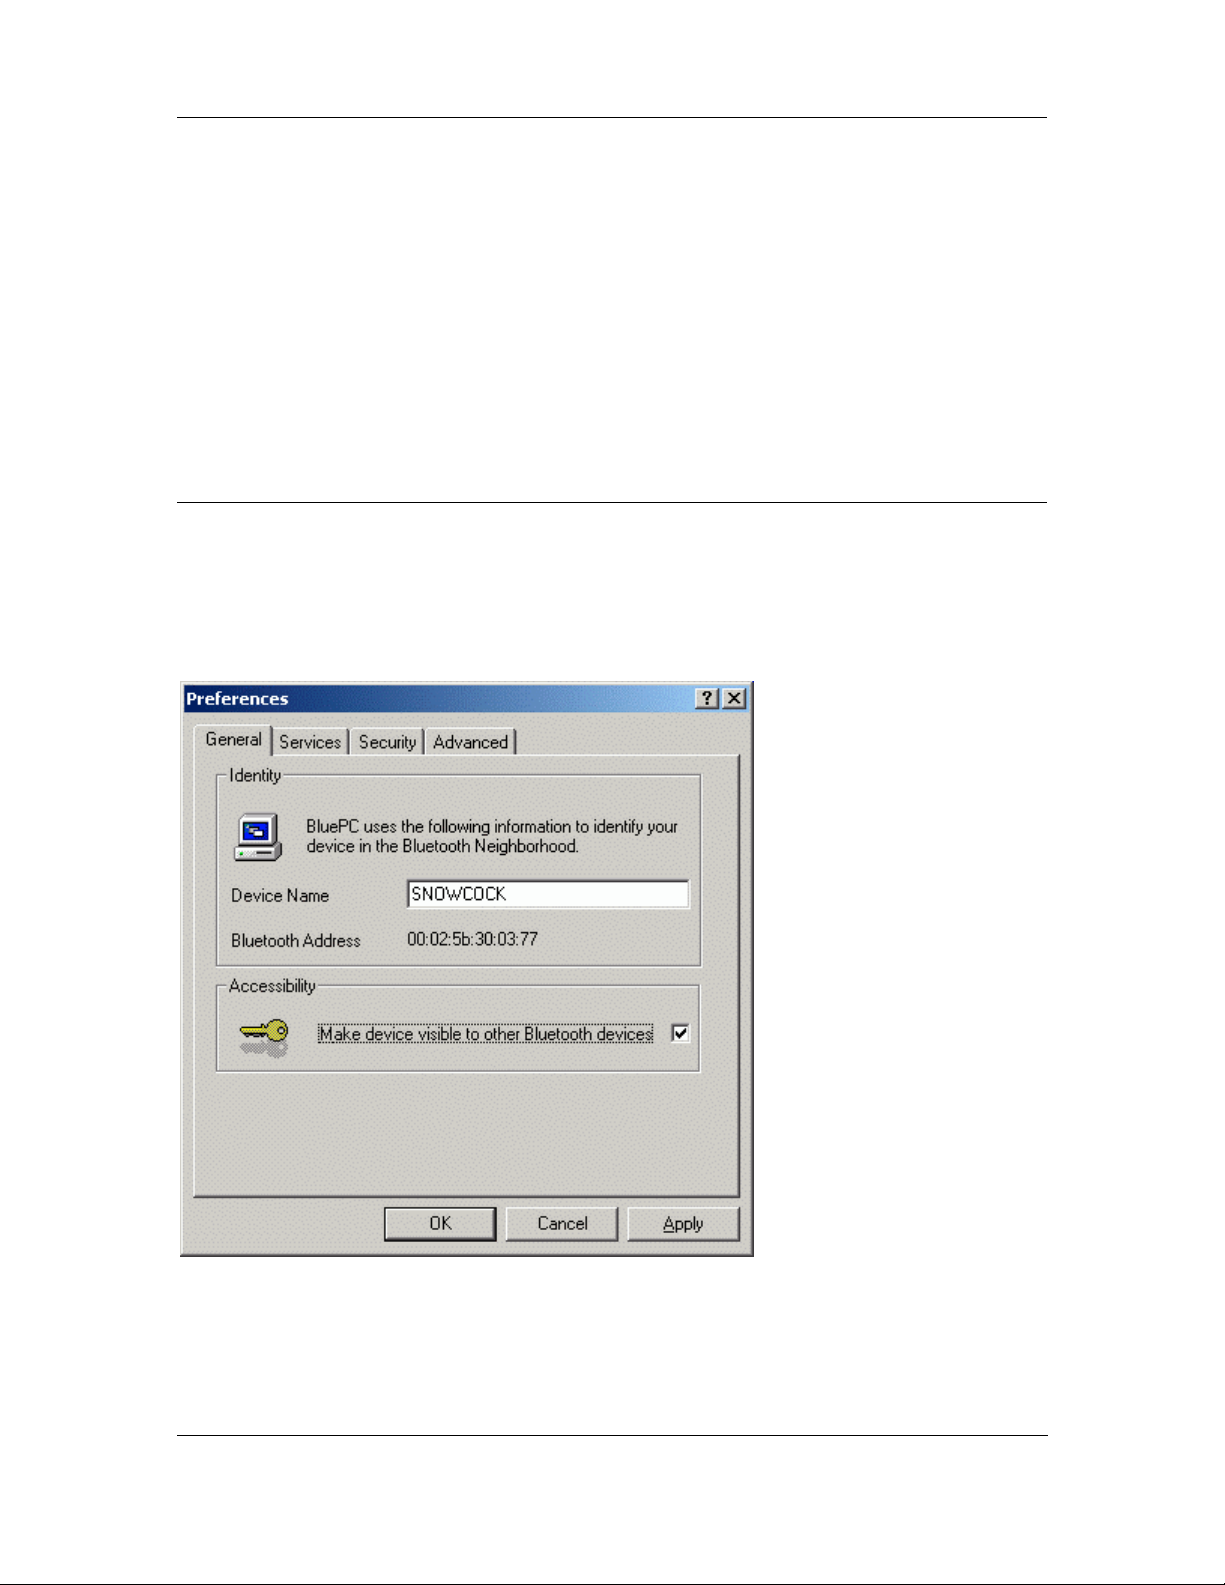
8. The Final screen is displayed. Click Finish to complete the process.
BluePC User Manual
Subsequently, when you access the
Preferences option, the Preferences screen is displayed. It has
four tabs through which you can configure the preferences for your local device:
• General
• Services
• Security
• Advanced
3.3.2 General tab
Through this tab you can configure the properties related to the Bluetooth device on the computer.
This tab displays the following information:
• Device Name
• Bluetooth Address
Figure 27. General tab
1. You can enter a name for the local Bluetooth device for the other Bluetooth devices to identify
the local Bluetooth device.
2. In order to make your device accessible to other Bluetooth devices in t he vicinity, you can s elect
Make device visible to other Bluetooth devices.
the
Getting Started 27
Page 28
BluePC User Manual
3. Click Apply to save the settings.
3.3.3 Services Tab
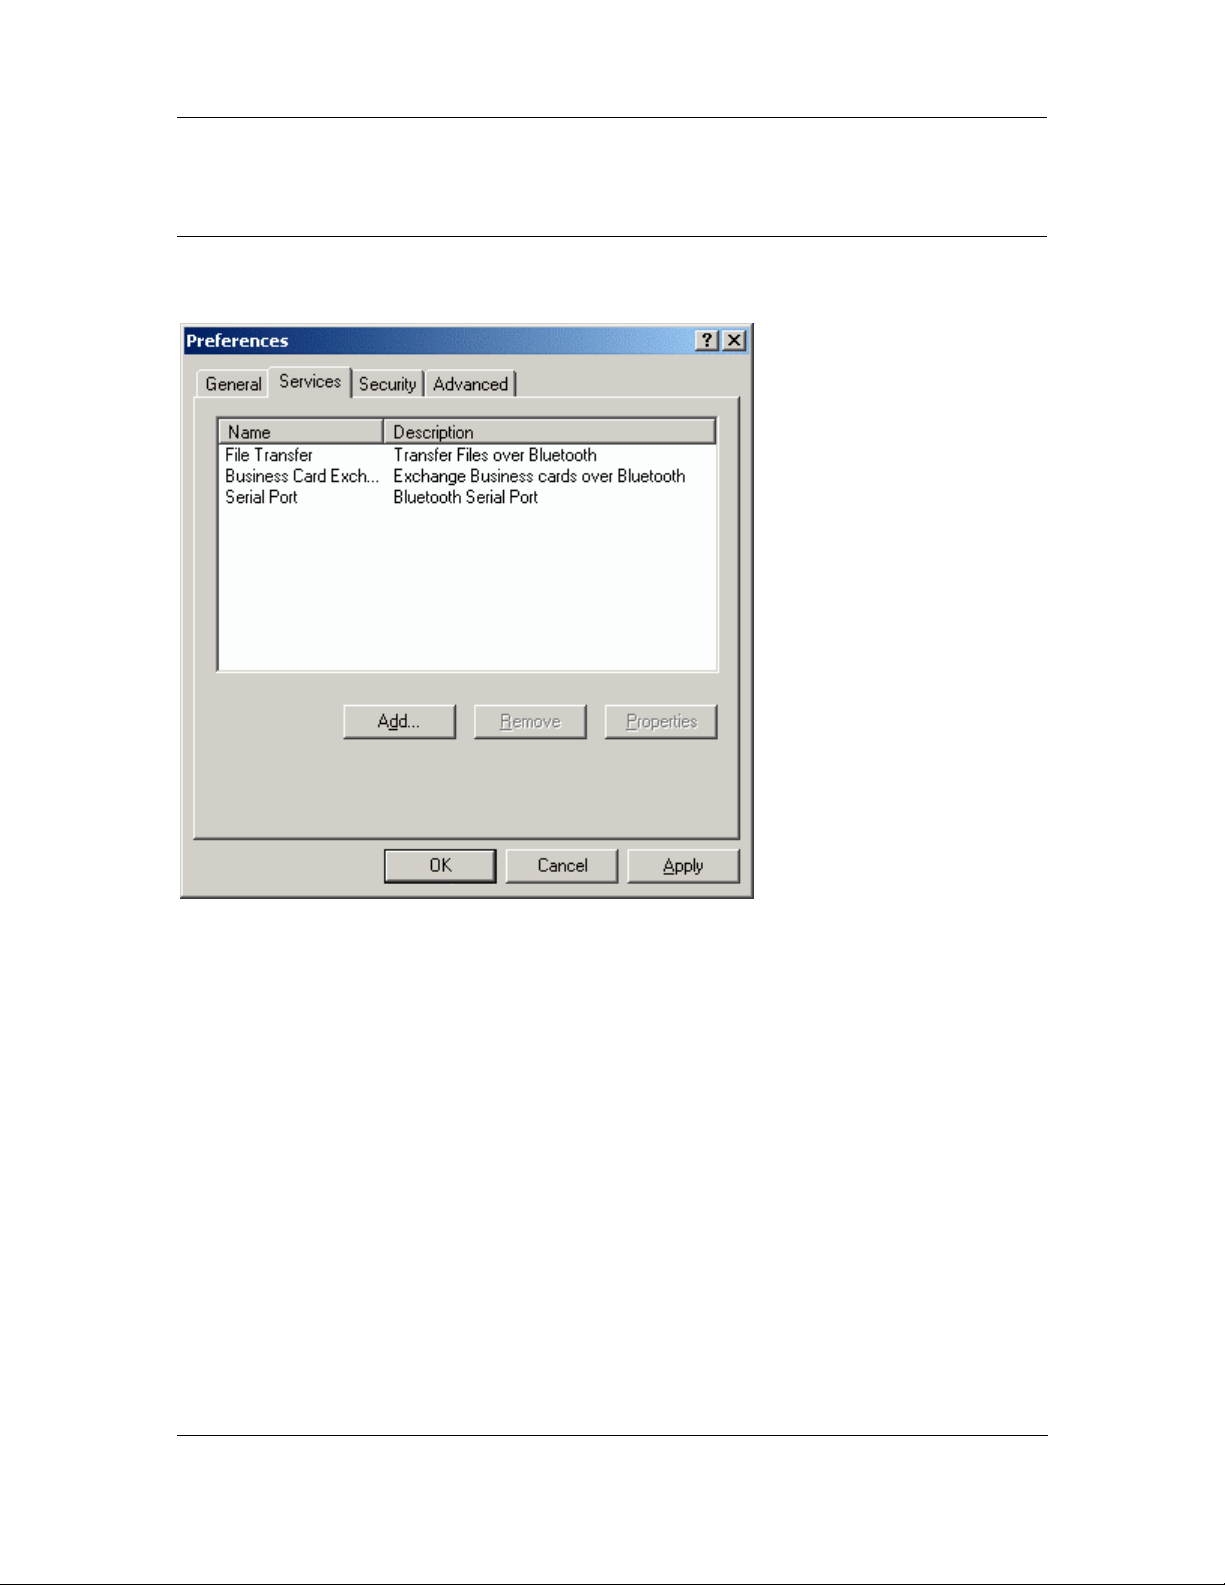
The Services tab is displayed as shown in the figure. You can add a service, which other Bluetooth
devices in the vicinity can use. Through this tab you can also remove a service.
Figure 28. Services tab
This tab displays the following information:
• Name of the service
• Brief description of the service
The following services are automatically offered:
• Serial Port
• File Transfer
• Business Card Exchange
Double-click on a service to view it’s properties.
Getting Started 28
Page 29
BluePC User Manual
Add a File Transfer Service
Using the File Transfer service you can exchange files with another Bluetooth device in the vicinity.
You need the service only if you would like other Bluetooth devices to access f iles on your computer
or to send files to your computer.
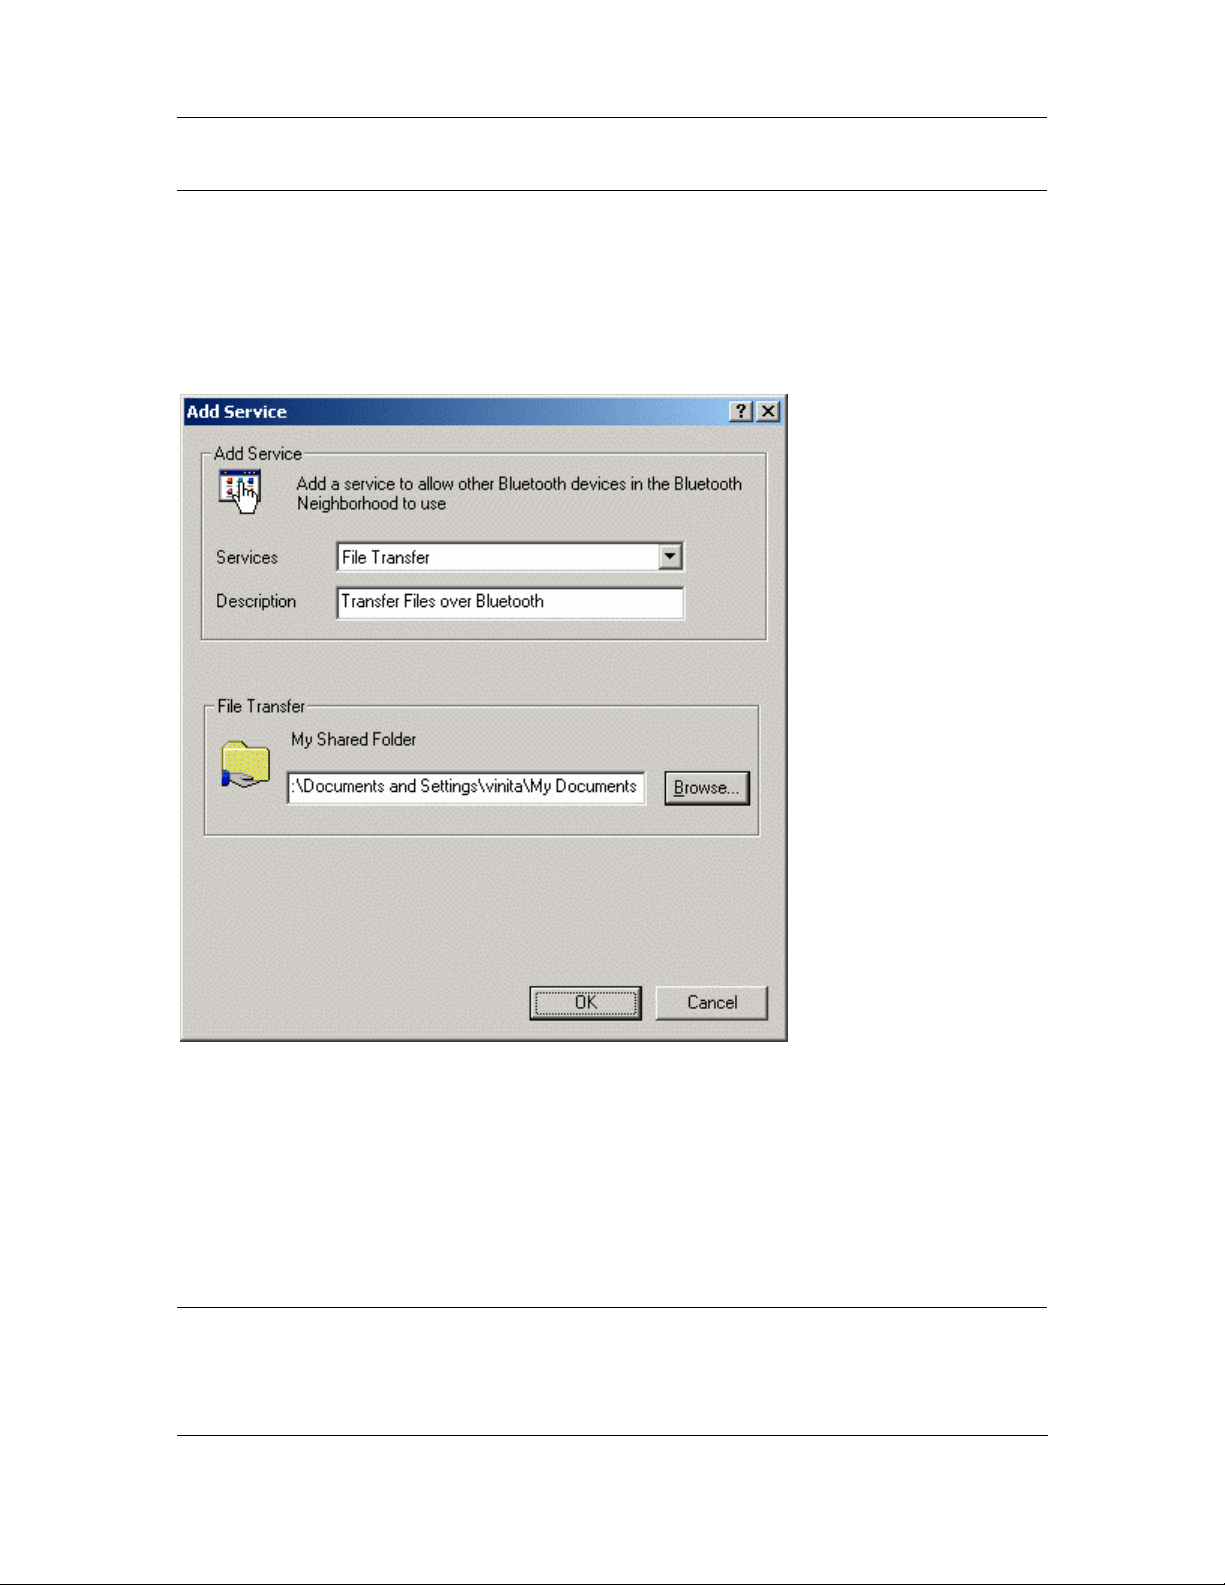
To add a File Transfer service:
1. Click Add. The Add Service dialog is displayed.
Figure 29. Add File Transfer
2. Select File Transfer from the Services list.
3. You can change the default description of the service.
4. By default the “share folder”, through which files can be transferred, is set to your default
directory in the My documents folder. Click
5. Click
OK to save the settings.
Browse to select the path to the share folder.
Add Business Card Exchange Service
Using the Business Card Exchange service you can send and receive business cards with other
Bluetooth devices in the vicinity. To enable the business card exchange service you first need to add
the service on your local device.
Getting Started 29
Page 30
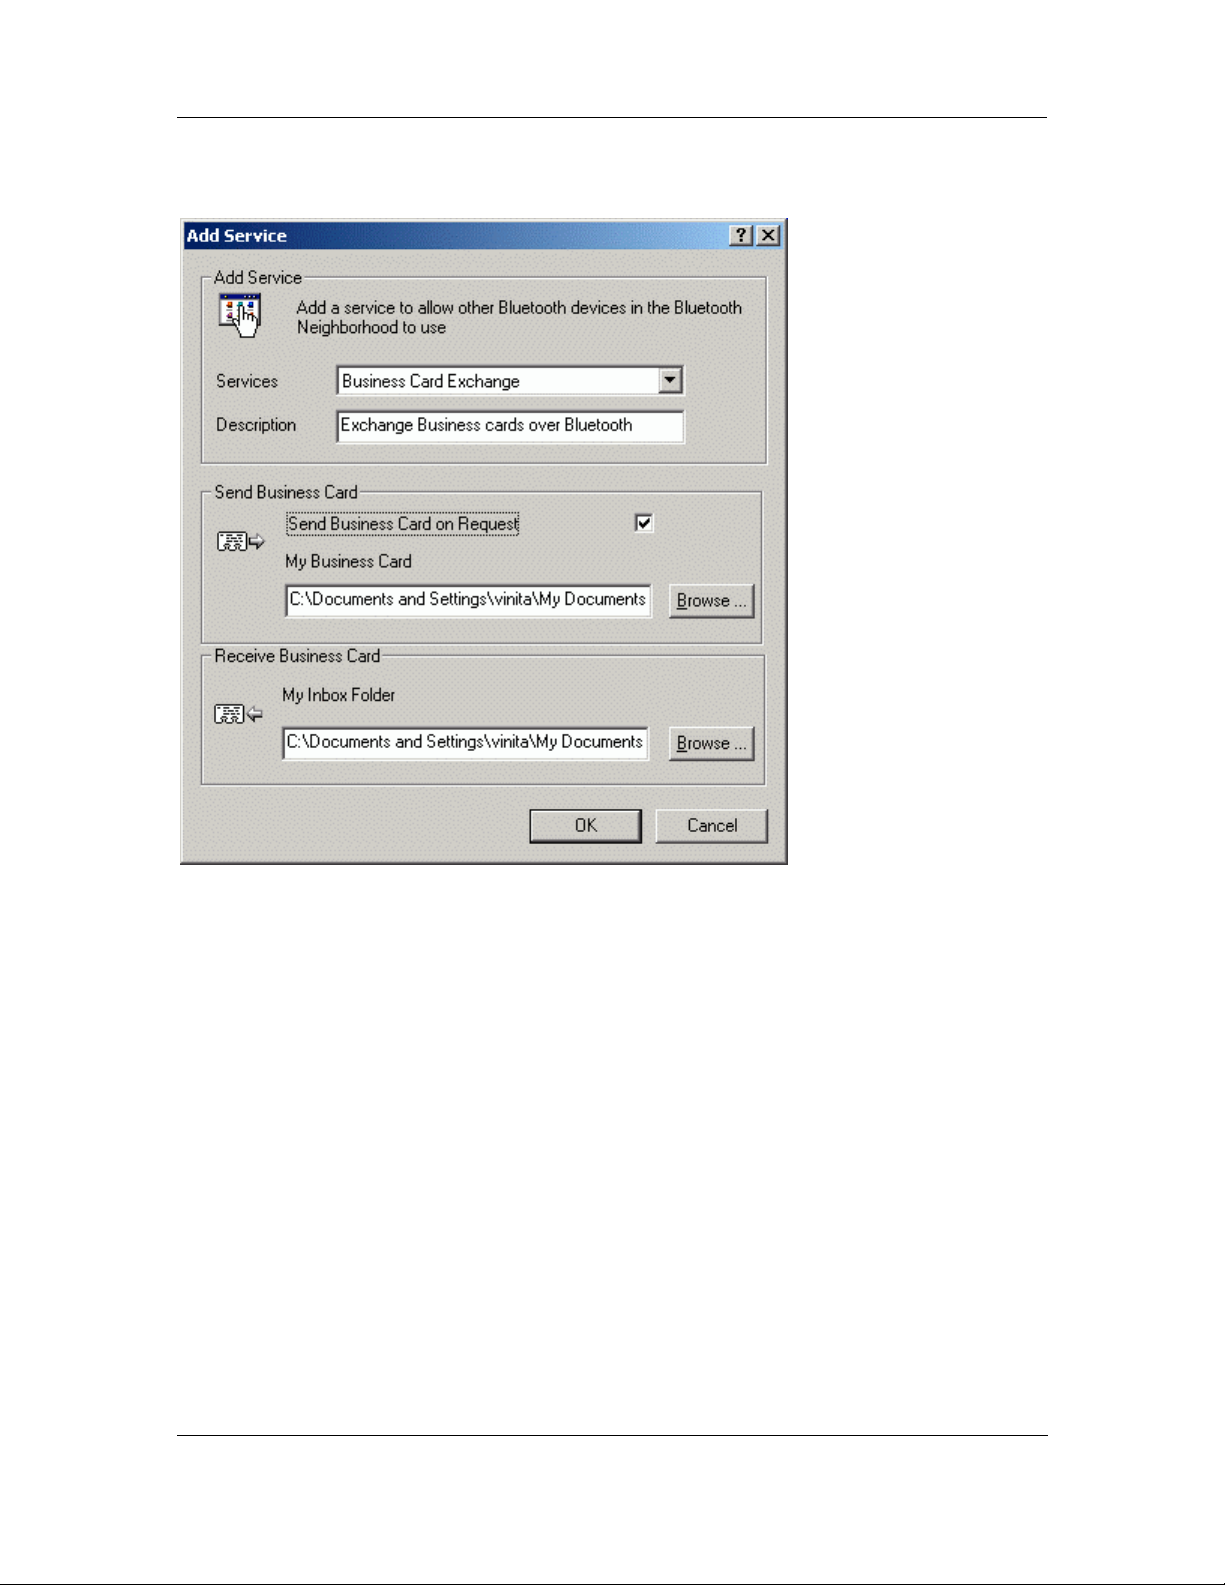
To add a Business Card Exchange service:
BluePC User Manual
1. In the Services tab click
Add. The Add Service dialog is displayed.
Figure 30. Add Business Card Service
2. Select Business Card Exchange from the Services list.
3. You can change the default description for the service.
4. If you want to send a business card to a remote device, click
the business card is stored. If the option
Send Business Card on Request is not selected
Browse to select the path where
remote devices cannot “pull” your business card. If the option is selected, they can “pull” the
card from your machine.
5. By default, the business card that is “sent” by a remote system or pulled from a remote system is
stored in the path C:\Documents and Settings\<username>\My Documents. To change
the default path, click the
6. Click
OK to save the settings.
Browse button and select the required path.
Getting Started 30
Page 31
BluePC User Manual
Add Serial Port Service
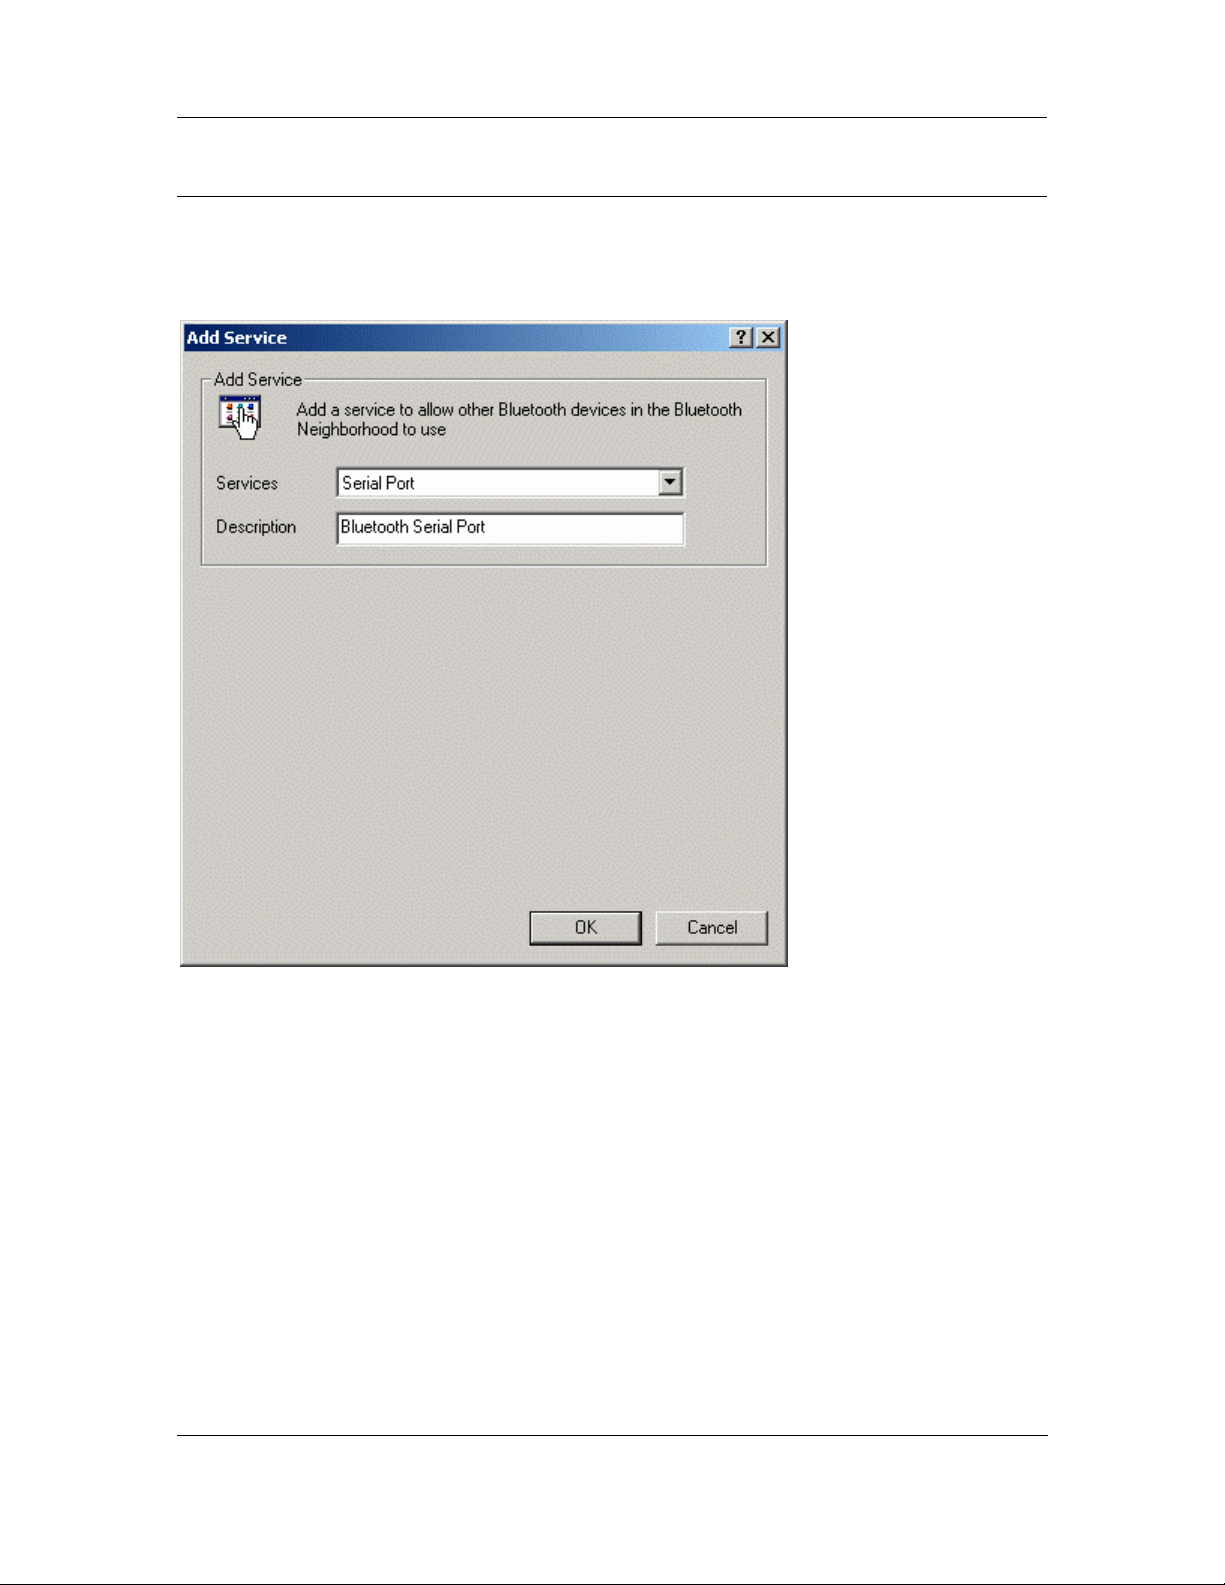
If your system is capable of offering a serial port service to other devices in the vicinity, you can add
the Serial Port service to Services list. To do so:
1. In the Services tab click
Add. The Add Service dialog is displayed.
Figure 31. Add Serial Port Service
2. Select Serial Port from the Services list.
3. You can modify the default description.
4. Click
OK to save the settings.
Getting Started 31
Page 32
BluePC User Manual
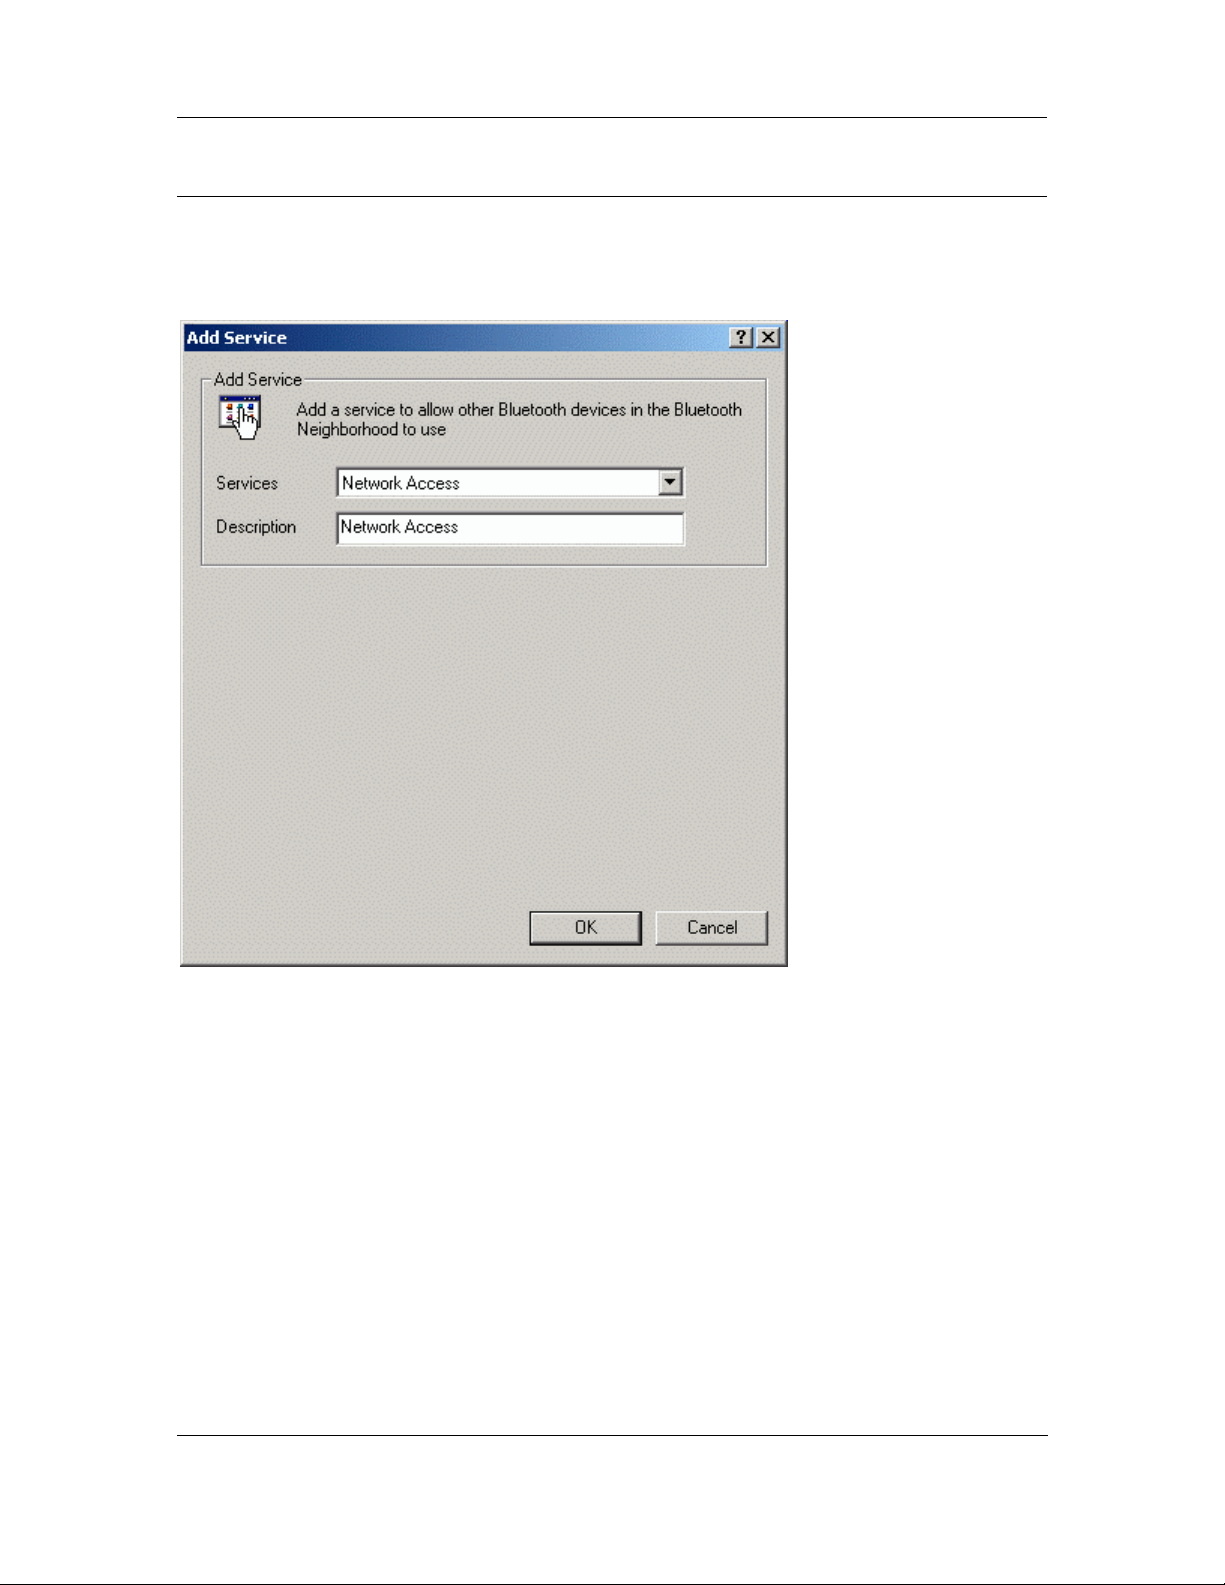
Add Network Access Service
If your system has access to the network, you can offer a network access service to other devices in
the vicinity. This would help devices in using network resources. To add network access service:
1. In the Services tab click
Add. The Add Service dialog is displayed.
Figure 32. Add Network Access Service
2. Select Network Access from the Services list.
3. You can modify the default description.
Getting Started 32
Page 33
BluePC User Manual
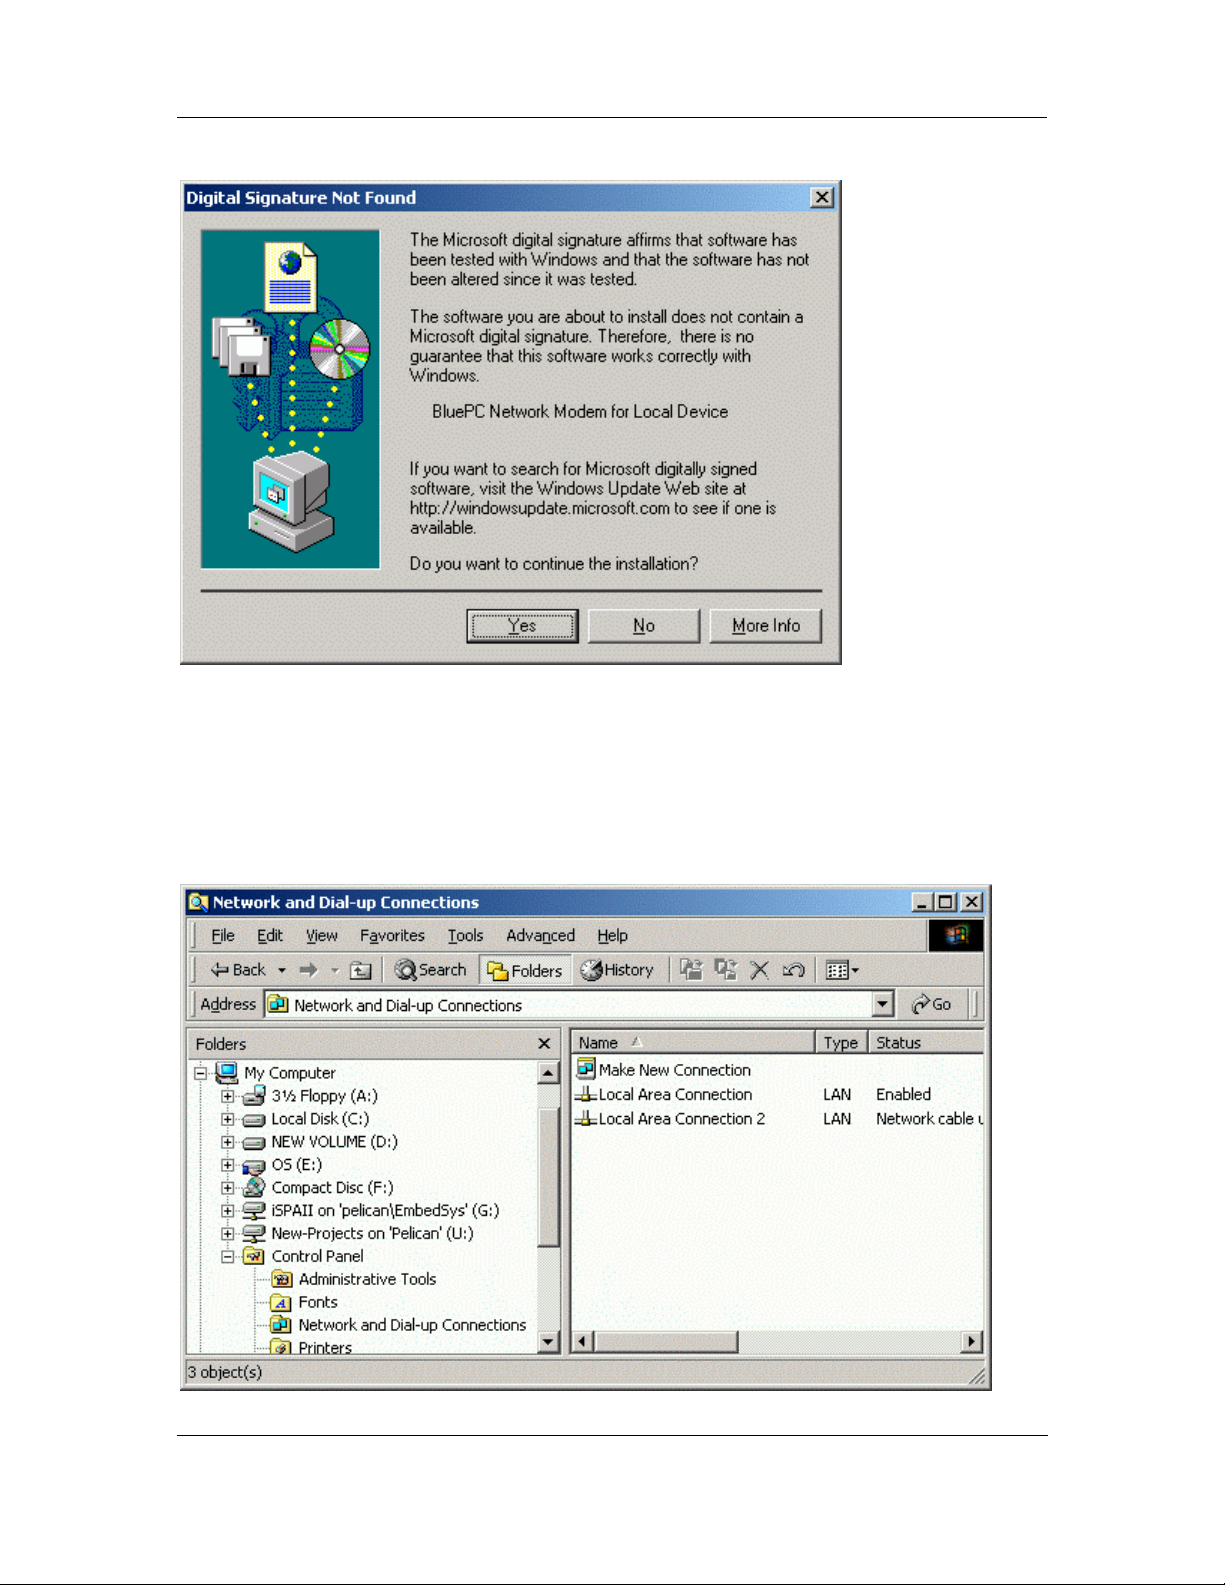
4. Click OK to save the settings. The Digital Signature Not Found screen is displayed.
Figure 33. Digital Signature Not Found
5. Click Yes.
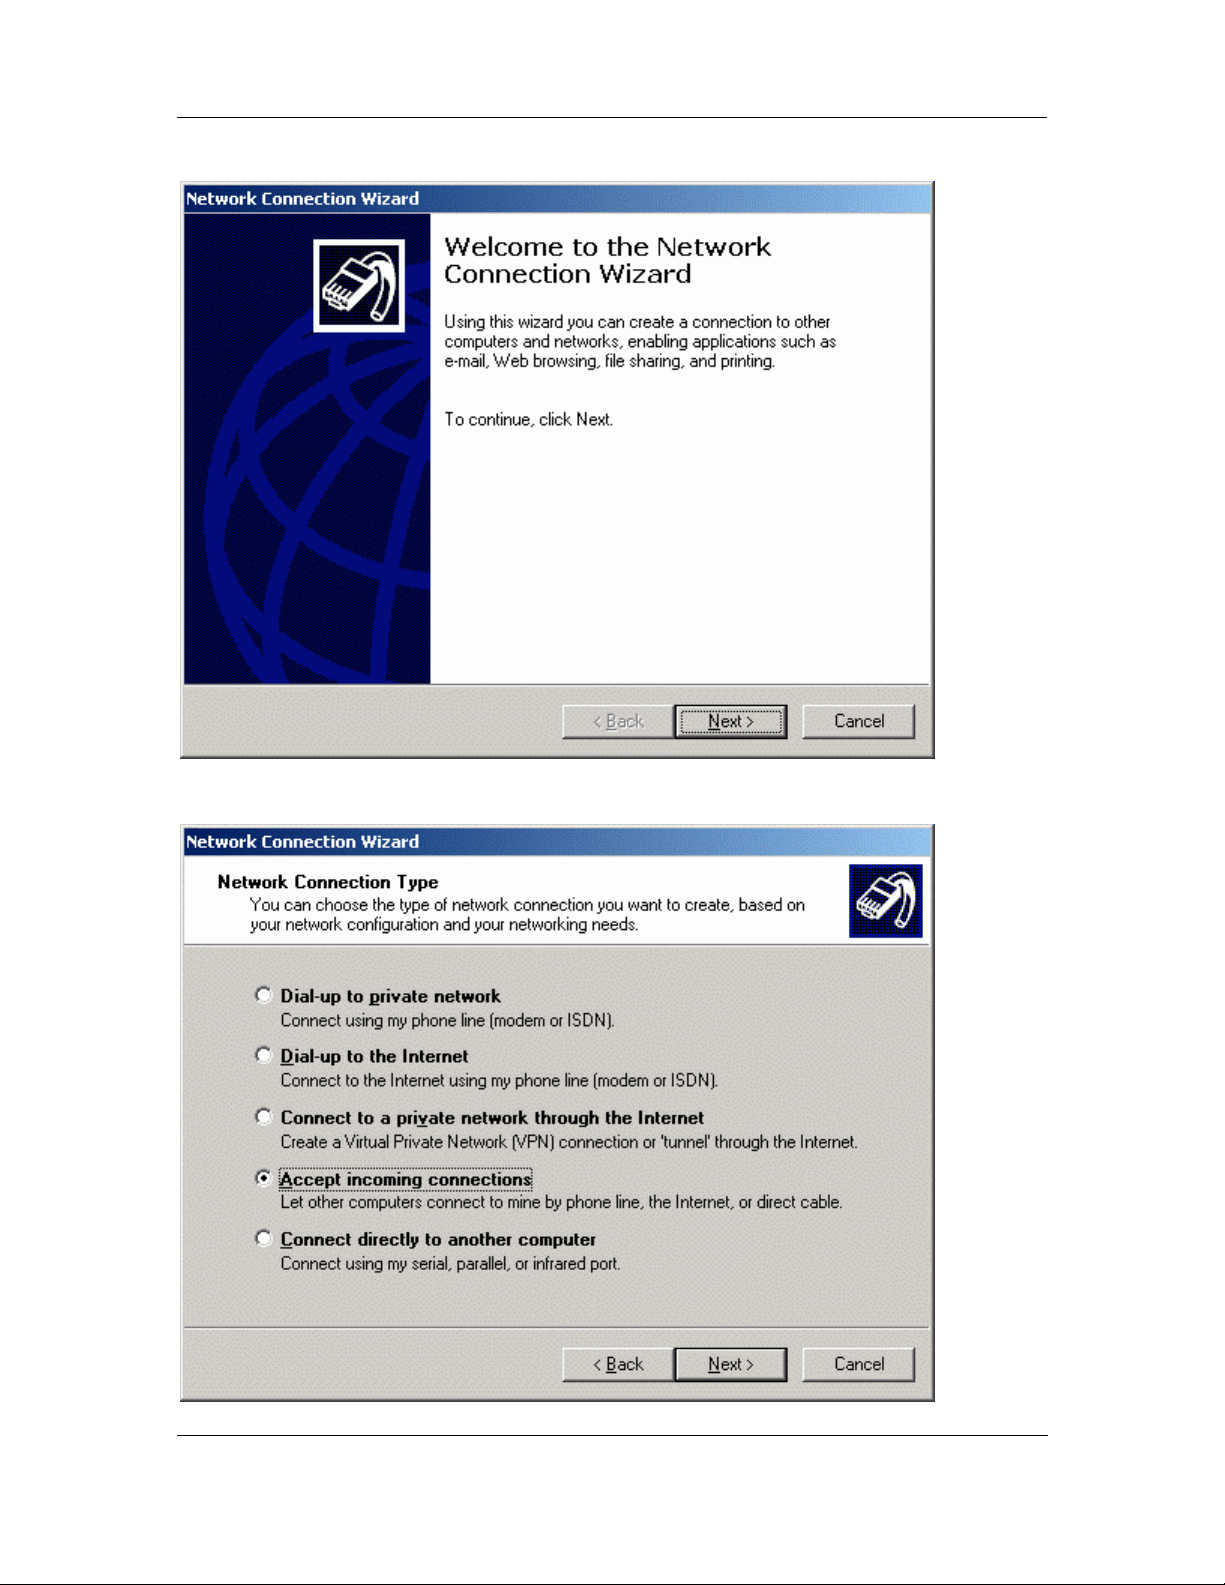
For other devices in the vicinity to access the network through your system, you need to configur e it
accept incoming connections. To do so:
1. Click
Start -> Programs -> Accessories -> Communications -> Network and Dial-up
Connections
. The Network and Dialup Connections window is displayed.
Figure 34. Network and Dial-up Connections
Getting Started 33
Page 34
BluePC User Manual
2. Double-click Make New Connection. The Network Connection Wizard is displayed.
Figure 35. Network Connection Wizard
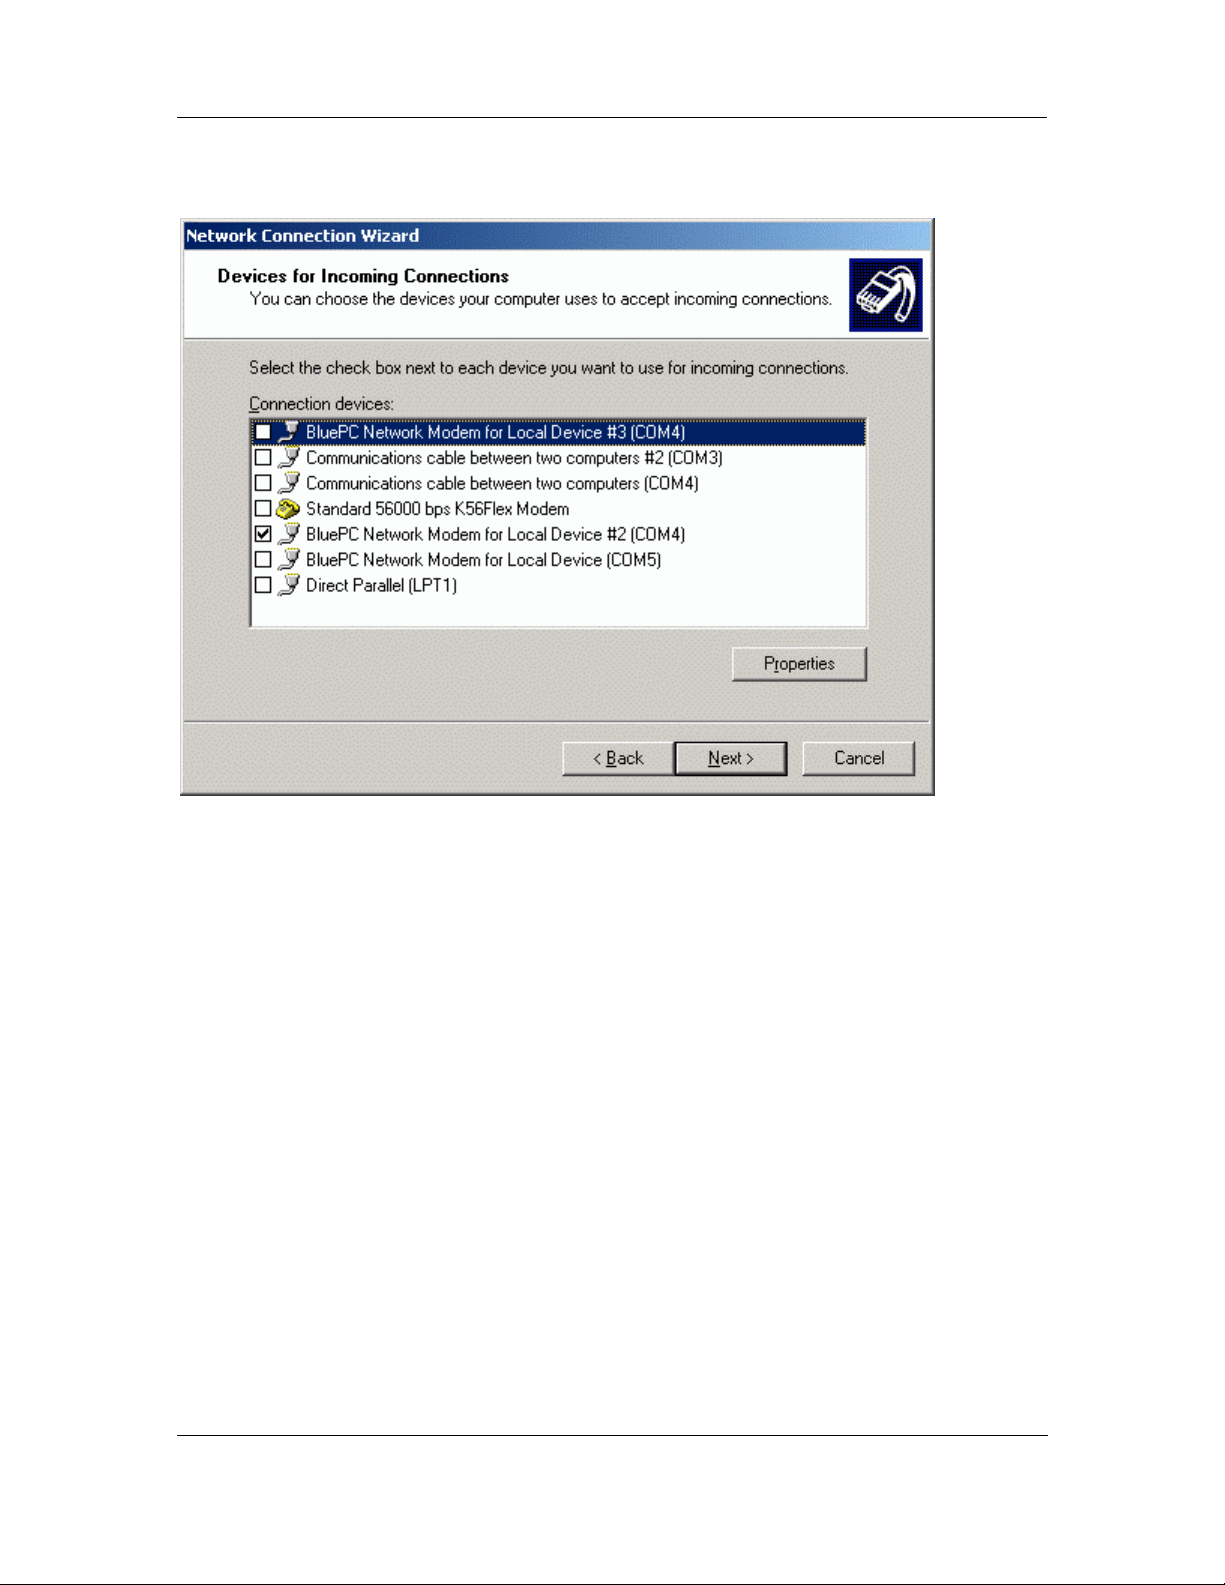
3. Click Next. The Network Connection Type screen is displayed.
Figure 36. Network Connection Type
Getting Started 34
Page 35
BluePC User Manual
4. Select the option Accept incoming connections. Click Next. The Devices for Incoming
Connections screen is displayed.
Figure 37. Devices for Incoming Connections
5. Ensure that only the option BluePC Network Modem for the Local Device is selected. Click
Next.
Getting Started 35
Page 36
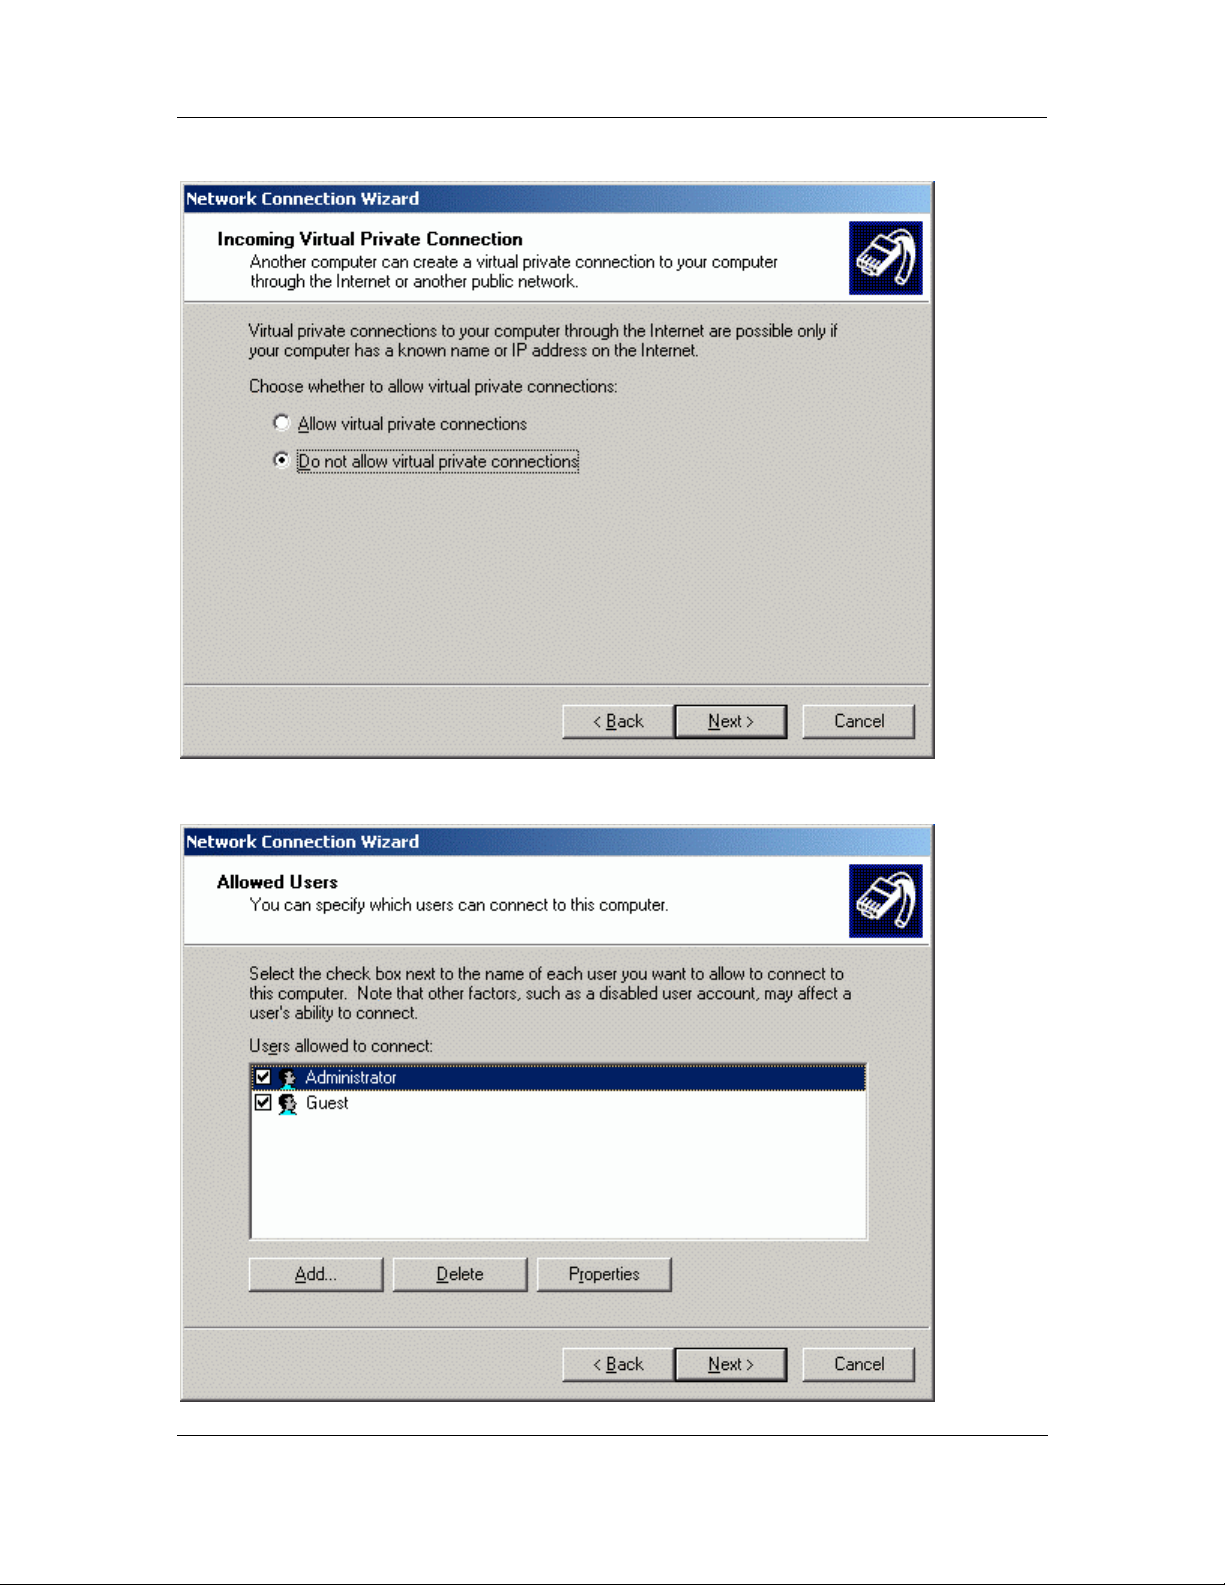
6. The Incoming Virtual Private Connection screen is displayed.
BluePC User Manual
Figure 38. Incoming Virtual Private Connections
7. Click Next. The Allowed Users screen is displayed.
Figure 39. Allowed Users
Getting Started 36
Page 37
BluePC User Manual
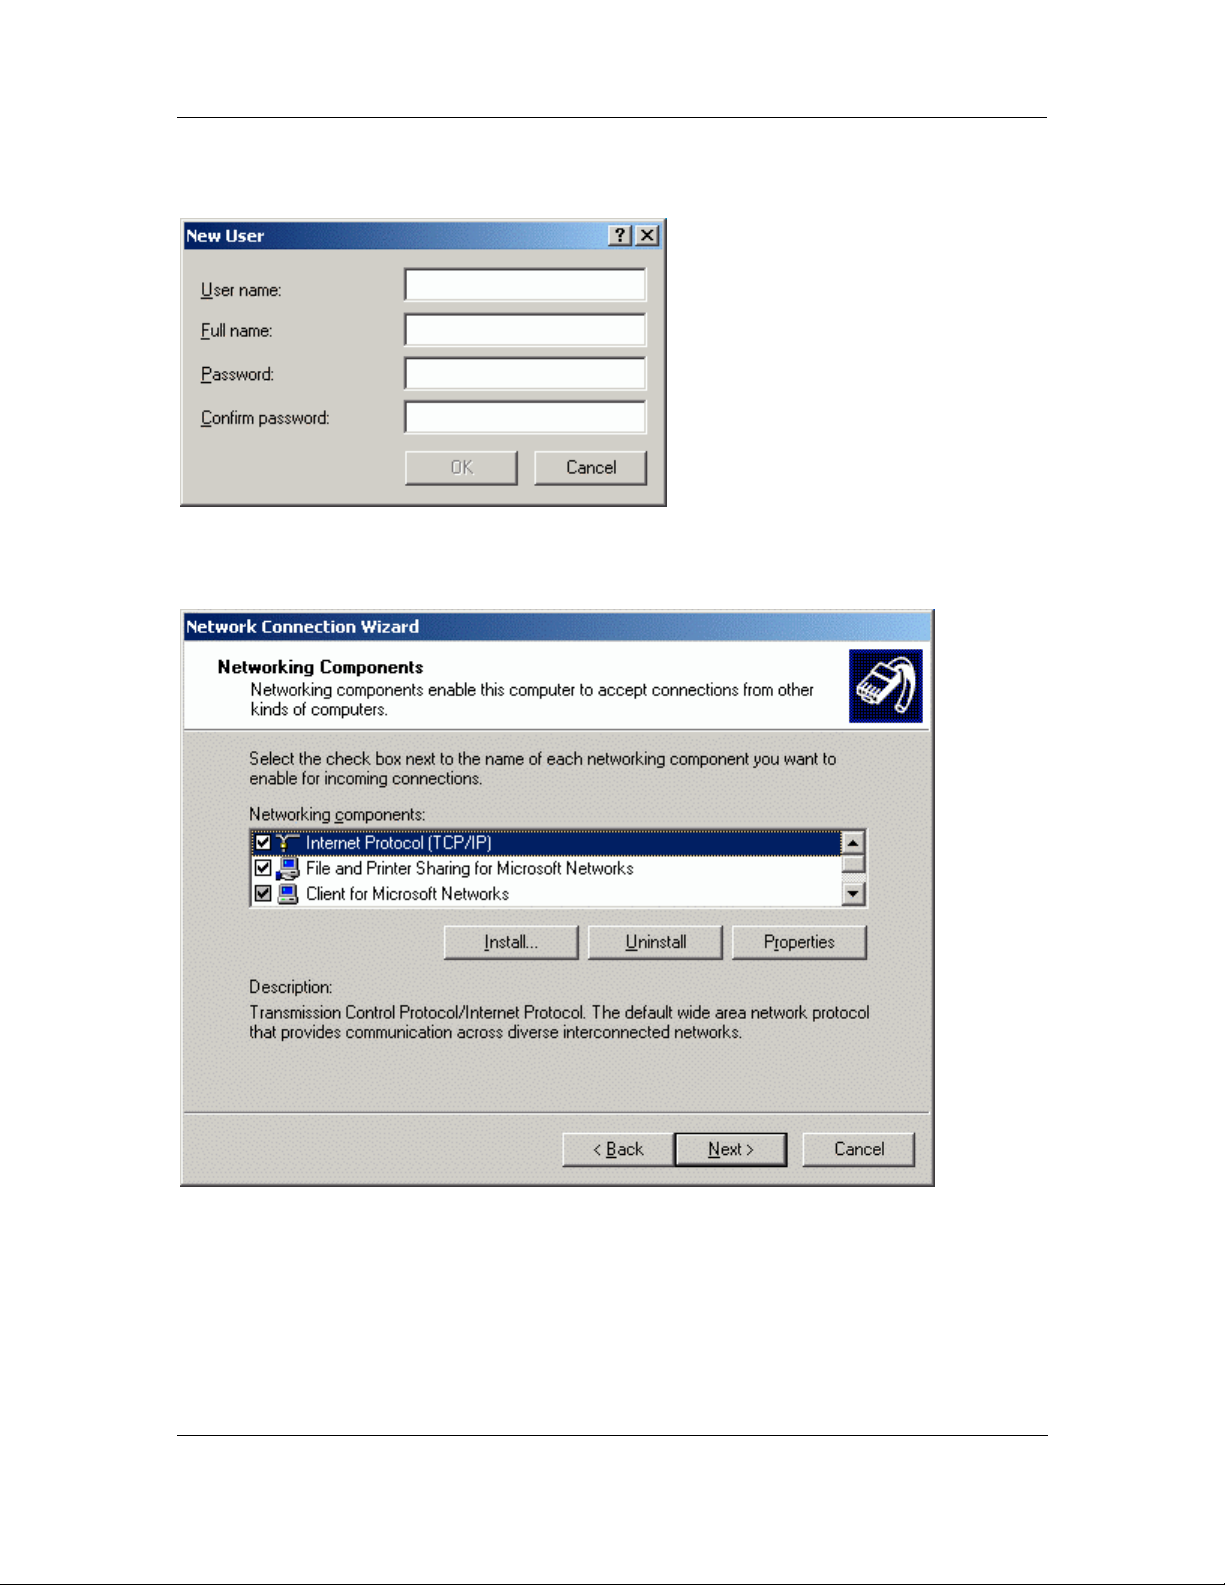
8. If a user other than the Administrator or Guest needs to connect, you will need to add the user.
Click
Add. The New User screen is displayed.
Figure 40. New User
9. Enter the details and click OK. Click Next to proceed. The Networking Components screen is
displayed.
Figure 41. Networking Components
10. Click Next.
Getting Started 37
Page 38
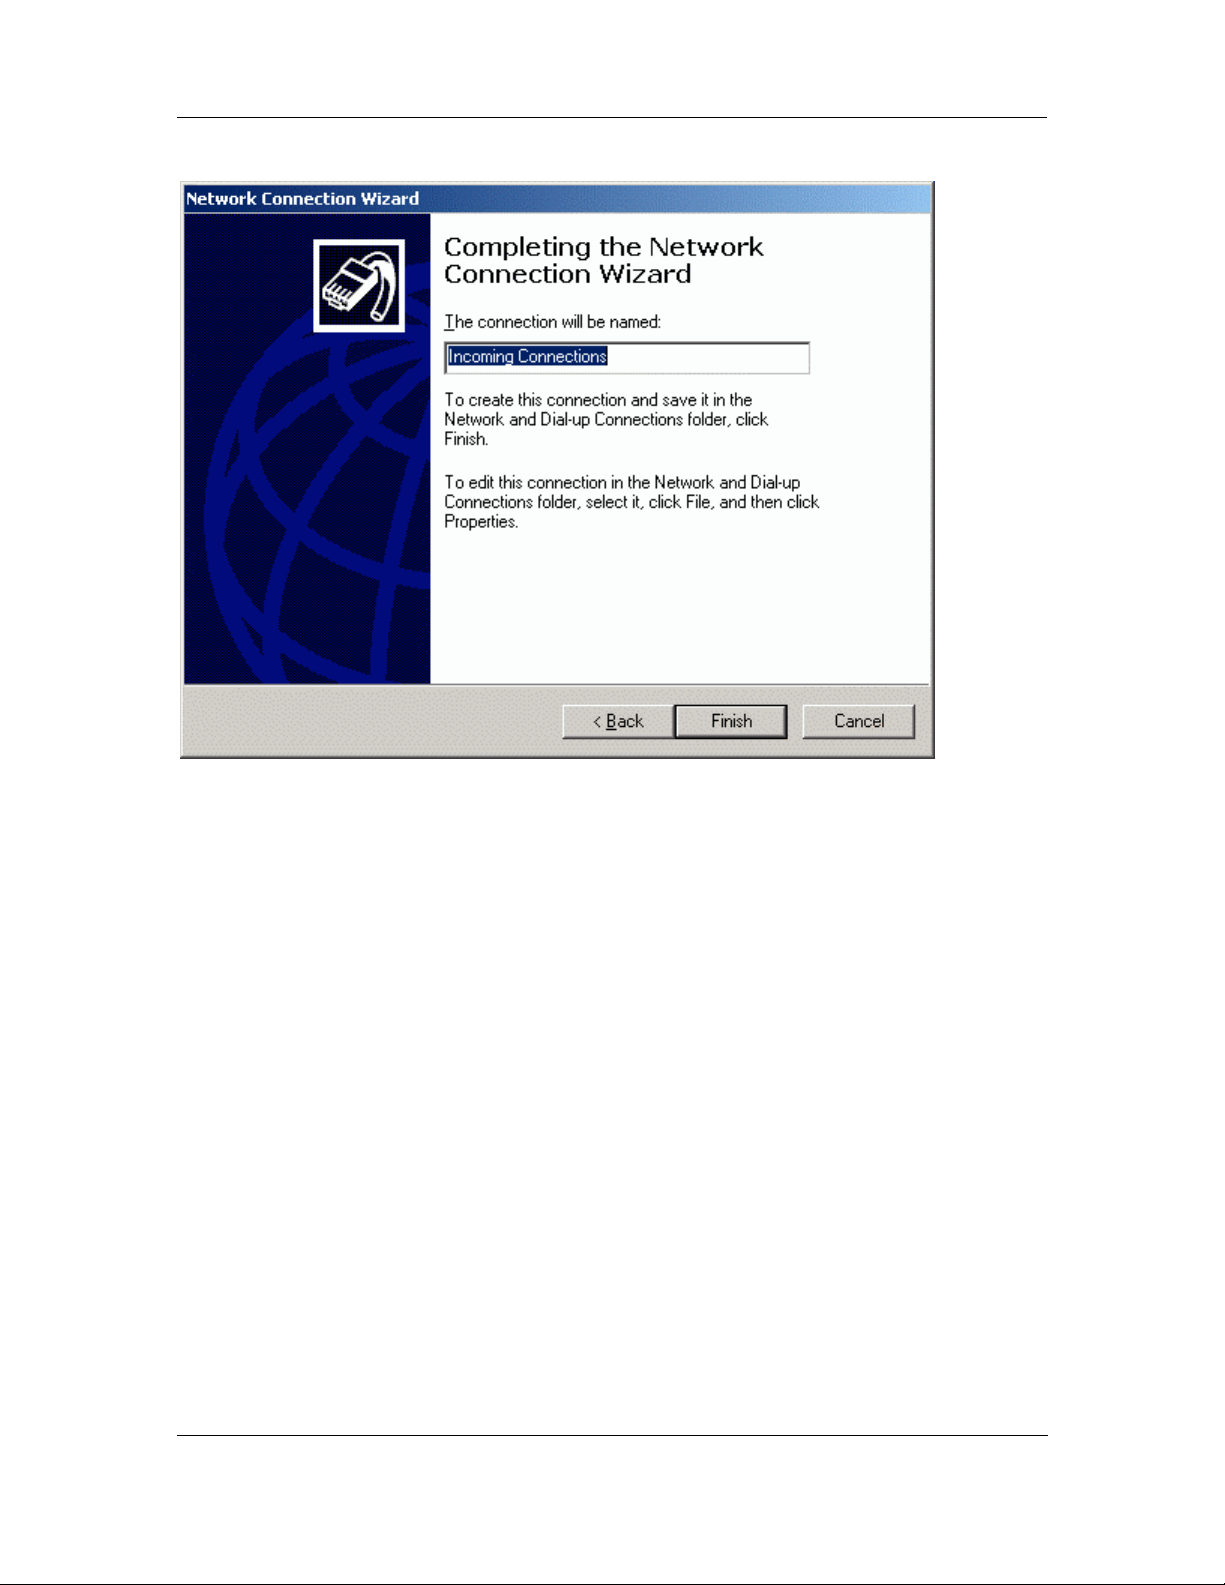
11. The Final screen is displayed.
BluePC User Manual
Figure 42. Completing the Network Connection
12. Enter a name for the incoming connection. Click Finish to complete the process.
Users on the client side will now be able to connect to the LAN through BluePC.
Getting Started 38
Page 39
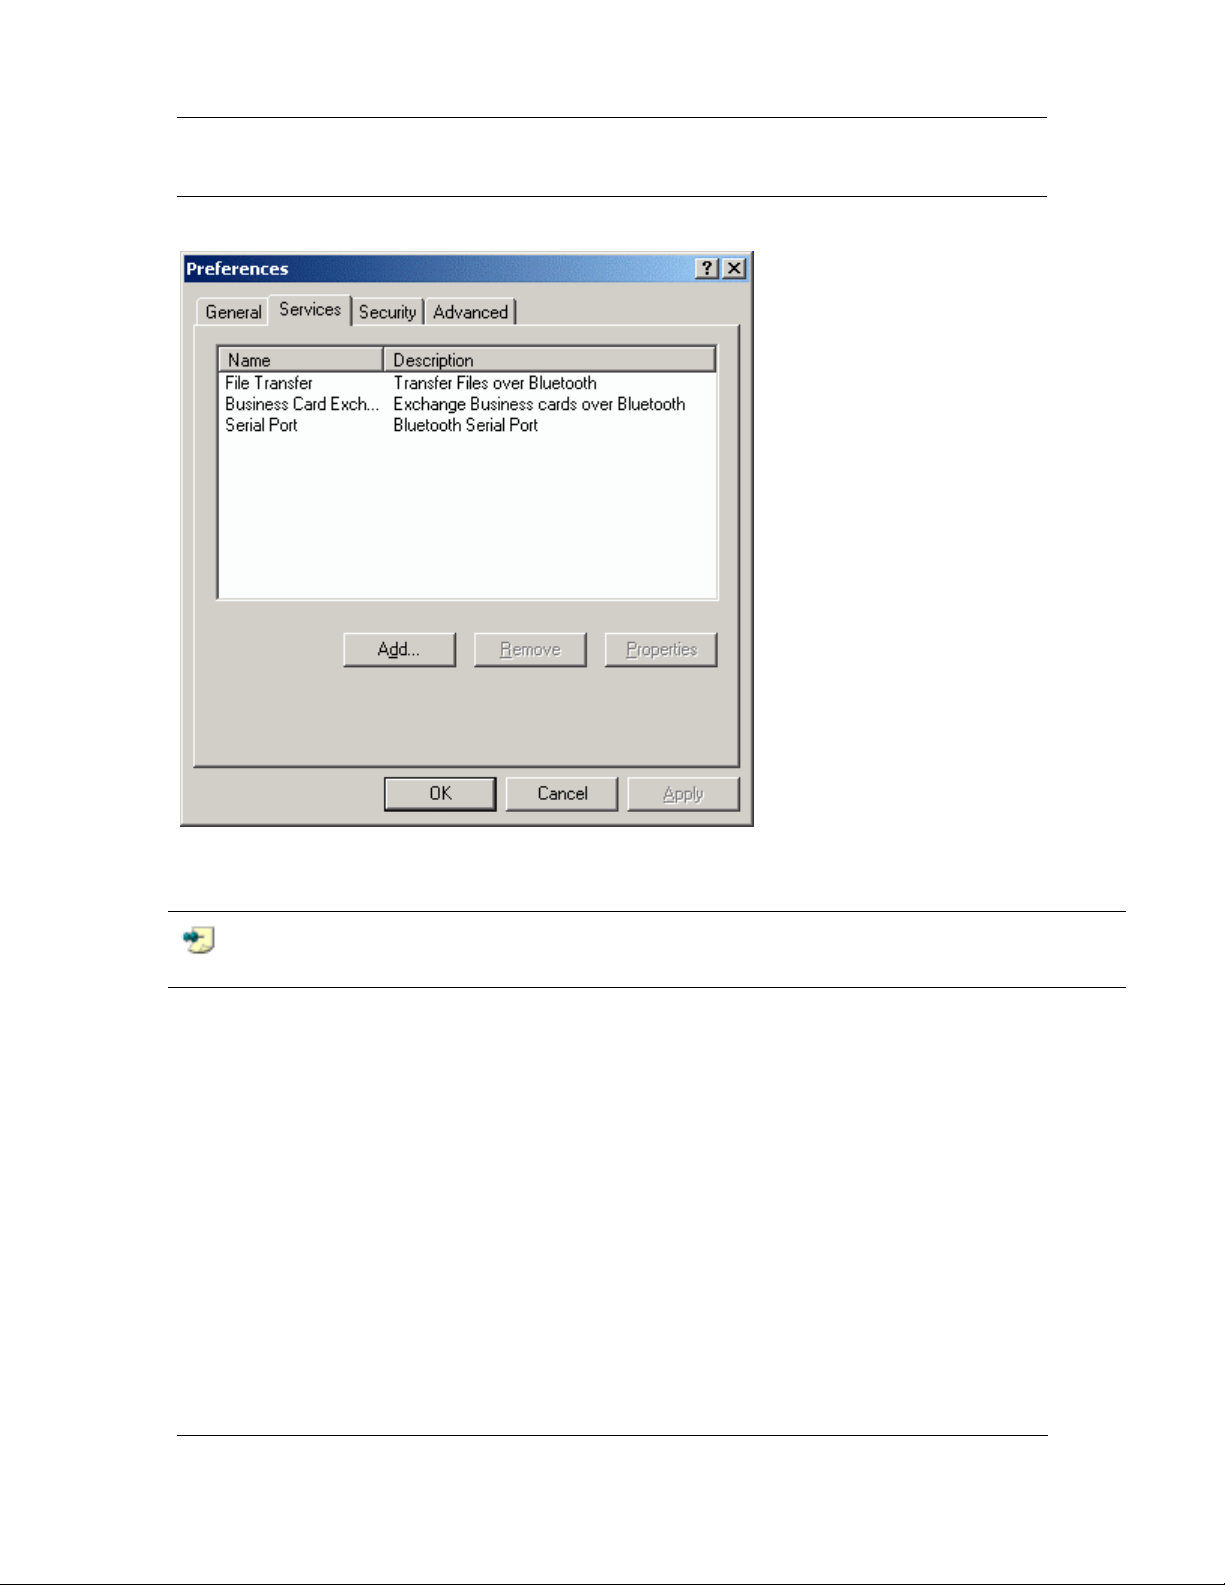
To remove a service:
Select the service in the Services tab and click Remove.
BluePC User Manual
Figure 43. Remove Service
If you click Properties, the properties of the selected service will be displayed in a window.
Note: Any settings modified will be valid only for the next connection, and will be ignored
for the current connection.
Getting Started 39
Page 40
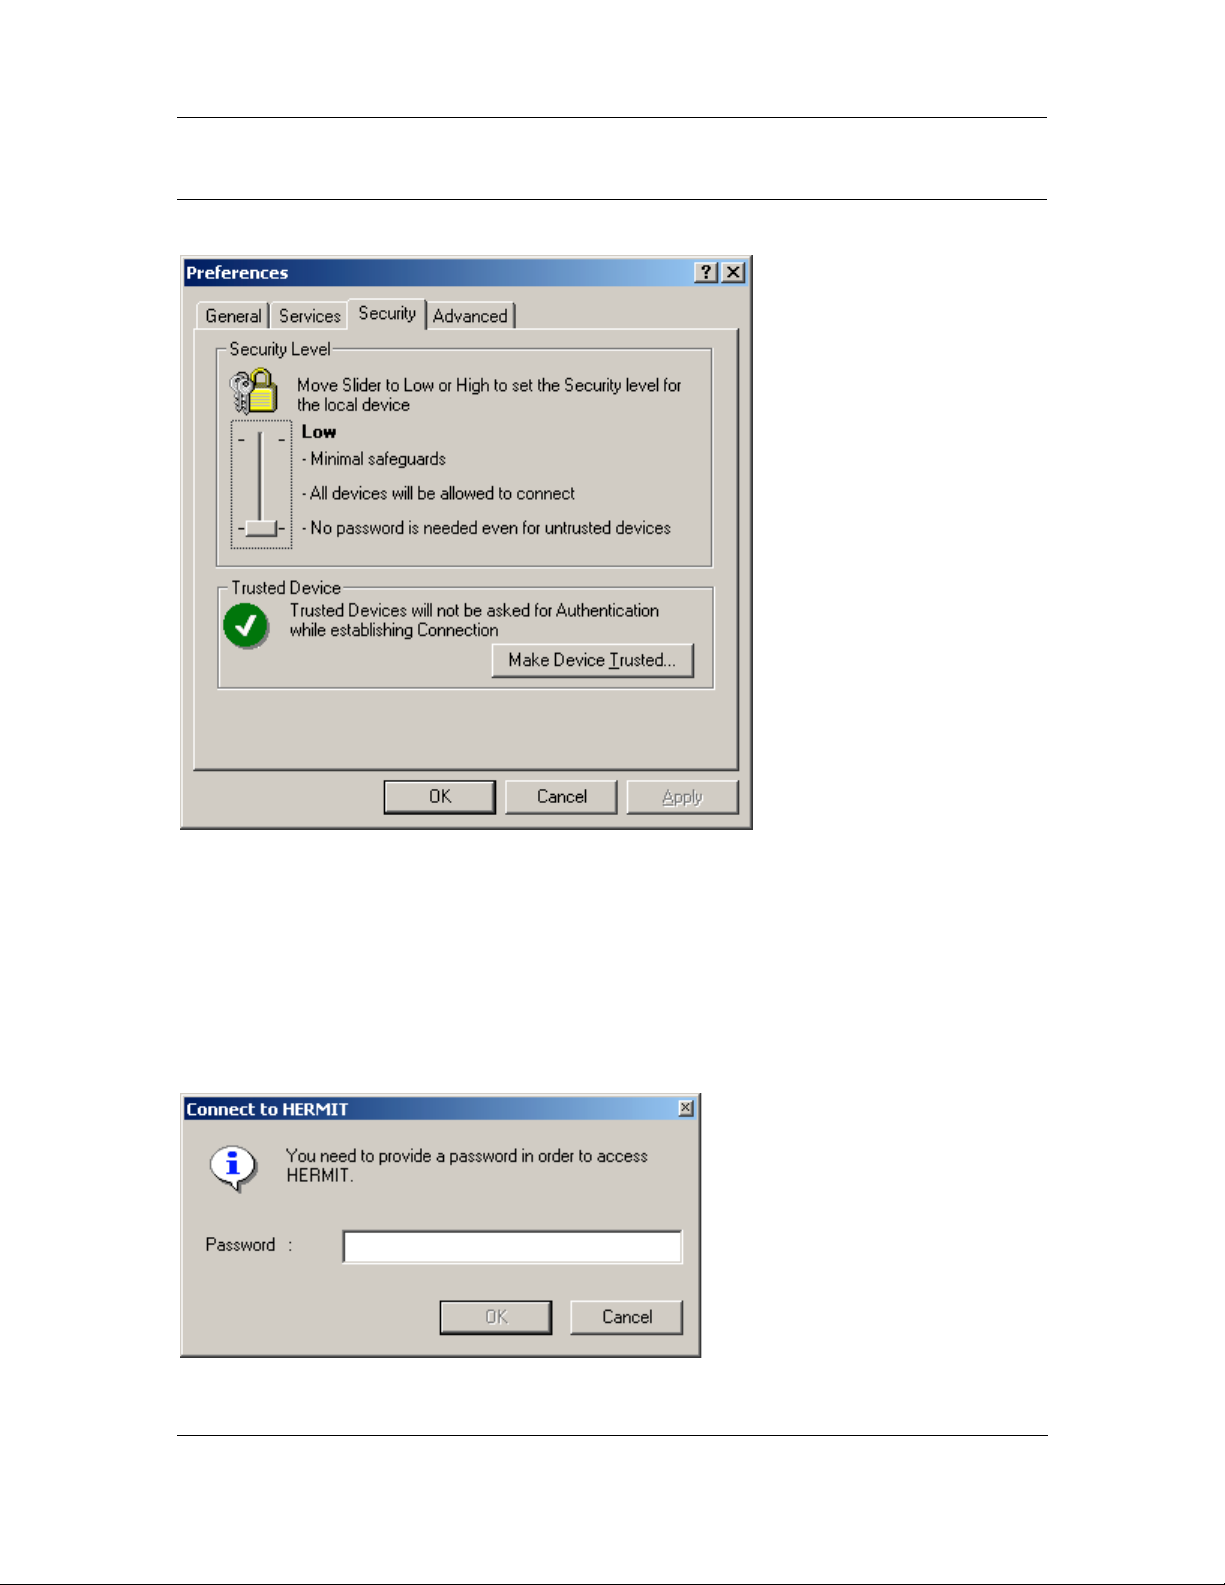
3.3.4 Security Tab
The Security tab is displayed as shown in the figure:
BluePC User Manual
Figure 44. Security tab
1. Move the slider to set the security level (low or high) for your device.
Low security setting indicates that all devices in the vicinity will be allowed to connect to
a.
your device and they do not need to provide password to connect
High security setting indicates that only trusted devices will be allowed to connect, and
b.
untrusted devices will need to provide a password to connect
2. Therefore, when devices try to connect they are prompted with the following message:
Figure 45. Password Window
Getting Started 40
Page 41
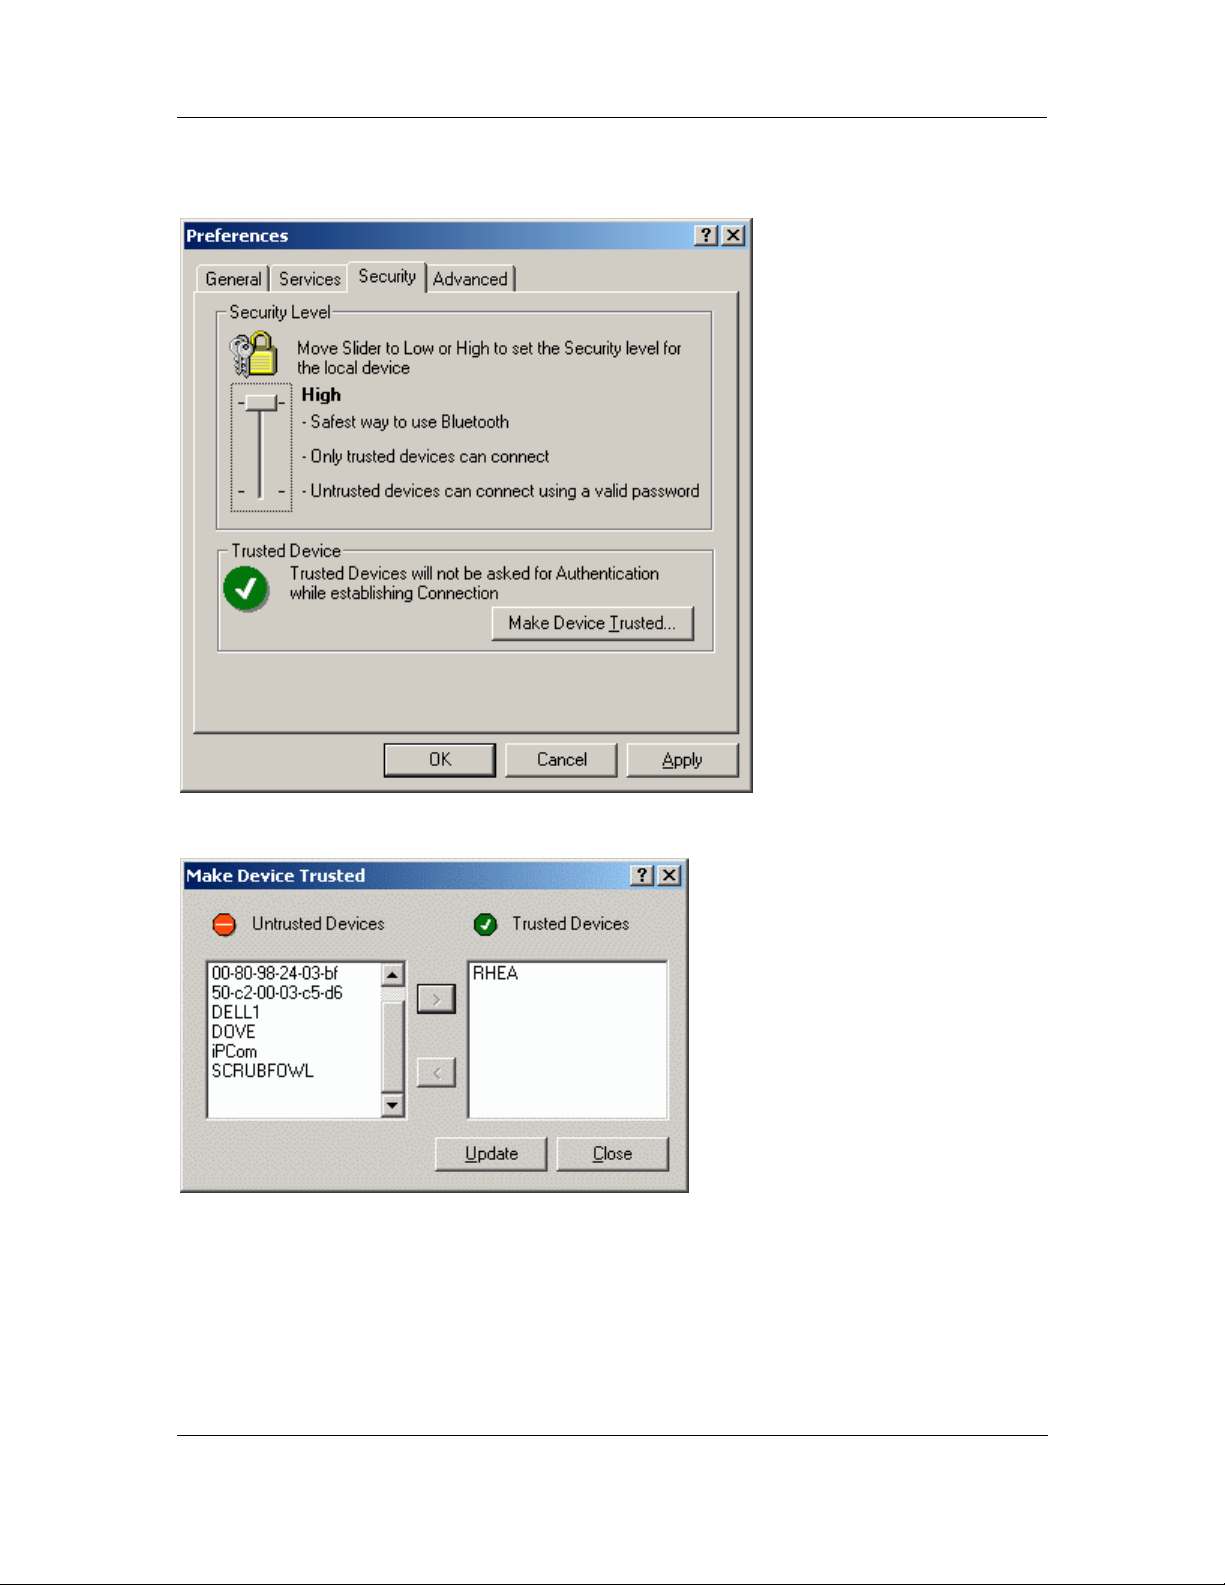
BluePC User Manual
3. If you choose a “High” security setting, you can specify devices that do not need to provide
password information. To do so, click
Make Device Trusted.
Figure 46. High Security
4. The following screen is displayed.
Figure 47. Make Device Trusted
5. Select a device in the Restricted Devices list, and click the arrow to move the device to
Trusted Devices
6. Click
Update to save the settings. You will be prompted for a password, one at a time, for each
list.
device
7. Click
Close to close the window.
Getting Started 41
Page 42
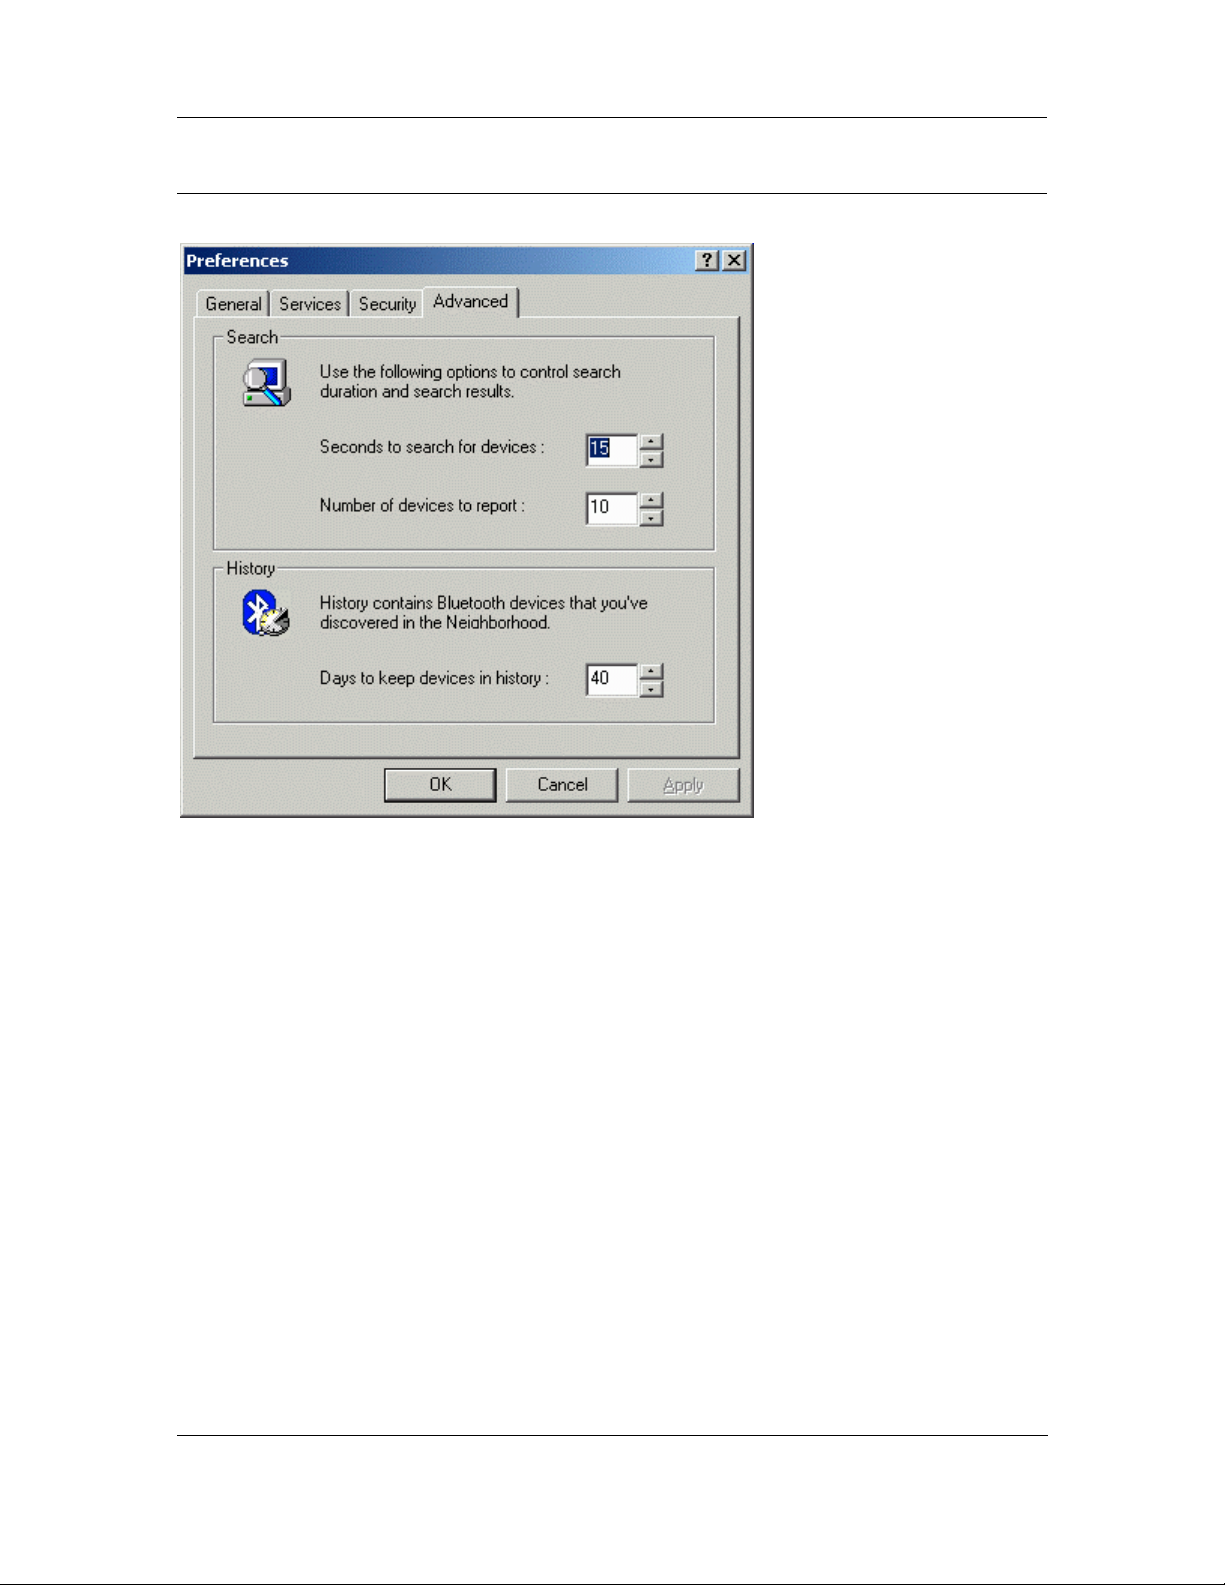
3.3.5 Advanced Tab
The Advanced tab is displayed as shown in the figure:
BluePC User Manual
Figure 48. Advanced tab
1. Through this tab you can set the search options
• Specify the number of seconds to search
• Specify the number of devices to report
2. BluePC remembers Bluetooth devices that were found in the past. You can specify the
maximum number of days to keep devices in history.
3. Click
You can obtain quicker results if you specify smaller values.
Apply to save the information
Getting Started 42
Page 43

BluePC User Manual
Chapter 4 Using BluePC
This section describes how you can use BluePC to browse the web, access your network, fax
information, or synchronize your PDA with your PC. This section describes how to:
• Access the Network
• Transfer Files
• Exchange Business Cards
• Print Files
• Synchronize PDAs with your PC
• Send a Fax
4.1 Access the Network
You can create a connection to another computer or network thereby enabling applications such as
e-mail, browsing, and accessing the network resources. Setting up a network connection is a two step
process. You need to:
• Locate a Bluetooth device offering network access
• Set up Connection
4.1.1 Locate the Network Access Service
You can setup devices in the following ways:
• Using the
• Using the BluePC wizard
• Using the Bluetooth enabled Windows explorer
There are two methods in which you can access the network:
• Through the Personal Area Network
• Through the standard Dial-up network or LAN Access setup
Access Network menu option in the Bluetooth menu
Till a PAN connection is established, the PAN icon
Using BluePC 43
in the system tray is displayed with a cross.
Page 44
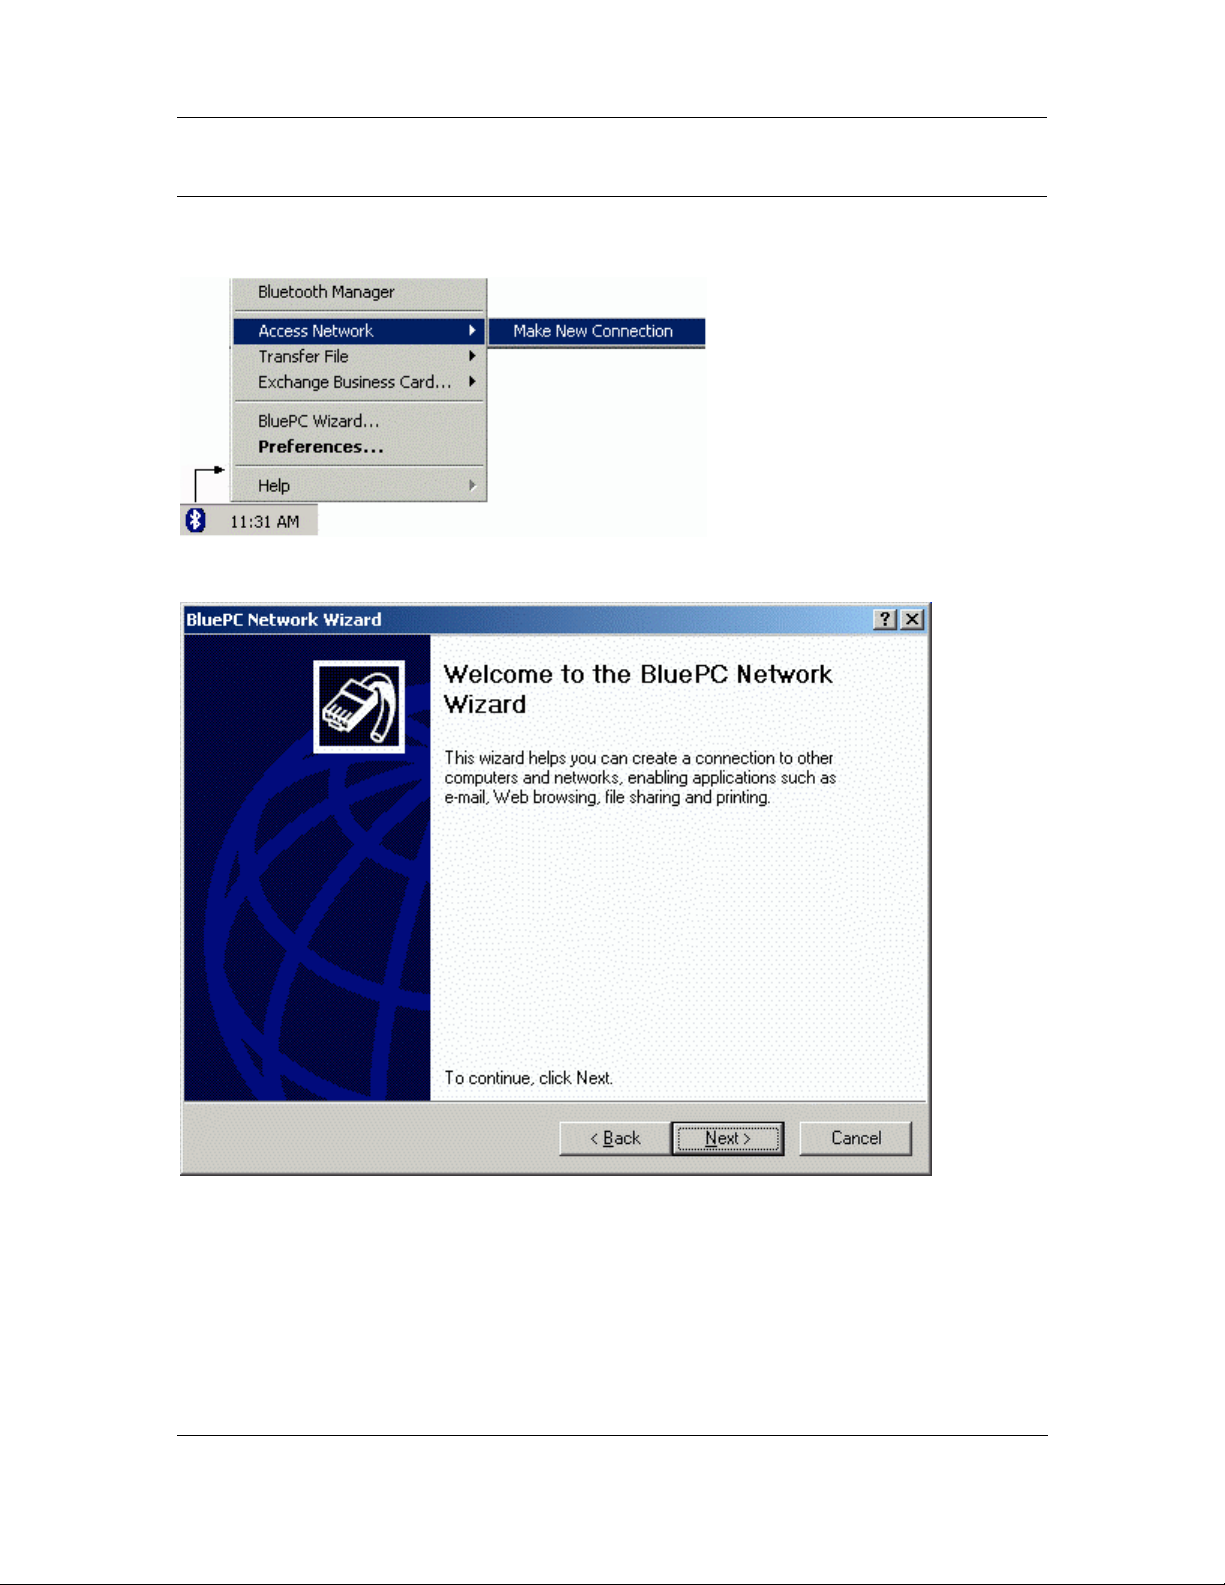
BluePC User Manual
Using the Bluetooth menu
1. Right-click the Bluetooth icon in the system tray and select Access the Network – >Make New
Connection
Figure 49. Network Access menu
.
2. The BluePC Ne two rk Wiz a rd screen is displayed. Click Next.
Figure 50. Network Connection Wizard
Using BluePC 44
Page 45
BluePC User Manual
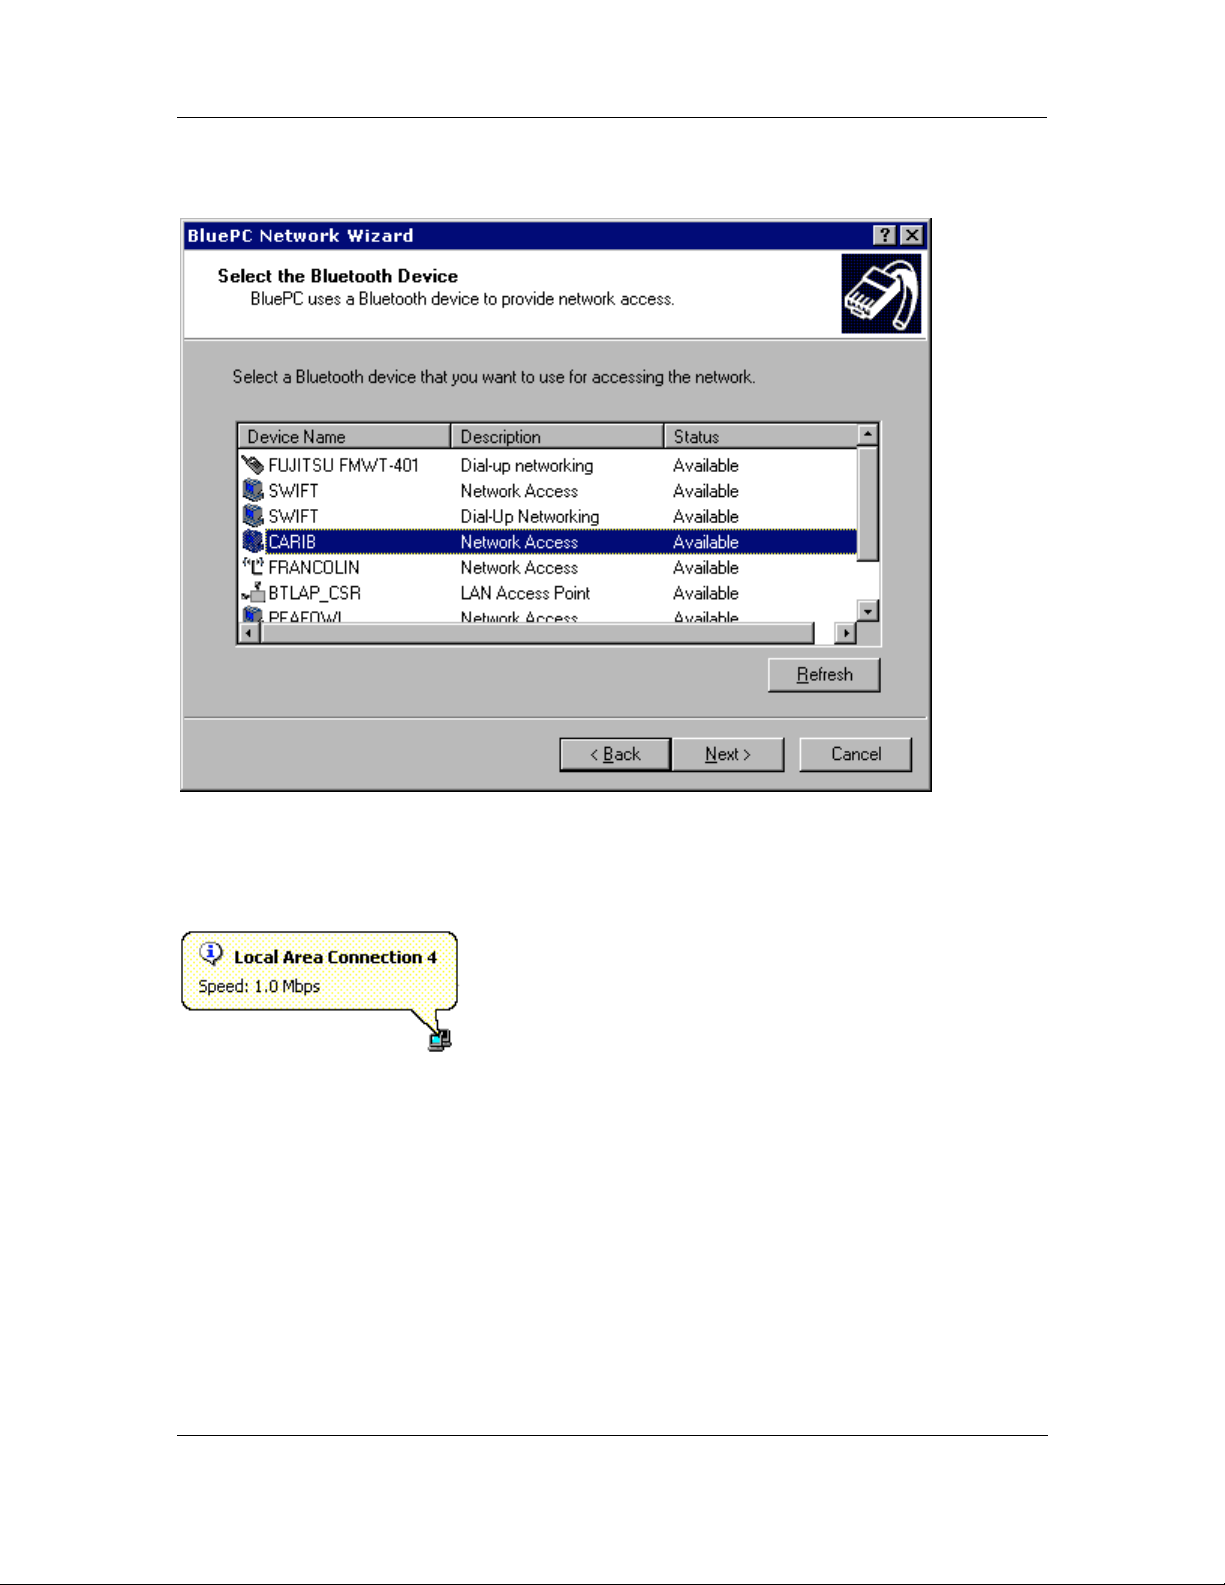
3. The Network Connection Configuration screen is displayed with a list of devices through
which you can access the network.
Figure 51. Network Device Selection
4. Select the device and click Next. If you are accessing the network through a Personal Area
Networking service, you are directly connected to the network. And, LAN connection icon
displays in the system tray as shown in the following figure:
Figure 52. LAN Connection in the system tray
Using BluePC 45
Page 46
BluePC User Manual
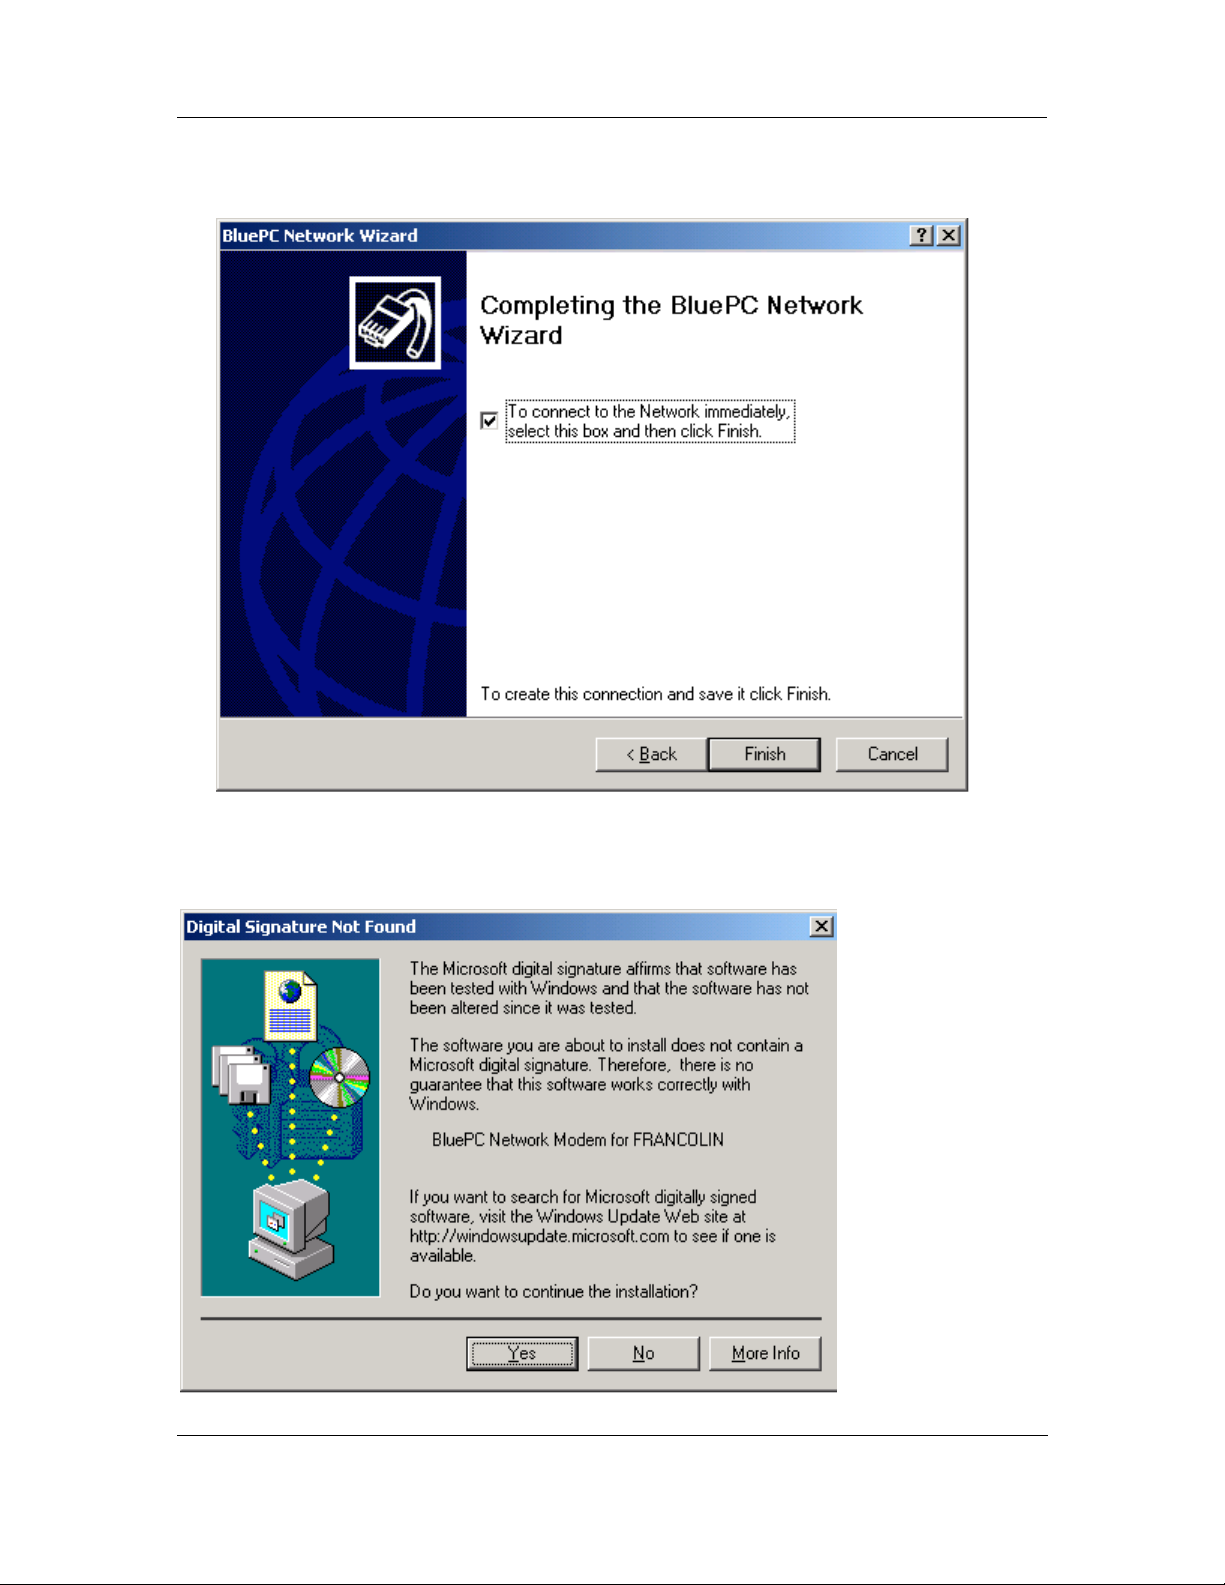
5. If you are accessing the network through a LAN or Dial-up connection., the Final screen is
displayed:
Figure 53. Complete Network Connection Configuration
6. If you check the option To connect to the Network immediatel y select this bo x and then
click Finish,
the Digital Signature Not Found screen is displayed.
Figure 54. Digital Signature Not Found
Using BluePC 46
Page 47
BluePC User Manual
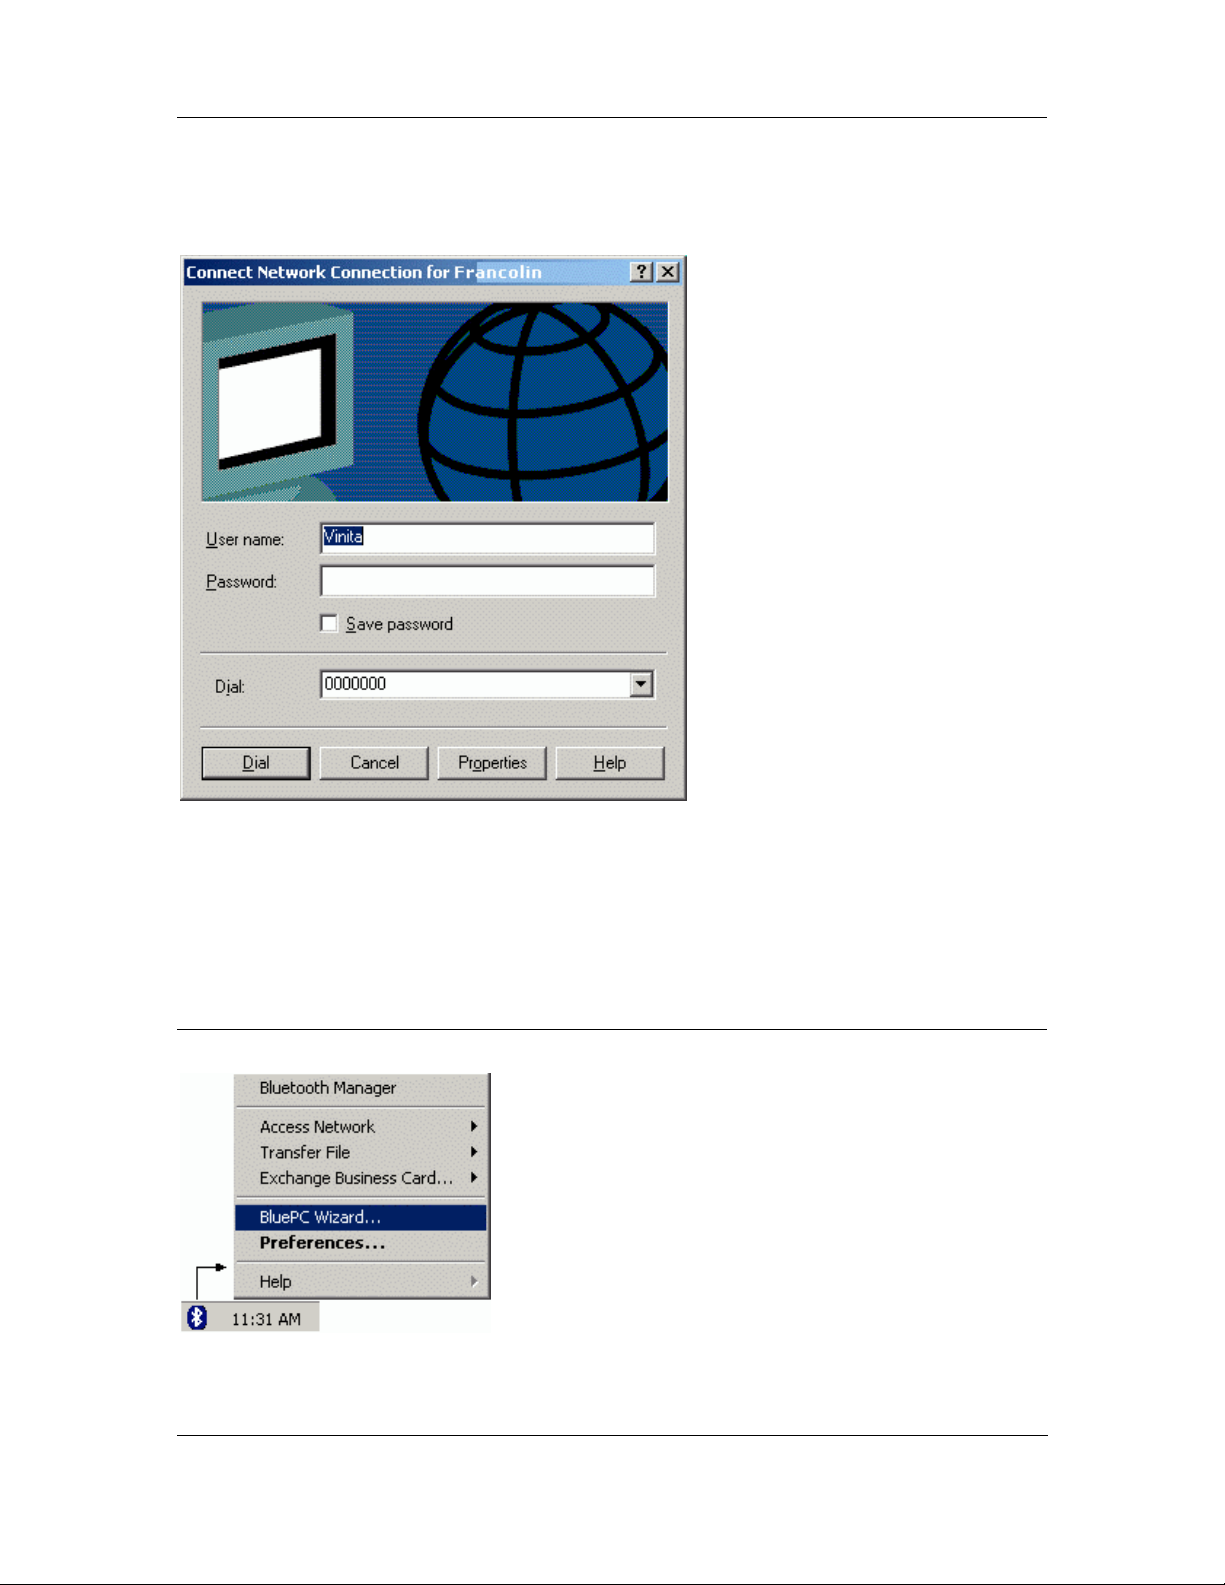
7. You will get this if you have not disabled “Digital Signature not Found” as explained in the
Appendix Disabling “Digital Signature Not Found”. Click
Connection screen is displayed.
Yes to proceed. The Network
Figure 55. Network Login screen
8. Enter your network user name and password and click Dial. Click Finish to complete the
process.
If you have not checked the option as indicated in Step 6, you can connect to the network using the
procedure described in section 4.1.2 Set up Connection on page 53.
Using BluePC Wizard
1. Right-click the Bluetooth icon in the system tray and select the option BluePC Wizard.
Figure 56. Bluetooth Wizard menu
Using BluePC 47
Page 48
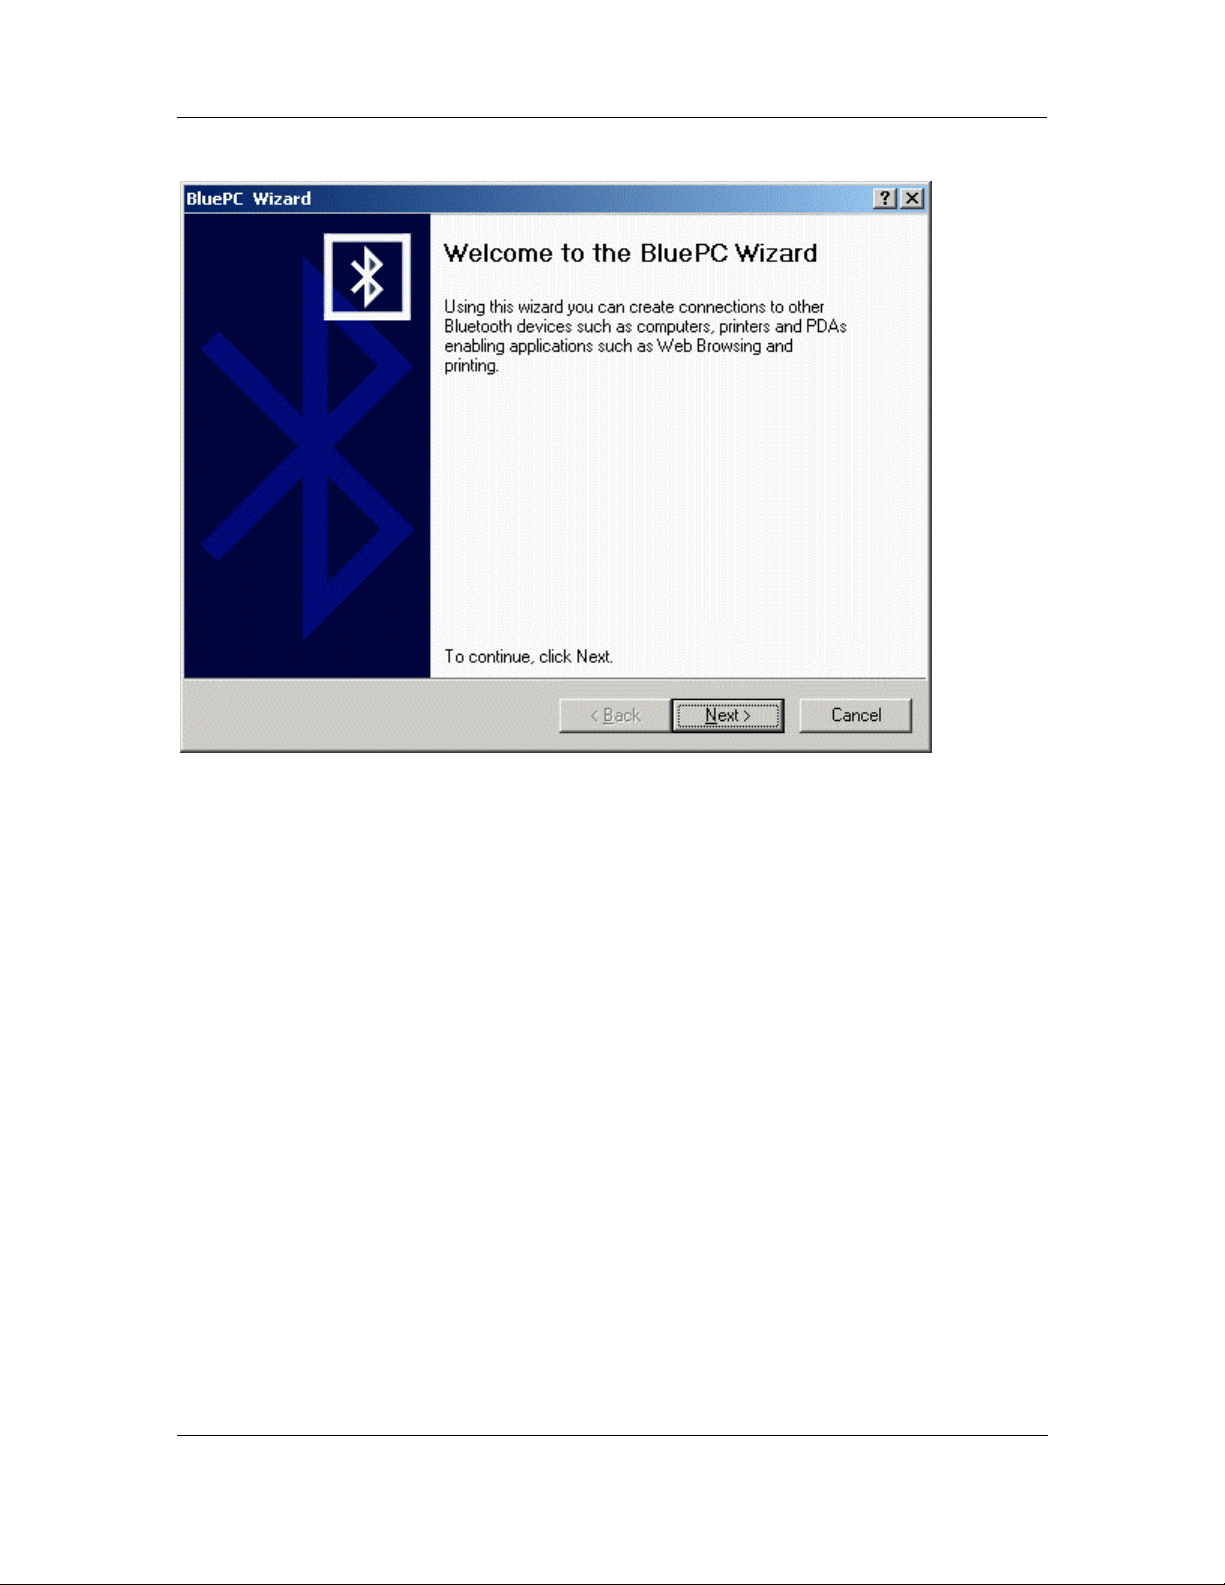
2. The BluePC Wizard welcome screen is displayed.
BluePC User Manual
Figure 57. BluePC Wizard welcome screen
Using BluePC 48
Page 49
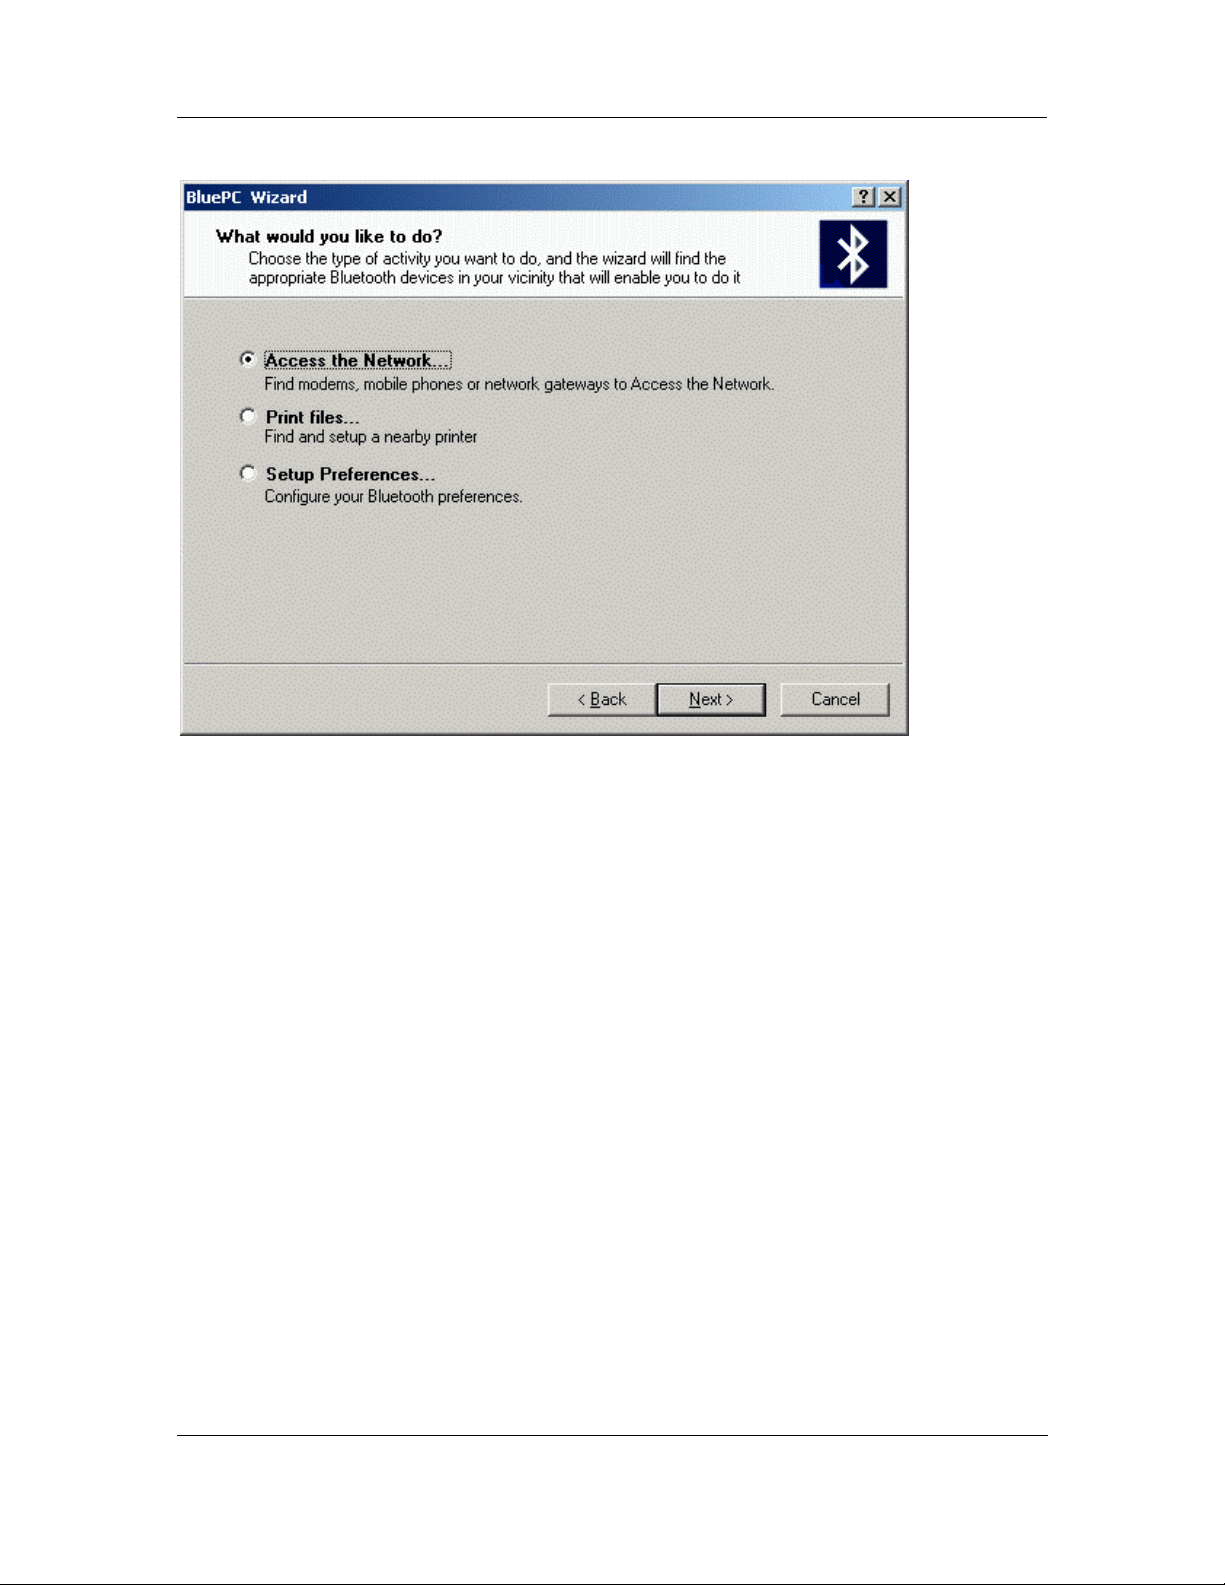
3. Click Next. The BluePC Wizard option screen is displayed.
BluePC User Manual
Figure 58. Access the Network option
4. Choose Access the Network. The steps that follow to setup the network access are the same as
described in the previous section Using the Bluetooth menu on page 44.
Using BluePC 49
Page 50
BluePC User Manual
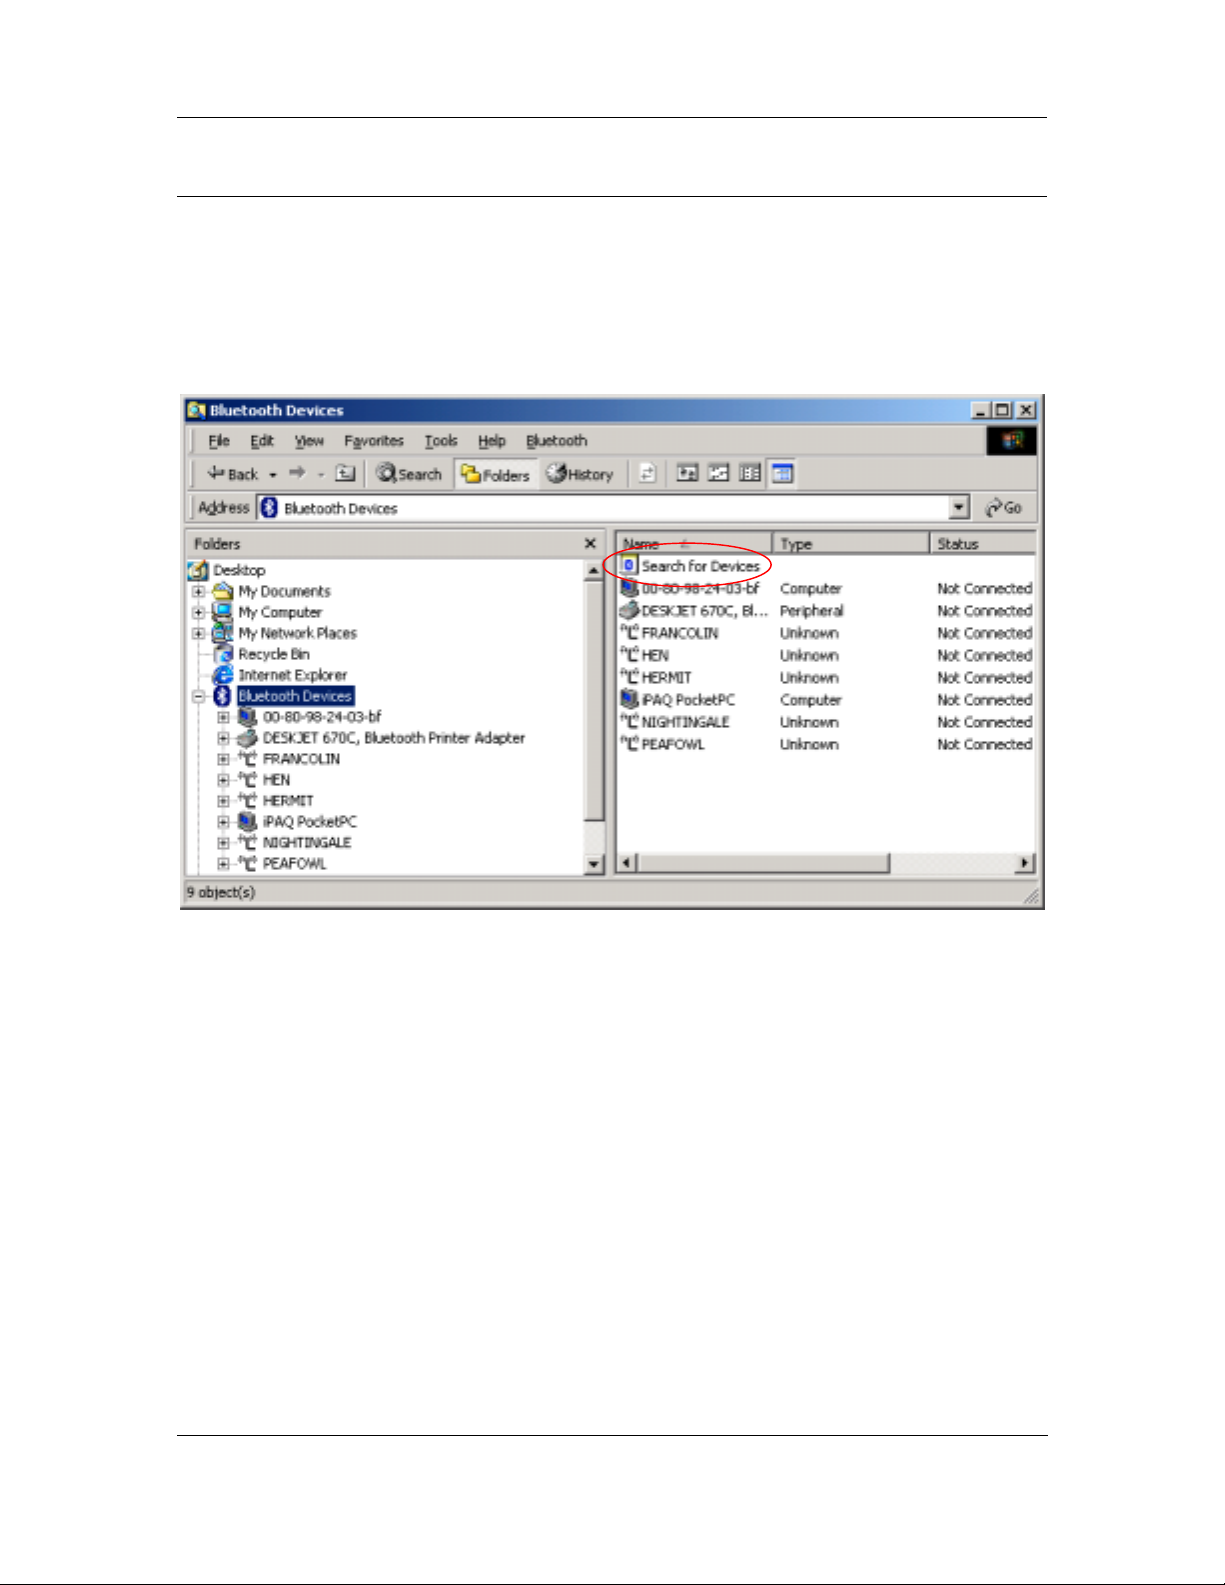
Using the Bluetooth-enabled Windows Explorer
If you know the Bluetooth device offering network access, use the Bluetooth-enabled Windows
Explorer to access the network.
1. Double-click the
Bluetooth Devices icon and select the option Search for Devices). The following screen is
Bluetooth Devices icon on your desktop (You may also right-click the
displayed:
Figure 59. Bluetooth Devices screen
2. Double-click the Search for Devices icon. The Explorer searches for devices in the vicinity.
Using BluePC 50
Page 51
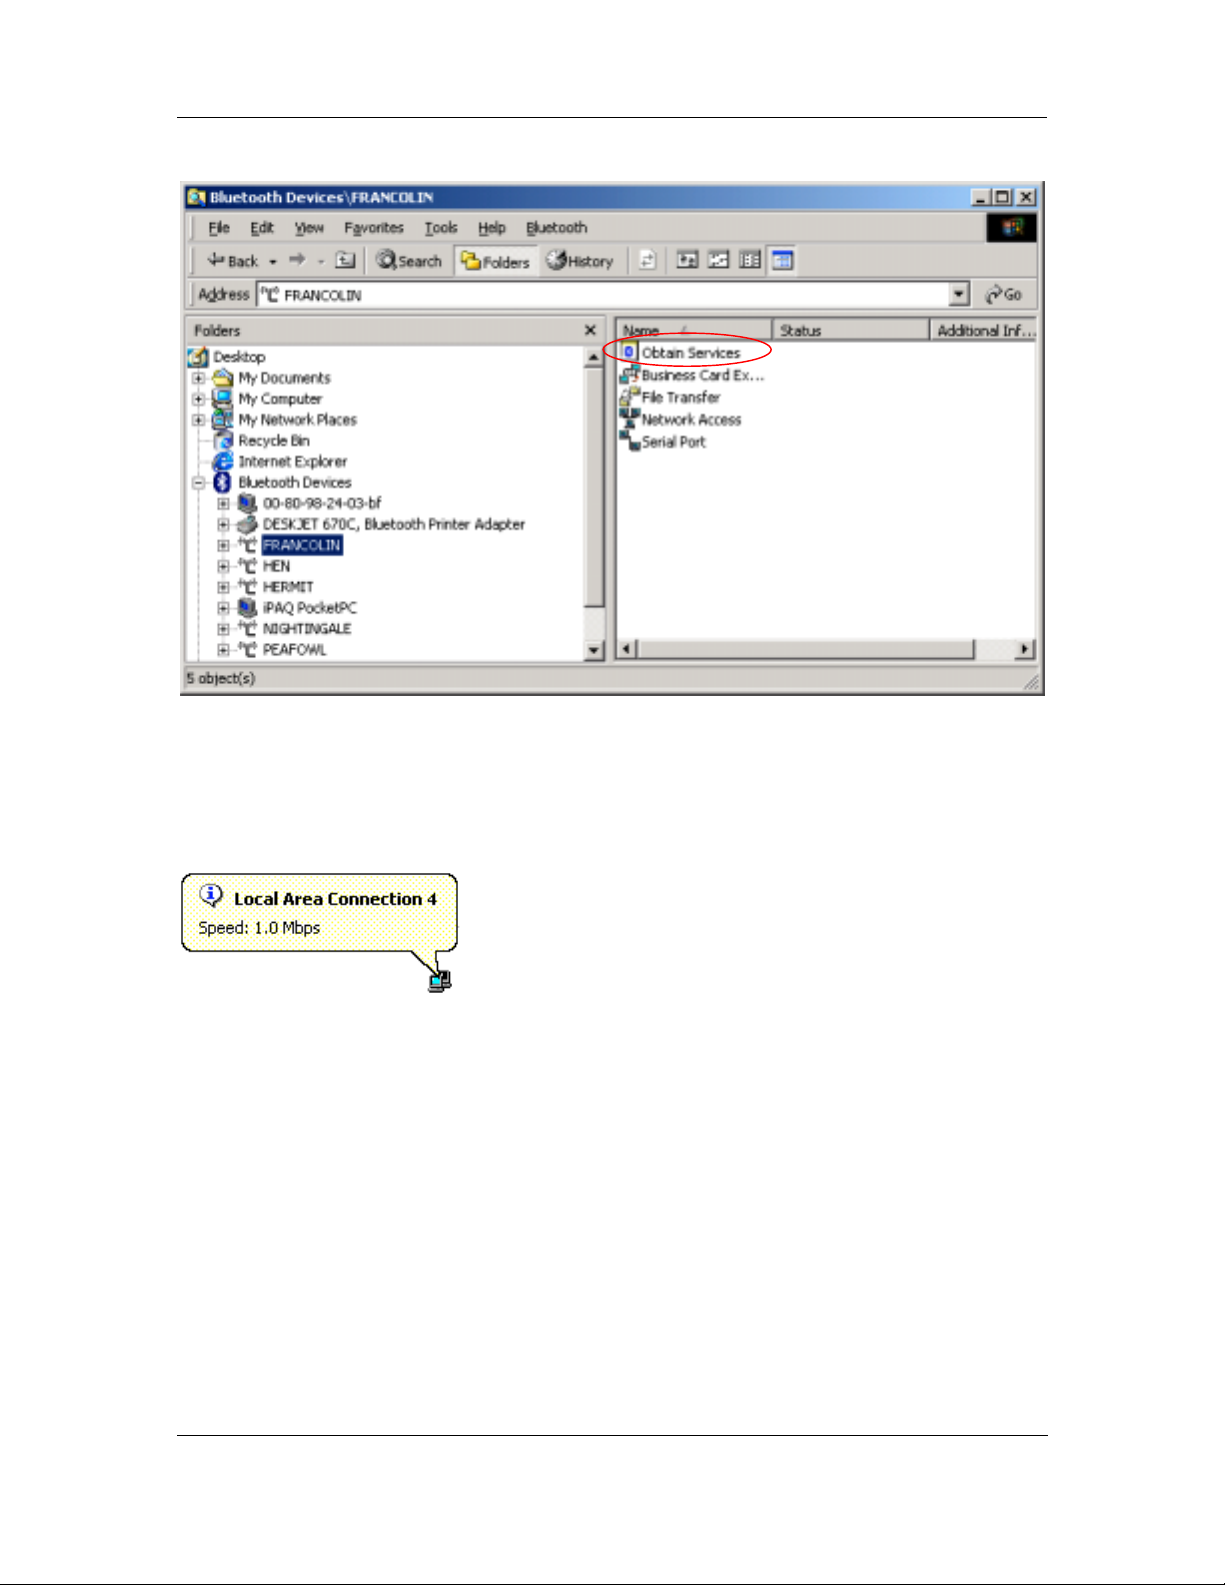
3. Select the required device and double-click Obtain Services.
BluePC User Manual
Figure 60. Obtain Services
4. The services offered by the selected device is listed.
5. If you are accessing the network through a Personal Area Network service, you are directly
connected to the network. And, LAN connection icon displays in the s ystem tray as shown in
the following figure:
Figure 61. LAN Connection
Using BluePC 51
Page 52
BluePC User Manual
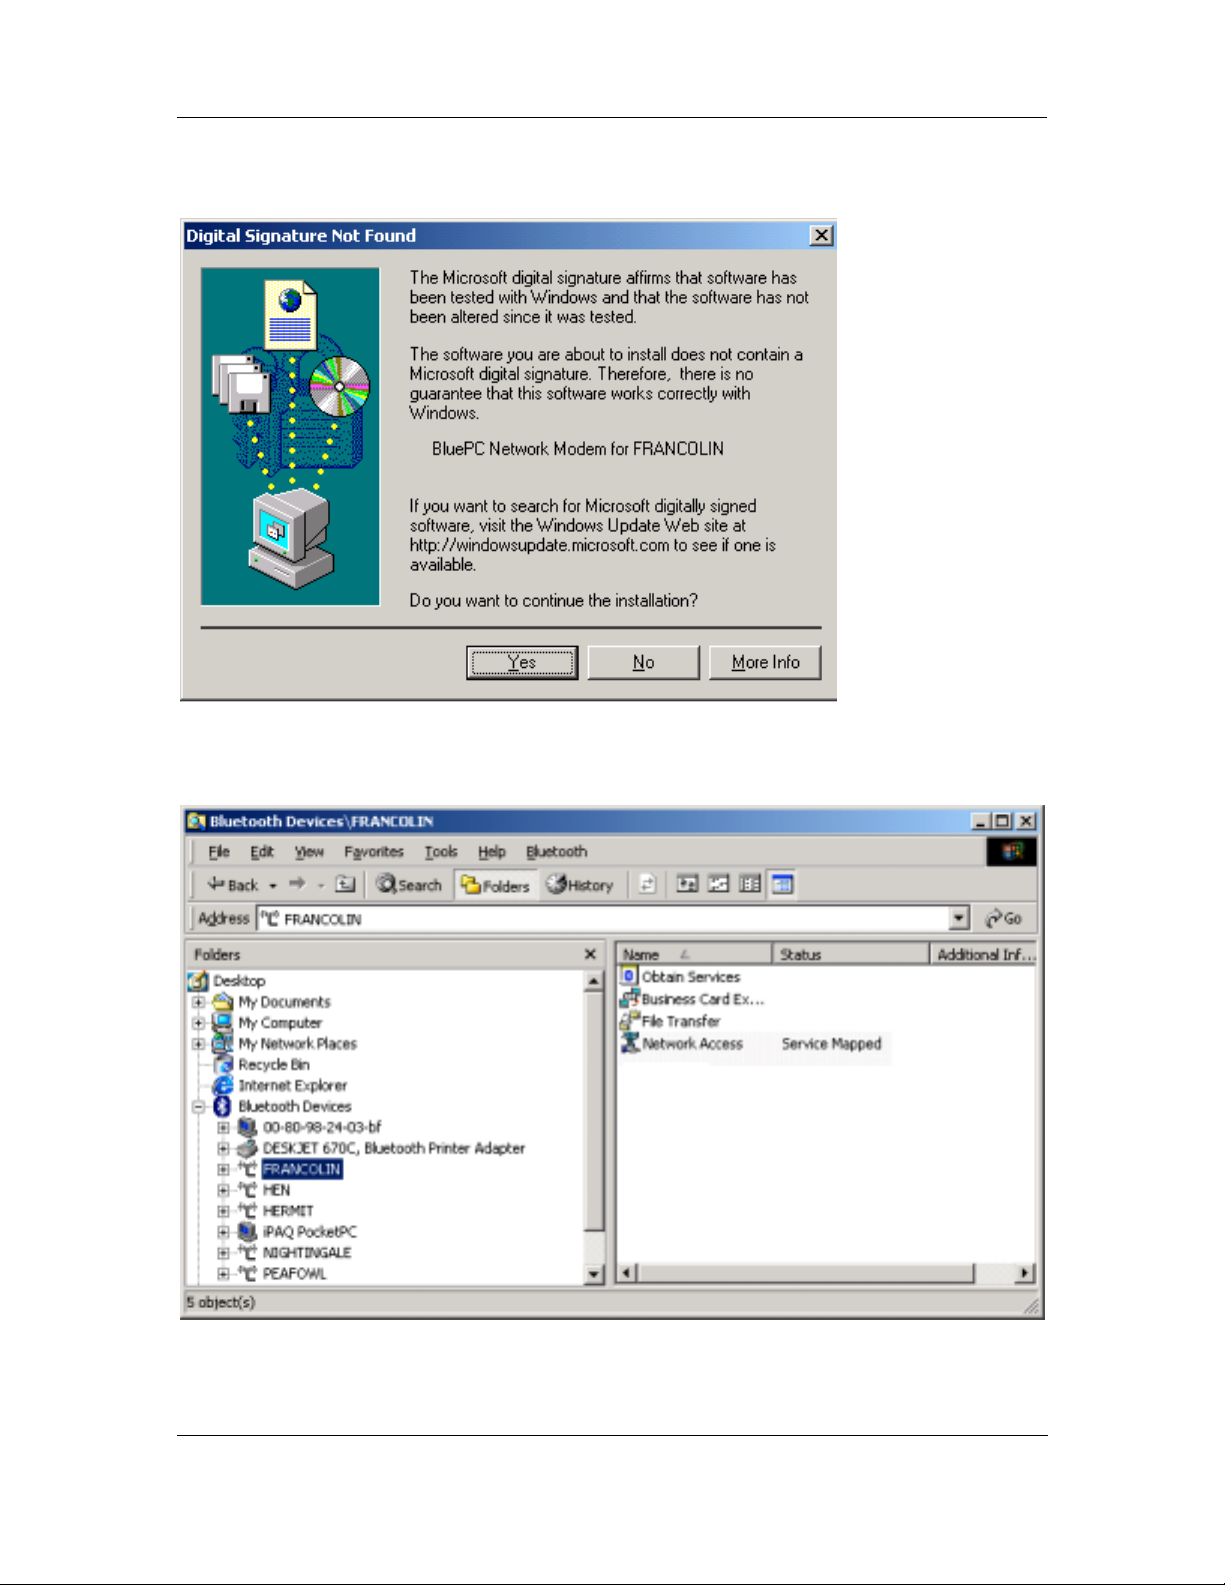
6. If you are accessing the network through a LAN or Dial-up connection, double-click the
Network Access icon to connect to the service. The following screen is displayed.
Figure 62. Digital Signature not Found
7. Click Yes. BluePC connects to the device offering the service and displays the status
Service Mapped in the
Status field.
Figure 63. Service Mapped
Using BluePC 52
Page 53
BluePC User Manual
4.1.2 Set up Connection
The network connection window is automatically launched once the service is set up. Later on, you
can access the connection through the system tray or through Bluetooth-enabled Windows explorer.
To access the connection through the system tray:
If you have connected to a Personal Area Network service:
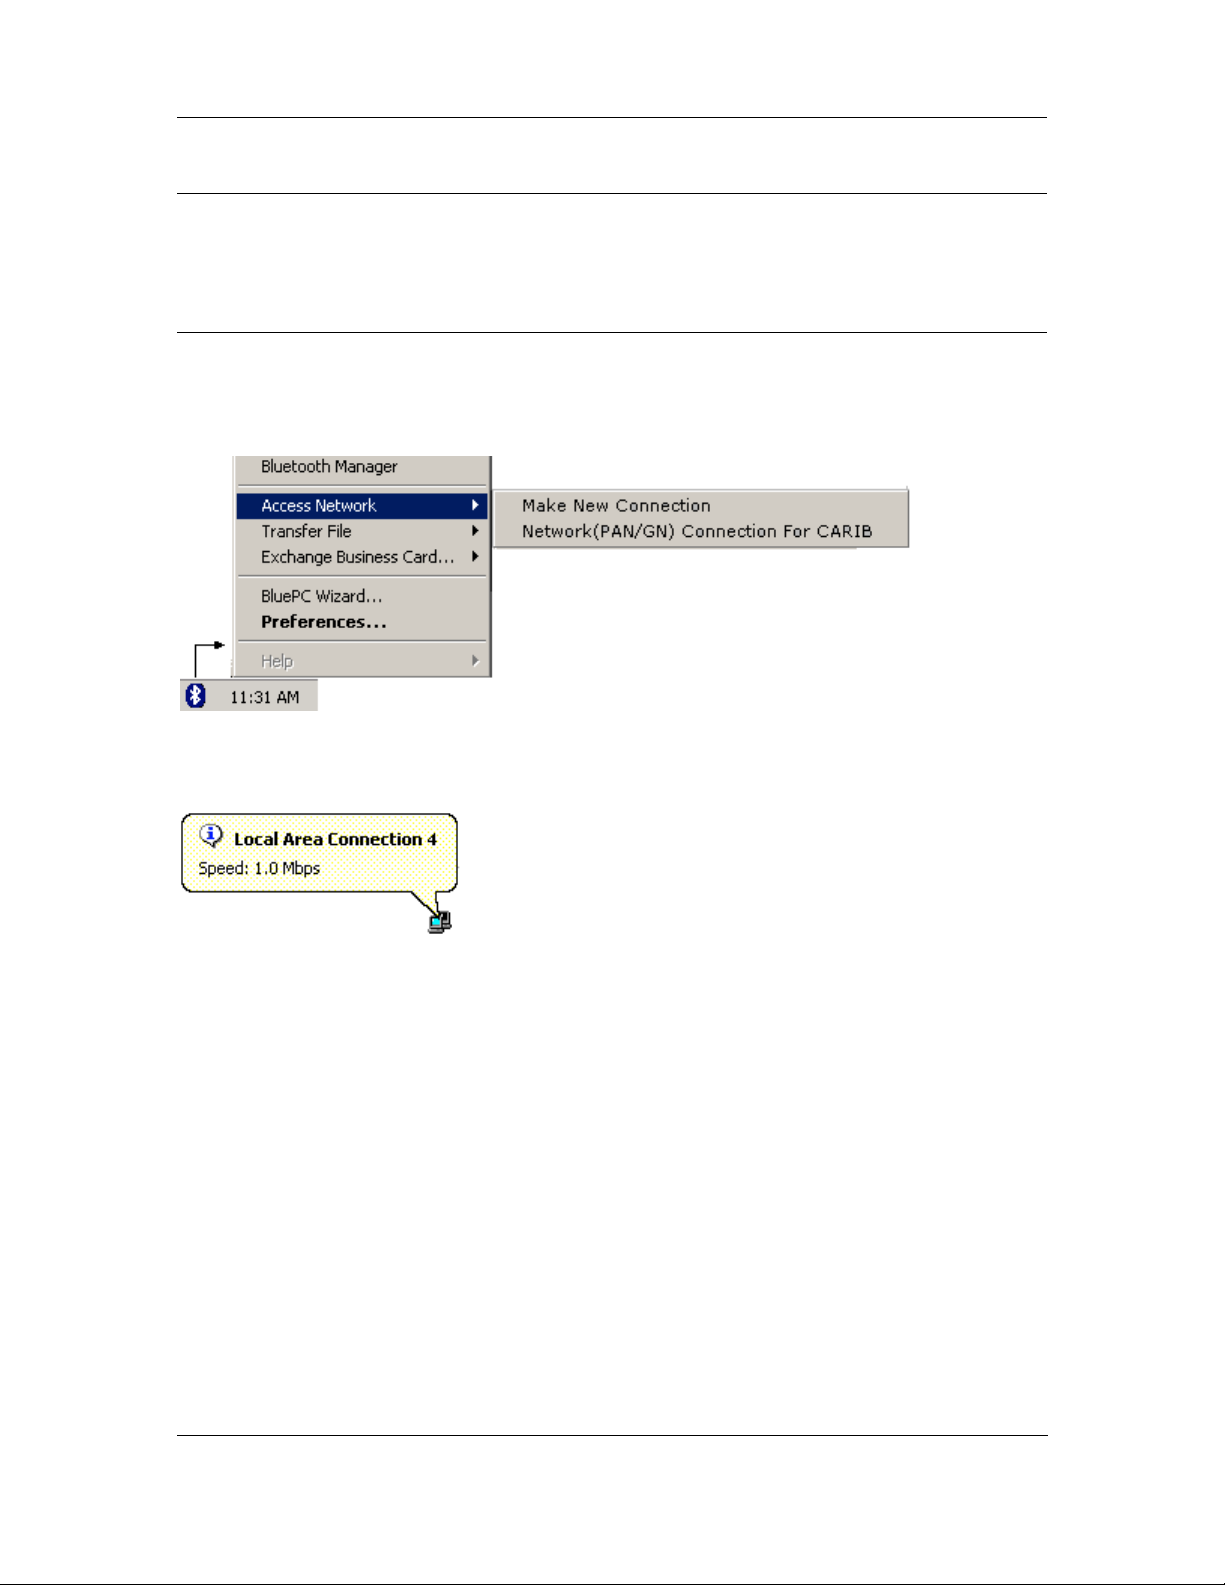
1. Right-click the Bluetooth icon and select the option
services that you have configured are displayed as shown.
Figure 64. Network Access Menu
2. Click the select the required service. You are directly connected to the network, and the LAN
connection icon displays in the system tray as shown in the following figure:
Figure 65. LAN Connection
Access the Network. T he Network Acces s
Using BluePC 53
Page 54
BluePC User Manual
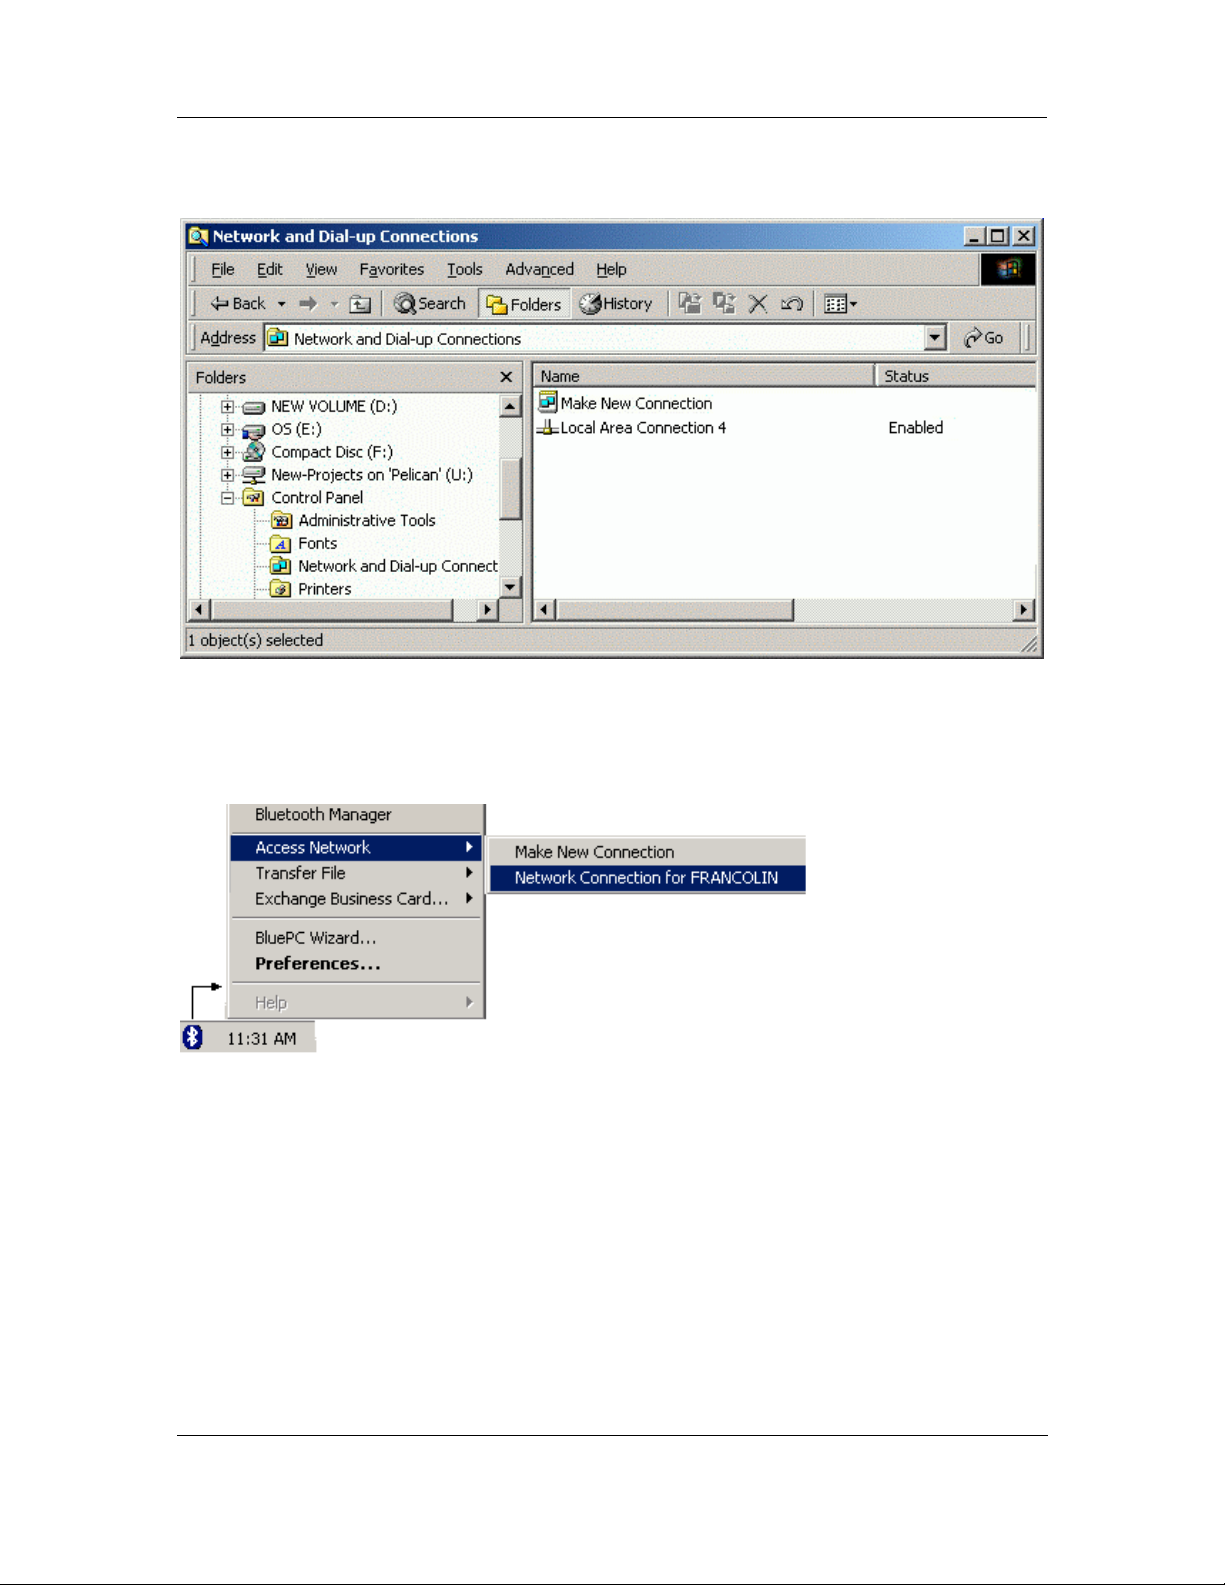
3. You can also see the status using Network and Dialup connections. The window displays the
Connected status.
Figure 66. Network and Dial-up Connections
If you have connected to a LAN access service or Dial-up networking service:
1. Right-click the Bluetooth icon and select the option
Access the Network. T he Network Acces s
services that you have configured are displayed as shown.
Figure 67. Access Network Menu
Using BluePC 54
Page 55
BluePC User Manual
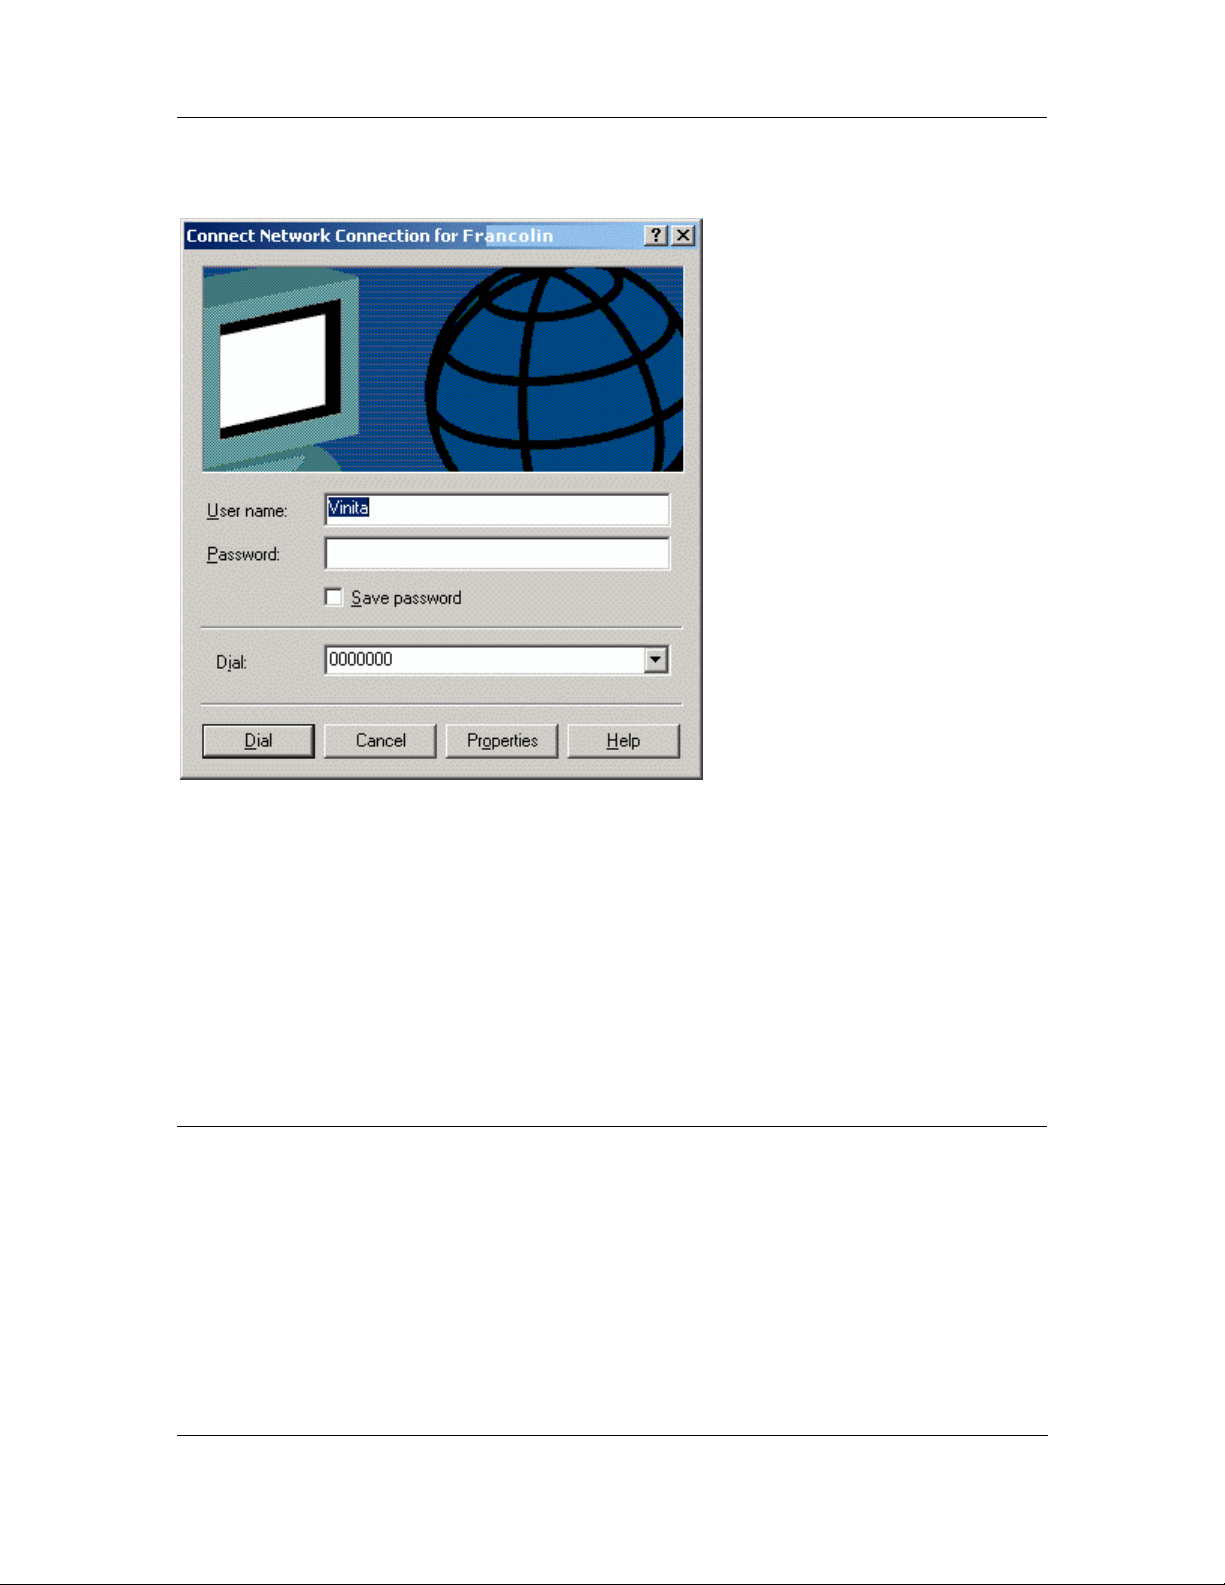
2. Click to select the required service. The corresponding log in screen is displayed. For example, if
you are connecting to a Network Connection the following screen is displayed.
Figure 68. Network Log in screen
3. Enter your network user name and password and click Dial.
Once you have established the connection you are a part of the Local Area Network (LAN). Now,
you can browse the Internet, share and access resources from the LAN, and use the printer resource
available in the LAN. For data transfer using the Network Access service, the user who has logged
into the system acting as the LAN gateway should have permissions to access the domain on which
the machine is connected, and administrator privileges on the machine acting as the LAN access
gateway.
To access the connection through the Bluetooth-enabled explorer:
1. In the Windows Explorer screen, double-click the service that you have configured (you may
also right-click the service and select the opt ion
displayed
Connect). The corresponding login screen is
Using BluePC 55
Page 56
BluePC User Manual
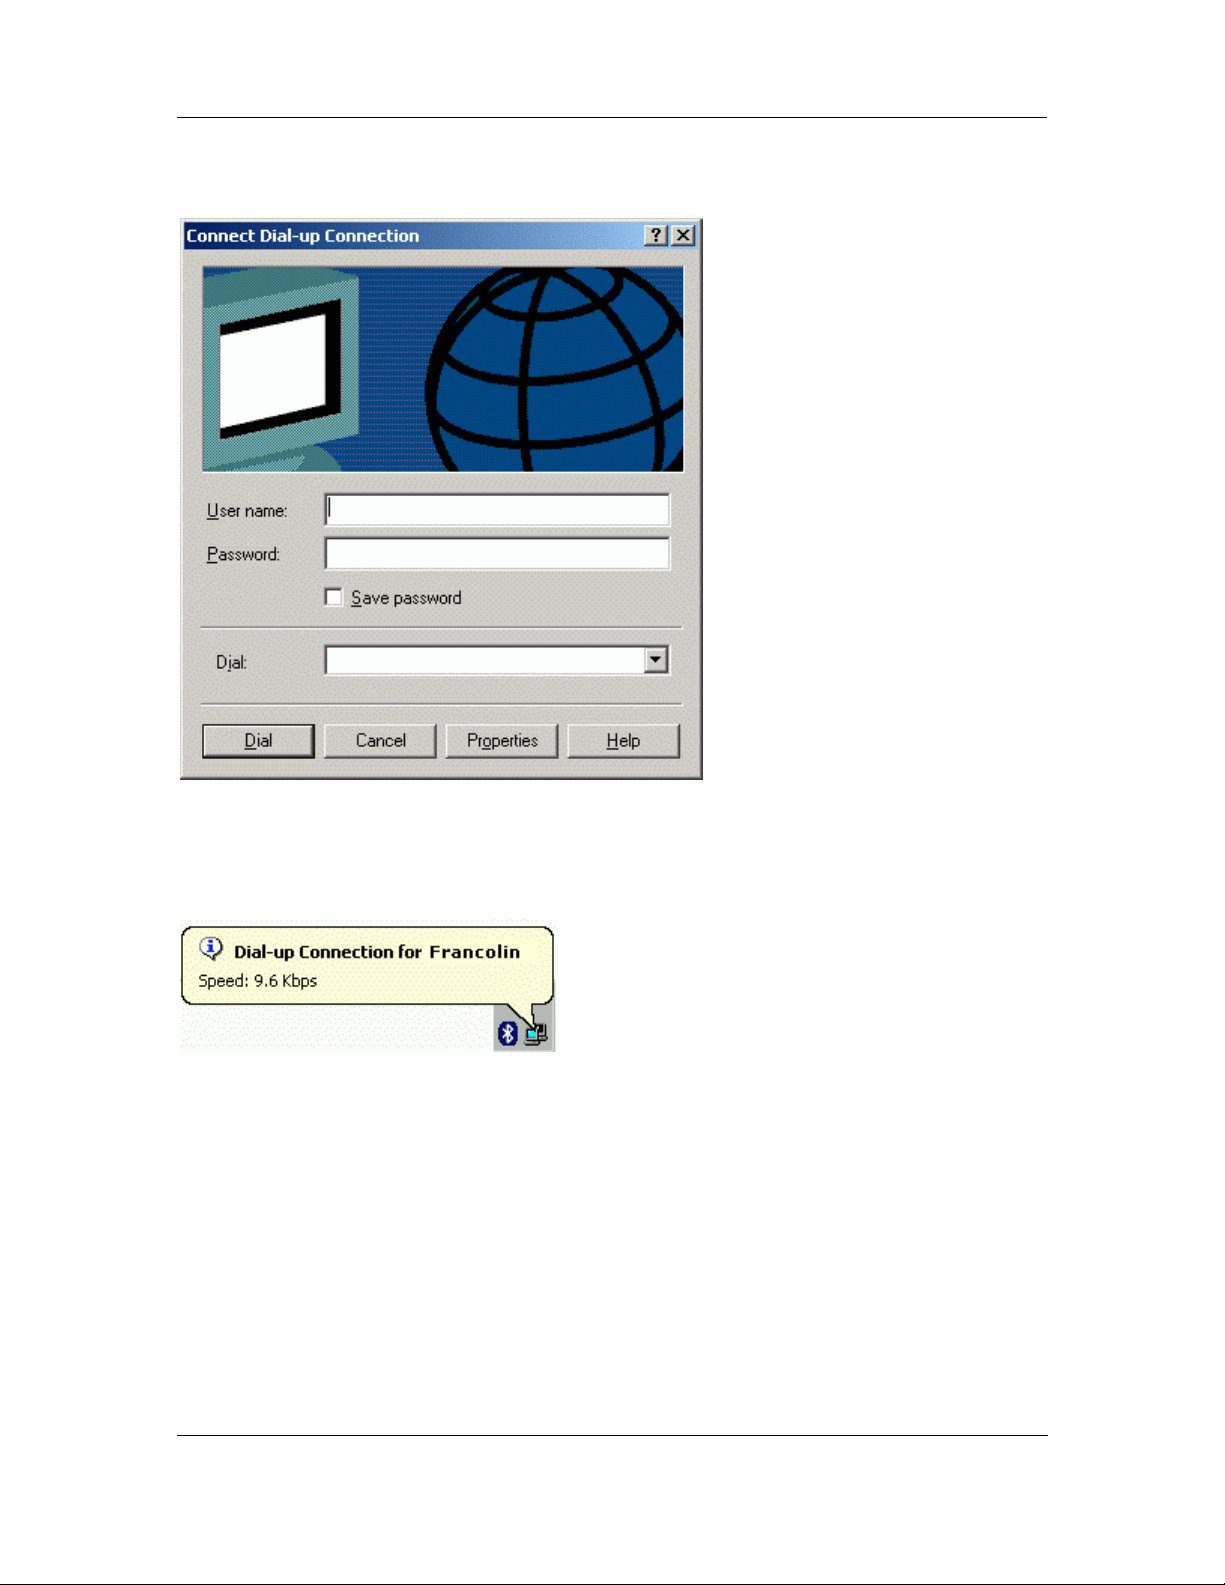
1. For example if you are connecting to a Dial-up Networking service the following screen is
displayed:
Figure 69. Dial-up connection
2. Edit your Internet Service Provider username and password. Click Connect.
3. Once you establish a connection the following icon is displayed in the system tray with a
message.
Figure 70. Dial-up Connection icon in System Tray
Using BluePC 56
Page 57
BluePC User Manual
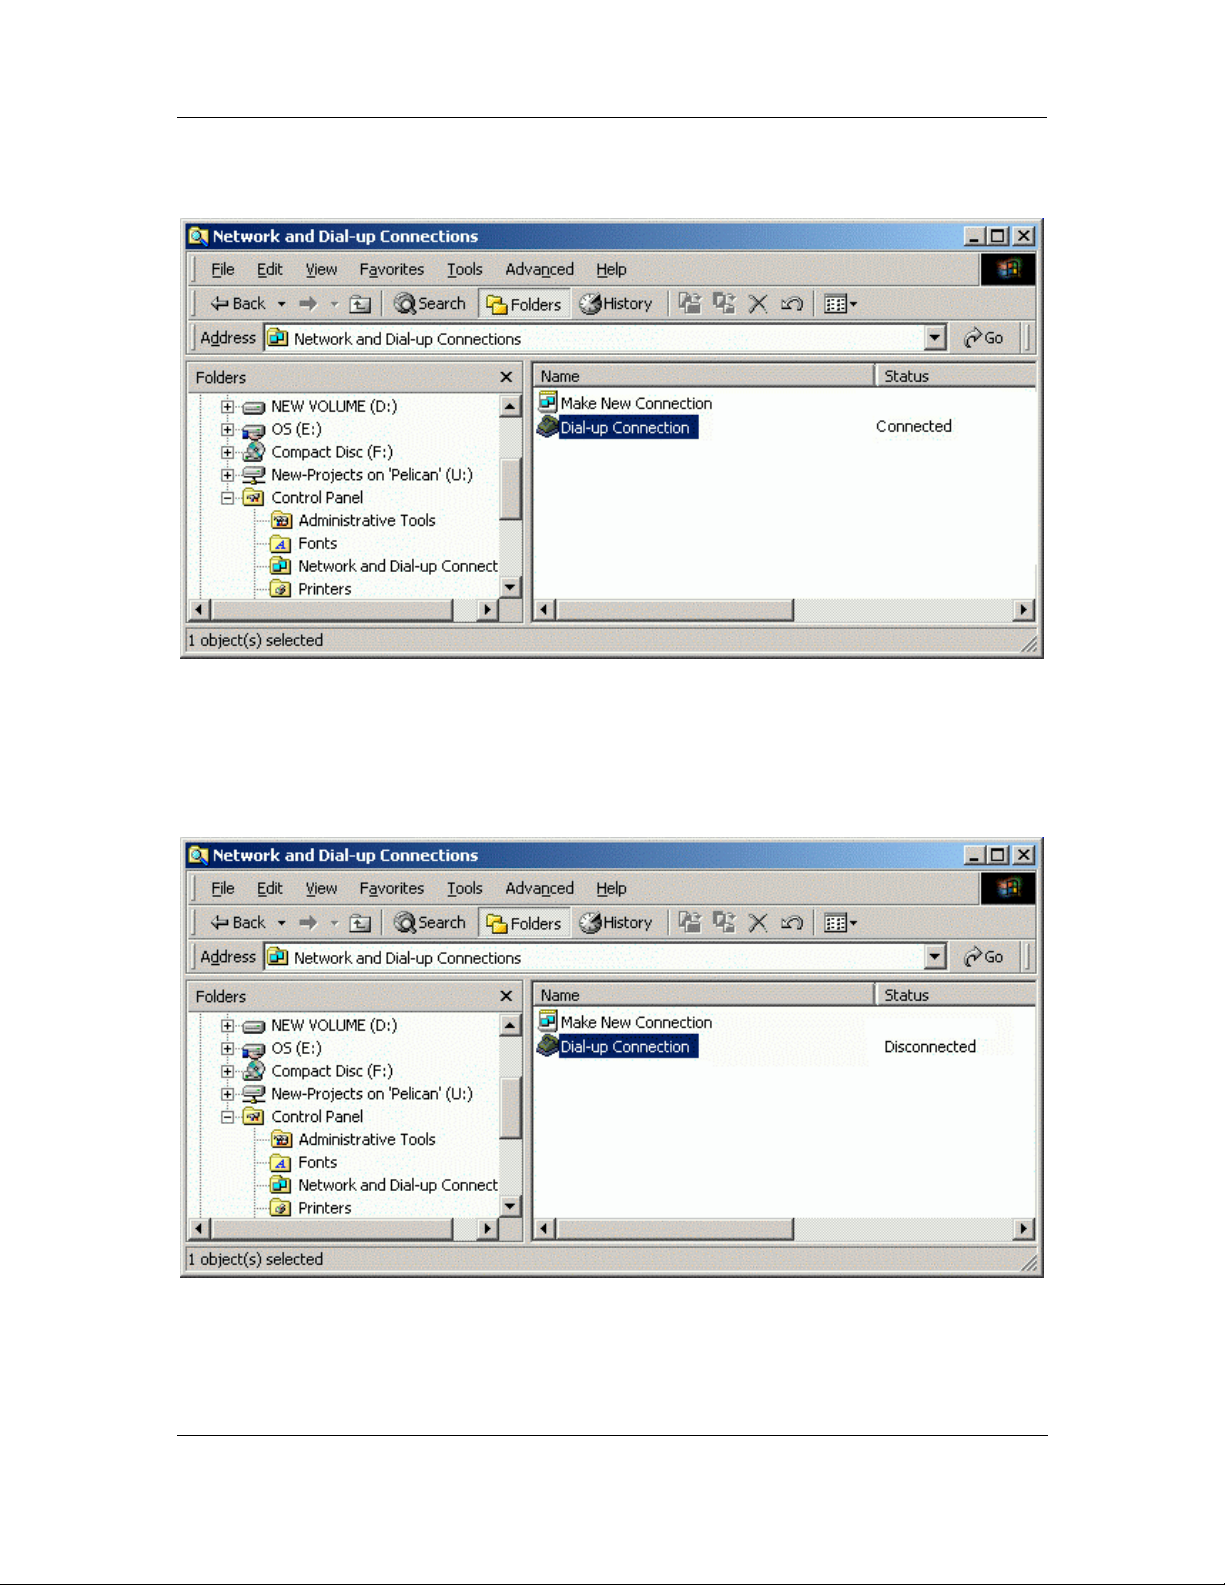
4. You can also see the status using Network and Dialup connections. The window displays the
Connected status.
Figure 71. Connected Status
5. Now that you have established a Dial-up networking connection, you can browse the Internet.
6. To disconnect the connection, right-click the icon in the system tray and select the option
Disconnect. The icon disappears from the system tray and Network and Dial-up
Connections window will display the Disconnected status.
Figure 72. Disconnected Status
Using BluePC 57
Page 58
BluePC User Manual
4.2 Transfer Files
BluePC allows you to browse folders and copy, move, or delete files on a remote Bluetooth enabled
system. You can transfer files in the following ways:
• Using the Transfer File menu option
• Using the Bluetooth-enabled Windows Explorer
4.2.1 Using the Transfer File Menu Option
Send Files
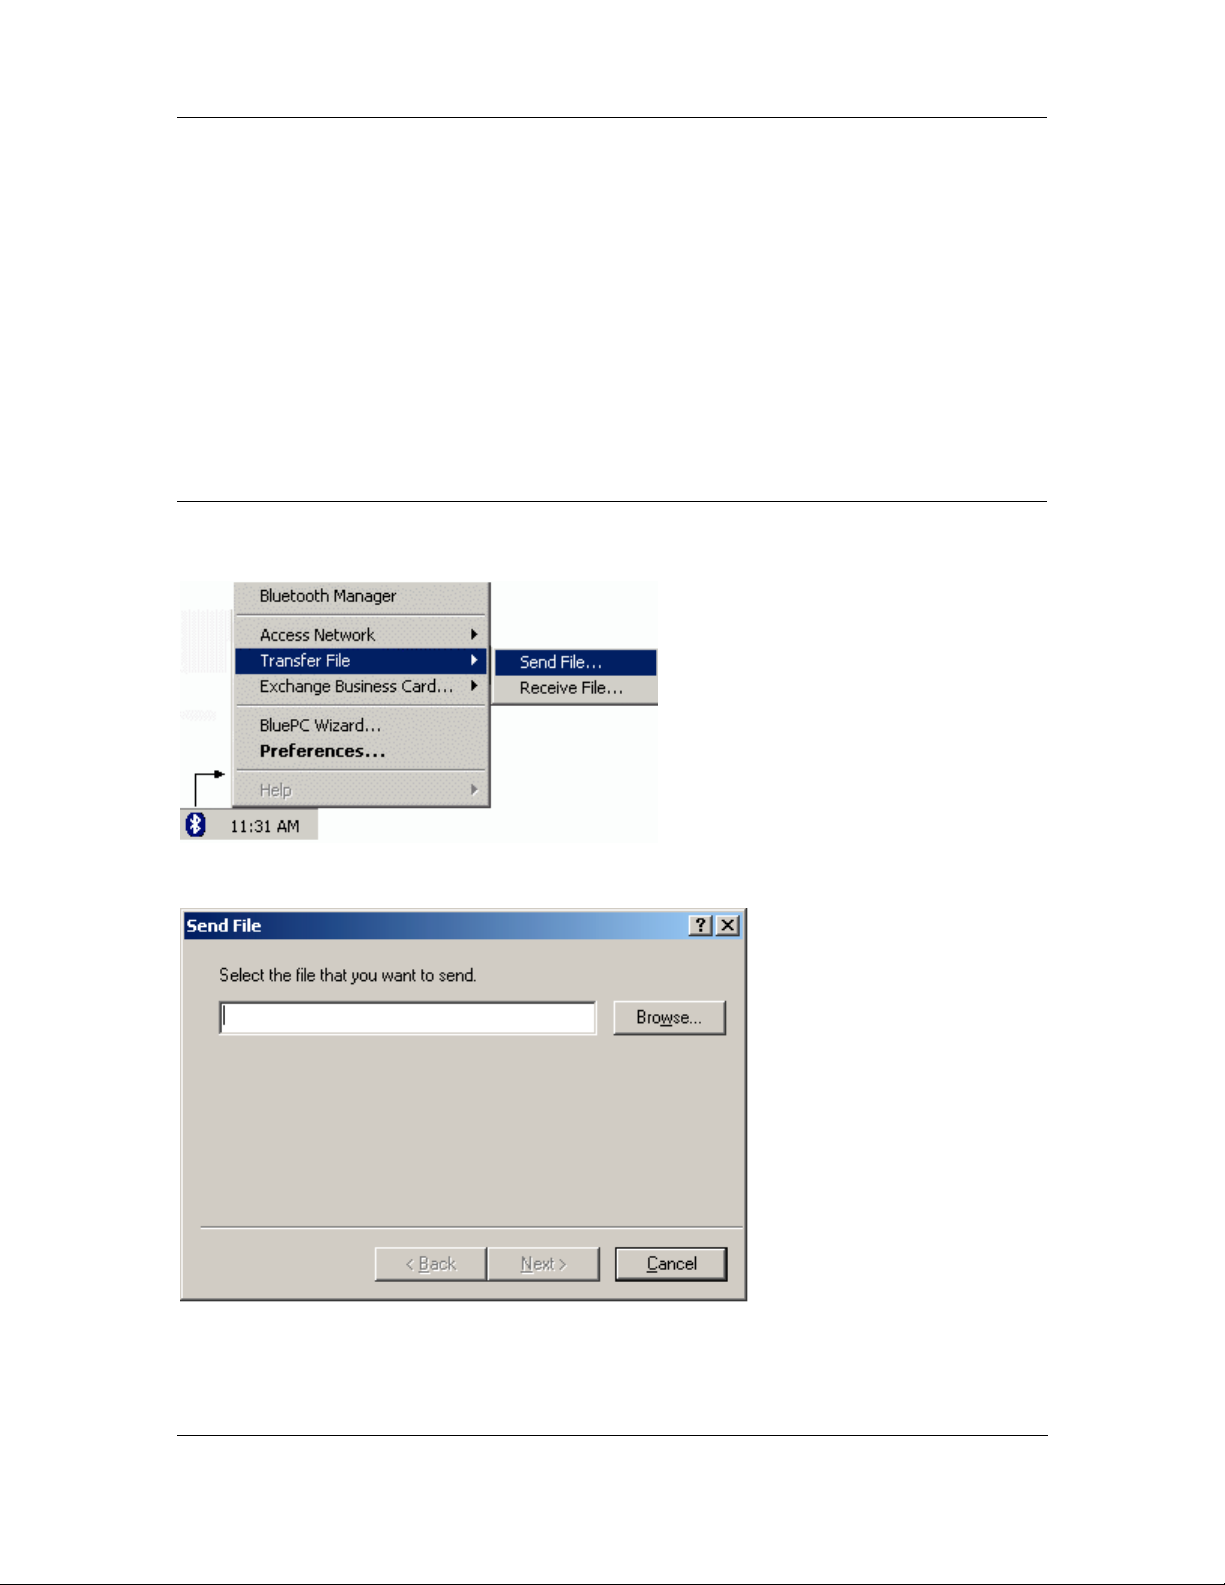
1. Right-click the Bluetooth icon in the system tray and select the option Transfer File -> Send
.
File
Figure 73. Send File menu
2. The File Selection screen is displayed. Click Browse to select the required file.
Figure 74. File Selection
3. Click Next to proceed.
Using BluePC 58
Page 59
BluePC User Manual
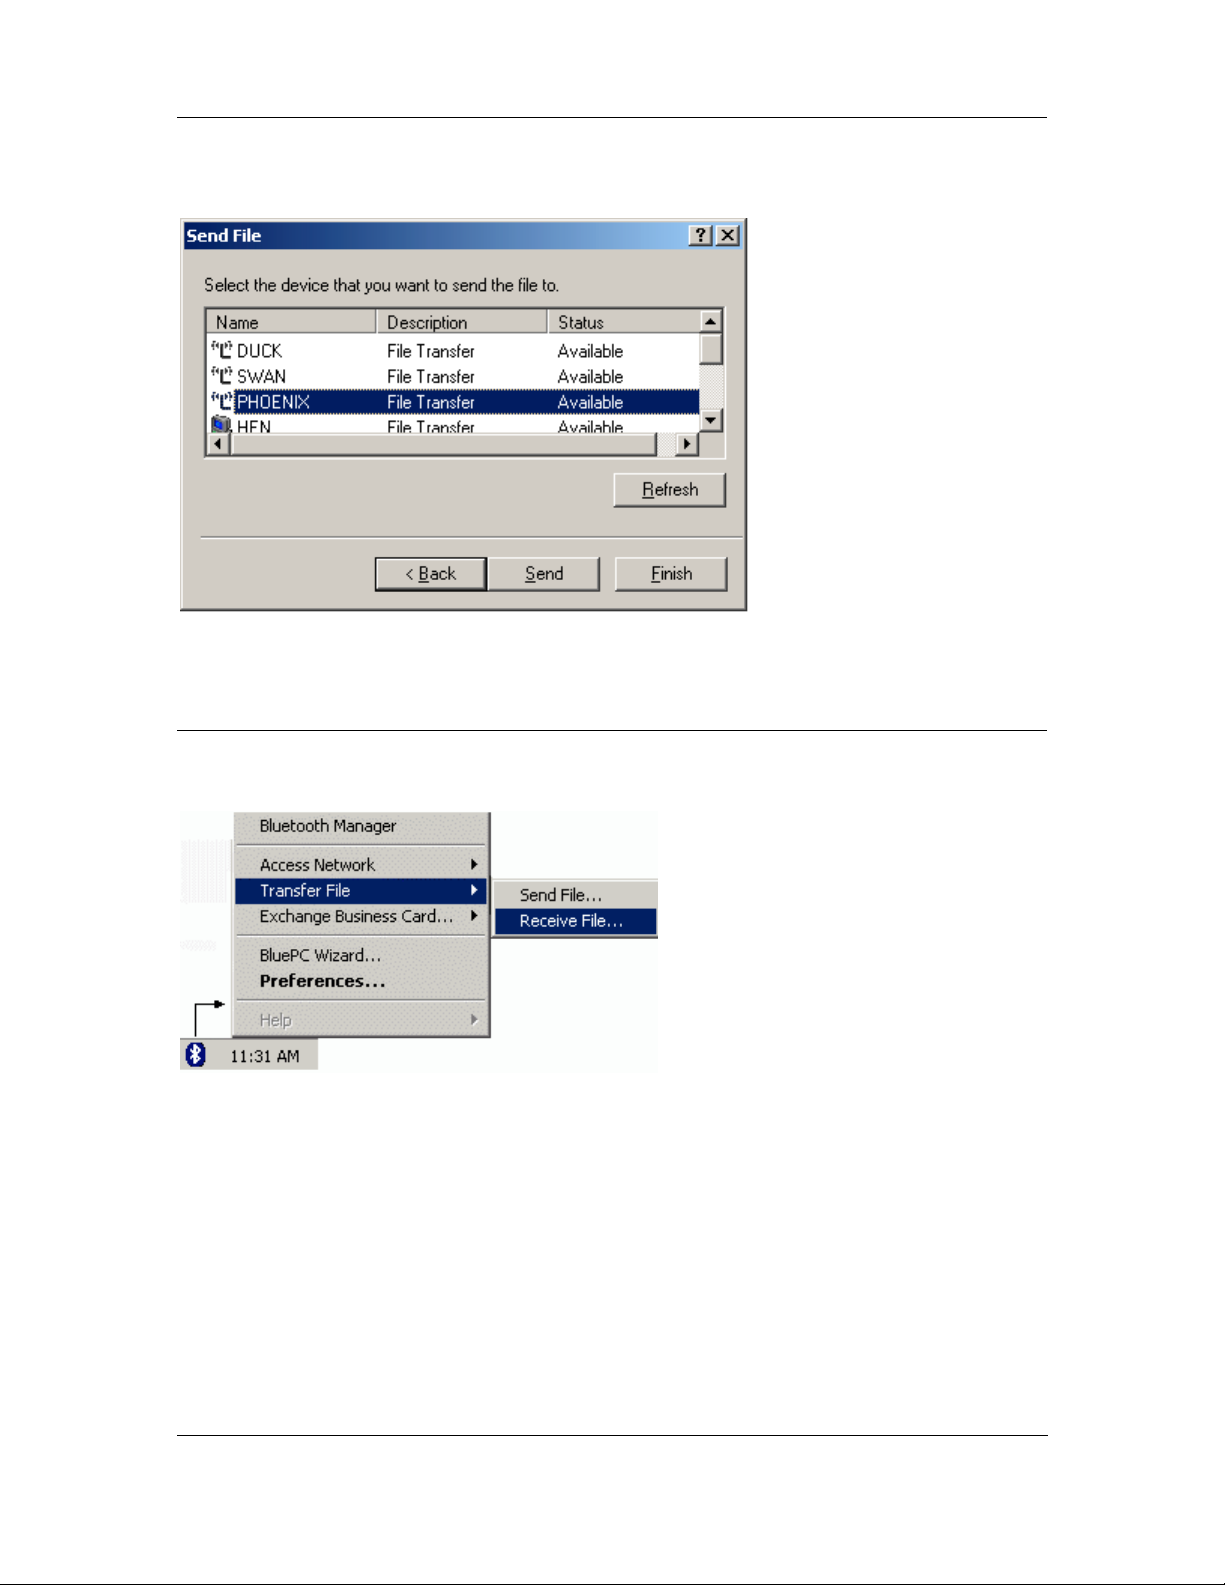
Next, you need to select the remote device to which you want to send th e file. Select the required
device and click
Figure 75. Select device
OK.
4. The file is sent to the shared folder of the remote device.
Receive Files
1. Right-click the Bluetooth icon in the system tray and select the option Transfer File -> Receive
File
.
Figure 76. Receive File Menu
Using BluePC 59
Page 60
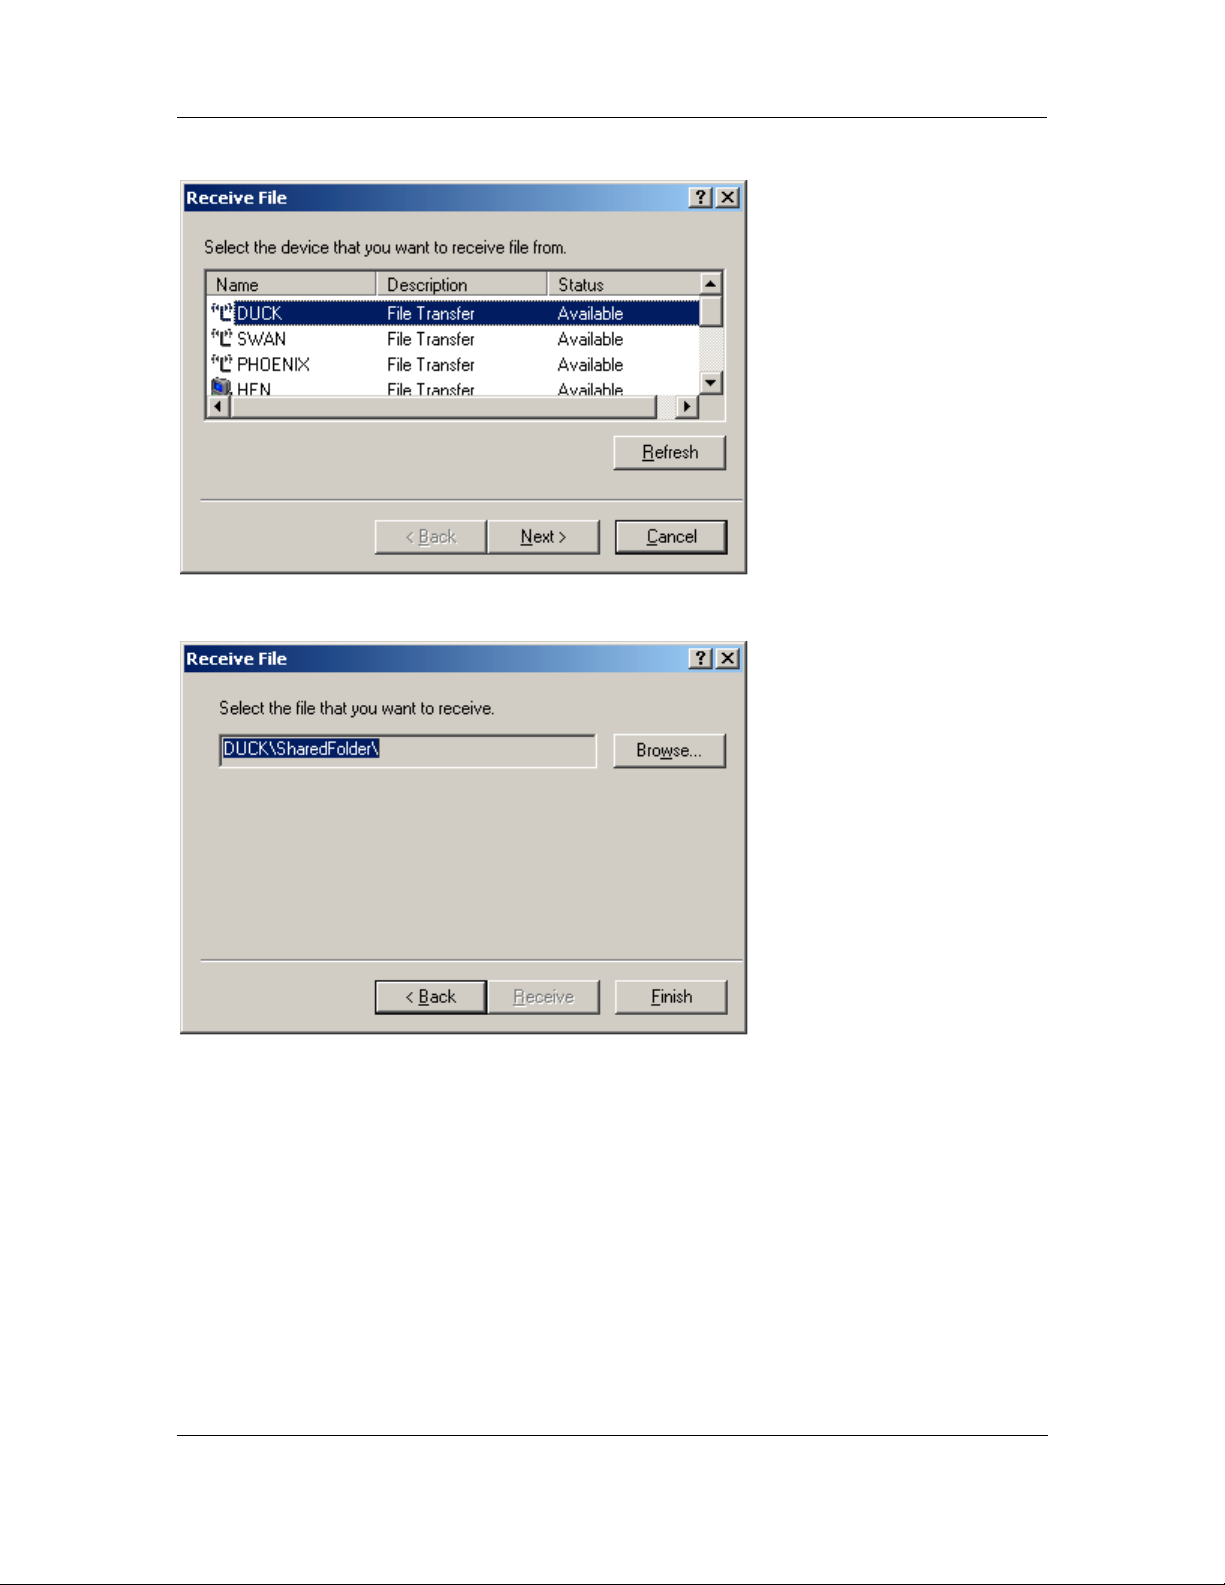
2. The Device Selection window is displayed.
Figure 77. Device Selection
3. Select the device and click Next. The File Selection screen is displayed.
BluePC User Manual
Figure 78. Receive File
Using BluePC 60
Page 61
BluePC User Manual
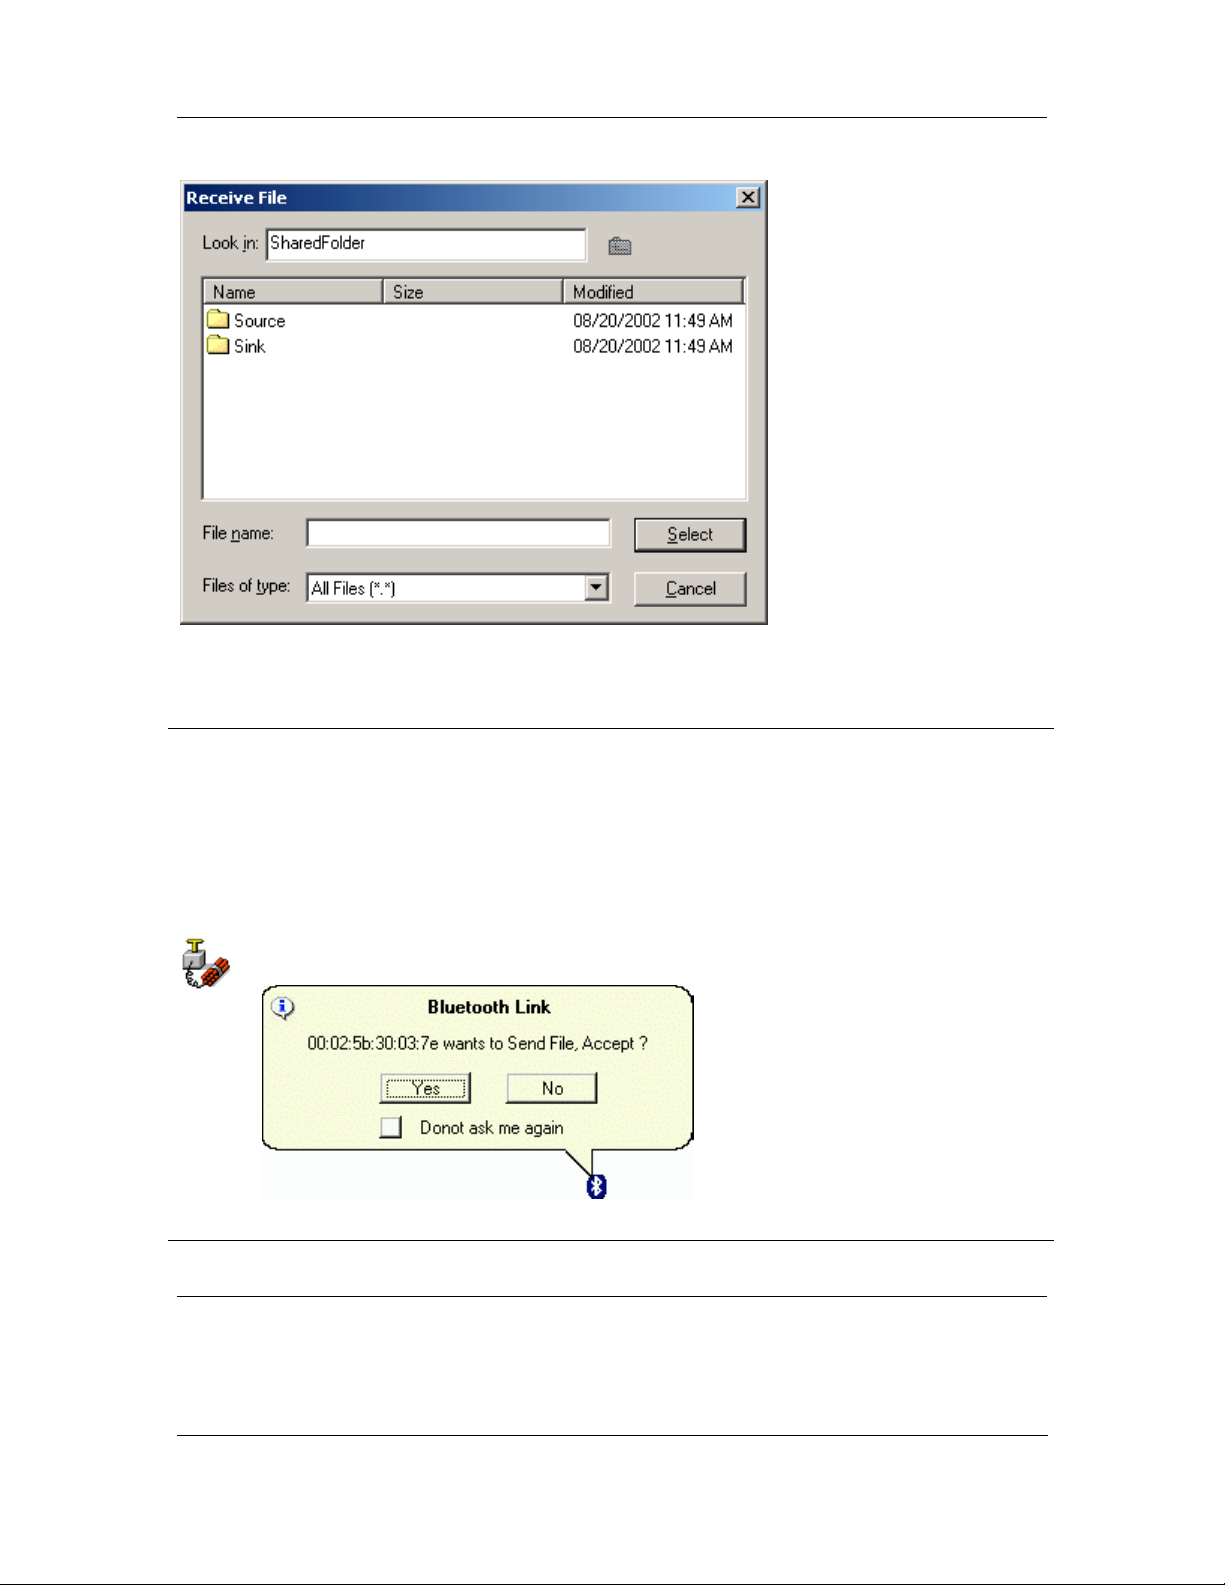
4. Click Browse. The Receive File screen is displayed.
Figure 79. Receive Files
5. Select the required file and click Select. In the File Selection screen, click Receive.
6. When the file has been copied to your shared folder, click
Caveat: If someone wants to send you a file or copy a file to your system or delete
a file from your system, a p rompt is displayed asking you whethe r you want to
allow the operation. Yo u h a ve th e op tio n of reje ct ing or a ccept ing th e operation. If
either option in this pop-up window is not exercised within 10 seconds, the
operation will be rejected and this window will disappear. If you select the option
“Do not ask me again” all the above ope rations will be pe rformed, for the remo te
device, without prompting you again
Figure 80. Security Prompt
.
Finish to close the screen.
4.2.2 Using the Bluetooth-enabled Windows Explorer
You can use the Explorer to transfer files between two Bluetooth devices. To do so:
1. In Windows Explorer double-click the
Bluetooth Devices icon. The devices are displayed in
the right-pane. Double-click the required device.
Using BluePC 61
Page 62
BluePC User Manual
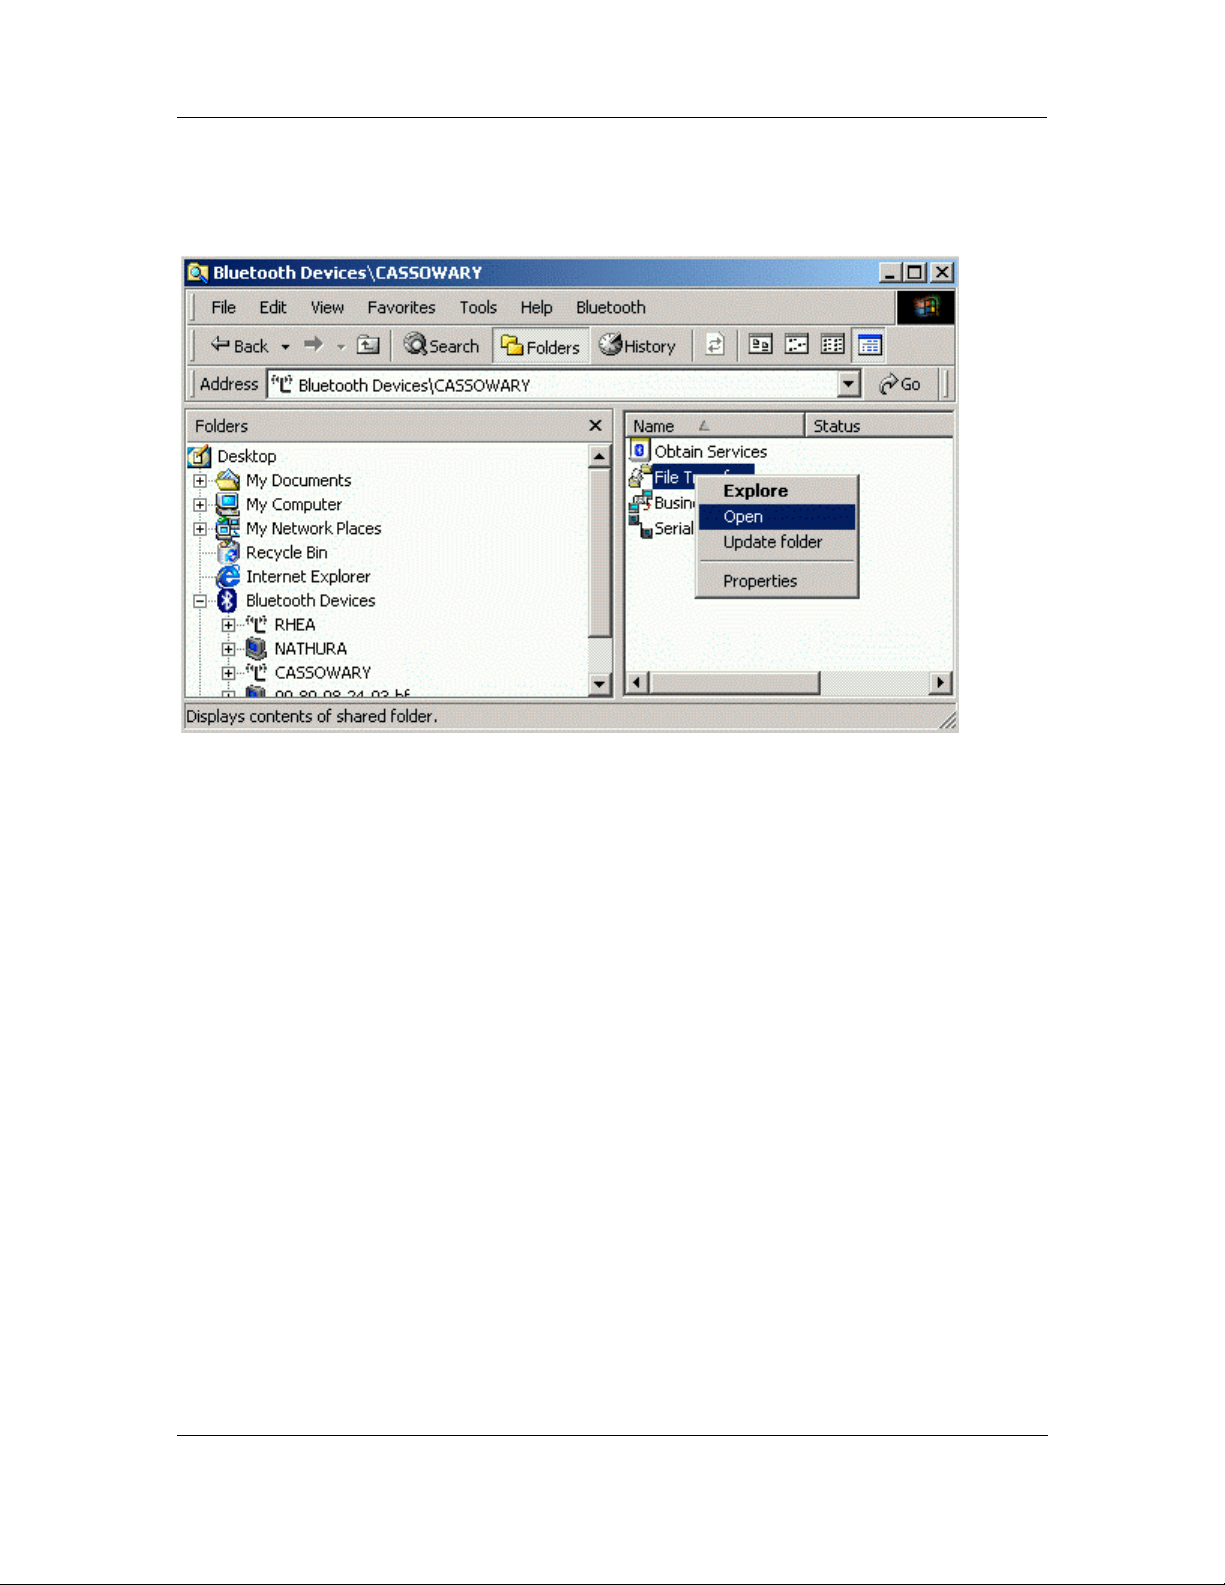
2. Double-click the device name to view the services offered. The services are listed as shown in
the figure. Double-click the
and select the option
Figure 81. File Transfer menu
File Transfer icon (you may also right-click the File Transfer icon
Open).
3. The contents of “shared folder” of the selected device is displayed.
Using BluePC 62
Page 63
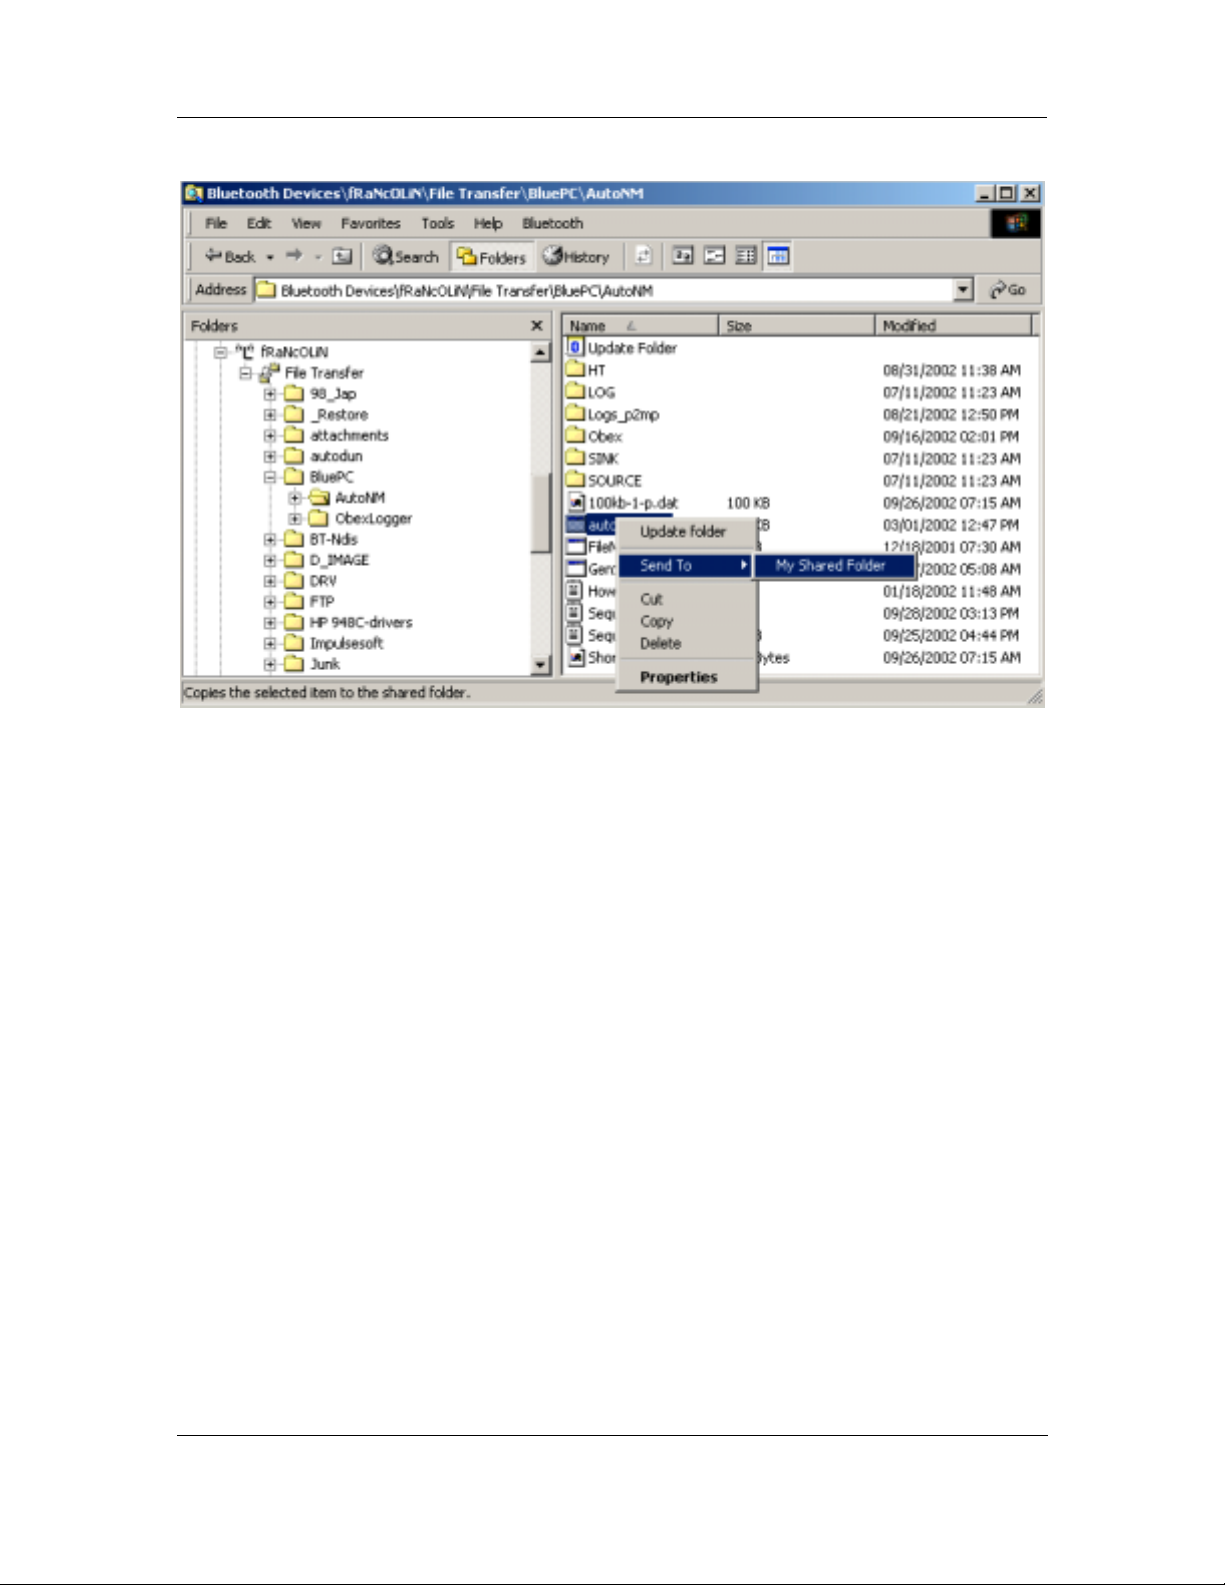
4. Right-click a file on the remote device.
BluePC User Manual
Figure 82. File Transfer option
5. You have the following options:
• To move a file, select the option
• To copy a file, select the option
• To send a file to your shared f older select the option
The selected file is copied to the shared folder on your system
• If you have required permissions you can also delete a file in the remote Bluetooth
device.
Cut. Select the destination location and Paste it there.
Copy and Paste it in the destination location.
Send To -> My Shared Folder.
Using BluePC 63
Page 64
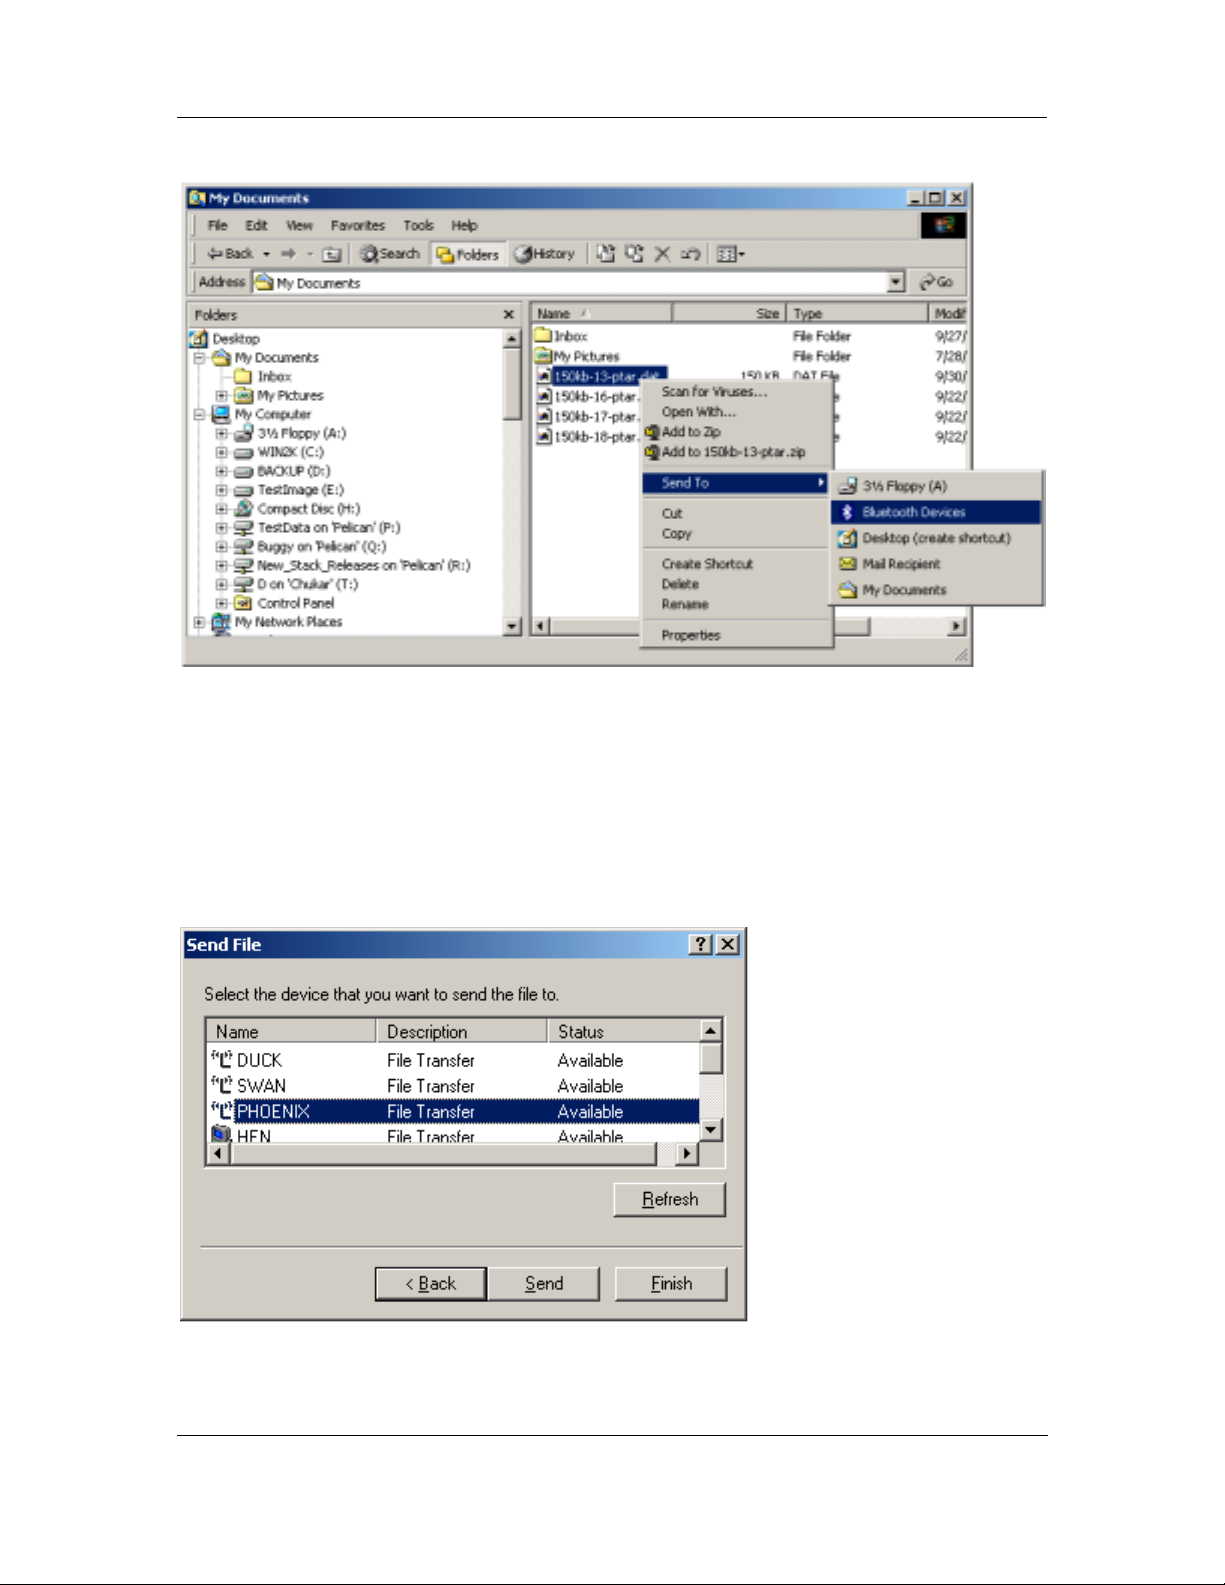
6. If you right-click a file on your system the following screen is displayed.
BluePC User Manual
Figure 83. Send to option
7. You have the following options:
• To move a file, select the option
• To copy a file, select the option
Send To -> Bluetooth Devices (Refer Step 8)
•
Cut. Select the destination location and Paste it there.
Copy and Paste it in the destination location.
8. To send a file to a Bluetooth device directly, select the option
The Send File screen is displayed.
Send To -> Bluetooth Devices.
Figure 84. Send File
9. Select the device to which you want to send the file. Click Send. The file is transferred to the
shared folder of the selected device.
Using BluePC 64
Page 65

BluePC User Manual
10. You can also drag and drop files. Select the required file on your system and drag and drop it in
the shared folder of the remote device. Or select a file in the shared folder of the remote device,
and drag and drop it into a folder on your system.
Using BluePC 65
Page 66
BluePC User Manual
4.3 Exchange Business Cards
BluePC allows you to send or receive business cards between your computer and other Bluetooth
enabled devices.
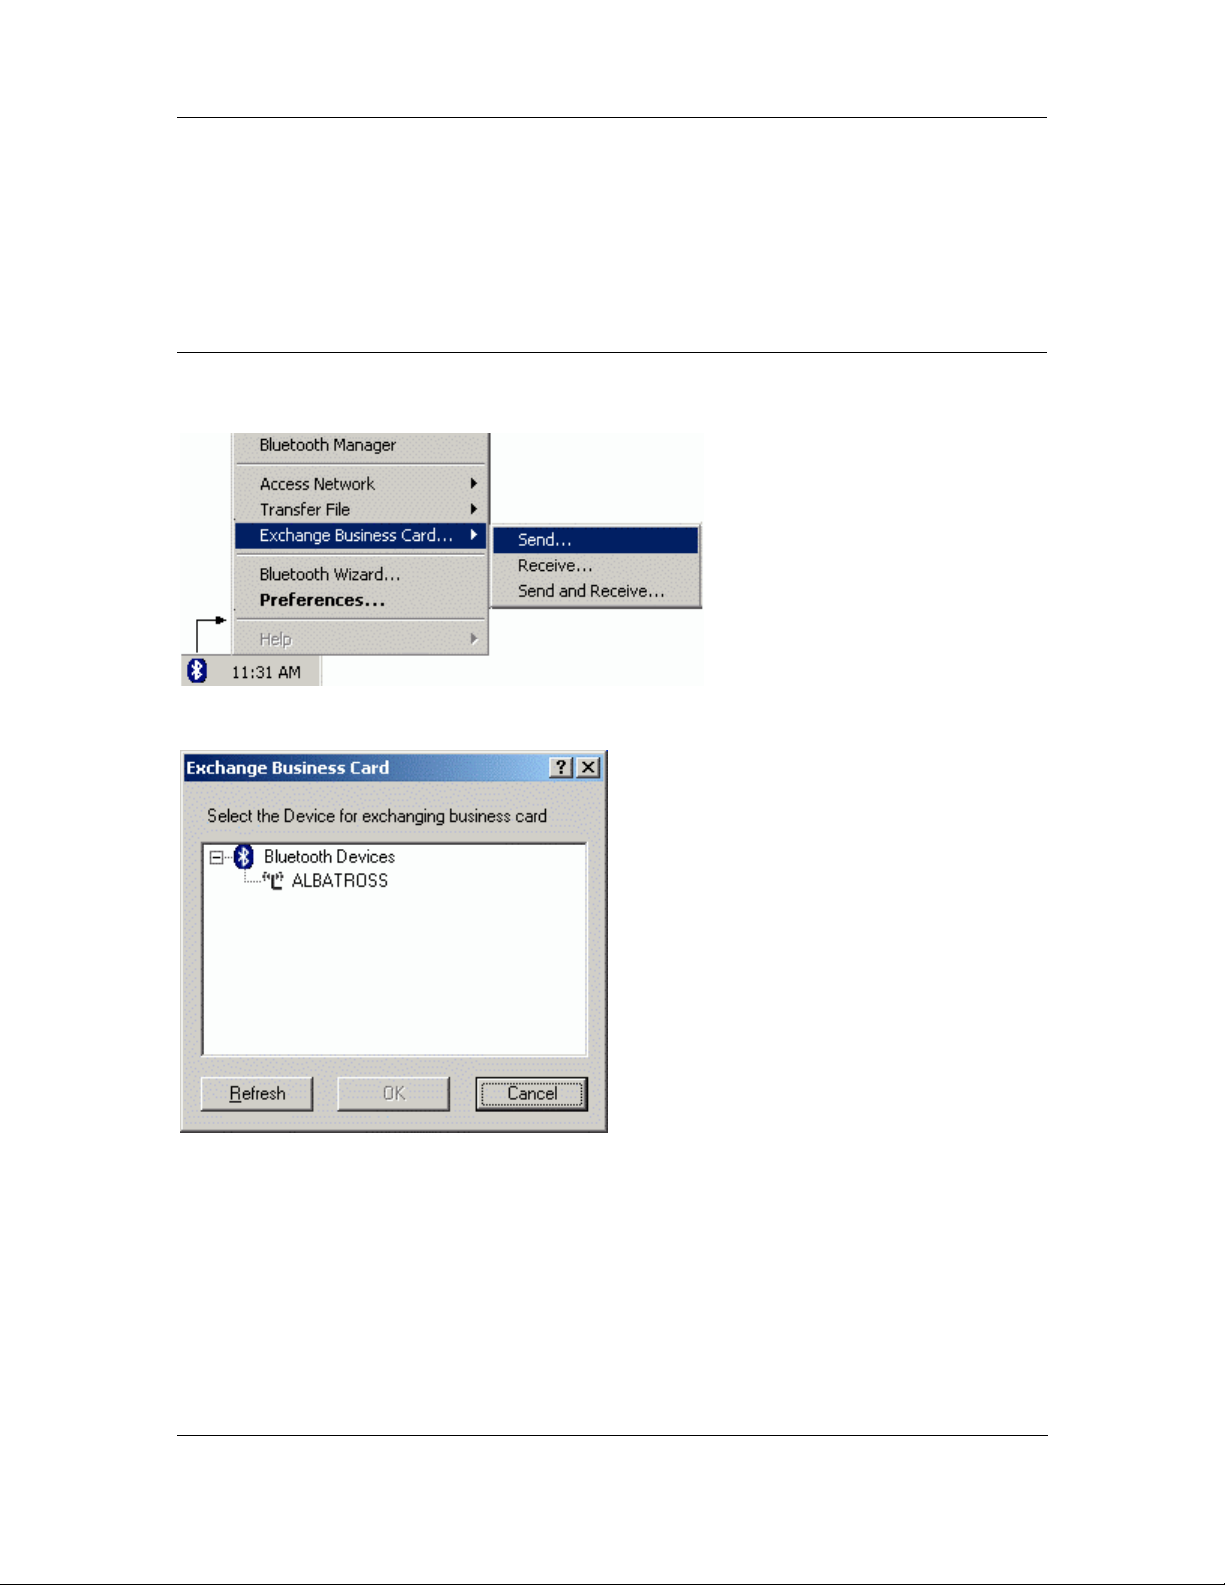
4.3.1 Send Business Cards
1. Right-click the Bluetooth icon in the system tray and select the option
Exchange Business Card->Send.
Figure 85. Send Business Card menu
2. The Exchange Business Card dialog is displayed
Figure 86. Exchange Business Card
3. Select the device to which you want to send the business card. Click OK.
Using BluePC 66
Page 67
BluePC User Manual
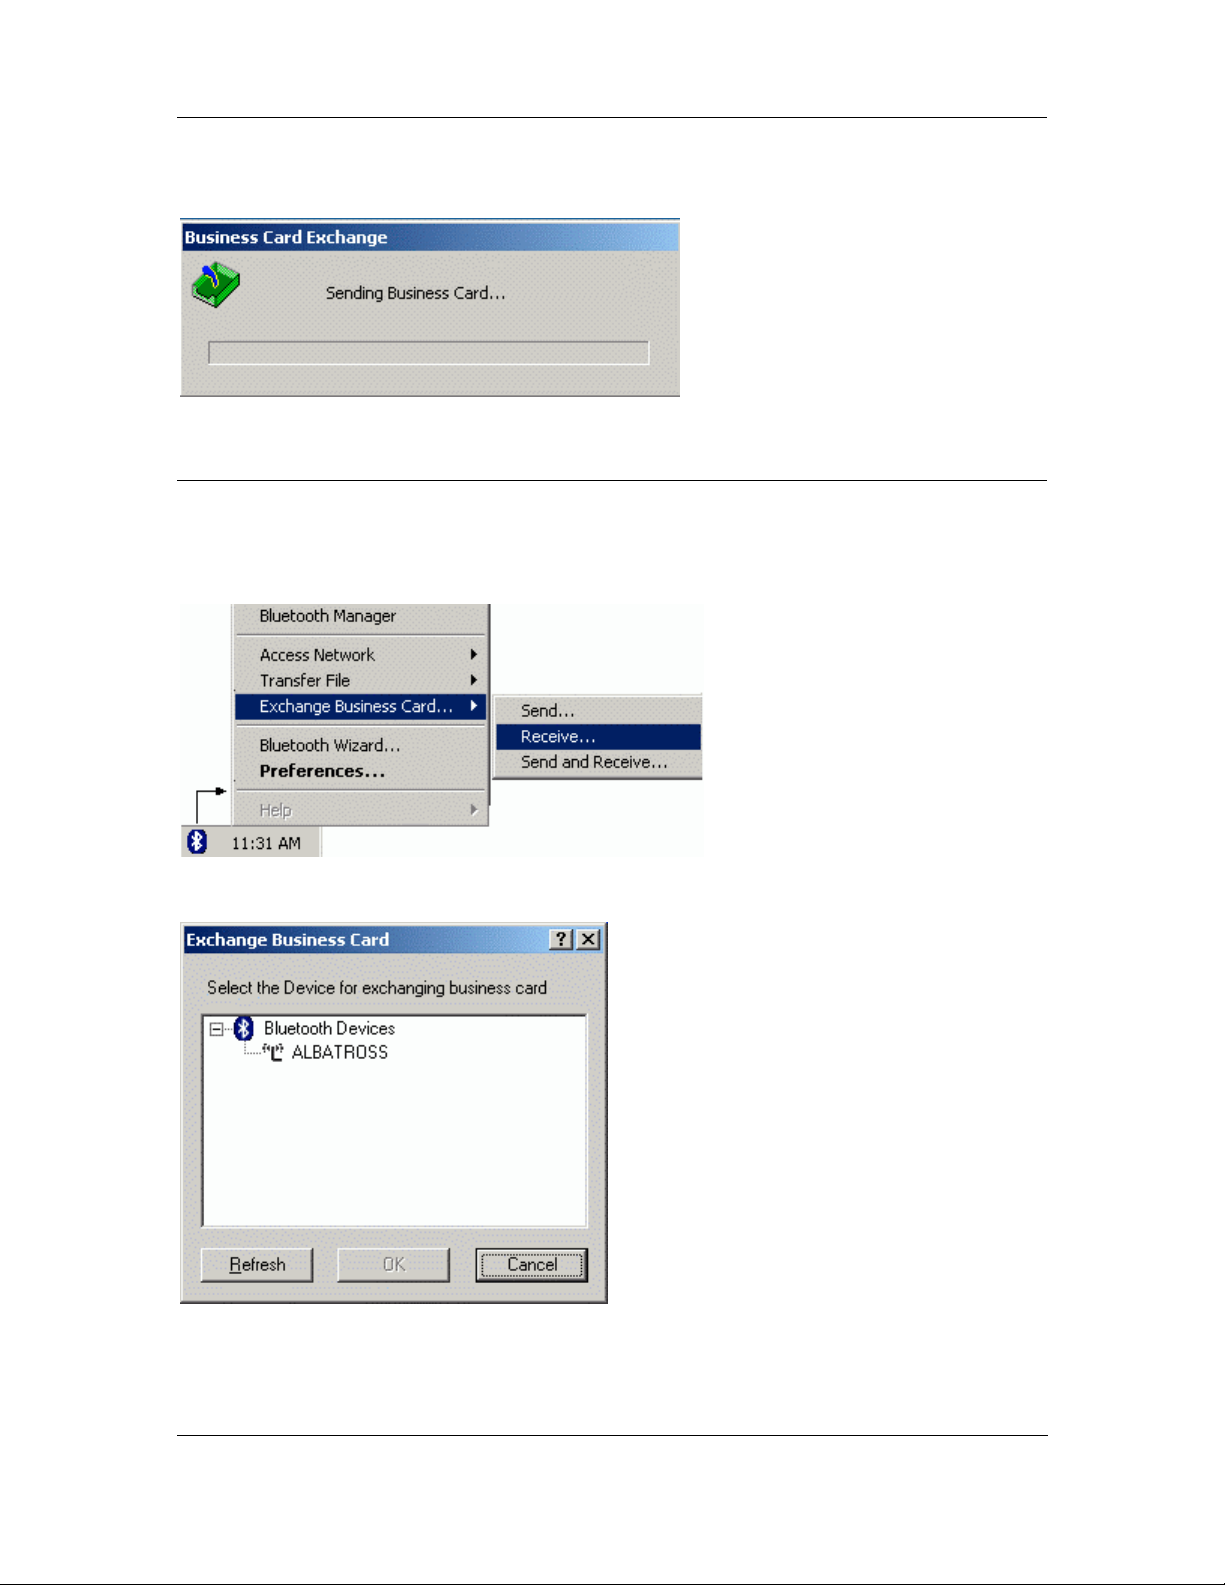
4. The business card is sent to the remote device. The Business Card Exchange dialog displays
the status of the business card exchange.
Figure 87. Send Business Card progress bar
4.3.2 Receive Business Cards
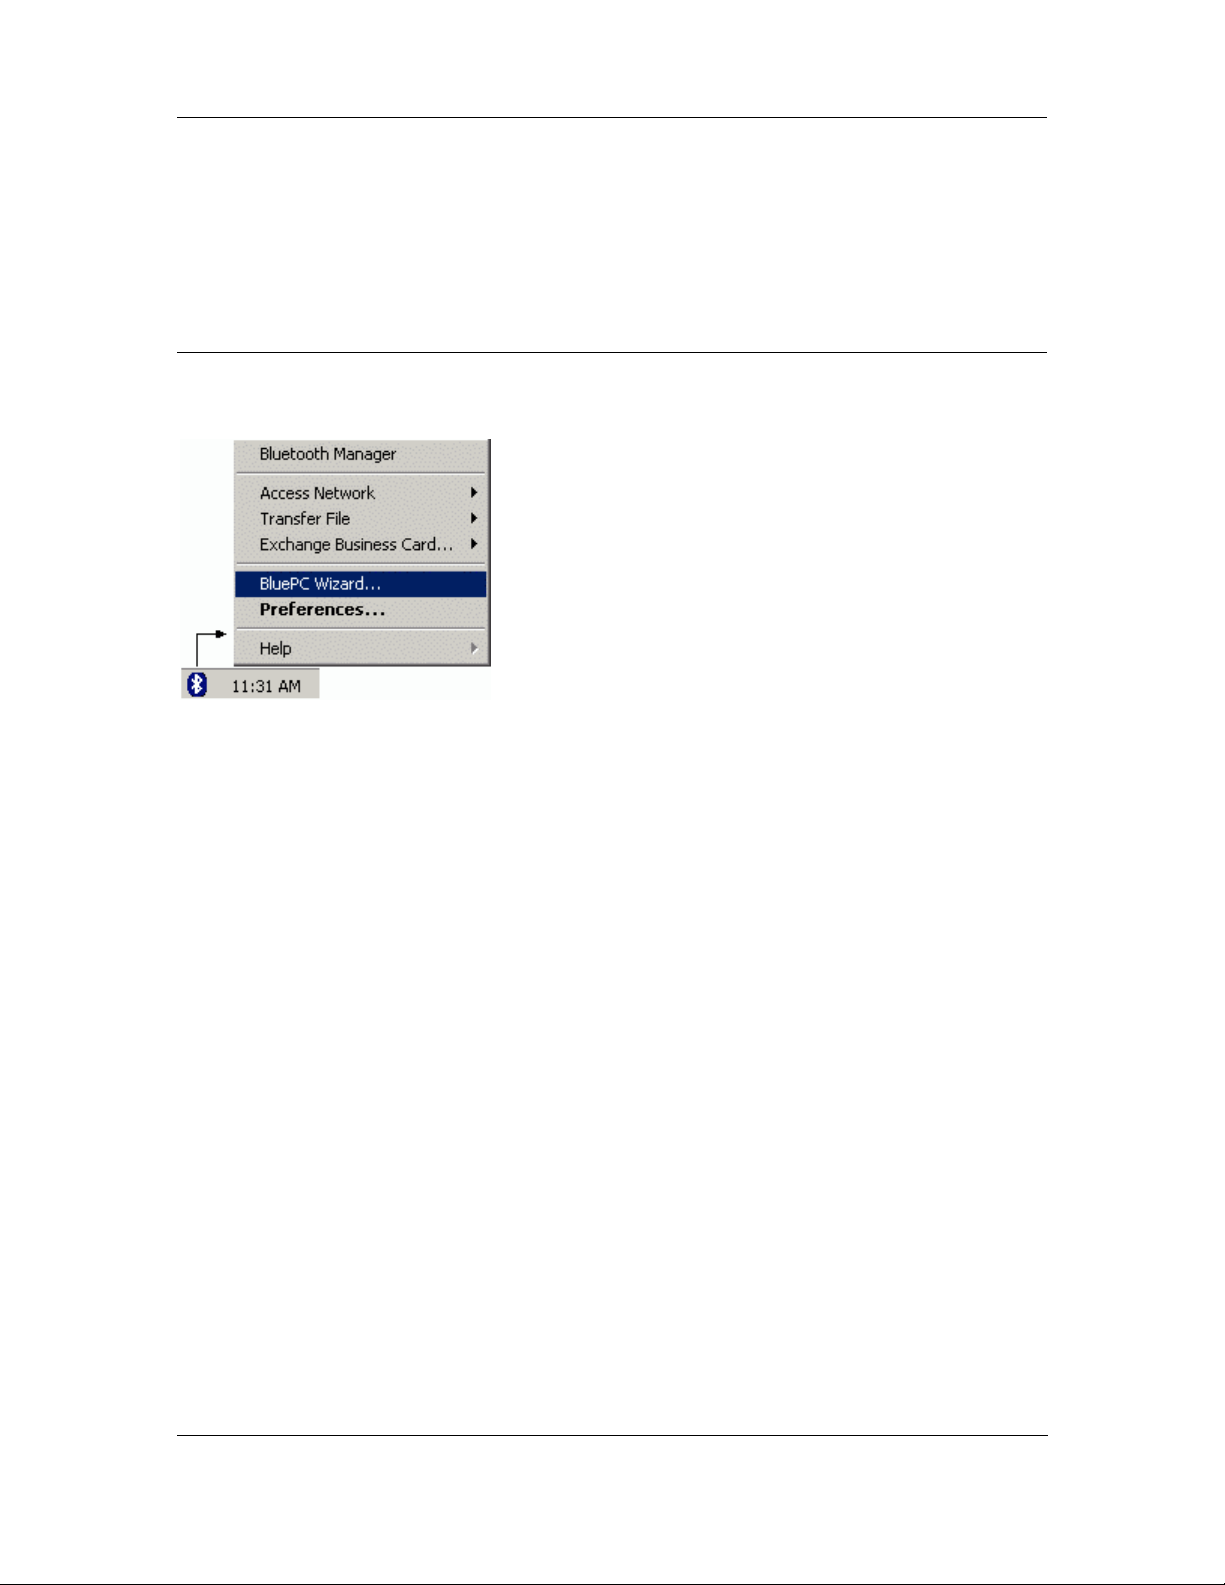
To receive business cards from a remote device:
1. Right-click the Bluetooth icon in the system tray and select the option
Exchange Business Card->Receive.
Figure 88. Receive Business Card menu
2. Select Receive. The Exchange Business Card screen is displayed.
Figure 89. Exchange Business Card
3. Select the device from which you want to receive a business card. Click OK.
Using BluePC 67
Page 68

BluePC User Manual
4. The Business Card Exchange dialog displays the status of the business card exchange.
Figure 90. Receive Business Card progress bar
You can exchange Business cards through the Bluetooth-enabled Windows Explorer.
Using BluePC 68
Page 69
BluePC User Manual
4.4 Print Files
You can set up the printing service through the BluePC wizard or through the Bluetooth-enabled
Windows Explorer.
4.4.1 Using BluePC Wizard
To set up the printer:
1. Right-click the Bluetooth icon in the system and select the option
Figure 91. Bluetooth Wizard menu option
BluePC Wizard.
Using BluePC 69
Page 70
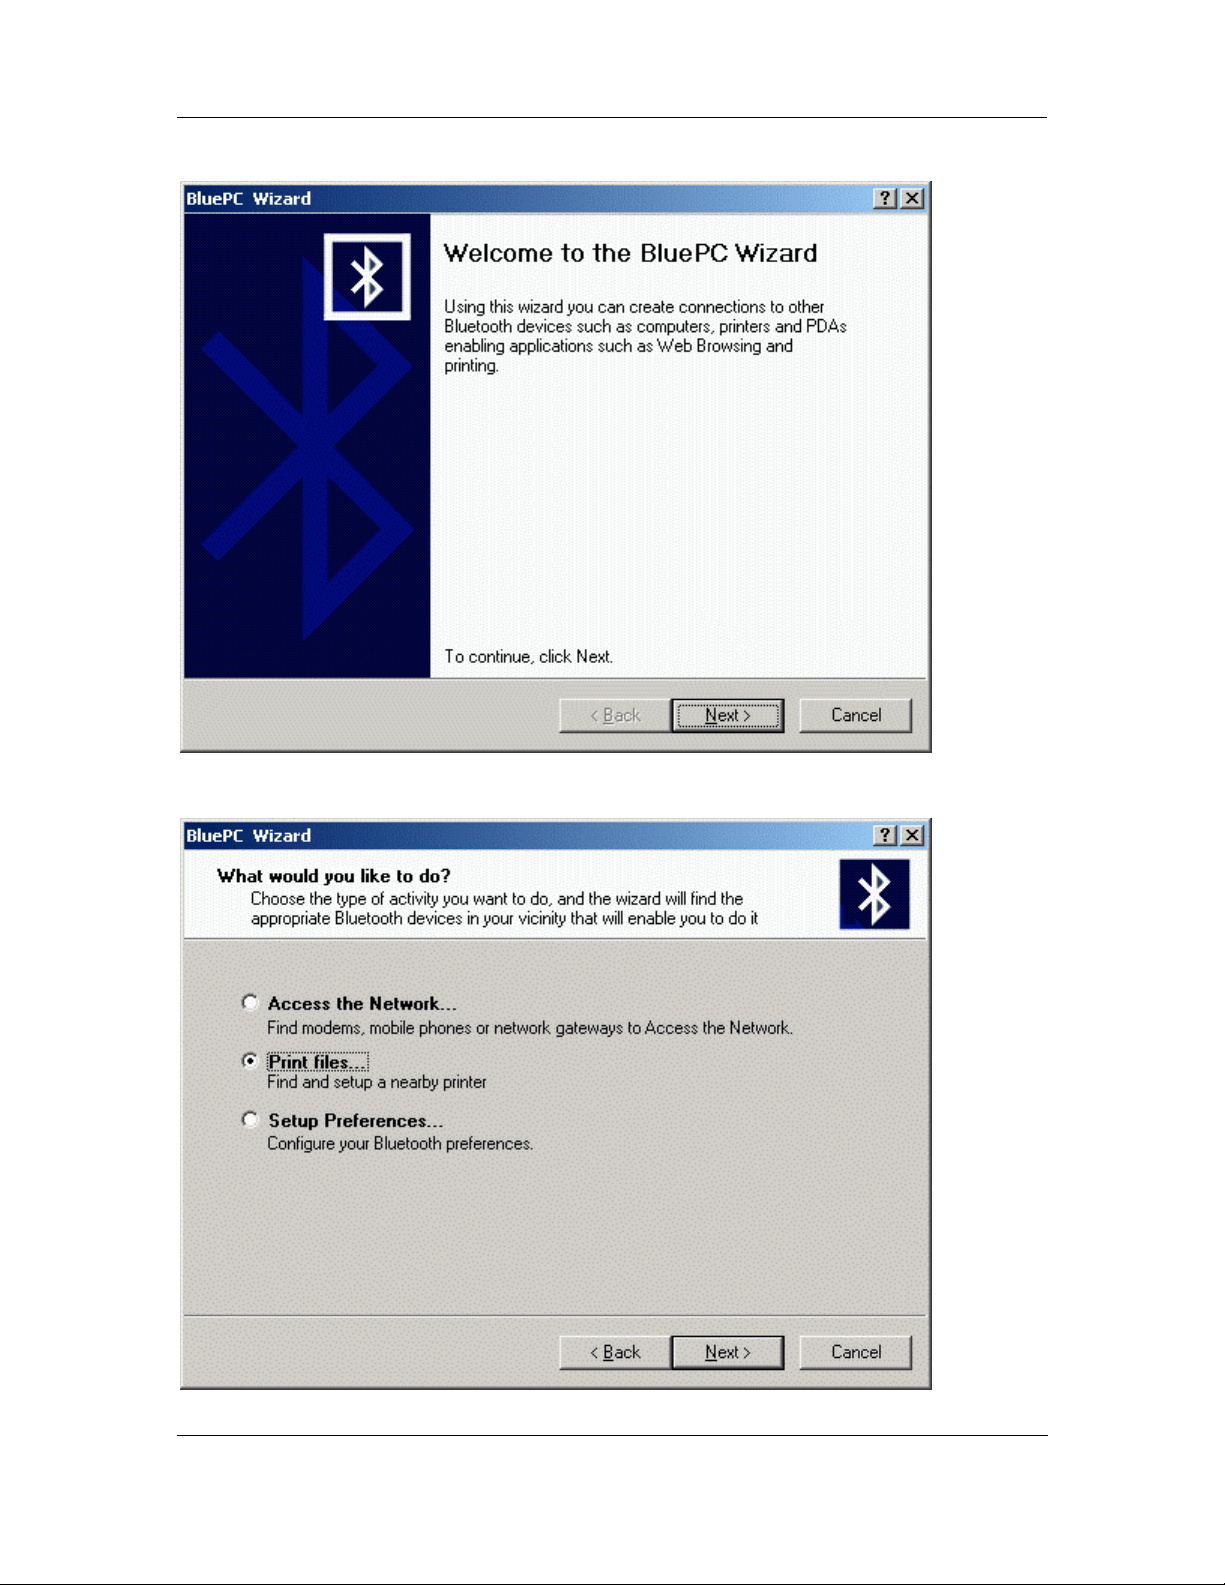
2. The BluePC Wizard welcome screen is displayed. Click Next.
BluePC User Manual
Figure 92. Bluetooth Wizard welcome screen
3. A list of options is displayed. Select Print Files and click Next.
Figure 93. Print Files option
Using BluePC 70
Page 71
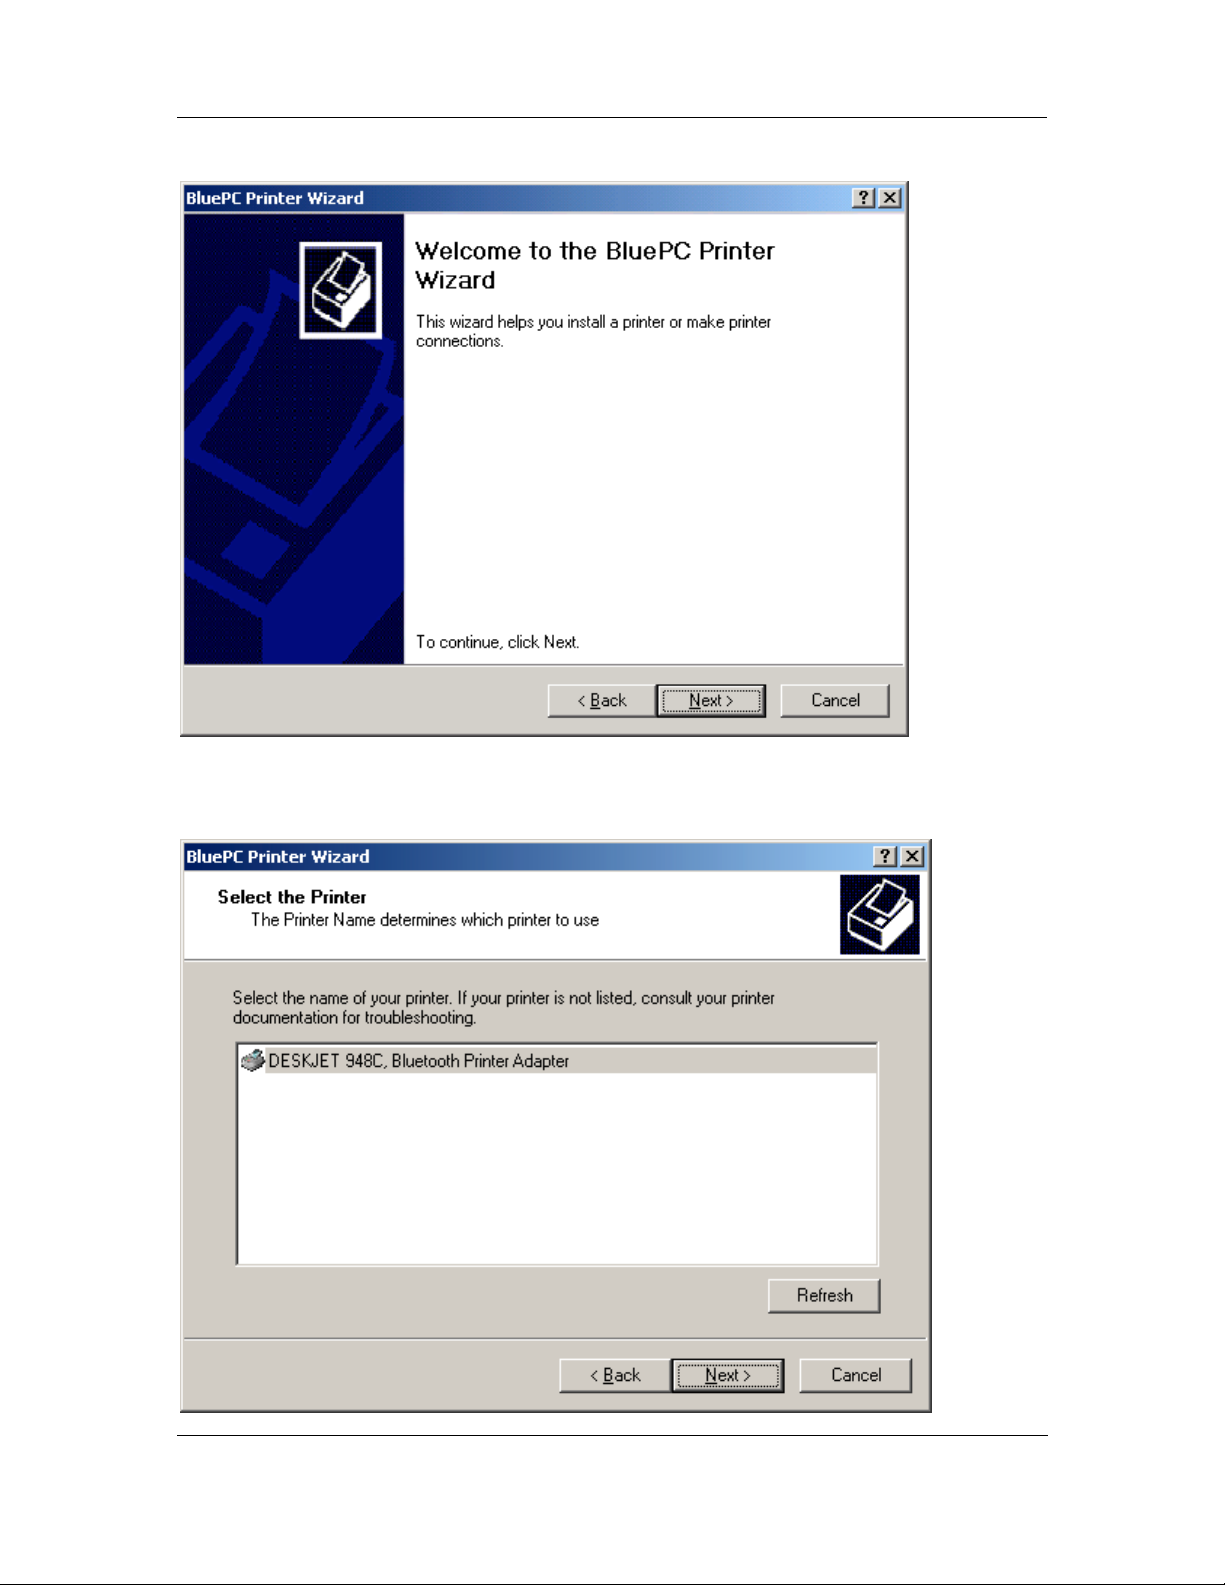
4. The BluePC Printer Wizard dialog is displayed. Click Next.
BluePC User Manual
Figure 94. Add Printer Wizard
5. BluePC automatically discovers all the devices in the vicinity offering a printing service and lists
them in the dialog.
Using BluePC 71
Page 72
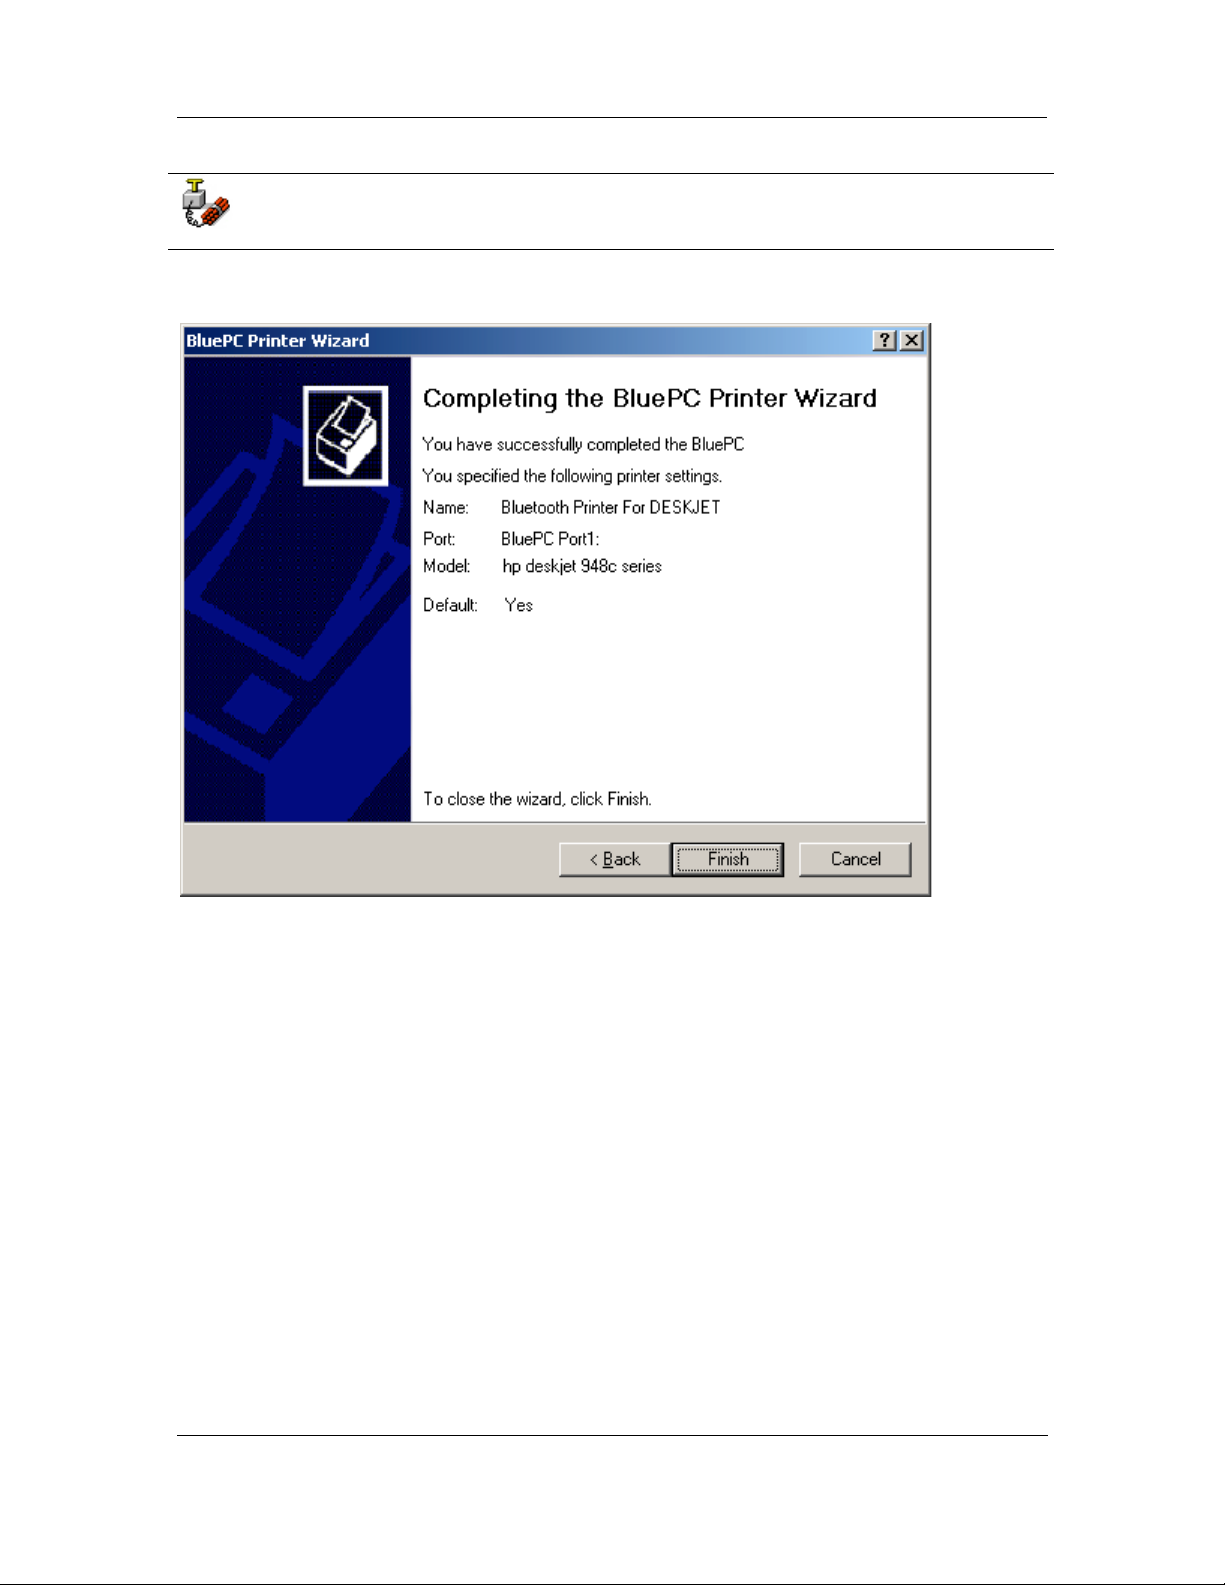
Figure 95. Printer selection
Caveat: BluePC Wizard will display only those printers that provide Bluetooth
Hardcopy Cable Replacement feature
6. Select the required printer. Click Next.
BluePC User Manual
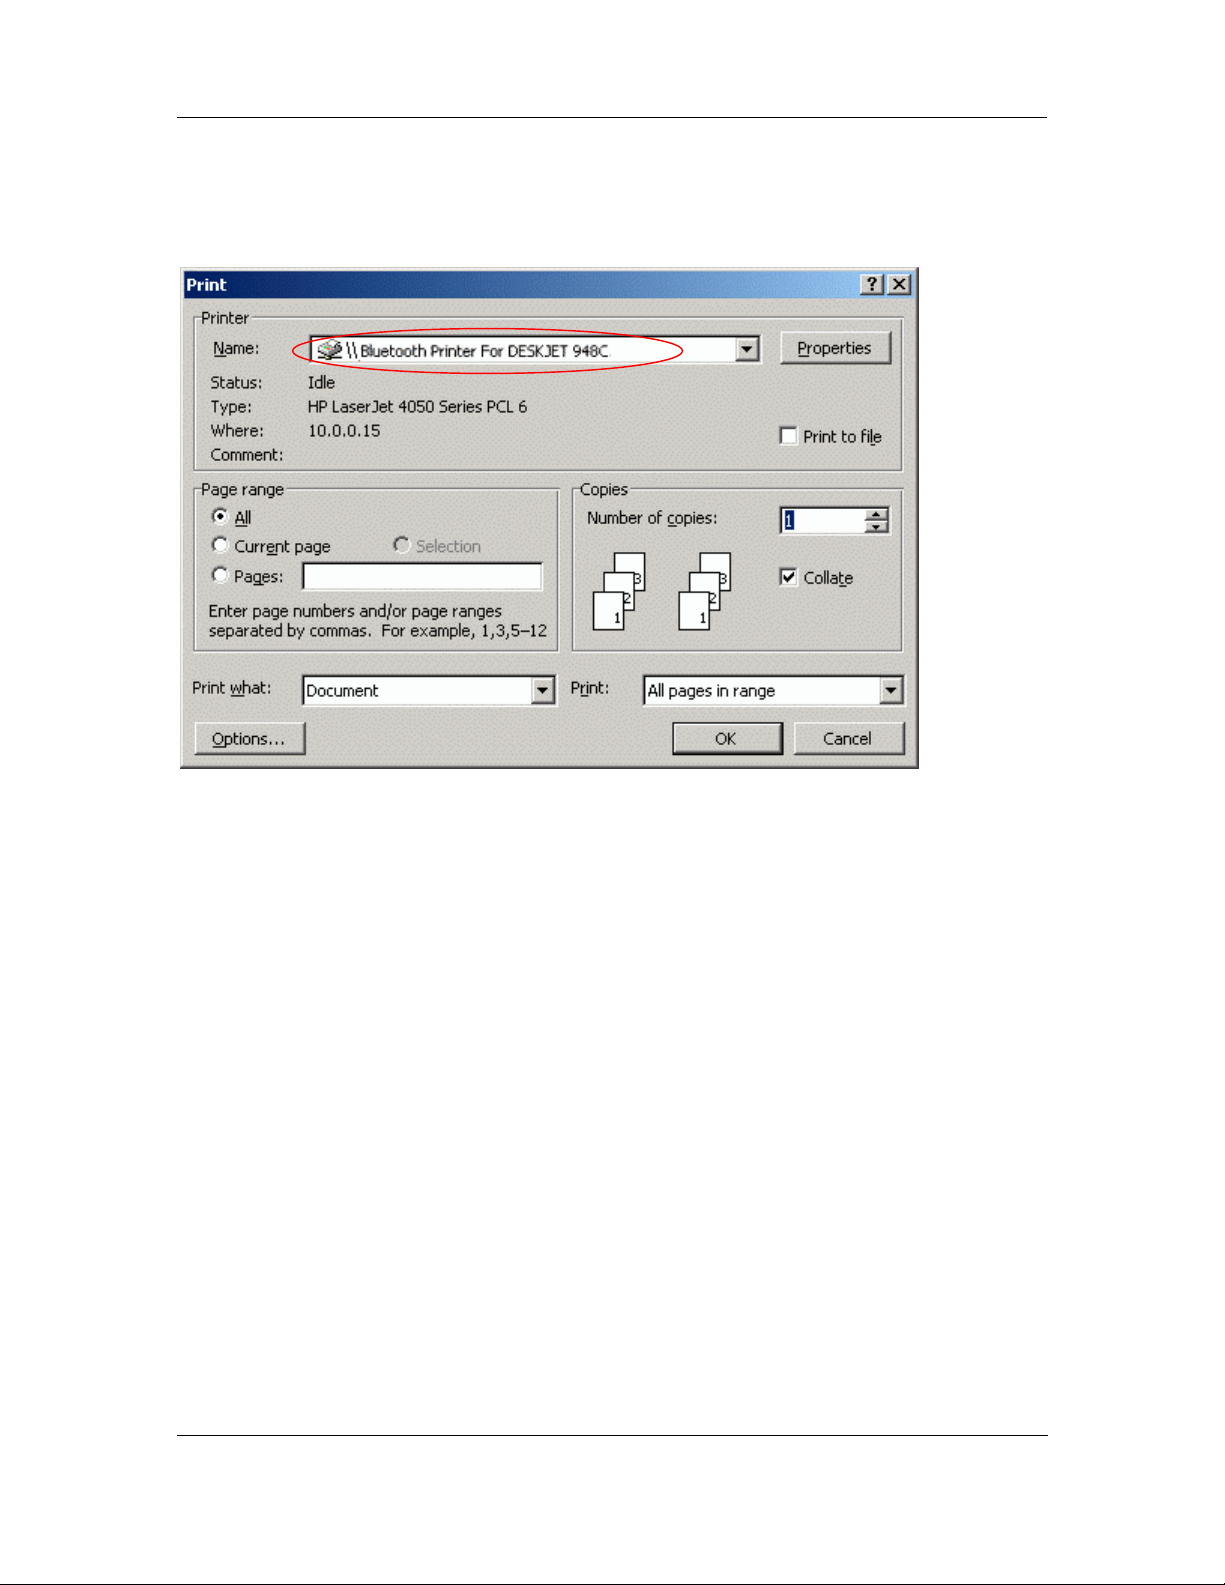
7. The Final screen is displayed. Click
Finish to complete the process.
Figure 96. Final screen
Using BluePC 72
Page 73
BluePC User Manual
Now, use any Windows application with the Print option to print files. The printer that you have
configured is added to the list of configured Printers. For example, if you are printing a Word file
select the printer that you have configured.
Figure 97. Printer Selection
Using BluePC 73
Page 74
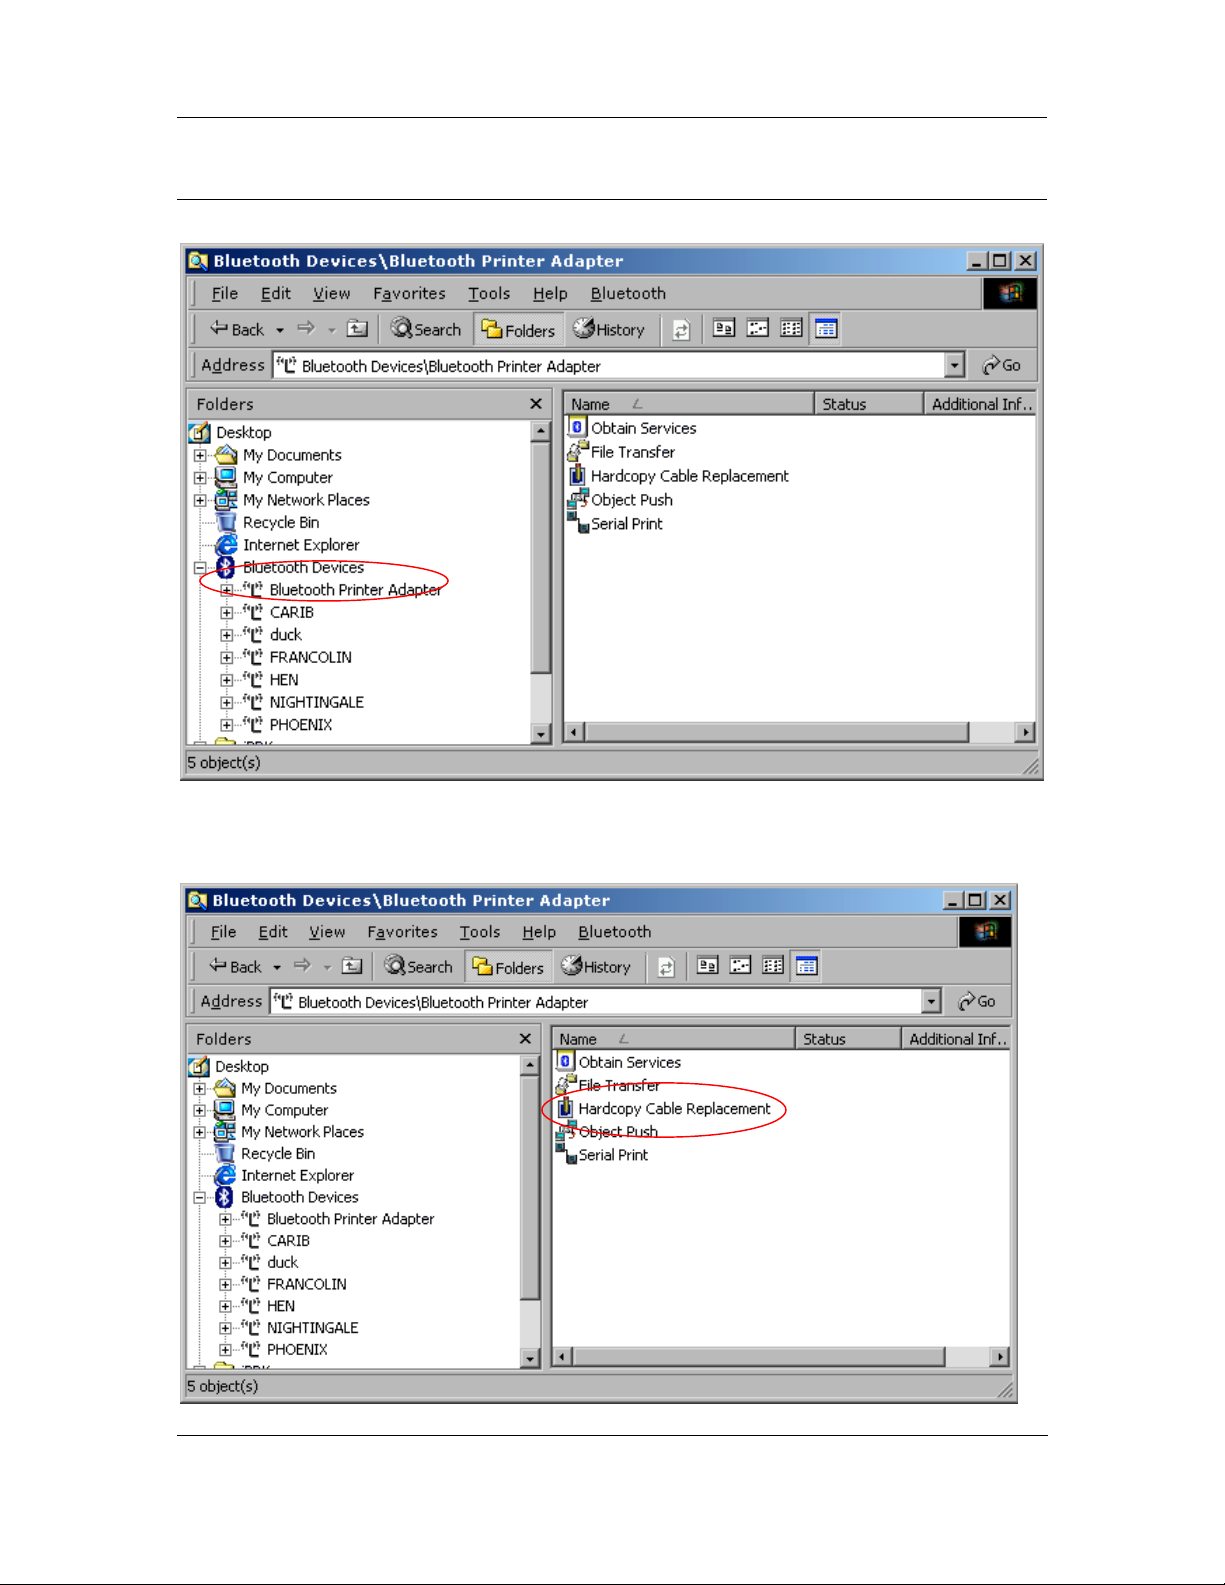
4.4.2 Using Bluetooth-enabled Windows Expl orer
1. In Windows Explorer double-click the Bluetooth devices.
BluePC User Manual
Figure 98. Explorer Devices
2. Double-click the device offering the printing service. The Printing service icon is displayed in
the right-pane.
Figure 99. Printer service
Using BluePC 74
Page 75
BluePC User Manual
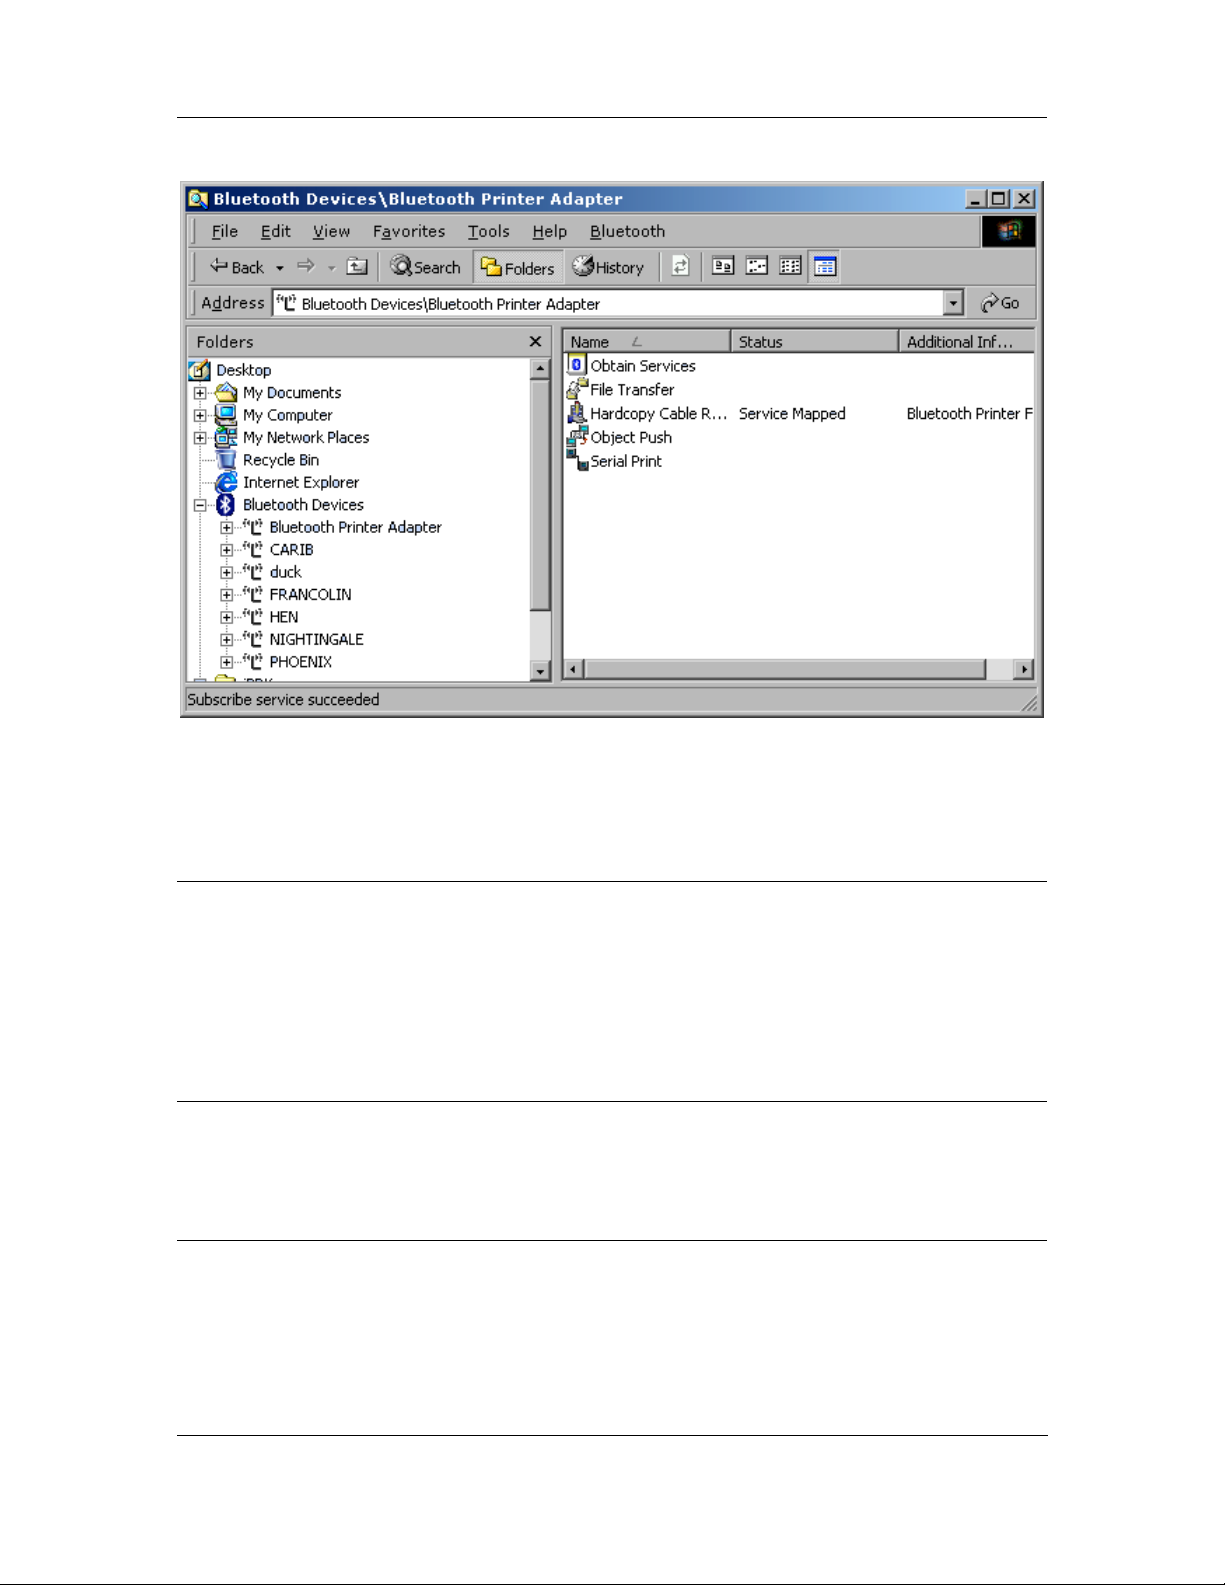
3. Double-click the Hardcopy Cable Replacement service to connect to the printing service.
Figure 100. Service Mapped
The status Service Mapped is displayed. Now, use any Windows application with the Print option
to print files. The printer that you have configured is added to the list of configured Printers.
4.4.3 Print to a Standalone Printer
You can print to a standalone printer offering Serial Port service. To do so, you need to do the
following:
• Setup the Bluetooth Enabled Printer
• Access the Serial Port Service on your computer
Setup the Bluetooth-Enabled Printer
The Bluetooth printer needs to offer a Serial Port Service. Please refer to the printer’s user manual
for instructions on how to setup the printer to offer a Serial Port Service.
Access the Serial Port Service
On your computer you first need to locate the Serial Port service offered by the printer.
To locate the service:
1. The Bluetooth-enabled Windows Explorer displays all the Bluetooth devices within the vicinity
along with a list of services provided by them.
Using BluePC 75
Page 76
BluePC User Manual
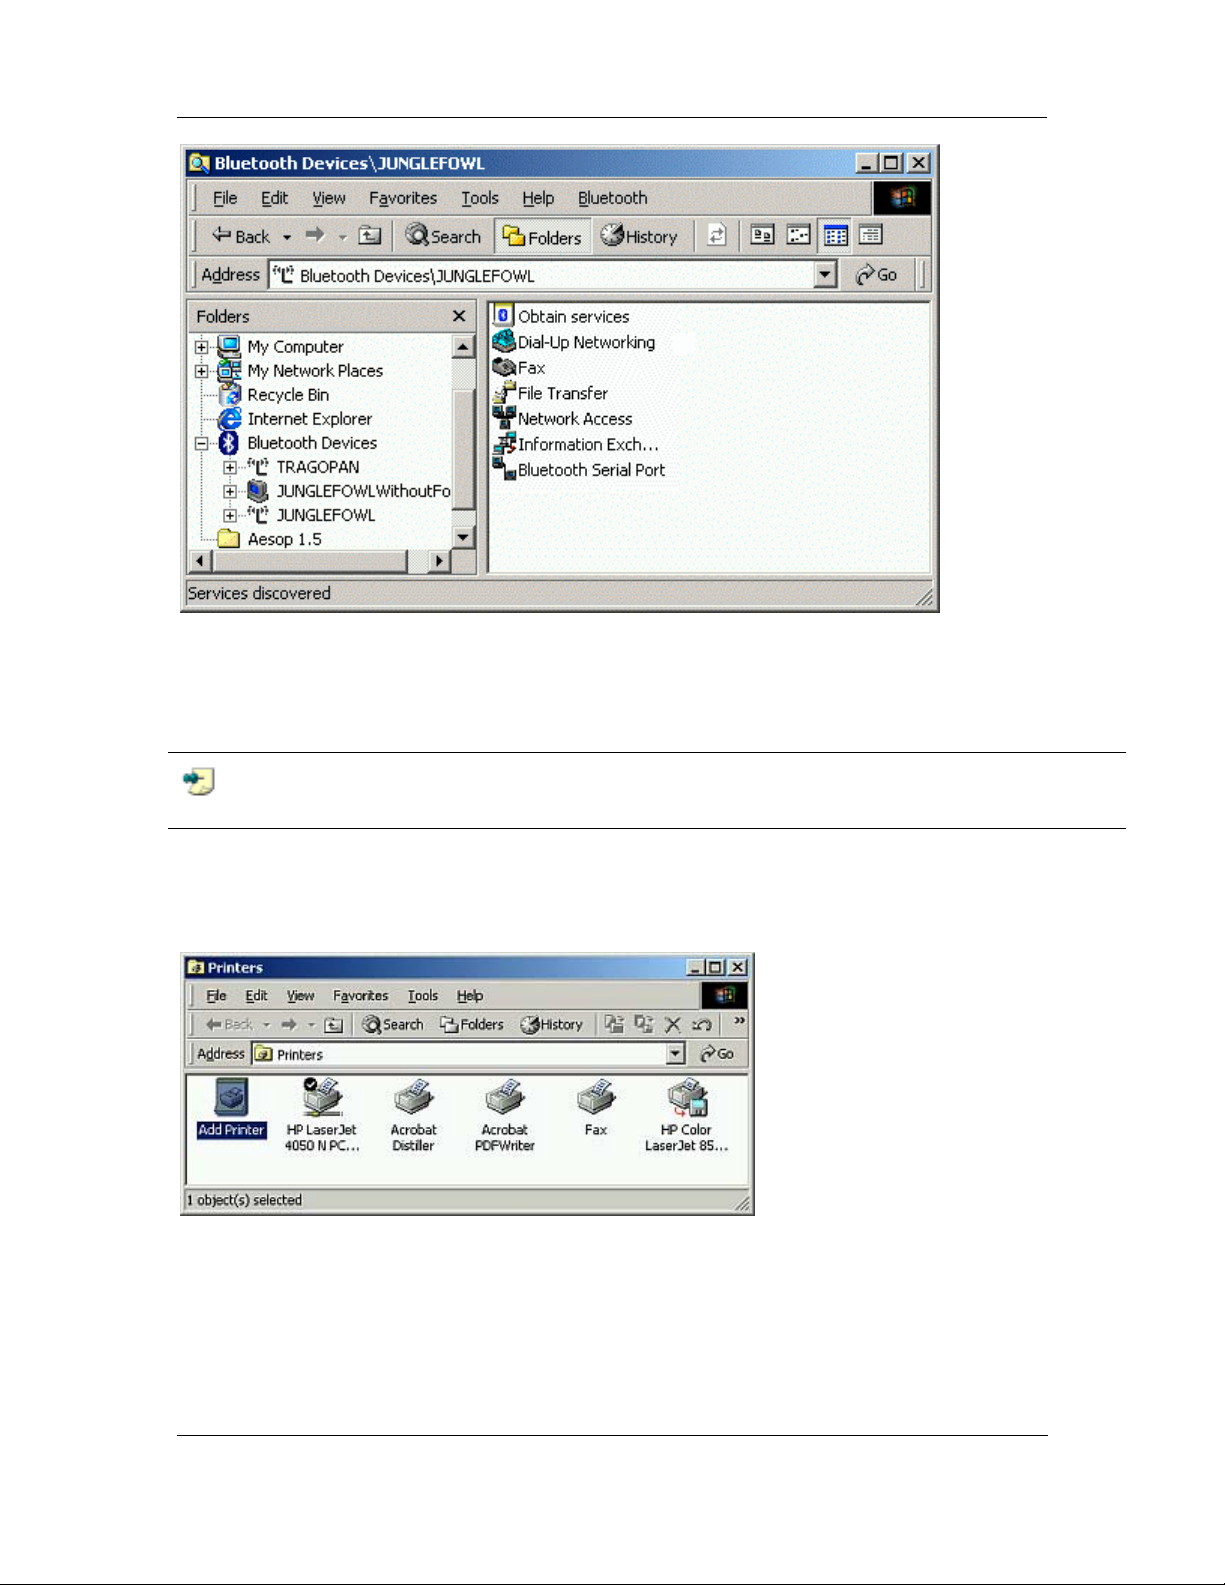
Figure 101. Bluetooth-enabled Windows Explorer
2. Select the printer that is offering the Serial Port Service from the list of displayed devices.
3. Double-click the Serial Port Service to connect to the service. Let us say that the COM port
through which you are connected is COM 7.
Note: COM 7 is for illustration pu rposes only. You can be as signed any other COM port in
your case.
Next, you need to setup a printer connection so that print jobs can be directed to the printer.
To setup the printer connection:
1. Click Start and select the Settings -> Printer option.
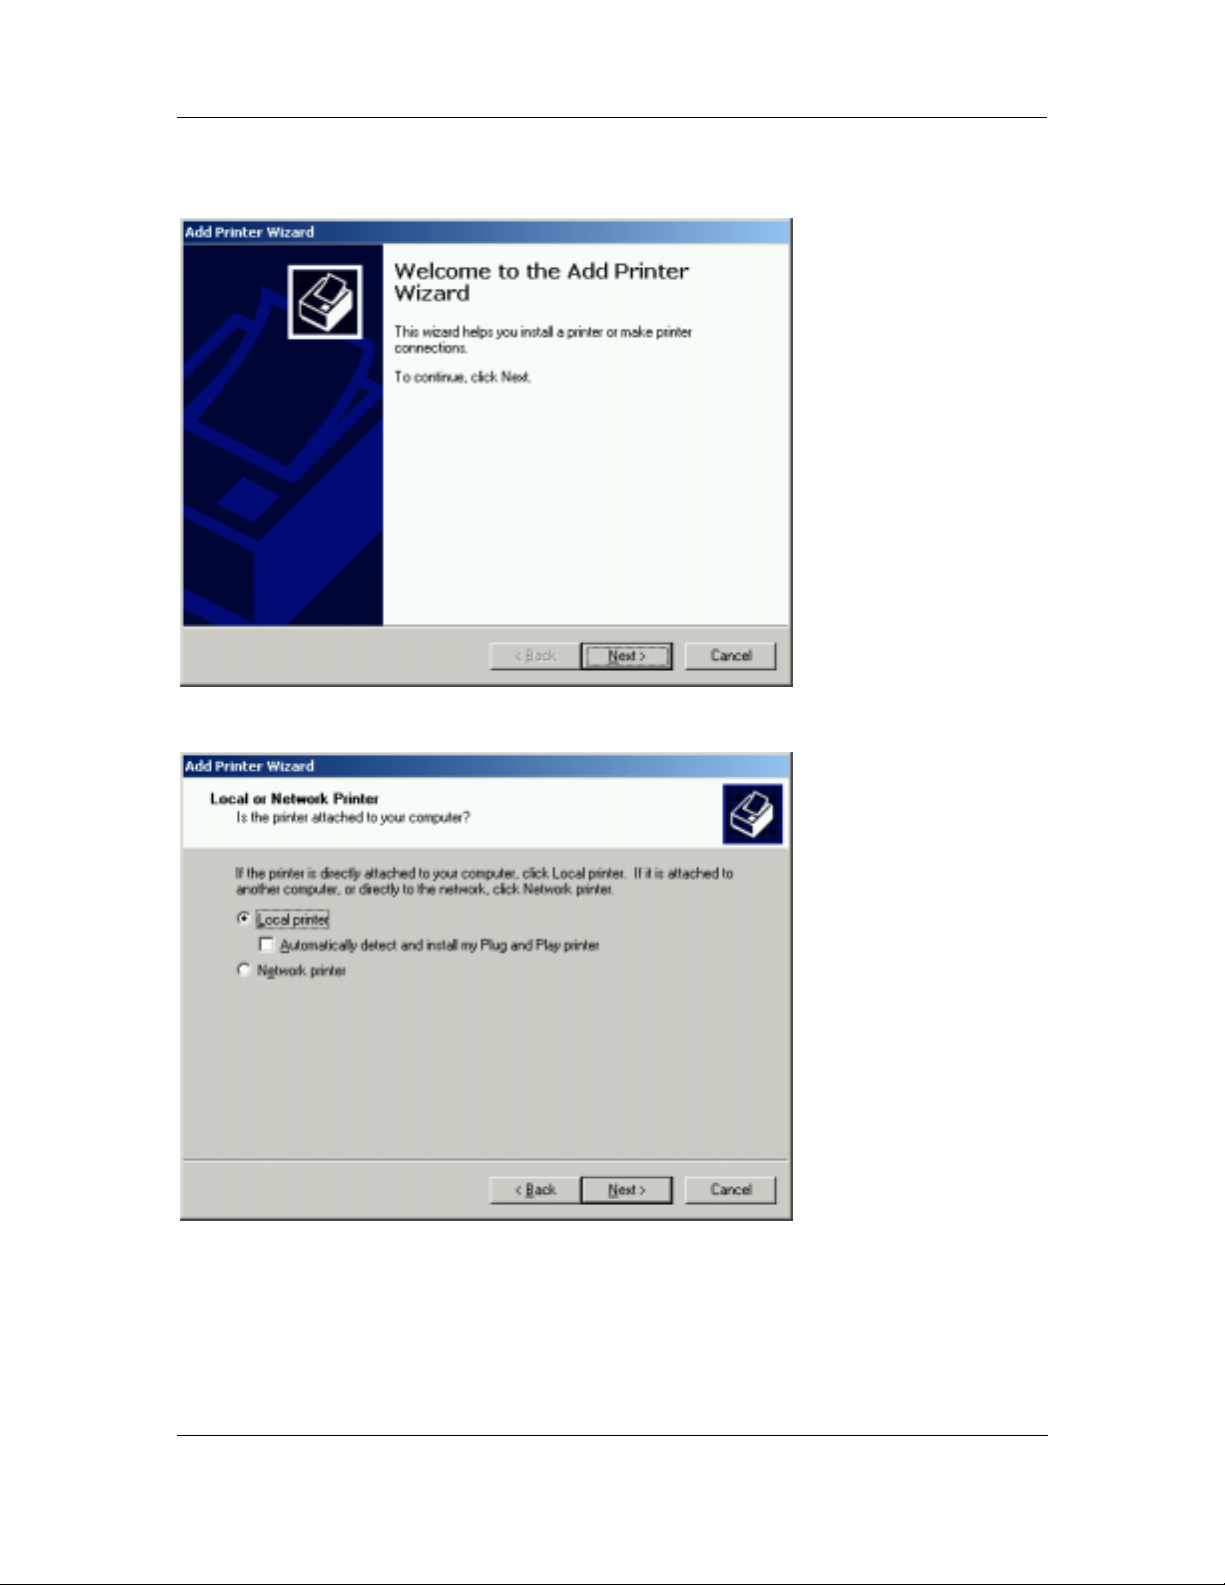
Figure 102. Printers
Using BluePC 76
Page 77
BluePC User Manual
2. The Printers screen is displayed. Double-click Add Printer. The Add Printer Wizard is
displayed.
Figure 103. Add Printer Wizard
3. Click Next to proceed.
Figure 104. Local or Network Printer
Using BluePC 77
Page 78
BluePC User Manual
4. The Local or Network Printer selection screen is displayed. Select the Local Printer option
and click
Figure 105. Select Printer Port
Next.
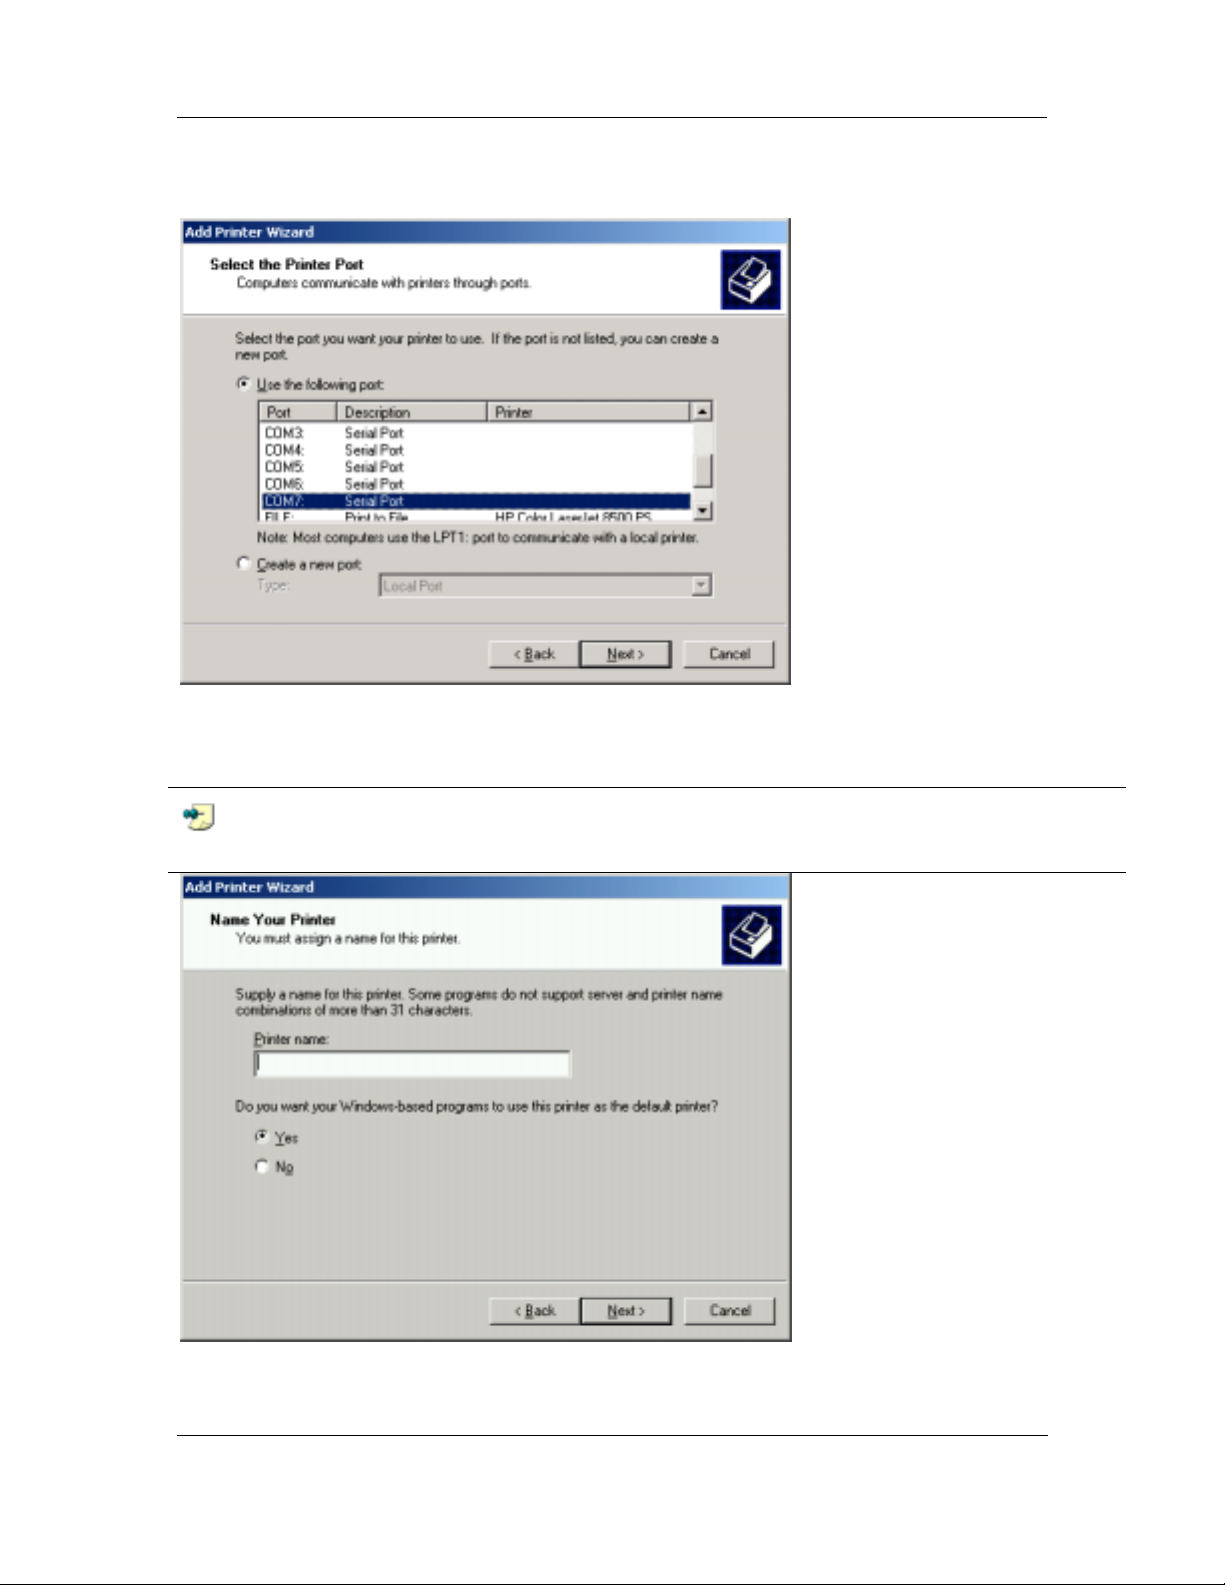
5. The Select Printer Port screen is displayed. Select the port through which you have connected
to the Serial Port Service, namely COM 7. Click
Next.
Note: COM 7 is for illustration p urposes only. You can be a ssigned any other COM port in
your case.
Figure 106. Name your Printer
Using BluePC 78
Page 79
BluePC User Manual
6. The Printer Name screen is displayed. Enter a name. If you want to set this printer as the
default printer, click the
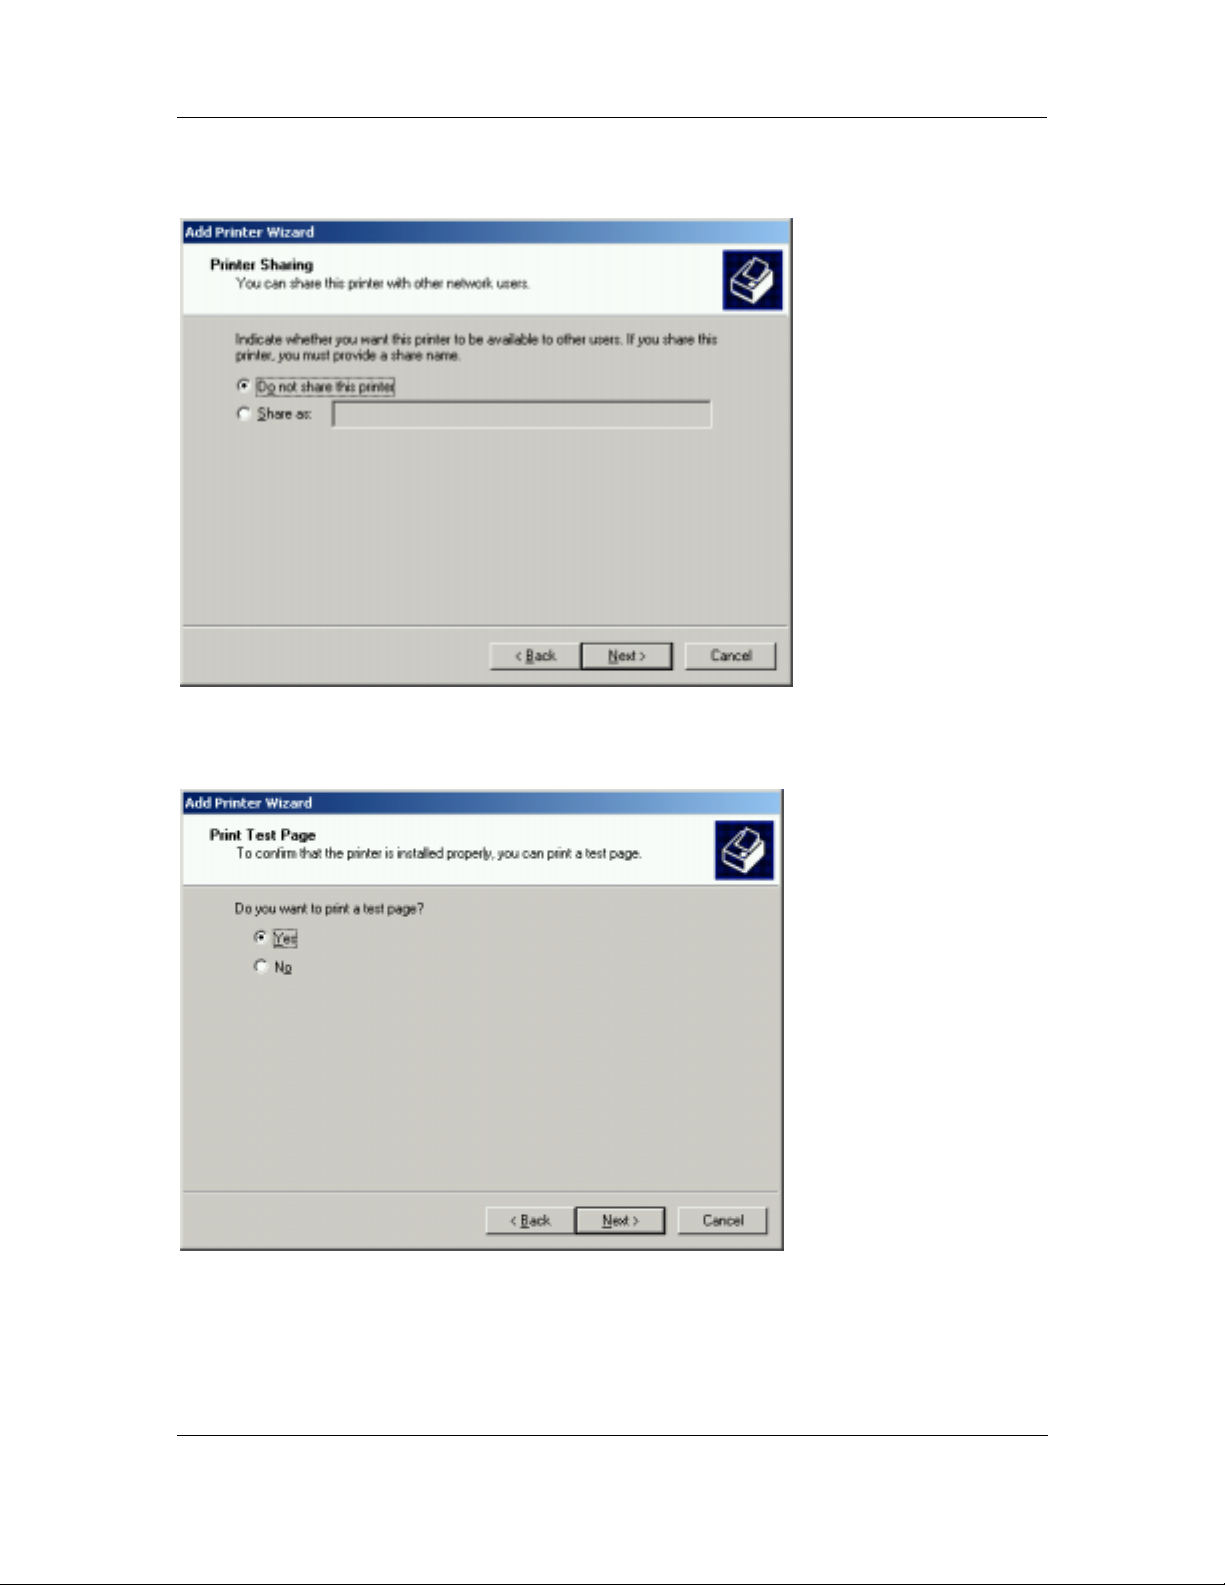
Figure 107. Printer Sharing
Yes radio button. Click Next.
7. The Printer Sharing screen is displayed. Select the option Do not share this printer, and click
Next.
Figure 108. Print Test Page
8. The Print Test Page screen is displayed. If you want to print a test page, select the option Yes
and click Next. Else, select the option No and click Next.
Using BluePC 79
Page 80
BluePC User Manual
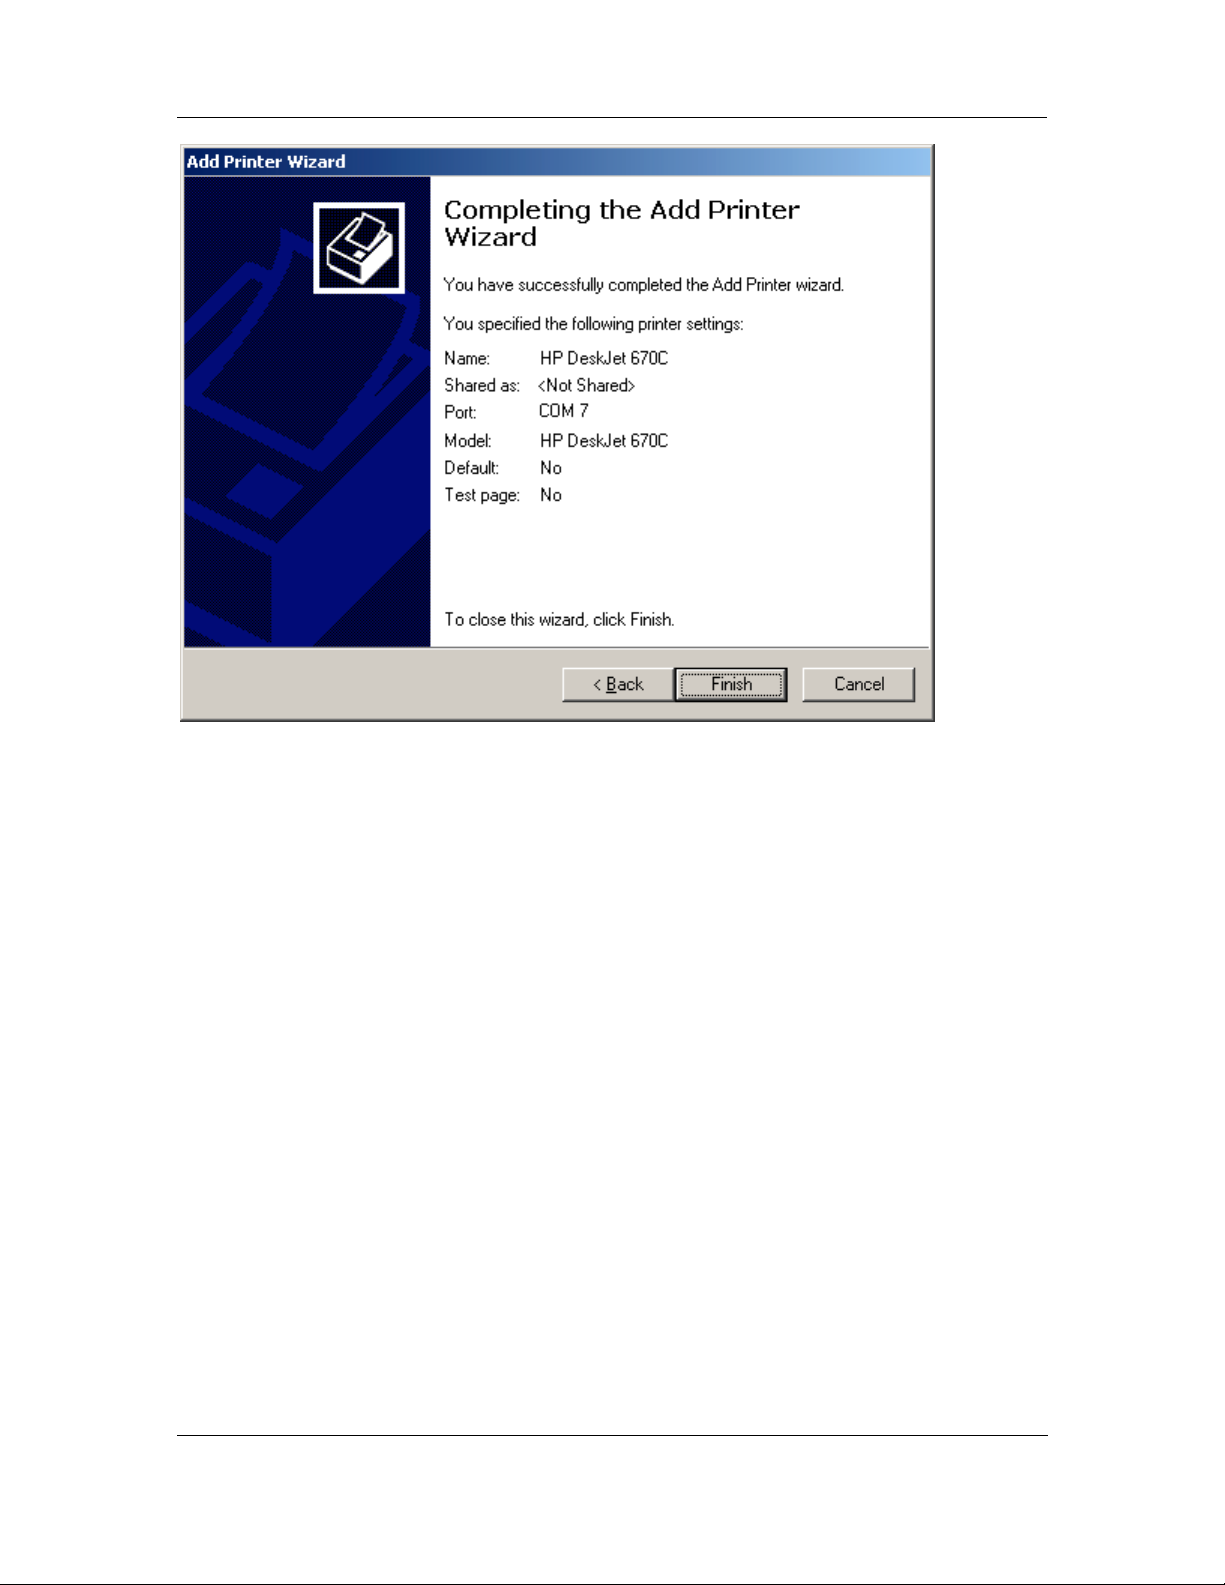
Figure 109. Final Printing Setup screen
9. The Final screen is displayed. Click Finish to complete the process.
Now, use any Windows application with the Print option to print files. When you select the Print
option in a Windows application, ensure that you select the printer that you have installed.
Using BluePC 80
Page 81

BluePC User Manual
4.5 Synchronize PDAs with your PC
With this scenario, you can synchronize your PDA with your PC to get your appointment calendar,
or Emails.
To synchronize your PDA with a PC, you need to:
• Add a Serial Port Service
• Setup the PDA to use the Serial Port Service
• Synchronize your PDA using the synchronization application
4.5.1 Add a Serial Port Service
You can add a serial port using the Bluetooth Configuration Manager. Refer to the section Add Serial
Port Service for more information.
Let us say that the port the service is subscribed to is COM 8.
Note: COM 8 is for illustration purposes onl y. You can be assigned any other COM port in
your case.
4.5.2 Setup the PDA to use the Serial Port Service
Refer to the respective PDA user manual for instructions on how to use the synchronization service,
such as ActiveSync, over the Serial Port offered by the Bluetooth-enabled PC.
4.5.3 Synchronize your PDA
Synchronize your PDA using ActiveSync
To synchronize the PDA with the PC:
1. Double-click the ActiveSync icon
is displayed.
2. Select the option
screen is displayed.
File -> Connection Settings from the main menu. The Connection S ettings
in the system tray on your laptop. The ActiveSync screen
Using BluePC 81
Page 82
BluePC User Manual
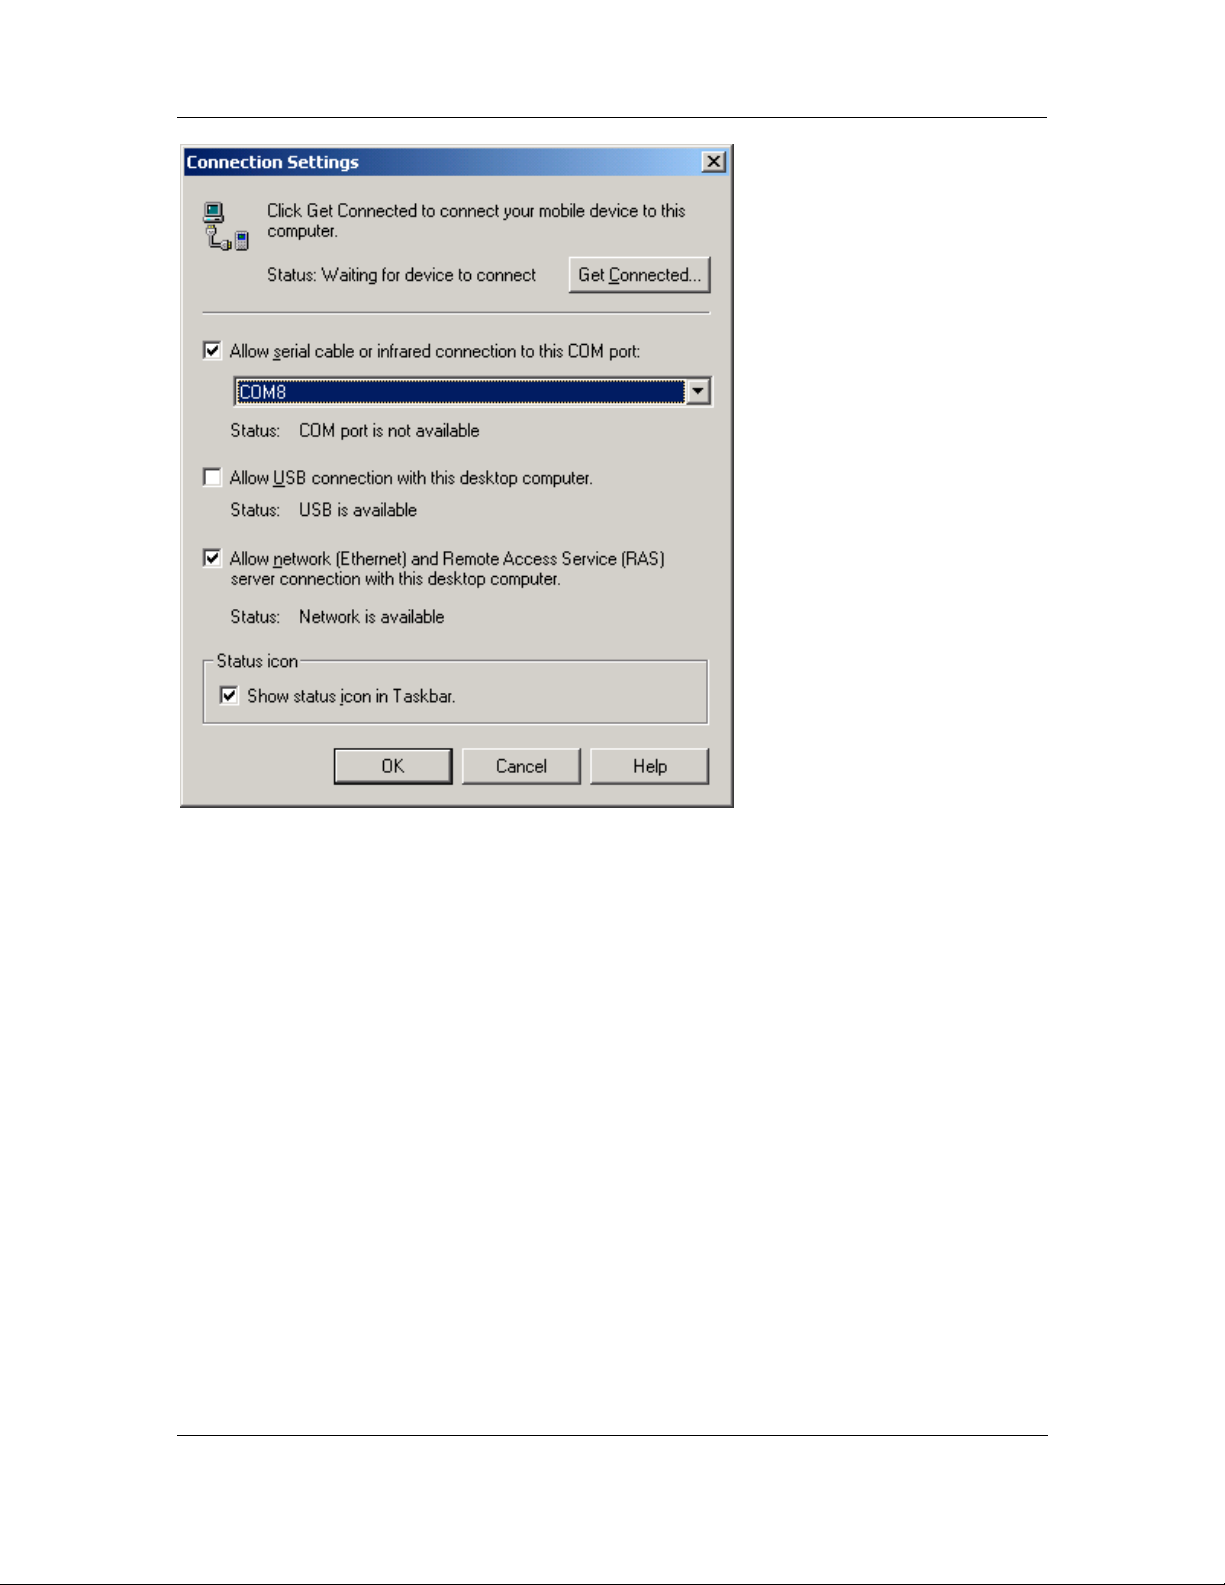
Figure 110. ActiveSync Connection Settings
3. Select the option Allow serial cable or infrared connection to this COM port:, and select
the Serial Port to which you have subscribed the service. In this example, it is COM 8. Click
OK.
You have now configured ActiveSync to use the required port.
Using BluePC 82
Page 83
BluePC User Manual
Now, to synchronize the PDA:
1. From the PDA, select the required synchronization option. The PDA connects with the PC.
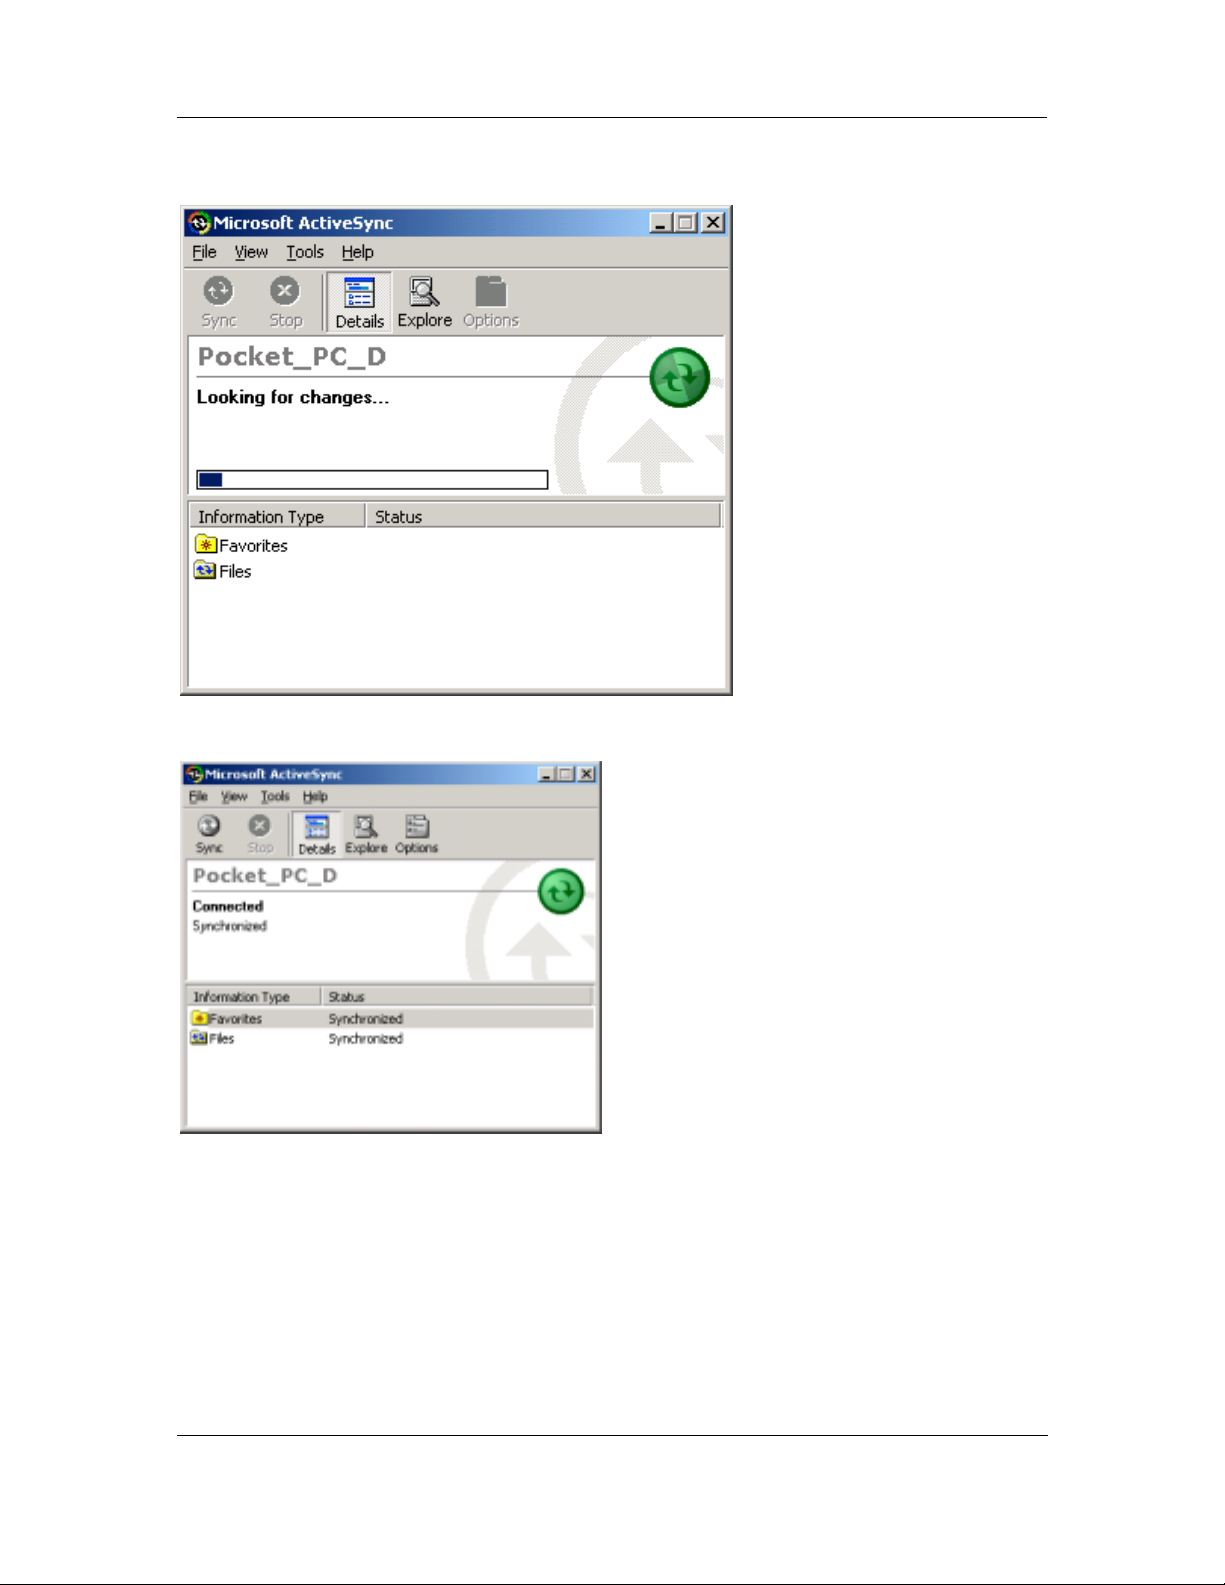
Figure 111. Connection Established
2. Once the connection is established the synchronization progress screen is displayed on your PC.
Figure 112. Synchronization Complete
3. Once the synchronization is complete, Synchronized status is displayed in the ActiveSync screen.
Using BluePC 83
Page 84
Synchronize your PDA Using Hotsync
To synchronize the PDA with the laptop:
1. Right-click the Hotsync icon in the system tray on your laptop.
Figure 113. Hotsync Menu
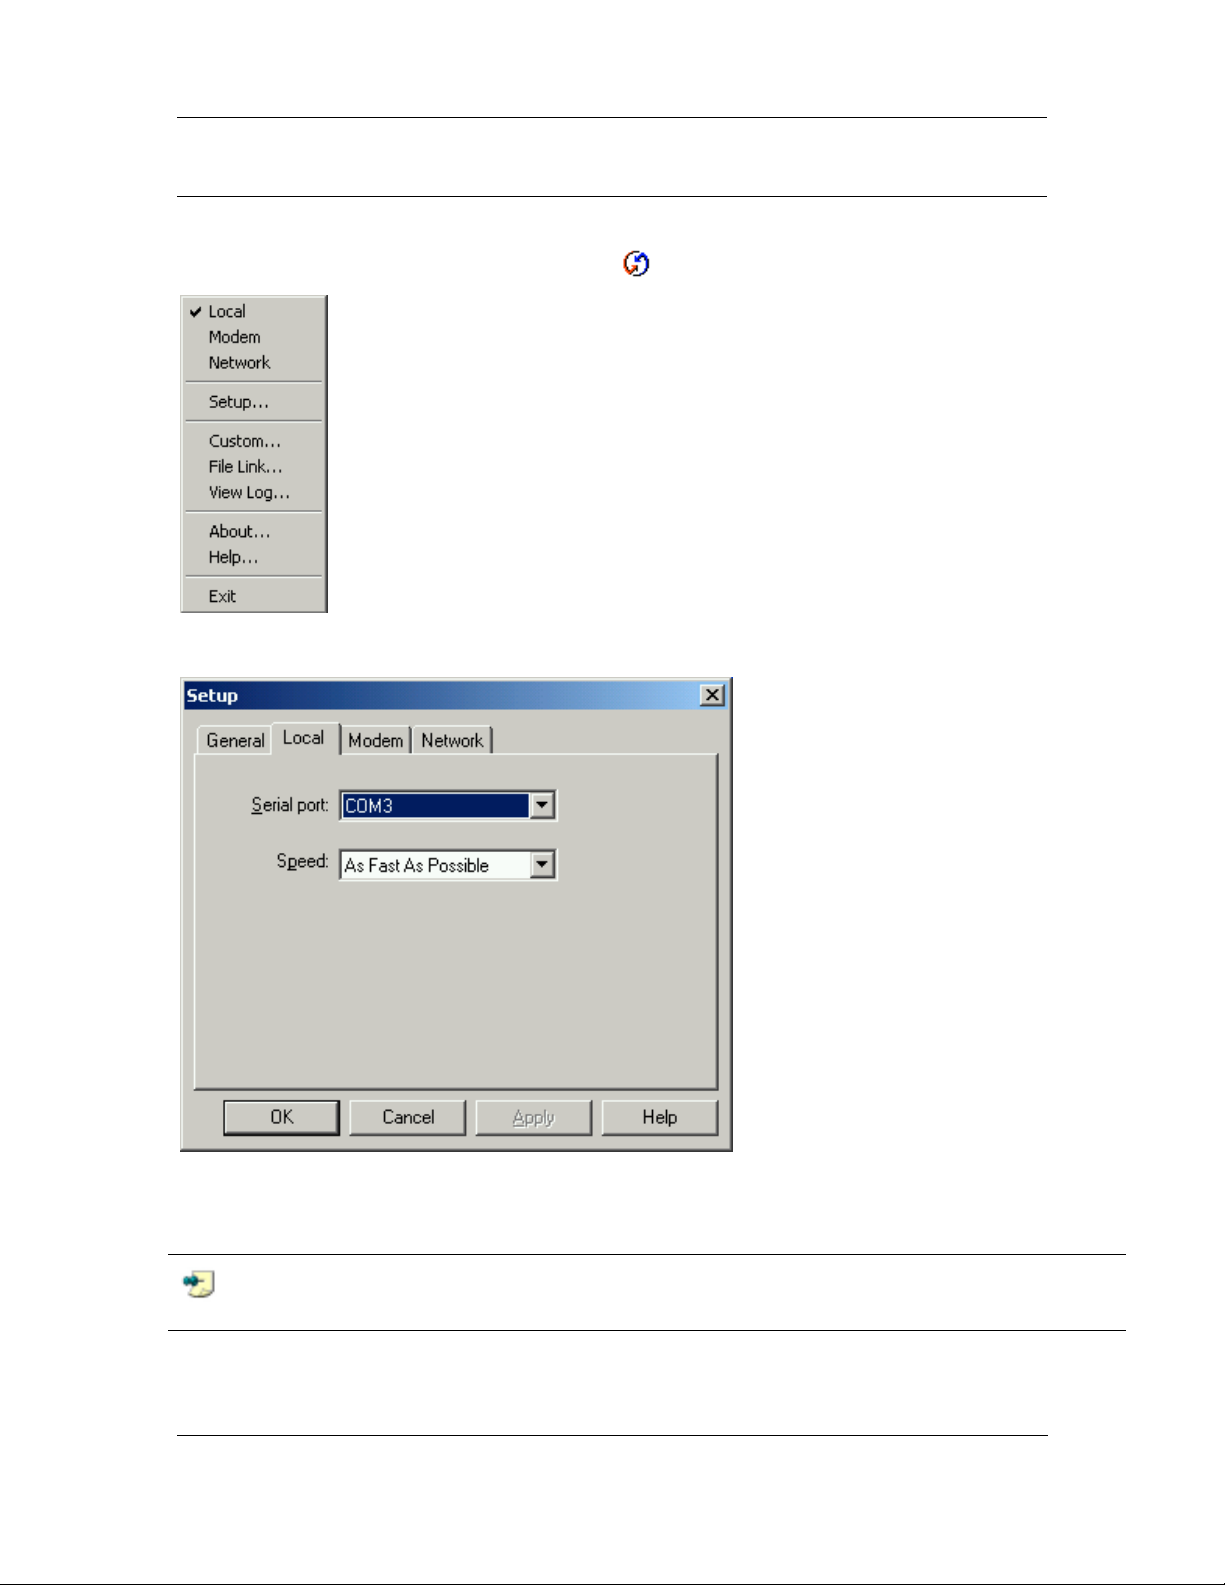
The HotSync menu is displayed. Select the option Setup.
BluePC User Manual
Figure 114. Synchronization setup
Select the Serial Port to which you have subscribed the Serial Port Service. In this example, it is
COM 3. Click
Note: COM 3 is for illustration pu rposes only. You can be a ssigned any other COM port in
your case.
OK.
You have now configured HotSync to use the required port.
Using BluePC 84
Page 85

BluePC User Manual
Now, to synchronize the PDA:
1. Press the HotSync button on your PDA cradle. This button has two arrows pointing towards
each other.
2. If this the first time you are doing a HotSync, enter a user name in the New User dialog box and
OK.
click
3. The HotSync dialog box will appear, and will you show you the synchronization progress.
Wait for a message on your PDA indicating that the synchronization is complete. Then, you can
remove the PDA from the cradle.
Using BluePC 85
Page 86
BluePC User Manual
4.6 Wireless Conferencing scenario
With this scenario, you can exchange information with friends and colleagues, to collaborate on
projects, teach a class, and give presentations wirelessly.
4.6.1 Setup the Host Computer
The first step is to add a Serial Port service on the host computer. Please refer to the section Add
Serial Port Service on page 31 for more Information.
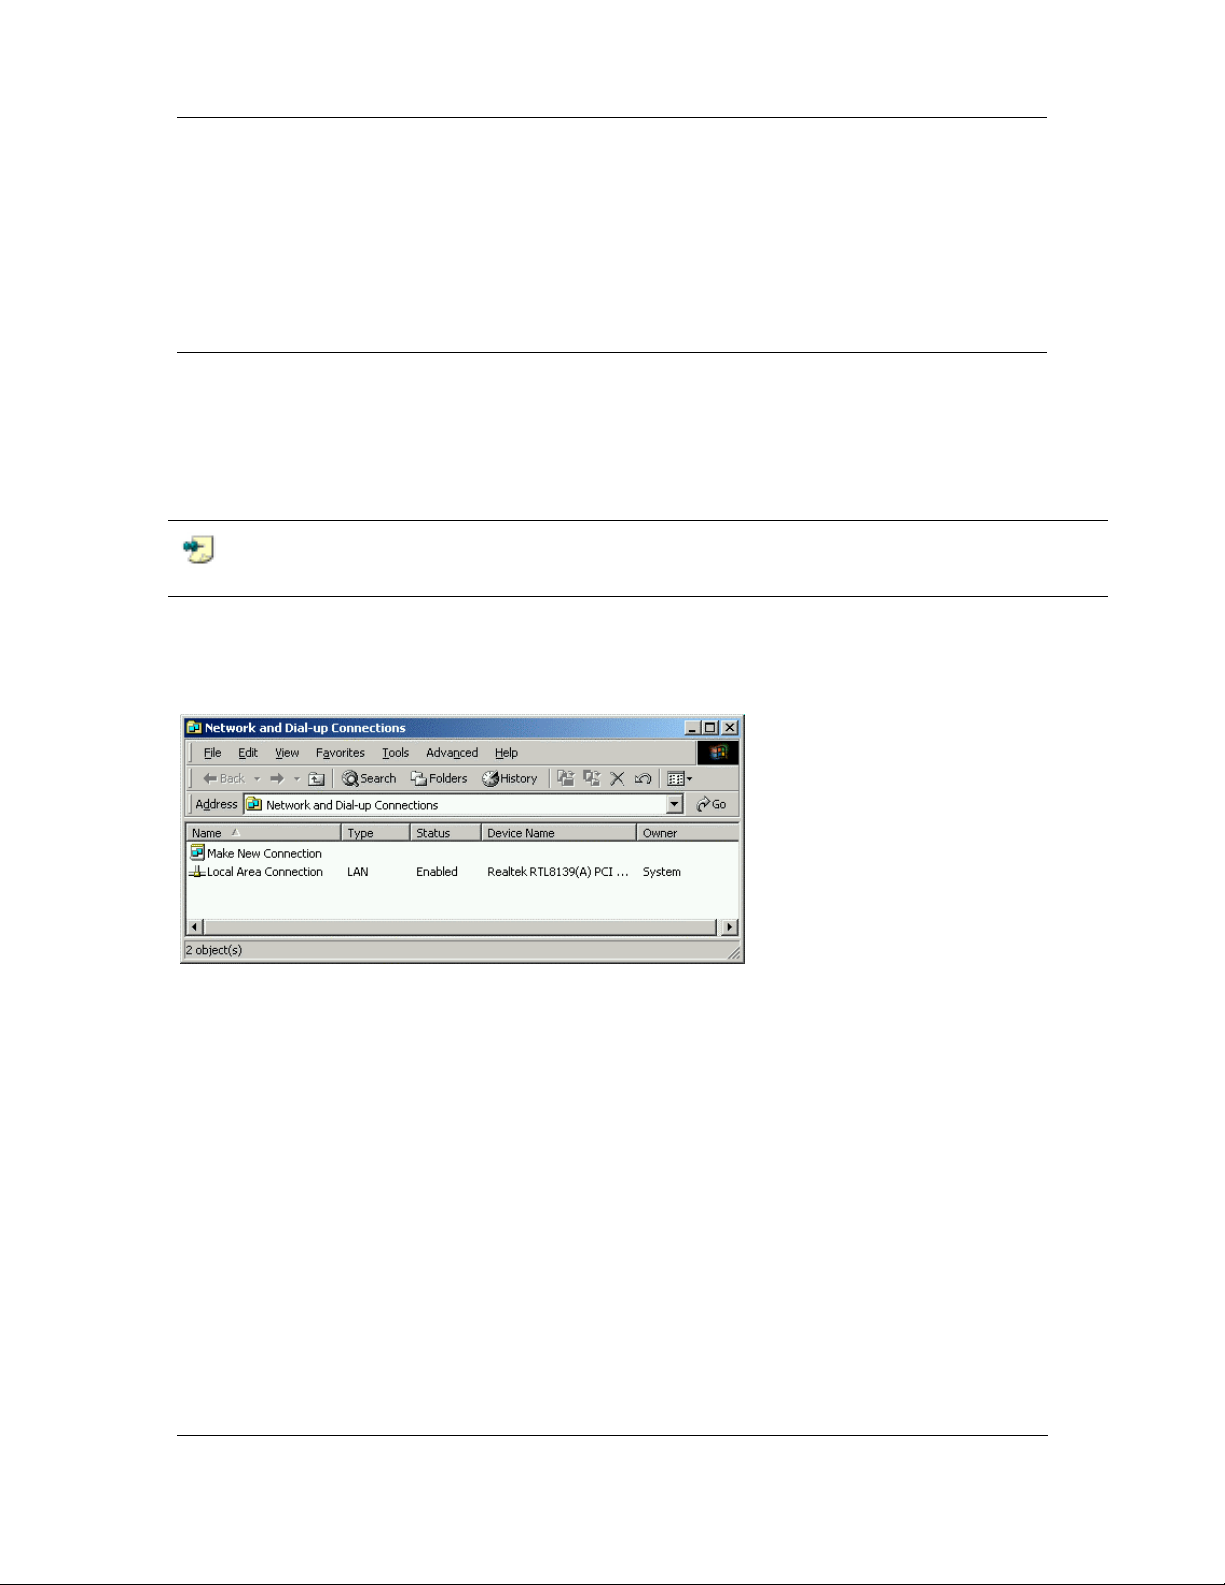
Next, you need to setup a Direct Connection. Let us say that the COM port assigned is COM 7. This
will be needed to setup Direct Connection.
Note: COM 7 is for illustration purposes only. You can be assigned any oth er COM port in
your case.
To set up a connection:
1. Click
Figure 115. Network and Dial-up Connections Window
Start and select the Programs > Accessories > Comm unication > Netw ork and D ial-
up Connections
option. The Network and Dial-up Connections screen is displayed.
Using BluePC 86
Page 87
BluePC User Manual
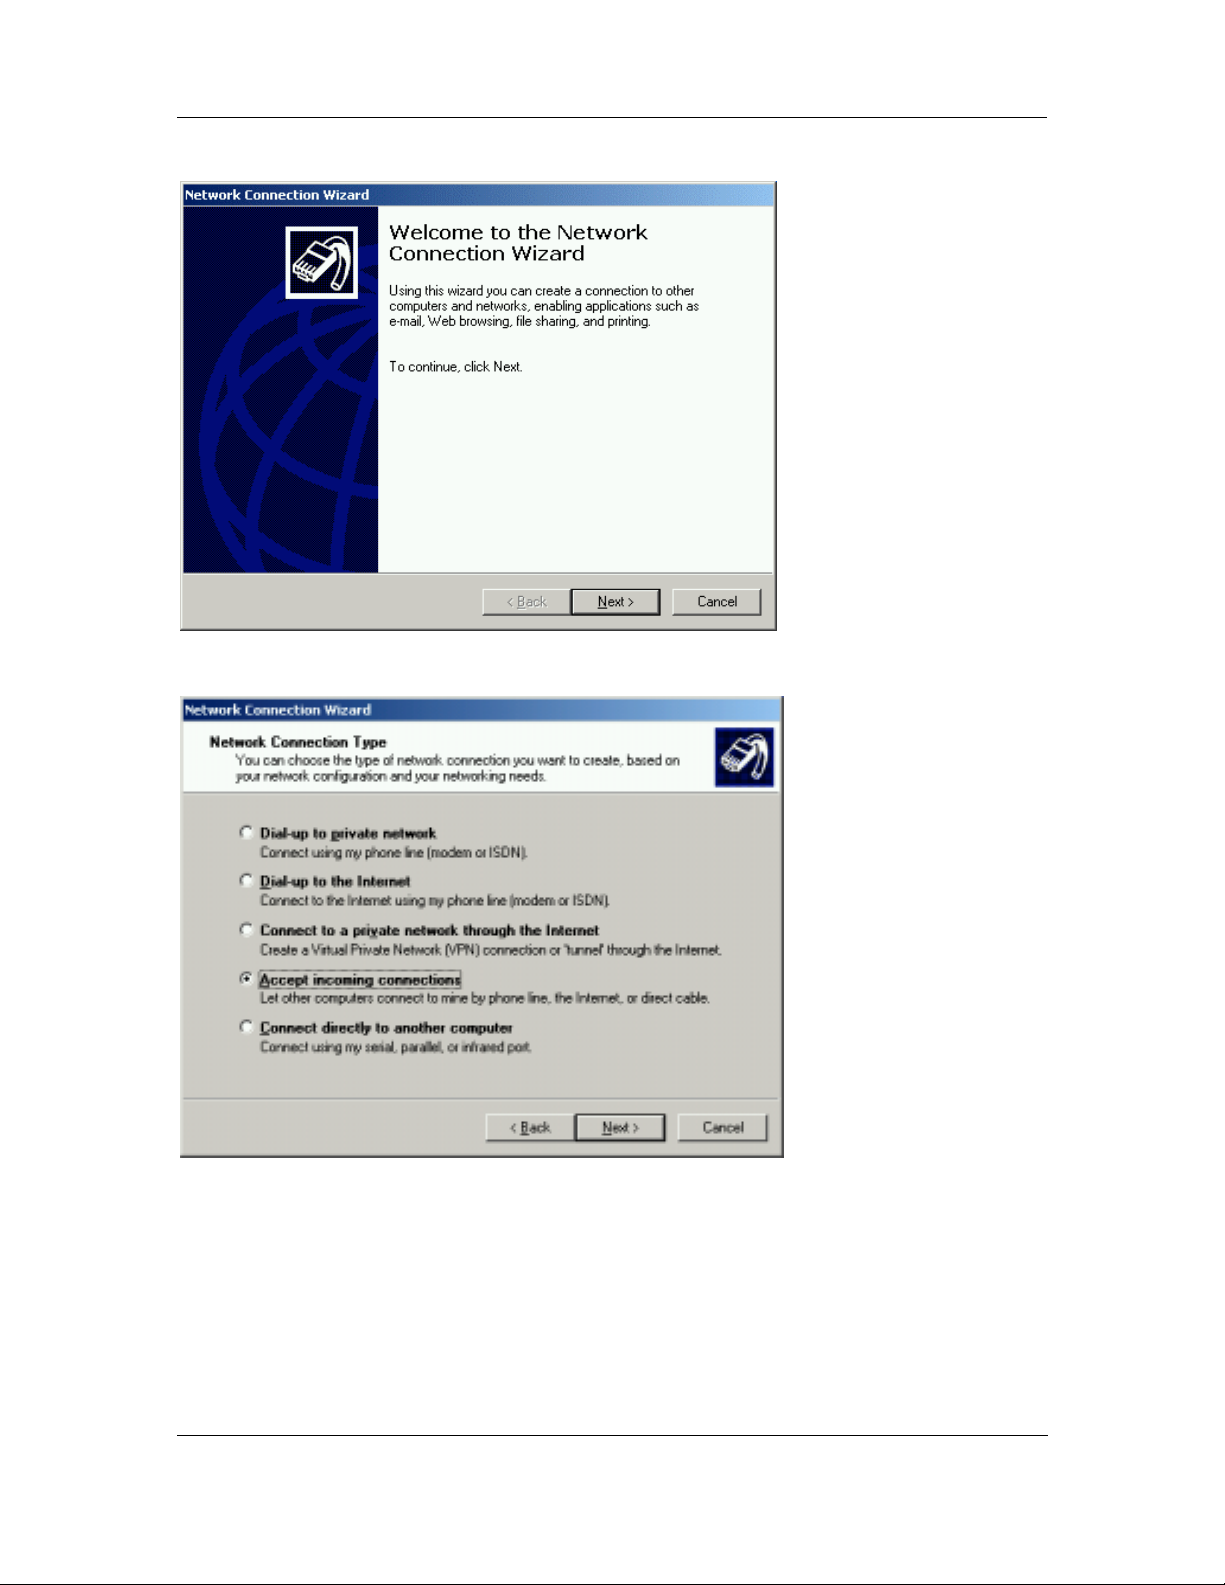
2. Double-click Make New Connection. The Network Connection Wizard displays.
Figure 116. Network Connection W indow
3. Click Next to proceed. The Network Connection Window is displayed.
Figure 117. Network Connection Type
Using BluePC 87
Page 88
BluePC User Manual
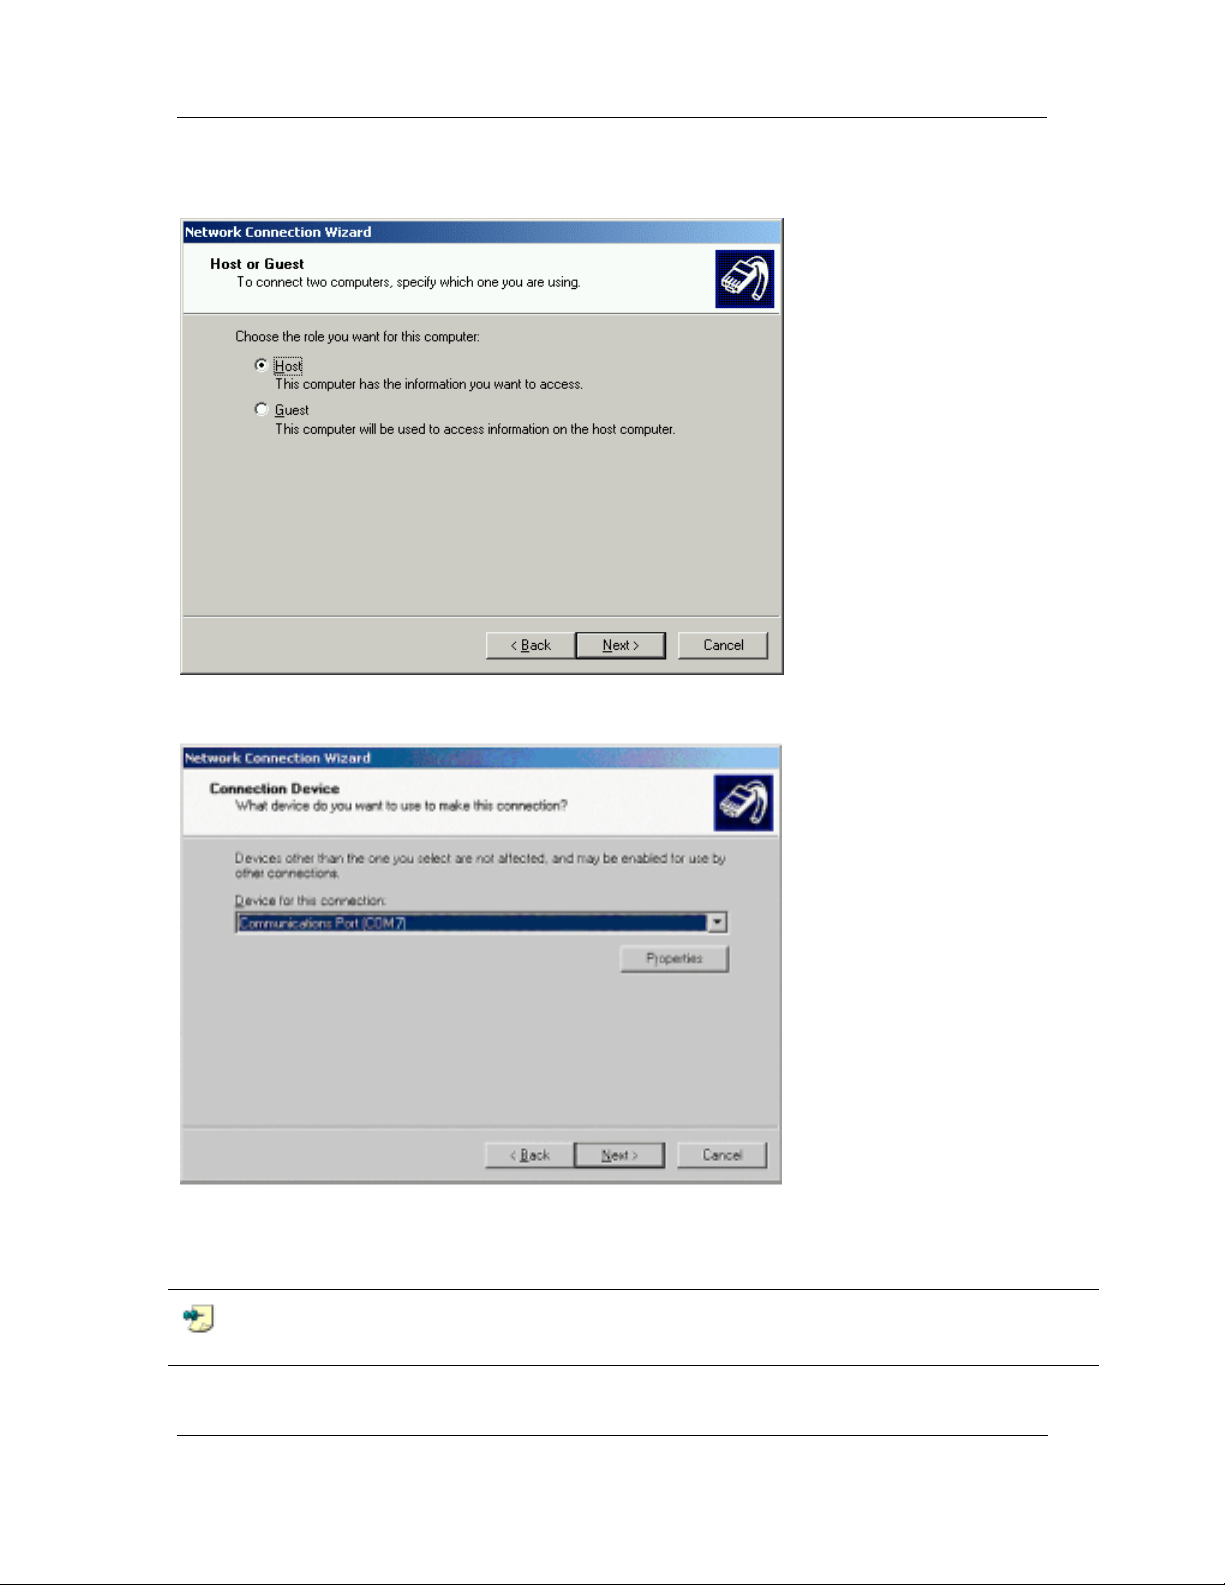
4. Select the Accept incoming connections option. Click Next. The Choose Role screen is
displayed.
Figure 118. Choose Role
5. Select the Host option. Click Next. The Connection Device screen displays.
Figure 119. Connection Window
6. Select the same communication service (COM 7). Click Next. The Allowed Users screen is
displayed.
Note: COM 7 is for illustration purposes only. You can be as signed any other CO M port in
your case.
Using BluePC 88
Page 89
BluePC User Manual
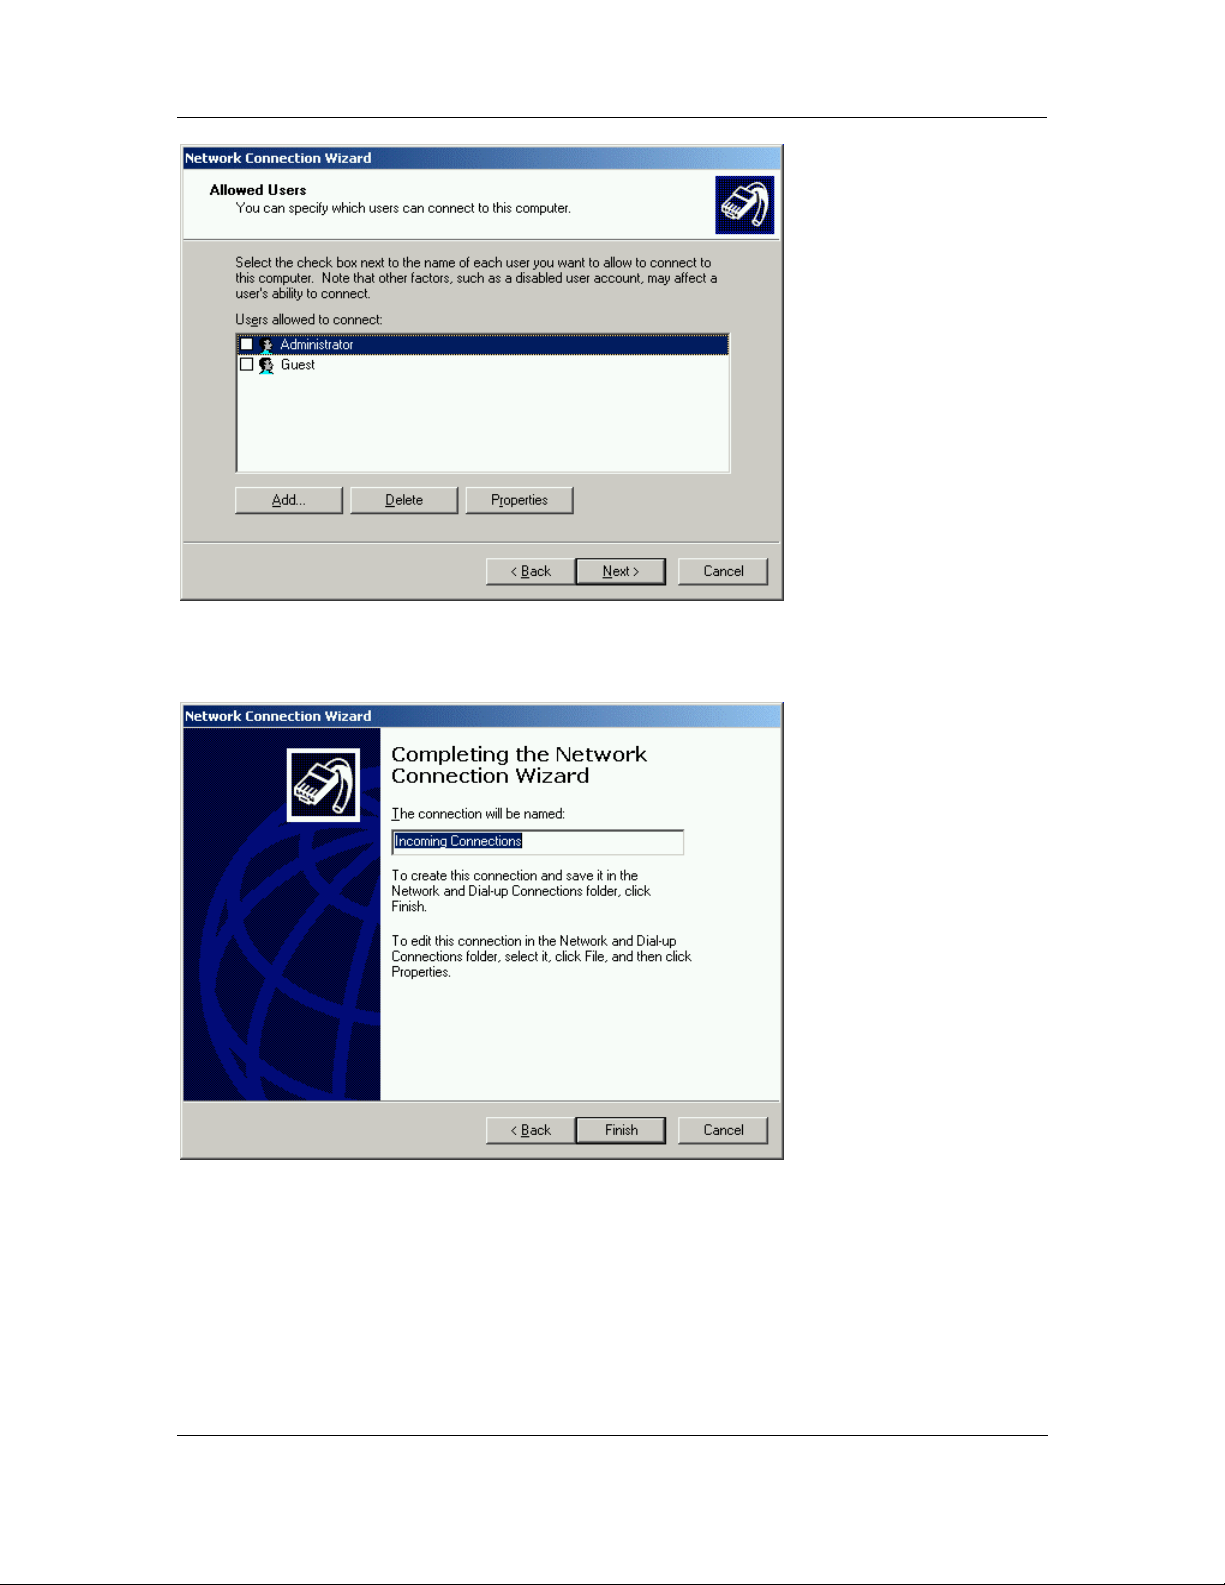
Figure 120. Allowed users
7. Click the checkbox to select the users who are authorized to use the direct cable connection.
Next. The Final screen is displayed.
Click
Figure 121. Incoming Connection Name
8. Enter the required name and click Finish to complete the process.
A new network connection link is created in the Network and Dial-up Connection explorer with
the name Incoming Connection. The connection type and connection status is also displayed adjacent to
it.
Using BluePC 89
Page 90
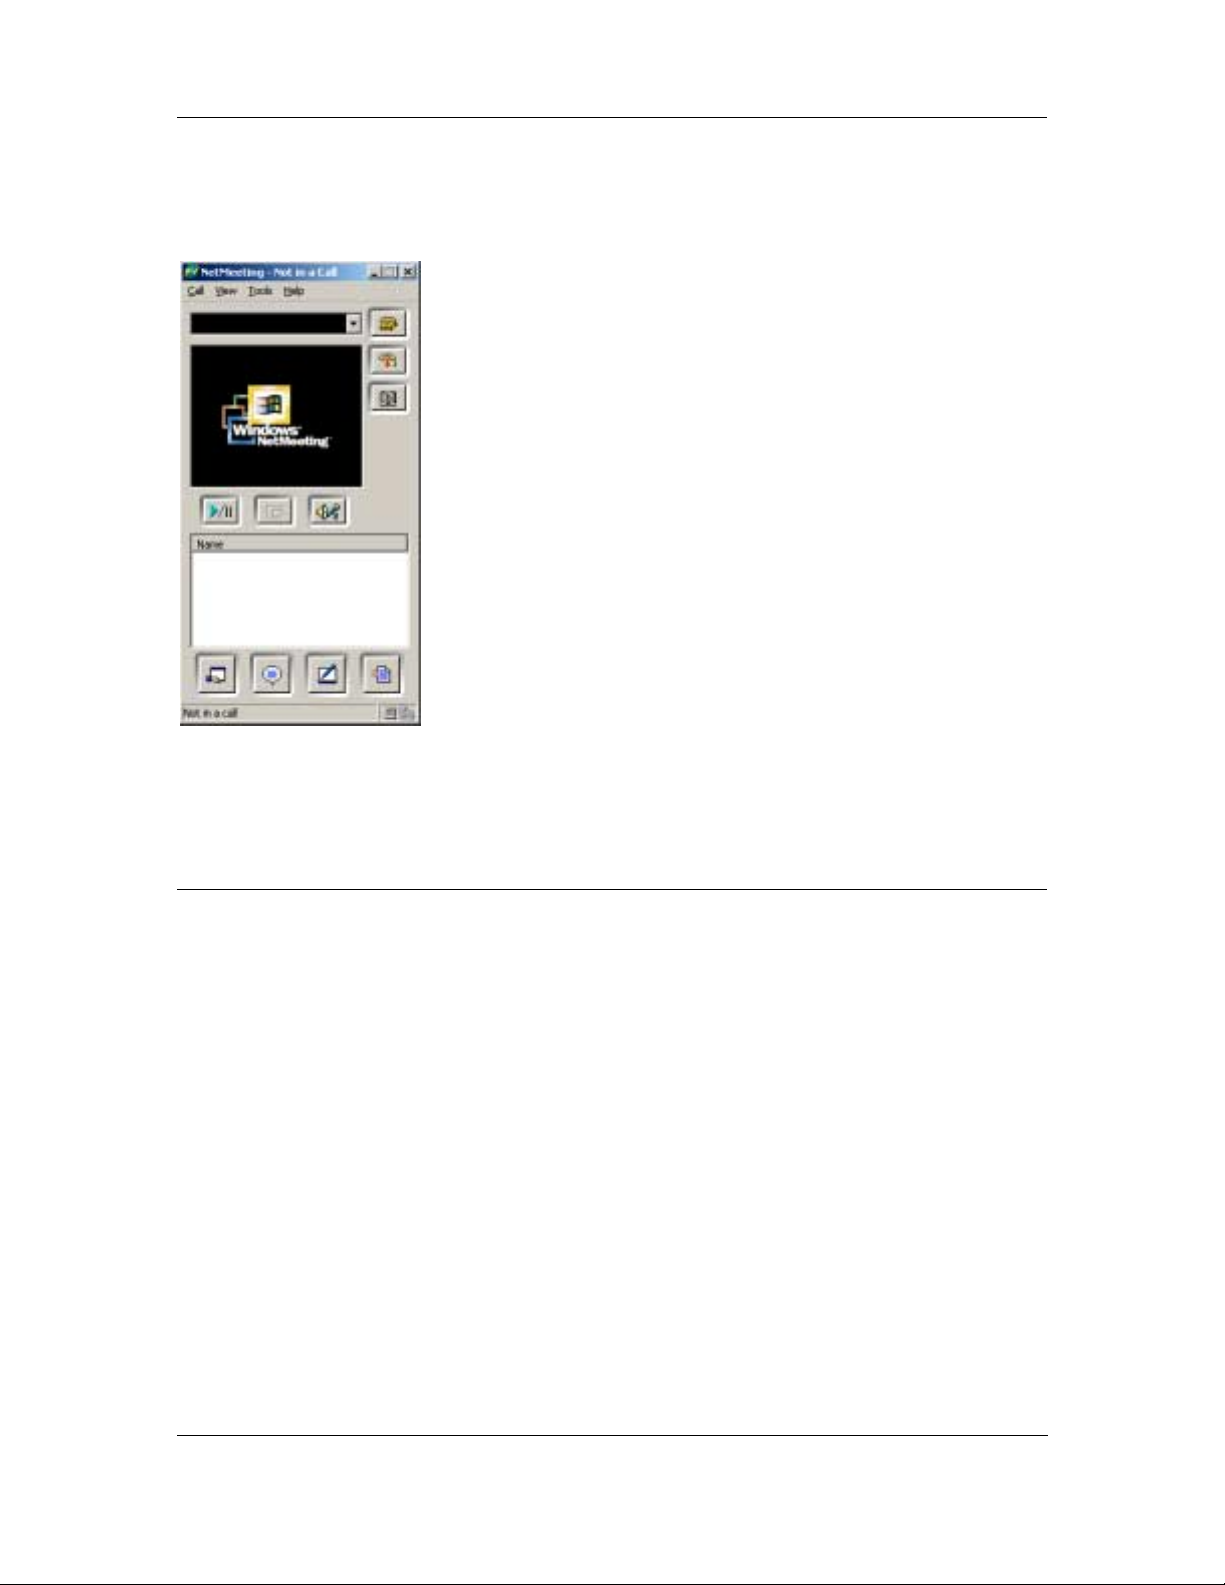
Next, you need to start a NetMeeting session on the host computer.
BluePC User Manual
1. Click
Figure 122. NetMeeting
Do not close the NetMeeting window until you wish to allow other Bluetooth devices to connect
Start > Programs > Accessories > Communication > NetMeeting. A NetMeeting
window appears as shown by Figure 122.
over NetMeeting.
4.6.2 Set up the Guest Computer
To setup the guest computer, which is your computer, you first need to access the Serial Port service
offered by the host computer.
To locate the service:
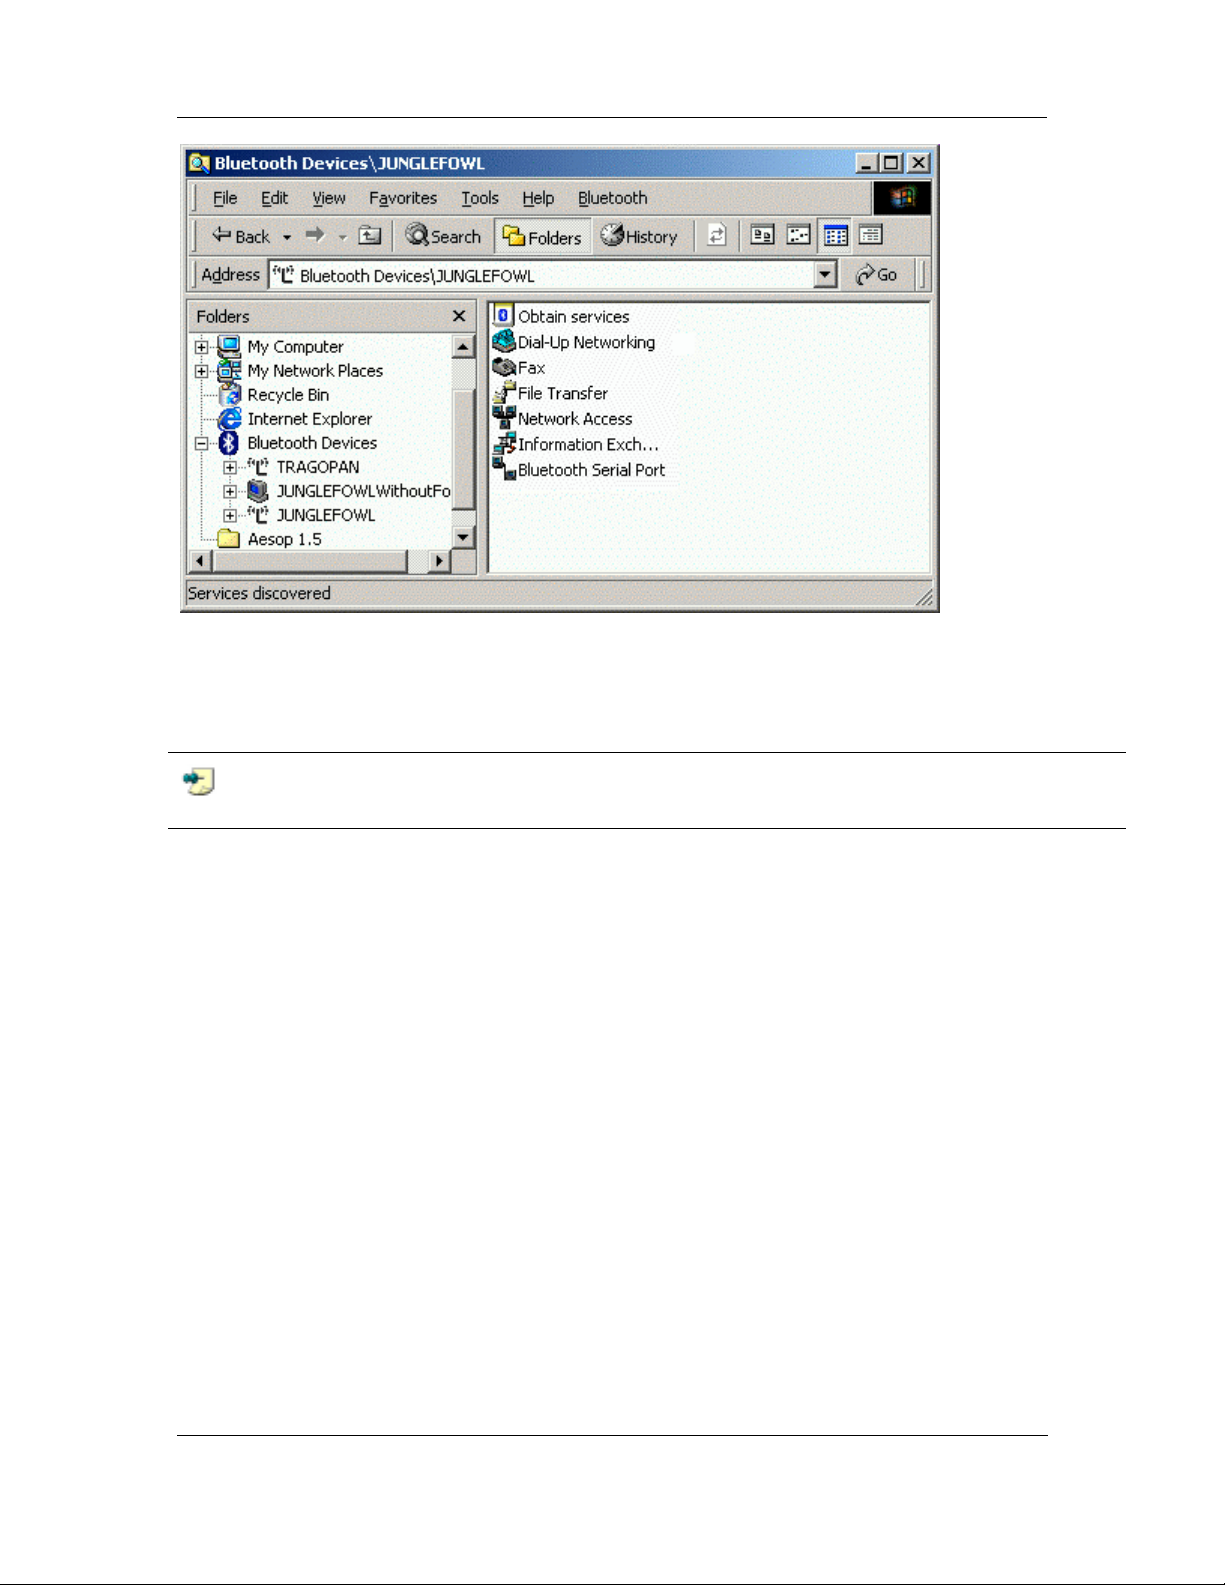
1. The Bluetooth-enabled Windows Explorer displays all the Bluetooth devices within the vicinity
along with a list of services provided by them.
Using BluePC 90
Page 91
BluePC User Manual
Figure 123. Bluetooth-enabled Windows Explorer
2. Select the host computer that is offering the Serial Port Service from the list of displayed devices.
3. Double-click the Serial Port Service to connect to the service. Let us say that the COM port
through which you are connected is COM 7.
Note: COM 7 is for illustration pu rposes only. You can be a ssigned any other COM port in
your case.
Next, you need to setup a direct connection with the host computer, which is offering printing
resources.
Using BluePC 91
Page 92
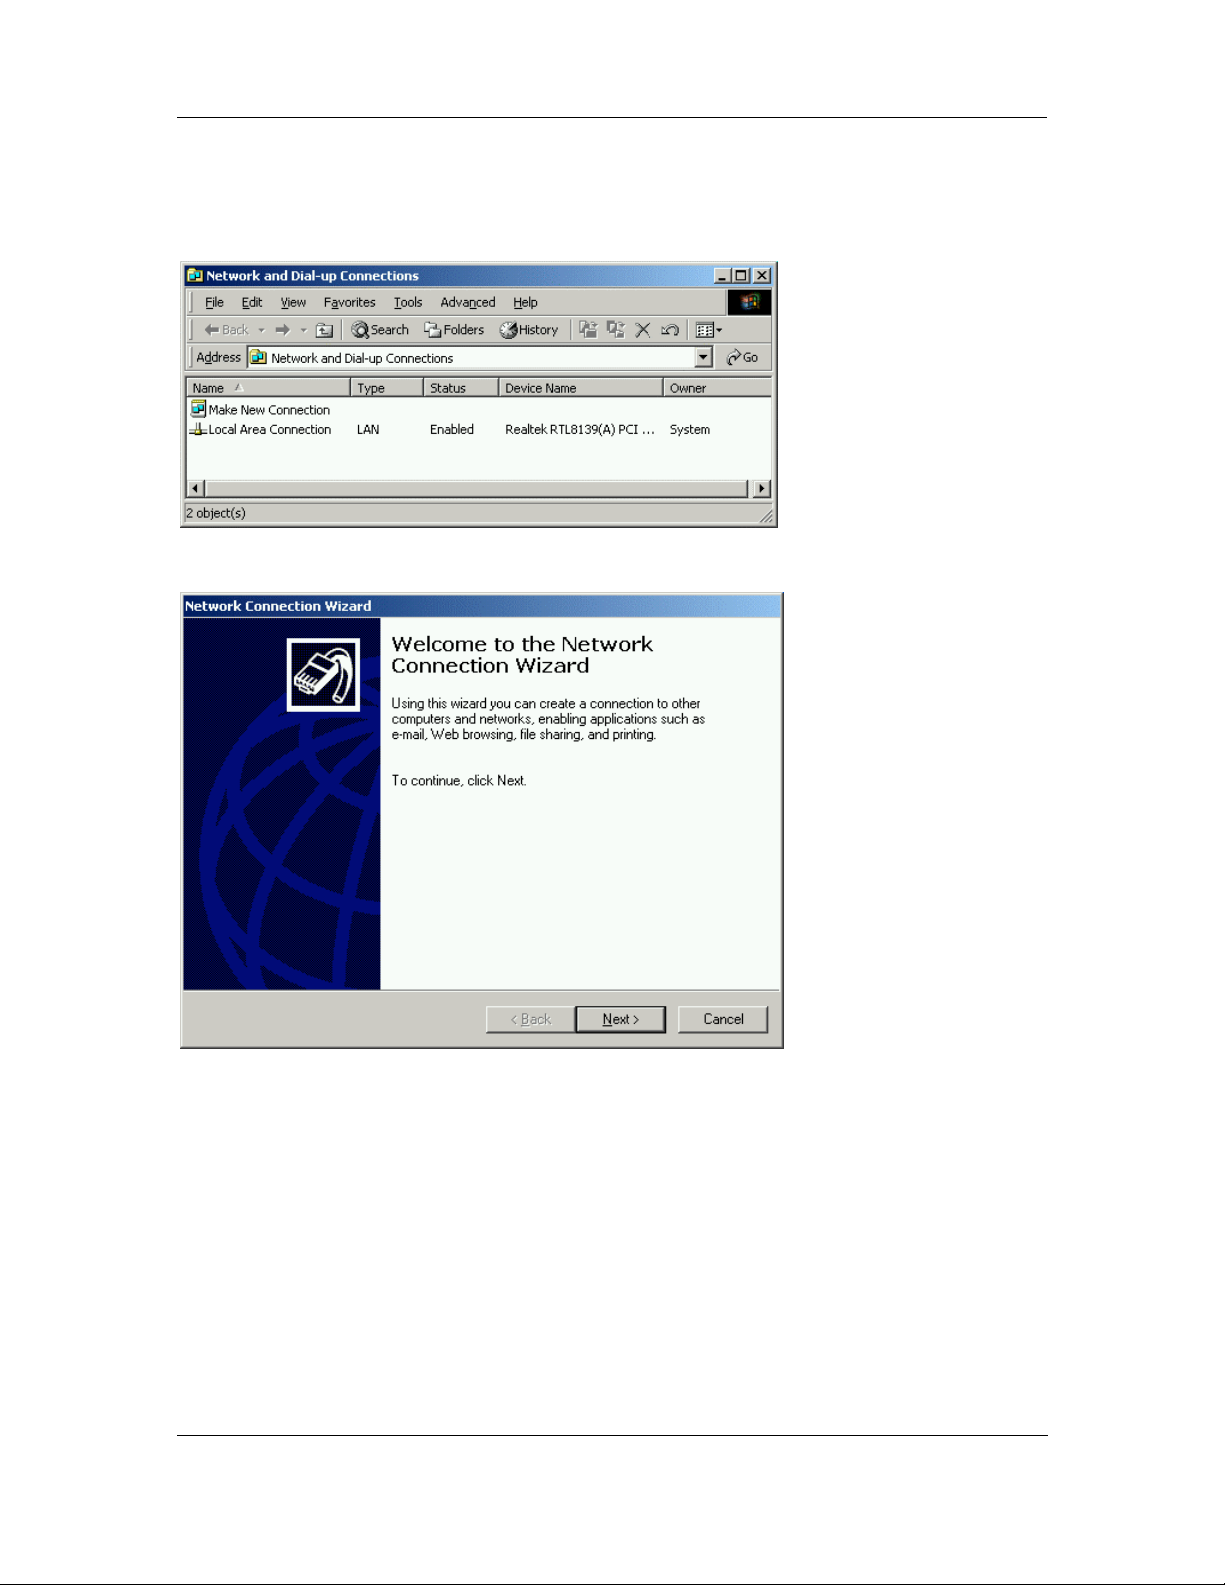
To setup a direct connection with the host computer:
BluePC User Manual
1. Click
Figure 124. Network and Dial-up Connections
Start and select the Programs > Accessories > Comm unication > Netw ork and D ial-
up Connections
option. The Network and Dial-up Connections screen is displayed.
2. Double-click Make New Connection. The Network Connection Wizard is displayed.
Figure 125. Network Connection Window
Using BluePC 92
Page 93
BluePC User Manual
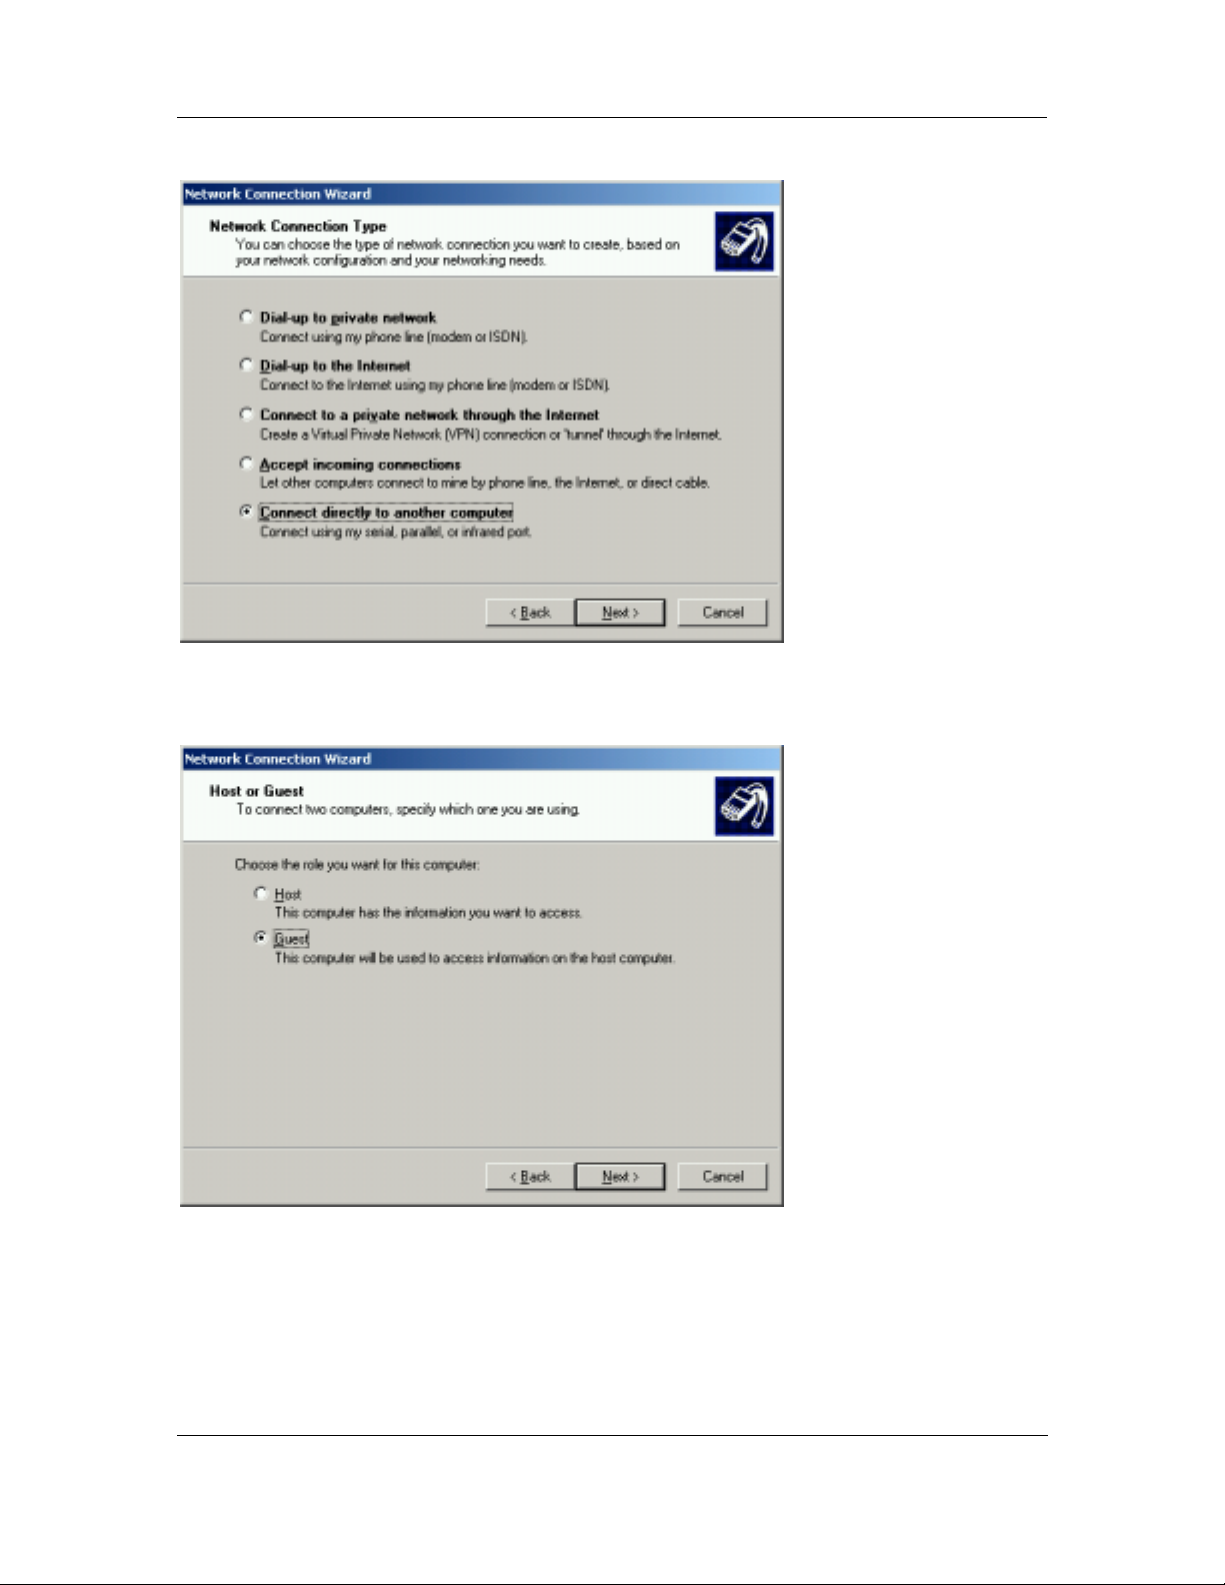
3. Click Next to proceed. The Network Connection screen is displayed.
Figure 126. Network Connection Type
4. Select the Connect directly to another computer option. The Choose Role screen is
displayed.
Figure 127. Choose Role
Using BluePC 93
Page 94
BluePC User Manual
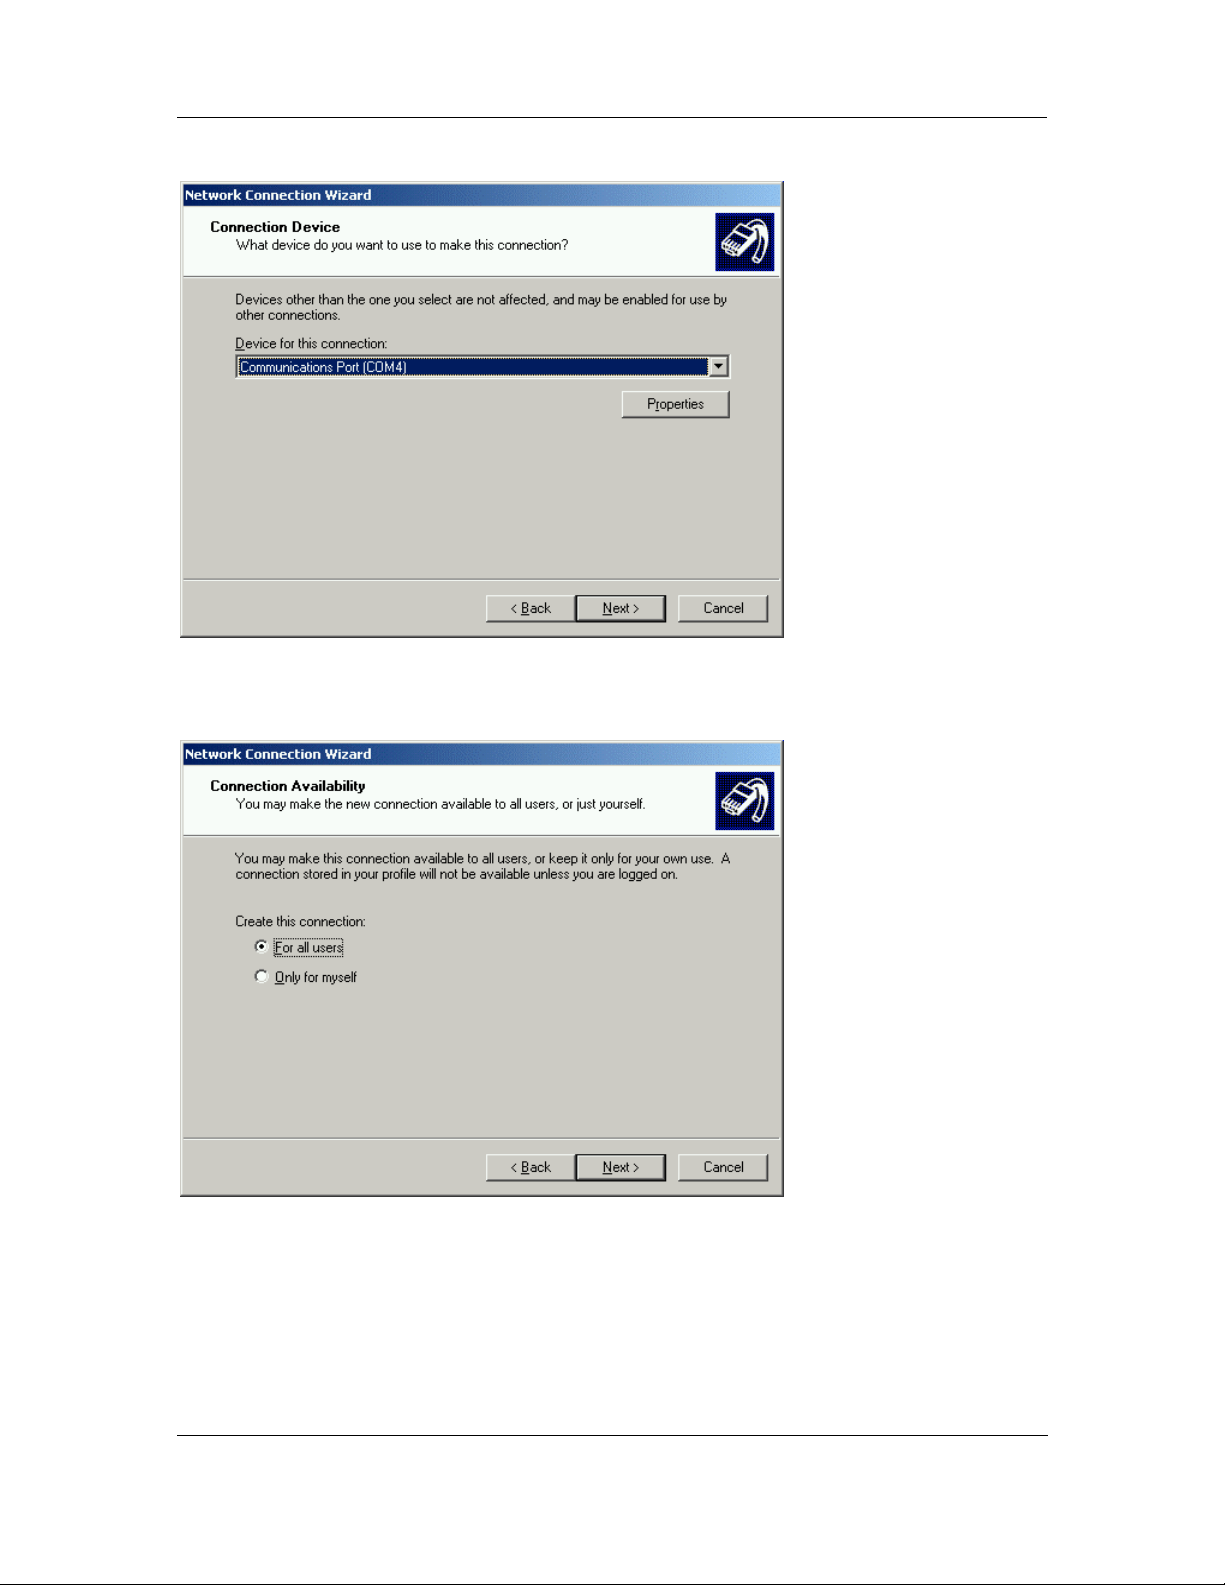
5. Select the Guest option. Click Next. The Connection Device screen is displayed.
Figure 128. Connection Window
6. Select the same communication port to which you have subscribed this service (COM 4). Click
Next. The Connection Availability screen is displayed.
Figure 129. Connection Availability
Using BluePC 94
Page 95
BluePC User Manual
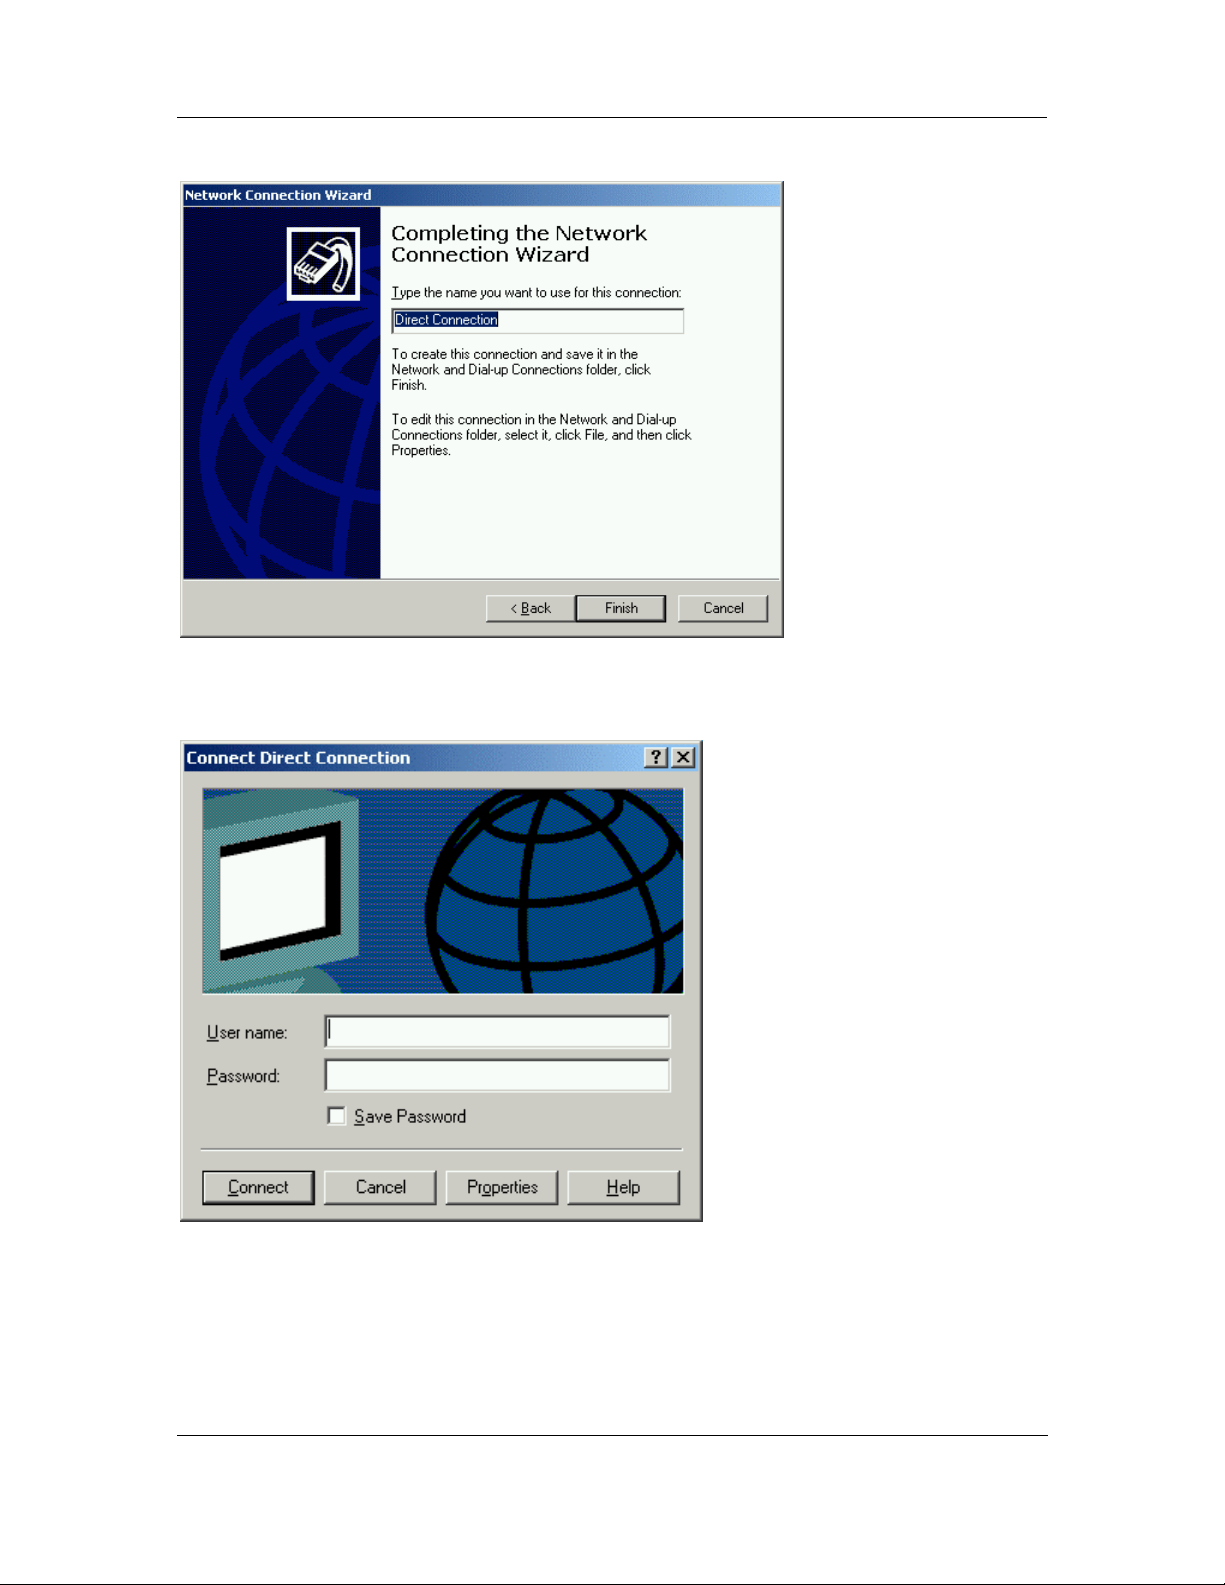
7. Select the For All Users option. Click Next. The Final screen is displayed.
Figure 130. Direct Connection name
8. Enter a name for the connection, and click Finish. The Connect Direct Connection screen is
displayed.
Figure 131. Connection Window
Enter the user name and password as specified by the host computer and click Connect. In case
“Guests” are allowed to connect, user name and password will be blank.
Using BluePC 95
Page 96
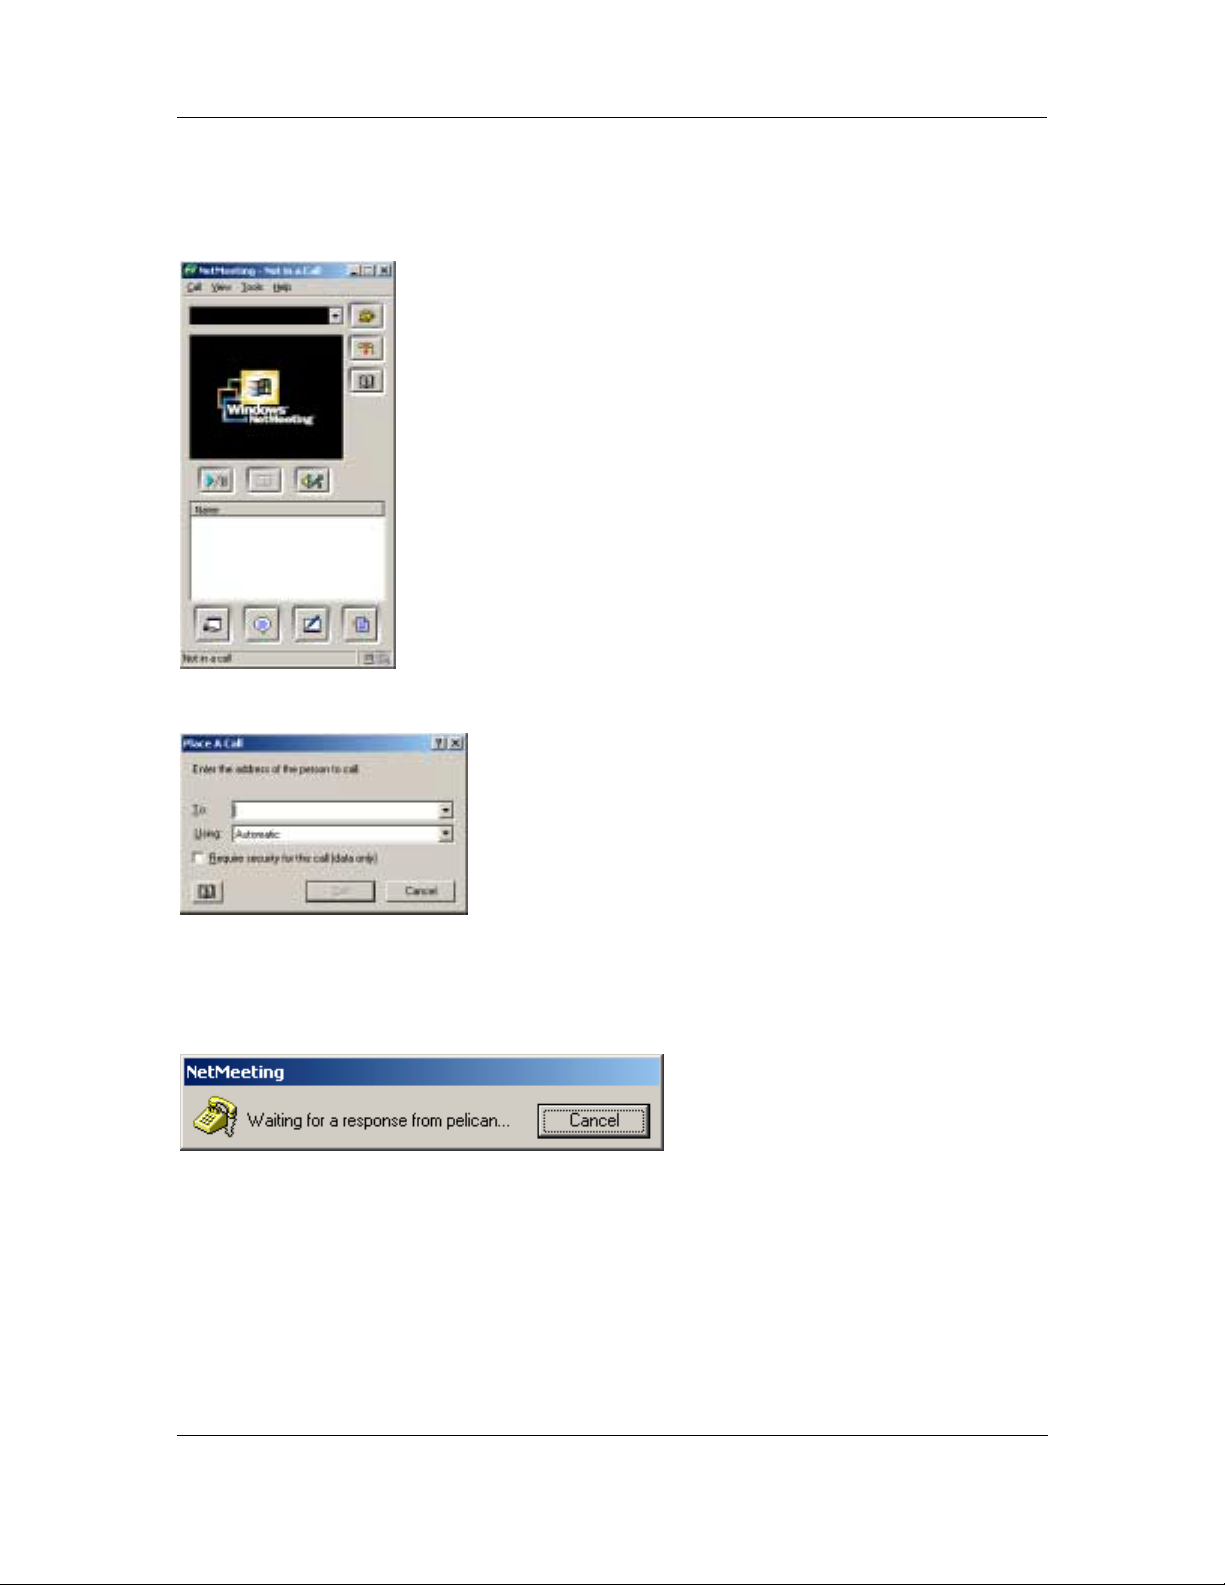
Next you need to start a NetMeeting session on the guest computer.
BluePC User Manual
1. Click
Start > Programs > Accessories > Communication > NetMeeting. A NetMeeting
window appears as shown by Figure 132.
Figure 132. NetMeeting
2. Click Call > New Call. The following dialog box appears.
Figure 133. Place a Call
3. Enter the address of the person to call.
4. Select the relevant address.
5. Click
Figure 134. NetMeeting Status
Call button. The following message box appears.
Using BluePC 96
Page 97
BluePC User Manual
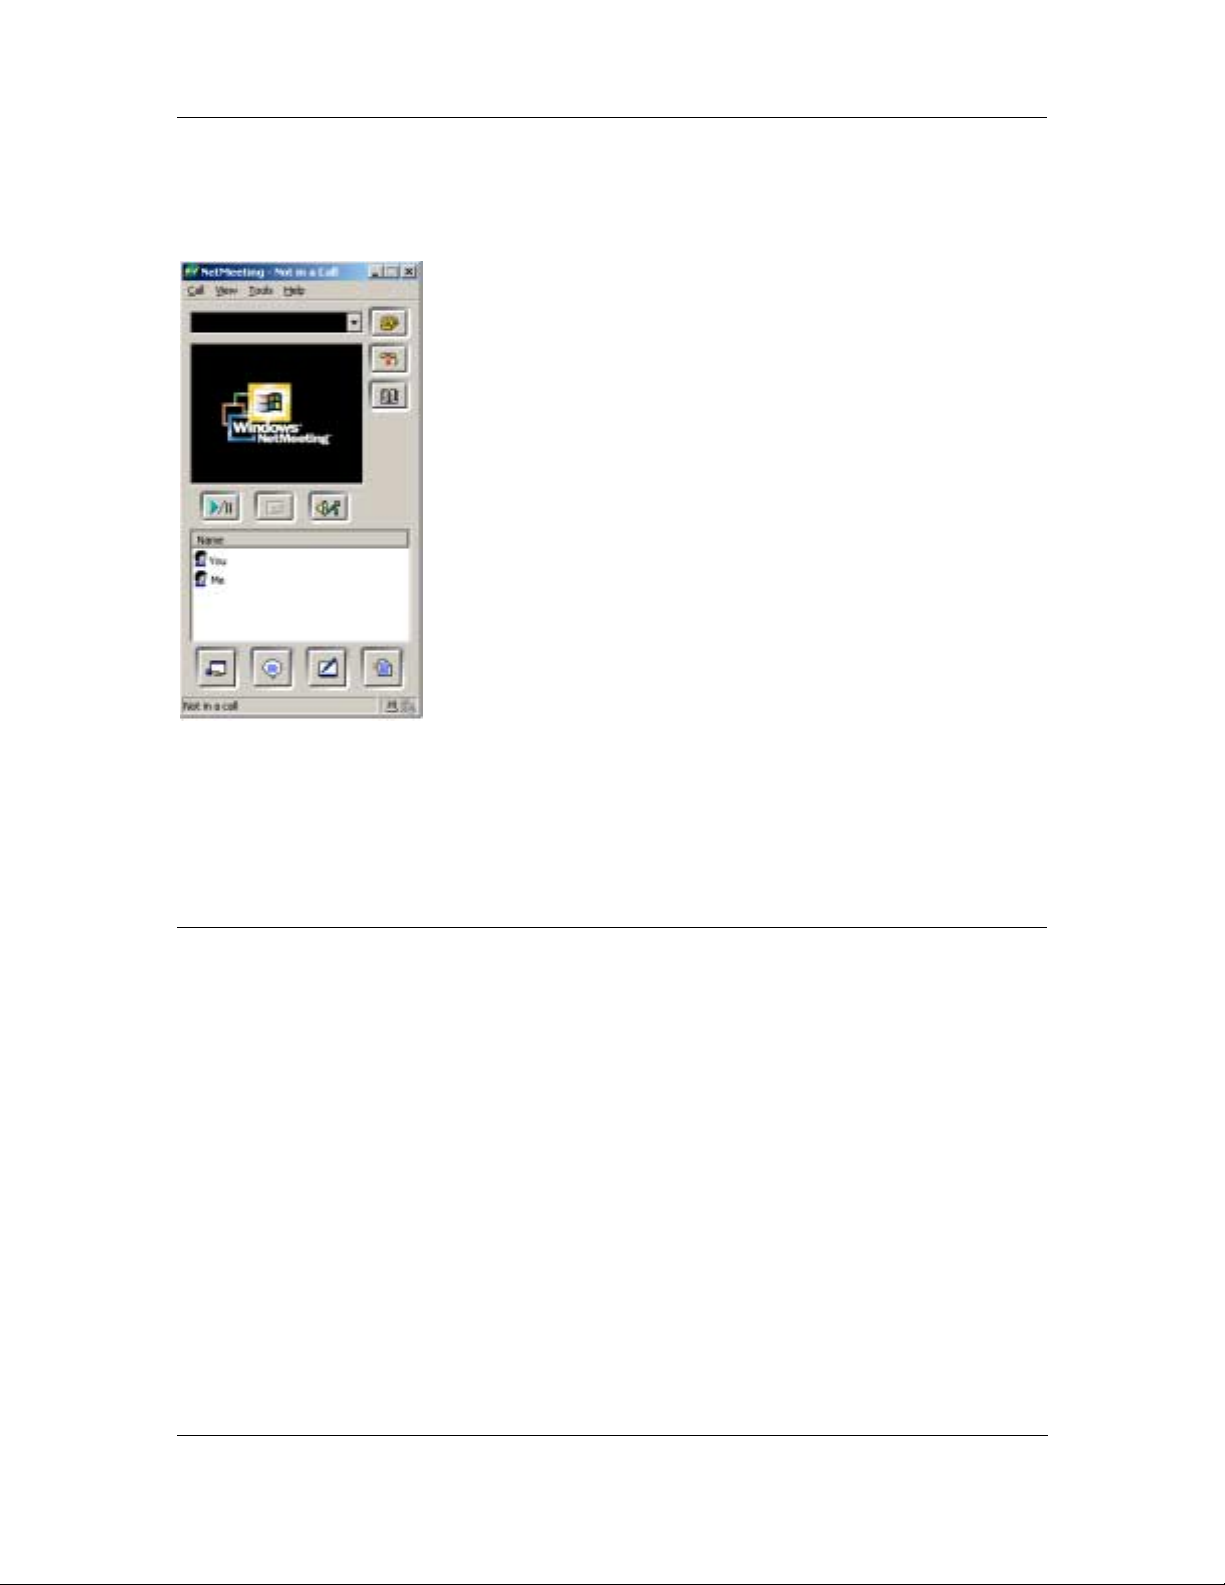
Once the host computer (the computer that you have called) accepts the call, the message box
disappears. The NetMeeting dialog box displays the user name of the host computer in the Name
field as shown by Figure 135.
Figure 135. NetMeeting Ready
Now you can correspond on any of the NetMeeting tools like; chat, whiteboard, and file transfer.
The following section describes how to chat and use whiteboard in NetMeeting. For the complete
information on how to use NetMeeting, refer to NetMeeting Help.
4.6.3 Use an already setup Wirele ss Conference Scenario
Every time you need to use the NetMeeting service, you need to setup both host and guest as given
in the previous sections.
To chat on NetMeeting, do the following:
1. Click on the relevant person name you need to chat in the
Name field.
Using BluePC 97
Page 98
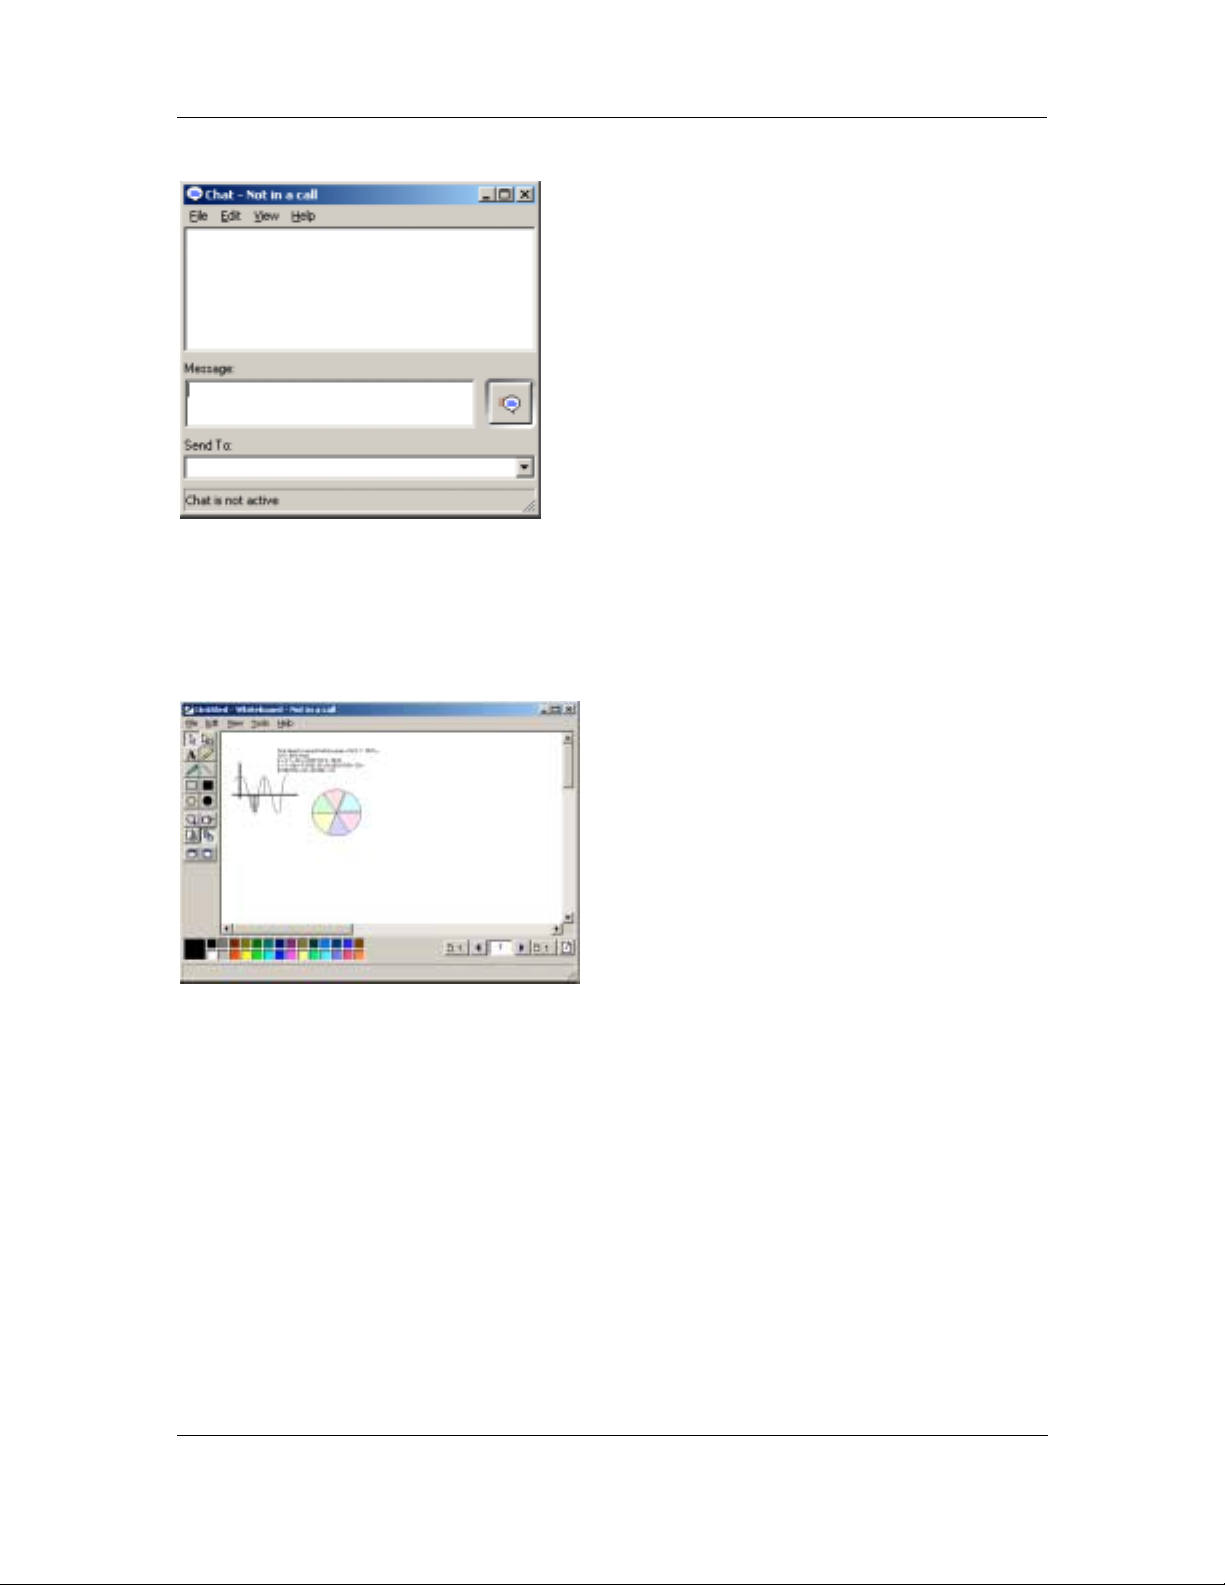
2. Click Tools > Chat. The following dialog box appears.
Figure 136. Chat Session
3. Enter your message in the Message field. Click File > Send Message.
To use Whiteboard, do the following:
BluePC User Manual
1. Click on the relevant person name you need to collaborate in the
2. Click
Figure 137. Whiteboard Session
Tools > Whiteboard. The Whiteboard appears as shown by Figure 137.
Name field.
You can now collaborate in real time with others via graphic information.
Using BluePC 98
Page 99
BluePC User Manual
4.7 Send a Fax
You can send a Fax to a Bluetooth-enabled Fax machine, or to Bluetooth Mobile Phone. To send a
Fax you first need to locate a device offering the Fax service. To do so:
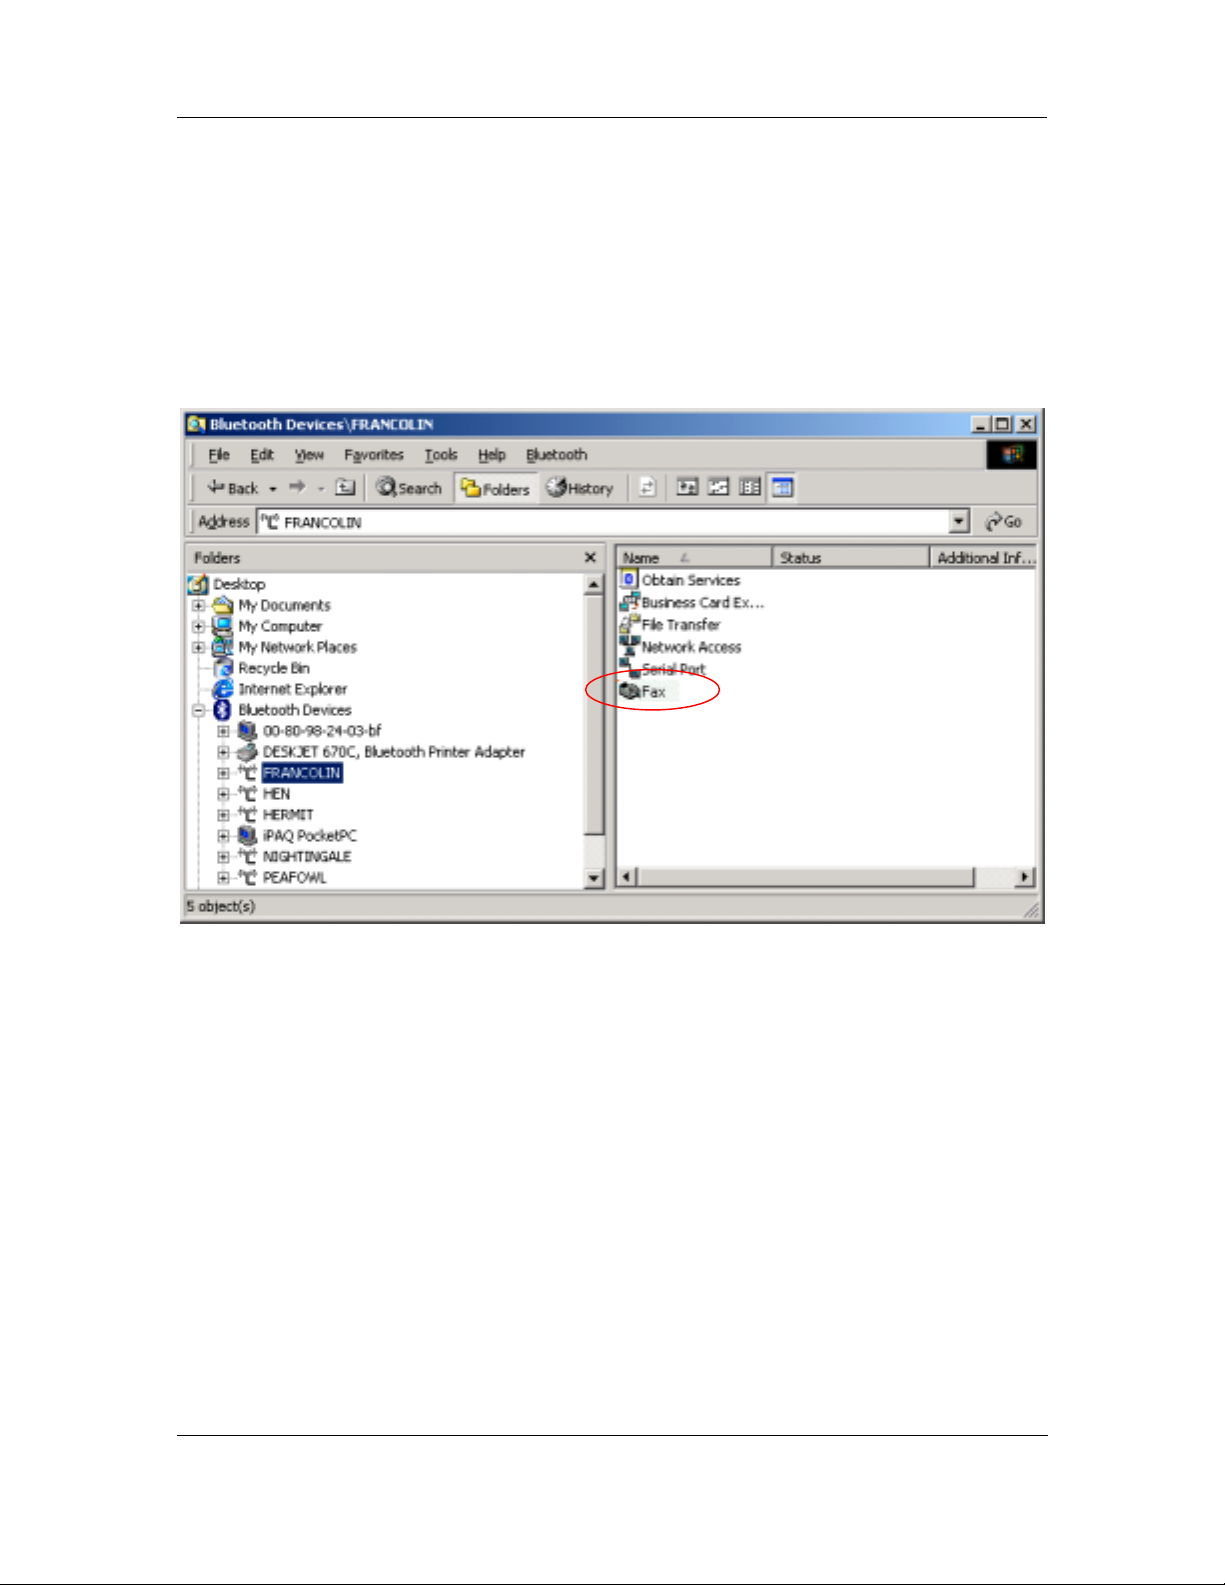
1. In the Bluetooth-enabled Windows explorer double-click the Bluetooth Devices icon. All the
devices in the vicinity are listed.
2. Double-click
Figure 138. Explorer Services
Obtain Services. The services offered by the device are listed.
Using BluePC 99
Page 100
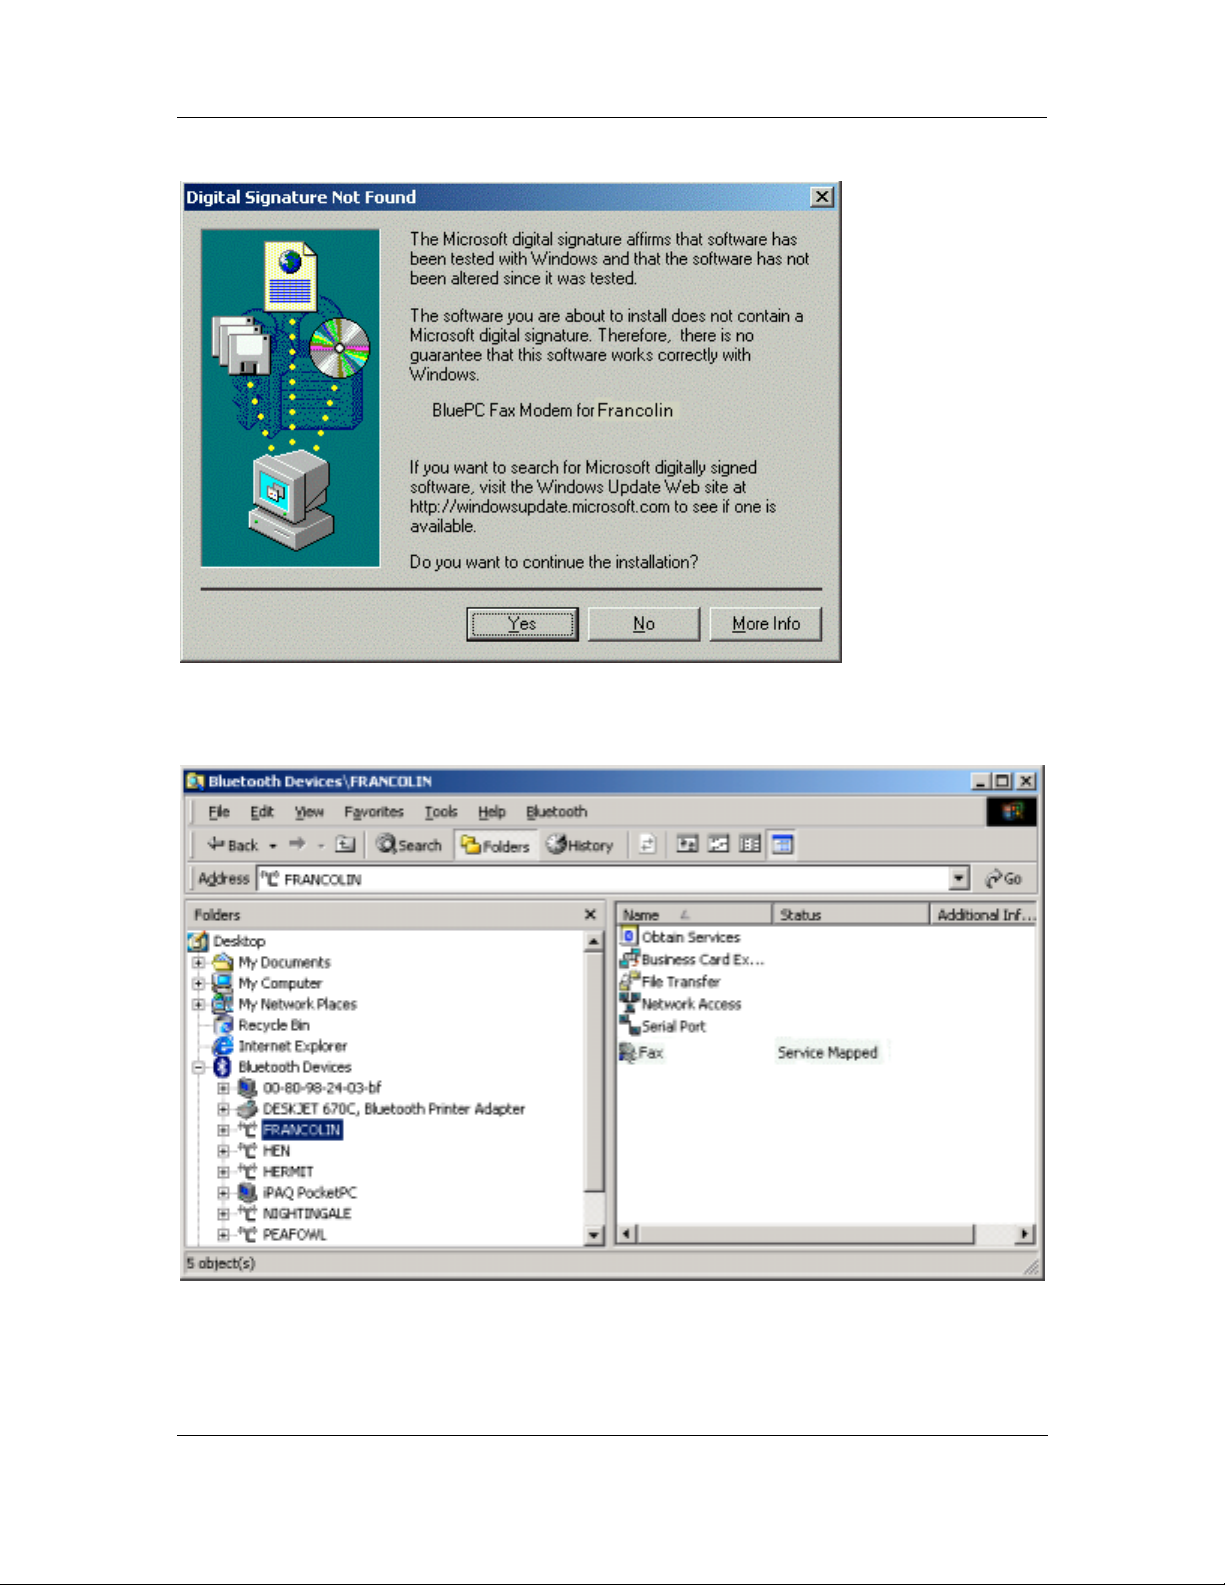
3. Double-click the Fax service icon. The following screen is displayed.
BluePC User Manual
Figure 139. Digital Signature not found
4. Click Yes. BluePC connects to the service and the status Service Mapped is displayed in the
Service field.
Figure 140. Service mapped
5. To connect to the service, right-click the Fax service icon and select the option Connect.
Using BluePC 100
 Loading...