

Page 1

Sehr geehrte Kundin, sehr geehrter Kunde,
bevor Sie die Kopfstation in Betrieb nehmen, müssen Sie sie vorschriftsmäßig erden. Verwenden Sie dazu die an der Unterseite
angebrachte Erdungsschraube (siehe Skizze).
WICHTIGER HINWEIS !
Page 2

Dear Customer!
before you put the headend into operation, you must ground it
correctly. Use the grounding screw on the bottom (see diagram).
IMPORTANT NOTICE !
Page 3

Evolution II
Kopfstation – Headend
Bedienungsanleitung – User Manual
Version: 30.03.2012
Page 4

Inhaltsverzeichnis
Inhaltsverzeichnis
1 Allgemeines ............................................................................................................................................ 4
1.1 Anwendung dieser Anleitung ...................................................................................................................................4
1.2 Zeichen, Symbole, Darstellungskonventionen ...................................................................................................4
1.3 Lieferumfang ...................................................................................................................................................................4
1.4 Produktbeschreibung ..................................................................................................................................................4
1.4.1 Bedienfeld ........................................................................................................................................................................5
1.4.2 Anschlüsse .......................................................................................................................................................................5
1.5 Kanalstreifen ....................................................................................................................................................................6
1.6 Garantie .............................................................................................................................................................................7
2 Sicherheitshinweise ............................................................................................................................... 8
2.1 Bestimmungsgemäße Verwendung.......................................................................................................................8
2.2 Gefahren bei bestimmungsgemäßem Gebrauch ..............................................................................................8
2.3 Montageort ......................................................................................................................................................................9
2.4 Umgang mit Batterien .................................................................................................................................................9
2.5 Hinweise zur Produkthaftung ...................................................................................................................................9
3 Inbetriebnahme .................................................................................................................................... 10
3.1 Wandbefestigung ....................................................................................................................................................... 10
3.2 Anschlussschema ....................................................................................................................................................... 10
3.3 Kopfstation erden ....................................................................................................................................................... 11
3.4 Anschluss an die Satellitenantenne ..................................................................................................................... 11
3.5 Anschluss an das Hausverteilnetz ........................................................................................................................ 11
3.6 Anschluss des Kontrollmonitors (optional) ....................................................................................................... 11
3.7 Anschluss eines Messgeräts (optional) ............................................................................................................... 11
3.8 Zusätzlicher Eingang ................................................................................................................................................. 11
3.9 Batterien der Fernbedienung einlegen .............................................................................................................. 12
3.10 Spannungsversorgung herstellen ........................................................................................................................ 12
3.11 Erstinbetriebnahme ................................................................................................................................................... 12
3.12 Betrieb mehrerer Evolution II ................................................................................................................................. 13
4 Kanalbelegung und Programmierung ................................................................................................ 14
4.1 Standard-Kanalbelegung ........................................................................................................................................ 14
2 smart Evolution II
4.2 Kanalstreifen (um)-programmieren ..................................................................................................................... 14
4.3 Fernbedienung ............................................................................................................................................................ 15
4.4 Betriebsart wählen ..................................................................................................................................................... 15
4.5 Menü aufrufen/beenden ......................................................................................................................................... 16
4.6 Navigation im Menü ................................................................
4.7 Programmwahl ............................................................................................................................................................ 16
4.7.1 Direkte Programmwahl ............................................................................................................................................ 16
4.7.2 Programmwahl über Auswahlfenster ................................................................................................................. 16
.................................................................................. 16
Page 5

Inhaltsverzeichnis
4.7.3 Programmwahl über Suchfunktion ..................................................................................................................... 16
4.8 UHF-Kanal wählen ...................................................................................................................................................... 17
4.9 Menü Installation ........................................................................................................................................................ 17
4.9.1 Antenneneinstellung ................................................................................................................................................ 17
4.9.2 Manueller Suchlauf .................................................................................................................................................... 17
4.9.3 Satelliten bearbeiten ................................................................................................................................................. 17
4.9.4 Transponder bearbeiten .......................................................................................................................................... 17
4.9.5 Werkseinstellung ........................................................................................................................................................ 17
4.9.6 RAPS .............................................................................................................................................................................. 17
4.10 Menü Systemeinstellungen .................................................................................................................................... 18
4.10.1 Systemmenü ................................................................................................................................................................. 18
4.10.2 Installationsassistent ................................................................................................................................................. 18
4.10.3 System Info ................................................................................................................................................................... 18
5 Technische Daten ................................................................................................................................. 19
smart electronic GmbH
Industriestraße 29
78112 St. Georgen
Germany
Service-Hotline: +49 (0) 7724 94783-54
Telefax: +49 (0) 7724 94783-33
E-Mail: service@smart-electronic.de
Internet: www.smart-electronic.de
© smart electronic GmbH 2012
Alle Rechte, technische Änderungen, Irrtümer sowie Druckfehler vorbehalten. Nachdruck, Vervielfältigung oder Übersetzung, auch auszugsweise, ist ohne schriftliche Genehmigung von smart nicht gestattet.
smart Evolution II 3
Page 6
Allgemeines
Darstellung
Bedeutung
Sie werden zu einer Handlung aufgefordert.
1.
Auflistung
kursiv
Verschiedene Möglichkeiten eines einstellbaren Wertes, sowie Abbildungsbeschriftun-
fett
Menüfenster und Menüpunkte (hinter denen sich oft weitere Menüpunkte oder direkt
1 Allgemeines
1.1 Anwendung dieser Anleitung
• Diese Anleitung gilt für die smart Kopfstation
Evolution II.
• Lesen Sie diese Bedienungsanleitung vollstän-
dig, bevor Sie das Gerät das erste Mal in Betrieb
nehmen.
• Beachten Sie alle Warnungen und Hinweise in
dieser Bedienungsanleitung.
• Betrachten Sie diese Bedienungsanleitung als
Teil des Produkts und bewahren Sie sie gut erreichbar auf.
1.2 Zeichen, Symbole, Darstellungskonventionen
WARNUNG
Gefahr durch Stromschlag mit möglicher schwerer Körperverletzung als Folge
ACHTUNG
• Bei einer Weitergabe des Gerätes an Dritte
muss diese Bedienungsanleitung beigefügt
werden.
• Bei Verlust der Bedienungsanleitung können
Sie sich im Support-Bereich unserer Website
www.smart-electronic.de die aktuelle Version
herunterladen.
Warnung vor einem möglichen Sachschaden
TIPP
2.
Nützliche Informationen und Hinweise
Führen Sie diese Handlungen in der beschriebenen Reihenfolge durch.
gen sind kursiv (schräg gedruckt) dargestellt.
einstellbare Werte verbergen), sowie die Namen von Tasten, sind fett gedruckt.
1.3 Lieferumfang
• smart Kopfstation Evolution II.
• Fernbedienung
• 2 Batterien (AAA) für die Fernbedienung
• Bedienungsanleitung
1.4 Produktbeschreibung
Mit der smart Kopfstation Evolution II lassen sich zehn digitale Fernsehprogramme auf UHF-Kanäle umsetzen, in ein Hausverteilnetz einspeisen und ohne weiteren Aufwand mit vorhandenen Fernsehgeräten empfangen.
4 smart Evolution II
Page 7

Allgemeines
Pro Kanal wird ein vom Satelliten kommender, nach DVB-S-Norm QPSK-modulierter, MPEG-Datenstrom in
Nr.
Beschreibung
1
Taster 1-10
Auswahl des Kanals 1-10 zur Programmierung.
2
LEDs 1-10
Signalisieren jeweils den aktivierten Kanal.
3
Infrarot-Empfänger
Empfängt das IR-Signal während der Programmierung.
ein Videosignal -und zwei Audiosignale umgesetzt. Dabei wird ein ausgewähltes Programm aus dem MPEGDatenstrom (MPEG-Multiplex) entnommen und in analoge Signale im Bereich K21 bis K69 (nicht nachbarkanaltauglich) umgewandelt. Bis zu drei Evolution II sind zusammenschaltbar (siehe Abschnitt 3.12, Seite 13),
maximal nutzbar sind dann 25 Kanäle.
Die einzelnen Digital-Sat-Streifen (Kanäle) werden über zehn Taster angesteuert. Sobald man einen Taster
drückt wird das Videobild und der Infrarot Empfänger aktiviert und man kann mithilfe der Fernbedienung
den umzusetzenden Kanal auswählen. Die Anlage wird vorprogrammiert ausgeliefert, die Kanalbelegung
finden Sie im Abschnitt 4.1 auf Seite 14.
1.4.1 Bedienfeld
1.4.2 Anschlüsse
smart Evolution II 5
Page 8

Allgemeines
Nr.
Beschreibung
1
INPUT HH
LNB-Eingang horizontal / high band
2
INPUT VH
LNB-Eingang vertikal / high band
3
INPUT HL
LNB-Eingang horizontal / low band
4
INPUT VL
LNB-Eingang vertikal / low band
5
OUTPUT VIDEO
Video-Ausgang zum Anschluss eines Kontrollmonitors
Ausgang zum Anschluss eines Messgerätes; kann auch als Eingang für zu-
falls noch
7
OUTPUT HF
HF-Ausgang zum Anschluss an das Hausverteilnetz (Nutzsignal)
6
EXT / TEST
sätzliche Kanäle im Freq. Bereich 5-1000 MHz genutzt werden, z. B.
DVB-T eingespeist werden soll.
1.5 Kanalstreifen
Die Evolution II enthält pro Kanal einen Kanalstreifen (Modul), mit dem jeweils ein Programm umgesetzt werden kann.
Die zehn Kanalstreifen der Evolution II sind mit
RAPS (Receiver-Automatik-ProgrammierungsSystem) ausgestattet: Auf dem Satelliten Astra
19,2° Ost stehen Programmlisten zur Verfügung,
die bei Bedarf, aber zumindest wöchentlich aktua-
lisiert werden (falsche Daten werden gelöscht,
neue Programme hinzugefügt). Bei der Erstinstallation kann viel schneller als über einen „normalen“
Sendersuchlauf und ohne Einstellungen bezüglich
der empfangenen Satelliten, Transponder, Frequenzen, Motorsteuerung oder Polarisation die
Programmliste erstellt werden. Später können Sie
durch ein manuelles RAPS-Update eine geänderte
Programmliste auf die Evolution II laden.
6 smart Evolution II
Page 9

Allgemeines
Im Auslieferungszustand der Evolution II ist pro Kanal ein Programm vorprogrammiert (siehe Abschnitt 4.1,
Seite 14).
1.6 Garantie
Die Gewährleistung für die smart Kopfstation Evolution II der smart electronic GmbH entspricht den gesetzlichen Bestimmungen zum Zeitpunkt des Erwerbs.
smart Evolution II 7
Page 10

Sicherheitshinweise
Durch Feuchtigkeit, falsche Netzspannung und/oder falsche Netzfrequenz,
Gefahr eines Stromschlages bei Berührung von Netzspannung.
2 Sicherheitshinweise
2.1 Bestimmungsgemäße Verwendung
Die smart Kopfstation Evolution II dient der Umwandlung von bis zu zehn digitalen Satelliten-TVProgrammen in ein analoges PAL-Signal. Die Evo-
lution II ist ausschließlich für diesen Zweck bestimmt und darf nur dafür verwendet werden.
Jede andere Verwendung gilt als nicht bestimmungsgemäß.
2.2 Gefahren bei bestimmungsgemäßem Gebrauch
Blitzschlag oder mechanische Überbeanspruchung können Fehlfunktionen oder
Schäden am Gerät auftreten.
Stellen Sie sicher, dass die Kopfstation (insbesondere der Netzstecker) und die Fern-
bedienung mit keinerlei Feuchtigkeit in Kontakt kommen.
Schließen Sie die Kopfstation nur an 175…250 V ~, 50/60 Hz an.
ACHTUNG!
Ziehen Sie bei Betriebsstörungen den Netzstecker.
Stellen Sie keine schweren Gegenstände auf das Gerät.
Kabel nicht knicken oder quetschen.
Beschädigungen des Gehäuses, des Netzkabels oder unsachgemäße Reparatur können zum Berühren von Netzspannung führen.
Stellen Sie keine schweren Gegenstände auf die Kopfstation.
Schließen Sie die Kopfstation nur an 175…250 V ~, 50/60 Hz an.
Lassen Sie Montage, Installation und Service bzw. eventuelle Reparaturen an Ste-
WARNUNG!
ckern, Kabeln oder der Kopfstation selbst nur von qualifiziertem Fachpersonal durchführen.
Stellen Sie sicher, dass die Betriebsspannung der Anlage vor Beginn von Montage-
oder Servicearbeiten abgeschaltet ist, oder dass der Netzstecker gezogen ist.
8 smart Evolution II
Page 11

Sicherheitshinweise
, dass der Netzstecker jederzeit gezogen und damit das
2.3 Montageort
ACHTUNG!
• Die Evolution II ist ausschließlich für vertikalen Betrieb geeignet!
• Montieren Sie die Anlage
− nur in staubfreier, trockener Umgebung,
− geschützt gegen Feuchtigkeit, Dämpfe, Spritzwasser und Nässe,
− an einem, gegen direkte Sonneneinstrahlung geschützten Ort,
− nicht in unmittelbarer Nähe von Wärmequellen,
− nur in Umgebungstemperatur <50°C.
• Befestigen Sie die Kopfstation gemäß der Montageanleitung sicher an der Wand,
um Verletzungen zu vermeiden (siehe Abschnitt 3.1).
• Stellen Sie keine brennenden Gegenstände, z. B. brennende Kerzen, auf das Gerät.
• Stellen Sie keine mit Flüssigkeit gefüllten Gegenstände, z. B. Blumenvasen auf das
Gerät.
• Sorgen Sie für ausreichende Belüftung (Lüftungsschlitze müssen frei sein). Die
Kopfstation muss auf jeder Seite mindestens 30 Zentimeter Abstand zur Umgebung haben.
• Stellen Sie sicher, dass Sie die Belüftungsöffnungen nicht mit Gegenständen ver-
decken, wie z. B. Zeitungen, Tischdecken, Vorhänge, …
• Montieren Sie die Anlage so
Gerät vom Stromnetz getrennt werden kann.
• Betreiben Sie das Gerät nur in gemäßigtem Klima (nicht in tropischem Klima).
• Beachten Sie die relevanten Normen, Vorschriften und Richtlinien zur Installation
und zum Betrieb von Antennenanlagen. Beachten Sie insbesondere die einschlägigen VDE-Vorschriften zur Erdung von Satelliten-Anlagen
1
(siehe auch Abschnitt
3.3 „Erdung“, Seite 11).
2.4 Umgang mit Batterien
Zum Betrieb der mitgelieferten Fernbedienung benötigen Sie die beiden im Lieferumfang enthaltenen Batterien 1,5 V (Typ: AAA).
• Batterien dürfen nicht in die Hände von Kindern gelangen.
• Auslaufende Batterien verursachen Schaden an Umwelt und Fernbedienung.
• Batterien dürfen keiner extremen Hitze, wie z. B. Sonnenstrahlung, Feuer o. ä., ausgesetzt werden.
Entsorgen Sie Batterien entsprechend der geltenden gesetzlichen Bestimmungen.
2.5 Hinweise zur Produkthaftung
In den folgenden Fällen kann der vorgesehene Schutz des Gerätes beeinträchtigt sein. Die Haftung für die
Gerätefunktion geht dann auf den Betreiber über:
• Das Gerät wird nicht entsprechend der Bedienungsanleitung benutzt.
• Das Gerät wird außerhalb des hier beschriebenen Anwendungsbereiches eingesetzt.
Am Gerät werden vom Betreiber unautorisiert Änderungen vorgenommen.
1
VDE 0855-1: 2011-06: Kabelnetze für Fernsehsignale, Tonsignale und interaktive Dienste, Teil 11: Sicherheitsanforderungen
smart Evolution II 9
Page 12
Inbetriebnahme
3 Inbetriebnahme
3.1 Wandbefestigung
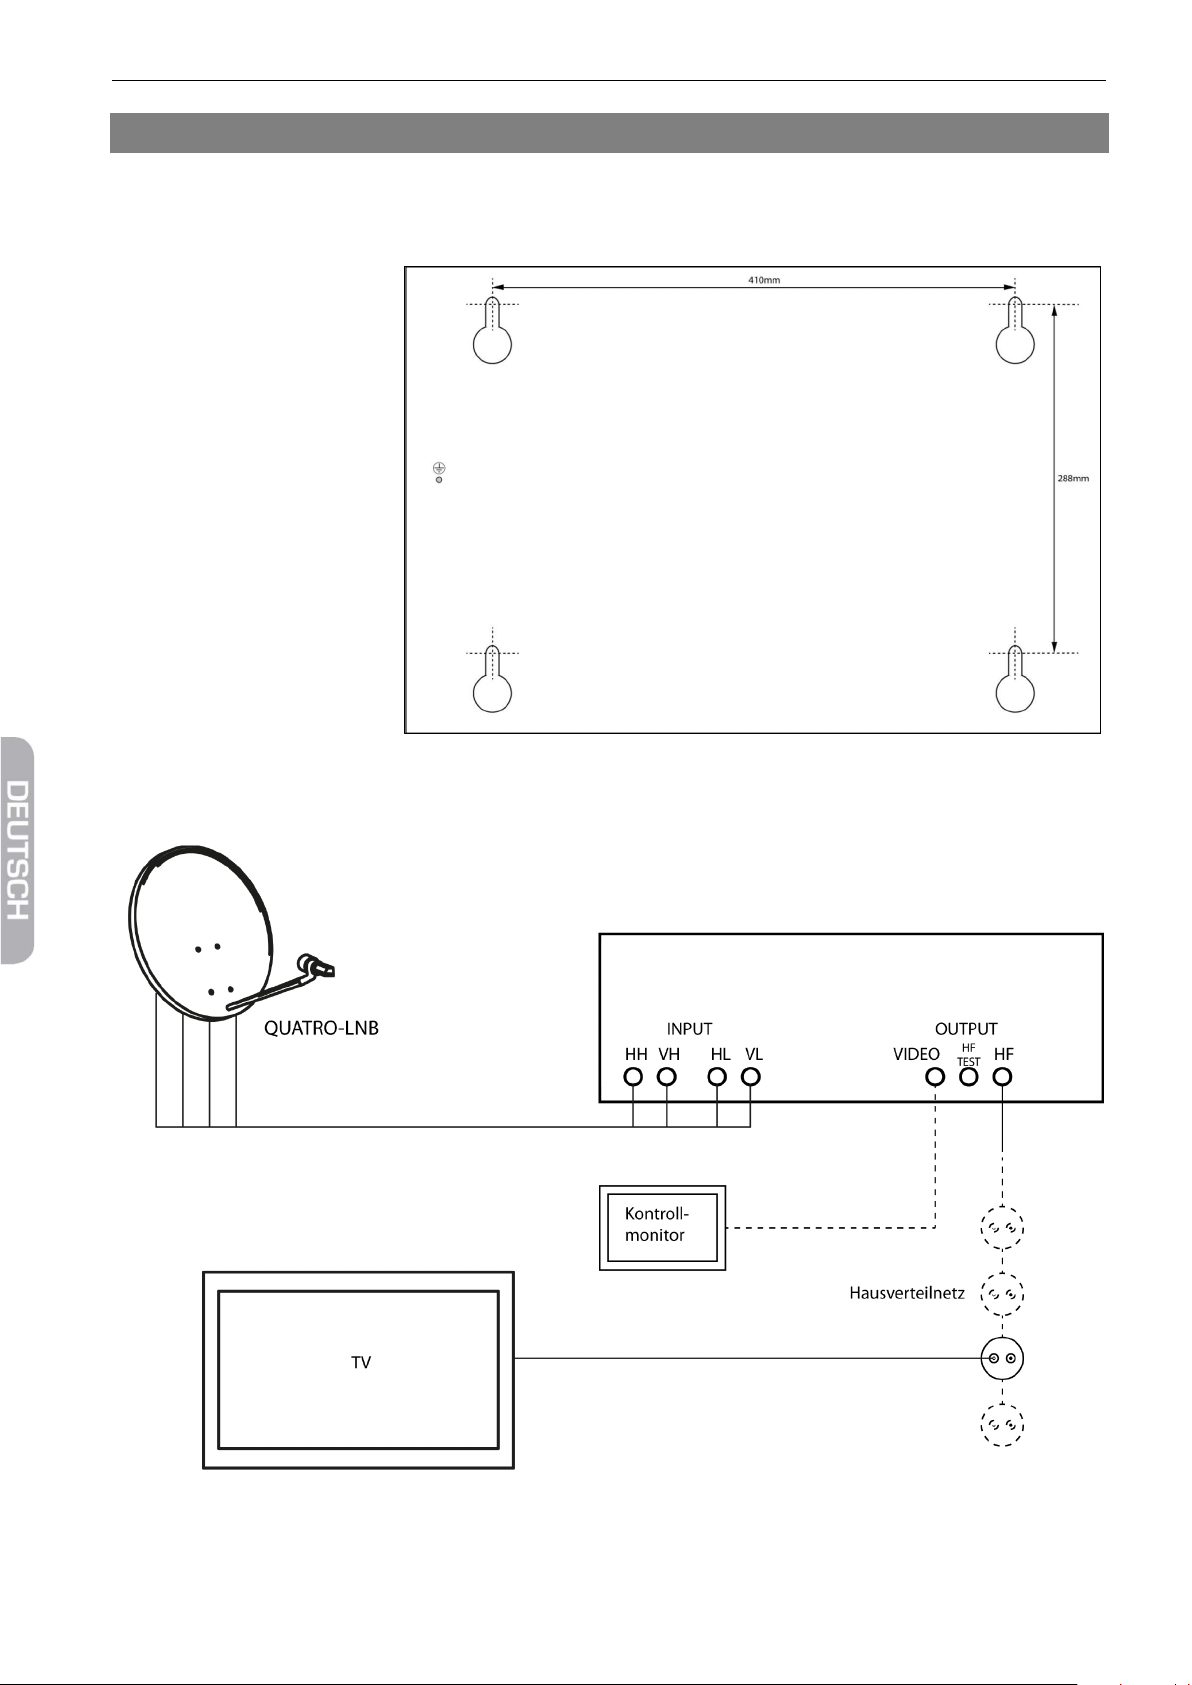
Zur Wandbefestigung befinden sich an der Unterseite der Evolution II vier Ösen für Schrauben mit Ø 5mm:
Skizze nicht maßstäblich
3.2 Anschlussschema
10 smart Evolution II
Page 13

Inbetriebnahme
3.3 Kopfstation erden
Der eingebaute Multischalter der Evolution II ist Quad-Switch-LNB (Quad-LNB)-
Bevor Sie die smart Evolution II in Betrieb nehmen, müssen Sie die Kopfstation vorschriftsmäßig erden. Verwenden Sie dazu die an der Unterseite angebrachte Erdungsschraube (siehe Skizze).
3.4 Anschluss an die Satellitenantenne
Verbinden Sie die vier Ausgänge eines Quatro-LNB mit den entsprechend bezeichneten Anschlüssen
INPUT HH, VH, HL und VL der Evolution II.
tauglich, d. h. Sie können an jeden Eingang INPUT HH, VH, HL und VL auch den Ausgang eines Quad-Switch-LNB anschließen.
3.5 Anschluss an das Hausverteilnetz
Verbinden Sie den Ausgang OUTPUT HF der Evolution II mit dem Hausverteilnetz.
3.6 Anschluss des Kontrollmonitors (optional)
Verbinden Sie den Ausgang OUTPUT VIDEO mit dem FBAS-Eingang (Composite Video) eines Monitors
2
(dient zur Darstellung des OSD
während der Programmierung).
3.7 Anschluss eines Messgeräts (optional)
Verbinden Sie den Ausgang OUTPUT HF TEST der Evolution II mit einem geeigneten Messgerät, um fest-
zustellen, ob das Ausgangssignal vorhanden ist und dieses gegebenenfalls darzustellen oder zu bewerten (z. B. wenn Ihnen als Kontrollmonitor nur das Fernsehgerät zur Verfügung steht).
3.8 Zusätzlicher Eingang
Der Ausgang OUTPUT HF TEST kann auch als Eingang für zusätzliche Kanäle im Freq. Bereich 5-1000 MHz
genutzt werden
2
OSD = On Screen Display (engl.), Bildschirmmenü
smart Evolution II 11
Page 14

Inbetriebnahme
Verbinden Sie beispielsweise OUTPUT HF TEST der Evolution II mit dem Ausgang der DVB-T-Antenne.
3.9 Batterien der Fernbedienung einlegen
So gehen Sie vor, wenn Sie Batterien in die Fernbedienung einlegen oder leere Batterien wechseln
möchten:
Öffnen Sie den Batteriefachdeckel an der Unterseite der Fernbedienung
Setzen Sie die beiden Batterien 1,5 V (Typ: AAA) ein.
Achten Sie dabei auf richtige Polung!
Erneuern Sie den Batteriesatz, wenn einzelne Fernbedienbefehle nicht mehr oder
nicht richtig ausgeführt werden.
Bei einem Batteriewechsel immer alle Batterien austauschen.
3.10 Spannungsversorgung herstellen
Nachdem Sie die Kopfstation ordnungsgemäß installiert haben, schalten Sie die Evolution II ein, indem
Sie den Netzstecker in die Steckdose stecken.
3.11 Erstinbetriebnahme
Die Evolution II ist jetzt betriebsbereit und kann aufgrund der werkseitigen Vorprogrammierung sofort eingesetzt werden.
Starten Sie an den angeschlossenen Fernsehgeräten einen Sendersuchlauf. Es werden die zehn vorprogrammierten Programme gefunden.
12 smart Evolution II
Page 15

Inbetriebnahme
3.12 Betrieb mehrerer Evolution II
Nachfolgend sehen Sie ein Beispiel für den Betrieb zweier Evolution II:
smart Evolution II 13
Page 16

Kanalbelegung und Programmierung
4 Kanalbelegung und Programmierung
4.1 Standard-Kanalbelegung
Im Auslieferungszustand sind alle zehn Kanäle der Evolution II vorprogrammiert. Die Kanalbelegung ist:
Kanal Programm Kanal Programm
21 ARD 31 Pro 7
23 ZDF 33 Arte
25 RTL 35 Das Vierte
27 Sat 1 37 Kabel 1
29 Vox 39 RTL2
4.2 Kanalstreifen (um)-programmieren
Wenn Sie andere als die zehn vorprogrammierten Programme nutzen möchten, müssen Sie die Kanalstreifen entsprechend umprogrammieren. Damit Sie auf das zur Programmierung notwendige OSD der einzelnen Kanalstreifen zugreifen können, müssen Sie einen Monitor, entsprechend Abschnitt 3.6, Seite 11, anschließen.
So programmieren Sie die einzelnen Kanäle:
1. Drücken Sie an der Evolution II den Taster mit der Nummer des Kanals,
den Sie programmieren möchten. Bei ausgewähltem Kanal leuchtet die
entsprechende LED (Programmiermodus).
2. Wählen Sie mit der nachfolgend beschriebenen Fernbedienung für den
Kanalstreifen im Programmiermodus ein TV- bzw. Radio-Programm aus,
um es dem analogen Ausgangssignal hinzuzufügen,
entweder,
indem Sie mit den Tasten PR+ und PR- das Programm, das Sie sehen möchten, auswählen,
oder
indem Sie die OK-Taste drücken, mit den Tasten PR+ und PR- ein Programm aus der Programmliste auswählen und dieses durch erneutes Drücken der OK-Taste bestätigen.
3. Drücken Sie an der Evolution II den Taster mit der Nummer des Kanals mit aktivem Programmiermodus.
Die entsprechende LED erlischt.
14 smart Evolution II
Page 17

Kanalbelegung und Programmierung
4.3 Fernbedienung
Nr.
Beschreibung
1 Umschalten zwischen Betriebs- und Standby-
2
0 … 9
Direkte Programmauswahl bzw. Eingabe alphanu-
3
TV/R
Umschalten zwischen TV- und Radio-Modus
4
PR+
Programm + bzw. Cursor aufwärts
5
EPG
Elektronischer Programmführer starten/beenden
6 Lautstärke – bzw. Menüoption nach links
7
FAV
Favoritenliste aufrufen
8
PR-
Programm - bzw. Cursor abwärts
9
INFO
Informationen zum aktuellen Programm anzeigen
10
TXT
Videotext
11
PAUSE
Nicht belegt
12
F1
Nicht belegt
13
F2
Untertitel
14
F3
Darstellen mehrerer Programme auf dem Bild-
15 Nicht belegt
16
PR
Wechsel zu den vorher gewählten Programmen
17
MENU
Hauptmenü
18
OK
Senderliste anzeigen bzw. Menüpunkt bestätigen
19 Lautstärke + bzw. Menüoption nach rechts
20
EXIT
Menü bzw. Menüpunkt verlassen
21 Im Menü seitenweise nach oben blättern
22
ZOOM
Nicht belegt
23 Im Menü seitenweise nach unten blättern
24
L/R
Audio-Modus ändern
25
F4
Anzeigen der programmierten Satelliten
Modus.
merischer Zeichen
schirm (Multi-Picture)
4.4 Betriebsart wählen
Die Betriebsart nach dem ersten Einschalten der Evolution II (oder nach dem Zurücksetzen auf Werkseinstellungen) ist Fernsehen (TV).
So können zwischen den Betriebsarten TV (Fernsehprogramme) und RADIO (Radioprogramme) wählen:
Drücken Sie die Taste TV/R auf der Fernbedienung.
Drücken Sie erneut die Taste TV/R, um wieder zur vorherigen Betriebsart zurückzukehren.
smart Evolution II 15
Page 18

Kanalbelegung und Programmierung
4.5 Menü aufrufen/beenden
Drücken Sie die Taste MENU, um das Menü aufzurufen.
Drücken Sie noch einmal MENU oder die Taste EXIT, um das Menü wieder zu verlassen oder eine Stufe
zurück zu gelangen.
4.6 Navigation im Menü
Die Menüpunkte mit den Einstellmöglichkeiten für TV bzw. Radio sind jeweils in beiden Betriebsarten TV
und Radio erreichbar.
Sie können mit den Tasten der Fernbedienung im Menü navigieren:
Drücken Sie PR+, um den Menüpunkt oberhalb auszuwählen.
Drücken Sie PR-, um den Menüpunkt unterhalb auszuwählen.
Drücken Sie , um den ausgewählten Wert zu ändern bzw. zu erhöhen oder um zu einem Untermenü
zu gelangen.
Drücken Sie , um den ausgewählten Wert zu ändern bzw. zu reduzieren oder um zur nächsthöheren
Menüebene zu gelangen.
Aktive (d. h. ausgewählte) Untermenüs und Menüpunkte werden farblich hervorgehoben.
4.7 Programmwahl
Wie oben beschrieben, legen Sie das Programm, das umgesetzt werden soll, durch die Programmauswahl
fest. Sie haben verschiedene Möglichkeiten, ein Programm auszuwählen:
• Direkte Programmwahl,
• Programmwahl über Auswahlfenster und
• Programmwahl über Suchfunktion.
4.7.1 Direkte Programmwahl
Wählen Sie mit den Tasten PR+ und PR- das Programm, das Sie sehen möchten.
4.7.2 Programmwahl über Auswahlfenster
1. Drücken Sie die OK-Taste, um ein Auswahlfenster mit allen verfügbaren Programmen anzuzeigen.
2. Wählen Sie mit den Tasten PR+, PR- , , , und das gewünschte Programm aus und bestätigen
Sie die Auswahl mit OK.
4.7.3 Programmwahl über Suchfunktion
Da die Programmliste recht umfangreich sein kann, bietet die smart Evolution II nach Aufruf des Auswahlfensters (s. o.) über die blaue Funktionstaste (alphabetische Sortierung), die Funktionstaste F2 (Finden)
und die Funktionstaste F4 (Genreauswahl) verschiedene Möglichkeiten die Liste zu filtern, innerhalb der
Liste nach Programmen zu suchen oder die Liste zu sortieren. Mit der roten Funktionstaste (Alle) kehren
Sie jeweils wieder zurück.
16 smart Evolution II
Page 19

Kanalbelegung und Programmierung
4.8 UHF-Kanal wählen
Wählen Sie den Menüpunkt Modulator CH im Menü Systemeinstellungen / Systemmenü, um mit der
Zehnertastatur der Fernbedienung den Kanal einzugeben, auf den das aktuelle Sat.-Programm umgesetzt
werden soll.
Achten Sie darauf, dass zwischen zwei Kanälen immer ein Kanal frei bleibt. Die
Evolution II ist nicht nachbarkanaltauglich. Beispiel für die Kanalabfolge: K21, K23,
K25, K27, K29, K31, K33, K35, K37, K39.
In den folgenden Abschnitten sind alle Menüpunkte des Bedienmenüs beschrieben.
4.9 Menü Installation
Insbesondere wenn die Programmliste neu geschrieben werden soll (z. B. nach dem Zurücksetzen auf
Werkseinstellungen können Sie in diesem Menü erneut mit RAPS eine Programmliste anlegen oder gezielt
spezielle Programme auswählen.
4.9.1 Antenneneinstellung
Im Untermenü Antenneneinstellung können Sie umfangreiche Einstellungen bezüglich der empfangenen
Satelliten, Transponder, Frequenzen, Motorsteuerung, Polarisation, … vornehmen.
4.9.2 Manueller Suchlauf
In diesem Untermenü können Sie einzelne Satelliten/Transponder nach empfangbaren Programmen durchsuchen.
4.9.3 Satelliten bearbeiten
Im diesem Untermenü können Sie Satelliten zur Programmliste hinzufügen, löschen, umbenennen, in der
Liste verschieben und ausblenden.
4.9.4 Transponder bearbeiten
Im diesem Untermenü können Sie Transponder zur Programmliste hinzufügen, löschen, umbenennen, in
der Liste verschieben und ausblenden.
4.9.5 Werkseinstellung
In diesem Untermenü können Sie den ausgewählten Kanalstreifen der Evolution II auf Werkseinstellungen
zurücksetzen. Sie können wählen zwischen
• Alle (Einstellungen)
• Nur TV Sender löschen
• Nur Radio Sender löschen
• Nur verschlüsselte Sender löschen
• Satellitenkanäle löschen
4.9.6 RAPS
Es wird angezeigt, wann das letzte RAPS-Update durchgeführt wurde (von wann die RAPS-Datei des Kanalstreifens ist). Außerdem stehen folgende Einstellmöglichkeiten zur Verfügung:
• RAPS Modus (konfigurieren/aktualisieren)
smart Evolution II 17
Page 20

Kanalbelegung und Programmierung
• Start (RAPS starten)
• RAPS-Scan aktivieren/deaktivieren
4.10 Menü Systemeinstellungen
4.10.1 Systemmenü
Wählen Sie den Menüpunkt Sprache, um die Menüsprache des OSD (On Screen Display) einzustellen.
Wählen Sie den Menüpunkt Audio1 und Audio2, um die Sprachen der beiden Audiokanäle einzustellen.
Manche Sender senden mehrsprachig. Wenn die von Ihnen eingestellte Sprache gesendet wird, wird automatisch diese Sprache von Ihrem Fernsehgerät wiedergegeben.
Wählen Sie den Menüpunkt TV Bildschirmformat, um auszuwählen in welchem Seitenverhältnis das TV-
Bild an den Modulator übertragen werden soll.
Wählen Sie den Menüpunkt Modulator CH, um den UHF-Kanal einzugeben (siehe Abschnitt, Seite 17).
Wählen Sie den Menüpunkt Unit Volume, um mit der Zehnertastatur der Fernbedienung die Lautstärke
des Programms, das umgesetzt wird einzustellen (Werte 0 bis 64).
4.10.2 Installationsassistent
In diesem Untermenü können Sie die Sprache und die Zeitzone der Evolution II neu einstellen.
4.10.3 System Info
In diesem Untermenü wird angezeigt, welchen Stand die aufgespielte Software hat. Einstellmöglichkeiten
stehen hier nicht zur Verfügung.
18 smart Evolution II
Page 21

Technische Daten
5 Technische Daten
Beschreibung 10-Kanal Kopfstation QPSK in PAL, modular aufgebaut
Nachbarkanaltauglich Nein (übernachbarkanaltauglich)
Eingänge 4 F-Buchsen (Multischalter Eingang)
Modulsteckplätze 10
Fernspeisung LNB 13/18 V mit oder ohne 22kHz, 400 mA
Frequenzbereich Eingang 950 - 2150 MHz
Eingangspegel 60 -100 dBµV
UHF Ausgangspegel 98 dBμV +/-2 dB
Ausgangskanäle K21 ... K69 Standard G (Zweiseitenband)
Audio Stereo
Nennspannung AC 200-240V, 47-63Hz
Spannungsbereich AC 180-264V, 47-63Hz
Sicherung: intern T4AH/250V 5x20mm
Abmessung (L x B x H) 495 x 365 x 155 mm
smart Evolution II 19
Page 22

Contents
Contents
1 General .................................................................................................................................................. 22
1.1 User Information ......................................................................................................................................................... 22
1.2 Signs, Symbols, Layout ............................................................................................................................................. 22
1.3 Scope of Delivery ........................................................................................................................................................ 22
1.4 Product Description ................................................................................................................................................... 22
1.4.1 Control Panel ................................................................................................................................................................ 23
1.4.2 Connections ................................................................................................................................................................. 23
1.5 Module ........................................................................................................................................................................... 24
1.6 Guarantee ...................................................................................................................................................................... 24
2 Safety Instructions ................................................................................................................................ 25
2.1 Intended Use ................................................................................................................................................................ 25
2.2 Risks in Case of Intended Use ................................................................................................................................. 25
2.3 Location ......................................................................................................................................................................... 26
2.4 Handling of Batteries ................................................................................................................................................. 26
2.5 Notes on Product Liability ....................................................................................................................................... 26
3 Installation and Commissioning .......................................................................................................... 27
3.1 Mounting ....................................................................................................................................................................... 27
3.2 Connection Scheme .................................................................................................................................................. 27
3.3 Grounding ..................................................................................................................................................................... 28
3.4 Connect Satellite Antenna ...................................................................................................................................... 28
3.5 Connect to the House Distribution Network .................................................................................................... 28
3.6 Connect the Control Monitor (Optional) ........................................................................................................... 28
3.7 Connect a Measuring Instrument (Optional) ................................................................................................... 28
3.8 Additional Input .......................................................................................................................................................... 28
3.9 Insert Batteries of Remote Control ....................................................................................................................... 29
3.10 Connect Power Supply ............................................................................................................................................. 29
3.11 Initial Commissioning ............................................................................................................................................... 29
3.12 Operation of Several Evolution II .......................................................................................................................... 30
4 Channel Assignment and Programming ............................................................................................. 31
4.1 Standard Channel Assignment .............................................................................................................................. 31
4.2 Programming ............................................................................................................................................................... 31
4.3 Remote Control ........................................................................................................................................................... 32
4.4 Select Operation Mode............................................................................................................................................. 32
4.5 Call/Leave Menu
4.6 Menu Navigation ........................................................................................................................................................ 33
4.7 Select a Channel .......................................................................................................................................................... 33
4.7.1 Direct Channel Selection ......................................................................................................................................... 33
4.7.2 Channel Selection via Selection Window .......................................................................................................... 33
................................
......................................................................................................................... 32
20 smart Evolution II
Page 23

Contents
4.7.3 Channel Selection via Search Function .............................................................................................................. 33
4.8 Select UHF Channel ................................................................................................................................................... 34
4.9 Menu Installation ........................................................................................................................................................ 34
4.9.1 Antenna Settings ........................................................................................................................................................ 34
4.9.2 Manual Search ............................................................................................................................................................. 34
4.9.3 Edit Satellite .................................................................................................................................................................. 34
4.9.4 Edit Transponder ........................................................................................................................................................ 34
4.9.5 Factory default ............................................................................................................................................................. 34
4.9.6 RAPS .............................................................................................................................................................................. 34
4.10 Menu System Setting ................................................................................................................................................ 34
4.10.1 System ............................................................................................................................................................................ 34
4.10.2 Setup Wizard ................................................................................................................................................................ 34
4.10.3 About STB ...................................................................................................................................................................... 34
5 Technical Data ...................................................................................................................................... 35
smart electronic GmbH
Industriestraße 29
78112 St. Georgen
Germany
Service-Hotline: +49 (0) 7724 94783-54
Telefax: +49 (0) 7724 94783-33
E-Mail: service@smart-electronic.de
Internet: www.smart-electronic.de
© smart electronic GmbH 2012
All rights, technical changes, errors as well as printing mistakes reserved. Any reproducing or copying of the contents requires prior
written permission from smart.
smart Evolution II 21
Page 24
General
Symbol/layout
Meaning
You are requested to perform an action.
1.
List
italics
The various possibilities of settings as well as image captions are stated in Italics.
bold
Menu windows and menu items (that often include further hidden menu items or direct set-
1 General
1.1 User Information
• This manual is intended for the headend smart Evolution II.
• Please carefully read this user manual before operating the device for the first time.
• Please note all warnings and notes included in this user manual.
• Consider this user manual to be an integral part of the product, and store it at a well accessible location.
• This user manual should also be enclosed when handing over the device to a third party.
• In case of loss, the current version of the user manual can be downloaded at the support center on our
website www.smart-electronic.de.
1.2 Signs, Symbols, Layout
WARNING
Danger due to electric shock with possible severe bodily injury
CAUTION
Warning of possible physical damage
NOTE
2.
Useful information and hints
Perform these steps in the stated order.
tings) as well as the designations of keys are printed in bold letters.
1.3 Scope of Delivery
• smart headend Evolution II.
• remote control
• 2 batteries (AAA) for remote control
• user manual
1.4 Product Description
With the smart headend Evolution II you can convert ten digital TV programs to UHF channels, feed
them into a house distribution network and receive them with existing television sets without
any further effort.
Per channel, a MPEG data stream from the satellite,
which is QPSK modulated according to DVB-S
standard, is converted into a video signal and two
22 smart Evolution II
audio signals: A selected program from the MPEG
data stream (MPEG-Multiplex) is extracted and
converted to an analog signal in the range K21 to
K69 (no adjacent channel). Up to three Evolution II
can be connected (see section 3.12, page 30), a
maximum of 25 channels are available then.
The individual modules can be controlled via ten
buttons. Once you press a button, the video image
Page 25

General
No.
Decription
1
Push buttons 1-10
Select channels 1-10 for programming.
2
LEDs 1-10
Show which channel is activated for programming.
3
Infrared receiver
Receives the infrared signal from the remote control during programming.
No.
Decription
1
INPUT HH
LNB input horizontal / high band
2
INPUT VH
LNB input vertical / high band
3
INPUT HL
LNB input horizontal / low band
4
INPUT VL
LNB input vertical / low band
and the infrared receiver are activated. Using the
remote control you can select the channel to be
converted. The system is shipped pre-
1.4.1 Control Panel
programmed, the channel assignment can be
found in section 4.1 on page 14.
1.4.2 Connections
smart Evolution II
23
Page 26

General
No.
Decription
5
OUTPUT VIDEO
Video output to connect a control monitor
RF output to connect a measuring instrument, can also be used as input for
7
OUTPUT HF
RF output to connect the house distribution network (the wanted signal)
6
EXT / TEST
additional channels with frequencies from 5-1000 MHz, e. g. to feed in DVBT signals.
1.5 Module
The Evolution II contains one module per channel.
With each of them you can convert one channel.
The ten modules of the Evolution II are equipped
with RAPS, the smart Receiver Automatic Pro-
gramming System: On the satellite Astra 19.2° East
there are channel lists available that are updated
weekly (false data are deleted, new channels are
added). During the initial installation the channel
list will be created much faster than via a "normal"
channel scan and without regard to the settings
for satellites, transponders, frequencies, power
steering or polarization. Later, you can download a
new channel list on the Evolution II by manual
RAPS update.
At delivery the Evolution II is preprogrammed for
the conversion of ten channels (see section 4.1,
page 14).
1.6 Guarantee
The warranty of the smart headend Evolution II of the smart electronic GmbH corresponds to the legal regulations at the time of purchase.
24 smart Evolution II
Page 27

Safety Instructions
Humidity, wrong mains voltage and/or wrong mains frequency, lightning stroke
Risk of electric shock when contacting mains voltage.
2 Safety Instructions
2.1 Intended Use
The smart headend Evolution II is intended for the conversion of up to ten digital satellite channels to an
analog PAL signal. The Evolution II is exclusively intended for such purpose and must be used exclusively for
such purpose.
Any other use is deemed to be unintended use.
2.2 Risks in Case of Intended Use
or mechanical overload may cause malfunction of or damage to the device.
Ensure that the headend (in particular the mains plug) and the remote control are not
exposed to any humidity.
Only connect the headend to 175…250 V ~, 50/60 Hz.
CAUTION!
Disconnect mains plug in case of thunderstorms or malfunction.
Do not place heavy items onto the headend.
Do not bend or squeeze the cable.
Damage to housing, mains cable or improper repair may result in contact to mains
voltage.
Do not place heavy items onto the headend.
Do not bend or squeeze the cable.
WARNING!
The assembly, installation and service, e.g, repairs of plug, cable or headend, should
only be performed by qualified personnel.
Make sure that the operating voltage of the system is shut down before beginning
installation or service work server, or that the mains plug is disconnected.
smart Evolution II
25
Page 28

Safety Instructions
2.3 Location
CAUTION!
• The Evolution II is only suitable for vertical operation!
• Install the system
− only in a dust free, dry environment,
− protected from moisture, fumes, splashing water and dampness,
− at a place protected from direct sunlight,
− not near any heat sources,
− only in ambient temperature < 50°C.
• To Prevent injury, the headend must be securely attached to the wall in accord-
ance with the mounting instruction (see section 3.1).
• Ensure sufficient ventilation (ventilation slots must not be blocked): the headend
should have a distance of at least 30 centimeters to its surrounding elements on all
sides.
• Ensure that the ventilation openings are not covered by objects such as newspa-
pers, table cloths, curtains etc.
• Do not place naked flame sources, such as lighted candles on the set.
• Do not place objects filled with liquids, such as vases, on the apparatus.
• The mains plug shall remain readily operable.
• Use the set only in moderate climates (not in tropical climates).
• Observe the relevant standards, regulations and guidelines for installing and oper-
ating- of antenna systems. Pay particular attention to the relevant VDE
for grounding of satellite systems
4
.
3
regulations
2.4 Handling of Batteries
To use the remote control, you need the two supplied batteries (1.5 V: AAA).
• Batteries should always be out of children's reach.
• Leaking batteries cause damage to the environment and the remote control.
• Batteries should not be exposed to extreme heat, e.g. sunlight, fire etc.
Dispose of the batteries in accordance with the applicable legal regulations.
2.5 Notes on Product Liability
In the following cases, the intended protection of the device may be limited. Then, liability regarding function of the device correspondingly passes over to the operator:
• The device is not used in accordance with the user manual.
• The device is used out of the field of application as described above.
• The operator performs unauthorized changes of the device.
3
VDE = Verband der Elektrotechnik, Elektronik, Informationstechnik (German) = Association for Electrical, Electronic & Information Technologies
4
DIN EN 60728-11 VDE 0855-1:2011-06: Cable networks for television signals, sound signals and interactive services, Part 11: Safety
26 smart Evolution II
Page 29

Installation and Commissioning
3 Installation and Commissioning
3.1 Mounting
For wall mounting there are four eyes for screws with a diameter of 5mm on the underside of the Evolution II
drawing not to scale
3.2 Connection Scheme
smart Evolution II
27
Page 30

Installation and Commissioning
The built-in multi-switch of the Evolution II is Quad-Switch LNB (Quad LNB)-
3.3 Grounding
Before you put the smart Evolution II into operation, you must ground the headend correctly. Use the
grounding screw on the bottom (see diagram).
3.4 Connect Satellite Antenna
Connect the four outputs of a quatro LNB using the corresponding Evolution II inputs INPUT HH, VH, HL,
and VL.
compatible, this means you can connect the output of a quad-LNB switch to any input INPUT HH, VH, VL and HL.
3.5 Connect to the House Distribution Network
Connect the output OUTPUT HF of the Evolution II with the house distribution network.
3.6 Connect the Control Monitor (Optional)
Connect the output OUTPUT VIDEO with the FBAS input (Composite Video) of a monitor (to show the
5
during programming).
OSD
3.7 Connect a Measuring Instrument (Optional)
Connect the output OUTPUT HF TEST of the Evolution II with an appropriate measuring device to de-
termine whether the output signal is present and to show or evaluate it, if necessary.
3.8 Additional Input
The output OUTPUT HF TEST can also be used as input for additional channels with frequencies from 51000 MHz.
Connect, for example, OUTPUT HF TEST to the output of a DVB-T antenna.
5
OSD = On Screen Display
28 smart Evolution II
Page 31

Installation and Commissioning
3.9 Insert Batteries of Remote Control
This describes the steps for inserting new batteries of the remote control or for replacing empty batteries:
1. Open the battery compartment on the bottom side of the remote control. Remove the cover of the battery compartment.
2. Place the two batteries 1.5 V (type: AAA).
Ensure correct polarity!
3. Close the battery compartment
Replace the batteries if certain remote control functions are not performed any more
or are performed incorrectly.
When replacing batteries, always ensure that all batteries are replaced.
3.10 Connect Power Supply
When all devices are properly connected to the headend you can connect the mains plug to the power
outlet.
3.11 Initial Commissioning
Die Evolution II is now operational and can be used immediately because of the factory pre-programming.
Start a channel scan with the connected television sets. The ten pre-programmed programs will be found.
smart Evolution II
29
Page 32

Installation and Commissioning
3.12 Operation of Several Evolution II
Below is an example of the operation of two Evolution II:
30 smart Evolution II
Page 33

Channel Assignment and Programming
4 Channel Assignment and Programming
4.1 Standard Channel Assignment
As delivered, all ten channels of are pre-programmed. The channel allocation is:
Channel Station Channel Station
21 ARD 31 Pro 7
23 ZDF 33 Arte
25 RTL 35 Das Vierte
27 Sat 1 37 Kabel 1
29 Vox 39 RTL2
4.2 Programming
If you want to use other than the ten programmed channels, you must re-program the modules accordingly.
To access the OSD of each module, you must connect a monitor, as described in Section 3.6, page 11.
To program the individual channels:
1. Press the button with the number of the channel you want to program. If a channel is selected the corresponding LED illuminates (program mode).
2. Use the remote control (described below) to select a TV or radio program, which should be added to the
analog output signal.
either,
by selecting the desired channel using the keys PR+ and PR-,
or
by pressing OK, selecting the desired channel from the channel list using the keys PR+ and PR-and confirming with OK.
3. Press the button with the number of the channel with active programming mode. The corresponding
LED goes out.
smart Evolution II
31
Page 34

Channel Assignment and Programming
No.
Description
1 To switch between the operating and standby
2
0 … 9
Direct channel selection or input of alphanumeric
3
TV/R
To switch between TV and radio modes.
4
PR+
Channel + or cursor up
5
EPG
To start/finish Electronic Programme Guide
6 Volume - or menu option to the left
7
FAV
To load favourite channel list
8
PR-
Channel - or cursor down
9
INFO
To show information on the current programme
10
TXT
Video text
11
PAUSE
Not used
12
F1
Not used
13
F2
Subtitles
14
F3
To show several programmes on screen (multi-
15 Not used
16
PR
To switch to the previously selected channel
17
MENU
Main menu
18
OK
To show channel list or confirm menu item
19 Volume + or menu option to the right
20
EXIT
To exit menu or menu item
21 To scroll page up in menu
22
ZOOM
Not used
23 To scroll page down in menu
24
L/R
To change Audio mode
25
F4
To show all programmed satellites
4.3 Remote Control
modes.
characters
picture)
4.4 Select Operation Mode
You can select between the operation modes TV (TV channels) and RADIO (radio channels) as follows:
TV is the operation mode after first switching-on (or after restoration of factory settings).
Press the key TV/R on the remote control.
Press again the key TV/R to return to the previous operation mode.
4.5 Call/Leave Menu
To call the menu, press the key MENU.
Press MENU once more or EXIT to leave the menu or to go back one step.
32 smart Evolution II
Page 35

Channel Assignment and Programming
It could be possible that you have to press EXIT several times to go back to TV mode.
4.6 Menu Navigation
The menu items with the settings for TV and radio can be respectively accessed in the two operation modes
TV and Radio.
For menu navigation, you can use the remote control:
Press PR+ to select the menu item above.
Press PR- to select the menu item below.
Press to change resp. increase the selected value or to go to a submenu.
Press to change resp. decrease the selected value or to go to the next higher menu level.
Active menu items are color-marked.
4.7 Select a Channel
As described above, you can set the channel to be converted just by selecting the channel. You have several
possibilities to select a channel:
• Direct channel selection;
• Channel selection via selection window; and
• Channel selection via search function;
4.7.1 Direct Channel Selection
Select the desired channel by using the keys PR+ and PR-.
4.7.2 Channel Selection via Selection Window
1. Press the OK key to display a selection window with all available channels.
2. Select the desired channel by using the keys PR+, PR- , , , and and confirm your selection by
pressing OK.
4.7.3 Channel Selection via Search Function
The channel lists can be quite comprehensive; correspondingly, the smart Evolution II offers various possibilities to filter the list, search for channels in the list, or sort the list:
Key Description
Blue function key Alphabetical order.
Function key F2 Find.
Function key F4 Select genre.
Red function key Back to the selection win-
dow.
smart Evolution II
33
Page 36

Channel Assignment and Programming
4.8 Select UHF Channel
Select the menu item Modulator CH in Settings /
System menu to enter with the numeric keypad of
the remote control the channel to which the current satellite program should be converted.
In the following sections, all menu items of the
operating menu are described.
Make sure that between two
channels, one channel always remains free. The Evolution II is not
suitable for adjacent channels. Example of the channel sequence:
K21, K23, K25, K27, K29, K31, K33,
K35, K37, K39.
• All settings
• TV Channel only
• Radio Channel only
• Scramble Channel only
• Delete Satellite Channels
4.9.6 RAPS
You see, how old the module’s RAPS file is. Besides
the following settings are possible:
• Activate/Deactivate RAPS Scan
• (Configure/Update) RAPS Mode
• Start (Start RAPS)
4.10 Menu System Setting
4.9 Menu Installation
Especially if the program list should be rewritten
(e. g after a reset to factory settings, you can use
this menu to create a new channel list with RAPS or
select specific programs.
4.9.1 Antenna Settings
In the Antenna Settings submenu, you can make
extensive settings with regard to the received satellites, transponders, frequencies, motorised control, polarisation, etc.
4.9.2 Manual Search
In this submenu, you can search individual satellites/transponders for receivable channels.
4.9.3 Edit Satellite
In this submenu, you can add, delete, rename,
move and hide satellites in the satellite list.
4.9.4 Edit Transponder
In this submenu, you can add, delete, rename,
move and hide transponders in the transponder
list.
4.10.1 System
Select the menu item Language to set the
menu language of the OSD (On Screen Display).
Select the menu items Audio1 and Audio2 to
set the language of the two audio channels.
Some stations broadcast in different languages.
When the language that you have set is broadcast, your TV set will broadcast automatically in
this language.
Select the menu item TV Screen Format to
select in which length-to-width ratio the TV picture is to be transmitted to the modulator.
Select the menu item Modulator CH to set the
UHF channel (see section 1.1, page 34).
Select the menu item Unit Volume to set the
volume of the converted channel using the
numeric keypad of the remote control (values 0
to 64).
4.10.2 Setup Wizard
In this submenu, you can adjust the language and
time of the Evolution II module.
4.9.5 Factory default
In this menu, the following settings (of the selected module) can be reset to the factory default:
34 smart Evolution II
4.10.3 About STB
This submenu displays the version of your loaded
software. No settings are possible here.
Page 37

Technical Data
5 Technical Data
Description 10 channel headend QPSK to PAL, modular system
Adjacent Channel Processing No
Inputs Four F sockets (Multiswitch input)
Module slots 10
LNB remote feeding 13/18 V with or without 22kHz, 400 mA
Input frequency range 950 - 2150 MHz
Input level 60 -100 dBµV
UHF output level 98 dBμV +/-2 dB
Output channels CH21 ... CH69 standard G (Double Side Band)
Audio Stereo
Nominal voltage AC 200-240V, 47-63Hz
Voltage range AC 180-264V, 47-63Hz
Fuse internal T4AH/250V 5x20mm
Dimensions (length x width x height) 495 x 365 x 155 mm
smart Evolution II
35
Page 38

Art.-Nr.: 35-06-99-0002
 Loading...