

Page 1
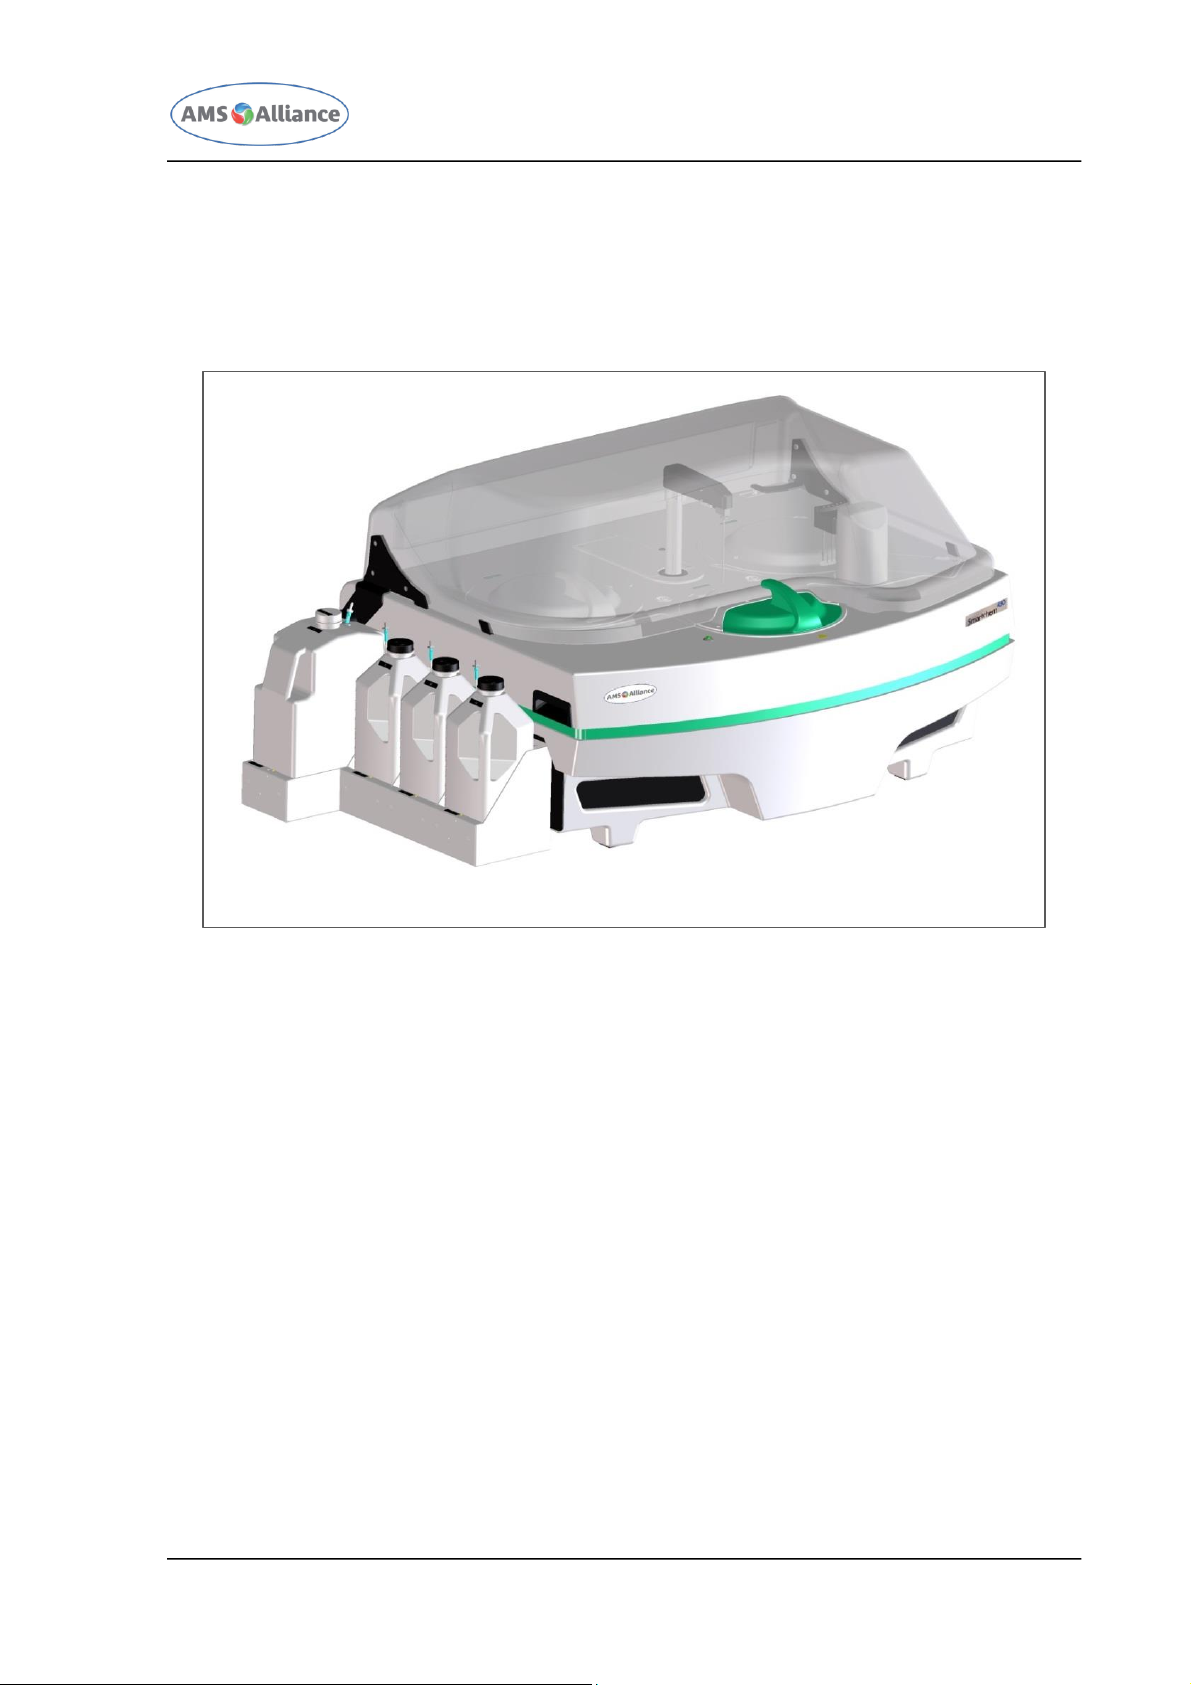
SMARTCHEM 450 USER MANUAL REV.01 JUNE 2020
SMARTCHEM 450 - USER MANUAL
Page 2
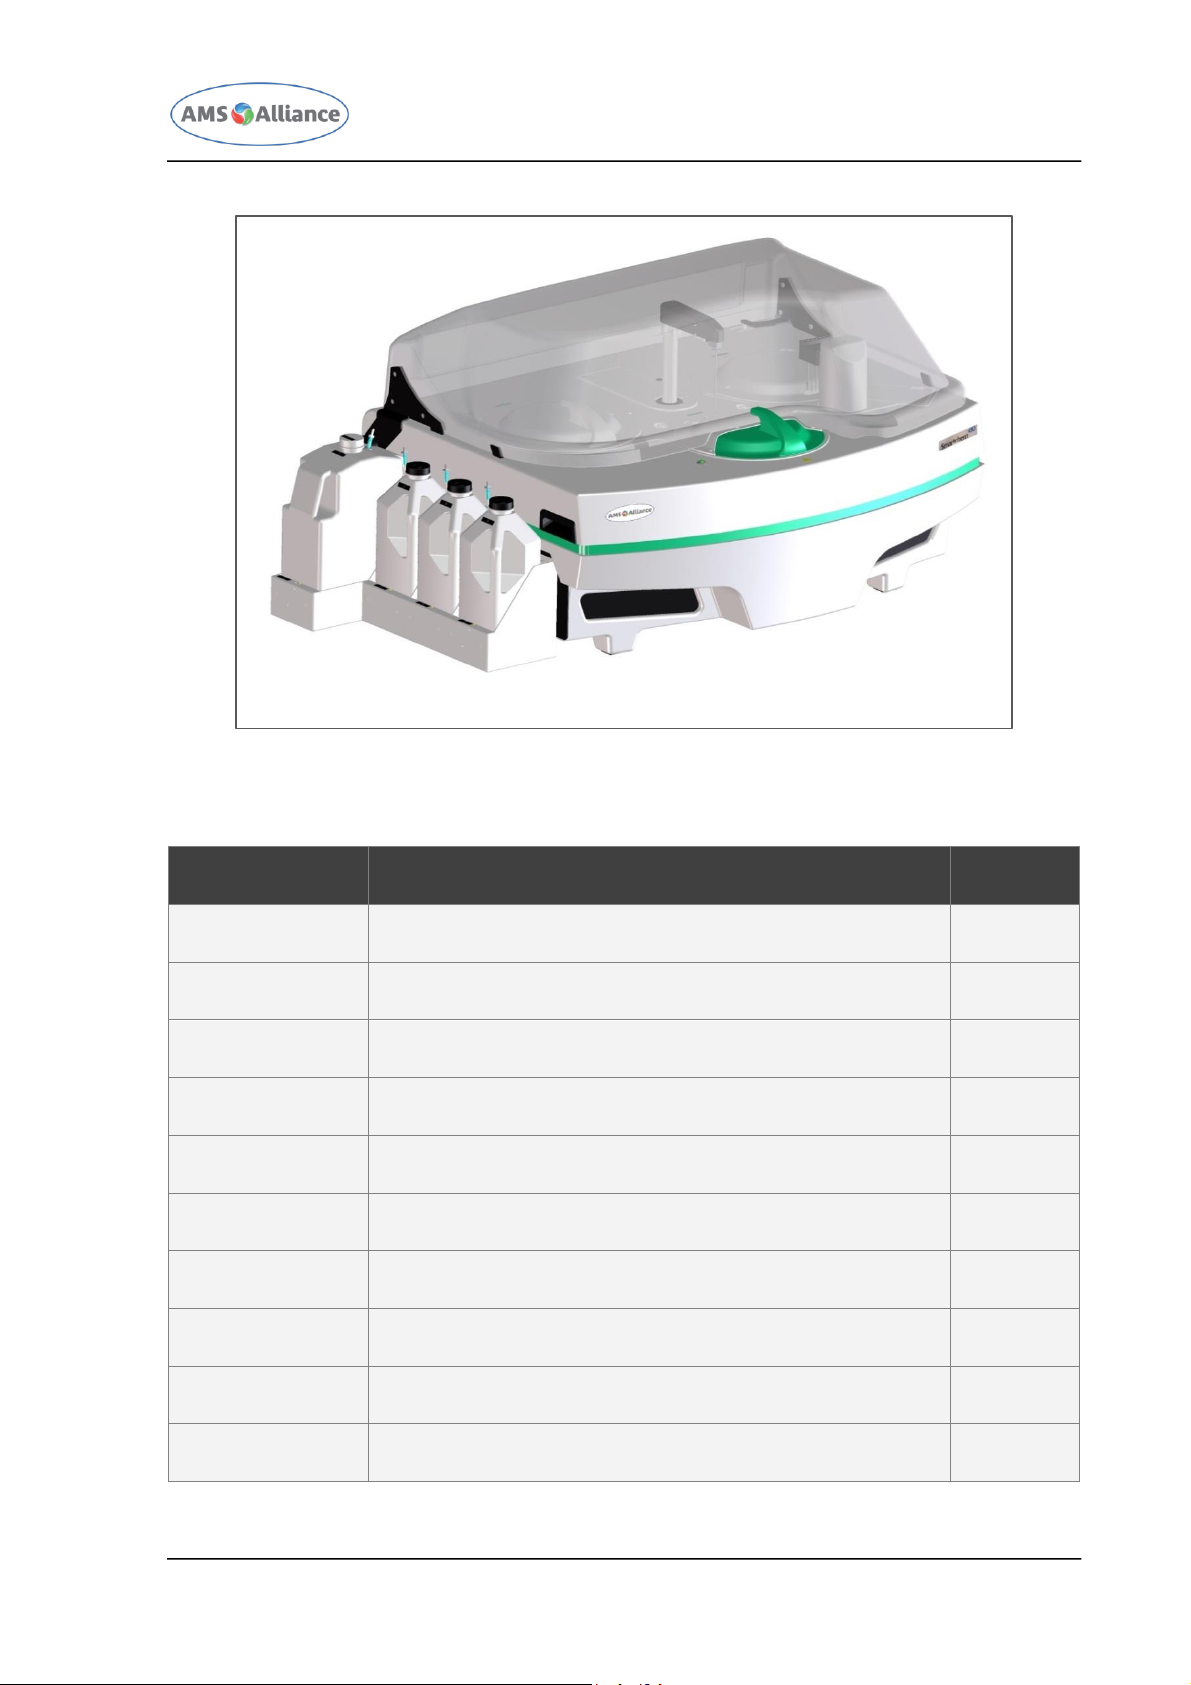
CHAPTER 01 – CONFIGURATION SHEET
SMARTCHEM 450 USER MANUAL REV.01 JUNE 2020 PAGE 1 OF 2
CHAPTER 01 – CONFIGURATION SHEET
CHAPTER
DESCRIPTION
REVISION
01
CONFIGURATION SHEET
01
02
SYSTEM DESCRIPTION
01
03
SOFTWARE DESCRIPTION
01
04
USER INSTALLATION
01
05
DIAGNOSTIC PROGRAM
01
06
FORMULAS AND CALCULATION MODELS
01
07
USER MAINTENANCE
01
08
DAILY ROUTINE
01
09
ERROR SIGNALLING AND TROUBLESHOOTING
01
10
LIMS COMMUNICATION
01
Page 3
CHAPTER 01 – CONFIGURATION SHEET
SMARTCHEM 450 USER MANUAL REV.01 JUNE 2020 PAGE 2 OF 2
1 Configuration Sheet
1.1 MANUAL HISTORY
Chapter
Release
Date
Description
Chapter 01
01
June 2020
First Release
Chapter 02
01
June 2020
First Release
Chapter 03
01
June 2020
First Release
Chapter 04
01
June 2020
First Release
Chapter 05
01
June 2020
First Release
Chapter 06
01
June 2020
First Release
Chapter 07
01
June 2020
First Release
Chapter 08
01
June 2020
First Release
Chapter 08
01
June 2020
First Release
Chapter 09
01
June 2020
First Release
Chapter 10
01
June 2020
First Release
Page 4
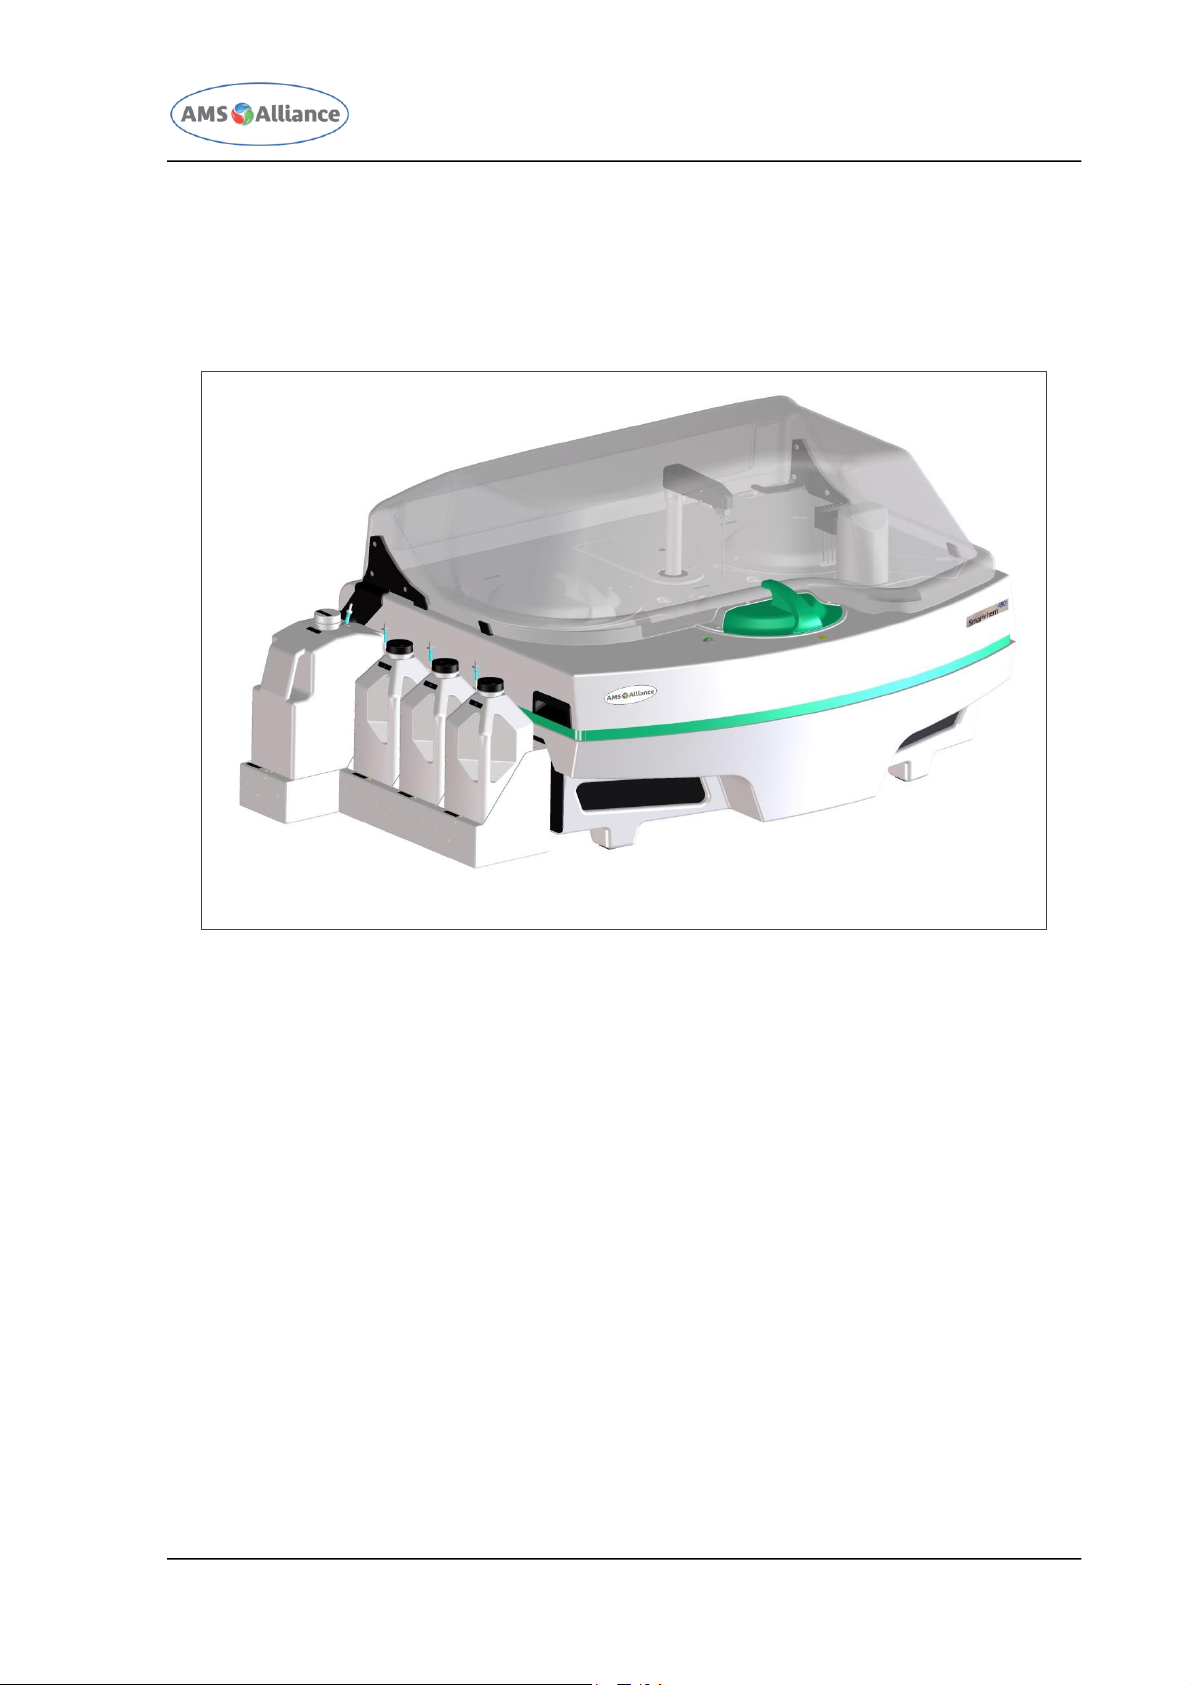
CHAPTER 02 – SYSTEM DESCRIPTION
SMARTCHEM 450 USER MANUAL REV.01 JUNE 2020 PAGE 1 OF 11
USER MANUAL
CHAPTER 02 – SYSTEM DESCRIPTION
Page 5

CHAPTER 02 – SYSTEM DESCRIPTION
SMARTCHEM 450 USER MANUAL REV.01 JUNE 2020 PAGE 2 OF 11
Summary
2 Description of the system .................................................................. 3
2.1 Introduction ................................................................................................... 3
2.2 Sampling Arm ................................................................................................. 4
2.3 Diluter ............................................................................................................ 4
2.4 Reactions Plate ............................................................................................... 5
2.5 Samples Plate ................................................................................................. 5
2.6 Reagents Plate ............................................................................................... 6
2.7 Photometer .................................................................................................... 7
2.8 Washing Station ............................................................................................. 8
2.9 Reagents and Samples barcode readers ......................................................... 8
2.10 ISE Module (Optional) .................................................................................... 9
2.11 Cadmium Module (Optional) ........................................................................... 9
2.12 Instrument Characteristics and Specifications ............................................. 10
2.13 Specifications and minimum requirements for the operative system and PC 11
2.14 Limitations of use ......................................................................................... 11
2.15 Certification .................................................................................................. 11
Page 6

CHAPTER 02 – SYSTEM DESCRIPTION
SMARTCHEM 450 USER MANUAL REV.01 JUNE 2020 PAGE 3 OF 11
2 Description of the system
2.1 INTRODUCTION
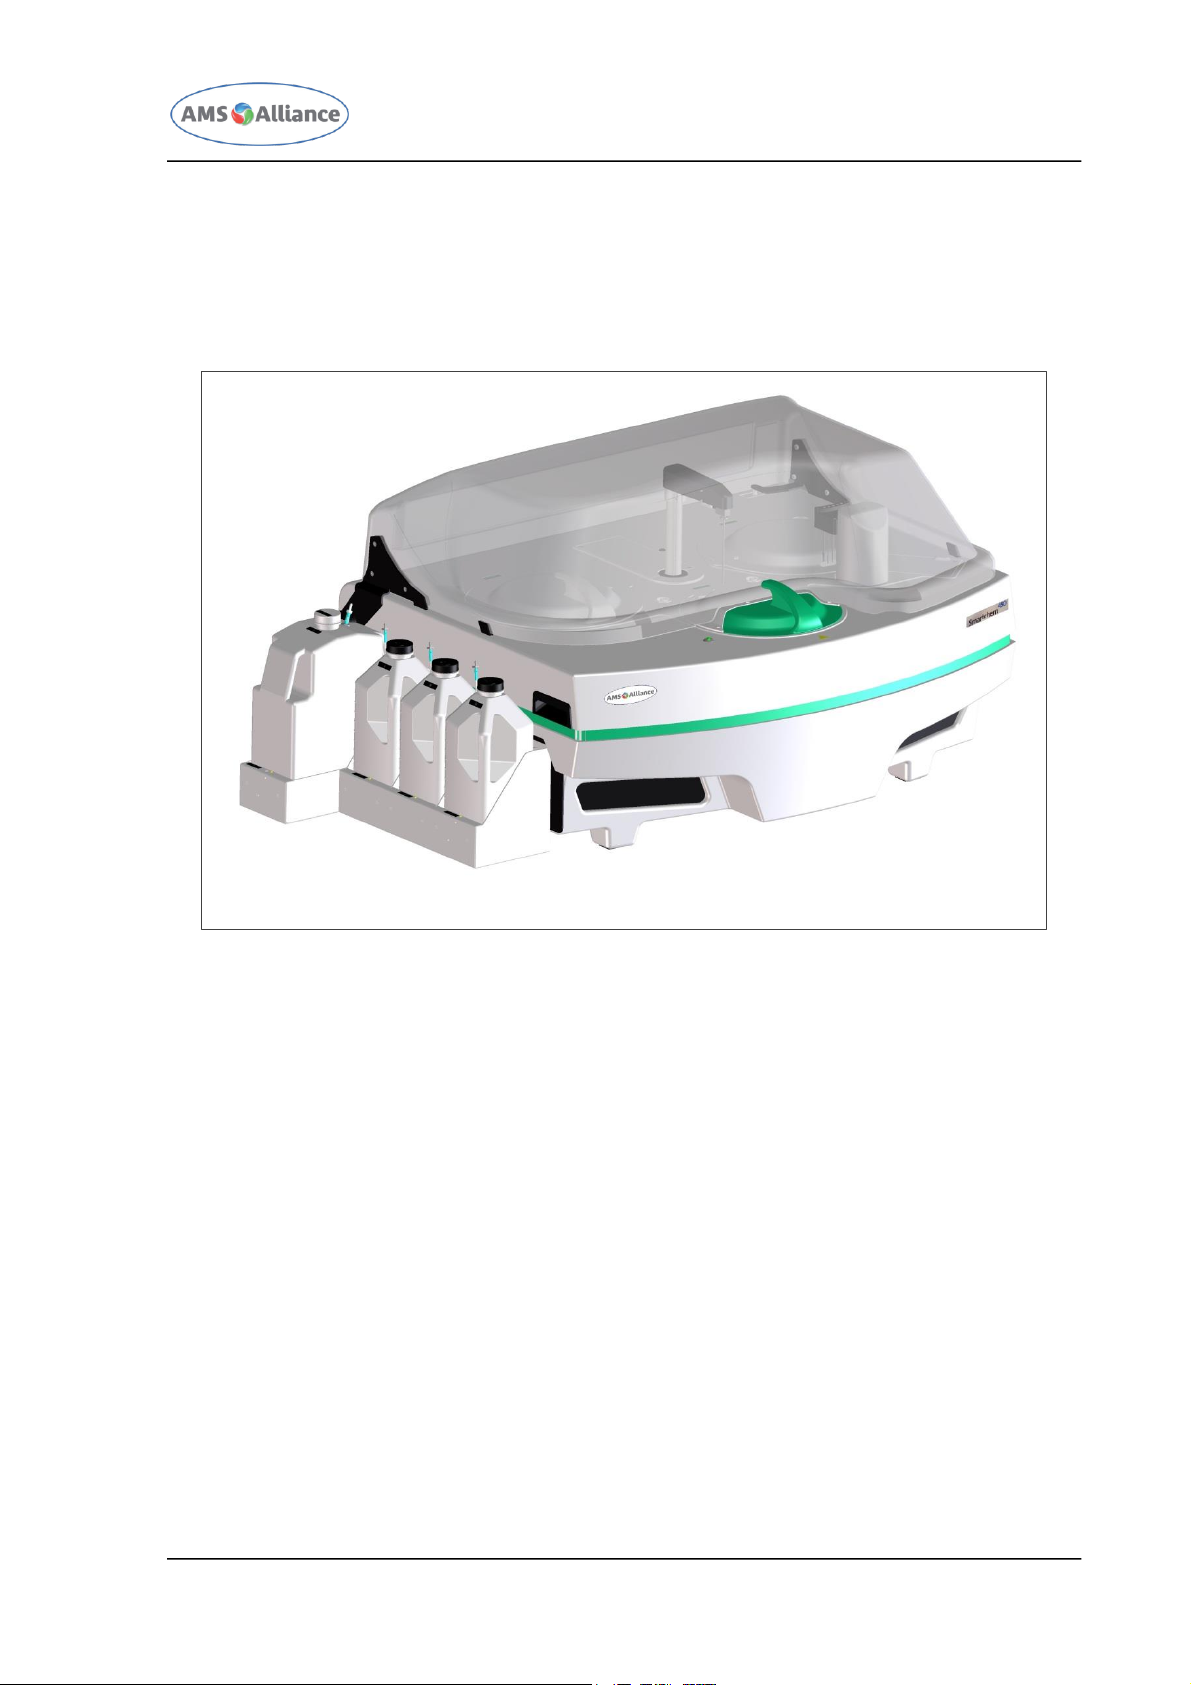
The Smartchem 450 is a benchtop, fully automatic, random access, open analyzer for
clinical and immunoturbidimetric assays.
It communicates with a computer through either a USB port (with a USB to Serial
adapter) or an RS 232 port.
The Smartchem 450 has a photometric analysis throughput rate of 287 tests per hour
and a 15 seconds machine cycle time.
The first time the system is used for normal laboratory operations, the user must
configure the system based on the specific needs of that laboratory. In other words, the
chemistry parameters and the reagents racks, along with the normal, calibrated and
control values, must all be defined.
The Smartchem 450 is an open system instrument that allows configuration with
reagents chosen by the user.
IMPORTANT NOTE: in order to guarantee overall analytical performance levels of the
“Instrument + Reagents” system, the Laboratory is responsible for using reagents,
controls and calibrators that have been validated and certified for use on the Smartchem
450.
The Smartchem 450 instrument is composed of the following main parts:
Sampling Arm;
Diluter;
Reactions Plate;
Samples Plate;
Reagents Plate;
Photometer;
Washing Station;
Barcode Readers (optional);
ISE Module (optional);
Cadmium Module (optional).
Page 7
CHAPTER 02 – SYSTEM DESCRIPTION
SMARTCHEM 450 USER MANUAL REV.01 JUNE 2020 PAGE 4 OF 11
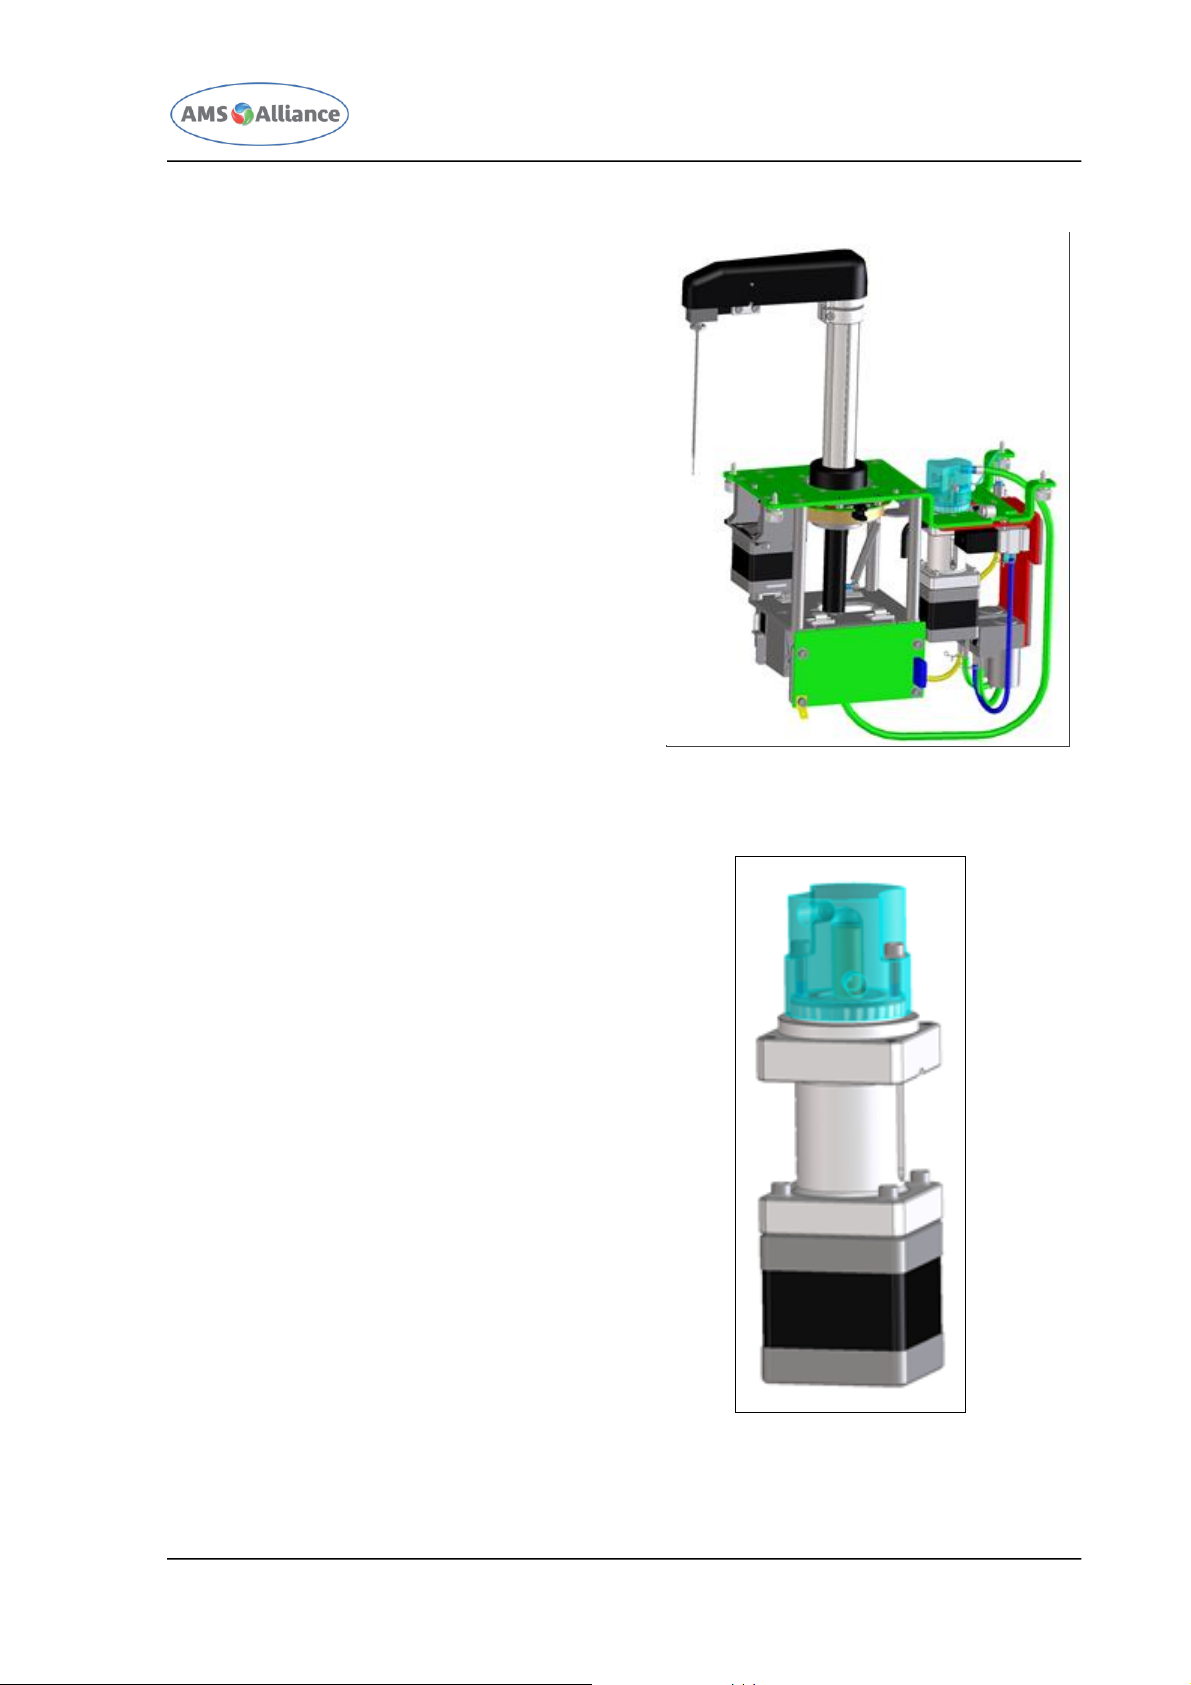
2.2 SAMPLING ARM
One mechanical Arm performs all sampling
operations. It is able to reach the
aspiration point of the Reagents Plate, the
aspiration point of the Samples Plate, the
delivery point of the Reactions Plate and
the two Washing Wells. A specific sampling
Probe is connected on its head. The
Sampling Arm can move vertically and
horizontally with respect to the Raising Top
of the instrument by means of two stepper
motors, respectively. The horizontally
movement take place along an arch of
circumference. The heated needle
performs a reagent pre-warming at 37.0
°C. Moreover, one Digital Level Sensor
Board - opportunely connected to the
Sampling Probe - allows the liquid level
sensing
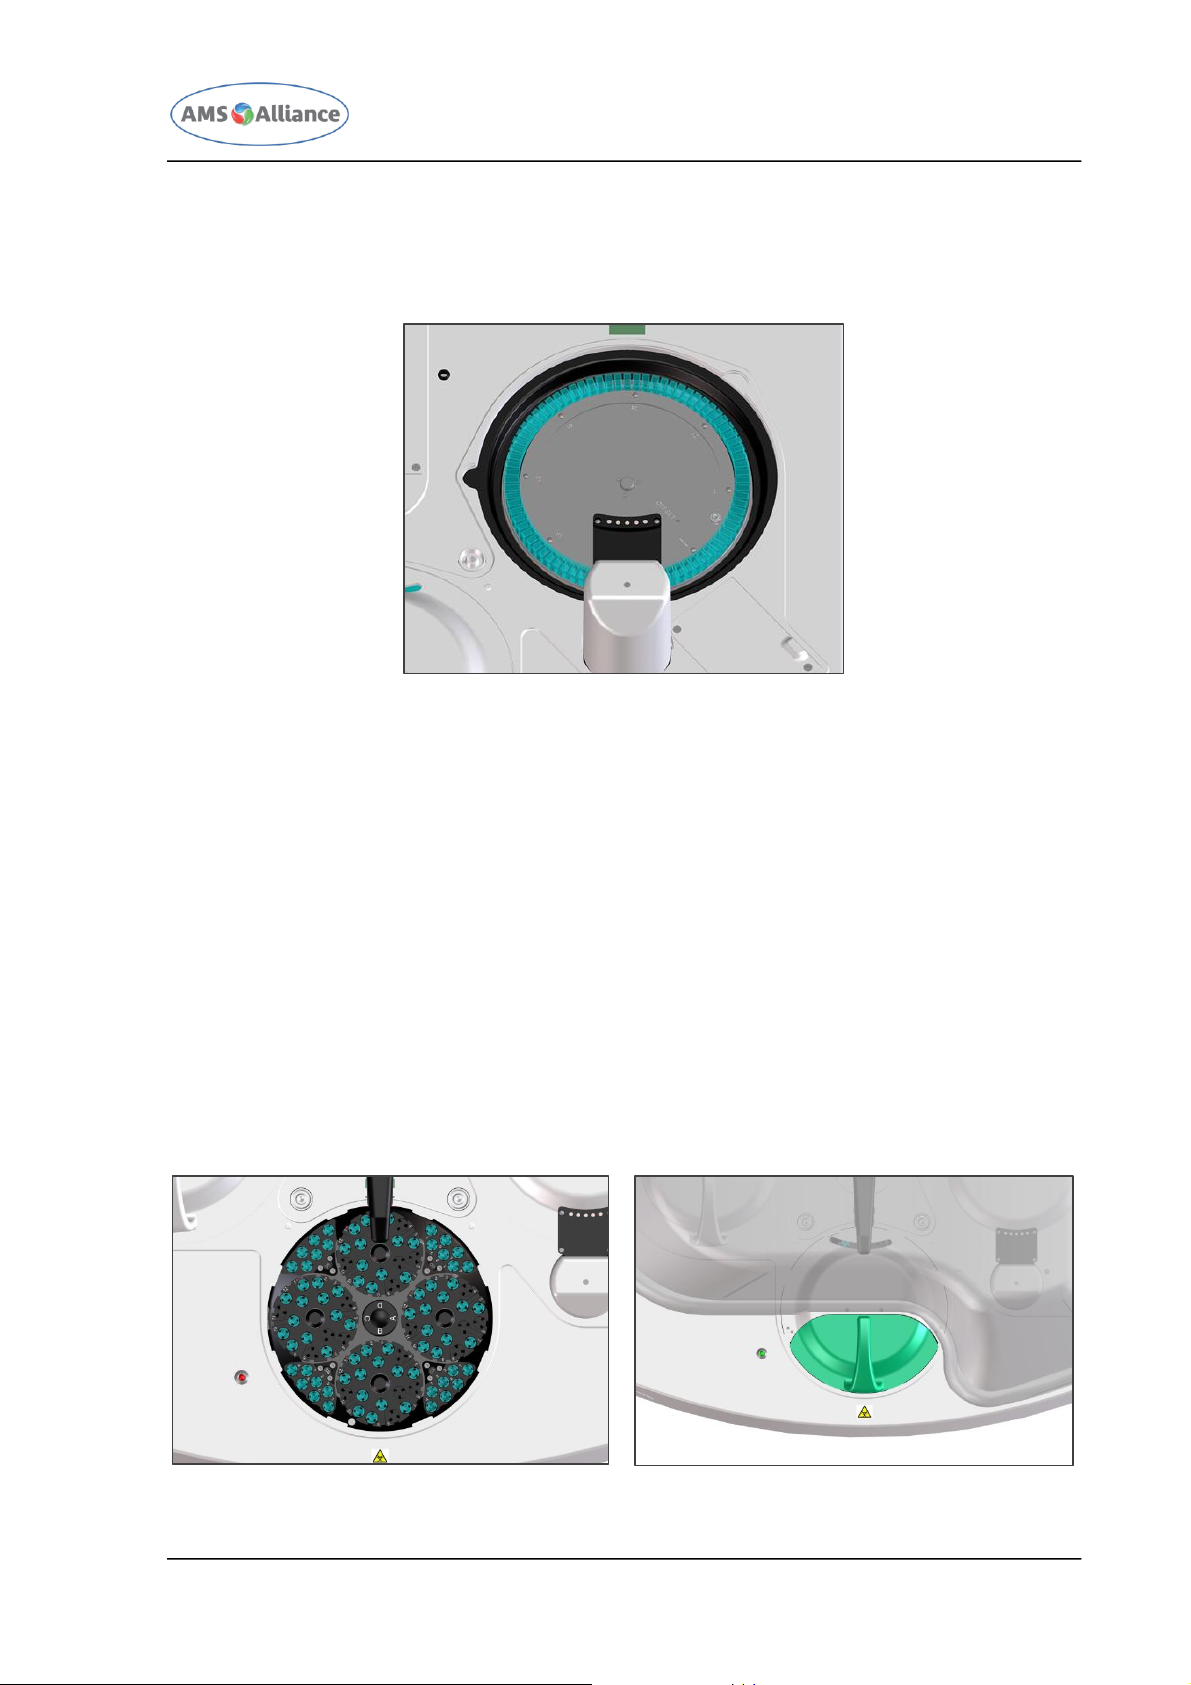
2.3 DILUTER
The Diluter allows to perform all the
operations of aspiration and delivery of the
liquid up till the capacity of 1000 μl. It is
connected to the Sampling Arm and to its
electro valve and micro pump. It is able to
sample volumes of 0.25 μl, with a CV less
than 1%.
The device works through the movement
of a unique central piston for the
operations of aspiration and delivery of
liquid. The piston is moved through a
stepper motor without use of step-down
gears to minimize the backlash. Moreover,
in this device are implemented some
solutions to avoid the presence of air micro
bubble inside it and inside the hydraulic
circuit.
Page 8
CHAPTER 02 – SYSTEM DESCRIPTION
SMARTCHEM 450 USER MANUAL REV.01 JUNE 2020 PAGE 5 OF 11
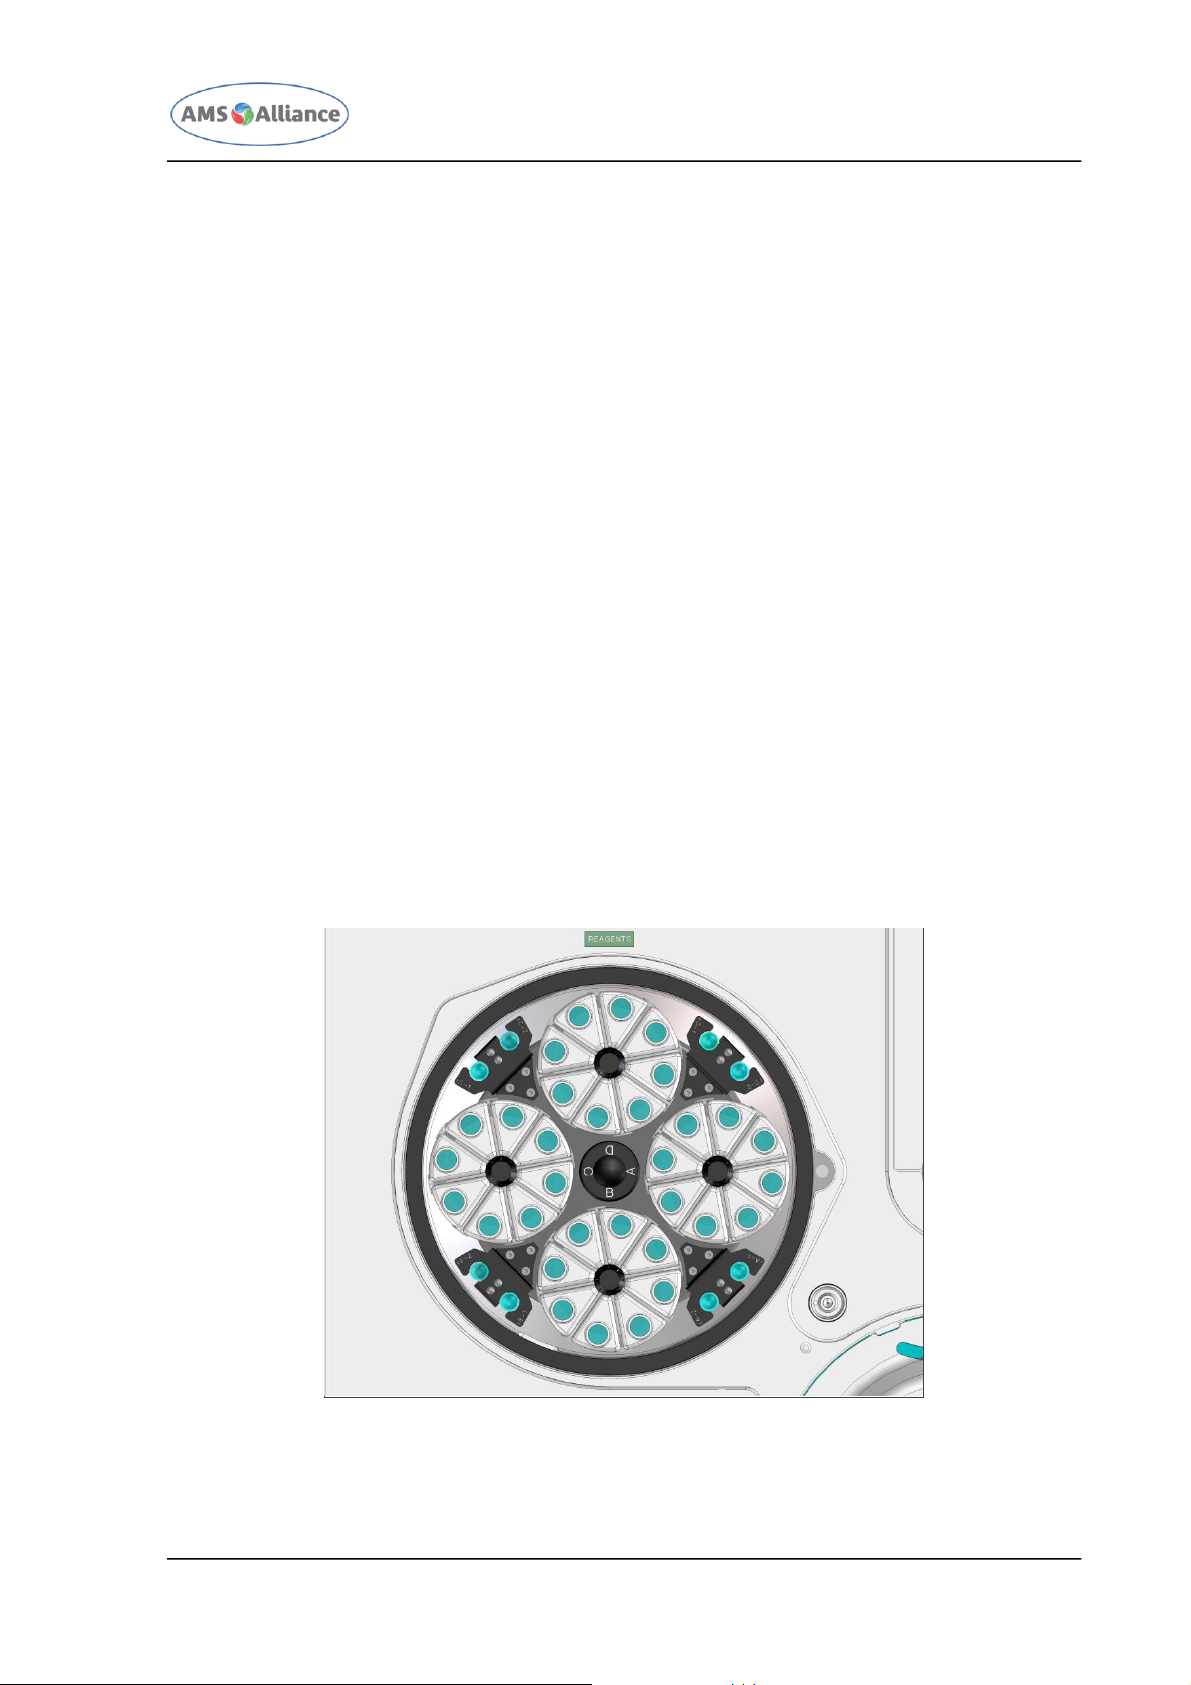
2.4 REACTIONS PLATE
The Reactions Plate of the instrument contains 80 cuvettes. Each of them has an optical
path of 10 mm. Each cuvette can be removed individually. The plate is covered by a
specific plate cover.
The plate rotates through a stepper motor. This motor assures a high precision of
positioning, superior to ± 0.1°.
The basic operating cycle includes: aspiration and dispensing of the reagents and the
samples by the Sampling Arm in the reaction cuvettes, optic reading of the cuvettes in
incubation by the Photometer, along with the relative positioning of the Reactions Plate,
washing of the filled cuvettes by a Washing Station.
The incubation temperature in the reactions cuvettes is controlled at 37° C ± 0.3° C by a
controlled heating unit (Reactions Plate Resistor) placed inside the Reactions Plate .
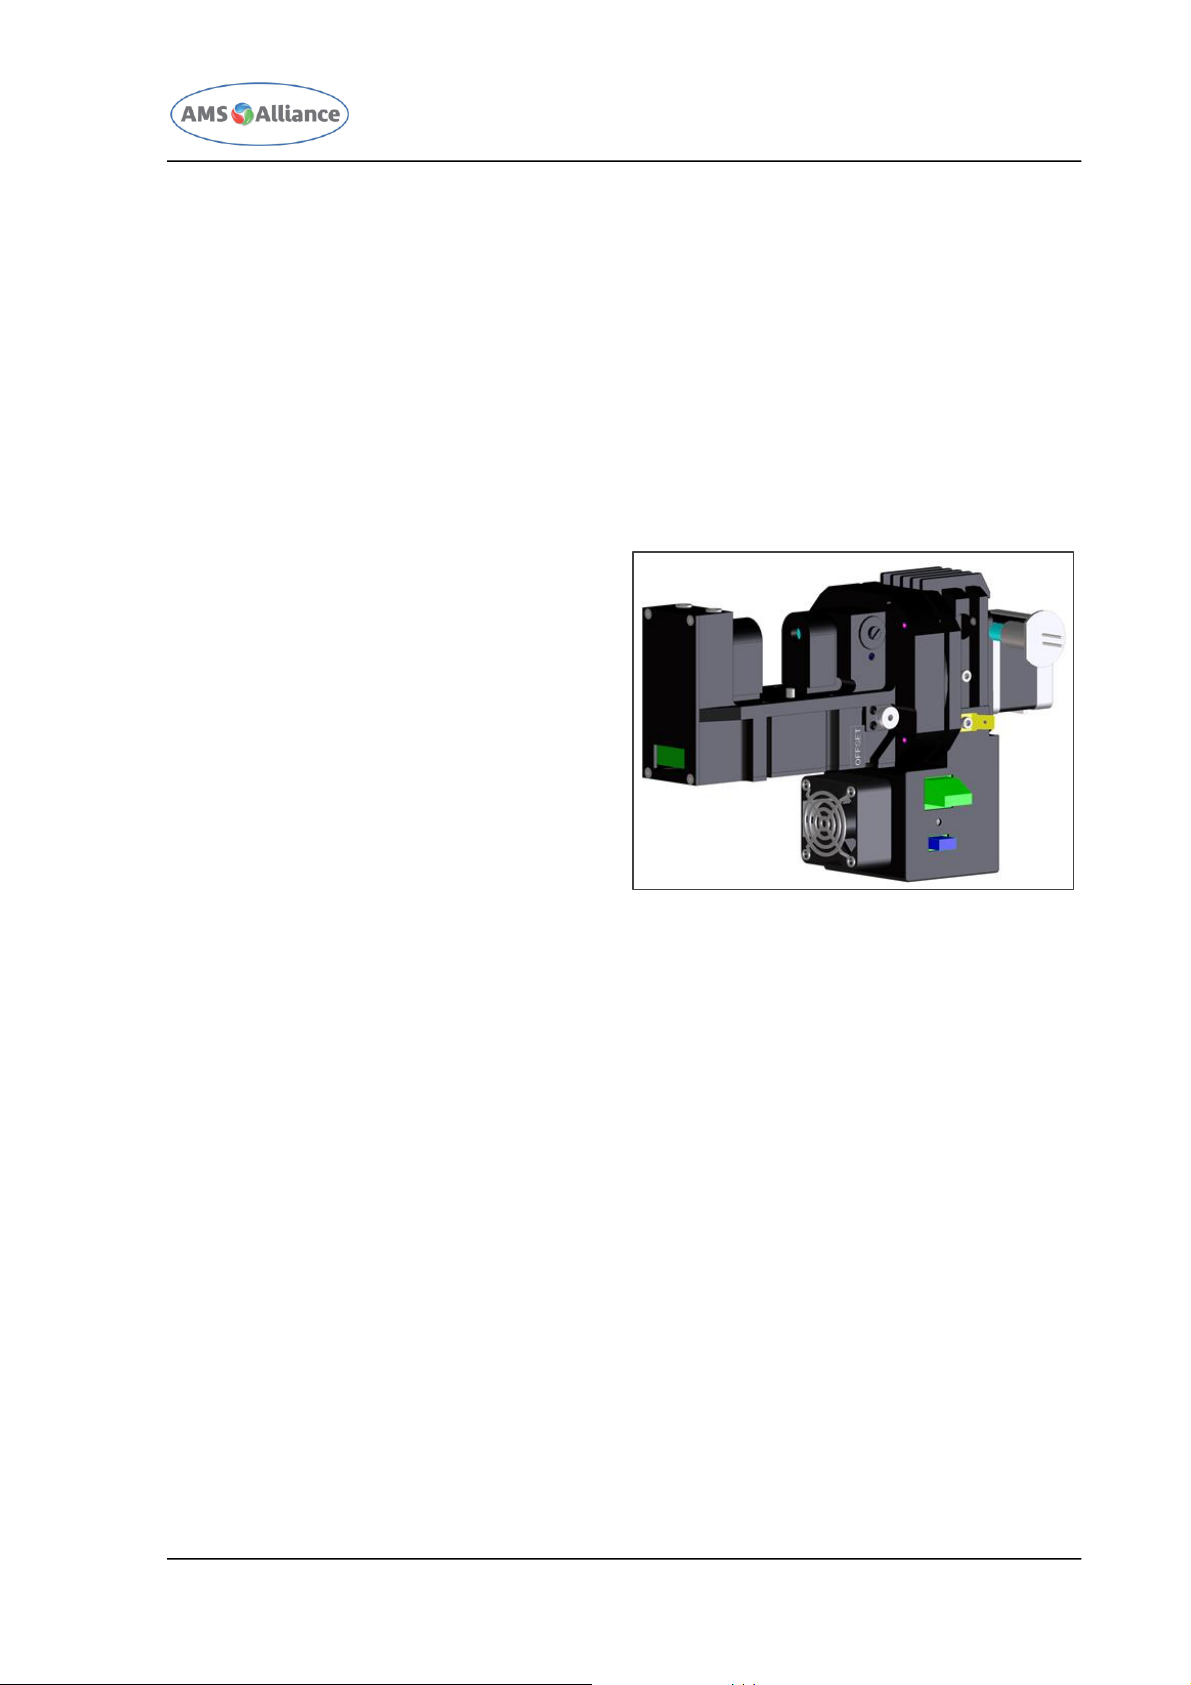
2.5 SAMPLES PLATE
The Samples Plate is composed by a main plate revolving around its axis and four
Satellite Racks (“A”, “B”, “C” and “D”), each of them revolving at the same time around
its own axis. Therefore, the Samples Plate is able to describe a substantially
hypocycloidal motion.
Page 9
CHAPTER 02 – SYSTEM DESCRIPTION
SMARTCHEM 450 USER MANUAL REV.01 JUNE 2020 PAGE 6 OF 11
The main plate rotates through a stepper motor, whereas the four Satellite Racks rotate
through another stepper motor. These two motors assure a high precision of positioning.
The two different rotations are controlled through the respective Home Sensors.
The four separate Satellite Racks (“A”, “B”, “C” and “D”) are universal racks for
continuous loading of samples, calibrators and controls.
Two different configurations are available for the samples plate:
100 Samples Plate
Each Satellite Rack contains up to 18 tubes with a volume of 5 ml. Moreover, 28
extra positions - for the same tubes - are positioned on the main plate for further
samples, calibrators and controls.
68 Samples Plate
Each Satellite Rack contains up to 15 tubes with a volume of 10 ml. Moreover, 8
extra positions - for the same tubes - are positioned on the main plate for further
samples, calibrators and controls.
The Samples Plate is covered by means of two covers: Samples Plate cover and Samples
Plate safety protection. Removing only the Samples Plate safety protection allows the
replacement of the Satellite Racks for continuous loading.
2.6 REAGENTS PLATE
The Reagents Plate is composed by a main plate revolving around its axis and four
Satellite Racks (“A”, “B”, “C” and “D”) each of them revolving at the same time around its
own axis. Therefore, the Reagents Plate is apt to describe a substantially hypocycloidal
motion.
The main plate rotates through a stepper motor, whereas the four Satellite Racks rotate
through another stepper motor. This two motors assure a high precision of positioning.
The two different rotations are controlled through the respective Home Sensors.
Page 10
CHAPTER 02 – SYSTEM DESCRIPTION
SMARTCHEM 450 USER MANUAL REV.01 JUNE 2020 PAGE 7 OF 11
Each of four removable universal racks (“A”, “B”, “C” and “D”) contains 8 positions for
trapezoidal bottles of 50 ml. Each of the trapezoidal bottles of 50 ml can be replaced with
two trapezoidal bottles of 25 ml. Moreover, 8 extra positions for rounded bottles of 5 ml
are positioned on the main plate.
All the bottles inside the Reagents Plate are cooled by four Cooler Modules positioned on
its border. Each module is composed by two Peltier cells and a fan opportunely powered.
One of them allows mounting of a Cooler Temperature Sensor in order to control the
refrigeration temperature.
The plate is covered by a specific plate cover.
2.7 PHOTOMETER
The Photometer allows the direct reading
of the Optic Density (O.D.) of the reaction
that take place in any cuvette of the
Reactions Plate.
The device is composed from two reading
channels: Sample Channel for the direct
reading of the O.D. value and Reference
Channel for its reference value. Each of
them is provided of a Pre-Ampl./ADC board
for the conversion in a digital signal of the
light beam that pass through the cuvette.
The light source is a halogen lamp (6V/10W). It is powered by a Photometer Lamp
Board.
The device contains a Filters Wheel that allows reading the reaction at different
wavelengths. The wavelengths of the 9 narrow band interferential filters placed on the
wheel are the following: 340 nm, 420 nm, 480 nm, 520 nm, 550 nm, 590 nm, 630 nm,
660 nm and 880 nm; each of the previous filters can be changed with one of the
following three: 505 nm, 570 nm or 815 nm. Moreover, the Filters Wheel has a dark
position.
The Filters Wheel rotates through a stepper motor. The selection of the exact reading
filter is controlled by means of the Filters Wheel Home Sensor and its reference on the
wheel.
Page 11
CHAPTER 02 – SYSTEM DESCRIPTION
SMARTCHEM 450 USER MANUAL REV.01 JUNE 2020 PAGE 8 OF 11
2.8 WASHING STATION
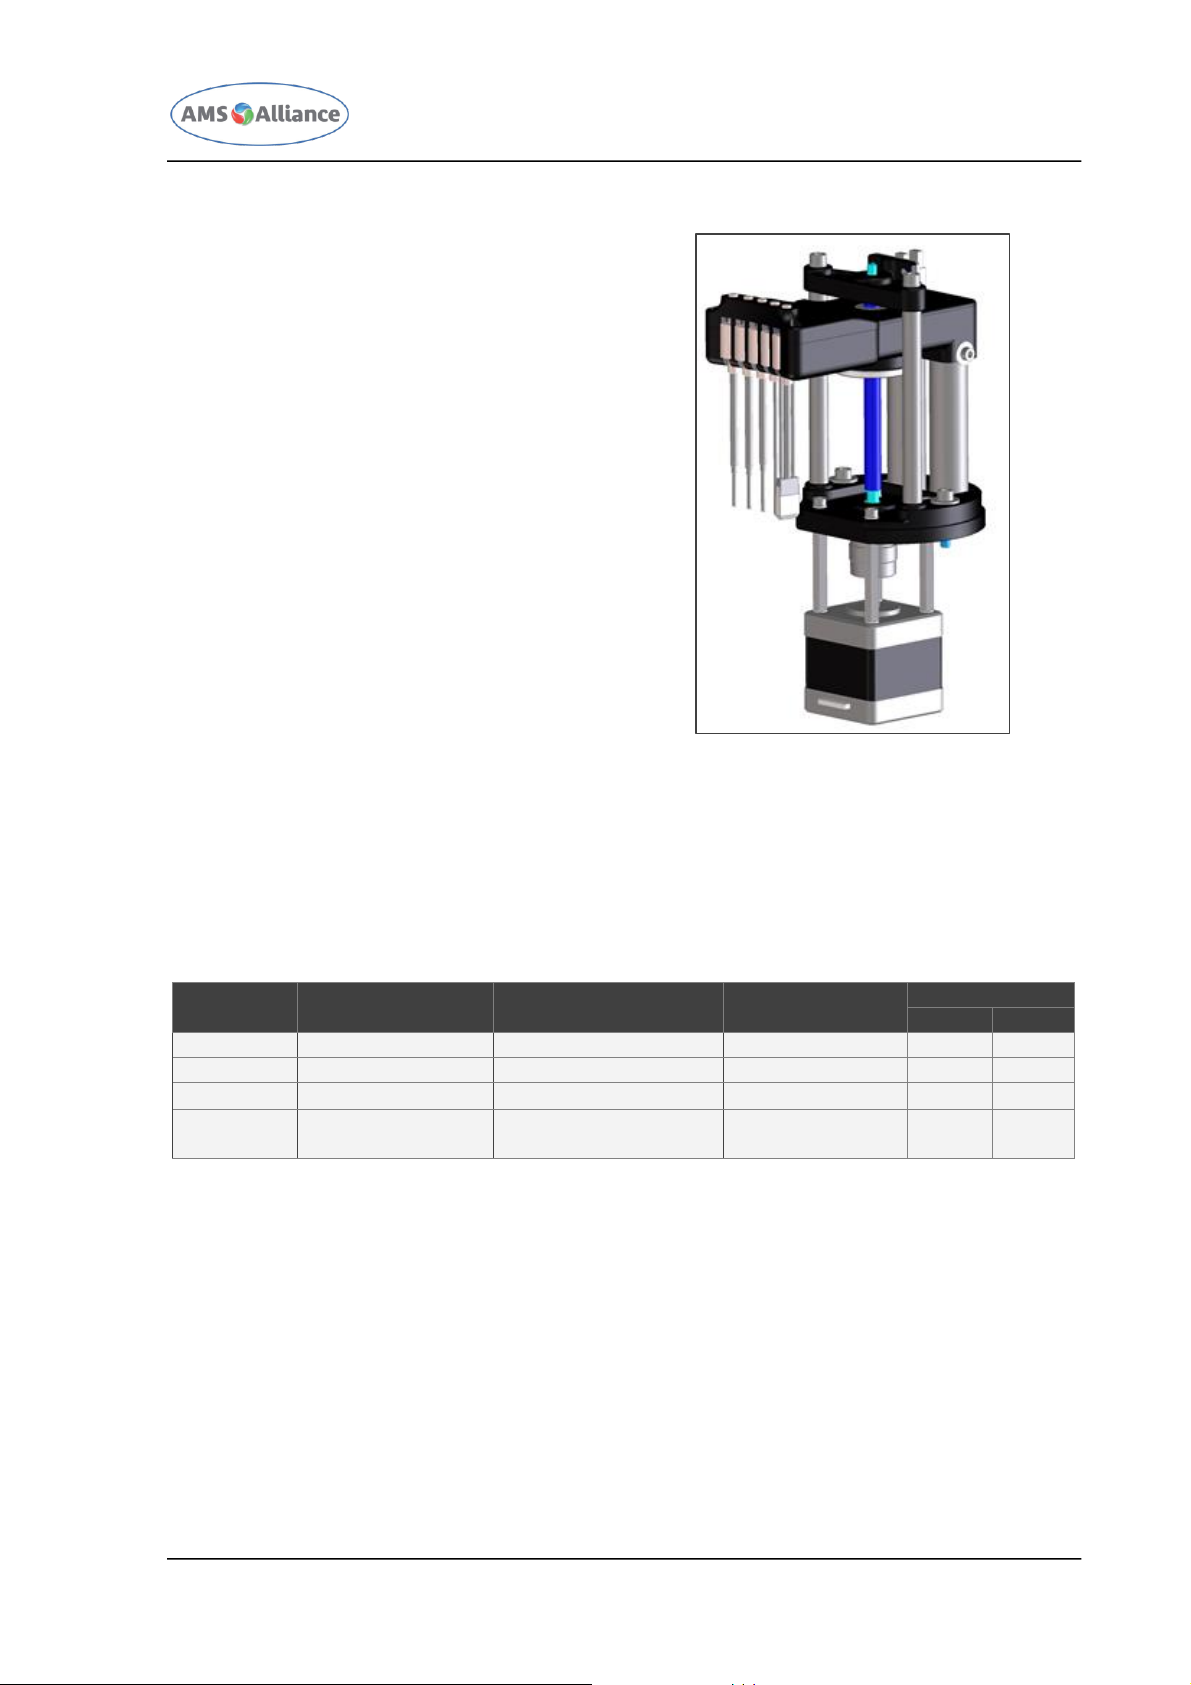
The Washing Station allows the washing
operations of the Reactions Plate cuvettes.
The Washing Station is made up of a series
of five small probes. It is situated beside
the Reactions Plate and each probe is able
to go down into a single cuvette.
The five probes are opportunely connected
to the washing station electro valves and
micro pumps for the emptying, washing
and drying operations of the cuvettes. In
particular, the last probe has a pad for the
drying operations.
The vertical movement of the Washing
Station on the Reactions Plate is allowed
by its lead screw connected to a stepper
motor.
2.9 REAGENTS AND SAMPLES BARCODE READERS
Two barcode readers can be installed (optional) for reagents and samples on the SAT 450
instrument.
The bar codes families expected on the Samples Plate to be read from the Samples
Barcode Reader are only the following: Code 2/5, Code 39, Code 128 and CODABAR.
The features of this families are reported in the following table.
Code
Family
Family Members
Check Digit Control
Options
Code Length
Min
Max
Code 2/5
Interleaved 2/5
Yes or No
NA
4
16
Code 39
Standard Code 39
Yes or No
NA
1
16
Code 128
Standard
No
NA
1
16
CODABAR
Standard
NA
No transmission
start/stop
1
16
Page 12
CHAPTER 02 – SYSTEM DESCRIPTION
SMARTCHEM 450 USER MANUAL REV.01 JUNE 2020 PAGE 9 OF 11
2.10 ISE MODULE (OPTIONAL)
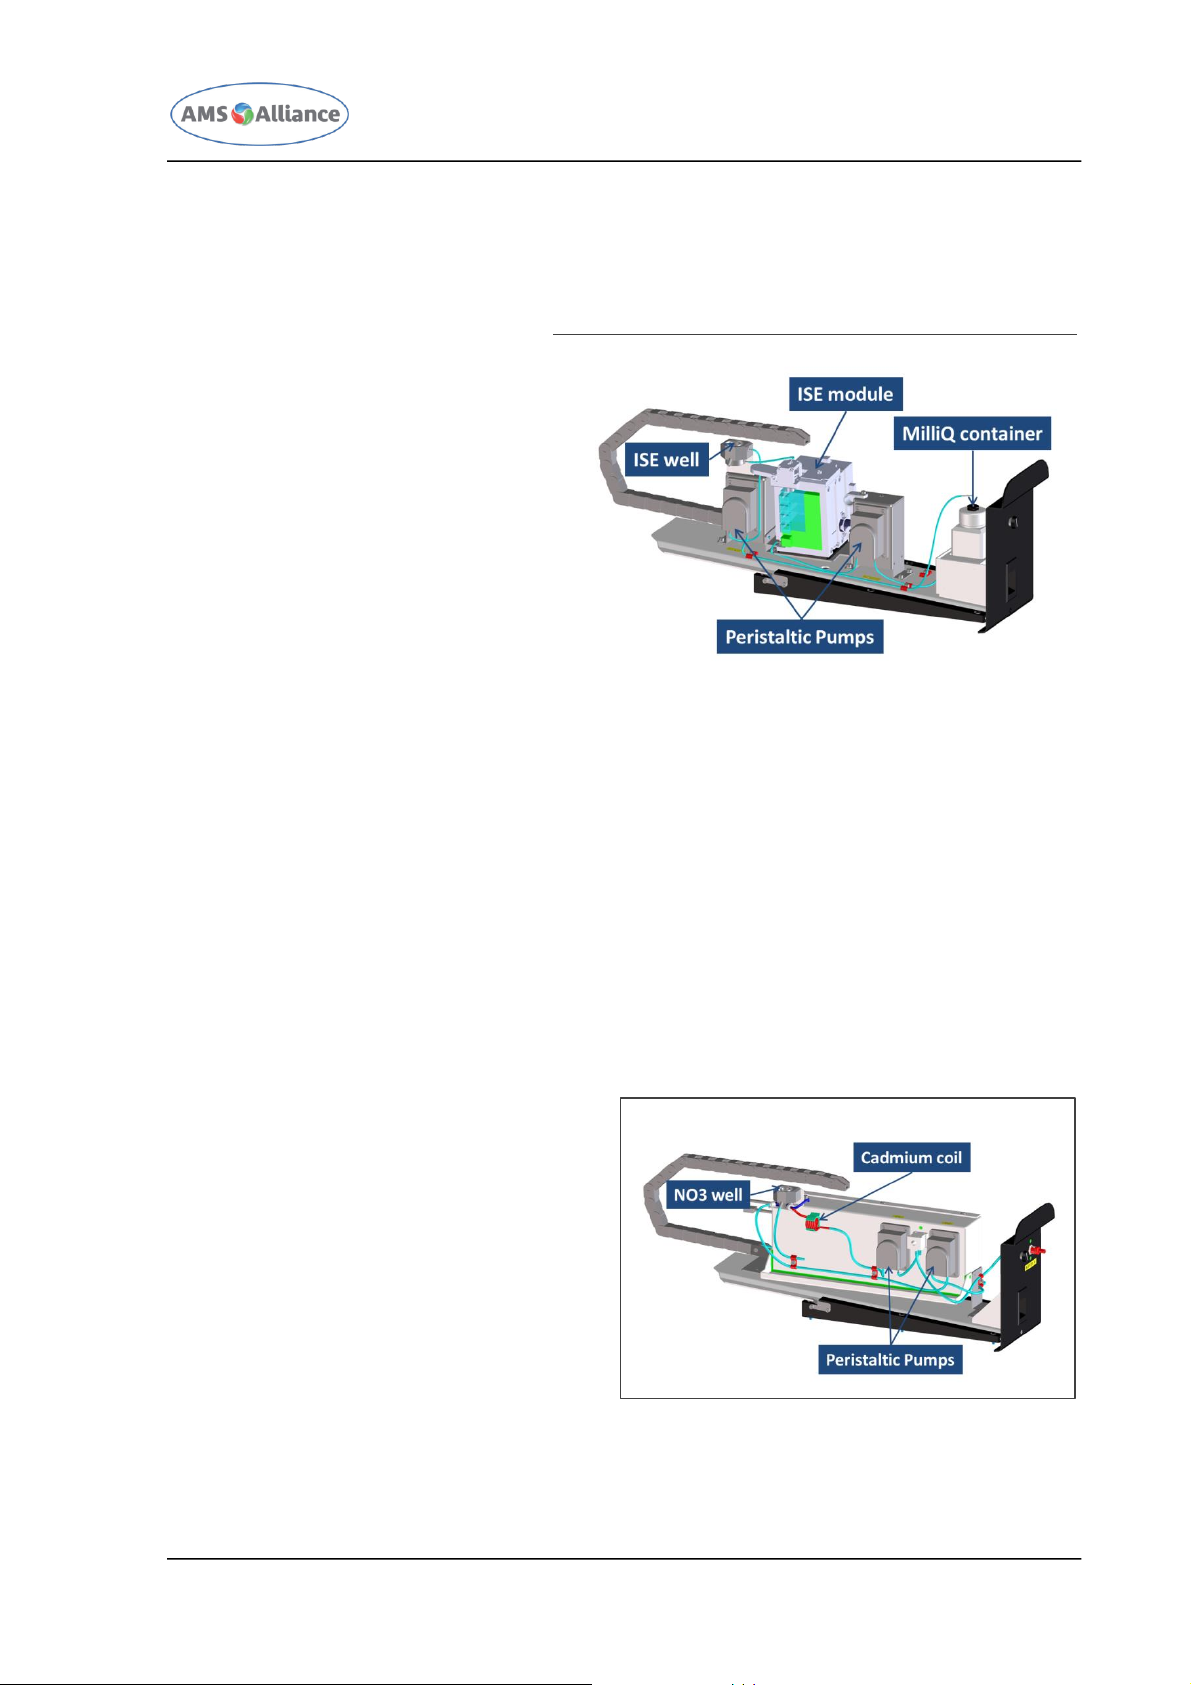
An ISE Module can be installed (optional) on the Smartchem 450 instrument.
This module is used to determine
the pH, Conductivity and Redox
values. The analyzer places the
sample in the ISE well of the
module.
A peristaltic pump positions the
sample inside the electrodes, waits
for the reading of the sample to be
completed and finally moves the
sample in the discharge line.
The second peristaltic pump is used
to wash the electrodes with the
distilled water contained in the
appropriate container.
In order to optimize the reading of the results, the sample, taken from the sampling arm,
is dispensed in three successive parts:
The first part called "washing part", used to remove residues of distilled water used to
wash the electrodes after each analysis;
The second part called the "rinse part", used to approach the electrodes with the
sample;
The third part called "reading part", used to perform the reading of the values.
2.11 CADMIUM MODULE (OPTIONAL)
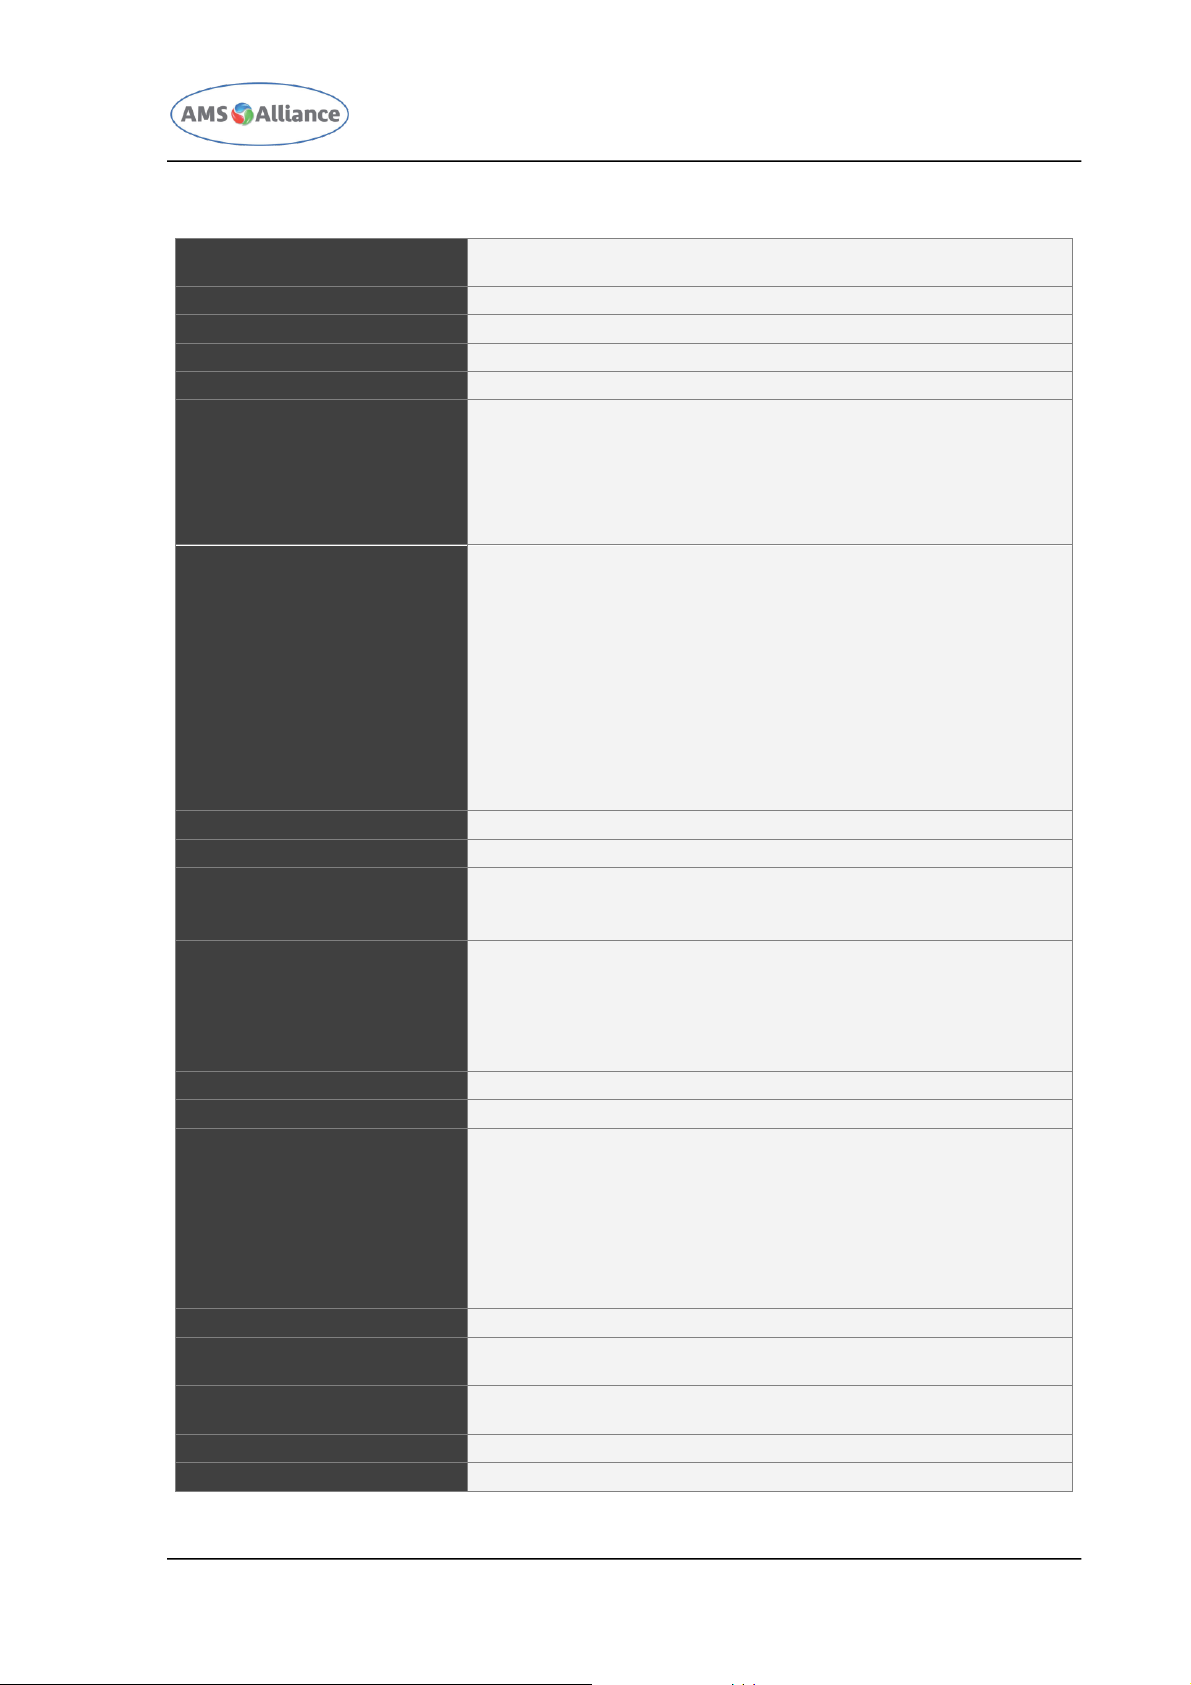
A Cadmium module can be installed (optional) on the Smartchem 450 instrument.
This module is used to analyze nitrates by
reducing nitrates to nitrites. The analyzer
places the sample in the NO3 well (the
same ISE well) of the module. The two
peristaltic pumps perform a cyclic
switching, circulating the sample inside
the cadmium column. Once the cycle has
been completed, the needle retrieves the
reduced sample and transfers it, together
with the reagents, to the reaction
cuvettes.
Page 13
CHAPTER 02 – SYSTEM DESCRIPTION
SMARTCHEM 450 USER MANUAL REV.01 JUNE 2020 PAGE 10 OF 11
2.12 INSTRUMENT CHARACTERISTICS AND SPECIFICATIONS
TYPE OF SYSTEM
Completely automated random access, computer controlled, countertop instrument for environmental analysis
ASSAY METHODS
End Point, Fixed Time, Kinetic, Bichromatic
TEST SCHEDULING MODES
Random, Batch, Strictly Batch or NELAC/EPA
THROUGHPUT RATE
240 tests/hour without the ISE Module
OPERATING TEMPERATURE
37C ± 0.3
IN LINE REAGENTS
4 removable sectors (Peltier cooling fully covered and insulated)
Each removable sector can house 8 positions for 50 ml bottles
(trapezoidal)
Each 50 ml bottle position can be divided into two 25 ml positions
(trapezoidal). 4 non-removable sectors (peripheral); each sector can
house two cylindrical 5 ml bottles.
SAMPLES LOADING
100 Samples Plate
Four satellite racks; each Satellite Rack contains up to 18 tubes
with a volume of 5 ml. Moreover, 28 extra positions - for the same
tubes - are positioned on the main plate for further samples,
calibrators and controls.
68 Samples Plate
Four satellite racks; each Satellite Rack contains up to 15 tubes
with a volume of 10 ml. Moreover, 8 extra positions - for the same
tubes - are positioned on the main plate for further samples,
calibrators and controls.
The samples area is protected by its own dedicated cover lid to limit
evaporation. The samples cover lid is divided into two parts so as to
allow continuous feed; it is monitored by a sensor.
MINIMUM REACTION VOLUME
300 μl
MAXIMUM REACTION VOLUME
640 μl
SAMPLING ARM
A single mechanical arm carries out all the sampling operations and is
equipped with a sampling needle, liquid level sensor, reagent preheating and internal needle washing
DILUTER
Integrated syringe-free module having the following specifications:
Sample volume: 2.0 μl 388 μl (0.25 μl incr.)
Reagent 1 volume: 0 μl 388 μl (1 μl incr.)
Reagent 2 volume: 0 μl 388 μl (1 μl incr.)
Reagent 3 volume: 0 μl 388 μl (1 μl incr.)
Reagent 4 volume: 0 μl 388 μl (1 μl incr.)
PRECISION
CV < 1 % at 2 μl
READING SYSTEM
Direct reading
OPTICAL SYSTEM
Photometer: dual channel, interferential filters
Wavelength: 9 narrow band interferential filters (340 nm, 420 nm, 480
nm, 520 nm, 550 nm, 590 nm, 630 nm, 660 nm and 880 nm); each of
the previous filters can be changed with one of the following three: 505
nm, 570 nm or 815 nm
Light source: 6V/10W halogen lamp
Linearity range: [0.001 4.2] Abs
Resolution: 0.0001 Abs
CUVETTE OPTICAL PATH LENGTH
10 mm
WASHING STATION
Made up of 4 probes plus one drying pad which empty, wash and dry
the reaction cuvettes
REACTIONS PLATE
80 cuvettes. Non-stop computer managed cuvette Quality Control
Incubation temperature: 37°C ± 0.3
NOISE SPECIFICATIONS
Max: 68 dBA
POWER REQUIREMENT
350 Watt
Page 14
CHAPTER 02 – SYSTEM DESCRIPTION
SMARTCHEM 450 USER MANUAL REV.01 JUNE 2020 PAGE 11 OF 11
2.13 SPECIFICATIONS AND MINIMUM REQUIREMENTS FOR THE OPERATIVE SYSTEM AND PC
OPERATING SYSTEM AND
OTHER SOFTWARE
Microsoft Windows 7
®
or Windows 10®
Microsoft .NET Framework 4.5.1
SQLite .NET Data Provider
VSP Driver for FTDI Chip (USB Driver)
HARDWARE
CPU: Intel i5
®
RAM: 8 GByte
Hard Disk: 500 GByte
Monitor: 19’’
Display resolution: 1366 x 768
Touch Screen: Projected capacitive
I/O Ports: 1 Serial port or USB port (with a USB/serial converter)
for the PC-Instrument connection, 1 USB port for the printer, 1
Ethernet port for the LIMS connection (optional), 1 USB port for the
touch screen, 1 USB port for the mouse, 1 USB port for the
keyboard, 1 HDMI port for the monitor
LANGUAGES AVAILABLE
Language management via external file containing strings that can be
translated into the required local language
PLEASE NOTE: in case the computer used is not provided by AMS along with the
instrument, it is strongly suggested to test computer + instrument prior to installation at
the Customer laboratory. AMS Alliance declines any and every responsibility for software
problems that may arise due to computer purchased locally.
2.14 LIMITATIONS OF USE
The Smartchem 450 instrument cannot be used by the blind as the user must interact
with the instrument by reading/writing on the monitor. Furthermore, the instrument must
be used with extreme care by color-blind users as the user interface graphics employs
and associates different colours to provide the user with important information.
2.15 CERTIFICATION
The Smartchem 450 instrument is CE marked. This compliance is certified by the hereillustrated symbols placed on the instrument.
Page 15
CHAPTER 03 – SOFTWARE DESCRIPTION
SMARTCHEM 450 USER MANUAL REV.01 JUNE 2020 PAGE 1 OF 143
USER MANUAL
CHAPTER 03 – SOFTWARE DESCRIPTION
Page 16

CHAPTER 03 – SOFTWARE DESCRIPTION
SMARTCHEM 450 USER MANUAL REV.01 JUNE 2020 PAGE 2 OF 143
Summary
3 Software description .......................................................................... 4
3.1 Software Start and the System Monitor mask................................................. 4
3.1.1 Reagents Plate ................................................................................................................. 6
3.1.2 Cuvettes Plate .................................................................................................................. 8
3.1.3 Samples Plate .................................................................................................................. 9
3.1.4 Start Operation ............................................................................................................... 16
3.1.5 Pause Operation ............................................................................................................. 20
3.1.6 Stop Operation ............................................................................................................... 20
3.1.7 Warnings and Emergency Stops ........................................................................................ 20
3.1.8 Legend .......................................................................................................................... 21
3.2 System Setup ............................................................................................... 22
3.2.1 Materials ........................................................................................................................ 22
3.2.2 Methods ........................................................................................................................ 35
3.2.3 ISE Methods ................................................................................................................... 48
3.2.4 Calculated Methods ......................................................................................................... 57
3.2.5 Quality Control Rules ....................................................................................................... 63
3.2.6 Profiles .......................................................................................................................... 66
3.2.7 Print Order ..................................................................................................................... 67
3.2.8 Display Order ................................................................................................................. 69
3.2.9 Sampling Order .............................................................................................................. 70
3.2.10 Special wash rules .......................................................................................................... 72
3.3 Checks .......................................................................................................... 75
3.3.1 Water Blank Level of the different cuvettes ........................................................................ 75
3.3.2 Reagents Configuration .................................................................................................... 78
3.4 Routine ......................................................................................................... 84
3.4.1 Calibration & QC operations ............................................................................................. 84
3.4.2 Work plan Setup ............................................................................................................. 89
3.4.3 Calibration results ........................................................................................................... 92
3.4.4 Quality Control results ................................................................................................... 104
3.4.5 Work Plan Results ......................................................................................................... 112
3.5 Archive ....................................................................................................... 115
3.5.1 Test Counters ............................................................................................................... 115
3.5.2 Event Logs ................................................................................................................... 117
3.5.3 Admission Logs ............................................................................................................. 118
3.5.4 Backup and Restore ...................................................................................................... 119
3.6 Maintenance ............................................................................................... 121
3.6.1 Preventive Maintenance ................................................................................................. 121
3.6.2 Technical Support Files .................................................................................................. 123
3.7 Options ....................................................................................................... 124
3.7.1 Systems Options ........................................................................................................... 124
Page 17

CHAPTER 03 – SOFTWARE DESCRIPTION
SMARTCHEM 450 USER MANUAL REV.01 JUNE 2020 PAGE 3 OF 143
3.7.2 Accounts Management ................................................................................................... 135
3.7.3 Change password ......................................................................................................... 137
3.7.4 Automatic Start-up and Shutdown procedures .................................................................. 138
3.8 Help ............................................................................................................ 142
3.8.1 Info ............................................................................................................................. 142
3.8.2 Guide .......................................................................................................................... 143
Page 18
CHAPTER 03 – SOFTWARE DESCRIPTION
SMARTCHEM 450 USER MANUAL REV.01 JUNE 2020 PAGE 4 OF 143
3 Software description
3.1 SOFTWARE START AND THE SYSTEM MONITOR MASK
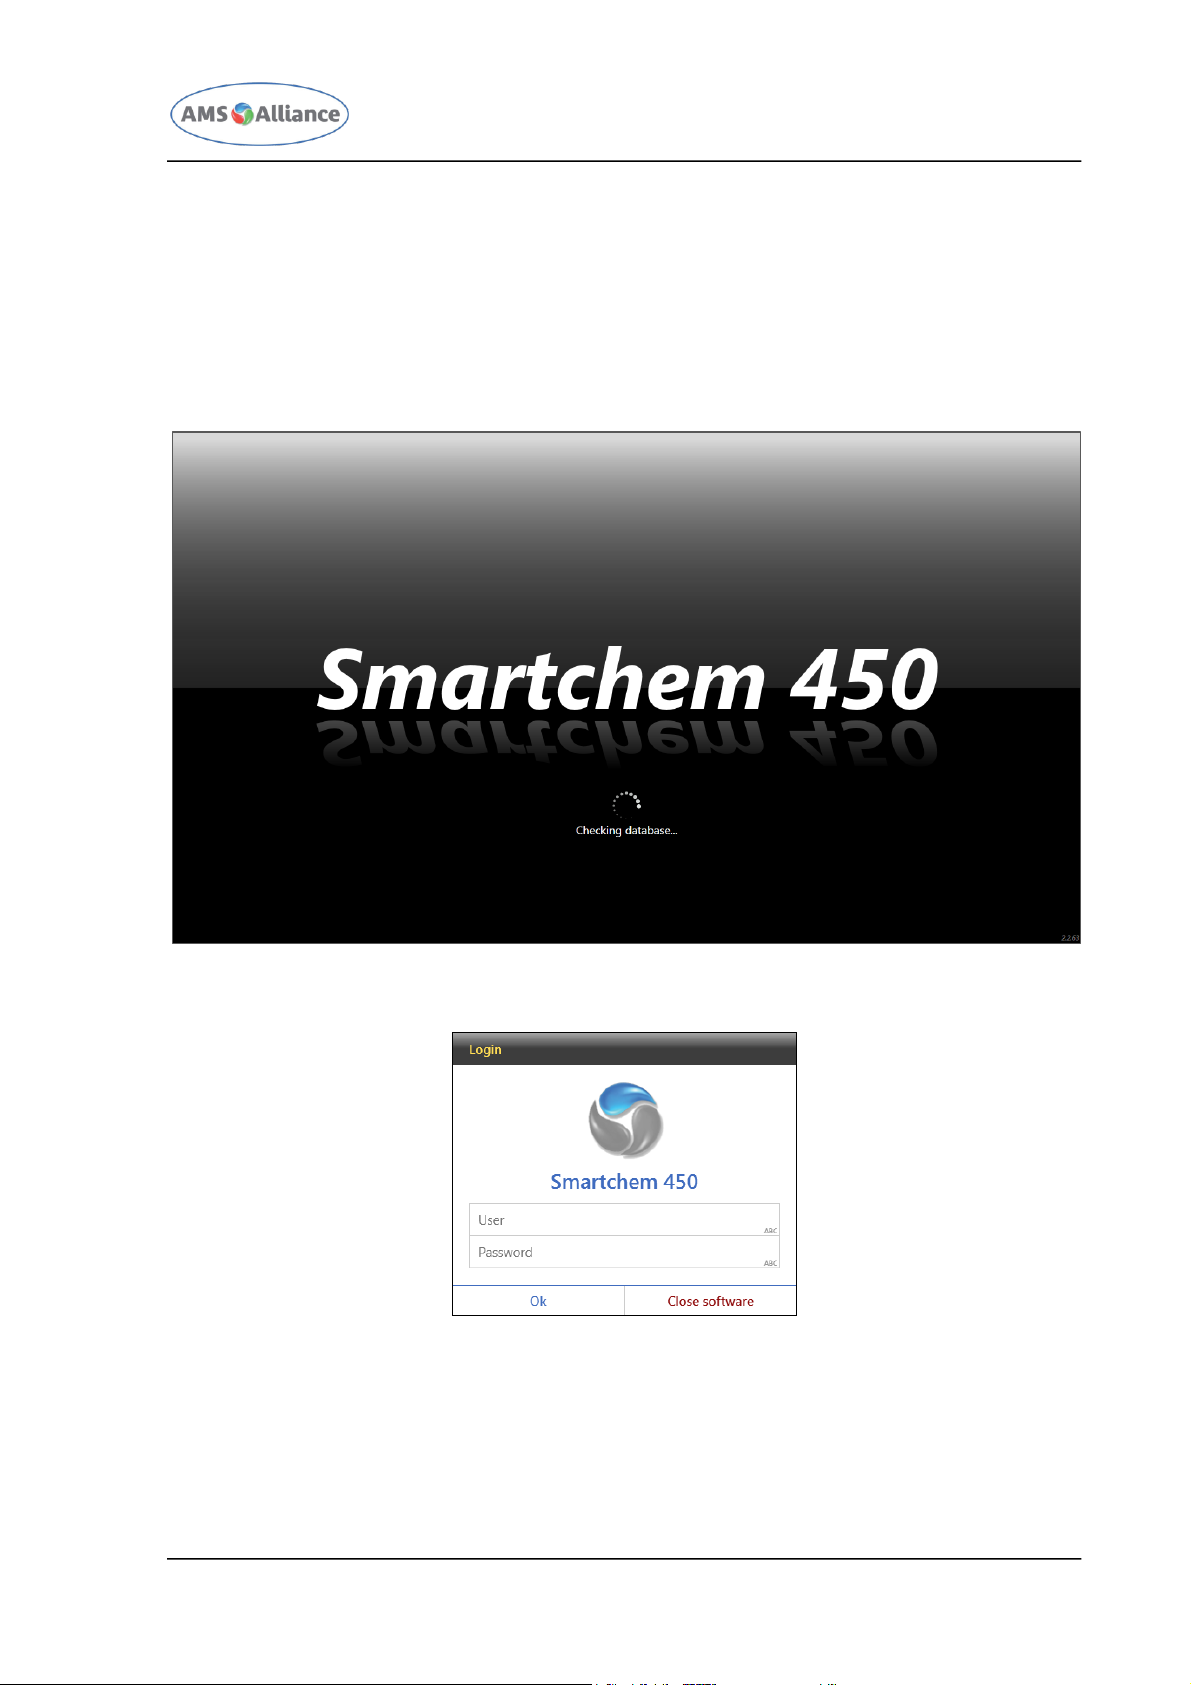
To access the software double click on the dedicated “Smartchem 450” icon (located on
the computer’s Desk Top); following page will be displayed during the software starting
procedures.
Once completed the software starting procedures, the login window will be displayed;
please enter a valid User and Password pair.
The first time the user accesses the software, please type “admin” as User and “0” as
password.
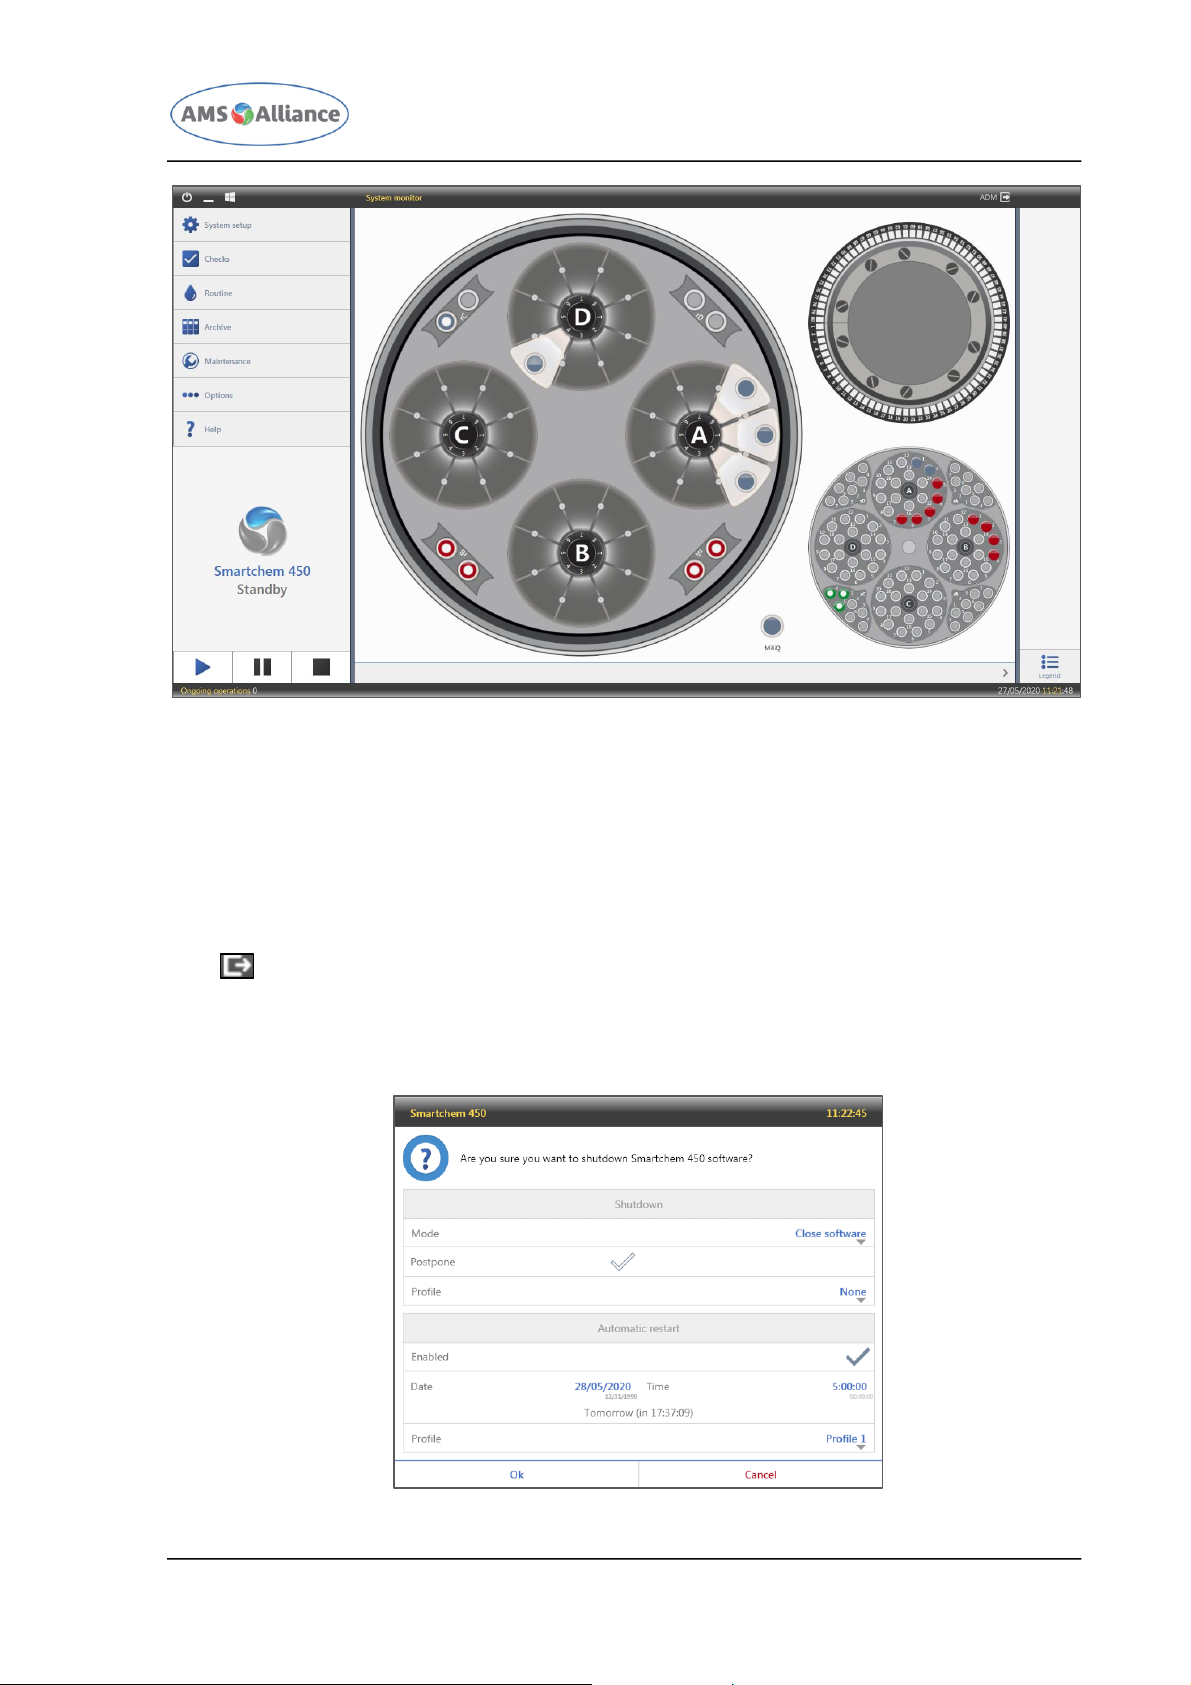
When the user has been logged in, the software will show the scheme/status of the
Smartchem 450 instrument. This mask, is called System Monitor.
Page 19
CHAPTER 03 – SOFTWARE DESCRIPTION
SMARTCHEM 450 USER MANUAL REV.01 JUNE 2020 PAGE 5 OF 143
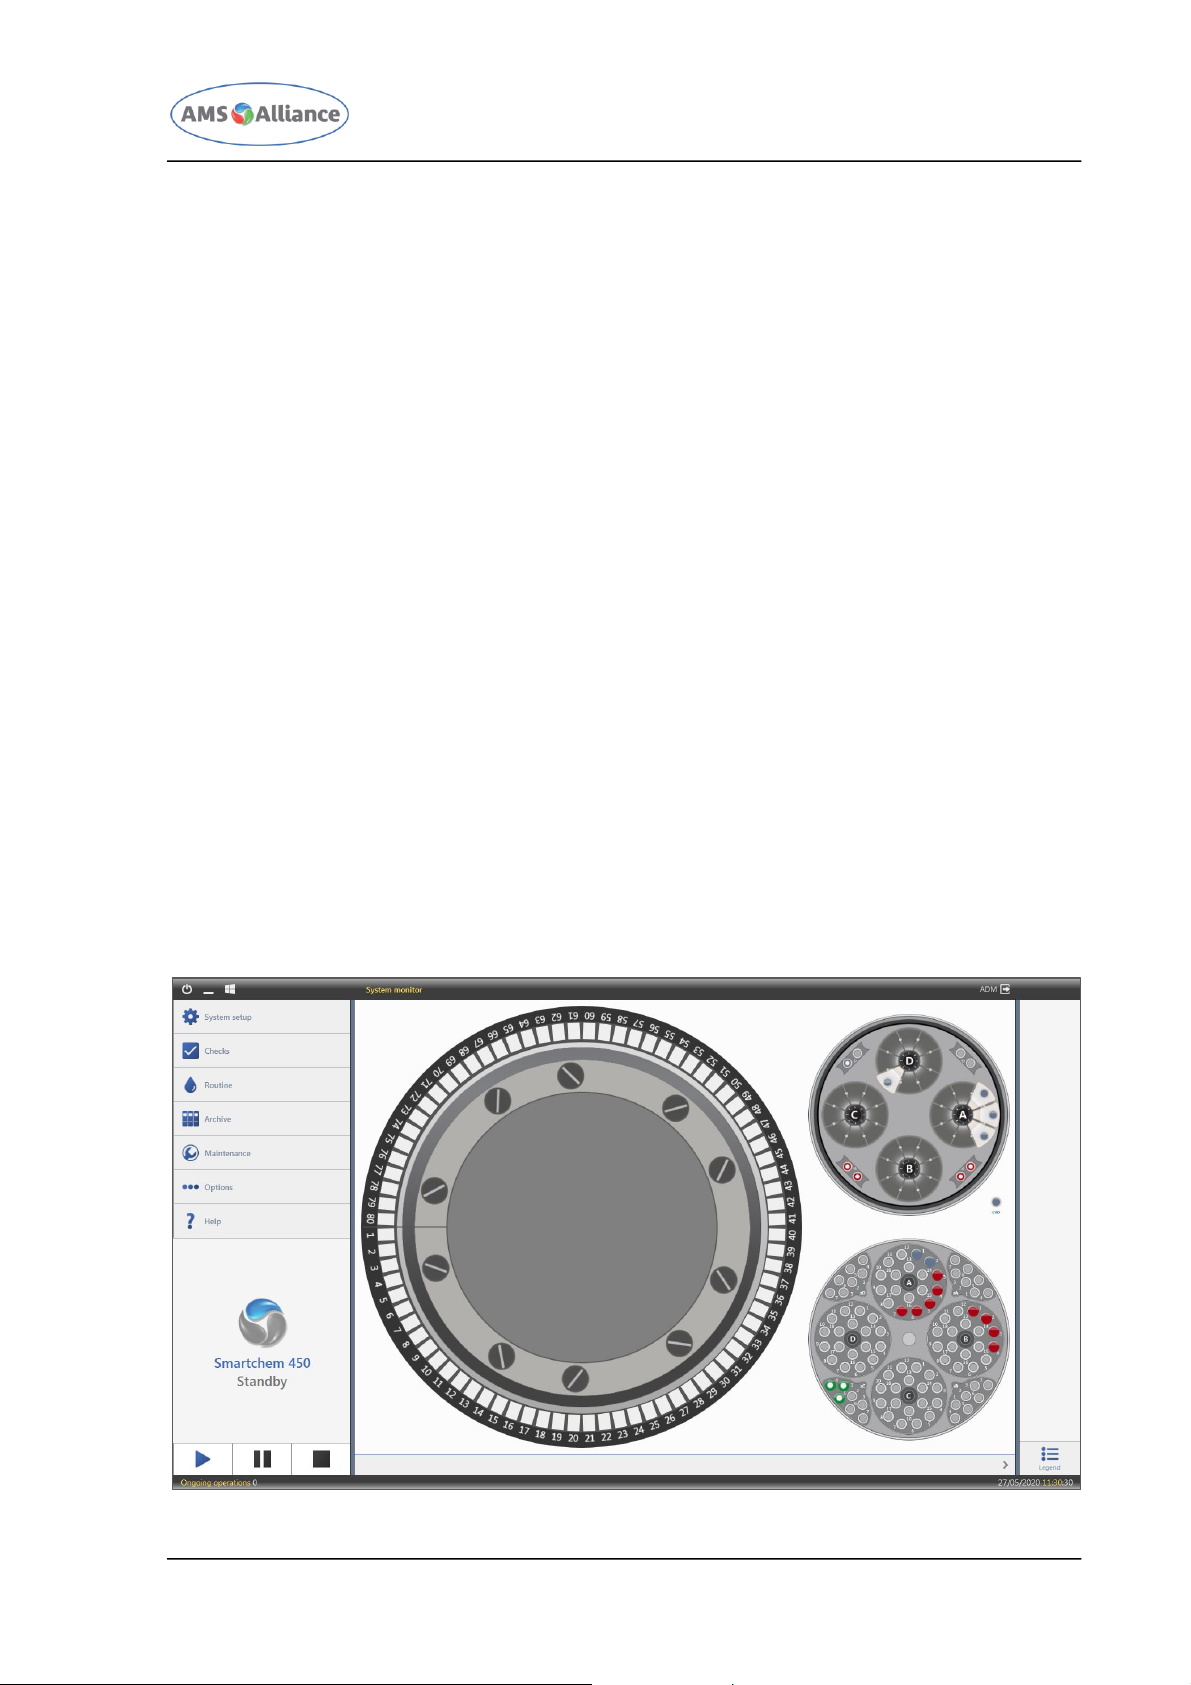
The user shall be able to select and view:
the Reagents Plate (the bigger one in figure);
the Cuvettes Plate (the right up one in figure);
the Samples Plate (the right down one in figure).
The upper right corner of the mask hosts the acronym of the logged user followed by the
icon that represents the log-out button; tapping it the login mask will appear (please
refer to the first picture).
The upper left corner of the mask hosts:
the Shutdown button; tapping this button, following window will appear.
Page 20

CHAPTER 03 – SOFTWARE DESCRIPTION
SMARTCHEM 450 USER MANUAL REV.01 JUNE 2020 PAGE 6 OF 143
The previous window allows the user to choose different settings related to the
shutdown and eventually to the following automatic startup:
SHUTDOWN MODE – the user can choose among following options: CLOSE
SOFTWARE, Close software and SUSPEND or Close software and HIBERNATE;
SHUTDOWN POSTPONE – checking this option, the user can choose to ask for the
shutdown at a later time;
SHUTDOWN TIME – modifying this time field, the user can choose to ask for the
shutdown at a later time;
SHUTDOWN PROFILE – the user can choose to use one of the automatic shutdown
profiles he/she had previously defined;
AUTOMATIC RESTART ENABLED – checking this option, the user can request for the
automatic startup of the instrument at a specific time; please note that in order to
complete the automatic startup procedures, the instrument has to be left switched
on and the PC has to be left switched on or suspended or hibernated;
AUTOMATIC RESTART DATE – modifying this date field, the user can choose to ask
for the automatic restart at the preferred day;
AUTOMATIC RESTART TIME – modifying this time field, the user can choose to ask
for the automatic restart at the preferred time;
AUTOMATIC RESTART PROFILE – the user can choose to use one of the automatic
restart profiles he/she had previously defined.
Minimize button, allows the user to hide the window, but keep the application running
and accessible;
Microsoft® Windows button, equivalent to the button in the Microsoft® Windows bar,
allows the user to access to any installed program on the Smartchem 450 PC.
3.1.1 REAGENTS PLATE
Each element of the Reagents Plate is tappable. Once the element has been tapped, the
software will show the related information about the reagents/diluent/special liquids.
Tapping a reagent rack (the user has to tap the letter of the rack), the mask will display
in a dedicated table information related to the reagents/diluents that are loaded in the
selected rack as well as will show the actions that the user can execute with the selected
rack.
Page 21
CHAPTER 03 – SOFTWARE DESCRIPTION
SMARTCHEM 450 USER MANUAL REV.01 JUNE 2020 PAGE 7 OF 143
With reference to the liquids present in the selected rack, the details table will display
following info: Position, Bottle Type (5 ml, 25 ml, 50 ml), Residual Volume,
Reagent/Diluent Name, Reagent/Diluent Lot Number, Reagent/Diluent Expiration Date
Loading date, remained stability days, Barcode if read, Alarm (Low, Empty…).
The user can tap the icon in order to view the table at full screen; re-tapping the
same icon the table will be resized.
Following actions are available with the selected reagents rack:
READ BARCODE - active only if the instrument is in Pause or in Stand-by; allows to
request the barcode reading;
EXPORT – allows the user to create an xlsx file that reports all the reagents/diluents
that are present in the selected rack;
PRINT - allows the user to print a page that reports all the reagents/diluents that are
present in the selected rack.
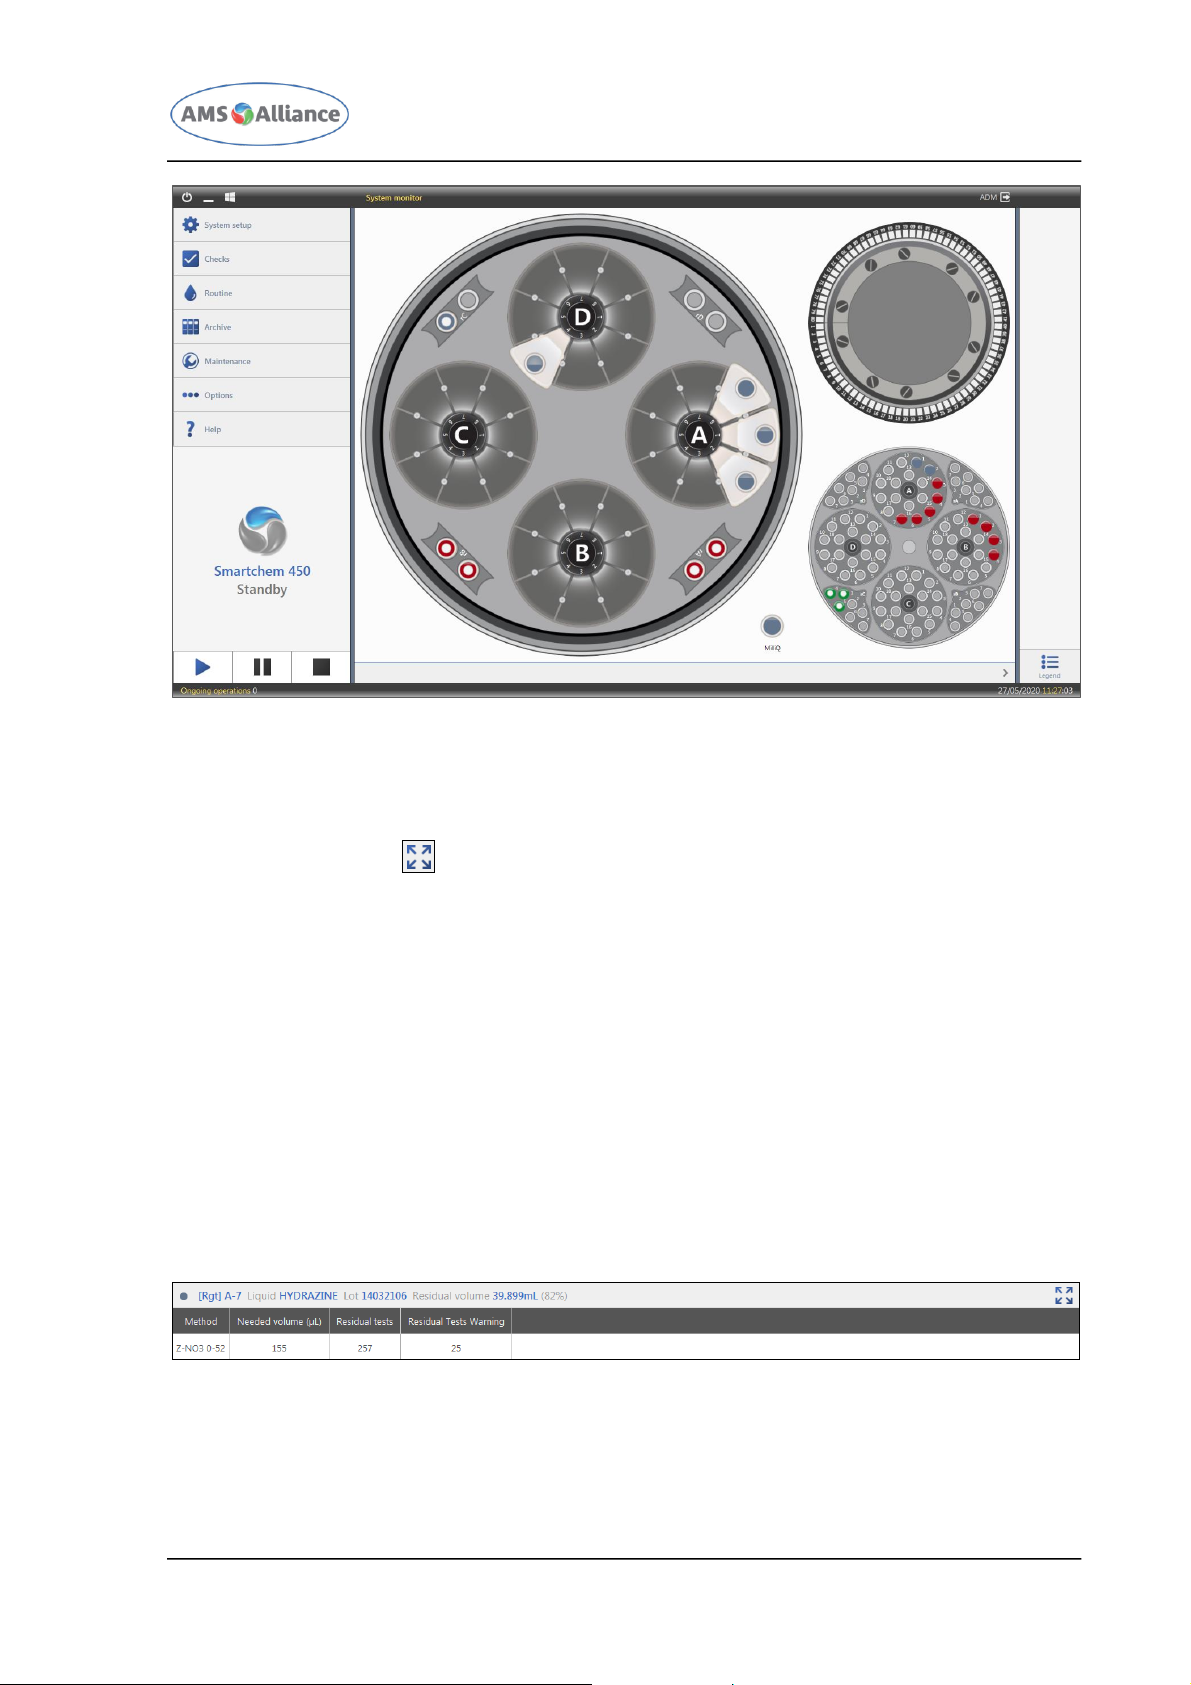
Tapping a single reagent/dilution bottle, the mask will display in a dedicated table some
information related to the selected reagent/diluent as well as will show the actions that
the user can execute with the selected rack.
With reference to the selected reagent/diluent bottle, the details table will display
following info: Position, Reagent/Diluent Name, Reagent/Diluent Lot Number and the
Residual Volume. Furthermore, for each method that uses the selected reagent/diluent,
Page 22
CHAPTER 03 – SOFTWARE DESCRIPTION
SMARTCHEM 450 USER MANUAL REV.01 JUNE 2020 PAGE 8 OF 143
the method Name, the needed volume requested by the method, the residual tests and
the residual tests warning limit set for the specific method will be displayed.
Following actions are available with the selected reagent/diluent bottle:
CHANGE BOTTLE - active only if the selected reagent volume is low or completed and if
the instrument is in Pause or in Stand-by or Search; allows the user to communicate
to the software that the bottle has been changed; the change bottle operation will
update the loading date and the volume will be set to Unknown;
LIQUID CHECKED - active only if the selected reagent volume is liquid level not found or
overfilled and if the instrument is in Pause or in Stand-by or Instrument not Available;
allows the user to communicate to the software that a verification of the liquid has
been performed; following to this operation the volume will be set to Unknown. This
action allows the instrument to restart using the liquid checked;
READ BARCODE - active only if the instrument is in Pause or in Stand-by; allows to
request the barcode reading of the bottle present in the selected position.
Please note that if the ISE module is configured, the MilliQ bottle is visible in the
Reagents plate area. Tapping on it the software will show the residual volume expressed
either in milliliter or in percentage.
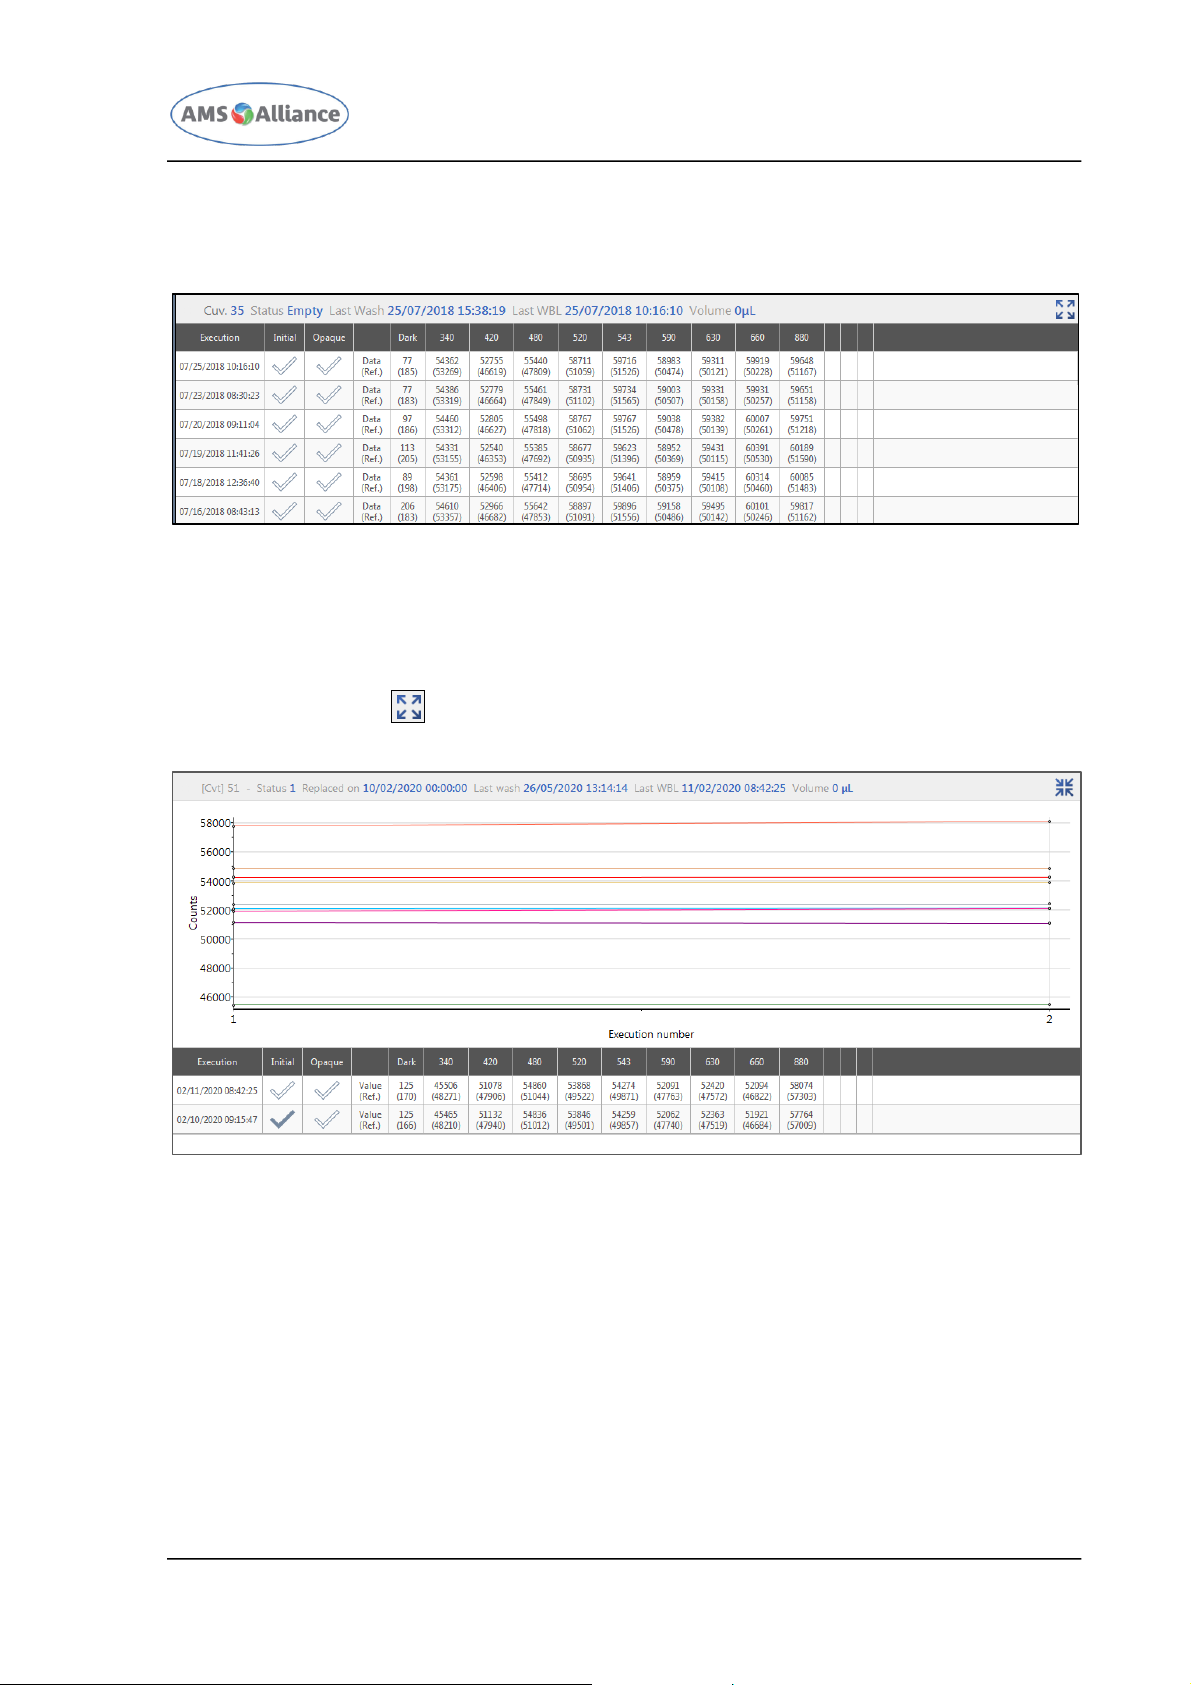
3.1.2 CUVETTES PLATE
Tapping once on the Cuvettes Plate, this plate will be moved in the left part of the screen
and will be enlarged (the plate that was in the left position will pass in the right position
and will be scaled down).
Page 23
CHAPTER 03 – SOFTWARE DESCRIPTION
SMARTCHEM 450 USER MANUAL REV.01 JUNE 2020 PAGE 9 OF 143
Tapping any cuvette, the mask will display in a dedicated part, the table with the WBL
results.
For each WBL execution, the table will show for each filter the WBL result and will
indicate if the cuvette will be used (Opaque check) or not and if the related execution is
the initial one or not. It is important to note that the WBL result is displayed in red for
each filter out of the validity check; the single cuvette will not be used for test execution
only for those filters that are not considered good.
The user can tap the icon in order to view the graph and the table at full screen; retapping the same icon the graph and the table will be resized.
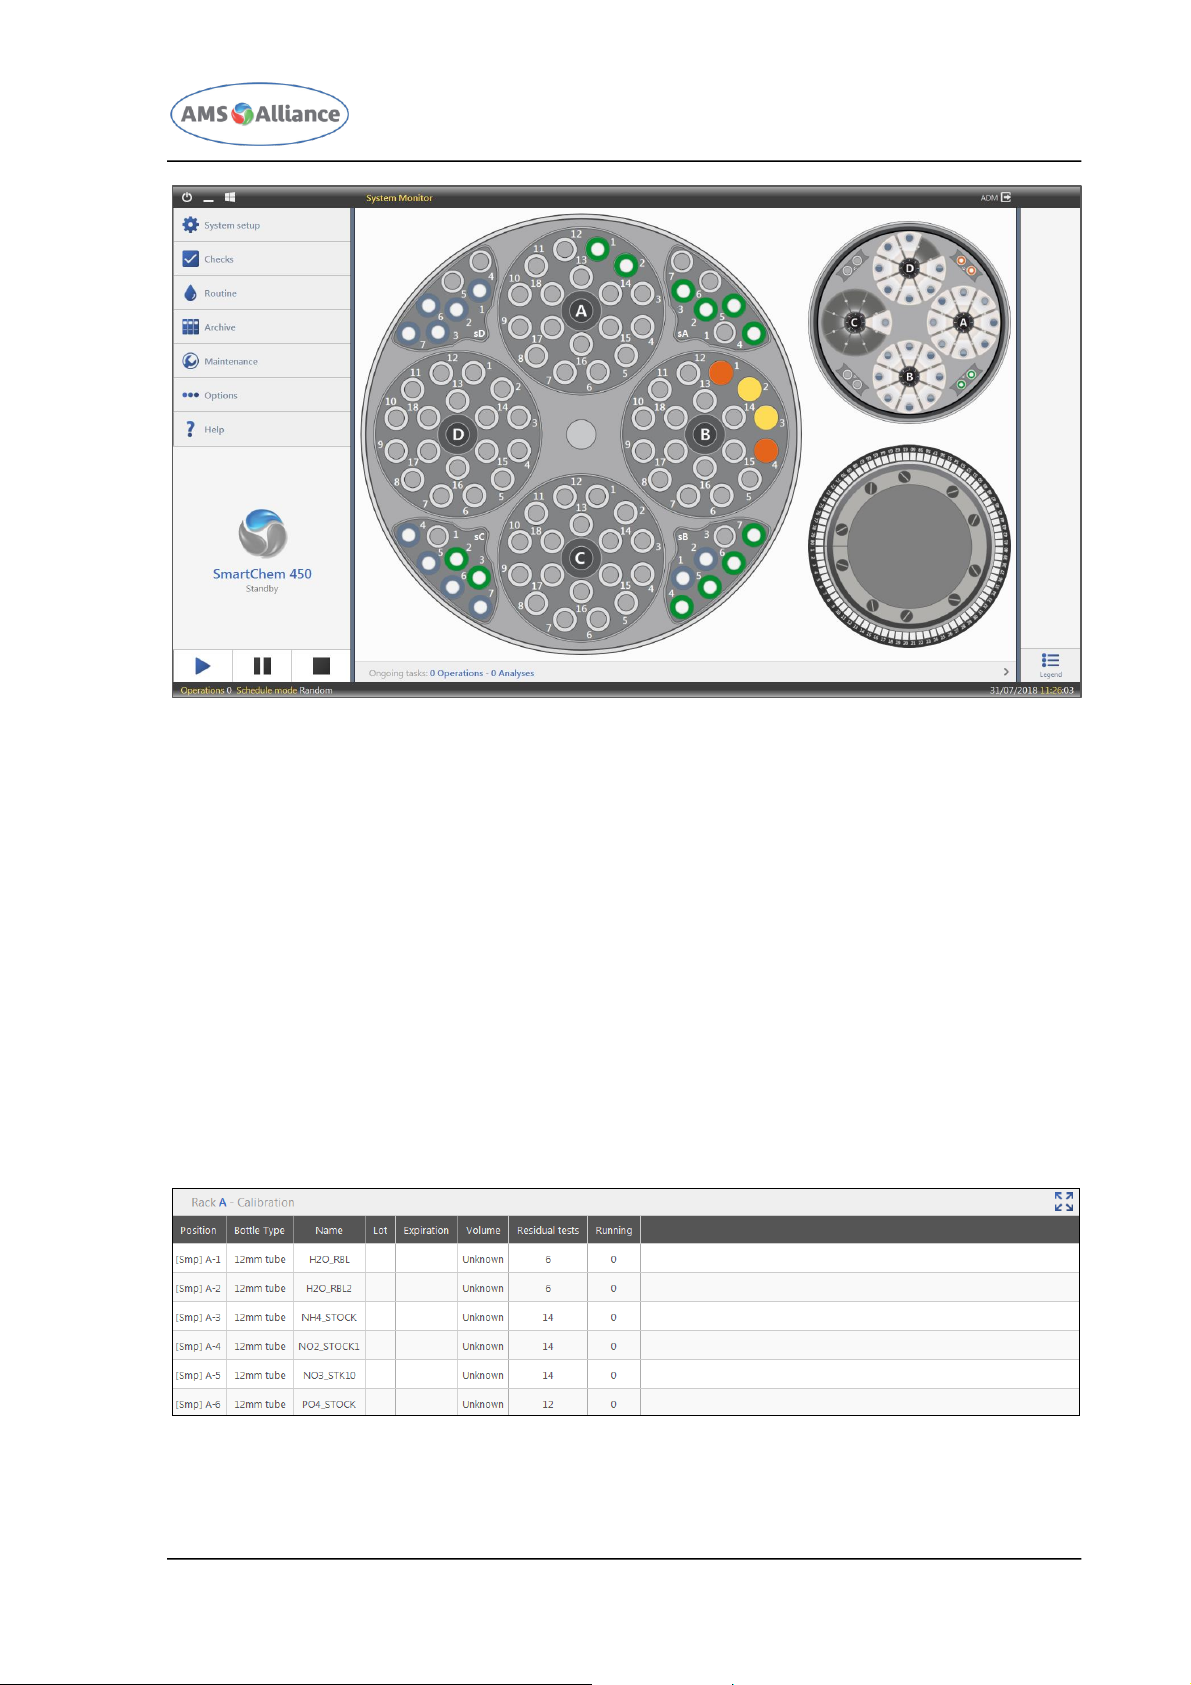
3.1.3 SAMPLES PLATE
Tapping once on the Samples Plate, this plate will be moved in the left part of the screen
and will be enlarged (the plate that was in the left position will pass in the right position
and will be scaled down).
Page 24
CHAPTER 03 – SOFTWARE DESCRIPTION
SMARTCHEM 450 USER MANUAL REV.01 JUNE 2020 PAGE 10 OF 143
The Samples Plate will host two different types of racks:
Calibration & Quality Controls racks: these racks will host Calibrators, liquid for
RBL and Quality Controls; Calibrators and the liquid for RBL can be placed using the
Calibration Setup Mask; Quality Controls can be placed using the QC Setup Mask; all
these type of liquids are represented as rings; these racks will include only liquids
represented as rings;
Sample racks: these racks will host samples and Quality Controls positioned among
the samples; samples and Quality Controls positioned among the samples can be
positioned using the Work List Setup Mask; these racks will include liquids represented
as disks (samples) and liquids represented as rings (controls).
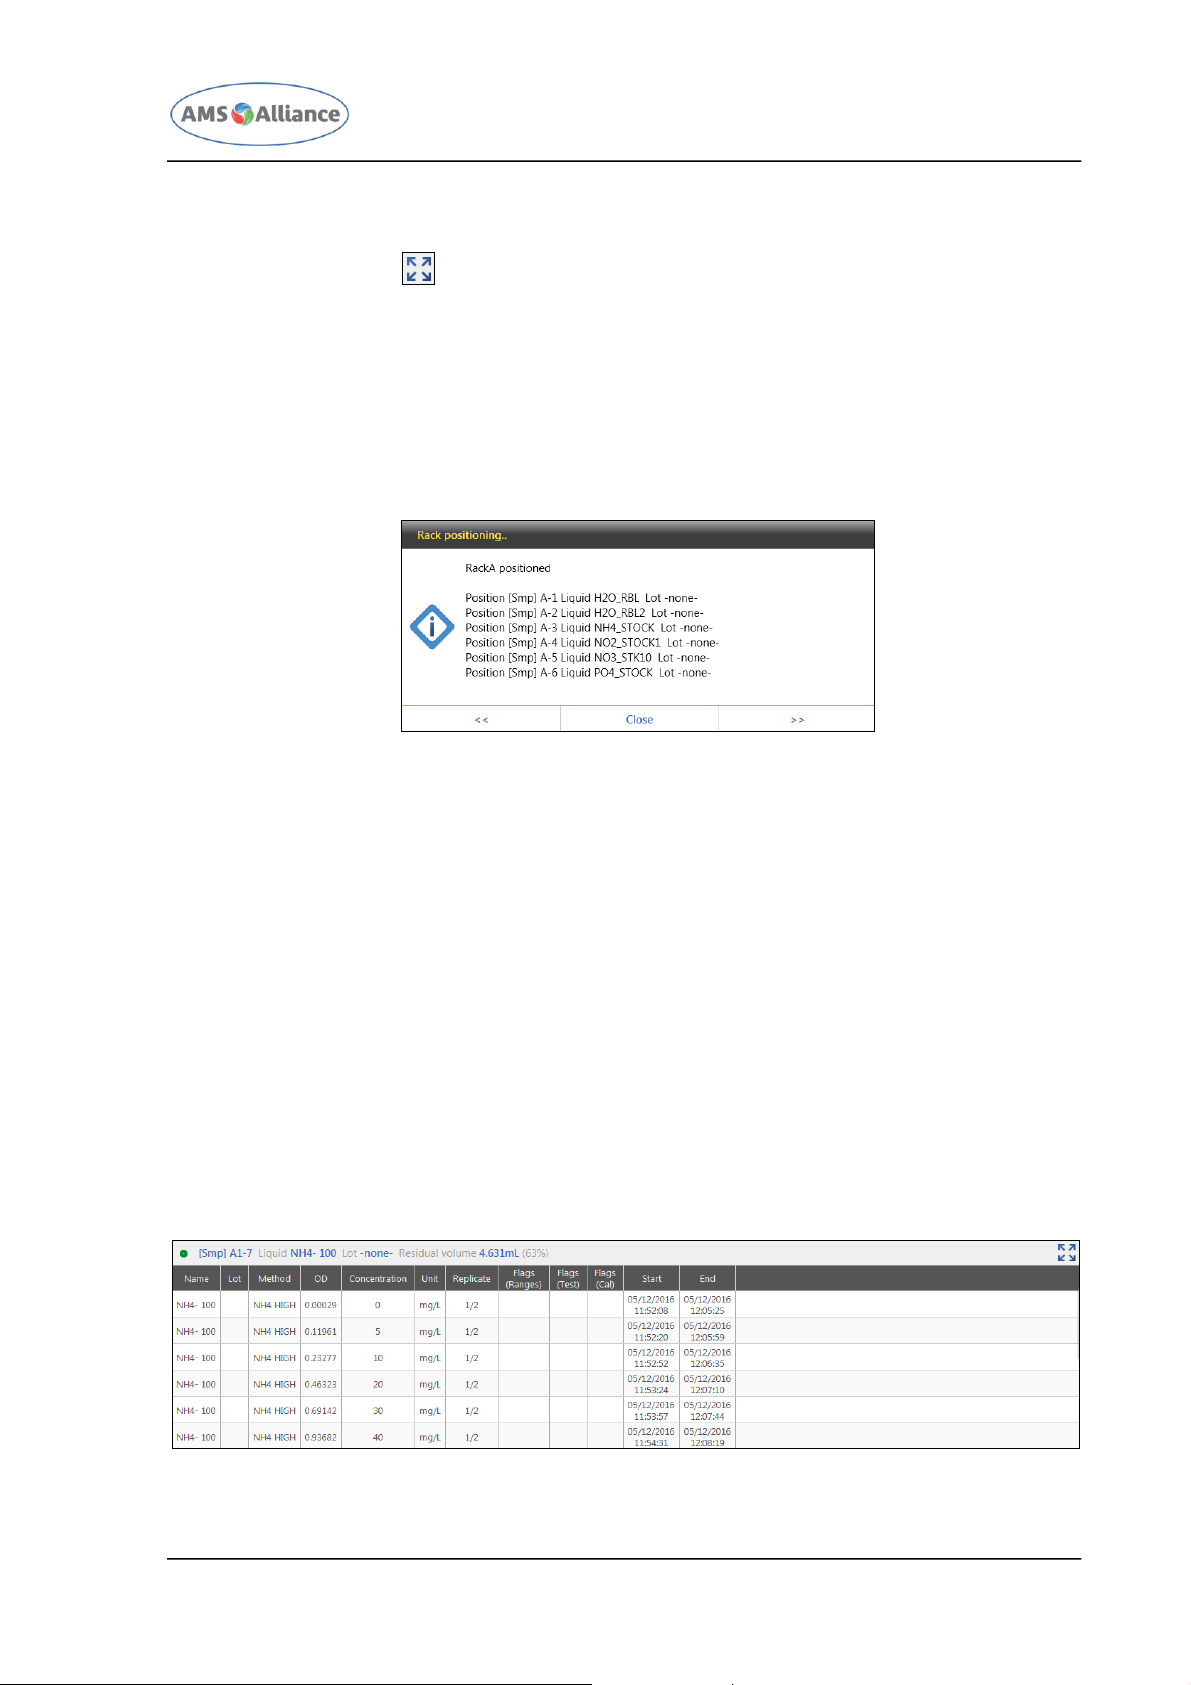
Tapping a Calibration & Quality Controls rack, the mask will display in a dedicated
table (Details table) some information related to the liquids that are loaded in the
selected rack as well as will show the actions that the user can execute with the selected
rack.
With reference to the liquids present in the selected rack, the details table will display
following info: Position, Bottle Type, Name, Lot Number and Expiration Date, Volume,
Page 25
CHAPTER 03 – SOFTWARE DESCRIPTION
SMARTCHEM 450 USER MANUAL REV.01 JUNE 2020 PAGE 11 OF 143
number of Residual tests, number of Running tests, number of tests with range errors,
number of tests with masked results and number of tests with critical errors.
The user can tap the icon in order to view the table at full screen; re-tapping the
same icon the table will be resized.
Following actions are available with the selected Calibration & Quality Controls rack:
PLACE RACK – allows the user to request for the physical loading of the selected rack in
the instrument; following this request, the instrument will bring the selected rack
(please refer to the letter of the rack; i.e. A, B, C or D) in the position accessible to
the user; as soon as the rack will be physically placed in the correct position, the
software will show the mask depicted in the following figure.
After the completion of the rack loading operation, the user can decide to request for
another physical rack loading (previous on next rack) as well as to close this mask.
LOAD WORK PLAN – visible only if the selected Calibration & Quality Controls rack has
not pending or scheduled or running operations; allows to put in the system monitor a
previous defined work plan starting from the selected rack; this is a software loading
and it is not a physical loading (please refer to the previous action);
EXPORT – allows the user to create an xlsx file that reports the data listed in the
Details table;
PRINT - allows the user to print a page that reports the data listed in the Details table.
Tapping each liquid present in the Calibration & Quality Controls rack, the mask will
display in a dedicated table the information related to the selected liquid; the displayed
information will depend on the type of selected liquid: liquid for RBL, Standard and
control.
Following picture shows the Standard information example.
Page 26
CHAPTER 03 – SOFTWARE DESCRIPTION
SMARTCHEM 450 USER MANUAL REV.01 JUNE 2020 PAGE 12 OF 143
With reference to the selected Standard, the details table will display following info:
Position, Liquid Name, Lot Number, Residual Volume (in the header of the table) and for
each associated test Method Name, Optical Density, Concentration, Measurement Unit,
Replicate (n/total), Flags (ranges), Flags (test), Flags (Calibration & QC), Starting Date
and Time and finally Execution Date and Time.
The user can tap the icon in order to view the table at full screen; re-tapping the
same icon the table will be resized.
Tapping a Samples rack, the mask will display in a dedicated table some information
related to the liquids that are loaded in the selected rack as well as will show the actions
that the user can execute with the selected rack.
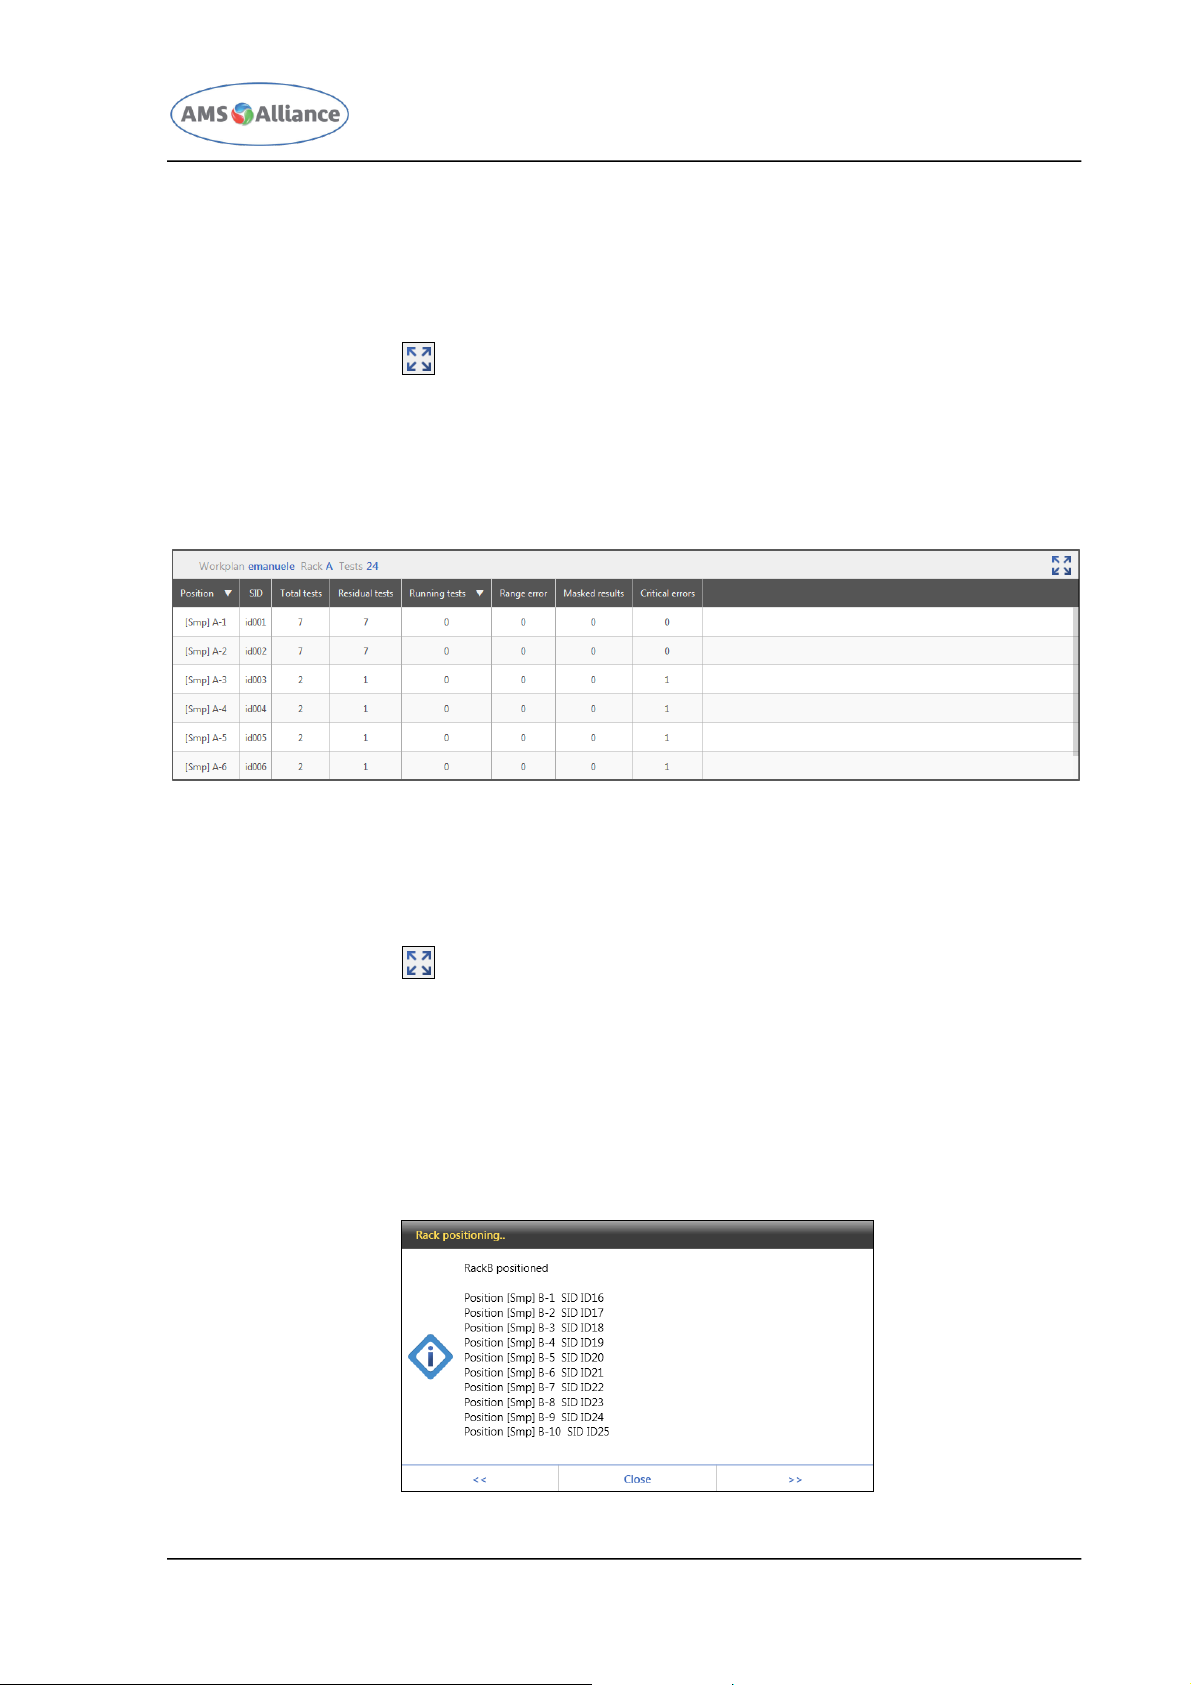
With reference to the liquids present in the selected rack, the details table will display
following info: Work Plan Name, Rack Number, Number of samples, Total number of tests
(in the header of the table) and for each position in the rack, Position, SID, number of
Total tests, Residual tests and Running tests, number of tests with Range errors, number
of tests with Masked results and number of tests with critical errors.
The user can tap the icon in order to view the table at full screen; re-tapping the
same icon the table will be resized.
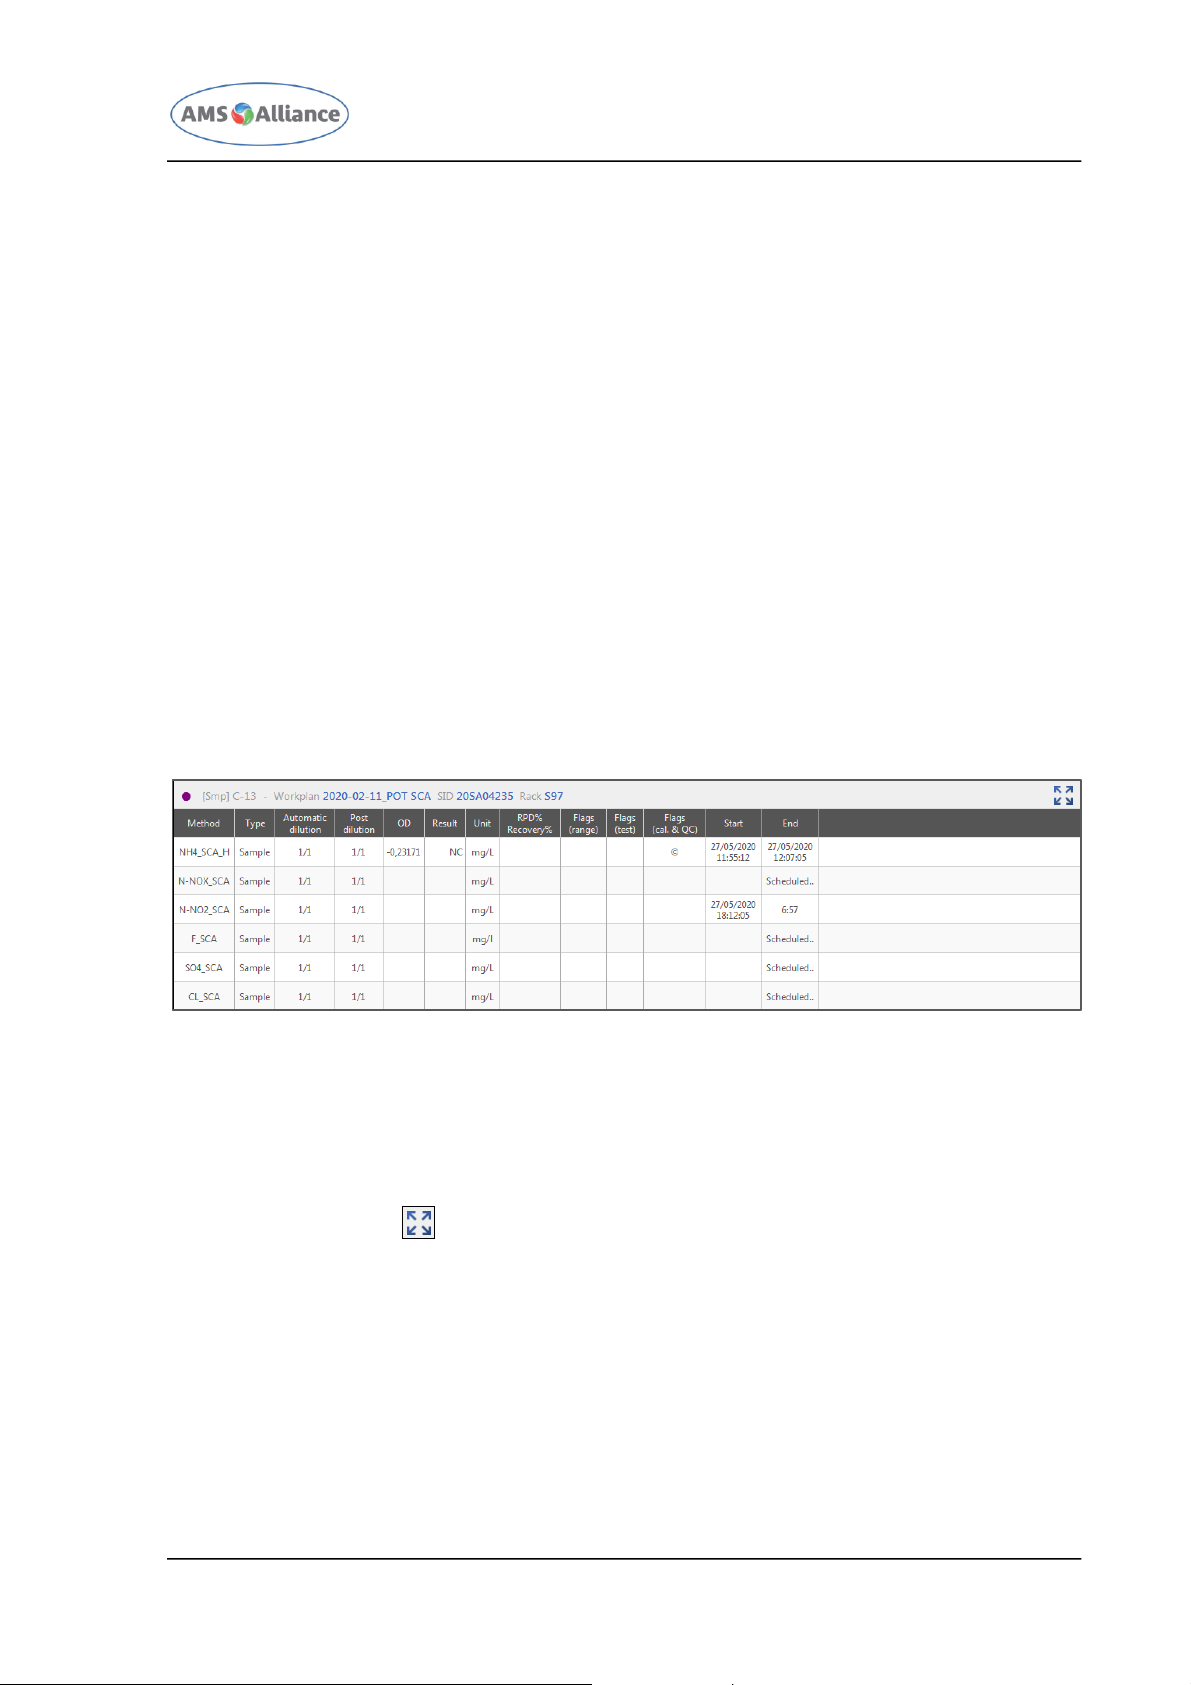
Following actions are available with the selected Samples rack:
PLACE RACK – allows the user to request for the physical loading of the selected rack in
the instrument; following this request, the instrument will bring the selected rack
(please refer to the letter of the rack; i.e. A, B, C or D) in the position accessible to
the user; as soon as the rack will be physically placed in the correct position, the
software will show the mask depicted in the following figure.
Page 27
CHAPTER 03 – SOFTWARE DESCRIPTION
SMARTCHEM 450 USER MANUAL REV.01 JUNE 2020 PAGE 13 OF 143
After the completion of the rack loading operation, the user can decide to request for
another physical rack loading (previous on next rack) as well as to close this mask.
LOAD WORK PLAN – visible only if the current Work plan is not running; allows to put in
the system monitor a previous defined work plan starting from the selected rack; this
is a software loading and it is not a physical loading (please refer to the previous
action);
UNLOAD WORK PLAN – visible only if the work plan currently loaded in the system
monitor is not running.
EXPORT – allows the user to create an xlsx file that reports the data listed in the
Details table;
PRINT - allows the user to print either a page that reports the data listed in the Details
table or the reports related to the samples loaded on the selected rack.
Tapping each liquid present in the Samples rack, the mask will display in a dedicated
table the information related to the selected liquid (either a sample or a quality control
positioned among the samples); the displayed information will depend on the type of
selected liquid.
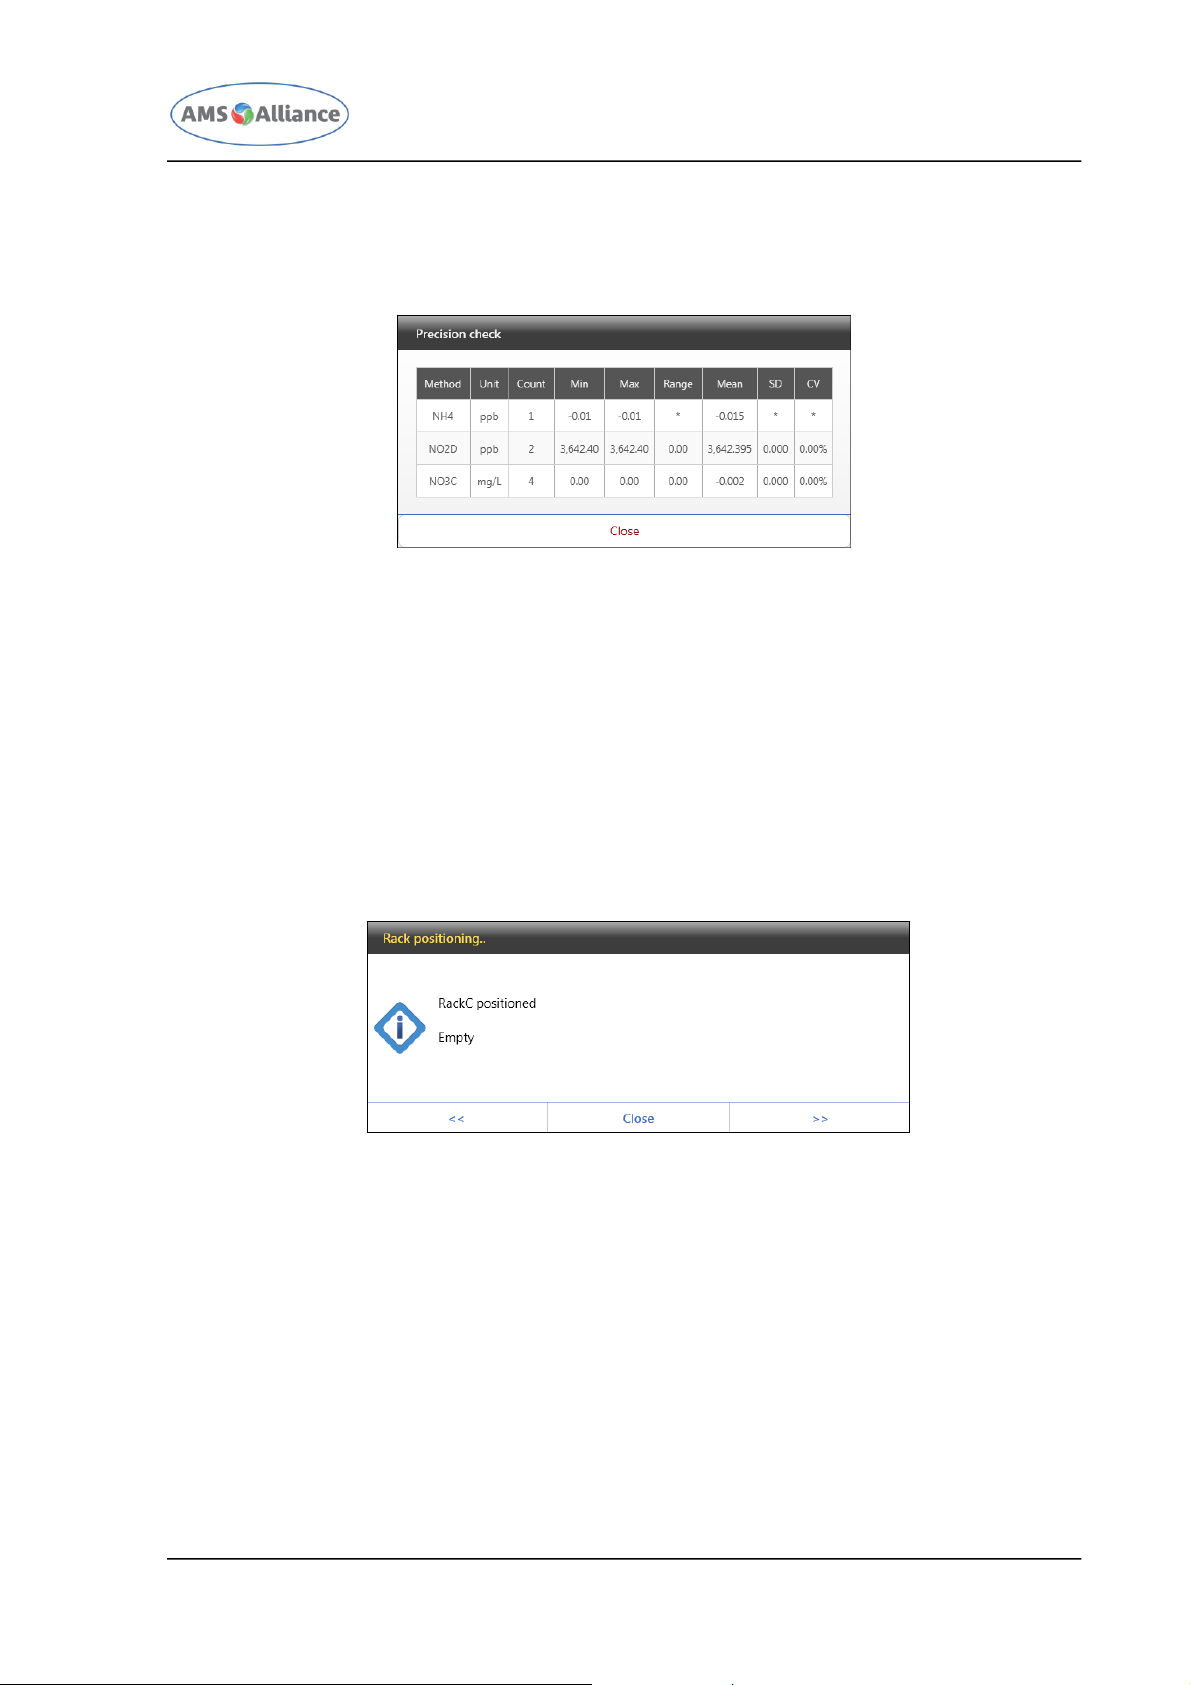
Following picture shows the sample information example.
With reference to the selected sample, the details table will display following info:
Position, Work Plan Name, SID and Rack Number (in the header of the table) and for
each associated test Method Name, Type, Automatic Dilution, Post Dilution, Optical
Density, Result, Measurement Unit, Relative Percentage Difference (%), evaluated for the
duplicates, Recovery (%), evaluated for the Spikes, Flags (ranges), Flags (test), Flags
(Calibration & QC), Start Time and End Time.
The user can tap the icon in order to view the table at full screen; re-tapping the
same icon the table will be resized.
Page 28
CHAPTER 03 – SOFTWARE DESCRIPTION
SMARTCHEM 450 USER MANUAL REV.01 JUNE 2020 PAGE 14 OF 143
Following actions are available with the selected sample:
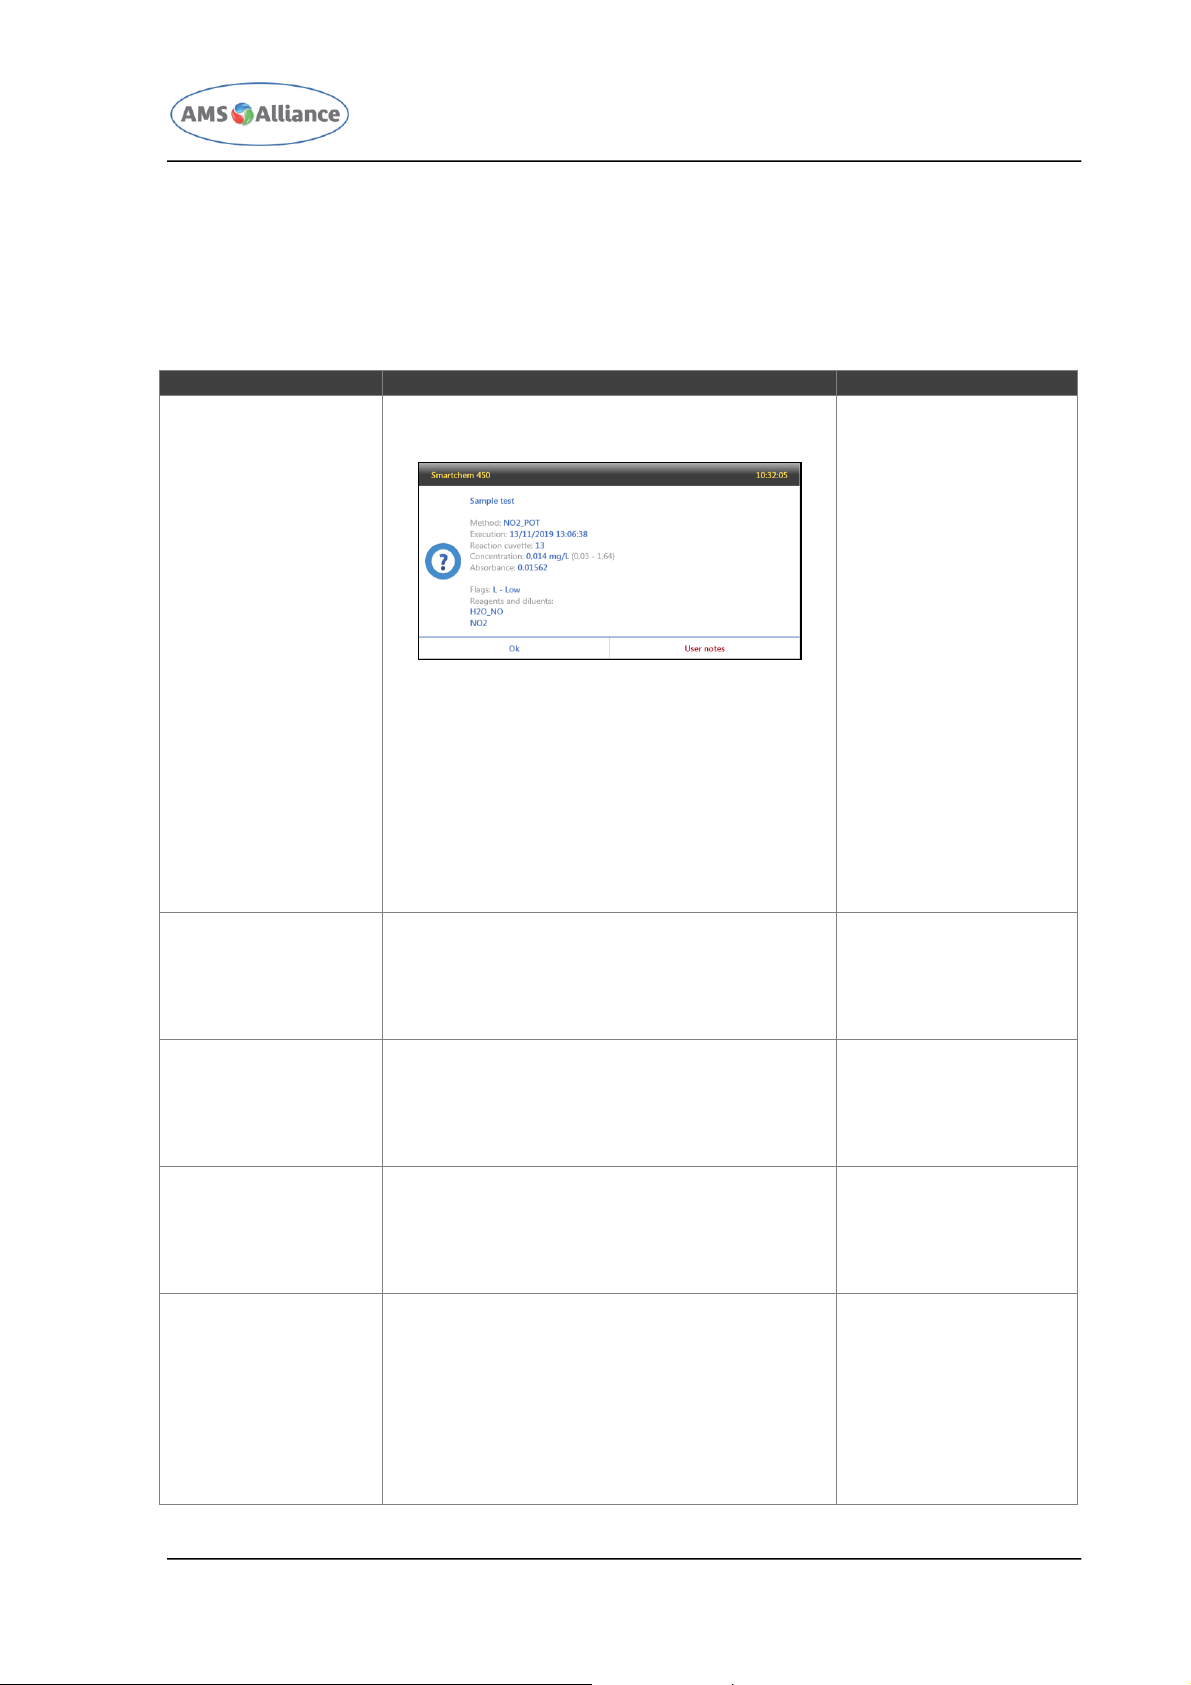
PRECISION CHECK – following this request, the software will show the mask depicted in
the following figure reporting statistics related to the tests associated to the selected
sample.
EXPORT – allows the user to create an xlsx file that reports the data listed in the
Details table;
PRINT - allows the user to print either a page that reports the data listed in the Details
table or the reports related to the selected sample.
Following actions are available with an empty rack:
PLACE RACK – allows the user to request for the physical loading of the selected rack in
the instrument; following this request, the instrument will bring the selected rack
(please refer to the letter of the rack; i.e. A, B, C or D) in the position accessible to
the user; as soon as the rack will be physically placed in the correct position, the
software will show the mask depicted in the following figure.
After the completion of the rack loading operation, the user can decide to request for
another physical rack loading (previous on next rack) as well as to close this mask.
LOAD WORK PLAN – visible only if the current Work plan is not running; allows to put in
the system monitor a previous defined work plan starting from the selected rack; this
is a software loading and it is not a physical loading (please refer to the previous
action);
LOAD NEXT WORK PLAN RACK – visible only if the current Work plan is not completely
loaded; this action is useful in case the user has to load new samples to a previously
defined work plan;
UNLOAD WORK PLAN – visible only if the work plan currently loaded in the system
monitor is not running.
Page 29
CHAPTER 03 – SOFTWARE DESCRIPTION
SMARTCHEM 450 USER MANUAL REV.01 JUNE 2020 PAGE 15 OF 143
Next table will list the available actions following the selection of a test associated to:
Liquid for the RBL (H2O)
Standard
Control
Sample
Action
Description
Test associated to
INFO
Following this request a dedicated window
will be displayed to the user.
In this message the user obtains detailed
information regarding the specific test. In
particular the user can read the
description of the flags associated with the
selected test and he can add a note to the
test if needed. If a note is added to a test,
a triangle in the upper right corner of the
result field will appear.
Liquid for the RBL
Standard
Control
Spike
Sample
Spike Duplicate
Sample Duplicate
REPLICATE
Allows the user to request for a replicate
of the selected test; the user can decide
how many replicates to be performed
(from 1 to 20)
Spike
Sample
Spike Duplicate
Sample Duplicate
RERUN TEST
Allows the user to request for a rerun of
the selected test; the user can decide
either the post concentration ratio or the
post-dilution ratio
Sample
SHOW CALIBRATION
CHART
Allows the user to view the calibration
chart built with the selected test; this
graph is automatically updated as soon as
arrive the different results
Standard
SHOW REACTION
CHART
Allows the user to view the reaction chart
(absorbance versus time)
Liquid for the RBL
Standard
Control
Spike
Sample
Spike Duplicate
Sample Duplicate
Page 30
CHAPTER 03 – SOFTWARE DESCRIPTION
SMARTCHEM 450 USER MANUAL REV.01 JUNE 2020 PAGE 16 OF 143
SHOW REPLICATES
CHART
Allows the user to view in the same chart
the reactions chart of the different
replicates (absorbance versus time)
Liquid for the RBL
Standard
VALIDATE RESULT
Allows the user to validate a result; this
action is important if the same test has
more than one result (e.g. in case of
manual/automatic rerun); furthermore is
needed if the sample has associated a
calculated test (validation of the test used
by the calculated test allows the
computation of the calculated test)
Sample
VIEW CALIBRATION
Allows the user to view the calibration
curve used by the test
Control
Spike
Sample
Spike Duplicate
Sample Duplicate
VIEW METHOD
DETAILS
Allows the user to view the complete
settings of the method at the moment of
the test running; this action opens the
Methods mask
Liquid for the RBL
Standard
Control
Spike
Sample
Spike Duplicate
Sample Duplicate
VIEW QC RESULTS
Allows the user to view the control results
executed before the execution of the
selected test; by default last 30 days
results are shown
Spike
Sample
Spike Duplicate
Sample Duplicate
3.1.4 START OPERATION
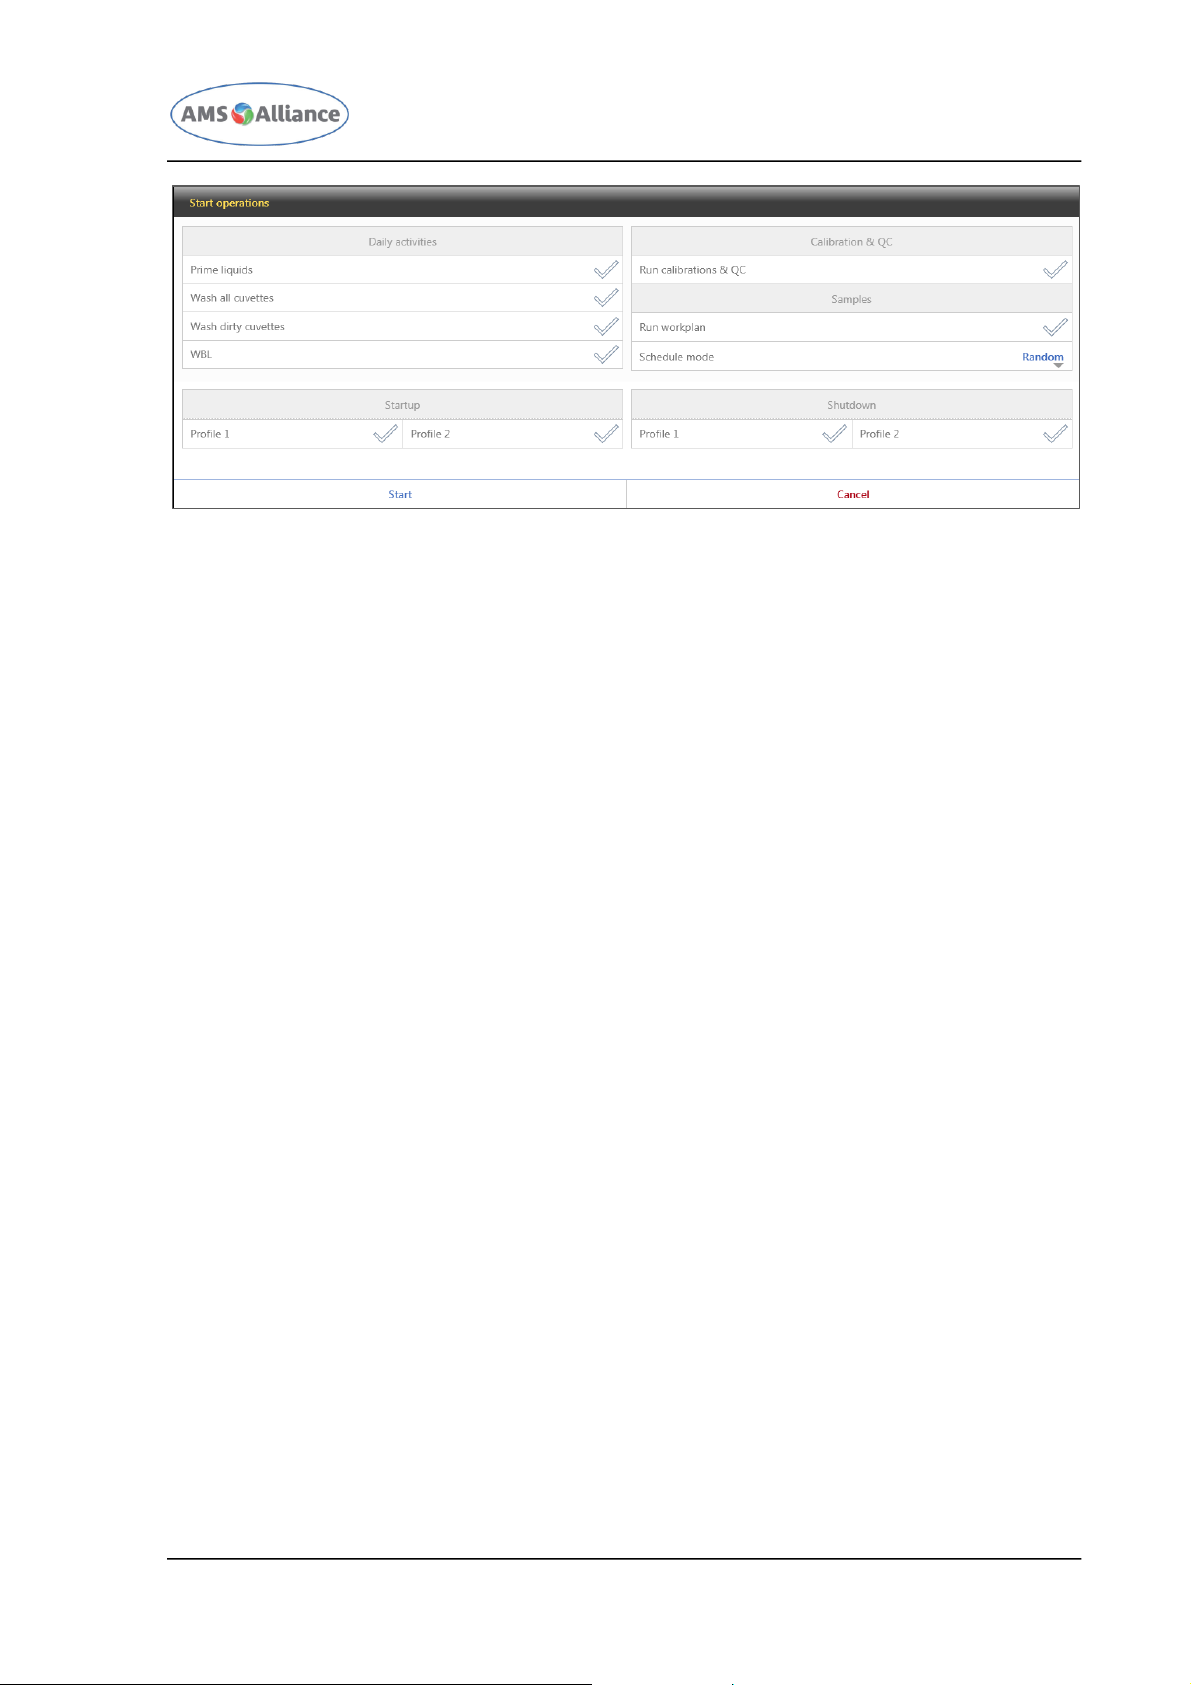
In order to start the operations the user has to tap the button.
Following this tap a new mask will be shown to the user.
Page 31
CHAPTER 03 – SOFTWARE DESCRIPTION
SMARTCHEM 450 USER MANUAL REV.01 JUNE 2020 PAGE 17 OF 143
Thanks to this mask the user can ask for:
PRIME LIQUIDS – this action consists in the hydraulic priming of the different tubes and
should be performed after a period of inactivity of the instrument; this action will be
the first performed by the instrument;
NO3 PRIME LIQUIDS – this action, visible only if the NO3 module has been set, allows
the liquid priming of the NO3 module;
CUVETTES WASHING – this action will activate the cuvettes washing running cycle; the
user can decide to wash either all the cuvettes or the cuvettes remained dirty from a
previous run (e.g. after a stop request of the user); this action will be executed after
the liquid priming if requested;
WBL – this action will activate the Water Blank Level running cycle; this action will be
executed after the cuvettes washing if requested;
RUN CALIBRATIONS & QC – this action will activate the Calibration and the QC
operation requested before thanks to the Calibration & QC Setup Mask; this action will
be executed after the WBL if requested; if the user selects this action, the mask will
allow the user to request for the samples rack positioning in order to physically load
the calibration & QC rack(s);
SAMPLES – this action will activate the execution of the work plan loaded in the system
monitor; this action will be executed after the calibration and QC if requested; if the
user selects this action, the mask will allow the user to request for the samples rack
positioning in order to physically load the sample rack(s);
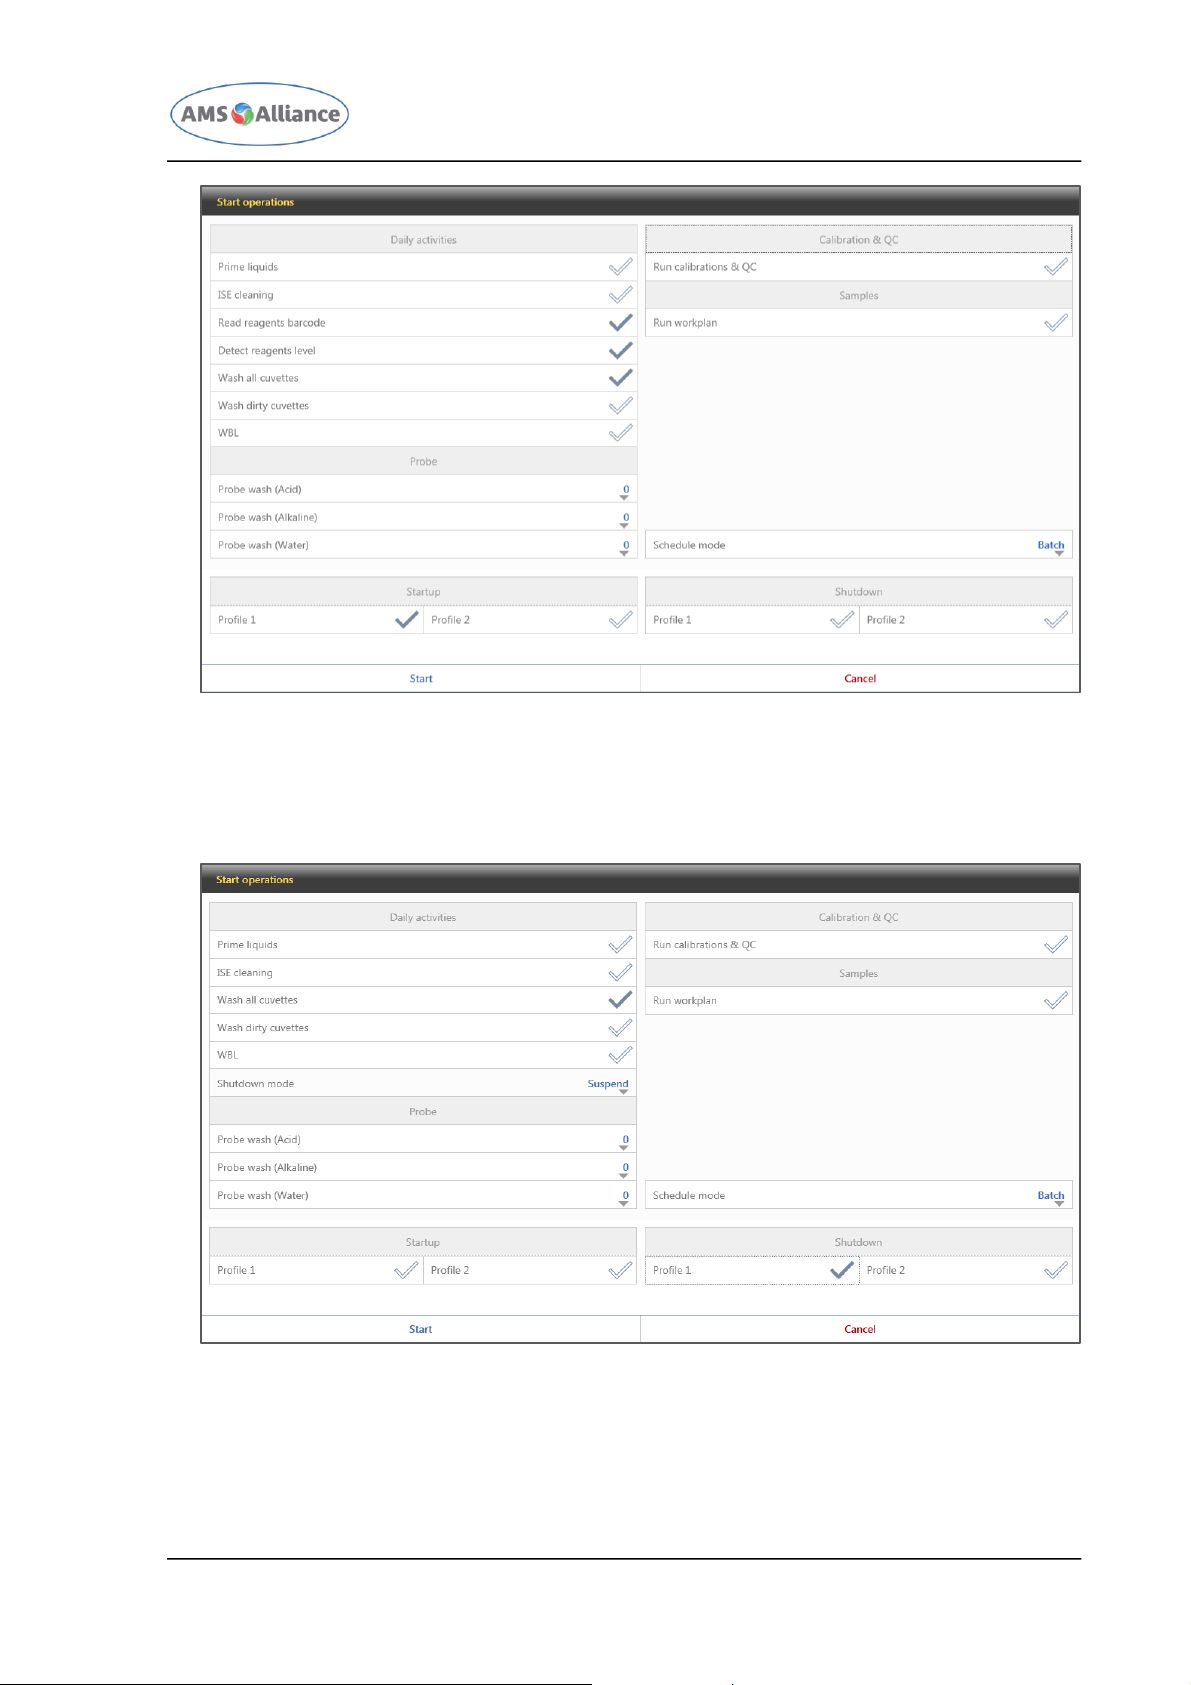
STARTUP PROFILE 1 OR PROFILE 2 – this action will allow the user to request for the
execution of the actions that are included in the Profile 1 or in the Profile 2 as set in
the automatic startup procedure mask (for more details please refer to section 3.7.4);
checking one of the Startup Profile, the Start operation mask will show also the
actions that can be performed with the automatic startup procedure.
Page 32
CHAPTER 03 – SOFTWARE DESCRIPTION
SMARTCHEM 450 USER MANUAL REV.01 JUNE 2020 PAGE 18 OF 143
SHUTDOWN PROFILE 1 OR PROFILE 2 – this action will allow the user to request for the
execution of the actions that are included in the Profile 1 or in the Profile 2 as set in
the automatic shutdown procedure mask (for more details please refer to section
3.7.4); checking one of the Shutdown Profile, the Start operation mask will show also
the actions that can be performed with the automatic shutdown procedure.
Page 33
CHAPTER 03 – SOFTWARE DESCRIPTION
SMARTCHEM 450 USER MANUAL REV.01 JUNE 2020 PAGE 19 OF 143
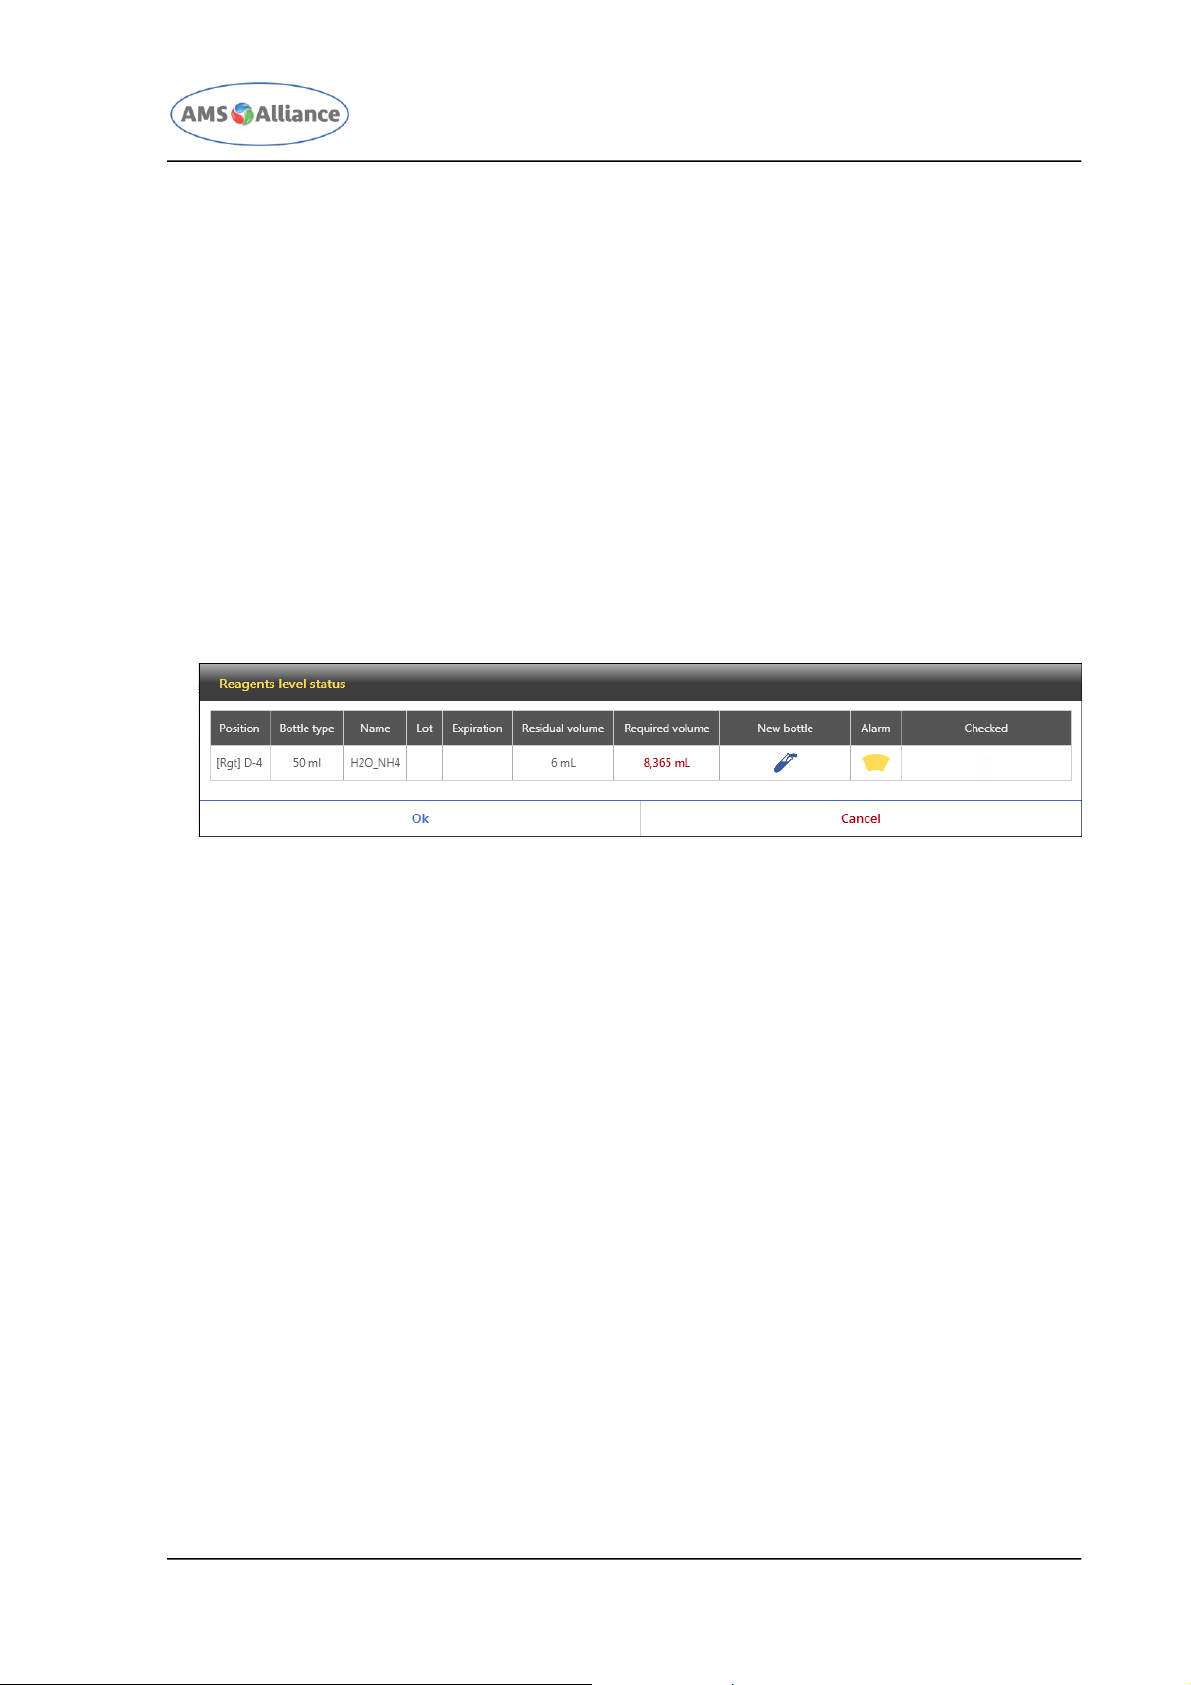
Please note that after having tapped the Start button following chooses can be requested
to the user:
READ BARCODE – after the first start of the software or after the reagents cover
opening, the software prompts the user with a specific message in order to allow the
user to perform or not the reagent barcode reading;
SCHEDULE A NEW CALIBRATION – requesting for the execution of methods, associated to
samples or controls, with an invalid calibration or with an expired calibration, the
software prompts the user with a specific message in order to allow the user to setup
the calibration of the involved methods;
CHANGE/CHECK THE REAGENTS BOTTLE – requesting for the execution of tests
(sample/controls/calibration), having on board reagents/diluents bottles characterized
by Empty volume, Low volume, Level to high or Level not detected, the software
prompts the user with a specific message in order to allow the user to change the
involved bottles (Empty volume, Low volume) or check the involved bottles (Level to
high or Level not detected).
RESTART THE CALIBRATION OPERATION – after any interruption of the calibration
operation of one or more methods, the software prompts the user with a specific
message in order to allow the user to restart the calibration operation of the
method(s) or to continue the already started operation.
Finally please note that the starting operations can be stopped (or not allowed) if one of
the following conditions will be met:
one of the covers has been left open;
the cuvettes tray temperature does not fall within the permitted range (it could be that
the cuvettes tray temperature has not yet reached the target temperature and the
user has just to wait for it); this check is performed every time the users is starting
the Calibration, Quality Control, Samples and WBL operations;
one of the hydraulic procedure checks fails; the hydraulic procedure checks are
performed every day after the Initialization procedure of the instrument.
Page 34
CHAPTER 03 – SOFTWARE DESCRIPTION
SMARTCHEM 450 USER MANUAL REV.01 JUNE 2020 PAGE 20 OF 143
3.1.5 PAUSE OPERATION
In order to bring the instrument in the Pause state, the user has to tap the
button.
Following this tap the instrument will pass in the Pausing state. In this state the arm is
completing the different operations in order to reach the Pause state coming from the
Running state.
As soon as the arm will reach the Pausing state with the sample compartment available,
it will be possible to load a new rack.
As soon as the arm will reach the Pause state the user will be able to refill a reagent or
add a new bottle.
3.1.6 STOP OPERATION
In order to immediately stop any ongoing operation, the user has to tap the
button.
Following this tap the instrument will interrupt the ongoing operations. Due to this forced
operation, some cuvettes can remain dirty; it is highly recommended to wash them after
a new restart of the instrument.
3.1.7 WARNINGS AND EMERGENCY STOPS
In presence of any Warning message or Emergency Stop message a special icon
starts flashing on the top bar of the window (at the left of acronym of the logged in user)
as well as in the left part of the window that hosts the menu.
Tapping the icon, the software will open a mask that include a table that reports the
unsolved Warnings and Emergency Stops.
In order to view all the Warnings and Emergency Stops occurred during the instrument
life, please refer to section 3.5.2.
Please note that in presence of at least one emergency stop, the reset alarm will be
automatically performed by the software; for this reason, at the next start, the
Instrument Initialization will be performed.
Page 35
CHAPTER 03 – SOFTWARE DESCRIPTION
SMARTCHEM 450 USER MANUAL REV.01 JUNE 2020 PAGE 21 OF 143
3.1.8 LEGEND
In the bottom right part of the mask, it is always visible the present the
action.
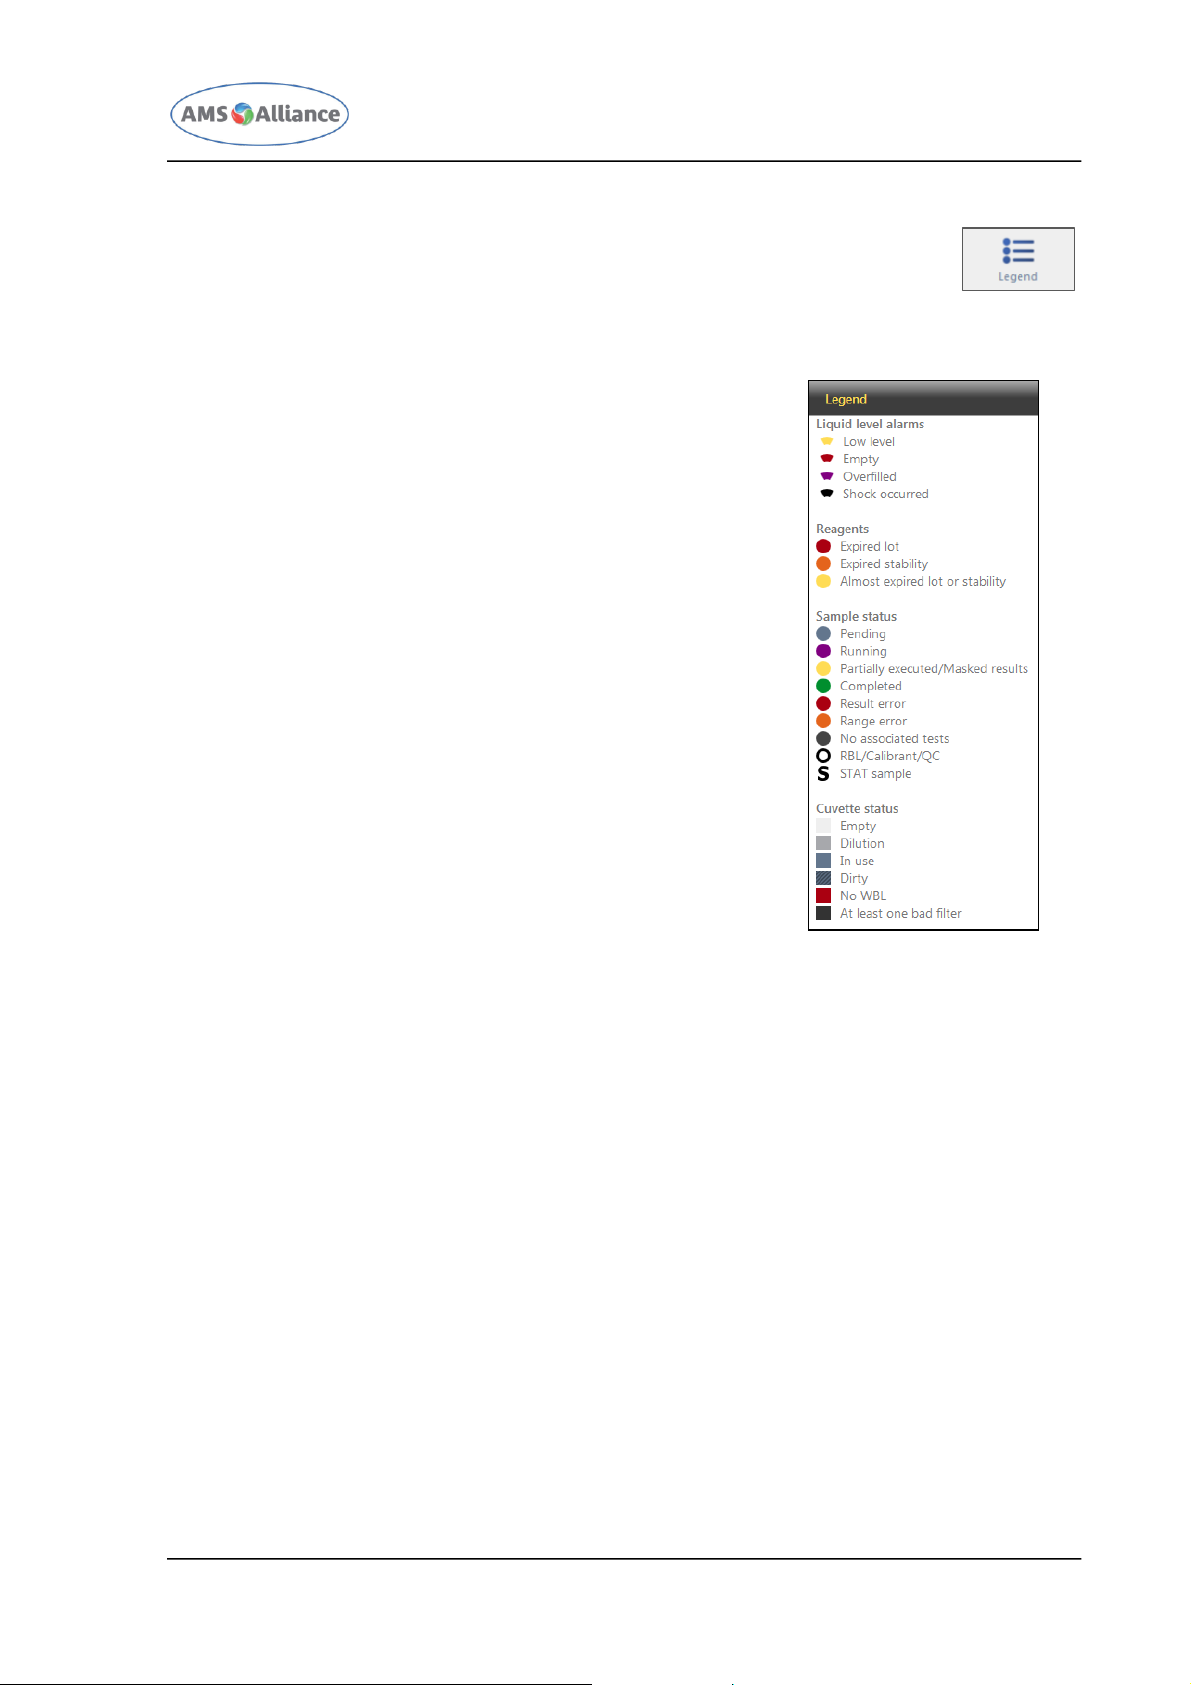
Tapping the Legend action, it will be opened an area dedicated to the description of:
the colors assumed by the different liquid in presence
of any alarm;
the colors that can assume a reagent;
the colors that can assume either a Sample or a
Control or a Calibrator or the liquid for the RBL. The
samples will be shown as disks while the other liquids
will be represented as rings;
the colors that can assume a cuvette.
At the right of the colors, appears a symbol that will
appear if the user has set the option Show status icon in
the System Option window – User interface tab.
Page 36
CHAPTER 03 – SOFTWARE DESCRIPTION
SMARTCHEM 450 USER MANUAL REV.01 JUNE 2020 PAGE 22 OF 143
3.2 SYSTEM SETUP
3.2.1 MATERIALS
The Material mask is dedicated to inventory the different liquids to be used in the
instrument. Note that the liquids can be preventively stored using this mask or they will
be stored directly adding these liquids from the Methods mask.
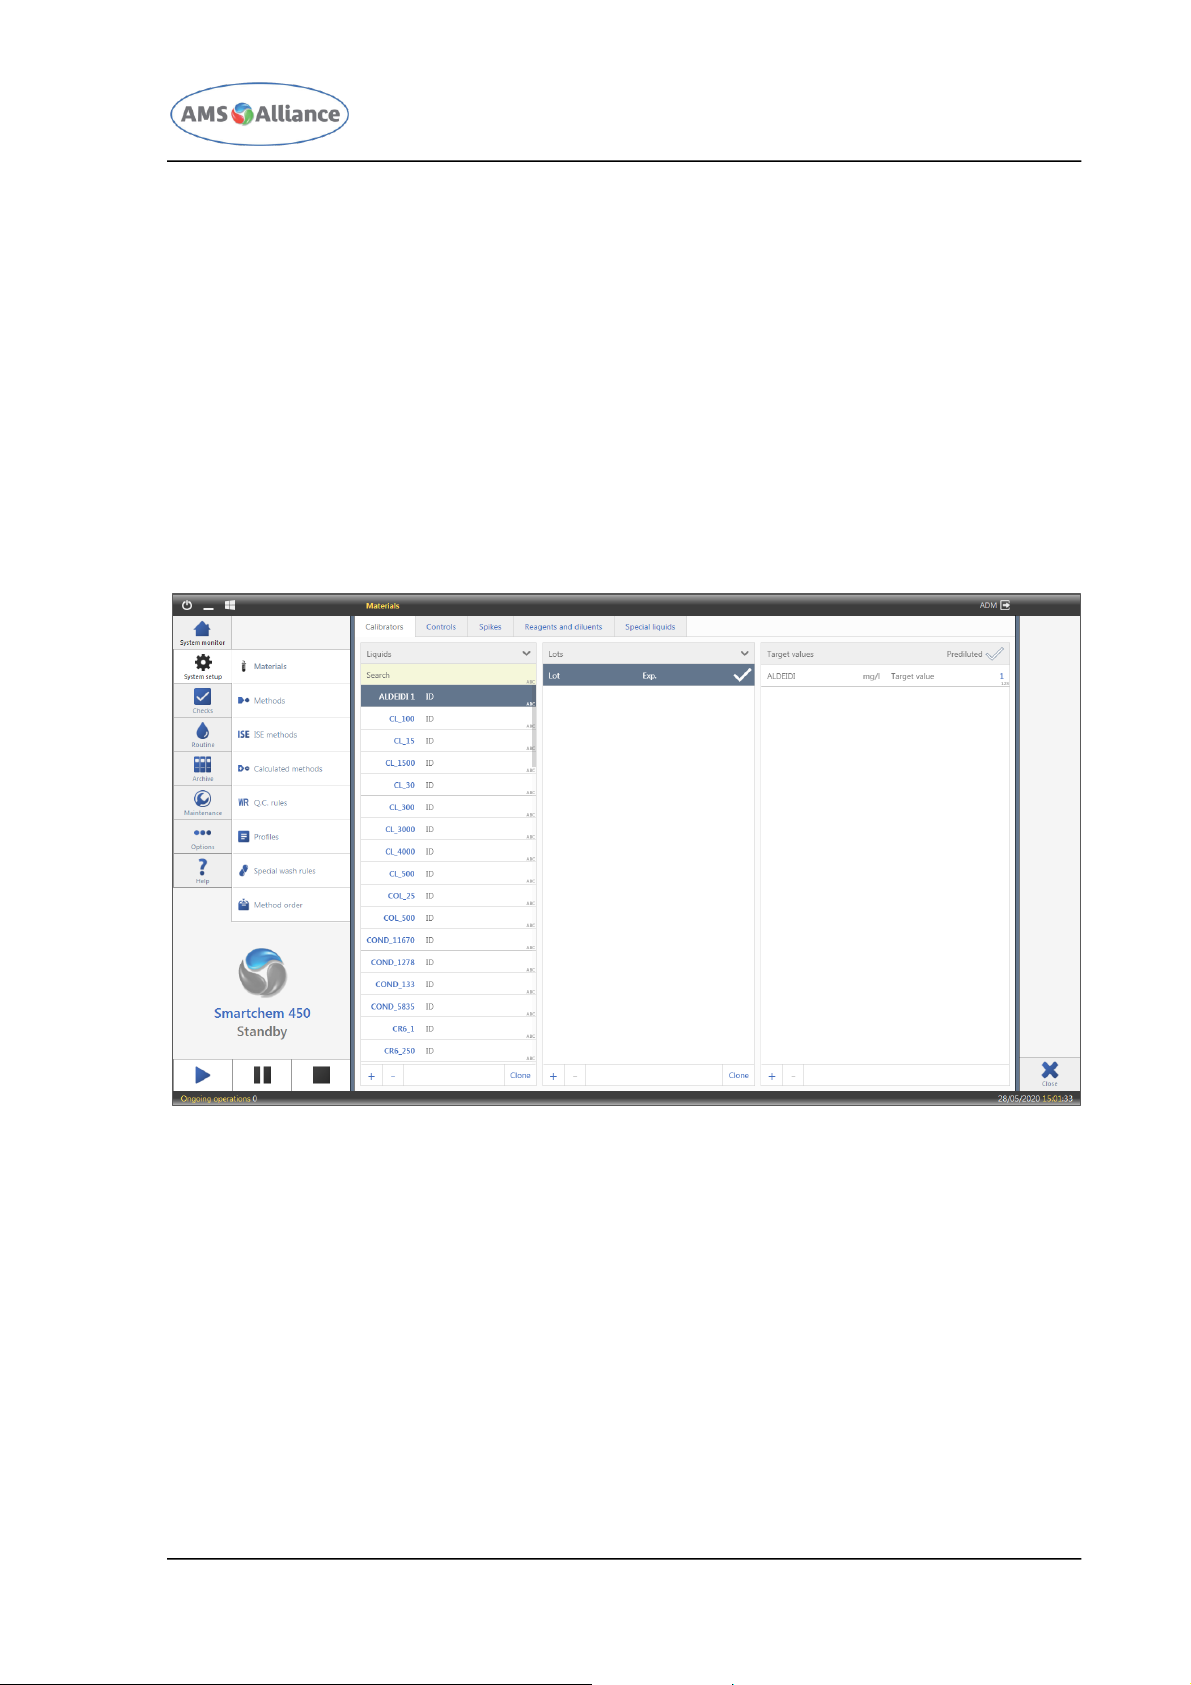
A material can be defined using the first level menu SYSTEM SETUP and the second level
menu MATERIALS.
Tapping this menu, the following mask will appear.
This mask is divided in different tabs, each dedicated to a different type of materials:
CALIBRATORS
CONTROLS
SPIKES
REAGENTS AND DILUENTS
SPECIAL LIQUIDS
3.2.1.1 CALIBRATORS
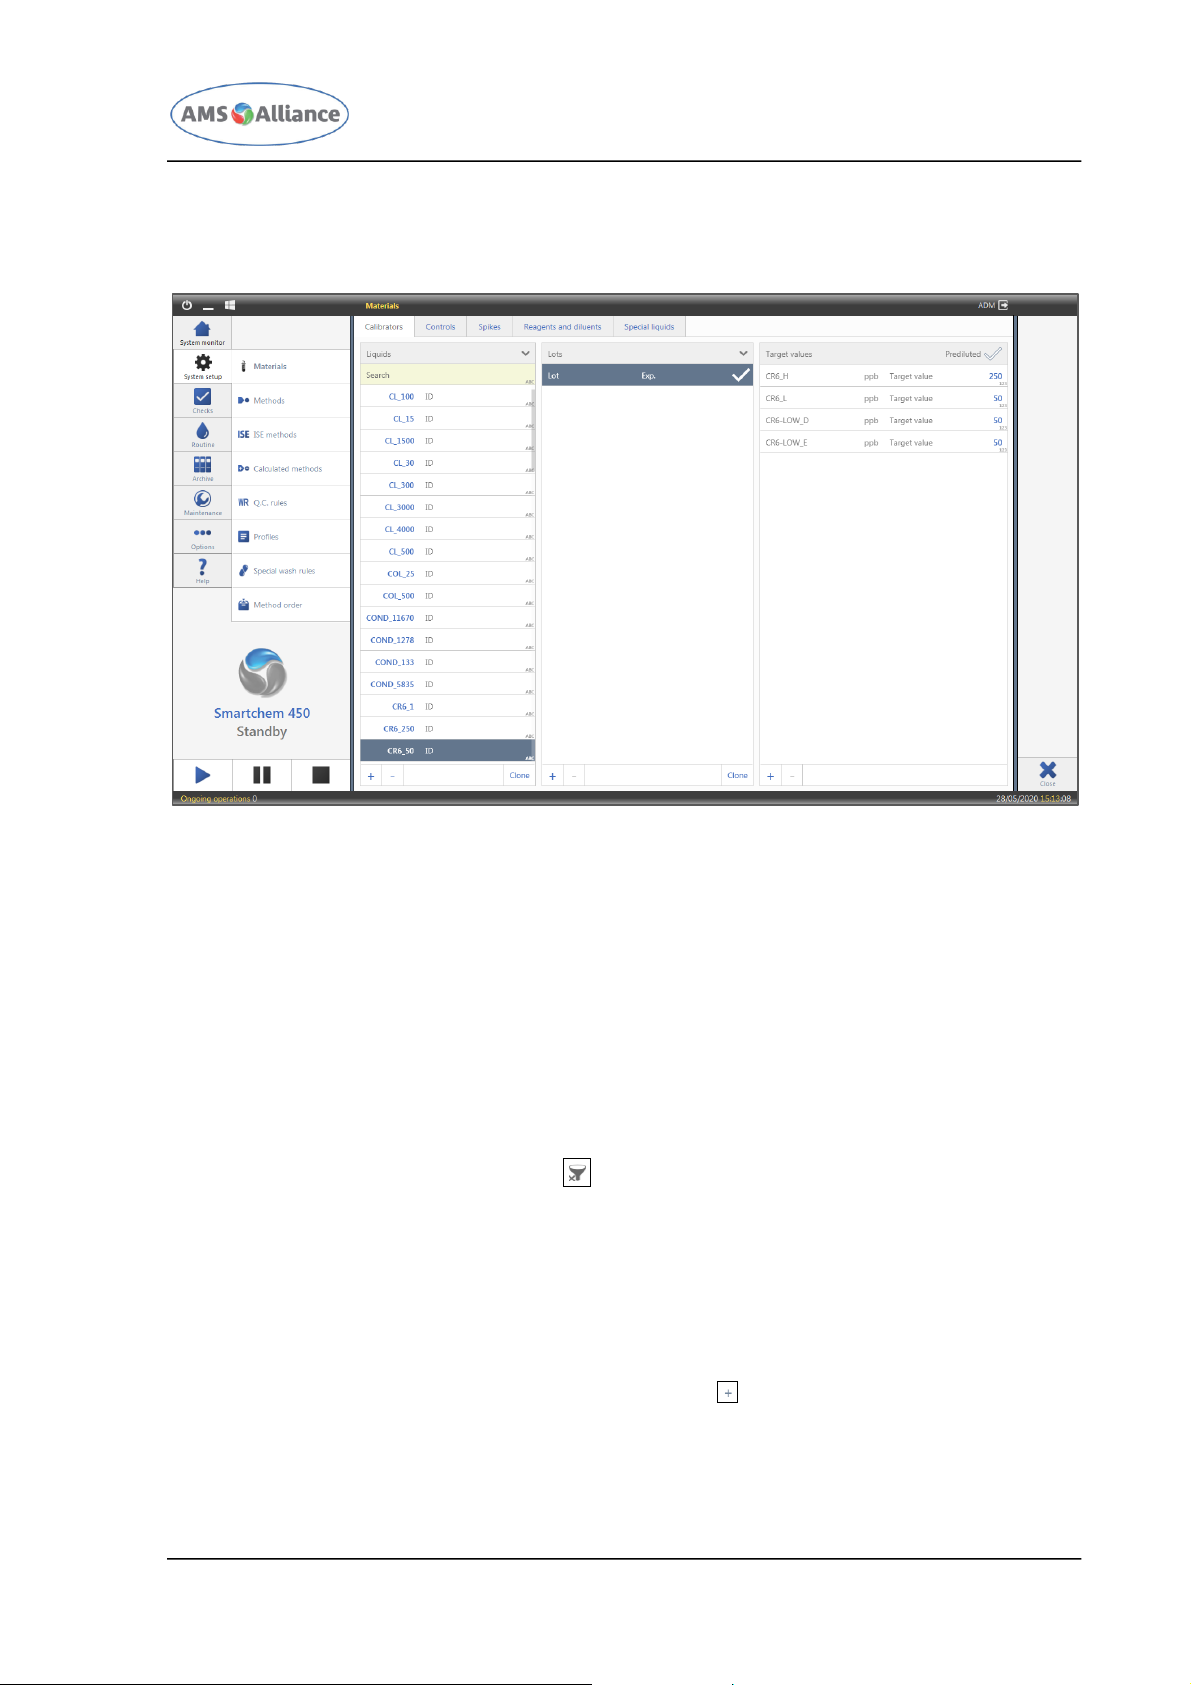
This tab is divided in three sections: LIQUIDS, the left one, reports the list of previously
defined calibrators and liquids for the RBL, LOTS, the middle one, reports the associated
Page 37
CHAPTER 03 – SOFTWARE DESCRIPTION
SMARTCHEM 450 USER MANUAL REV.01 JUNE 2020 PAGE 23 OF 143
lots to the selected calibrator and TARGET VALUES, the right one, reports the reference
value of the methods associated to the selected calibrator and to the selected lot.
The calibrator tab is depicted in the following picture.
The LIQUIDS section lists, in the alphabetical order, the previously defined liquids; this list
will include the stock standards, the prepared calibrator points and the liquids for the
RBL. Each liquid is characterized by:
NAME – the name of the liquid; this is the code that will be used in the software in
order to individually select the calibrator and/or the liquid for RBL;
ID – this is the code that can be used to identify the calibrator/liquid for RBL through
the barcode reader.
In this list, if the number of liquids is equal or greater than 20, a search field will be
displayed; the string will be searched in any part of the name of the list; it will be
possible to remove the filter using the button at the right of the filter.
Please note that once the material has been used it will not be possible to change the
name or the ID of the calibrator (these liquids are grey displayed while the editable ones
are blue displayed).
Furthermore, with reference to this section, the user can:
ADD – it allows to add a new liquid thanks to the button; following a tap over this
button the software will automatically display the keyboard in order to define the liquid
name; after having inserted the name of the new liquid, the addition of a new liquid
will imply the automatic creation of a new lot associated to the liquid;
Page 38

CHAPTER 03 – SOFTWARE DESCRIPTION
SMARTCHEM 450 USER MANUAL REV.01 JUNE 2020 PAGE 24 OF 143
DELETE – it allows to delete a previously defined liquid thanks to the button;
deletion of a liquid will be a soft removal; following a new re-enter of the same liquid
previously used and deleted, the software will show the previous properties of the
liquid;
CLONE – it allows to duplicate a previously defined liquid thanks to the button;
following a tap over this button the software will automatically display the keyboard in
order to define the liquid name; the Clone operation will provide to automatically
create the same active lot of the starting liquid as well as all the methods associations
and reference value of the active lot of the starting liquid.
The LOTS section lists, in the alphabetical order, the previously defined lots associated to
the selected liquid in the Liquids section. Each lot is characterized by:
LOT – lot number of the selected liquid;
EXPIRATION DATE – expiration date of the selected liquid;
ACTIVE – check used in order to define the active lot; no more than one lot can be the
active one; please note the changing the active lot will imply the usage in the
instrument of the method target values associated to the new lot.
In this list, if the number of liquids is equal or greater than 20, a search field will be
displayed; the string will be searched in any part of the lots of the list; it will be possible
to remove the filter using the button at the right of the filter.
Furthermore, with reference to this section, the user can:
ADD – it allows to add a new lot thanks to the button; following a tap over this
button the software will automatically display the keyboard in order to define the lot
number; after having inserted the new lot of the liquid, the addition of a new lot will
imply the automatic creation of the methods previously associated to the active lot
with the reference value set to 0;
DELETE – it allows to delete a previously defined lot thanks to the button; deletion
of a liquid will be a soft removal; following a new re-enter of the same liquid
previously used and deleted, the software will show the previous properties of the lot;
CLONE – it allows to duplicate a previously defined lot thanks to the button;
following a tap over this button the software will automatically display the keyboard in
order to define the liquid lot; the Clone operation will provide to automatically create
the same methods associations with the same reference values of the starting lot.
The TARGET VALUES section lists, in the alphabetical order, the previously associated
methods to the selected lot in the Lot section of the selected liquid in the Liquids section.
The user can define as PRE-DILUTED the selected lot: thanks to this option the predilution of a method will not be applied to the calibrator.
Each target value is characterized by:
Page 39

CHAPTER 03 – SOFTWARE DESCRIPTION
SMARTCHEM 450 USER MANUAL REV.01 JUNE 2020 PAGE 25 OF 143
METHOD NAME – name of the method associated to the selected lot of the selected
liquid;
MEASUREMENT UNIT – not editable field, the measurement unit used for the method;
TARGET VALUE – this is the reference value to be used for the calibrator of the specific
method; for the liquid of the RBL this value has to set equal to zero.
Furthermore, with reference to this section, the user can:
ADD – it allows to associate a new method to the selected lot thanks to the button;
following a tap over this button the software will automatically display in the right
panel the list of previously defined methods;
DELETE – it allows to delete a previously associated method to the selected lot defined
lot thanks to the button; deletion of a liquid will be a soft removal; following a new
re-enter of the same liquid previously used and deleted, the software will show the
previous reference values of the method;
USER UNITS – it allows to show the target values of all the methods that use the
selected material and lot, expressed in the user defined unit; this action appears only
if the target values of at least one method are shown using the primary unit but the
method has a user defined unit;
PRIMARY UNITS – it allows to show the target values of all the methods that use the
selected material and lot, expressed in the primary unit; this action appears only if the
target values of at least one method are shown using the user defined unit.
With reference to this tab, following actions are available:
SAVE – after the creation or modification of a liquid, this action is mandatory in order
to save the new list;
DISCARD CHANGES – after the creation or modification of a liquid, allows the user to
return in the state of the last save;
CLOSE – allows the user to close this mask.
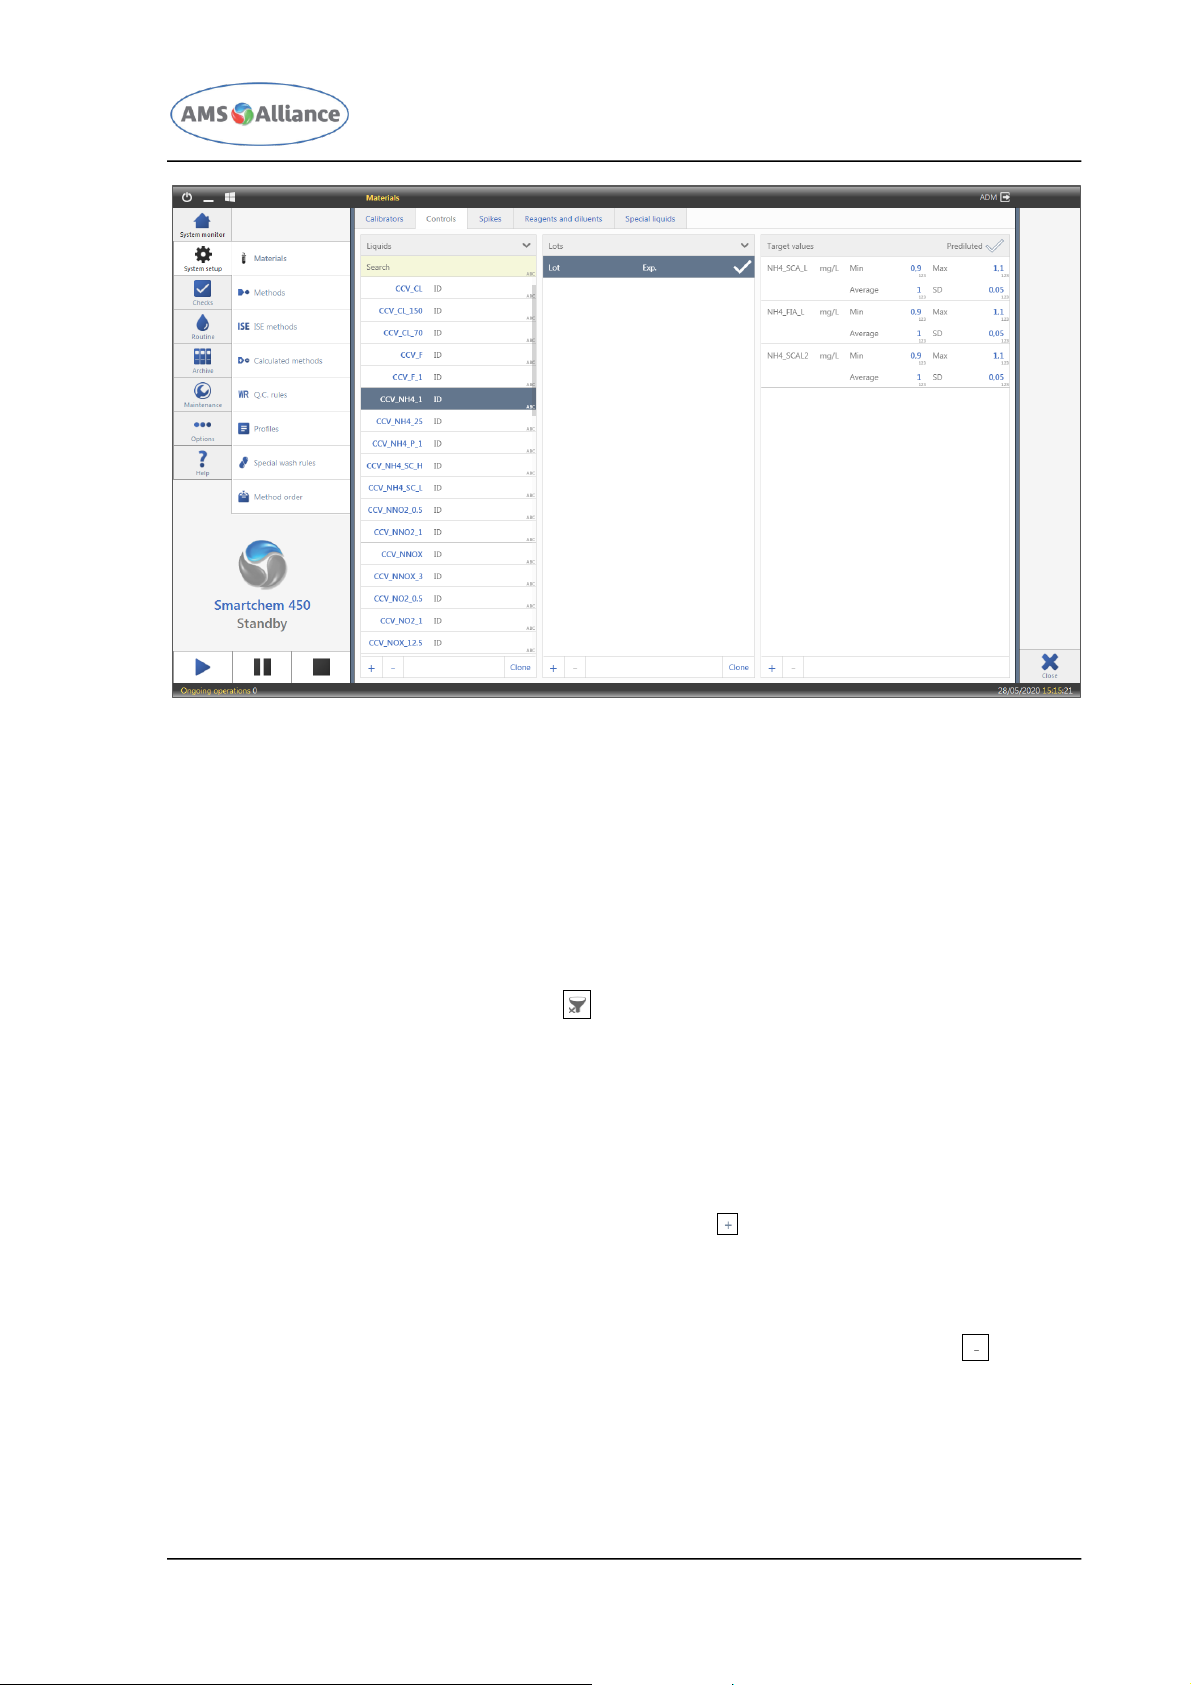
3.2.1.2 CONTROLS
This tab is divided in three sections: LIQUIDS, the left one, reports the list of previously
defined controls, LOTS, the middle one, reports the associated lots to the selected control
and TARGET VALUES, the right one, reports the target values of the methods associated to
the selected control and to the selected lot.
The controls tab is depicted in the following picture.
Page 40
CHAPTER 03 – SOFTWARE DESCRIPTION
SMARTCHEM 450 USER MANUAL REV.01 JUNE 2020 PAGE 26 OF 143
The LIQUIDS section lists, in the alphabetical order, the previously defined liquids. Each
liquid is characterized by:
NAME – the name of the liquid; this is the code that will be used in the software in
order to individually select the spike;
ID – this is the code that can be used to identify the spike through the barcode reader.
In this list, if the number of liquids is equal or greater than 20, a search field will be
displayed; the string will be searched in any part of the name of the list; it will be
possible to remove the filter using the button at the right of the filter.
Please note that once the material has been used it will not be possible to change the
name or the ID of the control (these liquids are grey displayed while the editable ones
are blue displayed).
Furthermore, with reference to this section, the user can:
ADD – it allows to add a new liquid thanks to the button; following a tap over this
button the software will automatically display the keyboard in order to define the liquid
name; after having inserted the name of the new liquid, the addition of a new liquid
will imply the automatic creation of a new lot associated to the liquid;
DELETE – it allows to delete a previously defined liquid thanks to the button;
deletion of a liquid will be a soft removal; following a new re-enter of the same liquid
previously used and deleted, the software will show the previous properties of the
liquid;
Page 41
CHAPTER 03 – SOFTWARE DESCRIPTION
SMARTCHEM 450 USER MANUAL REV.01 JUNE 2020 PAGE 27 OF 143
CLONE – it allows to duplicate a previously defined liquid thanks to the button;
following a tap over this button the software will automatically display the keyboard in
order to define the liquid name; the Clone operation will provide to automatically
create the same active lot of the starting liquid as well as all the methods associations
and reference value of the active lot of the starting liquid.
The LOTS section lists, in the alphabetical order, the previously defined lots associated to
the selected liquid in the Liquids section. Each lot is characterized by:
LOT – lot number of the selected liquid;
EXPIRATION DATE – expiration date of the selected liquid;
ACTIVE – check used in order to define the active lot; no more than one lot can be the
active one; please note the changing the active lot will imply the usage in the
instrument of the method target values associated to the new lot.
In this list, if the number of liquids is equal or greater than 20, a search field will be
displayed; the string will be searched in any part of the lots of the list; it will be possible
to remove the filter using the button at the right of the filter.
Furthermore, with reference to this section, the user can:
ADD – it allows to add a new lot thanks to the button; following a tap over this
button the software will automatically display the keyboard in order to define the lot
number; after having inserted the new lot of the liquid, the addition of a new lot will
imply the automatic creation of the methods previously associated to the active lot
with the target values set to 0;
DELETE – it allows to delete a previously defined lot thanks to the button; deletion
of a liquid will be a soft removal; following a new re-enter of the same liquid
previously used and deleted, the software will show the previous properties of the lot;
CLONE – it allows to duplicate a previously defined lot thanks to the button;
following a tap over this button the software will automatically display the keyboard in
order to define the liquid lot; the Clone operation will provide to automatically create
the same methods associations with the same target values of the starting lot.
The TARGET VALUES section lists, in the alphabetical order, the previously associated
methods to the selected lot in the Lot section of the selected liquid in the Liquids section.
The user can define as PRE-DILUTED the selected lot: thanks to this option the predilution of a method will not be applied to the control.
Each target value is characterized by:
METHOD NAME – name of the method associated to the selected lot of the selected
liquid;
MEASUREMENT UNIT – not editable field, the measurement unit used for the method;
Page 42

CHAPTER 03 – SOFTWARE DESCRIPTION
SMARTCHEM 450 USER MANUAL REV.01 JUNE 2020 PAGE 28 OF 143
MIN – minimum acceptable value of the selected lot of the control; the minimum and
the maximum values will be automatically calculated if the user fills the mean and the
standard deviation fields;
MAX – maximum acceptable value of the selected lot of the control; the minimum and
the maximum values will be automatically calculated if the user fills the mean and the
standard deviation fields;
MEAN – mean value of the selected lot of the control; the mean and the standard
deviation values will be automatically calculated if the user fills the minimum and the
maximum fields;
STANDARD DEVIATION – standard deviation of the selected lot of the control; the mean
and the standard deviation values will be automatically calculated if the user fills the
minimum and the maximum fields;
Furthermore, with reference to this section, the user can:
ADD – it allows to associate a new method to the selected lot thanks to the button;
following a tap over this button the software will automatically display in the right
panel the list of previously defined methods;
DELETE – it allows to delete a previously associated method to the selected lot defined
lot thanks to the button; deletion of a liquid will be a soft removal; following a new
re-enter of the same liquid previously used and deleted, the software will show the
previous reference values of the method;
USER UNITS – it allows to show the target values of all the methods that use the
selected material and lot, expressed in the user defined unit; this action appears only
if the target values of at least one method are shown using the primary unit but the
method has a user defined unit;
PRIMARY UNITS – it allows to show the target values of all the methods that use the
selected material and lot, expressed in the primary unit; this action appears only if the
target values of at least one method are shown using the user defined unit.
With reference to this tab, following actions are available:
SAVE – after the creation or modification of a liquid, this action is mandatory in order
to save the new list;
DISCARD CHANGES – after the creation or modification of a liquid, allows the user to
return in the state of the last save;
CLOSE – allows the user to close this mask.
3.2.1.3 SPIKES
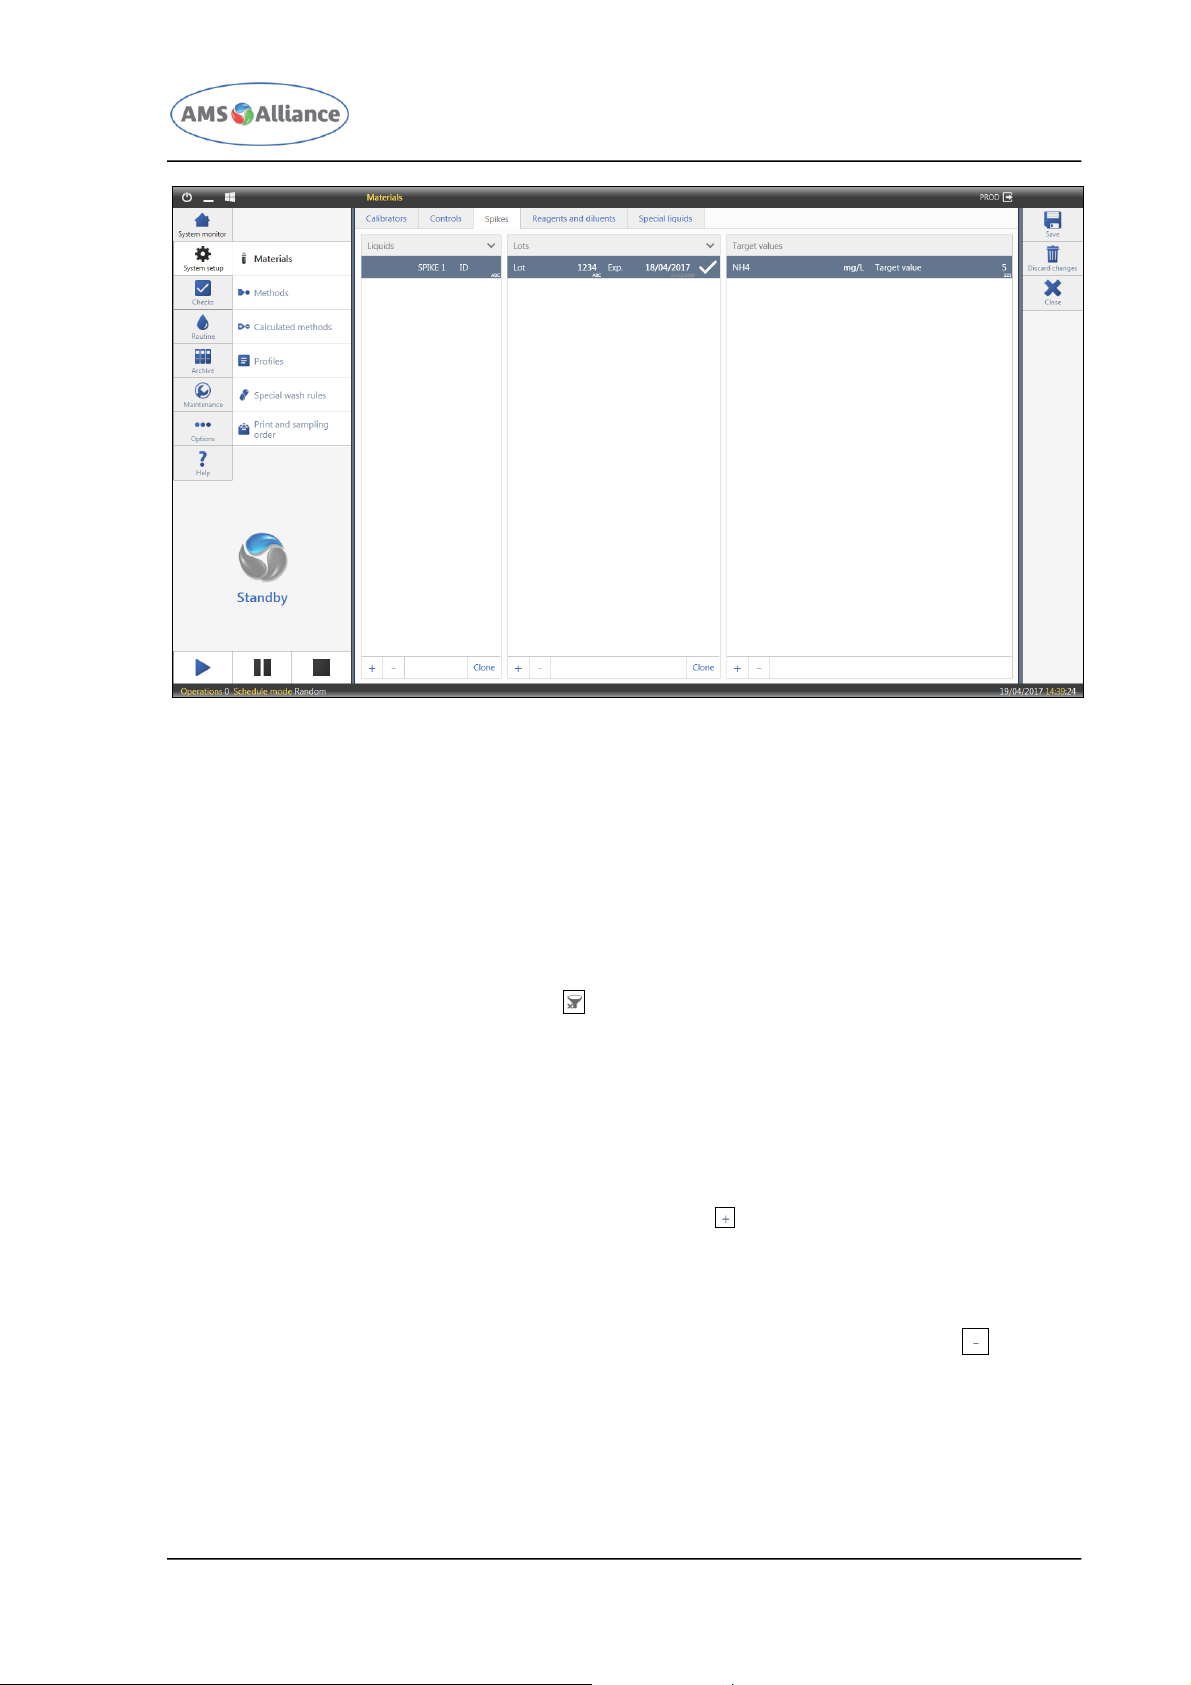
This tab is divided in three sections: LIQUIDS, the left one, reports the list of previously
defined spikes, LOTS, the middle one, reports the associated lots to the selected spike
and TARGET VALUES, the right one, reports the reference value of the methods associated
to the selected spike and to the selected lot.
The spikes tab is depicted in the following picture.
Page 43
CHAPTER 03 – SOFTWARE DESCRIPTION
SMARTCHEM 450 USER MANUAL REV.01 JUNE 2020 PAGE 29 OF 143
The LIQUIDS section lists, in the alphabetical order, the previously defined liquids. Each
liquid is characterized by:
NAME – the name of the liquid; this is the code that will be used in the software in
order to individually select the spike;
ID – this is the code that can be used to identify the spike through the barcode reader.
In this list, if the number of liquids is equal or greater than 20, a search field will be
displayed; the string will be searched in any part of the name of the list; it will be
possible to remove the filter using the button at the right of the filter.
Please note that once the material has been used it will not be possible to change the
name or the ID of the spike (these liquids are grey displayed while the editable ones are
blue displayed).
Furthermore, with reference to this section, the user can:
ADD – it allows to add a new liquid thanks to the button; following a tap over this
button the software will automatically display the keyboard in order to define the liquid
name; after having inserted the name of the new liquid, the addition of a new liquid
will imply the automatic creation of a new lot associated to the liquid;
DELETE – it allows to delete a previously defined liquid thanks to the button;
deletion of a liquid will be a soft removal; following a new re-enter of the same liquid
previously used and deleted, the software will show the previous properties of the
liquid;
Page 44
CHAPTER 03 – SOFTWARE DESCRIPTION
SMARTCHEM 450 USER MANUAL REV.01 JUNE 2020 PAGE 30 OF 143
CLONE – it allows to duplicate a previously defined liquid thanks to the button;
following a tap over this button the software will automatically display the keyboard in
order to define the liquid name; the Copy operation will provide to automatically
create the same active lot of the starting liquid as well as all the methods associations
and reference value of the active lot of the starting liquid.
The LOTS section lists, in the alphabetical order, the previously defined lots associated to
the selected liquid in the Liquids section. Each lot is characterized by:
LOT – lot number of the selected liquid;
EXPIRATION DATE – expiration date of the selected liquid;
ACTIVE – check used in order to define the active lot; no more than one lot can be the
active one; please note the changing the active lot will imply the usage in the
instrument of the method target values associated to the new lot.
In this list, if the number of liquids is equal or greater than 20, a search field will be
displayed; the string will be searched in any part of the lots of the list; it will be possible
to remove the filter using the button at the right of the filter.
Furthermore, with reference to this section, the user can:
ADD – it allows to add a new lot thanks to the button; following a tap over this
button the software will automatically display the keyboard in order to define the lot
number; after having inserted the new lot of the liquid, the addition of a new lot will
imply the automatic creation of the methods previously associated to the active lot
with the reference value set to 0;
DELETE – it allows to delete a previously defined lot thanks to the button; deletion
of a liquid will be a soft removal; following a new re-enter of the same liquid
previously used and deleted, the software will show the previous properties of the lot;
CLONE – it allows to duplicate a previously defined lot thanks to the button;
following a tap over this button the software will automatically display the keyboard in
order to define the liquid lot; the Copy operation will provide to automatically create
the same methods associations with the same reference values of the starting lot.
The TARGET VALUES section lists, in the alphabetical order, the previously associated
methods to the selected lot in the Lot section of the selected liquid in the Liquids section.
The user can define as PREDILUTED the selected lot: thanks to this option the predilution
of a method will not be applied to the spike.
Each target value is characterized by:
METHOD NAME – name of the method associated to the selected lot of the selected
liquid;
MEASUREMENT UNIT – not editable field, the measurement unit used for the method;
TARGET VALUE – this is the reference value to be used for the calibrator of the specific
method.
Page 45

CHAPTER 03 – SOFTWARE DESCRIPTION
SMARTCHEM 450 USER MANUAL REV.01 JUNE 2020 PAGE 31 OF 143
Furthermore, with reference to this section, the user can:
ADD – it allows to associate a new method to the selected lot thanks to the button;
following a tap over this button the software will automatically display in the right
panel the list of previously defined methods;
DELETE – it allows to delete a previously associated method to the selected lot defined
lot thanks to the button; deletion of a liquid will be a soft removal; following a new
re-enter of the same liquid previously used and deleted, the software will show the
previous reference values of the method;
USER UNITS – it allows to show the target values of all the methods that use the
selected material and lot, expressed in the user defined unit; this action appears only
if the target values of at least one method are shown using the primary unit but the
method has a user defined unit;
PRIMARY UNITS – it allows to show the target values of all the methods that use the
selected material and lot, expressed in the primary unit; this action appears only if the
target values of at least one method are shown using the user defined unit.
With reference to this tab, following actions are available:
SAVE – after the creation or modification of a liquid, this action is mandatory in order
to save the new list;
DISCARD CHANGES – after the creation or modification of a liquid, allows the user to
return in the state of the last save;
CLOSE – allows the user to close this mask.
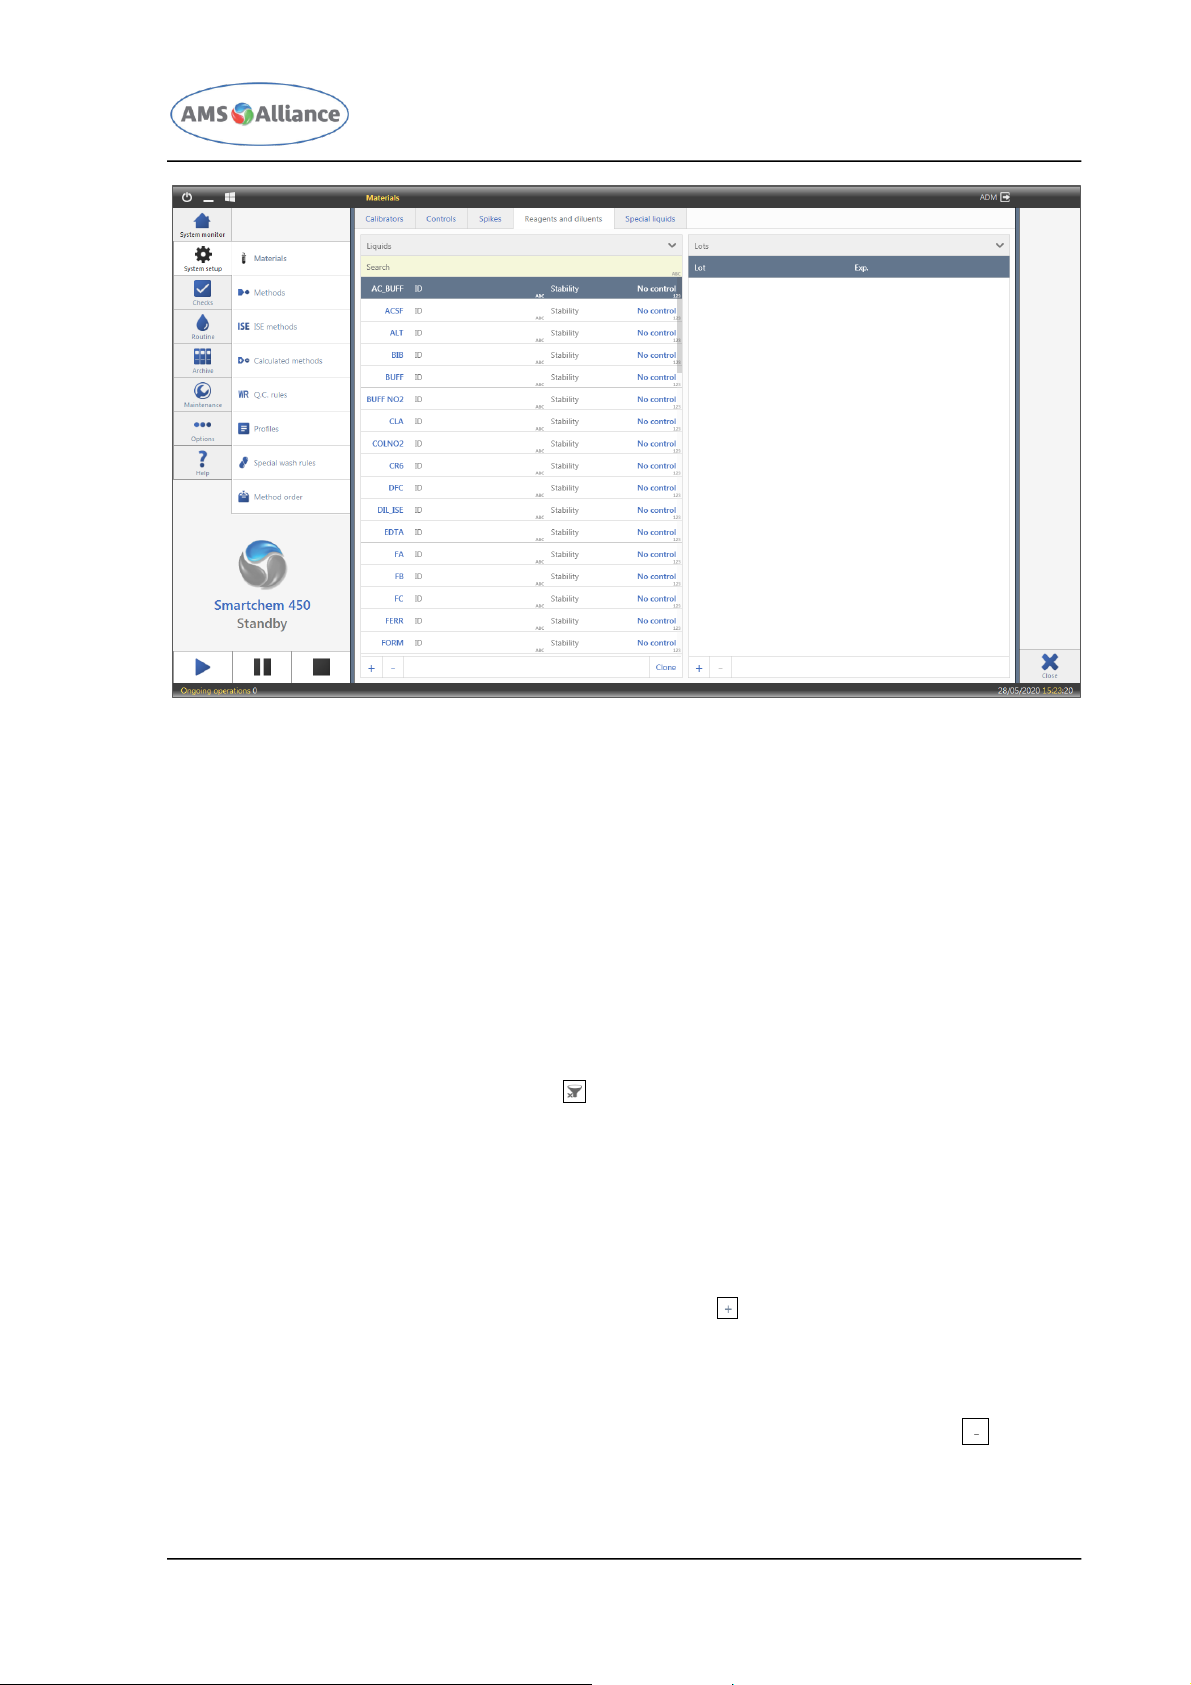
3.2.1.4 REAGENTS AND DILUENTS
This tab is divided in two sections: LIQUIDS, the left one, reports the list of previously
defined reagents or diluents and LOTS, the right one, reports the associated lots to the
selected reagent or diluent.
The reagents tab is depicted in the following picture.
Page 46
CHAPTER 03 – SOFTWARE DESCRIPTION
SMARTCHEM 450 USER MANUAL REV.01 JUNE 2020 PAGE 32 OF 143
The LIQUIDS section lists, in the alphabetical order, the previously defined liquids. Each
liquid is characterized by:
NAME – the name of the liquid; this is the code that will be used in the software in
order to individually select the spike;
ID – this is the code that can be used to identify the reagent through the barcode
reader;
STABILITY – number of days for which the reagent or the diluent may remain on board
the instrument for the stability of the liquid itself.
In this list, if the number of liquids is equal or greater than 20, a search field will be
displayed; the string will be searched in any part of the name of the list; it will be
possible to remove the filter using the button at the right of the filter.
Please note that once the material has been used it will not be possible to change the
name or the ID of the reagent or diluent (these liquids are grey displayed while the
editable ones are blue displayed).
Furthermore, with reference to this section, the user can:
ADD – it allows to add a new liquid thanks to the button; following a tap over this
button the software will automatically display the keyboard in order to define the liquid
name; after having inserted the name of the new liquid, the addition of a new liquid
will imply the automatic creation of a new lot associated to the liquid;
DELETE – it allows to delete a previously defined liquid thanks to the button;
deletion of a liquid will be a soft removal; following a new re-enter of the same liquid
Page 47

CHAPTER 03 – SOFTWARE DESCRIPTION
SMARTCHEM 450 USER MANUAL REV.01 JUNE 2020 PAGE 33 OF 143
previously used and deleted, the software will show the previous properties of the
liquid.
The LOTS section lists, in the alphabetical order, the previously defined lots associated to
the selected liquid in the Liquids section. Each lot is characterized by:
LOT – lot number of the selected liquid;
EXPIRATION DATE – expiration date of the selected liquid.
In this list, if the number of liquids is equal or greater than 20, a search field will be
displayed; the string will be searched in any part of the lots of the list; it will be possible
to remove the filter using the button at the right of the filter.
Furthermore, with reference to this section, the user can:
ADD – it allows to add a new lot thanks to the button; following a tap over this
button the software will automatically display the keyboard in order to define the lot
number;
DELETE – it allows to delete a previously defined lot thanks to the button; deletion
of a liquid will be a soft removal; following a new re-enter of the same liquid
previously used and deleted, the software will show the previous properties of the lot;
With reference to this tab, following actions are available:
SAVE – after the creation or modification of a liquid, this action is mandatory in order
to save the new list;
DISCARD CHANGES – after the creation or modification of a liquid, allows the user to
return in the state of the last save;
CLOSE – allows the user to close this mask.
3.2.1.5 SPECIAL LIQUIDS
This tab is divided in two sections: LIQUIDS, the left one, reports the list of previously
defined special liquids and LOTS, the right one, reports the associated lots to the selected
special liquids. The special liquids cannot be added by the user.
The special liquids tab is depicted in the following picture.
Page 48
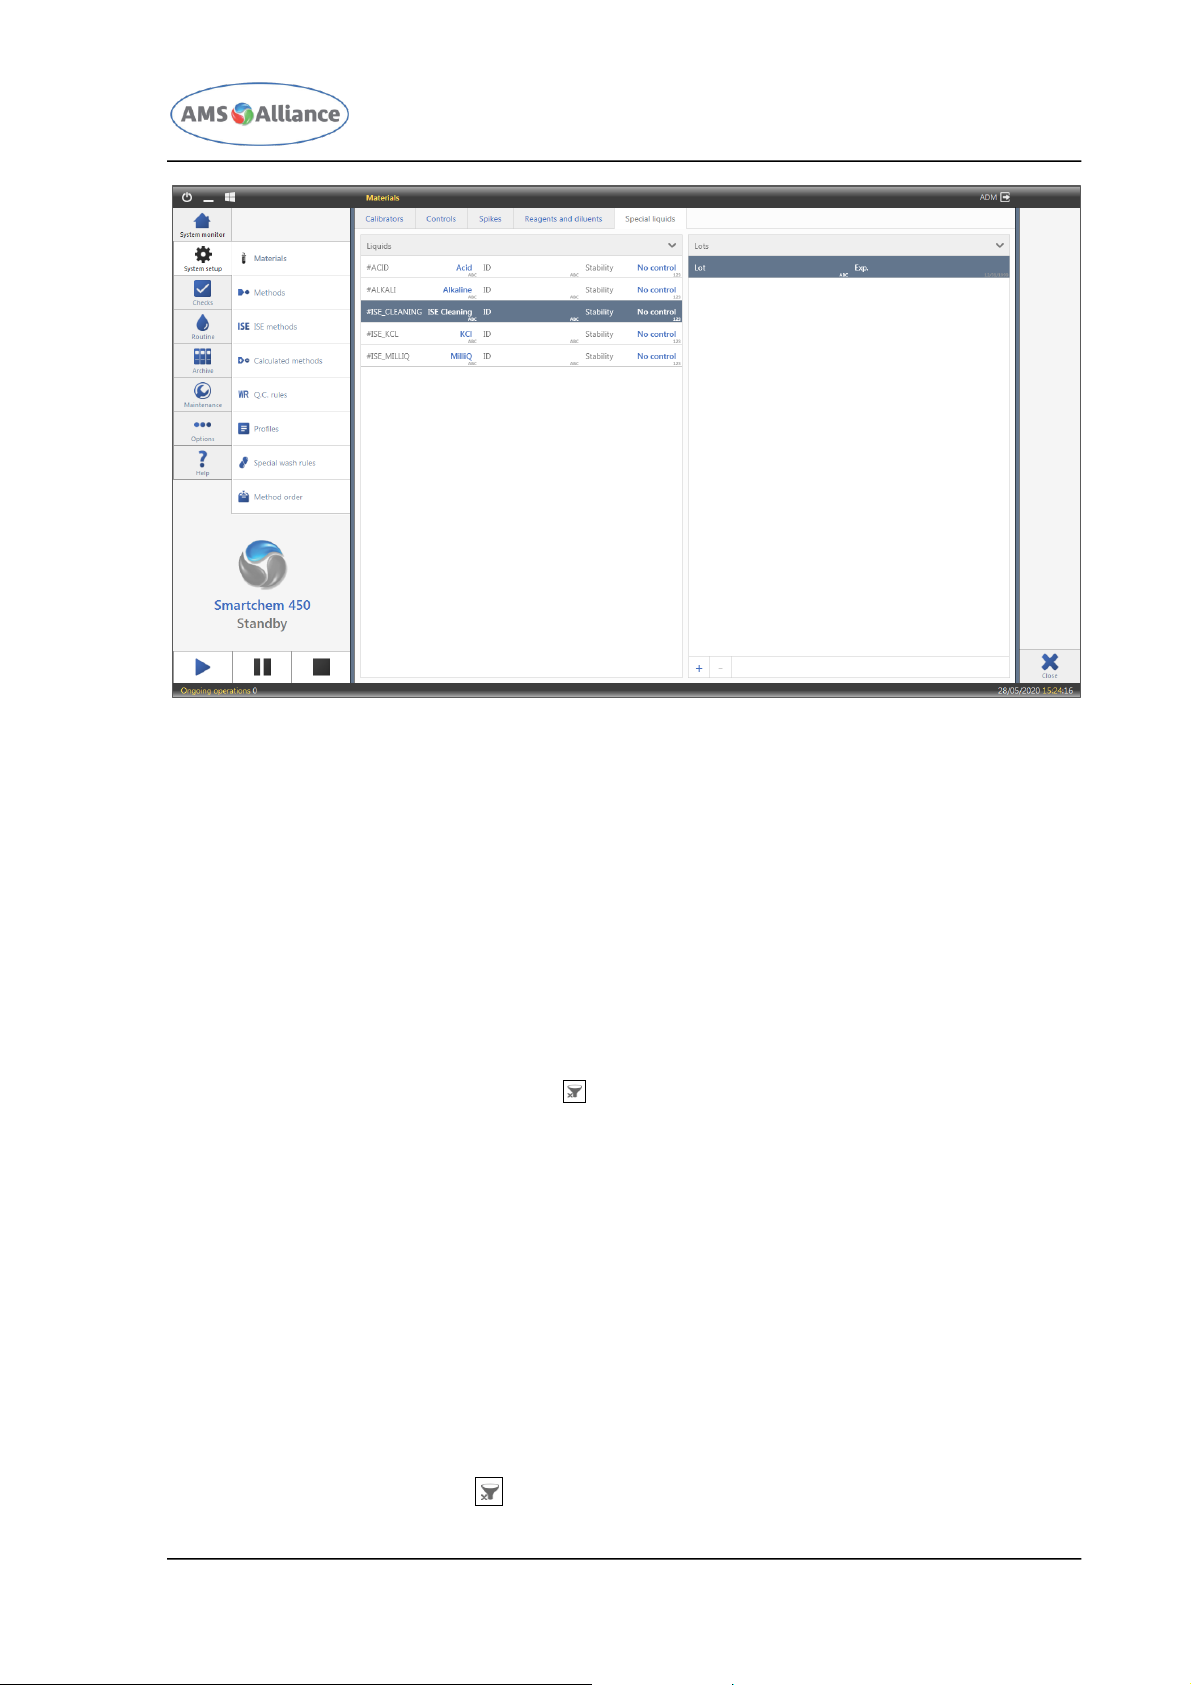
CHAPTER 03 – SOFTWARE DESCRIPTION
SMARTCHEM 450 USER MANUAL REV.01 JUNE 2020 PAGE 34 OF 143
The LIQUIDS section lists, in the alphabetical order, the previously defined liquids. Each
liquid is characterized by:
NAME – the name of the liquid; this is the code that will be used in the software in
order to individually select the spike;
ID – this is the code that can be used to identify the special liquid through the barcode
reader;
STABILITY – number of days for which the special liquid may remain on board the
instrument for the stability of the liquid itself.
In this list, if the number of liquids is equal or greater than 20, a search field will be
displayed; the string will be searched in any part of the name of the list; it will be
possible to remove the filter using the button at the right of the filter.
Please note that once the material has been used it will not be possible to change the
name or the ID of the reagent or diluent (these liquids are grey displayed while the
editable ones are blue displayed).
The LOTS section lists, in the alphabetical order, the previously defined lots associated to
the selected liquid in the Liquids section. Each lot is characterized by:
LOT – lot number of the selected liquid;
EXPIRATION DATE – expiration date of the selected liquid.
In this list, if the number of liquids is equal or greater than 20, a search field will be
displayed; the string will be searched in any part of the lots of the list; it will be possible
to remove the filter using the button at the right of the filter.
Page 49
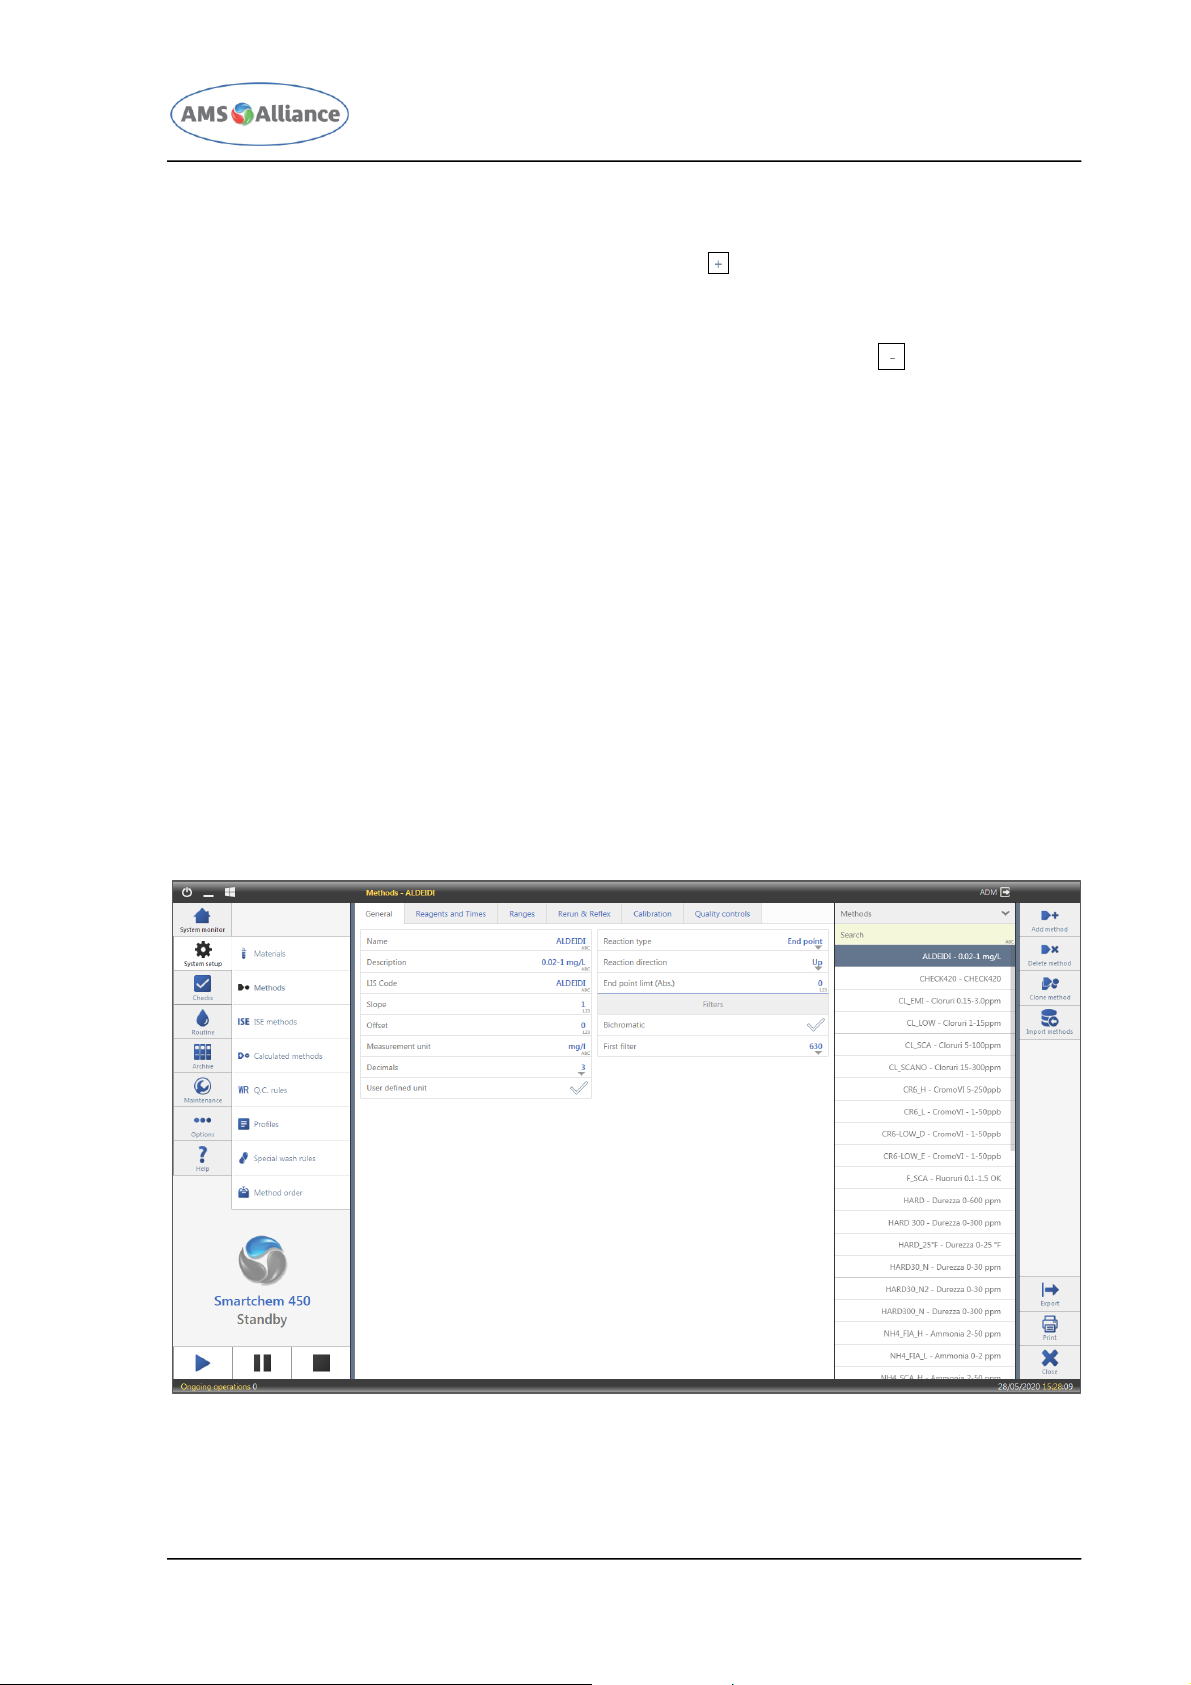
CHAPTER 03 – SOFTWARE DESCRIPTION
SMARTCHEM 450 USER MANUAL REV.01 JUNE 2020 PAGE 35 OF 143
Furthermore, with reference to this section, the user can:
ADD – it allows to add a new lot thanks to the button; following a tap over this
button the software will automatically display the keyboard in order to define the lot
number;
DELETE – it allows to delete a previously defined lot thanks to the button; deletion
of a liquid will be a soft removal; following a new re-enter of the same liquid
previously used and deleted, the software will show the previous properties of the lot.
With reference to this tab, following actions are available:
SAVE – after the creation or modification of a liquid, this action is mandatory in order
to save the new list;
DISCARD CHANGES – after the creation or modification of a liquid, allows the user to
return in the state of the last save;
CLOSE – allows the user to close this mask.
3.2.2 METHODS
A method can be defined using the first level menu SYSTEM SETUP and the second level
menu METHODS.
Tapping this menu, the following mask will appear.
This mask is divided in two areas:
Page 50

CHAPTER 03 – SOFTWARE DESCRIPTION
SMARTCHEM 450 USER MANUAL REV.01 JUNE 2020 PAGE 36 OF 143
The right one lists the previously defined methods (alphabetically ordered by method
name)
The main area (left one) shows the different fields specific of the selected method.
The different fields of a method are grouped in the following tabs:
General;
Reagents and Times;
Ranges;
Rerun & Reflex;
Calibration;
Quality Controls
Warnings and errors – visible during the definition/modification of a method in case
of some configuration warnings/problems.
With reference to this mask, following actions are available:
ADD METHOD – allows to create a new method; following a tap over this action the
software will automatically display the keyboard in order to define the method name;
DELETE METHOD – after selecting a method allows to delete it; deletion of a method will
be a soft removal; following a new re-enter of the same method previously used and
deleted, the software will show the previous properties of the method, including the
Printer Order and the Sampling Order;
CLONE METHOD – allows to create a new method starting from a previously defined
one; following a tap over this action the software will automatically display the
keyboard in order to define the method name; once entered the new method name,
the software will display the parameters set as the original method;
SAVE – after the creation or a modification of a previously defined method this action
is mandatory in order to save the new parameters associated to the method;
DISCARD CHANGES – after the creation or a modification of a previously defined
method, allows the user to return in the state of the last save;
IMPORT METHODS – this is a special function that allows to import the methods
configuration from the Smartchem 200 instrument; please note that in order to use
this action, the Microsoft® ACE.OLEDB.12.0 data provider component has to be
previously installed otherwise this function does not work; in order to import the
methods configuration from the Smartchem 200, it is necessary to store the
Easychem.mdb and the filter.ini in the same folder.
CLOSE – allows the user to close this mask;
PRINT – allows the user to print the selected method; following a tap over this action
will be displayed a dedicated mask.
Page 51
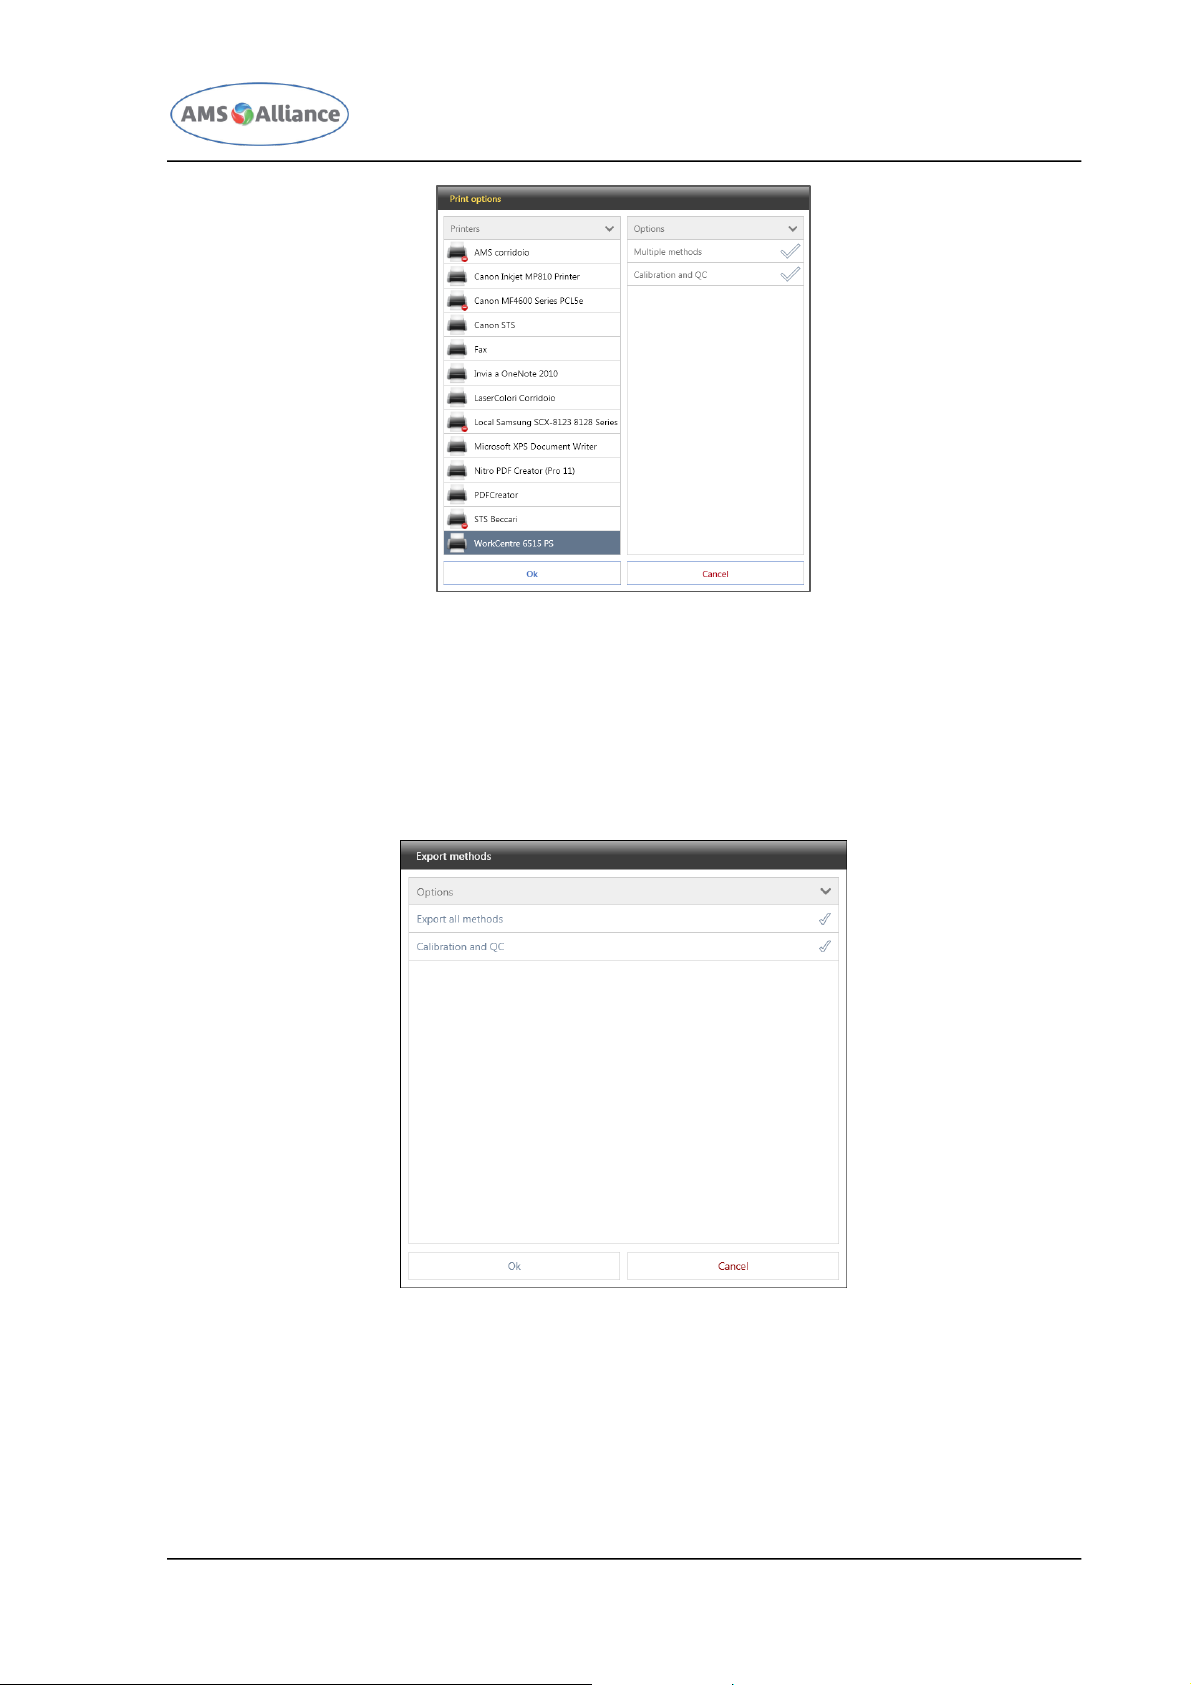
CHAPTER 03 – SOFTWARE DESCRIPTION
SMARTCHEM 450 USER MANUAL REV.01 JUNE 2020 PAGE 37 OF 143
Thanks to this mask the user can select the printer and can decide either to print or
not the Calibration parameters. Furthermore the user can decide to print more than
one method (in this case, the user will be able to select which methods have to be
printed). Please note that the printers that are not currently available will be
distinguished by the others thanks a dedicated icon.
EXPORT – allows the user to export the selected method as an excel file (.xlsx);
following a tap over this action will be displayed a dedicated mask.
Thanks to this mask the user can decide either to export or not the Calibration and
Quality Controls parameters. Furthermore the user can decide to export more than
one method (in this case, the user will be able to select which methods have to be
exported).
Page 52

CHAPTER 03 – SOFTWARE DESCRIPTION
SMARTCHEM 450 USER MANUAL REV.01 JUNE 2020 PAGE 38 OF 143
3.2.2.1 GENERAL
This tab is dedicated to the general information of the selected method. Following
parameters can be defined:
NAME - method code to be used in the software to identify the method;
DESCRIPTION – method description to be used in the report;
LIS CODE – method LIS code to be used in the LIMS communication;
SLOPE – slope of the line used to compare the results of an instrument with another
one;
OFFSET – offset of the line used to compare the results of an instrument with another
one;
MEASUREMENT UNIT – measurement unit of the method; adding or modifying the
measurement unit the software will suggest the previously defined ones;
DECIMALS – number of decimals to be used in the method result presentation;
USER DEFINED UNIT CHECK – checkbox that allows to use the measurement unit defined
by the user;
USER DEFINED UNIT - measurement unit of the method; adding or modifying the
measurement unit the software will suggest the previously defined ones;
USER DEFINED UNIT DECIMALS – number of decimals to be used in the method result
presentation;
CONVERSION FACTOR – ratio between the User Defined Unit and the Measurement Unit;
REACTION TYPE – allows the user to choose the reaction type among following options:
End Point, Fixed Time and Kinetic;
REACTION DIRECTION – it allows the user to choose the reaction type among following
options: Direct, Indirect or None; if the value set by the user is different from None,
tests that do not respect the direction will be flagged; this flag will not apply to the
RBL tests due to the potential uncertainty of those tests;
EP LIMIT (ABS) – visible only if Reaction Type equal to End Point or Differential, allows
the user to set the maximum acceptable interval between the last two readings; for
more details please refer to the Chapter 06 of this manual;
DEPLETION LIMIT (ABS) - visible only if Reaction direction is different by none and
Reaction Type equal to Fixed Time or Kinetic; for more details please refer to the
Chapter 06 of this manual;
DEPLETION LIMIT RERUN - visible only if the depletion limit has been defined; allows
the user to set post dilution ratio, if needed, to be used in the auto rerun request;
FIRST LIMIT (ABS) - visible only if Reaction Type equal to Fixed Time; for more details
please refer to the Chapter 06 of this manual;
LINEAR FACTOR - visible only if Reaction Type equal to Fixed Time; for more details
please refer to the Chapter 06 of this manual;
KINETIC FIT - visible only if Reaction Type equal to Kinetic;
BI-CHROMATIC – checkbox that allows the user to set a method as bi-chromatic;
FIRST FILTER – allows the user to choose the first filter among the list of filters that
has been previously set;
Page 53

CHAPTER 03 – SOFTWARE DESCRIPTION
SMARTCHEM 450 USER MANUAL REV.01 JUNE 2020 PAGE 39 OF 143
SECOND FILTER – allows the user to choose the first filter among the list of filters that
has been previously set;
BI-CHROMATIC FACTOR – visible only if Bi-chromatic is checked.
3.2.2.2 REAGENTS AND TIMES
This tab is dedicated to the definition of the liquids used by the methods. Following
parameters can be defined:
DILUENT – option list that allows the user to choose the diluent to be used either for
the pre-dilution or the post-dilution among the previously defined reagents and
diluents thanks to the materials mask (please refer to section 3.2.1.3); in case of nonpre-diluted methods this diluent, it will be used for the post dilution;
RESIDUAL TEST WARNINGS – allows the user to define the number of tests that can be
executed with the diluent under which the diluent bottle has to be shown with the Low
volume indication;
PRE-DILUTION RATIO – allows the user to select the pre-dilution ratio to be used for
the method; by default is set to 1:1 (no pre-dilution);
SAMPLE VOLUME (µL) – allows the user to set the volume of the sample in order to
perform the method;
NO3 PRETREATMENT – this section is visible only if the user has set the NO3 module
and includes following fields:
SAMPLE VOLUME (µL) – allows the user to set the volume of the sample to be used
in order to perform the pretreatment;
BUFFER LIQUID – allows the user to define the name of the buffer to be used in the
pretreatment; adding or modifying the buffer liquids the software will suggest the
previously defined ones;
BUFFER VOLUME (µL) – allows the user to define the volume of the selected buffer to
be used in the pretreatment;
BUFFER PRIMING VOLUME (µL) – allows the user to set the volume of the buffer to
be aspired before the selected buffer to be used for the test;
REDUCTION TIME (SEC.) – allows the user to choose the time interval during which
the sample and the buffer will remain inside the NO3 module;
REAGENTS NUMBER – allows the user to select the number of reagents (up to four) to
be used for the method; by default is set to 1;
For each reagent following parameters can be set:
REAGENT NAME – allows the user to choose the reagent among the previously
defined reagents and diluents thanks to the materials mask (please refer to section
3.2.1.3);
RESIDUAL TEST WARNINGS – allows the user to define the number of tests that can
be executed with the reagent under which the diluent bottle has to be shown with
the Low volume indication;
REAGENT VOLUME (µL) – allows the user to define the volume of the selected
reagent to be used;
Page 54

CHAPTER 03 – SOFTWARE DESCRIPTION
SMARTCHEM 450 USER MANUAL REV.01 JUNE 2020 PAGE 40 OF 143
PRIMING VOLUME (µL) – allows the user to set the volume of the rinse to be aspired
before the selected reagent;
PRIMING WITH REAGENT – visible only if the priming volume is greater than 0; if
checked the priming of the reagent will be performed with the reagent itself (the
priming volume will not be dispensed); if unchecked, the priming will be performed
with the liquid in the hydraulic line (in this case the reagent will be diluted, and it
will be dispensed the reagent volume minus the priming volume);
REAGENT TIME (SEC.) – allows the user to choose the time at which the reagent is
dispensed (the first reagent will always be dispensed at 0 seconds);
SAMPLE BLANK – the user can decide to have a sample blank check; this option is
not available for the last reagent and is applicable to only one reagent;
INCUBATION TIME (SEC.) – allows the user to choose the incubation time after the last
reagent will be dispensed;
READING TIME (SEC.) – allows the user to choose the reading time after the incubation
time; this time applies to Fixed Time methods only;
TIME LENGTH (SEC.) – allows the user to choose the time length after the incubation
time; this time applies to Kinetic methods only.
3.2.2.3 RANGES
This tab is dedicated to the definition of the ranges to be applied to the selected method.
Following parameters can be defined:
LOW LINEARITY – allows the user to set the low linearity limit for the specific method;
any test characterized by a result lower than this limit will be coherently flagged;
LOW – allows the user to set the low limit for the specific method; any test
characterized by a result lower than this limit will be coherently flagged;
HIGH – allows the user to set the high limit for the specific method; any test
characterized by a result greater than this limit will be coherently flagged;
HIGH LINEARITY – allows the user to set the high linearity limit for the specific method;
any test characterized by a result greater than this limit will be coherently flagged;
USER RANGE MIN – allows the user to set another minimum limit for the specific
method; any test characterized by a result lower than this limit will be coherently
flagged;
USER RANGE MAX – allows the user to set another maximum limit for the specific
method; any test characterized by a result greater than this limit will be coherently
flagged
Please note that the user from this tab can easily change the unit to be used in the
visualization or setting of the different ranges.
3.2.2.4 RERUN AND REFLEX
This tab is dedicated to the definition of the automatic rerun as well as of the reflex
testing.
The user can define the automatic rerun with reference to:
Page 55

CHAPTER 03 – SOFTWARE DESCRIPTION
SMARTCHEM 450 USER MANUAL REV.01 JUNE 2020 PAGE 41 OF 143
LOW LINEARITY – the user can require up to 5 sequential automatic with a chosen
concentration ratio (1/1, 2/1, 3/1, …, 100/1); with reference to non prediluted
methods, the concentration ratio will be obtained modifying the ratio between the
sample volume and the first reagent volume; for this reason only a subset
concentration ratios will be available for the specific method; the first automatic rerun
will be scheduled if the result is lower than the low linearity limit, the second
automatic rerun will be scheduled if the result of the first automatic rerun multiplied
by the concentration ratio will be lower than the low linearity limit and so on;
LOW – the user can require up to 5 sequential automatic with a chosen concentration
ratio (1/1, 2/1, 3/1, …, 100/1); with reference to non prediluted methods, the
concentration ratio will be obtained modifying the ratio between the sample volume
and the first reagent volume; for this reason only a subset concentration ratios will be
available for the specific method; the first automatic rerun will be scheduled if the
result is lower than the low limit, the second automatic rerun will be scheduled if the
result of the first automatic rerun multiplied by the concentration ratio will be lower
than the low limit and so on;
HIGH – the user can require up to 5 sequential automatic with a chosen dilution ratio
(1/1, 1/2, 1/3, …, 1/100); the first automatic rerun will be scheduled if the result is
greater than the high limit, the second automatic rerun will be scheduled if the result
of the first automatic rerun multiplied by the dilution ratio will be greater than the high
limit and so on;
HIGH LINEARITY – the user can require up to 5 sequential automatic with a chosen
dilution ratio (1/1, 1/2, 1/3, …, 1/100); the first automatic rerun will be scheduled if
the result is greater than the high linearity limit, the second automatic rerun will be
scheduled if the result of the first automatic rerun multiplied by the dilution ratio will
be greater than the high linearity limit and so on;
LOWER THAN FIRST CALIBRATION POINT – the user can require up to 5 sequential
automatic with a chosen concentration ratio (1/1, 2/1, 3/1, …, 100/1); with reference
to non prediluted methods, the concentration ratio will be obtained modifying the ratio
between the sample volume and the first reagent volume; for this reason only a
subset concentration ratios will be available for the specific method; the first
automatic rerun will be scheduled if the result is lower than the first calibration point,
the second automatic rerun will be scheduled if the result of the first automatic rerun
multiplied by the concentration ratio will be lower than the first calibration point and
so on; please note that in case both situations will occur (below low linearity limit and
lower than first calibration point) the linearity limit rerun will be applied; please note
that in case both situations will occur (below low limit and lower than first calibration
point) the first calibration point limit rerun will be applied;
GREATER THAN LAST CALIBRATION POINT – the user can require up to 5 sequential
automatic with a chosen dilution ratio (1/1, 1/2, 1/3, …, 1/100); the first automatic
rerun will be scheduled if the result is greater than the last calibration point, the
second automatic rerun will be scheduled if the result of the first automatic rerun
multiplied by the dilution ratio will be greater than the last calibration point; please
note that in case both situations will occur (greater than high linearity limit and
Page 56

CHAPTER 03 – SOFTWARE DESCRIPTION
SMARTCHEM 450 USER MANUAL REV.01 JUNE 2020 PAGE 42 OF 143
greater than last calibration point) the linearity limit rerun will be applied; please note
that in case both situations will occur (greater than high limit and greater than last
calibration point) the last calibration point limit rerun will be applied;
USER RANGE MIN – the user can require up to 5 sequential automatic with a chosen
concentration ratio (1/1, 2/1, 3/1, …, 100/1); with reference to non prediluted
methods, the concentration ratio will be obtained modifying the ratio between the
sample volume and the first reagent volume; for this reason only a subset
concentration ratios will be available for the specific method; the first automatic rerun
will be scheduled if the result is lower than the low limit, the second automatic rerun
will be scheduled if the result of the first automatic rerun multiplied by the
concentration ratio will be lower than the User range Min limit and so on;
USER RANGE MAX – the user can require up to 5 sequential automatic with a chosen
dilution ratio (1/1, 1/2, 1/3, …, 1/100); the first automatic rerun will be scheduled if
the result is greater than the high limit, the second automatic rerun will be scheduled
if the result of the first automatic rerun multiplied by the dilution ratio will be greater
than the User range Max limit and so on.
The same above conditions can be used for the reflex testing; the user can choose up to
four different methods/calculated methods to be executed if the condition occurs;
furthermore the user can decide to apply the reflex condition either at the test execution
as is or at the last automatic rerun execution condition; the first option involves that the
reflex testing and the automatic rerun will be simultaneously scheduled, while the second
option involves that the reflex testing will be scheduled only after the execution of the
last automatic rerun.
3.2.2.5 CALIBRATION
This tab is dedicated to the definition of the RBL and/or calibration related to the selected
method. Following parameters can be defined:
REAGENT BLANK LEVEL – checkbox that allows the user to request for the execution of
the Reagent Blank;
CALIBRATION TYPE – option list that allows the user to choose between following
options: curve (one or more calibration points and a calibration curve would be
defined), factor (calibration against factor) or reference (use the calibration of another
method).
With reference to the Reagent Blank Level the user has to set following parameters:
AUTO RERUN ON REAGENT CHANGED – if checked, the RBL will be automatically
executed when the reagent bottle is changed; please note that the RBL will be
executed only if the RBL Liquid is left on board (a work list does not overlap the
calibration rack where RBL fluid is present);
AUTO RERUN ON RBL EXPIRED – if checked, the RBL will be automatically executed
when the RBL is overdue; please note that the RBL will be executed only if the RBL
Page 57

CHAPTER 03 – SOFTWARE DESCRIPTION
SMARTCHEM 450 USER MANUAL REV.01 JUNE 2020 PAGE 43 OF 143
Liquid is left on board (a work list does not overlap the calibration rack where RBL fluid
is present);
RBL LIQUID – the name of this liquid cannot be changed and will be equal to
H2O_RBL;
RBL MIN (ABS) – in case the RBL absorbance will be lower than the set limit, the RBL
will be consequently flagged;
RBL MAX (ABS) – in case the RBL absorbance will be greater than the set limit, the
RBL will be consequently flagged;
RBL STABILITY (DAYS) – maximum number of days for which the RBL will be
considered valid; using an RBL older than the defined number of days, the tests will be
consequently flagged;
RBL REPLICATES – number of repetition of RBL tests that the instrument has to
perform; the final result of the RBL can use all the replicates or can exclude the
farthest from the mean depending on the set option;
RBL CV% – maximum acceptable correlation coefficient among the different
replicates execution of the RBL; in case the RBL CV% will be greater than the set limit,
the RBL will be consequently flagged.
With reference to the Calibration, the user has to set following parameters depending on
the chosen calibration type:
CALIBRATION TYPE - FACTOR
FACTOR – the Factor is the only parameter to be set; this is the ratio between the
concentration and the absorbance to be used for the results calculation;
CALIBRATION TYPE - REFERENCE
METHOD – this is the method whose calibration will be used for the current method;
FACTOR – this parameter is a coefficient to be used as a multiplier of the calibration
of the reference method;
CALIBRATION TYPE - CURVE
CALCULATION MODEL – one of the different calculation models provided in the
software can be selected by the user;
CALIBRATION FACTOR – this parameter is a coefficient to be used as a multiplier of
the curve obtained by the calibration;
CALIBRATION MIN SLOPE – visible only if calculation model is equal to Linear or
Standard; in case the slope of the calibration line will be lower than the set limit,
the calibration will be consequently flagged;
CALIBRATION MAX SLOPE – visible only if calculation model is equal to Linear or
Standard; in case the slope of the calibration line will be greater than the set limit,
the calibration will be consequently flagged;
CALIBRATION STABILITY (DAYS) – maximum number of days for which the calibration
will be considered valid; using a calibration older than the defined number of days,
the tests will be consequently flagged;
STOCK – if checked, the points will be prepared stating from a stock standard,
otherwise the points will be considered as already prepared;
Page 58

CHAPTER 03 – SOFTWARE DESCRIPTION
SMARTCHEM 450 USER MANUAL REV.01 JUNE 2020 PAGE 44 OF 143
PRE-DILUTED – applies only to pre-diluted methods; if checked, the calibration
points are considered by the instrument as already pre-diluted and no pre-dilution
will be applied to them;
DILUENT – option list that allows the user to choose the diluent to be used for the
preparation of the calibration points among the previously defined reagents and
diluents thanks to the materials mask (please refer to section 3.2.1.3); in case of
non-pre-diluted methods this diluent, it will be used for the post dilution;
POINTS – number of points to be used for the calibration;
FORCE ZERO CROSSING – if checked and one of the points is the 0 concentration
point, the calibration curve will pass through the zero point (0 absorbance, 0
concentration);
R
2
MIN – this is the minimum acceptable Correlation Coefficient for the calibration
curve; in case the correlation coefficient will be lower than the set limit, the
calibration will be consequently flagged;
ON FAIL – the user can decide the software behaviour to be followed in case the
correlation coefficient should be lower than the set limit:
IGNORE AND CONTINUE – the instrument will proceed the operation ignoring the
R2 mismatch;
PROMPT USER FOR ACTION – following an R
2
mismatch, the instrument will pause
the on-going the operation waiting for a choose of the user among following
options: IGNORE AND CONTINUE or STOP THE METHOD or RERUN THE CALIBRATION
and, if it will fail again IGNORE AND CONTINUE or STOP THE METHOD or STOP THE
WORK PLAN;
RERUN THE CALIBRATION – following an R
2
mismatch, the instrument will proceed
with an automatic rerun of the calibration; in case of a second failure the user
can decide among following options: IGNORE AND CONTINUE, STOP METHOD or
STOP WORK PLAN;
STOP THE METHOD – following an R
2
mismatch, the instrument will stop the
execution of the current method and it will pass to execution of the following
method;
STOCK LIQUID – if the user wants to use a stock liquid (see previous STOCK check),
in this section the user can set following parameters: LIQUID1 (name of the stock
standard to be used), LOT (lot number of the selected stock standard), EXPIRATION
DATE (expiration date of the selected stock standard), UNIT (measurement unit as
chosen by the user) and the CONCENTRATION (target of the stock standard);
EVERY CALIBRATION POINT – for each calibration point in this section the user can
set following parameters depending on the user wants to use a stock standard or
not:
STOCK STANDARD
1
Tapping the Liquid, Lot and Date field, an option list is opened that allows the user to choose the
standard to be used among the previously defined standards thanks to the materials mask (please
refer to section 3.2.1.1).
Page 59

CHAPTER 03 – SOFTWARE DESCRIPTION
SMARTCHEM 450 USER MANUAL REV.01 JUNE 2020 PAGE 45 OF 143
CONCENTRATION – target concentration of the selected point; the user can set
this value or the reference % and this field will be automatically calculated;
REFERENCE % – reference percentage of the selected point; the user can set
this value or the concentration and this field will be automatically calculated;
REPLICATES – number of repetition of the calibration point that the instrument
has to perform; the final result of the calibration point can use all the
replicates or can exclude the farthest from the mean depending on the set
option;
CV % – maximum acceptable correlation coefficient among the different
replicates execution of the calibration point; in case the target CV% will be
greater than the set limit, the calibration point will be consequently flagged;
NO STOCK STANDARD (ALREADY PREPARED POINT)
LIQUID
2
– name of the standard to be used;
LOT – lot number of the selected standard;
EXPIRATION DATE – expiration date of the selected standard;
UNIT – measurement unit as chosen by the user;
CONCENTRATION – target concentration of the selected point;
REPLICATES – number of repetition of the calibration point that the instrument
has to perform; the final result of the calibration point can use all the
replicates or can exclude the farthest from the mean depending on the set
option;
CV % – maximum acceptable correlation coefficient among the different
replicates execution of the calibration point; in case the target CV% will be
greater than the set limit, the calibration point will be consequently flagged.
3.2.2.6 QUALITY CONTROL
This tab is dedicated to the definition of the duplicates, spikes and quality controls to be
associated to the selected method.
With reference to the duplicates, the user has to set following parameters:
FREQUENCY – interval, expressed as number of samples, between subsequent
duplicates;
NUMBER OF REPLICATES – number of replicates to be executed for the specific sample;
setting this field to 1 (default) means executing a duplicate;
RPD % MAX – maximum Relative Percentage Difference between sample and
duplicate; if the value is greater than the set value, the duplicate will be consequently
flagged;
ON FAIL – the user can decide the software behaviour to be followed in case the
relative percentage difference should be greater than the set limit:
2
Tapping the Liquid, Lot and Date field, an option list is opened that allows the user to choose the
standard to be used among the previously defined standards thanks to the materials mask (please
refer to section 3.2.1.1).
Page 60

CHAPTER 03 – SOFTWARE DESCRIPTION
SMARTCHEM 450 USER MANUAL REV.01 JUNE 2020 PAGE 46 OF 143
IGNORE AND CONTINUE – the instrument will proceed the operation ignoring the RPD
% mismatch;
PROMPT USER FOR ACTION – following an RPD % mismatch, the instrument will
pause the on-going the operation waiting for a choose of the user among following
options: IGNORE AND CONTINUE or STOP THE METHOD or RERUN THE DUPLICATE and, if
it will fail again IGNORE AND CONTINUE or STOP THE METHOD or STOP THE WORK
PLAN;
RERUN THE DUPLICATE – following an RPD % mismatch, the instrument will proceed
with an automatic rerun of the duplicate; in case of a second failure the user can
decide among following options: IGNORE AND CONTINUE, STOP METHOD or STOP
WORK PLAN;
STOP THE METHOD – following an RPD % mismatch, the instrument will stop the
execution of the current method and it will pass to execution of the following
method.
With reference to the spikes, the user has to set following parameters:
LIQUID
3
– name of the spike to be used;
LOT – lot number of the selected spike;
EXPIRATION DATE – expiration date of the selected spike;
UNIT – measurement unit as chosen by the user;
CONCENTRATION – target concentration of the selected spike;
VOLUME – volume of the selected spike to be used in the preparation;
RECOVERY % – minimum recovery percentage; if the value is lower than the set value,
the spike will be consequently flagged;
FREQUENCY – interval, expressed as number of samples, between subsequent spikes;
DUPLICATE – if checked, the spike will be executed twice;
RPD % MAX – visible only if Duplicate is checked; maximum Relative Percentage
Difference between the two spikes execution; if the value is greater than the set
value, the duplicate will be consequently flagged;
ON FAIL – visible only if Duplicate is checked; the user can decide the software
behaviour to be followed in case the relative percentage difference should be greater
than the set limit:
IGNORE AND CONTINUE – the instrument will proceed the operation ignoring the RPD
% mismatch;
PROMPT USER FOR ACTION – following an RPD % mismatch, the instrument will
pause the on-going the operation waiting for a choose of the user among following
options: IGNORE AND CONTINUE or STOP THE METHOD or RERUN THE DUPLICATE and, if
it will fail again IGNORE AND CONTINUE or STOP THE METHOD or STOP THE WORK
PLAN;
3
Tapping this field, the software will show to the user an enhanced keyboard that will show, as
automatic suggestion the previously defined liquids as standard; choosing one of them, the
software will fill the other fields with the information related to the active lot.
Page 61

CHAPTER 03 – SOFTWARE DESCRIPTION
SMARTCHEM 450 USER MANUAL REV.01 JUNE 2020 PAGE 47 OF 143
RERUN THE DUPLICATE – following an RPD % mismatch, the instrument will proceed
with an automatic rerun of the duplicate; in case of a second failure the user can
decide among following options: IGNORE AND CONTINUE, STOP METHOD or STOP
WORK PLAN;
STOP THE METHOD – following an RPD % mismatch, the instrument will stop the
execution of the current method and it will pass to execution of the following
method.
With reference to the controls, the user has to set following parameters:
LIQUID
4
– name of the control to be used;
LOT – lot number of the selected control;
EXPIRATION DATE – expiration date of the selected control;
UNIT – measurement unit as chosen by the user;
MIN – minimum acceptable value of the selected control; the minimum and the
maximum values will be automatically calculated if the user fills the mean and the
standard deviation fields;
MAX – maximum acceptable value of the selected control; the minimum and the
maximum values will be automatically calculated if the user fills the mean and the
standard deviation fields;
MEAN – mean value of the selected control; the mean and the standard deviation
values will be automatically calculated if the user fills the minimum and the maximum
fields;
STANDARD DEVIATION – standard deviation of the selected control; the mean and the
standard deviation values will be automatically calculated if the user fills the minimum
and the maximum fields;
FIXED POSITION – if checked the control liquid will be always taken from a single
location of the sample plate; if unchecked the control liquid should be positioned in the
work plan according to the set frequency;
NELAC/EPA TYPE – allows to define the specific type for the selected control; by
default is set to QC5;
INITIAL – if checked the control will be scheduled in the initial block of any work plan;
FINAL – if checked the control will be scheduled in the final block of any work plan;
4
Tapping this field, the software will show to the user an enhanced keyboard that will show, as
automatic suggestion the previously defined liquids as Control; choosing one of them, the software
will fill the other fields with the information related to the active lot.
5
CB Calibration Blank
LRB Laboratory Reagent Blank
MB Method Blank
LCS Laboratory Control Sample
SSSV Second Source Standard (Calibration) Verification
QCS Quality Control Sample
SS Second Source Quality Control Sample
LFB Laboratory Fortified Blank
CCV1..9 Continuing Calibration Verification
CCB Continuing Calibration Blank
ICV Initial Calibration Verification
ICB Initial Calibration Blank
Page 62

CHAPTER 03 – SOFTWARE DESCRIPTION
SMARTCHEM 450 USER MANUAL REV.01 JUNE 2020 PAGE 48 OF 143
DYNAMIC – if checked the control will be scheduled in the during any work plan
according to the set frequency;
FREQUENCY – visible only if Dynamic is checked; interval, expressed as number of
samples, between subsequent control blocks;
ON FAIL – the user can decide the software behaviour to be followed in case the
relative percentage difference should be greater than the set limit:
IGNORE AND CONTINUE – the instrument will proceed the operation ignoring the
control reference range mismatch;
PROMPT USER FOR ACTION – following a control reference range mismatch, the
instrument will pause the on-going the operation waiting for a choose of the user
among following options: IGNORE AND CONTINUE or STOP THE METHOD or RERUN THE
DUPLICATE and, if it will fail again IGNORE AND CONTINUE or STOP THE METHOD or
STOP THE WORK PLAN;
RERUN THE DUPLICATE – following a control reference range mismatch, the
instrument will proceed with an automatic rerun of the duplicate; in case of a
second failure the user can decide among following options: IGNORE AND CONTINUE,
STOP METHOD or STOP WORK PLAN;
STOP THE METHOD – following a control reference range mismatch, the instrument
will stop the execution of the current method and it will pass to execution of the
following method.
Following bullets report the scheduling order depending on the control type:
INITIAL BLOCK – ICB, ICV, CB, LRB, MB, LCS, LFB, QCS, SS, SSSV, QC;
FREQUENCY BLOCK – QC, CB, LRB, MB, LCS, LFB, QCS, SS, SSSV, CCV1..CCV9, CCB;
FINAL BLOCK – QC, CB, LRB, MB, LCS, LFB, QCS, SS, SSSV, CCV1..CCV9, CCB.
3.2.2.7 WARNING AND ERRORS
This tab is visible only during the editing of a method and if some field is not
(presumably) correctly configured.
In this tab the user will find the list of warnings and errors related to the method that is
currently edited; each warning or error will be tappable and the software will show the
tab where the problem is.
Errors can be distinguished thanks to the following icon .
3.2.3 ISE METHODS
An ISE method can be defined using the first level menu SYSTEM SETUP and the second
level menu ISE METHODS. This menu is visible only if the ISE module has been previously
set.
Tapping this menu, the following mask will appear.
Page 63
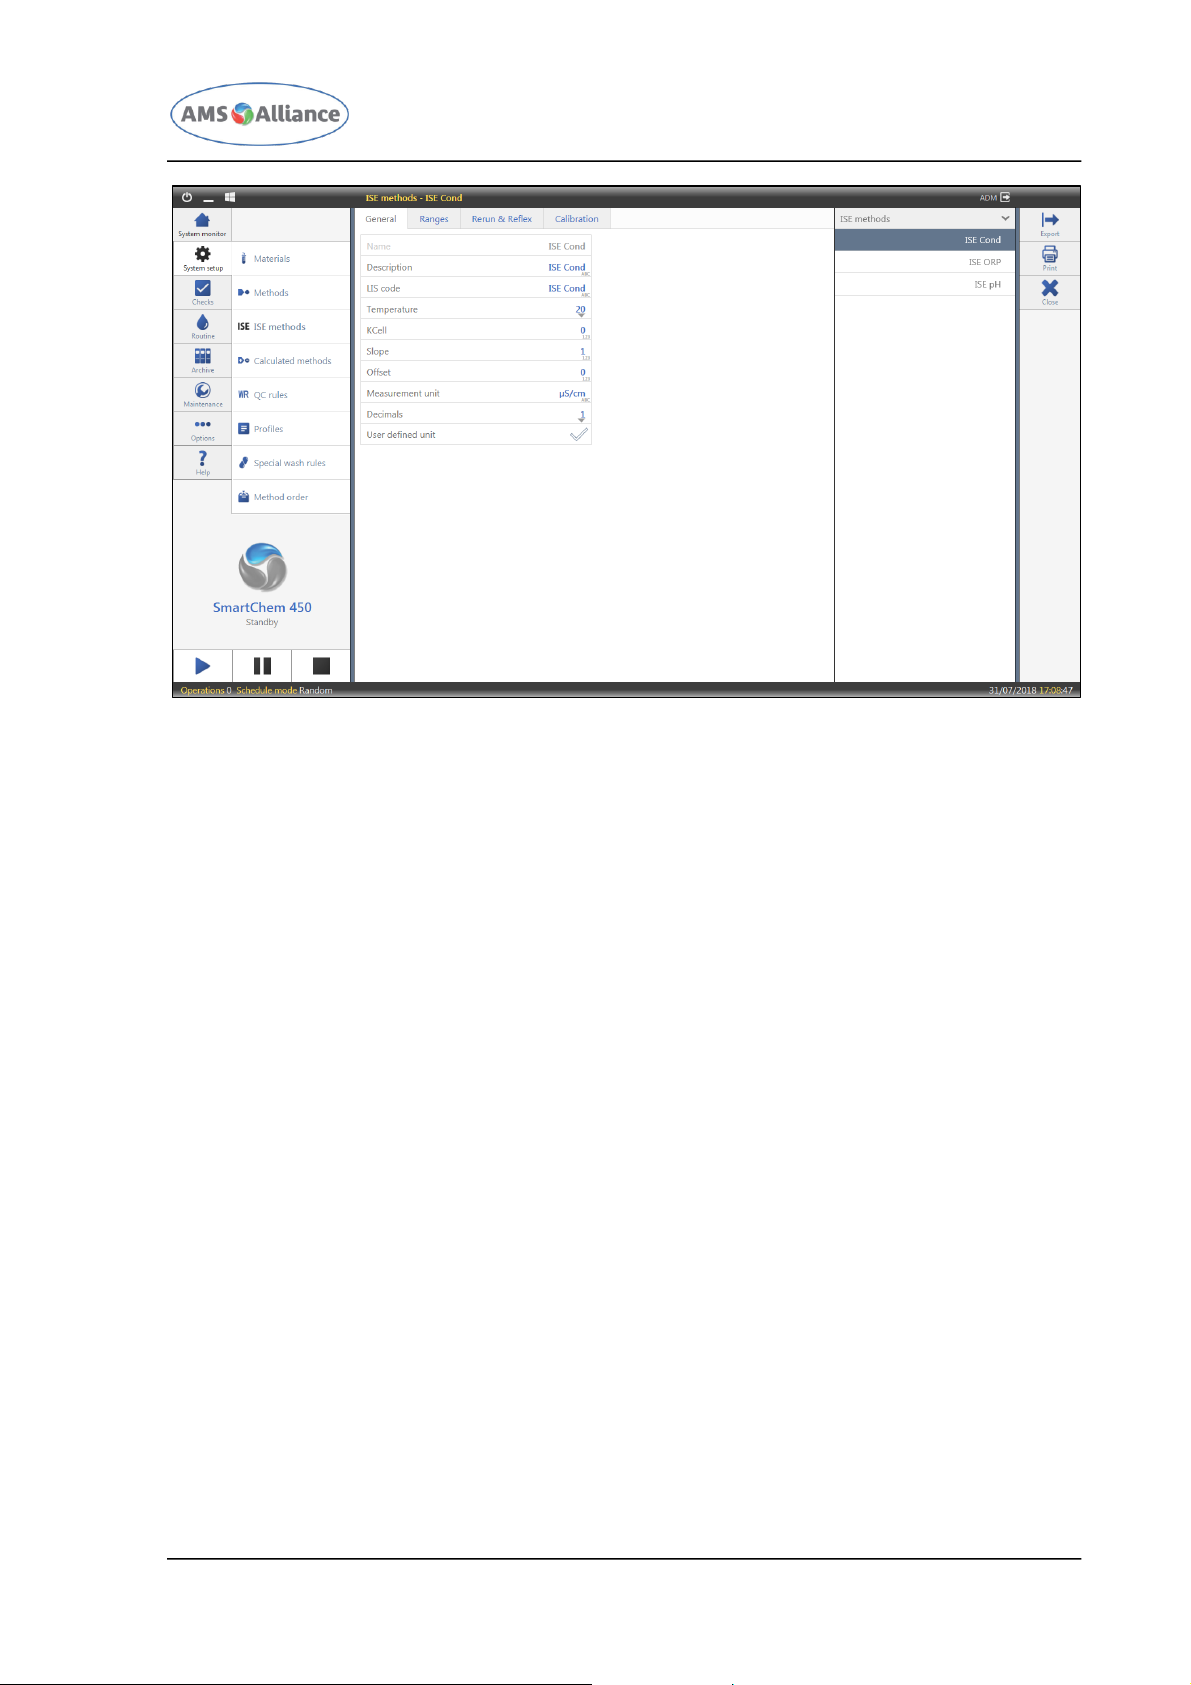
CHAPTER 03 – SOFTWARE DESCRIPTION
SMARTCHEM 450 USER MANUAL REV.01 JUNE 2020 PAGE 49 OF 143
This mask is divided in two areas:
The right one lists the previously defined methods: ISE Conductivity, ISE Oxidation
Reduction Potential, ISE pH;
The main area (left one) shows the different fields specific of the selected method.
The different fields of a method are grouped in the following tabs:
General;
Ranges;
Rerun & Reflex;
Calibration;
Quality control;
Warnings and errors – visible during the definition/modification of a method in case
of some configuration warnings/problems.
With reference to this mask, following actions are available:
SAVE – after the creation or a modification of a previously defined method this action
is mandatory in order to save the new parameters associated to the method;
DISCARD CHANGES – after the creation or a modification of a previously defined
method, allows the user to return in the state of the last save;
CLOSE – allows the user to close this mask;
PRINT – allows the user to print either the selected method or the entire set of
methods; following a tap over this action will be displayed a dedicated mask.
Page 64
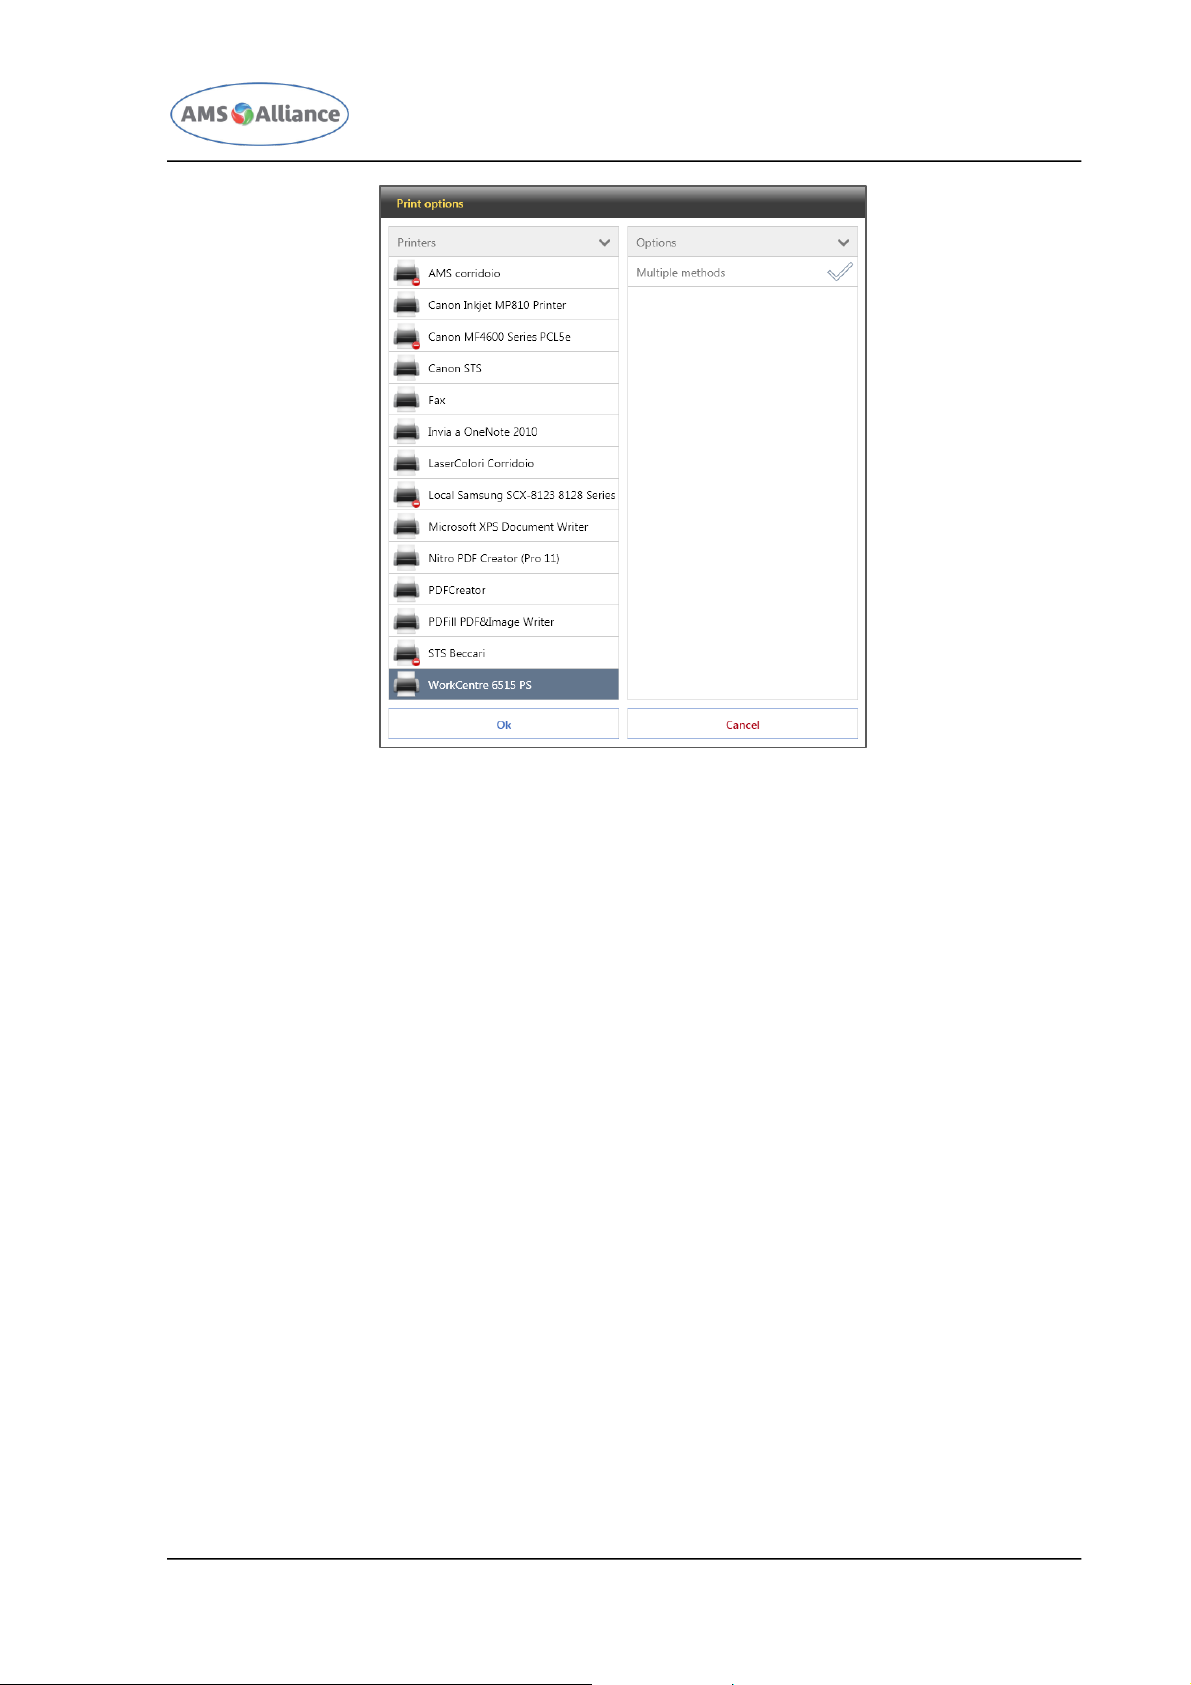
CHAPTER 03 – SOFTWARE DESCRIPTION
SMARTCHEM 450 USER MANUAL REV.01 JUNE 2020 PAGE 50 OF 143
Thanks to this mask the user can select the printer and can decide either to print or
not the Calibration and Quality Controls parameters. Please note that the printers that
are not currently available will be distinguished by the others thanks a dedicated icon;
Page 65
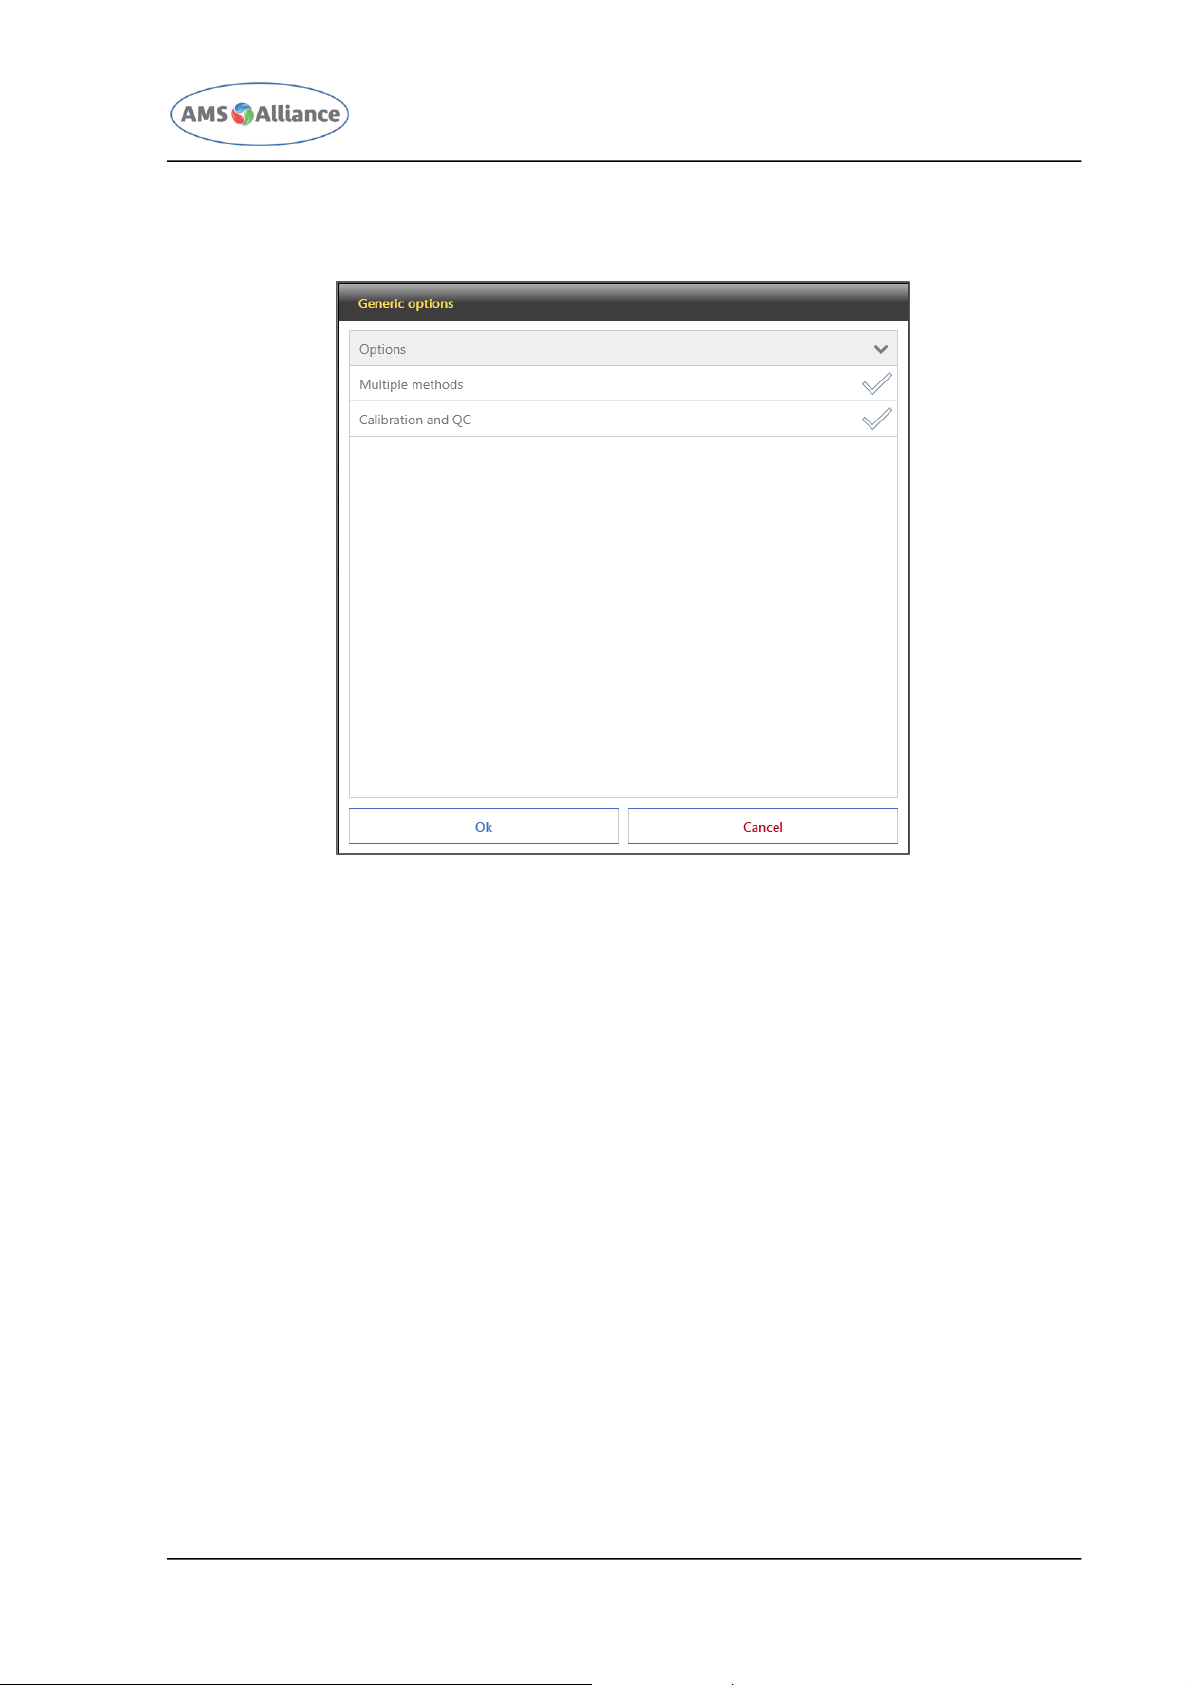
CHAPTER 03 – SOFTWARE DESCRIPTION
SMARTCHEM 450 USER MANUAL REV.01 JUNE 2020 PAGE 51 OF 143
EXPORT – allows the user to export either the selected method or the entire set of
methods as an excel file (.xlsx); following a tap over this action will be displayed a
dedicated mask.
Thanks to this mask the user can decide either to export or not the Calibration and
Quality Controls parameters.
3.2.3.1 GENERAL
This tab is dedicated to the general information of the selected method. Following
parameters can be defined:
NAME - method code to be used in the software to identify the method;
DESCRIPTION – method description to be used in the report;
LIS CODE – method LIS code to be used in the LIMS communication;
KCELL - K-CELL value provided with conductivity electrodes;
SLOPE – slope of the line used to compare the results of an instrument with another
one;
OFFSET – offset of the line used to compare the results of an instrument with another
one;
MEASUREMENT UNIT – measurement unit of the method; adding or modifying the
measurement unit the software will suggest the previously defined ones;
DECIMALS – number of decimals to be used in the method result presentation;
USER DEFINED UNIT CHECK – checkbox that allows to use the measurement unit defined
by the user;
Page 66

CHAPTER 03 – SOFTWARE DESCRIPTION
SMARTCHEM 450 USER MANUAL REV.01 JUNE 2020 PAGE 52 OF 143
USER DEFINED UNIT - measurement unit of the method; adding or modifying the
measurement unit the software will suggest the previously defined ones;
USER DEFINED UNIT DECIMALS – number of decimals to be used in the method result
presentation;
CONVERSION FACTOR – ratio between the User Defined Unit and the Measurement Unit;
3.2.3.2 RANGES
This tab is dedicated to the definition of the ranges to be applied to the selected method.
Following parameters can be defined:
LOW LINEARITY – allows the user to set the low linearity limit for the specific method;
any test characterized by a result lower than this limit will be coherently flagged;
LOW – allows the user to set the low limit for the specific method; any test
characterized by a result lower than this limit will be coherently flagged;
HIGH – allows the user to set the high limit for the specific method; any test
characterized by a result greater than this limit will be coherently flagged.
HIGH LINEARITY – allows the user to set the high linearity limit for the specific method;
any test characterized by a result greater than this limit will be coherently flagged;
USER RANGE MIN – allows the user to set another minimum limit for the specific
method; any test characterized by a result lower than this limit will be coherently
flagged;
USER RANGE MAX – allows the user to set another maximum limit for the specific
method; any test characterized by a result greater than this limit will be coherently
flagged.
Please note that this tab includes also the fields related to the measurement unit.
3.2.3.3 RERUN AND REFLEX
This tab is dedicated to the definition of the automatic rerun as well as of the reflex
testing.
The user can define the automatic rerun with reference to:
LOW LINEARITY – the user can require up to 5 sequential automatic with a chosen
concentration ratio (1/1);
LOW – the user can require up to 5 sequential automatic with a chosen concentration
ratio (1/1);
HIGH – the user can require up to 5 sequential automatic with a chosen dilution ratio
(1/1);
HIGH LINEARITY – the user can require up to 5 sequential automatic with a chosen
dilution ratio (1/1);
LOWER THAN FIRST CALIBRATION POINT – the user can require up to 5 sequential
automatic with a chosen concentration ratio (1/1);
GREATER THAN LAST CALIBRATION POINT – the user can require up to 5 sequential
automatic with a chosen dilution ratio (1/1);
Page 67

CHAPTER 03 – SOFTWARE DESCRIPTION
SMARTCHEM 450 USER MANUAL REV.01 JUNE 2020 PAGE 53 OF 143
LOWER THAN USER RANGE MIN – the user can require up to 5 sequential automatic with
a chosen concentration ratio (1/1); with reference to non prediluted methods, the
concentration ratio will be obtained modifying the ratio between the sample volume
and the first reagent volume; for this reason only a subset concentration ratios will be
available for the specific method; the first automatic rerun will be scheduled if the
result is lower than the low limit, the second automatic rerun will be scheduled if the
result of the first automatic rerun multiplied by the concentration ratio will be lower
than the User range Min limit and so on;
GREATER THAN USER RANGE MAX – the user can require up to 5 sequential automatic
with a chosen dilution ratio (1/1); the first automatic rerun will be scheduled if the
result is greater than the high limit, the second automatic rerun will be scheduled if
the result of the first automatic rerun multiplied by the dilution ratio will be greater
than the User range Max limit and so on.
The same above conditions can be used for the reflex testing; the user can choose up to
four different methods/calculated methods to be executed if the condition occurs;
furthermore the user can decide to apply the reflex condition either at the test execution
as is or at the last automatic rerun execution condition; the first option involves that the
reflex testing and the automatic rerun will be simultaneously scheduled, while the second
option involves that the reflex testing will be scheduled only after the execution of the
last automatic rerun.
3.2.3.4 CALIBRATION
This tab is dedicated to the definition of the calibration related to the selected method.
With reference to the Calibration, the user has to set following parameters depending on
the chosen calibration type:
CALCULATION MODEL – one of the different calculation models provided in the software
can be selected by the user;
CALIBRATION FACTOR – this parameter is a coefficient to be used as a multiplier of the
curve obtained by the calibration;
CALIBRATION MIN SLOPE – visible only if calculation model is equal to Linear or
Standard; in case the slope of the calibration line will be lower than the set limit, the
calibration will be consequently flagged;
CALIBRATION MAX SLOPE – visible only if calculation model is equal to Linear or
Standard; in case the slope of the calibration line will be greater than the set limit, the
calibration will be consequently flagged;
CALIBRATION STABILITY (HOURS) – maximum number of hours for which the calibration
will be considered valid; using a calibration older than the defined number of days, the
tests will be consequently flagged;
POINTS – number of points to be used for the calibration;
FORCE ZERO CROSSING – if checked and one of the points is the 0 concentration point,
the calibration curve will pass through the zero point (0 absorbance, 0 concentration);
Page 68

CHAPTER 03 – SOFTWARE DESCRIPTION
SMARTCHEM 450 USER MANUAL REV.01 JUNE 2020 PAGE 54 OF 143
R
2
MIN – this is the minimum acceptable Correlation Coefficient for the calibration
curve; in case the correlation coefficient will be lower than the set limit, the calibration
will be consequently flagged;
ON FAIL – the user can decide the software behaviour to be followed in case the
correlation coefficient should be lower than the set limit:
IGNORE AND CONTINUE – the instrument will proceed the operation ignoring the R
2
mismatch;
PROMPT USER FOR ACTION – following an R
2
mismatch, the instrument will pause the
on-going the operation waiting for a choose of the user among following options:
IGNORE AND CONTINUE or STOP THE METHOD or RERUN THE CALIBRATION and, if it will
fail again IGNORE AND CONTINUE or STOP THE METHOD or STOP THE WORK PLAN;
RERUN THE CALIBRATION – following an R
2
mismatch, the instrument will proceed
with an automatic rerun of the calibration; in case of a second failure the user can
decide among following options: IGNORE AND CONTINUE, STOP METHOD or STOP
WORK PLAN;
STOP THE METHOD – following an R
2
mismatch, the instrument will stop the
execution of the current method and it will pass to execution of the following
method;
EVERY CALIBRATION POINT – for each calibration point in this section the user can set
following parameters depending on the user wants to use a stock standard or not:
LIQUID
6
– name of the standard to be used;
LOT – lot number of the selected standard;
EXPIRATION DATE – expiration date of the selected standard;
UNIT – measurement unit as chosen by the user;
CONCENTRATION – target concentration of the selected point;
REPLICATES – number of repetition of the calibration point that the instrument has
to perform; the final result of the calibration point can use all the replicates or can
exclude the farthest from the mean depending on the set option;
CV % – maximum acceptable correlation coefficient among the different replicates
execution of the calibration point; in case the target CV% will be greater than the
set limit, the calibration point will be consequently flagged.
3.2.3.5 QUALITY CONTROL
This tab is dedicated to the definition of the duplicates, spikes and quality controls to be
associated to the selected method.
With reference to the duplicates, the user has to set following parameters:
FREQUENCY – interval, expressed as number of samples, between subsequent
duplicates;
6
Tapping this field, the software will show to the user an enhanced keyboard that will show, as
automatic suggestion the previously defined liquids as Standard; choosing one of them, the
software will fill the other fields with the information related to the active lot.
Page 69

CHAPTER 03 – SOFTWARE DESCRIPTION
SMARTCHEM 450 USER MANUAL REV.01 JUNE 2020 PAGE 55 OF 143
NUMBER OF REPLICATES – number of replicates to be executed for the specific sample;
setting this field to 1 (default) means executing a duplicate;
RPD % MAX – maximum Relative Percentage Difference between sample and
duplicate; if the value is greater than the set value, the duplicate will be consequently
flagged;
ON FAIL – the user can decide the software behaviour to be followed in case the
relative percentage difference should be greater than the set limit:
IGNORE AND CONTINUE – the instrument will proceed the operation ignoring the RPD
% mismatch;
PROMPT USER FOR ACTION – following an RPD % mismatch, the instrument will
pause the on-going the operation waiting for a choose of the user among following
options: IGNORE AND CONTINUE or STOP THE METHOD or RERUN THE DUPLICATE and, if
it will fail again IGNORE AND CONTINUE or STOP THE METHOD or STOP THE WORK
PLAN;
RERUN THE DUPLICATE – following an RPD % mismatch, the instrument will proceed
with an automatic rerun of the duplicate; in case of a second failure the user can
decide among following options: IGNORE AND CONTINUE, STOP METHOD or STOP
WORK PLAN;
STOP THE METHOD – following an RPD % mismatch, the instrument will stop the
execution of the current method and it will pass to execution of the following
method.
With reference to the controls, the user has to set following parameters:
LIQUID
7
– name of the control to be used;
LOT – lot number of the selected control;
EXPIRATION DATE – expiration date of the selected control;
UNIT – measurement unit as chosen by the user;
MIN – minimum acceptable value of the selected control; the minimum and the
maximum values will be automatically calculated if the user fills the mean and the
standard deviation fields;
MAX – maximum acceptable value of the selected control; the minimum and the
maximum values will be automatically calculated if the user fills the mean and the
standard deviation fields;
MEAN – mean value of the selected control; the mean and the standard deviation
values will be automatically calculated if the user fills the minimum and the maximum
fields;
STANDARD DEVIATION – standard deviation of the selected control; the mean and the
standard deviation values will be automatically calculated if the user fills the minimum
and the maximum fields;
7
Tapping this field, the software will show to the user an enhanced keyboard that will show, as
automatic suggestion the previously defined liquids as Control; choosing one of them, the software
will fill the other fields with the information related to the active lot.
Page 70

CHAPTER 03 – SOFTWARE DESCRIPTION
SMARTCHEM 450 USER MANUAL REV.01 JUNE 2020 PAGE 56 OF 143
FIXED POSITION – if checked the control liquid will be always taken from a single
location of the sample plate; if unchecked the control liquid should be positioned in the
work plan according to the set frequency;
NELAC/EPA TYPE – allows to define the specific type for the selected control; by
default is set to QC8;
INITIAL – if checked the control will be scheduled in the initial block of any work plan;
FINAL – if checked the control will be scheduled in the final block of any work plan;
DYNAMIC – if checked the control will be scheduled in the during any work plan
according to the set frequency;
FREQUENCY – visible only if Dynamic is checked; interval, expressed as number of
samples, between subsequent control blocks;
ON FAIL – the user can decide the software behaviour to be followed in case the
relative percentage difference should be greater than the set limit:
IGNORE AND CONTINUE – the instrument will proceed the operation ignoring the
control reference range mismatch;
PROMPT USER FOR ACTION – following a control reference range mismatch, the
instrument will pause the on-going the operation waiting for a choose of the user
among following options: IGNORE AND CONTINUE or STOP THE METHOD or RERUN THE
DUPLICATE and, if it will fail again IGNORE AND CONTINUE or STOP THE METHOD or
STOP THE WORK PLAN;
RERUN THE DUPLICATE – following a control reference range mismatch, the
instrument will proceed with an automatic rerun of the duplicate; in case of a
second failure the user can decide among following options: IGNORE AND CONTINUE,
STOP METHOD or STOP WORK PLAN;
STOP THE METHOD – following a control reference range mismatch, the instrument
will stop the execution of the current method and it will pass to execution of the
following method.
Following bullets report the scheduling order depending on the control type:
INITIAL BLOCK – ICB, ICV, CB, LRB, MB, LCS, LFB, QCS, SS, SSSV, QC;
FREQUENCY BLOCK – QC, CB, LRB, MB, LCS, LFB, QCS, SS, SSSV, CCV1..CCV9, CCB;
FINAL BLOCK – QC, CB, LRB, MB, LCS, LFB, QCS, SS, SSSV, CCV1..CCV9, CCB.
8
CB Calibration Blank
LRB Laboratory Reagent Blank
MB Method Blank
LCS Laboratory Control Sample
SSSV Second Source Standard (Calibration) Verification
QCS Quality Control Sample
SS Second Source Quality Control Sample
LFB Laboratory Fortified Blank
CCV1..9 Continuing Calibration Verification
CCB Continuing Calibration Blank
ICV Initial Calibration Verification
ICB Initial Calibration Blank
Page 71
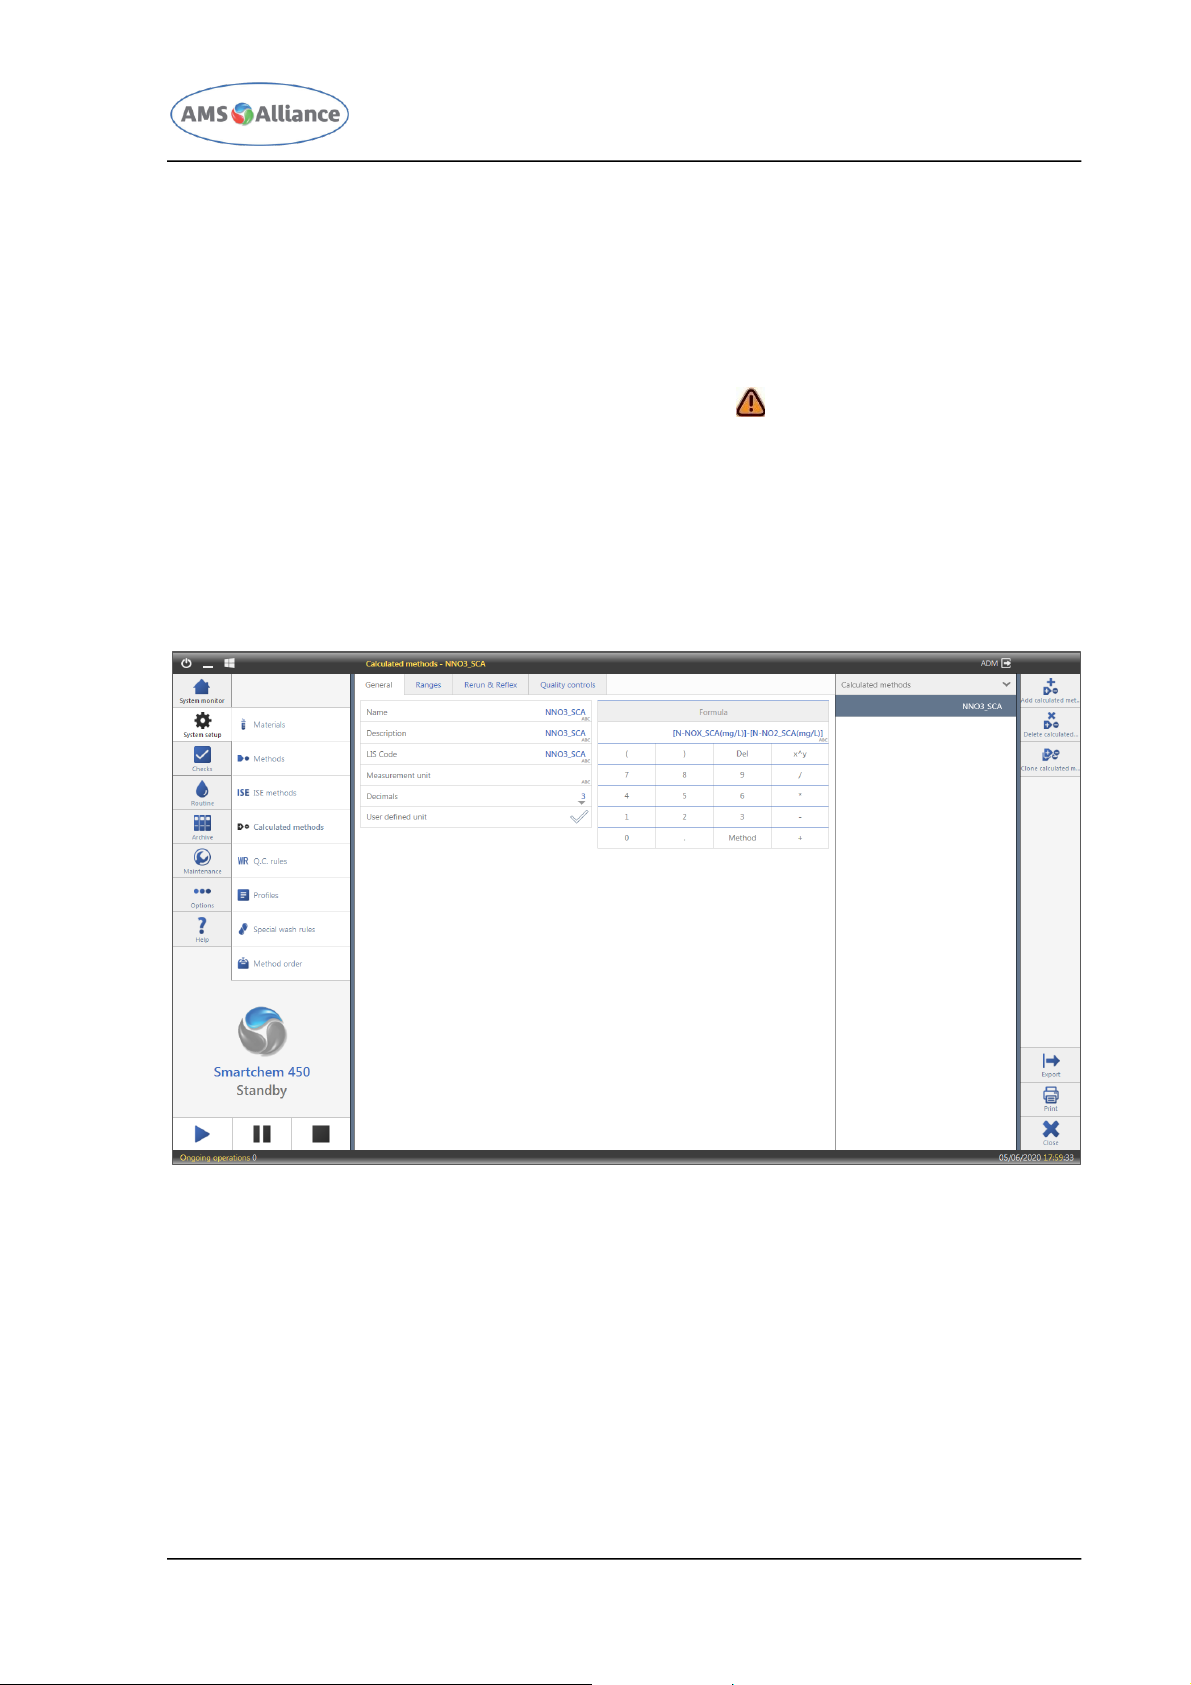
CHAPTER 03 – SOFTWARE DESCRIPTION
SMARTCHEM 450 USER MANUAL REV.01 JUNE 2020 PAGE 57 OF 143
3.2.3.6 WARNING AND ERRORS
This tab is visible only during the editing of a method and if some field is not
(presumably) correctly configured.
In this tab the user will find the list of warnings and errors related to the method that is
currently edited; each warning or error will be tappable and the software will show the
tab where the problem is.
Errors can be distinguished thanks to the following icon .
3.2.4 CALCULATED METHODS
A calculated method can be defined using the first level menu SYSTEM SETUP and the
second level menu CALCULATED METHODS.
Tapping this menu, the following mask will appear.
This mask is divided in two areas:
The right one lists the previously defined calculated methods (alphabetically ordered
by calculated method name)
The main area (left one) shows the different fields specific of the selected calculated
method.
The different fields of a calculated method are grouped in the following tabs:
General;
Ranges;
Rerun & Reflex;
Page 72
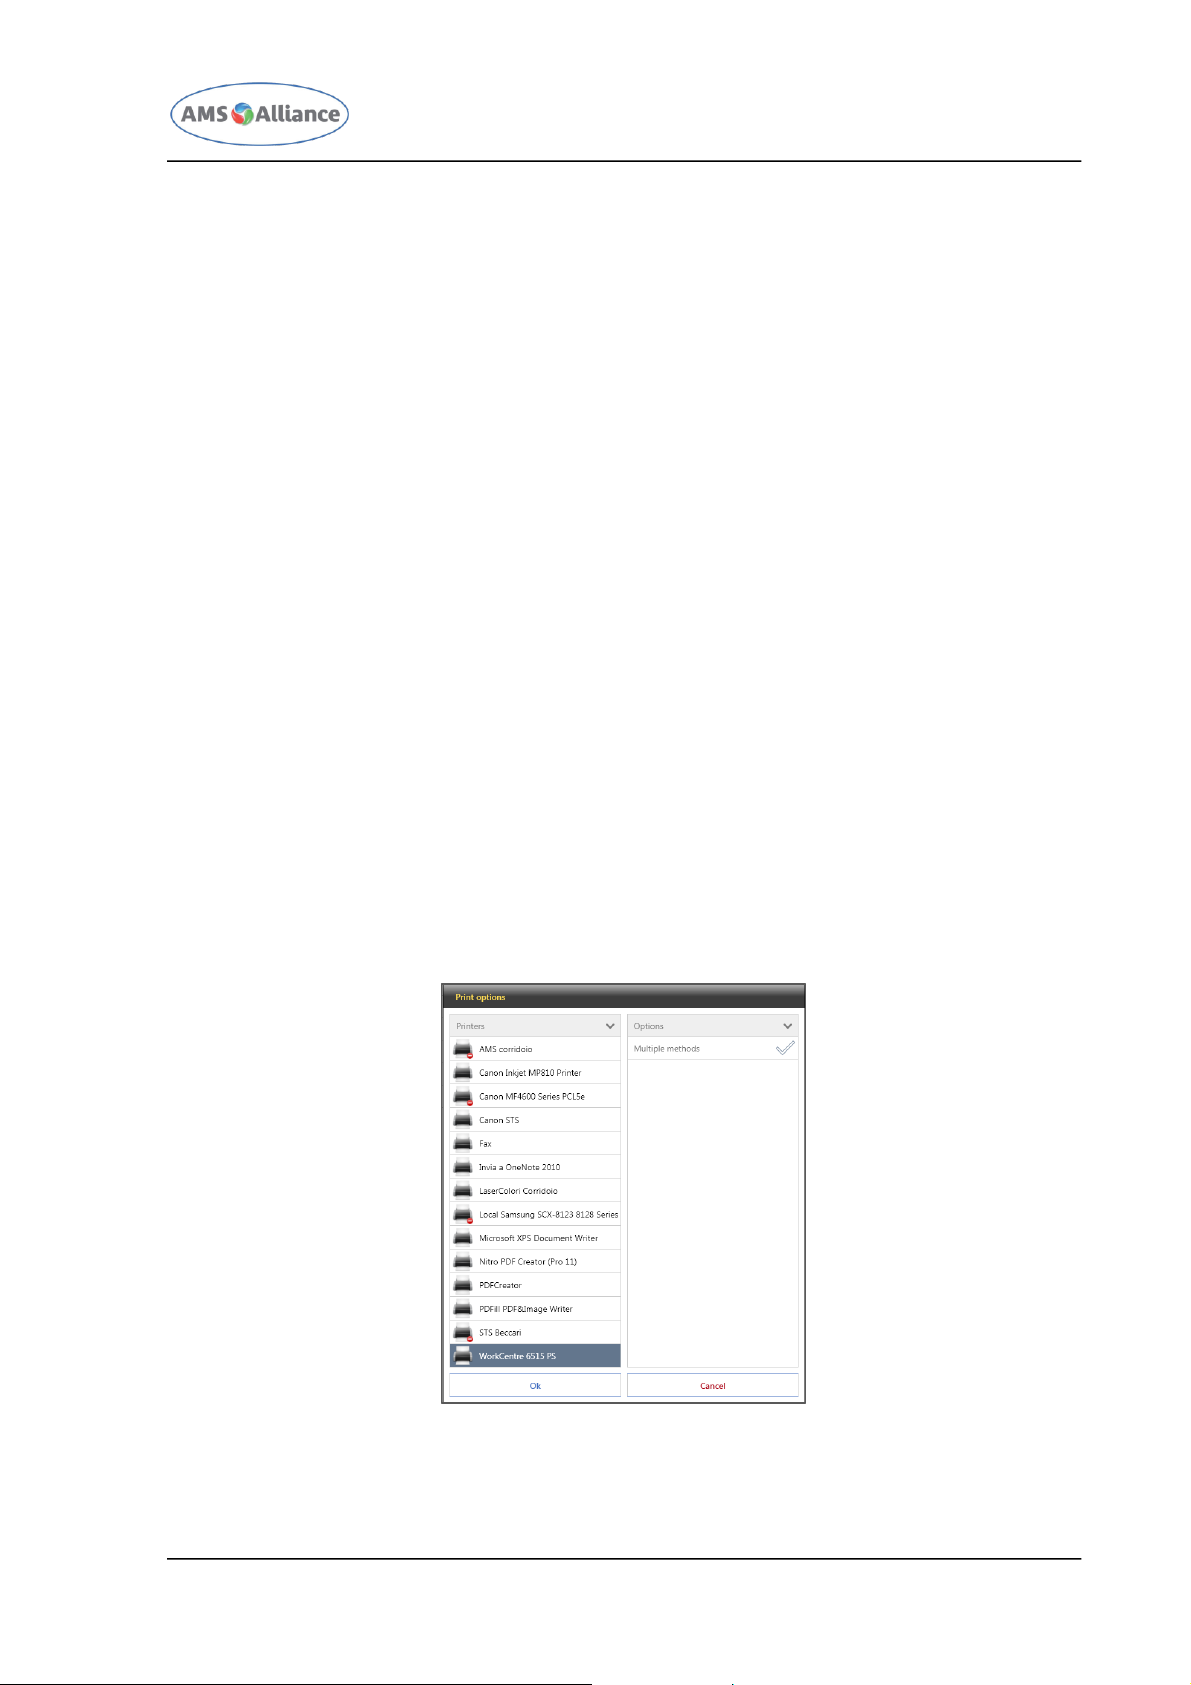
CHAPTER 03 – SOFTWARE DESCRIPTION
SMARTCHEM 450 USER MANUAL REV.01 JUNE 2020 PAGE 58 OF 143
Quality Control;
Warnings and errors – visible during the definition/modification of a calculated
method in case of some configuration warnings/problems.
With reference to this mask, following actions are available:
ADD CALCULATED METHOD – allows to create a new calculated method; following a tap
over this action the software will automatically display the keyboard in order to define
the calculated method name;
DELETE CALCULATED METHOD – after selecting a calculated method allows to delete it;
deletion of a calculated method will be a soft removal; following a new re-enter of the
same calculated method previously used and deleted, the software will show the
previous properties of the calculated method, including the Printer Order;
CLONE CALCULATED METHOD – allows to create a new calculated method starting from a
previously defined one; following a tap over this action the software will automatically
display the keyboard in order to define the calculated method name; once entered the
new calculated method name, the software will display the parameters set as the
original calculated method;
SAVE – after the creation or a modification of a previously defined calculated method
this action is mandatory in order to save the new parameters associated to the
calculated method;
DISCARD CHANGES – after the creation or a modification of a previously defined
calculated method, allows the user to return in the state of the last save;
CLOSE – allows the user to close this mask;
PRINT – allows the user to print the selected calculated method; following a tap over
this action will be displayed a dedicated mask.
The user can decide to print more than one calculated method (in this case, the user
will be able to select which methods have to be printed). Please note that the printers
Page 73
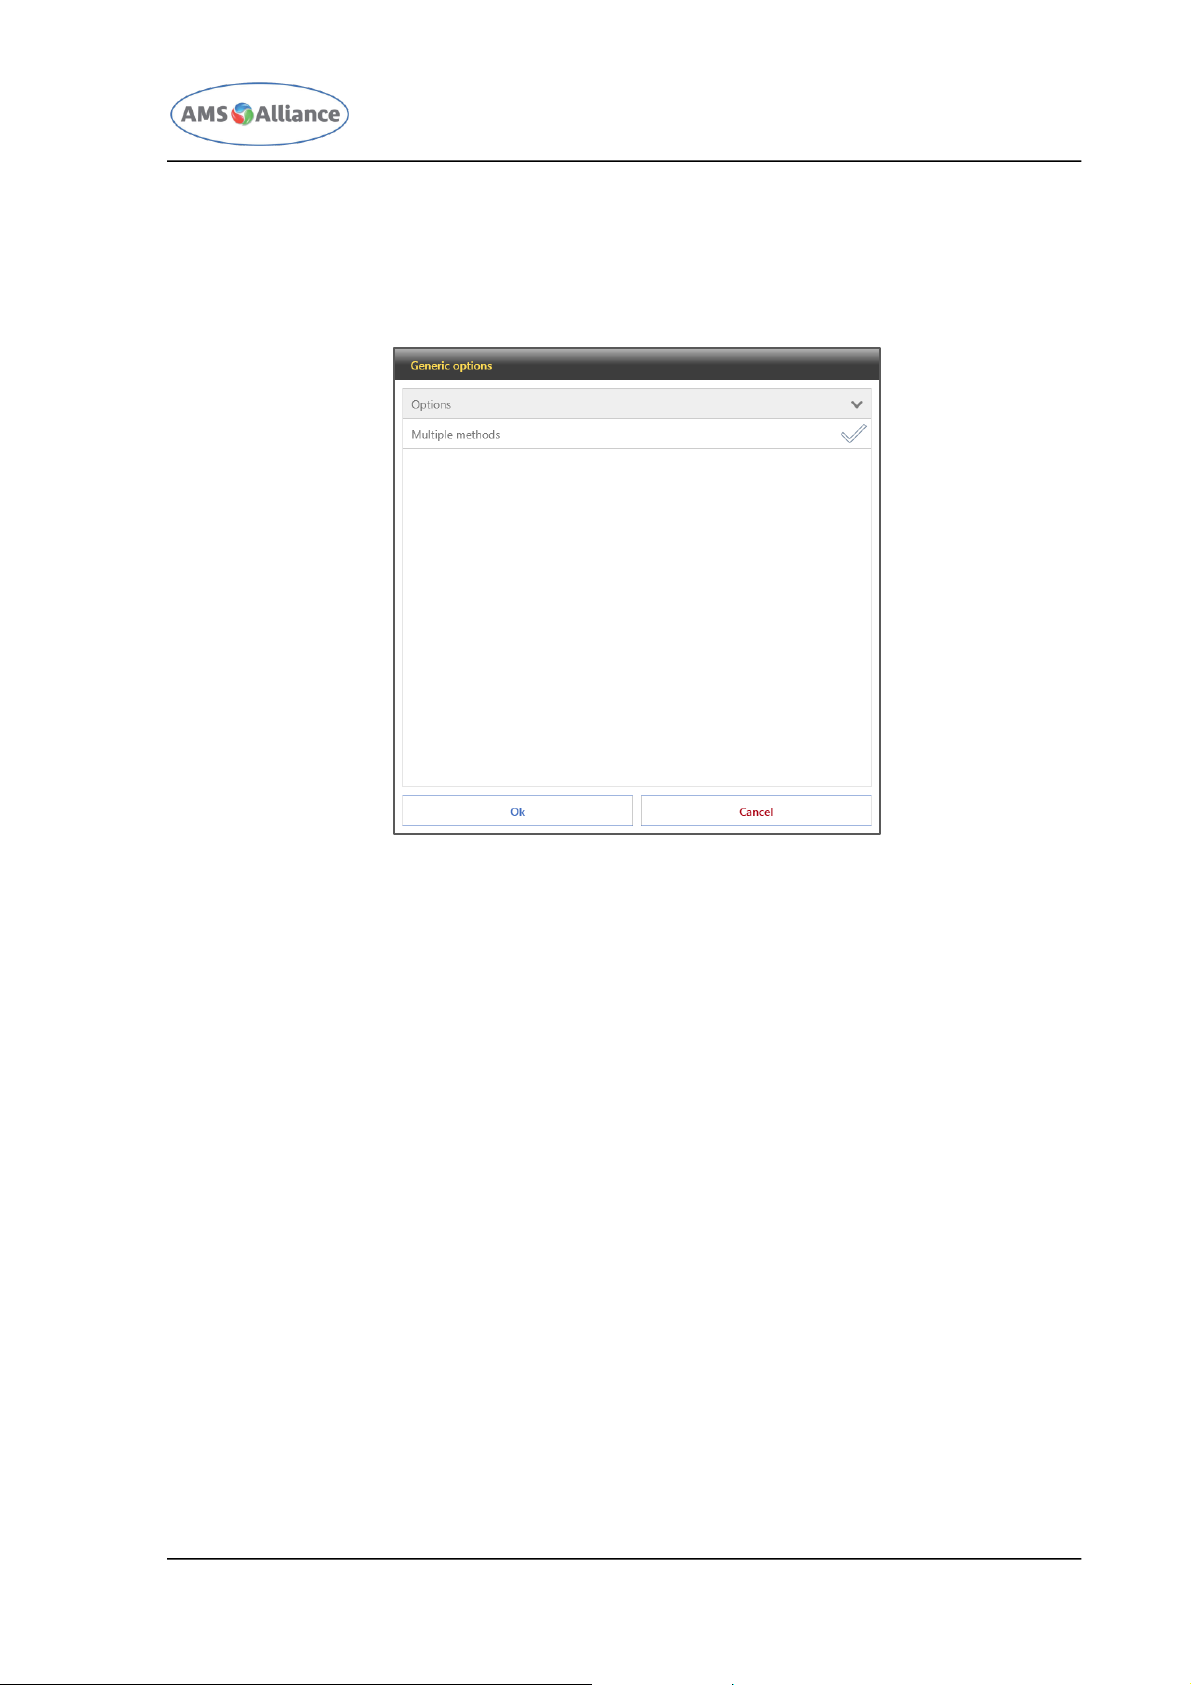
CHAPTER 03 – SOFTWARE DESCRIPTION
SMARTCHEM 450 USER MANUAL REV.01 JUNE 2020 PAGE 59 OF 143
that are not currently available will be distinguished by the others thanks a dedicated
icon.
EXPORT – allows the user to export the selected method as an excel file (.xlsx);
following a tap over this action will be displayed a dedicated mask.
The user can decide to export more than one method (in this case, the user will be
able to select which methods have to be exported).
3.2.4.1 GENERAL
This tab is dedicated to the general information of the selected calculated method.
Following parameters can be defined:
NAME – calculated method code to be used in the software to identify the method;
DESCRIPTION – calculated method description to be used in the report;
LIS CODE – calculated method LIS code to be used in the LIMS communication;
MEASUREMENT UNIT – measurement unit of the calculated method; adding or
modifying the measurement unit the software will suggest the previously defined
ones;
DECIMALS – number of decimals to be used in the calculated method result
presentation;
USER DEFINED UNIT CHECK – checkbox that allows to use the measurement unit defined
by the user;
USER DEFINED UNIT - measurement unit of the calculated method; adding or modifying
the measurement unit the software will suggest the previously defined ones;
USER DEFINED UNIT DECIMALS – number of decimals to be used in the calculated
method result presentation;
CONVERSION FACTOR – ratio between the User Defined Unit and the Measurement Unit;
Page 74

CHAPTER 03 – SOFTWARE DESCRIPTION
SMARTCHEM 450 USER MANUAL REV.01 JUNE 2020 PAGE 60 OF 143
FORMULA – this section allows to define the formula to be used for the calculated test;
in this formula can be used any arithmetical operator (+, -, /, *, x^y, (, )) and any
previously defined method.
3.2.4.2 RANGES
This tab is dedicated to the definition of the ranges to be applied to the selected
calculated method. Following parameters can be defined:
LOW – allows the user to set the low limit for the specific calculated method; any test
characterized by a result lower than this limit will be coherently flagged;
HIGH – allows the user to set the high limit for the specific calculated method; any test
characterized by a result greater than this limit will be coherently flagged;
USER RANGE MIN – allows the user to set another minimum limit for the specific
calculated method; any test characterized by a result lower than this limit will be
coherently flagged;
USER RANGE MAX – allows the user to set another maximum limit for the specific
calculated method; any test characterized by a result greater than this limit will be
coherently flagged.
Please note that the user from this tab can easily change the unit to be used in the
visualization or setting of the different ranges.
3.2.4.3 RERUN AND REFLEX
This tab is dedicated to the definition of the automatic rerun as well as of the reflex
testing.
The user can define the automatic rerun with reference to:
LOW – the user can require up to 5 sequential automatic with a chosen concentration
ratio (1/1, 2/1, 3/1, …, 100/1);
HIGH – the user can require up to 5 sequential automatic with a chosen dilution ratio
(1/1, 1/2, 1/3, …, 1/100);
USER RANGE MIN – the user can require up to 5 sequential automatic with a chosen
concentration ratio (1/1, 2/1, 3/1, …, 100/1);
USER RANGE MAX – the user can require up to 5 sequential automatic with a chosen
dilution ratio (1/1, 1/2, 1/3, …, 1/100).
The same above conditions can be used for the reflex testing; the user can choose up to
four different methods/calculated methods to be executed if the condition occurs;
furthermore the user can decide to apply the reflex condition either at the calculated test
execution as is or at the last automatic rerun execution condition; the first option
involves that the reflex testing and the automatic rerun will be simultaneously scheduled,
while the second option involves that the reflex testing will be scheduled only after the
execution of the last automatic rerun.
Page 75

CHAPTER 03 – SOFTWARE DESCRIPTION
SMARTCHEM 450 USER MANUAL REV.01 JUNE 2020 PAGE 61 OF 143
3.2.4.4 QUALITY CONTROL
This tab is dedicated to the definition of the duplicates and quality controls to be
associated to the selected method.
With reference to the duplicates, the user has to set following parameters:
FREQUENCY – interval, expressed as number of samples, between subsequent
duplicates;
NUMBER OF REPLICATES – number of replicates to be executed for the specific sample;
setting this field to 1 (default) means executing a duplicate;
RPD % MAX – maximum Relative Percentage Difference between sample and
duplicate; if the value is greater than the set value, the duplicate will be consequently
flagged;
ON FAIL – the user can decide the software behaviour to be followed in case the
relative percentage difference should be greater than the set limit:
IGNORE AND CONTINUE – the instrument will proceed the operation ignoring the RPD
% mismatch;
PROMPT USER FOR ACTION – following an RPD % mismatch, the instrument will
pause the on-going the operation waiting for a choose of the user among following
options: IGNORE AND CONTINUE or STOP THE METHOD or RERUN THE DUPLICATE and, if
it will fail again IGNORE AND CONTINUE or STOP THE METHOD or STOP THE WORK
PLAN;
RERUN THE DUPLICATE – following an RPD % mismatch, the instrument will proceed
with an automatic rerun of the duplicate; in case of a second failure the user can
decide among following options: IGNORE AND CONTINUE, STOP METHOD or STOP
WORK PLAN;
STOP THE METHOD – following an RPD % mismatch, the instrument will stop the
execution of the current method and it will pass to execution of the following
method.
With reference to the controls, the user has to set following parameters:
LIQUID
9
– name of the control to be used;
LOT – lot number of the selected control;
EXPIRATION DATE – expiration date of the selected control;
UNIT – measurement unit as chosen by the user;
MIN – minimum acceptable value of the selected control; the minimum and the
maximum values will be automatically calculated if the user fills the mean and the
standard deviation fields;
MAX – maximum acceptable value of the selected control; the minimum and the
maximum values will be automatically calculated if the user fills the mean and the
standard deviation fields;
9
Tapping this field, the software will show to the user an enhanced keyboard that will show, as
automatic suggestion the previously defined liquids as Control; choosing one of them, the software
will fill the other fields with the information related to the active lot.
Page 76

CHAPTER 03 – SOFTWARE DESCRIPTION
SMARTCHEM 450 USER MANUAL REV.01 JUNE 2020 PAGE 62 OF 143
MEAN – mean value of the selected control; the mean and the standard deviation
values will be automatically calculated if the user fills the minimum and the maximum
fields;
STANDARD DEVIATION – standard deviation of the selected control; the mean and the
standard deviation values will be automatically calculated if the user fills the minimum
and the maximum fields;
FIXED POSITION – if checked the control liquid will be always taken from a single
location of the sample plate; if unchecked the control liquid should be positioned in the
work plan according to the set frequency;
NELAC/EPA TYPE – allows to define the specific type for the selected control; by
default is set to QC10;
INITIAL – if checked the control will be scheduled in the initial block of any work plan;
FINAL – if checked the control will be scheduled in the final block of any work plan;
DYNAMIC – if checked the control will be scheduled in the during any work plan
according to the set frequency;
FREQUENCY – visible only if Dynamic is checked; interval, expressed as number of
samples, between subsequent control blocks;
ON FAIL – the user can decide the software behaviour to be followed in case the
relative percentage difference should be greater than the set limit:
IGNORE AND CONTINUE – the instrument will proceed the operation ignoring the
control reference range mismatch;
PROMPT USER FOR ACTION – following a control reference range mismatch, the
instrument will pause the on-going the operation waiting for a choose of the user
among following options: IGNORE AND CONTINUE or STOP THE METHOD or RERUN THE
DUPLICATE and, if it will fail again IGNORE AND CONTINUE or STOP THE METHOD or
STOP THE WORK PLAN;
RERUN THE DUPLICATE – following a control reference range mismatch, the
instrument will proceed with an automatic rerun of the duplicate; in case of a
second failure the user can decide among following options: IGNORE AND CONTINUE,
STOP METHOD or STOP WORK PLAN;
STOP THE METHOD – following a control reference range mismatch, the instrument
will stop the execution of the current method and it will pass to execution of the
following method.
10
CB Calibration Blank
LRB Laboratory Reagent Blank
MB Method Blank
LCS Laboratory Control Sample
SSSV Second Source Standard (Calibration) Verification
QCS Quality Control Sample
SS Second Source Quality Control Sample
LFB Laboratory Fortified Blank
CCV1..9 Continuing Calibration Verification
CCB Continuing Calibration Blank
ICV Initial Calibration Verification
ICB Initial Calibration Blank
Page 77
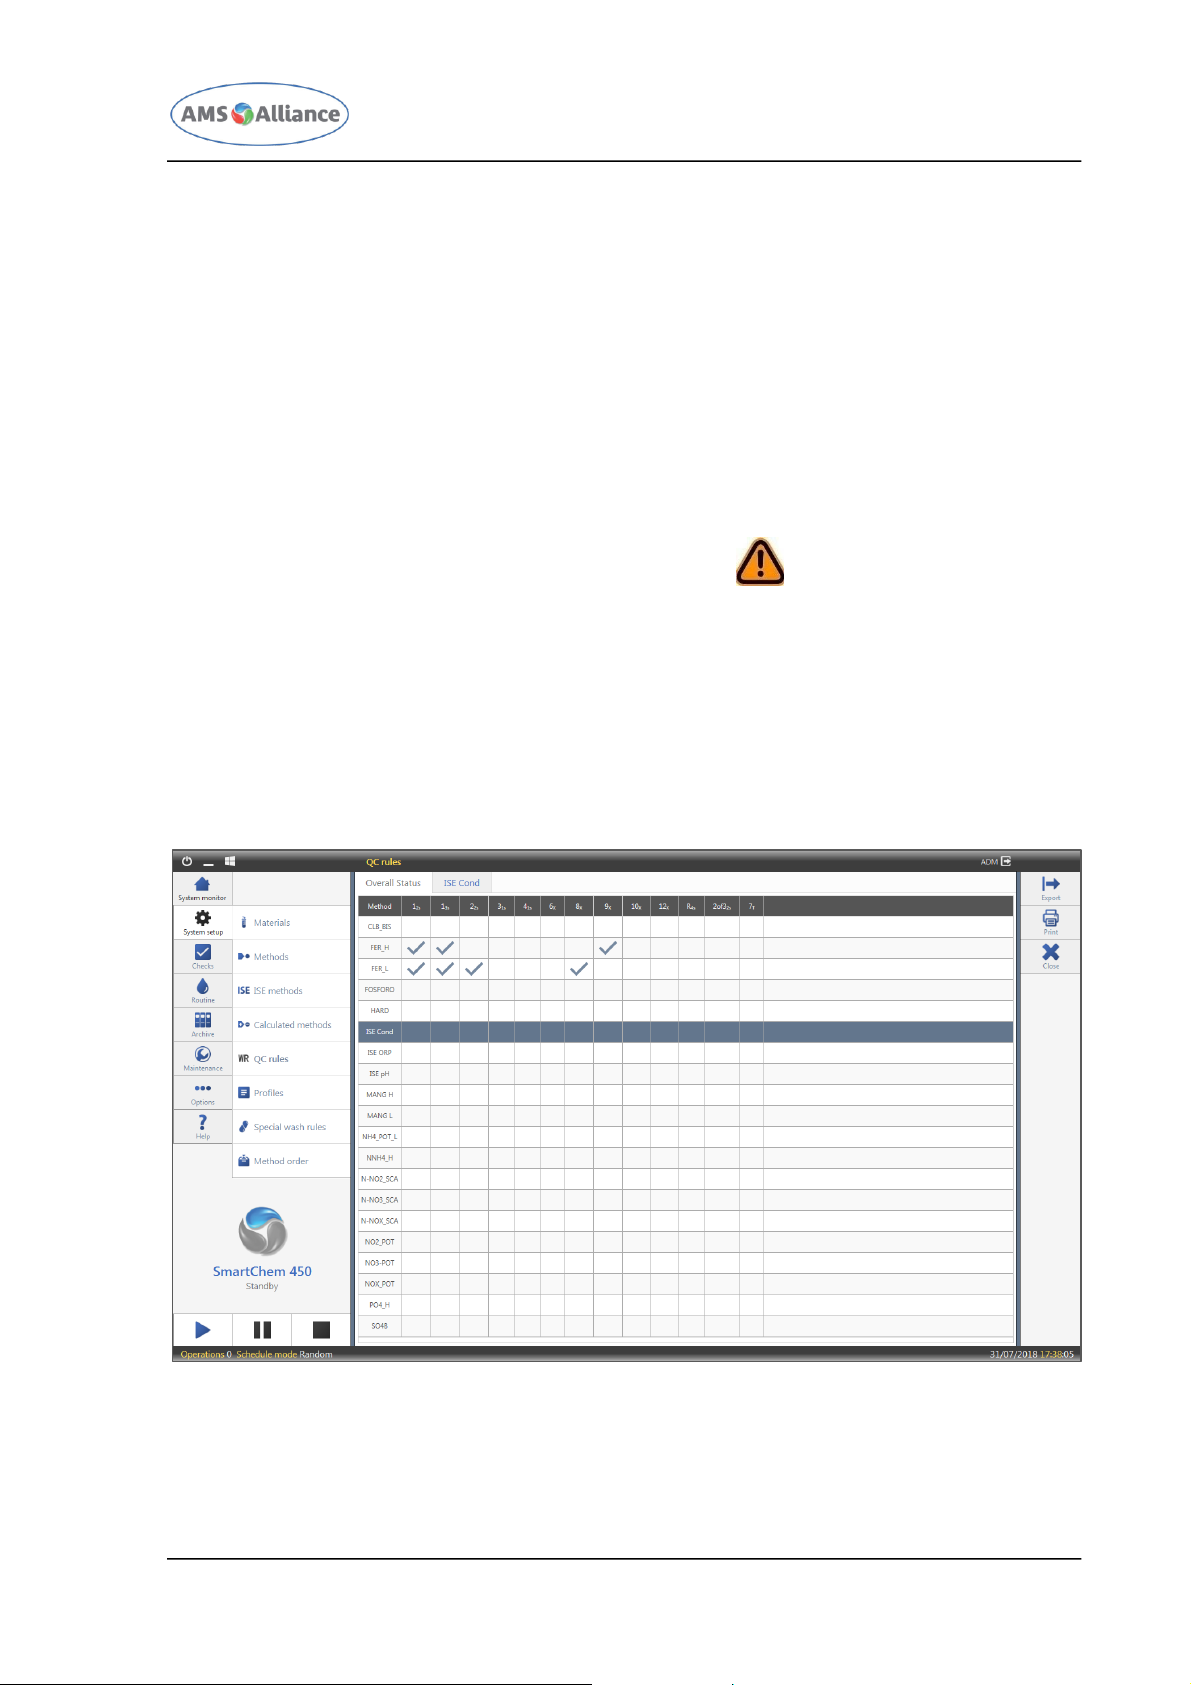
CHAPTER 03 – SOFTWARE DESCRIPTION
SMARTCHEM 450 USER MANUAL REV.01 JUNE 2020 PAGE 63 OF 143
Following bullets report the scheduling order depending on the control type:
INITIAL BLOCK – ICB, ICV, CB, LRB, MB, LCS, LFB, QCS, SS, SSSV, QC;
FREQUENCY BLOCK – QC, CB, LRB, MB, LCS, LFB, QCS, SS, SSSV, CCV1..CCV9, CCB;
FINAL BLOCK – QC, CB, LRB, MB, LCS, LFB, QCS, SS, SSSV, CCV1..CCV9, CCB.
3.2.4.5 WARNING AND ERRORS
This tab is visible only during the editing of a calculated method and if some field is not
(presumably) correctly configured.
In this tab the user will find the list of warnings and errors related to the calculated
method that is currently edited; each warning or error will be tappable and the software
will show the tab where the problem is.
Errors can be distinguished thanks to the following icon .
3.2.5 QUALITY CONTROL RULES
The Quality control rules mask allows the user to set the Westgard rules as well as the
dynamic controls to be executed for the different methods. The Quality control rules can
be defined using the first level menu SYSTEM SETUP and the second level menu QC RULES.
Tapping this menu, the following mask will appear.
This mask reports a table in which are summarized the Westgard rules set for each single
method/ISE method/Calculated method.
Page 78
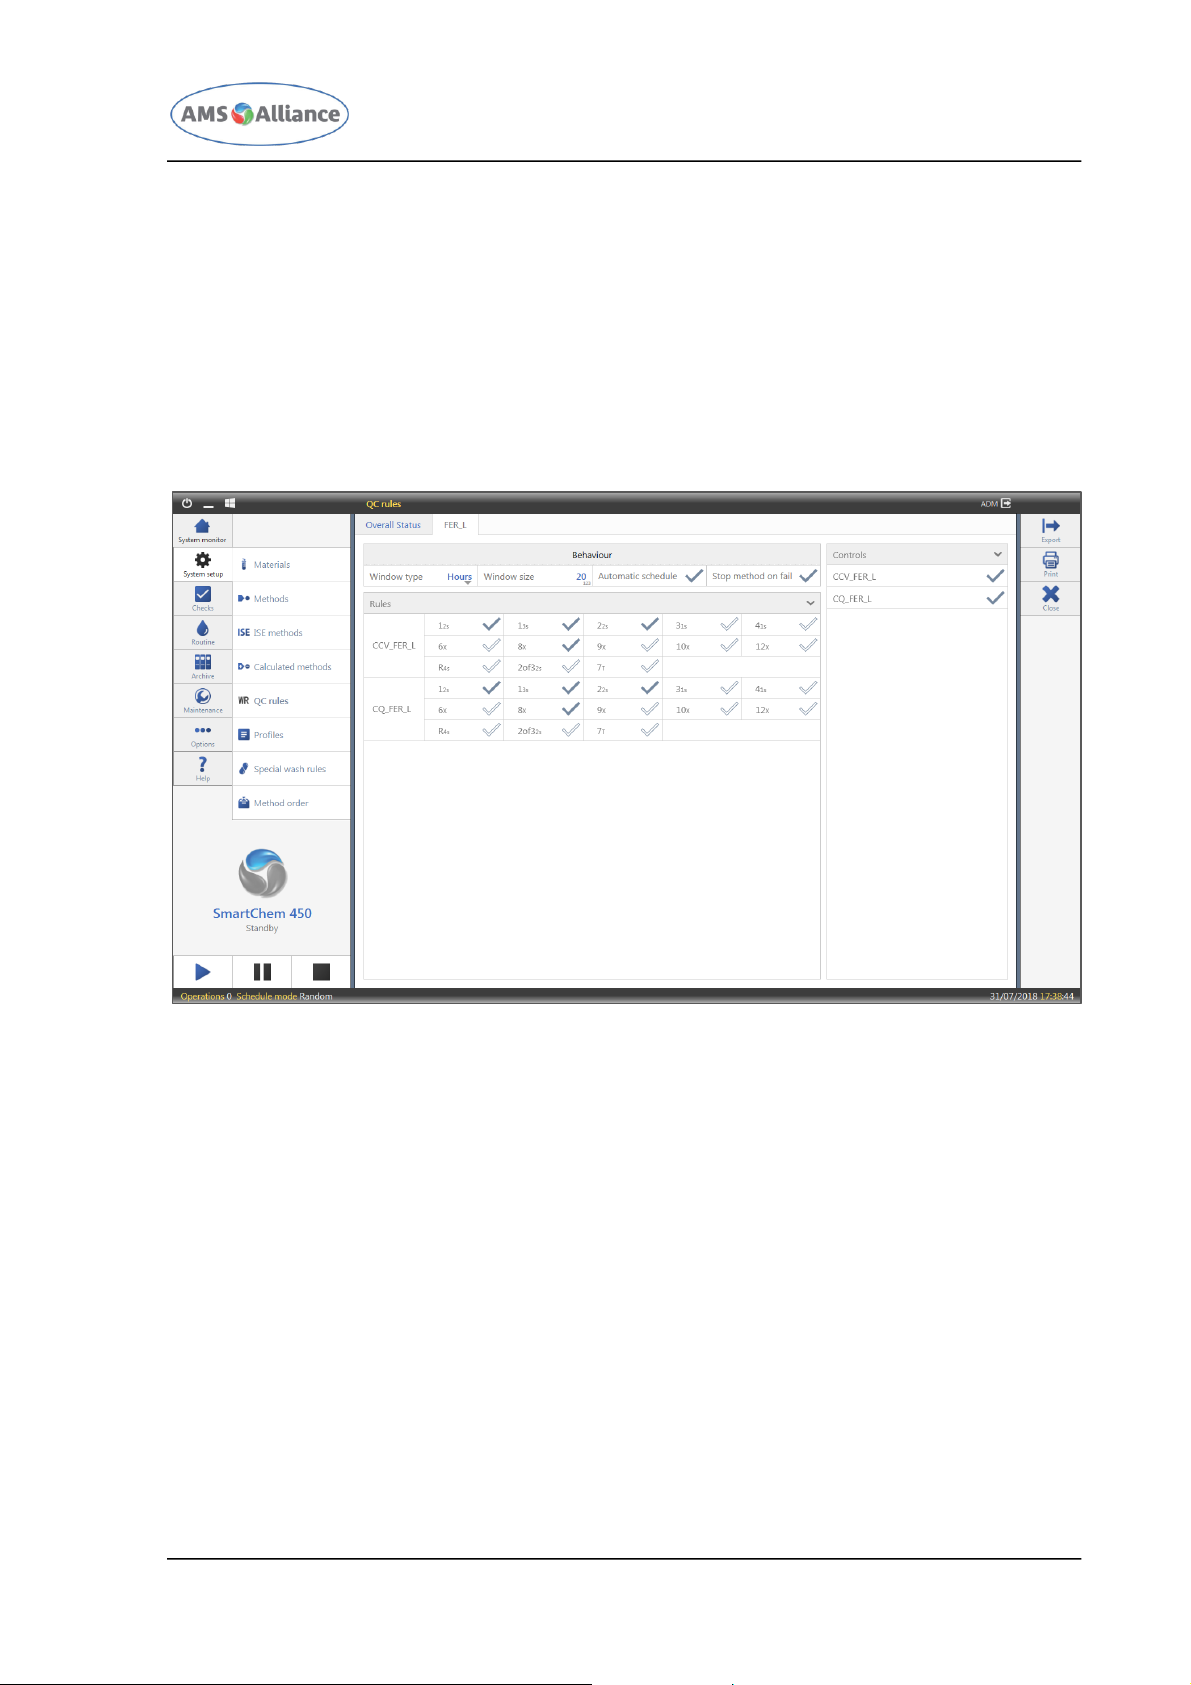
CHAPTER 03 – SOFTWARE DESCRIPTION
SMARTCHEM 450 USER MANUAL REV.01 JUNE 2020 PAGE 64 OF 143
With reference to this mask, following actions are available:
PRINT – allows the user to print the displayed table;
EXPORT – allows the user to export the displayed table as an excel file (.xlsx);
CLOSE – allows the user to close this mask.
Selecting each row (method/ISE method/Calculated method) of the table a new tab will
appear allowing the user to set the quality control rules to be applied to the selected
method/ISE method/Calculated method.
With reference to all the controls that can be associated to the single method, the user
has to set the following parameters:
WINDOW TYPE – the user can choose between time (hours), number of tests
(regardless the methods), number of tests of the selected method;
WINDOW SIZE – depending on the window type chosen, the user can set the time
window or the number of tests to be considered in order to identify the run; more in
detail the user can decide to set a run “period” equal to n hours or to k tests;
AUTOMATIC SCHEDULE – the user can choose if the instrument has to automatically
schedule the controls when the run period is over or if he wants to decide or not (in
this case the user has to schedule by himself the controls);
STOP METHOD ON FAIL – the user can decide to stop the running of the method for
which at least one Westgard rule has failed.
For the Westgard rules application purpose, the user can choose how many controls he
wants; in the right part of the mask, the controls associated to the selected method are
Page 79

CHAPTER 03 – SOFTWARE DESCRIPTION
SMARTCHEM 450 USER MANUAL REV.01 JUNE 2020 PAGE 65 OF 143
listed; selecting each control the user can decide which rules have to be checked for the
control. Following rules can be set:
1
2s
refers to the control rule that is commonly used with a Levey-Jennings chart when
the control limits are set as the mean plus/minus 2s (standard deviation). This rule, if
checked, will be used as a warning rule to trigger careful inspection of the control data
by the following rejection rules; in other words, when the 12s rule is violated, the
control is evaluated using the remaining rules. If no additional rule failure occurs, the
QC value is accepted.
1
3s
refers to a control rule that is commonly used with a Levey-Jennings chart when
the control limits are set as the mean plus 3s and the mean minus 3s. A run is
rejected when a single control measurement exceeds the mean plus 3s or the mean
minus 3s control limit. It detects random errors.
2
2s
reject when 2 consecutive control measurements exceed the same mean plus 2s
or the same mean minus 2s control limit. It detects systematic errors.
R
4s
reject when 1 control measurement in a group exceeds the mean plus 2s and
another exceeds the mean minus 2s. It detects random errors.
4
1s
reject when 4 consecutive control measurements exceed the same mean plus 1s
or the same mean minus 1s control limit. It detects systematic errors.
10
x
reject when 10 consecutive control measurements fall on one side of the mean.
It detects systematic errors.
8
x
reject when 8 consecutive control measurements fall on one side of the mean. It
detects systematic errors.
12
x
reject when 12 consecutive control measurements fall on one side of the mean.
It detects systematic errors.
2of3
2s
reject when 2 out of 3 control measurements exceed the same mean plus 2s
or mean minus 2s control limit. It detects systematic errors.
3
1s
reject when 3 consecutive control measurements exceed the same mean plus 1s
or mean minus 1s control limit. It detects systematic errors.
6
x
reject when 6 consecutive control measurements fall on one side of the mean. It
detects systematic errors.
9
x
reject when 9 consecutive control measurements fall on one side of the mean. It
detects systematic errors.
7
T
reject when seven control measurements trend in the same direction, i.e., get
progressively higher or progressively lower. It detects systematic errors.
The evaluation of the results will be applied across runs and/or across materials
depending on the single rule according to the following table.
Rule
Across Runs
Application
Across Materials
Application
12s
N.A.
N.A.
13s
N.A.
N.A.
Page 80
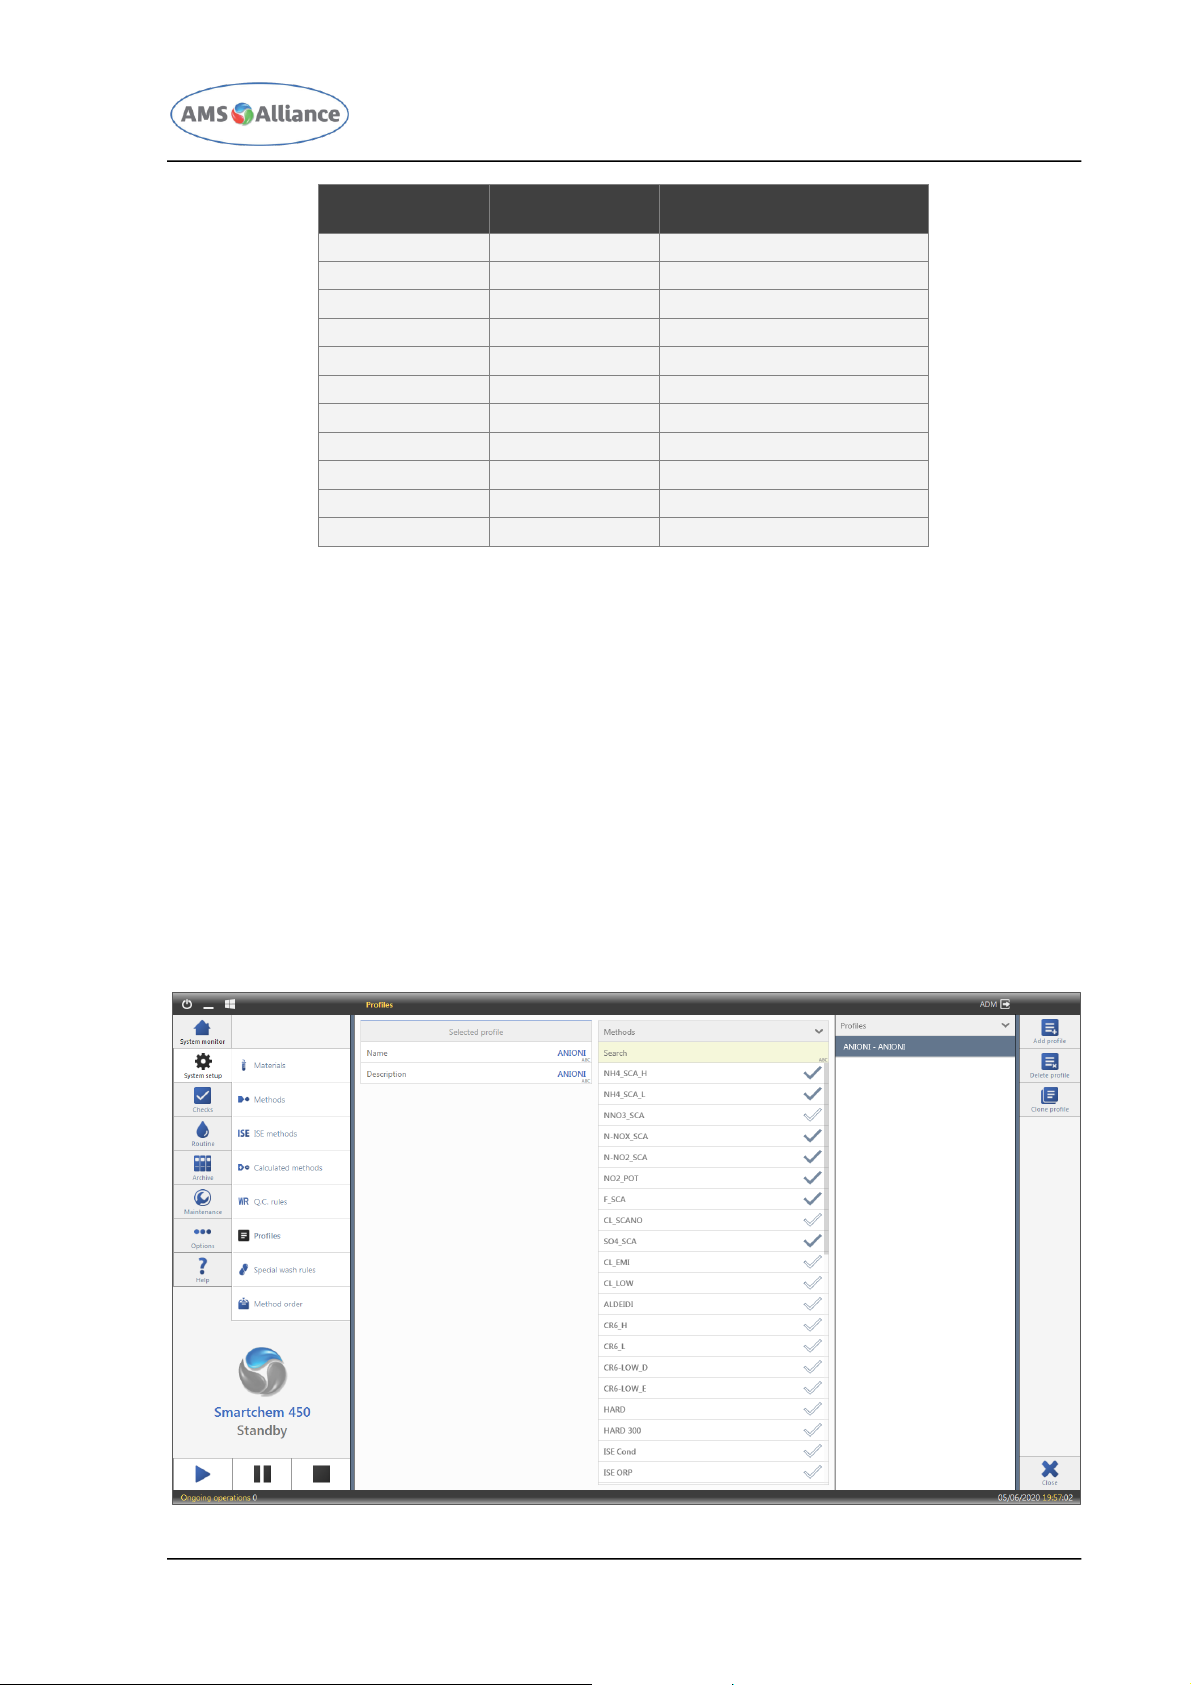
CHAPTER 03 – SOFTWARE DESCRIPTION
SMARTCHEM 450 USER MANUAL REV.01 JUNE 2020 PAGE 66 OF 143
Rule
Across Runs
Application
Across Materials
Application
22s
YES
YES
R4s
NO
YES
41s
YES
YES
7T
YES
NO
10x
YES
YES
8x
YES
YES
12x
YES
YES
2of32s
YES
YES
31s
YES
YES
6x
YES
YES
9x
YES
YES
With reference to this tab, following actions are available:
SAVE – after the modification of the quality control rules applied to the selected
method, this action is mandatory in order to save the new settings;
DISCARD CHANGES – after the modification of the quality control rules applied to the
selected method, allows the user to return in the state of the last save;
CLOSE – allows the user to close this mask.
3.2.6 PROFILES
A profile is a set of methods and calculated methods. A profile can be defined using the
first level menu SYSTEM SETUP and the second level menu PROFILES.
Tapping this menu, the following mask will appear.
Page 81

CHAPTER 03 – SOFTWARE DESCRIPTION
SMARTCHEM 450 USER MANUAL REV.01 JUNE 2020 PAGE 67 OF 143
This mask is divided in two areas:
The right one lists the previously defined profiles (alphabetically ordered by profile
name)
The main area (left one) shows the different fields specific of the selected method.
NAME – profile code to be used in the software to identify the profile;
DESCRIPTION – profile description to be used in the report;
METHODS – list of method and calculated method checks; methods and calculated
methods present in the selected profile will be checked; please use these checks in
order to add/delete a method/calculated method from the selected profile.
With reference to this mask, following actions are available:
ADD PROFILE – allows to create a new profile;
DELETE PROFILE – after selecting a profile allows to delete it; deletion of a profile will
be a soft removal; following a new re-enter of the same profile previously used and
deleted, the software will show the previous properties of the profile;
CLONE PROFILE – allows to create a new profile starting from a previously defined one;
SAVE – after the creation or a modification of a previously defined profile, this action is
mandatory in order to save the new parameters associated to the profile;
DISCARD CHANGES – after the creation or a modification of a previously defined profile,
allows the user to return in the state of the last save;
CLOSE – allows the user to close this mask.
3.2.7 PRINT ORDER
The Print Order is used to define the order of the methods and of the calculated methods
to be followed in the report printout.
The print order can be defined using the first level menu SYSTEM SETUP and the second
level menu METHOD ORDER.
Tapping this menu, the following mask will appear.
Page 82
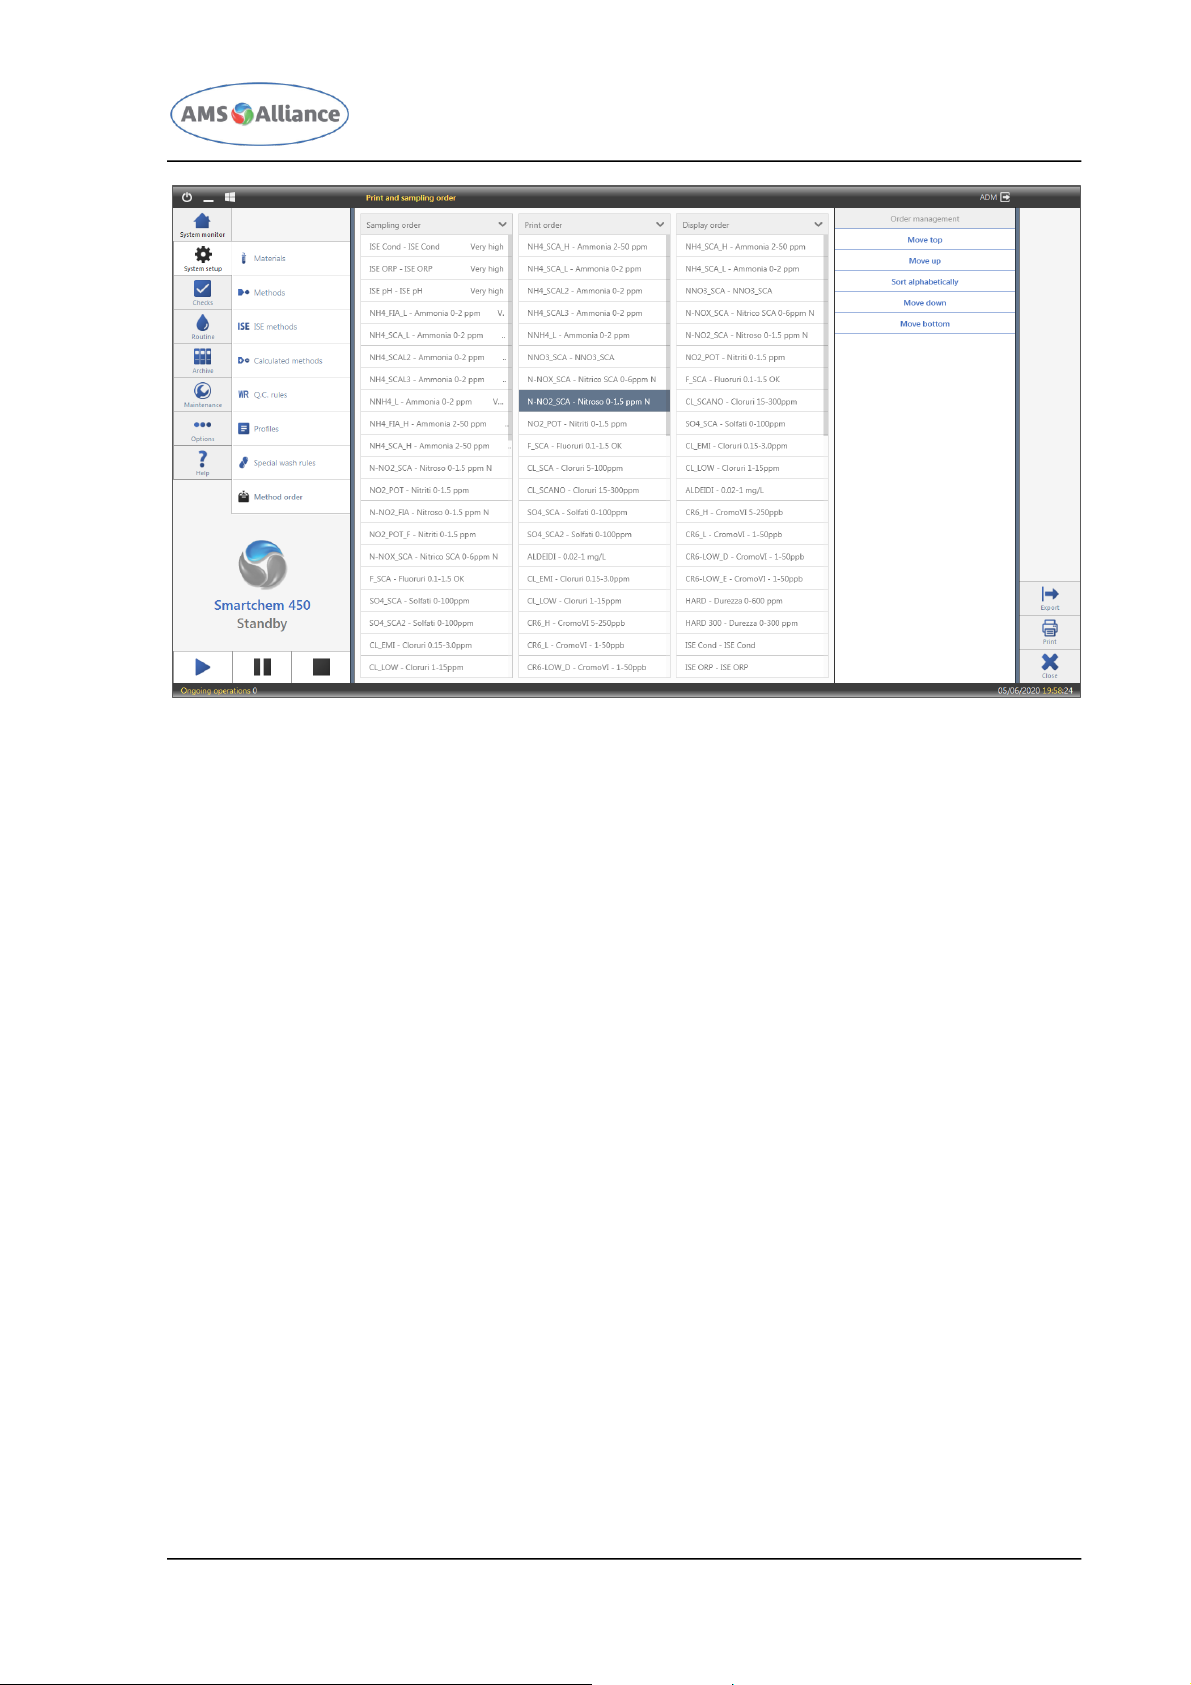
CHAPTER 03 – SOFTWARE DESCRIPTION
SMARTCHEM 450 USER MANUAL REV.01 JUNE 2020 PAGE 68 OF 143
This mask includes three lists; the center one is dedicated to the print order and includes
all the previously defined methods and calculated methods; by default the print order list
reports all the previously defined methods and calculated methods in the alphabetical
order.
If the user wants to change this order, has to tap the single item and the software will
display, in the right panel (Order Management), following buttons:
MOVE TOP – allows the user to bring the selected item in the first position (the selected
method will be printed as the first method);
MOVE UP – allows the user to bring up of one position the selected item;
SORT ALPHABETICALLY – allows the user to reset the printing order (the methods and
calculated methods will be listed following the alphabetical order);
MOVE DOWN – allows the user to bring down of one position the selected item;
MOVE BOTTOM – allows the user to bring the selected item in the last position (the
selected method will be printed as the last method).
With reference to this mask, following actions are available:
SAVE – after the modification of the Print Order, this action is mandatory in order to
save the new list;
DISCARD CHANGES – after the modification of the Print Order, allows the user to return
in the state of the last save;
CLOSE – allows the user to close this mask.
Page 83
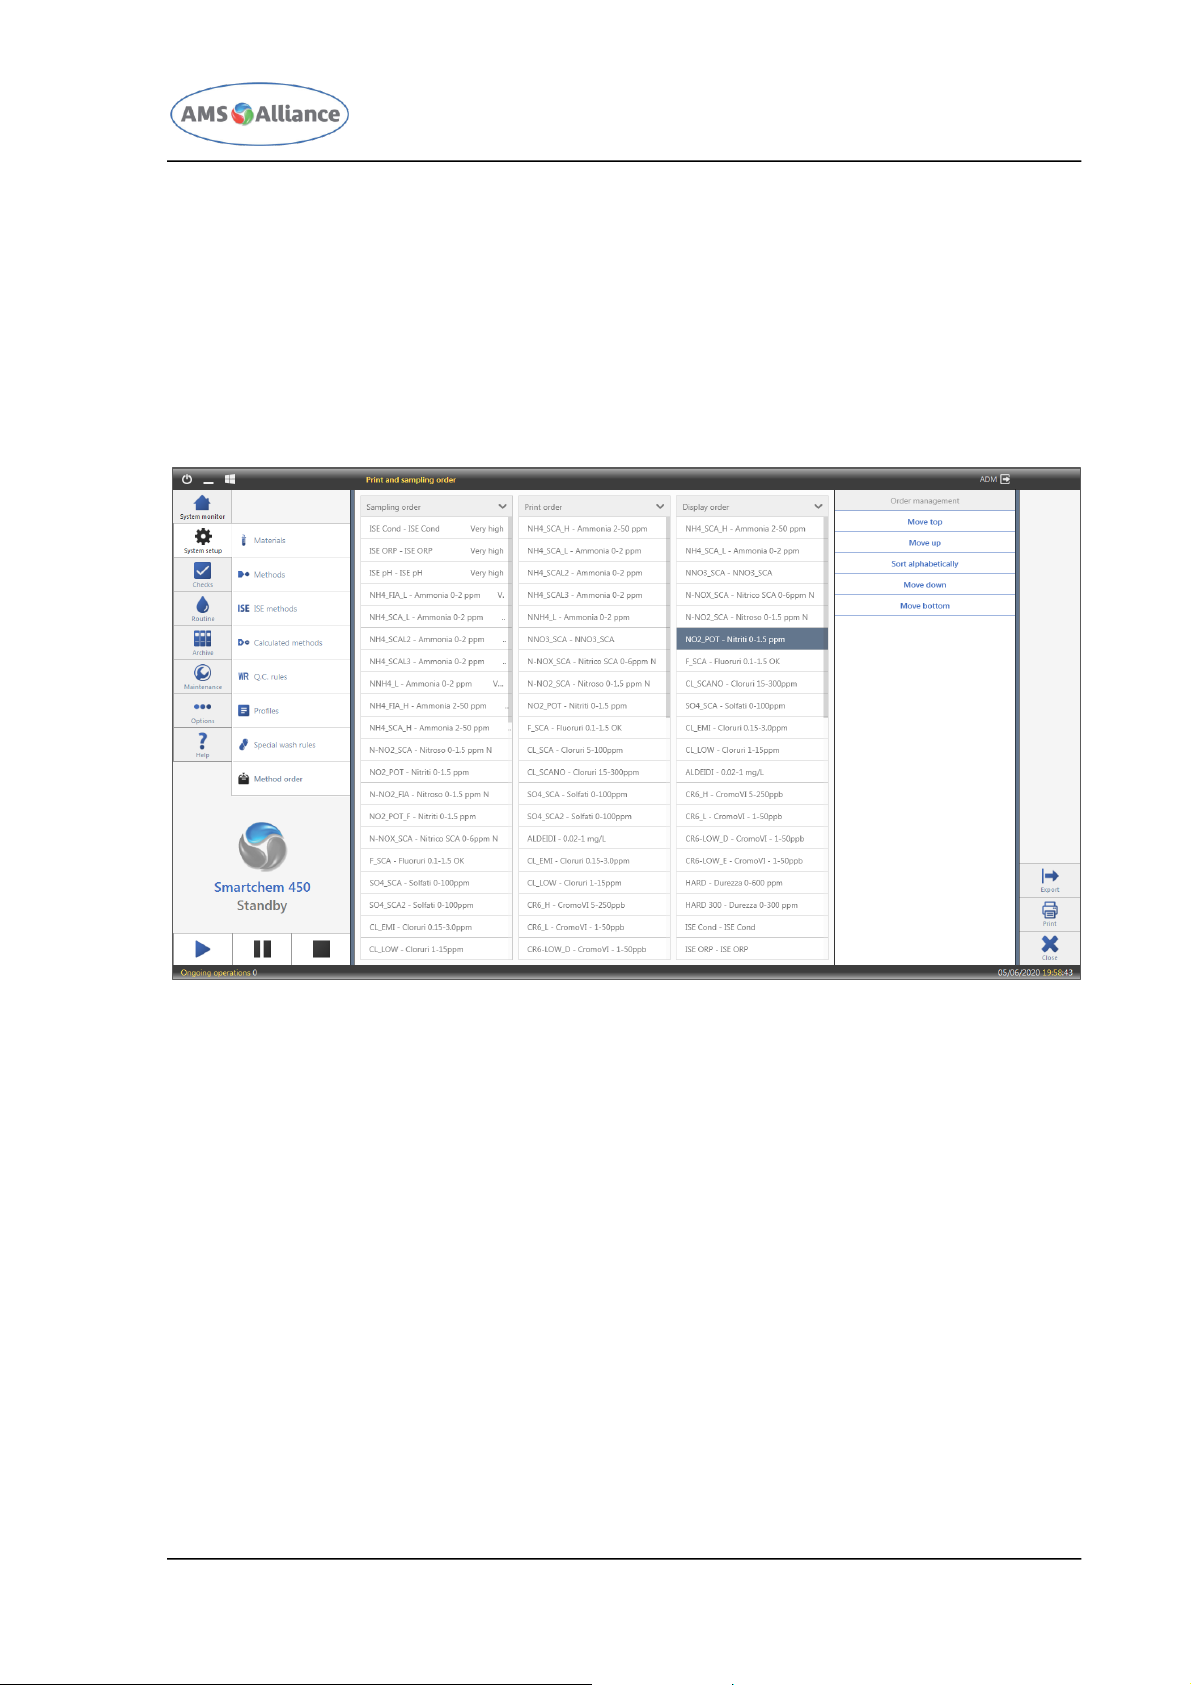
CHAPTER 03 – SOFTWARE DESCRIPTION
SMARTCHEM 450 USER MANUAL REV.01 JUNE 2020 PAGE 69 OF 143
3.2.8 DISPLAY ORDER
The Display Order is used to define the order of the methods and of the calculated
methods to be followed in the different mask of the software.
The display order can be defined using the first level menu SYSTEM SETUP and the second
level menu METHOD ORDER.
Tapping this menu, the following mask will appear.
This mask includes three lists; the right one is dedicated to the display order and
includes all the previously defined methods and calculated methods; by default the
display order list reports all the previously defined methods and calculated methods in
the alphabetical order.
If the user wants to change this order, has to tap the single item and the software will
display, in the right panel (Order Management), following buttons:
MOVE TOP – allows the user to bring the selected item in the first position (the selected
method will be printed as the first method);
MOVE UP – allows the user to bring up of one position the selected item;
SORT ALPHABETICALLY – allows the user to reset the printing order (the methods and
calculated methods will be listed following the alphabetical order);
MOVE DOWN – allows the user to bring down of one position the selected item;
MOVE BOTTOM – allows the user to bring the selected item in the last position (the
selected method will be printed as the last method).
Page 84
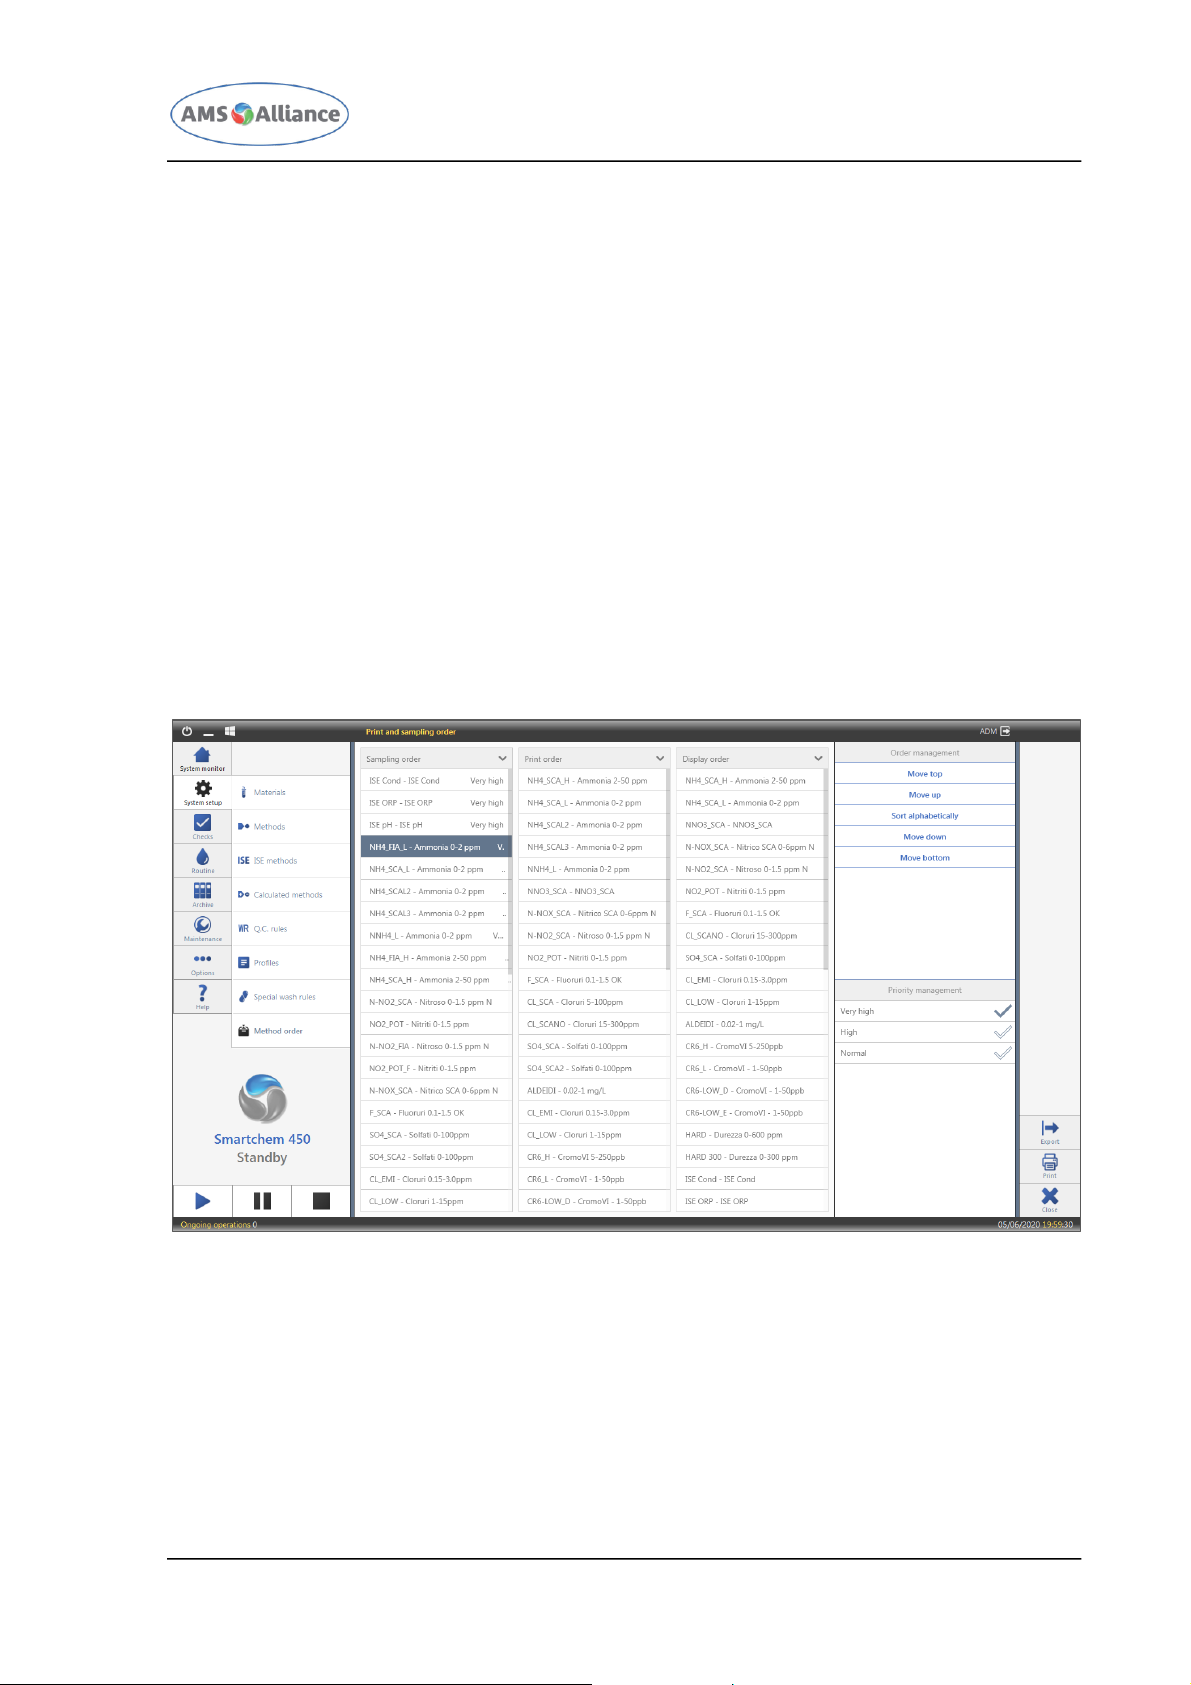
CHAPTER 03 – SOFTWARE DESCRIPTION
SMARTCHEM 450 USER MANUAL REV.01 JUNE 2020 PAGE 70 OF 143
With reference to this mask, following actions are available:
SAVE – after the modification of the Print Order, this action is mandatory in order to
save the new list;
DISCARD CHANGES – after the modification of the Print Order, allows the user to return
in the state of the last save;
CLOSE – allows the user to close this mask.
3.2.9 SAMPLING ORDER
The Sampling Order is used to define the order of the methods execution; in other terms
if the instrument has to perform different methods it will follow the sampling order
defined here.
The sampling order can be defined using the first level menu SYSTEM SETUP and the
second level menu METHOD ORDER.
Tapping this menu, the following mask will appear.
This mask includes three lists; the left one is dedicated to the sampling order and
includes all the previously defined methods; by default the sampling order list reports all
the previously defined methods in the alphabetical order.
If the user wants to change this order, has to tap the single item and the software will
display, in the right panel following sections.
Page 85
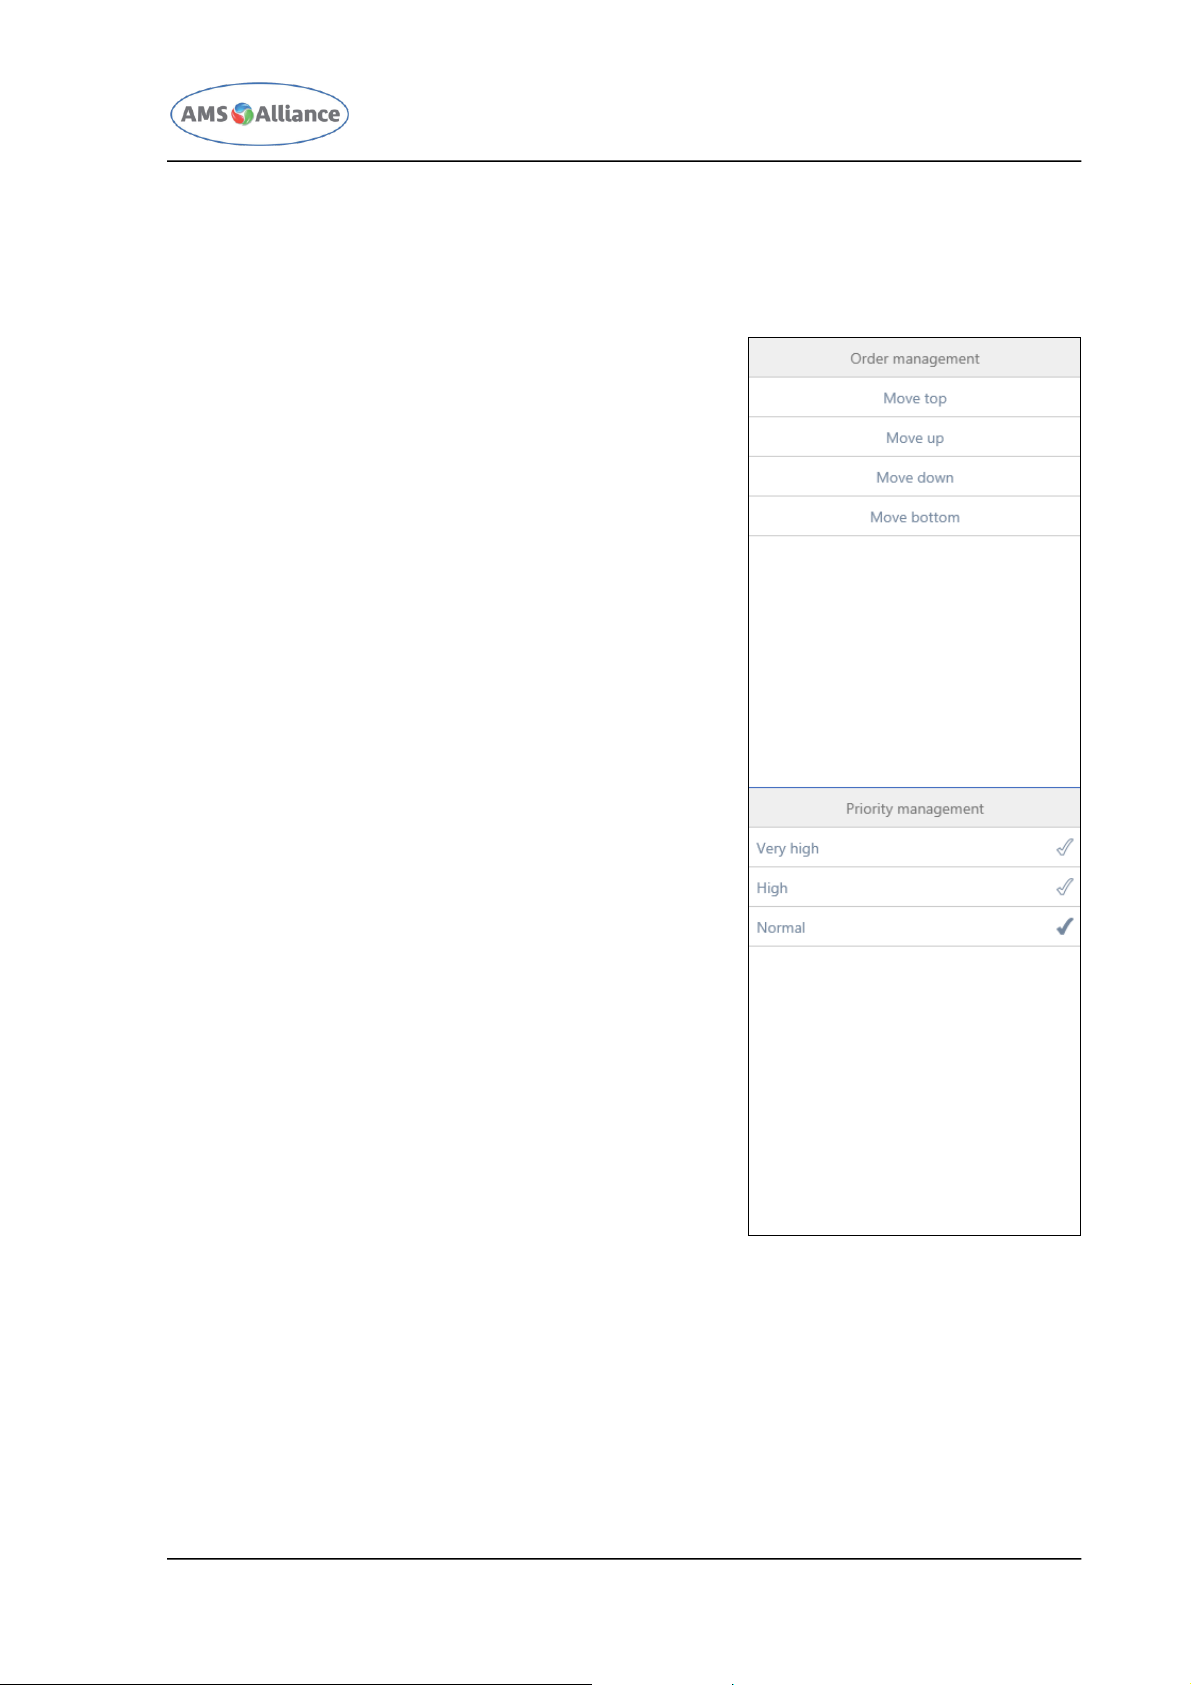
CHAPTER 03 – SOFTWARE DESCRIPTION
SMARTCHEM 450 USER MANUAL REV.01 JUNE 2020 PAGE 71 OF 143
ORDER MANAGEMENT
MOVE TOP – allows the user to bring the selected
item in the first position (the selected method
will be scheduled as the first method with the
same priority);
MOVE UP – allows the user to bring up of one
position the selected item;
MOVE DOWN – allows the user to bring down of
one position the selected item;
MOVE BOTTOM – allows the user to bring the
selected item in the last position (the selected
method will be scheduled as the first method
with the same priority);
PRIORITY MANAGEMENT
VERY HIGH – the methods with very high priority
will be executed before the other two priority
level; please note that this option can be used
for obtaining a “batch – random” scheduling; the
instrument will schedule before the very high
priority methods for all the samples included in
the work plan, after it will pass to the high
priority methods for all the samples included in
the work plan and finally it will schedule the
normal priority methods for all the samples
included in the work plan;
HIGH – the methods with high priority will be
executed after the very high priority methods;
please note that this option can be used for
obtaining a “batch – random” scheduling; the
instrument will schedule before the very high
priority methods for all the samples included in
the work plan, after it will pass to the high
priority methods for all the samples included in
the work plan and finally it will schedule the
normal priority methods for all the samples
included in the work plan;
NORMAL – this is the standard (default) priority
level for the methods; in order to obtain a
classical random schedule mode all the methods
should have the same priority level.
With reference to this mask, following actions are available:
SAVE – after the modification of the Sampling Order, this action is mandatory in order
to save the new list;
Page 86
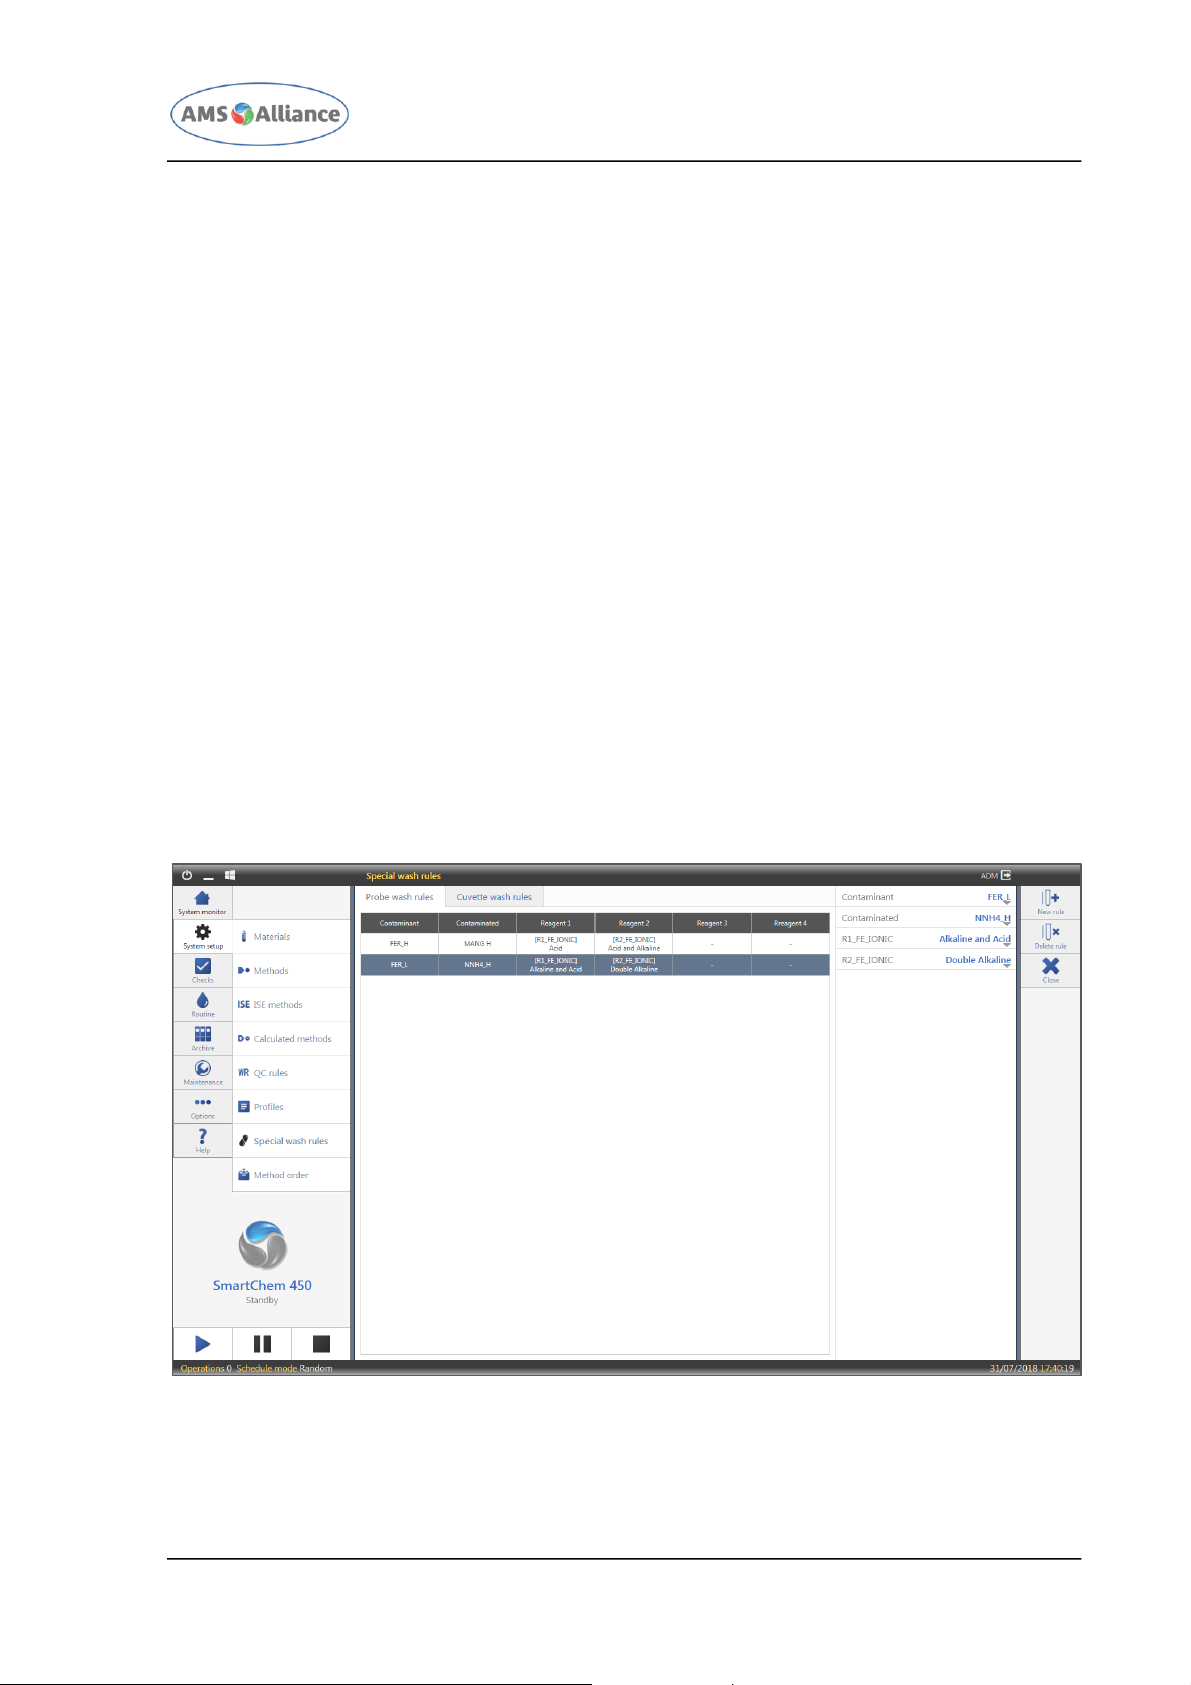
CHAPTER 03 – SOFTWARE DESCRIPTION
SMARTCHEM 450 USER MANUAL REV.01 JUNE 2020 PAGE 72 OF 143
DISCARD CHANGES – after the modification of the Sampling Order, allows the user to
return in the state of the last save;
CLOSE – allows the user to close this mask.
3.2.10 SPECIAL WASH RULES
The special wash rules allow to define a particular wash either of the probes or of the
cuvettes when:
one method is contaminating for another method (the contaminated method)
one method is contaminating for all the other methods (the contaminated method(s));
in this case the contaminating method is not included in the contaminated methods;
all methods are contaminating for another method (the contaminated method); in this
case the contaminated method is not included in the contaminating methods;
all methods are contaminating for all the other methods (the contaminated
method(s)); in this case the contaminated method is not included in the
contaminating methods and the contaminating method is not included in the
contaminated methods;
A special wash rule can be defined using the first level menu SYSTEM SETUP and the
second level menu SPECIAL WASH RULES.
Tapping this menu, the following mask will appear.
This mask is divided in two tabs, one dedicated to the Probe Wash Rules and the other
one to the Cuvette Wash Rules.
Page 87

CHAPTER 03 – SOFTWARE DESCRIPTION
SMARTCHEM 450 USER MANUAL REV.01 JUNE 2020 PAGE 73 OF 143
Entering this mask the selected tab is the one dedicated to the Probe Wash Rules (see
the above picture).
3.2.10.1 PROBE WASH RULES
This tab reports in a table format the previously defined probe wash rules.
The possible special wash types for the probes are: Acid, Alkaline, Acid and Alkaline,
Alkaline and Acid, Double Acid or Double Alkaline. The Acid and/or the Alkaline liquid
shall be positioned in the reagents plate using the Plates Configuration mask.
Following fields are displayed:
CONTAMINATING – it reports either the name of the contaminating method or “All
methods” as contaminating;
CONTAMINATED – it reports either the name of the contaminated method or “All
methods” as contaminated;
REAGENT 1 – it reports the type of special wash applied to the probe if after the first
reagent of the contaminating method, the same probe has to suck a reagent of the
contaminated method(s); the possible wash types are: Acid, Alkaline, Acid and
Alkaline, Alkaline and Acid, Double Acid or Double Alkaline;
REAGENT 2 – it reports the type of special wash applied to the probe if after the second
reagent of the contaminating method, the same probe has to suck a reagent of the
contaminated method(s);
REAGENT 3 – it reports the type of special wash applied to the probe if after the third
reagent of the contaminating method, the same probe has to suck a reagent of the
contaminated method(s);
REAGENT 4 – it reports the type of special wash applied to the probe if after the fourth
reagent of the contaminating method, the same probe has to suck a reagent of the
contaminated method(s);
Please note that in case the user wants to define as contaminating all the methods, the
same wash type could be defined after any reagent of any method.
If the user wants to modify a previously defined rule, has to tap the row in the table that
reports the rule and the software will display a right panel in which the user can edit all
the fields of the rule. The same right panel will be displayed if the user wants to add a
new rule.
With reference to this mask, following actions are available:
NEW RULE – allows to create a new probe wash rule; following a tap over this action
the software will automatically display right panel in which the user can define the
contaminating method, the contaminated method and the special washes after each
reagent of the contaminating method;
DELETE RULE – after selecting a probe wash rule allows to delete it;
Page 88
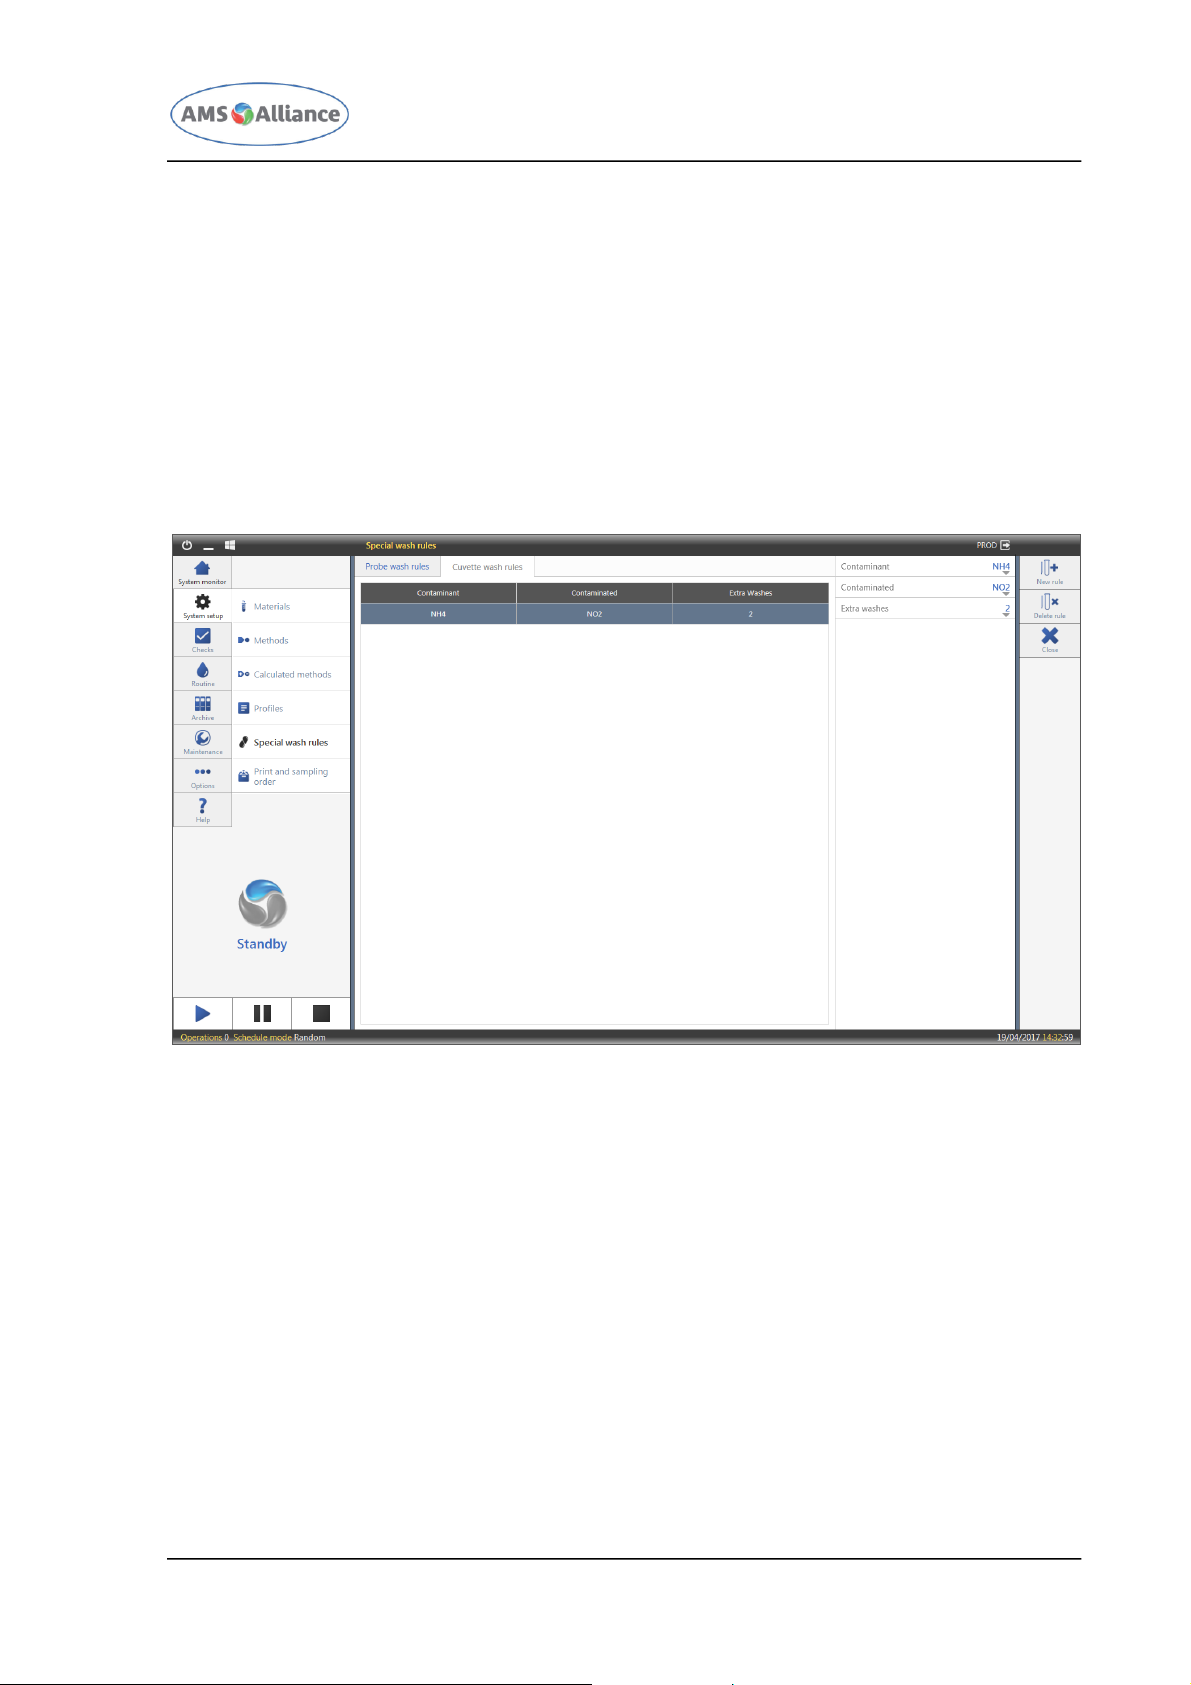
CHAPTER 03 – SOFTWARE DESCRIPTION
SMARTCHEM 450 USER MANUAL REV.01 JUNE 2020 PAGE 74 OF 143
SAVE – after the creation or a modification of a previously defined rule, this action is
mandatory in order to save the new parameters associated to the rule;
DISCARD CHANGES – after the creation or a modification of a previously defined rule,
allows the user to return in the state of the last save;
PRINT – allows to print the previously defined rules;
EXPORT – allows to export the previously defined rules;
CLOSE – allows the user to close this mask.
3.2.10.2 CUVETTE WASH RULES
This tab reports in a table format the previously defined cuvette wash rules.
Following fields are displayed:
CONTAMINATING – it reports either the name of the contaminating method or “All
methods” as contaminating;
CONTAMINATED – it reports the name of the contaminated method as contaminated;
EXTRA WASHES – it reports the number of extra washes for the cuvette in which should
be dispensed the contaminated method after the contaminating one; in other terms, in
addition to the normal washing of the cuvette, before the same can be utilized for the
execution of the method that has been contaminated after the usage for the
contaminant method, it should be performed the additional extra washings set in this
rule.
If the user wants to modify a previously defined rule, has to tap the row in the table that
reports the rule and the software will display a right panel in which the user can edit all
Page 89
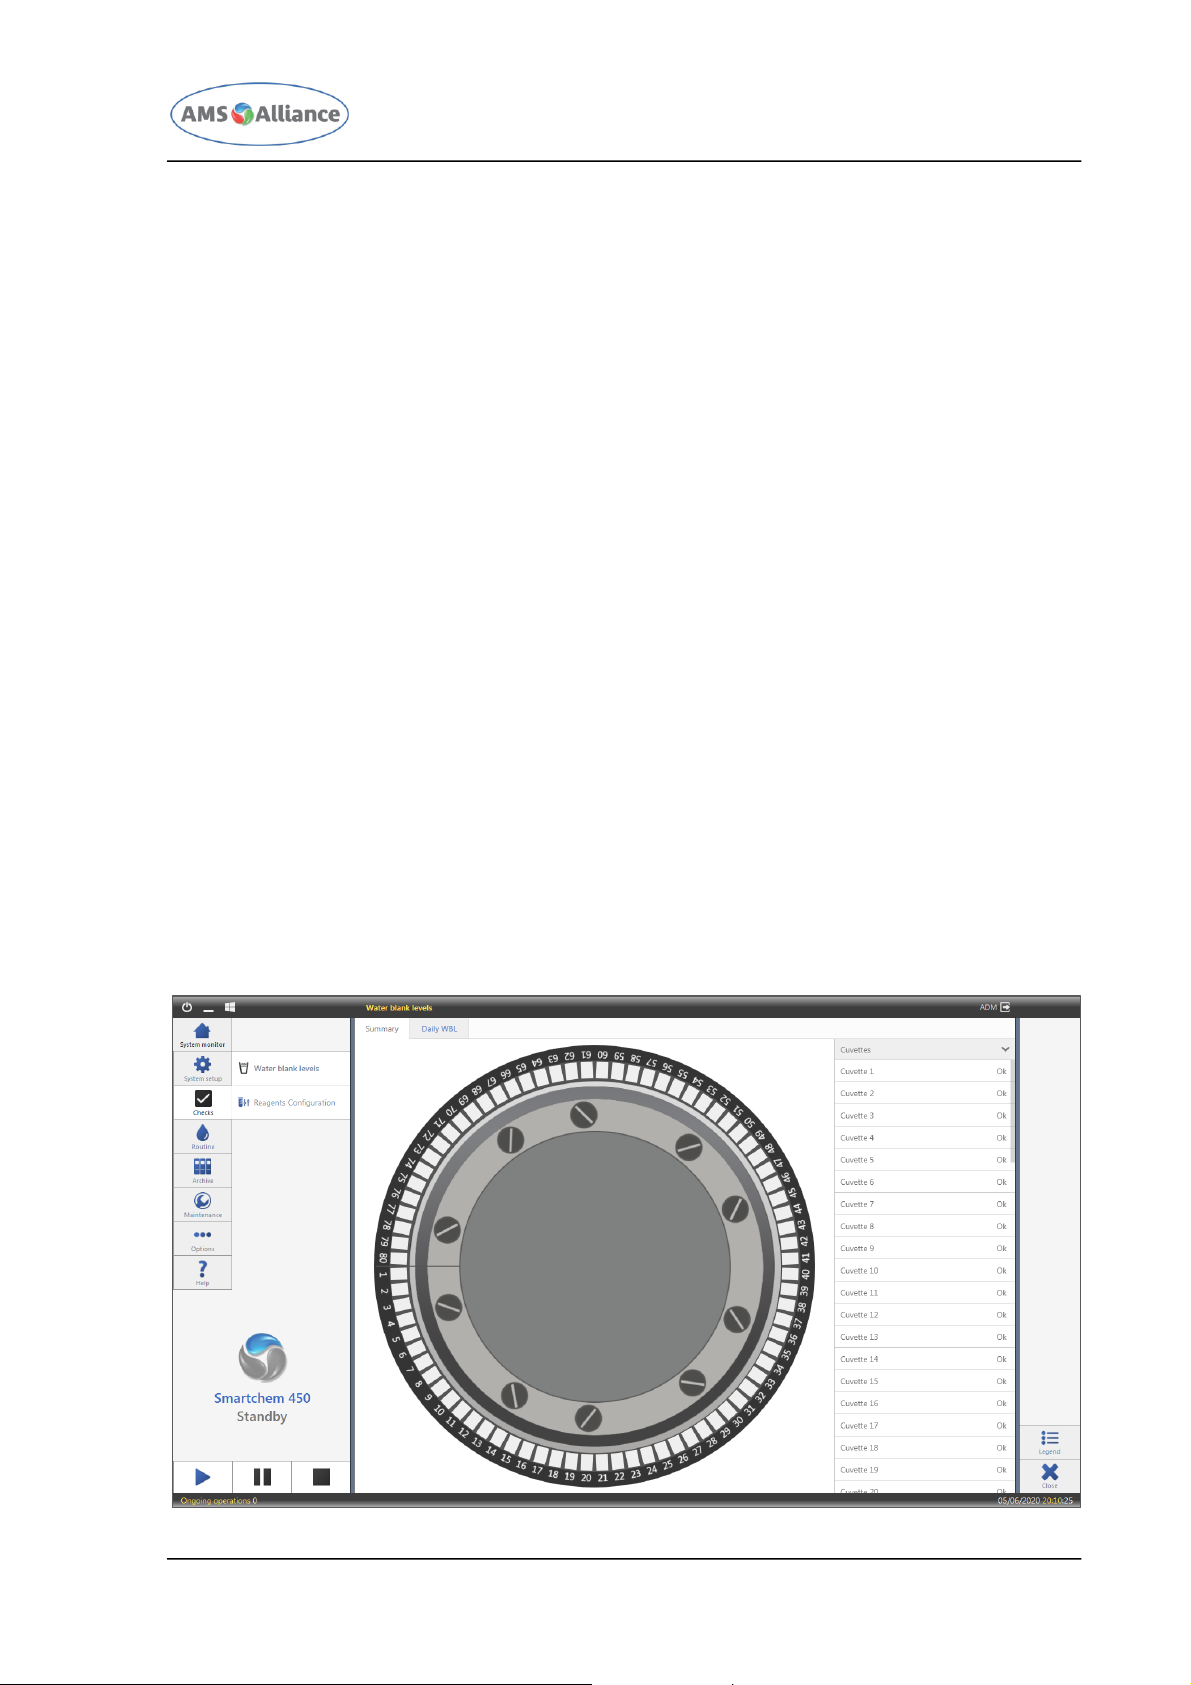
CHAPTER 03 – SOFTWARE DESCRIPTION
SMARTCHEM 450 USER MANUAL REV.01 JUNE 2020 PAGE 75 OF 143
the fields of the rule. The same right panel will be displayed if the user wants to add a
new rule.
With reference to this mask, following actions are available:
NEW RULE – allows to create a new cuvette wash rule; following a tap over this action
the software will automatically display right panel in which the user can define the
contaminating method, the contaminated method and the number of extra washes for
the cuvette;
DELETE RULE – after selecting a probe wash rule allows to delete it;
SAVE – after the creation or a modification of a previously defined rule, this action is
mandatory in order to save the new parameters associated to the rule;
DISCARD CHANGES – after the creation or a modification of a previously defined rule,
allows the user to return in the state of the last save;
PRINT – allows to print the previously defined rules;
EXPORT – allows to export the previously defined rules;
CLOSE – allows the user to close this mask.
3.3 CHECKS
3.3.1 WATER BLANK LEVEL OF THE DIFFERENT CUVETTES
Water blanks are used to verify the optical integrity of the reaction cuvettes and the
photometric system.
This mask is dedicated to show the Water Blank Levels associated to the 80 cuvettes of
the instrument and can be accessed using the first level menu CHECKS and the second
level menu WATER BLANK LEVEL.
Tapping this menu, the following mask will appear.
Page 90

CHAPTER 03 – SOFTWARE DESCRIPTION
SMARTCHEM 450 USER MANUAL REV.01 JUNE 2020 PAGE 76 OF 143
This mask is divided in different tabs:
SUMMARY – it provides an overview of the cuvette plates;
DAILY WBL – it provides a detailed view of the last WBL execution;
MONTHLY WBL – visible only having selected a single cuvette, it provides a detailed
detailed view of the WBL results in the last thirty one days for the selected cuvette.
3.3.1.1 SUMMARY
This tab provides a quick overall view of the status of all the 80 cuvettes.
This tab is divided in two areas:
the left one reports the graphical representation of the reaction plate; each cuvette
can assume following states:
EMPTY – the cuvette is not currently used but it is usable (white);
IN USE – the cuvette is currently used performing a test (light blue);
DIRTY – the cuvette is dirty and it will be washed (striped blue);
NO WBL – a WBL has never been performed and the cuvette is not usable before
doing this reading (red);
OPAQUE – the cuvette is not usable because the Water Blank Level is outside the
acceptability range (dark).
the right one reports the list of the 80 cuvette indicating the WBL status of each one.
The user can select the single cuvette either tapping on the cuvette in the graphical
representation of the reaction plate or tapping on the right list of the mask.
With reference to this tab, following actions are available:
REPLACE CUVETTES – following a tap on the middle of the reaction plate, this action will
be visible; it allows to change the reaction cuvettes; this action will imply that all the
cuvettes will be characterized by the No WBL status;
CLOSE – allows the user to close this mask.
3.3.1.2 DAILY WBL
This tab provides a detailed view of the last WBL execution of the 80 cuvettes.
Page 91
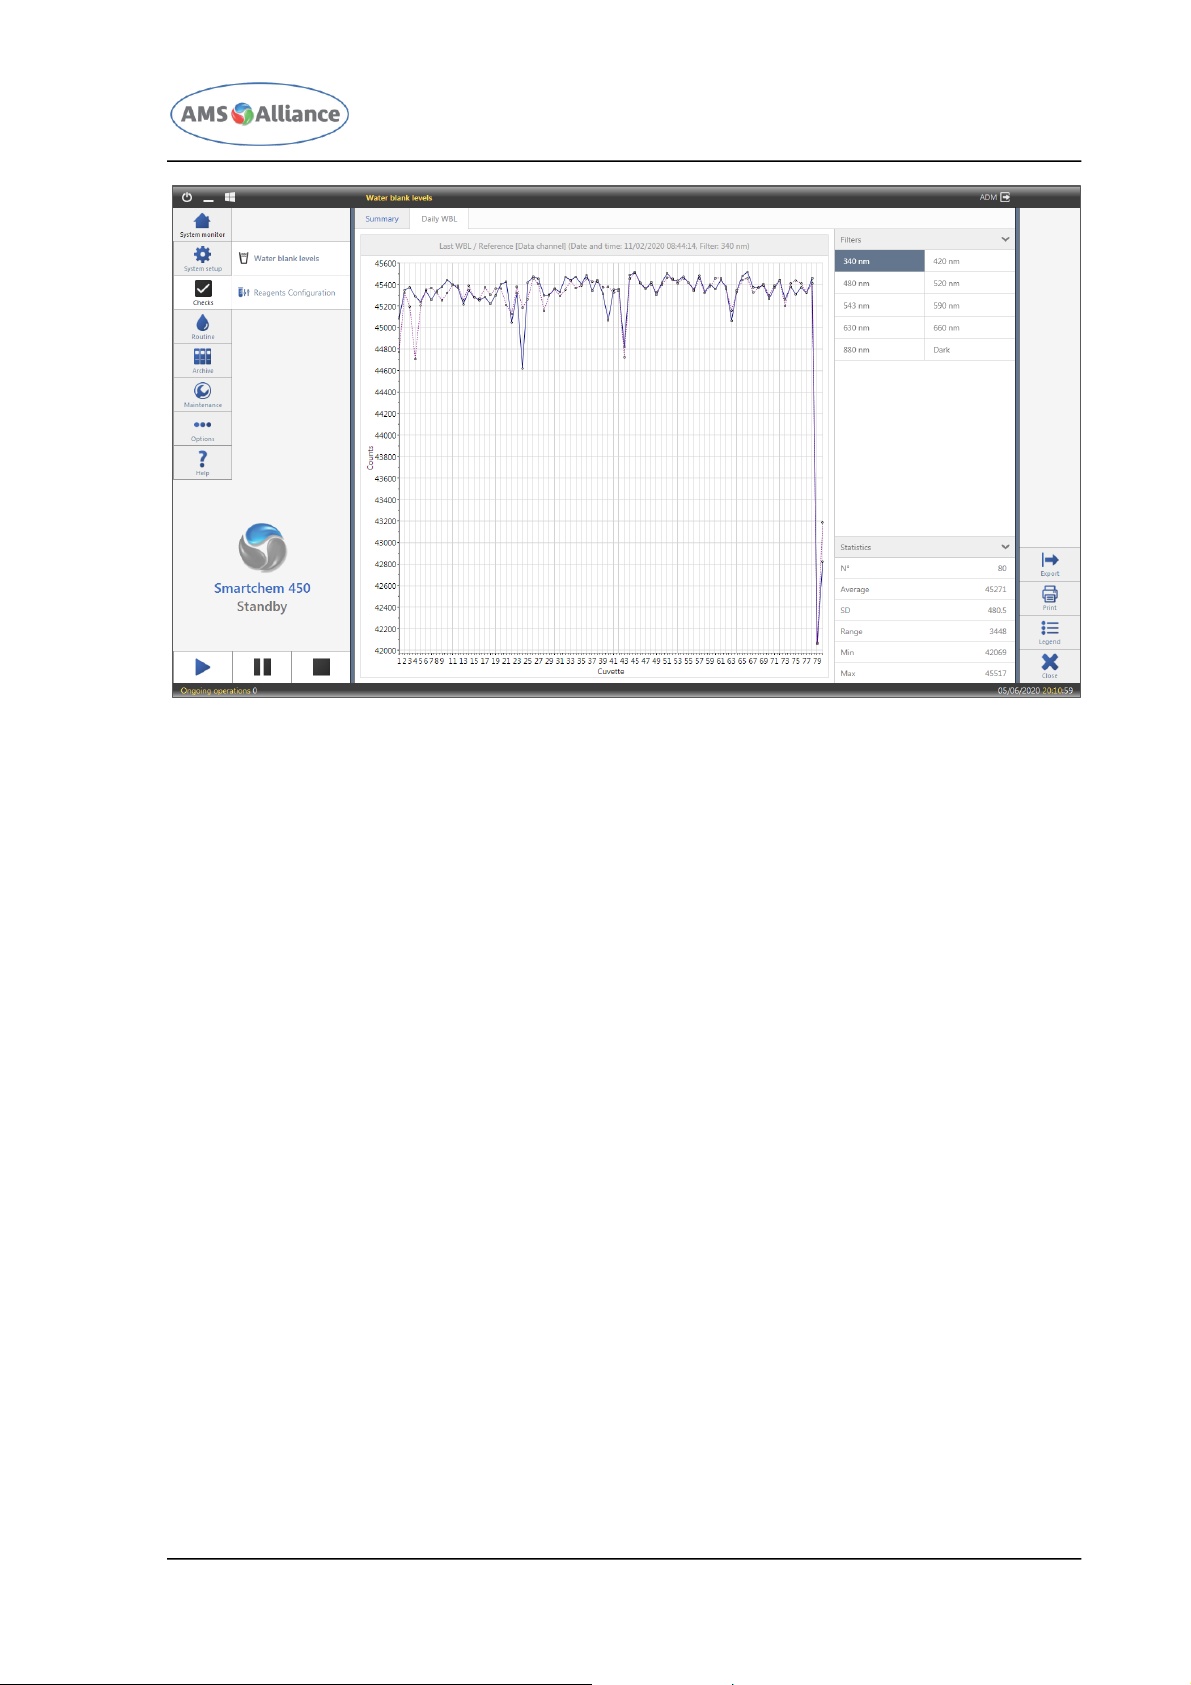
CHAPTER 03 – SOFTWARE DESCRIPTION
SMARTCHEM 450 USER MANUAL REV.01 JUNE 2020 PAGE 77 OF 143
This tab is divided in two areas:
the left one reports the graph of the last WBL execution (solid line) as well as the first
WBL run of the cuvettes (dotted line): the x-axis reports numbers from 1 to 85 that
represent the different cuvettes, while the y-axis is dedicated to show the WBL result
for the selected wave length.
the right one includes the FILTER SECTION (each filter is tappable and is used to select
the interested one) and a STATISTICAL SECTION that reports the statistic values
referred to the shown graph (Number, average, standard deviation, range, minimum
value and maximum value).
With reference to this tab, following actions are available:
PRINT – allows the user to print the daily WBL;
EXPORT – allows the user to export the daily WBL in an .xls file;
CLOSE – allows the user to close this mask.
3.3.1.3 MONTHLY WBL
This tab provides a detailed detailed view of the WBL results in the last thirty one days
for the selected cuvette.
Page 92
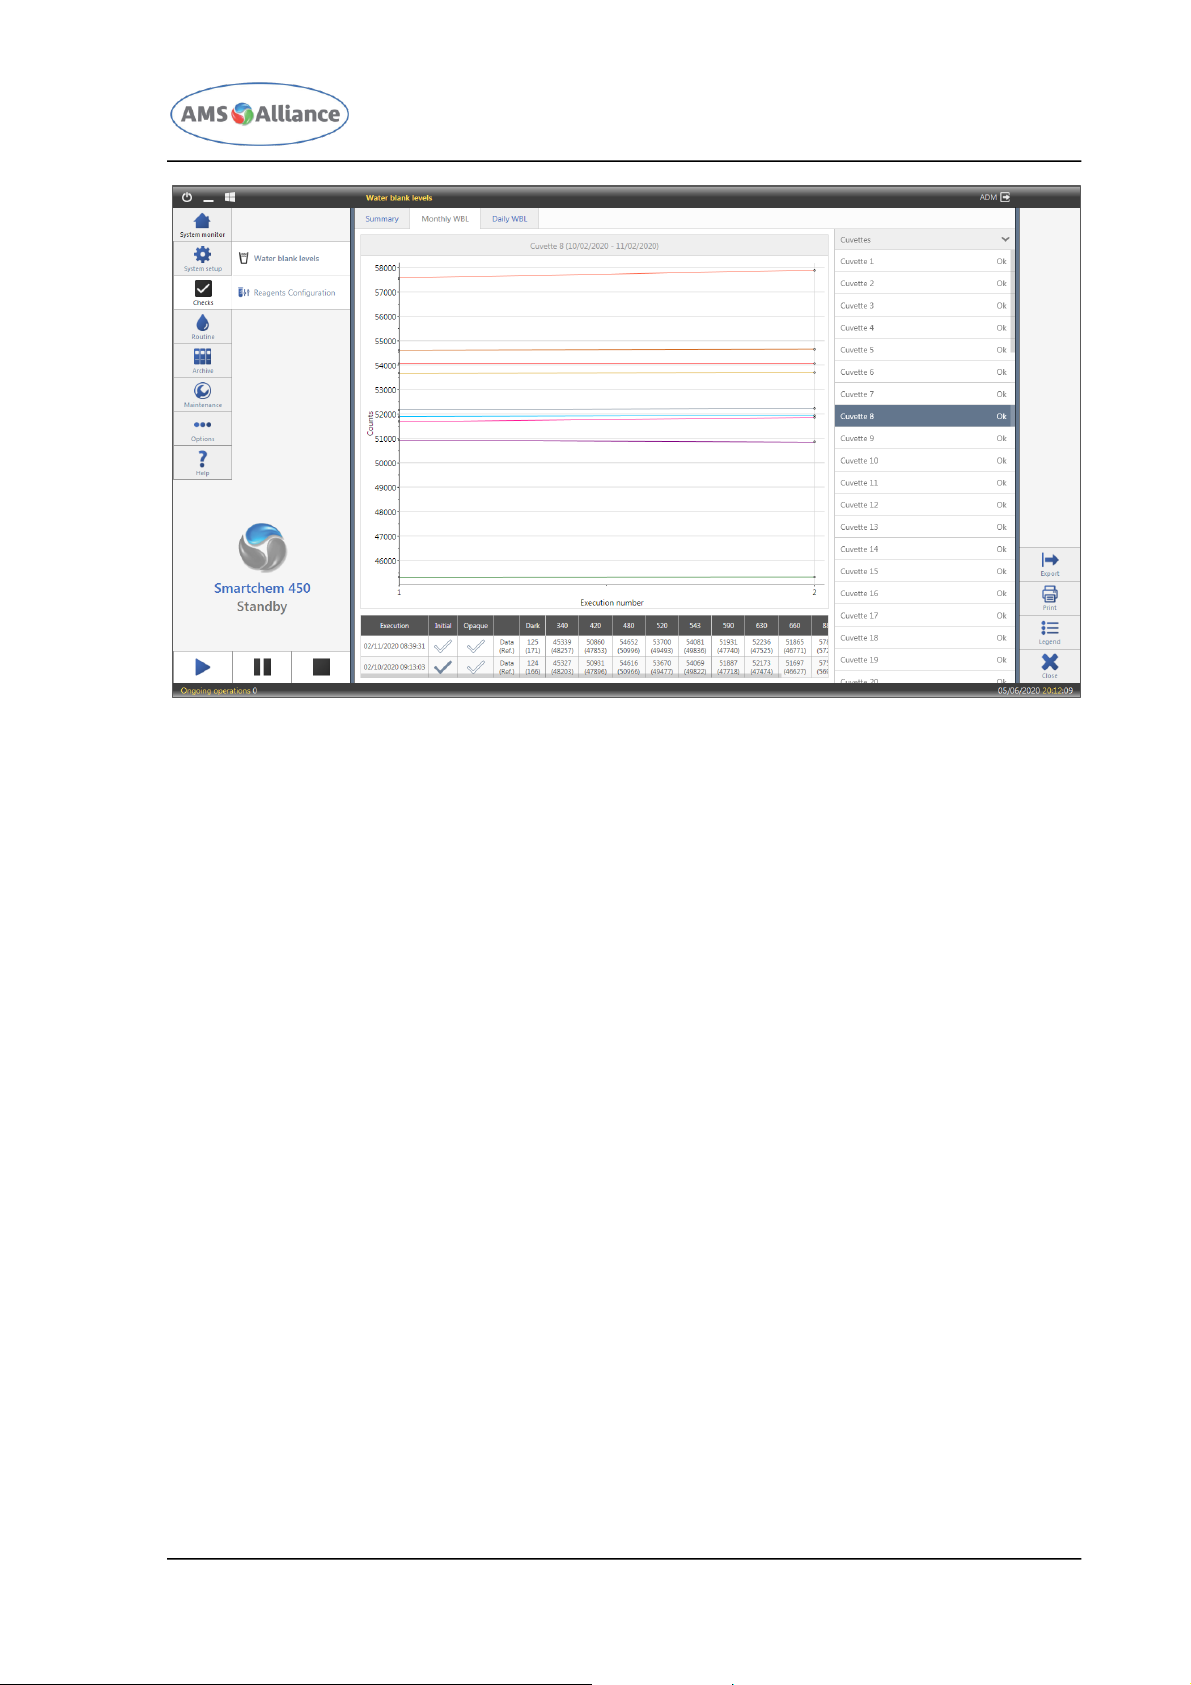
CHAPTER 03 – SOFTWARE DESCRIPTION
SMARTCHEM 450 USER MANUAL REV.01 JUNE 2020 PAGE 78 OF 143
This tab is divided in two areas:
the left one reports the WBL result of the selected cuvette; it includes:
a graph of the last 31 WBL executions of the selected cuvette: the x-axis is
dedicated to the single execution, while the y-axis is dedicated to show the WBL
result for all the wave lengths of the selected cuvette;
a table that reports the WBL results of the last 31 WBL executions of the selected
cuvette and the first WBL execution after the last cuvettes replacement.
the right one reports the list of the 80 cuvette indicating the WBL status of each one.
With reference to this tab, following actions are available:
PRINT – allows the user to print the monthly WBL results;
EXPORT – allows the user to export the monthly WBL results in an .xls file;
CLOSE – allows the user to close this mask.
3.3.2 REAGENTS CONFIGURATION
The Reagents Configuration mask will allow the user to set up one or more plates
configuration; the user could define which methods will be configured on the specific
configuration; if the user will decide to include a specific method in a configuration, the
related liquids (reagents, diluents and special liquids) will be positioned in the reagent
plate or in the sample plate.
This mask can be accessed using the first level menu CHECKS and the second level menu
REAGENTS TRAY.
Tapping this menu, the following mask will appear.
Page 93
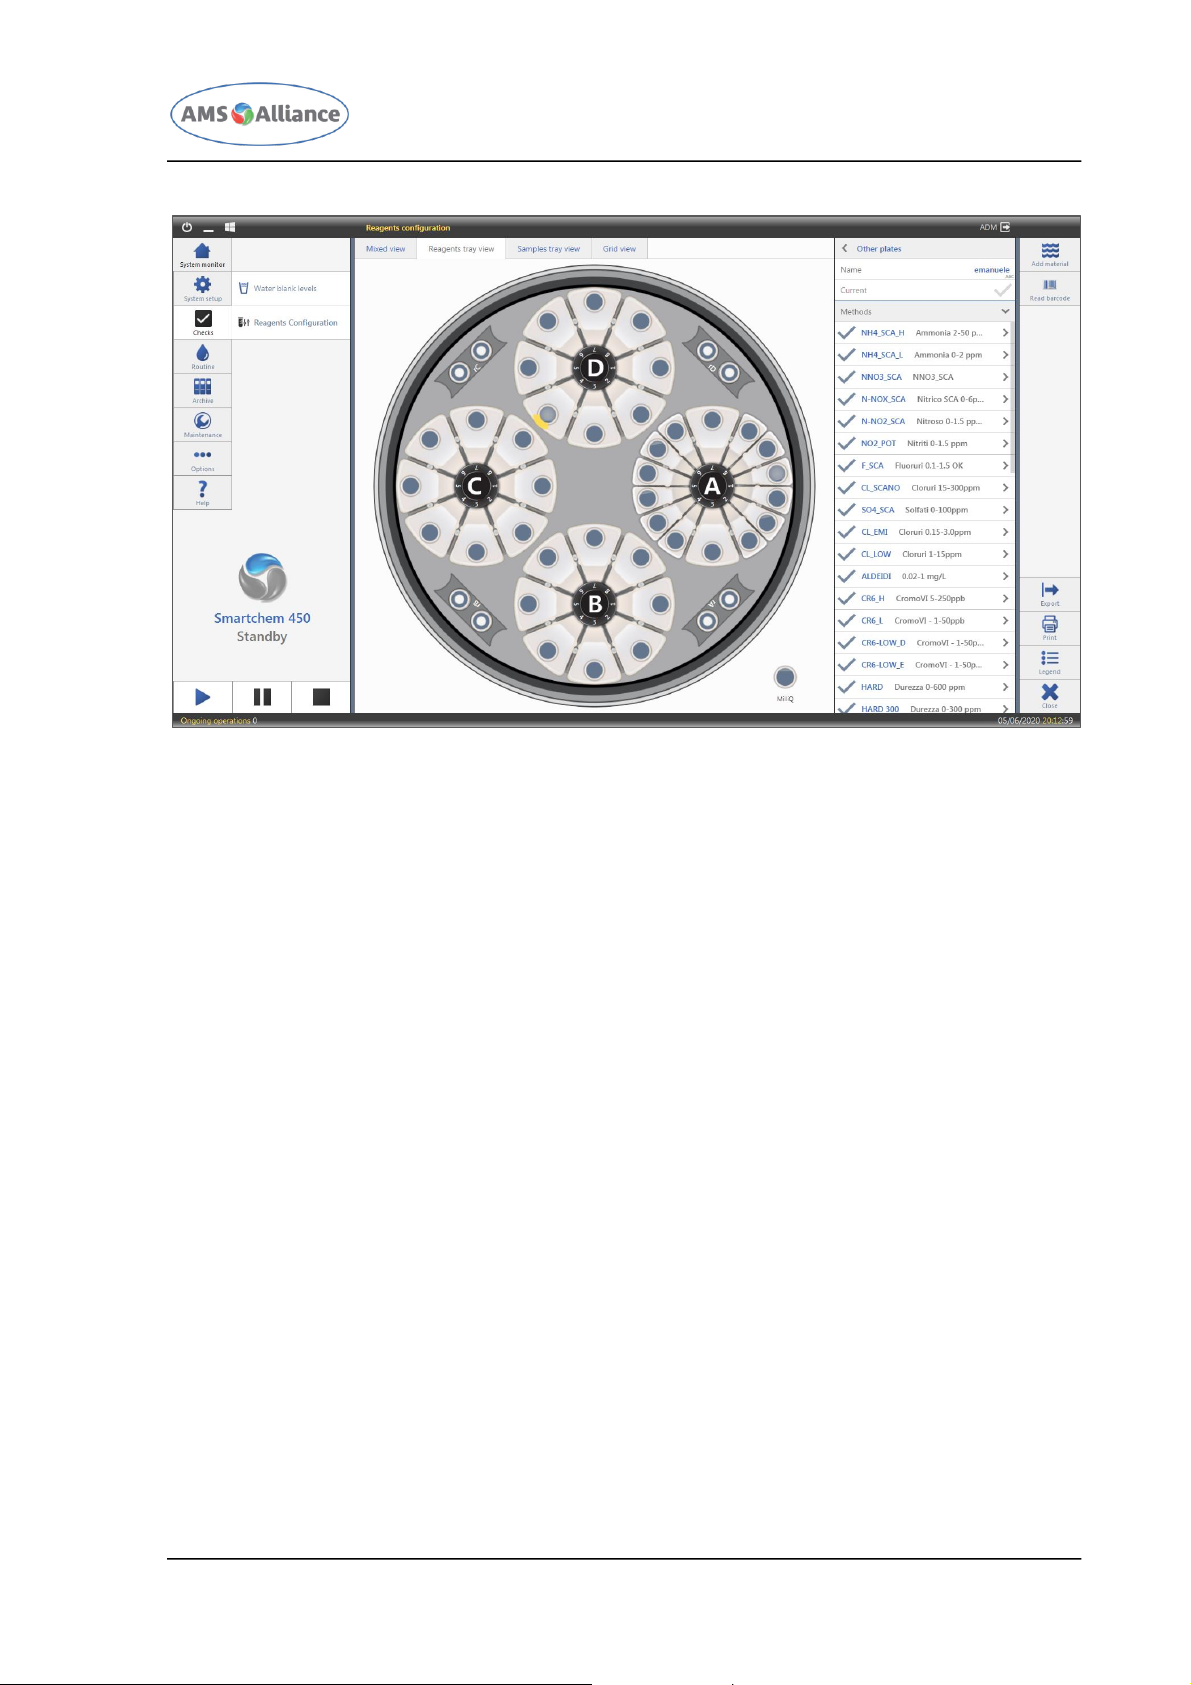
CHAPTER 03 – SOFTWARE DESCRIPTION
SMARTCHEM 450 USER MANUAL REV.01 JUNE 2020 PAGE 79 OF 143
This mask is divided in different tabs:
MIXED VIEW – it provides a graphical representation of the Reagents Plate and of the
Samples Plate;
REAGENTS PLATE VIEW – it provides a graphical representation of the Reagents Plate
(the reagents plate in this case is greater than the one present in the mixed tab) and
the actions related to the Reagents Plate are exactly equal to those that the user can
do from the Mixed View; for this reason it will not be further explained in this
document;
SAMPLES PLATE VIEW – it provides a graphical representation of the Samples Plate (the
samples plate in this case is greater than the one present in the mixed tab) and the
actions related to the Samples Plate are exactly equal to those that the user can do
from the Mixed View; for this reason it will not be further explained in this document;
GRID VIEW – it provides a table representation of the positioned liquids of the selected
plate configuration.
3.3.2.1 MIXED VIEW
This tab allows to create/delete/modify the plates configuration and provides a graphical
representation of the reagents and samples plate.
This tab is divided in two areas:
The right one will display information related to the reagents configuration(s).
The right area will allow to edit a previously defined one, to add a new configuration
or to remove an old one.
Page 94
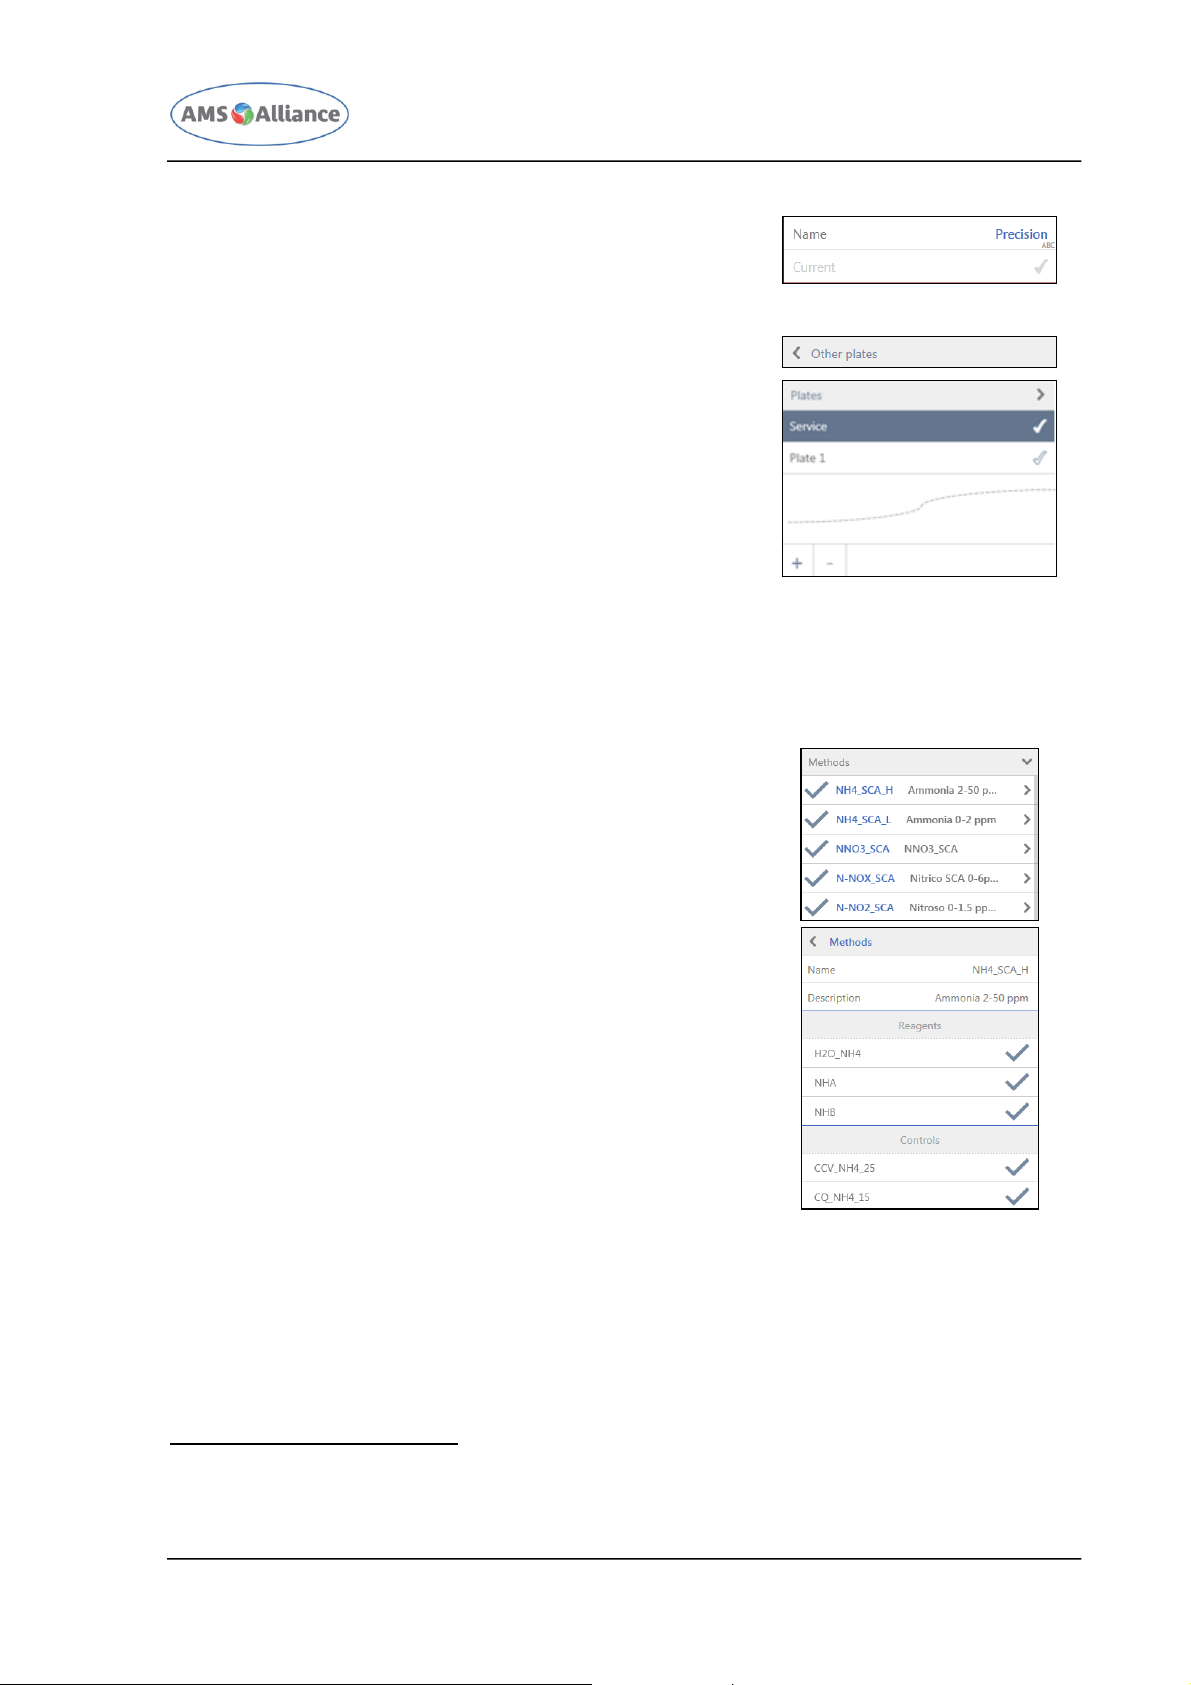
CHAPTER 03 – SOFTWARE DESCRIPTION
SMARTCHEM 450 USER MANUAL REV.01 JUNE 2020 PAGE 80 OF 143
The user can EDIT the name of the plates
configuration as well as to set as CURRENT the
selected configuration, directly tapping on one of
the two visible items.
The user create/delete or set as current a different
Plates configuration, tapping the item OTHER
PLATES.
Tapping the Other Plates item a list with the
previously defined plates.
Using this visualization the user can create a new
Plates Configuration (using the PLUS button) or
delete the selected Plates Configuration (using the
MINUS button).
Once defined a new configuration, the user will be able to select the methods to be
placed in the specific configuration; choosing a specific method, the software will put
on the plates all the related reagents/diluents11; reagents/diluents will only be placed
in the reagents plate whilst controls and spikes will be positioned in the sample plate.
Tapping one of the previously defined methods that
are listed in this area, reagents and diluents used
by the selected method, will be automatically
positioned in the reagents plate.
If the user taps the arrow at the right of the
selected method, it will be opened, always in this
right position, the list of the related liquids.
As shown in the picture above, selecting a method, it is possible to see the controls
associated to the method itself; checking any control, is possible to place the Controls
from this mask in the peripheral positions either of the Reagents tray or of the
Samples tray; any control positioned from this mask will be always visible in the
System Monitor mask independently by the status of the control (assigned, scheduled,
11
Default bottle type and position for reagents and diluents will be respectively 50 ml and rotor
position.
Page 95

CHAPTER 03 – SOFTWARE DESCRIPTION
SMARTCHEM 450 USER MANUAL REV.01 JUNE 2020 PAGE 81 OF 143
running or not); for this reason the controls placed from this mask can be specifically
the automatically scheduled ones.
The main area (left one) shows the reagents plate and the samples plates and the
positioned liquids of the selected configuration.
Drag and drop feature allows the user to move a liquid from one position to another;
reagents/diluents can be positioned only in the reagent plate; controls and spike can
be positioned only in the samples plate. Drag and drop feature can also be used in
order to remove a liquid from a reagents configuration (please note the presence of
the recycle bin in the bottom left part of this area).
Reagents and controls positioned from this window, will be shown in yellow if are
almost expired/unstable (1 day to the expiration/stability date) or in red if are
expired/unstable.
Tapping any reagent or diluent following information will be displayed in the right
area:
NAME – it displays the name of the selected liquid;
LOT – it displays the lot number of the selected liquid; tapping it, the user can
change the lot number directly from here;
EXPIRATION – it displays the expiration date of the selected liquid; tapping it, the
user can change the lot number directly from here;
POSITION – it displays the position of the selected liquid;
BOTTLE TYPE – it displays the bottle type of the selected liquid; tapping it, the user
can change the bottle type (5 ml, 25 ml, 50 ml);
RESIDUAL VOLUME – it displays, if known by the instrument, the residual volume
present in the bottle of the selected liquid;
LOADED ON – it displays the loading date of the bottle of the selected liquid;
METHODS LIST – list of the methods that use the selected liquid; the user can also
add the single method to the selected plate configuration directly tapping it.
Furthermore, tapping any reagent or diluent following specific actions will be available:
DUPLICATE – it allows to add a new liquid bottle of the same selected liquid; with
this action the user can have on the same Plates Configuration more than one
bottle of the same liquid;
NEW BOTTLE – it allows to let the instrument known that the specific bottle has been
changed by the user.
Tapping any control following information will be displayed in the right area:
NAME – it displays the name of the selected liquid;
LOT – it displays the lot number of the selected liquid; tapping it, the user can
change the lot number directly from here;
EXPIRATION – it displays the expiration date of the selected liquid; tapping it, the
user can change the lot number directly from here;
POSITION – it displays the position of the selected liquid.
Page 96
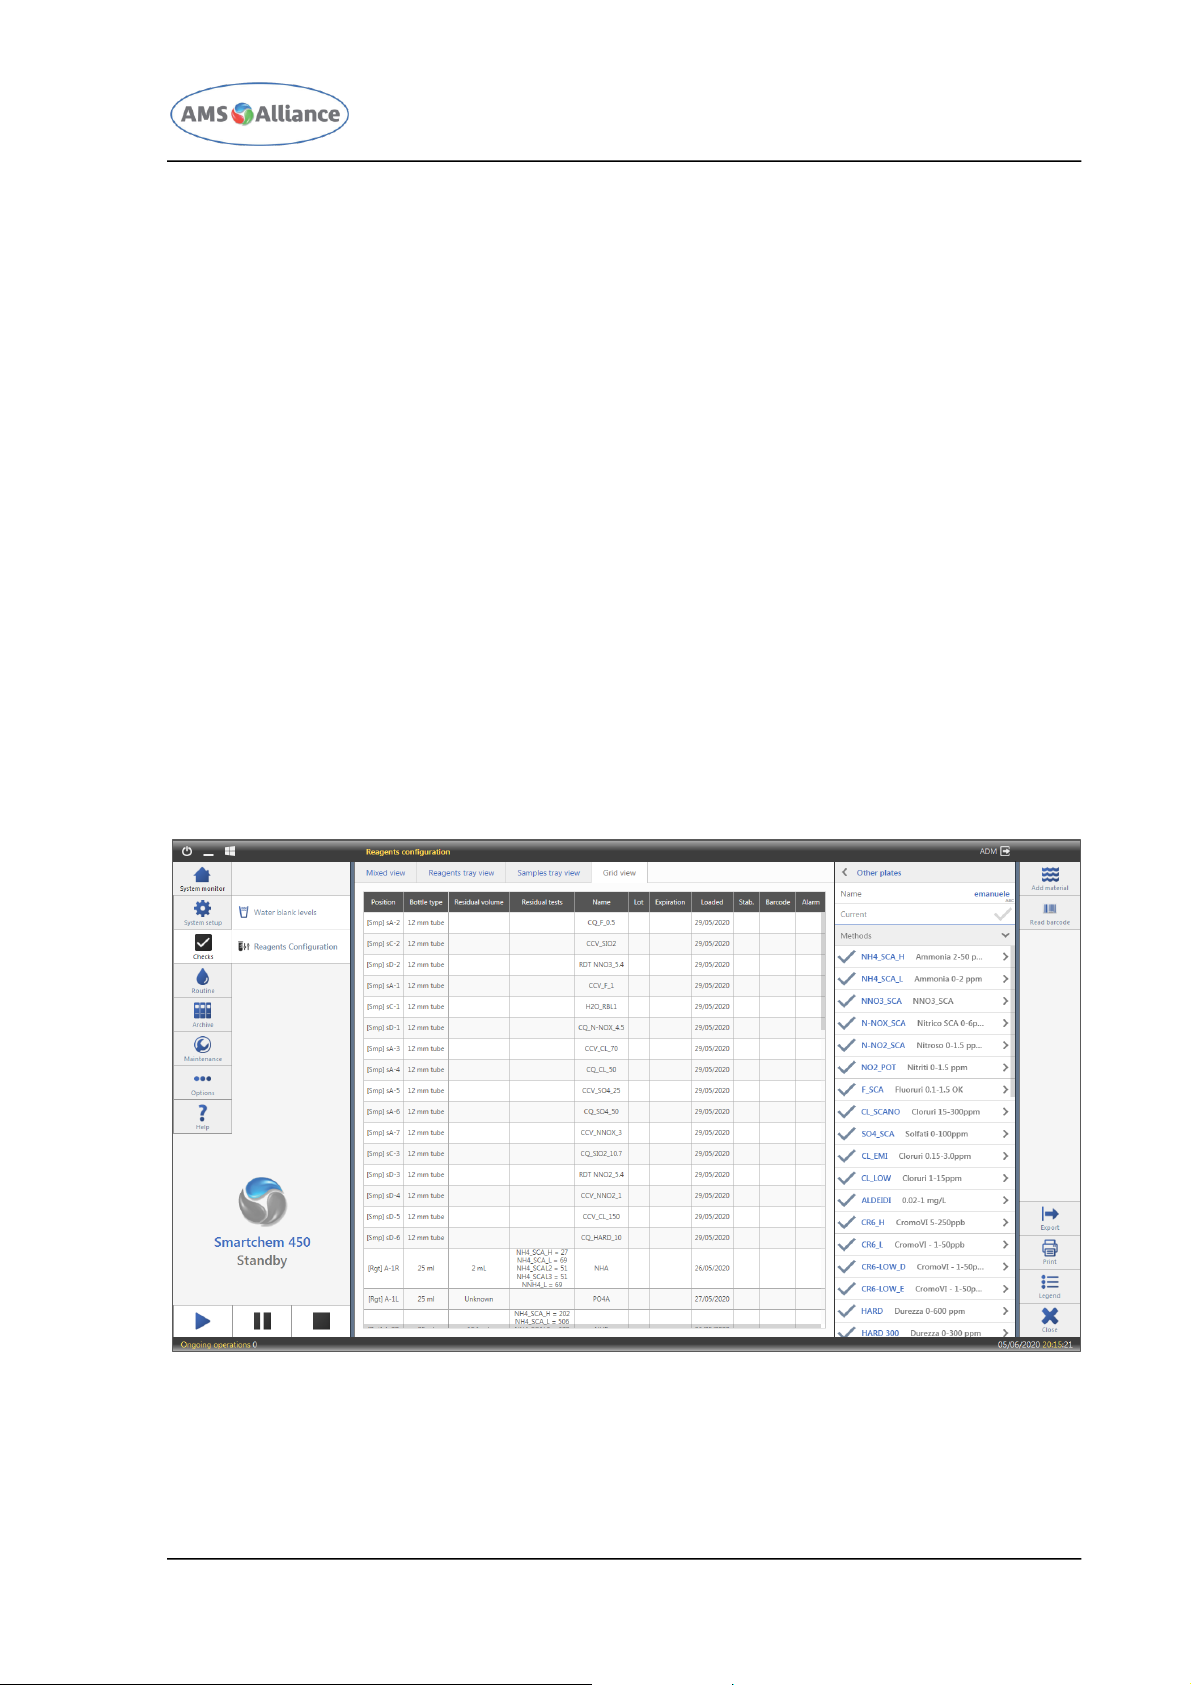
CHAPTER 03 – SOFTWARE DESCRIPTION
SMARTCHEM 450 USER MANUAL REV.01 JUNE 2020 PAGE 82 OF 143
With reference to this mask, following actions are available:
ADD MATERIAL – this action allows to add any liquid independently by the specific
method; in particular it is important in order to add the special liquids (Acid and/or
Basic) to be used for the implementation of the probe wash rules; please note that
this action can be used also for placing the H2O_RBL liquid (in order to perform
automatically the RBL, if requested, once the instrument passed to use a new reagent
bottle);
SAVE – after the creation or a modification of a reagents configuration, this action is
mandatory in order to save the new parameters;
DISCARD CHANGES – after the creation or a modification of a reagents configuration,
allows the user to return in the state of the last save;
CLOSE – allows the user to close this mask;
PRINT – allows the user to print the table displayed in the grid view tab; following a
tap over this action will be displayed a dedicated mask in order to choose the printer;
EXPORT – allows the user to export the table displayed in the grid view tab.
3.3.2.2 GRID VIEW
This tab provides a table view of the liquids that are present in the selected reagents
configuration. A small image at the left of the Grid view text, will inform the user if at
least one reagent or control positioned from this page is almost expired/unstable (1 day
to the expiration/stability date) or expired/unstable.
This tab is divided in two areas:
The right one shows information related to the reagents configuration(s); for a
description of this area, please refer to the previous section
Page 97

CHAPTER 03 – SOFTWARE DESCRIPTION
SMARTCHEM 450 USER MANUAL REV.01 JUNE 2020 PAGE 83 OF 143
The main area (left one) shows, in a table format, the information related to
positioned liquids in the reagents plate and the samples plates of the selected
configuration.
Following information are displayed:
POSITION – it displays the position of each liquid;
BOTTLE TYPE – it displays the bottle type of the liquid (5 ml, 25 ml, 5 ml);
RESIDUAL VOLUME – it displays, if known by the instrument, the residual volume
present in the bottle of the liquid;
RESIDUAL TESTS – it displays the number of residual tests for each method that
used the specific reagent, based on the residual volume present in the bottle of the
liquid;
NAME – it displays the name of the liquid;
LOT – it displays the lot number of the liquid;
EXPIRATION – it displays the expiration date of the liquid;
LOADED ON – it displays the loading date of the bottle of the liquid;
STABILITY DAYS – it displays the residual number of stability days of the liquid;
BARCODE – it displays the barcode of the bottle, if read;
ALARM – it displays any alarm of the bottle if present (Low, Empty, …).
With reference to this mask, following actions are available:
SAVE – after the creation or a modification of a reagents configuration, this action is
mandatory in order to save the new parameters;
DISCARD CHANGES – after the creation or a modification of a reagents configuration,
allows the user to return in the state of the last save;
CLOSE – allows the user to close this mask;
PRINT – allows the user to print the table displayed in the grid view tab; following a
tap over this action will be displayed a dedicated mask in order to choose the printer;
EXPORT – allows the user to export the table displayed in the grid view tab.
Page 98

CHAPTER 03 – SOFTWARE DESCRIPTION
SMARTCHEM 450 USER MANUAL REV.01 JUNE 2020 PAGE 84 OF 143
3.3.2.3 READ BARCODE ACTION
In the stand-by state and with the current configuration, the read barcode action is
available from any tab of this mask.
Tapping the Barcode action, the software will allow to select the different rack(s) to be
read; every rack can be read with the barcode reader.
As soon as the user has confirmed the rack(s) to be read, the barcode reader starts to
read the different reagent bottles positioned in the selected rack(s).
At the end of the barcode reading operation, if any position has some reading problem, a
mask will appear to the user; thanks to this mask, the user can choose among the
following options:
READ AGAIN – the barcode reader will try to perform a new reading in the requested
position;
TYPE MANUALLY – the software will prompt the user with a text box allowing him to
manually type the barcode of the reagent bottle.
Once the barcode reading procedure has been completed, the software will automatically
check all the methods that can be executed with the on board reagents/diluents.
Please note that the methods will be considered on board if and only if all the
reagents/diluent have been loaded either manually or thanks to the barcode reading.
3.4 ROUTINE
3.4.1 CALIBRATION & QC OPERATIONS
The Calibration & Quality Control setup mask allows the user to define the calibration and
the controls activities to be done; the user could define which methods, positioned in the
active configuration, will need of the calibration process as well as the user could define
which controls have to be executed for those methods that are positioned in the active
configuration.
This mask can be accessed using the first level menu ROUTINE and the second level
menu CALIBRATION & QC SETUP.
Tapping this menu, the following mask will appear.
Page 99
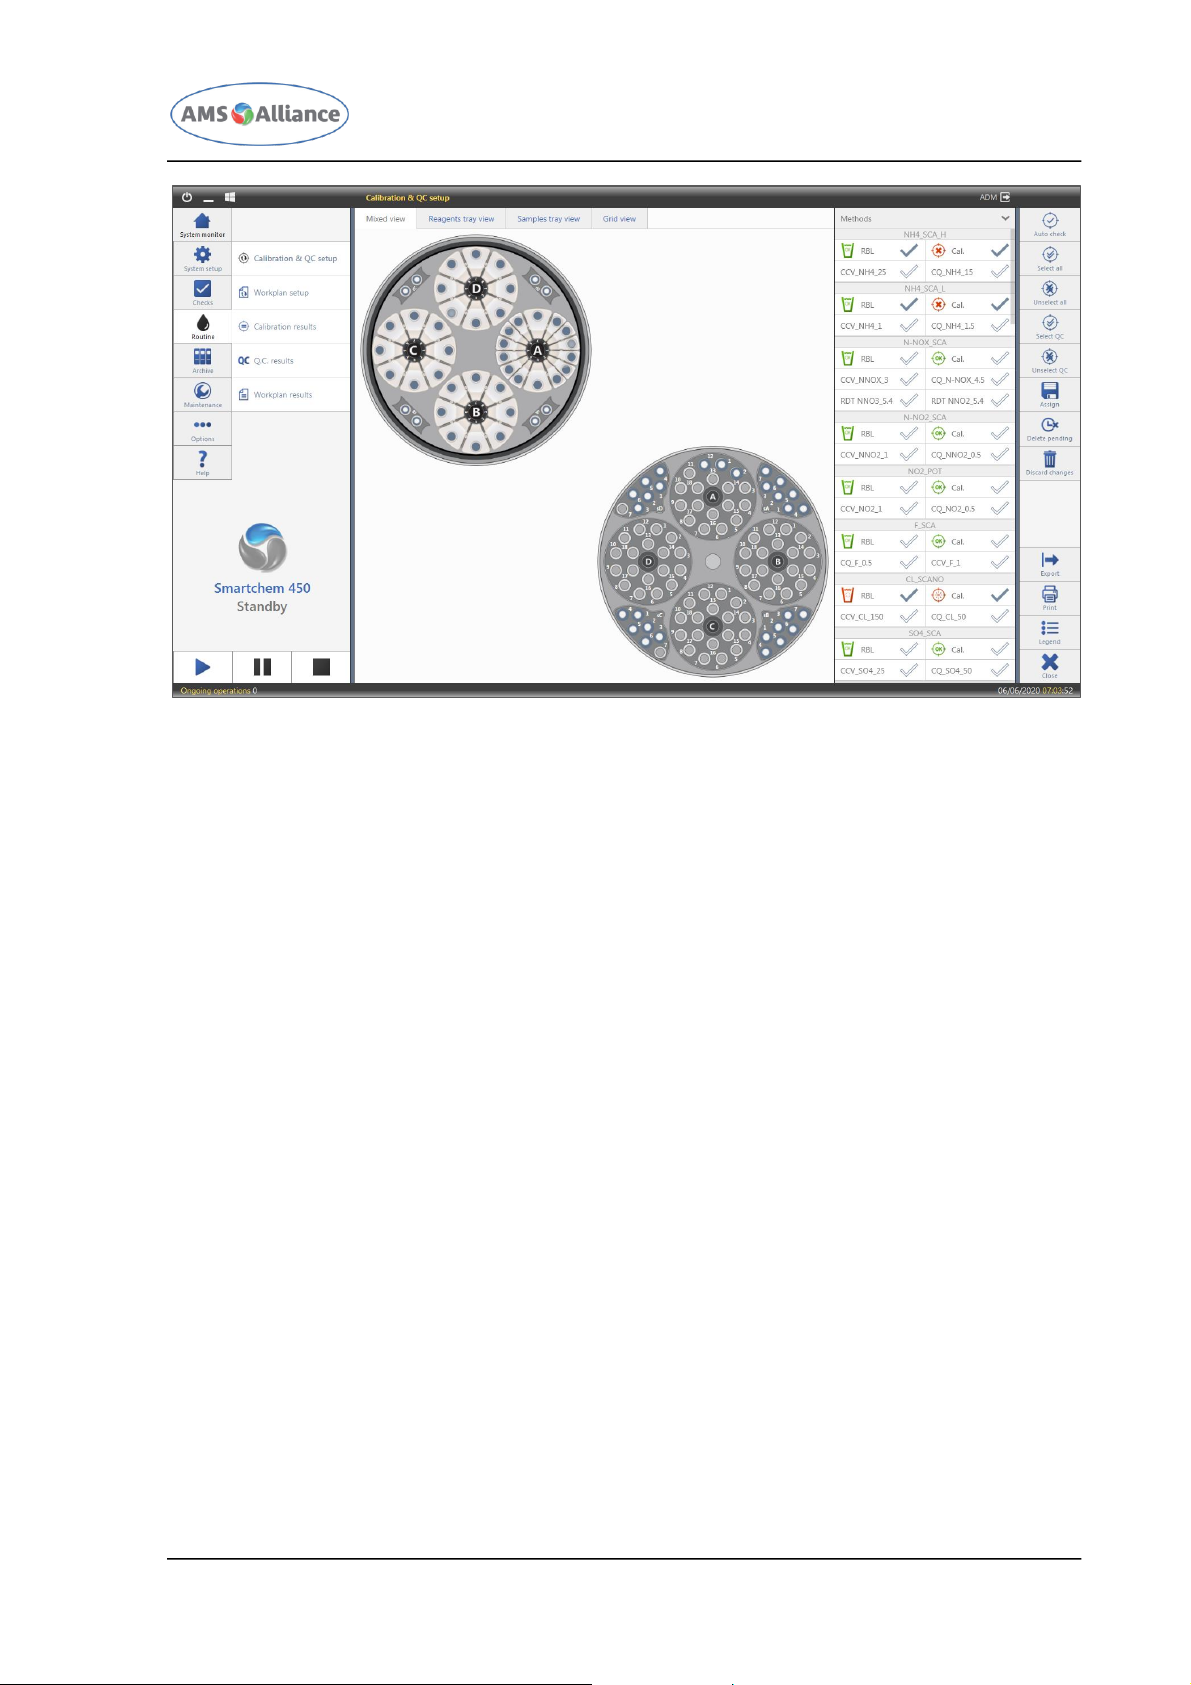
CHAPTER 03 – SOFTWARE DESCRIPTION
SMARTCHEM 450 USER MANUAL REV.01 JUNE 2020 PAGE 85 OF 143
This mask is divided in different tabs:
MIXED VIEW – it provides a graphical representation of the Reagents Plate and of the
Samples Plate;
REAGENTS PLATE VIEW – it provides a graphical representation of the Reagents Plate
(the reagents plate in this case is greater than the one present in the mixed tab) and
the actions related to the Reagents Plate are exactly equal to those that the user can
do from the Mixed View; for this reason it will not be further explained in this
document;
SAMPLES PLATE VIEW – it provides a graphical representation of the Samples Plate (the
samples plate in this case is greater than the one present in the mixed tab) and the
actions related to the Samples Plate are exactly equal to those that the user can do
from the Mixed View; for this reason it will not be further explained in this document;
GRID VIEW – it provides a table representation of the positioned liquids of the selected
plate configuration.
3.4.1.1 MIXED VIEW
This tab allows to define the calibration operation that the user wants to set.
This tab is divided in two areas:
The right one reports the list of methods that are present in the Current Reagents
configuration; for each method the user can ask for the RBL execution and/or for the
calibration execution and/or for the execution of any control associated to each
method; furthermore, for each method it is graphically displayed the status of the RBL
and of the calibration (Missing, Almost expired [the day before the expiration],
Expired, Failed, Reagent changed, Validated, Bad, Good).
Page 100

CHAPTER 03 – SOFTWARE DESCRIPTION
SMARTCHEM 450 USER MANUAL REV.01 JUNE 2020 PAGE 86 OF 143
Requesting for the calibration operation, automatically will set the RBL operation if
defined for the specific method.
The request of the RBL implies the automatic positioning on the sample plates or on
the peripheral positions of the reagents tray of the liquid for RBL associated to the
specific method.
The request of the calibration involves the automatic positioning on the sample plate
or on the peripheral positions of the reagents tray of the calibration points associated
to the specific method; if the method uses a stock standard, it will be positioned also
the diluent of the standard in the reagent plate.
The request of the single control implies the automatic positioning on the sample
plates or on the peripheral positions of the reagents tray of the selected control
associated to the specific method.
Finally, in this area, the software shows any operation still pending/scheduled/running
(the operation is dashed).
The main area (left one) shows the reagents plate and the samples plates and the
positioned liquids needed for the requested calibration operations. Calibrators and
controls will be shown in yellow if almost expired (1 day to the expiration date) or in
red if expired.
Tapping any reagent or diluent following information will be displayed in the right
area:
NAME – it displays the name of the selected liquid;
LOT – it displays the lot number of the selected liquid;
EXPIRATION – it displays the expiration date of the selected liquid;
POSITION – it displays the position of the selected liquid;
BOTTLE TYPE – it displays the bottle type of the selected liquid (5 ml, 25 ml, 50 ml);
RESIDUAL VOLUME – it displays, if known by the instrument, the residual volume
present in the bottle of the selected liquid;
LOADED ON – it displays the loading date of the bottle of the selected liquid;
METHODS LIST – list of the methods that use the selected liquid.
Tapping any liquid for RBL or any standard or any control following information will be
displayed in the right area:
NAME – it displays the name of the selected liquid;
LOT – it displays the lot number of the selected liquid; tapping it, the user can
change the lot number directly from here;
EXPIRATION – it displays the expiration date of the selected liquid; tapping it, the
user can change the lot number directly from here;
POSITION – it displays the position of the selected liquid.
 Loading...