


u n w i r i n g o u r w o r l d T M
airClient™ Nexus PRO TOTAL sB3412
User Guide
Version 1.0
Copyright © smartBridges Pte Ltd. All Rights Reserved.

i n t e l l i g e n t |
w i r e l e s s |
p l a t f o r m |
|
|
|
TABLE OF CONTENTS
About This Document .................................................................................................................. |
4 |
|||||
|
Technical Support Center ..................................................................................................... |
5 |
||||
1. |
Introduction ........................................................................................................................... |
6 |
||||
|
SYSTEM REQUIREMENTS......................................................................................................... |
6 |
||||
|
1.1.............................................................................................................................................. |
|
|
|
6 |
|
|
1.2. |
CHECKLISTS ................................................................................................................... |
7 |
|||
2. |
aCNPT Configuration .......................................................................................................... |
11 |
||||
|
USER LOGIN AND LICENSE AGREEMENT ................................................................................ |
11 |
||||
|
2.1............................................................................................................................................ |
|
|
|
11 |
|
|
2.2. |
WEB GUI ADMINISTRATOR PASSWORD CHANGE ............................................................ |
13 |
|||
|
2.3. |
USING THE CONFIGURATION PAGES .............................................................................. |
14 |
|||
|
2.4. |
DEVICE MODE CONFIGURATION..................................................................................... |
18 |
|||
|
2.5. |
ACNPT ROUTER/NAT TO ACNPT BRIDGE..................................................................... |
19 |
|||
|
2.6. |
ACNPT BRIDGE TO ACNPT ROUTER/NAT..................................................................... |
20 |
|||
|
2.7. |
ACNPT BRIDGE CONFIGURATION .................................................................................. |
21 |
|||
|
2.7.1. |
Ethernet Configuration ........................................................................................ |
21 |
|||
|
2.7.2. |
Wireless Configuration ........................................................................................ |
22 |
|||
|
2.7.3. |
Bridge Configuration............................................................................................ |
24 |
|||
|
2.7.4. |
Configuring Spanning Tree Protocol (STP) ......................................................... |
24 |
|||
|
2.7.5. |
STP Settings Configuration ................................................................................. |
25 |
|||
|
2.8. |
ACNPT ROUTER/NAT CONFIGURATION......................................................................... |
28 |
|||
|
2.8.1. |
Ethernet Configuration ........................................................................................ |
28 |
|||
|
2.8.2. |
Wireless Configuration ........................................................................................ |
29 |
|||
|
2.8.3. |
DHCP Configurations .......................................................................................... |
31 |
|||
|
2.8.4. |
DHCP Relay Configurations ................................................................................ |
33 |
|||
|
2.8.5. |
Routing Table ...................................................................................................... |
34 |
|||
|
2.8.6. |
Wireless Settings Management........................................................................... |
35 |
|||
|
2.8.7. |
Wireless Settings................................................................................................. |
36 |
|||
|
2.8.8. |
Security ............................................................................................................... |
37 |
|||
3. Performance Parameters and Bandwidth Controller........................................................... |
42 |
|||||
|
3.1. |
LINK PERFORMANCE PARAMETERS AND FEATURES........................................................ |
42 |
|||
|
3.2. |
BANDWIDTH CONTROLLER............................................................................................. |
44 |
|||
4. Quality of Service (QoS) ..................................................................................................... |
46 |
|||||
5. Site Survey Tool...................................................................................................................... |
54 |
|||||
6. Antenna Alignment.................................................................................................................. |
55 |
|||||
7. Traffic Statistics....................................................................................................................... |
57 |
|||||
8. Tools ....................................................................................................................................... |
|
|
|
60 |
||
|
8.1 |
SYSTEM CONFIGURATION.............................................................................................. |
60 |
|||
|
8.1.1 |
SNMP Security .................................................................................................... |
62 |
|||
|
8.1.2 |
Reset Options...................................................................................................... |
63 |
|||
airClient™ Nexus PRO TOTAL User Guide |
|
|||||
Page 2 of 78 |
||||||
|
|
|
|
|
||

i n t e l l i g e n t |
w i r e l e s s |
p l a t f o r m |
|
|
|
8.1.3 |
NTP Time Server Setup ...................................................................................... |
64 |
|
8.2 |
PROFILE MANAGER ....................................................................................................... |
64 |
|
8.2.1 |
Save Profile ......................................................................................................... |
66 |
|
8.2.2 |
Load Operating Profile ........................................................................................ |
66 |
|
8.2.3 |
Profile Calendar................................................................................................... |
66 |
|
8.3 |
LINK TEST..................................................................................................................... |
67 |
|
8.4 |
LINK BUDGET PLANNING................................................................................................ |
69 |
|
9. Firmware Upgrade .................................................................................................................. |
72 |
||
Appendix A – SNMP Trap........................................................................................................... |
74 |
||
Appendix B – Useful terms and definitions ................................................................................. |
75 |
||
Appendix C – License ................................................................................................................. |
78 |
||
airClient™ Nexus PRO TOTAL User Guide |
Page 3 of 78 |
|

i n t e l l i g e n t |
w i r e l e s s |
p l a t f o r m |
|
|
|
About This Document
This User Guide is for the networking professional who configures and manages the smartBridges’ Intelligent Nexus Platform of wireless client device, the airClient™ Nexus PRO TOTAL (sB3412).
It provides detailed information on using the web-based configuration GUI to configure the airClient Nexus PRO TOTAL unit, hereafter shortened to aCNPT. This manual will help you gain a better understanding of how the various components work.
To configure smartBridges’ products, you need to have fundamental understanding of the concepts and technology of Local Area Networks (LAN) and wireless networking. The system installer will require expertise in the following areas:
∙Outdoor radio equipment installation
∙Network configuration
∙Use of web browser for system configuration, monitoring and fault finding
In this chapter, you will find an overview of the User Guide and where to obtain additional information regarding installation and set-up.
Overview of User Guide
The checklists for pre-and postinstallation are provided in Chapter 1. Chapter 2 shows the three modes that the airClient Nexus PRO TOTAL can work in: Bridge, Router and NAT and the procedures for configuring the various parameters in each mode.
Chapter 3 gives instructions for editing the wireless radio protocol parameters to optimize radio performance and changing the Bandwidth Controller. The Quality of Service (QoS) features are explained in Chapter 4.
Accessing the Site Survey page is shown in Chapter 5 and the antenna alignment process is outlined in Chapter 6. Wireless and Ethernet Traffic Statistics and the explanations is given in Chapter 7. Finally, the firmware upgrade process for aCNPT Nexus is explained in Chapter 9.
Related Publications
These documents provide complete information about the Nexus series of radio units: airHaul™, airPoint™ and airClient™.
∙Quick Install Guide (QIG)
∙Release Notes
∙Technical Specification
For the latest information on smartBridges products, please visit our website at
http://www.smartbridges.com/
airClient™ Nexus PRO TOTAL User Guide |
Page 4 of 78 |
|

i n t e l l i g e n t |
w i r e l e s s |
p l a t f o r m |
|
|
|
Technical Support Center
Comprehensive technical support by dedicated smartBridges engineers is available to all customers through the smartBridges support center website. The website provides updated tools and documents to help troubleshoot and resolve technical issues related to smartBridges products and technologies. To access the technical support resources, please visit the support center website at http://www.smartbridges.com/support/
You will need to register for certain services and downloads on the smartBridges support center website.
airClient™ Nexus PRO TOTAL User Guide |
Page 5 of 78 |
|

i n t e l l i g e n t |
w i r e l e s s |
p l a t f o r m |
|
|
|
1. Introduction
This User Guide provides information on how to set-up and deploy the airClient Nexus PRO TOTAL unit. A web-based management tool is provided to assist the user to configure the aCNPT.
The aCNPT web-based management tool provides the user with the following features:
1.System configuration
2.Device operational mode configuration
3.Ethernet and wireless IP configurations
4.Radio (SSID, domain, channel, etc) parameter configuration
5.Network bridge (STP, etc) parameter configuration
6.Bandwidth management
7.Security
8.QoS
9.Antenna alignment
10.Traffic Statistics
11.Site Survey
12.Profile management
13.User management
14.Link Test
15.Link Budget Planning Calculator
16.Firmware Upgrade
1.1. System Requirements
The following are the minimum system requirements for the aCNPT web-based configuration management tool:
1.Operating System: either Windows 98/2000/XP/NT or Linux
2.Connection to the internet for downloading the latest firmware and Sun JRE
3.Web browser: either Internet Explorer 5.0 and higher, Netscape 7.2 and higher, Mozilla 1.7 and higher or Mozilla Firefox 0.8 and higher
4.SUN JRE: v1.5 and above. You may download it from http://java.sun.com/j2se/1.5.0/download.jsp
airClient™ Nexus PRO TOTAL User Guide |
Page 6 of 78 |
|

i n t e l l i g e n t |
w i r e l e s s |
p l a t f o r m |
|
|
|
1.2. Checklists
Pre-Installation Checklist for airClient Nexus PRO TOTAL
Organization Name/Site Name
Address
City
State
Zip Code
Telephone Number
Site Survey and Link Planning
|
|
No |
|
|
Parameters |
|
|
Units |
|
|
Site A |
|
|
Site B |
|
|
|
|
|
|
|
|
|
|
|
|
|
|
|||||
|
1 |
|
|
Regulatory Standard to be followed |
|
For example, FCC, ETSI, |
|
|
|
|
|
|
|
|||
|
|
|
|
|
|
|
|
etc |
|
|
|
|
|
|
|
|
|
2 |
|
|
Frequency Band |
|
2.4GHz |
|
|
|
|
|
|
|
|||
|
|
|
|
|
|
|
5.25-5.35 |
|
|
|
|
|
|
|
|
|
|
|
|
|
|
|
|
5.47-5.725 |
|
|
|
|
|
|
|
|
|
|
|
|
|
|
|
|
5.725-5.805 |
|
|
|
|
|
|
|
|
|
|
3 |
|
|
Maximum Output Power as per the |
|
100mW/1W/4W |
|
|
|
|
|
|
|
|||
|
|
|
|
|
Regulatory Authority |
|
|
|
|
|
|
|
|
|
|
|
|
|
|
|
|
|
|
|
|
|
|
|
|
|
|||
|
4 |
|
|
Latitude |
|
Deg Min Sec |
|
|
|
|
|
|
|
|||
|
5 |
|
|
Longitude |
|
Deg Min Sec |
|
|
|
|
|
|
|
|||
|
6 |
|
|
UPS Installed |
|
Yes/No |
|
|
|
|
|
|
|
|||
|
7 |
|
|
UPS specification if any |
|
KVA |
|
|
|
|
|
|
|
|||
|
8 |
|
|
Line Voltage |
|
90V-264V AC,50-60 Hz |
|
|
|
|
|
|
|
|||
|
9 |
|
|
Near Line of site between sites |
|
Yes/No |
|
|
|
|
|
|
|
|||
|
10 |
|
|
Height of tower |
|
Feet/Meters |
|
|
|
|
|
|
|
|||
|
11 |
|
|
Repeater required to achieve a link |
|
Yes/No |
|
|
|
|
|
|
|
|||
|
12 |
|
|
If Repeater required, then reason why |
|
For example, to achieve |
|
|
|
|
|
|
|
|||
|
|
|
|
|
|
|
|
long distance/LOS etc |
|
|
|
|
|
|
|
|
|
13 |
|
|
No. of repeaters required |
|
No |
|
|
|
|
|
|
|
|||
|
14 |
|
|
Required Throughput |
|
Mbps |
|
|
|
|
|
|
|
|||
|
15 |
|
|
Gain of antenna |
|
dBi |
|
|
|
|
|
|
|
|||
|
|
|
|
|
|
|
|
(Internal antenna dBi is 15 |
|
|
|
|
|
|
|
|
|
|
|
|
|
|
|
|
for 802.11b/g and 17 for |
|
|
|
|
|
|
|
|
|
|
|
|
|
|
|
|
802.11a) |
|
|
|
|
|
|
|
|
|
16 |
|
|
Antenna Polarization |
|
Horizontal/Vertical |
|
|
|
|
|
|
|
|||
|
17 |
|
|
Distance between sites |
|
Miles/km |
|
|
|
|
|
|
|
|||
|
18 |
|
|
Antenna Type (if using external antenna) |
|
Parabolic/sector |
|
|
|
|
|
|
|
|||
|
19 |
|
|
Antenna Mfg. (if using external antenna) |
|
smartBridges/Name of |
|
|
|
|
|
|
|
|||
|
|
|
|
|
|
|
|
other manufacturer |
|
|
|
|
|
|
|
|
|
20 |
|
|
Beam width of antenna (if using external |
|
Horizontal – deg |
|
|
|
|
|
|
|
|||
|
|
|
|
|
antenna) |
|
|
|
|
|
|
|
|
|
|
|
|
|
|
|
|
|
|
|
Vertical – deg |
|
|
|
|
|
|
|
|
airClient™ Nexus PRO TOTAL User Guide |
Page 7 of 78 |
|

i n t e l l i g e n t |
w i r e l e s s |
p l a t f o r m |
|
|
|
No |
Parameters |
Units |
Site A |
Site B |
21 |
Type of external cable type |
LMR 400/LMR600/ |
|
|
22 |
Length of external cable connecting a |
Feet/meters |
|
|
|
Radio and antenna |
|
|
|
23 |
Fade Margin taken into account for a link |
Ideally between 10 to 20 |
|
|
|
budgeting |
dBm |
|
|
24 |
Model of smartBridges aCNPT equipment |
sB3412 |
|
|
|
selected for a link. Please refer to note |
|
|
|
|
below for selecting the right equipment |
|
|
|
|
|
|
|
|
25 |
GroundingEarth to Neutral Voltage |
Ideally less than 2 Volts |
|
|
26 |
Length of the Ethernet cable required for |
Feet/meters |
|
|
|
powering a unit |
|
|
|
27 |
Choose a best channel which can be used |
Specify channel number |
|
|
|
on the basis of site survey with a help of |
|
|
|
|
scanning tools like Netstumbler |
|
|
|
Pre Installation Lab Testing of Equipment
No |
Parameters |
Units |
Site A |
Site B |
1 |
Network diagram along with IP address of |
Yes/No |
|
all the interfaces for link to be setup in |
|
|
place |
|
2 |
Availability of Quick Installation Guide |
Yes/No |
3 |
Availability of User Guide and CD |
Yes/No |
4 |
Ensure that all items listed in the "Package |
Yes/No |
|
Contents" of Quick Installation Guide are |
|
|
included in the shipment |
|
5 |
Availability of Installation Kit |
Yes/No |
6 |
Radio MAC address of Access Point |
Yes/No |
7 |
Configured for pre installation testing |
Yes/No |
8 |
Ping response |
Ms |
9 |
Ping Success Rate |
Percentage % |
10 |
Throughput test (Upload/Download) |
Varies depending on the |
|
|
Bandwidth Control, signal |
|
|
strength, link quality and |
|
|
distance |
|
|
|
Signature of Engineer:
Name:
Email:
Date:
airClient™ Nexus PRO TOTAL User Guide |
Page 8 of 78 |
|

i n t e l l i g e n t |
w i r e l e s s |
p l a t f o r m |
|
|
|
Post-Installation Checklist for aCNPT
Organization Name/Site Name
Address
City
State
Zip Code
Telephone Number
General Configuration Information
No |
|
Parameters |
|
Units |
Site A |
Site B |
1 |
|
Radio operations Mode |
|
Bridge/Router/NAT |
|
|
2 |
|
SSID of a Radio |
|
Up to 32 characters |
|
|
3 |
|
IP address of Ethernet Port |
|
32-bit numeric address |
|
|
4 |
|
IP address of Wireless Port |
|
32-bit numeric address |
|
|
5 |
|
Noise Floor |
|
dBm |
|
|
6 |
|
RSSI |
|
dBm |
|
|
7 |
|
Channel selected for Link |
|
|
|
|
8 |
|
Radio TX Output Power |
|
(-5 to +23 dBm) |
|
|
9 |
|
Model of smartBridges aCNPT equipment |
|
SB3412 |
|
|
|
|
selected for a link. |
|
|
|
|
10 |
|
Antenna Gain |
|
dBi |
|
|
|
|
|
|
(Internal antenna dBi is 15 |
|
|
|
|
|
|
for 802.11b/g and 17 for |
|
|
|
|
|
|
802.11a) |
|
|
11 |
|
Antenna Polarization |
|
Horizontal/Vertical |
|
|
12 |
|
Antenna Type (if using external antenna) |
|
Parabolic/sector |
|
|
13 |
|
Antenna Mfg. (if using external antenna) |
|
smartBridges/Name of |
|
|
|
|
|
|
other manufacturer |
|
|
14 |
|
Beam width of antenna (if using external |
|
Horizontal – deg |
|
|
|
|
antenna) |
|
|
|
|
|
|
|
|
Vertical – deg |
|
|
airClient™ Nexus PRO TOTAL User Guide |
Page 9 of 78 |
|

i n t e l l i g e n t |
w i r e l e s s |
p l a t f o r m |
|
|
|
Checklist
No |
Parameters |
Units |
Site A |
Site B |
1 |
Check the crimping of the Ethernet cable |
Yes/No |
|
|
|
at both the ends |
|
|
|
|
|
|
|
|
2 |
Check the proper grounding of the |
Yes/No |
|
|
|
equipment |
|
|
|
|
|
|
|
|
3 |
Ensure that there are no extreme bends or |
Yes/No |
|
|
|
kink's in the cable |
|
|
|
4 |
Ensure that the Ethernet cable is not |
Yes/No |
|
|
|
running near a sharp edge |
|
|
|
5 |
Ensure that the aCNPT along with antenna |
Yes/No |
|
|
|
is fixed properly on a tower with the help of |
|
|
|
|
nuts and bolt supplied in packaging |
|
|
|
6 |
Ensure that the device/ external antenna is |
Yes/No |
|
|
|
pointed to get the best RSSI and link |
|
|
|
|
quality |
|
|
|
7 |
Ping response |
Ms |
|
|
8 |
Ping success rate |
Percentage |
|
|
9 |
Throughput test (Upload/Download) |
Mbps |
|
|
10 |
Link stability based on observation for 1 Hr |
Yes/No |
|
|
Signature of Engineer:
Name:
Email:
Installation Date:
Commissioned Date:
For the latest information on smartBridges products, please visit our website at: http://www.smartbridges.com/
airClient™ Nexus PRO TOTAL User Guide |
Page 10 of 78 |
|
i n t e l l i g e n t |
w i r e l e s s |
p l a t f o r m |
|
|
|
2. aCNPT Configuration
The airClient Nexus PRO TOTAL can work in one of three modes: Bridge, Router and NAT. The procedures for configuring the various parameters in each mode are outlined in this chapter.
2.1. User Login and License Agreement
The aCNPT unit comes with a pre-configured default Ethernet (wired-side) IP address: 192.168.0.210 and subnet mask: 255.255.255.0. This default device IP address should be used when accessing the device configuration management interface for the first time using a web-browser (Enter http://192.168.0.210 for the URL address). In addition, the Sun Java Plug-in should be installed. The PC must be on the same subnet as the aCNPT.
Follow the steps below to login as an Administrator to the web-based configuration management interface system:
1.Connect the aCNPT using the Power over Ethernet (PoE) to a PC or network via the ETH A or ETH B port. (Please refer to the Quick Install Guide for more information on connections).
2.Open a web browser on the PC and enter the device IP address 192.168.0.210 in the web browser address field and press the Enter key.
3.A user login box will appear. Enter the ’User name’ and ’Password’ and check the ’Remember my password’ checkbox if you want the system to remember the password. The default user name is Administrator and the password is smartBridges (case sensitive).
Figure 2-1 Administrator Login
4.Click the ’OK’ button. A license agreement page will appear as shown in Fig 2-2 below.
5.Click ‘Accept’. The aCNPT ’Nexus Summary Information’ page (Fig 2-3) will appear.
airClient™ Nexus PRO TOTAL User Guide |
Page 11 of 78 |
|

i n t e l l i g e n t |
w i r e l e s s |
p l a t f o r m |
|
|
|
Figure 2-2 License Agreement Page
Figure 2-3 aCNPT Summary Information Page
airClient™ Nexus PRO TOTAL User Guide |
Page 12 of 78 |
|

i n t e l l i g e n t |
w i r e l e s s |
p l a t f o r m |
|
|
|
The page information descriptions are provided in the table below:
Table 2-1 Description of Parameters
|
Page Item |
|
|
Descriptions |
|
|
IP Address |
Editable Ethernet IP Address. |
|
|
Ethernet |
IP Mask |
|
Editable Ethernet IP subnet Mask |
|
Gateway |
|
Editable Gateway IP address. |
|
|
Configuration |
DHCP |
|
Editable DHCP status Disabled / Enabled |
|
|
|
|
User can enable DHCP by ticking the check box to obtain |
|
|
|
|
an IP address from the network DHCP server |
|
Wireless |
SSID |
|
Device SSID. |
|
Channel |
|
Device operation channel. |
|
|
Configuration |
RSSI |
|
RSSI value when associated |
|
|
Maximum |
Wireless |
Maximum Wireless Throughput in kbps |
|
|
Throughput |
|
|
|
|
ETH A MAC Address |
Ethernet A (wired side) MAC address. |
|
|
Port |
|
|
Display only |
|
ETH B MAC Address |
Ethernet B (wired side) MAC address. |
||
|
Information |
|
|
Display only |
|
|
Radio MAC Address |
Radio MAC address. |
|
|
|
|
|
Display only |
|
Operational |
Device |
operational |
Current device operational mode, either as Bridge, Router, |
|
Mode |
mode |
|
NAT |
2.2. Web GUI Administrator Password Change
By default the administrator password is smartBridges (case sensitive).
Follow the steps below to change the Administrator password:
1.Click on the Tools | User Manager drop down menu in the navigation menu bar. An
Administrator Password Change GUI will appear.
2.Enter the fields for Old Password, new Authentication Password and Confirm new Authentication Password.
3.Click on the Apply Changes button to change the password.
Figure 2-4 Administrator Password Change
airClient™ Nexus PRO TOTAL User Guide |
Page 13 of 78 |
|

i n t e l l i g e n t |
w i r e l e s s |
p l a t f o r m |
|
|
|
2.3. Using the Configuration Pages
The aCNPT Nexus configuration system comprises several pages for configuring each parameter. A common navigation menu bar is provided at the top of each page for easy navigation as shown in the figure below.
Figure 2-5 Navigation Menu Bar showing editable boxes for parameters
System configuration information is displayed as read-only in each page. As shown in the ’Summary Information’ page in the above figure, ’Ethernet Configuration’, ’Wireless Configuration’ and ‘Port Information’ parameters are displayed as read only.
Clicking on the UNDERLINED parameter heading allows you to edit the configuration parameters. To change the ’Ethernet Configuration’ parameters, click on the ’Ethernet Configuration’ link. Similarly, clicking on the ‘Wireless Configuration’ link, the ‘Radio Configuration page’ will be displayed to edit any wireless settings. The figure below shows the ’Ethernet Configuration’ parameters in editable boxes.
To save the changes to the system, click on the ’Apply Changes’ button.
Note: Clicking the web browser's Back button returns to the previous screen without saving any changes. Changes are saved only when the user clicks the ’Apply Changes’ button
The Navigation menu bar contains menu items that allow user to go to different configuration pages. The following table summarizes functionalities available for the menu item links.
|
|
Table 2-2 Description of Menus |
|
|
|
|
|||
|
|
|
|
|
|
|
|
||
|
Menu Item |
Menu Sub-items |
Description |
|
|
|
|
||
|
Home |
Summary Information |
Displays |
summary |
page |
with |
|
||
|
|
|
information such as Ethernet and |
|
|||||
|
|
|
Wireless IP settings. |
|
|
|
|||
|
|
|
Allows user to set the IP settings for |
|
|||||
|
|
|
Ethernet (wired side) and Wireless |
|
|||||
|
|
|
interfaces depending on the device |
|
|||||
|
|
|
operational mode. |
|
|
|
|||
airClient™ Nexus PRO TOTAL User Guide |
|
|
|
|
|
|
|
||
|
|
|
|
Page 14 of 78 |
|||||
|
|
|
|
|
|
|
|||

i n t e l l i g e n t |
w i r e l e s s |
p l a t f o r m |
|
|
|
Menu Item |
Menu Sub-items |
Description |
|
|
|
|
Networking |
Bridge Configuration |
Displays the bridge address, generic |
||||
|
|
bridge port table, spanning tree port |
||||
|
|
table for ports ETH A, ETH B, Radio A., |
||||
|
|
etc |
|
|
|
|
|
|
Bridge configuration option is available |
||||
|
|
when aCNPT is configured in aCNPT |
||||
|
|
Bridge mode. |
|
|
|
|
|
DHCP |
Configure DHCP server or Relay |
|
|||
|
|
This option is available only if aCNPT is |
||||
|
|
configured |
in |
aCNPT |
Router/NAT |
|
|
|
mode. |
|
|
|
|
|
Traffic Statistics |
Displays the Ethernet and Wireless |
||||
|
|
Traffic Statistics |
|
|
||
|
Bandwidth Controller |
Allows bi-directional bandwidth |
|
|||
|
|
management of the wireless link. |
|
|||
|
Routing Table |
Allows user to view, add and delete |
||||
|
|
static routes. |
|
|
|
|
|
|
Routing table is only available for |
||||
|
|
aCNPT Router mode. |
|
|
||
|
QoS |
The primary goal of QoS is to provide |
||||
|
|
priority such as dedicated bandwidth, |
||||
|
|
controlled jitter and latency (required by |
||||
|
|
some real-time and interactive traffic), |
||||
|
|
and improved loss characteristics. |
||||
Radio |
Main |
Wireless Settings: |
|
|
||
|
|
Allows user to set SSID, Channel, |
||||
|
|
ACL Controls and Country, as well |
||||
|
|
as Dial-a-Power. |
|
|
||
|
|
Provides a link to view association |
||||
|
|
Link Status. |
|
|
||
|
|
Performance: |
|
|
|
|
|
|
Allows user to set Fragment |
||||
|
|
Length, |
RTS/CTS Length, |
RSSI |
||
|
|
Threshold |
and |
Throughput |
||
|
|
Optimizer. |
Radio Operation mode |
|||
|
|
is set to mixed 802.11a/b/g by |
||||
|
|
default. |
|
|
|
|
|
|
Wireless Traffic Statistics: |
|
|
||
|
|
Displays |
|
the Wireless |
Traffic |
|
|
|
Statistics. |
|
|
|
|
airClient™ Nexus PRO TOTAL User Guide |
Page 15 of 78 |
|

i n t e l l i g e n t |
w i r e l e s s |
p l a t f o r m |
|
|
|
Security |
Security: |
|
|
|
|
Allows user to set the WEP Keys |
|||
|
and |
to |
choose |
between |
|
Open/Shared |
System |
modes of |
|
|
authentication. |
|
|
|
WPA-PSK:
Where encryption keys are automatically changed (called rekeying) and authenticated between devices after a specified period of time, or after a specified number of packets has been transmitted.
WPA-RADIUS:
Provides encryption via the Temporary Key Integrity Protocol (TKIP) using the RC4 algorithm. It is based on the 802.1x protocol and addresses the weaknesses of WEP.
WPA2-PSK:
Based on the 802.11i standard, WPA2 was released in 2004 and uses a stronger method of encryption
WPA2-RADIUS:
The enterprise version of WPA2 is WPA2-RADIUS which uses an external RADIUS server for authentication which uses EAP (Extended Authentication Protocol).
Note: The Default Security is None
Reset to Defaults:
Resets the device to factory default values.
Ethernet MTU Size:
Allows user to set the Ethernet
MTU size for different applications.
Syslog server IP Address:
Allows user to set the Syslog server
IP and log level.
SNMP Trap server IP Address:
Allows user to set the SNMP Trap server IP for SNMP trap forwarding.
LED Control:
Allows user to turn on/off LED .
airClient™ Nexus PRO TOTAL User Guide |
Page 16 of 78 |
|

i n t e l l i g e n t |
w i r e l e s s |
p l a t f o r m |
|
|
|
|
|
Operational mode: |
|
|
Allows the User to set the Radio |
|
|
Operational mode. |
|
Profile Manager |
Save Profile: |
|
|
Allows user to define and save up |
|
|
to three device operating profiles for |
|
|
easy device management. |
|
|
One installation profile is always |
|
|
available. |
|
|
Operating Profile: |
|
|
Allows user to load the profile from |
|
|
saved profiles and shows last |
|
|
loaded profile |
|
|
Profile Calendar: |
|
|
Allows user to plan and manage the |
|
|
use of different profiles at different |
|
|
times efficiently. |
|
Link Test |
Allows user to do a throughput test and |
|
|
ping test. These tools could be very |
|
|
helpful during the installation phase. |
|
Link Budget Planning Calculator |
Allows user to calculate the Link |
|
|
Budget. |
|
Antenna alignment |
Shows the link status, link quality, |
|
|
RSSI. |
|
Site Survey |
Shows all the wireless devices |
|
|
operating in the area. |
|
User Manager |
Allows the administrator to change the |
|
|
Administrator password. |
|
Firmware Upgrade |
Allows user to update to new firmware |
|
|
versions. |
Help |
Technical Support |
Information on Technical Support |
|
User Guide – Online |
Links to online User Guide |
|
Product Registration and Feedback |
Allows user to register product and |
|
|
provide feedback or suggestions. |
|
Check for Updates |
LInks to smartBridges website for any |
|
|
software updates. |
|
About aCNPT |
General system description, software |
|
|
version information and warranty |
|
|
information. |
airClient™ Nexus PRO TOTAL User Guide |
Page 17 of 78 |
|
i n t e l l i g e n t |
w i r e l e s s |
p l a t f o r m |
|
|
|
2.4. Device Mode Configuration
The device operational mode is displayed at the top right hand corner of each page. The Device Mode Configuration allows the user to configure the aCNPT in Bridge, Router and NAT.
NAT: This is the default operating mode. This mode allows a Local Area Network (LAN) to use one set of IP addresses for internal traffic and a single wireless IP for external traffic. It provides a type of firewall by hiding internal IP addresses and allows sharing by many computers behind the aCNPT. Since these are done in the LAN there is no possibility of conflict with IP addresses in the public or wireless network. This is in the Client Infrastructure mode.
Router: A normal routing functionality is provided in this mode. This is in Client Infrastructure mode.
Bridge: A transparent bridging functionality is provided in this mode which uses WDS implementation.
Figure 2-6 Device mode settings (similar for Router/NAT/Bridge)
airClient™ Nexus PRO TOTAL User Guide |
Page 18 of 78 |
|
i n t e l l i g e n t |
w i r e l e s s |
p l a t f o r m |
|
|
|
2.5.aCNPT Router/NAT to aCNPT Bridge
Follow the steps below to change aCNPT Router/NAT mode to aCNPT Bridge Mode
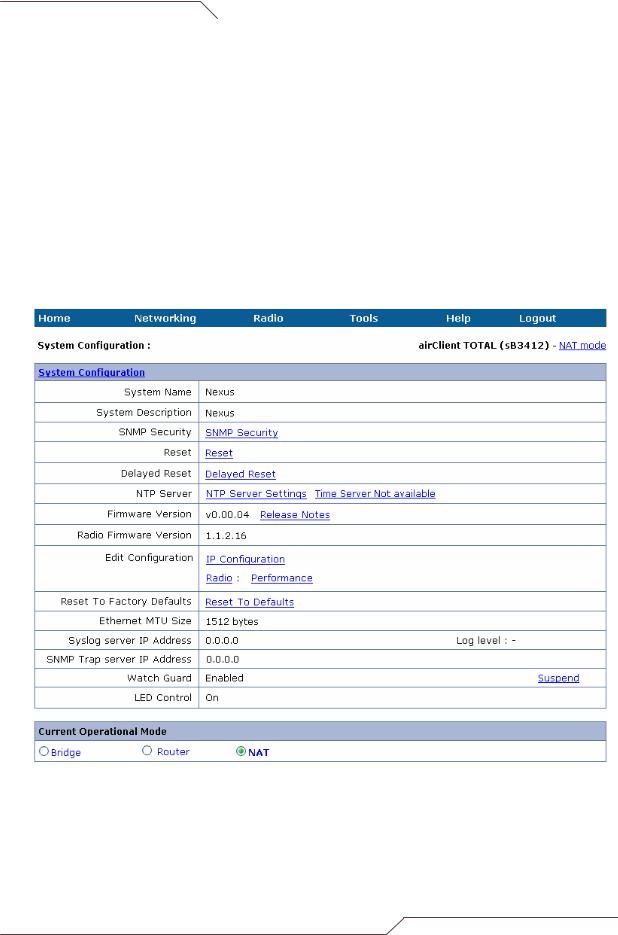
1.Go to ‘Tools | System Configuration’ drop down menu. The ‘System Configuration’ will be displayed.
2.Click on the ‘Current Operational Mode’ link to go to the ‘System Configuration’ page. Choose ‘Bridge under the ‘Remote Device’ option.
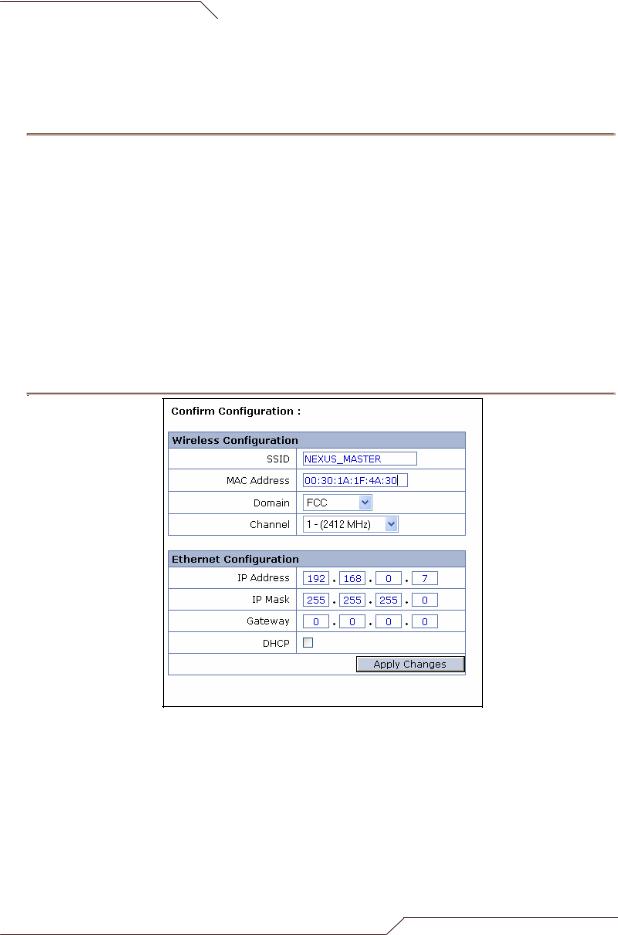
3.Click on ‘Apply Changes’. A confirmation pop-up window will be displayed.
4.Enter the fields for ‘IP Address’, ‘IP Mask’ and Gateway for ‘Ethernet Configuration’.
5.Enter the MAC address and the SSID of the remote radio.
6.Enter the Channel and Domain.
7.Click on the ’Apply Changes’ button to change the settings.
8.The device will be rebooted and set to the chosen operational mode.
Figure 2-7 Changing aCNPT Router/NAT to aCNPT Bridge
airClient™ Nexus PRO TOTAL User Guide |
Page 19 of 78 |
|

i n t e l l i g e n t |
w i r e l e s s |
p l a t f o r m |
|
|
|
2.6. aCNPT Bridge to aCNPT Router/NAT
Follow the steps below to change aCNPT Bridge mode to aCNPT Router/NAT mode
1.Go to ‘Tools | System Configuration’ drop down menu. The ‘System Configuration’ will be displayed.
2.Click on the ‘Current Operational Mode’ link to go to the ‘System Configuration’ page. Choose ‘Router’ (or NAT) under the ‘Remote Device’ option.
3.Click on ‘Apply Changes’. A confirmation pop-up window will be displayed.
4.Enter the fields for ‘IP Address’, ‘IP Mask’ and ‘Gateway’ for ‘Ethernet Configuration’ and ‘Wireless Configuration’.
5.Enter the SSID and the Domain of a remote radio.
6.Click on ’Apply Changes’ button to change the settings. The device will be rebooted and set to the chosen operational mode.
Figure 2-8 Changing aCNPT Bridge to aCNPT Router/NAT
airClient™ Nexus PRO TOTAL User Guide |
Page 20 of 78 |
|
i n t e l l i g e n t |
w i r e l e s s |
p l a t f o r m |
|
|
|
2.7. aCNPT Bridge Configuration
The aCNPT in Bridge mode can associate only with a smartBridges airPoint access point in bridge mode (SB3210) as they both use WDS link implementation. It can associate with any third party bridge but the link is more effective with a smartBridges airPoint.
The following sections outline the procedures for changing the settings for bridge mode.
2.7.1. Ethernet Configuration
The Ethernet IP is configured when the operational mode was changed to the bridge mode.
Follow these steps below if you need to re-configure the aCNPT Bridge Ethernet parameters:
1.From the ’Summary Information’ page, click on the ’Ethernet Configuration’ link.
2.Select DHCP enable/disable radio button. Enter the ‘IP address’, ‘IP mask’, ‘Gateway’ for non DHCP. Assign the unit a unique IP Address in the designated IP subnet.
3.Click on the ‘Apply Changes’ button to effect the changes.
Figure 2-9 aCNPT Bridge Ethernet Configuration
airClient™ Nexus PRO TOTAL User Guide |
Page 21 of 78 |
|

i n t e l l i g e n t |
w i r e l e s s |
p l a t f o r m |
|
|
|
2.7.2. Wireless Configuration
The wireless parameters need to be configured to allow the aCNPT in Bridge mode to associate with an airPoint™ (sB3210) in Bridge mode.
Follow the steps below to configure the aCNPT Bridge Mode wireless association parameters:
1.Select ‘Main – aCNPT Bridge Mode’ from the ‘Radio’ drop-down menu on the menu bar.
2.Enter the SSID and access point’s radio MAC address.
3.Choose a radio regulatory domain and channel from the drop down lists.
4.Select the transmit power of the radio from the Dial-a-Power drop down menu and select the appropriate gain of the antenna.
5.Enter the RF cable loss based on the cable specifications.
6.Click ‘Apply Changes’. The units will attempt to associate.
7.Click on the ‘View Association Table’ to check for the associated clients.
Figure 2-10 aCNPT Bridge Wireless Settings
airClient™ Nexus PRO TOTAL User Guide |
Page 22 of 78 |
|

i n t e l l i g e n t |
w i r e l e s s |
p l a t f o r m |
|
|
|
Figure 2-11 Radio Main (Wireless Settings Page) - Associated
Click on ‘Status’ to view the association link-status graph.
Figure 2-12 Link Status
Noise Floor is the measure of the signal created from the sum of all the noise sources and unwanted signals within a measurement system.
Note: If the association status window does not appear, click on the Java link to download the JRE.
airClient™ Nexus PRO TOTAL User Guide |
Page 23 of 78 |
|
i n t e l l i g e n t |
w i r e l e s s |
p l a t f o r m |
|
|
|
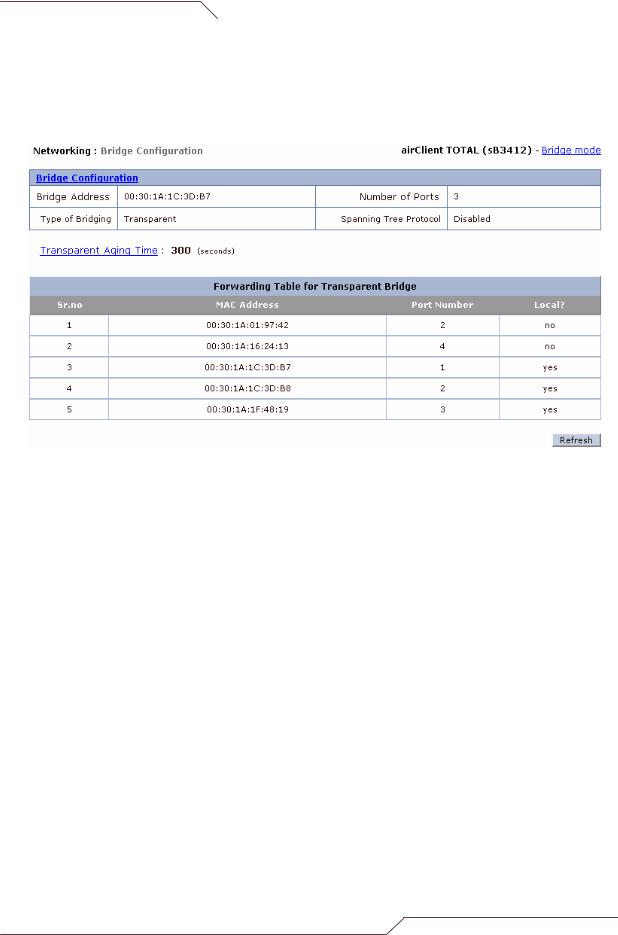
2.7.3. Bridge Configuration
In Bridge mode the aCNPT unit acts as a transparent bridge between the Radio and the Ethernet interfaces. The figure below shows the bridge configuration and the table of bridge forwarding information. The STP (Spanning Tree Protocol) is disabled by default.
Figure 2-13 Bridge Configuration Information
2.7.4. Configuring Spanning Tree Protocol (STP)
STP is a Layer 2 link management protocol that provides path redundancy while preventing loops in the network. For a Layer 2 Ethernet network to function properly, only one active path can exist between any two redundant links.
To create a fault-tolerant network, there needs to be a loop-free path between all nodes in the network. The Spanning Tree Algorithm calculates the best loop-free path throughout a Layer 2 network. Infrastructure devices such as wireless bridges and switches send and receive spanning tree frames, called Bridge Protocol Data Units (BPDUs), at regular intervals. The devices do not forward these frames but use them to construct the loop-free path.
Multiple active paths among end stations cause loops in the network. If a loop exists in the network, end stations might receive duplicate messages. Infrastructure devices might also learn end-station MAC addresses on multiple Layer 2 interfaces. Such conditions result in an unstable network.
STP defines a tree with a root bridge and a loop-free path from the root to all infrastructure devices in the Layer 2 network.
STP forces redundant data paths into a standby (blocked) state. If a network segment in the spanning tree fails and a redundant path exists, the Spanning Tree Algorithm recalculates the spanning tree topology and activates the standby path.
When two interfaces on a device are part of a loop, the spanning tree port priority and path cost settings determine which interface is put in the forwarding state and which is put in the blocking state. The port priority value represents the location of an interface in the network topology and how well it is located to pass traffic. The path cost value represents the media speed.
airClient™ Nexus PRO TOTAL User Guide |
Page 24 of 78 |
|
 Loading...