

Page 1
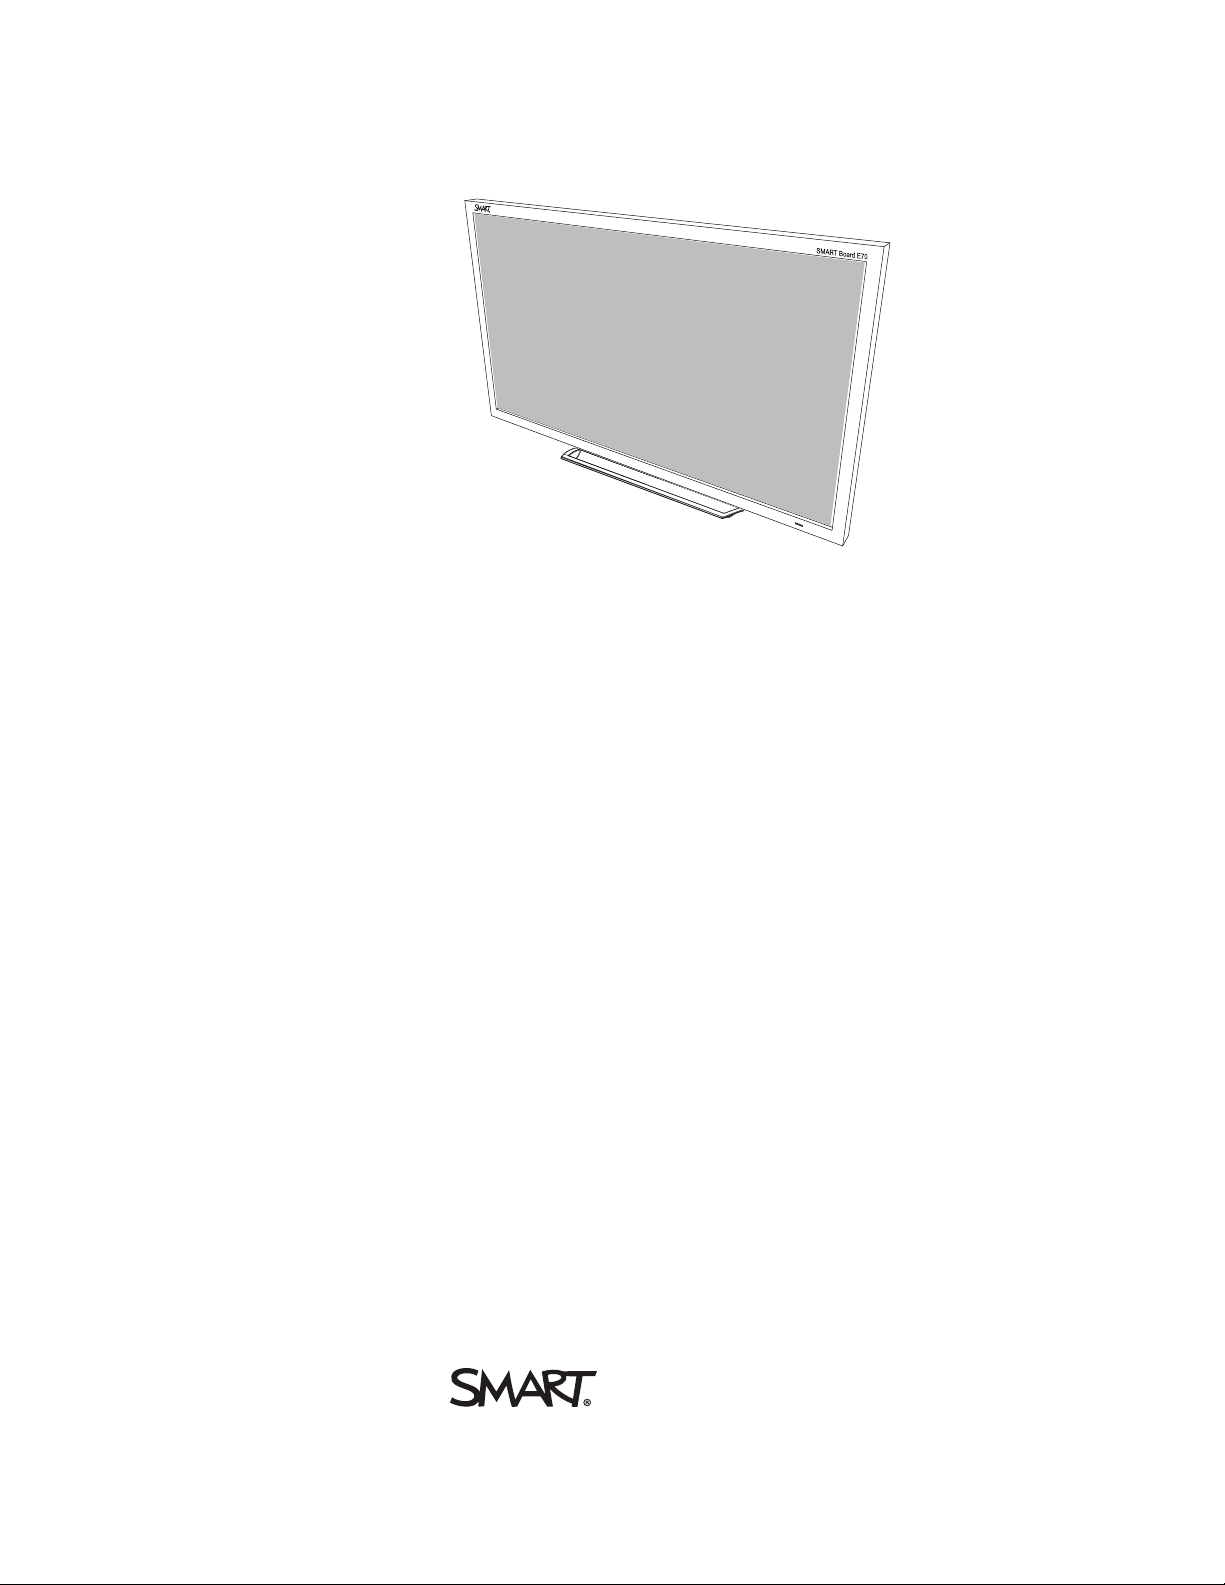
SMARTBoard® E70
Interactive flat panel
User’s guide
Page 2

Product registration
If you register your SMART product, we’ll notify you of new features and software upgrades.
Register online at smarttech.com/registration.
Keep the following information available in case you need to contact SMARTSupport.
Serial number:
Date of purchase:
FCC warning
This equipment has been tested and found to comply with thelimits for a Class A digital device, pursuant to Part 15 of theF CC Rules. These lim its are designed to provide
reasonable protection against harmful interference whenthe equipment is operated in a commercial environment. This equipment generates, uses and can radiater adio
frequency energy and, if not installed andused in accordance with the manufacturer’s instructions, may cause harmful i nterference to radio communications. Operation of
this equipm ent in a r esidential areai s likely to cause harmful i nterference in which case the user will be requir ed to correct the interference at his own expense.
Trademark no tice
SMARTBoard, SMARTNotebook, smarttech, the SMART logoand all SMART taglines are trademarks or registeredtrademarks of SMARTTechnologiesULC i n the U.S.
and/or other countries. Windows is either a registeredtrademark or a trademark of Microsoft Corporationi n the U.S. and/or other countries. All other third-party product and
company names may be trademarks of their respective owners.
Copyright notice
© 2013SMARTTechnologiesULC. All r ights reserved. No part of this publi cationm ay be r eproduced, transmitted, transcribed, stored in a retrieval system or translated
into any language in any form by any m eans without the prior wri ttenconsent of SMARTTechnologiesULC. Information in this manual is subject to change w ithout notice
and does not represent a commi tment on the part of SMART.
This product and/or use thereofcover ed by one or more of the following U.S. patents.
www.smarttech.com/patents
08/2013
smarttech.com/kb/170534
Page 3

Important information
W A R N I N G
l Failure to follow the installation instructions shipped with your SMART product could result in
personal injury and product damage which may not be covered by your warranty.
l Do not open or disassemble the SMART product. You risk electrical shock from the high
voltage inside the casing. Opening the casing also voids your warranty.
l Do not stand (or allow children to stand) on a chair to touch the surface of your SMART
product. Rather, mount the product at the appropriate height.
l To reduce the risk of fire or electric shock, do not expose your SMART product to rain or
moisture.
l If your SMART product requires replacement parts, make sure the service technician uses
replacement parts specified by SMARTTechnologies or parts with the same characteristics
as the original.
l Ensure that any cables extending across the floor to your SMART product are properly
bundled and marked to avoid a trip hazard.
l Useonly extension cords and outlets into which this product’s polarized plug can be fully
inserted.
l Use the power cable provided with this product. If a power cable is not supplied with this
product, please contact your supplier. Use only power cables that match the AC voltage of the
power outlet and that comply with your country’s safety standards.
l If the glass is broken, do not touch the liquid crystal. To prevent injury, handle glass fragments
with care when disposing of them.
l Use only VESA®-approved mounting hardware.
l Do not insert objects inside the cabinet ventilation holes, because they could touch dangerous
voltage points and cause electric shock, fire or product damage which may not be covered by
your warranty.
l Do not place any heavy objects on the power cable. Damage to the cable could cause shock,
fire or product damage which may not be covered by your warranty.
i smarttech.com/kb/170534
Page 4

I M P O R T A N T I N F O R M A T I O N
l Disconnect all power cables for your interactive flat panel from the wall outlet and seek
assistance from qualified service personnel when any of the following occurs:
o
The power cable or plug is damaged
o
Liquid is spilled into the interactive flat panel
o
Objects fall into the interactive flat panel
o
The interactive flat panel is dropped
o
Structural damage such as cracking occurs
o
The interactive flat panel behaves unexpectedly when you follow operating instructions
ii smarttech.com/kb/170534
Page 5

Contents
Important information i
Chapter 1: About your interactive flat panel 1
Feature highlights 1
Included accessories 2
Chapter 2: Installing your interactive flat panel 3
Choosing a mounting location 4
Choosing a mounting height 4
Cable management 4
Connecting your interactive flat panel 5
Configuring your computer’s screen resolution 6
Chapter 3: Using your interactive flat panel 9
Using the remote control 9
Menu control panel 12
On-screen display menu 13
Multi Media mode 14
Chapter 4: Troubleshooting your interactive flat panel 17
Locating the serial number 17
Resolving common touch control and resolution issues with Windows and Mac operating
systems 18
Resolving image issues 21
Configuring and calibrating your SMART Board E70 interactive flat panel with Windows 22
Configuring your touch and display settings for the SMART Board E70 22
Calibrating your SMARTBoard E70 interactive flat panel with Mac OS X 28
Calibrating your SMART Board E70 28
SMARTE70 multiple displays setup Mac 29
Appendix A: Hardware environmental compliance 31
Waste Electrical and Electronic Equipment and Battery regulations (WEEE and Battery
Directives) 31
Batteries 31
More information 31
Index 33
iii smarttech.com/kb/170534
Page 6

Page 7
Chapter 1
Feature highlights 1
Included accessories 2
Pen and pen tray 2
Remote control 2
Included cables 2
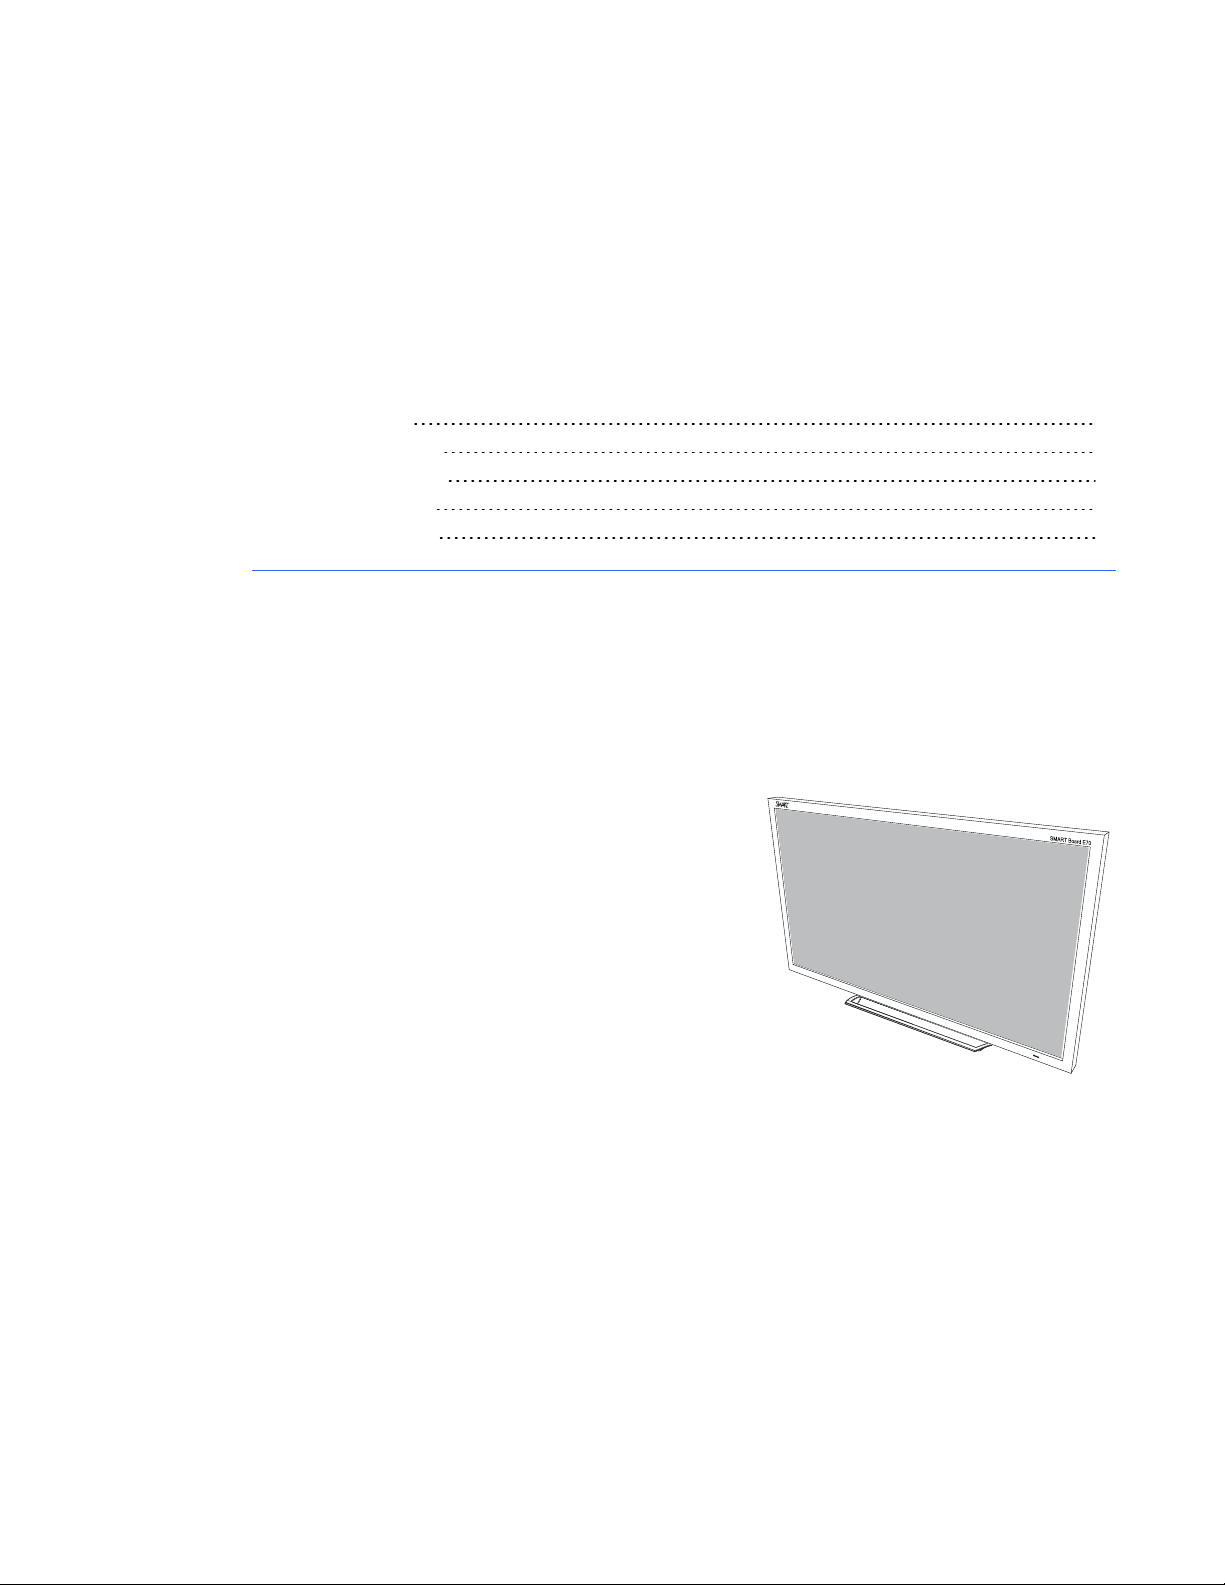
This chapter describes the features of your SMARTBoard® E70 interactive flat panel and provides
information about product parts and accessories.
Feature highlights
Designed specifically for classrooms, the
SMARTBoard E70 interactive flat panel combines a
premium touch experience with the power of
SMARTNotebook™ collaborative learning software
on a 70" display.
The high-definition, shadow-free 70" (177.8 cm) LED
display features low friction coated glass that enables
fingers to glide smoothly over the surface, facilitating a
natural touch experience. The interactive flat panel
also virtually eliminates glare and provides an optimal
view from any angle in the classroom, delivering an
unparalleled viewing and writing experience to offer the best value for classrooms. The multitouch
interactive flat panel features freestyle multi-user interaction anywhere on the display with
Windows®7 or Windows8 operating systems, enabling students to collaborate without limitations.
1 smarttech.com/kb/170534
Page 8
C H A P T E R 1
About your interactive flat panel
Included accessories
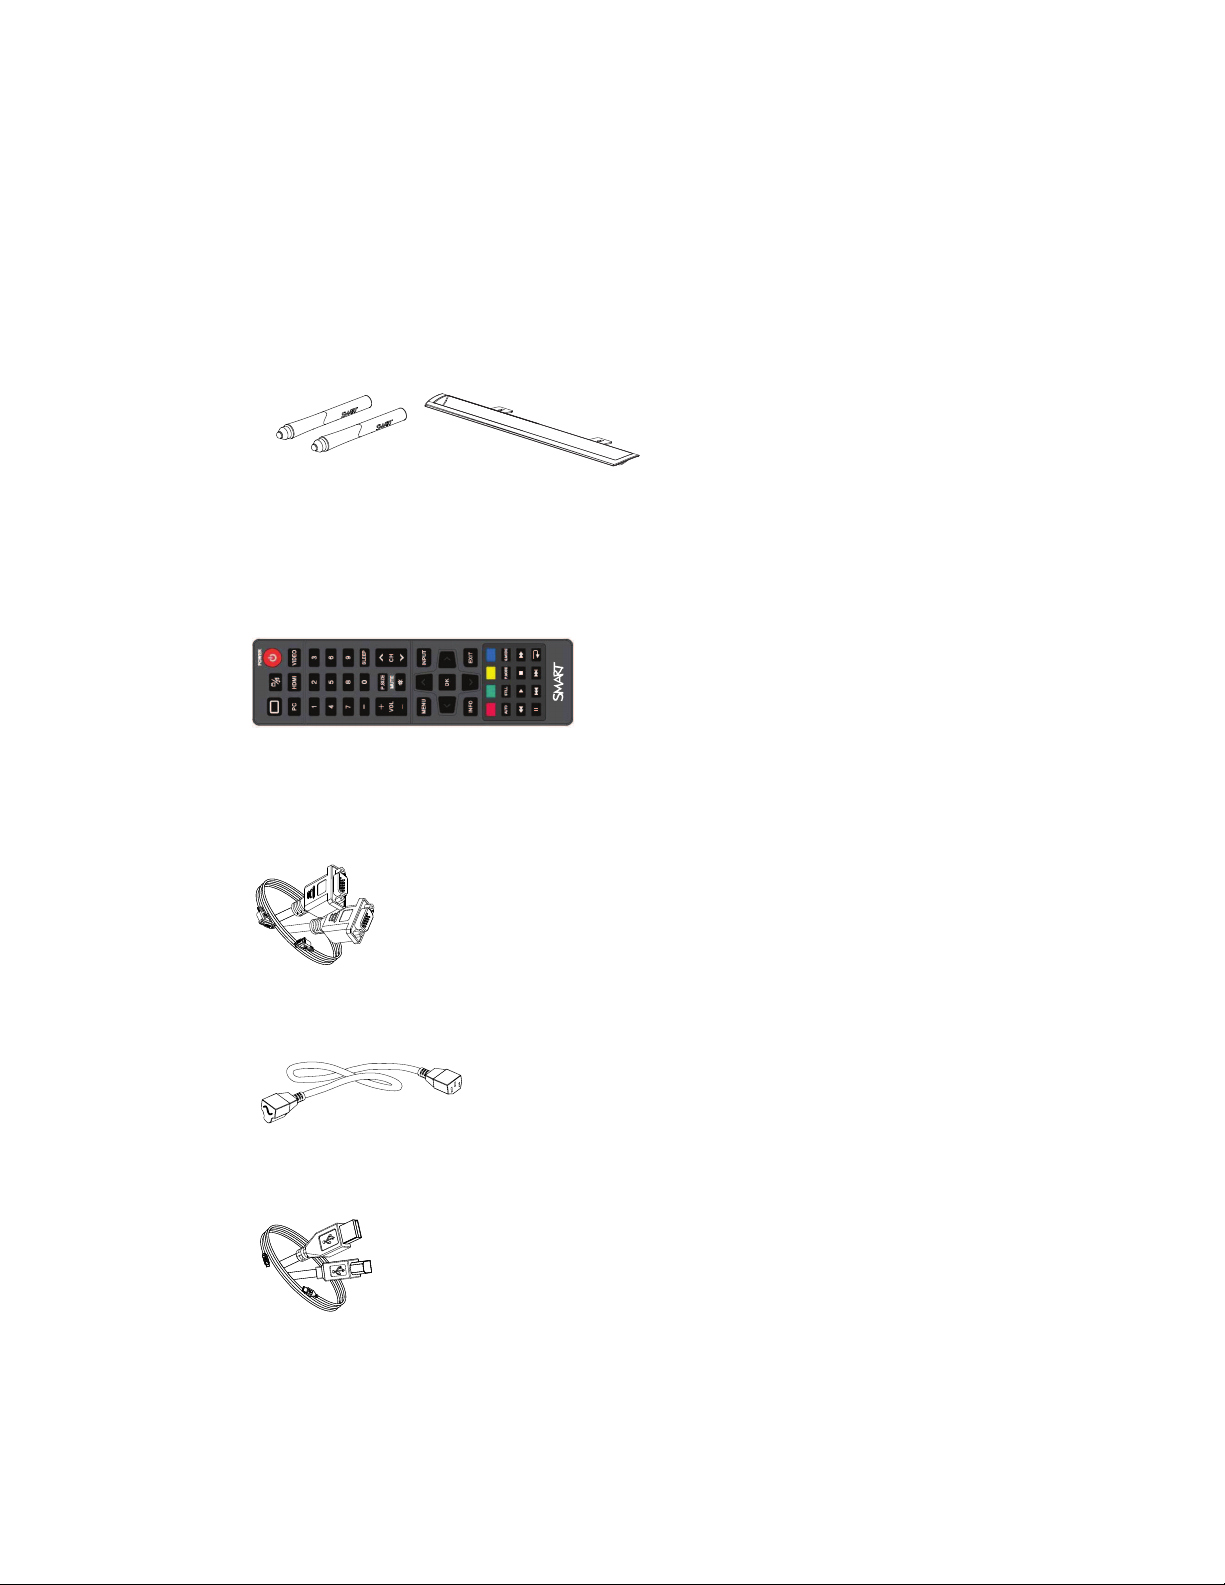
The following accessories are included with your interactive flat panel.
Pen and pen tray
Two pens are included with your interactive flat panel.
Remote control
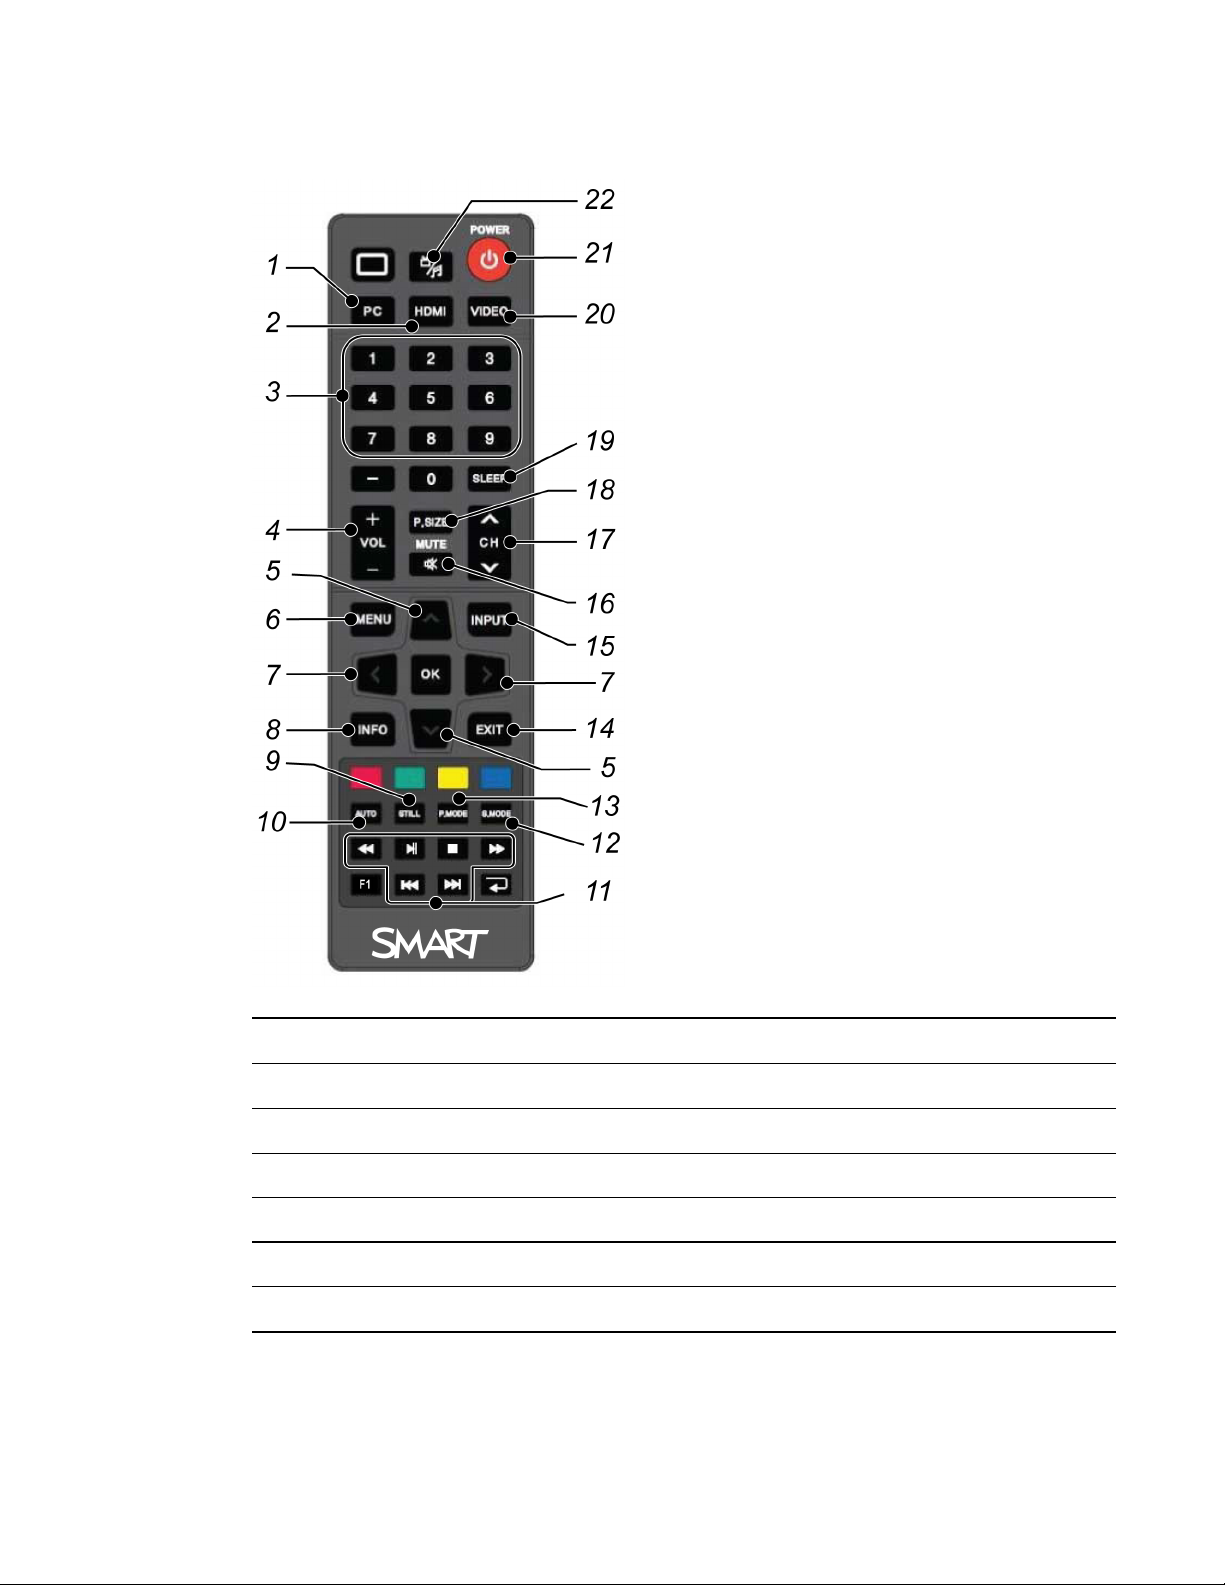
The remote control enables you to access the on-screen menus and to change the display and input
settings.
Included cables
VGA - RGB video input
Power cable - NA, UK and EU
USB cable - touch interface
2 smarttech.com/kb/170534
Page 9
Chapter 2
panel
Choosing a mounting location 4
Choosing a mounting height 4
Cable management 4
Connecting your interactive flat panel 5
Configuring your computer’s screen resolution 6
Recommended computer screen resolution 6
Windows 7 and Windows 8 operating systems 7
Mac OS operating system software 7
W A R N I N G
The weight of the interactive flat panel is 169.8 lb. (77 kg), refer to your local building code to ensure
the wall and the mount being used can support this installation. Use appropriating hardware in
accordance to building code and always use 3 or more people to lift and install E70 interactive flat
panel.
This chapter provides additional considerations and details for installing your interactive flat panel.
3 smarttech.com/kb/170534
Page 10
C H A P T E R 2
Installing your interactive flat panel
Choosing a mounting location
Consider the following when you select a location for the interactive flat panel:
l The wall must be strong enough to support the interactive flat panel and the mounting equipment.
The interactive flat panel weighs 169.8 lb. (77 kg).
l Select a wall with a flat, regular surface and sufficient clearance to accommodate your
interactive flat panel. For best presentation alignment, mount your interactive flat panel in a
location that’s central to your audience’s viewing direction.
l Choose a location for your interactive flat panel that’s far from bright light sources, such as
windows and strong overhead lighting. Bright light sources can cause distracting shadows on
your interactive flat panel and can cause glare.
For mobile or adjustable installation options, contact your authorized SMART reseller
(smarttech.com/where).
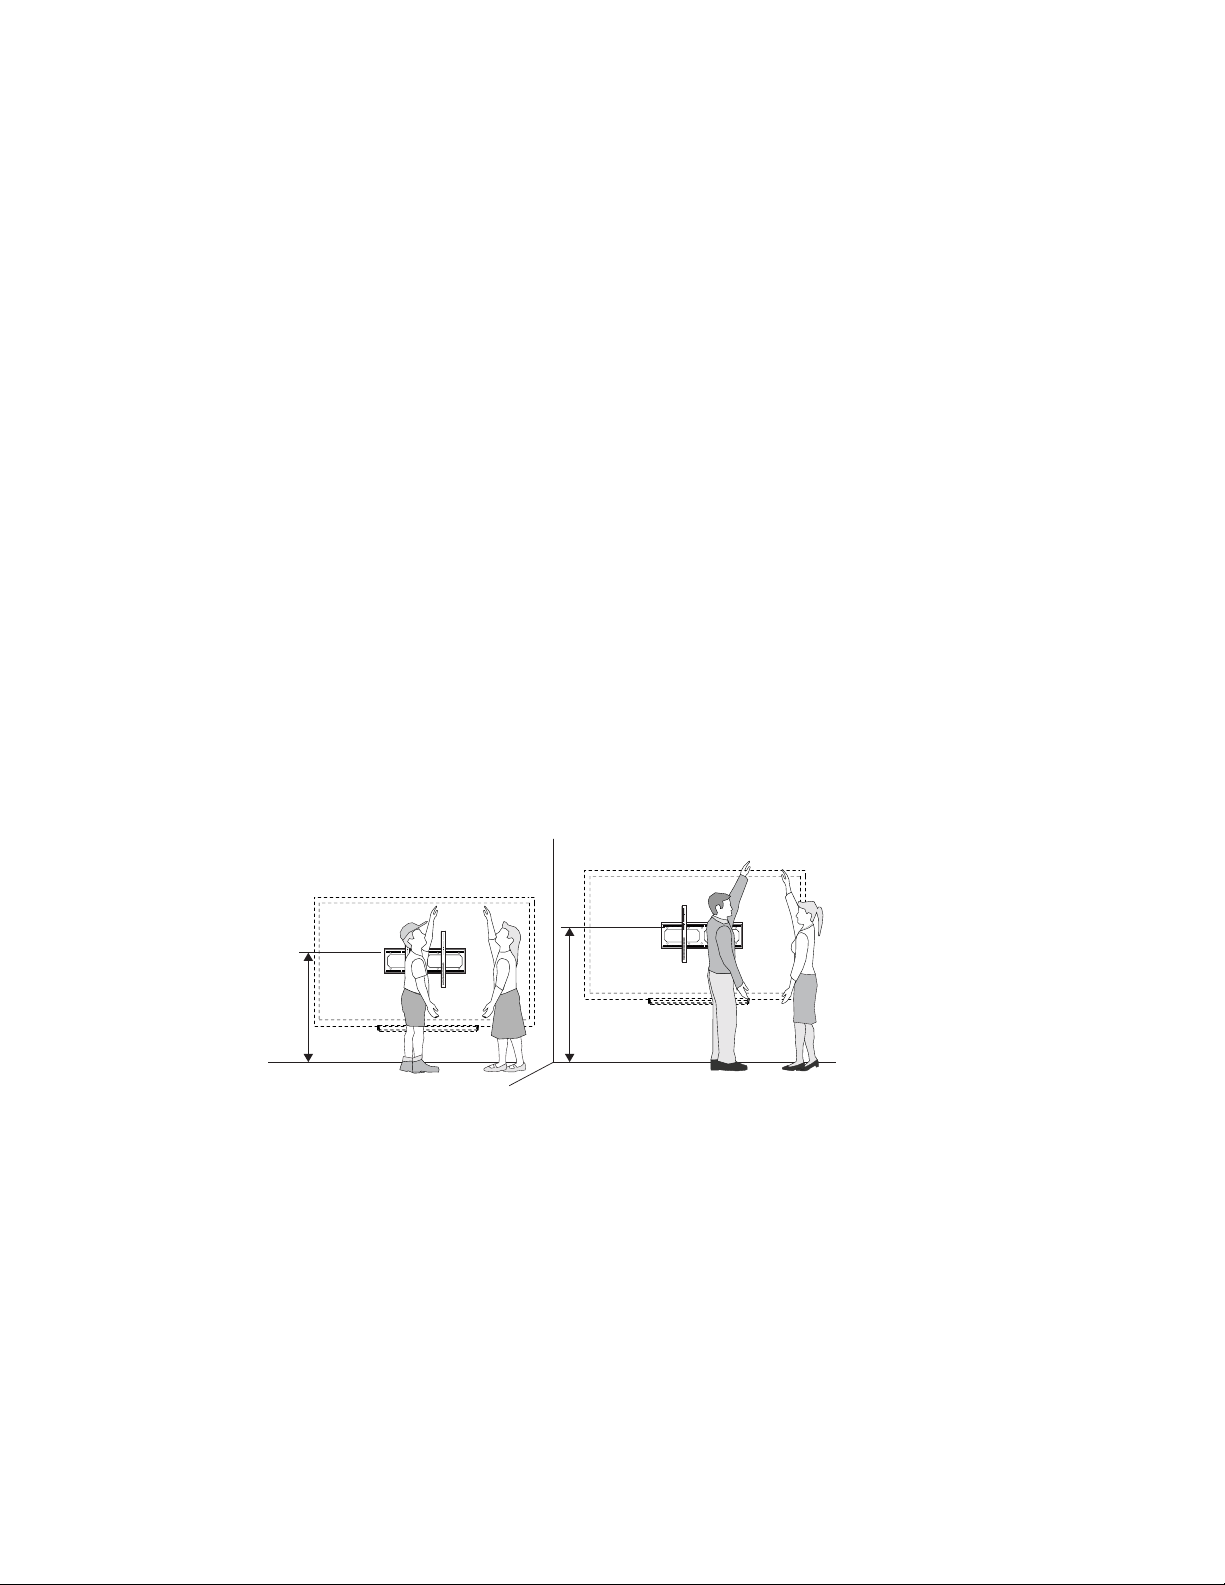
Choosing a mounting height
Mount the interactive flat panel according to audience and/or user(s) height. The flat panel height is
based on the midpoint between the reach of the students and the teacher.
Cable management
When connecting cables from the interactive flat panel to a computer and other peripheral devices,
ensure the cables aren’t a trip hazard. The use of channels and raceways safely hides cables. For
accessories and options, contact your authorized SMART reseller.
4 smarttech.com/kb/170534
Page 11
C H A P T E R 2
Installing your interactive flat panel
I M P O R T A N T
Do not connect the power cable to a power outlet until you have connected all the other cables to
the interactive flat panel.
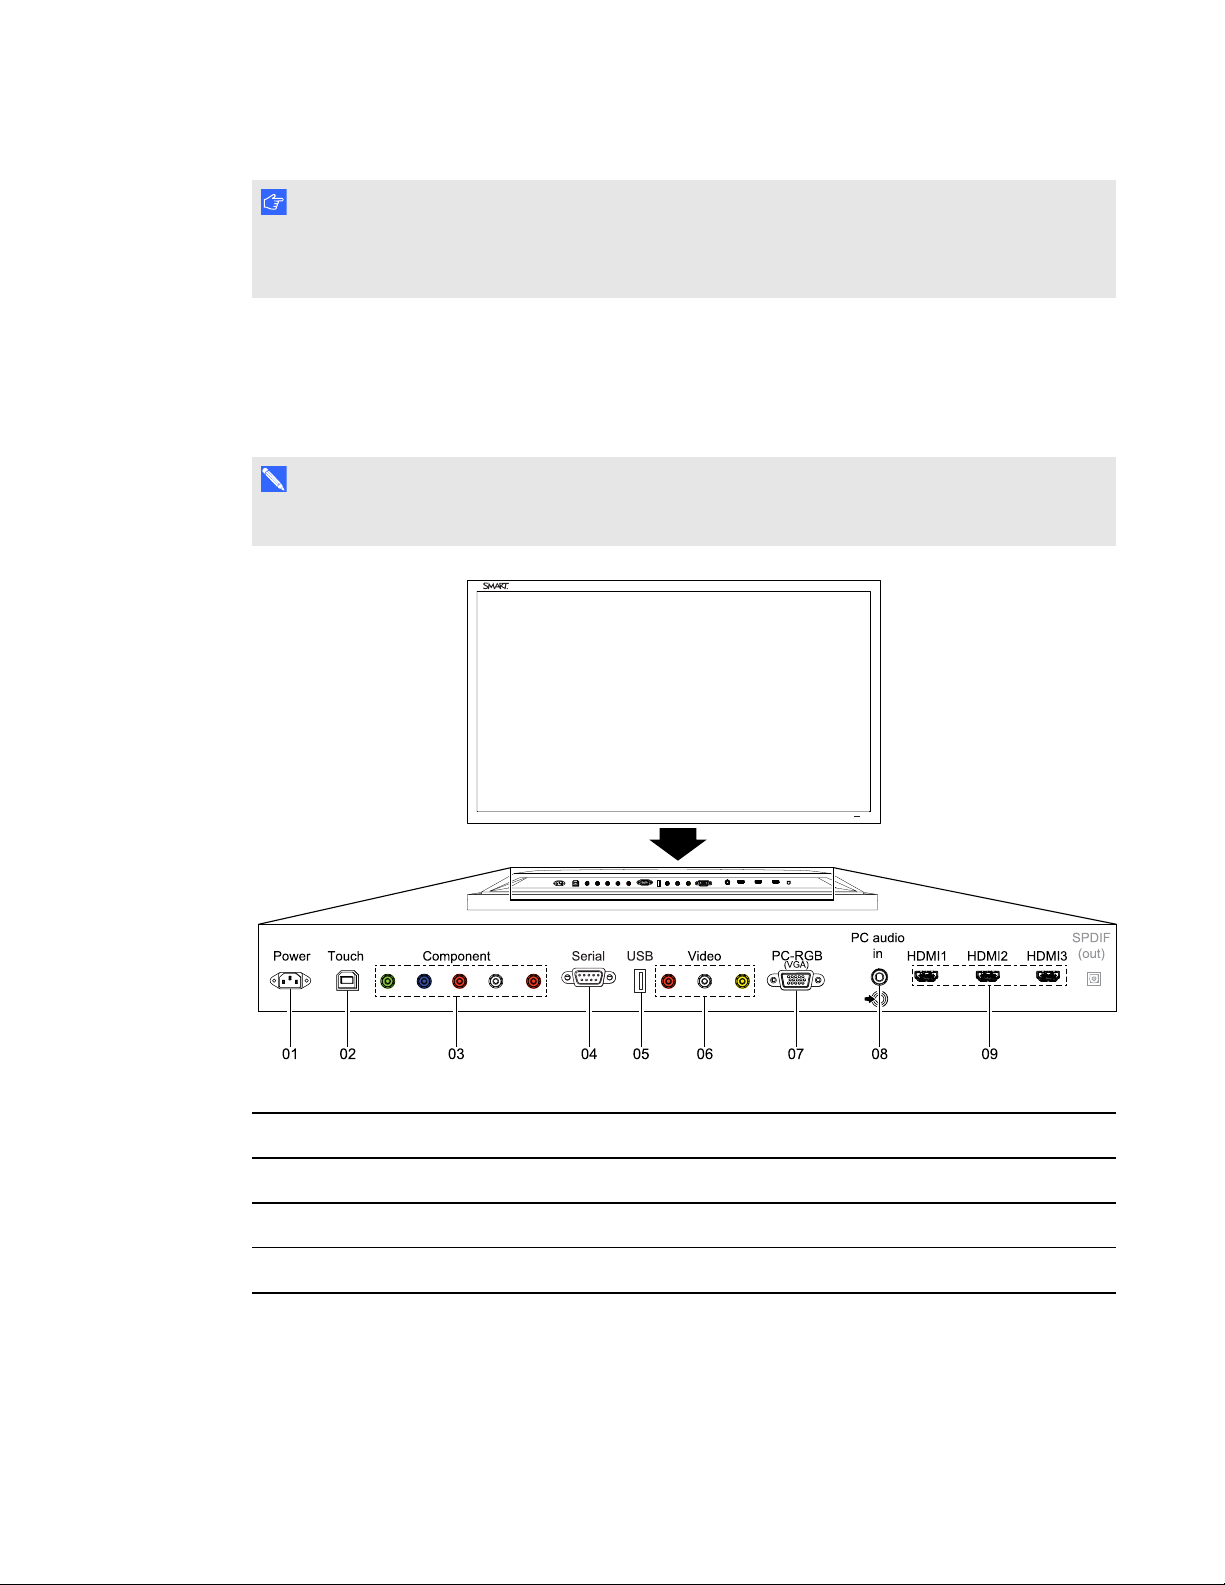
Connecting your interactive flat panel
The connector panel is at the bottom of your interactive flat panel.
N O T E
The power, PC-RGB (VGA) and USB cable are included with your interactive flat panel.
No. Connector Details
1 AC power AC power pass-through
2 USB B receptacle Computer to interactive flat panel touch interface
3 Video in Component video receptacle
5 smarttech.com/kb/170534
Page 12
C H A P T E R 2
Installing your interactive flat panel
No. Connector Details
4
5 USBA Media port; contents accessible using the control
6 Video in Composite video receptacle
7 Video in
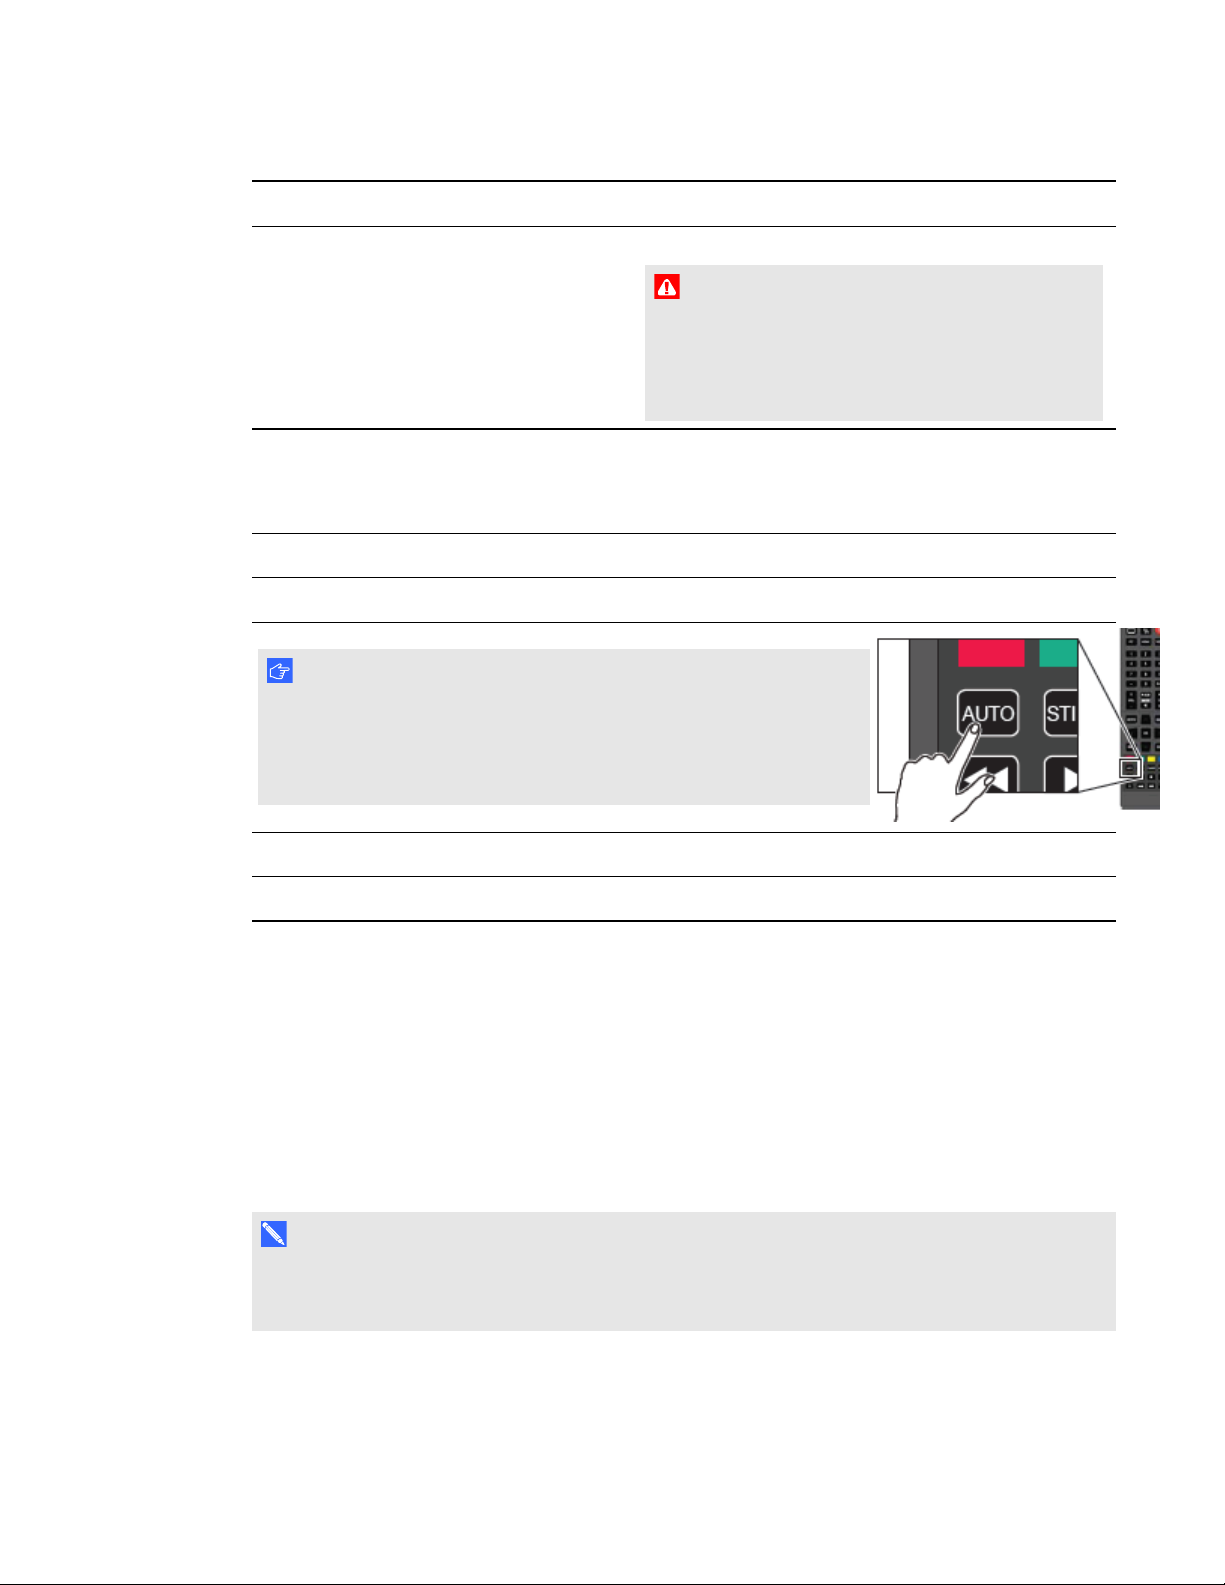
I M P O R T A N T
If you see flicking or the display is not sized correctly pressing the
Auto button will help with the adjustment process. Ensure that you
check and change E70 display to recommended resolution for best
performance.
Service port RS-232 connector
W A R N I N G
This is a servicing port for the product and
must only be used by a qualified trained
technician, this port is NOT for customer
usage.
panel menu or the remote control (see Multi media
mode)
PC-RGB (VGA)
8 Audio in Stereo 3.5 mm connector (from computer)
9 Video in HDMI™
Configuring your computer’s screen resolution
When you connect a computer to the interactive flat panel, you may have to adjust the computer’s
screen resolution to achieve the best image quality and touch performance.
Recommended computer screen resolution
SMARTrecommends the following computer screen resolutions:
N O T E
1920 × 1080 and 1280 × 720 are the recommended screen resolutions for best performance and
most accurate touch.
1920x1080 * 1280x768
1600x1200 1280x720 *
6 smarttech.com/kb/170534
Page 13
C H A P T E R 2
Installing your interactive flat panel
1280x1024 1024x768
1360x768 800x600
1280x960 640x480
Windows 7 and Windows 8 operating systems
To configure your computer’s screen resolution
N O T E
This procedure varies depending on your version of Windows operating system and your system
preferences.
1. Right click on an empty space on the desktop screen and select Screen Resolution from the
menu.
2. Click Display and select the SMARTE70.
3. Beside Resolution, use the drop-down menu to select a screen resolution. Refer to Configuring
your computer’s screen resolution on the previous page.
4. Click OK.
The computer applies the new screen resolution. See Configuring and calibrating your SMART
Board E70 interactive flat panel with Windows for setup and extended display settings.
Mac OS operating system software
To configure your Mac computer’s screen resolution
1.
Click the Apple ( ) menu.
2. Click System Preferences > Displays.
The Display window appears.
3. Select a screen resolution from the list. Refer to Configuring your computer’s screen resolution
on the previous page.
The computer applies the new screen resolution. See Calibrating your SMARTBoard E70
interactive flat panel with Mac OS X for setup and extended display settings.
7 smarttech.com/kb/170534
Page 14

Page 15

Chapter 3
Using the remote control 9
Menu control panel 12
On-screen display menu 13
Picture settings 13
Audio settings 13
Setup settings 13
Time settings 14
Multi Media mode 14
Compatible file formats 14
Video 14
Audio 15
Images 15
This chapter describes the basic operation and setup of your interactive flat panel.
Using the remote control
The infrared remote control enables you to turn on and turn off your interactive flat panel, to change
the input source, to change the volume and more. You can also use the remote control to open the
on-screen display menu and then change the interactive flat panel’s settings.
9 smarttech.com/kb/170534
Page 16
C H A P T E R 3
Using your interactive flat panel
No. Button Details
1 PC Selects the VGA input
2 HDMI Select the HDMI input
3 [Number buttons] Press buttons on the number pad to change channels
4 VOL +/- Increase or decrease the audio output level
5 [Up and down buttons]
Select a menu option in the on-screen display menu
6 MENU Display the on-screen display menu
10 smarttech.com/kb/170534
Page 17
C H A P T E R 3
Using your interactive flat panel
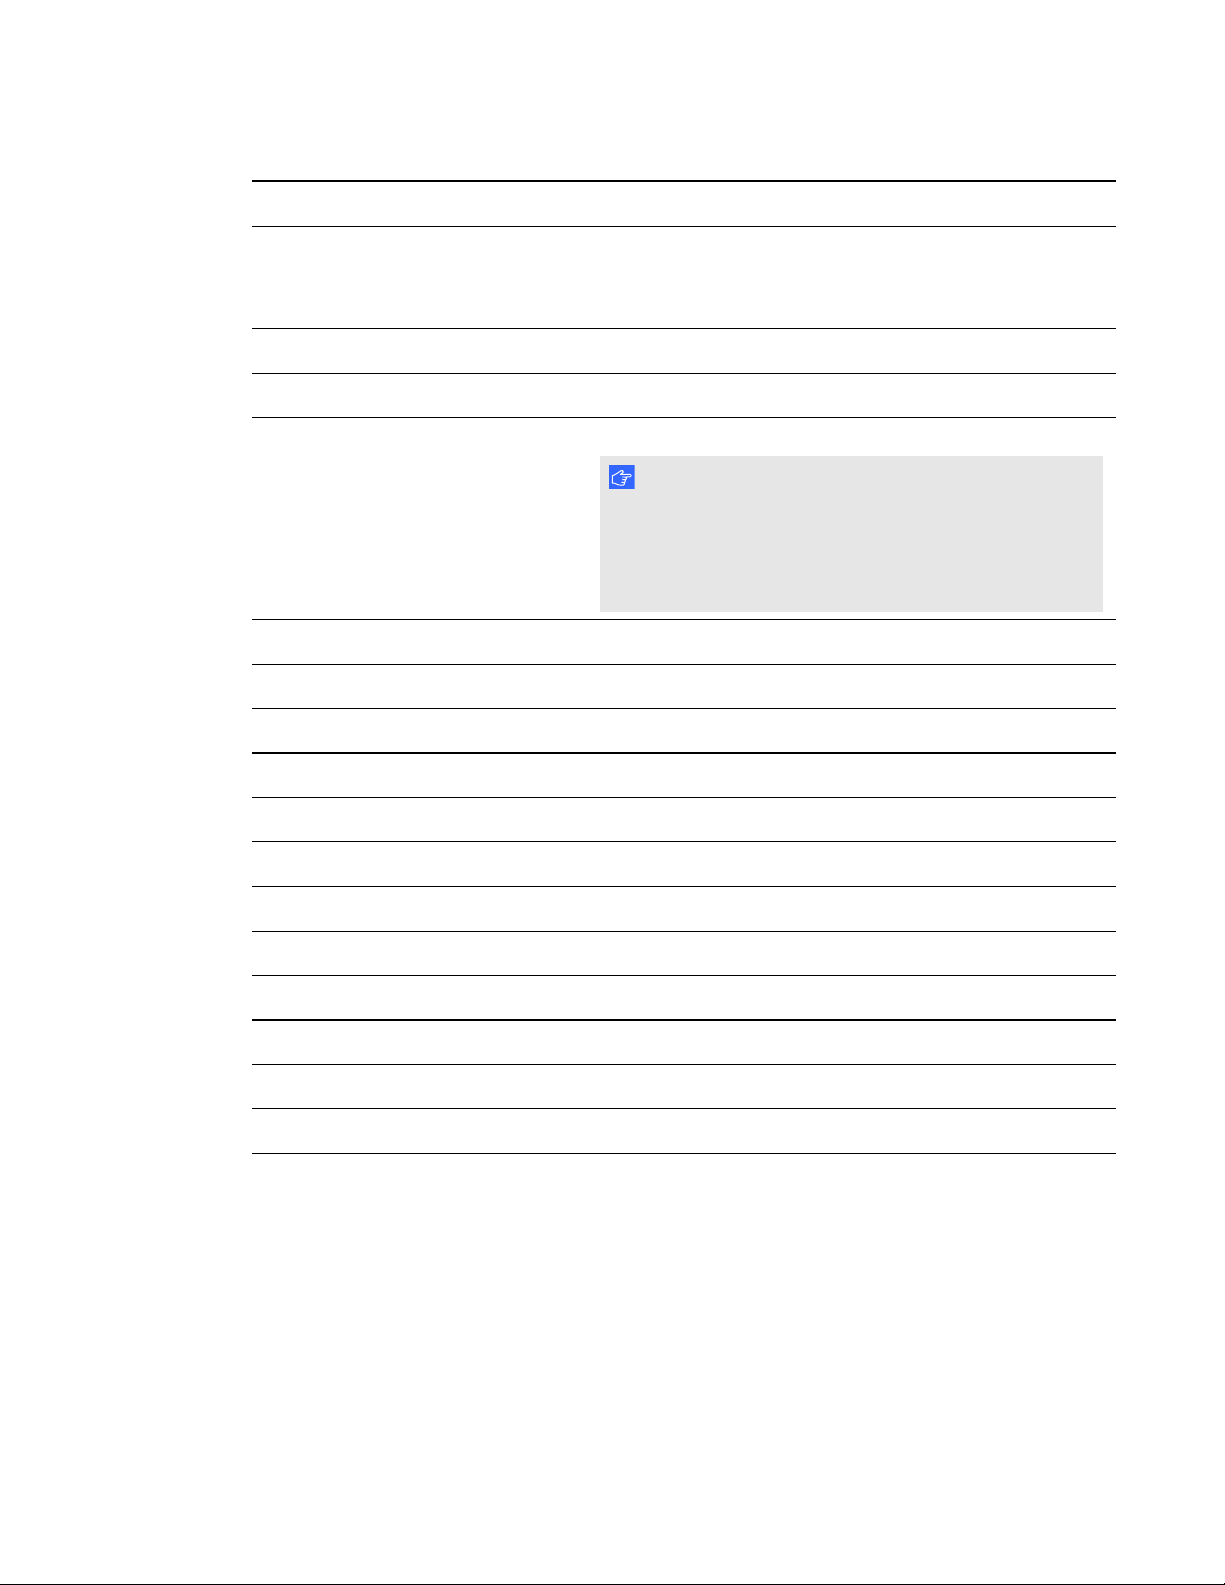
No. Button Details
7 [Left and right buttons] l Select an option in the on-screen display menu
l Use the right button to increase a value
l Use the left button to decrease a value
8 INFO Display the current video source
9 STILL Turn on or off the still picture mode
10 AUTO
Automatically adjusts the VGA video input
I M P O R T A N T
This will automatically adjust the image to the settings
display adapter is sending, in most cases this will help or
solve touch issues, manually adjust E70 display settings
if needed.
11 [Media buttons] Use these while in Multi Media mode
12 S.MODE Switch between stereo and mono sound
13 P.MODE Switch between color modes
14 EXIT Close the on-screen display menu
15 INPUT Switch video inputs
16 MUTE Mute audio inputs for your interactive flat panel
17 CH +/- Change channels
18 P.SIZE Select the video aspect ratio
19 SLEEP Set the sleep timer
20 VIDEO Select the RCA input
21 Power Turn on or turns off the interactive flat panel
22 Multi Media button Display the Multi Media mode
11 smarttech.com/kb/170534
Page 18
C H A P T E R 3
Using your interactive flat panel
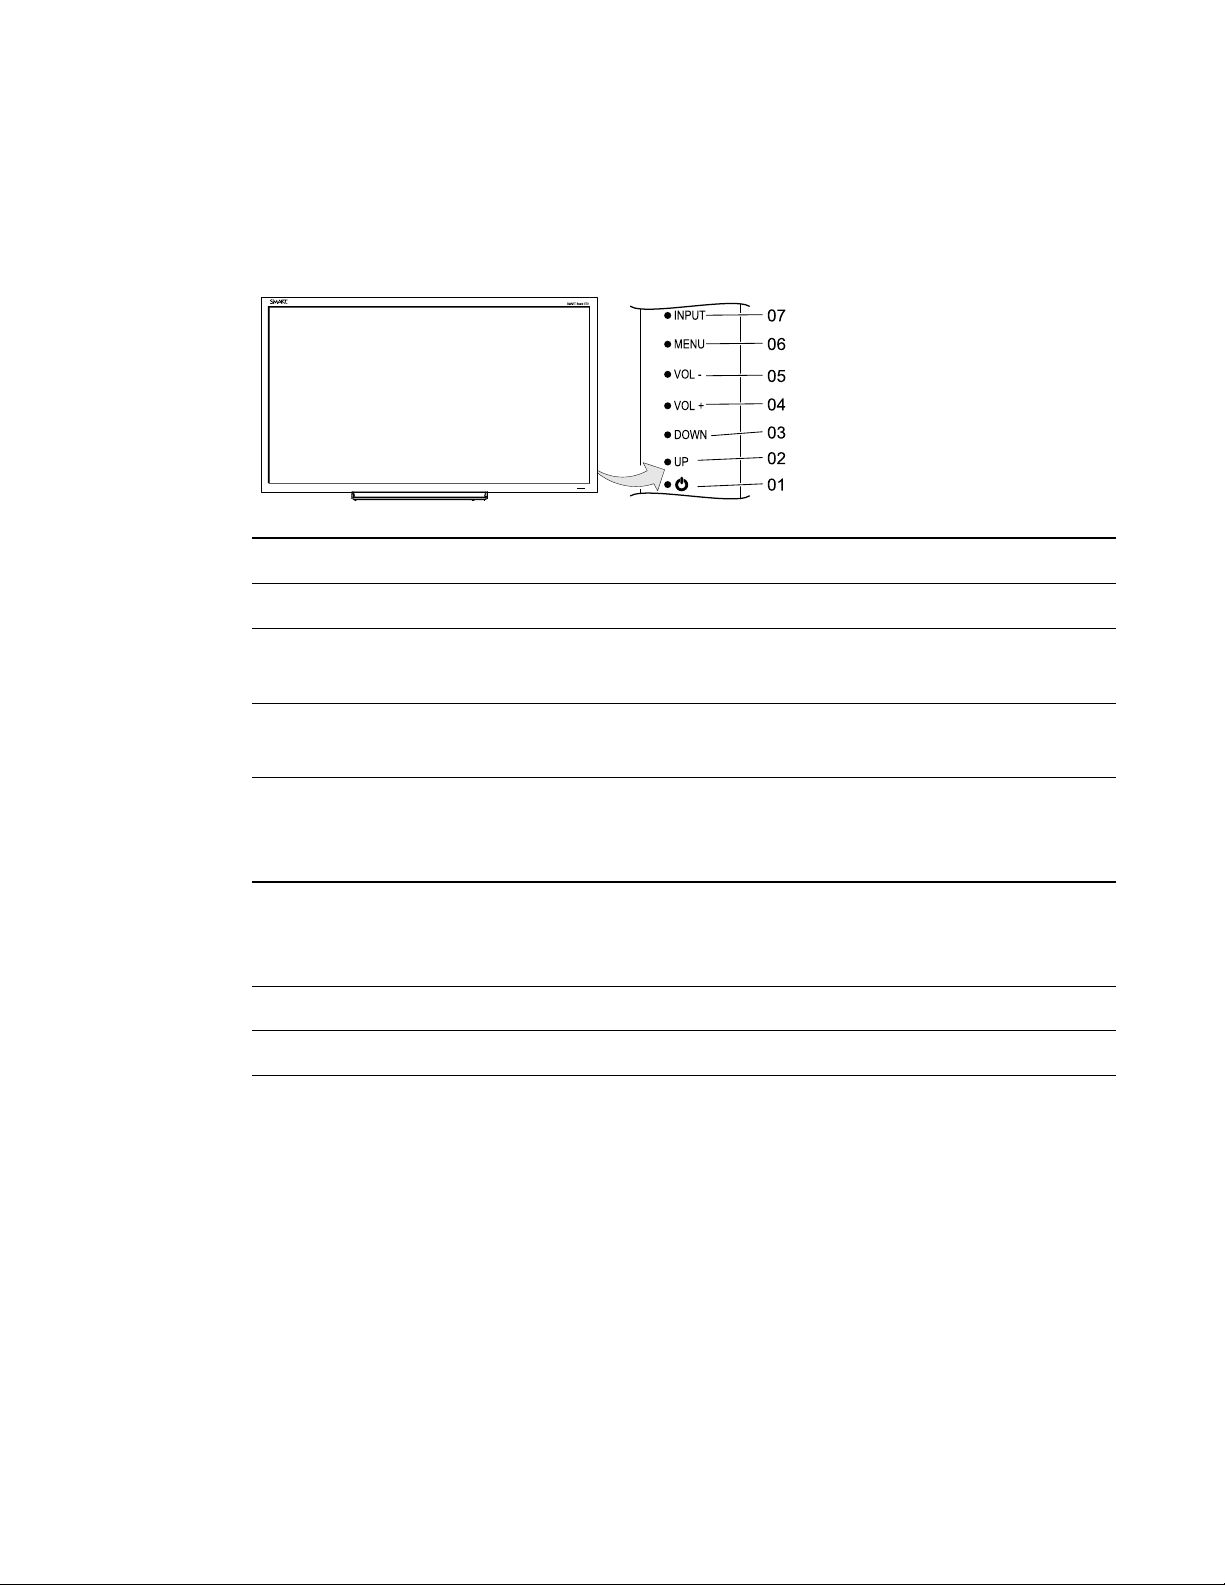
Menu control panel
The menu control panel enables you to access the on-screen display menu to adjust settings.
No. Button Details
1 Power Turn on or turn off the interactive flat panel
2 UP Move the highlighted area up to select items in the on-
screen display menu
3 DOWN Move the highlighted area down to select items in the on-
screen display menu
4 VOL + Move the highlighted area left to select items in the on-
screen display menu, increase the audio output level and
increase settings
5 VOL- Move the highlighted area right to select items in the on-
screen display menu, decrease the audio output level and
decrease settings
6 MENU Display the on-screen display menu
7 INPUT Toggle between video inputs for your interactive flat panel
12 smarttech.com/kb/170534
Page 19

C H A P T E R 3
Using your interactive flat panel
On-screen display menu
You can access the on-screen display (OSD) menu by pressing MENU on the menu control panel on
the right side of the interactive flat panel or on the remote control. To exit the OSD menu, press
MENU on the menu control panel on the right side of the interactive flat panel or EXITon the remote
control.
Picture settings
Menu item Function
Picture Mode Sets the picture mode to Custom, Standard, Mild or Vivid
Brightness Adjusts the overall brightness of the image and background
Contrast Adjusts the brightness of the image in relation to the background
Tint Adjusts the tint of the screen
Color Adjusts the color depth of the screen
Color Temp Sets the color temperature to Normal, Warm or Cold
Audio settings
Menu item Function
Surround Turns on or off the surround sound
Sound Mode Sets the audio mode to Music, Standard, User, News or Movie
Auto Volume Turns on or off the automatic volume adjustment
Setup settings
Menu item Function
Menu Language Selects the language used by the OSD menu
Menu Trans. Adjusts the transparency of the OSD menu
Screen Mode Sets the image size to 16:9, 4:3, Zoom1 or Zoom2
Reset Resets all Setup options
Software Update
13 smarttech.com/kb/170534
N O T E
Software update should be performed only by a system administrator. Please
contact your authorized SMARTreseller if you require further assistance.
Page 20

C H A P T E R 3
Using your interactive flat panel
Time settings
Menu item Function
Time mode Sets the time mode to automatic or manual
Time Sets the time manually
Sleep Time Sets the sleep timer
On Timer Turns on the On Time function
On Time Sets when the interactive flat panel turns on
Volume Sets the volume when the interactive flat panel turns on
Off Timer Turns on the Off Time function
Off Time Sets when the interactive flat panel turns off
Multi Media mode
You can play video files, view images and listen to music stored on the USB drive. Use the remote
control to pause, fast-forward and rewind videos.
Compatible file formats
The interactive flat panel can play the following file types.
Video
Category Code
MPEG1 MPEG1
MPEG2 MPEG2
14 smarttech.com/kb/170534
Page 21
C H A P T E R 3
Using your interactive flat panel
Category Code
MPEG4 AVC
MPEG-4 Visual
DivX5
DivX4
DivX3
XviD
MS-MEG4 V3
WMV3
MJPEG M-JPEG
Audio
l AC-3
l AAC
l MP3
l PCM
Images
l JPEG
l BMP
l PNG
l GIF
l TIFF
To access content on the USB drive
1. Turn on the interactive flat panel
On the remote control press, the Multi Media button.
2.
3. Connect a USB drive to the USB A receptacle on the bottom connector panel. See Connecting
your interactive flat panel on page 5.
4. Use the remote control to select a file.
5. Press the Play button on the remote control to view the file.
15 smarttech.com/kb/170534
Page 22

Page 23
Chapter 4
flat panel
Locating the serial number 17
Resolving common touch control and resolution issues with Windows and Mac operating systems 18
Resolving image issues 21
This chapter provides you with the information necessary to solve simple issues that occur with your
interactive flat panel. If issues persist, or aren’t covered in this chapter, contact SMARTSupport
(smarttech.com/support) or your authorized SMARTreseller (smarttech.com/where).
Locating the serial number
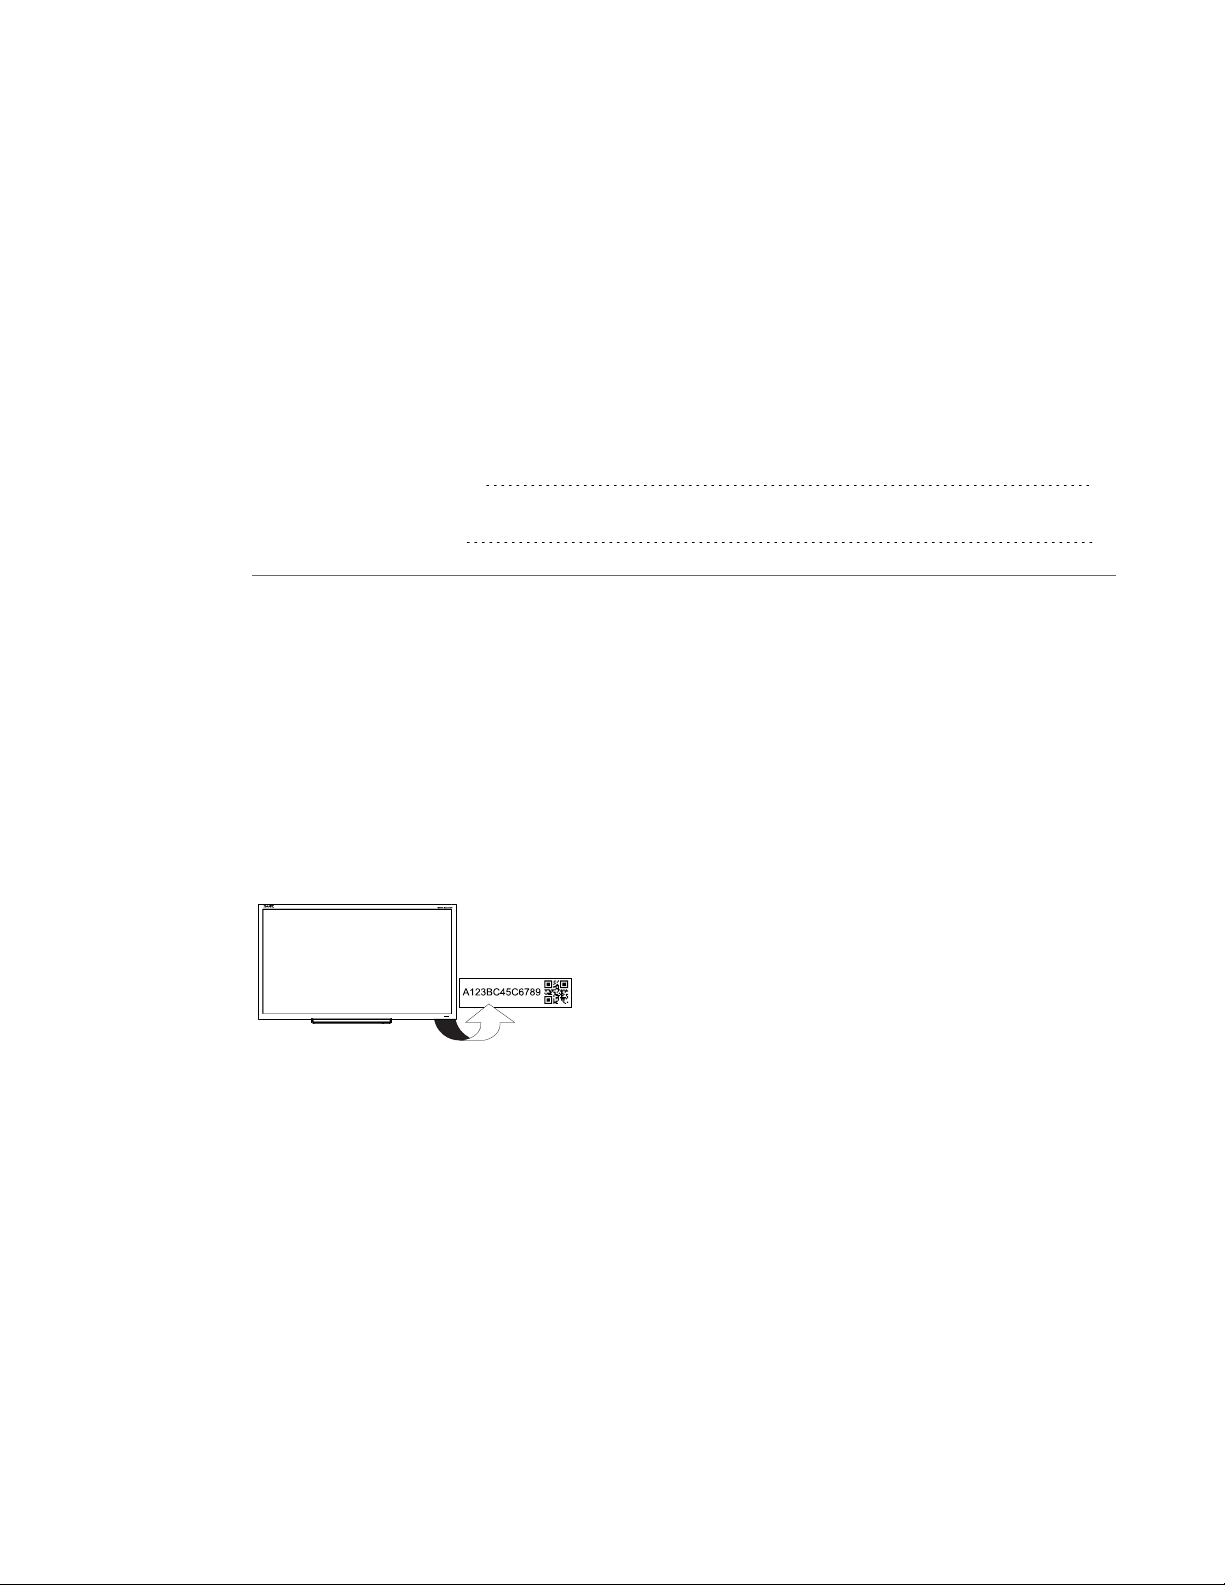
When you contact SMARTSupport, you might be asked to provide the E70 interactive flat panel’s
serial number. The serial number is located under the front right bezel.
17 smarttech.com/kb/170534
Page 24
C H A P T E R 4
Troubleshooting your interactive flat panel
Resolving common touch control and resolution
issues with Windows and Mac operating systems
Problem Cause Solution
Resolution and/or touch
inaccuracies
N O T E
The recommended
resolutions for the
SMARTE70 interactive flat
panel are:
l 1920 × 1080 and
l 1280 × 720
see Recommended
computer screen resolution
in this guide for more
information and settings.
When the resolution is not set
to recommend setting the
touch detection system may
not function as expected. The
image should fill the screen
fully, no black bars on top,
bottom or on the sides.
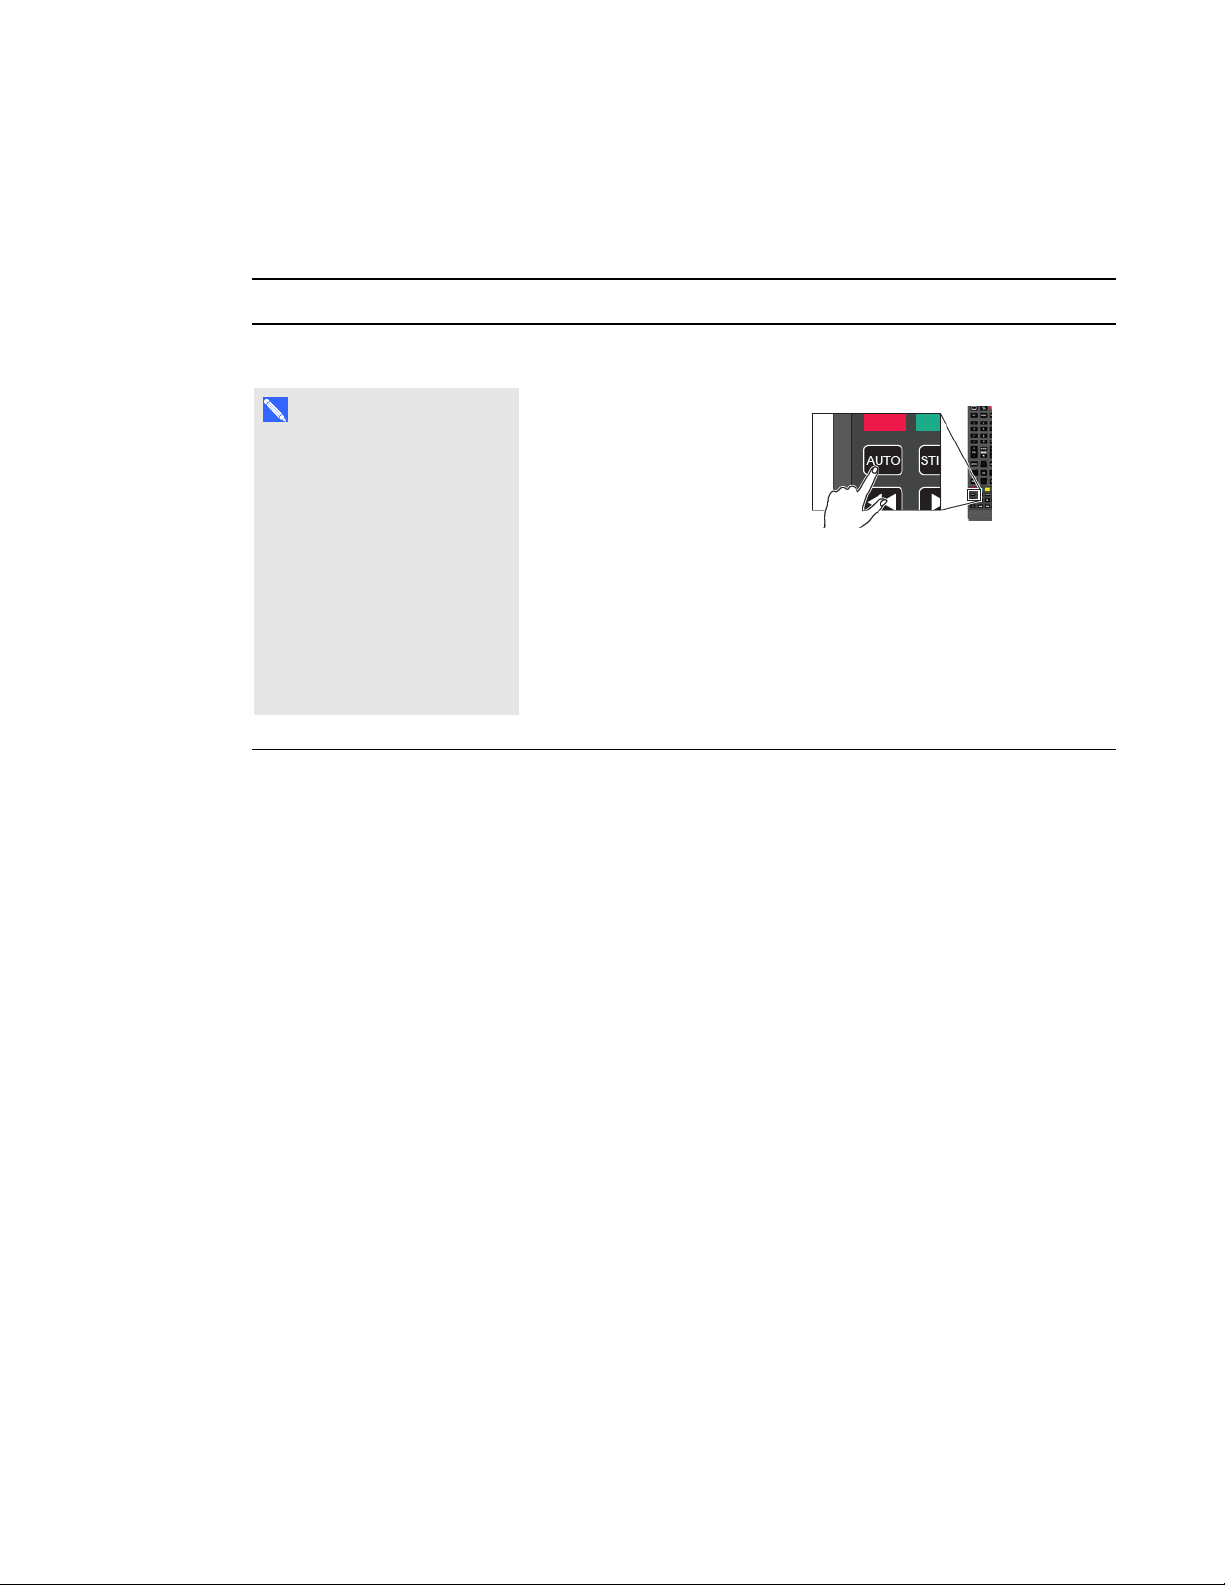
The easiest and the best practice
is to always use the auto button
on the remote.
This will automatically adjust the
image to the settings display
adapter is sending, in most cases
this will help or solve touch
issues, manually adjust E70
display settings if needed. See
Configuring your computer’s
screen resolution.
18 smarttech.com/kb/170534
Page 25
C H A P T E R 4
Troubleshooting your interactive flat panel
Problem Cause Solution
Touch isn't working as
expected.
The USB cable between the
computer and the interactive
flat panel could be loose.
Bright lights are interfering
with the interactive flat panel.
Your interactive flat panel isn't
calibrated properly.
Check all cable connections
Close blinds or shades or dim all
halogen lights and LEDs.
Your SMART E70 iterative flat
panel may need to be recalibrated.
For Windows 7 ot 8 operting
systems see Configuring and
calibrating your SMART E70
interactive flat panel with
Windows in this user guide.
For Mac OS X 10.7 or 10.8 see
Calibrating SMARTE70
interactive flat panel with Mac.
I M P O R T A N T
The E70 interactive flat panels
are pre-calibrated and oriented
at the factory. Calibration
should be done only by an
administrator.
19 smarttech.com/kb/170534
Page 26
C H A P T E R 4
Troubleshooting your interactive flat panel
Problem Cause Solution
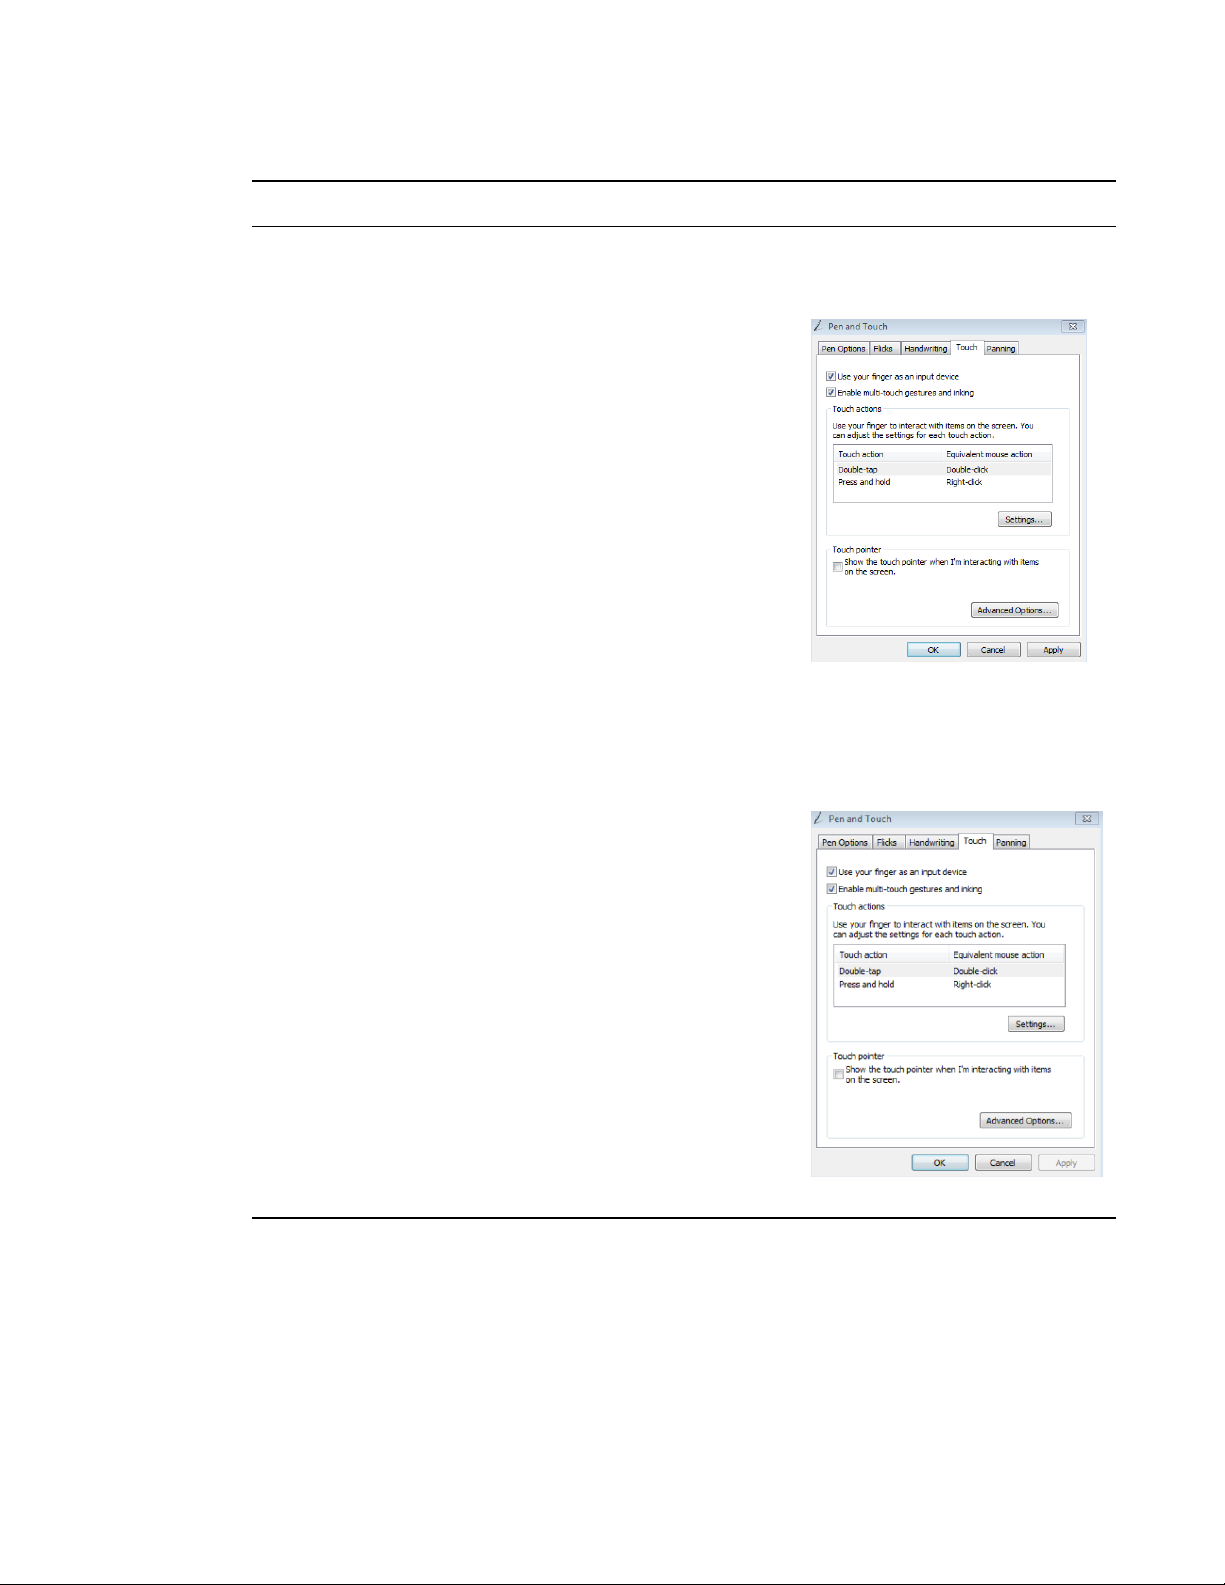
Pen and touch setting may not
be selected.
1. Open Control Panel. Pen and
Touch.
2. Select Touch tab.
3. Ensure that the following are
selected:
Use your finger as an input device
Enable multi-touch gestures and
inking
20 smarttech.com/kb/170534
Click Apply and/or OK
Page 27
C H A P T E R 4
Troubleshooting your interactive flat panel
Resolving image issues
Problem Causes Solution
The interactive flat panel
doesn’t turn on.
When the video source is
HDMI, the image and audio are
low quality.
The image is poor quality
and/or doesn’t fit on the screen.
The interactive flat panel isn’t
connected to a power source.
The interactive flat panel is in
Sleep mode.
The cable between the HDMI
source and the interactive flat
panel could be loose.
The HDMI cable could be too
long.
The computer's screen
resolution is incorrect.
Connect your interactive flat
panel to a power outlet.
Press the Power button on the
menu control panel or on the
remote control.
Check all cable connections.
Ensure the HDMI cable doesn’t
exceed 9' (3 m).
See Configuring your
computer’s screen resolution on
page 6 to select the correct
screen resolution.
21 smarttech.com/kb/170534
Page 28
C H A P T E R 4
Troubleshooting your interactive flat panel
Configuring and calibrating your
SMART Board E70 interactive
flat panel with Windows
If your SMART Board E70 interactive flat panel has an inaccurate touch or the touch is not working,
you may need to configure or calibrate it. Follow the instructions below to configure and calibrate your
SMART Board E70 interactive flat panel.
I M P O R T A N T
The SMART Board E70 interactive flat panel is factory calibrated. We recommend that you resolve
touch inaccuracy through configuration prior to calibration.
Configuring your touch and display settings for the SMART Board E70
If touch is inaccurate:
l Ensure that your resolution is set to one of the supported resolutions (below).
The following list contains the supported resolutions for you SMART Board E70 interactive flat
panel:
1920x1080 * 1280x768
1600x1200 1280x720 *
1280x1024 1024x768
1360x768 800x600
1280x960 640x480
The resolutions marked with an asterisk (*) are recommended.
N O T E
There should be no black bar bars on the top bottom or on either side of the image, the image
should completely fill the screen.
l If you have multiple displays for example and laptop connected to your E70, ensure that they are
set up correctly (See Setting up multiple displays)
22 smarttech.com/kb/170534
Page 29
C H A P T E R 4
Troubleshooting your interactive flat panel
l Check your graphics card configuration (See Graphics card configuration)
l Check your panel settings (See Panel settings)
l Calibrate, or clear previously set calibration data (See Calibrating of the SMART Board E70 with
Windows 7 or 8)
If there is no touch:
l Ensure that the USB cable is properly connected.
l Try power cycling the SMART Board E70.
l Ensure that Windows automatically installed the required device drivers the SMART E70 and
AFO TCM10X-700 HID should be listed under Windows Devices and Printers.
l If you have multiple displays, ensure the pen and touch are settings are correct (see Setting up
multiple displays).
Graphics card configuration
If you are using an unsupported graphics card configuration is used you may experience a display
problem or issues with touch accuracy. For example, you may experience issues if your graphics
card scaling option is set to something other than full-screen.
I M P O R T A N T
When using an ATI video card they must go into the ATI Catalyst Control panel, go to the Flat
Panel menu, select Pixel Format and change it to RGB 4:4:4 timing.
Panel settings
Ensure that you set the SMART Board E70’s Screen Mode to either 16:9 or Full and that you select
the correct input source.
To select input:
On the remote or on the side panel select Input, use the arrows to select input.
To change screen mode:
1. Select Menu on the remote or on the side panel.
2. Use the arrow keys and select Setup from the drop down list.
3. Use the arrow keys to move over and down to Screen Mode select 16:9 if not already selected.
23 smarttech.com/kb/170534
Page 30
C H A P T E R 4
Troubleshooting your interactive flat panel
Setting up multiple displays
When you use your SMART Board E70 in a multiple display environment (that is, your computer has
an additional monitor or a built-in display), you must ensure that your display settings are configured
properly for your operating system.
Windows XP operating system
Ensure that:
l Your computer’s display is mirrored or
l You set up the E70 to be your primary monitor
Calibrating Windows 7 or 8 operating system
To set up the SMART Board E70 as your touch screen:
N O T E S
l Ensure the resolution has been set to recommend settings prior to calibration.
l Steps to calibration, first Setup then Calibrate (only calibrate if required).
a. Setup - This tells the system what device is a touch device and enables touch, test touch
device after Setup if touch is accurate the calibration step may not be required.
b. Calibration - This step fine tunes touch points.
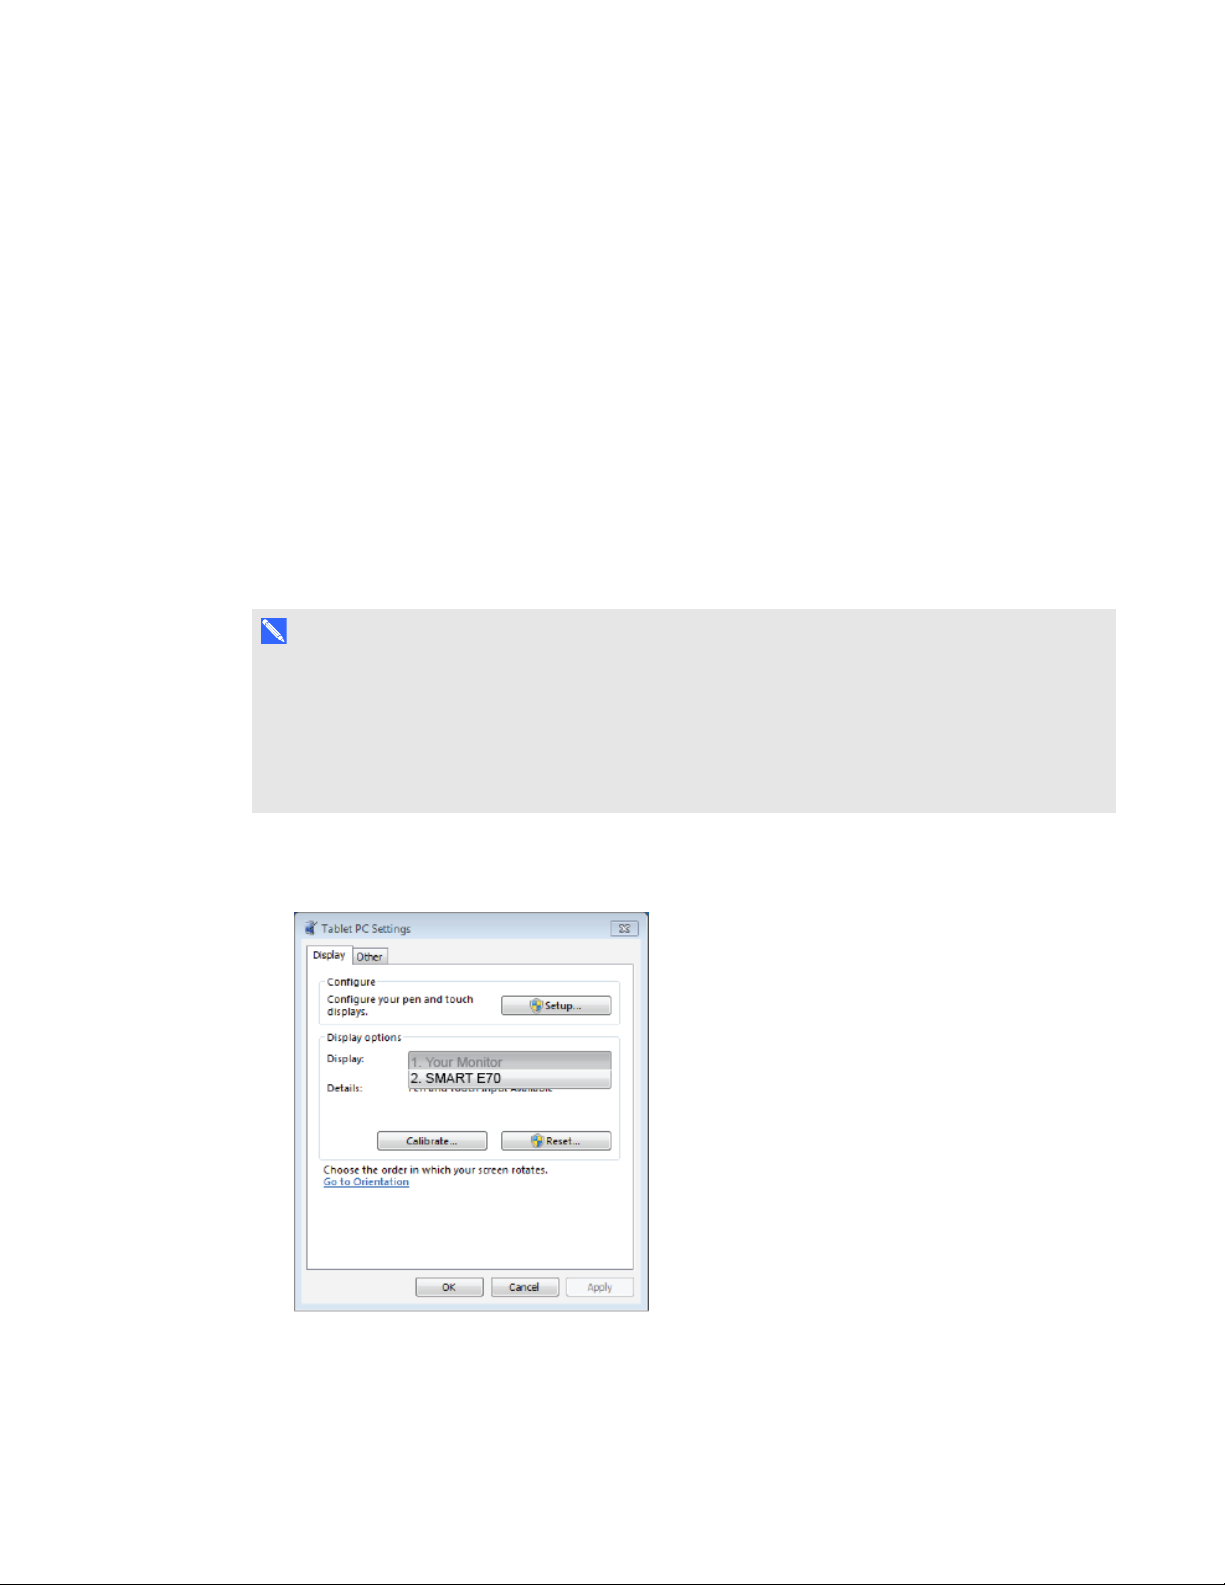
1. Launch Control Panel -> Tablet PC Settings. Ensure that the Display tab is visible. Ensure that
the Display tab is visible. Select E70 from the display drop down menu.
24 smarttech.com/kb/170534
Page 31
C H A P T E R 4
Troubleshooting your interactive flat panel
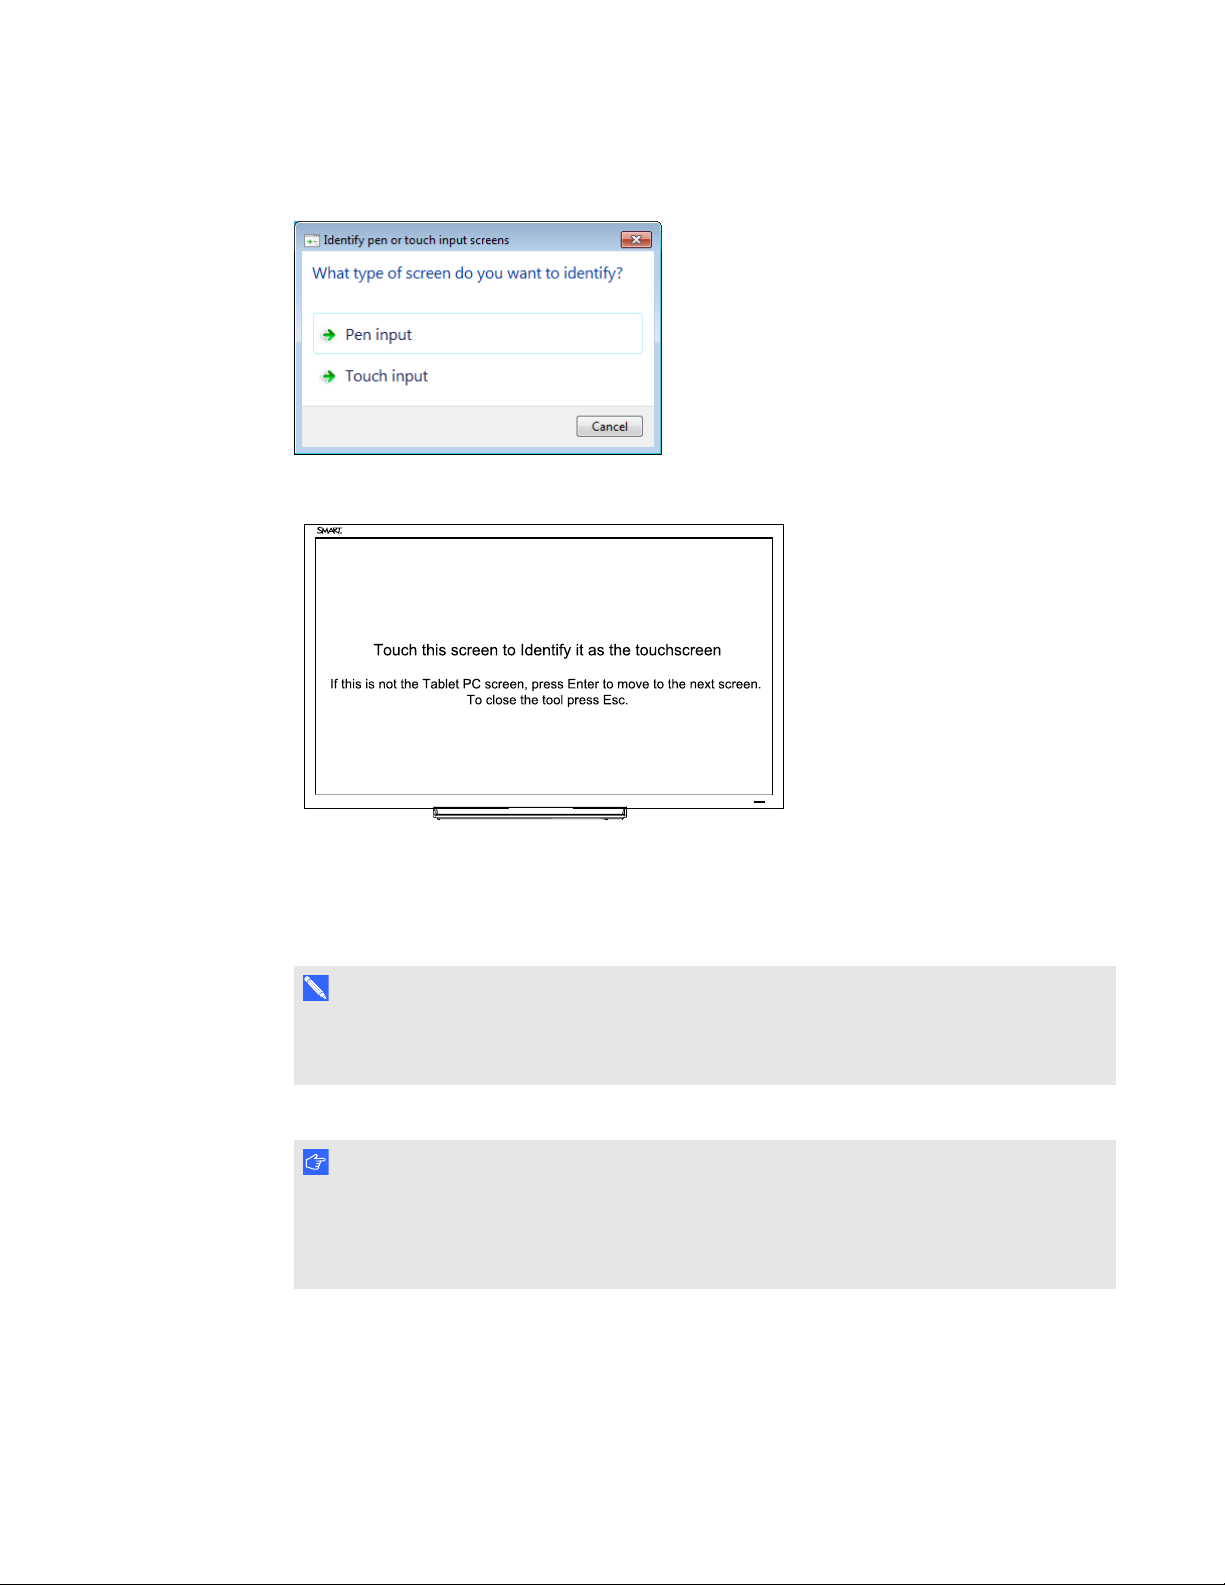
2. Click Setup Windows displays the following page; select Touch input.
3. Windows displays the following page on your first display:
4. If necessary, press Enter until the page is displayed on your touch screen.
5. Tap your touchscreen two or three times until the text changes.
6. Press enter to skip through any remaining screens until the window closes.
N O T E
Do not touch any further touch screens as the correct association between the selected
monitor and touch screen will be lost.
7. Click OK.
I M P O R T A N T
If you have difficulty with the above procedure, set up your E70 as the primary monitor (or main
display) and try again. You can switch your main display back to its original setting after you
have successfully identified the E70 as your touch screen.
25 smarttech.com/kb/170534
Page 32
C H A P T E R 4
Troubleshooting your interactive flat panel
Calibrating your SMART BOARD E70 with Windows 7 or 8
Calibration ensures that your E70 recognizes the position of your pen. In Windows 7, when you
calibrate for the first time, the screen uses 16 different reference points. This initial calibration applies
to all users of the E70. If you calibrate again, only 4 points are used, and apply only to your user
account. http://windows.microsoft.com/en-ca/windows7/getting-more-out-of-your-tablet-pc
Under normal conditions, the SMART Board E70 should not require calibration. However, calibration
may be required if touch is inaccurate.
N O T E
Calibration should be done only by an administrator.
To calibrate your SMART Board E70:
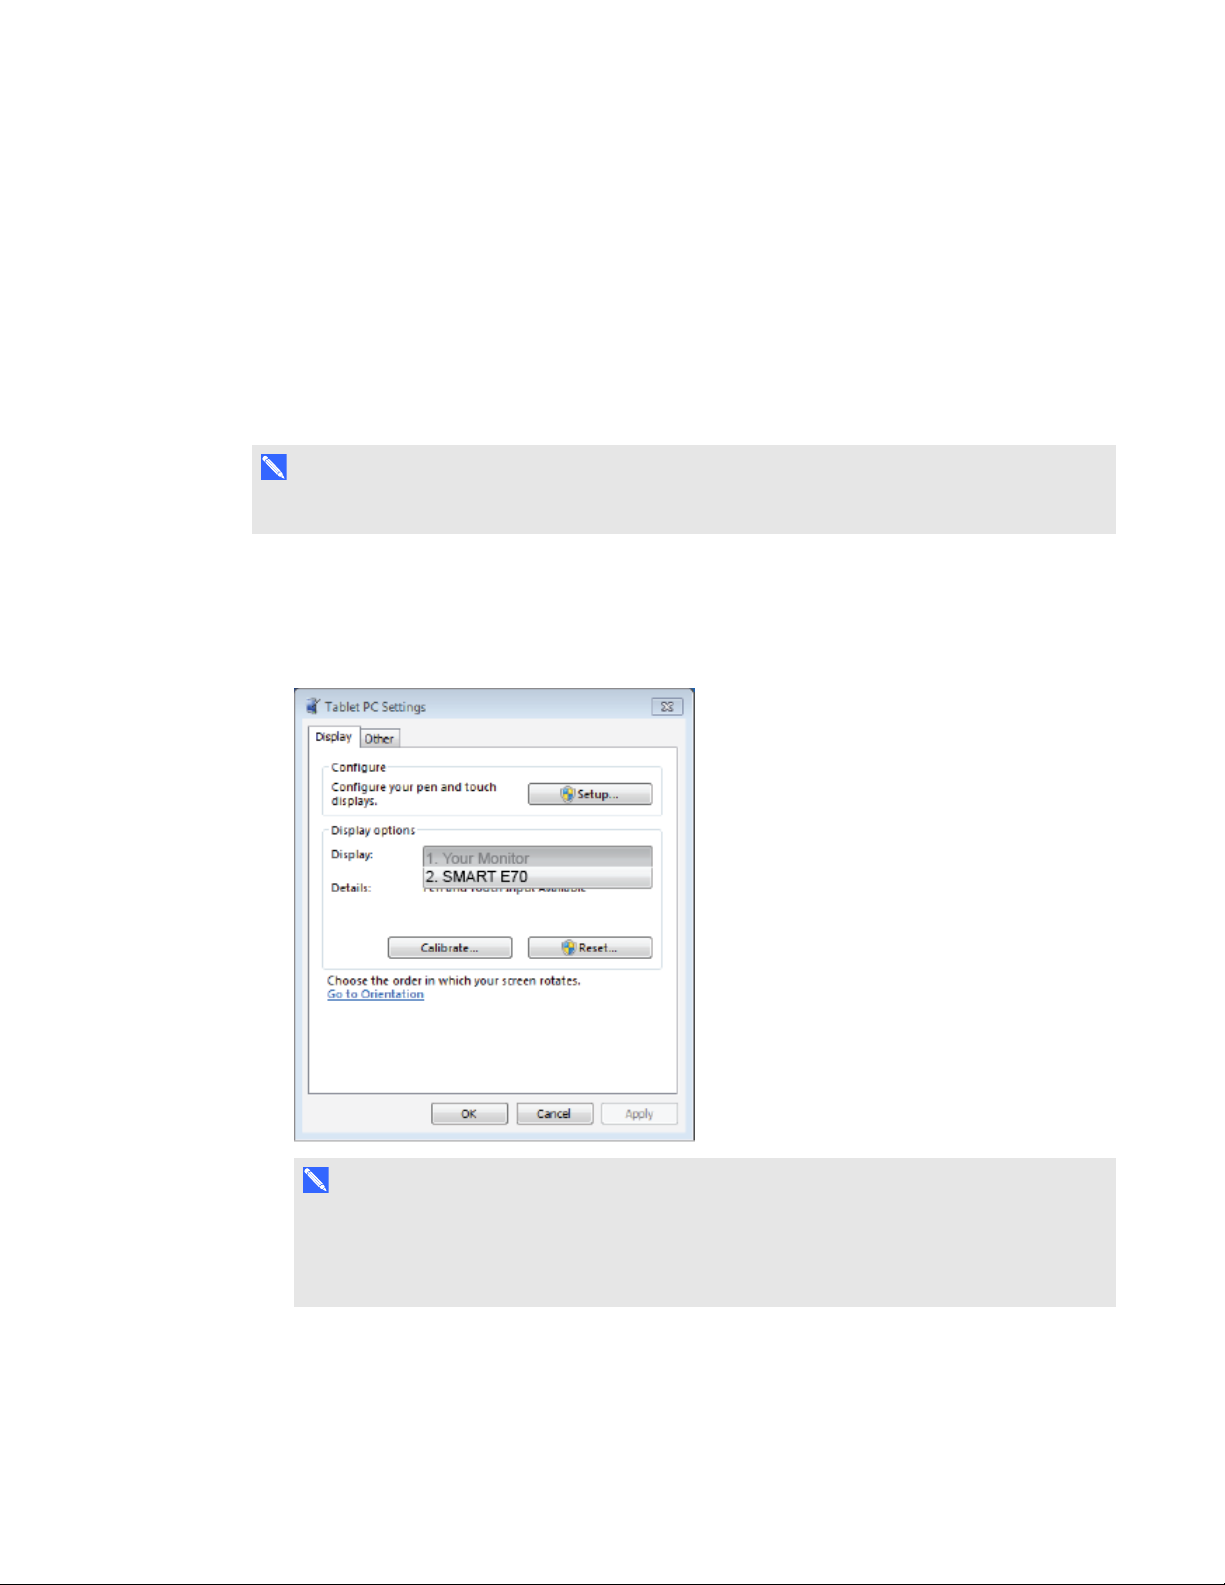
1. Launch Control Panel -> Tablet and PC Settings. Ensure that the Display tab is visible. Select
E70 from the display drop down menu.
N O T E
If you have multiple monitors ensure that you have identified the SMART E70 interactive flat
panel as your touch screen with Windows 7 and Windows 8 operation systems, see previous
step "Setting up multiple displays"
2. Click Calibrate.
26 smarttech.com/kb/170534
Page 33
C H A P T E R 4
Troubleshooting your interactive flat panel
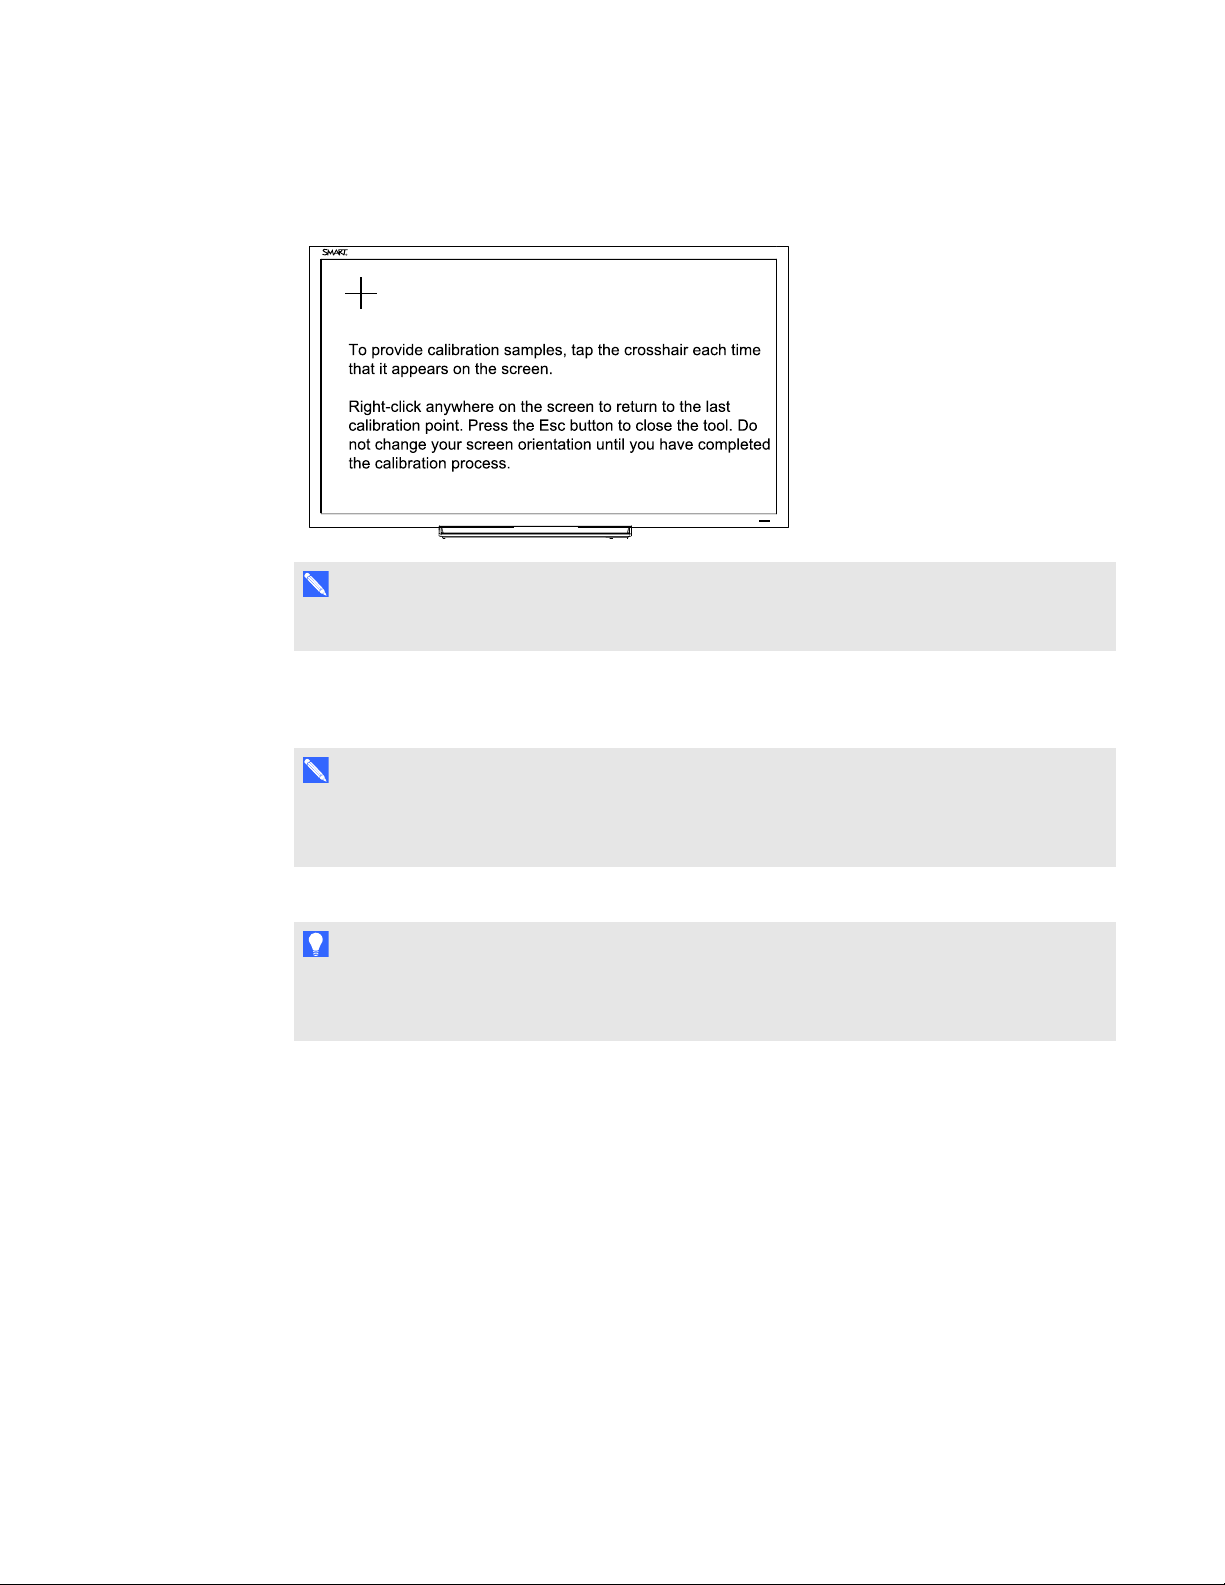
3. Then tap each cross as they appear.
N O T E
Each cross hair may take several attempts, so please be patient with this process.
4. Follow the instructions on screen.
5. When finished, click OK on the Tablet and PC settings page to commit your changes.
N O T E
If you make a mistake like tapping somewhere else other than the cross hair you will have to
repeat the procedure.
The process is complete.
T I P
To clear your calibration data; for example, if you accidentally performed the procedure, click
“Reset”.
27 smarttech.com/kb/170534
Page 34
C H A P T E R 4
Troubleshooting your interactive flat panel
Calibrating your SMARTBoard
E70 interactive flat panel with
Mac OS X
You need to calibrate the SMART Board E70 interactive flat panel after you install the software or if
you change the display resolution.
Calibrating your SMART Board E70
Before you calibrate your SMART E70 interactive flat panel, ensure that you have installed the
required drivers. See smarttech.com/E70Software for product drivers and software.
To calibrate your SMART Board E70
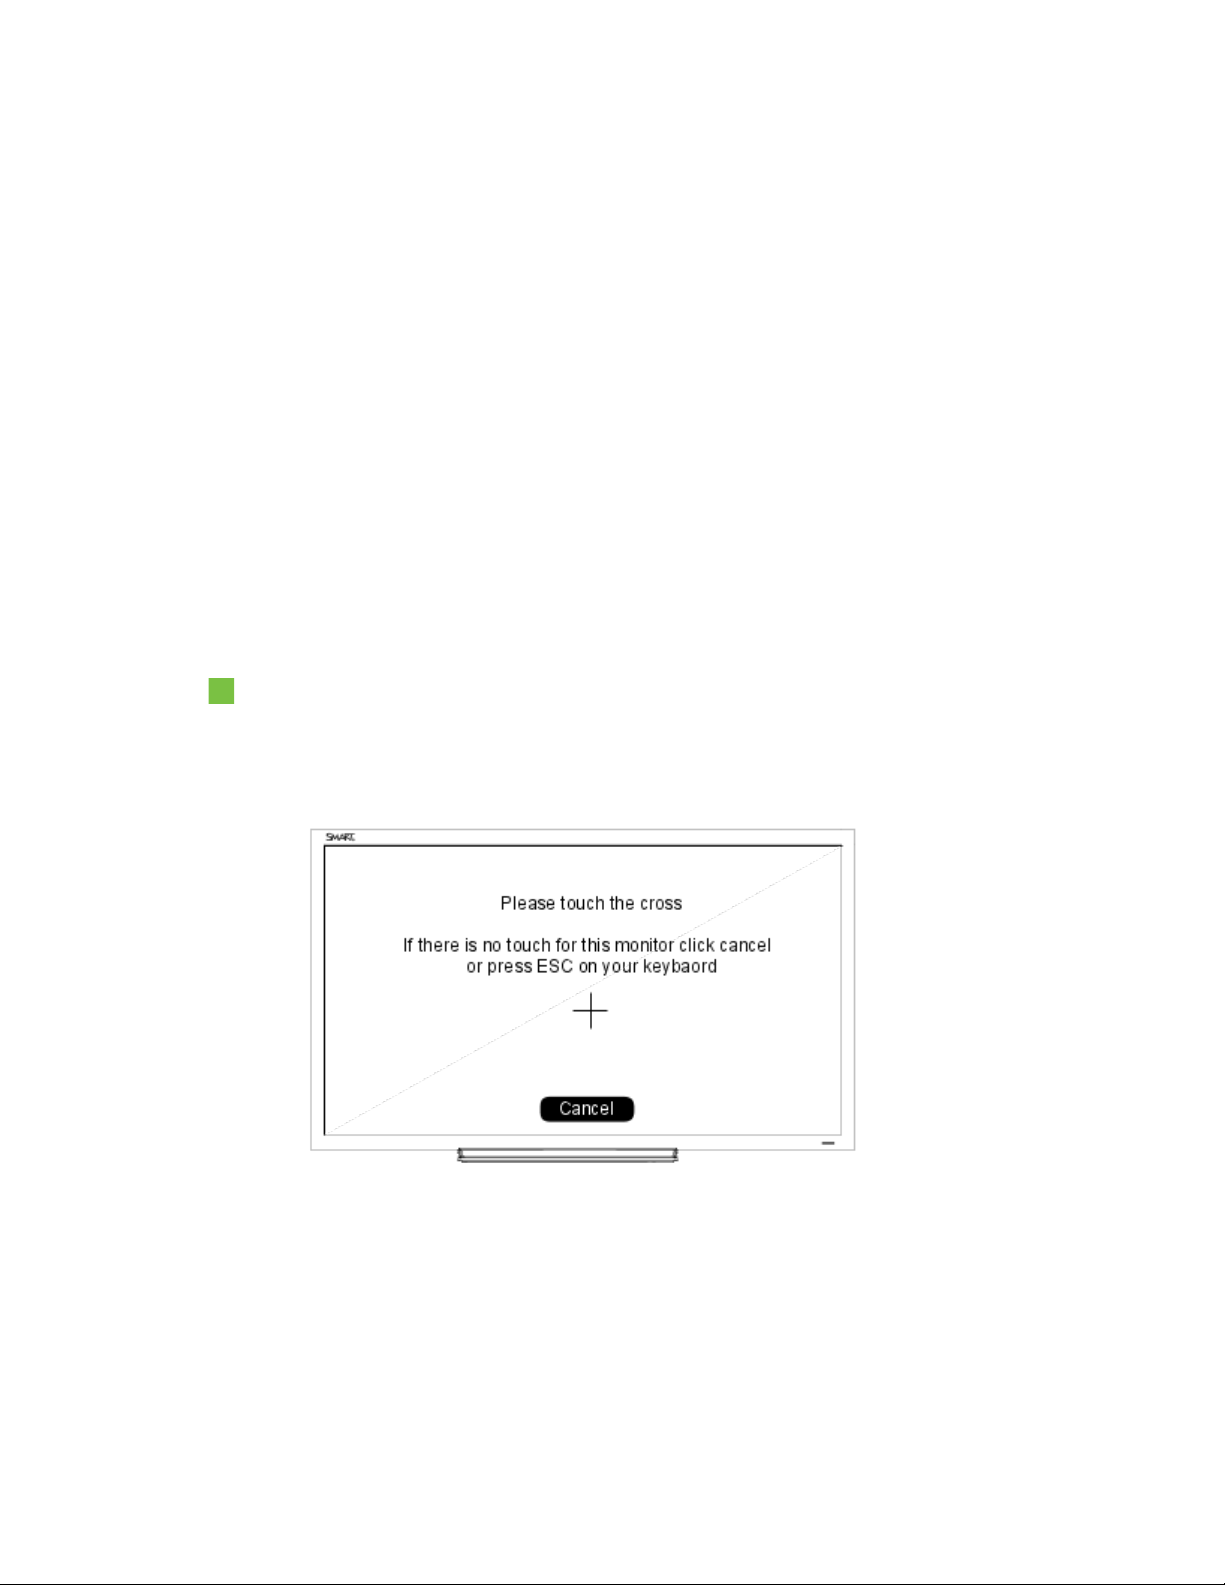
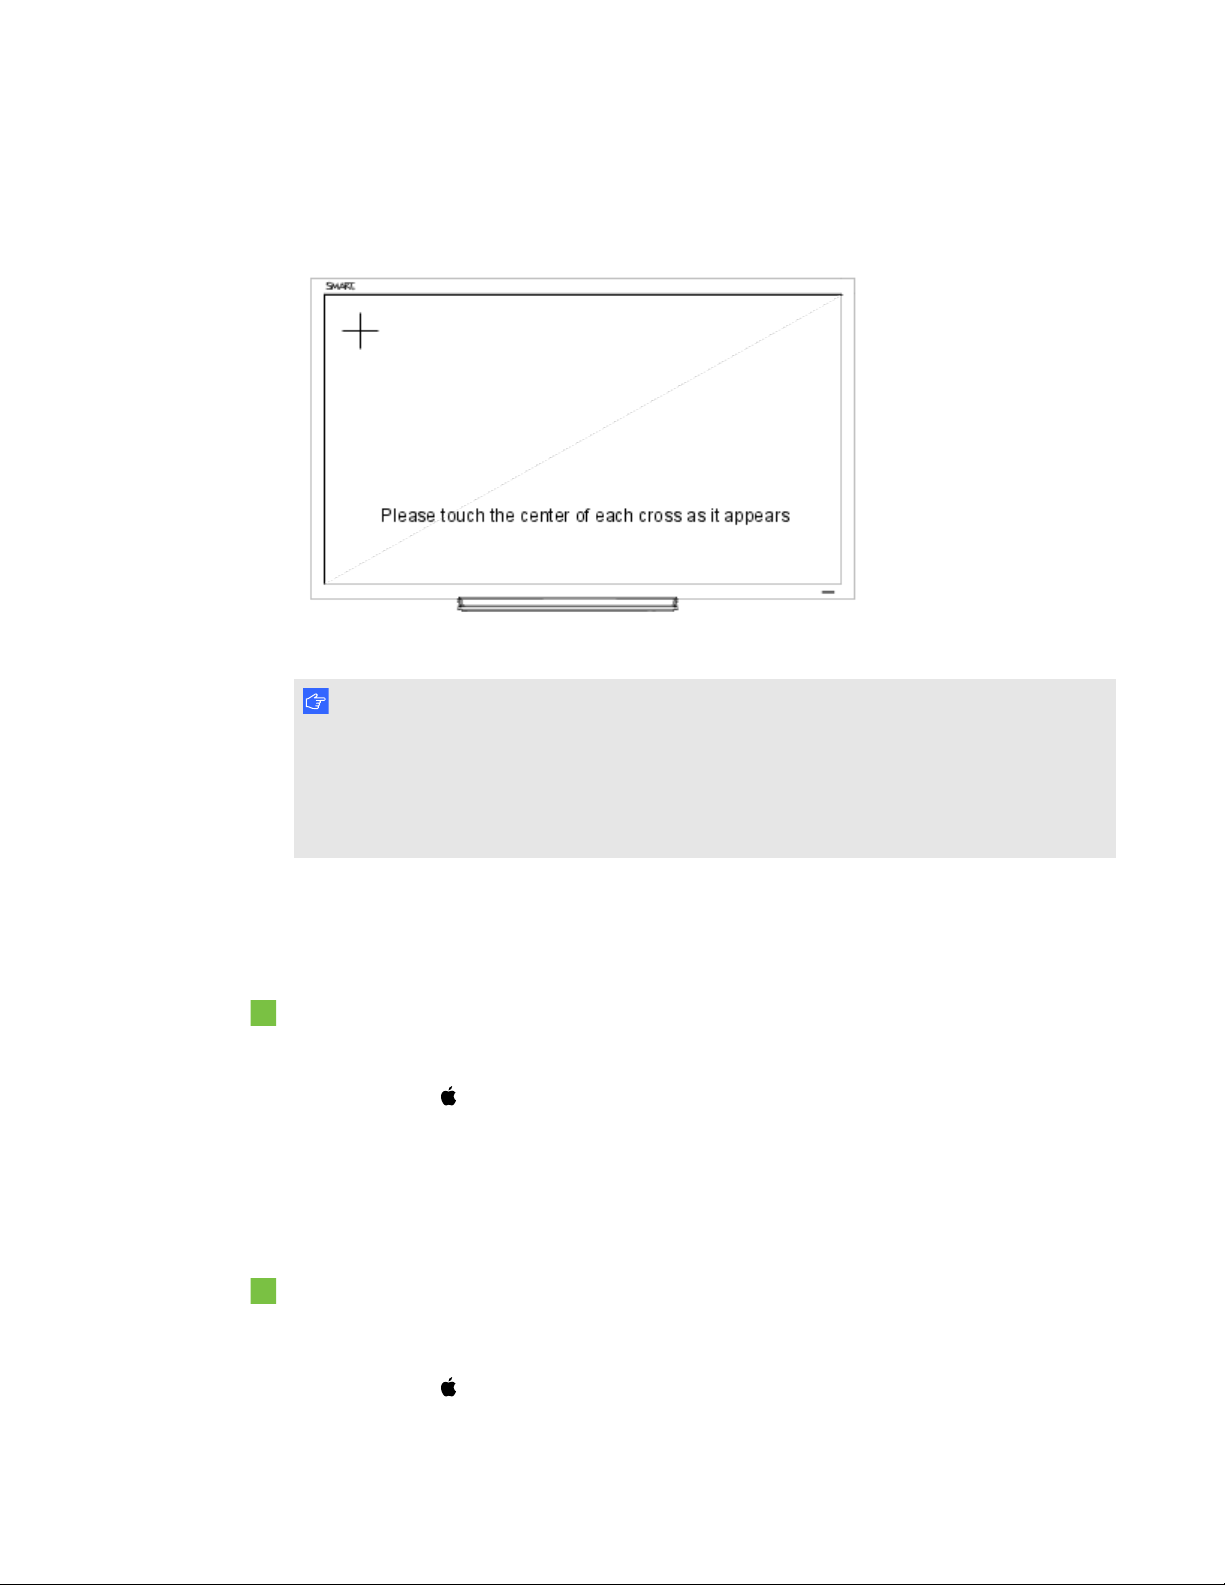
1. Select the Orientation from system tray or SMART settings
The following screen is displayed on your first monitor.
2.
If you have multiple monitors, press Esc on your keyboard until the page is visible on your E70
touch interface.
28 smarttech.com/kb/170534
Page 35
C H A P T E R 4
Troubleshooting your interactive flat panel
3. Tap the cross. After a few seconds the following screen appears. In some cases, you may have
to tap twice.
4. Tap each cross as they appear once.
I M P O R T A N T
If there are multiple monitors, the orient screen will automatically move to the next monitor. If
this other monitor is NOT an E70 touch screen press ESC or click Cancel with the mouse. If
you accidentally touch the board while the screen is on this monitor, then you will have to
repeat the above procedure.
SMARTE70 multiple displays setup Mac
Extending desktop
1. Make sure each additional display is properly connected and powered on.
2.
From the Apple ( ) menu, choose System Preferences.
3. From the View menu, choose Displays.
4. Click the Arrangement tab.
5. Disable (uncheck) "Mirror Displays" in the bottom-left corner.
Mirroring desktop
1. Make sure your additional display is properly connected and powered on.
2.
From the Apple ( ) menu, choose System Preferences.
29 smarttech.com/kb/170534
Page 36

C H A P T E R 4
Troubleshooting your interactive flat panel
3.
From the View menu, choose ( ).
4. Click the Arrangement tab.
5. Enable (check) "Mirror Displays" in the bottom-left corner.
30 smarttech.com/kb/170534
Page 37

Appendix A
compliance
SMARTTechnologies supports global efforts to ensure that electronic equipment is manufactured,
sold and disposed of in a safe and environmentally friendly manner.
Waste Electrical and Electronic Equipment and
Battery regulations (WEEE and Battery
Directives)
Electrical and electronic equipment and batteries contain substances that can be harmful to
the environment and to human health. The crossed-out wheeled bin symbol indicates that
products should be disposed of in the appropriate recycling stream and not as regular waste.
Batteries
Remote contains 2 AAA batteries. Recycle or dispose of batteries properly.
More information
See smarttech.com/compliance for more information.
31 smarttech.com/kb/170534
Page 38

Page 39

Index
A
accessories
included 2
Audio settings 13
B
batteries 31
F
file formats
compatible 14
I
Included cables 2
installation
choosing a location 4
L
P
pen 2
Picture settings 13
projector
installing 3
R
Recommended computer screen resolution 6
remote control 2
S
serial number
locating 17
Setup settings 13
T
Time settings 14
tray 2
light sources 4
location 4
M
Menu control panel 12
Multi Media mode 14
O
on-screen display menu 13
33 smarttech.com/kb/170534
W
WEEE and Battery Directives 31
Page 40

Page 41

Page 42

SMARTTechnologies
smarttech.com/support
smarttech.com/contactsupport
smarttech.com/kb/170534
 Loading...