


Unifi 35
Table of contents
 Loading...
Firmware Update and User’s Guide
SMART Board™ 600i Series
Interactive Whiteboard System

Trademark Notice
SMART Board, Notebook, Bridgit, LinQ, the SMART logo and smarttech are trademarks or registered trademarks of SMART Technologies
ULC in the U.S. and/or other countries. All other third-party product and company names may be the trademarks of their respective
owners.
Copyright Notice
© 2008 SMART Technologies ULC. All rights reserved. No part of this publication may be reproduced, transmitted, transcribed, stored in a
retrieval system or translated into any language in any form by any means without the prior written consent of SMART Technologies ULC.
Information in this manual is subject to change without notice and does not represent a commitment on the part of SMART.
Patent No. US5448263; US6141000; US6326954; US6337681; US6540366; US6741267; US6747636; US7,151,533; US7289113; and
CA2058219. Other patents pending.
06/2008

Table of Contents i
Table of Contents
About the Firmware 1
Whiteboard...................................................................................................................................... 1
Bridgit Conferencing Software ........................................................................................................ 1
Computer and Video Source Inputs................................................................................................1
Configuration................................................................................................................................... 2
Version Comparison............................ .... ... ... ... ... .... ... ... .......................................... ... ..................... 3
Updating the Firmware 5
Updating the Firmware through a Computer................................................................................... 5
Configuring the Firmware 9
Orienting Your SMART Board 600i Interactive Whiteboard System ............................................... 9
Configuring Multiple SMART Board 600i Interactive Whiteboard Systems....................................11
Securing Configuration Settings.................................................................................................... 14
Connecting Computers to the SMART Board 600i Interactive Whiteboard System ..................... 16
Connecting Video Sources to the SMART Board 600i Interactive Whiteboard System................ 19
Configuring the Display Settings................................................................................................... 22
Configuring Networking and Conferencing Settings ..................................................................... 24
Configuring Room Control Settings...............................................................................................30
Configuring Language and General System Settings................................................................... 36
Configuring Unifi 35 Projector Settings.........................................................................................39
Using the Firmware 45
Basic Tools.................................................................................................................................... 45
Starting a Firmware Session......................................................................................................... 50
Whiteboarding............................................................................................................................... 50
Collaborating................................................................................................................................. 58
Connecting to Computers and Video Sources.............................................................................. 68
Using Your SMART Board 600i Interactive Whiteboa rd System with Computer and
Video Source Inputs...................................................................................................................... 71
Ending a Firmware Session.................... ... ... ... ... .... ... ... ... .... ... ... ... .... ... ......................................... 74
Customer Support 77
Online Support.................... ... .... ... .......................................... ... ................................................... 77
Training......................................................................................................................................... 77
Contacting SMART Technical Support.......................................................................................... 77
General Inquiries........................................... ... .......................................... ... ................................ 77
Warranty........................................................................................................................................ 78
Registration................................................................................................................................... 78
Index 79

ii Table of Contents

About the Firmware 1
About the Firmware
This chapter introduces the latest version of firmware for the Unifi 35 projector. This version
includes several enhancements that bring the SMART Board™ 600i interactive whiteboard
system’s feature set in line with that of the new SMART Hub SE240.
• Whiteboard (this page)
• Bridgit Conferencing Software (this page)
• Computer and Video Source Inputs (this page)
• Configuration (page 2)
• Version Comparison (page 3)
Whiteboard
Whiteboard (formerly ScratchPad interactive whiteboarding application) captures notes and
drawings in digital ink on your 600i interactive whiteboard system without a computer.
Use Whiteboard for brainstorming, note taking and other activities for which you want to use your
interactive whiteboard system’s digital ink tools without connecting to a computer.
In addition to saving Whiteboard files to a USB storage device, you can also send them in e-mail
messages.
Bridgit Conferencing Software
If you have access to a Bridgit software server, you can use the collaboration features included in
the latest version of the firmware to collaborate with others through conferences.
Bridgit conferencing software allows you to create conferences or join conferences. While in a
conference, you can:
• share your display
• view other participants’ displays
• communicate with others through chat
• use other features of the firmware, including Whiteboard and computer and video source
connections to present information or otherwise participate in the conference
Computer and Video Source Inputs
Like previous versions of the firmware, the latest version allows you to connect computers and
video sources, such as DVD players and VCRs, to your 600i interactive whiteboard system and
view their outputs on the projected images. You can then write digital ink notes, temporar ily free ze
the display, and take screen captures to include in Whiteboard files.
In addition, the latest version of the firmware introduces support for LinQ software. LinQ software
allows you to view output from computers on the same subnet as the 600i interactive whiteboard
system without having to connect those computers directly. Connect the LinQ software client
computers to the subnet wirelessly or through a network cable.

2 About the Firmware
Configuration
The latest version of the firmware enhances the Unifi 35 Settings dialog box to include basic
networking, SMTP and SNMP configuration settings, the ability to export configuration settings
from one 600i interactive whiteboard system and then import them to other 600i interactive
whiteboard systems, and the ability to password protect configuration settings.
In addition, the latest version includes the following configuration settings:
• display and other basic firmware settings
• projector settings
• RS-232 room control support

About the Firmware 3
Version Comparison
The following table compares the featur es of the late st version of the firmware to those of previous
versions.
Feature
Previous
Versions
Latest
Version
Whiteboard
• Write and erase digital ink notes in Whiteboard
• Save Whiteboard files to a USB storage device
• Send Whiteboard files to an e-mail address
9
9
9
9
9
Bridgit conferencing software
• Create conferences
• Join conferences
• Share your display
• View other participants’ displays
• Communicate with others through chat
• Work with Whiteboard and computer and video source connections
during a conference
9
9
9
9
9
9
Computer and video source inputs
• View input of locally connected computers and video sources
• View input of LinQ software client computers
• Write digital ink notes on the display
• Freeze the display
• Take a screen capture of the display
9
9
9
9
9
9
9
9
9
Configuration
• Configure display and other basic firmware settings
• Configure computer and video source input settings
• Configure basic networking, SMTP and SNMP settings
• Configure projector settings
• Use RS-232 room control support
• Secure configuration settings with a password
• Import and export configuration settings
9
9
9
9
9
9
9
9
9
9
9

4 About the Firmware
Updating the Firmware 5
Updating the Firmware
This chapter explains how to download and inst all the update to the SMAR T Board 600i inter active
whiteboard system firmware.
Updating the Firmware through a Computer
Updating the firmware through a computer involves:
1. installing the Unifi 35 projector updater
2. connecting the Unifi 35 projector to the computer
3. updating the firmware
NOTE: You need a Windows computer with Internet access that you can connect to the Unifi 35
projector through a USB cable. The computer must have a moni tor or be a laptop so that you can
view and interact with the wizards during the update process.
1. In your browser, go to www.smarttech.com/600ifirmware
.
2. Click Download, and then follow the on-screen instructions.
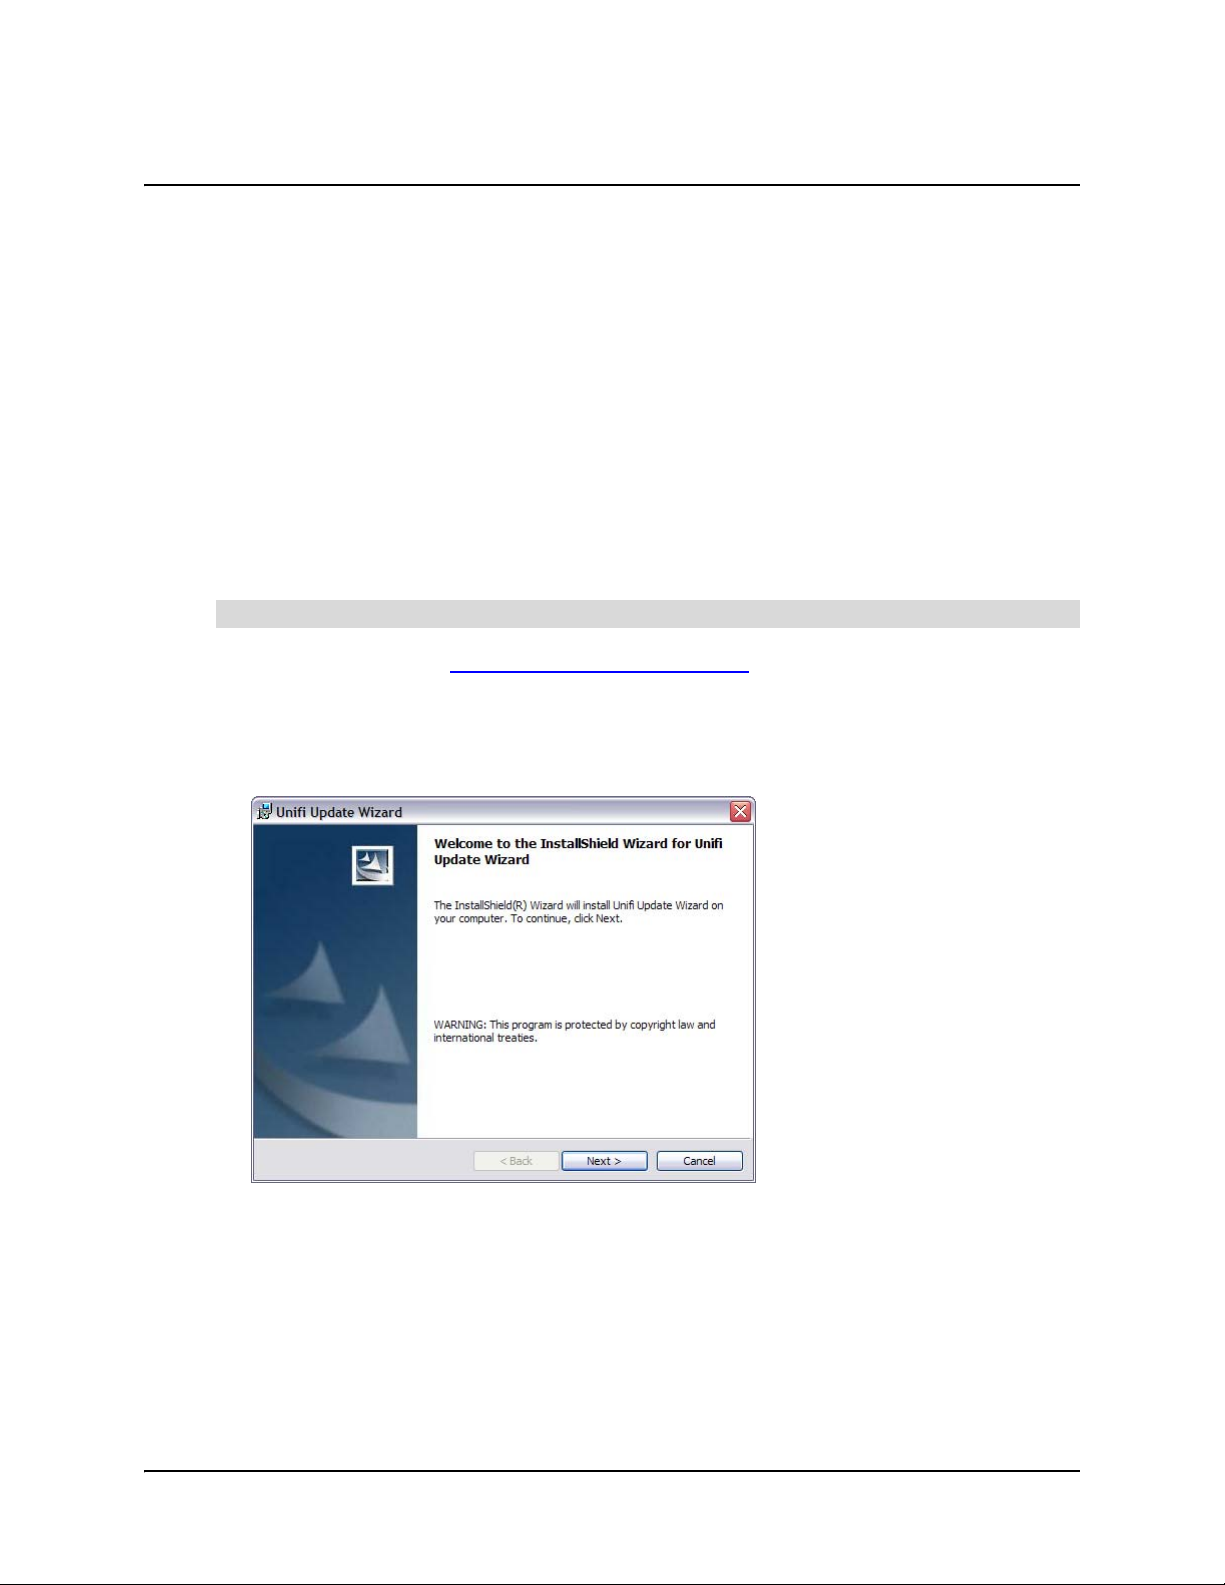
3. After the file finishes downloading, open it.
The Unifi Update wizard appears.
4. Click Next.
5. Select the I accept the terms in the license agreement option, and then click Next.
6. Click Next.
To install the Unifi 35 projector updater

6 Updating the Firmware
7. Click Install.
The wizard installs the updater in the default des tination folder. This may take several minutes.
8. Click Finish.
The Unifi Update wizard closes.
You’ve installed the updater for the latest firmware version on your computer.
1. Connect the 5' 11" (1.8 m) USB cable provided by SMART Technologies from the USB B
receptacle on the Unifi 35 projector or the Extended Connection Panel (ECP) to your
computer.
2. Press and hold the Unifi 35 projector’s Up button, and then press and hold the
Power/Standby button.
The status light blinks amber rapidly.
To connect the Unifi 35 projector to the computer
USB B Receptacle
Power/Standby Button
Up Button
Status Light
Updating the Firmware 7
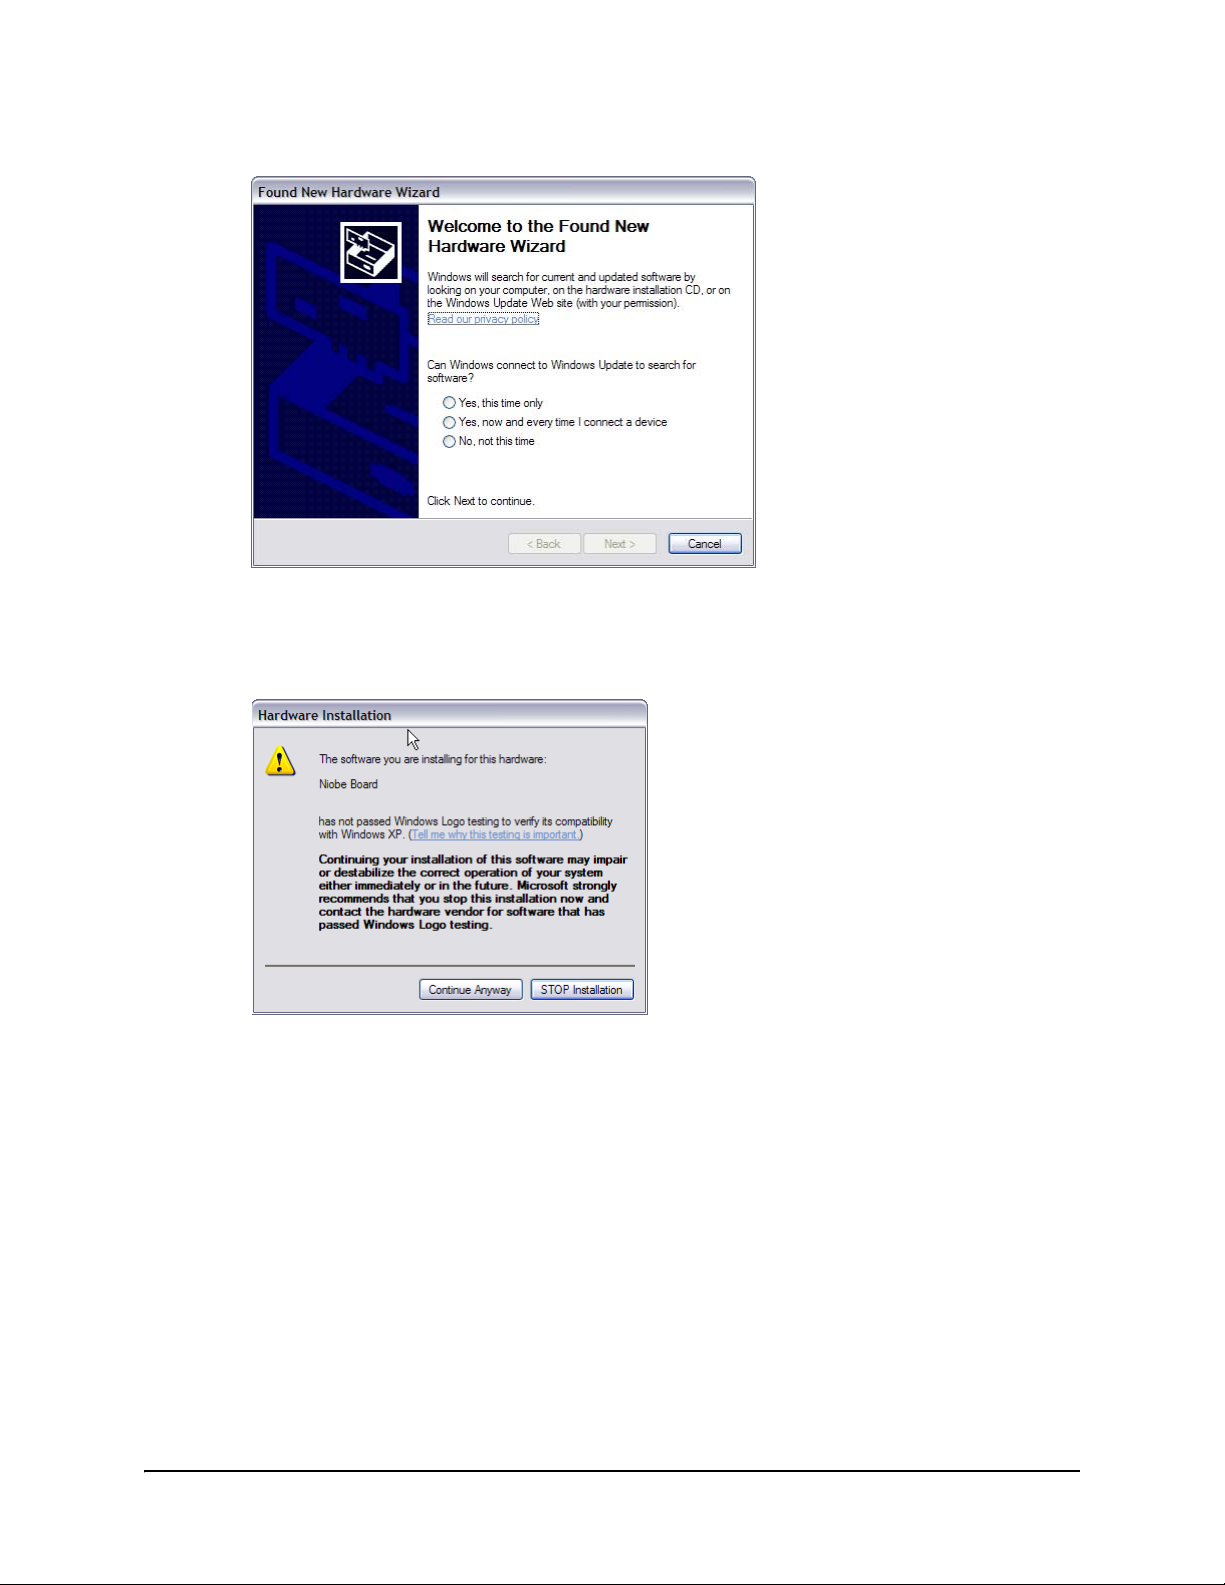
The Found New Hardware wizard appears.
3. Select the No, not this time option, and then click Next.
4. Select the Install the software automatically option, and then click Next.
The Hardware Installation window appears.
5. Click Continue Anyway.
6. Click Finish.
The Found New Hardware wizard closes.
You’ve connected the Unifi 35 projector to the computer.
NOTE: You only need to complete the new hardware installation procedure once.
8 Updating the Firmware
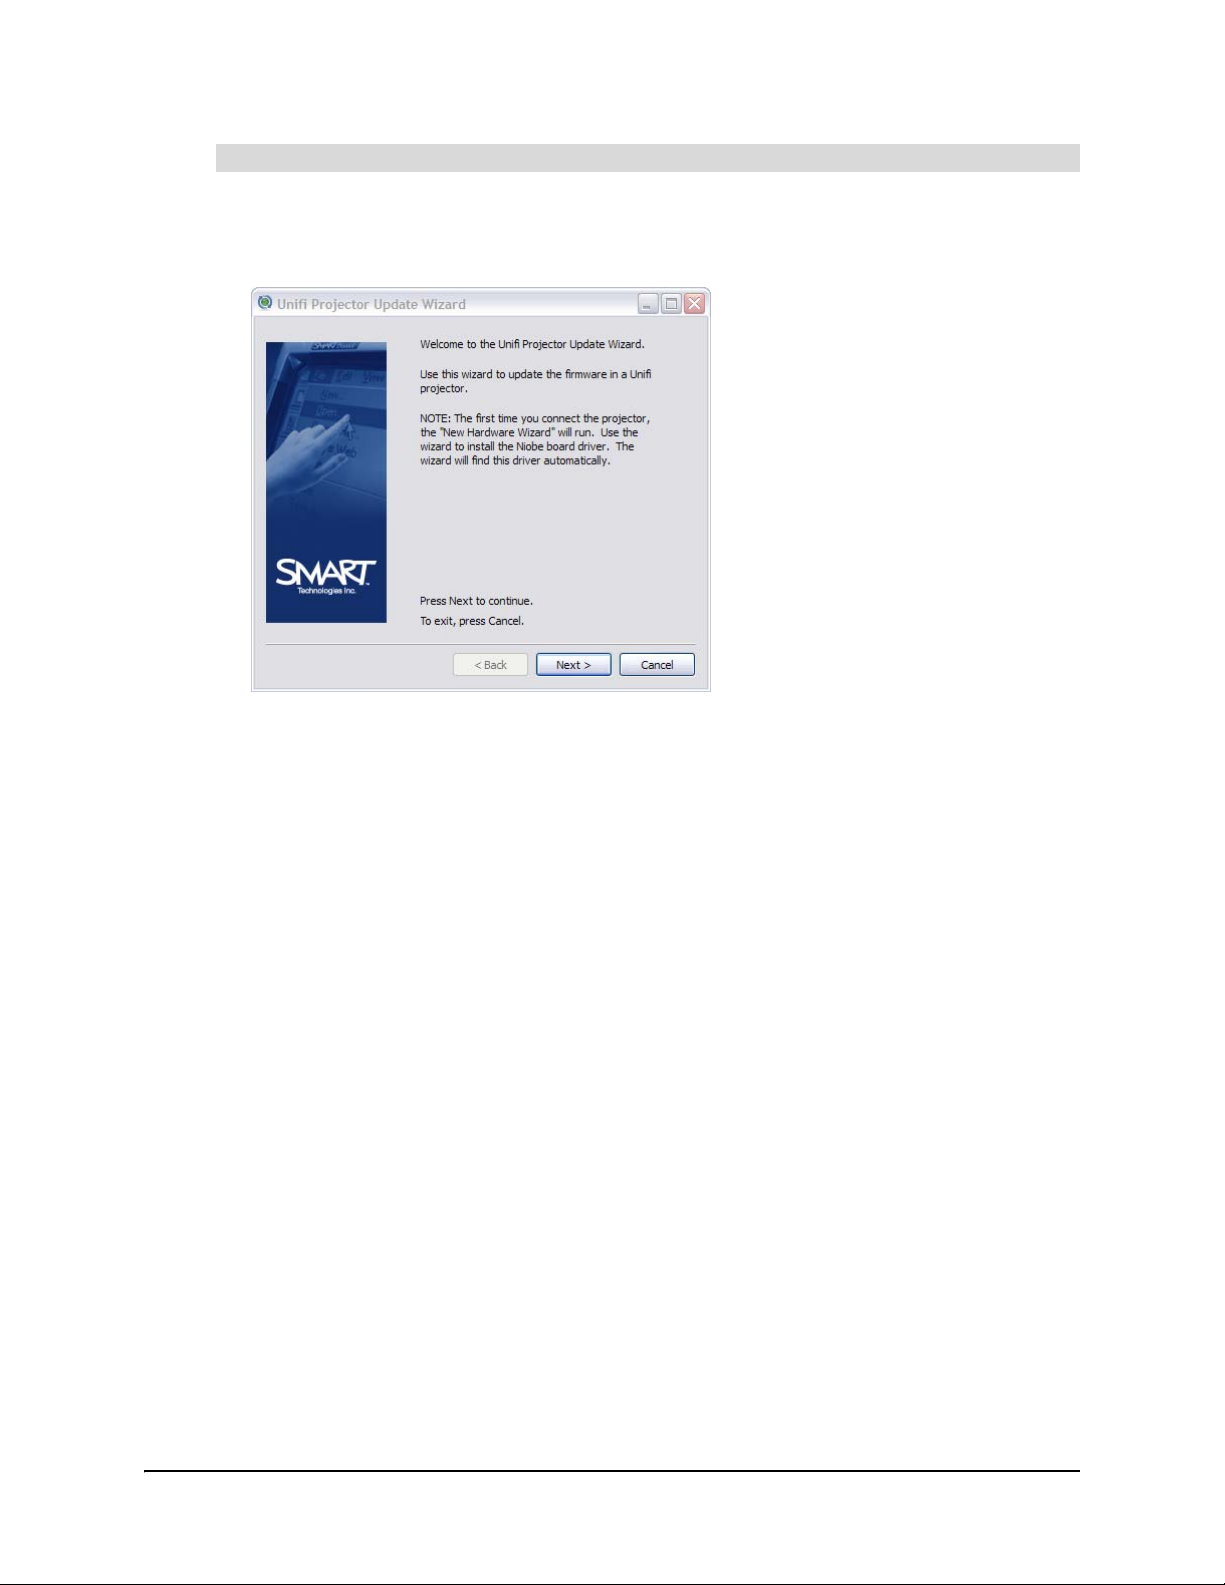
1. In Windows Explorer, browse to C:\Program Files\Unifi Update Wizard, and then do uble-
click Unifi x.x.x.x-Updater.exe, where x.x.x.x is the current versio n of the firm ware.
The Unifi Projector Update wizard appears.
2. Click Next.
3. If you haven’t done so already, connect the 5' 11" (1.8 m) USB cable provided by SMART
Technologies from the USB B receptacle on the Unifi 35 projector or the ECP to your computer
as documented on page 6.
4. Click Next.
5. Select the Yes option, and then click Next.
The wizard updates the firmware.
NOTE: This may take several minutes.
6. Press Next.
7. Click Finish.
The Unifi Projector Update wizard closes.
8. Reset the 600i interactive whiteboard system by unplugging the Unifi 35 projector.
9. Press and hold the Power/Standby button.
10. Plug in the Unifi 35 projector and continue holding the Power/Standby button until the status
light flashes amber.
You’ve updated the firmware to the latest version.
To update the firmware

Configuring the Firmware 9
Configuring the Firmware
This chapter explains how to configure the firmware after the update. It includes information on
connecting the SMART Board 600i interactive whiteboard system to computers, video sources and
a network.
• Orienting Your SMART Board 600i Interactive Whiteboard System (this page)
• Configuring Multiple SMART Board 600i Interactive Whiteboard Systems (page 11)
• Securing Configuration Settings (page 14)
• Connecting Computers to the SMART Board 600i Interactive Whiteboard System (page 16)
• Connecting Video Sources to the SMART Board 600i Interactive Whiteboard System
(page 19)
• Configuring the Display Settings (page 22)
• Configuring Networking and Conferencing Settings (page 24)
• Configuring Room Control Settings (page 30)
• Configuring Unifi 35 Projector Settings (page 39)
Orienting Your SMART Board 600i Interactive Whiteboard System
When your 600i interactive whiteboard system uses its default orientation data, the touch point on
the screen corresponds to the projected image, provided the projected image fills the entire
interactive screen. However, the projected touch point might be offset from the actual touch point
in some situations. Resolve this problem by orienting the interactive whiteboard.
Complete a 9-point orientation using the firmware. The orientation data saves to your
SMART Board interactive whiteboard’s flash memory. Therefore, the orientation data remains the
same when you connect different computers and video sources to the 600i interactive whiteboard
system.
If a computer with Notebook™ software is connected to the Unifi 35 projector or Extended
Connection Panel, you can complete a 4-, 9-, 12- or 20-point orient ation using Notebo ok software.
If you complete such an orientation, the orientation data saves to the computer rather than your
SMART Board interactive whiteboard’s flash memory. Therefore, the orientation data changes
when you connect different computers and video sources.

10 Configuring the Firmware
1. Press Menu, and then press Orient.
OR
Press both pen tray buttons simultaneously.
2. Press Orient.
The orientation screen appears.
3. Using a pen from the pen tray, press and release the center of the first target.
4. Repeat step 3 for each target.
The orientation data saves to the 600i interactive whiteboard system’s flash memory.
You’ve oriented your 600i interactive whiteboard system.
1. Connect the computer (with Notebook software installed) to the Unifi 35 projector or
extended connection panel.
2. Open Notebook software’s Welcome Center and press Orient.
OR
Open Notebook software’s Control Panel and press Orient/Align the SMART Board.
OR
Press both pen tray buttons simultaneously.
The orientation screen appears.
To orient your SMART Board 600i interactive whiteboard system using the
firmware
To orient your SMART Board 600i interactive whiteboard system using Notebook
software
Configuring the Firmware 11
3. Using a pen from the pen tray, press and release the center of the first target.
4. Repeat step 3 for each target.
The orientation data saves to Notebook software.
You’ve oriented your 600i interactive whiteboard system.
NOTE: For more information on orienting your 600 i interactive whiteboard system using Note book
software, see Notebook software online Help
.
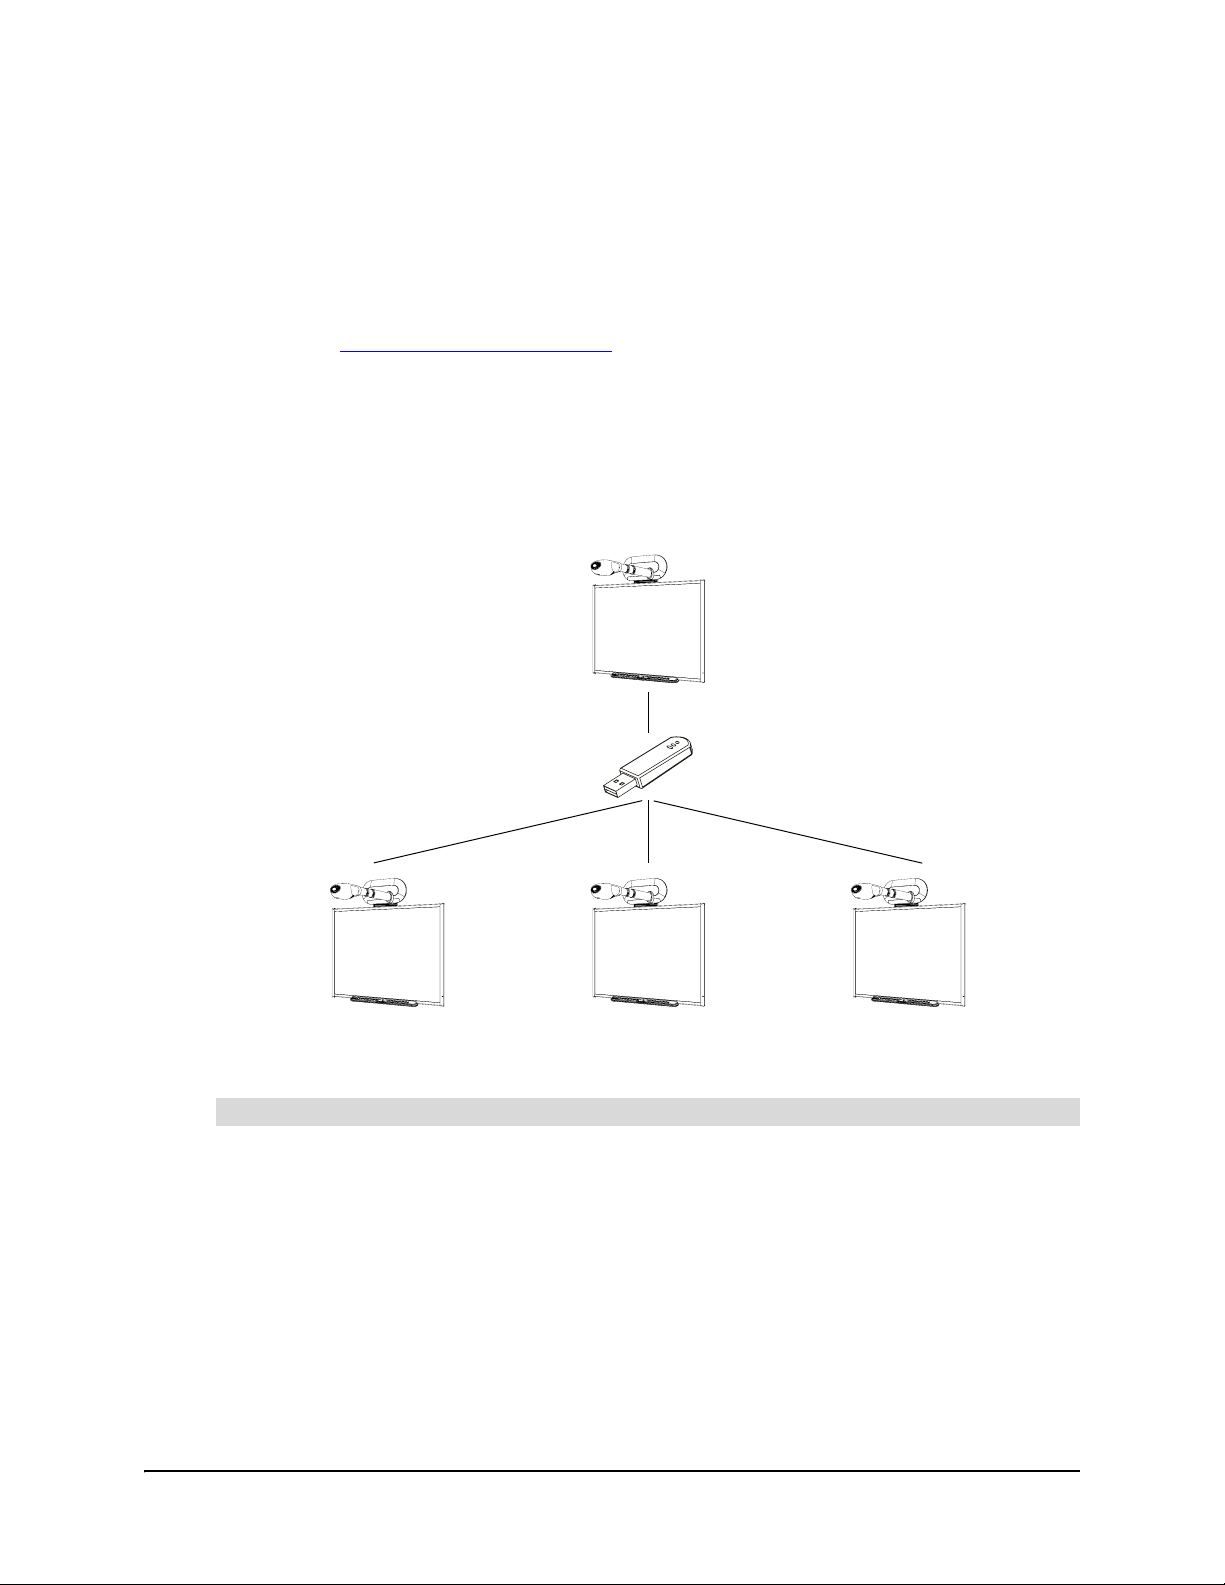
Configuring Multiple SMART Board 600i Interactive Whiteboard
Systems
If you have more than one 600i interactive whiteboard system, you don’t have to configure each
system separately. Instead, configure one system, export the configuration settings to a USB
storage device, and then import the configuration settings to the other systems.
NOTE: The export process doesn’t include orientation data on the USB storage device.
1. Connect a USB storage device to the Unifi 35 projector or Extended Connection Panel.
2. Press Menu.
The Welcome Center appears.
3. Press Settings.
The Unifi 35 Settings dialog box appears.
4. If a password is required to change the con figur ation settings, type the p a ssword in the box at
the bottom of the menu, and then press OK.
NOTE: For information on the configuration settings password, see page 14.
To export configuration settings to a USB storage device
12 Configuring the Firmware
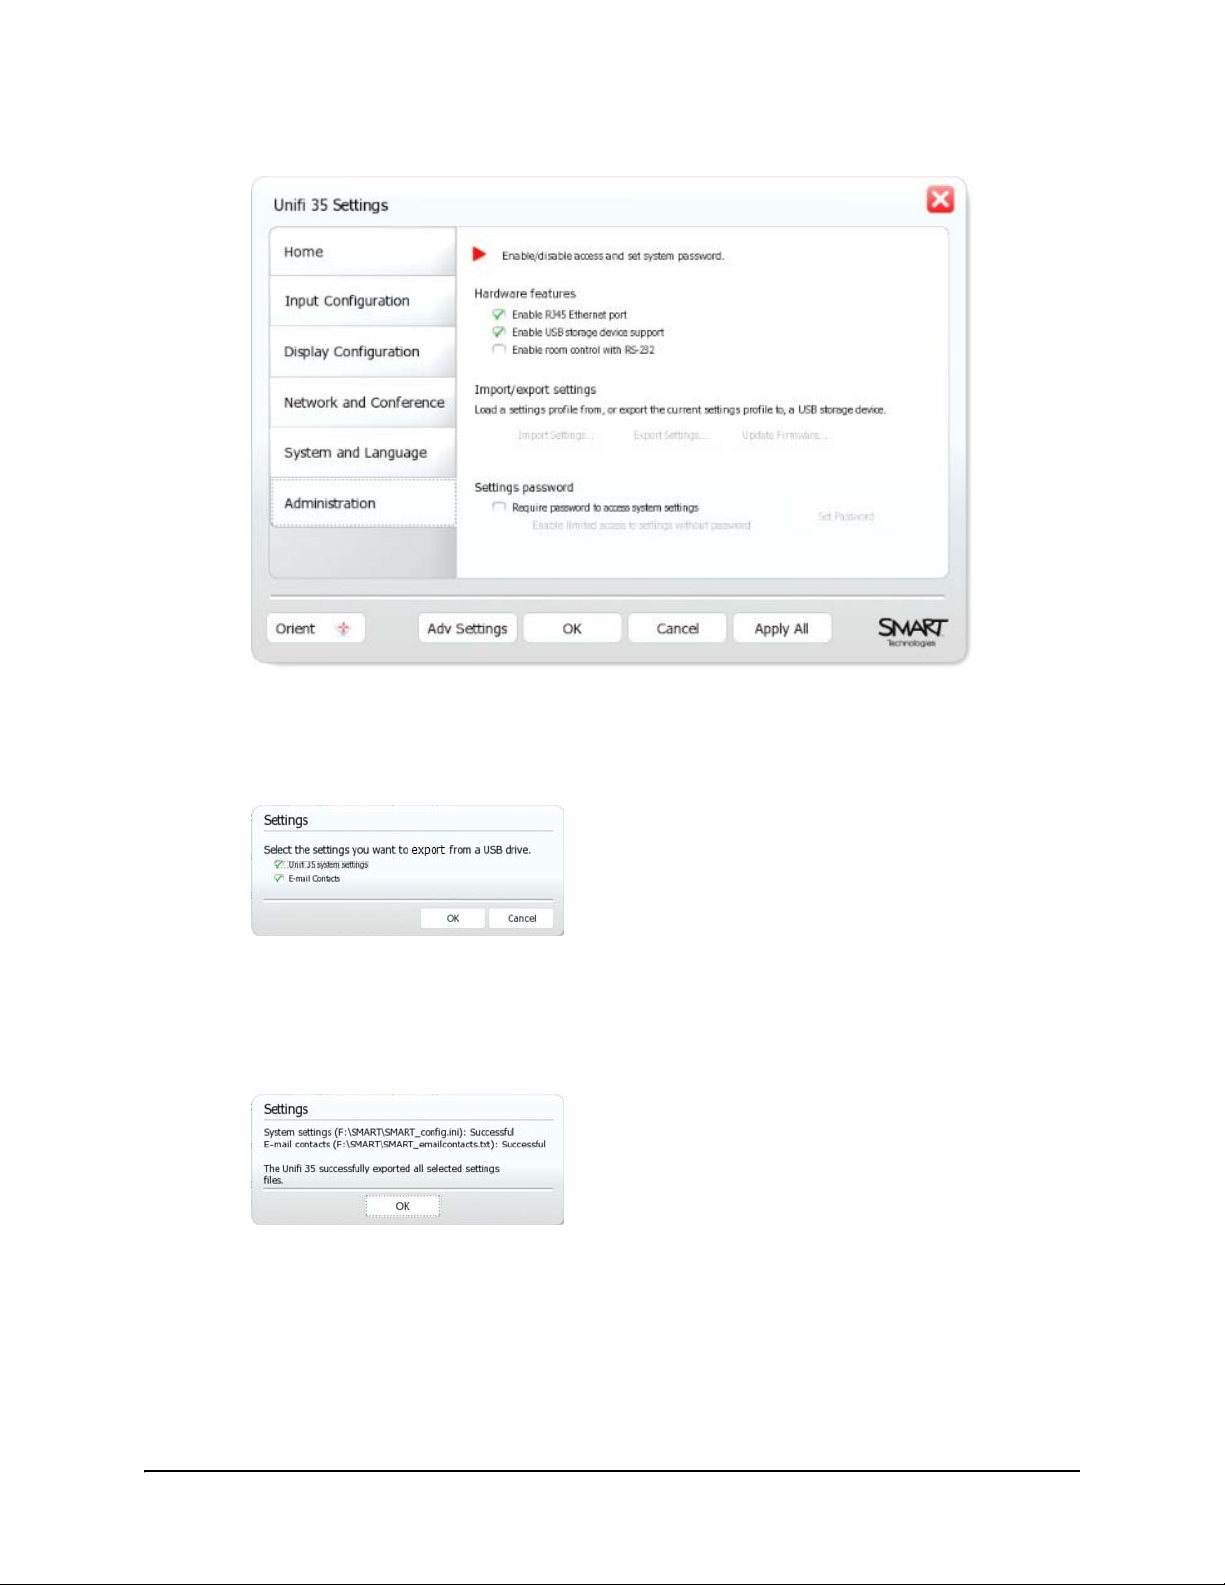
5. Press Administration.
6. Ensure the Enable USB storage device support check box is selected.
7. Press Export Settings.
The Settings dialog box appears.
8. Select the Unifi 35 system settings check box to export configuration settings and th e E-mail
Contacts check box to export contacts.
9. Press OK.
The Settings dialog box appears.
10. Press OK.
You’ve exported the configuration settings from one 600i interactive whiteboard system to a USB
storage device. You can now import those configuration settings to other 600i interactive
whiteboard systems.
Configuring the Firmware 13
1. Connect the USB storage device to the Unifi 35 projector or Extended Connection Panel.
2. Press Menu.
The Welcome Center appears.
3. Press Settings.
The Unifi 35 Settings dialog box appears.
4. If a password is required to change the con figur ation settings, type the p a ssword in the box at
the bottom of the menu, and then press OK.
NOTE: For information on the configuration settings password, see page 14.
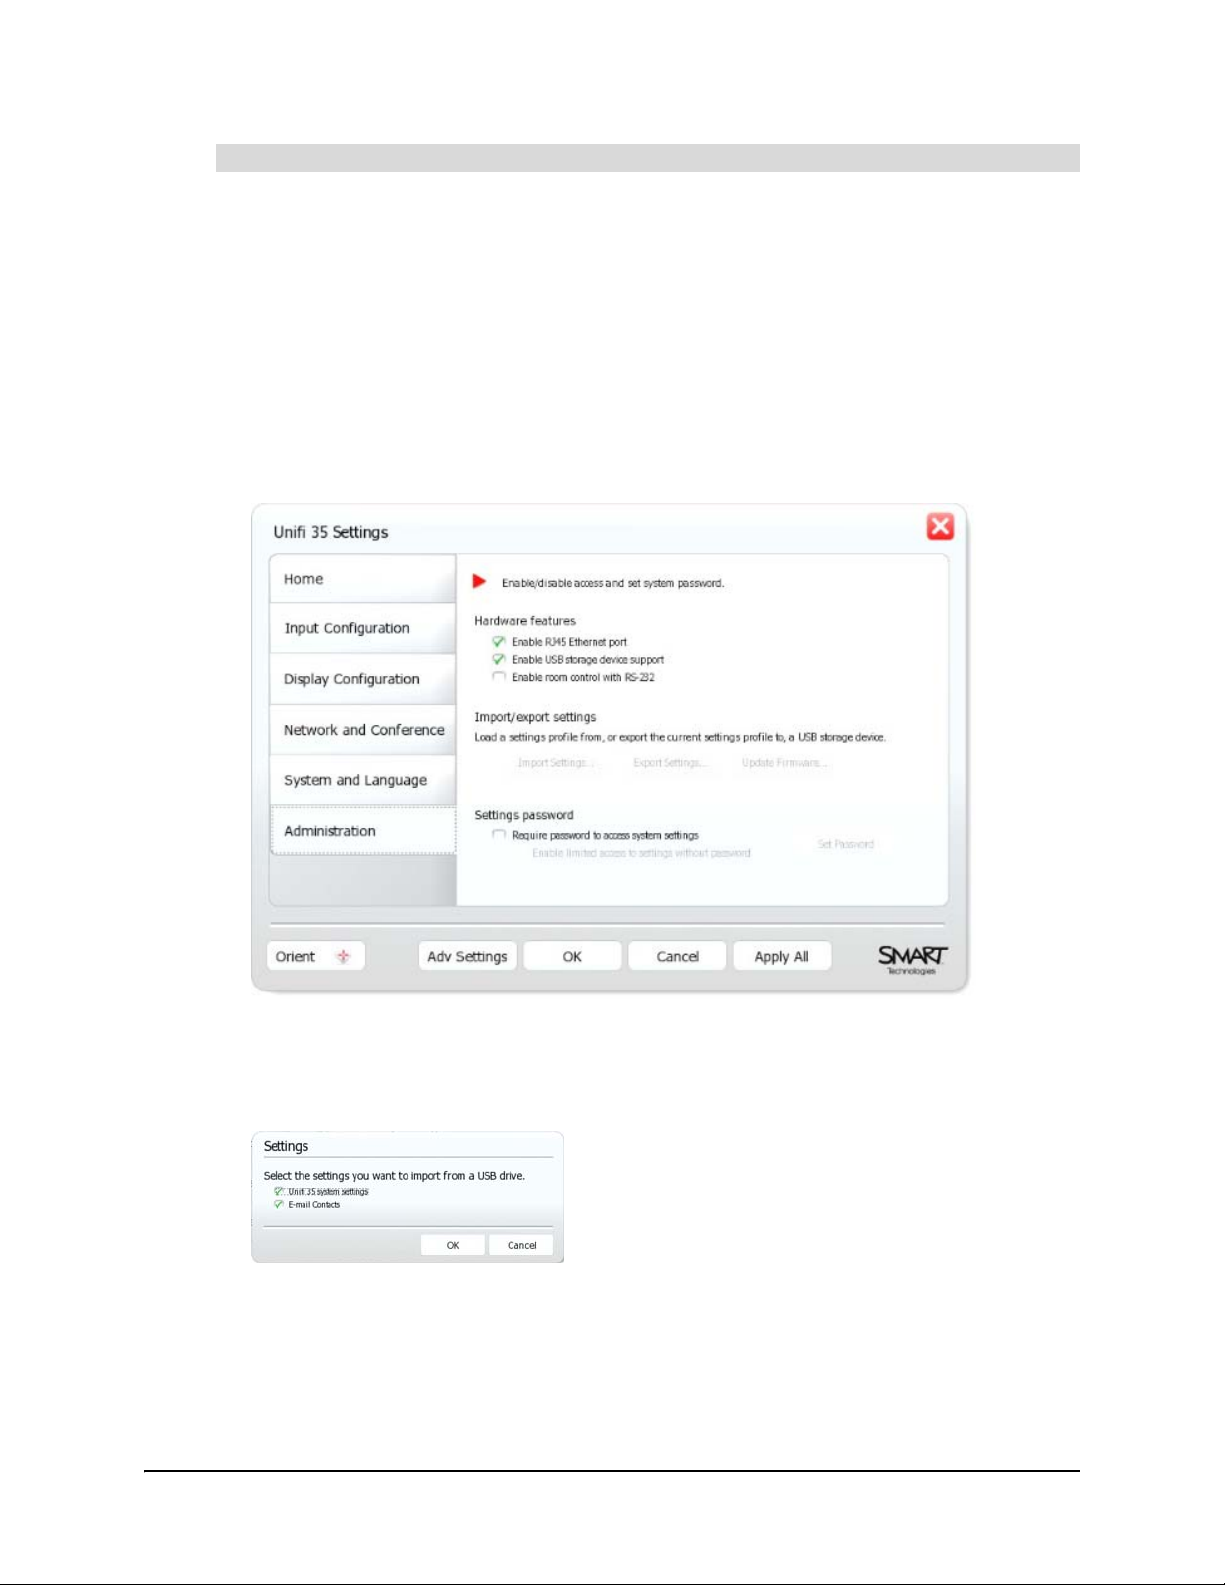
5. Press Administration.
6. Ensure the Enable USB storage device support check box is selected.
7. Press Import Settings.
The Settings dialog box appears.
8. Select the Unifi 35 system settings check box to import configuration settings and th e E-mail
Contacts check box to import contacts.
To import configuration settings from a USB storage device
14 Configuring the Firmware
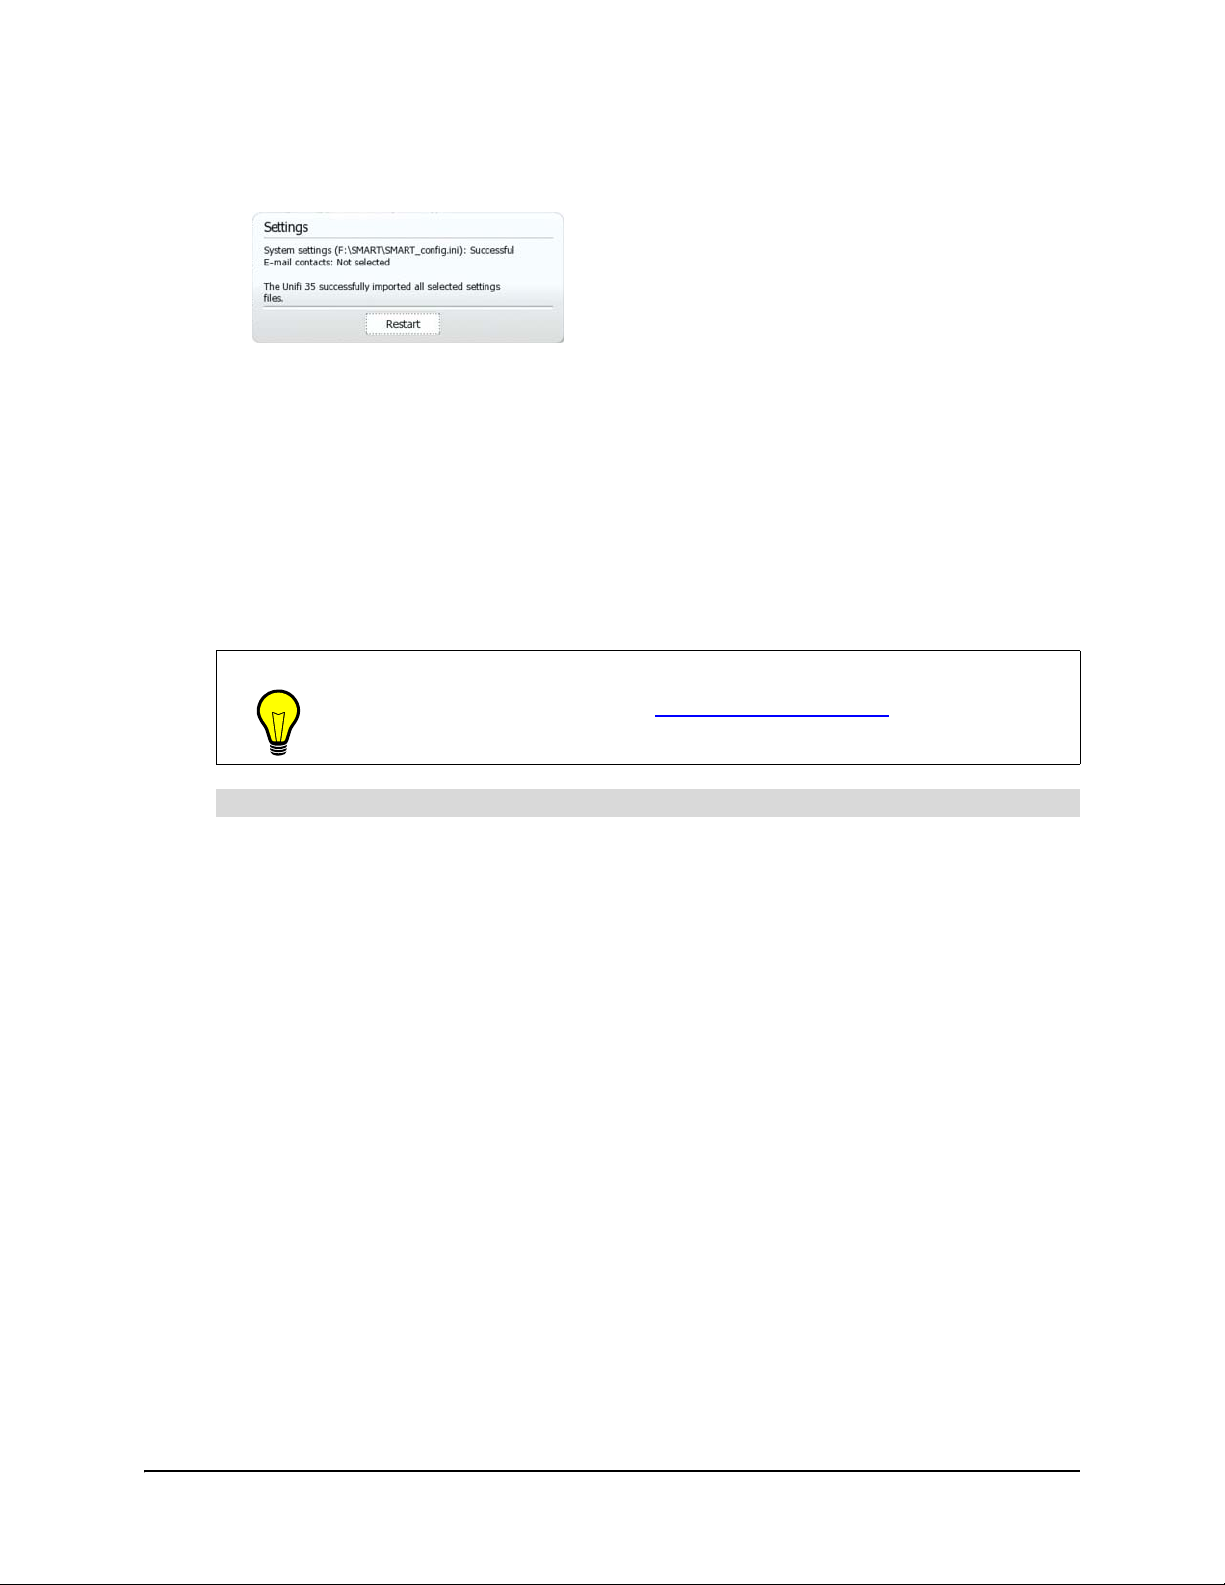
9. Press OK.
The Settings dialog box appears.
10. Press Restart to end the current session and turn off the projector.
11. After a six-minute cool-down period, turn on the projector.
You’ve imported configuration settings from a USB storage device to a 600i interactive whiteboard
system.
Securing Configuration Settings
You can assign a password to the configuration settings. Users must enter this password to
change the configuration settings.
1. Press Menu.
The Welcome Center appears.
2. Press Settings.
The Unifi 35 Settings dialog box appears.
TIP
If you forget the password, contact SMART Technical Support.
To secure configuration settings
Configuring the Firmware 15
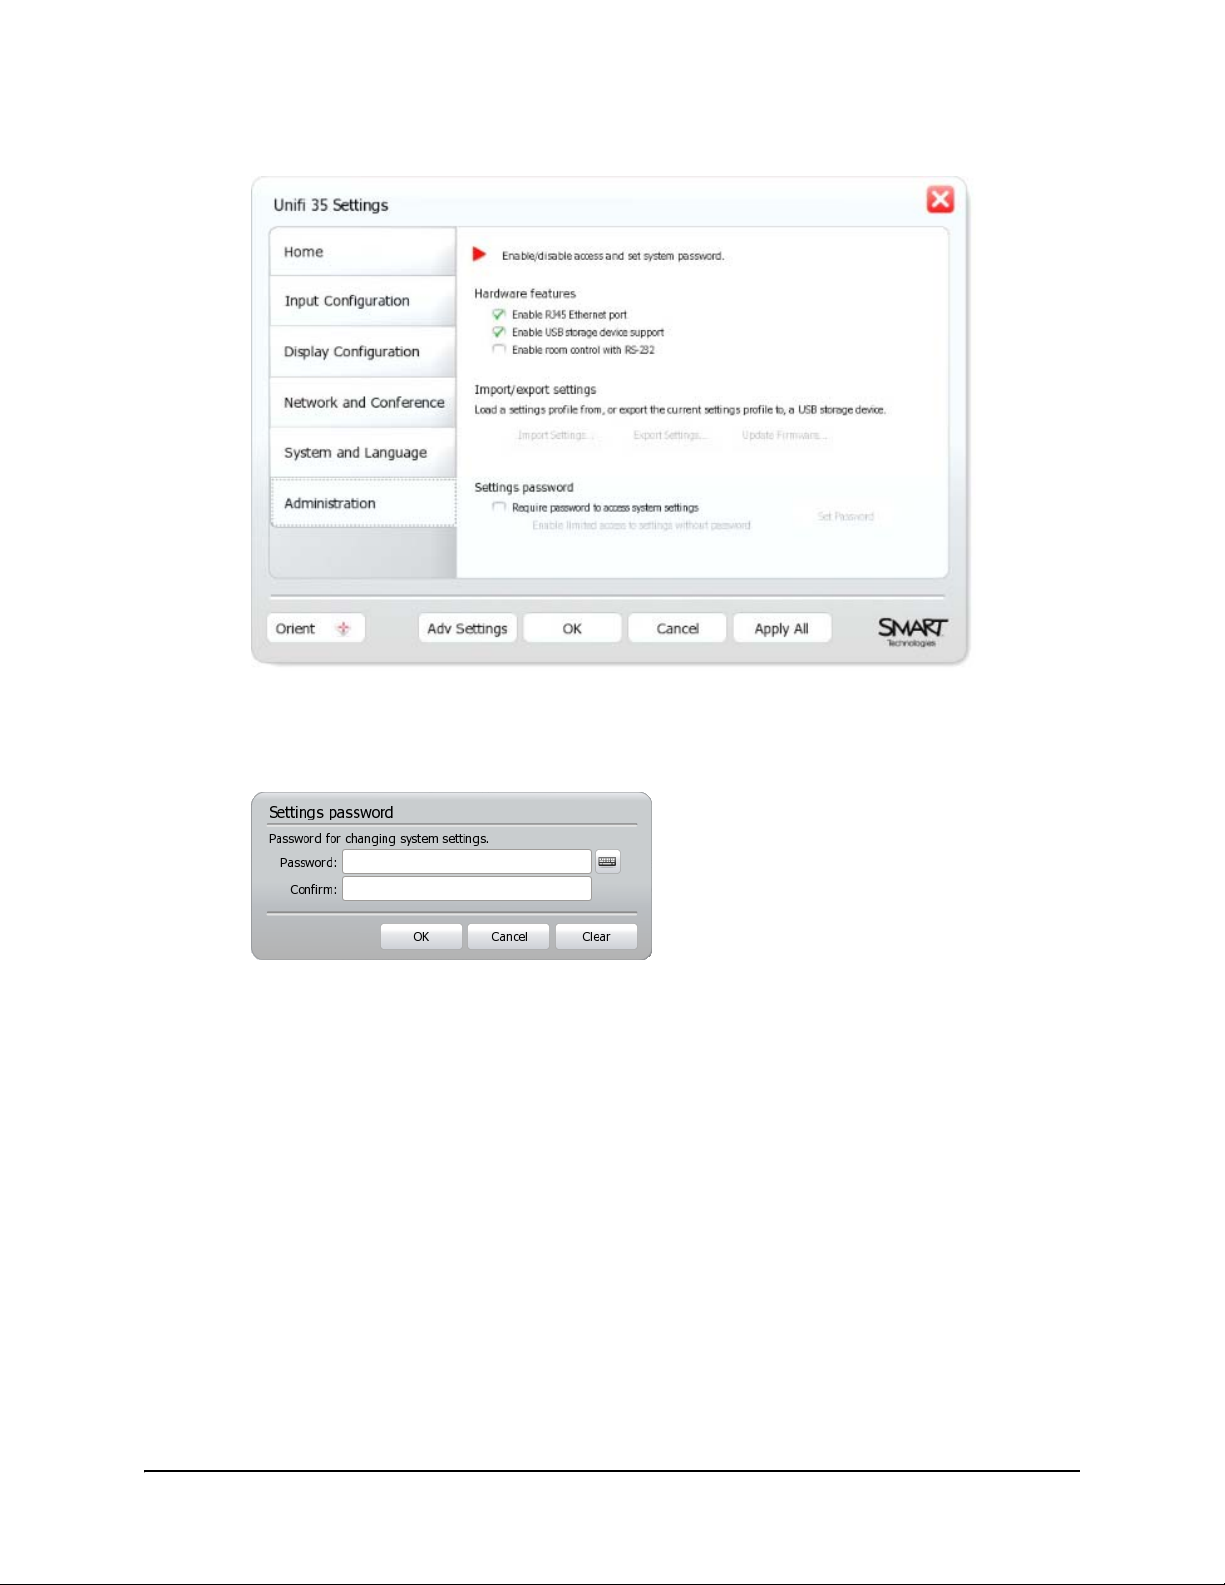
3. Press Administration.
4. Select the Require password to access system set tings check box to require users to enter
a password to change the configuration settings.
The Settings password dialog box appears.
NOTE: If the Require password to access system settings check box was previously
selected, press Set Password to open the Settings Administrator Password dialog box.
5. Type the password in the Password and Confirm boxes.
6. Press OK.
7. Select the Enable limited access to settings without password check box to al low users to
change the display settings (see page 22) and language settings (see page 37) but no other
settings.
8. Press Apply All.
You’ve secured the configuration settings.
16 Configuring the Firmware
Connecting Computers to the SMART Board 600i Interactive
Whiteboard System
You can connect two computers to the 600i interactive whiteboard system.
NOTE: Yo u can connect additional computers to the 600i interactive whiteboard system through
LinQ software (see page 28).
After connecting a computer to the 600i interactive whiteboard system, you can view its input on
the display and do the following:
• Draw digital ink notes.
• Freeze the display.
• Take screen captures.
• Use the on-screen keyboard and right-click features of the firmware.
For more information, see page 71.
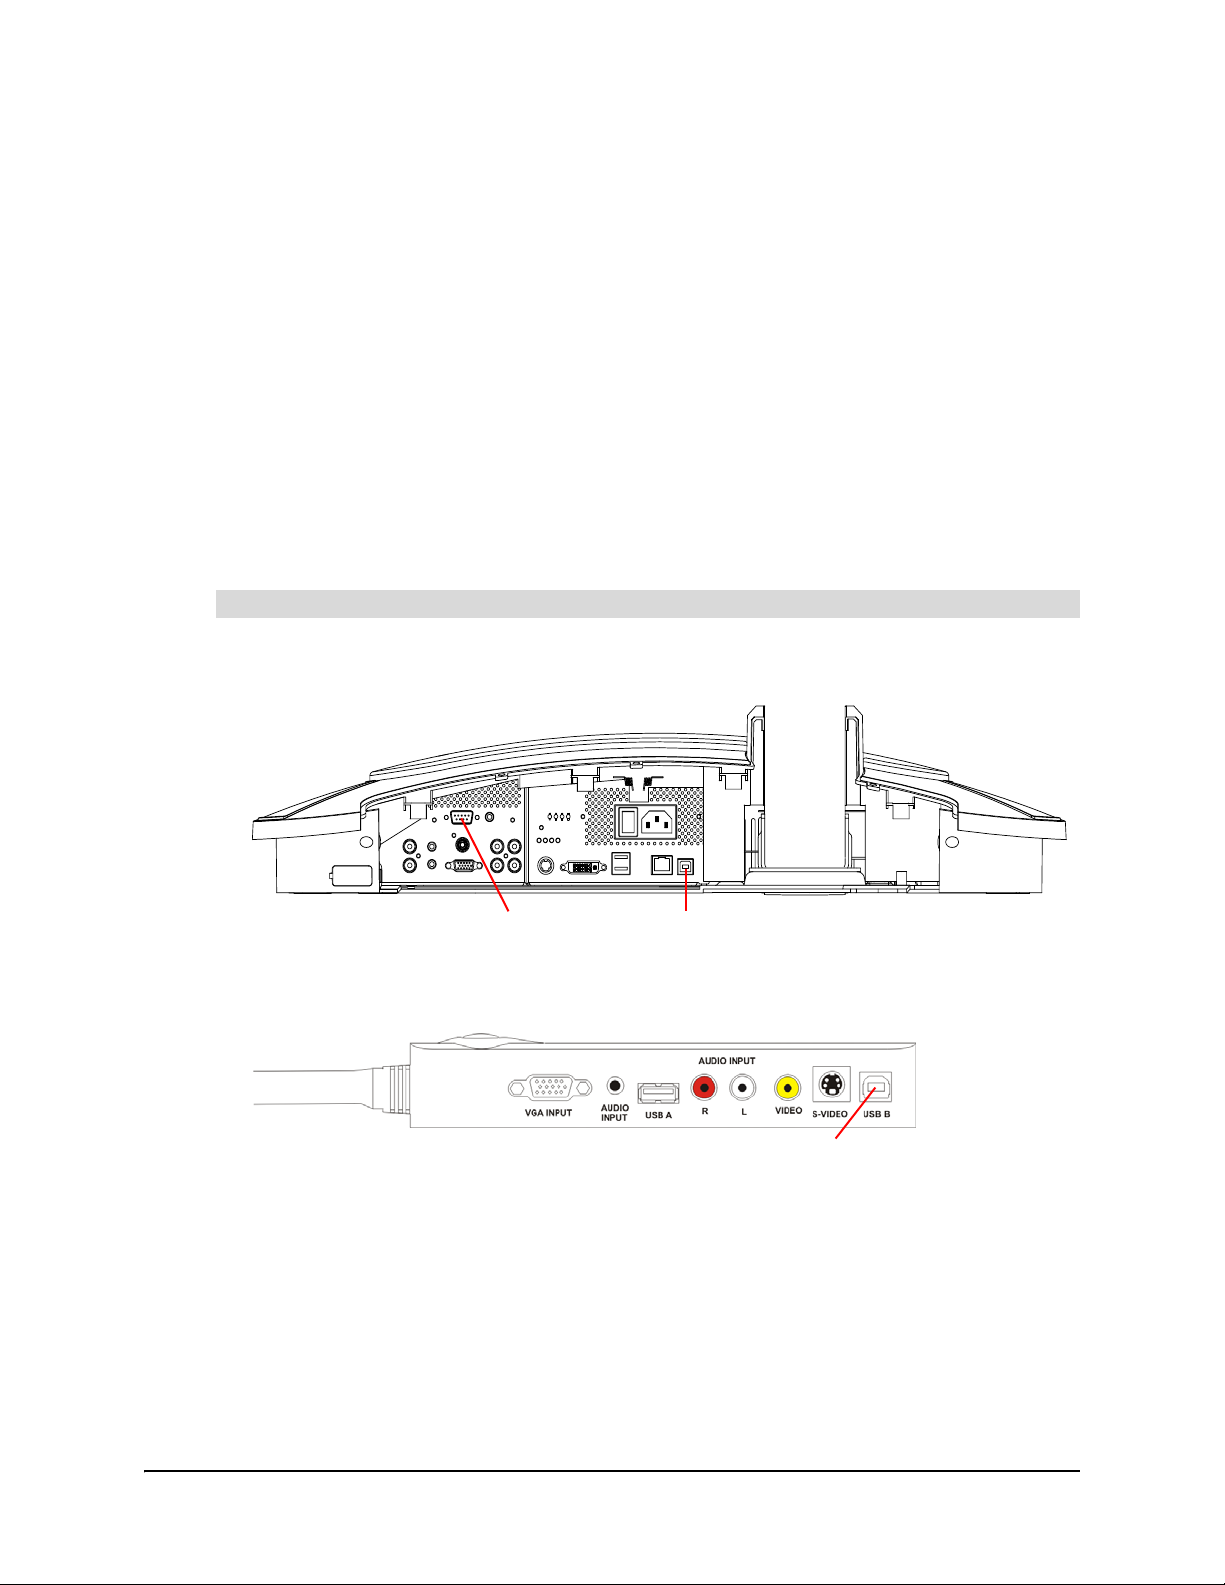
1. Connect the SMART Board interactive whiteboard input using the USB B or RS-232
connectors on the Unifi 35 projector.
OR
Use the USB B connector on the ECP.
To connect a computer
USBRS-232
USB
Configuring the Firmware 17
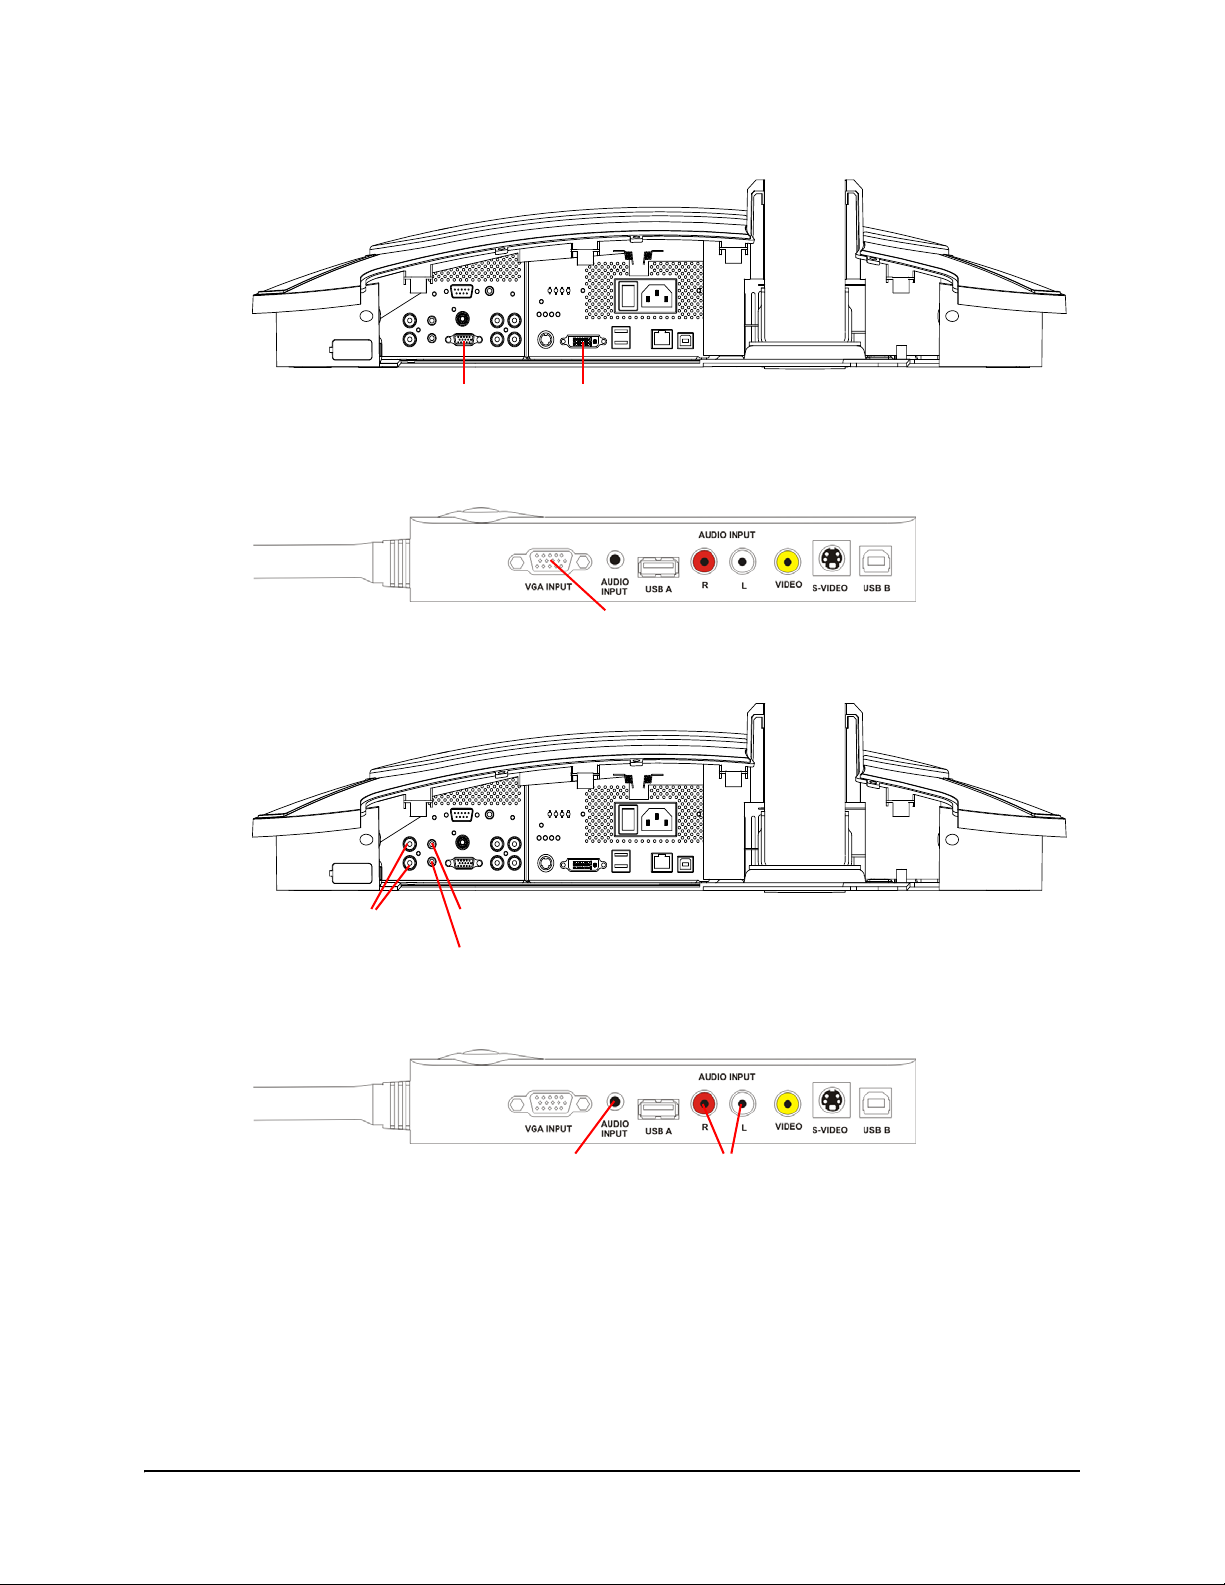
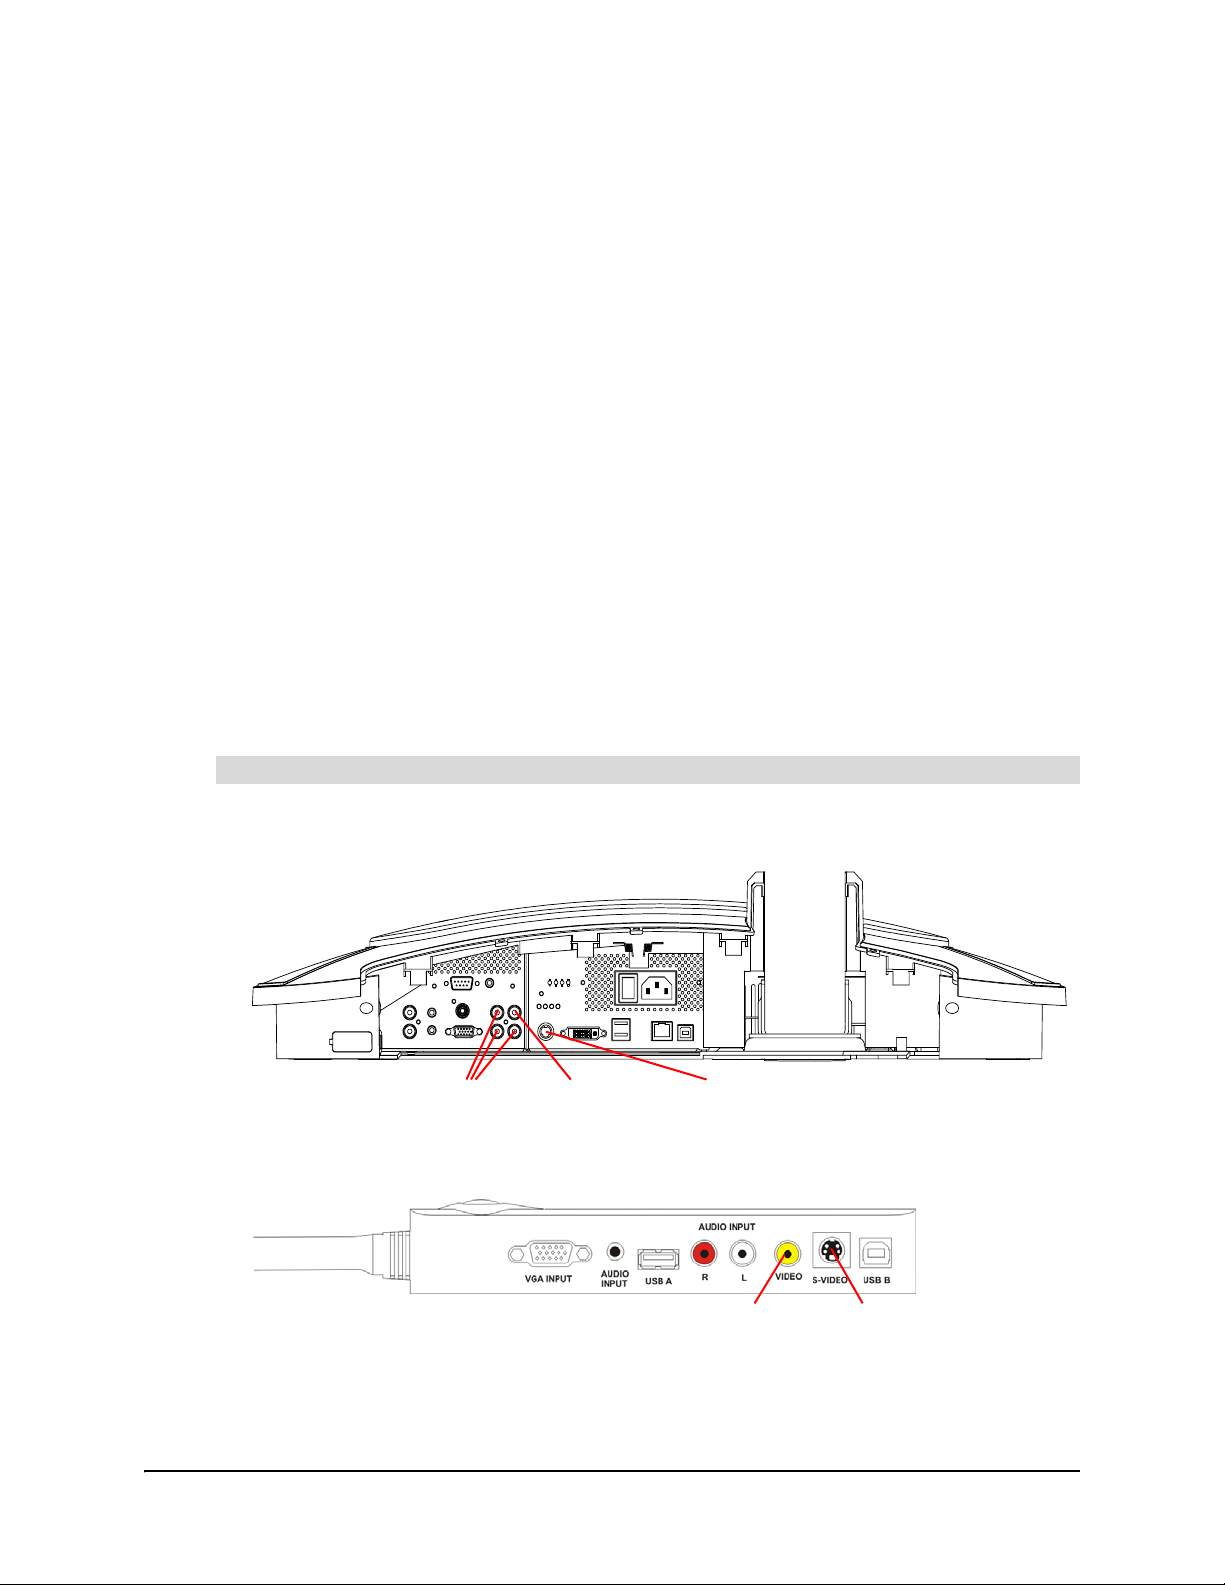
2. Connect the video input using the VGA or DVI connectors on the Unifi 35 projector.
OR
Use the VGA connector on the ECP.
3. Connect the audio input using the RCA or Stereo Mini connectors on the Unifi 35 projector.
OR
Use the RCA or Stereo Mini connectors on the ECP.
You’ve connected a computer to the 600i interactive whiteboard system.
DVIVGA
VGA
RCA
Stereo Mini 1
Stereo Mini 2
Stereo Mini RCA
18 Configuring the Firmware
1. Press Menu.
The Welcome Center appears.
2. Press Settings.
The Unifi 35 Settings dialog box appears.
3. If a password is required to change the con figur ation settings, type the p a ssword in the box at
the bottom of the menu, and then press OK.
NOTE: For information on the configuration settings password, see page 14.
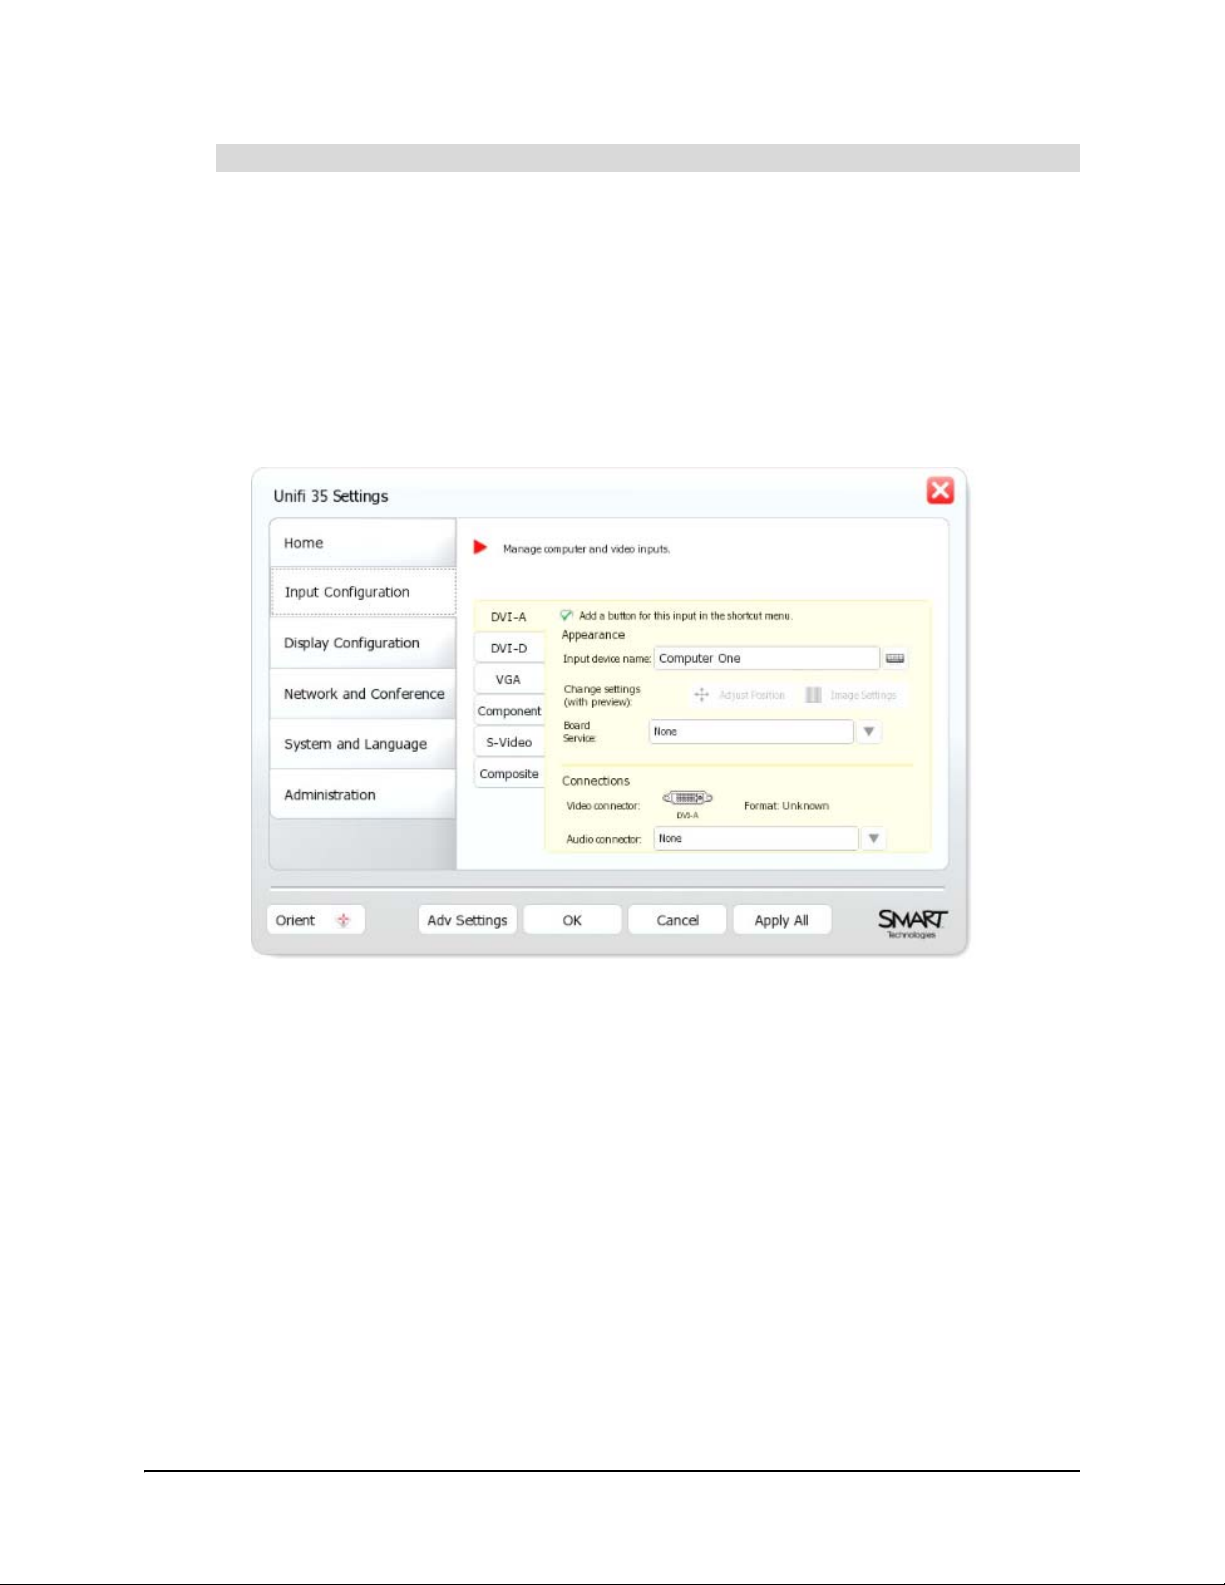
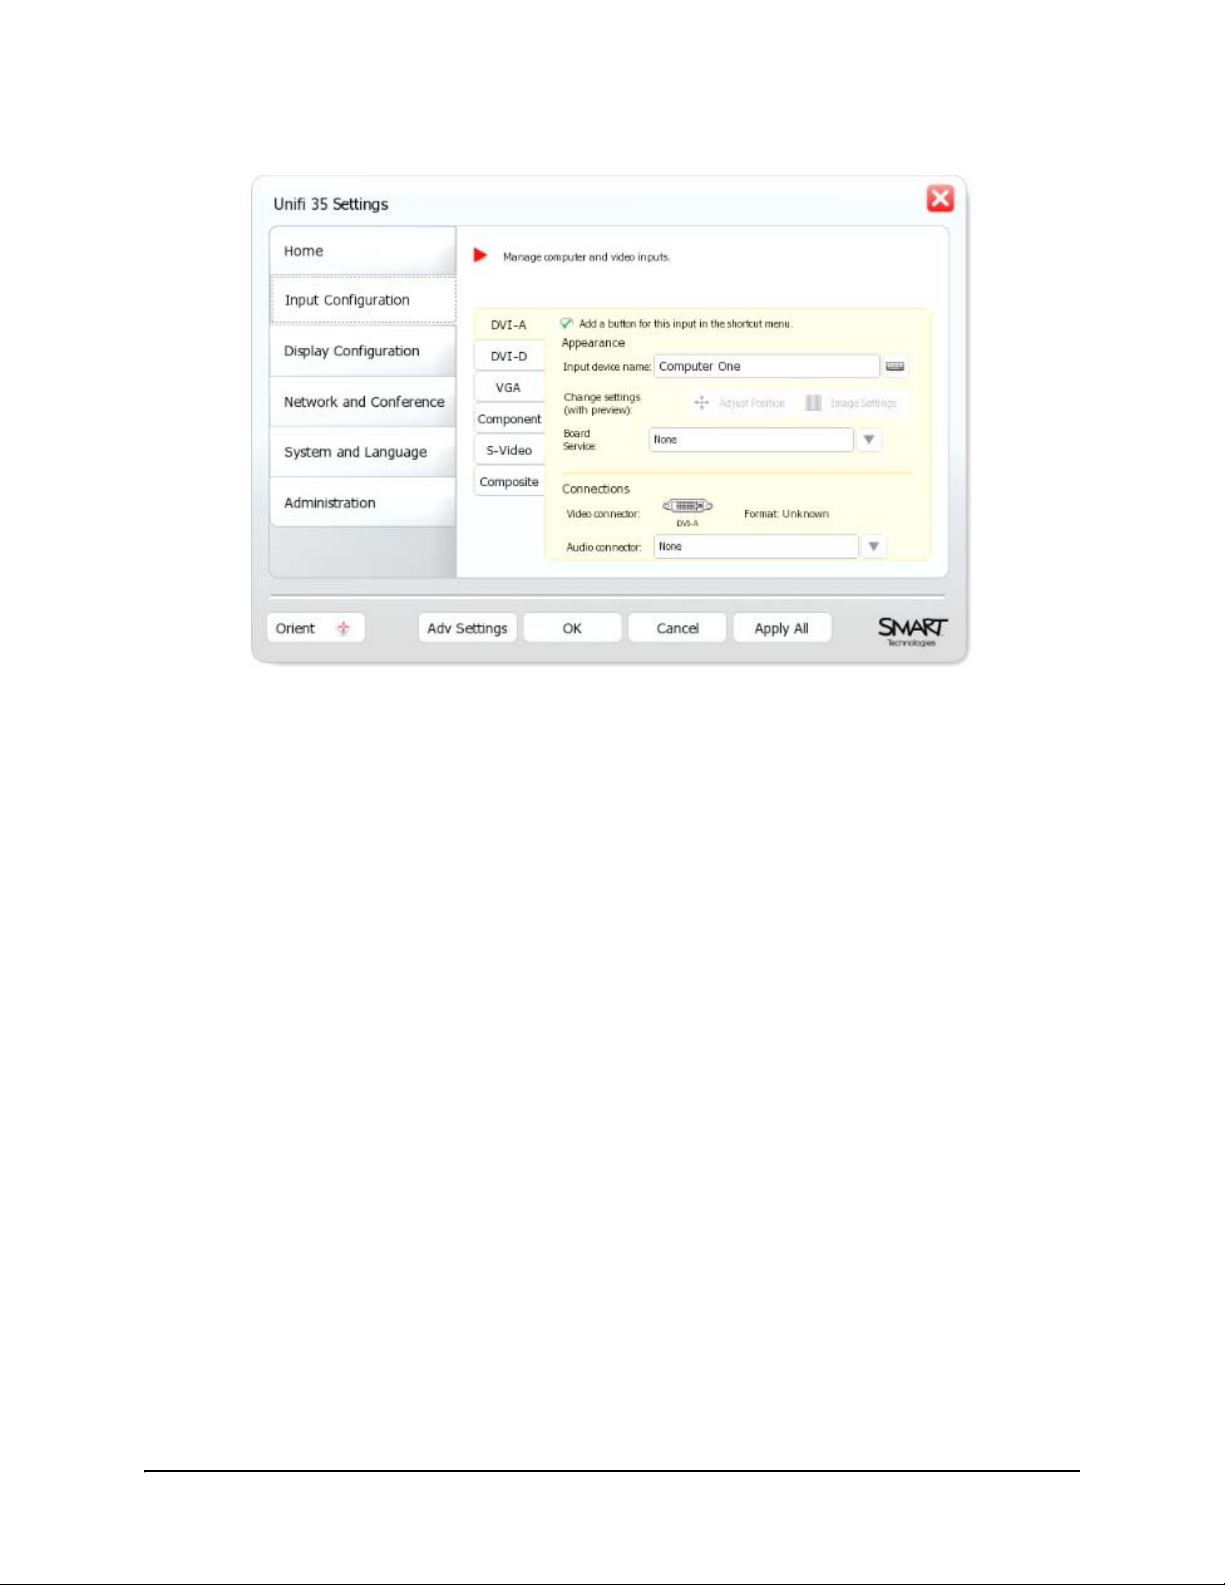
4. Press Input Configuration.
5. Press one of the following:
– DVI-A
– DVI-D
– VGA
6. If you want to remove the button for the computer input from the shortcut menu, clear the
Add a button for this input in the shortcut menu check box.
NOTE: For information on the shortcut menu, see page 46.
7. In the Input device name box, type a name for the computer.
8. In the Board Service list, select the appropriate SMART Board interactive whiteboard
connector:
– USB
– RS232
To configure the firmware for the computer
Configuring the Firmware 19
9. In the Audio Connector list, select the appropriate audio connector:
– RCA
– Stereo Mini 1
– Stereo Mini 2
10. Press Apply All.
You’ve configured the firmware for the computer.
Connecting Video Sources to the SMART Board 600i Interactive
Whiteboard System
You can connect up to three video sources to the 600i interactive whiteboard system. Video
sources include DVD players, VCRs and similar devices.
After connecting a video source to the 600i interactive whiteboard system, you can view its input
on your SMART product’s interactive screen and do the following:
• Draw digital ink notes.
• Freeze the display.
• Take screen captures.
For more information, see page 71.
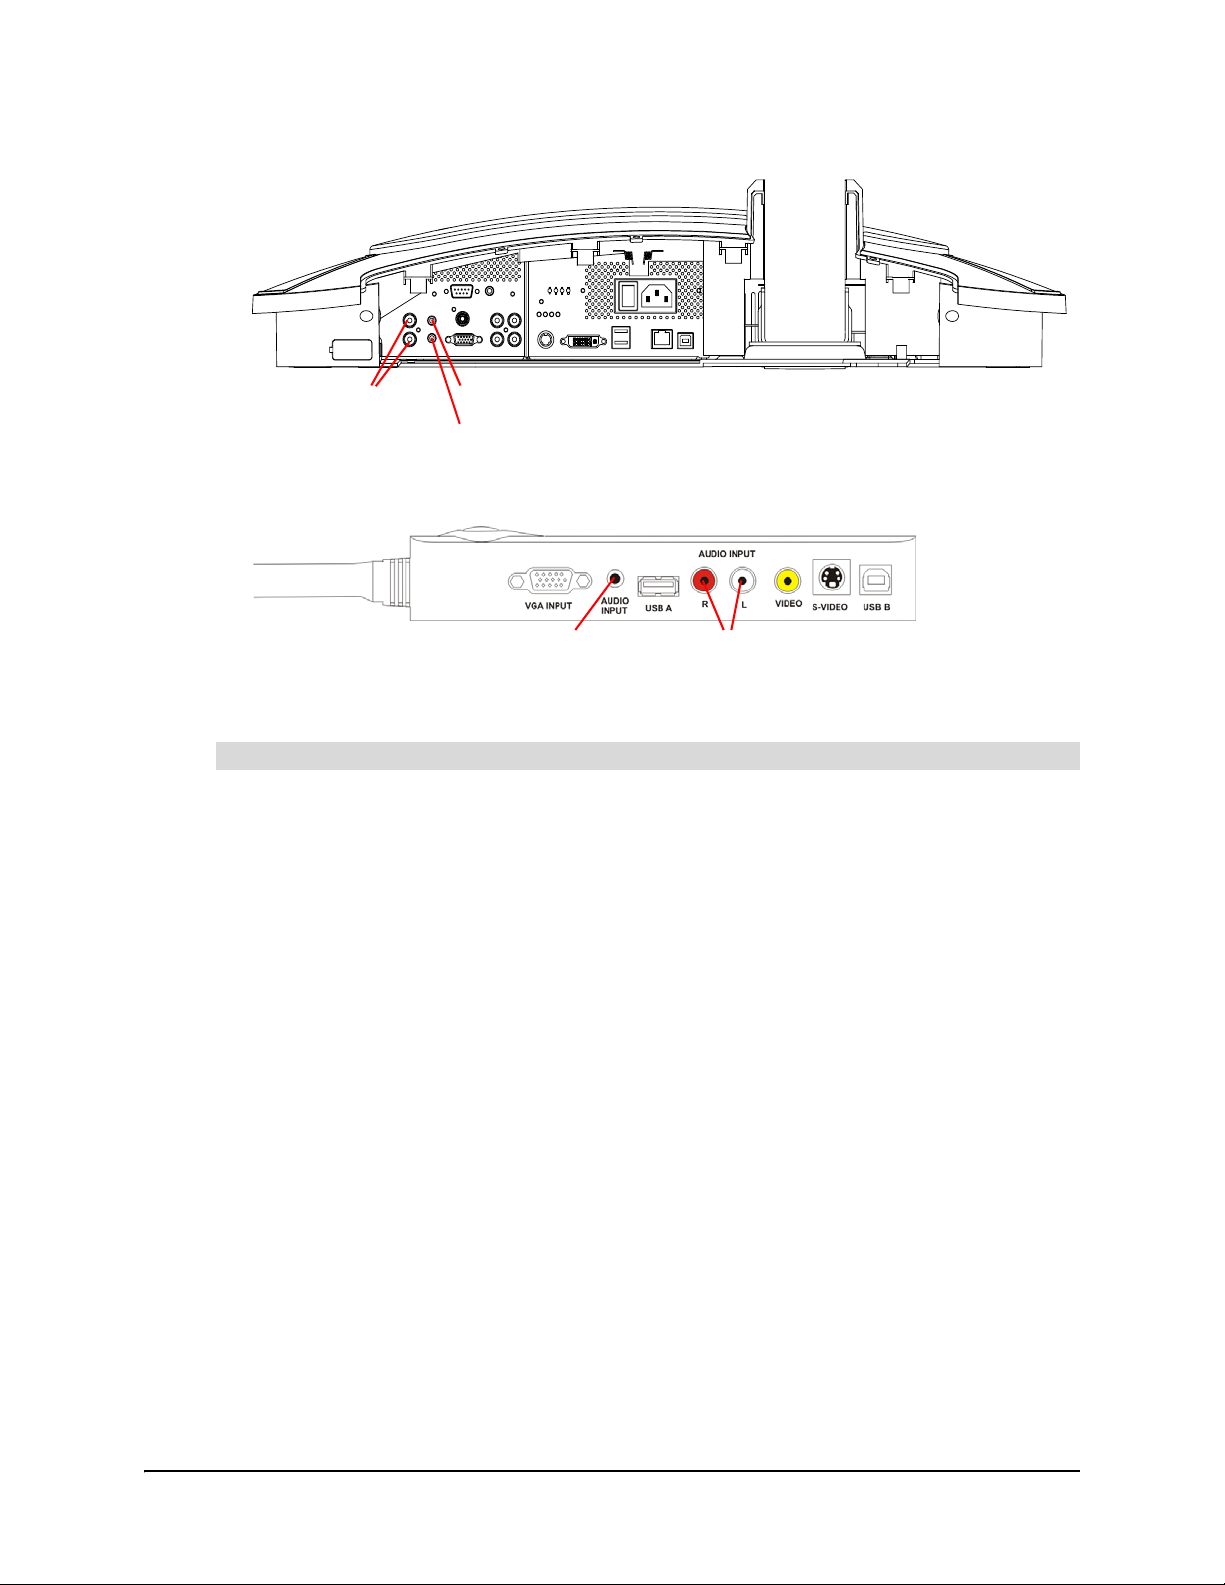
1. Connect the video input using the component, composite or S-video connectors on the Unifi
35 projector.
OR
Use the composite or S-video connectors on the ECP.
To connect a video source
S-videoComponent Composite
S-videoComposite
20 Configuring the Firmware
2. Connect the audio input using the RCA or Stereo Mini connectors on the Unifi 35 projector.
OR
Use the RCA or Stereo Mini connectors on the ECP.
You’ve connected a video source to the 600i interactive whiteboard system.
1. Press Menu.
The Welcome Center appears.
2. Press Settings.
The Unifi 35 Settings dialog box appears.
3. If a password is required to change the con figur ation settings, type the p a ssword in the box at
the bottom of the menu, and then press OK.
NOTE: For information on the configuration settings password, see page 14.
To configure the firmware for the video source
RCA
Stereo Mini 1
Stereo Mini 2
Stereo Mini RCA
Configuring the Firmware 21
4. Press Input Configuration.
5. Press the appropriate tab:
– Component
– S-Video
– Composite
6. If desired, clear the Add a button for this input in the shortcut menu check box to remove
the button for the video source input from the shortcut menu.
NOTE: For information on the shortcut menu, see page 46.
7. In the Input device name box, type a name for the video source.
8. In the Board Service list, select None.
9. In the Audio Connector list, select the appropriate audio connector:
– RCA
– Stereo Mini 1
– Stereo Mini 2
10. Press Apply All.
You’ve configured the firmware for the video source.
22 Configuring the Firmware
Configuring the Display Settings
You can configure the firmware’s aspect ratio and timeout settings to work with your 600i
interactive whiteboard system’s display.
1. Press Menu.
The Welcome Center appears.
2. Press Settings.
The Unifi 35 Settings dialog box appears.
3. If a password is required to change the con figur ation settings, type the p a ssword in the box at
the bottom of the menu, and then press OK.
NOTE: For information on the configuration settings password, see page 14.
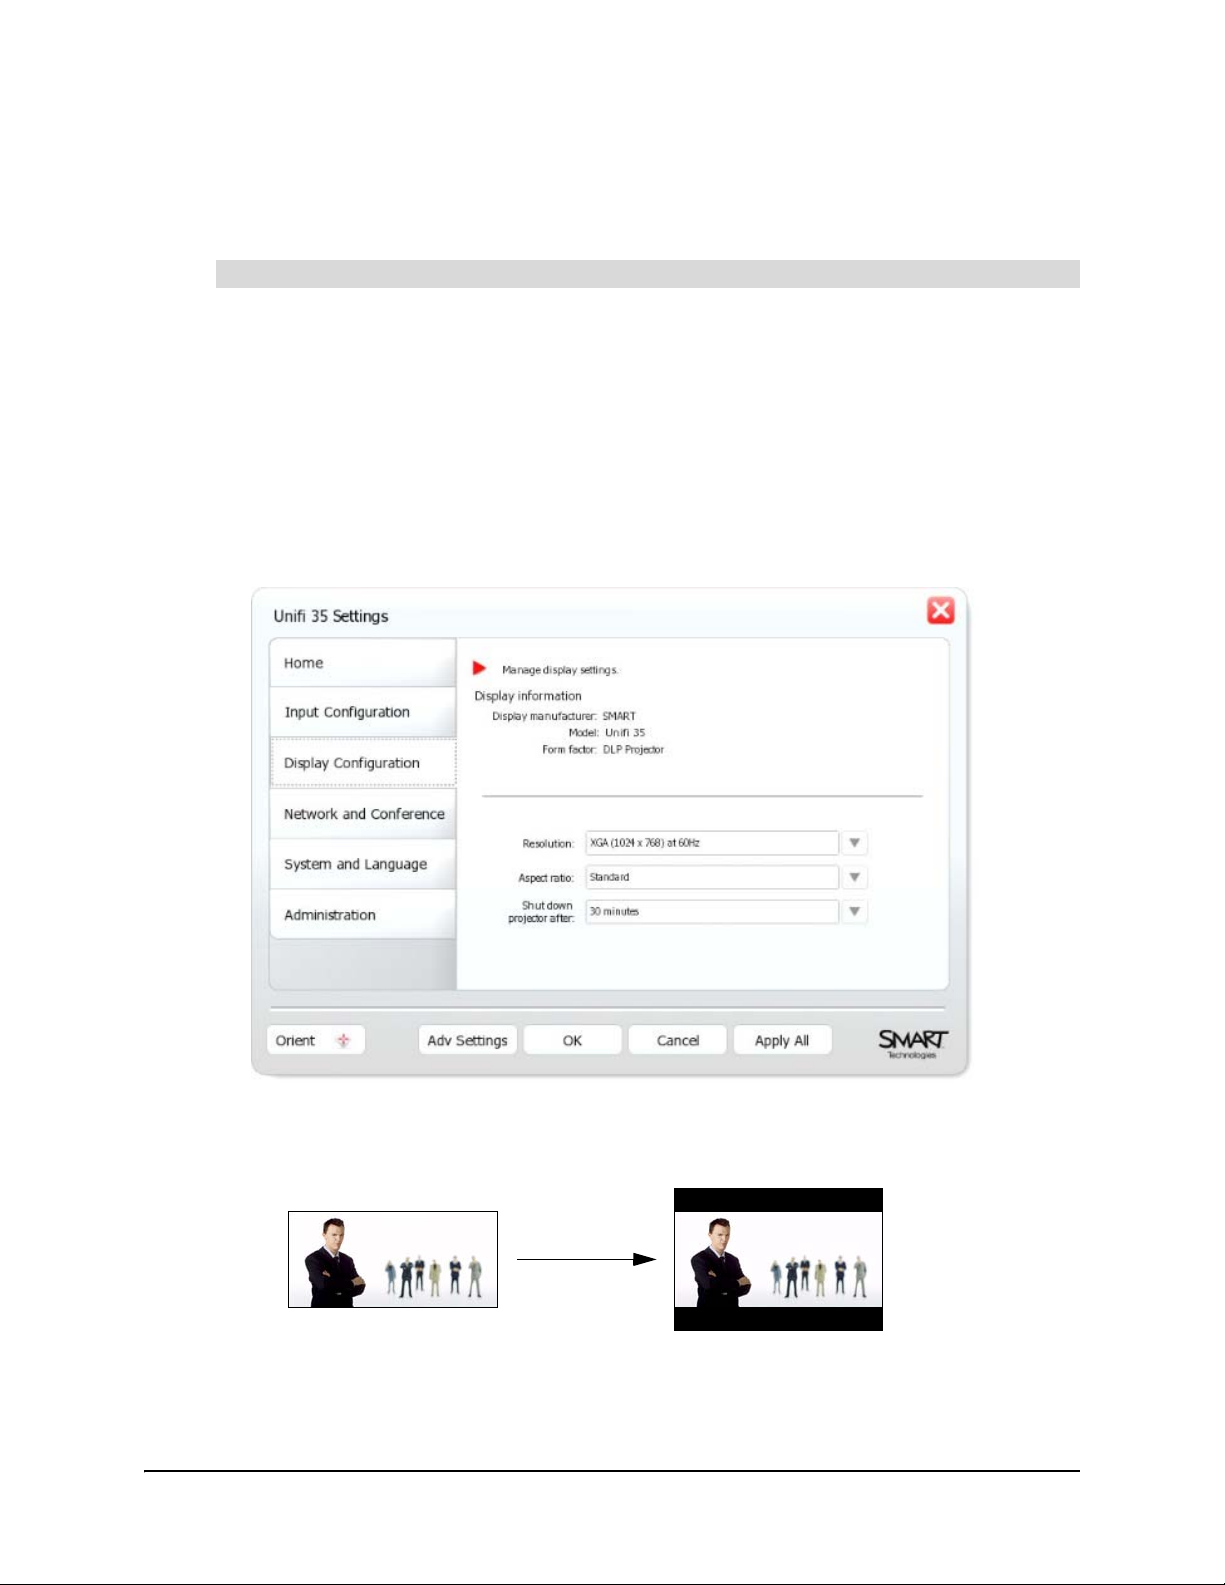
4. Press Display Configuration.
5. In the Aspect ratio list, select an aspect ratio.
– Standard preserves the computer or video source input’s aspect ratio.
To configure the display settings
Computer or
Video Source Input
SMART Board
Output
(Letterboxing)
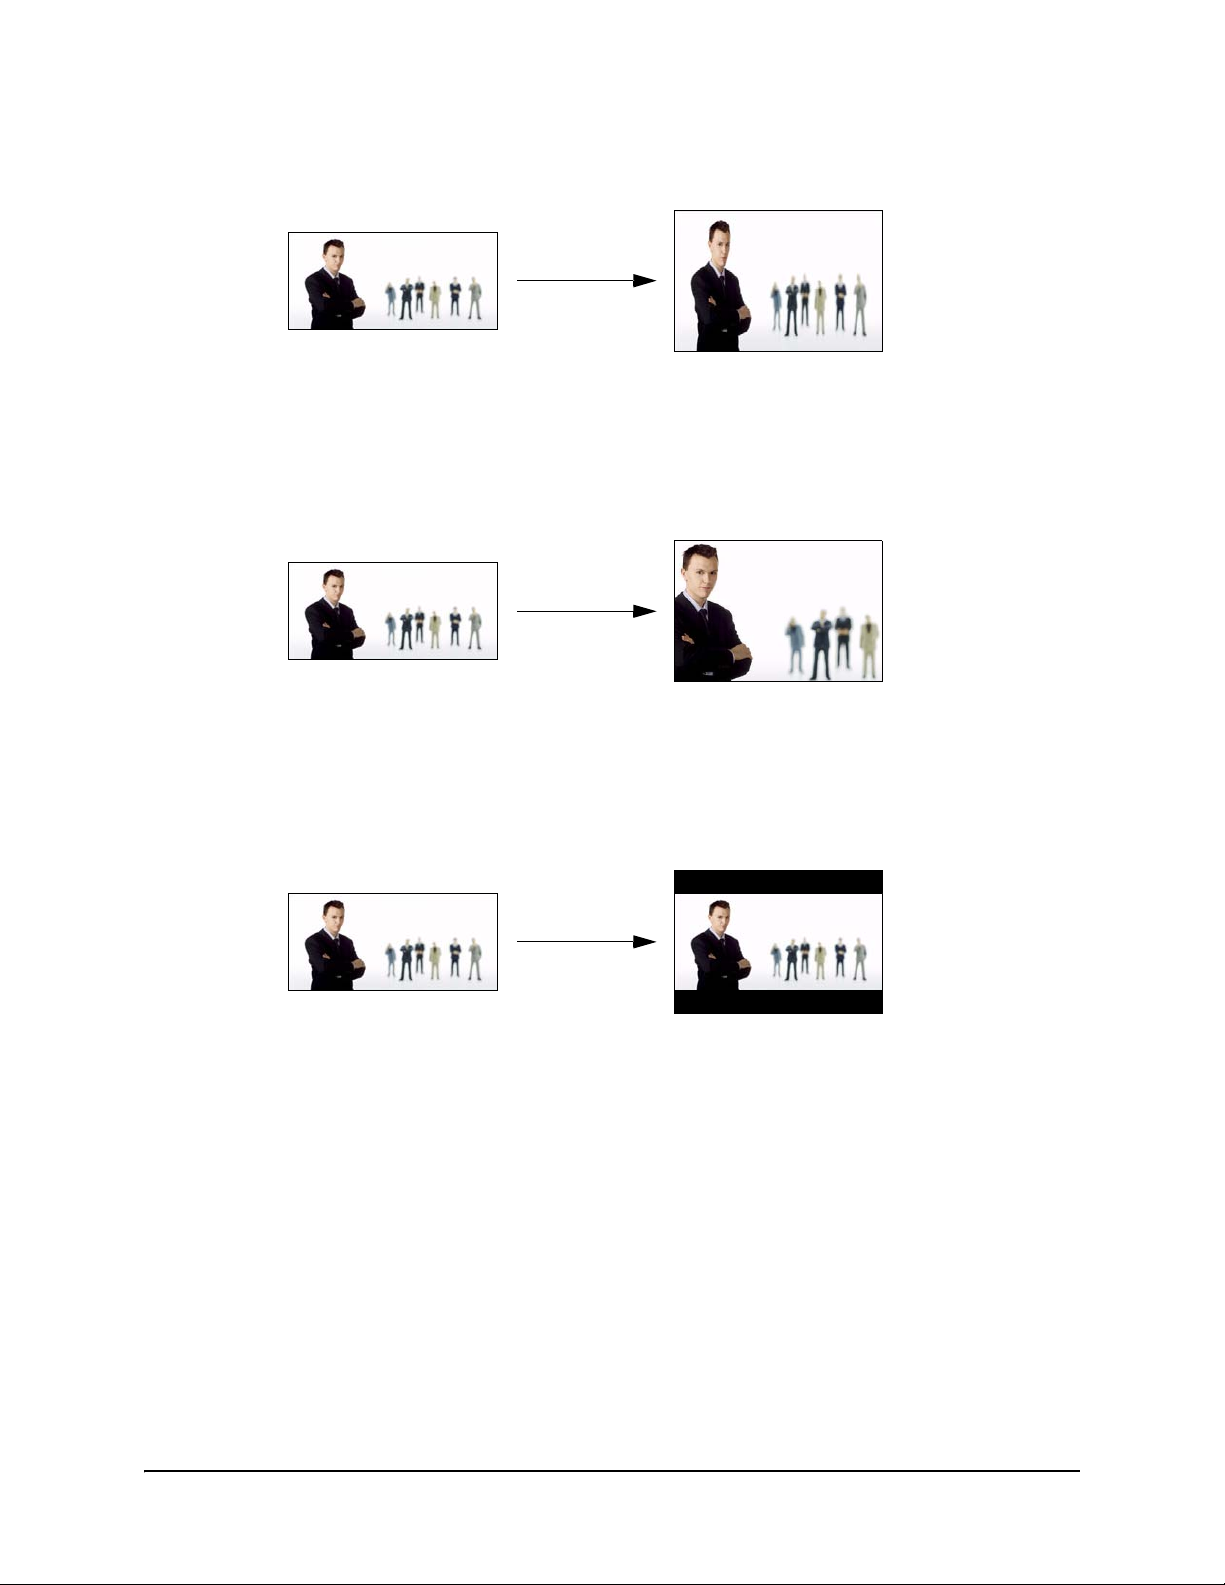
Configuring the Firmware 23
– Full screen changes the computer or video source input to match your SMART Board
interactive whiteboard’s aspect ratio.
– Cropped crops the computer or video source input to match your SMART Board
interactive whiteboard’s aspect ratio.
– Enhanced widescreen changes the computer or video source input to a widescreen
(16:9) aspect ratio.
6. In the Shut down projector after list, select the number of minutes you want to pass before
the projector shuts down, or No Timeout to not shut down the projector.
NOTE: If the 600i interactive whiteboard system is connected to a computer or video source,
the value in the Shut down projector after list doesn’t take effect until after the computer or
video source times out.
7. Press Apply All.
You’ve configured the display.
Computer or
Video Source Input
SMART Board
Output
Computer or
Video Source Input
SMART Board
Output
Computer or
Video Source Input
SMART Board
Output
Loading...