

Page 1
Firmware Update and User’s Guide
SMART Board™ 600i Series
Interactive Whiteboard System
Page 2

Trademark Notice
SMART Board, Notebook, Bridgit, LinQ, the SMART logo and smarttech are trademarks or registered trademarks of SMART Technologies
ULC in the U.S. and/or other countries. All other third-party product and company names may be the trademarks of their respective
owners.
Copyright Notice
© 2008 SMART Technologies ULC. All rights reserved. No part of this publication may be reproduced, transmitted, transcribed, stored in a
retrieval system or translated into any language in any form by any means without the prior written consent of SMART Technologies ULC.
Information in this manual is subject to change without notice and does not represent a commitment on the part of SMART.
Patent No. US5448263; US6141000; US6326954; US6337681; US6540366; US6741267; US6747636; US7,151,533; US7289113; and
CA2058219. Other patents pending.
06/2008
Page 3

Table of Contents
About the Firmware 1
Whiteboard...................................................................................................................................... 1
Bridgit Conferencing Software ........................................................................................................ 1
Computer and Video Source Inputs................................................................................................1
Configuration................................................................................................................................... 2
Version Comparison............................ .... ... ... ... ... .... ... ... .......................................... ... ..................... 3
Updating the Firmware 5
Updating the Firmware through a Computer................................................................................... 5
Configuring the Firmware 9
Orienting Your SMART Board 600i Interactive Whiteboard System ............................................... 9
Configuring Multiple SMART Board 600i Interactive Whiteboard Systems....................................11
Securing Configuration Settings.................................................................................................... 14
Connecting Computers to the SMART Board 600i Interactive Whiteboard System ..................... 16
Connecting Video Sources to the SMART Board 600i Interactive Whiteboard System................ 19
Configuring the Display Settings................................................................................................... 22
Configuring Networking and Conferencing Settings ..................................................................... 24
Configuring Room Control Settings...............................................................................................30
Configuring Language and General System Settings................................................................... 36
Configuring Unifi 35 Projector Settings.........................................................................................39
Using the Firmware 45
Basic Tools.................................................................................................................................... 45
Starting a Firmware Session......................................................................................................... 50
Whiteboarding............................................................................................................................... 50
Collaborating................................................................................................................................. 58
Connecting to Computers and Video Sources.............................................................................. 68
Using Your SMART Board 600i Interactive Whiteboa rd System with Computer and
Video Source Inputs...................................................................................................................... 71
Ending a Firmware Session.................... ... ... ... ... .... ... ... ... .... ... ... ... .... ... ......................................... 74
Customer Support 77
Online Support.................... ... .... ... .......................................... ... ................................................... 77
Training......................................................................................................................................... 77
Contacting SMART Technical Support.......................................................................................... 77
General Inquiries........................................... ... .......................................... ... ................................ 77
Warranty........................................................................................................................................ 78
Registration................................................................................................................................... 78
Index 79
Table of Contents i
Page 4

ii Table of Contents
Page 5

About the Firmware
This chapter introduces the latest version of firmware for the Unifi 35 projector. This version
includes several enhancements that bring the SMART Board™ 600i interactive whiteboard
system’s feature set in line with that of the new SMART Hub SE240.
• Whiteboard (this page)
• Bridgit Conferencing Software (this page)
• Computer and Video Source Inputs (this page)
• Configuration (page 2)
• Version Comparison (page 3)
Whiteboard
Whiteboard (formerly ScratchPad interactive whiteboarding application) captures notes and
drawings in digital ink on your 600i interactive whiteboard system without a computer.
Use Whiteboard for brainstorming, note taking and other activities for which you want to use your
interactive whiteboard system’s digital ink tools without connecting to a computer.
In addition to saving Whiteboard files to a USB storage device, you can also send them in e-mail
messages.
Bridgit Conferencing Software
If you have access to a Bridgit software server, you can use the collaboration features included in
the latest version of the firmware to collaborate with others through conferences.
Bridgit conferencing software allows you to create conferences or join conferences. While in a
conference, you can:
• share your display
• view other participants’ displays
• communicate with others through chat
• use other features of the firmware, including Whiteboard and computer and video source
connections to present information or otherwise participate in the conference
Computer and Video Source Inputs
Like previous versions of the firmware, the latest version allows you to connect computers and
video sources, such as DVD players and VCRs, to your 600i interactive whiteboard system and
view their outputs on the projected images. You can then write digital ink notes, temporar ily free ze
the display, and take screen captures to include in Whiteboard files.
In addition, the latest version of the firmware introduces support for LinQ software. LinQ software
allows you to view output from computers on the same subnet as the 600i interactive whiteboard
system without having to connect those computers directly. Connect the LinQ software client
computers to the subnet wirelessly or through a network cable.
About the Firmware 1
Page 6

Configuration
The latest version of the firmware enhances the Unifi 35 Settings dialog box to include basic
networking, SMTP and SNMP configuration settings, the ability to export configuration settings
from one 600i interactive whiteboard system and then import them to other 600i interactive
whiteboard systems, and the ability to password protect configuration settings.
In addition, the latest version includes the following configuration settings:
• display and other basic firmware settings
• projector settings
• RS-232 room control support
2 About the Firmware
Page 7

Version Comparison
The following table compares the featur es of the late st version of the firmware to those of previous
versions.
Feature
Whiteboard
• Write and erase digital ink notes in Whiteboard
• Save Whiteboard files to a USB storage device
• Send Whiteboard files to an e-mail address
Bridgit conferencing software
• Create conferences
• Join conferences
• Share your display
• View other participants’ displays
• Communicate with others through chat
• Work with Whiteboard and computer and video source connections
during a conference
Computer and video source inputs
• View input of locally connected computers and video sources
• View input of LinQ software client computers
Previous
Versions
9
9
9
Latest
Version
9
9
9
9
9
9
9
9
9
9
9
• Write digital ink notes on the display
• Freeze the display
• Take a screen capture of the display
Configuration
• Configure display and other basic firmware settings
• Configure computer and video source input settings
• Configure basic networking, SMTP and SNMP settings
• Configure projector settings
• Use RS-232 room control support
• Secure configuration settings with a password
• Import and export configuration settings
9
9
9
9
9
9
9
9
9
9
9
9
9
9
9
9
9
About the Firmware 3
Page 8

4 About the Firmware
Page 9
Updating the Firmware
This chapter explains how to download and inst all the update to the SMAR T Board 600i inter active
whiteboard system firmware.
Updating the Firmware through a Computer
Updating the firmware through a computer involves:
1. installing the Unifi 35 projector updater
2. connecting the Unifi 35 projector to the computer
3. updating the firmware
NOTE: You need a Windows computer with Internet access that you can connect to the Unifi 35
projector through a USB cable. The computer must have a moni tor or be a laptop so that you can
view and interact with the wizards during the update process.
To install the Unifi 35 projector updater
1. In your browser, go to www.smarttech.com/600ifirmware
2. Click Download, and then follow the on-screen instructions.
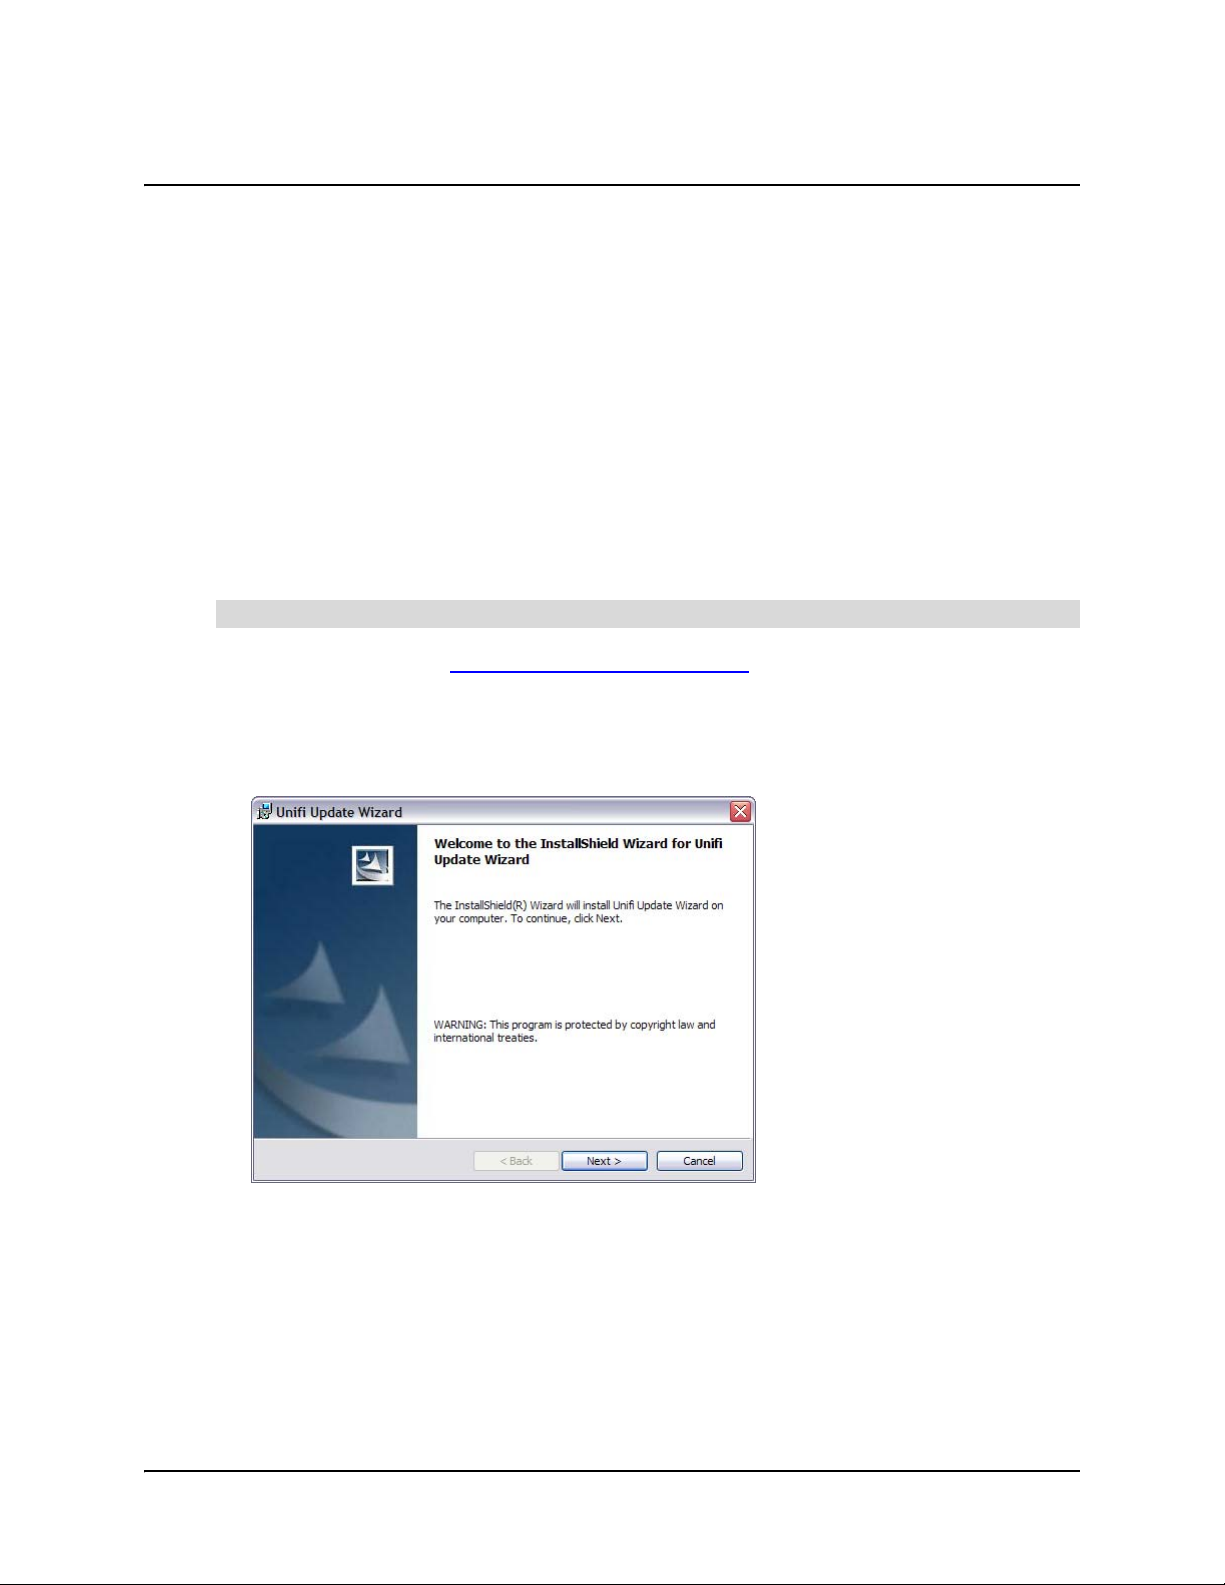
3. After the file finishes downloading, open it.
The Unifi Update wizard appears.
4. Click Next.
.
5. Select the I accept the terms in the license agreement option, and then click Next.
6. Click Next.
Updating the Firmware 5
Page 10

7. Click Install.
The wizard installs the updater in the default des tination folder. This may take several minutes.
8. Click Finish.
The Unifi Update wizard closes.
You’ve installed the updater for the latest firmware version on your computer.
To connect the Unifi 35 projector to the computer
1. Connect the 5' 11" (1.8 m) USB cable provided by SMART Technologies from the USB B
receptacle on the Unifi 35 projector or the Extended Connection Panel (ECP) to your
computer.
USB B Receptacle
2. Press and hold the Unifi 35 projector’s Up button, and then press and hold the
Power/Standby button.
Power/Standby Button
Status Light
Up Button
The status light blinks amber rapidly.
6 Updating the Firmware
Page 11
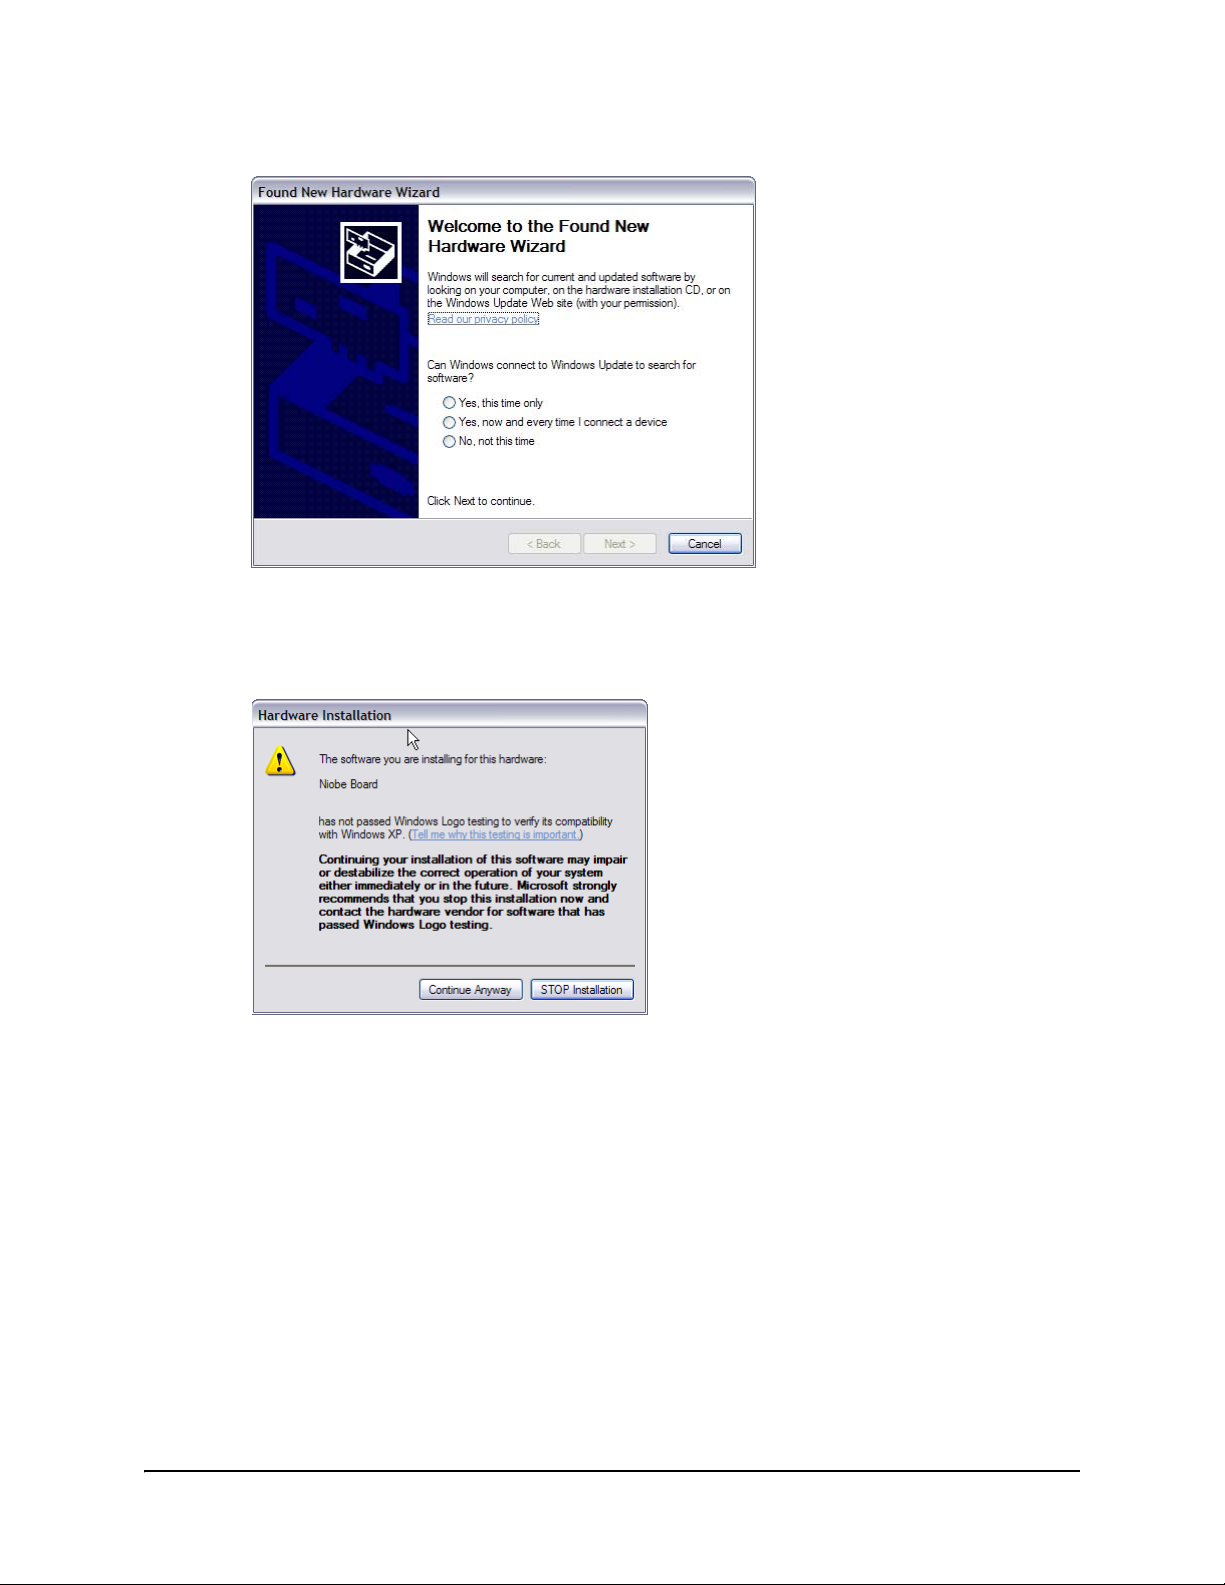
The Found New Hardware wizard appears.
3. Select the No, not this time option, and then click Next.
4. Select the Install the software automatically option, and then click Next.
The Hardware Installation window appears.
5. Click Continue Anyway.
6. Click Finish.
The Found New Hardware wizard closes.
You’ve connected the Unifi 35 projector to the computer.
NOTE: You only need to complete the new hardware installation procedure once.
Updating the Firmware 7
Page 12
To update the firmware
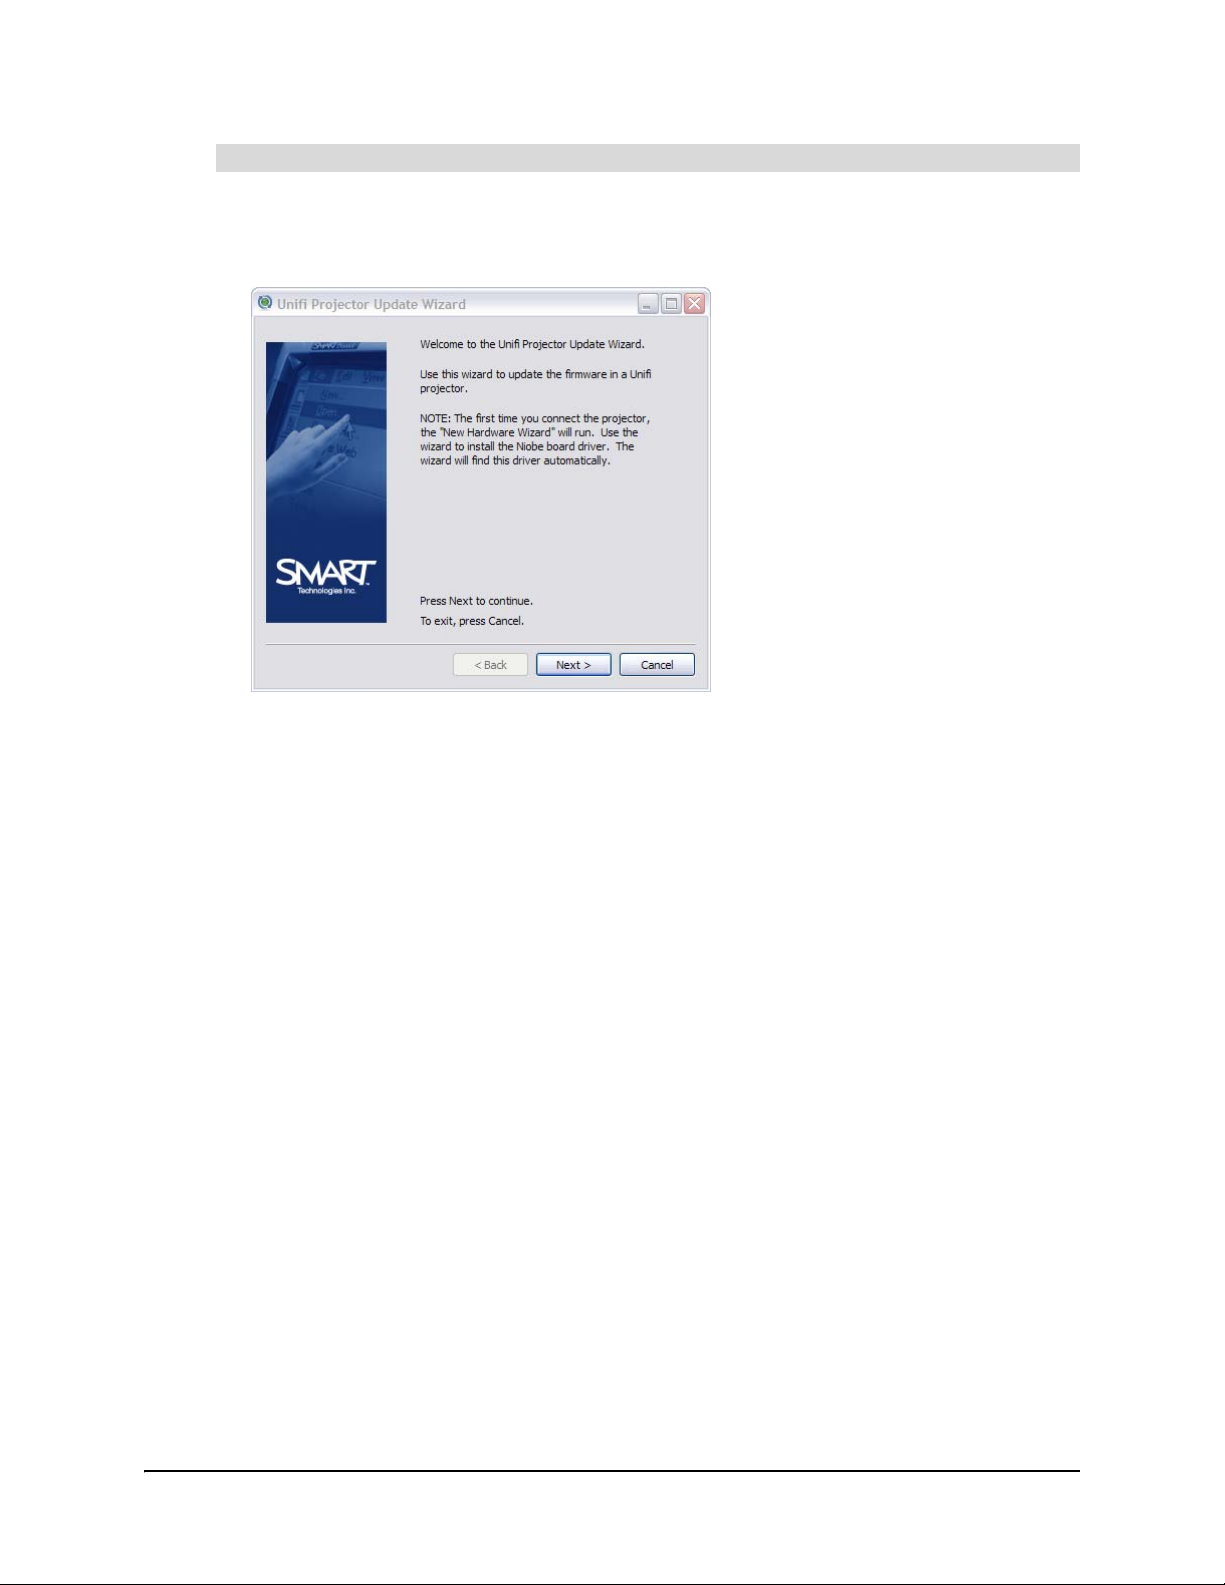
1. In Windows Explorer, browse to C:\Program Files\Unifi Update Wizard, and then do ubleclick Unifi x.x.x.x-Updater.exe, where x.x.x.x is the current versio n of the firm ware.
The Unifi Projector Update wizard appears.
2. Click Next.
3. If you haven’t done so already, connect the 5' 11" (1.8 m) USB cable provided by SMART
Technologies from the USB B receptacle on the Unifi 35 projector or the ECP to your computer
as documented on page 6.
4. Click Next.
5. Select the Yes option, and then click Next.
The wizard updates the firmware.
NOTE: This may take several minutes.
6. Press Next.
7. Click Finish.
The Unifi Projector Update wizard closes.
8. Reset the 600i interactive whiteboard system by unplugging the Unifi 35 projector.
9. Press and hold the Power/Standby button.
10. Plug in the Unifi 35 projector and continue holding the Power/Standby button until the status
light flashes amber.
You’ve updated the firmware to the latest version.
8 Updating the Firmware
Page 13

Configuring the Firmware
This chapter explains how to configure the firmware after the update. It includes information on
connecting the SMART Board 600i interactive whiteboard system to computers, video sources and
a network.
• Orienting Your SMART Board 600i Interactive Whiteboard System (this page)
• Configuring Multiple SMART Board 600i Interactive Whiteboard Systems (page 11)
• Securing Configuration Settings (page 14)
• Connecting Computers to the SMART Board 600i Interactive Whiteboard System (page 16)
• Connecting Video Sources to the SMART Board 600i Interactive Whiteboard System
(page 19)
• Configuring the Display Settings (page 22)
• Configuring Networking and Conferencing Settings (page 24)
• Configuring Room Control Settings (page 30)
• Configuring Unifi 35 Projector Settings (page 39)
Orienting Your SMART Board 600i Interactive Whiteboard System
When your 600i interactive whiteboard system uses its default orientation data, the touch point on
the screen corresponds to the projected image, provided the projected image fills the entire
interactive screen. However, the projected touch point might be offset from the actual touch point
in some situations. Resolve this problem by orienting the interactive whiteboard.
Complete a 9-point orientation using the firmware. The orientation data saves to your
SMART Board interactive whiteboard’s flash memory. Therefore, the orientation data remains the
same when you connect different computers and video sources to the 600i interactive whiteboard
system.
If a computer with Notebook™ software is connected to the Unifi 35 projector or Extended
Connection Panel, you can complete a 4-, 9-, 12- or 20-point orient ation using Notebo ok software.
If you complete such an orientation, the orientation data saves to the computer rather than your
SMART Board interactive whiteboard’s flash memory. Therefore, the orientation data changes
when you connect different computers and video sources.
Configuring the Firmware 9
Page 14

To orient your SMART Board 600i interactive whiteboard system using the
firmware
1. Press Menu, and then press Orient.
OR
Press both pen tray buttons simultaneously.
2. Press Orient.
The orientation screen appears.
3. Using a pen from the pen tray, press and release the center of the first target.
4. Repeat step 3 for each target.
The orientation data saves to the 600i interactive whiteboard system’s flash memory.
You’ve oriented your 600i interactive whiteboard system.
To orient your SMART Board 600i interactive whiteboard system using Notebook
software
1. Connect the computer (with Notebook software installed) to the Unifi 35 projector or
extended connection panel.
2. Open Notebook software’s Welcome Center and press Orient.
OR
Open Notebook software’s Control Panel and press Orient/Align the SMART Board.
OR
Press both pen tray buttons simultaneously.
The orientation screen appears.
10 Configuring the Firmware
Page 15
3. Using a pen from the pen tray, press and release the center of the first target.
4. Repeat step 3 for each target.
The orientation data saves to Notebook software.
You’ve oriented your 600i interactive whiteboard system.
NOTE: For more information on orienting your 600 i interactive whiteboard system using Note book
software, see Notebook software online Help
.
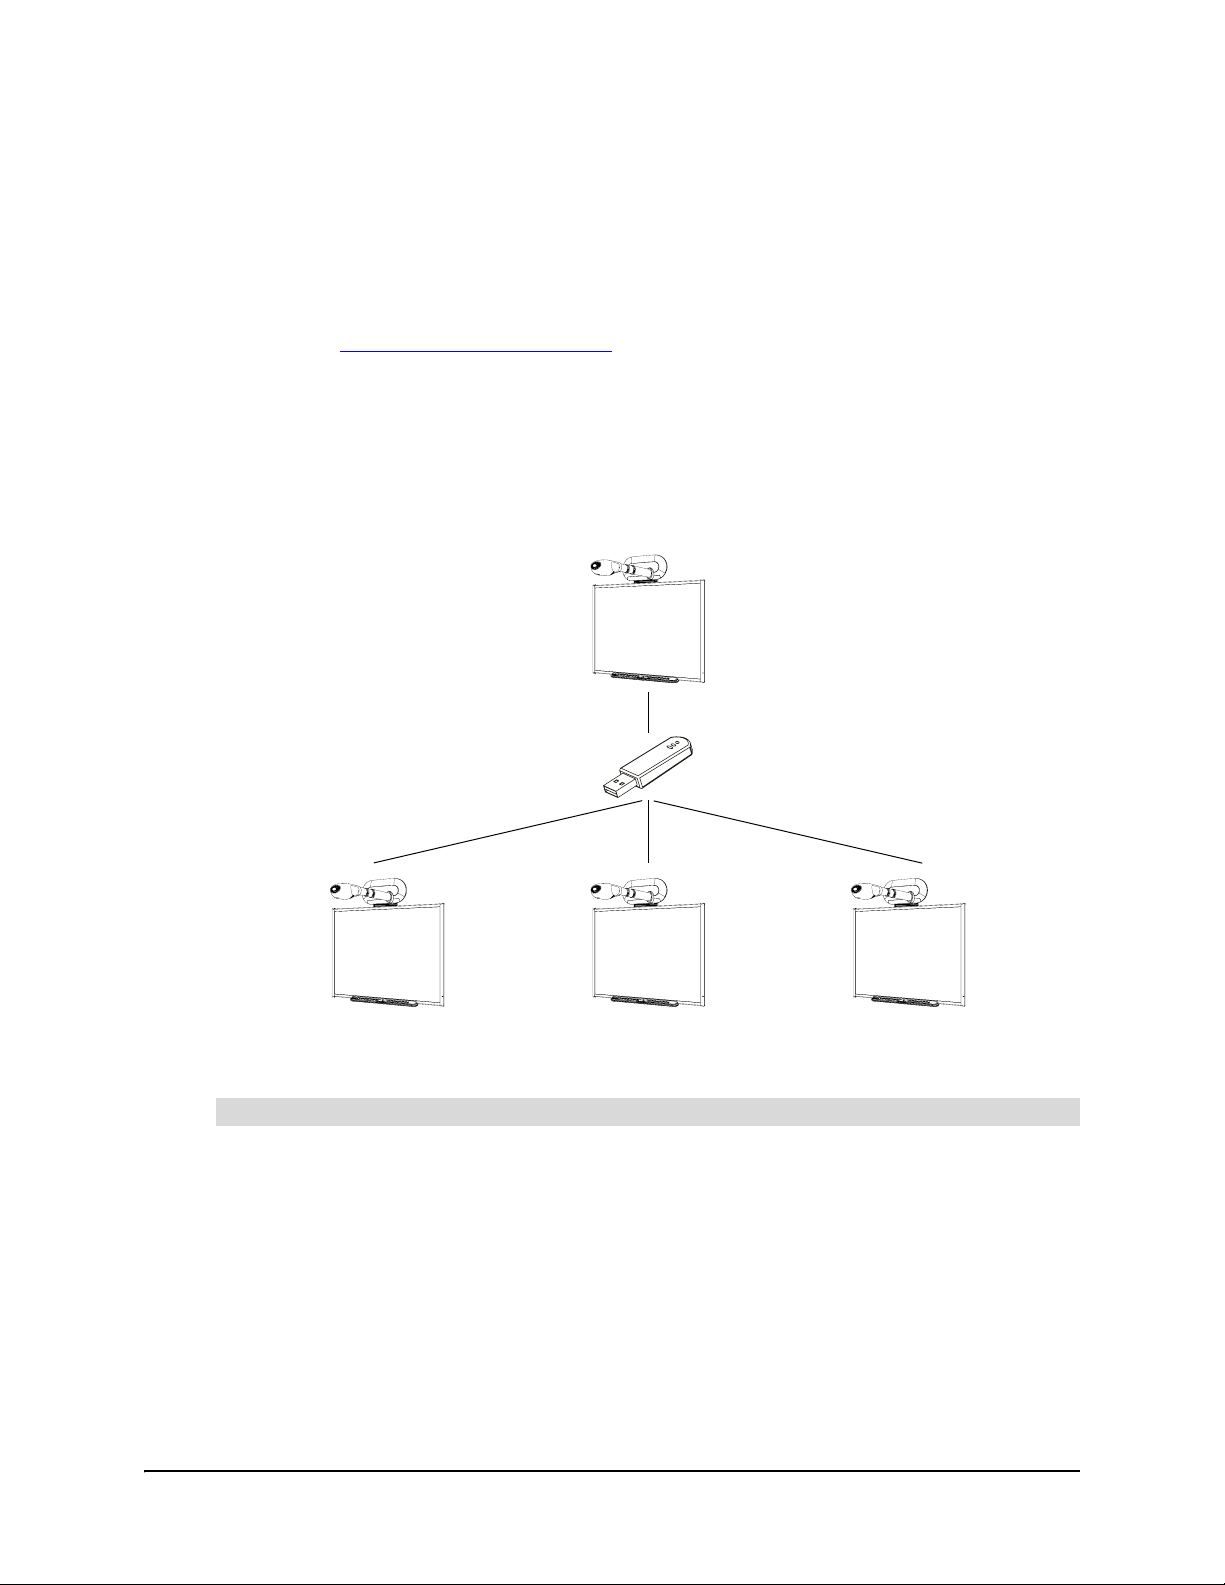
Configuring Multiple SMART Board 600i Interactive Whiteboard Systems
If you have more than one 600i interactive whiteboard system, you don’t have to configure each
system separately. Instead, configure one system, export the configuration settings to a USB
storage device, and then import the configuration settings to the other systems.
NOTE: The export process doesn’t include orientation data on the USB storage device.
To export configuration settings to a USB storage device
1. Connect a USB storage device to the Unifi 35 projector or Extended Connection Panel.
2. Press Menu.
The Welcome Center appears.
3. Press Settings.
The Unifi 35 Settings dialog box appears.
4. If a password is required to change the con figur ation settings, type the p a ssword in the box at
the bottom of the menu, and then press OK.
NOTE: For information on the configuration settings password, see page 14.
Configuring the Firmware 11
Page 16
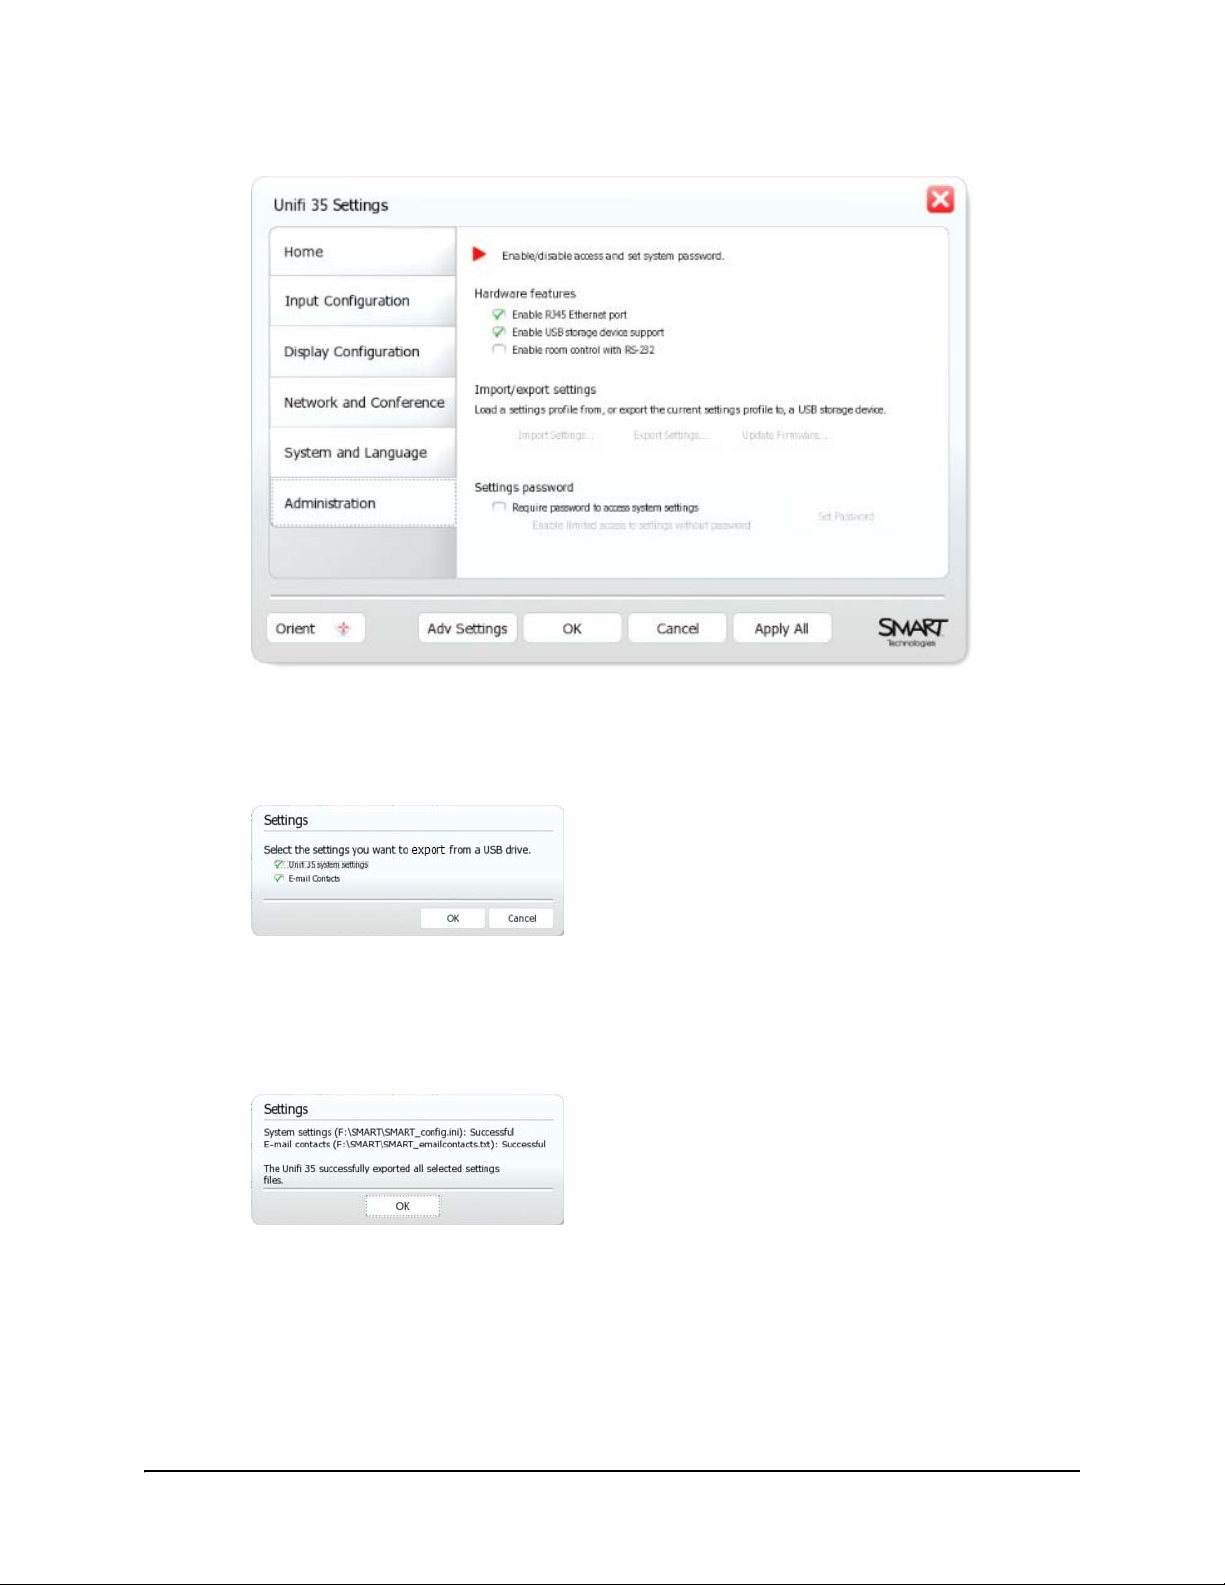
5. Press Administration.
6. Ensure the Enable USB storage device support check box is selected.
7. Press Export Settings.
The Settings dialog box appears.
8. Select the Unifi 35 system settings check box to export configuration settings and th e E-mail
Contacts check box to export contacts.
9. Press OK.
The Settings dialog box appears.
10. Press OK.
You’ve exported the configuration settings from one 600i interactive whiteboard system to a USB
storage device. You can now import those configuration settings to other 600i interactive
whiteboard systems.
12 Configuring the Firmware
Page 17
To import configuration settings from a USB storage device
1. Connect the USB storage device to the Unifi 35 projector or Extended Connection Panel.
2. Press Menu.
The Welcome Center appears.
3. Press Settings.
The Unifi 35 Settings dialog box appears.
4. If a password is required to change the con figur ation settings, type the p a ssword in the box at
the bottom of the menu, and then press OK.
NOTE: For information on the configuration settings password, see page 14.
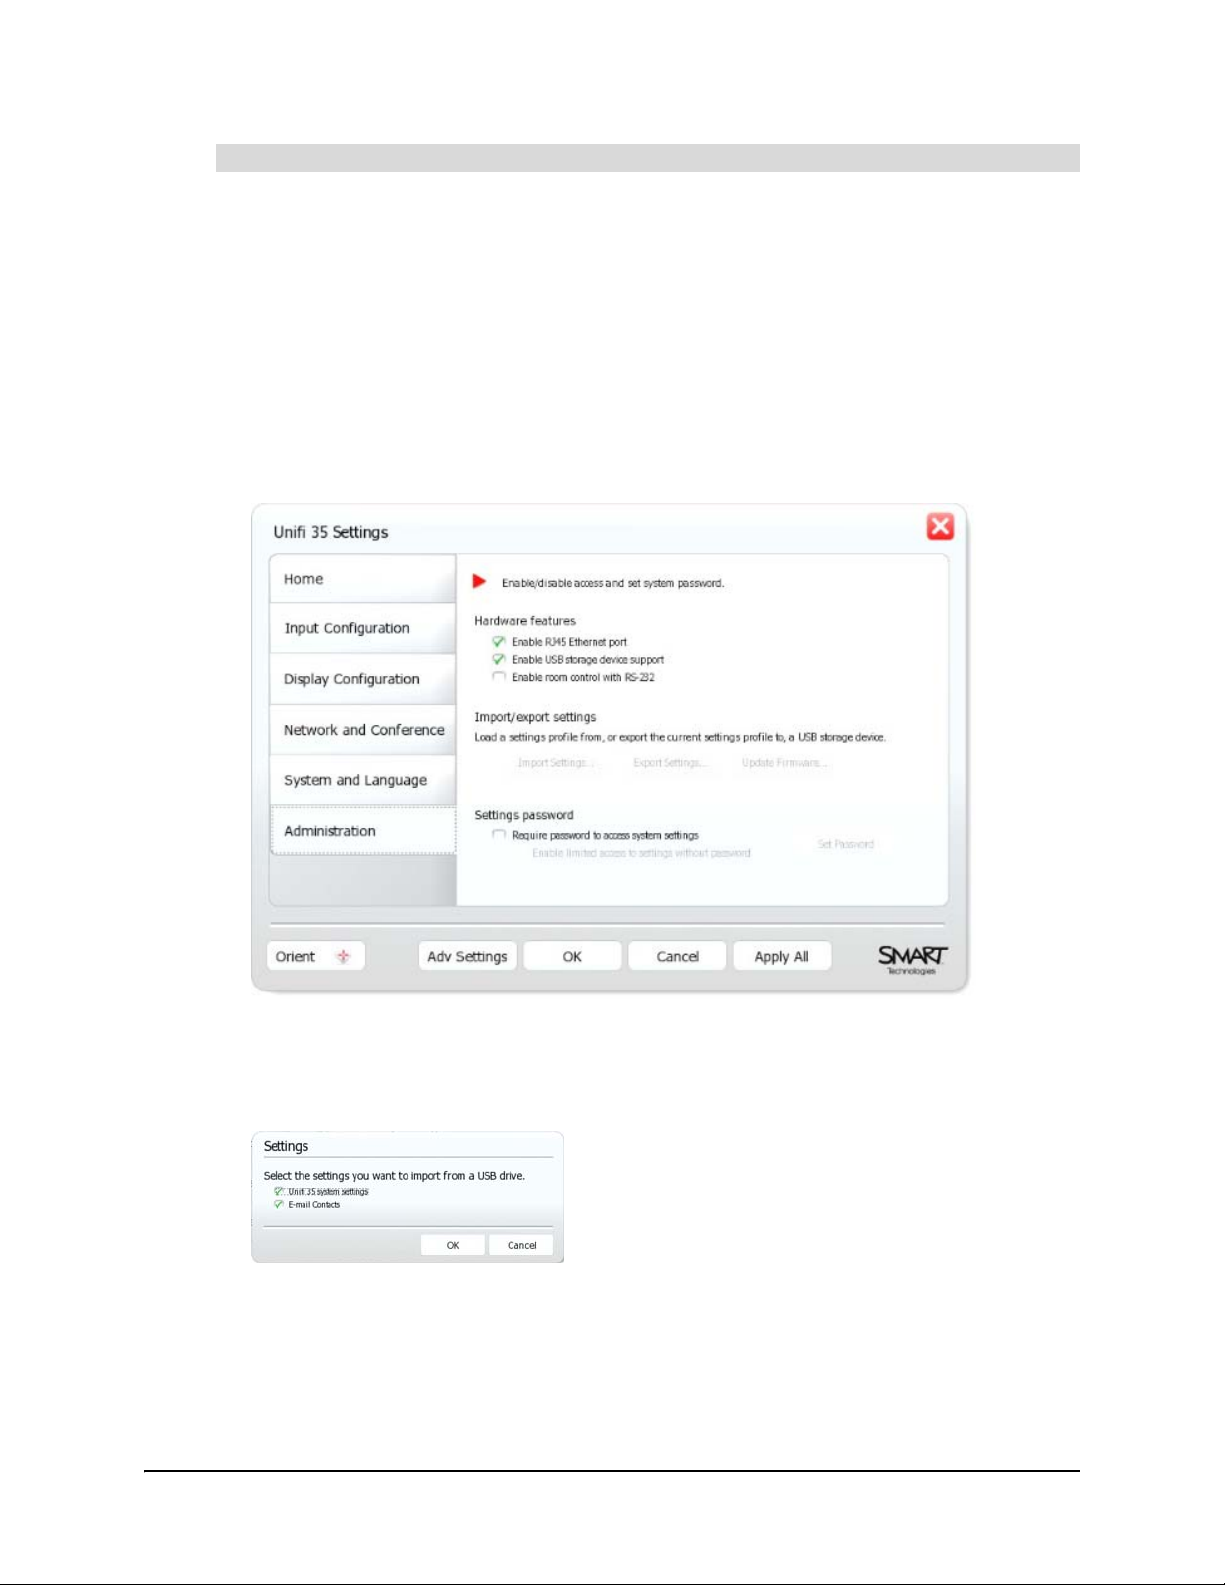
5. Press Administration.
6. Ensure the Enable USB storage device support check box is selected.
7. Press Import Settings.
The Settings dialog box appears.
8. Select the Unifi 35 system settings check box to import configuration settings and th e E-mail
Contacts check box to import contacts.
Configuring the Firmware 13
Page 18
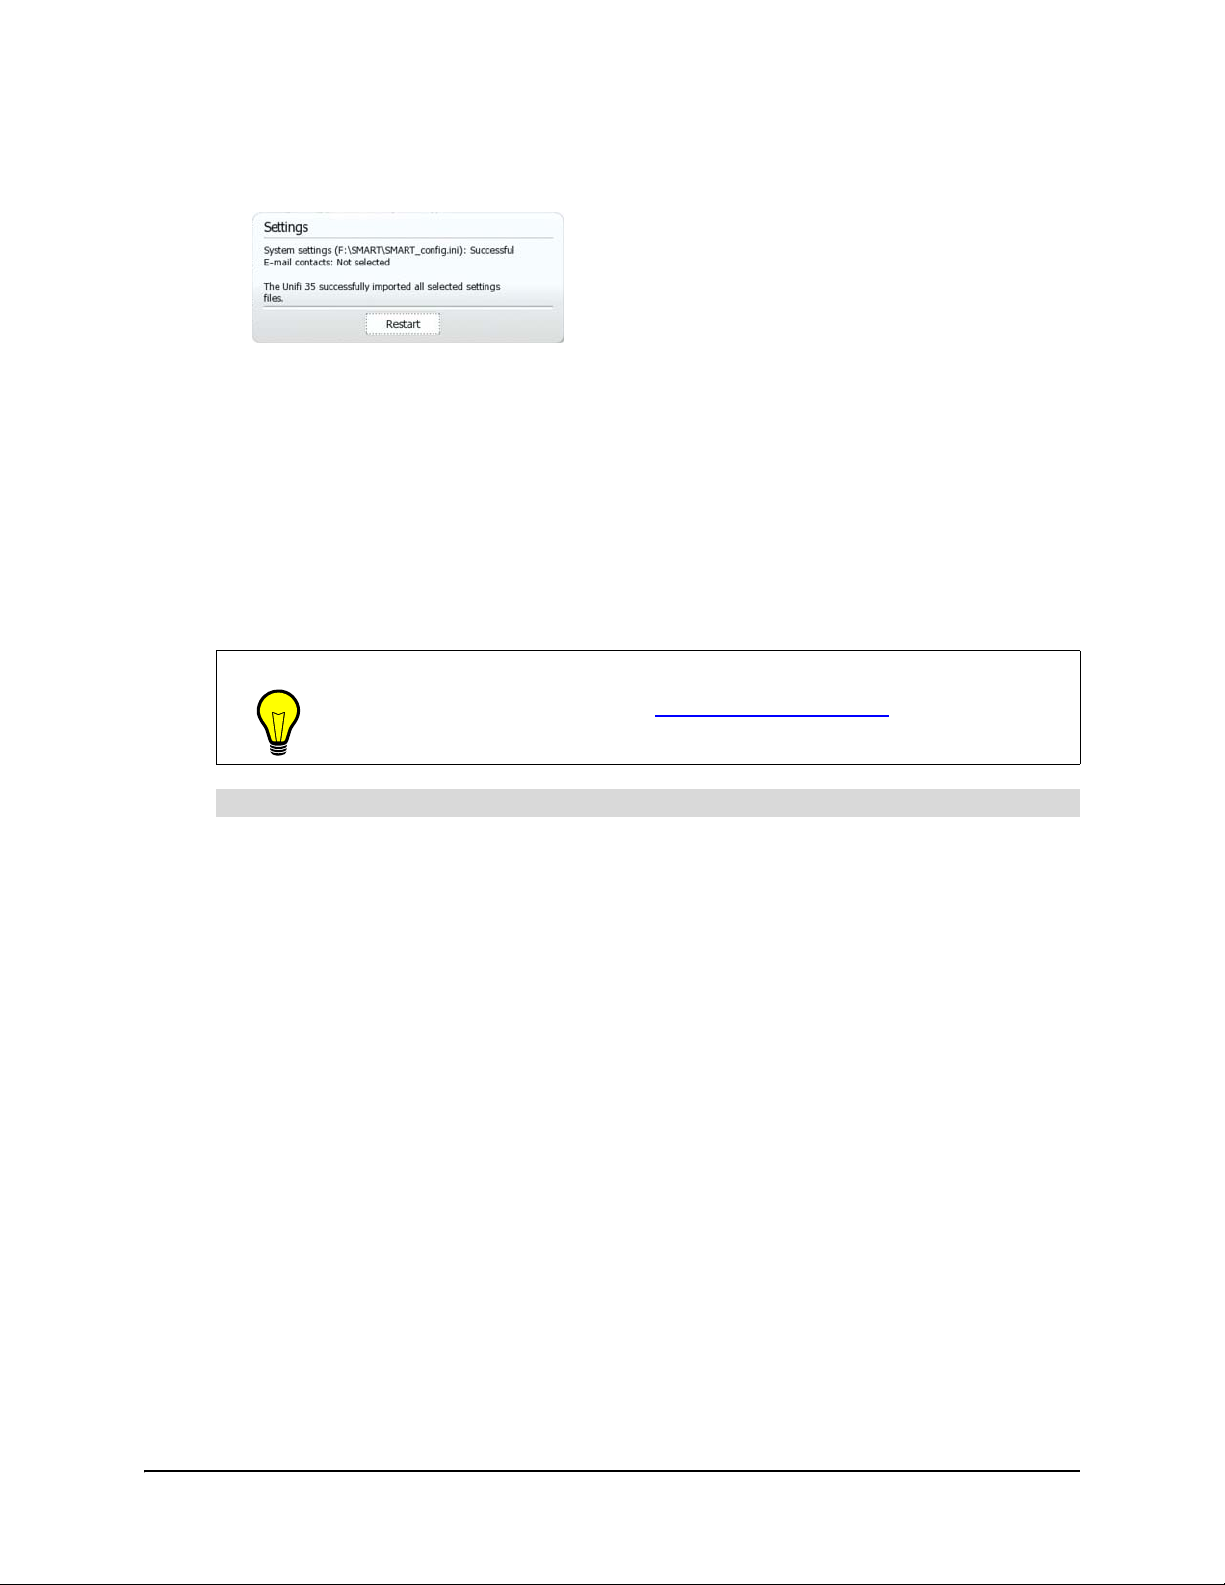
9. Press OK.
The Settings dialog box appears.
10. Press Restart to end the current session and turn off the projector.
11. After a six-minute cool-down period, turn on the projector.
You’ve imported configuration settings from a USB storage device to a 600i interactive whiteboard
system.
Securing Configuration Settings
You can assign a password to the configuration settings. Users must enter this password to
change the configuration settings.
TIP
If you forget the password, contact SMART Technical Support.
To secure configuration settings
1. Press Menu.
The Welcome Center appears.
2. Press Settings.
The Unifi 35 Settings dialog box appears.
14 Configuring the Firmware
Page 19
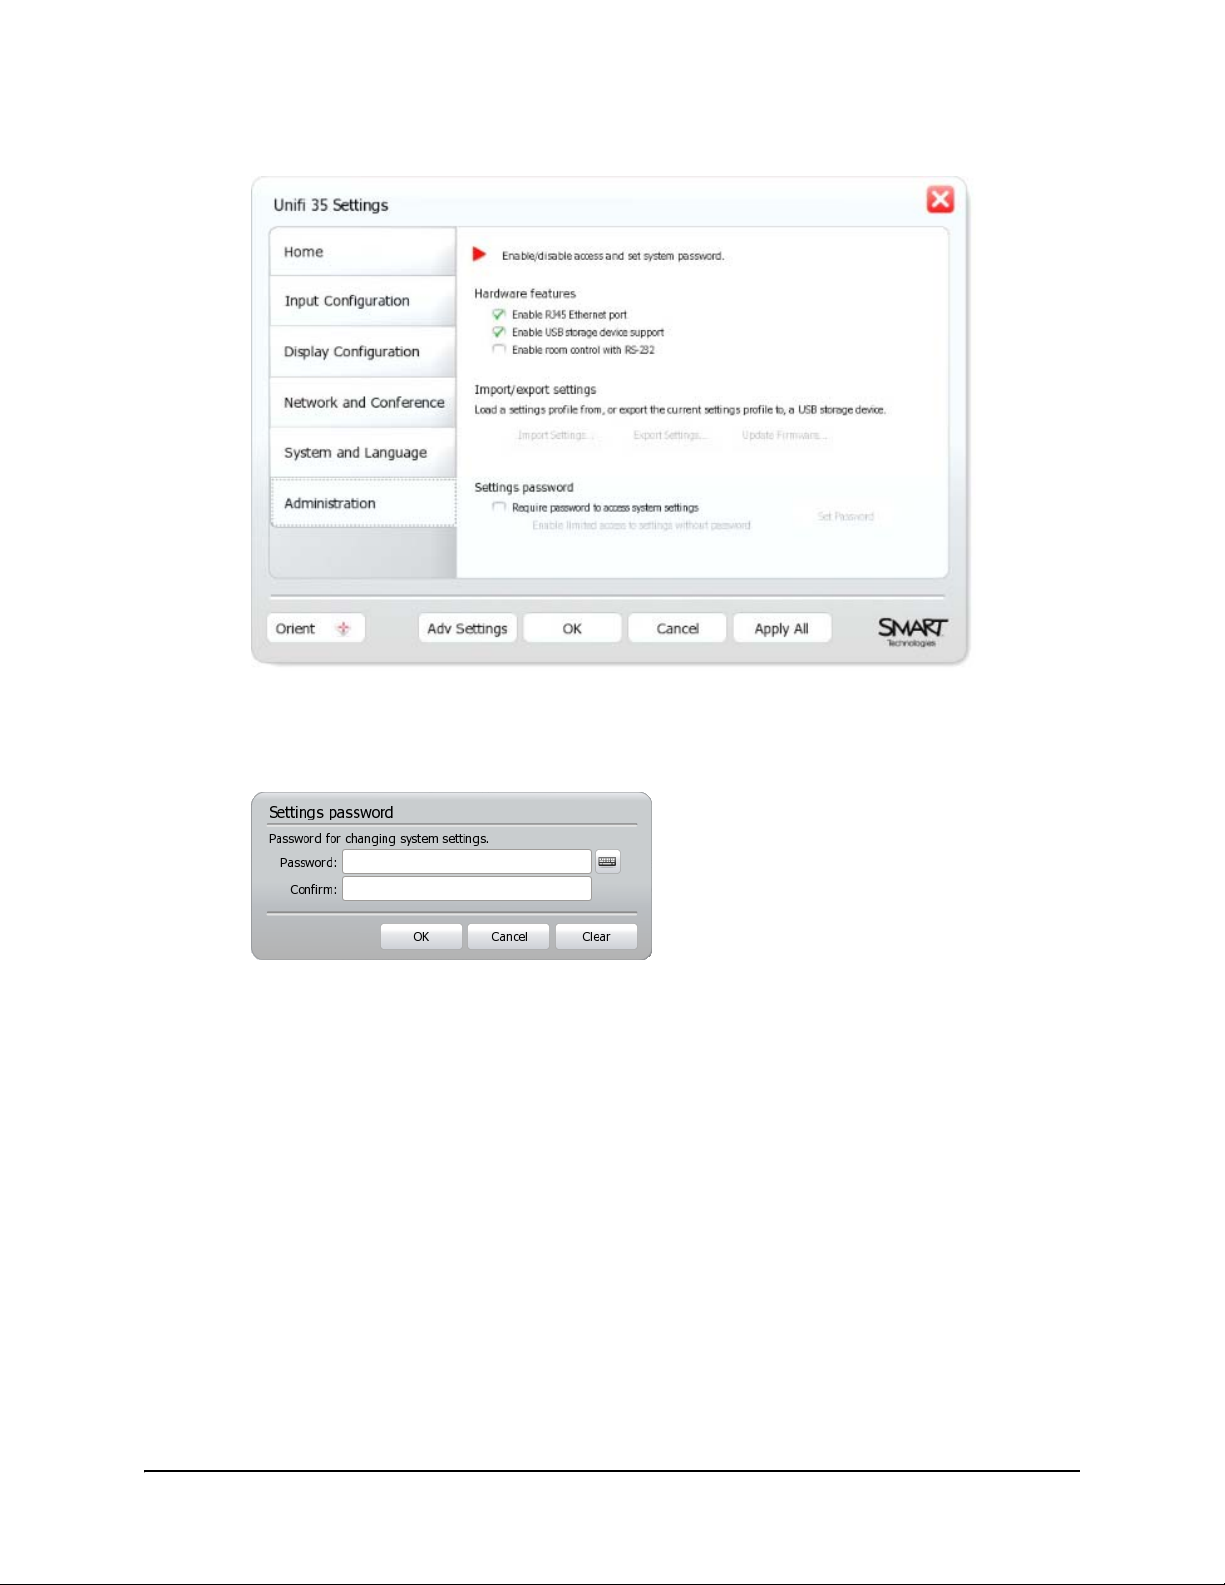
3. Press Administration.
4. Select the Require password to access system set tings check box to require users to enter
a password to change the configuration settings.
The Settings password dialog box appears.
NOTE: If the Require password to access system settings check box was previously
selected, press Set Password to open the Settings Administrator Password dialog box.
5. Type the password in the Password and Confirm boxes.
6. Press OK.
7. Select the Enable limited access to settings without password check box to al low users to
change the display settings (see page 22) and language settings (see page 37) but no other
settings.
8. Press Apply All.
You’ve secured the configuration settings.
Configuring the Firmware 15
Page 20
Connecting Computers to the SMART Board 600i Interactive Whiteboard System
You can connect two computers to the 600i interactive whiteboard system.
NOTE: Yo u can connect additional computers to the 600i interactive whiteboard system through
LinQ software (see page 28).
After connecting a computer to the 600i interactive whiteboard system, you can view its input on
the display and do the following:
• Draw digital ink notes.
• Freeze the display.
• Take screen captures.
• Use the on-screen keyboard and right-click features of the firmware.
For more information, see page 71.
To connect a computer
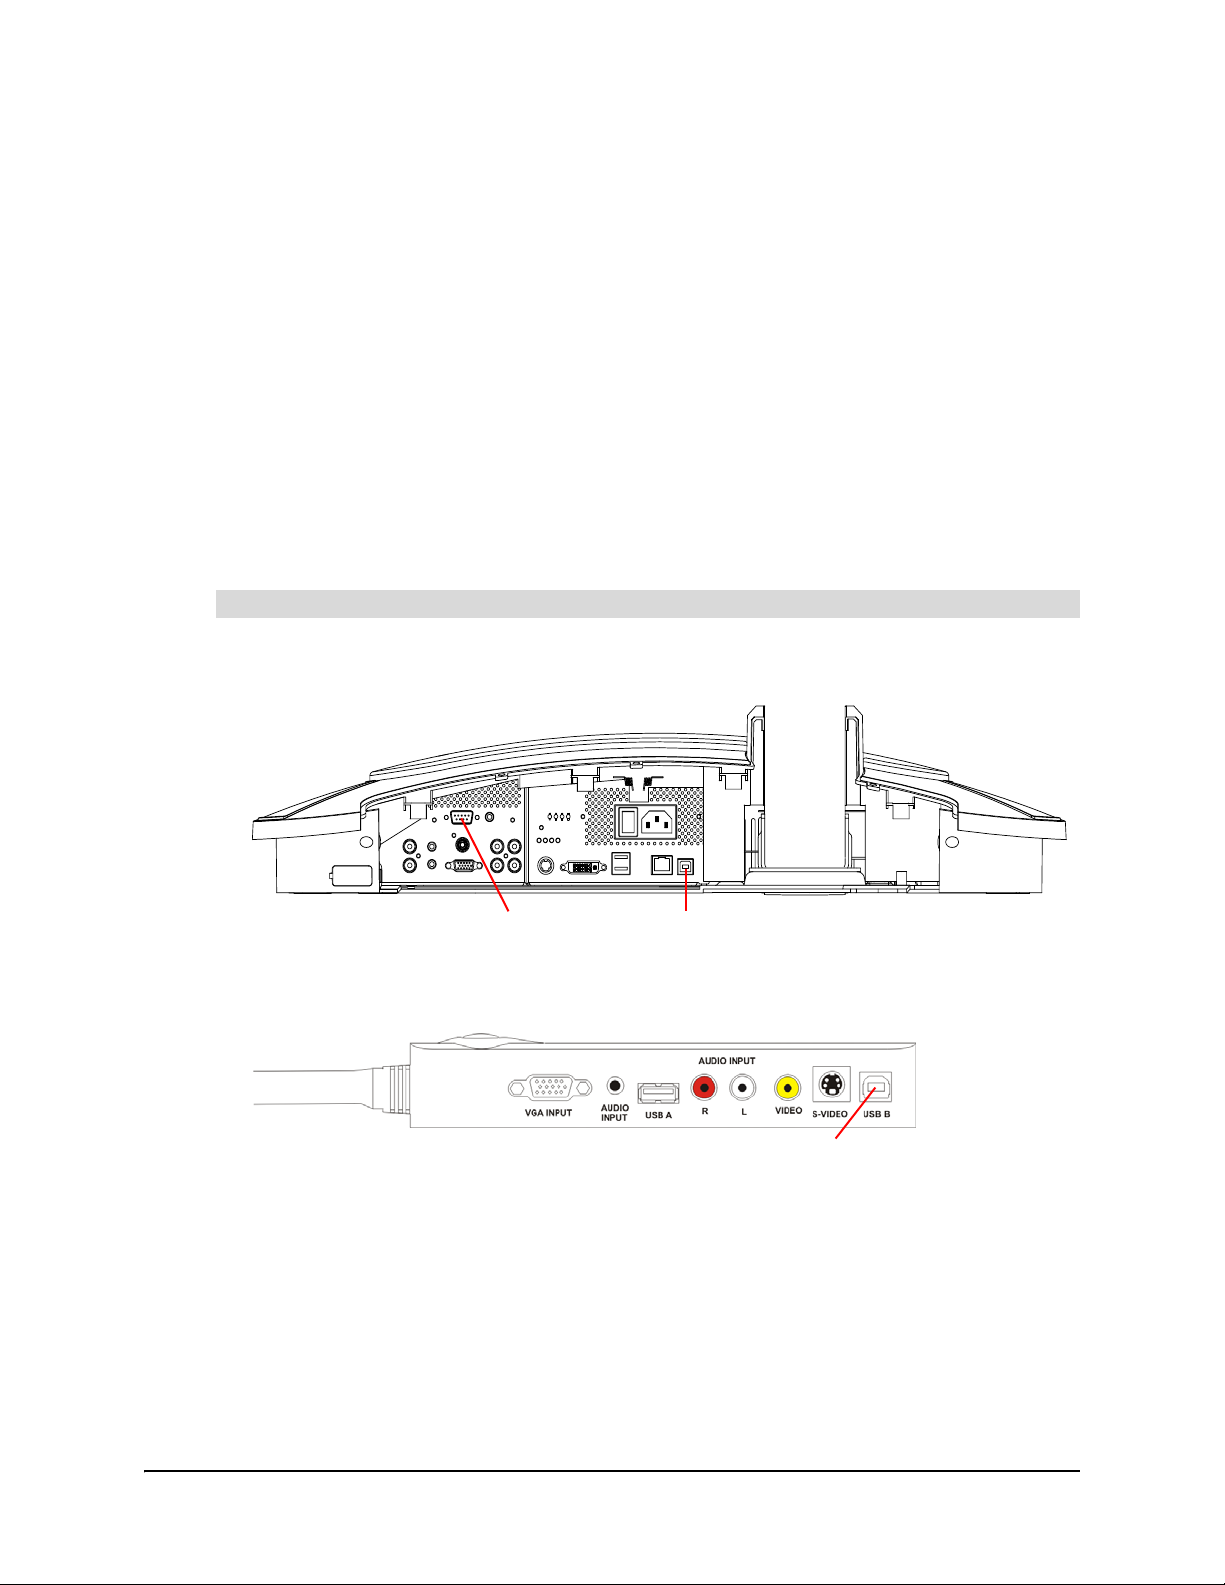
1. Connect the SMART Board interactive whiteboard input using the USB B or RS-232
connectors on the Unifi 35 projector.
USBRS-232
OR
Use the USB B connector on the ECP.
16 Configuring the Firmware
USB
Page 21
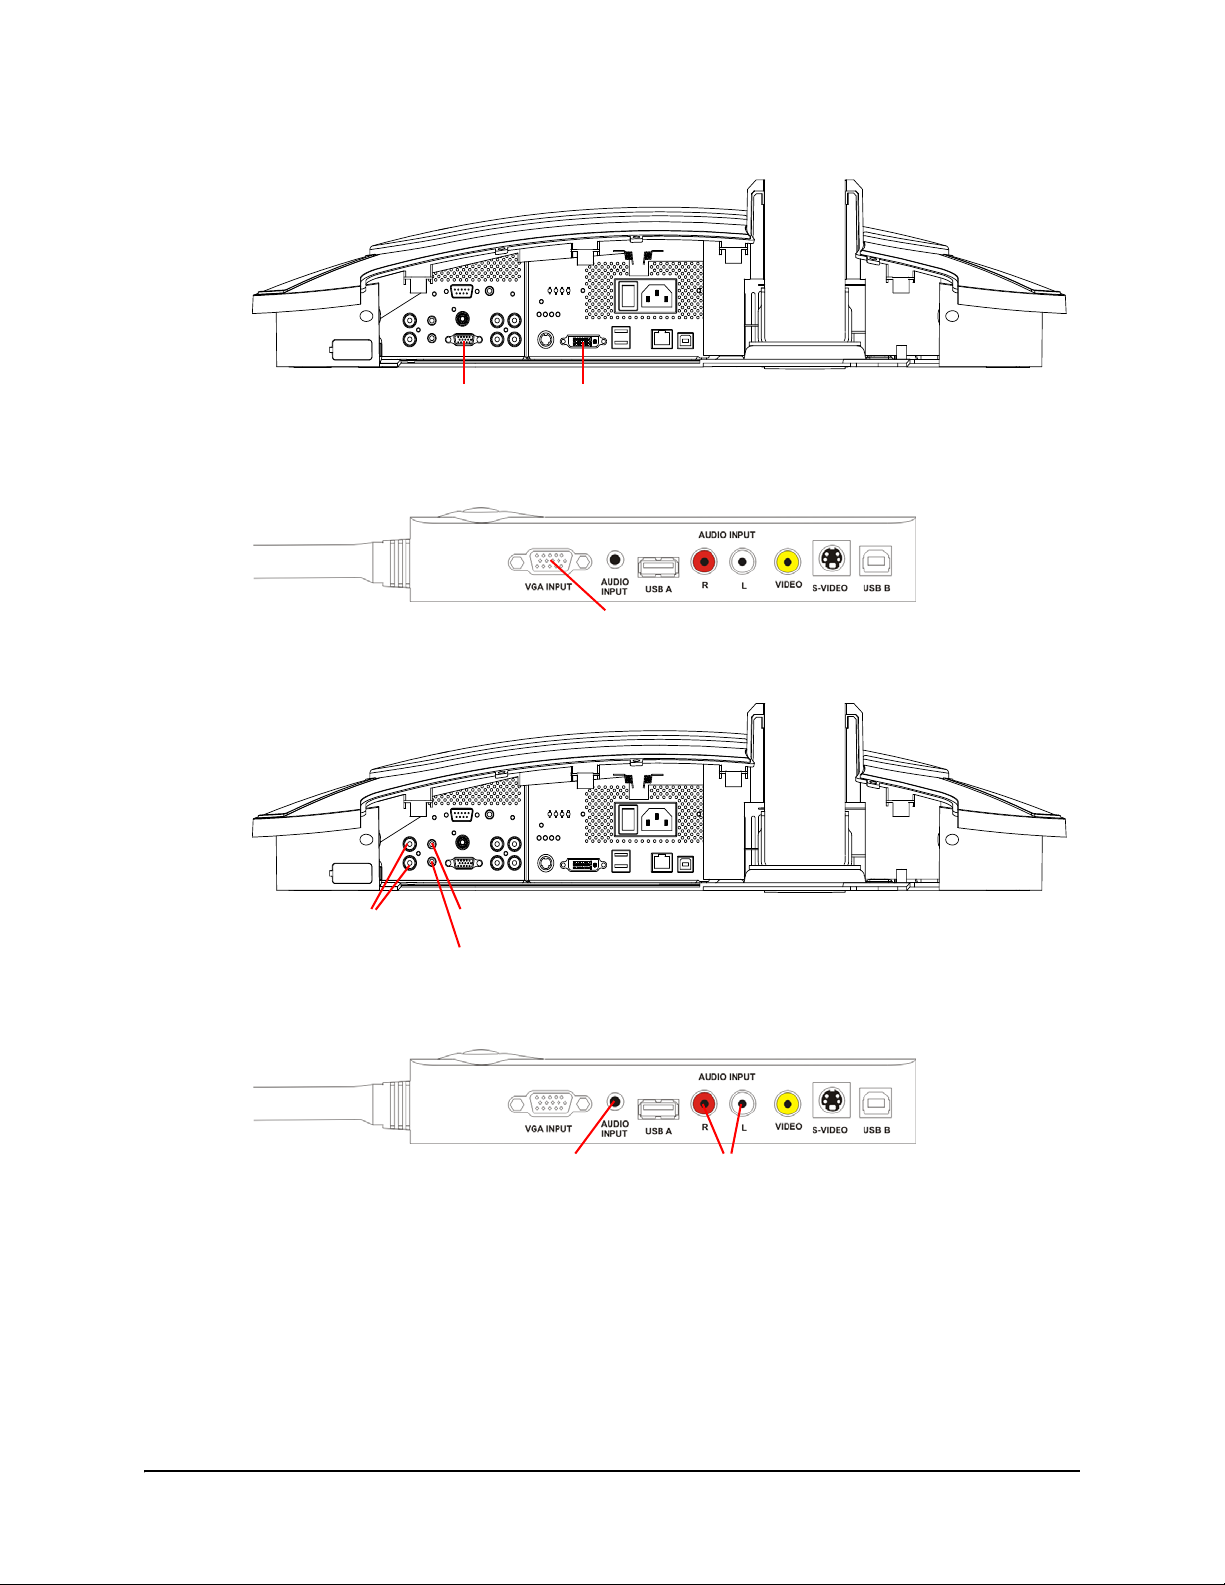
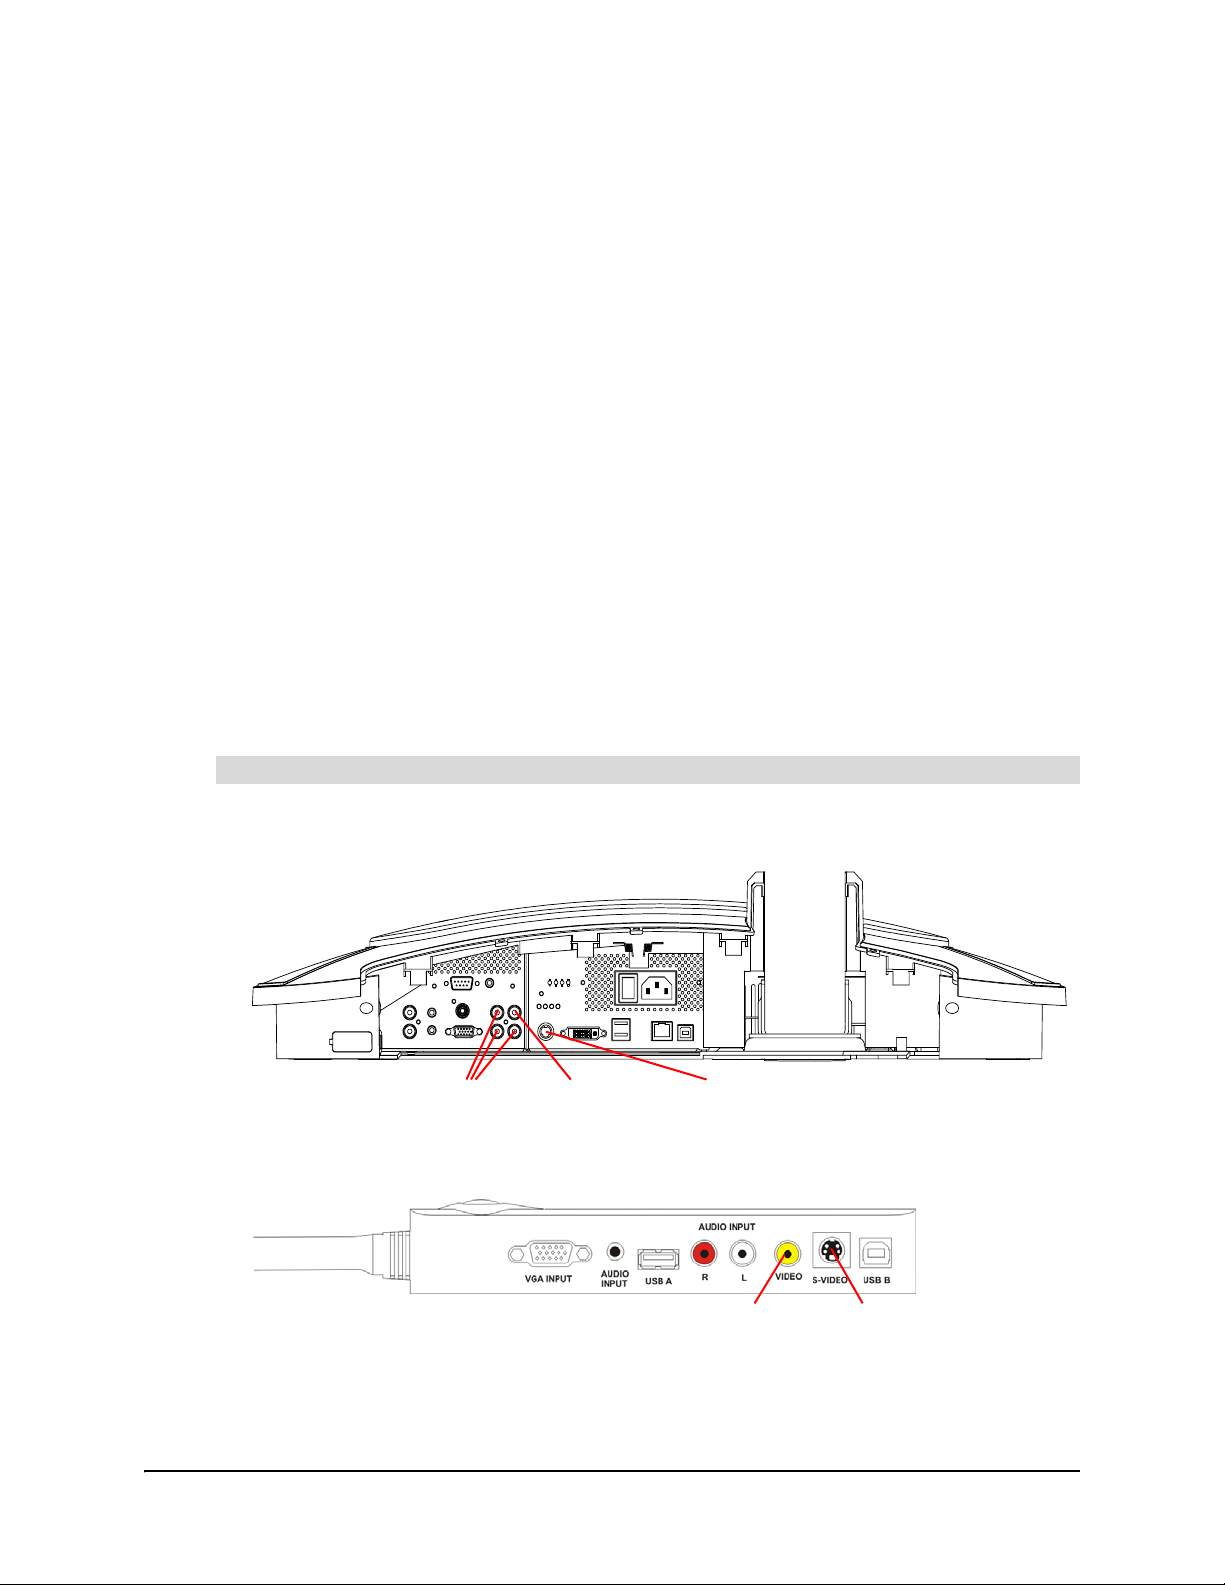
2. Connect the video input using the VGA or DVI connectors on the Unifi 35 projector.
DVIVGA
OR
Use the VGA connector on the ECP.
VGA
3. Connect the audio input using the RCA or Stereo Mini connectors on the Unifi 35 projector.
RCA
Stereo Mini 1
Stereo Mini 2
OR
Use the RCA or Stereo Mini connectors on the ECP.
Stereo Mini RCA
You’ve connected a computer to the 600i interactive whiteboard system.
Configuring the Firmware 17
Page 22
To configure the firmware for the computer
1. Press Menu.
The Welcome Center appears.
2. Press Settings.
The Unifi 35 Settings dialog box appears.
3. If a password is required to change the con figur ation settings, type the p a ssword in the box at
the bottom of the menu, and then press OK.
NOTE: For information on the configuration settings password, see page 14.
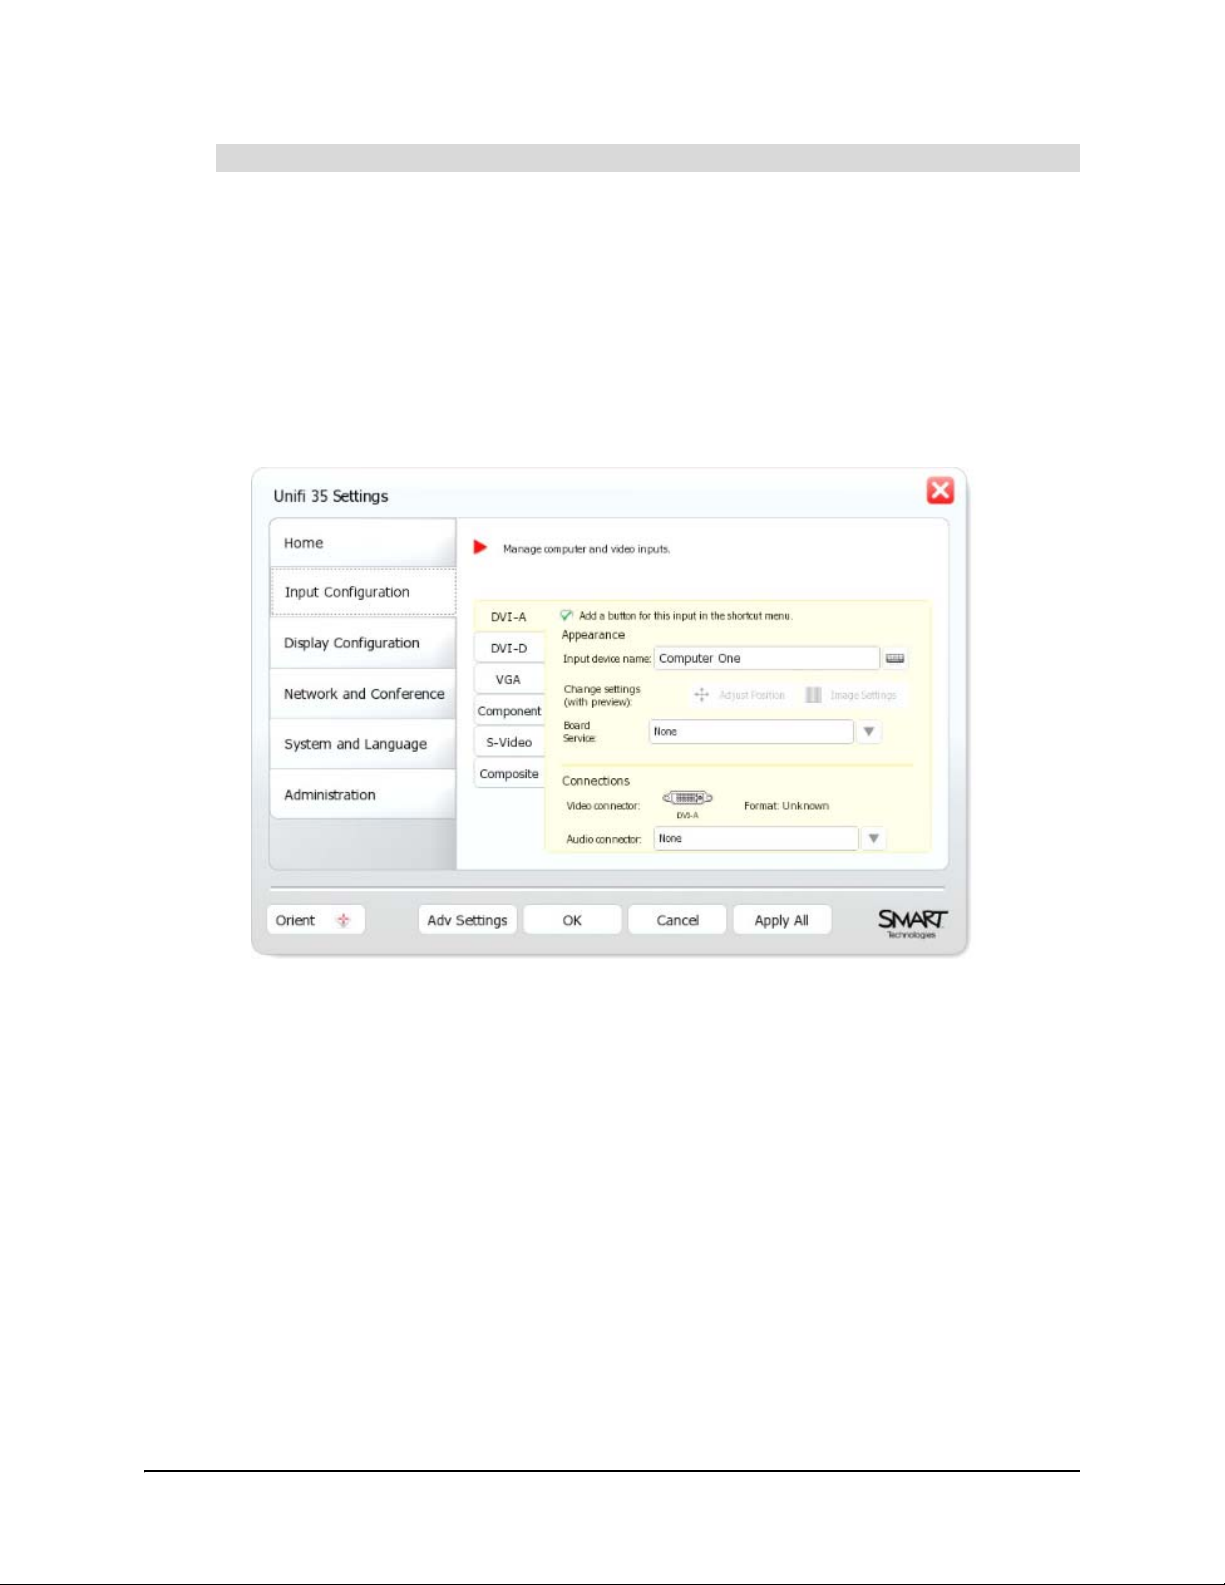
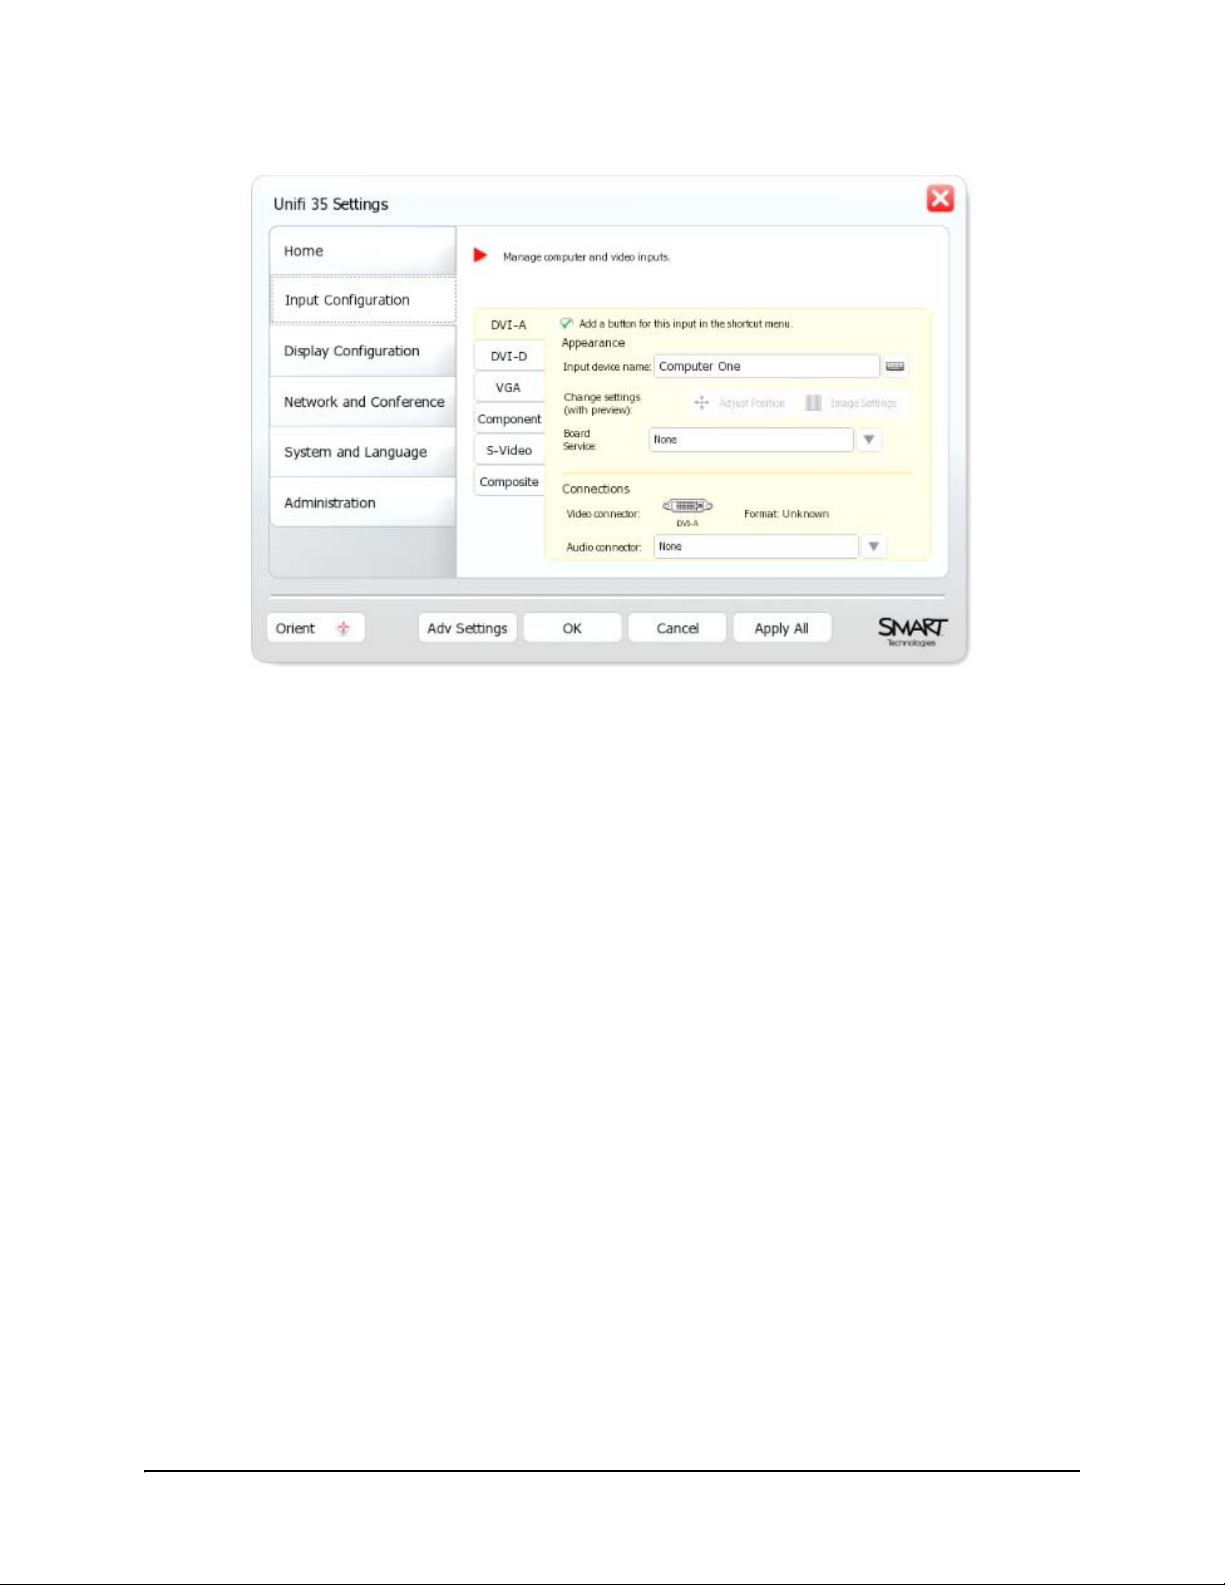
4. Press Input Configuration.
5. Press one of the following:
– DVI-A
– DVI-D
– VGA
6. If you want to remove the button for the computer input from the shortcut menu, clear the
Add a button for this input in the shortcut menu check box.
NOTE: For information on the shortcut menu, see page 46.
7. In the Input device name box, type a name for the computer.
8. In the Board Service list, select the appropriate SMART Board interactive whiteboard
connector:
– USB
– RS232
18 Configuring the Firmware
Page 23
9. In the Audio Connector list, select the appropriate audio connector:
– RCA
– Stereo Mini 1
– Stereo Mini 2
10. Press Apply All.
You’ve configured the firmware for the computer.
Connecting Video Sources to the SMART Board 600i Interactive Whiteboard System
You can connect up to three video sources to the 600i interactive whiteboard system. Video
sources include DVD players, VCRs and similar devices.
After connecting a video source to the 600i interactive whiteboard system, you can view its input
on your SMART product’s interactive screen and do the following:
• Draw digital ink notes.
• Freeze the display.
• Take screen captures.
For more information, see page 71.
To connect a video source
1. Connect the video input using the component, composite or S-video connectors on the Unifi
35 projector.
S-videoComponent Composite
OR
Use the composite or S-video connectors on the ECP.
S-videoComposite
Configuring the Firmware 19
Page 24
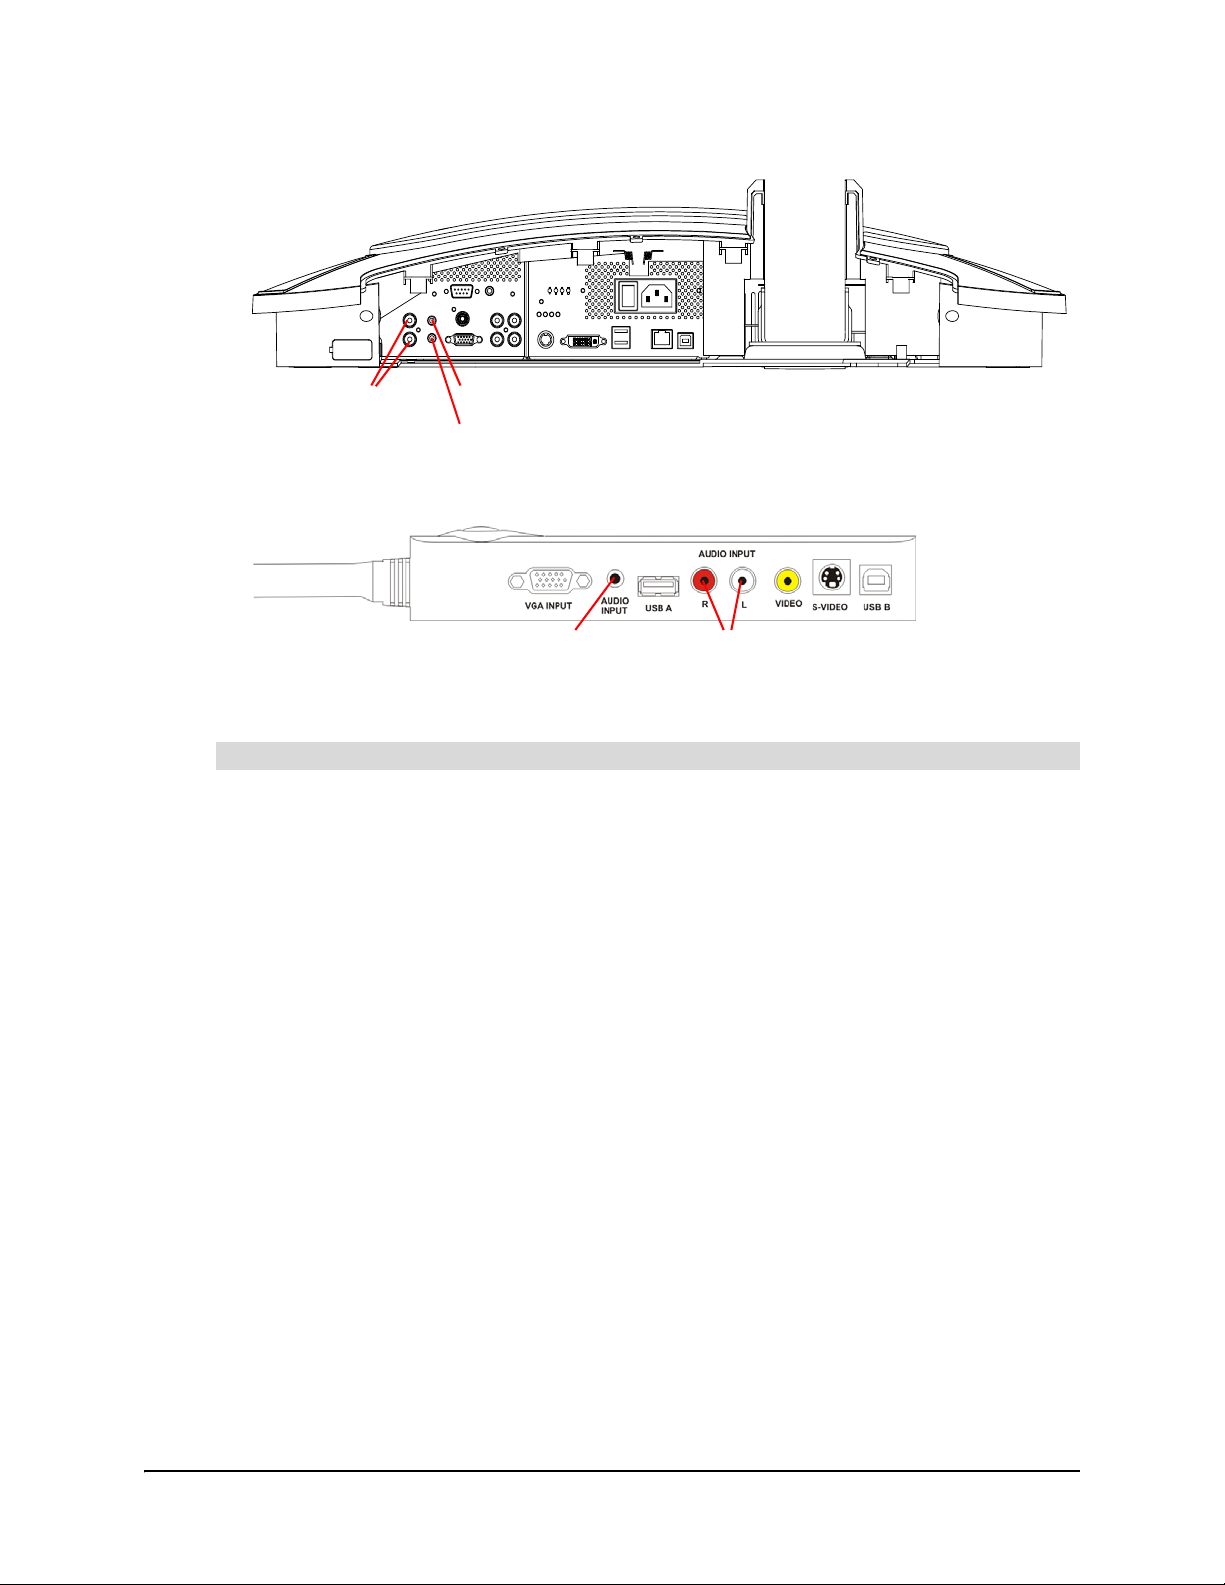
2. Connect the audio input using the RCA or Stereo Mini connectors on the Unifi 35 projector.
RCA
Stereo Mini 1
Stereo Mini 2
OR
Use the RCA or Stereo Mini connectors on the ECP.
Stereo Mini RCA
You’ve connected a video source to the 600i interactive whiteboard system.
To configure the firmware for the video source
1. Press Menu.
The Welcome Center appears.
2. Press Settings.
The Unifi 35 Settings dialog box appears.
3. If a password is required to change the con figur ation settings, type the p a ssword in the box at
the bottom of the menu, and then press OK.
NOTE: For information on the configuration settings password, see page 14.
20 Configuring the Firmware
Page 25
4. Press Input Configuration.
5. Press the appropriate tab:
– Component
– S-Video
– Composite
6. If desired, clear the Add a button for this input in the shortcut menu check box to remove
the button for the video source input from the shortcut menu.
NOTE: For information on the shortcut menu, see page 46.
7. In the Input device name box, type a name for the video source.
8. In the Board Service list, select None.
9. In the Audio Connector list, select the appropriate audio connector:
– RCA
– Stereo Mini 1
– Stereo Mini 2
10. Press Apply All.
You’ve configured the firmware for the video source.
Configuring the Firmware 21
Page 26
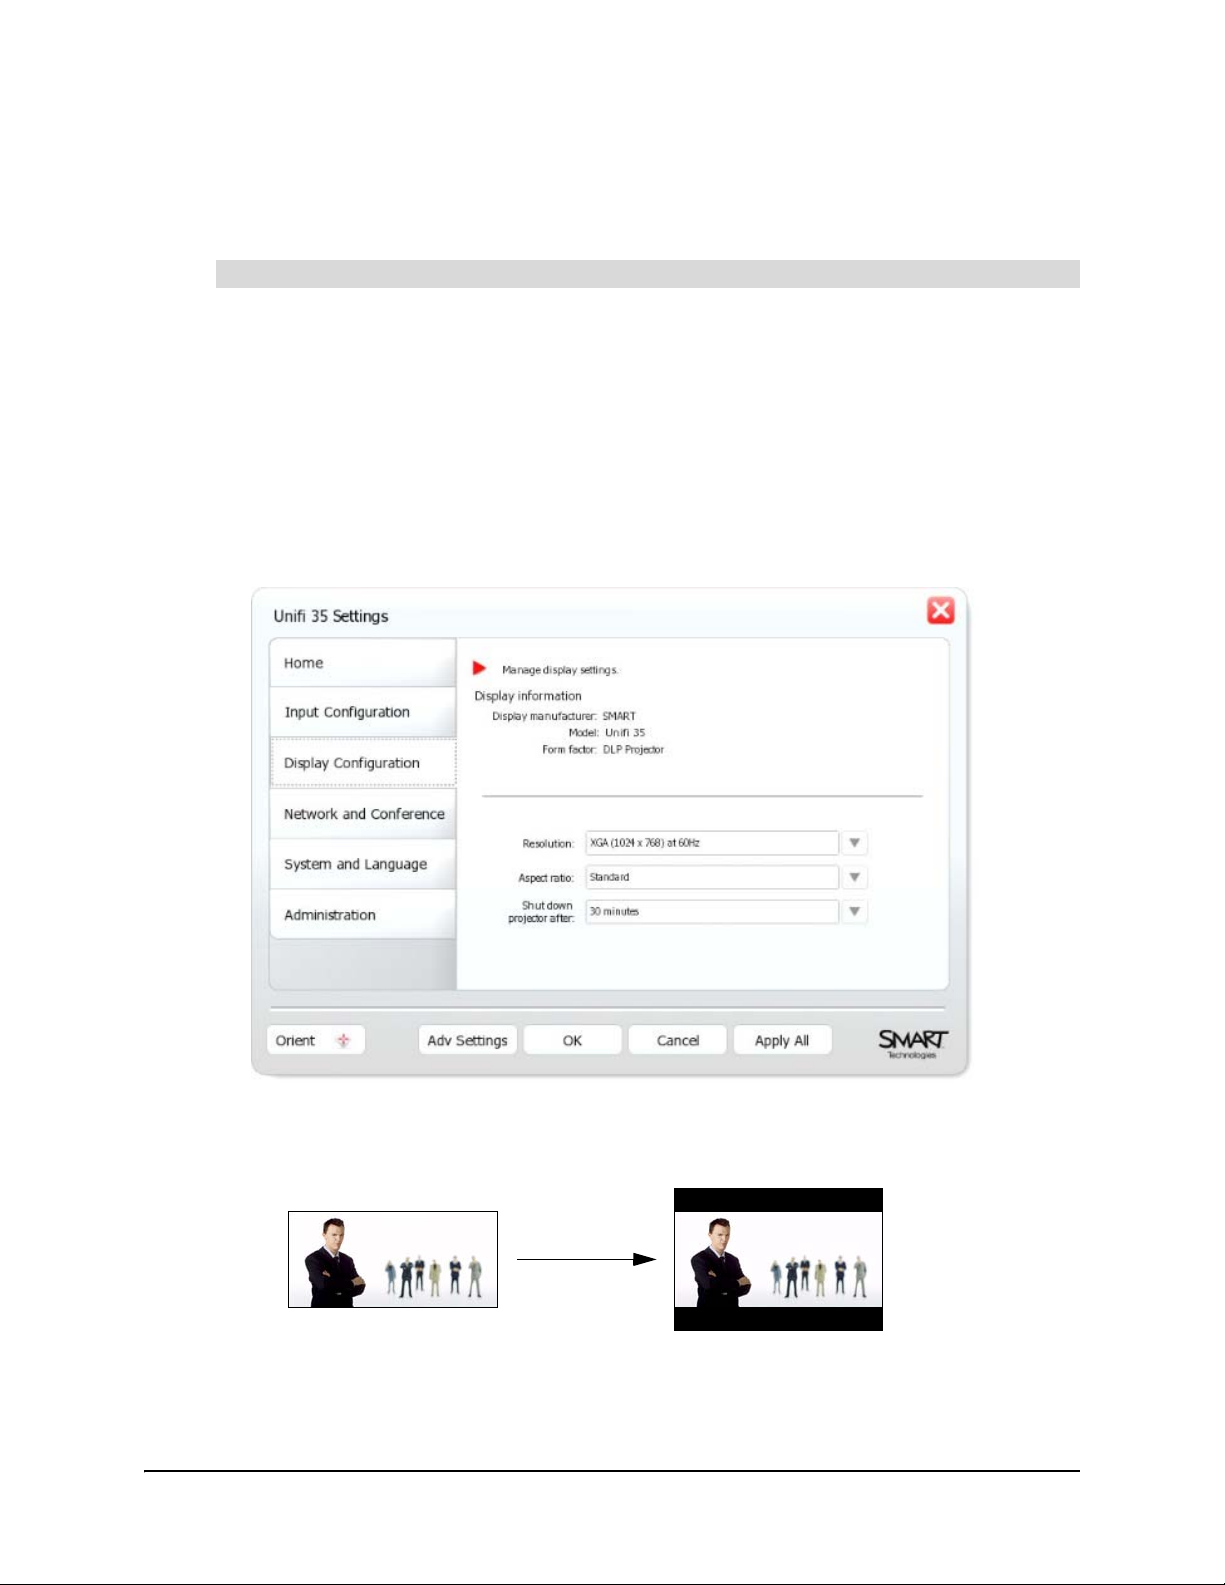
Configuring the Display Settings
You can configure the firmware’s aspect ratio and timeout settings to work with your 600i
interactive whiteboard system’s display.
To configure the display settings
1. Press Menu.
The Welcome Center appears.
2. Press Settings.
The Unifi 35 Settings dialog box appears.
3. If a password is required to change the con figur ation settings, type the p a ssword in the box at
the bottom of the menu, and then press OK.
NOTE: For information on the configuration settings password, see page 14.
4. Press Display Configuration.
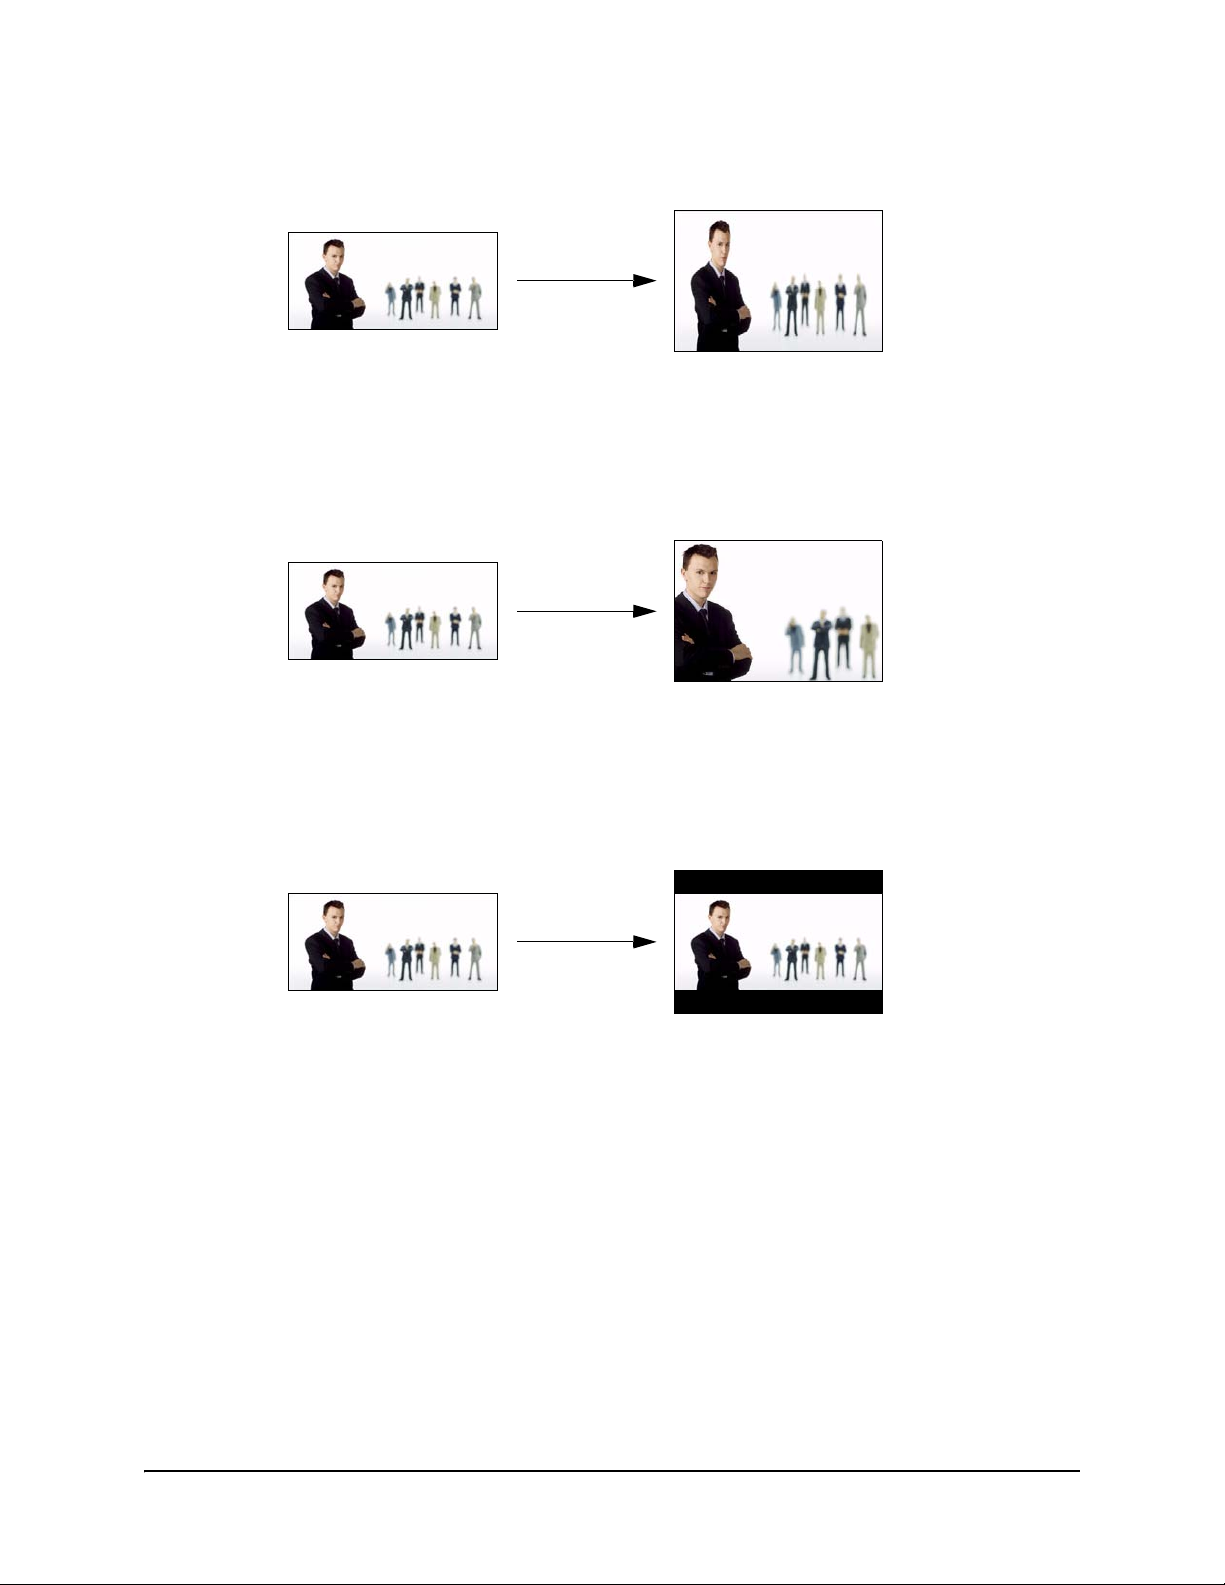
5. In the Aspect ratio list, select an aspect ratio.
– Standard preserves the computer or video source input’s aspect ratio.
Computer or
Video Source Input
22 Configuring the Firmware
(Letterboxing)
SMART Board
Output
Page 27
– Full screen changes the computer or video source input to match your SMART Board
interactive whiteboard’s aspect ratio.
Computer or
Video Source Input
SMART Board
Output
– Cropped crops the computer or video source input to match your SMART Board
interactive whiteboard’s aspect ratio.
Computer or
Video Source Input
SMART Board
Output
– Enhanced widescreen changes the computer or video source input to a widescreen
(16:9) aspect ratio.
Computer or
Video Source Input
SMART Board
Output
6. In the Shut down projector after list, select the number of minutes you want to pass before
the projector shuts down, or No Timeout to not shut down the projector.
NOTE: If the 600i interactive whiteboard system is connected to a computer or video source,
the value in the Shut down projector after list doesn’t take effect until after the computer or
video source times out.
7. Press Apply All.
You’ve configured the display.
Configuring the Firmware 23
Page 28

Configuring Networking and Conferencing Settings
Connect the 600i interactive whiteboard system to a network to take advantage of the firmware’s
networking and conferencing feat ur es . Th es e fea tu re s inclu d e:
• sending Whiteboard files to specified e-mail addresses
• connecting to LinQ software client computers
• using Bridgit conferencing software to collaborate with anyone, anywhere in the world
IMPORTANT
You must be familiar with basic networking, Simple Network Management Protocol
(SNMP) and Simple Mail Transfer Protocol (SMTP) to complete the following
procedures. If you are not familiar with these concepts, refer this guide to an
information technology professional in your organization.
To connect the 600i interactive whiteboard system to a network
Connect the Unifi 35 projector to the network using a Cat 5 cable.
Network Connection
IMPORTANT
If you have connected the Unifi 35 projector to a network but the networking
features of the firmware are not available, see document 124969
.
To configure basic networking settings
1. Press Menu.
The Welcome Center appears.
2. Press Settings.
The Unifi 35 Settings dialog box appears.
3. If a password is required to change the con figur ation settings, type the p a ssword in the box at
the bottom of the menu, and then press OK.
NOTE: For information on the configuration settings password, see page 14.
24 Configuring the Firmware
Page 29

4. Press Network and Conference.
5. In the Device name/network ID box, type a name for the 600i interactive whiteboard system.
NOTE: The firmware uses this name in Bridgit software conferen ce s as th e participant’s
name, and in LinQ software as the server name.
6. Press Network Address (if this tab doesn’t currently appear).
7. Select the Use DHCP (automatically detect network settings) option to configure
networking settings automatically.
OR
Select the Manually specify network settings and addresses op tion to configure
networking settings manually, and then type the appropriate information (as supplied by your
network administrator) in the following boxes:
– IP address
– Subnet mask
– Default gateway
– DNS server 1
– DNS server 2
8. Press Apply All.
You’ve configured the basic networking settings of the firmware.
Configuring the Firmware 25
Page 30

To configure e-mail (SMTP) settings
1. Press Menu.
The Welcome Center appears.
2. Press Settings.
The Unifi 35 Settings dialog box appears.
3. If a password is required to change the con figur ation settings, type the p a ssword in the box at
the bottom of the menu, and then press OK.
NOTE: For information on the configuration settings password, see page 14.
4. Press Network and Conference.
5. Press E-Mail (SMTP).
6. In the SMTP server name box, type the name of the SMTP server (for example, mail).
7. In the Port number box, type the port number of the SMTP server (for example, 25).
NOTE: 25 is the default port number for SMTP.
8. In the Domain name box, type the domain name of the SMTP server (for example,
yourcompany.com).
9. Press Apply All.
You’ve configured the SMTP settings of the firmware.
26 Configuring the Firmware
Page 31

To configure network management (SNMP) settings
1. Press Menu.
The Welcome Center appears.
2. Press Settings.
The Unifi 35 Settings dialog box appears.
3. If a password is required to change the con figur ation settings, type the p a ssword in the box at
the bottom of the menu, and then press OK.
NOTE: For information on the configuration settings password, see page 14.
4. Press Network and Conference.
5. Press Management, Room Control.
6. Select the Enable network management check box to enable the SNMP settings of the
firmware.
7. Select the Use the settings password as the SNMP read/write strings option to use the
general settings password for the SNMP read/write strings.
OR
Select the Manually assign SNMP read/write strings option, and then enter the app ro pri ate
information (as provided by your network administrator) in the following boxes to manually
assign the SNMP read/write strings:
– Read community string
– Write community string
NOTE: In SNMP, community strings are text strings that act as passwords. Get requests are
only valid if their community strings match the value in the Read community string box, and
set requests are only valid if their community strings match the value in the
Write community string box.
Configuring the Firmware 27
Page 32

8. In the Trap destination address box, type the IP address to which the 600i interactive
whiteboard system should send traps (as provided by your network administrator).
NOTE: Traps are unsolicited, asynchronous events that devices such as the 600i interactive
whiteboard system generate to indicate status changes.
9. Press Apply All.
You’ve configured the SNMP settings of the firmware.
NOTE: To fully utilize the SNMP features, download the 600i interactive whiteboard system’s
Management Information Base (MIB) files from www.smarttech.com/600ifirmware
management software uses MIB files to interpret the devices that it monitors.
. SNMP
To configure LinQ software
1. Press Menu.
The Welcome Center appears.
2. Press Settings.
The Unifi 35 Settings dialog box appears.
3. If a password is required to change the con figur ation settings, type the p a ssword in the box at
the bottom of the menu, and then press OK.
NOTE: For information on the configuration settings password, see page 14.
4. Press Network and Conference.
5. Press Conferencing.
6. Select the Enable sharing with LinQ software check box to connect to LinQ software client
computers.
28 Configuring the Firmware
Page 33

7. Select the Prompt before viewing a shared desktop using LinQ check box to prom pt users
before connecting to LinQ software client computers.
8. Press Apply All.
You’ve configured LinQ software.
To configure Bridgit conferencing software
1. Press Menu.
The Welcome Center appears.
2. Press Settings.
The Unifi 35 Settings dialog box appears.
3. If a password is required to change the con figur ation settings, type the p a ssword in the box at
the bottom of the menu, and then press OK.
NOTE: For information on the configuration settings password, see page 14.
4. Press Network and Conference.
5. Press Conferencing.
Configuring the Firmware 29
Page 34

6. Select the Enable conferences with Bridgit soft ware check box to use Bridgit conferencing
software.
IMPORTANT
7. In the Bridgit server box, type the URL of the Bridgit conferencing software server (for
example, bridgit.yourcompany.com).
8. In the Default conference box, type a default, easy-to-identify name for all Bridgit so ftware
conferences created with the firmware.
9. In the Viewing password box, type a password that participants must enter to view Bridgit
software conferences created with the firmware.
10. In the Creation Password box, type a password that participants must enter to create Bridgit
software conferences with the firmware.
11. Press Apply All.
To use the Bridgit conferencing software features in the firmware, you must do
one of the following:
• Purchase and install Bridgit server software.
• Purchase a subscription for the Bridgit conferen cin g se rvic e.
• Install a trial version of Bridgit software for 30 days, and then purchase the
server software or service from SMART Technologies
• Be invited to a conference by a person or organization with Bridgit software.
For more information on these options, see the Bridgit page of the SMART
support site.
.
You’ve configured Bridgit conferencing software.
Configuring Room Control Settings
You can control the Unifi 35 projector externally with a computer or room control system using a
TELNET session established over a TCP/IP network connection or through a serial (RS-232)
connection. This allows you to select inputs, control audio volume, request inform ation such as
projector lamp usage or network settings and complete other tasks.
This section describes how to configure the firmware for extern al control using a computer or room
control system, and the commands you use to change and view the projector settings.
Enabling and Using Room Control Settings through the Serial Interface
To enable and use the firmware’s room control settings:
1. Connect the computer or room control system to the 600i interactive white board system.
2. Enable the firmware’s room control mode.
3. Configure the connected computer or room control system’s serial interface.
4. Program your room control system to use the firmware’s room con trol commands.
30 Configuring the Firmware
Page 35

To connect the computer or room control system to the SMART Board 600i
interactive whiteboard system
Connect the Unifi 35 projector to the computer or room control system using the RS-232
connector.
RS-232 Connector
IMPORTANT
When the 600i interactive whiteboard system is in room control mode, you can only
use the RS-232 connector for command inputs and responses. You must connect
your computer to the Unifi 35 projector’s or ECP’s USB connector.
To enable the SMART Board 600i interactive whiteboard system’s room control
mode
1. Press Menu.
The Welcome Center appears.
2. Press Settings.
The Unifi 35 Settings dialog box appears.
3. If a password is required to change the con figur ation settings, type the p a ssword in the box at
the bottom of the menu, and then press OK.
NOTE: For information on the configuration settings password, see page 14.
Configuring the Firmware 31
Page 36

4. Press Administration.
5. Select the Enable room control with RS-232 check box.
6. Press Apply All.
You’ve enabled the firmware’s room control mode through the serial interface.
To configure your serial interface settings
The firmware’s serial interface settings aren’t configurable. Therefore, configure your computer’s
serial communication program, such as Microsoft® HyperTerminal, or your room control system’s
serial communication settings to the following values.
Setting Value
Data rate 9600 bps
Data bits 8
Parity None
Stop bits 1
Flow control None
32 Configuring the Firmware
Page 37

To verify that the serial interface is in room control mode
1. Turn on your communication program.
2. Configure your communication program as documented in the previous section.
3. Press Enter.
If your configuration is correct and the 600i interactive whiteboard system is in room control
mode, the > character appears.
4. Type ?, and then press Enter to see a list of available commands.
Enabling and Using Room Control Settings through TELNET
Instead of connecting the 600i interactive whiteboard system to room control through the serial
interface, you can connect through TELNET.
To connect the computer or room control system to the SMART Board 600i
interactive whiteboard system through TELNET
1. Connect the Unifi 35 projector and the computer or room control system to the same network.
For more information on connecting the Unifi 35 projector to a network, see page 24.
2. Press Menu.
The Welcome Center appears.
3. Press Settings.
The Unifi 35 Settings dialog box appears.
4. If a password is required to change the con figur ation settings, type the p a ssword in the box at
the bottom of the menu, and then press OK.
NOTE: For information on the configuration settings password, see page 14.
5. Press Network and Conference.
Configuring the Firmware 33
Page 38

6. Press Management, Room Control.
7. Select the Enable room control via telnet check box.
8. In the Port number text box, type the port number for TELNET.
NOTE: 23 is the default port number for TELNET.
9. Press Apply All.
You’ve connected a computer or room control system to the 600i interactive whiteboard system
through TELNET.
Command Summary
The 600i interactive whiteboard system responds to the following types of commands:
• power state
• input selection
• video and audio
• conferencing
• system information
NOTES
• Press Enter after each command.
• Commands aren’t case-sensitive.
34 Configuring the Firmware
Page 39

Power State Commands
The following table presents the power state commands.
Command Description
off
get powerstate
Turns off the Unifi 35 projector .
NOTE: Alternatively, use the command
Requests the Unifi 35 projector state.
off now.
Possible returned values:
•
on
•
cooldown
•
off
NOTE: You can’t turn on the Unifi 35 projector using room control. Use a manual or infrared
command to turn on the projector.
Input Selection Commands
The following table presents the input selection commands.
Command Description
set input vga
set input dvi-d
set input dvi-a
set input component
set input composite
set input s-video
set input whiteboard
Selects the VGA computer input
Selects the DVI-D computer input
Selects the DVI-A computer input
Selects the component video source input
Selects the composite video source input
Selects the S-video source input
Selects Whiteboard mode
get input
NOTE: Alternatively, you can use the command
set input scratchpad.
Requests the projector’s current input
Configuring the Firmware 35
Page 40

Video and Audio Commands
The following table presents the video and audio commands.
Command Description
set brightness {+ or -}
set brightness {0 to 100}
get brightness
set contrast {+ or -}
set contrast {0 to 100}
get contrast
set volume {+ or -}
set volume {0 to 100}
get volume
Increases or decreases the brightness in increments
Sets the brightness to an absolute value from 0 (off) to
100 (full brightness)
Requests the projector’s current brightness setting
Increases or decreases the contrast in increments
Sets the contrast to an absolute value from
0 (minimum contrast) to 100 (maximum contrast)
Requests the projector’s current contrast setting
Increases or decreases the volume in increments
Sets the volume to an absolute value from 0 (off) to
100 (full volume)
Requests the projector’s current volume setting
System Information Commands
The following table presents the system information co mmands.
Command Description
get lamphrs
Requests the number of hours that the pr ojector lamp ha s be en
in use (from
0 to 3000)
get syshrs
get ipaddr
get macaddr
get fwver
Requests the number of hours that the system has been in use
Requests the IP address
Requests the MAC address
Requests the firmware version
Configuring Language and General System Settings
The firmware’s user interface is set to English by default. You can change the language to one of
the following:
•French
•German
• Italian
•Spanish
In addition, you can view the 600i interactive whiteboard systems’s system information, including
the firmware version, Internet Protocol (IP) address and Media Access Control (MAC) address.
36 Configuring the Firmware
Page 41

To set the firmware’s user interface language
1. Press Menu.
The Welcome Center appears.
2. Press Settings.
The Unifi 35 Settings dialog box appears.
3. If a password is required to change the con figur ation settings, type the p a ssword in the box at
the bottom of the menu, and then press OK.
NOTE: For information on the configuration settings password, see page 14.
4. Press System and Language.
5. In the Language list, select your preferred language.
6. Press Apply All.
You’ve set the firmware’s user interface language.
Configuring the Firmware 37
Page 42

To view system information
1. Press Menu.
The Welcome Center appears.
2. Press Settings.
The Unifi 35 Settings dialog box appears.
3. If a password is required to change the con figur ation settings, type the p a ssword in the box at
the bottom of the menu, and then press OK.
NOTE: For information on the configuration settings password, see page 14.
4. Press System and Language.
5. View the system information.
You’ve viewed the system information.
To disable system hardware settings
1. Press Menu.
The Welcome Center appears.
2. Press Settings.
The Unifi 35 Settings dialog box appears.
3. If a password is required to change the con figur ation settings, type the p a ssword in the box at
the bottom of the menu, and then press OK.
NOTE: For information on the configuration settings password, see page 14.
38 Configuring the Firmware
Page 43

4. Press Administration.
5. Clear the Enable RJ45 Ethernet port check box to disable networking settings.
6. Clear the Enable USB storage device support check box to disable USB storage device
settings.
7. Press Apply All.
You’ve disabled system hardware settings.
Configuring Unifi 35 Projector Settings
The Unifi 35 Settings dialog box includes an Adv Settings button. When you click this button, the
Advanced Settings dialog box appears.
Configuring the Firmware 39
Page 44

This menu allows you to configure and view the Unifi 35 projector’s hardware settings, including:
• image settings, including brightness, contrast and color
• audio settings, including bass and treble
• lamp hours
• lamp and fan modes
Use the buttons on the left side of the menu to navigate its options.
To configure image settings
1. Select a computer or video source input. (See page 68.)
2. Press Menu.
The Welcome Center appears.
3. Press Settings.
The Unifi 35 Settings dialog box appears.
4. Press Adv Settings.
The Advanced Settings dialog box appears.
5. Press .
6. Configure the primary image settings:
– Adjust the Brightness, Contrast, Color, Hue, Sharpness and Detail Enhance sliders to
the appropriate values.
–Set Noise Reduction to On or Off.
40 Configuring the Firmware
Page 45

7. Press More.
8. Configure the secondary image settings:
– Adjust the Overscan, Color/Brightness, Frequency, Phase, 3D NR and Codec NR
sliders to the appropriate values.
–Set Black-Level to the appropriate value.
–Set HQV and Block NR to On or Off.
NOTE: To return the image settings to their default values, press Reset.
9. Press Close.
You’ve configured the image settings for the Unifi 35 projector.
To configure audio settings
1. Press Menu.
The Welcome Center appears.
2. Press Settings.
The Unifi 35 Settings dialog box appears.
3. Press Adv Settings.
The Advanced Settings dialog box appears.
Configuring the Firmware 41
Page 46

4. Press .
5. Configure the audio settings:
– Adjust the Bass, Treble and Digital Audio Delay sliders to the appropriate values.
–Set Audio Mode to the appropriate value.
NOTE: To return the audio settings to their default values, press Reset.
6. Press Close.
You have configured the audio settings for the Unifi 35 projector.
To configure other settings
1. Press Menu.
The Welcome Center appears.
2. Press Settings.
The Unifi 35 Settings dialog box appears.
3. Press Adv Settings.
The Advanced Settings dialog box appears.
42 Configuring the Firmware
Page 47

4. Press .
5. Configure other settings:
– Open the Reset Lamp HRS section to reset the lamp hour counter.
NOTE: Only do this after replacing the projector bulb as explained in document 87643
–Set Lamp Mode and Fan Mode to the appropriate values.
– Open the Factory Reset section to reset th e projector to the factory default configuration.
NOTE: To return the other settings to their default values, press Reset.
6. Press Close.
You’ve configured the other settings of the Unifi 35 projector.
To view Unifi 35 projector information
1. Press Menu.
The Welcome Center appears.
2. Press Settings.
The Unifi 35 Settings dialog box appears.
3. Press Adv Settings.
The Advanced Settings dialog box appears.
.
Configuring the Firmware 43
Page 48

4. Press .
5. View the information, and then press Close.
You’ve viewed the Unifi 35 projector information.
44 Configuring the Firmware
Page 49

Using the Firmware
In this Chapter
This chapter explains how to use the features of the firmware with your SMART Board 600i
interactive whiteboard system. The firmware’s features include Whiteboard, Bridgit conferencing
software and the ability to connect to computers and video sources.
• Basic Tools (this page)
• Starting a Firmware Session (page 50)
• Whiteboarding (page 50)
• Collaborating (page 58)
• Connecting to Computers and Video Sources (page 68)
• Using Your SMART Board 600i Interactive Whiteboard System with Computer and Video
Source Inputs (page 71)
• Ending a Firmware Session (page 74)
Basic Tools
Regardless of which features of the firmware you use, you’ll find these tools useful:
• Welcome Center menu
• shortcut menu
• toolbar
• on-screen keyboard
• right-click
• volume adjustment and mute
• online Help
Using the Firmware 45
Page 50

Welcome Center
The Welcome Center allows you to create or open Whiteboard files, Bridgit software conferences,
and computer and video source sessions, as well as open the Unifi 35 Settings dialog box to
configure the firmware (see page 9) and end the current session (see page 74).
The Welcome Center appears when you start a firmware session. If you’re in a Whiteboard file,
Bridgit software conference, or computer or video source session, open the Welcome Center by
pressing Menu in the toolbar.
Shortcut Menu
The shortcut menu allows you to move between Whiteboard files, Bridgit software conferences,
and computer and video source sessions without opening the Welcome Center.
The LinQ/Bridgit dialog box only
The currently open
session is outlined
in yellow.
NOTE: A session only displays in the shortcut menu if you select its input’s Add a button for this
input in the shortcut menu check box (see page 18 and page 20).
To open the shortcut menu, press to the right of Menu in the tool bar. Press a session’s button to
move to that session, or press outside of the shortcut menu to close it.
displays if there are open
Bridgit software conferences or
LinQ software connections.
46 Using the Firmware
Page 51

Toolbar
The toolbar appears at the bottom of the display in Whiteboard files, Br idgit sof tware con ferences,
and computer and video source sessions. The buttons in the too lbar differ depending on the type
of session.
Whiteboard Toolbar
Computer or Video Source Toolbar
NOTE: The two right-most buttons in the computer or video source toolbar are only available for
computer inputs.
To minimize the toolbar, press Minimize . After minimizing the toolbar, you can move it to
different positions on the display by pressing the appropriate buttons.
Move to the Left-Middle
Position
Move to the Left-Top
Position
Move to the Left-Bottom
Position
Move to the Left-Middle
Position
Move to the Bottom-Left
Position
Move to the Bottom-Middle
Position
Move to the Left-Bottom
Position
Move to the Bottom-Left
Position
Move to the Bottom-Right
Position
Move to the Right-Middle
Position
Move to the Right-Top
Position
Move to the Right-Bottom
Position
Move to the Right-Middle
Position
Move to the Bottom-Right
Position
Move to the Bottom-Middle
Position
Move to the Right-Bottom
Position
Using the Firmware 47
Page 52

Alternatively, press Show/Hide Menu on the control module (on the left side of the pen tray) to
minimize the toolbar.
Show/Hide Menu
SMART Keyboard
If there’s no keyboard connected to the 600i interactive whiteboard system, you can use SMART
Keyboard to type information.
To open SMART Keyboard
Press Keyboard or the keyboard button on the pen tray.
SMART Keyboard appears.
NOTE: SMART Keyboard uses the QWERTY layout.
Right-Click
If you connect a computer to the 600i interactive whiteboard system (see page 68) and there’s no
mouse connected to the system, you can simulate a right-click by pr essing Right-Click or the
right-click button on the pen tray, and then pressing the interactive screen with your finger.
Volume Adjustment and Mute
Adjust and mute the volume by pressing Volume .
Adjust the volume by moving the slider to the right to increase volume, or to the left to decrease
the volume. Mute the volume by pressing Volume .
48 Using the Firmware
Page 53

Alternatively, adjust and mute the volume using the volume control on the control module (on the
left side of the pen tray):
Volume Control
Adjust the volume by turning the volume control. Mute the volume by pushing down on the volume
control.
NOTE: Volume adjustment and mute aren’t available in Whiteboard or any computer or video
source connection without audio input.
Online Help
The firmware includes online Help.
To view the online Help
Open the Welcome Center, and then press Help.
The Help Topics window appears.
Using the Firmware 49
Page 54

Starting a Firmware Session
There are two situations in which you need to start a new firmware sess ion.
Situation Procedure
Your 600i interactive whiteboard system is off. Turn on your 600i interactive whiteboar d
system as documented in document 87643
Your 600i interactive whiteboard system is on
but the display is blank.
The firmware has timed out and is in sleep
mode. (For information on setting the number of
minutes before the firmware times out, see
page 22.)
When you start a new session, the Welcome Center appears.
Swipe your finger or a pen from the pen tray
across the display of your 600i interactive
whiteboard system.
.
Whiteboarding
Whiteboard allows you to capture notes and drawings in digital ink on your 600i interactive
whiteboard system.
Use Whiteboard for brainstorming, note taking and other activities for which you want to use your
interactive whiteboard system’s digital ink tools without connecting to a computer.
50 Using the Firmware
Page 55

Getting Started
To use Whiteboard, create or open a Whiteboard file.
To create a Whiteboard file
1. Press Menu.
The Welcome Center appears.
2. Press Whiteboard.
Using the Firmware 51
Page 56

3. Press Whiteboard.
OR
Press New File.
A new file opens.
You’ve created a new Whiteboard file.
52 Using the Firmware
Page 57

To open a Whiteboard file
1. Connect the USB storage device that contains the Whiteboard file to the Unifi 35 projector or
the Extended Connection Panel.
2. Press Menu.
The Welcome Center appears.
3. Press Whiteboard.
4. Press Open File.
The Open dialog box appears.
5. In the Look in list, select the USB storage device’s drive letter.
Using the Firmware 53
Page 58

6. Browse to and select the file.
7. Press Open.
The file opens.
You’ve opened an existing Whiteboard file.
Using Whiteboard
After creating or opening a Whiteboard file, you can:
• draw digital ink
• erase digital ink
• add a page to the file
• delete a page from the file
• minimize and restore the toolbar
To draw digital ink
1. Pick up a pen from the pen tray.
OR
Press Pen .
The pen toolbar appears.
54 Using the Firmware
Page 59

2. In the pen toolbar, select the appropriate color and thickness options.
3. Draw digital ink.
To erase digital ink
1. Pick up the eraser from the pen tray.
OR
Press Eraser .
2. Erase digital ink.
To add a page to the Whiteboard file
Press Add Page .
A new page appears after the curre ntly selected page.
To delete a page from the Whiteboard file
Open the page you want to delete, and then press Delete Page .
The page deletes.
NOTE: If there’s only one page in the file, pressing Delete Page clears the page rather than
deleting it.
Using the Firmware 55
Page 60

Saving or E-mailing a Whiteboard File
You can save your Whiteboard file on a USB storage device or e-mail it in one of the following
formats:
• Whiteboard file (.notebook)
• JPEG archive (.zip)
•PDF (.pdf)
After saving a file on a USB storage device, you can open, view and edit it in Whiteboard or on a
computer with Notebook software.
To save a Whiteboard file
1. Connect a USB storage device to the Unifi 35 projector or the Extended Connection Panel.
2. Press Save .
The Save dialog box appears.
3. In the Look in list, select the USB storage device’s drive letter.
4. Browse to the folder where you want to save the file.
NOTE: Create a new folder for the file by pressing New Folder .
5. In the File name box, type a file name.
56 Using the Firmware
Page 61

6. In the Save as type list, select a file type:
– Whiteboard File (.notebook)
– JPEG Archive (.zip)
– Portable Document Format (.pdf)
NOTE: If you select JPEG Archive (.zip), the firmware saves each page in the Whiteboard file
as a JPEG image file inside an archive file.
7. Press Save.
You’ve saved the Whiteboard file to a USB storage device.
To e-mail a Whiteboard file
1. Press E-mail .
The E-mail dialog box appears.
2. In the Recipient list, select the recipient.
OR
In the E-mail address box, type the recipient’s e-mail address.
Using the Firmware 57
Page 62

NOTES
– Add a new recipient or edit the list of recipient s by pressing the appropriate button in the
upper-right corner of the E-mail dialog box:
Add a New Recipient
Edit the List of Recipients
– If you’re using SMART Keyboard to enter e-mail addresses, press Shift to view the key for
the @ symbol.
3. In the Save as type list, select a file type:
– Whiteboard File (.notebook)
– JPEG Archive (.zip)
– Portable Document Format (.pdf)
NOTE: If you select JPEG Archive (.zip) file, the firmware saves each page in the Whiteboard
file as a JPEG image file inside an archive file.
4. Press Send E-mail.
You’ve e-mailed the Whiteboard file.
Collaborating
Bridgit conferencing software is a client/server application that lets you collaborate with anyone,
anywhere in the world. Using Bridgit conferencing software, you can:
• share your display
• view other participants’ displays
• communicate with others through chat
• use your SMART product to write digital ink notes
58 Using the Firmware
Page 63

NOTE: Yo u must connect the 600i interactive whiteboard system to a network and configure it as
documented on page 29 to use Bridgit conferencing software.
IMPORTANT
To use the Bridgit conferencing software features in the firmware, you must do one
of the following:
• Purchase and install Bridgit server software.
• Purchase a subscription for the Bridgit conferen cin g service.
• Install a trial version of Bridgit software for 30 days, and then purchase the
server software or service from SMART Technologies
• Be invited to a conference by a person or organization with Bridgit software.
For more information on these options, see the Bridgit page of the SMART
support site.
.
Getting Started
To get started with Bridgit conferencing software, create or join a conference.
To create a Bridgit software conference
1. Press Menu.
The Welcome Center appears.
2. Press Collaborate.
Using the Firmware 59
Page 64

3. Press Create Conference.
The Create Conference dialog box appears.
4. In the Conference box, type a name for the conference.
NOTE: You define the default name in this box in the firmware settings (see page 29).
5. In the Password and Confirm boxes, type a password for the conference (if you want to
assign a password to the conference).
IMPORTANT
If you do not assign a password to the conference, any person with Bridgit
conferencing software and access to the server can join the conference.
60 Using the Firmware
Page 65

6. Press Create.
If the server administrator has assigne d a password for crea tin g co nf er en ce s, th e
Password Required dialog box appears. Proceed to step 7.
OR
If the server administrator has not assigned a password for crea tin g co nfe r en ce s, th e Brid git
software conference screen appears. Do not proceed to step 7.
7. In the Creation Password box, type the password for creating conferences, and then press
OK.
The Bridgit software conference screen appears.
You’ve created a Bridgit software conference.
Using the Firmware 61
Page 66

To join a Bridgit software conference
1. Press Menu.
The Welcome Center appears.
2. Press Collaborate.
3. Press Join Conference.
The Conference Connection dialog box appears.
62 Using the Firmware
Page 67

4. Select the Bridgit software conference you want to join, and then press Join.
If the Bridgit software conference owner has assigned a password for joinin g th e co nfer en ce ,
the Join Conference dialog box appears. Proceed to step 5.
OR
If the Bridgit software conference owner has not assigned a password for joining the
conference, the Bridgit software conference screen appears. Don’t proceed to step 5.
5. In the Password box, type the password, and then press OK.
The Bridgit software conference screen appears.
You’ve joined an existing Bridgit software conference.
Using Bridgit Conferencing Software
After creating or joining a Bridgit software conference, you can :
• share your display with other participants
• view other participants’ displays
• chat with other participants
Using the Firmware 63
Page 68

To share your display
1. Press Share This Display or Share .
A blue border appears around your display.
NOTE: If you’re a participant in another person’ s Bridg it softwa re conference, the other per son
must approve your request before you can share your display.
2. Open a Whiteboard file or a computer or video source session.
For information on Whiteboard files, see page 50.
For information on computer and video source sessions, see page 68 and page 71.
Y ou’ve shared your displa y with the other particip ants in the Bridgit software confe rence. The other
participants can view and contribute to the Whiteboard files and computer and video sessions
you open.
To stop sharing your display
Press Stop Sharing .
The blue border around your display disappears.
You’ve stopped sharing your display with the other participants in the Bridgit software conference.
64 Using the Firmware
Page 69

To view another participant’s display
Other participants can share their displays. When they do, a red border ap pear s ar ou nd
the display.
Depending on how the owner or presenter configures the Bridgit sof tware conference settings (see
page 66), you can draw digital ink on the participant’s display or request remote control of the
other participant’s display.
To request remote control of another participant’s display
Press Request Remote Control .
The Request for Remote Control dialog box appears on the other participant’s display, and the
Bridgit dialog box appears on your display.
If the other participant presses Yes in the Request for Remote Control dialog box, you can control
the other participant’s display from your display.
Using the Firmware 65
Page 70

To relinquish remote control of another participant’s display
Press Relinquish Remote Control .
You’ve relinquished remote control of the other participant’s display.
To chat with other participants
1. Press Participant List .
The Participant List dialog box appears.
2. Press .
3. Type a message.
4. Press Send.
You’ve sent a chat message to all participants in the Bridgit software conference.
NOTE: If another participant sends you a chat message and the Participant List dialog box isn’t
open, a message appears below the Bridgit conferencing software toolbar:
Configuring the Bridgit Software Conference Settings
If you’re the owner or presenter of a Bridgit software conference, you can configure whether other
participants can:
• draw digital ink notes when you’re sharing your display
• share their displays
•chat
• request remote control when you’re sharing your display
66 Using the Firmware
Page 71

To configure the Bridgit software conference settings
1. Press Options .
The Conference Options dialog box appears.
2. Select the Allow others to draw check box to allow other participants to draw digital ink notes
when you’re sharing your display.
3. Select the Allow others to share their desktop check box to allow other participants to share
their displays.
4. Select the Allow others to use chat check box to allow other participants to chat.
5. Select the Allow others to use remote control check box to allow other participants to
request remote control when you’re sharing your display.
6. Press OK.
Leaving a Bridgit Software Conference
You can leave a Bridgit software conference at any time.
If you’re the owner of the conference, the conference ends when you leave. Bridgit conferencing
software automatically disconnects the other participants in the conference.
If you’re not the owner of the conference, the conference continues until the owner leaves.
To leave a Bridgit software conference
Press Exit Conference .
OR
Using the Firmware 67
Page 72

Complete the following steps:
1. Press Menu.
The Welcome Center appears.
2. Press Collaborate.
3. Press Exit Conference.
You’ve left the Bridgit software conference.
Connecting to Computers and Video Sources
After connecting the 600i interactive whiteboard system to a computer or video source, you can
view the computer or video source’s input on your SMART product’s interactive screen.
NOTE: Yo u can connect a computer with Notebook software 9.7 SP1 or later to the 600i
interactive whiteboard system and use th e d igital ink features of the software. The 600i interactive
whiteboard system doesn’t support earlier versions of Notebook software.
68 Using the Firmware
Page 73

To connect to a local computer
1. Press Menu.
The Welcome Center appears.
2. Press Computer Access.
OR
Press Watch Video.
NOTE: The computer input that appears in the Watch Video tab isn’t connected to the
interactive whiteboard through the USB or RS-232 interface. Therefore, you can view this
input on the interactive whiteboard but you’re unable to interact with it through touch.
Using the Firmware 69
Page 74

3. Press one of the computer input buttons.
The computer’s input appears.
You’ve connected to a local computer.
To connect to a LinQ software client computer
1. Start LinQ software on the client computer.
NOTE: You can download LinQ software for client computers from the SMART Technologies
website.
2. Press Menu.
The Welcome Center appears.
3. Press Computer Access.
4. Press one of the buttons in the LinQ Connected Clients grou p bo x.
The computer’s input appears.
You’ve connected to a LinQ software client computer.
70 Using the Firmware
Page 75

To connect to a video source
1. Press Menu.
The Welcome Center appears.
2. Press Watch Video.
3. Press one of the video source input buttons.
The video source’s input appears.
You’ve connected to a video source.
Using Your SMART Board 600i Interactive Whiteboard System with Computer and Video Source Inputs
When viewing computer or video source input, you can draw digital ink notes on the display. If you
want to save your digital ink notes, you can take a screen capture of the display.
To draw digital ink
1. Pick up a pen from the pen tray.
OR
Press Pen .
The pen toolbar appears.
2. In the pen toolbar, select color and thickness options.
3. Draw digital ink.
Using the Firmware 71
Page 76

To erase digital ink
1. Pick up the eraser from the pen tray.
OR
Press Eraser .
2. Erase digital ink.
To clear the display
Press Clear.
Your digital ink notes clear from the display.
To freeze the display
Press Freeze.
The display freezes.
NOTE: To unfreeze the display, press Resume.
IMPORTANT
Pressing Freeze only freezes the image on the display. It does not pause the
computer or video input.
To take a screen capture
1. Press Capture.
2. Press Menu.
The Welcome Center appears.
72 Using the Firmware
Page 77

3. Press Whiteboard.
4. Press Whiteboard.
A Whiteboard file opens. The last page in the file contains a screen capture of the display.
Using the Firmware 73
Page 78

Ending a Firmware Session
When you’ve finished using the firmware, you can end your session. Ending your session:
• closes open Whiteboard files
• closes open Bridgit software conferences
• disconnects LinQ software client computers
To end a firmware session
1. Press Menu, and then press End Session.
The End Session dialog box appears.
2. Press Yes.
The Save Changes? dialog box appears.
3. Press Save to save the changes.
OR
Press E-mail to e-mail the changes.
OR
Press Discard to discard the changes.
The firmware session ends, closing open Whiteboard files and Bridgit software conferences and
disconnecting LinQ software client computer s.
74 Using the Firmware
Page 79

To end a firmware session and turn off the Unifi 35 projector
1. Press Power on the control module (on the left side of the pen tray).
Power
The End Session dialog box appears.
2. Press Yes.
The Save Changes? dialog box appears.
3. Press Save to save the changes.
OR
Press Discard to not save the changes.
The firmware session ends, closing open Whiteboard files and Bridgit software conferences and
disconnecting LinQ software client computers. The projector lamp goes off, the cooling fans
continue running, and the indicator ring blinks red for two minutes. During these two minutes, you
can’t restart the projector.
After two minutes, the second stage of cooling begins: the indicator ring turns white and the fans
run for three minutes. During this stage, you can restart the projector. At the end of the cycle, the
indicator remains white and the fans stop, indicating that the system is in full standby.
Using the Firmware 75
Page 80

76 Using the Firmware
Page 81

Customer Support
Online Support
Visit www.smarttech.com/support to view and download user’s guides, “how-to” and
troubleshooting articles, software and more.
Training
Visit www.smarttech.com/trainingcenter for training materials and information about our
training services.
Contacting SMART Technical Support
SMART Technical Support welcomes your call. However, if you experience difficulty with your
SMART product, you may want to contact your local reseller first. Your local reseller may be able
to resolve the issue without delay.
All SMART products include online, telephone, fax and e-mail support:
Online: www.smarttech.com/contactsupport
Telephone: +1.403.228.5940 or
Toll Free 1.866.518.6791 (U.S./Canada)
(Monday to Friday, 5 a.m. – 6 p.m. Mountain Time)
Fax: +1.403.806.1256
E-mail: support@smarttech.com
General Inquiries
Address: SMART Technologies
1207 – 11 Ave SW, Suite 300
Calgary, AB T3C 0M5
CANADA
Switchboard: +1.403.245.0333 or
Toll Free 1.888.42.SMART (U.S./Canada)
Fax: +1.403.228.2500
E-mail: info@smarttech.com
Customer Support 77
Page 82

Warranty
Product warranty is governed by the terms and conditions of SMART’s “Limited Equipment
Warranty” that shipped with the SMART product at the time of purchase.
Registration
To help us serve you, register online at www.smarttech.com/registration.
78 Customer Support
Page 83

Index
A
Adobe PDF, See PDF
advanced settings, 39–44
archive files, 56
aspect ratio, 22
audio, 20, 41–42
B
bass, 42
Bridgit conferencing software
about, 1
configuring, 29–30
configuring settings for, 67
using, 58–68
brightness, 36, 40
bulbs, 43
button board, See control module
C
chat, 66
collaboration, 58–68
color, 40
community strings, 27
component video, 19, 35
composite video, 19, 35
computer connections, 1, 6–8, 16–19, 69–70
conferencing software, See Bridgit conferencing
software
configuring multiple units, 11–14
connections, 6–8, 16–21, 68–71
contrast, 36, 40
control module, 48, 49, 75
cooling fans, 75
D
displays
clearing, 72
freezing, 72
relinquishing remote control of, 66
requesting remote control of, 65
sharing, 64
stop sharing, 64
viewing another participant’s, 65
DNS servers, 25
downloads, 5–6
drivers, 6–7
DVD players, 19–21, 71
DVI, 35
E
e-mail, 26, 56–58
end, 74–75
English, 36
eraser, 55, 72
exporting configuration settings, 11–12
F
fans, 43, 75
files
archive (zip), 56
JPEG, 56
PDF, 56
Whiteboard, 51–54, 56–58
firmware, 5–8
flash drives, See USB storage devices
French, 36
G
gateways, 25
German, 36
desktops, See displays
DHCP, 25
digital ink notes
clearing, 72
drawing, 54–55, 71
erasing, 55, 72
H
hardware settings, 38–39
Help, See online Help
home, See Welcome Center
H-position, 40
hue, 40
HyperTerminal, 32
Index 79
Page 84

I
O
importing configuration settings, 13–14
indicator ring, 75
IP addresses, 25, 36
Italian, 36
J
JPEG, 56
K
keyboards, 48
L
lamps, 43
language settings, 36–37
latest version, 3
letterboxing, 22
LinQ software
about, 1
configuring, 28–29
connecting to computers with, 70
online Help, 49
on-screen keyboard, See SMART Keyboard
orientation, 9–11
P
pages (Whiteboard)
adding, 55
deleting, 55
passwords
for Bridgit conferencing software, 30, 60–61,
63
for configuration settings, 14–15
pause, 72
PDF, 56
pens, 54–55, 71
pillar-boxing, 22
Power button, 75
previous versions, 3
projector lamps, 75
Q
M
MAC addresses, 36
menus
Adv Settings, 39–44
Settings, 9–44
shortcut, 46
Welcome Center, 46
MIB files, 28
Microsoft HyperTerminal, 32
Minimize button, 47
multiple units, 11–14
mute, 48–49
N
network connections, 24–28, 39
new version, See latest version
noise reduction, 40
Notebook software, 10–11, 56, 68
notifications, 28
QWERTY layout, 48
R
RCA connectors, 19–20
Registering Your Slate, 78
remote control, 65–66
right-click, 48
room control, 30–36
RS-232, 2
RS-45, See network connections
S
ScratchPad, See Whiteboard
screen captures, 72–73
screens, See displays
securing configuration settings, 14–15
serial connectors, 30–36
Settings menu, 9–44
sharpness, 40
shortcut menu, 46
shutdown, 74–75
SMART Keyboard, 48
SMTP, 2, 24, 26
SNMP, 2, 24, 27–28
80 Index
Page 85

Spanish, 36
speakers, 48–49
standby, 75
startup, 50
subnet masks, 25
S-video, 19, 35
system settings, 36–39
T
Technical Support
Contacting, 77
TELNET, 33–34
toolbars, 47
traps, 28
treble, 42
U
Unifi 35 projector, 39–44
updates, 5–8
USB storage devices, 1, 11–14, 39, 53, 56
V
VCRs, 19–21, 71
versions
comparison of, 3
latest, 3, 5–8
previous, 3
VGA, 35
video source connections, 1, 19–21, 71
volume, 36, 48–49
V-position, 40
W
Warranty, 78
Welcome Center, 46
Whiteboard, 1, 35, 50–58, 72–73
Whiteboard file format (.notebook), 56
wireless, 1
wizards
driver installer, 7
firmware updater, 8
update installer, 5–6
Z
zip files, 56
Index 81
Page 86

82 Index
Page 87

Page 88

SMART Technologies
1207 – 11 Avenue SW, Suite 300
Calgary, AB T3C 0M5
CANADA
www.smarttech.com/support
wwww.smarttech.com/contactsupport
Support +1.403.228.5940 or Toll Free 1.866.518.6791
 Loading...