

Page 1
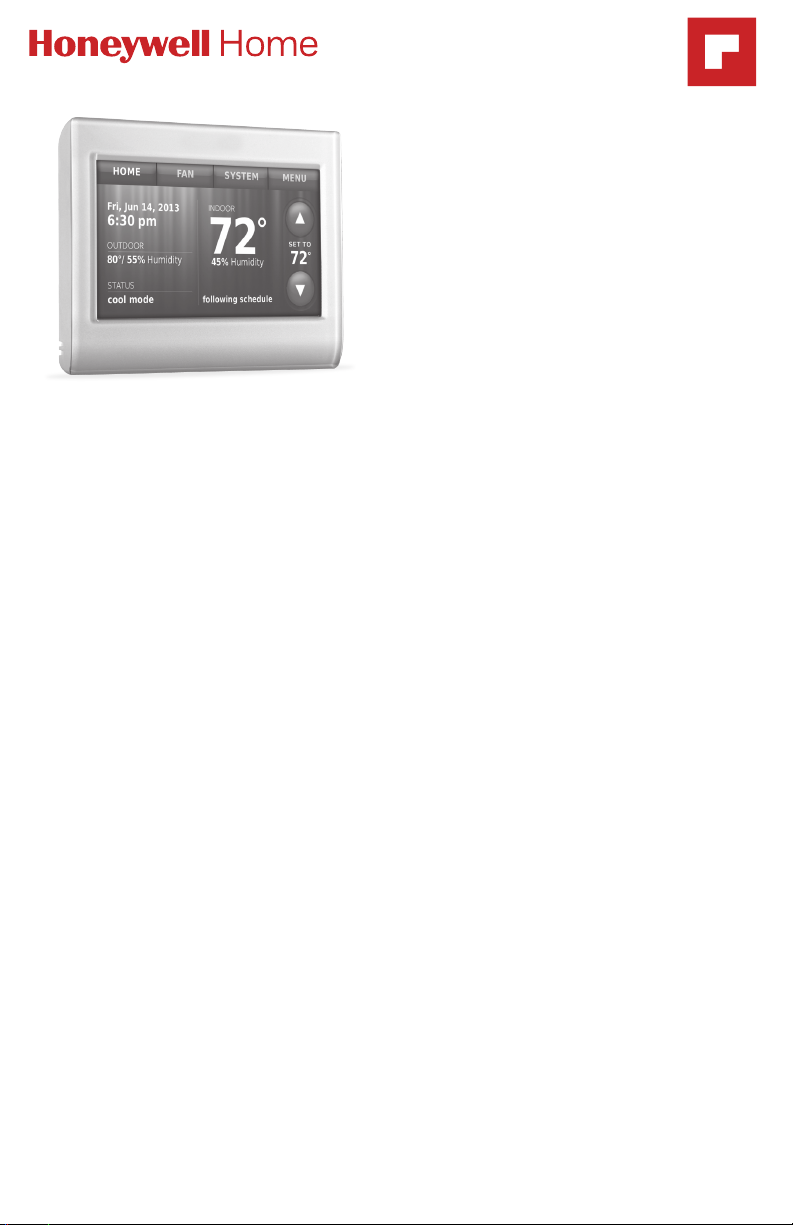
RTH9580
Smart Series
Smart Colour Touchscreen
Programmable Thermostat
User Guide
Read and save these instructions.
For help please visit
getconnected.honeywellhome.com/en/total-connect-comfort-app
In the box you will find
• Thermostat
• Wallplate
• Screws and anchors
• Quick Start Guide
• Thermostat ID Card
• Wire labels
• User Guide
Features of your smart thermostat
With your new thermostat, you can:
• Connect to the Internet to monitor and control your heating/cooling system.
• View and change your heating/cooling system settings.
• View and set temperature and schedules.
• Receive alerts via email and get automatic upgrades.
• View outdoor temperature and humidity (requires WiFi set up and
registration).
Page 2
Welcome
Congratulations on your purchase of a Resideo
Smart Colour touchscreen programmable
thermostat. When registered to Total Connect
Comfort Solutions, you can remotely monitor and
control the heating and cooling system in your home
or business—you can stay connected to your comfort
system wherever you go.
Total Connect Comfort is the perfect solution if you
getconnected.honeywellhome.com
This thermostat works with common 24 volt systems such as forced air,
hydronic, heat pump, oil, gas, and electric. It will not work with millivolt
systems, such as a gas fireplace, or with 120/240 volt systems such as
baseboard electric heat.
MERCURY NOTICE: Please do not dispose of your old thermostat with
other household refuge as it may contain mercury. Please help to protect the
environment by recycling your old thermostat and batteries in accordance
with local regulations.
NOTICE: To avoid possible compressor damage, do not run air conditioner if
the outside temperature drops below 50°F (10°C).
travel frequently, own a vacation home, a business,
or manage an investment property or if you are
simply looking for peace of mind.
Need help?
Visit getconnected.honeywellhome.com or call +971 4 450 5800 for assistance
before returning the thermostat to the store.
69-2715EF—07 ii
Page 3
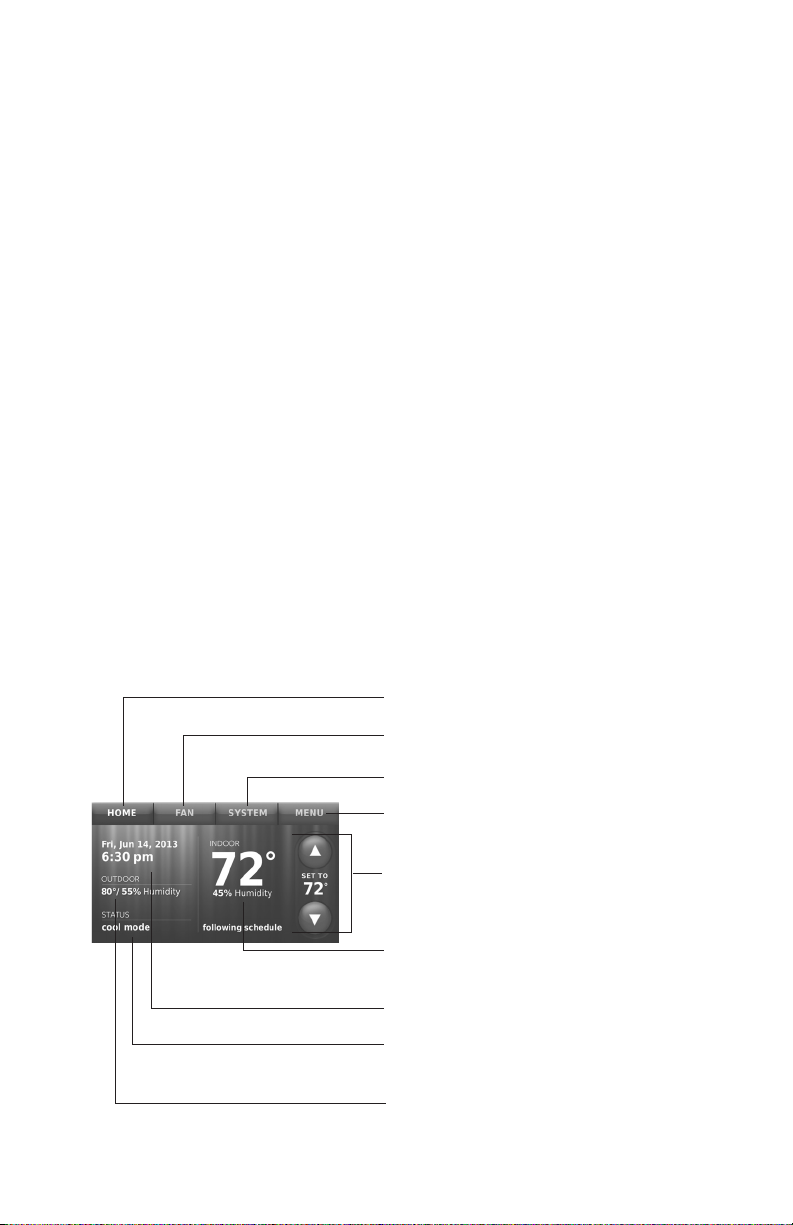
Table of contents
About your new thermostat
Home screen quick reference ..............1
Business screen quick reference ........2
Installation
Installing your thermostat .....................3
Connecting to your
WiFi network ........................................... 10
Registering your
thermostat online ................................... 13
Operation
Setting the time/date ...........................15
Setting the fan ......................................... 15
Selecting system mode ........................ 16
Pre-set energy-saving schedules .... 16
Adjusting program schedules ........... 17
Overriding schedules–home .............18
Overriding schedules–business ....... 18
Viewing equipment status .................. 19
Setting vacation hold–home .............19
Setting holiday/event
schedules–business .............................. 20
Setting custom events–business ..... 20
Setting holiday schedule–business 21
Setting holiday override–business .. 22
Quick reference: home use
Initiating occupancy
mode–business ....................................... 22
Customizing screen colour ................23
Setting preferences ............................... 23
Cleaning the thermostat screen ......24
Adjusting security settings ................. 24
Software updates ................................... 25
Unregistering your thermostat ......... 25
Smart Response Technology .............25
Pre-occupancy purge ........................... 26
Compressor protection ........................ 26
Auto changeover ..................................... 26
Setting advanced preferences .......... 27
Temperature display °C or °F ............27
Changing system setup ....................... 28
Appendices
Frequently asked questions ...............30
Getting help and responding
to alerts....................................................... 31
Troubleshooting ......................................32
Regulatory information ....................... 32
Glossary ......................................................33
Limited warranty .................................... 33
HOME. Touch to display Home screen.
FAN. Select fan mode.
SYSTEM. Select system mode (heat/cool).
MENU. Touch to display options. Start here
to set a program schedule.
Current schedule. Change set temperature
(°C or °F) and select temporary or
permanent hold.
Indoor conditions. Shows indoor
temperature (°C or °F) and humidity (%).
Current date and time.
Current status. Shows system mode (heat/
cool).
Outdoor conditions. Outdoor temperature
(°C or °F) and humidity (%) appear after
registration.
1 69-2715EF—07
Page 4
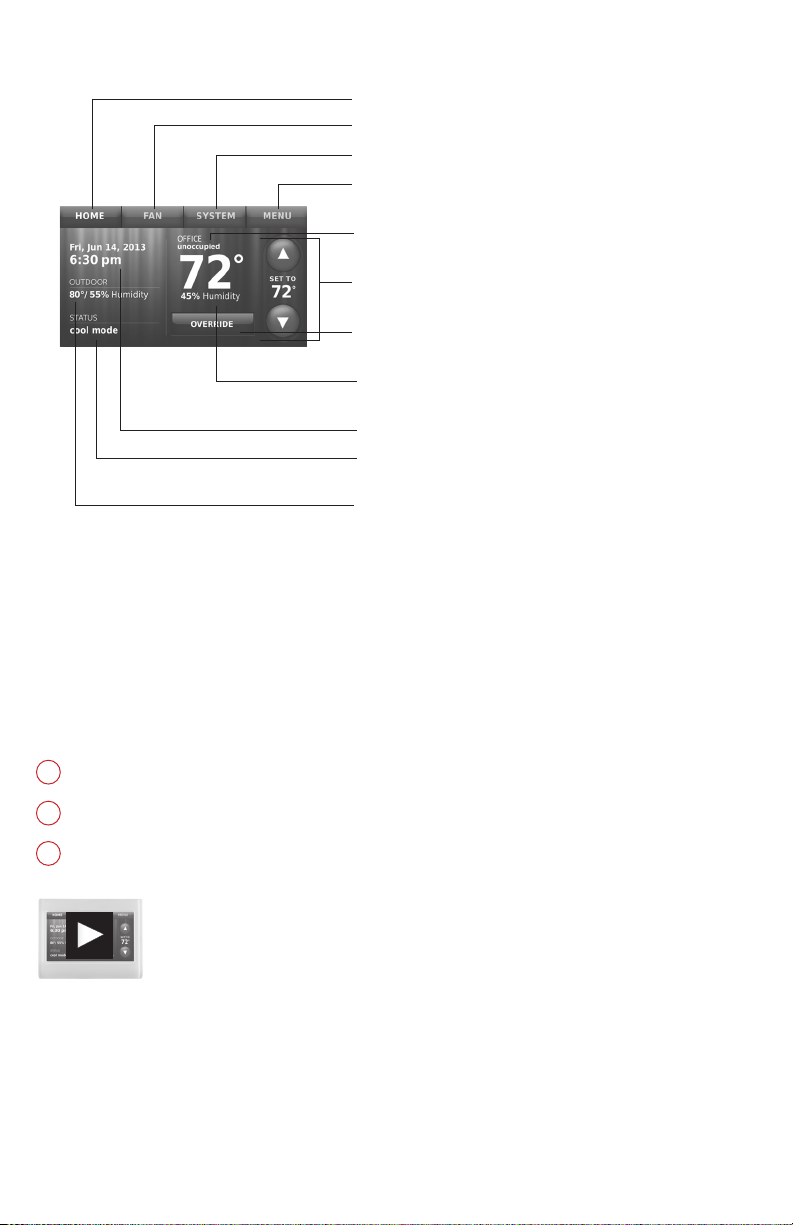
Quick reference: business use
HOME. Touch to display Home screen.
FAN. Select fan mode.
SYSTEM. Select system mode (heat/cool).
MENU. Touch to display options. Start here
to set a program schedule.
Thermostat location. Quickly identify which
thermostat is in control of a specific area.
Current schedule. Touch an arrow to
change temperature (°C or °F) setting and
set a temporary hold.
Override. Touch to temporarily override the
program schedule.
Indoor conditions. Shows indoor
temperature (°C or °F) and humidity (%).
Current date and time.
Current status. Shows system mode (heat/
cool).
Outdoor conditions. Outdoor temperature
(°C or °F) and humidity (%) appear after
registration.
Setting up your thermostat
Setting up your smart programmable touchscreen thermostat is easy. It is
preprogrammed and ready to go as soon as it is installed and registered.
1
Install your thermostat.
2
Connect it to your home wireless network.
3
Register online for remote access.
Before you begin, you may want to watch a brief installation video.
Use the QR Code
getconnected.honeywellhome.com
69-2715EF—07 2
®
at the front of this guide, or go to
Page 5
Installing your thermostat
You might need the following tools to install this thermostat:
• No. 2 Phillips screwdriver
• Pen
• Pencil
• Level (optional)
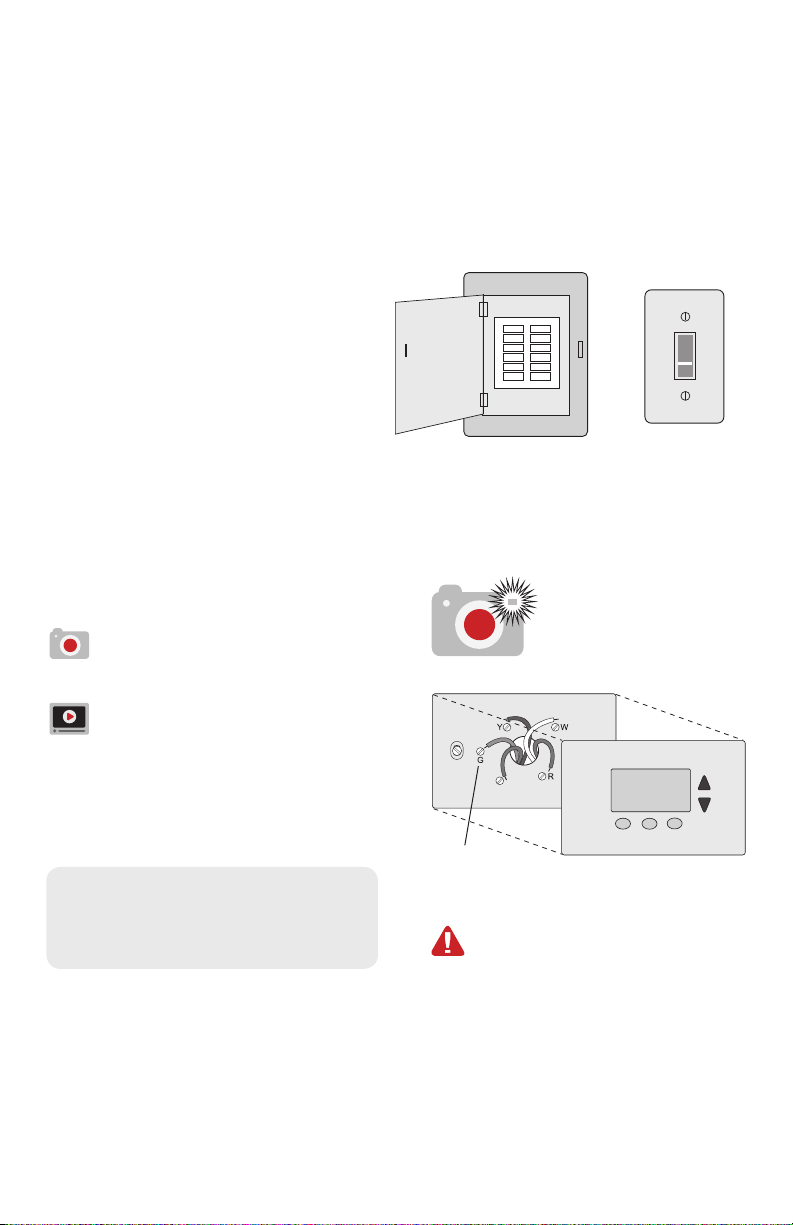
1 Switch OFF power to your
heating/cooling system.
Important! To protect your
equipment, switch OFF the power
to your heating/cooling system
at the breaker box or the system
switch.
2 Remove old thermostat faceplate
and leave wires connected.
2a Take a picture of the wire
connections for later
reference.
2b If no wire is connected to
a terminal labelled C or no
C terminal exists on the old
thermostat, view the
Alternate Wiring videos at
getconnected.honeywellhome.com
• Drill and bits (4.5mm for
drywall, 5.5mm for plaster)
(optional)
• Hammer (optional)
• Electrical tape (optional)
Circuit
breaker
box
Note: You will need a
picture of your wire
connections to wire the
new thermostat.
C
or
Heating/
cooling
system power
switch
Terminal
Important! C wire is required
and is the power source for your
thermostat. Without a C wire, your
thermostat will not power up.
3 69-2715EF—07
designation
If you have an older thermostat
with a sealed mercury tube,
turn to page ii for proper
disposal instructions.
Page 6
Installing your thermostat
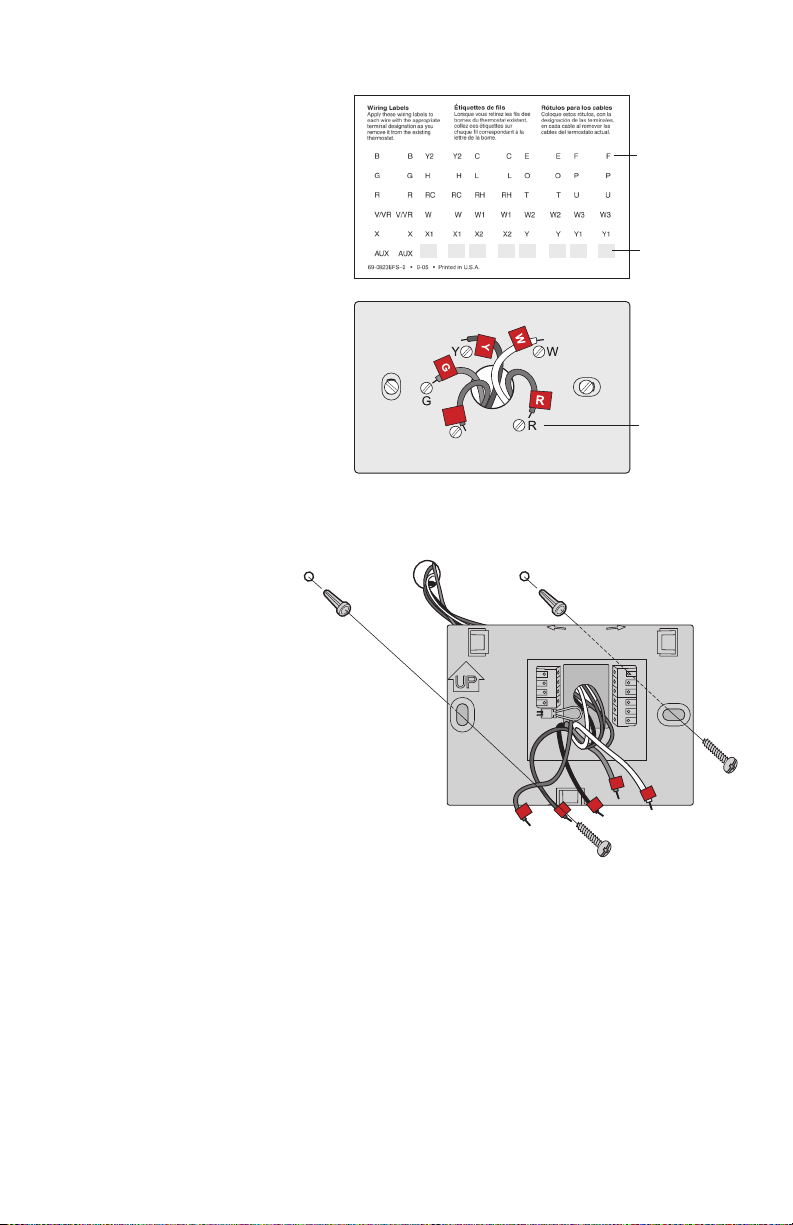
3 Label the wires.
Use the supplied sticky tags to
label each wire as you disconnect
it. Label wires according to
the old thermostat terminal
designations, not by wire colour.
Note: If no tag matches a
terminal designation, write the
appropriate letter on a blank
sticky tag.
4 Remove wallplate.
Remove the old wallplate from
the wall after all wires have been
labelled and disconnected.
Note: Wrap the wires around
a pencil to prevent them from
falling back into the wall.
5 Mount wallplate for smart
thermostat.
Mount your new wallplate
using screws and
anchors included with the
thermostat.
If necessary:
Drill 4.5mm holes for
drywall.
Drill 5.5mm holes for
plaster.
Note: You may be able to use
your existing wall anchors.
Hold the wallplate up to the
existing anchors to check for
alignment.
Sticky tag
Blank tags
C
C
LEVEL
HERE
C
K
Rc
R
C
G
Y
R
Terminal
designation
WO/B
Y
G
W2Aux/E
Y2
L
W
MCR34499
Wallplate
69-2715EF—07 4
Page 7
Installing your thermostat
Important! The Smart thermostat requires a C wire to operate. The C, or common,
wire brings 24 VAC power to the thermostat. Many older mechanical or battery
operated thermostats do not require a C wire. If you don’t have a C wire, try:
• Looking for an unused wire that is pushed into the wall. Connect that wire to C
and check that it is connected to the 24 VAC common at your heating/cooling
system. Check the video section at honeywellhome.com/wifi-thermostat
Note: Not all heating/cooling systems label the 24 VAC common C. Check your
system manual or contact the manufacturer to find out which terminal is the 24 VAC
common.
View the Alternate Wiring videos at getconnected.honeywellhome.com
Wiring
For conventional heating/cooling systems (natural gas, oil or electric furnace, air
conditioner), see page 5. See “Glossary” on page 33 for further definition.
For a heat pump system, see page 6. See “Glossary” on page 33 for further
definition.
Wiring (Conventional System)
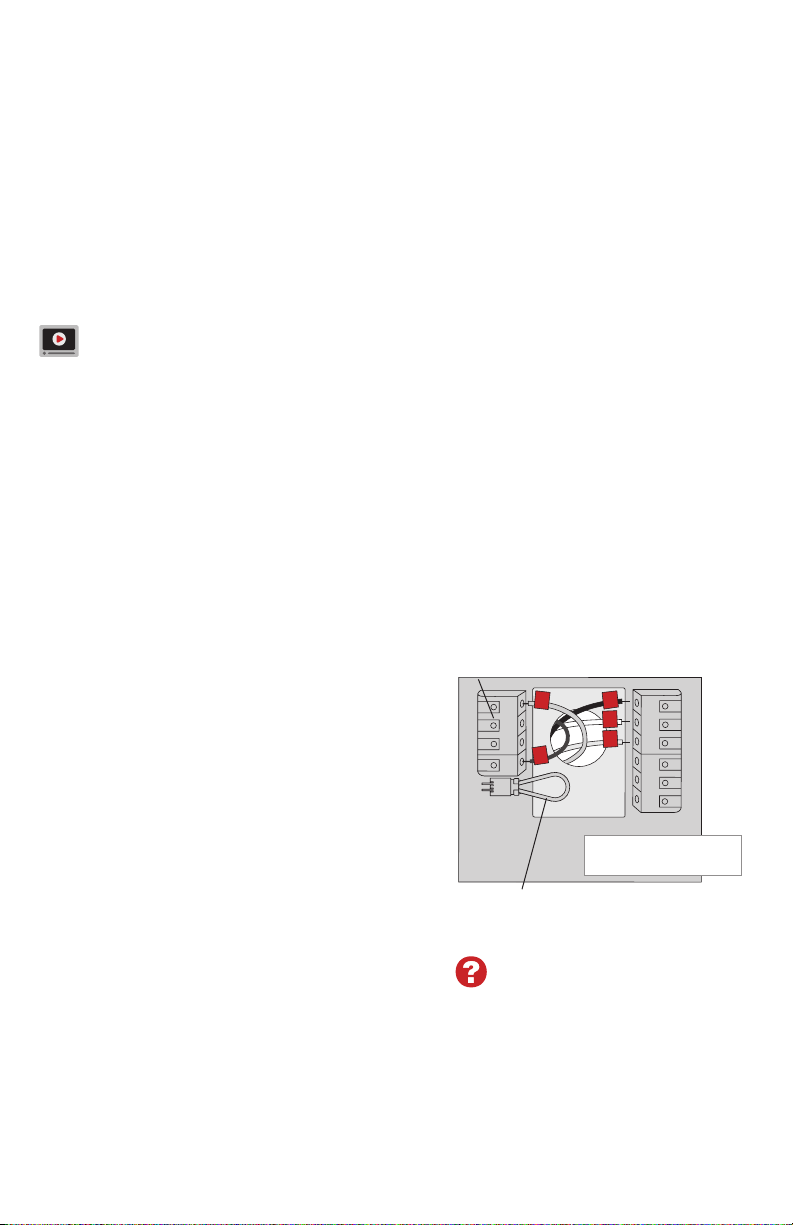
6A Wire the smart thermostat to your
conventional system.
a Starting with the C Wire, match the
sticky tag on the wire to the terminal
labels.
You must have a C wire.
Straighten wire and gently slide
b
terminal hole until it clicks into place.
(If you need to remove a wire, use a
pen tip to press the terminal release
and then pull wire out.)
Note: Refer to the wiring picture you took
in Step 2.
Tip: To make it easier to slide the wire
into place, use a pen tip to hold down the
terminal release.
into
Note: The wiring for your
application might be different
than the wiring shown below.
Terminal release
C
K
Rc
R
C
R
W
Y
G
EXAMPLE WIRING
Yours may look different
WO/B
Y
G
W2-
Aux/E
Y2
L
Remove jumper loop ONLY if
you have both R and Rc wires.
Labels don’t match?
See alternate wiring keys
on pages 78.
5 69-2715EF—07
Page 8
Installing your thermostat
Wiring (Conventional System
continued)
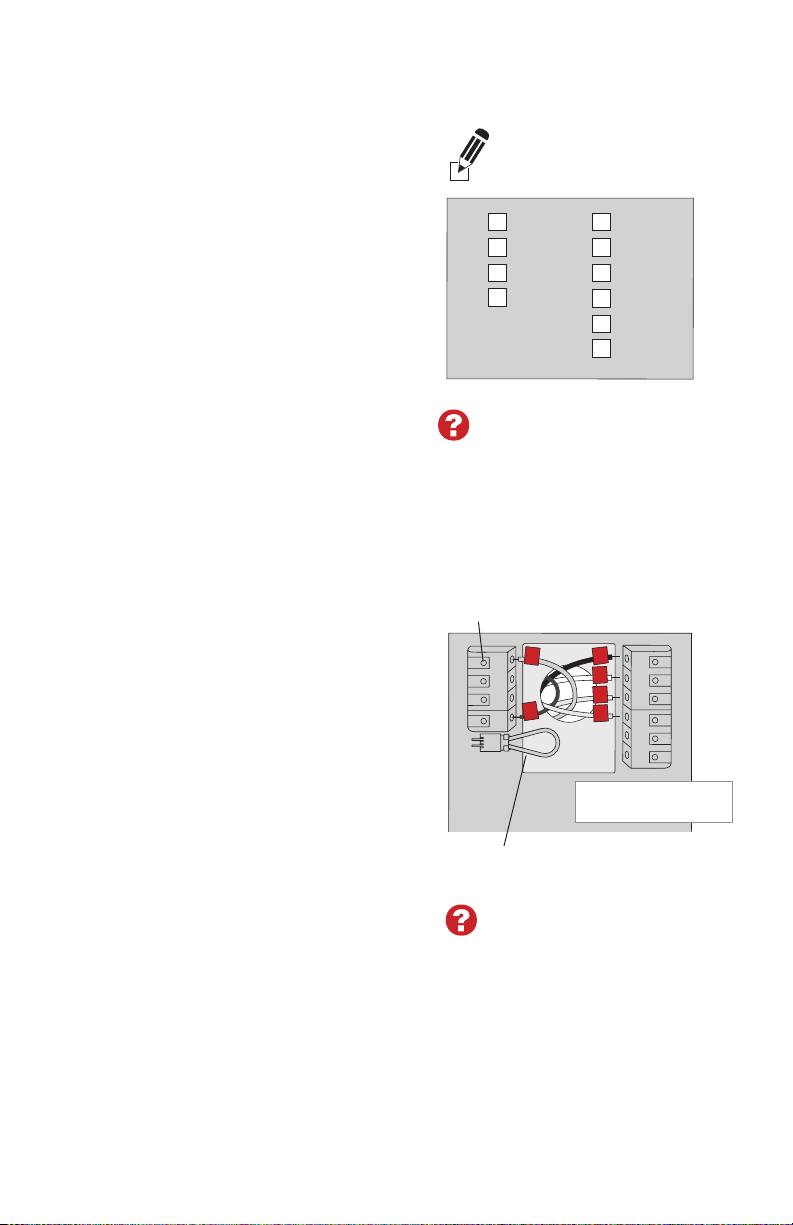
c In the image on the right, check the
box next to each connection. You will
use this checklist in Step 9.
d Verify wire is firmly secured by gently
pulling on wire.
e Repeat steps a–d for all other wires.
f Push any excess wire back into the
wall opening after all wires are
installed.
g Continue to page 8.
Wiring (Heat Pump System)
6B Wire smart thermostat to your heat
pump.
a Starting with the C Wire, match the
sticky tag on the wire to the terminal
labels.
You must have a C wire. See page 5.
b Slide wire gently into terminal hole
until it clicks into place. (If you need
to remove a wire, use a pen tip to
press the terminal release and then
pull the wire out.)
Note: Refer to the wiring picture you took
in Step 2.
Tip: To make it easier to slide the wire
into place, use a pen tip to hold down
the terminal release.
Important!
Check the box for each wire
you connect. You will need
this information in Step 9.
C
K
Rc
R
W-O/B
Y
G
W2-
Aux/E
Y2
L
Labels don’t match?
See alternate wiring keys
on pages 78.
Note: The wiring for your
application might be different
than the wiring shown below.
Terminal release
C
K
Rc
R
C
R
O
Y
G
AUX
EXAMPLE WIRING
Yours may look different
WO/B
Y
G
W2-
Aux/E
Y2
L
Remove jumper loop ONLY if
you have both R and Rc wires.
Labels don’t match?
See alternate wiring keys
on pages 78.
69-2715EF—07 6
Page 9
Installing your thermostat
E
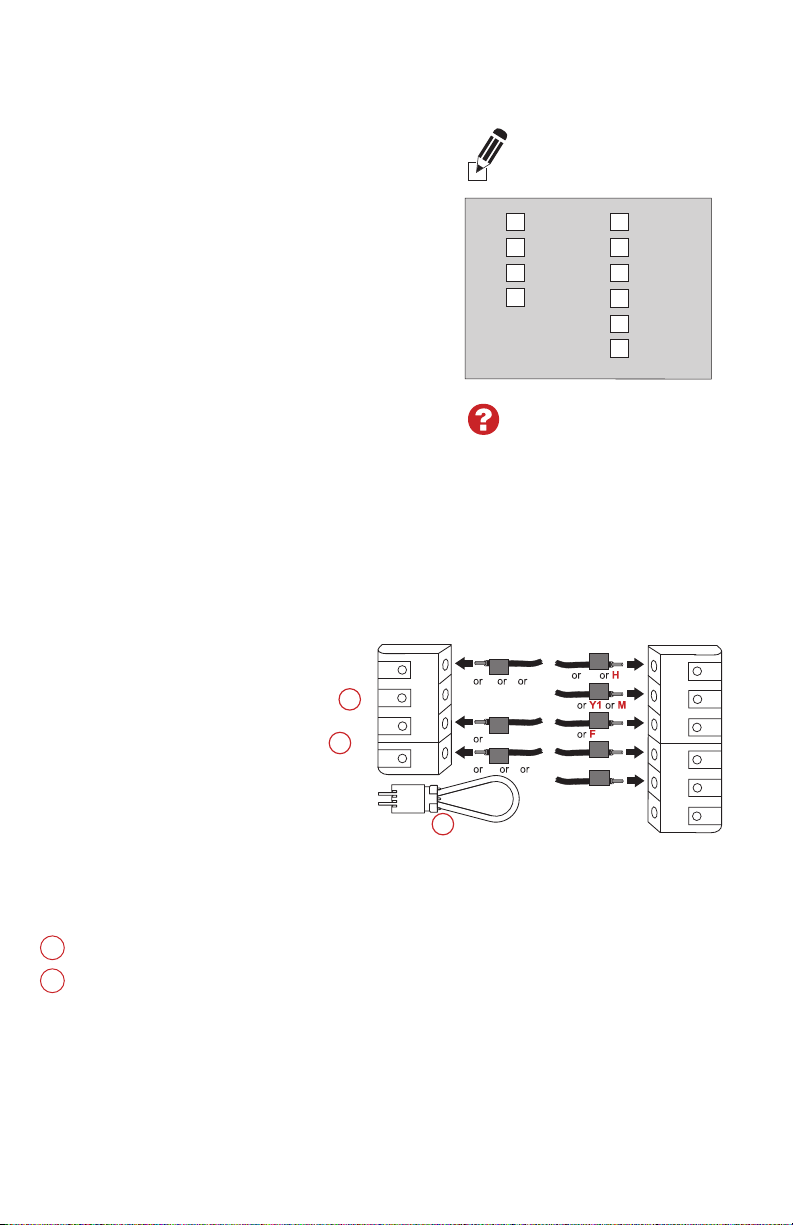
Wiring (Heat Pump System continued)
c In the image on the right, check the
box next to each connection. You will
use this checklist in Step 9.
d Verify wire is firmly secured by gently
pulling on wire.
e Repeat steps a–d for all other wires.
Note: If old thermostat has separate
wires on AUX and E, use a wire nut to
attach both wires to a separate wire.
Slide this third wire into the W2-Aux/E
terminal.
f Push any excess wire back into the
wall opening after all wires are
installed.
g Continue to page 8.
Alternate wiring (Conventional System)
Use this if your wire labels
don’t match the terminal labels.
Note: You must have a C wire
or equivalent. See page 5.
C
1
K
Rc
2
R
Important!
Check the box for each wire
you connect. You will need
this information in Step 9.
C
K
Rc
R
W-O/B
Y
G
W2-
Aux/E
Y2
L
Labels don’t match?
See alternate wiring keys
on pages 78.
C
B
X
C1
Rc
R
R
V
4
RH
2
W
W1
Y
G
W2
Y2
WO/B
Y
G
W2-
Aux/
Y2
L
Alternate wiring key (Conventional System)
Do not use K terminal. For future use.
1
• If you have both an R and Rc wire, unplug the jumper loop by pulling on the
2
wire loop.
• If your old thermostat had both R and RH wires, connect the R wire to the Rc
terminal, the RH wire to the R terminal, and unplug the jumper loop.
7 69-2715EF—07
Page 10
Installing your thermostat
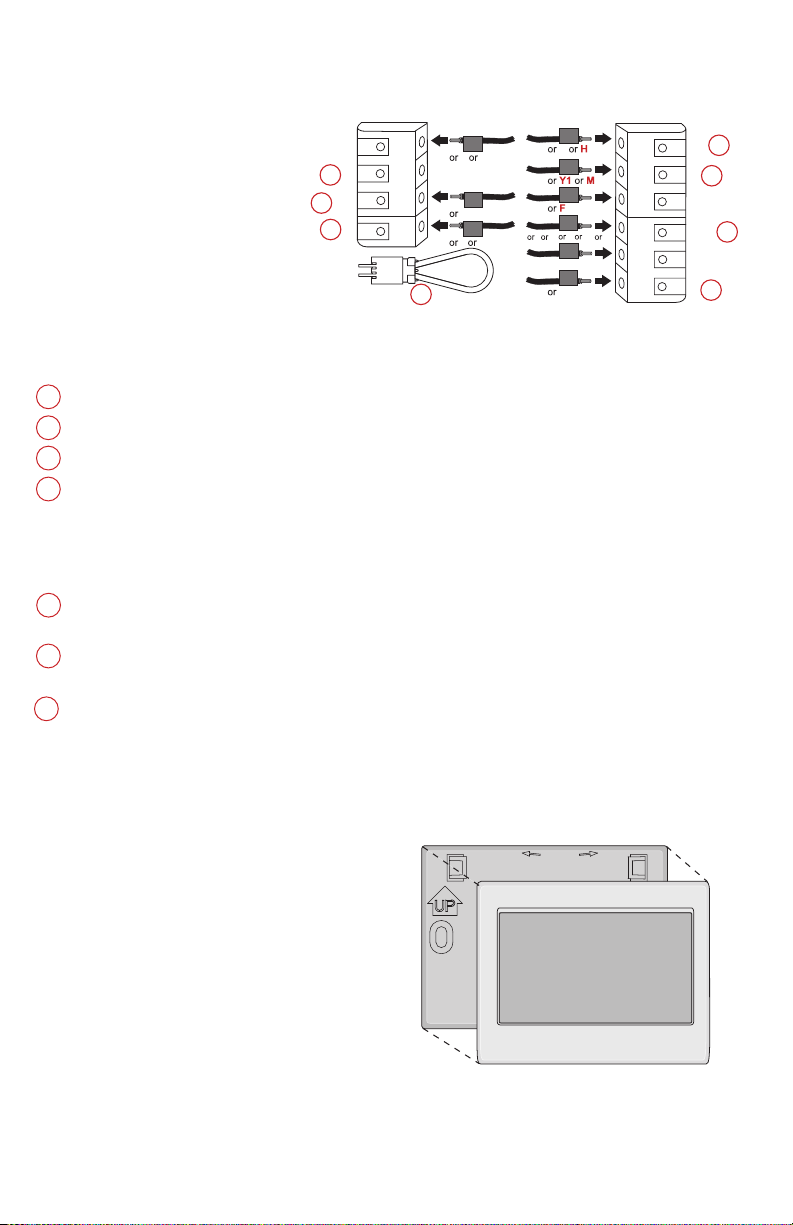
Alternate wiring (Heat Pump System)
XX2
B
AUX
F
O
Y
G
WW1
Y2
L
W2
Use this if your wire labels
don’t match the terminal labels.
Note: You must have a C wire
or equivalent. See page 5.
C
1
K
2
Rc
3
R
C
B
X
Rc
R
R
VR
V
2
Alternate wiring key (Heat Pump System)
1
Do not use K terminal. For future use.
2
Leave jumper loop in place.
3
If your old thermostat had both V and VR wires, check honeywellhome.com/
wifi-thermostat for help.
4
If your old thermostat had separate O and B wires, attach the B wire to the C
terminal. If another wire is attached to the C terminal, check honeywellhome.
com/wifi-thermostat for help. Attach the O wire to the O/B terminal. On the
Type of Changeover Valve screen, select Cooling Changeover Valve. See page
28. If your old thermostat had an O wire and not a B wire, attach the O wire
5
to the O/B terminal.
If your old thermostat had separate Y1, W1, and W2 wires, check
6
honeywellhome.com/wifi-thermostat for help.
If the old thermostat has separate wires on Aux and E, use a wire nut to attach
7
both wires to a separate wire. Slide this third wire into the W2-Aux/E terminal.
This is the system monitor. If the monitor finds a problem, you will see an
orange alert button on the thermostat home screen.
WO/B
Y
G
W2-
Aux/E
Y2
L
4
5
6
7
7 Attach thermostat to wallplate.
Align the thermostat with the
wallplate and then snap into
place.
69-2715EF—07 8
Wallplate
LEVEL
HERE
Thermostat
Page 11
Installing your thermostat
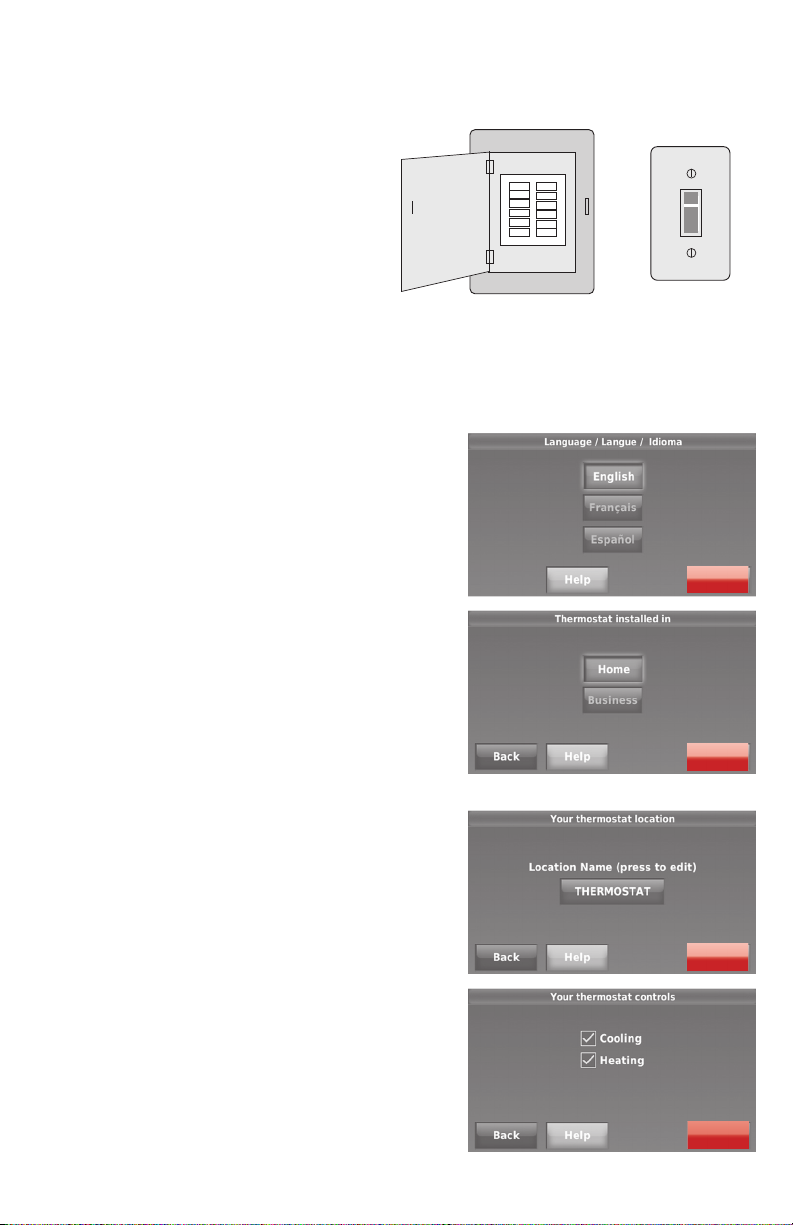
8 Switch heating/cooling system ON.
Important!
8a Verify that the C wire is connected
at the thermostat and at the
heating/cooling system.
8b Make sure the heating/cooling
system door is firmly secured.
8c Switch power back ON for your
heating/cooling system at the
breaker box or its power switch.
Before connecting to your WiFi network,
you need to set initial thermostat options to
define your heating/cooling system:
• Language
• Home or business
You can customise other options later.
9 Follow prompts on the screen to select
appropriate options.
9a Touch the language you want the
thermostat to display, then touch
Next.
9b Select Home or Business installation,
then touch
Next.
Circuit
breaker
box
or
Heating/
cooling
system power
switch
Next
Next
9c Touch Next, or name the thermostat
location—touch THERMOSTAT and
follow the rest of the instructions.
9d Select what your thermostat will
control and touch
Note: Touch the orange Help button on any
Next.
Next
screen for more information.
Next
9 69-2715EF—07
Page 12
Installing your thermostat
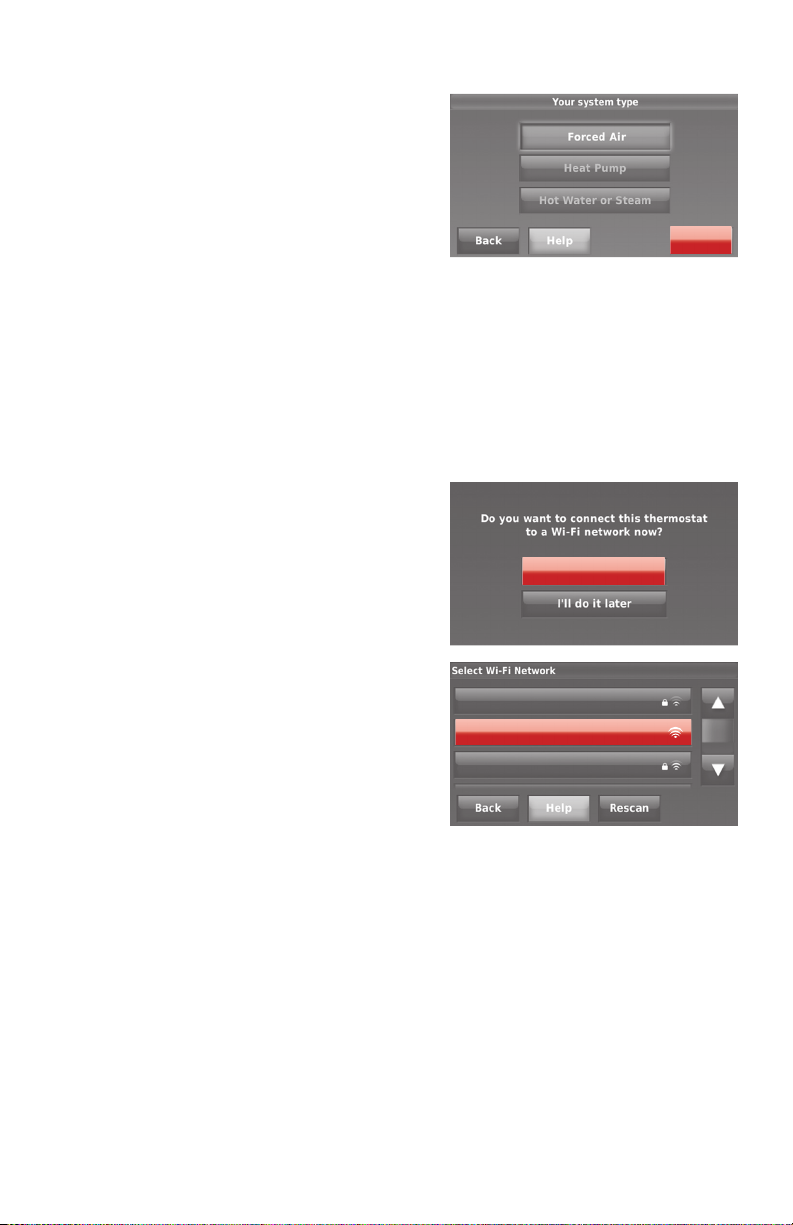
9e Select your system type and touch
Next. The system type determines
other selections for completing initial
setup. Use the checklist from Step 6d
when making selections.
9f Touch
9g Touch
Note: Touch the orange Help button on any
screen for more information.
Next after making selections
on each screen.
Done on the last screen. The
thermostat displays an option to
connect to your WiFi network.
Connecting to your WiFi network
Next
After touching
the initial set up, the thermostat displays an
option to connect to your WiFi network.
1 Connect the WiFi network.
Touch Yes to connect the thermostat to
your WiFi network. The screen displays the
message “Searching for wireless networks.
Please wait...” after which it displays a list of
all WiFi networks it can find.
Note: If you cannot complete this step now,
touch
I’ll do it later
display the home screen. Complete this
process by selecting
Continue with Step 2.
2 Select the network.
2a Touch the name of the network you
want to use. The thermostat displays a
password page.
Done
on the final screen of
. The thermostat will
MENU
>
Wi-Fi Setup
Yes
Public
Your Network
Neighbor
.
Note: If your home network is not
shown on the list, touch
Rescan
.
69-2715EF—07 10
Page 13
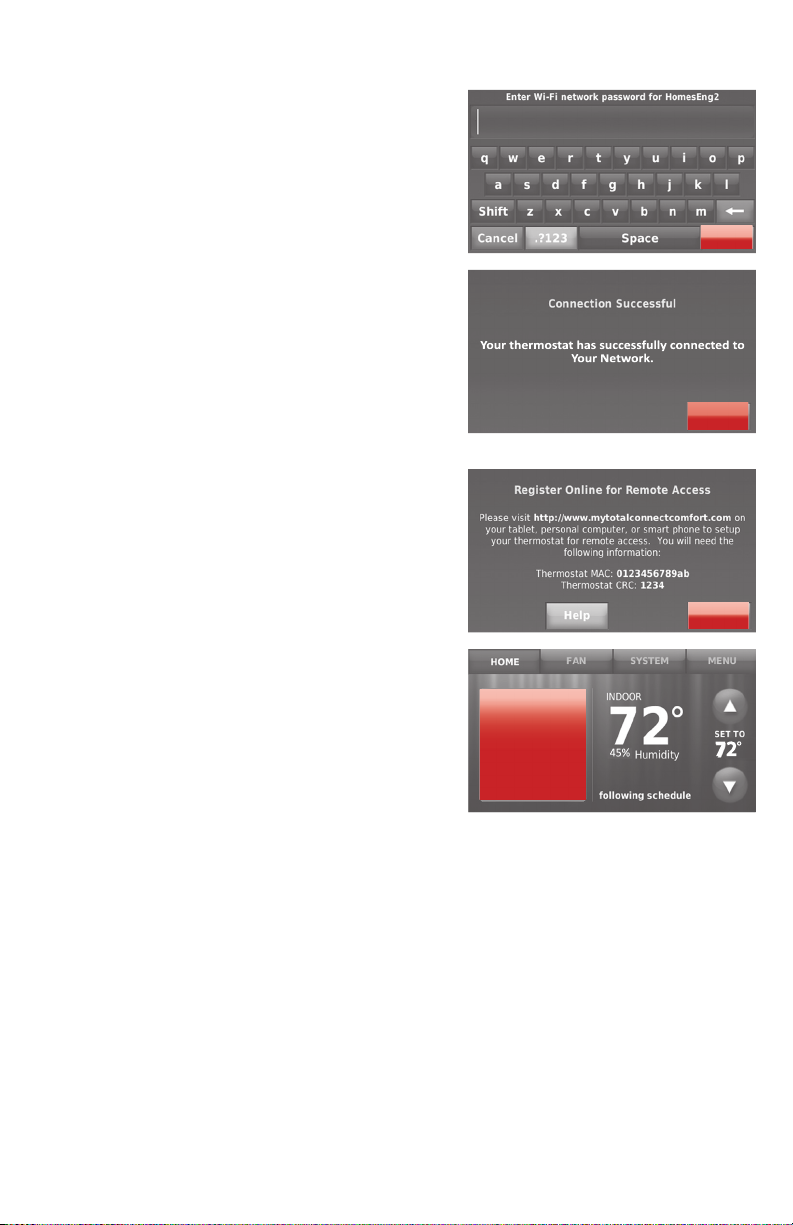
Connecting to your WiFi network
2b Using the keyboard, touch the
characters that spell out your home
network password.
2c Touch
2d Touch
2e Note your Thermostat MAC and
To register your thermostat, follow the
instructions beginning on page 13.
Note: The Register Online screen remains
active until you complete registration and/
or touch
Note: If you touch
register online, your home screen displays
an orange alert button telling you to
register. Touching that button displays
registration information and an option to
snooze the task.
Done. The thermostat
displays “Connecting to your
network. Please wait...” then shows a
“Connection Successful” screen.
Next to display the
registration information screen.
Thermostat CRC. You need these
numbers to complete online
registration.
Done.
Done before you
Register
online for
remote
access
Press for info
Done
Next
Done
11 69-2715EF—07
Page 14
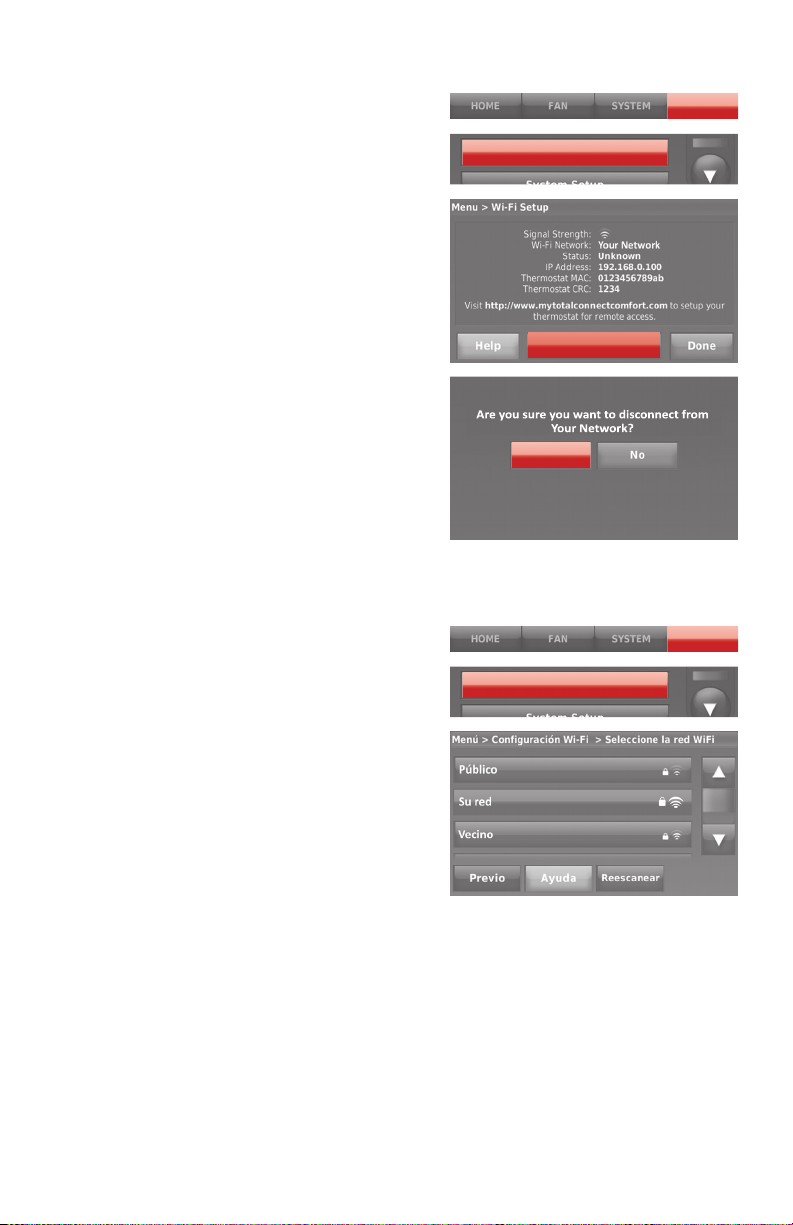
Disconnecting your WiFi network
1 Touch MENU.
2 Select Wi-Fi Setup.
3 Touch
Disconnect from Network.
The thermostat will display a
question to confirm your selection.
4 Touch
Yes to confirm that you want
to disconnect from the network. The
thermostat will display the WiFi
Setup screen.
5 Touch
OK to display the menu.
Reconnecting your WiFi network
1 Touch MENU.
2 Select Wi-Fi Setup.
3 Touch the name of the network you
want to use. The thermostat may
display a password page.
4 To enter a password, touch characters
to spell out your home network
password, then touch
5 The thermostat displays “Connecting
to your network. Please wait...” then a
“Connection Successful” screen.
6 Touch
Next.
• If your thermostat is registered, you
will see your signal strength and
other status information. Touch
Done.
• If the screen displays “Register
Online for Remote Access,” follow
instructions on page 13.
Done.
Wi-Fi Setup
Disconnect from
Network
Yes
Wi-Fi Setup
MENU
MENU
69-2715EF—07 12
Page 15
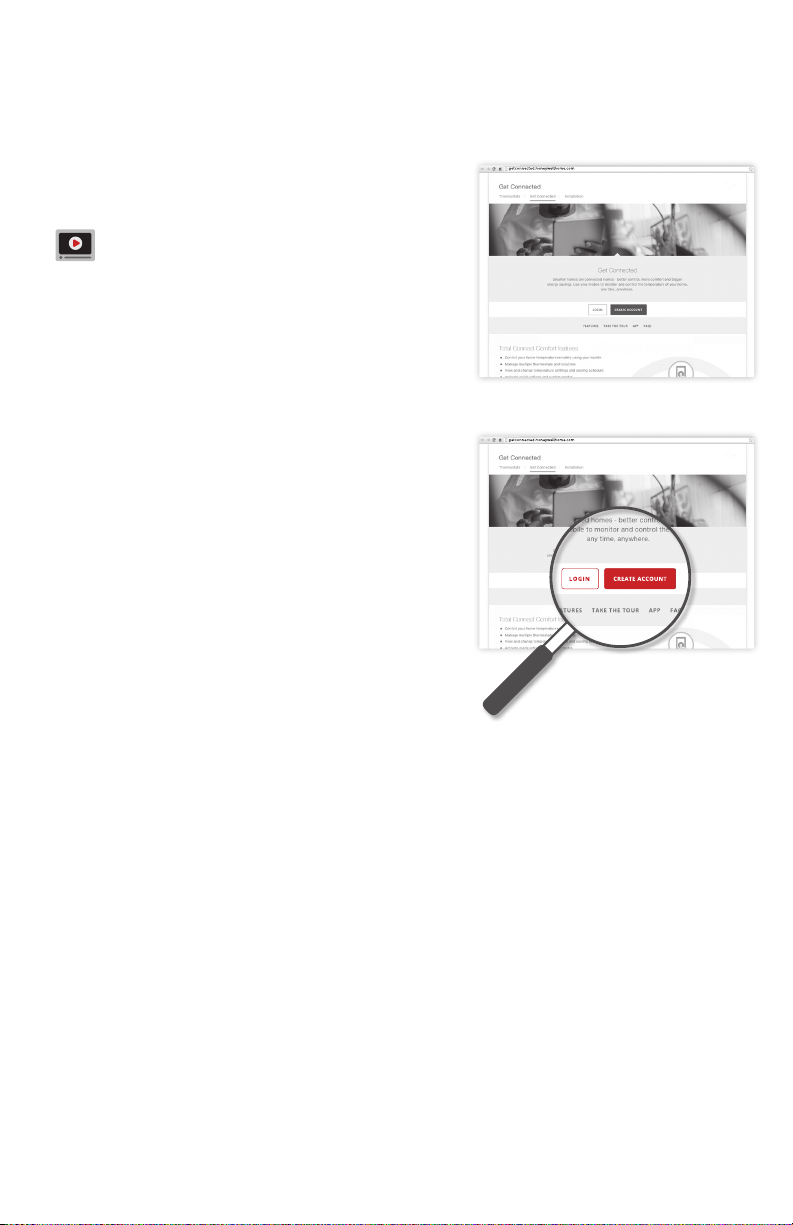
Registering your thermostat online
To view and set your smart thermostat
remotely, you must have a Total Connect
Comfort account. Use the following steps.
1 Open the Get Connected website.
Go to getconnected.honeywellhome.com
View the smart Thermostat
Registration video at
getconnected.honeywellhome.com
2 Login or create an account.
If you have an account, click LOGIN
– or –
CREATE AN ACCOUNT
click
2a Follow the instructions on the
screen.
2b Check your email for an activation
message from My Total Connect
Comfort. This may take several
minutes.
Note: If you do not receive a response,
check your junk mailbox or use an
alternate e-mail address.
2c Follow activation instructions in
the email.
2d Log in.
CREATE
ACCOUNT
13 69-2715EF—07
Page 16
Registering your thermostat online
Printed in U.S.A.
69-2723EFS-03
.resi
deo.com
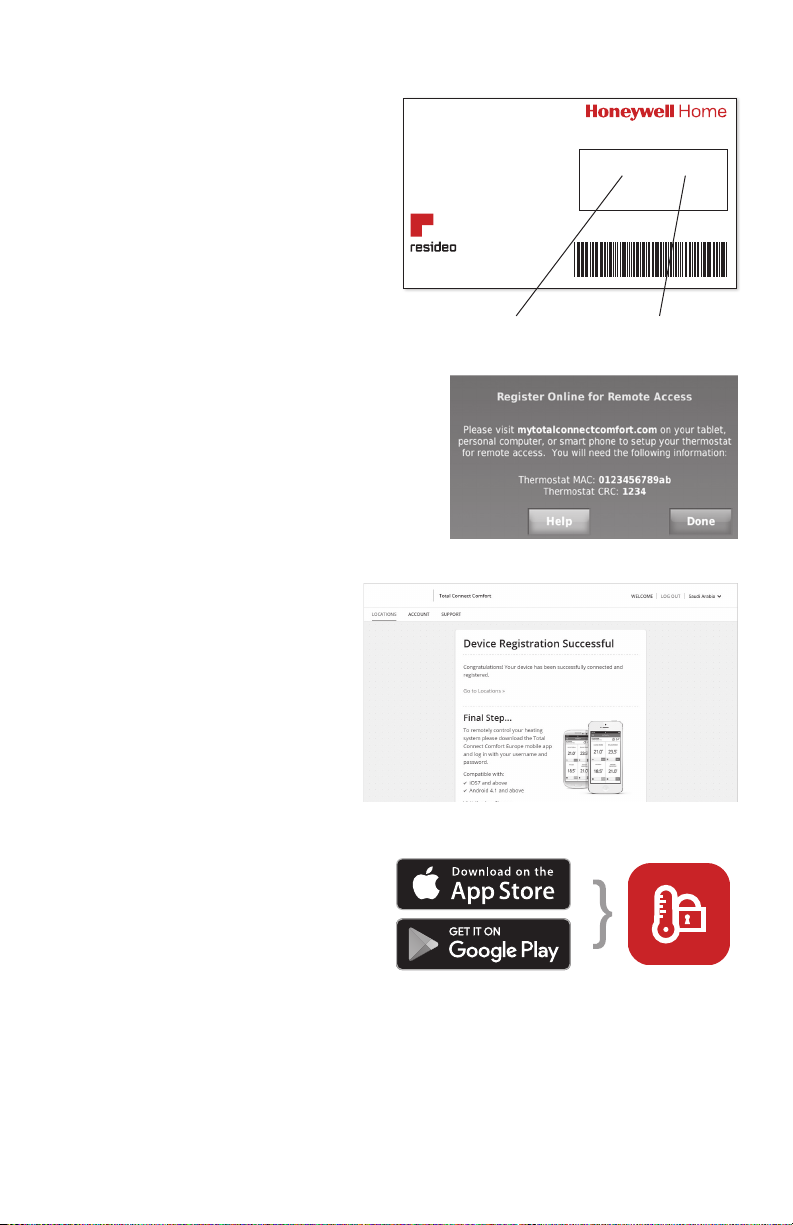
3 Register your smart thermostat.
After you are logged in to your
Total Connect Comfort account,
register your thermostat.
3a Follow the instructions on
the screen. After adding your
thermostat location, you must
enter the thermostat’s unique
identifiers:
• MAC ID
• MAC CRC
Note: These IDs are listed on the
Register Online screen or on the
Thermostat ID Card included in the
thermostat package. The IDs are
not case sensitive.
When the thermostat is
successfully registered,
the Total Connect Comfort
registration screen will display
a SUCCESS message.
You can now control your
thermostat from anywhere
through your laptop, tablet, or
smartphone.
Thermostat ID Card
Use the MAC ID and CRC ID to register
this product at mytotalconnectcomfort.com
Carte d’identification de thermos tat
Utilisez l’identification MAC et l’identification CRC pour enregistrer
ce produit à mytotalconnectcomfort.com
Tarjeta de identificación del termostato
Utilice la identificación MAC y la identificación CRC para inscribir este
producto en mytotalconnectcomfort.com
Resideo Inc., 1985 Douglas Drive North,
© 2018 Resideo Technologies, Inc. All rights reserved. The Honeywell
Home logo is used under license from Honeywell International Inc.
69-2723EFS—03 M.S. Rev. 12-18
Golden Valley, MN 55422
MAC ID MAC CRC
The free ‘Total Connect Comfort
International’ app is available for
®
iPhone®, iPad® and iPod touch®
Apple
devices at iTunes® or at Google
Play® for all Android™ devices.
69-2715EF—07 14
Select your store Get the App
Page 17
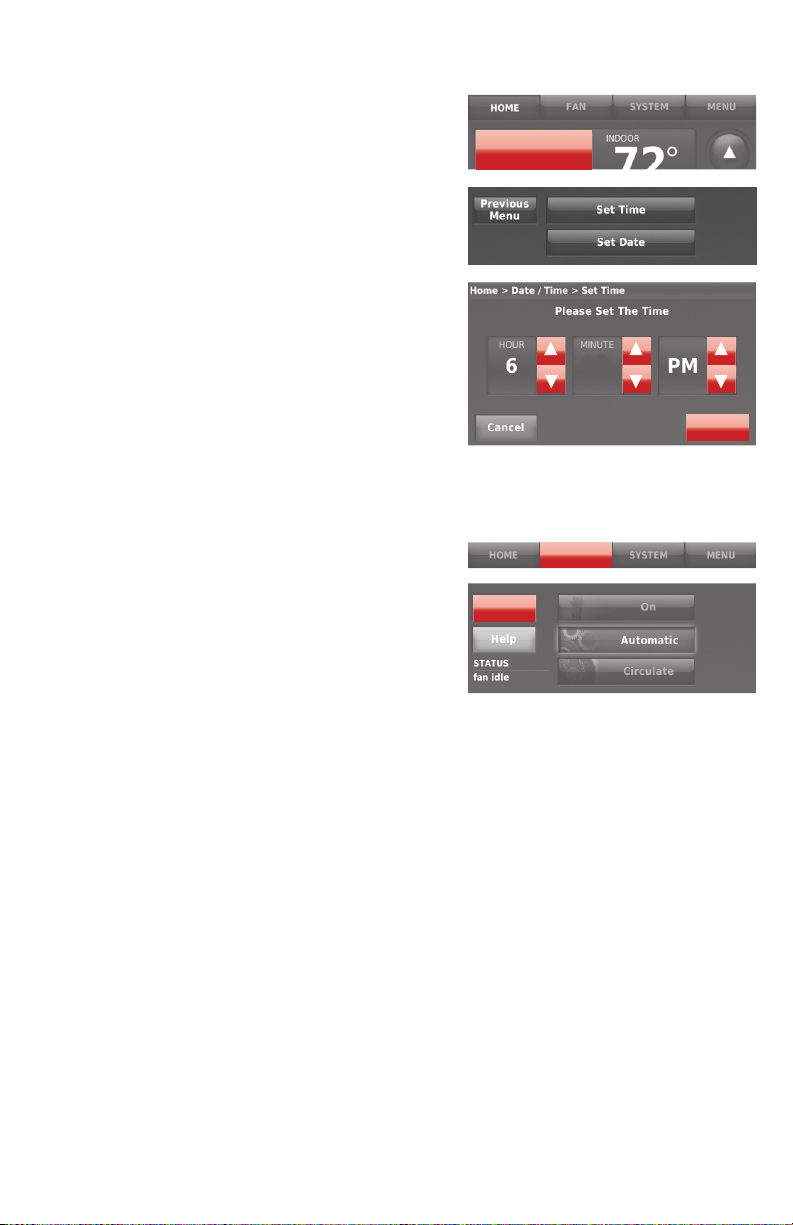
Setting the time/date
6:30 pm
1 Touch the current time. The screen
displays Set Time/Set Date.
2 Touch
3 Touch p or q until the proper time/date
4 Touch
Note: This thermostat will automatically
update for daylight saving time (if observed
in your area) and all date/time information
is stored. If the thermostat is connected
to WiFi and registered to Total Connect
Comfort, the current time is updated from
the internet.
Set Time or Set Date.
is displayed.
Done to save or Cancel to ignore
changes.
Setting the fan
Fri, Jun 14, 2013
30
Done
1 Touch FAN to display fan settings.
2 Touch
3 Touch
Note: Touch Auto or On to temporarily override the programmed fan
schedule.
On, Automatic, Circulate, or
Follow Schedule.
Done
Done to save and exit.
On: Fan is always on.
Automatic: Fan runs only when the
heating or cooling system is on.
Circulate: Fan runs randomly about 35% of the time (home use only).
Follow Schedule: Fan controlled by program (see pages
FAN
16
18).
15 69-2715EF—07
Page 18
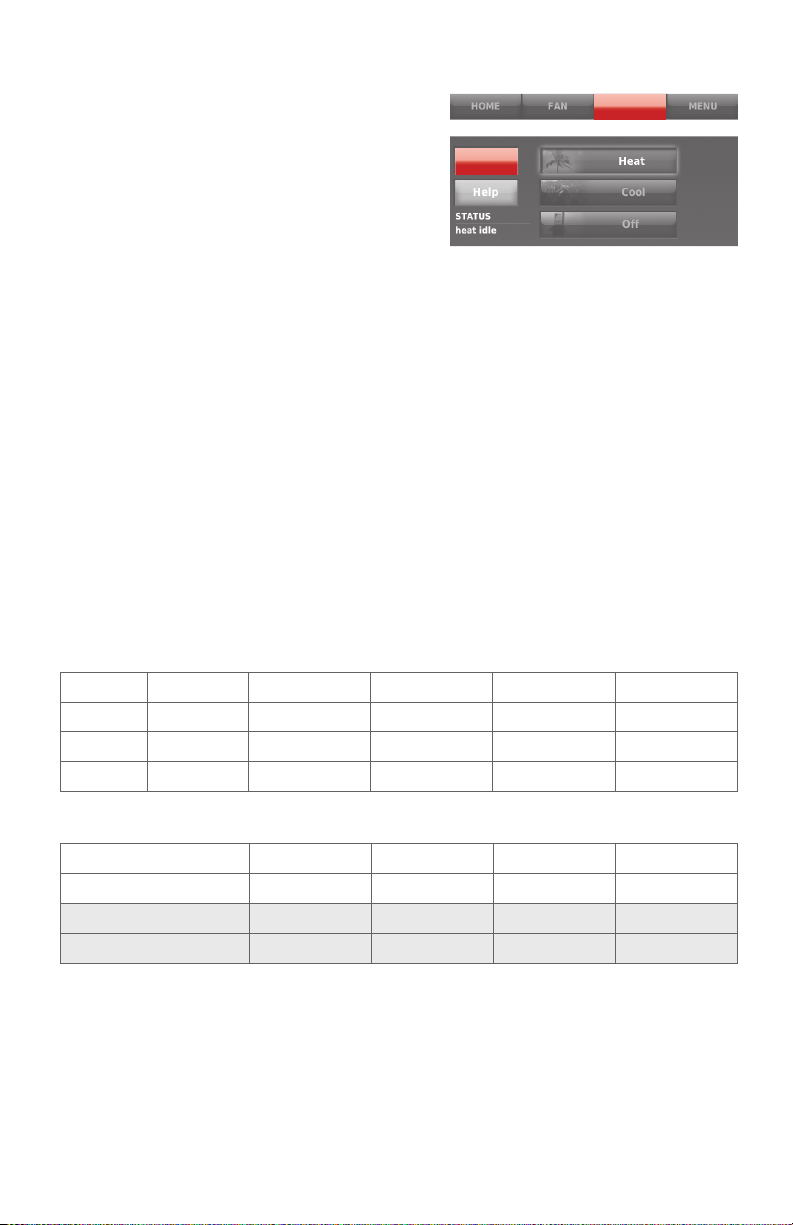
Setting system mode
1 Touch SYSTEM to display system
settings.
2 Touch desired option:
Heat: Thermostat controls only the
heating system.
Cool: Thermostat controls only the
cooling system.
Off: Heating/cooling systems are off.
Automatic: Thermostat selects heating or cooling as needed
depending on the indoor temperature.
Emergency Heat (heat pumps with aux. heat): Controls
auxiliary/emergency heat. Compressor is locked out.
3 Touch Done to save and exit.
Note: The Automatic and Emergency Heat system settings may not
appear, depending on how your thermostat was installed.
Done
SYSTEM
Pre-set energy-saving schedules
This thermostat uses default Energy Saver settings that can reduce your
heating/cooling expenses. To customise settings, see next page.
Heat
Period Start time
Wake 6:00 am 70°F (21°C) 78°F (25.5°C) 70°F (21°C) 78°F (25.5°C)
Leave 8:00 am 62°F (16.5°C) 85°F (29.5°C) 62°F (16.5°C) 85°F (29.5°C)
Return 6:00 pm 70°F (21°C) 78°F (25.5°C) 70°F (21°C) 78°F (25.5°C)
Home Use
Sleep 10:00 pm 62°F (16.5°C) 82°F (28°C) 62°F (16.5°C) 82°F (28°C)
(MonFri)
Cool
(MonFri)
Heat
(SatSun)
(SatSun)
Cool
Period Start time Heat Cool Fan
Occupied 1 8:00 am 70°F (21°C) 75°F (24°C) On
Unoccupied 1 10:00 pm 55°F (13°C) 85°F (29.5°C) Auto
Occupied 2* 12:00 am 70°F (21°C) 75°F (24°C) On
Unoccupied 2* 12:00 am 55°F (13°C) 85°F (29.5°C) Auto
Business Use
* Period 2 is cancelled by default. If you activate it, the values shown above are
default settings.
69-2715EF—07 16
Page 19
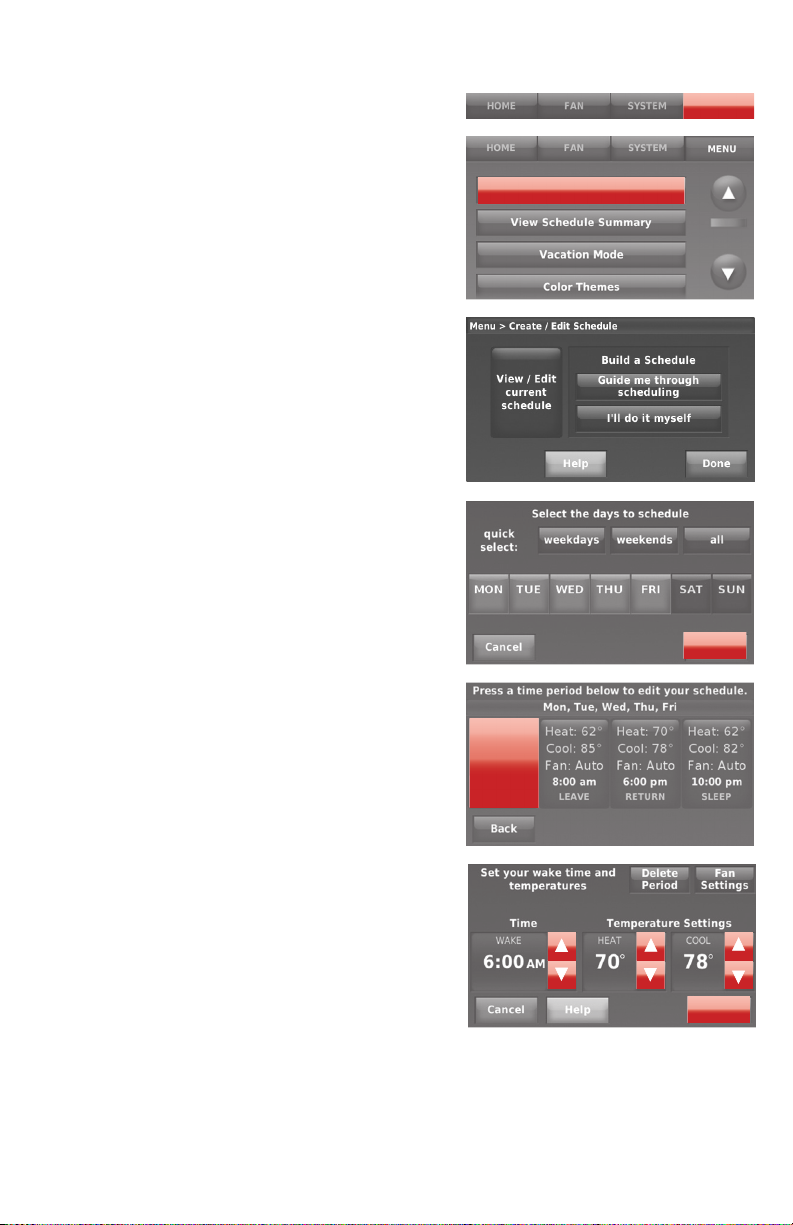
Adjusting program schedules
1 Touch MENU.
2 Select
Create/Edit Schedule.
• Touch
View/Edit to view the
full schedule and make a quick
adjustment.
• Touch
Guide Me to create a schedule
by answering simple questions.
• Touch
I’ll do it myself to manually
create a program schedule.
Note: To reduce costs, use the pre-set
Energy Saver settings described on
page 16.
If you selected I’ll do it myself on the
Create/Edit Schedule screen follow these
steps:
1 Select the days to schedule, touch
2 Touch
Wake to set your Wake time for
Next.
selected days.
MENU
Create / Edit Schedule
Next
Heat: 70°
Cool: 78°
Fan: Auto
3 Touch p or q to set Heat and Cool
temperatures for the Wake period, then
touch
Done.
4 Touch other time periods (
Leave, Return,
6:00 am
WAKE
Sleep) to set time and temperatures for
each.
5 Touch
Note: Touch
unwanted time period.
Note: Touch
settings for any time period.
Note: When configured for business, the
thermostat uses
instead of
17 69-2715EF—07
Done to save and exit.
Delete Period to eliminate any
Done
Fan Settings to customise fan
Occupied and Unoccupied
Wake, Leave, Return, and Sleep.
Page 20
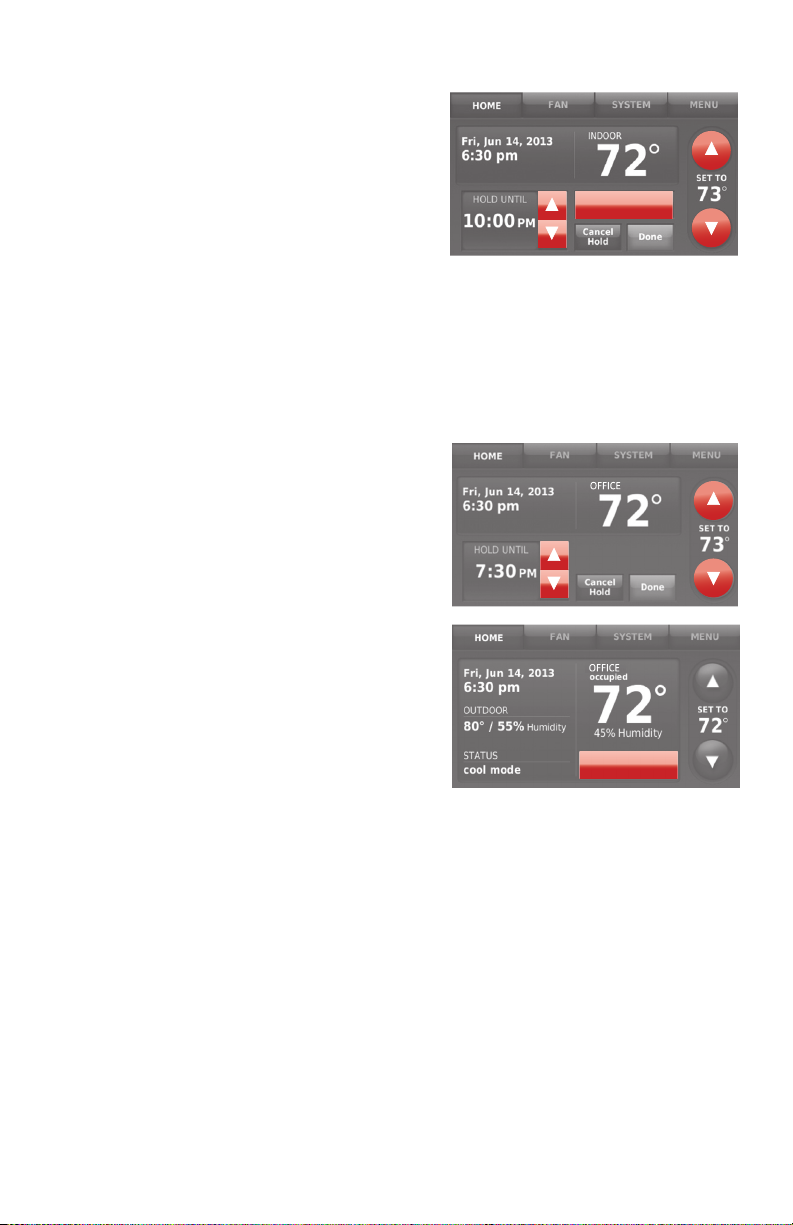
Overriding schedules: home use
1 Touch p or q to adjust the temperature
(right side of screen) and the Hold Until
time (left side). The schedule will resume
when the Hold Until time expires.
2 Touch
3 Touch
Switch to Permanent Hold
to keep the same temperature until
you change it or resume the program
schedule.
Cancel Hold at any time to
resume the program schedule.
Overriding schedules: business use
Touch p or q to adjust the temperature.
It will be maintained until the hold time
you set.
• To change the hold time, touch the
Hold Until arrow buttons. This time can
be adjusted up to the maximum time
set on the Override Duration screen in
Advanced Preferences (page 27).
• Touch
The programmed schedule will resume
when the override timer expires. Touch
Cancel Hold at any time to resume the
program schedule.
Override to use a pre-set
occupied temperature if a person
uses the room during an unoccupied
period. The new temperature will be
maintained for 1 hour and can be
adjusted up to the maximum time set
on the Override Duration screen in
Advanced Preferences (page 27).
Switch To
Permanent Hold
OVERRIDE
69-2715EF—07 18
Page 21
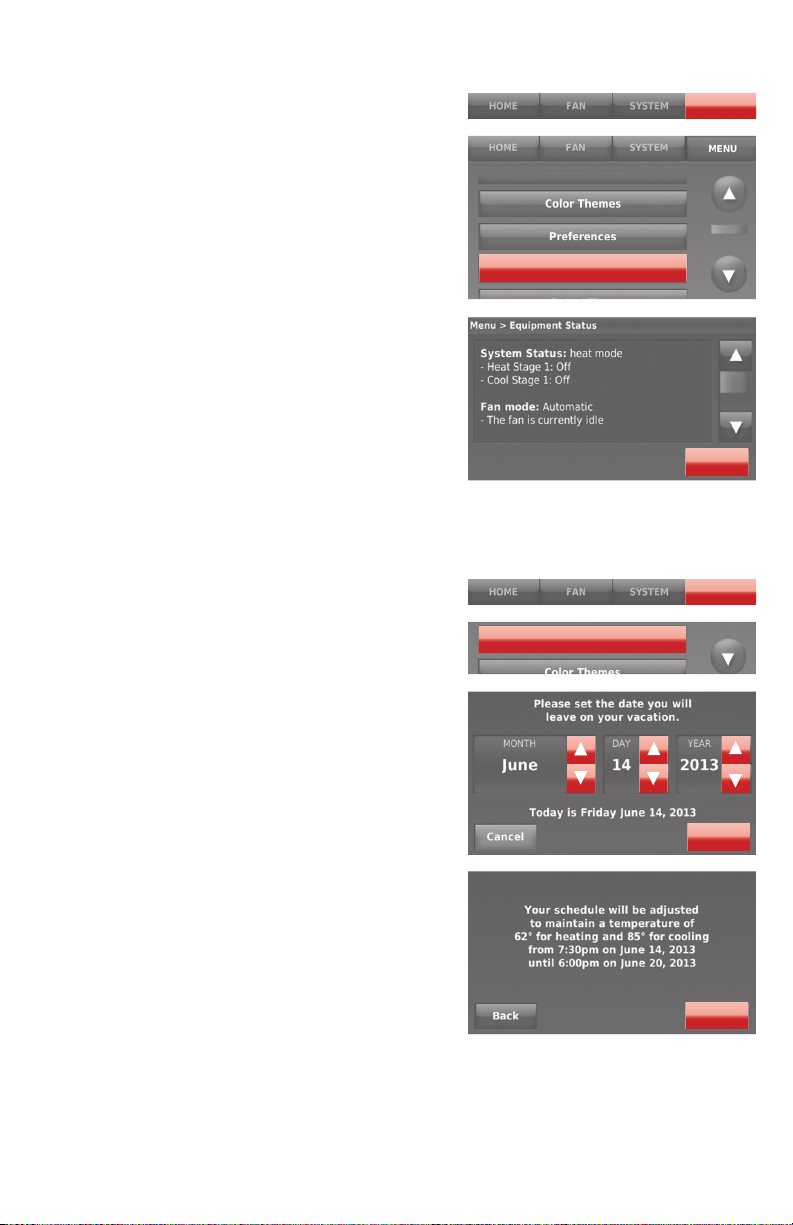
Viewing equipment status
1 Touch MENU.
2 Select
Equipment Status.
3 Touch p or q to view the status of
all the equipment your thermostat
is controlling. Depending on how
your thermostat was installed, the
Equipment Status screen can report
data about the following systems:
• Heating and cooling
• Fan
• Thermostat information
Setting vacation hold: home use
This feature helps you save energy while
you are away, and restores comfortable
settings just before you return home.
1 Touch
2 Select
3 Touch p or q to select the date you
4 Review your selections on the last
MENU.
Vacation Mode.
leave, then touch
scheduling details, including times
of day, temperature settings, return
date, and return settings.
display, and touch
your settings. Touch
Next for further
Done to save
Back, then
Cancel to ignore the changes.
MENU
Equipment Status
Done
MENU
Vacaon Mode
Next
Done
19 69-2715EF—07
Page 22
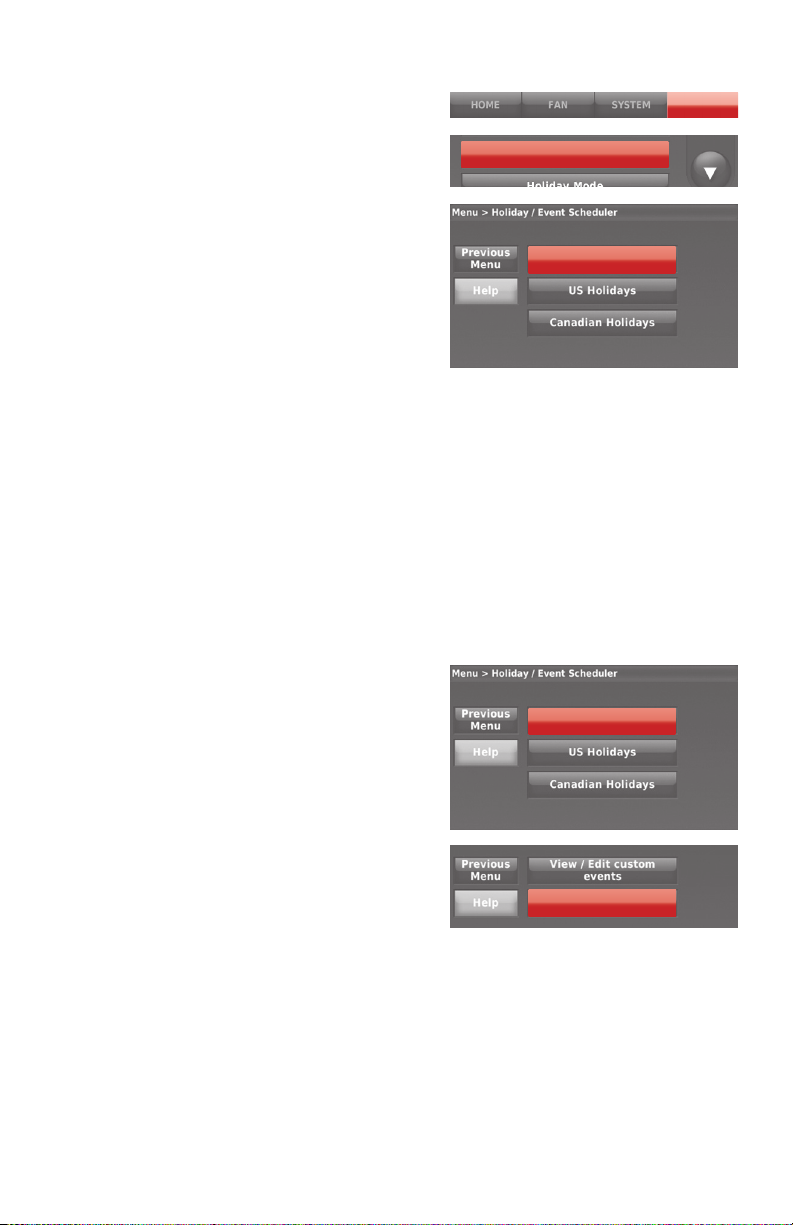
Setting holiday/event schedules: business use
This feature helps you conserve energy
when the workplace is unoccupied for
special events and holidays.
1 Touch
2 Select
3 Select the item you want to schedule.
4 Make selections as prompted on each
5 Touch
MENU.
Holiday/Event Scheduler.
• Custom Events lets you set up
other days for special schedules.
• US and Canadian Holiday options
let you select from a list of holidays
commonly observed in each
country.
screen. For more information, see next
two pages.
Done to save your settings.
Holiday / Event Scheduler
Setting custom events: business use
This feature lets you customise
temperature settings to be maintained
during a specific event. You can set up
an event for a specific date or day in a
month. The thermostat resumes normal
scheduling after the event.
1 Select
Custom events from the
Holiday/Event Scheduler menu.
MENU
Custom events
Custom events
69-2715EF—07 20
Create a new event
Page 23
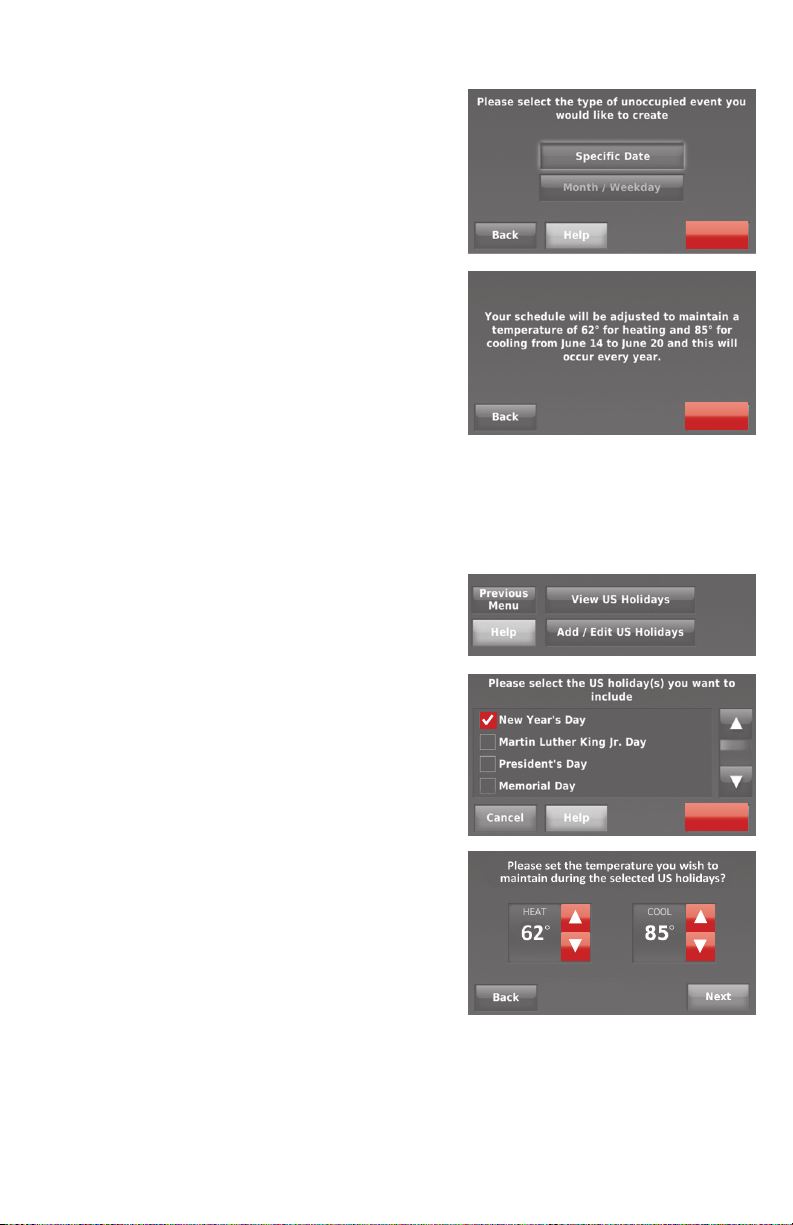
Setting custom events: business use
2 Select Create a new event.
3 Select
Specific Date or Month/
Weekday.
• For
Specific Date, you are
prompted to select the start date,
settings, end date, and frequency for
the event.
• For
Month/Weekday, you are
prompted to select the month, day
of the week, week of the month,
settings, length of event, and
frequency of the event.
4 Review the settings and touch
save them. Touch
to ignore the changes.
Back, then Cancel
Done to
Setting holiday schedule: business use
This feature lets you customise temperature
settings to be maintained on specified
national holidays. The thermostat resumes
normal scheduling between selected
holidays.
1 Select
2 Select
3 Touch the check box next to each holiday
4 Touch p or q to select the Heat and Cool
5 Review the settings and touch
US Holidays or Canadian
Holidays from the Holiday/Event
Scheduler menu.
Add/Edit Holidays. A list of
national holidays is displayed.
for which you want to maintain specific
settings, (Touch p or q to scroll through
the holiday list.) then touch
Set the holiday schedule for Occupied
or Unoccupied temperatures, depending
whether the building will be in use.
temperatures.
Next.
Done to
save them. Touch
ignore the changes.
Back, then Cancel to
Next
Done
Next
21 69-2715EF—07
Page 24
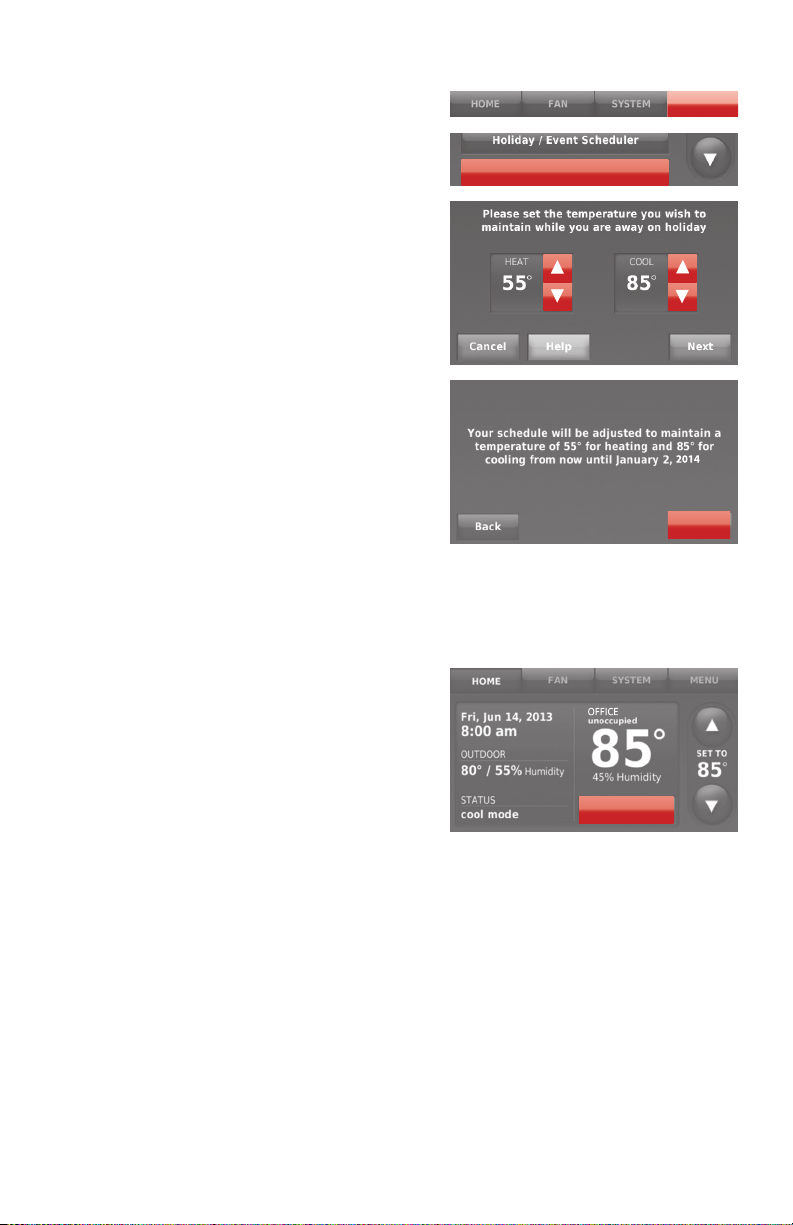
Setting holiday override: business use
This feature lets you customise temperature
settings to be maintained from now until
a specified date. The thermostat resumes
normal scheduling on the date you select.
1 Touch
2 Select
3 Touch p or q to select the Heat and
4 Review the settings and touch
Note: The cool temperature can only be
set higher than the unoccupied program
setting and the heat temperature can only
be set lower than the unoccupied program
setting.
MENU.
Holiday Mode to display
temperatures while you are away on
holiday.
Cool temperatures, then touch
select return date.
Next to
Done to
save them. Touch
ignore the changes.
Back, then Cancel to
Holiday Mode
Initiating occupancy mode: business use
This feature keeps temperature at an
energy-saving level until you touch
to start occupancy
touch the button to maintain a comfortable
temperature while the room is occupied.
Touch the p or q buttons to set the
temperature or the Hold Until time. The
temperature is maintained until the time
you set. Temperature returns to an energysaving level after the timer expires, or the
“Occupied” period ends.
. When you arrive,
Press
Press to start
MENU
Done
occupancy
69-2715EF—07 22
Page 25
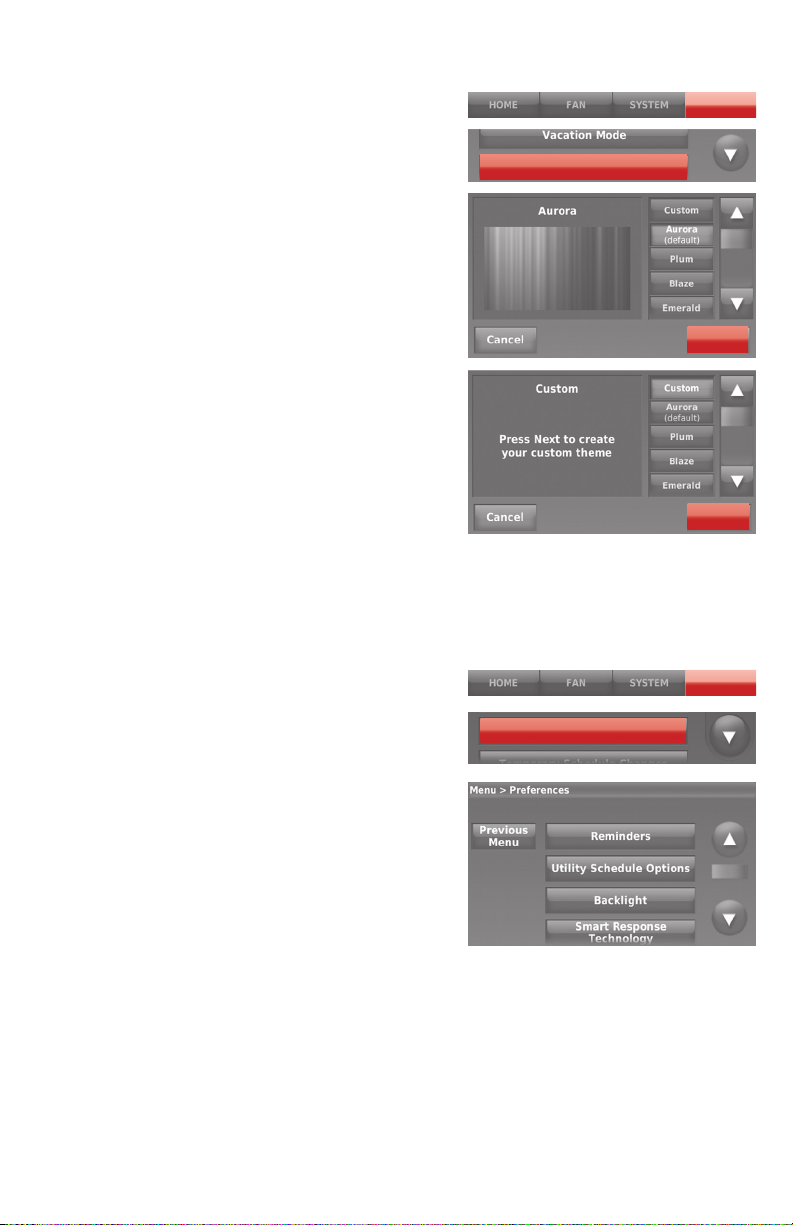
Customizing screen colour
You can customise your thermostat
display to match your décor.
1 Touch Menu.
2 Touch Colour Themes.
3 Select the name of a colour to
use a predefined background, or
select Custom to define you own
background colour and text.
• If you select a colour name, the
screen shows an example on the
left. Touch Done to accept that
selection.
• If you touch Custom, the screen
gives you instructions. Touch Next
to step through the choices; touch
Done when you are satisfied with
your changes.
Setting preferences
Preference menu options let you select
how the thermostat displays information
or responds to certain situations.
1 Touch
2 Select an option and follow prompts:
3 Touch
MENU and select
Preferences.
• Reminders
• Utility Schedule Options
• Backlight
• Smart Response Technology*
• Advanced Preferences
• Restore Default Schedule
Done to save your settings.
Touch
Cancel to ignore changes.
MENU
Color Themes
Done
Next
MENU
Preferences
* Smart Response is not available if thermostat is configured for business.
23 69-2715EF—07
Page 26
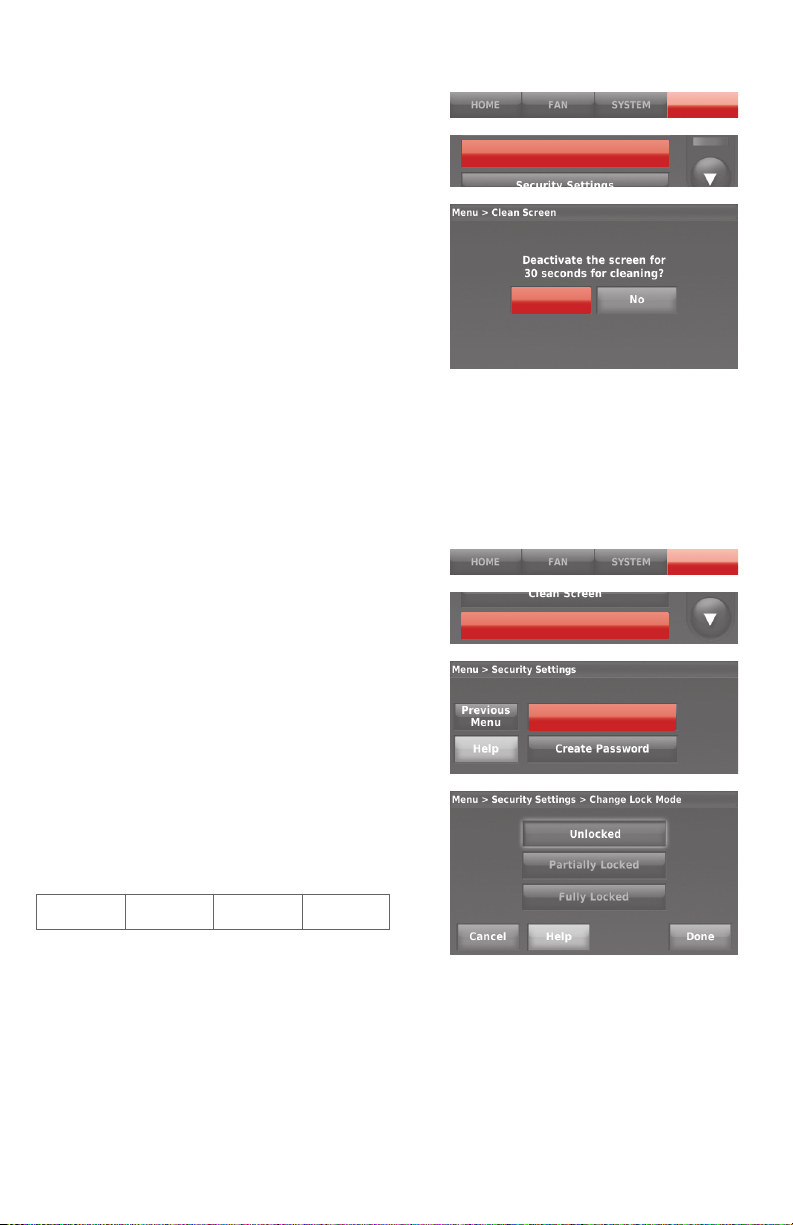
Cleaning the thermostat screen
When you select the Clean Screen option,
the screen is locked so you don’t accidentally
change settings while you clean.
1 Touch
2 Select
MENU.
Clean Screen. A prompt asks
if you want to clean the screen for 30
seconds.
3 Touch
Yes. A countdown timer displays
elapsed time until the screen is
reactivated.
Note: Do NOT spray any liquid directly on
the thermostat. Spray liquids onto a cloth,
then use the damp cloth to clean the screen.
Use water or household glass cleaner. Avoid
abrasive cleansers.
Adjusting security settings
You can adjust security options to prevent
unauthorized changes to system settings.
1 Touch
2 Select
3 Select an option and follow prompts:
Note: If you choose to use a password
for additional security, write it here for
reference:
MENU and select Security
Settings.
Change Lock Mode.
Unlocked: Full access allowed.
Partially locked: Only temperature
can be changed.
Fully locked: No access allowed.
MENU
Clean Screen
Yes
MENU
Security Sengs
Change Lock Mode
69-2715EF—07 24
Page 27
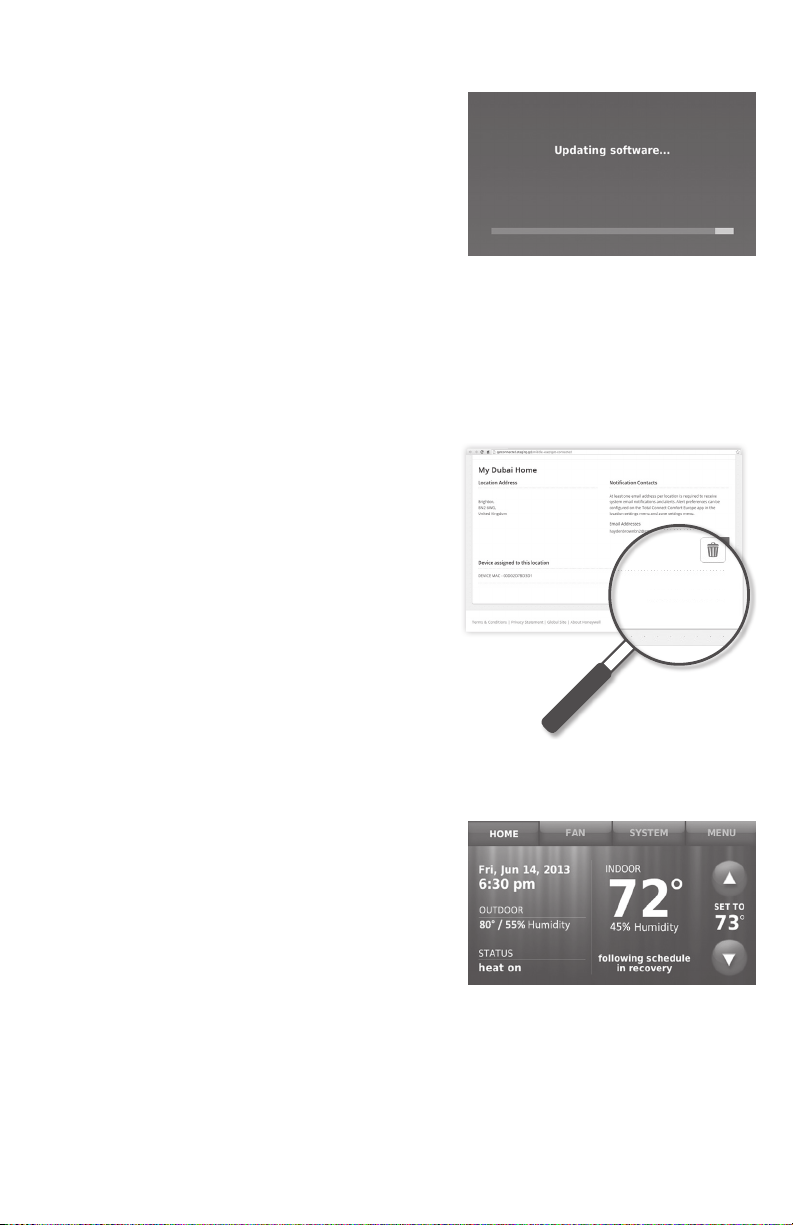
Software updates
Resideo periodically issues updates to the
software for this thermostat. The updates occur
automatically through your WiFi connection.
All your settings are saved, so you will not need
to make any changes after the update occurs.
Updates occur in the early morning. After your
thermostat receives the software, it reboots. The
screen then shows “Updating software…” with a
green progress bar. When the update is complete, your home screen will appear as
usual.
Note: If you are not connected to WiFi or registered at Total Connect Comfort, you
will not get automatic updates.
Unregistering your thermostat
To remove a thermostat from your Total
Connect Comfort account follow these steps:
1 On mytotalconnectcomfort.com log into
your account.
2 Under LOCATIONS, click on the location
you want to remove
3 Click the Delete Location link to remove
this location.
You will be returned to the LOCATIONS
screen and your thermostat will display an
orange button that says
Register Online.
Delete Location
Smart Response Technology*
This feature (home use only) allows the
thermostat to “learn” how long the heating/
cooling system takes to reach programmed
temperature settings, so the temperature is
reached at the time you set.
For example: Set the Wake time to 6:00 am, and
the temperature to 70° (21°C). The heat will
come on before 6:00 am, so the temperature is
70° (21°C) by 6:00 am.
Note: Select Smart Response Technology in the Preferences menu (“Setting
preferences” on page 23).
The message “in recovery” is displayed when the system is activated before a
scheduled time period.
* Smart Response is not available if thermostat is configured for business.
25 69-2715EF—07
Page 28
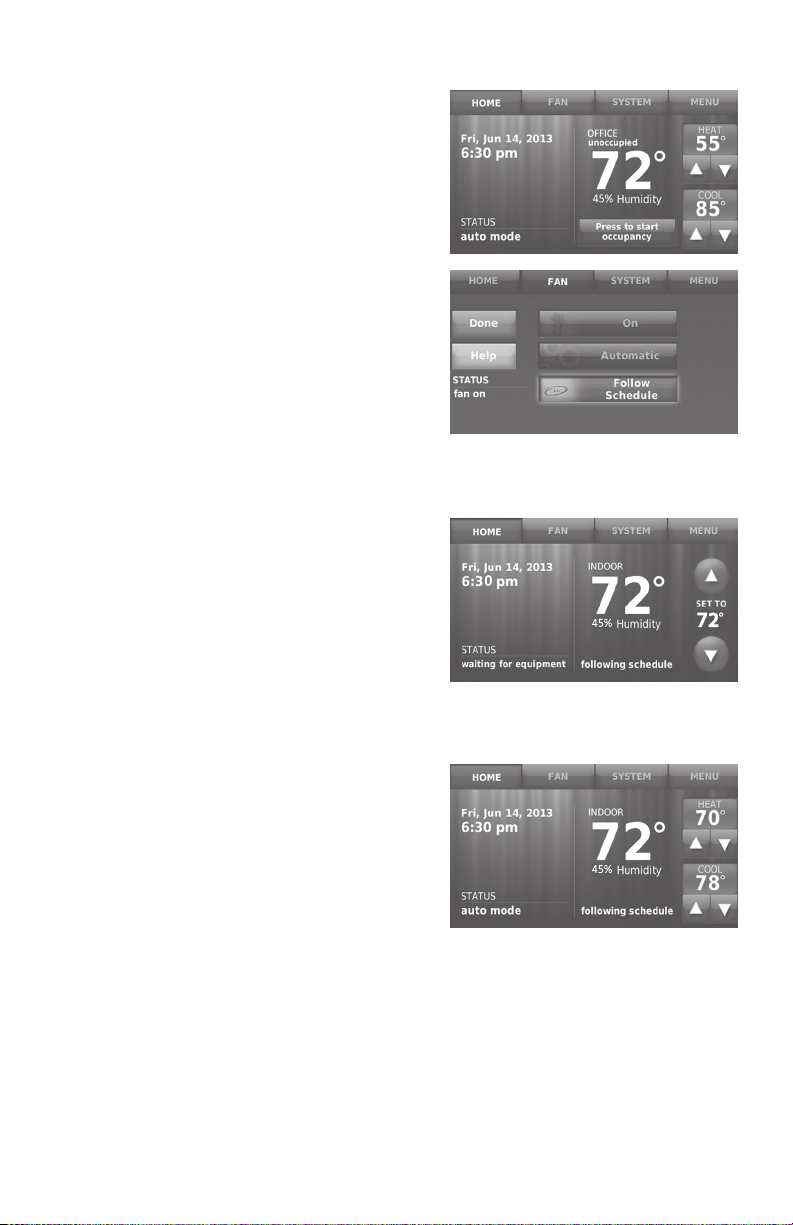
Pre-occupancy purge
This business use feature turns on
the fan 1 to 3 hours before each
“occupied” time period, to provide a
comfortable work environment when
you arrive.
Compressor protection
The thermostat keeps the compressor
off for a few minutes before restarting,
to prevent equipment damage. During
this “off” time, the message “waiting for
equipment” is displayed on screen.
Auto changeover
This feature is used in climates where
both air conditioning and heating are
used on the same day.
When the system is set to
the thermostat automatically selects
heating or cooling depending on the
indoor temperature.
Heat and cool settings must be at
least 3 degrees apart. The thermostat
will automatically adjust settings to
maintain this 3-degree separation.
Note: Select
on the Heating and Cooling System
Changeover screen under Advanced
Preferences. See “Setting advanced
preferences” on page 27.
69-2715EF—07 26
Auto Changeover
Automatic,
Page 29
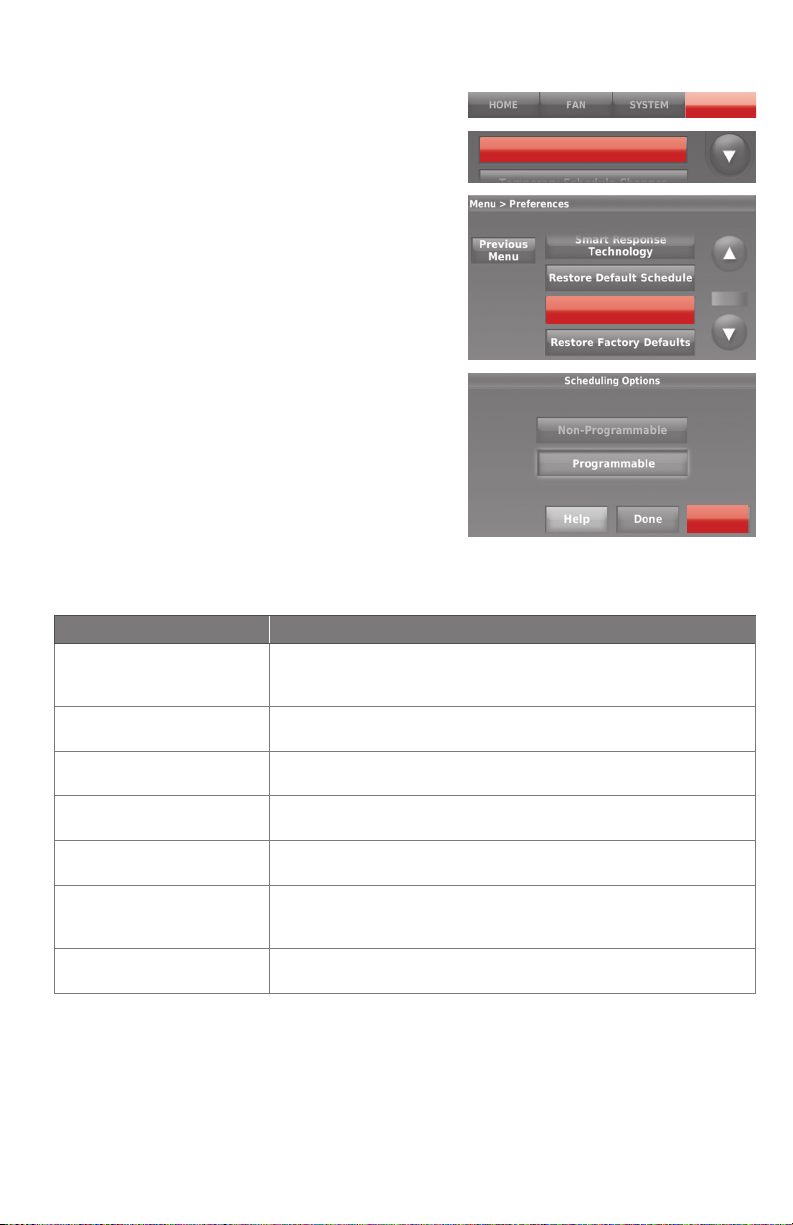
Setting advanced preferences
You can change options for a number of
MENU
system functions. Although many options,
such as language and temperature indication
Preferences
settings are the same for all set-ups, others
depend on the type of system you have.
1 Touch
MENU. The thermostat displays a
list of options.
2 Select
Preferences > Advanced
Preferences. The thermostat displays the
first screen of options that you can change.
Advanced Preferences
3 On each screen, make changes as needed,
then touch
Next to display new options.
Repeat this step until you have made all
changes.
Tables on pages 2728 explain the
screens and options under Advanced
Preferences.
4 When you have made all changes, press
Next
Done to save and exit.
Advanced Preferences Options (MENU > Preferences > Advanced Preferences)
Screen Title Settings and Options
Scheduling Options
Temperature Indication
Scale
Heating and Cooling
System Changeover
Number of Schedule
Periods
Pre-occupancy Purge
Duration*
Type of Override*
Override Duration*
* These settings are only available if thermostat is configured for business.
Select Non-programmable or Programmable. Programmable
uses default or customised programming to automatically
raise and lower temperature settings for different times of day.
Select Fahrenheit or Celsius (default setting = Fahrenheit).
Select Manual or Automatic.
Select 2 Periods Per Day or 4 Periods Per Day. (see page
16).
Select how long the fan will run before each occupied period:
Off, 1, 2, or 3 hours.
Select Standard to maintain the programmed periods or
Initiate Occupancy to use energy-saving settings until a user
presses Start Occupancy.
Select how long to maintain temperature during an override:
110 hours or No Limit.
27 69-2715EF—07
Page 30
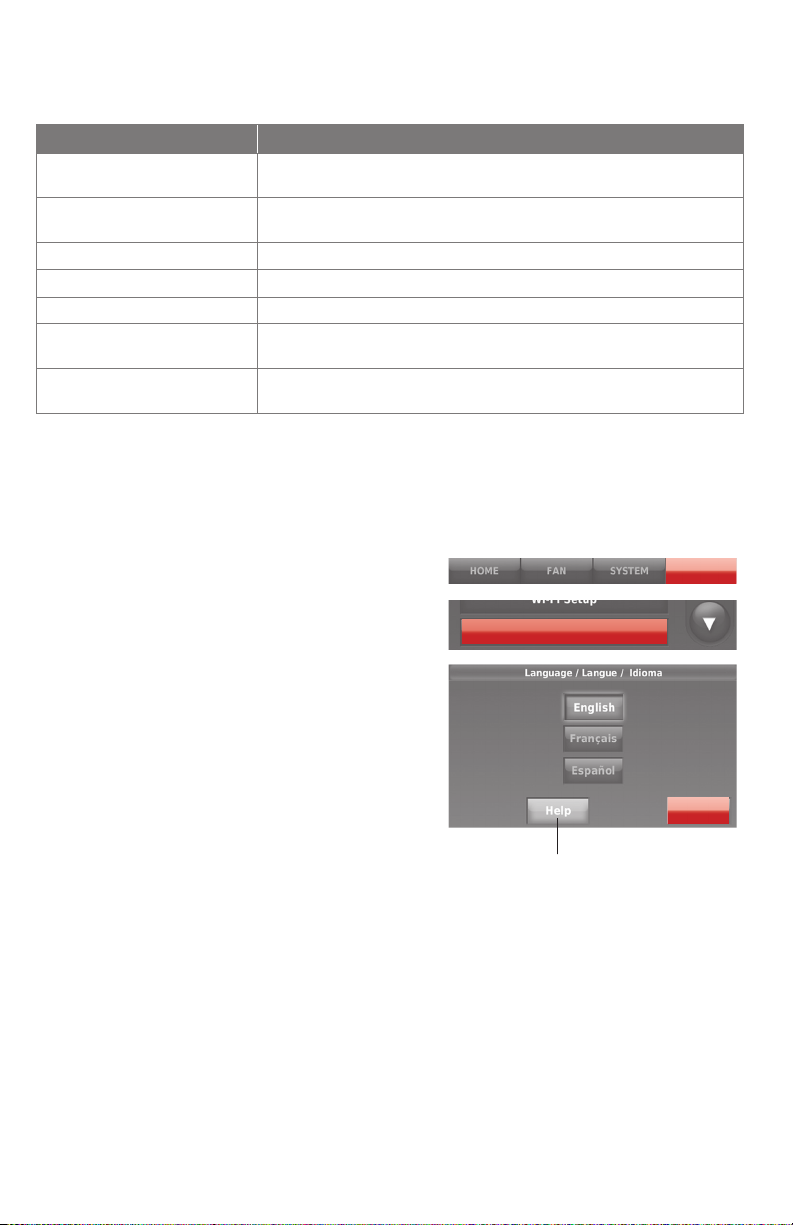
Setting advanced preferences
Advanced Preferences Options (concluded)
Screen Title Settings and Options
Early Recovery for Heating*
Early Recovery for Cooling*
Temperature Limits Select the Minimum Cool and Maximum Heat Limit.
Keypad Lockout Select Unlocked/Partially Locked/Locked.
Clock Format Select 12 Hour or 24 Hour.
Daylight Saving Time
Indoor Display Offsets
Select No to begin recovery on schedule or Yes to ramp up
temperature early.
Select No to begin recovery on schedule or Yes to ramp down
temperature early.
Select Off or On. If set to On, the system will automatically
change time/date to account for daylight saving.
Select the number of degrees to offset indoor temperature or
percentage to offset indoor humidity.
* Early recovery only available when configured for business. If configured for Home,
see “Smart Response Technology*” on page 25.
Changing system setup
If your needs change, you can change
the basic system settings you chose
during thermostat installation (page
9).
1 Touch
MENU. The thermostat
displays a list of options.
2 Select
System Setup. The
thermostat displays the first screen
of options that you can change.
3 On each screen, make changes as
needed then touch
Next to display
new options. Repeat this step until
you have made all changes. Table on
page 29 explain the System Setup
screens and options.
4 When you have made all changes,
press
Done to save and exit.
MENU
System Setup
Next
Touch the Help button
to see information
about screen options.
69-2715EF—07 28
Page 31
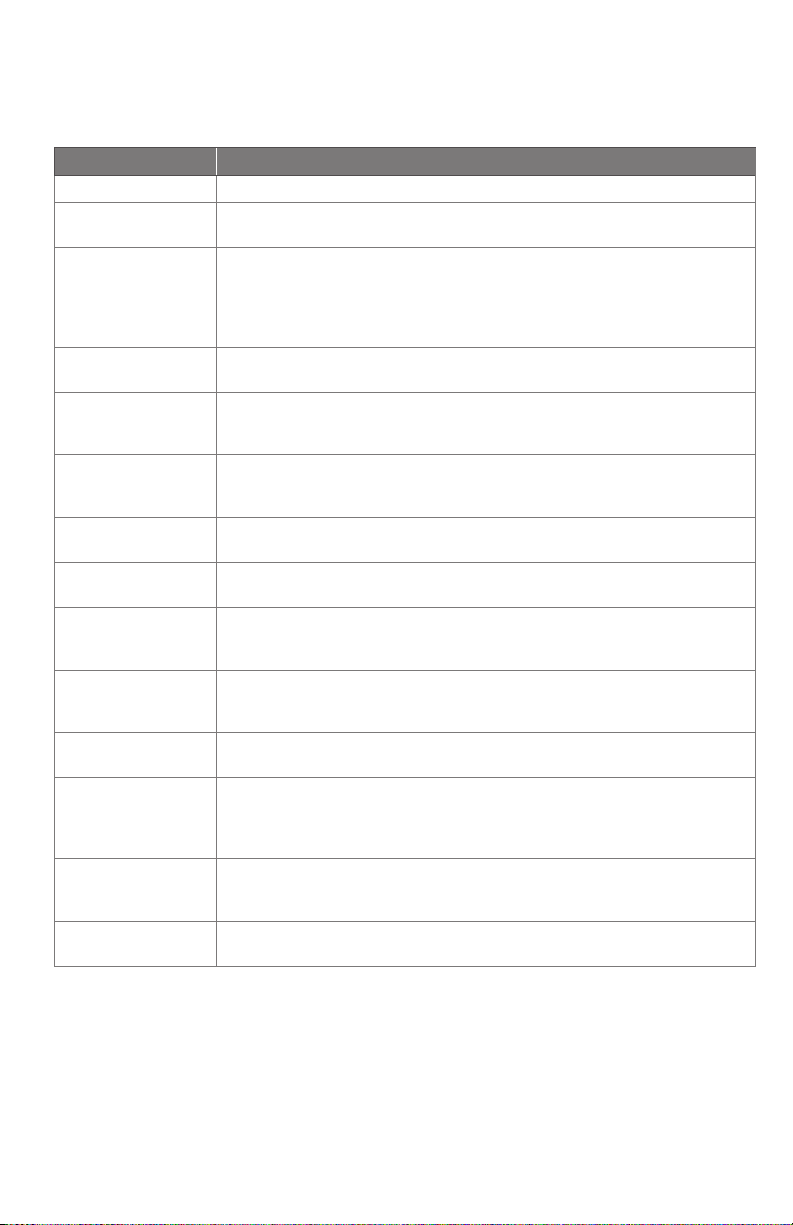
Changing system setup
Note: Touch the orange Help button on any screen for more information.
System Setup Options (MENU > System Setup)
Screen Title Settings and Options
Language English/Français/Español.
Thermostat
installed in
Your thermostat
location
Your thermostat
controls
Your system type
Your forced air
heating system
type
Efficiency of your
heating system
Your heating
system type
Number of cooling
stages
Number of heating
stages
Your fan control
Type of changeover
valve
Number of heat
pump compressor
stages
Your backup heat
Home/Business (Thermostat is used in a residential (default) or
commercial setting).
THERMOSTAT button to display a screen where you can
Touch
enter a custom name using a keypad. If you have only one thermostat,
you can leave the name as THERMOSTAT. For business installations
you can check a box to display the thermostat name on the home
screen.
Select Heating or Cooling or both (default).
Select Forced Air (default), Heat Pump, or Hot Water or Steam. Each
option offers different choices on the following screens. See Step 9e
under Installing your Thermostat on page 10.
Select how your forced air system is powered: Gas/Oil (default) or
Electric.
Select Standard Efficiency Forced Air (default) or High Efficiency
Forced Air.
If you selected Hot Water or Steam on “Your system type,” select the
specific heating system here.
Select 1 Stage (default) or 2 Stages. If you are unsure, note which
wires you have connected: ‘Y’ wire only (1 stage) or ‘Y’ and ‘Y2’(refer to
your check list in Step 6 on page 5.)
Select 1 Stage (default) or 2 Stages. If you are unsure, note which
wires you have connected: ‘W’ wire only (1 stage) or ‘W’ and ‘W2’ (refer
to your check list in Step 6 on page 5.)
Select whether your thermostat (default) or heating system controls
the fan.
If you selected Heat Pump on “Your system type,“ select whether it
uses a cooling changeover valve (default) or heating changeover valve.
If you are unsure, note which wires you have connected: refer to your
check list in Step 6 on page 6.
Select 1 Stage (default) or 2 Stages. If you are unsure, note which
wires you have connected: ‘Y’ wire only (1 stage) or ‘Y’ and ‘Y2’(refer to
your check list in Step 6 on page 6.).
No or Yes (default) you can determine whether you have backup heat
by referring to your check list in Step 6 on page 6..
29 69-2715EF—07
Page 32

Frequently asked questions
:Q Will my thermostat still work if I lose my Wi-Fi connection?
:A Yes, the thermostat will operate your heating and/or cooling system with or
without WiFi.
:Q How do I find the password to my router?
:A Contact the manufacturer of the router or check the router documentation.
:Q Why isn’t my thermostat connecting to my Wi-Fi router even though it is
very close to the thermostat?
:A Verify that the password entered for the WiFi router is correct.
:Q My thermostat is unable to register to the Total Connect Comfort website.
:A Verify that the thermostat is correctly enrolled on your home WiFi network. At
Menu > WiFi Setup, check for the WiFi signal strength icon. Verify that the
WiFi router has a good internet connection. On your computer, verify that you
can open the site at mytotalconnectcomfort.com If you cannot open the site,
switch off the internet modem for a few seconds, then power it back on.
:Q I registered on the Total Connect Comfort website but was unable to login
using my new account.
:A Check your email and ensure that you received an activation email. Follow the
instructions to activate your account and then login to the website.
:Q I have signed up on Total Connect Comfort website and have not received a
confirmation email.
:A Check for the email in your Junk or Deleted folder.
:Q Is there a way to extend the signal strength?
:A Most standard routers can be set up to be a repeater. You can also purchase
and install a WiFi repeater.
For more FAQs, see getconnected.honeywellhome.com
69-2715EF—07 30
Page 33
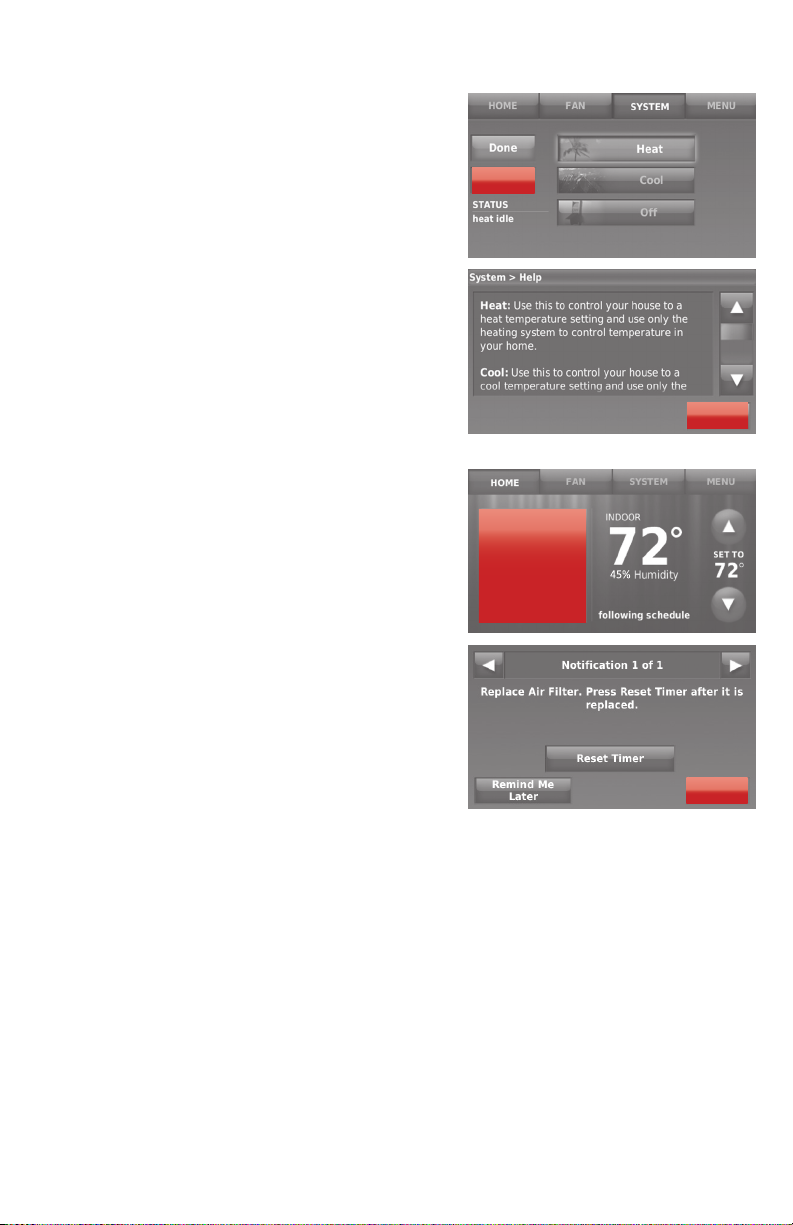
Getting help and responding to alerts
Your thermostat offers two types
of assistance, if these assistance
options do not answer your questions,
review the FAQs (page 30) and
troubleshooting tips (page 32).
On screen help
Most displays include an orange Help
button.
1 Touch
Help to display instructions
for using the screen.
2 Touch
OK to redisplay the original
screen.
On screen alerts
Your home screen will display a large
orange button when you need to correct
a setting or system problem.
1 Touch the button, the thermostat
displays instructions for completing
the task to which you were alerted.
2 Touch
OK on the instruction display,
then carry out the task. When the
task is complete, the alert button will
no longer be displayed.
Help
Replace Air
Filter
Press for info
OK
OK
31 69-2715EF—07
Page 34

Troubleshooting
If you have difficulty with your thermostat, please try the following suggestions.
Most problems can be corrected quickly and easily.
Display is
blank
Cannot
change system
setting to Cool
Fan does
not turn on
when heat is
required
“Wait” appears
on the screen
Heat pump
issues cool air
in heat mode,
or warm air in
cool mode
Heating or
cooling system
does not
respond
Heating
system is
running in cool
mode
• Check circuit breaker and reset if necessary.
• Make sure power switch at heating and cooling system is on.
• Make sure furnace door is closed securely.
• Make sure C wire is connected (see page 5).
• Check that System Setup screen “Your thermostat controls” or “Your
system type” is set to match your heating and cooling equipment (see
page 29).
• Check that System Setup screen “Your fan control” is set to match
your heating equipment (see page 28).
• Compressor protection feature is engaged. Wait 5 minutes for the
system to restart safely, without damage to the compressor.
• Check your setting for System Setup screen “Type of changeover
valve” to make sure it is properly configured for your system (see page
28).
• Touch
• Touch SYSTEM to set system to Cool. Make sure the temperature is
• Check circuit breaker and reset if necessary.
• Make sure power switch at heating and cooling system is on.
• Make sure furnace door is closed securely.
• If “Wait” is displayed, the compressor protection timer is on. Wait
• Check that System Setup screen “Your thermostat controls” or “Your
SYSTEM to set system to Heat. Make sure the temperature is
set higher than the Inside temperature.
set
lower than the Inside temperature.
5 minutes for the system to restart safely, without damaging the
compressor (see page 26).
system type” is set to match your heating and cooling equipment (see
“System Setup Options (MENU > System Setup)” on page 29).
Regulatory information
EN 30 0 328 V1 .9. 1 (201 5-0 2)
This equipment has been tested and found to comply with EN 300 328 V1.9.1 (201502).
Electromagnetic compatibility and Radio spectrum Matters (ERM); Wideband transmission systems; Data transmission
equipment operating in the 2,4 GHz ISM band and using wide band modulation techniques; Harmonized EN covering the
essential requirements of article 3.2 of the R&TTE Directive
69-2715EF—07 32
Page 35

Glossary
C wire
The “C” or common wire brings 24 VAC power to the thermostat from the heating/cooling
system. Some older mechanical or battery operated thermostats may not have this wire
connection. It is necessary for establishing a WiFi connection to your home network.
Heat Pump heating/cooling system
Heat pumps are used to heat and cool a home. If your old thermostat has a setting for
auxiliary or emergency heat, you likely have a heat pump.
Conventional heating/cooling system
Non–heat pump type systems; these include air handlers, furnaces or boilers that run on
natural gas, oil or electricity. They may or may not include an air conditioner.
Jumper Loop
In this thermostat, a plug with a wire loop located below the terminal block is used to
connect the R and Rc terminals.
MAC ID, MAC CRC
Alphanumeric codes that uniquely identify your thermostat.
QR Code
®
Quick response code. A two-dimensional,machine-readable image. Your wireless device can
read the black and white pattern in the square and link its browser directly to a web site. QR
Code is a registered trademark of DENSO WAVE INCORPORATED.
1-year limited warranty
Resideo warrants this product, excluding battery, to be free from defects in workmanship or materials, under
normal use and service, for a period of one (1) year from the date of first purchase by the original purchaser. If at
any time during the warranty period the product is determined to be defective due to workmanship or materials,
Resideo shall repair or replace it (at Resideo’s option).
If the product is defective,
(i) return it, with a bill of sale or other dated proof of purchase, to the place from which you purchased it; or
(ii) call Resideo Customer Care at +971 4 450 5800. Customer Care will make the determination whether the
product should be returned to the following address: Resideo Return Goods, 1985 Douglas Dr. N., Golden Valley,
MN 55422, or whether a replacement product can be sent to you.
This warranty does not cover removal or reinstallation costs. This warranty shall not apply if it is shown by Resideo
that the defect was caused by damage which occurred while the product was in the possession of a consumer.
Resideo’s sole responsibility shall be to repair or replace the product within the terms stated above. RESIDEO
SHALL NOT BE LIABLE FOR ANY LOSS OR DAMAGE OF ANY KIND, INCLUDING ANY INCIDENTAL OR
CONSEQUENTIAL DAMAGES RESULTING, DIRECTLY OR INDIRECTLY, FROM ANY BREACH OF ANY WARRANTY,
EXPRESS OR IMPLIED, OR ANY OTHER FAILURE OF THIS PRODUCT.
Some states do not allow the exclusion or limitation of incidental or consequential damages, so this limitation
may not apply to you.
THIS WARRANTY IS THE ONLY EXPRESS WARRANTY RESIDEO MAKES ON THIS PRODUCT. THE DURATION
OF ANY IMPLIED WARRANTIES, INCLUDING THE WARRANTIES OF MERCHANTABILITY AND FITNESS FOR A
PARTICULAR PURPOSE, IS HEREBY LIMITED TO THE ONE YEAR DURATION OF THIS WARRANTY. Some states do
not allow limitations on how long an implied warranty lasts, so the above limitation may not apply to you.
This warranty gives you specific legal rights, and you may have other rights which vary from state to state. If you
have any questions concerning this warranty, please write Resideo Customer Care, 1985 Douglas Dr, Golden
Valley, MN 55422 or call +971 4 450 5800.
Middle East: Resideo Middle East FZE. Customer Relations, EMAAR Business Park, Bldg 2, Shwikh Zayed Road,
P.O. Box 232362, Dubai, UAE
33 69-2715EF—07
Page 36

33-00167-03
ADEMCO FZE
Office no. 1175 & 1177, Jafza One
Jebel Ali Free Zone, Dubai, United Arab Emirates
getconnected.honeywellhome.com/middle-east
Appl e, iPhone, iPa d, iPod t ouch and i Tunes are trademarks of A pple Inc.
All ot her tra demark s are the prope rty of their r espec tive owner s.
Resideo Inc., 1985 Douglas Drive North,
www.resideo.com
©2019 Resid eo Technolo gies, In c. This pro duct is man ufactur ed by Resi deo Technol ogies, I nc., Gol den Valley, M N, +971 4 450 5800
The Hon eywell H ome trade mark is us ed under lic ense fro m Honeyw ell Inter national I nc. All ri ghts res erved.
Golden Valley, MN 55422
33-00167—03 M.S. Rev. 05-19 | Printed in United States
 Loading...