

Page 1
EN
Communication Interface for SMA Inverters
®
SMA BLUETOOTH
Installation Guide
PIGGY-BACK
BTPB-IEN112112 | 98-0014212 | Version 1.2
Page 2

Page 3

SMA Solar Technology AG Table of Contents
Table of Contents
1 Notes on this Manual. . . . . . . . . . . . . . . . . . . . . . . . . . . . . . 5
1.1 Validity . . . . . . . . . . . . . . . . . . . . . . . . . . . . . . . . . . . . . . . . . . . . 5
1.2 Target Group . . . . . . . . . . . . . . . . . . . . . . . . . . . . . . . . . . . . . . . 5
1.3 Additional Information . . . . . . . . . . . . . . . . . . . . . . . . . . . . . . . . 5
1.4 Symbols Used . . . . . . . . . . . . . . . . . . . . . . . . . . . . . . . . . . . . . . . 5
2 Safety . . . . . . . . . . . . . . . . . . . . . . . . . . . . . . . . . . . . . . . . . . 6
2.1 Appropriate Usage. . . . . . . . . . . . . . . . . . . . . . . . . . . . . . . . . . . 6
2.2 Safety Instructions . . . . . . . . . . . . . . . . . . . . . . . . . . . . . . . . . . . . 7
3 Unpacking. . . . . . . . . . . . . . . . . . . . . . . . . . . . . . . . . . . . . . . 8
3.1 Packing List . . . . . . . . . . . . . . . . . . . . . . . . . . . . . . . . . . . . . . . . . 8
3.2 Identifying the SMA Bluetooth Piggy-Back . . . . . . . . . . . . . . . . . 8
4 Electrical Connection . . . . . . . . . . . . . . . . . . . . . . . . . . . . . . 9
4.1 Overview of Interface Port . . . . . . . . . . . . . . . . . . . . . . . . . . . . . 9
4.2 Installing the Communication Interface . . . . . . . . . . . . . . . . . . . . 9
4.3 Setting the Bluetooth Communication. . . . . . . . . . . . . . . . . . . . 10
5 Update . . . . . . . . . . . . . . . . . . . . . . . . . . . . . . . . . . . . . . . . 11
6 Troubleshooting . . . . . . . . . . . . . . . . . . . . . . . . . . . . . . . . . 12
7 Technical Data . . . . . . . . . . . . . . . . . . . . . . . . . . . . . . . . . . 13
8 Contact . . . . . . . . . . . . . . . . . . . . . . . . . . . . . . . . . . . . . . . . 14
Installation Guide BTPB-IEN112112 3
Page 4

Table of Contents SMA Solar Technology AG
4 BTPB-IEN112112 Installation Guide
Page 5
SMA Solar Technology AG Notes on this Manual
1 Notes on this Manual
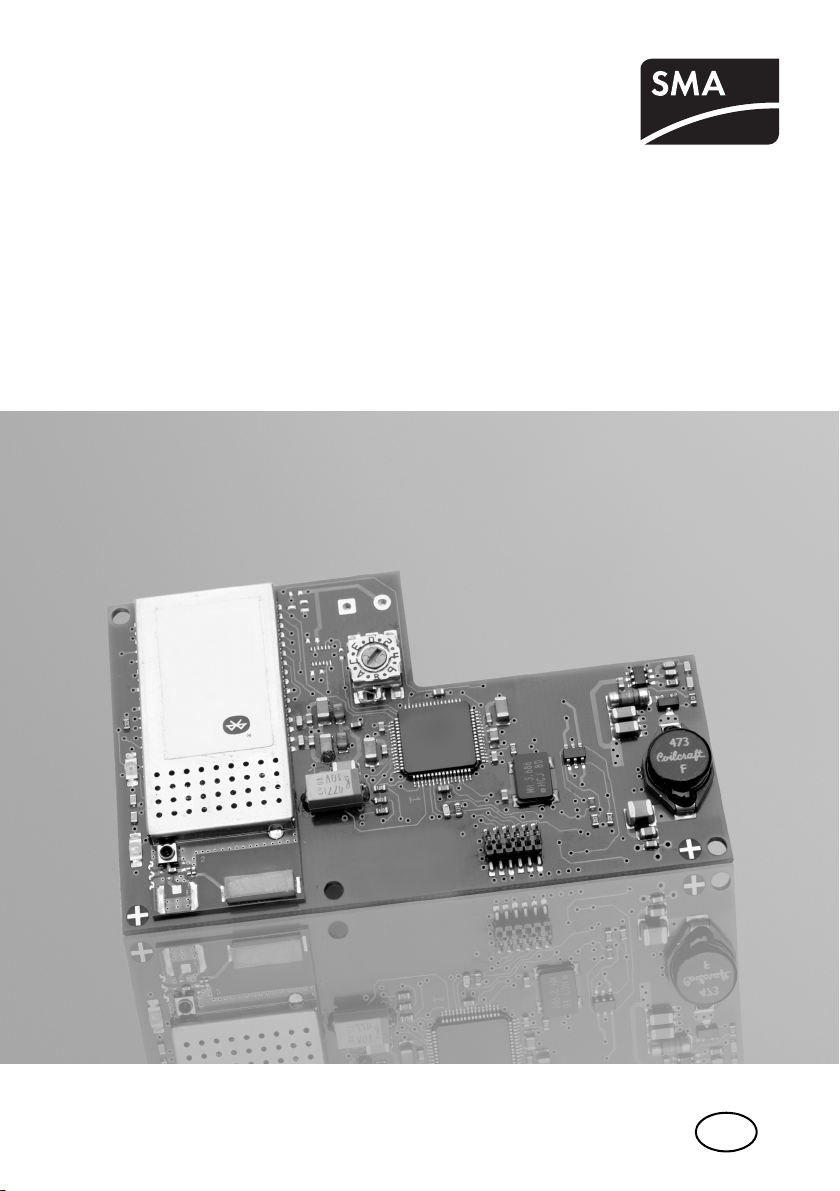
This manual describes the mounting and installation of the SMA Bluetooth Piggy-Back add-on kit.
Store this guide where it will be accessible at all times.
1.1 Validity
This manual applies for the SMA Bluetooth Piggy-Back for software versions 02.00.00.R and higher.
1.2 Target Group
This guide is for qualified electrical technicians. All tasks described in this manual may only be
performed by qualified personnel.
1.3 Additional Information
Further information on Bluetooth by SMA is available in the download area of www.SMA.de/en.
1.4 Symbols Used
The following types of safety instructions and general information appear in this document as
described below:
DANGER!
DANGER indicates a hazardous situation which, if not avoided, will result in death or
serious injury.
WARNING!
WARNING indicates a hazardous situation which, if not avoided, could result in death or
serious injury.
CAUTION!
CAUTION indicates a hazardous situation which, if not avoided, could result in minor or
moderate injury.
NOTICE!
NOTICE indicates a situation that can result in property damage if not avoided.
Installation Guide BTPB-IEN112112 5
Page 6

Safety SMA Solar Technology AG
Information
Information provides tips that are valuable for the optimal installation and operation of
your product.
2 Safety
2.1 Appropriate Usage
The communication interface allows you to establish a connection via Bluetooth wireless technology
to other SMA inverters and communication devices (e.g., Sunny Explorer).
The SMA Bluetooth Piggy-Back provides data of the inverter for configuring and creating daily,
monthly, and annual energy values. These can be accessed and configured using a communication
product (e.g., Sunny Explorer).
The SMA Bluetooth Piggy-Back is compatible with all SMA Bluetooth devices in terms of radio
frequency.
The interface is provided as an add-on kit or pre-installed in the inverter. Also observe the relevant
inverter manual.
The following inverters can be retrofitted with the SMA Bluetooth Piggy-Back:
• All Sunny Boys of type SB (with Piggy-Back port)
• SWR 2500
• All Sunny Mini Centrals of type SMC
• All Windy Boys of type WB
Information on Configuring the Installation Country
All country standards that cannot be set through the SMA Bluetooth Piggy-Back can be set
through the USB service interface and Sunny Data Control or through RS485 and the
Sunny WebBox.
The communication interface complies with the following standards:
• R&TTE 1999 / 5 / EC
– EN 300 328-2, EN 301 489-17, EN 50371, EN 60950, EN301489-1
In addition, you will find a current overview of the standards at www.SMA.de/en. If you have any
questions, contact SMA Solar Technology.
6 BTPB-IEN112112 Installation Guide
Page 7

SMA Solar Technology AG Safety
2.2 Safety Instructions
DANGER!
Risk of lethal electric shock when opening the inverter.
• All work on the inverter must be carried out by qualified personnel only.
• Disconnect the inverter on the AC and DC sides as described in the inverter manual.
NOTICE!
Electrostatic discharges can damage the communication interface.
• Avoid coming into contact with component connections and plug contacts.
• Ground yourself before touching the component by holding on to the PE or a noncoated part of the inverter enclosure.
Possible communication faults via Bluetooth wireless technology.
Certain ambient conditions can reduce the connection quality and data transmission speed
between Bluetooth devices.
• Mount or install the Bluetooth device at a distance of at least 1 m from the following
devices:
–WLAN devices
– Microwave ovens
– Other devices that use the 2.4 GHz frequency band
Installation Guide BTPB-IEN112112 7
Page 8

Unpacking SMA Solar Technology AG
A
B
3 Unpacking
3.1 Packing List
BTPBINV-NR
Position Number Designation
A 1 Piggy-Back: BTPBINV.BG1
B1 Manual
3.2 Identifying the SMA Bluetooth Piggy-Back
Type Label
You can identify the communication interface by the type
label. The type label is located on the front of the
communication interface.
Software Version
The software version of the SMA Bluetooth Piggy-Back is
displayed through the communication device, e.g., Sunny Explorer or Sunny Beam with Bluetooth. If
necessary, refer to the manual of the communication device.
8 BTPB-IEN112112 Installation Guide
Page 9

SMA Solar Technology AG Electrical Connection
A
A B
4 Electrical Connection
This section describes the installation and connection of the communication interface.
4.1 Overview of Interface Port
Inverters of type: SB, SMC, WB Inverter of type: SWR
Position Designation
AInterface port
BResistors
4.2 Installing the Communication Interface
Determining a Free NetID before Installation of the SMA Bluetooth Piggy-Back
SMA Solar Technology recommends determining a free NetID using a mobile communication device
(e.g., Sunny Beam with Bluetooth or a laptop with Bluetooth and the Sunny Explorer software) before
installing the communication interface. You can find information on how to determine a free NetID in
the relevant manual of the communication device.
Commissioning of a Bluetooth PV system with 1 master
Always carry out the commissioning of a Bluetooth PV system with only 1 master
(e.g., Sunny Beam with Bluetooth, Sunny Explorer). As soon as the Bluetooth network is up
and running, you can introduce further masters into the Bluetooth network.
Sunny Beam with Bluetooth and SMA Bluetooth Repeater
The Sunny Beam with Bluetooth and the SMA Bluetooth Repeater cannot register any
Bluetooth devices which are set to NetID 1. Only NetIDs from 2 to 9 and from A to F are
possible.
Installation Guide BTPB-IEN112112 9
Page 10

Electrical Connection SMA Solar Technology AG
Proceed as follows to install the communication interface for the above mentioned inverters of type
SB, SMC, WB, and SWR.
DANGER!
Risk of lethal electric shock when opening the inverter.
Open the inverter as described in the inverter manual.
In the case of inverters of type SWR the fitted display can block the interface port. You can
either install a display or a communication interface.
1. In the case of inverters of type SWR detach the existing display, if necessary.
2. If necessary, detach the installed communication interface.
3. Removing the resistors from inverters of the type SWR is not necessary.
4. Plug the communication interface to the left of the
interface port. The far right pins on the lower short
row of pins remain free.
5. Set the NetID (see section 4.3”Setting the
Bluetooth Communication” (page10)).
6. Close the inverter as described in the inverter
manual.
☑ The communication interface is installed.
4.3 Setting the Bluetooth Communication
The inverter can communicate with a communication
device and can be linked to other inverters via Blue to oth.
To ensure the devices communicate with each other and
are interlinked, they have to be set to the same NetID.
NetID
PV systems with SMA Bluetooth operating in close proximity to one another are
distinguished by their individual NetID. SMA Solar Technology Bluetooth devices
recognize your Bluetooth PV System via an assigned NetID. The NetID can be a number
from 1 to 9 or a letter from A to F. NetID 1 is not possible for Sunny Beam with Bluetooth.
10 BTPB-IEN112112 Installation Guide
Page 11

SMA Solar Technology AG Update
Setting the NetID
The NetID is set via the rotary coded switch on the SMA Bluetooth Piggy-Back.
1. Use a screwdriver (2.5 mm) to turn the arrow on the
rotary switch to the correct position. The meanings
of the switch positions are explained in the table.
Layout of the switch positions
NetID Function
0 Bluetooth is switched off.
1 (Status upon delivery) Bluetooth is switched on.
The SMA Bluetooth Piggy-Back can only connect with a maximum of
2 computers with Sunny Explorer from SMA Solar Technology. A
connection to the Sunny Beam with Bluetooth is not possible.
2 - F Bluetooth is switched on.
The device can interlink with all SMA Bluetooth products with the same
NetID.
2. Close the inverter as described in the inverter manual.
☑ The NetID is set. You can detect the inverter with a communication product (e.g. computer with
Sunny Explorer).
5 Update
The SMA Bluetooth Piggy-Back is updated through the Sunny Explorer. It is not required to replace
the Piggy-Back. Existing settings and data of the inverter will be saved after the update process. Only
perform the update if the inverter has a sufficient power output to the grid of at least 50 W. Restart
the Sunny Explorer if the update was successful.
Installation Guide BTPB-IEN112112 11
Page 12

Troubleshooting SMA Solar Technology AG
6 Troubleshooting
Error Cause Corrective measure
Sunny Beam / Sunny
Explorer does not establish
a connection to the inverter
(with SMA Bluetooth PiggyBack).
The connection between the
inverter (with SMA
Bluetooth Piggy-Back) and
the communication device
often breaks off.
The update is not
completed.
The inverter (with SMA
Bluetooth Piggy-Back) has not
been commissioned.
The inverter (with SMA
Bluetooth Piggy-Back) is not in
feeding operation.
The SMA Bluetooth Piggy-Back
is not correctly connected.
The NetID is set to 0. Set the NetID of your PV system (see
The Sunny Beam with Bluetooth
and the SMA Bluetooth
Repeater cannot register any
Bluetooth devices which are set
to NetID 1.
The Net ID is set to a different
NetID than the NetID of the PV
system.
The connection quality is
unreliable or critical.
The connection quality is
unreliable or critical.
Power output to the grid is less
than 50 W.
Commission the inverter as
described in the inverter manual.
Wait until the inverter switches to
feeding operation.
Check if the SMA Bluetooth PiggyBack is correctly placed on the
interface port (see Section 4.2)
Section 4.3).
Determine a free NetID, as
described in the manual for Sunny
Beam with Bluetooth. Only NetIDs
from 2 to 9 and from A to F are
possible. Set your PV system to the
determined NetID (see section 4.3).
Set the NetID of your PV system (see
section 4.3).
Change the position of your devices
in relation to one another in order to
shorten the radio link. If that is not
possible install the SMA Bluetooth
Repeater, in order to close the radio
ga p. For a higher r ange yo u can al so
use the SMA Bluetooth Piggy-Back
Plus with antenna.
Change the position of your devices
in relation to one another in order to
shorten the radio link. If that is not
possible install the SMA Bluetooth
Repeater, in order to close the radio
ga p. For a higher r ange yo u can al so
use the SMA Bluetooth Piggy-Back
Plus with antenna.
Only perform the update if the
inverter has a s ufficient power output
to the grid of at least 50 W.
12 BTPB-IEN112112 Installation Guide
Page 13

SMA Solar Technology AG Technical Data
7 Technical Data
Mechanical Data
Width x Length 50 mm x 81 mm
Weight 60 g
Communication
Communication interface Bluetooth
Maximum free field communication range* 50 m
* With integrated SMA Bluetooth Piggy-Back
Connections
Number of 10-pin socket connectors 1
Number of 14-pin socket connectors 1
Environmental Conditions during Operation
Ambient temperature −25°C … +85°C
Relative humidity* 5 % … 95 %
Maximum operating altitude 3 000 m above mean sea level (AMSL)
* Non-condensing
Installation Guide BTPB-IEN112112 13
Page 14

Contact SMA Solar Technology AG
8 Contact
If you have technical problems concerning our products, contact the S MA Serv iceline. We req uire th e
following information in order to provide you with the necessary assistance:
• Type and serial number of the inverter
• Serial number of the communication interface
• Type and serial number/version of the communication device (e.g., Sunny Beam, Sunny
Explorer)
• Detailed description of the problem
SMA Solar Technology AG
Sonnenallee 1
34266 Niestetal, Germany
www.SMA.de
SMA Serviceline
Inverters: +49 561 9522 1499
Communication: +49 561 9522 2499
Fax: +49 561 9522 4699
E-Mail: Serviceline@SMA.de
14 BTPB-IEN112112 Installation Guide
Page 15

SMA Solar Technology AG Legal Restrictions
The information contained in this document is the property of SMA Solar Technology AG. Publishing its content, either partially or
in full, requires the written permission of SMA Solar Technology AG. Any internal company copying of the document for the
purposes of evaluating the product or its correct implementation is allowed and does not require permission.
Exclusion of liability
The general terms and conditions of delivery of SMA Solar Technology AG shall apply.
The content of these documents is continually checked and amended, where necessary. However, discrepancies cannot be
excluded. No guarantee is made for the completeness of these documents. The latest version is available online at www.SMA.de
or from the usual sales channels.
Guarantee or liability claims for damages of any kind are excluded if they are caused by one or more of the following:
• Damages during transportation
• Improper or inappropriate use of the product
• Operating the product in an unintended environment
• Operating the product whilst ignoring relevant, statutory safety regulations in the deployment location
• Ignoring safety warnings and instructions contained in all documents relevant to the product
• Operating the product under incorrect safety or protection conditions
• Altering the product or supplied software without authority
• The product malfunctions due to operating attached or neighboring devices beyond statutory limit values
• In case of unforeseen calamity or force majeure
The use of supplied software produced by SMA Solar Technology AG is subject to the following conditions:
• SMA Solar Technology AG rejects any liability for direct or indirect damages arising from the use of software developed by
SMA Solar Technology AG. This also applies to the provision or non-provision of support activities.
• Supplied software not developed by SMA Solar Technology AG is subject to the respective licensing and liability agreements
of the manufacturer.
SMA Factory Warranty
The current guarantee conditions come enclosed with your device. These are also available online at www.SMA.de and can be
downloaded or are available on paper from the usual sales channels if required.
Trademarks
All trademarks are recognized even if these are not marked separately. Missing designations do not mean that a product or brand
is not a registered trademark.
The Bluetooth
Solar Technology is under license.
SMA Solar Technology AG
Sonnenallee 1
34266 Niestetal
Germany
Tel. +49 561 9522-0
Fax +49 561 9522-100
www.SMA.de
E-Mail: info@SMA.de
© 2004 to 2011 SMA Solar Technology AG. All rights reserved
®
word mar k and lo gos are registered trademar ks owned by Bluetooth SIG, In c. and a ny use of such m arks by SMA
Installation Guide BTPB-IEN112112 15
Page 16

4."4PMBS5FDIOPMPHZ"(
XXX4."EF
 Loading...