

Page 1

SUNNY BEAM USB Driver
Installing the Sunny Beam USB Driver
Version: 1.4
1 Sunny Beam USB Driver
The Sunny Beam USB driver is needed to connect a Sunny Beam to a computer.
System requirements:
The Sunny Beam USB driver supports the following operating systems:
•Windows 2000
•Windows XP (32-bit and 64-bit)
• Windows Vista (32-bit and 64-bit)
• Windows 7 (32-bit and 64-bit)
User Manual 1/21 SBeamUSB-BEN103814
Page 2

SMA Solar Technology AG Installing the Driver
2 Installing the Driver
2.1 Downloading the Driver
Required material:
• Computer with a zip program
• Internet access
• Supported operating system (see section 1 "Sunny Beam USB Driver" (page1)).
•Sunny Beam.
1. Switch on the computer.
2. Create a new folder on your computer and name it "Sunny Beam", for example.
3. Download the Sunny Beam USB driver from the download area at www.SMA.de/en:
– Select the Sunny Beam USB driver for your operating system.
–Click Open in the "File Download" window.
– Save the zip file on your computer.
– Using your zip program, unzip the files in the folder you created earlier.
User Manual 2/21 SBeamUSB-BEN103814
Page 3

SMA Solar Technology AG Installing the Driver
2.2 Installing the Driver
2.2.1 Installing the Driver on Systems Operating Windows XP/ Windows 2000
Installation of the driver is the same for Windows XP and Windows 2000.
Drivers for 2 hardware components have to be installed.
Procedure:
• Installing the driver for Sunny Beam USB UART
• Installing the driver for USB Serial Port
Windows Logo testing
During the installation process of an SMA Windows driver, Windows will warn you that
the software you are installing has not passed the Windows Logo testing.
This warning is displayed when third-party drivers are installed. It indicates that the
manufacturer's driver has not been tested in the Microsoft "Windows Hardware Quality
Labs (WHQL)".
SMA Solar Technology AG has tested and approved the driver's functionality. You can
ignore the recommendation from Microsoft to abort the installation and proceed with the
installation of the driver.
Installing the driver for Sunny Beam USB UART
1. Connect the Sunny Beam to your computer using
the USB cable provided.
☑The "Found New Hardware Wizard" window
opens.
–The "Found New Hardware Wizard" window
does not open?
– See section 3 "Starting the Add Hardware
Wizard Manually" (page15).
User Manual 3/21 SBeamUSB-BEN103814
Page 4

SMA Solar Technology AG Installing the Driver
2. If the window shows the question "Can Windows
connect to Windows Update to search for
software?" select No, not this time and click
[Next>].
3. If the window shows the question "What do you
want the wizard to do?" select Install from a list
or specific location (Advanced) and click
[Next >].
4. Click [Browse] and select the folder in which the
unzipped driver files are saved.
5. Click [Next >].
6. Click [Continue Anyway].
☑ The installation starts.
User Manual 4/21 SBeamUSB-BEN103814
Page 5

SMA Solar Technology AG Installing the Driver
☑"Found New Hardware Wizard" opens.
7. Click [Finish].
☑The "Found New Hardware Wizard" window
opens.
–The "Found New Hardware Wizard" window
does not open?
– See section 3 "Starting the Add Hardware
Wizard Manually" (page15).
Installing the driver for USB Serial Port
1. Select Install from a list or specific location
(Advanced) field and click [Next >].
2. Click Browse and select the folder in which the
unzipped driver files are saved.
3. Click [Next >].
4. Click [Continue Anyway].
☑ The installation starts.
User Manual 5/21 SBeamUSB-BEN103814
Page 6

SMA Solar Technology AG Installing the Driver
5. Click [Finish].
☑ Both drivers are installed.
User Manual 6/21 SBeamUSB-BEN103814
Page 7
SMA Solar Technology AG Installing the Driver
2.2.2 Installing the Driver on Systems Operating Windows Vista.
Drivers for 2 hardware components have to be installed.
Procedure:
• Installing the driver for Sunny Beam USB UART
• Installing the driver for USB Serial Port
Windows Security
During the installation process of an SMA Windows driver, Windows will warn you that it
cannot verify the publisher of the driver software.
This warning is displayed when third-party drivers are installed. It indicates that the
manufacturer's driver has not been tested in the Microsoft "Windows Hardware Quality
Labs (WHQL)".
SMA Solar Technology AG has tested and approved the driver's functionality. You can
ignore the recommendation from Microsoft to abort the installation and proceed with the
installation of the driver.
Installing the driver for Sunny Beam USB UART
1. Connect the Sunny Beam to your computer using the USB cable provided.
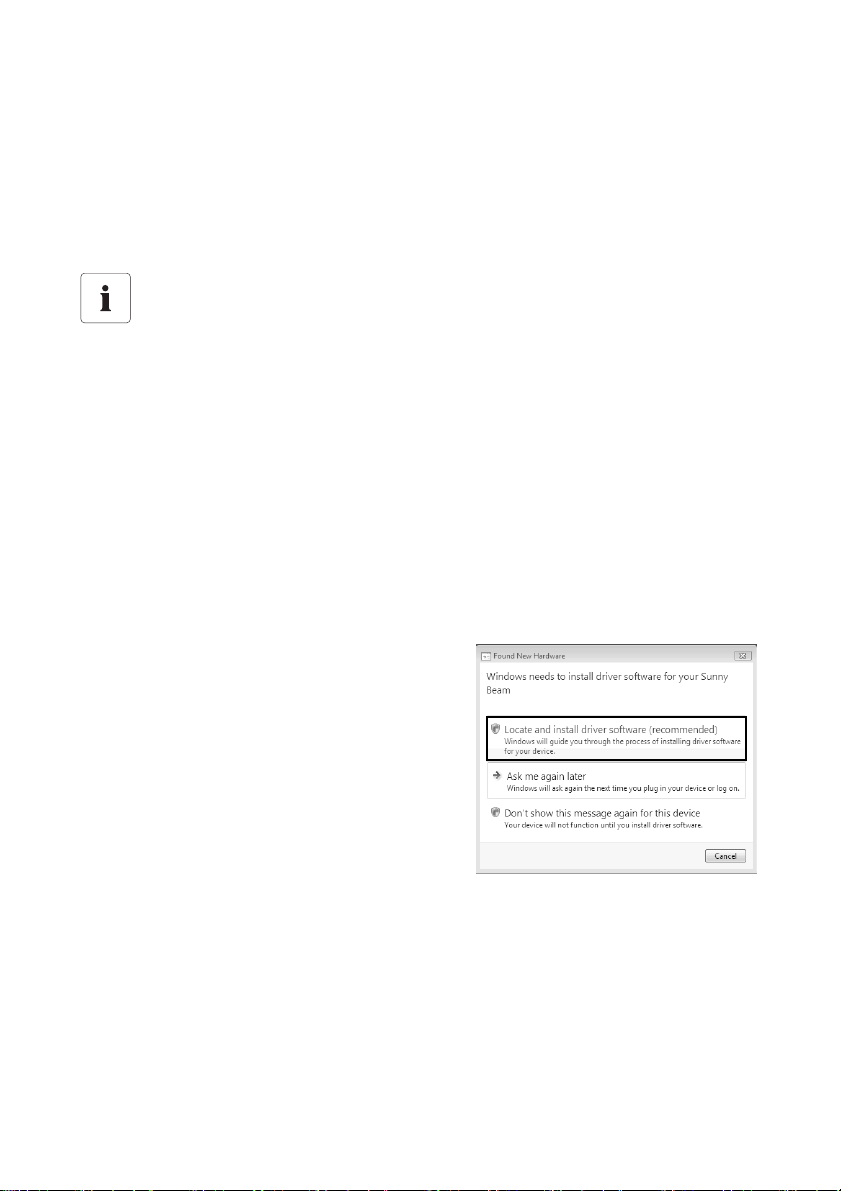
☑The "Found New Hardware" window opens.
–The "Found New Hardware" window does not open?
– See section 3 "Starting the Add Hardware Wizard Manually" (page15).
2. Click Locate and install driver software
(recommended).
User Manual 7/21 SBeamUSB-BEN103814
Page 8

SMA Solar Technology AG Installing the Driver
3. Click I don't have the disc. Show me other
options.
4. Click Bro wse my comp ute r for dr ive r so ftware
(advanced).
5. Click [Browse...] and select the folder in which the
unzipped driver files are saved.
6. Click [OK].
7. Click [Next].
8. Click Install this driver software anyway.
☑ The installation starts.
User Manual 8/21 SBeamUSB-BEN103814
Page 9

SMA Solar Technology AG Installing the Driver
☑The "Found New Hardware - Sunny Beam USB
UART" window opens.
9. Click [Close].
☑The "Found New Hardware - USB Serial Port"
window opens.
–The "Found New Hardware - USB Serial Port"
window does not open?
– See section 3 "Starting the Add Hardware
Wizard Manually" (page15).
Installing the driver for USB Serial Port
1. Click I don't have the disc. Show me other
options.
2. Click Bro wse my comp ute r for dr ive r so ftware
(advanced).
3. Click [Browse...] and select the folder in which the
unzipped driver files are saved.
4. Click [OK].
5. Click [Next].
User Manual 9/21 SBeamUSB-BEN103814
Page 10

SMA Solar Technology AG Installing the Driver
6. Click Install this driver software anyway.
☑ The installation starts.
☑The "Found New Hardware - USB Serial Port
(COMx)" window opens.
7. Click [Close].
☑ Both drivers are installed.
2.2.3 Installing the Driver on Systems Operating Windows 7.
Drivers for 2 hardware components have to be installed.
Procedure:
• Installing the driver for Sunny Beam USB UART
• Installing the driver for USB Serial Port
Windows Security
During the installation process of an SMA Windows driver, Windows will warn you that it
cannot verify the publisher of the driver software.
This warning is displayed when third-party drivers are installed. It indicates that the
manufacturer's driver has not been tested in the Microsoft "Windows Hardware Quality
Labs (WHQL)".
SMA Solar Technology AG has tested and approved the driver's functionality. You can
ignore the recommendation from Microsoft to abort the installation and proceed with the
installation of the driver.
User Manual 10/21 SBeamUSB-BEN103814
Page 11

SMA Solar Technology AG Installing the Driver
Installing the driver for Sunny Beam USB UART
1. Connect the Sunny Beam to your computer using the USB cable provided.
2. Click Start.
3. Right click on My Computer and select Properties.
4. Click Device Manager.
5. Click Other devices.
6. Right click on Sunny Beam and select Update
Driver Software...
7. Click Browse my computer for driver
software.
8. Click [Browse...], select the folder in which the
unzipped driver files are saved and click [OK].
9. Click [Next].
User Manual 11/21 SBeamUSB-BEN103814
Page 12

SMA Solar Technology AG Installing the Driver
10. Click Install this driver software anyway.
☑ The installation starts.
☑The "Update Driver Software - Sunny Beam USB
UART" window opens.
11. Click [Close].
User Manual 12/21 SBeamUSB-BEN103814
Page 13

SMA Solar Technology AG Installing the Driver
Installing the driver for USB Serial Port
1. Click Start.
2. Right click on My Computer and select Properties.
3. Click Device Manager.
4. Click Other devices.
5. Right click on USB Serial Port and select Update
Driver Software...
6. Click Browse my computer for driver
software.
7. Click [Browse...] and select the folder in which the
unzipped driver files are saved.
8. Click [OK].
9. Click [Next].
User Manual 13/21 SBeamUSB-BEN103814
Page 14

SMA Solar Technology AG Installing the Driver
10. Click Install this driver software anyway.
☑ The installation starts.
☑The "Update Driver Software - USB Serial Port
(COMx)" window opens.
11. Click [Close].
☑ Both drivers are installed.
User Manual 14/21 SBeamUSB-BEN103814
Page 15

SMA Solar Technology AG Starting the Add Hardware Wizard Manually
3 Starting the Add Hardware Wizard Manually
If the Add Hardware Wizard does not start automatically when you connect new hardware to the
computer, you can also start the Add Hardware Wizard manually.
Starting the Add Hardware Wizard manually on systems operating
Windows XP/Windows 2000
1. Click Start > Settings > Control Panel >
System > Hardware > Device Manager.
☑"Sunny Beam" is listed under "Other devices".
–"Sunny Beam" is not listed under
"Other devices"?
– Check whether "Sunny Beam" is listed under
"USB Controller".
2. Right click on Sunny Beam and select Update
Driver.
☑ Add Hardware Wizard opens.
User Manual 15/21 SBeamUSB-BEN103814
Page 16

SMA Solar Technology AG Starting the Add Hardware Wizard Manually
Starting the Add Hardware Wizard manually on systems operating Windows
Vista
1. Click Start.
2. Right click on My Computer and select Properties.
3. Click Device Manager.
☑"Sunny Beam" is listed under "Other devices".
–"Sunny Beam" is not listed under "Other devices"?
– Check whether "Sunny Beam" is listed under "USB Controller".
4. Right click on Sunny Beam and Update Driver
Software...
☑ Add Hardware Wizard opens.
User Manual 16/21 SBeamUSB-BEN103814
Page 17

SMA Solar Technology AG Uninstalling the Driver
4 Uninstalling the Driver
4.1 Uninstalling the Driver on Systems Operating Windows XP/ Windows 2000
You can uninstall the Sunny Beam USB driver if you no longer need it.
Uninstalling the driver for USB UART
1. Click Start > Settings > Control Panel > System > Hardware > Device Manager.
☑"Sunny Beam" is listed under "Other devices".
–"Sunny Beam" is not listed under "Other devices"?
– Check whether "Sunny Beam" is listed under "USB Controller".
2. Right click on Sunny Beam and select Uninstall.
3. Click [OK] in the "Confirm Device Removal" window.
Uninstalling the driver for USB Serial Port
1. Click Start > Settings > Control Panel > System > Hardware > Device Manager.
☑"USB Serial Port" is listed under "Ports (COM and LPT)".
2. Right click on "Ports (COM and LPT)" and select Uninstall.
3. Click [OK] in the "Confirm Device Removal" window.
☑ Both drivers are uninstalled.
4.2 Uninstalling the Driver on Systems Operating Windows Vista/ Windows 7
You can uninstall the Sunny Beam USB driver if you no longer need it.
Uninstalling the driver for USBPB
1. Click Start.
2. Right click on My Computer and select Properties.
3. Click Device Manager.
☑"Sunny Beam" is listed under "Other devices".
–"Sunny Beam" is not listed under "Other devices"?
– Check whether "Sunny Beam" is listed under "USB Controller".
4. Right click on Sunny Beam and select Uninstall.
☑Click [OK] in the "Confirm Device Uninstall" window.
User Manual 17/21 SBeamUSB-BEN103814
Page 18

SMA Solar Technology AG Uninstalling the Driver
Uninstalling the driver for USB Serial Port
1. Click Start.
2. Right click on My Computer and select Properties.
3. Click Device Manager.
☑"USB Serial Port" is listed under "Ports (COM and LPT)".
4. Right click on "Ports (COM and LPT)" and select Uninstall.
5. Click [OK] in the "Confirm Device Removal" window.
6. Both drivers are uninstalled.
User Manual 18/21 SBeamUSB-BEN103814
Page 19

SMA Solar Technology AG Contact
5 Contact
If you have technical problems concerning our products, contact the SMA Servicel ine. W e requ ire th e
following information in order to provide you with the necessary assistance:
• Type and serial number of the inverter
• Serial number of communication interface
• Type and serial number or version of the communication device (e.g. Sunny Beam,
Sunny Explorer)
• Detailed description of the problem
SMA Solar Technology AG
Sonnenallee 1
34266 Niestetal, Germany
www.SMA.de
SMA Serviceline
Inverters: +49 561 9522 1499
Communication: +49 561 9522 2499
Fax: +49 561 9522 4699
E-Mail: Serviceline@SMA.de
User Manual 19/21 SBeamUSB-BEN103814
Page 20

SMA Solar Technology AG Contact
The information contained in this document is the property of SMA Solar Technology AG. Publishing its content, either partially or
in full, requires the written permission of SMA Solar Technology AG. Any internal company copying of the document for the
purposes of evaluating the product or its correct implementation is allowed and does not require permission.
Exclusion of Liability
The general terms and conditions of delivery of SMA Solar Technology AG shall apply.
The content of these documents is continually checked and amended, where necessary. However, discrepancies cannot be
excluded. No guarantee is made for the completeness of these documents. The latest version is available online at www.SMA.de
or from the usual sales channels.
Guarantee or liability claims for damages of any kind are excluded if they are caused by one or more of the following:
• Damages during transportation
• Improper or inappropriate use of the product
• Operating the product in an unintended environment
• Operating the product whilst ignoring relevant, statutory safety regulations in the deployment location
• Ignoring safety warnings and instructions contained in all documents relevant to the product
• Operating the product under incorrect safety or protection conditions
• Altering the product or supplied software without authority
• The product malfunctions due to operating attached or neighboring devices beyond statutory limit values
• In case of unforeseen calamity or force majeure
The use of supplied software produced by SMA Solar Technology AG is subject to the following conditions:
• SMA Solar Technology AG rejects any liability for direct or indirect damages arising from the use of software developed by
SMA Solar Technology AG. This also applies to the provision or non-provision of support activities.
• Supplied software not developed by SMA Solar Technology AG is subject to the respective licensing and liability agreements
of the manufacturer.
SMA Factory Warranty
The current guarantee conditions come enclosed with your device. These are also available online at www.SMA.de and can be
downloaded or are available on paper from the usual sales channels if required.
Trademarks
All trademarks are recognized even if these are not marked separately. Missing designations do not mean that a product or brand
is not a registered trademark.
The Bluetooth
Solar Technology AG is under license.
SMA Solar Technology AG
Sonnenallee 1
D-34266 Niestetal
Germany
Tel. +49 561 9522-0
Fax +49 561 9522-100
www.SMA.de
E-mail: info@SMA.de
© 2004 to 2010 SMA Solar Technology AG. All rights reserved.
®
word mark and logos are registered trademarks owned by Bluetooth SIG , In c. a nd a ny u se o f th ese mar ks b y SM A
User Manual 20/21 SBeamUSB-BEN103814
Page 21

XXX4."4PMBSDPN
4."4PMBS5FDIOPMPHZ
4."4PMBS5FDIOPMPHZ"(
XXX4."EF
4.""NFSJDB--$
XXX4.""NFSJDBDPN
4."5FDIOPMPHZ"VTUSBMJB1UZ-UE
XXX4.""VTUSBMJBDPNBV
4."#FOFMVY413-
XXX4."#FOFMVYDPN
4."#FJKJOH$PNNFSDJBM$P-UE
XXX4."$IJOBDPN
4."$[FDI3FQVCMJDTSP
XXX4."$[FDIDPN
4."'SBODF4"4
XXX4."'SBODFDPN
4.")FMMBT"&
XXX4.")FMMBTDPN
4."*C©SJDB5FDOPMPHB4PMBS4-
XXX4."*CFSJDBDPN
4."*UBMJB4SM
XXX4."*UBMJBDPN
4."5FDIOPMPHZ,PSFB$P-UE
XXX4.",PSFBDPN
 Loading...