

Page 1

CA
US
Central Inverter
SUNNY CENTRAL 250U / 500U / 500HE-US / 500HE-CA
User Manual
SCUS-BE-BUS120514 | 98-4000614 | Version 1.4
Page 2

Page 3

SMA America, LLC Legal Restrictions
Copyright © 2012 SMA America,LLC. All rights reserved.
No part of this document may be reproduced, stored in a retrieval system, or transmitted, in any form
or by any means, electronic, mechanical, photographic, magnetic or otherwise, without the prior
written permission of SMA America,LLC.
Neither SMA America,LLC nor SMA Solar Technology Canada Inc. makes no representations,
express or implied, with respect to this documentation or any of the equipment and/or software it may
describe, including (with no limitation) any implied warranties of utility, merchantability, or fitness for
any particular purpose. All such warranties are expressly disclaimed. Neither SMA America,LLC nor
its distributors or dealers nor SMA Solar Technology Canada Inc. nor its distributors or dealers shall
be liable for any indirect, incidental, or consequential damages under any circumstances.
(The exclusion of implied warranties may not apply in all cases under some statutes, and thus the
above exclusion may not apply.)
Specifications are subject to change without notice. Every attempt has been made to make this
document complete, accurate and up-to-date. Readers are cautioned, however, that
SMAAmerica,LLC and SMA Solar Technology Canada Inc. reserve the right to make changes
without notice and shall not be responsible for any damages, including indirect, incidental or
consequential damages, caused by reliance on the material presented, including, but not limited to,
omissions, typographical errors, arithmetical errors or listing errors in the content material.
All trademarks are recognized even if these are not marked separately. Missing designations do not
mean that a product or brand is not a registered trademark.
The Bluetooth® word mark and logos are registered trademarks owned by Bluetooth SIG, Inc. and
any use of such marks by SMA America,LLC and SMA Solar Technology Canada Inc. is under
license.
SMA America, LLC
3801 N. Havana Street
Denver, CO 80239 U.S.A.
SMA Solar Technology Canada Inc.
2425 Matheson Blvd E, 8th Floor
Mississauga, ON L4W 5K5 Canada
User Manual SCUS-BE-BUS120514 3
Page 4
Important Safety Instructions SMA America, LLC
IMPORTANT SAFETY INSTRUCTIONS
SAVE THESE INSTRUCTIONS
This manual contains important instructions for Sunny Central 250U, Sunny Central 500U, Sunny
Central 500HE-US and Sunny Central 500HE-CA photovoltaic (PV) inverters, that shall be followed
during installation and maintenance of the inverter.
The Sunny Central is designed and tested according to international safety requirements, but as with
all electrical and electronic equipment, certain precautions must be observed when installing and/or
operating the Sunny Central. To reduce the risk of personal injury and to ensure the safe installation
and operation of the Sunny Central, you must carefully read and follow all instructions, cautions and
warnings in this Installation Guide.
Warnings in this document
A Warning describes a hazard to equipment or personnel. It calls attention to a procedure or practice,
which, if not correctly performed or adhered to, could result in damage to or destruction of part or all
of the SMA equipment and/or other equipment connected to the SMA equipment or personal injury.
DANGER
DANGER indicates a hazardous situation which, if not avoided, will result in death or
serious injury.
WARNING
WARNING indicates a hazardous situation which, if not avoided, could result in death or
serious injury.
CAUTION
CAUTION indicates a hazardous situation which, if not avoided, could result in minor or
moderate injury.
NOTICE
NOTICE indicates a situation that can result in property damage if not avoided.
4 SCUS-BE-BUS120514 User Manual
Page 5

SMA America, LLC Important Safety Instructions
Other Symbols
In addition to the safety and hazard symbols described on the previous pages, the following symbol
is also used in this Installation Guide:
Information
This symbol accompanies notes that call attention to supplementary information that you
should know and use to ensure optimal operation of the system.
Markings on this Product
The following symbols are used as markings on this product with the following meanings.
Warning regarding dangerous voltage
The product works with high voltages. All work on the product must only be performed
as described in it‘s documentation.
Electric arc hazards
The product has large electrical potential differences between its conductors. Arc flashes
can occur through air when high-voltage current flows. Do not work on the product
during operation.
Beware of hot surface
The product can become hot during operation. Do not touch the product during
operation.
Observe the operating instructions
Read the documentation of the product before performing any work. Follow all safety
precautions and instructions as described in the documentation.
Evaluated to the requirements of the Underwriters Laboratories Standard for Safety for
Inverters, Converters, Controllers and Interconnection System Equipment for Use With
Distributed Energy Resources, UL 1741.
The inverter has been additionally evaluated by Underwriters Laboratories to
CAN/CSA C22.2 No. 107.1-1, "General Use Power Supplies".
DC current
Earth Ground
User Manual SCUS-BE-BUS120514 5
Page 6

General Warnings SMA America, LLC
General Warnings
General Warnings
All electrical installations must be done in accordance with the local and
NationalElectrical Code
®
ANSI/NFPA 70 or the Canadian Electrical Code®
CSAC22.1. This document does not and is not intended to replace any local, state,
provincial, federal or national laws, regulation or codes applicable to the installation and
use of the SMA inverter, including without limitation applicable electrical safety codes. All
installations must conform with the laws, regulations, codes and standards applicable in
the jurisdiction of installation. SMA assumes no responsibility for the compliance or
noncompliance with such laws or codes in connection with the installation of the SMA
inverter.
Before installing or using the Sunny Central, read all of the instructions, cautions, and
warnings on the Sunny Central, the PV array, in this Installation Guide and in User Manual.
Before connecting the Sunny Central to the electrical utility grid, contact the local utility
company. This connection must be made only by qualified personnel.
PV arrays produce electrical energy when exposed to light and thus can create an
electrical shock hazard. Wiring of the PV-arrays shall only be performed by qualified
personnel.
6 SCUS-BE-BUS120514 User Manual
Page 7

SMA America, LLC Table of Contents
Table of Contents
1 Information on this Manual. . . . . . . . . . . . . . . . . . . . . . . . . 9
1.1 Target Group . . . . . . . . . . . . . . . . . . . . . . . . . . . . . . . . . . . . . . . 9
1.2 Validity . . . . . . . . . . . . . . . . . . . . . . . . . . . . . . . . . . . . . . . . . . . . 9
2 Safety Instructions . . . . . . . . . . . . . . . . . . . . . . . . . . . . . . . 10
3 Description of the Sunny Central . . . . . . . . . . . . . . . . . . . 11
3.1 Design of the Sunny Central . . . . . . . . . . . . . . . . . . . . . . . . . . . 13
3.2 Location of the Safety Instructions. . . . . . . . . . . . . . . . . . . . . . . 15
3.3 Identifying the Sunny Central . . . . . . . . . . . . . . . . . . . . . . . . . . 16
3.4 Firmware . . . . . . . . . . . . . . . . . . . . . . . . . . . . . . . . . . . . . . . . . . 16
3.5 Elements for Sunny Central Operation . . . . . . . . . . . . . . . . . . . 16
3.5.1 Sunny Display . . . . . . . . . . . . . . . . . . . . . . . . . . . . . . . . . . . . . . . . . . . . . . . . 16
3.6 Optional Accessories . . . . . . . . . . . . . . . . . . . . . . . . . . . . . . . . 17
4 Operating the Sunny Display . . . . . . . . . . . . . . . . . . . . . . 18
4.1 Functions of the Buttons. . . . . . . . . . . . . . . . . . . . . . . . . . . . . . . 18
4.2 Description of Display Symbols . . . . . . . . . . . . . . . . . . . . . . . . 19
4.3 Navigating through the Menu . . . . . . . . . . . . . . . . . . . . . . . . . 21
4.4 Switching the display . . . . . . . . . . . . . . . . . . . . . . . . . . . . . . . . 21
4.5 Menu Overview . . . . . . . . . . . . . . . . . . . . . . . . . . . . . . . . . . . . 22
4.5.1 Description of Menu Items . . . . . . . . . . . . . . . . . . . . . . . . . . . . . . . . . . . . . . 23
4.6 Changing Date and Time . . . . . . . . . . . . . . . . . . . . . . . . . . . . . 23
4.6.1 Changing Time . . . . . . . . . . . . . . . . . . . . . . . . . . . . . . . . . . . . . . . . . . . . . . . 23
4.6.2 Changing Date . . . . . . . . . . . . . . . . . . . . . . . . . . . . . . . . . . . . . . . . . . . . . . . 24
4.7 Display Firmware Version . . . . . . . . . . . . . . . . . . . . . . . . . . . . . 25
5 Spot Values. . . . . . . . . . . . . . . . . . . . . . . . . . . . . . . . . . . . . 26
User Manual SCUS-BE-BUS120514 7
Page 8

Table of Contents SMA America, LLC
6 Parameters . . . . . . . . . . . . . . . . . . . . . . . . . . . . . . . . . . . . . 28
6.1 Description of Parameters . . . . . . . . . . . . . . . . . . . . . . . . . . . . . 28
6.2 Changing Parameters . . . . . . . . . . . . . . . . . . . . . . . . . . . . . . . . 31
7 Error Diagnosis. . . . . . . . . . . . . . . . . . . . . . . . . . . . . . . . . . 32
7.1 Diagnosis . . . . . . . . . . . . . . . . . . . . . . . . . . . . . . . . . . . . . . . . . 33
7.1.1 PV Generator Fault . . . . . . . . . . . . . . . . . . . . . . . . . . . . . . . . . . . . . . . . . . . . 33
7.1.2 Sunny Central Fault. . . . . . . . . . . . . . . . . . . . . . . . . . . . . . . . . . . . . . . . . . . . 34
7.1.3 Grid Fault . . . . . . . . . . . . . . . . . . . . . . . . . . . . . . . . . . . . . . . . . . . . . . . . . . . 36
7.1.4 Display Fault . . . . . . . . . . . . . . . . . . . . . . . . . . . . . . . . . . . . . . . . . . . . . . . . . 38
7.1.5 Acknowledge Error at the Sunny Display . . . . . . . . . . . . . . . . . . . . . . . . . . . 38
7.1.6 Acknowledge the Error with the Sunny WebBox . . . . . . . . . . . . . . . . . . . . . 39
8 Appendix - Glossary . . . . . . . . . . . . . . . . . . . . . . . . . . . . . 40
9 Contact . . . . . . . . . . . . . . . . . . . . . . . . . . . . . . . . . . . . . . . . 43
8 SCUS-BE-BUS120514 User Manual
Page 9

SMA America, LLC Information on this Manual
1 Information on this Manual
This document describes the operation, maintenance and failure correction of the Sunny Central
250U, Sunny Central 500U and Sunny Central 500HE-US. This manual does not cover any details
concerning PV modules. Information concerning the PV modules is available from the manufacturer of
the PV modules.
1.1 Target Group
Th is m anu al i s for the ins tal ler , the mai nte nan ce p ers onn el a nd the o perator of a S unny C entral 250U,
Sunny Central 500U and Sunny Central 500HE-US. The installer, the maintenance personnel and the
operator of the Sunny Central have to be qualified personnel. Qualified personnel has received
training and has demonstrated skills and knowledge in the construction and operation of the device.
Qualified personnel is trained to deal with the dangers and hazards involved in installing electric
devices.
1.2 Validity
This manual applies for the Sunny Central 250U, Sunny Central 500U, Sunny Central 500HE-US and
Sunny Central 500HE-CA from the BFR firmware version 1.030 and the DSP firmware version 1.030.
In this manual the Sunny Central 250U, Sunny Central 500U, Sunny Central 500HE-US and
Sunny Central 500HE-CA are referred to as "Sunny Central".
User Manual SCUS-BE-BUS120514 9
Page 10

Safety Instructions SMA America, LLC
2 Safety Instructions
DANGER
High voltages are present in the live components of the medium voltage grid.
Death resulting from burning and electric shock.
• Do not touch the live components of the medium voltage grid or the inverter.
• Pay close attention to all safety precaution measures regarding the medium voltage
grid.
WARNING
Fa ilu re t o fo llo w the ma nua l, t he o per ati ng inst ruc tio ns a nd t he s afe ty p rec aution s ma y le ad
to severe injury from electric shock.
• All work on the Sunny Central may only be done as described in this manual.
• Pay attention to all safety instructions.
• Follow all operating instructions.
• If problems occur when performing the work described here, contact SMA America.
WARNING
Operating a damaged Sunny Central may cause severe injury from electric shock.
• The Sunny Central may only be used when it is technically faultless and safe to
operate.
• Operate the Sunny Central only if there are no visible damages.
• Regularly check the Sunny Central for visible damage.
• Ensure that all external safety features are freely accessible at all times, and that they
are regularly tested for correct functionality.
Storage of handbooks
This documentation must be kept in the immediate vicinity of the Sunny Central. It must be
accessible to service and maintenance personnel at any time.
Do not store this documentation or other papers in the Sunny Central.
10 SCUS-BE-BUS120514 User Manual
Page 11
SMA America, LLC De scri ptio n of the S unny Cent ral
AB
CD F
G
E
S
t
o
p
S
t
a
r
t
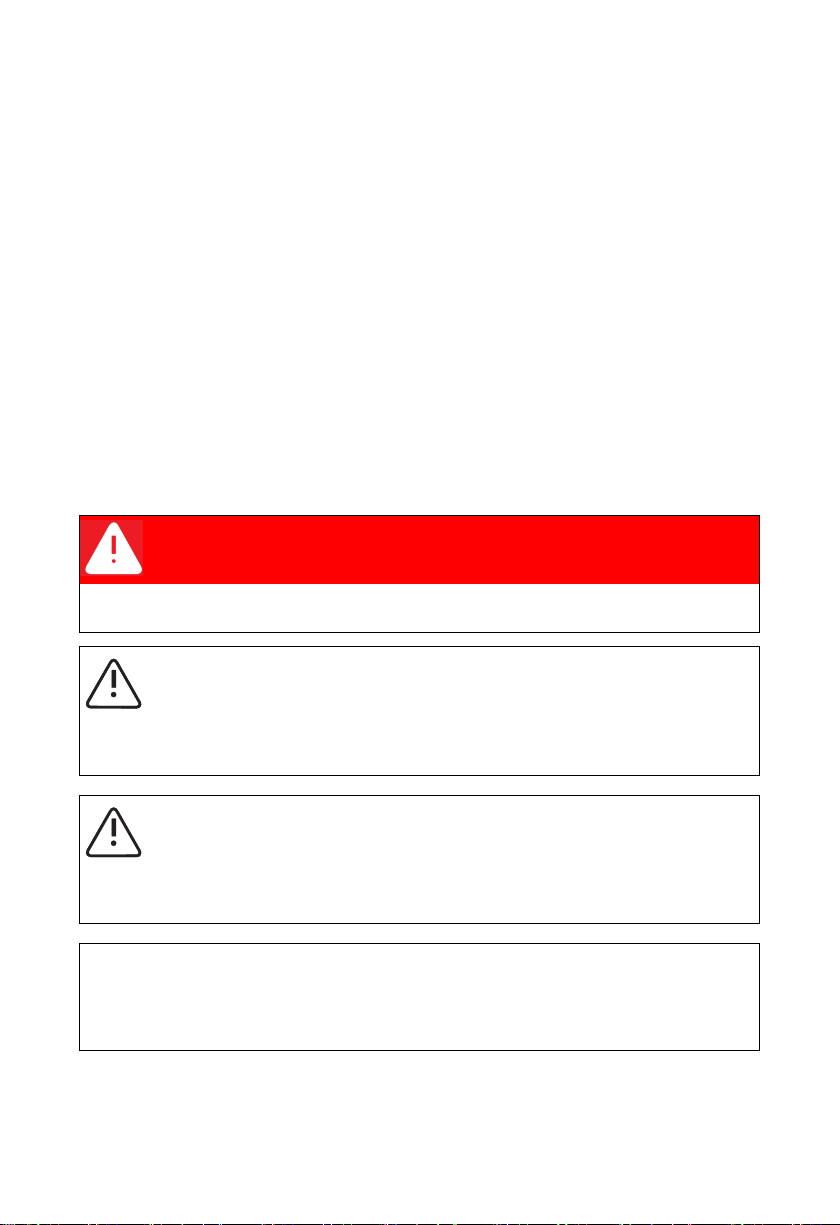
3 Description of the Sunny Central
The Sunny Central is a PV inverter that converts the DC energy from PV modules to AC energy. This
energy is then fed to the public grid. The Sunny Central is designed for indoor and outdoor
installation.
Principle of a PV Power System with a Sunny Central 250U or
Sunny Central 500U
Position Description
APV modules
B DC distribution with DC fuses (e.g., Sunny Central String-Monitor)
CDC disconnect
DSunny Central
EAC fuse
F AC disconnect
GPublic grid
User Manual SCUS-BE-BUS120514 11
Page 12

Description of the Sunny Central SMA America, LLC
Principle of a PV Power System with a Sunny Central 500HE-US
Position Description
APV modules
B DC distribution with DC fuses (e.g., Sunny Central String-Monitor)
CDC disconnect
DSunny Central
E Transformer
FPublic grid
12 SCUS-BE-BUS120514 User Manual
Page 13
SMA America, LLC De scri ptio n of the S unny Cent ral
A B
C
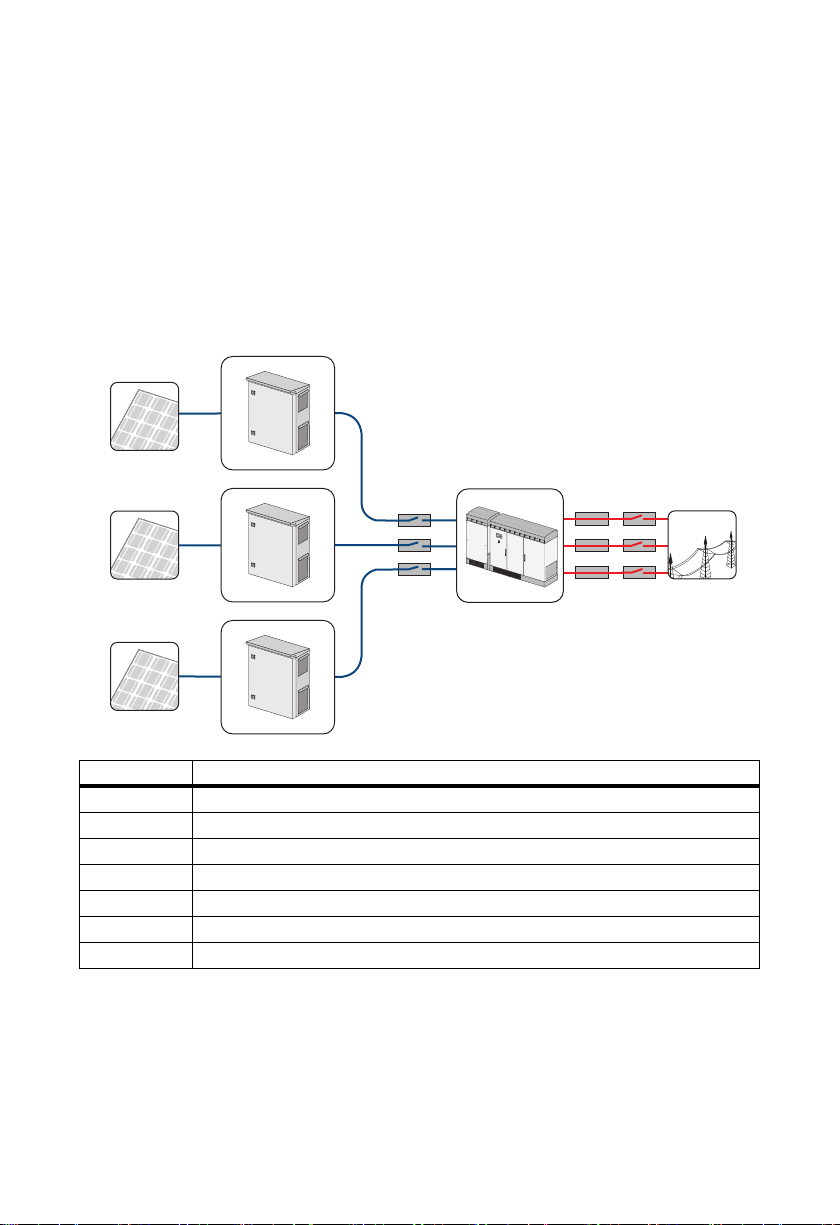
3.1 Design of the Sunny Central
Sunny Central 250U
Sunny Central 500U
Position Cabinet Description
A Magnetics Cabinet The Sunny Central's transformer is contained in the
Magnetics Cabinet.
B Control Cabinet The Control Cabinet contains the system control, the
Sunny Display, the stop/start switch and the stacks for
converting direct current to alternating current.
C Interface Cabinet All AC, DC and data cables are connected in the Interface
Cabinet.
User Manual SCUS-BE-BUS120514 13
Page 14
Description of the Sunny Central SMA America, LLC
A
B
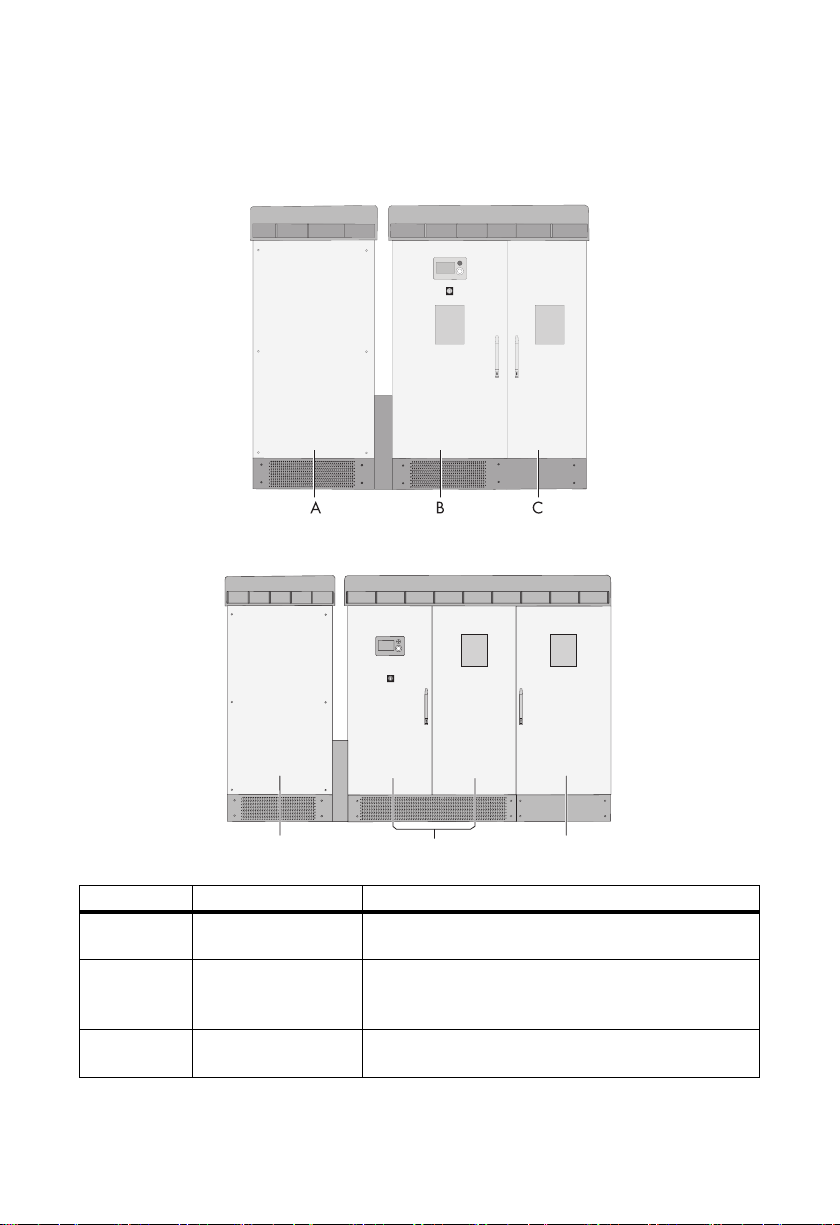
Sunny Central 500HE-US
Position Cabinet Description
A Power Cabinet The power cabinet contains the power unit for converting
direct current to alternating current.
B Control and Interface
Cabinet
All AC, DC and communication cables are connected in
the control and interface cabinet. The control and
interface cabinet contains:
• system control
• Sunny Display
• stop/start switch
• optional communication devices
14 SCUS-BE-BUS120514 User Manual
Page 15

SMA America, LLC De scri ptio n of the S unny Cent ral
A
BB
3.2 Location of the Safety Instructions
Sunny Central 250U
The figure to the right shows the location of the safety
instructions on the Sunny Central 250U.
Position Description
A Wall of the Magnetics Cabinet
General warnings
B Door of the Control Cabinet and
Interface Cabinet
Warning regarding high voltages in the
Sunny Central.
Sunny Central 500U
The figure to the right shows the location of the safety
instructions on the Sunny Central 500U.
Position Description
A Wall of the Magnetics Cabinet
General warnings
B Door of the Control Cabinet and
Interface Cabinet
Warning regarding high voltages in the
Sunny Central.
Sunny Central 500HE-US
The figure to the right shows the location of the safety
instructions on the Sunny Central 500HE-US.
Position Description
A Warning regarding high voltages in the
Sunny Central.
B Warning regarding hazardous
voltage.
C Notice regarding operation of the
User Manual SCUS-BE-BUS120514 15
Sunny Central without transformer.
Page 16

Description of the Sunny Central SMA America, LLC
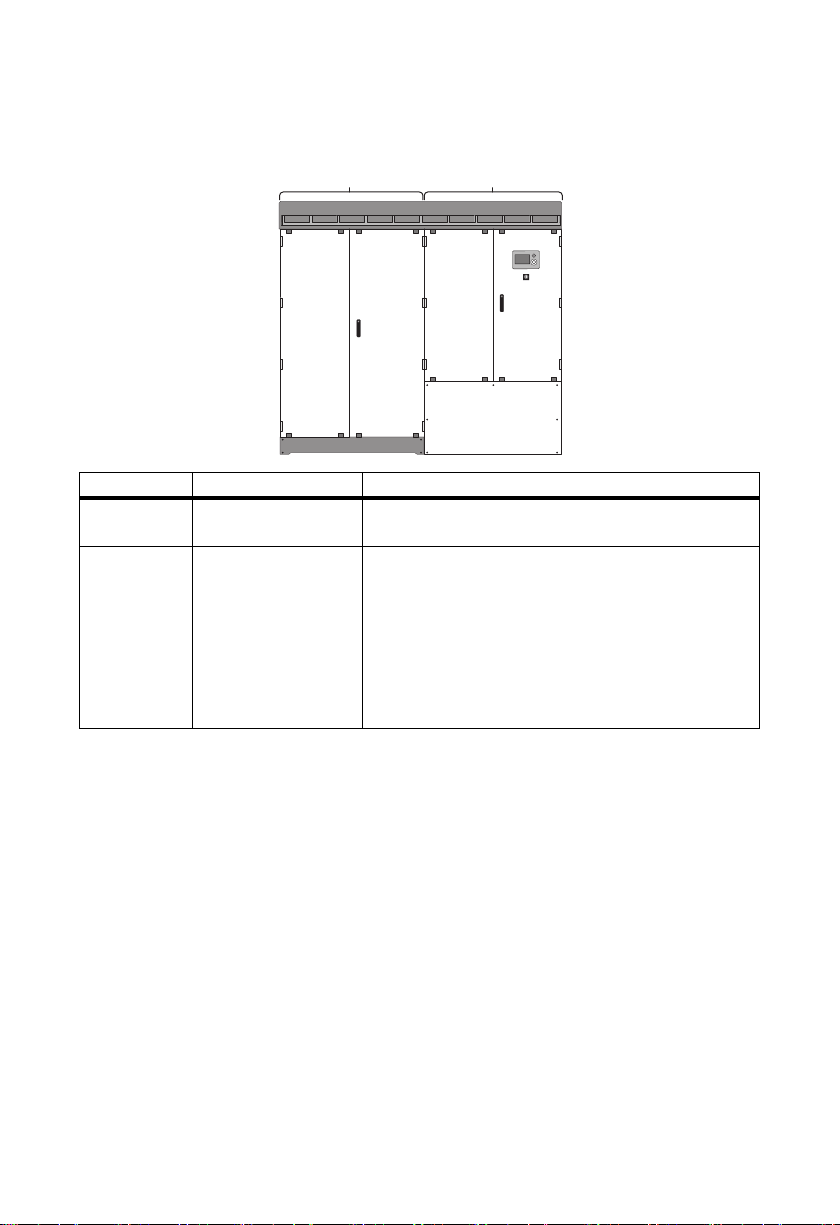
3.3 Identifying the Sunny Central
You can identify the Sunny Central using the type plate
(see figure at right, example for a typeplate of the Sunny
Central 500U). The type plate is located in the Interface
Cabinet.
Position Description
A Type description of the Sunny Central
B Serial number of the Sunny Central
CDate of manufacture
3.4 Firmware
You can use the display to call up the firmware version of the Sunny Central and of the display (see
Section 4.7”Display Firmware Version” (page25)).
3.5 Elements for Sunny Central Operation
3.5.1 Sunny Display
There is a display on the front side of the Sunny Central. The
display shows the current values of the PV power system. See
Section 4”Operating the Sunny Display” (page18).
16 SCUS-BE-BUS120514 User Manual
Page 17

SMA America, LLC De scri ptio n of the S unny Cent ral
3.6 Optional Accessories
The Sunny Central can be equipped with various communication and data acquisition devices.
Sunny WebBox
The Sunny WebBox collects the data from the Sunny Central continuously. To read the data, the
Sunny WebBox can be connected to a laptop or PC. The data can be processed with Sunny Portal,
for example.
Sunny SensorBox
The Sunny SensorBox and the sensors enable you to acquire environmental data of your PV power
system which are relevant for performance evaluation. For this purpose, the Sunny SensorBox is
equipped as standard with an integrated irradiation sensor and an external module temperature
sensor. The Sunny SensorBox delivers the sensor data via an RS485 interface to the SMA
communication devices (e.g. Sunny WebBox).
Power Metering (not for Sunny Central 500HE-US)
The Shark power meter and iLon device are a revenue grade metering system. They allow the output
generation of the inverter to be monitored and recorded. This information is sent via the internet to a
network that can process the data into a utility bill.
User Manual SCUS-BE-BUS120514 17
Page 18

Operating the Sunny Display SMA America, LLC
4 Operating the Sunny Display
4.1 Functions of the Buttons
Position Description
A Pushbutton
BKnob
The display can be operated with a pushbutton and a knob.
Pushbutton
If an error occurs during operation, the pushbutton is backlit red. The display indicates the error with
a number and a description in the text line.
Knob
The knob can be pressed or turned to the left or the right.
•Turn:
– Moves up and down in the menu
– Entering values (decrease, increase)
•Press
– Open/close menu
– Select/cancel function
–Select value
– Confirm entry
– Activation of the background illumination
18 SCUS-BE-BUS120514 User Manual
Page 19

SMA America, LLC Operating the Sunny Display
4.2 Description of Display Symbols
The following figure is an example for the Sunny Central 250U.
Postion Description
ATapping
The background illumination is switched on by tapping on the housing cover.
B Open switch: The Sunny Central is not feeding the grid (e.g., at night).
Closed switch: The Sunny Central is feeding the grid.
CPower
This displays the power which the Sunny Central is feeding into the grid. The display is
updated every 5 seconds.
DDay
The energy fed into the grid on this day is displayed here. This is the energy generated
from the moment the Sunny Central begins to operate to the moment of the reading.
The display is updated every 5 seconds.
ETotal
This displays the total energy which the Sunny Central has fed into the grid during its
operating time. The display is updated every 5 seconds.
FText line
The text line shows the menu and a plain text error description.
For example, if there is an error, the cause of the error is shown in the text line. In
addition, the display shows the respective error number in position G, I or K.
User Manual SCUS-BE-BUS120514 19
Page 20

Operating the Sunny Display SMA America, LLC
Postion Description
GEvent number grid
If there is a failure in the AC grid, an error number will be shown in this position. In
addition, a plain text message will be shown in the text line (position F). See Section
7”Error Diagnosis” (page32).
H Grid voltage, grid frequency, grid current
Changing display between:
•Grid voltage
•Grid frequency
• Grid current (average over all three phases)
The display changes between the values every 2 seconds.
I Event number Sunny Central
If there is an error in the Sunny Central, an error number will be shown in this position.
In addition, a plain text message will be shown in the text line (position F). See Section
7”Error Diagnosis” (page32).
J PV voltage, PV current
This displays the PV voltage and PV current in alternation. The display changes
between the values every 2 seconds.
K Event number PV generator
If there is a failure in the PV generator, an error number will be shown in this position.
In addition, a message in plain text will be shown in the text line (position F). See
Section 7”Error Diagnosis” (page32).
L Errors
This symbol is illuminated if an error occurs. Contact the SMA Serviceline, see Section
9”Contact” (page43).
M Errors
This symbol is illuminated if an error occurs. In Section 7”Error Diagnosis” (page32)
it is described how this error can be rectified.
N Graphic display of the output power of the Sunny Central
The output power of the Sunny Central is shown in a chart in the display. The daily
graph is displayed by default. Also see Section 4.4”Switching the display” (page21).
The column for the current hour is adjusted every five seconds.
20 SCUS-BE-BUS120514 User Manual
Page 21

SMA America, LLC Operating the Sunny Display
4.3 Navigating through the Menu
You can navigate through the menu using the knob and the pushbutton on the Sunny Display.
Action Procedure
Change menu item Turn knob.
Select menu Press knob once.
Leave menu Turn the knob until the text line reads "BACK".
Press the knob.
The Sunny Display changes to the outer menu.
Confirm entry Press knob once.
Increase / decrease values. Turn knob.
4.4 Switching the display
You can view the hourly graph or the daily graph in the display. The display shows the hourly graph
by default. The current hour or the current day is the right column of the chart. With every new hour
or new day , th e ch art mov es fu rth er t o th e le ft, out of t he s cre en. In t otal the dis pla y ca n sh ow 1 6 ho urs
or 16 days.
E-DAY
E-DAY charts the hours and indicates the maximum power
output of the day. When no energy is fed into the grid (at
night, for example) a gap is inserted in the chart. The gap is
the same width as a column.
Position Description
A No energy is fed into the grid
BCurrent hour
E-HISTORY
E-HISTORY is the chart of the last 16 days. The daily chart
displays the energy which the Sunny Central fed into the grid
on the respective days.
Position Description
A Current day
User Manual SCUS-BE-BUS120514 21
Page 22

Operating the Sunny Display SMA America, LLC
Switching between E-DAY and E-HISTORY
You change the display by turning the knob.
Turn the knob to the left: E-HISTORY
Turn the knob to the right: E-DAY
4.5 Menu Overview
The menu of the Sunny Display is subdivided into two menu items. To access the menu, proceed as
follows:
1. Keep the knob and the pushbutton pressed for 2 seconds.
☑ The Sunny Display changes to the main menu.
Menu 1st level Menu 2nd level Menu 3rd level Menu 4th level
SETTINGS CURRENT TIME
TIME SETTINGS SET CURRENT TIME HOUR
MIN
BACK
SET CURRENT DATE YEAR
MONTH
DAY
BACK
BACK
BACK
INFO VERSION BFR
VERSION DSP
VERSION DISPLAY
VERSION LCD
BACK
BACK
22 SCUS-BE-BUS120514 User Manual
Page 23

SMA America, LLC Operating the Sunny Display
4.5.1 Description of Menu Items
SETTINGS In the Settin gs m enu yo u ca n adjus t th e se ttings on t he disp lay (e. g. d ate
and time settings) and display the current time.
• CURRENT TIME Displays the current time.
• TIME SETTINGS In this menu you can change the time and the date (see Section
4.6”Changing Date and Time” (page23)).
INFO The Info menu displays the firmware numbers of the Sunny Display and
the Sunny Central.
• VERSION BFR Displays the firmware number of the Sunny Central operation control
unit (BFR).
• VERSION DSP Displays the firmware number of the Sunny Central Digital Signal
Processor (DSP).
• VERSION DISPLAY Displays the firmware version of the Sunny Display.
• VERSION LCD Displays the firmware number of the Sunny Display LCD.
4.6 Changing Date and Time
If a Su nny Web Box is no t bu ilt int o th e Su nny C ent ral , yo u ca n change the date and time on the Sunny
Display. If you wish to change the date or the time (e.g. from summer to winter time), proceed as
follows:
4.6.1 Changing Time
1. Keep the knob and the pushbutton pressed for 2 seconds.
2. Turn the knob until the text line displays "SETTINGS".
3. Press the knob once.
The Sunny Display changes to the "SETTINGS" menu.
4. Turn the knob until the text line displays "TIME SETTINGS".
5. Press the knob once.
The Sunny Display changes to the "TIME SETTINGS" menu.
6. Turn the knob until the text line displays "SET CURRENT TIME".
7. Press the knob once.
The Sunny Display changes to the "SET CURRENT TIME" menu. You can set the hours and
minutes in this menu.
– HOUR: Current hour. The time is shown in 12-hour format.
– MIN: Current minute.
8. Turn the knob until the text line displays "HOUR", for example.
9. Press the knob once.
The Sunny Display changes to the "HOUR" menu item.
User Manual SCUS-BE-BUS120514 23
Page 24

Operating the Sunny Display SMA America, LLC
10. Turn the knob until the text line displays the desired hour.
11. Press the knob once to confirm and save the current value.
The Sunny Display springs back to the "SET CURRENT TIME" menu. The value (in this case the
hour) is set.
12. To set the minute, proceed as described in point 9. Select "MINUTE" instead of "HOUR".
4.6.2 Changing Date
13. Follow points 1 through 6 in chapter 4.6.1”Changing Time” (page23).
14. Turn the knob until the text line displays "SET CURRENT DATE".
15. Press the knob once.
The Sunny Display changes to the "SET CURRENT DATE" menu. You can set the year, month
and day in this menu.
– YEAR: Current year.
–MONTH: Current month.
– DAY: Current day.
16. Turn the knob until the text line displays "YEAR", for example.
17. Press the knob once.
The Sunny Display changes to the "YEAR" menu item.
18. Turn the knob until the text line displays the desired year.
19. Press the knob once to confirm and save the desired value.
The Sunny Display springs back to the "SET CURRENT DATE" menu. The value (in this case the
year) is set.
20. To set the month and day, proceed as described in point 4. Select "MONTH" or "DAY" instead
of YEAR.
24 SCUS-BE-BUS120514 User Manual
Page 25

SMA America, LLC Operating the Sunny Display
4.7 Display Firmware Version
You can display the firmware versions of the Sunny Central and the Sunny Display as follows:
1. Keep the knob and the pushbutton pressed for 2 seconds.
2. Turn the knob until the text line displays "INFO".
3. Press the knob once.
The Sunny Display changes to the "INFO" menu. In this menu you can select the firmware
versions and version numbers.
– VERSION BFR: firmware version of the Sunny Central operation control unit (BFR).
– VERSION DSP: firmware version of the Sunny Cetral Digital Signal Processor (DSP).
– VERSION DISPLAY: firmware version of the Sunny Display.
– VERSION LCD: firmware version of the Sunny Display LCD.
4. Turn the knob until the text line of the event display reads "VERSION BFR", for example.
5. Press the knob once.
The Sunny Display shows the version number of the operation control unit.
6. Press the knob once to spring back one level.
User Manual SCUS-BE-BUS120514 25
Page 26

Spot Values SMA America, LLC
5 Spot Values
The following table shows the spot values that are visible to the user. The spot values are part of the
channel list and display the Sunny Central‘s status.
Name Description
Cntry Country code
Dsc Error description
ErrNo Display of error number
Error Identification of the error „Photovoltaic“, „Inverter“ or „Grid“
E-heute Energy generated today
E-Total Total amount of energy fed into the grid.
Fac AC frequency
Firmware Firmware version of the operation control unit (BFR)
Firmware-2 Firmware version of the digital signal processor (DSP)
Firmware-3 Operation control unit boot loader
Firmware-4 Digital signal processor boot loader
Firmware-5 Version of I/O-unit
GdCtcStt Display of a symbol indicating whether the Sunny Central is feeding into the grid.
h-On h- on ind icates how long su ffici ent DC voltage has been a pplied to the Sunny Central
and the Sunny Central has been active including the time it was not able to feed to
the utility with respect to low DC voltage or operation in stop mode.
h-Total Total number of grid-feeding operational hours
Iac AC current (active current)
Ipv DC current
Mode Display of the current operating mode.
Msg Message
The display indicates how to proceed.
Pac Generated AC power
Ppv DC power
Prio Priority
The following appears on the display:
• Wrench (the Sunny WebBox shows plain text message „Prio_B“):
In section 7 ”Error Diagnosis” (page 31) it is described how this error can be
rectified.
or
• Telephone receiver (the Sunny WebBox shows plain text message „Prio_A“):
Contact the SMA Serviceline, see section 8 ”Contact” (page 39).
Qac AC reactive power
26 SCUS-BE-BUS120514 User Manual
Page 27

SMA America, LLC Spot Values
Name Description
SerTm Current time in seconds since 01.01.1970
SN_BFS Serial number of BFS
TmsRmg Remaining time until the Sunny Central restarts.
Type Inverter type
Vac AC voltage
Vpv DC input voltage
User Manual SCUS-BE-BUS120514 27
Page 28

Parameters SMA America, LLC
6 Parameters
6.1 Description of Parameters
The following table shows the parameters that are visible to the user. The installation guide of the
Sunny Central also shows the parameters that are visible to the installer.
Parameter Name Range Default Parameter Description
Ackn –––, Ackn,
NoAckn
CardFunc –––, ForcedWrite,
StoEvtHis,
StoFailHis
ChkGdFrqLo 57 ... 59.8 Hz 59.3 Hz Minimum frequency for Sunny Central
ChkGdFrqLoT 160 ... 300000 ms 160 ms
ChkGdFrqMax 60.5 ... 64.5 Hz 60.5 Hz Maximum frequency for Sunny Central
ChkGdFrqMin 57 ... 59.8 Hz 57 Hz Minimum frequency for Sunny Central
ChkGdVtgHi 288 ... 321.3 Vrms 304.7 Vrms Maximum voltage for Sunny Central
ChkGdVtgLo 149.6 ... 265.9
Vrms
––– Acknowledge an error manually
You can acknowledge an error with the
optional Sunny WebBox. Refer to
Section 7.1.6”Acknowledge the Error
with the Sunny WebBox” (page39).
––– Saving ring memory with errors and
events on SD card.
operation.
If the frequency drops below the value
given in ChkGdFrqLo, the Sunny Central
will shut down after the time period given
in ChkGdFrqLoT.
operation.
If the frequency exceeds the value given
in ChkGdFrqMax, the Sunny Central
shuts down immediately.
operation.
If the frequency drops below the value
given in ChkGdFrqMin, the Sunny
Central shuts down immediately.
operation.
The Sunny Central shuts down within 1
second in case the voltage exceeds the
value defined in ChkGdVtgHi.
243.8 Vrms Minimum voltage for Sunny Central
operation.
The Sunny Central shuts down within 2
seconds in case the voltage exceeds the
value defined in ChkGdVtgLo.
28 SCUS-BE-BUS120514 User Manual
Page 29

SMA America, LLC Parameters
Parameter Name Range Default Parameter Description
ChkGdVtgMax 288 ... 332,4 Vrms 332,4 Vrms Maximum voltage for Sunny Central
operation.
If the voltage exceeds the value defined
in ChkGdVtgMax, the Sunny Central
shuts down immediately.
ChkGdVtgMin 138,5 ... 265,9 Hz 138,5 Hz Minimum voltage for Sunny Central
operation.
If the voltage drops below the value
defined at ChkGdVtgMin, the Sunny
Central shuts down immediately.
ChkGnFrqLo Sunny Central operation with a
ChkGnFrqLoT
ChkGnFrqMax
ChkGnFrqMin
ChkGnVtgHi
ChkGnVtgLo
generator.
More information on parameter settings
and operating the Sunny Central with a
generator can be obtained from SMA
America.
ChkGnVtgMax
ChkGnVtgMin
Dt yyyymmdd Current Date.
Here you can set the current date.
Ofs_E-Total 0 ... 214748364
kWh
0 kWh The Sunny Central's total energy yield
Changing the Ofs_E_Total parameter
may be necessary if you exchange the
computer assembly (BFR) of the Sunny
Central and want to transfer the data
from the old device.
Ofs_h-On 0 ... 2147483 h 0 h The Sunny Central's total number of
hours of operation
Changing the Ofs_h_On parameter may
be necessary if you exchange the
computer assembly (BFR) of the Sunny
Central and want to transfer the data
from the old device.
User Manual SCUS-BE-BUS120514 29
Page 30

Parameters SMA America, LLC
Parameter Name Range Default Parameter Description
Ofs_h-Total 0 ... 2147483 h 0 h Total number of operational hours with
grid feeding
Changing the Ofs_h_Total parameter
may be necessary if you exchange the
computer assembly (BFR) of the Sunny
Central and want to transfer the data
from the old device.
Plimit 0 ... 1000 kW 250 kW
(SC250U)
500 kW
Upper limit for AC output power
This parameter cannot be changed.
(SC500U)
500 kW
(SC500HEUS/SC500HECA)
Pmax 0 ... 250 kW
(SC250U)
0 ... 500 kW
(SC500U)
0 ... 500 kW
(SC500HE-US)
250 kW
(SC250U)
500 kW
(SC500U)
500 kW
(SC500HE-
Output limit of the Sunny Central
The output power of the Sunny Central
can be reduced with this parameter.
US/SC500HECA)
PVPwrMinTr 0 ... 1200 kW 10 kW
(SC250U)
20 kW
(SC500U)
20 kW
(SC500HE-
MPP tracking
If the output exceeds the value
PVPwrMinTr, the Sunny Central will wait
for the period of time set in PVPwrMinTrT
before it begins to seek the Maximum
Power Point.
US/SC500HE-
CA)
PVPwrMinTrT 1 ... 1800 s 600 s
PVStrT 1 ... 1800 s 90 s Initial voltage of the Sunny Central
PVVtgStr 0 ... 1200 V 390 V
If the vol tag e in cre ases ov er t he v alu e se t
at PVVtgStr, the Sunny Central will start
after waiting for the period of time set at
PVStrT.
Serial Number Serial number of the Sunny Central.
This parameter cannot be changed.
30 SCUS-BE-BUS120514 User Manual
Page 31

SMA America, LLC Parameters
Parameter Name Range Default Parameter Description
SpntRemEna –––, Off, On On Switching off the Sunny Central
With this parameter you can switch off
the Sunny Central via the remote access.
Tm hhmmss Current Time.
Here you can set the current time.
6.2 Changing Parameters
DANGER
Danger to life through changing the internal safety specifications of the Sunny Central.
• Parameters may only be changed with the express authorization of the grid operator
and SMA America.
If a Sunny WebBox is installed in the Sunny Central, you can change the parameters of the Sunny
Central via remote access from a PC or laptop. If you want to change the parameters of a Sunny
Central without an inbuilt Sunny WebBox, contact SMA America.
Change the parameters as described in the following:
1. Open Internet browser.
2. Enter the Sunny WebBox IP address.
The Sunny WebBox interface appears in the browser.
3. Enter the user or installer password. The parameters are displayed depending on the password
level.
4. Select Sunny Central from the selection list to the left.
5. Select the "Parameter" tab.
☑ The browser displays the parameter list of the Sunny Central.
6. Select and change the desired parameter.
7. Go to the bottom of the parameter list and click on "Save".
☑ The parameter changes after 2 seconds.
User Manual SCUS-BE-BUS120514 31
Page 32

Error Diagnosis SMA America, LLC
7 Error Diagnosis
If the Sunny Central detects a fault during operation, it shows the fault in the display. Faults are
indicated with a two-digit error code, a plain text message in the text line, a symbol in the display and
a glowing pushbutton. This section describes how to recognize the type of fault and how you can
rectify it. For the user of the Sunny Central this section should only be used for diagnosing a fault.
DANGER
Even in the case of a fault the Sunny Central can still contain high voltages.
Risk of death from electric shock.
• All procedures described in this section may only be carried out by qualified
personnel.
• All the safety instructions in the installation guide and user manual must be observed
when working on the Sunny Central.
• Contact SMA America if you cannot rectify the fault with the help of this manual.
Example of an Isolation Failure
A The pushbutton glows to indicate a failure.
B Symbol for a failure (in this case a wrench)
C Error number (here: isolation failure)
D Plain text message in the text line
32 SCUS-BE-BUS120514 User Manual
Page 33

SMA America, LLC Error Diagnosis
7.1 Diagnosis
The displayed faults are divided into the three areas of the PV system:
• PV generator (see Section 7.1.1”PV Generator Fault” (page33)).
• Sunny Central (see Section 7.1.2”Sunny Central Fault” (page34)).
• Grid (see Section 7.1.3”Grid Fault” (page36)).
7.1.1 PV Generator Fault
If the fault is on the PV generator side, a two-digit error code
ap pea rs on th e le ft side of t he s ystem d isp lay (se e fi gur e to the
right: A). With this error number you can narrow down the
type of malfunction. The table below describes the type of
fault, its cause and what you can do to rectify the fault.
No. Description
34 Error text:
DC-Overvoltage
Cause of fault:
The voltage of the PV generator is too high.
Corrective measures:
• Immediately disconnect the PV generator from the Sunny Central! The
Sunny Central can be damaged by the high input voltage.
• Check the input voltage.
• Check module wiring and system design.
35 Error text:
Ground Fault
Cause of fault:
The PV generator has a connection to ground.
Corrective measure:
• Check the PV generator for a ground fault.
User Manual SCUS-BE-BUS120514 33
Page 34

Error Diagnosis SMA America, LLC
No. Description
38 Error text:
DC-Overcurrent
Cause of fault:
The current of the PV generator is too high.
Corrective measures:
• Immediately disconnect the PV generator from the Sunny Central! The
Sunny Central can be damaged by the high input current.
• Check the input current.
• Check module wiring and system design.
7.1.2 Sunny Central Fault
If the fault is with the Sunny Central, a two-digit error code
appears in the middle of the system display (see figure to the
right: A). With this error number you can narrow down the
type of malfunction. The table below describes the type of
fault, its cause and what you can do to rectify the fault.
No. Description
60 Error text:
Device Fault
Cause of fault:
• Internal fault of the Sunny Central.
Corrective measures:
• Contact the SMA Serviceline.
61 Error text:
Device Fault
Cause of fault:
Internal fault of the Sunny Central.
Corrective measures:
• Contact the SMA Serviceline.
64 Error text:
Device Fault
Cause of fault:
Internal fault of the Sunny Central.
Corrective measures:
• Contact the SMA Serviceline.
34 SCUS-BE-BUS120514 User Manual
Page 35

SMA America, LLC Error Diagnosis
No. Description
65 Error text:
Overtemperature
Cause of fault:
The ambient temperature is too high.
Corrective measures:
• Check functionality of fan.
• Clean the fan.
• Clean dirty fan inlets and the ventilation plate.
70 Error text:
Temperature sensor failure
Cause of fault:
• Cable break
•Short circuit
• Internal fault of the Sunny Central.
Corrective measures:
• Check the cabling of the temperature sensor.
• Contact the SMA Serviceline.
75 Error text:
Fan failure
Cause of fault:
The ambient temperature is too high.
Corrective measures:
• Check functionality of fan.
• Clean the fan.
• Clean dirty fan inlets and the ventilation plate.
76 Error text:
Communication failure
Cause of fault:
Internal fault of the Sunny Central.
Corrective measures:
• Contact the SMA Serviceline.
User Manual SCUS-BE-BUS120514 35
Page 36

Error Diagnosis SMA America, LLC
No. Description
77 Error text:
Device fault
Cause of fault:
Contactor defective.
Corrective measures:
• Contact the SMA Serviceline.
78 Error text:
Surge voltage arrestor failure
Cause of fault:
Surge error.
Corrective measures:
• Check surge voltage arrestor.
79 Error text:
Reverse current failure
Cause of fault:
Short circuit in the PV generator.
Corrective measures:
• Check the PV generator for short circuits.
7.1.3 Grid Fault
If the fault is on the grid side, a two-digit error code appears
on the right side of the system display (see figure to the right:
A). With this error number you can narrow down the type of
malfunction. The table below describes the type of fault, its
cause and what you can do to rectify the fault.
No. Description
01 Error text:
Grid fault
Cause of fault:
The grid voltage is too high.
Corrective measures:
• Check the grid voltage.
• If the grid voltage lies outside the acceptable range because of local grid conditions,
ask the grid operator if the voltages can be adjusted at the feed-in point.
36 SCUS-BE-BUS120514 User Manual
Page 37

SMA America, LLC Error Diagnosis
No. Description
02 Error text:
Grid fault
Cause of fault:
The grid voltage is too low.
Corrective measures:
• Check the grid voltage.
• If the grid voltage lies outside the acceptable range because of local grid conditions,
ask the grid operator if the voltages can be adjusted at the feed-in point.
• Check that the external fuses are functional.
• Check that the AC cable is securely connected.
05 Error text:
Grid fault
Cause of fault:
The grid frequency is outside the permitted range.
Corrective measures:
•Check grid frequency.
• If the grid frequency lies outside the acceptable range because of local grid
conditions, ask the grid operator if the frequency can be adjusted at the feed-in point.
• Check that the external fuses are functional.
• Check that the AC cable is securely connected.
08 Error text:
Grid failure
Cause of fault:
One phase of the grid has failed.
Corrective measures:
• Check the grid voltage.
• Check that the external fuses are functional.
• Check that the AC cable is securely connected.
13 Error text:
Grid installation failure
Cause of fault:
Counterclockwise phase sequence
Corrective measures:
• Check connection to the grid.
• Check phase sequence.
User Manual SCUS-BE-BUS120514 37
Page 38

Error Diagnosis SMA America, LLC
7.1.4 Display Fault
If the fault is with the display, the cause of the fault appears in
text line (see example to the right). A display fault is shown
without a two-digit error code. The table below describes the
type of fault, its cause and what you can do to rectify the fault.
No. Description
none Error text:
NO COMMUNICATION
Cause of fault:
The display has received no data for 5 minutes.
Corrective measures:
• Check communication cable.
• Check supply voltage of the operation control unit (BFR).
• Check operating mode of the Display (see the Sunny Central installation guide).
– WEBBOX: For this operating mode a Sunny WebBox has to be installed.
– NO WEBBOX: No Sunny WebBox installed.
• For operation with Sunny WebBox: Check function of the Sunny WebBox.
• Contact the SMA Serviceline.
7.1.5 Acknowledge Error at the Sunny Display
Acknowledge the error as described in the following.
1. Rectify the error at the Sunny Central as described in section 7”Error Diagnosis” (page32).
2. Press the glowing pushbutton once.
– After 2 seconds the error is acknowledged.
38 SCUS-BE-BUS120514 User Manual
Page 39

SMA America, LLC Error Diagnosis
7.1.6 Acknowledge the Error with the Sunny WebBox
If a Sunny WebBox is installed in the Sunny Central, you acknowledge an error via a Sunny WebBox
from a PC or Laptop. You will find an extensive description of the operation of the Sunny WebBox in
the technical description of the Sunny WebBox.
The error can only be acknowledged in the installer mode. Proceed as follows:
1. Rectify the error at the Sunny Central as described in section 7”Error Diagnosis” (page32).
1. Open Internet browser.
2. Enter the Sunny WebBox IP address.
The Sunny WebBox interface appears in the browser.
3. Enter the installer or user password. The parameters are displayed depending on the password
level.
4. Select Sunny Central from the selection list to the left.
5. Select the "Parameter" tab.
– The browser displays the parameter list of the Sunny Central.
6. Select the "Ackn" parameter.
7. Select "Ackn" from the menu list.
8. Go to the bottom of the parameter list and click on "Save".
– The error is acknowledged.
User Manual SCUS-BE-BUS120514 39
Page 40

Appendix - Glossary SMA America, LLC
8 Appendix - Glossary
AC
Abbreviation for "Alternating Current"
ANSI
Abbreviation for American National Standards Institute
BFR
Abbreviation for operation control unit
CANDI
Fimware version of internal CAN communication
CEC
Abbreviation for California Energy Commission
Crossover cable
A crossover cable is needed, for example, to connect two computers directly with one another. A
crossover cable is an 8-wire twisted pair cable with an RJ45 plug on each end. In one of the plugs
certain wires are interchanged.
DC
Abbreviation for "Direct Current"
Derating
A controlled reduction in performance, usually dependent on component temperatures. Compared
with the normal process of completely shutting down the device, the negative effect on the external
power network is reduced with derating.
DSP
Abbreviation for Digital Signal Processor
Energy
The energy is measured in Wh (watt hours), kWh (kilowatt hours) or MWh (megawatt hours). The
energy is the power calculated over time. If, for example, your Sunny Central operates at a constant
output of 150 kW for half an hour and then at a constant output of 250 kW for another half hour, it
has fed 200 kWh of energy into the gird within that hour.
Ethernet
Ethernet is a cable-based data network technology for local data networks. It allows data exchange
in the form of data frames between all devices connected to a local network (e.g. computer, printer).
Fast Ethernet
Fast Ethernet is a further development of Ethernet which works at 100 Mbit/s. Also see "Ethernet".
40 SCUS-BE-BUS120514 User Manual
Page 41

SMA America, LLC Appendix - Glossary
Maximum Power Point (MPP)
Operating point with the maximum output power. This operating point varies with the PV radiation
and temperature conditions of the modules.
NEMA
Abbreviation for National Electrical Manufactures Association
NFPA
Abbreviation for National Fire Protection Association
Patch Cable
A patch cable is used, for example, to connect a computer to a switch or router. A patch cable is an
8-wire twisted pair cable with an RJ45 plug on each end.
Power
The power is measured in W (watts), kW (kilowatts) or MW (megawatts). Power is a present value.
It displays the power the Sunny Central is currently feeding into the grid.
PV
Abbreviation for photovoltaic, designates the conversion of PV energy into electrical energy.
PV Cell
An electronic component which generates electrical energy when irradiated with sunlight. Since the
voltage produced by a PV cell is very small (approx. 0.5 V), several PV cells are combined to form a
PV module. The most common material presently used for PV cells is silicon, which is manufactured in
different forms (monocrystalline, polycrystalline, amorphous).
PV Energy System
A PV power plant is a power plant in which a portion of the PV irradiation is converted to electrical
energy by means of PV cells. The DC voltage won this way is converted to AC voltage by an inverter
(for example, Sunny Central) and is fed into the electricity network.
PV Inverter
A device for converting the direct current (DC) from the PV generator into alternating current (AC),
which is required by most normal household devices and especially for feeding energy into an
existing supply grid.
PV Module
A collection of PV cells in a housing that protects the sensitive cells from mechanical stresses and
allows easy installation.
PWM
Abbreviation for Pulse Width Modulation
Router
A router connects several computer networks together.
User Manual SCUS-BE-BUS120514 41
Page 42

Appendix - Glossary SMA America, LLC
RS485
RS485 is an interface standard for cable-bound data transmission. RS485 allows communication with
50 inverters and communication devices over a distance of 4,000 ft.
String
Describes a group of PV modules connected in series.
Sunny Central
The Sunny Central is an inverter for large PV power systems. This inverter concept is one in which all
PV modules are connected to each other (in series and/or parallel) and a single inverter is used for
feeding energy into the grid.
Sunny Portal
Sunny Portal is a web-based service provided by SMA which offers the possibility of creating a
personal Sunny Portal website on which the data pertaining to a photovoltaic plant can be displayed.
Additionally, the Sunny Portal archives this data. The PV power system data is available worldwide
over the Internet.
Sunny SensorBox
The Sunny SensorBox and the sensors enable you to acquire environmental data of your PV power
system which are relevant for performance evaluation. For this purpose, the Sunny SensorBox is
equipped as standard with an integrated irradiation sensor and an external module temperature
sensor. The Sunny SensorBox delivers the sensor data via an RS485 interface to the SMA
communication devices (e.g. Sunny WebBox).
Sunny Central String-Monitor
The DC cables from the PV generators are collected in the Sunny Central String-Monitor. The Sunny
Central String-Monitor monitors the current of the PV modules and can detect failures, e.g., the failure
of a module.
Sunny WebBox
The Sunny WebBox collects the data from the Sunny Central continuously. To read the data, the
Sunny WebBox can be connected to a laptop or PC. The data can be processed with Sunny Portal,
for example.
Switch
A switch is a network component which allows the connection of several computers or network
segments in a local network.
THD
Abbreviation for Total Harmonic Distortion
42 SCUS-BE-BUS120514 User Manual
Page 43

SMA America, LLC Contact
9 Contact
If you have technical problems concerning our products, contact the S MA Ser vicel ine. W e requ ire th e
following information in order to provide you with the necessary assistance:
• Inverter type
• Type and number of modules connected
• Serial number of the Sunny Central
• Error number of the Sunny Central
• Display of the Sunny Central
SMA Solar Technology America, LLC
6020 West Oaks Blvd, Ste 300
Rocklin, CA 95765
Tel. +1 916 625 0870
Tel. +1 877-MY SMA TECH
Tel. +1 877 697 6283 (Toll free, available for USA, Canada and Puerto Rico)
Fax +1 916 625 0871
Service@SMA-America.com
www.SMA-America.com
SMA Solar Technology Canada Inc.
2425 Matheson Blvd. E, 8th Floor
Mississauga, ON L4W 5K5
Canadá
Tel. +1 877 506 1756 (Toll free, available for Canadá)
Service@SMA-Canada.ca
www.SMA-Canada.ca
User Manual SCUS-BE-BUS120514 43
Page 44

4.""NFSJDB1SPEVDUJPO--$
XXXSMAANFSJDBDPN
 Loading...