

Page 1
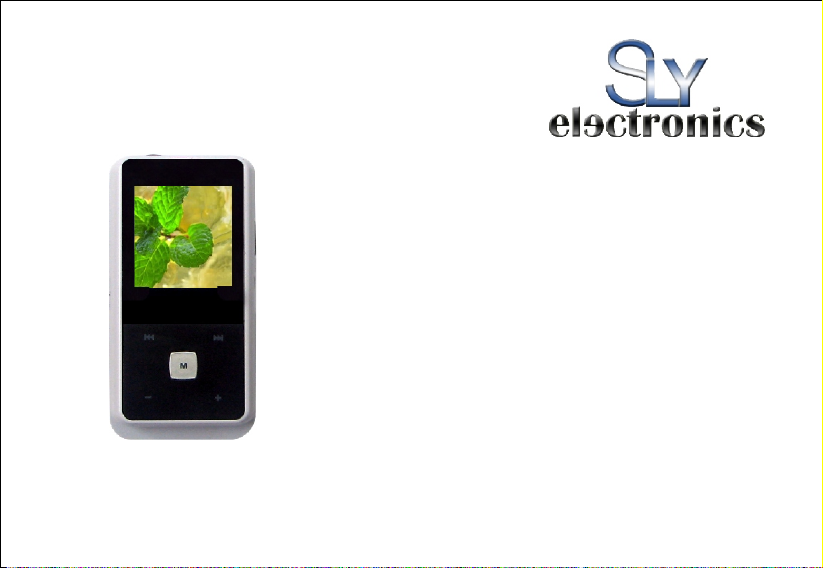
SLV152G
SLV154G
Designed in the United States V1
Page 2

Reminder: Thank you for selecting our product. In order to ensure correct operation, please read this manual carefully.
1.
Instruction
(1) We try to ensure the correctness and completeness of this manual, but mistakes and omission may still exist.
(2) Our company is not responsible for any data loss caused by malpractice of software, wrong repair or other accidents,
or any indirect loss herein arising.
(3) Revision to the software and hardware or user’s manual is not subject to further notification, and our company boasts
the final interpretation right to this manual.
(4) The software, hardware or user’s manual are subject to change and improvements should be done without notice. All rights
reserved.
(5) Don't press the screen or the buttons too hard to avoid damages to the player.
1
Page 3

TABLE OF CONTENTS
1. INSTRUCTION............................................................................................. 1
2. PRECAUTION................................................................................................5
3. SYSTEM REQUIREMENT.......................................................................... 6
4. INTRODUCTION............................................................................................ 7
4.1 FEATURES................................................................................................. 7
4.2 BUTTON LAYOUT........................................................................................ 8
4.3 BATTERY CHARGE......................................................................................9
4.4 USB DRIVER INSTALLATION...................................................................... 10
4.5 CONNECTION AND DOWNLOAD ................................................................. 10
4.5.1 Connection to PC ......................................................................10
4.5.2 MP3 music download................................................................ 11
4.5.3 Remove from USB port.............................................................12
4.6 LCD DISPLAY........................................................................................... 14
4.7 MENU...................................................................................................... 15
4.7.1 Main menu................................................................................. 15
4.7.2 Selection and exit......................................................................16
2
Page 4

4.8 POWER ON AND OFF ................................................................................16
4.8.1 Power on player.........................................................................16
4.8.2 Power off player.........................................................................17
5. APPLICATION............................................................................................. 18
5.1 MUSIC PLAYBACK FUNCTION .................................................................... 18
5.1.1 Play all....................................................................................... 19
5.1.2 Internal device...........................................................................19
5.2 PHOTO.................................................................................................... 21
5.2.1 Manual browse........................................................................ 22
5.2.2 Slide show...............................................................................23
5.2.3 Thumbnail..................................................................................23
5.3 MOVIE..................................................................................................... 24
5.4 VOICE ..................................................................................................... 30
5.5 RADIO .....................................................................................................31
5.5.1 FM radio....................................................................................33
5.5.2 FM record..................................................................................34
5.6 RECORD.................................................................................................. 35
5.7 DELETE ...................................................................................................37
5.7.1 Delete one.................................................................................37
3
Page 5

5.7.2 Delete all ...................................................................................37
5.8 SETTINGS................................................................................................ 38
5.8.1 Language .................................................................................. 38
5.8.2 EQ.............................................................................................39
5.8.3 Play mode..................................................................................40
5.8.4 Record Settings......................................................................... 40
5.8.5 FM band....................................................................................41
5.8.6 FM auto scan.............................................................................41
5.8.7 Contrast..................................................................................... 42
5.8.8 Timer off ....................................................................................43
5.8.9 Reset.........................................................................................44
5.9 ABOUT .................................................................................................... 44
5.10 EXIT.................................................................................................. 44
6. OTHER FUNCTIONS................................................................................... 45
6.1 A-B PLAY MODE....................................................................................... 45
6.2 BUTTON LOCK ......................................................................................... 45
7. TROUBLE SHOOTING................................................................................ 46
8. SPECIFICATION.......................................................................................... 47
4
Page 6
2. Precaution
(1) Do not use this player when driving, riding or operating any other vehicles as it may lead to traffic accidents, which
is illegal in some regions. Even when walking on the road, especially crossing the roads, listening with high volume
is also hazardous. Please pay special attention or stop using this player in places with potentia l hazard.
(2) Before powering on the player, please plug in the earphone to avoid damaging the earphone as well as
maintenance of the player. Turn off the player when not in use.
(3) Keep it clean. Do not place it near heat resource or subject to direct sunlight, dust, humid or rain.
(4) If the surface becomes dusty, clean it with a soft, slightly dampened cloth. Never use any alcohol or diluted
detergent to clean the cabinet.
(5) Do not use it in extra-dry environment to avoid electrostatics.
(6) Please make sure that the player will not be disconnected in the process of formatting or uploading and downloading
to avoid program mistakes.
(7) When it is used as mobile disc, make sure read and write files with correct method. Any mal-operation may lead to the
loss of data, which our would not be responsible.
(8) As the software provided by original equipment manufacturer has the optimum flash storage speed, all players with
memory less than 128MB cannot be formatted as FAT-32 in the operating system.
5
Page 7
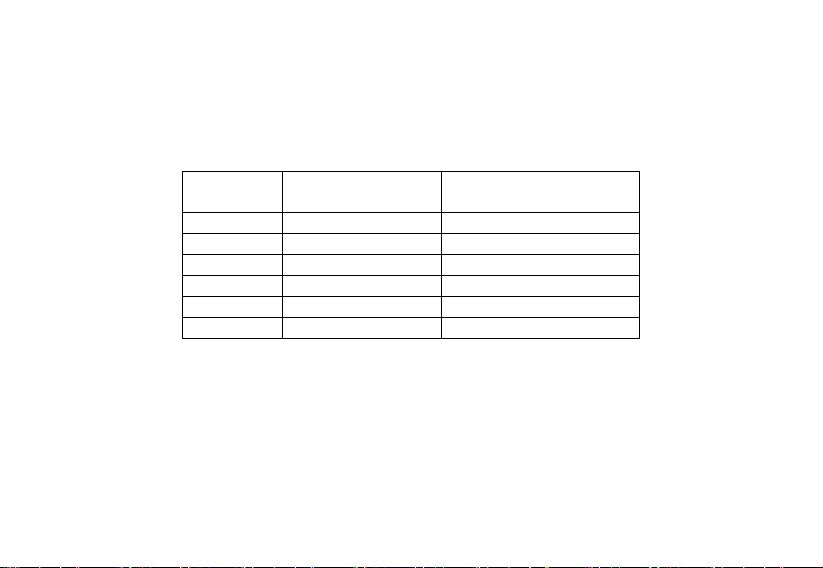
(9) Attention: Because of the different memory calculating method and the player software (firmware) is stored in the device flash
memory and, it will cause the difference between flash memory marked capacity and real capacity. The real flash memory
capacity is lesser than the marked memory capacity of this device is normal. Due to different firmware size, it will have the
different free flash memory capacity. Please refer to the following table for more details.
3. System requirement
System requirement of MP3 player:
Microsoft ® Windows ® 98SE ® / 2000 / ME / XP(Service pack 1 or higher)
Intel® Pentium® II 350MHz, AMD® K6-2® 450MHz or better processor (Pentium III 450 MHz or higher recommended for MP3
encoding in Creative MediaSource™)
USB port
64MB RAM (128MB recommended)
Marked
Capacity
128MB 122MB~128MB 69MB~127MB
256MB 244MB~256MB 185MB~255MB
512MB 488MB~512MB 417MB~511MB
1GB 953MB~1000MB 858MB~999MB
2GB 1907MB~2000MB 1765MB~1999MB
4GB 3815MB~4000MB 3577MB~3999MB
Real Capacity
Range
Free Capacity Range
After Stored Firmware
6
Page 8

170MB free hard drive space
4. Introduction
4.1 Features
(1) Support formats such as MP3 WMA SMV JPEG BMP
This product supports playback of music files, photo browsing and movie playing with high quality.
(2) Folder management
Easy to choose the folder or music file to play.
(3) FM radio function
This product provides FM radio. The user can also record the favorite FM program in WAV files.
(4) Built-in 1.44" 65K color CSTN LCD
There is a build-in 1.44" color screen, which can display photo and movie clearly.
(5) Removable disc
This product can be connected to PC with USB cable and serves as a removable disc.
(6) Built-in rechargeable Li battery
Charging is convenient and no need to buy extra batteries.
(7) Convenient firmware upgrade
The firmware can be upgraded with software downloaded from Internet or in the attached disc
(if any).
7
Page 9
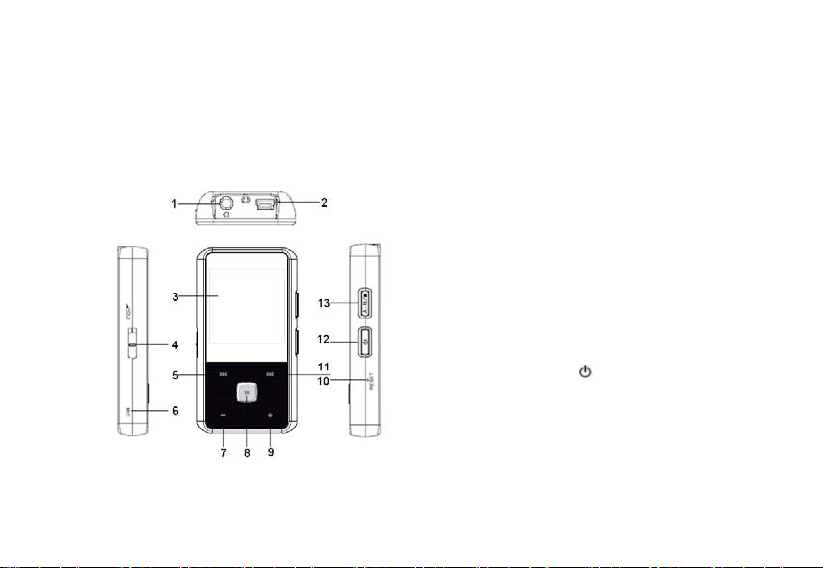
4.2 Button layout
(1) Earphone jack
(2) USB port
(3) Display area
(4) Button lock
(5) Rewind button
(6) Microphone
(7) Volume down button-
(8) MENU (M)
(9) Volume up button+
(10) Reset hole
(11) Fast forward button
(12) Power button
(13) A-B repeat/record button
8
Page 10

Battery charge
This product adopts build-in rechargeable Li battery.
You can connect the mp3 player to PC or use USB adapter to charge the battery.
The battery icon will be displayed at the upper left corner of the screen. The following pictures indicate the charging status
of the battery:
(1) When the battery is charging, the icon will be changing from an empty battery to a full one to indicate the
process. Æ
(2) The following icon will replace the charging one when the battery is full but the power supply is not being cut off.
(3) The player will be automatically shut off when the power is used up. In this case, all setting will be saved.
(4) Power saving mode: User can define the power off mode, such as idle off, sleep off, screen off to save
power. Please refer to the setting instruction in function section for details.
Note:
The battery could be over discharged if the player is not used for a long time (over three months). To avoid over discharged, fully
charge the player every two or three month and keep the voltage of the battery above 50%.
Do not touch the player with bare hands if the built-in battery is leaking. In this case, contact service center for help since the liquid
may remain in the player. If your body or clothes has contacted with the battery liquid, wash it off thoroughly with water. Also, if some of
liquid gets into your eyes, do not rub your eyes but immediately wash them with clean water, and consult a doctor.
9
Page 11
4.3 USB driver installation
(USB driver needs to be installed only when Windows 98SE operating system is used.)
(1) Execute Setup.exe in driver CD and complete the driver installation.
(2) Reboot the PC.
(3) Connect the MP3 player to the USB port of the PC.
4.4 Connection and download
4.4.1 Connection to PC
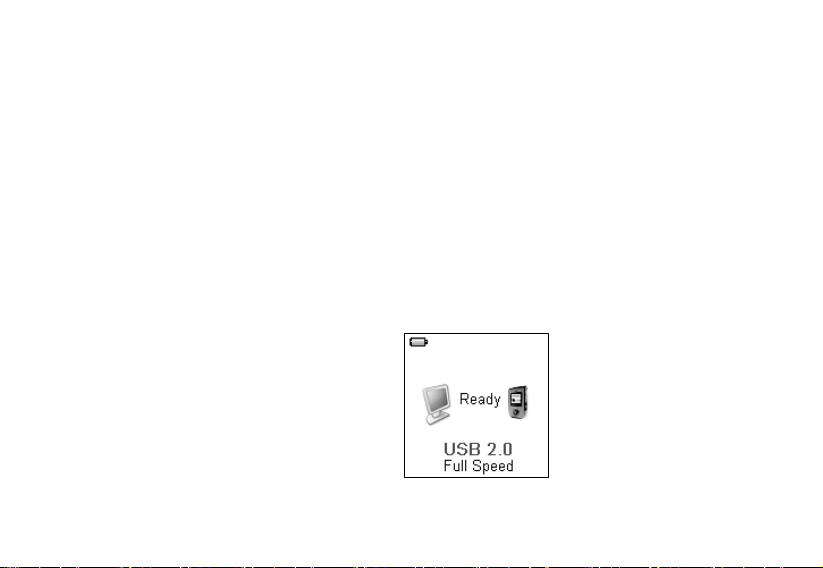
Plug the attached USB cable to PC,and connect the other end to the MP3 player. If the connection is
successful, the screen of player will display the following picture. Please don’t use USB hub or USB
extended line, which may cause the player cannot be found or data cannot be copied.
10
Page 12
4.4.2 MP3 music download
To download the files from your computer, perform the following steps:
1. Open the Windows Explorer or “My computer” The new “Removable Disk” appears.
2. Select the your favorite MP3 or WMA music files on your computer and right click on your mouse
to select “copy”..
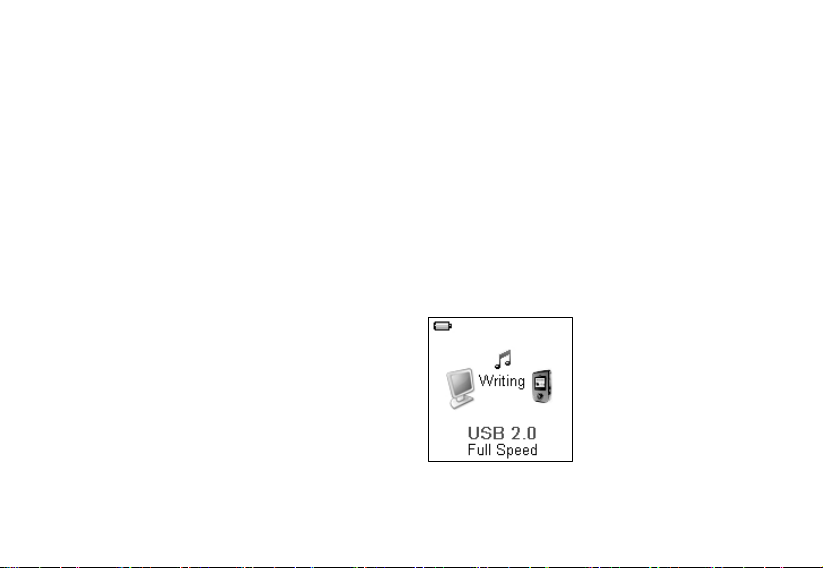
3. Open the new “Removable Disk” and right click on your mouse to select “paste”. The following
picture will appear on your player.
Note: The MP3 player supports up to 500 music files or 30 folders (includes sub-folders) stored. The player
will build the play list by scanning the only first 500 files or 30 folders after turning on. So please do not copy
too many files to the player or build too many folders on the player.
11
Page 13
Remove from USB port 4.4.3
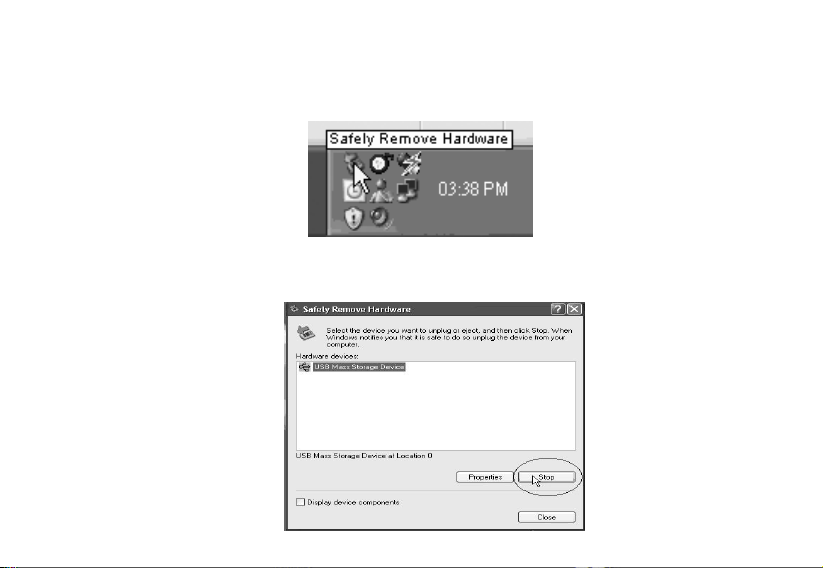
(1) Double click the icon of safely remove hardware on the task column, and the relevant dialog box will be
displayed.
(2) On the picture of safely remove hardware dialog box, select the item of “USB mass storage device” and
cli ck “stop” button. The screen will display “stop a Hardware Device” as point .
12
Page 14
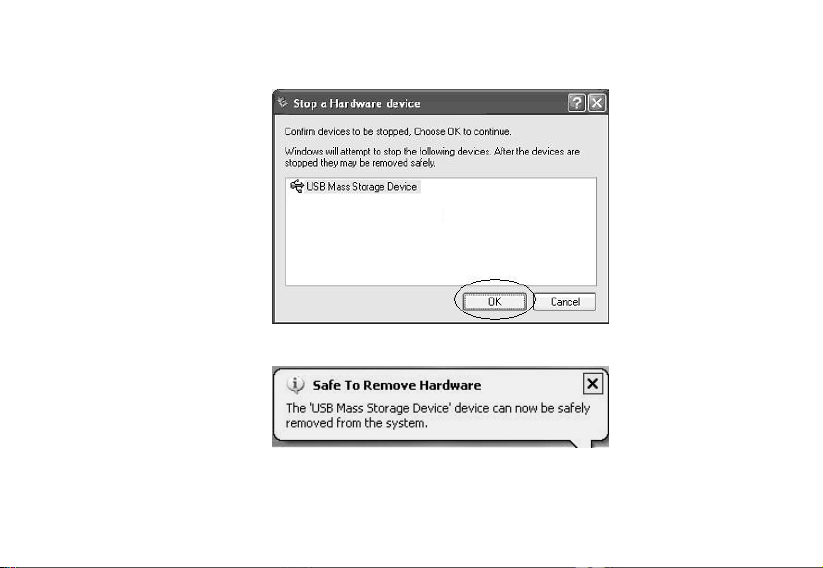
(3) Click “OK” button.
(4) When the screen displays “Safe to Remove Hardware”, the player can be safely removed f rom PC.
Special reminder:
Do not disconnect the USB cable when the data is being transmitted between PC and the player, which may damage
13
Page 15
and lose the data in the player. Disconnection should be conducted only when “device can now be safely removed
from the system” is displayed. When connecting to the computer, all buttons are unavailable. If the player fails to
power on due to data loss or I/O mistake reminder by mal-operation, please refer to the trouble shooting section for
solution.
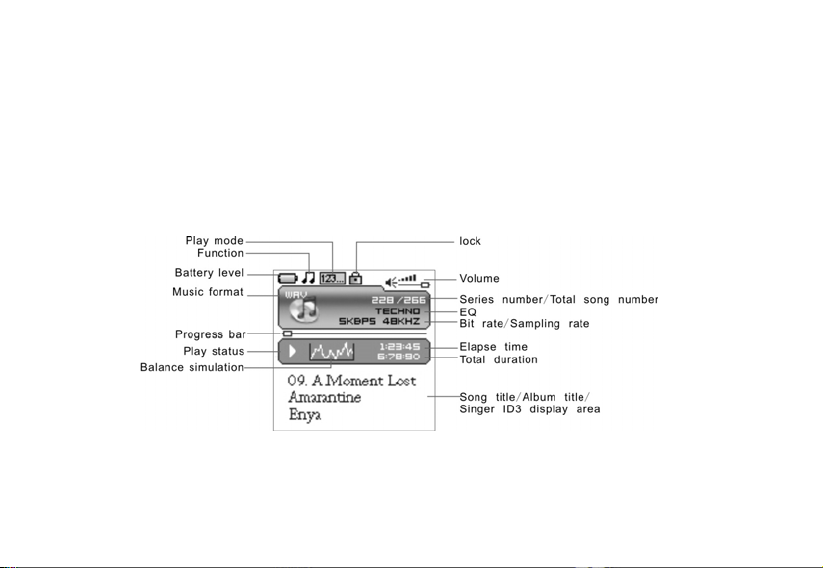
4.5 LCD display
14 15
Page 16

4.6 Menu
4.6.1
Main menu
(1) MUSIC: Select MUSIC in the main menu, the device will enter music sub-menu.
(2) PHOTO: Select PHOTO in the main menu, the device will enter photo sub-menu.
(3) MOVIE: Select MOVIE in the main menu, the device will enter movie function.
(4) VOICE: Select VOICE in the main menu, the device will enter voice playback function.
(5) FM RADIO: Select FM RADIO in the main menu, the device will enter FM radio function.
(6) MIC. RECORD:Select MIC. RECORD in the main menu, the device will enter microphone record function.
(7) DELETE: Select DELETE in the main menu, the device will enter delete sub-menu.
(8) SETTINGS: Select SETTINGS in the main menu, the device will enter setting sub-menu.
(9) ABOUT: Select ABOUT in the main menu to check the memory status and software version of the device.
(10) EXIT: EXIT the main menu and return to the music playback function.
Page 17
4.6.2 Selection and exit
(1) Long press MENU button (M) or press power button to exit and return to the upper level menu. The
uppermost menu is main menu, which includes: music mode, photo mode, movie mode, voice mode, FM
radio mode, record mode, delete mode, setting mode, about and exit.
(2) Select next or previous item by pressing fast forward button or rewind button. If the main menu is in
Music picture, press rewind button to switch to Exit page; if the main menu is in Exit page, press fast
forward button to switch to Music picture.
(3) Press MENU button (M) to confirm and enter the selected item.
4.7 Power on and off
4.7.1 Power on player
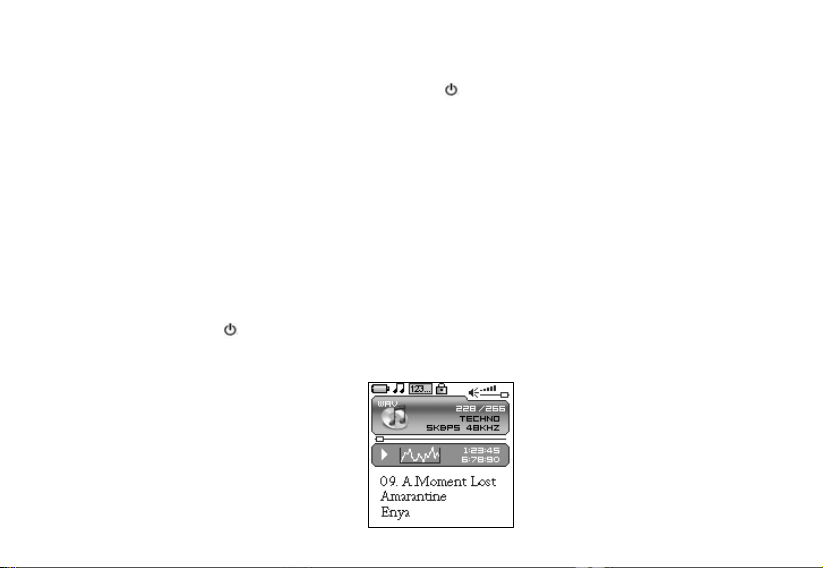
Press power button to turn it on while the player is off. Power on images will be shown before going to the
defaulted music play mode and followed by music playback. The power on time is determined by the number of
music files in the player.
16
Page 18

4.7.2 Power off player
(1) When the player is powered off, the following statuses will be saved, which includes: current mode, music
elapse time, user settings.
(i.e. volume, EQ, and timing off and play mode etc.)
(2) If the player is powered off normally (i.e. the user shut it off or it is shut off according to the setting), the
above-mentioned modes will be saved. If the player is powered off by pressing reset button, the
above-mentioned modes will not be saved.
(3) Except in record mode, long press power button until the letters of Bye Bye appears and the screen will
turn dark, the player will be powered off.
17
Page 19
5. Application
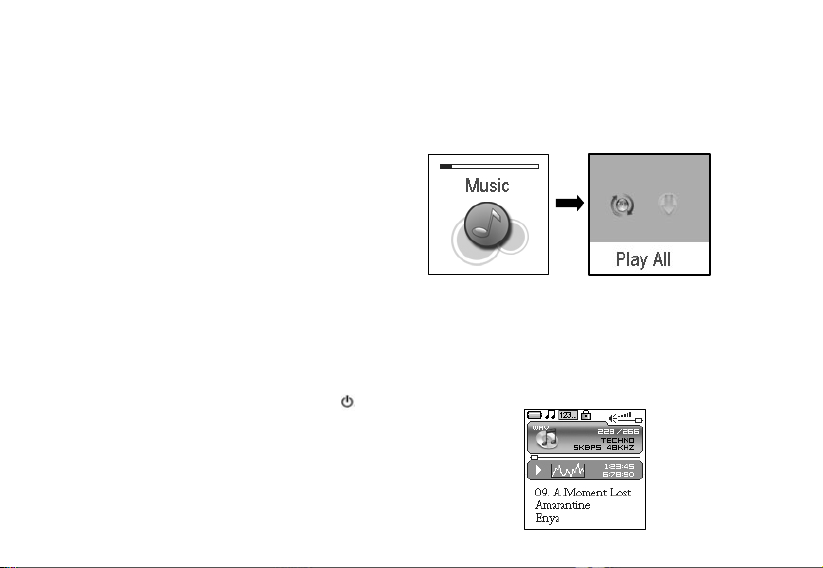
5.1 Music playback function
Press rewind button or fast forward button in the main menu to select Music function. Press MENU button (M) to
enter the sub-menu of Music: Play All or Internal Device.
Operation instruction:
(1) When the music is stopped or played, press rewind button or fast forward button to select previous or
next file.
(2) When playing the music, long press rewind button or fast forward button to move fast backward or
forward within the track.
(3) When playing the music, press MENU button (M) to pause and press MENU button (M) again to resume
the playing. Press power button to stop the playing.
18
Page 20
(4) W hen the music is playing, press A-B/●button to set the start point of repeat section A-B, the screen
displays AÆ, press that button again to set the end of repeat section A-B, the screen will display AÆ B and
start repeating section AB. Press A-B/● button for the third time to cancel section AB repeat function.
5.1.1
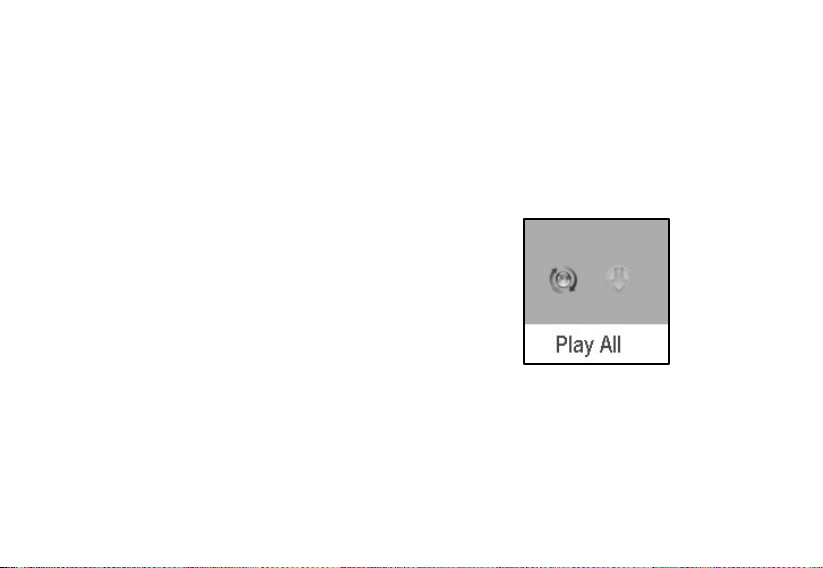
Play all
Press rewind button or fast forward button to select Play All, and press MENU button (M) to enter and start
playing all music in the player.
5.1.2
Internal device
Press rewind button or fast forward button to select Internal device,and press MENU button (M) to enter the
function of play list. Press rewind button or fast forward button to select folder or a single music and press
MENU button (M) to start playing. Use volume up button+ or volume down- button to enter or exit a certain folder. The
player will play the selected music or all the music in a certain selected layer of folder (sub folder inclusive).
19
Page 21
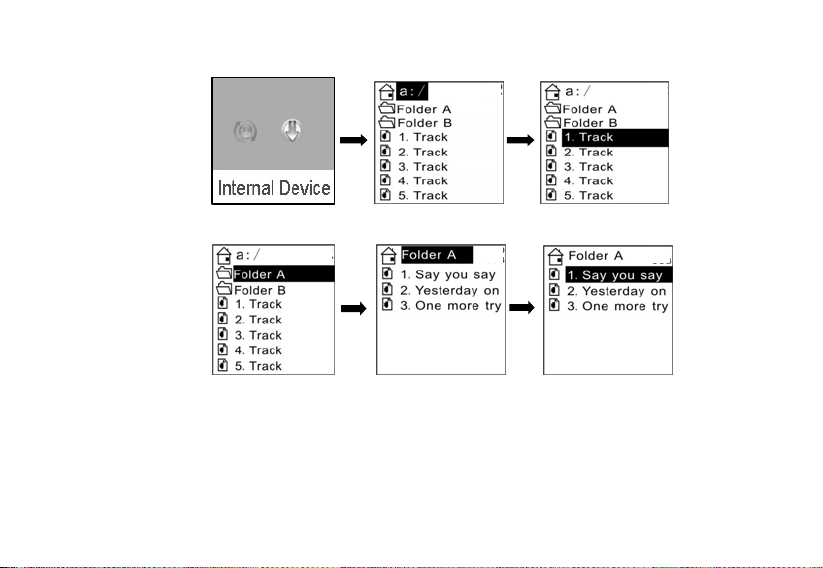
Play one file
Play one folder
The difference of playing songs in folders and playing under root directory
20
Page 22
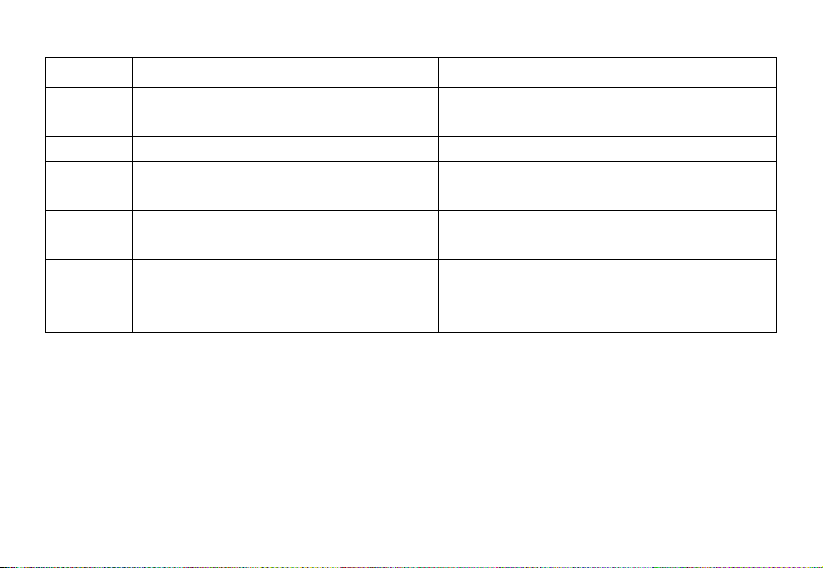
Play mode Under root directory In folder and its subdirectory.
Normal Play all the songs under root directory and in folders
one time and then stop.
Repeat one Repeat playing the current song. Repeat playing the current song in current folder.
Repeat all Repeat playing all the songs under root directory and
in folders.
Random Repeat playing all the songs under root directory and
in folders.
Rand.&Rep. Shuffle repeating play all the songs under root
directory and in folders.
Play all the songs in current folder one time and then stop.
Repeat playing all the songs in current folder except the
songs in folder’s sub-folder.
Repeat playing all the songs under root directory and in
folders.
Shuffle repeat playing all the songs under root directory and
in folders.
5.2 Photo
Press rewind button or fast forward button in the main menu to select Photo function. Press MENU button (M) to
enter the submenu of Photo : Manual,Slide Show and Thumbnail. This player supports pictures in JPEG and BMP
formats. In order to get a smooth and clear display, please convert the resolution of pictures to 128x128 on PC
and then put them in PHOTO folder (If there is no PHOTO folder, please create one).
21
Page 23
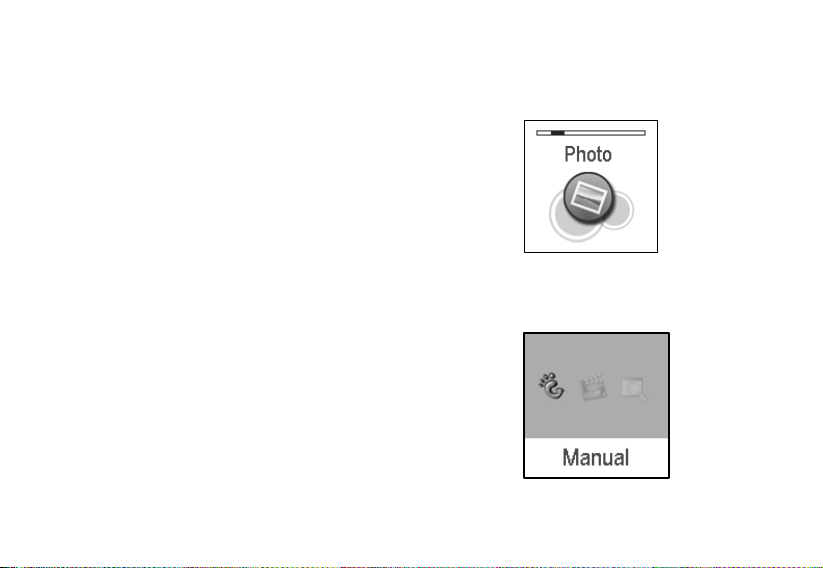
Please be noted that the player cannot find that photo if it is not stored in PHOTO folder of the player. The
PHOTO folder will be created by the software automatically if there is no PHOTO folder on the player.
Manual browse
After entering photo function, press rewind button or fast forward button to select manual browse display and
press Menu button (M) to start displaying photo manually. In manual mode, press rewind button or fast forward
button to to select the previous or next picture.
22 23
Page 24
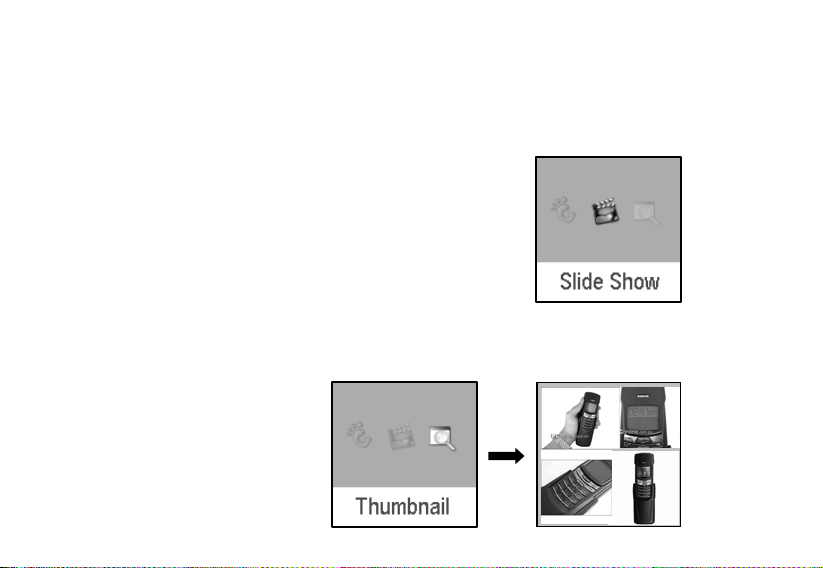
5.2.1 Slide show
After entering photo function, press rewind button or fast forward button to select slide show display and press
Menu button (M) to start displaying photo in slide show. Under slide show, the photos are displayed automatically.
Rewind button or fast forward button are still under function in this mode.
5.2.2 Thumbnail
After entering photo function, press rewind button or fast forward button to select thum bnail display and press
MENU button (M) to start displaying photo in thumbnail form. Rewind button or fast forward button are used
to move forward or backward.
Page 25

5.3 Movie
Press rewind button or fast forward button in main menu to select Movie function and press M ENU button (M) to
enter Movie play.
(1) This player supports the playing of movie files in SMV format. Convert the desired movie (MPG, MP4,
Real Player, Quick Time, DVD, AVI, WMV format) to SMV format with transcoder software (video2smv.exe) in
the attached CD .
(2) Movie should be put in MVIDEO folder of the player. If there is no such folder, please create one.
Please be noted that the player cannot find those movie files if they are not stored in MVIDEO folder
of the player. MVIDEO folder will be created by the software automatically after power on.
(3) When the movie is playing, press volume up button + or volum e down buton – to adjust the volume.
24
Page 26
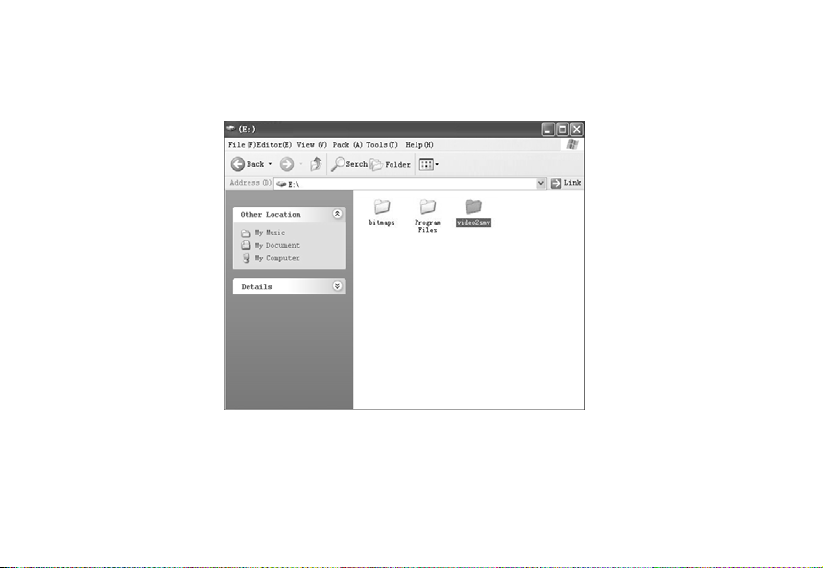
How to transfer the movie file to SMV format by Video2smv.exe process
a. Select video2smv and double click it to enter the folder as indicates in the following figure:
25
Page 27
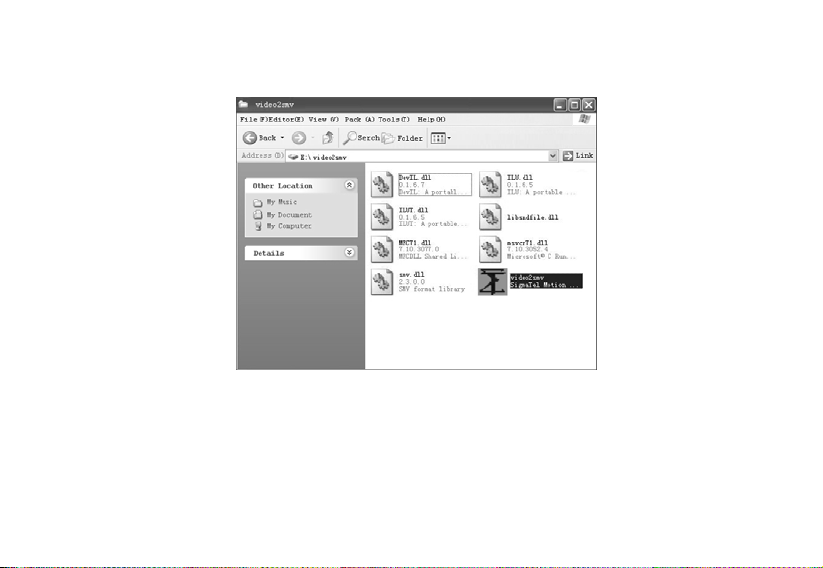
b. Select and double click video2smv.exe program to enter as indicates in the following figure:
.
26
Page 28
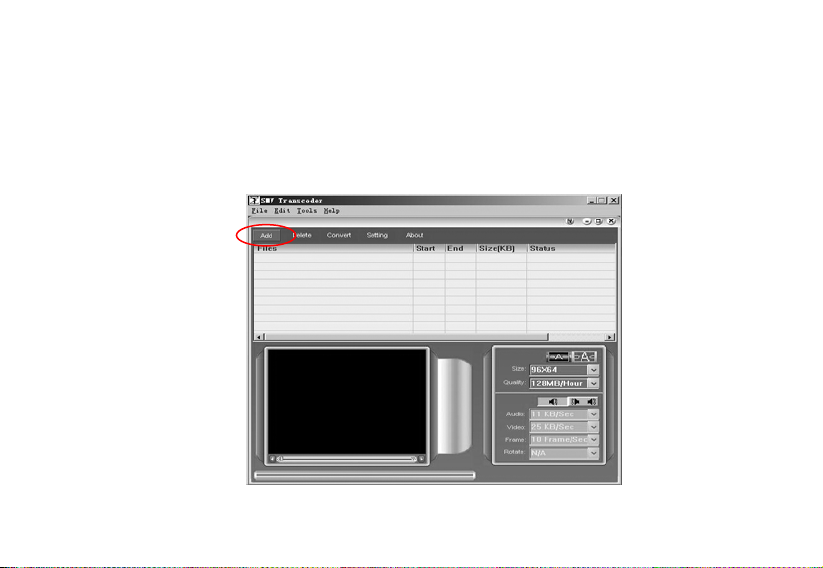
c. Click “Add” to select the files that need to be converted. You can set the size and quality at the same time. The screen
resolution of this player is 128x128 pixel, so please set the size less than 128*128 pixel. The higher quality produces larger SMV file
size and vice versa. The higher the quality setting value, the clearer the picture will be and vice versa. Click Setting to select the
directory where the converted SMV files store.
27
Page 29
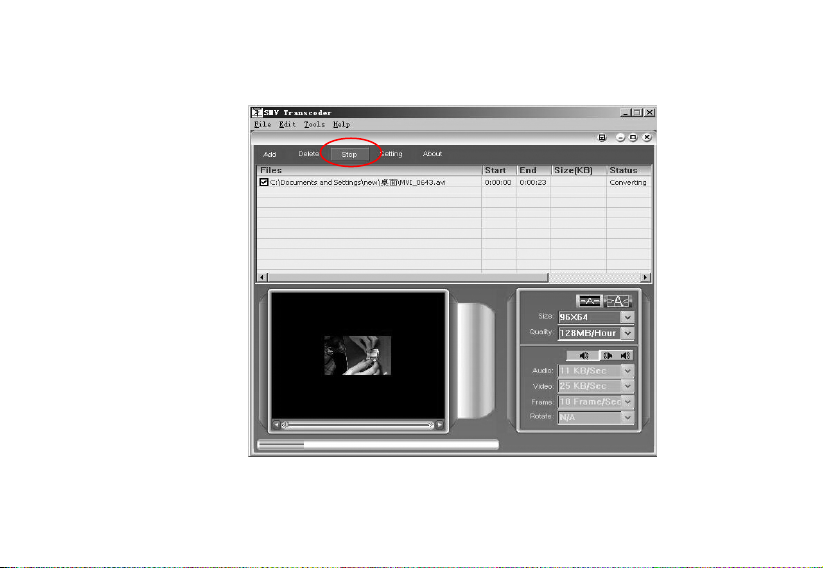
d. Click Convert to start the converting. Meanwhile you can click “stop” to stop transferring.
28
Page 30
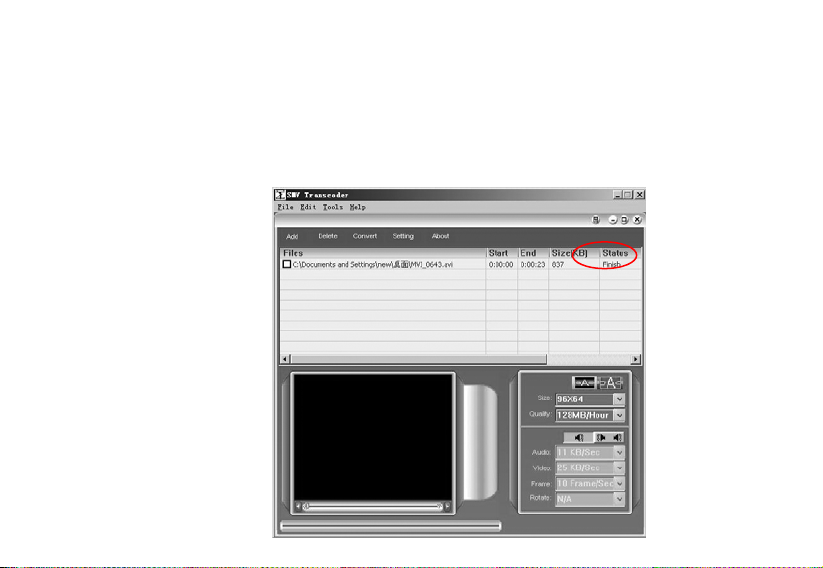
e. When there is Finish appears in the column of Status, it means the conversion is finished. You may close the windows and
transfer the formatted movie with SMV format to the player.
Attention : If you can use the windows media player to play the video files in your PC, and the video file type is supported by video2smv,
it will be able to be converted to SMV format. If it shows no Codec to convert the video files, please try to download and install the free
Codec pack on Internet, such as K-Lite codec pack. (http://www.k-litecodecpack.com)
29
Page 31
5.4 Voice
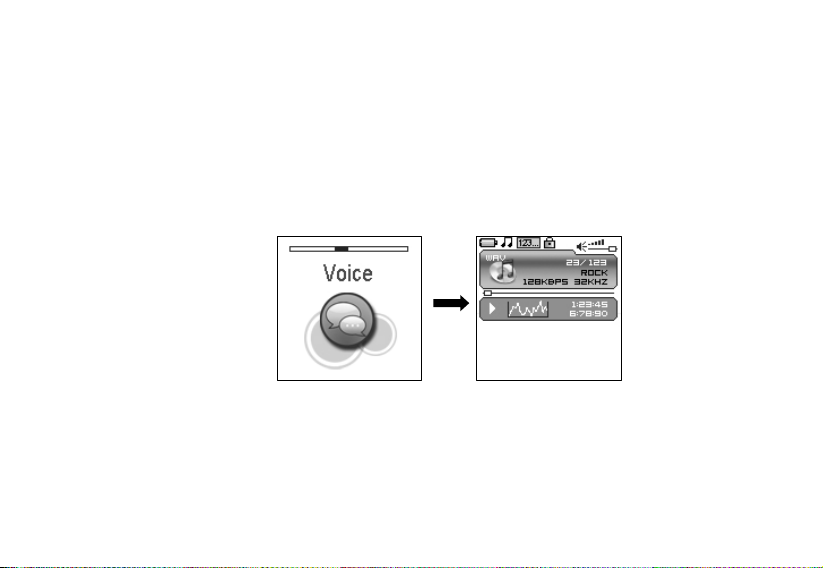
Press rewind button or fast forward button in the main menu to select Voice function and press MENU button (M)
to enter the voice play function.
The following functions are provided in voice mode:
(1) Play recorded files from FM
(2) Play recorded files from microphone
(3) Support record files in WAV format (ADPCM),that stored in VOICE directory of the player.
V002.WAV
Operation instruction:
(1) When in voice standby or play mode, press rewind button or fast forward button to select the previous or
next voice file.
(2) When in voice play mode, long press rewind button or fast forward button to move fast backward or
30
Page 32
forward within the track.
(3) When in voice play mode, press MENU button (M) to pause and press MENU button (M) again to resume
play. Press power button to stop playing.
5.5 Radio
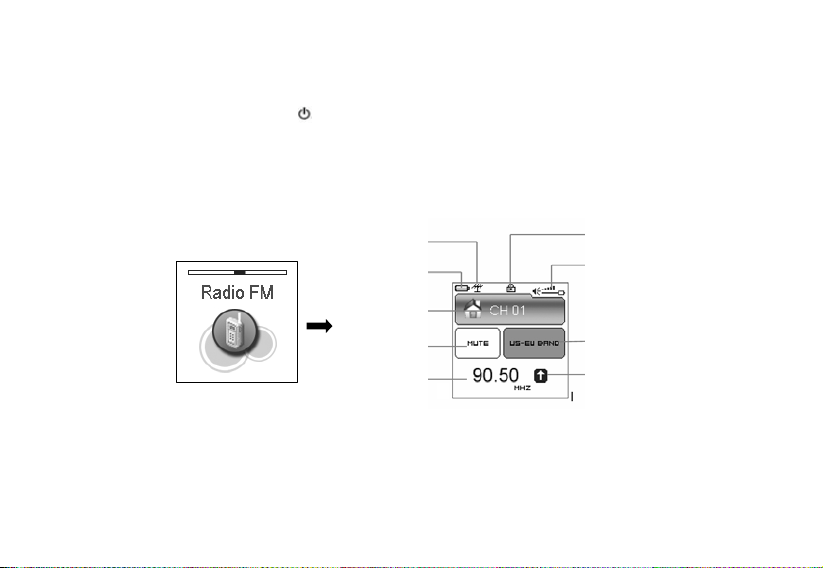
Press rewind button or fast forward button in the main menu to select FM Radio function and press menu
button (M) to enter FM Radio play function.
Current function
Power level
Pre-set radio
FM audio output
Current channel
Locked state
Volume
Radio band
Band scanning
(1) Up to 20 radio stations can be stored in the radio.
(2) 2 radio band: US-EU band(87~108MHz),Japan band( 76~91MHz),which can be set in setting menu.
(3) Autoscan function: enter the Auto Scan in the setting menu, push the or to select
31
Page 33
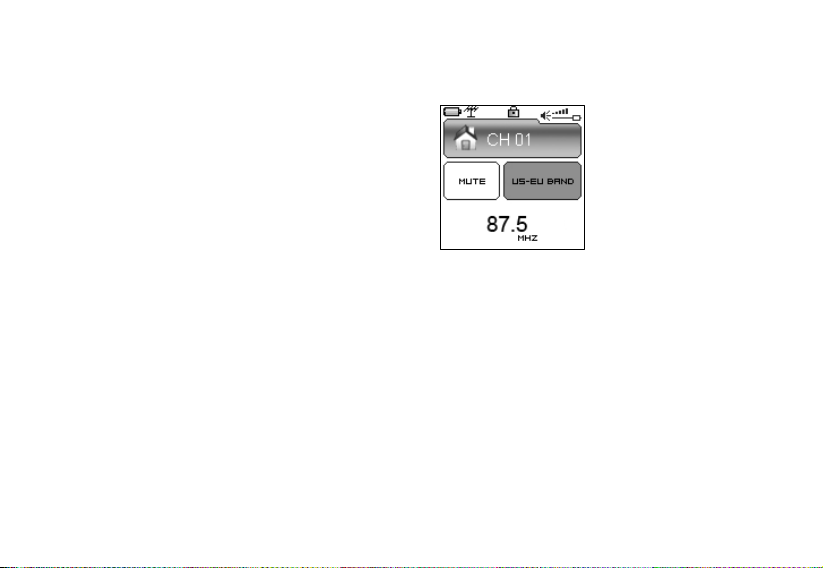
YES, Press the MENU button (M) to begin scanning. It will play at the first station after scanning out all the
stations in this FM band.
AUTOSCANNING…
32 33
Page 34
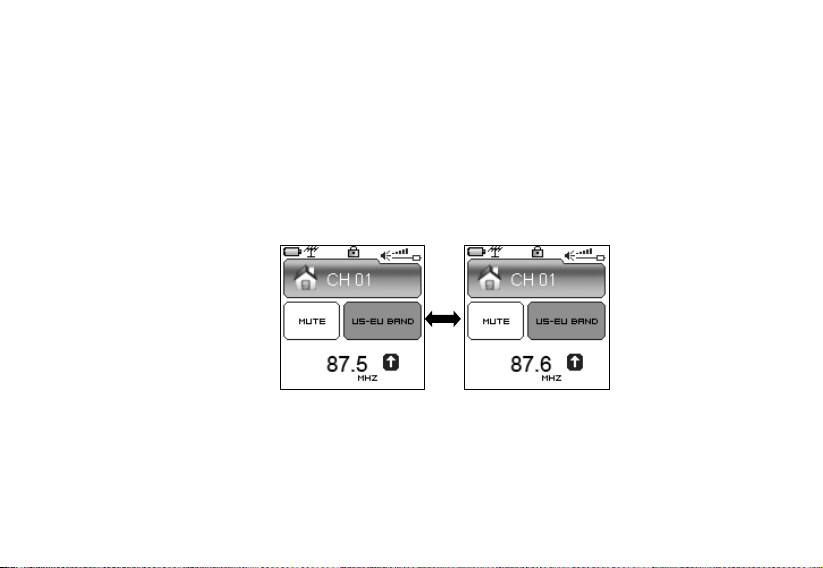
5.5.1 FM radio
(1) Press MENU button (M) to switch radio station from CH01ÆCH02Æ …ÆCH20.Press A-B/● to switch radio
station from CH01ÆCH20Æ CH19Æ…Æ CH01. When switching the radio station, the player will save the
current frequency to the current station number before skip to the next station.
(2) Press rewind button or fast forward button to fine-tune the frequency forward or backward by 0.1MHz.
(3) Long press rewind button or fast forward button to search for the radio station with the strongest signal
forward or backward.
Page 35
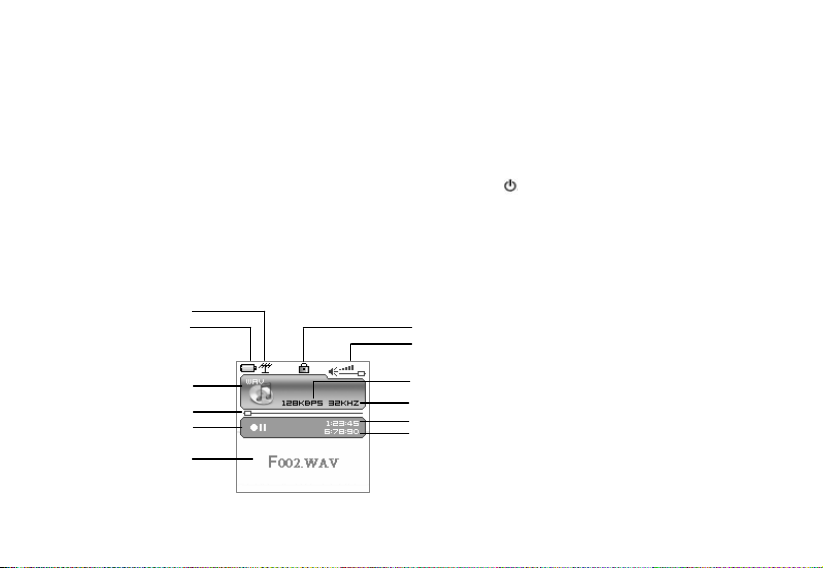
FM record 5.5.2
(1) Long press A-B/● button to start FM record. At this moment, the player will display the picture of FM record
and record icon. The recorded content is FM program but not microphone. The flashing record status icon
indicating record in progress; At this moment, press MENU button (M), record pause and the icon
will appear when FM record pause. But FM radio will continue when only FM record pause. Press MENU
button (M) again to resume FM record. Press power button to stop the FM record. When FM record
stops, the picture will be changed to FM radio function. Enter voice function to listen to the recorded FM
program.
(2) When the battery is running out of power in record state, there will be low energy level warning. The
recorded files will be saved before player exits from record state and returns to FM radio.
Power level
Current function
Format
Record progress
Record state
Title of record file
Locked state
Vol ume
Bit rate
Sampling rate
Elapse record time
34
Page 36
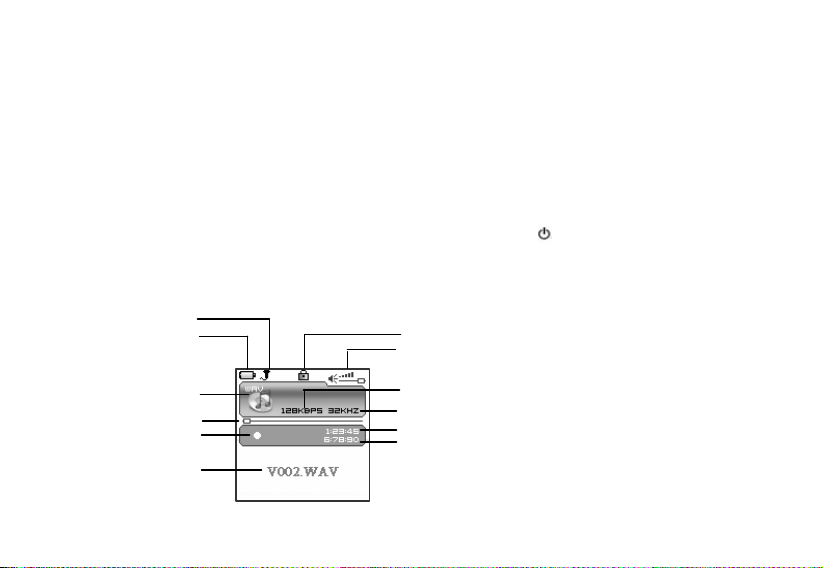
5.6 Record
Press rewind button or fast forward button in the main menu to select Mic. Record function and press MENU
button (M) to enter Mic. Record function. Or long press A-B/● button to enter microphone record function when the
player is in any state other than FM radio.
(1) The flashing recording state icon indicates recording is in progress; At this moment, press MENU button
(M), recording pause icon will appear and the microphone recording will be paused. Press MENU button
(M) again to resume microphone recording. Press POWER button to stop microphone recording. When
the microphone recording is stopped, the interface will be changed to voice playback function.
Current function
Power level
Format
Record progress
Record state
Title of record file
Locked state
Vol ume
Bit rate
Sampling rate
Elapse record time
Leftover record time
35
Page 37

(2) 7 recording sampling rate: user can set the sampling rate of recorded file. The higher the sampling rate, the
better recording quality will gain. The lower the sampling rate, the more common quality will gain with
longer recording duration. There are total 7 sampling rate available: 8KHz, 11KHz, 16KHz, 22KHz, 32KHz,
44KHz and 48KHz.
(3) If the memory is full during the recording, Device Full will be displayed and the player will stop
recording and save the recorded files automatically. No more recording can be done in this case.
(4) If the battery is running out of power during the recording, Low Battery will be displayed and the player will
stop recording and save the recorded files automatically. No more recording can be done in this
case.
(5) The recorded file is defined automatically as V###.WAV,### is a figure composed of three numbers
starting with 001 for the first file and 002 for the second one…The format of recorded file is WAV.
36
Page 38
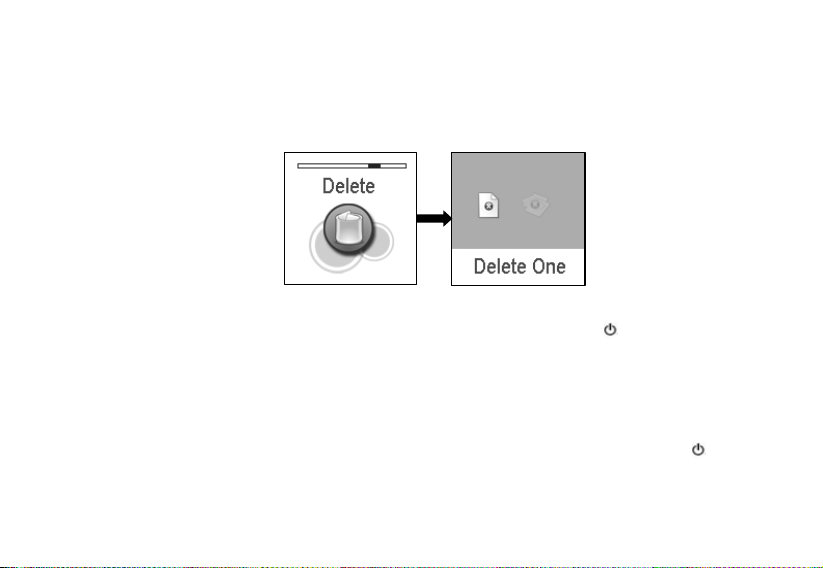
5.7 Delete
Press rewind button or fast forward button in the main menu to select Delete function and press MENU button (M)
to enter Delete function, which includes delete one and delete all. Note that, deleted files can’t be recovered.
5.7.1
Delete one
Press rewind button or fast forward button to select the files that need to be deleted and press MENU button
(M) to confirm the deletion. Long press MENU button (M) or press power button to quit the deletion and
return to the main menu.
5.7.2 Delete all
Press rewind button or fast forward button to select if or not to delete all files in the pla yer. Press MENU
button (M) to confirm the selection. If YES, all music files(MP3 and WMA),voice files (WAV) and movie files
(SMV) user’s own files and photo files(JPEG and BMP) in the player will be deleted. Long press button to
stop deleting, but deleted files can’t be recovered.
37
Page 39
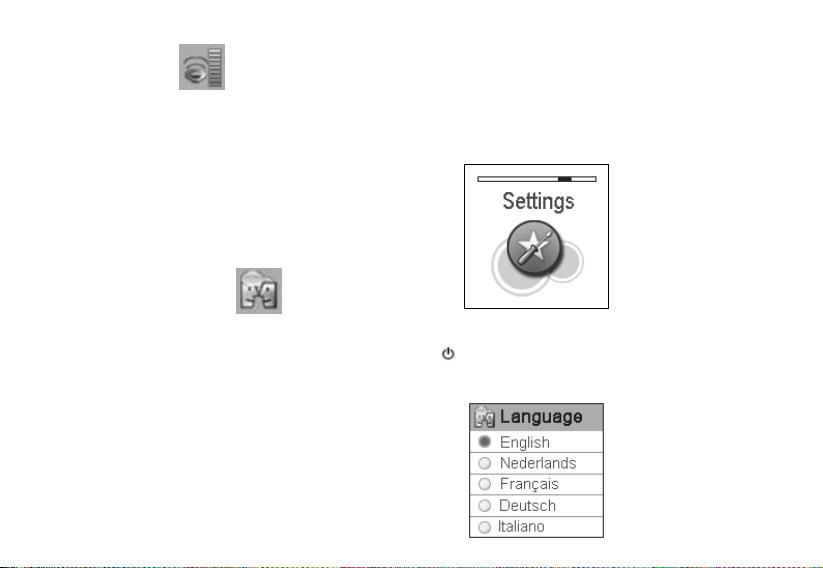
5.8 Settings
Press rewind button or fast forward button in the main menu to select Settings menu and press ME NU button (M)
to enter Settings menu, which includes language setting, EQ setting, play mode setting, recording format setting, FM
band setting, FM auto scan setting, contrast setting, timer off and reset.
Language 5.8.1
Press rewind button or fast forward button in language setting menu to select language and press MENU b utton (M)
to confirm. Long press MENU button (M) or press power button to skip this setting. The following languages are available:
English, Dutch, French, German, Italian, Portuguese, Spanish, Hebrew, Poland and Hungarian. It will be difference due to
different firmware version
38
Page 40
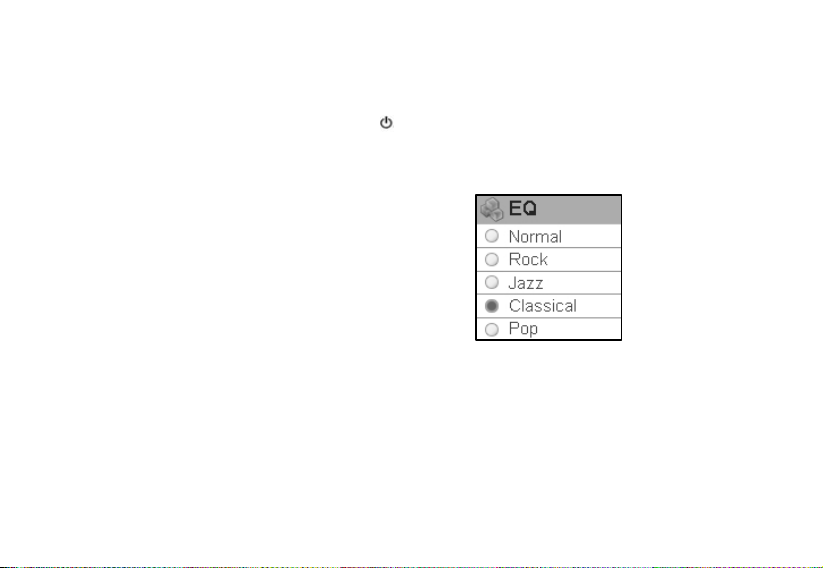
5.8.2 EQ
Press rewind button or fast forward button in EQ setting menu to select EQ and press MENU button (M) to confirm.
Long press MEN U bu tton (M) or press power button to skip this setting. When playing music, the change of EQ can be
felt in the earphone. EQ of this player includes: Normal, Rock, Jazz, Classical, Pop, Ultra Bass, Blues, Club, Dance, Full
Bass and Treble, Full Treble, Large Hall, Live, Party, Reggae, Ska, Soft Music, Soft Rock, and Techno.
39
Page 41
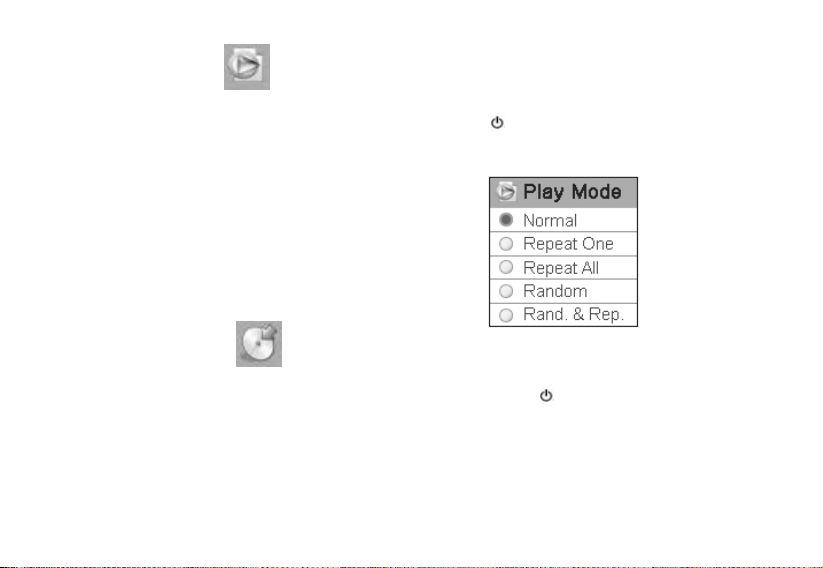
5.8.3 Play mode mode
Press rewind button or fast forward button in play mode setting menu to select play mode and press MENU button
Press rewind button or fast forward button in play mode setting menu to select play mode and press MENU button
(M)to confirm. Long press MENU button (M)or press power button
(M)to confirm. Long press MENU button (M)or press power button to skip this setting. The play mode of this
player includes: normal, repeat one, repeat all, random and random & repeat. Random and random & repeat can only
be applied to music play.
5.8.4 Record Settings
Press rewind button or fast forward button in Record Type setting menu to select recording format and press MENU
button (M) to confirm. Long press MENU button (M) or press power button to skip this setting. This setting is
used to set the sampling rate of microphone recording. The available recording formats for this player are: 8KHz,
11KHz, 16KHZ, 22KHz, 32KHz, 44KHz and 48KHz.
40
Page 42
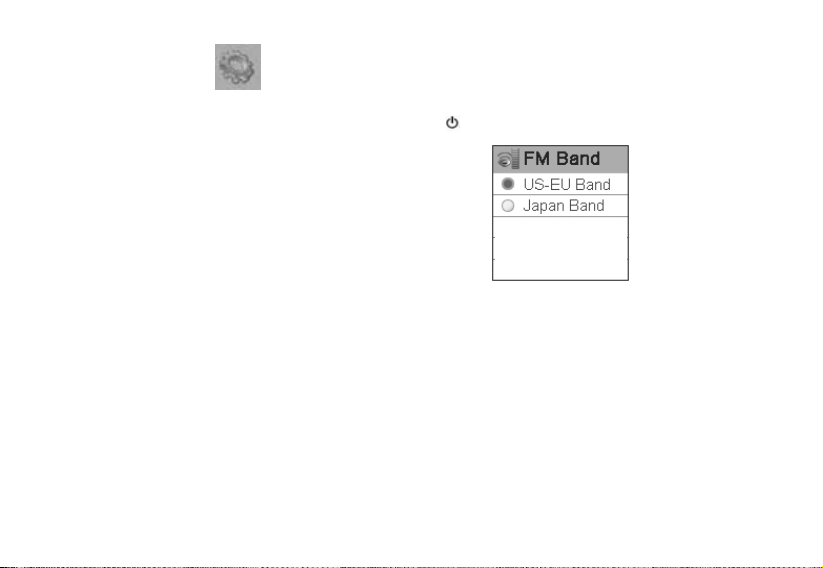
5.8.5 FM band M band
Press rewind button or fast forward button in FM band setting menu to select FM band and press play buttonto
Press rewind button or fast forward button in FM band setting menu to select FM band and press play buttonto
confirm. Long press MENU button (M) or press power button
confirm. Long press MENU button (M) or press power button to skip this setting. FM band includes: US-EU band
and Japan band.
5.8.6 FM auto scan
Select “YES” to start FM auto scan, while select “NO” to return to the setting menu. All the keys will be no response
during the Autoscan is executing till autoscan completed.
41
Page 43
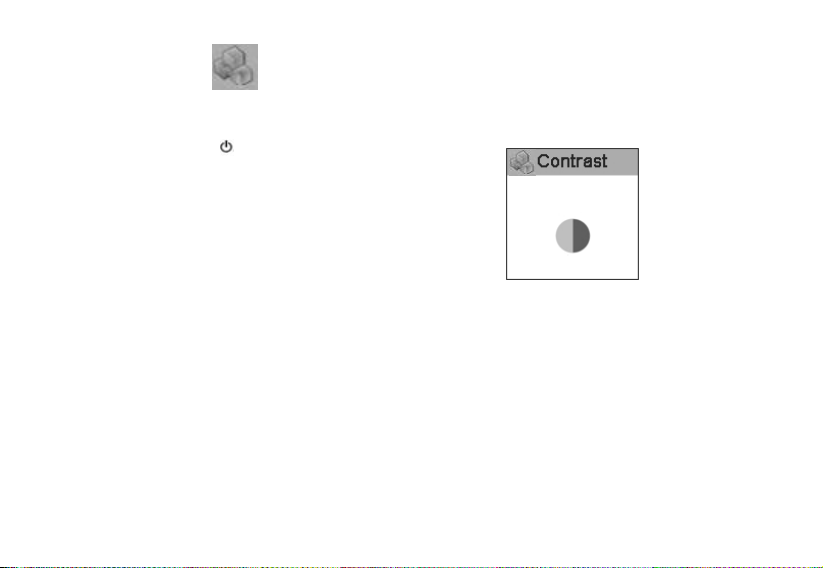
5.8.7 Contrast
Press rewind button or fast forward button in the contrast setting menu to select contrast and press MENU button
Press rewind button or fast forward button in the contrast setting menu to select contrast and press MENU button
(M) t o confirm. Rewind button and fast forward button are used to adjust the contrast. Long press MENU button (M)
(M) t o confirm. Rewind button and fast forward button are used to adjust the contrast. Long press MENU button (M)
or press power button
or press power button to skip this setting.
42
Page 44
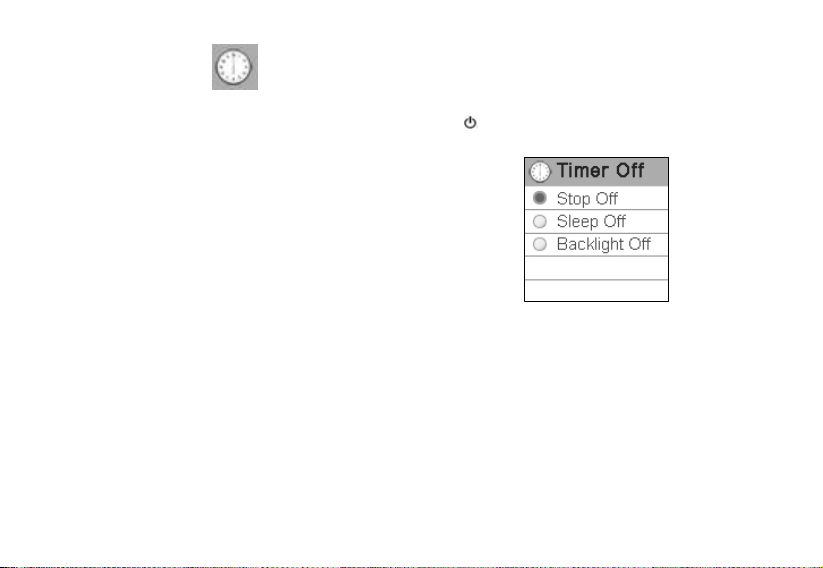
5.8.8 Timer off
Press rewind button or fast forward button in timing off setting menu to select timing off and press MENU button(M)
Press rewind button or fast forward button in timing off setting menu to select timing off and press MENU button(M)
to confirm. Long press MENU button (M) or press power button
to confirm. Long press MENU button (M) or press power button to skip this setting. The sub-menus of timing off
are: stop off, sleep off and backlight off.
(1) Stop off: Disable, 15 SEC, 30 SEC, 1 MIN, 2 MIN, 5 MIN, 10 MIN and 30 MIN.
(2) Sleep off: Disable, 10 MIN, 15 MIN, 30 MIN, 60 MIN, 90 MIN, 2 HR and 3 HR.
(3) Backlight off: 1 MIN, 5 MIN, 10 MIN, 30 MIN, 60 MIN and Always On.
43
Page 45
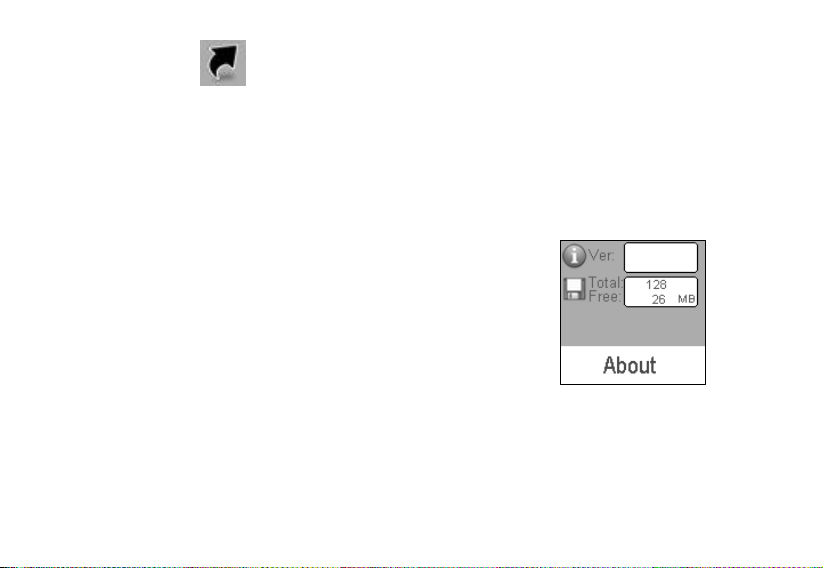
Reset 5.8.9
Sel ect "Yes" to restore all settings to default value and the player will be automatically reset (V3.07 later firmware version).
5.9 About
Press rewind button or fast forward button in the main menu to select ABOUT and press MENU button (M) to
enter ABOUT. You can check the total memory capacity, free space and version of the software. The “x.xxx.xx”
means the number of the software version. It is variational according to the update of software.
X.XXX.XXX
.
5.10 Exit
Exit and return to the music playback function.
44 45
Page 46

6. Other functions
6.1 A-B play mode
In music or voice play mode:
(1) Press A-B/● button to set the starting point of repeat section A-B, and the play mode icon AÆ will be
displayed.
(2) Press A-B/● button again to set the finishing point of repeat section A-B, and the play mode icon AÆB will
be display. The player will start repeating section AB.
(3) Press A-B/● button for the third time to cancel the repeating of AB and the icon will return to play mode.
6.2 Button lock
In any state, push the lock button HOLD to the direction of the arrow to lock the button and all button operations are
invalid. In music or voice play mode, or listening to FM radio, the screen will display a lock icon (as below figure).
You have to push the HOLD button to the opposition direction of the arrow to unlock the button before any other
button operations.
Page 47

7. Trouble shooting
If there is no picture displayed after the player is connected to PC and cannot serve as storage disc or cannot be
powered on after the battery is fully charged, please refer to the following steps to update the software in the
player.
(1) Download the most updated software from the attached CD (if any) or from the website and implement the
setup.exe files in the folder to complete the installation.
(2) Long press power button of the player for five seconds and then plug in the USB cable.
(3) Implement the updated software installed by step (1) to start software upgrade and release the Power/Stop
button.
(4) The upgrade of software may format the player, so please copy the music or files in the player.
(5) If the software upgrade program cannot detect the player, please unplug the USB cable and repeat step (2)
and (3) until the player is detected and the software upgrade is completed.
46
Page 48
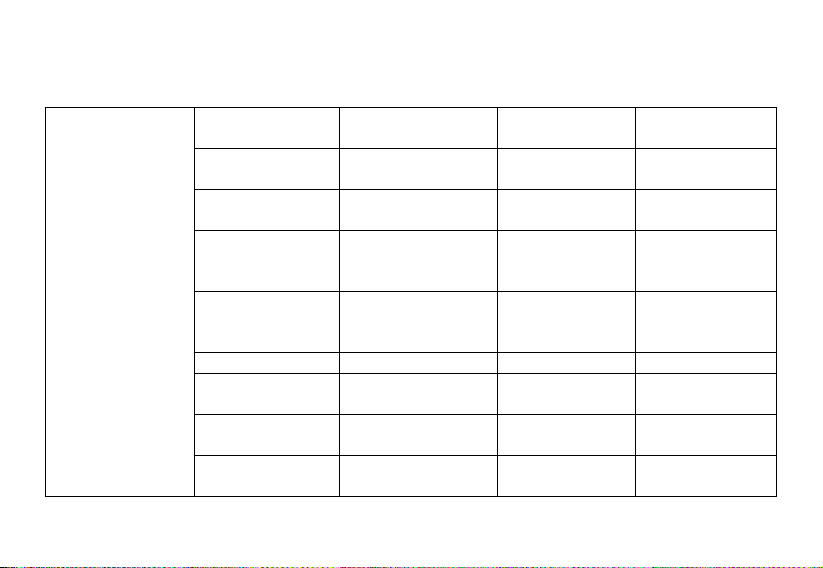
8. Specification
Technical
Specification
MP3
bit rate
Photo
format
Sampling rate 8/11/16/22/
Recorded format WAV
Maximun Record
duration
SNR >90db Dimension 74x40x11.5mm
Dynamic
scope
Distortion <0.05% Screen 1.44 〞 65K color
Output
power
32~320Kbps Music format MP3, WMA
JPEG,BMP Movie format SMV
Frequency
32/44/48KHz
( ADPCM)
9 hours
(128M
8KHz)
>80db
(1KHZ)
5mW*2 Battery Rechargeable Li-Ion
response
Dynamic current <70mA (play mp3
Power off current <500uA
Weight <40g
20Hz~20KHz
music & backlight
OFF)
CSTN display
battery
47
Page 49
Music number
limitation
500 files or 30 folders Play time(music)
>11H Display off
(350mAh)
File saving conditions
Working environment Humidity <85%,
Capacity □128MB □256MB □ 512MB
□1GB □2GB □4GB
Getting Started 500 songs
Humidity <90%,
Normal temperature
-10~40 Celsius
Play time(video)
USB
port
〉4H(350mAH)
USB 2.0 Full Speed
48
 Loading...