

Page 1
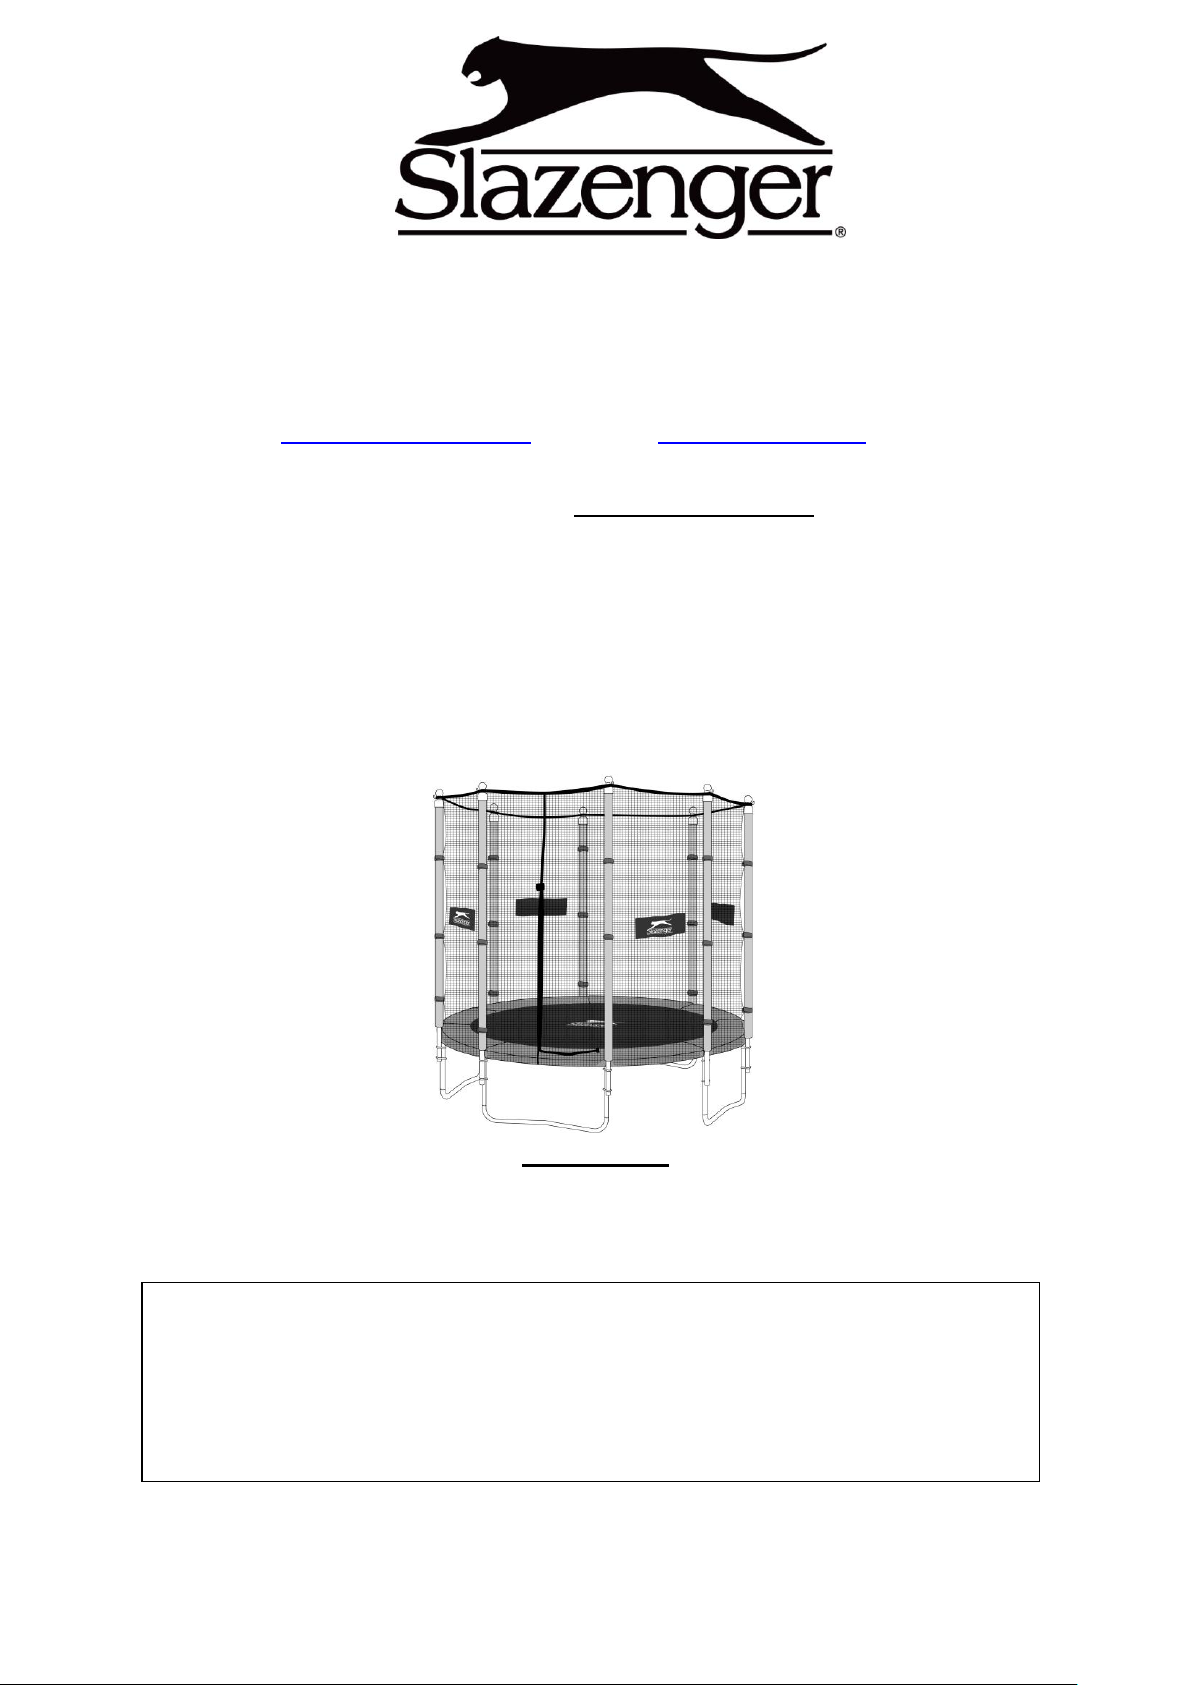
- Warning -
These trampolines are subject to 100kgs (10ft) & 150kgs (12ft) weight limit.
Usage of these trampolines is limited to persons weighing less than weights specified above.
Do not allow more than one person on the trampoline at a time.
Do not allow young children to use unless supervised by an adult.
Slazenger is a trade mark of Pacific Brands and is used under licence by Action Sports Equipment Ltd.
Action Sports Equipment Pty Ltd.
72 Silverwater Rd, Silverwater, NSW, Australia, 2128
Parts & Service Enquiries: 1800 465 070 (Australia); 09 477 6020 (New Zealand)
Or email: [email protected] (Australia) or [email protected] (New Zealand)
Sales Enquiries: 1800 777 137 (Australia); 09 477 6020 (New Zealand)
Or visit our website: www.actionsports.com.au
Model: S000154 - 10FT TRAMPOLINE COMBO
Model: S000155 – 12FT TRAMPOLINE COMBO
Assembly, Installation, Care, Maintenance and Use Instructions
Manual depicts typical installation – your model may differ from illustrations in terms of the number of legs
on the unit and also the number of enclosure poles.
IMPORTANT
Please read and retain this manual as it will assist with identification for parts and service.
Read these materials prior to assembling and using of this product
THIS PRODUCT IS FOR DOMESTIC USE ONLY.
Action Sports has reproduced extracts from AS4989-2006 Clauses 3.2.1 – 3.2.2; 3.3.1.2 & 3.3.2.1 and
Appendices A & B. These have been reproduced with permission from SAI Global under licence 1004-C016.
The relevant standard may be purchased online at www.saiglobal.com.
@ACTION SPORTS EQUIPMENT PTY LIMITED – www.actionsports.com.au Page: 1
Page 2

Contents
SAFETY INFORMATION………………………………………………………………………….3
ADDITIONAL SAFE USE INSTRUCTIONS……………………………………………………..4
HOW TO USE YOUR TRAMPOLINE…………………………………………………………….4
FUNDAMENTAL TRAMPOLINE SKILLS………………………………………………………5
JUMPERS’ ROLE IN PREVENTING ACCIDENTS…………………………………………….12
SUPERVISORS’ ROLE IN PREVENTING ACCIDENTS………………………………………12
INSTALLATION AND MAINTENANCE INSTRUCTIONS……………………………………13
PARTS LIST – Trampoline…………………………………………………………………………13
PARTS LIST – Enclosure…………………………………………………………………………..14
TRAMPOLINE ASSEMBLY………………………………………………………………………15
Frame Assembly…………………………………………………………………………………….15
Mat Assembly……………………………………………………………………………………….16
Frame Pad Assembly………………………………………………………………………………..18
ENCLOSURE ASSEMBLY……………………………………………………………….……….19
Pole Assembly………………………………………………………………………………………19
Net Assembly……………………………………………………………………………………….20
CARE & MAINTENANCE OF YOUR TRAMPOLINE…………………………………………23
DISPOSAL INFORMATION……………………………………………………………………..24
LIMITED WARRANTY…………………………………………………………………………..25
@ACTION SPORTS EQUIPMENT PTY LIMITED – www.actionsports.com.au Page: 2
Page 3

WARNING
SAFETY INFORMATION, INSTALLATION AND MAINTENANCE INSTRUCTIONS:
READ THESE MATERIALS PRIOR TO ASSEMBLING AND USING THE TRAMPOLINE.
SAFETY INFORMATION
Specific Use Limitation
(a) Do not use trampoline and enclosure without mature and knowledgeable supervision.
(b) Do not attempt or allow somersaults.
(c) Do not allow more than one person on the trampoline and enclosure at any time.
(d) Do not use the trampoline and enclosure when wet.
(e) Do not jump onto or off the trampoline and enclosure.
(f) Do not use a trampoline and enclosure while under the influence of alcohol or drugs.
(g) Do not allow any activity underneath the trampoline.
(h) This trampoline has been designed for users to be barefooted or only wearing socks when
using the trampoline. Footwear must not be worn.
(i) Foreign objects including wakeboards, snowboards, skateboards, bicycles or any other
items are not to be used with the trampoline. Use of any foreign object on the trampoline
will void all product warranty.
(j) Inspect the trampoline and enclosure before each use. Make sure the frame padding is
correctly and securely positioned. Replace any worn, defective, or missing parts.
(k) Keep objects away which could interfere with the user. Maintain a clear area around,
above, and under the trampoline and enclosure.
(l) Learn fundamental bounces and body positions thoroughly before trying more advanced
skills.
Safe Use Instructions
(a) Read all instructions before using the trampoline and enclosure.
(b) Allow only one person on the trampoline and enclosure at any time. Use by more than
one person at the same time can result in serious injury.
(c) Use the trampoline and enclosure only with mature, knowledgeable supervision at all
times.
(d) Inspect the trampoline and enclosure before each use. Make sure the frame padding is
correctly and securely positioned. Replace any worn, defective, or missing parts.
(e) Keep objects away which could interfere with the user. Maintain a clear area around,
above, and under the trampoline.
(f) Learn fundamental bounces and body positions thoroughly before trying more advanced
skilled.
@ACTION SPORTS EQUIPMENT PTY LIMITED – www.actionsports.com.au Page: 3
Page 4

ADDITIONAL SAFE USE INSTRUCTIONS
(a) Misuse and abuse of the trampoline and enclosure is dangerous and can cause serious injuries.
(b) Focus your eyes on the edge of the trampoline. This will help control your bounce.
(c) Avoid bouncing for too long. Do not bounce when tired.
(d) Stop your bounce by flexing your knees as your feet come in contact with the trampoline bed.
Learn this skill before you attempt any others.
(e) Climb on and off the trampoline, do not jump. It is a dangerous practice to jump from the
trampoline to the floor or ground when dismounting, or onto the trampoline when mounting.
Always use two hands on the frame getting on and off the trampoline. Never use springs or
suspension elements as “hand grips”.
(f) Learn fundamental bounces and body positions thoroughly before trying more advanced skills.
A variety of trampoline activities can be carried out by performing the basic fundamentals in
various series and combinations, or performing one fundamental after the other, with or
without bounces between them.
(g) Avoid bouncing too high. Stay low until you can control your bounce and repeatedly land in
the centre of the trampoline.
(h) Do not use the trampoline as a springboard to other objects. Use the trampoline only for
trampoline style bouncing.
(i) Keep objects away that could interfere with the person jumping.
(j) For further information or additional instructional materials, contact your nearest trampoline
club.
(k) It is advisable not to bounce immediately after a meal.
(l) Do not attempt knee drops as these can cause injury if you attempt this skill without some
experience or personal instruction.
(m) Your clothing should allow plenty of body freedom, but no flapping shirts or skirts to distract
your concentration.
(n) No buckles or jewellery should be worn, as these could damage the trampoline mat and cause
injury to you.
(o) Do not wear shoes while bouncing on the trampoline.
HOW TO USE YOUR TRAMPOLINE
Always bounce at the centre of the trampoline mat. Bouncing near the edge of the trampoline
mat can lead to injury and can also stretch the springs. The frame pad is not designed nor
intended to support the weight of the trampoline user. Do not step or jump directly onto the
frame pad.
Avoid bouncing too high. Stay low until you can control your bounce and land consistently in
the middle of the trampoline mat.
To regain control and stop your jump, bend your knees quickly when you land.
@ACTION SPORTS EQUIPMENT PTY LIMITED – www.actionsports.com.au Page: 4
Page 5

Allow each jumper a brief turn on the trampoline. Extended bouncing exposes an over tired
user to an increased risk of injury. Longer turns tend to lessen the interest of others waiting to
jump.
Do not use the trampoline when under the influence of alcohol or drugs.
The trampoline mat is several feet from the ground. Jumping off the trampoline to the ground
or any other surface may result in injury. Jumping onto the trampoline from a roof, deck, or
other object also represents a risk of injury. Smaller children may need assistance getting up
on or down from the trampoline. Mounting and dismounting properly should be a strict rule
from the very beginning. Users should climb onto the trampoline by placing their hands on the
frame and stepping or rolling up onto the frame, across the springs, and onto the mat (bed).
Do not step directly on the frame pad or grasp the frame pad when mounting or dismounting
the trampoline. Users should always place their hands on the frame while mounting or
dismounting. To dismount, jumpers should walk to the side of the mat (bed), bend over and
place one hand on the frame, then step from the mat to the ground.
Injury may result from hitting the frame or falling through the springs while jumping or getting
on or off the trampoline. Stay in the centre of the trampoline mat when jumping. BE SURE TO
KEEP THE FRAME PAD IN PLACE TO COVER THE FRAME AT ALL TIMES. Do not step
or jump directly onto the frame pad as it is not designed nor intended to support the weight of
the user.
FUNDAMENTAL TRAMPOLINE SKILLS
BASIC SKILLS - Bouncing
The most important thing about bouncing is that it should be done with control in the centre of
the bed. The basic bounce should always being low. High, reckless bouncing should never
be allowed.
The Stop Bounce
This technique allows the jumper to gain control by stopping quickly. It is achieved by
keeping the feet in contact with the bed, and absorbing the rebound of the trampoline with the
knees and waist. This skill should be the first skill learnt and should be employed whenever
you feel out of balance, or land away from the center area.
To learn the stop bounce:
(a) Stand in centre of the bed with your feet about hip-width apart.
(b) Attempt about three easy bounces, keep them low and controlled.
(c) Focus your eyes towards the perimeter of the trampoline while bouncing in order to keep
your balance.
(d) Stop the bounce by bending at your knees and hips on contact with the bed.
@ACTION SPORTS EQUIPMENT PTY LIMITED – www.actionsports.com.au Page: 5
Page 6
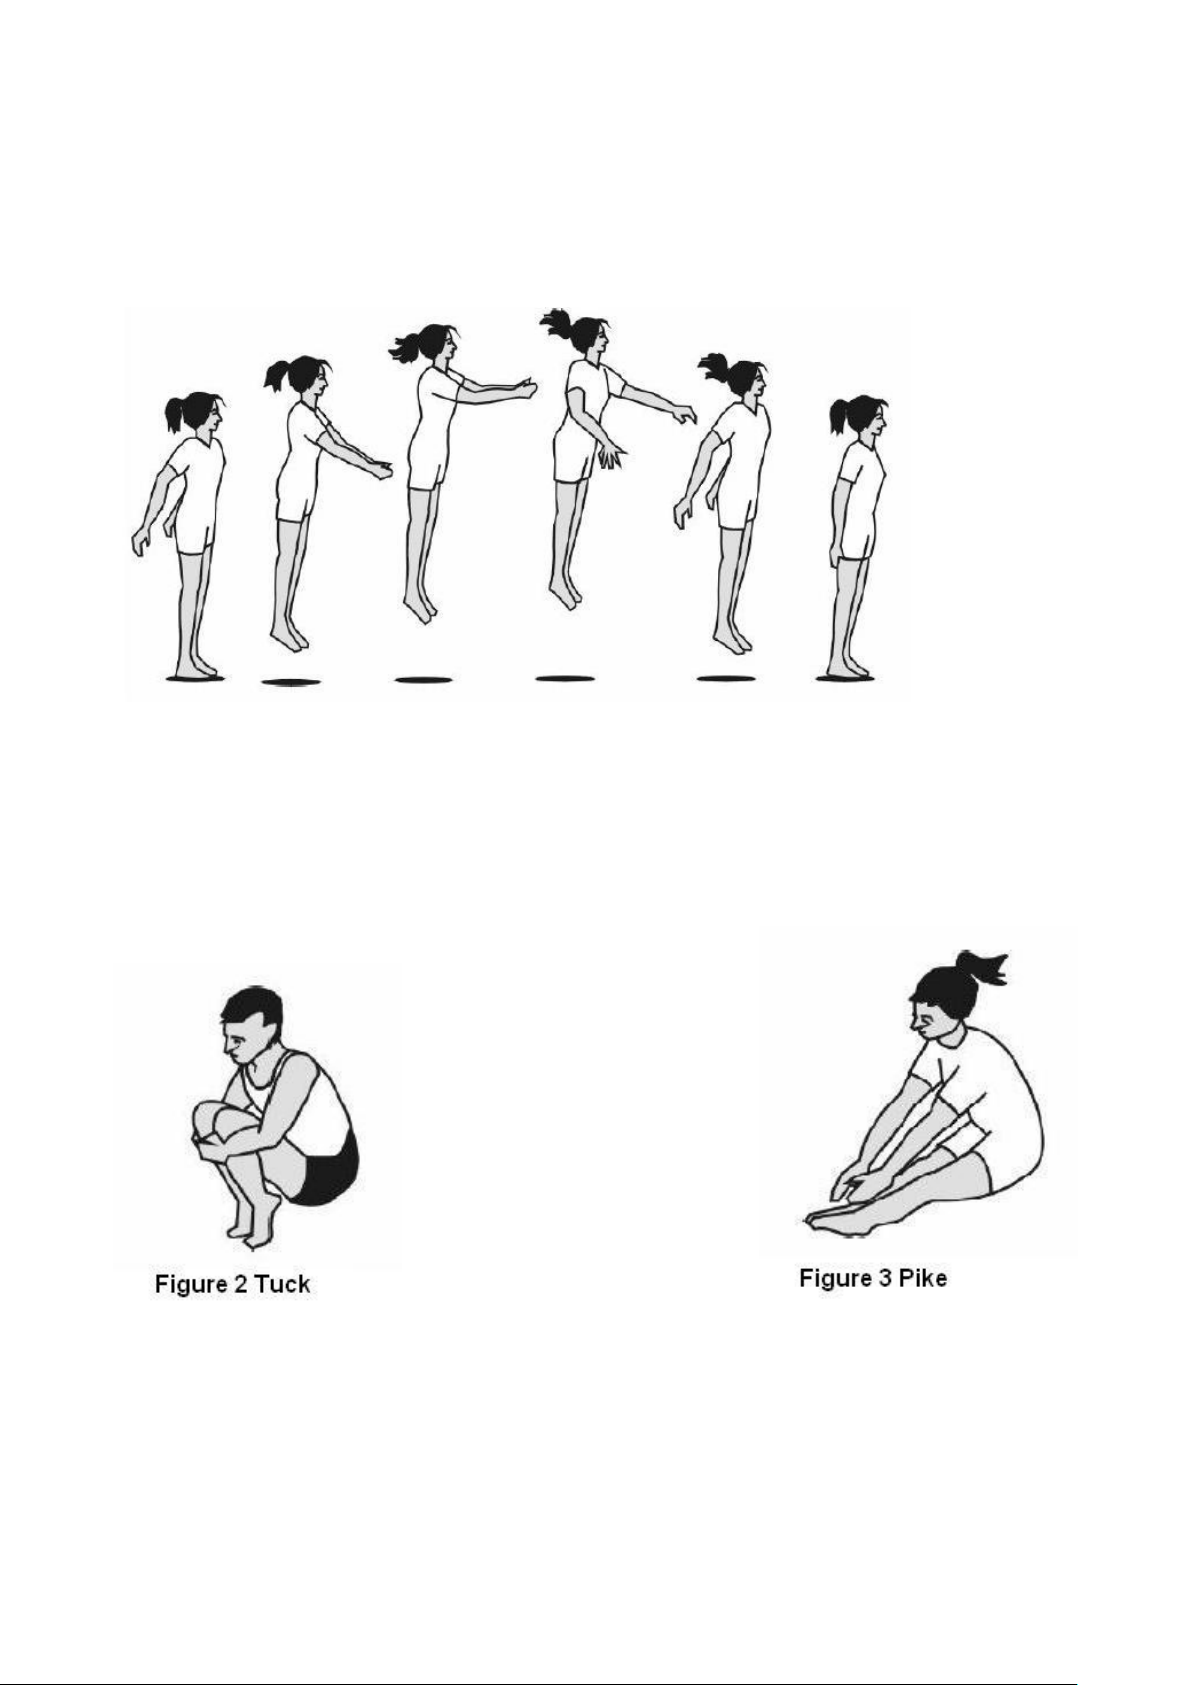
Arm Action
Arms are very important for proper control and lift. Whenever you go up, your arms go up. They go
up to a set position about shoulder height and shoulder width. They should remain in this balanced
position until you start down. Then they circle down and slightly behind the hips, ready to lift again
as you bounce up (see Figure 1).
Figure 1 Arm Action
Bounce variations
Figures 2, 3 and 4 show three variations, the tuck, the pike, and the straddle pike respectively. These
should be assumed at the top of the bounce, before resuming the normal landing position on your
feet.
@ACTION SPORTS EQUIPMENT PTY LIMITED – www.actionsports.com.au Page: 6
Page 7
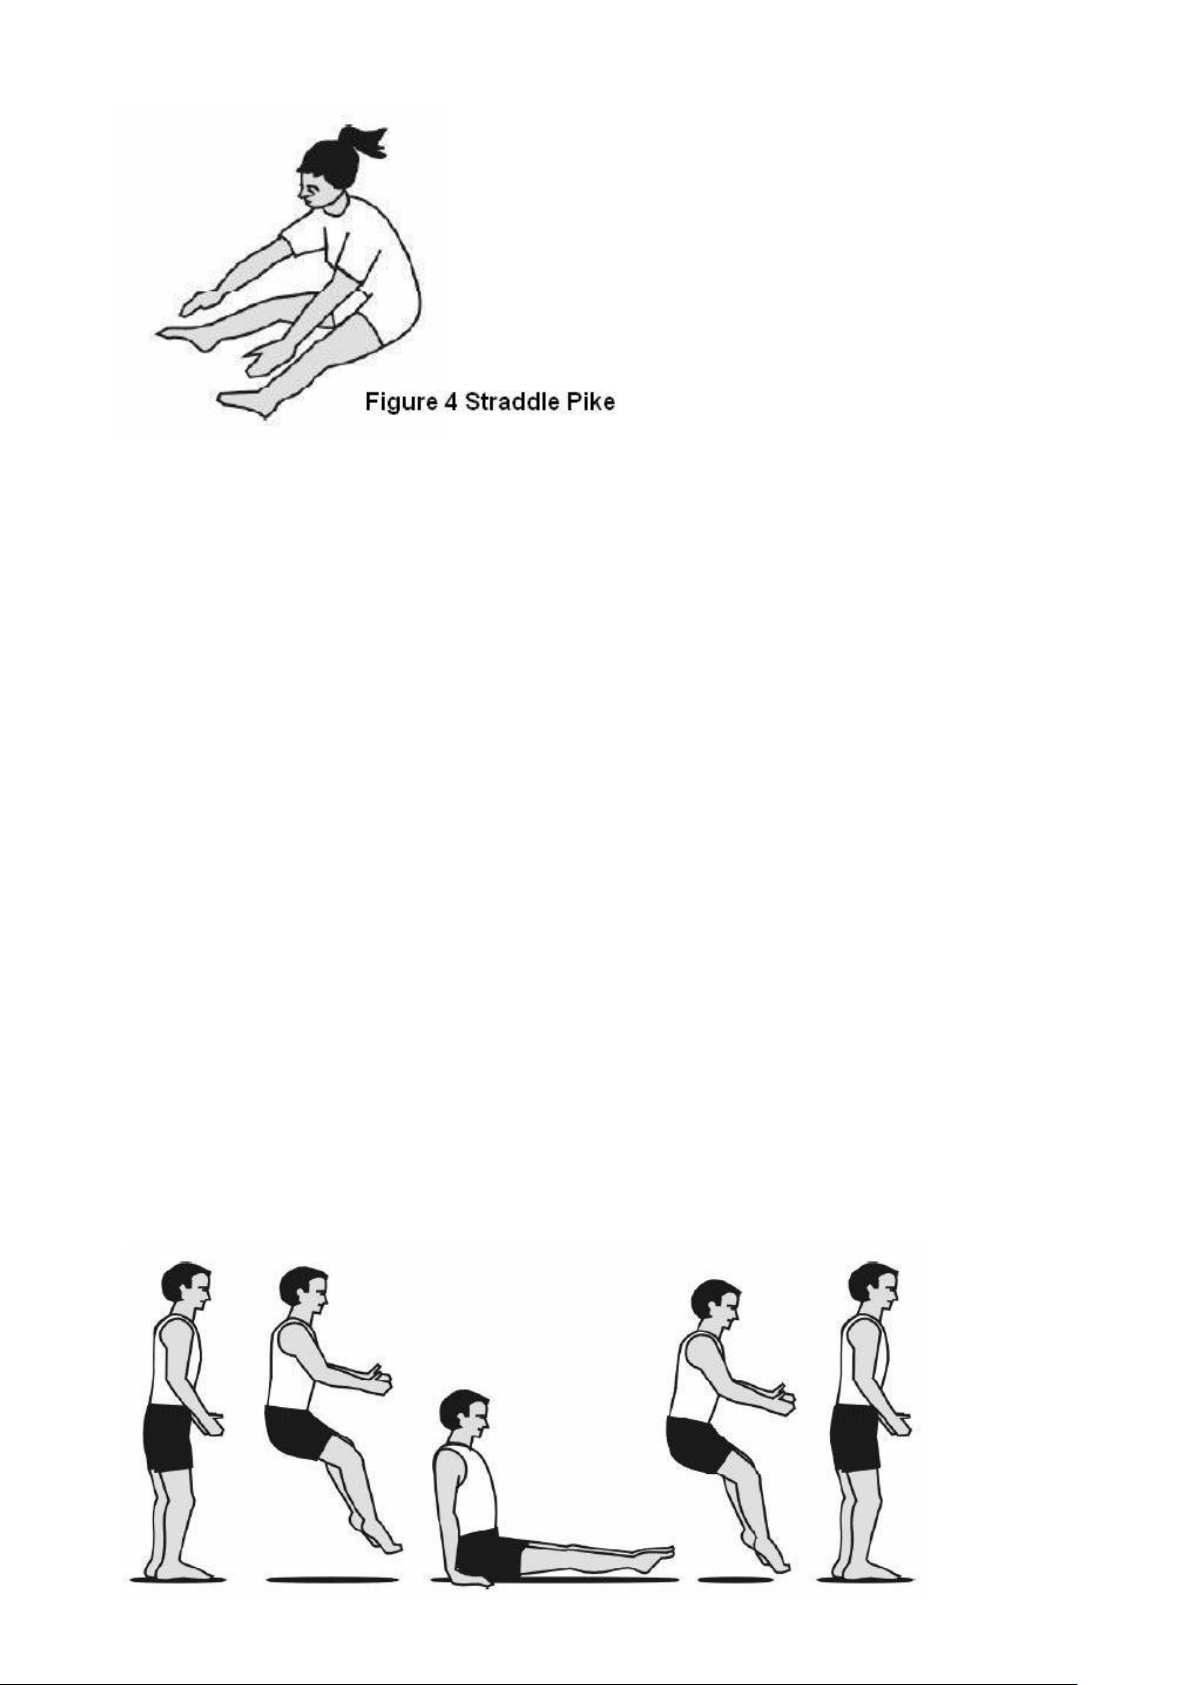
Practice these simple variations and concentrate on perfect form. Make sure that your toes are
pointed and fingers are straight.
These are simple variations to the basic bounce and are very important for gaining experience in
coordinated movement.
BASIC LANDING POSITIONS
General
Positions for all drops: seat, hands and knees, and front, should first be practiced on the ground,
then in a stationary position, and only the on the trampoline bed.
Drops should be performed after “Priming” the trampoline bed. Priming is done by bending your
knees and pushing down repeatedly on the trampoline bed, thereby setting the bed in motion. The
feet stay in contact with the bed during the entire priming motion.
The seat drop
To learn the seat drop:
(a) From the standing position, prime the bed several times.
(b) Pick up your feet at the top of the last bounce, and sit down. You should land so that your body
is in a sitting position with legs straight out in front and your toes pointed. Hands should be on
the bed next to your hips. Fingers should be together and pointed toward the toes.
(c) Push on the bed with your hands to rebound up to your feet (see Figure 5).
@ACTION SPORTS EQUIPMENT PTY LIMITED – www.actionsports.com.au Page: 7
Page 8
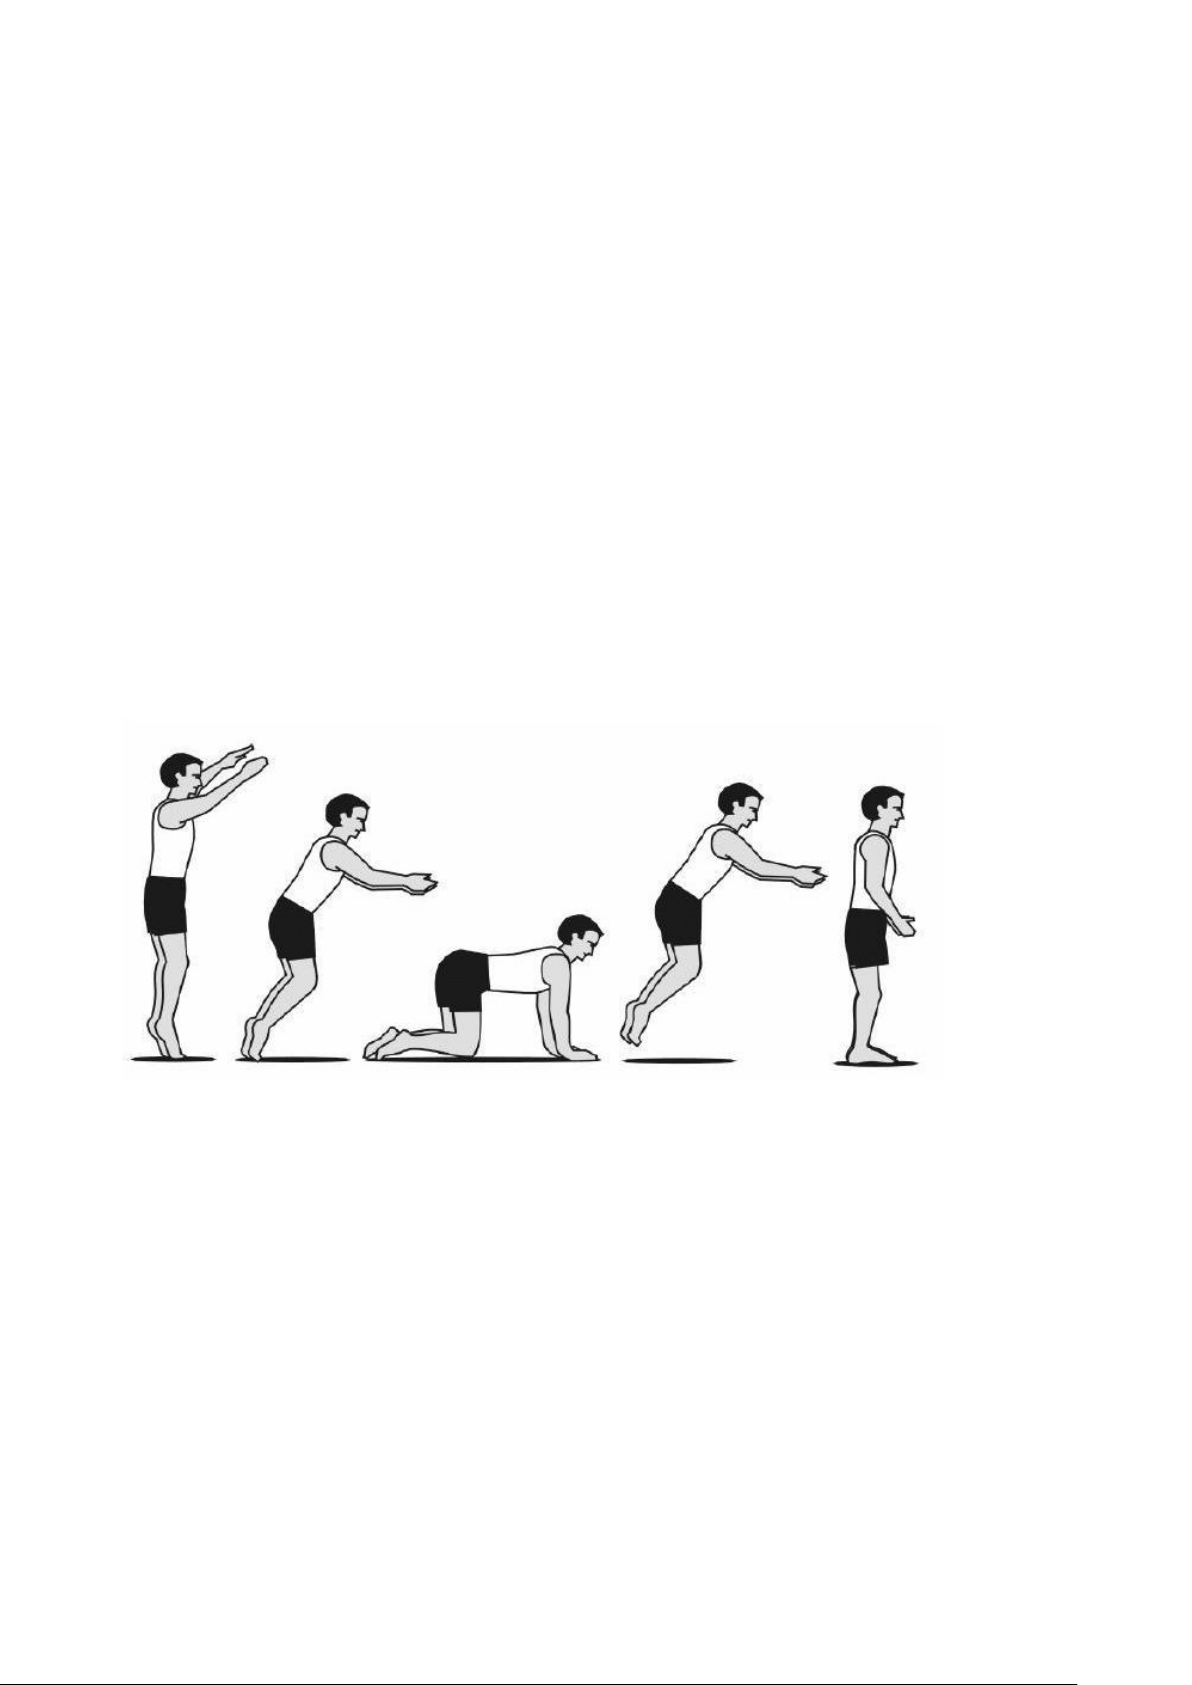
Figure 5 Seat Drop
The Hands and Knees Drop
To do this drop properly, there should be just as much weight on your hands as on your knees. Your
back should be about approximately parallel to the bed. Knees and hands should land
simultaneously, with the middle of the body landing in the centre of the trampoline. Hands should
be directly under the shoulders. Knees should be directly under the hips. Your toes should be
pointed.
To learn the hands and knees drop:
(a) Get down on your hands and knees on the bed. Make sure you have weight on both your hands
and your knees. Do not sit on your heels.
(b) Remain in this position and try to bounce. Do not rock back and forth between the hands and
knees, but develop an even landing on all four points.
(c) From the standing position, prime the bed several times. Lift upward with your hips, reach
forward with our hands, and land on all fours. Look slightly in front of your hands on landing.
Push to rebound to your feet (see Figure 6).
Figure 6 Hands and Knees Drop
The Front Drop
Contact with the trampoline be should simultaneously take place with your hands, elbows, chest,
stomach, hips and knees. Knees should be bent.
You must come down level. If the landing is made first on your chest and arms, they will rebound
before your knees hit which will result in a straining action on you back. If this type of landing is
made with a traveling, diving approach there is a chance that your elbows may become skinned. If
the landing is made so that your knees and hips hit first, then they will rebound and your shoulders
and face will land heavily.
Step 1:
(a) Start from the hands and knees drop position.
@ACTION SPORTS EQUIPMENT PTY LIMITED – www.actionsports.com.au Page: 8
Page 9
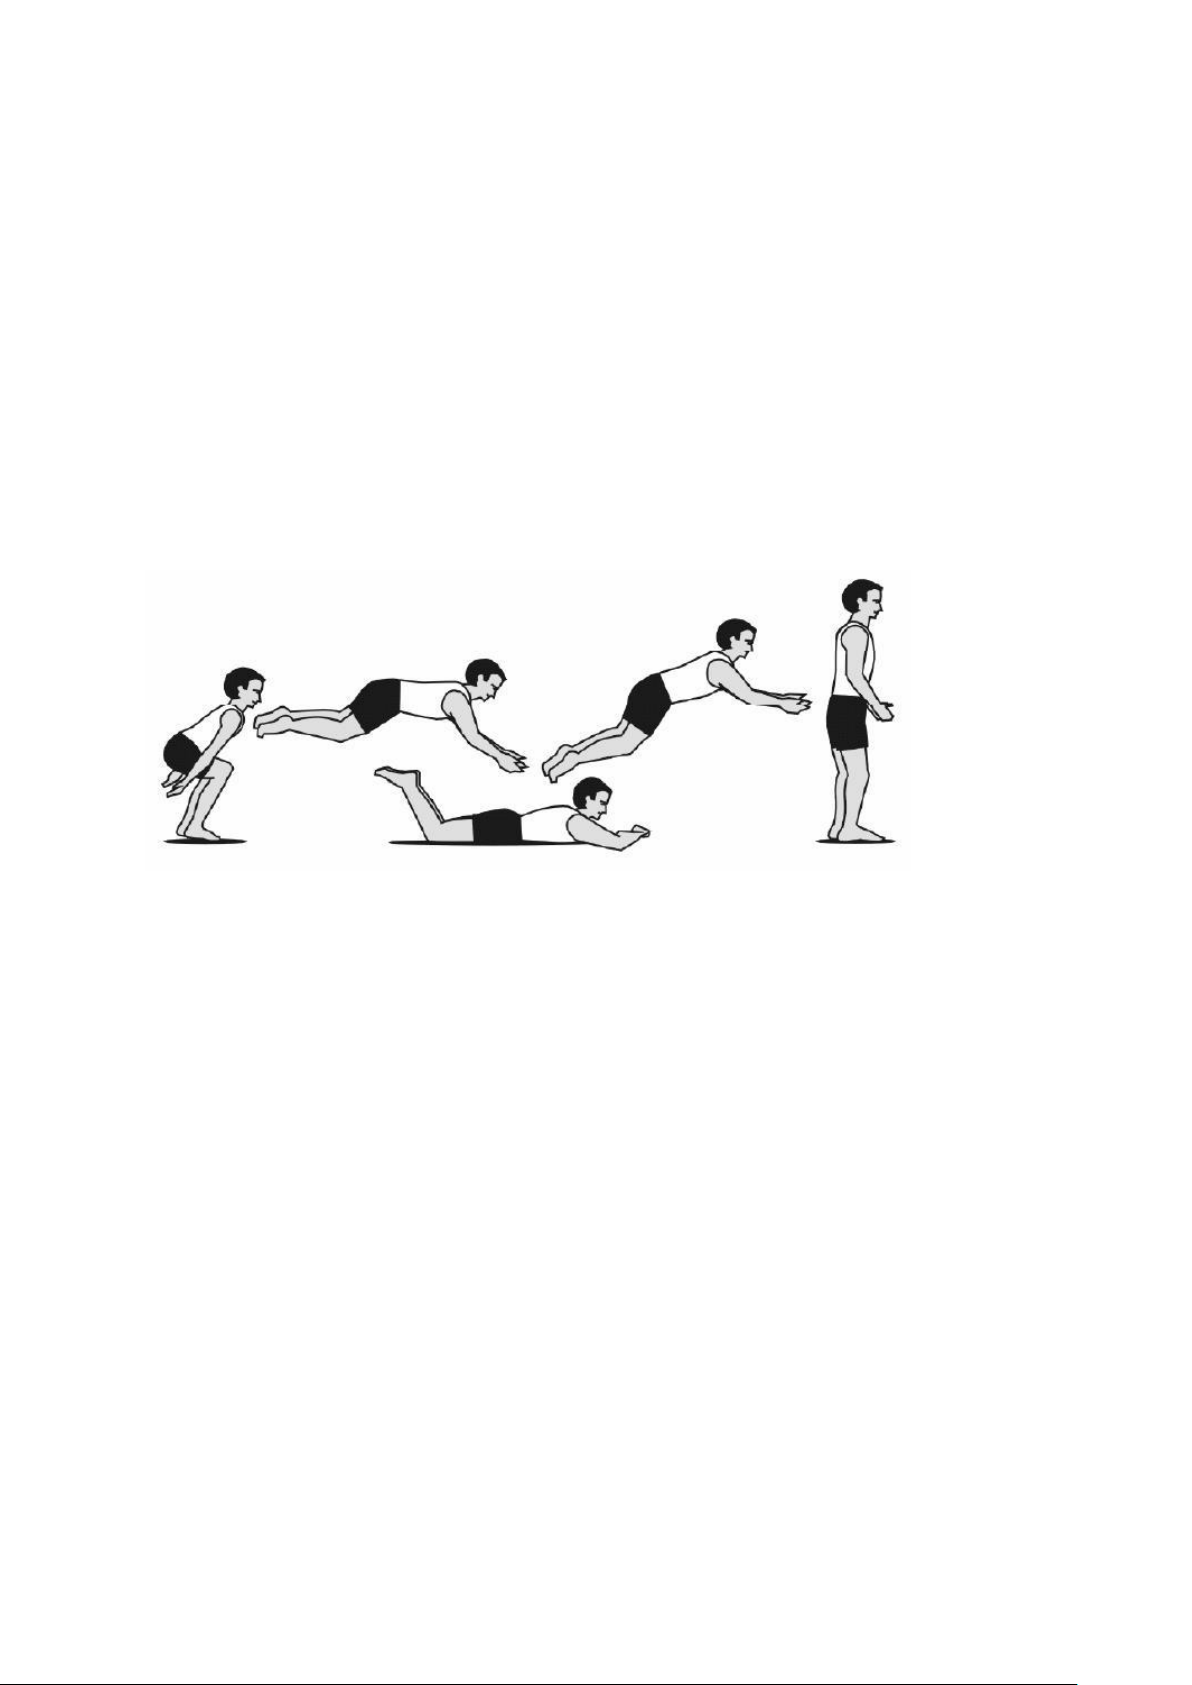
(b) As you rebound from the hands and knees, stretch so that you land on your stomach. From this
position, rebound to your hands and knees.
Step 2:
(a) Start from a standing position with knees bent so that your upper body is low and close to the
trampoline bed.
(b) Prime the bed several times.
(c) Lift hips gently upward and backward.
(d) Land in contact with the bed as described in Step 1.
(e) Push with your hands to return to the feet
Step 3:
(a) Start from a straight standing position.
(b) Prime the bed several times.
(c) Perform skill as in Step 2 (see Figure 7).
Figure 7 Front Drop
SERIES OF DROPS
Sequencing
Once you have mastered the individual bounce variations and drops, practice them in sequence. For
example: Seat drop-Hands and knees drop-Front drop, or Seat drop-Front drop-Hands and
knees drop-Seat drop.
Beginning Twisting
General
Figures 8, 9 and 10 will show you a few of the many possible twisting variation of the basic landing
positions.
Seat drop-Half twist-Seat drop(AKA: Swivel hips)
Step 1:
(a) Perform a seat drop.
(b) Push down on the bed with your hands and come to a stand with the arms stretched overhead.
Step 2:
(a) Perform the movement in Step1. As you rebound up to your feet, move one shoulder in the
direction you want to twist.
@ACTION SPORTS EQUIPMENT PTY LIMITED – www.actionsports.com.au Page: 9
Page 10
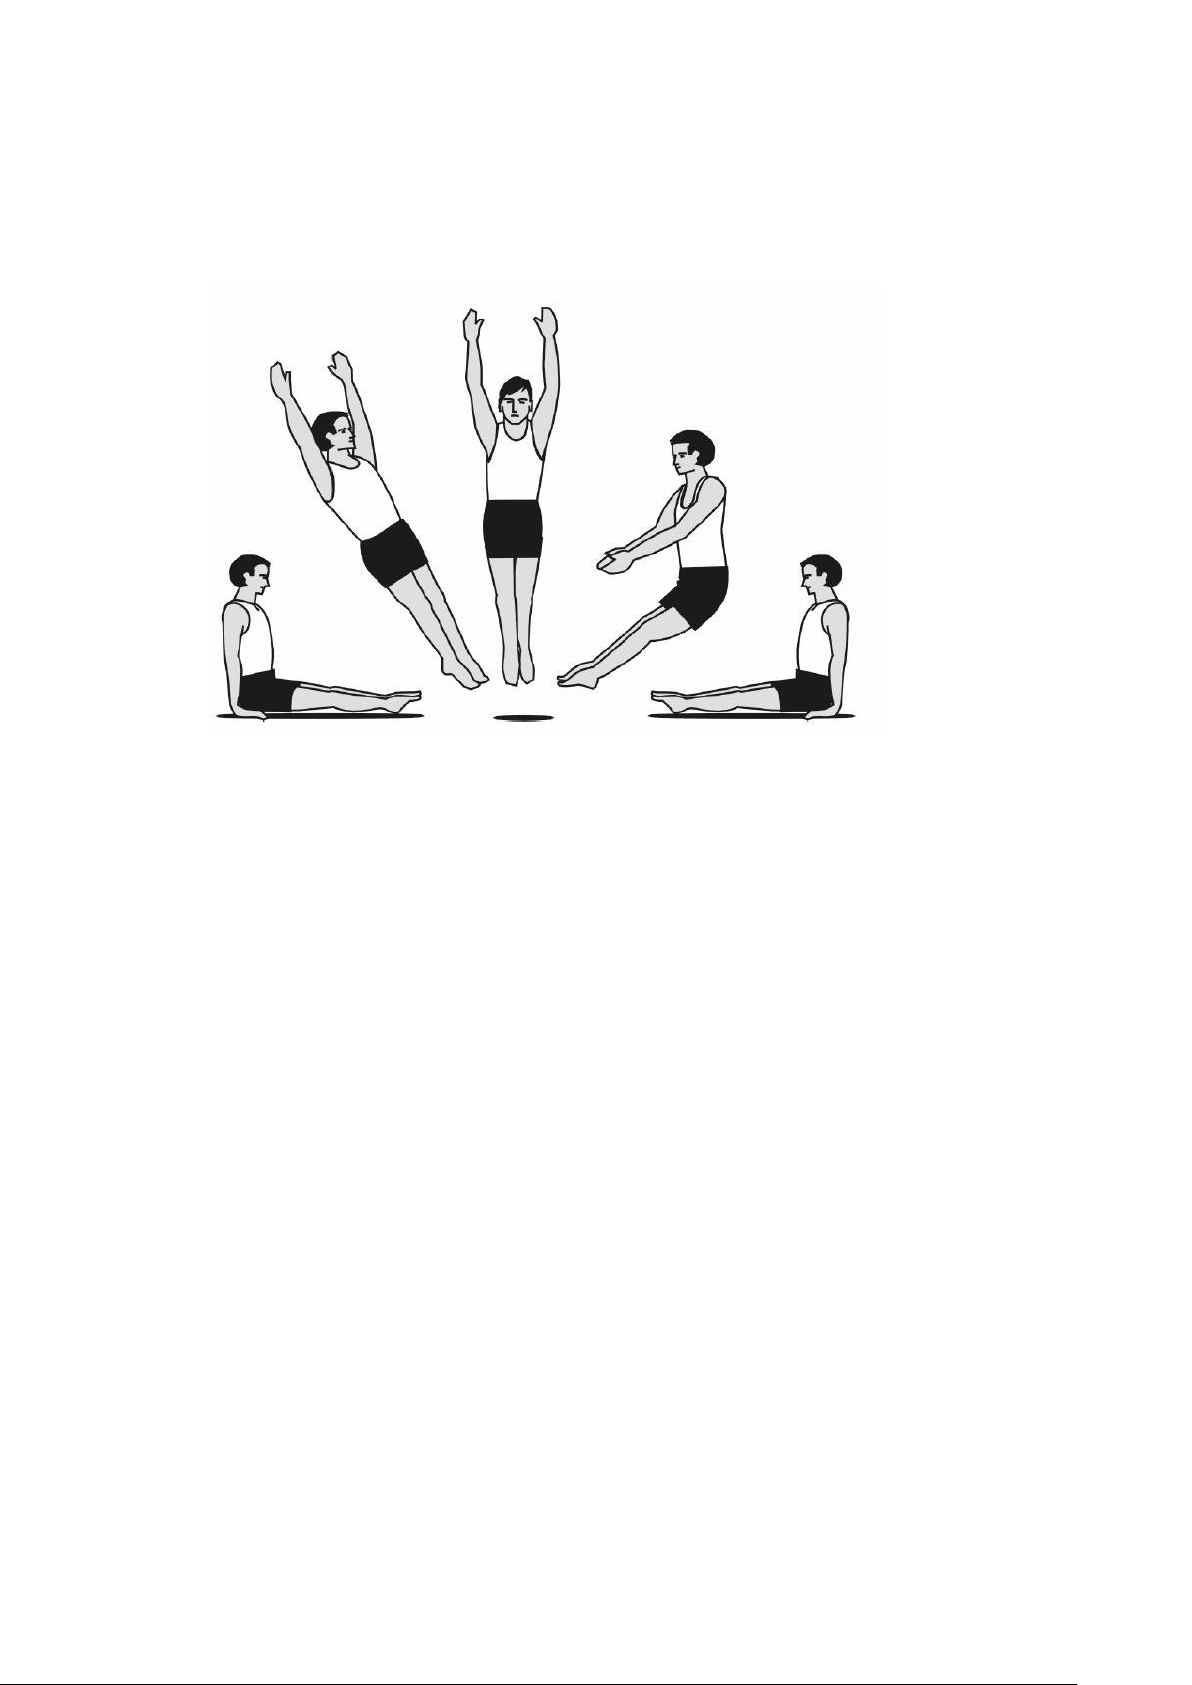
(b) Finish standing with arms stretched overhead, facing the opposite direction (180 degree twist
completed).
Step 3:
Perform as in Step 2. Just before contacting feet with the trampoline bed, lift your legs to land in a
sitting position (see Figure 8).
Figure 8 Seat Drop—Half Twist—Seat Drop
Front drop-Half twist-Front Drop(AKA: Turntable)
Step 1:
(a) Begin in a hands and knees position, with hands forming the apex of a triangle, like in front
drop.
(b) Prime the bed in this position.
(c) Push backward with your hands and extend your body to land in the front drop position.
(d) Repeat several times in succession: Hands and knees drop-Front drop-Hands and knees
drop-etc.
Step 2:
Perform the movement as in Step 1. However, do it at twice the speed so as to bring your knees
inward, under your hips and out again without touching your knees on the bed.
Step 3:
Perform the movement as in Step 2. Push sideways on the trampoline bed so your body rotates.
Step 4:
From a standing position, prime the bed, then perform a front drop. Push sideway, as in Step 3, and
complete a 180 degree turn, finishing in a front drop facing the opposite position (see Figure 9).
@ACTION SPORTS EQUIPMENT PTY LIMITED – www.actionsports.com.au Page: 10
Page 11
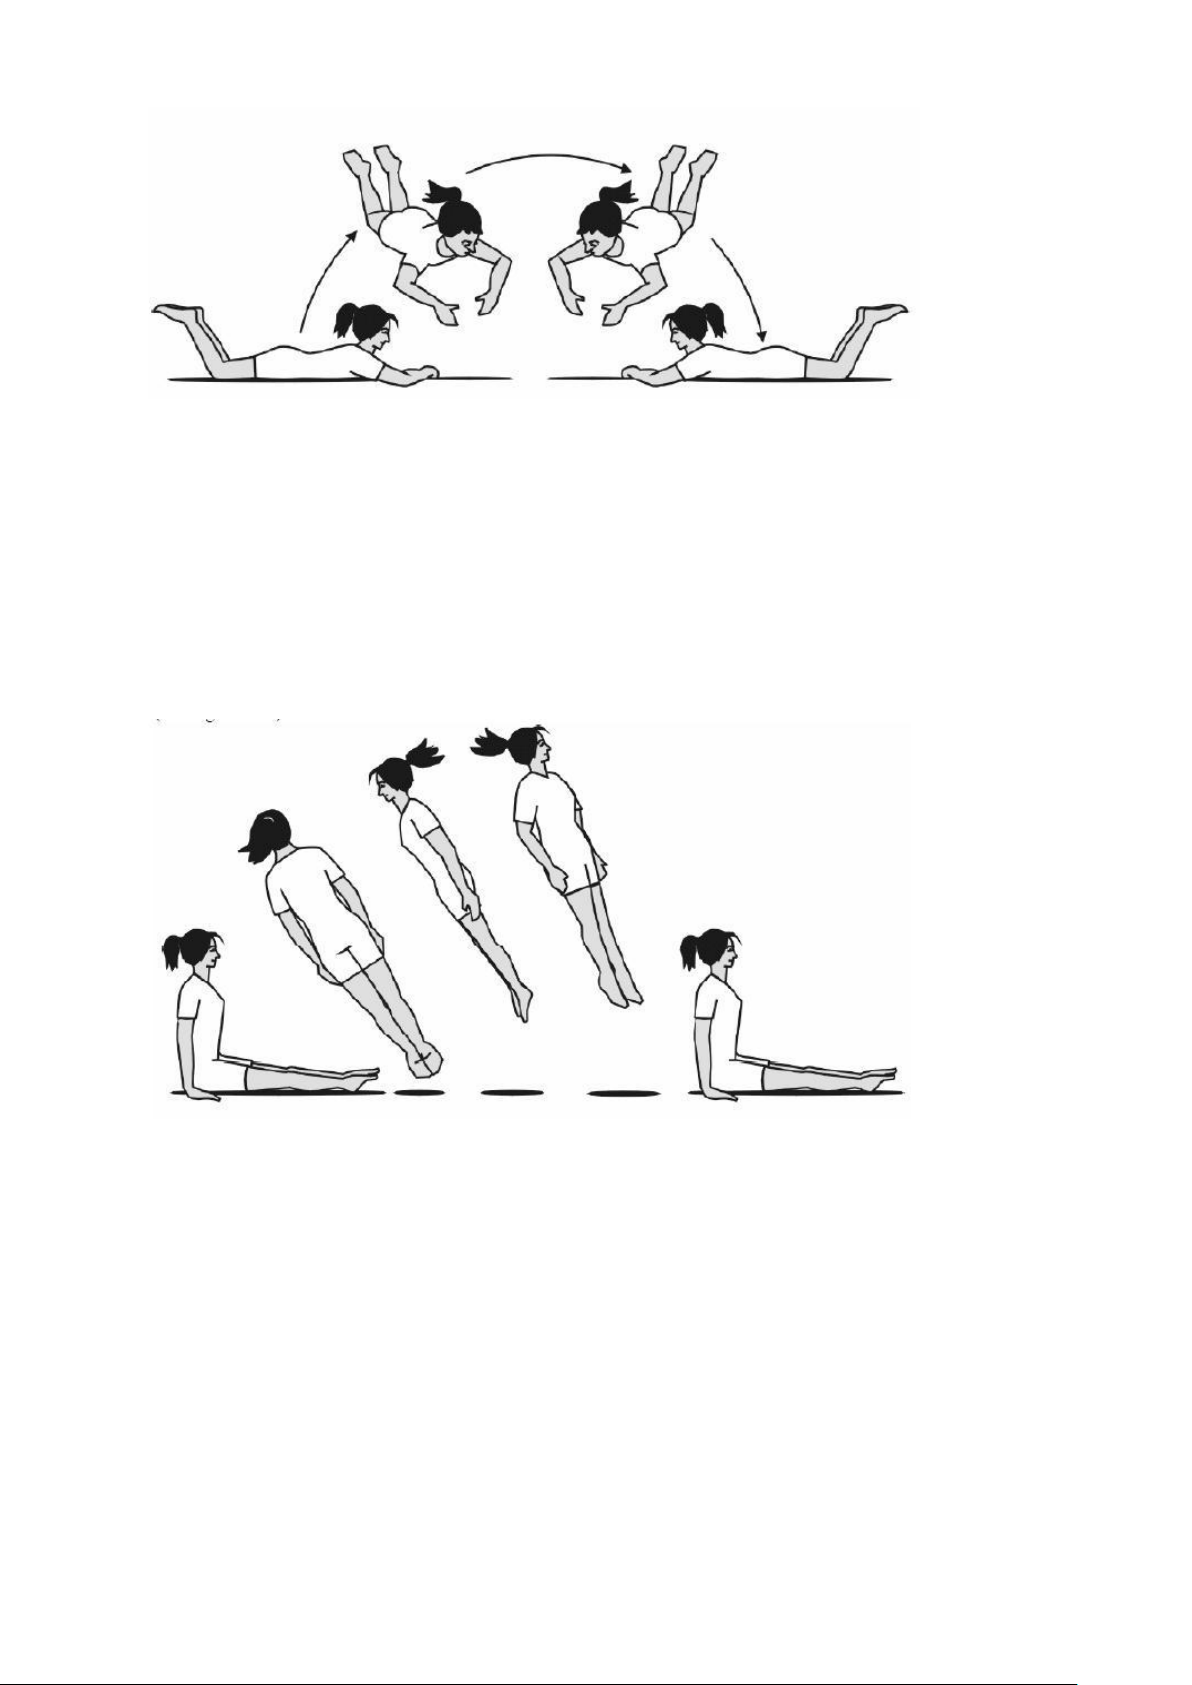
Figure 9 Front Drop—Half Twist—Front Drop
Seat drop-Full twist-Seat drop (Full barrel roll)
Perform this as you would a half barrel roll but keep moving your shoulder in the direction of the
twist so that you finish in the seat drop position.
During the twist, hands should be placed by your sides, with your body held straight (see Figure
10).
Figure 10 Seat Drop—Full Twist—Seat Drop
Additional Twisting
You can combine a twist with each of the basic landing positions. You can twist after the landing
position.
Example: Seat drop-1/2 twist-feet
You can add more twists. Remember to practice and perfect the smaller twists before moving on to
larger twists.
You can also perform a series of twists.
@ACTION SPORTS EQUIPMENT PTY LIMITED – www.actionsports.com.au Page: 11
Page 12

Example: Swivel hips-perform several in a row, all twisting in one direction, or alternating
directions.
JUMPERS’ ROLE IN PREVENTING ACCIDENTS
Education on the part of the user is a must for safety. Users must first learn a low controlled
bounce and the basic landing positions and combinations before proceeding to intermediate
skills. Jumpers must understand why they have to master “control” before they can start
thinking about other moves. Understanding the proper progression of skills in jumping on a
trampoline must be the first lesson.
SUPERVISORS’ ROLE IN PREVENTING ACCIDENTS
It is the responsibility of the supervisor(s) of trampoline users to provide knowledgeable and
mature supervision. They need to know and enforce all the rules and warnings set forth in
this manual in order to minimise the likelihood of accidents and injuries and to inform users of
these rules. When supervision is unavailable or inadequate, this may require that the
trampoline be disassembled, placed in a secure area, or otherwise secured against unauthorized
use. It is the responsibility of the supervisor(s) to be sure that the users are fully aware of the
safety guidelines which are printed on the pads.
These instructions are issued in the interest of child safety, and we ask you to follow our
advice.
@ACTION SPORTS EQUIPMENT PTY LIMITED – www.actionsports.com.au Page: 12
Page 13
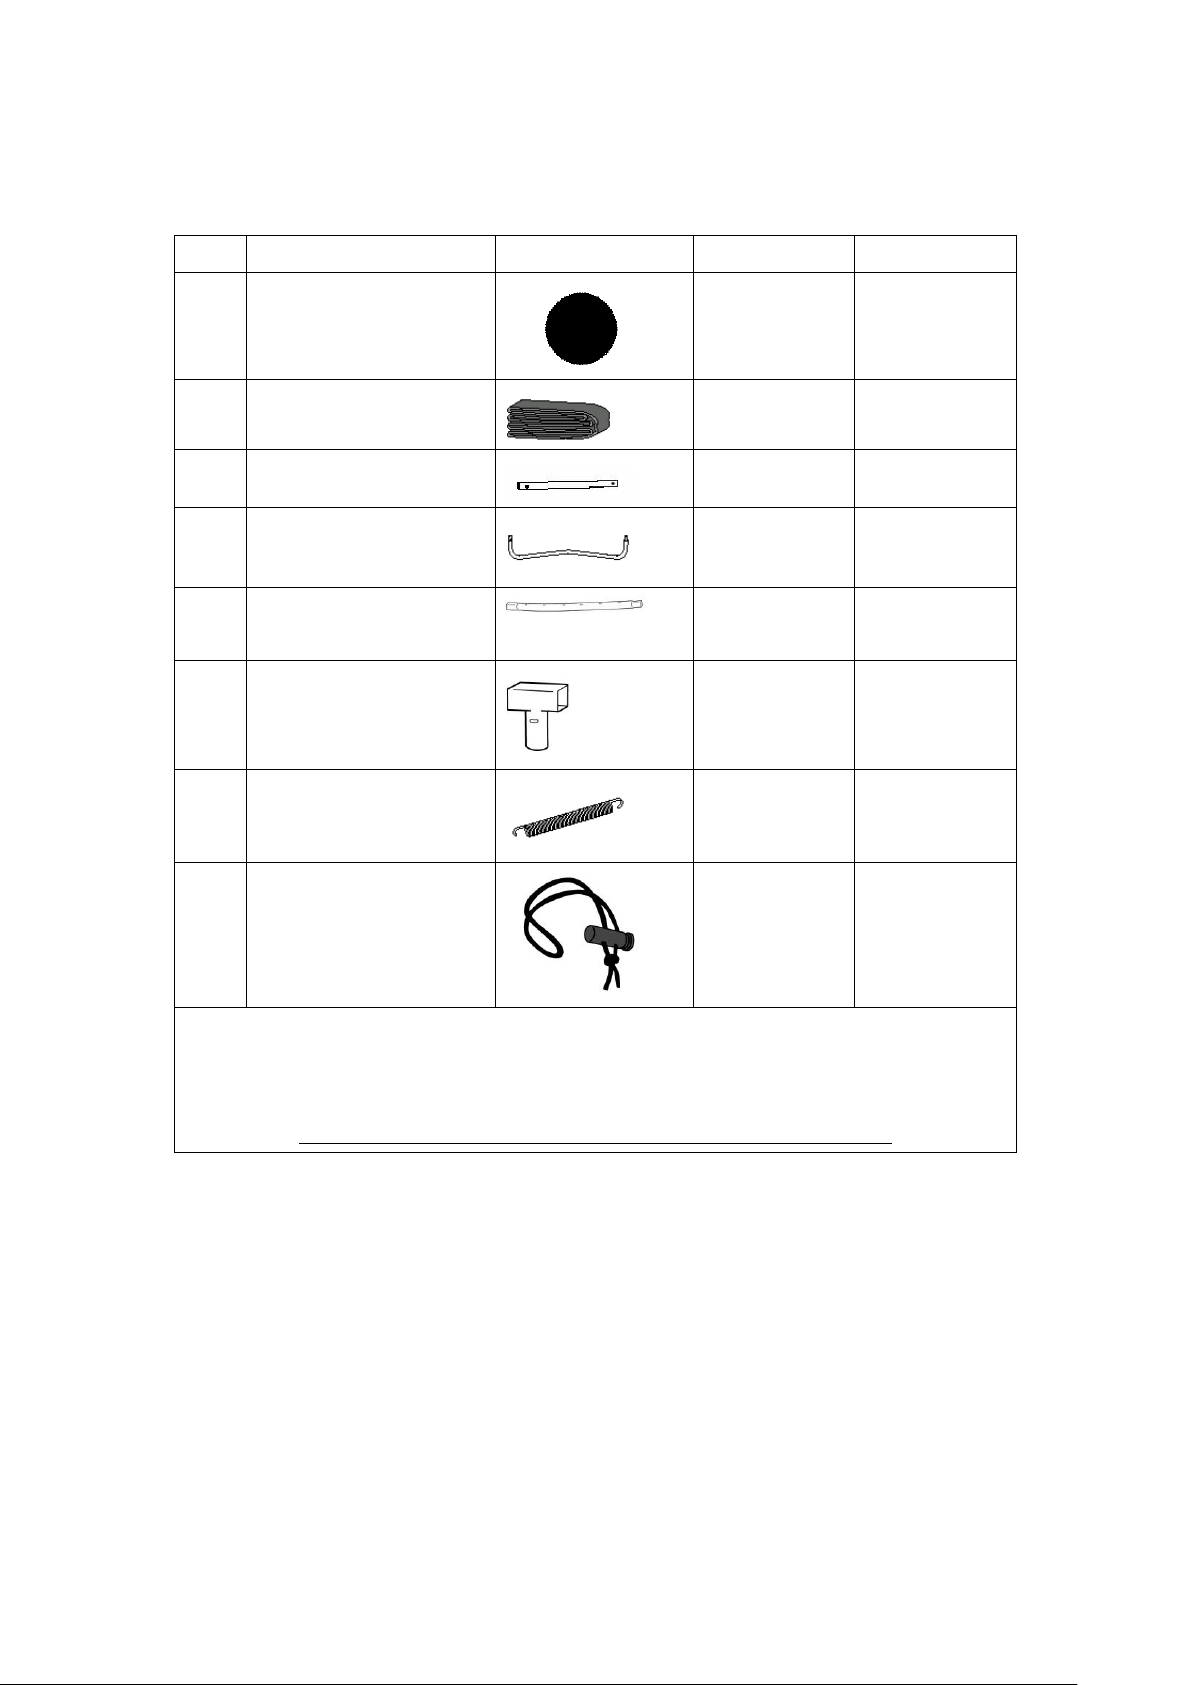
INSTALLATION AND MAINTENANCE INSTRUCTIONS
Ref
Description
Illustration
10ft
12ft
A
Mat with Sewn-in
V-Rings
1
1
B
Frame Pad
2
2
C
Vertical Leg Tube
8
12
D
W-Shape Leg Tube
4
6
E
Top Rail Tube
8
12
F
T-Joint 8
12
G
Springs 64
72
H
Elastic Toggle
8
12
Use the Parts List to ensure all parts are present.
Contact Customer Service at 1800 465 070 (Australia) or
09 477 6020 (New Zealand) if any parts are missing.
Do not attempt to assemble the trampoline if any parts are missing.
PARTS LIST - Trampoline
Parts Supplied
@ACTION SPORTS EQUIPMENT PTY LIMITED – www.actionsports.com.au Page: 13
Page 14
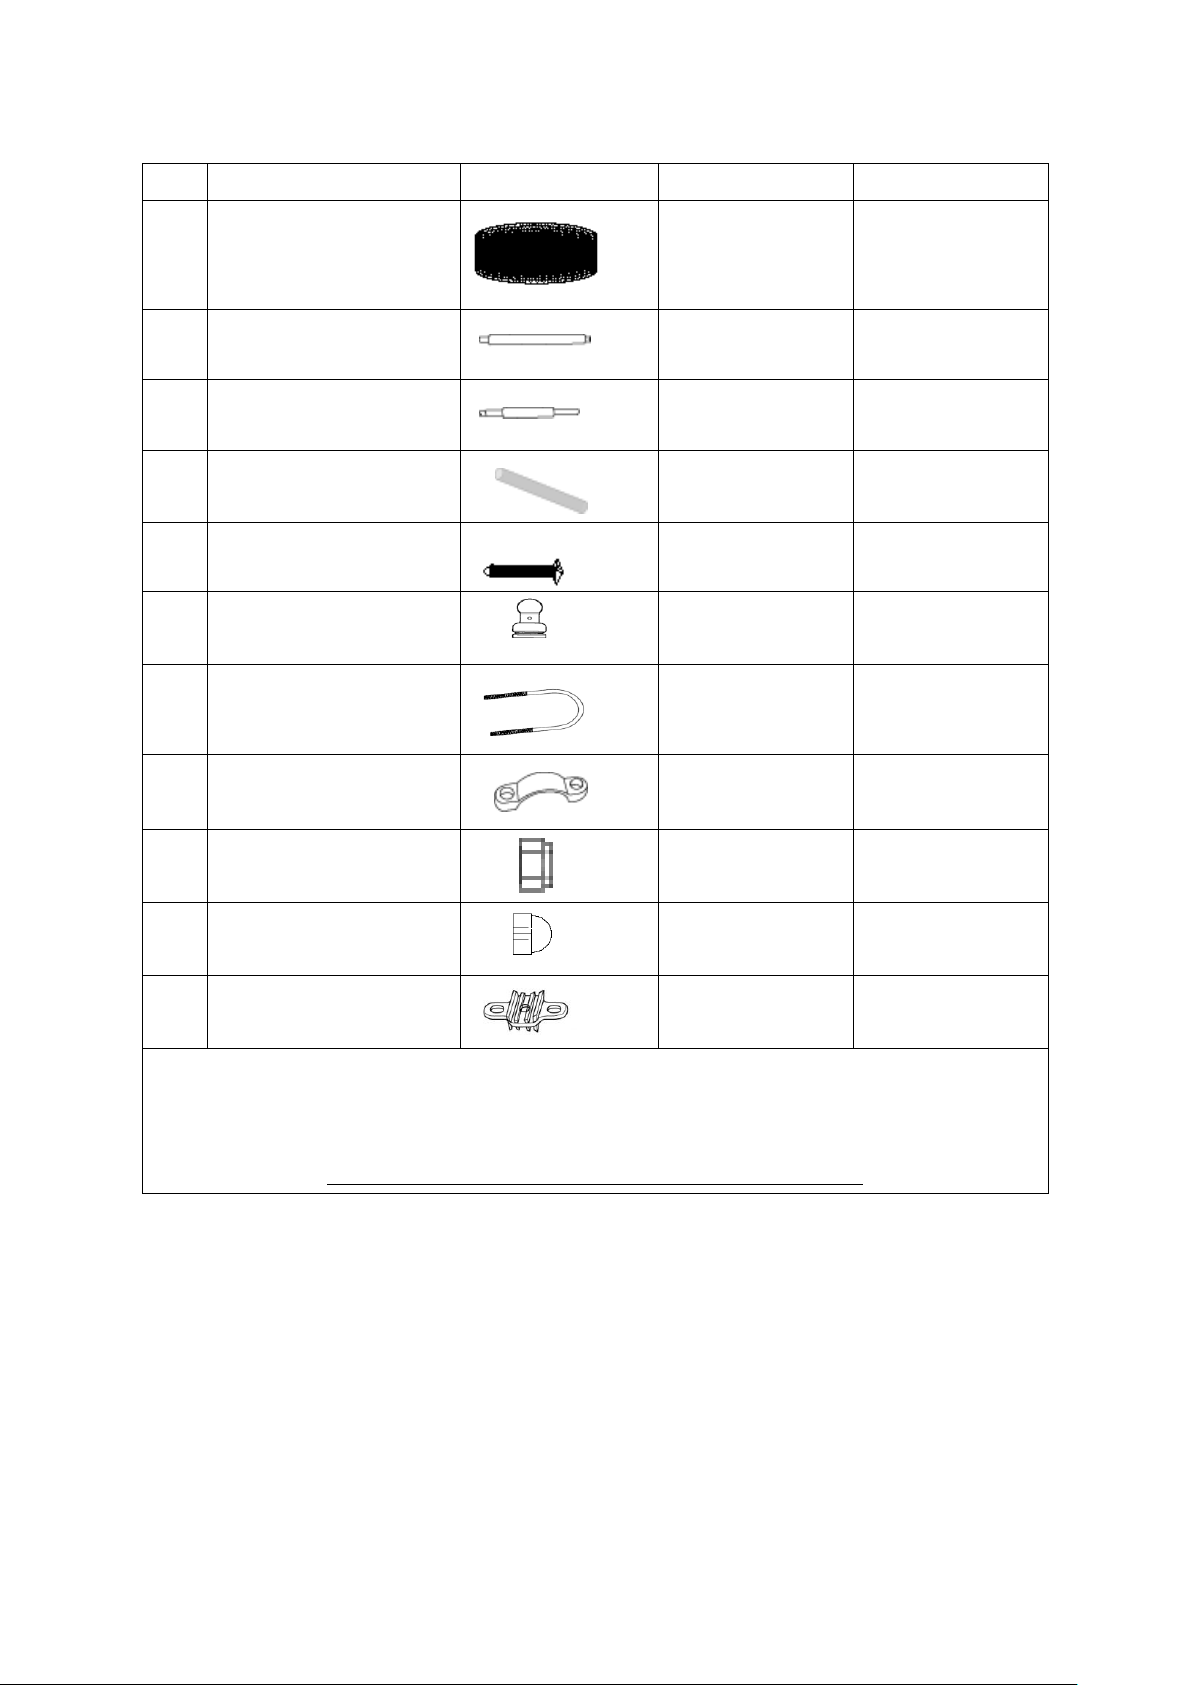
Parts Supplied
Ref
Description
Illustration
10ft
12ft
I
Net Assembly
1
1
J
Upper Support Pole
8
6
K
Lower Support Pole
8
6
L
Foam Sleeve
8
6
M
Ball Cap Screw
8
6
N
Ball Cap
8
6
O
U-Bolt 16
12
P
U-Bolt Clamp
16
12
Q
Lock Nut 32
24
R
Dome Nut
32
24
S
U-Bolt Spacer
16
12
Use the Parts List to ensure all parts are present.
Contact Customer Service at 1800 465 070 (Australia) or
09 477 6020 (New Zealand) if any parts are missing.
Do not attempt to assemble the trampoline if any parts are missing.
PARTS LIST - Enclosure
@ACTION SPORTS EQUIPMENT PTY LIMITED – www.actionsports.com.au Page: 14
Page 15
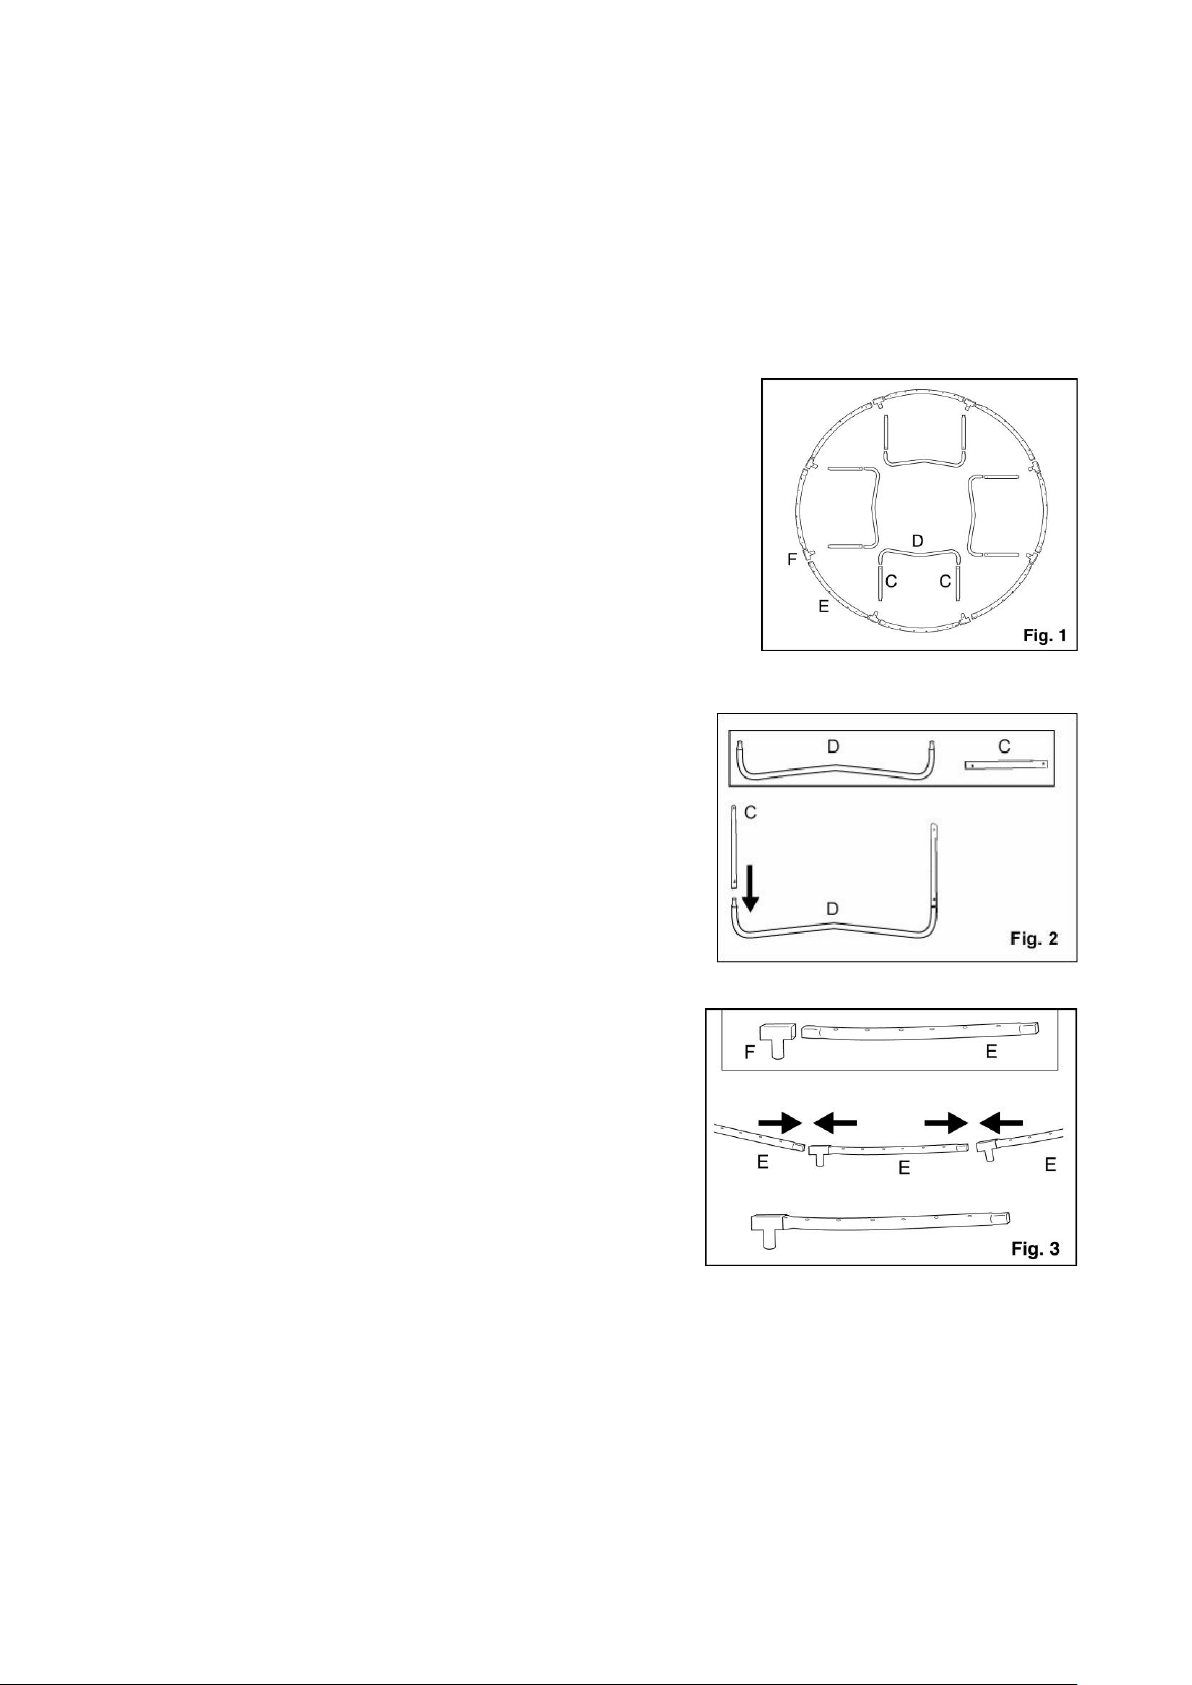
TRAMPOLINE ASSEMBLY
For ease of installation, it is recommended two adults assemble the trampoline. While one adult is
connecting the relevant pieces, the other adult can assist by supporting the frame and holding the
connecting pieces in the appropriate position.
Frame Assembly
1. Lay out the parts on a clear dry level surface as shown in
Figure 1. The top rail tubes (E) should form a circle, with
the spring hole eyelets facing upwards. A T-joint (F) should
be placed between each of the top rail sections.
2. To complete the Legs assembly. Connect the Vertical
Leg Tubes (C) with the W-Shape Leg Tube (D) as
shown in Figure 2. Ensure spring loaded locking pins
are aligned with locking holes and pin locks into the
secured position.
3. Connect the top rail tube (E) by sliding the wider end
of the tube into the T-Joint (F) first. If standing on the
outside of the circle created in step 1, the wider end
should be on your left hand side. Slide the
SMALLER END (right hand side) of the next Top
Rail tube into the T Joint and follow this process
around the trampoline to form the top rail loop.
Push each section firmly to ensure both ends of the
rail pieces are firmly in position within the T Joint.
Please see Figure 3.
@ACTION SPORTS EQUIPMENT PTY LIMITED – www.actionsports.com.au Page: 15
Page 16
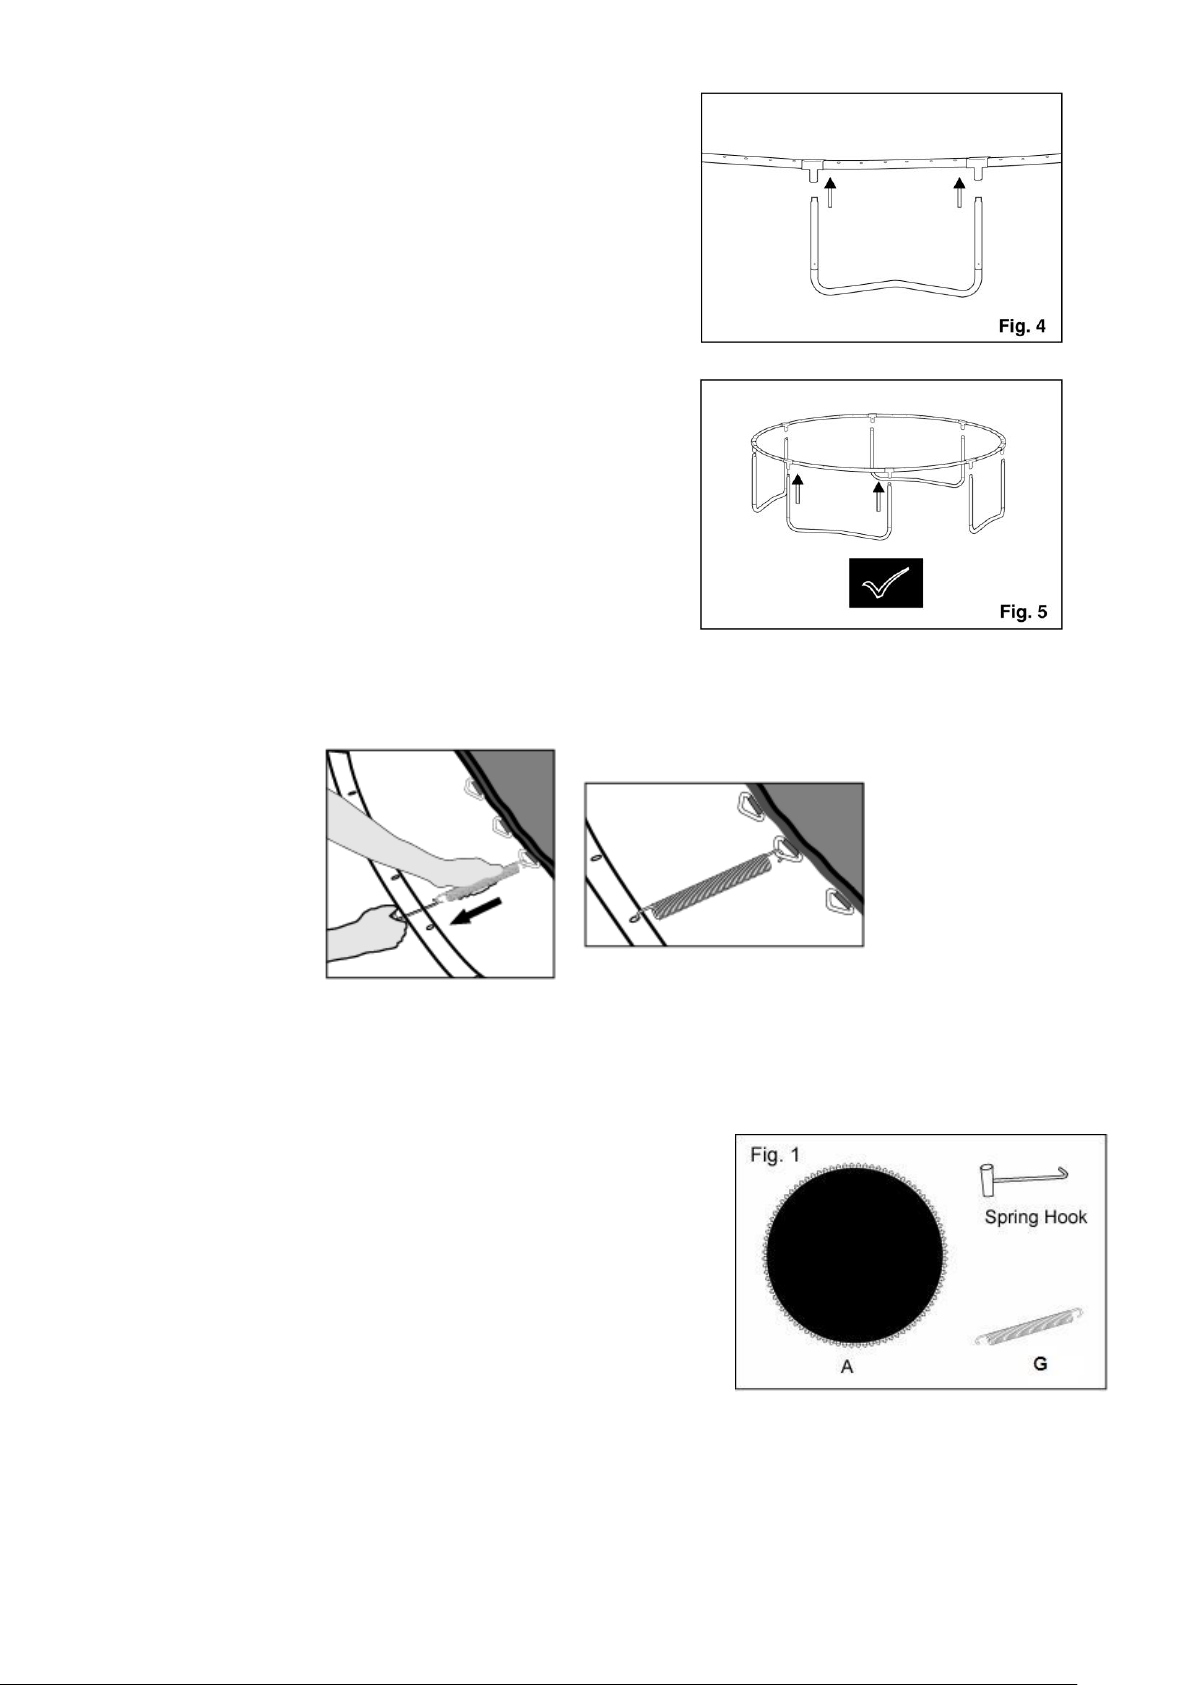
4. Join the completed Leg Tubes to the Top Rail Loop as
shown in Figure 4. Ensure spring loaded locking pins
are aligned with locking holes and pin locks into
position.
5. Once completed, the skeleton of the Trampoline
should look like the Figure 5.
Mat Assembly
To facilitate the assembly of the springs to the mat, please use the Spring Hook provided to pull the
springs during assembly.
1. Spread out the Mat (A) and have both the Springs (G)
and Spring Hook ready for assembly.
@ACTION SPORTS EQUIPMENT PTY LIMITED – www.actionsports.com.au Page: 16
Page 17
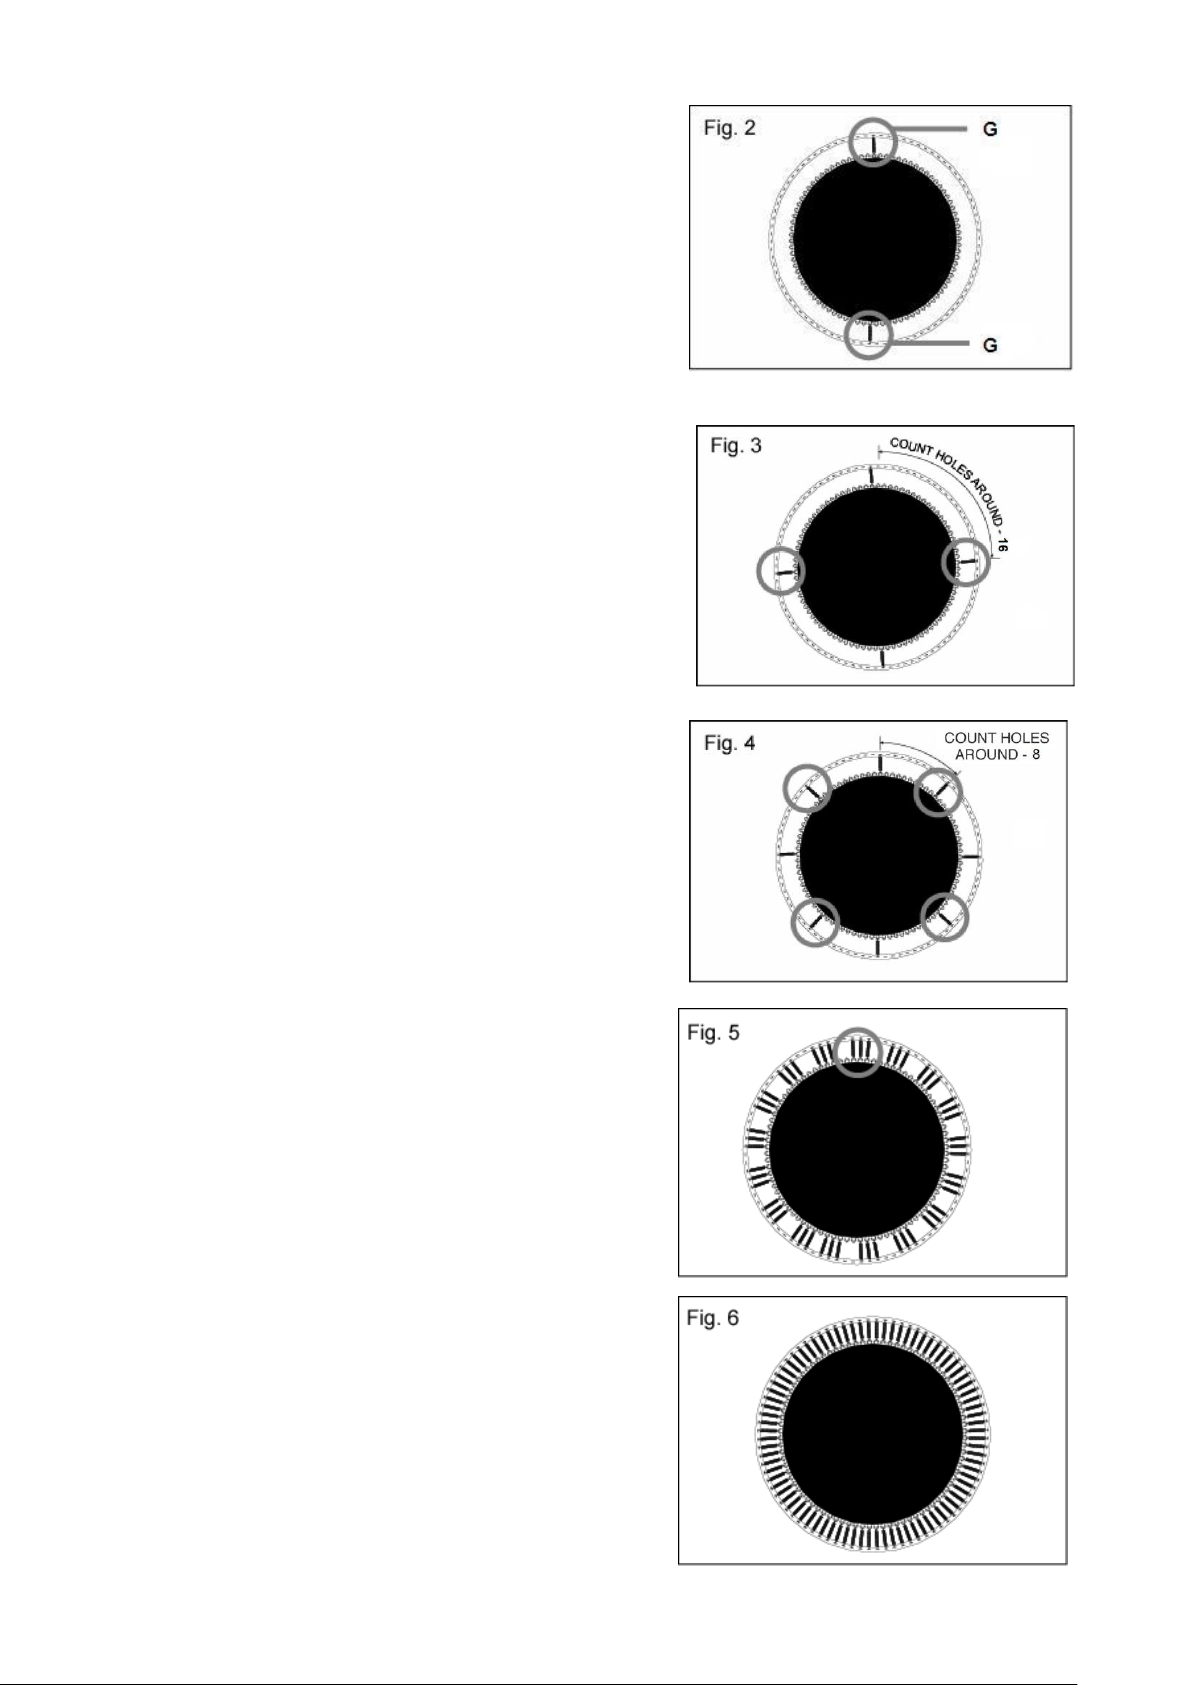
2. Divide the Mat into halves and then connect the first
set of Springs (G) directly opposite each other as
shown in Figure 2.
3. Divide the Mat (A) in to quarters and connect the
springs as shown in Figure 3.
4. Divide the Mat (A) into eighths and connect the
springs as shown in Figure 4.
5. Connect the remaining springs to the mat.
6. When the Springs (F) have been properly connected,
the trampoline should look like Figure 6.
@ACTION SPORTS EQUIPMENT PTY LIMITED – www.actionsports.com.au Page: 17
Page 18
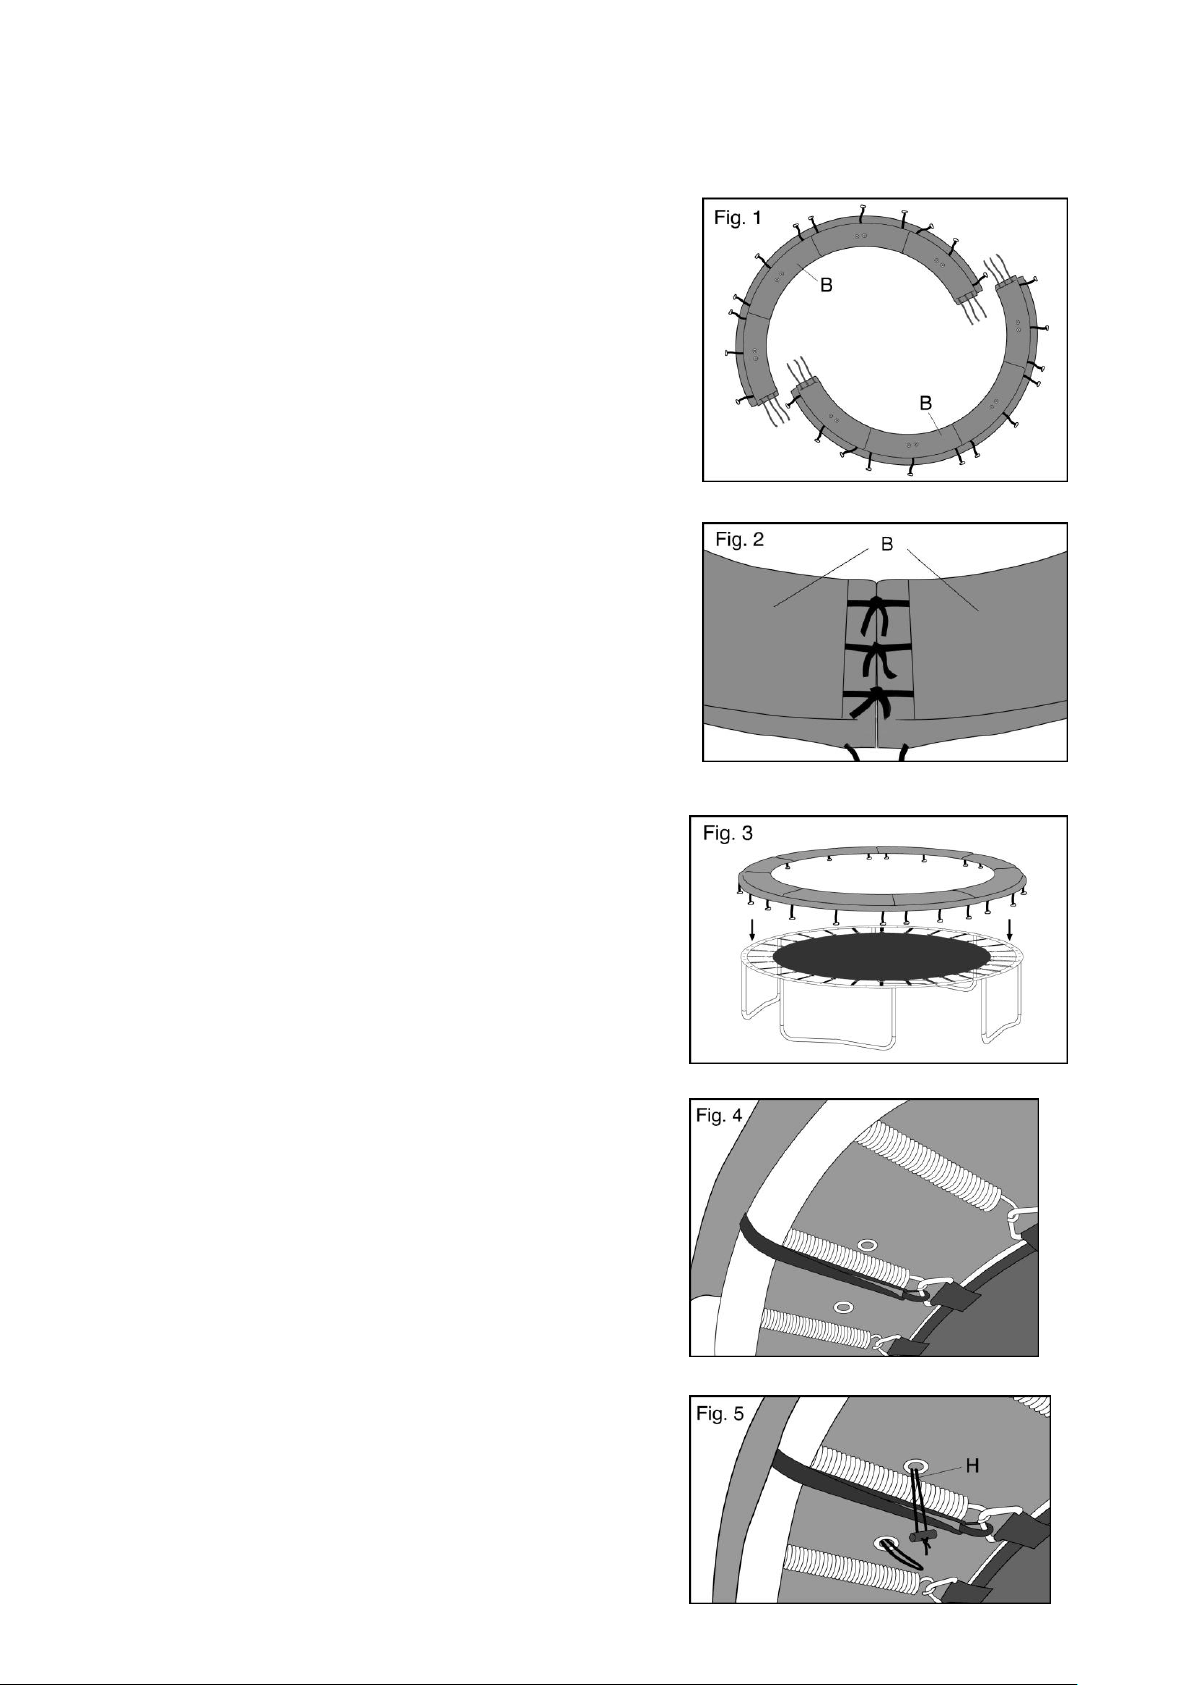
Frame Pad Assembly
1. Lay out the Frame Pads (B) on a dry and clean
surface.
2. Connect the two Frame Pads (B) together by firmly
tying together the straps located at the end of each
pad. When tying, ensure the pads are spaced
appropriately so that the two ends of the pads meet
and there is no gap between the pads.
3. Place the Frame Pad on top of the trampoline. The
tying points that have connected the pad segments
should be on the underside of the unit (facing the
ground).
4. There are some bungee straps with hook at the end
provided to connect the pads to the trampoline.
Secure the hook going around the top rail to the
v-ring in correspondence as shown in Figure 4.
5. Thread the Elastic Toggle (H) through the eyelets on
the pad as shown in Figure 5.
@ACTION SPORTS EQUIPMENT PTY LIMITED – www.actionsports.com.au Page: 18
Page 19
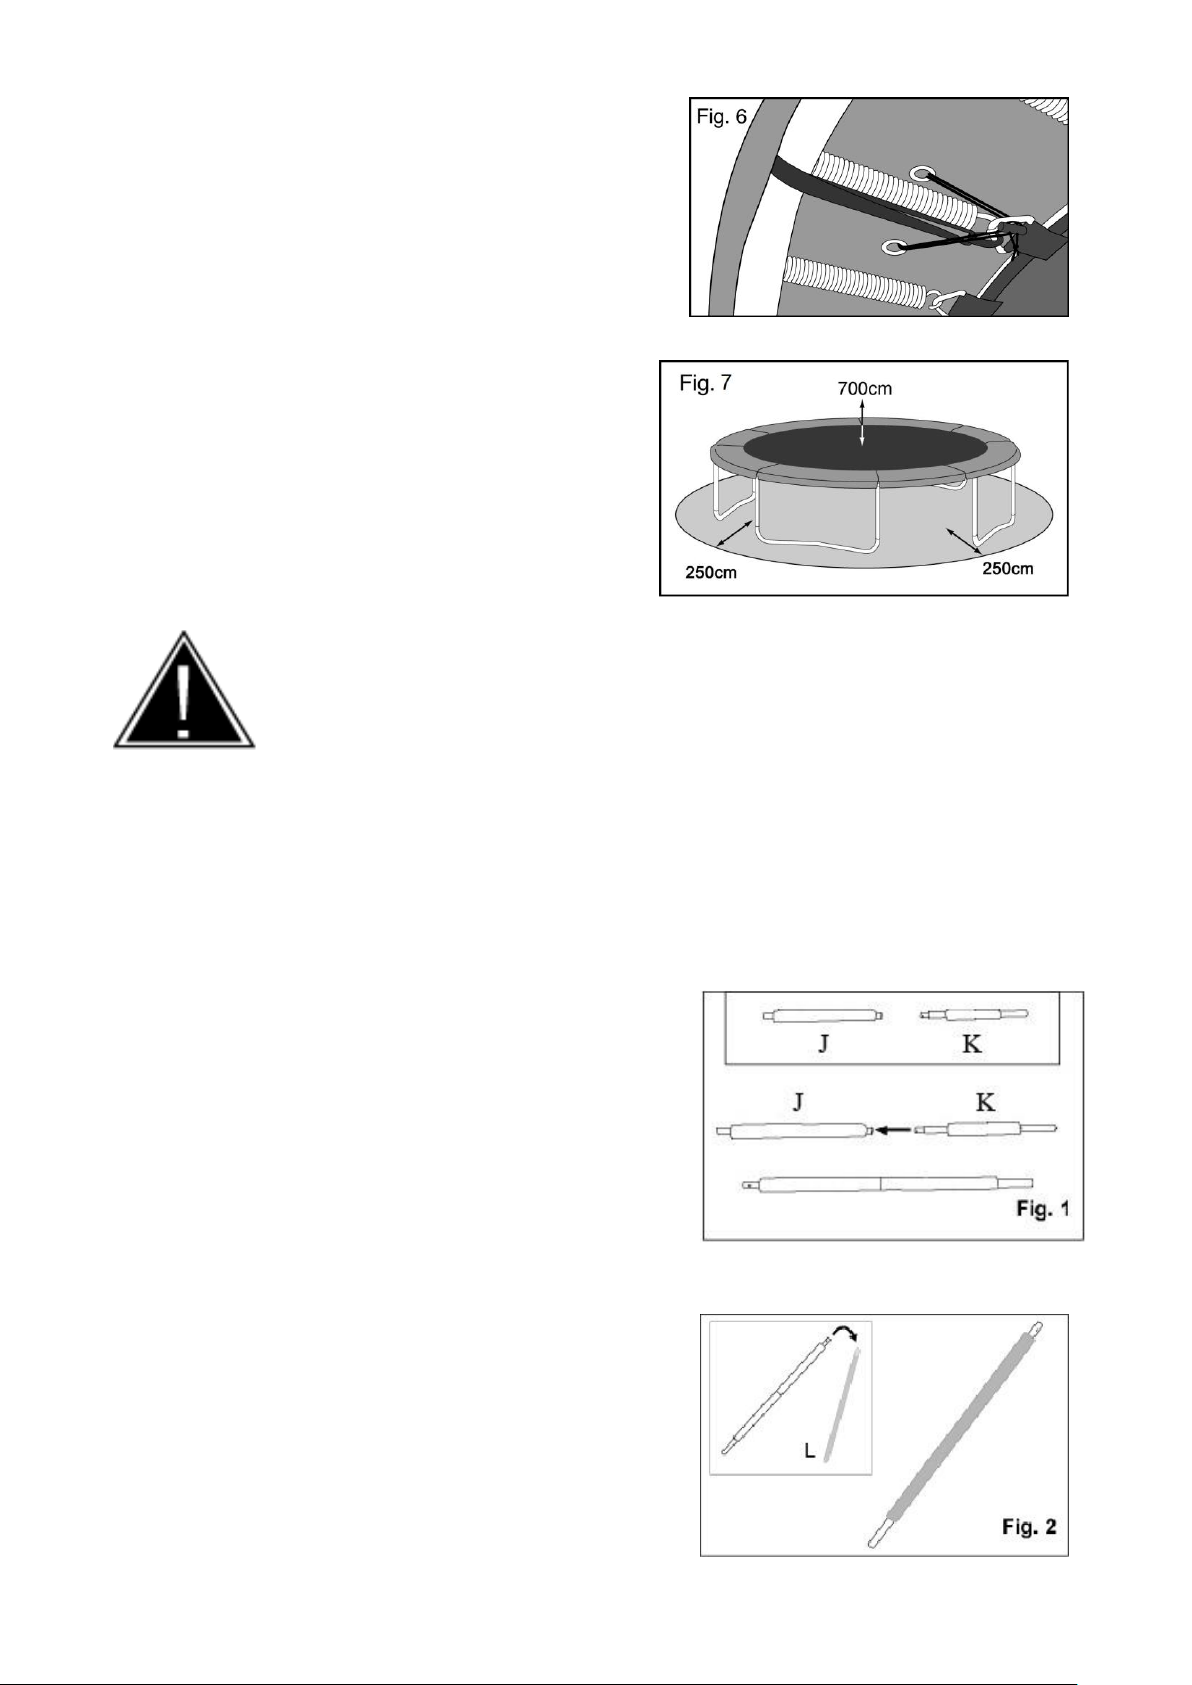
6. Pull the Elastic Toggle (H) to the nearest v-ring and
secure as shown in Figure 6.
7. The recommended Safe Play Area is to be 250cm
(2.5 metres) of clear area around the perimeter of
the trampoline, free of any obstructions or
potential hazards. There should also be no
obstructions above the trampoline up to a height
of 700cm (7metres) above the jumping mat
surface.
The Safe Play Area must be on level ground, free from all structures, landscaping,
trees and branches, rocks, wires, sprinkler heads and other obstacles. Children can
be seriously injured running or colliding into such obstacles.
ENCLOSURE ASSEMBLY
Pole Assembly
1. Attach the Upper Support Poles (J) and the Lower
Support Poles (K) which have both been
pre-assembled with foam (See Figure 1). Ensure
spring loaded locking pins are aligned with locking
holes and pin locks into position.
2. Slide the assembled Support Pole (J & K) done in
step 1 into the Foam Sleeve (L). Cover the entire area
of the Support Pole’s Foam. (See Fig.2).
@ACTION SPORTS EQUIPMENT PTY LIMITED – www.actionsports.com.au Page: 19
Page 20
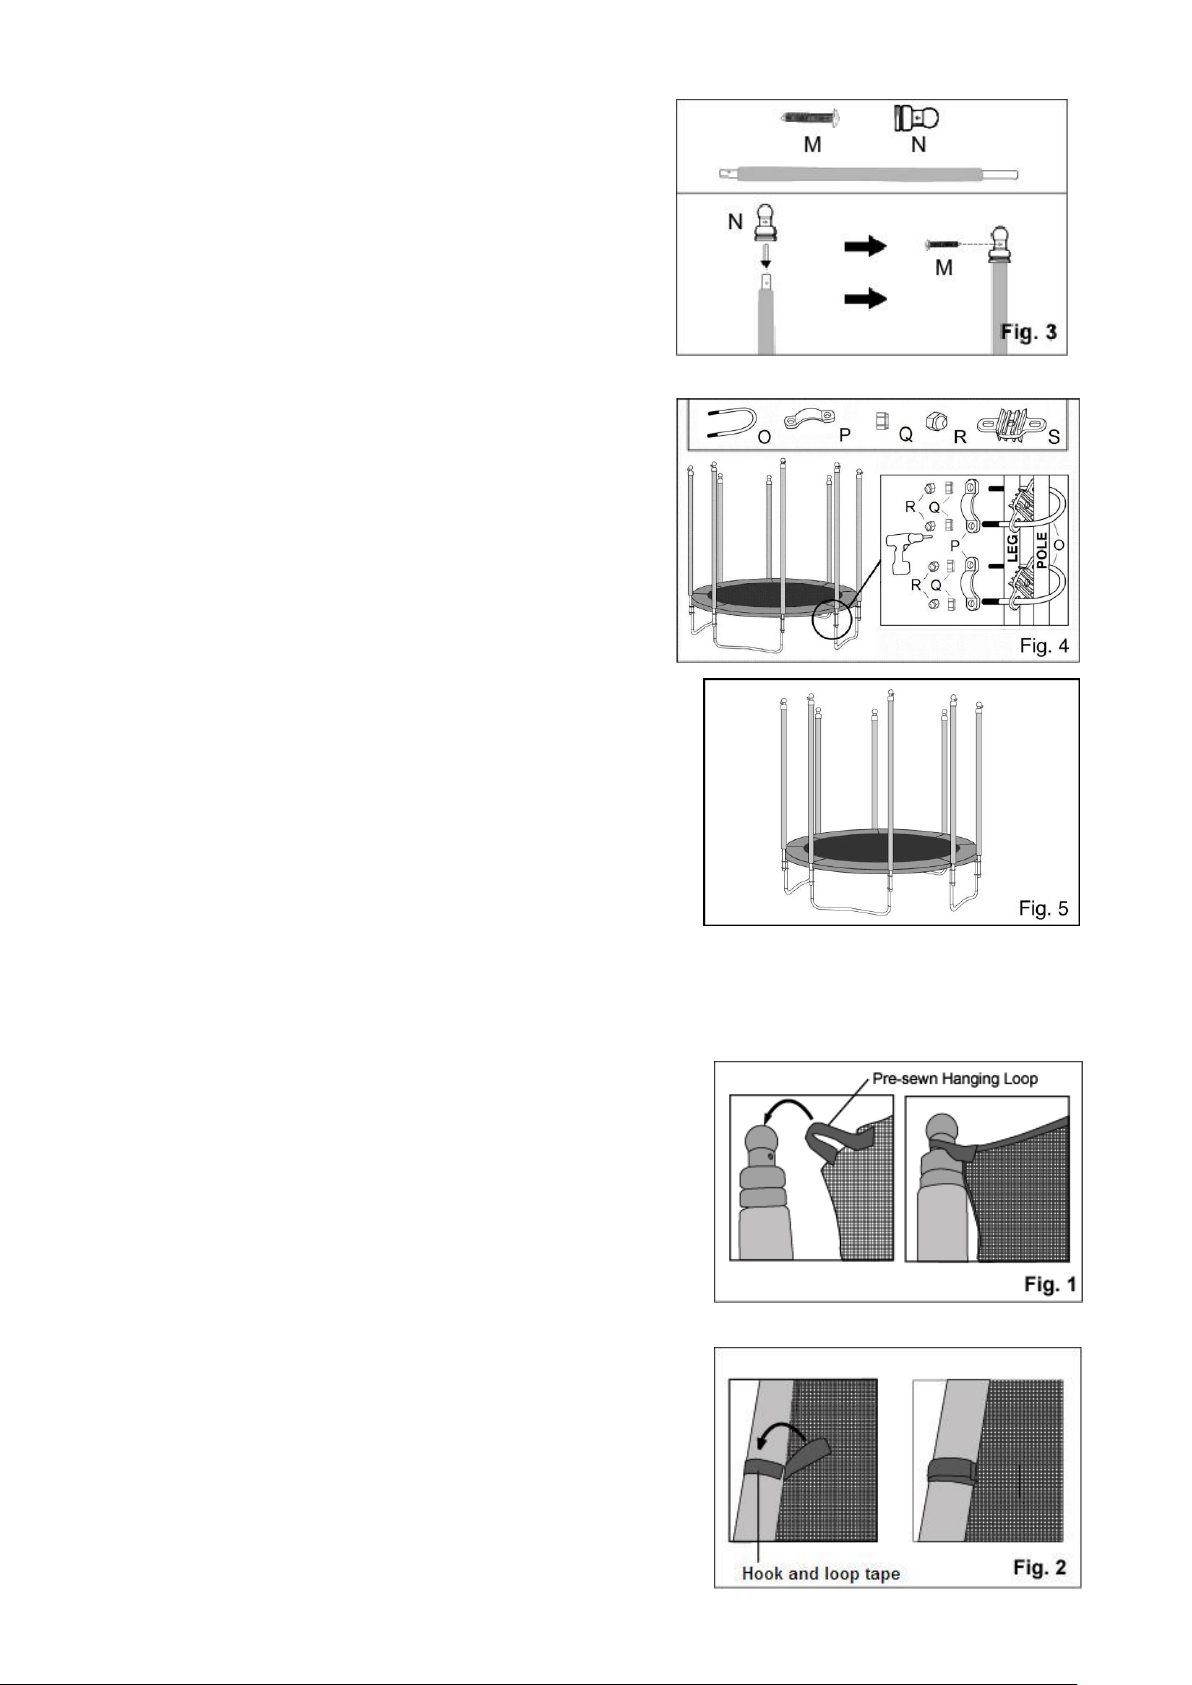
3. Insert the Ball Cap (N) over top of Upper Support
Pole. Align holes and fasten the Ball Cap (N) to
the assembled Support Pole using Ball Cap Screw
(M). (See Figure 3)
4. Place one of each assembled Support Pole done in
step 3 at every leg of the Trampoline. One adult
can support the pole in an upright position while
the other adult attaches the u-bolts. Place the
U-Bolt Spacer (S) in between the Leg Tube and the
Support Pole. Using the U-Bolts x 2 (O), first place
the u-bolts around the Support Pole through the
U-Bolt Spacer and then slide on the U-Bolt Clamp
(P) over the Leg Tube. Fasten the U-Bolt and the
U-bolt Clamp using (Q) and (R) (See Figure 4). The
Support Poles should reach half way of the
Trampoline Legs leaving the bottom of pole foam in
the same level to the frame pad. Once the assembly
has been completed properly, the Support Poles
should look like Figure 5. If possible use an electric
screwdriver to assist.
Net Assembly
1. Stretch Net Assembly (A) out. Locate the panel with
the doorway and align the net as to where you would
like to get in and out of the trampoline. The edge with
the pre-sewn hanging loops is the top of the net.
Working your way around the unit, place each hanging
loop over the top of each ball cap. (See Figure 1)
2. Directly underneath each of the pre-sewn loop at the
net top, there is a row of sewn-in hook and loop tapes,
three or four in line. Attach these hook and loop tapes
securely to each of the pole. Adjust the net to make
sure each of the hook and loop tapes are securely
fastened. (See Figure 2)
@ACTION SPORTS EQUIPMENT PTY LIMITED – www.actionsports.com.au Page: 20
Page 21
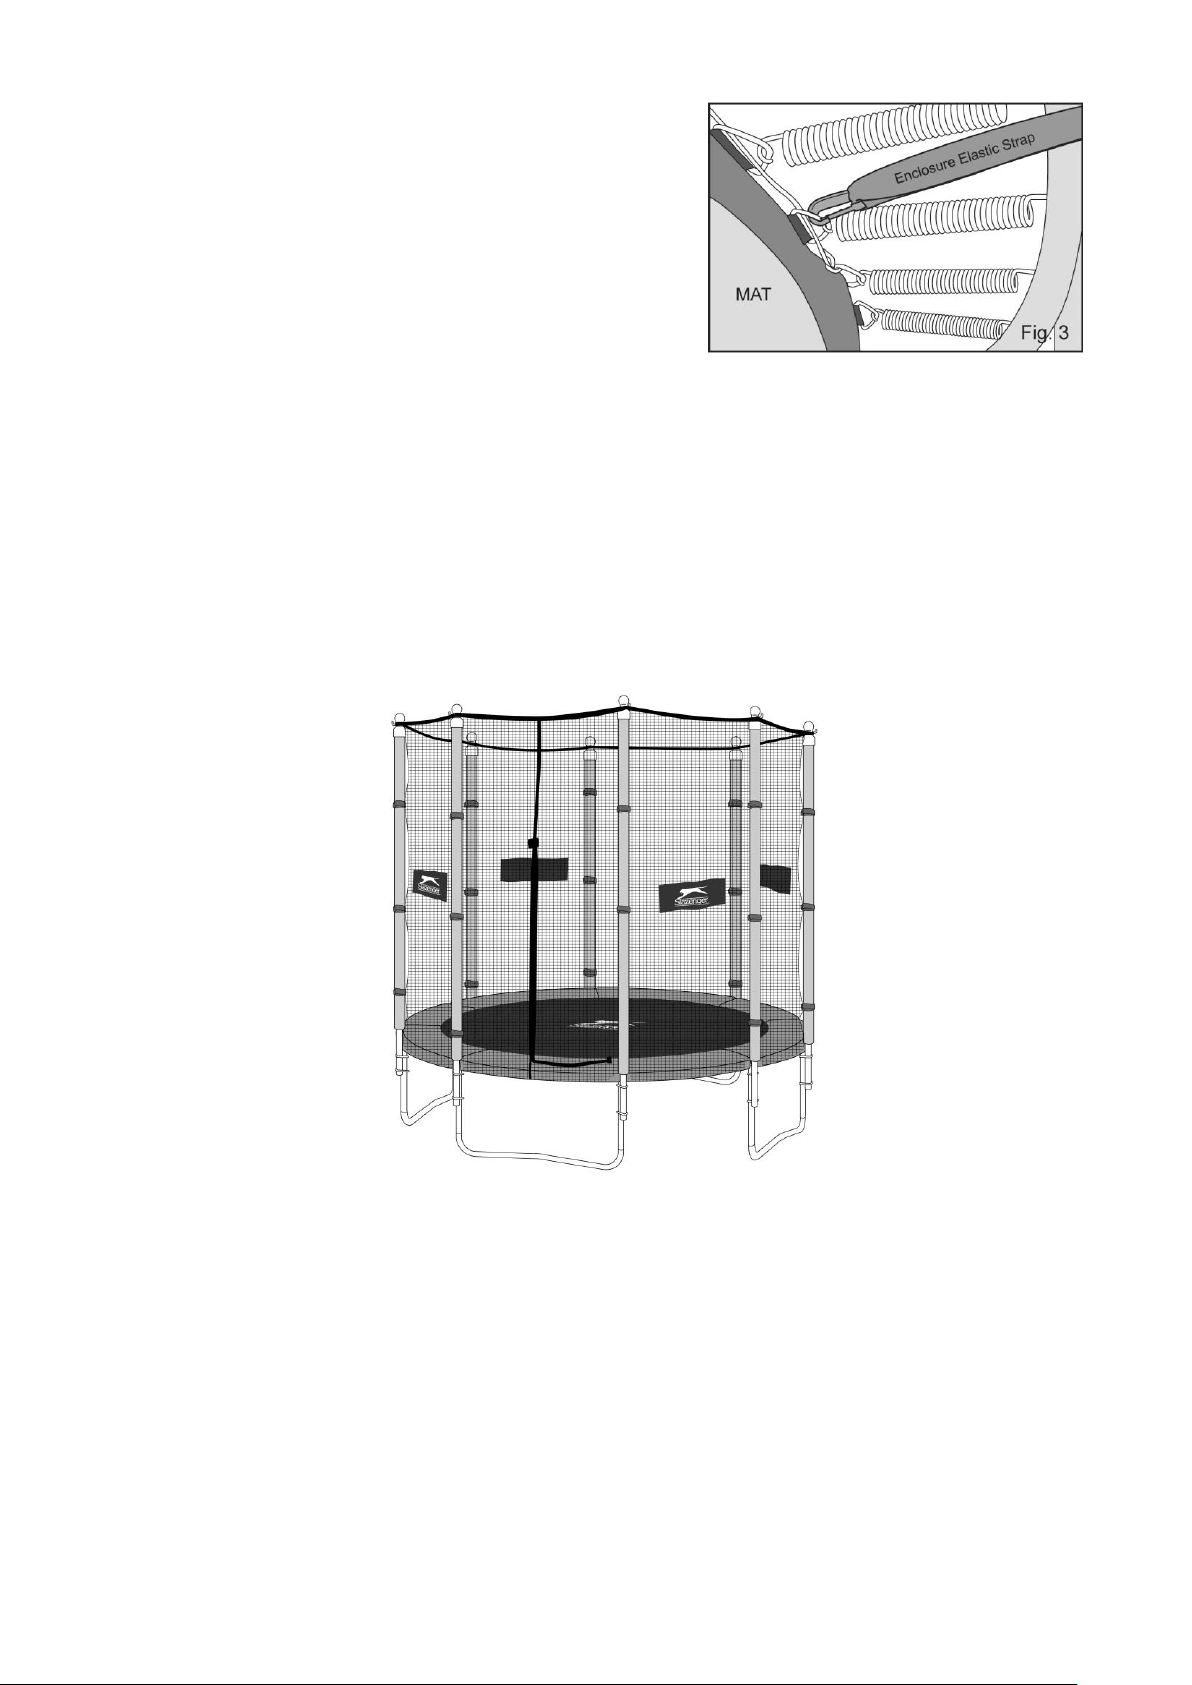
3. At the bottom perimeter of the net, there are elastic
straps which are used to secure the base of the net to
the Trampoline. Pull the bottom of the net down to the
trampoline using the elastic straps and wrap them
under the Trampoline Top Rail Tube and hook them to
the nearest V-ring of the trampoline mat (beneath the
safety pads) as shown in Figure 3.
4. Now go around the whole enclosure to make sure all the loops, hooks and loop tapes and
elastic straps are securely attached to the poles and trampoline. Check that the enclosure is
positioned evenly around the trampoline and that it is not under strain on any particular one
point. IMPORTANT – When assembled there should not be visible/exposed metal v-rings, the
padding should lay flat on the trampoline bed with the net tucked underneath.
The assembly of the enclosure is now completed as shown below.
There is a plastic warning placard enclosed with the enclosure package. Permanently affix this
warning placard to the outside of the enclosure, next to the entrance.
@ACTION SPORTS EQUIPMENT PTY LIMITED – www.actionsports.com.au Page: 21
Page 22

GENERAL SAFETY ADVICE
IMPORTANT – PLEASE READ!
-WARNING-
(a) Adequate overhead clearance is essential. A minimum of 8 m from ground level is
recommended. Provide clearance for wires, tree limbs, and other possible hazards.
(b) Lateral clearance is essential. Place the trampoline away from walls, structures, fences, and
other play areas.
(c) Maintain a free space of minimum 2500 mm on all sides of the trampoline. This area should
not include concrete, bitumen, brick or other hard surfaces as these can cause serious injuries.
(d) Keep the trampoline on a level surface.
(e) Use the trampoline in a well-lighted area.
Please retain this information for future reference.
- WARNING -
Any trampoline, with or without an enclosure can be blown around in high
winds and cause injury or damage. Do not use the trampoline in these
conditions – only use trampolines in calm or non wind conditions. In extreme
cases, trampolines can be blown over or even become airborne. If aware of
pending abnormal weather conditions, such as severe and gusty winds, or
extreme storms, Action Sports advises dis-assembling the trampoline and
enclosure and storing in a dry place. If you see fit, you may wish to anchor your
trampoline as an added prevention against sudden high wind conditions.
For normal weather conditions, ―normal weather Anchoring kits‖ are also
available for Action Trampolines. For more information please call 1800 46 50
70.
@ACTION SPORTS EQUIPMENT PTY LIMITED – www.actionsports.com.au Page: 22
Page 23

CARE & MAINTENANCE OF YOUR TRAMPOLINE
Inspect the trampoline before each use and replace any worn, defective, or missing parts.
The following conditions could represent potential hazards:
(i) Missing, improperly positioned, or insecurely attached frame padding, barrier or
enclosure support system padding and pole caps.
(ii) Punctures, frays, tears, or holes worn in the bed, frame padding, barrier or support
system padding.
(iii) Deterioration in the stitching or fabric of the bed, frame padding, barrier or support
system padding.
(iv) Broken or stretched springs.
(v) A bent or broken frame or support system.
(vi) A sagging bed or barrier.
(vii) Sharp protrusions on the frame, padding or suspension system.
(viii) Damaged or degraded padding.
The product must not be used until properly and fully installed and checked. Galvanised
tubular products may require occasional maintenance. If surface rust appears it should be
removed with either a wire brush or coarse sandpaper, and the area treated with non-toxic
paint.
Foreign objects including wakeboards, snowboards, skateboards, bicycles or any other items
are not to be used with the trampoline. Use of any foreign object on the trampoline will void
all product warranty.
Do not attach anything to the barrier that is not a manufacturer-approved accessory or part of
the enclosure system.
Do not hang from, kick, cut or climb on the barrier.
To avoid damage to the Trampoline, do not allow pets or other animals on the Trampoline.
Their claws and teeth can damage the mat of the trampoline.
Make sure that no bonfires are lit close enough to threaten your trampoline. In windy
conditions, sparks and embers can travel significant distances and burn holes in the trampoline
mat.
Any large trampoline, with or without an enclosure, can be blown around in high winds and
cause injury or damage. We recommend that the Enclosure should be removed under these
conditions and stored in a dry place.
@ACTION SPORTS EQUIPMENT PTY LIMITED – www.actionsports.com.au Page: 23
Page 24

DISPOSAL INFORMATION
Never allow toys to be placed or used near a fire. When it becomes necessary to dispose of
your equipment, remove all bolts and disassemble. Store safely & out of reach for children
until it can be properly disposed of. Remember to dispose it in a safe place and manner so as
not to present any hazards to any individuals.
@ACTION SPORTS EQUIPMENT PTY LIMITED – www.actionsports.com.au Page: 24
Page 25

Trampoline Limited Warranty
ACTION SPORTS warrants its trampoline products to be free from defects in material and
workmanship under normal use and service conditions.
The various components of the trampoline are warranted against defects and workmanship for
the time periods specified as follows:
Steel Frame 5 years
Mat Fabric 2 years
Frame Pads 1 year
Springs 1 year
Enclosure Frame 5 years – where applicable
Enclosure Netting 1 year – where applicable
All warranty coverage extends only to the original retail purchaser from the date of purchase.
ACTION SPORTS’ obligation under this Warranty is limited to replacing or repairing, at
ACTION’s option, the product or parts therein. Any enquiries relating to warranties or spare
parts must be directed to our Freecall 1800 465 070 or Standard call 09 477 6020 (New
Zealand). For efficient processing of your enquiry please have relevant date of purchase,
retailer name you purchased the item from and the brand on the product. This warranty does
not extend to any damage to a product caused by abuse, improper or abnormal usage (as
detailed in this instruction manual), or repairs not provided by ACTION. Nor does this
warranty extend to products used for commercial or rental purposes. This warranty does not
cover ordinary wear, tear and weathering, failure to follow directions, improper installation,
improper maintenance or acts of God (such as damage caused by storms, lightning and by
snow or ice). No other Warranty beyond that specifically set forth above is authorised by
ACTION.
Our sales and service centre has been set up to provide assembly assistance, replacement parts
and accessories, and to efficiently handle all warranty related matters.
Freecall 1800 465 070 (Australia) or email [email protected]
Standard Call 09 477 6020 (New Zealand) or email [email protected]
Opening hours 9am – 4:30pm Mon-Fri (excluding Public Holidays), 9am – 3pm Sat
www.actionsports.com.au
@ACTION SPORTS EQUIPMENT PTY LIMITED – www.actionsports.com.au Page: 25
 Loading...