

Slant/Fin CB-45, CB-90, CB-135, CB-180, CONCEPT 21 CB-180 Installation And Operating Instructions Manual
Page 1
CONCEPT 21Models CB-45 through CB-180
• Cast-iron • Hot water boilers • Gas Fired • Sealed Combustion
• Direct Vent, Category I, or Category IV Venting Flexibility
INSTALLATION AND OPERATING INSTRUCTIONS
Contents . . . . . . . . . . . . . . . . . . . . . . . . . . . . . . . . . . . . .Page
Specifications and Dimensions . . . . . . . . . . . . . . . . . . . . . . . .2
Installation Requirements
Boiler Location . . . . . . . . . . . . . . . . . . . . . . . . . . . . . . . . . 3
Boiler Foundation . . . . . . . . . . . . . . . . . . . . . . . . . . . . . . . 3
Minimum Clearances . . . . . . . . . . . . . . . . . . . . . . . . . . . . 3
Approved Venting Applications . . . . . . . . . . . . . . . . . . . . 4
Direct Vent Application Requirements . . . . . . . . . . . . . 4–8
Category IV Venting Requirements . . . . . . . . . . . . . 9–11
Category I Venting Requirements . . . . . . . . . . . . . 12–14
Water Piping . . . . . . . . . . . . . . . . . . . . . . . . . . . . . . . . . . .15
Gas Piping . . . . . . . . . . . . . . . . . . . . . . . . . . . . . . . . . . . .16
Electrical Wiring . . . . . . . . . . . . . . . . . . . . . . . . . . . . .16–17
Operation Procedures . . . . . . . . . . . . . . . . . . . . . . . . . . . .18–19
Input Rate Adjustment Specifications . . . . . . . . . . . . . . . . . .20
Testing of System . . . . . . . . . . . . . . . . . . . . . . . . . . . . . . . . . .21
Sequence of Operations . . . . . . . . . . . . . . . . . . . . . . . . . . . . .22
Wiring Diagrams . . . . . . . . . . . . . . . . . . . . . . . . . . . . . . . . . . .23
Troubleshooting . . . . . . . . . . . . . . . . . . . . . . . . . . . . . . . . .24-27
Air and Gas Orifices . . . . . . . . . . . . . . . . . . . . . . . . . . . . 28–29
Lighting Instructions . . . . . . . . . . . . . . . . . . . . . . . . . . . . . . . .30
Maintenance Procedures . . . . . . . . . . . . . . . . . . . . . . . . . . . .31
Boiler Package/Options . . . . . . . . . . . . . . . . . . . . . . . . . . . . .32
IMPORTANT
READ ALL OF THE FOLLOWING WARNINGS
AND STATEMENTS BEFORE READING THE
INSTALLATION INSTRUCTIONS
WARNING
LIQUEFIED PETROLEUM (L.P.)
PROPANE FIRED GAS BOILERS
Installation location ONLY as permitted in paragraph entitled
"LIQUEFIED PETROLEUM (L.P.) PROPANE GAS FIRED
BOILER LOCATION" on page 3 of this instruction book.
The above warning does not apply to NATURAL gas fired
boilers.
NOTICE: INSTALLATION AND SERVICE MUST BE PERFORMED BY A
TRAINED AND QUALIFIED TECHNICIAN.
The installation must conform to the requirements of the
National Fuel Gas Code ANSI Z223.1 or the CSA B149.1-00
for natural gas and propane and the requirements of the
authority having jurisdiction as well as the requirements in
this instruction manual. In addition, where required by the
authority having jurisdiction, installation must conform to the
Standard for Controls and Safety Devices for Automatically
Fired Boilers, ANSI/ASME CSD-1 or the CSA B149.1-00 for
natural gas and propane. If there is any conflict in the above
requirements, then the more stringent requirement will apply.
WARNING
This boiler, gas piping and accessories must be installed,
connected, serviced and repaired by a trained, experienced
service technician, familiar with all precautions required for
gas fired equipment and licensed or otherwise qualified, in
compliance with the authority having jurisdiction.
Printed in Canada
Publication No. CB-40 Rev. C
Part No. 66-1001
This manual must be left with owner, hung on or
adjacent to the boiler. Owner should retain manual
for future reference.
Heating Contractor
Address
Phone Number
Boiler Model Number
Boiler Serial Number
Installation Date
®
Page 2
2
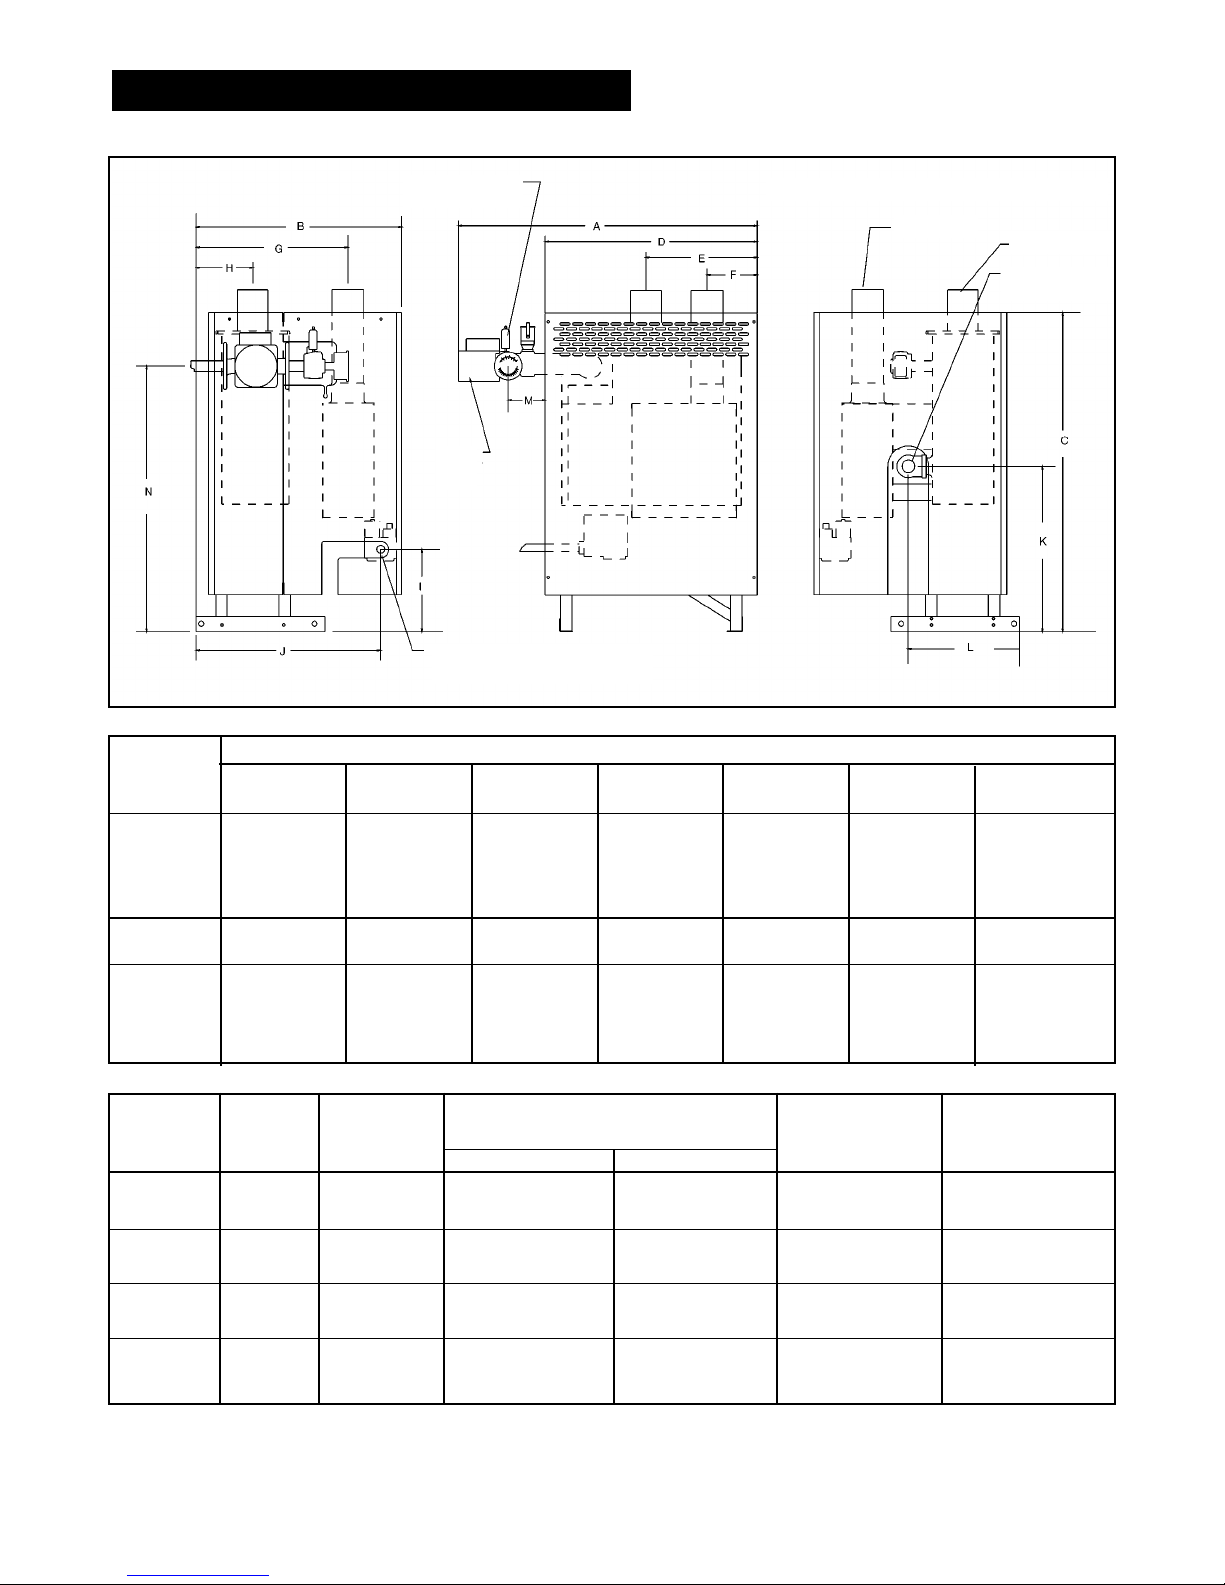
Figure 1. Views — Dimensions — Data
ABCDEFG
mm in mm in mm in mm in mm in mm in mm in
CB-45 743 29.25 508 20 794 31.25 527 20.75 279 11 127 5 356 14
CB-90 743 29.25 584 23 794 31.25 527 20.75 279 11 127 5 432 17
CB-135 743 29.25 660 26 794 31.25 527 20.75 279 11 127 5 508 20
CB-180 743 29.25 737 29 794 31.25 527 20.75 279 11 127 5 584 23
HIJKLMN
mm in mm in mm in mm in mm in mm in mm in
CB-45 127 5 203 8 457 18 413 16.25 273 10.75 95 3.75 660 26
CB-90 165 6.5 203 8 533 21 413 16.25 273 10.75 95 3.75 660 26
CB-135 203 8 203 8 610 24 413 16.25 273 10.75 95 3.75 660 26
CB-180 241 9.5 203 8 686 27 413 16.25 273 10.75 95 3.75 660 26
Boiler
Model
DIMENSIONS INCHES
RATINGS AND DIMENSIONS
Boiler No. of Gas Gas Supply Pressure Shipping Boiler
Model Sections Type Max Min Weight Water Vol.
mm in mm in kg lbs l USG
CB-45 1 Natural 229 9 89 3.5
87 192 1.9 0.5
CB-45 1 Propane 356 14 279 11
CB-90 2 Natural 229 9 89 3.5
112 246 3.8 1.0
CB-90 2 Propane 356 14 279 11
CB-135 3 Natural 229 9 89 3.5
142 312 5.7 1.5
CB-135 3 Propane 356 14 279 11
CB-180 4 Natural 229 9 89 3.5
167 368 7.6 2.0
CB-180 4 Propane 356 14 279 11
WATER SUPPLY
32mm (1 1/4") NPT
GAS SUPPLY
13mm (1/2") NPT
76mm (3") VENT DIA. FOR ALL VENTING, ALL MODELS
AIR INTAKE
EXHAUST
WATER RETURN
32mm (1 1/4")
LEFT SIDE VIEW FRONT VIEW RIGHT SIDE VIEW
CIRC.
PUMP
Page 3

NOTICE: INSTALLATION AND SERVICE MUST BE
PERFORMED BY A QUALIFIED HEATING CONTRACTOR
The installation must conform to the requirements of
the National Fuel Gas Code ANSI Z223.1 and CSA
B149.1-00 for natural gas and propane for Gas Burning
Appliances and Equipment, and the requirements of the
authority having jurisdiction as well as the requirements
in this instruction manual. In addition, where required by
the authority having jurisdiction, installation must
conform to the Standard for Controls and Safety Devices
for Automatically Fired Boilers, ANSI/ASME CSD-1. If
there is any conflict in the above requirements, then the
more stringent requirement will apply.
BOILER LOCATION
Structure through which venting will pass must be free
and clear for opening (i.e. no hidden conduit, telephone
cables or other obstructions).
Boiler location should be such that the gas ignition
system components are protected from water (dripping,
spraying, rain, etc.) during appliance operation and
service (circulator replacement, condensate trap, control
replacement, etc.).
For a closet installation, ventilation openings must be
provided through a door or wall to prevent excessive
heat build-up. Two openings, one near the floor and one
near the ceiling, should be sized to assure sufficient air
circulation in the closet (minimum 64,516mm
2
[100 sq.
inches] each).
WARNING
LIQUEFIED PETROLEUM (L.P.) PROPANE FIRED
GAS BOILER LOCATION
REQUIRES SPECIAL ATTENTION
Liquefied Petroleum (L.P.) propane gas is heavier than
air. Therefore, propane boilers, piping, valves must NOT
be installed in locations where propane leaking from
defective equipment and piping will "pool" in a basement
or other space below the leak.
A spark or flame from the boiler or other source may
ignite the accumulated propane gas causing an
explosion or fire.
Provide a level, solid foundation for the boiler. Location
should be as near the chimney as possible so that the
flue pipe from boiler to the chimney is short and direct.
The UNIFORM MECHANICAL CODE may be in effect
in your geographic area.
The following precautions are cited by the 1994
UNIFORM MECHANICAL CODE, section 304.6 or CSA
B149.1-00 for natural gas and propane.
“LPG Appliances. Liquefied petroleum gas-burning
appliances shall not be installed in a pit, basement
or similar location where heavier-than-air-gas might
collect. Appliances so fueled shall not be installed in
an above-grade under-floor space or basement
unless such location is provided with an approved
means for removal of unburned gas.”
Consult Chapter 5 of the 1994 UNIFORM MECHANICAL
CODE for design criteria of the "approved" means for
removal of unburned gas.
SAFETY—
KEEP THE BOILER AREA CLEAR AND FREE FROM
COMBUSTIBLE MATERIALS, GASOLINE AND OTHER
FLAMMABLE VAPORS AND LIQUIDS.
BOILER FOUNDATION
A. Provide a solid, level foundation, capable of
supporting the weight of the boiler filled with water,
and extending at least 51mm (2") past the jacket on
all sides. See dimensions of boilers, page 2.
B. Boiler can be installed on both combustible and non-
combustible floors, but must NOT be installed on or
above carpeting.
C. If boiler is to be located over buried conduit
containing electric wires or telephone cables, consult
local codes or the National Board of Fire Underwriters
for specific requirements.
MINIMUM CLEARANCES
A. Minimum clearances to the exterior surfaces of the
boiler shall be as follows:
MINIMUM ALCOVE AND CLOSET CLEARANCE.
B. Provide 457mm (18") on sides used for passage.
For Combustible Recommended
Surface
Construction for Service
Front 51mm (2") 457mm (18")
Rear 51mm (2") 203mm (8")
Left Side 51mm (2") 457mm (18")
Right Side 51mm (2") 457mm (18")
Top 254mm (10") 254mm (10")
Flue Connector 76mm (3") 152mm (6")
C. All minimum clearances shown above must be met.
This may result in increased values of some
minimum clearances in order to maintain the
minimum clearances of others.
D. Clearance from hot water pipes shall be
25mm (1") **.
** At points where hot water pipes emerge from a
floor, wall or ceiling, the clearance at the opening
through the finished floor boards or wall or ceiling
boards may not be less than 13mm (1/2"). Each
such opening shall be covered with a plate of
noncombustible material.
3
INSTALLATION REQUIREMENTS
Page 4

APPROVED VENTING APPLICATIONS
This Concept 21 boiler is approved to be vented using
Direct Vent, Category I, or Category IV applications.
These applications are differentiated as follows:
Direct Vent — The air for combustion is piped directly to
the air intake of the boiler from outdoors. The vent piping
may be run horizontally or vertically to the outdoors, to a
common terminal with the combustion air intake or
separate from the combustion air intake means.
Category I— The air for combustion is taken from the
ambient air surrounding the boiler. The vent piping must
be upsized and run into a vertical chimney or vent which
will insure a non-positive vent pressure. There is only one
specified input rate for each model boiler on Category I
installations. See chart 2 on page 20.
Category IV— The air for combustion is taken from the
ambient air surrounding the boiler. The vent piping may be
run horizontally or vertically to the outdoors. The vent
pressure is typically positive in this application.
The following venting installation requirements are divided
into 3 sections, each pertaining to the 3 different
applications described above. Once the appropriate
venting application has been selected, follow only the
requirements specified under that section for venting the
boiler. These requirements must be carefully read and
followed in order to avoid any hazardous conditions due to
improper installation of the flue gas venting system.
DIRECT VENT APPLICATION REQUIREMENTS
VENTING LOCATION
Vent installations shall be in accordance with Part 7,
Venting of Equipment, of the National Fuel Gas Code,
ANSI Z223.1, and CSA B149.1-00 for natural gas and
propane, or applicable provisions of local building codes.
Vent termination must meet the following clearances:
Minimum of 305mm (12”) above grade and normal snow
line to vent terminal bottom; minimum of 305mm (12”)
from any building opening; minimum of 914mm (3 feet)
above any forced air intake located within 3048mm (10
feet); minimum of 1219mm (4 feet) horizontally from, and
in no case above or below, unless 1219mm (4-foot)
horizontal distance is maintained, from electric or gas
meters, regulators and relief equipment.
Vent termination must not be located over any public
walkway, in any confined space (i.e. window wells,
alcoves, narrow alleys) or under any overhang or deck.
Vent termination should not allow flue gas discharge
towards neighbor's windows or where personal injury or
property damage can occur.
DO NOT install the vent into a common venting system.
DO NOT install a vent damper or similar device in vent
tubing or on the boiler.
VENT MATERIAL
A. DO NOT use galvanized or plastic vent system
materials. The vent system for Direct Vent Applications
must be UL listed 76mm (3”) diameter corrosion
resistant stainless steel. The following manufacturer’s
systems are approved for use within a specified
minimum and maximum equivalent vent length for each
model of boiler. Refer to Slant/Fin Parts List, Publication
CB 10PL.
B. When joining the various components of the above
listed vent systems, the manufacturers’ instructions
should be closely followed to insure proper sealing
. Use
GE-RTV106 or Dow-Corning 732 sealant for sealing of
pipe and fittings. See Figure 4 for proper application of
vent pipe sealant.
C. All vent connections must be liquid and pressure tight.
4
CB-45 30 100 5 914 3 1524 5 1
CB-90 30 100 5 914 3 1524 5 1
CB-135 24 80 5 914 3 1524 5 1
CB-180 12 40 5 914 3 1524 5 1
Boiler
Model
No.
Maximum
Equivalent
Length
including
Elbows
m ft
Max.
No. of
Elbows*
Equivalent
Length of
each
Elbow
mm ft
Minimum
Equivalent
Length*
mm ft
Min.
No. of
Elbows*
* All lengths specified include mandatory minimum use of 610mm (2
feet) of tubing plus one elbow from boiler to vent termination all
models.
Heat Fab Saf-T Vent System
CB-45 30 100 5 1829 6 2438 8 1
CB-90 30 100 5 1829 6 2438 8 1
CB-135 18 60 5 1829 6 2438 8 1
CB-180 9 30 3 1829 6 2438 8 1
Boiler
Model
No.
Maximum
Equivalent
Length
including
Elbows*
m ft
Max.
No. of
Elbows*
Equivalent
Length of
each
Elbow
mm ft
Minimum
Equivalent
Length*
mm ft
Min.
No. of
Elbows*
ProTech Fas-N Seal System
CB-45 30 100 5 1829 6 2438 8 1
CB-90 30 100 5 1829 6 2438 8 1
CB-135 21 70 5 1829 6 2438 8 1
CB-180 11 35 4 1829 6 2438 8 1
Boiler
Model
No.
Maximum
Equivalent
Length
including
Elbows*
m ft
Max.
No. of
Elbows*
Equivalent
Length of
each
Elbow
mm ft
Minimum
Equivalent
Length*
mm ft
Min.
No. of
Elbows*
Flex-L Star-34 System
Page 5

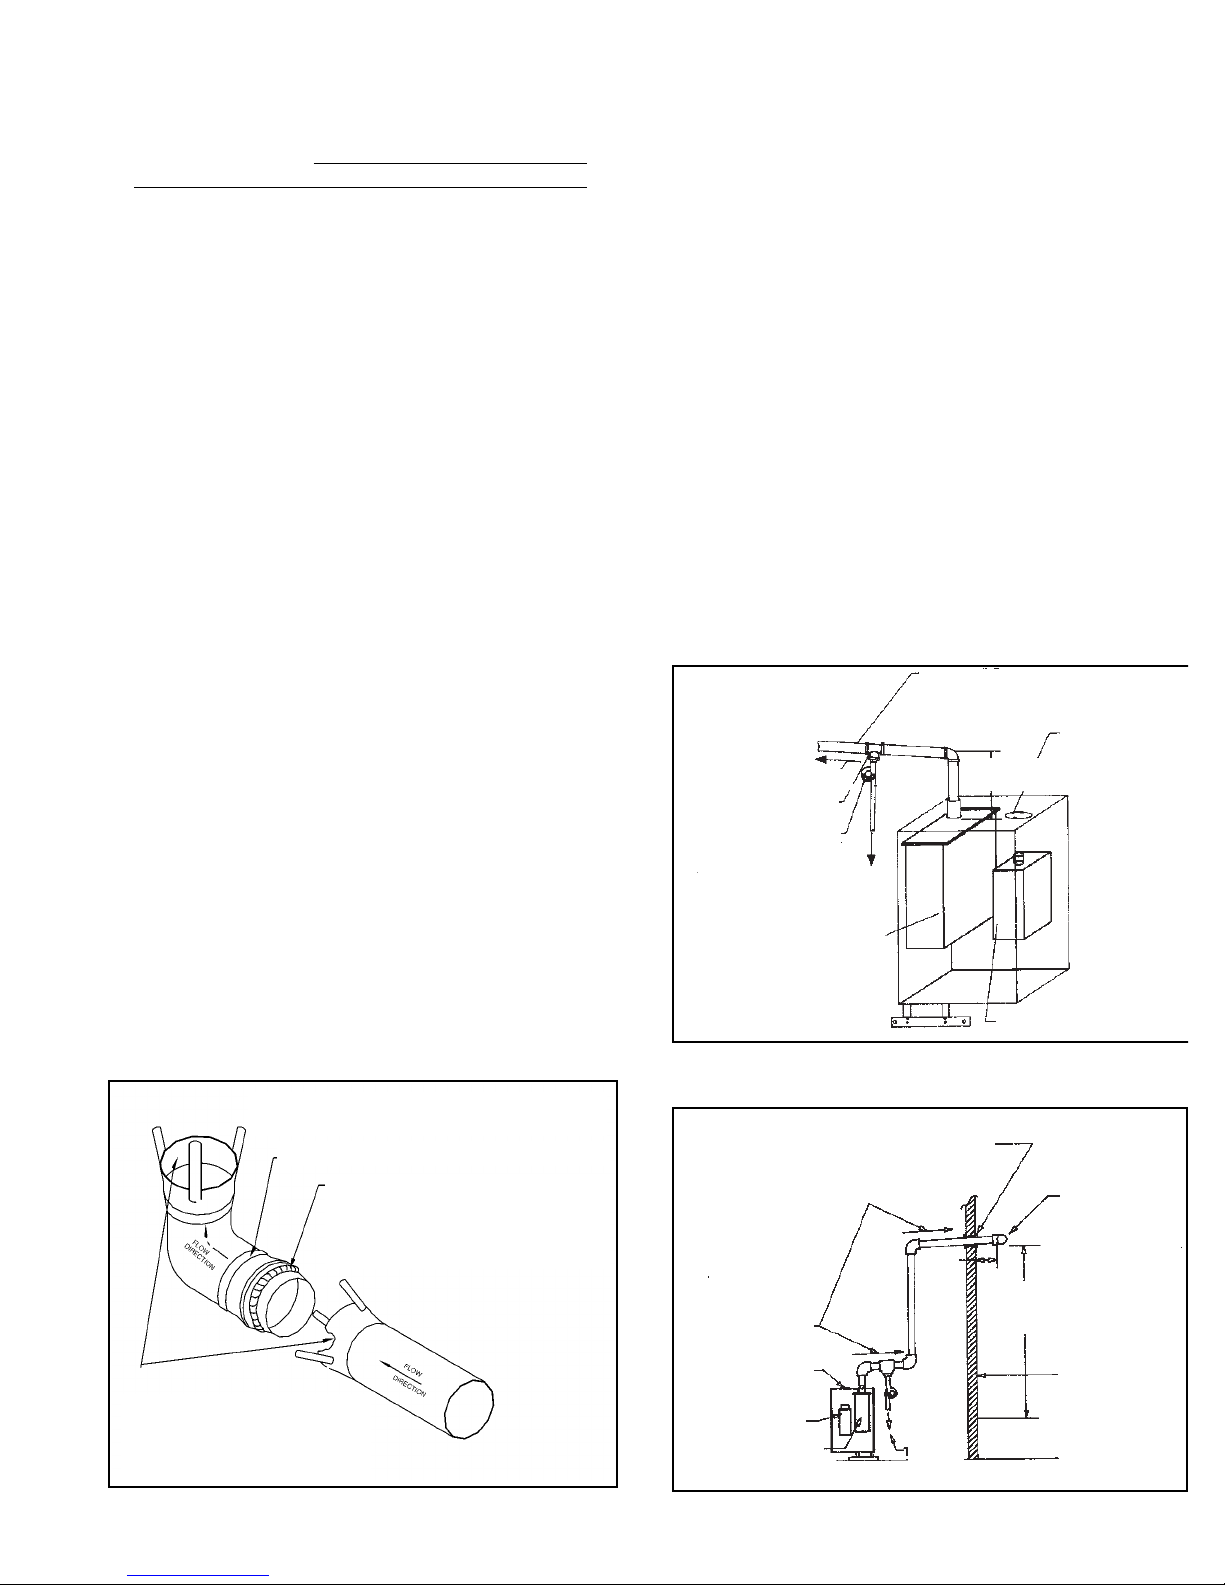
Figure 2. General Vent and Air Intake Piping from Boiler
for Direct Venting
All items shown below are REQUIRED. All vent
joints must be LIQUID and PRESSURE TIGHT.
Figure 3. Floor and ceiling venting passage
All items shown below are REQUIRED.
All vent joints must be LIQUID and PRESSURE TIGHT.
Figure 4. Vent sealing instructions
(Consult vent manufacturer’s instructions.)
5
DIRECT VENT APPLICATION REQUIREMENTS
AIR INTAKE
A. 76mm (3”) diameter PVC piping materials are
recommended. Sewer and drain type material or PVC
schedule 40 piping are best suited for connection to
boiler and vent terminal. Use 76mm (3”) PVC fitting
provided with vent kit to adapt PVC schedule 40 air
intake tubing to air filter box collar. The fitting provided
will fit onto the filter box collar and then a schedule 40
76mm (3”) coupling will fit over that.
B. The venting length requirements specified in this
section also apply to the air intake piping.
C. Seal all joints on air intake piping using appropriate
sealants.
VENTING INSTALLATION
A. Follow the vent material manufacturer’s instructions in
conjunction with these instructions for venting system
installation.
B. Refer to Figures 2, 3 and 4 which illustrate some of
the requirements for venting in a typical installation.
C. A condensate drain and drain trap MUST be installed
on the flue tubing, see Figure 2. The condensate
drain should be installed close to the boiler, as
shown, and must be equipped with a trap formed by
attaching 10mm (3/8”) I.D. clear plastic tubing to the
drain assembly, making a loop approximately 102mm
(4") diameter and securing with cord or a tie wrap
where the loop crosses over itself. This loop should
then be filled with water to form a liquid-filled trap.
DO NOT OPERATE THE BOILER WITHOUT
INSTALLING THIS TRAP AND FILLING WITH WATER
EXHAUST VENT PIPING 76mm (3”) I.D.
AIR INTAKE PIPING 76mm (3”) I.D.
76mm
(3”) PVC
FITTING.
152mm (6”)
MIN. 610mm
(24”) MAX.
CONTINUE WITH PIPING
AS SHOWN IN
FOLLOWING FIGURES
SLOPE UP
20mm/m (1/4”/FT)
CONDENSATE
DRAIN ASSY
FILL TRAP WITH
WATER
HEAT EXCHANGER
ASSY
TO DRAIN
AIR FILTER BOX ASSY
VENT SEALING INSTRUCTIONS FOR HEAT-FAB 29-4C
STAINLESS STEEL VENTING MATERIALS
RING
APPLY ADHESIVE BEAD (6mm [1/4”] DIA. MINIMUM)
AROUND OUTSIDE OF MALE END ONLY, BETWEEN
6mm (1/4”) AND 10 mm (3/8”) FROM THE EDGE OF
THE MALE END. CARE MUST BE TAKEN TO ASSURE
THAT ADHESIVE DOES NOT BLOCK INSIDE OF PIPE
DO NOT APPLY ADHESIVE INSIDE
OF FEMALE FITTINGS IN ORDER TO PREVENT
BLOCKAGE OF INSIDE OF FITTINGS AND TUBING.
IF ANY ADHESIVE SHOULD GET INSIDE, BE SURE
TO WIPE IT OUT BEFORE ASSEMBLING
FIRESTOP
EXHAUST VENT TUBING
76mm (3”) I.D.
CLEARANCE: 152mm
(6”) MIN. FOR 29-4C
STAINLESS STEEL
VENTING
FIRESTOP AND SUPPORT
AIR INTAKE
TUBING 76mm
(3”) I.D.
CLEARANCE:
51mm (2”) MIN.
BETWEEN TUBING
76mm (3”)
MIN. 610mm
(24”) MAX.
TO PREVENT FLUE GAS DISCHARGE INTO SPACE.
Periodic inspection should be made of this assembly for
deterioration of the tubing and to insure that the trap is
filled with water, but not plugged. If it is plugged or
appears to have excessive sediment in it, it should be
removed from the drain assembly, straightened out to clear
the obstruction, reformed, filled with water and reinstalled
as before. The drain must extend to a floor drain.
D. The horizontal pipe must be sloped UPWARD from
the boiler, at a pitch of 20mm/m (*1/4” per 1 foot) of
run, so that the condensate from the vent system runs
to the drain trap. The horizontal portion must also be
supported with 19mm (3/4”) pipe strap at intervals no
greater than 1829mm (6 feet).
E. The vertical portion of the pipe must be supported in
at least one location for each 9m (30 feet) of vertical
run. A firestop is required for each wall, ceiling and
floor penetration.
F. Use tabs on vent collar to secure stainless steel vent
tubing to the boiler.
G. Venting is approved for combustible wall passage
through a 102mm (4”) minimum to 305mm (12”)
maximum thick wall, providing a thimble is used.
Page 6

6
Figure 5a. Vent terminal orientation
Figure 5b. Vent terminal installation
VENT TERMINAL INSTALLATION
Warning: The vent terminal provided is to be used for
horizontal venting only. DO NOT alter this part in any
manner other than shown in these instructions. Only mount
on a vertical surface. DO NOT use when vertically venting
through a roof or chimney.
1. Wall cutout opening:
a) Cut out a rectangular opening 152mm (6”) high and
305mm (12”) wide in the appropriate location of an
exterior wall. Be sure that this location will allow for
the connection of vent materials that come in fixed
lengths, or an adjustable connector will be needed.
b) Boxing in the cutout with wood is allowable, but the
152mm x 305mm (6” x 12”) opening size must be
maintained.
c) Plan on the edge of the cutout to be about 76mm (3”)
from the center of the exhaust tube, when installed.
2. Vent terminal orientation: see Figure 5a.
a) The open slots for the air intake on the vent terminal
must face downward.
b) The air inlet cover plate must face upward to insure
that rain, debris and flue gases do not enter the air
inlet.
3. Vent and air intake tubing orientation: see Figure 5a.
a) Air inlet tubing may be located to the left or to the
right of the flue exhaust tubing.
b) If the air inlet tubing is going to be to the left of the
flue exhaust (viewed from outside of building) then
the vent terminal should be installed as supplied
without alteration.
c) If the air inlet tubing is going to be to the right of t
flue exhaust (viewed from outside building) then t
air inlet cover plate must be removed and reinstall
over the alternate set of slots. This alteration w
insure that the air inlet slots face down when the ve
terminal is installed.
4. Vent terminal installation: see Figure 5b.
a) Center the vent terminal over the wall cutout. T
collar on the back of the vent terminal panel shou
clear the cutout edges by about 12mm (1/2”).
b) Mark and drill out the location of the four screw hol
in the wall for mounting vent terminal.
c) Seal the vent collar adapter tube 76mm (3”) dia. ma
end stainless) into the collar on the back of the ve
terminal box and slide the ring on the tube over t
collar tabs, then bend the tabs back over the rin
This piece will allow easy connection of the fl
exhaust tubing from inside the building.
d) Run a bead of silicone around the perimeter of w
panel and vent collar to prevent water and drafts fro
entering building.
e) Orientate the vent terminal on the wall as describ
in Step 2 and secure it to the wall.
5. Interior wall panel installation:
a) Cut the wall thimble 127mm (5”) diameter galv. pip
about 12mm (1/2”) shorter than the wall thickness
b) Fit thimble onto the collar on the back of the ve
terminal inside the wall.
c) Hold the interior wall panel up to the wall cutout a
fit the collar on this panel into the thimble. Line up t
air inlet holes and secure to wall.
6. Vent and air intake tubing installation to vent terminal:
a) Finish tubing connections back to the boil
following
the requirements in the venting installati
instructions
on pages 4 and 5.
b) Exhaust tubing connects to the vent collar adapt
tube. Observe correct flow direction.
c) Air intake tubing should slip into the air inlet openi
in the back of the vent terminal. Make sure the tubi
extends into the vent terminal box as far as the tu
stop inside the box allows (19mm [3/4”] approx
Seal around the air intake tubing where it pass
through the outside wall plate.
*Shown with air inlet to the left of exhaust
from outside view.
* Shown from top view.
DIRECT VENTING WITH VENT TERMINAL
All Concept 21 boiler models are certified for horizontal
Direct Venting utilizing the vent terminal provided by
Slant/Fin only.
This vent terminal must be mounted on a vertical wall
outside surface. Terminal CANNOT be mounted on a roof
or any horizontal surface.
Vent terminal is designed to deflect flue gases away from
outside building wall; properly installed, it will prevent flue
gas degradation of normal building materials and reduce
the possibility of air intake freeze-up. It is recommended
to utilize this vent terminal on Direct Vent applications
whenever the installation permits.
Page 7

Figure 7a. Vent and air intake run through a pitched roof
Figure 7b. Vent and air intake run through a flat roof
7
EXHAUST WITH SCREEN
AIR INTAKE 180° ELBOW
WITH SCREEN FACE
DOWN
3048mm (10 ft)
or less
610mm (2 ft) min.
ROOF FLASHING
54mm (2“) min.
305mm
(1 ft) min.
54mm (2“) min.
ROOFLINE
SNOWLINE
EXHAUST WITH
SCREEN
3048mm (10 ft)
or less
610mm (2 ft) min.
ROOF
LINE
SNOW
LINE
ROOF FLASHING
54mm (2”) min.
54mm (2”) min.
AIR INTAKE 180° ELBOW
WITH SCREEN FACE DOWN
305mm (1 ft) min.
305mm (1 ft) min.
914mm
(3 ft)
min.
305mm
(1 ft) min.
914mm
(3 ft) min.
Vertical Venting Configurations
All Concept 21 boiler models are certified for vertical
Direct Venting utilizing the following configurations.
1. Vent and air intake piping vertically run up through a
roof in close proximity.
a. For a pitched roof installation, refer to Figure 7a. For
a flat roof installation, refer to Figure 7b. When floor
and ceiling passage is necessary, refer to Figure 3.
Adhere to all clearances and materials specified in
these illustrations.
b. The stainless exhaust vent pipe must pass through
the roof vertically through a 178mm (7”) min.
diameter cutout and appropriate roof flashing. The
pipe must exhaust straight up and terminate with a
screen terminator.
c. The air intake pipe must pass through the roof
vertically. The cutout does not require any clearance,
but must be sealed with a flashing or other means.
The air intake opening must face down by using a
180° elbow with a screen positioned at the opening.
The air intake opening must be at least 305mm (1
foot) below the vent opening.
DIRECT VENTING WITHOUT VENT TERMINAL
Page 8

Figure 8b. Vent piping vertically run up an existing chimney
and air intake horizontally run out a vertical wall.
Figure 8a. Vent run through a roof and air intake run through
a wall
8
REFER TO VENT PIPE
REQUIREMENTS SHOWN IN
PREVIOUS FIGURES FOR
VENT AND AIR INTAKE RUN
THROUGH A PITCHED OR
FLAT ROOF
EXHAUST WITH SCREEN
AIR INTAKE 90° ELBOW WITH
SCREEN FACE DOWN
SNOWLINE
305mm (1 ft) min.
GROUNDLINE
CONDENSATE DRAIN ASSY
TO DRAIN
HEAT EXCHANGER
ASSY
AIR FILTER
BOX ASSY
Slope up
20mm/m
(1/4” per ft)
RUN AIR INTAKE PIPE
THROUGH THE
FOUNDATION OR AN
EXTERIOR WALL
REFER TO
PREVIOUS FIGURE
FOR FLOOR AND
CEILING PASSAGE
ROOF LINE
3048mm
(10 ft) or
less
EXHAUST WITH
SCREEN
305mm (1 ft) min.
CHIMNEY TOP PLATE
AIR INTAKE 90° ELBOW
WITH SCREEN FACE
DOWN
SNOWLINE
305mm (1 ft) min.
GROUNDLINE
CONDENSATE DRAIN ASSY
TO DRAIN
HEAT EXCHANGER
ASSY
AIR FILTER
BOX ASSY
SLOPE UP
20mm/m
(1/4” per ft)
RUN AIR INTAKE PIPE
THROUGH THE
FOUNDATION OR AN
EXTERIOR WALL
SEAL CHIMNEY OPENING
WITH MORTAR OR
COVER PLATE
610mm
(2 ft) min.
Vertical Venting Configurations
2. Vent piping vertically run up through a roof and air
intake horizontally run out a vertical wall.
a. See Figure 8a for general configuration. For a
pitched roof installation, refer to vent pipe
requirements shown in Figure 7a. For a flat roof
installation, refer to the vent pipe requirements
shown in Figure 7b. When floor and ceiling passage
is necessary, refer to Figure 3. Adhere to all
clearances and materials specified in these
illustrations for installing the vent pipe only. For
installing the air intake pipe, refer to the air intake
requirements shown in Figure 8a.
b. The stainless exhaust vent pipe must pass through
the roof vertically through a 178mm (7”) min.
diameter cutout and appropriate roof flashing. The
pipe must exhaust straight up and terminate with a
screen terminator.
c. The air intake pipe must pass through a vertical wall
or foundation horizontally. The cutout does not
require any clearance, but must be sealed with a
flashing or by other means. The air intake opening
must face down by using 90° elbow with a screen
positioned at the opening.
3. Venting piping vertically run up an existing chimney
and air intake horizontally run out a vertical wall.
a. Refer to Figure 8b. Adhere to all clearances and
materials specified in this illustration.
b. The stainless exhaust vent pipe must extend the
total length of the chimney. The pipe must exhaust
straight up and terminate with a screen terminator.
The top of the chimney must be sealed off around
the protruding pipe with an appropriate plate or
flashing. Other appliances CANNOT be vented into
the same chimney or vent pipe within the chimney.
c. The air intake pipe must pass through a vertical wall
or foundation horizontally. The cutout does not
require any clearance, but must be sealed with a
flashing or by other means. The air intake opening
must face down by using a 90° elbow with a screen
positioned at the opening.
DIRECT VENTING WITHOUT VENT TERMINAL
Page 9

BOILER ROOM AIR SUPPLY AND VENTILATION
An ample supply of air is required for combustion and
ventilation. When buildings are insulated, caulked and
weather-stripped, now or later on, direct openings to outside
may be required and should be provided. If the boiler is not
near an outside wall, air may be ducted to it from outside
wall openings.
Provisions for combustion and ventilation air must be made
in accordance with section 5.3, Air for Combustion and
Ventilation, of the National Fuel Gas Code, ANSI Z223.1 and
CSA B149.1-00 for natural gas and propane
, or applicable
provisions of the local building codes. The following
recommendation applies to buildings of energy-saving
construction, fully caulked and weather- stripped:
Provide one GRILLED opening near the floor and one near
the ceiling on an outside wall near the boiler (or duct from
such openings to the boiler), EACH opening to be a
minimum of 645mm
2
(one square inch) per 586w (2000 Btuh)
input to ALL
APPLIANCES in the area. For a total appliance
input of 58 620w
(200,000 Btuh), each opening will be 64 516
mm
2
(100 square inches). A grilled opening 254mm x 254mm
(10"X10") has 64 516mm
2
(100 square inches) of area. If fly
screen must be used over openings, double the area and
inspect and clean the screen frequently.
Openings must never be reduced or closed. If doors or
windows are used for air supply, they must be locked open.
Protect against closure of openings by snow and debris.
Inspect frequently.
No mechanical draft exhaust or supply fans are to be used in
or near the boiler area.
The flow of combustion and ventilating air to the boiler must
not be obstructed.
The air inlet passage hole located on the top of the boiler
jacket should be covered for any installation which does not
require combustion air to be piped into the boiler. (i.e. Direct
Vent Installation)
VENTING LOCATION REQUIREMENTS
Vent installations shall be in accordance with Part 7, Venting
of Equipment, of the National Fuel Gas Code, ANSI Z223.1
and
CSA B149.1-00 for natural gas and propane, or
applicable provisions of local building codes.
This Concept 21 boiler is approved for pressure venting both
horizontally and vertically. The following requirements apply
to both types of venting installation.
Vent termination must meet the following clearances:
Minimum of 305mm (12”) above grade and normal snow line
to vent termination bottom; minimum of 1219mm (4 feet)
below or horizontally, or 305mm (1 foot) above any building
opening; minimum of 914mm (3 feet) above any forced air
intake located within 3048mm (10 feet); minimum of 1219mm
(4 feet) horizontally from, and in no case above or below,
unless 1219mm (4-foot) horizontal distance is maintained,
from electric or gas meters, regulators and relief equipment.
Vent termination must not be located over any public
walkway, in any confined space (i.e. window wells,
alcoves, narrow alleys) or under any overhang or deck.
Vent termination should not allow flue gas discharge
towards neighbor's windows or where personal injury or
property damage can occur.
DO NOT install the vent into a common venting system.
DO NOT install a vent damper or similar device in vent
tubing or on the boiler.
VENT MATERIAL REQUIREMENTS
A. DO NOT use galvanized or plastic vent system
materials. The vent system for Category IV applications
must be UL listed 76mm (3”) diameter corrosion
resistant stainless steel. The following manufacturer’s
systems are approved for use within a specified
minimum and maximum equivalent vent length for each
model of boiler.
Category IV Venting Requirements
CB-45 30 100 5 914 3 1524 5 1
CB-90 30 100 5 914 3 1524 5 1
CB-135 24 80 5 914 3 1524 5 1
CB-180 12 40 5 914 3 1524 5 1
Boiler
Model
No.
Maximum
Equivalent
Length
including
Elbows
m ft
Max.
No. of
Elbows*
Equivalent
Length of
each
Elbow
mm ft
Minimum
Equivalent
Length*
mm ft
Min.
No. of
Elbows*
* All lengths specified include mandatory minimum use of 610mm (2
feet) of tubing plus one elbow from boiler to vent termination all
models.
Heat Fab Saf-T Vent System
CB-45 30 100 5 1829 6 2438 8 1
CB-90 30 100 5 1829 6 2438 8 1
CB-135 18 60 5 1829 6 2438 8 1
CB-180 9 30 3 1829 6 2438 8 1
Boiler
Model
No.
Maximum
Equivalent
Length
including
Elbows*
m ft
Max.
No. of
Elbows*
Equivalent
Length of
each
Elbow
mm ft
Minimum
Equivalent
Length*
mm ft
Min.
No. of
Elbows*
ProTech Fas-N Seal System
CB-45 30 100 5 1829 6 2438 8 1
CB-90 30 100 5 1829 6 2438 8 1
CB-135 21 70 5 1829 6 2438 8 1
CB-180 11 35 4 1829 6 2438 8 1
Boiler
Model
No.
Maximum
Equivalent
Length
including
Elbows*
m ft
Max.
No. of
Elbows*
Equivalent
Length of
each
Elbow
mm ft
Minimum
Equivalent
Length*
mm ft
Min.
No. of
Elbows*
Flex-L Star-34 System
Page 10
B. When joining the various components of the above
listed vent systems, the manufacturers’ instructions
should be closely followed to insure proper sealing. Use
GE-RTV106 or Dow-Corning 732 sealant for sealing of
pipe and fittings. See Figure 4 for proper application of
vent pipe sealant.
C. All vent connections must be liquid and pressure tight.
VENTING INSTALLATION
A. Follow the vent material manufacturer’s instructions in
conjunction with these instructions for venting system
installation.
B. Refer to Figures 4 and 9 which illustrate some of the
requirements for venting in a typical installation.
C.
A condensate drain and drain trap MUST be installed on
the flue tubing, see Figure 9. The condensate drain should
be installed close to the boiler, as shown, and must be
equipped with a trap formed by attaching 9mm (3/8") I.D.
clear plastic tubing to the drain assembly, making a loop
approximately 102mm (4") diameter and securing with cord
or a tie wrap where the loop crosses over itself. This loop
should then be filled with water to form a liquid-filled trap.
DO NOT OPERATE THE BOILER WITHOUT INSTALLING
THIS TRAP AND FILLING WITH WATER TO PREVENT
FLUE GAS DISCHARGE INTO SPACE. Periodic inspection
should be made of this assembly for deterioration of the
tubing and to insure that the trap is filled with water, but not
plugged. If it is plugged or appears to have excessive
sediment in it, it should be removed from the drain
assembly, straightened out to clear the obstruction,
reformed, filled with water and reinstalled as before. The
drain must extend to a floor drain.
D. The horizontal pipe must be sloped UPWARD from the
boiler, at a pitch of 20mm/m (1/4” per 1 foot) of run, so
that the condensate from the vent system runs to the
drain trap. The horizontal portion must also be
supported with 19mm (3/4”) pipe strap at intervals no
greater than 1828mm (6 feet).
Category IV Venting Requirements
E.
The vertical portion of the pipe must be supported in at leas
one location for each 9m (30 feet) of vertical run. A firestop
is required for each wall, ceiling and floor penetration.
F. Use tabs on vent collar to secure stainless steel vent
tubing to the boiler.
G. Venting is approved for combustible wall passage
through a 102mm (4”) minimum to 305mm (12”)
maximum thick wall, providing a thimble is used.
HORIZONTAL CATEGORY IV VENTING
All Concept 21 boiler models are certified for horizontal
Category IV venting provided the following conditions are met
1. For combustible wall passage of vent piping, a UL and
CUL listed thimble must be used, providing the wall
thickness is 102mm (4”) minimum to 305mm (12”)
maximum.
2. The venting piping must terminate with a screened tee,
elbow, or straight termination at the minimum distance
from the outside wall shown in Figure 10.
10
Figure 9. General Vent Piping from Boiler for Category IV Ventin
All items shown below are REQUIRED.
All vent joints must be LIQUID and PRESSURE TIGHT.
Figure 4. Vent sealing instructions
(Consult vent manufacturer’s instructions.)
Figure 10. Horizontal Category IV Venting through outside wall
CONTINUE WITH VENT
PIPING AS SHOWN IN
FOLLOWING FIGURES
EXHAUST VENT
PIPING 76MM (3”) I.D.
AIR INLET COVER
203mm (8”) MIN.
610mm (24”) MAX.
AIR FILTER BOX ASSY.
HEAT
EXCHANGER
ASSY.
TO DRAIN
FILL TRAP WITH WATER
CONDENSATE DRAIN ASSY.
SLOPE UP 20mm/m (1/4” PER FT.)
76mm (3”) MIN.
610mm (24”) MAX.
VENT SEALING INSTRUCTIONS FOR HEAT-FAB 29-4C
STAINLESS STEEL VENTING MATERIALS
RING
APPLY ADHESIVE BEAD (6mm [1/4”] DIA.
MINIMUM) AROUND OUTSIDE OF MALE END ONLY,
BETWEEN 6mm (1/4”) AND 9mm (3/8”) FROM THE
EDGE OF THE MALE END.
CARE MUST BE TAKEN TO ASSURE THAT
ADHESIVE DOES NOT BLOCK INSIDE OF PIPE
DO NOT APPLY ADHESIVE INSIDE
OF FEMALE FITTINGS IN ORDER TO
PREVENT BLOCKAGE OF INSIDE OF
FITTINGS AND TUBING. IF ANY ADHESIVE
SHOULD GET INSIDE, BE SURE TO WIPE IT
OUT BEFORE ASSEMBLING
WALL
THIMBLE
VENT
TERMINATION
WITH SCREEN
305mm
(1 FT.)
MIN.
OUTSIDE WALL
SNOW LINE
GROUNDLINE
HEAT EXCHANGER
ASSY.
AIR FILTER BOX
ASSY.
AIR INLET COVER
VENT PIPE
SLOPE UP 20mm/m
(1/4” PER FT.)
102mm
(4”)
MIN.
TO
DRAIN
Page 11

1
Figure 11. Vertical Category IV Venting through a roof Figure 12. Vertical Category IV Venting up an existing
chimney
VERTICAL CATEGORY IV VENTING
All Concept 21 boiler models are certified for vertical
Category IV venting through a roof provided the
following conditions are met:
1. For roof passage of vent piping, a CUL listed roof
flashing must be used.
2. The vent piping must terminate with a screened tee,
elbow, straight, or cap termination at the minimum
distance from the roof shown in Figure 11.
All Concept 21 boiler models are certified for vertical
Category IV venting up an existing chimney provided the
following conditions are met:
1. To utilize an existing chimney as a chase, the vent
pipe must extend the total length of the chimney. The
top of the chimney must be sealed off around the
protruding pipe with an appropriate plate or flashing.
2. The vent piping must terminate with a screened tee,
elbow, straight or cap termination at the minimum
distance from the roof shown in Figure 12.
3. Other appliances CANNOT be vented into the same
chimney or vent pipe within the chimney.
VENT TERMINATION WITH
SCREEN
305mm (1 FT.) MIN.
SNOWLINE
ROOFLINE
FIRESTOP AND
SUPPORT
152mm (6”) MIN.
CLEARANCE
CONDENSATE DRAIN
ASSY.
TO DRAIN
HEAT EXCHANGER
ASSY.
AIR FILTER BOX
ASSY.
AIR INLET COVER
SLOPE UP 20mm/m (1/4” PER FT.)
FIRE STOP AND
SUPPORT
ROOF FLASHING
610mm (2 FT.) MIN.
3048mm
(10 FT.)
OR LESS
VENT TERMINATION WITH
SCREEN
305mm (1 FT.) MIN.
CHIMNEY TOP PLATE
SEAL CHIMNEY OPENING
WITH MORTAR OR COVER
PLATE
CONDENSATE DRAIN
ASSY.
TO DRAIN
HEAT EXCHANGER
ASSY.
AIR FILTER BOX
ASSY.
AIR INLET COVER
SLOPE UP 20mm/m (1/4” PER FT.)
610mm (2 FT.) min.
ROOF LINE
3048mm
(10 FT.)
OR LESS
Page 12

VENTING REQUIREMENTS
If the boiler vent is to be installed into a natural draft
masonry chimney or Type “B” venting, it must be in
accordance with Part 7, Part 11 and Appendix G,
of the
National Fuel Gas Code, ANSI Z223.1 and
CSA B149.1-00 for
natural gas and propane
.
For a masonry vitreous tile-lined chimney which is not
exposed to the outdoors, use Table 1 in this Slant/Fin
manual for venting requirements. DO NOT install this
system into an unlined masonry chimney.
If a masonry chimney is exposed to the outdoors on one or
more sides below the roof line (exposed chimney), it must
be re-lined with a UL listed metallic liner system. See Table
2 in this Slant/Fin manual for venting requirements of
metallic re-lined chimneys.
If a Type “B” vent system is used, it must NOT be exposed
to the outdoors below the roof line. See Table 2 in this
Slant/Fin manual for venting requirements. Vent
connectors serving appliances vented by natural draft shall
NOT be connected into any portion of mechanical draft
systems operating under positive pressure. Single or
multiple appliance venting is shown in Figures 13 and 14.
The 76mm to 127mm (3” to 5”) vent adapter MUST be used
on the vent collar of ALL models of the Concept boiler for
these installations. In some cases, the vent connector
diameter must be upsized further to 152mm or 178mm (6”
or 7”). Refer to Table 1 and 2 for installations requiring this
increased size.
Standard vent connector materials such as galvanized or
stainless steel are allowed for these installations. NO types
of plastic material can be used as a part of the venting
system in any installation.
All Concept boilers require a condensate drain and drain
trap. Vent connectors must be liquid tight.
The condensate drain should be installed as close to the
boiler as possible and must be equipped with a trap formed by
attaching 9mm (3/8") I.D. clear plastic tubing to the drain
assembly, making a loop approximately 102mm (4") diameter
and securing with cord or a tie wrap where the loop crosses
over itself. This loop should then be filled with water to form a
liquid filled trap. DO NOT OPERATE THE BOILER WITHOUT
INSTALLING THIS TRAP AND FILLING WITH WATER. Periodic
inspection should be made of this assembly for deterioration
of the tubing and to insure that the trap is filled with water, but
not plugged. If it is plugged or appears to have excessive
sediment in it, it should be removed from the drain assembly,
straightened out to clear the obstruction, reformed, filled with
water and reinstalled as before. The drain should extend to a
floor drain or to a plastic container which may require
emptying periodically.
Category I Venting Requirements
BOILER ROOM AIR SUPPLY AND VENTILATION
An ample supply of air is required to obtain combustion
and ventilation. When buildings are insulated, caulked and
weather-stripped, now or later on, direct openings to
outside may be required and should be provided. If the
boiler is not near an outside wall, air may be ducted to the
installation area from outside wall openings.
Provisions for combustion and ventilation air must be made
in accordance with section 5.3, Air for Combustion and
Ventilation,
of the National Fuel Gas Code, ANSI Z223.1 and
CSA B149.1-00 for natural gas and propane, or applicable
provisions of the local building codes. The following
recommendation applies to buildings of energy-saving
construction, fully caulked and weather stripped:
Provide one GRILLED opening near the floor and one near th
ceiling on an outside wall near the boiler (or duct from suc
openings to the boiler), EACH opening to be a minimum o
645 mm
2
(one square inch) per 586w (2000 Btuh) input to AL
APPLIANCES in the area. For a total appliance input of 58,620w
(200,000 Btuh), each opening will be 64 516mm2 (100 squar
inches). A grilled opening 254mm x 254mm (10"X10") ha
64 516mm
2
(100 square inches) of area. If fly screen must b
used over openings, double the area and inspect and clea
the screen frequently.
Openings must never be reduced or closed. If doors o
windows are used for air supply, they must be locked open
Protect against closure of openings by snow and debris
Inspect frequently.
No mechanical draft exhaust or supply fans are to be used
in or near the boiler area.
The flow of combustion and ventilating air to the boile
must not be obstructed.
The air inlet passage hole located on the top of the boile
jacket should be left covered with the plate provided, to
prevent debris from falling into the air intake.
On all Category I installations, the air pressure switch provided
on the boiler must be replaced with the switch provided in ven
kit 665194. This switch is set to prevent the boiler from
operating below the approved Category I input rate.
12
Page 13

1
Natural Draft Chimney and Type “B” Venting Diagrams
Figure 13. Chimney Venting for models specified in Table 1 only.
Minimum vent connectors diameter is 127mm (5 inches). It may have to be upsized to 152mm or 178mm (6 or 7
inches) [see Table 1].
Single or multiple appliance venting into chimney using single wall or type “B” metal connectors. Must be installed in
accordance with part 7 or 11 of the National Fuel Gas Code, ANSI Z223.1 and CSA B149.1-00 for natural gas and
propane. DO NOT use galvanized risers and connectors in cool boiler rooms.
ALL ITEMS SHOWN BELOW ARE REQUIRED.
All vent connector joints must be liquid tight.
Figure 14. Venting with “B” vent or metal-lined chimney for models specified in Table 2 only.
Minimum vent connectors diameter is 127mm (5 inches). It may have to be upsized to 152mm or 178mm (6 or
7 inches) [see Table 2].
Single or multiple appliance venting into Type “B” double wall metal vent with single or Type “B” metal connectors. Must
be installed in accordance with part 11 of the National Fuel Gas Code, ANSI Z223.1 and CSA B149.1-00 for natural gas
and propane. DO NOT use galvanized risers and connectors in cool boiler rooms.
ALL ITEMS SHOWN BELOW ARE REQUIRED EXCEPT WHERE OTHERWISE INDICATED.
All vent connector joints must be liquid tight.
TYPE “B” VENT
OTHER GAS
APPLIANCE
ADDITIONAL CONDENSATE DRAIN: A
DRAIN AT THE BOTTOM OF THE “B”
VENT MAY BE NECESSARY IF
OTHER APPLIANCES OR THE VENT
IS CONDENSING
TO DRAIN OR
CONTAINER
FILL TRAP WITH
WATER
BOILER
CONDENSATE
DRAIN
ASSEMBLY
TO DRAIN OR
CONTAINER
FILL TRAP WITH
WATER
CONCEPT
BOILER
INSTALL 127mm
(5”) VENT
ADAPTER
610mm (24”) MIN.
203mm (8”) MAX.
152mm (6”) MIN.
406mm (16”) MAX.
CONNECTORS:
PITCH UP TO CHIMNEY
20mm/m (1/4” PER FT.) MIN.
INSTALL WITH SEAM ON TOP
305mm (12”)
MIN.
CONNECTORS: PITCH UP TO
CHIMNEY 20mm/m (1/4” PER FT.)
MIN. INSTALL WITH SEAM ON TOP
152mm (6”) MIN.
457mm (18”) MAX.
610mm (24”) MIN.
203mm (8”) MAX.
INSTALL 127mm
(5”) VENT ADAPTER
CONCEPT
BOILER
TO DRAIN OR CONTAINER
FILL TRAP
WITH WATER
BOILER
CONDENSATE
DRAIN
ASSEMBLY
305mm (12”) MIN.
CHIMNEY (NOT EXPOSED TO THE
OUTDOORS BELOW THE ROOF
LINE)
OTHER
GAS
APPLIANCE
Page 14

14
Natural Draft Chimney and Type “B” Venting Tables
Table 1. Masonry Vitreous Tile-Lined Chimney (not metal lined)
Chimneys not exposed to the outdoors below the roof line. (127mm [5"] dia. vent adapter must be used)
Concept Additional CSA B149.1-00
Boiler Gas Appliance for natural gas
Model(s) † in Venting System Connector Requirements* and propane
CB-90 No Type “B” 1.
Connector diameter must be upsized to 178mm (7").
Table 5
CB-135 2.
Chimney height limits: Min. 4.6m (15 ft.), Max. 9.1m (30 ft.)
CB-180 3. Lateral length restriction applies (see Table 11-3)
4.
Internal area of chimney: Min. 32 200mm2 (50 sq. in.),
Max. 173 500mm2 (269 sq. in.)
CB-180 No Single-wall 1.
Connector diameter must be upsized to 178mm (7").
Table 6
2.
Chimney height limits: Min. 4.6m (15 ft.), Max. 9.1m (30 ft.)
3. Max. lateral length may not exceed 610mm (2 ft.)
4.
Internal area of chimney: Min. 32 200mm2 (50 sq. in.),
Max. 173 500mm2 (269 sq. in.)
CB-90 Yes Type “B” 1. See Table 7 for chimney height and connector Table 7
CB-135 length restrictions.
CB-180 2.
Connector may have to be upsized to 152mm (6") diameter
to meet requirement of Table 7.
CB-135 Yes Single-wall 1. See Table 8 for chimney height and connector Table 8
CB-180 length restrictions.
2.
Connector may have to be upsized to 152mm (6") diameter
to meet requirement of Table 8.
Table 2. Type “B” Venting and Metal-Lined Masonry Chimney
UL LISTED MATERIALS ONLY. (127 mm [5"] dia. vent adapter must be used)
Concept Additional CSA B149.1-00
Boiler Gas Appliance for natural gas
Model(s) † in Venting System Connector Requirements* and propane
All Models No Type “B” See Table 1 for minimum and maximum of vent Table 1
height and lateral length restriction.
CB-90 No Single-wall See Table 2 for minimum and maximum of vent Table 2
CB-135 height and lateral length restriction.
CB-180
CB-90 Yes Type “B” 1. See Table 3 for vent height and connector Table 3
CB-135 length restrictions.
CB-180 2.
Connector and vent diameter may have to be increased
to 152mm or 178mm (6" or 7") to meet requirement
of Table 3.
CB-90 Yes Single-wall 1. See Table 4 for vent height and connector Table 4
CB-135 length restrictions.
CB-180 2.
Connector and vent diameter may have to be
increased
to 152mm (6") to meet requirement of Table 4.
† Only Concept boiler models shown for each application permitted to be installed in that manner specified.
Page 15

FILL AND PURGE HEATING SYSTEM
• Make sure flow direction arrows on components are
facing in direction of flow.
• Place bucket under pressure relief valve discharge.
Baseboard & radiant floor systems
• Close all shutoff valves, drain valves and air vents.
• Open supply shutoff valve and return drain valve on
first zone (or return drain valve on non-zoned system).
If zoned with zone valves, manually open zone valve.
• Attach a hose from return drain valve to a drain. Open
fill line shutoff valve. Manually operate fill valve
regulator. When water runs out of hose in a steady
stream (with no air bubbles), close return drain valve.
• Repeat procedure for additional zones (one at a time).
• On completion, open all return shutoff valves.
Standing iron radiation & systems
with manual vents at high points
• Close all shutoff valves, drain valves and air vents.
• Open supply and return shutoff valves. If zoned with
zone valves, manually open all zone valves.
• Open fill line shutoff valve. Manually operate fill valve
regulator. Open pressure relief valve manual operator
to fill boiler. When water runs out of discharge pipe in
a steady stream (with no air bubbles), close operator.
• Starting with nearest manual air vent, open vent until
water flows out; close vent. Repeat procedure,
working your way toward farthest air vent.
When finished
• Place fill valve regulator and all zone valve operators in
automatic position.
• Check that temperature/pressure gage reads minimum
of 82.7 kPa (12 psi) (fill pressure) cold. If piping
system rises more than 4877mm (16 ft.) vertically
above boiler, higher fill pressures are required.
• Check for and repair any water leaks.
15
WATER PIPING
Always follow good piping practices. Observe minimum
25mm (1") clearance to combustibles around all
uninsulated hot water pipes or when openings around
pipes are not protected by non-combustible materials.
On a hot water boiler installed above radiation level, the
boiler must be provided with a low water cut off device at
the time of installation by the installer.
Boiler must not be used in connection with a refrigeration
system. If the boiler supplies hot water to heating coils in
air handling units, flow control valves or other devices
must be installed to prevent gravity circulation of boiler
water in the coils during the cooling cycle.
Expansion T
ank: Install into water outlet manifold as
shown in Figure 11. Use appropriate size tank for volume
of water in system. Boiler volume on page 2 chart.
Relief V
alve Discharge Piping: Use same size or larger
piping (iron or copper) than valve outlet. Must terminate
152mm (6") from floor (or local codes) with a plain (no
threads) end. Do not hard-pipe to drain piping. Make
sure discharge is always visible.
Cold W
ater Fill: Pressure reducing (fill) valve and shutoff
valve should be installed.
Supply & Return
: For tapping sizes, see dimensions on
page 2. Recommend shutoff valve in supply (and shutoff
and drain valves in return on non-zoned system).
Radiant Floor & Standing Iron Radiant Systems
: A boiler
by-pass loop (or equivalent) will be required to avoid flue
gas condensation on cast iron sections for low
temperature application. I.E. radiant floor systems.
Zone Piping
: See page 17 for zoning with zone valves
and domestic hot water installation.
Figure 15. Water piping
Note: Orientation of piping drawn for clarity. Observe relative location of components.
Page 16

ELECTRICAL WIRING
Boiler must be electrically grounded in accordance with the
requirements of the authority having jurisdiction or, in the
absence of such requirements, with the Canadian Electric
Code - CSA-C22.1, Part 1.
P
ower supply: A separately fused circuit is recommended.
Use a standard 15-amp fuse or breaker and 14-gauge
conductors in BX cable or conduit.
Thermostat connections
: Wire connections to T1 and T2
terminal block must be from an isolated circuit. DO NOT
BRING VOLTAGE FROM AN EXTERNAL SOURCE HERE.
Wires should be only run from thermostats, zone valve end
switches, or circulator end switches. 3 wire zone valves which
do not have isolated end switches cannot be used unless a
relay is added with the dry contacts wired to T1 and T2.
Thermostat heat anticipator
: For zoned system, set to match
amp draw of zone valve or circulator relay. For a non-zoned
system, set to .3 amps.
Circulator relay on board: Do not exceed 5 amp/120V max. rating.
Circulator pump: Wire to BX harness from boiler junction box.
GAS PIPING
A. Local installation codes apply. The pipe joint
compound used on threads must be resistant to the
action of liquefied petroleum gases.
B.
The gas supply line to the boiler should be run directly
from the meter for natural gas or from the fuel tank for
L.P. propane gas. See figure 16 for location of union and
manual main shut off valve that may be specified locally.
Selecting pipe size for natural gas:
1. Measure or estimate the length of piping from the
meter to the installation site.
2. Consult gas supplier for heating value of gas-W/m
3
(BTU/cu. ft.).
3. Divide boiler rated input by heating value to find
gas flow in piping (m
3
/hr) (cu. ft. per hour).
4. Use table below to select proper pipe size.
Example: Boiler model CB-180 is to be installed.
Distance from gas meter to the boiler is 6.1m (20 ft).
Heating value of natural gas is 10350 W/m
3
(1000
BTU/cu. ft.) Select proper pipe size.
At 6.1m (20 ft.) length of pipe, match required
capacity from table below (choose higher capacity, in
this case is 5.4 m
3
[190 cu. ft.] per hour). Required
pipe size is 19mm (3/4").
Improper gas pipe sizing will result in insufficient heat
and other installation difficulties. For more information
and also if other appliances are to be attached to the
piping system, see Appendix C of National Fuel Gas
Code ANSI Z223.1-latest edition, and CSA B149.00
C.
The boiler and its gas connection must be leak tested
before placing the boiler in operation. Use liquid soap
solution for all gas leak testing. Do not use open flame.
This boiler and its individual shutoff valve must be
disconnected from the gas supply piping system
during any pressure testing of that system at test
pressures in excess of 3.5 kPa (1/2 PSIG).
This boiler must be isolated from the gas supply
16
Figure 16. Gas piping components location
13mm (1/2”) 19mm (3/4”) 25mm (1”) 32mm (1-1/4”) 38mm (1-1/2”)
mft
m3/hr cu.ft./ hr. m3/hr cu.ft./ hr. m3/hr cu.ft./ hr. m3/hr cu.ft./ hr. m3/hr cu.ft./ hr.
3.0 10 3.7 132 7.9 278 14.7 520 29.7 1050 45.3 1600
6.1 20 2.6 92 5.4 190 9.9 350 20.7 730 31.1 1100
9.1 30 2.1 73 4.3 152 8.1 285 16.7 590 25.2 890
12.2 40 1.8 63 3.7 130 6.9 245 14.2 500 21.5 760
15.2 50 1.6 56 3.3 115 6.1 215 12.5 440 19.0 670
18.3 60 1.4 50 3.0 105 5.5 195 11.3 400 17.3 610
21.3 70 1.3 46 2.7 96 5.1 180 10.5 370 15.9 560
24.3 80 1.2 43 2.5 90 4.8 170 9.9 350 15.0 530
27.4 90 1.1 40 2.4 84 4.5 160 9.1 320 13.9 490
30.5 100 1.1 38 2.2 79 4.2 150 8.6 305 13.0 460
Length
of Pipe
Gas Flow In Piping
Pressure Drop = 8mm (.3”) in water Specific Gravity = 0.60
Iron Pipe Size (Ips)—inches
At pressure drop of 0.3 in. water, specific gravity = 0.60.
piping system by closing its individual manual shutoff
valve during any pressure testing of the gas supply
piping system at test pressures equal to or less than
3.5 kPa (1/2 PSIG).
D. All gas piping used should be inspected thoroughly
for cleanliness before makeup. A sediment trap must
be provided, as illustrated in figure 16.
E. The minimum and maximum gas supply pressure (at
the inlet of gas valve) are shown on the boiler rating
plate for the type of gas used. Gas supply pressure
should never be less than minimum or more than
maximum pressure when the boiler or any other
appliance is turned on or off.
Gas flow = = 5.1 m3/hr
52 760 W/hr
10 350 W/m
3
INSTALL MANUAL MAIN SHUTOFF
VALVE 1524mm (5 FT) ABOVE FLOOR
WHEN REQUIRED BY LOCAL CODE
UNION
GAS
VALVE
FULL SIZE
SEDIMENT
TRAP
(Gas flow = = 180 cu. ft. per hour)
180,000 BTU/hour
1000 BTU/cu. ft.
DANGER: BEFORE WIRING, ALWAYS TURN OFF ELECTRIC POWER SUPPLY.
OTHERWISE, SHOCK OR DEATH CAN RESULT.
WARNING: DO NOT USE BOILER TRANSFORMER TO POWER EXTERNAL
ACCESSORIES (I.E. ZONE VALVES, RELAYS). OVERLOADED/BURNED-OUT
TRANSFORMER CAN RESULT.
Page 17

Figure 17. Power and thermostat wiring
Power Connections
• Remove electrical junction box cover.
• HOT CONNECTION LEAD IS BLACK.
• NEUTRAL CONNECTION LEAD IS WHITE.
• Connect ground inside box.
DO NOT REVERSE POWER CONNECTIONS: if
reversed, ignition control will not detect a flame and
will go into safety shutdown.
OPTIONS AVAILABLE
Alarm system:
A remote-type alarm device may
be connected the boiler that will be activated if
the boiler shuts down due to a malfunction, or if
power is turned off. Fault contactor terminals on
electronic boiler control board are a dry contact (5
amp 120 V max) that makes on a system fault or
power outage.
Domestic hot water installation: Connect zone valve
end switch to T1 and T2 terminal block on control
board mounting panel. Water heater thermostat
operates zone valve. DO NOT bring power from an
external source to these terminals.
Note: 3 wire zone valves which do not have isolated
end switches cannot be used unless a relay is
added with the dry contacts wired to T1 and T2.
Figure 18. Zone valves (with indirect fired water heater) piping & wiring
17
Page 18

CONTROL BOARD INDICATOR LIGHTS. See Figure 19.
Flame indicator (amber): Steady on means burner is lit
and producing sufficient flame current signal.
P
ower indicator (green): Steady on means there is
electrical power to the control board.
Diagnostic fault indicator (red): Steady on or intermittent
flashing indicates a system operation problem. See page
24 for codes and following pages for causes and solutions.
CALIBRATION EQUIPMENT:
Pressure measurement fittings:
There are 3 service
fittings with caps provided on this boiler for convenient
calibration of the air/gas ratio and input in the field. See
Figure 20 for the location of each.
Pressure measurement gauge
: Magnehelic or Incline
differential pressure gauge with 0-25mm/w.c. (0 - 1.0”
w.c.) range and 0.5mm (0.02”) increments
recommended.
Available from Slant/Fin is a calibration gauge kit (part
number 665185) that has a gauge mounted on a stand
with a “toggling” feature which allows the user to switch
between the blower and gas valve calibration without
moving the tubing connections.
T
ubing and connectors for gauge: Need 2 lengths of
5mm (3/16”) I.D. plastic tubing with female adapters
which mate to the service fittings.
STEP A: CALIBRATE BLOWER AIR FLOW
Note: This step will set the air flow required at the proper
air/gas ratio for the specified input rate. Refer to the
Input Rate Adjustment Specifications Charts on page 20
for the appropriate air flow differential pressure required
to achieve the desired input rate of the boiler.
1. With power off, set differential pressure gauge on a
level surface and adjust to zero.
2. Locate blower outlet pressure fitting and burner
enclosure pressure fitting. See Figure 20.
3. Remove cap on blower outlet pressure fitting and
connect to high side of gauge tubing.
4. Remove cap on burner enclosure pressure fitting and
connect to low side of gauge tubing.
5. Turn power on. Raise thermostat to start boiler.
6. Boiler should start after 20 seconds. Amber flame
indicator light will come on.
7. While the boiler is running, perform the air flow
calibration to set the differential pressure to the
required reading for the desired input.
8. Locate knurled adjustment knob on side of air filter
box. See Figure 20.
9. Loosen air adjustment locking screw on knob by
turning counterclockwise. DO NOT remove.
10. Turn knurled adjustment knob to set pressure.
Observe gauge while adjusting. Turn clockwise to
decrease reading if over the desired differential
pressure. Turn counterclockwise to increase reading
if under the desired differential pressure.
11. When reading is set correctly, retighten the air
adjustment locking screw finger tight. Hold knurled
adjustment knob steady while doing this to maintain
setting. Double check gauge reading.
12. Disconnect both sides of gauge tubing from fittings
and replace service fitting caps hand tight.
18
Basic Operation Principle
The gas valve on the Concept 21 boiler is “coupled” to the
combustion blower; so that the gas flow is proportional to
the air flow, even under the most adverse conditions. This
insures a high level of safety and reliability when the
following Operation Procedures are carefully followed. Note
that the proper input is obtained by adjusting the air damper
on the blower for a certain air flow, which will feed back to
the gas valve and produce a proportionate gas flow. See
Step A. DO NOT adjust the gas valve adjustment screw to
set input rate, only use this adjustment to set the differential
pressure between the blower outlet and gas valve outlet to
zero as shown in Step B.
Figure 19. Control board indicator lights Figure 20 . Location of calibration pressure fittings and
adjustment devices
OPERATION PROCEDURES
BURNER ENCLOSURE
PRESSURE FITTING
BLOWER OUTLET
PRESSURE FITTING
KNURLED
ADJUSTMENT
KNOB
GAS VALVE OUTLET
PRESSURE FITTING
AIR
ADJUSTMENT
LOCKING
SCREW
GAS VALVE
ADJUSTMENT
SCREW
Page 19

1
STEP B: CALIBRATE GAS VALVE
Note: This step will set the air/gas ratio for optimum
combustion. The purpose of this step is NOT to set input
rate. Follow Step A and/or Step C to adjust input.
1. With power off, set differential pressure gage on a level
surface and adjust to zero.
2. Locate blower outlet pressure fitting and gas valve
outlet pressure fitting. See figure 20.
3. Remove cap on blower outlet pressure fitting and
connect to high side of gage tubing.
4. Remove cap on gas valve outlet pressure fitting and
connect to low side of gage tubing.
5. Turn power on. Raise thermostat to start boiler.
6. Boiler should start after 20 seconds.Let run for about 1
minute.
7. Gauge reading should register a differential pressure
reading of 0. If so, proceed to line 11.
8. If gage reading is not at 0, re-adjustment is necessary.
Locate gas valve adjustment screw cap on top of gas
valve.See figure 20.
9. Remove gas valve adjustment screw cap by turning
counterclockwise with a screwdriver.
10. Position screwdriver into adjustment screw slot
carefully. Observe gage while adjusting and turn screw
slowly. Turn adjustment screw clockwise to decrease
reading if over 0 set point. Turn adjustment screw
counterclockwise to increase reading if under 0
setpoint.
Note:
Remember that the gas pressure is on the low
side of the gage. Consequently, decreasing the
differential reading actually is INCREASING the gas
pressure reading, since the blower outlet pressure is
on the high side of the gage and not changing.
11. When reading is set correctly to 0, retighten the gas
valve adjustment screw cap tightly with screwdriver.
Double check gage reading.
12. Turn power off, disconnect both sides of gage from
fittings and replace service fitting caps hand tight.
STEP C: CHECK BOILER INPUT RATE
1. Turn power on. Raise thermostat to start boiler. Let
boiler run steady about 10 minutes.
2. At meter, observe number of M
3
(cu. ft.) of gas the
boiler uses in 3 minutes. Be sure that only this
appliance is running on the gas meter at this time.
3. Consult gas supplier for heating value of gas
- usually 10,350 W/m
3
(1000 BTU/cu.ft.) for natural gas,
25,875 W/m
3
(2500 BTU/cu.ft.) for propane.
4. Verify input using following formula:
m
3
in 3 minutes X heating value X 20 = W/hr input
(
Cu.ft. in 3 minutes X heating value X 20 = BTU/hr input)
Example:
0.1274m
3
X 10,350 W/m3X 20 = 26,400 W/hr input
(4.5 cu.ft. X1000 BTU/cu.ft. X 20 = 90,000 BTU/hr input)
5. If gas flow is not at the specified input rate, it is
necessary to adjust the air shutter to attain the correct
input rate.
6. Locate the knurled adjustment knob on side of air filter
box. See figure 20.
7. Loosen air adjustment locking screw on knob. Do not
remove.
8. Turn knurled adjustment knob clockwise to reduce air
flow, and consequently, reduce gas flow and input rate
Turn adjustment rod counterclockwise to increase air
flow, and consequently, increase gas flow and input
rate.
Note:
Make adjustments in small increments and re-
check input as in line 4.
9. When input is set properly, retighten the air adjustment
locking screw finger tight. Hold knurled adjustment
knob steady while doing this to maintain setting.
10. Restore operation to any appliance shut off for meter
clocking.
Notes on Input Rate:
1. Refer to the Input Rate Adjustment Specifications
Charts on page 20 for the appropriate input rate setting
on each model boiler for each venting application.
2. The procedure in Step A is adequate for setting the
input rate. If a gas meter is available, it can be used to
verify the setting or as an alternate method for setting
the input.
3. For altitudes above 610m (2,000 ft.), ratings shall be
reduced at the rate of 4% for each 305m (1,000 ft.)
above sea level.
4. Re-orificing for altitude change IS NOT necessary on
this Concept 21 boiler.
5. By maintaining the air flow differential pressure set in
Step A, this Concept 21 boiler will derate itself
accordingly, due to air and gas density reduction as
altitude increases.
Page 20

The input rate for the Concept boiler, on Direct Vent or
Category IV installations, may be set up to a maximum of
15% above to 25% below the nominal specified rating plate
input of each model. See Chart 1. This allowance is useful in
better sizing the boiler’s input rate to each installation site's
heat load.
The input rate for the Concept boiler, on Category I
installations, must only be set to one specified input rate for
each model. See Chart 2. This rate, which is typically higher
than the nominal specified rating plate input for each model
(except the CB-180), will ensure that a high enough flue
temperature is obtained to safeguard against condensation
forming in the flue piping and chimney stack. On all Category
I installations, the air pressure switch provided on the boiler
must be replaced with the switch provided in vent kit 665194.
This switch is set to prevent the boiler from operating below
the approved Category I input rate.
Input Rate Adjustment Specifications
To set the input rate of the Concept boiler perform the
following adjustment procedure:
A. Refer to the Operation Procedures on pages 18 and 19
which specify the methods of calibrating the boiler’
components for proper input rate and air/gas ratio.
B. Note that Step A and Step C are followed to set rate only
depending on whether a differential pressure gauge or a
gas meter is available. Either method is adequate to se
input, or both can be performed as a verification of inpu
rate. Use these procedures, in conjunction with the
appropriate chart below, to adjust the input rate a
specified for that venting application.
C. Note that Step B is followed to set the air/gas ratio only
not to set input rate. Follow Step B precisely as specified
in the instruction manual.
20
CB-45 CB-90 CB-135 CB-180
w BTUH w BTUH w BTUH w BTUH
mm w.c. in.w.c.
9 890 33,750 19 780 67,500 29 670 101,250 39 560 135,000 10.67 .42 Reduced by 25%
10 550 36,000 21 100 72,000 31 650 108,000 42 200 144,000 12.19 .48 Reduced by 20%
11 210 38,250 22 420 76,500 33 630 114,750 44 840 153,000 13.72 .54 Reduced by 15%
11 870 40,500 23 740 81,000 35 610 121,500 47 480 162,000 15.49 .61 Reduced by 10%
12 530 42,750 25 060 85,500 37 590 128,250 50 120 171,000 17.27 .68 Reduced by 5%
13 190 45,000 26 380 90,000 39 570 135,000 52 760 180,000 19.05 .75 Nominal 0%
13 850 47,250 27 700 94,500 41 550 141,750 55 400 189,000 21.08 .83 Increased by 5%
14 510 49,500 29 020 99,000 43 530 148,500 58 040 198,000 23.11 .91 Increased by 10%
15 170 51,750 30 340 103,500 45 510 155,250 60 680 207,000 25.15 .99 Increased by 15%
Boiler Model and Allowable Input *
Air Flow
Differential
Pressure †
Percent of change
to nominal boiler
input rate
* Follow instruction manual operation procedures, Step C, to set with meter. Ability to attain input rates over the nominal rating plate specifications
may be constrained by installation variables such as vent length, altitude, and calorific value of the gas, particularly on the larger models of boilers.
† Follow instruction manual operation procedures, Step A, to set with gauge.
w BTUH mm w.c. in. w.c.
CB-45 16 120 55,000 25.40 1.00 22%
CB-90 30 480 104,000 21.59 .85 15%
CB-135 42 500 145,000 19.05 .75 7%
CB-180 52 760 180,000 16.51 .65 0%
Boiler
Model
Category I Input Rate * Air Flow
Differential Pressure †
Percent of increase
over nominal boiler
input rate
Chart 2:
This chart must be used for Input Rate Adjustment for Category I Installations
* Follow instruction manual operation procedures, Step C, to set with meter.
† Follow instruction manual operation procedures, Step A, to set with gauge.
Provisions for combustion and ventilation air must be made in accordance with Section 5.3, air for combustion and ventilation, CSA 149.1-00 for
natural gas and propane..
Chart 1:
Input Rate Adjustment Specifications for Direct Vent and Category IV Installations
Page 21

2
NORMAL SYSTEM STARTUP
Follow lighting instructions on page 30. Safe lighting and
other performance criteria were met with the gas manifold
and control assembly provided on the boiler when the
boiler underwent tests specified in ANSI Z21.13, and of the
National Fuel Gas Code, ANSI Z223.1 and CSA B149.1-00
for natural gas and propane.
CHECK SYSTEM OPERATION
P
urge air one final time:
• Let system water reach 710C (160°F).
Temperature/pressure gage should be between 83 and
172 kPa (12 and 25 psi.).
• Bleed all air vents until water squirts out; start on lowest
floor with first air vent in the line of flow.
Check exhaust and air intake venting:
• Check for and reseal any vent tubing leaks.
• Check for and remove any vent terminal obstructions.
Check gas valve operation (with burner firing):
USE CAUTION - LINE VOLTAGE PRESENT.
• Disconnect flame sensor wire lead from flame sensor
tab. See Fig. 21 for location. Gas valve should close.
• It is normal for boiler to retry for ignition (3 times) with
wire removed from flame sensor, but gas valve should
only open for a few seconds during each retry and be
closed between trials.
• Replace flame sensor wire lead on flame sensor tab.
• If fault shown after trials complete, cycle thermostat or
power off/on to clear.
Check high limit operation:
HIGH LIMIT CANNOT BE SET BELOW 82°C (180°F).
HIGHEST MAXIMUM ALLOWABLE SETTING IS 104°C
(220°F).
• Set thermostat high enough for the water temperature
to reach limit switch setting of 82°C (180°F).
• When reached, limit switch should open and gas valve
should close.
Testing of System
TEST COMMON VENTING SYSTEM (IF REQUIRED)
If existing boiler was removed from a common venting
system, common venting system may be too large for
proper venting of appliances remaining connected to it.
At the time of removal of existing boiler, the following
steps shall be followed with each appliance remaining
connected to common venting system placed in
operation, while the other appliances remaining
connected to the common venting system are not in
operation.
1. Seal any unused openings in common venting system.
2. Visually inspect venting system for proper size and
horizontal pitch and determine there is no blockage or
restriction, leakage, corrosion and other deficiencies
which could cause an unsafe condition.
3. Insofar as is practical, close all building doors and
windows and all doors between the space in which
the appliances remaining connected to the common
venting system are located and other spaces of
building. Turn on clothes dryer and any appliance not
connected to common venting system. Turn on any
exhaust fans, such as range hoods and bathroom
exhausts, so they will operate at maximum speed. Do
not operate a summer exhaust fan. Close fireplace
dampers.
4. Place in operation the appliance being inspected.
Follow the lighting instructions. Adjust thermostat so
appliance will operate continuously.
5. Test for spillage at the draft hood relief opening after 5
minutes of main burner operation. Use the flame of a
match or candle, or smoke from cigarette, cigar or
pipe.
6. After it has been determined that each appliance
remaining connected to common venting system
properly vents when tested as outlined above, return
doors, windows, exhaust fans, fireplace dampers and
any other gas-burning appliances to their previous
condition of use.
7. Any improper operation of common venting system
should be corrected so installation conforms with
National Fuel Gas Code ANSI Z223.1 and CSA
B1491-00 for natural gas and propane. When resizing
any portion of the common venting system, common
venting system should be resized to approach minimum
size as determined using appropriate tables in Part II of
the National Fuel Gas Code, ANSI Z223.1 and CSA
B1491-00 for natural gas and propane.
Page 22

THERMOSTAT CALLS FOR HEAT
CIRCULATOR ON
BLOWER ON
BLOWER PREPURGE 10 SEC.
HOT SURFACE IGNITOR ON
IGNITOR WARM UP 10 SEC.
GAS VALVE OPEN 4 SEC.
IGNITOR OFF
GAS VALVE REMAINS OPEN
CIRCULATOR AND BLOWER
CONTINUE TO RUN
THERMOSTAT SATISFIED. GAS VALVE
CLOSED. CIRCULATOR OFF. BLOWER
POST PURGE 5 SEC. BLOWER OFF
AIR
PRESSURE
SWITCH
CLOSED?
HIGH
LIMIT
CLOSED?
AIR
PRESSURE
SWITCH
OPEN?
IGNITOR
CURRENT
CHECK
OK?
FLAME
DETECTED?
GAS VALVE CLOSES
CIRCULATOR & BLOWER
CONTINUE TO RUN
COMPLETE
3 TRIALS
TO DETECT
FLAME?
WAIT 1 HR.
CLEAR FAULT.
RE-TRY
OPERATION.
WAIT 1 HR.
CLEAR FAULT.
RE-TRY
OPERATION.
CIRCULATOR
CONTINUES TO RUN.
BLOWER OFF
DISPLAY FAULT AND
CLOSE FAULT
CONTACTOR.
CIRCULATOR
CONTINUES TO RUN.
BLOWER OFF
DISPLAY FAULT AND
CLOSE FAULT
CONTACTOR.
CIRCULATOR
CONTINUES TO RUN.
BLOWER OFF
DISPLAY FAULT AND
CLOSE FAULT
CONTACTOR.
WAIT 1 HR.
CLEAR FAULT.
RE-TRY
OPERATION.
CIRCULATOR & BLOWER
CONTINUE TO RUN
CIRCULATOR
CONTINUES TO RUN.
DISPLAY FAULT AND CLOSE
FAULT CONTACTOR. WAIT FOR
PRESSURE SWITCH TO OPEN.
COMPLETE 3
TRIALS
TO CHECK
PRESSURE?
DISPLAY FAULT
AND CLOSE FAULT
CONTACTS
DISPLAY LED
INDICATION
CIRCULATOR
CONTINUES TO RUN
HIGH
LIMIT
OPEN OVER
1 HOUR?
NO
NO
NO
NO
YES
YES
YES
NO
YES
NO
YES
NO
YES
YES
YES
NO
22
SEQUENCE OF OPERATION
Page 23

WIRING DIAGRAMS
Page 24

24
Indicator codes and component location
DIAGNOSTIC INDICATOR LIGHT (RED)
Carefully note red diagnostic indicator light. When a
system failure occurs, indicator light will show a series of
quick flashes with a short interval between the series of
flashes. Count the number of flashes that occur after the
short no-flashing interval. Correct failure code for each
number of flashes is shown in box.
If the diagnostic light is off when service technician
arrives, set thermostat to call for heat. Boiler will attempt
restart. (Boiler also attempts restart each hour during
failure mode and after a power interruption.) If the boiler
restarts, the diagnostic light will stay off. If the boiler
does not restart, the diagnostic light will return to either
steady on or the series of flashes.
Additional tools recommended
• Differential pressure gauge: 0-25mm/w.c. (0 - 1.0”
w.c.) range with 0.5mm (.02”) increments
• Plastic gauge hookup tubing: 2 lengths of 5mm
(3/16”) I.D. tubing with female service fitting adapters.
• Microampmeter: 0-25 microamp range with
1 microamp increments.
Boiler Failure Codes
Indicator
Fault indicated Page
Steady ON Control internal failure 26
1 Flash High limit open 25
2 Flashes No ignition 25
3 Flashes Pressure switch problem 26
4 Flashes Ignitor failure 26
5 Flashes Flame signal loss 25
6 Flashes Improper flame signal 26
Figure 21. Boiler components location
TROUBLESHOOTING
Page 25

2
TROUBLESHOOTING: POSSIBLE CAUSES & SOLUTIONS
DIAGNOSTIC “1 FLASH” - HIGH LIMIT OPEN
Important Note: During normal boiler operation, short periods of high limit open indication are normal provided the
fault contactor remains open. If the high limit remains open for over 1 hour, the fault contactor
closes, indicating there is a system problem.
CAUSE
High limit is
defective?
Circulator not
running?
Zone valves not
opening?
Boiler water level
too low?
TEST
Set high limit above boiler water temperature (raise limit
setting substantially as water temperature may be higher
than gauge reading when there is no water flow through
boiler). Check for continuity across high limit contacts.
With thermostat calling for heat, check for power to
circulator. If no power, check wiring connections to circulator.
With thermostat calling for heat, check for power to each
valve. If no power, check wiring connections to valve.
Check temperature/pressure gauge pressure reading.
Carefully snap open relief valve handle to determine if boiler
is full of water. If not full of water, check for system leaks and
check water pressure regulator operation.
SOLUTION
If contacts remain open, replace
high limit. Replacement must be
same manufacturer and model.
DO NOT set above 104°C (220°F).
If power OK, but circulator not
running, replace circulator.
If power OK, but valve not
opening, replace valve.
Repair any system leaks. Adjust
or replace water pressure
regulator.
No gas supply to
gas valve?
No gas supply to
burner?
Electrical connections are loose?
Check that manual gas shut-off is open. Check for gas
supply pressure to valve.
Check gas valve knob in ON position. Check wiring and
tubing connections to valve. Check valve outlet pressure to
determine if valve is opening.
Check power wiring to electronic board (hot wire to L1;
neutral to L2) and ground wire in junction box.
If no pressure, check for gas shutoff by utility.
If valve not opening, replace valve.
Replacement must be same
manufacturer and model.
Calibrate new valve as shown
in Operation Procedures on
page 19.
Tighten all wiring connections.
Air-gas ratio is not
proper?
Orifice sizing is
not correct?
Flame sensor
current is weak?
Flame sensor is
defective?
Ground bar is
defective?
Check gas valve calibration as shown in Operation
Procedures on page 19.
Check gas and air orifice size and gas type. Orifice plate is
stamped with model number and gas type. Refer to orifice
identification on pages 28 and 29.
Check flame sensor current with microampmeter (see
Troubleshooting Procedures on page 27).
Remove flame sensor from boiler (see Troubleshooting
Procedures on page 27). Check for cracked, wet ceramic
insulator or bent, burned, coated kanthal rod.
Remove ground bar from boiler (see Troubleshooting
Procedures on page 27). Check for bent, burned, coated or
broken assembly. Also check ground wire connections to
assembly.
If pressure reading incorrect,
adjust gas valve as shown in
Operation Procedures on page 19
If size not correct, contact Slant/Fin
Technical Services Dept.
If reading is below 1 microamp,
continue with “Flame Loss”
troubleshooting.
If defective, replace flame sensor.
Replacement must be same
manufacturer and model.
If defective, replace ground bar.
Replacement must be same
manufacturer and model. Be sure
ground wire is connected properly.
DIAGNOSTIC “2 FLASHES” - NO IGNITION
DIAGNOSTIC “2 FLASHES” AND/OR “5 FLASHES” — no flame signal or flame signal loss
Refer to Replacement Parts information on
page 31 when parts need to be replaced.
Page 26

26
CAUSE
Electrical wiring?
Pressure switch is
defective?
Blower motor not
running?
No or reduced
pressure signal to
pressure switch?
Pressure switch is
out of calibration?
TEST
Check wiring connections to pressure switch. Wires
should go to normally open (N.O.) and common
(C) terminals on switch.
Check that pressure switch contacts are open
(between N.O. and C) when blower is off.
Check for voltage to motor at connector.
Check for loose or blocked tubing connections to
pressure switch; loose blower hose connection; loose
blower wheel or wires. Check for blocked air filter,
vent terminal or vent tubing. Check air flow differential
pressure. See Operation Procedures on page 18.
Check pressure switch calibration. See
Troubleshooting Procedures on page 27.
SOLUTION
Correct all wiring connections.
Replace switch if not. Replacement must be
same manufacturer, model and setting.
If voltage is present at connector, motor does
not run, replace blower/motor assembly.
Replacement must be same manufacturer
and model. Check air flow differential
pressure and adjust, if necessary, following
Operation Procedures on page 18.
Secure all loose connections. Tighten
blower wheel set screw. Remove
obstructions. Replace or clean filter.
Re-adjust air flow differential pressure as
shown in Operation Procedures on
page 18.
Replace switch. Replacement must be
same manufacturer, model and setting.
Electrical wiring?
Hot surface ignitor
tip or ceramic
insulator is broken?
Hot surface ignitor
is defective?
Check wire connections from ignitor.
Turn power OFF. Carefully remove ignitor from boiler
(see Troubleshooting Procedures on page 27).
Check for cracks or breakage.
Energize ignitor while outside of boiler. BE CAREFUL
OF HOT TIP. Observe glow on ignitor tip. Do NOT
allow hot tip to come in contact with your hand or any
other objects. Turn off gas valve to prevent gas from
exiting ignitor opening and igniting outside of boiler.
Tighten all wiring connections.
If defective, replace ignitor. Replacement
must be same manufacturer, model and
length.
If tip does not glow quickly and strongly,
replace ignitor. Replacement must be same
manufacturer, model and length.
DIAGNOSTIC “4 FLASHES” - HOT SURFACE IGNITOR FAILURE
TROUBLESHOOTING: POSSIBLE CAUSES AND SOLUTIONS
DIAGNOSTIC “3 FLASHES” - PRESSURE SWITCH PROBLEM
Important Note: Boiler control checks for switch contacts to be open before combustion blower is turned on and
switch contacts to be closed once blower is running and proper air flow is established.
Gas valve
defective?
Flame detector
shorted?
Turn gas valve knob to “OFF” position and check
that valve shuts off gas flow.
Remove flame detector from boiler. Check for
coating on rod or material contacting rod inside
ceramic or combustion area.
If gas flow continues, replace valve.
Replacement must be same manufacturer
and model. Calibrate new valve following
Operation Procedures on page 19.
Clean or clear any foreign matter. Replace
flame detector, if necessary, with same
manufacturer, model and length.
DIAGNOSTIC “6 FLASHES” - IMPROPER FLAME SIGNAL
Indicates flame signal detected when gas valve should be closed.
DIAGNOSTIC “Steady On” - ELECTRONIC CONTROL FAILURE
Electronic Control Control board cannot be serviced. Replacement must be same manufacturer and model.
Is Defective?
Refer to Replacement Parts information on
page 31 when parts need to be replaced.
Page 27

2
• Disconnect wires to gas valve. May be necessary to
disconnect gas supply line to gas valve to move
assembly slightly.
• Disconnect air adapter from burner enclosure.
• Remove air filter box cover to access blower
mounting studs and nuts. Remove the four nuts and
drop blower down to move out of way.
• Remove nuts around perimeter of burner enclosure,
drop down off of studs and remove enclosure.
• Allow burner enclosure to drop down low enough to
access burner bracket. Remove and clear tubing, if
necessary, but mark location of each tube for
reassembly.
• While supporting underside of burner bracket to keep
from falling, undo knurled nuts at either end of burner.
• Drop burner down off studs gently. Pull down burner
gasket with burner without ripping it.
• Ceramic burner is only attached to the burner bracket
by the ground wire, unscrew the wire tab to remove.
• Ground bar is held to burner with a weld stud through
the burner, remove the nuts and washers from the
underside of the burner to disassemble.
• To reassemble, follow this procedure in reverse,
carefully relocating all items removed in their proper
location at tightness noted in removal.
Pressure switch calibration check
• Turn power OFF.
• Remove wire leads from pressure switch terminals.
• Hookup resistance meter between normally open
(N.O.) and common (C) terminals.
• With blower off, the switch should be open, meter
reading is infinity. If not, switch is defective.
• If switch is open, check cutout pressure with blower
running, as described in following steps.
• Hookup differential pressure gauge in same manner
as to set blower air flow - high side to blower outlet,
low side to burner enclosure. The switch and gauge
both read the same air flow differential pressure.
• Turn on power and raise thermostat.
• Note pressure reading on gauge when blower is
running. Reading should be higher than the pressure
switch cutout pressure, which is marked on the
pressure switch label.
• If the pressure switch terminals are still open with the
blower running and the gauge reading is at least
2.54mm (.10”) higher than the pressure switch setting,
the switch is defective.
TROUBLESHOOTING PROCEDURES
Note: All of the procedures below require the removal
of some of the boiler jacket panels.
Checking flame sensing current
• Turn power OFF and remove lead from flame sensor.
• Connect one microampmeter lead to the flame
sensor wire lead; connect other microampmeter lead
to the flame sensor. (Meter is in series.)
• Turn power ON. Once the gas valve opens, and
ignition occurs at the burner, the microampmeter
must read at least 1 microamp to keep the gas valve
open. Typically, the reading is between 5 and 10
microamps. (If no reading, polarity may be wrong reverse leads.)
Flame sensor removal
• Turn power OFF and remove lead from flame sensor.
• Remove flame sensor hold-down bracket.
• Carefully pull out flame sensor.
Hot surface ignitor removal
• Turn power OFF and remove ignitor hold-down
bracket.
• Carefully pull out ignitor (handle with care, fragile).
DO NOT CUT WIRES TO REMOVE IGNITOR.
Ceramic burner/Kanthal ground bar removal
• Turn power and gas supply OFF.
• If burner enclosure not accessible from the rear of
the boiler, remove sheet metal tray under blower and
leg support brace behind blower.
Figure 22. Ceramic burner/Kanthal ground bar removal
Page 28

28
Combination Air and Gas Orifice Plate
Air and Gas Orifice Plate Description
1. There are two different plates for each boiler model.
One plate is for Natural Gas, the other is for Propane.
The plate for Natural Gas has a slightly larger gas
orifice hole stamped into it. The air orifice hole is the
same size on each.
2. The plate for Natural Gas used is stamped “N” after
the boiler model number. The plate for Propane used
is stamped “P” after the boiler model number. These
stampings are visible just below the air/gas adapter
and face the front of the boiler.
IMPORTANT:
Reorificing for altitude change is NOT necessary on
this Concept boiler.
Air and Gas Orifice Plate Conversion
1. Turn off power and gas supply to boiler.
2. Remove boiler jacket front cover by turning the four
slotted fasteners one quarter turn.
3. Remove boiler jacket right side cover by removing the
four sheet metal screws.
4. Locate orifice plate behind air/gas adapter.
5. Remove nuts holding air/gas adapter onto burner
enclosure studs and pull air/gas adapter off studs.
6. May be necessary to disconnect gas supply line to
gas valve to move assembly slightly.
7. Pull out orifice plate off studs.
8. Replace the orifice plate with the appropriately
stamped orifice plate for the gas being utilized on that
model boiler.
9. When reassembling, make sure there is a gasket on
both sides of the orifice plate. To reassemble, follow
this procedure in reverse, carefully relocating all items
removed in their proper location at tightness noted in
removal.
10. Place the appropriate self-adhesive gas conversion
label (supplied in the gas conversion kit) adjacent to
the boiler rating plate, if the gas being utilized differs
from the gas specified on the rating plate.
11. Power and gas supply can be turned back on to
operate boiler.
Figure 23. Combination Air and Gas Orifice Plate Installation
Note: This original design of the air and gas orifice holes stamped into the same plate has been revised on the Concept
boiler. Whether this design is implemented on any particular Concept boiler depends on when the boiler was
manufactured. Follow these instructions only if the boiler is equipped with the design features shown here.
GAS
ORIFICE
GAS
TYPE
BOILER
MODEL
AIR
ORIFICE
BURNER
ENCLOSURE
MOUNTING STUDS
AIR AND GAS
ORIFICE PLATE
WITH GASKETS
AIR/GAS
ADAPTER
HOSE CLAMP
BOOT
BLOWER
AIR
FILTER
BOX
NUTS
BOTTOM
OF
BOILER
Page 29

2
utilized. To convert from one type of gas to the other
the plate should be rotated 180°. The I.D. tab for the
gas being utilized must face outward over the straight
flange in the gas manifold so that it is clearly in view.
7. Reposition the four screws through the flanges and
orifice plate and tighten the four nuts onto the
screws. Make sure the nuts are tightened evenly and
with sufficient force to prevent loosening or leakage.
8. Replace boiler jacket covers removed for this
procedure.
9. The appropriate self-adhesive gas conversion label
supplied with these instructions must be positioned
adjacent to the boiler rating plate, if the gas being
utilized differs from the gas specified on the rating
plate.
10. Power and gas supply can be turned back on to
operate boiler.
AIR ORIFICE PLATE
1. The air orifice plate for each boiler model is the same
for both natural and propane gas — no conversion is
necessary.
2. Each model’s air orifice plate has an I.D. tab which
protrudes from the side of the boiler, behind the
boiler jacket right side cover. The I.D. tab is stamped
for the model of each boiler it is to be installed on.
IMPORTANT: Reorificing for altitude change is NOT
necessary on this Concept boiler.
Air and Gas Orifice Plates with Convertible Gas Orifice
Figure 24. Convertible Gas Orifice Installation
Note: This revised design features a gas orifice plate which contains both the natural gas and the propane gas orifice
hole. Whether this design is implemented on any particular Concept boiler depends on when the boiler was
manufactured. Follow these instructions only if the boiler is equipped with the design features shown here.
GAS TYPE
I.D.
GAS TYPE
I.D.
BOILER
MODEL
NATURAL GAS
ORIFICE.
PROPANE
ORIFICE
GAS ORIFICE
I.D. TAB
BOILER
MODEL
AIR ORIFICE
ADAPTER
BURNER
ENCLOSURE
AIR ORIFICE
PLATE WITH
GASKETS
GAS
VALVE
SCREWS
STRAIGHT
FLANGE
O-RING
GAS
ORIFICE
PLATE
O-RING
STUDS
NUTS
ANGLE
FLANGE
NUTS
AIR ORIFICE
I.D. TAB
(BOILER MODEL)
GAS ORIFICE PLATE ORIENTATION
1. The gas orifice plate contains both the natural gas
orifice hole and the propane gas orifice hole, to
provide for a fast and simple conversion to either
gas use.
2. Each gas orifice hole on the plate has an I.D. tab
located adjacent to it. The I.D. tab specifies the boiler
model and type of gas for each orifice. The larger
hole in the plate is always the natural gas orifice hole,
and is adjacent to the I.D. tab that is stamped “NAT”.
The smaller hole in the plate is always the propane
gas orifice hold, and is adjacent to the I.D. tab that is
stamped “PROP”.
3. When installed properly, the I.D. tab that is stamped
for the type of gas being utilized must face outward
over the straight flange in the gas manifold, so that it
is clearly in view.
GAS ORIFICE PLATE CONVERSION
1. Turn off power and gas supply to boiler.
2. Remove boiler jacket front cover by turning the four
slotted fasteners one quarter turn.
3. Remove boiler jacket right side cover by removing
the four sheet metal screws.
4. Remove the four nuts on the gas manifold angle
flange.
5. Pull out the four screws on the gas manifold straight
flange far enough to remove the gas orifice plate.
6. Place the gas orifice plate in the position specified in
the orientation instructions for the type of gas being
Page 30

30
OPERATING INSTRUCTIONS (Label 65-0640)
• STOP! Read the safety information above on this label.
• Set the thermostat to lowest setting.
• Turn off all electric power to the appliance.
• This appliance is equipped with an ignition device which
automatically lights the burner. DO NOT try to light the
burner by hand.
• Remove control access panel.
• Turn gas control knob clockwise to “OFF” position.
• Wait five (5) minutes to clear out any gas. Then smell for
gas, including near the floor. If you smell gas, STOP!
Follow "B" in the safety information above on this label. If
you don't smell gas, go to next step.
• Turn gas control knob counterclockwise to “ON”
position.
• Replace control access panel.
• Turn on all electric power to the appliance.
• Set thermostat to desired setting.
• If the appliance will not operate, follow the instructions “To
Turn Off Gas To Appliance” and call your service technician
or gas supplier.
TO TURN OFF GAS TO APPLIANCE
• Set thermostat to lowest setting.
• Turn off all electric power to the appliance if service is to be
performed.
• Remove control access panel.
• Turn gas control knob clockwise to “OFF” position.
• Replace control access panel.
OPERATING INSTRUCTIONS (Label 65-0645)
• STOP! Read the safety information above on this label.
• Set the thermostat to lowest setting.
• Turn off all electric power to the appliance.
• This appliance is equipped with an ignition device which
automatically lights the burner. DO NOT try to light the
burner by hand.
• Remove control access panel.
• Depress and move gas control selector arm left to
“OFF” position. Note: Arm cannot be turned to “OFF”
unless arm is pushed in slightly. DO NOT force.
• Wait five (5) minutes to clear out any gas. Then smell for
gas, including near the floor. If you smell gas, STOP!
Follow "B" in the safety information above on this label. If
you don't smell gas, go to next step.
• Depress and move gas control selector arm right to
“ON” position.
• Replace control access panel.
• Turn on all electric power to the appliance.
• Set thermostat to desired setting.
• If the appliance will not operate, follow the instructions “To
Turn Off Gas To Appliance” and call your service technician
or gas supplier.
TO TURN OFF GAS TO APPLIANCE
• Set thermostat to lowest setting.
• Turn off all electric power to the appliance if service is to be
performed.
• Remove control access panel.
• Depress and move gas control selector arm left to
“OFF” position.
• Replace control access panel.
(Reference For Labels 65-0640 & 65-0645)
FOR YOUR SAFETY READ BEFORE OPERATING
A. This appliance does not have a pilot. It is equipped with an
ignition device that automatically lights the burner. DO NOT
try to light the burner by hand.
B. BEFORE OPERATING smell all around the appliance area
for gas. Be sure to smell next to the floor because some gas
is heavier than air and will settle on the floor.
WHAT TO DO IF YOU SMELL GAS
• DO NOT try to light any appliance.
• DO NOT touch any electric switch; DO NOT use any
phone in your building.
• Immediately call your gas supplier from a neighbor's
phone. Follow the gas supplier's instructions.
• If you cannot reach your gas supplier, call the fire
department.
C. Use only your hand to turn the gas control knob or depress
and move the gas control selector arm. NEVER use tools. If
the knob will not turn or selector arm will not depress or
move by hand, don't try to repair it, call a qualified service
technician. Force or attempted repair may result in a fire or
explosion.
D. DO NOT use this appliance if any part has been under
water. Immediately call a qualified service technician to
inspect the appliance and to replace any part of the control
system and any gas control which has been under water.
Gas Valve 36E65
LIGHTING INSTRUCTIONS
WARNING: If you do not follow these instructions exactly, a
fire or explosion may result causing property damage,
personal injury or loss of life.
Page 31

This section must be brought to the owner’s attention, so
the owner can make necessary arrangements with a
qualified heating contractor for periodic maintenance of
this boiler. Installer must also inform owner that the lack of
proper care and maintenance of this boiler may result in a
hazardous condition. Installer should discuss contents of
the User’s Information Manual with the owner.
KEEP THE BOILER AREA CLEAR AND FREE FROM
COMBUSTIBLE MATERIALS, GASOLINE AND OTHER
FLAMMABLE VAPORS AND LIQUIDS.
BEFORE EACH HEATING SEASON
A trained and qualified service technician should perform the
inspections listed in these instructions at least once a year.
Air filter: Located in sheet metal box in front area of boiler.
One quarter turn fasteners hold air filter box cover on.
Replace (recommended) or clean filter annually (more
often if conditions dictate). Slant/Fin replacement air filter,
part number 66-0515 must be used. Can be cleaned with
soap and water; after drying, spray with an adhesive-type
air filter spray which will attract/hold airborne dust particles.
Vent termination: Check for and remove obstructions.
Closet installations
: Check for and remove ventilation
and/or combustion air opening obstructions.
V
ent tubing: Check for and repair tubing separation, leaks
or sagging.
V
ent tubing (externally): Check for corrosion of vent
material. If corrosion is present, replace and reseal
exhaust tubing assembly. If corrosion is present on
galvanized vent material (approved for use on Category I
installations only), this material should be replaced with
#29-4C stainless steel.
V
ent and air intake tubing (internally): Check for and
remove obstructions. To inspect, remove tubing from
boiler. When finished, reseal all removed tubing parts with
manufacturer’s specified sealant.
Heat exchanger:
In the unlikely event of boiler flue
passage blockage, service to remedy situation must be
performed only by an authorized Slant/Fin representative.
Burner: Annual service of the burner is not necessary. Follow
the burner removal procedure on page 27 when improper
operation of the boiler necessitates inspection of this part.
System water:
Check if full of water and properly
pressurized. Check for and correct radiation system
air “noise”.
Water piping: Check for and repair any leaks.
Gas piping:
Check for and repair any leaks.
Clear plastic tubing: Located around burner enclosure
area. Check for cracked, loose or blocked conditions.
Replace if necessary.
Safety shutdown controls:
Check operation as detailed on
page 21 in this manual.
Blower:
This is a sealed component which does not
require lubrication. Check convoluted boot on blower
outlet for air leakage. Replace if necessary.
Circulator:
Some models require lubrication. S.A.E. #20
oil recommended.
WATER TREATMENT
A good water treatment program will extend the useful life
of the boiler and is especially recommended in areas
where water quality is a problem. A reputable water
treatment company should be consulted for determining
the best overall treatment program for this equipment.
FREEZE PROTECTION
If anti-freeze must be used, INHIBITED PROPYLENE
GLYCOL is recommended as it is practically non-toxic. Fo
useful information on the characteristics and mixing
proportions of anti-freeze in heating systems, obtain a
copy of Technical Topics No. 2A from Hydronics Institute,
34 Russo Place, Berkeley Heights, NJ 07922.
IF REPLACEMENT PARTS ARE NEEDED
When parts are needed, refer to boiler model and serial
number shown on the boiler name/rating plate. Whenever
possible refer to the original order by number and date.
Control identification and replacement should not be
attempted by unskilled personnel. Only simple, easily
identified controls and parts may be obtained locally. All
other controls and parts should be identified by and
ordered from Slant/Fin. Relief/Safety valves must be ASME
rated for the pressure and gross output of the boiler.
This boiler is equipped with an unconventional gas
control. If this control is replaced, it must be replaced with
an identical gas control and calibrated as specified in the
Operation Procedures.
Replacement parts are available from:
SLANT/FIN LTD/LTEE
6450 Northam Drive
Mississauga, ON L4V 1H9
Phone: (905) 677-8400 Fax: (905) 677-1829
MAINTENANCE PROCEDURES
WARNING: DO NOT USE ETHYLENE GLYCOL,
AN AUTOMOTIVE-TYPE OR UNDILUTED ANTI-FREEZE. SEVERE BOILER
DAMAGE CAN RESULT.
3
Page 32

SLANT/FIN LTD/LTEE, 6450 Northam Drive, Mississauga, Ontario L4V 1H9
• Phone: (905) 677-8400 / FAX: (905) 677-1829 e-mail: slantcan@aol.com
©Slant/Fin Corp. 1998. Printed in Canada 0501. Publication No. CB-40 Rev. C.
Boiler package includes mounted on boiler:
• Full jacket enclosure
• Water manifold/air scoop
• Relief valve
Unmounted parts
:
• Circulator pump (optional)
• Secondary water high limit (optional)
Literature included
:
• Boiler Instruction Manual
• Users Information Manual
• Replacement Parts List
• Lifetime Limited Warranty
V
enting kit options available:
• Horizontal venting with vent terminal
• Vertical venting with roof termination
• Horizontal venting with separate vent and air intake
• Chimney or “B” vent venting
Boiler Package/Options
 Loading...