

Page 1

Slacker G2
User Guide
Version 1.0
September 16, 2008
Page 2
2
Table of Contents
Part I
Part II
Part III
Introduction
Using the Slacker G2
................................................................................................................................... 51 System Requirements
................................................................................................................................... 62 Slacker G2 Features
................................................................................................................................... 73 Powering the Slacker G2
................................................................................................................................... 74 Low Battery
................................................................................................................................... 85 Charging the Slacker G2
................................................................................................................................... 86 Using the Scroll Wheel
Getting Started
................................................................................................................................... 101 Overview
................................................................................................................................... 102 Activate Slacker Personal Radio Player
................................................................................................................................... 113 Install the Slacker USB Station Refresher
................................................................................................................................... 124 Refresh the Slacker Personal Radio Player
.......................................................................................................................................................... 12Refresh Overview
.......................................................................................................................................................... 12Connect via Wi-Fi
.......................................................................................................................................................... 13Enter a Network Key
.......................................................................................................................................................... 14Connect via USB
................................................................................................................................... 155 Add Slacker Radio Stations
................................................................................................................................... 156 Remove Slacker Radio Stations
................................................................................................................................... 167 Reorder Slacker Radio Stations
................................................................................................................................... 168 Subscribe to Slacker Premium Radio
4
5
10
Part IV
Part V
Part VI
Navigating the Slacker G2
................................................................................................................................... 181 Overview
................................................................................................................................... 182 Now Playing
................................................................................................................................... 193 MENU
................................................................................................................................... 204 Status (Top Row Icons)
Stations
................................................................................................................................... 211 Station Overview
................................................................................................................................... 212 Playing a Station
................................................................................................................................... 223 Favorite & Ban Songs
Library
................................................................................................................................... 241 Library Overview
18
21
24
© 2008 Slacker, Inc.
Page 3
................................................................................................................................... 242 Add Songs & Playlists
................................................................................................................................... 253 Navigate the Library
................................................................................................................................... 264 Remove Songs from the Library
................................................................................................................................... 265 Play a Folder
................................................................................................................................... 266 Shuffle Play Library
................................................................................................................................... 277 Select Specific Songs
................................................................................................................................... 278 View Songs in Current Playlist
................................................................................................................................... 279 Repeat Songs in Current Playlist
................................................................................................................................... 2810 Change Library View
3Contents
Part VII
Part VIII
Part IX
Part X
Playlists
................................................................................................................................... 291 Playlists Overview
................................................................................................................................... 292 Create a Playlist
................................................................................................................................... 303 Play a Playlist
................................................................................................................................... 304 Remove a Playlist
................................................................................................................................... 305 Shuffle a Playlist
................................................................................................................................... 316 Edit a Playlist
................................................................................................................................... 317 Clear a Playlist
Settings
................................................................................................................................... 321 Feature Settings
................................................................................................................................... 342 Reset Settings
................................................................................................................................... 343 About
Slacker Support
Troubleshooting the Slacker G2
29
32
35
36
Index 38
© 2008 Slacker, Inc.
3
Page 4
4
1 Introduction
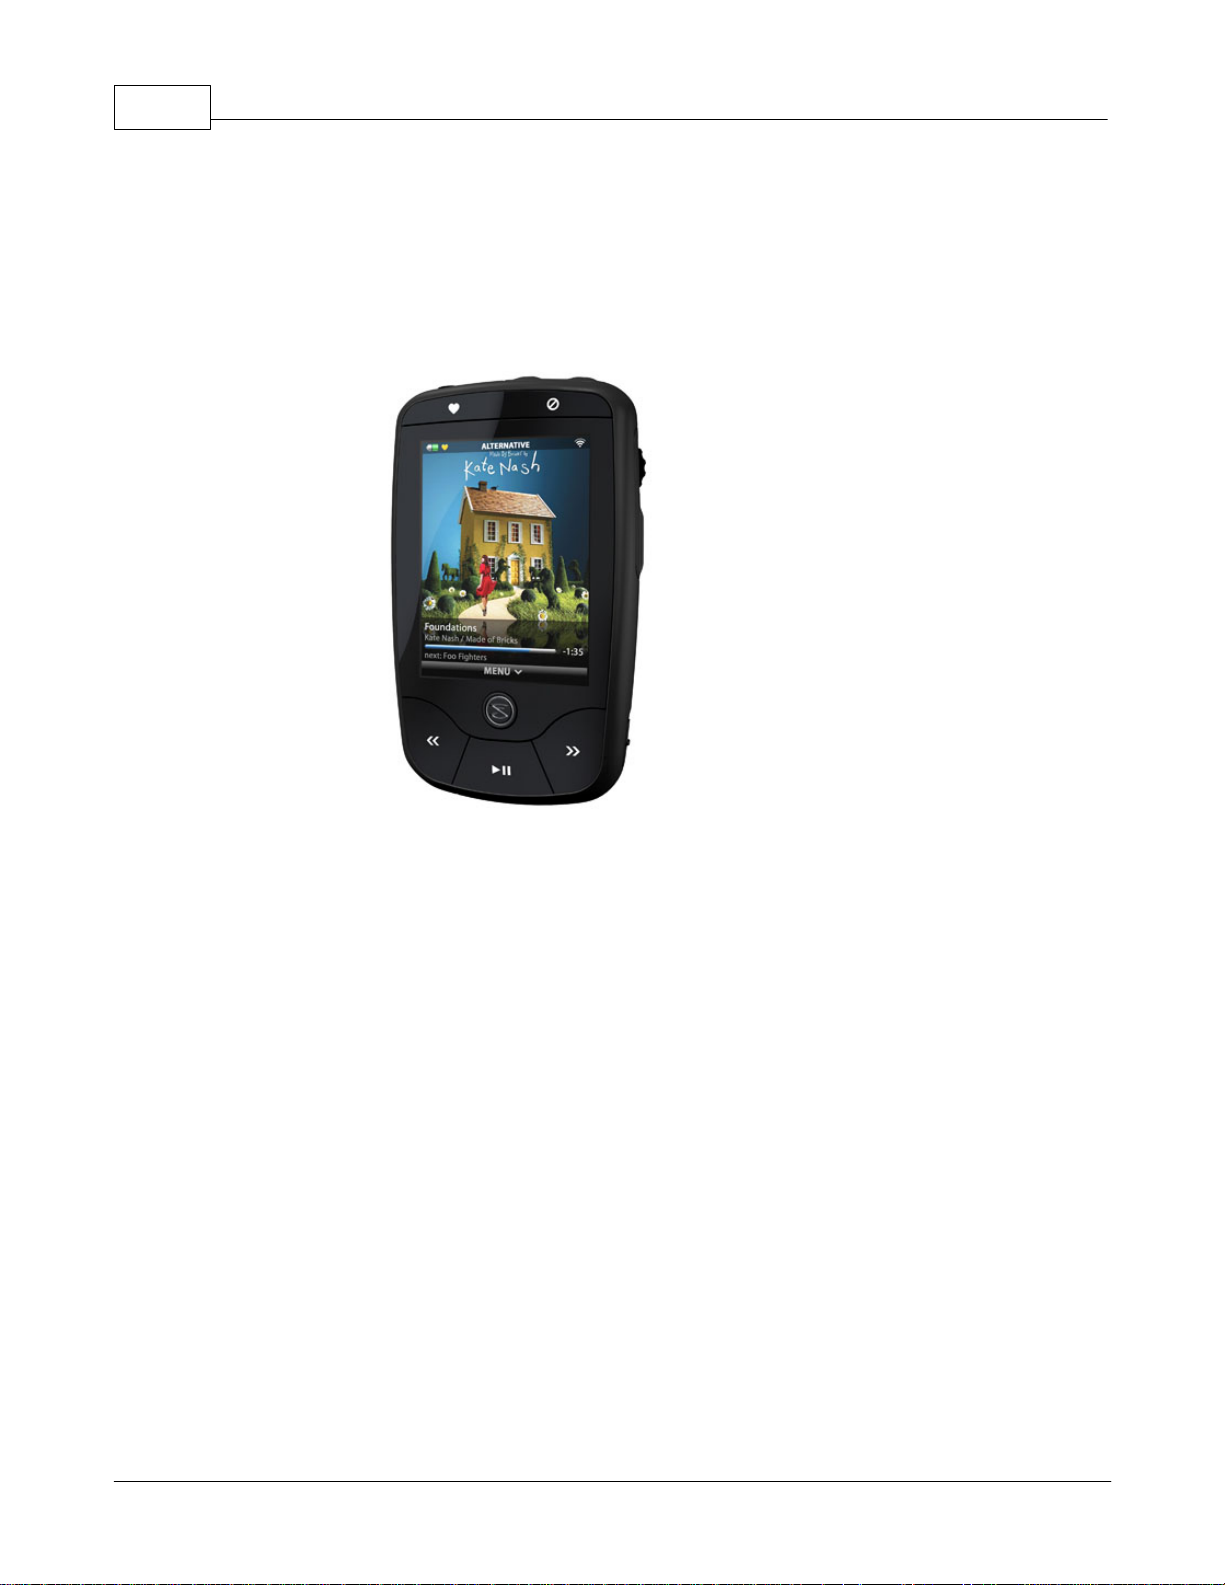
The Slacker G2 Personal Radio Player is the revolutionary way to take your Slacker Radio stations
with you wherever you go. Built-in Wi-Fi automatically refreshes your personalized Slacker stations
and the music plays whether you are connected or not. You also can play your personal music
collection and custom playlists. Plus, the large 2.5” screen displays album art, artist information, and
album reviews in vivid color.
The Slacker G2 comes with the following:
· Slacker G2 Personal Radio Player
· Earphones
· USB cable
· Power adapter
· Carrying case
© 2008 Slacker, Inc.
Page 5
2 Using the Slacker G2
2.1 System Requirements
You do not need additional hardware or software to play Slacker Radio stations on the Slacker G2.
However, you will need a computer with access to an Internet connection in order to access the
Slacker Web Player, which enables you to set up and manage the Slacker Radio stations on your
Slacker G2.
For the best Slacker Web Player experience, we recommend using a high speed connection and one
of the following configurations:
Windows XP + SP2 Operating system
· Internet Explorer 6.0 (Windows Media Player 9.0 or higher)
· Internet Explorer 7.0 (Windows Media Player 9.0 or higher)
· Firefox 1.5 or 2.0 (Flash Player 8.0 or higher)
Introduction 5
Windows Vista Operating system
· Internet Explorer 7.0 (Windows Media Player 9.0 or higher)
· Firefox 1.5 or 2.0 (Flash Player 8.0 or higher)
Apple Mac OSX
· Safari 2.0 (Flash Player 8.0 or higher)
· Firefox 1.5 or 2.0 (Flash Player 8.0 or higher)
And when you refresh the stations on your Slacker G2, you will need one of the following:
· Wi-Fi
NOTE: The Slacker G2 is compatible with Wi-Fi routers that use 802.11a, b, or g wireless
network protocols.
· USB port
NOTE: USB is supported only on computers running Windows XP SP2 or Vista. In addition,
USB is the only method that allows you to transfer personal content. Thus you cannot
transfer content on computers running Mac or Linux.
For the latest software updates please visit these sites:
Microsoft Internet Explorer
Mozilla Firefox
Adobe Flash Player
Windows Media Player
© 2008 Slacker, Inc.
Page 6
6
Apple Safari
2.2 Slacker G2 Features
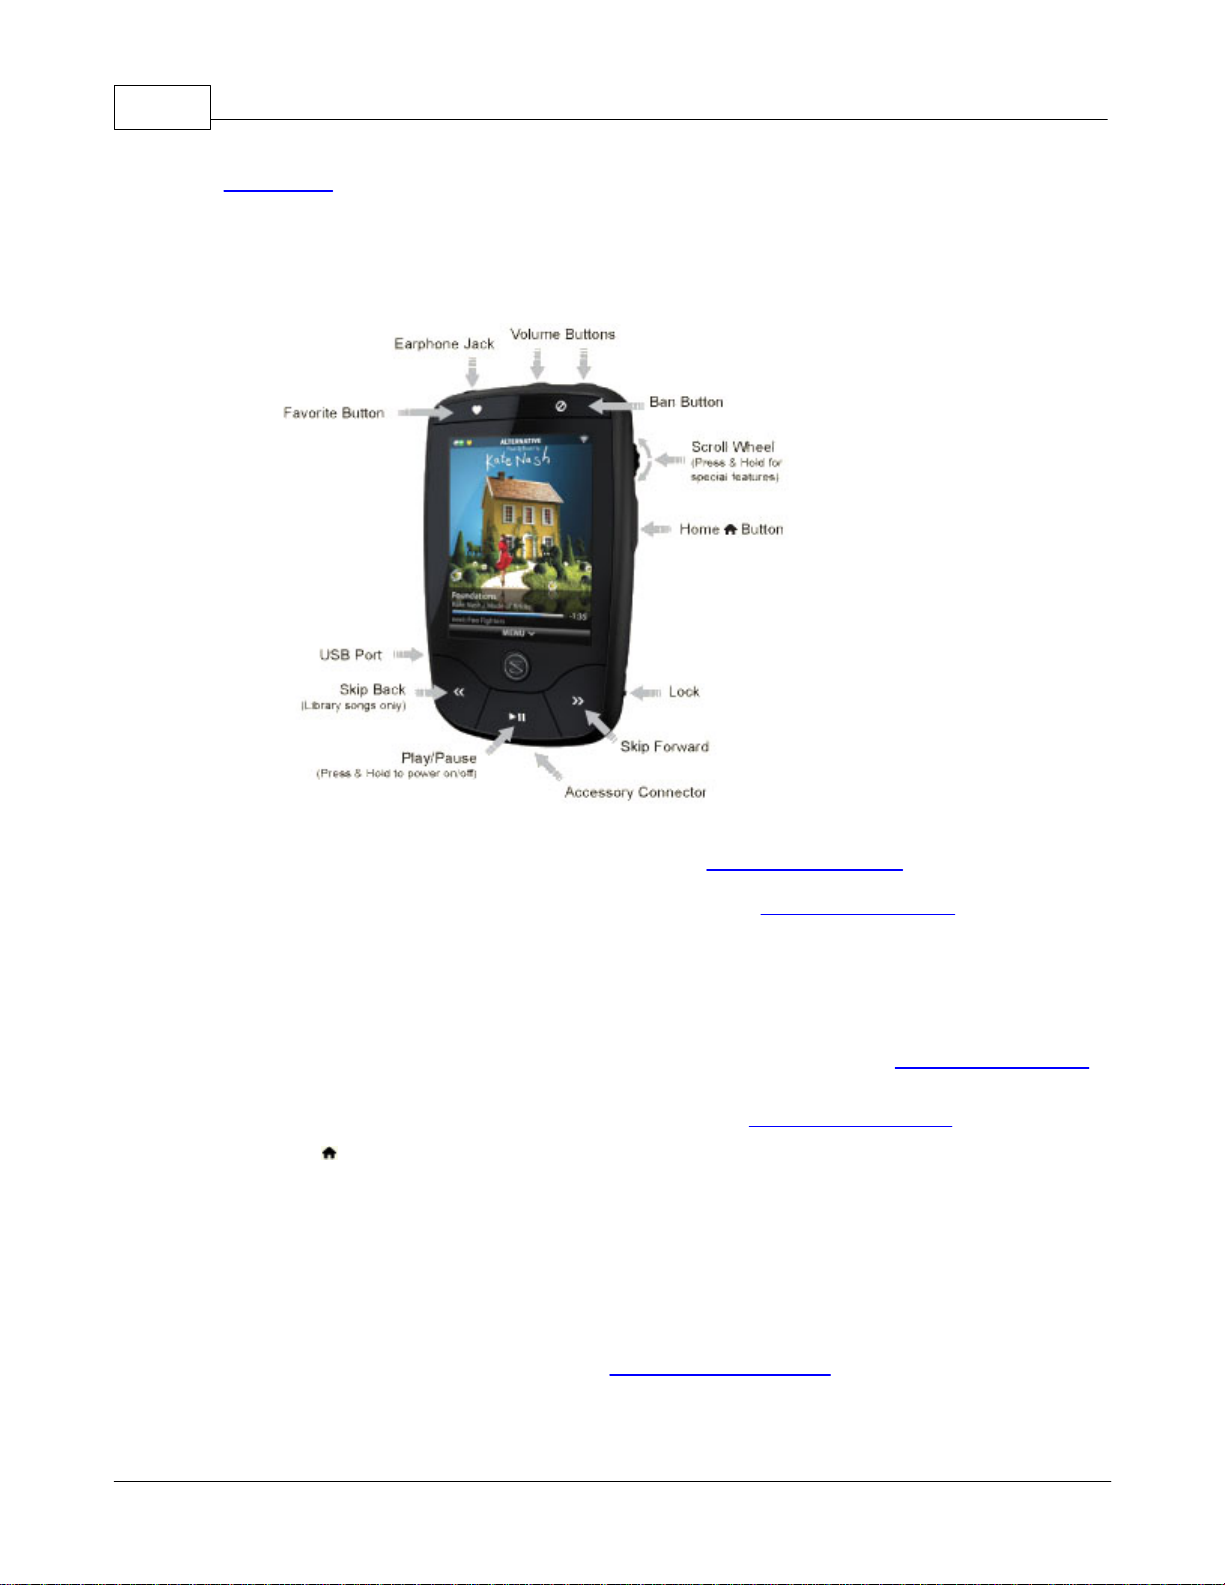
The Slacker G2 features a convenient scroll wheel and simple buttons.
· Favorite - Press the Favorite button to rate a Slacker Radio song as a “favorite.” Favorites will
be played more often on that station. If you have a Premium Subscription, your favorites are
saved to the Slacker G2’s Library and can be listened to anytime. Rating songs as Favorites
affects what will be played only on that station. See also, Favorite & Ban Songs.
· Earphone Jack - Plug your earphones into this jack. The jack accommodates a standard 1/8
th
inch headphone jack.
· Volume - Raise and lower the volume.
· Ban - Press the Ban button to ban a Slacker Radio song from being played again on that
station. You ban songs on a per-station basis, not all stations. See also, Favorite & Ban Songs.
· Scroll Wheel - The Scroll wheel is the primary control for navigating around the Slacker G2.
Click it to select a menu item. For more details, refer to Using the Scroll Wheel.
· Home - Press the Home button to take you back to the previous screen. Press & hold the
button to go to the MENU.
· Lock - Place all of the buttons in a Hold state by sliding the switch up and leaving it in that
position. Slide the switch down to unlock.
· Skip Forward - Skip to the next song.
· Accessory Connector - This is how you will connect the Slacker G2 to Slacker accessories.
· Play/Pause - Play and pause the currently playing song. Press & hold this button for 5 seconds
to power on or off the Slacker G2. See Powering the Slacker G2 for more details.
· Skip Back - Skip to the previous song. (Library and Playlists only)
© 2008 Slacker, Inc.
Page 7
· USB Port - Plug one end of the USB cable into this port and the other end into your computer.
The connection allows you to update radio station content if you have an Internet connection.
Also, it enables you to transfer your personal music collection to your Slacker G2. This port also
allows you to charge the player with the Power Adapter.
2.3 Powering the Slacker G2
To power your Slacker G2 , do the following:
· ON: Press & hold the Play button for a second.
· OFF: Press & hold the Play button for 5 seconds.
The Slacker G2 will power down automatically after 2 minutes if it is not playing any music AND you
are not interacting with it.
If the Slacker G2 is playing music but you are not interacting with it, the player will shut off the screen
in order to conserve the battery. If this happens and you want to view the screen, you can press the
Home button or move the scroll wheel to turn on the screen again.
Using the Slacker G2 7
NOTE: Use the Backlight Time setting to determine how long the screen remains lighted when you
are not interacting with it.
See Also:
Low Battery
2.4 Low Battery
When the battery runs low, the Slacker G2 will display a warning message. You can click the scroll
wheel to dismiss the message and the player will continue running. If you ignore the message, then
the Slacker G2 will power off.
The Slacker G2 provides up to three warning messages. Once the third message is displayed, you
can click OK, but the player will be able to run only for another minute or two. You must charge the
battery. If you ignore the third message, then later when you charge the Slacker G2, the player will go
through the restart process, which can take up to 30 seconds.
IMPORTANT: If you let the battery run out completely and then plug the Slacker G2 in to charge,
the screen may be blank for a few minutes. However, the screen will turn on and the player will
go through the restart process.
© 2008 Slacker, Inc.
Page 8
8
2.5 Charging the Slacker G2
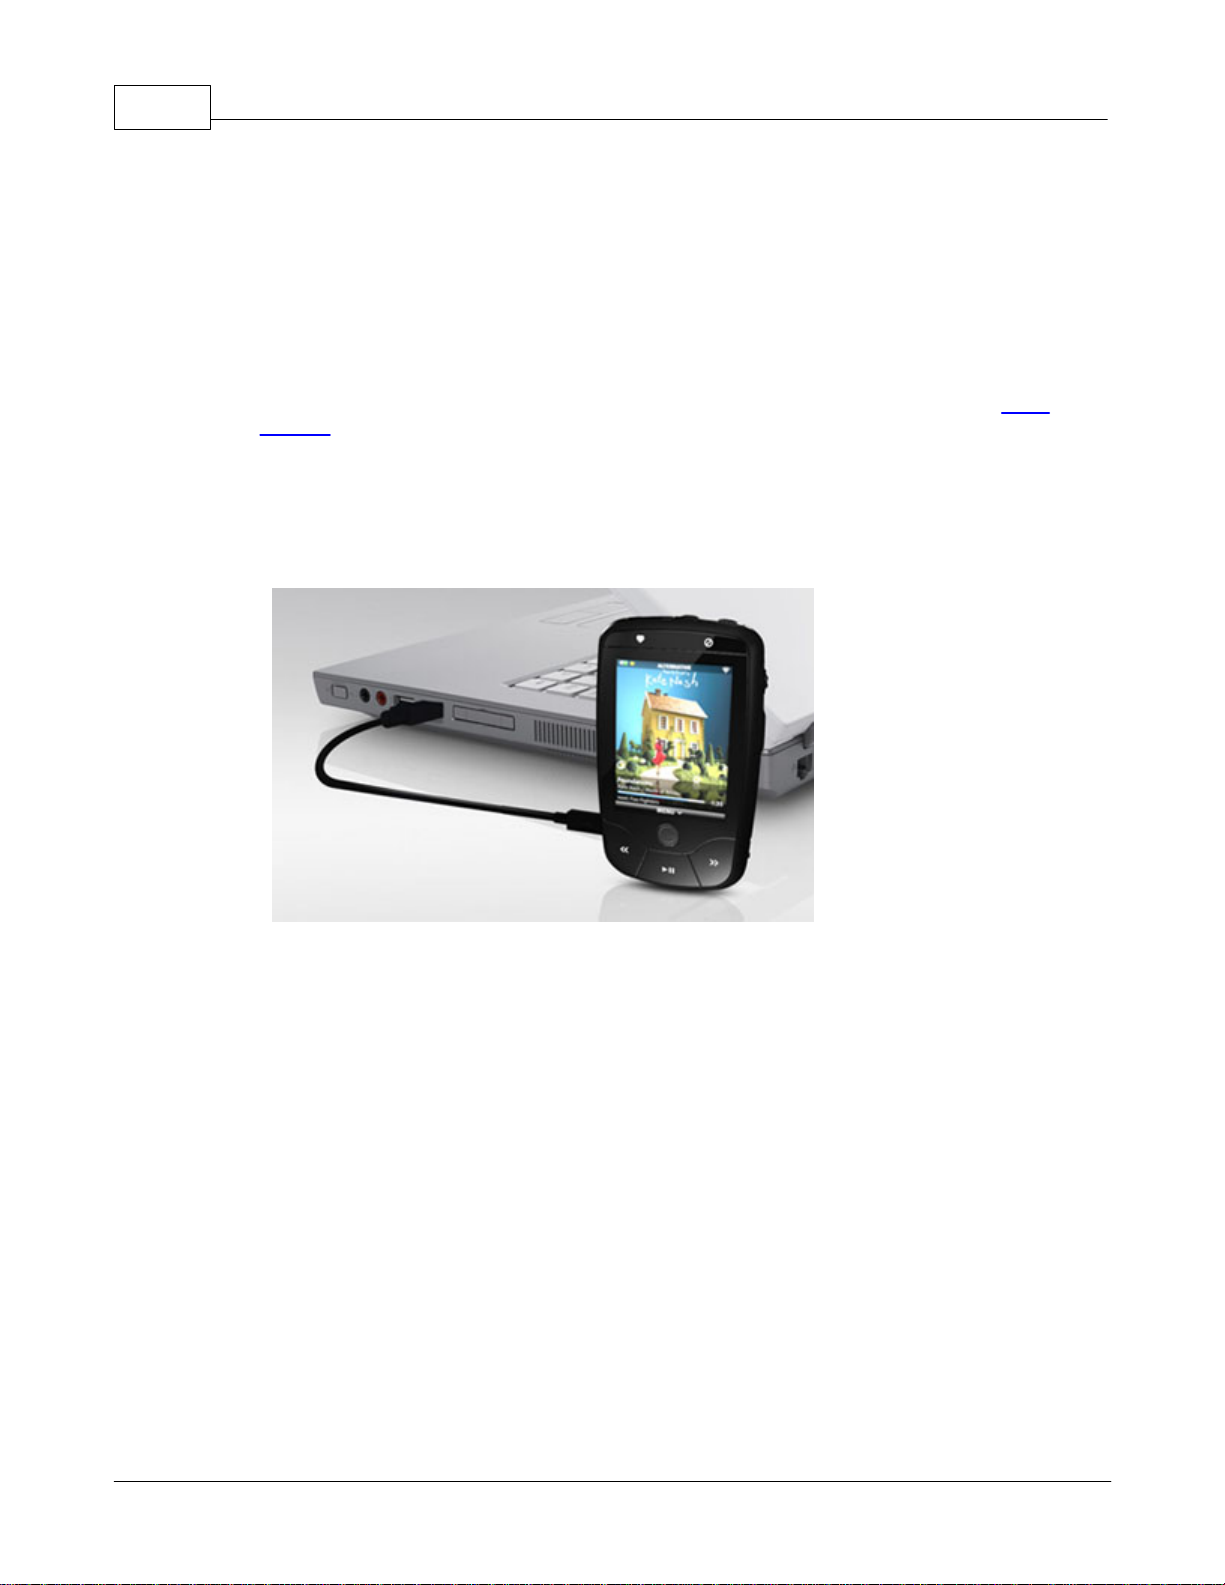
You can charge the Slacker G2 two ways. The USB cable and Power Adapter are packaged with the
Slacker G2.
NOTE: While you are charging the Slacker G2, you cannot power it off.
· Plug the USB cable into the Slacker G2 and into the Power Adapter. Plug the Power Adapter
into an AC outlet. You will be able to play music while the player is charging. When you plug in
the player to an AC outlet, the player automatically attempts refresh its content via a Wi-Fi
network.
· Plug the USB cable into the Slacker G2 and your computer. When you connect your Slacker
G2, it will display a status screen. You will not be able to play music while on this screen. To
return to normal operation, simply unplug your Slacker G2.
2.6 Using the Scroll Wheel
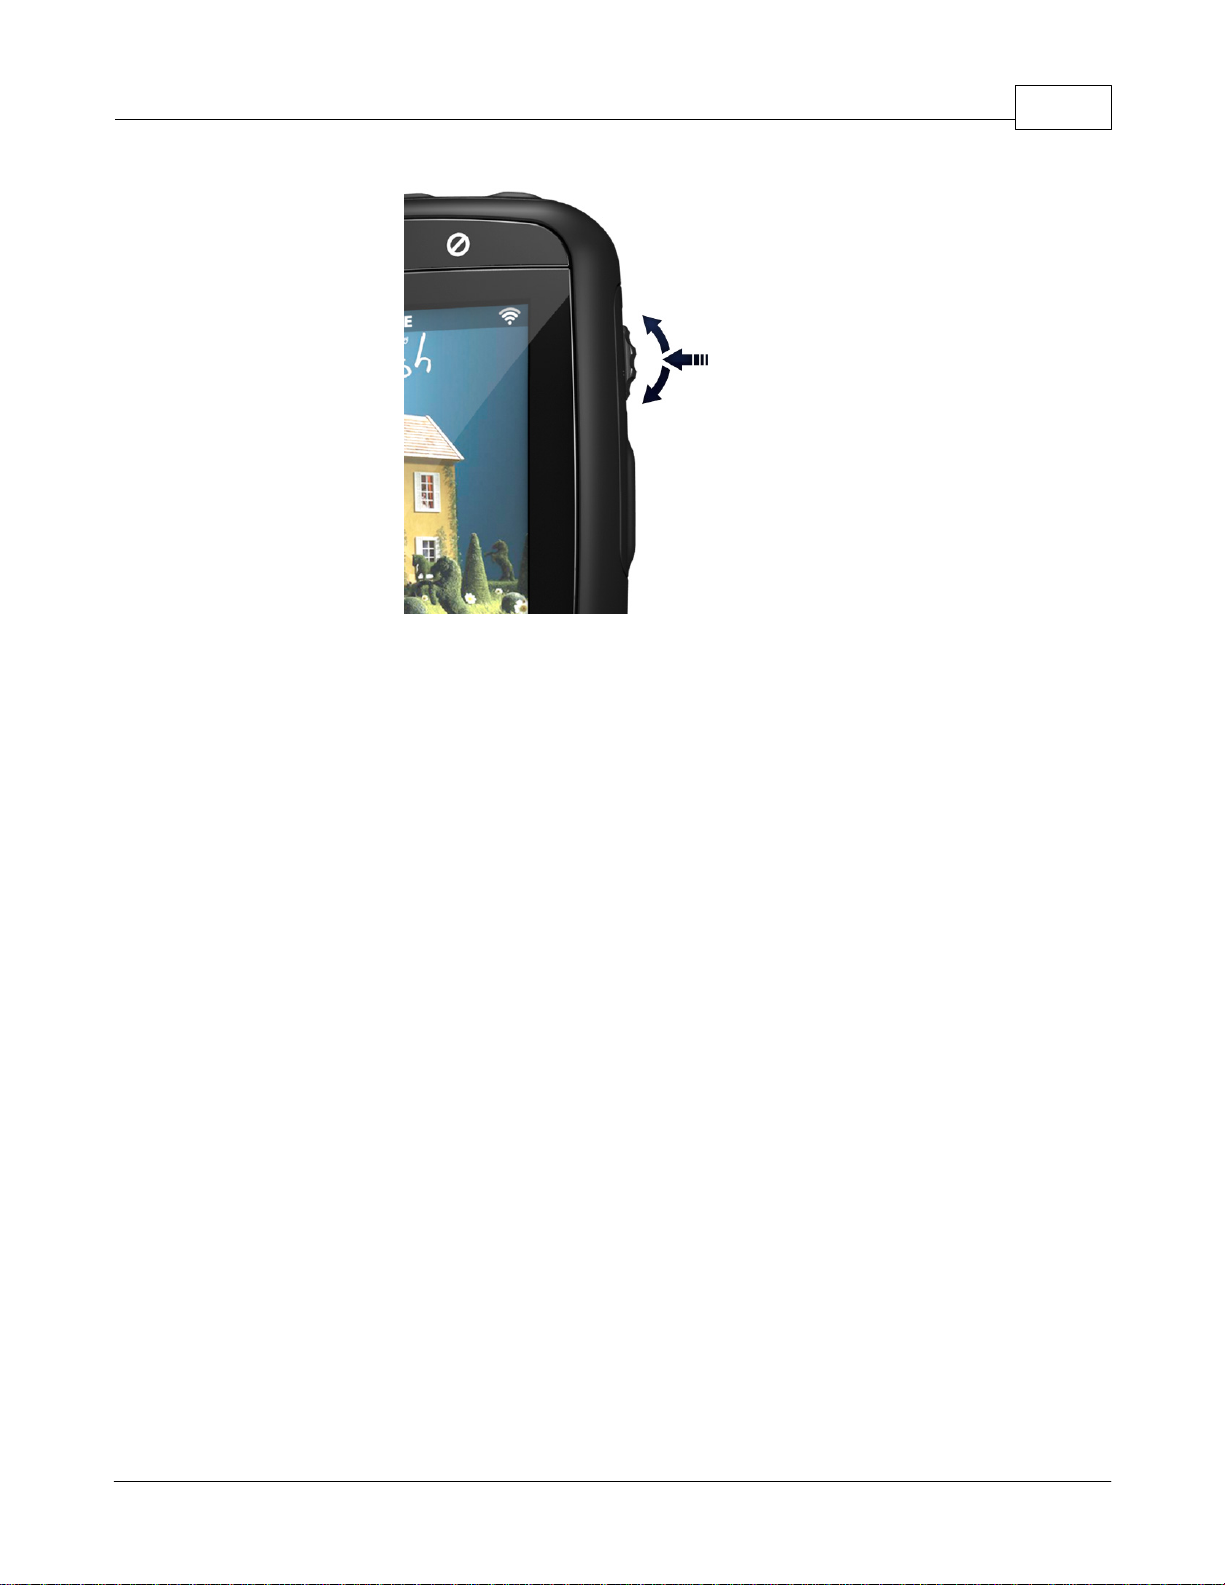
The scroll wheel is your primary method of interaction with the Slacker G2. It enables you to scroll to
areas on the screen and select the items. There are four actions:
· Scroll: Use your thumb to rotate the wheel up or down. As you do, the selection bar on the
screen moves with the scrolling. Use this to navigate to the desired item on the screen such as
a button or a song.
· Click (or Single-Click): This is a quick press & release. Use this to select items on the screen.
· Double Click: Quickly press & release the scroll wheel twice. Use this to add songs from your
Library into the Current Playlist.
· Press & Hold: Press down the scroll wheel, but do not release it until the Slacker G2 displays
a menu. The menu is a “contextual options” menu, similar to a right-click menu on many
computer software applications.
© 2008 Slacker, Inc.
Page 9
Using the Slacker G2 9
© 2008 Slacker, Inc.
Page 10

10
3 Getting Started
3.1 Overview
Your Slacker G2 comes loaded with great Slacker Radio stations. You can listen to these stations
without taking any other steps. But you will need to refresh your stations after 30 days to renew music
licenses. And you will need to refresh if you want to add new stations to your Slacker G2. When you
refresh your stations, the Slacker Radio service downloads new content onto your player.
To get started, go through a simple set-up tutorial:
www.slacker.com/start
This tutorial will walk you through the basic steps:
· Activating your Slacker G2.
· Selecting the stations you want on your Slacker G2.
· Installing the Slacker USB Station Refresher.
· Connecting to the Slacker service by Wi-Fi or USB to refresh the stations on your Slacker G2.
You only need to activate your Slacker G2 one time. But you will select and refresh stations multiple
times. The instructions for all of the steps in the tutorial are presented below in the order you perform
them during the tutorial.
NOTE: The tutorial will cover all of the tasks. But you may wish to refer to these sections during the
tutorial for additional detail. Or you may wish to refer to them in the future if you repeat any
of these tasks.
3.2 Activate Slacker Personal Radio Player
Each Slacker Personal Radio Player has a unique ID, called the Slacker Portable ID. You must have a
Slacker Account and enter this ID into your Slacker Account in order to activate your player. Once
your player is activated, the Slacker Radio service will know where to send your Slacker Radio
stations.
NOTE: If you already have a Slacker Personal Radio Player, you will need to create a new account
for this player. Or you can use your current account for this player and create a new account
for your original Slacker player.
You activate your Slacker Personal Radio Player in Account Management. To activate your Slacker
player, do the following:
Sign in to the Slacker Web Player.
1.
Go to the menu Options > Account > Manage Account.
2.
© 2008 Slacker, Inc.
Page 11
Sign in to the Account Management section. (This is for extra security.)
3.
NOTE: If you just have signed in to the Web Player, then you may not be asked to sign in to
Account Management.
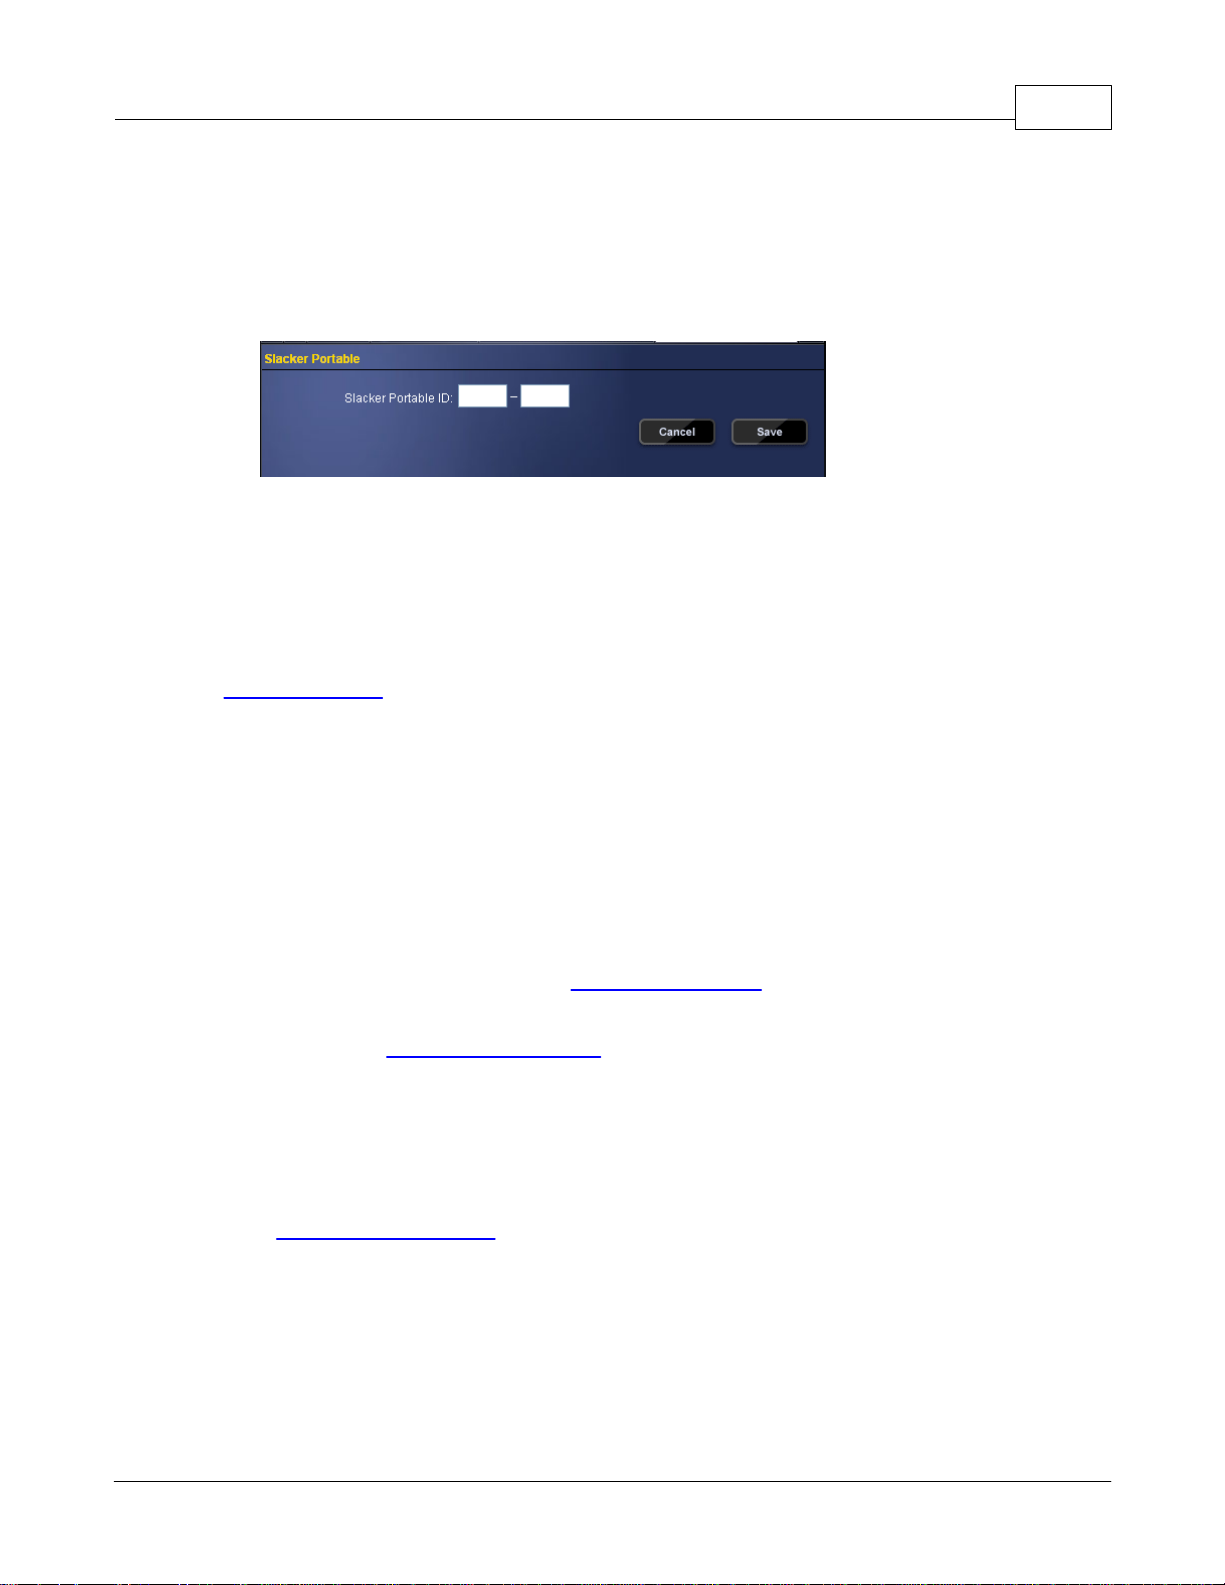
In the section called Slacker Portable, click Edit.
4.
Enter the Slacker Portable ID and then click Save.
5.
NOTE: To find the Slacker Portable ID, navigate to Settings > About.
You may now refresh your Slacker G2 via a USB or a Wi-Fi connection.
See Also:
Getting Started 11
Refresh Overview
3.3 Install the Slacker USB Station Refresher
If you want to transfer your personal music collection from a computer to the Slacker G2, you will need
to download and install the Slacker USB Station Refresher on that computer.
NOTE: If you only plan to refresh via Wi-Fi, then you can skip this step.
You are prompted to download during the Slacker online tutorial. However, you also can download the
application as follows:
Download the USB Station Refresher. A message box is displayed.
1.
Click the Save File button. The file is saved to your computer.
2.
Double-click the file to start it. An Install wizard starts.
3.
Follow the on-screen instructions until the installation is complete.
4.
Then to transfer the files from your computer to the Slacker G2, you will use Windows Media Player.
Refer to Add Songs to the Library for details.
© 2008 Slacker, Inc.
Page 12

12
3.4 Refresh the Slacker Personal Radio Player
3.4.1 Refresh Overview
Refreshing is the process by which the Slacker G2 connects to the Slacker Radio service to update
the music, add new stations or remove stations. The Slacker G2 connects to the extensive Slacker
music library over Wi-Fi when in wireless range, or over USB when attached to an Internet connected
PC.
NOTE: You cannot refresh your Slacker G2 until you activate it.
Instead of live streaming of songs, the Slacker G2 quickly fills itself up with personally selected music
each time you connect. Depending upon the capacity, a player can hold up to 4,000 CD quality songs
that are continuously refreshed to match your tastes and the radio stations you play. This means you
don’t need a continuous connection to play Slacker Radio on your Slacker G2.
The Slacker G2 starts this process automatically when you plug it into an AC Outlet. In addition, you
can start the refresh process manually. In order to start the refresh process, you connect to the
Slacker Radio service one of two ways:
· Wi-Fi
· USB
See Also:
Activate Slacker Personal Radio Player
3.4.2 Connect via Wi-Fi
You can connect to almost any Wi-Fi network. The Slacker G2 is compatible with Wi-Fi routers that
use 802.11a, b, or g wireless network protocols. Slacker will work with many Wi-Fi connections, even
those that require a WEP or WPA security code. However, some Wi-Fi networks require you to enter
additional information or check boxes prior to use. The Slacker G2 may not be able to access these
types of networks.
If you do not have a Wi-Fi network at home, you can connect at many other locations:
· Any location that has an open Wi-Fi network, such as friends’ homes, the office, or a coffee
shop.
· Any secure Wi-Fi network for which you have the network key.
· Any Wi-Fi hotspot that is supported by Devicescape.
Connect via a Wi-Fi network
From the MENU, scroll to Connect and click the scroll wheel.
1.
The Slacker G2 will search for an available Wi-Fi network. If it can connect, it will, and then will
2.
sign in to your Slacker Account and begin the refresh process.
NOTE 1: If the Slacker G2 cannot connect, it will display a list of networks that it found. Scroll
© 2008 Slacker, Inc.
Page 13
Getting Started 13
to one of the networks and click the scroll wheel. The player will repeat the connection
process.
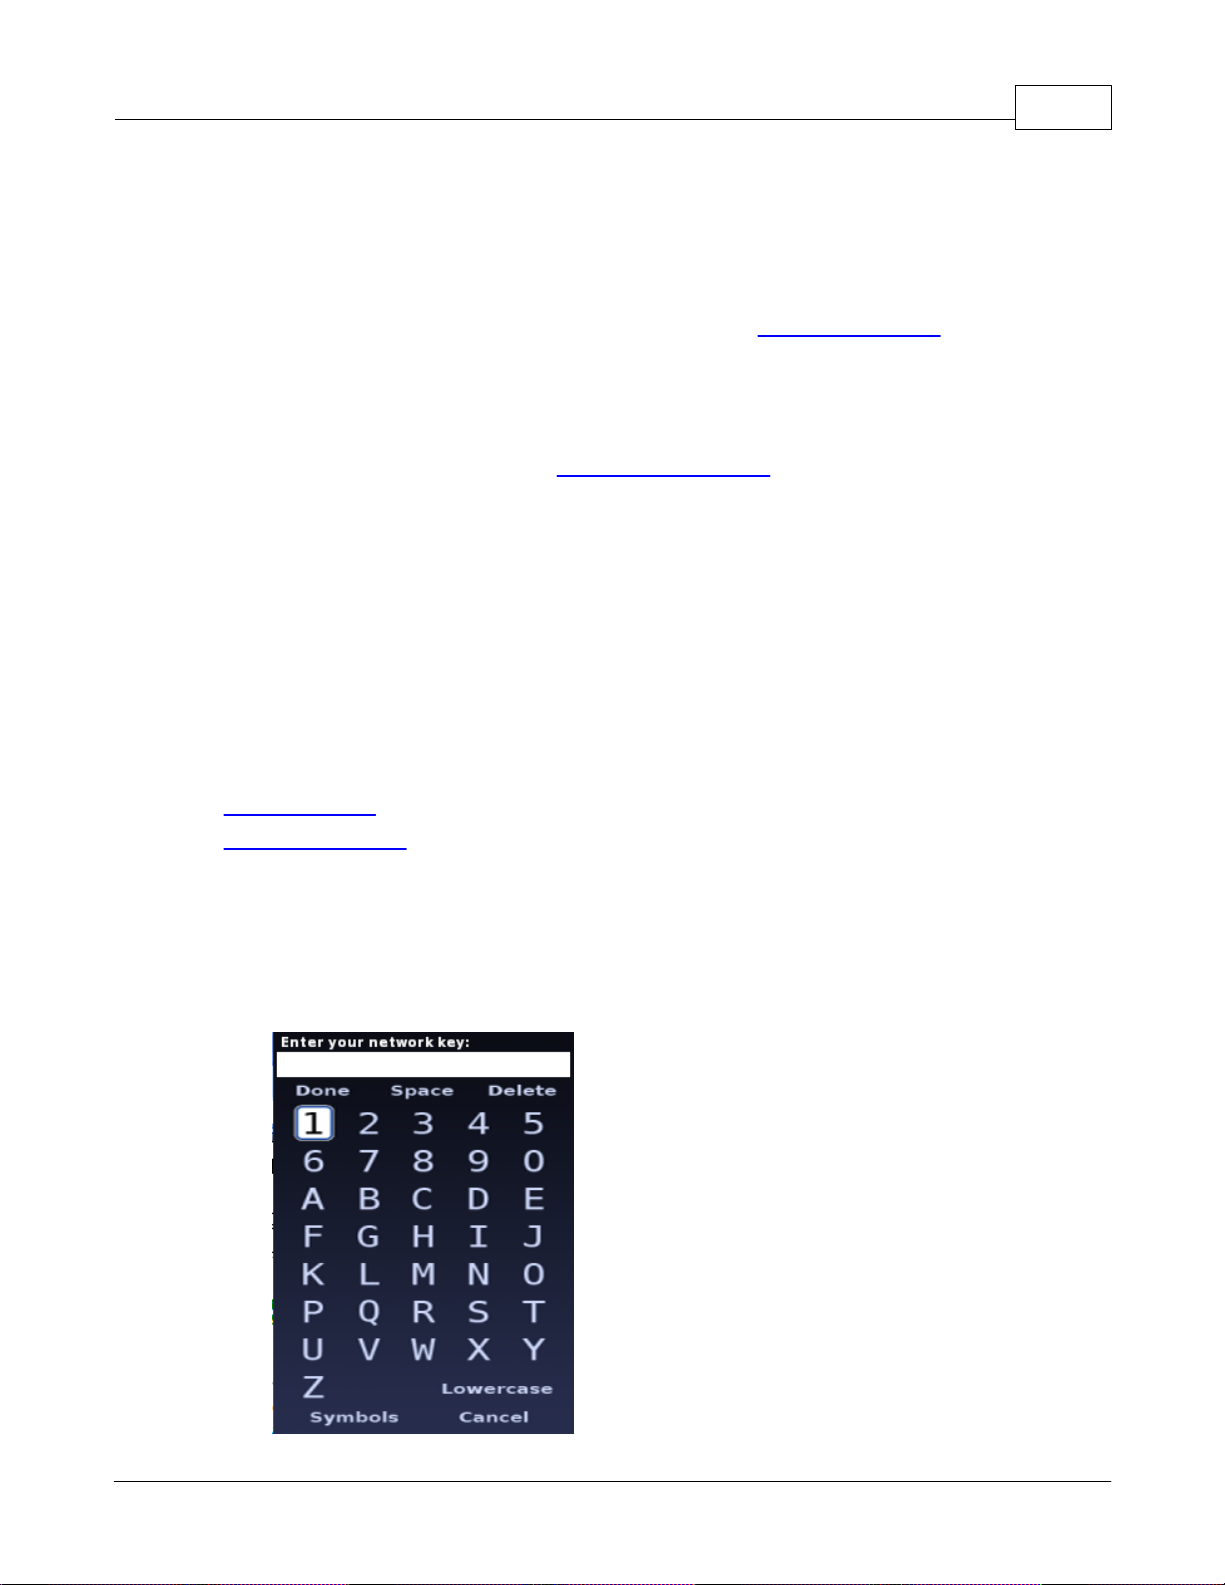
NOTE 2: If the network requires a WEP or WPA key, the Slacker G2 will display a screen
where you enter the key. Once you enter the key, the Slacker G2 will attempt to connect
to the network. If the Slacker G2 successfully connects to the network, the player will
save the key so you do not have to enter the key the next time you connect to that
network. For details on entering the key, refer to Enter a Network Key.
A progress bar provides a visual guide to the time remaining until the refresh is complete.
3.
Refreshing content can take from a few minutes to several hours depending on the amount of
content that needs to be added. After the stations are refreshed, the Slacker service will
download any saved Slacker Radio songs that you transferred from the Web Player. To transfer
saved Slacker songs, refer to the Web Player Online Help.
NOTE: During the refresh process, you can press the Home button to return to the MENU and
use the Slacker G2. Pressing the Home button will not stop the refresh process.
When the refresh is complete, the screen will display a “Refresh Complete” message. Scroll to
4.
Home and click the scroll wheel. The Slacker G2 will display the MENU.
Cancel a refresh
You can cancel a refresh mid-way through the refresh. From the Connect screen, click the scroll
wheel. This selects the one menu option at the bottom of the screen, Cancel.
See Also:
Connect via USB
Enter a Network Key
3.4.3 Enter a Network Key
WEP and WPA network keys are security PIN codes found on many personal and business networks.
See your network administrator or booklet for information on where to find your network key. If you
need to enter a key, you will be prompted to do so when you select the network. You will be presented
with a text-entry window.
© 2008 Slacker, Inc.
Page 14

14
Using the scroll wheel, do the following:
Scroll to the first number or letter you need and click the scroll wheel once. Repeat this step
1.
for each character in the key.
NOTE: If you need to enter a lowercase letter, first scroll to the bottom of the screen and click
Lowercase. The screen then will display all of the characters in a lowercase format.
The screen displays Uppercase at the bottom so you can return to uppercase letters. If
you need to enter any symbols, scroll to the bottom of the screen and click Symbols.
NOTE: If you want to delete a character you entered, scroll to Delete and click the scroll wheel.
When you have completed the network key, scroll to Done, and click the scroll wheel. The
2.
Slacker G2 now will attempt to access the network.
3.4.4 Connect via USB
Your Slacker G2 comes with a USB cable. You attach your Slacker G2 to your computer using this
cable. In addition to refreshing your stations, USB is the only method that enables you to transfer your
personal music collection from your computer to the player. Finally, the computer charges your
Slacker G2 while connected.
NOTE: This method works with PC computers that have the Slacker USB Station Refresher
installed and running. You only can install this software on PCs running Windows XP or
Vista. If you have an Apple Macintosh or Linux-based PC, you cannot transfer local music
and you must connect via a Wi-Fi network.
Connect via USB
Plug the supplied USB cable into your PC and the other end into the Slacker G2.
1.
NOTE: While connected to your PC, your Slacker G2 will go into a “connected state.” You will
not be able to listen to music or access any player's features until you unplug your
player.
The Slacker G2 will display a screen to show that it is connecting to the Internet and signing in
2.
to Slacker. Once signed in, the Slacker Radio station refresh process begins.
NOTE: A progress bar provides a visual guide to the time remaining until the refresh is
complete. Refreshing content can take from a few moments to several hours depending
on the amount of content that needs to be downloaded. Your first Refresh and adding
multiple stations often takes the longest. If you have saved any Slacker Radio songs,
the Slacker service will download those songs after refreshing the stations.
When the refresh is complete, the screen will display a “Station Refreshed” message. Unplug
3.
your Slacker G2. The player will display the MENU so you can play your stations.
NOTE: If you want to add music to your Slacker G2, do not unplug the player from the
computer in Step 3. Instead, refer to Add Songs to the Library.
See Also:
Connect via Wi-Fi
Install the Slacker USB Station Refresher
© 2008 Slacker, Inc.
Page 15
3.5 Add Slacker Radio Stations
You can add any Slacker Radio station to your Slacker G2, including genre, artist, and custom
stations. You add stations from the Slacker Web Player with the Portable Manager tool. You cannot
add them from the Slacker G2. The number of stations you can add depends upon your player's
capacity.
NOTE: For more details on the Portable Manager tool, refer to the Web Player's Online Help.
Stations Listed in the Station Tree
In the left column, click the Portable button to navigate to the Portable Manager.
1.
Click the Transfer Radio Stations tab.
2.
NOTE: On the left is the station tree with a complete list of Slacker genre stations, your custom
stations, your recently played stations, and your favorite stations. On the right is a list of
stations on your Slacker G2.
Next to each station on the left is an Add button. Click the Add button. The station will appear
3.
on the right. You may add as many stations as your Slacker G2 can hold.
Getting Started 15
Click Save. The Slacker Radio service will update your Slacker G2 the next time you refresh
4.
your player.
Stations NOT Listed in the Station Tree
In addition to the genre and custom stations, there are tens of thousands of artist stations. An artist
station will not appear in the station tree unless you recently played it or saved it as a favorite. To add
an artist station, do the following in the Web Player:
In the left column, click Stations. (If you are leaving the Portable Manager, make sure you
1.
have saved your changes.)
In the Search for Artist Stations field, type in the name of the desired artist and click GO.
2.
If there is an exact match, the artist’s station page is displayed. If not, a list possible matches is
3.
displayed. Click the desired artist from that list and the station page is displayed.
On the station page, click Send to Portable Player.
4.
NOTE: The Send to Portable Player button also is displayed on genre and custom station
pages.
3.6 Remove Slacker Radio Stations
You can remove Slacker Radio stations from the Portable Manager.
1.
2.
3.
© 2008 Slacker, Inc.
Sign in to the Slacker Web Player.
In the left column, click the Devices button to navigate to the Portable Manager.
Click the Transfer Radio Stations tab.
Page 16
16
In the right column, click the X button next to the station you want to remove.
4.
Click Save. The Slacker Radio service will update your Slacker G2 the next time you refresh
5.
your player.
3.7 Reorder Slacker Radio Stations
By default, your stations will be listed in alphabetical order. You can change the order so they appear
in any order you desire. You reorder stations from the Portable Manager tool in the Slacker Web
Player. You cannot reorder the stations from the Slacker G2.
Reorder Stations on Your Slacker G2
Sign in to the Slacker Web Player.
1.
In the left column, click the Portable button to navigate to the Portable Manager.
2.
Click the Transfer Radio Stations tab.
3.
The stations on your player are on the right. Move a station in one of two ways:
4.
· In the right column, click and hold on a station and then drag it to the desired spot.
Release the mouse button when done.
OR
· In the right column, right-click on a station. A menu is displayed. Select Move Up or
Move Down.
Click Save. The Slacker Radio service will update your Slacker G2 the next time you refresh
5.
your player.
3.8 Subscribe to Slacker Premium Radio
When you sign up for a Slacker account, you automatically get the Basic Radio subscription. With that
subscription level, you may listen to pre-programmed stations, create and save your own custom
stations, and skip through a total of 6 songs per station, per hour. Commercials that are relevant to
your interests will play occasionally while listening.
Slacker Premium Radio includes all the great features of Basic Radio, and you also can do the
following:
· Save radio songs to the Library to play on-demand
· Skip as many songs as you want
· Avoid ads - they'll never be played
· Request songs by your favorite artists
Sign up for Slacker Premium Radio
© 2008 Slacker, Inc.
Page 17
Getting Started 17
· Go to http://www.slacker.com/products/radio/premium/
Follow the instructions on the website to learn more about and sign up for Premium Radio. You
can try Premium Radio for free.
© 2008 Slacker, Inc.
Page 18
18
Now Playing
MENU
4 Navigating the Slacker G2
4.1 Overview
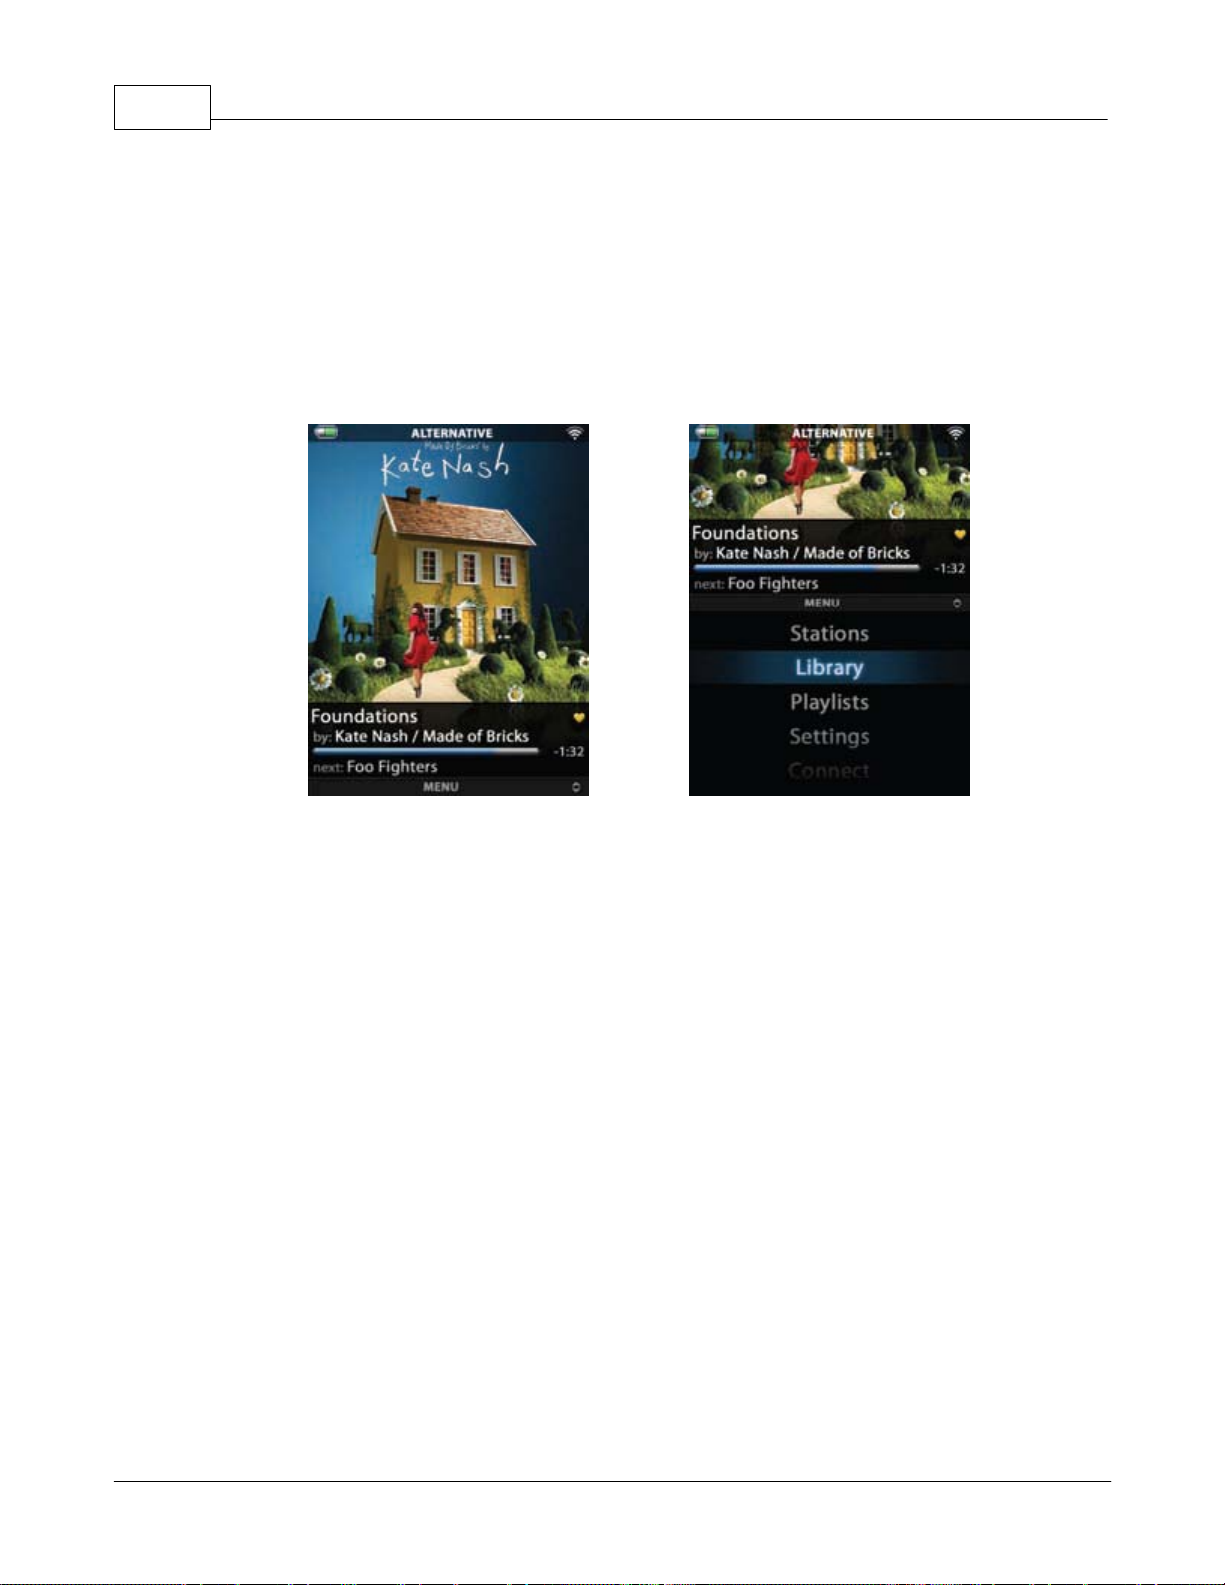
When you power on the Slacker G2, the player displays Now Playing information - album art and song
details. Now Playing is the top half of a long screen. At the bottom of the screen is a menu - MENU that enables you to access all of the Slacker G2 features. To navigate between Now Playing and
MENU simply turn the scroll wheel up and down.
4.2 Now Playing
Now Playing displays information about the currently playing Radio or Library song: album art,
upcoming artist, and basic song details: title, artist, and elapsed time. This is the same information
that you will find in the Now Playing views on the Slacker Web Player. From this screen, you can
access additional information:
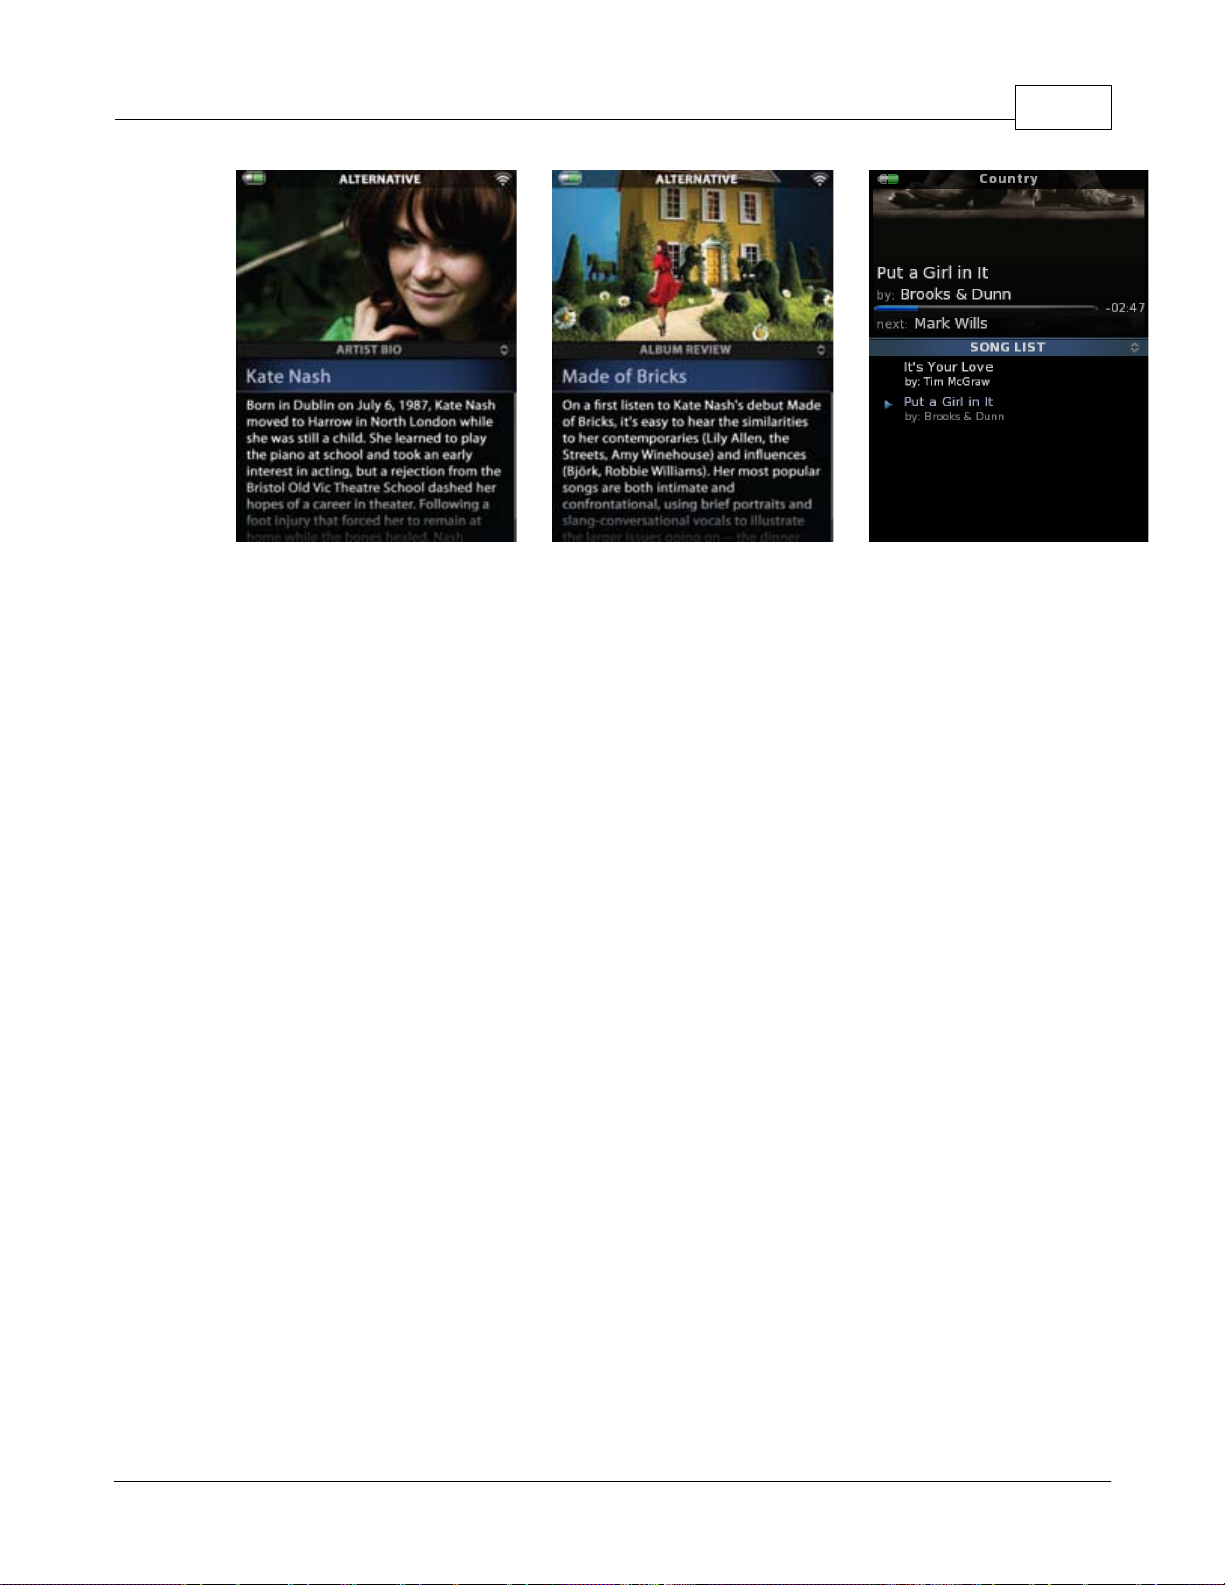
· Artist Biography: Scroll to the artist name and click scroll wheel. Displays a detailed
biography of the artist.
· Album Review: Scroll to album art and click scroll wheel. Displays an extensive review of the
album.
· Playlist: Scroll to the song title and click scroll wheel. Displays a list of the songs from the
currently playing station, playlist, or Library.
NOTE: When you are playing your personal music content, the Slacker G2 may not have Artist
Biography and Album Review information.
To exit from these three views, press the Home button. You return to the album art.
© 2008 Slacker, Inc.
Page 19
Artist Biography
Album Review
Song List
Access Now Playing
You can access Now Playing the following ways:
Navigating the Slacker G2 19
· From MENU, Stations, Library or Playlists, scroll up till the player displays Now Playing.
· From Settings & Connect, press & hold the Home button, and then scroll up till the player
displays Now Playing.
4.3 MENU
There are five items in the MENU:
· Stations
· Library
· Playlists
· Settings
· Connect
To select any of the items, use the scroll wheel to scroll to the desired item. When the item is
highlighted, click the scroll wheel once.
Access the MENU
You can access the MENU from any point in the Slacker G2 one of two ways:
© 2008 Slacker, Inc.
· Press the Home button to go back to the previous screen.
· Press & hold the Home button to return to the MENU in one step.
Page 20
20
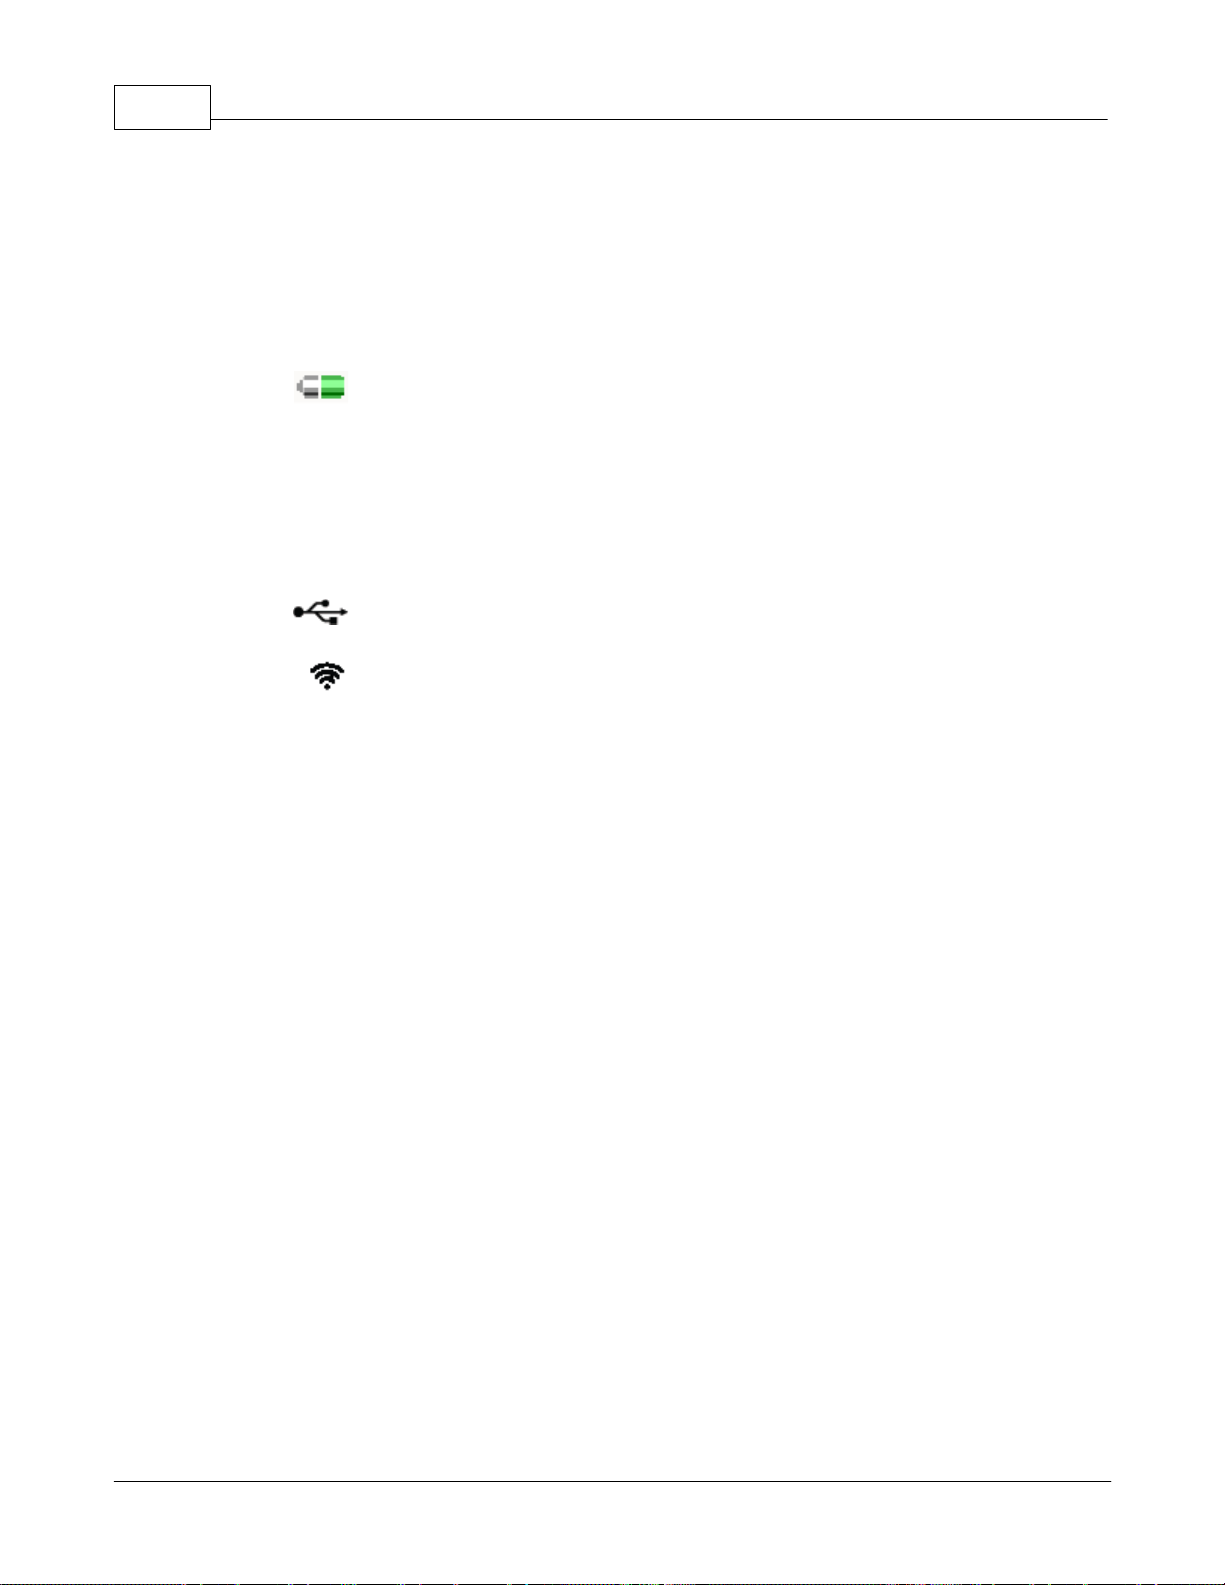
Battery icon: This icon always is displayed and shows the battery strength or AC
power.
Title: This can display one of three titles:
Name of the Slacker Radio station
Name of your saved playlist
“Current Playlist” if you are playing music from the Library
USB icon: This is displayed when the Slacker G2 is connected to a computer via
USB.
Wi-Fi icon: This is displayed when the Slacker G2 is connected to a Wi-Fi
network.
4.4 Status (Top Row Icons)
The top row of the screen shows you status information:
© 2008 Slacker, Inc.
Page 21
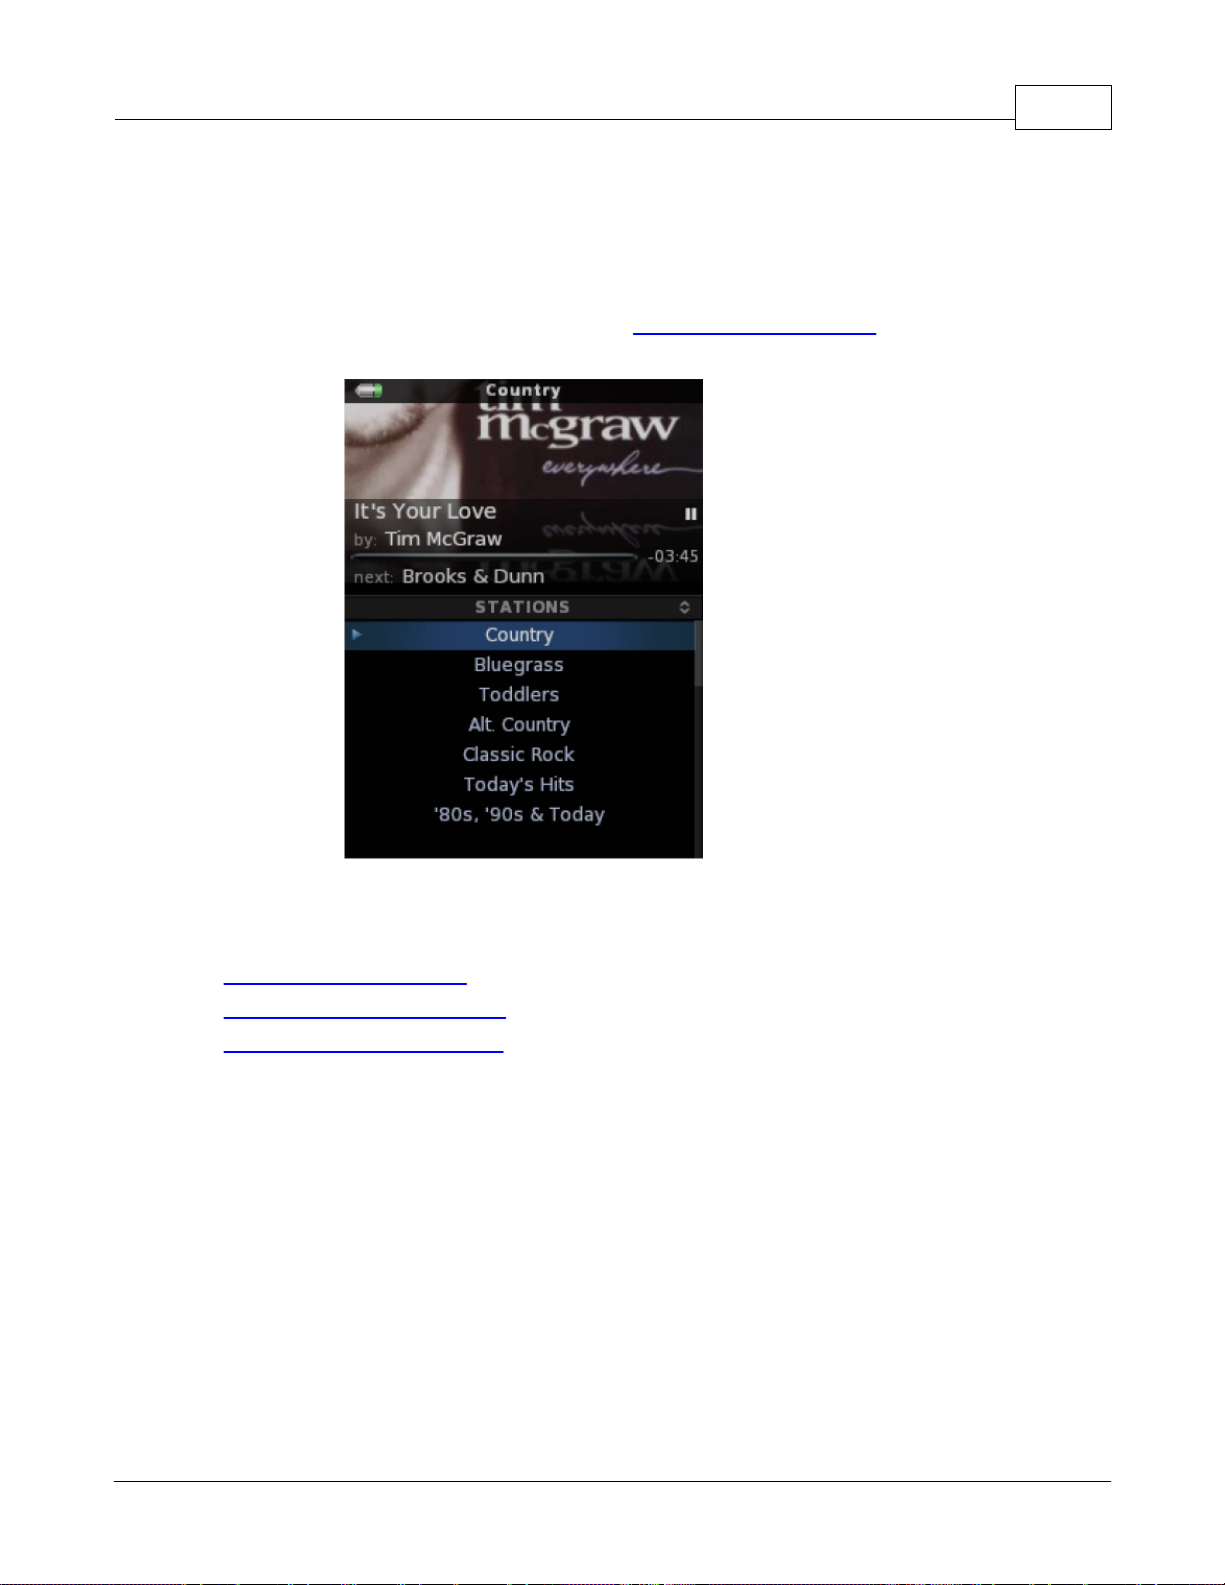
5 Stations
5.1 Station Overview
Your Slacker G2 comes pre-loaded with Slacker Radio stations. These are ready to play. To listen to
other stations not loaded on your player, refer to Add Slacker Radio Stations.
Navigating the Slacker G2 21
See Also:
Add Slacker Radio Stations
Remove Slacker Radio Stations
Reorder Slacker Radio Stations
5.2 Playing a Station
To play a Slacker Radio station, do the following:
· Scroll to the desired station and click the scroll wheel.
The station will begin to play.
· Pause: Stop the song at the point it is playing. When you un-pause it will begin playing where
you stopped. To pause a song, press the Pause button on the front of the player. To un-pause,
press the Pause button again.
© 2008 Slacker, Inc.
Page 22

22
· Skip Forward: Skip to the next song. If you are a Basic subscriber, you can skip up to 6 times
per station, per hour. If you are a Slacker Premium subscriber, you will have unlimited skips. To
skip a song, press the Skip button on the front of the Slacker G2.
NOTE: You cannot Skip Back when playing Slacker Radio Stations due to licensing
restrictions.
See Also:
Add Slacker Radio Stations
Remove Slacker Radio Stations
Reorder Slacker Radio Stations
5.3 Favorite & Ban Songs
It is extremely easy to customize any Slacker Radio station. You can rate a song as a favorite to tell
Slacker you want to hear it more often. You also can ban a song to remove it from that station.
NOTE: There are additional ways to customize your stations. You can use the Edit Station feature,
which is available on the Slacker Web Player. For details on this feature, refer to the Web
Player Online Help.
Favorite
Rate the currently playing Slacker Radio song as a favorite. Slacker Radio will play that song more
often.
· Press the button with the © on it.
The Slacker G2 displays a message to verify this rating. You can select "Yes Always" to hide this
message in the future.
If you have a Premium subscription, Slacker will save that song to your Library so you can play the
song whenever you want. To learn more about Slacker Premium radio, visit the Slacker website.
Ban
Ban a currently playing Slacker Radio song so that the station will not play that song again. Ban
affects songs on a per-station basis, so you still may hear that song on other stations.
· Press the button with the on it.
The Slacker G2 displays a message to verify this ban. You can select "Yes Always" to hide this
message in the future.
Remove a Rating
If you rate a song as a favorite or ban a song, you can remove that designation. However, you must
© 2008 Slacker, Inc.
Page 23
Stations 23
go to the Web Player and edit that station in order to remove the designation. Refer to the Web Player
Online Help for details.
© 2008 Slacker, Inc.
Page 24
24
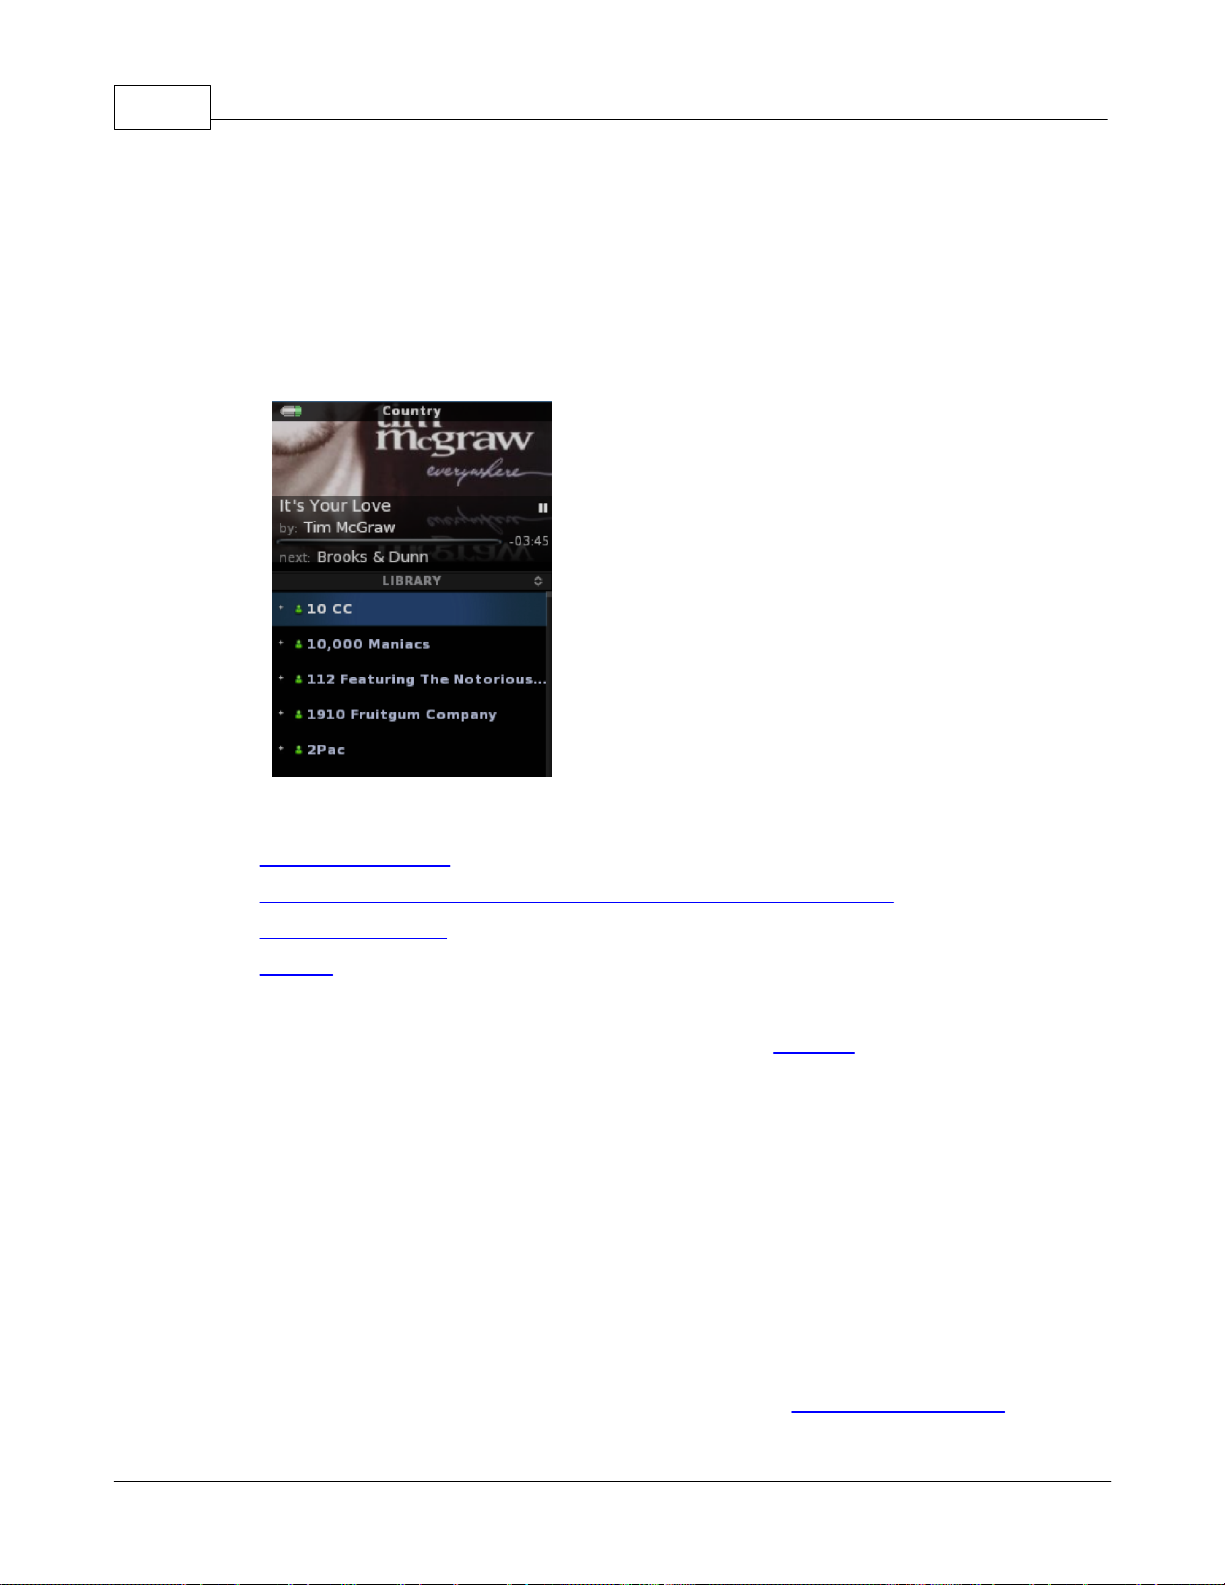
6 Library
6.1 Library Overview
You access your personal music collection through the Slacker G2 Library. The Library holds the
music files which you transfer from your computer. And if you have a Premium subscription, the
Library also holds the Slacker Radio songs that you marked as favorites. The Slacker G2 can play
MP3, WMA, and AAC music files transferred from your computer.
The Portable enables you to play music in your Library four ways:
· Play songs in a folder
· Shuffle all of the songs in the Library and play them in the shuffled order
· Select specific songs
· Playlists
The Software Player enables you to manage your personal music collection. The Library can display
songs that you have stored on your computer. And if you have a Premium subscription, it will display
all of the Slacker Radio songs that you saved. You can play any of the songs in your Library any time
that you desire. However, the Slacker Radio songs only will be displayed when you are signed in to
your Slacker account.
6.2 Add Songs & Playlists
You can transfer your personal music collection (songs) on your computer to your Slacker Library with
Windows Media Player. The songs will be displayed in the Library. Your Slacker G2 supports MP3,
WMA, and AAC files. To transfer saved Slacker songs, refer to the Web Player Online Help.
© 2008 Slacker, Inc.
Page 25
Library 25
You also can transfer playlists, but you must use Windows Media Player 11 (or greater). The playlists
will be displayed in Playlists, not the Library.
NOTE: You can transfer songs & playlists only with computers running Windows XP or Vista.
This feature is not support by Apple Macintosh or Linux. In addition, you must have
downloaded the Slacker USB Station Refresher on your computer as described in Install
the Slacker USB Station Refresher.
To add songs, you connect to the computer via the USB cable as you did to refresh your stations.
Plug the supplied USB cable into your PC and the other end into the Slacker G2.
1.
While connected to your PC, your Slacker G2 will go into a “connected state.” You will not be
able to listen to music or access any player's features until you unplug your player. The
Slacker G2 will display a screen to show that it is connecting to the Internet and then signing in
to Slacker. Once signed in, the Slacker service refreshes the stations. When it finishes, it
displays the “Stations Refreshed” screen.
NOTE: During the refresh process, if you click Cancel, the Slacker G2 displays the “Ready to
Transfer” screen.
On the “Stations Refreshed” screen, click the scroll wheel to select Transfer MP3s. The
2.
Slacker G2 displays the “Ready to Transfer” screen.
NOTE: If Microsoft Windows displays the Portable Device dialog box, select the item
Windows Media Player and click the OK button. Windows Media Player may display a
“Device Setup” wizard. Follow those instructions.
NOTE: The first time you sync the Slacker G2, Windows Media Player make take a few minutes
to configure.
Drag-and-drop songs, folders, and playlist in Windows Media Player. (This process can vary
3.
depending upon the version of Windows Media Player.)
When you are done adding songs, click the Start Sync button. You can repeat steps 3 & 4 as
4.
desired.
Then unplug your Slacker G2 from the computer.
5.
6.3 Navigate the Library
Navigate Folders
In most Library views, your songs will be listed in folders. To open a folder, do the following:
· Scroll to the folder and click the scroll wheel. One click opens the folder and a second closes
the folder.
Navigate Songs
There are four ways to start playing music in your library: Play a Folder, Play Entire Library, Select
Specific Songs, and Play a Playlist.
Once you start playing music, you may Pause, Skip Back and Skip Forward any of the songs in your
© 2008 Slacker, Inc.
Page 26
26
Library or in a playlist.
· Press the Play/Pause, Skip Forward, or Skip Back buttons on the front of the Slacker G2.
6.4 Remove Songs from the Library
You can remove songs from your Library. To remove a song, do the following:
From the MENU, scroll to Library and click the scroll wheel.
1.
Scroll to the desired song and press & hold the scroll wheel. The Slacker G2 displays a menu.
2.
Scroll to Remove and click the scroll wheel.
3.
6.5 Play a Folder
You play one song in the Library and then the Slacker G2 continues to play the songs in the same
folder.
The order of the songs can change depending upon the Library View. If you have selected a view
where there are folders, such as “by Artist” or “by Album,” then the Slacker G2 will play all of the songs
in a folder. If you have selected a view where there are no folders, such as All Songs, then the Slacker
G2 will play all of the songs in the Library.
Play All Songs in a Folder
From the MENU, scroll to Library and click the scroll wheel.
1.
Scroll to the desired song and click the scroll wheel to play the song.
2.
6.6 Shuffle Play Library
Play all of the songs in your Library, not just a folder. The player shuffles the order of the songs before
playing the music.
From the MENU, scroll to Library and click the scroll wheel.
1.
Scroll to any song in the Library and press & hold the scroll wheel. The player displays a menu.
2.
Scroll to Shuffle Play Library and click the scroll wheel.
3.
NOTE: To view the list of songs, scroll to any song, and then press & hold the scroll wheel
again. When the player display a menu, select View Current Playlist.
© 2008 Slacker, Inc.
Page 27
6.7 Select Specific Songs
Select specific songs or folders, and add them to the Current Playlist. For details on the Current
Playlist, refer to My Current Playlist.
From the MENU, scroll to Library and click the scroll wheel.
1.
Scroll to the folder that holds the song you want to play and click the scroll wheel. The folder
2.
will open.
Scroll to the desired song and double-click the scroll wheel to play the song.
3.
OR
Scroll to the desired song, and press & hold the scroll wheel. The player displays a menu.
Scroll to Add to Current Playlist and click the scroll wheel.
Continue selecting songs.
4.
If you are playing a radio station or there are no songs in your Current Playlist, the Slacker G2
immediately starts to play the song. If you already are playing the Current Playlist, the Slacker G2
appends the song to the end of the Current Playlist.
Library 27
6.8 View Songs in Current Playlist
You can view the songs that you’ve added to the Current Playlist.
· Scroll to Now Playing and click the song title.
or
· Scroll to any song in the Library, press & hold the scroll wheel, and select View Current
Playlist.
6.9 Repeat Songs in Current Playlist
When you enable Repeat mode, the Slacker G2 will play the music in your Current Playlist
continuously. When all of the songs have been played once, the player automatically starts playing the
first song in the list. If you disable Repeat, then the Slacker G2 will stop playing music once it finishes
the last song in the list.
From the MENU, scroll to Library and click the scroll wheel.
1.
Scroll to any song in the Library and press & hold the scroll wheel. The player displays a
2.
menu.
3.
© 2008 Slacker, Inc.
Scroll to Repeat and click the scroll wheel.
NOTE: If there is a check mark to the left of Repeat, then the Repeat function is on.
Page 28

28
6.10 Change Library View
By default, the music in your Library is organized in a folder format by Artists. This is just one of 5
views.
· All Songs: Displays all the songs in your Library in alphabetical order. There are no folders.
· by Artist: Displays all the artists in your Library. Each artist is a folder and you click the folder
to see all of the songs you have by that artist.
· by Album: Displays all the albums in your Library. Each album is a folder and you click the
folder to see all of the songs you have for that album.
· by Artist / Album: Displays all the music in your Library in folders, where the artist is the top
folder and the album is a sub-folder.
· by Genre: Displays the music in your Library by genres. Each folder is a genre. Saved Slacker
Radio songs are grouped by Slacker Radio stations. If you saved a Slacker Radio song on the
Web Player and then transferred it to the Slacker G2, the song is listed in the folder called
Saved Radio Songs.
NOTE: When you are playing your personal music content, the Slacker G2 may not display the
Artist Biography and Album Review information.
Change Library View
From the MENU, scroll to Library and click the scroll wheel.
1.
Scroll to any song in the Library and press & hold the scroll wheel. The player displays a
2.
menu.
Scroll to Library Views... and click the scroll wheel.
3.
Scroll to the desired view and click the scroll wheel.
4.
You also can change the view with the Library View Setting.
© 2008 Slacker, Inc.
Page 29
7 Playlists
7.1 Playlists Overview
The Slacker G2 enables you to create playlists from the music in your Library. To navigate to these
playlists, select Playlists from the MENU. You also can transfer saved playlists from a computer to
your Slacker G2.
Library 29
Saved Playlists
You can create and save playlists on your Slacker G2. When you save a playlist, the player calls the
playlist Playlist 1, Playlist 2, etc.
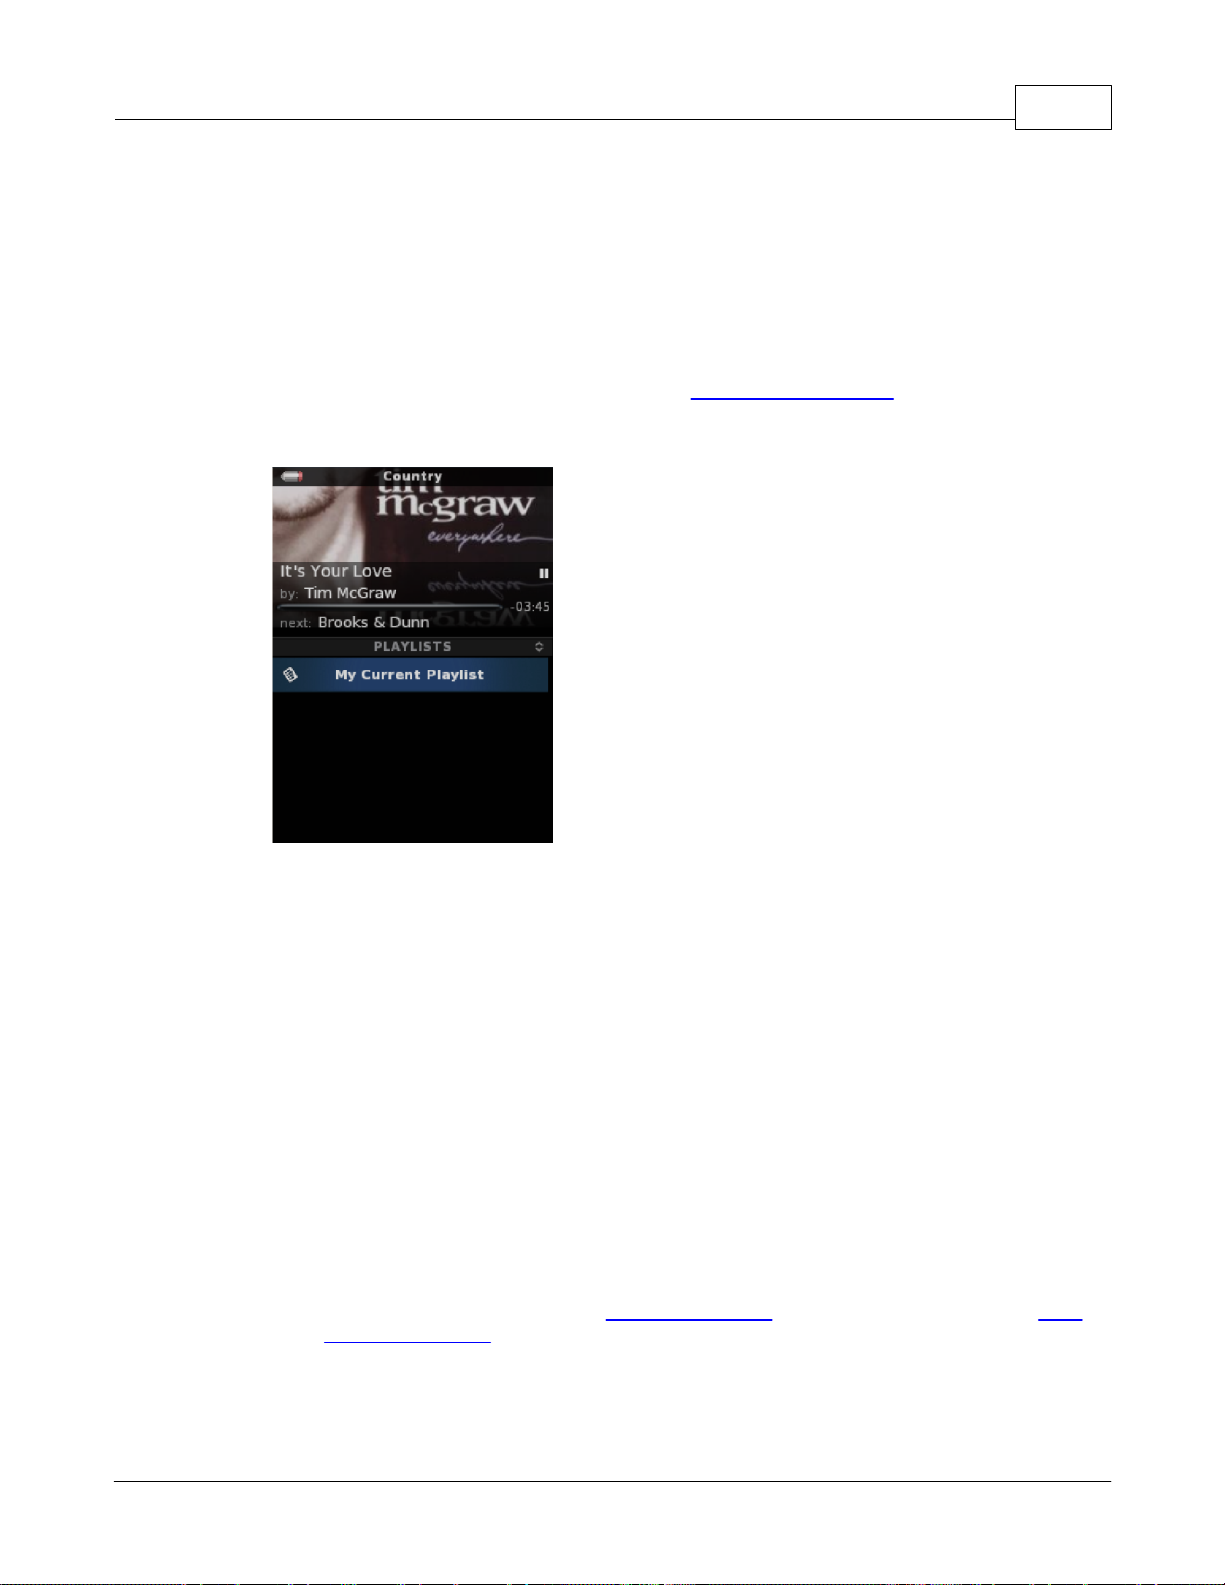
My Current Playlist
The first playlist always is My Current Playlist. This acts as a temporary playlist until you clear it or save
it. You can add songs or folders to this playlist.
7.2 Create a Playlist
To create a playlist, select songs from your Library. The Slacker G2 puts the songs in My Current
Playlist. Then you save the playlist.
NOTE: There already may be songs in My Current Playlist. To start with a “blank slate,” clear
My Current Playlist before you add songs.
From the MENU, scroll to Library and click the scroll wheel.
1.
© 2008 Slacker, Inc.
Page 30
30
Scroll to the song you want to add and double-click the scroll wheel OR press & hold the scroll
2.
wheel and select Add To Current Playlist.
Repeat the steps to add and remove songs until you have made all desired change.
3.
NOTE: If you scroll to a folder, press & hold the scroll wheel, and select Add To Current Playlist,
the Slacker G2 adds all the songs in the folder to My Current Playlist.
When done, scroll to any song and press & hold the scroll wheel. The player displays a menu.
4.
Scroll to Save Current Playlist and click the scroll wheel. The Slacker G2 automatically names
5.
the playlist for you, Playlist 1, Playlist 2, etc. You cannot change the name of the playlist.
7.3 Play a Playlist
Your playlists are stored in the Playlists feature. To play one of these lists, do the following:
From the MENU, scroll to Playlists and click the scroll wheel.
1.
Scroll to the desired playlist and click the scroll wheel. The Slacker G2 displays the Now
2.
Playing screen and plays the first song in the playlist.
7.4 Remove a Playlist
You can remove playlists. When you remove them, the songs on the playlist remain on the Slacker
G2 (in your Library).
From the MENU, scroll to Playlists and click the scroll wheel.
1.
Scroll to the desired playlist and press & hold the scroll wheel. The player displays a menu.
2.
Scroll to Remove and click the scroll wheel. Repeat steps 2-3 to remove additional songs.
3.
7.5 Shuffle a Playlist
You can shuffle the contents of the currently playing playlist. When you play a playlist (saved or My
Current Playlist), the Slacker G2 displays the Now Playing screen. From this screen, do the following:
Scroll to the song title just under the Album Art, and click the scroll wheel. The player displays
1.
the current playlist.
Scroll to any song and press & hold the scroll wheel. The player displays a menu.
2.
Scroll to Shuffle Playlist and click the scroll wheel.
3.
© 2008 Slacker, Inc.
Page 31
7.6 Edit a Playlist
You can add songs to or remove songs from the currently playing playlist. When you play a playlist
(saved or My Current Playlist), the Slacker G2 displays the Now Playing screen. From this screen, do
the following to add or remove songs:
Add Songs
Press the Home button to go to the MENU.
1.
Scroll to Library and click the scroll wheel.
2.
Scroll to the song you want to add and double-click the scroll wheel OR press & hold the scroll
3.
wheel and select the menu item Add To Current Playlist. The player adds songs to the
bottom of the playlist. Repeat this step to add more songs.
Remove Songs
From the Now Playing screen, scroll to song title just under the Album Art and click the scroll
1.
wheel. The player displays the list of songs in the playlist.
Scroll to the song you want to remove and press & hold the scroll wheel. The player displays
2.
a menu.
Select Remove. Repeat steps 3-4 to remove more songs.
3.
Playlists 31
Save Changes
Once you finish adding and removing songs, you must save the changes. If you don’t save the
changes, the Slacker G2 will play the original (unchanged) version of the playlist the next time you
navigate to Playlists and click that particular playlist.
Scroll to any song in the Library and press & hold the scroll wheel. The player displays a menu.
1.
Select Save Current Playlist to save your changes.
2.
7.7 Clear a Playlist
You can remove all of the songs from a My Current Playlist or any saved playlist.
From the MENU, scroll to Playlists and click the scroll wheel.
1.
Scroll to the desire playlist and click the scroll wheel. The Slacker G2 begins to play the
2.
playlist and displays the Now Playing screen.
Scroll to song title just under the Album Art and click the scroll wheel. The player displays the
3.
list current playlist.
Scroll to any song and press & hold the scroll wheel.
4.
5.
© 2008 Slacker, Inc.
Scroll to Clear Playlist and click the scroll wheel.
Page 32
32
Change the amount of time that the Slacker G2 remains idle before the player displays the Now
Playing information.
1.
From the MENU, scroll to Settings and click the scroll wheel.
2.
From the Settings menu, scroll to Autoscroll Delay and click the scroll wheel.
3.
Scroll to the desired duration and click the scroll wheel. The default setting is 10 seconds.
Change the length of time the backlight remains illuminated when you are not interacting with the
Slacker G2.
1.
From the MENU, scroll to Settings and click the scroll wheel.
2.
From the Settings menu, scroll to Backlight Time and click the scroll wheel.
3.
Scroll to the desired duration and click the scroll wheel. The default setting is 15 seconds.
8 Settings
8.1 Feature Settings
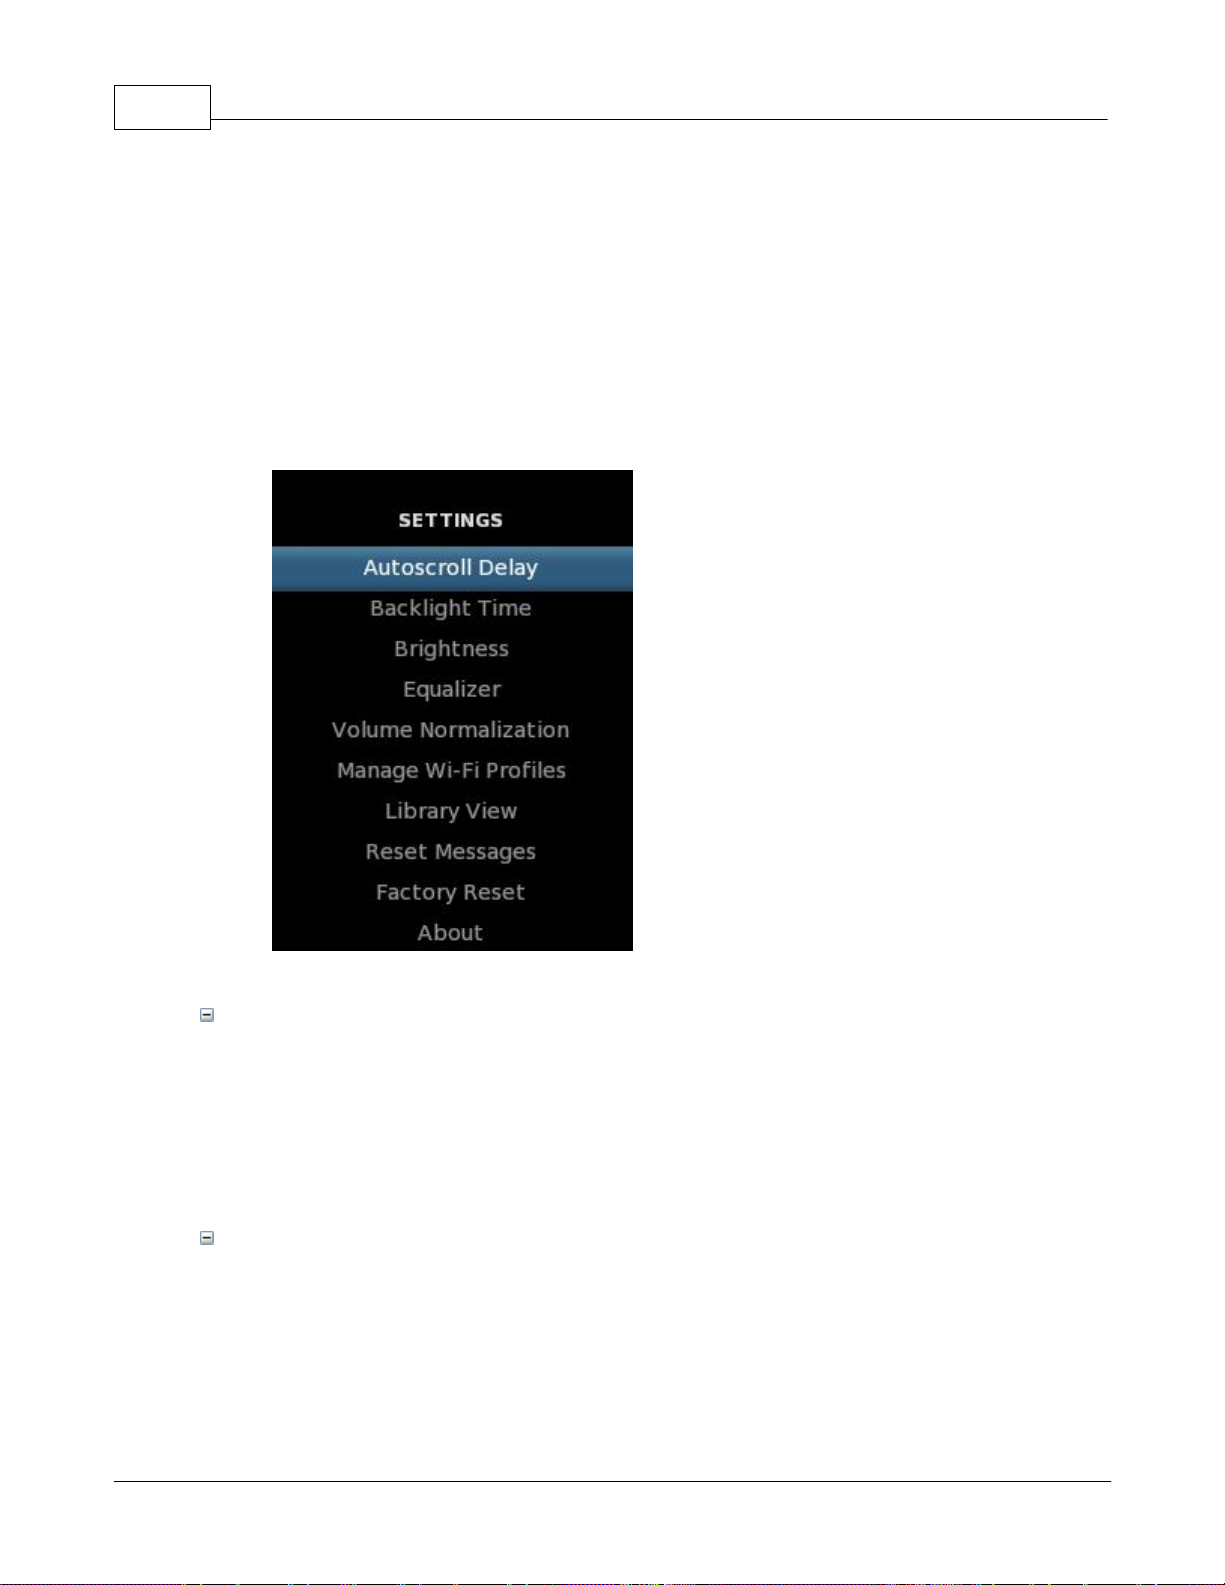
There are several feature settings: Autoscroll Delay, Volume Normalization, Backlight Time,
Brightness, and Library View.
Autoscroll Delay
Backlight Time
© 2008 Slacker, Inc.
Page 33
NOTE: A shorter duration will save battery power and increase overall playtime on the
Slacker G2.
Brightness
Change the brightness intensity of the screen.
1.
From the MENU, scroll to Settings and click the scroll wheel.
2.
From the Settings menu, scroll to Brightness and click the scroll wheel.
3.
Scroll to the desired duration and click the scroll wheel. 1 is the lowest (dimmest) setting
and 5 is the brightest setting. The default setting is 3.
NOTE: A lower setting will save battery power and increase overall playtime on the Slacker
G2.
Select a sound to enhance a particular music genre or style.
1.
From the MENU, scroll to Settings and click the scroll wheel.
2.
From the Settings menu, scroll to Equalizer and click the scroll wheel.
3.
Scroll to the desired sound and click the scroll wheel. The default setting is Off.
This setting levels the volume of the songs so that all songs play at the same volume.
1.
From the MENU, scroll to Settings and click the scroll wheel.
2.
From the Settings menu, scroll to Volume Normalization and click the scroll wheel.
3.
Scroll to the desired setting and click the scroll wheel. The default setting is On.
View a list of the Wi-Fi networks to which the Slacker G2 has connected successfully.
1.
From the MENU, scroll to Settings and click the scroll wheel.
2.
From the Settings menu, scroll to Manage Wi-Fi Profiles and click the scroll wheel.
If you scroll to a profile and then press & hold the scroll wheel, the Slacker G2 displays a menu.
From this menu you can delete a profile. If you delete a profile, you erase details about the
network, such as a network key.
The Library View setting enables you to organize your music by songs, artist, album, artist/album, or
genre.
1.
From the MENU, scroll to Settings and click the scroll wheel.
2.
From the Settings menu, scroll to Library and click the scroll wheel.
3.
Scroll to the desired view and click the scroll wheel. The default setting is “by Artist.” You
have the same choices as described in Change Library View: All Songs, by Artist, by Album,
Equalizer
Settings 33
Volume Normalization
Manage Wi-Fi Profiles
Library View
© 2008 Slacker, Inc.
Page 34
34
by Artist/Album and by Genre.
The Slacker G2 displays a number of messages. You can hide any of the messages that have a
"Yes Always" option. If you have hidden these messages and would like to display them again, use
this setting. You will reset all of the messages, not one message at a time.
1.
From the MENU, scroll to Settings and click the scroll wheel.
2.
From the Settings menu, scroll to Reset Message and click the scroll wheel. The Slacker
G2 displays a confirmation message that you have reset the messages.
You can reset the Slacker G2 to remove all data and restore original factory settings. When you
reset the player, all of your radio stations, playlists, and Library content (including favorited songs)
are erased. All of your Wi-Fi network settings are erased. And all of the settings are returned to the
default state. However, your Slacker G2 still is associated with your Slacker account.
1.
From the MENU, scroll to Settings and click the scroll wheel.
2.
From the Settings menu, scroll to Factory Reset and click the scroll wheel.
3.
The Slacker G2 displays a confirmation message asking you if you want to reset the player.
Click OK to continue or Cancel to quit the reset.
4.
If you click OK, the Slacker G2 displays one more message, "Are you sure?" Click Yes to
reset the player or No to cancel the reset. If you click yes, the player restarts.
During the start-up, the Slacker G2 displays the message, "Performing Factory Reset. This
may take a few minutes. Please wait." When done, the player displays the Now Playing
information.
8.2 Reset Settings
You can reset all of the messages on the Slacker G2 or you can reset the entire player.
Reset Messages
Factory Reset
8.3 About
The About screen provides information about your Slacker G2. This information includes the Slacker
Portable ID - which you use to activate your player, the firmware build number, and the manufacturing
serial number.
From the MENU, scroll to Settings and click the scroll wheel.
1.
From the Settings menu, scroll to About and click the scroll wheel.
2.
© 2008 Slacker, Inc.
Page 35
9 Slacker Support
Do you have any questions?
· Please visit the Slacker Support online at www.slacker.com/support.
· We also can be reached by sending an e-mail to [email protected].
· Talk with other members of the Slacker community on the Slacker Forums at
http://www.slacker.com/forum/.
On the Slacker Support website,you can read the latest FAQs and download a copy of the Slacker G2
User Guide.
This Help System
If you cannot find the exact Topic or phrase you're looking for, try using the Search feature located just
above the Table of Contents or Index. Enter in the word or phrase you'd like help on and then click
Submit. A list of relevant topics will be displayed that you may click on to view more information.
Settings 35
© 2008 Slacker, Inc.
Page 36
36
First, you need to download and install the USB Station Refresher to install the drivers . You can
download this program by going to http://www.slacker.com/support/ and clicking on the Portable
Radio Tab. At the bottom of the Portable Radio section you will see the download button.
If you already have installed the program but you still are being asked for the drivers, then you can
find them on your computer by browsing to the following folder C:\Program Files\Slacker\USB
Station Refresher\driver. All of the needed drivers are located in that folder after the USB Station
Refresher has been installed.
There are a number of applications that might be installed on a computer that will block the
Personal Radio Player from being able to connect properly such as Anti-Virus Programs, Windows
Defender, Firewalls, etc. If you are having problems connecting, then you will want to disable these
types of programs temporarily. Once they are all disabled, then try connecting the Personal Radio
Player again. If it works, then turn the disabled programs on one at a time until you find the program
that is causing the problems. Once the program has been identified, then you may need to
configure it to allow "ICS" (Internet Connection Sharing) to work properly with the application.
Internet Connection Sharing is part of Windows XP and Windows Vista; we use ICS to make a
connection to the Internet so we can refresh the Personal Radio Players.
The most common cause of this problem is a network conflict. Built into Windows XP and Windows
Vista is a program called "ICS" or Internet Connection Sharing. The Personal Radio Players use
this program to access the Internet and connect to the Slacker servers. When you use this
program, it uses a network address of 192.168.0.1 for the connection. If you have another device
on your home network, such as a router or modem (DSL/Cable) that also uses this same address,
then it can cause a conflict. At this time, Microsoft does not allow us the ability to change the
address for Internet Connection Sharing. Therefore, in order to resolve the conflict, you would need
to consult the manual or manufacturers help on changing the IP address of the device causing the
conflict with this address.
The Slacker G2 requires that the SSID be broadcast in order to connect to the Wi-Fi network. You
can consult your Router manual for assistance in setting up the router to broadcast the SSID.
10 Troubleshooting the Slacker G2
If you are having any issues, please refer to these troubleshooting topics. If you still have questions
after reviewing these topics, refer to Slacker Support.
When I Connect the Player to USB, It asks me to install the drivers for the device. Where are
these drivers?
I have all the drivers installed, but the Portable Player gets stuck on "Connecting" when I try
to refresh my Personal Radio Player via the USB port.
When I connect the Personal Radio Player to the USB port, I get a message about limited or
no connectivity.
When I try to connect via Wi-Fi the Portable Player does not see my hidden Wi-Fi network.
My Slacker G2 downloaded a Software Update but then it did not install this update.
© 2008 Slacker, Inc.
Page 37
Troubleshooting the Slacker G2 37
In order for the player to perform the Software Update, your player must have at least 50% battery
life. If your player is under 50% charged, then you will need to attach the player to the AC adapter or
your USB cable to a computer in order to charge the player. Once the batter has more than a 50%
charge, unplug it from the adapter/cable and shut if off. The player automatically will start the
upgrade.
© 2008 Slacker, Inc.
Page 38
38
Index
- A -
About 34
Activate Slacker Personal Radio Player 10
Add Slacker Radio Stations 15
Add Songs & Playlists 24
Album Library View 28
All Songs Library View 28
Artist / Album Library View 28
Artist Library View 28
- B -
Ban a Song 22
Brightness 32
- C -
- N -
Navigate the Library 25
- P -
Play a Playlist 30
Play All Songs in Library 26
Playing a Station 21
Powering the Slacker G2 7
Premium Radio 16
- R -
Remove a Playlist 30
Remove Slacker Radio Stations 15
Remove Songs 31
Remove Songs from the Library 26
Reorder Slacker Radio Stations 16
Repeat Songs and Playlists 27
Change Library View 28
Charging the Slacker G2 8
Clear a Playlist 31
Connect via USB 14
Connect via Wi-Fi 12
Customer Service 35
- D -
Display Settings 32
- E -
Edit a Playlist 31
Enter a WEP or WPA Key 13
- F -
Favorite a Song 22
- L -
- S -
Scroll Wheel 8
Select Specific Songs 27
Shuffle a Playlist 30
Shuffle Play Library 26
Slacker G2 Features 6
Slacker Portable ID 10
- T -
Touch Strip 32
- V -
View Songs in Current Playlist 27
- W -
WEP Key 13
WPA Key 13
Low Battery 7
© 2008 Slacker, Inc.
 Loading...