

Page 1

User Manual
Fully Automatic Front Loading Washing Machine
Model:
F701202ND
F751202ND
Page 2

Content
Specification
Safety Notice
Parts Name
Installation
Door Lock and Unlock
Use of Detergent Box
Function Introduction of Main Control Board
Introduction of Programs
Introduction of Washing Programs
Maintenance
Varieties of Functions
Notice before Washing
Not Fault Situation
Fault Solving Guidance
1
Specifications
2
3
4
9
9
10
12
21
22
24
26
28
29
30
Model
Rated washing capacity
Rated spinning capacity
Rated water consumption
Rated voltage
Rated washing power
Rated spinning power
Rated heating power
Maximum power
Washing noise
Spinning noise
Energy efficiency rate
clean
Power consumption
Water pressure
External dimension
Executive standard
F701202ND
7kg
7kg
49
( )L/work cycle
220V-50HZ
200W
380W
2000W
2200W
60dB(A)
72dB(A)
Class 1
1.03
0.77
( )KWH/Cycle
0.03-1Mpa
595*600*850
GB4706.1、 、GB4706.24、GB/T4288、GB4706.26、
GB19606、GB17625.1、GB12021.4、GB/T2828.1;GB/T4288、
GB/T17499-2008
GB4343.1
F751202ND
7.5kg
7.5kg
52
( )L/work cycle
220V-50HZ
200W
400W
2000W
2200W
60dB(A)
72dB(A)
Class 1
1.03
0.825
( )KWH/Cycle
0.03-1Mpa
595*600*850
30
Accord with the noise limit stipulated by GB19606.
The procedures of energy efficiency test are default programs
Half loading/Full Loading The process of energy test is as below:
F701202ND/F751202ND Standard Wash( without soak function)+ Intensive+ rinse 2 times+ water
temperature 40℃+ Spin Speed 400
Page 3

29
Model:
F651003S\F751203N
Phenomenon
Washer can't start
Spinning screen
shows “UE”
Water inflow
screen shows “IE”
Water outflow
screen shows “OE”
Door trouble
screen shows “DE”
Not heating,
screen shows
Keep water inletting
without stop, screen
shows “FE”
The wash drum does
not running, screen
shows “LE” or “CE”
Too much bubble
The fault of motor
sensor, the screen
shows “HE”
The fault of water
level sensor, the
screen shows “PE”
Power off, the screen
shows “PF”
“ ”EE
Troubleshooting guide
check points
Check if press the power button or
start/pause button?
Is the plug pulling out?
Is there a power failure?
Check if cut the leakage protector?
Check if disassemble the carriage bolt?
Is the machine placed steadily?
Are the clothes too small or light?
Are the locknuts on under the feet
tightened up?
Check if turn the tap off?
Is the water supply cut off or the water
pressure too low?
Are the water inlet pipes frozen?
Are the filters blocked?
Are the outlet pipe placed too highly?
Are the outlet pipes frozen?
Are the outlet pipes blocked?
Are the floor drain blocked?
Make sure if start the washer without
closing the door well.
Please pull out the plug and call for the after sale service
Due to the abnormal of water inlet valve
and water level sensor
Please pull out the plug and call for the after sale service
If adding the amount of detergent is more
than the suggested?
If use the low bubble detergent which is
especially for front loading washing
machine?
If the position sensor motor fall off or not?
If the water level sensor has fallen off
or not?
If the water level sensor pipe blocked or
there is a big pressure?
Power off then power on, push the
“power” button, the screen display
“PF” to indicate that the power has
powered off before. The machine can
be in normal operation.
Press the power button or start/
pause button.
Connect the plug.
Please wait.
Open the leakage protector.
Disassemble the carriage bolt.
Place the machine on a steady ground.
Add more clothes.
Tighten up the locknuts.
Open the stopcock.
Please wait.
Use hot water to unfreeze the pipes.
Take out the filters and clean them.
Please put away the outlet pipes
and make sure the height within 1M.
Use hot water to unfreeze the pipes.
Take out the foreign matter and
dredge the pipes.
Clean the floor drain.
Make sure the door truly closed
Shut the water tap, pull out the plug
and call for the after sale service
Add proper amount of detergent.
Use the correct type of detergent.
To firmly connect the sensor and
motor stator
Tighten the sensor. Open the water
pipe excluded congestion or pressure
To push the button of” Start/Pause”
can continue the operations before
power off. And the other operations
can be processed.
solutions
Safety Notifications (Please Must Follow)
In order to prevent the harm or damage to the user or the person and
property of others, please make sure to follow the safety issues.
Warnings
The risk of electric shock.
1.Please use 220v, above 10A with
ground wire dedicated socket.
2.When inserting and pulling out the
power cord please use the plug, please.
Don't use the damaged power cord.
When the power cord pin is dirty please
wipe clean with dry cloth in time.
3.Do not use the wet hand to insert or
pull out the plug.
4.Please pull out the plug when finishing,
repairing or cleaning.
The danger of high temperature
1.When washing in high temperature,
the door glass will be heating. Please do
not touch the door glass, especially
Children.
2.When opening the door after high
temperature washing, please wait for the
temperature cooled down to a safe level
and the door will unlocked automatically.
The danger of injury
1.Do not put any heavy things on the
top of the washing machine.
2.If you want to move the machine,
please remember ask for help.
3.Please do not ask unprofessional
people to repair the machine.
The danger of fire and current leakage
1.Do not allow the washing machine
close to the fire, or lighted cigarettes,
candles and volatile materials.
2.Please do not sprinkle the water on
the control panel of washing machine.
3.Please do not put the washing
machine in the place of wet and outside
place.
4.Please fix the drain pump and make
sure the sewer unobstructed.
The danger of getting hurt
1.Please handle the carton box after
removing, don't let the children touch or
eat.
2.Do not allow the children to operate or
climb up to the washing machine.
3.Please close the door after use to
avoid the children enter into the drum.
The danger of damage the cloths
1.Please do not wash the cloths which
is waterproof, like Raincoat, feather
products, sleeping bags
2.Please wash the cloths which can be
washed, if you have any doubt, please
following the instructions.
2
The danger of explosion
1.Please do not washing the cloths which
stained with kerosene, gasoline, thinner,
inflammable goods.
2.Please do not washing when gas leakage.
If want to open the door when the
machine running or other circumstances,
please check the water level in the drum
first in order to avoid the water overflow
tand cause unnecessary loss.
Page 4
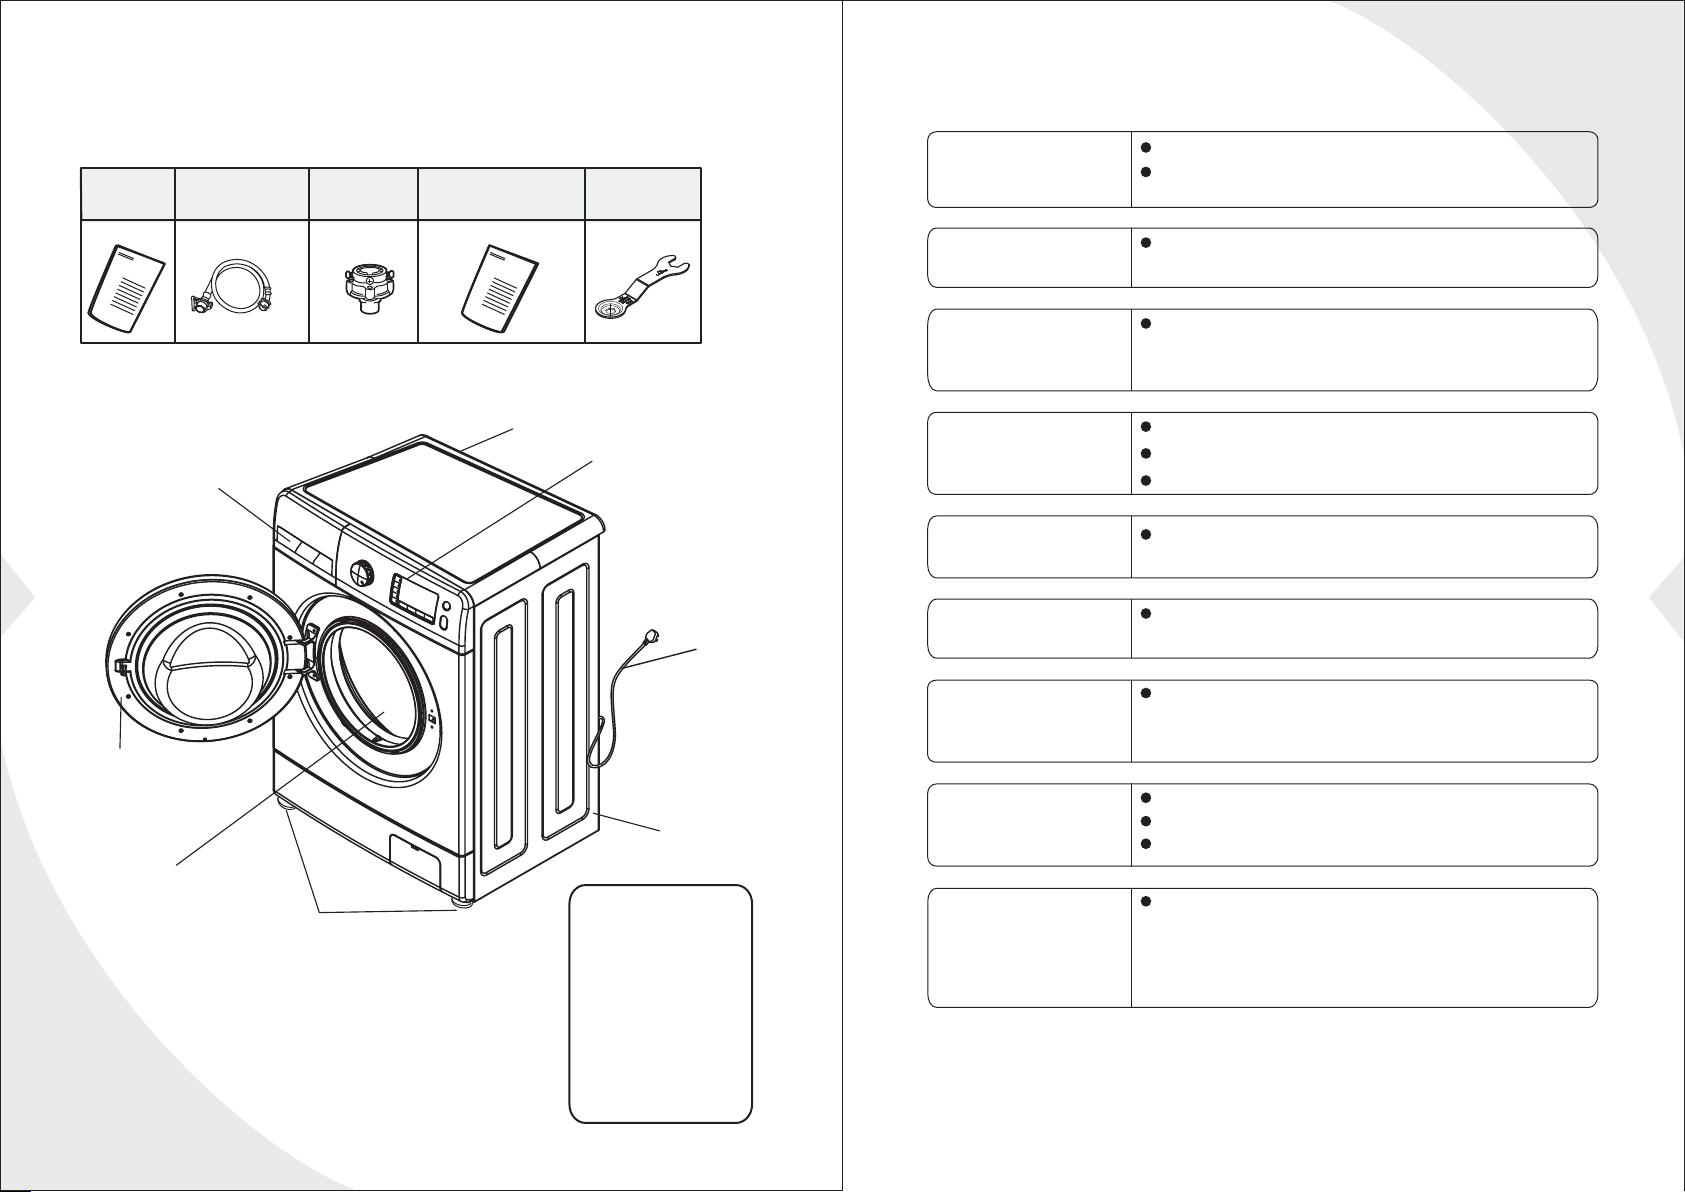
Part name
Non-fault conditions
Attachment specification
Instruction
water supply hose universal joint
installation instruction
wrench
The door can't
open.
There is an odor.
There is too little
water when wash
Part name
Inlet valve
Control Panel
Detergent box
and rinse.
No water
inflowing.
Water inflows
halfway
3
Water outflows
Power line
when washing.
Remaining time
changes
Door assembly
he program is running.
There are clothes between the door and
door seals.
There may be a smell of rubber because
some components are made up of rubber.
Roller washing machine just needs a little
water when operating.
Is the tap turned on?
Is the inlet pipe frozen?
Are the filters blocked?
If the water level declines, the washer will
supply water automatically.
Check if add the detergent with too much
bubbles.
If clothes are off center when spin,
spinning time will extend to correct the
deviation.
28
Wash and spin tub
Adjustable feet
The above picture is just for refference,the detailed
information should be based on the real product!
Cabinet
Notice:
1.the first use may drain
some water out. It's
residual water after
performance test,
belong to the normal
phenomenon.
2.After each use, please
pull the plug and turn off
the faucet to prevent
accidental flood or fire.
There is abnormal
noise when spin.
The washer can't
work after the
failure of electricity.
Check if the power line touches with cabinet.
Have the transport bolts been dismantled?
Are there some hairpins or coins in the roller?
The washer will stop working after the
failure of electricity. When the power is
restored, it still can't continue to work.
Please press the power button and
reset the program.
Page 5
3.Notes
Installation instruction
27
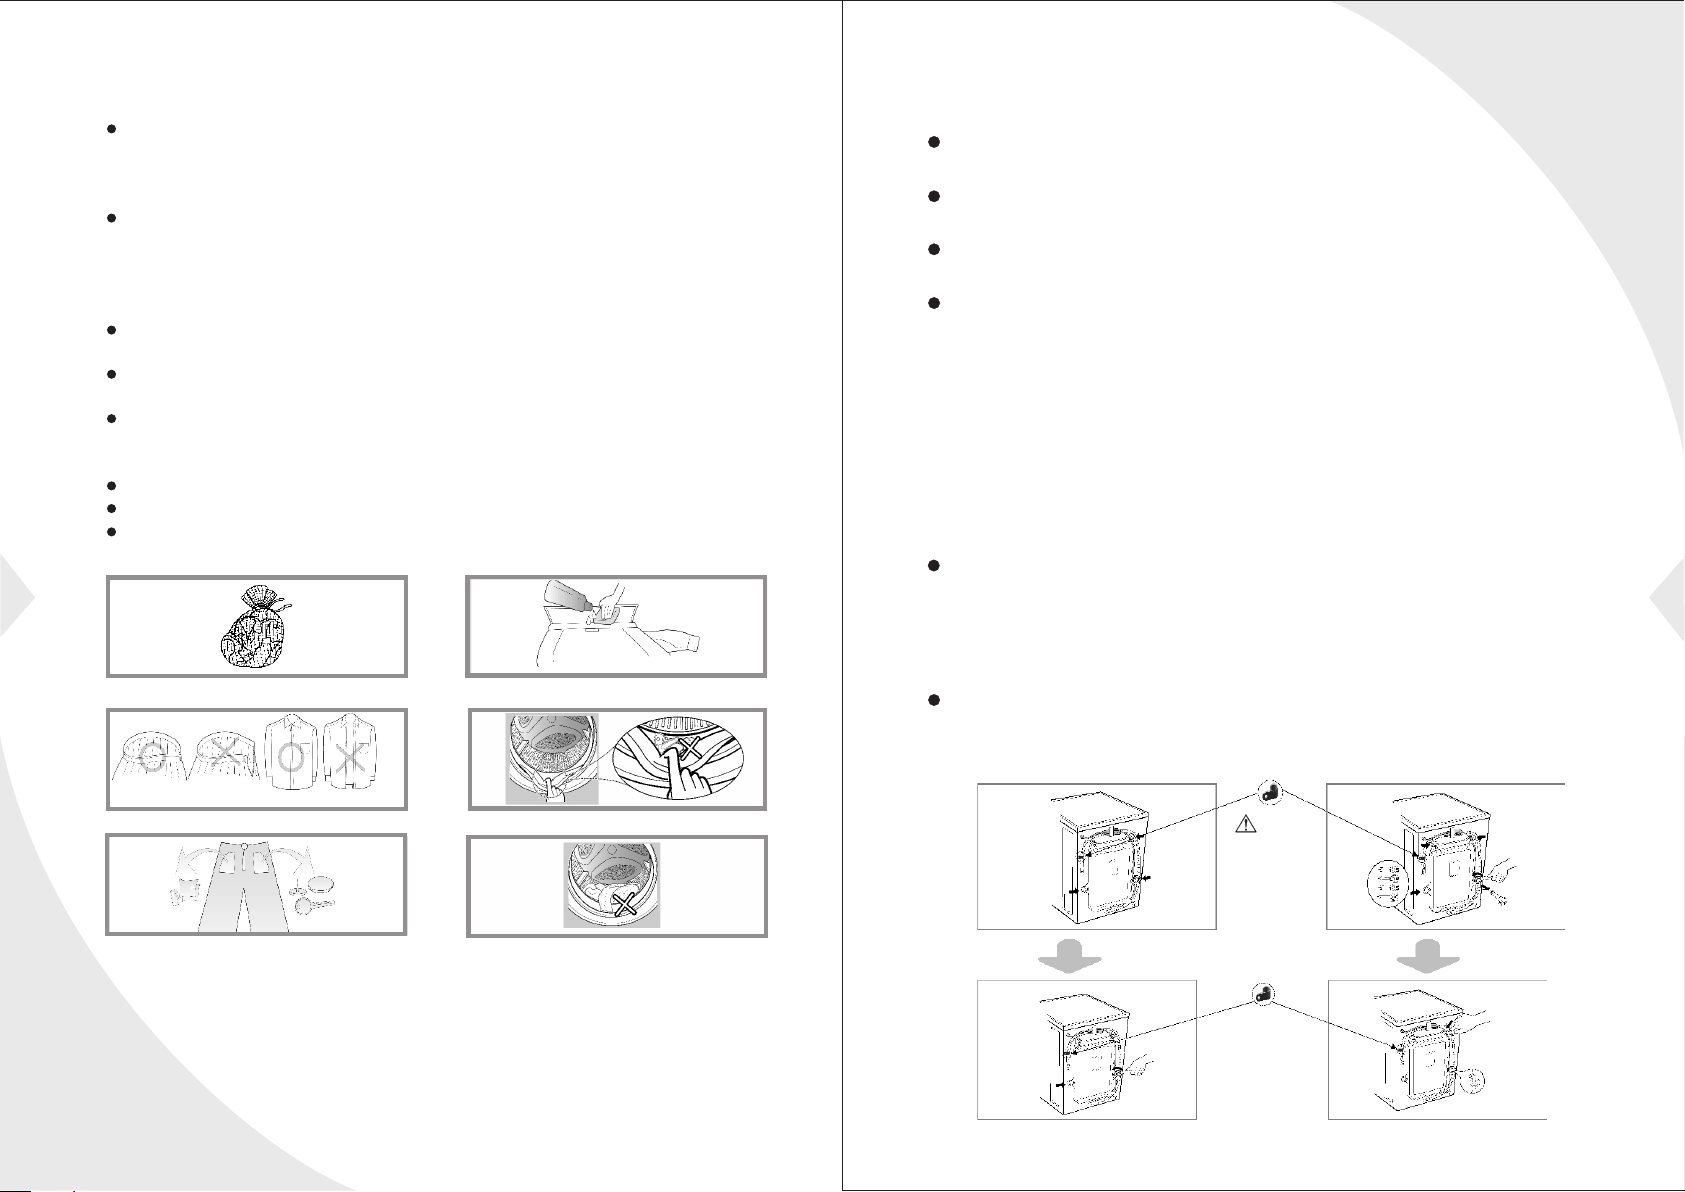
When put big and small clothes together, put the big first and they
have to be less than half of total clothes. Please don't wash single
cloth because it may cause the trouble of imbalance.
Please add one or two similar clothes.
Small clothes like silk stockings and handkerchiefs should be put
into mesh bags to wash. Before washing the bra with steel rings,
please take the rings off. If it is inconvenient to do this, please put
them into mesh bags to prevent the bra slipping into the gap between
internal and external tubs.
Check all pockets and make sure nothing in them. Nails, hairpin,
match, pen, coin and key will damage your washer and clothes.
Zip up all clothes, fix the button and hook and tie the loose belt,
make sure that other clothes cannot be damaged by them.
Firstly use the water with a little detergent to wash the parts with too
many stains, such as collar and cuffs, which can make the clothes
cleaner.
Check the door seals and make sure nothing on them.
Make sure there is nothing in the tub before washing.
Please use the low bubble detergent specially for front loading
washing to wash the cloths.
Make sure the temperature of the places where the washer is installed
or placed above 0℃ or put it outside.
Place the washer correctly according to management standards and
regulations.
Keep the base of washer ventilated when it is placed on the ground
with carpet.
There are too much pests in villages. Please keep the surroundings
clean because any damages caused by cockroaches or other pests
don't belong to warranty.
Transport bolt
Washers are installed with transport bolt to prevent internal damage
in transit.
Dismantle the transport bolt
1.In order to prevent internal damage in transit, 4 bolts are installed.
Before using the washer, dismantle the bolt.(see chart I )
If the bolts are not dismantled, violent vibration, noise and trouble
will be caused.
2.Use the attached wrench to loosen the 4 bolts. (see chart 2)
3.Twist the bolt rubber slightly and then pull out the bolts, keep the
bolts and wrench as standby.(see chart 3)
The bolts should be remounted no matter when to transport the washer.
4.Use attached stopples to seal the screw holes. (see chart 4)
4
see chart 1
see chart 2
Notice:
please don't
dismantle the
drainpipe fixed
device.
see chart 3
the plug
of trans
portation
bolt
see chart 4
Page 6

Requires for positions
Horizontal adjustment:
The slant angle should be less than 1 degree.
Drain pipe
Power outlet
The distance between any side of washer and
power outlet should be within 1.5 meters.
Wash tub
A
bo
u
t 2
c
m
Don't use too many electrical appliances
in one outlet.
Environment cleaning
It's necessary to clean the wall, door and ground.
Install the washer on a hard and steady ground with floor drain rather
than soft blanket or wooden floor.
Don't put dirty clothes or some other goods on a washer's head cover,
otherwise it may impact the normal operation.
Notice
Power connection
Push"Start/Pause"button to start the washing machine, it is normal to hear
"Clicking" sound, which is door locking sound not an error. If it occurs"dE"
warnings, please use hand to push and shut the door. Push two times of
"Start/Pause"button to continue running of the machine.
9. Quick entering into the functions: Power on, push "Power" button, directly
push the following functional button(no need to turn the knob).
Push "Start/Pause" to enter standard washing mode directly.
Quick entering into the functions: Power on, push "Power" button, directly
push the following functional button(no need to turn the knob).
"Spin speed" button,the washing machine enter" Spin only"mode(You can
choose spin speed),push "Start/Pause"button to start the washing machine.
10. Eliminate the sound: Push "Prewash"button for 3 seconds to start/close
the sound.
11. Power off memory: After power off for a while,the machine can continue
the programs as before when power on.
12. Power off memory: After power off for a while,the machine can continue
the programs as before when power on.
1.Don't use the wiring board or something like that.
2.If the power lines are damaged, please contact professionals to repair.
3.After the use of washer, pull the plug and turn the tap off.
5
4.Connect the washer with grounded outlet to correspond to the wiring
principles.
26
NOTICE
5.Place the washer in which is easy to connect the outlet.
Contact the maintenance center and ask professionals to repair the
washer. Laypeople may cause damages and troubles on the washer.
Don't put the washer in the place where the temperature is below zero.
The pipes will be frozen and break. Moreover, the temperature below
zero will damage the programming controller.
If move the washer in an environment whose temperature is below
zero, please keep the washer at room temperature for a few hours
before starting it.
Grounding introduction
A washer must have the grounding devices. If a trouble happens, the
1.Washing guide identification
Please check cloths washing guide identification,which shows
cloths texture and washing method.
2.Classification washing
Please wash cloth of the same texture, different texture,
different water temperature, speed and washing procedure,
please split deep colored cloths from white cloths.Split dyed
cloths from cotton,otherwise the white cloths would be
discolored.If possible, please do not washing high contaminated
cloths with clean ones together.
device can reduce the risk of electrical shock. The device is equipped
with a cable (including a wire and a grounded plug). The grounded plug
must be inserted in an appropriate outlet. If you want to know if the
The degree of pollution
(serious,moderate,slight)
classify clothes and wash
according to the degree.
washer is grounded correctly, please contact with professional
maintenance staff. If the plug can't match with the outlet, please don't
change the plug by yourself.
Once your washer smokes or emits an odor, please cur the power and
contact with professional maintenance staff.
color (white,light color,deep color)
velveteen
(easy to fall off, easy to be adhered)
classify them and wash.
classify the white and the
deep color.
Page 7

25
6. Drum clean: The program of drum clean is use the high water level, high
water temperature, high speed to clean the drum and kill the bacteria. The
detailed operations ways, please take reference of Page 18.
7. Child Lock function: You can lock and unlock the child lock function by
pushing 3 seconds when the machine is running.
Once the child lock function set, all the other buttons will be locked except
the power button.
After setting child lock function, the lamp will light up, meanwhile the screen
will display “CL” intermittently.
When the washing process ending or push “power off” button or default
warning, the child lock function cannot be unlocked. It means that the child
lock function must be unlocked by hand. When the power on and start the
machine, if the child lock function is going on(the lamp of child lock light up
and the screen display CL),you need to push “prewash” button for 3 second
to unlock the child lock function and then continue to operate the washing
machine.
Already set the child lock function and then want to change the programs.
Firstly remove the child lock function and push the "Start/Pause" button to
stop running, then select the required function, then push the "Start/Pause"
button to restart running.
8. Add garment function: During the process running, if you want to add
garment, please push "Start/Pause"button to stop running;
After around 5 seconds, it has a sound of unlocking, meanwhile the door
lock mark in the screen disappear then you can open the door.
Add the additional garment into the drum(Don't let the door clamp clothes,
this will cause failure of leakage and error).
Forced to open the door part, damage may occur, such as safety problem.
When there are many bubble in the inner barrel and plenty of water, open
the door, water and foam will flow out .
When the inner drum is running, it is in danger status since the temperature
of water is above 45℃ and there is plenty of water inside. At this time, the
door can not be forced to open. If want to open the door, please follow the
below instructions:
(1) Wait till the inner drum stop running.
(2) Wait till the water temperature cool down to below 45℃. If want to
open the door when the water temperature is above 45℃,please shut off
the power and open the door after 5 minutes.
(3) When there is plenty of water inside of inner drum, please restart the power
and select "spin speed" button to drain out the water then open the door.
Abnormal power off for 2 minutes, you can open the door. During the process
of running, the required condition for opening door(water level below door
gasket, water temperature below 45℃,spin speed is 0),push "Start/Pause"
button, wait till door lock mark disappear, then open the door. When closing
the door, press the middle place of the door handle.
Washers should be connected with water inlet. Please use
attached new plumbing rather than the old.
In order to ensure the quality, water injection tests are carried out
before the washer leaves factory, so there may be water inside the
internal tub, door seals and door panel, which are normal.
Water inlet connection
1.The pressure of supply water should be between
30kpa and 1000kpa.
2.Don't abrade the screw thread when connect the
inlet pipes with valves.
3.Please install dropping equipment if the pressure
of supply water surpasses 1000kpa.
Two seals are supplied in the connectors of both ends
of the pipe to prevent water leaking.
Turn on the tap and check if the connectors leak.
Check the pipes regularly. Please change them if necessary.
Make sure the pipes don't be damaged or twine with each other.
Use the standard faucet
standard faucet
longer faucet
square faucet
water pipe connector
rubber gasket
The connection of inlet pipes and taps
Hold the connecting seat in one hand and
press the retaining ring and pull it down by
the other hand. Separate the seat and pipe.
connector
Retaining
ring
Retaining
ring
Adjust the four screws evenly to make the
two screws near the wall fully contact with
the tap.
The screw close to the wall can insert some part.
As shown in picture ,two screws to make
it in the opposite rotating wall after
contact with the faucet with a screwdriver.
Inlet
Faucet
Loosen the four fixed screws in the top
connector and rotate the bottom connector
to make enough space between the top and
bottom connector so that the screws can be
installed.
Plastic cup
If the diameter if the faucet is too big, the plastic cup can be
removed.
Make the top connecting seat block the tap
and make the seal fully contact with the tap
(please don't take out the seal).
Please use the standard faucet. The mouth of faucet
must be flat. If not flat,please smooth it.
Unscrew the connector till it is tightened
(if not tightened,leakage will happen).
After unscrewing, the gap between up and
down connector is below 3mm.
up connector
Down connector
6
Page 8

Take Off the Inlet Pipe: Press down the
retaining ring of the inlet pipe.
Retaining
ring
Please make sure the connector and the inlet pipe joint tightly.
please tighten the connector of inlet pipe and inlet valve, turn on the water faucet
slowly to check whether leak.
If leak happens, please turn off the stopcock and install again.
It will loosen after long period of usage, please stall again as per 1--9.
Remark:
If you use special stopcock. Please install as following processes.
Replace the original
connector to the
standard connector
provided.
replace
standard
connector
7
Such washing machine is designed for home appliances, please
In one hand holds the
connector, the other
hand holds the buckle
down,to seperate the
inlet pipe and connector.
Retaining
ring
do not install it on ship,traveling truck or plane.
Please turn off the stopcock if long time out of use.
(e.g vacation)
Please remove plug and cancel door lock function to avoid child
locking himself/herself inside.
Packing materials(e.g film, foam) could harm child's safety and
cause asphyxia! Attention: MAKE ALL PACKING MATERIEALS
OUT OF CHILD REACH.
Install drain-pipe
Please fix the drain-pipe by a lifting rope.
For the sake of lightening damage of leak towards ground, please
place the drain-pipe correctly.
In order to avoid siphon,the height of drain-pipe should between
(0.85m-1.25m),moreover, the terminal of is should not be placed in
water.
If the drain-pipe is too long, please do not force to insert it into
washing machine, which would cause abnormal noise.
(Please check sketch map next page)
Install the inlet pipes, please insert it up
into the connector,then undo the retaining
ring.
Make sure
the retaining
ring on the
connector
standard
connector
Inlet
standard
connector
Inlet
Retaining
ring
To pull the buckle
down,connect the
inlet pipe directly
inserted into the
standard connetor.
Retaining
ring
Function Introduction of Operating Panel
1. Prewash: If the cloths are too dirty, you can choose this program
before washing.
2. Soak: After selecting this function, there is a period of time for cloth
soaking, which can enhance the performance of washing. If the
program has the “weight” function, push one more time for “soak”
button can select the function of “weight”. If the programs do not have
“weight” function, or the “weight” function finished and the screen
display the remaining time, push the button of “soak”, you can
choose “soaking 16mins.”- “soaking 24mins”-cancelling soaking” for
optional. (The above operation should be done before running.)
3. Rinse: After selecting this function, the machine will heat the water
during last time of rinse in order to enhance the performance of rinse.
4. Memory: Used to memory the commonly used programs make it
convenient for users to select the used program by push one time
button. Push the “memory” button for 3 seconds and hear a chime,
at this time this program has been already memorized successfully. If
you want to use the memorized program, you can push the program
button when it is not running. (Do not push the buttons too long time,
just light up the lamp; the above operation should be done when it is
not running).
5. Prewash Function: When use “Prewash” function for washing, the
delay time is 3 hours to 19 hours.
When pushing the button for the first time, the screen display “3:00”, then
the maximum prewash time can be 19 hours.
Push one more time for button, it will increase 1 hour.
If want to cancel the prewash function, push “power: button or push one
cycle of “prewash” button.
The prewash time means from prewash to wash ending time.
You should operate the prewash function after selecting the grogram
and before push the button of “start/pause”.
6. Drum clean: The program of drum clean is use the high water level,
high water temperature, high speed to clean the drum and kill the bacteria.
The detailed operations ways, please take reference of Page 18.
24
Page 9

23
Maintenance
When washing machine is frozen
1.Cover stopcock and the universal coupling with hot towel.
2.ake off the inlet pipe, and put it into 50 degree water.
3.Pour into the drum about 2-3L of 50 degree water.
4.Connect inlet pipe, turn on the stopcock and start the washing
machine, please check whether inlet and outlet is normal.
a.
Faucet
Connecting part
Inlet pipe
ake off the inlet pipe,
b.
and put it into 50
degree water.
50 degree
water
The Clearance of dewatering-pump filter( Suggest: once/monthly)
1.Press fastener on the pump after dewtering and power off, open the
lid of water-pump filter.(Attention: if hot water inside, please go
ahead after it be cold.)
2.Take off the filter anti-anticlockwise.
3.Wash the filter.
4.Direct at pump and insert the filter, tighten it clockwise and tighten
the lid.
Attention: a. Please tighten the filter well to avoid leak.
b. Please do not clean during operation.
c.Pour into the drum
about 2-3L of 50
degree water.
50 degree
water
Wash tub
pipe holder
m
5cm
5c
2
8
.
. 1
x
in
M
Ma
the instruction of installation of pipe
wire harness
Horizontal Adjustment
To avoid noise and vibrate by adjusting washing machine level.
place it at the room corner preferably.
If ground not level, please adjust alignment
pins.(Do not put wood pieces or something
like), please make sure four alignment pins
touch ground tightly, and machine level
completely.
Adjust alignment pins
After adjusting alignment pins.
The diagonal check
Applying force downward on the diagonal of the
washing machine, washing machine should not
shake. (both diagonal need to check, if the
washing machine shake, must readjust
adjustable foot.)
ajustable
foot
up down
locknut
m
m
5c
c
2
. 1
.85
x
in
M
Ma
8
The Drum Clearance (Suggest once/monthly)
After using for a period, some dirt maybe exist. You can clean the
inside and outside of drum by operating the drum procedure.
Attention: please do not put cloths and detergent when clearing the
drum.
Page 10

Methods of Door Lock and Remove
Maintenance
DOOR LOCK
After operating,the door will be locked automatically and
Please maintenance washing machine to extend service life.
Before maintenance, please unplug.
light/picture on the panel is lighting.“DOO LOCK”
Remove Door Lock
When
“DOO LOCK”light/picture is lighting,press“START/PAUSE”,
WASHING/DEWATERING drum stop operting.Please wait for about
10s, door lock will be removed automatically.
Unplug directly and wait for about 65s~85S,door lock will be
removed automatically.
Foam overflowing if open the door during operating, please
catch foam with towel.
If temperature is too high, the door can not be opened during
operating.
If water level is too high, the door can not be open during operating.
The Usage Method of the Detergent Box
9
Synthetic Detergent
Powder
Please dissolve detergent
(e.g soap pieces)before
putting into detergent box.
Liquid detergent. Bleach
Please use detergent with
less foam.
Please use two times water
to dilute the concentrated
type detergent before putting
into detergent box.
Please add softener before last time
washing, it will be added into the drum
during the last time of rinse.
Please use concentrated fabric
softeners, use the corresponding
percentage of water to dilute then pour
into the washing machine.
Do not surpass the mark of "MAX".
Softener
Body of washing machine
After washing, please clean it with soft
cloth. If much contamination ,please
use appropriate detergent or soap.
Do not watering directly.
Do not use putty-powder,diluent,
gasoline,alcohol to clean machine
body.
Door Gasket Ring
After washing, please remove
contamination, wastepaper and so
on, if foreign matter exists, please
remove.
The Clearance of Universal coupling ( Suggest:Once/ half year)
If waste accumulated, it will influence
water inlet speed.
1.Take off the soft pipe from the
universal coupling side.
2.Take off the screwing device according to the arrow showed.
3.Wash the inside of the screwing device.
4.Install the cleaned crewing device with the inlet soft pipe.
The clearance of inlet water valve ( Suggest:Once/ half year)
The Clearance of
Detergent Box
Please clean the detergent
box regularly. Pall it out
and wash with clean water,
then insert back.
Push down
pull out
22
Tightening device
1.Take off the soft pipe from washing machine side.
Softener
2.Take off the filter net from water valve.
3.Clean the filter net with tooth-brash.
Please put softener before washing,
which will pour into drum
automatically when last potch
happening.
When using concentrated type
softener, please dilute it with
appropriate water.
Do not exceed MAX mark.
Use special detergent.
Do not use too much detergent which will cause
too much foam and affect washing quality or will
cause malfunction.
Select detergent according to cloths variety, color,
water temperature and contamination level.
Please use moderate detergent to get washing
effect and protect environment.
4.Install the soft inlet pipe.
valve of water
inlet
Page 11

21
Model :F701202ND/F751202NDNo.
Program
Stardard
/Cotton
Eco
Synthetic
Duvet
Delicate
Sports
Wear
Wool/
Hand wash
Mix
Down
Jacket
Baby Care
Tub Clean
Quick 15'
Spin only
Rinse+
Spin
Temperature
(℃)
40℃(cold,
30℃,60℃,
96℃)
30℃(cold,
40℃,60℃)
40℃(cold,
30℃,60℃)
40℃(cold,
30℃)
30℃(cold,
40℃)
cold(30 ,
℃
40℃)
40℃(cold,
30℃)
cold(30
℃
40℃)
30℃(cold,
40℃)
60℃(cold,
40℃)
60℃
cold(30 ,
℃
40℃)
Rinse
(times)
3
(1,2,
4,5)
2
(1,3,
4)
3
(1,2,
4,5)
2
(1,3,
4)
2
(3,4)
2
(1,3)
2
(3,4)
3
(1,2,
4,5)
3
(2,4)
3
(2,4,
5)
2
1
(2,3)
1
(2,3)
Spin Speed
(Run/Min.)
1000(0,
400,800,
1200)
1000(0,
400,800)
1000(0,
400,800)
800(0,
400)
800(0,
400)
800(0,
400)
800(0,
400)
800(0,
400)
800(0,
400)
800(0,
400,
1000)
800
800(0,
400)
1000(0,
400,800,
1200)
1000(0,
400,800,
1200)
Time(m)
96
59
88
80
63
46
51
83
77
138
75
15
12
18
Max.Load
(Kg)
Rated
≤4. 0
Rated
≤5. 0
≤2. 0
≤4. 0
≤2. 0
Rated
≤2. 5
≤4. 0
≤4. 0
≤2. 0
Rated
Rated
Cloth Materials
Normal Co tt on
Fab ri c
Normal Co tt on
Fab ri c
Syn th et ic F ab ri c
Sheet/ Cu rt ai n
Gau ze /S il k
Fab ri c
Apply to Ma ch in e
-w as ha bl e
Sportsw ea r
Apply to Ma ch in e
-washable Woo l
Fab ri c
Normal Co tt on
Fab ri c an d
Syn th et ic F ab ri c
Apply to Ma ch in e
-wash ab le D ow n
Jacke t
Infan t cl ot hi ng n ee d
to re mo ve b ac te ri as
and mits
Clothes to be c ha ng ed
Fri eq ue nt ly, n ot t oo
dirty a nd t hi n cl ot he s
Norma l Co tt on F ab ri c
and Synth et ic F ab ri c
Norma l Co tt on F ab ri c
and Synth et ic F ab ri c
Instruction:
1 .The needed time can be changed due to water pressure,drain condition,clothing textile,weight,water
temperatue changing.
2 .During the process of washing,the time of washing and spining will be different with the real running time.
3 .During the process of washing, the real display time will beat according to sensing the weight chaning
of clothing.
4 .Due to different weight of clothing and detergent, if the spin speed is too low,the rinse performance will not be
good,please increase times of rinse.
5 .The data in the chart can be different from different models.
6 .When editing the default program as energy efficiency program, washing time will increase automatically.
7 .Delicate and down jacket program can be only used in model F751202ND.
Soak
(Additional)
YES
NO
YES
YES
NO
NO
NO
NO
YES
NO
NO
NO
NO
NO
Wash options
Cotto n( Sa vi ng
tim e, I nt en st iv e)
Savin g ti me
(Cott on )
Cotto n( Sa vi ng
tim e, I nt en si ve )
Cotto n( Sa vi ng
tim e, I nt en si ve )
Cotto n( Sa vi ng
tim e, I nt en si ve )
Cotto n( Sa vi ng
tim e, I nt en si ve )
Cotto n
(In te ns iv e)
Savin g ti me
(Cott on ,I nt en si ve )
Savin g ti me
(Cott on ,I nt en si ve )
Savin g ti me
(Cott on ,I nt en si ve )
Savin g ti me
(Cott on ,I nt en si ve )
Savin g ti me
(Cott on ,I nt en si ve )
Function Introduction of Operating Panel(One)
6
7
8
5
4
3
2
1
1 START/PAUSE
Press START button to start operation.
Press PAUSE button to stop, and press it again to continue.
2 POWER
Press it to turn off/on power.
Procedure over, power off automatically.
3 SELECT
Press it to select additional function.
4 “Washing” button
When push the power button to start the machine and select the program,
you can choose the washing mode (saving time, standard, intensive) by
this button.
5 “Rinse” Button
When push the power button to start the machine and select the program,
you can choose the times of rinse by this button, which can make better
washing performance.
6 “Temperature” button
When push the power button to start the machine and select the program,
you can choose proper water temperature according to the material of cloths.
7 “Spin” button
When push the power button to start the machine and select the program,
you can choose different spin speed (1200, 1000, 800, 400, avoid dehydration ).
8 ”Additional Function” Button
According to your request, you can add the additional function to the basic
programs. The additional function will be different according to different basic
programs. (Please take reference the additional functions introduction in
details).
10
Page 12

11
Child Lock Lamp
9
To avoid the children wrongly operations
If you want to start child lock function, you should push prewash buttonfor 3
seconds during the running process of washing machine. To unlock child lock
function, you can push prewash button for 3 seconds during the running
process or under non- running process. (Please check the detailed introduction
of child lock function in the “additional function introduction”).
1 0 Display Screen
To display the remaining time or prewash time
Remaining time gradually reduce in accordance with the washing.
During the process of washing, if there is a abnormal phenomenon, the screen
will display the error code accordingly.
If the remaining time is different with the real time, the program will adjust
according to the real situation. It is not an error.
If the program has self-weight function, the screen will display” - - -“. If washing
machine is in the process of weighting, the screen will flash” –“. If the weighting
function ends, the screen will display the remaining time of washing.
11 The reminding window of washing status
There are four indicator lamp on the top, represent weighting, washing, rinse
and spin.
When setting the programs before washing, if some indicator lamp lights, it
means that this washing program has the following washing process; When the
machine is running, if one indicator lamp lights, it means the current washing
process is under this status; If some indicator lamp always flash, it means that
the following washing process include the corresponding programs.
The introduction for single spinning program
The machine will not wash and rinse, only spin.
1. preparation for washing
Open the door, put clothes in and closes the door.
2. Press the power button, connect the power.
3. Rotate the program button and choose the “single spinning”
The default rotate speed is 88r/m, pressing “rotate speed” button
can adjust the speed.
4.Press the start/pause button
Begin to drain away water and spin.
5.When the program ends, it will have a hum sound.
If you want to change the current settings during the process of spin,
please push the “Start/Pause” button to stop the washing machine
and then push “spin speed” button to change.
During the process of spinning, the actual spinning speed may be
inconsistent with the program speed, which is because the washer
adjust the speed according to the balance between clothes.
There may be rhythmic drone during spinning, which is the normal
voice of drain bump rather than the machine fault.
Rinse and Spin function Introduction
The machine will not wash, only rinse and spin.
1.Prepare washing
Open the door and put the cloths then close the door
2. Push “Power” button and connect to the power
3. Turn the program button to choose”Rinse+ Spin” program
The washing program will be selected automatically. Take reference on
page 21.
Choose the proper spin speed and rinse times.
4.Push “Start/Pause “button to start washing.
5.When the program ends, it will have a hum sound.
20
。
If you want to change the current setting, please push “Start/Pause”
button first and stop washing, then push “Rinse” and “Spin Speed”
button to reset.
The Spin speed can be selected the highest, but the temperature
cannot be set.
Page 13

19
If you want to change the current setting during the process of
washing, please firstly push"Start/Pause" button to stop the operation,
then to reset different programs.
This mode can not adjust the temperature, spin speed and rinse
times, but can adjust the washing time.
During the process of setting tub clean program, it will alternatingly
display washing remainning time and "CL n".During the process of
operating, it will onl display remainning time.
When the program ends,open the door and dry the inner part of
washing machine in order to prevent the doformation of gasket.
If there are children at home, please don't open the door for too
much time.
Quick Wash 15’ Program Introduction
To wash clothes that are changed frequently, not too dirty and thin clothes
1.Prepare for washing.
Open the door, put the clothes then close the door.
Taking the detergent box and add detergent then close it.
Connect the water inlet pipe well and make sure the faucet is running.
2.Push “Power” button and connect to the power.
3.Turn the program button to choose “quick wash” program
The washing program will be selected automatically. Take reference
on page 21.
Choose the needed water temperature, spin speed, rinse times and
washing intensity.
4.Push “Start/Pause “button to start washing.
5.When the program ends, it will have a hum sound.
If you want to change the current setting during the process of
washing, please push “Start/Pause” button first and stop washing,
then push button to reset.
In order to prevent clothing damage, speed cannot set the highest
speed, the temperature cannot be set to “cold”,” 30℃”,”40℃”
prevent the door from distorting.
In order to ensure the washing effect, washing is suitable for the
washing capacity under 2 k g.
The introduction of function and program
Usage of routine clothes
1.Preparations
Open the door put clothes in and closes the door.
Pull out the detergent box, add detergent and close the box.
Connect the inlet pipes and make sure the tap turned on.
2.Press the power button
3.The programs can be selected according to requirements.
Standard-Eco-Synthetic-Duvet-Delicate-Sports Wear-Wool/Hand wash-Mix-
-Down Jacket-Baby Care-Tub Clean-Quick 15’-Spin Only-Rinse+Spin
4.Press start/pause button and begin to wash
5.Washing Ending
The screen displays “End” with a hum.
Open the door and take out the cloth.
Pull out the plug and close the faucet.
The usage of self-compiled program
You can use it when need to set washing intensity, rinse times, water
temperature, spin speed.
1.Prepare to wash
Open the door, put clothes in and close the door.
Pull out the detergent box, add detergent and close the box.
Connect the inlet pipes and make sure the tap turned on.
2.Press the power button
3. The programs can be selected according to requirements.
4. Push “wash”/”rinse”/”temperature” button to set washing intensity,
rinse times, water temperature, spin speed.
5. Press the start/pause button to start washing.
6.When the program ends, it will have a hum sound.
The screen displays “End” with a hum.
Open the door and take out the cloth.
Pull out the plug and close the faucet.
12
Page 14

Cotton Program Introduction
This program is suitable for the clothes which are moderate or mild dirty,
like cotton, beddings, underwear, towels and shirt, etc…
1.Preparation for washing
Open the door, put the clothes then close the door
Taking the detergent box and add detergent then close it.
Connect the water inlet pipe well and make sure the faucet is running.
2.Push “Power” button and connect to the power
3.Turn the program button to choose “cotton” program
The washing program will be selected automatically. Take reference on page 21.
page 21.
Choose the needed water temperature, spin speed, rinse times and
washing intensity.
4.Push “Start/Pause “button to start washing
5. When the program ends, it will have a hum sound.
Baby Care Function
This program is to wash infant clothing, allergy people clothing and clothing
need high temperature bacteria suppression mite.
1.Prepare for washing
Open the door, put the clothes then close the door.
Taking the detergent box and add detergent then close it.
Connect the water inlet pipe well and make sure the faucet is running.
2.Push “Power” button and connect to the power
3.Turn the program button to choose “quick wash” program
The washing program will be selected automatically. Take reference
on page 21.
Choose the needed water temperature; spin speed, rinse times and
washing intensity.
4.Push “Start/Pause “button to start washing
5.When the program ends, it will have a hum sound.
13
If you want to change the current setting during the process of washing, please
push “Start/Pause” button first and stop washing, then push button to reset.
When the washing machine washing towel, the yarn will be squeezed, washing
will get rough surface, using the fiber softening agent, to prevent this kind of
phenomenon happens to the greatest extent.
The introduction for energy-saving program
To wash the clothes that is not too dirty, it will save time and water.
1.Preparation for washing
Open the door, put clothes in and closes the door.
Pull out the detergent box, add detergent and close the box.
Connect the inlet pipes and make sure the tap turned on.
2. Press the power button, connect the power.
3. Rotate the program button and choose the “energy-saving”
The washing program will be selected automatically. Take reference on
page 21.
Choose the needed water temperature, spin speed, rinse times and
washing intensity.
4. Press the start/pause button and begin to wash.
5. When the program ends, it will have a hum sound.
When the washer is working, if you want to change its setting, please press
the start/pause button to stop running temporarily and then choose the
program you need.
If you want to change the current setting during the process of
washing, please push “Start/Pause” button first and stop washing,
then push button to reset.
Reach the best temperature aseptic divide mite effect, can choose
"9 6 ℃".
When taking the clothes out, pay attention to the internal heating
steam.Before opening the door to take out clothes, please
Tub Clean Function
Tub Clean program is to use high water level, high temperature and high
spin speed to clean and sterilize the inner tube.
1.Preparation for washing
Please make sure nothing in the tub before cleaning.
Open the distribution box, add the liquid bleach in the main box.
Don't add detergent or laundry detergent to prevent causing too much
foam.
Close the distribution box.
Please make sure the inlet pipes connected well and the tap turned on.
2.Press the power button, connect the power.
3.Turn the program button to choose “tub clean” program.
The washing program will be selected automatically. Take reference
on page 21.
4.When the program ends, it will have a hum sound.
18
Page 15

17
Mix Washing Function
This function can be used to wash mix clothes like cotton,synthetic and
so on (please do not mix wash the clothes that easily rub off.
1.Prepare for washing
Open the door, put the clothes then close the door
Taking the detergent box and add detergent then close it.
Connect the water inlet pipe well and make sure the faucet is running.
2.Push “Power” button and connect to the power
3.Turn the program button to choose “duvet” program
The washing program will be selected automatically. Take reference
on page 21.
Choose the needed water temperature, spin speed, rinse times and
washing intensity.
4.Push “Start/Pause “button to start washing
5.When the program ends, it will have a hum sound.
If you want to change the current setting during the process of washing,
please push “Start/Pause” button first and stop washing, then push button
to reset.
In order to prevent clothing damage, speed cannot set the highest speed,
the temperature cannot be set to "60 ℃ and "96 ℃
Please separate white or bright color clothes from dark clothes.
Down Jacket Function
Washing down fill clothing.
1.Prepare for washing
Open the door, put the clothes then close the door
Taking the detergent box and add detergent then close it.
Connect the water inlet pipe well and make sure the faucet is running.
2. Push “Power” button and connect to the power
3. Turn the program button to choose “duvet” program
The washing program will be selected automatically. Take reference
on page 21.
Choose the needed water temperature, spin speed, rinse times and
washing intensity.
4. Push “Start/Pause “button to start washing
5. When the program ends, it will have a hum sound.
If you want to change the current setting during the process of washing,
please push “Start/Pause” button first and stop washing, then push button
to reset.
In order to prevent clothing damage, speed cannot set the highest speed, the
temperature can only be set to “cold”, "30 ℃ and "40 ℃
Synthetic Program Introduction
To wash the synthetic clothes
1.Preparation for washing
Open the door, put the clothes then close the door.
Taking the detergent box and add detergent then close it.
Connect the water inlet pipe well and make sure the faucet is running.
2.Push “Power” button and connect to the power
3.Turn the program button to choose “synthetic” program
The washing program will be selected automatically. Take reference
on page 21.
Choose the needed water temperature, spin speed, rinse times and
washing intensity.
4.Push “Start/Pause “button to start washing
5.When the program ends, it will have a hum sound.
If you want to change the current setting during the process of
washing, please push “Start/Pause” button first and stop washing,
then push button to reset.
In order to prevent clothing damage, speed cannot set the highest
speed, the temperature cannot be set to "96 ℃
Duvet Program Introduction
The cloths have the machine-washable mark, like bedding, bed
sheets, curtains, etc
1.Prepare for washing
Open the door, put the clothes then close the door
Taking the detergent box and add detergent then close it.
Connect the water inlet pipe well and make sure the faucet is running.
2.Push “Power” button and connect to the power
3.Turn the program button to choose “duvet” program
The washing program will be selected automatically. Take reference on
page 21.
Choose the needed water temperature, spin speed, rinse times and
washing intensity.
4.Push “Start/Pause “button to start washing
5.When the program ends, it will have a hum sound.
If you want to change the current setting during the process of washing,
please push “Start/Pause” button first and stop washing, then push button
to reset.
In order to prevent clothing damage, speed cannot set the highest speed,
the temperature cannot be set to "60 ℃ and "96 ℃
The electric blanket and carpet cannot be washed.(It will damage the
machine and clothes).
14
Page 16

15
Put the clothes in the washing drum properly and uniform when
spining, in order to avoid large vibration and drying time may be
extended.
Heavy clothes can not be entanglement, need to put inside the
washing machine after shaking loose.
Uneven clothes can lead to not spining(display UE), take out again
in the after washing to shake loose.
Delicate Function
Washing gauze, silk underclothes.
1.Prepare for washing
Open the door, put the clothes then close the door.
Taking the detergent box and add detergent then close it.
Connect the water inlet pipe well and make sure the faucet is running.
2.Push “Power” button and connect to the power.
3.Turn the program button to choose “duvet” program.
The washing program will be selected automatically. Take reference on
page 21.
Choose the needed water temperature, spin speed, rinse times and
washing intensity.
4.Push “Start/Pause “button to start washing.
5.When the program ends, it will have a hum sound.
If you want to change the current setting during the process of
washing, please push “Start/Pause” button first and stop washing,
then push button to reset.
In order to prevent clothing damage, speed cannot set the highest
speed, the temperature cannot be set to "60 ℃ and "96 ℃.
Sports Wear Function
Wash the machine- washable sports clothes
1. Prepare for washing
Open the door, put the clothes then close the door
Taking the detergent box and add detergent then close it.
Connect the water inlet pipe well and make sure the faucet is running.
2. Push “Power” button and connect to the power
3. Turn the program button to choose “duvet” program
The washing program will be selected automatically. Take reference on
page 21.
Choose the needed water temperature, spin speed, rinse times and
washing intensity.
4.Push “Start/Pause “button to start washing
5.When the program ends, it will have a hum sound.
If you want to change the current setting during the process of
washing, please push “Start/Pause” button first and stop washing,
then push button to reset.
In order to prevent clothing damage, speed cannot set the highest
speed, the temperature cannot be set to "60 ℃ and "96 ℃
Wool/Hand Wash Function
Wash wool fiber texture, such as machine washable wool fabrics, etc.
1.Prepare for washing
Open the door, put the clothes then close the door
Taking the detergent box and add detergent then close it.
Connect the water inlet pipe well and make sure the faucet is running.
2.Push “Power” button and connect to the power
3.Turn the program button to choose “duvet” program
The washing program will be selected automatically. Take reference
on page 21.
Choose the needed water temperature, spin speed, rinse times and
washing intensity.
4.Push “Start/Pause “button to start washing
temperature, dewatering speed and appoint time.
5. When the program ends, it will have a hum sound.
If you want to change the current setting during the process of
washing, please push “Start/Pause” button first and stop washing,
then push button to reset.
In order to prevent clothing damage, speed cannot set the highest
speed, the temperature cannot be set to "60 ℃ and "96 ℃
After washing completed, take the clothes in time, drying, after
shaking loose plastic deformation in order to avoid placing time
is too long.
Please separate white or bright color clothes from the dark clothes
for washing.
Using special wool detergent can reduce clothing damage, improve
the washing effect.
16
 Loading...