


SKYSCAN ATOMIC CLOCK
WITH OUTDOOR WIRELESS TEMPERATURE
MODEL 86722
Instruction Manual
INTRODUCTION:
Congratulations on purchasing this state-of-the-art Skyscan Atomic Clock as an example of superior design and engineering. Providing WWVB radio-controlled time, date, time zone, indoor and outdoor temperature display, this innovative clock is ideal for home or office use. Operation of this product is simple and straightforward. By reading this operating manual, the user will however receive a better understanding of the Skyscan Atomic Clock together with the optimum benefit of all its features.
FEATURES:
ATOMIC CLOCK:
LCD1 display
LCD2 display
Hanging holes |
|
Function keys |
|
Foldable stand |
|
Battery cover |
Foldable stand |
WWVB Radio controlled time with manual time setting
12/24 hour time display
Time display: hour, minute, second
Alarm setting with snooze function
Calendar display
Weekday display (3 languages to choose from: English, French and Spanish)
Time zone setting
Daylight savings time ON/OFF option (DST)
ºC or ºF temperature display selectable
Indoor temperature display
Outdoor temperature display via 433MHz transmission
Wall mounting or freestanding
OUTDOOR TEMPERATURE TRANSMITTER:
Holder |
Remote transmission of outdoor temperature to Temperature Station by 433 MHz signals |
|
|
|
Wall mounting case |
TO INSTALL AND REPLACE BATTERIES IN THE ATOMIC CLOCK
The Atomic Clock uses 2 x AA, 1.5V batteries. To install and replace the batteries, please follow the steps below:
1.Insert finger or other solid object in the space at the bottom center of the battery compartment and lift up to remove the cover.
2.Insert batteries observing the correct polarity (see marking).
3.Replace compartment cover.
DO NOT SET THE CLOCK.

TO INSTALL AND REPLACE BATTERIES IN THE TEMPERATURE TRANSMITTER
The transmitter uses 2 x AA,1.5V batteries. To install and replace the batteries, please follow the steps below:
1.Remove the cover.
2.Insert the batteries, observing the correct polarity (see marking).
3.Replace the battery cover on the unit.
SETTING UP: Do not set the clock until the outdoor temperature is displayed.
1.Slide the battery cover open on the SkyScan Atomic Clock as indicated above (see "To install and replace batteries in the Atomic Clock“ above).
2.Checking the correct polarization, insert 2 x AA, 1.5V batteries into the battery compartment and replace the battery cover.
3.Once the batteries are in place, all segments of the LCD will light up briefly. Then the indoor temperature, the time as -:--, the date as 1.1. , and weekday will be displayed.
IMPORTANT: If the indoor temperature is not displayed after a few seconds, remove the batteries and wait for at least 10 seconds before reinserting them.
4.Within 2 minutes of activating the SkyScan Atomic Clock, place the batteries into the transmitter (see “To install and replace batteries in the Temperature Transmitter” above).
5.After a few seconds of inserting the batteries into the transmitter, the Atomic Clock will start receiving data from the transmitter. The remote temperature will then be displayed on the SkyScan Atomic Clock.
IMPORTANT: if this does not happen after 4 minutes, the batteries will need to be removed from both units and reset from step 1. Remove the batteries and wait for at least 30 seconds before reinserting them.
6.After the clock receives the outdoor temperature, set your time zone using the manual settings below. The default time zone is Eastern Standard Time.
7.After the clock receives the outdoor temperature the WWVB time code reception will automatically start. This reception typically takes between 5-10 minutes in good conditions. If after 10 minutes the WWVB time has not been received, use the SET key to manually enter the set mode and change either the time or date in order to activate the WWVB reception (see manual settings below). The clock will then automatically attempt to receive the WWVB time from 12:00 am through 6:00 am each day (attempts WWVB reception every full hour within this time frame). When this is successful, the received time will override the manually set time. The date is also updated with the received time (Please refer to notes on “Radio controlled time” and “Manual time setting”).
Note:
In the event of changing batteries of the unit ensure that the batteries do not spring free from the contacts. Always wait at least 30 seconds after removing the batteries before reinserting, otherwise start up and transmission problems may occur.
FUNCTION KEYS
The Atomic Clock has four easy to use keys:
SET key : |
To enter into the set mode for the following functions: time zone, DST ON/OFF (daylight saving |
|
time), language, hour, minute, year, month, day, weekday, 12/24 hour, ºC or ºF temperature |
|
display |
+ key: |
To toggle between the second, temperature or weekday display |
|
To change any values in manual set mode |
ALARM key: |
To enter into the alarm set mode |
|
To set the alarm ON/OFF |
SNOOZE key: |
To activate the snooze function during alarm |
|
To display the alarm time in normal mode display |
|
To exit the setting modes |
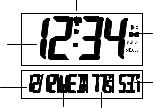
ATOMIC CLOCK LCD SCREEN DESCRIPTIONS
The Atomic Clock's LCD is divided into 2 sections and once the batteries are inserted, all the segments will light up briefly before displaying the information for time, date, indoor and outdoor temperatures.
Radio reception icon
WWVB |
Alarm icon |
|
time |
||
|
||
|
Outdoor |
|
Date |
temperature |
|
display |
||
|
||
Weekday or seconds display Indoor temperature or seconds display |
||
CHANGING THE DISPLAY MODE (DAY, SECONDS, AND TEMPERATURES)
There are three possible display modes to view the day, seconds, and temperatures.
The month&date/weekday/indoor temperature/outdoor temperature is the default.
To change the display:
1.Press the + key. The display should now show the month&date/weekday/seconds/ outdoor temperature.
2.Press the + key a second time and the display will now show the month&date/seconds/indoor temperature/outdoor temperature.
3.Press the + key third time and the display will return to the normal display.
WWVB RADIO CONTROLLED TIME
The NIST radio station, WWVB, is located in Ft. Collins, Colorado and transmits the exact time signal continuously throughout the United States at 60 kHz. The signal can be received up to 2,000 miles away through the internal antenna in the Atomic Clock. However, due to the nature of the Earth’s Ionosphere, reception is very limited during daylight hours. The Atomic Clock will search for a signal every night when reception is best. The WWVB radio station derives its signal from the NIST Atomic clock in Boulder, Colorado. A team of atomic physicists continually measures every second of every day to an accuracy of ten billionths of a second a day. These physicists have created an international standard, measuring a second as 9,192,631,770 vibrations of a Cesium 133 atom in a vacuum. This Atomic Clock regulates the WWVB transmitter.
Once the outdoor temperature is displayed on the Atomic Clock, the WWVB tower icon in the clock display will start flashing in the top center of the LCD. This indicates that the clock has detected a radio signal and is trying to receive it. When the time code is received, the WWVB tower becomes permanently lit and the time will be displayed.
If the tower icon flashes, but does not set the time or the WWVB tower does not appear at all, then please take note of the following:
Recommended distance to any interfering sources like computer monitors or TV sets is a minimum of 6 feet (2 meters).
Within ferro-concrete rooms (basements, superstructures), the received signal is naturally weakened. In extreme cases, please place the unit close to a window and/ or point its front or back towards the Fort Collins, Colorado, transmitter.
During nighttime, the atmospheric disturbances are usually less severe and reception is possible in most cases. A single daily reception is adequate to keep the accuracy deviation below 1 second.
Note:
In case the Atomic Clock is not able to detect the WWVB-signal (disturbances, transmitting distance, etc.), the time can be manually set (please refer to notes on Manual time setting)
 Loading...