

Page 1

Digital Satellite Receiver
DXH 90
OPERATING INSTRUCTIONS
19660
Page 2

General Installation
GB 2
Page 3

1. Contents
GB 3
Congratulations! You have purchased a quality product from our SKYMASTER®range. Our products are
subject to continuous, strict quality checks which guarantee product satisfaction. Welcome to the new
era of digital television!
The SKYMASTER®DXH 90 digital receiver is designed to receive uncoded satellite channels. Please note
that
a satellite antenna which is suitable for digital reception is required to operate the SKYMASTER®DXH 90.
This has to be equipped with a digital LNB for the reception of ASTRA or EUTELSAT.
TV reception is not the only thing now going digital! The DXH 90 has a high-quality digital HDMI output
for connecting plasma or LCD TV sets. The digital picture signal provides maximum picture quality.
Visibly better colour clarity and intensity compared to a conventional Scart connection.
The Skymaster®DXH 90 is tuning for every TV set with a HDMI connection.
Quick Installation ............................... 2
1. Contents ......................................... 3
2. Safety information ............................. 5
3. Receiver Operating Elements ................. 5
4. Remote control ................................. 6
5.
The OSD menu: the most important functions
.9
Open and close the OSD ................................. 9
Navigate in the OSD ....................................... 9
General OSD information ................................. 9
5.1 The OSD menu:
Info screen, audio channels and volume .. 10
Channel Information ...................................... 10
Select audio channels ................................... 10
Volume settings / mute .................................. 10
5.2 The OSD menu:
Direct channel selection, etc. ............... 11
Direct channel selection ................................ 11
Display the channel list .................................. 11
Display subtitles ........................................... 11
5.3 The OSD menu: Teletext, EPG and menu .. 12
Teletext ....................................................... 12
EPG – Electronic Program Guide .................... 12
Menu .......................................................... 13
Navigation and opening os submenus .............. 13
Close the menus .......................................... 13
6. Everyday use .................................. 13
7. The OSD menu SIMPLE MODE – overview 15
The OSD menu SIMPLE MODE ....................... 16
8. The OSD menu EXPERT MODE – overview 19
8. The OSD menu – Channels .................. 22
1. Edit channel .......................................... 22
1.1 TV channel list – (radio stations) .............. 22
1.2 Radio station list .................................... 24
1.3 Delete all .............................................. 24
1.4 Save as Default ..................................... 24
8. The OSD menu – Installation ............... 25
2. Installation ............................................ 25
2.1 Antenna connection ............................... 25
2.2 Satellite list ........................................... 27
2.3 Antenna setting ..................................... 27
2.4 Individual satellite search ........................ 29
2.5 Multi-satellite search .............................. 29
2.6 TP list .................................................. 30
8. The OSD Menu – System Setup ............. 31
3. System Setup ........................................ 31
3.1 Language .............................................. 31
3.2 TV System ............................................ 32
3.3 Display Setting ...................................... 33
3.4 Time Setting .......................................... 33
3.5 Timer Setting ........................................ 34
3.6 Parental lock ......................................... 35
3.7 OSD Setting .......................................... 35
3.8 Favouriten ............................................. 36
3.9 Miscellaneous ....................................... 36
8. The OSD Menu – Tools ....................... 37
4. Tools .................................................... 37
4.1 Information ........................................... 37
4.2 Factory setting ...................................... 37
4.3 Software upgrade via satellite ................... 37
4.4 USB Update........................................... 38
4.5 Save to USB ......................................... 38
4.6 USB ..................................................... 39
4.7 Safely remove data carrier ....................... 42
8. The OSD Menu – Game ...................... 43
5. Game ................................................... 43
8. The OSD Menu: Media ....................... 44
6.1 Record Manager .................................... 44
6.2 HDD Information .................................... 46
6.3 Formatting the hard drive ........................ 46
6.4 PVR settings ......................................... 46
9. Troubleshooting ............................... 47
10. Features ....................................... 48
11. Technical data ................................. 48
12. Service ......................................... 49
Page 4

DXH 90
GB 4
D
1 2 43 5 6 7 8
1 3 4 5 6 7 8 92
A
B
230 V
Dish
USB HDD
AC3/Surround
TV
LCD/Plasma TV
HiFi
Beamer
Page 5

2. Safety information
3. Receiver Operating Elements
GB 5
Please read this safety information thoroughly before commissioning the device! Prolonged absence: In the event
of prolonged absence or thunderstorms, remove the mains plug of the device from the wall socket. Also disconnect
the antenna connections to avoid storm damage.
SM Electronic GmbH hereby declares that Article No. 19660 complies with the basic requirements and other relevant
regulations of directives 2004/108/EC and 2006/95/EC.
Cleaning: Remove the mains plug before cleaning the device.
Use a dry or damp cloth and make sure that no moisture
penetrates the device!
Objects in the device: Make sure that no objects can enter the
ventilation slots. There is risk of death through electric shock!
Repair: Repairs must be performed by qualified experts. In the event
of improper intervention by a third party, the warranty will be voided
and the safety of the device can no longer be guaranteed! Never
open the housing of the device yourself: Even when disconnected
from the mains, there is an acute risk of death through electric
shock. Internal components can be damaged if touched.
Place of installation: Place the device on a straight and even
surface. To protect the surface from being discoloured as a
result of the natural heat generated by the device, place the
device on a suitable underlay.
Adequate ventilation: The ventilation slots on the device
must never be covered. Ensure that the device has a clearance
of at least 10 cm at the sides and top, and that the heat can be
dissipated upwards unimpeded.
External influences: Never expose the device to moisture
(e.g. condensation or splash water) or direct sunlight. Do not
place the device in the vicinity of heat sources, such as e.g.
heaters or devices that heat up.
Mains voltage: Use the equipment with the voltage specified
on the case only! Do not plug the equipment into the mains
until all connection and installation work has been completed.
Earthing: Antenna systems must always be earthed, paying
heed to the pertinent local and VDE regulations.
ASTRA, EUTELSAT, TÜRKSAT, DiSEqC and Skymaster are registered trademarks.
A
B
1. Mains switch
Switches the device on/off.
2. ON/OFF Lights up green if the device has been
switched on via the ON/Off switch.
3. USB Lights up green if the device is connected.
4. REC Lights up red when recording.
5. Calls the previous channel / leafs through
the menu.
6. Calls the next channel / leafs through the
menu.
7. I R Infrared sensor, receives the signal of the
remote control.
8.
3000 4 digit blue display
1. ANT OUT Connection to analogue SAT
receiver
2. ANT IN Input for an LNB of the satellite
system
3. USB USB-Port, max. 500mA
4. HDMI HDMI port
5.
TV SCART
SCART jack, connection to
aTVset
6. YPbPr Component output for
connecting a Beamer/TV
7. L/R Stereo audio output, for
connection to a stereo system
or TV/VCR (Cinch)
8. SPDIF
Sepate, digital audio output
(coaxial)
9. Mains cable 230V/50Hz
Information on the use of USB devices
If a USB device without its own power supply is
connected, according to the USB specification
the total power consumption must not exceed
500 mA. Otherwise the USB devices may
malfunction or the receiver may be damaged.
USB memories which require more than 500 mA,
for example hard drives with USB Y-cables or hard
drives with a power supply should only be
operated with their own power supply in order
to prevent damage to the receiver or the USB
memory.
Please note that external influences also affect the
USB memory of the receiver. For example, voltage
spikes or voltage reductions may occur due to bad
weather or the USB memory may destroy the data
structure when writing to the memory, as a result
of large numbers of defective sectors due to age.
In such cases there may be a complete loss of
data. Skymaster therefore recommends that a
back up copy of the memory content is made, so
that your data is not lost in case of data losses in
the USB memory.
Page 6

4. Remote control
GB 6
C
1:To switch the device on or off (standby).
2 Number buttons 0 - 9: Use these buttons to switch to a
certain channel or to enter numeric values and passwords
or to change channel names and favourites lists
3 TV/Radio mode: Toggles between TV and radio mode
4 SUB-T: Displays subtitles for the current programme
5 MENU: Access to the menu of the selected device.
6 왖/왔/왗/왘: For navigating within the OSD
(up/down/left/right)
7 EPG: Electronic Program Guide.
8
INFO: Displays programme information.
9 Fast Text Function (coloured buttons).
LAST: Toggles between the current and the previously set
channel
M/P: Opens the multi-picture preview. An overview of
9 images can be displayed in a preview.
ZOOM: to enlarge image. Use the cursor keys to navigate
within the picture.
MODE: Display and/or select the available on-screen
settings (screen, video etc.) for devices such as satellite
receivers etc.
10 FIND: To search for channels from the programme list
using the buttons 0-9/A-Z.
11 MUTE: Mutes the sound. Press again to reactivate the
sound.
12 AUDIO: Displays all the available audio channels.
13 FAVOR: Favourite channels.
14 TEXT: Opens teletext pages.
15 EXIT: Closes the current OSD and displays the higher-level
menu or the TV picture.
16 OK: To confirm executed changes.
18 For use as PVR and with USB:
PVR: Opens the list of all recordings on the connected
data carrier.
USB: Opens an overview of all image and music files on
the connected data carrier.
왎
왘 STEP: Jogs by single pictures when replaying recor-
dings.
왎
왗왗 SKIP-: Jumps back by adjustable time intervals, or to
the next bookmark.
왘왘
왎
SKIP+: Jumps forwards by adjustable time intervals,
or to the next bookmark.
왗왗 F.RWD: Fast rewind during replay. The speed can be
adjusted by pressing several times.
왘왘 F.FWD: Fast forward during replay. The speed can be
adjusted by pressing several times.
왘 PLAY:
Replay of multimedia files and recordings.
왎왎
PAUSE: Pauses the TV picture, multimedia files or the
replay of recordings. For further details, please refer to
“Timeshift”.
왎 STOP: Stops replay or recording.
쎲 REC: Immediately records a TV or radio programme.
Please always observe correct polarity when inserting batteries!
Correct polarity is displayed in the battery compartment.
Batteries: 2 x AAA, UM-4, Micro or R03.
Used batteries are considered hazardous waste – always
dispose of them correctly! Range approx. 6 m.
111
2
3 13
144
155
66
17
16
9
18
10
17
6
7
8
6
12
Page 7

USB
GB 7
An external hard drive can be connected via the USB port. If correctly installed, this enables the
recording and playback of TV and radio programmes. Please note the installation information for the
USB hard drive and the information for the use of USB devices on page 55.
Please note that due to the large number of different computer hard drives and the wide variety of
IDE/SATA-USB adapters, there may be compatibility problems, which are not caused by the receiver. If
there are functional problems, we recommend that the hard drive is first exchanged as well as the use of
the Skymaster IDE/SATA–USB adapter (Article-No. 8632).
The receiver supports the use of hard drives up to 500GB in FAT32 format.
The following hard drives have been successfully tested:
Hitachi 160GB, Samsung 160GB, Seagate 250 GB, 2,5" Seagate Momentus 40 GB.
The USB port of the receiver is also active in standby mode, in order to enable recording with the timer
from the standby mode, i.e. the hard drive is still supplied with power. If the receiver is not to be used
for a longer period, both it and the hard drive should be completely disconnected from the mains.
Initial installation:
Switch the receiver to standby mode with the Power key on the front of the device. Connect the hard
drive to the USB port at the rear of the receiver and switch the receiver on again. After the receiver has
started, the contents of the hard drive should be displayed on the screen after a short time.
If this is not the case, first check whether the receiver has recognised the hard drive via the menu item > Recording management -> Hard drive information If this does not contain any information, the hard
drive must first be formatted with a format which can be read by the receiver.
To do this, press the menu key and switch to “Recording management” using the navigation keys.
Select the item “Format hard drive". If this is confirmed with the OK key, the hard drive will be
formatted.
CAUTION! The formatting process deletes all existing data on the hard drive!!! Once the hard drive has
been formatted, exit from the menu via the EXIT key and select “Hard drive information”. This displays
the amount of space which is available on the hard drive.
In order to prevent loss of data from the hard drive, it should never be disconnected from the receiver
while running. First switch the receiver to standby mode in order to disconnect the hard drive from the
receiver.
SKYMASTER accepts no liability for loss of data or damage as a result of the use of the
USB port.
The total available recording time on a hard drive depends on the size of the hard drive as well as the
programmes to be recorded.
Page 8

HDMI
GB 8
HDMI Connection
Connect the receiver and the TV set via a HDMI connection cable. This connection provides you with
perfect and lossless picture and sound quality for your TV set.
The receiver automatically switches to the HDMI output as soon as a TV is connected to the receiver by
means of an HDMI cable.
The screen resolution at the HDMI output can be optimised using the MODE button. Please note that
the picture may disappear when the resolution is changed. In order to maintain an overview in this case,
the resolution is briefly displayed in the display of the unit (e.g. 480i, 720P, 1080). For optimum display
on a modern flat screen device we recommend the setting 1080i_50 or 720p_50.
To achieve the connection, we recommend the use of a conventional Scart and a HDMI connection
cable, since the HDMI input is not preset as standard on every TV set. It is also possible to access and
adapt the set-up menus via the conventional Scart cable should the screen remain blank.
Setting up the picture and sound connection:
All the necessary possibilities can be found in the section “System Settings”.
The following video signals are supported:
HDMI: The HDMI output provides you with perfect picture and sound quality. Note: The device has a
standardised HDMI output. Nevertheless, picture and sound interferences may occur at TV sets with
first generation HDMI inputs.
In this case, select one of the following connection options.
RGB: Extremely high-quality picture and sound transmission via a conventional (21-pole) Scart cable.
YUV: Very high quality image output via the 3 cinch sockets “YPbPr” for connecting a TV or a beamer.
Dolby Digital Sound (AC3)
Please note that if the channel broadcasts Dolby Digital Sound, this is only available via the digital
sound output or the HDMI output if this is connected to an external AV receiver.
Page 9

5. The OSD menu: The most important functions
GB 9
OSD = On Screen Display
Open and close the OSD: Carry out all your receiver
settings via the OSD. Press the MENU button to open the
OSD. To close the OSD, press the MENU or EXIT button
until all the menus have been closed.
Navigate in the OSD: Use the control buttons or
specific buttons to navigate through the OSD. These
buttons and their functions are displayed in the OSD. The
number buttons on the remote control are usually used
for this task.
General OSD information: The receiver has been
preset and usually no or only a few changes are
necessary. The OSD is clearly structured and the buttons
required for changing a certain setting are shown on the
screen. These are the best prerequisites for putting the
operating instructions to one side and referring to them
again at a later date, e.g. after extending the antenna
installation.
If you are a novice to digital satellite reception, please
take time and carefully read through the entire operating
instructions once. The instructions contain several
possibilities to extend your antenna installation.
Page 10

5.1
The OSD menu: Info screen, audio channels and volume
GB 10
Channel information:
After switching the device on and changing channels, an
info window appears. This window provides you with
information about the respective channel:
Date/Time
Channel name
Title of the programme (current and next programme)
Teletext available/not available
EPG
Subtitles
Storage location (e.g. CH 0189)
Satellite name and position
Type of programme list (e.g. all satellites, favourites)
The amount of information displayed depends on the
channel provider. If no additional information about the
channel is transmitted, a respective message is displayed (e.g. “no channel information”). The info window
can be opened at any time* by pressing the INFO button.
The duration of the display (1 - 10 seconds) can be
changed under (see System settings/OSD setting).
Note: If you cannot access certain channels, the
favourites list is most probably active. To select the
desired list, press the OK button and the
왗 or 왘 button
until the desired overview appears.
Select audio channels:
Some channels are broadcast with multiple audio
channels. These audio channels can be multi-language
channels or various radio stations.
Press the AUDIO button to select an audio channel or a
language. Select the desired selection from the list and
close the selection via EXIT.
In addition to this, it is possible to set whether the left or
right audio channel is played. The default setting is stereo.
In order to reproduce Dolby Digital-/AC3 sound, the TV must
be equipped with a suitable decoder, or the SAT receiver
must be connected to an AC3 enabled hifi amplifier. For
further information, please refer to page 58.
Volume settings/mute:
Use the VOL왗 and VOL왘 control buttons to control the
volume. Press the MUTE button to turn off the sound.
Reactivate the sound by pressing this button again or by
pressing the volume buttons.
*Not when Timeshift/Recording is active!
Page 11

The ever increasing number of channels has created a satellite channel jungle: Many channels are only
of interest in certain regions (e.g. foreign language channels), are coded and can only be received via
special receivers and after pre-payment or are just not interesting. In order to achieve a clear overview
in the channel lists, there are various channel groups and sort criteria. Access to the channels can
occur in various ways:
Direct channel selection via the numeric buttons 0 - 9:
If you know the position of the desired channel in the channel list, you can enter it directly via the
number buttons (e.g. 108 for “Example TV”). The desired channel is then displayed by the receiver after
a few moments. TIP: Press the LAST button to toggle between the current and the last channel.
5.2 The OSD menu: Direct channel selection, etc.
GB 11
Display the channel list:
An overview of all the stored channels is opened by
pressing the OK button. Use the CH 왖왔 control buttons
to navigate through this list. Use the PG+/PG- buttons to
“leaf through” the list faster. Once you have found the
desired channel, press the OK or EXIT button to hide
the list.
An extremely comfortable way to quickly access specific
channels is provided by the channel groups: Once you
have opened the TV channel or radio station list, use the
왗 and 왘 button to select the various groups: The group
“All Satellites” displays all the stored channels of all the
available satellites. Open the “Edit Channel” menu to
accept channels in the favourites list. The procedure is
explained in the course of these instructions.
To quickly find certain programmes, after calling up the
programme list, you can open the search field with the
FIND key.
Via the numeric keys of the remote control, enter the
letters of the channel which you are looking for. The left
hand window is then restricted to the programmes which
agree with the sequence of letters. As soon as you see
your channel, press the blue key in order to switch to the
left hand window and select the channel.
Display subtitles:
Sometimes subtitles are available for the current
programme, e.g. for audibly challenged people or in
various languages. Press the SUB-T button to open the
subtitle selection. Note: DVB subtitles are extremely rare
and are different to conventional teletext subtitles.
Page 12

5.3 The OSD menu: Teletext and EPG
GB 12
Teletext:
Most channels broadcast additional information and
services. Teletext pages are “electronic magazines”
which provide the latest news, sports results, weather
forecasts, commercial offers and much more. The
quantity and content is regulated by the channel
provider. Page 100 always displays a table of contents.
From here you can select an overview of further
subpages (e.g. page 200, sports overview). Always
enter the three-digit page number or use the control
buttons. Use the EXIT button to exit teletext.
EPG – Electronic Program Guide:
The Electronic Program Guide (EPG) is – like teletext –
not broadcast by each channel provider. The content can
also vary significantly. Therefore, statements such as “if
provided by the channel provider” are not expressly
stated in the following.
The EPG displays a daily or weekly overview of current or
future programmes with the corresponding air times. Use
the OK button to open information about the programme
in a new window.
If you find an interesting programme, you can accept it
in the timer via the [green] button! The satellite receiver
is then switched on at the selected time and the
programme can be recorded using a VCR. The timer
functions are described below.
Press the [red] button to switch to the “Schedule”.
Navigation in the EPG overview occurs as follows:
Back to the normal view
Jumps back to the current time
One channel previous/next
Two hours previous/next
One day previous/next
Page 13

6. Everyday use
Menu
In order to keep the controls as simple as possible, we
have divided the menu into the sections Simple and
Expert. The Simple section provides the basic functions
of the receiver. The Expert section provides all the
functions of the receiver. This is described in detail in
Section 8.
If you press the MENU button and select the Expert
Mode, the main menu appears on the screen. It is
possible to open submenus or change settings at your
receiver via this menu. You can change the layout of the
OSD, add or delete channels, adapt the receiver to your
satellite system, update new software via satellite and much more. But it is also possible to
inadvertently change everything and be left with just a black screen. Therefore, read the following pages
carefully before carrying out any changes.
Navigation and opening of submenus:
After opening the main menu the most recently selected menu is highlighted. Use the 왗왘 control
buttons to toggle between the main and submenu items. Press OK to open the submenus. Use the
왖왔 control buttons to highlight the desired submenu and open it via OK.
Close the menus:
Menus are either closed automatically after confirming your changes via OK or by closing each opened
submenu individually via the EXIT or MENU button.
For everyday use you only need a few functions – as you do with your TV set: switching channels,
adjusting the volume and a few special ones such as Teletext. You will hardly ever need to use your
TV set's remote again because you can regulate all its present and additional functions with the
SKYMASTER remote control.
Switch channels: 0 - 9 Enter channel number directly (e.g. 0108)
왖/왔 Channel up, forwards/backwards
Channel lists/browsing: OK Browse channels
왖/왔 Channel up while browsing
PG- /PG + Navigate page by page, forwards/backwards
FAVOR Favourites – a list of your favourite programs
Volume:
왗/왘 Volume control
MUTE Mute
Useful special functions: TEXT Teletext or Videotext
EPG “Electronic program guide”
SUB-T Subtitles
TV/RADIO Switching between TV and radio
5.3 The OSD menu: Menu
GB 13
Page 14

Info key
Via the Info key, you can obtain information about the current
programme. If the key is pressed once, information about the
current of following programme is displayed.
Pressing the key twice displays more detailed information about the current
programme.
Pressing the key three times displays information about the currently
selected frequency.
If a USB data carrier is connected and the Timeshift function is
enabled, the Timeshift status is displayed if the Info key is
pressed once. The bar which is displayed shows the current
playback point after switching to this programme. With the
navigation keys you can then access any point on the blue bar
and start at this point by pressing OK.
Pressing the key twice displays a list of existing recordings,
which can simply be selected for playback.
Immediate recording
If a USB data carrier is connected, a recording can be started
at any time by pressing the Record key.
Press the Record key again (if the display is no longer visible,
press the Record key twice) in order to set the duration of the
recording by means of the navigation keys. The default setting
is 2 hours.
You can find detailed descriptions of these and other functions on the following pages.
The preset password: 0000
6. Everyday use
GB 14
Page 15

7. The OSD menu SIMPLE MODE – overview
GB 15
1. Edit Channel
TV Channel List Favourites
16
Radio Channel List Favourites
16
2. System Setup
Local Time Setting Summer Time
16
Timer Setting Timer 1-30
Timer repeat
16/17
Timer service
17
Switch-on channel
17
Switch-on date
17
Switch-on time
17
Duration
17
Other Sleep Timer
17
3. Tools
Information
18
USB
Setup
18
Play-list
18
Repeat
18
(Find) Sort
18
(0) All MP3
18
(1) All Image
18
(FAV) Play-list
18
Remove USB device safely
18
4. Game
Tetris
18
Othello
18
Sodoku
18
5. Media
Record Manager
Lock
18
Delete
18
Rename
18
FHDD information
18
HDD Format
18
DVR Configuration
Timeshift
18
Timeshift to recording
18
USB Speed Detect
18
Record Type
18
Record Subtitle
18
Record Selection
18
Jump
18
Page 16

7. The OSD menu SIMPLE MODE
GB 16
The OSD Menu Edit Channel
For editing the available TV channels and radio stations.
Radio Channeln administration is the same as described
for TV channels
Favourites
It is possible to place your favourite channels in a
separate list. Use the [FAVOR] button to quickly access
your favourite channels.
Select the desired channel and press the [OK] button.
Press the [OK] button to insert the channel into one or
several FAV lists. Channel deleting is carried out in the
same way.
The OSD Menu System Setup
Local Time Setting
The time settings have to be checked and, if necessary,
adjusted to ensure that the receiver displays the correct
time and the timer starts at the desired time.
In Simple Mode, only the function for switching to
Summer Time is available.
Timer Setting
Timer 1-30
You can pre-program up to 30 different time events. For
example, programmes which you do not wish to miss or
to remind you of birthdays or anniversaries.
Page 17

7. The OSD menu SIMPLE MODE
GB 17
Timer repeat
Under timer repeat it is possible to set how often the
timer is to be activated: Once, daily, weekly or monthly. If
you select the “Off” setting, the timer remains
deactivated.
Timer service
Select “Programme” if you wish to view a particular
programme or record it with the video recorder. Select
“Record” if the programme is to be recorded on the
connected USB data carrier.
Switch-on channel
For a normal reminder message select “General”. If you
have selected “Channel” under “Timer Service”, it is
possible to select the channel which should appear after
switching on.
Switch-on date
Enter the desired date (e.g. 2nd of June 2009) as fol-
lows: 02.06 2009.
Switch-on-time
Enter the 4-figure start time of the event.
Duration
Enter the 4-figure duration of the event.
Sleep Timer
Off • 10 min • 30 min • 60 min • 90 min • 120 min
After the set time has elapsed, the unit switches to
standby.
Page 18

7. The OSD menu SIMPLE MODE
GB 18
The OSD Menu Tools
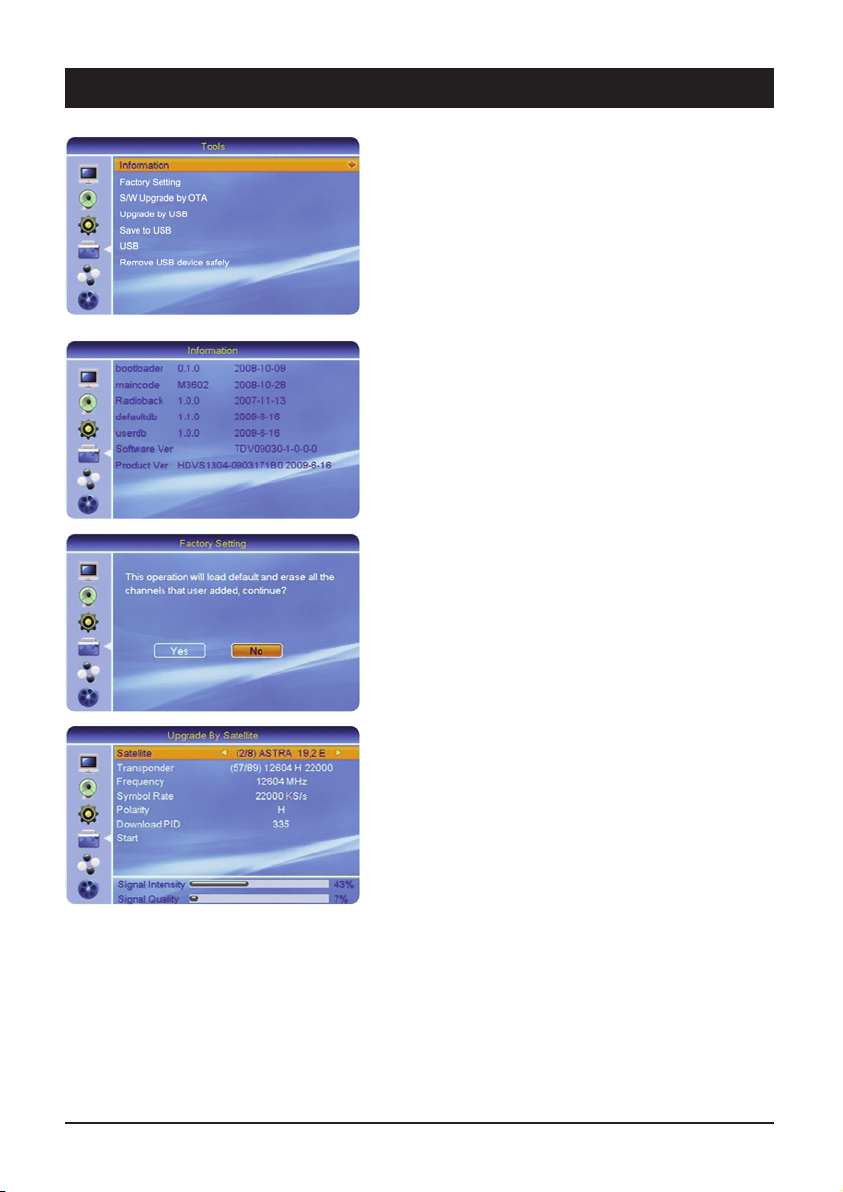
Information
This overview provides extensive information about the
software status of your satellite receiver. This data is
extremely useful if you need to contact our telephone
hotline.
The OSD Menu Game
Three classic games are available for your entertainment.
•Tetris
•Othello
•Sudoku
The OSD Menu Media
Information about the Recording Manager menu can be
found on page 44.
Page 19

7. The OSD menu EXPERT MODE – overview
GB 19
1. Edit channel 1.1 TV channel list 1.1.1 Favourites
22
1.1.2 Parental lock
22
1.1.3 Skip
23
1.1.4 Move
23
1.1.5 Change
1.1.5.1 Sort 23
1.1.5.2 Rename 24
1.1.5.3 Delete 24
1.2 Radio Channel list
24
1.3 Delete all
24
1.4 Save as Default 24
2. Installation
2.1 Antenna connection
2.1.1 Rotating system or
permanent alignment
25
2.2 Satellite List 2.2.1 Satellite 26
2.3 Antenna Setup
2.3.1 Satellite 26
2.3.2 LNB Frequency 26
2.3.3 Transponder 26
2.3.4 DiSEqC 26
2.3.5 22kHz 27
2.3.6 Polarisation 28
2.3.7 Signal Indicators 28
2.4 Single Satellite Search
2.4.1 Satellite 29
2.4.2 FTA 29
2.4.3 Search 29
2.4.4 Net work search 29
2.4.5 Search mode 29
2.4.6 Search 29
2.5 Multi Satellite Search 2.5.1 Satellite 29
2.6 TP List
2.6.1 Satellite selection 30
2.6.2 Symbol rate 30
2.6.3 Polarisation 30
Page 20

3. System Setup
3.1 Language
3.1.1 Menu language 31
3.1.2 1. Audio language 31
3.1.3 2. Audio language 31
3.1.4 Subtitle 31
3.1.5 Teletext 31
3.2 TV System
3.2.1 Video Resolution 32
3.2.2 Screen format 32
3.2.3 Video output 32
3.3 Display Setting
3.3.1 Brightness 33
3.3.2 Contrast 33
3.3.3 Saturation 33
3.4 Local Time Setting
3.4.1 GMT utilization 33
3.4.2 GMT time shift 33
3.4.3 Summer time 33
3.4.4 Date 33
3.4.5 Time 33
3.5 Timer Setting 3.5.1 Timer 1-30
3.5.1.1 Timer repeat 34
3.5.1.2 Timer service 34
3.5.1.3 Switch-on-channel 34
3.5.1.4 Switch-on date 34
3.5.1.5 Switch-on-time 34
3.5.1.6 Duration 34
3.6 Parental lock
3.6.1 Menu lock 35
3.6.2 Channel lock 35
3.6.3 New password 35
3.6.4 Confirm Password 35
3.7 OSD Setting
3.7.1 Subtitle display 35
3.7.2 OSD duration 35
3.7.3 OSD transparency 35
3.7.4 Dimmer 35
3.8 Favourites 36
3.9 Other
3.9.1 LNB voltage 36
3.9.2 Channel type 36
3.9.3 Signal 36
3.9.4 Sleep timer 36
7. The OSD menu EXPERT MODE – overview
GB 20
Page 21

7. The OSD menu EXPERT MODE – overview
GB 21
4. Tools
4.1 Information 37
4.2 Factory Setting 37
4.3 Software Upgrade via satellite 37
4.4 Upgrade by USB
4.4.1 Updating 38
4.4.2 Update file 38
4.5 Save to USB 38
4.6 USB
4.5.1 Setup 39/41
4.5.2 Playlist 42
4.5.3 Repeat 42
4.7 Remove USB device safely 42
5. Game
5.1 Tetris 43
5.2 Othello 43
5.3 Sodoku 43
6. Media
6.1 Recording Manager
6.1.1 Lock 44
6.1.2 Deleting 44
6.1.3 Renaming 44
6.2 HDD Information 45
6.3 HDD Format 45
6.4 DVR Configuration
6.4.1 Timeshift 45
6.4.2 Timeshift to recording 45
6.4.3 USB Speed Detect 46
6.4.4 Record Type 46
6.4.5 Record Subtitle 46
6.4.6 Record Selection 46
6.5 Jump 46
Page 22

8. The OSD menu – Channels
GB 22
1. Edit Channel List
For editing the available TV channels and radio stations.
1.1 TV Channel List – (Radio Channel)
TV channels can be accepted, moved, locked, sorted
and edited in FAV lists. Use the [
왗왘] buttons to select
the satellites. Use the [PG-/PG+] buttons to navigate
page-by-page through the channel list.
After exiting via the [Exit] button, a safety query appears
asking whether you wish to save the changes.
Press the coloured buttons to execute the following
functions:
1.1.1 Favourites
It is possible to place your favourite channels in a
separate list. Use the [FAVOR] button to quickly access
your favourite channels.
Select the desired channel and press the [FAVOR] button. Press the [OK] button to insert the channel into one
or several FAV lists. Channel deleting is carried out in the
same way.
1.1.2 Parental lock
It is possible to lock unauthorized access to certain
channels, e.g. with contents which are inappropriate for
young viewers. They can then only be accessed by
entering a password. Press the [red] button and highlight
the channels you wish to lock via the [OK] button. Note:
In order to activate the parental lock, you have to switch
on the parental lock in the “Child Protection” menu.
Page 23

8. The OSD menu – Channels
GB 23
1.1.3 Skip
It is possible to skip channels whilst zapping via the
[CH왔] button. Press the [green] button and highlight the
respective channel via the [OK] button. Note: It is also
possible to select the channel by directly entering the
channel position.
1.1.4 Move
Press the [yellow] button, select the desired channel and
press the [OK] button. Use the [CH
왖/CH왔] buttons to
move the channel to the new position and press the [OK]
button.
1.1.5 Change
Press the [blue] button to edit the existing TV channels
and radio stations, the same as delete, rename and sort.
1.1.5.1 Sort
Press the [red] button to sort the selected channel list.
The channels can be sorted according to various criteria:
“Name (A-Z)” and “Name (Z-A)” (alphabetical), “Free/Pay
TV” (free-to-air channels before coded channels) and
“lock” (locked channels at the end of the list). Note:
When you exit the menu and confirm continuous sorting,
the previous channel sequence is no longer available!
Page 24

8. The OSD menu – Channels
GB 24
1.1.5.2 Rename
Press the [green] button if you wish to rename the
selected channel.
CAPS (red button): Toggles between upper and
lowercase letters
DEL (green button): Deletes characters
OK (yellow button): Saves names
CANCEL (blue button): Exits the menu without saving
1.1.5.3 Delete
Press the [blue] button and highlight the channels you
wish to delete and confirm via the [OK] button. After
exiting the menu, a safety query appears asking whether
you wish to delete all the selected channels. Note: It is
possible to cancel the selection by pressing the [OK]
button again.
1.2 Radio Channel List
Radio station administration. The same as described for
TV channels above.
1.3 Delete all
The “Delete all” function is useful if you wish to reinstall
the receiver and subsequently start an automatic search.
1.4 Save to USB
Your DXH 90 is supplied with a default list of programme
sequences and satellite lists, which you can change as
required. After restoring the default settings or a software
upgrade, the sequence is always reset to the original
condition as supplied and all changes which you have
made are lost. In order to permanently set your personal
programme sequence, select the function “Save to USB”.
After restoring the default settings or a software upgrade,
the sequence is now retained. You can also save several
versions of your programme lists on a USB data carrier
and then reload them (see Item 4.5).
Page 25

8. The OSD menu – Installation
GB 25
2. Installation
The installation menu contains all the required settings
for adapting the satellite system and saving the channels.
2.1 Antenna connection
2.1.1 Rotating system (DiSEqC-LNB required) or
permanent alignment
If the device is to be used to control systems which are
capable of receiving more than one satellite, it is necessary to use a DiSEqC-LNB instead of a universal LNB.
If you own a motor-controlled rotating system, select the
option rotating system in the antenna connection menu.
Subsequently open the antenna setting menu and select
the LNB and rotor type. If you are not sure whether you
own a DiSEqC 1.2 or DiSEqC 1.3 (USALS) rotor, please
refer to the operating instructions of your antenna rotor.
If you own an USALS rotor, you can enter the coordinates
of the antenna location under the local longitude and
latitude (e.g. Hamburg 10.03 E and 053.57 N). Press the
OK button prior to entering the coordinates.
Delete all: For deleting all the stored satellite positions.
After deleting all the stored position, you have to reset
the positions for the DiSEqC 1.2.
Page 26

8. The OSD menu – Installation
GB 26
Rotor settings (DiSEqC 1.2):
Satellite: Select the desired satellite for setting the
rotating system. Note: If any satellites are missing here,
add them to the satellite list menu.
Transponder: It is possible to select a pre-programmed
transponder to search for the satellite.
Position & saving: Allocate a position number to each
satellite. Important: After successful alignment of the
satellite, you have to confirm the number via the OK
button!
Note: You can skip the following points if you are using
an USALS rotor. The satellite positions have already been
stored automatically.
Go To X: In order to facilitate the search for further
satellites, you can directly access already stored
positions from the list. The “reference” value represents
the central position and should face due south.
West/East: Use the
왗왘 control buttons to move the
antenna westwards or eastwards. Always observe the
signal indicators. Note: If a signal level is not achieved
during the search, select another transponder.
Recalculation: This is where the internal counter for the
individual satellite positions is recalculated starting from
the central position of the rotor (south). Deviations can
occur over time due to frequent rotation, mechanical
tolerances and external influences (wind).
It is possible to restrict the swivel range of the antenna in
order to prevent obstacles causing damage to it. Under
the limit setting select a direction (westerly or easterly
limit) and press the OK button. The following selection is
used for controlling the antenna to the outermost rotating
range. Use the
왗왘 control buttons for rotation. Use the
OK button to confirm both limits one after the other.
Page 27

8. The OSD menu – Installation
GB 27
2.2 Satellite list
All the preset satellites are displayed in the satellite list.
2.2.1 Satellite
Press the [OK] button to select the desired satellite. You
also have the possibility to rename the satellite ([red]
button), to add a new satellite ([green] button) or to
delete a satellite position ([blue] button).
Rename: Select the satellite position from the list and
press the [red] button. Use the number and control
buttons to select the letters and characters.
Further important buttons on the screen keypad:
Space: [0]
Delete: [green]
Save name and close keypad: [yellow]
Cancel: [blue]
Upper/Lowercase: [red]
2.3 Antenna setting
In order to carry out a successful search, you have to
adapt the receiver to the existing antenna.
2.3.1 Satellite
Select the satellite whose settings you wish to change.
2.3.2 LNB Frequency
Digital is almost without exception the correct choice for
all conventional LNBs. Only select further settings if they
are expressly specified in the assembly instructions!
2.3.3 Transponder
Select a transponder of the selected satellite. Check the
correct settings via the signal strength and signal quality
indicators.
2.3.4 DiSEqC
DiSEqC enables the reception of several satellite positions. If you have, e.g., aligned two LNBs to two different
satellites (ASTRA and HOTBIRD), use DiSEqC LNBs and
a DiSEqC switch. For the ASTRA position select the setting 1/2 and for the HOTBIRD position the setting 2/2.
You can control a 2, 4, 8 or 16-way switch and a DiSEqCsuitable multi-switch. Note: On some DiSEqC switches
the connections are marked with letters (A, B, C, D …)
instead of numbers. However, the sequence is the same.
Page 28

8. The OSD menu – Installation
GB 28
2.3.5 22 kHz
The 22kHz signal is used to switch a universal LNB
(off = low band, 22kHz = high band). If you have selected
“digital” as the LNB type, switching occurs automatically.
If you do not own a conventional LNB, the setting has to
be carried out manually.
2.3.6 Polarisation
Satellite signals are transmitted on two levels (horizontal
and vertical). Always select the AUTO setting which
enables the reception of both levels. In exceptional
situations it may be necessary to receive only the
horizontal OR the vertical level, e.g. in household
systems or to receive exotic satellites.
2.3.7 Signal indicators
Signal strength
The signal strength indicator shows the entire level of the
input signal.
Signal quality
The signal quality is extremely important for trouble-free
reception. Always align the antenna in such a way that
the signal strength and signal quality achieve the
maximum level!
Page 29

8. The OSD menu – Installation
GB 29
2.4 Individual satellite search
2.4.1 Satellite
Select a preset satellite from the list. If the desired
satellite is not listed, you have to add the satellite as
described under point 2.2.
2.4.2 Only FTA
Decide whether you wish to store only FTA or also coded
channels. We recommend you to select the setting
“OK (yes)” in order to filter the coded channels.
2.4.3 Search
Decide whether you wish to search for TV channels
and/or radio stations.
2.4.4 Network search
The ASTRA (19.2° East) and HOTBIRD (13° East)
satellites offer a so-called network search. These
satellites transmit a table (NIT = Network Information
Table) via all the available channels. Therefore, the
satellite receiver can read all the channels.
2.4.5 Search mode
Autom. search Automatic search of all the available
transponders of a satellite position.
Preset search Starts the search with the factory
default transponders.
2.4.6 Search
Starts the search after pressing the [OK] button.
2.5 Multi-satellite search
2.5.1 Satellite
Overview of the satellites which are actually searched for
during the multi-satellite search. Information on the
settings is stated above (2.4.2-2.4.6).
Page 30

8. The OSD menu – Installation
GB 30
2.6 TP list
For searching for an individual transponder. This search
method is advisable if you only wish to store a certain
channel or a certain channel package. The respective
reception parameters (frequencies, etc.) are stated on
the Internet or in TV and specialist magazines.
2.6.1 Satellite selection
Select a preset satellite via the [
왗왘] buttons.
To change a transponder press the [red] button, to add a
new transponder press the [green] button and to delete
the current transponder press the [yellow] button. If you
wish to search for the transponder of the currently
selected satellite, press the [blue] button.
2.6.2 Symbol rate
The symbol rates of the most common satellite
transponders have a value of 27500 or 22000. Change
the values either via direct input or in single steps via the
[
왗왘] buttons.
2.6.3 Polarisation
Satellite signals are transmitted on two levels (horizontal
and vertical). Select the corresponding level H or V.
Note: The common number, e.g. 12480H, equals:
Frequency 12480 MHz and the H stands for horizontal.
Page 31

8. The OSD Menu – System Setup
GB 31
3. System Setup
In the system menu you can adapt the satellite receiver
to the connected TV set, and set the languages for the
menu and the audio playback, the time, parental lock and
much more.
3.1 Language
In the “language” submenu you can select your preferred
language for the screen menu and audio playback.
3.1.1 Menu language
Select the desired OSD language. Use the [왗왘] buttons.
3.1.2 First Audio language
Select the language which should be used for
multilingual channels if this option is available.
3.1.3 Second Audio language
Select the language which should be used for
multilingual channels if the first audio language is
not available. If neither of the selected languages is
available, it is provided by the channel.
3.1.4 Subtitle language
DVB subtitles can be transmitted as multilingual
subtitles. Select the desired language.
3.1.5 Teletext
Select the desired language for multilingual teletext
offers.
Page 32

8. The OSD Menu – System Setup
GB 32
3.2 TV System
For adapting the satellite receiver to the TV set.
3.2.1 Video Resolution
Here the screen resolution at the HDMI output can be
optimised. Please note that the picture may disappear
when the resolution is changed. For optimum display on
a modern flat screen device we recommend the setting
1080i_50 or 720p_50. In addition, there are the settings
“By Source” (depends on the channel) and “By Native TV”
(automatic adaptation to the TV).
3.2.2 Screen format
If your TV set has a 16:9 screen, select the setting 16:9.
For 4:3 screens select the settings 4:3PS (Pan & Scan)
or 4:3LB (Letterbox). With Pan & Scan the black bars at
the top and bottom of the screen are cropped when
watching 16:9 broadband programmes. The picture is
thus enlarged. However, the sides of the widescreen are
also hidden. With the letterbox print the entire picture,
including the black bars in 16:9 cinema format
programmes, is visible.
3.2.3 Video output
For setting which type of video signals are output at the
Scart jacks of the receiver. Due to the separate transmission of red, green and blue, RGB achieves the best possible true colour quality and picture definition.
The best possible image quality is obtained with the
setting YUV+HDMI. The sockets YPbPr are especially
suitable for connecting a beamer.
Page 33

8. The OSD Menu – System Setup
GB 33
3.3 Display Setting
3.3.1 Brightness
The brightness of the TV picture at the HDMI output can
be set with the 왗왘 navigation buttons.
3.3.2 Contrast
The ratio of dark/light (contrast) of the TV picture at the
HDMI output can be set with the
왗왘 navigation buttons.
3.3.3 Saturation
The colour intensity of the TV picture at the HDMI output
can be set with the 왗왘 navigation buttons.
3.4 Local Time Setting
The time settings have to be checked and, if necessary,
adjusted to ensure that the receiver displays the correct
time and the timer starts at the desired time.
3.4.1 GMT utilization
GMT (Greenwich Mean Time) is the reference time for the
various time zones. When the GMT setting is switched
off, you can enter the time manually.
3.4.2 GMT time shift
The time in German-speaking countries is – depending
on summer or wintertime – 1 or 2 hours ahead of GMT.
3.4.3 Summer time
Switch the summertime setting on or off every six
months.
3.4.4 Date
For entering the current date manually
(only if GMT is off).
3.4.5 Time
For entering the current time manually
(only if GMT is off).
Page 34

8. The OSD Menu – System Setup
GB 34
3.5 Timer Setting
3.5.1 Timer 1-30
You can pre-program up to 30 different time events. For
example, programmes which you do not wish to miss or
to remind you of birthdays or anniversaries.
3.5.1.1 Timer repeat
Under timer repeat it is possible to set how often the
timer is to be activated: Once, daily, weekly or monthly.
If you select the “Off” setting, the timer remains
deactivated.
3.5.1.2 Timer service
Select “Programme” if you wish to view a particular
programme or record it with the video recorder. Select
“Record” if the programme is to be recorded on the
connected USB data carrier.
3.5.1.3 Switch-on channel
For a normal reminder message select “General”. If you
have selected “Channel” under “Timer Service”, it is
possible to select the channel which should appear after
switching on.
3.5.1.4 Switch-on date
Enter the desired date (e.g. 2
nd
of June 2009) as follows:
02.06 2009.
3.5.1.5 Switch-on-time
Enter the 4-figure start time of the event.
3.5.1.6 Duration
Enter the 4-figure duration of the event.
If the timer is enabled, the device does not switch back
to the energy-saving standby mode if the device is
switched off. This is shown by the display of the time,
if the display has not been switched off.
Page 35

8. The OSD Menu – System Setup
GB 35
3.6 Parental lock
It is possible to lock access to the menu or channels,
e.g. with contents which are inappropriate for young
viewers. They can then only be accessed via entering
a 4-digit password.
3.6.1 Menu lock
If you wish to protect certain areas of the OSD menu, set
the menu lock to “On”.
3.6.2 Channel lock
Channels which you have locked in the Channel menu
can be selected after entering a password if you have set
the channel lock.
3.6.3 New password
If you wish to change the preset password 0000, enter
the new password here.
3.6.4 Confirm password
Confirm the new password. Memorise your new
password, or note and store it in a safe place!
3.7 OSD Setting
In this menu it is possible to edit the layout of the OSD
menu.
3.7.1 Subtitle display
Select “On” if you wish to see the subtitles of a programme.
3.7.2 OSD duration
The display duration of information, error messages can
be set to between 1 and 10 seconds.
3.7.3 OSD transparency
Select the transparency of the OSD menu – 10% (background slightly visible) and 40% (back ground very
transparent).
3.7.4 Dimmer
To set the display on the unit:
Off – Low – Medium – High
Page 36

8. The OSD Menu – System Setup
GB 36
3.8 Favourites
In this menu you can rename the eight favourite lists.
Select an entry and press the [OK] button. Press the
number buttons 0-9 several times to select various
characters. The [red] button enables you to toggle
between upper and lowercase letters. Use the [green]
button to delete characters.
3.9 Other
3.9.1 LNB voltage
The LNB voltage of the satellite receiver provides the
LNB with an operating voltage and ensures switching at
the various reception levels. Note: Always leave the LNB
voltage switched on, unless you are expressly instructed
to switch it off. This may be the case in rare large
communal installations.
3.9.2 Channel type
Decide whether all FTA channels, only coded or all the
stored channels are to be displayed.
3.9.3 Signal
The signal can help you to align the antenna. The higher
the pitch, the stronger the satellite signal is. The signal
can be heard after opening the Antenna Setting menu.
3.9.4 Sleep Timer
OFF • 10 min • 30 min • 60 min • 90 min • 120 min
After the set time has elapsed, the unit switches to
standby.
Page 37
8. The OSD Menu – Tools
GB 37
4. Tools
Miscellaneous contains lots of useful and helpful
information, entertaining games and numerous
possibilities to upgrade your satellite receiver.
4.1 Information
This overview provides extensive information about the
software status of your satellite receiver. This data is
extremely useful if you need to contact our telephone
hotline.
4.2 Factory Setting
The Presetting function is used to reset the device to the
delivery status. Caution: All the values and channels
which have been changed and stored since initial setup
will be reset or deleted!
4.3 Software upgrade via satellite
The latest software can be loaded at regular intervals via
the ASTRA satellite (19.2° East). Check whether new
software is available by using the [
왖왔] buttons to go to
“Start” and pressing the [OK] button. The search and
download procedure can take several minutes!
Page 38

8. The OSD Menu – Tools
GB 38
4.4 USB Update
With this item, the receiver software can be updated.
This method is faster than updating by satellite or is
recommended if no software is available for your device
via satellite. Download the appropriate software from
www.skymaster.de and save this on the USB storage
medium (Please note the information when downloading)
4.4.1 Updating
Select the item “Allcode” in order to update the receiver
software.
4.4.2 Update file
Select the relevant file and start the update with START.
Follow the instructions on the screen and under no
circumstances switch off the device or disconnect it
from the mains. This could result in a complete failure
of the device.
4.5 Save to USB
You can save three different types of file on a USB data
carrier:
1. AllCode: The complete receiver software, e.g. in
order to archive older versions before an upgrade on
a PC. The file cannot be edited. It can only be
reloaded. After saving, you should add a date to the
specified file name, e.g. “M3602AllCode.abs” is
changed to “M3602AllCode_2009_07_19.abs”.
2. Radioback: No function
3. defaultdb (programme and satellite list): You can
save the complete programme and satellite list on a
USB data carrier, copy it to a PC and edit the
sequence and many other properties. The edited
programme list can be conveniently loaded via the
option “Upgrade via USB”. You can download the
editor for the programme list from our Internet site
www.sm-electronic.de · Service · Download-Center
Page 39

8. The OSD Menu – Tools
GB 39
4.6 USB
After a readable storage media has been connected, a
window opens, which displays the current files on the
hard drive in a folder structure similar to on a PC.
This menu can be called up by pressing the USB key on
the remote control. Please note that only MP3 and JPG
files can be played back.
The symbols used in this overview have the following
meanings:
Indicates that you are in the main directory of the data
carrier.
Indicates that you are in a sub-directory If this item is
enabled (press the OK key), the receiver switches to the
next higher directory.
Indicates that this is an MP3 audio file.
Indicates that this is a JPG image file.
Indicates that there is a further sub-directory at this
point.
The current folder is played continuously in a random
sequence.
The current folder is played continuously in sequence.
The current song is continuously repeated.
Elapsed and remaining time of the current title.
Control elements for audio files are the same as the keys
on the remote control.
Name of song, size and duration for audio titles.
File name, size and image information for image files.
Preview window for image files, this image is displayed
with audio titles.
Page 40

8. The OSD Menu – Tools
GB 40
Playback of images
Select an image from the overview using the navigation
keys and press OK.
The automatic slideshow starts from the selected image.
This symbol indicates that at present image 22 of 90 is
displayed.
During image playback, the following options are available:
The key 왖왔 selects whether the list is played forwards
or backwards.
The 왗왘 keys stop playback and rotate the image
clockwise or counter-clockwise.
The 왘 key continues playback in sequence.
If the Zoom key is pressed during playback, the image is
stopped. The degree of magnification can be set with the
Zoom key and the selected portion of the image can be
set with the navigation keys.
Quit the Zoom mode with the EXIT key and continue the
playback with the
왘 key.
M/P Multi-image preview
By pressing the green M/P button, up to 9 images can be
displayed in a preview. If there are further images in the
same directory of the USB data carrier, press the
PG+/Pg- buttons on the remote control unit. If you wish
to view a particular image, use the navigation buttons
and then press the OK button.
Page 41

8. The OSD Menu – Tools
GB 41
Playback of audio files
Select an audio file from the overview using the
navigation keys and press OK.
The playback is carried out according to the selected
Repeat mode.
The default setting is to play back “all files of the current
directory in sequence”.
To change this, select the required mode with the blue
key (See item 4.5 Symbols)
4.6.1 Setup for play lists (Play Listen)
Before setting up a play list, set the basic behaviour of
the list in Setup, using the INFO key.
4.6.1.1 Image size
Set whether the image is to be displayed in original size
or in full format (the image is adjusted to the screen
format (enlarged or reduced)).
4.6.1.2 Slide show time
Select how long an image is to be displayed before
changing.
Values between 0 and 9 are possible.
4.6.1.3 Slide show repeat
Select whether a slide show is to be repeated or not.
After all settings have been made, save these by
pressing OK.
Page 42

8. The OSD Menu – Miscellaneous
GB 42
4.6.2 Playlists (Play-Listen)
If you only wish to play certain images or songs, it is
possible to set up a playlist for images and audio files.
4.6.2.1 Add all images
To add all images from the directory to the playlist,
simply press "1" on the remote control.
4.6.2.2 Add all titles
To add all audio titles from the directory to the play list,
simply press "0" on the remote control.
4.6.2.3 Individual (Add Item)
If you only wish to add certain titles or images, select the
appropriate file and press the FAV key on the remote
control. The file is then added to the list.
Play playlist
Press the yellow key (Play List) and select whether you
wish to play the audio list (music) or the image list
(pictures).
Start the playback with the red key. Individual files can be
removed from the list using the yellow key or all files can
be removed with the blue key.
Note:
Of course, the files will only be removed from the list, not
from the data carrier.
Hint:
Once you have set up a music and a picture list, first
start the music list and then the picture list in order to
obtain a slide show with background music.
4.6.3 Repeat
Here you can specify in what form the selected files are
repeated.
The following options are available:
The current folder is played continuously in a random
sequence.
The current folder is played continuously in sequence.
The current song is continuously repeated.
4.7 Safely remove data carrier
In order to prevent loss of data from your USB data
carrier, you should not simply disconnect it from the
receiver, but rather always deactivate it with this item.
This is the only way to prevent loss of data.
Page 43

8. The OSD Menu – Game
GB 43
5. Game
Three classic games are available for your entertainment.
5.1 Tetris
5.2 Othello
5.3 Sudoko
Page 44
8. The OSD menu – Media
GB 44
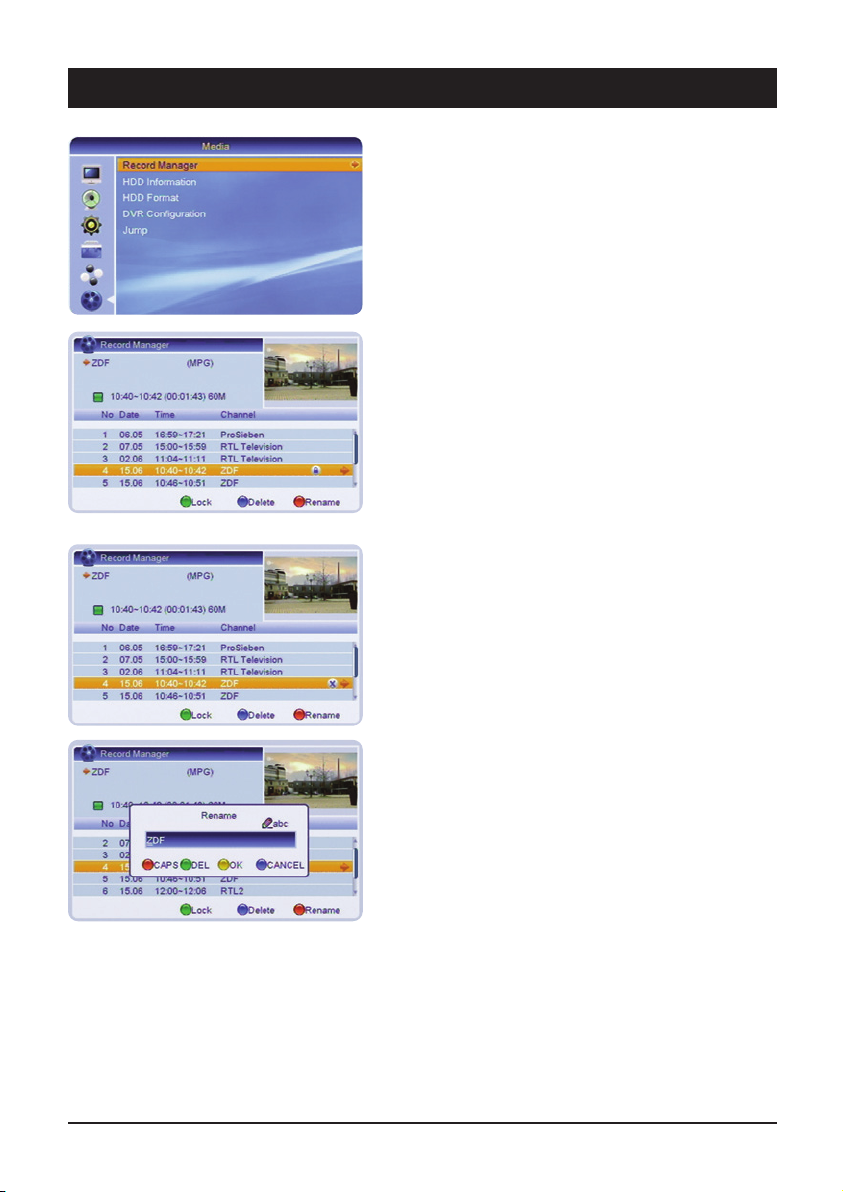
6. Record Manager
6.1 Recording management
The Recording management can also be called up by
pressing the PVR key on the remote control. In this
menu, you can edit recordings which have already been
made.
6.1.1 Lock
In order to prevent recordings from being accidentally
deleted, or for reasons of parental protection, these can
be locked.
Select the relevant recording with the navigation keys
and press the green key. Once the password has been
entered, the file is protected. The recording can only be
played or deleted if the password is entered.
6.1.2 Deleting
If you wish to delete a recording, select the relevant
recording and press the blue key. The recording is highlighted and if you exit from the menu, the recording will
be deleted once the safety query has been confirmed.
6.1.3 Renaming
If you wish to rename a recording, select the recording
file and press the red key. Enter the new name with the
letters on the numeric keys of the remote control and
confirm the entry with the yellow key.
Page 45

8. The OSD menu – Media
GB 45
6.2 HDD information
Here you can obtain information about the connected
USB data carrier.
6.3 HDD Format
If the hard drive is not recognised by the receiver, it must
first be converted to a format which the receiver can
read.
Select “Format hard drive” and confirm this with the
OK key.
CAUTION!
If you confirm the safety query, all data on the data
carrier will be deleted. If necessary, back up existing files
on a PC beforehand.
After formatting, the status of the hard drive is displayed
under “Hard drive information”.
6.4 DVR Configuration
All the relevant settings for the hard drive can be set with
this menu.
6.4.1 Timeshift
Here you can set whether the receiver should always
record the currently selected channel on order e.g. to
rewind the current program at any time.
In this case, set Timeshift to “On”.
Please note that with this setting, after a short time the
display switches from the current channel number to the
display "TSFT" for Timeshift.
Also, switching channels takes place more slowly than
when the Timeshift function is switched off.
6.4.2 Timeshift recording
If Timeshift recording is activated, you can press the Record button on the remote control at any time and the
current programme will be saved as a recording from the
time that you switched to the channel. Please note that
this function also depends on the amount of memory
which has been reserved (Timeshift file size). If the recording has not been saved from the time that you switched
to this channel, please increase the Timeshift file size.
Page 46

8. The OSD menu – Media
GB 46
6.4.3 USB Speed Detect
The suitability of a USB data carrier is checked on
connection or on recording. If the USB data carrier has
proved itself in normal use, this option may be switched
off in order to suppress unnecessary messages and
increase performance.
6.4.4 Record Type
Select the setting TS (Transport Stream), if you wish to
retain the original format. Select the setting PS, if the
format is to be displayed on a PC. However, on
conversion, some channel information is lost.
6.4.5 Subtitles on
With some channels, the programme is also transmitted
with subtitles. If you also wish to record these, switch
this item “On”
With the SUB-T key on the remote control, you can then
switch in the subtitles during playback.
6.4.6 Recording partition
If the connected USB data carrier is divided into several
partitions, the required partition can be selected with the
왗왘 buttons.
6.5 Jump
This allows the setting of the skip distance of recordings
on pressing the SKIP button on the remote control unit.
30sec. • 1min • 5 min • 10min • 30min
Page 47

No antenna signal (No signal display on the unit or via the signal displays in the OSD):
1. Check the antenna cable first: the mesh wire shield and aluminium insulation must be in contact with the f-plug and should not
touch the cable conductor.
2. Check the LNB settings. For ASTRA satellites LNB1 should be
on. If you use an digital LNB, the lower and upper frequencies
have to be 9750 MHz and 10600 MHz respectively. To trace an
error you should connect the LNB directly to the receiver and
first remove the switch and splitter.
Malfunctions 1. The unit displays incorrect broadcasting times in the EPG or the
incorrect time: after the receiver is switched on the data has to
be read and evaluated. Depending on the transponder this process may take some time. Sometimes it is necessary to call up
the EPG again or to switch channels.
2. No response from the unit: Pull out the power plug and wait a
few seconds before starting the unit again.
Only a few channels 1. The antenna is aligned to the wrong satellite position. When ali-
gning the antenna you may be receiving one of numerous satellites, which is transmitting on a similar frequency and interfering
with the receiver's signal displays. When switching channels foreign stations will often appear as well as a notification of “No
Signal”. It is often enough to turn the antenna a few degrees to
the east or west to receive the channels you want.
2. Check to see if you have activated the right list of channels.
Press BROWSE to call up the list. Press the
왗 or 왘 buttons to
select the channel list you require (e.g. “All Satellites”).
No sound, poor sound quality 1. If there is no sound, or only interference can be heard, your TV
or AV receiver is unable to decode the Dolby Digital/AC3 sound
from the HDMI connection. Remedy: Press the AUDIO button
and select stereo sound. If the channel does not provide stereo
sound, connect the digital sound output SPDIF to your
Surround/AC3/Dolby Digital system.
9. Troubleshooting
GB 47
Page 48

10. Features
11. Technical data
GB 48
•3000 channel positions
•Future-proof software update via satellite (OTA)
•EPG (Electronic Program Guide) – up to 14 days
•Teletext (with 500 page memory)
•30 timer pre-programming
•SLEEP timer
•Multi-lingual OSD menu
•Channel name and channel contents display
in OSD
•Blue, 4-digit programme display
•Signal strength indicator for setting the antenna
•Scart jack for TV
•Cinch sockets for audio
•Separate, digital audio output (coaxial)
•DiSEqC
®
1.0 – for the reception of several
satellite positions
•Environmentally friendly energy saving
technology for small stand-by power
•USB 2.0 standard connection
•HDMI port
Tuner
Input connector 1x F type
Frequency range 950 MHz bis 2150MHz
Input impedance 75 Ohm
Signal level -25 bis -65 dBm
LNB power & polarization
Vertical: +14V ± 0,5V
Horizontal: +18V ± 0,5 V
22kHz sound
Frequency: 22kHz ± 2kHz
Demodulation QPSK, compatible with
SCPC and MCPC
Input symbol rate 2 - 45 Mbit/s
FEC decoder Convolutional code rate
1/2, 2/3, 3/4, 5/6 and
7/8
MPEG Transport Stream A/V Decoding
Transport stream MPEG-2 ISO/IEC 13818
transport stream
specification
MPEG-4 IDO/IEC 14496
Profile & level MPEG-2/4 MP @ ML
Input T/S data rate 80Mbit/S Max.
Aspect ratio AUTO, 4:3 Pan & Scan,
4:3 Letter Box, 16: 9
Teletext DVB-TXTETSI/EN300472
TV SCART: RGB, FBAS
RF Remote
Operating Voltage: DC 3V, 2x AAA
heavy duty /
alkaline battery
Mains power supply unit
Input voltage AC 230 V, 50 Hz
Power consumption:
Stand-by consumption < 1W if no timer set
< 6W if timer set
Operating consumption max 28 W
Dimensions 266 x 170 x 40mm
Page 49

12. Service
GB 49
Do you have any problem to put the receiver into operation?
Don’t worry, – do not refuse the receiver,
call us!
High value technical units are often very complex. Technical problems have
normally a simple reason, which can be cleared quick and uncomplicated by
phone.
Our experts on our hotline service know your model very well and will give
you helpful information and support on connection and handling.
Take our service – please call us!
You will reach our experts from Monday to Sunday between 8:00 and 22:00 o’clock.
Germany:
0900 1512 532 (€ 0,25/Min. from german landline)
Austria:
0900 400 222 (€ 0,68/Min. from austrian landline)
Returns
In case your model is really defect, please return the unit with error description and voucher to our
hands. Before you return the unit, please call our hotline and request a special reparation number
(RMA). Without this number the reparation will not start or could be delayed.
SM ELECTRONIC GmbH
Retourenzentrum • Großer Kamp 9 • D-22885 Barsbüttel • www.skymaster.de • info@sm-electronic.de
Subject to technical changes • ASTRA, EUTELSAT, TÜRKSAT, DiSEqC and Skymaster are registered trademarks.
☞
Waste electrical and electronic equipment is classed as recyclable waste and does not
belong in domestic refuse!
We therefore request you to actively support the conservation of resources and environmental
protection and to dispose of this device at responsible take back points – if possible.
Page 50

9901966002-V2-BDA-E-GB-08/2009
 Loading...