

Page 1

Digital Satellite Receiver
DCX 10
39730
OPERATING INSTRUCTIONS
Page 2

DCX 10
134 3 2
174
3 5 6 8 2
3
21
4
5
6
9
9
10
13
11
8
7
17
16
15
11
12
TV
AC3/SURROUND
VCR
230 V
A
B
CD
DISH
Page 3

Page 4

GB 2
1. Contents
Congratulations! You have purchased a quality SKYMASTER®receiver. Our products are subject to continuous, strict quality checks which guarantee
product satisfaction. The SKYMASTER
®
DCX 10 is designed to receive uncoded digital TV, but can also receive coded channels if a respective
Cryptoworks smart card is used. Please note that a satellite system suitable for digital use is required for SKYMASTER
®
DCX 10 operation.
1. Contents . . . . . . . . . . . . . . . . . . . . . . . . . . . . . 2
2. Safety information . . . . . . . . . . . . . . . . . . . . . . 3
3. Receiver Operating Elements (see packaging) . . 3
4. Remote control . . . . . . . . . . . . . . . . . . . . . . . . 3
5. Configuration and Operation . . . . . . . . . . . . . . . 4
5.1 Prior to Configuration . . . . . . . . . . . . . . . . . . . . 4
5.2 Setup Menu . . . . . . . . . . . . . . . . . . . . . . . . . . . 4
5.2.1 System Setup . . . . . . . . . . . . . . . . . . . . . . . . . . . . . . 4
5.2.2 Antenna Setup . . . . . . . . . . . . . . . . . . . . . . . . . . . . . . 5
Motor Control . . . . . . . . . . . . . . . . . . . . . . . . . . . . . . . 6
5.2.3 Channel Search . . . . . . . . . . . . . . . . . . . . . . . . . . . . . 7
5.2.4 Setup LOCK/PIN . . . . . . . . . . . . . . . . . . . . . . . . . . . . . 8
5.2.5 Time Settings . . . . . . . . . . . . . . . . . . . . . . . . . . . . . . . 8
5.2.6 Factory Default . . . . . . . . . . . . . . . . . . . . . . . . . . . . . . 8
5.3 Setup via the Main Menu . . . . . . . . . . . . . . . . . 9
5.3.1 Program Guide (EPG) . . . . . . . . . . . . . . . . . . . . . . . . . 9
5.3.2 Sort Programs . . . . . . . . . . . . . . . . . . . . . . . . . . . . . 10
5.3.3 Language . . . . . . . . . . . . . . . . . . . . . . . . . . . . . . . . . 10
5.3.4 Edit Channels . . . . . . . . . . . . . . . . . . . . . . . . . . . . . . 10
5.3.5 Scramble System . . . . . . . . . . . . . . . . . . . . . . . . . . . 12
5.3.6 About Version / Software Update . . . . . . . . . . . . . . . . 12
5.4 Directly Accessible Information . . . . . . . . . . . . 13
5.4.1 Program Specific Data . . . . . . . . . . . . . . . . . . . . . . . 13
6. Troubleshooting . . . . . . . . . . . . . . . . . . . . . . . 15
7. Performance Features . . . . . . . . . . . . . . . . . . 16
8. Technical data . . . . . . . . . . . . . . . . . . . . . . . . 16
9. Service . . . . . . . . . . . . . . . . . . . . . . . . . . . . . 16
Page 5

GB 3
2. Safety information
3. Receiver Operating Elements (see packaging)
4. Remote control
1 LED display (four digits) displays the
time in standby mode and the selected
channel number in operating mode;
2 Infrared receiver
recognises the infrared command signals
from the remote control;
3 Channel selection upwards / downwards
(왖/왔) for scrolling in menu mode and
for selecting a channel in program mode;
4 On/Off button
switches from standby to operating mode
and vice versa;
1 LNB INPUT:
IF input of LNB to the digital tuner
2 LOOP OUT
(Loop-through output) for connecting an analogue SAT receiver
3 TV SCART SCART
jack for connecting a TV set
4 VCR SCART
SCART jack for connecting a VCR, an analogue receiver or a
stereo system
5 AUDIO L
Left audio output
6 AUDIO R
Right audio output
7 S/PDIF
Digital audio output (coaxial)
8 RS-232C
For service purposes
A B
Please read this safety information thoroughly before commissioning the device! Prolonged absence: In the event of prolonged
absence or thunderstorms, remove the mains plug of the device from the wall socket. Also disconnect the antenna connections to
avoid storm damage.
Hiermit erklärt SM Electronic GmbH, dass sich Artikel-Nr. 39730 in Übereinstimmung mit den grundlegenden Anforderungen und den anderen relevanten Vorschriften der Richtlinien 89/336/EWG und 73/23/EWG befindet.
Cleaning: Remove the mains plug before cleaning the device. Use a
dry or damp cloth and make sure that no moisture penetrates the
device!
Objects in the device: Make sure that no objects can enter the
ventilation slots. There is risk of death through electric shock!
Repair: Repairs must be performed by qualified experts. In the event
of improper intervention by a third party, the warranty will be voided
and the safety of the device can no longer be guaranteed! Never open
the housing of the device yourself: Even when disconnected from the
mains, there is an acute risk of death through electric shock. Internal
components can be damaged if touched.
Place of installation: Place the device on a straight and even
surface. To protect the surface from being discoloured as a result of
the natural heat generated by the device, place the device on a
suitable underlay.
Adequate ventilation: The ventilation slots on the device must never
be covered. Ensure that the device has a clearance of at least 10 cm at
the sides and top, and that the heat can be dissipated upwards
unimpeded.
External influences: Never expose the device to moisture
(e.g. condensation or splash water) or direct sunlight. Do not place the
device in the vicinity of heat sources, such as e.g. heaters or devices
that heat up.
Mains voltage: Use the equipment with the voltage specified on
the case only! Do not plug the equipment into the mains until all
connection and installation work has been completed.
Earthing: Antenna systems must always be earthed, paying heed to
the pertinent local and VDE regulations.
ASTRA, EUTELSAT, TÜRKSAT, DiSEqC and Skymaster are registered trademarks.
1 On/Off button: To switch from standby to operating mode
and vice versa
2 Mute button: To switch the sound on or off
3 MENU: To display the main menu
4 SETUP: To display the receiver's setup menu
5 EXIT: To return to the previous status or menu
6 Numerical keypad (0~9): Direct selection of the channel
or input of numerical or alphanumerical characters
7 TV/RADIO: To toggle between TV channel and radio station
lists
8FAV:To display the list with your favourite TV channels
9 CH (왖/왔): To select a channel in program mode and to
move the cursor in the menu mode
10 EPG (Electronic Program Guide): To display detailed
information about individual channels. Press again to return
to program mode
11 VOL (왗/왘): To alter the volume in program mode and to
change or select the desired menu item in menu mode
12 OK: To select menu options or confirm a selection
13 TXT: To display teletext data if available
14 PAUSE (II)
1. To hold teletext pages in teletext mode
2. To fix images while viewing programs
15 INFO: To display available information about a selected
channel
16 RECALL: To return to the previous channel
17 LANG: To select the desired sound mode or the menu
language
C
Please ensure correct polarity when inserting the batteries!
The polarity is marked in the battery compartment.
Batteries: 2 pieces, Size: AAA, UM-4, Micro or R03. Used
batteries are special waste – please dispose of them
correctly! Range approx. 6m.
Page 6

GB 4
5. Configuration and Operation
5.1 Prior to Configuration
Information:
A menu is a text field which appears on the TV screen. Selectable menu options are usually colour
highlighted. Options which are not colour highlighted cannot be altered or set. The options and
settings of most menus are explained at the bottom of your TV screen.
5.2 Setup Menu
Correct receiver setup includes its configuration. The device is ready for operation after configuration,
i.e. you can watch or listen to a desired TV channel or radio station. Short explanations appear at the
bottom of the screen during standard value setup.
• Switch on the TV set and the receiver.
• Press the SETUP button to access the setup menu.
• Enter the PIN (factory setting: “1234”)
Use the CH 왖/왔 buttons to move in the menu.
As soon as the desired option/setup has been selected, confirm via the OK button.
Press the EXIT button to exit the menu and return to the previous mode.
5.2.1 System Setup
Select the option “System Setup” in the “Setup Menu” and press the OK button. A window with the
following menu items appears on the screen. A value can be selected for these items: “Video Format”,
“RF Channel (UHF channel)”, “TV Type”, “Scart RGB”, “Positioner”, “Teletext”, “GMT Offset” and
“Summer Time”.
Video Format: NTSC / PAL I, B, G or K / SECAM/MULTI
RF Channel: No function
TV Type: Standard (4:3) / Broadband (16:9)
SCART RGB: On / Off
Teletext Type: Receiver / TV (basic TV setup)
GMT Offset: GMT Offset +12:00 ~ -12:00 (automatic)
Summer Time: On / Off
Video Format: PAL I
PAL B
PAL G
PAL K
The PAL TV standard is used in most Euro-pean countries,
Australia and some Asian and African countries. PAL, short for
Phase Alternating Line, describes the way that part of the colour
information on the video signal is reversed in phase with each
line. In contrast to NTSC, phase errors are automatically corrected.
SECAM SECAM is used in France and eastern Europe as the analogue TV
standard for colour transmission. SECAM is the abbreviation for
Sequentiel Couleur avec Mémoire (sequential colour with memory).
NTSC The National Television Standards Committee (NTSC) was
introduced in 1954 and is mainly used in North America and
Japan as the TV standard for colour transmission.
Multi If you own a TV set which can function with all of the
aforementioned TV standards, it is recommended not to alter
this setting since the receiver automatically switches to the
broadcast TV standard.
TV Type Standard (4:3)
Broadband (16:9)
If a film is broadcast in broadband format (16:9) and your TV set
supports this, set 16:9 in this menu; otherwise 4:3 is the
recommended format.
Scart RGB On / Off If your receiver has been connected to your TV set via a Scart
cable, it is recommended to leave the “On” setting. This ensures
a better picture.
Teletext Type STB
VBI
If you wish to access teletext directly via the receiver, select
“STB”. However, if the teletext signal should be looped through
the TV set, please select “VBI”.
GMT Offset GMT Is automatically recognised.
Summer Time On / Off When changing from standard time to summer time set to “On”,
when changing back to standard time set to “Off”.
Page 7

GB 5
5. Configuration and Operation
5.2.2 Antenna Setup
Select the option “Antenna Setup” in the “Setup Menu” and press the OK button. A window with the
following menu items appears on the screen. A value can be set for these items: “SAT”, “LNB
Frequency”, “22kHz Tone”, “DiSEqC”, “LNB Power” and “Positioner”.
Mark and select the satellites via the OK button. If you remove the tick, the question
“Delete channel ?” appears; answer “Yes” to delete the channels of this satellite.
Satellite: Select from the saved list.
LNB Frequency: Universal / Broadband / OSC C Band / C Band
High L.O.: Enter frequency
Low L.O.: Enter frequency
22kHz Tone: On / Off
DiSEqC: Off / DiSEqC A, B, C or D / Tone A or B
LNB Power: H / V / 14V / 18V / Off
Positioner: For activating the rotor control
• Scroll up and down the list via the CH 왖/왔 buttons.
• Select the desired value via the Vol 왗/왘 buttons.
• Select the value and press the OK button to confirm your setup.
• Press the EXIT button to exit the menu and return to the previous mode.
Satellite e.g.:
[019.2° E] Astra1
[013.0° E] Hotbird 1~5
etc.
A list of most of the satellites which can be received in
Europe has already been saved in the receiver.
However, if you wish to add satellites to this list, carry out
the settings in the menu item “Motor Control” (see below).
LNB Frequency Universal
Broadband
OSC C Band
C Band
High L.O.
Low L.O.
It is recommended not to carry out changes in this menu
item, since the factory settings have been adjusted to the
respective satellites.
22kHz Tone It is recommended not to carry out changes in this menu
item, since the factory settings have been adjusted to the
respective satellites.
DiSEqC DiSEqC A
DiSEqC B
DiSEqC C
DiSEqC D
Tone A
Tone B
At this menu item it is possible to directly allocate the
individual satellites a DiSEqC position. DiSEqC was
developed by Eutelsat. For more information about this
(very extensive) subject please go to:
http://www.eutelsat.com/deutsch/2_2.html.
LNB Power H/V (Horizontal/Vertical)
14V (Vertical)
18V (Horizontal)
Off
At this menu item the H/V setup is recommended. The
other settings are only relevant if you are connected to
single cable systems or special distribution systems in
your house.
Positioner None
DiSEqC 1.2
USALS
None is the preferred setting if rotor operation is not
required.
DiSEqC 1.2 is the setting for rotors which support this
function. USALS comply with this function. Please see the
operating instructions of your rotor for exact details.
Page 8

GB 6
5. Configuration and Operation
쐽 Motor Control
It is possible to select various factory-set satellites under the menu item “Satellite”.
The preset transponders are displayed in the following order under “Transponder”:
Transponder Number, Frequency, Polarity (V or H) and Symbolrate.
It is possible to change the position of your motor via the “Move” function. Use the left and right-hand
arrow buttons for this task. Simply observe the “Signal Quality” bar: The correct satellite has been
found as soon as a picture appears in the background. It is possible to see whether the antenna is
moving or has stopped under the menu item “Antenna Status”. Once you have found the correct
position for a satellite, go to the “Save Position” function and confirm the position via the OK button.
It is possible to see whether the antenna is moving or has stopped under the menu item “Antenna
Status”. Once you have found the correct position for a satellite, go to the “Save Position” function and
confirm the position via the OK button.
If you wish for the selected satellite to be your main satellite, go to the “Reference Position” function.
This ensures that the desired satellite is always set, even in case of malfunctioning or a defective
motor.
It is possible to set the following characteristics under the menu item “Function”:
Recalculate: Recalculates the satellite positions.
Nudge West: Motor moves one “step” westwards.
Nudge East: Motor moves one “step” eastwards.
Nudge tilt up: Motor moves one “step” upwards.
Nudge tilt down: Motor moves one “step” downwards.
Set West Limit: Motor can only be moved westwards to the set position.
Set East Limit: Motor can only be moved eastwards to the set position.
Disable Limit: Deactivate limitation of west or eastward motor movement.
Enable Limit: Activate limitation of west or eastward motor movement.
It is possible to see how well the selected satellite can be received under the menu item “Signal
Quality”.
For “normal installation” simply select the satellite which you wish to receive. Then change to the
“Channel Search” menu and carry out the steps described below.
Page 9

GB 7
5. Configuration and Operation
5.2.3 Channel Search
Select the option “Channel Search” in the “Setup Menu” and press the OK button. A window with the
following menu items appears on the screen. A value can be set for these items: “Satellite“, “Tune
Method”, “Transponder”, “Frequency”, “Symbolrate”, “Polarity”, “FEC”, “Function” and “AGC Signal”
(signal strength).
Satellite: Select from the saved list.
Tune Method: Sat (Free) / Sat (Free+Scr) / TP (Free) / TP (Free+Scr) / NIT (Free) / NIT (Free+Scr)
Transponder: 1~999
Frequency: Automatic / Manual
Symbolrate: Automatic / Manual
Polarity: Horizontal / Vertical / Right / Left
FEC: Auto, 1/2, 2/3, 3/4, 5/6, 7/8
Function: Attach, Delete, Change
AGC Signal: Displays the strength of the received signal.
Tune Method:
SAT (Free+Scr): Searches for all the free and scrambled channels at the satellite.
SAT (Free): Searches for all the free channels at the satellite.
TP (Free+Scr): Searches for all the free and scrambled channels at a specified transponder.
TP (Free): Searches for all the free channels at a specified transponder
NIT (Free+Scr): Searches for all transponders which belong to a channel group.
NIT (Free): Searches for all transponders which belong to a free channel group.
Transponder:
Specify the transponder which you wish to search for here (only possible in TP and NIT tune method).
Frequency, Symbolrate, Polarity, FEC:
Enter the exact data for manually locating a channel or program here (only possible in TP and NIT tune
method).
AGC Signal:
Here it is possible to see the exact strength of reception between the receiver and the setup satellites.
You will probably have to readjust your antenna if the value is too low or the TV picture poor.
• Scroll up and down the list via the CH 왖/왔 buttons.
• Select the desired value via the Vol 왗/왘 buttons.
• Select the value and press the OK button to confirm your setup.
• Press the EXIT button to exit the menu and return to the previous mode.
Page 10

GB 8
5. Configuration and Operation
5.2.4 Setup LOCK/PIN
Select the option “Setup Lock/PIN” in the “Setup Menu” and press the OK button. A window with the
following menu items appears on the screen. Subsequently carry out the setting for “Menu Lock”. It is
possible to change your PIN under the menu item “Change Password”. If you wish to change your PIN,
enter a new password under “New Password” and confirm your entry under “Confirm Password”.
Menu Lock: On / Off
Change Password: Press the OK button if you wish to change your PIN
New Password: Enter a new four-digit PIN
Confirm Password: Confirm your new four-digit PIN
Important: The PIN »1234« is set ex works.
• Scroll up and down the list via the CH 왖/왔 buttons.
• Select the desired value via the Vol 왗/왘 buttons.
• Select the value and press the OK button to confirm your setup.
• Press the EXIT button to exit the menu and return to the previous mode.
5.2.5 Time Settings
Select the option “Time Settings” in the “Setup Menu” and press the OK button. A window with the
following menu items appears on the screen. A value can be set for these items: “Local Time” (set date
and time), “Sleep Timer” (timer with automatic switch-off function), “Timer” with programming.
Local Time: Can be entered manually here as: DD;MM;YYYY - Day - hh:mm
Sleep Timer: 0~180 min. Here it is possible to enter after how many minutes the receiver should
automatically switch off. If “0” is displayed the function has not been activated.
Timer: Use this function to program the receiver to switch to a desired channel at a certain
time. Up to seven timer functions can be preset.
Switch the “Status” line to “On” and select either TV or radio for the “Channel type”.
Enter the desired channel under “Channel Number”. The name of the selected channel should appear
under “Channel Name”.
Enter at which time the receiver should switch on or off under “Start Time” and the time period under
“Duration”. This function is extremely useful if you wish to record a certain program with your VCR.
• Scroll up and down the list via the CH 왖/왔 buttons.
• Select the desired value via the Vol 왗/왘 buttons.
• Select the value and press the OK button to confirm your setup.
• Press the EXIT button to exit the menu and return to the previous mode.
5.2.6 Factory Default
Select the option “Factory Default” in the “Setup Menu” and press the OK button. Press “Yes” or “No”
to either accept the factory default or to confirm the changes.
If you press “Yes”, the device is reset to its delivery condition.
Caution: Any program lists you may have set are also deleted if the device is reset to the factory
default.
Page 11

GB 9
5. Configuration and Operation
5.3 Setup via the Main Menu
It is possible to access the following menu options via the main menu: “Program Guide”, “Sort
Programs”, “Language”, “Edit Channels”, “Scramble System”, “About Version”.
• Press the MENU button.
• Scroll up and down the list via the CH 왖/왔 buttons.
• Select the desired value via the Vol 왗/왘 buttons.
• Select the value and press the OK button to confirm your setup.
• Press the EXIT button to exit the menu and return to the previous mode.
5.3.1 Program Guide (EPG)
Select the option “Program Guide” in the “Main Menu” and press the OK button. The following window
appears on the screen.
This mode provides you with information (if supported by the respective channel) about the current
program and following programs. This function is known as EPG (Electronic Program Guide).
You can select between radio and TV mode here.
Now & Next: Displays the current and the next program at the selected channel.
Schedule: Displays the schedule of the selected channel for the next 24 hours.
Search for the desired function via the Vol 왗/왘 buttons and confirm via the OK button.
Now & Next: Use the CH 왖/왔 buttons to select the desired channel. If a pop-up window appears
below the “Now” or “Next” header, use the Vol 왗/왘 buttons to select the desired
pop-up window and press the OK button to receive extensive information about the
selected program. Press the EXIT button to return to the overview.
Schedule: If you have selected “Schedule”, a list of the following programs for the selected
channel appears after pressing the OK button. Use the CH 왖/왔 buttons to switch to
a program and press the OK button to receive additional information about this
program. Press the RECALL button to program the selected program in your “Timer”,
i.e. the receiver auto-matically switches to this channel when the program starts.
Press the EXIT button to exit the menu and return to the previous mode.
Page 12

GB 10
5. Configuration and Operation
5.3.2 Sort Programs
Select the option “Sort Programs” in the “Main Menu” and press the OK button. The following window
appears on the screen:
It is now possible to access the channels which have been sorted alphabetically.
• Select a letter via the Vol 왗/왘 buttons.
• Press the OK button to confirm your selection.
• Move in the list via the CH 왖/왔 buttons.
• Scroll through the pages via the Vol 왗/왘 buttons.
• Press the OK button to access the selected channel and to close the menu.
• Press the EXIT button to return to the previous mode (letter selection).
5.3.3 Language
Select the option “Language” in the “Main Menu” and press the OK button. A window with the
following menu items appears on the screen:
Menu Language: English / Arabic / German / Turkish / Russian / French / Italian / Spanish / Dutch /
Hungarian / Greek / Farsi
Game: Tetris, Puzzle
Radio Ch Logo: Setting to display a logo on the screen while listening to the radio
Setup menu language
• Use the Vol 왗/왘 buttons to select a language.
• Press the OK button to confirm your setting.
• Press the EXIT button to exit the menu and return to the previous mode.
Game
Tetris : Tetris is a game in which the player has to rotate and quickly manoeuvre falling tile-like
tetrominoes in order for them to fit into a space at the bottom of the screen and
gradually build up a wall. As soon as the Tetris pieces form a solid row of blocks
across the playing area, that row vanishes. The game is over when the playing area is
stacked to the top with incomplete rows. The initial score value increases with each
vanishing row.
Use the OK button to rotate falling pieces, use the 왔 button to quickly manoeuvre a
piece to a desired position.
Puzzle: The aim of the game is to move the numbers into the correct order (1 to 15).
Use the directional buttons (왗; 왘; 왖 and 왔) to select the number which you wish to
move. The numbers then jump to the corresponding position.
5.3.4 Edit Channels
Select the option “Edit Channels” in the “Main Menu” and press the OK button. The following
window appears on the screen (enter the required code if the menu lock has been activated
(factory setting “1234”)).
TV or Radio
Move channels
Select favourites
Lock function on/off
Delete channel
Add channel
Change channel data
- Move channels
Use the OK button to select the channel which you wish to move. You can simultane-ously select
several channels. After selecting the channels which you wish to move, go to the location where you
wish to save these channels. It is now possible to move these channels via the RECALL button.
Page 13

GB 11
5. Configuration and Operation
- Select favourites
Use the CH 왖/왔, Vol 왗/왘 buttons and the OK button to select the respective channel in the
favourite column. Then use the CH 왖/왔 buttons and the OK button to allocate the channel in the
category overview which has just appeared. The following categories are available:
[1] Movies, [2] Music, [3] Cartoons, [4] News und [5] Sports.
Select point [0] “Unselect” to delete a channel from a favourite category. Please observe the point
“Edit Favourite Lists” in order to sort the favourite lists.
- Lock channels
Use the CH 왖/왔, Vol 왗/왘 buttons and the OK button to select the channel which you wish to lock
in the column with the lock symbol. Press the OK button to lock the channel. Successful locking is
indicated by a “√” in the respective column. The channel can now only be viewed after entering a PIN
(factory setting “1234”). Reselect the channel and press the OK button to unlock the channel.
- Delete channels
Use the CH 왖/왔 and Vol 왗/왘 buttons to select the channel which you wish to delete in the column
with the “X” symbol and press the OK button. The channel will be deleted as soon as you exit the
“Edit Channels” menu. If, before exiting the menu, you decide not to delete the channel, reselect the
channel and press the OK button. The channel will not be deleted when you exit the menu.
- Add channels
Only access this menu if you are familiar with digital satellite technology.
To add a channel as described below it is necessary to have the exact data to ensure reception of the
desired channel after data input. If you do not have all the required data, we recommend adding the
desired channel to your program list via the menu item “Setup Menu” 앶앸 “Channel Search”.
Select the symbol in the upper menu bar.
Use the CH 왖/왔 and Vol 왗/왘 buttons and the OK button to enter the respective parameters.
The following parameters can be set:
Satellite: Select the channel's satellite here.
Transponder, Frequency, Symbolrate, Polarity, FEC:
Enter the exact data of the channel which you wish to add.
Channel Name: Enter the name of the channel via the keypad which appears on
the screen. (See below for keypad explanation.)
Audio PID; Video PID; PCR PID: Enter the exact PIDs (ID rates) for the audio, video and data
packet of a channel.
As soon as you have entered all the settings correctly, press the EXIT button to auto-matically add
the new channel to the end of the program list.
- Change channel data
Select the symbol in the upper menu bar and press the OK button.
The following settings can be changed in this menu item:
Change channel name, change audio PID, change video PID, change PCR PID
Change channel name: Use the CH 왖/왔 buttons to select the channel whose name you wish to
change and confirm your selection via the OK button.
A keypad appears. Use the CH 왖/왔 and Vol 왗/왘
buttons to move the cursor over the keypad and
enter the selected letters via the OK button.
The keypad has the following special keys:
왗 Moves back one position in the line
왘 Moves forward one position in the line
Ins Inserts a letter at the selected position
Del Deletes the selected position
Caps Switches from upper to lower case letters and vice versa
Special Changes keypad to numbers and special symbols
Space Enters spaces and automatically overwrites the existing symbol
Save Saves changes
Cancel Cancels the process without saving changes
Page 14

GB 12
5. Configuration and Operation
5.3.5 Scramble System
Use your receiver to enjoy not only free-to-air programs but also ones coded with Cryptoworks (if you
possess a smart card from a program provider).
Select the option “Scramble Systems” in the “Main Menu” and press the OK button. The following
window appears on the screen (only works if a smart card has been inserted into the card slot):
General Card Information
It is possible to see the following current card information under the menu item “General Card
Information”:
“Card Label and Additional Info”
Under this menu item you can recognise the card label, the smart card address, the validity period
(card valid until) and whether the current maturity rate has been activated (enable MR) or deactivated
(disable MR).
You can activate (enable MR) or deactivate (disable MR) the current maturity rate under the menu item
“Set Maturity Rating”.
You can change or, if necessary, switch off (“Enable/Disable PIN”) the card's PIN under the menu item
“Smart Card Pin Code Change“.
You can see for which program provider your card has been activated under the menu item “Available
Program Providers”.
Available Entitlements
In this menu item you can see which channels have been activated by your program provider.
Note: Only free-to-air programs can be received without a smart card.
The smart card is used as follows:
Carefully insert the smart card into the slot at the front of the receiver (golden contact surface of the
smart card facing upwards and towards the device).
5.3.6 About Version / Software Update
Move the cursor in the “Main Menu” over the option “About Version” and press the OK button.
A window appears on the screen with details about the model name, build date and the application
version.
To update the software via satellite (only for Astra reception) access the “System Software Update
Service” menu and confirm via the OK button.
Enter your PIN (factory setting “1234”). The device now starts to search for new software - see below.
If the upper bar does not start to move after 10 minutes, new software is not available. Cancel this
process via the OK button.
If there is a more recent software version at the satellite, the receiver downloads the software until
“100%” is displayed. Once the software has been completely downloaded onto the receiver the display
returns to “99.5 %”. The receiver subsequently processes the downloaded software (i.e. it checks
whether the software is suitable for the receiver and feeds it into the system). This process can take
between 15 and 20 minutes. Once it has been completed a question about saving the software
appears. Answer this ques-tion with “Yes”; your receiver now has the most up-to-date software status.
Page 15

GB 13
5. Configuration and Operation
5.4 Directly Accessible Information
5.4.1 Program Specific Data
Press the INFO button to receive information about the current program. Information about the
current program appears. Press the INFO button again to receive more detailed information
(only functions if the channel provides the respective information).
- Channel list for TV/radio
Press the TV/Radio button to access the channel list while watching a program. A channel is colour
highlighted on the screen which appears. Use the CH 왖/왔 buttons to select another channel. Use the
Vol 왗/왘 buttons to scroll through the list pages. Press the OK button to access the selected channel
and to exit the channel list. Press the EXIT button once to access the SAT option (the receiver only
displays the channels at the selected satellite) or the option to sort the program list according to the
following criteria:
Free (1, 2, 3) Displays all the free channels sorted according to the channel number.
Free (A, B, C) Displays all the free channels sorted according to the channel name.
All (1, 2, 3) Displays all the free and coded channels sorted according to the channel number.
All (A, B, C) Displays all the free and coded channels sorted according to the channel name.
Page 16

GB 14
5. Configuration and Operation
- Favourites List
Press the FAV button while watching TV or listening to the radio to access a list with your favourite
channels or stations (TV or radio).
If favourite channels/stations have not been entered into a respective list (see above), there will be no
reaction on the screen.
Press the CH 왖/왔 button to exit and subsequently confirm the channel you wish to watch via the
OK button.
If you now use the CH 왖/왔 buttons while watching the normal TV picture, the device only switches
channels within the selected favourite list. Press the TV/Radio button to return to general mode.
- Program Guide (EPG)
Press the EPG button to access a program guide – if supported by the program provider.
- Teletext
Press the TXT button to access teletext pages – if provided by the program provider.
- Language
Press the LANG button to access the language selection menu for the audio channel.
Track: 1 of 1, 2. (depending on the provider)
Mode: Stereo / Mono left / Mono right
Level: Normal / High / Low
Language: The language is displayed if broadcast by the provider
Subtitle: If a program is broadcast with subtitles, they can be activated here
If a channel or a program is simultaneously broadcast in several languages, it is possible to select your
desired language under the menu item “Track”.
You can choose between stereo and mono under the menu item “Mode”.
You can select the intensity of the sound under the menu item “Level”.
You can, if provided by the program provider, display subtitles for the current program under the menu
item “Subtitle”.
- Recall function
Press the RECALL button to re-access the previously selected channel.
Page 17
GB 15
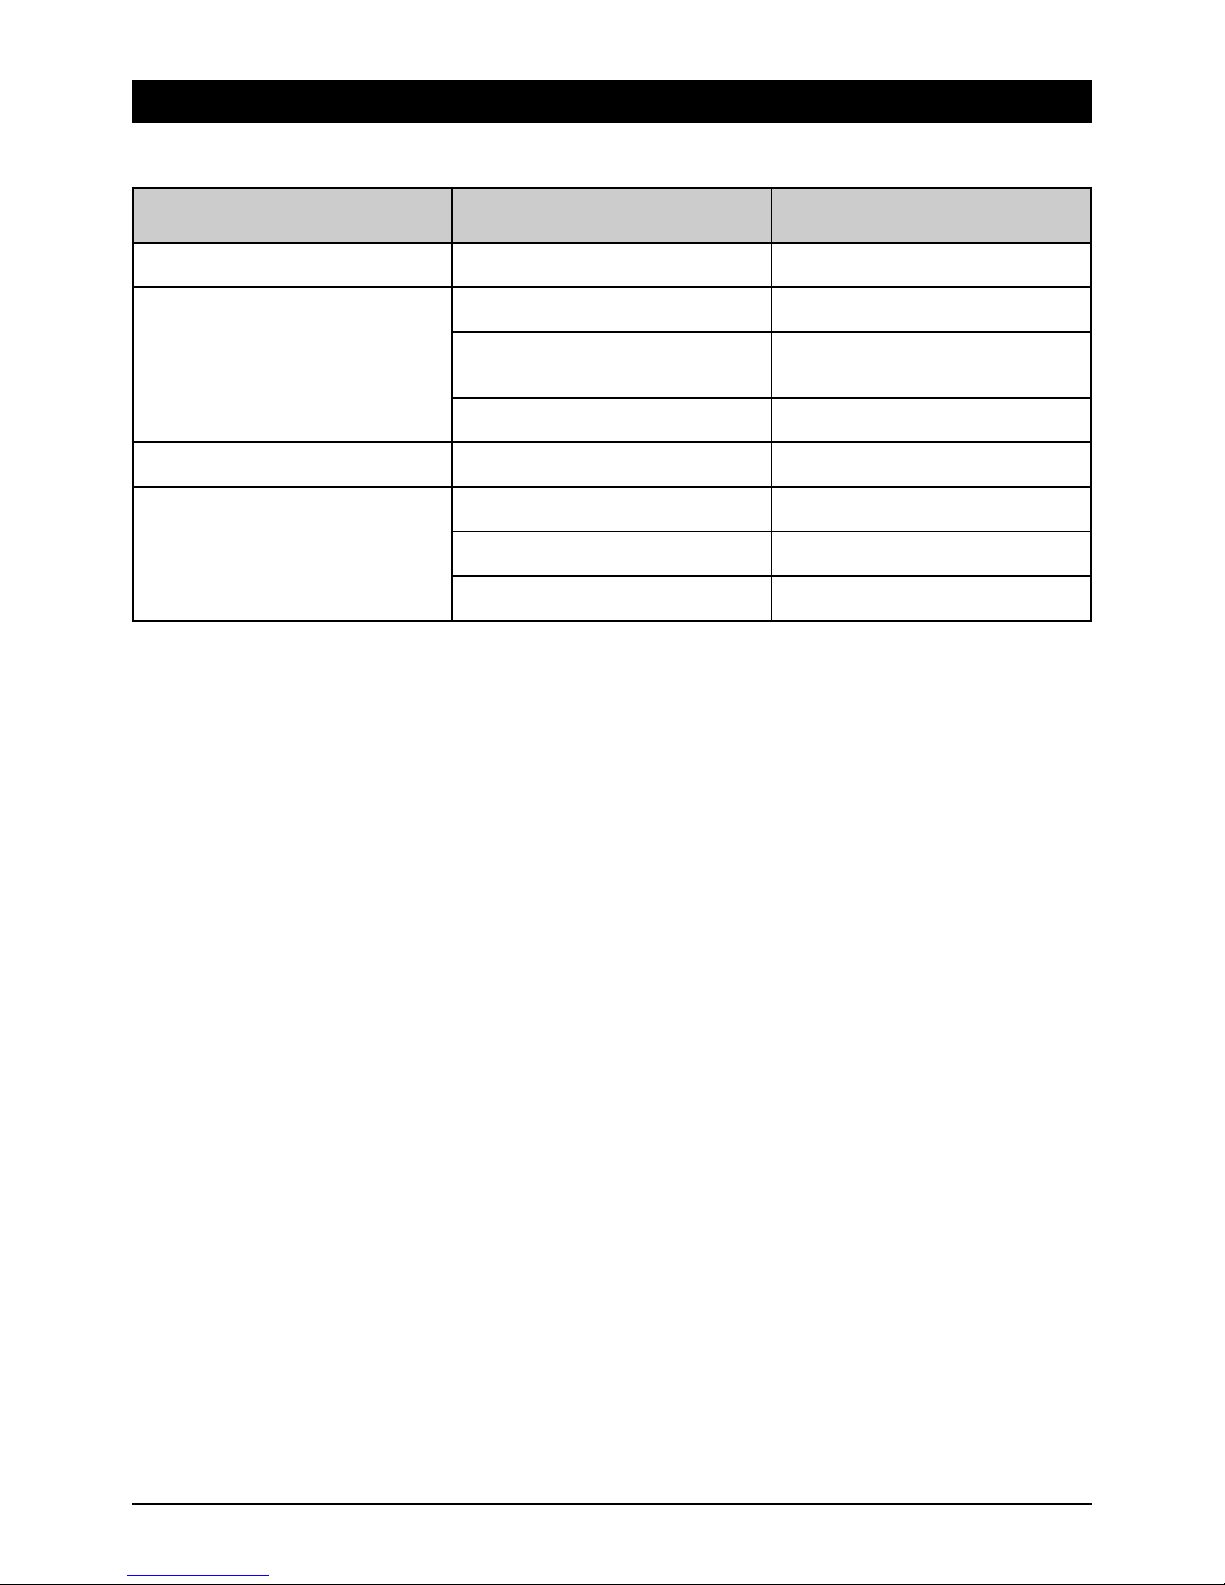
6. Troubleshooting
There can be various reasons for problems during device operation. Please observe the following information when troubleshooting.
Problem Possible Reason Remedy
Front LED display does not light up. Mains plug not connected. Connect the plug to the mains socket correctly.
No picture or sound. Video/Audio output incor-rectly connected to
the TV input.
Connect two connections with Scart,
RCA correctly.
No signal or weak signal. Check cable connections, the LNB and other
devices switched between the LNB and the
receiver, or re-align the antenna.
Incorrect program data entered during
configuration.
Re-enter the program data correctly.
Only black and white picture. Your TV and receiver mode do not match. Adjust the receiver mode to the mode of the TV.
The remote control does not function. Batteries are flat. Insert new batteries.
Fluorescent light from another light source is
obstructing the remote control signal.
Switch off the other light source.
Remote control not aimed correctly at the
infrared receiver.
Aim the remote control at the receiver correctly.
Page 18

GB 16
7. Performance Features
8. Technical data
9. Service
Dear Customer!
Please bear in mind that unjustified complaints will cost you money! Please consult our telephone HOTLINE if you need assistance. Here experts will
provide you with speedy advice and tips on localising the cause of a fault. If it transpires that the problem is actually a defective device, please send
it in for repair with a precise description of the fault.
Our HOTLINE:
(D) 0900 1 512 532 (€ 0,25/Min.)
(A) 0900 400 222 (€ 0,64/Min.)
Monday to Sunday from 8.00 - 22.00 Uhr
SM ELECTRONIC GmbH
Waldweg 2
D-22145 Stapelfeld/Braak
Internet: www.skymaster.de
E-Mail: info@sm-electronic.de
Subject to technical changes
ASTRA, EUTELSAT, TÜRKSAT, DiSEqC and Skymaster are registered trademarks.
• OTA (satellite update)
• Complies with MPEG-2 and DVB standards
• Digital audio output (S/PDIF) (coaxial)
• Integrated teletext decoder (STB/VBI)
• PIG (Picture In Graphics)
• MPEG-2 video (MP@ML), MPEG-1 audio layer1, layer2
• Programmable channels/stations (3000 TV and 1000 radio)
• LNB drive (13/18V, 0/22KHz)
• SCPC/MCPC reception at C/Ku band
• Digital tuner with loop-through output
• Input data rate 2~45Mbps & frequency range 950~2150MHz
• DiSEqC 1.2
• Manual PID input
• Direct program selection via EPG
• 8 colour OSD with 17 transparency levels
• 4-digit LED display
• Variable screen format (4:3, 16:9)
• Child protection and lock for individual programs
• RS-232C port for the reception of additional information services
and system software update (jack)
• Timer (7 timers with optional time period)
• 5 favourite lists
• Menu languages: German, English, Arabic, French, Italian, Russian,
Turkish, Farsi, Dutch, Greek, Spanish and Hungarian
• 1 integrated Cryptoworks • interface module for use with a smart
card o Smart card not included
System
Complies with DVB standard
LNB/Tuner input
F jack: IEC 169-24
Frequency range: 950MHz ~ 2150MHz
Input level range: -65dBm ~ -25dBm
LNB supply current: 14/18V, max. 400mA
LNB control signal: 22KHz
DiSEqC control: Ver. 1.2 compatible
Demodulator
Front end module: QPSK
Input data rate: 2MSps ~ 45MSps
SCPC and MCPC compatible
Spectral inversion Automatic conversion
System resources
Processor: 32bit processor (60MHz)
SDRAM: 8Mbyte
FLASH: 2Mbyte
Video decoder
MPEG 2: Main Profile @ Main Level
Transfer rate: Up to 15Mbps
Resolution: 720x576, 720x480
Video format: NTSC, PAL, MULTI
Screen format: 4:3, 16:9
Teletext
Complies with DVB standard: STB (Normal TV) / VBI
MPEG audio
MPEG 1 layer 1&2 type: Mono, dual mono, stereo
Bit rate: 32, 44.1 and 48KHz
Data interface
Socket: 9-pole, D-sub, max. 115Kbps
Remote control
Range: max. 7 metres
Mains power supply unit
Electricity consumption: max. 30W
Mains voltage: AC 90 - 250V AC, 50/60Hz
Rear connections
Audio L/R: 2 x RCA Cinch
Digital audio output: 1 x coaxial
Data interface: 9-pole, D-sub
Digital tuner input: IEC 169-24
Loop-through digital tuner: IEC 169-24
TV SCART: RGB, CVBS, Y/C, audio
VCR SCART: CVBS, Y/C, audio
Other data
Dimensions (W x H x D): 27 x 5.5 x 19.5cm
Page 19

GB 17
Page 20

9903973002-BDA-GB-09/2005
 Loading...