

Page 1
WARNING: To reduce the risk of injury, the user must read and understand the
Owner’s Manual before using this product. Save these instructions for future reference.
AVERTISSEMENT : Afin de réduire les risques de blessure, l’utilisateur doit lire et
comprendre le guide d’utilisation avant d’utiliser cet article. Conservez le présent guide
afin de pouvoir le consulter ultérieurement.
ADVERTENCIA : Para reducir el riesgo de lesiones, el usuario debe leer y comprender
el Manual del operador antes de utilizar este producto. Guarde estas instrucciones para
consultarlas en caso sea necesario.
Owner’s Manual
Guide d’utilisation
Manual del propietario
For Customer Service
Pour le service à la clientèle
Servicio al cliente
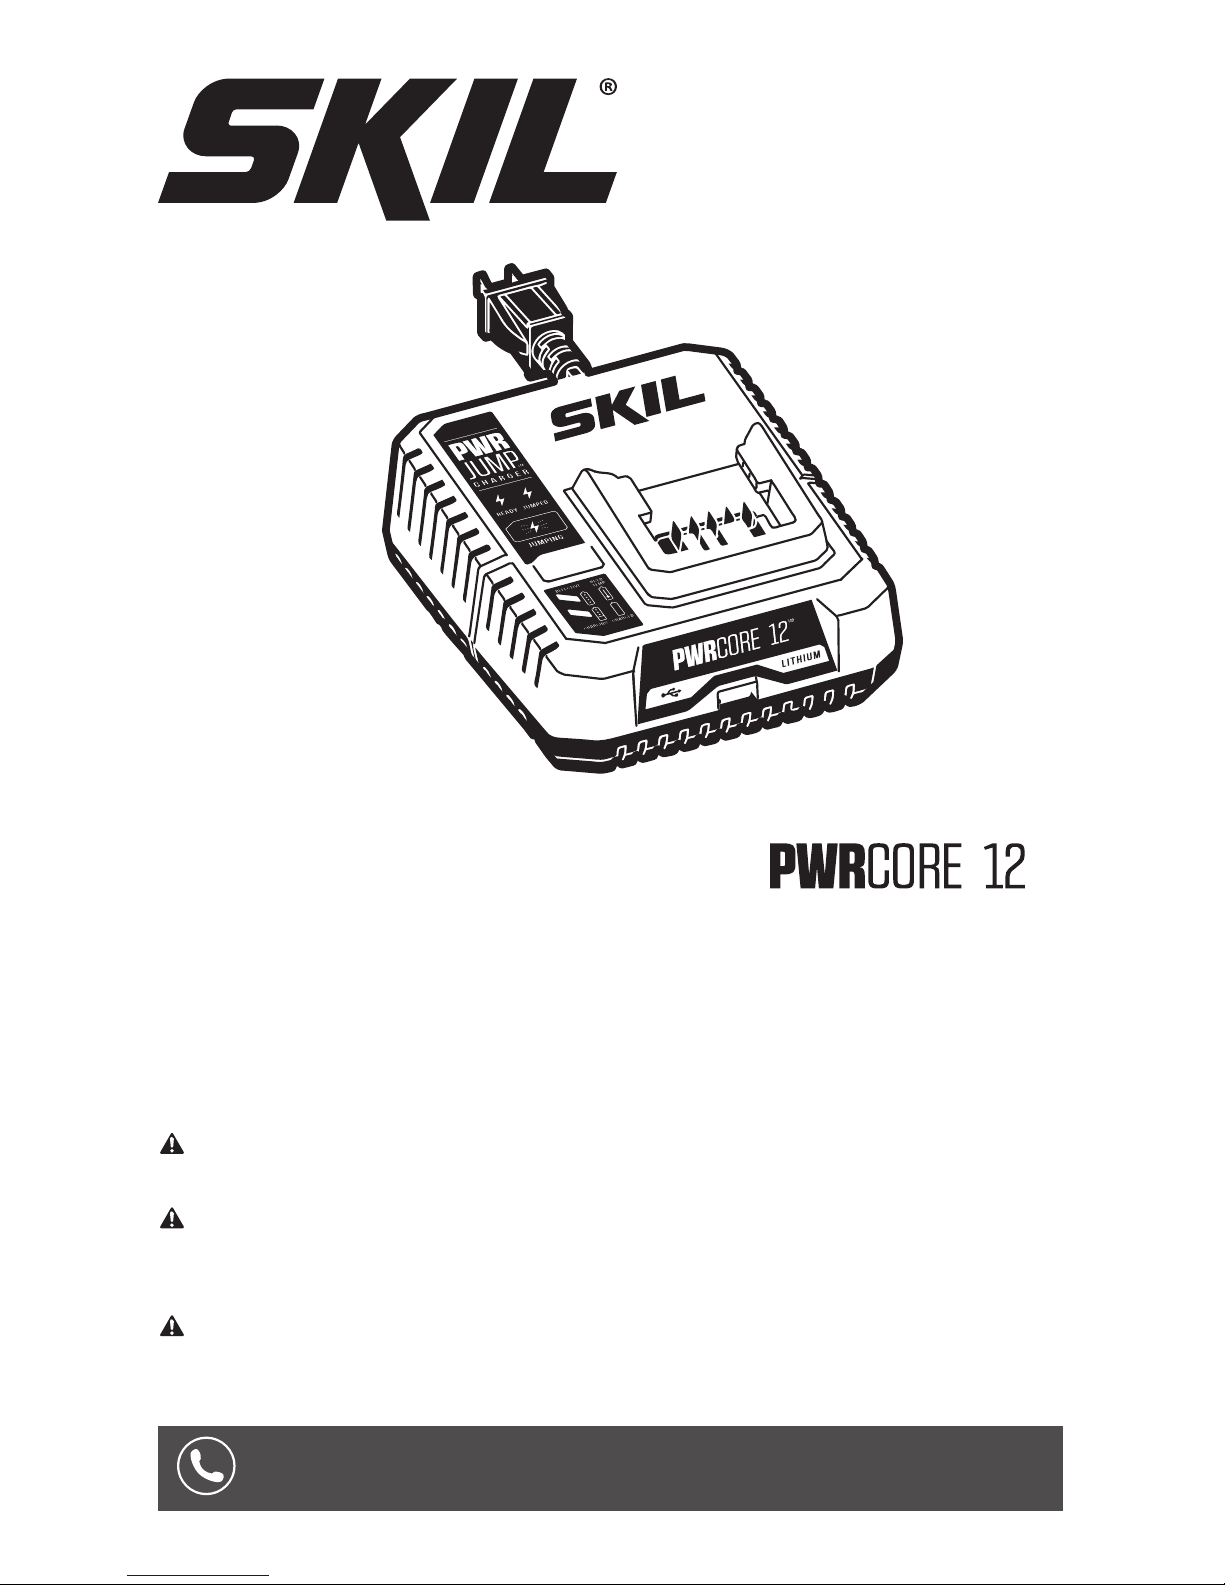
PWRJUMP™ Charger
Chargeur PWRJUMP™
Cargador PWRJUMP™
Model/ Modelo/ Modèle: QC535701
TM
1-877-SKIL-999 OR www.skil.com
Page 2

2
TABLE OF CONTENTS
Charger Safety Instructions .....................................3-4
Extension Cords ................................................4
FCC Caution ....................................................5
Symbols .....................................................6-9
Get to Know Your Charger .......................................10
Specications .................................................10
Important Charging Notes .......................................11
Operating Instructions .......................................12-14
Maintenance ...................................................15
Troubleshooting ...............................................15
Limited Warranty of SKIL Charger .................................16
Page 3

3
IMPORTANT SAFETY INSTRUCTIONS - SAVE THESE
INSTRUCTIONS
DANGER
TO REDUCE THE RISK OF FIRE OR ELECTRIC SHOCK, CAREFULLY
FOLLOW THESE INSTRUCTIONS.
CHARGER SAFETY INSTRUCTIONS
This manual contains instructions for battery charger model QC535701. Do not substitute
any other charger.
Before using battery charger, read all instructions and cautionary markings on (1)
battery charger, (2) battery pack, and (3) product using battery.
Charge only SKIL rechargeable batteries listed in the manual. Other types of batteries
may burst causing personal injury and damage.
Charge battery pack within the required temperature range. Store charger and battery
pack in locations where temperature is within the recommended storage temperature
range. This is important to prevent serious damage to the battery cells.
Do not recharge battery in damp or wet environment. Do not expose charger to rain or
snow. Water entering battery charger may result in electric shock or re.
Battery leakage may occur under extreme usage or temperature conditions. Avoid
contact with skin and eyes. The battery liquid is caustic and could cause chemical burns
to tissues. If liquid comes in contact with skin, wash quickly with soap and water. If the liquid
contacts your eyes, ush them with water for a minimum of 10 minutes and seek medical
attention.
Place charger on at nonammable surfaces and away from ammable materials when
recharging battery pack. Carpeting and other heat insulating surfaces block proper air
circulation which may cause overheating of the charger and battery pack. If smoke or melting
of the charger or battery pack is observed, unplug the charger immediately and do not use the
battery pack or charger. Contact customer service immediately.
Keep the cord and charger from heat to prevent damage to housing or internal parts.
Do not allow gasoline, oils, petroleum-based products, etc. to come in contact with
plastic parts. These materials contain chemicals that can damage, weaken, or destroy
plastic.
Make sure cord is located so that it will not be stepped on, tripped over, or otherwise
subjected to damage or stress. Damaged plug and cord may result in electric shock or re.
Disconnect the charger by pulling the plug rather than the cord. Do not operate charger
with damaged cord or plug; have them replaced immediately. Damaged plug or cord may
result in electric shock or re.
Do not insert battery pack in charger if battery pack case is cracked. Using damaged
battery pack may result in electric shock or re.
Do not disassemble charger or operate the charger if it has received a sharp blow, been
dropped or otherwise damaged in anyway. Incorrect reassembly or damage may result in
electric shock or re.
Before each use, check the battery charger, cable and plug. If damage is detected,
do not use the battery charger. Never open the battery charger yourself, take it to a
SKIL Factory Service Center, or qualied serviceman only using original spare parts.
Incorrect reassembly may result in electric shock or re.
Do not touch the uninsulated portion of output connector or uninsulated battery
terminal. There is a risk of electric shock.
Do not use attachment not recommended or sold by SKIL. Using attachments not
recommended may result in electric shock or re.
Page 4

4
Do not store battery pack in charger. Battery pack stored in charger over a long period of
time could lead to battery pack damage and re.
Unplug charger from outlet before storage, attempting any maintenance or cleaning.
Such preventive safety measures reduce the risk of electric shock or re.
Keep the battery charger clean by blowing compressed air on charger vents and wiping
the charger housing with a damp cloth. Contamination may result in electric shock or re.
Replace battery pack if a substantial drop in operating time per charge is observed.
Battery pack may be nearing the end of its life.
To reduce the risk of injury, close supervision is necessary when an appliance is used
near children.
Do not use outdoors.
EXTENSION CORDS
WARNING
AN EXTENSION CORD SHOULD NOT BE USED UNLESS
ABSOLUTELY NECESSARY. Use of improper extension cord could result
in risk of re and electrical shock. If an extension cord is used, make sure:
a. The pins on plug of extension cord are the same number, size, and shape as those of plug
on charger.
b. The extension cord is properly wired and in good electrical condition.
c. The wire size is large enough for AC ampere rating of charger as specied below:
Length of Cord (Feet) 25’ 50’ 100’ 150’
Size of Cord (AWG) 18 16 16 14
Extension Cord Chart for 220/240 Volt Tools:
0.75mm
2
CORD 50 Meters
1.0mm
2
CORD 75 Meters
d. An extension cord is a temporary solution. Move the charger to a standard receptacle as
soon as the job has been completed.
Page 5

5
FCC CAUTION
1. This device complies with Part 15 of the FCC Rules. Operation is subject to the following
two conditions:
(1) This device may not cause harmful interference.
(2) This device must accept any interference received, including interference that may cause
undesired operation.
2. Changes or modications not expressly approved by the party responsible for compliance
could void the user’s authority to operate the equipment.
NOTE: This equipment has been tested and found to comply with the limits for a Class B
digital device, pursuant to Part 15 of the FCC Rules. These limits are designed to provide
reasonable protection against harmful interference in a residential installation. This equipment
generates, uses, and can radiate radio frequency energy and, if not installed and used in
accordance with the instructions, may cause harmful interference to radio communications.
However, there is no guarantee that interference will not occur in a particular installation. If
this equipment does cause harmful interference to radio or television reception, which can be
determined by turning the equipment off and on, the user is encouraged to try to correct the
interference by one or more of the following measures:
•
Reorient or relocate the receiving antenna.
•
Increase the separation between the equipment and receiver.
•
Connect the equipment into an outlet on a circuit different from that to which the receiver is
connected.
•
Consult the dealer or an experienced radio/TV technician for help.
DANGER
People with electronic devices, such as pacemakers, should consult their
physician(s) before using this product. Operation of electrical equipment in
close proximity to a heart pacemaker could cause interference or failure of the pacemaker.
Page 6
6
SYMBOLS
Safety Symbols
The purpose of safety symbols is to attract your attention to possible dangers. The safety
symbols and the explanations with them deserve your careful attention and understanding.
The symbol warnings do not, by themselves, eliminate any danger. The instructions and
warnings they give are no substitutes for proper accident prevention measures.
WARNING
Be sure to read and understand all safety instructions in this Owner’s
Manual, including all safety alert symbols such as “DANGER,”
“WARNING,” and “CAUTION” before using this tool. Failure to following all instructions listed
below may result in electric shock, re, and/or serious personal injury.
The denitions below describe the level of severity for each signal word. Please read the manual
and pay attention to these symbols.
This is the safety alert symbol. It is used to alert you to potential
personal injury hazards. Obey all safety messages that follow this
symbol to avoid possible injury or death.
DANGER
DANGER indicates a hazardous situation which, if not avoided, will
result in death or serious injury.
WARNING
WARNING indicates a hazardous situation which, if not avoided, could
result in death or serious injury.
CAUTION
CAUTION, used with the safety alert symbol, indicates a hazardous
situation which, if not avoided, will result in minor or moderate injury.
Damage Prevention and Information Messages
These inform the user of important information and/or instructions that could lead to equipment
or other property damage if they are not followed. Each message is preceded by the word
“NOTICE”, as in the example below:
NOTICE: Equipment and/or property damage may result if these instructions are not followed.
WARNING
The operation of any power tools can result in
foreign
objects being thrown into your eyes, which can result
in severe eye damage. Before beginning power tool operation, always
wear safety goggles or safety glasses with side shields and a full face
shield when needed. We recommend a Wide Vision Safety Mask for use
over eyeglasses or standard safety glasses with side shields. Always use
eye protection which is marked to comply with ANSI Z87.1.
Page 7

7
SYMBOLS (CONTINUED)
IMPORTANT: Some of the following symbols may be used on your tool. Please study them
and learn their meaning. Proper interpretation of these symbols will allow you to operate the
tool better and more safely.
Symbol Name Designation/Explanation
V Volts Voltage (potential)
A Amperes Current
Hz Hertz Frequency (cycles per second)
W Watt Power
kg Kilograms Weight
min Minutes Time
s Seconds Time
Wh Watt-hours Battery capacity
Ah Ampere-Hours Battery capacity
Ø Diameter Size of drill bits, grinding wheels, etc.
n
0
No load speed Rotational speed, at no load
n Rated speed Maximum attainable speed
…/min
Revolutions or reciprocation
per minute
Revolutions, strokes, surface speed,
orbits, etc. per minute
0 Off position Zero speed, zero torque...
1,2,3,…
I,II,III
,
Selector settings
Speed, torque or position settings. Higher
number means greater speed
Innitely variable selector
with off
Speed is increasing from 0 setting
Arrow Action in the direction of arrow
Alternating current Type or a characteristic of current
Direct current Type or a characteristic of current
Alternating or direct current Type or a characteristic of current
Class II construction
Designates Double Insulated Construction
tools.
Earthing terminal Grounding terminal
Li-ion RBRC seal
Designates Li-ion battery recycling
program
Page 8
8
Symbol Name Designation/Explanation
Ni-Cad RBRC seal
Designates Ni-Cad battery recycling
program
Read manual symbol Alerts user to read manual
Wear eye protection symbol
Always wear safety goggles or safety
glasses with side shields and a full face
shield when operating this product.
Page 9
9
SYMBOLS (CERTIFICATION INFORMATION)
IMPORTANT: Some of the following symbols for certication information may be used on your
tool. Please study them and learn their meaning. Proper interpretation of these symbols will
allow you to operate the tool better and more safely.
Symbol Designation/Explanation
This symbol designates that this tool is listed by Underwriters Laboratories.
This symbol designates that this tool is recognized by Underwriters
Laboratories.
This symbol designates that this tool is listed by Underwriters
Laboratories, to United States and Canadian Standards.
This symbol designates that this tool is listed by the Canadian
Standards Association.
This symbol designates that this tool is listed by the Canadian
Standards Association, to United States and Canadian Standards.
This symbol designates that this tool is listed by the Intertek Testing
Services, to United States and Canadian Standards.
This symbol designates that this tool complies to NOM Mexican
Standards.
This symbol designates that this tool is listed by the California Energy
Commission.
Page 10
10
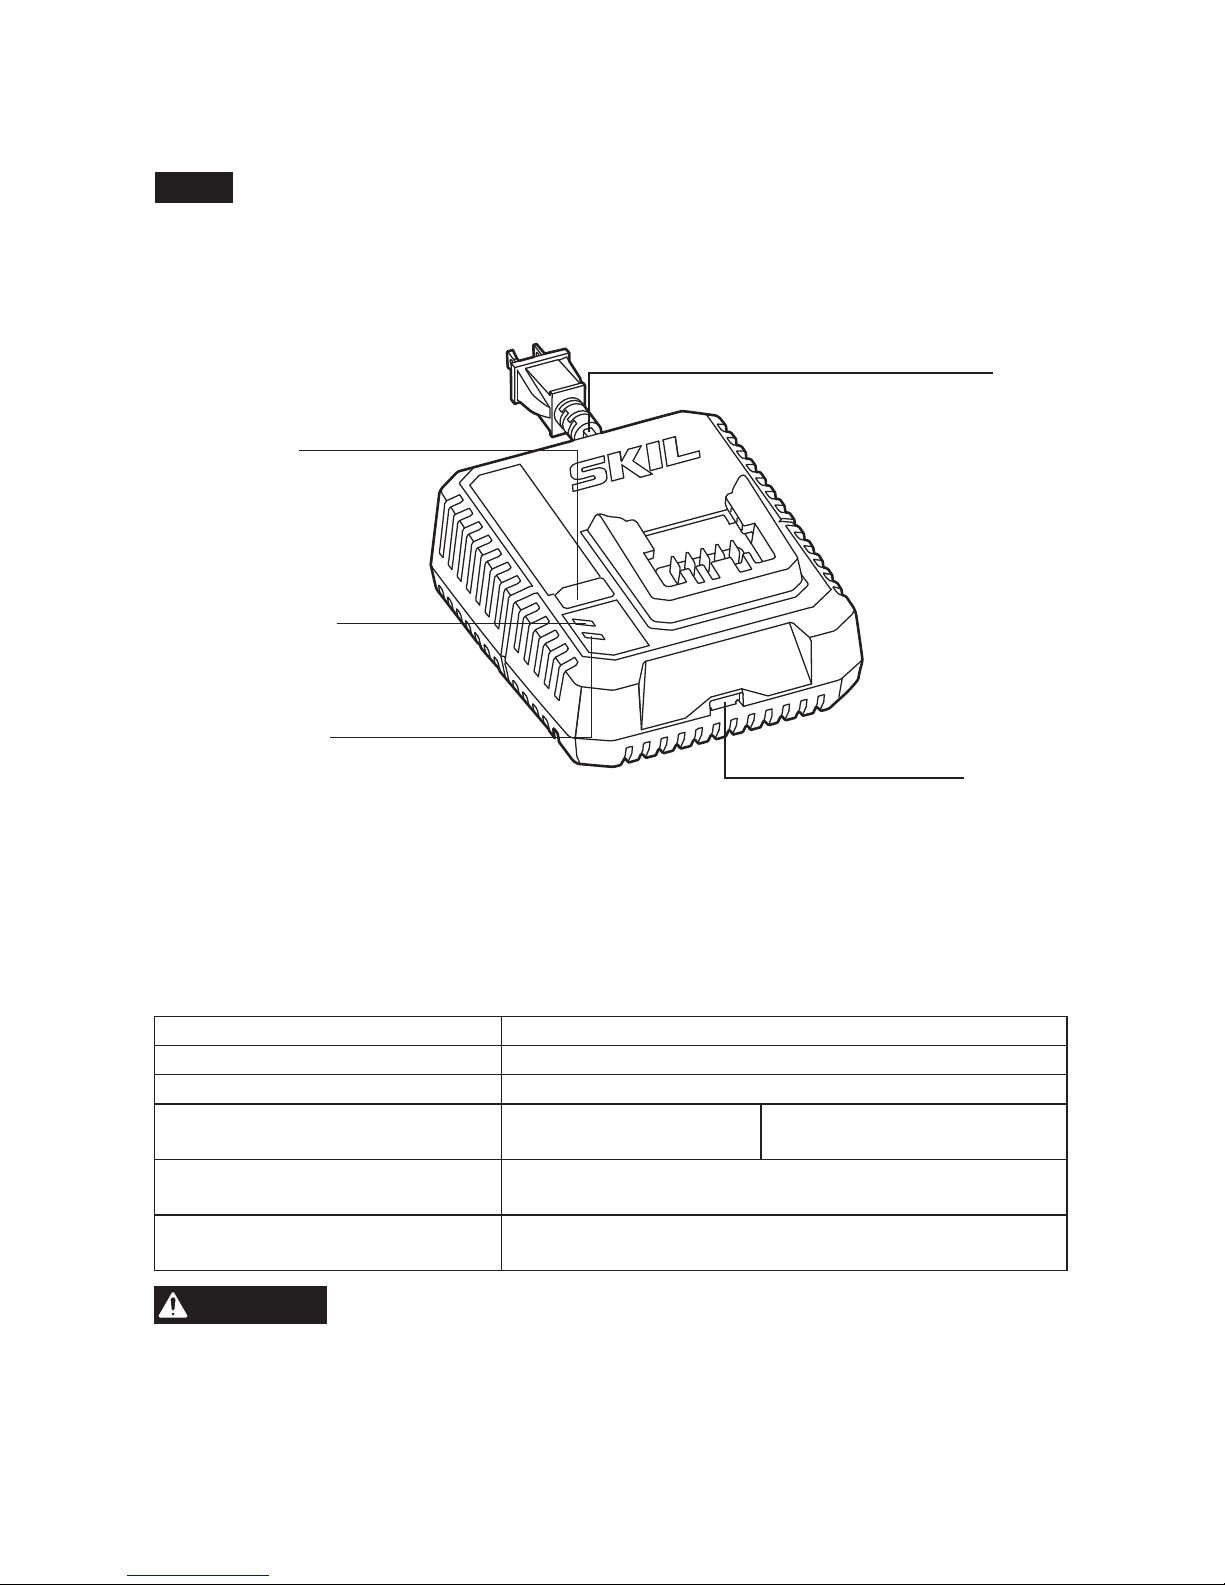
GET TO KNOW YOUR CHARGER
PWRCORE-12™ PWRJUMP™ Charger
Fig. 1
PWRJUMP
Button/Indicator
Defect Indicator
Normal Charging
Indicator
USB Port
Cord
SPECIFICATIONS
Rated input 120V, 60Hz AC 90W
Rated output 12.6V
USB output 5V 1A
Battery Compatibility 2Ah:
SKIL BY500101
4Ah:
SKIL BY519801
Recommended Charging Temperature
Normal Charging: 39.2
°F (4°C
) - 104
°F (
40°C)
PWR
JUMP Charging: 50°F (10°C) - 104°F (40°C)
Recommended Storage Temperature
32°F (0°C) - 104°F (40°C)
WARNING
This charger will only charge the batteries listed in the table above.
Page 11

11
IMPORTANT CHARGING NOTES
1. The charger was designed to rapidly charge the battery only when the battery temperature
is within the required PWRJUMP charging temperature range. If the battery pack is too hot
or too cold, the charger will not charge the battery rapidly. (This may happen if the battery
pack is hot from heavy use).
2. A substantial drop in operating time per charge may mean that the battery pack is nearing
the end of its life and should be replaced.
3. Remember to unplug the charger during storage.
4. If battery does not charge properly:
a. Check for power at the outlet by plugging another electrical device into the outlet.
b. Check to see if the outlet is connected to a light switch that turns power “off” when lights
are turned off.
c. Check the battery pack terminals for dirt. Clean with cotton swab and alcohol, if
necessary.
d. If proper charging still does not occur, take or send the tool, battery pack and charger to
your local SKIL Service Center. Please refer to the Customer Service information on the
cover of this manual.
NOTICE: Use of chargers or battery packs not sold by SKIL will void the warranty.
Page 12

12
OPERATING INSTRUCTIONS
WARNING
To reduce the risk of re, personal injury, and product damage due to
a short circuit, never immerse your charger or battery pack in uid or
allow a uid to ow inside them. Corrosive or conductive uids, such as seawater, certain
industrial chemicals, and bleach or bleach-containing products, etc, can cause a short circuit.
How to Charge the Battery Pack
NOTICE: The battery pack is shipped partially charged.
Before using it the rst time, fully charge the battery pack.
The PWRJUMP function charges a fully-depleted 2.0Ah battery pack to approximately 25%
capacity in 5 minutes.
NOTICE: The remaining 75% charge will be
achieved under the normal charging mode.
a) Charge the battery pack with the correct
charger.
b) Connect the charger to a power supply. The
red Defect Indicator, green Normal Charging
Indicator, and yellow PWRJUMP Indicator
will shine for one second and then go out,
indicating that the charger self-inspection is
completed.
c) Align the raised ribs of the battery pack with
the slot in the charger.
d) Insert the battery pack into the charger
(Fig. 2).
e) The charger will communicate with the battery pack to evaluate the condition of the battery
pack.
f) If the battery pack temperature is within the PWRJUMP charging temperature range and the
battery is signicantly depleted, the PWRJUMP indicator will shine yellow.
g) Depress the button to activate PWRJUMP charging. The PWRJUMP light will ash green to
indicate PWRJUMP charging.
h) When the battery has charged to approximately 25% capacity in 5 minutes, the green
Normal Charging Indicator will begin ashing to indicate that normal charging is occurring;
the PWRJUMP indicator will remain green.
i) The green normal charging indicator will keep ashing when charging the battery pack
in the normal charging mode. After the charging is complete, the green normal charging
indicator will stay green.
j) A ickering red defect indicator indicates a defective battery or a bad connection between
the battery and the charger.
k) A solid red defect indicator indicates that the battery is over-temperature. Remove the
battery pack from the charger. If the battery is too hot, cool the battery under air ow. If the
battery is too cold, place it indoors until it reaches room temperature.
l) It is not recommended that the battery pack remain on the charger for more than 24 hours.
NOTICE: If the battery pack cannot accept a charge, the contacts of the charger or battery
pack may be contaminated. Clean the contacts of the charger or battery pack (e. g. by
inserting and removing the battery several times or scrubbing with a cotton swab and alcohol)
or replace the battery pack, as required.
Fig. 2
Attach
Detach
Page 13
13
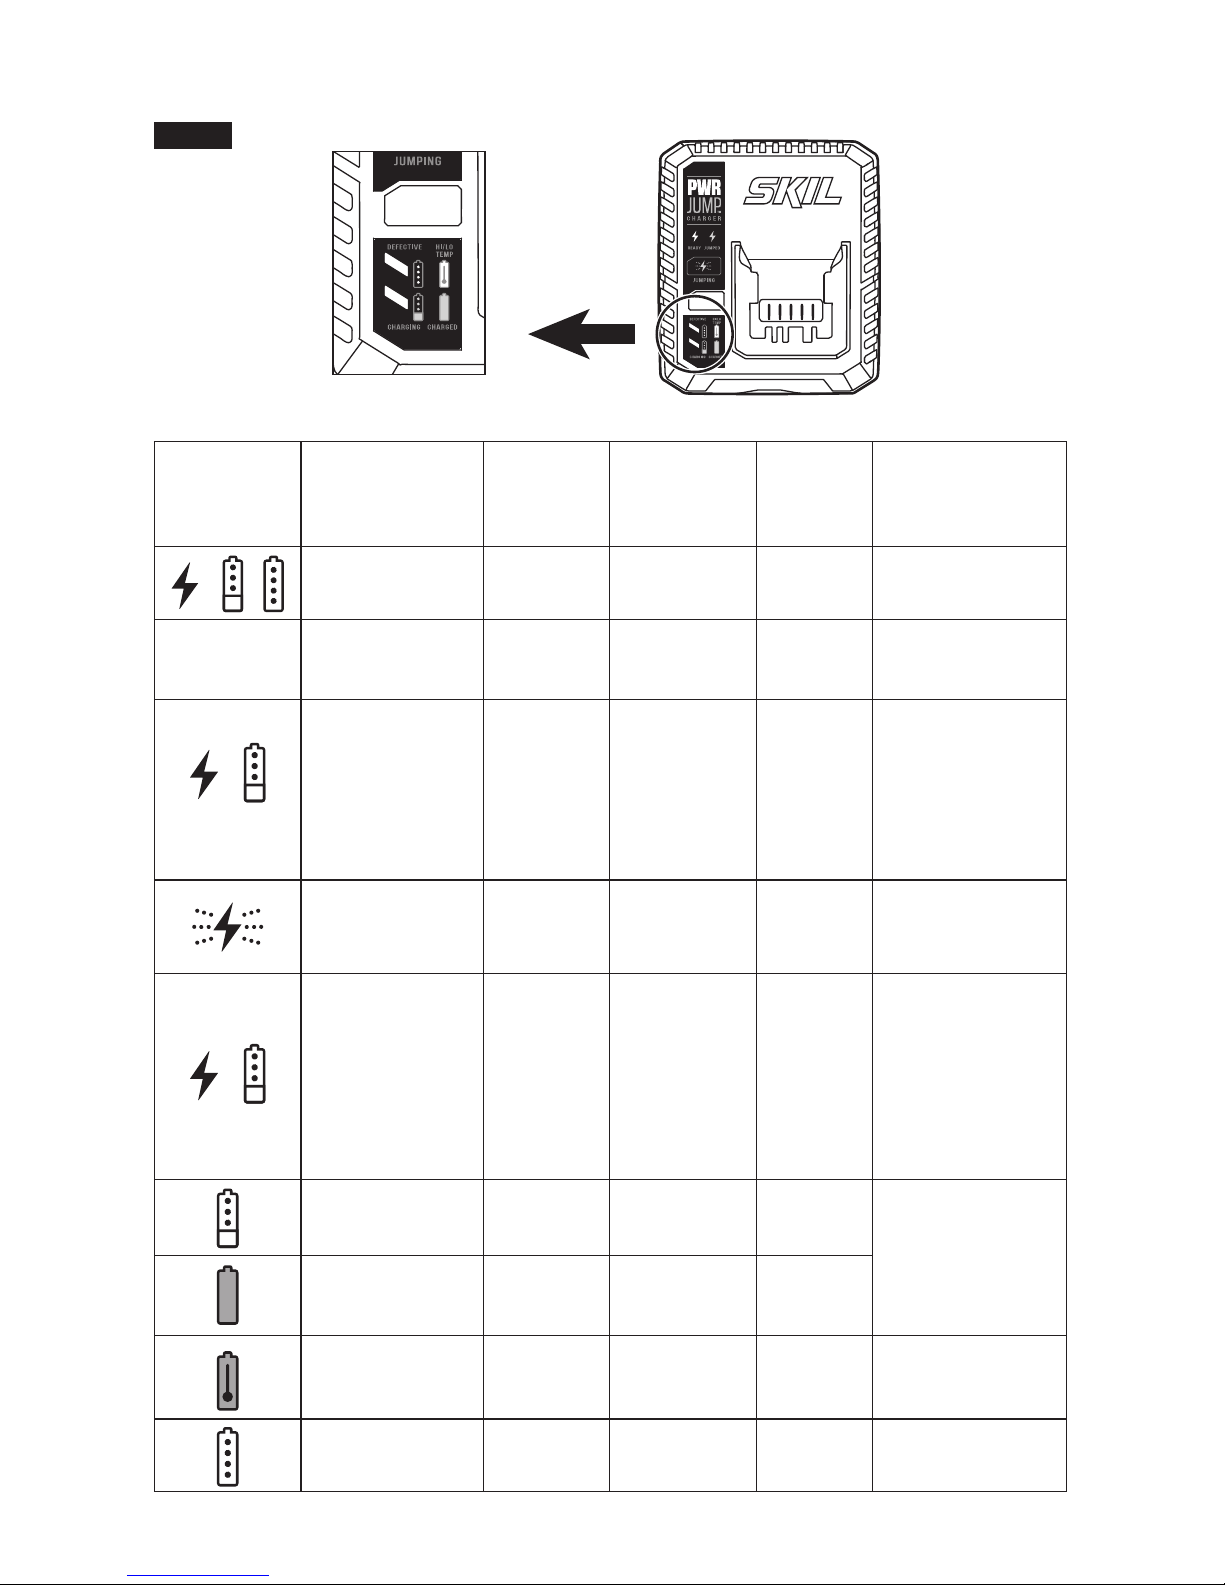
Charger Display (Fig.3)
Fig. 3
Indicator Mode
Normal
Charging
Indicator
(green)
PWRJUMP
Button/
Indicator
(green/yellow)
Defect
Indicator
(red)
Note
Self-inspection
completed
steady steady yellow steady Shine for 1 second
/
Self-inspection
failed
off off off
No reaction when
the charger is
plugged in
Ready for
PWRJUMP
charging
ashing steady yellow off
The charger will
communicate
with the battery
pack to evaluate
if PWRJUMP
charging can be
activated
PWRJUMP
charging
off ashing green off
PWRJUMP
charging
PWRJUMP
charging
completed
start
ashing
steady green off
When the
PWRJUMP
charging is
completed, the
charger will
automatically
switch into normal
charging mode
Normal charging ashing
steady green
or off
off
If PWRJUMP
charging hasn’t
activated, the
PWRJUMP light
will stay off during
the whole process
Fully Charged
steady
green
steady green
or off
off
Hot/Cold Battery off off steady red
Remove the
battery from the
charger
Defective off off
ashing or
off
charging defect
Page 14
14
NOTICE: Charger may become warm with several continuous charge cycles.This is part of
the normal operation of the charge. Charge in a well ventilated area.
Defective Charger
If the charger self-inspection fails to react when the charger is plugged in, the causes include
no power to the charger, bad contacts, or a defective charger. Check to see if the charger
self-inspection can be activated when the charger is plugged in again or plugged into a
different outlet. If it still fails, have the charger serviced by an Authorized SKIL Service Station.
Defective Battery Pack
If the charger detects a problem, the red Defect Indicator will begin ashing. Remove and
re-insert the battery pack in the charger. If the Defect Indicator ashes a second time, try
charging a different battery pack.
a. If a different battery pack charges normally, have the rst defective battery pack serviced by
an Authorized SKIL Service Station.
b. If a different battery pack also indicates “defective,” the charger may be defective. Have the
charger serviced by an Authorized SKIL Service Station.
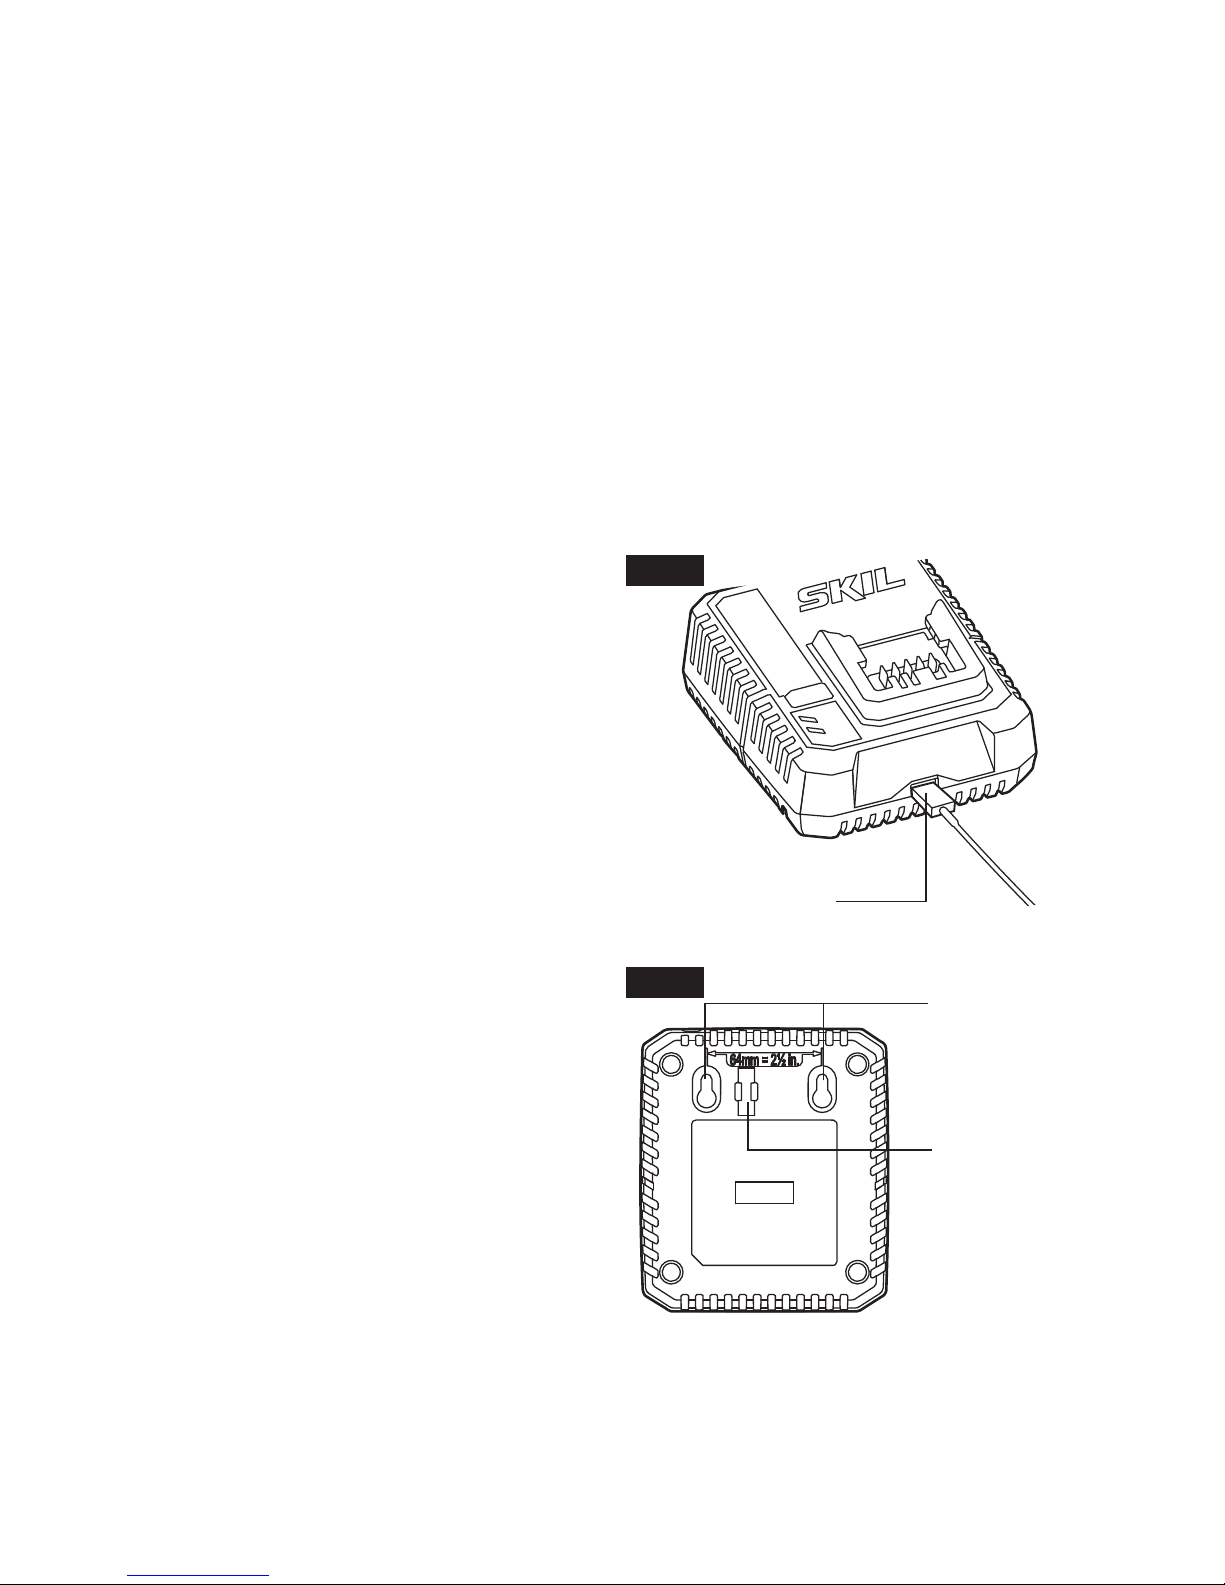
USB Charging Port (Fig. 4)
The charger has a USB port, which can provide
5V 1A output (e.g. mobile phones, E-readers
and any other products of appropriate power
input) when plugged in.
Connect an applicative device with the charger
with a standard USB cable.
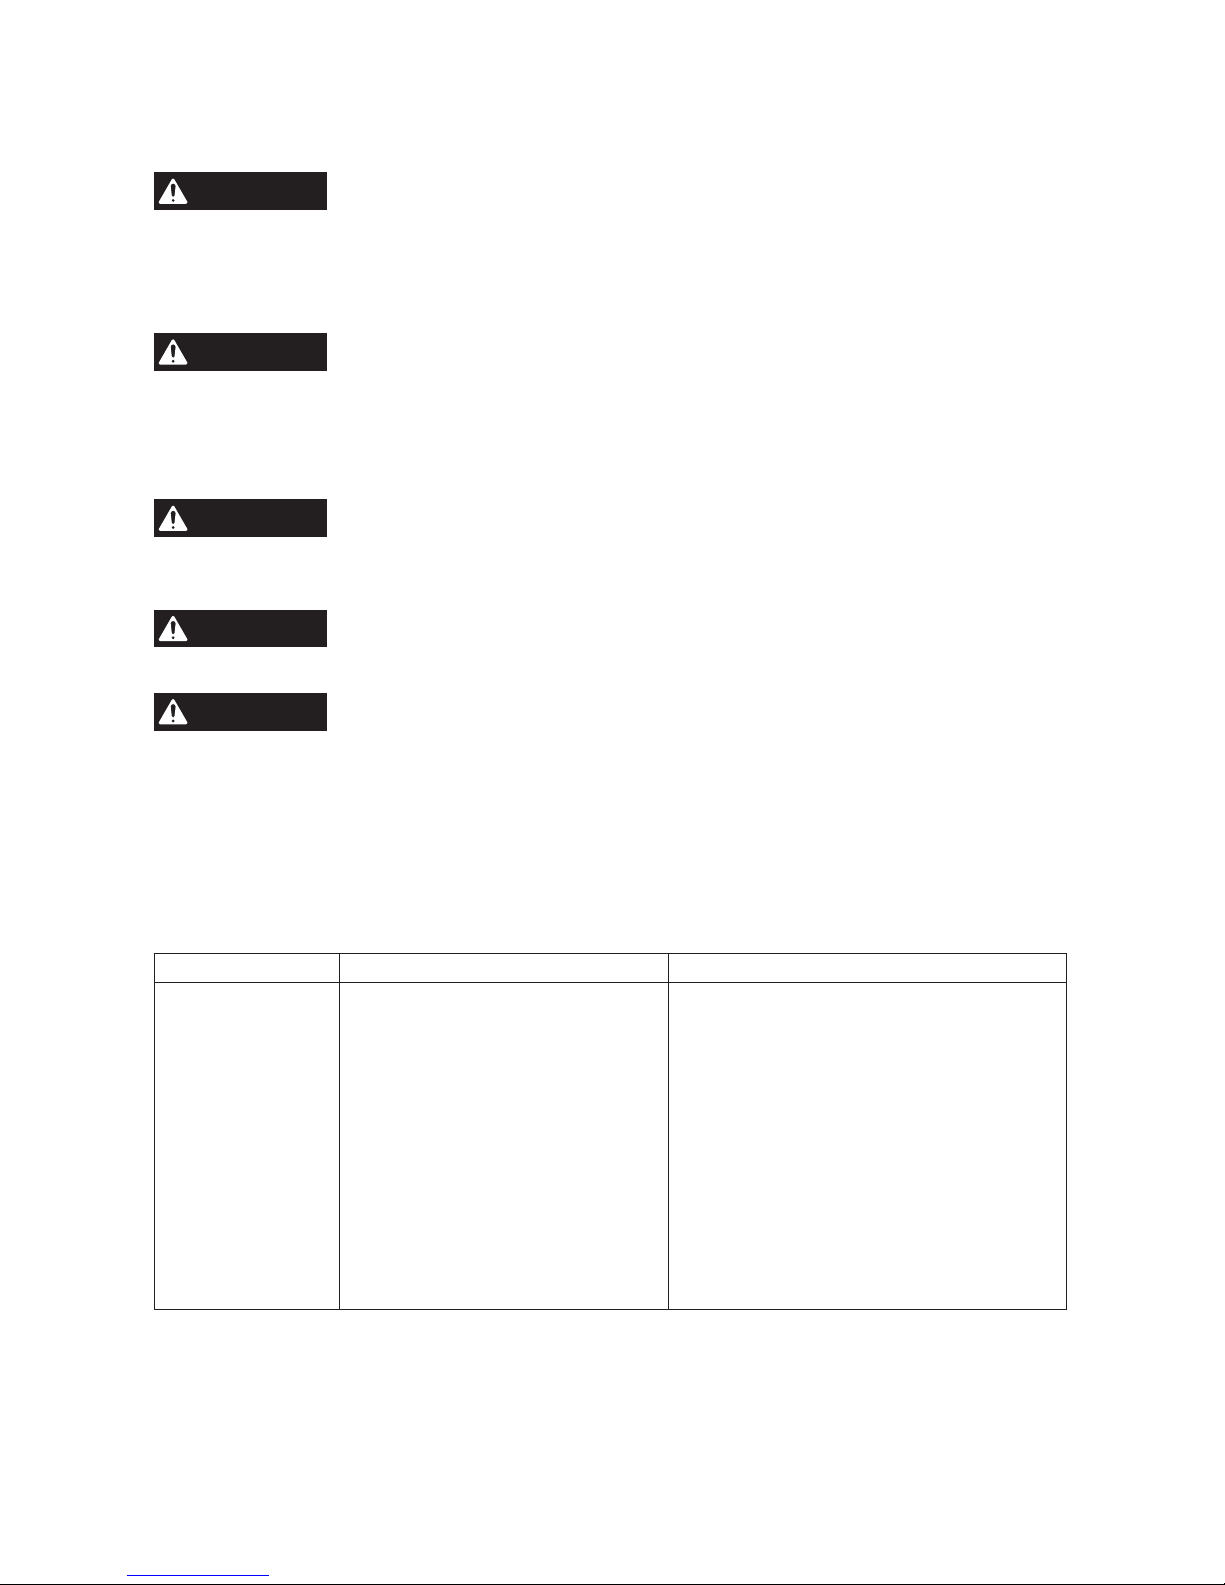
Wall-Mount Holes (Fig. 5)
The charger has hanging holes for convenient
storage. Install screws in the wall 2-1/2 inches
(64mm) apart.
Use screws sufciently strong to hold the
combined weight of the charger and battery
pack.
There is also a slot for conveniently positioning
the cord.
Fig. 4
USB charging port
Fig. 5
Hanging
holes
Cord slot
Page 15
15
MAINTENANCE
Service
WARNING
Preventive maintenance performed by unauthorized personnel may
result in misplacing of internal wires and components which could
cause serious hazard. We recommend that all tool service be performed by a SKIL Factory
Service Center or Authorized SKIL Service Station.
General Maintenance
WARNING
When servicing, use only identical replacement parts. Use of any
other parts could create a hazard or cause product damage.
Periodically inspect the entire product for damaged, missing, or loose parts such as screws,
nuts, bolts, caps, etc. Tighten securely all fasteners and caps and do not operate this product
until all missing or damaged parts are replaced. Please contact customer service or an
authorized service center for assistance.
WARNING
To avoid serious personal injury, always remove the battery pack
from the charger/tool when cleaning or performing any maintenance.
Cleaning
WARNING
The tool may be cleaned most effectively with compressed dry air. Always
wear safety goggles when cleaning tools with compressed air. Do not
attempt to clean by inserting pointed objects through openings.
WARNING
Certain cleaning agents and solvents damage plastic parts. Some of
these are: gasoline, carbon tetrachloride, chlorinated cleaning solvents,
ammonia and household detergents that contain ammonia.
Storage
Store the tool indoors in a place that is inaccessible to children. Keep it away from corrosive
agents.
TROUBLESHOOTING
Problem Cause Remedy
Battery pack will
not charge.
1. Charger is not plugged into a
functioning outlet.
1. Conrm charger is plugged into a
functioning outlet.
2. Battery pack is not completely
inserted into the charger.
2. Conrm battery pack is inserted into
charger completely.
3. Bad contacts 3. Clean the contacts of the charger or
battery packs.
4. Battery is over- or under-
temperature.
4. Cool the battery if too hot. Place the
battery indoors if too cold.
5. Battery pack is damaged. 5. Have the battery pack serviced by an
Authorized SKIL Service Station.
6. Charger is damaged. 6. Have the charger serviced by an
Authorized SKIL Service Station.
Page 16

16
LIMITED WARRANTY OF SKIL CONSUMER TOOLS
5 YEAR LIMITED WARRANTY- LEGAL
Chervon North America, Inc. ("Seller") warrants to the original purchaser only, that all SKIL
consumer TOOLS will be free from defects in material or workmanship for a period of ve
years from date of purchase, if original purchaser registers the product within 30 days from
purchase. BATTERIES AND CHARGERS are warranted for 2 years. Product registration
can be completed online at www.Registermyskil.com. Original purchasers should also retain
their receipt as proof of purchase. THE FIVE-YEAR WARRANTY PERIOD FOR TOOLS IS
CONDITIONED ON REGISTRATION OF THE PRODUCT WITHIN 30 DAYS OF PURCHASE.
If original purchasers do not register their product timely, the foregoing limited warranty will
apply for a duration of three years for tools. All batteries and chargers will remain under the
two-year limited warranty.
Notwithstanding the foregoing, if a SKIL consumer tool is used for industrial, professional
or commercial purposes, the foregoing warranty will apply for a duration of ninety days,
regardless of registration.
SELLER’S SOLE OBLIGATION AND YOUR EXCLUSIVE REMEDY under this Limited
Warranty and, to the extent permitted by law, any warranty or condition implied by law, shall
be the repair or replacement of parts, without charge, which are defective in material or
workmanship and which have not been misused, carelessly handled, or repaired by persons
other than Seller or Authorized Service Station. To make a claim under this Limited Warranty,
you must return the complete product, transportation prepaid, to any SKIL Factory Service
Center or Authorized Service Station. For Authorized SKIL Power Tool Service Stations,
please visit www.Registermyskil.com or call 1-877-SKIL-999 (1-877-754-5999).
THIS LIMITED WARRANTY DOES NOT APPLY TO ACCESSORY ITEMS SUCH AS
CIRCULAR SAW BLADES, DRILL BITS, ROUTER BITS, JIGSAW BLADES, SANDING
BELTS, GRINDING WHEELS AND OTHER RELATED ITEMS.
ANY IMPLIED WARRANTIES APPLICABLE TO A PRODUCT SHALL BE LIMITED IN
DURATION EQUAL TO THE DURATION OF THE EXPRESS WARRANTIES APPLICABLE
TO SUCH PRODUCT, AS SET FORTH IN THE FIRST PARAGRAPH ABOVE. SOME
STATES IN THE U.S., SOME CANADIAN PROVINCES DO NOT ALLOW LIMITATIONS ON
HOW LONG AN IMPLIED WARRANTY LASTS, SO THE ABOVE LIMITATION MAY NOT
APPLY TO YOU.
IN NO EVENT SHALL SELLER BE LIABLE FOR ANY INCIDENTAL OR CONSEQUENTIAL
DAMAGES (INCLUDING BUT NOT LIMITED TO LIABILITY FOR LOSS OF PROFITS)
ARISING FROM THE SALE OR USE OF THIS PRODUCT. SOME STATES IN THE U.S.
AND SOME CANADIAN PROVINCES DO NOT ALLOW THE EXCLUSION OR LIMITATION
OF INCIDENTAL OR CONSEQUENTIAL DAMAGES, SO THE ABOVE LIMITATION OR
EXCLUSION MAY NOT APPLY TO YOU.
THIS LIMITED WARRANTY GIVES YOU SPECIFIC LEGAL RIGHTS, AND YOU MAY ALSO
HAVE OTHER RIGHTS WHICH VARY FROM STATE TO STATE IN THE U.S., PROVINCE
TO PROVINCE IN CANADA AND FROM COUNTRY TO COUNTRY.
THIS LIMITED WARRANTY APPLIES ONLY TO PRODUCTS SOLD WITHIN THE UNITED
STATES OF AMERICA, CANADA AND THE COMMONWEALTH OF PUERTO RICO. FOR
WARRANTY COVERAGE WITHIN OTHER COUNTRIES, CONTACT YOUR LOCAL SKIL
DEALER OR IMPORTER.
© Chervon North America, 1203 E. Warrenville Rd, Naperville, IL 60563.
08/18
Page 17

17
TABLE DES MATIÈRES
Consignes de sécurité relatives au chargeur .....................18-19
Rallonges .....................................................19
Mise en garde de la FCC
(Commission fédérale des communications des États-Unis) ...........20
Symboles ..................................................21-24
Apprenez à connaître votre chargeur ..............................25
Caractéristiques techniques .....................................25
Consignes importantes concernant le chargement ...................26
Mode d’emploi ..............................................27-29
Entretien ......................................................30
Dépannage ....................................................30
Garantie limitée du chargeur SKIL. . . . . . . . . . . . . . . . . . . . . . . . . . . . . . 31-32
Page 18

18
CONSIGNES DE SÉCURITÉ IMPORTANTES – À CONSERVER
INSTRUCTIONS
DANGER
SUIVEZ RIGOUREUSEMENT CES INSTRUCTIONS AFIN DE RÉDUIRE
LES RISQUES D’INCENDIE OU DE CHOC ÉLECTRIQUE.
CONSIGNES DE SÉCURITÉ RELATIVES AU CHARGEUR
Ce guide contient des instructions pour le chargeur QC535701. Ne le remplacez par
aucun autre chargeur.
Avant d’utiliser le chargeur, lisez l’ensemble des instructions et des avertissements sur
(1) le chargeur, (2) le bloc-piles et (3) l’article alimenté par le bloc-piles.
Chargez uniquement les piles SKIL rechargeables mentionnées dans ce guide. Les
autres types de piles pourraient exploser et ainsi causer des blessures ou des dommages.
Chargez le bloc-piles dans la plage de température prescrite. Rangez le chargeur et
le bloc-piles dans un endroit où la température se situe dans la plage de température
de rangement recommandée. Cela est important pour éviter d’endommager gravement les
piles.
Ne rechargez pas le bloc-piles dans un endroit humide ou mouillé. N’exposez pas le
chargeur à la pluie ou à la neige. Une inltration d’eau dans le chargeur peut causer un
choc électrique ou un incendie.
Il se peut que le bloc-piles fuie dans des conditions d’utilisation intenses ou de
températures extrêmes. Évitez tout contact avec la peau et les yeux. Le liquide du bloc-
piles est caustique et peut causer des brûlures chimiques aux tissus. Si le liquide entre en
contact avec la peau, lavez-la rapidement avec de l’eau et du savon. Si le liquide entre en
contact avec vos yeux, rincez-les immédiatement avec de l’eau pendant au moins 10 minutes
et consultez un médecin.
Placez le chargeur sur une surface plate ininammable et à l’écart des matériaux
inammables lors de la recharge du bloc-piles. La moquette et les autres surfaces
calorifuges bloquent la circulation de l’air, ce qui peut entraîner une surchauffe du chargeur
et du bloc-piles. Si vous percevez de la fumée ou remarquez que le chargeur ou le bloc-piles
a fondu, débranchez immédiatement le chargeur et n’utilisez pas le bloc-piles ou le chargeur.
Communiquez immédiatement avec le service à la clientèle.
Gardez le cordon et le chargeur loin de la chaleur pour éviter d’endommager le boîtier
ainsi que les pièces internes. Ne laissez pas de l’essence, des huiles, des produits à
base de pétrole, des huiles dégrippantes ni d’autres produits de ce genre entrer en
contact avec les pièces en plastique. Ces matières contiennent des produits chimiques
pouvant endommager, affaiblir ou détruire le plastique.
Veillez à ce que le cordon ne soit pas placé dans un endroit où l’on pourrait marcher
dessus, l’accrocher ou lui faire subir un dommage ou une contrainte. Une che ou un
cordon endommagé peuvent entraîner un choc électrique ou un incendie.
Débranchez le chargeur en tirant sur la che plutôt que sur le cordon. N’utilisez pas le
chargeur si le
cordon ou la che sont endommagés et faites-les remplacer immédiatement le cas
échéant. Une che ou un cordon endommagés peuvent entraîner un choc électrique ou un
incendie.
N’insérez pas le chargeur dans le bloc-piles si ce dernier est ssuré ou endommagé.
L’utilisation d’un bloc-piles endommagé peut causer un choc électrique ou un incendie.
Ne démontez pas et n’utilisez pas le chargeur si celui-ci a reçu un coup violent, s’il est
tombé par terre ou s’il a été endommagé d’une quelconque façon. Un réassemblage
incorrect ou des dommages peuvent entraîner un choc électrique ou un incendie.
Page 19

19
Avant chaque utilisation, vériez l’état du chargeur, du cordon et de la che. Si vous
repérez des dommages, n’utilisez pas le chargeur. N’ouvrez jamais le chargeur vousmême; apportez-le à un centre de service de l’usine de SKIL ou faites-le réparer avec
des pièces de rechange d’origine par un technicien qualié. Un réassemblage incorrect
peut entraîner un choc électrique ou un incendie.
Ne touchez pas à la partie non isolée du connecteur de sortie ni à la borne non isolée
de la pile. Un choc électrique pourrait s’ensuivre.
N’utilisez pas d’accessoires qui ne sont pas recommandés ou vendus par SKIL.
L’utilisation d’accessoires non recommandés peut entraîner un choc électrique ou un incendie.
Ne rangez pas le bloc-piles dans son chargeur. Un bloc-piles rangé dans son chargeur
peu, au l du temps, se détériorer et causer un incendie.
Débranchez le chargeur de la prise avant de le ranger ou de procéder à toute tâche
d’entretien ou de nettoyage.
De telles mesures de sécurité préventives réduisent le risque de choc électrique ou
d’incendie.
Assurez-vous que le chargeur reste propre en soufant de l’air comprimé par ses
évents et en essuyant le boîtier à l’aide d’un linge humide. La saleté peut entraîner un
choc électrique ou un incendie.
Remplacez le bloc-piles si vous remarquez une baisse considérable de la durée de
fonctionnement par charge. Il se peut que le bloc-piles ait atteint la n de sa durée de vie
utile.
Lorsqu’un appareil est utilisé en présence d’enfants, une surveillance étroite doit être
exercée an de réduire les risques de blessure.
N’utilisez pas l’appareil à l’extérieur.
RALLONGES
AVERTISSEMENT
N’UTILISEZ PAS DE RALLONGE ÉLECTRIQUE À MOINS
QUE CELA SOIT ABSOLUMENT NÉCESSAIRE. L’utilisation
d’une rallonge inadaptée peut entraîner un risque d’incendie et de choc électrique. Si vous
utilisez une rallonge électrique, prenez les précautions suivantes :
a. Les broches de la che de la rallonge doivent être identiques en taille et en nombre à celles
de la che du chargeur.
b. La rallonge doit être bien branchée et en bon état.
c. Le calibre de la rallonge doit être sufsant pour l’intensité nominale du chargeur :
Longueur de la rallonge (mètres) 25’ 50’ 100’ 150’
Calibre du cordon (AWG) 18 16 16 14
Tableau des rallonges pour les outils de 220 V à 240 V :
CONDUCTEUR de 0,75 mm² 50 mètres
CONDUCTEUR de 1 mm² 75 mètres
d. Une rallonge est une solution temporaire. Branchez le chargeur sur une prise standard dès
que le travail est terminé.
Page 20

20
MISE EN GARDE DE LA FCC (COMMISSION FÉDÉRALE DES
COMMUNICATIONS DES ÉTATS-UNIS)
1. Cet appareil est conforme à la partie 15 des règlements de la FCC. Son fonctionnement est
soumis aux deux conditions suivantes :
(1) Cet appareil ne doit provoquer aucune interférence nuisible.
(2) Cet appareil doit accepter toute interférence reçue, y compris des interférences
susceptibles de causer un fonctionnement non désiré.
2. Tout changement ou toute modication non expressément approuvés par la partie
responsable de la conformité peut annuler le droit de l’utilisateur à faire fonctionner l’appareil.
REMARQUE: Cet équipement a été testé et a été déclaré conforme aux restrictions pour
dispositifs numériques de classe B en vertu de la partie 15 des règles de la FCC. Ces
restrictions visent à offrir une protection raisonnable contre l’interférence nuisible d’une
installation résidentielle. Cet équipement génère, utilise et peut émettre de l’énergie de
fréquence radio et, s’il n’est pas installé et utilisé conformément aux instructions, il peut
causer une interférence nuisible aux radiocommunications. Toutefois, il n’est pas garanti
qu’une interférence ne puisse pas se produire dans une installation particulière. Si l’utilisateur
constate des interférences lors de la réception d’émissions de radio ou de télévision (il suft
pour le vérier d’allumer et d’éteindre successivement le dispositif), il devra prendre les
mesures nécessaires pour les éliminer. À cette n, il devra :
•
Réorienter ou déplacer l’antenne réceptrice;
•
Accroître la distance entre l’appareil et le récepteur;
•
Brancher l’article sur une prise de courant appartenant à un autre circuit que celui du
récepteur;
•
Obtenir de l’aide auprès du détaillant ou d’un technicien en radio ou en télévision
expérimenté.
DANGER
Les personnes qui portent des dispositifs électroniques, comme un
stimulateur cardiaque, doivent consulter leur médecin avant d’utiliser le
produit. L’utilisation d’équipement électrique à proximité d’un stimulateur cardiaque peut
causer des interférences et l’arrêt du stimulateur.
Page 21

21
SYMBOLES
Symboles de sécurité
L’objectif des symboles de sécurité est d’attirer votre attention sur les dangers potentiels.
Vous devez examiner attentivement et bien comprendre les symboles de sécurité et les
explications qui les accompagnent. Les symboles d’avertissement en tant que tels n’éliminent
pas le danger. Les consignes et les avertissements qui y sont associés ne remplacent en
aucun cas les mesures préventives adéquates.
AVERTISSEMENT
Assurez-vous de lire et de comprendre toutes les consignes de
sécurité présentées dans le présent guide d’utilisation,
notamment toutes les consignes de sécurité telles que « DANGER »,« AVERTISSEMENT »
et « ATTENTION » avant d’utiliser cet outil. Le non-respect des consignes qui suivent peut
entraîner un choc électrique, un incendie ou des blessures graves.
Les dénitions ci-dessous décrivent le degré de gravité pour chaque mot-indicateur. Veuillez
vous assurer de lire ce manuel et de prêter attention à ces symboles.
Voici le pictogramme d’alerte de sécurité. Il sert à vous indiquer
les risques potentiels de blessures. Respectez toutes les
consignes de sécurité associées à ce pictogramme pour éviter
les risques de blessures ou de mort.
DANGER
DANGER indique un danger imminent qui, s’il n’est pas évité,
causera des blessures graves ou la mort.
AVERTISSEMENT
AVERTISSEMENT indique un risque pouvant entraîner des
blessures graves ou la mort s’il n’est pas prévenu.
ATTENTION
ATTENTION, utilisée avec le symbole d’alerte de sécurité,
indique un risque potentiel qui, s’il n’est pas éliminé, provoquera
des blessures mineures ou moyennement graves.
Messages d’information et de prévention des dommages
Ces messages fournissent à l’utilisateur de l’information et des consignes importantes. Les
ignorer pourrait occasionner des dommages à l’équipement ou d’autres dommages matériels.
Le mot « AVERTISSEMENT » précède chaque message, comme dans l’exemple ci-dessous :
AVIS:
Ne pas suivre ces consignes pourrait occasionner des dommages à l’équipement ou
d’autres dommages matériels.
AVERTISSEMENT
L’utilisation de tout outil électrique peut
entraîner la projection de corps étrangers
dans les yeux et ainsi causer des lésions oculaires graves. Avant
d’utiliser un outil électrique, veillez à toujours porter des lunettes de
sécurité couvrantes ou à écrans latéraux, ou un masque complet au
besoin. Nous recommandons le port d’un masque de sécurité
panoramique par-dessus les lunettes ou de lunettes de sécurité standard
avec écrans latéraux. Portez toujours des lunettes de sécurité conformes
à la norme ANSI Z87.1.
Page 22

22
SYMBOLES (SUITE)
IMPORTANT: Les symboles suivants peuvent gurer sur votre outil. Familiarisez-vous avec
eux et apprenez leur signication. En comprenant ces symboles, vous serez en mesure de
faire fonctionner cet outil de façon adéquate et sécuritaire.
Symbole Nom Forme au long et explication
V Volts Tension (possible)
A Ampère Courant
Hz Hertz Fréquence (cycles par seconde)
W Watt Puissance
kg Kilogrammes Poids
min Minutes Durée
s Secondes Durée
Wh Wattheures Capacité de la pile
Ah Ampères-heures Capacité de la pile
Ø Diamètre Taille des forets, des meules, etc.
n
0
Vitesse sans charge Vitesse de rotation à vide
n Vitesse nominale Vitesse maximale atteignable
…/min
Tours ou va-et-vient par
minute
Tours, coups, battements, vitesse de
surface, orbites, etc., par minute
0 Position d’arrêt Vitesse nulle, couple nul...
1,2,3,…
I,II,III
,
Réglages du sélecteur
Réglages de vitesse, de couple ou de
position. Plus le nombre est élevé, plus la
vitesse est grande.
Sélecteur à réglable continu
avec mode d’arrêt
La vitesse augmente à partir du réglage 0
Flèche L’activation se fait dans le sens de la èche
Courant alternatif
Type de courant ou caractéristique de
courant
Courant continu
Type de courant ou caractéristique de
courant
Courant alternatif ou continu
Type de courant ou caractéristique de
courant
Appareil de classe II
Désigne les outils de construction à
double isolation
Borne de mise à la terre Borne de mise à la terre
Page 23

23
Symbole Nom Forme au long et explication
Sceau du programme de
recyclage des piles au
lithium-ion
Désigne le programme de recyclage des
piles au lithium-ion
Sceau du programme de
recyclage des piles au
nickel-cadmium
Désigne le programme de recyclage des
piles au nickel-cadmium
Symbole de lecture du
manuel
Invite l’utilisateur à lire le manuel
Symbole du port de lunettes
de sécurité
Lorsque vous utilisez ce produit, portez
toujours des lunettes de protection ou de
sécurité à écrans latéraux et un masque
de protection complet.
Page 24

24
SYMBOLES (RENSEIGNEMENTS EN MATIÈRE
D’HOMOLOGATION)
IMPORTANT: Certains des symboles suivants, qui fournissent des renseignements en
matière d’homologation, peuvent gurer sur l’outil. Familiarisez-vous avec eux et apprenez
leur signication. En comprenant ces symboles, vous serez en mesure de faire fonctionner cet
outil de façon adéquate et sécuritaire.
Symbole
Forme au long et explication
Ce symbole indique que cet outil est répertorié par Underwriters
Laboratories.
Ce symbole indique que cet outil est reconnu par Underwriters
Laboratories.
Ce symbole indique que cet outil est répertorié par Underwriters
Laboratories et qu’il est conforme aux normes américaines et
canadiennes.
Ce symbole indique que cet outil est répertorié par l’Association
canadienne de normalisation.
Ce symbole indique que cet outil est répertorié par l’Association
canadienne de normalisation et qu’il est conforme aux normes
américaines et canadiennes.
Ce symbole indique que cet outil est répertorié par Intertek Testing et
qu’il est conforme aux normes américaines et canadiennes.
Ce symbole indique que cet outil est conforme aux normes mexicaines
ofcielles (NOM).
Ce symbole indique que cet outil est répertorié par la California Energy
Commission.
Page 25

25
APPRENEZ À CONNAÎTRE VOTRE CHARGEUR
Chargeur PWRCORE-12™ PWRJUMP™
Fig. 1
Bouton/voyant
PWRJUMP
Voyant de défaut
Voyant de chargement
normal
Port USB
cordon d’alimentation
CARACTÉRISTIQUES TECHNIQUES
Tension nominale d’entrée 120 V, 60 Hz c.a. et 90 W
Tension nominale de sortie 12.6V
Sortie USB 5V 1A
Piles compatibles 2Ah:
SKIL BY500101
4Ah:
SKIL BY519801
Température de chargement
recommandée
Chargement normal : 4 °C (39.2 °F) - 40 °C (104 °F)
Chargement PWRJUMP : 10 °C (50 °F) - 40 °C (104 °F)
Température de stockage recommandée
de 0 °C à 40 °C (de 32 °F à 104 °F)
AVERTISSEMENT
Ce chargeur permet uniquement de charger le bloc-piles
indiqué dans le tableau ci-dessus.
Page 26

26
CONSIGNES IMPORTANTES CONCERNANT LE
CHARGEMENT
1. Ce chargeur est conçu pour charger rapidement le bloc-piles, mais uniquement lorsque sa
température se trouve dans la plage de température pour le chargement PWRJUMP. Si le
bloc-piles est trop chaud ou trop froid, le chargeur ne le chargera pas rapidement. (Cela
peut se produire lorsque le bloc-piles a chauffé à la suite d’une utilisation intensive.)
2. Une baisse considérable de la durée de fonctionnement par charge peut signier que le
bloc-piles arrive à la n de sa vie utile et qu’il doit être remplacé.
3. N’oubliez pas de débrancher le chargeur lorsque vous le rangez.
4. Si le bloc-piles ne se charge pas correctement :
a. Vériez la puissance de la prise de courant en y branchant un autre appareil électrique.
b. Vériez si la prise est raccordée à un interrupteur qui permet d’éteindre les lumières en
coupant l’alimentation électrique.
c. Assurez-vous que les bornes du bloc-piles sont propres. Nettoyez-les avec un coton-tige
et de l’alcool, au besoin.
d. Si le bloc-piles ne se charge toujours pas correctement, apportez ou expédiez l’outil,
le bloc-piles et le chargeur à votre centre de service SKIL local. Les coordonnées du
service à la clientèle se trouvent à la première page ce guide.
AVIS:
L’utilisation de chargeurs ou de blocs-piles autres que ceux vendus par SKIL annulera
la garantie.
Page 27

27
MODE D’EMPLOI
AVERTISSEMENT
Pour réduire les risques d’incendie, de blessures
corporelles et de détérioration de l’article découlant d’un
court-circuit, ne plongez jamais le chargeur ou le bloc-piles dans un liquide et ne
laissez aucun liquide s’écouler sur ceux-ci. Les liquides corrosifs ou conducteurs, tels que
l’eau de mer, certains produits chimiques industriels, l’eau de javel, les produits contenant de
l’eau de Javel, etc., peuvent causer un court-circuit.
Comment charger le bloc-piles
AVIS:
Le bloc-piles au lithium est partiellement
chargé au moment de la livraison.
Chargez complètement le bloc-pile avant sa
première utilisation.
La fonction PWRJUMP permet de recharger
un 2.0Ah bloc-piles complètement déchargé à
environ 25 % de sa capacité en 5 minutes.
AVIS:
La charge restante (75 %) sera fournie
en mode de chargement normal.
a) Chargez le bloc-piles avec le bon chargeur.
b) Branchez le chargeur sur une source
d’alimentation. Le voyant de défaut rouge,
le voyant de chargement normal vert et
le voyant jaune PWRJUMP™ s’allumeront pendant une seconde, puis s’éteindront pour
indiquer que l’auto-inspection du chargeur est terminée.
c) Alignez les nervures du bloc-piles avec les fentes du chargeur.
d) Insérez le bloc-piles dans le chargeur (Fig. 2).
e) Le chargeur vériera le bloc-piles an d’évaluer son état.
f) Si la température du bloc-piles se situe dans la plage de température de chargement
PWRJUMP et que le bloc-piles est considérablement déchargé, le voyant PWRJUMP jaune
s’allumera.
g) Appuyez sur le bouton pour activer la fonction de chargement PWRJUMP. Le voyant
PWRJUMP vert clignotera pour indiquer que la fonction de chargement PWRJUMP est
activée.
h) Après 5 minutes, une fois le bloc-piles chargé à environ 25 % de sa capacité, le voyant
de chargement normal vert commencera à clignoter pour indiquer que la fonction de
chargement normal est activée; le voyant PWRJUMP vert restera allumé.
i) Le voyant de chargement normal vert clignotera tant que le bloc-piles se rechargera en
mode de chargement normal. Une fois le bloc-piles complètement chargé, le voyant de
chargement normal vert demeurera allumé.
j) Un voyant rouge clignotant signie que le bloc-piles est défectueux ou qu’il y a un mauvais
contact entre le bloc-piles et le chargeur.
k) Un voyant rouge allumé indique une surchauffe du bloc-piles. Retirez le bloc-piles du
chargeur. Si le bloc-piles est trop chaud, refroidissez-le à l’air. Si le bloc-piles est trop froid,
amenez-le à l’intérieur jusqu’à ce qu’il atteigne la température ambiante.
l) Il n’est pas recommandé de laisser le bloc-piles dans le chargeur pendant plus de
24 heures.
AVIS:
Si le bloc-piles ne se recharge pas, il se peut que ce soit parce que les contacts
électriques du chargeur ou du bloc-piles sont sales. Nettoyez les contacts électriques du
chargeur ou du bloc-piles (par ex., en insérant et en retirant le bloc-piles plusieurs fois ou en
frottant les contacts avec un coton-tige et de l’alcool) ou remplacez le bloc-piles, au besoin.
Fig. 2
Fixez
Retirer
Page 28

28
Afchage du chargeur (Fig. 3)
Fig. 3
Voyant Mode
Voyant de
chargement
normal (vert)
Bouton/voyant
PWRJUMP
(vert/jaune)
Voyant
de défaut
(rouge)
Remarque
Auto-inspection
terminée
Allumé
Voyant jaune
allumé
Allumé
Le voyant brille
pendant 1
seconde.
/
Échec
de l’autoinspection
Éteint Éteint Éteint
Le branchement
du chargeur ne
produit aucun effet.
Prêt pour le
chargement
PWRJUMP
Clignotant
Voyant jaune
allumé
Éteint
Le chargeur
vériera le blocpiles an de
déterminer si
la fonction de
chargement
PWRJUMP peut
être activée.
Chargement
PWRJUMP
Éteint
Voyant vert
clignotant
Éteint
Chargement
PWRJUMP
Chargement
PWRJUMP
terminé
Commence à
clignoter
Voyant vert
allumé
Éteint
Lorsque le
chargement
PWRJUMP
est terminé,le
chargeur activera
automatiquement
le mode de
chargement normal.
Chargement
normal
Clignotant
Voyant vert
allumé ou
éteint
Éteint
Si le chargement
PWRJUMP ne
s’est pas activé, le
voyant PWRJUMP
demeurera éteint
pendant tout le
processus.
Chargé au
maximum de sa
capacité
Voyant vert
allumé
Voyant vert
allumé ou
éteint
Éteint
Bloc-piles froid/
chaud
Éteint Éteint Allumé
Retirez le blocpiles du chargeur.
Défectueux Éteint Éteint
Clignotant
ou éteint
Échec du
processus de
chargement.
Page 29

29
AVIS:
Le chargeur peut devenir chaud à la suite de plusieurs cycles de chargement
consécutifs. Il s’agit d’une conséquence normale du processus de chargement. Chargez dans
un endroit bien aéré.
Chargeur défectueux
Si l’auto-inspection du chargeur ne s’active pas lorsque le chargeur est branché, les causes
possibles sont l’absence d’alimentation au chargeur, des bornes qui ne se touchent pas
correctement ou un chargeur défectueux. Vériez si l’auto-inspection du chargeur s’active
lorsque vous rebranchez le chargeur ou lorsque vous le branchez sur une autre prise de
courant. Si le problème persiste, faites réparer le chargeur dans un centre de service autorisé
de SKIL.
Bloc-piles défectueux
Si le chargeur détecte un problème, le voyant de défaut rouge se mettra à clignoter. Retirez
le bloc-piles du chargeur, puis réinsérez-le. Si le voyant de défaut clignote une deuxième fois,
essayez de charger un autre bloc-piles.
a. Si l’autre bloc-piles se recharge normalement, faites réparer le premier bloc-piles
défectueux dans un centre de service autorisé de SKIL.
b. Si le chargeur indique que l’autre bloc-piles est également défectueux, il se peut que le
chargeur soit défectueux. Faites réparer le chargeur dans un centre de service autorisé de
SKIL.
Port de chargement USB (Fig. 4)
Le chargeur est doté d’un port USB, qui
peut fournir une tension de sortie de 5 V et
de 1 A aux appareils connectés (par ex., les
téléphones mobiles, les lecteurs électroniques
et tout autre article nécessitant une tension
d’entrée appropriée à la tension de sortie du
chargeur).
Branchez un appareil compatible sur le
chargeur à l’aide d’un câble USB standard.
Trous pour montage mural (Fig. 5)
Le chargeur est muni de trous de suspension
pour un rangement pratique. Installez des
vis dans le mur en les espaçant de 64 mm
(2 1/2 po).
Utilisez des vis sufsamment fortes pour
soutenir le poids combiné du chargeur et du
bloc-piles.
Le chargeur comporte également une fente
pratique qui permet de xer le cordon.
Fig. 4
Port de chargement USB
Fig. 5
Trous
suspendus
Fente de
cordon
Page 30

30
ENTRETIEN
Entretien
AVERTISSEMENT
Un entretien préventif effectué par du personnel non
autorisé peut entraîner un mauvais positionnement des ls
et des composants internes, ce qui peut représenter un grave danger. Tout entretien
d’outil devrait être effectué dans un centre de service de l’usine de SKIL ou dans un centre de
service autorisé de Skil.
Entretien général
AVERTISSEMENT
Lorsque vous procédez à l’entretien de la scie à chaîne, utilisez
uniquement des pièces de remplacement identiques à celles
d’origine. L’utilisation de toute autre pièce peut constituer un danger ou endommager l’article.
Inspectez périodiquement l’intégralité du produit pour y déceler des pièces endommagées,
manquantes ou lâches telles que les vis, les écrous, les boulons, les capuchons, etc.
Resserrez fermement toutes les xations et tous les capuchons et ne faites pas fonctionner ce
produit tant que toutes les pièces manquantes ou endommagées n’ont pas été remplacées.
Veuillez communiquer avec le service à la clientèle ou avec un centre de service autorisé pour
obtenir de l’aide.
AVERTISSEMENT
Pour éviter des blessures graves, retirez toujours le blocpiles du chargeur ou de l’outil avant d’effectuer toute tâche
d’entretien ou de nettoyage.
Nettoyage
AVERTISSEMENT
L’utilisation d’air sec comprimé est la meilleure technique de
nettoyage. Portez toujours des lunettes de sécurité lorsque
vous nettoyez des outils avec de l’air comprimé. Ne tentez pas de nettoyer l’outil en
insérant des objets pointus dans les ouvertures.
AVERTISSEMENT
Certains agents nettoyants et solvants endommagent les
pièces en plastique. Notamment : l’essence, le tétrachlorure
de carbone, les solvants nettoyants chlorés, l’ammoniaque et les détergents ménagers qui
contiennent de l’ammoniaque.
Rangement
Rangez l’outil à l’intérieur dans un endroit inaccessible aux enfants. Rangez-le à l’écart des
agents corrosifs.
DÉPANNAGE
Problème Cause Solutions
Le bloc-piles ne
se charge pas.
1. Le chargeur n’est pas branché
sur une prise de courant
fonctionnelle.
1. Assurez-vous que le chargeur est
branché sur une prise de courant
fonctionnelle.
2. Le bloc-piles n’est pas
complètement inséré dans le
chargeur.
2. Assurez-vous que le bloc-piles est
complètement inséré
3. Les bornes ne se touchent
pas correctement.
3. Nettoyez les contacts électriques du
chargeur ou du bloc-piles.
4. Le bloc-piles est trop froid ou
trop chaud.
4. Laissez refroidir le bloc-piles s’il est
trop chaud. Placez le bloc-piles à
l’intérieur s’il est trop froid.
5. Le bloc-piles est endommagé. 5. Faites réparer le bloc-piles dans un
centre de service autorisé
6. Le chargeur est endommagé. 6. Faites réparer le chargeur dans un
centre de service autorisé
Page 31

31
GARANTIE LIMITÉE DE L’OUTIL SKIL
GARANTIE LIMITÉE DE 5 ANS
Chervon North America, Inc. (le « vendeur ») garantit à l’acheteur initial seulement que tous
les OUTILS SKIL destinés à un usage résidentiel seront exempts de défauts de matériaux
ou de fabrication pour une période de cinq ans à compter de la date d’achat si l’acheteur
initial enregistre l’article dans les 30 jours suivant la date d’achat. LES PILES ET LES
CHARGEURS sont garantis pour une période de 2 ans. L’enregistrement de l’article peut être
effectué en ligne au www.Registermyskil.com. De plus, nous recommandons aux acheteurs
initiaux de conserver leur reçu comme preuve d’achat. LA PÉRIODE DE GARANTIE DE CINQ
ANS SUR LES OUTILS EST CONDITIONNELLE À L’ENREGISTREMENT DE L’ARTICLE
DANS LES 30 JOURS SUIVANT LA DATE D’ACHAT. Si les acheteurs initiaux n’enregistrent
pas leur article dans le délai prévu, la garantie limitée sur les outils électriques susmentionnée
ne s’appliquera que pour une période de trois ans. Toutes les piles et tous les chargeurs
demeureront couverts par la garantie limitée de deux ans.
Nonobstant les dispositions précédentes, si un outil SKIL destiné à un usage résidentiel est
utilisé à des ns industrielles, professionnelles ou commerciales, la garantie susmentionnée
ne s’appliquera que pour une période de quatre-vingt-dix (90) jours, que l’article ait été
enregistré ou non.
LA SEULE OBLIGATION DU VENDEUR ET VOTRE RECOURS EXCLUSIF au titre de cette
garantie limitée et, dans les limites permises par la loi, de toute garantie ou condition prévue
par la loi, est la réparation ou le remplacement, sans frais, des pièces qui présentent un défaut
matériel ou de fabrication, qui n’ont pas fait l’objet d’un usage abusif ou inapproprié et qui n’ont
pas été réparées par des personnes autres que le vendeur ou un technicien d’un centre de
service autorisé. Pour effectuer une réclamation au titre de la présente garantie limitée, vous
devez retourner, port payé, l’article en entier à un centre de service de l’usine de SKIL ou à
un centre de service autorisé. Pour communiquer avec un centre de service autorisé de SKIL
Power Tools, veuillez visiter le www.Registermyskil.com ou composer le 1 877 SKIL-999
(1 877 754-5999).
CETTE GARANTIE LIMITÉE NE S’APPLIQUE PAS AUX ACCESSOIRES TELS QUE LES
LAMES DE SCIE CIRCULAIRE, LES FORETS, LES FRAISES À TOUPIE, LES LAMES
DE SCIE SAUTEUSE, LES COURROIES DE PONÇAGE, LES MEULES ET LES AUTRES
ACCESSOIRES CONNEXES.
TOUTE GARANTIE IMPLICITE APPLICABLE À UN ARTICLE EST LIMITÉE À UNE DURÉE
ÉGALE À LA DURÉE DES GARANTIES EXPRESSES APPLICABLES À UN TEL ARTICLE,
COMME IL EST INDIQUÉ AU PREMIER PARAGRAPHE DE CETTE GARANTIE. CERTAINS
ÉTATS DES ÉTATS-UNIS ET CERTAINES PROVINCES DU CANADA NE PERMETTENT
PAS DE LIMITATIONS QUANT À LA DURÉE DES GARANTIES IMPLICITES, DE SORTE
QUE LES LIMITATIONS INDIQUÉES CI-DESSUS PEUVENT NE PAS S’APPLIQUER À
VOUS.
LE VENDEUR NE SERA EN AUCUN CAS TENU RESPONSABLE DES DOMMAGES
ACCESSOIRES OU CONSÉCUTIFS (Y COMPRIS, SANS TOUTEFOIS S’Y LIMITER,
DES PERTES DE PROFIT) RÉSULTANT DE LA VENTE OU DE L’USAGE DE CET
ARTICLE. CERTAINS ÉTATS DES ÉTATS-UNIS ET CERTAINES PROVINCES DU
CANADA NE PERMETTENT PAS L’EXCLUSION OU LA LIMITATION DES DOMMAGES
ACCESSOIRES OU CONSÉCUTIFS, DE SORTE QUE LA LIMITATION OU L’EXCLUSION
SUSMENTIONNÉE POURRAIT NE PAS S’APPLIQUER À VOUS.
CETTE GARANTIE LIMITÉE VOUS CONFÈRE DES DROITS PRÉCIS. IL EST POSSIBLE
QUE VOUS DISPOSIEZ ÉGALEMENT D’AUTRES DROITS, QUI VARIENT D’UN ÉTAT,
D’UNE PROVINCE OU D’UN PAYS À L’AUTRE.
Page 32

32
CETTE GARANTIE LIMITÉE S’APPLIQUE UNIQUEMENT AUX ARTICLES VENDUS AUX
ÉTATS-UNIS D’AMÉRIQUE, AU CANADA ET À L’ÉTAT LIBRE DE PORTO RICO. POUR
CONNAÎTRE LA COUVERTURE DE LA GARANTIE DANS D’AUTRES PAYS, VEUILLEZ
COMMUNIQUER AVEC VOTRE DÉTAILLANT OU IMPORTATEUR SKIL LOCAL.
© Chervon North America, 1203 E. Warrenville Rd, Naperville, IL 60563.
08/18
Page 33

33
ÍNDICE
Instrucciones de seguridad del cargador ........................34-35
Extensiones eléctricas ..........................................35
Advertencia de la FCC ..........................................36
Símbolos ..................................................37-40
Conozca su cargador ...........................................41
Especicaciones ...............................................41
Notas importante sobre el proceso de carga ........................42
Instrucciones de funcionamiento ..............................43-45
Mantenimiento .................................................46
Solución de problemas ..........................................46
Garantía limitada del cargador SKIL ............................47-48
Page 34

34
INSTRUCCIONES IMPORTANTES DE SEGURIDAD – GUARDE
ESTAS INSTRUCCIONES
PELIGRO
SIGA ATENTAMENTE ESTAS INSTRUCCIONES PARA DISMINUIR EL
RIESGO DE INCENDIO O DESCARGA ELÉCTRICA.
INSTRUCCIONES DE SEGURIDAD DEL CARGADOR
Este manual contiene para el cargador de batería modelo QC535701. No lo reemplace
por otro cargador.
Antes de usar el cargador de batería, lea todas las instrucciones y las marcas de
precaución en el (1) cargador de la batería, en la (2) batería y en el (3) producto que use
la batería.
Cargue solo las baterías recargables SKIL que se indican en el manual. Otros tipos de
baterías podrían quemarse y causar lesiones personales y daños
.
Cargue el paquete de baterías dentro del rango de temperatura requerido. Guarde el
cargador y el paquete de baterías en lugares cuya temperatura esté dentro del rango
de temperatura de almacenamiento recomendado. Esto es importante para evitar daños
graves en las celdas de la batería.
No recargue la batería en ambientes húmedos o mojados. No exponga el cargador a la
lluvia ni a la nieve. La entrada de agua en el cargador de baterías puede provocar descargas
eléctricas o incendios.
Es posible que se produzcan fugas de la batería en condiciones de temperatura o uso
extremos. Evite el contacto con la piel y los ojos. El líquido de la batería es cáustico y
puede causar quemaduras químicas en los tejidos. Si el líquido entra en contacto con la piel,
lave rápidamente con agua y jabón. Si el líquido entra en contacto con sus ojos, láveselos
con agua durante al menos 10 minutos y busque atención médica.
Cuando recargue el paquete de baterías, coloque el cargador sobre una supercie
plana no inamable y lejos de materiales inamables. Las alfombras y otras supercies
aislantes del calor bloquean la circulación de aire adecuada, lo que puede causar el
sobrecalentamiento del cargador y de la batería. Si se observa humo o derretimiento
del cargador o del paquete de baterías, desenchufe el cargador inmediatamente y no
utilice el paquete de baterías ni el cargador. Póngase en contacto con el Servicio al Cliente
de inmediato.
Mantenga el cable y el cargador alejados del calor para evitar daños a las piezas
internas o a la carcasa. No permita que las piezas de plástico entren en contacto con
gasolina, aceites, productos a base de petróleo, etc. Estos contienen sustancias químicas
que pueden dañar, debilitar o destruir el plástico.
Asegúrese de saber dónde está el cable para evitar pisarlo, tropezarse con él o dañarlo
de alguna otra forma. Un enchufe y cable dañados pueden provocar descargas eléctricas o
incendios.
Para desconectar el cargador, tire del enchufe, no del cable. No utilice el cargador con
el cable o el enchufe dañados; pida que los reemplacen de inmediato. Un enchufe o
cable dañados pueden provocar descargas eléctricas o incendios.
No inserte el paquete de baterías en el cargador si la carcasa de las baterías está
agrietada. El uso de baterías dañadas puede provocar descargas eléctricas o incendios.
Si el cargador recibió un golpe fuerte, se cayó o se dañó de algún otro modo, no lo
desarme ni lo haga funcionar. Un reensamblaje incorrecto o daños pueden provocar
descargas eléctricas o incendios.
Page 35

35
Antes de cada uso, revise el cargador de baterías, el cable y el enchufe. Si se detecta
algún daño, no utilice el cargador de baterías. Nunca abra el cargador de baterías por
su propia cuenta, llévelo a un centro de servicio de SKIL o a un técnico calicado que
utilice solo repuestos originales. Al volver a ensamblar en forma incorrecta puede provocar
una descarga eléctrica o un incendio.
No toque la parte no aislada de la conexión de salida o del terminal no aislado de la
batería. Existe un riesgo de descarga eléctrica.
No utilice accesorios no recomendados o vendidos por SKIL. El uso de accesorios no
recomendados puede provocar descargas eléctricas o incendios.
No almacene el paquete de baterías en el cargador. El paquete de baterías almacenado
en el cargador durante un tiempo prolongado podría provocar daños en el mismo y provocar
un incendio.
Desenchufe el cargador de la toma de corriente antes de guardarlo o intentar cualquier
tipo de mantenimiento o limpieza.
Estas medidas preventivas de seguridad reducen el riesgo de descarga eléctrica o incendio.
Para mantener limpio el cargador de baterías, sople aire comprimido en las rejillas
de ventilación del cargador y limpie la carcasa del mismo con un paño húmedo. La
contaminación puede provocar descargas eléctricas o incendios.
Si se observa una caída sustancial en el tiempo de funcionamiento por carga del
paquete de baterías, reemplácelo ya que posiblemente esté llegando al nal de su vida útil.
Para reducir el riesgo de lesiones, es necesario supervisar cuando los niños están
cerca del artefacto.
No lo use en exteriores.
EXTENSIONES ELÉCTRICAS
ADVERTENCIA
NO SE DEBE UTILIZAR UNA EXTENSIÓN ELÉCTRICA A MENOS
QUE SEA ABSOLUTAMENTE NECESARIO. El uso de una
extensión eléctrica inapropiada podría causar riesgo de incendio y de descarga eléctrica. Si
se utiliza una extensión eléctrica, verique lo siguiente:
a. Que las clavijas del enchufe de la extensión eléctrica sean del mismo número, tamaño y
forma que las del enchufe del cargador.
b. Que la extensión eléctrica esté conectada correctamente y en buenas condiciones
eléctricas.
c. Que el cable tenga el tamaño adecuado para el amperaje de CA que gura en el cargador
como se especica a continuación:
Longitud del cable (en pies) 25’ 50’ 100’ 150’
Tamaño del cable (AWG) 18 16 16 14
Tabla de extensiones eléctricas para herramientas de 220/240 voltios:
Cable de 0,75 mm
2
50 metros
Cable de 1,0 mm
2
75 metros
d. Una extensión eléctrica es una solución temporal. Traslade el cargador a un receptáculo
estándar tan pronto como haya terminado el trabajo.
Page 36

36
ADVERTENCIA DE LA FCC
1. Este dispositivo cumple con la sección 15 de las reglas de la FCC. El funcionamiento está
sujeto a las siguientes dos condiciones:
(1) Este dispositivo no debe causar interferencia perjudicial.
(2) Este dispositivo deberá aceptar cualquier interferencia recibida, incluida la interferencia
que pudiese causar un funcionamiento no deseado.
2. Los cambios o modicaciones que no estén expresamente aprobados por la parte
responsable del cumplimiento podrían anular la autorización del usuario para utilizar el
equipo.
NOTA: Este equipo ha sido probado y se ha vericado que cumple los límites para un
dispositivo digital clase B, conforme a la sección 15 de las reglas de la FCC. Estos límites
están diseñados para proporcionar protección razonable contra interferencias perjudiciales
en una instalación residencial. Este equipo genera, utiliza y puede irradiar energía de
radiofrecuencia y, si no se instala y usa de acuerdo con las instrucciones, puede causar
interferencia perjudicial a las comunicaciones de radio. Sin embargo, no se garantiza que
no se producirán interferencias en una instalación en particular. Si este equipo causa
interferencia perjudicial a la recepción de radio o televisión, lo que se puede determinar al
encender y apagar el equipo, se recomienda al usuario que intente corregir la interferencia
con una o más de las siguientes medidas:
•
Reorientar o reubicar la antena de recepción.
•
Aumentar la separación entre el equipo y el receptor.
•
Conectar el equipo a un tomacorriente de un circuito distinto al que usa el receptor.
•
Solicitar ayuda al distribuidor o a un técnico con experiencia en radio/TV.
PELIGRO
Las personas con dispositivos electrónicos, como marcapasos, deben
consultar a su médico antes de usar este producto. El funcionamiento del
equipo eléctrico en proximidad de un marcapasos cardíaco puede causar interferencias o
hacer que el marcapasos falle.
Page 37

37
SÍMBOLOS
Símbolos de seguridad
El objetivo de los símbolos de seguridad es captar su atención ante posibles peligros. Los
símbolos de seguridad y las explicaciones que se dan merecen su atención y comprensión
cuidadosa. Las advertencias del símbolo no eliminan por sí mismas ningún peligro. Las
instrucciones y las advertencias que se dan no son substitutos de las medidas adecuadas de
prevención de accidentes.
ADVERTENCIA
Asegúrese de leer y de comprender todas las instrucciones de
seguridad en este manual del propietario, incluidos todos los
símbolos de alerta de seguridad como “PELIGRO”, “ADVERTENCIA” Y “PRECAUCIÓN”
antes de usar esta herramienta. El incumplimiento de las siguientes instrucciones puede
provocar descargas eléctricas, incendios y/o lesiones personales graves.
Las deniciones que se ofrecen a continuación describen el nivel de gravedad de cada símbolo.
Lea el manual y preste atención a dichos símbolos.
Este es el símbolo de advertencia de seguridad. Se utiliza para
advertirlo de los peligros de posibles lesiones personales. Cumpla
con todos los mensajes de seguridad a continuación de este
símbolo para evitar posibles lesiones o consecuencias fatales.
PELIGRO
PELIGRO indica una situación de peligro que, de no evitarse,
ocasionará la muerte o lesiones graves.
ADVERTENCIA
ADVERTENCIA indica una situación potencialmente peligrosa que,
de no evitarse, puede ocasionar la muerte o lesiones graves.
PRECAUCIÓN
PRECAUCIÓN, se usa con el símbolo de advertencia de seguridad
e indica una situación peligrosa que, de no evitarse, puede causar
lesiones menores o moderadas.
Mensajes de prevención de daños e información
Estos mensajes entregan al usuario información o instrucciones importantes que, de no
seguirse, pueden causar daños al equipo o la propiedad. Antes de cada mensaje, aparece la
palabra "AVISO", como en el ejemplo a continuación:
AVISO: Si no se siguen estas instrucciones se pueden producir daños al equipo o la
propiedad.
ADVERTENCIA
Durante el funcionamiento de cualquier
herramienta eléctrica, pueden entrar objetos
extraños a los ojos y causar graves daños oculares. Use siempre lentes
o gafas de seguridad con protecciones laterales y, cuando sea
necesario, una mascarilla que cubra todo el rostro antes de comenzar a
operar una herramienta eléctrica. Recomendamos usar una máscara de
seguridad de visión amplia sobre los lentes o las gafas de seguridad
estándar con protección lateral. Siempre use lentes de protección que
cumplan con la norma ANSI Z87.1.
Page 38

38
SÍMBOLOS (CONTINUACIÓN)
IMPORTANTE: Algunos de los siguientes símbolos pueden aparecer en sus herramientas.
Obsérvelos y conozca su signicado. La interpretación correcta de estos símbolos le permitirá
utilizar la herramienta de manera ecaz y segura.
Símbolo Nombre Designación/Explicación
V Voltios Voltaje (potencial)
A Amperios Corriente
Hz Hertz Frecuencia (ciclos por segundo)
W Vatios Alimentación
kg Kilogramos Peso
min Minutos Hora
s Segundos Hora
Wh Vatio por horas Capacidad de la batería
Ah Amperios por hora Capacidad de la batería
Ø Diámetro
Tamaño de las brocas para taladro,
piedras de amolar, etc.
n
0
Velocidad sin carga Velocidad de rotación sin carga
n Rango de velocidad Velocidad máxima alcanzable
…/min
Revoluciones o pasadas por
minuto
Revoluciones, pasadas, velocidad de
supercie, órbitas, etc. por minuto
0 Posición de apagado Velocidad cero, torsión cero...
1,2,3,…
I,II,III
,
Ajustes del selector
Ajustes de velocidad, par o posición. Un
número mayor signica mayor velocidad
Selector de regulación
continua con apagado
La velocidad aumenta desde el ajuste 0
Flecha Acción en la dirección de la echa
Corriente alterna Tipo o característica de corriente
Corriente directa Tipo o característica de corriente
Corriente alterna o directa Tipo o característica de corriente
De clase II para construcción
Designa las herramientas de construcción
con doble aislamiento
Terminal de tierra Terminal de conexión a tierra
Sello de iones de litio de
RBRC
Designa el programa de reciclaje de
baterías de iones de litio
Page 39

39
Símbolo Nombre Designación/Explicación
Sello de níquel-cadmio de
RBRC
Designa el programa de reciclaje de
baterías de níquel-cadmio
Símbolo de lectura del
manual
Indica al usuario que lea el manual
Símbolo de use de lentes de
protección
Siempre use gafas o lentes de seguridad
con protecciones laterales y una careta
protectora cuando opere este producto
Page 40

40
SÍMBOLOS (INFORMACIÓN DE NOTIFICACIÓN)
IMPORTANTE: Algunos de los siguientes símbolos de información de certicación pueden
aparecer en su herramienta. Obsérvelos y conozca su signicado. La interpretación correcta
de estos símbolos le permitirá utilizar la herramienta de manera ecaz y segura.
Símbolo
Designación/Explicación
Este símbolo designa que esta herramienta está incluida en la lista de
Underwriters Laboratories.
Este símbolo designa que esta herramienta está incluida en la lista de
Underwriters Laboratories.
Este símbolo designa que esta herramienta es reconocida por
Underwriters Laboratories.
Este símbolo designa que esta herramienta está incluida en la lista de
Underwriters Laboratories, conforme a las normas de Estados Unidos
y Canadá.
Este símbolo designa que esta herramienta está incluida en la lista de
Canadian Standards Association.
Este símbolo designa que esta herramienta está incluida en la lista de
Canadian Standards Association, conforme a las normas de Estados
Unidos y Canadá.
Este símbolo designa que esta herramienta está incluida en la lista de
Intertek Testing Services, conforme a las normas de Estados Unidos y
Canadá.
Este símbolo designa que esta herramienta está homologada por la
California Energy Commission.
Page 41

41
CONOZCA SU CARGADOR
Cargador PWRCORE-12™ PWRJUMP™
Fig. 1
Botón/indicador
PWRJUMP
Indicador de defectos
Indicador de carga
normal
Puerto USB
Cable
ESPECIFICACIONES
Consumo nominal 120 V, 60 Hz CA 90 W
Capacidad nominal 12.6V
Salida USB 5V 1A
Compatibilidad de baterías 2Ah:
SKIL BY500101
4Ah:
SKIL BY519801
Temperatura de carga
recomendada
Carga normal: 39,2 °F (4 °C) a 104 °F (40 °C)
Carga PWRJUMP: 50 °F (10 °C) a 104 °F (40 °C)
Temperatura de almacenaje
recomendada
32 °F (0 °C) a 104 °F (40 °C)
ADVERTENCIA
Este cargador carga solamente las baterías que se muestran en
la tabla anterior.
Page 42

42
NOTAS IMPORTANTE SOBRE EL PROCESO DE CARGA
1. El cargador se diseñó para cargar rápidamente la batería solo cuando la temperatura de la
batería está dentro del rango de temperatura de carga PWRJUMP requerido. Si el paquete
de baterías está demasiado caliente o demasiado frío, el cargador no cargará la batería
rápidamente. (Esto puede suceder si el paquete de baterías está caliente debido al uso
intensivo).
2. Una caída sustancial en el tiempo de funcionamiento por carga puede signicar que el
paquete de baterías está llegando al nal de su vida útil y se debe reemplazar.
3. Recuerde desconectar el cargador durante el almacenamiento.
4. Si la batería no se carga correctamente:
a. Verique si hay corriente en el tomacorriente, para esto enchufe otro dispositivo.
b. Compruebe si el tomacorriente está conectado a un interruptor de luz que apaga la
alimentación cuando se apagan las luces.
c. Revise si los terminales del paquete de baterías están sucios. Si es necesario, limpie
con un bastoncillo de algodón y alcohol.
d. Si aún no se efectúa la carga correctamente, lleve o envíe la herramienta, el paquete
de baterías y el cargador a un Centro de Servicio SKIL local. Consulte la información de
Servicio al Cliente en la portada de este manual.
AVISO:
El uso de cargadores o paquetes de baterías no vendidos por SKIL anulará la
garantía.
Page 43

43
INSTRUCCIONES DE FUNCIONAMIENTO
ADVERTENCIA
Para reducir el riesgo de incendios, lesiones personales y
daños al producto por un cortocircuito, nunca sumerja el
cargador ni el paquete de baterías en líquidos ni permita que los líquidos ingresen a
estos. Los líquidos corrosivos o conductores, como el agua de mar, algunos productos
químicos industriales y el blanqueador o los productos que contienen blanqueador, pueden
generar un cortocircuito.
Cómo cargar el paquete de baterías
AVISO:
El paquete de baterías de iones de
litio se envía parcialmente cargado.
Antes de usarlo por primera vez, debe cargar
completamente el paquete de baterías.
La función PWRJUMP carga un paquete de
2.0Ah baterías completamente descargadas
hasta aproximadamente un 25 % de su
capacidad en 5 minutos.
AVISO:
El 75 % de capacidad restante se
obtendrá durante el modo de carga normal.
a) Cargue el paquete de baterías con el
cargador correcto.
b) Conecte el cargador a un suministro de
electricidad. El indicador de defectos rojo, el indicador de carga normal verde y el indicador
PWRJUMP™ amarillo brillarán durante un segundo y luego se apagarán, lo que signica
que se ha completado la autoinspección del cargador.
c) Alinee las varillas elevadas del paquete de baterías con la ranura del cargador.
d) Inserte el paquete de baterías en el cargador (Fig. 2).
e) El cargador se comunicará con el paquete de baterías para evaluar su estado.
f) Si la temperatura del paquete de baterías está dentro del rango de temperatura de carga
PWRJUMP y la batería está bastante agotada, el indicador PWRJUMP brillará de color
amarillo.
g) Presione el botón para activar la carga PWRJUMP. La luz de PWRJUMP parpadeará en
verde para indicar la carga PWRJUMP.
h) Cuando la batería se haya cargado aproximadamente al 25 % de su capacidad en 5
minutos, el indicador verde de Carga normal comenzará a parpadear para indicar que se
está realizando una carga normal; el indicador PWRJUMP permanecerá en verde.
i) El indicador verde de carga normal seguirá parpadeando cuando cargue el paquete de
baterías en el modo de carga normal. Una vez nalizada la carga, el indicador verde de
carga normal permanecerá en verde.
j) Un indicador de defectos rojo que parpadea indica una batería defectuosa o una mala
conexión entre la batería y el cargador.
k) Un indicador de defectos en rojo sólido indica que la batería está sobrecalentada. Retire
el paquete de baterías del cargador. Si la batería está demasiado caliente, enfríela con
aire. Si la batería está demasiado fría, déjela en un lugar interior hasta que alcance la
temperatura ambiente.
l) No se recomienda que el paquete de baterías permanezca en el cargador por más de 24 horas.
AVISO: Si el paquete de baterías no puede aceptar una carga, es posible que los contactos
del cargador o del paquete de baterías estén contaminados. Limpie los contactos del cargador
o del paquete de baterías (por ejemplo, inserte y retire la batería varias veces o frote con un
bastoncillo de algodón y alcohol) o reemplace el paquete de baterías, según sea necesario.
Fig. 2
Conectar
Desconectar
Page 44

44
Pantalla del cargador (Fig.3)
Fig. 3
Indicador Modo
Indicador de
carga normal
(verde)
Botón/
indicador
PWRJUMP
(verde/
amarillo)
Indicador
de defectos
(rojo)
Nota
Autoinspección
nalizada
continuo
encendido
amarillo
continuo
continuo
Brilla durante 1
segundo
/
Error en
autoinspección
apagado apagado apagado
Sin reacción
cuando el cargador
está enchufado
Listo para
la carga
PWRJUMP
intermitente
encendido
amarillo
continuo
apagado
El cargador se
comunicará con
el paquete de
baterías para
evaluar si se
puede activar la
carga PWRJUMP.
Carga
PWRJUMP
apagado
verde
intermitente
apagado Carga PWRJUMP
Carga
PWRJUMP
nalizada
inicio
intermitente
encendido
continuo
verde
apagado
Cuando naliza la
carga PWRJUMP,
el cargador cambia
automáticamente
al modo de carga
normal
Carga normal intermitente
encendido
continuo
verde o
apagado
apagado
Si la carga
PWRJUMP no
se ha activado,
la luz PWRJUMP
permanecerá
apagada durante
todo el proceso
Carga completa
encendido
continuo
verde
encendido
continuo
verde o
apagado
apagado
Batería
caliente/fría
apagado apagado
encendido
continuo
rojo
Retire la batería
del cargador
Defectuoso apagado apagado
intermitente
o apagado
Defecto de carga
Page 45

45
AVISO: El cargador se debe entibiar con varios ciclos continuos de carga. Esto es parte del
funcionamiento normal del cargador. Realice la carga en un área bien ventilada.
Cargador defectuoso
Si la autoinspección del cargador no reacciona cuando el cargador está enchufado, puede ser
porque el cargador no recibe alimentación, los contactos están en mal estado o el cargador
está defectuoso. Compruebe si la autoinspección del cargador puede activarse cuando el
cargador se vuelve a conectar o se conecta a otro tomacorriente. Si sigue fallando, lleve el
cargador a una estación de servicio SKIL autorizada para que lo reparen.
Paquete de baterías defectuoso
Si el cargador detecta un problema, el indicador de defectos rojo empezará a parpadear.
Retire y vuelva a colocar el paquete de baterías en el cargador. Si el indicador de defectos
parpadea por segunda vez, intente cargar otra batería.
a. Si un paquete de baterías diferente se carga de manera normal, lleve el paquete de
baterías defectuoso a una estación de servicio SKIL autorizada para que lo reparen.
b. Si el otro paquete de baterías también indica “defectuoso”, puede que el cargador esté
fallando. Lleve el cargador a una estación de servicio SKIL autorizada para que lo reparen.
Puerto de carga USB (Fig. 4)
El cargador tiene un puerto USB, que puede
proporcionar una salida de 5V 1A (por
ejemplo, para teléfonos móviles, dispositivos
de lectura y cualquier otro artefacto con la
entrada de alimentación adecuada) cuando
está enchufado.
Conecte el dispositivo correspondiente con el
cargador mediante un cable USB estándar.
Oricios para montar en la pared
(Fig. 5)
El cargador cuenta con oricios para colgar
que facilitan el almacenaje. Instale los tornillos
en la pared con una separación de 2 1/2
pulgadas (64 mm) entre sí.
Use tornillos que puedan resistir el peso
combinado del cargador y el paquete de
baterías.
También hay una ranura para ubicar
convenientemente el cable.
Fig. 4
Puerto de carga USB
Fig. 5
Agujeros
colgantes
Ranura de
cable
Page 46

46
MANTENIMIENTO
Reparación
ADVERTENCIA
El mantenimiento preventivo realizado por personal no
autorizado puede derivar en la mala colocación de los cables y
componentes internos, lo que podría crear un riesgo grave. Recomendamos que todas
las reparaciones de la herramienta se realicen en un centro de servicio de fábrica de SKIL o
una estación de servicio SKIL autorizada.
Mantenimiento general
ADVERTENCIA
Al realizar el mantenimiento, utilice solo piezas de repuesto
idénticas a las de fabricación. El uso de cualquier otra pieza
puede crear un peligro o causar daños en el producto.
Inspeccione el producto periódicamente para vericar que no haya piezas dañadas, faltantes
o ojas, como tornillos, tuercas, pernos, tapas, etc. Apriete bien todos los sujetadores y las
tapas y no use el producto hasta que se hayan reemplazado las piezas faltantes o dañadas.
Póngase en contacto con el Servicio al Cliente o con un centro de servicio autorizado si
necesita ayuda.
ADVERTENCIA
Para evitar lesiones personales graves, siempre retire el
paquete de baterías del cargador o la herramienta antes de
limpiarla o realizar cualquier tarea de mantenimiento.
Limpieza
ADVERTENCIA
La herramienta se puede limpiar mejor con aire comprimido seco.
Siempre use gafas de seguridad al usar herramientas de
limpieza con aire comprimido. No intente limpiar insertando objetos puntiagudos a través
de las aberturas.
ADVERTENCIA
Algunos solventes y agentes de limpieza dañan las piezas de
plástico. Por ejemplo, gasolina, tetracloruro de carbono, solventes
de limpieza con cloro, amoniaco y detergentes domésticos que contienen amoniaco.
Almacenamiento
Almacene la herramienta en interiores, en un lugar que sea inaccesible para los niños.
Manténgala alejada de agentes corrosivos.
SOLUCIÓN DE PROBLEMAS
Problema Causa Solución
El paquete de
baterías no se
carga.
1. El cargador no está enchufado
a un tomacorriente que
funcione.
1. Conrme que el cargador está
enchufado a un tomacorriente que
funcione.
2. El paquete de baterías no está
completamente insertado en
el cargador.
2. Conrme que el paquete de baterías
está completamente insertado en el
cargador.
3. Contactos en mal estado. 3. Limpie los contactos del cargador o
de las baterías.
4. La batería está sobrecalentada
o fría.
4. Enfríe la batería si está demasiado
caliente. Coloque la batería en un
lugar interior si está demasiado fría.
5. El paquete de baterías está
dañado.
5. Lleve el paquete de baterías a una
estación de servicio SKIL autorizada
para que lo reparen.
6. El cargador está dañado. 6. Lleve el cargador a una estación de
servicio SKIL autorizada para que lo
reparen.
Page 47

47
GARANTÍA LIMITADA PARA HERRAMIENTA SKIL
5 AÑO DE GARANTÍA LIMITADA
Chervon North America, Inc. (“Vendedor”) garantiza únicamente al comprador original
que ninguna HERRAMIENTA SKIL del consumidor presentará defectos en los materiales
ni la mano de obra durante un período de cinco años a partir de la fecha de compra si el
comprador original registra el producto dentro de los 30 días de realizada la compra. Las
BATERÍAS y los CARGADORES tienen una garantía de 2 años. El registro del producto se
puede completar en línea en www.Registermyskil.com. Los compradores originales también
deben conservar el recibo como comprobante de compra. EL PERÍODO DE GARANTÍA
DE CINCO AÑOS PARA HERRAMIENTAS ESTÁ CONDICIONADA POR EL REGISTRO
DEL PRODUCTO DENTRO DE LOS 30 DÍAS DE REALIZADA LA COMPRA. Si los
compradores originales no registran el producto de manera oportuna, se aplicará la garantía
limitada anterior durante tres años para las herramientas eléctricas. Todas las baterías y los
cargadores permanecerán bajo la garantía limitada de dos años.
No obstante lo señalado anteriormente, si se usa una herramienta SKIL del consumidor
para nes industriales, profesionales o comerciales, se aplicará la garantía anterior durante
noventa días, sin considerar el registro.
LA ÚNICA OBLIGACIÓN DEL VENDEDOR Y SU ÚNICA SOLUCIÓN en virtud de esta
garantía limitada y, en la medida en que lo permita la ley, cualquier garantía o condición
implícita por la ley, será la reparación o el reemplazo, sin cargo, de las piezas que presentan
defectos en el material o la mano de obra y que no se hayan usado de manera incorrecta,
que no se hayan manejado sin la debida atención o que las hayan reparado personas que no
sean el Vendedor o una estación de servicio autorizada. Para exponer un reclamo en virtud
de esta garantía limitada, debe devolver el producto completo, con el transporte prepagado,
a cualquier centro de servicio de la fábrica SKIL o a cualquier estación de servicio autorizada.
Para comunicarse con las estaciones de servicio autorizadas de Skil para reparar su
herramienta eléctrica, visite www.Registermyskil.com o llame al 1-877-SKIL-999
(1-877-754-5999).
ESTA GARANTÍA LIMITADA NO SE APLICA A ARTÍCULOS ACCESORIOS, COMO HOJAS
DE SIERRA CIRCULAR, BROCAS PARA TALADROS, BROCAS PARA REBAJADORAS,
HOJAS DE SIERRA DE VAIVÉN, BANDAS DE LIJADO, DISCOS DE PULIDO Y OTROS
ARTÍCULOS RELACIONADOS.
TODA GARANTÍA IMPLÍCITA APLICABLE A UN PRODUCTO DEBE ESTAR LIMITADA A LA
MISMA DURACIÓN QUE LA DURACIÓN DE LAS GARANTÍAS EXPRESAS APLICABLES
A DICHO PRODUCTO, SEGÚN SE ESTABLECIÓ EN EL PRIMER PÁRRAFO. ALGUNOS
ESTADOS EN ESTADOS UNIDOS Y ALGUNAS PROVINCIAS EN CANADÁ NO PERMITEN
LIMITACIONES SOBRE EL TIEMPO DE DURACIÓN DE UNA GARANTÍA IMPLÍCITA, DE
MODO QUE LA LIMITACIÓN ANTES DESCRITA PUEDE QUE NO SE APLIQUE A USTED.
BAJO NINGUNA CIRCUNSTANCIA, EL VENDEDOR SERÁ RESPONSABLE DE DAÑOS
ACCIDENTALES O RESULTANTES (INCLUIDA ENTRE OTRAS, LA RESPONSABILIDAD
POR PÉRDIDA DE GANANCIAS) QUE SE ORIGINEN DE LA VENTA O EL USO DE ESTE
PRODUCTO. ALGUNOS ESTADOS EN ESTADOS UNIDOS Y ALGUNAS PROVINCIAS EN
CANADÁ NO PERMITEN LA EXCLUSIÓN O LIMITACIÓN DE DAÑOS ACCIDENTALES O
RESULTANTES, DE MODO QUE LA LIMITACIÓN O EXCLUSIÓN ANTERIOR PUEDE QUE
NO SE APLIQUE A USTED.
ESTA GARANTÍA LIMITADA LE OTORGA DERECHOS LEGALES ESPECÍFICOS, Y ES
POSIBLE QUE TAMBIÉN TENGA OTROS DERECHOS QUE VARÍAN DE UN ESTADO A
OTRO EN ESTADOS UNIDOS, DE UNA PROVINCIA A OTRA EN CANADÁ Y DE UN PAÍS
A OTRO.
Page 48

48
ESTA GARANTÍA LIMITADA SE APLICA SOLAMENTE A PRODUCTOS VENDIDOS EN
ESTADOS UNIDOS DE AMÉRICA, CANADÁ Y EL COMMONWEALTH DE PUERTO RICO.
PARA TENER UNA COBERTURA DE GARANTÍA EN OTROS PAÍSES, PÓNGASE EN
CONTACTO CON SU DISTRIBUIDOR O IMPORTADOR DE SKIL.
© Chervon North America, 1203 E. Warrenville Rd, Naperville, IL 60563.
08/18
 Loading...