

HEAT GUN
8005 (F0158005..)
SKIL Europe BV - Konijnenberg 60 02/08 2610397655
4825 BD Breda - The Netherlands
www.skileurope.com
www.skileurope.com
ORIGINAL INSTRUCTIONS . . . . . . . . . . . . . 6
NOTICE ORIGINALE . . . . . . . . . . . . . . . . . 10
ORIGINALBETRIEBSANLEITUNG . . . . . .
15
ORIGINELE GEBRUIKSAANWIJZING. . . . 20
BRUKSANVISNING I ORIGINAL . . . . . . . . 25
ORIGINAL BRUGSANVISNING . . . . . . . . . 29
ORIGINAL DRIFTSINSTRUKS. . . . . . . . . .
34
ALKUPERÄISET OHJEET . . . . . . . . . . . . . 38
MANUAL ORIGINAL . . . . . . . . . . . . . . . . . 43
MANUAL ORIGINAL. . . . . . . . . . . . . . . . . . 48
ISTRUZIONI ORIGINALI . . . . . . . . . . . . . . 53
EREDETI HASZNÁLATI UTASÍTÁS. . . . . . 58
PÒVODNÍM NÁVODEM K POUÎÍVÁNÍ . . . 63
OR‹J‹NAL ‹fiLETME TAL‹MATI . . . . . . . . . 67
INSTRUKCJÑ ORYGINALNÑ. . . . . . . . . . . 72
ОДЛИННИК РУКОВОДСТВА
ПО ЭКСПЛУАТАЦИИ . . . . . . . . . . . . . . . .
77
ОРИГІНАЛЬНА ІНСТРУКЦІЯ
З ЕКСПЛУАТАЦІЇ . . . . . . . . . . . . . . . . . . .
83
ΠΡΩΤΟΤΥΠΟ Ο∆ΗΓΙΩΝ ΧΡΗΣΗΣ . . . . . . 88
INSTRUCØIUNI DE FOLOSIRE
ORIGINALE . . . . . . . . . . . . . . . . . . . . . . . .
94
ОРИГИНАЛНО РЪКОВОДСТВО
ЗА ЕКСПЛОАТАЦИЯ . . . . . . . . . . . . . . . .
99
PÔVODN¯ NÁVOD NA POUÎITIE . . . . . 104
ORIGINALNE UPUTE ZA RAD . . . . . . . . 109
ORIGINALNO UPUTSTVO ZA RAD . . . . 113
IZVIRNA NAVODILA . . . . . . . . . . . . . . . . 118
ALGUPÄRANE KASUTUSJUHEND . . . . 122
INSTRUKCIJÅM ORI˛INÅLVALODÅ . . . 127
ORIGINALI INSTRUKCIJA. . . . . . . . . . . . 132
GB
F
D
NL
S
DK
N
FIN
E
P
I
H
CZ
TR
PL
ME77
RU
UA
GR
RO
BG
SK
HR
SRB
SLO
EST
LV
LT
2
1
8005
MD
G
N
CB
F
E
A
HJ
KL
2
250 ltr/min
(50º... 550º)
500 ltr/min
(50º... 650º)
4
Watt
2000
0,8 kg
EPTA 01/2003
250-500
l/min
RUBBER
3
3
B
C
B
5
F EE
6
7
4
M
8
N
9
0
H
!
J
@
J
#
5
&
K
L
$
K
%
K
^

6
GB
Heat gun 8005
INTRODUCTION
• This tool is intended for the removal of paint, the
forming and welding of plastic, and the warming of
heat-shrinkable tubing; the tool is also suitable for
soldering and tinning, loosening adhesive joints and
defrosting water pipes
• Read and save this instruction manual 3
TECHNICAL SPECIFICATIONS 1
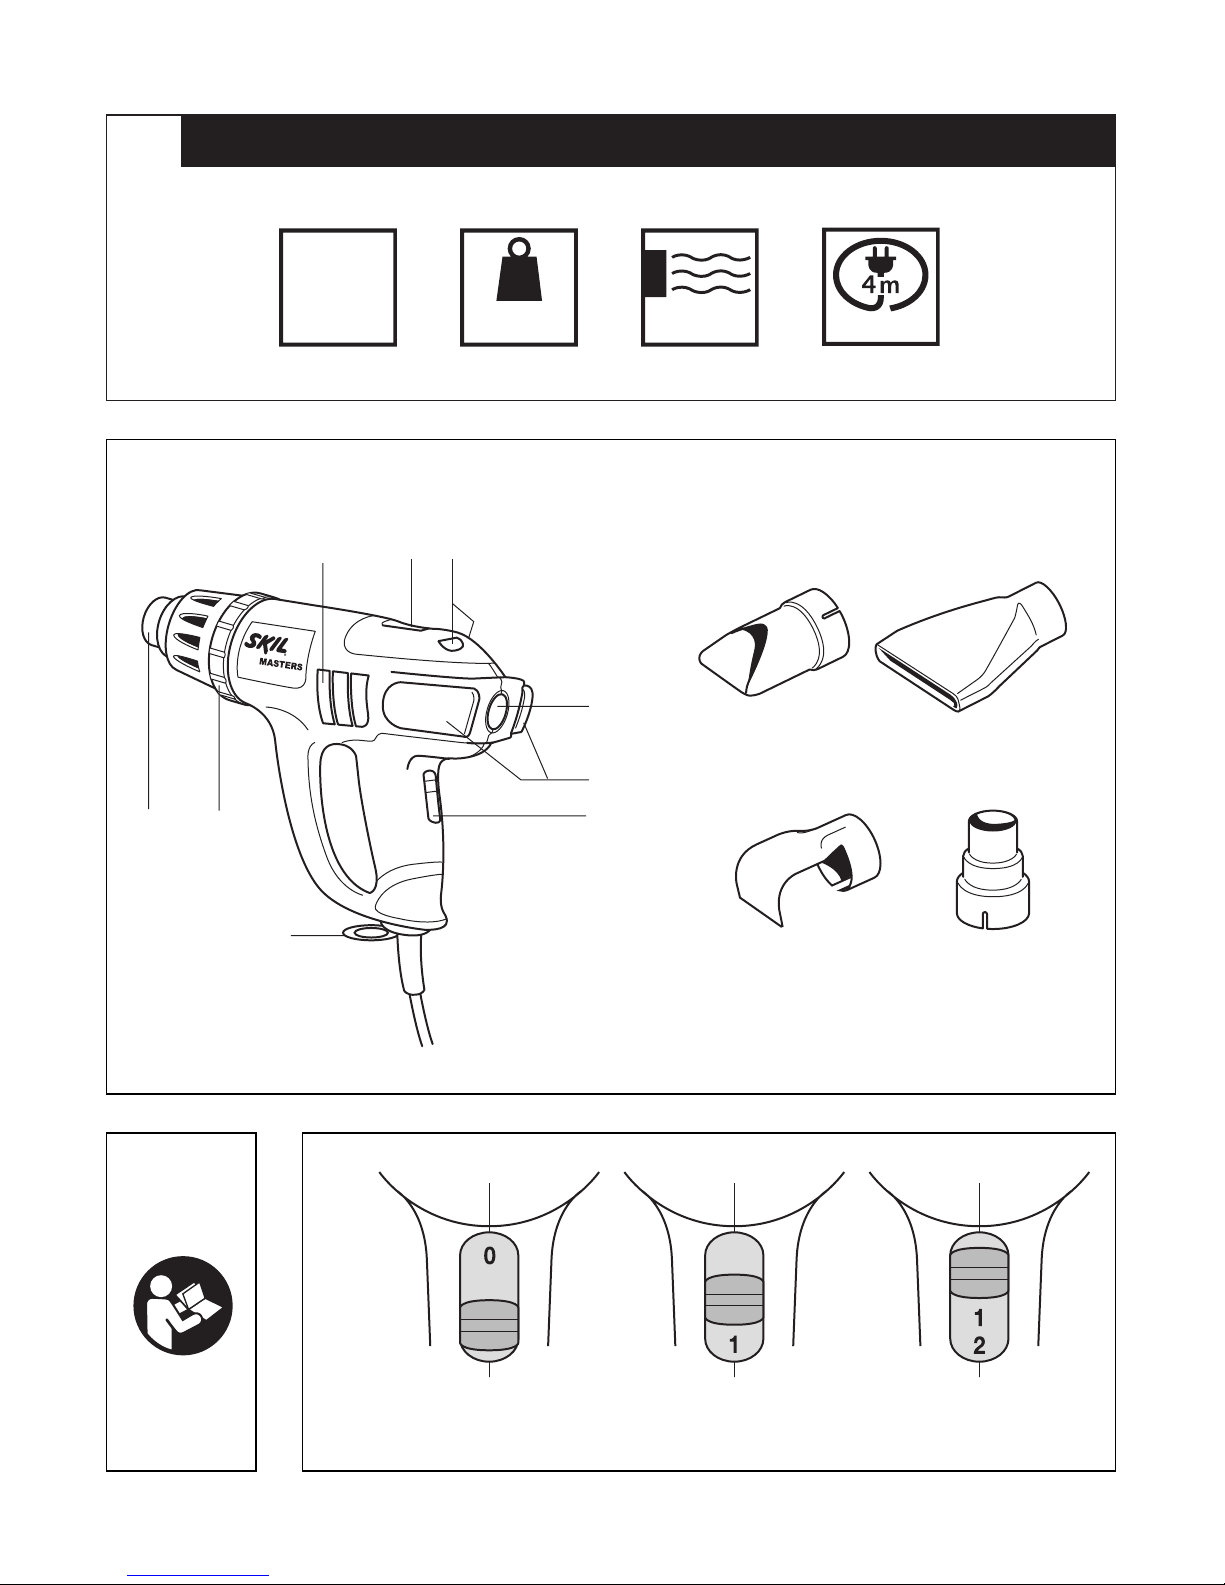
TOOL ELEMENTS 2
A On/off switch
B Buttons for setting temperature
C LCD display
D Air outlet/nozzle
E Supports for stationary use
F Button for folding out supports
G Ventilation slots
H Glass protection nozzle
J Flat nozzle
K Refl ector nozzle
L Reduction nozzle
M Nozzle release ring
N Hanging ring
SAFETY
GENERAL SAFETY INSTRUCTIONS
WARNING! Read all safety warnings and all
instructions. Failure to follow the warnings and
instructions may result in electric shock, fire and/or serious
injury. Save all warnings and instructions for future
reference. The term “power tool” in the warnings refers to
your mains-operated (corded) power tool.
1) WORK AREA SAFETY
a) Keep work area clean and well lit.
Cluttered or dark areas invite accidents.
b) Do not operate power tools in explosive
atmospheres, such as in the presence of flammable
liquids, gases or dust. Power tools create sparks
which may ignite the dust or fumes.
c) Keep children and bystanders away while operating
a power tool. Distractions can cause you to lose
control.
2) ELECTRICAL SAFETY
a) Power tool plugs must match the outlet.
Never modify the plug in any way. Do not use any
adapter plugs with earthed (grounded) power tools.
Unmodifi ed plugs and matching outlets will reduce risk
of electric shock.
b) Avoid body contact with earthed or grounded
surfaces such as pipes, radiators, ranges and
refrigerators. There is an increased risk of electric
shock if your body is earthed or grounded.
c) Do not expose power tools to rain or wet conditions.
Water entering a power tool will increase the risk of
electric shock.
d) Do not abuse the cord. Never use the cord for
carrying, pulling or unplugging the power tool.
Keep cord away from heat, oil, sharp edges or
moving parts. Damaged or entangled cords increase
the risk of electric shock.
e) When operating a power tool outdoors, use an
extension cord suitable for outdoor use. Use of a
cord suitable for outdoor use reduces the risk of electric
shock.
f) If operating a power tool in a damp location is
unavoidable, use an earth leakage circuit breaker.
Use of an earth leakage circuit breaker reduces the risk
of electric shock.
3) PERSONAL SAFETY
a) Stay alert, watch what you are doing and use
common sense when operating a power tool.
Do not use a power tool while you are tired or
under the influence of drugs, alcohol or medication.
A moment of inattention while operating power tools
may result in serious personal injury.
b) Use personal protective equipment. Always wear
eye protection. Protective equipment such as dust
mask, non-skid safety shoes, hard hat, or hearing
protection used for appropriate conditions will reduce
personal injuries.
c) Prevent unintentional starting. Ensure the switch is
in the off-position before connecting to power
source, picking up or carrying the tool. Carrying
power tools with your fi nger on the switch or energising
power tools that have the switch on invites accidents.
d) Remove any adjusting key or wrench before turning
the power tool on. A wrench or a key left attached to a
rotating part of the power tool may result in personal
injury.
e) Do not overreach. Keep proper footing and balance
at all times. This enables better control of the power
tool in unexpected situations.
f) Dress properly. Do not wear loose clothing or
jewellery. Keep your hair, clothing and gloves away
from moving parts. Loose clothes, jewellery or long
hair can be caught in moving parts.
g) If devices are provided for the connection of dust
extraction and collection facilities, ensure these are
connected and properly used. Use of dust collection
can reduce dust-related hazards.
4) POWER TOOL USE AND CARE
a) Do not force the power tool. Use the correct power
tool for your application. The correct power tool will
do the job better and safer at the rate for which it was
designed.

7
b) Do not use the power tool if the switch does not turn
it on and off. Any power tool that cannot be controlled
with the switch is dangerous and must be repaired.
c) Disconnect the plug from the power source before
making any adjustments, changing accessories, or
storing power tools. Such preventive safety measures
reduce the risk of starting the power tool accidentally.
d) Store idle power tools out of the reach of children
and do not allow persons unfamiliar with the power
tool or these instructions to operate the power tool.
Power tools are dangerous in the hands of untrained
users.
e) Maintain power tools. Check for misalignment or
binding of moving parts, breakage of parts and any
other condition that may affect the power tool’s
operation. If damaged, have the power tool repaired
before use. Many accidents are caused by poorly
maintained power tools.
f) Keep cutting tools sharp and clean.
Properly maintained cutting tools with sharp cutting
edges are less likely to bind and are easier to control.
g) Use the power tool, accessories and tool bits etc.,
in accordance with these instructions, taking into
account the working conditions and the work to be
performed. Use of the power tool for operations
different from those intended could result in a
hazardous situation.
5) SERVICE
a) Have your power tool serviced by a qualified repair
person using only identical replacement parts.
This will ensure that the safety of the power tool is
maintained.
SAFETY INSTRUCTIONS FOR HEAT GUNS
BEFORE USE:
• Check the functioning of the tool before each use and,
in case of a defect, have it repaired immediately by a
qualifi ed person; never open the tool yourself
• Inspect tool cord and plug before each use and, if
damaged, have them replaced by a qualifi ed person
• Use completely unrolled and safe extension cords with
a capacity of 16 Amps (U.K. 13 Amps)
• Inspect the extension cord periodically and replace it,
if damaged
• Only use the original SKIL accessories supplied with the
tool
• Use the tool and its accessories in accordance with this
instruction manual and in the manner intended for the
tool; use of the tool for operations, different from those
normally expected to be performed by the tool, could
result in a hazardous situation
• This tool should not be used by people under the age of
16 years
• This tool is not intended for use by persons (including
children) with reduced physical, sensory or mental
capabilities, or lack of experience and knowledge,
unless they have been given supervision or instruction
concerning use of the tool by a person responsible for
their safety
• Always check that the supply voltage is the same as the
voltage indicated on the nameplate of the tool
• Be sure tool is switched off when plugging in
DURING USE:
• Handle the tool with care; prevent fire and burns
- do not touch the air outlet/nozzle and the heated
object; they become extremely hot
- do not hold the air outlet/nozzle too close to the
object to be worked on
- do not direct the hot air fl ow towards the same
surface for too long
- never look down the air outlet/nozzle
- wear protective gloves and use safety glasses
- never direct the hot air fl ow towards persons or
animals
- never use the tool for drying hair
- do not leave the tool unattended
- never use the tool in the proximity of infl ammable
gases or combustible materials (risk of explosion)
- when working with plastic, paint, varnish and similar
materials, infl ammable and poisonous gases may be
produced; inform yourself beforehand about the
materials to be worked on
- take into account, that heat may be transferred to
combustible materials out of eyesight
- to be on the safe side, have a bucket of water or a
fi re extinguisher handy, in case any material catches
fi re
• Prevent electrical shock
- never poke anything down the air outlet/nozzle
- avoid body contact with earthed surfaces (e.g. pipes,
radiators, ranges, refrigerators)
- ensure the tool does not get wet
- do not use the tool in damp locations
- when used outdoors, connect the tool via a fault
current (FI) circuit breaker with a triggering current of
30 mA maximum, and only use an extension cord
which is intended for outdoor use and equipped with
a splashproof coupling-socket
• Handle the cord with care
- always keep away the cord from the hot air fl ow and
the air outlet/nozzle
- keep the cord away from heat, oil and sharp edges
- do not carry the tool by the cord, and do not yank the
cord to disconnect it from the socket
- do not suspend the tool by the cord
• Never use the tool in conjunction with chemical solvents
• Make sure work area is adequately ventilated
• Keep work area clean and well lit
• Keep children away from work area
• Ensure that children do not play with the tool
• Inrush currents cause short-time voltage drops; under
unfavourable power supply conditions, other equipment
may be affected (if the system impedance of the power
supply is lower than 0,127 + j0,079 Ohm, disturbances
are unlikely to occur); if you need further clarifi cation,
you may contact your local power supply authority
• Stay alert; watch what you are doing, use common
sense and do not operate the tool when you are tired

8
• Take a secure stance; do not overreach, especially on
ladders and stages
• Ensure that the tool is switched off, before putting it
aside
• In case of electrical or mechanical malfunction,
immediately switch off the tool and disconnect the plug
AFTER USE:
• Switch off the tool and disconnect the plug
• Allow the tool to cool down for at least 30 minutes
before storage
• Suspend the tool on hanging ring N 2 or set it down on
its rear in an upright position; when doing so, make sure
no combustible materials or infl ammable gases are in
the proximity
• Do not store/leave the tool outdoors
• Store the tool in a dry and locked-up place, out of reach
of children
USE
• On/off switch with 2 air fl ow settings 4
! check if switch A 2 is in position “0” before
plugging in
- switch on the tool by pushing switch A in desired
position:
1 = air fl ow 250 litres/minute (50°C ... 550°C)
2 = air fl ow 500 litres/minute (50°C ... 650°C)
- when using it for the fi rst time, some smoke may emit
from the tool; this is normal and will soon cease
- switch off the tool by pushing switch A in position “0”
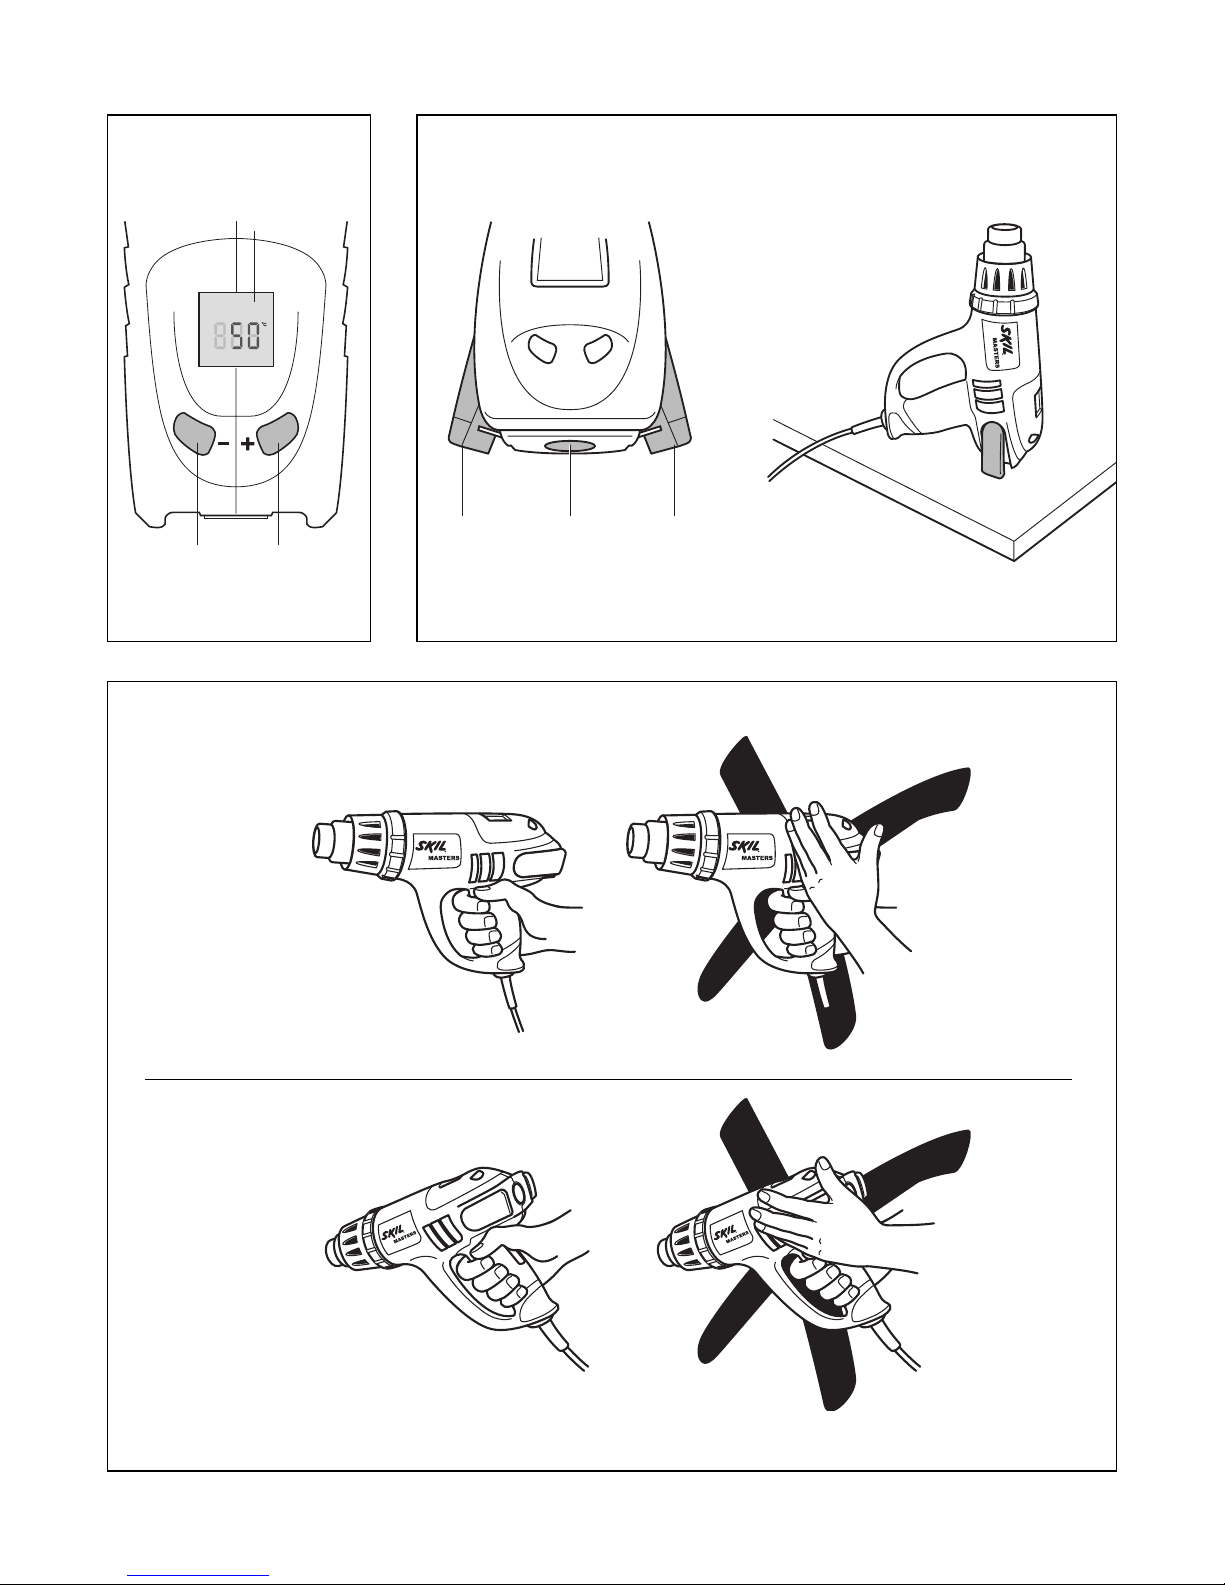
• Temperature setting 5
- set desired target temperature in steps of 10°C by
pressing buttons B briefl y
- pressing buttons B constantly increases/decreases
the target temperature continuously until the buttons
are released or the minimum/maximum temperature
is reached
- after the target temperature is set, display C shows
the actual rising/falling temperature until the desired
temperature is reached
- the target temperature applies for both air fl ow
settings and does not change when switching
between air fl ow 1 and 2
- the target temperature will be stored in the memory
of the tool, so that each time after switching on the
tool heats up to the last selected target temperature
• General use
- determine the right temperature by testing out on an
inconspicuous part of the workpiece; start with a low
temperature setting
- the temperature falls as the distance between the air
outlet/nozzle and the workpiece increases
- the temperature required depends on the material to
be worked on
• Stationary use 6
- press button F for folding out supports E
- set the tool down on its rear in an upright position
- make sure the surface is clean and dustfree; polluted
air damages the motor
- make sure the air fl ow is directed away from you
- secure the cord to prevent pulling down the tool
- do not touch the air outlet/nozzle
- make sure nothing drops into the air outlet/nozzle
- carefully hold the tool with one hand while switching
it off with the other hand, and then allow it to cool
down
• Holding and guiding the tool 7
- hold the tool with one hand
- keep ventilation slots G 2 uncovered
• Standard accessories 2
- glass protection nozzle H (for defl ecting air fl ow)
- fl at nozzle J (for broadening air fl ow)
- refl ector nozzle K (for refl ecting air fl ow)
- reduction nozzle L (for concentrating air fl ow)
NOTES:
- all application examples (except removing paint
next to glass) can be performed without
accessories; however, using the appropriate
accessory simplifi es the work and signifi cantly
improves the quality of the results
- this tool can also be used in combination with
BOSCH accessories for heat guns
• Mounting/removing accessories
- simply fi t the accessory onto air outlet D 2
! mount an accessory only when the air outlet is
cold, when the switch is in position “0” and when
the plug is disconnected
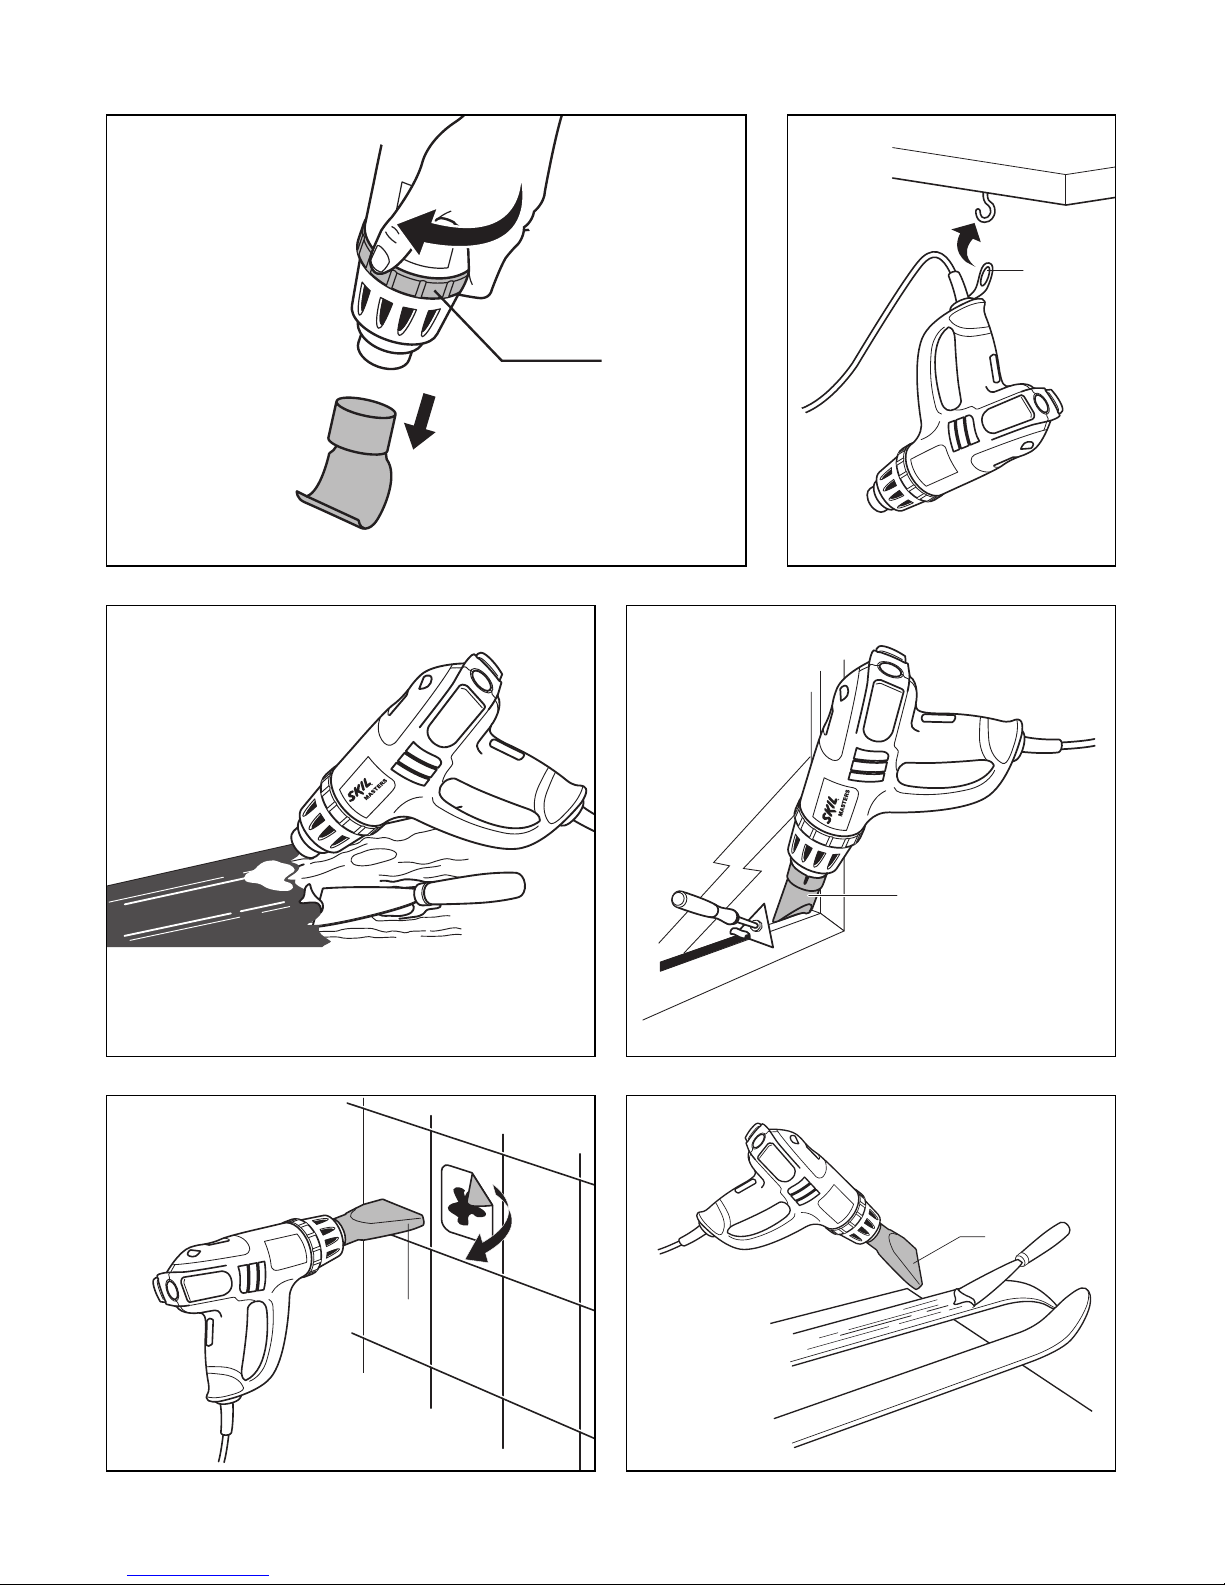
- use nozzle release ring M for easy removing hot
nozzles 8
• Constant heat control (overload protection)
Protects heating element from damage when tool is
overloaded without having to stop it and/or let it cool
down for a period of time
- when the temperature gets too high, the heating
element switches itself off, while the motor continues
to run and produces cold air (“HEAT CONTROL”
appears in the display)
- when the temperature has fallen down suffi ciently
(taking only a few seconds), the heating element will
be switched on automatically (“HEAT CONTROL” is
no longer displayed)
• Hanging ring N 9
- for easy storage of the tool
! allow the tool to cool down for at least 30 minutes
before storage
APPLICATION ADVICE
• Removing paint/lacquer 0
- use a clean, sharp scraper
- scrape fi rmly, when the paint softens
- experiment to establish the length of time necessary
to apply the heat for optimal results
- scrape the softened paint immediately, or it will
harden again
- keep a 30° to 40° angle between the tool and the
workpiece
- remove paint and debris immediately from the
scraper to prevent them from ignition

9
- scrape with the grain of the wood, wherever possible
- do not direct the hot air fl ow towards the same
surface for too long
- dispose of all paint debris safely
- thoroughly clean the work area after completing the
job
! be careful when removing layers of paint in old
buildings; in the past the building may have been
painted with paint containing lead, which is highly
poisonous
! exposure to even low levels of lead can cause
serious brain and nervous system damage; young
and unborn children are particularly vulnerable
! have lead-based paint removed by a professional
without using a heatgun
OTHER APPLICATION EXAMPLE:
★ removing (synthetic) wall covering
• Removing paint/lacquer next to glass !
- always use glass protection nozzle H when working
next to glass
- remove the paint with a hand scraper
! do not use the tool for removing paint on metal-
framed windows; metal is heat-conducting which
might lead to breaking of the glass
• Removing stickers (use fl at nozzle J) @
- many adhesives become softer when heated,
allowing adhesive bonds to be separated and
superfl uous adhesive to be removed
! heat sticker on the upper side
! always take care not to overheat the underlying
surface
OTHER APPLICATION EXAMPLES:
★ removing linoleum and vinyl carpeting
★ removing carpet tiles made of synthetic fi bres
★ removing veneers/applying veneer strips
★ softening/melting tar, tin, bitumen, wax (use fl at
nozzle J)
★ waxing (skis, furniture) (use fl at nozzle J) #
★ removing resin
★ loosening rusty/too tightly fastened metal screws,
nuts and bolts
★ removing candle wax (do not overheat the
underlying surface)
★ repairing broken candles/restoring bent candles to
their original shape
• Shrink fi tting $
- use refl ector nozzle K or reduction nozzle L
- select a shrink-fi t tube with a diameter matching that
of the workpiece
- heat the shrink-fi t tube evenly
OTHER APPLICATION EXAMPLE:
★ shrink-wrapping
• Soldering water pipes %
This tool is most suitable for working with soft solders
(melting point below 400°)
- use refl ector nozzle K
- thoroughly clean both joining sections before
soldering
- pre-heat both sections and apply soldering wire (do
not use lead-based soldering wire)
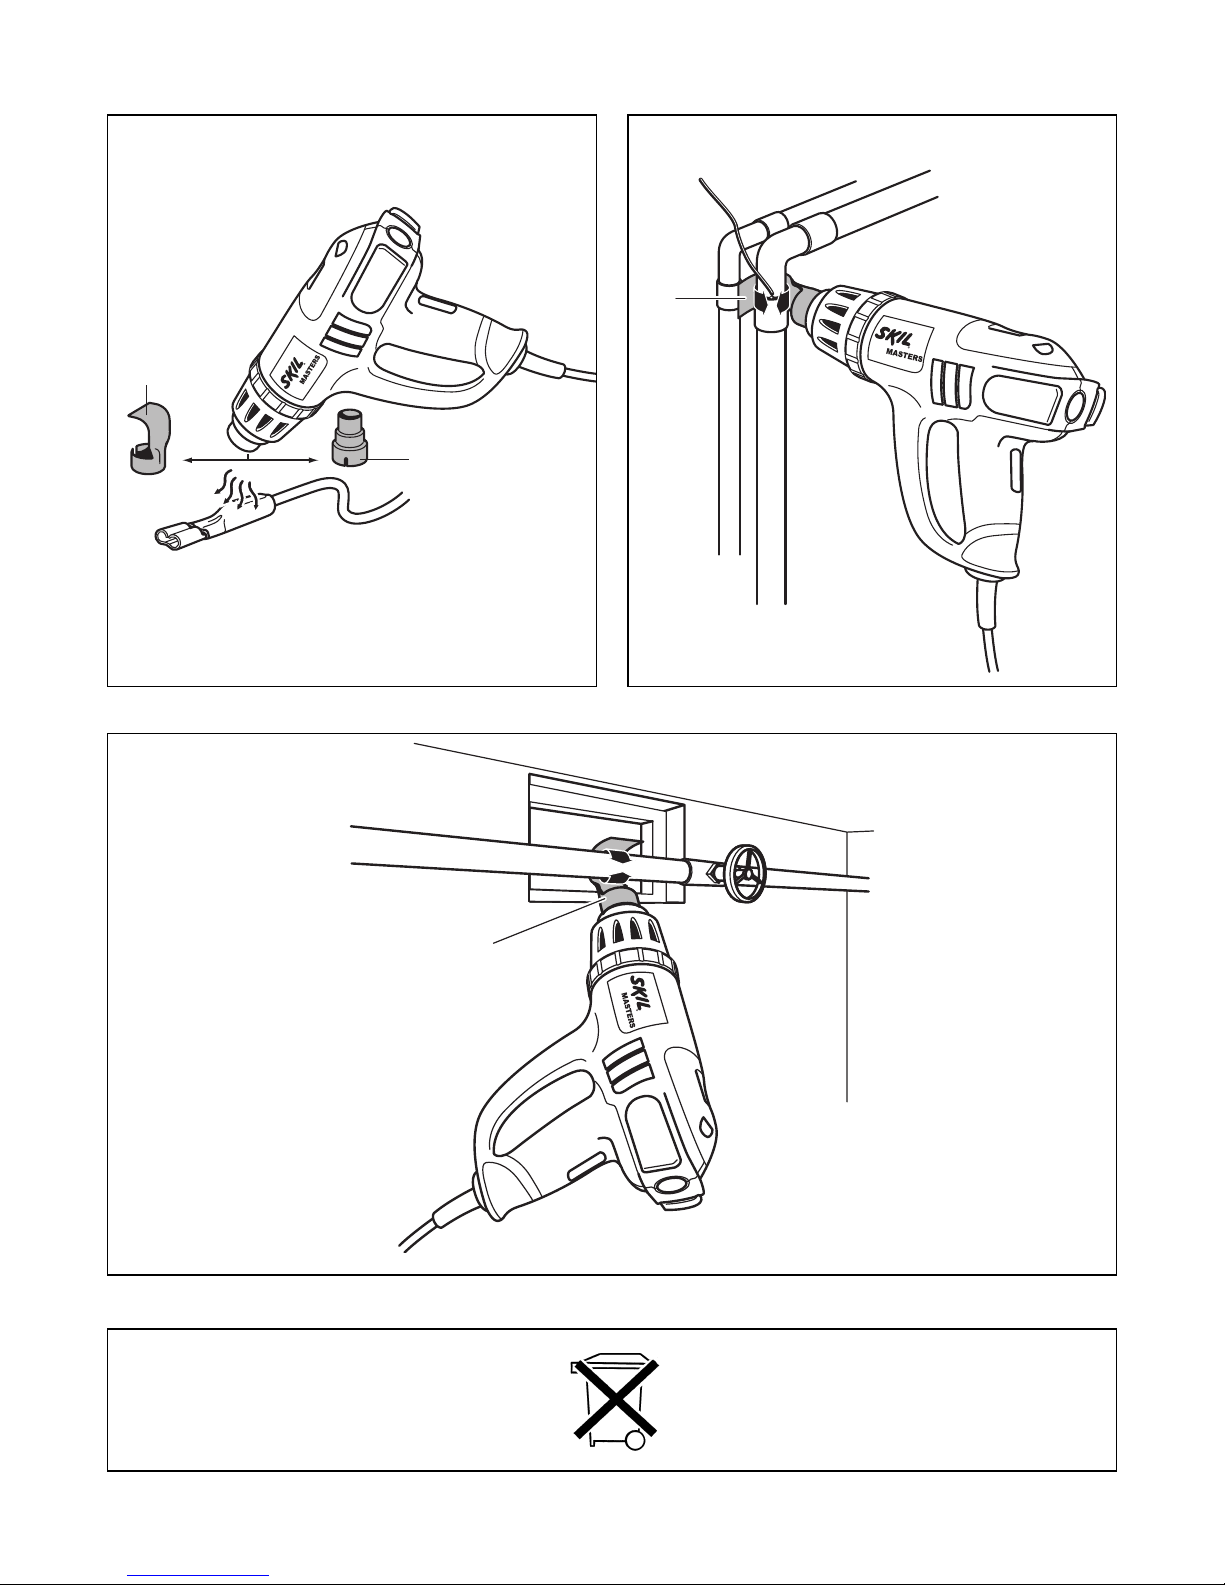
• Thawing out frozen water pipes ^
- use refl ector nozzle K
- heat the frozen area evenly
! do no thaw out water pipes made of PVC
! water pipes are often difficult to distinguish from
gas pipes; heating gas pipes is extremely
dangerous – risk of explosion
OTHER APPLICATION EXAMPLES:
★ thawing out frozen car locks (use reduction nozzle L)
★ defrosting freezers (do not damage the plastic
housing)
★ thawing out ice-covered steps and pavements
• Shaping plastic tubes
- use refl ector nozzle K
- fi ll the tube with sand and seal it at both ends, to
avoid kinking of the tube
- heat the tube evenly by moving it from side to side
OTHER APPLICATION EXAMPLES:
★ shaping all plastics with a low melting-point
(polyethylene, PVC etc.)
★ shaping all plastics with a high melting-point (acrylic
glass, Plexiglas etc.)
★ shaping and bending carpet tiles made of synthetic
fi bres
★ shaping and bending of wood (model-building)
• Welding plastics
- the weld seam must be clean and grease-free
- keep welding rod close to weld seam and apply heat,
until the welding rod gets tacky
- remove heat, when weld seam is fi lled up
OTHER APPLICATION EXAMPLES:
★ repairing of surfboards, skis and other synthetic
sports goods (use fl at nozzle J)
★ welding PVC-materials
★ smoothening blisters after sticking PVC-labels
★ connecting garden hoses (use refl ector nozzle K)
• Drying
! only dry with a low or medium temperature
setting and with an increased distance between
the tool and the workpiece
- drying of paint, varnish, gypsum, mortar and plaster
- drying wet timber prior to fi lling
- drying thickly applied fi ller or adhesive quickly
- drying building joints before spraying insulation or
sealant
- drying joints and cracks in boatbuilding
• Cleaning/disinfecting
- disinfecting rabbit hutches, dove cotes, etc. (remove
your pet first)
- combatting ant colonies
- combatting woodworms and boring beetles (hold the
tool at an adequate distance from the wood)
- eliminating weeds

10
MAINTENANCE / SERVICE
• Always keep tool and cord clean (especially the
ventilation slots G 2)
! disconnect the plug before cleaning
• Never use easy infl ammable liquids for cleaning the
heat gun in general and the air outlet/nozzle in particular
• If the tool should fail despite the care taken in
manufacturing and testing procedures, repair should be
carried out by an after-sales service centre for SKIL
power tools
- send the tool undismantled together with proof of
purchase to your dealer or the nearest SKIL service
station (addresses as well as the service diagram of
the tool are listed on www.skileurope.com)
ENVIRONMENT
• Do not dispose of electric tools, accessories and
packaging together with household waste material
(only for EU countries)
- in observance of European Directive 2002/96/EC on
waste of electric and electronic equipment and its
implementation in accordance with national law,
electric tools that have reached the end of their life
must be collected separately and returned to an
environmentally compatible recycling facility
- symbol & will remind you of this when the need for
disposing occurs
F
Pistolet chauffant 8005
INTRODUCTION
• Cet outil sert à enlever la peinture, la mise en forme et le
soudage de plastique, le chauffage de gaine
thermorétractable; l’outil peut également servir au
soudage et à l’étamage, au détachement de joints
adhésifs et au dégivrage de tuyauteries d’eau
• Lisez et conservez ce manuel d’instructions 3
SPECIFICATIONS TECHNIQUES 1
ELEMENTS DE L’OUTIL 2
A Interrupteur marche/arrêt
B Boutons de réglage de la température
C Écran à cristaux liquides
D Sortie/embouchure d’air
E Supports pour utilisation stationnaire
F Bouton pour déplier les supports
G Fentes de ventilation
H Embouchure de protection en verre
J Embouchure plate
K Embouchure réfl ecteur
L Embouchure réducteur
M Bague de dégagement de l’embouchure
N Bague de suspension
SECURITE
INSTRUCTIONS GENERALES DE SECURITE
ATTENTION! Lisez tous les avertissements de
sécurité et toutes les instructions. Ne pas suivre les
avertissements et instructions peut entraîner un choc
électrique, un incendie et/ou de graves blessures sur les
personnes. Conservez tous les avertissements et
toutes les instructions pour pouvoir s’y reporter
ultérieurement. La notion d’”outil électroportatif” dans les
avertissements se rapporte à des outils électriques
raccordés au secteur (avec câble de raccordement).
1) SECURITE DE LA ZONE DE TRAVAIL
a) Maintenez l’endroit de travail propre et bien éclairé.
Un lieu de travail en désordre ou mal éclairé augmente
le risque d’accidents.
b) N’utilisez pas l’outil dans un environnement
présentant des risques d’explosion et où se trouvent
des liquides, des gaz ou poussières inflammables.
Les outils électroportatifs génèrent des étincelles
risquant d’enfl ammer les poussières ou les vapeurs.
c) Tenez les enfants et autres personnes éloignés
durant l’utilisation de l’outil électroportatif.
En cas d’inattention vous risquez de perdre le
contrôle sur l’outil.
2) SECURITE RELATIVE AU SYSTEME ELECTRIQUE
a) La fiche de secteur de l’outil électroportatif doit être
appropriée à la prise de courant. Ne modifiez en
aucun cas la fiche. N’utilisez pas de fiches
d’adaptateur avec des outils avec mise à la terre.
Les fi ches non modifi ées et les prises de courant
appropriées réduisent le risque de choc électrique.
b) Evitez le contact physique avec des surfaces mises
à la terre telles que tuyaux, radiateurs, fours et
réfrigérateurs. Il y a un risque élevé de choc électrique
au cas où votre corps serait relié à la terre.
c) N’exposez pas l’outil électroportatif à la pluie ou à
l’humidité. La pénétration d’eau dans un outil
électroportatif augmente le risque d’un choc électrique.
d) N’utilisez pas le câble à d’autres fins que celles
prévues, n’utilisez pas le câble pour porter l’outil ou
pour l’accrocher ou encore pour le débrancher de la
prise de courant. Maintenez le câble éloigné des
sources de chaleur, des parties grasses, des bords
tranchants ou des parties de l’outil en rotation.
Un câble endommagé ou torsadé augmente le risque
d’un choc électrique.
e) Au cas où vous utiliseriez l’outil électroportatif à
l’extérieur, utilisez une rallonge autorisée
homologuée pour les applications extérieures.
L’utilisation d’une rallonge électrique homologuée pour
les applications extérieures réduit le risque d’un choc
électrique.
f) Si l’usage d’un outil dans un emplacement humide
est inévitable, utilisez un disjoncteur de fuite à la
terre. L’utilisation d’un disjoncteur de fuite à la terre
réduit le risque de choc électrique.

✎
137

138
CE DECLARATION OF CONFORMITY We declare under our sole responsibility that this product is in conformity with the following
standards or standardized documents: EN 60 335, EN 61000-3, EN 55 014, in accordance with the provisions of the directives
2006/95/EC, 2004/108/EC.
Technical file at: SKIL Europe BV (PT-SEU/PJE), 4825 BD Breda, NL.
CE DÉCLARATION DE CONFORMITÉ Nous déclarons sous notre propre responsabilité que ce produit est en conformité avec les
normes ou documents normalisés suivants: EN 60 335, EN 61000-3, EN 55 014, conforme aux réglementations 2006/95/EC,
2004/108/EC.
Dossier technique auprès de: SKIL Europe BV (PT-SEU/PJE), 4825 BD Breda, NL.
CE KONFORMITÄTSERKLÄRUNG Wir erklären in alleiniger Verantwortung, daß dieses Produkt mit den folgenden Normen oder
normativen Dokumenten übereinstimmt: EN 60 335, EN 61000-3, EN 55 014, gemäß den Bestimmungen der Richtlinien 2006/95/EG,
2004/108/EG.
Technische Unterlagen bei: SKIL Europe BV (PT-SEU/PJE), 4825 BD Breda, NL.
CE CONFORMITEITSVERKLARING Wij verklaren, dat dit product voldoet aan de volgende normen of normatieve documenten:
EN 60 335, EN 61000-3, EN 55 014, overeenkomstig de bepalingen van de richtlijnen 2006/95/EG, 2004/108/EG.
Technisch dossier bij: SKIL Europe BV (PT-SEU/PJE), 4825 BD Breda, NL.
CE KONFORMITETSFÖRKLARING Vi intygar och ansvarar för, att denna produkt överensstämmer med följande norm och
dokument: EN 60 335, EN 61000-3, EN 55 014, enl. bestämmelser och riktlinjema 2006/95/EG, 2004/108/EG.
Teknisk tillverkningsdokumentation finns hos: SKIL Europe BV (PT-SEU/PJE), 4825 BD Breda, NL.
CE KONFORMITETSERKLÆRING Vi erklærer under almindeligt ansvar, at dette produkt er i overensstemmelse med følgende
normer eller normative dokumenter: EN 60 335, EN 61000-3, EN 55 014, i henhold til bestemmelserne i direktiverne 2006/95/EF,
2004/108/EF.
Teknisk dossier hos: SKIL Europe BV (PT-SEU/PJE), 4825 BD Breda, NL.
CE SAMSVARSERKLÆRING Vi erklærer at det er under vårt ansvar at dette produkt er i samsvar med følgende standarder eller
standard- dokumenter: EN 60 335, EN 61000-3, EN 55 014, i samsvar med reguleringer 2006/95/EF, 2004/108/EF.
Tekniske underlag hos: SKIL Europe BV (PT-SEU/PJE), 4825 BD Breda, NL.
CE TODISTUS STANDARDINMUKAISUUDESTA Todistamme täten ja vastaamme yksin siitä, että tämä tuote en allalueteltujen
standardien ja standardoimisasiakirjojen vaatimusten mukainen EN 60 335, EN 61000-3, EN 55 014, seuraavien sääntöjen
mukaisesti 2006/95/ETY, 2004/108/ETY.
Tekninen tiedosto kohdasta: SKIL Europe BV (PT-SEU/PJE), 4825 BD Breda, NL.
CE DECLARACION DE CONFORMIDAD Declaramos bajo nuestra sola responsabilidad que este producto está en conformidad
con las normas o documentos normalizados siguientes: EN 60 335, EN 61000-3, EN 55 014, de acuerdo con las regulaciones
2006/95/CE, 2004/108/CE.
Expediente técnico en: SKIL Europe BV (PT-SEU/PJE), 4825 BD Breda, NL.
CE DECLARAÇÃO DE CONFIRMIDADE Declaramos sob nossa exclusiva responsabilidade que este producto cumpre as
seguintes normas ou documentos normativos: EN 60 335, EN 61000-3, EN 55 014, conforme as disposições das directivas
2006/95/CE, 2004/108/CE.
Processo técnico em: SKIL Europe BV (PT-SEU/PJE), 4825 BD Breda, NL.
GB
F
D
NL
S
DK
N
FIN
E
P
08 SKIL Europe B.V. A. v.d. Kloot
CE DICHIARAZIONE DI CONFORMITÀ Dichiaramo, assumendo la piena responsabilità di tale dichiarazione, che il prodotto è
conforme alle seguenti normative e ai relativi documenti: EN 60 335, EN 61000-3, EN 55 014 in base alle prescrizioni delle direttive
CE 2006/95, CE 2004/108.
Fascicolo tecnico presso: SKIL Europe BV (PT-SEU/PJE), 4825 BD Breda, NL.
I
CE MINÖSÉGI TANUSITVANY Teljes felelösségünk tudatában kijelentjük, hogy jelen termék a következö szabványoknak vagy
kötelezö hatósági elöírásoknak megfelel: EN 60 335, EN 61000-3, EN 55 014, a 2006/95/EK, 2004/108/EK elöírásoknak megfelelöen.
A mıszaki dokumentáció a következŒ helyen található: SKIL Europe BV (PT-SEU/PJE), 4825 BD Breda, NL.
H
CE STRVZUJÍCÍ PROHLÅ◊ENÍ Potvrzujeme na odpovπdnost, Ωe tento v¥robek odpovídå nåsledujícím normåm nebo normativním
podkladüm: EN 60 335, EN 61000-3, EN 55 014, podle ustanovení smπrnic 2006/95/EG, 2004/108/EG.
Technická dokumentace u: SKIL Europe BV (PT-SEU/PJE), 4825 BD Breda, NL.
CZ
CE STANDARDIZASYON BEYANI Ye¤ane sorumlu olarak, bu ürünün afla¤ıdaki standartlara veya standart belgelerine uygun
oldu¤unu beyan ederiz: EN 60 335, EN 61000-3, EN 55 014, yönetmeli¤i hükümleri uyarınca 2006/95/EC, 2004/108/EC.
Teknik belgelerin bulundu¤u merkez: SKIL Europe BV (PT-SEU/PJE), 4825 BD Breda, NL.
TR

139
08 SKIL Europe B.V. A. v.d. Kloot
ЗАЯВЛЕНИЕ О СООТВЕТСТВИИ Мы с полной ответственностыо заявляем, что это изделие соответствует следующим
стандартам или стандартизованным документам: EN 60 335, EN 61000-3, EN 55 014, в соответсувии с инструкциями
2006/95/EC, 2004/108/EC.
Техническая документация у: SKIL Europe BV (PT-SEU/PJE), 4825 BD Breda, NL.
RU
CE ВІДПОВІДНІСТЬ Ми заявляємо, що відповідність даного продукту наступним стандартам і регулюючим документам
повністю нашою відповідальністю: EN 60 335, EN 61000-3, EN 55 014, відповідно до положень директив 2006/95/ЄС,
2004/108/ЄС.
Технічні документи в: SKIL Europe BV (PT-SEU/PJE), 4825 BD Breda, NL.
UA
CE ∆ΗΛΩΣΗ ΣYMBATOTΗΤΑΣ ∆ηλώνουµε υπευθύνως τι το προϊν αυτ είναι κατασκευασµένο σύµφωνα µε τους εξής
κανονισµούς ή κατασκευαστικές συστάσεις: EN 60 335, EN 61000-3, EN 55 014, κατά τις διατάξεις των κανονισµών της
Κοινής Αγοράς 2006/95/EK, 2004/108/EK.
Τεχνικς φάκελος απ: SKIL Europe BV (PT-SEU/PJE), 4825 BD Breda, NL.
GR
DECLARAØIE DE CONFORMITATE CE Declaråm pe proprie råspundere cå acest product este conform cu urmåtoarele standarde
sau documente standardizate: EN 60 335, EN 61000-3, EN 55 014, în conformitate cu regulile 2006/95/EC, 2004/108/EC.
Documentaøie tehnicå la: SKIL Europe BV (PT-SEU/PJE), 4825 BD Breda, NL.
RO
CE ДЕKЛАPAЦИЯ ЗA CБOTВETCTBИE Декларираме на изцяло наша отговорност, че това изделие е съобразено със
следните стандарти или стандартизирани документи: EN 60 335, EN 61000-3, EN 55 014, в съответствие с нормативната
уредба на 2006/95/EG, 2004/108/EG.
Подробни технически описания при: SKIL Europe BV (PT-SEU/PJE), 4825 BD Breda, NL.
BG
CE IZJAVA O USKLA ĐENOSTI Izjavljujemo uz punu odgovornost da je ovaj proizvod usklađen sa slijedeçim normama i
normativnim dokumentima: EN 60 335, EN 61000-3, EN 55 014, prema odredbama smjernica 2006/95/EG, 2004/108/EG.
Tehniãka dokumentacija se moÏe dobiti kod: SKIL Europe BV (PT-SEU/PJE), 4825 BD Breda, NL.
HR
CE IZJAVA O USKLA ĐENOSTI Pod punom odgovorno‰çu izjavljujemo da je ovaj proizvod usklađen sa sledeçim standardima ili
standardizovanim dokumentima: EN 60 335, EN 61000-3, EN 55 014, u skladu sa odredbama smernica 2006/95/EG, 2004/108/EG.
Tehniãka dokumentacija kod: SKIL Europe BV (PT-SEU/PJE), 4825 BD Breda, NL.
SRB
IZJAVA O USTREZNOSTI CE Odgovorno izjavljamo, da je ta izdelek v skladu z naslednjimi standardi ali standardnimi dokumenti:
EN 60 335, EN 61000-3, EN 55 014, v skladu s predpisi navodil 2006/95/EG, 2004/108/EG.
Tehniãna dokumentacija se nahaja pri: SKIL Europe BV (PT-SEU/PJE), 4825 BD Breda, NL.
SLO
CE VASTAVUSDEKLARATSIOON Kinnitame ainuvastutajana, et see toode vastab järgmistele standarditele või
normdokumentidele: EN 60 335, EN 61000-3, EN 55 014 vastavalt direktiivide 2006/95/EÜ, 2004/108/EÜ nõuetele.
Tehniline toimik saadaval aadressil: SKIL Europe BV (PT-SEU/PJE), 4825 BD Breda, NL.
EST
CE DEKLARÅCIJA PAR ATBILST±BU STANDARTIEM Mïs ar pilnu atbild¥bu pazi¿ojam, ka ‰is izstrÇdÇjums atbilst standartiem vai
standartizÇcijas dokumentiem EN 60 335, EN 61000-3, EN 55 014 un ir saska¿Ç ar direkt¥vÇm 2006/95/EG, 2004/108/EG.
TehniskÇ lieta no: SKIL Europe BV (PT-SEU/PJE), 4825 BD Breda, NL.
LV
CE KOKYBñS ATITIKTIES DEKLARACIJA Mes atsakingai parei‰kiame, kad ‰is gaminys atitinka tokius standartus ir normatyvinius
dokumentus: EN 60 335, EN 61000-3, EN 55 014 pagal EEB reglament˜ 2006/95/EG, 2004/108/EG nuostatas.
Techninò byla laikoma: SKIL Europe BV (PT-SEU/PJE), 4825 BD Breda, NL.
LT
CE PREHLÁSENIE O ZHODE Vÿhradne na na√u vlastnú zodpovednos† prehlasujeme, Ωe tento vÿrobok zodpovedá nasledujúcim
normám alebo normovanÿm dokumentom: EN 60 335, EN 61000-3, EN 55 014, v súlade s predpismi 2006/95/EC, 2004/108/EC.
Súbor technickej dokumentácie sa nachádzajú na adrese: SKIL Europe BV (PT-SEU/PJE), 4825 BD Breda, NL.
SK
OÂWIADCZENIE ZGODNOÂCI CE Niniejszym oÊwiadczamy ponoszàc osobistà odpowiedzialnoÊç, ˝e produkt wykonany jest
zgodnie z nast´pujàcymi normami i dokumentami normalizujàcymi: EN 60 335, EN 61000-3, EN 55 014, z godnie z wytycznymi
2006/95/WE, 2004/108/WE.
Dokumentacja techniczna: SKIL Europe BV (PT-SEU/PJE), 4825 BD Breda, NL.
PL

 Loading...