

Page 1

Flite 2 High Volume Air Sampling Pump
This manual covers the following models:
901-2011 & 901-2012
www.skcltd.com
Operating Instructions
Page 2

Purchase Details and Service History
Thank you for choosing an SKC product. Your purchase is covered by our warranty, details of which can be
found inside the rear cover of this manual.
Product Model Number Product Serial Number Date of Purchase
SKC recommends annual servicing of this product. The first service is due one year from the date of purchase,
and then at yearly intervals on this date.
Service Date Service Date Service Date
1 5 9
2 6 10
3 7 11
4 8 12
Please note that SKC Ltd are the only authorised service centre in the UK, guaranteeing you access to the full
range of genuine SKC replacement parts. For all other areas a full list of SKC approved distributors and service
centres can be found at www.skcltd.com
SKC UK service centre - Tel: +44 (0)1258 480188 Fax: +44 (0)1258 480184 Email: info@skcltd.com
Page 2 901-FTM Issue I www.skcltd.com
Page 3

Contents
Specifications .........................................................................................................................................................2
General Information - 1) Pump Models .............................................................................................5
2) Care of the Flite 2 Pump .............................................................................5
3) The WEEE Directive ....................................................................................5
4) The Batteries Directive ................................................................................5
The Flite 2 Pump ....................................................................................................................................................6
Getting Started - 1) Fitting the Battery .......................................................................................7
2) Charging the Battery ..................................................................................7
3) Use of the Keypad and LCD Screen ...........................................................8
Programming the Flite 2 Pump - 1) Waking the Pump from Sleep Mode .........................................................10
2) Setting the Flow Rate ...............................................................................10
3) Manual Operation .....................................................................................12
4) Setting a Timed Run .................................................................................12
5) Reviewing Sampling Programs .................................................................14
Operating the Flite 2 Pump - 1) Manual Run ..............................................................................................17
2) Simple Timed Run ....................................................................................18
3) Timed Run with Delayed Start ..................................................................19
4) Timed Run with Repeat Runs ...................................................................19
5) Manually Stopping the Pump During a Run ..............................................20
Trouble Shooting ..................................................................................................................................................22
Battery Care .........................................................................................................................................................23
Flite 2 Pump Components ....................................................................................................................................24
Flite 2 Pump Head and Motor Components ..........................................................................................................25
Flite 2 Pump Replacement Parts ...........................................................................................................................26
Flite 2 Pump Accessories .....................................................................................................................................27
Warranty Information ............................................................................................................................................28
www.skcltd.com 901-FTM Issue I Page 1
Page 4

Specifications
Dimensions ....................................................178mm W x 115mm H x 206mm D
Weight ...........................................................2.24 kg (without battery)
3.56 kg (fitted with P901201 3.2Ah battery)
4.84 kg (fitted with P901202 7Ah battery)
Casing IP rating .............................................IP20
Flow range ....................................................2 - 26 litre/min
Maximum sampler back pressure ..................62 kPa (250 inches H2O)
Power supply ................................................12V lead/acid battery
Storage / operating temperature ....................-5 to +50 °C
Charging temperature ....................................-5 to +45 °C
Relative humidity ...........................................0 to 95 % RH
24
20
16
12
8
Flow Rate (litre/min)
4
0
0
04080 120 160 200 240
Page 2 901-FTM Issue I www.skcltd.com
10 20 30 40 50 60
Filter Back Pressure
Average Filter Back Pressure
25mm GFA
25mm 1.2µm MCE
25mm 0.8µm MCE
Pump Performance at 12Vdc
(kPa)
(inches HO)
2
Page 5

Specifications
Pump Features
Battery capacity options
Intelligent battery charging
External power supply options
Flow fault
Low battery
Timer display LCD screen indicates sample run time in hours, minutes and seconds.
Programmable run time Sample run time programmable in hours and minutes, via keypad and LCD screen.
Programmable delayed start time
Programmable repeat runs
www.skcltd.com 901-FTM Issue I Page 3
Choose from two capacities of internal battery - 3.2Ah (Part No. P901201), for
applications where a lightweight pump is desirable, or 7Ah (Part No. P901202), where
longer run times or multiple samples on a single charge are required.
The SKC lead/acid battery charger (Part No. 901-210), provides optimum charging in the
minimum possible time. The charger automatically detects when the battery is fully charged
and switches to a trickle charging rate to prevent over-charging. Typical charging times for a
fully discharged battery are 5 hours for 3.2Ah battery and 10 hours for 7Ah battery.
The pump can be powered by a mains adaptor (Part No. 901-211) suitable for 100-240V
~ 50/60Hz mains supplies, or by an external high capacity 12V lead/acid battery (such
as Part No. P901107 - 12Ah) using an external battery hookup cable (Part No. 901-212).
Fault shutdown with indication on LCD screen, plus run time display retention, if flow is
restricted.
Low battery shutdown with indication on LCD screen, plus run time display retention, in
the event of a low battery condition.
Sample start delay time programmable in hours and minutes, via keypad and LCD
screen. Start delay countdown display on LCD screen in operation.
Number of sample period repeats programmable via keypad and LCD screen. Indication
of sample period repeats on LCD screen in operation.
Page 6

Specifications
Filter Type Flow Rate
Typical Pump Run Times
Run Time P901201
3.2Ah Battery
4 litre/min 8 hours 30 hours
Run Time P901202
7Ah Battery
25mm 0.8µm MCE
25mm 1.2µm MCE
25mm GFA
The pump run time tests were carried out with new fully charged batteries under clean factory conditions,
therefore the results do not take account of filter loading.
Note - These are not suggested flow rates for sampling methods - they are pump performance indicators.
Page 4 901-FTM Issue I www.skcltd.com
8 litre/min 2½ hours 13 hours
12 litre/min 1 hour 4½ hours
4 litre/min 9 hours 32 hours
8 litre/min 3½ hours 15 hours
12 litre/min 1½ hours 8 hours
8 litre/min 5 hours 16 hours
12 litre/min 2 hours 8½ hours
16 litre/min 1 hour 5½ hours
Page 7

General Information
1) Pump Models
901-2011 Standard single port pump
901-2012 Twin port pump for through flow applications
2) Care of the Flite 2 Pump
• The Flite 2 pump is supplied complete with rubber dust caps for the inlet/outlet hosetails and a screw-in dust cap for the
charging/power socket. Please ensure that these are fitted at all times when the pump is not in use or being charged.
• Never run the Flite 2 pump without a filter in line, to prevent dust from contaminating the pump mechanism.
• Always use the correct SKC batteries and battery charger designated for the Flite 2 pump.
• The Flite 2 pump casing is IP20 rated, it is not rated as water or splashproof and therefore must not be used where it is
possible for water to enter the pump casing.
Warning - Failure to follow these guidelines will void the product warranty.
3) The WEEE Directive
4) The Batteries Directive
The lead/acid batteries supplied for use with this pump, fall within the scope of the EC Directive 2006/66/EC on batteries and
accumulators and waste batteries and accumulators. At the end of a battery’s life it must be disposed of in an environmentally
sound way as detailed in the Directive. Please contact your local distributor or SKC Ltd for further details on how to comply with
the requirements of the Batteries Directive. SKC Ltd’s batteries producer registration number is BPRN00454.
www.skcltd.com 901-FTM Issue I Page 5
This product is marked with the crossed out wheelie bin symbol, which identifies that it falls within the scope of the
EC Directive 2002/96/EC on waste electrical and electronic equipment (WEEE). At the end of it’s useful life, this
product must be disposed of in an environmentally sound way as detailed in the Directive. Note that the battery
must be separated from the pump and disposed of as detailed in the Batteries Directive (see below). Please
contact your local distributor or SKC Ltd for further details on how to comply with the requirements of the WEEE
Directive. SKC Ltd’s producer registration number is WEE/KH0054TQ.
Page 8
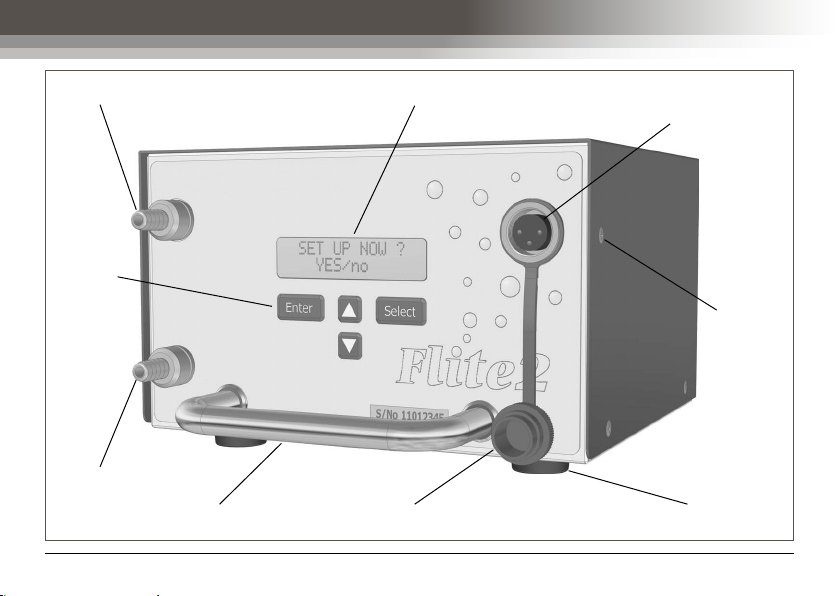
The Flite 2 Pump
Inlet hosetail LCD screen Charging /
Keypad
Outlet hosetail
(901-2012
model only)
Page 6 901-FTM Issue I www.skcltd.com
Carry handle Screw-in cap Casing feet
power socket
Casing
screws
Page 9

Getting Started
1) Fitting the Battery
The Flite 2 pump is supplied without a battery. Refer to the instructions supplied with each battery for details
of how to fit it into the pump casing.
Note - The toolkit (Part No. P901203) supplied with the pump is required to fit the battery.
2) Charging the Battery
Prior to first use the battery should be fully charged, ideally overnight.
The Flite 2 pump must only be charged using the correct SKC charger (Part No. 901-210).
The charger is supplied with mains input plugs suitable for use in the UK, Europe, USA and Australia/New
Zealand. Select the correct mains input plug and fit it to the charger.
Unscrew the dust cap from the charging/power socket on the pump and connect the output connector from
the charger to the pump socket. Screw the charging connector into the socket to prevent it from coming
loose during charging.
Plug the charger into the electrical mains supply and switch on the power. The LED indicator on the charger
will illuminate amber to indicate that the charger is charging at full rate.
Leave the pump to charge fully. For a fully depleted battery this will take approximately 5 hours for the
P901201 3.2Ah battery and approximately 10 hours for the P901202 7Ah battery. When the battery is fully
charged the LED indicator on the charger will illuminate green to indicate that the charger has switched to
trickle charge.
When fully charged, switch off the mains power to the charger and disconnect the charger output connector
from the pump. Always fit the screw-in dust cap to the charging/power socket on the pump after charging.
www.skcltd.com 901-FTM Issue I Page 7
Page 10

Getting Started
3) Use of the Keypad and LCD Screen
Key functions -
- Switches between menu options and selects digits to adjust when entering times.
- Enters the selected menu option or run time.
and - Used to enter the sample run times and set the pump flow rate.
The available options for each menu item are displayed on
the bottom line of the LCD screen. The currently selected
option is indicated in capitals, with the remaining options in
lower case as shown.
Press the key to scroll through the available options
Æ
as shown.
Æ
Press the key to accept the selected menu option.
The next menu screen will be shown on the LCD screen as
shown.
Page 8 901-FTM Issue I www.skcltd.com
Æ
SET UP NOW ?
YES/no
SET UP NOW ?
yes/NO
SET UP NOW ?
YES/no
SET FLOW NOW ?
YES/no
Page 11

On number entry menu screens such as the sample run
time screen, each digit of the hours and minutes is entered
individually. The currently selected digit is identified by being
underlined.
Press the key to scroll through the digits as shown.
Use the and keys to enter the required value for the
selected digit as shown.
Æ
Æ
/ Æ
Getting Started
ENTER RUN TIME
000:0▵ (HH:MM)
ENTER RUN TIME
▴00:01 (HH:MM)
ENTER RUN TIME
0▴0:01 (HH:MM)
ENTER RUN TIME
0▵0:01 (HH:MM)
Press the key to accept the run time. The next menu
screen will be shown on the LCD screen as shown.
www.skcltd.com 901-FTM Issue I Page 9
DELAYED START ?
Æ
YES/no
Page 12

Programming the Flite 2 Pump
1) Waking the Pump from Sleep Mode
When not in use the pump should be put into ‘Sleep’ mode
to conserve battery power. The LCD display appears as
shown when in Sleep mode.
SAMPLING PUMP
SLEEPING
To ‘wake’ the pump from Sleep mode press the keypad
keys in the sequence - , , . The pump will
display the ‘SET UP NOW ?’ screen.
Æ Æ
SET UP NOW ?
YES/no
Æ
Alternatively, if a sampling setup has previously been
programmed into the pump, the ‘REVIEW DATA ?’ screen
will be displayed, or if a pump program has been previously
used to take a sample, the ‘USE LAST SETUP ?’ screen is
displayed, when the pump is woken from Sleep mode.
Refer to section - 5) Reviewing Sampling Programs, for
REVIEW DATA ?
yes/NO
USE LAST SETUP ?
OR
YES/no
further details.
2) Setting the Flow Rate
Fit a new filter into the sampling head and connect the sampling head outlet to the pump inlet hosetail using
a length of flexible tubing. Connect the sampling head inlet to the outlet of a flow calibration device, such as
a rotameter or Defender primary calibrator.
Page 10 901-FTM Issue I www.skcltd.com
Page 13

Programming the Flite 2 Pump
SET UP NOW ?
Select the ‘YES’ option in the ‘SET UP NOW ?’ menu
screen, and press to display the next menu screen.
Æ
Ensure that the ‘YES’ option is selected and press to
display the next menu screen.
Press to increase the pump flow rate. More arrow
symbols are displayed on the LCD screen to indicate the
Æ
Æ
increased flow rate.
Press to decrease the pump flow rate. Less arrow
symbols are displayed on the LCD screen to indicate the
Æ
reduced flow rate.
Observing the reading of the flow calibrator, use the and
keys to set the required flow rate. When the pump is
running at the required flow rate press
to save the flow
rate setting and display the next menu screen.
If the flow rate is not entered within 60 seconds, the following
Æ
screens are displayed and the flow rate must be set again.
www.skcltd.com 901-FTM Issue I Page 11
YES/no
SET FLOW NOW ?
YES/no
SET FLOW USING
>>>
SET FLOW USING
>>>>>>>>>>>>
SET FLOW USING
>>>>>>>
NO FLOW ENTERED
TRY AGAIN
SET FLOW NOW ?
YES/no
Page 14

Programming the Flite 2 Pump
Having set the required pump flow rate disconnect the flow calibrator from the sampling head inlet. Remove
the filter from the sampling head and replace it with a fresh new filter. Fit the sealing cap to the sampling head
inlet to prevent contamination of the filter prior to sampling.
3) Manual Operation
SET FLOW USING
Having set the pump flow rate to the desired level, the ‘RUN
PARAMETER’ menu screen is displayed.
For simple non-timed, manual operation select the
‘MANUAL’ option, and press to display the ‘REVIEW
DATA ?’ menu screen. Refer to section - 5) Reviewing
Sampling Programs, for further details. Alternatively, select
the ‘EXIT’ option, and press to cancel the sample
program and return to the ‘SET UP NOW ?’ menu screen.
4) Setting a Timed Run
Having set the pump flow rate to the desired level, from the
‘RUN PARAMETER’ menu screen select the ‘TIME’ option,
and press to display the next menu screen.
Page 12 901-FTM Issue I www.skcltd.com
>>>>>>>
RUN PARAMETER
MANUAL/time/exit
Æ
RUN PARAMETER
MANUAL/time/exit
REVIEW DATA ?
Æ
Æ
yes/NO
RUN PARAMETER
manual/TIME/exit
ENTER RUN TIME ?
YES/no
Page 15

Programming the Flite 2 Pump
To enter a sample run time select the ‘YES’ option, and
press
to display the next menu screen. Alternatively,
select the ‘NO’ option, and press to return to the
‘RUN PARAMETER’ menu screen.
Use the , and keys to enter the required sample
run time in hours and minutes.
Press to save the sample run time and display the next
menu screen.
To enter a start delay time select the ‘YES’ option, and press
to display the next menu screen. Alternatively, select
the ‘NO’ option, and press to display the ‘REVIEW
DATA ?’ menu screen. Refer to section - 5) Reviewing
Sampling Programs, for further details.
Use the , and keys to enter the required start
delay time in hours and minutes.
www.skcltd.com 901-FTM Issue I Page 13
ENTER RUN TIME ?
YES/no
ENTER RUN TIME
000:0▵ (HH:MM)
Æ
/ /
ENTER RUN TIME
001:0▴ (HH:MM)
DELAYED START ?
Æ
Æ
YES/no
DELAYED START ?
YES/no
SET DELAY TIME
000:0▵ (HH:MM)
/ /
SET DELAY TIME
000:▵0 (HH:MM)
Æ
Æ
Page 16

Programming the Flite 2 Pump
Press to save the start delay time and display the next
menu screen.
REPEAT RUN AND D
Æ
YES/no
To program repeat sample run and delay times select the
‘YES’ option, and press to display the next menu
screen. Alternatively, select the ‘NO’ option, and press
to display the ‘REVIEW DATA ?’ menu screen. Refer
to section - Operation 5) Reviewing Sampling Programs, for
ENTER NUMBER OF
REPEATS =1
Æ
further details.
Use the and keys to enter the required number of
sample run and delay time repeats, and press to save
the number of repeats and display the ‘REVIEW DATA ?’
menu screen. For example entering 2 repeats will give a total
of 3 sample runs and delays.
/
ENTER NUMBER OF
Æ
REPEATS =2
REVIEW DATA ?
Æ
yes/NO
5) Reviewing Sampling Programs
Once a sampling program has been entered the pump
displays the ‘REVIEW DATA ?’ menu screen. This enables
the programmed settings to be viewed and amended if
required. To review the settings select the ‘YES’ menu
option and press to display the first review screen.
Alternatively, select the ‘NO’ menu option and press
to display the ‘START NOW ?’ screen. Refer to section Operating the Flite 2 Pump for further details.
Page 14 901-FTM Issue I www.skcltd.com
REVIEW DATA ?
CHECK FLOW ?
Æ
YES/no
yes/NO
Page 17

Programming the Flite 2 Pump
To check the pump flow rate select the ‘YES’ menu option
and press . The pump will run for 1 minute allowing the
flow rate to be checked with a flow calibrator. Alternatively,
select the ‘NO’ menu option and press to display the
‘TIMER MODE’ screen.
Æ
When the flow rate has been checked press to display
the next screen.
Æ
If the flow rate was correct select the ‘YES’ menu option and
press to display the ‘TIMER MODE’ screen.
Æ
If the flow rate was incorrect, select the ‘NO’ menu option and press
detailed in section - Programming 2) Setting the Flow Rate. When the correct flow rate has been entered, the
CHECK FLOW ?
YES/no
FLOW CHECK IN PR
000:00:59 R00/01
FLOW OK ?
YES/no
MODE=TIMED
OK ? YES/no
to set the correct flow rate as
‘CHECK FLOW ?’ menu screen is again displayed.
The remaining review data screens allow the timer settings to be checked and amended if required. When all
of the timer settings have been checked, the ‘REVIEW DATA ?’ menu screen is again displayed.
If all of the sample program settings are correct select the
‘NO’ menu option and press
, the ‘START NOW ?’
menu screen is displayed.
www.skcltd.com 901-FTM Issue I Page 15
REVIEW DATA ?
YES/no/escape
Æ
yes/NO
START NOW ?
Page 18

Programming the Flite 2 Pump
If the sample is to be carried out at a later time, put the
pump into Sleep mode by selecting the ‘NO’ option and
pressing .
Æ
When ‘MANUAL’ mode is selected, the ‘START NOW ?’
menu screen includes the menu option ‘ESCAPE’. Selecting
the ‘ESCAPE’ menu option and pressing
‘RUN PARAMETER’ menu screen.
Page 16 901-FTM Issue I www.skcltd.com
displays the
Æ
START NOW ?
yes/NO/escape
SAMPLING PUMP
SLEEPING
START NOW ?
yes/no/ESCAPE
RUN PARAMETER
MANUAL/time/exit
Page 19

Operating the Flite 2 Pump
1) Manual Run
Having programmed the desired flow rate and fitted a new filter into the sampling head, place the pump at
the sampling location, and ensure that the sealing cap is removed from the sampling head inlet.
If the pump is in Sleep mode, wake it and either the
‘REVIEW DATA ?’, or if the pump program has already been
used to take a sample, the ‘USE LAST SETUP ?’ screen is
displayed. From the ‘USE LAST SETUP ?’ screen select the
‘YES’ option and press
to display the ‘REVIEW DATA’
screen.
Select the ‘NO’ option and press to display the
‘START NOW ?’ screen.
Select the ‘YES’ option and press . The pump will
start and display the ‘ELAPSED TIME’ screen. This screen
displays the elapsed run time in hours, minutes and seconds.
www.skcltd.com 901-FTM Issue I Page 17
USE LAST SETUP ?
YES/no
REVIEW DATA ?
Æ
Æ
Æ
yes/NO
REVIEW DATA ?
yes/NO
START NOW ?
YES/no/escape
START NOW ?
YES/no/escape
ELAPSED TIME
000:00:16
Page 20

Operating the Flite 2 Pump
To stop the pump at the end of the required sample period,
press the and select keys simultaneously. The LCD
screen will appear as shown.
Press the keys in the sequence , , and the
‘CHECK FLOW ?’ screen is displayed.
If required the flow rate can be checked to verify that it has
remained within the required tolerance during the sample
run. Alternatively, select the ‘NO’ option and press and
the pump will go into Sleep mode.
+
ELAPSED TIME
001:00:03 STOP
Æ Æ
CHECK FLOW ?
YES/no
CHECK FLOW ?
Æ
Æ
yes/NO
SAMPLING PUMP
SLEEPING
Æ
Æ
2) Simple Timed Run
Having previously programmed a simple timed run without delayed start and repeat runs, start the pump as
detailed for manual run. On accepting the ‘YES’ option in the ‘START NOW ?’ screen the pump will display the
‘ELAPSED TIME’ screen and the elapsed time will count up until the end of the programmed run time is reached.
At the end of the timed run the pump will automatically stop
and retain the elapsed run time on the LCD screen.
Page 18 901-FTM Issue I www.skcltd.com
ELAPSED TIME
001:00:00 OK
Page 21

3) Timed Run with Delayed Start
Having previously programmed a timed run with delayed start,
start the pump as detailed for manual run. On accepting the
‘YES’ option in the ‘START NOW ?’ screen the ‘TIME TO START’
screen is displayed. This screen displays the start delay time in
hours, minutes and seconds, and counts down to ‘000:00:00’.
At the end of the start delay time the pump will automatically
start and the ‘ELAPSED TIME’ screen is displayed.
Operating the Flite 2 Pump
TIME TO START
000:29:52
ELAPSED TIME
000:00:16
At the end of the timed run the pump will automatically stop
and retain the elapsed run time on the LCD screen.
ELAPSED TIME
001:00:00 OK
4) Timed Run with Repeat Runs
Having previously programmed a timed run with repeat runs,
start the pump as detailed for manual run. On accepting the
‘YES’ option in the ‘START NOW ?’ screen the ‘TIME TO
START’ screen is displayed. This screen displays the start
delay time in hours, minutes and seconds, and counts down
to ‘000:00:00’. It also displays the sample repeat number
and the total number of repeats. The first sample period is
repeat zero.
www.skcltd.com 901-FTM Issue I Page 19
TIME TO START
000:29:52 R00/02
Page 22

Operating the Flite 2 Pump
At the end of the first start delay time the pump will
automatically start and the ‘ELAPSED TIME’ screen is
displayed. Again the screen also displays the sample repeat
number and the total number of repeats.
At the end of the first run period the pump will automatically
stop and the ‘TIME TO START’ screen is again displayed.
Note that the sample repeat number has incremented.
At the end of the second delay time the pump will
automatically start and the ‘ELAPSED TIME screen is again
displayed. Note that the elapsed time is the total time for all
run periods.
This cycle will repeat until the end of the final run period. The
pump will automatically stop and the total accumulated run
time is displayed on the LCD screen.
5) Manually Stopping the Pump During a Run
Holding a Run - In any operating mode the pump can
be put into ‘Hold’ at any time by pressing the keys in the
sequence , , . The pump will stop and the
elapsed run time is retained on the LCD screen.
Page 20 901-FTM Issue I www.skcltd.com
Æ Æ
ELAPSED TIME
000:00:23 R00/02
TIME TO START
000:29:47 R01/02
ELAPSED TIME
001:01:22 R01/02
ACCUM RUN TIME
003:00:00 R02/02
Æ
ELAPSED TIME
000:37:46 HOLD
Page 23

Operating the Flite 2 Pump
To restart the pump from Hold, press the keys in the
sequence , , . The pump will restart and the
elapsed time will continue to increment.
Cancelling a Run - In any operating mode the run can be
cancelled at any by point pressing the and keys
simultaneously. The pump will stop and the elapsed run time
is retained on the LCD screen.
www.skcltd.com 901-FTM Issue I Page 21
Æ Æ
ELAPSED TIME
000:37:48
+
ELAPSED TIME
000:45:19 STOP
Æ
Æ
Page 24

Troubleshooting
Should the Flite 2 pump detect that the battery is at a low
charge state a low battery message will be displayed on the
LCD screen. Charge the battery fully using the correct SKC
charger before use.
The Flite 2 pump will display a general fault message on the
LCD screen in the event of any error, as shown.
OR
BATTERY
TOO LOW
ELAPSED TIME
003:24:17LOW BAT
ELAPSED TIME
000:16:53 FAULT
Possible Fault Corrective Action
1. Check media for heavy loading or damage.
Sample media fault
2. Rectify problem.
3. Try restarting programming.
1. Check tubing for blockage or crimping.
Sample train fault
2. Rectify problem.
3. Try restarting programming.
Software error (frozen keypad)
1. Disconnect battery for one minute, reconnect.
2. Try restarting programming.
For further assistance contact your supplier or SKC customer care - +44 (0) 1258 480188.
Page 22 901-FTM Issue I www.skcltd.com
Page 25

Battery Care
The Flite 2 pump utilises sealed, valve regulated, lead/acid batteries. This type of battery requires no
maintenance and when used in accordance with manufacturer’s instructions should give a life of approximately
400 charge/discharge cycles (based on 50% depth of discharge). Battery life is affected by a number of
factors, but the most significant of these are overcharging and the depth of discharge in use.
Overcharging of the battery causes overheating and off-gassing of the battery electrolyte which will lead to
loss of capacity and reduced service life. The Flite 2 charger (part no. 901-210) is an intelligent charger which
automatically detects when the battery is fully charged and switches to a trickle charging rate to prevent
overcharging. Always use the correct charger.
A deeper discharge of the battery prior to charging will result in a shorter battery life. This can be as low as
200 charge/discharge cycles if the battery is fully discharged every time prior to charging. If the intended pump
usage pattern would fully discharge a P901201 3.2Ah battery between charges, it may be advisable to select
the larger P901202 7Ah battery, which for the same usage pattern could have a life of up to 500 charge/
discharge cycles.
Long term storage - If the pump is to remain unused for a long period of time, SKC recommends that the
battery be fully charged prior to storage, and a top up charge be carried out at 6 monthly intervals, or if stored
at a temperature in excess of 30°C, at 3 monthly intervals. Failure to do so could lead to significant reduction in
battery capacity and service life, and in extreme cases can prevent the battery from accepting a charge entirely.
Note that the pump should either be put into ‘Sleep’ mode during long term storage, or ideally the battery
wires disconnected from the battery terminals (these would need to be reconnected during top up charging).
Battery Disposal - The EC Battery Directive requires that all lead/acid batteries are disposed of correctly at
the end of their working life. This means that they must be collected and treated separately from other waste
to ensure that the harmful lead they contain does not enter the environment via landfill sites. Please ensure that
any end-of-life SKC batteries are collected and treated correctly.
www.skcltd.com 901-FTM Issue I Page 23
Page 26

Flite 2 Pump Components
Casing screw
2
Casing lid
Pump head & motor assembly
Bulkhead connector & back nut
Keypad
5
Inlet/outlet
6
hosetail
Sealing cap
Charging
socket cap
Power/charging
socket connector
Page 24 901-FTM Issue I www.skcltd.com
Carry handle
Battery clamping bracket, nuts & washers
3
Casing base
Casing foot
1
Casing foot
Casing screw
Battery
Main control PCB assembly
1
2
Casing screw
2
4
Page 27

Flite 2 Pump Head and Motor Components
7
8
9
O ring
Pump head
inlet/outlet
Pump head inlet/
outlet tube
12
www.skcltd.com 901-FTM Issue I Page 25
O ring
8
Valve retainer
Valve housing
11
10
Valve diaphragm
Valve diaphragm
10
11
Valve housing
Valve retainer
9
13
Valve plate
Cam & bearing
Tee piece
19
14
14
Outer clamp
Pump diaphragm
assembly
14
16
Inner clamp
Cam follower
Tubing
Motor
18
Pump
housing
15
17
Encoder
assembly
Encoder
plate
Pump diaphragm
Inner clamp
14
14
11
13
Valve plate
Valve housing
Valve retainer
Outer clamp
9
14
10
Valve diaphragm
Valve diaphragm
10
9
Valve retainer
O ring
Valve housing
8
11
8
7
O ring
Pump head
inlet/outlet
Pump head inlet/
outlet tube
12
Page 28

Flite 2 Pump Replacement Parts
Item Part No. Description Item Part No. Description
1 P901111 Casing feet (pack of 4) 11 P901116 Valve housing (pack of 4)
2 P901110 Casing screws (pack of 10) 12 P901208 Pump head inlet tube (pack of 2)
3 P901201 Battery 12V 3.2Ah lead/acid 13 P901125 Valve plate
3 P901202 Battery 12V 7Ah lead/acid 14 P901130 Clamp & diaphragm assembly
4 P901204 Main control PCB assembly 15 P901122 Pump housing
5 P901205 Keypad 16 P901121 Cam follower
6 P901108 Inlet / outlet hosetail 17 P901115 Encoder assembly
7 P901206 Pump head inlet / outlet 18 P901113 Motor
8 P901126 ‘O’ ring (pack of 4) 19 P901118 Tubing tee
9 P901207 Valve retainer (pack of 4) 20 P901203 Tool kit
10 P901129 Valve diaphragm (pack of 4)
If the required part is not listed, contact SKC customer care on +44 (0) 1258 480188.
Note: Table item numbers correspond to the ringed numbers shown in the figures on pages 24 and 25 of this
manual.
Page 26 901-FTM Issue I www.skcltd.com
Page 29

Flite 2 Pump Accessories
Part No. Description
901-210 Battery charger 100-240V ~ 50/60Hz - 12Vdc 1A with UK/EU/US/AUS mains plugs
901-211 Mains adaptor 100-240V ~ 50/60Hz - 12Vdc 2A with UK/EU/US/AUS mains plugs
P901107 12V 12Ah high capacity lead/acid battery (requires 901-212 cable)
901-212 External battery hookup cable with crocodile clip connectors
901-213 Rigid aluminium sampling mast - two piece 1 metre high
901-214 Rigid aluminium sampling mast - four piece 1 metre high
225-54 ‘Asbestos’ cowled sampling head plastic
225-54A ‘Asbestos’ cowled sampling head aluminium
225-1913 Gridded MCE filters 25mm diameter 0.8 micron pore size (pack of 100)
393-1130 Rotameter 1.0 - 13.0 litre/min accuracy class 2.5 VDI/VDE 3513/2
393-2260 Rotameter 2.0 - 26.0 litre/min accuracy class 2.5 VDI/VDE 3513/2
717-510HA Defender primary calibrator 0.3 - 30.0 litre/min accuracy ±1% of reading
391-05 ‘Calidaptor’ flow calibration adaptor for cowled asbestos heads
If the required item is not listed, contact your supplier or SKC sales on +44 (0) 1258 480188.
SKC provide a wide range of sampling media, including filters, sorbent tubes and impingers. A full selection
can be found in the current SKC catalogue and at www.skcltd.com
www.skcltd.com 901-FTM Issue I Page 27
Page 30

Warranty Information
Limited One Year Warranty
1. SKC warrants that this instrument, and each of its component parts, provided for occupational health
and safety and environmental applications is free from defects in workmanship and materials under normal
use for a period of one (1) year. This warranty DOES NOT cover any claims due to abuse, misuse, neglect,
alteration, or accident, or use in application for which the instrument was either not designed or not approved
by SKC, or, due to the buyer’s failure to maintain normal maintenance, improper selection or misapplication.
The warranty also DOES NOT cover any claims due to the use of a non-SKC approved charger to charge the
battery pack. This warranty shall further be void if changes or adjustments to the instrument are made by a
person other than an employee of the seller or, if the operating instructions furnished at the time of installation
are not complied with.
2. SKC hereby expressly disclaims all warranties either expressed or implied, including any implied warranties
of merchantability or fitness for a particular purpose and neither assumes nor authorises any person to assume
for it any liability in connection with the sale of these instruments. No description of the goods being sold has
been made a part of the basis of the bargain or has created or amounted to an express warranty that the
goods will conform to any such description. Buyer shall not be entitled to recover from SKC any consequential
damages; damages to property, damages for loss of use, loss of time, loss of profits or income or any other
incidental damages. Nor shall the Buyer be entitled to recover from SKC any consequential damages resulting
from defect of the instrument.
3. This warranty extends only to the original purchaser of the warranted instrument during the term of
the warranty, the buyer may be required to present proof of purchase in the form of a paid receipt for the
instrument.
4. In the event of a defect, malfunction, or other failure of the instrument not caused by any misuse or damage
to the instrument while in the possession of the Buyer, SKC will remedy the failure or defect without charge
Page 28 901-FTM Issue I www.skcltd.com
Page 31

Warranty Information
to the buyer. The remedy will consist of service or replacement of the instrument, or refund of the purchase
price, at the option of SKC. However, SKC will not elect refund unless it is unable to provide replacement and
repair is not commercially practicable.
5. The terms of this warranty begin on the date the instrument is delivered to the Buyer and continue for a
period of one (1) year.
6(a) To obtain performance of any obligation under this warranty, the buyer shall return the instrument, freight
prepaid to SKC at the following address:-
SKC Limited
11 Sunrise Park
Higher Shaftesbury Road
Blandford Forum
Dorset DT11 8ST
t: 44 (0) 1258 480188
f: 44 (0) 1258 480184
6(b) To obtain further information on the warranty performance contact SKC.
7. This warranty is provided under English law.
8. No other warranty is given by SKC in conjunction with this sale.
The disclaimers and limitations shall not affect the statutory rights of a consumer.
www.skcltd.com 901-FTM Issue I Page 29
Page 32

A member of the SKC global group of companies
SKC Limited 11 Sunrise Park, Higher Shaftesbury Road, Blandford Forum, Dorset DT11 8ST United Kingdom
901-FTM Issue I December 2013
T: +44 (0) 1258 480188 F: +44 (0) 1258 480184 E: info@skcltd.com W: www.skcltd.com
 Loading...