

Page 1

Operating Instructions
Tel: 724-941-9701 Fax: 724-941-1369 e-mail: skctech@skcinc.com
863 Valley View Road, Eighty Four, PA 15330 USA
IOM Personal Samplers and
IOM Samplers with MultiDust
Stainless steel IOM
Conductive plastic IOM
Description
The patented* IOM Sampler is a sampling head that houses a reusable two-part
fi lter casse e with specifi ed 25-mm fi lter for the collection of inhalable airborne
particles. The fi lter and casse e assembly are pre and post-weighed as a single unit
for gravimetric analysis. The IOM Sampler and casse e are available in conductive
plastic or stainless steel. The stainless steel model is ideal for sampling vapor-phase
isocyanates followed by chemical analysis. The IOM Sampler meets the following
U.S. and international standards:
• ACGIH
• NIOSH Method 5700 for formaldehyde on dust
• Australian standard for inhalable particulate
• Preferred sampler for HSE Method MDHS 14/3 for inhalable and respirable dust
• Complies with MDHS 25/3 for organic isocyanates (with stainless steel model)
• Complies with MDHS 6 for lead (with accessory single-hole head)
• ISO
• OSHA equivalent method for particulates not otherwise regulated (PNOR)
The sampler is supplied with a casse e cover and casse e transport clip to prevent
contamination during transport.
* U.S. Patent No. 4,675,034
‡ Reference: OSHA le er November 8, 2011
®
sampling criteria for inhalable particulate mass
®
/CEN health-related fractions of bioaerosols
‡
IOM with MultiDust Foam Disc
The IOM can be used to sample for inhalable and respirable fractions simultaneously by using a fi lter and a MultiDust Foam Disc (polyurethane foam). In addition,
a polycarbonate fi lter can be combined with a MultiDust Foam Disc for eff ective
size-selective bioaerosol sampling and be er microorganism survivability when
compared to fi lter-only sampling.
1
Page 2

Performance Profi le
Flow Rate: 2 L/min (personal sampling)
50% Cut-point: 100 μm at 2 L/min inhalable fraction
4.0 μm at 2 L/min respirable (with MultiDust Foam Disc)
Material: Molded conductive plastic (polypropylene) or
stainless steel
Maximum Operating
Temperature: Plastic IOM and casse e: 212 F (100 C) with no pressure
Stainless steel IOM and casse e: 392 F (200 C) – suitable
for autoclaving and solvent washing
Filters: 25-mm membrane or fi brous fi lter
Tubing: 1/4-inch ID
Weight: (plastic
model with casse e) < 2 oz (55 gm)
Dimensions: 3.3 x 1.1 in (8.5 x 2.8 cm)
Analysis: Gravimetric or chemical (stainless steel model)
† The plastic IOM is NOT suitable for autoclaving or ethylene oxide sterilization
Components and O-ring Placement
Wear powder-free gloves when handling casse es and use forceps
when working with fi lters. Users may wish to use sterile gloves
and forceps depending on the contaminant of interest.
†
Cover
Cassette
Filter
Filter
Front
Cover
Front
plate
O-ring A
plate
Figure 1. Confi guration for conductive plastic IOM
Sampler and cassette - Cat. No. 225-70A and plastic
IOM with stainless steel cassette - Cat. No. 225-79A
O-ring A
Figure 2. Confi guration for stainless steel IOM
Sampler and cassette - Cat. No. 225-76A
O-ring B
O-ring B
Cassette
top
Cassette
top
2
bottom
Cassette
O-ring C
Housing
bottom
Housing
body
body
Collar clip
Outlet
Dust cap
Collar clip
Outlet
Dust cap
Page 3
O-ring B
O-ring A
Proper O-ring placement in
IOM front plate, plastic and
stainless steel models
Figure 3. O-ring placement
O-ring C
Proper O-ring placement in housing
body, plastic model only
Preparation and Assembly
Handling
Wear powder-free gloves when handling casse es and use forceps when working
with fi lters and foams to prevent the transfer of moisture, dust, or other contami-
nants onto the sampling media. Users may wish to use sterile gloves and forceps
depending on the contaminant of interest.
Cleaning the Sampler
1. Disassemble the IOM Sampler (Figures 1, 2, and 3).
2. Place parts in an ultrasonic cleaner with water and a we ing agent such as a mild
soap. IOM components may also be cleaned with a solvent such as isopropyl
alcohol. O-rings should be cleaned separately using water only.
Do not use CFC-based substances to clean the plastic IOM. Do
not use solvents on O-rings.
When using solvents, protect against splashes to the eye, vapor
inhalation, and vapor ignition.
3. Clean the components using a clean lint-free paper, cloth, or so brush. Allow
components to dry completely.
Sterilizing Filter, Foam Disc, and Cassette (for Bioaerosol Sampling)
Polycarbonate Filter
Autoclave polycarbonate fi lter according to manufacturer instructions.
MultiDust Foam Disc
1. Place foam in a sonic bath of distilled water for 20 minutes. Remove from
bath.
2. Rinse foam with distilled water.
3. Dry overnight at 158 F (70 C). Equilibrate to standard conditions of
temperature and humidity.
Do not desiccate foam.
4. Expose foam to ultraviolet light according to a standard UV light exposure
method.
3
Page 4

IOM Stainless Steel Casse e
Use stainless steel casse e only.
Autoclave stainless steel casse e up to 392 F (200 C).
Reminder: Use powder-free gloves and forceps to insert the fi lter and foam into the
casse e (see Filter Casse e: Opening, Installing Filter, and Closing). Users may wish to
use sterile gloves and forceps depending on the contaminant of interest.
Storage Requirements for IOM MultiDust Foam Discs
IOM MultiDust Foam Discs are sensitive to heat, humidity, and ultraviolet light.
The foams must be stored in the supplied packaging (including the resealable bag).
Keep in a cool, dry place away from direct sunlight. SKC recommends checking the
condition of the foams before use. Note that the expiration date on the package is
subject to correct storage as detailed above.
General Weighing Guidelines
• The plastic casse e with fi lter and MultiDust Foam Disc (if used) should be
equilibrated overnight in a balance room under controlled humidity conditions
and weighed. Maintain a stable humidity level in the balance room. A stainless
steel casse e with fi lter may be desiccated.
• Before pre and post-weighing, wipe the external surface of the sampler with a
clean lint-free paper, cloth, or so brush.
• For inhalable only, pre and post-weigh casse e with fi lter as a single unit. For
inhalable and respirable, pre and post-weigh fi lter, foam, and casse e together
fi rst for inhalable result and then fi lter and casse e bo om together for respirable
result.
• Field blanks can be used to correct weights when using plastic casse es at low
fi lter loadings. See Sample Blanks on page 9.
• The IOM casse e assembled with fi lter or the fi lter alone should be weighed
on a fi ve-fi gure forced balance. Allow the casse e three-and-a-half minutes to
stabilize before taking a reading. The same balance should be used for both pre
and post-weighing procedures.
Pre and Post-weighing for Specifi c Fractions
Particle Size Collected Pre-weigh Components Post-weigh Components
Inhalable only Filter and cassette together Filter and cassette together
Respirable (#1) and
Inhalable (#2)
#1 Filter and cassette
bottom together
#2 Filter, foam, and cassette
together
4
#1 Filter and cassette
bottom together
#2 Filter, foam, and cassette
together
Page 5

Filter Cassette: Opening, Installing Filter, and
Closing (Figure 4)
1. Separate the casse e top from the casse e bo om.
a. Plastic casse e: Use gentle pressure to separate
the two halves of the plastic casse e (Figure 4).
b. Stainless steel cassette: Twist cassette top in
casse e bo om until notch on casse e top aligns
with bump on casse e bo om. Pull straight up.
2. Place a fi lter into the casse e bo om (on the support grid)
and insert casse e top into casse e bo om.
a. Plastic casse e: Snap the plastic casse e top into
the casse e bo om, ensuring a tight fi t.
b. Stainless steel casse e: Align the notch in
Figure 4.
Exploded cassette
the casse e top with the bump in the casse e
bo om, set top into bo om, and twist top to secure.
Pre-weighing Cassette for Inhalable Gravimetric Sampling
1. Equilibrate casse e and fi lter as indicated in General Weighing
Guidelines on page 4.
2. Wipe the external surface of a loaded IOM casse e with a
clean lint-free paper, cloth, or so brush.
3. Pre-weigh the fi lter inside the IOM casse e as a single unit
(Figure 5).
4. Note the result and assign a reference number or le er to the
casse e or complete IOM sampler (casse e inside housing
body).
Figure 5. Weigh
cassette with fi lter
on a fi ve-fi gure
Cassette
top
Filter
Cassette
bottom
balance.
Note: The casse e cover (Figure 6) can be included in
pre and post-weighing as part of the complete casse e,
if required, but must be referenced to the casse e used.
Figure 6.
Cassette with
cover
Pre-weighing Cassette for Inhalable and Respirable Gravimetric
Sampling
1. Equilibrate casse e, fi lter, and foam as indicated in General Weighing Guidelines
on page 4.
2. Wipe the external surface of a loaded IOM casse e with a clean lint-free paper,
cloth, or so brush.
3. Using forceps place a fi lter into the casse e bo om and weigh.
4. Record pre-weight #1 and assign a reference number or le er to the casse e or
complete IOM Sampler (casse e inside a housing body).
5
Page 6

5. Place a single MultiDust Foam Disc for
respirable sampling (Cat. No. 225-772) into
the inlet of the casse e top so that it sits just
below the rim (Figure 7). Ensure that it is
not creased and there are no gaps between
Foam
insert
Cassette
front
it and the casse e wall.
Filter
Note: The foam disc is larger than the
inlet; therefore, it must be compressed
evenly to fi t properly.
6. Insert the casse e top containing the foam
disc into the casse e bo om ensuring the
Cassette
support
grid
Figure 7. Foam inserted into cassette
fi lter is in place (see Filter Casse e: Opening,
Installing Filter, and Closing).
7. Re-weigh the entire assembly and record pre-weight #2. If the casse e cover is
included in this operation, reference it to the casse e with a number or le er. It
is recommended that the casse e cover remain in place until ready to sample.
Transporting Loaded Cassettes
If not ready to sample immediately or if transporting pre-weighed loaded casse es to a sampling
location, place the casse e with cover into the
provided transport clip (Figure 8). Ensure the
casse e cover is in place. An alternative is to insert
the loaded casse e into an IOM housing body and
place the cover on the casse e opening (See Load-
ing a Casse e into the IOM Housing Body and Figure
9). Users may wish to transport loaded casse es
or loaded IOM housing bodies in a sterile plastic
bag depending on the contaminant of interest.
Figure 8. Insert cassette with cover
into transport clip
Loading a Cassette into the IOM Housing Body
Reminder: Use powder-free gloves and forceps to handle casse e, fi lter, and foams.
Users may wish to use sterile gloves and forceps depending on the contaminant
of interest.
Front
Cover
plate
Figure 9. Load pre-weighed
cassette into an IOM housing body;
1. Unscrew front plate from IOM housing body.
2. Ensure the O-rings are positioned correctly (Figures 1, 2, and 3).
3. Insert the casse e into the IOM housing body.
4. Screw the front plate into the housing body. Tighten securely to achieve a good
seal. Install cover on inlet until ready to sample.
Cassette
assembled
with fi lter
include cover.
6
Housing
body
Page 7

Calibration
Calibrate pump fl ow rate using a primary standard calibrator, IOM Calibration
Adapter accessory, and a representative loaded IOM Sampler in line.
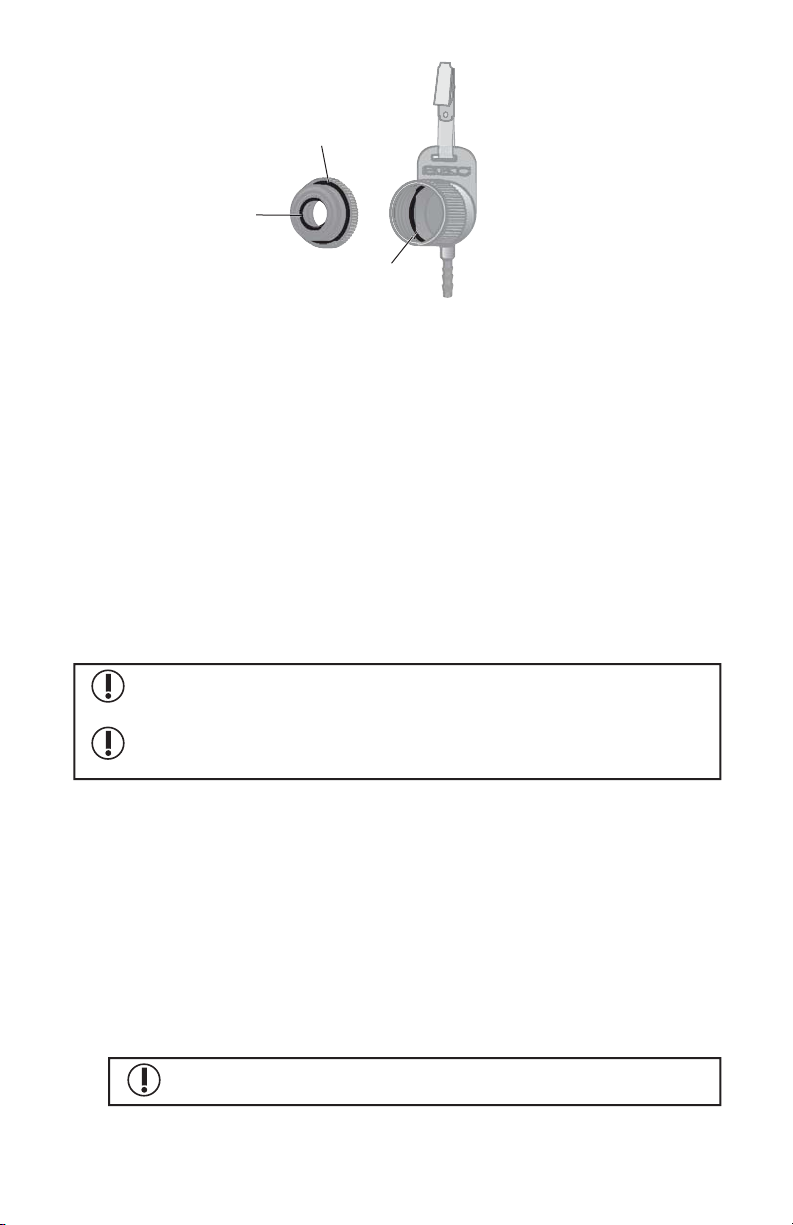
Calibration Adapter Setup (Figure 10)
Hinged
bracket
1. Push an IOM Sampler loaded with a
representative fi lter and casse e through
the hinged bracket and place inlet against
the adapter’s foam ring.
Foam ring
2. Clamp IOM in place with plastic clamping
screw until foam ring compresses by 1 mm.
Ensure IOM inlet is centered.
3. Screw supplied hose barb into threaded hole
in calibration adapter inlet.
4. Use a length of fl exible tubing to connect
hose barb to calibrator outlet.
5. Remove sampler dust cap from outlet.
6. Connect IOM outlet to the inlet of a sample
pump.
Figure 10. IOM Calibration
Calibrating Pump Flow Rate
Calibrate pump fl ow rate using the IOM Calibration Adapter accessory and an IOM
sampler loaded with a representative fi lter and casse e in line.
1. Insert IOM with loaded fi lter casse e into the calibration adapter (see Calibration
Adapter Setup and Figure 10).
2. Calibrate pump fl ow rate to 2 L/min. See calibrator and sample pump operating
instructions for additional information.
3. Disconnect IOM from pump and calibrator and remove representative casse e.
Set aside for fl ow rate verifi cation a er sampling.
Plastic
clamping
screw
Insert IOM here,
inlet side down
Adapter
inlet
Hose barb
Adapter
Sampling
Wear powder-free gloves when handling casse es. Users may wish to
use sterile gloves depending on the contaminant of interest.
1. Remove a newly loaded casse e from its
transport clip and remove the casse e cover.
Ensure the O-rings are fi ed correctly inside
the sampler housing body. Insert the casse e
into a clean IOM housing body. Screw the
front plate into the housing body. Tighten
to achieve a good seal (Figure 11).
2. Clip onto a worker’s clothing in the breathing
zone (Figure 12).
3. Ensure sampler dust cap is removed from the
outlet. Using fl exible tubing, connect outlet of
the IOM Sampler with the inlet of a sample
pump calibrated to 2 L/min (Figure 12).
4. Remove cover, start pump, and sample for
the time specifi ed in the method used.
7
Figure 11. Insert loaded cassette
in sampler body and screw on
front plate.
Page 8

5. A er sampling, stop the pump. Unscrew the front
plate from the housing body and remove the casse e
from the sampler (may use sterile forceps and gloves
depending on the contaminant of interest). Place the
cover on the casse e and wipe the external surface
of the casse e with a clean lint-free paper, cloth,
or so brush (may use sterile items depending on
the contaminant of interest). Place cassette with
cover into the supplied transport clip (Figure 8). For
post-weighing instructions, see Analysis on page 9. If
not performing post-weighing on the premises, see
Transporting Samples to a Laboratory on page 9.
Note: If inhalable samples were collected to
determine exposure to formaldehyde on dust using
NIOSH Method 5700, place the casse e cover on
the casse e and load it into the transport clip. Send
casse e in clip, a blank, and all other pertinent
sampling information to a laboratory for analysis.
Sampling for Bioaerosols
Figure 12. IOM Sampler and
pump on worker
Using MultiDust Foam Disc and Filter
Note: Use stainless steel casse es only.
Note: MultiDust Foam Discs are designed for single use only. MultiDust Foam
Discs are pre-washed to ensure the highest quality and accurate results. Use only
MultiDust Foam Discs with the IOM.
Filters, foam discs, and casse e must be sterilized and handled
aseptically. See Preparation and Assembly on page 3.
1. Sterilize stainless steel casse e, fi lter, and foam disc. A 25-mm polycarbonate fi lter
is recommended. See Sterilizing Filter, Foam, and Casse e (for Bioaerosol Sampling)
on page 3.
2. Load fi lter into casse e. See Filter Casse e: Opening, Installing Filter, and Closing,
page 4.
3. Place the MultiDust Foam Disc for respirable (Cat. No. 225-772) into the inlet
of the casse e top so that it sits just below the rim (Figure 7). Ensure the foam
is not creased and there are no gaps between the foam and the casse e wall.
Note: The foam disc is larger than the inlet; therefore, it must be compressed
evenly to fi t properly.
4. Insert the casse e top containing the foam disc into the casse e bo om ensuring
the fi lter is in place. See Filter Casse e: Opening, Installing Filter, and Closing,
page 4.
5. Calibrate the sample pump using representative sample media. See Calibration
on page 6.
6. Sample using the procedure in Sampling on page 7.
7. If shipping samples to a laboratory for analysis, see Transporting Samples to a
Laboratory on page 9. If performing analysis on the premises, see Analysis on
page 9.
8
Page 9

Transporting Samples to a Laboratory
Wear powder-free gloves when handling casse es and use forceps
when working with fi lters. Users may wish to use sterile gloves
and forceps depending on the contaminant of interest.
For gravimetric samples:
Immediately following sampling, unscrew IOM front plate and remove casse e
from housing body. Place casse e cover on casse e and insert into a transport clip
(Figure 8). Place unit into a sterile plastic bag depending on the contaminant of interest. Package in a padded envelope and send to a laboratory for analysis. Include
pertinent sampling information and blanks (see Sample Blanks). If post-weighing on
the premises, see Analysis.
For chemical samples (stainless steel cassette only):
1. Unscrew the IOM front plate.
2. Remove the stainless steel casse e.
3. Choose from the following options:
a. Immediately place entire casse e/fi lter assembly into a large vial fi lled
with method-specifi ed desorbing solution and cap the vial or,
b. Immediately remove casse e top and use forceps to remove fi lter. Place
fi lter in a vial fi lled with method-specifi ed desorbing solution and cap
4. Package securely to prevent leakage and breakage, include pertinent sampling
For bioaerosol samples:
Transport samples in vials fi lled with Peptone Inositol Tween (PIT), a biological
buff er, as indicated in Method 1 or 2 on page 10. Users may wish to place vials in a
sterile plastic bag depending on the contaminant of interest. Samples can be stored
overnight at 39.2 F (4 C) in vials or bags and analyzed the next day.
the vial.
information and blanks, and send to a laboratory for analysis.
Sample Blanks
Load and handle the blank IOM Sampler in the same manner as the IOM used for
sampling. Do not pull air through the blank. Send the blank with the samples to
a laboratory.
Analysis
Post-weighing for Inhalable Fraction
Wear powder-free gloves when handling casse es and use forceps
when working with fi lters.
1. Equilibrate fi lter and plastic casse e for a reasonable time based on humidity
conditions.
2. Remove the casse e from the transport clip or sampler housing body. The casse e
cover can remain on the casse e if it was included in the pre-weight.
3. Weigh the entire casse e. Compare the pre and post-weights. The diff erence
between weights is the amount of inhalable particles collected.
The IOM casse e can be cleaned, reloaded with a fresh fi lter, and reused. See Clean-
ing the Sampler on page 3.
9
Page 10

Post-weighing for Inhalable and Respirable Fraction
Wear powder-free gloves when handling casse es and use forceps
when working with fi lters.
1. Equilibrate plastic casse e, fi lter, and foam for a reasonable time based on
humidity conditions.
2. Remove the casse e from the transport clip or sampler housing body. The
casse e cover can remain on the casse e if it was included in the pre-weight.
Before proceeding, see table on Pre and Post-weighing for Specifi c Fractions on
page 4. Weigh the casse e with fi lter and foam disc together. Record post-weight
#2. Compare pre-weight #2 to post-weight #2. The diff erence between weights
is the amount of inhalable particles collected.
3. Gently split the casse e apart (see Filter Casse e: Opening, Installing Filter, and
Closing on page 4), taking care not to dislodge the fi lter.
4. Before proceeding, see table on Pre and Post-weighing for Specifi c Fractions on
page 4. Weigh the casse e bo om with fi lter only.
5. Record post-weight #1. Compare pre-weight #1 to post-weight #1. The diff erence
between weights is the amount of respirable particles collected.
The IOM casse e can be cleaned, reloaded with a fresh fi lter and foam, and reused.
See Cleaning the Sampler on page 3.
Chemical Analysis
Follow method instructions for sample preparation and analysis.
Bioaerosol Sample Extraction1 and Analysis
1. Using sterile forceps and gloves, remove the casse e from the transport clip.
2. Gently split the casse e apart; do not dislodge the fi lter.
3. Remove the foam and fi lter from the casse e.
Push foam down through the fl anged end of the casse e, not
through the inlet.
4. There are two methods for extracting the sample from the MultiDust Foam Disc
and the fi lter.
a. Method 1
Place the foam and the fi lter in individual vials each fi lled with 10 ml of
Peptone Inositol Tween (PIT). When analyzed, this method provides data
on inhalable and respirable bioaerosol fractions.
b. Method 2
Place fi lter and foam together in a vial fi lled with PIT. When analyzed,
this method provides data on the inhalable fraction only of the bioaerosols
5. Create a suspension.
collected.
a. Using Method 1 with fi lter only: Whirlimix the fi lter in PIT for one minute
to re-suspend collected particles.
b. Using Method 1 with foam only: Whirlimix the foam for one minute, and
then plunge rapidly for one minute in situ using a sterile 20-ml hypodermic
syringe plunger.
c. Using Method 2 with foam/fi lter combined: Whirlimix the foam for one
minute, and then plunge rapidly for one minute in situ using a sterile
20-ml hypodermic syringe plunger.
10
Page 11

6. Create fi ve 10-fold serial dilutions (to 10-5 of original suspension) from each
suspension and spread 0.1 ml of each dilution (plus 0.2 ml of undiluted sample
if a low bioaerosol count is expected) onto the surface of duplicate agar plates.
Select agar media based on the expected microbial species.
7. Incubate plates at appropriate temperatures and count emerging colonies a er
four to seven days of incubation. Use total number of CFU per plate to calculate
airborne viable cell concentrations. Samples can be stained and analyzed with
epifl uorescent microscope.
References
1
Kenny, L.C., Bowry, A., Crook, B., and Stancliff e, J.D., “Field Testing of a Personal Size-
selective Bioaerosol Sampler,” American Occupational Hygiene, Vol. 43, No. 6, 1999, pp.
393-404
2
Kenny, L.C., Stancliff e, J.D., Crook, B., Staff , S., Griffi ths, W.D., Stewart, I.W., and Fut-
ter, S.J., “The Adaptation of Existing Personal Inhalable Aerosol Samplers for Bioaerosol
Sampling,” American Industrial Hygiene Association Journal, Vol. 59, 1998, pp. 831-841
3
Kenny, L.C., Chung, K.Y.K., and Dilworth, M., “Applications of Low-cost Multifraction
Aerosol Samplers - Final Report,” IR/EXM/99/06, Health and Safety Laboratory, U.K.,
1999
4
Kenny, L.C., Chung, K.Y.K., Dilworth, M., Hammond, C., Jones, J. Wynn, Shreeve, Z.,
and Winton, J., “Applications of Low-cost Dual-fraction Dust Samplers,” Ann. Occup.
Hyg., Vol. 45, No. 1, 2001, pp. 35-42
5
Mark, D. and Vincent, J. H., “A New Personal Sampler for Airborne Total Dust in Work-
places,” Ann. Occup. Hyg. Vol. 30, 1986, pp. 89-102
6
ACGIH Technical Commi ee on Air Sampling Procedures: Particle Size-selective Sampling
in the Workplace, ACGIH, Cincinnati, Ohio, 1984
11
Page 12

Ordering Information
Description Cat. No.
IOM Sampler and cassette,
IOM Sampler and cassette,
IOM Sampler,
§
in conductive plastic, with stainless steel cassette, transport clip,
and cover 225-79A
Accessories
Cassette assembly, in conductive plastic, with transport clip and cover 225-71A
Cassette assembly, in stainless steel, with transport clip and cover 225-75A
Transport Clip and Cover 225-72A
Calibration Adapter 391-01
Single Hole Lead Head, for sampling lead according to MDHS 6 225-52
MultiDust Foam Discs, use with fi lters below
MultiDust Foam Discs for Respirable and Inhalable PM pk/10
pk/50
25-mm Filters for IOM, each sample requires its own fi lter
PVC, 5.0 μm, pk/100 225-5-25
Glass Fiber, 1.0 μm, pk/500 225-702
MCE, 0.8 μm, pk/100 225-1930
Polycarbonate, 0.8 μm, pk/100 225-1601
Gelatin, pk/50 225-9551
§ The IOM requires a 25-mm fi lter; see above.
§
in conductive plastic, with transport clip and cover 225-70A
§
in stainless steel, with transport clip and cover 225-76A
225-772
225-772-50
SKC Limited Warranty and Return Policy
SKC products are subject to the SKC Limited Warranty and Return Policy,
which provides SKC’s sole liability and the buyer’s exclusive remedy. To view the
complete SKC Limited Warranty and Return Policy, go to h p://www.skcinc.com/
warranty.asp.
www.skcinc.com
Form 37372 Rev 1302
12
 Loading...