

Page 1

Operating Instructions
Universal Sample Pump
Cat. No. 224-PCXR4
SKC Inc.
863 Valley View Road
Eighty Four, PA 15330
Form 37712 Rev 1302
Page 2

Table of Contents
Description ........................................................................ 1
Performance Profi le ............................................................................................2
Operation ........................................................................... 5
High Flow Applications .......................................................................................5
Low Flow Single-tube Applications .....................................................................9
Low Flow Multiple-tube Applications ................................................................13
Maintenance .................................................................... 17
Pump Inlet Filter ...............................................................................................17
Battery Pack Care ............................................................................................17
Installing the Battery Pack ................................................................................18
Replacing Battery Pack ....................................................................................18
Pump Service ...................................................................................................19
Parts Descriptions ............................................................................................20
Replacement Parts ...........................................................................................22
Optional Accessories ..................................................... 24
Warranty .......................................................................... 25
Indicates a warning or caution
Indicates a premier feature of the pump
Universal Sample Pump Operating Instructions
are also available in Spanish, German, and French Canadian.
Page 3
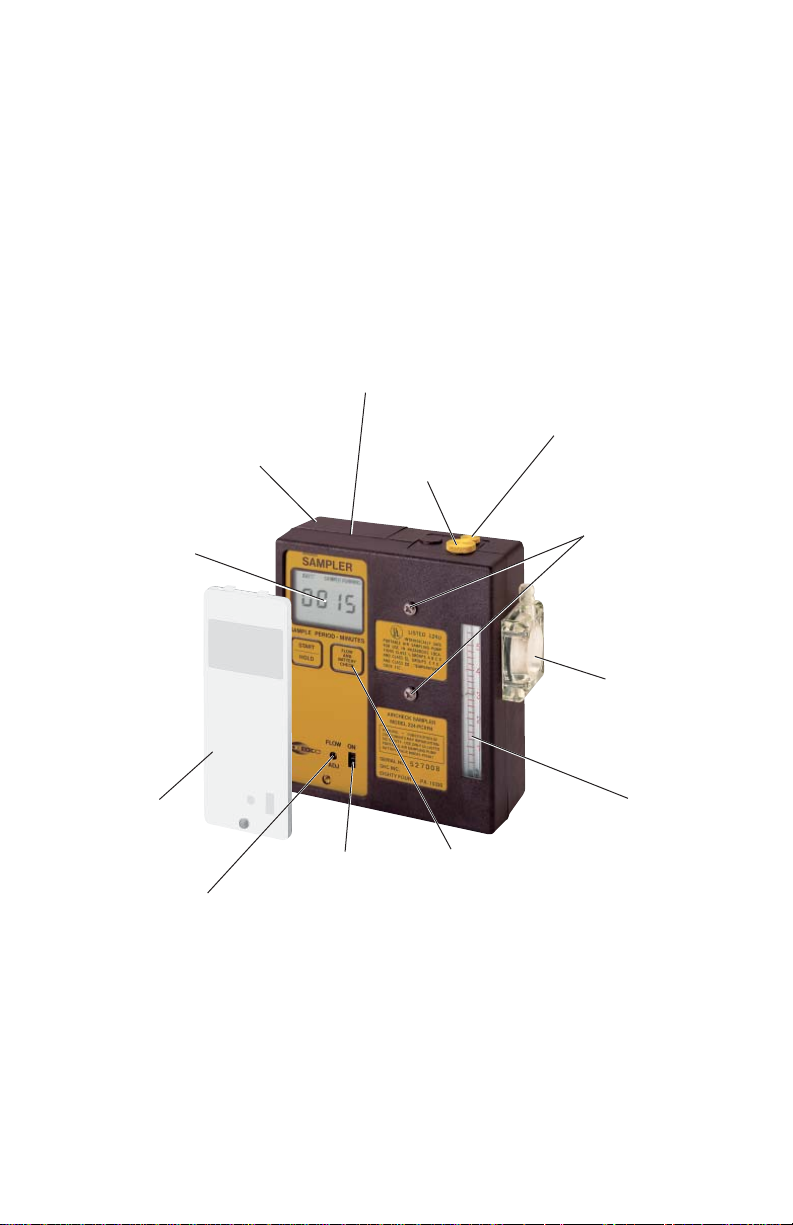
Description
The PCXR4 Universal Sample Pump is a constant fl ow air sampler suitable for a broad
range of applications. It is ideal for industrial hygiene studies as well as environmental
testing.
Durable RFI-shielded Case
provides protection from radio
Rechargeable Battery
Digital LCD
shows run time,
battery check, and
fault conditions.
frequency interference
between 27 and 1000 MHz.
Air Discharge Port
(beneath cap screw)
Low Flow Regulator Screw
(beneath cap screw)
allows pump to be switched
from high to low fl ow.
Accessory Mounting
Screws
allow sampling accessories
such as impinger holders
to be secured to pump.
Built-in Particulate
Trap
in see-through
housing
protects pump.
Tamper-resistant Cover
prevents changes to
settings.
Recessed Flow
Adjustment
adjusts fl ow rate between
1000 and 5000 ml/min.
On/Off
Switch
Touch Keypad
PCXR4 Universal Sample Pump
1
Built-in Rotameter
provides a visible check of
relative fl ow rate during
sampling, from 0.5 to 5 L/min.
Page 4

Performance Profi le
Flow Range: 1000 to 5000 ml/min (UL Listed model)
(5 to 500 ml/min requires adjustable low fl ow holder)
Weight: 34 oz (964 gm)
Dimensions: 5.1 x 4.7 x 1.9 in (13 x 11.9 x 4.8 cm)
Compensation Range: 1000 to 2500 ml/min at 40 inches water back pressure
3000 ml/min at 35 inches water back pressure
4000 ml/min at 20 inches water back pressure
5000 ml/min at 10 inches water back pressure
Typical Back Pressure of Sampling Media (inches water)
Flow Rate (L/min) 1.0 1.5 2.0 2.5
Filter/Pore Size (μm)
25-mm MCE, 0.8 6 9 12 15
25-mm MCE, 0.45 14 22 28 35
37-mm MCE, 0.8 2345
37-mm PVC, 5.0 1122
Compare the information in this table to pump compensation range to determine appropriate applications.
Flow Control: Holds constant fl ow to ± 5% of the set point
Run Time: NiCad Battery: 8 hrs minimum at 4000 ml/min and 20 inches water
back pressure; dependent on media used. See Table 1 on page 4.
NiMH Battery: 12 hrs minimum at 4000 ml/min and 20 inches water
back pressure; dependent on media used. See Table 2 on page 4.
Battery Eliminator: Pump provides extended runs.
Flow Indicator: Built-in rotameter with 250-ml division; scale marked at 1, 2, 3,
4, and 5 L/min
Power Supply: 6.0-V plug-in NiMH battery pack, rechargeable, 3.5-Ah capacity or
6.0-V plug-in NiCad battery pack, rechargeable, 2.0-Ah capacity
A battery eliminator is available (see Optional Accessories); use
voids the UL Listing for intrinsic safety.
Charging Time: 6 to 8.5 hrs with PowerFlex charger
(varies with battery capacity
and level of discharge)
Intrinsic Safety: UL Listed for: Class I, Division 1 and 2, Groups A, B, C, D;
Class II, Division 1 and 2, Groups E, F, G; and Class III,
Temperature Code T3C
ATEX-approved models available. Contact SKC.
Operating Temperature: 32 to 113 F (0 to 45 C)
Storage Temperature: -4 to 113 F (-20 to 45 C)
Charging Temperature: 50 to 113 F (10 to 45 C)
Operating Humidity: 0 to 95% non-condensing
Protect sample pump from weather when in use outdoors.
Multiple-tube Sampling: Built-in constant pressure regulator allows user to take up to
four simultaneous tube samples at different fl ow rates up to
500 ml/min each using optional adjustable low fl ow holder.
2
Page 5

RFI/EMI Shielding: Complies with requirements of EN 55022, FCC Part 15 Class
B,
EN 50082-1; frequency range of the radiated susceptibility test
was 27 to 1000 MHz.
Flow Fault: If the pump is unable to compensate for longer than 15 seconds due
to excessive back pressure, the pump enters fl ow fault. During fl ow
fault, the pump stops, displays FLOW FAULT, pauses timing functions, and displays elapsed time. Auto-restart is attempted up to 5
times.
Low Battery Fault: Pump stops, displays LO BATT, pauses timing functions, and dis-
plays elapsed time.
Battery Test: LCD shows battery condition prior to sampling.
Time Display: LCD displays up to 9999 minutes (6.8 days) at which point the
display rolls over to 0.
Timing Accuracy: ± 0.05% (± 45 seconds per day)
Sampling Pause (Hold): Allows user to temporarily halt sampling without loss of timing data.
Restart does not require resetting time.
Tubing: Requires 1/4-inch ID tubing
CE marked UL Listed
ATEX-approved models available
3
Page 6
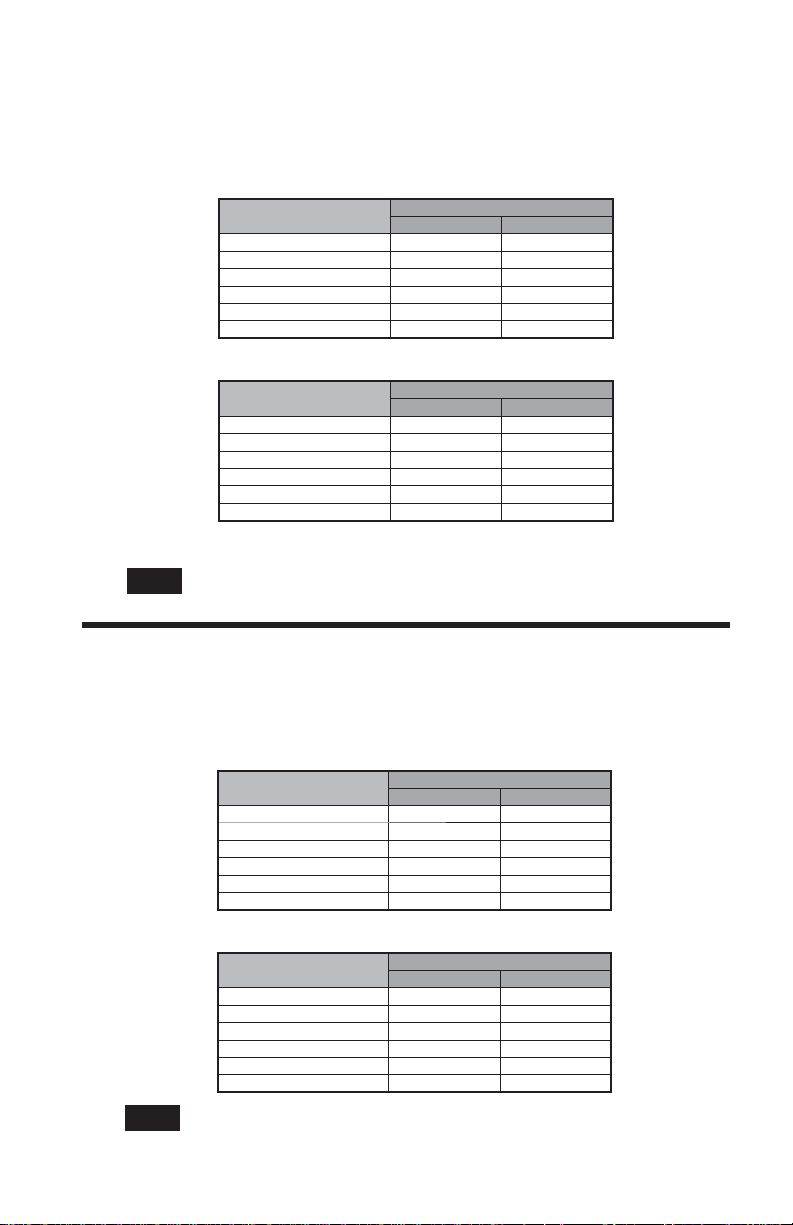
Table 1. Pump Run Time in Hours with NiCad Battery
Following are typical run times achieved when using a fully charged nickelcadmium (NiCad) battery pack. Data is sorted by type of sample media. All run
times are listed in hours. Results obtained using a new pump and new fully
charged battery. Pump performance may vary.
Mixed Cellulose (MCE) fi lter, 0.8-μm pore size
Flow Rate (L/min)
2.0 24.1 16.3
2.5 21.4 14.5
3.0 19.1 11.0
3.5 17.8 10.7
4.0 15.4 **
4.5 14.6 **
Polyvinyl Chloride (PVC) fi lter, 5.0-μm pore size
Flow Rate (L/min)
2.0 31.6 21.7
2.5 27.7 24.0
3.0 27.0 18.6
3.5 22.8 16.4
4.0 19.4 16.2
4.5 19.0 14.6
** Filter back pressure exceeded pump capability during testing.
Filter Diameter
37 mm 25 mm
Filter Diameter
37 mm 25 mm
Note
Increases in back pressure during sampling due to buildup of sample
on the fi lter can decrease ba ery life.
Table 2. Pump Run Time in Hours with NiMH Battery
Following are typical run times achieved when using a fully charged nickel-metal
hydride (NiMH) battery pack. Data is sorted by type of sample media. All run times
are listed in hours. Results obtained using a new pump and new fully charged
battery. Pump performance may vary.
Mixed Cellulose (MCE) fi lter, 0.8-μm pore size
Filter Diameter
37 mm 25 mm
Filter Diameter
37 mm 25 mm
Note
Flow Rate (L/min)
2.0 37 33
2.5 34 26
3.0 31 21
3.5 29 18
4.0 25 15
4.5 20 14
Polyvinyl Chloride (PVC) fi lter, 5.0-μm pore size
Flow Rate (L/min)
2.0 47 41
2.5 38 33
3.0 35 30
3.5 26 27
4.0 22 25
4.5 21 23
Increases in back pressure during sampling due to buildup of sample
on the fi lter can decrease ba ery life.
4
Page 7
Operation
High Flow Applications (1000 to 5000 ml/min)
1
8
9
5
4
3
2
1
14
9
15
BACK
AIRCHEK
SAMPLER
1
2
SAMPLE PERIOD Ñ MINUTES
3
START
HOLD
4
5
FRONT
16
18
16
LISTED 124U
FLOW
AND
BATTERY
CHECK
AIRCHEK SAMPLER
MODEL 224-PCXR4
ON
FLOW
ADJ
7
TOP
Figure 1
Front, back, and top views of PCXR4 Sampler
For additional drawings, see pages 21 and 23.
Setup
Install battery (see Installing the Battery Pack on page
18). For optimum charging, ensure pump is not running.
Charge the battery by connecting the charger plug to the
sampler charging jack (Figure 1, #18). Ensure that the
battery is fully charged before sampling.
After charging the battery pack, it is good practice
to run the pump for approximately fi ve minutes
before calibrating. This ensures the battery is in
more steady-state conditions and improves the
agreement in pre and post-sampling calibrations.
Do not charge or operate pump from charger in hazardous locations.
Use only an SKC-approved charger designated for this model to
ensure reliable performance. Failure to do so voids any warranty.
Ensure proper orientation of charging cable before plugging it into
the charging jack. Improper orientation/contact will short-circuit the
battery and voids any warranty.
Short-circuiting the battery pack will render it immediately inoperative.
Failure to follow warnings and cautions voids any warranty.
1 LCD
2 Flow and Battery
Check Key
3 Start/Hold Key
4 On/Off Switch
5 Tamper-resistant Cover
7 Flow Adjustment Screw
8 Accessory Mounting
Screws (2)
9 Intake/Filter Housing
14 Cap Screw to Regulator
15 Cap Screw to Air
Discharge Port
16 Battery Pack Screws (2)
18 Charging Jack
Charger and battery
connected
The battery pack may be kept on the SKC-approved charger for an
indefi nite time.
5
Page 8
2
De-activating the Regulator
To ensure the pump is set for high fl ow,
remove the cap screw (Figure 1, #14)
covering the regulator valve and turn the
exposed screw clockwise until it stops.
(Do not overtighten.)
Replace the cap screw. The pump is now
set for high fl ow.
Setting or Verifying Flow Rate
Before use, allow pump to
equilibrate after moving
it from one temperature
extreme to another.
Ensure pump has run for
fi ve minutes before proceeding with calibration.
Sample
medium
For high fl ow,
turn valve screw
clockwise.
3
Using 1/4-inch Tygon®
tubing, connect the
sampling medium to the
pump intake (Figure 1,
#9).
Remove the tamper-resistant cover. Start the pump using the on/
off switch (Figure 1, #4). Press Start/Hold (Figure 1, #3). Press
Flow and Battery Check (Figure 1, #2). Adjust fl ow using the fl ow
adjustment screw (Figure 1, #7) until the built-in rotameter reads
2 L/min. The LCD should indicate BATT OK in the upper left
corner (if it doesn’t, recharge battery). Press Flow and Battery
Check to place pump in Hold.
Connect a calibrator to the intake of the sampling medium.
Press Flow and Battery Check to start pump, and set the fl ow rate
using the fl ow adjustment screw (Figure 1, #7).
When the fl ow rate is set, press Flow and Battery Check to place
pump in Hold. Disconnect the calibrator.
Replace the sampling medium used for calibration with an
unexposed medium for sample collection.
Flow
adjustment
screw
6
On/Off
switch
Calibrator
Calibration train with fi lter cassette
Tubing
Page 9

4
Sampling
Before use, allow pump to equilibrate after
moving it from one temperature extreme to
another.
Protect sample pump from weather when in
use outdoors.
Use of any device other than the approved
battery pack to power the pump voids the
UL Listing for intrinsic safety and any
warranty.
For personal sampling, clip the sample collection media to the worker in the breathing
zone.
While the LCD displays HOLD, start sampling by pressing Start/
Hold. SAMPLE RUNNING will display. Record the start time. The
LCD will automatically track sampling period time elapsed.
At the end of the sampling period, press Start/Hold and record the
stop time.
User Options During Sampling
Pause - Pause (shutdown) the pump by pressing Start/Hold. All
timing data will freeze. To resume sampling, press Start/Hold;
timing data will resume.
Flow or Battery Fault Shutdown - If the pump is unable to
compensate due to excessive back pressure or a low battery condition
exists the sampler will shut down. HOLD will display on the LCD
and timing functions will pause, but continue to display elapsed time.
LO BATT or FLOW FAULT will display on the LCD depending
on the cause of the shutdown. Fifteen seconds after fl ow fault shut
down, the pump will attempt to restart up to fi ve times. To restart
from fl ow fault, correct the blockage and press Start/Hold. If LO
BATT is displayed, recharge the battery before sampling.
Clip sample medium to
worker and pump to belt.
continued on page 8
7
Page 10

4
cont’d
Sampling with Impingers
When using impingers, place an in-line trap
between the pump and the impinger to
protect the sampler from liquid or vapors.
The impinger and trap can be mounted to
the sampler using the accessory mounting
screws (Figure 1, #8) or placed in a holster at
the worker’s waist.
Failure to use the impinger trap voids
any warranty.
Protect sample pump from weather when
in use outdoors.
Use of any device other than the approved
battery pack to power the pump voids
the UL Listing for intrinsic safety and any
warranty.
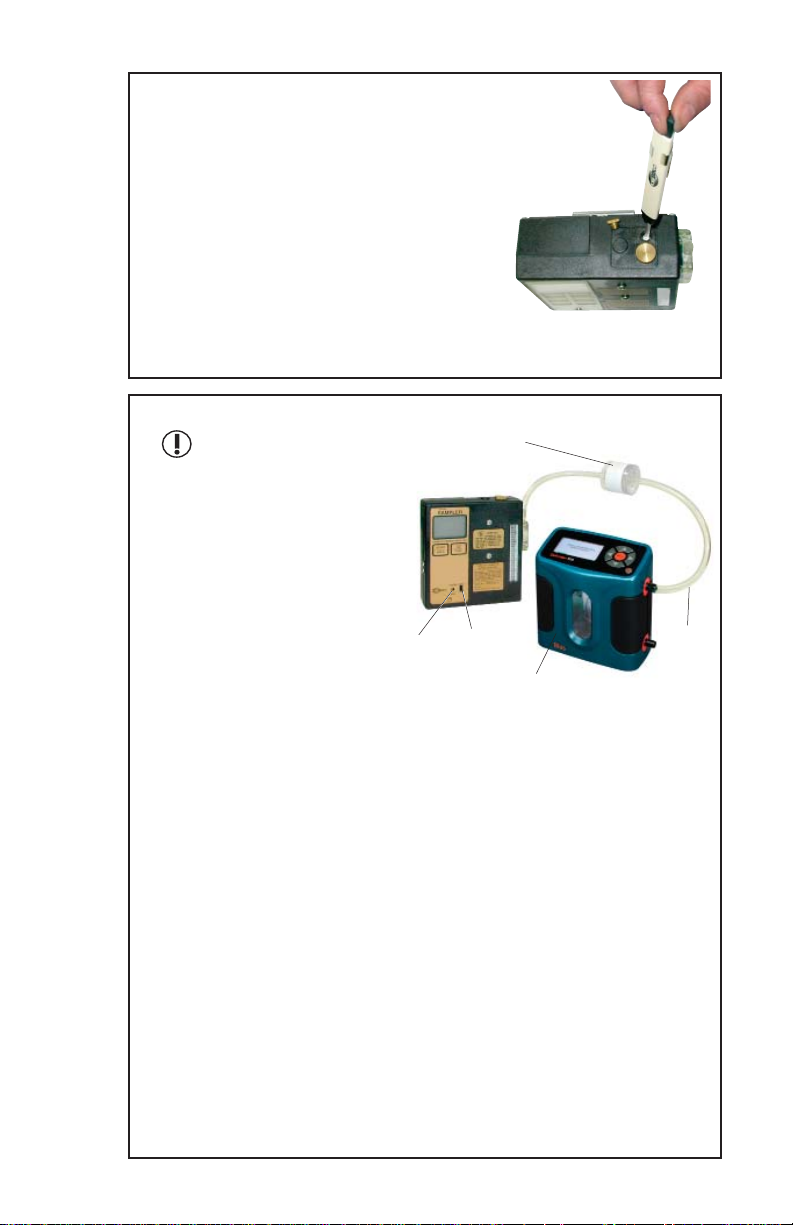
Pressure Applications (Bag Sampling)
When using the pump for pressure
applications, such as bag sampling,
thread the exhaust port fi tting supplied
with the pump into the air discharge
port on top of the pump (Figure 1, #15);
hand tighten only. Using PTFE tubing,
connect the inlet of the sample medium
(e.g., sample bag) to the exhaust port
fi tting on the pump. Turn on the pump
to collect the appropriate volume of air.
Shut off pump and close inlet on sample
medium to stop sampling.
Impinger holder on pump
with impinger and trap
Thread exhaust port
fi tting into air discharge
port on pump.
8
Page 11

Low Flow Applications (5 to 500 ml/min)
Using Single Adjustable Low Flow Holder
8
9
5
4
3
2
1
14
9
15
Figure 2
BACK
AIRCHEK
SAMPLER
1
2
SAMPLE PERIOD Ñ MINUTES
3
START
HOLD
4
5
FRONT
16
18
16
LISTED 124U
FLOW
AND
BATTERY
CHECK
AIRCHEK SAMPLER
MODEL 224-PCXR4
ON
FLOW
ADJ
7
TOP
Front, back, and top views of PCXR4 Sampler
For additional drawings, see pages 21 and 23.
Setup
Install battery (see Installing the Battery Pack on page
18). For optimum charge, ensure pump is not running.
Charge the battery by connecting the charger plug to
the sampler charging jack (Figure 2, #18). Ensure that
the battery is fully charged before sampling.
1 LCD
2 Flow and Battery
Check Key
3 Start/Hold Key
4 On/Off Switch
5 Tamper-resistant Cover
7 Flow Adjustment Screw
8 Accessory Mounting
Screws (2)
9 Intake/Filter Housing
14 Cap Screw to Regulator
16 Battery Pack Screws (2)
18 Charging Jack
1
After charging the battery pack, it is good practice
to run the pump for approximately fi ve minutes
before calibrating. This ensures the battery is in
Charger and battery
connected
more steady-state conditions and improves the
agreement in pre and post-sampling calibrations.
Do not charge or operate pump from charger in hazardous locations.
Use only an SKC-approved charger designated for this model to ensure
reliable performance. Failure to do so voids any warranty.
Ensure proper orientation of charging cable before plugging it into
the charging jack. Improper orientation/contact will short-circuit the
battery and voids any warranty.
Short-circuiting the battery pack will render it immediately inoperative.
Failure to follow warnings and cautions voids any warranty.
The battery pack may be kept on the SKC-approved charger for an
indefi nite time.
9
Page 12

2
Activating the Regulator
Remove the tamper-resistant cover.
Start the pump using the on/off switch
(Figure 2, #4). Press Start/Hold (Figure
2, #3). Press Flow and Battery Check
(Figure 2, #2). Adjust fl ow using the
fl ow adjustment screw (Figure 2,
#7) until the built-in rotameter reads
1.5 L/min. The LCD should indicate
BATT OK in the upper left corner (if
it doesn’t, recharge the battery). Press
Flow and Battery Check to place the
pump in Hold.
Remove the cap screw covering the regulator valve (Figure 2, #14)
and turn the exposed screw four to fi ve turns
counterclockwise.
Replace the cap screw. The pump is now set for low fl ow.
For low fl ow,
turn valve screw
counterclockwise.
10
Page 13

Setting or Verifying Flow Rate
For a diagram of the pump, see Figure 1, page 5.
1 Flow adjust screw
2 Rubber sleeve
3 Sorbent tube
3
Figure 3
Airfl ow
Before use, allow pump to equilibrate after moving it from one
temperature extreme to another.
Ensure pump has run for fi ve minutes before proceeding with
calibration.
Connect a single adjustable low fl ow holder (Figure 3) to the pump
intake (Figure 2, #9) using 1/4-inch Tygon tubing.
Insert an opened sorbent tube (Figure 3, #3) into the rubber sleeve
(Figure 3, #2) of the low fl ow holder with the arrow on the tube
pointing toward the holder.
Connect a calibrator to the exposed end of the sorbent tube.
Loosen the brass fl ow adjust screw on
the low fl ow holder. Activate the pump
by pressing Flow and Battery Check.
Adjust the fl ow rate by turning the
fl ow adjust screw (Figure 3, #1) on the
holder until the calibrator indicates the
desired fl ow.
Do not adjust the fl ow on the
pump. Adjust the fl ow only by
using the fl ow adjust screw on
the low fl ow holder.
When the desired fl ow is set, place
pump in Hold by pressing Flow and
Battery Check. Disconnect the calibrator.
continued on page 12
Single Adjustable
Low Flow Holder
with sample tube
Calibration train with
tube in low fl ow holder
Flow adjust
screw
Turn screw on
low fl ow holder
to adjust fl ow.
11
Page 14

Replace the sorbent tube used for setting the fl ow with a new
unexposed sorbent tube for sample collection.
3
cont’d
4
Place the appropriate size tube cover over the tube, and screw it into
place on the low fl ow holder.
Sampling
Before use, allow pump to
equilibrate after moving it
from one temperature extreme
to another.
Protect sample pump from
weather when in use outdoors.
Use of any device other than
the approved battery pack
to power the pump voids the
UL Listing for intrinsic safety
and any warranty.
For personal sampling, clip the
low fl ow holder to the worker in
the breathing zone.
While the LCD displays HOLD, start sampling by pressing Start/
Hold. SAMPLE RUNNING will display. Record the start time.
The LCD will automatically track sampling period time elapsed.
Clip holder to worker and
pump to belt.
At the end of the sampling period, press Start/Hold and record the
stop time.
To return to high fl ow, remove the low fl ow holder and
de-activate the regulator. See page 6.
For user options during sampling, see page 7.
12
Page 15

Low Flow Applications (5 to 500 ml/min)
Using Multiple-tube Adjustable Low Flow Holder
Top view of
fl ow adjust screws
1 Anti-tamper Cover
2 Flow Adjust Screws
3 Rubber Sleeve
4 Sorbent Sample Tube
5 Protective Cover
Figure 4
Quad Adjustable Low Flow Holder
Setup
For a diagram of the pump, see Figure 1, page 5.
Install battery (see Installing the Battery Pack on page
18). For optimum charge, ensure pump is not running.
Charge the battery by connecting the charger plug to
the sampler charging jack (Figure 2, #18). Ensure that
the battery is fully charged before sampling.
Charger and battery
1
After charging the battery pack, it is good practice
to run the pump for approximately fi ve minutes
before calibrating. This ensures the battery is in
more steady-state conditions and improves the agreement in pre and
post-sampling calibrations.
Do not charge or operate pump from charger in hazardous locations.
Use only an SKC-approved charger designated for this model to ensure
reliable performance. Failure to do so voids any warranty.
Ensure proper orientation of charging cable before plugging it
into the charging jack. Improper orientation/contact will short-circuit
the battery and voids any warranty.
Short-circuiting the battery pack will render it immediately inoperative.
Failure to follow warnings and cautions voids any warranty.
connected
The battery pack may be kept on the SKC-approved charger for an
indefi nite time.
13
Page 16

Setting or Verifying Flow Rate
When performing multiple-tube sampling using an adjustable
low fl ow holder (dual, tri, or quad), ensure the regulator has been
activated and the pump fl ow rate is set at 1.5 L/min. The maximum
fl ow rate through any one tube is 500 ml/min*. Calculate the sum
of all tube fl ow rates. If the sum is ≤1000 ml/min, proceed with
calibration and sampling without any further adjustment to the
pump fl ow rate. If the sum is >1000 ml/min, set the pump fl ow rate
15% higher than the sum of tube fl ow rates.
* Back pressure across some sample tubes can be higher than average. In
these instances, the maximum fl ow rate of 500 ml/min per tube may not be
achieved.
Before use, allow pump to equilibrate after moving it from one
temperature extreme to another.
Ensure pump has run for five minutes before proceeding with
calibration.
Ensure the pump is set for low fl ow. See Activating the Regulator,
page 9.
Connect the adjustable low flow holder (Figure 4, page 13)
to the pump intake (Figure 2, #9) using 1/4-inch Tygon tubing.
2
Insert an opened sorbent tube into each rubber sleeve of the low
fl ow holder (Figure 4, #3 and 4) with the arrow on the tube pointing
toward the holder.
If sampling with fewer tubes than number of ports, insert
unopened sorbent tubes in the empty ports to seal them.
Connect holder to
pump intake and tube
inlet to calibrator.
Note the fl ow rates specifi ed by each sampling method and
add them together. If the sum is ≤1000 ml/min, proceed to
the next step. If the sum is >1000 ml/min, multiply the total
tube fl ow rate by 1.15 and set the pump for that fl ow rate.
Connect a calibrator to the exposed end of a sorbent tube,
loosen the brass fl ow adjust screw on the low fl ow holder, and
activate the pump by pressing Flow and Battery Check.
continued on page 15
14
Page 17

Turn the fl ow adjust screw (Figure 4, #2) for the appropriate
port of the low fl ow holder until the desired fl ow rate is
achieved through the tube. Turn clockwise to decrease the
fl ow.
Do not adjust the fl ow on the pump. Adjust the fl ow only by
using the fl ow adjust screw on the low fl ow holder.
Do not exceed 500 ml/min fl ow rate per tube.
2
cont’d
When the desired fl ow is set on the
initial tube, place pump in Hold by
pressing Flow and Battery Check.
Remove the calibrator from the tube
and connect to the exposed end of
the next sorbent tube. Press Flow and
Battery Check and repeat the fl ow
adjustment process until all tubes are
fl ow calibrated. Changing the fl ow on
one tube will not affect the fl ow rate
through the remaining tubes.
Do not exceed 500 ml/min fl ow rate per tube.
For tri and quad models, fi rst rotate each anti-tamper cover
(Figures 4 [on page 13] and 5) to expose the fl ow adjust
screws, then adjust the appropriate screw until calibrator
indicates the desired fl ow.
When the fl ow rate is set for each tube, press Flow and
Battery Check to place the pump in Hold and disconnect the
calibrator.
Replace the sampling media used for calibration with
unexposed media for sample collection. Use a protective tube
cover to prevent tube breakage.
Screw
Figure 5 -
Cut-away of Tri/Quad Low
Flow Holder
Screw
If sampling with fewer tubes than number of ports, insert
unopened sorbent tubes in the empty ports to seal them.
15
Page 18

3
Sampling
Before use, allow pump to equilibrate
after moving it from one temperature
extreme to another.
Protect sample pump from weather
when in use outdoors.
Use of any device other than the
approved battery pack to power the
pump voids the UL Listing for intrinsic
safety and any warranty.
For personal sampling, clip the low fl ow
holder to the worker in the breathing
zone.
While the LCD displays HOLD, start
sampling by pressing Start/Hold.
SAMPLE RUNNING will display. Record
the start time. The LCD will automatically
track sampling period time elapsed.
At the end of the sampling period, press Start/Hold and record
the stop time.
To return to high fl ow, remove the low fl ow holder and
deactivate the regulator. See page 6.
Clip holder to worker and
pump to belt.
For user options during sampling, see page 7.
16
Page 19

Maintenance
Pump Inlet Filter
The PCXR4 Sampler is fi tted with a fi lter/trap inside a clear plastic intake port
housing. This prevents particles from being drawn into the pump mechanism.
The fi lter should be visually checked to assure that it does not become clogged.
If maintenance is necessary, follow this procedure:
1. Clean dust and debris from around the fi lter housing.
2. Remove the four screws and the front fi lter
housing.
3. Remove and discard the fi lter membrane.
4. Remove O-ring.
5. Clean the fi lter housing.
6. Insert O-ring
*
and a new fi lter membrane. See
Replacement Parts, pages 22-23.
7. Reattach the front fi lter housing and
cross-tighten the four screws.
Close-up of inlet
* Replace with new O-ring only as needed.
fi lter housing
Battery Pack Care
For proper maintenance of battery packs, SKC offers chargers (see Optional
Accessories, page 24) that condition the battery for optimum performance
in 6 to 8.5 hours. For optimum charge, ensure pump is not running during
charging. Follow charger instructions.
Intake
O-ring
Filter
membrane
Screw (4)
Fully charge packs before use. For more information on SKC pump batteries,
visit http://www.skcinc.com/instructions/1756.pdf.
To comply with intrinsic safety regulations, do not charge or operate the pump
from the charger in hazardous locations.
Using a non-approved charger voids any warranty.
Use of a repaired or rebuilt battery pack voids any warranty and the UL Listing
for intrinsic safety.
Use of any device other than the approved battery pack to power the pump voids
the UL Listing for intrinsic safety and any warranty.
Ensure proper orientation of charging cable before plugging it into the charging
jack. Improper orientation/contact will short-circuit the battery and voids any
warranty.
Short-circuiting the battery pack will render it immediately inoperative.
Failure to follow warnings and cautions voids any warranty.
The battery pack may be kept on the SKC-approved charger for an indefi nite time.
17
Page 20

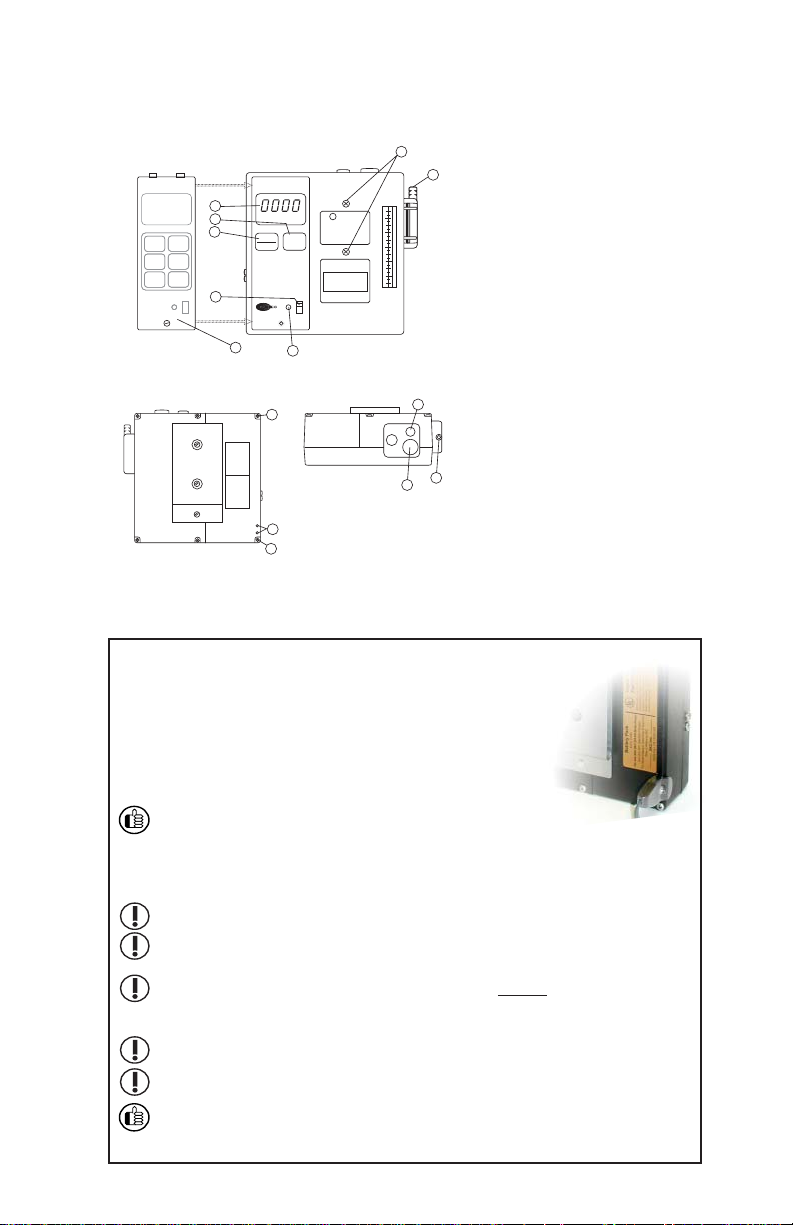
Installing the Battery Pack
To enhance battery life, SKC ships battery packs separate from the
pump. Once installed, completely charge battery pack before operating
pump.
1. Loosen the two case screws above and below the belt clip.
2. Slip the front edge of the battery pack under the belt clip and position battery pack to engage the grooves in the case.
3. Slide battery pack toward the pump until it is fl ush with the pump
case on all sides.
4. Install two battery screws and tighten the case screws loosened in
Step 1.
5. Charge battery completely. For optimum charge, ensure pump is not
running during charging.
Replacing the Battery Pack
To enhance battery life, SKC ships battery packs separate from
the pump. Once installed, completely charge battery pack before
operating pump.
For information on SKC pump batteries, visit www.skcinc.com/
instructions/1756.pdf.
1. Remove the two screws that secure the battery pack and loosen the
two case screws above and below the belt clip.
2. Carefully slide battery pack out from under the belt clip. Ensure that
the battery is kept level.
3. Slip the front edge of the new battery pack under the belt clip and
position battery pack to engage the grooves in the case.
4. Slide the battery pack toward the pump until it is fl ush with the
pump case on all sides.
5. Reinstall battery screws and tighten the case screws.
Case screw
(not shown)
Ba ery pack screws
Beltclip
Back of pump
pack sliding out
Case screw
Important Cautions/Warnings on next page
Ba ery connector
Case grooves
18
with battery
Page 21

Use of a repaired or rebuilt battery pack voids any warranty and
the UL Listing for intrinsic safety.
Do not charge or operate the pump from the charger in hazardous
locations!
Use only an SKC-approved charger and battery pack designed for the
Universal Sample Pump to ensure reliable performance. Failure to do
so voids any warranty and UL Listing for intrinsic safety.
Use of any device other than the approved battery pack to power the
pump voids the UL Listing for intrinsic safety and any warranty.
Pump Service
Pumps under warranty should be sent to SKC Inc. for servicing.
See Limited Warranty and Return Policy, page 25.
19
Page 22

Parts Descriptions
Use only SKC-approved parts to ensure reliable performance. Failure to do so
voids any warranty and UL Listing for intrinsic safety.
See page 21 for drawing.
No. Description
1 LCD indicates all sampler functions.
2 FLOW AND BATTERY CHECK Key allows fl ow rate setting and battery condition testing.
3 START/HOLD Key is used to start the sampling cycle, pause the sampling cycle, and
restart the cycle after pause.
4 ON/OFF Switch shuts down the pump completely and clears time display.
5 Tamper-resistant Cover protects controls from incidental contact or tampering.
6 Cover Screw fastens tamper-resistant cover.
7 Flow Adjustment Control adjusts fl ow from 1000 to 5000 ml/min.
8 Accessory Mounting Screws (2) secure accessories such as impinger and trap holders.
9 Intake/Filter Housing air intake port and trap
10 Filter Housing Screws (4) secure fi lter housing
11 Filter O-ring - leak seal for fi lter in housing
12 Filter (crimped fi ber polyester) prevents particles from entering pump.
13 Built-in Flowmeter monitors fl ow changes.
14 Cap Screw accesses regulator.
15 Cap Screw accesses air discharge port.
16 Battery Pack Screws (2) secure pack to pump.
17 Battery Pack Assembly provides power to pump.
18 Charging Jack, connector for battery charger
19 Belt Clip secures pump to worker.
A Compensation Pot A adjusts pump compensation, which is factory set. Access screw
guards against accidental contact or tampering.
B Compensation Pot B adjusts pump compensation, which is factory set. Access screw
guards against accidental contact or tampering.
20
Page 23

224-PCXR4 Sample Pump
See page 20 for parts listing.
8
AIRCHEK
SAMPLER
1
2
3
SAMPLE PERIOD Ñ MINUTES
START
HOLD
FLOW
AND
BATTERY
CHECK
A
LISTED 124U
AIRCHEK SAMPLER
MODEL 224-PCXR4
B
4
5
ON
FLOW
ADJ
7
6
5
4
3
2
1
9
10
11
12
10
13
FRONT
14
16
19
BACK
16
18
17
21
TOP
15
9
Page 24

Replacement Parts
See drawings on page 23.
Pump Case Parts
P21411 Case Parts (excluding Battery Case)
P21661MH Battery Pack Assembly, NiMH
P21661 Battery Pack Assembly, NiCad
P22417BC Belt Clip with screws
P22433N Keyboard Assembly
P22433R Cap Screws (set of 2)
P22433U Control Board
P22433RS2 Replacement Stack - does not include fl owmeter and fi lter housing
assemblies or motor
P22417C Exhaust Port Fitting
Pump Stack Parts
P22417D Filter Housing Assembly
P22417E Pressure Switch Assembly
P22417F Valve Plate Assembly
P22417G Pump Body
P22417HC Diaphragm/Yoke Assembly
P22417J Regulator Assembly
P22417K Pulsation Dampener Assembly (2)
P22433L Flowmeter Assembly
Parts not indicated in illustration
P22417M Motor/Eccentric Assembly
P22433C Tamper-resistant Cover
P22433ES External Screws
P5187 Foam Cover for control board, pk/5
P72392 LCD
Replacement Filters
P22409 Filter/O-ring, pk/3
P2240901 Filters, pk/10
P2240902 Filter/O-ring (100 fi lters/10 O-rings)
22
Page 25

P22417C
See page 22 for replacement parts listing.
P22433N
P22433R
P22433RS2
(
does not
include
fl owmeter and
fi lter housing
assemblies or
motor
)
P22433L
P21411
Pump Case Parts
P22433U
P21661MH
or P21661
P22417BC
P22417J
P22417K
P22417D
P22433RS2
(
does not
include
fl owmeter and
fi lter housing
assemblies or
motor
)
P22417F
Pump Stack (Part #P22433RS2) Exploded
23
P22417G
P22417HC
P22417E
Page 26

Optional Accessories
Calibrator Cat. No.
Defender Primary Standard Calibrator, 50 to
5000 ml/min, includes lead-acid battery, charger
(100-240 V), software, and 1-m serial cable 717-510M
Adjustable Low Flow Holders
Single Holder 224-26-01
Dual Holder 224-26-02
Tri Holder 224-26-03
Quad Holder 224-26-04
Protective Sample Tube Covers
A, 70 mm, standard charcoal 224-29A
B, 110 mm, large charcoal 224-29B
C, 150 mm 224-29C
D, 220 mm 224-29D
Battery Maintenance
PowerFlex Charging System for SKC Personal Pumps
5-station, 100-240 V 223-1000
Single, 100-240 V 223-2000
PowerFlex Cable,
for Universal XR models 223-1002
PowerFlex Cable,
for Universal XR MSHA models 223-1003
Replacement Battery Pack, NiMH P21661MH
Replacement Battery Pack, NiCad P21661
Battery Eliminator,* connects pump to
line power for extended sampling 115 V 223-325
230 V 223-325B
Pump Accessories
Screwdriver Set, included with pump 224-11
Protective Nylon Pouch, with belt and
shoulder strap
Black 224-87
Red 224-95A
* Not UL Listed for intrinsic safety
24
Protective
Nylon Pouch
Page 27

SKC Limited Warranty and Return Policy
SKC products are subject to the SKC Limited Warranty and Return Policy, which
provides SKC’s sole liability and the buyer’s exclusive remedy. To view the
complete SKC Limited Warranty and Return Policy, go to h p://www.skcinc.
com/warranty.asp.
25
 Loading...