

Page 1
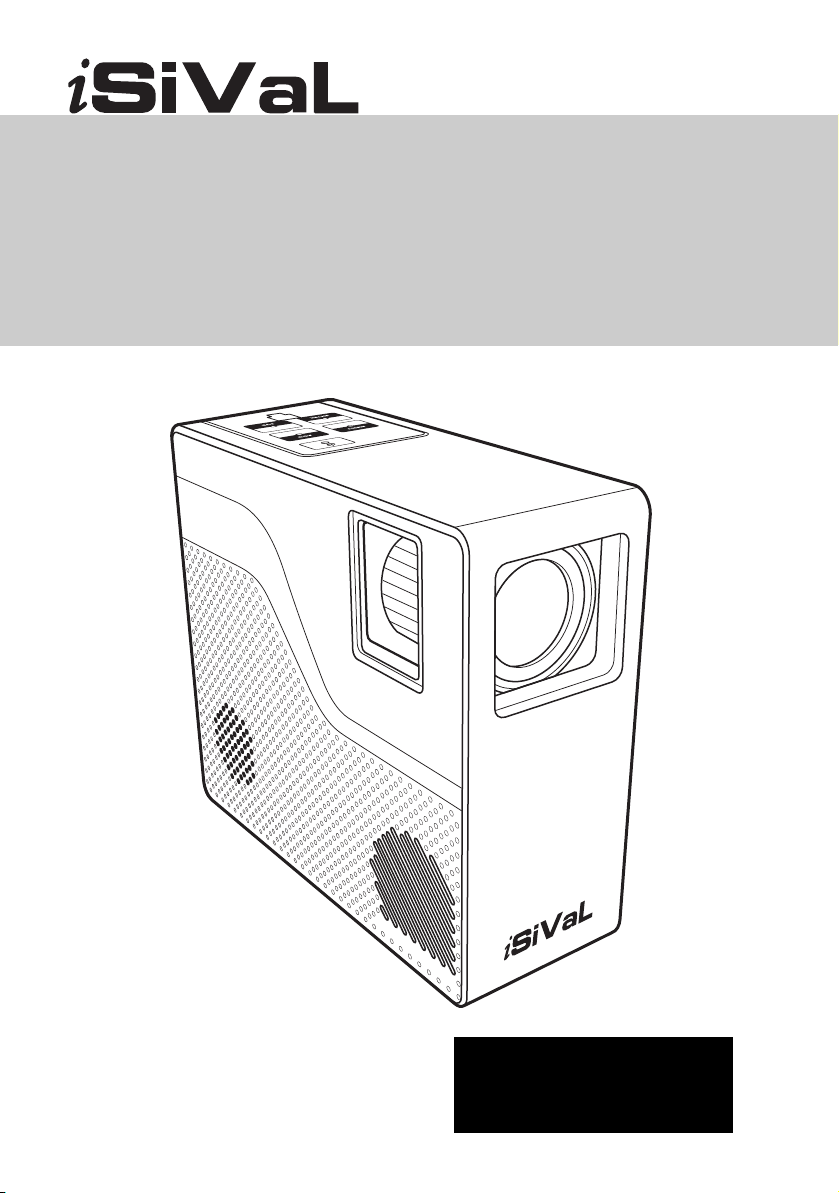
mini projector
User Manual
Page 2

Page 3

User Manual
Safety instructions
Follow these instructions to ensure that the safety and functionality of the device
are not compromised in any way.
Note: The mini projector can be operated in the upright position when
attached to the supplied stand or in the horizontal position.
• Never push objects of any kind into the receiver as this could result in a fire
or electric shock.
• Never spill liquid of any kind onto the receiver. If any liquid or solid object
does get into the receiver, switch it off immediately and have it checked by
qualified personnel.
• To prevent fire or shock hazard, do not expose the receiver to rain or moisture.
• Never place the receiver in hot, humid, or excessively dusty places. Do not
install the receiver where it may be exposed to mechanical vibrations or electromagnetic radiation.
• Clean the receiver with a soft, lightly dampened cloth. Do not use any type of
abrasive pad, alkaline cleaner, scouring powder, or solvent such as alcohol or
benzene.
• Do not place any objects on top of the receiver. To prevent fire, keep inflammable objects or objects such as candles away from the receiver.
• Do not cover the ventilation openings of the receiver with newspapers or curtains. For ventilation, leave a space of at least 10cm all around the receiver.
• Remember to dispose of batteries in an environmentally friendly manner. Do
not dispose in domestic waste containers.
Warning
• Hazardous moving parts
• Keep away from moving fan blades
iii
Page 4

mini projector
Customer Support
If you need assistance, please visit our website: http://www.sivalinstruments.com
for help.
Copyright information
No part of this manual, including the products and software described in it, may be
reproduced, transmitted, transcribed, stored in a retrieval system, or translated into
any language in any form or by any means, except documentation kept by the purchaser for backup purposes, without the express written permission of the manufacturer.
Products and corporate names appearing in this manual may or may not be registered trademarks or copyrights of their respective companies, and are used only for
identification or explanation and to the owners’ benefit, without intent to infringe.
All trademarks are the property of their respective owners.
Copyright © 2009. All rights reserved.
iv
Page 5

User Manual
Table of Contents
Introducing the mini projector
Features ............................................................................................... 1
Package contents ................................................................................. 2
Hardware description .......................................................................... 3
Front view ..................................................................................... 3
Rear view ...................................................................................... 3
Control panel ................................................................................. 4
Overview of the remote control .......................................................... 5
Setting up the projector
Connecting power ............................................................................... 7
Connecting AV devices ...................................................................... 7
Connecting HDMI devices ................................................................. 8
Connecting USB drive ........................................................................ 8
Connecting to a computer ................................................................... 9
Connecting speakers ........................................................................... 9
Installing remote control battery ....................................................... 10
Installing baffle plate ........................................................................ 11
Using the mini projector
Positioning your projector ................................................................ 13
Turning on the power ........................................................................ 13
Turning the power off ....................................................................... 13
Adjusting the OSD settings .............................................................. 14
Switching the input source ................................................................ 14
Adjusting picture .............................................................................. 14
Picture Mode ....................................................................... 15
Brightness ............................................................................ 15
Contrast ................................................................................ 16
v
Page 6

mini projector
Sharpness ............................................................................. 16
Color .................................................................................... 17
Tint ...................................................................................... 17
Digital NR ........................................................................... 18
Aspect Ratio ........................................................................ 18
Color Temp .......................................................................... 19
Recall ................................................................................... 19
Adjusting Keystone .......................................................................... 20
Auto ..................................................................................... 20
Manual ................................................................................. 21
Image Flip H. ....................................................................... 21
Image Flip V. ....................................................................... 22
Setting up the mini projector ............................................................ 22
Sleep Time ........................................................................... 23
OSD Time ............................................................................ 23
Selecting the OSD language ................................................ 24
Background .......................................................................... 24
Auto Search ......................................................................... 25
Viewing information ......................................................................... 25
Adjusting PC settings ....................................................................... 26
H Position ............................................................................ 26
V Position ............................................................................ 27
Phase .................................................................................... 27
Clock .................................................................................... 28
Auto Adjust ......................................................................... 28
Viewing pictures in USB mode ........................................................ 29
Thumbnail view ................................................................... 29
SlideShow ............................................................................ 29
Zoom .................................................................................... 29
Pan ....................................................................................... 29
Rotate ................................................................................... 29
Appendix
Specifications .................................................................................... 31
Troubleshooting ................................................................................ 32
vi
Page 7

User Manual
Introducing the mini projector
Congratulations on purchasing the mini projector. The mini projector is a slim,
compact digital system with multiple video outputs that can be connected to most
TV connectors. Read this chapter to learn more about the features and functions of
the mini projector.
Note: Information in this document has been carefully checked for accu-
racy; however, no guarantee is given to the correctness of the contents. The information inthis document is subject to change
without notice.
Features
• 1280x720p output native resolution
• Input resolution up to 1920 x 1080p / 165MHz
• 16:9 output or 4:3 (manually switch) aspect ratio
• Support HDMI 1.3
• Support USB 2.0 for JPEG viewing
• Auto Keystone
• Input I/O: HDMI,D-Sub, Composite, USB, Audio in (Phone jack)
1
Page 8
mini projector
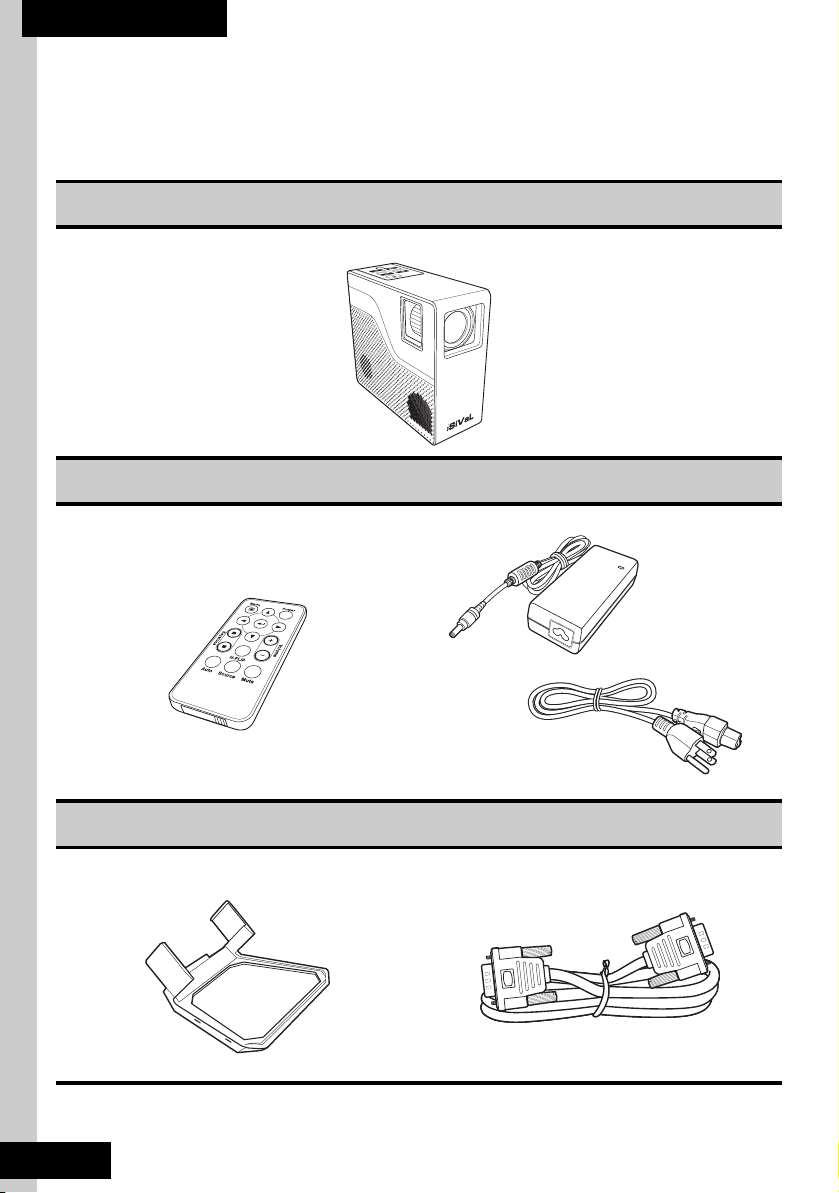
Package contents
Make sure that your package contains the following items. If any of the items is
missing or appears to be damaged, contact your vendor.
mini projector
Remote control Power adapter
Baffle plate VGA cable
2
Page 9
User Manual
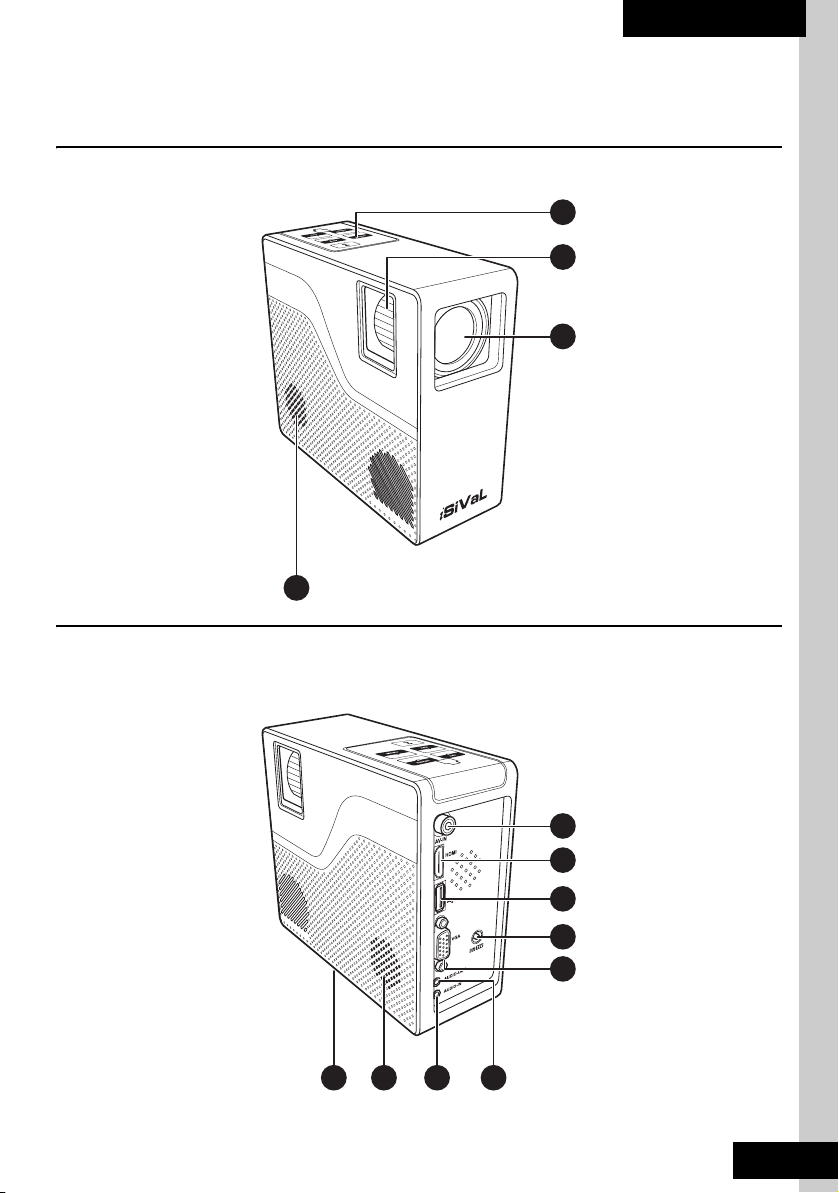
Hardware description
The following sections describe the hardware components of the mini projector.
Front view
1
Rear view
4
2
3
5
11412 10
6
7
8
9
3
Page 10
mini projector
Name Description
1. Control panel Tap the keys to operate the projector.
2. Focus ring Rotate to sharpen the image.
3. Projection lens Projects the image.
4. Speaker Plays audio.
5. AV-in Connects to AV devices.
6. HDMI Connects to HDMI devices.
7. USB Connects to USB drives for JPEG viewing.
8. DC-in Connects to the AC adapter.
9. VGA Connects to VGA input sources.
10. Audio-out Connects to speakers.
11. Audio-in Connects to audio.
12. Ceiling mounting Hole Use to mount the mini projector on the ceiling.
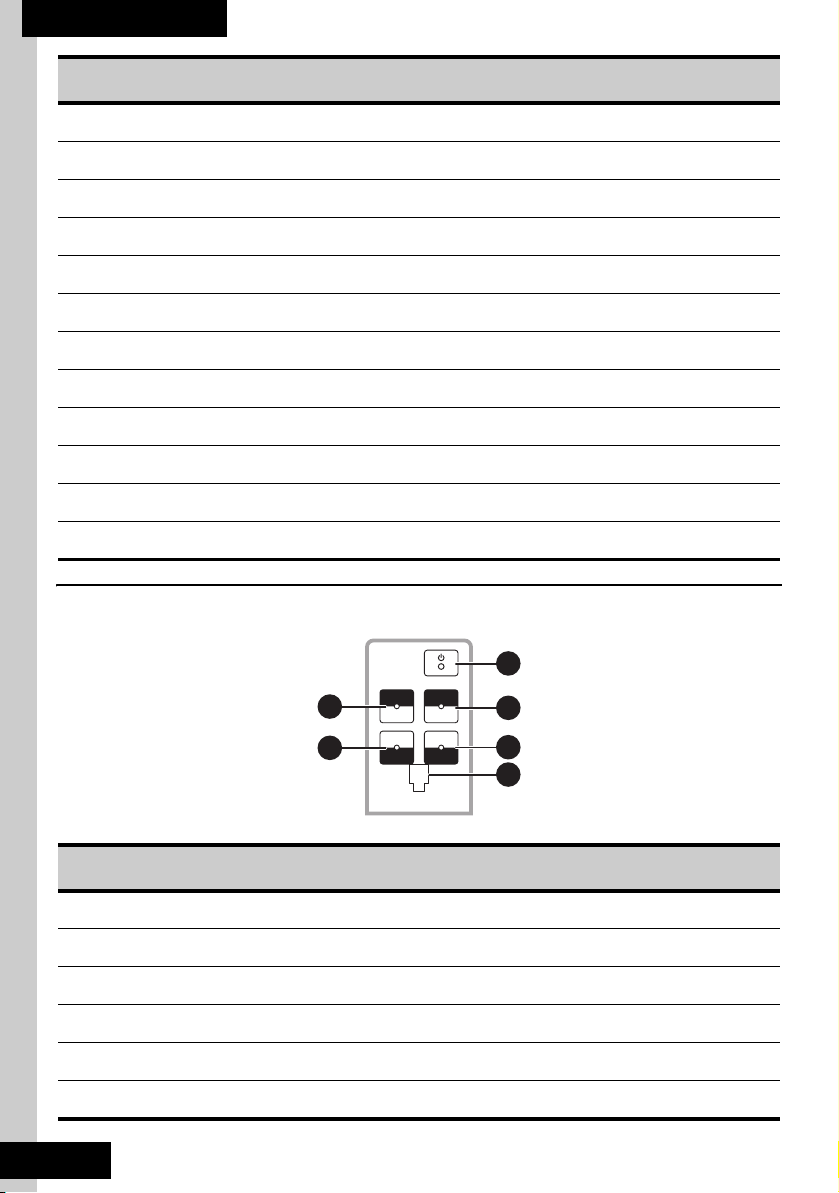
Control panel
1
ENTER SUB
ADDMENU
2
3
4
6
5
Name Description
1. Power Press to turn power on and off.
2. Add Press to increase the volume
3. Sub Press to decrease the volume
4. IR Remote control receiver
5. Enter Press to confirm selection of menu item.
6 Menu Press to view the OSD menu.
4
Page 11
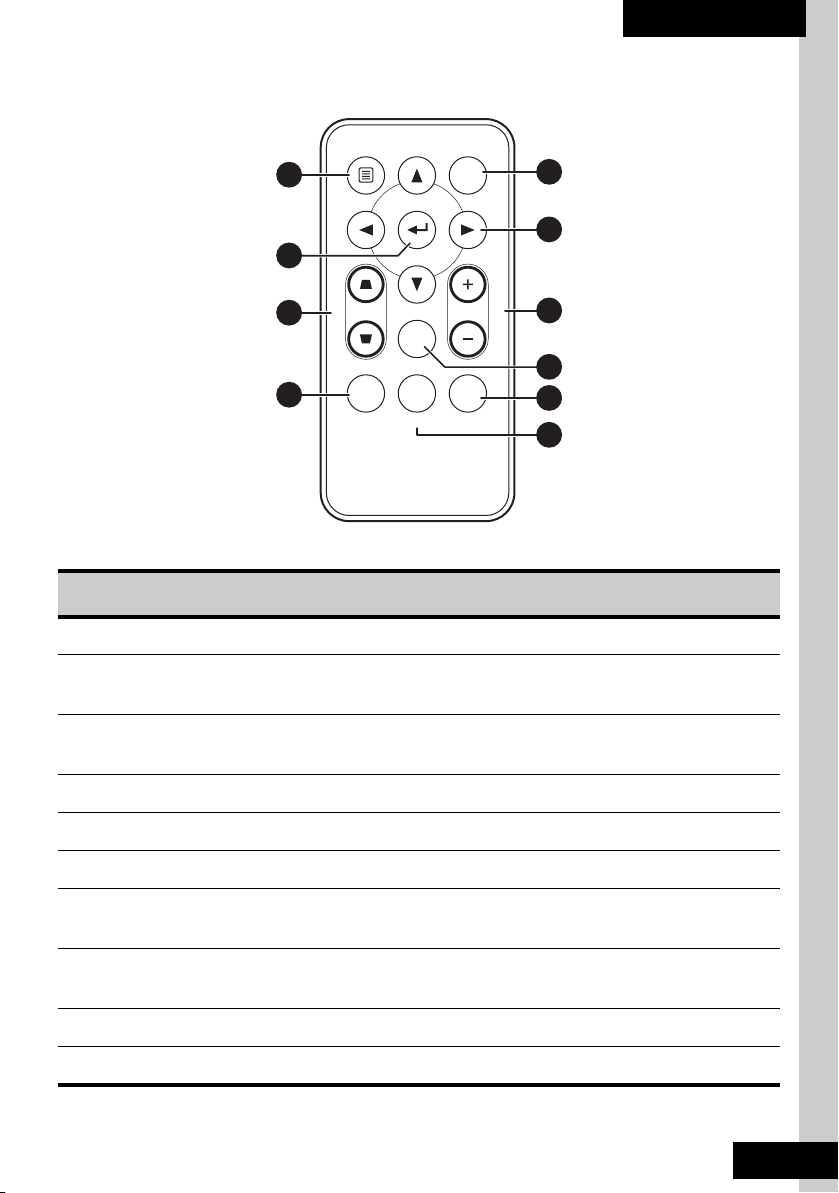
Overview of the remote control
Menu Power
10
9
Keystone
8
1
2
Volume
3
User Manual
H-FLIP
7
Auto
MuteSource
4
5
6
Name Description
1. Power Press to turn power on and off.
2. Arrow (S/ T / W / X) buttons Press to move up, down, left, or right through menu
items.
3 Volume Press + to increase volume and - to decrease
volume
4. Help Press to display the help menu.
5. Mute Press to mute the audio.
6. Source Press to select the video sources.
7. Auto Press to automatically optimizes the projected
image.
8. Keystone Press to adjust image distortion caused by tilting
the projector.
9. Enter Press to confirm selection of menu item.
10 Menu Press to view the OSD menu.
5
Page 12

mini projector
6
Page 13
User Manual
Setting up the projector
Before you begin any of the procedures in this section, please read and follow the
safety instructions as described in the beginning of the user’s manual. Before
connecting, be sure to turn off both the projector and the devices. After making all
connections, turn on the projector and then the other devices.
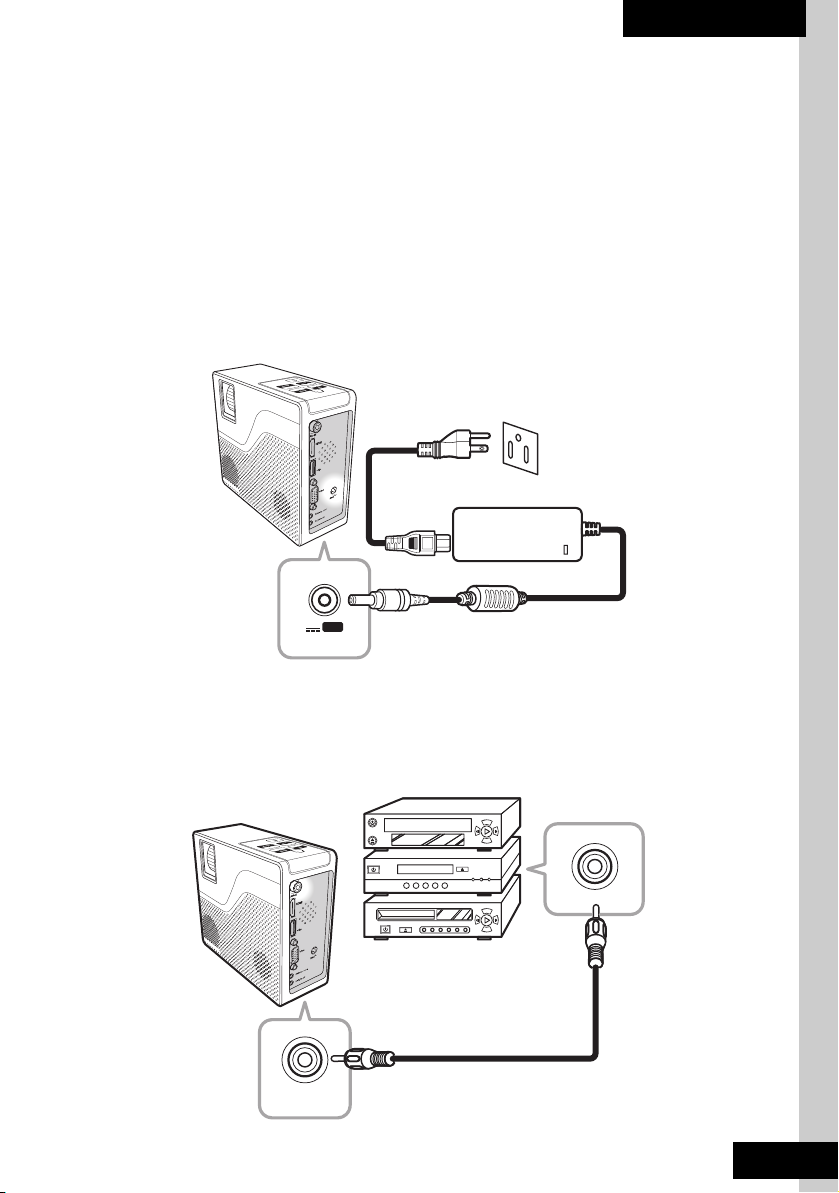
Connecting power
Connect the power adapter to the mini projector as shown in the illustration.
DCIN
19V
Connecting AV devices
Use a component cable to connect the AV devices to the mini projector.
AV
AV-IN
7
Page 14
mini projector
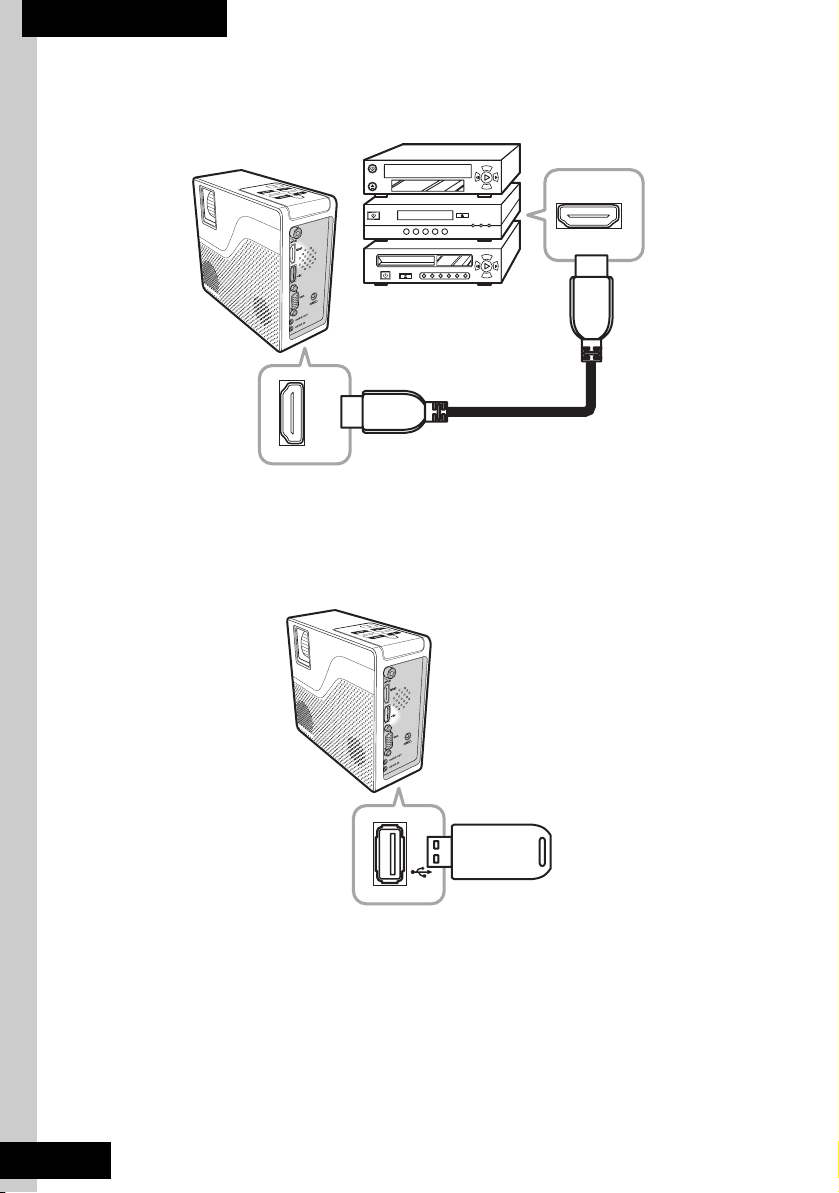
Connecting HDMI devices
Use a HDMI cable to connect the HDMI devices to the mini projector.
HDMI
HDMI
Connecting USB drive
Connect an USB drive to the mini projector to view image files on the drive.
Note: Only JPEG format images are supported by the mini projector
8
Page 15
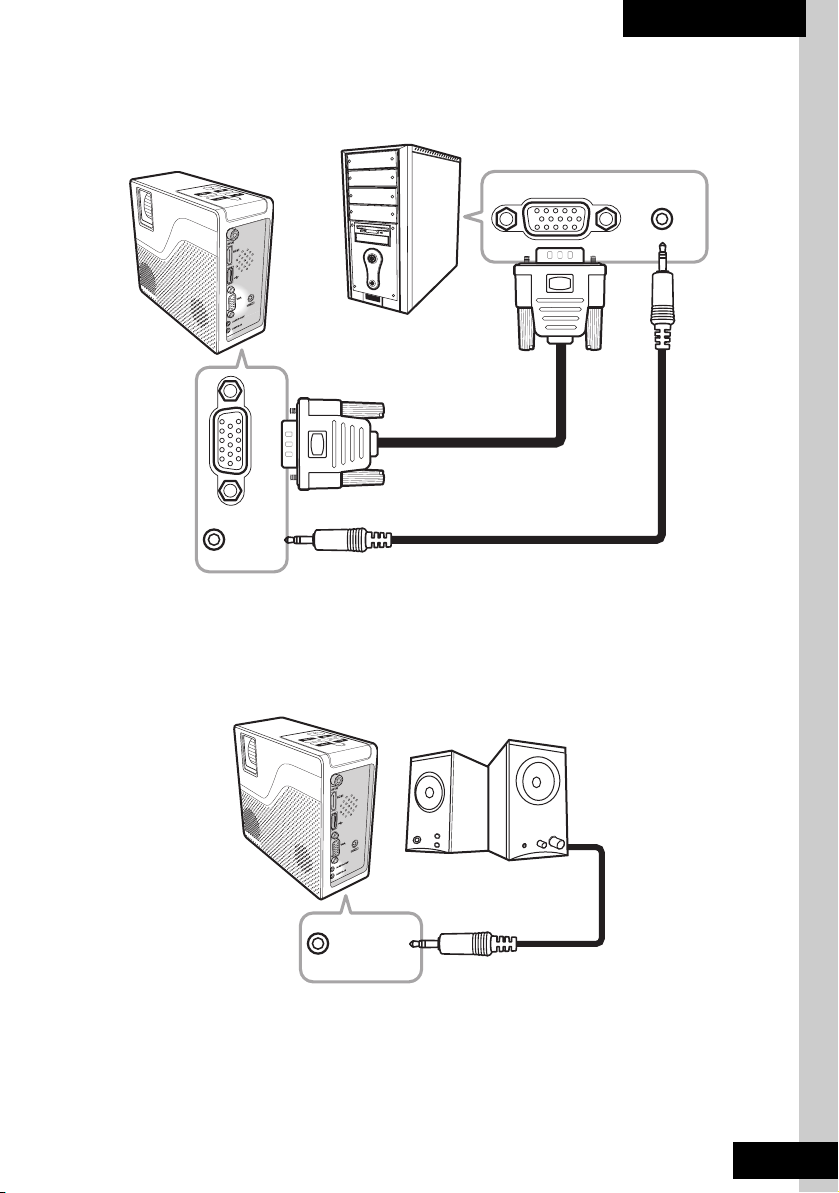
Connecting to a computer
Use the VGA cable to connect the computer to the mini projector.
VGA
AUDIO-IN
User Manual
AUDIO-OUTVGA
Connecting speakers
Use an audio cable to connect speakers to the mini projector.
AUDIO-OUT
Note: Some cables are sold separately and may not be included in the
package.
9
Page 16
mini projector
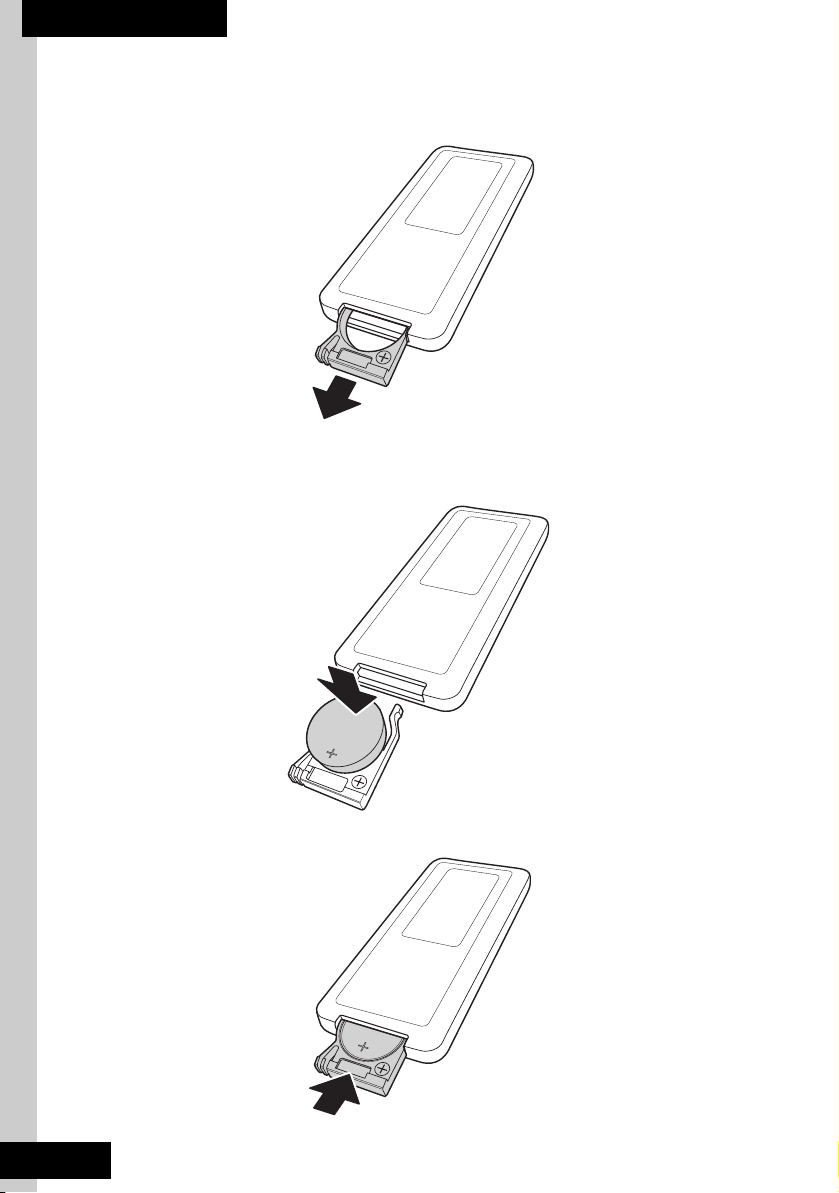
Installing remote control battery
1. Slide out the battery holder from the remote control.
2. Make sure power polarity is correct and insert the battery to the battery
holder.
3. Slide the battery holder back in the remote control.
10
Page 17
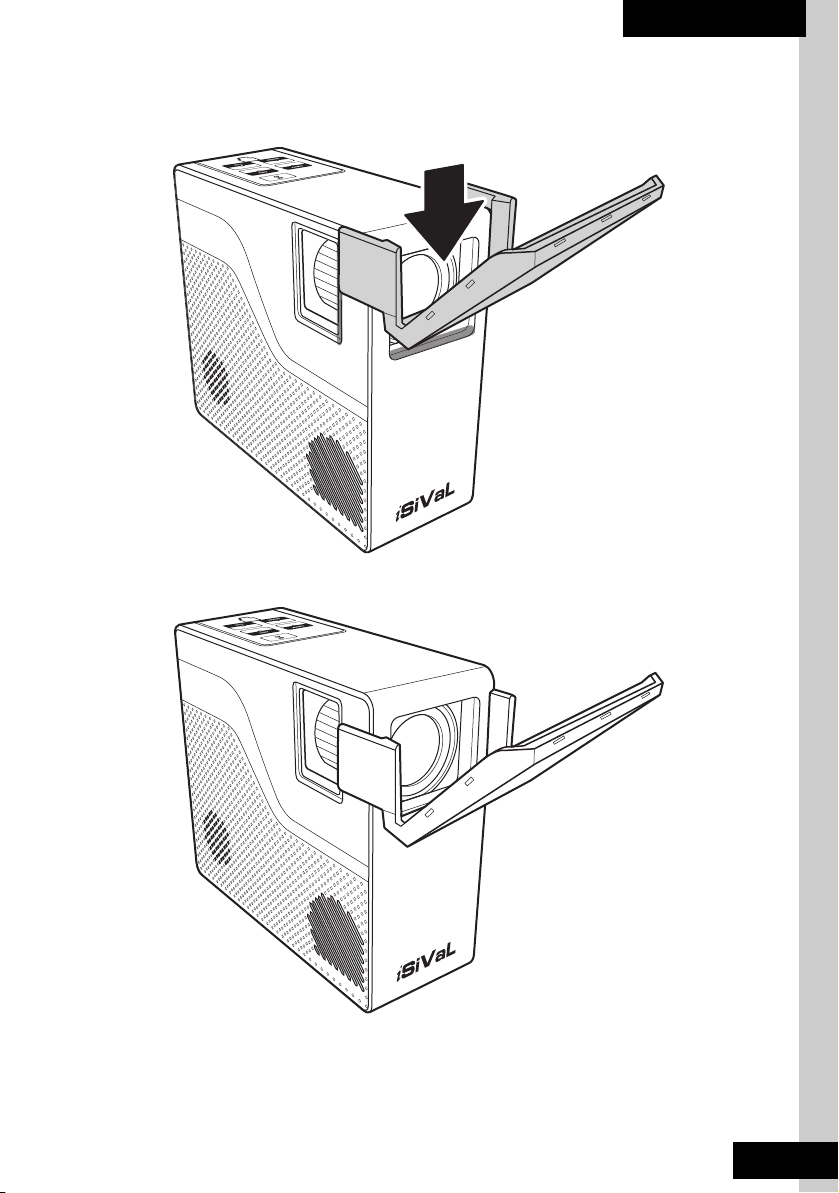
Installing baffle plate
1. Attach the baffle plate as shown in illustration.
2. You can now project screen to the ceiling.
User Manual
11
Page 18

mini projector
12
Page 19
User Manual
Using the mini projector
Positioning your projector
• Front table: Place the projector on the table in front of the screen.
• Front ceiling: Mount the projector on the ceiling in front of the screen.
• Rear table: Place the projector on the table behind the screen.*
• Rear ceiling: Mount the projector on the ceiling behind the screen.*
*A special rear projection screen is required.
Note: To get more projection possibilities, attach the baffle place to suit
your needs.
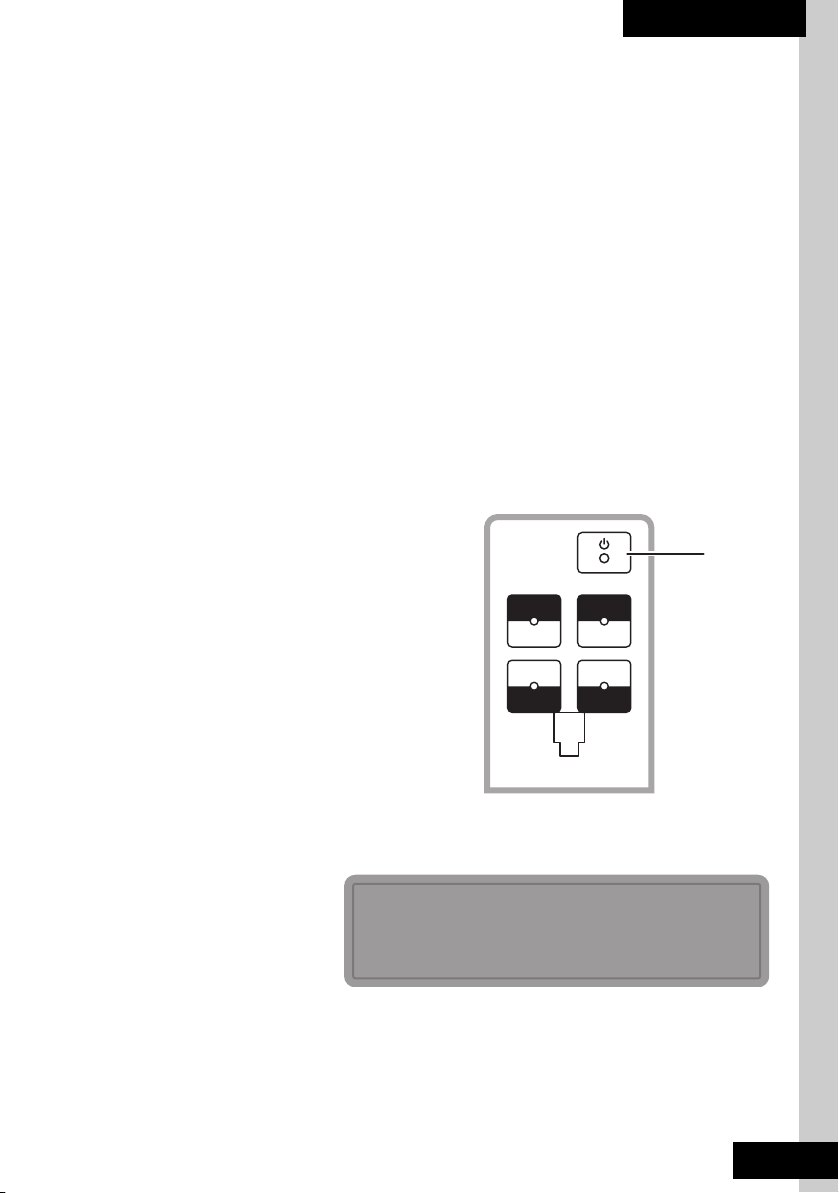
Turning on the power
1. Ensure that the AC adapter is connected to the power outlet and the
mini projector.
2. Tap Power on the control panel to
turn on the projector.
ADDMENU
Power
1
2
Turning the power off
1. Tap Power on the
control panel.
2. A confirmation
message appears.
3. Tap Power again to
confirm.
ENTER SUB
Power Off ?
Please enter Power Key again to turn off mini Projector.
3
4
13
Page 20
mini projector
Adjusting the OSD settings
1. Press Menu to open the OSD menu.
2. Press S/ T /W /X on the remote control to select a submenu and adjust the
settings.
3. Press to confirm.
Note: Available menu options vary depending on the current input
source.
Switching the input source
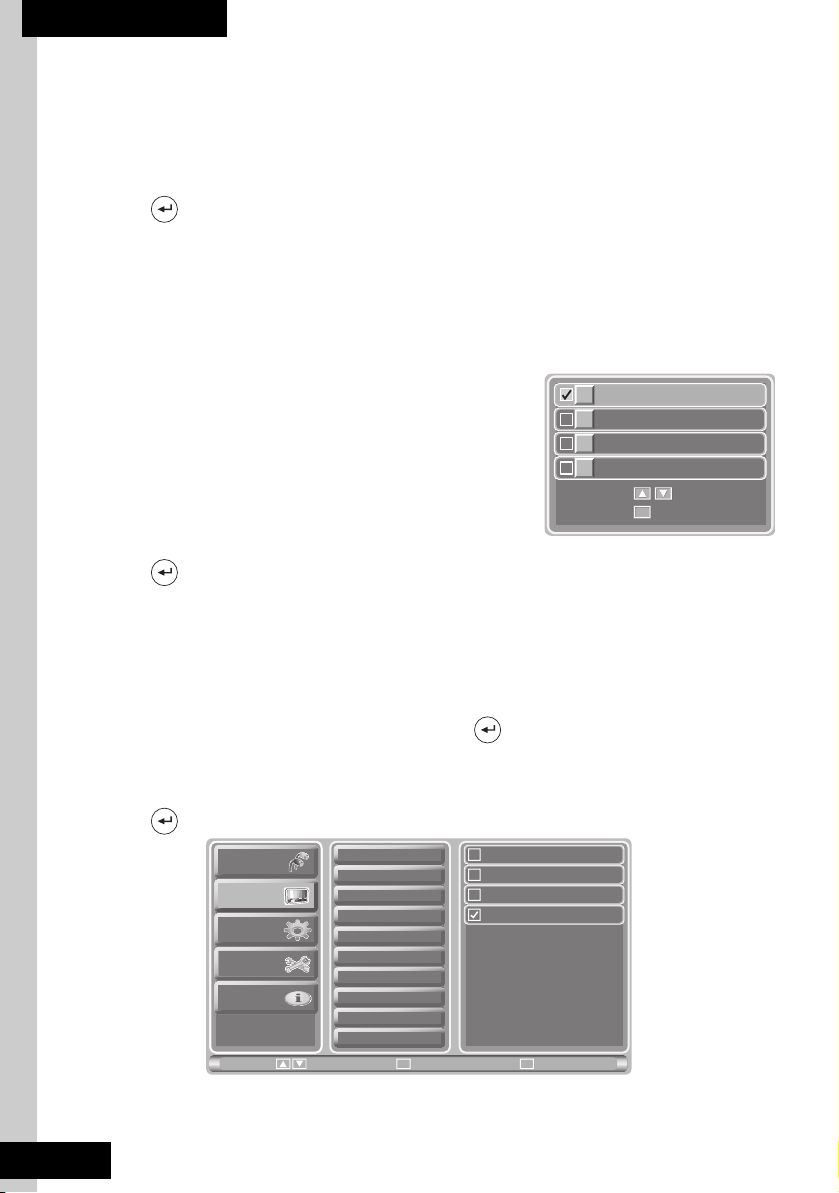
1. Ensure that the appropriate cable is
AV
connected to your input source and the mini
projector.
2. Press Source on the remote control.
3. The Source Selection menu appears on the
screen.
4. Press S/T to select the desired input source.
5. Press to confirm.
1
2
3
4
HDMI
PC
JPEG
Move
OK
OK
Set
Adjusting picture
1. Press Menu on the remote control.
2. Press S/T to select Picture, then press .
3. Press S/ T /W /X on the remote control to select a submenu and adjust the
settings.
4. Press to confirm and press Menu to exit.
Input
Picture
KeyStone
Setup
Information
P ICTURE MODE
14
Picture Mode
Brightness
Contrast
Sharpness
Color
Tint
Digital NR
Aspect Ratio
Color Temp
Recall
Move Enter
OK
Vivid
Standard
Movie
User
Menu
Return
Page 21
User Manual
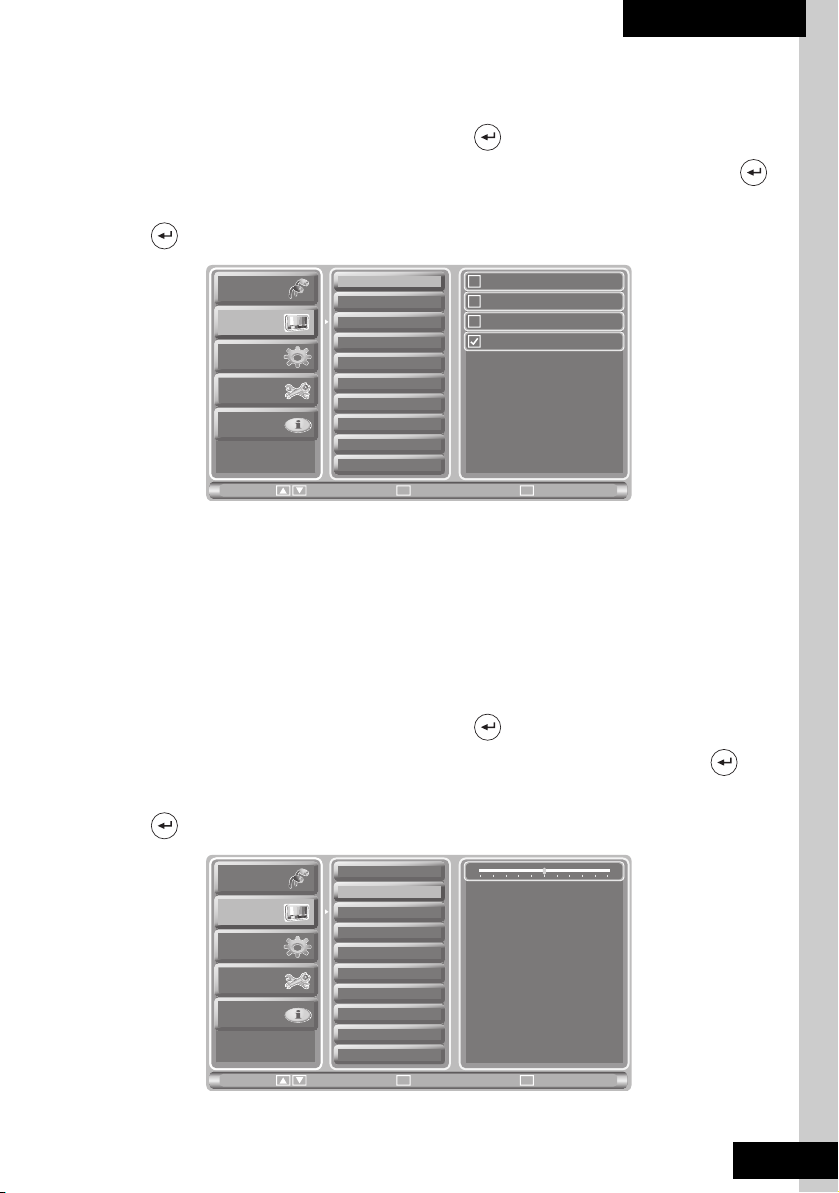
The Picture Mode can be set to Vivid, Standard, Movie, or User.
1. Press Menu on the remote control.
2. Press S/T to select Picture, then press .
3. Press S/Ton the remote control to select Picture Mode then press .
4. Press S/Ton the remote control to select the desired option.
5. Press to confirm and press Menu to exit.
Input
Picture
KeyStone
Setup
Information
Picture Mode
Brightness
Contrast
Sharpness
Color
Tint
Digital NR
Aspect Ratio
Color Temp
Recall
Move Enter
OK
Vivid
Standard
Movie
User
Menu
Return
Note: Select User option to enable other submenus in the Picture menu.
B RIGHTNESS
Brightness can be set to 0 to 100.
1. Press Menu on the remote control.
2. Press S/T to select Picture, then press .
3. Press
S/Ton the remote control to select Brightness then press .
4. Press W/X on the remote control to adjust the brightness value.
5. Press to confirm and press Menu to exit.
C
ONTRAST
Input
Picture
KeyStone
Setup
Information
Picture Mode
Brightness
Contrast
Sharpness
Color
Tint
Digital NR
Aspect Ratio
Color Temp
Recall
Move Enter
OK
Menu
50
Return
15
Page 22
mini projector
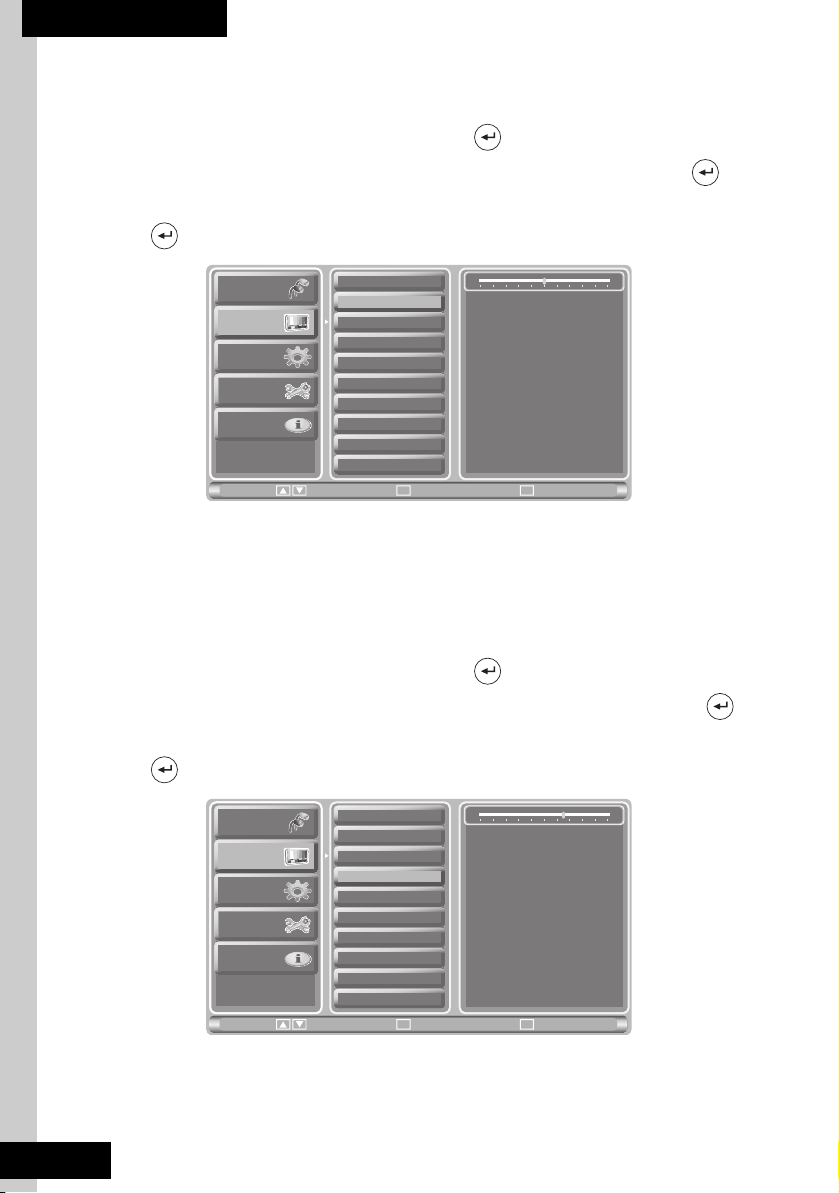
Contrast can be set to 0 to 100.
1. Press Menu on the remote control.
2. Press S/T to select Picture, then press .
3. Press S/Ton the remote control to select Contrast then press .
4. Press W/X on the remote control to adjust the contrast value.
5. Press to confirm and press Menu to exit.
Input
Picture
KeyStone
Setup
Information
Picture Mode
Brightness
Contrast
Sharpness
Color
Tint
Digital NR
Aspect Ratio
Color Temp
Recall
Move Enter
OK
Menu
50
Return
S HARPNESS
Sharpness can be set to 0 to 100.
1. Press Menu on the remote control.
2. Press S/T to select Picture, then press .
3. Press S/Ton the remote control to select Sharpness then press .
4. Press
W/X on the remote control to adjust the sharpness value.
5. Press to confirm and press Menu to exit.
Input
Picture
KeyStone
Setup
Information
Picture Mode
Brightness
Contrast
Sharpness
Color
Tint
Digital NR
Aspect Ratio
Color Temp
Recall
Move Enter
OK
Menu
65
Return
16
Page 23
User Manual
C OLOR
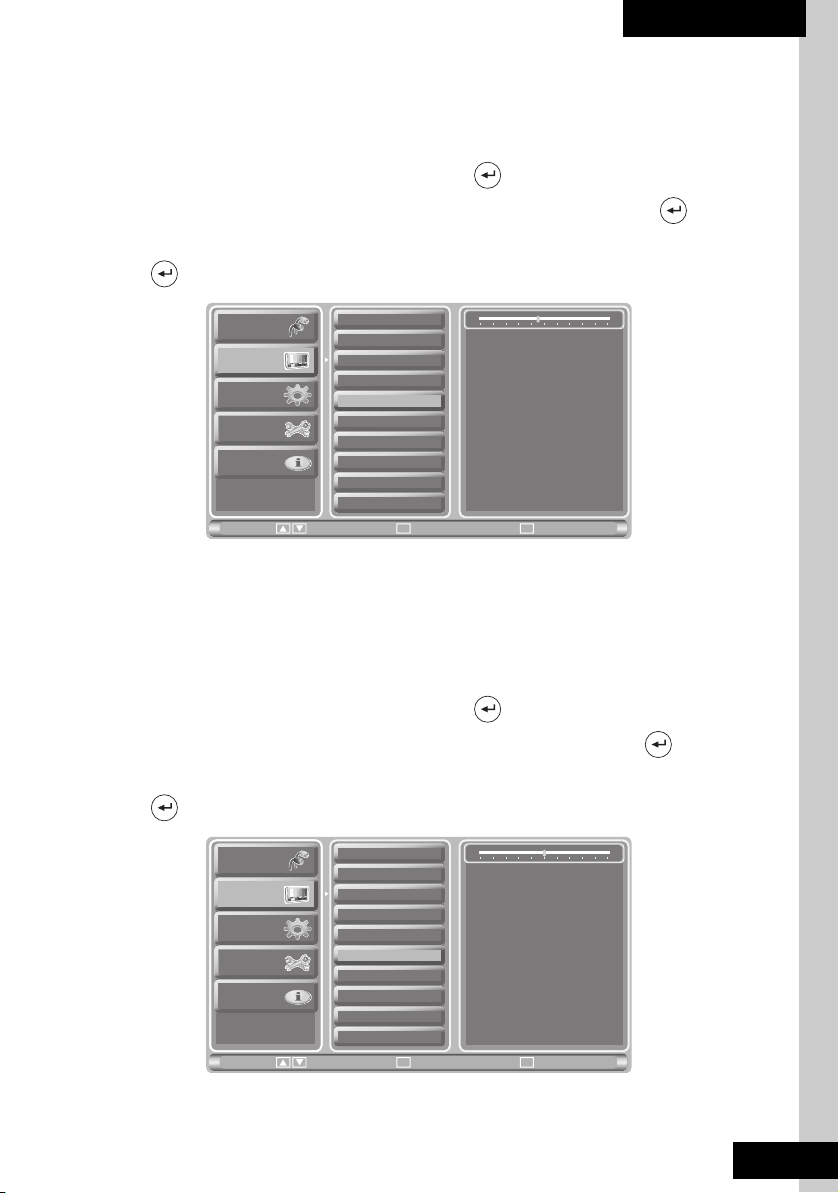
Color can be set to 0 to 100.
1. Press Menu on the remote control.
2. Press S/T to select Picture, then press .
3. Press S/Ton the remote control to select Color then press .
4. Press
W/X on the remote control to adjust the color value.
5. Press to confirm and press Menu to exit.
Picture Mode
Brightness
Contrast
Sharpness
Color
Tint
Digital NR
Aspect Ratio
Color Temp
Recall
Move Enter
OK
Menu
45
Return
T
Input
Picture
KeyStone
Setup
Information
INT
Tint can be set to -16 to 16.
1. Press Menu on the remote control.
2. Press S/T to select Picture, then press .
3. Press
S/Ton the remote control to select Tint then press .
4. Press W/X on the remote control to adjust the tint value.
5. Press to confirm and press Menu to exit.
Input
Picture
KeyStone
Setup
Information
Picture Mode
Brightness
Contrast
Sharpness
Color
Tint
Digital NR
Aspect Ratio
Color Temp
Recall
Move Enter
OK
Menu
Return
0
17
Page 24
mini projector
D IGITAL NR
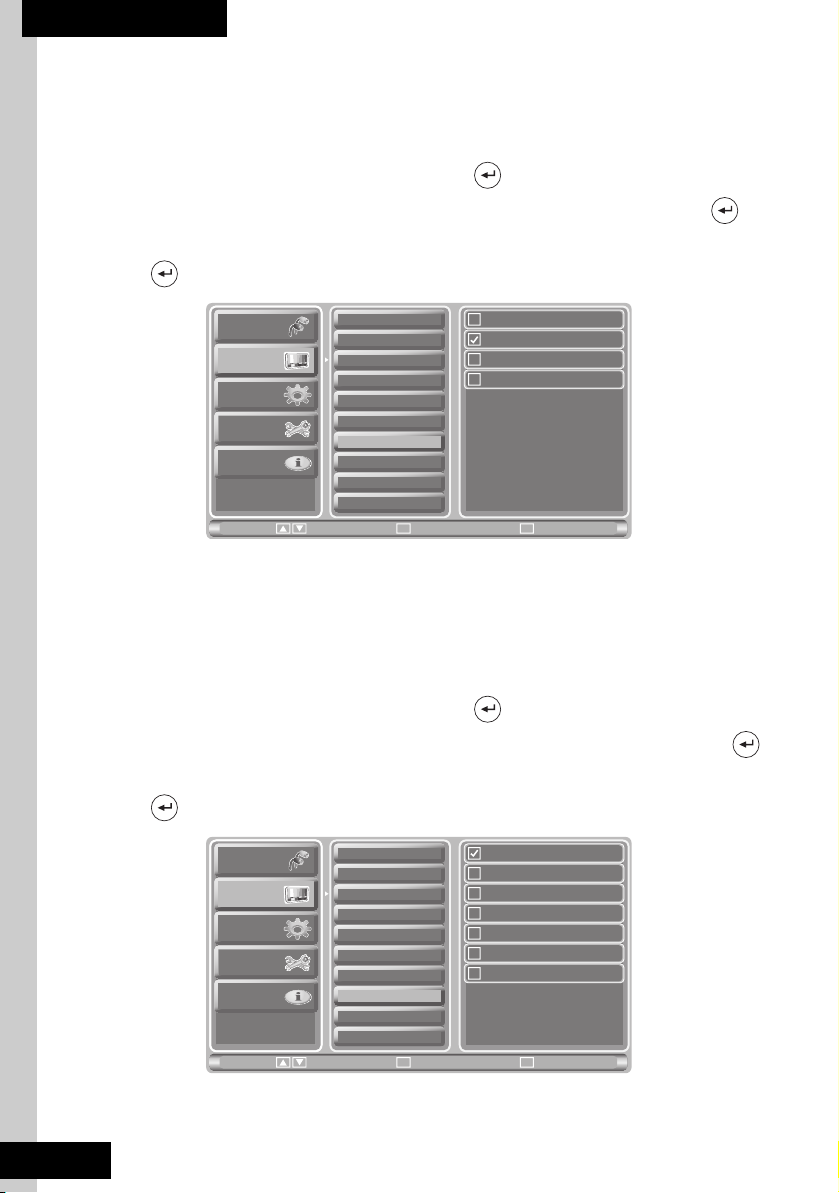
Digital NR can be set to Off, Weak, Medium, or Strong.
1. Press Menu on the remote control.
2. Press S/T to select Picture, then press .
3. Press S/Ton the remote control to select Digital NR then press .
4. Press
S/Ton the remote control to select the desired option.
5. Press to confirm and press Menu to exit.
Off
Weak
Medium
Strong
Menu
Return
A
SPECT RATIO
Input
Picture
KeyStone
Setup
Information
Picture Mode
Brightness
Contrast
Sharpness
Color
Tint
Digital NR
Aspect Ratio
Color Temp
Recall
Move Enter
OK
Aspect Ratio can be set to Full, Normal, Zoom, Subtitle, Auto, Wide, or Zoom-1.
1. Press Menu on the remote control.
2. Press S/T to select Picture, then press .
3. Press
S/Ton the remote control to select Aspect Ratio then press .
4. Press S/Ton the remote control to select the desired option.
5. Press to confirm and press Menu to exit.
Input
Picture
KeyStone
Setup
Information
Picture Mode
Brightness
Contrast
Sharpness
Color
Tint
Digital NR
Aspect Ratio
Color Temp
Recall
Move Enter
OK
Full
Normal
Zoom
Subtitle
Auto
Wide
Zoom-1
Menu
Return
18
Page 25
User Manual
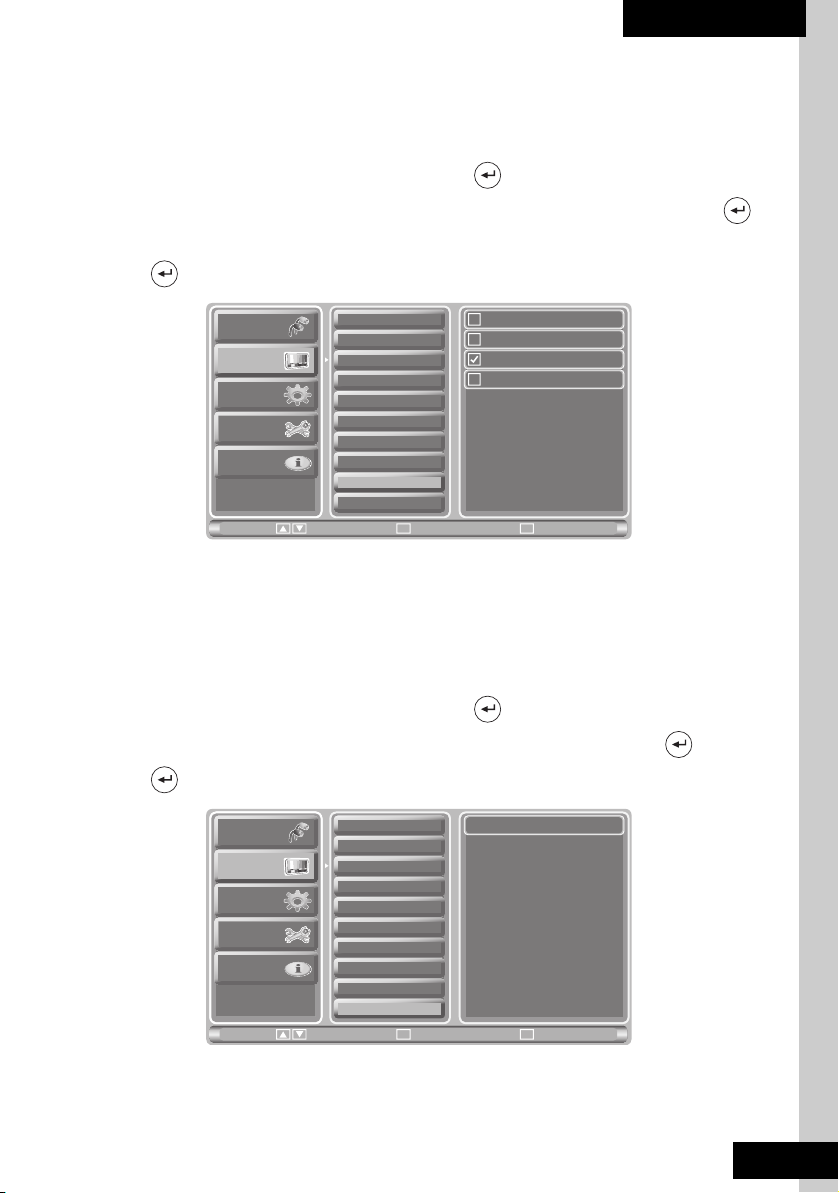
C OLOR TEMP
Color Temp can be set to Warm, Standard, Cool or Data.
1. Press Menu on the remote control.
2. Press S/T to select Picture, then press .
3. Press S/Ton the remote control to select Color Temp then press .
4. Press
S/Ton the remote control to select the desired option.
5. Press to confirm and press Menu to exit.
Warm
Standard
Cool
Data
R
ECALL
Input
Picture
KeyStone
Setup
Information
Picture Mode
Brightness
Contrast
Sharpness
Color
Tint
Digital NR
Aspect Ratio
Color Temp
Recall
Move Enter
OK
Use Recall to reset all settings back to factory default.
1. Press Menu on the remote control.
2. Press S/T to select Picture, then press .
3. Press
S/Ton the remote control to select Recall then press .
4. Press again to confirm recall.
Input
Picture
KeyStone
Setup
Information
Picture Mode
Brightness
Contrast
Sharpness
Color
Tint
Digital NR
Aspect Ratio
Color Temp
Recall
Move Enter
OK
Menu
Menu
Return
Set
Return
19
Page 26
mini projector
Adjusting Keystone
1. Press Menu on the remote control.
2. Press S/T to select Keystone, then press .
3. Press S/ T /W /X on the remote control to select a submenu and adjust the
settings.
4. Press to confirm and press Menu to exit.
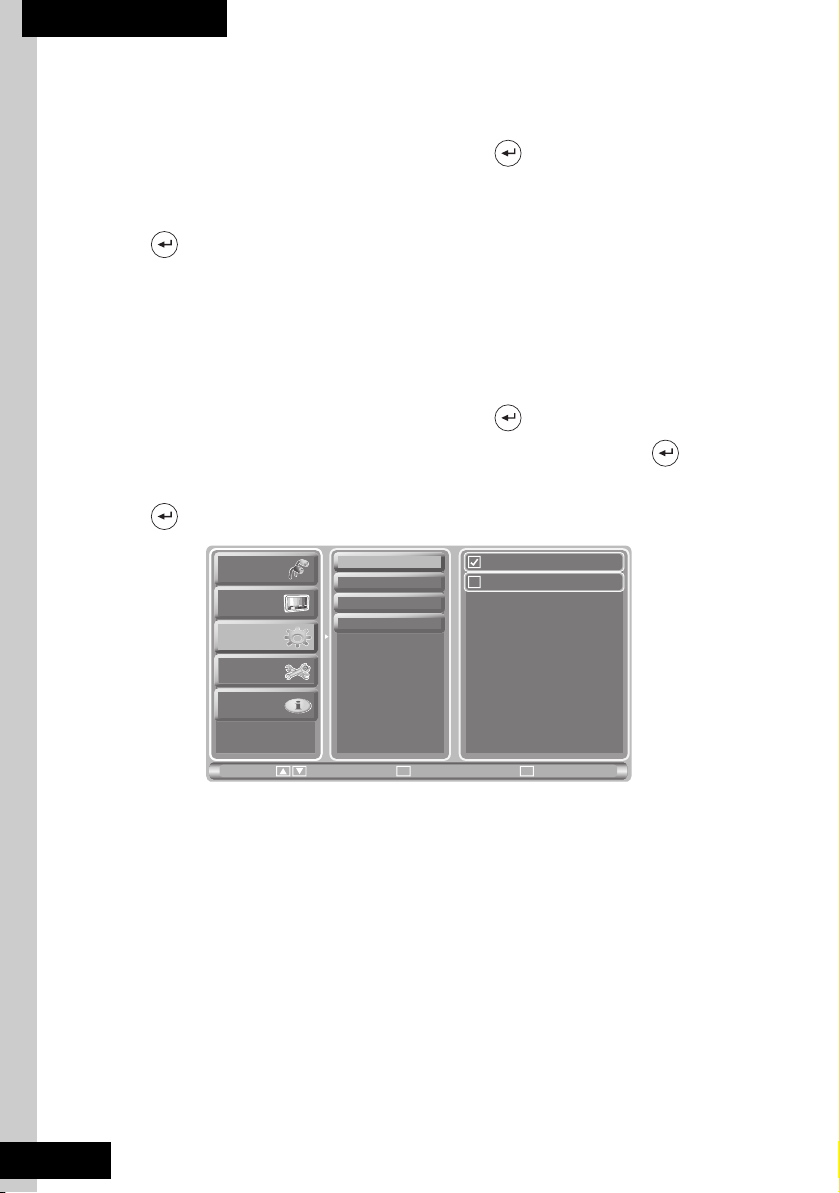
A UTO
Auto can be set to On or Off.
1. Press Menu on the remote control.
2. Press S/T to select Keystone, then press .
3. Press S/Ton the remote control to select Auto then press .
4. Press S/Ton the remote control to select the desired option.
5. Press to confirm and press Menu to exit.
Input
Picture
KeyStone
Setup
Information
Auto
Manual
Image Flip H.
Image Flip V.
Move Enter
OK
Off
On
Menu
Return
20
Page 27
User Manual
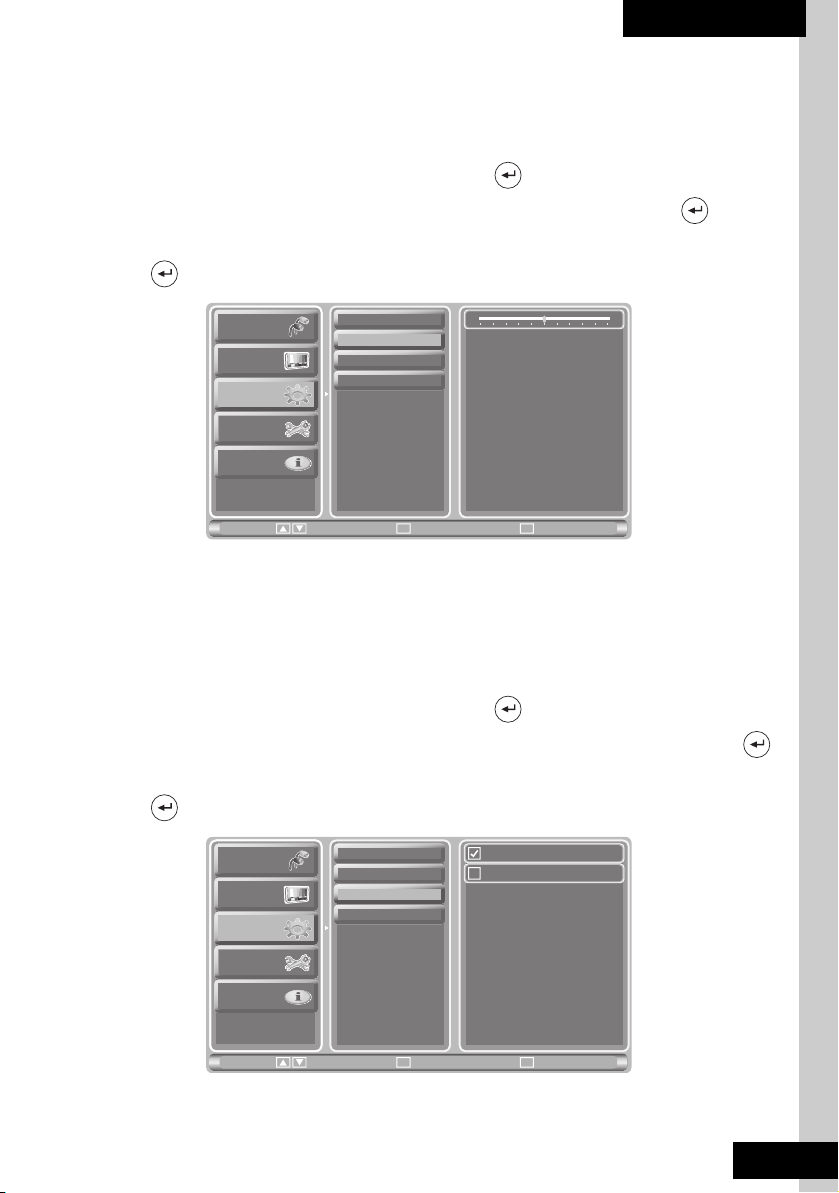
M ANUAL
Use this option to adjust keystone manually. It can be set to -64 to 64.
1. Press Menu on the remote control.
2. Press S/T to select Keystone, then press .
3. Press S/Ton the remote control to select Manual then press .
4. Press
W/X on the remote control to adjust the value.
5. Press to confirm and press Menu to exit.
Input
Picture
KeyStone
Setup
Information
I
MAGE FLIP H.
Auto
Manual
Image Flip H.
Image Flip V.
Move Enter
OK
Menu
0
Return
Use this option to flip the image horizontally. It can be set to On or Off.
1. Press Menu on the remote control.
2. Press S/T to select Keystone, then press .
3. Press
S/Ton the remote control to select Image Flip H. then press .
4. Press S/Ton the remote control to select the desired option.
5. Press to confirm and press Menu to exit.
Input
Picture
KeyStone
Auto
Manual
Image Flip H.
Image Flip V.
Off
On
Setup
Information
Move Enter
OK
Menu
Return
21
Page 28
mini projector
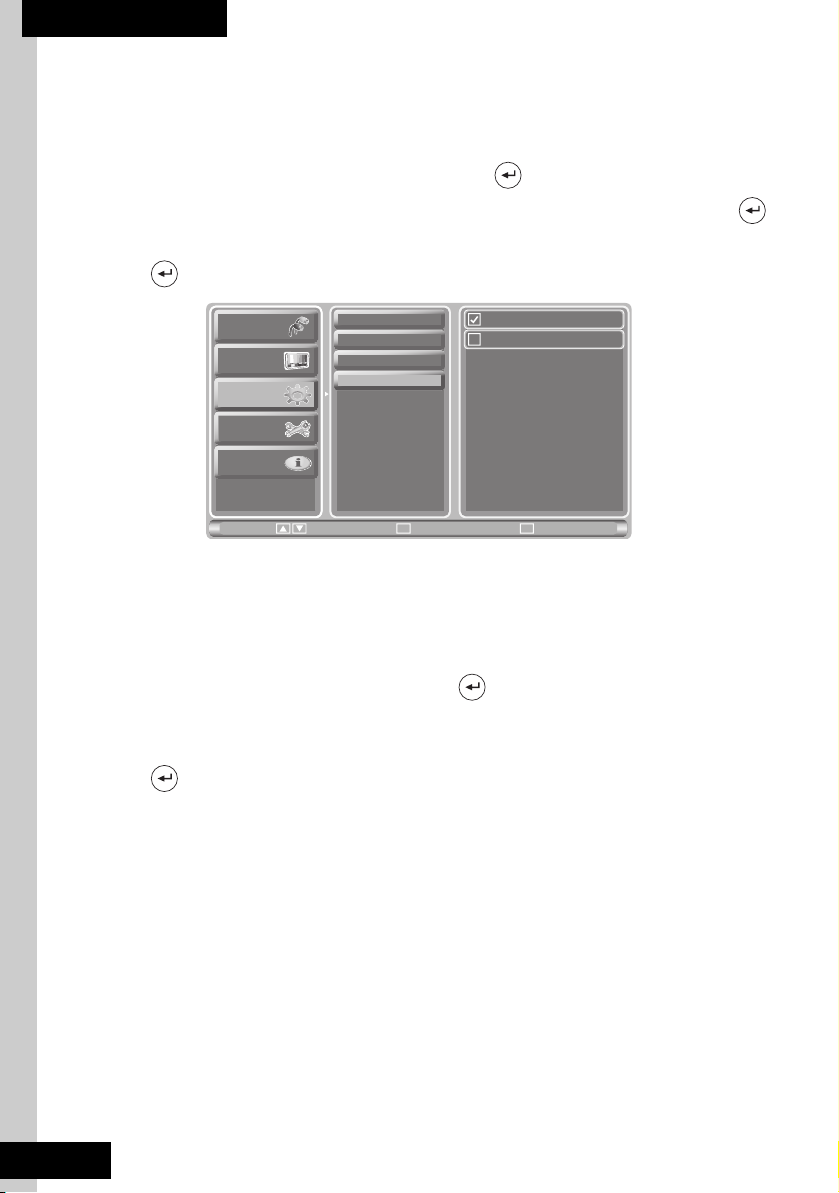
I MAGE FLIP V.
Use this option to flip the image vertically. It can be set to On or Off.
1. Press Menu on the remote control.
2. Press S/T to select Keystone, then press .
3. Press S/Ton the remote control to select Image Flip V. then press .
4. Press
S/Ton the remote control to select the desired option.
5. Press to confirm and press Menu to exit.
Input
Picture
KeyStone
Setup
Information
Auto
Manual
Image Flip H.
Image Flip V.
Move Enter
OK
Off
On
Menu
Return
Setting up the mini projector
1. Press Menu on the remote control.
2. Press S/T to select Setup, then press .
3. Press S/ T /W /X on the remote control to select a submenu and adjust the
settings.
4. Press to confirm and press Menu to exit.
22
Page 29
User Manual
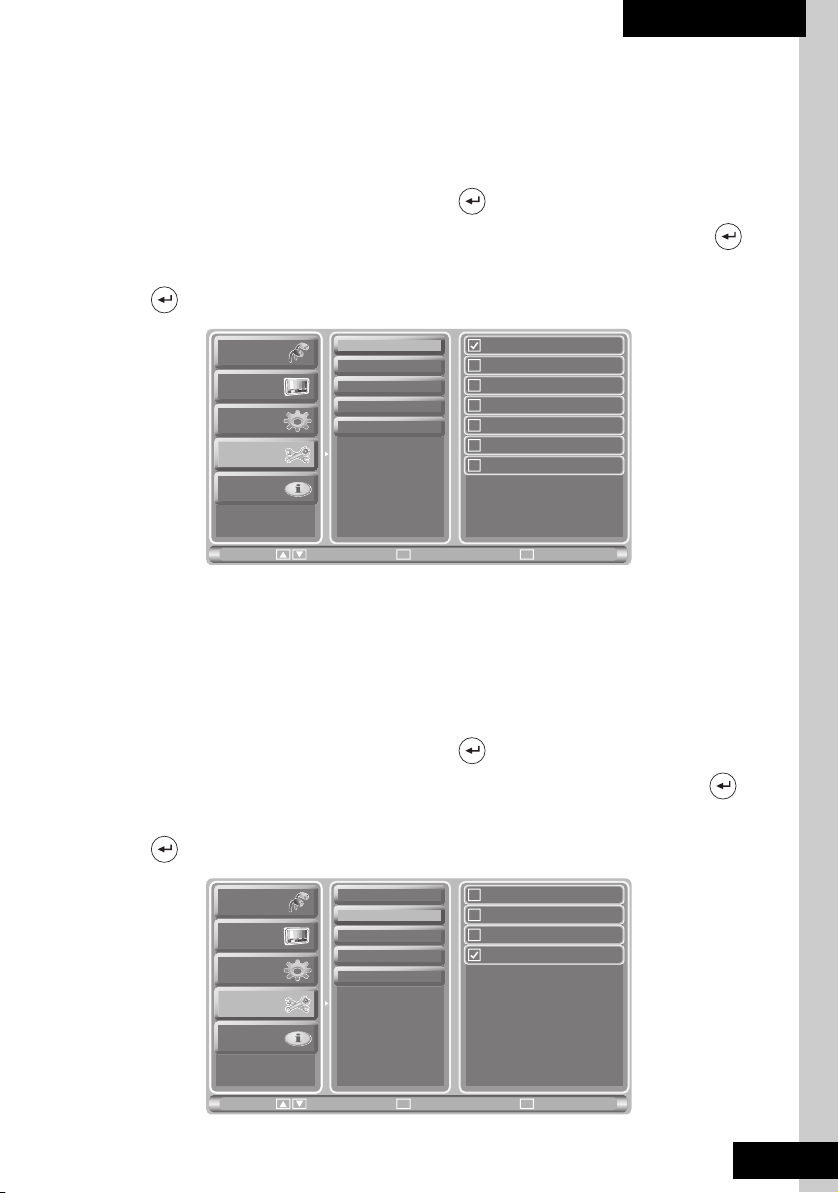
S LEEP TIME
Use Sleep time to set a set a timer to turn the mini projector off. It can be set to
Sleep Off, 15 mins, 30 mins, 45 mins, 60 mins, 90 mins, or 120 mins.
1. Press Menu on the remote control.
2. Press S/T to select Setup, then press .
3. Press S/Ton the remote control to select Sleep Time then press .
4. Press S/Ton the remote control to select the desired option.
5. Press to confirm and press Menu to exit.
Input
Picture
KeyStone
Setup
Information
Sleep Time
OSD Time
OSD Language
Background
Auto Search
Move Enter
OK
Sleep Off
15 mins
30 mins
45 mins
60 mins
90mins
120 mins
Menu
Return
OSD TIME
Use OSD Time to set a timer for OSD to turn off. It can be set to 10 secs, 20 secs,
or 30 secs.
1. Press Menu on the remote control.
2. Press S/T to select Setup, then press .
3. Press
S/Ton the remote control to select OSD Time then press .
4. Press S/Ton the remote control to select the desired option.
5. Press to confirm and press Menu to exit.
Input
Picture
KeyStone
Setup
Sleep Time
OSD Time
OSD Language
Background
Auto Search
10 secs
20 secs
30 secs
60 secs
Information
Move Enter
OK
Menu
Return
23
Page 30
mini projector
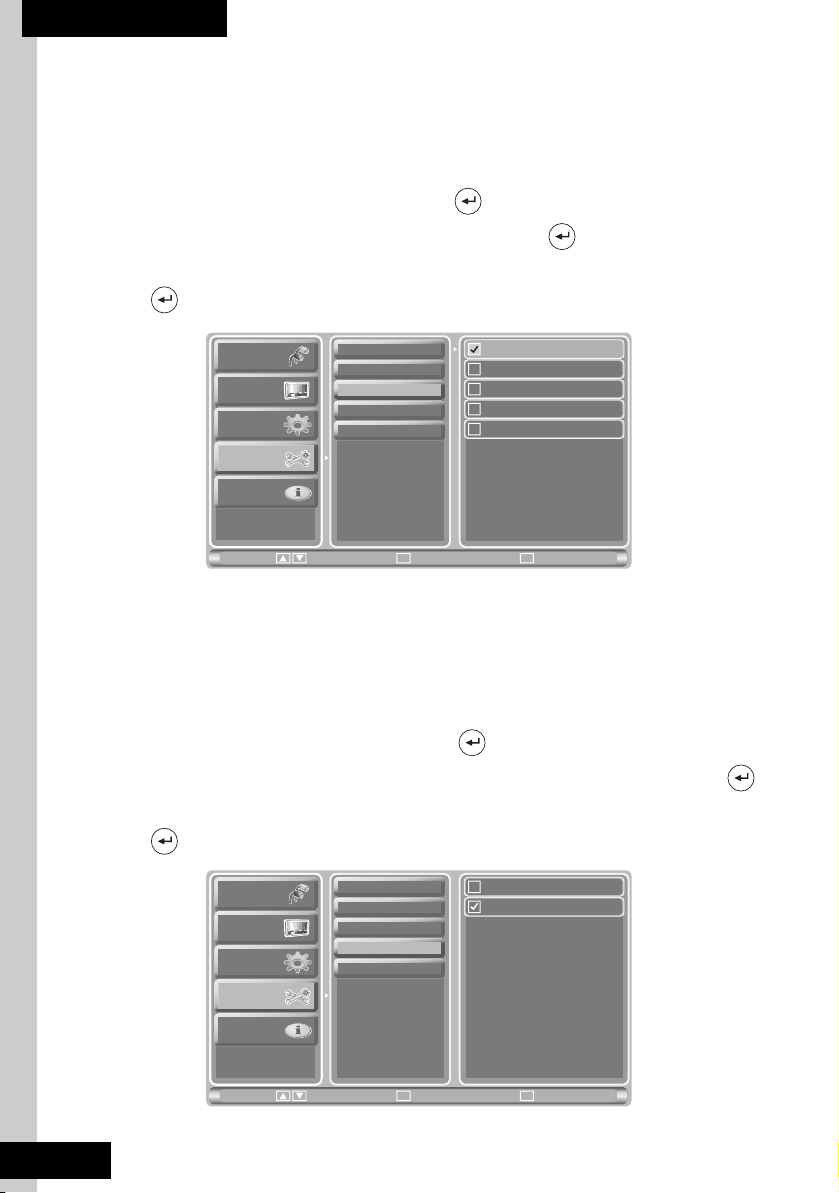
S ELECTING THE OSD LANGUAGE
OSD Language can be set to English, Spanish, French, Traditional Chinese, or
Simplified Chinese.
1. Press Menu on the remote control.
2. Press S/T to select Setup, then press .
3. Press S/T to select OSD Language, then press .
4. Press S/T to select the desired language.
5. Press to confirm.
Input
Picture
KeyStone
Setup
Information
Sleep Time
OSD Time
OSD Language
Background
Auto Search
Move Enter
OK
English
Español
Français
᧯խ֮
ㅔԧЁ᭛
Menu
Return
B ACKGROUND
Use Background to adjust the background color. It can be set to Blue or Black.
1. Press Menu on the remote control.
2. Press
3. Press
S/T to select Setup, then press .
S/Ton the remote control to select Background then press .
4. Press S/Ton the remote control to select the desired option.
5. Press to confirm and press Menu to exit.
Input
Picture
KeyStone
Setup
Sleep Time
OSD Time
OSD Language
Background
Auto Search
Blue
Black
24
Information
Move Enter
OK
Menu
Return
Page 31
User Manual
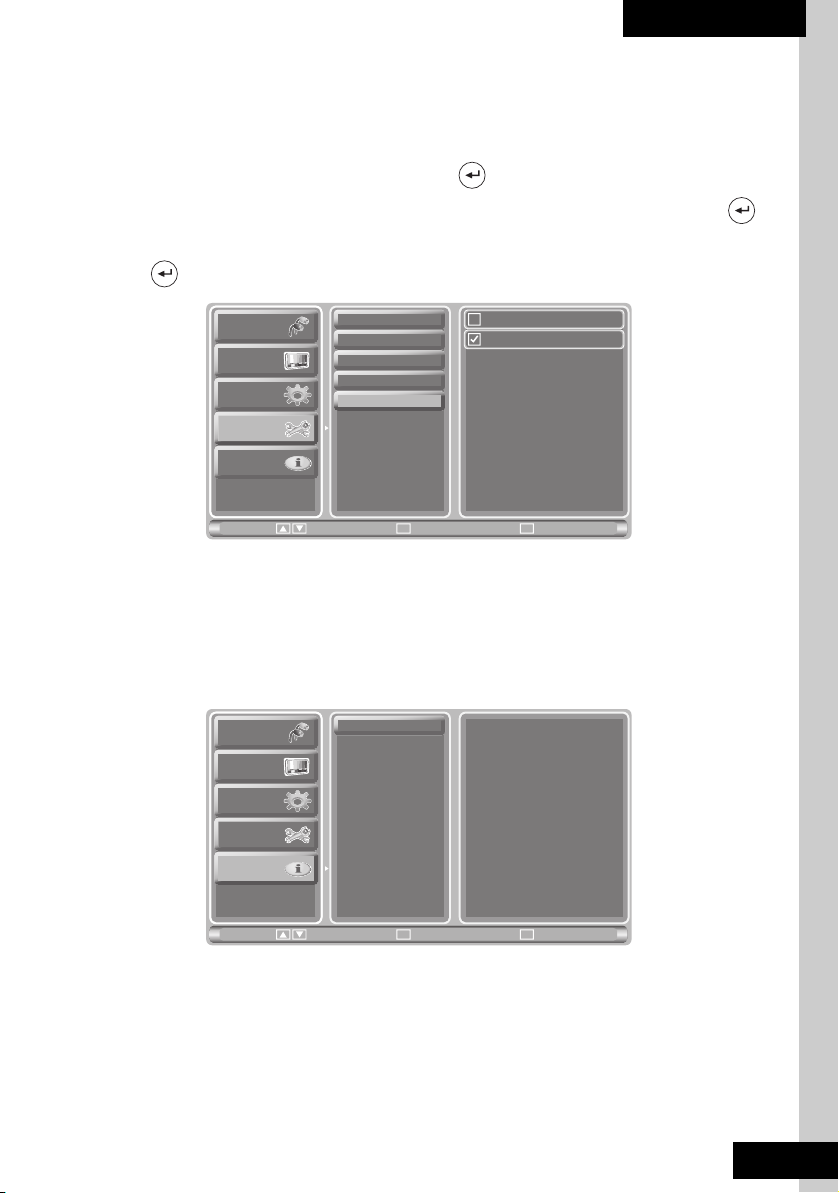
A UTO SEARCH
Auto Search can be set to On or Off.
1. Press Menu on the remote control.
2. Press S/T to select Setup, then press .
3. Press S/Ton the remote control to select Auto Search then press .
4. Press
S/Ton the remote control to select the desired option.
5. Press to confirm and press Menu to exit.
Input
Picture
KeyStone
Setup
Information
Sleep Time
OSD Time
OSD Language
Background
Auto Search
Move Enter
OK
Off
On
Menu
Return
Viewing information
1. Press Menu on the remote control.
2. Press S/T to select Information to view projector information.
Input
Picture
KeyStone
Setup
Information
Information
Timing Info:
AV
PAL
Version:
Move Enter
OK
Menu
Return
25
Page 32
mini projector
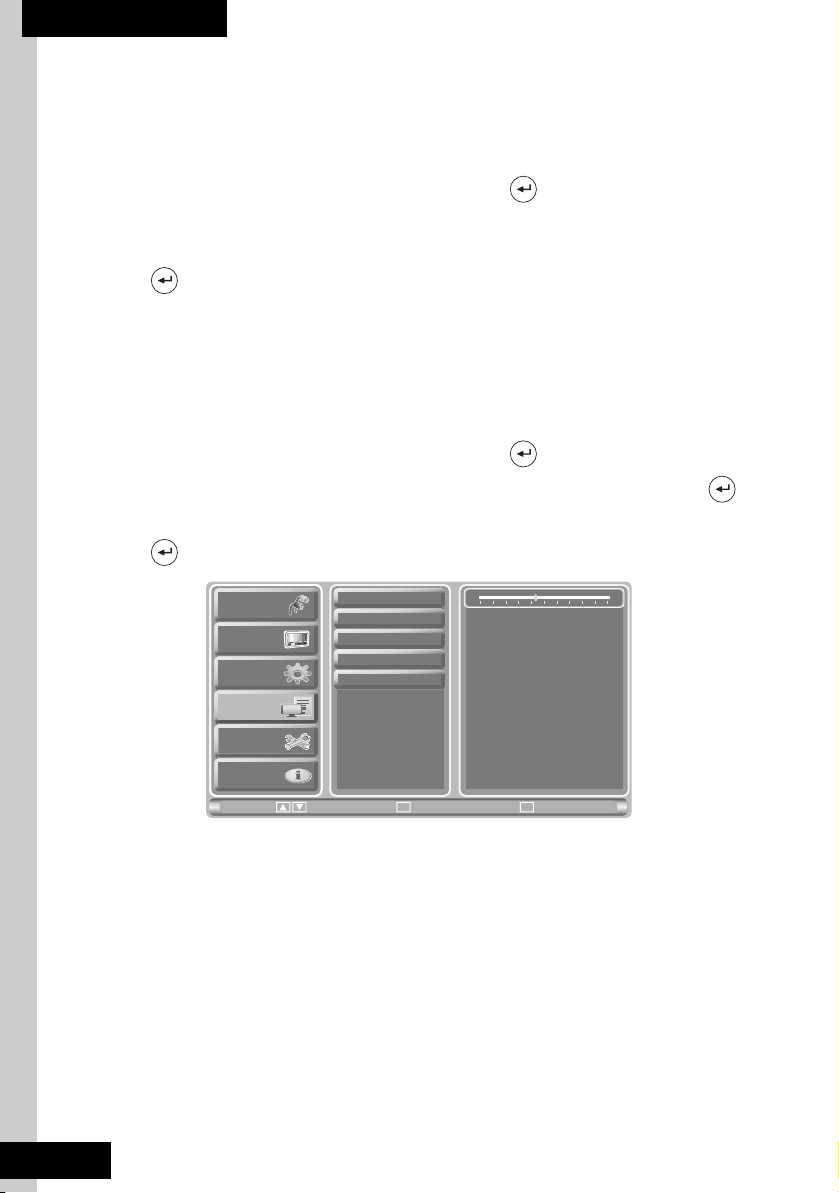
Adjusting PC settings
Adjust PC settings in PC mode.
1. Press Menu on the remote control.
2. Press S/T to select PC Setting, then press .
3. Press S/ T /W /X on the remote control to select a submenu and adjust the
settings.
4. Press to confirm and press Menu to exit.
H POSITION
H Position can be set to -30 to 30.
1. Press Menu on the remote control.
2. Press S/T to select PC Setting, then press .
3. Press S/Ton the remote control to select H Position then press .
4. Press W/X on the remote control to adjust the value.
5. Press to confirm and press Menu to exit.
26
Input
Picture
KeyStone
PC Setting
Setup
Information
H Position
V Position
Phase
Clock
Auto Adjust
Move Enter
OK
Menu
-4
Return
Page 33
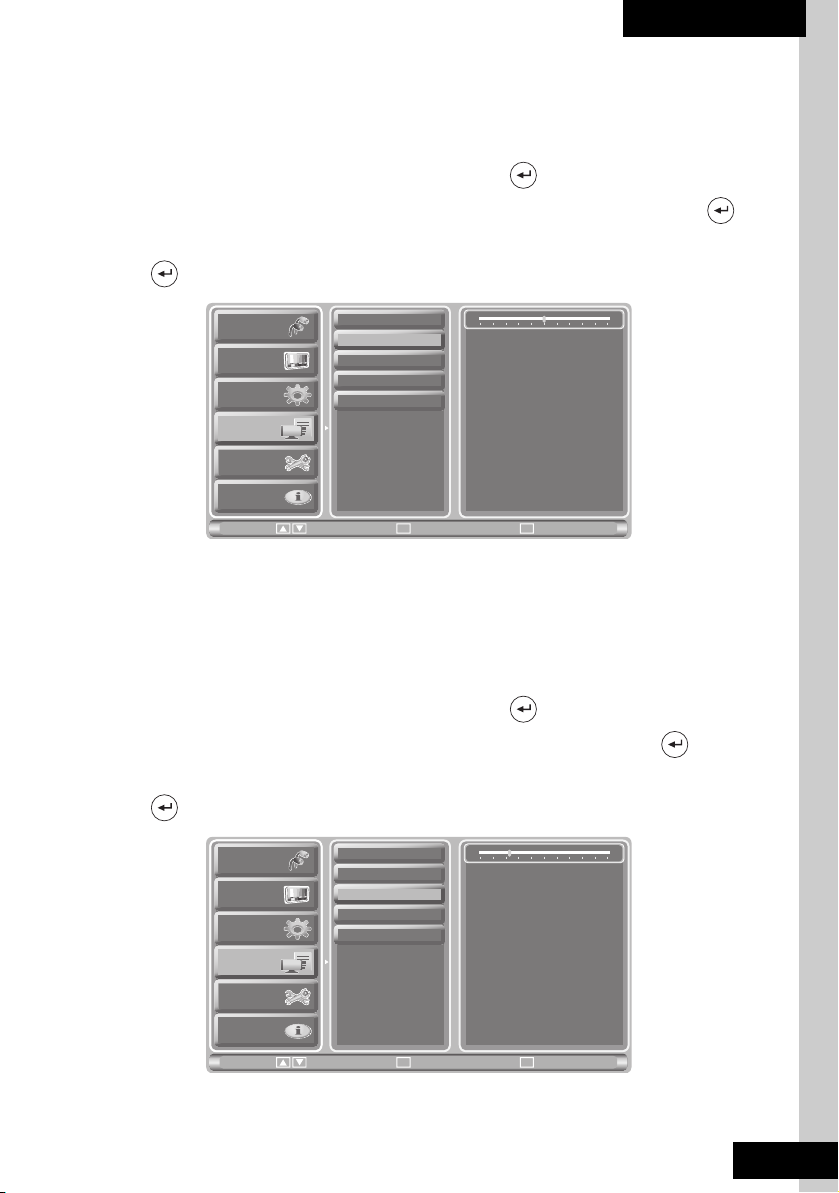
User Manual
V POSITION
H Position can be set to -30 to 30.
1. Press Menu on the remote control.
2. Press S/T to select PC Setting, then press .
3. Press S/Ton the remote control to select V Position then press .
4. Press
W/X on the remote control to adjust the value.
5. Press to confirm and press Menu to exit.
H Position
V Position
Phase
Clock
Auto Adjust
Move Enter
OK
Menu
Return
P
HASE
Input
Picture
KeyStone
PC Setting
Setup
Information
Phase can be set to 0 to 31.
1. Press Menu on the remote control.
2. Press S/T to select PC Setting, then press .
3. Press
S/Ton the remote control to select Phase then press .
4. Press W/X on the remote control to adjust the value.
5. Press to confirm and press Menu to exit.
Input
Picture
KeyStone
PC Setting
H Position
V Position
Phase
Clock
Auto Adjust
0
7
Setup
Information
Move Enter
OK
Menu
Return
27
Page 34
mini projector
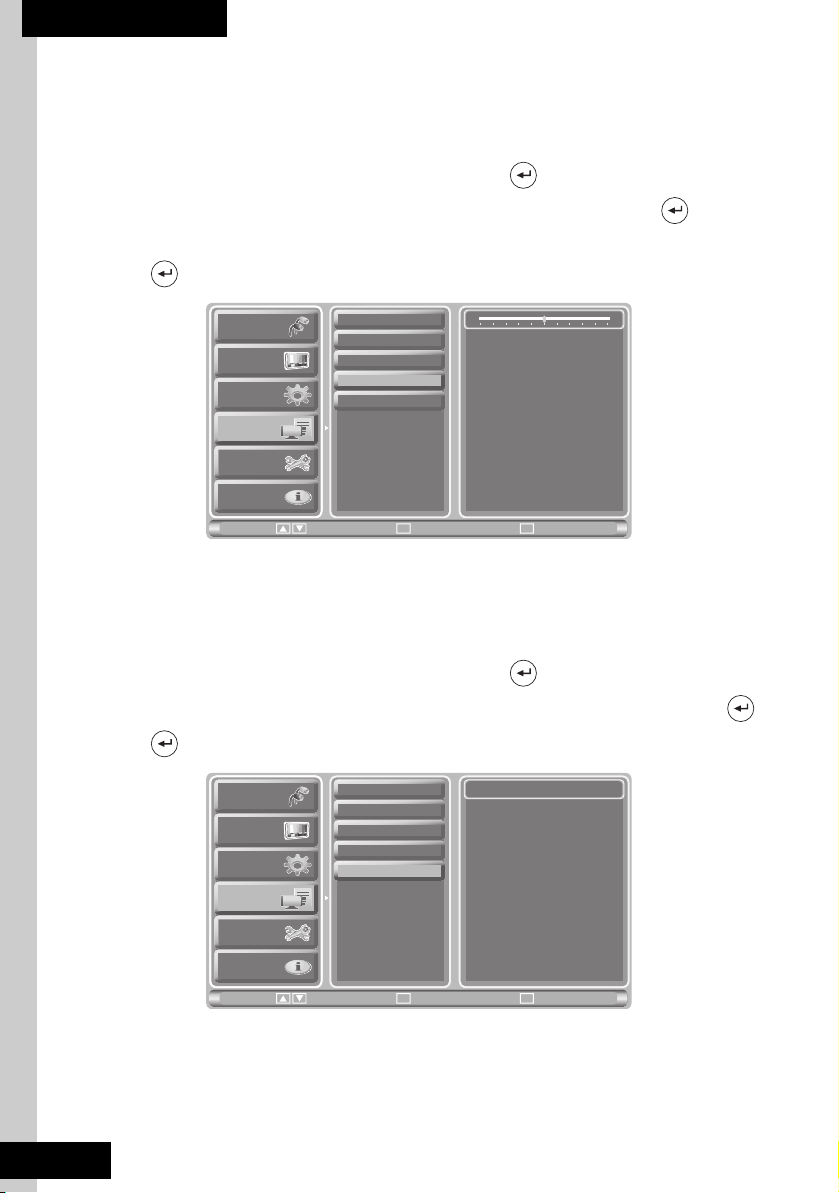
C LOCK
Clock can be set to -30 to 30.
1. Press Menu on the remote control.
2. Press S/T to select PC Setting, then press .
3. Press S/Ton the remote control to select Clock then press .
4. Press
W/X on the remote control to adjust the value.
5. Press to confirm and press Menu to exit.
H Position
V Position
Phase
Clock
Auto Adjust
Move Enter
OK
Menu
0
Return
A
UTO ADJUST
Input
Picture
KeyStone
PC Setting
Setup
Information
1. Press Menu on the remote control.
2. Press S/T to select PC Setting, then press .
3. Press S/Ton the remote control to select Auto Adjust then press .
4. Press again to confirm.
Input
Picture
KeyStone
PC Setting
H Position
V Position
Phase
Clock
Auto Adjust
Set
28
Setup
Information
Move Enter
OK
Menu
Return
Page 35
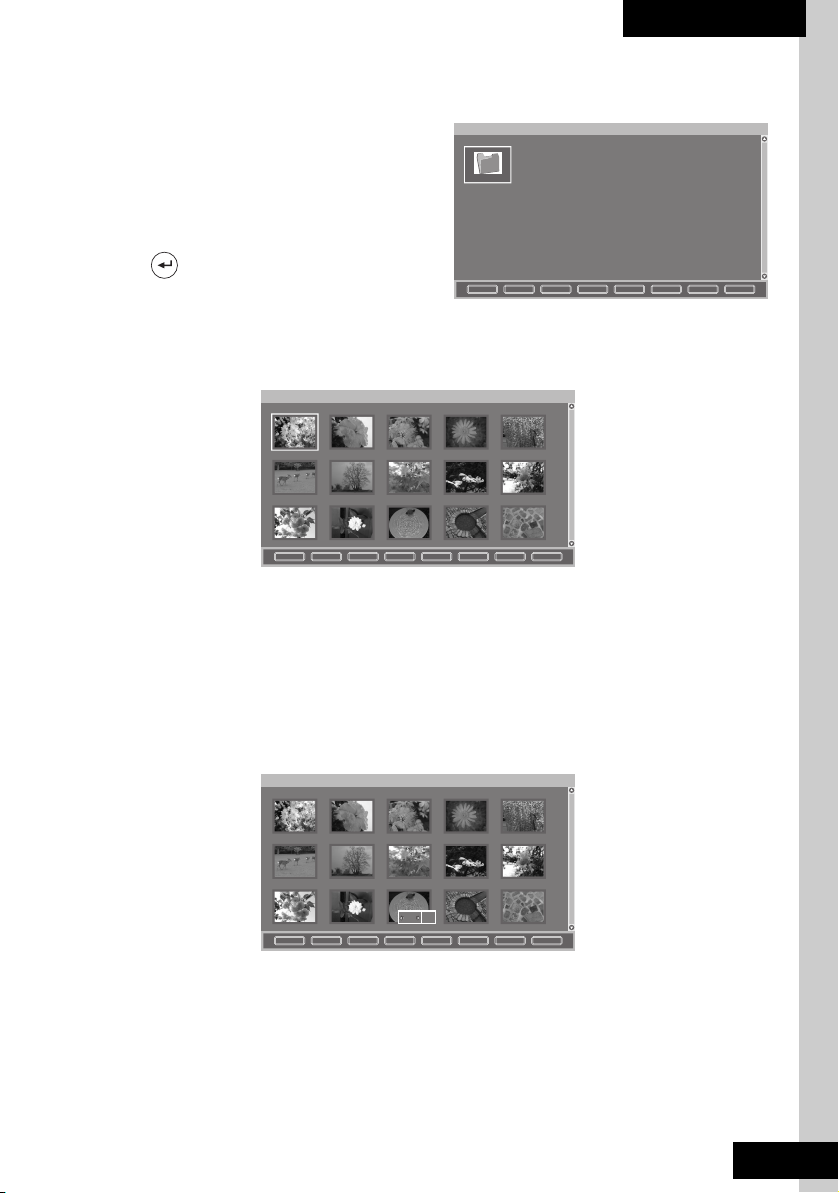
Viewing pictures in USB mode
User Manual
1. Press S/T/ W / X on the remote
Photo Information 100MEDIA
1/1 file
control to select the picture folder.
2. Press S/T/ W / X on the remote
100MEDIA
control to scroll through the
pictures and options.
3. Press to confirm.
Thumbnail SlideShow Next Previous Zoom Pan Rotate LastLayer
T HUMBNAIL VIEW
Select Thumbnail to view pictures in a thumbnail view.
Photo Information FILE0030.JPG 4000X3000 1/15 file
Thumbnail SlideShow Next Previous Zoom Pan Rotate LastLayer
S LIDES HOW
Select SlideShow and press W / X on the remote control to adjust the transition
time.
• To pause the slide show, press the Enter key on the remote control.
• To resume the slide show, press the Enter key again.
Photo Information 1/1 page
03s
OK
Thumbnail SlideShow Next Previous Zoom Pan Rotate LastLayer
29
Page 36

mini projector
Z OOM
Select Zoom to zoom in on the pictures.
P AN
Select Pan to reposition the pictures.
R OTATE
Select Rotate to rotate the pictures.
30
Page 37

User Manual
Appendix
Specifications
Model AUR-UNIPROJECTOR 16-9
Solution 1 x 0.555" LCoS
Resolution(native) 720P
Input I/O HDMI, D-Sub, Composite,
USB, Audio In(Phone Jack)
Output I/O Audio line out (Phone Jack)
Power Consumption 40 W (Max)
Picture arrangement NTSC, VGA, HDMI 1.3, USB 2.0(JPEG only)
Weight 890 g
31
Page 38

mini projector
Troubleshooting
Problem Possible causes Solutions
Power LED is not
illuminated.
ON/OFF LED is not
illuminated.
Remote control is
not working.
No picture A/V connection may be
No sound Audio cable not connected or
Power cord is not connected
correctly.
Power not available. There may be a power outage in
The mini projector is not
turned on.
Batteries may be low. Replace the remote control
loose.
Incorrect source is selected. Make sure that the correct input
loose connection.
Volume too low or muted
from the mini projector.
Video played is a silent
program.
Make sure that the power cord is
connected correctly. Refer to the
quick start guide.
your area. Make sure that other
electronic devices are working
correctly.
Use the remote control to turn
on the mini projector.
battery.
Check that the A/V cables are
connected securely.
source is selected.
Make sure that the audio cable
is connected properly.
Increase volume setting for the
mini projector.
Ensure that the video is not a
silent program.
32
Page 39

User Manual
33
 Loading...