

Page 1

Digital
OPERATION MANUAL
MARINE RADAR
T-900 Series
This product is specifically
designed to be installed on boats
and other means of maritime
transport. If your country forms part
to the EU, please contact your
dealer for advice before attempt ing
to install elsewhere.
T-900SER.OM.E 0093142132-00-S
Page 2
Page 3

T-900 series Document Revision History
T-900 series Operation Manual
Doc No. 0093142132
Document Revision History
No. Doc. No / Rev. No. Date Revised
(D/M/Y)
0 0093142132-00 18/07/2008 First edition
1
2
3
4
5
6
7
8
9
10
Document No. Revised Version Norm
When part of the document needs to be revised, change the cover and the version of chapter in which
the revision occurs. And, keep a version of original chapter unchanged. The document No. is indicated
Revised Content
at the lower right side on the cover and at the left or right side of the footer region of each page.
Ban of Re-use/ Transcription
Unless the re-use/transcription of a document is permitted in written form of SI-TEX manufacturing
company, we prohibit the unauthorized transcription and re-use of any part of content in this manual.
Non-liability
The specification and engineering content described in this manual may be changed without notice.
SI-TEX manufacturing company is not liable for any human damage, or damage or trouble due to
misunderstanding of content described in this manual.
0093142132-00 i
Page 4

Important Notices T-900 series
Important Notices
• The re-use and transcription of the Operation Manual (hereafter called this manual) requires
permission from SI-TEX. SI-TEX prohibits any un-authorized re-use and transcription.
• If this manual is lost or damaged, consult the dealer or SI-TEX.
• The specifications of our products and the content in the Operation Manual may be changed without
notice.
• In the explanations of this manual, the content displayed on the menu of the product may be
different. The keys and menus in the illustrations may differ in physical font and shape. And some
parts may be omitted.
• SI-TEX is not liable or responsible for damage or trouble due to misunderstanding of the content
described in this manual.
• SI-TEX is not liable or responsible for damage due to “acts of nature” such as earthquake, lightning,
fire actions by third parties, other accidents, customer’s unintended error/abuse or damage caused
by use under other abnormal conditions.
• SI-TEX is not liable for financial or loss (change/loss of memorized content, loss of business profit,
business failure) due to use or failure of our products.
• SI-TEX is not liable for any damage due to malfunction caused by the combination of software and
connected equipment which are not specifically approved.
ii 0093142132-00
Page 5
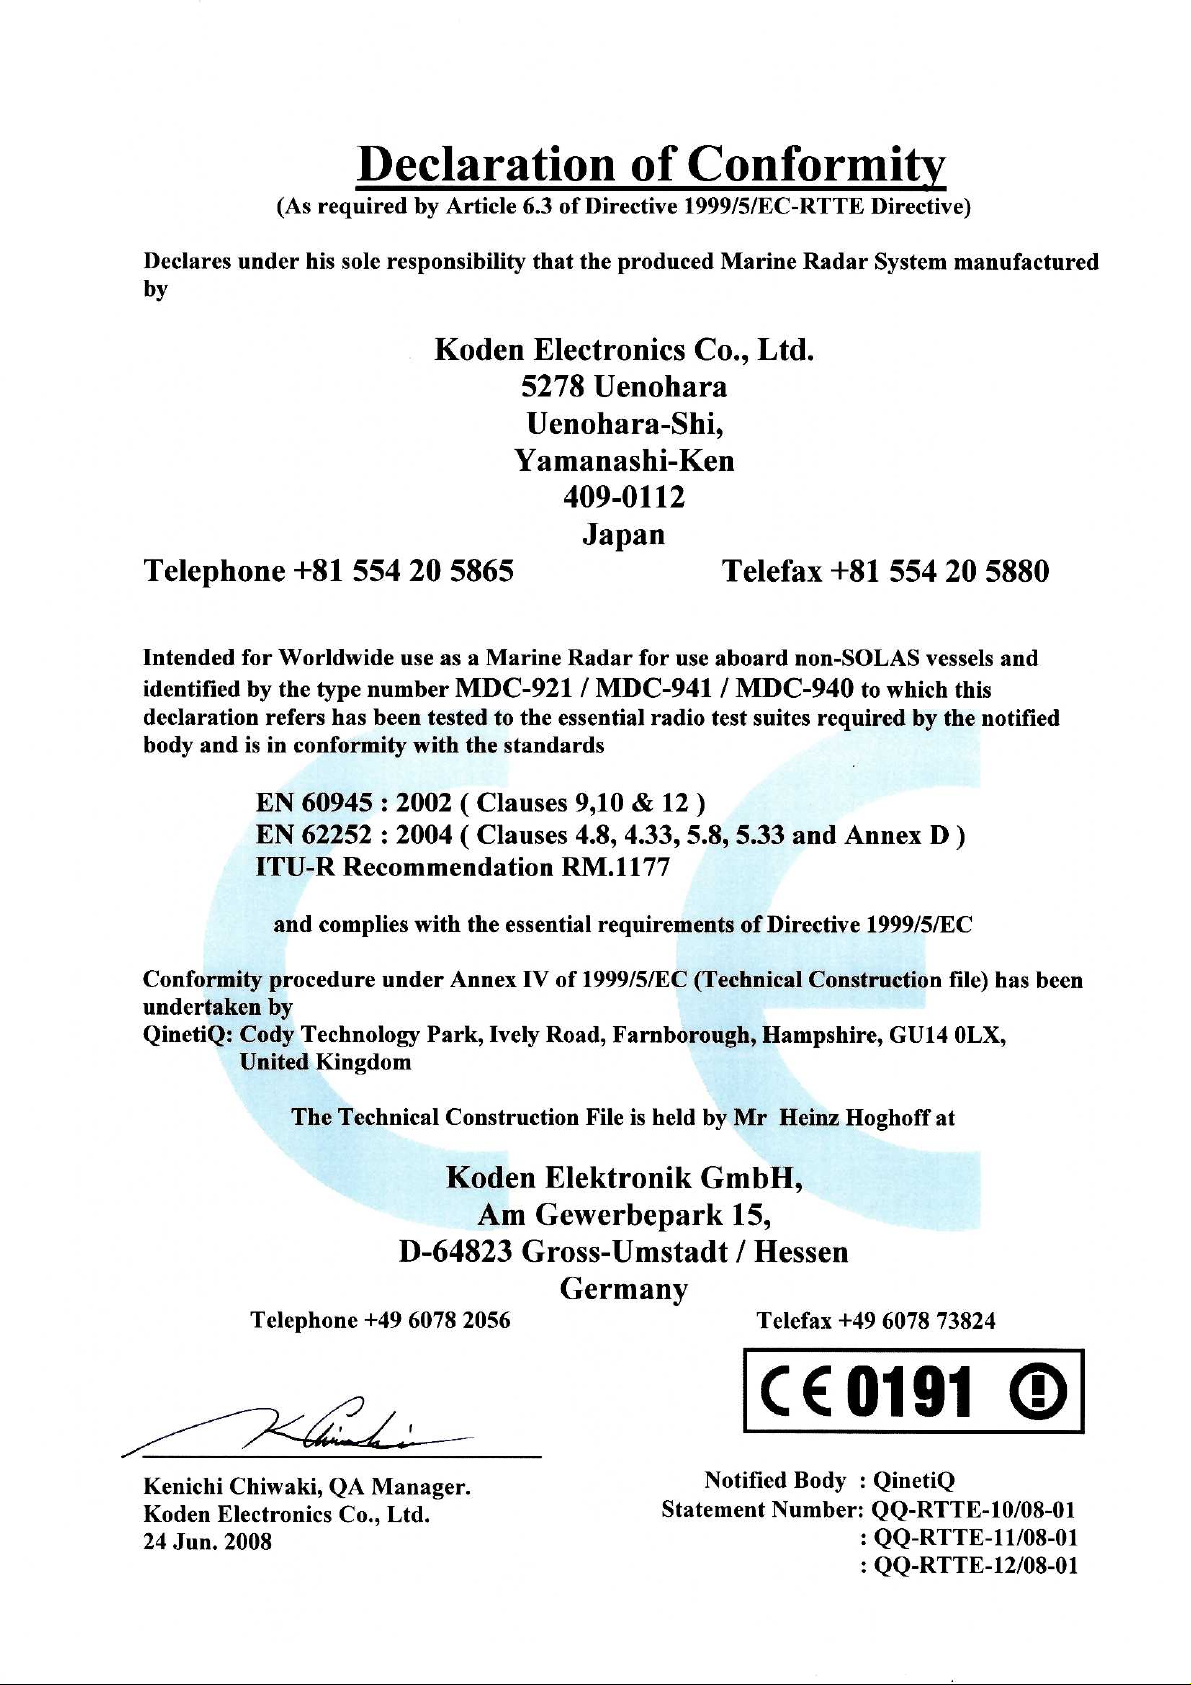
T-900 series For Safe Operation
For Safe Operation
Symbol used in this Operation Manual
This Operation Manual uses the following symbols. Understand the meaning of each symbol and
implement the maintenance and inspections given.
Symbol Meaning
Warning mark
Handle correctly. Otherwise, it may lead to death or serious injury.
High Voltage Caution mark
Handle correctly. Otherwise, electrocution may occur, which could result in
death or serious injury.
Caution mark
Handle correctly. Otherwise, it may lead to light injury or damage to the
equipment.
Prohibit Mark
This mark indicates that the specific action is prohibited. The inhibited
action is displayed around the mark.
Cautions and Warnings on Equipment
Be careful of rotating aerial.
The radar may start to rate without notice. For safety, keep away from the
radar.
Be careful of high frequency interference
Strong electromagnetic wave is radiated from the antenna. If the
electromagnetic wave is continuously radiated, human bodies may be
affected. The international law defines that the electromagnetic wave of a
power density of below 100W/m2 does not affect human bodies.
However, a medical appliance such as pacer maker may become unstable
due to small amount of power of electromagnetic wave.
In any cases, a person wearing such appliance should not be allowed
access to a place where the electromagnetic wave is radiated,
0093142132-00 iii
Page 6
For Safe Operation T-900 series
Distance from equipment having a specific power density of electromagnetic wave.
(By IEC 60945 regulation)
Model Transmitting power/ Antenna length 100W/m2 10W/m2
MDC-921 2kW/ 1.2 feet (Radome antenna)
MDC-941 4kW/ 2 feet (Radome antenna)
MDC-940
4kW/ 3 feet (Open antenna)
4kW/ 4 feet (Open antenna)
Be careful of a high voltage inside.
A lethal high voltage is used. This high voltage remains in the circuit after
you have turned off the power switch. To prevent touching the high voltage
circuit inadvertently, the protective cover is provided to the high voltage
circuit and the high voltage caution label is affixed. Be sure to turn off the
power switch for your safety and discharge the electricity remaining in the
capacitor before starting inspections. Only an engineer authorized by
SI-TEX should provides inspections and maintenance.
Be sure to turn off the power of the boat.
If the power switch is inadvertently turned on during work, lethal
electrocution could occur. To prevent such an accident from occurring, be
sure to turn off the power of the boat and the power of the equipment.
Furthermore, it is safer to hang a caution tag described as [Under Work]
near the power switch of the equipment.
Be careful of dust
Inhaling dust may cause a respiratory problem. When cleaning the inside of
the equipment, be careful not to inhale dust. Wearing a safety mask is
recommended.
0.4m 1.27m
0.8m 2.54m
0.9m 2.85m
1.01m 3.2m
Caution on location of equipment
Do not install the equipment where it is excessively damp and exposed to
water spray or dripping. The inside of the unit may be misted and the inside
may be corroded.
Preventing from static electricity
Static electricity may be generated from the carpet on the floor in the cabin
or clothes made of synthetic fiber. Static electricity can damage the
electronic parts in the circuit board. Be sure to take appropriate measures to
disseminate any static electricity from your body before handling the circuit
board.
iv 0093142132-00
Page 7
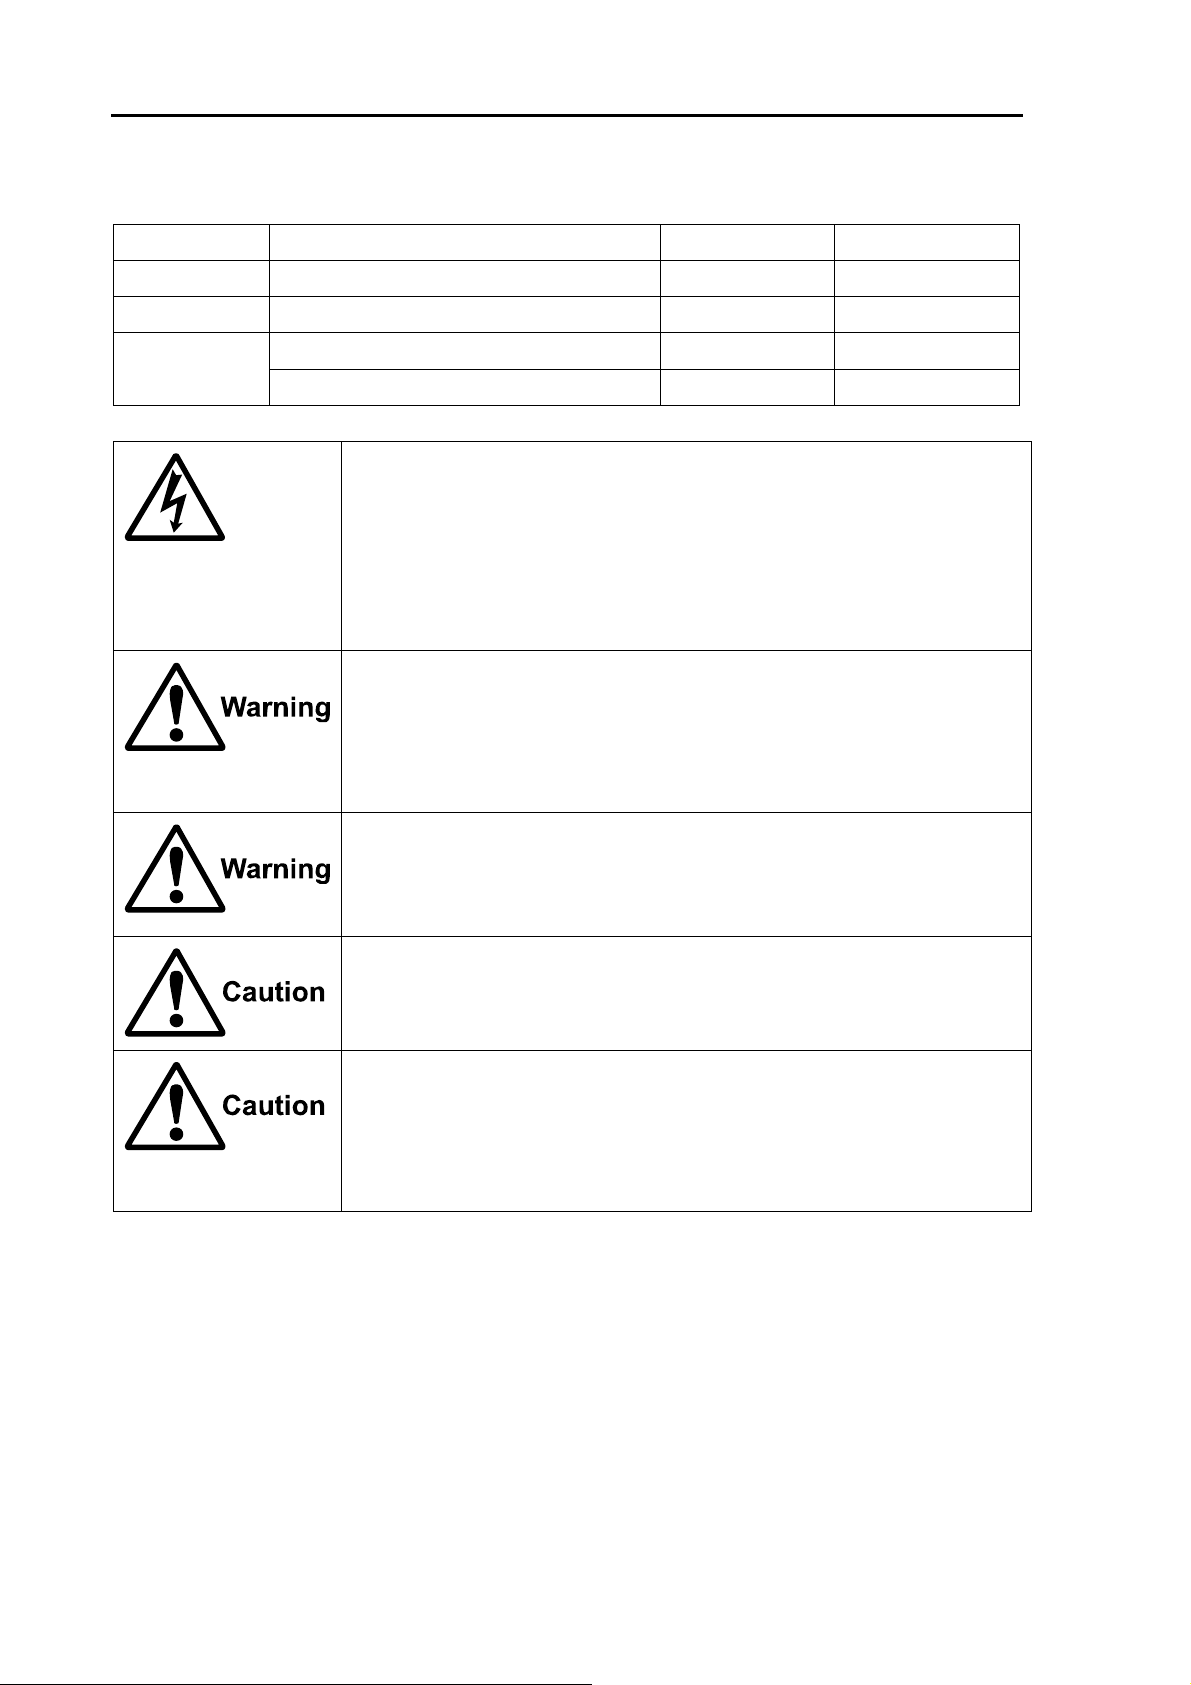
T-900 series For Safe Operation
Cautions and Warnings on Handling
Do not disassemble or modify. Otherwise fire, smoking or electric shock could occur. In case of trouble,
contact your dealer or SI-TEX.
In case of smoking or fire, turn off the boat power and the power of this
unit. Otherwise, fire, electric shock or damage could occur.
The information displayed in this unit is not provided directly for your
navigation. For your navigation, be sure to see the specified material.
Use the specified fuse. If un-specified fuse is used, it may cause a fire,
smoking or damage.
Caution on Display Unit
Do not push or scrub the surface of the display unit with a pointed tip of a
hard matter (tool, tip of a pen, etc) Scars could be made.
Do not press the surface of the display unit. Interference stripes or display
abnormality could occurs.
0093142132-00 v
Page 8

Contents T-900 series
Contents
Document Revision History ...................... i
Important Notices .....................................ii
For Safe Operation..................................iii
Introduction............................................ viii
System Configuration ..............................ix
Configuration of Equipment..................... x
Chapter 1 Basic Operation..................... 1-1
1.1 How to read the radar screen.....1-3
1.2 How to use the keys...................1-4
1.3 Power On/Off..............................1-6
Power On ...................................1-6
Power Off ...................................1-6
Language Selection at Initial
Start-up.......................................1-6
1.4 Brilliance Adjustment..................1-6
Brightness Adjustment of LCD... 1-6
Brightness Adjustment of
1.12 Measuring the distance and
bearing between two points .....1-10
Measuring the distance and bearing
between two points ..................1-10
1.13 Camera Display........................ 1-10
How to connect a CCD
camera .....................................1-10
How to display the video of a
CCD camera ............................1-10
Chapter 2 How to use the menu............. 2-1
2.1 How to operate the menu........... 2-1
Display/Non-display of Menu .....2-1
Operation of Menu .....................2-1
2.2 FTC Adjustment .........................2-2
2.3 Setting of Display Mode .............2-2
H UP (Head Up) ......................... 2-2
N UP (North Up).........................2-3
Panel ..........................................1-6
1.5 Transmission.............................. 1-6
Start of Transmission..................1-6
Stop of Transmission.................. 1-6
1.6 Switch-over of Range................. 1-7
Change of Range .......................1-7
Change of Sub-screen Range....1-7
1.7 Gain Adjustment......................... 1-7
Gain Adjustment......................... 1-7
Adjustment of Sub-screen
Gain............................................1-7
1.8 STC Adjustment .........................1-8
STC Adjustment .........................1-8
1.9 Use of [F1] and [F2] keys ........... 1-8
How to use [F1] and [F2] keys ...1-8
1.10 Delete of Heading Line...............1-9
Delete of Heading Line...............1-9
C UP (Course Up) ...................... 2-3
WPT UP .....................................2-3
Relative Motion (RM) and True
Motion (TM)................................ 2-3
True Motion Reset...................... 2-5
2.4 Display Select ............................2-5
PPI Display................................. 2-5
PPI/PPI Display.......................... 2-5
Note on PPI/PPI Display ............2-6
PPI/NAV Display ........................2-6
Note on PPI/NAV Display...........2-6
2.5 Setting of OFF CENTER............ 2-6
2.6 Setting of Enhance
(Enlarged Target) .......................2-6
2.7 Setting of Signal Process........... 2-6
2.8 Setting of Pulse Width................2-7
2.9 Trailing........................................2-7
1.11 Use of Crosshair Cursor.............1-9
Relative Display (R) ...................2-7
True Display (T)..........................2-8
vi 0093142132-00
Page 9

T-900 series Contents
2.10 EBL ............................................ 2-8
2.11 VRM ........................................... 2-8
2.12 Display Color.............................. 2-9
2.13 Crosshair Cursor Shape ............ 2-9
2.14 PI (Parallel Index Line) .............. 2-9
2.15 Bearing Mode............................. 2-9
2.16 Vector......................................... 2-9
2.17 Alarm........................................ 2-10
IN Mode ................................... 2-10
OUT Mode ............................... 2-10
Setting of Alarm Range............ 2-10
2.18 Sleep........................................ 2-10
Operation during executing the
sleep ........................................ 2-10
2.19 AIS ........................................... 2-10
Setting of Symbol Display of
AIS ........................................... 2-11
Setting of Detailed Information of
Chapter 4 Maintenance........................... 4-1
4.1 Maintenance .............................. 4-1
4.2 Fuse Replacement..................... 4-3
4.3 Consumables ............................. 4-3
4.4 Trouble Diagnosis ...................... 4-3
Chapter 5 Equipment ............................. 5-1
5.1 Antenna Installation ...................5-1
5.2 Mutual Connection Diagram .... 5-10
5.3 Installation Display Unit............ 5-11
5.4 Adjustment after Installation..... 5-13
5.5 Wiring....................................... 5-14
5.6 List of Input/Output
Sentence.................................. 5-18
Chapter 6 Attached Table....................... 6-1
6.1 Menu Configuration.................... 6-1
6.2 Specifications............................. 6-3
6.3 External View ............................. 6-5
Designated Symbol Display..... 2-11
Types and Meanings of AIS
Symbols ................................... 2-11
2.20 ATA........................................... 2-11
Automatic Acquisition............... 2-12
Manual Acquisition................... 2-12
Target Level ............................. 2-12
Target Delete............................ 2-12
Number of Acquisition.............. 2-13
Information Display .................. 2-13
Types and Meanings of ATA
Symbols ................................... 2-13
Chapter 3 How to use the system
menu ......................................3-1
3.1 Display of System Menu ............ 3-1
3.2 Setting of Assist Items................ 3-1
3.3 Setting of Adjustment Items....... 3-2
Chapter 7 Principle of radar system....... 7-1
7.1 What is the radar system? ......... 7-1
7.2 Characteristics of radar radio
wave........................................... 7-2
7.3 Radar interference ..................... 7-4
3.4 NMEA......................................... 3-7
3.5 Preset......................................... 3-7
3.6 Self-diagnosis ............................ 3-8
0093142132-00 vii
Page 10

Introduction T-900 series
Introduction
Thank for your purchase of SI-TEX color LCD radarT-900 series.
The quality and endurance of a unit is well considered. For the best performance, read this Operation
Manual and operate a unit correctly and safely.
The main features of this unit are as follows.
• The high performance radar equipped with 8.4 inch display can be used for professional use.
• In the true trail function, as moving targets such as other ships are displayed being tailed and
stationary targets such as land are displayed being fixed, the moving targets and fixed targets can
be easily discriminated.
• Two screen images of different ranges can be displayed. If you set a near distance screen and a far
distance, you can navigate properly and grasp a situation.
• The automatic tracking function (ATA) is provided. The maximum 50 targets can be tracked. The
current motion of other ships can be grasped in a vector and numeral so that it helps your ship to
navigate safely. (Optional)
• By connecting the AIS receiver, the gathered information such as name, heading and speed of a
ship can be displayed. (Optional interface)
• With the adoption of a specific filter (AR coat), an image can be seen clearly, refusing sunshine. The
countermeasures against the reflection on the LCD screen and dew are provided.
• The RGB output for an external monitor is provided as standard equipment. The use of the external
monitor enables you to observe easily the radar screen at a location which is remote from a main
unit. (External monitor: Prepared by a customer)
• A video from a CCD camera can be displayed. The inside of a ship can be observed by a camera
installed at the engine room helps your ship navigate safely. (CCD camera: Prepared by a customer)
• With the adoption of the gain/STC rotary knob, the operability is enhanced.
• When flush-mounted, a unit can be installed or removed from the front of the unit.
viii 0093142132-00
Page 11
T-900 series System Configuration
System Configuration
Connection Diagram
Antenna Unit
AIS receiver
Remote Display
MRD- XXX
RB714A/RB715A/RB716A
J5
POWER
J1
E
N
T
U
N
E
M
RANGE
J2 J6
GAIN
TX
BRILL
Display Unit MRD-103
J3 J4
Navigation Equipment Navigation Equipment
10.8 31.2VDC
J7
CCD camera
External Monitor
External Buzzer
Be sure to connect the KGC-1 to J4.
: Standard product
: Optional product
: Product prepared by a user
0093142132-00 ix
Page 12
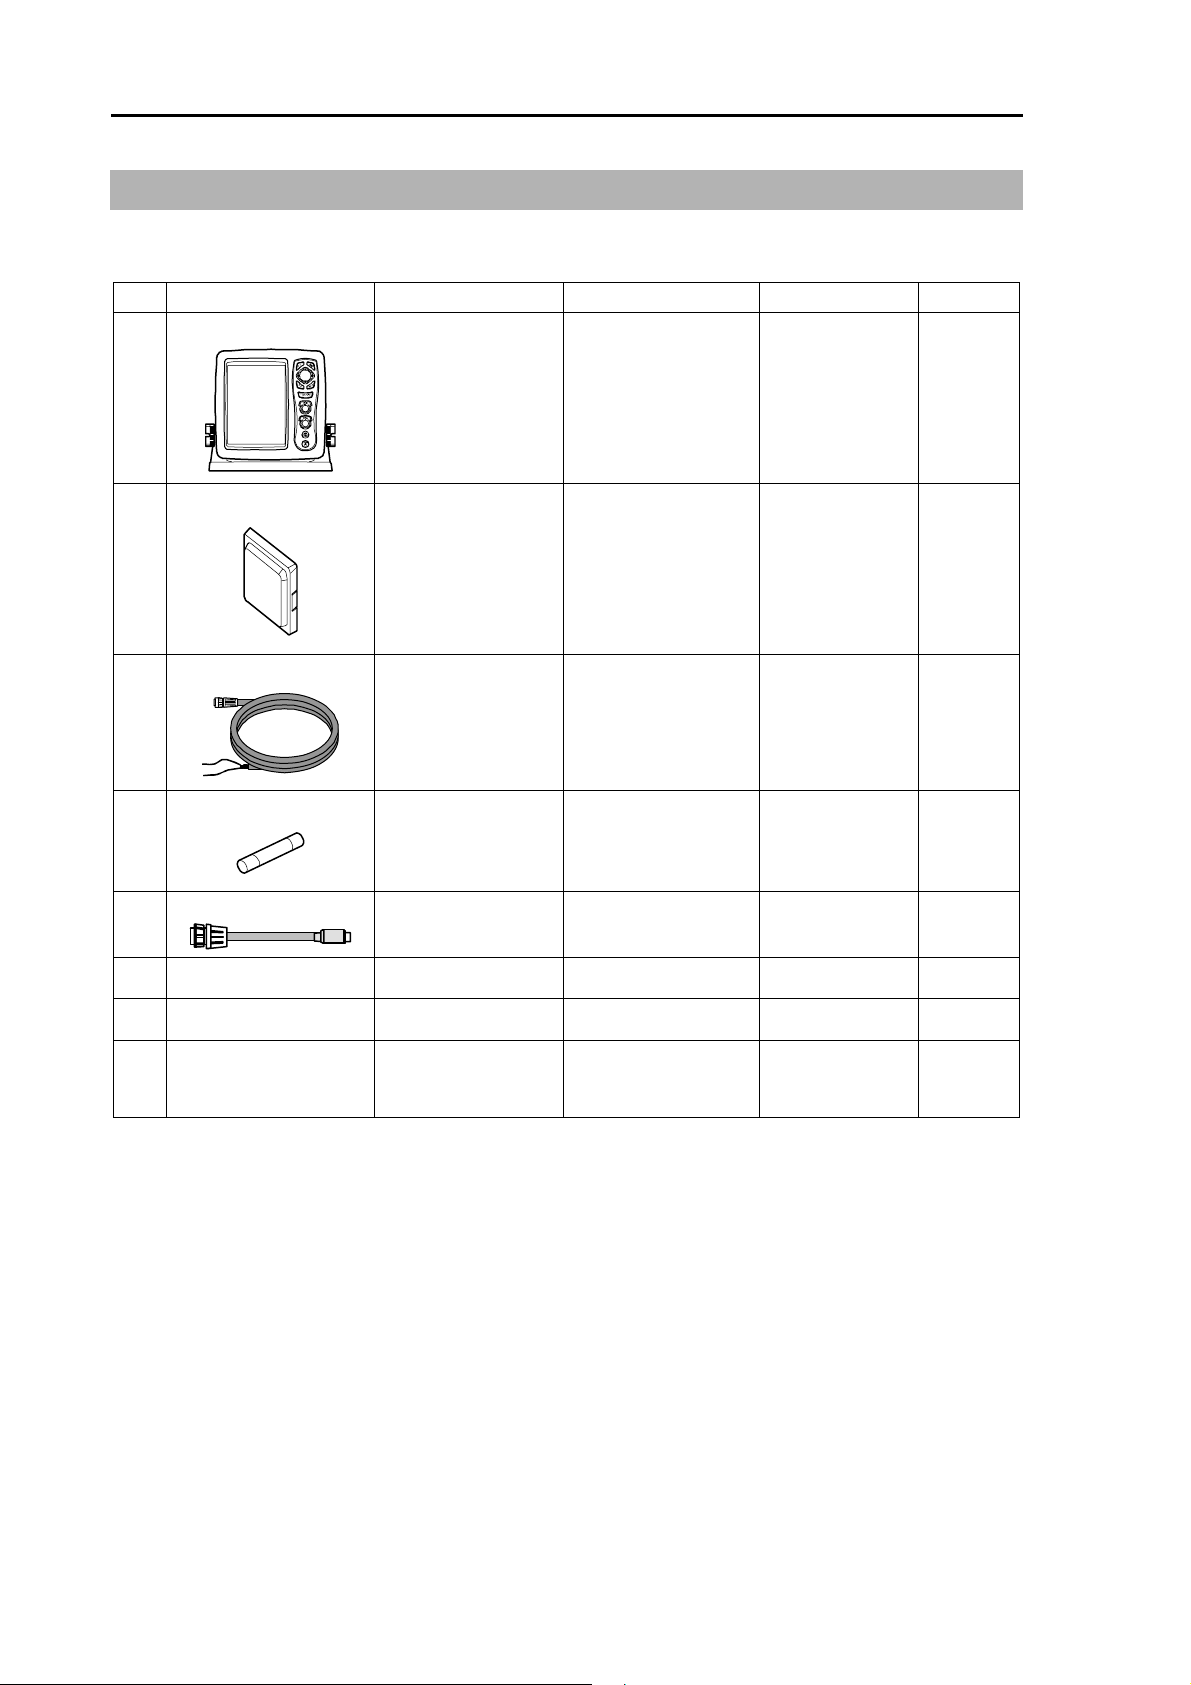
Configuration of Equipment T-900 series
Configuration of Equipment
Standard Equipment Configuration List
No Name of item Type Remarks Weight/Length Quantity
1 Display unit
MRD-103 With mounting
bracket and knobs
3.7kg 1
2 Hard cover
3 DC power cable
4 Fuse
5 CCD camera cable
6 Antenna unit See next page. With cable 1
7 Operation Manual English 1
8 Quick Reference
E57MB11060 250g 1
CW-265-2M 2m 1
F-1065-8A
Cylinder (ø6.3x32)
CW-405-0.3M 30cm 1
English 1
Normal fusion type
for main power
1
Guide
x 0093142132-00
Page 13
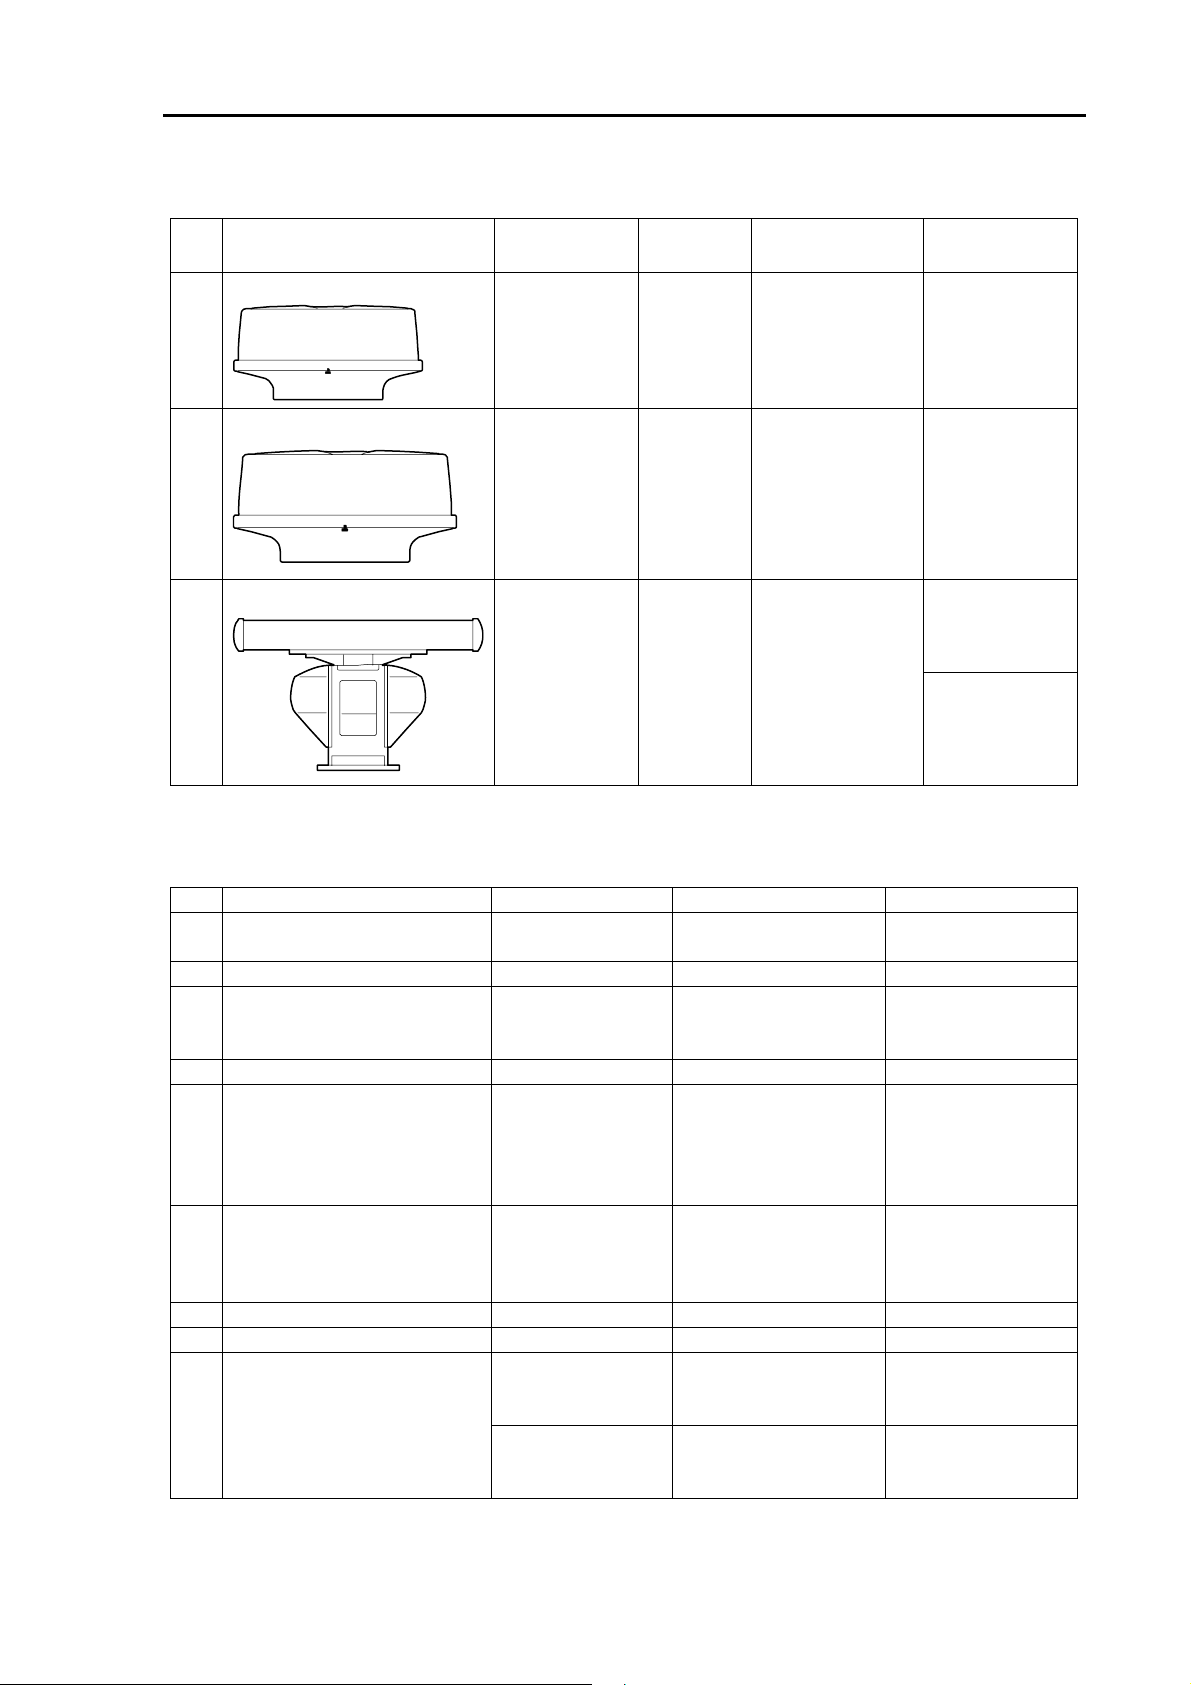
T-900 series Configuration of Equipment
Types of Antenna unit
No Type Transmitting
Power
1 RB714A
2 RB715A
2kW Radome With 10m cable* 6kg / 1.2ft
4kW Radome With 10m cable* 10kg / 2ft
Shape Remarks Antenna
Weight/Length
4kW Open With 10m cable*
* Cables of 20m and 30m are available. (Optional)
21kg / 3ft 3 RB716A
22kg / 4ft
Optional List
No Item Name Type Remarks Cable Length
1 GPS compass KGC-1 GPS/Heading
measuring
2 AIS interface AIS-110
3 Cable for AIS receiver CW-376-5M With 6-pin waterproof
connector and one
end plain.
4 ATA interface MRE-340
5 Cables for external
monitor/external buzzer
6 Cable for remote display CW-561-10M With 12-pin
7 Power rectifier PS-010 With two fuses (5A)
8 AC power cable VV-2D8-3M Both ends plain.
CW-576-0.5M With 10-pin
waterproof
connector/D-sub
(female)+ buzzer
terminal
waterproof
connectors at both
ends.
CW-373-5M With 6-pin waterproof
connectors at both
ends.
CW-376-5M With 6-pin waterproof
connector and one
end plain.
-
5m
0.5m
10m
5m 9 Cable for navigation cable
5m
0093142132-00 xi
Page 14
Chapter 1 Basic Operation T-900 series
Chapter 1 Basic Operation
The basic operation of this unit is as follows. For detailed explanation, refer to each item in this manual.
1.
1. Press the [BRILL] to turn
on the power.
When [ST'BY] appears, press
2.
the [STBY/TX] key to start
the transmission.
1.3 Power On/Off
1.5 Transmission
E
N
T
U
N
E
M
RANGE
GAIN
STBY
TX
BRILL
5. Rotate the [STC] knob to adjust the sea surface reflection suppression effect.
The suppression effect becomes strong when rotating clockwise the knob and
becomes weak when rotating counterclockwise the knob.
・This function reduces the gain at a near distance. If you turn clockwise the knob
too much, desired objects may disappear. Adjust properly to meet the weather
condition.
Example of STC adjustment :
: The suppression
is too weak.
The reflection from sea
surface is displayed.
1.8 STC adjustment
: Optimum
suppression.
The desired objects
are displayed.
:Thesuppression
is too strong.
Some objects are
not displayed.
1-1 0093142132-00
Page 15
T-900 series Chapter 1 Basic Operation
Change the observation range with the [- RANGE +] key.
3.
When pressing the [+] key, the observation range expands.
When pressing the [-] key, the enlarged surrounding around own ship can be observed.
To make it easier to observe the range you desire, change the range.
Example of display :
Long range : Far distance Middle range : Middle distance
Short range : Near distance
Objects at far distance
can be covered.
1.6 Switch-over of range
Adjust the gain by rotating the [GAIN] knob.
4.
The gain becomes high when rotating clockwise the knob and becomes low when rotating
counterclockwise the knob.
When the observation range is narrow or targets are crowded, reduce the gain so that
targets can be easily seen.
When the observation range is wide, if the gain is increased, it is effective.
But, due to noise increase, small targets become hard to be seen.
Objects near own ship
can be easily confirmed.
Example of gain adjustment:
: Too high gain
Noise is also displayed. Desired targets are
1.7 Gain adjustment
: Optimum gain : Too low gain
Some targets are not
displayed.
displayed.
0093142132-00 1-2
Page 16
Chapter 1 Basic Operation T-900 series
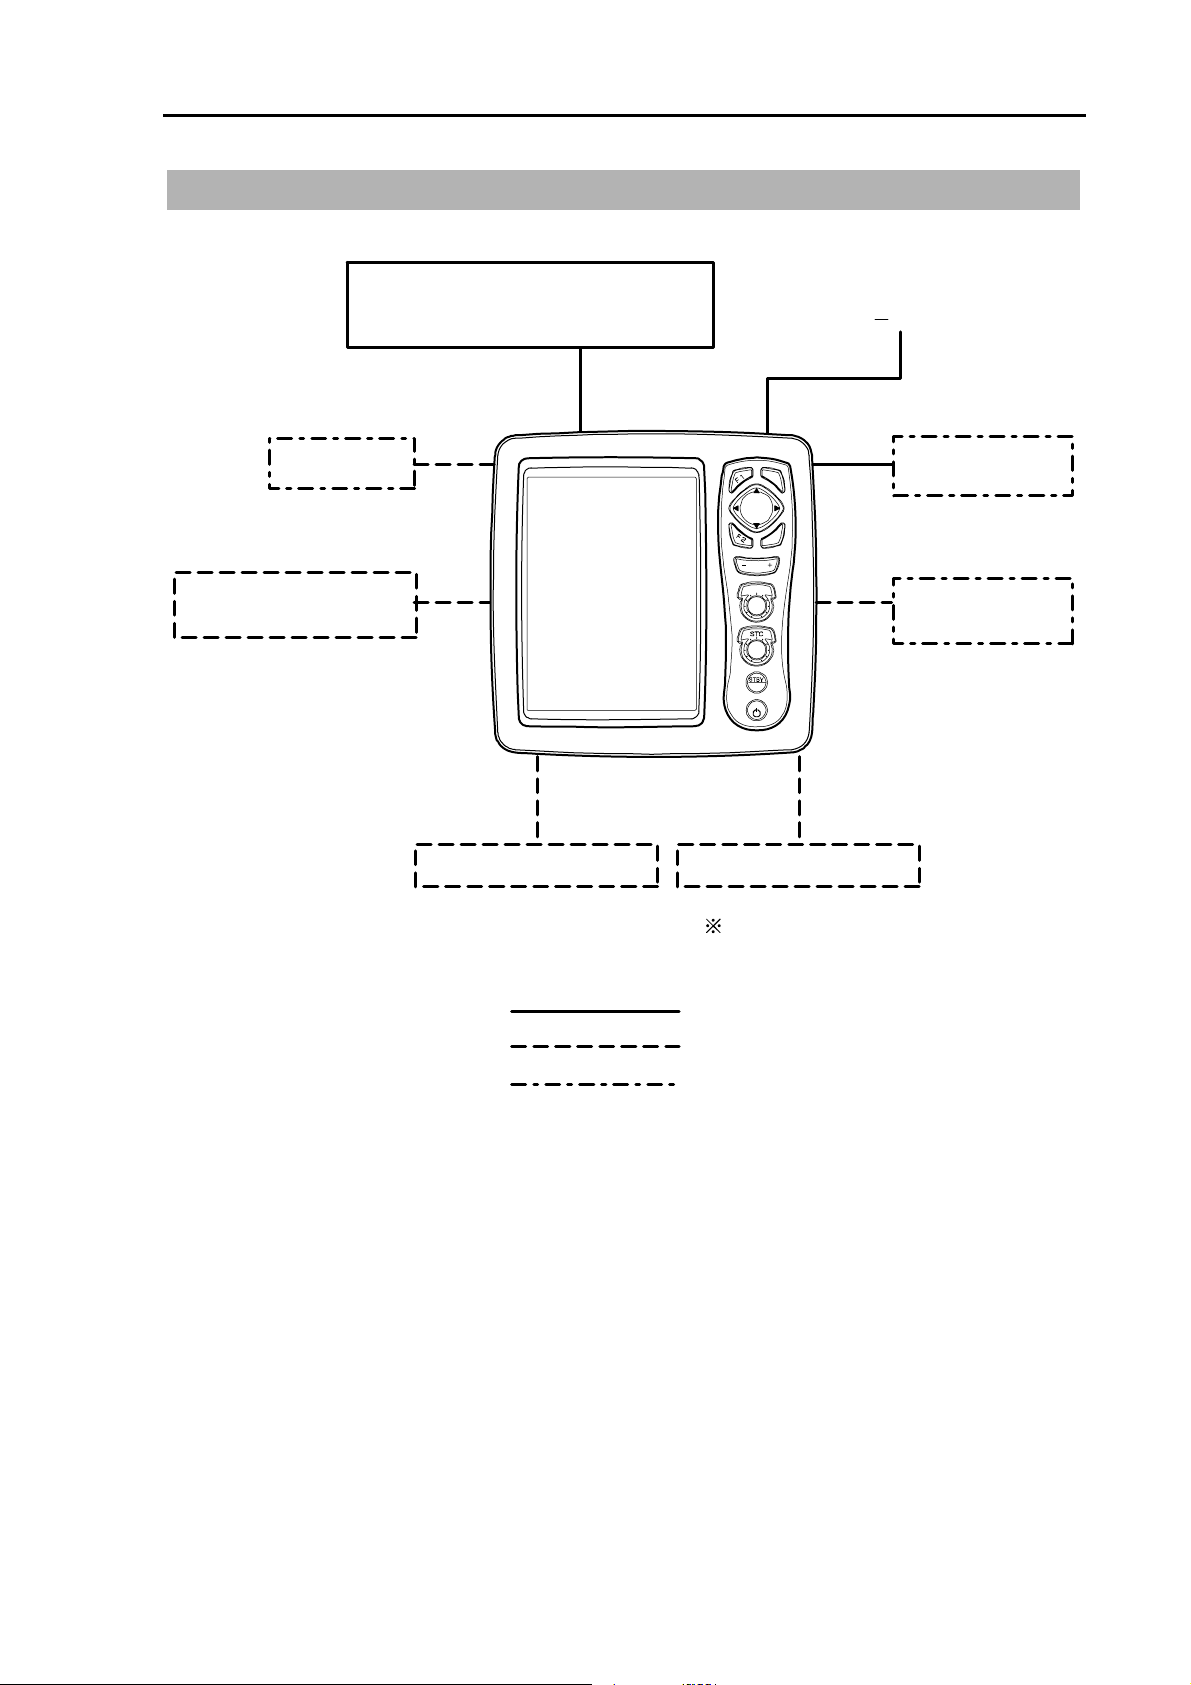
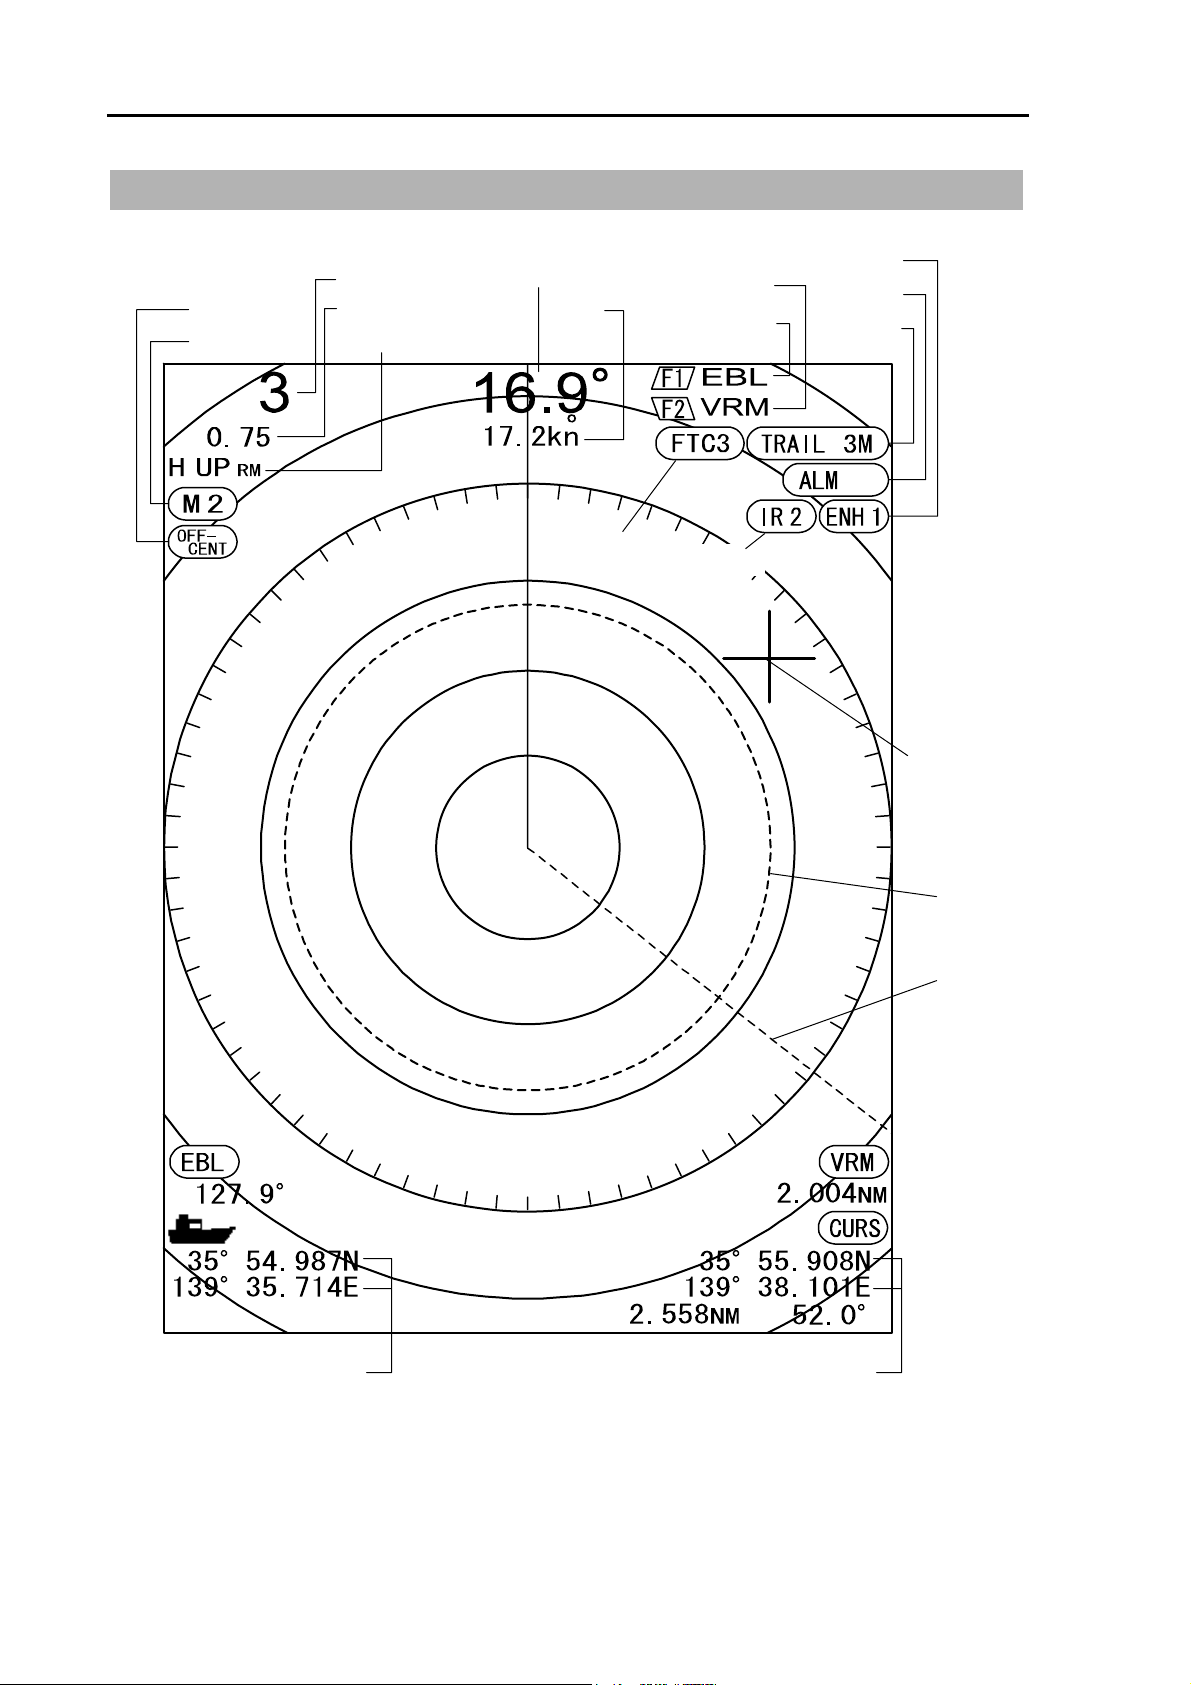
1.1 How to read the radar screen
Off center
Pulse width
Range
Fixed marker interval
Display mode
Heading
Ship
speed
FTC
F2 key content
F1 key content
Interference
Rejection
Enhance
Alarm
Trail
IN
Crosshair
cursor
VRM
EBL
OWN ship's position
Cursor position
1-3 0093142132-00
Page 17
T-900 series Chapter 1 Basic Operation
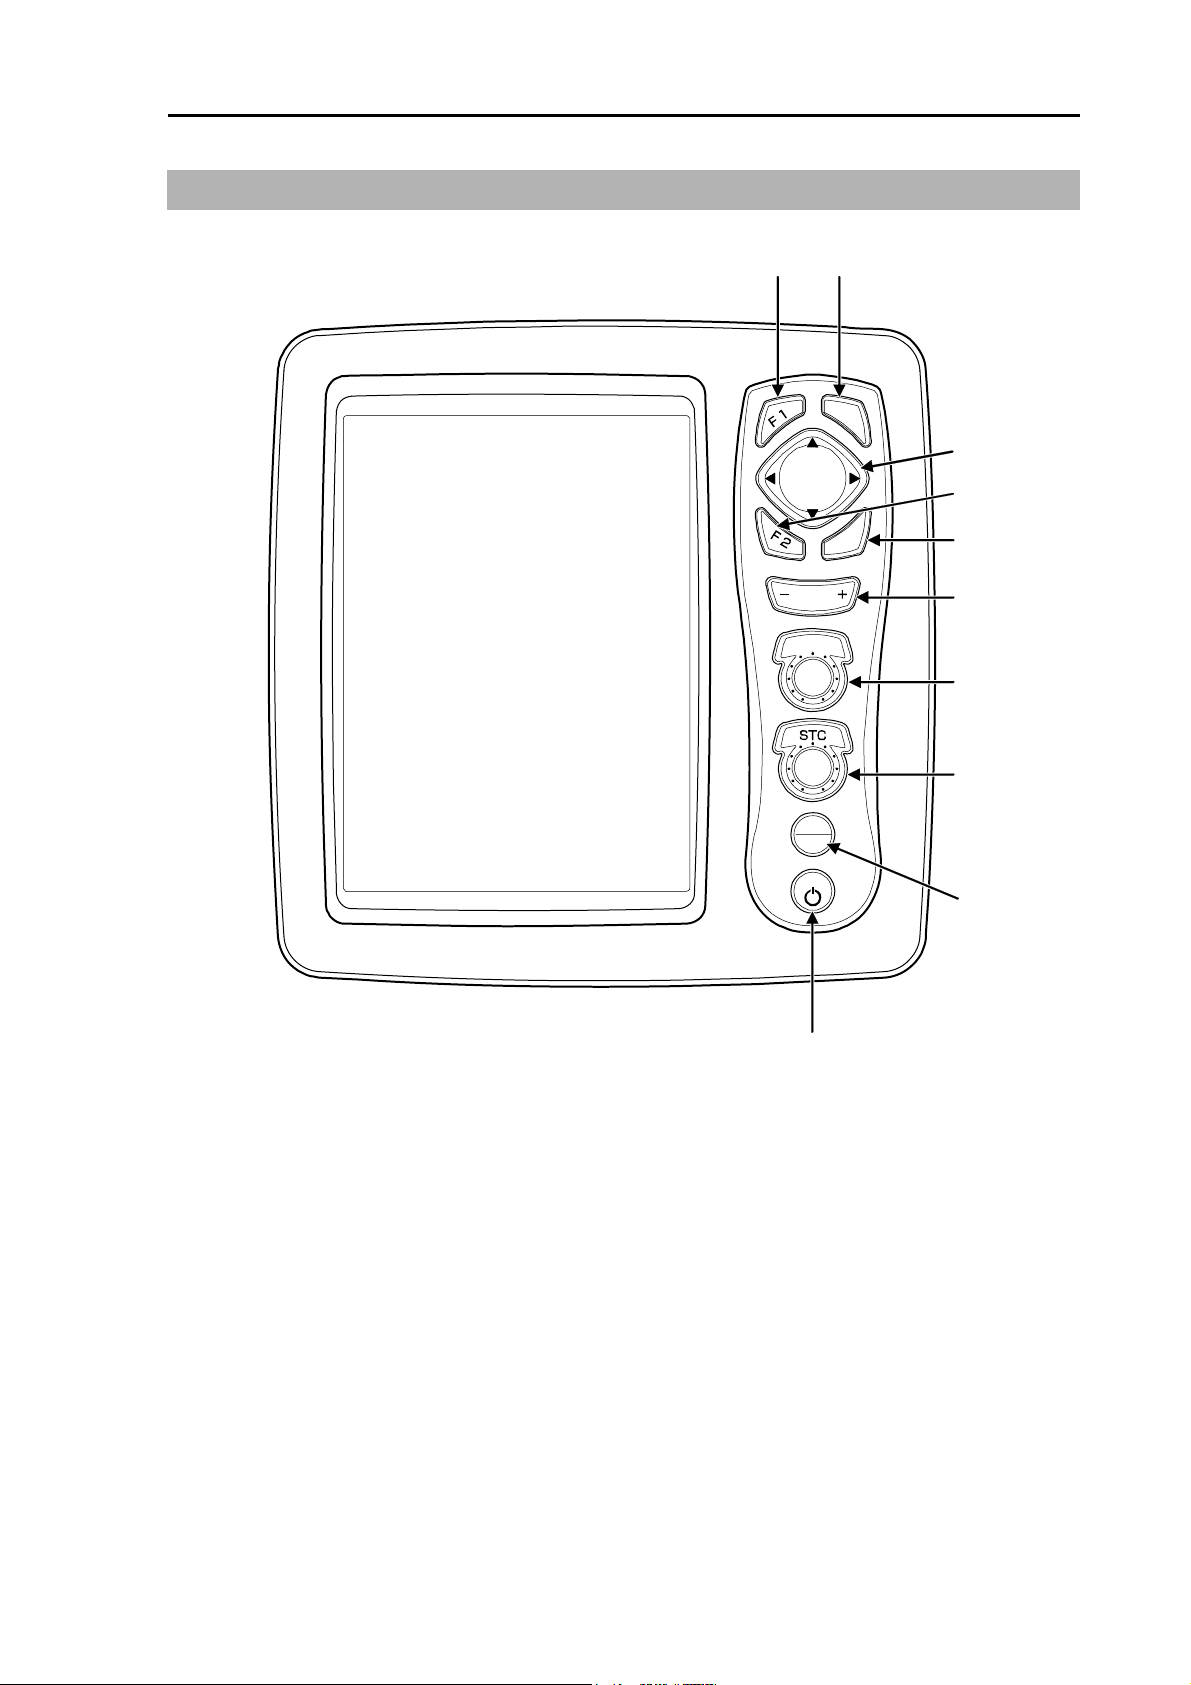
1.2 How to use the keys
(1) (2)
E
N
T
(3)
(4)
U
N
E
M
(5)
RANGE
GAIN
(6)
(7)
(8)
STBY
TX
BRILL
(9)
(10)
Various adjustment items can be set by operating each key.
The menu displayed by pressing the [MENU] key closes when pressing the [MENU] key again.
0093142132-00 1-4
Page 18

Chapter 1 Basic Operation T-900 series
Number Key name Explanation
(1) [F1] Recalls directly the preset menu item.
(2) [ENT] Press: measures bearing of distance between two points.
Continuously pressing: Deletes the heading line. The crosshair cursor
moves to the own ship’s position.
The value in the menu is set. (Some of functions)
(3) CURSOR
[
], [ ]
[
], [ ]
Selects the menu item.
Changes the content of set value.
Moves the crosshair cursor.
(4) [F2] Recall directly the preset menu item.
(5) [MENU] Opens or closes the menu.
(6) [- RANGE+] Changes the range setup.
(7) [GAIN]* Rotate: Changes the gain.
Push: Changes the gain adjustment of sub-screen (lower screen of
PPI/PPI) and the range.
(8) [STC]* Rotate: Changes the STC.
Push: Display the video of a CCD camera.
When the video of a CCD camera is displayed, if you press it,
the size of video changes.
(9) [STBY/TX] Starts or stops the transmission.
(10) [BRILL]* Push: Adjusts the brilliance and the brightness of the panel.
Continuously pressing: Turns on or off the power.
* When pressed during the CCD camera video display, the display of the CCD camera video becomes
no display.
When the alarm is functioning, the alarm stops by operating any key.
1-5 0093142132-00
Page 19
Chapter 1 Basic Operation Chapter 1 Basic Operation
1.3 Power On/Off
The [BRILL] key is used for both the power on/off
and the change of brilliance of the LCD and
panel.
Power On
1 Press the [BRILL] key to turn on the power.
The start-up menu is displayed. During the
display of start-up menu, the memory is
automatically checked. If the check result is
correct, the radar image appears.
Power Off
1 When turning off the power, continuously
pressing the [BRILL] key for 3 seconds.
A time required to shut down the power is
displayed on the screen.
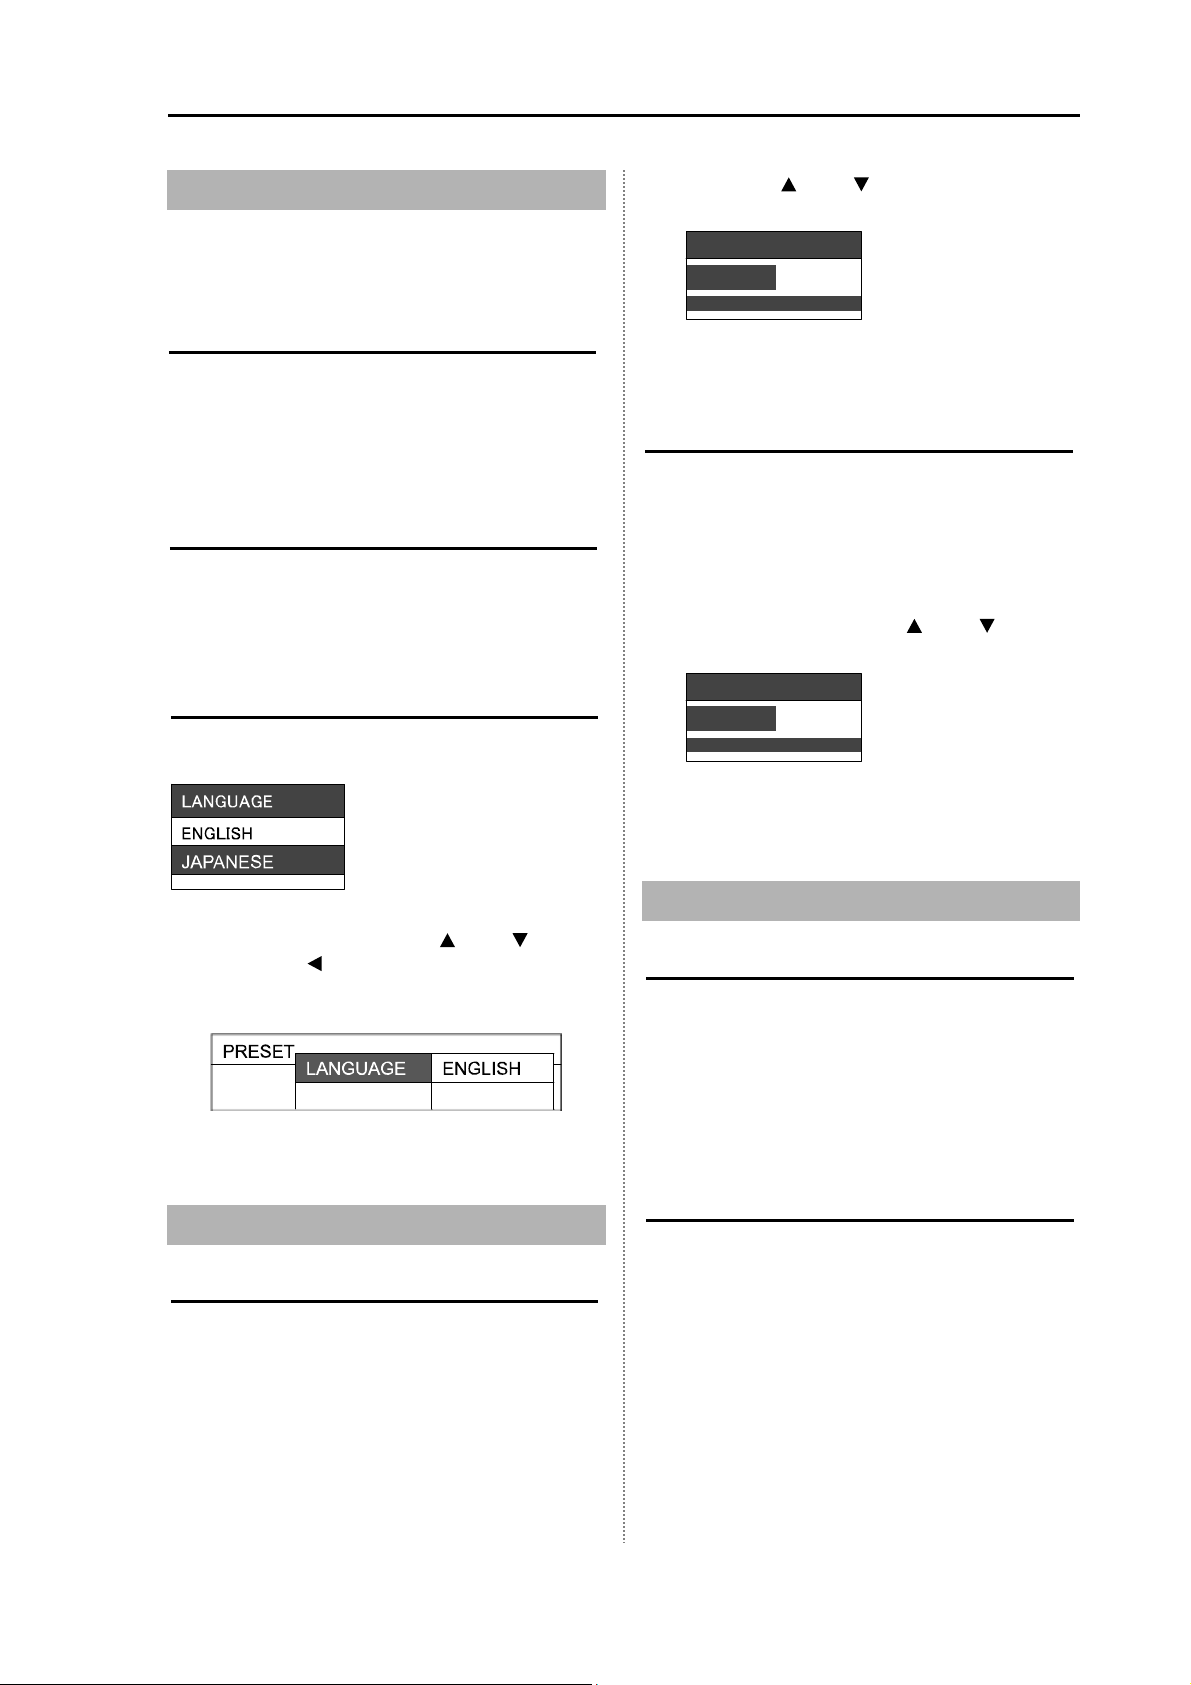
Language Selection at Initial Start-up
When turning on the power for the first time after
[ALL RESET], the [LANGUAGE] menu appears.
2 Press the [ ] and [ ] keys.
“1” is darkest. “10” is brightest.
LCD BRILL
10
3 Press the [MENU] key or [ENT] key to close
the menu.
Brightness Adjustment of Panel
The panel brightness can be adjusted,
Setup: (1 to 10) (Initial value: 10)
1 Press the [BRILL] key briefly.
When [LCD BRILL] appears, press the
[BRILL] key again.
2 Select the level with the [ ] and [ ] keys.
“1” is darkest. “10” is brightest.
PANEL BRILL
10
3 Press the [MENU] key or [ENT] key to close
the menu.
1 Select the language with [ ] and [ ] keys.
When the [
of [LANGUAGE] menu, the menu returns to
the initial setup menu.
] key is pressed during display
2 Press the [MENU] key to set the language.
1.4 Brilliance Adjustment
Brightness Adjustment of LCD
The brilliance of menu can be adjusted to make it
easier to see.
Setup: (1 to 10) (Initial value: 10)
1 Press the [BRILL] key briefly.
1.5 Transmission
Start of Transmission
In the 「STBY」 state, when the [STBY/TX] key is
pressed, the unit starts the transmission.
After turning on the power, remaining time of
pre-heat is displayed in the center of the screen.
After 120 seconds, ST’BY appears in the center
of the screen and the unit becomes 「STBY」
state.
Stop of Transmission
In the 「TX」 state, when the [STBY/TX] key is
pressed, the unit stops the transmission and
returns to the 「STBY」 mode.
0093142132-00 1-6
Page 20
Chapter 1 Basic Operation T-900 series
1.6 Switch-over of Range
The observation range can be changed.
Change of Range
1 Press the [- RANGE +] key.
When pressing the [+] key, an image shrinks
but the observation range expands.
When pressing the [-] key, the observation
range becomes narrow but the enlarged
surroundings around own ship can be seen.
The value of the range is displayed at the
upper left side of the screen.
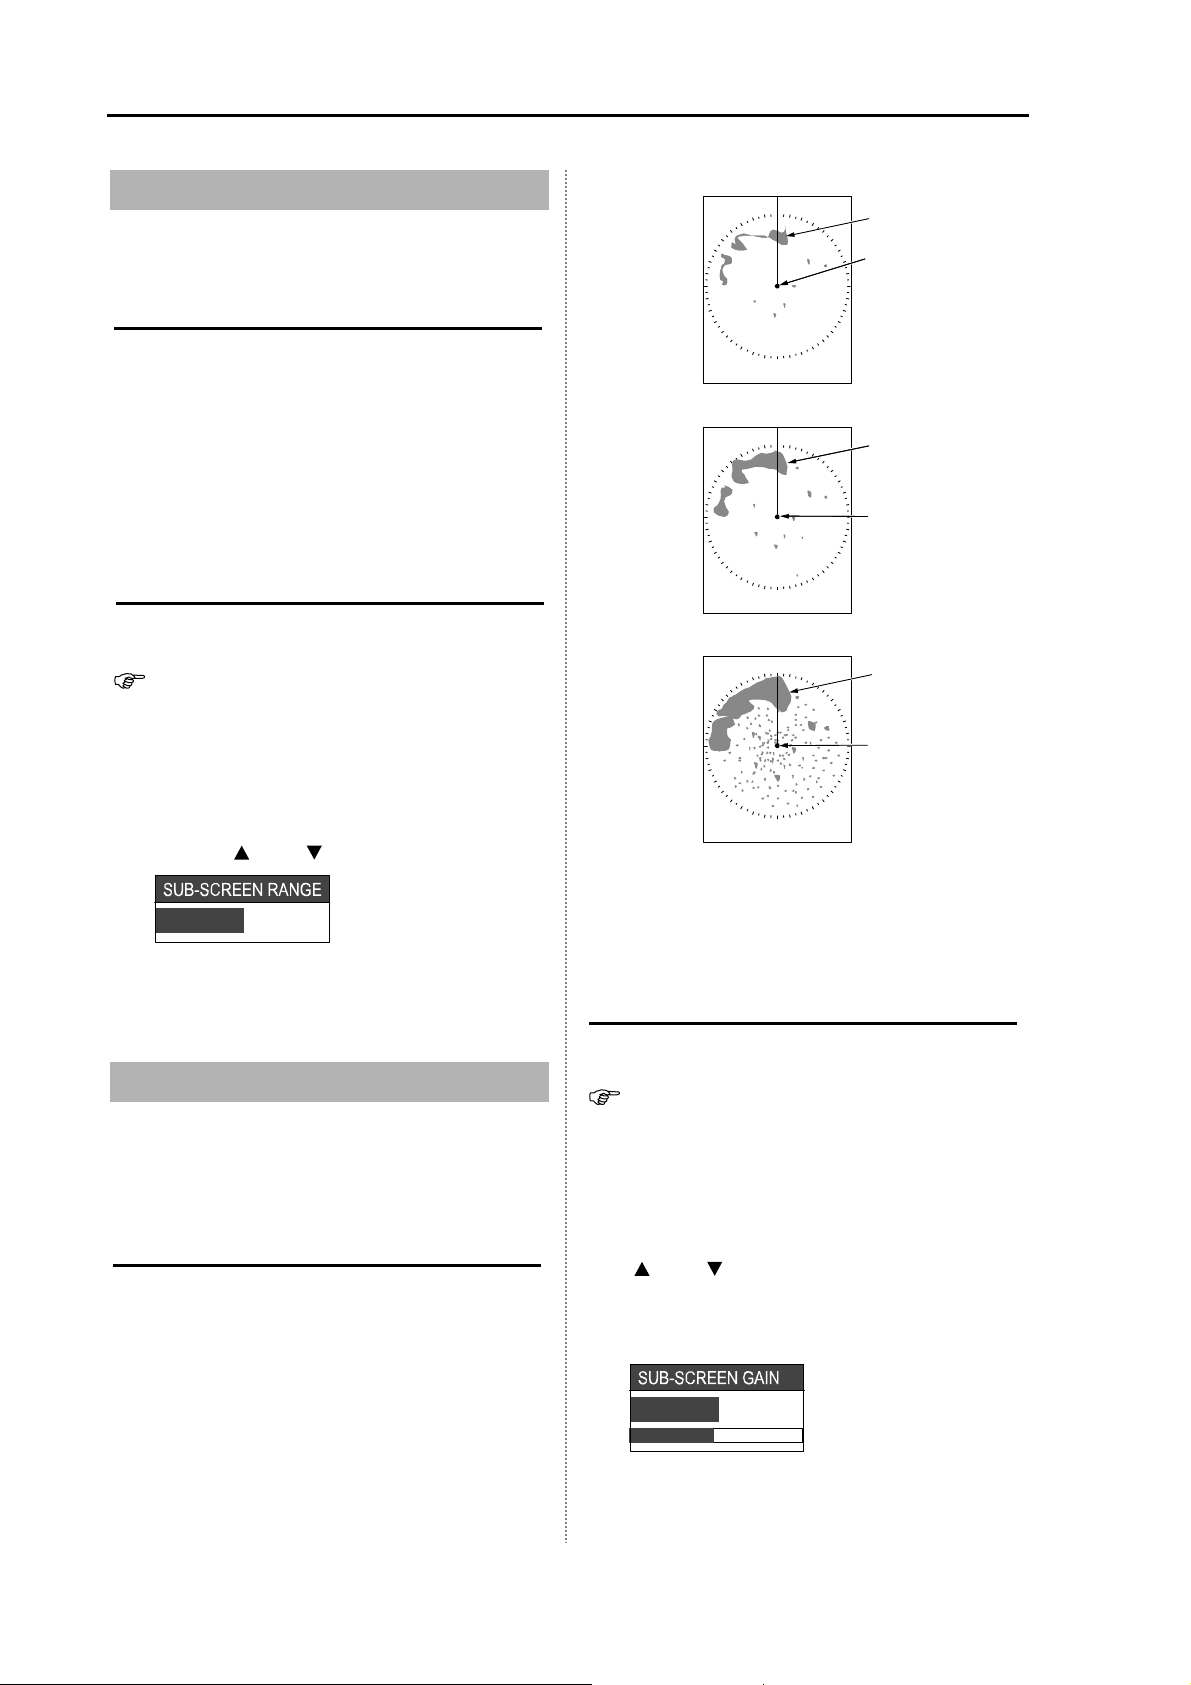
Change of Sub-screen Range
Change the range of the lower screen
(sub-screen) of the PPI/PPI menu.
For the PPI/PPI screen, refer to 2.4 Display
Select.
1 Press the [GAIN] knob.
When the [SUB-SCREEN GAIN] appears,
press the [GAIN] knob again.
Result picture after adjustment by [GAIN] knob
Land
Own ship
<Picture of too low gain>
Land
Own ship
<Picture of adjusted gain>
Land
Own ship
2 Change the range of the sub-screen range
with the [
0.75
] and [ ] keys.
3 Press the [MENU] key or [ENT] key to close
the menu.
1.7 Gain Adjustment
Adjust the gain according to the distance range
and reflection from the sea surface/rain/snow to
observe easily an image.
Gain Adjustment
1 When rotating clockwise the [GAIN] knob,
the gain increases.
When rotating counterclockwise the [GAIN]
knob, the gain decreases.
• When the short distance or targets are
crowded, if the gain is reduced, the image can
be easily seen.
• When the long distance, if the gain is
increased, it is effective but due to increase of
noise, the image becomes hard to be seen.
<Picture of too much gain>
In the PPI/PPI menu, the gain of the upper
screen (main screen) changes when the [GAIN]
knob is adjusted.
Adjustment of Sub-screen Gain
Adjust the lower screen (sub-screen) in the
PPI/PPI menu.
For the PPI/PPI screen, refer to 2.4 Display
Select.
1 Press the [GAIN] knob.
When the [SUB-SCREEN RANGE] appears,
press the [GAIN] knob again.
2 Adjust the sub-screen gain again with the
[
] and [ ] keys.
The gain increases when increasing the
numeral and decreases when decreasing the
numeral.
5.0
3 Press the [MENU] key or [ENT] key to close
the menu.
1-7 0093142132-00
Page 21
Chapter 1 Basic Operation Chapter 1 Basic Operation
1.8 STC Adjustment
In the short distance menu, even if waves are
low and the sea surface is calm, an echo
reflected from the sea surface appears in the
image.
When waves become high, the sea surface
reflected echo covers around the center of the
image and make it harder to see targets.
Adjust the STC to suppress the reflection from
the sea surface so that the image becomes
visible easily.
STC Adjustment
1 When rotating clockwise the [STC] knob, the
reflection suppressing effect becomes
stronger.
• When not influenced by waves, rotate fully
counterclockwise the [STC] knob.
• This function reduces the gain at short
distance. If rotating clockwise the [STC] knob
too much, desired targets disappear.
Picture after adjustment with [STC] knob
Land
In the PPI/PPI menu, when rotating the [STC]
knob, the STC functions effective in both
displays.
1.9 Use of [F1] and [F2] keys
The following functions can be assigned to the
[F1] and [F2] keys.
• [FTC]
• [MODE]
• [DISPLAY SELECT]
• [OFF CENTER]
• [ENHANCE]
• [TRAIL TIME]
• [EBL]
• [VRM]
• [PI]
• [ALARM MODE]
• [COLOR]
• [MAN ACQ]
• [DELETE]
• [POB]
• [TARGET]
• [OTHER SHIP]
Refer to the F1/F2 keys set in 3.5 Preset.
<Picture with sea clutter>
<Picture of adjusted STC>
<Picture of too much STC>
Own ship
Land
Own ship
Land
Own ship
[The assigned function is displayed at the upper
right side of the screen.
How to use [F1] and [F2] keys
When pressing the [F1] / [F2] key, the assigned
function works.
Function Operation
FTC
Display Mode
Display Select
Off Center
Enhance
Trail Time
When pressing the [F1] / [F2] key, the
setup of FTC changes.
When pressing the [F1] / [F2] key, the
display mode changes.
When pressing the [F1] / [F2] key, the
display changes.
After pressing the [F1] / [F2] key, if [ ]
or [
] key is pressed, the ON/OFF
setup of the OFF CENTER changes.
After pressing the [
selected and moving the crosshair
cursor, if the [ENT] key is pressed, the
position of crosshair cursor is set as a
position of own ship.
When pressing the [F1] / [F2] key, the
setup of ENHANCE changes.
When pressing the [F1] / [F2] key, the
trail time changes.
] key with ON
0093142132-00 1-8
Page 22
Chapter 1 Basic Operation T-900 series
EBL
VRM
Screen Color
PI (Parallel
Index Line)
Alarm Mode
Manual
Acquire*
Delete*
POB***
Target***
Other Ship
Information**
The On/Off display of EBL is toggled
by pressing the [F1] / [F2] key.
Operate the EBL during display with
the [
] and [ ] keys.
The On/Off display of VRM is toggled
by pressing the [F1] / [F2] key.
Operate the VRM during display with
the [
] and [ ] keys.
When pressing the [F1] / [F2] key, the
display color changes.
After pressing the [F1] / [F2] key, the
display of parallel cursor changes to
the one side/both sides/OFF.
After pressing the [
side/both sides, change the interval
with the [
bearing with [
After pressing the [F1] / [F2] key, if the
[
] or [ ] key is pressed, the alarm
mode changes to the IN/OUT/OFF.
When selecting the In/Out, if the [
key is pressed, the mode enters in the
alarm range set state.
When pressing the [F1] / [F2] key, a
target aligned with the crosshair cursor
is acquired.
In case of selecting [NUMBER] in the
menu, if the [F1] / [F2] key is pressed, the
numeral selection menu appears.
Select the number of the desired capture
to be released with [
press the [ENT] key to set it.
In case of selecting [CURSOR] in the
menu, if the [F1] / [F2] key is pressed, the
capture of a target aligned with the
crosshair cursor is released.
The position of own ship at the
moment when the [F1] / [F2] key is
pressed is stored as a POB position. In
the state that the POB position is
stored, if the [
after pressing the [F1] / [F2] key, the
setup of renewal/release of the POB
position can be changed.
The renewal or release of the PO
position can be performed with the
[ENT] key.
The position of own ship at the
moment when pressing the [F1] / [F2]
key is outputted to the external
terminal with the TLL sentence.
When pressing the [F1] / [F2] key, the
information of a target aligned with the
crosshair cursor is displayed in the
window.
] / [ ] keys and then the
] key to the one
] / [ ] keys.
]
] / [ ] keys and
] or [ ] key is pressed
B
* The ATA interface (optional) is required.
** The AIS interface / cable (optional) or ATA
interface (optional) is required.
*** Inputting the latitude and longitude data is
required.
1.10 Delete of Heading Line
When a heading line overlaps over targets and it
is hard to see targets, the heading line can be
deleted.
Delete of Heading Line
1 When keep pressing the [ENT] key, the
heading line disappears. While pressing the
[ENT] key, heading line can be deleted.
Caution
For safety, it is not allowed that the
heading line remains deleted.
2 When releasing the [ENT] key, the heading
line appears again. At this moment, the
crosshair moves to the own ship’s position.
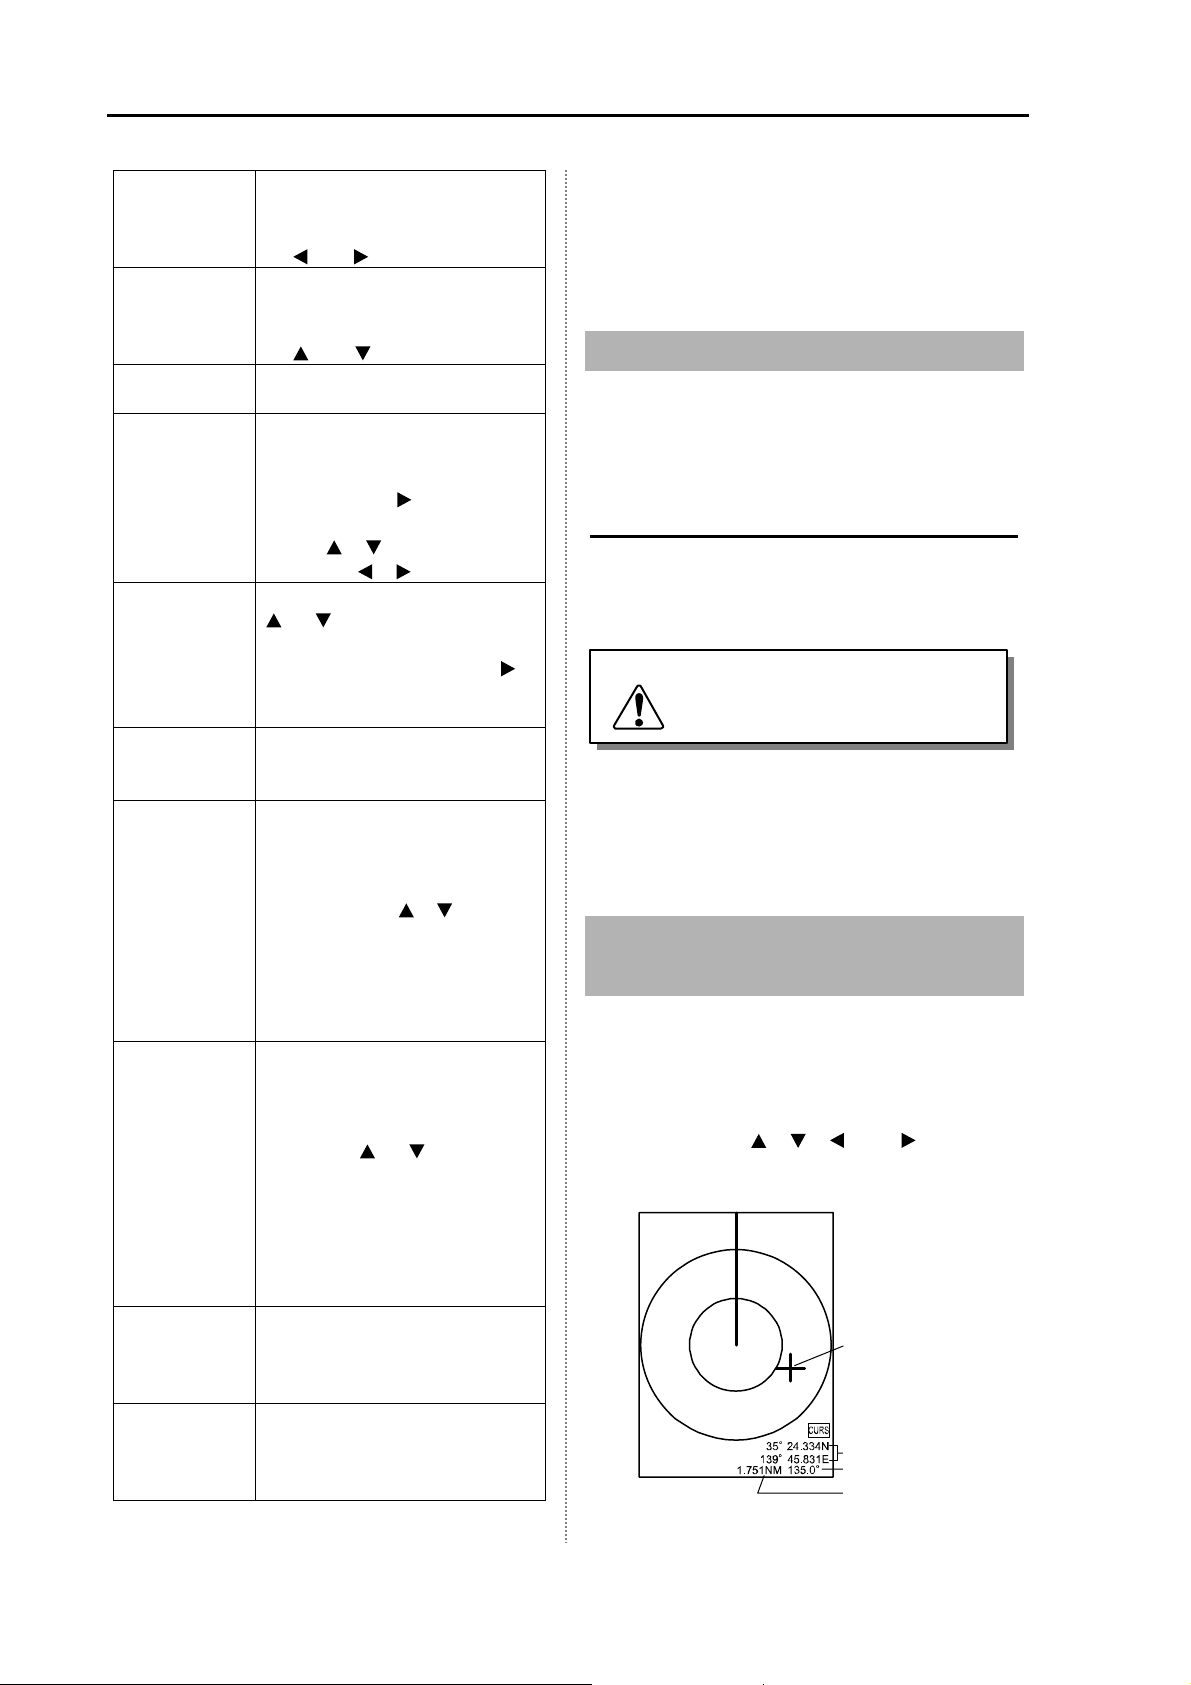
1.11 Use of Crosshair
Cursor
The crosshair cursor can move freely on the
radar screen. According to moving of the cursor,
the cursor position, distance and bearing from
own ship are displayed.
1 Press any of [ ], [ ], [ ] and [ ].
The crosshair cursor moves and the cursor
information is displayed.
crosshair cursor
cursor position
cursor bearing
cursor distance
1-9 0093142132-00
Page 23
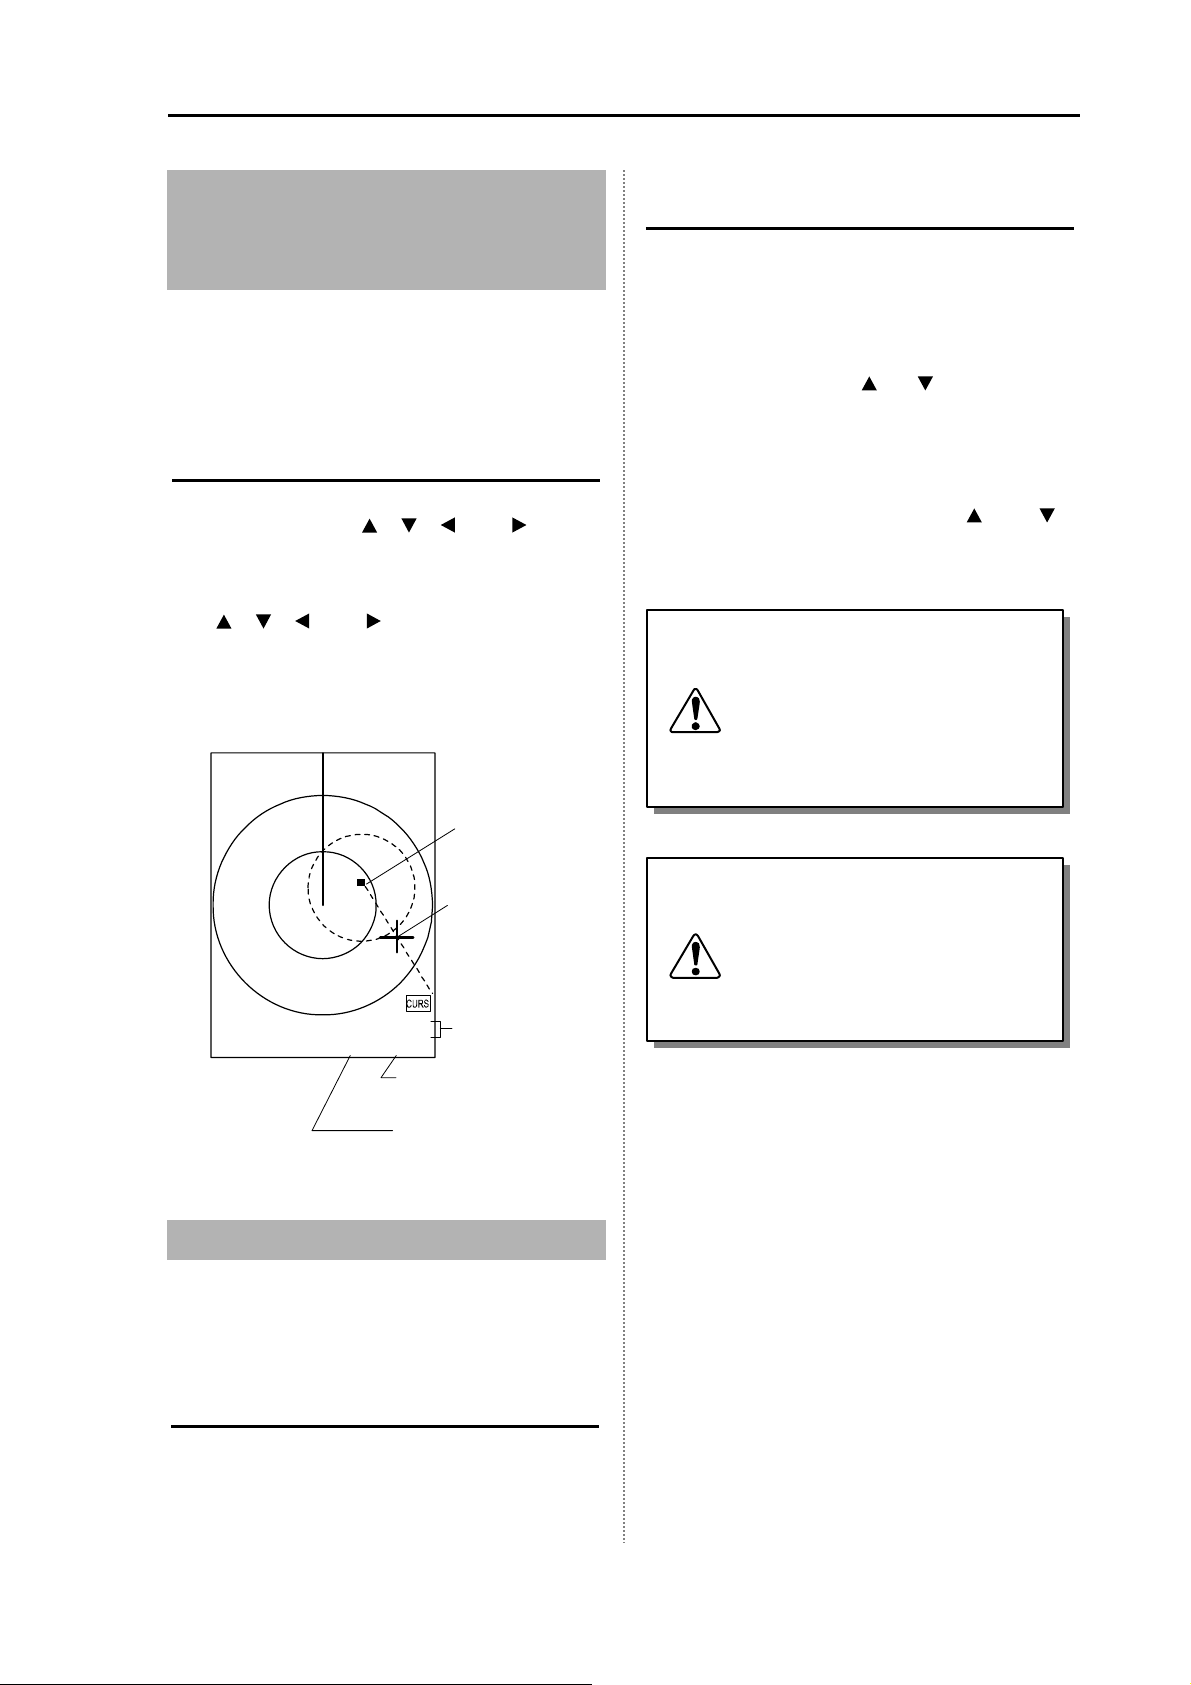
Chapter 1 Basic Operation Chapter 1 Basic Operation
1.12 Measuring the
distance and bearing
between two points
The distance and bearing between two points,
you desire, can be measured, using the
crosshair cursor.
Measuring the distance and bearing
between two points
Move the crosshair cursor to one point
1
desired with the [
2 Press the [ENT] key to set it as an origin.
3 When moving the crosshair cursor with the
[
], [ ], [ ] and [ ] keys, the distance and
bearing from the origin to the position of the
crosshair cursor are displayed.
4 When pressing the [MENU] key, the 2-point
calculation is finished.
], [ ], [ ] and [ ] keys.
origin
How to display the video of a CCD
camera
1 Press the [STC] knob.
The video of a CCD camera appears.
A split-screen display and a full screen
display are toggled by pressing the [STC]
knob.
2 When pressing the [ ] or [ ] key in the state
that a video of the CCD camera is displayed,
the display position of the video of the
camera video can be corrected.
3 When displaying the video of the CCD
camera, if a key other than the [
keys is pressed, the video of the CCD
camera disappears.
When displaying the video of a CCD
camera, the display area of the radar
Caution
image is narrowed.
When set to [Full Screen Display], the
radar image is completely concealed.
When displaying the video of a CCD
camera, pay attention to the display
area.
] and [ ]
crosshair cursor
35°24.334N
139°
0.903NM
45.831E
152.1°
cursor position
Bearing of the crosshair cursor
when viewed from the origin
Distance between the origin
and the crosshair cursor
1.13 Camera Display
The video of a CCD camera can be displayed on
the radar screen. (CCD camera: Prepared by a
customer)
How to connect a CCD camera
1
Connect the supplied cable (CW-405-0.3M)
to the rear connector (J7).
When installing a CCD camera, orient
Caution
it correctly. When correctly installed,
the 90 degree-shifted video of a CCD
camera is displayed. Install a CCD
camera in a correct orientation so that
the video in a correct direction is
displayed.
2 Connect a commercially available CCD
camera to the cable.
0093142132-00 1-10
Page 24
Chapter 2 How to use the menu T-900 series
Chapter 2 How to use the menu
2.1 How to operate the
menu
Display/Non-display of Menu
1 Press the [MENU] key.
The displays of the menu and the
explanation of operation are displayed.
Setting item column
OFF
H UP RM
PPI
OFF
OFF
OFF
RESO-P PRL
ECHO
TRAILS
DISPLAY
ALARM
AIS
ATA
NEXT
Menu column
Cursor
FTC
MODE
DISPLAY SELECT
OFF CENTER
ENHANCE
PROCESS
PULSE
When [Operation Guide] is set to ON,
the explanation of operation appears.
See 3.2 Setting of Assist Items.
2 Press the [ ] key.
The displays of the menu and the
explanation of operation close.
3 Select an item you desire to change with the
[
] and [ ] keys.
ECHO
TRAILS
DISPLAY
ALARM
AIS
ATA
NEXT
TRAIL MODE
TRAIL TIME
TRAIL SHAPE
TRAIL LEVEL
REL
3MIN
STANDARD
7
4 Press the [ ] key.
According to the selected item, the setup
menu appears.
TRAIL MODE
REL
TRUE
FIELD OF ANGLE
5.0
GUIDE
2 Press the [MENU] key, the display of the
menu and the explanation of operation
close.
Operation of Menu
1
When the menu is displayed, select a menu
name with the [
According to the selected menu, contents in
the setup items at the right side change.
ECHO
TRAILS
DISPLAY
ALARM
AIS
ATA
NEXT
TRAIL MODE
TRAIL TIME
TRAIL SHAPE
TRAIL LEVEL
] and [ ] keys.
OFF
3MIN
STANDARD
7
PI NUMBER
7
1 ~ 7
5 Change contents of setup with the [ ] and
[
] keys.
6 Press the [ ] key. Then, the cursor returns
to the setup item column.
7 To select another menu name, press the [ ]
key.
The cursor returns to the menu column.
8 Press the [MENU] key to close the menu.
Caution
Unless the AIS interface is equipped,
you cannot operate the AIS menu.
Unless the ATA interface is equipped,
you cannot operate the ATA menu.
0093142132-00 2-1
Page 25
T-900 series Chapter 2 How to use the menu
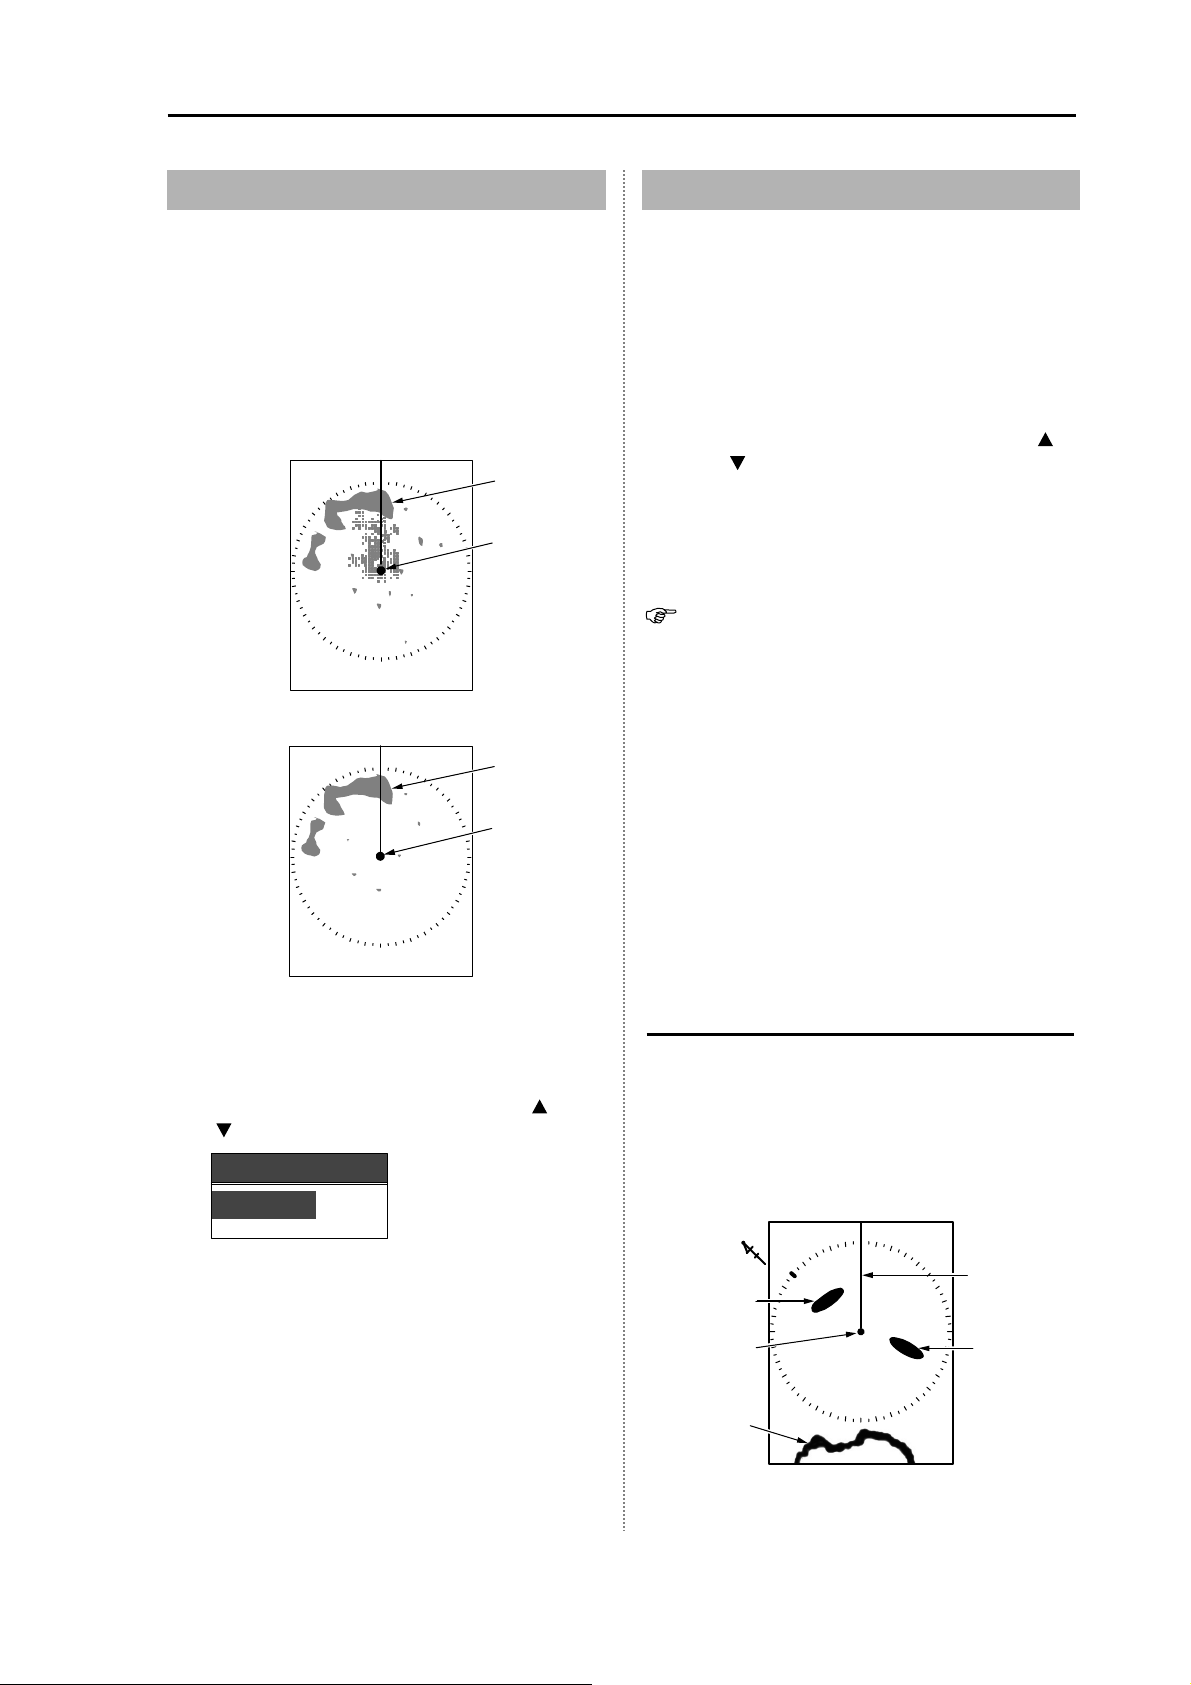
2.2 FTC Adjustment
When raining or snowing, due to reflection from
rain or snow, an object is hard to be seen.
By increasing the set value of FTC, the contour
of an object, which was concealed by an image
of rain or snow, appears. But, you may miss a
small object. (Normally, set the FTC to OFF.)
Setup: OFF, 1 to 8 (Initial value: OFF)
Result picture after adjustment by FTC
Land
Own ship
<Picture with rain clutter>
Land
Own ship
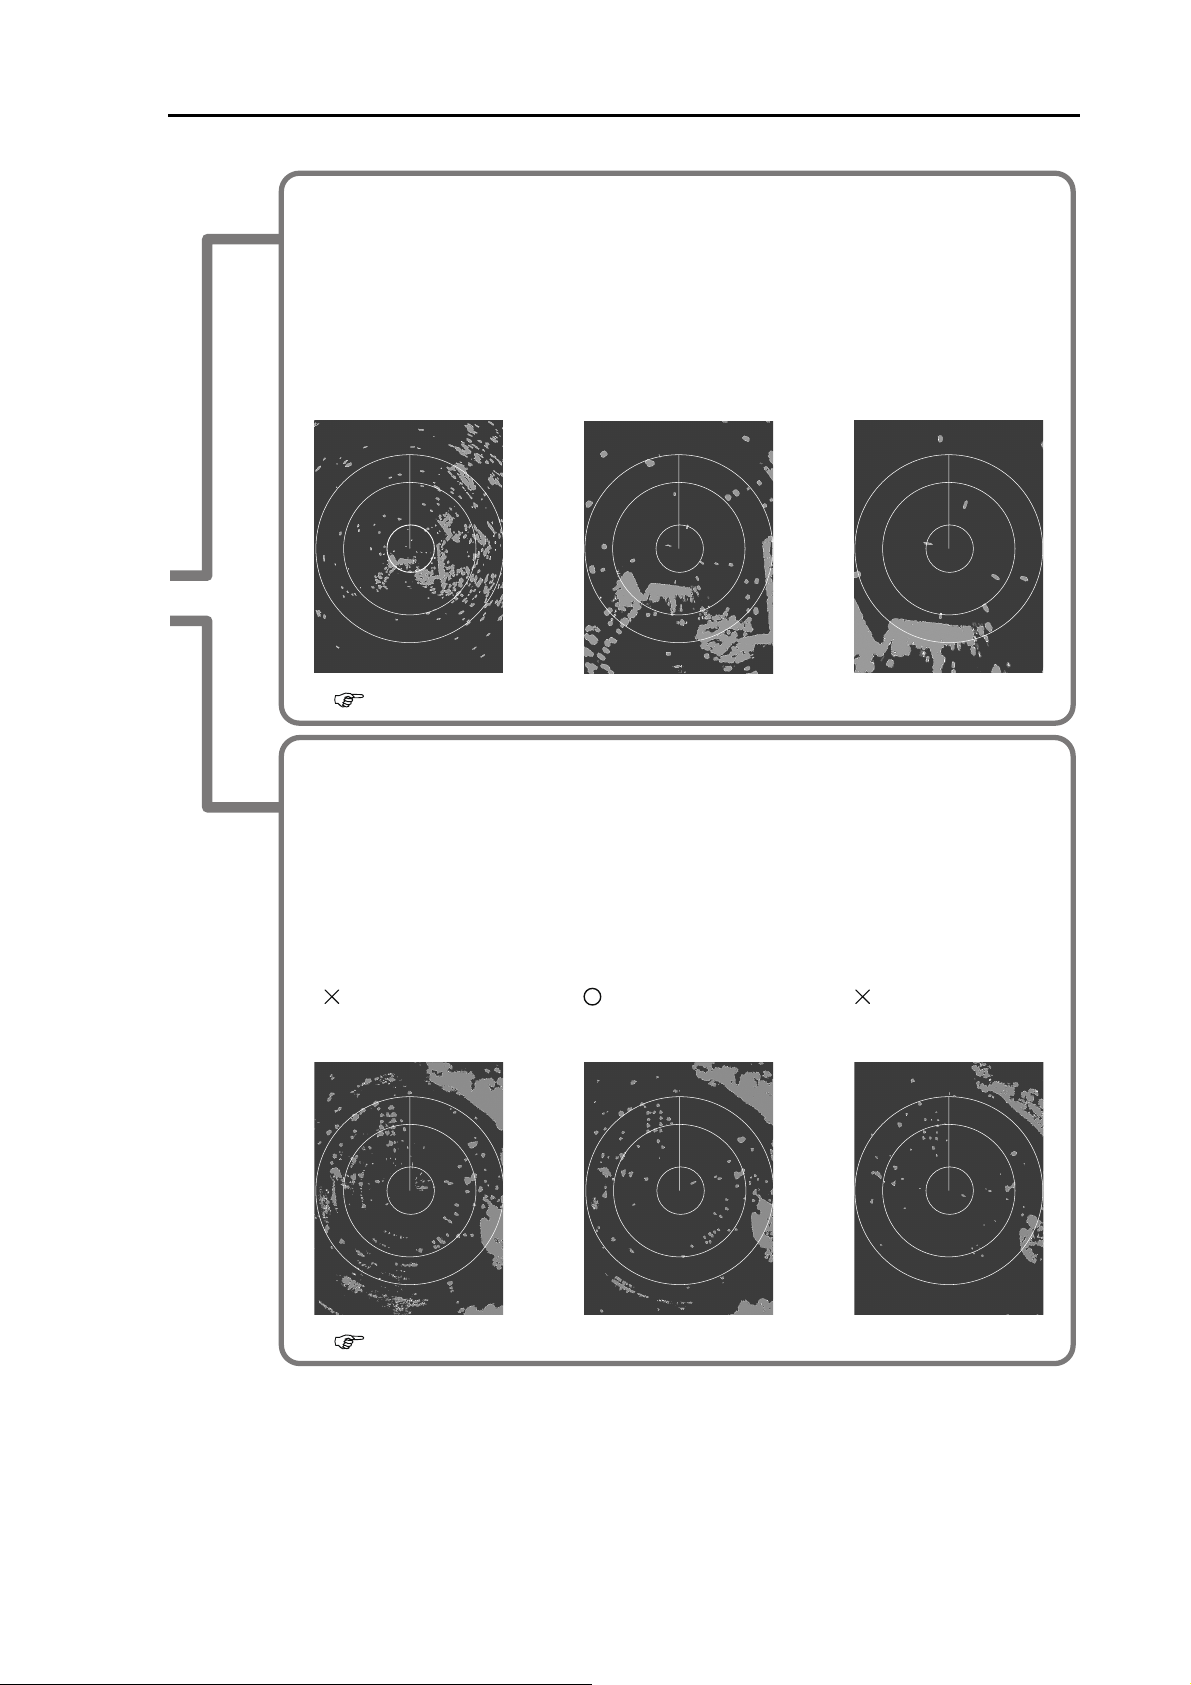
2.3 Setting of Display Mode
In the display mode, the bearing and the target
motion are displayed in combination.
Setup: H UP RM, N UP RM, N UP TM, C UP RM,
C UP TM, WPT UP RM (Initial value: H UP RM)
1 Press the [MENU] key.
2 Select [ECHO] → [MODE].
3 Change the setting of [MODE] with the [ ]
and [
4 Press the [MENU] key to close the menu.
Four bearing displays of [H UP], [N UP], [C UP]
and [WPT UP] are provided.
[NUP] and [SUP] can be swapped.
Refer to [N UP/S UP] in 3.2 Setting of Assist
• Entering the bearing data for C UP, N UP
「RM」 is required.
• Entering the bearing, speed and
latitude/longitude data for C UP, N UP 「TM」
is required.
] keys.
Items.
Two types of display method 「RM」 and
「TM」 are provided for the motion display.
<Picture with rain reflex suppressed>
1 Press the [MENU] key.
2 Select [ECHO] → [FTC].
3 Change the setup of [FTC] with the [ ] and
[
] keys.
FTC
1
4 Press the [MENU] key to close the menu.
• Entering the WPT data for WPT UP is
required.
Your ship heading is assumed 45°in the following
description of each mode.
H UP (Head Up)
The H UP is the display mode to orient the
heading to the top of the screen.
In this mode, the heading is used as a reference
and the screen image, which is similar to the
visibility when navigating your ship, can be seen.
Therefore, this mode is suitable for watching
targets.
NORTH
HDG
Target 1
Own ship
Land
Target 2
0093142132-00
2-2
Page 26
Chapter 2 How to use the menu T-900 series
N UP (North Up)
The N UP is the display mode to orient the true
north to the top of the screen.
Due to the true north oriented display, the screen
image can be easily compared with a chart with a
north oriented representation.
NORTH
Target 1
HDG
Own ship
Target 2
Land
When selecting the S UP (South Up), the true
south is oriented to the top of the screen.
C UP (Course Up)
The C UP is the display mode in which the
heading becomes the set course instantly when
[C UP] is selected and the set course is oriented
to the top of the screen.
When navigating your ship along the planned
course, use this mode. If your ship is off the
planned course, it visually shows the deviation
from the planned course.
NORTH
Target 1
045
0
0
0
HDG set as
the course
WPT UP (Waypoint Up)
The WPT is the display mode to always orient
the WPT to the top of the screen.
When this mode is used in combination with the
course up function of the plotter, the
understandable image is available.
WPT BRG
NORTH
Target 1
Own ship
Land
045
0
0
0
HDG
Target 2
Relative Motion (RM) and True Motion (TM)
The relative (RM) motion mode indicates
motions of surrounding targets while fixing your
ship’s position at the center of the display.
As the own ship’s position is placed at the center
of the display, the fixed targets such as the land
move on the screen when the ship navigates.
The true (TM) motion indicates the motion of
targets with respect to the specified bearing.
Fixed targets, which do not move in any
directions, stay on the screen, and all moving
targets move on the screen.
No true motion [TM] is provided for [H UP] mode
as the constantly moving heading is used as a
reference. The true motion [TM] is also not
provided for [WPT UP] which uses the specified
course as a reference.
Own ship
Land
NORTH
Target 1
Own ship
Land
0093142132-00 2-3
Specified Course
045
0
0
0
Target 2
HDG
Target 2
No true motion [TM] is provided for
Caution
[H UP] mode as the constantly moving
heading is used as a reference.
The true motion [TM] is also not
provided for [WPT UP] which uses the
specified course as a reference.
Caution
In [TM] mode, entering the data of the
bearing, speed and latitude/longitude
is required.
Page 27

T-900 series Chapter 2 How to use the menu
Relative motion (RM): The own ship is fixed
and other surrounding targets move
on the screen.
This is useful when monitoring the
surrounding situation based on your
own ship’s position.
Own ship
Land
Moving
Fixed
True motion (TM): Your ship moves
according to its speed and tidal
current on the screen.
Stationary targets are fixed on the
screen. It is useful when monitoring
your ship’s position with respect to
the fixed targets such as land.
Own ship
Land
Moving
Own ship
Moving
34%
66%
Fixed
OWN ship's position
relocatable area in TM
Center of display
0093142132-00
2-4
Page 28

Chapter 2 How to use the menu T-900 series
True Motion Reset
When your ship exits from movable range of your
ship’s position, it moves to the opposite side
within the range.
NORTH
Own ship
Moving toward the stern
NORTH
PPI Display
The radar screen is displayed on the entire
display.
Land
Own ship
PPI/PPI Display
Two radar images are displayed in the upper
(main screen) and lower (sub-screen) halves of
the screen. The screen is switched every two
rotation of the antenna.
The images of two different ranges can be
displayed.
Own ship
2.4 Display Select
The display selection designates the
combination of the radar image to be displayed.
Setup: PPI, PPI/PPI, PPI/NAV (Initial value: PPI)
1 Press the [MENU] key
2 Select [ECHO] → [DISPLAY SELECT].
3 Change the setting of [DISPLAY SELECT]
with the [
DISPLAY SELECT
PPI
PPI / PPI
PPI / NAV
4 Press the [MENU] key to close the menu.
] and [ ] keys.
PPI/PPI Display
Land
Main screen
Sub-screen
Own ship
Land
Own ship
The range of the upper display (main screen)
can be changed with the [- RANGE +] key.
The gain of the upper display (main screen) can
be adjusted by rotating the [GAIN] knob.
The range of the lower display (sub-screen) can
be changed with the [
] and [ ] keys after
displaying [SUB-SCREEN RANGE] by pressing
the [GAIN] knob.
The gain of the lower display (sub-screen) can
be adjusted with the [
] and [ ] keys after
displaying [SUB-SCREEN GAIN] by pressing the
[GAIN] knob.
Other setting items are used in common in the
main screen and sub-screen.
0093142132-00 2-5
Page 29

T-900 series Chapter 2 How to use the menu
Note on PPI/PPI Display
In the PPI/PPI display, to avoid risk, the following
functions do not work.
• TM (True Motion)
• Off center
• Trailing
• ATA (Optional)
The EBL, VRM and PI (parallel cursor) can be
displayed only in the main screen.
PPI/NAV Display
The radar image is displayed in the upper half of
the screen and the navigation data is displayed
in the lower half of the screen.
The content of the navigation data display can be
selected.
Refer to the NAV Display Select in 3.5
Preset.
Note on PPI/NAV Display
In the PPI/NAV display, to avoid risk, the
following functions do not work.
• TM (True Motion)
• Off Center
2.5 Setting of OFF CENTER
When viewing widely in the heading, use this
function.
7 Press the [MENU] key to close the menu.
• The movable range is limited.
(See the movable range shown below.)
Own ship
34%
66%
• When [PPI/PPI] or [PPI/NAV] is selected in
[DISPLAY SELECT], the off-center cannot be
executed.
relocatable
area
Own ship
2.6 Setting of Enhance
(Enlarged Target)
If a target is too small to see, the target can be
enlarged to make it easier to see it.
Setup: OFF, 1, 2 (Initial value: OFF)
1 Press the [MENU] key
2 Select [ECHO] → [ENHANCE].
3 Change the setting of [ENHANCE] with the
[
] and [ ] keys.
The greater the numeral is, the larger the
target is enlarged.
Setup: OFF, ON (Initial value: OFF)
1 Press the [MENU] key
2 Select [ECHO] → [OFF CENTER].
3 Change the setting of [OFF CENTER] to
[ON] with the [
It moves to the off center position where the
own ship point is stored
OFF CENTER
OFF
ON
] and [ ] keys.
4 Press the [ ] key.
5 Move the crosshair cursor to the point you
desire to move your ship with the [
[
] [ ] keys.
], [ ],
6 Press the [ENT] key.
Own ship’s position moves to the position of
the crosshair cursor.
4 Press the [MENU] key to close the menu.
2.7 Setting of Signal
Process
If the reflection from a target you desire to see is
unstable, the target is stabilized by rendering the
signal process.
Setup: OFF, ON (Initial value: OFF)
1 Press the [MENU] key,
2 Select [ECHO] → [PROCESS].
3 Change the setting of [PROCESS] with the
[
] and [ ] keys.
4 Press the [MENU] to close the menu.
0093142132-00
2-6
Page 30

Chapter 2 How to use the menu T-900 series
2.8 Setting of Pulse Width
The short pulse width is suitable for target
crowded area. (The resolution is of high priority.)
The long pulse width is suitable for searching a
small target as the gain increases. (The gain is of
high priority.)
Setup: RESO-P PRI. GAIN PRI. (Initial value:
RESO-P PRI.)
1 Press the [MENU] key.
2 Select [ECHO] → [PULSE].
3 Change the setting of [PULSE] with the [ ]
and [
] keys.
4 Press the [MENU] key to close the menu.
The setup of the pulse width is determined by the
range.
The setup of the present pulse width is displayed
at the left top side of the screen.
For pulse width adjustment, refer to [Pulse
Width] of 3.3 Setting of Adjustment Item.
2.9 Trailing
By leaving the trail of a target, the situation of the
moving target can be seen.
Relative Display (R)
The relative speed of a target with respect of own
ship is displayed as a trail.
This is used to watch a target which is
approaching to own ship. The trail of fixed target
such as land, if own ship is moving, will be drawn.
In the illustration below, own ship is moving east
at a certain speed and other ship 1 is moving
east at the identical speed. And other ship 2 is
moving west at the identical speed. After a
certain period of time, the trails of three ships are
drawn.
The relative speed of a target with respect to own
ship is drawn as a trail. Since the ship 2 is
moving in the opposite direction at the identical
speed, the speed derived by adding the ship 2
speed and own ship speed is drawn as a trail.
The land is drawn as a trail of own ship speed as
the land moves at the own ship speed.
< MODE [ N UP RM ] >
NORTH
Other ship 1
Own ship
Land
Other ship 2
1 Press the [MENU] key,
2 Select [TRAILS] → [TRAIL MODE].
3 Change the setting of [TRAIL MODE] with
the [
] and [ ] keys.
4 Select [TRAILS] → [TRAIL TIME].
5 Change the setting of [TRAIL TIME] with the
[
] and [ ] keys.
6 Press the [MENU] to close the menu.
For the display method, the relative display (R)
and the true display (T) are provided.
When changing the range, display mode or
display select, the trail disappears.
Time passes
NORTH
Other ship 1
Own ship
Other ship 2
Land
0093142132-00 2-7
Page 31

T-900 series Chapter 2 How to use the menu
True Display (T)
Irrespective of the motion of own ship, trails
representing the course and speed of moving
targets are drawn. This mode is used to monitor
the courses and speeds of moving targets.
The fixed target such as land is not drawn.
The trails of speeds of own ship, other ship 1 and
other ship 2 are drawn. No trail of the land is
drawn as it does not move.
< MODE [ N UP RM ] >
NORTH
Other ship 1
Own ship
Land
Time passes
NORTH
Other ship 1
Own ship
Other ship 2
Other ship 2
2.10 EBL
This mode is used when measuring the bearing
from own ship to a target.
Setup: OFF, ON (Initial value: OFF)
1 Press the [MENU] key.
2 Select [DISPLAY] → [EBL].
3 Change the setting of [EBL] with the [ ] and
[
] keys.
EBL
OFF
ON
4 After selecting [ON], press the [ ] key. Then,
the EBL can be operated.
The EBL rotates clockwise with the [
and counterclockwise with the [
The bearing indicated by the EBL is shown
at the lower left side of the display.
] key
] key.
5 Press the [MENU] key to close the menu.
2.11 VRM
This mode is used when measuring a distance
from own ship to a target.
Setup: OFF, ON (Initial value: OFF)
Land
The length of the trail display is specified in
[TRAILS] → [TRAIL TIME].
The length is specified by a time, and “One
minute” indicates the trail of past one minute.
When selecting [OFF], the trail is not displayed.
The shape of trail display is specified in [TRAILS]
→ [TRAIL SHAPE].
When [STANDARD] is selected, the trail shape
of a target does not change as time goes.
When [DECREMENT] is selected, the shape of a
target becomes narrower as time goes.
The signal level of a target which is left as a trail
is specified in [TRAILS] → [TRAIL LEVEL].
By increasing the numeral, only trails of strongly
reflected targets can be displayed.
By decreasing the numeral, trails of weakly
reflected targets can be displayed.
1 Press the [MENU] key.
2 Select [DISPLAY] → [VRM].
3 Change the setting of [VRM] with the [ ]
and [
VRM
OFF
ON
] keys.
4 After selecting [ON], press [ ] key. Then,
the VRM can be operated.
The VRM moves in the far direction with the
[
] key and in the near direction with the [ ]
key.
The distance indicated by the VRM is shown
at the lower right side of the display.
5 Press the [MENU] key to close the menu.
0093142132-00
2-8
Page 32

Chapter 2 How to use the menu T-900 series
2.12 Display Color
When the display is hard to see due to the
environment, by changing the color of the display,
it makes it easier to see the display.
Setup: STANDARD, DAY, NIGHT (Initial value:
STANDARD)
1 Press the [MENU] key.
2 Select [DISPLAY] → [COLOR].
3 Change the setting of [COLOR] with the [ ]
and [
When selecting [DAY], the color of the entire
display changes so that it can be seen under
the direct sunlight.
When selecting [NIGHT], the display
changes to a color suitable for use at night.
] keys.
4 Press the [MENU] key to close the menu.
2.13 Crosshair Cursor Shape
The shape of the crosshair cursor can be
changed.
In [LONG], the vertical and horizontal lines of
crosshair cursor can be extended to the end of
display. It is suitable for grasping the relationship
between two remote points.
In [EBL + VRM], the crosshair cursor is the
combination of [EBL] + [VRM].
It is suitable for grasping the relationship
between own ship and the target.
Setup: STANDARD, LONG, EBL+VRM (Initial
value: STANDARD)
1 Press the [MENU] key.
2 Select [Display] → [Cursor Shape].
3 Change the setting of [Cursor Shape] with
the [
] and [ ] keys.
4 Press the [MENU] key to close the menu.
2.14 PI (Parallel Index Line)
The straight lines parallel with own ship are
displayed.
Setup: OFF, ONE SIDE, BOTH SIDES (Initial
value: OFF)
1 Press the [MENU] key.
2 Select [DISPLAY] → [PI].
3 Change the setting of [PI] with the [ ] and
[
] keys.
PI
OFF
ONE SIDE
BOTH SIDES
4 After selecting [ONE SIDE] or [BOTH
SIDES], press the [
cursor can be operated. The distance
between parallel lines can be changed with
the [
] and [ ] key and the bearing can be
changed with the [
] key. Then, the parallel
] and [ ] key.
5 Press the [MENU] key to close the menu.
Set a number of parallel lines in [DISPLAY]
→ [PI NUMBER].
2.15 Bearing Mode
This mode is used when changing the bearing
display mode of crosshair cursor and EBL.
One setting is the true bearing with the true north
set to 0°. The other setting is the relative bearing
with the heading set to 0°.
Setup: REL, TRUE (Initial value: REL)
• To display in the true bearing mode, entering
the bearing, ship speed and longitude/latitude
is required, using the optional GPS compass
or others.
1 Press the [MENU] key.
2 Select [DISPLAY] → [BRG TRUE/REL].
3 Change the setting of [BRG TRUE/REL] with
the [
] and [ ] keys.
4 Press the [MENU] key to close the menu.
2.16 Vector
The vector means arrow that represents heading
and speeds of own ship and other ships.
The bearing indicated by the arrow denotes the
heading and the length of arrow denotes the
speed.
The length is specified by time “One minute”
shows the positions of own ship and other ships
after one minute.
Setup: 0 to 60min (Initial value: 0)
0093142132-00 2-9
Page 33

T-900 series Chapter 2 How to use the menu
1 Press the [MENU] key.
2 Select [DISPLAY] → [VECTOR].
3 Change the setting of [Vector] with the [ ]
and [
] keys.
4 Press the [MENU] key to close the menu.
The bearing mode of the vector line is
specified in [DISPLAY] → [VECTOR
TRUE/REL].
2.17 Alarm
This mode is used when monitoring targets.
When targets enter in the set range or exit from
the set range, the buzzer notifies.
Two types [IN] and [OUT] are provided for the
alarm mode.
IN Mode
When a target enters within the specified range,
the alarm is issued.
This mode is used when watching targets which
are approaching to own ship.
OUT Mode
When a target exits from the specified range, the
alarm is issued.
Setting of Alarm Range
1
Press the [MENU] key.
2 Select [ALARM] → [ALARM MODE].
3 Change the setting of [ALARM MODE] with
the [
] and [ ] keys.
ALARM MODE
OFF
IN
OUT
4 After selecting [IN] or [OUT], press the [ ]
key. Then, the alarm range can be set.
5 Move the crosshair cursor to the center of
the alarm range with the [
keys.
6 Press the [ENT] key.
7 Change the distance direction with the [ ]
and [
and [
] keys and the bearing with the [ ]
] keys.
], [ ], [ ] and [ ]
8 Press the [ENT] key. Then, the alarm range
is set.
9 Press the [MENU] key to close the menu.
The level of targets for alarm is set in [ALARM]
→ [DETECT LEVEL].
The alarm works when detecting the level higher
than the set level.
2.18 Sleep
The power OFF state and the transmitting state
are alternately repeated. This mode saves the
power consumption.
The sleep is used in combination with the
IN/OUT alarm.
For the setting of the alarm, refer to 2.17
Alarm.
Setup: OFF, 5MIN, 10MIN, 15MIN, 30M, (Initial
value: OFF)
1 Press the [MENU] key.
2 Select [ALARM] → [SLEEP].
3 Change the setting of [SLEEP] with the [ ]
and [
] keys.
4 Press the [MENU] key to close the menu.
Operation during executing the sleep
During executing the sleep, the transmitting for
30 seconds is repeated at the interval of the set
time. If the IN/OUT of a target occurs during
transmitting, the buzzer beeps for alarm.
In case that the set time is set to 5
minutes, the sleep works as follows.
Time 30 sec. 2 min.
30 sec.
Antenna Transmitting Power
OFF
LCD/Panel
illumination
ON OFF ON ON
5 minutes
2 min. 30 sec.
Power On
(Countdown)
Transmitting
→
Hereafter
repeated
2.19 AIS
By installing the optional AIS interface, the
information on other ships, which are received by
the AIS receiver, can be displayed.
0093142132-00
2-10
Page 34

Chapter 2 How to use the menu T-900 series
The other ship symbols of up to 100 ships can be
displayed.
Caution
As the AIS is optional, the menu
becomes valid when the AIS interface
is installed.
Setting of Symbol Display of AIS
1 Press the [MENU] key.
2 Select [AIS] → [AIS].
3 Change the setting of [AIS] with the [ ] and
[
] keys.
4 Press the [MENU] key to close the menu.
To change the region to display the other ship’s
symbol, set it in [AIS] → [LIMIT].
Only other ship’s symbols within the radius of the
set distance from own ship placed in center can
be displayed.
Setting of Detailed Information of
Designated Symbol Display
The information display is set in [AIS] → [INFO].
The other ship’s information of the designated
number is displayed at the bottom of the display.
1 Press the [MENU] key.
2 Select [AIS] → [INFO].
3 Change the setting with the [ ] and [ ]
keys.
4 Select [AIS] → [INFO NUMBER].
5 Select the number with the [ ] and [ ] keys.
6 Press the [MENU] key to close the menu.
Types and Meanings of AIS Symbols
In the AIS, the symbols are displayed, overlaying
them on other ships from which the information is
derived.
Normal Symbol Meanings
Sleep Display
Alarm Symbol Meanings
Blinks at the interval
of 0.5 seconds.
Blinks at the interval
of 0.5 seconds.
Displays ships of which information
display is not performed.
Or displays ships which are changed to
the sleep * after performing the
information display.
Active Display**
Displays ships which are performing
the information display or after
performing it.
The dotted line denotes the speed and
the real line denotes the heading.
The line perpendicular to the heading
direction denotes the course direction.
Displays ships while selecting the
detailed information display.
The detailed information display is
shown at the bottom of the display.
Displayed when the values are lower
than the set CPA and TCPA.
Shown by the bold line and the alarm
sounds.
Displays lost ships during tracking. In
case that ships are lost from the sleep,
the alarm does not sound and they
disappear from the screen.
*: To change from the active display to the sleep
display, set OFF in [AIS] → [INFO].
Or change the number, which is presently
active-displayed, to other number.
**: To change from the sleep display to the
active display, after setting ON in [AIS] →
[INFO], change the number in [AIS] →
[INFO NUMBER].
2.20 ATA
To use the ATA, install the optional ATA interface.
The ATA automatically tracks targets and stores
and displays their courses and speeds as
vectors.
Entering the heading bearing and ship speed is
required, using the optional GPS compass or
others.
After tracking, targets are displayed as a vector
of course and speed.
An object, which is acquired and tracked, is
called a target.
Caution
As the ATA is optional, the menu
becomes valid only when the ATA
interface is installed.
0093142132-00 2-11
Page 35

T-900 series Chapter 2 How to use the menu
Automatic Acquisition
Targets entering in the preset range can be
automatically acquired.
1 Press the [MENU] key.
2 Select [ATA] → [AUTO DETECT AREA].
3 Change the setting of [AUTO DETECT
AREA] with the [
AUTO DETECT AREA
OFF
ON
] and [ ] keys.
4 After selecting ON, press the [ ] key. Then,
the automatic acquisition range can be set.
5 After moving the crosshair cursor to the
center of [AUTO DETECT AREA] with the
[
], [ ], [ ] and [ ] keys.
6 Press the [ENT] key.
7 Change the distance with the [ ] and [ ]
keys and bearing with the [
] and [ ] keys.
8 Press the [ENT] key. Then, the [AUTO
DETECT AREA] is set.
9 Press the [MENU] key to close the menu.
Manual Acquisition
Direct to acquire a target by designating a target
on the display.
1 Press the [MENU] key.
2 Select [ATA] → [ACQ].
3 Press the [ ] key.
Target Level
The signal level of a target to be
automatic/manual-acquisition is specified in
[ATA] → [ATA TGT LEVEL].
By increasing the numeral, a strongly reflected
target can be acquired.
By decreasing the numeral, a weakly reflected
target can be also acquired.
Target Delete
Release the acquisition of a target.
1 Press the [MENU] key.
2 Select [ATA] → [DELETE].
3 Press the [ ] key.
4 Change the setting of [DELETE] with the [ ]
and [
] keys.
DELETE
NUMBER
CURSOR
5 After selecting [NUMBER] or [CURSOR],
press the [
designation or the cursor designation can be
set.
] key. Then, the number
6 • In case of [MAN ACQ NUM], change the
number to be deleted with the [
[
] keys.
• In case of [CURSOR], align the crosshair
cursor with the target you desire to delete
with the [
], [ ], [ ] and [ ] keys.
] and
7 Press the [ENT] key. Then, the acquisition of
the designated target is released.
4 Align the crosshair cursor with a target you
desire to acquire with the [
[
] keys.
], [ ], [ ] and
5 Press the [ENT] key.
6 When acquiring several targets, repeat
steps 4 and 5.
7 Press the [MENU] key to close the menu.
0093142132-00
8 When releasing acquisition of several
targets, repeat steps 6 and 7.
9 Press the [MENU] key to close the menu
To release acquisition of all targets, execute
[ATA] → [ALL DELETE].
2-12
Page 36

Chapter 2 How to use the menu T-900 series
Number of Acquisition
A total number of targets to be acquired is 50
targets when combined in both
automatic/manual methods.
The number specified in [ATA] → [MAN ACQ
NUM] becomes a number of targets to be
manually acquired. And the rest becomes a
number of targets to be automatically acquired.
1 Press the [MENU] key.
2 Select [ATA] → [MAN ACQ NUM].
3 Change the setting of [MAN ACQ NUM] with
the [
] and [ ] keys.
4 Press the [MENU] key to close the menu
Information Display
The information display is set in [ATA] → [INFO]
or [INFO NUMBER].
The target information of the designated number
is displayed at the bottom of the display.
1 Press the [MENU] key.
2 Select [ATA] → [INFO].
3 Change the setting with the [ ] and [ ]
keys.
4 Select [ATA] → [INFO NUMBER].
5 Select the number with the [ ] and [ ] keys.
6 Press the [MENU] key to close the menu
Types and Meanings of ATA Symbols
In the ATA, the symbols are displayed, overlaying on acquire-started targets.
Normal Symbol
Displayed when setting the acquisition.
Meanings
Alarm Symbol
Blinks at the interval
of 0.5 seconds.
Blinks at the interval
of 0.5 seconds.
Displayed when in the stable tracking state.
Displayed when numeral-displayed after the stable
tracking state.
Meanings
Displayed when the values are lower than the set
CPA and TCPA.
Displayed when above numeral display symbols are
lower than the set CPA and TCPA.
Displayed when targets become in the tracking
inability state.
After displayed, the alarm sounds.
After 5 seconds, both the display and the alarm
disappear.
0093142132-00 2-13
Page 37

T-900 series Chapter 3 How to use the system menu
Chapter 3 How to use the system menu
3.1 Display of System Menu
There is a standard menu which is displayed for
the first time after pressing the [MENU] key and
following a system menu which is not frequently
required to change the setup.
• ASSIST
• ADJUST
• NMEA
• PRESET
• MAINTE
Display the system menu.
1 Press the [MENU] key.
2 Select [Next] with the [ ] and [ ] keys.
ECHO
TRAILS
DISPLAY
ALARM
AIS
ATA
NEXT
ASSIST
ADJUST
NMEA
PRESET
MAINTE
3.2 Setting of Assist Items
In the supplement items of the system menu, to
use the radar effectively, the supplement
functions are set.
Range Rings
The fixed marker is displayed at the constant
distance from own ship’s position.
It is used as a scale to measure roughly the
distance of a target.
Setup: OFF, ON (Initial value: OFF)
Range Unit
Set the unit of distance (range, VRM distance).
Setup: NM, km, sm (Initial value: NM)
Speed Unit
Set the unit of speed.
3 Press the [ ] key.
The system menu appears.
PREV
ASSIST
ADJUST
NMEA
PRESET
MAINTE
RANGE RINGS
RANGE UNIT
SPEED UNIT
TEMP UNIT
DEPTH UNIT
WPT DISPLAY
NEXT
ON
NM
kn
°C
m
OFF
Return to the normal menu.
1 Select [Prev] with the [ ] and [ ] keys.
2 Press the [ ] key.
The normal menu appears.
Setup: kn, km/h, m/h (Initial value: kn)
Temperature Unit
Set the unit of water temperature.
Setup: °C, °F (Initial value: °C)
Depth Unit
The unit of water depth is set.
Setup: m, fm, l.fm, ft, J.fm (Initial value: m)
Position Display
The content of position informatin displayed at
the lower left of the display is set.
Setup: OFF, OWN Position, WPT position, POB
Position (Initial value: OWN Position)
0093142132-00 3-1
Page 38

Chapter 3 How to use the system menu T-900 series
WPT Display
Select ON or OFF of the WPT icon (flag mark) to
be displayed on the radar screen.
Caution
Setup: OFF, OWN Position, WPT Position, POB
Position (Initial value: OWN Position)
Unless the WPT data is inputted from
the external source, no WPT icon is
displayed.
Rotation Speed
Set the rotation speed of the radar image by
inputting bearing data in the H UP mode or WPT
UP mode.
Setup: STANDARD, HIGH SPEED (Initial value:
HIGH SPEED)
ALL PPI
Select ON or OFF of the background of
numerical information displayed near the image
when the PPI display is selected.
N UP/S UP
Change the mode of the N UP or S UP of the
display mode.
The selected item can be selected in [ECHO] →
[MODE].
Setup: N UP, S UP (Initial value: N UP)
Crosshair Cursor Display
Set the indication methods of the crosshair
cursor.
Setup: ALWAYS, OPERATING (Initial value:
ALWAYS)
Radar Setting Display
Set ON or OFF of the radar setting indication
status shown in upper portion of the screen.
Setup: OFF, ON (Initial value: ON)
Menu Operation
Select the type of the operation methods in the
menu.
Setup: OFF, ON (Initial value: ON)
Guide
Select ON or OFF of the display of operation
guide when operating the menu.
Setup: OFF, ON (Initial value: ON)
Buzzer
Set ON or OFF of the buzzer sound.
The ON/OFF of external buzzer (optional) sound
is also set.
Setup: OFF, ON (Initial value: ON)
Motor Speed
Set the rotational speed of the antenna.
During the antenna rotation, the setting cannot
be changed.
Setup: OFF, ON (Initial value: OFF)
Setup: A, B (Initial value: A)
3.3 Setting of Adjustment
Items
In the adjustment items of the system menu,
when using the radar, the initial adjustment and
setup are performed. When setting the
adjustment item, set the screen brightness to
maximum.
For screen brilliance, refer to 1.4 Brilliance
Adjustment.
Bearing Setting
Adjust the bearing of the radar image on the
screen.
Setup: -180.0 to +180.0 (Initial value: 0.0)
1 Press the [STBY/TX] key to start the
transmission.
2 Set the range of the display to more than
1nm with the [- RANGE +] key.
3-2 0093142132-00
Page 39

T-900 series Chapter 3 How to use the system menu
3 Press the [MENU] key.
4 Move to the system menu.
Refer to 3.1 Display of System Menu.
5 Select [ADJUST] → [BRG ADJ].
6 Change the setting of [BRG ADJ] with the
[
] and [ ] keys.
When increasing the numeral, the radar
image moves clockwise.
When decreasing the numeral, the radar
image moves counterclockwise.
Change the bearing so that the bearing of
the image of a target becomes the same
bearing as measured by the compass.
TX Delay Adjustment
By adjusting the delay time of the transmission,
match the distance of the target on the radar
screen with the distance of the actual target To
adjust precisely, select a nearest hard straight
object (pier) (within 100m). Adjust the
transmission delay time in the following
procedure.
Setup: 0 to 100 (Initial value: 20)
1 Press the [STBY/TX] key to start the
transmission.
2 Set the range of the display to more than
0.125nm with the [- RANGE +] key.
3 Press the [MENU] key.
4 Move to the system menu.
Refer to [3.1 Display of System Menu].
5 Select [ADJUST] → [TX DELAY ADJ].
6 Change the setting of [TX DELAY ADJ] with
the [
] and [ ] keys.
When the echo reflected from the target
warps to near, decrease the value.
When the echo reflected from the target
warps to far, increase the value.
As illustrated below, adjust so that the
straight target is straightly displayed on the
screen.
MBS
Set the MBS to suppress and cancel the disc-like
transmission leak at the center of the image as
shown below.
Setup: 0 to 100 (Initial value: 20)
1 Press the [STBY/TX] key to start the
transmission.
2 Set the [GAIN] knob to 8, the [STC] knob to
0 and the [FTC] setting to [OFF].
3 Set the range of the display to 0.125nm with
the [- RANGE +] key.
4 Rotate the [STC] knob so that the disc-like
transmission leak is displayed at the
rotational center of the image.
5 Move to the system menu.
Refer to 3.1 Display of System Menu.
6 Select [ADJUST] → [MBS].
7 Change the setting of [MBS] with the [ ]
and [
Adjust while observing the disc-like
transmission leak.
When the transmission leak disappears, the
MBS is best adjusted.
] keys.
0093142132-00 3-3
Page 40

Chapter 3 How to use the system menu T-900 series
STC Curve
When changing the STC curve according to the
antenna’s setting position, perform as follows.
Setup: 1 to 8 (Initial value: 4)
Note: Set the STC curve after the gain
setting. When setting the STC curve,
go out of the harbor and perform at
the location where the reflection
from sea surface is displayed on the
radar screen.
1 Set the [GAIN] knob to 8, the [STC] knob to
0 and the [ECHO] → [FTC] setting to [OFF].
Adjust so that the noise-like sea surface
reflected echo is displayed at the center of
the image as shown below.
2 Press the [- RANGE +] key to select the
range that can display the entire sea surface
reflected echo can be displayed.
3 Adjust the [STC] knob and stop it just before
the sea surface reflected echo completely
disappears (In the state that the sea surface
reflected echo is sparsely displayed.) As
shown in [Proper] below, when the sea
surface reflected echo from near to far
distance disappears evenly, the STC curve
set value is proper. As shown in [Large],
when the sea surface reflected echo at near
distance disappear first or the sea surface
reflected echo at far distance disappears
first, it is necessary to change the setting in
the procedure described in the next page.
4 Press the [MENU] key.
5 Move to the system menu.
Refer to 3.1 Display of System Menu.
6 Select [ADJUST] → [STC CURVE].
7 Change the setting of [STC CURVE] with the
[
] and [ ]
When the sea surface reflected echo at near
distance disappears first, decrease the
value.
When the sea surface reflected echo at far
distance disappears first, increase the value.
8 Adjust the [STC] knob again.
Adjust so that the sea surface reflected echo
from near to far distance disappears evenly
as shown in the illustration [Correct] in step
3.
The STC curve set value is applied to all
ranges.
Note: The setting of STC characteristics
needs to be performed in the ocean.
However, when it is obliged to
perform in a harbor, set the STC
curve to [4].
3-4 0093142132-00
Page 41

T-900 series Chapter 3 How to use the system menu
Tune Select
Due to a sudden environment change, tuning of
the transmission frequency with the reception
frequency may be detuned. If detuned, the gain
will decrease and it is hard to display the image
even if setting remains unchanged.
Setup: AUTO, MANUAL (Initial value: AUTO)
Automatic Tuning
For the best performance, when newly installing
or replacing the magnetron, the automatic tuning
should be adjusted.
Unless the auto tune is adjusted, the optimum
gain is not achieved.
Setup: 0 to 100 (Initial value: 31)
1 Press the [STBY/TX] key to start the
transmission.
2 Set the range of the display to more than
12nm with the [- RANGE +] key.
Find a large and stable target of more 6nm
(mountain or island) at farthest location as
possible.
3 Adjust by rotating the [GAIN] knob so that
the target is faintly visible.
1 Press the [STBY/TX] key to start the
transmission.
2 Set the range of the display to 12nm with the
[- RANGE +] key.
Find a large and stable target of more than
6nm (mountain or island) at farthest location
3 Adjust by rotating the [GAIN] knob so that
the target is faintly visible.
4 Press the [MENU] key.
5 Move to the system menu.
Refer to 3.1 Display of System Menu.
6 Select [ADJUST] → [TUNE SELECT], and
then [MANUAL].
7 Select [ADJUST] → [MANUAL TUNE ADJ].
8 Change the setting of [MANUAL TUNE ADJ]
with the [
Maximize the size of fixed target on the
screen. If the target becomes too large and
the best tuning point is lost, reduce the gain
with the [GAIN] knob once to make its size
small and maximize the target with the [
and [
] and [ ] keys.
]
] keys.
Pulse Width
4 Press the [MENU] key.
5 Move to the system menu.
Refer to 3.1 Display of System Menu.
6 Select [ADJUST] → [TUNE SELECT], and
then [AUTO].
7 Select [ADJUST] → [AUTO TUNE ADJ].
8 Change the setting of [AUTO TUNE ADJ]
with the [
Maximize the size of fixed target on the
screen. If the target becomes too large and
the best tuning point is lost, reduce the gain
with the [GAIN] knob once to make its size
small and maximize the target with the [
and [
] and [ ] keys.
] keys.
Manual Tune Adjustment
Due to a sudden environment change, the
automatic tuning may be detuned. In this case,
use the manual tune adjustment.
Setup: 0.0 to 100.0 (Initial value: 44.0)
In [2.8 Setting of Pulse Width], [RESO-P PRI.] or
[GAIN PRI.] is selected. At this moment, the
pulse width (Displayed at the upper left of the
display.) can be changed.
This setting can be set for only the range (0.75 –
8).
Setup: SP, M1, M2, L1, L2
1 Press the [MENU] key.
2 Move the system menu.
Refer to 3.1 Display of System Menu.
3 Select [ADJUST] → [PULSE WIDTH].
]
4 Select the range in which the pulse width
adjustment is performed with the [
keys, and press the [
] key.
] and [ ]
5 Change the setting of [Pulse Width
Adjustment] with the [
] and [ ] keys.
0093142132-00 3-5
Page 42

Chapter 3 How to use the system menu T-900 series
The content of the set value of [PULSE WIDTH]
is as follows.
M1 / M2
Pulse width at gain priority
Pulse width at resolution priority
The length of pulse width varies as shown below.
Short
SP < M1 < M2 < L1 < L2
Interference Rejection
This feature is used to eliminate the radar
interference wave from other radars.
When radars having the same frequency band
as your radar are used near your ship, the
interference noise from transmission signals of
other radars appears on the radar screen.
Though the appearance of the interference is not
uniform, in most cases, this interference noise
pattern is spiral or a radiation form.
This unit can reduce the interference with the
interference rejection function.
Setup: OFF, 1, 2 (Initial value: 2)
1 Press the [MENU] key.
2 Move to the system menu.
Refer to 3.1 Display of System Menu.
3 Select [ADJUST] → [IR].
4 Change the setting of [IR] with the [ ] and
[
] keys.
The greater the numeral is the stronger the
interference rejection.
If the interference rejection effect is too
strong, it is hard to see small targets.
So be cautious not to set it stronger.
Echo Color Divide
The color of an image can be changed to make it
easier to see.
Setup: STANDARD, DETAIL (Initial value:
STANDARD)
1 Press the [MENU] key.
2 Move to the system menu.
Long
3 Select [ADJUST] → [ECHO COLOR DIV].
4 Change the setting of [ECHO COLOR DIV]
with the [
[STANDARD]: Standard color
[DETAIL]: Displays many middle colors so
] and [ ] keys.
that the strength or weakness of
the echo can be discriminated.
Signal Select
Select the input signal of the image from antenna,
monitor and demo.
Setup: ANTENNA, MONITOR, DEMO (Initial
value: ANTENNA)
1 Press the [MENU] key.
2 Move to the system menu.
Refer to 3.1 Display of System Menu.
3 Select [ADJUST] → [SIGNAL SELECT].
4 Change the setting of [SIGNAL SELECT]
with the [
[ANTENNA]: In case that the input signal of the
[MONITOR]: In case that two units are
[DEMO]: The Fixed video is displayed.
] and [ ] keys.
image is antenna:
connected and used as a monitor
Field of Angle
Due to the installing position of the display unit, if
it is hard to see the screen, it can be improved by
adjusting this setting.
Setup: 0 to 50 (Initial value: 0)
1 Press the [MENU] key.
2 Move to the system menu.
Refer to 3.1 Display of System Menu.
3 Select [ADJUST] → [FIELD OF ANGLE].
4 Change the setting of [FIELD OF ANGLE]
with the [
When increasing the numeral, the visibility
angle is widened.
However, if the field of angle is widened too
much, it is hard to see the image from front.
] and [ ] keys.
Refer to 3.1 Display of System Menu.
3-6 0093142132-00
Page 43

T-900 series Chapter 3 How to use the system menu
3.4 NMEA
In the NMEA item of the system menu, the
transmission speed of the external input/output
can be changed.
Match the transmission speed with that of the
external connection equipment.
1 Press the [MENU] key.
2 Move to the system menu.
Refer to 3.1 Display of System Menu.
3 Select [NMEA] → [CH1 (J3)] or [CH2 (J4)].
Select the connector of which the
transmission speed is changed.
4 Change the setting of transmission speed
with the [
5 Press the [ ] key to display the NMEA
monitoring menu.
If the external equipment is connected at the
correct transmission speed, the received
NMEA sentence is displayed.
For the NMEA sentence, refer to 5.6
KGC-1 Setting (Connection with the
] and [ ] keys.
List of Input/Output sentence.
3.5 Preset
In the Preset of the system menu, the radar is
customized.
F1/F2 Key Set
Select the function assigned to F1 and F2 keys.
Select Range
Select the range to be set with the [- RANGE +]
key.
Echo Color Set
Set an arbitrary color to the video color.
Trail Color Set
Set an arbitrary color to the trail color.
Display Color Set
Set an arbitrary color to the color of cursor and
numerals.
KODEN GPS compass)
Incase KGC-1 is connected to CH2 (J4), the best
performance can be achieved by executing
[KGC-1 SETTING],
1 Press the [MENU] key.
2 Move to the system menu.
Refer to 3.1 Display of System Menu.
3 Select [NMEA] → [KGC-1 SETTING].
4 Select [Yes] with the [ ] and [ ] keys.
5 Press the [ENT] key.
Both the display unit and the KGC-1 are properly
set.
The HDT, GGA and VTG signals are outputted
from the KGC-1.
Language Select
Select the language used in the menu.
NAV Display Select
When [DISPLAY SELECT] is set to [PPI/NAV],
set the content to be displayed on the NAV
display.
Camera Position Correction
The CCD camera video displayed by pressing
the [STC] knob may be shifted.
By performing [CAMERA POSITION], the display
position of CCD camera video can be corrected
in the upper and lower directions.
0093142132-00 3-7
Page 44

Chapter 3 How to use the system menu T-900 series
3.6 Self-diagnosis
The self-diagnosis of the system menu is the
menu for maintenance. Normally, it is not used.
Perform the self-diagnosis of the display unit and
the antenna.
Display Unit
The state of the display unit is displayed.
The version of the system program is displayed.
Antenna
The state of the antenna is displayed.
The type of antenna connected and the state of
voltage are displayed.
Panel Test
Testing the operation block is performed.
LCD Test
Testing the LCD is performed.
Operation Hours Reset
The memorized operating hours are reset.
TX Hours Reset
The memorized transmitting time is reset.
All Reset
The internal memory is reset.
All of the set values are returned to the
factory-settings.
System Program Renewal
The system program is renewed from the
external equipment.
3-8 0093142132-00
Page 45

T-900 series Chapter 4 Maintenance
Chapter 4 Maintenance
4.1 Maintenance
To operate the radar equipment in a good condition for a long period of time, perform the inspection and
cleaning periodically.
4.1.1 Monthly Inspection
Caution:
Do not turn on the power of the radar during
inspection.
(1) To protect the LCD and enhance the visibility, the acrylic filter is installed on the surface. If the
acrylic filter is dirty, an image cannot be clearly seen. If dirty, dip a soft cloth into a neutral
detergent, wring it lightly and wipe the filter surface lightly with the cloth. Do not use a dry cloth. If
done so, due to static electricity, the acrylic filter will attract dust.
thinner
Caution
solvent
(2) Check that the radiation surface of the antenna is not dirtied by soot. Dip a soft cloth into water or
soap water, wring lightly and wipe the antenna with the cloth. Check for damage and paint
sticking.
Note: Before performing the maintenance and inspection of the antenna, thread a string
through the hole of radome (upper) as illustrated below and hang it up.
String
A
Never use a thinner solvent. The filter surface will be
chemically decomposed, resulting in the loss of the
transparency.
A : Top View
Hole
Radome (lower)
String
Radome (upper)
0093142132-00 4-1
Fixing screw
Page 46

Chapter 4 Maintenance T-900 series
r
4.1.2 Yearly Inspection
In case of antenna (RB716A), check the brush of the antenna drive motor inspect every 2,000 hours of
transmission. If the length is shorter than 6mm, replace it with a new one.
Press the [MENU] key and select [MAINTE] → [DISPLAY UNIT], message of transmission time is
displayed.
approx. 6mm
Contacting surface
WARNING:
Before opening the cover of the antenna, be sure to turn off the
power of the radar equipment to avoid the electrocution.
Motor brush
(1) Loosen the fixing screws and remove the cover of the antenna at the bow side. The antenna drive
motor can be seen at the lower side in the cabinet.
(2) Referring to the illustration below, remove the motor brush with flat screw driver.
(3) Insert the screwdriver in the groove of the brush and rotate it clockwise and slowly.
Be sure to replace both brushes at both sides.
(4) Insert new brushes and install the brushes in reverse steps.
Inside of antenna cabinet
Motor
Motor brush
To remove the motor brush, turn it counterclockwise
Moto
Motor brush
and slowly with the screwdriver.
4-2 0093142132-00
Page 47

T-900 series Chapter 4 Maintenance
4.2 Fuse Replacement
WARNING
If the input voltage is too high, hyper-current flows or a trouble occurs inside, the fuse blows out.
The fuse is housed in the rear side of the unit.
Use the specified fuse. If a fuse other than the
specified one is used, it leads to a serious accident.
4.3 Consumables
This unit employs the magnetron which is the consumables and needs the replacement periodically.
The magnetron is housed in the antenna drive block. When it is hard to see an image at a far distance,
the magnetron may be deteriorated. In this case, replace the magnetron. When replacing, consult your
sales dealer.
Press the [MENU] key and select [MAINTE] → [DISPLAY UNIT], message of transmission time is
displayed.
Replacement target: Normally 3,000 hours
4.4 Trouble Diagnosis
In this chapter, for finding a troubled location on a ship, a simple troubleshooting is mentioned.
4.4.1 Information required for requesting a repair
Inform us of the following items.
(1) Name of ship, telephone number if the satellite communication system is equipped
(2) Type of equipment
(3) Manufacturing number of the equipment
(4) ROM version(Press the [MENU] key and select [MAINTE] → [DISPLAY UNIT], message of ROM
version is displayed.)
(5) Port of next arrival, arrival schedule and dealer name
(6) Trouble situation and inspected result on a ship
4.4.2 Error Display
When an abnormality occurs in the equipment or miss-operated, the content of the abnormality is also
displayed on the radar screen. The error, alarm and warning are provided. When an abnormality is
detected in the radar, after recording the abnormal classification, abnormal location and abnormal
content, press the [ENT] key.
0093142132-00 4-3
Page 48

Chapter 4 Maintenance T-900 series
Error Content
Error Display Causes
L/L NO SIGNAL
HDG NO SIGNAL
SPD NO SIGNAL
ANTENNA ERROR 1
ANTENNA ERROR 2
ANTENNA ERROR 3
ANTENNA ERROR 4
ANTENNA ERROR 5
ANTENNA ERROR 6
ANTENNA ERROR 7
The latitude and longitude is not entered.
The bearing signal is not entered.
The ship speed signal is not inputted.
The trigger signal is not inputted from the antenna.
The video signal is not inputted from the antenna.
The heading signal is not inputted from the antenna.
The auto tune is abnormal.
The transmission voltage (+250V) is abnormal.
The magnetron current is abnormal.
The heater voltage of the magnetron is abnormal.
4.4.3 Self-diagnostic Function
The self-diagnostic menu is provided in the equipment.
Referring to 3.6 Self-diagnosis, check for the abnormality of the radar.
4-4 0093142132-00
Page 49

T-900 series Chapter 4 Maintenance
4.4.4 Inspection at Each Location
After finishing the inspection by the self-diagnosis, according to the table, check each location of the
radar.
Trouble conditions Suspected causes of troubles Countermeasures
The radar cannot be
powered.
The radar can be
powered. But,
nothing is displayed
on the screen.
The screen is dark.
The character
information can be
displayed. But, the
image of the radar
cannot be displayed.
The target image is
different from the
actual one.
The image is weak.
Too much noise
The antenna does
not rotate.
The power cable is not connected. Connect the power cable and fix the
connector firmly.
The power voltage is out of the
specified range.
The main power fuse blew out. Replace the fuse with a new one.
The screen brightness adjustment
is set to the minimal value.
Defect of the LCD unit Request the repair.
Defect of the LCD drive circuit Request the repair.
The screen brightness adjustment
is not properly performed
Defect of the backlight Request the repair.
The mutual connection cable is
not connected.
Detuned. Re-adjust.
Defect of the transmission
equipment
The heading is not correctly set. Set the heading.
The distance adjustment is not
properly set.
The set value of the gain is low. Rotate clockwise the [GAIN] knob to
The setting defect of STC or FTC. Re-adjust.
Detuned. Re-adjust.
Defect of the magnetron or MIC
(front end)
Detuned. Re-adjust.
The radar is not grounded. Connect the ground wire.
The power is not fed to the motor. Check the connection of the motor
The motor brush is worn. Replace the motor brush with a new
Use the appropriate power.
Adjust the brightness with the [BRILL]
key.
Adjust the brightness with the [BRILL]
key.
Connect correctly the mutual
connection cable.
Refer to Tune Select in 3.3 setting
of Adjustment Items.
Request the repair.
Refer to Bearing Setting in 3.3
Setting of Adjustment Items.
Set correctly the TX delay adjustment.
Refer to TX Delay in 3.3 Setting of
Adjustment Items.
display an image.
Refer to 1.8 STC Adjustment or
2.2 FTC Adjustment.
Refer to Tune Select in 3.3 Setting
of Adjustment Items.
Request the repair.
Refer to Tune Select in 3.3 Setting
of Adjustment Items.
power.
one.
0093142132-00 4-5
Page 50

Chapter 5 Equipment T-900 series
Chapter 5 Equipment
5.1 Antenna Installation
Determining the location of the installation
The search capability of the radar varies largely, depending on the position of the antenna installation.
The ideal installation position is the high place over the keel line where no obstacle surrounds. Actually,
though there are many limitations in a ship, determine the installation position, considering the
following items.
1. The antenna block should be over the line drawn between the bow and the stern, and should be
installed to a position where no obstacle to block the radiation path of the radar beam is present.
2. To avoid the electromagnetic wave interference with human bodies, install the antenna block
higher than the living space by 0.6m. However, if installed at the higher position, objects at the
near distance cannot be searched. Thus, when approaching to a pier, if the radar is used, you
must pay attention.
The higher the position of the antenna is, the stronger the reflection from the sea surface
becomes.
3. Keep the surface of the platform, where the antenna is installed, horizontal as possible to be
parallel with the sea surface.
4. Install the antenna lock in front of the large structure and exhaust chimney to avoid the blind
sector (inability angle of image search) on the screen and to prevent the opening of the antenna
from being dirtied by the engine exhaust.
5. Keep enough space for maintenance.
6. To prevent a blind or ghost from occurring in the heading, place the antenna towards the bow
rather than obstacles, keep it away from obstacles. And when installing the antenna on the mast,
place it in front of the mast. (If obstacles cannot be avoided due to limitation of structure, refer to
[How to shift the antenna from an obstacle] described later.
7. Keep away the antenna from other equipment’s antenna.
Keep a distance from antennas of a direction finder and a VHF transmitter-receiver as far as
possible.
8. Keep a distance for safety from the magnetic compass. Table 3.1
Safety Distance from Magnetic Compass
Type of drive Standard Compass Steering Compass
RB714A 2.0m 1.4m
RB715A 2.0m 1.4m
RB716A 2.0m 1.4m
WARNING
5-1 0093142132-00
Install the antenna, keeping it away from wireless
equipment not to be interfered.
Page 51

T-900 series Chapter 5 Equipment
How to shift the antenna from an obstacle
1. How to shift the antenna from the keel line
By shifting the antenna from keel line to the starboard, the blind moves to the port and the visibility in
the heading can be secured. According to a distance to an obstacle, the distance to be shifted can be
derived from the formula below.
Distance to be shifted from the keel line
Diameter of an obstacle over the keel line
Distance to an obstacle
Antenna
Obstacle
Ls
R
D
Keel line
How to shift the antenna from the keel line
2. How to keep an angle of depression
To keep enough angle of depressionθ that is an angle between the horizontal and the observer’s line of
sight (In this case, it is not the observer but an antenna), elevate the antenna height. By making θ more
than 5°, the blind at the middle and long distances can be avoided.
An object below the line of sight cannot be detected.
Horizon
Line of sight
0093142132-00
How to keep an angle of depression
5-2
Page 52

Chapter 5 Equipment T-900 series
Installation of Antenna
After determining the location of the installation, install the antenna. When installing, if the bracket
shown below is available, the installation is easier. If not available, install the antenna directly on the
roof, paying attention to the air tube for drain at the bottom of the antenna.
Note: If the radar mast or installation bracket is warped more than 2mm, make it flat or adjust
by inserting spacers.
Do not use the edge as it causes a sump.
Bracket
Installation of Radome Antenna
Referring to the illustration below, make five (5) holes on the cradle and fix the bracket and the antenna
together with hexagon bolts. If the thickness of the bracket is 9 – 14mm, it can be installed with the
supplied bolts. If not within this range, prepare bolts shown on the table in the next page. To prevent the
looseness from occurring, fortify with the commercially available loose-preventive silicon sealing.
However, for preventing the looseness of the radome antenna, do not use the putty. The putty may
deteriorate chemically the plastic material of the radome.
HDG
214
(8.43)
Center
(0.47)
140
(5.51)
30
60
(2.36)
(1.18)
For air tube
HDG
140
(5.51)
Center
(0.47)
170
(6.69)
35
For air tube
65
(2.56)
(1.38)
(0.59)
2kW radome antenna
Unit: mm (inch)
4kW radome antenna
Drawing of Work for Installation Holes on the Bracket
5-3 0093142132-00
Page 53

T-900 series Chapter 5 Equipment
Chassis
Radome (bottom)
Bracket
Flat washer
Spring washer
M10 hexagon bolt
Install with four bolts
Accessory
Specification of bracket thickness-wise installation bolt (In case of radome antenna)
Thickness of bracket Bolt for fixing the antenna Material Remarks
1 - 4 mm (0.04 – 0.16 in) M10x15 (pitch 1.5mm) stainless
4 - 9 mm (0.16 – 0.35 in) M10x20 (pitch 1.5mm) stainless
9 - 14mm (0.35 – 0.55 in) M10x25 (pitch 1.5mm) stainless Included in accessories
14 – 19 mm (0.55 – 0.75in) M10x30 (pitch 1.5mm) stainless
Setting of Open Antenna
As illustrated below, install the drive block, facing the cut portion of the installation base toward the
stern. This makes it easier to perform the maintenance
1. Referring to the illustration below, make holes of 14mm diameter on the installation side of
platform.
2. Place the antenna block at the specified position and fix it with four 12mm stainless bolts included
in the installation material. If the thickness of the bracket is 9 – 14mm, the bracket can be installed
with the supplied bolts. If not within this range, prepare the bolts shown on the table in the next
page.
HDG
199
(7.83)
0093142132-00
Antenna raotational radius
185
(7.28)
Opening for cable
(3.97)
Cut portion of antenna base
R500 (3 ft antenna)
R700 (4 ft antenna)
(0.55)
Unit: mm (inch)
5-4
Page 54

Chapter 5 Equipment T-900 series
M12 bolt
Flat washer
Electric erosion preventive washer
Scanner installation foot
Electric erosion preventive washer
Installation base
Flat washer
Spring washer
M12 nut
Install with four bolts
Specification of bracket thickness-wise installation bolt (In case of open antenna)
Thickness of bracket Bolt for fixing the antenna Material Remarks
1 - 4 mm (0.04 – 0.16 in) M10x45 (pitch 1.5mm) stainless
4 - 9 mm (0.16– 0.35 in) M10x50 (pitch 1.5mm) stainless
9 - 14mm (0.35 – 0.55 in) M10x55 (pitch 1.5mm) stainless Included in accessories
14 – 19 mm (0.55 – 0.75in) M10x60 (pitch 1.5mm) stainless
Installation of Antenna
1. Remove the protective cap covered on the output of the scanner unit rotational shaft.
2. Remove four bolts tentatively fixed to the base of the aerial and install the scanner unit to the
rotational shaft. Align the direction of antenna opening side (SI-TEX seal is affixed.) with the
arrow on the rotational shaft.
3. Fix the aerial with four bolts removed in step 2.
5-5 0093142132-00
Page 55

T-900 series Chapter 5 Equipment
Aerial opening side
Aerial
Rotational shaft
Protective cap Arrow
Installation bolt
Cable Connection
Radome Antenna (2kW)
1. Confirm that the power of the scanner unit is turned off.
Install the cable to the connector J5 at the rear of the
display unit.
2. Next, remove the upper radome of the scanner unit,
lifting upward not to touch the aerial inside.
(3 pieces of fixing screw)
Rotational shaft
Flat washer
Spring washer
Logo sheet is affixed to the side.
HDG
3. Peel off the tape fixing the aerial.
4. Remove the shield cover at the stern side. (3 pieces of
fixing screws)
0093142132-00
5-6
Install with three bolts.
Installation of cover (2kW radome)
Page 56

Chapter 5 Equipment T-900 series
5. Remove the holder plate for fixing
the cable and the rubber ring
Thread the cable through the
Aerial
leading opening
Insert the rubber ring from both
sides of the antenna cable, thread
it through the holder plate and fix it
Stern
Shielding cover
to the antenna with the screws.
Connect the 7-pin connector of the
cable to X1 of the printed circuit
board.
Cable shield
Holder plate
6. Install the shield cover. At this
moment, install the shield of the
Rubber ring
cable in the groove, using the
shield cover. But, be careful for the
cable not to be caught by the unit
Radome (bottom)
and the cover.
7. Install the upper radome with
caution not to touch the radiator.
Antenna cable
Orient the cover as shown in the
illustration at the right hand side. 3
markings indicating the screw
positions are marked on the upper
and lower radomes respectively.
Install the radome, aligning these
markings.
Radome Antenna (4kW)
1. Confirm that the power of the scanner unit is turned off.
Install the antenna cable to the connector J5 at the rear of the display unit.
2. Remove the upper radome of the scanner unit, lifting upward not to touch the aerial inside.
(4 pieces of fixing screw)
3. Peel off the tape fixing the aerial.
4. Remove the shield cover at the stern side. (4 piece of fixing screw)
5. Remove the holder plate for fixing the cable and the rubber ring
Thread the cable through the leading opening
Insert the rubber ring from both sides of the scanner unit, thread it through the holder plate and fix
it to the aerial with the screws.
6. Connect the 7-pin connector of the cable to X11 of the printed circuit board and the 9-pin
connector to X11 respectively.
7. Install the shield cover. At this moment, install the shield
of the cable in the groove, using the shield cover. But, be
careful for the cable not to be caught by the unit and the
cover.
Install with four bolts.
5-7 0093142132-00
Page 57

T-900 series Chapter 5 Equipment
8. Install the upper radome with caution not to touch the aerial. Orient the cover as shown in the
illustration below. 4 markings indicating the screw positions are marked on the upper and lower
radomes respectively. Install the radome, aligning these markings.
Aerial
Stern
Radome (bottom)
Internal shield
Circuit board
X11 (connect it here. )
Radome (bottom)
X12 (connect it here.)
Installation of 4kW radome antenna cable
0093142132-00
5-8
Page 58

Chapter 5 Equipment T-900 series
Open Radome Antenna (4kW)
1. Confirm that the power of the scanner unit is turned off.
2. Remove the front cover and rear cover of the antenna drive block by loosening installation
screws.
3. Loosen the fixing bolts of the TR block, disconnect each connector and remove the TR unit. At
this moment, be careful for the magnetron not to attract metals.
4. Loosen the bolts at the bottom of the cabinet of the antenna drive block and remove the cable
holder plate, washer, and waterproof rubber packing from the antenna drive block.
5. Pull the antenna cable into the cabinet, threading it through cable leading hole.
6. Install the cable holder plate, washer, waterproof rubber packing, which are removed in step 4, to
the connection cable as shown in the illustration below. Remove the heat contraction tube at the
foot of the cable.
7. Fix the cable with the holder plate. At this moment, fix the cable holder plate at one location. Next,
tighten the shield wire of antenna cable (with crimp-style terminal) together with the holder plate
with the rest of bolts.
8. Fix the antenna cable with the cable clamp which is fixed to the chassis of the TR unit.
9. Install the TR unit and connect the connectors removed in step 3.
10. Connect the 7-pin cable of the connection cable to X11 of the printed circuit board and the 9-pin
connector to X12 respectively.
11. Install the front cover and rear cover.
TR fixing bolt
Remove these connectors
Holding volt
Holder plate
Mutual connection cable
Sandwich the braided wire with the
holder plate at a short distance
Holding volt
Ground the shield material
Clamp
Remove the heat contraction tube
Washer
Holder plate
Base of
transmitter-receiver
Mutual connection cable
Make the height less than 5mm
Rubber packing
Cable leading opening
5-9 0093142132-00
Page 59

T-900 series Chapter 5 Equipment
5.2 Mutual Connection Diagram
2kW Radome Antenna(RB714A)
4kW Radome Antenna /4kWOpen Radome Antenna(RB715A/RB716A)
Antenna
Remark
Violet
Yellow
Blue
No.
Blue
Shield
Shield
Display Unit
No. RemarkNo.Remark
Violet
Blue
Yellow
Shield
Shield
Shield
Blue
GND terminal
GDN
0093142132-00
Shield
Shield
5-10
Page 60

Chapter 5 Equipment T-900 series
5.3 Equipment of Display Unit Installation
The display unit can be installed on the desktop or to the panel. Mount in the procedure below.
Desktop Installation
1. Remove two knob bolts fixing the display unit to the bracket.
2. Remove the display unit from the bracket and place it on the stable flat place.
3. Place the bracket on the position where the display unit will be installed and fix the bracket with
five 5mm screws.
4. Place the display unit on the installation bracket and fix the display unit with two knob bolts
removed in step 1.
Display unit
Installation bracket
Knob bolts
1
2
(4
5
5
9
/
6
4
)
1
2
(
5
4
5
9
/
6
4
)
1
4
1
4
)
4
6
/
9
3
1
(
)
4
6
/
9
3
1
(
Unit: mm (inch)
5-11 0093142132-00
Page 61

T-900 series Chapter 5 Equipment
Caution: When installing on the desktop, the maintenance space shown in the illustration
below is required for cable lay-out, plugging-in/out of connector, fuse replacement and
bolt tightening.
100
(3 15/16)
Flush-mount Installation
240 100
(3 15/16)(9 29/64))
Unit: mm (inch)
2
2
0
(
8
2
1
/
3
2
)
Threading hole
Unit:mm (inch)
0093142132-00
5-12
Page 62

Chapter 5 Equipment T-900 series
1. Make a square hole of 220x220 (depth x width) on the installation place. (See the illustration
below.)
4-4mm (4-5/32)
Hole for screw
R
220
(8 21/32)
25
(
63/64)
Threading
hole
224
(8 13/16)
Unit: mm (inch)
2. Turn counterclockwise the knob bolt fixing the display unit to the installation bracket to loosen and
lift the display unit upward. The bracket and the knob are no longer used.
3. Confirm that the display unit fits the square hole by mating them. If not fit, correct the square hole.
4. Insert a coin in the gap at the lower part of the display unit and remove the front frame. (Refer to
the illustration below.)
Insert a coin and remove the front frame
by depressing to lift up the front frame.
5. Connect all of the connectors for power, antenna and others to the main unit.
6. Insert the indictor in the place (square hole) and fix it with four pieces of 4mm tapping screw (or
M4 pan-head screws). (Prepare 4mm screws suited for thickness of the installation part.)
7. Install the front frame removed in step 4.
5.4 Adjustment after Installation
Before setup, confirm the following points to operate properly the equipment
1. The ship’s power, to which the radar system is connected, should be the specified voltage.
2. No person should be present around the antenna and mast. The display unit should bear the
placecard, describing the caution [Radar being adjusted, do not touch the operating block.]
5-13 0093142132-00
Page 63

T-900 series Chapter 5 Equipment
After confirming the above items, be sure to perform the adjustments.
The adjustments after the installation are the following items in 3.3 Setup of Adjustment Items.
• BRG ADJ
• TX DELAY ADJ
• MBS
• AUTO TUNE ADJ
5.5 Wiring
Cable connection to the Display unit
Connect the power cable, antenna cable and cables of others to specified connectors of the display
unit. If optional navigation equipment and CCD camera are provided, connect also the cables of these
equipments.
Display unit MRD-103
CW-376-5M
AIS
receiver
To J1
To J2
To J3
To POWER
DC10.8 to 31.2V
GND
To J4 To J5 To J7 to J6
CCD
camera
CW-265-2M
+
GND
Remote
display
0093142132-00
Navigation
equipment
Navigation
equipment
Antenna
unit
: Standard product
: Optional product
: Product prepared by a user
External
monitor
5-14
Page 64

Chapter 5 Equipment T-900 series
Pin Assignment of Rear Connector
The pin assignment is viewed from the rear of the display unit.
AIS Input Remote display
NMEA/IEC61162 Input/Output NMEA/IEC61162 Input/Output
External monitor/External buzzer CCD camera Input
Power Input
5-15 0093142132-00
Page 65

T-900 series Chapter 5 Equipment
Connection of DC Cable (CW-265-2M)
DC+(White)
DC- (Black)
To [POWER] port
GND (Gray)
Grounding
• Use the large diameter cable for ground wire as possible.
• Connect the ground wire to the ground material at a shortest distance.
• When connecting the external equipment whose positive polarity is connected to the ground line, do
not connect the ground of the signal line to the cabinet ground.
Connection with the AIS Receiver (J1) (Prepared by a customer)
Use the CW-376-5M (Optional) when installing the AIS receiver. For connecting any equipment, one
end of the CW-376-5W is left un-treated. Prepare a connector suitable for the equipment you desire to
connect.
The connection cable consists of six core wires and the shield wire around them. A signal is inputted
from the orange (AISIN+) and black (AISIN-) wires.
For the CW-376-5M and connector for connection of AIS receiver, refer to the illustration below.
After soldering, perform the waterproof and insulation treatment on the junction with a self-fusion tape.
AISIN+ (Orange )
AISIN- (Black)
To AIS receiver
0093142132-00
Insulate other wires (including the shield wire)
5-16
Page 66

Chapter 5 Equipment T-900 series
Connection with the navigation equipment (J3, J4)
Two NMEA0183/IEC61162 input/output ports are provided. Connect the navigation equipment and the
external equipment such as SI-TEX made GPS sensor to them. The optional cable with connectors at
both ends is available. The CW-376-5M of which one end is left untreated is also available. Prepare a
cable suitable for the equipment you desire to connect.
The connection cable CW-376-5M consists of six core wires and the shield wire around them. A signal
is outputted from the white (NMEA TX+) and red (NMEA TX-) wires, and a signal is inputted from the
orange (NMEA RX+) and black (NMEA RX-) wires.
For wiring of CW-376-5M, refer to the illustration below.
Structure of CW-376-5M
GND(Blue)
NMEA TX+(White)
NMEA TX-(Red)
NMEA RX+(Orange)
NMEA RX-(Black)
+12V OUTPUT
(Green)
To navigation equipment
* In only J3, +12V is outputted
Caution: Insulate the un-used lead wires by winding them with an insulation tape not to
contact each other.
Connection of External Buzzer and External Monitor (J6) (Prepared by a
customer)
When installing an external buzzer or external monitor (VGA monitor, analog RGB input), connect it via
CW-576-0.5M. For its wiring, refer to the illustration below.
After soldering, perform the waterproof and insulation treatment on the junction with a self-fusion tape.
Note: For the rated voltage of the buzzer, use the same DC voltage of the ship’s power supply
to which the radar display unit is connected.
Structure of CW-576-0.5M
To an external monitor
via CW-560-2M or the
equivalent
To an external
buzzer+ (White)
To an external buzzer
To an external
buzzer- (Black)
5-17 0093142132-00
Page 67

T-900 series Chapter 5 Equipment
Connection of CCD Camera (J7) (Prepared by a customer)
The standard product CW-405-0.3M is equipped with a RCA jack for connection to the CCD camera
(NTSC/PAL/SECAM), Connect the video output terminal (RCA plug (In most cases, yellow)) of your
CCD camera. Perform the waterproof treatment on the junction of the RCA terminal with a self-fusion
tape.
5.6 List of Input/Output Sentence
Input Sentence
The sentences shown on the table below can be received.
In NMEA0183 versions 1.5, 2.0 and 3.0, inputting is possible.
Information Priority of Sentence
Latitude/Longitude GGA > RMC > RMA > GNS > GLL
Heading HDT > HDG > HDM > VHW > RMC > RMA > VTG
Ship speed RMC > RMA > VTG > VHW
WPT BEC > BWC > BWR > RMB
Cross Track Error RMB > XTE
Wind direction MWV > MWD
RCA jack (Yellow)
Wind speed MWV > MWD
Water depth DPT > DBT
Water temperature MTW
Output Sentence
The TTM and TLL sentences can be transmitted.
Outputting is performed in NMEA0183 version 2.0.,
Sentence Information
TTM* Target Information
TLL** Target Position
* To output the TTM sentence, the ATA interface (optional) is required.
** To output the TLL sentence, the GPS sensor (optional) is required.
0093142132-00
5-18
Page 68

Chapter 6 Attached Table T-900 series
Chapter 6 Attached Table
6.1 Menu Configuration
【MENU】key
ECHO
FTC (OFF 1 - 8: OFF)
MODE (H UP RM, N UP RM, N UP TM, C UP RM, C UP TM, WPT UP RM)
DISPLAY SELECT (PPI, PPI/PPI, PPI/NAV)
OFF CENTER (OFF, ON)
ENHANCE (OFF, 1, 2)
PROCESS (OFF, ON)
PULSE (RESO-P PRL., GAIN PRL.)
TRAILS
DISPLAY
ALARM
AIS
ATA
TRAIL MODE (REL. TRUE)
TRAIL TIME (OFF, 15SEC, 30SEC, 1MIN, 3MIN, 6MIN, 15MIN, 30MIN, CONTINUE)
TRAIL SHAPE (STANDARD, DECREMENT)
TRAIL LEVEL (1 - 7: 7)
EBL (OFF, ON)
VRM (OFF, ON)
COLOR (STANDARD, DAY, NIGHT)
CURSOR SHAPE (STANDARD, LONG, EBL + VRM)
PI (OFF, ONE SIDE, BOTH SIDES)
PI NUMBER (1 - 7: 7)
BRG TRUE/REL (REL, TRUE)
VECTOR (0 -60MIN: 0)
VECTOR TRUE/REL (REL, TRUE)
ALARM MODE (OFF, IN, OUT)
DETECT LEVEL (1 - 7: 7)
SLEEP (OFF, 5MIN, 10MIN, 5MIN, 30MIN)
LIM CPA (0.0 - 19.9NM: 0.0NM)
LIM TCPA (1.0 - 60.0MIN: 1.0MIN)
AIS (OFF, ON)
LIMIT (1.0 - 20.0NM: 3.0NM)
INFO (OFF, ON)
INFO NUMBER (1 -100: 1)
AUTO DETECT AREA (OFF, ON)
ACQ
DELETE (NUMBER, CURSOR)
ALL DELETE (CANCEL, EXECUTE)
MAN ACQ NUM (1 - 50: 30)
INFO (
OFF, ON)
INFO NUMBER (0 -49: 0)
ATA TGT LEVEL (1 - 7: 7)
A
6-1 0093142132-00
Page 69

T-900 series Chapter 6 Attached Table
ASSIST
ADJUST
RANGE RINGS (OFF, ON)
RANGE UNIT (NM, km, sm)
SPPED UNIT (kn, km/h, m/h)
TEMP UNIT (°C, °F)
DEPTH UNIT (m, fm, l. fm, ft, J.fm)
POSITION DISPLAY (OFF, OWN Position, WPT Position, POB Position)
WPT DISPLAY (OFF, ON)
ROTATION SPEED (STANDARD,HIGH SPEED)
ALL PPI (OFF, ON)
GUIDE (OFF, ON)
BUZZER (OFF, ON)
MOTOR SPEED (OFF, ON)
N UP/S UP (N UP, S UP)
CURSOR DISPLAY (ALWAYS , OPERATING)
SET STATUS DISP (OFF,ON)
MENU OPERATE (A, B)
BRG ADJ (-180.0 - +180.0: 0.0)
TX DELAY ADJ (0 -100: 20)
MBS (0 -100: 20)
STC CURVE (1 - 8: 4)
TUNE SELECT (AUTO, MANUAL)
AUTO TUNE ADJ (0 -100: 31)
MANUAL TUNE ADJ (0 - 100: 44.0)
PULSE WIDTH (SP, M1, M2, L1, L2)
[RANGE 0.75 - 8 Set individually.]
IR (OFF, 1, 2)
ECHO COLOR DIV (STANDARD, DETAIL)
SIGNAL SELECT (ANTENNA, MONITOR, DEMO)
FIELD OF ANGLE (0 - 50: 0)
NMEA
PRESET
MAINTE
CH1 (J3) (4800, 9600, 19200, 38400)
CH2 (J4) (4800, 9600, 19200, 38400)
KGC-1 SETTING (CANCEL, START)
F1 KEY SET (FTC,MODE, DISPLAY SELECT, OFF CENTER, ENHANCE,
TRAIL TIME, EBL, VRM, COLOR, PI, ALARM MODE, ACQ,
DELETE, POB, TARGET, OTHER SHIP)
F2 KEY SET (SAME AS F1 KEY: VRM)
SELECT RANGE S (OFF, ON [RANGE 0.0625 - 1.5])
SELECT RANGE M (OFF, ON [RANGE 2 - 16])
SELECT RANGE L (OFF, ON [RANGE 24 - 48])
The maximum range differs depending on type of antenna.
ECHO COLOR (BACK, ECHO COLOR 1 - 7)
TRAIL COLOR (TRAIL COLOR 1 - 7)
DISPLAY COLOR (CURSOR, CHARACTER, STRING EDGE, AIS/ATA)
LANGUAGE (ENGLISH, JAPANESE, OTHERS)
NAV SELECT (WPT, DEPTH/TEMP, WIND, COMPASS, AIS LIST,
ATA LIST)
CAMERA POSITION (-25 - +25: 0)
DISPLAY UNIT
ANTENNA
PANEL TEST
LCD TEST
OPE HOURS RESET
TX HOURS RESET
ALL RESET
SYS PROG LOAD
0093142132-00 6-2
Page 70

Chapter 6 Attached Table T-900 series
6.2 Specifications
Specification item Content
Antenna type Radome Radome Open array Open array
Aerial length 1.2feet 2feet 3feet 4feet
Transmitting output 2 kW 4 kW 4 kW
Output frequency 9445 MHz 9410 MHz 9410 MHz 9410 MHz
Horizontal beam
width
Vertical beam width 25° 25° 22° 22°
Number of antenna
rotation
Antenna
IF center frequency 60 MHz
Range accuracy Better than 8 m
Minimum detecting
distance
Range resolution Within 30 m Within 25 m Within 25 m
Warm-up time 2 min
Pulse width 0.08 us, 0.15 us, 0.3 us, 0.5 us, 1 us
Display unit MRD-103
Display 8.4 inch color TFT LCD Display VGA
Effective diameter 127.4mm
Display resolution 480 x 640 pixels
Off-center Maximum up to 66%
Echo area 2 types (All screen, within effective diameter)
Display mode Head Up, North Up*, Course Up*, WPT Up**
Indication system PPI, PPI/PPI, PPI/NAV
Distance accuracy 8m or 1% of range
Range Up to 0.0625, 0.125, 0.25, 0.5, 0.75, 1, 1.5, 2, 3, 4, 6, 8, 12, 16, 24, 32
Display Unit
Video level 8 colors
Distance unit (VRM
UNIT)
Alarms IN and OUT alarms
Other functions VRM, EBL, PI, trail**, alarm, enhance, interference rejection, CCD
AIS interface 100 targets (Optional)
ATA 50 targets (Optional)
Type MDC-921 MDC-941 MDC-940
6.0° 3.9° 2.5° 1.8°
24rpm 24rpm or 48rpm 24rpm or 48rpm
(48rpm:24VDC or more)
Within 30 m Within 25 m Within 25 m
and 48 NM
In the MDC-921, 24 NM. In the MDC-941, 32 NM.
In the MDC-940, 48 NM.
NM, SM, KM
camera display, dual station, external monitor output, external buzzer
etc
6-3 0093142132-00
Page 71

T-900 series Chapter 6 Attached Table
NMEA input/output 2 CH
Input sentence BEC、BWC、BWR、DPT、DBT、GGA、GLL、GNS、HDG、HDM、HDT、
MTW 、MWD、MWV、RMA、RMB、RMC、VHW、VTG、XTE
Input/Output
Output sentence TTM、TLL
Power
Range of operating
10.8-31.2VDC
45W
45W
70W
-15°C - +55°C (Display Unit) -25°C - +55°C (Antenna)
temperature
Upper limit of
+70°C
conservation
temperature
Upper limit of
93% ± 3% (at +40°C)
humidity
Waterproof IPX5 (Display Unit)
CER-46 (RB714A) IPX6 (RB715A,RB716A)
Vibration Resistant When the following vibration is applied to equipment respectively under
Environment condition
Dimension of
specified condition, its performance should not be affected.
• From 2 - 5Hz up to 13.2Hz vibration width ±1mm ±% (Maximum
acceleration 7m/s
• From 13.2Hz up to 60Hz Maximum acceleration 7m/s
2
constant at 13.2Hz)
2
Maximum 274x263x133mm (Main unit 240x240x112mm)
cabinet
Weight 3.7kg
* Entering the bearing is required.
constant
** For WPT up, entering the WPT data is required.
*** For true trail, entering the bearing data, ship’s speed data and latitude/longitude are required.
0093142132-00 6-4
Page 72

Chapter 6 Attached Table T-900 series
6.3 External View
6-5 0093142132-00
Page 73

T-900 series Chapter 6 Attached Table
100
(3 15/16) (3 15/16)(9 29/64))
240 100
Dimension drawing of table installation
Unit: mm (inch)
Hole for installing
4-4mm screw
R
2
5
240
(9 29/64)
220
(8 21/32)
(
6
3
/
6
4
)
Threading hole
224
(8 5/32)
Unit: mm (inch)
Dimension drawing of flush-mount installation
0093142132-00 6-6
Page 74

Chapter 6 Attached Table T-900 series
RB714A
Unit: mm (inch)
Weight: 6kg
RB715A
220 (8 11/16)
Bow
448 (17 5/8)
Weight: 10kg
448 (17 5/8)
Unit: mm (inch)
255 (10 1/16)
Bow
(25 63/64)
636 (25 1/16)
660
636 (25 1/16)
6-7 0093142132-00
Page 75

T-900 series Chapter 6 Attached Table
RB716A
Unit: mm (inch)
Weight: 21kg/ (RW701A-03): 22kg/ (RW701A-04)
1034/ (RW701A-03)
1346/ (RW701A-04)
104
(4 1/8)
Bow
450 (17 3/4)
220 (8 11/16)
234 (9 3/16)
390 (15 3/8)
280 (11)
0093142132-00 6-8
Page 76

Chapter 7 Principle of radar system T-900 series
Chapter 7 Principle of radar system
7.1 What is the radar system?
The radar system is a navigation device that transmits a very high frequency radio wave referred as
microwave from antenna. The radar then receives the radio wave reflected by target(s) (e.g. other ship,
buoy, island, etc) via the same antenna and converts the received radio wave to electronic signals and
sends these signals to the display unit. The radar makes it possible to find objects (targets), such as
other ships, rocks or coastline, not seen by eyesight or in fog and allows ships to avoid these potential
hazards.
As the antenna transmits while rotating, it is possible to see the current surrounding situation around
your ship at a glance.
The microwave radiated from the radar is referred as pulse wave and transmitting and receiving of
these waves alternate. Up to thousands of pulse waves are transmitted and received during one 360
degree rotation.
The typical radar antenna is a parabolic type or slotted array and its performance is essential for good
radar performance. Some of factors affecting the quality of the target returns are the antenna beam
width and the side lobe level. The narrow beam width provides a high resolution for angular orientation
to distinguish objects and the low side lobe level reduces a false image effect.
Other
ship
Radar wave
Own
ship
Buoy
Antenna
(during
rotating)
Figure 7-1 What is Radar?
Radar display
Side lobe
The main lobe means the strongest radiated beam sent from the specific antenna, and the other
weaker beams, are referred as side lobes. A side lobe level is a difference between the largest side
lobe level and main lobe level.
Main lobe
Side lobe level
Beam width
Side lobe
Antenna
Figure 7-2 Antenna pattern
Beam width
The antenna beam width is defined as the angle where the radiation power density is within a half of
the maximum power supply in the main lobe (also, referred as “half” value width”).
7-1 0093142132-00
Page 77

T-900 series Chapter 7 Principle of radar system
7.2 Characteristics of radar radio wave
The radio wave propagates slightly along the ground (primarily line of sight). This characteristic varies
depending on the density of atmosphere but generally calculated according to the formula as shown
below, considering that the distance with radar sight D is about 6% longer than the distance with optical
sight.
D(NM)=2.22 X ( h1 + h2
h1 : Antenna height (m)
h2 : Target height (m)
1
h
Earth
Sight line
Radar radio wave
h
2
Figure 7-3 Characteristics of radar radio wave
Target with less reflection
The strength of the reflected waves from a target varies depending on not only the distance from the
target, its height or size, but also (radar absorbing) material and shapes. A target with a low degree of
reflection or low incident angle, such as FRP and wooden is not reflected well. Therefore, care should
be taken that a FRP ship, a wooden ship or an object such as sand, a sandbar and muddy cay poor
radar targets.
Since the distance from the coastline, etc. to your ship on a radar image to be seen as longer than that
from the actual coastline, more caution should be used navigating around such objects.
Not see n
Seen
Coastline on ra dar imag e
Actual (not seen )
coastline
3
1
HU
Figure 7-4 E xample of targets hard to be reflected
Radar shadow
Since the radar radio wave propagates straightly, your ship’s chimney stack and mast close to the
antenna, a large ship or mountain can create blind spots for which the radar wave cannot penetrate. In
such cases, they may completely or partially hide targets and cast a long shadow.
Since the shadow your ship’s chimney stack or mast is known at the time of installation, proper
selection of the antenna location is required to reduce the shadow effect. Since targets less likely to be
in this shadow area than in open sea, an extra attention should be taken in shadow areas.
False image
An image that does not actually exist (false image) at sea may appear on the display.
The phenomenon that causes false echoes are categorized and be described as follows:
0093142132-00 7-2
Page 78

Chapter 7 Principle of radar system T-900 series
e
● False image
The image of a large physical object in a close proximity may appear in two different orientations. One
is a real image and the other is a false image caused by wave reflected on the chimney stack or the
mast, etc.
On the display, one image appears with a right distance and bearing, and another one appears in the
direction of chimney stack, mast, etc. These images may also be generated by being reflected multiple
times from the bridges and quays too.
Passage of direct
reflection
Mast, etc
Direction of false image
3
1
HU
Passage of
secondary
reflection
Figure 7-5 False image by virtual image
Real image
False image
● Duplicate target images
When there is a big reflective surface nearby and perpendicular at a close distance (i.e. when your ship
is passed by a big ship, etc.) radio wave bounces repeatedly between your ship and the other ship.
Therefore, 2 to 4 images may appear at equal range in the direction of this target. The false image
generated by this multi-path reflection is referred as “double targets”. In this case, the closest target is
the real one.
Even if the double targets appear, if the distance and bearing between own ship and the reflective
target changes, the duplicate targets will disappear. Therefore, this false image can be easily
distinguished.
Own ship
Large vessel
3
1
HU
Real imag
Double image
Figure 7-6False image caused by double image
7-3 0093142132-00
Page 79

T-900 series Chapter 7 Principle of radar system
The microwave beam radiated from the antenna has a side lobe in different direction than that of the
main beam. Since this side lobe is lower than that of main beam, the effect is negligible for targets at a
long range, but a close, strong reflecting target may cause false image in a circular arc shape.
If a large target such as land exists near your ship, a circular arc shaped
image may appear.
3
1
Main lobe
Virtual image
by sidelobe
Side lobe
HU
Antenna
Figure 7-7 False image by sidelobe
Real image
● False image of a distant target caused by “duct”
Depending on a weather conditions, a duct occurs by the temperature inversion, etc.
In this case, the unusual propagation of the radio wave may reach distant targets out of radar range.
A target at more than the maximum range may appear as an image, and may be displayed as a false
image closer than an actual distance. This phenomenon is a result of the long range echo delay time
exceeds the transmission period, and is displayed as the echo in the next cycle.
When changing the range of a distance, if the distance of the target changes, it can be judged as a
false image.
7.3 Radar interference
When the radar with the same frequency band is used nearby, interference noise appears on a display.
Although appearance of interference is not constant, the shape is almost always swirling or radial. This
device features an interference rejection facility to reduce interference.
0093142132-00 7-4
Page 80

Page 81

Page 82

Page 83

Page 84

11001 Roosevelt Blvd., Suite 800
St. Petersburg, FL 33716
Tel: 727-576-5995
Fax: 727-576-5547
www.si-tex.com
 Loading...