

Page 1

Quick Installation Guide
Wireless Network Broadband Router
WL-114
Page 2
3
This guide only covers the most common situations. See the complete User’s Manual on the CD-ROM for
advanced conguration
Requirements
• Cable modem or DSL/ADSL modem.
• Standard 10/100BaseT (UTP) net work cables with RJ45 connectors.
• PCs with TCP/IP net work protocol.
Setting up the broadband router
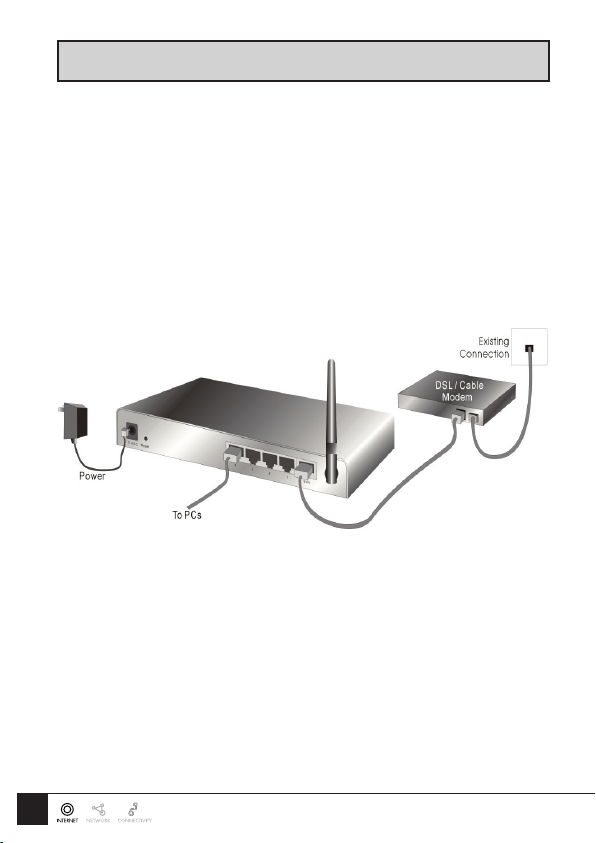
1 Physical installation
1 For the installation of the Broadband router it is assumed that you have at least one PC with a working
broadband Internet connection. It is also assumed that the modem is congured in accordance with the
requirements of your ISP and of the modem manufacturer. If not, consult your ISP support literature.
2 Before you be gin, ensure that the power lead is not connected to either the broadband router or the cable
modem/DSL modem. Leave your cable modem/DSL modem plugged in (telephone line or cable input ).
3 Connect the L AN cables: For the WL-114, use standard LAN cables to connect the PCs to the LAN ports
(hub) on the broadband router.
4. Connect your cable modem/DSL modem to the WAN -port on the broadband router. Use the cable
supplied with your cable modem/DSL modem. If no cable was supplied with your modem, use a standard
network cable.
5. Switch on the cable modem/DSL modem.
6. Connect the power supply adapter to the broadband router. Use only the adapter supplied with the router.
7. Check the LEDs:
• The M1 LED should turn on and after a few seconds it should start BLINKING
• The M2 LED should turn OFF, if this light stays on this usually indicates a hardware problem, in this case
please contact Sitecom support.
• The WAN LED must be ON.
• For each active LAN connection, the associate d LAN Link/Act LED must be ON.
2
Page 3

PC Setup
1 Set up TCP/IP
1. Windows 98/ME
Right click the Network Neighbourhood icon on the desktop and click Properties. The following window
will be displayed:
Windows 20 00/XP
Right click the My Network Places icon on the desktop and click Properties. The following window will be
displayed:
Right click the Local Area Connection of the correct network card, and then choose Properties.
3
Page 4

5
2 If the list that appears on screen does not include a line, such as the one that has been selected above
(“TCP/IP -> network card”), then follow the steps indicated below to add this line:
• Click on the button “Add”
• Double -click on “Protocol”
• Select “Microsoft” and thereafter “TCP/IP”
• Click on “OK”
• Wait a few seconds, so that TCP/IP can be added. Thereafter, click “OK” to leave the network
properties screen. Restart your PC.
3 Select the line “TCP/IP -> Network card” as shown above. Click on the but ton Properties to obtain a
window similar to the following:
4 Check whether the setting “Obtain an IP address automatically” has been selected, as is illustrated above.
The DHCP server in the broadband router will now assign an IP address to the PC.
Restart your PC, even if you have not made any changes.
2 Internet access
Windows 98/ME/2000
• In the Taskbar, click on the Start button and select Settings - Control Panel - Internet options.
• Select the tab Connections and click on the button Settings.
• Select “I want to congure my Internet connection manually” or “I want to make a connection via a LAN
network” and click on “Next >”.
• Select “I want to connect via a LAN network” and click on “Next >”.
• Check carefully that all of the checkboxes in the screen Internet conguration for a L AN have not been
checked.
• Continue with the steps in the wizard, until the task is completed.
The PC conguration is now completed.
4
Page 5

Windows XP
• In the Taskbar, click on the Start button and select - Settings - Control Panel - Internet options.
• Select the tab Connections and click the Setup... button.
• When the New Connection Wizard starts, click on Next.
• Select Connect to internet and click on Next.
• Select Set up my connection manually and click on Next.
• Select Connect using a broadband connection that is always on and click on Next.
• Click on Finish to close the Wizard.
• In the Taskbar, click on the Start button and select - Settings - Control Panel - Internet options.
• Select the Connections tab and click on the LAN Settings button.
• Check carefully that none of the boxes in the Local Area Network (LAN) Settings window are checked.
The PC conguration is now completed.
Router setup
Manual conguration - Internet access
1 Ensure you have TCP/IP settings on your PC, as described above.
Do not forge t to restart your PC after you have nished.
2 Start your web browser. In the Address eld, enter the following: http ://192.168.123.254
3 Login with the username admin and password admin.
4. The start up window will now be displayed. Click on Wizard.
5. The Setup wizard will now be displayed; check that the modem is connected and click on Next.
5
Page 6

7
6 Select your country from the Country list.
7 From Service, select your internet provider. Click Next.
8 Depending on the chosen provider, you may need to enter your user name and password and M AC
address or hostname in the following window. Then click on Next.
6
Page 7

9 Click Reboot to complete the conguration.
10 The conguration is now completed. If your provider does not appear in the list, consult the full manual to
nd out how you can congure the router for your connection.
11 Click OK to reboot the router and commit the changes.
12 If you are using a PPTP or PPPoE connection please click Connect in the following window.
13 The router will now connect to the Internet.
7
Page 8

9
Wireless settings
To change the settings of your wireless network please follow the steps below:
• Start your web browser. In the Address eld, enter the following: http://192.168.123.254
• Login with the username admin and password admin.
• Go to Basic set tings->Wireless
• Change the settings according to your wishes.
• Network ID (SSID): The SSID is an unique ID used by Access Point and stations to identif y a wireless
LAN. Make sure all wireless stations and Access Points have the same SSID. The SSID can be set up to
32 characters and is case sensitive.
• Channel: Enables you to change the channel of the wireless network. Ever y channel corresponds with a
different frequenc y in the 2.4Ghz band.
• Encryption: By default None is selected. This means encr yption is not enabled. See the next chapter for
more information about encryption.
• Click Save to save the changes.
• Click Reboot to activate the changes you have made.
8
Page 9

Advanced wireless settings - Encryption
Data Encr yption lets you enable encryption and set the encryption keys, making your data transmissions in
your wireless network more secure. The WL-114 supports a wide range of encryption algorithms including the
latest WPA standard.
Note Before setting up encryption, make sure your wireless clients support the encryption type you want
to use. While almost all wireless adapters will suppor t WEP encryption there are still a few which do not
support WPA encryption.
If you use an encryption type which your wireless clients do not support, they will not be able to communicate
with the router, resulting in a loss of network connection.
WEP
WEP- encryption is the simplest form of encryption and uses a single static key to encrypt and decr ypt all traf c
between your router and wireless clients. To set up WEP encryption follow these steps:
• Select WEP
• Select the encryption strength, 64-bit, 128- bit, or 256-bit. The higher the bit count, the stronger the
encryption.
• Enter the key you wish to use for encryption in the WEP Key 1 text eld. See the follow table for valid WEP
key formats:
64 bit hexadecimal 10 characters A- F & 0-9
128 bit hexadecimal 26 characters A- F & 0-9
256 bit hexadecimal 58 characters A- F & 0-9
• Click Save to save the changes.
• Click Reboot to activate the changes you have made.
9
Page 10

WPA-PSK
WPA is the ofcial successor to WEP encr yption featuring a more advanced encryption algorithm and making
use of dynamic encryption keys providing a much more secured wireless connection. If possible you should
use this encr yption type. To set up WPA -PSK encryption follow these steps:
• Select WPA-PSK
• Select which type of encryption key you wish to use; ASCII or HEX.
• Enter your encryption key. Unlike WEP encryption, a WPA-PSK encryption key can be of any length.
• Click Save to save the changes.
• Click Reboot to activate the changes you have made.
10
 Loading...