


TR2

Table of contents
Pressure Washer
Safety guidelines .............................................................. 2
Important safety instructions ............................................. 2
Grounding instructions & Extension cords ........................ 3
Starting up - Usage ........................................................... 4-5
Usage ............................................................................... 6
Parts drawing & Parts list - Caution .................................. 7
Storage - Trouble shooting guide ..................................... 8
Sistema USA Inc. 1520 Yokel Rd - Evansville, IN 47711 - USA
General e-mail: info@sistemausa.com - Web: www.sistemausa.com
Customer Support: support@sistemausa.com
Toll Free Customer Support Line: 1-866-463-3000
REV. 1 - 25/05/06
Carefully read and understand these instructions
before operating this pressure washer.
Only For Cold Water Application
Only Models Sold in the U.S.A. are equipped with
a GFCI (Ground Fault Circuit Interrupter) plug.
ART. 3920201
TR2
1650 psi
General warning.
Read carefully.
Ear protection is advised.
Wear safety goggles.
Product Manual

This manual contains infor m a tion that is important for you to know and understand . This inf o rmatio n relat e s to pr o tectin g YOUR SAF E TY and P R E VENTI N G
EQUIPMENT PROBLE M S . To help you recog n i z e this infor m a t ion, we use s y mbols to the right. Please read the manual and pay attention to th e se sections.
URGENT SAFETY INFORMATION - A HAZARD THAT WILL CAUSE
SERIOUS INJURY OR LOSS OF LIFE
IMPORTANT SAFETY INFORMATION - A HAZARD THAT
COULD CAUSE
SERIOUS INJURY OR LOSS OF LIFE
A POTENTIAL HAZARD THAT
MAY CAUSE MODERATE INJURY OR
DAMAGE TO EQUIPMENT
INFORMATION THAT YOU SHOULD PAY SPECIAL ATTENTION TO.
Save these instructions
When us i n g th i s product basic precaution s should always be
followed including the following:
1. Read and understand all the instructions before using the product.
2. To reduce the risk of injury, close supervision is necessary when a product is used near children.
3. ALWAYS disconnect power before disassembling or repairing the unit.
4. Follow all safety codes as well as the Occupational Safety and Health Act (OSHA).
5. Ensure safety button on the gun and button on the GFCI plug (only for model equipped with a
GFCI plug) are working properly before each use.
DO NOT remove or modify any part of the gun or unit.
6.
Know how to stop the product and bleed pressures quickly. Be thoroughly familiar with the controls.
7. Stay alert - watch what you are doing.
8. Do not operate the product when fatigued or under the influence of alcohol or drugs.
9. Keep operating area clear of all persons.
10. Do not overreach or stand on unstable support. Keep good footing and balance at all times.
11. Follow the maintenance instructions specified in the manual.
12. If replacement of the plug or cord is needed, use only identical replacement parts.
13. WARNING Risk of injection or Injury - Do not direct discharge stream at persons.
14. This model is provided with
RS Restart System.
The pressure washer is equipped with a stop device which will sense when the trigger on the
gun is released. It will open the power circuit to the motor and cause the pressure washer to stop.
Remember not to use the
RS Restart System as a main switch.
15. Always wear safety glasses or goggles and protective clothing when operating or performing
maintenance.
16. Never put hand or fingers over the spray tip while operating the unit.
17. Never attempt to alter factory settings. Altering factory settings could damage the unit and will
void the warranty.
18. NEVER store the pressure washer outdoors or where it could freeze. The pump will be seriously
damaged.
19. Always follow detergent manufacturer’s label recommendations for proper use of detergents.
Always protect eyes, skin and respiratory system from detergent use.
20. Explosion hazard: NEVER spray flammable liquids or use pressure washer in areas containing
combustible dust, liquids or vapors.
21. Do not spray electrical apparatus and wiring.
Safety guidelineS - definitionS
important Safety inStructionS
☞
NOTE
WARNING
CAUTION
- 2 -
Model Voltage Frequency Current Pressure max Operating pressure Cleaning power Max flow rate Inlet pressure max
V Hz. Amp psi psi gpm psi
TR2 1650 psi
120 60 10.5 1650 1400 2100 1.6 100
DA NG ER
WARNING

- 3 -
GROUNDING: This product must be grounded. If it should malfunction or breakdown, grounding provides a path of least resistance for electric current to reduce the risk of electric shock. This product is
equipped with a cord having an equipment-grounding conductor and a grounding plug. The plug must
be plugged into an appropriate outlet that is properly installed and grounded in accordance with all local
codes and ordinances.
Improper connection of the equipment-grounding conductor can result in a risk
of electrocution. Check with a qualified electrician or service personnel if you are in doubt as to
whether the outlet is properly grounded. Do not modify the plug provided with the product-If it will
not fit the outlet, have a proper outlet installed by a qualified electrician. Do not use any type of
adaptor with this product.
Only Models Sold in the U.S.A. are equipped with a GFCI (Ground Fault Circuit
Interrupter) plug.
GROUND FAULT CIRCUIT INTERRUPTER PROTECTION: Only for high pressure cl ean er s pro vi de d w it h a g ro un d f au lt ci rc ui t i nt er ru p te r (GF CI )
built into th e plug of the powe r supply cord. This device provides additio-
nal protection from the risk of electric shock. Should replacement of the plug or cord become necessary, use only identical replacement parts that include GFCI protection.
EXTENSION CORDS: Extension cords are NOT recommended to be used with product. If an
extension cord must be used, the following 3 requirements should be met:
1) 14 gauge minimum wire size up to 25 ft. (762 cm.) cord.
2) 12 gauge minimum wire size up to 50 ft. (1524 cm.) cord.
3) Use only 3-wire extension cords that have 3-prong grounding-type plugs and 3-pole cord
connectors that accept the plug from the product. Use only extension cords that are intended for
outdoor use. These extension cords are identified by a marking ”Acceptable for use with outdoor
appliances; store indoors while not in use.” Use only extension cords having an electrical rating
not less than the rating of the product. Do not use damaged extension cords. Examine extension
cord before using and replace if damaged. Do not abuse extension cord and do not yank on any
cord to disconnect. Keep cord away from heat and sharp edges. Always disconnect the extension
cord from the receptacle before disconnecting the product from the extension cord.
To reduce the risk of electrocution, keep all connections dry and off the ground.
Do not touch plug with wet hands. Do not use if cord is damaged.
grounding inStructionS & eXtenSion cordS
inStruction for uSe
This model is equipped with a pressure adjustment device. See instructions on page 6.
D A N G E R
WARNING
MEDIUM MAXMIN
Starting - up
- 4 -
BEFORE START-UP PLEASE READ THE INSTRUCTIONS CAREFULLY.
1
The water jet can be dangerous if used incorrectly; never direct the water jet towards yourself or
others, do not use water jet to clean clothing or footwear, never direct the water jet towards animals or electrical appliances.
Do not let children or persons not familiar with these safety instructions use the unit.
Before start-up make sure that the lance is not unrestrained and free: the sudden jet of high pressure water would turn the lance into a dangerous whip.
max 40° C
max 104° F
IN
2
3
4
5
Nipple
Adapter
Quick
Connect
Fitting
Nipple
Adapter
Garden Hose
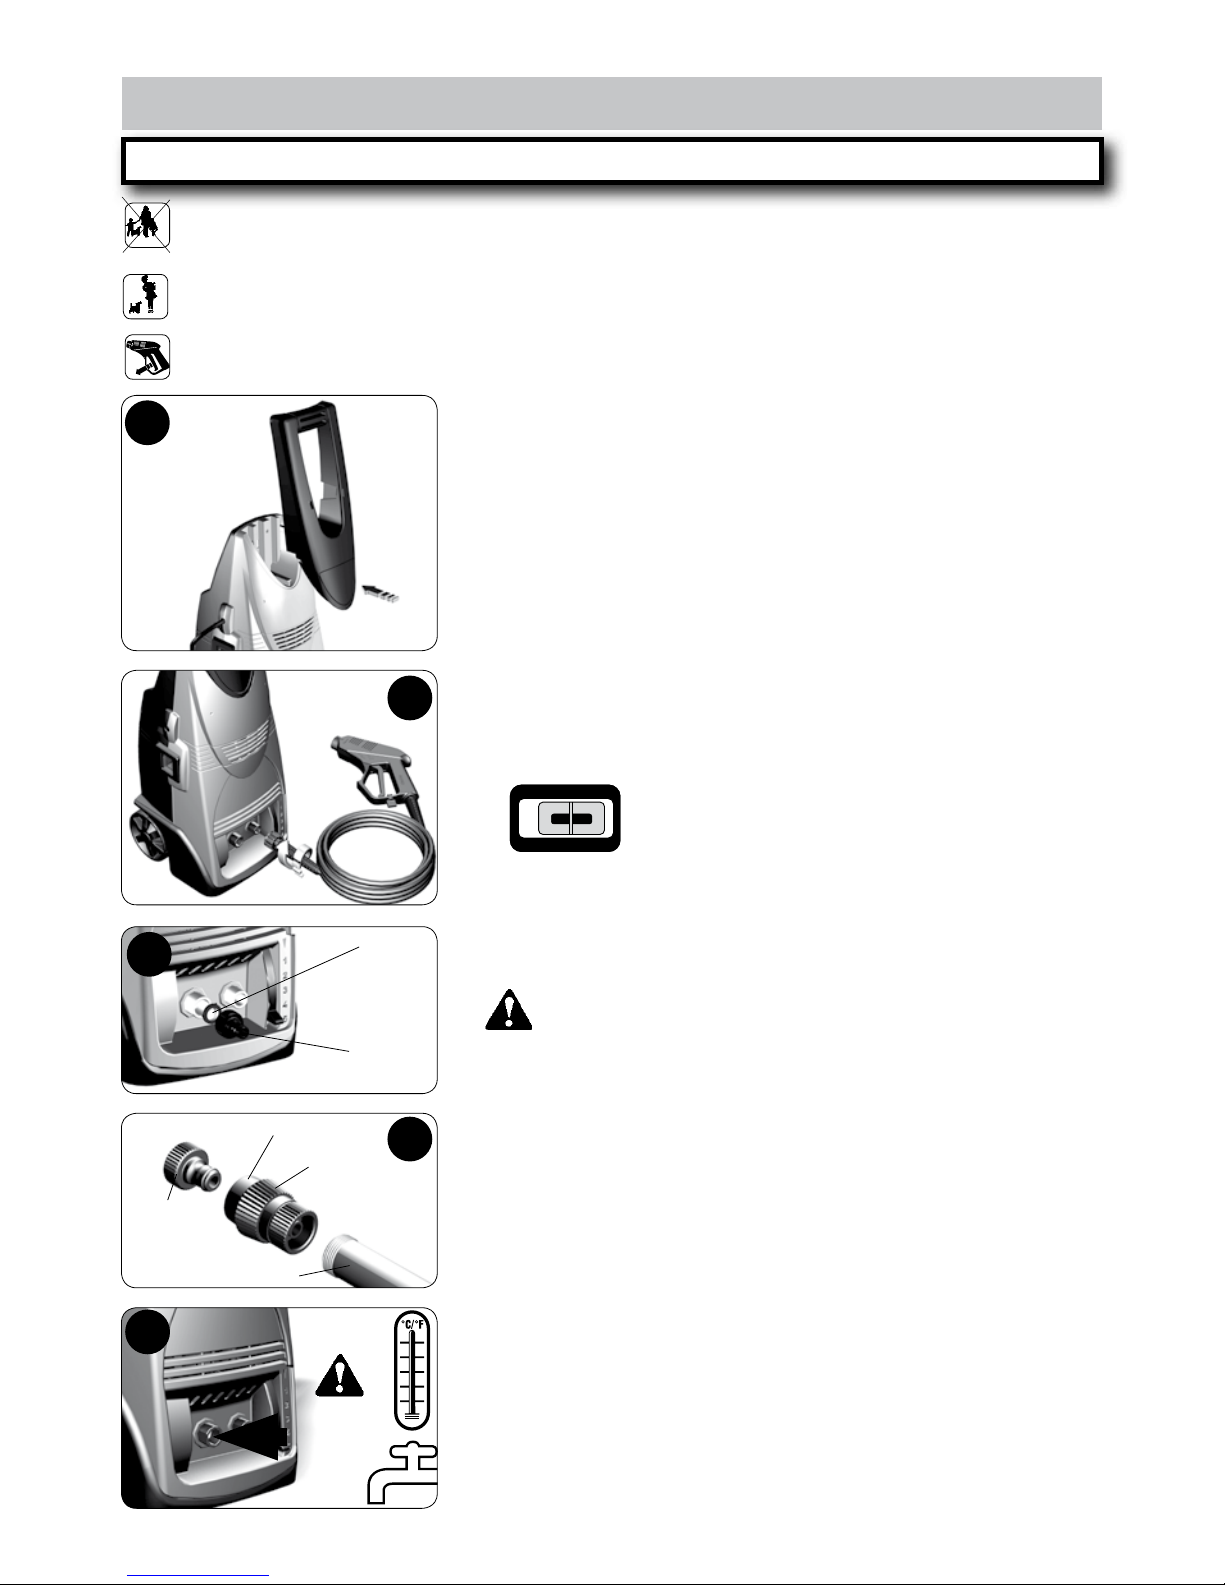
A
1. Handle assembly.
2. Turn the starting switch into the “OFF” position. Connect the
high pressure hose to the delivery pipe OUTLET.
3. Attach nipple adapter to inlet fitting on the unit.
Make sure supplied filter is installed.
Sand, limestone and sediment damage the pump valves.
Using soiled water invalidates the warranty!
4. GARDEN HOSE CONNECTION INSTRUCTIONS
1) Attach quick connect fitting to garden hose.
2) Pull side “A” of quick connect fitting toward garden hose and
push onto nipple adapter.
3) Push side “A” of quick connect fitting towards nipple adapter
and release.
5. Open the water tap completely. The maximum temperature of
the incoming water can not exceed 104°F (40°C).
The maximum pressure of the incoming water can not exceed 100
psi (7 bar). The minimum pressure of the incoming water can not
be less than 30 psi (2 bar) to obtain the best performances of the
machine.
ONOFF
Filter

Starting - up
- 5 -
uSage
6
7
8
TWIST
CLICK
TWIST
PUSH
PUSH
CLICK
ONOFF
6. Plug into 120 Volt 15 Amp. circuit.
Only Models Sold in the U.S.A. are equipped with a GFCI
(Ground Fault Circuit Interrupter) plug.
Only for high pressure cleaners provided with a ground fault
circuit interrupter GFCI: push “RESET” button on GFCI plug.
7. Pull the gun trigger to release the trapped air.
Wait for a steady flow of water to emerge from the spray
nozzle.
8. Assemble lance
extension and nozzle.
ALWAYS USE
THE LANCE EXTENSION
9. Keeping the gun trigger pressed,
turn the starting switch to the “ON”
position: the water WILL shoot out
of the gun.
9
• To increase washing effect, increase spray pattern by
rotating nozzle counter-clockwise.
• To decrease spray pattern, rotate nozzle clockwise.
• Turbo lance is not adjustable.

uSage
- 6 -
OK NO
NOZZLE CLEANING if the water jet is irregular during the operation
or the thermic safety switch shuts off the machine, the nozzle is likely
to be blocked. Proceed as follows:
1) Turn the starting switch to the “OFF” position;
2) Remove plug from power socket;
High pressure can cause serious injury.
Keep spray head well clear of the face, other people, animals or
plants. Protective clothing and goggles must be worn during use.
3) Remove the lance from the gun;
4) Clean the opening with the suitable instrument
(diameter < 0.04 in. = 1 mm.); Wire tool included.
5) Perform a visual check through the nozzle to see if all obstructions
are removed.
WARNING
For proper unit operation the pressure washer
must be used in the vertical position.
The safety button on the handgun prevents
inadvertent starting on of the unit.
The output water pressure is adjustable and it is
controlled by the pressure regulation lever.
Turn the lever upward to decrease pressure or
downward to increase pressure.
The output pressure is indicated on the scale.
TURBO NOZZLE Use turbo nozzle or adjust the jet nozzle to increase the
washing effect (the turbo lance is not adjustable).
Caution: Do not move the Adjustable Lance very close to a painted surface at a
90° angle and adjust the nozzle to a pinpoint spray. Hold the lance at a distance of
12 to 15 inches and aim the nozzle at a 45° angle to the surface level. Significant
damage may occur to the painted surface if appropriate care is not observed.
When using detergent applicator,
use only detergents formulated
for pressure washers.
MIN
MEDIUM
MAX

1
2
5
3
caution
- 7 -
partS draWing & partS liSt
POS. No. CODE No. DESCRIPTION
1. Water inlet
2. Water outlet
3. 2410073 ON/OFF switch
4. 2440018 Power supply cord
with GFCI plug
2440025 Power supply cord
with NEMA plug
5. 3310182 Handle
6. 2210004 Detergent bottle
7. 1410009 Detergent spraying
attach.
8. 1410059 Gun and hose
9. 1410062 Adjustable lance
10. 1410050 Extension
11. 1410056 Turbo lance
12. 8100001 Fixed brush
13. 3350006 Nozzle cleaning pin
14. 2210019 Garden hose
connection
13
14
9
10
11
12
ONOFF
Do not point wand at self or others.
With wand trigger pulled, push startbutton on washer.
WARNING
BEFORE START UP ALWAYS OPERATE THE MACHINE WITHOUT
THE LANCE.
ALWAYS USE THE EXTENSION.
Clean the filter
Periodically inspect the suction filter in order to avoid obstruction and damage to the machine operation.
Sand, limestone and furrings damage the pump valves.
Priming soiled water invalidates the warranty!
Use multi
purpose grease or oil
to lubricate the
o-ring on the wand.
The motor/pump
is a sealed system.
No addition of grease is
needed.
7
6
8
4

TROUBLE CAUSE REMEDY
- 8 -
Storage
This pressure washer should be stored in such a way to protect it from freezing. Do not store
this unit outdoors or in area where temperatures will fall below 32°F (0° C). This can cause
extensive damage to this unit. Drain as much water as possible as follows:
1. Stop the pressure washer, detach the water hose, and pull the trigger on the spray handle
to release the pressure in the inlet hose.
2. Restart the unit, pull the trigger, and run until water no longer sprays out of the nozzle. (Max.
10 seconds)
3. Stop unit. Detach high pressure hose from unit. Leave hose attached to wand to protect it
against accidental dropping. Pull trigger to drain water from wand and hose, and place assembly in storage.
The pump pressure fluctuates in by-pass even when
the gun is operated.
The electrical pump does
not start.
The electrical pump operates but there is no pressure.
Very noisy pump operation.
The motor halts suddenly.
Low Pressure
Nozzle blocked.
No electrical power.
The thermal cut-out trips.
Only for high pressure cleaners, provided with GFCI:
GFCI has tripped.
Inlet filter clogged.
The pump takes in air
Nozzle has too large or worn
hole.
Air intake.
The thermal cut-out has tripped because of short-circuit
or over-heating.
Regulator too low
Clean or replace.
Check circuit breaker.
Switch off unit and allow motor to cool and leave the lance
open. If the problem persists,
call customer service.
Push reset button.
Clean the filter
Check the inlet coupling con-
nectors. Make sure the water
supply is adequate.
Replace.
Check the air inlets.
Make sure there are no short-circuits and the power supply features (voltage, frequency, current)
are correct. Leave the machine
to cool with the switch off for a
few minutes.
Increase pressure
 Loading...