

Page 1

SC-C1
SiriusConnectTM Vehicle Tuner
Installation Guide
Page 2

Congratulations on the Purchase of your new SIRIUS SC-C1
SiriusConnect Vehicle Tuner.
The SC-C1 S iriusConnect Vehicle Tuner is designed to work with any Si rius-Ready or SAT
Radio Ready headunit. Some headunits will require the use of a Sirius Connect Interface
Translator. Please consult your headunit manufacturer for more detail s concerning comp atibility and inte rface availability. The SC-C1 can also be integrated in se lect factory audi o systems.
Please cons ult your retailer for interface compatibility options. For the latest infor mation about
this and ot her SIRIUS products and accessories, visit http://www.siri us.com.
Compatib le with Sir ius-Ready o r
SAT-Radi o Ready Hea dunits
May requ ire a Siriu sConnect In ter-
face cab le or trans lator
Page 3

Table of Contents
TABLE OF CONTENTS . . . . . . . . . . . . . . . . . . . . . . . . . . . . . . 3
WARNING AND SAFETY INFORMATION . . . . . . . . . . . . . . . . . . . . . . 4
Safety Precautions . . . . . . . . . . . . . . . . . . . . . . . . . . . . . . . .4
FCC Warning . . . . . . . . . . . . . . . . . . . . . . . . . . . . . . . . . . 5
FCC Compliance . . . . . . . . . . . . . . . . . . . . . . . . . . . . . . . . 5
Canadian Compliance . . . . . . . . . . . . . . . . . . . . . . . . . . . . . . 5
COPYRIGHTS & TRADEMARKS . . . . . . . . . . . . . . . . . . . . . . . . . 6
PACKAGE CONTENTS . . . . . . . . . . . . . . . . . . . . . . . . . . . . . . 7
CONNECTIONS . . . . . . . . . . . . . . . . . . . . . . . . . . . . . . . . . 8
Connector Information . . . . . . . . . . . . . . . . . . . . . . . . . . . . . . 8
Basic system wiring options . . . . . . . . . . . . . . . . . . . . . . . . . . . . 9
INSTALLATION . . . . . . . . . . . . . . . . . . . . . . . . . . . . . . . . 10
Installing the SC-C1 Vehicle Tuner . . . . . . . . . . . . . . . . . . . . . . . . 10
Alternate Mounting Methods . . . . . . . . . . . . . . . . . . . . . . . . . . . 11
Installing the Antenna . . . . . . . . . . . . . . . . . . . . . . . . . . . . . 12
Optimum Antenna Mounting Locations . . . . . . . . . . . . . . . . . . . . . . 13
OPERATION . . . . . . . . . . . . . . . . . . . . . . . . . . . . . . . . . 14
Activating Your SC-C1 Tuner . . . . . . . . . . . . . . . . . . . . . . . . . . 14
SPECIFICATIONS . . . . . . . . . . . . . . . . . . . . . . . . . . . . . . . 15
WARRANTY . . . . . . . . . . . . . . . . . . . . . . . . . . . . . . . . . 16
SIRIUS ID . . . . . . . . . . . . . . . . . . . . . . . . . . . . . . . . . . 17
[ Table o f Conte nt s ]
3
Page 4

Warning and Safety Information
Safety Precautions
Be sure to observe the following warnings. Failure to follow these sa fety instructions and
warnings ma y result in a serious accident and/or personal injury..
Install the cables and wiring so that it is not crimped or pinched by screws or sharp metal
•
edges. Route the cables away from moving parts or sharp pointed e dges. This will prevent
crimping an d damage to the wiring. If the wiring must pass through a metal hole, be su re
to use a ru bber grommet to prevent the wire’s insulation from being c ut by the metal e dge
of the hole .
Use caution if you need to disconnect the battery terminal. Please co nsult the vehicle ’s
•
owner’s man ual or a service technician prior to removing the battery positive or groun d
connection, as it may cause damage to the vehicle’s electrical system or require repro gramming of the vehicle’s computer-controlled devices.
Do not oper ate any function that takes your attention away from safel y driving your ve hicle.
•
Any functio n that requires your prolonged attention should only be pe rformed after com ing
to a comple te stop. Always stop the vehicle in a safe location before performing these
functions. Failure to do so may result in an accident.
Do not open , disassemble or alter the unit in any way. Doing so may result in fire, electric
•
shock or pr oduct damage.
Do not inse rt any objects into the unit. Doing so may result in fire, electric shock o r prod-
•
uct damage.
Do not install in locations that might hin der vehicle opera tion. Doing so may obstr uct vision
•
or hamper m ovement which can result in a serious accident.
Do not inst all the unit to high levels of humidity, moisture or dust. Doing so can res ult in
•
electric sh ock or product failure.
[ Warni ng a nd Sa fe ty I nform at io n ]
4
Page 5

FCC Warning
This equipm ent may generate or use radio frequency energy. Changes or modifications to this
equipment m ay cause harmful interference unless the modifications are expressly approv ed in
this User G uide. The user could lose the authority to operate this eq uipment if an una uthorized change or modification is made.
FCC Compliance
Note: This equipment has been tested and found to comply with Part 15 of the FCC Rules .
These rules are designed to provide reasonable protection against har mful interference . This
equipment m ay cause harmful interference to radio communications if i t is not installe d and
used in acc ordance with these instructions. However, there is no guar antee that interf erence
will not oc cur in a particular installation. If this equipment does c ause harmful inte rference
to radio or television reception, which can be determined by turning the equipment off and
on, the use r is encouraged to try to correct the interference by one of more of the fo llowing
measures:
Relocate th e receiving antenna.
•
Increase th e separation between the other equipment and the receiver.
•
Consult the dealer or an experienced radio technician for help.
•
Canadian Compliance
This Class B digital apparatus complies with Canadian ICES-003
Cet apparei l numérique de la classe B est conforme à la nome NMB-003 du Canada.
[ Warni ng a nd Sa fe ty I nform at io n ]
5
Page 6

Copyrights & Trademarks
© 2007 Siri us Satellite Radio Inc. All Rights Reserved.
® “SIRIUS”, the SIRIUS dog logo, “SiriusConnect”, channel names and logos are tradema rks
of Sirius S atellite Radio Inc. All Rights Reserved.
Hardware, s ubscription, and activation fee required. For full Terms & Conditions, visi t
http://siri us.com. Prices and programming are subjec t to change. Not available in HI a nd AK.
Equipment a nd subscription sold separately. Installation required wit h some equipment.
[ Copyr ig ht s & T ra de ma rks ]
6
Page 7

Package Contents
AN
T
EN
N
A
SC OUTPUT
The followi ng items are included with your purchase of the SIRIUS SC- C1 SiriusConnect
Vehicle Tun er. Unpack the kit carefully and make sure that everything shown is present . If
anything is missing or damaged, or if the unit fails to operate prope rly, notify your dealer immediately. It is recommended that you retain the original carton and packing materials in case
you need to ship your kit in the future.
SC-C1 Vehi cle T uner
(with moun ting plate atta ched)
Siriu sConn ect I nterf ace C able
(Male /Male )
Mini- magne tic a ntenn a wit h 21’ cabl e,
tail cover and alcoh ol pa d
Mount ing s crews
(x4)
[ Packa ge C onten ts ]
7
Page 8
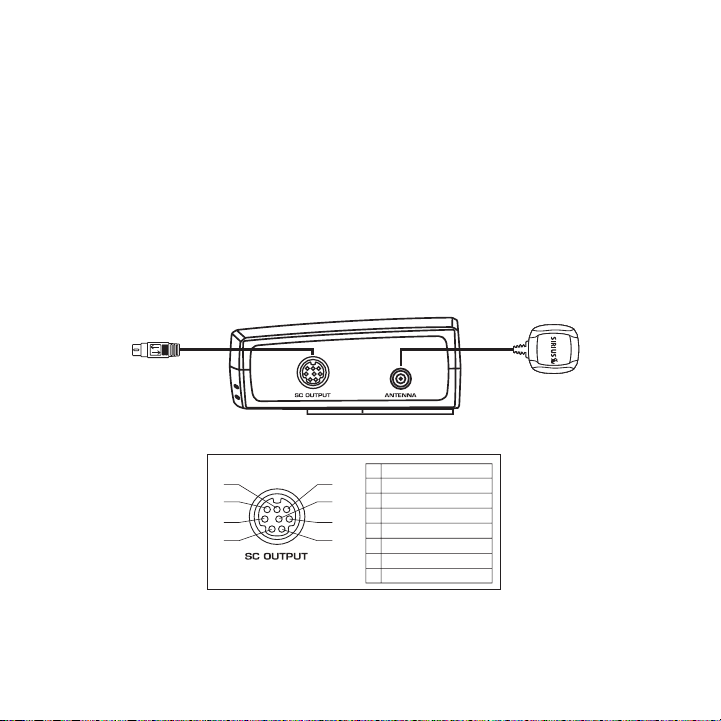
Connections
6
7
3
1
4
8
1 Battery
2 Power Enable
3 Serial Data (RX)
4 Ground
5 Audio Right
6 Serial Data (TX)
7 Audio Ground
1 Audio Left
5
2
Figur e 1
Figur e 2
Connector Information
Figure 1 id entifies and describes the connectors on the SC-C1 Vehicle Tuner. Figure 2 identifies the 8- pin pin-out configuration.
SC O UTP UT: Connection for the SC Interface Cable.
•
ANTE NNA : Co nnection for the satellite antenna.
•
Conne ct to Sir ius-Ready
Headu nit or Si riusConnec t
Inter face Tran slator
Note 1: Th e Serial Data TX a nd RX line s in the Siri usCon nect Inte rface cab le ar e cro ssed
Note 2: Th e Audio o utput is 1volt RMS.
8
[ Conne ct io ns ]
Page 9

Basic system wiring options
Syste m 1
Syste m 2
Syste m 3
The SC-C1 S iriusConnect Vehicle Tuner is designed to work with any Si rius-Ready or SAT
Radio Ready headunit. Some headunits will require the use of a Sirius Connect Interface
Translator. Please consult your headunit manufacturer for more detail s concerning comp atibility and interface availability. The SC-C1 can also be integrated in select factory audio
systems. Pl ease consult your retailer for interface compatibility opt ions.
SiriusC onnect 8-pin DIN Cable
Sirius -Read y or S AT Ra dio Re ady h eaduni t wit h a Si riusCo nnect 8-pin DIN connec tor. Note t hat t he hea dunit must be
capabl e of direct ly co mmunic ating to th e SC- C1 tun er pro tocol
Headuni t cable to S iriusConnect Interface Cable
Sirius -Read y or S AT Ra dio Re ady h eaduni t wit h an o ptiona l hea dunit speci fic co nnect or/ada pter. Note that the he aduni t
must b e cap able o f dir ectly commu nicati ng to the S C-C1 t uner protoc ol
Headuni t bus cable SiriusC onnect Cable
Sirius -Read y, SAT Radi o Read y or select OEM headun its wi th op tional Siri usConn ect I nterfa ce tr anslat or
Optional
SiriusCo nnect
Interfac e
[ Conne ct io ns ]
9
Page 10

Installation
AN
T
EN
N
A
S
C
O
U
T
P
U
T
Installing the SC-C1 Vehicle Tuner
It is recom mended that prior to starting the installation, you thorou ghly read this ma nual and
follow the guidelines listed below:
Consider th e mounting location carefully. You should make sure that y ou avoid the foll owing:
Any locatio n where the tuner is exposed to moisture.
•
Any locatio n where the unit is exposed to extreme heat.
•
Any locatio n where the tuner can not get adequate ventilation.
•
Any locatio n that would interfere with moving parts on the vehicle o r hamper driving.
•
Mounting th e SC-C1 Tuner
Be sure tha t you find a location that is flat and has clear-
ance above the unit to prevent any damage as well as
allow for v entilation.
Caution: If you are attaching the unit directly to the
vehicle’s c hassis, be sure that you check to make sure
the area be hind the unit is free from moving parts, fuel
or break li nes, wire harnesses or any other items which
may get dam aged by drilling a mounting hole or using the
supplied sc rews.
[ Insta ll at ion ]
10
Page 11

Alternate Mounting Methods
Figur e 3
Figur e 4
Figur e 5
SiriusC onnect
Interfa ce
SC-C1 T uner
The mountin g plate can be removed allowing the SC-C1 to
be mounted directly to a surface using either double stick
tape, Velcr o or other adhesive material. Simply remove the
2 screws on the bottom of the SC-C1 tuner to remove the
bracket as in Figure 3 below. If using adhesive material,
avoid cover ing the SID label.
Comb ining w ith a Siri usConne ct Interfa ce devi ce
Some third- party interfaces are designed with the same asymmetrical c hassis as the SC- C1.
To connect the units together, simply remove the mounting brackets fr om each unit, rot ate
them 90° an d connect as show in Figures 4 and 5 below
[ Insta ll at ion ]
11
Page 12

Figur e 6
Installing the Antenna
The antenna includes a 2-3/4” cable cover/tail which covers the expos ed antenna cable and
keeps it at tached securely to vehicle roof. The tail also helps posit ion the antenna t he proper
distance fr om the window, sunroof or rear hatch.
To a ttach t he cover/t ail:
Turn the an tenna upside-down and extend the cable.
1.
Connect the cover/tail to the antenna cable, making sure that the str ain-relief on the
2.
antenna sea ts into the cover/tail groove.
Route the c able through the wire channel in the cover/tail. (Figure 6 )
3.
Once you ha ve determined the proper mounting location (see next secti on), clean the
4.
area with t he supplied alcohol pad.
Remove the remaining protective tape from the adhesive, carefully pos ition the antenna
5.
and apply p ressure to secure to the vehicle. (Figure 7)
Adhes ive
Strip s
Anten na
Cover /Tail
Figur e 7
[ Insta ll at ion ]
12
Page 13

Optimum Antenna Mounting Locations
The optimum location to mount the included antenna is on the roof of the vehicle. It i s important to avo id any obstruction that will block satellite signal – like a roof rack. For convertible
vehicles, i nstall the antenna on the trunk lid.
Place the a ntenna on a metal surface of your vehicle at least 2-
•
3/4” from a window or another edge. (Use the antenna cover/tail
as a guide for the proper distance).
The antenna ’s magnet will secure it to the metal surface. The
•
adhesive th at is attached to the antenna cover/tail will secure the
cable to th e vehicle. Before routing the antenna cable, confirm
that the an tenna is mounted in a good location.
Route the c able from the antenna to the vehicle’s interior by
•
tucking it underneath the rubber molding around the rear window
(if possibl e). Avoid sharp edges or tight areas that may pinch the
cable.
For SUVs, m inivans and five-door vehicles, bring the cable into
•
the vehicle under the rubber molding for the tailgate, and continue under the interior trim.
For convert ibles mount the antenna to the rear deck
•
and route t he cable into the interior from within the
trunk.
Caut ion:
Avoi d sharp edges, mo ving pa rts and areas of
•
extr eme hea t.
[ Insta ll at ion ]
13
Page 14

Operation
Activating Your SC-C1 Tuner
You must ac tivate the SC-C1 tuner before you can begin to receive the SIRIUS Satellite
Radio Servi ce.
In order to activate your radio subscription, you will need the SIRIU S ID (SID) which uniquely
identifies your tuner. The SID can be found on a sticker located on t he SC-C1 packagin g, or
on the bott om of the SC-C1 itself. When you have located the SID, wri te it down in the space
provided ne ar the end of this manual and store it for future referenc e.
The SID can also be recalled from your Sirius-Ready headunit. Most un its will display the SID
on either C hannel-0 or on Channel 255. Please consult your headunit o wners manual or u ser
guide for s pecific details.
Power on yo ur system and make sure that you are receiving good signal you are able to hear
audio on th e SIRIUS Preview channel (Ch-184)
Have your c redit card handy and contact SIRIUS on the internet at
http s://act ivate.siri us.radi o.com/ and follow the pr ompts to activate your subscriptio n.
You can als o call SIRIUS toll-free at 1-888-5 39-SIRI US (1-888- 539-747 4)
Once activa ted, you will be able to begin enjoying SIRIUS Satellite R adio’s digital en tertainment and ca n tune to other channels.
Operation Information
Consult the owners manual for your Sirius-Ready headunit or SiriusCon nect Interface f or
operating i nstructions.
14
[ Opera ti on ]
Page 15

Specifications
Operation F requencies . . . . . . . . . . . . . . . . . . . . . . . . . . . . . . . . . . . . . . . . . . . . . . . . . . . . . . . . .
Satellite . . . . . . . . . . . . . . . . . . . . . . . . . . . . . . . . . . . . . . . . . . . . . . . . 232 2.293/2330.207 MH z
Terrestrial . . . . . . . . . . . . . . . . . . . . . . . . . . . . . . . . . . . . . . . . . . . . . . . . . . . . . . . . 2326.250MHz
Power Requi rements . . . . . . . . . . . . . . . . . . . . . . . . . . . . . . . . . . . . . 12 Volts DC (1Amp MAX),
Operation T emperature . . . . . . . . . . . . . . . . . . . . . . . . . . . . . . . . -20° to +85° C (-4° to 185° F)
Audio Outpu t . . . . . . . . . . . . . . . . . . . . . . . . . . . . . . . . . . . . . . . . . . . . . . . . . . . . . . . . . 1V (RMS)
Signal-to-n oise (S/N) . . . . . . . . . . . . . . . . . . . . . . . . . . . . . . . . . . . . . . . . . . . Greater than 75dB
Receiver Di mensions (SC-C1 only) . . . . . . . . . . . . . . . . 86. 7mm x 88.7mm x 33 .2mm (WxHxD)
Receiver We ight (with packaging). . . . . . . . . . . . . . . . . . . . . . . . . . . . . . . . . . . . . . . . . . . . 520g
Receiver We ight (SC-C1 only) . . . . . . . . . . . . . . . . . . . . . . . . . . . . . . . . . . . . . . . . . . . . . . 120g)
Receiver We ight (SC-C1 with Mounting Bracket) . . . . . . . . . . . . . . . . . . . . . . . . . . . . . . . 180g)
Antenna Typ e . . . . . . . . . . . . . . . . . . . . . . . . . . . . . . . . . . . . . . . . . . . . . . . . . . . . . . . .Automotive
Antenna Cab le Length . . . . . . . . . . . . . . . . . . . . . . . . . . . . . . . . . . . . . . 21’ (single micro-cable)
Antenna Con nector Type . . . . . . . . . . . . . . . . . . . . . . . . . . . . . . . . . . . . . . . . . . . . . . . . . . . . SMB
[ Speci fi ca tions ]
15
Page 16

Warranty
12 M onth Warran ty
SIRIUS S atellite Ra dio Inc. (t he “Company ”) w arrants to the origina l retail pu rchaser of this produc t
that sho uld this pr oduct or an y part ther eof, under norm al use and conditions, be proven defective i n
material or workman ship within 12 months from the da te o f original purchase, s uch defect( s) will be
repaired or replace d with new or recondit ione d produ ct ( at the Comp any’s optio n) without charge for
parts an d repair la bor. To obt ain repair or r eplacem ent within the terms of th is Warranty , the produ ct
is to be delivered with proof of warranty cov erage ( e.g. dated bill of sale), specificati on of defec t(s),
transpor tation prep aid, to the location s hown below unde r WARRANTY RETURN.
This War ranty does not extend to the elim inat ion of exte rnally gene rated stati c or noise, to correct ion
of anten na problems , to costs incurred fo r in stallat ion, removal or reinstalla tion of the product, o r to
damage t o tapes, co mpact discs , speakers, acc essorie s, o r vehicle e lectrical s ystems.
This War ranty does not apply t o any produ ct o r part ther eof which, in the opin ion of the Company,
has suff ered or bee n damaged t hrough alte rati on, imp rope r installat ion, mishan dling, misu se, neglect ,
accident , or by rem oval or def acement of the factory ser ial number/ bar code la bel(s). THE EXTENT
OF THE C OMPANY’S LI ABILITY UND ER THIS WAR RANT Y IS LI MITE D TO THE RE PAIR OR
REPLACEM ENT PROVIDE D ABOVE AND , IN NO EVE NT, SHALL T HE C OMPANY’S LI ABILITY
EXCEED T HE PURCHASE PRICE PAID BY PURCHAS ER F OR THE PROD UCT.
This War ranty is in lieu of al l other exp ress warran ties or liabili ties. ANY I MPLIED WARR ANTIES, INCLUDING ANY IMPLIED WARRANTY O F MERCHANTA BILI TY, SHA LL B E LIMITED T O THE DURATION OF THIS WRITTE N WARRANTY. ANY ACTION FOR BREACH OF ANY WARRANT Y HEREUNDER IN CLUDING ANY IMPLIED WA RRANTY OF M ERCH ANTABIL ITY MUST BE BRO UGHT
WITHIN A PERIOD OF 48 MONTHS F ROM DATE OF ORI GINAL P URCH ASE. IN NO CASE SHALL
THE COMP ANY BE LIAB LE FOR ANY CONSEQUENTI AL O R INCID ENTA L DAMAGES F OR
BREACH O F THIS OR A NY OTHER WA RRANTY, EXP RESS OR IMP LIED , WHATSOEVE R. No
person o r represent ative is au thorized to ass ume for the Company an y liability other than expressed
herein i n connectio n with the sale of thi s pr oduct. Some states do not allow l imitations on how long
an impli ed warranty lasts or t he exclusio n or limita tion of inciden tal or cons equential d amage so th e
above li mitations o r exclusion s may not a pply to you . Th is Warranty gives you specific le gal rights and
you may also have o ther rights which vary fro m state to state.
WARRANTY RETURN: To obtain rep air or repl acem ent wit hin the terms o f this Warr anty, pleas e return pro duct to an authorized retailer or cal l Custo mer Service at 1-800-869-5 187; proof of purchase
and desc ription of defect are required. P rodu cts to be r eturned to an approved warranty s tation must
be shipp ed freight prepaid.
16
[ Warra nt y ]
Page 17

SIRIUS ID
Write down the SIRIUS ID (SID) of your SC-C1 Tuner in the space provi ded below.
SID:
[ SIRIU S ID ]
17
Page 18

SIRI US Cust ome r S ervi ce: 1-888-539-7474
customercar e@sirius-radio.com
SIRI US Sate lli te Radi o I nc.
1221 Avenue of the Americas
New York, N Y 10020
1-888-539-7 474
http://www. sirius.com
Page 19

Page 20

SI RIU S Sa tell ite Rad io I nc.
1221 Avenue of the Americas
New York, NY 10020
(800) 869-5590
http://sirius.com
SIRIUS SC-C1 (1 13006a)
 Loading...