

Page 1
Page 2

Congratulations on the Purchase of your new SCV1
SiriusConnect Audio/Video Tuner
Your new SCV1 SiriusConnect Audio/Video Tuner allows you to enjoy SIRIUS® Satellite Radio programming on the main audio system, while your rear seat passengers
enjoy the family friendly SIRIUS Backseat TV programming.
For the latest information about this and other SIRIUS products and accessories, visit
http://www.sirius.com.
Page 3

[ Tab le of Co ntent s ]
2
[ Tab le of Co ntent s ]
3
Table of Contents
TABLE OF CONTENTS . . . . . . . . . . . . . . . . . . . . . . . . . . . 2
WARNING AND SAFETY INFORMATION . . . . . . . . . . . . . . . . . . . 4
FCC Information . . . . . . . . . . . . . . . . . . . . . . . . . . . . 4
Canadian Compliance . . . . . . . . . . . . . . . . . . . . . . . . . . 5
General Precautions . . . . . . . . . . . . . . . . . . . . . . . . . . . 5
COPYRIGHTS & TRADEMARKS . . . . . . . . . . . . . . . . . . . . . .7
PACKAGE CONTENTS . . . . . . . . . . . . . . . . . . . . . . . . . . . 8
CONNECTORS & CONTROLS . . . . . . . . . . . . . . . . . . . . . . . 10
Tuner Connectors Reference Guide . . . . . . . . . . . . . . . . . . . . . 10
Display Control Unit Buttons and Connector Reference Guide . . . . . . . . . . 13
Radio Remote Control Reference Guide . . . . . . . . . . . . . . . . . . . 17
Video Remote Control Reference Guide . . . . . . . . . . . . . . . . . . . 18
INSTALLATION . . . . . . . . . . . . . . . . . . . . . . . . . . . . . 20
Configuration Considerations . . . . . . . . . . . . . . . . . . . . . . . 20
Wiring Diagrams . . . . . . . . . . . . . . . . . . . . . . . . . . . . 21
Wiring Diagram using the Display Control Unit (DCU) and Connecting to an AUX
Audio Input . . . . . . . . . . . . . . . . . . . . . . . . . . . . . 22
Wiring Diagram using the Display Control Unit (DCU) and the FMDA Adapter. . . 24
Tuner Module, Display Control Unit, Infrared Eye, & Power Harness Installation . . . 26
Power Harness . . . . . . . . . . . . . . . . . . . . . . . . . . . . . 28
Magnetic Vehicle Antenna Installation . . . . . . . . . . . . . . . . . . . . 29
Installing the FM Direct Adapter . . . . . . . . . . . . . . . . . . . . . . 35
SUBSCRIBING TO THE SIRIUS SERVICE . . . . . . . . . . . . . . . . . 36
AUDIO MODE OPERATION . . . . . . . . . . . . . . . . . . . . . . . 39
Basic Operation . . . . . . . . . . . . . . . . . . . . . . . . . . . . . 39
Power On/Off and Standby . . . . . . . . . . . . . . . . . . . . . . . 39
Changing Channels . . . . . . . . . . . . . . . . . . . . . . . . . . 40
Switching between Audio and Video Modes . . . . . . . . . . . . . . . . 40
Display Button (DISP) . . . . . . . . . . . . . . . . . . . . . . . . . 41
Search Modes (Category, Channel, Artist, Song Title) . . . . . . . . . . . . 41
Direct Tuning (Remote Control Only) . . . . . . . . . . . . . . . . . . . 43
Advanced Features . . . . . . . . . . . . . . . . . . . . . . . . . . . 43
Setting Channel Presets . . . . . . . . . . . . . . . . . . . . . . . . 43
Recalling Channel Presets . . . . . . . . . . . . . . . . . . . . . . . 44
Searching for a Channel Preset (P.TUNE Mode) (Audio Mode Only) . . . . . . . 44
Preset Tune Mode (Audio Mode Only) . . . . . . . . . . . . . . . . . . . . 45
Memory (MEMO) and Song-seek (S-Seek) Functions (Audio Mode Only) . . . . . 46
VIDEO MODE OPERATION . . . . . . . . . . . . . . . . . . . . . . . . 53
Using the Video Remote . . . . . . . . . . . . . . . . . . . . . . . . 53
Using the DCU to Control Backseat TV . . . . . . . . . . . . . . . . . . 53
Activating Backseat TV . . . . . . . . . . . . . . . . . . . . . . . . . 54
MENU OPTIONS . . . . . . . . . . . . . . . . . . . . . . . . . . . . 55
Sirius ID . . . . . . . . . . . . . . . . . . . . . . . . . . . . . . 55
FM Transmitter . . . . . . . . . . . . . . . . . . . . . . . . . . . . 56
Settings . . . . . . . . . . . . . . . . . . . . . . . . . . . . . . . 58
Clock Settings . . . . . . . . . . . . . . . . . . . . . . . . . . . . 68
Signal Indicator . . . . . . . . . . . . . . . . . . . . . . . . . . . . 70
Factory Default . . . . . . . . . . . . . . . . . . . . . . . . . . . . 72
TROUBLESHOOTING . . . . . . . . . . . . . . . . . . . . . . . . . . 74
SPECIFICATIONS . . . . . . . . . . . . . . . . . . . . . . . . . . . . 75
SIRIUS ID . . . . . . . . . . . . . . . . . . . . . . . . . . . . . . . 77
Page 4

[ War ning and Safe ty Infor matio n ]4[ War ning and Safe ty Infor matio n ]
5
Warning and Safety Information
WARN ING
Changes or modifications not expressly approved by the manufacturer could void the
user’s authority to operate the equipment.
FCC Information
This device complies with part 15 of the FCC Rules. Operation is subject to the following two conditions:
This device may not cause harmful interference, and
1.
This device must accept any interference received, including interference that
2.
may cause undesired operation.
Note: This equipment has been tested and found to comply with the limits for
a CLASS B digital device, pursuant to Part 15 of the FCC Rules. These limits
are designed to provide reasonable protection against harmful interference
when the equipment is operated in a commercial environment. This equipment
generates, uses, and can radiate radio frequency energy and, if not installed
and used in accordance with the instructions, may cause harmful interference
to radio communications. However, there is no guarantee that interference will
not occur in a particular installation. If this equipment does cause harmful interference to radio or television reception, which can be determined by turning the
equipment off and on, the user is encouraged to try to correct the interference
by one or more of the following measures:
Reorient or relocate the receiving antenna.
1.
Increase the separation between the equipment and the receiver.
2.
Connect the equipment into an outlet on a circuit different from that to
3.
which the receiver is connected.
Consult the dealer or an experienced radio/TV technician for help.
4.
Canadian Compliance
This Class B digital apparatus complies with Canadian ICES-003.
Cet appareil numérique de la classe B est conforme à la norme NMB-003 du Canada.
General Precautions
Liqu id Crysta l Pr ecautions
If the LCD screen on the Display Control Unit (DCU) is damaged, do not to touch the
liquid crystal fluid. If any of the following situations happen, take the action indicated:
If the liquid crystal fluid comes in contact with your skin, wipe the skin area with a
1.
cloth and then wash the skin thoroughly with soap and running water.
If the liquid crystal fluid gets into your eye, flush the eye with clean water for at
2.
least 15 minutes. Seek medical care.
If the liquid crystal fluid is ingested, flush your mouth thoroughly with water. Drink
3.
large quantities of water and induce vomiting. Seek medical care.
Safe ty Precau tion s
Be sure to observe the following warnings. Failure to follow these safety instructions
and warnings may result in a serious accident.
Do not operate the DCU in a way that might divert your attention from driving
•
safely. As a driver, you alone are responsible for safely operating your vehicle in
accordance with traffic safety laws at all times.
Page 5

Do not install the unit where it may obstruct your view through the windshield, or of
•
your vehicle’s indicator displays.
Do not install the unit where it may hinder the function of safety devices such as an
•
airbag. Doing so may prevent the airbag from functioning properly in the event of
an accident.
Be sure the unit is installed as described in the installation instructions. SIRIUS
•
Satellite Radio is not responsible for issues arising from installations which were
not installed according to the instructions.
To avoid short circuits, do not open the unit, and never put or leave any metallic
•
objects (coins, tools, etc.), inside the unit.
If the unit emits smoke or unusual odors, turn the power off immediately, and dis-
•
connect the unit from any power source.
Do not drop the unit or subject it to strong shocks.
•
If the unit doesn’t seem to be working properly, turn the unit off, remove the battery
•
from the unit, wait 10 seconds, replace the battery and then turn it on again.
The installation and use suggestions contained in this manual are subject to any
•
restrictions or limitations that may be imposed by applicable law. The purchaser
should check applicable law for any restrictions or limitations before installing
and/or operating this unit.
Oper ating Tem pera ture
The DCU is designed to operate between -20° to +85° C (-4° to +185° F). Avoid
leaving the unit in a vehicle or elsewhere where the temperature may fall outside this
range. Extreme temperatures or extreme temperature fluctuations can degrade the
performance of the LCD display screen, and possibly damage it.
Clea ning and Main tenance
If the DCU becomes dirty, turn the power off and wipe it clean with a soft cloth. Do not
use hard cloths, strong cleaning fluids, paint thinner, alcohol, or other volatile solvents
to clean. These may cause damage to the unit.
Copyrights & Trademarks
© 2007 SIRIUS Satellite Radio Inc. All Rights Reserved.
® “SIRIUS”, the SIRIUS dog logo, “SIRIUS Backseat TV”, channel names and logos
are trademarks of SIRIUS Satellite Radio Inc. “NFL” and the NFL Shield logo, and the
NFL Sunday Drive name and logo are registered trademarks of the National Football
League. “NHL” and the NHL Shield are registered trademarks of the National Hockey
League. “NBA” and the NBA silhouette logo are registered trademarks of NBA Properties Inc. All other trademarks, service marks, sports team names, album art, and logos
are the property of their respective owners. All Rights Reserved.
Portions of the software on this radio are licensed under the eCos License. Distribution of eCos requires that the eCos source code be made available to Sirius Satellite
Radio customers. The eCos License and eCos source code are available to the public
at http://www.sirius.com/ecoslicense.
Sirius Satellite Radio reserves all rights to all radio software not covered under the
eCos license. This includes all portions of radio software that were not distributed to
Sirius as part of the eCos operating system.
Hardware, subscription and activation fee required. For full Terms & Conditions, visit
http://sirius.com. Prices and programming are subject to change. Not available in HI
and AK. Equipment and subscription sold separately. Installation required with some
equipment.
[ War ning and Safe ty Infor matio n ]
6
[ Cop yrights & Tra demarks ]
7
Page 6
[ Pac kage Con tents ]
8
[ Pac kage Con tents ]
9
Package Contents
memo
1
2 3 4 5 6
menu
band
disp
a/v
s-seek
a/v
disp
ch
ch
menu
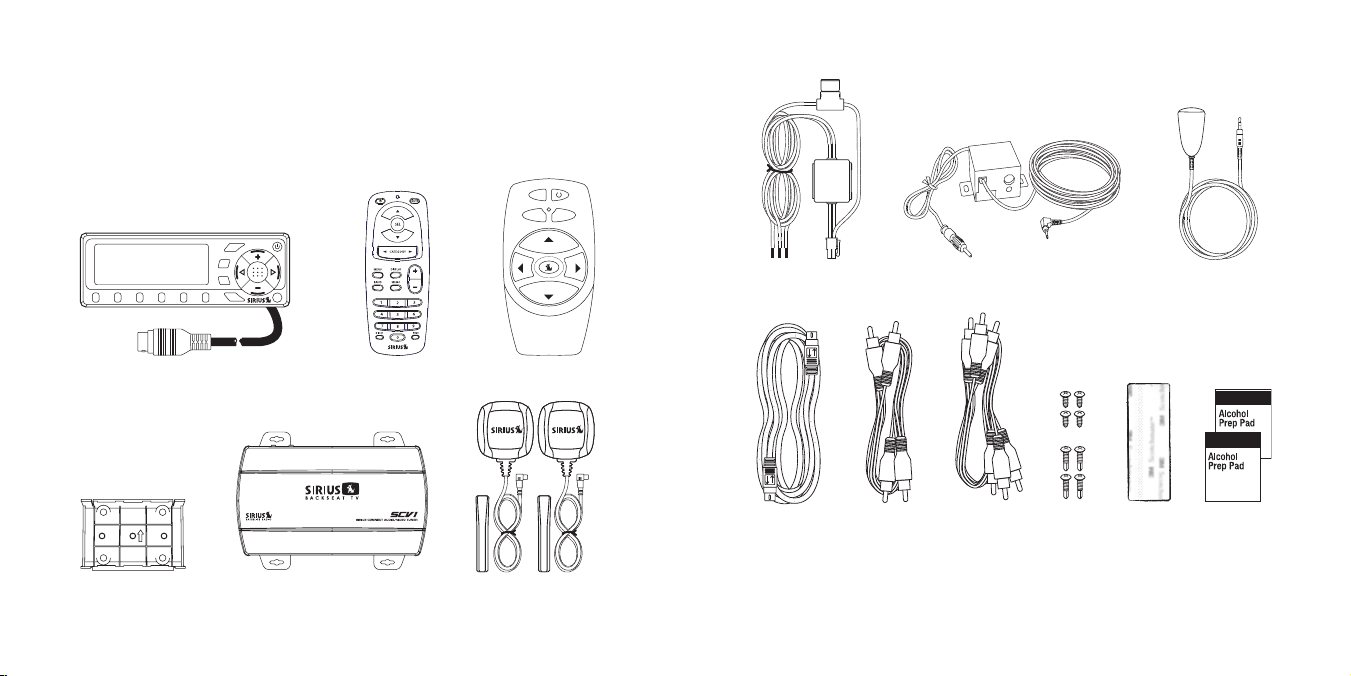
The following items are included with your purchase of the SCV1 SiriusConnect Audio
Plus Video Tuner.
Audio /Video
Displ ay Con trol U nit (D CU)Displ ay Con trol U nit (D CU)
DCU M ountin g Brac ketDCU M ountin g Brac ket Magne tic An tennas and
SCV1 Tuner Module (with
SCV1 Tuner Module (with
Mount ing Pl ates a ttache d)
Mount ing Pl ates a ttache d)
Audio /Video
Remot e Cont rol
Remot e Cont rol
Magne tic An tennas and
Anten na Cov er/Tai ls (2)
Anten na Cov er/Tai ls (2)
Video
Video
Remot e Cont rol
Remot e Cont rol
Power Harne ssPower Harne ss
Siriu sConne ct
Siriu sConne ct
Exten sion C able
Exten sion C able
Audio CableAudio Cable Audio /Video
FM Di rect A dapterFM Di rect A dapter Rear Seat I R EyeRear Seat I R Eye
Audio /Video
Cable
Cable
Screw s (8)Screw s (8)
Hook & Loop
Hook & Loop
Strip
Strip
Swabs (2)
Swabs (2)
Alcoh ol
Alcoh ol
Unpack your SCV1 carefully and make sure that everything shown is present. If
anything is missing or damaged, or if your anything fails to operate, notify your dealer
immediately. It is recommended that you retain the original carton and packing materials in case you need to ship your SCV1 in the future.
Page 7
[ Con nectors & Con trols ]
10
[ Con nectors & Con trols ]
11
Connectors & Controls
SiriusConnect
Control
Infrared Eye InputL/R
SIRIUS
Radio
Audio Output
FM Out
Power
Connector
SIRIUS Backseat
TV Audio & Video
Output
Figur e 1Figur e 1
Antenna 1
Antenna 2
Figur e 2Figur e 2
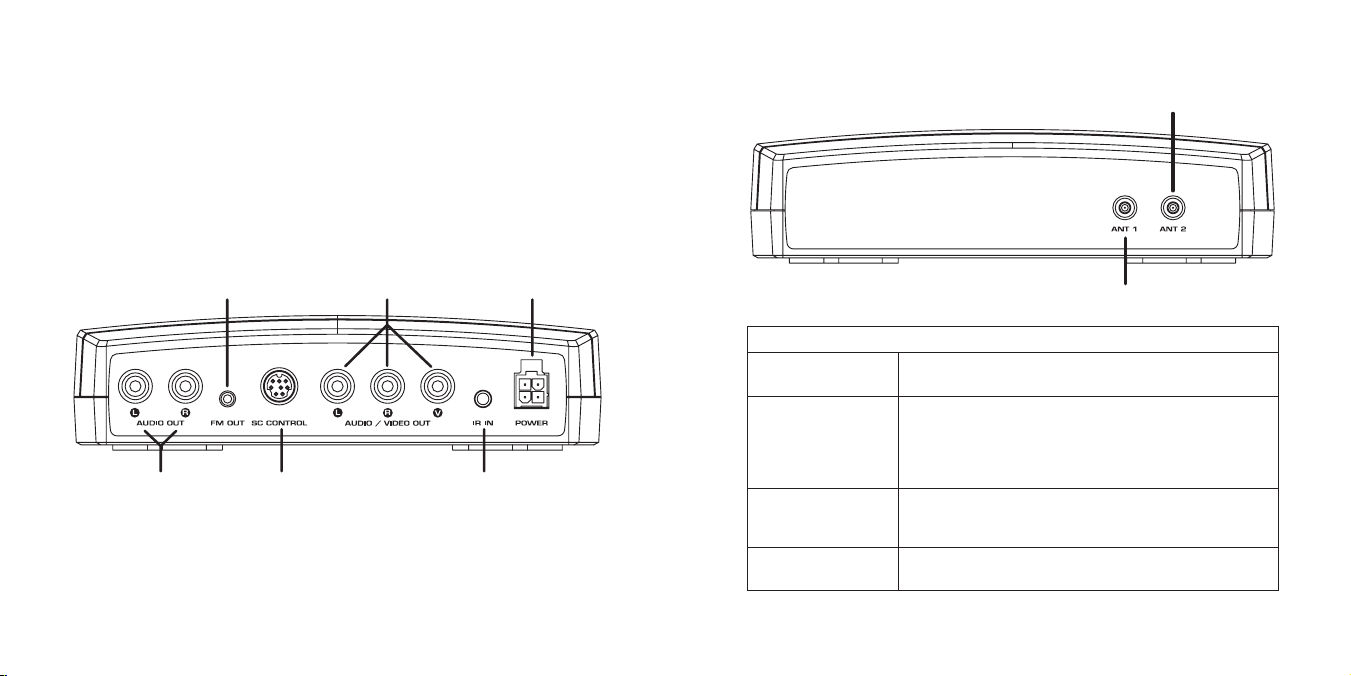
Tuner Connectors Reference Guide
Figures 1 & 2 and the table following identify and describe connectors of the tuner.
Ante nna 1
Ante nna 2
L/R SIRI US R adio
Audi o Ou tput
FM O ut
Siri usCo nnec t
Cont rol
Tune r Co nnec tors Ref eren ce G uide
Antenna connections for the two magnetic antennas.
Audio output for a direct connection to an auxiliary audio
input to the vehicle’s radio. This output will send either
SIRIUS Satellite Radio audio or SIRIUS Backseat TV audio
to the vehicle headunit, depending on mode selected by
the DCU.
Connection for the FM Direct Adapter. The FMDA must be
used when a direct audio connection to the vehicle’s radio
is not used.
Connection for the SiriusConnect cable. This will connect
to the DCU.
Page 8

[ Con nectors & Con trols ]
12
[ Con nectors & Con trols ]
13
SIRI US B acks eat TV
memo
1
2 3 4 5 6
menu
band
p.tune
disp
a/v
s-seek
009 The Pulse 12:00 A
U2
Vertigo
Band/
P.Tune
SelectDispPresets
Memo/
S-Seek
Display
Screen
Power
On/Off
Category
Up/Down
Channel
Up/Down
SiriusConnect
Control Connector
A/V
Menu
Figur e 3Figur e 3
Audi o & Vide o
Outp ut
Infr ared Inp ut
Powe r Co nnec tor
Tune r Co nnec tors Ref eren ce G uide
Audio and video connections to the rear seat monitor system. These connections will only output SIRIUS Backseat
TV audio and video.
Connection for the infrared receiver eye for the video
remote control.
Vehicle power connector.
Display Control Unit Buttons and Connector Reference
Guide
Figure 3 and the table following identify and describe the buttons and connector of the
Display Control Unit.
Page 9

[ Con nectors & Con trols ]
14
[ Con nectors & Con trols ]
15
Disp lay Cont rol Unit But tons and Con nect or R efer ence Gui de
Powe r ON - To power on the SCV1, press and release the
power button.
Powe r OF F - Press and hold the power button for 2 sec-
onds to completely shut down the system.
Powe r bu tton
A/V / Me nu b utto n
Memo / S -See k
butt on
Audio Standby Mode - When the SCV1 is in the Audio
mode, press and release the power button to put the system
in standby, which turns off the front audio and FM outputs.
Video Standby Mode - When in the SCV1 is in the Video
mode, press and release the power button to put the system in standby, which turns off the front audio and FM outputs. Press the power button again to turn the system on.
A/V: Pressing and releasing this button toggles the mode
between the SIRIUS Satellite Radio mode and SIRIUS
Backseat TV mode. When in the audio/video mode, the
DCU controls the backseat TV operation.
Menu : Pressing and holding the button accesses the
Menu Opt ions to make setup and feature changes.
Memo (Memory): Pressing and releasing this button saves
artist names and/or song titles. You can store up to 20
artist/song title combinations. The system will alert you
when a stored artist or song is played on any channel.
S-Se ek: Pressing and holding the button will enter the
recall mode, displaying the stored artist/song titles.
The Memo / S-Seek button is functional only in the Audio
mode.
Disp lay Cont rol Unit But tons and Con nect or R efer ence Gui de
Navigates through the category list screens which dis-
Cate gory < > but tons
Chan nel + / —
butt ons
Sele ct b utto n
Band / P .Tun e bu tton
plays the Satellite Radio channel categories. The category
buttons are not operational when in Video mode.
Navigates through display screens and makes selections
of items highlighted on the display screen. Pressing +
increases the channel number (down the list), and moves
down when in a menu list.
Pressing — decreases the channel number (up the list),
and moves up in when in a menu list. Pressing and holding
either + or — will rapid tune the audio channels.
Pressing this button selects a highlighted item in a menu
or list.
The Band / P.Tune button is functional only in the Audio
mode.
Band : This button switches between the preset banks A
through E, which hold 6 presets each for a total of 30.
P.Tu ne: Pressing and holding the button enables the
Preset Tune Mode, which allows for viewing and browsing
of stored presets using the channel + and — buttons.
Page 10
[ Con nectors & Con trols ]
16
[ Con nectors & Con trols ]
17
Disp lay Cont rol Unit But tons and Con nect or R efer ence Gui de
Power
Mute
Select
Category Select
Volume Up/Dn
(Not used)
Prev
Channel Up/Down
Display
Menu
Band
Memo
Numeric Keypad
Direct
Figur e 4Figur e 4
Disp (Di spla y) b utto n
Pres et b utto ns ( 1—6)
Pressing the DISP button will toggle the top line of the display to show either Channel Name and Clock, or Category
and Date.
When in Category tune mode, pressing the display changes
between Channel Name, Artist, and Song Title.
In addition pressing and holding the DISP button will enter
the channel list mode. Repeatedly pressing the DISP button
again when in the channel list mode will cause the list to
cycle between Channel Name, Artist, and Song information.
Use the + or — buttons to rotate through the channels. Press
Select to tune to a selected channel, or push and hold the
DISP button to exit the channel list mode.
When in Audio mode, the preset buttons set and select
preset channels, and are also used to enter the lock code.
When in Video mode, presets 1, 2, and 3 are preassigned
to directly tune to the three SIRIUS Backseat TV channels.
Preset buttons 4, 5, and 6 are inoperative.
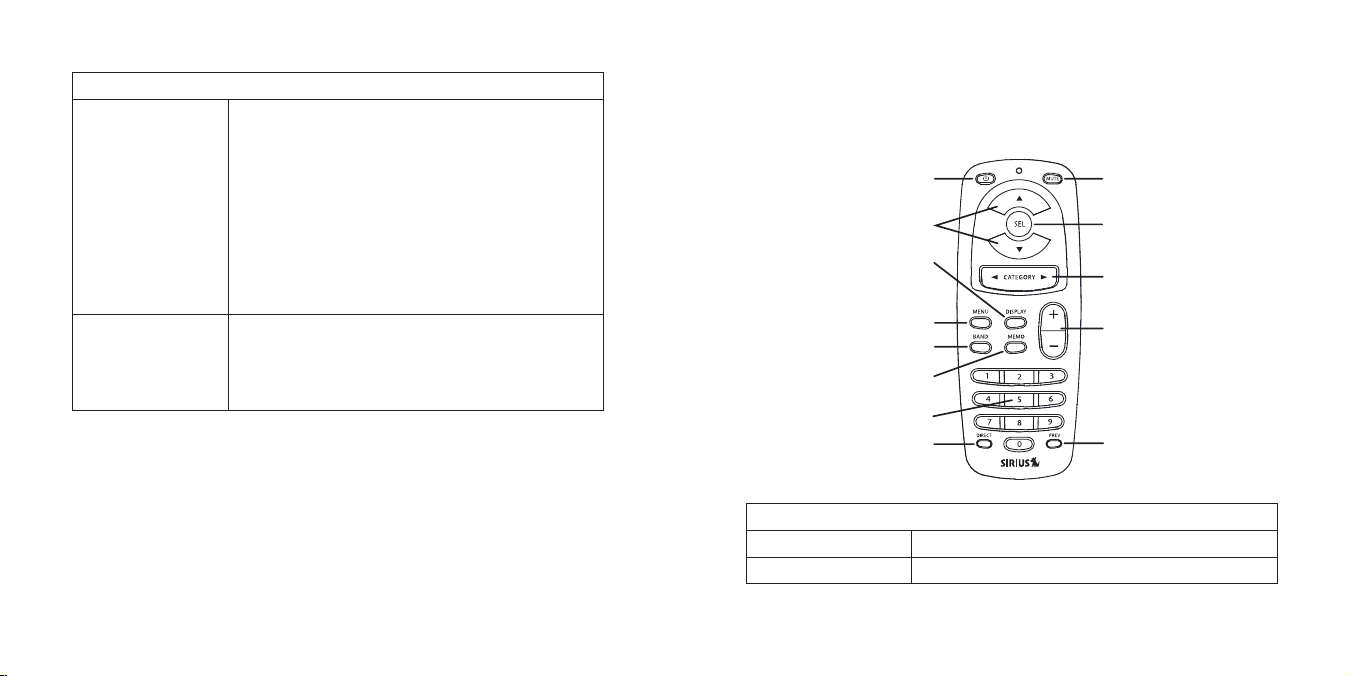
Radio Remote Control Reference Guide
Figure 4 and the section following identify the buttons unique to the radio remote
control.
Mute but ton
Volu me + /– b utto n
Radi o Re mote Con trol Ref eren ce G uide
Mutes the front audio output of the radio.
Not used.
Page 11
[ Ins tallatio n ]
18
[ Ins tallatio n ]
19
Radi o Re mote Con trol Ref eren ce G uide
a/v
disp
ch
ch
menu
Not Used
Not Used
Power
Not Used
Not Used
Not Used
Channel
Up/Down
Figur e 5Figur e 5
Nume ric Keyp ad
Dire ct b utto n
Prev (Pr evio us) butt on
Selects channels directly and selects audio presets.
Allows you to directly tune a channel by entering the
channel number using the numeric keypad
Tunes the radio to the previously tuned audio channel.
Pres sing and hol ding : Accesses the M enu Opti ons to
make setup and feature changes.
Menu but ton
Pres sing and rel easi ng: Toggles the mode between the
SIRIUS Satellite Radio audio mode and SIRIUS Backseat
TV video mode.
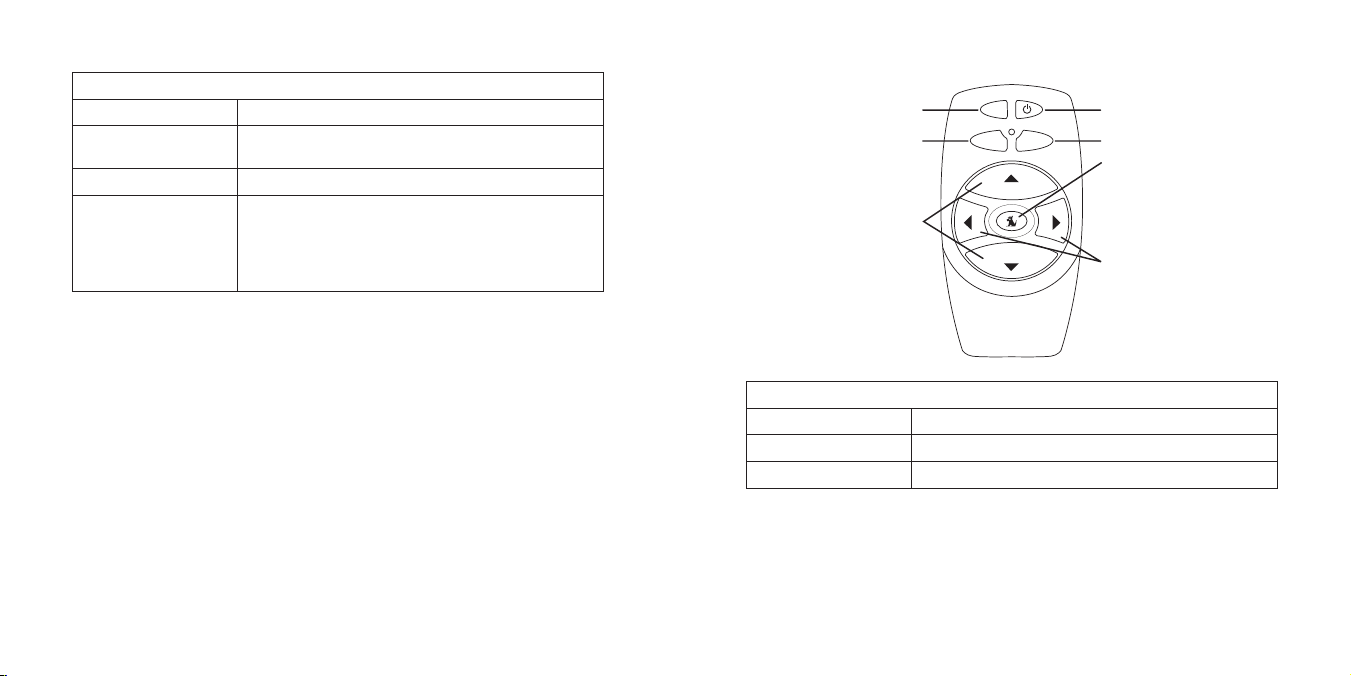
Video Remote Control Reference Guide
Figure 5 and the section following identify the buttons unique to the video remote
control.
Vide o Re mote Con trol Ref eren ce G uide
Powe r
Chan nel Up/D own
Not Used
Remo te Contro l Ba ttery Ins tall ation
Turns On/Off the rear Audio/Video outputs only
Changes the channels of the backseat TV.
These buttons are not used.
To install the battery or batteries in the remote controls, turn the remote control over and
locate the battery cover near the bottom edge. Open the battery compartment and place
the appropriate battery or batteries in the compartment. Replace the battery cover on the
remote control.
Page 12

[ Ins tallatio n ]
20
[ Ins tallatio n ]
21
Installation
SIRIUS suggests professional installation of this product in your vehicle. Professional
installation provides an experienced technician to install this product in your vehicle,
advice for selecting a suitable mounting location for the tuner and DCU, installation of
the antennas and infrared receiver, and routing and connecting all the necessary wires
and cables.
Configuration Considerations
Disp lay Contr ol U nit
The SCV1 includes a Display Control Unit (DCU) which provides an interface to control the SIRIUS A/V tuner. The DCU can tune and display the SIRIUS radio channels,
and can also control the SIRIUS Backseat TV and change TV channels, as well as
displaying TV programming information.
Audi o Connect ion to the Ve hicl e Headuni t
There are two options for connecting the SIRIUS audio output to your vehicle’s headunit:
Direct connection using an audio cable. An audio cable with RCA-type connectors
•
is included for vehicles where the headunit has an auxiliary audio input. This option
provides the best possible audio quality.
Connection using the FM Direct Adapter (FMDA). If your vehicle’s headunit does
•
not have an auxiliary audio input, you must use the provided FMDA instead. The
FMDA installs in-line with the FM antenna input to the vehicle headunit. When you
turn on the SIRIUS radio, the FM antenna input to your vehicle’s headunit is tem-
porarily redirected away from the vehicle radio. The SIRIUS audio is then sent via
the FM antenna cable to the headunit. By setting the SIRIUS tuner and your vehicle
headunit to the same FM channel, you can hear the SIRIUS radio audio. Note that
the FMDA does not affect the SIRIUS Backseat TV reception which is available
whether or not you are listening to SIRIUS radio broadcasts.
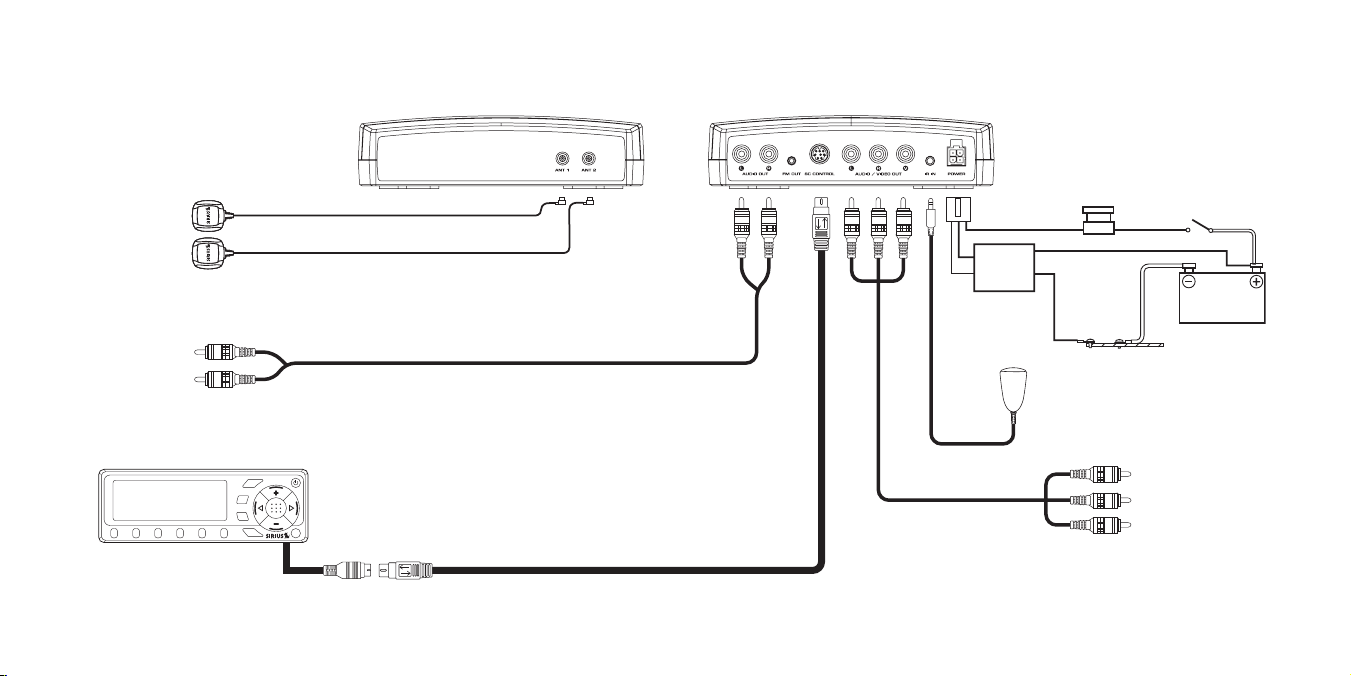
Wiring Diagrams
Figures 1, 2, and 3 show several possible wiring diagrams:
Figure 1 depicts the wiring when the DCU is used, and the audio is connected via
•
a cable to the AUX input of the headunit
Figure 2 depicts the wiring when the DCU is used, and the FMDA is used for the
•
audio input to the headunit
The FMDA must be used if the vehicle’s headunit does not have a direct audio connection.
Page 13
[ Ins tallatio n ]
22
[ Ins tallatio n ]
23
ACC
BATT
GND
BATTERY
Power Filter
with Fuse
Audio Cable
Display Control Unit (DCU)
TunerTuner
SiriusConnect
8-Pin DIN Cable
To headunit
audio input
A
ntennas must
be installed at
least 24” apart
Sirius Vehicle
Antennas
memo
1
2 3 4 5 6
menu
band
disp
a/v
s-seek
Power Harness
Audio/Video Cable
Infrared Eye
Mount in rear seat area
To backseat TV
video monitor
Note: Compatible with rear seat monitors that
have a standard composite video input.
Figur e 1Figur e 1
Wir in g D iag ram u sin g t he Di spl ay Co nt rol un it (D Cu) an D Con neC ti ng
to an au X a uDi o inp ut
Page 14

[ Ins tallatio n ]
24
[ Ins tallatio n ]
25
ACC
BATT
GND
BATTERY
Power Filter
with Fuse
Display Control Unit (DCU)
TunerTuner
SiriusConnect
8-Pin DIN Cable
A
ntennas must
be installed at
least 24” apart
Sirius Vehicle
Antennas
memo
1
2 3 4 5 6
menu
band
disp
a/v
s-seek
Power Harness
Audio/Video Cable
Infrared Eye
Mount in rear seat area
To backseat TV
video monitor
Note: Compatible with rear seat monitors that
have a standard composite video input.
To headunit FM
antenna connection
Connection from
vehicle FM antenna
FM Direct Adapter
(FMDA)
Figur e 2Figur e 2
Wir in g D iag ram u sin g t he Di spl ay Co nt rol un it (D Cu) an D the Fm Da
aDa pt er
Page 15

[ Ins tallatio n ]
26
[ Ins tallatio n ]
27
Tuner Module, Display Control Unit, Infrared Eye, &
Tuner Module
Under Passenger Seat
DCU
Front Seating Area
IR Eye for Video Remote Control
Rear of Center Console or
Left or Right Pillar
Figur e 4Figur e 4
Figur e 5Figur e 5
Power Harness Installation
Figure 4 shows a typical installation of the tuner module, DCU, and IR eye in a vehicle.
The exact placement of these devices will be dependent upon the interior design of
your particular vehicle.
Tune r Module Inst allation
The tuner module can be located in any place which is convenient, such as under a
seat, under or behind the dashboard, or in the trunk or rear cargo area, etc. The location should be one where the tuner module will not get bumped or kicked, and where
the wiring can be easily hidden. It should not be located where it will be in direct
sunshine, causing the temperature to exceed 85° C (185° F) in warm weather.
The tuner module has four feet for securing mounting it to the vehicle as shown in
Figure 5. These feet are removable if a different mounting choice is desired.
Disp lay Contr ol U nit Insta llat ion
The DCU should be mounted in the front seating area of the vehicle, where it can be
easily seen and operated by the driver, but not mounted where it could distract the
driver, or obstruct the driver’s view. It should also not be mounted where it could interfere with the operation of the airbags in the vehicle. Figure 4 shows a typical mounting
location on the center console of the dash.
Infr ared Eye Inst allation
The IR eye receives the backseat TV remote control signals, and should be mounted in
the rear seat area where the video monitor is located. It can be mounted on the rear of
the center console, or on the pillar behind one of the front doors, as shown in Figure 4.
You may need to test your mounting location to ensure that the IR eye will receive the
Page 16

[ Ins tallatio n ]
28
[ Ins tallatio n ]
29
signal from the video remote control.
BATTERY
Power Filter
with Fuse
2A AGC Type Fuse
ACC (Ignition)
Battery 12 VDC
No Connection
GND
In-Line Fuse
Power Connector
(As Viewed From End of Plug)
2A ATC
Type Fuse
ACC
BATT
GND
Figur e 6Figur e 6
If needed, the IR eye cable can be extended by using a 1/8” mini-stereo extension
cable (not included).
Power Harness
The power harness for the SCV1 has power filter box which contains a fuse for the
12V battery connection. The power harness also has an in-line fuse for the ignition
connection. Figure 6 shows the location and type of these fuses, and also the identifies the pin-outs of the power connector.
Magnetic Vehicle Antenna Installation
The magnetic vehicle antennas have a strong magnetic mount designed to hold the
antenna in place on the exterior of the vehicle during normal driving conditions (highway/city). Installation of the antennas consists of three installation steps:
Selecting the mounting locations for the antennas
1.
Mounting each antenna with the cover/tail on the vehicle.
2.
Routing the antenna cables through the vehicle to the tuner.
3.
Sele cting the Ant enna Moun ting Location s
For optimal performance of the SCV1, these guidelines should be followed when installing
the antennas. Figure 7 shows the optimal mounting locations for the antennas for several
types of vehicles. If possible, mount the antennas in the locations shown, while observing
these guidelines:
The antennas should be mounted on the exterior of the vehicle, on the roof.
1.
The tail/cover for the antenna serves to secure the antenna wire to the surface,
2.
and position the antenna exactly 3 inches from the roof edge. It should be used
when installing the antennas.
Each antenna should be mounted where no obstructions will block the antenna from
3.
receiving the SIRIUS signal. Each antenna needs to have an unobstructed area of
3 inches by 3 inches around it. Objects which can obstruct the antenna could be a
roof rack, a sunroof, a roof mounted cargo container, another antenna, etc. If your
vehicle has a potential obstruction, be sure that the SIRIUS antenna is mounted at
least 3 inches away from it (but no closer than 3 inches from the roof edge).
The separation between the two antennas should be 36 inches or greater. The
4.
greater the distance between the antennas, the better the performance. If it is not
possible to install the antennas at least 36 inches apart on your vehicle, then they
can be placed a minimum of 24 inches apart. Any separation less than 24 inches
will compromise the performance of the SCV1.
Page 17

[ Ins tallatio n ]
30
[ Ins tallatio n ]
31
S
S
S
S
Separation = 36 in. or greater for optimum performance
A minimum separation of 24 in. is required for the diversity system to be effective.
Figur e 7Figur e 7
Sedan /CoupeSedan /Coupe
SUV/M ini-Va nSUV/M ini-Va n
Picku p Truc kPicku p Truc k
S
S
S
S
Separation = 36 in. or greater for optimum performance
A minimum separation of 24 in. is required for the diversity system to be effective.
Figur e 8Figur e 8
Note : The SCV1 uses a special diversity antenna system that requires the use of
two antennas mounted at opposite ends of the vehicle to maximize video signal
reception when driving in areas with heavy foliage or lots of buildings.
Figure 8 shows several alternate mounting locations for the antennas. These can be
used if it is not possible to install the antennas as shown in Figure 7 on your vehicle, or
to achieve a minimum separation of at least 24 inches between the antennas.
Figure 9 shows several antenna mounting configurations which will compromise the
performance of the SCV1. Avoid mounting the antennas in any of these configurations:
Don’t mount the antennas closer than 24 inches to each other
•
Don’t mount one or both of the antennas inside the vehicle on the dashboard
•
Don’t mount one or both of the antennas on the trunk lid of a sedan
•
Page 18

[ Ins tallatio n ]
32
[ Ins tallatio n ]
33
Figur e 9Figur e 9
Rubber Cover/Tail
Protective Material
Adhesive Strips
Strain Relief
Antenna Cable
Figur e 10Figur e 10
Figur e 11Figur e 11
Moun ting the Ante nnas on t he V ehicle
Follow this procedure for mounting each antenna:
Select an appropriate mounting position for your type of vehicle according to the
1.
instructions in the previous section.
Attach the rubber cover/tail to the antenna, as shown in Figure 10, and press the
2.
antenna cable into the rubber cover/tail. The rubber cover/tail will help to position
the antenna the correct distance from the edge of the roof or trunk lid.
Clean the surface area of the vehicle where you will be installing the antenna with
3.
the alcohol prep pad.
Peel the protective material from the adhesive strips (Figure 10) and press the
4.
rubber cover/tail firmly into place on the vehicle (Figure 11).
Double check that the location of the antenna and rubber cover/tail are correct,
5.
and continue to press firmly down on rubber cover/tail for another 30 seconds.
At room temperature (68 degrees), maximum adhesion usually occurs within 72
hours. During this period, avoid car washes and other contact with the antenna
and rubber antenna cable cover/tail.
Repeat steps 1 through 5 for the second antenna.
Page 19

[ Ins tallatio n ]
34
[ Ins tallatio n ]
35
Rout ing the A nten na Cables
1. Fe ed Cable U nder
Rubber Seal Arou nd
Hatch Opening
3. Ro ute Cable
Under Carpet
to Tun er
2. Rou te Cable U nder
In terior Tri m, into
Ca bin and To wards
Fr ont of Veh icle
4. Rou te Cable
Un der Rubber
Mo lding Arou nd
Wi ndshield
5. Con tinue Tuck ing Cab le
Un der Moldin g To
Bo ttom of Wi ndshiel d
6. Rou te Cable O ut of M olding
an d Into Wea therstr ipping
Ar ound Door Opening .
Co ntinue to Bottom of
Do or Opening
7. Bri ng Cable o ut from
We atherstrip ping an d
Ro ute Under interio r Trim
Figur e 12Figur e 12
VEHICLE AM/FM
ANTENNA
VEHICLE HEADUNIT
FM DIRECT
ADAPTER (FMDA)
SCV1 TUNER
DCU
FROM VEHICLE
AM/FM ANTENNA
TO SCV1 TUNER
FM OUT CONNECTION
TO VEHICLE HEADUNIT
AM/FM ANTENNA CONNECTION
memo
1
2 3 4 5 6
menu
band
disp
a/v
s-seek
Figur e 13Figur e 13
When you have successfully mounted the antennas on the vehicle, you can begin routing the antenna cables to the tuner.
Figure 12 shows a typical antenna cable routing diagram, where the tuner has been
installed under the front passenger seat. The exact routing of the antenna cables may
vary depending upon where you have installed the tuner in your vehicle. Avoid side
airbag locations on front and back pillars, and above the doors. (Airbag locations are
marked with “SRS” logos.)
Installing the FM Direct Adapter
The FMDA is used if the vehicle’s headunit does not have a connection for a direct audio input. The FMDA should be located near the headunit as the vehicle’s FM antenna
will need to be connected to it. Figure 13 shows the wiring connections for the FMDA.
To hear the SIRIUS audio, the vehicle’s headunit and the SCV1 will need to be tuned
to the same FM channel. Refer to the FM Tran smit ter section on page 56 for more
detailed instructions on how to tune the SCV1 to an FM channel.
Note: The FM transmitter in SCV1 is by default set to FM channel 88.1. If you don’t want
to change to a different channel you can simply tune the vehicle’s headunit to 88.1.
Page 20

[ Sub scribing to t he SIRIU S Ser vice ]36[ Sub scribing to t he SIRIU S Ser vice ]
37
CH NAME
Call 1-888-539-SIR
Call 1-888-539-SIR
12:00
A
001
TO SUBSCRIBE CALL
888-539-SIRIUS (7474)
Figur e 2Figur e 2
Figur e 3Figur e 3
Updating Channels
XX% Completed
Figur e 1Figur e 1
Subscribing to the SIRIUS Service
Before you can listen to the SIRIUS service, you need to subscribe to the SIRIUS
Satellite Radio service. To subscribe, do the following:
Be sure that the SCV1 is correctly installed according to the previous installation
1.
instructions.
Turn on the DCU.
2.
After the startup sequence, the SCV1 will update the SIRIUS channel line-up. (Figure
3.
1) Wait until the channel updates have completed before pressing any buttons.
Once the channels have been updated, the display will change to Call 1-8 88-
4.
539- SIRI US t o Su bscr ibe and will tune to channel 184. (Figure 2) The backseat
TV will also display a message to subscribe. (Figure 3) You will not be able to
listen to SIRIUS satellite radio or watch Backseat TV until you activate your
SIRIUS subscription.
Tune to channel 0 to display the SCV1’s unique 12-digit SIRIUS ID number (SID).
5.
(Figure 4) Write the SID number down in the space provided near the end of this
manual. The SID number is also available on the SCV1’s packaging, and may also
be accessed by pressing the MENU button and selecting Sirius ID.) (If you are using the DCU, you can also tune to channel 0 by using the audio remote control:
Press the Se lect button, then the 0 (zero) button, and then the Select button
again. Note that the same SID number is used to subscribe both the SIRIUS
Satellite Radio service and the SIRIUS Backseat TV service.
Page 21

SID 000123456789
Sirius ID
Subscription Updated
Press Any Key
to Continue
Figur e 4Figur e 4
Figur e 5Figur e 5
Audio Mode Operation
3-Digit Channel Number
Time (or Date)
Auto Scrolling
Artist Name (Audio Mode)
Program Title (Video Mode)
Channel Name (Or Category)
Preset Bank
Auto Scrolling
Song Title (Audio Mode)
Episode Title / TV Rating*
(Video Mode)
CH NAME
Artist Name
Song Title
12:00
A
001
* When available
Figur e 1Figur e 1
Basic Operation
Have your credit card handy and contact SIRIUS on the Internet at:
6.
htt ps:/ /act ivat e.si rius radi o.co m/
and follow the prompts to activate your subscription. You can also call SIRIUS
toll-free at:
1-8 88-5 39-S IRIU S (1-888-539-7474).
When you have successfully subscribed to the SIRIUS service, and the SCV1
7.
has been updated with your subscription information, an alert will be displayed.
(Figure 5) To continue, press the Se lect button.
You are now ready to begin enjoying SIRIUS Satellite Radio’s digital radio and TV
entertainment!
[ Sub scribing to t he SIRIU S Ser vice ]
38
After you have successfully activated your SIRIUS subscription, the Default display
screen will be displayed (Figure 1). Use the + and – buttons to scroll through the
channels. The selected channel will automatically start playing and the artist name and
song title of the currently playing song will be displayed.
Pow er on /o ff and S tand by
In addition to using the power button to turn the SCV1 on and off, it is also used to
place the SCV1 in a standby mode, both for the audio and video modes. The following
table describes the operation of the power button.
Powe r Bu tton Ope rati on Resu lt
Press and release when
the SCV1 is Off
Turns the SCV1 On
[ Aud io Mode Opera tion ]
39
Page 22

[ Aud io Mode Opera tion ]
40
[ Aud io Mode Opera tion ]
41
CH NAME
Artist Name
Song Title
12:00
A
001 Category
Artist Name
Song Title
Date
A
001
CH NAME
Program Title
Episode/Rating
12:00
V
001 Category
Program Title
Episode/Rating
Date
V
001
A
udio Mode
Video Mode
Note- Episode and Rating will only display when available
Figur e 2Figur e 2
Powe r Bu tton Ope rati on Resu lt
Press and hold for 2 seconds when SCV1 is On
Press and release when
the SCV1 is On
Press and release when
the SCV1 is in Standby
The SCV1 will remember what state it was in when the vehicle was turned off and will
resume that state (i.e., On, Off, Audio Standby, or Video Standby) the next time the
vehicle is turned on.
Cha ng ing C han nel S
Pressing the + button will increase or move up to the next channel. Pressing the – button will decrease or move to the previous channel.
sWi tC hin g B etW ee n a uDi o anD Vi De o m oDe s
You can switch the DCU between the Sirius Satellite Radio service and the Sirius
Backseat TV service by pressing the A/V button on the DCU, or the Me nu button on
the audio remote control.
When the DCU is in the video mode, the audio will switch from SIRIUS radio to the
Backseat TV, and the TV channel information and programming will be displayed on
Turns the SCV1 Off
Places the SCV1 in Standby.
If placed in Standby while in Audio mode: Mutes the
front audio output from Sirius Satellite Radio, dims the
screen, and displays AUD IO S TAND BY M ODE. The
FM output is also turned off.
If p lace d in Sta ndby whi le i n Vi deo mode : Mutes the
front audio output from Sirius Backseat TV, dims the
screen, and displays VID EO S TAND BY M ODE. The
FM output is also turned off.
Exits Standby and resumes the last mode (i.e., audio
or video mode) before it was placed in Standby
the DCU. The TV channel can be then changed by using the + and – buttons, or the
Channel Up/Down buttons on the audio remote control.
To switch the DCU back into the audio mode for SIRIUS radio, press the A /V button.
Dis pl ay Bu tto n ( Di sp)
Pressing the DISPLAY (DI SP) button from the Default display screen toggles the top
line of the display between the channel name and time, and the category and date.
(Figure 2)
Pressing and holding the DISPLAY (DI SP) button for 1½ seconds while in the audio
mode will enter Channel List mode which is described in the next section.
sea rC h m oDe s ( Cate go ry, Ch ann el, ar tis t, s ong ti tl e)
There are several ways to search for and select music: by channel, by category, by artist, and by song title. If you want to find a different channel to listen to, press and hold
the DISPLAY (DIS P) button to enter Channel List mode:
Use the < and > buttons to scroll through the categories. Use the + and – but-
1.
tons to scroll through the available channels in each category.
Pressing the DISPLAY (DI SP) button while in the Channel List mode will switch
2.
Page 23

[ Aud io Mode Opera tion ]
42
[ Aud io Mode Opera tion ]
43
between Channel Name, Artist Name, and Song Title displays to preview what
Press one of the < or >
buttons to activate the
category list.
Press DISPLAY (DISP)
again to show the Song
Title
Press DISPLAY (DISP) to
show the Artist Name
001
002
003
Channel Name
Channel Name
Channel Name
Category
001
002
003
Artist Name
Artist Name
Artist Name
Category
001
002
003
Song Title
Song Title
Song Title
Category
002
003
004
Channel Name 2
Channel Name 3
001 Channel Name 1
Channel Name 4
Figur e 3Figur e 3
CH NAME
12:00
A
001
Enter Channel #
_ _ _
Figur e 4Figur e 4
is playing on other channels before selecting one. (Figure 3) To exit this mode
without changing to a new channel, press and hold the DISPLAY (D ISP) button
for 1½ seconds.
the channel. The channel will change and the display will revert to the default
screen for the new channel.
Note : If you are viewing a sports category channel list such as NFL®, NBA®, NHL®,
COLLEGE, pressing the DISPLAY (D ISP) button will toggle between the team names
and the current score of any live play-by-play game.
Dir eC t t uni ng (r emo te Co ntr ol on ly)
Channels can be directly accessed by pressing the DIRECT button on the remote control and then using the 0-9 keys to enter the desired channel number. (Figure 4) Once
the desired number has been entered, the channel will change and the display will
revert to the default screen for the new channel. The display will change immediately if
three numbers are entered (for example, 117), but if just one or two digits are entered,
the SCV1 will wait for 3 seconds before changing the channel.
When the channel you want is highlighted, press the SELE CT button to tune to 3.
Advanced Features
set ti ng Cha nne l pre set s
You can store up to 30 of your favorite channels as presets, for quick access. Presets
are stored in 3 banks, A, B, C, D, and E, each containing 6 channel presets, numbered
1 to 6.
Press the BA ND button to activate the preset bank you want. The selected bank
1.
is shown in the top right corner of the default screen. (Figure 5)
Page 24

[ Aud io Mode Opera tion ]
44
[ Aud io Mode Opera tion ]
45
Select the channel you want to preset by pressing the + or – button to move up
CH NAME
Artist Name
Song Title
12:00
A
001 CH NAME
Artist Name
Song Title
12:00
A
001
Figur e 5Figur e 5
P.Tun e Disp layP.Tun e Disp lay
Defau lt Dis playDefaul t Disp lay
2.
or down through the channels.
When the channel is selected, hold the numbered preset button in which you
3.
want the channel stored for at least 1½ seconds. You will hear a beep and the
preset bank number will indicate the memory location to which the channel has
been stored. If the preset button already has a channel stored in it, the stored
channel will be replaced by the new channel.
In video mode, there is only one preset bank V. The first three presets in this bank are
set to the three TV channels.
reC al lin g C han ne l p res et s
The 6 presets in the active bank (A through E) can be selected by pressing the 1
through 6 buttons on the DCU, or the remote control.
Press the BA ND button to activate the preset bank you want. The selected bank
1.
is shown in the top right corner of the Default display screen. (Figure 5)
Press the desired preset button (1 – 6) on the DCU or the remote to recall the
2.
preset. The channel will change and the display will revert to the Default display
screen for the new channel.
When in video mode, the first three presets, 1, 2, and 3 are already pre-programmed
to the three TV channels. Presets 4, 5, and 6 are inoperative.
sea rC hin g F or a Cha nne l pre set ( p.tune m oDe ) ( AUD IO MO DE ONLY)
It is possible to quickly search through all of your presets using the + or – button.
Press and hold the B AND button to enter the Preset Tune Mode (P.TUNE).
1.
Pres et T une Mode will momentarily be displayed and the top corners of the
2.
display will invert to indicate Preset Tune Mode. (Figure 5)
Use the + or – button to move up or down through your presets. Only channels
3.
stored in your presets will be displayed, regardless of which bank they are stored
in. Presets will be grouped and displayed by preset bank and number (ex. A-1,
A-2...B-1, B-2) and rotate back to the beginning.
To exit the Preset Tune Mode and return to Default display screen, press and hold the
BAND button.
pre se t t une mo De (A UDI O MOD E O NLY)
In the Preset Tune Mode, you can view your list of presets showing Channel Name,
Artist Name, or Song Title just like in the Channel List mode:
Press and hold the B AND button to enter the Preset Tune Mode (P.TUNE).
1.
(Figure 6)
Press the DISPLAY (D ISP) button for 1½ seconds which will enter the Preset
2.
Tune Mode displaying up to 3 preset channel names. Pressing the DISPLAY
(DIS P) button while in this mode will change between the Channel Name, Artist
Name, or Song Title list modes. The name field will scroll only if the length of the
Artist Name or Song Title cannot be viewed in its entirety.
Use the + or – button to highlight the desired preset.
3.
Push the SEL ECT button to select the channel. The channel will change and the
4.
display will revert to the P.TUNE display.
Page 25

[ Aud io Mode Opera tion ]
46
[ Aud io Mode Opera tion ]
47
P.TUNE Channel Name List Display
P.TUNE Song Title List Display
P.TUNE Artist Name List Display
002
003
004
Channel Name 2
Channel Name 3
001 Channel Name 1
Channel Name 4
002
003
004
Artist Name 2
Artist Name 3
001 Artist Name 1
Artist Name 4
002
003
004
Song Title 2
Song Title 3
001 Song Title 1
Song Title 4
CH NAME
12:00
A
001
Preset
Tune Mode
Figur e 6Figur e 6
CH NAME
Artist Nmae
Song Name
12:00
A
001
Song Alert
Artist 1/Song 1
Artist 2/Song 2
S-Seek Alerts
Team 1 @ Team 2
Team 3 @ Team 4
My Game Zone
Figur e 7Figur e 7
Figur e 8Figur e 8
mem ory (m emo ) anD so ng -se ek (s-se ek) Fu nC tio ns (AUDI O M ODE O NLY)
This feature allows the you to capture and store information about the programming,
artist name, song title, or sports team, on the currently tuned channel, up to a total of
20 listings. If the S-Seek feature is enabled, when the SCV1 is powered on it automatically searches the incoming channels to determine if a match is made to an artist’s
name, song title, or sports team stored in memory. If any matches are found, a screen
will appear for 2 seconds displaying Son g Al ert (Figure 7), Arti st A lert , or Gam e Al ert,
depending upon the type of alert.
A beep tone will also be heard indicating that a match has been found, if the Confirmation Tone feature is turned on. (Refer to the Confirmation Tone section on page 64.)
The display then shows the S-Seek Alert or My Game Zone screen which displays the
current matches. (Figure 8)
You can scroll through the list using the + and – buttons and press the SELE CT button to tune to the channel. The display will then revert to the last active display mode.
If a selection is not made within 10 seconds, the screen will revert to the last active
display screen and tuning mode.
During the 10 seconds that the matches are displayed, the currently tuned channel will
continue to play. An S-Seek alert is not provided for the currently tuned channel if it is
matched because you are already tuned to the channel.
Stor ing Song Titl es, Artis t Na mes, or S port s Events
To ensure that no duplicate entries are stored in memory, the SCV1 will check to
ensure the information about to be stored is not already in saved. If it is already saved,
the display will indicate So ng S tore d or Art ist Stor ed.
Page 26

[ Aud io Mode Opera tion ]
48
[ Aud io Mode Opera tion ]
49
To store a song title, artist name, or a sports event:
CH NAME
Artist Nmae
Song Name
12:00
A
001
Song Stored
CH NAME
Artist Name
Song Title
12:00
A
001
X Used / Y Empty
CH NAME
Giants vs Cowboys
NFL
12:00
A
001
NYG
DAL
Figur e 8Figur e 8
Figur e 9Figur e 9
Initial Game Alert
All Score Updates
Alert Type
CH NAME
Artist Nmae
Song Name
12:00
A
001
Memory Full
Figur e 10Figur e 10
Figur e 11Figur e 11
Song Tit les/ Arti st N ames : While at the Default display screen, momentarily
1.
pressing and releasing the M EMO button stores the current program data
information in memory. A Son g St ored or Arti st S tore d pop-up screen, followed
by a X Used / Y Emp ty screen will appear for 1 and 2 seconds respectively, X
being the total number of listings saved in memory, and Y being the total number
of memory listings still available for storage. (Figure 8)
Spor ts E vent s: If the current tuned channel is an NFL, NBA, NHL, or college
2.
play-by-play sports broadcast, pressing the MEMO button will allo w you to select
one of the teams which is playing to be stored in memory. (Figure 9)
Use the + or – buttons to highlight the team you wish to store in memory and
3.
press the SE LECT button.
The next screen will ask which kind of alert you wish to have. (Figure 10)
3.
Init ial Game Ale rt will sound an alert when the team you have chosen is playing
a game. All Scor e Up date s will sound an alert when the team you have chosen is
playing a game, and also when the scores are updated for the team.
Use the + or – buttons to highlight the type of alert you wish to have and press
the SELE CT button.
If when the MEMO button is pressed and the memory is full, M emor y Fu ll will be
4.
displayed for one second. (Figure 11)
A screen displaying the Repl ace or C ance l options will follow. (Figure 12) This
prompt allows you to make the following choices:
Page 27

[ Aud io Mode Opera tion ]
50
[ Aud io Mode Opera tion ]
51
CH NAME
Artist Nmae
Song Name
12:00
A
001
Replace
Cancel
Artist 1
Artist 2/Song 2
Artist 3/Song 3
Replace
Artist 1
Artist 2/Song 2
Artist 3/Song 3
Replace
20 Used / 0 Empty
Figur e 12Figur e 12
Figur e 13Figur e 13
Figur e 14Figur e 14
Artist Name
Song Name
Memory S X / Y
Figur e 15Figur e 15
Repl ace: The list of stored memory items will be displayed. (Figure 13)
Use the + or – buttons to highlight the programming that you would like to overwrite with the new artist name, song title or sports game. After highlighting the
selected item in the list, press the SEL ECT button to delete the item and replace
it with the updated information. The screen will then display how much is used,
and how much is empty. (Figure 14)
Canc el: Nothing will be stored in memory and the display will revert to the previous display screen.
View ing Progr amme d Informa tion Stored i n Me mory
To review previously stored program information:
Press and hold the M EMO button for 1½ seconds to enter the S-Seek Mode.
1.
The program information stored in memory will be displayed in a one-at-a-time
page format. S or A will be displayed in the title bar to indicate whether a song
title or an artist name has been saved to the memory location.
Use the + or – buttons to scroll through the program information. (Figure 15)
2.
Dele ting an I tem from Memo ry
To delete an item from memory:
Press and hold the M EMO button for 1½ seconds to enter the S-Seek Mode.
1.
The program information stored in memory will be displayed in a one-at-a-time
page format.
Use the + or – buttons to scroll through the program information until the item to
2.
be deleted is displayed.
Press the SE LECT button. The Memory Recall screen will be displayed. (Figure
3.
16)
Page 28

Song Seek On
Song Seek Off
Delete
Memory Recall
A
001
Yes
No
Delete
Figur e 16Figur e 16
Figur e 17Figur e 17
© 2007 Viacom International Inc. All Rights Reserved.
Figur e 1Figur e 1
Use the + or – buttons to highlight the Dele te option.
4.
Press the SE LECT button and a Delete confirmation screen will be displayed.
5.
(Figure 17)
To permanently delete the program from your list, select Yes and press the
6.
SELE CT button.
Turn ing the S ong Alert Fea ture (S-Seek) On or Off
To turn the S-Seek alert feature on or off:
Press and hold the M EMO button for 1½ seconds to enter the S-Seek Mode.
1.
Press and release the SE LECT button. The Memory Recall screen will be dis-
2.
played. (Figure 16)
Use the + and – buttons to highlight the S-S eek On or S- Seek Off option and
3.
press the SE LECT button.
[ Aud io Mode Opera tion ]
52
Video Mode Operation
usi ng th e V iDe o rem ote
To turn on the backseat TV, press the power button on the video remote control.
As the backseat TV starts up, a progress screen is displayed until the TV channel is
tuned. (Figure 1) The power button only controls the Backseat TV audio and video (to
turn it on and off) and does not affect the operation of the SIRIUS satellite radio.
To change the TV channel, use the ch up and down buttons on the video remote control. While the channel is changing, the progress screen is displayed until the channel
is changed. (Figure 1).
usi ng th e D Cu to Co ntr ol Ba Cks eat tV
Backseat TV can also be controlled using the DCU by switching to video mode. To
switch to video mode press the A/V button on the DCU (or the Menu button on the
audio remote control). When in video mode, the audio from the tuned TV channel will be
[ Vid eo Mode Opera tion ]
53
Page 29

TO SUBSCRIBE CALL
888-539-SIRIUS (7474)
Figur e 2Figur e 2
Sirius ID
FM Transmitter
Settings
Menu Options
Figur e 1Figur e 1
heard, and the TV channel and programming information displayed on the DCU. (This
information is not displayed on the Backseat TV video screen.)
The TV channel can be changed by using the + and – buttons on the DCU or by using
the Channel Up/Down buttons on the audio remote control. Channels can also be
changed by using preset buttons 1, 2, and 3 on the DCU and on the audio remote
control.
To switch the DCU back to the audio mode, press the A/V button.
aCt iVati ng BaC kseat t V
Before you can watch your backseat TV, you’ll need to subscribe to the service. Refer
to the section S ubsc ribi ng t o th e SI RIUS Ser vice on page 36 for instructions on how
to subscribe. Until you have subscribed, the backseat TV will display the message
shown in Figure 2.
[ Vid eo Mode Opera tion ]
54
Menu Options
To enter the Menu Options press the MENU button. The Menu Options list will be
displayed. (Figure 1)
Using the + and – buttons, highlight the option you wish to adjust and press the SE-
LECT button. The following options are displayed:
Sirius ID Clock Settings
FM Transmitter Signal Indicator
Settings Factory Default
Each option is described in the following sections.
Note : If a button is not pressed within 10 seconds, the SCV1 will exit the Menu Options function and revert back to the Default display screen, except for the Sirius ID
display screen which will remain displayed.
sir iu s i D
Displays your 12 digit SIRIUS ID (SID). (Figure 2) The SID is unique to your SCV1 and
is required to activate your service. It is recommended that you write this number in the
space provided on the last page of this guide. No adjustments are allowed in this mode.
[ Men u Option s ]
55
Page 30

[ Men u Option s ]
56
[ Men u Option s ]
57
SID 000123456789
Sirius ID
Frequency
On/Off
FM Transmitter
Figur e 2Figur e 2
Figur e 3Figur e 3
88.9
MHz
Frequency
On
Off
FM On/Off
Figur e 4Figur e 4
Figur e 5Figur e 5
To exit this option, press the SELE CT or ME NU button.
Fm tr ans mit ter
The FM transmitter can be turned On/Off and the FM channel that the SCV1 transmits
on can be changed with this option. (Figure 3) If you are using the FMDA, the FM
transmitter must be turned on, and the channel on your headunit must be set to the
same FM channel as the SCV1. If you are not using the FMDA, turn off the FM transmitter.
Freq uency
To change the frequency of the FM channel:
Use the + and – buttons to highlight Fre quen cy. Press the SE LECT button.
1.
(Figure 3)
Use the + and – buttons and the < and > buttons to adjust the FM channel
2.
(Figure 4):
The + and – b uttons adjust in 0.2 MHz i ncrements
•
The < and > b uttons adjust in 1 MHz inc rements
•
FM transmitte r frequencies are from 88. 1 to 107.9
•
To exit the FM Transmitter menu, press the M ENU button.
On/O ff
To turn the FM transmitter on or off:
Use the + and – buttons to highlight On/ Off. Press the S ELEC T button. (Figure
1.
3)
Use the + and – buttons to highlight On or Off and press the SELECT button.
2.
(Figure 5)
To exit the FM Transmitter menu, press the M ENU button.
Page 31

[ Men u Option s ]
58
[ Men u Option s ]
59
Sports Alert
Display Settings
Memory Options
Settings
Figur e 6Figur e 6
Favorite Team
Alert On/Off
Sports Alert
NFL
NBA
NHL
Favorite Team
None
Arizona Cardinals
Atlanta Falcons
NFL
Figur e 7Figur e 7
Figur e 8Figur e 8
Figur e 9Figur e 9
set ti ngs
The settings menu provides for changing the following options:
Sports Alert Audio Settings
Display Settings Confirmation Tone
Memory Options Parental Control
Each option in the Settings menu (Figure 6) is described in the following sections.
Spor ts Alert
Sports Alert allows you to store your favorite sports teams in memory. The SCV1 will
constantly scan the SIRIUS channels and will sound an alert when a team you stored
in memory is playing, or when there is a score update for a team, depending on which
option you have chosen for the team. Teams which you have selected and are currently
playing will be displayed in a category called M y Ga me Z one.
You may select one team from each sports league and the college category, however,
more teams may be chosen by using the MEMORY (MEMO) function. (Se e th e section
titled, Memo ry ( MEMO ) an d So ng S eek (S-S eek) Fun ctio ns for more information to
add additional teams.)
Favo rite Team
To choose teams to add to your stored game alerts:
Use the + and – buttons to highlight Fav orit e Te am and press the SEL ECT but-
1.
ton. (Figure 7)
Use the + and – buttons to highlight the sports league or college category of the
2.
team you wish to add, and press the SELE CT button. (Figure 8)
Use the + and – buttons to highlight the league team name or college team name
3.
you wish to add, and press the S ELEC T button. (Figure 9)
Use the + and – buttons to highlight the type of alert you wish to have for the selected
team, and press the SELE CT button. (Figure 10)
Page 32

[ Men u Option s ]
60
[ Men u Option s ]
61
Initial Game Alert
All Score Updates
Alert Type
Init ial Game Ale rt will alert you when your selected teams begin playing a game.
On
Off
Alert On/Off
Figur e 10Figur e 10
Figur e 11Figur e 11
Brightness
Contrast
Display Settings
Brightness
Contrast
Figur e 12Figur e 12
Figur e 13Figur e 13
All Scor e Up date s will alert you each time the score changes for your selected teams.
Note that for college teams, you will receive an alert for all teams playing for that col-
lege.
To exit the Sports Alert menu, press the MEN U button.
Aler t On/Off
To turn game alerts for your favorite teams on or off:
Use the + and – buttons to highlight Ale rt O n/Of f and press the SELE CT button.
1.
(Figure 7)
Use the + and – buttons to highlight On or Off and press the SELECT button.
2.
(Figure 11)
Disp lay Optio ns
Display options adjust the brightness and contrast of the DCU’s display. (Figure 12)
Brightness adjusts the overall intensity of the display to help with viewing in different
lighting conditions. Contrast adjusts the relationship between the background and the
text on the LCD display.
To adjust the display:
Use the + and – buttons to highlight the display setting Bri ghtn ess or C ontr ast
1.
which you wish to adjust, brightness or contrast. Press the SELE CT button to
select your choice.
Use the + and – buttons to adjust the brightness or contrast up or down. The bar
2.
graph will move to indicate the change. (Figure 13)
When the SCV1 is powered in SIRIUS radio mode, and Alert is set to On, it will sound
an alert when the team you have chosen is playing a game.
To exit the Sports Alert menu, press the MEN U button.
To exit the Brightness or Contrast menu, press the M ENU button.
Page 33

[ Men u Option s ]
62
[ Men u Option s ]
63
Memo ry Option s
Auto Memory Search
Clear All Memory
Memory Options
On
Off
Auto Memory Search
Figur e 14Figur e 14
Figur e 15Figur e 15
Yes
No
Clear All Memory
Power On/Off Tone
Audio Settings
Figur e 16Figur e 16
Figur e 17Figur e 17
The Auto Memory Search feature controls whether a channel highlighted in a list will
be immediately tuned, or whether the SEL ECT button needs to be pressed before
the channel will be tuned. When this feature is on, the channel is immediately tuned
when it is highlighted in the list. The Clear All Memory option allows you to clear all the
programming stored in memory. (Figure 14)
Clea r All Mem ory
To clear all the programming in memory:
Use the + and – buttons to highlight Cl ear All Memo ry and press the SEL ECT
1.
button. (Figure 14)
Use the + and – buttons to highlight either Yes or No and press the SEL ECT
2.
button. (Figure 16)
Auto Memory S earc h
To turn the automatic memory search on or off:
Use the + and – buttons to highlight Au to M emor y Se arch and press the S E-
1.
LECT button. (Figure 14)
Use the + and – buttons to highlight either On or O ff and press the SEL ECT
2.
button. (Figure 15)
To exit the Memory Options menu, press the M ENU button.
To exit the Memory Options, press the ME NU button.
Audi o Setting s
The audio settings of the SCV1 can be adjusted to set the power-on tone On or Off
which will sound an audio tone alert when the SCV1 powers on and off. The default
setting is on. (Figure 17)
Powe r On/Off Tone
To change the power tone option:
Use the + and – buttons to highlight Pow er T one. Press the S ELEC T button.
1.
Page 34

[ Men u Option s ]
64
[ Men u Option s ]
65
(Figure 17)
On
Off
Power On/Off Tone
On
Off
Confirmation Tone
Figur e 18Figur e 18
Figur e 19Figur e 19
Lock / Unlock
Edit Code
Parental Control
Enter Code
_ _ _ _
Lock / Unlock
Figur e 20Figur e 20
Figur e 21Figur e 21
Use the + and – buttons to highlight On or O ff and press the SEL ECT button.
2.
(Figure 18)
Pare ntal Cont rol
The SCV1 can password protect any channels you do not want others to access without your permission. (Figure 20) Locked channels will not appear in the channel list.
To exit the Audio Settings menu, press the M ENU button.
Conf irmation Tone
An audio tone alert can be set to confirm when presets are stored and for S-Seek
alerts.
To change the confirmation tone option:
Use the + and – buttons to highlight Con firm atio n To ne. Press the SE LECT
1.
button.
Use the + and – buttons to highlight On or O ff and press the SEL ECT button.
2.
(Figure 19)
To exit the Settings menu, press the MEN U button.
When anyone tries to access a locked channel using the D irec t button on the remote
and entering a locked channel number, the En ter Code screen is displayed and the
channel cannot be accessed until the correct code is entered.
The first time you access the Lock/Unlock menu item, you will be prompted to set a
4-digit lock code. (Figure 21).
The code can be any four digit number from 1 111 to 6 666. The numbers 0, 7, 8 , and 9
are not valid entries. When you have entered the code, you will be prompted to verify
the code by entering it again. (Figure 22)
Page 35

[ Men u Option s ]
66
[ Men u Option s ]
67
Confirm Code
_ _ _ _
Lock / Unlock
Enter Code
_ _ _ _
Lock / Unlock
Figur e 22Figur e 22
Figur e 23Figur e 23
001
002
003
Hits 1 Lock
StarLite
Love
Lock / Unlock
Lock / Unlock
Edit Code
Parental Control
Enter Code
_ _ _ _
Figur e 24Figur e 24
Figur e 25Figur e 25
If you should exit without entering a code, you will be prompted to set a code next time
you attempt to lock a channel.
Lock /Unlock C hann els
To lock or unlock channels
Use the + and – buttons to highlight Loc k/Un lock . Press the SELE CT button.
1.
(Figure 20)
The Ente r Co de prompt will be displayed. (Figure 23) Enter your four digit lock
2.
code and press the S ELEC T button.
When the correct lock code has been entered, use the + and – buttons to
3.
highlight the channel you want to lock or unlock. A locked channel will have Loc k
displayed to the right of the channel name. (Figure 24) Highlight a channel name
and press the SE LECT button to lock or unlock the channel.
To exit the Lock/Unlock menu, press the MENU button.
Edit Code
To change the lock code:
Use the + and – buttons to highlight Edi t Co de. Press the SE LECT button.
1.
(Figure 20)
At the E nter Cod e prompt, enter your existing lock code. (Figure 25)
2.
The New Code prompt will be displayed. (Figure 26) Enter a new four digit lock
3.
code using the 1-6 number buttons on the DCU, or the 1-6 numbers using the
remote.
Page 36

[ Men u Option s ]
68
[ Men u Option s ]
69
Lock / Unlock
Edit Code
Parental Control
New Code
_ _ _ _
Lock / Unlock
Edit Code
Parental Control
Confirm Code
_ _ _ _
Figur e 26Figur e 26
Figur e 27Figur e 27
Clock Format
Time Zone
Daylight Savings Time
Clock Settings
12 Hour
24 Hour
Clock Format
Figur e 28Figur e 28
Figur e 29Figur e 29
You will then be prompted to confirm the new code by entering it again. (Figure
4.
27) Enter the new code.
The lock code is now changed. To exit the Parental Control menu, press the M ENU
button.
Note : If you have forgotten your lock code, call SIRIUS Customer Service for help.
Clo Ck se tti ngs
Clock Settings allows for adjustment of the time based features of the SCV1. (Figure
28) You can change the clock display format to 12 or 24 hour time, set the time zone,
and set daylight savings time to be observed or not observed.
Note : The time data for the SCV1’s clock is provided via the SIRIUS signal, and will
update based on the data received from SIRIUS.
Cloc k Format
To change the clock display format to a 12 hour or 24 hour format:
Use the + and – buttons to highlight Clo ck F orma t and press the SELE CT but-
1.
ton. (Figure 28)
Use the + and – buttons to highlight either 12 H our or 2 4 Ho ur and press the
2.
SELE CT button. (Figure 29)
To exit the Clock Settings menu, press the M ENU button.
Time Zone
To change the time zone setting:
Use the + and – buttons to highlight Tim e Zo ne and press the SEL ECT button.
1.
(Figure 28)
Page 37

[ Men u Option s ]
70
[ Men u Option s ]
71
(GMT -5:00) Eastern
(GMT -4:00) Atlantic
(GMT -3:30) Newfndlnd
Time Zone
DST Observed
DST Not Observed
Daylight Savings Time
Figur e 30Figur e 30
Figur e 31Figur e 31
Antenna 1
Antenna 2
Signal Indicator
SAT
TER
Signal Indicator
Figur e 32Figur e 32
Figur e 33Figur e 33
Since the clock adjusts automatically, it is important to specify your proper time
2.
zone. Use the + and – buttons to highlight the correct time zone for your location.
and press the SE LECT button. (Figure 30)
To exit the Clock Settings menu, press the M ENU button.
Dayl ight Savi ngs Time
Use the + and – buttons to highlight Day ligh t Sa ving s Ti me and press the SE-
1.
LECT button. (Figure 29)
Use the + and – buttons to highlight DS T Ob serv ed (default) or DST Not Ob-
2.
serv ed and press the SEL ECT button. (Figure 31)
To exit the Clock Settings menu, press the M ENU button.
sig na l i nDi Cato r
The signal indicator menu displays the strength of the SIRIUS signal from each satellite antenna and also from terrestrial (ground) transmitters for each of the two antennas. (Figure 33)
To display the SIRIUS signal strength:
Use the + and – buttons to highlight either Ante nna 1 or Ant enna 2. Press the
1.
SELE CT button. (Figure 32)
Two 10 segment horizontal bar graphs will be displayed (SAT and TER) with a
2.
– sign to the left and a + sign to the right. (Figure 33) SA T indicates satellite
signal strength and TER indicates terrestrial signal strength, if available, for the
selected antenna.
To exit the Signal Indicator screen, press the M ENU button.
Page 38

[ Men u Option s ]
72
[ Men u Option s ]
73
Restore Settings
Yes
No
Are You Sure?
Yes
No
Figur e 34Figur e 34
Figur e 35Figur e 35
FaCt ory De Fault
The Factory Default option will restore most every feature to the original factory settings.
To set the SCV1 back to the factory defaults:
Use the + and – buttons to select Ye s and press the SELE CT button to restore
1.
all settings to the settings from the factory. (Figure 34) Select No to leave the
settings as-is and return to the Menu Options list.
If Y es is chosen, you will be prompted A re Y ou S ure? to confirm that you do
2.
want to restore SCV1 to the factory settings. (Figure 35) If you do, use the +
and – buttons to select Yes and press the SE LECT button.
The SCV1 will now revert back to the original factory settings for the following
3.
parameters:
All Presets R evert to Empt y
•
All Game Aler ts Cleared
•
FM Frequency set to 88.1 M Hz
•
Display Contr ast to 50%
•
Display Brigh tness set to 50%
•
Volume Contro l Level set t o 100%
•
Lock Code is not cleared
•
Eastern Time Zone
•
Daylight Savi ngs Time Obse rved
•
Memory Search On
•
Memory Locati ons Erased
•
Page 39

Troubleshooting
Specifications
Symp tom Solu tion
SCV1 does not power onBlown fuse, or the power cable is not properly connected.
Ante nna Not Dete cted
is displayed
Acqu irin g Si gnal is
displayed
Audio static or loss of
clarity
No sound If using a direct audio cable connection, the audio cables
Rear Audio and Video
not on
[ Tro ubleshoo ting ]
74
Check for a bad fuse and check power cable connection
One or both satellite antennas are not connected to the
Tuner Check the satellite antenna connections.
No satellite signal is being received.
Check for obstacles over or around the satellite antenna.
Change the vehicle location to eliminate nearby obstacles
(bridges, overpasses, tress, buildings, etc.).
If using an direct audio cable connection, check the
cable connections. If you are using the FMDA, check the
antenna connections, the connection to the FM connector
on the tuner, and the FM cable connection to the vehicle’s
headunit.
are not connected. Check the audio cables at the tuner
and the vehicle headunit.
If you are using the FMDA, be sure the vehicle’s headunit
and the SCV1 are tuned to the same FM channel.
If the system is on, press the Power button on the video
remote control to turn on the rear audio and video outputs.
Oper atio nal Freq uenc ies
Satellite . . . . . . . . . . . . . . . . . . . . . . . . . . . . . . . . . . . . . . . .2322.239/2330.207 MHz
Terrestrial. . . . . . . . . . . . . . . . . . . . . . . . . . . . . . . . . . . . . . . . . . . . . . . 2226.250 MHz
Powe r Re quir emen ts . . . . . . . . . . . . . . . . . . . . . . . . . . . . . . . 12 Volts DC (1Amp MAX)
Fuse Req uire ment s
Accessory Line . . . . . . . . . . . . . . . . . . . . . . . . . . . . . . . . . . . . . . . . . . . . . . . . 2A ATC
Battery Line . . . . . . . . . . . . . . . . . . . . . . . . . . . . . . . . . . . . . . . . . . . . . . . . . . . 2A AGC
Oper atio n Te mper atur e . . . . . . . . . . . . . . . . . . . . . . . . . -20° to +85° C (-4° to 185° F)
Audi o Ou tput Lev el. . . . . . . . . . . . . . . . . . . . . . . . . . . . . . . . . . . . . . . . . . . . . . . . . . . . . .
Front . . . . . . . . . . . . . . . . . . . . . . . . . . . . . . . . . . . . . . . . . . . . . . . .1V (RMS) Variable
Rear (A/V) . . . . . . . . . . . . . . . . . . . . . . . . . . . . . . . . . . . . . . . . . . . . . . 1V (RMS) Fixed
Sign al-t o-no ise (S/N ) . . . . . . . . . . . . . . . . . . . . . . . . . . . . . . . . . . . . . . . . . . . . . . . . . . .
Front . . . . . . . . . . . . . . . . . . . . . . . . . . . . . . . . . . . . . . . . . . . . . . . Gr eate r th an 7 9dB
Rear (A/V) . . . . . . . . . . . . . . . . . . . . . . . . . . . . . . . . . . . . . . . . . . . Greater than 79dB
Tota l Ha rmon ic D isto rtio n . . . . . . . . . . . . . . . . . . . . . . . . . . . . . . . . . . . . . . . . . . . . . . . .
Front . . . . . . . . . . . . . . . . . . . . . . . . . . . . . . . . . . . . . . . . . . . . . . . . . . . . . . . . . <0.2%
Rear (A/V) . . . . . . . . . . . . . . . . . . . . . . . . . . . . . . . . . . . . . . . . . . . . . . . . . . . . . <0.2%
Vide o
Output Type. . . . . . . . . . . . . . . . . . . . . . . . . . . . . . . . . . . . . . . . . . Composite (NTSC)
Aspect Ratio . . . . . . . . . . . . . . . . . . . . . . . . . . . . . . . . . . . . . . . . . . . . . . . . . . . . . . 4:3
Frame Rate . . . . . . . . . . . . . . . . . . . . . . . . . . . . . . . . . . . . . . . . . . . . . . . . . . 29.97 fps
Resolution . . . . . . . . . . . . . . . . . . . . . . . . . . . . . . . . . . . . . . . . . . . . . . . . . . 7 20 x 480
Video Decoder. . . . . . . . . . . . . . . . . . . . . . . . . . . . . . . . . . . . . . . . . . . . . . . . . . .H.264
Audio Decoder . . . . . . . . . . . . . . . . . . . . . . . . . . . . . . . . . . . . . . . . . . . . . . . . . . . AAC
[ Spe cificati ons ]
75
Page 40

Disp lay Cont rol Unit
Dimensions (WxHxD) . . . . . . . . . . . . . . . . . . . . . . . . . . . . 114mm x 40mm x 18.6mm
(4.49” x 1.58” x 0.73”)
Weight . . . . . . . . . . . . . . . . . . . . . . . . . . . . . . . . . . . . . . . . . . . . . . . . . . 81g (2.86oz..)
Tune r Mo dule
Dimensions (WxHxD) . . . . . . . . . . . . . . . . . . . . . . . . . . . . . . 164mm x 94mm x 37mm
(6.47” x 3.65” x 1.50”)
Weight . . . . . . . . . . . . . . . . . . . . . . . . . . . . . . . . . . . . . . . . . . . . . . . . 313g (11.04oz.)
Audi o Re mote Con trol
Dimensions (WxHxD) . . . . . . . . . . . . . . . . . . . . . . . . . . . . . . 41mm x 104mm x 15mm
(1.61” x 4.09” x 0.59”)
Battery Type . . . . . . . . . . . . . . . . . . . . . . . . . . . . . . . . . . . . . . . . . . . . . . CR2025 (x1)
Vide o Re mote Con trol
Dimensions (WxHxD) . . . . . . . . . . . . . . . . . . . . . . . . . . . . . . 55mm x 107mm x 50mm
(2.17” x 4.21” x 1.97”)
Battery Type . . . . . . . . . . . . . . . . . . . . . . . . . . . . . . . . . . . . . . . . . . . . . . . . “AAA ” (x 2)
Ante nna
Type . . . . . . . . . . . . . . . . . . . . . . . . . . . . . . . . . . . . . .Automotive magnetic mount (x2)
Cable Length . . . . . . . . . . . . . . . . . . . . . . . . . . . . . . . . . . . . . . . . . . . . . . . 6.40m (21’)
Connector Type . . . . . . . . . . . . . . . . . . . . . . . . . . . . . . . . . . . . . . . . . . . . . . . . . . .SMB
SIRIUS ID
Write down the SIRIUS ID (SID) of your SIRIUS SCV1 in the space provided below.
SID: ___________________________________
[ Spe cificati ons ]
76
[ SIR IUS ID ]
77
Page 41

SIRI US C usto mer Serv ice: 1-888-539-7474
customercare@sirius-radio.com
SIRI US S atel lite Rad io I nc.
1221 Avenue of the Americas
New York, NY 10020
1-888-539-7474
http://www.sirius.com
Page 42

SCV1( SBTV09180 7a)
00.AB CD1.001
 Loading...