

Page 1
DETAILS
Sirius-S50
PER SONA L SATE LLIT E RAD IO + CAR KIT
Page 2

Congratulations on the purchase of your new Sirius S50
The Sirius S50® allows you to capture and store up to 50 hours of SIRIUS Satellite Radio
content, or a mix of SIRIUS® programming and MP3/WMA files, for portable entertainment.
When attached to a home dock, vehicle dock, or executive docking station, the Sirius S50
provides easy access to live broadcasts and saved content, and captures and stores both
scheduled and unscheduled SIRIUS programming. This feature allows you to listen to the
unique programming provided by SIRIUS which you have saved, in locations where you would
ordinarily be unable to receive adequate satellite reception.
When the Sirius S50 is docked and powered on, it gathers content in a variety of ways for
listening on the go including My SIRIUS Channels, My Sirius Songs, scheduled recordings,
and My Playlists.
The My Sirius Studio PC software which is included allows you to supplement the SIRIUS
broadcast content with your own MP3/WMA library when attached to a PC through a USB
connection. The PC application also allows for channel and image updates automatically when
connected to the SIRIUS website.
The vehicle and home dock utilize a rotary Media Dial for quick and easy navigation. You can
turn the Media Dial to find your favorite SIRIUS channel, tilt the Media Dial to pause, rewind,
fast-forward, or save a favorite song or show.
Voice-assisted navigation informs you what channel you’ve selected, eliminating the need for
you to take their eyes off the road while driving. The Sirius S50 also includes many other features, such as 30 channel presets; a jump button for one-touch tuning to traffic and weather
reports or to a favorite SIRIUS channel; a sports ticker that flashes personalized sports
scores; and a game alert feature which prompts you when your favorite NFL®, NHL®, NBA®,
or other sports teams are playing on SIRIUS.
Page 3

[ Table o f Conte nt s ]
2
[ Table o f Conte nt s ]
3
Table of Contents
TABLE OF CONTENTS . . . . . . . . . . . . . . . . . . . . . . . . . . . . . . 2
WARNING AND SAFETY INFORMATION . . . . . . . . . . . . . . . . . . . . . . 4
FCC Warning . . . . . . . . . . . . . . . . . . . . . . . . . . . . . . . . . . 4
FCC Compliance . . . . . . . . . . . . . . . . . . . . . . . . . . . . . . . . 4
Canadian Compliance . . . . . . . . . . . . . . . . . . . . . . . . . . . . . . 5
General Precautions . . . . . . . . . . . . . . . . . . . . . . . . . . . . . . . 5
END USER LICENSE AGREEMENT . . . . . . . . . . . . . . . . . . . . . . . . 7
PREFACE . . . . . . . . . . . . . . . . . . . . . . . . . . . . . . . . . . 11
Copyrighted Broadcast Material . . . . . . . . . . . . . . . . . . . . . . . . . 11
Copyrights & Trademarks . . . . . . . . . . . . . . . . . . . . . . . . . . . . 11
PACKAGE CONTENTS . . . . . . . . . . . . . . . . . . . . . . . . . . . . . 12
CONTROLS . . . . . . . . . . . . . . . . . . . . . . . . . . . . . . . . . 14
Sirius S50 Reference Guide . . . . . . . . . . . . . . . . . . . . . . . . . . . 14
Remote Control Reference Guide . . . . . . . . . . . . . . . . . . . . . . . . . 19
Display Screen Information . . . . . . . . . . . . . . . . . . . . . . . . . . . 21
Using the Media Dial . . . . . . . . . . . . . . . . . . . . . . . . . . . . . . 22
Audio Navigation . . . . . . . . . . . . . . . . . . . . . . . . . . . . . . . 23
GETTING STARTED . . . . . . . . . . . . . . . . . . . . . . . . . . . . . . 24
Installing the Car Dock . . . . . . . . . . . . . . . . . . . . . . . . . . . . . 24
Installing the Antenna . . . . . . . . . . . . . . . . . . . . . . . . . . . . . 32
Connecting the Cigarette Lighter Adapter . . . . . . . . . . . . . . . . . . . . . 34
Battery Installation, Charging, and Disposal . . . . . . . . . . . . . . . . . . . . . 35
Docking and Un-Docking the Media Player . . . . . . . . . . . . . . . . . . . . . 38
Turning the Sirius S50 On and Off . . . . . . . . . . . . . . . . . . . . . . . . 39
Selecting an FM Frequency . . . . . . . . . . . . . . . . . . . . . . . . . . . 40
Subscribing to the SIRIUS Service . . . . . . . . . . . . . . . . . . . . . . . . 40
Connecting the Media Player to a Computer . . . . . . . . . . . . . . . . . . . . 41
Using the Media Player with the Wearable Clip . . . . . . . . . . . . . . . . . . . 42
OPERATION . . . . . . . . . . . . . . . . . . . . . . . . . . . . . . . . . 43
Learning the Features . . . . . . . . . . . . . . . . . . . . . . . . . . . . . 43
Listening Environments . . . . . . . . . . . . . . . . . . . . . . . . . . . . . 43
Navigating Menus and Lists . . . . . . . . . . . . . . . . . . . . . . . . . . . 44
Listening to Live Broadcasts . . . . . . . . . . . . . . . . . . . . . . . . . . . 46
Channel Presets . . . . . . . . . . . . . . . . . . . . . . . . . . . . . . . 47
Pausing a Live Broadcast . . . . . . . . . . . . . . . . . . . . . . . . . . . . 49
Saving Songs and Shows . . . . . . . . . . . . . . . . . . . . . . . . . . . . 52
Listening to Saved Songs, Shows, and MP3s . . . . . . . . . . . . . . . . . . . . 56
Saving Songs or Shows with a Scheduled Recording . . . . . . . . . . . . . . . . . 61
Game Alert . . . . . . . . . . . . . . . . . . . . . . . . . . . . . . . . . . 64
Sports Ticker . . . . . . . . . . . . . . . . . . . . . . . . . . . . . . . . . 66
Parental Controls . . . . . . . . . . . . . . . . . . . . . . . . . . . . . . . 67
Hide Channels . . . . . . . . . . . . . . . . . . . . . . . . . . . . . . . . 70
FM Transmitter . . . . . . . . . . . . . . . . . . . . . . . . . . . . . . . . 71
Back/Jump Feature . . . . . . . . . . . . . . . . . . . . . . . . . . . . . . 73
Sleep Timer . . . . . . . . . . . . . . . . . . . . . . . . . . . . . . . . . 75
Auto Shutdown . . . . . . . . . . . . . . . . . . . . . . . . . . . . . . . . 76
Auto Dimming . . . . . . . . . . . . . . . . . . . . . . . . . . . . . . . . 77
SETUP MENU . . . . . . . . . . . . . . . . . . . . . . . . . . . . . . . . 78
Setup Menu Navigation . . . . . . . . . . . . . . . . . . . . . . . . . . . . . 78
Audio Settings . . . . . . . . . . . . . . . . . . . . . . . . . . . . . . . . 79
Content Management . . . . . . . . . . . . . . . . . . . . . . . . . . . . . 80
Device Settings . . . . . . . . . . . . . . . . . . . . . . . . . . . . . . . . 81
Display Settings . . . . . . . . . . . . . . . . . . . . . . . . . . . . . . . . 85
Jump Settings . . . . . . . . . . . . . . . . . . . . . . . . . . . . . . . . 87
Parental Controls . . . . . . . . . . . . . . . . . . . . . . . . . . . . . . . 87
Shut-Down Device . . . . . . . . . . . . . . . . . . . . . . . . . . . . . . . 88
Sport Settings . . . . . . . . . . . . . . . . . . . . . . . . . . . . . . . . 88
Time Settings . . . . . . . . . . . . . . . . . . . . . . . . . . . . . . . . . 89
MY SIRIUS STUDIO SOFTWARE INSTALLATION . . . . . . . . . . . . . . . . . 90
TROUBLESHOOTING . . . . . . . . . . . . . . . . . . . . . . . . . . . . . 100
OPTIONAL ACCESSORIES . . . . . . . . . . . . . . . . . . . . . . . . . . . 102
SPECIFICATIONS . . . . . . . . . . . . . . . . . . . . . . . . . . . . . . . 104
WARRANTY . . . . . . . . . . . . . . . . . . . . . . . . . . . . . . . . . 105
SIRIUS ID . . . . . . . . . . . . . . . . . . . . . . . . . . . . . . . . . . 106
INDEX . . . . . . . . . . . . . . . . . . . . . . . . . . . . . . . . . . . . 107
Page 4

[ Warni ng a nd Sa fe ty Info rm at ion ]
4
[ Warni ng a nd Sa fe ty Info rm at ion ]
5
Warning and Safety Information
Canadian Compliance
This Class B digital apparatus complies with Canadian ICES-003.
Cet appareil numérique de la classe B est conforme à la norme NMB-003 du Canada.
FCC Warning
This equipment may generate or use radio frequency energy. Changes or modifications to this
equipment may cause harmful interference unless the modifications are expressly approved in
this owners guide. The user could lose the authority to operate this equipment if an unauthorized change or modification is made.
FCC Compliance
This equipment has been tested and found to comply with Part 15 of the FCC Rules. These
rules are designed to provide reasonable protection against harmful interference. This equipment may cause harmful interference to radio communications if it is not installed and used in
accordance with these instructions. However, there is no guarantee that interference will not
occur in a particular installation. If this equipment does cause harmful interference to radio
reception, which can be determined by turning the equipment off and on, the user is encouraged to try to correct the interference by one of more of the following measures:
Reorient or relocate the receiving antenna.
•
Increase the separation between the other equipment and the Receiver.
•
Connect the other equipment to a different circuit from that to which the Receiver is con-
•
nected.
Consult the dealer or an experienced radio technician for help.
•
General Precautions
Liqu id C rystal Prec auti ons
If the LCD screen on the Sirius S50 is damaged, do not to touch the liquid crystal fluid. If any
of the following situations happen, take the action indicated:
If the liquid crystal fluid comes in contact with your skin, wipe the skin area with a cloth
1.
and then wash the skin thoroughly with soap and running water.
If the liquid crystal fluid gets into your eye, flush the eye with clean water for at least 15
2.
minutes. Seek medical care.
If the liquid crystal fluid is ingested, flush your mouth thoroughly with water. Drink large
3.
quantities of water and induce vomiting. Seek medical care.
Safe ty P recautions
Be sure to observe the following warnings. Failure to follow these safety instructions and
warnings may result in a serious accident.
Do not operate the Sirius S50 in a way that might divert your attention from driving safely.
•
As a driver, you alone are responsible for safely operating your vehicle in accordance with
traffic safety laws at all times.
Be sure the unit is installed as described in the installation instructions in this guide. When
•
installing the unit using a Home Kit or Executive Kit, follow the installation instructions
included with those kits.
To avoid short circuits, do not open the unit, and never put or leave any metallic objects
•
(coins, tools, etc.) inside the unit.
If the unit emits smoke or unusual odors, turn the power off immediately, and disconnect
•
the unit from any power source.
Page 5

Do not drop the unit or subject it to strong shocks.
•
If the unit doesn’t seem to be working properly, turn the unit off, remove the battery from
•
the unit, wait 10 seconds, replace the battery and then turn it on again.
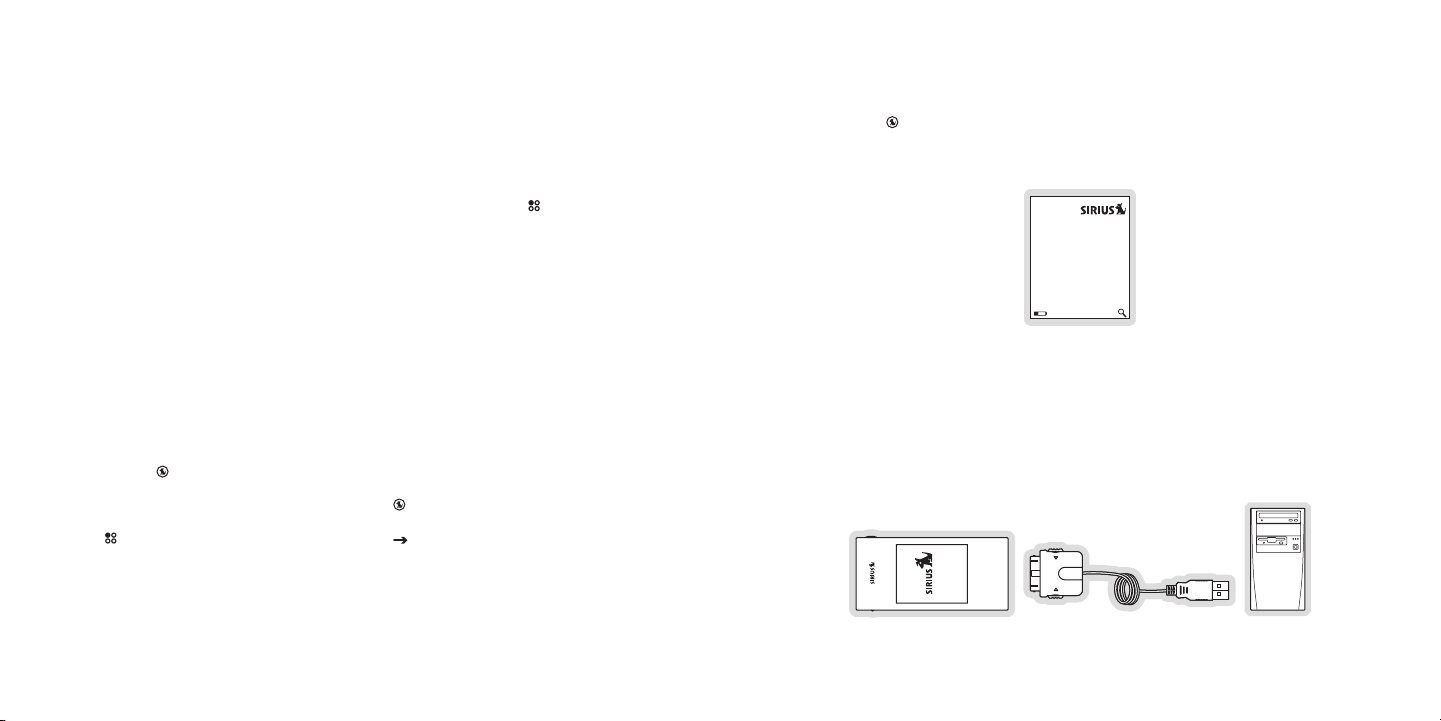
My S iriu s Studio So ftwa re
The My Sirius Studio Software CD included with the Sirius S50 will allow you to connect your
Sirius S50 to your PC running the Windows® XP or Windows 2000 operating system. It is
important that only this software be used to transfer and manage information on your Sirius
S50 to ensure that the operating system software essential to the operation of the Sirius
S50 is not removed or damaged. Should this essential software be removed or damaged, the
Sirius S50 will no longer function.
The software also provides for upgrading features and functionality as they become available
from SIRIUS. Be sure to periodically connect the Sirius S50 to your PC to load the latest
updates. Refer to the user manual included on the software CD for further information on
installing and using the software.
The My Sirius Studio software should be installed before connecting the Sirius S50 to your
computer.
Ciga rett e Lighter A dapt er
Do not use any other power adapter for the Sirius S50, or connect it directly to the vehicle’s
power. Doing so will damage the unit.
The vehicle dock operates on 5v DC, 1.5A. Using anything other than the supplied cigarette
lighter adapter to power the vehicle dock will void the warranty.
Oper atin g Temperatu re
The Sirius S50 is designed to operate between -5° to +40° C (23° to 104° F). Avoid leaving
the unit in a vehicle or elsewhere where the temperature may fall outside this range. Extreme
temperatures or extreme temperature fluctuations can degrade the performance of the LCD
display screen, and possibly damage it.
Clea ning and Mainte nanc e
If the Sirius S50 becomes dirty, turn the power off and wipe it clean with the provided microfiber cleaning pouch. Do not use hard cloths, paint thinner, alcohol, or other volatile solvents to
clean. These may cause damage to the unit.
End User License Agreement
SIRI US S ATELLITE RA DIO INC. EN D US ER LICE NSE AGRE EMENT ( EULA )
This End User License Agreement (this “EULA”) sets forth the agreement between you and Sirius Satellite Radio Inc. (“Sirius”)
for the use of the software in S Series Sirius satellite radio receivers (the “Receiver Software”), the My Sirius Studio computer
software (the “Computer Software” and, together with the Receiver Software, the “Software”) and their use with S Series Sirius
satellite radio receiver and accessories (the “Receiver”) and Sirius’ satellite radio service (the “Sirius Service”).
In addition, for your use of the Sirius Service, you agree to be bound by the “Terms & Conditions of Service” set forth at: http://
www.sirius.com/serviceterms (the “Terms and Conditions”).
YOU ACKNOWLEDGE AND AGREE THAT YOU HAVE READ AND UNDERSTAND THIS EULA. BY USING THE RECEIVER
AND THE RECEIVER SOFTWARE, CLICKING ON THE “ACCEPT” BUTTON TO INSTALL THE COMPUTER SOFTWARE,
AND/OR INSTALLING, COPYING OR OTHERWISE USING THE COMPUTER SOFTWARE, YOU AGREE TO BE BOUND
BY THE TERMS OF THIS EULA. IF YOU DO NOT AGREE TO THE TERMS OF THIS EULA, CLICK ON THE “CANCEL”
BUTTON IF YOU ARE INSTALLING THE COMPUTER SOFTWARE SO THAT IT IS NOT INSTALLED, AND DO NOT USE THE
RECEIVER.
1. GRANT OF LICENSE. Sirius hereby grants to you a non-exclusive, limited, license to use the Software and any related
documentation (the “Documentation”). You may: (a) use the Receiver Software (including the PPI Software (as defined below)
in object code form only as fully integrated into the Receiver in order to operate the Receiver for its usual purpose, (b) use the
Computer Software simultaneously on up to three computers and (c) copy the Computer Software for back-up and archival
purposes; provided that any copy must contain all of the original Software’s proprietary notices. Sirius and its suppliers, including
without limitation, Microsoft Corporation (“Microsoft”) and PortalPlayer, Inc. (“PortalPlayer), and their respective suppliers, retain all
rights not expressly granted herein, including without limitation, all world-wide patent, copyright, trademark, trade secret and other
proprietary rights associated with the Software. You agree that Sirius’ suppliers (including Microsoft and PortalPlayer) are third
party beneficiaries of this EULA and may enforce your performance of its terms.
2. LICENSE RESTRICTIONS. (a) You must be at least 18 years old to assume the obligations set forth in this EULA. Minors may
use the Software and the Documentation only if a parent or legal guardian assumes the obligations set forth in this EULA and
thereby assumes full responsibility for the minor’s use of the Software and the Documentation.
(b) You may not: (i) permit other individuals to use the Computer Software; (ii) modify, translate, reverse engineer, decompile,
extract source code from, disassemble (except to the extent that this restriction is expressly prohibited by law), reproduce, or
create derivative works based upon the Software or the Documentation; (iii) copy the Software or the Documentation (except as
permitted by Section 1(c)); (iv) rent, lease, publicly display, transfer, or otherwise transfer rights to the Software or the Documentation and/or (v) remove any proprietary notices or labels on the Software or the Documentation. Any violations of this Section 2(b)
will immediately terminate your license to the Software and the Documentation.
(c) You may use the Software and the Documentation only in a manner that complies with all applicable laws in the jurisdictions in
which you use the Software and the Documentation, including without limitation, applicable restrictions concerning copyright and
other intellectual property rights.
(d) You may use the Software only for your private, non-commercial use. You may not use the Software in any way to provide, or
as part of, any commercial service or application. Copies of content files, including without limitation songs and other audio recordings, which are stored and/or transferred using the Software, and which are protected by the copyright laws or related laws of any
jurisdiction, are for your own personal use only and you may not publicly perform them or distribute them to third parties.
(e) By storing content on the Receiver, you are making a digital copy. You may not use the Receiver or the Software in an attempt
to, or in conjunction with, any device, program or service designed to circumvent technological measures employed to control
access to, or the rights in, a content file or other work protected by the copyright laws of any jurisdiction.
(f) The Software embodies a serial copying management system required by the laws of the United States. You may not circum-
[ Warni ng a nd Sa fe ty Info rm at ion ]
6
[ EULA ]
7
Page 6

[ EULA ]
8
[ EULA ]
9
vent or attempt to circumvent this system by any means.
(g) You shall not export or re-export the Software or the Receiver without the appropriate U.S. or foreign government licenses.
(h) The PPI Software (as defined below) is “commercial computer software” and any accompanying documentation is “commercial
computer software documentation”. Use, duplication or disclosure of the PPI Software and/or documentation by an agency or
instrumentality of the U.S. government is subject to the terms of this EULA pursuant to FAR 12.212 or DFARS 227.7202, and their
successors, as applicable.
(i) Supply of the Receiver and the Software does not convey a license nor imply any right to distribute content created with this
product in revenue-generating broadcast systems (terrestrial, satellite, cable and/or other distribution channels), streaming applications (via Internet, intranets and/or other networks), other content distribution systems (pay-audio or audio-on-demand applications
and the like) or on physical media (compact discs, digital versatile discs, semiconductor chips, hard drives, memory cards and the
like). An independent license for such use is required. For details, please visit http://mp3licensing.com.”
3. AUTOMATIC COMMUNICATIONS FEATURES; USE OF INFORMATION. (a) The Computer Software includes functionality
that may automatically communicate information to Sirius over the Internet as part of its normal operation. These communications
features may be enabled by default. You may opt out of these communications by changing the settings in preferences menu
of the Computer Software. An initial list of the communications features is listed below. The communications features may be
changed by any updates of the Computer Software that you install. By installing and/or using the Computer Software and any
related updates, you agree to permit the installation and use of the communications features. You are responsible for any telecommunications or other connectivity charges incurred through use of the Computer Software.
(i) Once you install the Computer Software and connect the Receiver, the Computer Software may provide Sirius with user information, including electronic identification number of the Receiver (the “ESN”).
(ii) The Computer Software may provide Sirius with the following information from time to time: the channels of the Sirius Service
that you listen to on the Receiver and the amount of time which you listen, the content that you store on the Receiver, and the channels of the Sirius Service that you have set as presets on the Sirius Receiver.
(b) Sirius may match the ESN and other information it receives to personally identifiable information provided by you as part of your
subscription to the Sirius Service. Sirius may use the information it receives to keep statistics on the aggregated anonymous use
of the Software and/or the Sirius Service and to provide you with additional content. You may opt out of receiving any additional
content by changing the settings in preferences menu of the Computer Software.
4. DIGITAL RIGHTS MANAGEMENT. (a) The Software uses the Microsoft digital rights management technology for Windows
Media (“WM-DRM”) to protect the integrity of Sirius and third party content (“Secure Content”) so that the intellectual property,
including without limitation, the copyright, in such content is not misappropriated. Portions of the WM DRM software (the “WMDRM Software”) use WM-DRM to transfer or play Secure Content. If the WM-DRM Software’s security has been compromised,
owners of Secure Content (“Secure Content Owners”) may request that Microsoft revoke the WM-DRM Software’s right to copy,
display, transfer, and/or play Secure Content. Revocation does not alter the WM-DRM Software’s ability to play unprotected
content. A list of revoked WM-DRM Software is sent to your computer whenever you download a license for Secure Content from
the Internet. Microsoft may, in conjunction with such license, also download revocation lists onto your computer on behalf of Secure Content Owners. Secure Content Owners may also require you to upgrade some of the WM-DRM components distributed
with the WM-DRM software (“WM-DRM Upgrades”) before accessing their content. When you attempt to play such content,
WM-DRM Software built by Microsoft may notify you that a WM-DRM Upgrade is required and then ask for your consent before
the WM-DRM Upgrade is downloaded. WM-DRM Software used by third parties may do the same. You agree that Microsoft and
other third parties may upgrade the WM-DRM Software without notice to you. If you decline an upgrade, you will not be able to
access content that requires the WM-DRM Upgrade; provided that, you will still be able to access unprotected content and Secure
Content that does not require the upgrade.
(b) You may not take any action to circumvent or defeat the security or content usage rules provided or enforced by the WM-DRM
Software. Sirius is not responsible for the operation of the WM-DRM Software in any way, including without limitation, revocation
of the WM-DRM Software’s right to copy, display, transfer, and/or play Secure Content. Sirius is not responsible for any communications to or from any Secure Content Owner, or for the collection or use of information by any Secure Content Owner.
5. OWNERSHIP. All title, ownership, rights, and intellectual property rights in and to the Software and the Documentation shall
remain in the property of Sirius and its licensors. The Receiver Software contains software owned by PortalPlayer and/or its suppliers (the “PPI Software”). The PPI software includes MPEG Layer-3 audio coding technology licensed from Fraunhofer IIS and
Thomson. The Software also includes Microsoft Windows Media Technology. The Software is protected by the copyright laws of
the United States and international copyright treaties.
6. WARRANTIES. (a) Sirius warrants that for a period of 90 days from the date of your acquisition the Software if operated as
directed, will substantially achieve the functionality described in the Documentation and will be free from defects in material and
workmanship. This warranty shall immediately terminate if the Software is used on or in conjunction with hardware or software
other than the unmodified version of Receiver which the Software was designed to be used as described in the Documentation,
any modifications are made to the Software during the warranty period, if the media is subjected to accident abuse or improper
use, and/or the terms of this EULA are breached. Sirius does not warrant that use of the Software will be uninterrupted or that the
operation of the Software will be error-free or secure. Depending on manufacturer and model of your Receiver, you may or may not
be entitled to upgrades of the Receiver Software. Please check your Receiver owner’s manual for further information.
(b) SIRIUS LICENSES THE SOFTWARE TO YOU “AS IS”, AND TO THE MAXIMUM EXTENT PERMITTED BY APPLICABLE
LAW SIRIUS AND ITS SUPPLIERS (INCLUDING MICROSOFT AND PORTALPLAYER) HEREBY DISCLAIM ALL OTHER
WARRANTIES EITHER EXPRESS OR IMPLIED, INCLUDING WITHOUT LIMITATION IMPLIED WARRANTIES OF MERCHANTABILITY AND FITNESS FOR A PARTICULAR PURPOSE WITH REGARD TO THE SOFTWARE AND THE DOCUMENTATION.
THIS LIMITED WARRANTY GIVES YOU SPECIFIC LEGAL RIGHTS; YOU MAY HAVE OTHER RIGHTS THAT VARY FROM
STATE/JURISDICTION TO STATE/JURISDICTION.
(c) Sirius’ sole liability for a breach of its warranties shall be in Sirius’ sole discretion: (i) to replace your defective media, (ii) to
advise you how to achieve substantially the same functionality with the Software as described in the Documentation through a
procedure different from that set forth in the Documentation and/or (iii) if the above remedies are impracticable, to refund the
license fee, if any, you paid for the Software. Repaired, corrected or replaced copies of the Software and the Documentation shall
be covered by the same limited warranty for the period remaining under the warranty that covered the original copy of the Software
or if longer for 30 days after the date Sirius either provided you with the repaired or replaced copy of the Software or advised you
as to how to operate the Software so as to achieve the functionality described in the Documentation, whichever is applicable.
Sirius will be obligated to honor its obligations in this Section 6(c) only if you inform Sirius of the problem with the Software during
the applicable warranty period and provide evidence of the date you acquired the Software.
7. INDEMNIFICATION. (a) You shall defend, indemnify and harmless Sirius, its officers, directors and employees, from and against
any losses, damages, fines and expenses. including without limitation, attorneys’ fees and expenses, arising out of or relating to any
claims that you have: (i) viewed, downloaded, encoded, compressed, copied or transmitted any in connection with the Software in
violation of another party’s rights or in violation of any law, or (ii) violated any terms of this EULA and/or the Terms and Conditions.
(b) If you are importing the Software from the United States, you shall defend, indemnify and hold harmless Sirius from and against
any import and export duties or other claims arising from such importation.
8. LIMITATION OF LIABILITY. NEITHER SIRIUS NOR ITS SUPPLIERS (INCLUDING MICROSOFT AND PORTALPLAYER)
IS RESPONSIBLE FOR ANY SPECIAL, INCIDENTAL, OR CONSEQUENTIAL DAMAGES OR LOSSES RELATING TO THE
USE AND/OR PURCHASE OF THE SOFTWARE, THE DOCUMENTATION, THE RECEIVER AND/OR THE SIRIUS SERVICE,
INCLUDING WITHOUT LIMITATION, COMPUTER FAILURE AND/OR MALFUNCTION, WHETHER BASED ON NEGLIGENCE
OR OTHERWISE, AND WHETHER OR NOT SIRIUS OR SUCH SUPPLIER (INCLUDING MICROSOFT AND PORTALPLAYER)
HAS BEEN ADVISED OF THE POSSIBILITY THEREOF. SIRIUS TOTAL LIABILITY TO YOU AND ANY OTHER PERSONS
USING THE RECEIVER, THE SOFTWARE AND/OR THE DOCUMENTATION, REGARDLESS OF THE CAUSE, WILL IN NO
EVENT EXCEED THE AMOUNTS THAT YOU HAVE PAID TO SIRIUS FOR THE RECEIVER, THE SOFTWARE AND THE
DOCUMENTATION. THIS ALLOCATION OF RISK AND THE DISCLAIMER OF WARRANTIES IS REFLECTED IN SIRIUS’
PRICES AND IS A FUNDAMENTAL ELEMENT OF SIRIUS AGREEMENT TO PROVIDE YOU WITH THE SOFTWARE AND THE
DOCUMENTATION. YOU MAY HAVE GREATER RIGHTS THAN DESCRIBED ABOVE UNDER YOUR STATE’S LAWS.
9. TERMINATION. (a) This EULA will automatically terminate without notice if you fail to comply with any of its terms
(b) This EULA may also terminate without notice to you in the event Sirius’ or any of its suppliers (including without limitation
Microsoft and PortalPlayer ) licenses for technology incorporated into the Software terminates.
(c) You may terminate this EULA at any time by providing Sirius with written notice of termination to: Sirius Satellite Radio Inc.,
1221 Avenue of the Americas, 36th Floor, New York, New York 10020, Attention: My Sirius Studio Software Termination.
(d) Upon any termination of this EULA, you shall immediately discontinue use of the Software and shall within three days return
to Sirius, or certify destruction of, all full or partial copies of the Software, documentation and related materials provided by Sirius.
Your obligation to pay accrued charges and fees shall survive any termination of this License Agreement.
(e) Except for the license granted in paragraph 1, the terms of this EULA shall survive termination under this paragraph 10.
10. RESOLVING DISPUTES. In order to expedite and control the cost of disputes, you agree that any legal equitable claim (a
“Claim”) relating to the Software, the Documentation and/or this EULA, will be resolved as follows:
(a) Informal Resolution. You and Sirius will first try to resolve any Claim informally. Accordingly, neither you nor Sirius may start a
formal proceeding (except for Claims described in Section 10(d)) for at least 60 days after one of us notifies the other of a Claim
Page 7

in writing. To initiate a Claim, you must send notice by U.S. mail to: Sirius Satellite Radio Inc., 1221 Avenue of the Americas, 36th
Floor, New York, New York 10020, Attention: General Counsel. If Sirius initiates a Claim, notice will be sent to your address on file
with Sirius.
(b) Formal Resolution. Except as provided in Section 10(d), if you and Sirius cannot resolve a Claim informally, any Claim either of
you or Sirius asserts will be resolved only by binding arbitration. The arbitration will be conducted under the Commercial Arbitration
Rules of the American Arbitration Association (the “AAA Rules”) that are in effect at the time the arbitration is initiated and under
the rules set forth in this EULA. If there is a conflict between the AAA Rules and this EULA, this EULA will govern. ARBITRATION
MEANS THAT YOU WAIVE YOUR RIGHT TO A JURY TRIAL. If you initiate an arbitration, you agree to pay a fee of $125 or, if
less and you notify Sirius in writing, the amount that you would pay to initiate a lawsuit against Sirius in the appropriate court of your
state. Sirius agrees to pay any additional fee or deposit required by the American Arbitration Association in excess of your filing
fee. Sirius also agrees to pay the costs of the arbitration proceeding up to a maximum of one-half day (four hours) of hearings.
Other fees, such as attorney’s fees, expenses, travel to the arbitration and the costs of a proceeding that goes beyond one-half day,
will be paid in accordance with the AAA Rules. The arbitration will be held at a location within 100 miles of your residence unless
you and Sirius both agree to another location. To start the arbitration, you or Sirius must do the following things:
(i) Write a demand for arbitration. The demand must include a description of the Claim and the amount of damages sought to be
recovered;
(ii) Send three copies of the demand for arbitration plus the appropriate filing fee to: American Arbitration Association, 601 Pennsylvania Avenue, N.W., Suite 700, Washington, D.C. 20004; and
(iii) Send one copy of the demand for arbitration by U.S. mail to Sirius Satellite Radio Inc., 1221 Avenue of the Americas, 36th
Floor, New York, New York 10020, Attention: General Counsel, or to your address on file with Sirius (if Sirius starts the arbitration).
(c) Binding Effect. In the arbitration proceeding, the arbitrator must follow applicable law, and any award may be challenged if the
arbitrator fails to do so. The arbitrators shall not have the power, jurisdiction or authority to waive, amend and/or modify any of the
terms or provisions of this EULA. The arbitrators shall enforce this EULA in accordance with its terms and provisions.
Otherwise, the arbitrator’s decision is final and binding on all parties and may be enforced in any federal or state court that has
jurisdiction. A court may sever any portion of this Section 9 that it finds to be unenforceable.
(d) Exceptions. Notwithstanding the foregoing, any: (i) dispute over the validity of intellectual property rights or Sirius licenses to
operate its business; (ii) Claim based on Section 2(a) above; and (iii) dispute involving a violation of the Communications Act of
1934, 47 U.S.C. §605, or the Electronic Communications Privacy Act, 18 U.S.C. §§2510-2521, may be decided only by a court
of competent jurisdiction.
11. MISCELLANEOUS. (a) Notice. Notices to you will be deemed given when deposited in the mail or when sent by email.
Notices may be included in statements or other communications to you. Sirius may also provide notice to you by telephone, which
will be deemed given when a message is left with you, someone answering the telephone at your residence or on an answering
machine or voice mail system at your phone number on record with Sirius. Your notices to Sirius will be deemed given when Sirius
receives them 1221 Avenue of the Americas, 36th Floor, New York, New York 10020, Attention: General Counsel.
(b) Applicable Law. The interpretation and enforcement of this EULA shall be governed by the internal laws of the State of New
York. This EULA is subject to modification if required by such laws. Notwithstanding the foregoing, Section 10 shall be governed
by the Federal Arbitration Act. You agree that the United Nations Convention on Contracts for the International Sale of Goods is
specifically excluded from application to this EULA.
(c) Assignment. Except as set forth in this paragraph 11(c), you may not assign your rights and/or obligations under this EULA to
any third party. If you sell or otherwise transfer the Receiver as a whole, you may transfer the Receiver Software as fully integrated
into the Receiver; provided that you also supply this EULA to the purchaser or recipient of the Receiver, at which time all of your
rights under this EULA will immediately cease. Sirius may assign its rights and/or obligations under this EULA to any third party
without notice for any purpose, including without limitation, in the event of an acquisition, corporate reorganization, merger or sale
of substantially all of Sirius’ assets to another entity. You hereby consent to such assignment.
(d) No Waiver. No failure or delay on the part of Sirius or its suppliers (including Microsoft and PortalPlayer) in exercising any right,
power or privilege hereunder and no course of dealing by Sirius or its suppliers (including Microsoft and PortalPlayer) shall operate
as a waiver of any right, power or privilege hereunder.
(e) Other. This EULA constitutes the entire agreement between you and Sirius relating to your use of the Software and the Documentation. No salesperson or other representative is authorized to change it for you. If any provision is declared by a competent
authority to be invalid, that provision will be deleted or modified to the extent necessary, and the rest of this EULA will remain
enforceable.
Preface
Copyrighted Broadcast Material
Several features of the Sirius S50 enable you to record and store broadcast content for
playback. Broadcast content is subject to copyright laws, and distribution of copyrighted material is prohibited by law without the express permission of the copyright holder. To prevent
unlawful distribution of copyrighted material, the Sirius S50 prevents you from electronically
copying stored (recorded) songs or shows to another device.
Copyrights & Trademarks
© 2005 SIRIUS Satellite Radio Inc. All Rights Reserved.
® “SIRIUS”, My Sirius Studio, S Series and related marks, the SIRIUS dog logo, channel
names and logos are trademarks of SIRIUS Satellite Radio Inc. “NFL” and the NFL Shield
logo, and the NFL Sunday Drive name and logo are registered trademarks of the National
Football League. “NHL” and the NHL Shield are registered trademarks of the National Hockey
League. “NBA” and the NBA silhouette logo are registered trademarks of NBA Properties
Inc. Microsoft, Windows, and Windows Media Player are registered trademarks of Microsoft
Corporation. All other trademarks, service marks, sports team names, album art, and logos are
the property of their respective owners. All Rights Reserved.
™ PortalPlayer and the PortalPlayer logo are trademarks owned by PortalPlayer, Inc.
10
[ EULA ]
[ Prefa ce ]
11
Page 8
[ Packa ge C onten ts ]
12
[ Packa ge C onten ts ]
13
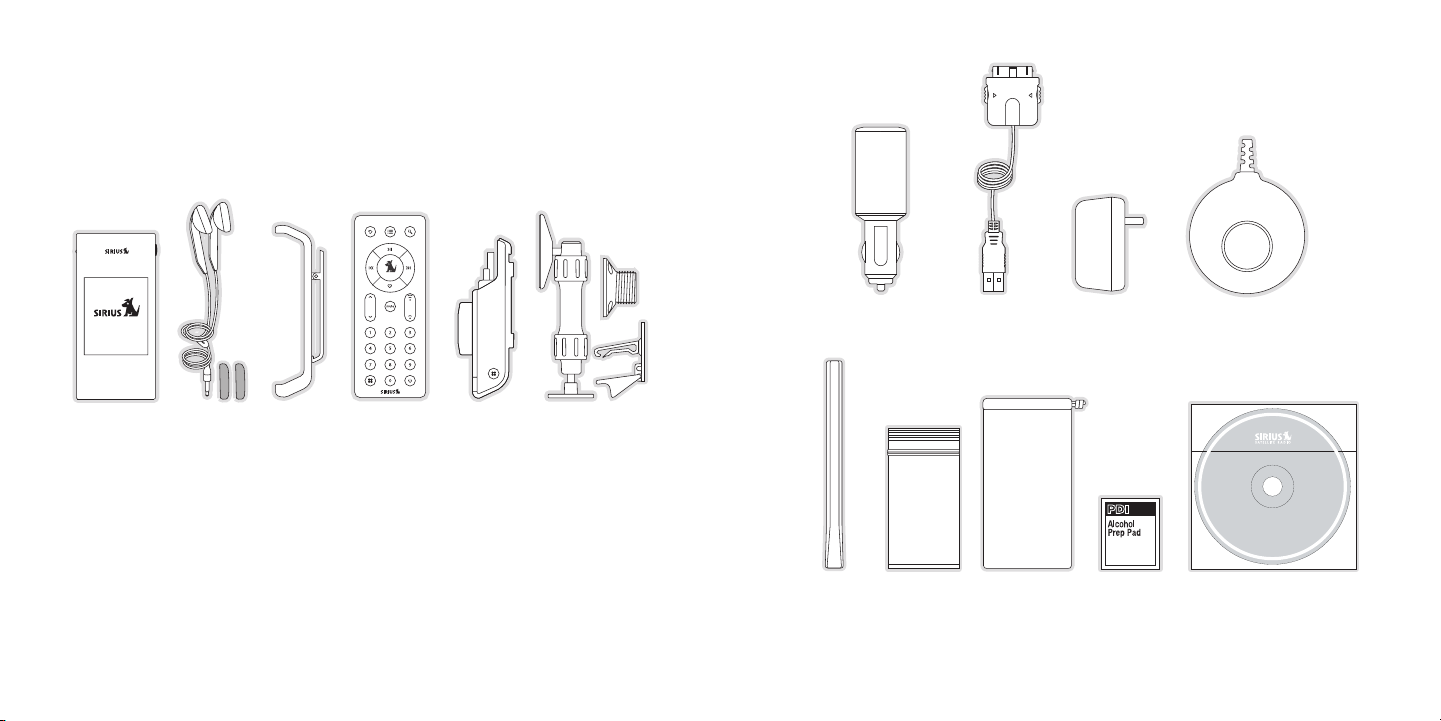
Package Contents
©
2
0
0
5
S
i
r
i
u
s
,
I
n
c
.
A
l
l
r
i
g
h
t
s
r
e
s
e
r
v
e
d
.
U
n
a
u
t
h
o
r
i
z
e
d
c
o
p
y
i
n
g
o
r
r
e
p
r
o
d
u
c
t
i
o
n
p
r
o
h
i
b
i
t
e
d
.
MY SIR IUS S TUDI O
SOFTWARE VE RSIO N XX XX
Anten na Ca ble
Cover /Tail
Anten na Ca ble
Cover /Tail
Alcoh ol Sw abAlcoh ol Sw ab
Parts Bag*Parts Bag*
PC So ftwar e CDPC Softwar e CD
Media Play er
Carry ing P ouch/
Micro fiber
Clean ing P ouch
Media Play er
Carry ing P ouch/
Micro fiber
Clean ing P ouch
The following items are included with your purchase of the Sirius S50:
Media
Media
Playe r
Playe r
Ear B uds &
Ear B uds &
Pads
Pads
Media Play er
Media Play er
Clip
Clip
Remot e Con trolRemot e Con trol
Vehic le Do ckVehic le Do ck Vehic le Mo untVehic le Mo unt
Cigar ette Light er
Cigar ette Light er
Adapt er
Adapt er
USB C ableUSB C able AC Ad apterAC Ad apter Magne tic A ntenn aMagne tic A ntenn a
*The parts bag contains mounting screws and an alcohol swab.
Page 9
[ Contr ol s ]
14
[ Contr ol s ]
15
Fast Forward
Mode
Media Dial
Play/Pause
Playlists
Rewind
Select
Back
Display Screen
Setup
Playlists
Rewind
FM OUT
DC 5V
ANT
LINE OUT
Play/Pause
Fast Forward
Setup
Love
Volume
Lock
Headphone
Jack
FM OUT LINE OUTDC 5V ANT
Figur e 1Figur e 1
Controls
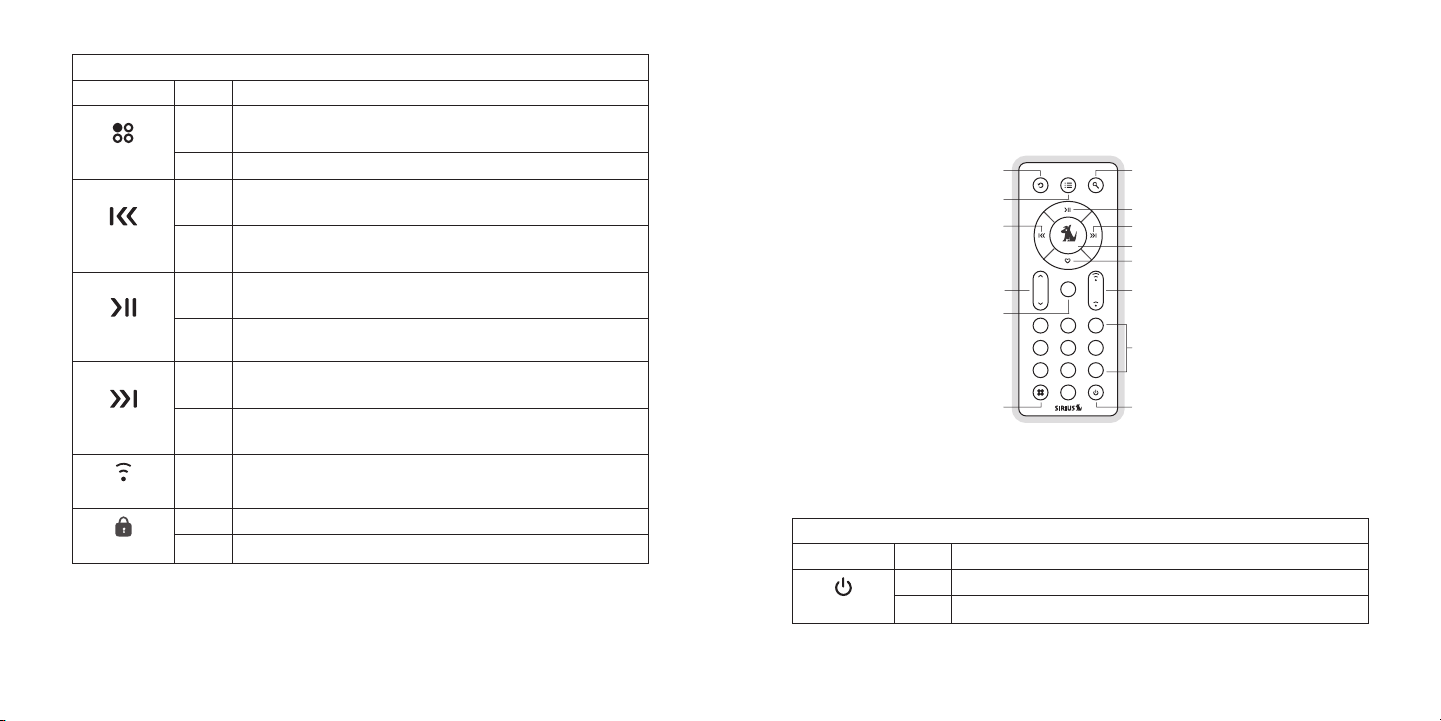
Sirius S50 Reference Guide
Figure 1 identifies the buttons, controls, and connectors of the Sirius S50.
The following tables describe the functions of the buttons, controls, and connectors on the
vehicle dock and the media player.
Vehi cle Dock Button Des criptio ns
Butt on Acti on Li ve Environm ent Descrip tion
Pauses a live broadcast or
Press
resumes playing a broadcast
Plays or pauses the current
song or show
Play back
Envi ronm ent Descrip tion
If paused, returns to live
Play /Pau se
broadcast
Hold
If in a channel list, plays the
No Action
highlighted channel
Rewi nd
Fast -For ward
Love
Rewinds a broadcast to previ-
Press
ous song or show
Hold Rewinds through a broadcast Rewinds through song or show
Fast-Forwards the replay buf-
Press
fer to the next song or show
Fast-Forwards through the
Hold
replay buffer
Press
Saves song or show
Cancels currently active
Hold
recording
Rewinds to the previous song
or show
Fast-Forwards to the next song
or show
Fast-Forwards through song
or show
If listening to My Sirius Channels, No Action
If listening to My Sirius Songs
or My Sirius Shows, displays
prompt to delete the song or
show
Medi a Di al
If listening to live broadcast,
tunes next channel
Turn
If in a list, menu, or prompt,
scrolls to next or previous item
If listening to playlist, no action
If in a list, menu, or prompt,
scrolls to next or previous item
Page 10
[ Contr ol s ]
16
[ Contr ol s ]
17
Vehi cle Dock Button Des criptio ns C ontinued
Butt on Acti on Li ve Environm ent Descrip tion
Press Selects highlighted items in lists, menus, or prompts
Allows you to Add/Move/Re-
Sele ct
Play list s
Hold
move a preset
Allows you to browse the
Press
playlists
Hold No Action No Action
If listening, returns to previous channel or playlist
If in a list at the top level, exits and returns back to previous
Press
content
If in a list not at the top level, moves up one level in the list
Back
structure
Jumps to programmed traffic/weather or other channel
Hold
If a jump is pending, cancels jump
If in a list or in Setup, exits the list or Setup
First push allows you to browse live channels according to the
current tuning mode
Press
Second push cycles browse mode between Channel, Genre, and
Presets
Mode
Cycles between channel
Hold
name/artist/title when in
browse mode
Play back
Envi ronm ent Descrip tion
No Action
Goes to the most recent playlist
menu screen and highlights the
currently selected song or show
If browsing playlists, moves up
one level in the playlist menu
structure
No Action
Vehi cle Dock Button Des criptio ns C ontinued
Butt on Acti on Li ve Environm ent Descrip tion
Displays the Setup menu
Press
If in the S etup menus, moves up one level in the menu structure
First push and hold displays the frequency of the currently se-
Setu p
lected FM preset for 10 seconds
Hold
Second and subsequent push within 10 seconds cycles through
the FM presets
Vehi cle Dock Connec tor Descrip tion s
Conn ecto r Desc ript ion
FM output connection. This connection may be used to connect to the op-
FM O UT
tional FM Relay Switch which connects to the vehicle’s FM radio antenna
input.
DC 5 V
LINE OUT
ANT
Butt on Ac tion Desc ript ion
Connection for the Cigarette Lighter Adapter.
Audio output for connection to the vehicle’s audio system. An audio cable
(not supplied) is required to utilize this connection.
Connection for the Magnetic Antenna.
Medi a Pl ayer Button Des criptio ns
Press Displays the Playlists
Play list s
Hold Turns the Sirius S50 on and off
Play back
Envi ronm ent Descrip tion
Page 11
[ Contr ol s ]
18
[ Contr ol s ]
19
mute
2 31
5 64
8 97
0
Play/Pause
Love
Select
Mode
PowerSetup
Playlists
Mute
Rewind
Back
Channel
Up/Down
Volume
Numeric
Keypad
Fast-Forward
Figur e 1Figur e 1
Medi a Pl ayer Button Des criptio ns C ontinued
Butt on Ac tion Desc ript ion
Displays the Setup menu
Press
Setu p
Rewi nd
Play /Pau se
Fast -For ward
Volu me
Lock
If in the S etup menus, moves up one level in the menu structure
Hold No Action.
If listening, rewinds to the previous song or show
Press
If in a menu, scrolls down
If listening, rewinds through song or show
Hold
If in a menu, scrolls down until the button is released
Plays or pauses a song or show
Press
Selects highlighted items in lists, menus, or prompts
When listening to playlists, displays Save or Delete prompt
Hold
When listening to My Sirius Channels, allows you to Love songs
If Listening, Fast-Forwards to the next song or show
Press
If in a menu, scrolls up
Fast-Forwards through song or show
Hold
If in a menu, scrolls up until the button is released
Press Increases or decreases the volume
On Slide Up — Locks all other buttons on the media player
Off Slide Down — Unlocks all buttons on the media player
Remote Control Reference Guide
Figure 1 identifies the buttons of the remote control.
The following table describes the functions of the buttons of the remote control. Note that
only the buttons unique to the remote control are described. Please refer to the vehicle dock
button descriptions for descriptions of the other buttons.
Remo te C ontrol Butt on D escript ions
Butt on Acti on De scri ption
Press Turns the Sirius S50 on/off
Powe r
Hold Turns the Sirius S50 on/off
Page 12

[ Contr ol s ]
20
[ Contr ol s ]
21
Remo te C ontrol Butt on D escript ions Continued
24
Little Richard
Lucille
Channel or Preset Number
Recording Time Information or
Replay Buffer Time Information or
Audio Volume Information
Time Display or
Signal Strength Indicator ( ) or
MUTE or Battery Condition Indicator
Channel Logo
Song/Show Title & Artist or
Sports Team & Game Score
Information
ROCK
10:51a
Genre (when in Genre mode) or
Mode Indicator ( Tune,
Preset, Love, Playlists)
05:00
C.W. McCall
Convoy
Playlist Information
Playback Time Information or
Audio Volume Information
Battery Condition Indicator
Song/Show Title & Artist or
Sports Team & Game Score
Information
1/7 MySiriusSongs
Mode Indicator
03:3402:05
Live
Playback
Figur e 1Figur e 1
Butt on Acti on De scri ption
0 - 9
Mute
Directly selects the channel indicted by the numbers which were
Press
pressed
Press Mutes (or un-mutes) the audio
Display Screen Information
The display screen of the Sirius S50 provides information about the operation of the Sirius
S50, such as the currently tuned channel, song or show being played, mode, status, recording, and other information. Figure 1 identifies the display screen information when listening to
a live broadcast and when playing back saved content.
Volu me
Chan nel
Up/D own
Press Increases or decreases the volume
Tunes the next or previous channel
Press
When in a list, menu, or prompt, scrolls up and down
Page 13
[ Contr ol s ]
22
[ Contr ol s ]
23
Using the Media Dial
Figur e 1Figur e 1
Audio Navigation
The Media Dial is a unique multifunction control which can be turned and pressed to accomplish many functions of the Sirius S50. Turning the Media Dial clockwise or counterclockwise which will scroll channels, genres, presets, menus and lists. Pressing the Media
Dial in the center (on the SIRIUS dog logo) provides the ‘Select’ function for choosing channels, genres, presets, prompts, menu or list items.
The Media Dial also provides for selecting four other functions when pressed at the north,
south, east, or west positions as shown in Figure 1 ( Play/Pause, Love, Fast-Forward,
and Rewind).
The Sirius S50 features Audio Navigation which provides voice announcements when buttons
are pressed or the Media Dial is turned, announcing the various modes or the channel
tuned. Audio prompts are also provided for navigating certain other functions such as channel
presets.
Audio Navigation may be turned off using Setup. Refer to the Au dio Nav On /Off section on
page 79.
Page 14

[ Getti ng S tarte d ]
24
[ Getti ng S tarte d ]
25
Getting Started
B.
A.
C.
Figur e 1Figur e 1
Figur e 2Figur e 2
SIRIUS suggests professional installation of this product in your vehicle. Professional installation provides an experienced technician to install this product in your vehicle, advice for
selecting a suitable mounting location, installation of the antenna, and routing all the necessary wires and cables. If the FM reception within your vehicle proves to be poor, an installer
will have the necessary accessories to install an optional FM relay switch, or an audio cable
to connect the audio output of the Sirius S50 directly to your vehicle’s audio system. Ask your
SIRIUS retailer if they provide professional installation services, or can recommend a professional installation service.
Installing the Car Dock
When installing the dock in your vehicle, choose a location in your vehicle where the unit will
not block your vision, interfere with the vehicle controls, or obstruct the air bag. The location
should be easily accessible and provide good visibility of the display, and should not be
located where it will be in direct sunlight which will affect the visibility of the display screen.
The mounting accessories necessary to install the dock in a vehicle are provided. Figures 1 &
2 show several examples of the Sirius S50 mounted in a vehicle: A is the console front mount
method using the adhesive mount, B is the console side mount method using the adhesive
mount, and C is the vent mount method using the vent mount clip.
Depending upon the mounting location you select in your vehicle, console front mount, console side mount, or vent mount, the mount should be assembled as described in the following
three sections. Each type of mount method should only be installed as depicted, i.e., the console side mount method should only be used when installing to the side of the console, etc.
Page 15

[ Getti ng S tarte d ]
26
[ Getti ng S tarte d ]
27
Cons ole Front Mount Met hod (A)
Adhesive
Foot
Collar
Mounting
Bracket
Vehicle
Dock
Figur e 3Figur e 3
To mount the car dock using the console front mount method, assemble the mount as follows,
as shown in Figure 3:
Attach the adhesive foot to the mounting bracket, placing a collar in the bracket before
1.
screwing the foot to the arm. The side of the collar with the hole should face the foot.
Attach the car dock to the mounting bracket using the provided screws.
2.
Before adhering the mount to the side of the console, be sure to select your mounting
3.
position carefully because once the mount has been adhered to a surface, it will not be
possible to remove it and adhere it again.
Clean the selected mounting surface area in the vehicle with the alcohol swab.
4.
Unscrew the adhesive foot from the mount. Peel the protective material off the adhesive
5.
on the foot and press the foot firmly against the vehicle surface.
The adhesive mount should then be allowed to adhere for a minimum of 2-4 hours before
6.
use. Best adhesion occurs after 24 hours. When the adhesive foot has achieved sufficient adhesion, reattach the remainder of the mount to the foot.
Page 16
[ Getti ng S tarte d ]
28
[ Getti ng S tarte d ]
29
Cons ole Side Mount Meth od (B)
Adhesive
Foot
Collar Collar
Extension
Arm
Mounting
Bracket
Vehicle
Dock
Figur e 4Figur e 4
To mount the car dock using the console side mount method, assemble the mount as follows,
as shown in Figure 4:
Attach the adhesive foot to the extension arm, placing a collar in the arm before screw-
1.
ing the foot to the arm. The side of the collar with the hole should face the foot.
Attaching the mounting bracket to the extension arm, placing a collar into the arm before
2.
screwing the bracket to the arm. The side of the collar with the hole should face the
bracket.
Attach the car dock to the mounting bracket using the provided screws.
3.
Before adhering the mount to the side of the console, be sure to select your mounting
4.
position carefully because once the mount has been adhered to a surface, it will not be
possible to remove it and adhere it again.
Clean the selected mounting surface area in the vehicle with the alcohol swab.
5.
Unscrew the adhesive foot from the mount. Peel the protective material off the adhesive
6.
on the foot and press the foot firmly against the vehicle surface.
The adhesive mount should then be allowed to adhere for a minimum of 2-4 hours before
7.
use. Best adhesion occurs after 24 hours. When the adhesive foot has achieved sufficient adhesion, reattach the remainder of the mount to the foot.
Note that the console side mount method should not be used for mounting to the dashboard
of the vehicle.
Page 17

[ Getti ng S tarte d ]
30
[ Getti ng S tarte d ]
31
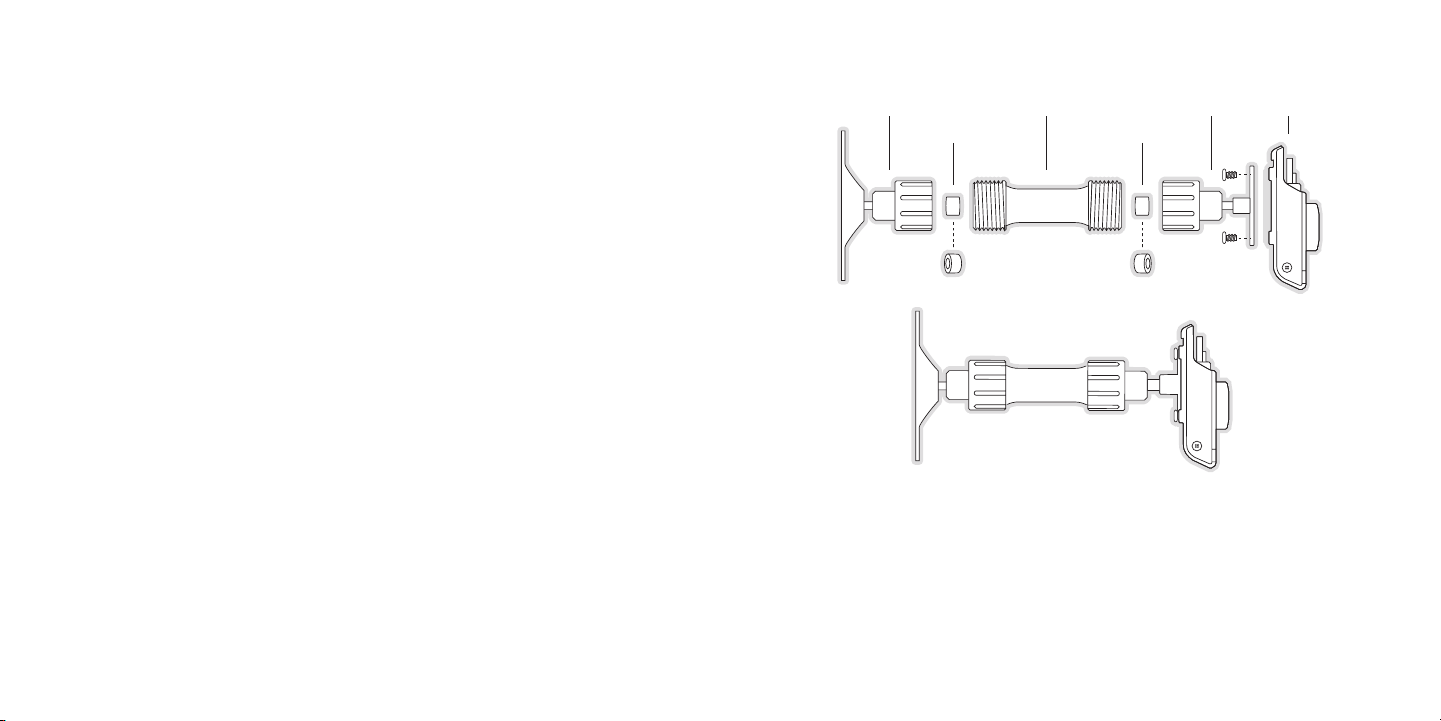
Vent Mou nt Method ( C)
Figur e 5Figur e 5
Vent Clip
Collar
Mounting
Bracket (2)
Vehicle
Dock
Mounting
Bracket (1)
Clip Arms
Figur e 6Figur e 6
When assembling the vent clip, note that the lower arm may be attached in two different positions. You should assemble the vent clip in the configuration that works best in your particular
vehicle. Figure 5 illustrates both possible configurations of the vent clip.
To mount the car dock using the vent mount method, assemble the mount as follows, as
shown in Figure 6:
Attach the vent clip to mounting bracket 1 using the hex screws and nuts provided.
1.
Attach mounting bracket 2 to mounting bracket 1, placing a collar into bracket 1 before
2.
screwing bracket 2 to bracket 1. The side of the collar with the hole should face mounting bracket 2.
Attach the car dock to mounting bracket 2 using the provided screws.
3.
Slide the vent clip portion of the mount into a vent in your vehicle, insuring that one of
4.
the vent louvers slides between the upper and lower portions of the two clip arms, and
hooks the rear of the louver.
Page 18

[ Getti ng S tarte d ]
32
[ Getti ng S tarte d ]
33
Rubber Antenna
Cover/Tail
Protective
Strips
Adhesive
Strain
Relief
Cable
Figur e 2Figur e 2
Figur e 3Figur e 3
Figur e 1Figur e 1
Installing the Antenna
The optimum mounting location for the magnetic antenna is on the roof of the vehicle, with a
minimum unobstructed area of 12 inches by 12 inches, and exactly 6½ inches from the rear
roof edge of the vehicle (the length of the rubber antenna cable cover/tail). It is important to
avoid any obstructions that will block the SIRIUS signal, obstructions such as a roof rack,
a sunroof, roof mounted cargo containers, or other antennas. For convertible vehicles, the
antenna should be installed on the trunk lid.
For best performance, it is recommended that the antenna be installed with the rubber
antenna cable cover/tail. This rubber antenna cable cover/tail provides two benefits: first, it
positions the antenna the recommended distance from the rear window, rear door/hatch, or
trunk edge to give the antenna the best view of the sky. Secondly, it conceals and protects
the exposed antenna cable. The rubber antenna cable cover/tail has adhesive strips that hold
it securely in place.
The following illustrations show the recommended mounting locations of the antenna for
several types of vehicles. (Figure 1) Follow these recommendations for best performance from
the antenna.
Seda n/Coupe . Mount the antenna along the rear center-line of the vehicle roof, located at the
rear of the roof near the rear window.
Pick up Truc k. Mount the antenna along the rear center-line of the cab roof, located at the
rear of the roof near the rear window.
SUV/ Mini-Va n. Mount the antenna along the rear center-line of the vehicle roof, located at the
rear of the roof near the rear door/hatch.
Conv ertible . Mount the antenna along the center-line of the trunk lid, with the rubber antenna
cable cover/tail directed toward the rear window.
When you have selected a suitable mounting location, clean the area where the antenna and
rubber antenna cable cover/tail will be mounted with the supplied alcohol swab.
Connect the rubber antenna cable cover/tail to the antenna cable, making sure that the strainrelief on the antenna sits into the rubber antenna cable cover/tail groove. (Figure 2) Route the
antenna cable through the wire channel in the rubber antenna cable cover/tail. Do not remove
the protective strips yet.
Temporarily position the antenna and rubber antenna cable cover/tail in the selected mounting
area and route the cable from the antenna to the vehicle’s interior by tucking it underneath the
rubber molding around rear window, as shown in Figure 3.
Route the cable from the lowest point of the rear window into the trunk. Take advantage of
any existing cable channels or wiring conduits. For SUVs, mini-vans and 5-door vehicles, bring
the cable into the vehicle under the rubber molding for the tailgate, and continue under the
interior trim.
From the trunk, or rear of the vehicle, route the cable around the passenger compartment and
to the front of the vehicle, to the receiver. Take care not pull the cable across sharp edges
that could damage it, and keep it away from areas where it might entangle feet. Coil any
Page 19

[ Getti ng S tarte d ]
34
[ Getti ng S tarte d ]
35
excess antenna cable in a location where it can be hidden.
Figur e 4Figur e 4
Protective Material
Figur e 1Figur e 1
Once the antenna cable is routed through the vehicle, and you are satisfied with the cable
routing, peel the protective material from the adhesive strips and press the rubber antenna
cable cover/tail firmly into place on the vehicle. Double check that the location of the antenna
and rubber antenna cable cover/tail are correct, and continue to press firmly down on rubber antenna cable cover/tail for another 30 seconds. (Figure 4) At room temperature (68
degrees), maximum adhesion usually occurs within 72 hours. During this period, avoid car
washes and other contact with the antenna and rubber antenna cable cover/tail.
Connecting the Cigarette Lighter Adapter
Battery Installation, Charging, and Disposal
The SIRIUS S50 is provided with a battery which, when fully charged, will provide approximately 6 hours of listening time when listening to SIRIUS content, and will vary when listening
to your audio files depending upon the encoding technique of the audio files. As batteries
age, the amount of listening time diminishes and replacement (or spare) batteries are available
from your SIRIUS product distributor.
The amount of listening time the battery provides is also dependent upon several factors
which may be adjusted to maximize the time between charging. Decreasing the length of time
the backlight of the display screen remains on will prolong battery life, as well as adjusting
the brightness of the display screen to a dimmer setting. Both of these adjustments are made
through the Setup menu. Refer to the Brigh tness section on page 85 and the Backl ight
section on page 86 for instructions on changing these settings.
Medi a Pl ayer Batter y In stallat ion
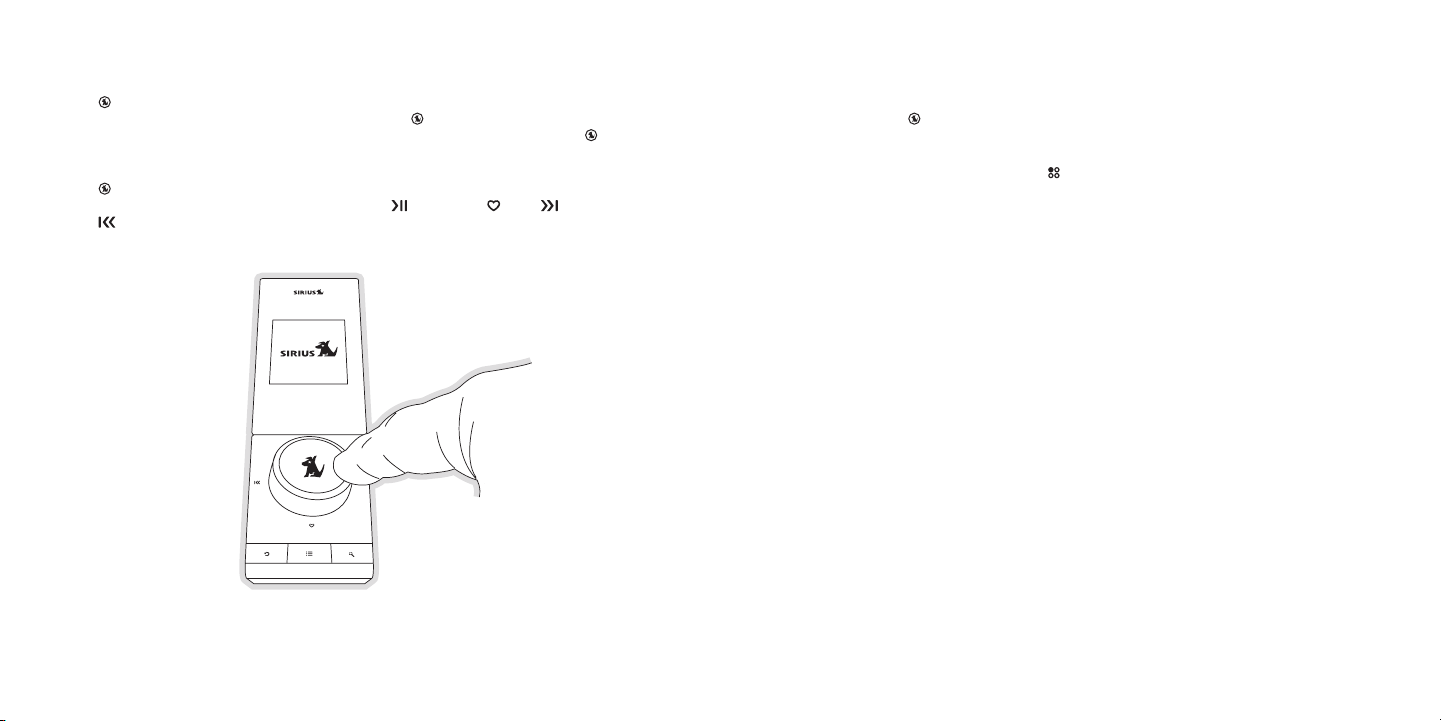
To install the battery in the media player, grasp the media player in your hand as shown in
Figure 1, positioning your thumb just above the head of the SIRIUS dog logo. Then press your
thumb down gently on the battery cover and slide your thumb to the right to open the battery compartment. Lift and remove the cover, and remove the battery from the compartment.
Discard the plastic protective material from underneath the battery, and place the battery back
into the compartment. Slide the battery cover back into place.
The battery provided with the Sirius S50 is fully charged at the factory, but may require additional charging time to top off the charge.
Connect the provided cigarette lighter adapter to the DC 5V connection at the rear of the
vehicle dock. (Refer to Figure 1 on page 14 for the location of this connector.)
Do not use any other power adapter for the Sirius S50, or connect it directly to the vehicle’s
power. Doing so will damage the Sirius S50. Using anything other than the supplied cigarette
lighter adapter to power the vehicle dock will void the warranty.
Page 20
[ Getti ng S tarte d ]
36
[ Getti ng S tarte d ]
37
Remo te C ontrol Batt ery Install atio n
Latch Tab
Latch Tab
+
Figur e 2Figur e 2
Figur e 3Figur e 3
Figur e 4Figur e 4
To install the remote control battery, turn the remote control over and locate the battery
drawer on the bottom edge. Open the battery drawer by holding the latch tab to the right and
sliding the drawer out as shown in Figure 2. Place the battery in drawer with the + side of the
battery facing up and slide the drawer back into the remote control.
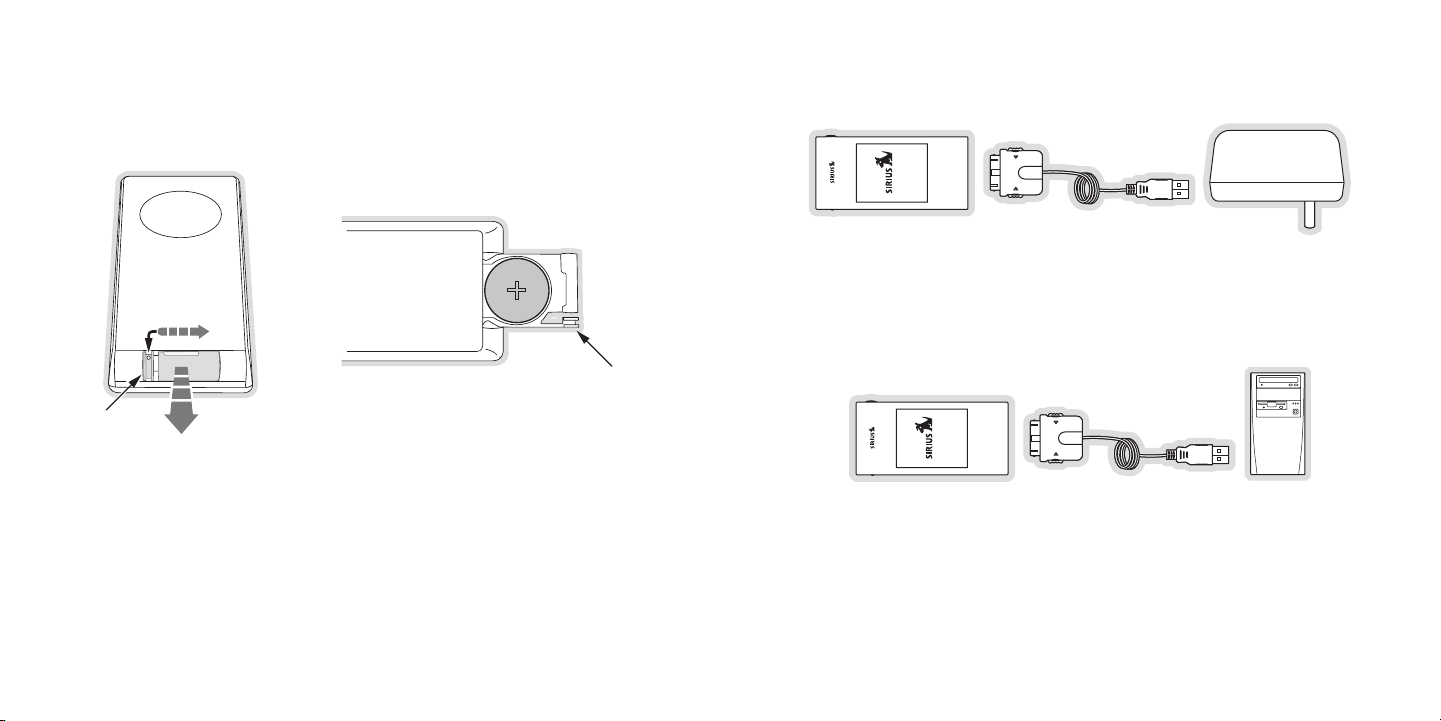
Batt ery Charging
The battery in the Sirius S50 is shipped charged, however, it may need additional charging
to obtain the maximum charge. The time necessary to charge the battery when it is fully discharged is approximately 1 to 4 hours, depending upon how it is being charged: vehicle dock,
AC adapter, or computer.
The battery may be charged in several ways:
In t he vehi cle doc k. The battery will be charged when the media player is in the vehicle
dock and the vehicle is on.
Usin g the A C adapt er. The AC adapter may be used to charge the battery when the
media player is not in the dock. To use the AC adapter, connect one end of the USB cable
to the AC adapter and the other end to the media player, as shown in Figure 3.
When connec ted to a computer. The battery will also be charged when the media player
is connected to a computer using the USB cable while the computer is turned on. To
connect the media player to a computer, connect one end of the USB cable to the media
player and the other end to an available USB port on the computer, as shown in Figure 4.
Batt ery Disposal
When disposing of batteries, do so in accordance with the local waste disposal regulations.
Generally, batteries should not be disposed of in household waste, but should instead be
recycled.
Page 21

[ Getti ng S tarte d ]
38
[ Getti ng S tarte d ]
39
Docking and Un-Docking the Media Player
Figur e 1Figur e 1
Unlocked Locked
Figur e 1Figur e 1
Turning the Sirius S50 On and Off
Care should be taken when docking the media player to align the media player with the dock
before seating the media player. There are two posts on the dock which correspond to mounting holes in the media player, as shown in Figure 1. To dock the media player, align the posts
with the mounting holes, grasp and hold the dock with your free hand, and press the media
player down until it is fully seated in the dock.
When removing the media player from the dock, the dock should be firmly grasped in one
hand (to minimize any pulling or twisting of the mount) while pulling the media player up with
your other hand.
To turn on the Sirius S50 when in a dock, press and hold the Playlist button on the media
player. To turn it on with the remote control, press the Power button.
To turn on the media player, press and hold the Playlists button. Note that the Lock button must in the unlocked position for the media player buttons to function. (Figure 1)
Note that you should not leave the Sirius S50 turned on in your vehicle when the vehicle is not
running. Doing so may result in the vehicle’s battery becoming discharged.
To turn off the Sirius S50 when in a dock, press and hold the Playlists button on the side of
the media player, or press the Setup button on the dock and select the Sh ut-Down Device
menu option. It may also be turned off by pressing the Power button on the remote control.
To turn off the media player, press and hold the Playlists button, or press the Setup button and select the Shut-Down Device menu option.
Page 22
[ Getti ng S tarte d ]
40
[ Getti ng S tarte d ]
41
0
Sirius ID
ESN000492229812
Figur e 1Figur e 1
Figur e 1Figur e 1
Selecting an FM Frequency
To listen to the audio from the Sirius S50, you will need to tune the FM radio in your vehicle
and the FM transmitter in the Sirius S50 to the same FM frequency. The FM transmitter in the
Sirius S50 defaults to 88.1 MHz, so you can begin by tuning your vehicle’s FM radio to 88.1
MHz. If there is an FM station broadcasting on that frequency, you will have to search for a
different FM frequency to use, and the change the FM frequency that the Sirius S50 will use
to transmit.
The FM transmitter frequency of the Sirius S50 may be changed using the Setup menu.
Details for changing the FM frequency are found in the FM T ransmit ter section on page 71.
Subscribing to the SIRIUS Service
Before you can listen to the SIRIUS service, you need to subscribe to the SIRIUS Satellite
Radio service. Do the following:
Be sure that the Sirius S50 is correctly installed, is in the vehicle dock, and that the
1.
antenna is oriented to receive the SIRIUS signal.
Turn on the Sirius S50. After the startup sequence, it will update the SIRIUS channel
2.
line-up. Wait until the channel updates have completed before pressing any buttons.
Once the channels have been updated, the display will change to
3.
“Call 1-888-539-SIRIUS to Subscribe” and will tune to channel 184. You will not be
able to listen to other channels until you activate your SIRIUS subscription.
Use the Media Dial to tune to channel 0 to display the Sirius S50’s unique 12-digit
4.
SIRIUS ID Number (SID). (Figure 1) You can also tune to channel 0 by using the remote
control: Press the 0 (zero) button and then the Select button. The SID number is also
available on the Sirius S50’s packaging, and may also be accessed by pressing the
Setup button and selecting Device Setting s Siri us ID. Write the SID number down
in the space provided near the end of this guide.
Have your credit card handy and contact SIRIUS on the Internet at:
5.
https ://activate.siriu sradio. com/
and follow the prompts to activate your subscription. You can also call SIRIUS toll-free
at: 1-888-539-SIRIUS (1-888-539-7474).
When you have successfully subscribed to the SIRIUS service, and the Sirius S50 has
6.
been updated with your subscription information, an alert will be displayed. To continue,
press the Select button.
You are now ready to begin enjoying SIRIUS Satellite Radio’s digital entertainment, and can
tune to other channels!
Connecting the Media Player to a Computer
To connect the media player to a computer, connect one end of the USB cable to the media
player and the other end to an available USB port on the computer, as shown in Figure 1.
Note that the My Sirius Software should be installed before connecting the media player to
your computer.
Page 23

Using the Media Player with the Wearable Clip
Figur e 1Figur e 1
The wearable clip provides a secure way of carrying the media player. It may be clipped to a
belt, pocket, or strap, etc. To attach the wearable clip to the media player, place the bottom
of the media player into the bottom of the clip as shown in Figure 1, and press the top of the
player into the clip until it snaps into place.
Operation
Learning the Features
The best way to learn and explore the many exciting features of the Sirius S50 is by trying it.
Experience for yourself how the Sirius S50 will enhance your SIRIUS satellite radio listening
pleasure! Press the buttons, turn the Media Dial, change the settings. Find out what that
Love does, and see how easy the Sirius S50 is to use. If you change any settings you can
easily reset the unit by accessing the Res et Defaults feature in the Setup menu. So go
ahead, take the Sirius S50 out for drive.
Listening Environments
The Sirius S50 functions in two distinct listening environments, L ive and Playback.
Live
In the Live environment, the Sirius S50 plays the SIRIUS channels, as they are being broadcast. To use the Live mode, the Sirius S50 must be in a dock which is connected to the
antenna. The live environment allows you to browse and select the SIRIUS channels, and find
information about the songs, artists, sports, news, weather, traffic, or other entertainment being broadcast. You can also save songs and shows for later playback.
While in the live environment, the broadcast to which you are listening is put into a replay
buffer temporarily, up to the most recent 30-60 minutes (depending upon the content of the
broadcast). At any time you may rewind to repeat something you just heard or you may press
Play/Pause to pause the live broadcast. You may resume listening to the broadcast at any
time, beginning from the point where the broadcast was paused, or you can fast-forward or
rewind through the replay buffer, pause the replay buffer again, or return to the live broadcast.
The replay buffer is retained until the memory becomes full. When memory becomes full, the
[ Getti ng S tarte d ]
42
[ Opera ti on ]
43
Page 24

[ Opera ti on ]
44
[ Opera ti on ]
45
Press the Playlist button
Turn the Media Dial to scroll to My Sirius Shows
Press the Select button
Turn the Media Dial to scroll to Stars
Press the Select button
Turn the Media Dial to scroll to
The Dawn & Drew Show
Press the Select button
Listen to the show
Back
PLAYLISTS
BACK
My Alt Nation
73:12
My Totally 70’s
My Octane
PLAYLISTS
My Sirius Songs
My Sirius Shows
26 shows
My Playlists
Find by
MY SIRIUS SHOWS
BACK
2 Shows
My NBA Zone
My PRI
STARS
The Dawn & Drew Sh
10/19 7:51 PM
Steve Gillmor’s Atten
Adam
Curry’s
10/19 7:51 PM
1/2 MyStars
Stars
BACK
20:0510:45
Figur e 1Figur e 1
oldest part of the replay buffer is deleted to make room for the new material so that the live
broadcast can continue to be added to the replay buffer. The replay buffer is discarded when
either the Sirius S50 is turned off or tuned to another channel or a playlist.
Play back
In the playback environment, you can playback songs or shows which you have saved from
live broadcasts using Love or scheduled recordings, content saved in My Sirius Channels, or songs which you have downloaded to the Sirius S50 from your PC using the My
Sirius Studio software. Any combination of songs, sports, talk shows, news broadcasts, talk
entertainment, etc., can be browsed in several playlists which are automatically created when
songs or shows are recorded or downloaded. Songs or shows in the playlists can be played
while in the dock, or taken along with you for playback when using the media player. Playlists
are retained even when the Sirius S50 is turned off.
Navigating Menus and Lists
The menu and list structures in the Sirius S50 are navigated by turning the Media Dial to
scroll through a menu or list to highlight your choice, and then pressing the Select button
to select the choice. When using the media player, menus and lists are navigated by pressing
the Fast-Forward and Rewind buttons, and then pressing the Play/Pause button to
select the choice.
Let’s say you have saved the show T he Dawn and Drew Show and now you want to listen to
it. Following the concept of turning the Media Dial to highlight a choice and pressing the
Select button, refer to Figure 1 (following) for an example of navigating to the show:
In this guide, menu or list structures like the previous example are shown as:
Playlist button My Sirius Shows Stars The Dawn & Drew Show Listen.
At the end of some menus or lists is the B ACK menu item which may be selected to return
back to the previous menu or list. To return to live mode from the playlist mode, press the
Mode button to enter the tune, genre, or preset mode and select a channel.
Page 25
[ Opera ti on ]
46
[ Opera ti on ]
47
Listening to Live Broadcasts
025
Garage
Maroon 5
Sunday Morning
024
Disorder
026
LeftCntr
ELEC/DNC
HIP-HOP
COUNTRY
JAZZSTAND
CLASSICAL
P07
Boombox
P09
SlowJamz
P08
Comedy
Jim Breuer
Marriage
Figur e 1Figur e 1
Figur e 2Figur e 2
Figur e 3Figur e 3
P13
(channel logo)
(Empty)
Preset Saved
TalkLeft
P13
Press Select to
Save Preset
Replace
Insert
P12
(channel logo)
Figur e 1Figur e 1
Figur e 2Figur e 2
Figur e 3Figur e 3
Channel Presets
When you are using your Sirius S50 in the live environment, there are several ways to locate
and tune to the broadcast channels: by channel, by genre, and by preset. When initially turned
on, the Sirius S50 is in the channel mode.
Tuni ng b y Channel
Press the Mode button and stop at the channel mode.
1.
Use the Media Dial to choose to a channel. (Figure 1)
2.
Press the Select button to tune to the highlighted channel.
3.
Tuni ng b y Genre
Press the Mode button and stop at the genre mode.
1.
Use the Media Dial to choose a genre. (Figure 2)
2.
Press the Select button to select a genre.
3.
Use the Media Dial to choose to a channel.
4.
Press the Select button to tune to the highlighted channel.
5.
Tuni ng b y Preset
Press the Mode button and stop at the preset mode.
1.
Use the Media Dial to choose a preset. (Figure 3)
2.
Press the Select button to tune to the highlighted preset channel.
3.
Note s:
To listen to a live broadcast, the S50 must be in a dock.
The Sirius S50 can store up to 30 of your favorite channels in the preset list for fast tuning to
your favorite channels.
Addi ng C hannel Pres ets
To add the channel to which you are listening as a preset, press and hold the Select
1.
button. (Figure 1)
To save the channel in the next available preset press the Select button. (Figure 2)
2.
To save the channel to a different preset number, choose the desired preset number us-
3.
ing the Media Dial to choose a preset and press the Select button.
If a preset already exists for the preset you have selected, select whether to replace the
4.
existing preset or insert the new preset. (Figure 3)
Note s:
Channel presets can only be added while listening to a live broadcast.
Page 26

[ Opera ti on ]
48
[ Opera ti on ]
49
Move
Cancel
Remove
P15
(channel logo)
P15
(channel logo)
Preset
Removed
CNN
Replace
Insert
P12
(channel logo)
Figur e 4Figur e 4
Figur e 5Figur e 5
Figur e 6Figur e 6
-4:00
Johnny Cash
Solitary Man
36
(channel logo)
ELEC/DNC
Figur e 1Figur e 1
Remo ving or Moving Chan nel Pre sets
While listening to the channel, press and hold the Select button.
1.
Select whether to remove or move the preset. (Figure 4)
2.
If R emove was chosen, the preset is removed from the presets list. (Figure 5)
3.
If M ove was chosen, use the Media Dial to choose a new location and press the
4.
Select button.
(a) If the selected preset location is empty, the preset will then be moved to the new
location.
(b) If the selected preset location is already used, select whether to replace the existing
preset with the one being moved, or to insert the preset which will bump all the following
presets back. (Figure 6)
Pausing a Live Broadcast
If you are unable to continue listening to a live broadcast but do not want to miss the broadcast, you can pause the channel for 30 to 60 minutes depending upon the content. When
paused, the broadcast is put into a replay buffer.
Paus ing a Live Broa dcas t
Press Play/Pause to pause a live broadcast.
1.
The audio will mute and a time bar will be shown near the bottom of the display screen
2.
indicating the memory capacity and how much of the replay buffer is filled with the
broadcast. (Figure 1)
Note s:
When a broadcast has been paused, the time bar will fill from the right (live broadcast) to the
left, and the time display indicates how much of the broadcast is in the replay buffer. The
indicator within the time bar indicates your current listening position in the replay buffer.
When the currently paused time is at the limit of the replay buffer capacity, play of the
broadcast will automatically resume. The live broadcast will continue to be added to the replay
buffer, overwriting the oldest portion of the broadcast in the replay buffer.
Page 27

[ Opera ti on ]
50
[ Opera ti on ]
51
Play ing a Paused Br oadc ast
40
Panther Power
Tupac
40
Panther Power
Tupac
-22:12
(channel logo)(channel logo)
-22:12
Figur e 2Figur e 2
Figur e 3Figur e 3
-4:30
Johnny Cash
Solitary Man
36
(channel logo)
ELEC/DNC ELEC/DNC
-2:00
Johnny Cash
Solitary Man
36
(channel logo)
Figur e 4Figur e 4
Figur e 5Figur e 5
Press Play/Pause to begin playing a paused broadcast from the point at which it was
paused. (Figures 2 & 3)
Note s:
Pressing and holding Play/Pause jumps to the live broadcast.
Tuning a different channel or playback of a playlist will discard the replay buffer.
Fast -For warding and Rew inding Thro ugh a P ause d Br oadcast
Pressing Fast-Forward and Rewind navigates through the replay buffer, either by
1.
time or by segments.
As you fast-forward or rewind, the indicator in the time bar will move to show your cur-
2.
rent playback position relative to the live broadcast. (Figures 4 & 5)
Note s:
Pressing and releasing Fast-Forward and Rewind moves forwards or backwards to the
start of the next or previous segment and play immediately begins. (Segments are the beginning of songs or shows.) If the beginning of the replay buffer is reached playback immediately
begins. If the end of the replay buffer is reached the live broadcast resumes.
Pressing and holding Fast-Forward and Rewind for one second moves forward or
backwards in 10 second intervals, which increases to 30 and then 60 second intervals the
longer the button remains pressed. Play begins immediately when the button is released or
the beginning of the replay buffer is reached. If the end of the replay buffer is reached, the live
broadcast resumes.
Page 28

[ Opera ti on ]
52
[ Opera ti on ]
53
40
Johnny Cash
Solitary Man
36
(channel logo)
11:12a
Figur e 1Figur e 1
Don’t Save
Make Room & Save
Memory is Full
Figur e 2Figur e 2
Saving Songs and Shows
Songs and shows can be saved by using Love while listening to a live broadcast. The
Sirius S50 will hold approximately 50 hours of SIRIUS content, saved using Love and
scheduled recordings, and includes the content automatically saved in My Sirius Channels.
As much as half of the total memory storage space (512MB) is available for MP3 or WMA
files downloaded from your computer. Downloading files will reduce the amount of storage
space available for SIRIUS content, however, storage space is always reserved for SIRIUS
content. The encoding technique of your downloaded files will also affect the amount of
files you can store, as higher quality audio formats consume greater storage space. Current
memory usage may be checked by accessing C ontent Management from the Setup menu.
Refer to the Memor y U sage section on page 81 for instructions.
Savi ng a Song
Press Love to begin saving the song.
1.
While the song is being saved the love icon will be displayed briefly, and the heart icon
2.
in the lower right corner will be displayed until the song is saved. (Figure 1)
When the song is complete, it is saved in My Sirius Songs. Refer to the List ening t o
3.
Save d Songs , Shows , a nd MP3s section on page 56 for information on playing back
the song.
Note s:
If you have tuned to a channel that is in the middle of playing a song that you want to save,
you will only be able to save the song from the point at which you tuned to the channel. You
will be prompted to save or not to save the partial song.
When recording a song, it will be recorded exactly as it was broadcast.
If you attempt to tune away before the song is complete, you will be prompted to confirm
that you wish to stop recording, and if you want to save or discard the partial recording. In
some instances, songs are protected and cannot be saved. When this occurs, an alert will be
displayed and the song will not be saved.
If you attempt to save a song, and the memory is full, a Me mory is Full prompt will be displayed. If there are at least 10 songs in My Sirius Songs which can be deleted, Figure 2 is
displayed with the following choices:
Don’ t Save. The current song or show you are attempting to save will not be saved.
•
Make Room a nd Save . The 10 songs which are least played are deleted, and the current
•
song is saved.
Page 29

[ Opera ti on ]
54
[ Opera ti on ]
55
Savi ng a Show
-08:19
Jay Thomas
Jay Thomas
103
(channel logo)
11:12a
-00:01
Jay Thomas
Jay Thomas
103
(channel logo)
ENTERTN11:12a
-00:05
103
(channel logo)
11:12a
Press love to set
record start
Press love to set
record start
-31:23
103
(channel logo)
11:12a
-08:19
103
(channel logo)
11:12a
Press love to set
record end
Figur e 3Figur e 3
Figur e 4Figur e 4
Figur e 5Figur e 5
Figur e 6Figur e 6
Figur e 7Figur e 7
Note s:
Recordings made using Love are limited to a maximum of 1 hour each.
You may only rewind the starting point for approximately 30 to 60 minutes (depending upon
the content of the show), or to the point at which the channel was tuned.
If you attempt to tune to another channel before the recording is complete, you will be prompt-
ed to confirm that you wish to stop recording, and if you wish to save the partial recording.
Press and hold Love to begin saving the show. The heart icon will be displayed briefly
1.
and a time bar will indicate the amount of time available for recording. (Figure 3) You will
be prompted to press Love to set the record start. (Figure 4)
You may use Fast Forward and Rewind to modify the starting point of the record-
2.
ing before pressing Love. (Figure 5)
Press Love to set the starting point.
3.
You will be prompted to press Love to set the end of the recording. (Figure 6) You
4.
may use Fast Forward and Rewind to modify the ending point of the recording
before pressing Love.
Press Love to set the ending point.
5.
The recording time is now set. (Figure 7) When the show completes recording, it is
6.
saved in My Sirius Shows. Refer to the Lis ten ing to Saved S ongs, S hows, and MP3s
section on page 56 for information on playing back the show.
In some instances, shows are protected and cannot be saved. When this occurs, an alert will
be displayed and the show will not be saved.
If you attempt to save a show, and the memory is full, a Me mory is Full prompt will be displayed. Refer to the notes in the previous section on page 52 for information concerning the
Memo ry is F ull prompt.
Down load ing Audio F iles
In addition to saving songs and shows from the live broadcast, you can also download MP3
and WMA format audio files using the My Sirius Studio software included with the Sirius
S50. Refer to the manual on the software CD for more information and instructions on how to
download and manage audio files.
Page 30

[ Opera ti on ]
56
[ Opera ti on ]
57
Listening to Saved Songs, Shows, and MP3s
PLAYLISTS
My Faction
My Sirius Songs
127 Songs
My Sirius Shows
My Playlists
MY SIRIUS SONGS
All Songs
Blues
17 Songs
Country
Electronic/Dance
BLUES
BACK
Shuffle All ...
17 Songs
Apple of my eye
Boyscouts revolt
MY SIRIUS SONGS
BACK
Shuffle All ...
127 Songs
All Songs
Blues
Figur e 1Figur e 1
The playback environment allows you to listen to songs, shows, and MP3s which has been
saved in the Sirius S50. In addition, you can also listen to songs and/or comedy from your
three most listened to music or comedy channels which the Sirius S50 has automatically
saved for you.
In the playback environment, the playlists are arranged into several categories: My Sirius
Channels, My Sirius Songs, My Sirius Shows, and My Playlists.
My S irius C hannels . My Sirius Channels consists of three playlists which are automati-
•
cally created and contain songs or comedy from the three music and/or comedy channels
to which you listen the most. Content from these channels are stored in playlists named
after the channel names, for example, My Octane, My Bluegrass, My Hip-Hop Nation, etc.
My S irius S ongs. This playlist contains individual songs which you have saved from music
•
broadcast channels and from My Sirius Channels, except if they have been saved using
the scheduled recording feature. (All songs saved using the scheduled recording feature
are saved in the My Sirius Shows.) Songs and sets are automatically grouped by genres
within My Sirius Songs for easy browsing.
My S irius S hows. This playlist contains shows, news, sports, etc., and scheduled record-
•
ings which you have saved from broadcast channels. They are automatically grouped by
sub-categories within My Sirius Shows which are named after the channel from which they
are saved, such as My NPR Now, My Talk Left, My Maxim, etc. Sports games are saved in
sub-categories named My NBA Zone, My NHL Zone, etc.
My P laylist s. This playlist contains audio files (MP3 and WMA format) which you have
•
downloaded from your PC using the My Sirius Studio software. You may design this category in any way you wish, using the software application.
While listening, you may use Fast-Forward, Rewind, and Play/Pause to navigate
through the song or show. The following table describes their actions:
Pres s and R elease Pres s and H old
Fast -Forwar d/
Rewi nd
Play /Pause
Play ing Songs from My S irius S ongs
Press the Playlists button.
1.
Select My S irius S ongs Select a genre (or Shuffl e or All Songs) Select a song (or
2.
Begins playing the next/previous
song/show in the playlist
Pauses or plays the song/show
currently selected
Fast-Forwards/Rewinds the song/
show currently playing
When in the dock, pauses or plays
the song/show currently selected
Shuf fle). (Figure 1)
Note s:
Press and hold Play/Pause to shuffle the playlist currently highlighted, or press Play/
Pause to begin playing with the song currently highlighted.
Page 31
[ Opera ti on ]
58
[ Opera ti on ]
59
Play ing Shows from My S irius S hows
PLAYLISTS
My Sirius Songs
My Sirius Shows
26 shows
My Playlists
Find by
MY SIRIUS SHOWS
BACK
My NPR
12 Shows
My NBA Zone
My PRI
MY NPR
BACK
All Things Considered
11/17 7:00pm
Fresh Air
All Things Consider
PLAYLISTS
Find by...
My Alt Nation
73:12
My Totally 70’s
My Octane
Figur e 2Figur e 2
Figur e 3Figur e 3
PLAYLISTS
My Sirius Shows
My Playlists
2 Playlists
Find By ...
MY PLAYLISTS
BACK
Shuffle All ...
Playlist Name #2
Playlist Name #3
PLAYLIST NAME
BACK
Shuffle All ...
Song Title #1
Song Title #2
FIND BY ...
BACK
Artist
Song Title
Show Name
Figur e 4Figur e 4
Figur e 5Figur e 5
Press the Playlists button.
1.
Select My S irius S hows Select a channel playlist Select a show. (Figure 2)
2.
Play ing Audio Files fro m My Pl ayli sts
Press the Playlists button.
1.
Select My P laylist s Select a Playlist Select an audio file (or Shuffle). (Figure 4)
2.
Play ing Songs from the My Siri us C hannels Pla ylis ts
Press the Playlists button.
1.
Select a My Sirius Channels playlist. (Figure 3)
2.
Find ing Songs, Show s, a nd Audi o Fi les in Play list s
You can find songs, shows, and audio files (except in My Sirius Channels) by using the Fin d
by … playlist menu option. Find by… will create lists of the artists, song titles, show names,
and genres found within the playlists.
Press the Playlists button.
1.
Select Find by … Select Artist, Song Titl e, Show Name, or Genre (Figure 5)
2.
Artist: Select an artist Select a song (or Shuffl e).
Song Title: Select a song (or Shuf fle).
Show Name: Select a show (or Shuff le).
Genre: Select a genre Select a song (or Shuffle ).
Page 32

[ Opera ti on ]
60
[ Opera ti on ]
61
DELETE CONTENT
BACK
My MP3/WMA
My Sirius Songs
My Sirius Shows
DELETE SONGS
DELETE SHOWS
BACK
By Least Played
By Artist
By Title
BACK
By Most Played
By Date
By Channel
Figur e 6Figur e 6
Figur e 7Figur e 7
Figur e 8Figur e 8
Dele ting Songs or S hows from M y Si rius So ngs, My Sirius Show s, and My P layl ists
Songs and shows are deleted using the Dele te Content menu option from the Content M anagem ent menu in Setup to delete content.
Press Setup button.
1.
Select Cont ent Man agement Delete Content Select the playlist from which to
2.
delete content (Figure 6)
When My Si rius So ngs is selected (Figure 7), the following delete options are
displayed:
By L east Pl ayed. Songs are listed in order by least played to most played.
By A rtist. Songs are listed alphabetically by artist.
By T itle. Songs are listed alphabetically by title.
Dele te All. Deletes all songs in the playlist.
When My Si rius Sh ows is selected (Figure 8), the following delete options are
displayed:
By M ost Pla yed. Shows are listed in order by most played to least played.
By D ate. Shows are listed chronologically from the oldest recording date to
the newest recording date.
By C hannel. Shows are listed in ascending order by channel number.
Dele te All. Deletes all shows in the playlist.
When My MP 3/WMA is selected, the following delete options are displayed:
Audio files are listed and may be individually selected and deleted.
Dele te All. Deletes all audio files in the playlist.
You can delete songs or shows by selecting them in the various lists. Repeat this process
until you have completed deleting songs and shows.
Saving Songs or Shows with a Scheduled Recording
A scheduled recording is a recording session that you program to begin at a future time and
day to record a live broadcast.
Sche dule , Edit, or Dele te a Pr ogra m for S ched uled Record ings
Press the Setup button.
1.
Select Cont ent Man agement Schedule Recordin gs
2.
If you are creating a new program: Select New Program. (Figure 1)
If you are editing an existing program: Select the program you wish
to edit Select Edit Progra m. (Figure 2)
If you are deleting an existing program: Select the program you wish to
delete Select Delete Pro gram. (Figure 2) The program will be deleted and you will
be
returned to the Schedule Recordings screen. (Figure 1)
The New Pro gram screen will be displayed (Figure 3). Use the Media Dial to change
3.
an entry, and press the Select button to set the entry and move to the next entry. To
return to a previous entry use the Back button. Refer to the table following for an
explanation of each entry.
When you have pressed the Select button at the last entry, the new program will be
4.
saved. If it conflicts with an existing scheduled recording, you will be prompted to keep
the new program and replace the conflicting one, or delete the new program. (Figure 4)
New Prog ram Entry F ield Descri ptio ns
Chan nel
Date
Time
Dura tion
This entry specifies the SIRIUS channel you wish to record. The default
entry is the current channel.
This entry specifies the date the scheduled recording should begin. The
default entry is the current date.
This entry specifies the time of day the scheduled recording should
begin. The default entry is the current time.
This entry specifies the length of time to record. The default entry is
one hour.
Page 33

[ Opera ti on ]
62
[ Opera ti on ]
63
Freq uency
01
06 10 05
0010
PM
01
00
Daily
SCHEDULE REC
BACK
New Program
06-25 Ch 143 08:05p
08-20 Ch 64 11:55a
Channel: ____
Date: ___ / ___ / ___
Time: ___ : ___
Duration: ___:___
Frequency:
NEW PROGRAM
New program
conflicts with:
06-10 Ch 01 10:00p
Keep New Program
Delete New Program
06-25 Ch 143 08:05p
BACK
Edit Program
Delete Program
Recording set
to begin on
TALKLEFT
Go
Ignore
Figur e 1Figur e 1
Figur e 2Figur e 2
Figur e 3Figur e 3
Figur e 4Figur e 4
Figur e 5Figur e 5
Note s:
Scheduled recordings are limited to a maximum of 20, with a maximum of 2 hours per each
recording session. If you attempt to schedule more than 20 recordings, you will be prompted
to delete an existing scheduled recording or to discard the new recording schedule. All
recordings are saved to My Sirius Shows.
New Prog ram Entry F ield Descri ptio ns Continue d
This entry specifies how often the scheduled recording should take
place. The default entry is Once. Options for frequency are:
Once . The scheduled recording will take place only one time on the
•
specified date and time, and will not repeat.
Dail y. The scheduled recording will take place daily, beginning on
•
the date specified and continuing every day of the week at specified
time.
M—F. The scheduled recording will take place every Monday,
•
Tuesday, Wednesday, Thursday, and Friday at the specified time.
Saturday and Sunday are not included in the schedule.
Week ly. The scheduled recording will take place once a week
•
beginning on the day of the week specified by the date, at the
specified time.
Scheduled recordings are automatically performed without any intervention, however, the
Sirius S50 must be docked, connected to a power source, connected to the antenna and
receiving a good signal.
If the Sirius S50 is turned off at the time of a scheduled recording, it will wake up and perform
the recording session only if it has external power from the home dock. Scheduled recordings
will only occur in the vehicle dock if the Sirius S50 is on at the time of the recording.
If you are using the Sirius S50 at the time a scheduled recording is set to begin, you will
receive a prompt to either Go and perform the scheduled recording, or to Ignore and not perform the scheduled recording. If you do not respond to the prompt, the scheduled recording
will be performed. (Figure 5)
If you attempt to tune away before a recording session is complete, you will be prompted to
confirm that you wish to stop recording. You will have the choice to save the recording up to
the point where it was interrupted, or to discard it.
Page 34

[ Opera ti on ]
64
[ Opera ti on ]
65
None
All NBA
Atlanta
Boston
NFL
NBA
NHL
College Football
NBA
FAVORITE TEAMS
NBA
Atlanta
Boston
Celtics
Charlotte
Chicago
Figur e 2Figur e 2
Figur e 3Figur e 3
Figur e 1Figur e 1
On Now!
Mavericks
(league logo)
Go
Ignore
76ers 00
Mavericks 06
1Q
Trail Blazers 128
Seahawks 125
30T
49ers 28
Seahawks 21
30
Figur e 5Figur e 5
Figur e 4Figur e 4
Game Alert
You can program the Sirius S50 to remember your favorite sports teams. The Sirius S50 will
then automatically alert you when any of your favorite sports teams are playing in a game.
Addi ng a nd Removing Fav orite T eams for Ga me A lert s
Press the Setup button.
1.
Select Spor t Setti ngs Favo rite Teams Select the sports league or college for the
2.
team you want to add/remove (Figure 1)
To add teams for game alerts: Select an individual team (or select All…). (Figure 2)
Selected teams will appear in the list with a star beside the team name. (Figure 3)
To remove teams: Select the team you want to remove. The star beside the team
name will be removed indicating it is no longer selected for game alerts.
You may continue selecting or removing teams from other sports leagues by using the
3.
Back button to navigate back in the menu structure.
When complete, scroll to the end of the list and select BAC K, or press the Back
4.
button.
Note s:
There is no limit on the number of teams you can select for game alerts.
The Sirius S50 must be docked and the dock connected to the antenna in order for the game
alert feature to work.
When the Sirius S50 is turned on, a check is done to see if any of your favorite sports teams
are playing. An alert will be displayed if a match is found, and selecting Go at the prompt will
to tune to the game. (Figure 4)
If one of your favorite sports teams begins playing a game while you are listening to other content you will receive an alert. (Figure 4) Pressing the Select button will tune to the game.
Whenever any of your favorite sports teams are playing, you can check My Game Zone in the
genre list to see a listing of all the games scores. (Figure 5) Use the Media Dial to scroll
through the current scores of all the teams. Selecting a game from the list will tune to the
channel where the game is being broadcast.
Page 35

[ Opera ti on ]
66
[ Opera ti on ]
67
Sports Ticker
(channel logo)
24
NBA DAL 123 PHILLY
124 40T
Maroon 5
37
Blugrass
40
Hip-Hop
FolkTown
Enter Password
(channel logo)
Figur e 1Figur e 1
Parental Controls
When you are listening to the Sirius S50, you can have a sports ticker displayed which will
show the scores of all your favorite teams which are currently playing. (Figure 1) While the
sports ticker is displayed, one line of the song/show title is also displayed.
Figur e 1Figur e 1
Note s:
The Sirius S50 must be docked and the dock connected to the antenna in order for the sports
ticker feature to work.
The sports ticker is not displayed if you are listening to a playlist.
The parental controls feature sets a password for access to specific channels or playlists.
Locked channels and playlists are visible when browsing lists, and display a lock icon next to
the name.
When you attempt to access a locked channel or playlist, you will be prompted to enter your
password before you can proceed. (Figure 1)
Page 36

[ Opera ti on ]
68
[ Opera ti on ]
69
BACK
Locks: Disabled
Define Locks
Enter Password
PARENTAL CONTROLS
ENABLE LOCKS
ENABLE LOCKS
Confirm Password
Figur e 3Figur e 3
Figur e 4Figur e 4
Figur e 2Figur e 2
BACK
Lock Channels
Lock Playlists
Locks: Enabled
Define Locks
Hide Channels
Back
PARENTAL CONTROLS
DEFINE LOCKS
LOCK CHANNELS
BACK
Clear All Locks
01 channel name
channel name
LOCK PLAYLISTS
BACK
My Shows
My Playlists
My Songs
Figur e 5Figur e 5
Figur e 6Figur e 6
Figur e 7Figur e 7
Figur e 8Figur e 8
Enab ling or Disabli ng L ocks
Press the Setup button.
1.
Select Pare ntal Co ntrols L ocks Enabled or L ocks Di sabled/Enabled. (Figure 2)
2.
(a) If the locks are enabled, you will be prompted to enter your password. Use Fast-
3.
Forward and Rewind to enter each digit of the password and press the
Select button. (Figure 3)
(b) When you are enabling locks, you will be prompted to create a password. Use
Fast-Forward and Rewind to enter each digit (0—9) of the password and press
the Select button. (Figure 3)
You will be then be prompted to confirm the password you just entered. (Figure 4)
When you have entered the password, the locks will be enabled or disabled according
4.
to your choice.
Note s:
The lock feature requires you to set a password. Once a password has been set, it is important to remember your password as it cannot be reset or erased by using the Reset D efaults
feature of the Sirius S50 except by entering the password. This prevents circumvention of the
lock. If you have forgotten your password, call SIRIUS Customer Service for assistance.
Lock ing and Unlocki ng C hannels and Playli sts
In order for the lock settings to be enforced, you must have set the locks to be enabled (previous section).
Press the Setup button.
1.
Select Pare ntal Co ntrols D efine Locks. (Figure 5)
2.
You will be prompted to enter your password. Use Fast-Forward and Rewind to
3.
enter each digit of the password and press the Select button. (Figure 3)
Select either Lock Channels or Lock Playli sts. (Figure 6)
4.
Select a channel or playlist to lock/unlock. (Figures 7 & 8) If you are locking a channel or
5.
playlist, a lock icon will be displayed beside the locked channel or playlist. The lock
icon is removed if you have unlocked a channel or playlist. When unlocking channels,
Clea r All L ocks may be selected to unlock all locked channels.
You may continue locking or unlocking channels and playlists until you have finished.
6.
Use the Back button to exit the Lock Channels or Loc k Playl ists menu.
Note s:
When you tune away from a locked channel or playlist, the channel or playlist will become
locked again.
Locking a channel that is also a My Sirius Channel will not automatically lock the corresponding playlist. You must also lock the My Sirius Channel playlist.
Page 37

[ Opera ti on ]
70
[ Opera ti on ]
71
Hide Channels
BACK
Show All
001 Hits 1
Starlite
HIDE CHANNELS
PARENTAL CONTROLS
Define Locks
Hide Channels
BACK
Locks: Enabled
Figur e 1Figur e 1
Figur e 2Figur e 2
FM1
90.9 MHz
BACK
FM1 - 88.1
FM2 - 99.1
FM3 - 100.1
FM FREQUENCIES
Figur e 1Figur e 1
Figur e 2Figur e 2
FM Transmitter
The hide feature allows you to designate channels to not be displayed when browsing channel
lists.
Hidi ng o r Showing C hann els
Press the Setup button.
1.
Select Pare ntal Co ntrols H ide Channels. (Figure 1)
2.
Select a channel to hide or show, or select Show All to show all hidden channels. Hid-
3.
den channels will have the hidden icon next to them. (Figure 2)
You may continue hiding or showing channels until you have finished. Use the Back
4.
button to exit the Hide Channels menu.
Note s:
The hide feature differs from the lock feature in that a locked channel will be displayed while
browsing a list (but is password protected), while a hidden channel will never appear in a list.
Hidden channels are not locked, but can only be tuned by directly entering the channel number using the numeric keypad on the remote control.
When docked in the vehicle docking station, the Sirius S50 can transmit on an FM frequency
which may be received by an FM radio, such as the FM radio in your home or vehicle.
Three FM frequencies may be chosen as FM presets allowing you to quickly change the FM
broadcast frequency.
Chan ging an FM Pres et
Press the Setup button.
1.
Select Devi ce Sett ings FM Frequencies and the FM preset you wish to change.
2.
(Figure 1)
Use the Media Dial to choose a new FM frequency. (Figure 2)
3.
Press the Select button to set the new FM frequency.
4.
Note s:
When selecting a frequency for a preset, if you scroll all the way to the left the preset is set
to N one.
Page 38

[ Opera ti on ]
72
[ Opera ti on ]
73
Sele ctin g an FM Pre set
36
(channel logo)
ELEC/DNC
FM Transmitter
FM1 - 88.1
Figur e 3Figur e 3
BACK
Traffic/Weather:
Los Angeles
JumpSet:
-----
Houston
Los Angeles
Miami
New York
BACK
Traffic/Weather:
------
JumpSet:
------
TRAFFIC/WEATHER
JUMP SETTINGS JUMP SETTINGS
BACK
None
001 Hits 1
002 Starlite
Traffic/Weather:
-----
JumpSet:
064 Outlaw
BACK
JUMPSET
JUMP SETTINGS
Figur e 1Figur e 1
Figur e 2Figur e 2
Figur e 3Figur e 3
Figur e 4Figur e 4
Figur e 5Figur e 5
Press and hold the Setup button. The current FM preset frequency is displayed and
1.
highlighted. (Figure 3)
To tune to the next FM preset, press the Setup button again within 10 seconds.
2.
Back/Jump Feature
The Back button has two main functions: To jump to a pre-programmed traffic/weather
channel (or other channel), or to return back to a previous channel, song, show, menu, or list.
The back or jump function is controlled by whether the button is pressed and released, or
pressed and held. Both functions are described in the following table:
Pres s and R elease Pres s and H old
List ening L ive
or P layback
Brow sing a
Menu or Lis t
Prog ramm ing the Jum p Fe ature
Press the Setup button and select J ump Set tings. (Figure 1)
1.
To program the Back button for traffic/weather, select Traf fic/Weather and the city
2.
Returns to the previous content
Returns to previous menu or list
closest to your location. (Figures 2 & 3)
To program the Back button to a regular channel, select Jum pSet and the desired
3.
channel. (Figures 4 & 5)
When listening live, jumps to programmed channel: Traffic/Weather
report or other channel
If in a list or in the Setup Menu, exits
the list or Setup Menu
Note s:
Your local traffic/weather report will be played within 4 minutes of when the Back button
Page 39

[ Opera ti on ]
74
[ Opera ti on ]
75
BACK
Off
15 min
30 min
SLEEP TIMER
Figur e 1Figur e 1
is pressed. While a jump is pending, the jump icon is displayed in the lower right corner of
the display screen.
A pending jump can be cancelled by pressing the Back button.
Sleep Timer
The sleep timer feature will turn the Sirius S50 off after 15, 30, 45, or 60 minutes. The sleep
timer function differs from the auto shutdown feature in that you may change channels, or any
other activity, without interrupting the sleep timer.
Sett ing the Sleep T imer
Press the Setup button.
1.
Select Time Settin gs Sle ep Timer: Off Select an amount of time. (Figure 1)
2.
Note s:
The Sirius S50 must be in a dock for this feature to work.
When you set a sleep time, it will only occur once. You will have to choose a new sleep time
each time you use the sleep time feature.
If you are recording any songs or shows when the sleep time has been reached, the recording
will be terminated when the Sirius S50 turns itself off.
Page 40

[ Opera ti on ]
76
[ Opera ti on ]
77
Auto Shutdown
Auto-Dim: On
Auto-Dim Brightness
BACK
Wallpaper: Off
DISPLAY SETTINGS
Auto-Dim: Off
Auto-Dim Brightness
BACK
Brightness
DISPLAY SETTINGS
AUTO-DIM BRIGHT
0%
100%
Figur e 2Figur e 2
Figur e 3Figur e 3
Figur e 1Figur e 1
Auto Dimming
The auto shutdown feature turns the Sirius S50 off after one hour of inactivity. This feature
is only available when in the vehicle dock. Enabling this feature while using the Sirius S50 in
your vehicle prevents accidental battery drainage by turning it off if you forget to do so.
Enab ling Auto Shutd own
Press the Setup button.
1.
Select Time Settin gs Aut o Shutdown.
2.
Note s:
If there have been no buttons pressed for one hour, the Sirius S50 will automatically turn itself
off. If any buttons are pressed during the one hour shutdown period, the auto shutdown timer
will be reset to one hour.
After 59 minutes of inactivity, a prompt will be displayed to cancel the auto shutdown. Pressing the Select button at the prompt will reset the auto shutdown timer to one hour.
The auto dimming feature will automatically dim the display screen of the Sirius S50 when the
ambient light becomes dark. This is useful if using the Sirius S50 at night in a vehicle.
Enab ling or Disabli ng A uto Dim ming
Press the Setup button.
1.
Select Disp lay Set tings Auto-Dim: Off/On. (Figure 1)
2.
The Auto-Dim menu option toggles to turn Auto-Dim on or off.
3.
Adju stin g the Auto Dimm ing Bri ghtn ess
Press the Setup button.
1.
Select Disp lay Set tings Auto-Dim Brightne ss. (Figure 2)
2.
Turn the Media Dial to select the brightness level. (Figure 3)
3.
Press the Select button to set the new brightness level.
4.
Note s:
The Sirius S50 must be in a vehicle dock for the auto dimming feature to function.
Page 41

[ Setup M en u ]
78
[ Setup M en u ]
79
BACK
Audio Settings
Content Management
Device Settings
SETUP MENU
Time Settings
Audio Settings
Content Management
Device Settings
SETUP MENU
Figur e 1Figur e 1
Figur e 2Figur e 2
AUDIO LEVEL
0% 100%
Figur e 1Figur e 1
Setup Menu
Setup Menu Navigation
When the Sirius S50 is docked, the Setup M enu is accessed by pressing the Setup button
on the vehicle dock. (Figure 1) Options in the setup menu are selected by highlighting the
menu option using the Media Dial and pressing the Select button. To return to a previous menu, choose the BACK menu option or press the Back button. To exit Setup, press
and hold the Back button.
When the Sirius S50 is being used as a media player, the Se tup Men u is accessed by
pressing the Setup button on the media player. (Figure 2) Options in the setup menu are
selected by highlighting the menu option using Fast-Forward and Rewind and pressing
Play/Pause. To return to a previous menu, choose the BACK menu option if available, or
press the Setup button.
Not all menu options described in this section are available from the media player. To indicate
which menu options are available on the media player, each applicable section or sub-section
will have an earbud icon indicating that the menu option is available on the media player.
Each option in the setup menus is described in the following sub-sections, in the order in
which they appear when the Sirius S50 is docked.
Audio Settings
The Audio S ettings menu option provides for enabling or disabling the verbal audio navigation
cues, system sounds, and startup sounds, and for changing the audio output level.
Audi o Na v On/Off
Audio navigation cues are the audible voice cues which are heard when using the Sirius S50.
To enable or disable the audio navigation cues, select the Audio N av On/Off menu option
from the Au dio Set tings menu to toggle the On/Off setting.
Syst em S ounds On/Of f
System sounds are the beeps and other sounds which are heard when using the Sirius S50.
To enable or disable the system sounds, select the System S ounds O n/Off menu option from
the Audio S ettings menu to toggle the On/Off setting.
Star tup Sounds On/O ff
Startup sounds are the sounds which are heard when the Sirius S50 is turned on. To enable
or disable the system startup sounds, select the Startup So unds On /Off menu option from the
Audi o Setti ngs menu to toggle the On/Off setting.
Audi o Le vel
The audio level menu option changes the audio output level of the Sirius S50. To change the
audio level, select the Audio Level menu option from the Au dio Set tings menu. Turn the
Media Dial to increase or decrease the audio level and press the Select button to set the
audio level. (Figure 1)
Page 42

[ Setup M en u ]
80
[ Setup M en u ]
81
BACK
Clear All Channels
Clear My Alt Natn
Clear My Faction
MY CHANNELS
Yes
No
CLEAR ALT NATN?
Figur e 1Figur e 1
Figur e 2Figur e 2
MEMORY USAGE
52%
Figur e 3Figur e 3
Content Management
The Content Manage ment menu option provides for scheduling recordings, deleting saved
songs and shows from playlists, for clearing My Sirius Channels, and for checking the amount
of the Sirius S50’s memory currently being used.
Sche dule Recordings
Details for scheduling recordings is found in the Sa ving So ngs or Shows with a Sche duled
Reco rding section on page 61.
Dele te C ontent
The Delete Content menu option provides for deleting songs and shows from My Sirius
Songs, My Sirius Shows, and My MP3/WMA (My Playlists). Details for deleting content is
found in the Delet ing Songs or Show s from My Sirius Songs, My Siri us Shows, and My
Play lists on page 60.
My S iriu s Channels
The My Siri us Chan nels menu option clears all songs from a favorite channel in My Sirius
Channels. If you discontinue listening to a particular channel, and want the Sirius S50 to begin saving content from another channel, select the My Siri us Chan nels menu option from the
Cont ent Man agement menu and select a favorite channel to clear. (Figure 1) Select Y es at the
prompt to clear the channel. (Figure 2) You may also clear all My Sirius Channels by selecting
the Clear A ll Chan nels menu option.
Memo ry U sage
To check the amount of memory currently being used, select the Mem ory Usage menu option
from the Co ntent M anagement menu. The memory usage screen displays the percentage of
memory currently being used. The My Sirius Channels are not included in the memory usage
total. (Figure 3)
Device Settings
The Device Setting s menu option provides for turning the FM transmitter On/Off, choosing the
FM preset frequencies, for displaying the antenna aiming signal strength screen, for displaying
the Sirius ID (SID), and for displaying device information about the Sirius S50.
FM T rans mit On/Off
The FM Tran smit On /Off menu option provides for turning the Sirius S50’s FM transmitter On
or Off. To enable or disable the FM transmitter, select the FM Tra nsmit On/Off menu option
from the De vice Se ttings menu to toggle the On/Off setting.
FM F requ encies
Three FM frequencies may be chosen as presets for quickly tuning the Sirius S50’s FM
transmitter by pressing and holding the Setup button. Details for setting the FM presets are
found in the FM Tr ans mitter section on page 71.
Page 43

[ Setup M en u ]
82
[ Setup M en u ]
83
Batt ery Level
BATTERY LEVEL
76%
ANTENNA AIMING
SATELLITE
TERRESTRIAL
Figur e 1Figur e 1
Figur e 2Figur e 2
Model S50
SW Ver: 1.0.0
Certain software
contained in this
product is copyrighted
work of PortalPlayer,
DEVICE INFO
ESN 000492229812
SIRIUS ID
Figur e 3Figur e 3
Figur e 4Figur e 4
To check the battery level, select the Bat tery Level menu option from the Device Se ttings
menu. The battery level screen displays the percentage of battery power remaining. (Figure 1)
Devi ce I nfo
The Device Info menu option displays information about the model number and software and
hardware version numbers of the Sirius S50. To display the device information, select the
Devi ce Info menu option from the Device Settings menu. (Figure 3)
Ante nna Aiming
The antenna aiming display shows the strength of the SIRIUS signal being received by the
Sirius S50. This is useful when installing and orienting the antenna for optimal reception of
satellite signal. To display the antenna aiming information, select the Antenna Aim ing menu
option from the De vice Settings menu.
The SATELLITE portion of the Antenn a Aimin g display screen shows the strength of the
signal being received from the satellite, while the TERRESTRIAL portion of the display screen
shows the strength of the signal being received from terrestrial based transmitters, if available.
(Figure 2)
Siri us I D
The Sirius ID (SID) is the unique identification number assigned to your Sirius S50. This number is used when subscribing to the Sirius Satellite Radio service. To display the SID, select
the Sirius ID menu option from the Device Settings menu. (Figure 4) It is recommended that
you record the SID number in the space provided near the end of this guide.
Rese t De faults
The reset defaults feature sets most parameters and features of the Sirius S50 back to the
defaults as manufactured from the factory. The following parameters or features are reset:
All presets are erased
•
The Sirius S50 is set to the normal tuning mode
•
Page 44

[ Setup M en u ]
84
[ Setup M en u ]
85
Wallpaper is on
No
Yes
RESET DEFAULTS
Figur e 5Figur e 5
BRIGHTNESS
0% 100%
Figur e 1Figur e 1
•
Display brightness is set to 80%
•
Auto-Dim is set to off
•
FM transmitter is set to on
•
FM Frequency of the FM presets are set to 88.1, None, None
•
Hidden channels are added back
•
Favorite teams for game alerts erased
•
Game alert is set to off
•
Sports ticker is set to off
•
Clock is set to Eastern time zone
•
Clock is set to daylight savings time observed
•
Auto shutdown is set to off
•
Jump is set to none
•
Audio navigation cues are set to on
•
Startup sound is set to on
•
System sounds are set to on
•
Scheduled recordings are erased
•
Channels locked with parental controls are unlocked
•
Parental controls password is cleared
•
To perform a reset of the factory defaults, select the Rese t Defau lts menu option from the
Setu p Menu. At the prompt, select Y es to perform a factory default reset or No to cancel.
(Figure 5) If you have set a parental control password you will be prompted to enter the
password before you can proceed with the reset. Once you have performed the reset, turn the
Sirius S50 off and on to allow the settings to take effect.
Display Settings
The Display Settin gs menu option provides for turning wallpaper On/Off, for adjusting the
brightness of the display screen, for adjusting the backlight of the media player, for enabling
or disabling the auto-dim feature, and for setting the auto-dim brightness.
Wall pape r On/Off
The Wallpap er On/O ff menu option provides for turning the wallpaper displayed in the
background of the screen On or Off. To enable or disable the wallpaper, select the Wallpap er
On/O ff menu option from the Display Settin gs menu to toggle the On/Off setting.
Brig htne ss
The brightness feature increases or decreases the brightness of the display screen. To set
the brightness, select the Brightne ss menu option from the Display Settings menu. Turn the
Media Dial to adjust the brightness and press the Select button to set the brightness.
(Figure 1)
Page 45

[ Setup M en u ]
86
[ Setup M en u ]
87
BACK
Backlight: 15 sec
Brightness
5 sec
15 sec
30 sec
60 sec
DISPLAY SETTINGS
BACKLIGHT
Figur e 2Figur e 2
Figur e 3Figur e 3
Back ligh t (Media Player Only)
The backlight feature sets the amount of time the backlight remains on after no buttons
have been pressed on the media player. The time may be set to 5, 15, 30, or 60 seconds,
or A lways O n if you want the backlight to always remain on. To set the backlight, select the
Back light menu option from the Disp lay Set tings menu when using the media player. Use
Fast-Forward and Rewind to highlight your choice and press Play/Pause to set the
backlight. (Figures 2 & 3)
Auto -Dim Off/On
The Auto-Di m Off/O n feature turns the automatic dimming feature of the display screen in low
light conditions On or Off. Details for setting auto-dim On or Off is found in the Auto Di m-
ming section on page 77.
Auto -Dim Brightness
The Auto-Di m Brigh tness menu option sets the brightness of the display screen when it is
dimmed. Details for setting the auto-dim brightness is found in the Auto Dim ming section on
page 77.
Jump Settings
The Jump Settings menu option provides for setting the jump function of the Back button.
Traf fic/ Weather
Details for setting the jump feature to a traffic/weather channel is found in the J ump/Bac k
Feat ure section on page 73.
Jump set
Details for setting the jump feature to a channel is found in the Jump/Back Feature section
on page 73.
Parental Controls
The Parenta l Contr ols menu provides for locking channels and playlists, and for hiding channels.
Lock s Di sabled/Enab led
The Locks E nabled/ Locks Disabled menu option provides for enabling or disabling the
channel and playlist locks. Details for enabling or disabling locks are found in the Paren tal
Cont rols section on page 67.
Defi ne L ocks
The Set Loc ks menu option provides for locking (or unlocking) channels and playlists. Details
for setting locks are found in the Parenta l C ontrols section on page 67.
Hide Cha nnels
The Hide Ch annels menu option provides for hiding specific channels from channel lists, or
showing channels which had previously hidden. Details for hiding/showing channels are found
in the Hide Channe ls section on page 70.
Page 46

[ Setup M en u ]
88
[ Setup M en u ]
89
Shut-Down Device
BACK
-9:00 Alaska
-8:00 Pacific
-7:00 Mountain
TIMEZONE
Figur e 1Figur e 1
Time Settings
This option is used to turn off the Sirius S50. Select the Shut-Do wn Device menu option to
turn the Sirius S50 off.
Sport Settings
The Sports Setting s menu option provides for choosing your favorite teams for game alerts,
and also for enabling or disabling the Game Alert and Sport Ticker features.
Favo rite Teams
Details for adding favorite teams for game alerts is found in the Game Alert section on page
64.
Game Ale rt On/Off
To enable or disable the game alert feature, select the Gam e Alert On/Off menu option in the
Spor t Setti ngs menu to toggle the On/Off setting.
Spor t Ti cker On/Off
To enable or disable the sport ticker feature, select the S port Ti cker On/Off menu option in
the Sport S ettings menu to toggle the On/Off setting.
The Time Settings menu option provides access to features having to do with time functions:
the timezone, daylight savings time, auto shutdown, and the sleep timer. When docked, the
clock in the Sirius S50 is automatically set by the satellite signal to an accurate time, and
does not need to be adjusted.
Time zone
The Timezon e menu option provides for selecting the time zone to be used for your locale. To
set the time zone, select the Timez one menu option from the Time S ettings menu and select
the time zone for your local area. (Figure 1)
DST Obse rved/Not Ob serv ed
The Daylight Savings Time option enables or disables the daylight savings time adjustment.
To enable or disable the daylight savings time function, select the DST Observed (or DST N ot
Obse rved) menu option from the Time Settin gs menu to toggle the observed/not observed
setting.
Auto Shu tdown
The auto shutdown feature turns the Sirius S50 off after one hour of inactivity. Details for setting the auto shutdown are found in the Au to Shutdow n section on page 76.
Slee p Ti mer
Sleep timer turns the Sirius S50 off after a specified period of time 15, 30, 45, or 60 minutes.
Details for setting the sleep timer are found in the Sleep Timer section on page 75.
Page 47

[ My Si ri us Stud io S oftwa re I nstalla ti on ]90[ My Si ri us Stud io S oftwa re I nstalla ti on ]
91
My Sirius Studio Software Installation
The My Sirius Studio software included with your Sirius S50 allows you to connect your Sirius
S50 to your PC. The software requires your computer to be using the Microsoft Windows XP
or Windows 2000 operating system.
Impo rtant: The software must be installed bef ore connecting the Sirius S50 to your com-
puter.
The following list provides a few highlights of the capabilities of the software:
Create playlists and download songs to the playlists.
•
Streaming of SIRIUS music channels over the internet.
•
Check for updates to the operating system software and download them to Sirius S50,
•
and re-install deleted operating system files.
The following procedure will guide you through the installation of the My Sirius Studio
software. If your computer does not already have Microsoft Windows Media Player® version
10 or Microsoft .NET Framework 1.1 installed, this software will also be installed during the
installation process.
To install the My Sirius Studio software:
Place the My Sirius Studio software CD into your computer’s CD-ROM drive to start the
1.
software installation.
If the installation does not begin automatically, double click the SiriusStudioSet up icon
2.
to begin the installation.
At the Welc ome screen, click the Ne xt button.
3.
At the Lice nse Agr eement screen, click the checkbox ‘I acce pt the terms of the Lice nse
4.
Agre ement’ if you accept the terms of the license agreement and click the Next button.
Page 48

[ My Si ri us Stud io S oftwa re I nstalla ti on ]92[ My Si ri us Stud io S oftwa re I nstalla ti on ]
93
At the Choo se Comp onents screen, click the Next button.
5.
At the Choo se Inst all Location screen, click the Next button to accept the default instal-
6.
lation directory.
At the Choo se Star t Menu Folder screen, click the Install button to select the default
7.
Start Menu folder.
Page 49

[ My Si ri us Stud io S oftwa re I nstalla ti on ]94[ My Si ri us Stud io S oftwa re I nstalla ti on ]
95
Wait while the installation progresses.
8.
If the Microsoft .NET Framework software needs to be installed, the installation will
9.
begin, otherwise continue to the next step.
At the Micr osoft . NET Framework Set up screen, click the Yes button to install the
software. If you agree, choose to accept the license agreement and complete the installation.
At the PortalPlayer™ Welcome screen, click the Next button. (The PortalPlayer Service
10.
Provider is a driver that ensures proper communication between the S50 and your PC.)
At the Lice nse Agr eement screen, click Yes if you accept the license agreement.
11.
Page 50

[ My Si ri us Stud io S oftwa re I nstalla ti on ]96[ My Si ri us Stud io S oftwa re I nstalla ti on ]
97
At the Choo se Dest ination Location screen, click the Next button to accept the default
12.
installation directory.
Wait while the Set up Status screen is displayed for the installation to complete.
13.
When the PortalPlayer software installation is complete, click the Finish button.14.
Page 51
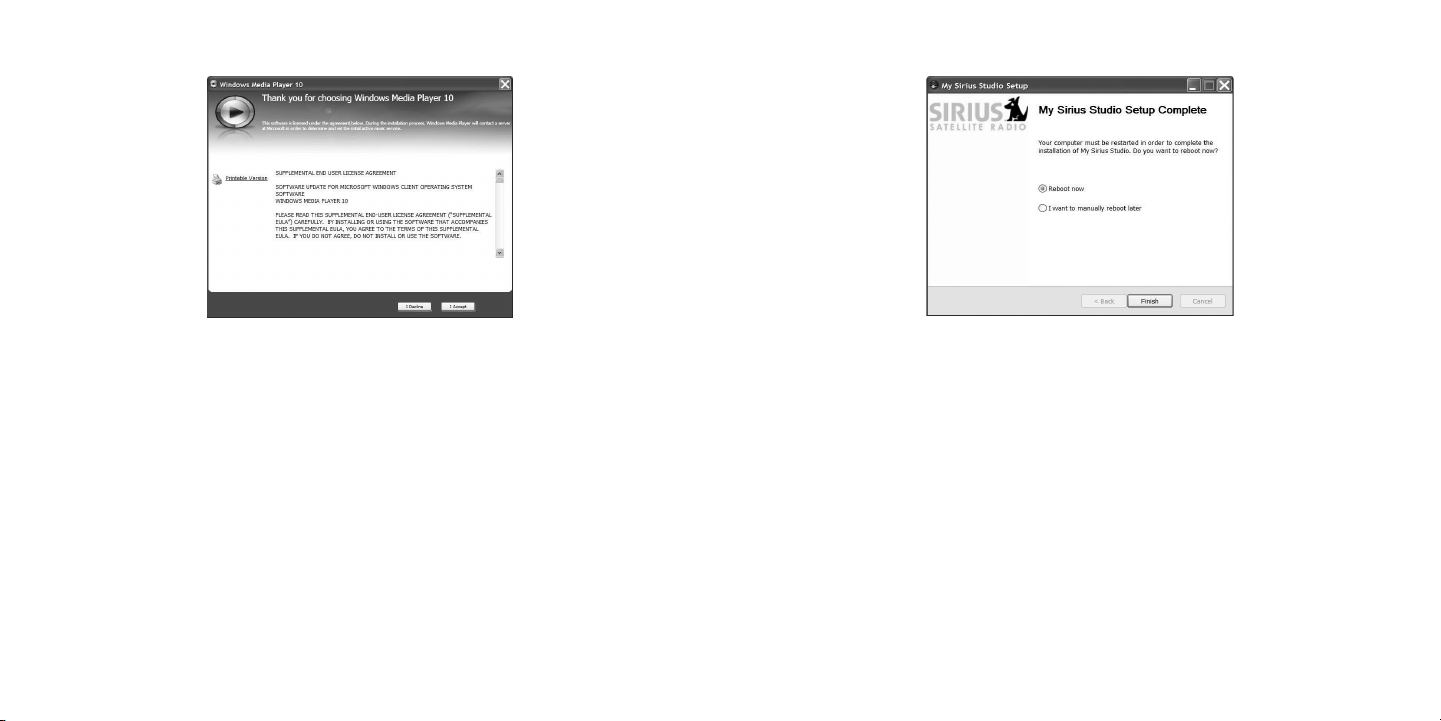
[ My Si ri us Stud io S oftwa re I nstalla ti on ]98[ My Si ri us Stud io S oftwa re I nstalla ti on ]
99
If Windows Media Player needs to be installed, the installation will begin next, otherwise
15.
continue to the next step.
Complete the Windows Media Player installation before continuing the My Sirius Studio
software installation. If you agree, choose to accept the license agreement, and accept
the default selections presented with each installation screen.
When the My Sirius Studio software installation is complete, at the My Sirius Studi o
16.
Setu p screen click Finish to reboot your computer and finalize the installation of the
software.
When the computer has rebooted, the My Sirius Studio software will be ready to use. Please
refer to the user manual included on the software CD for instructions on using the software.
Page 52

[ Troub le sh ootin g ]
100
[ Troub le sh ootin g ]
101
Troubleshooting
Symp tom Solu tion
Sirius S50 does not
power on
Sirius S50 displays
No A ntenna
Sirius S50 displays:
No S ignal
Audio static or loss of
clarity
Check the battery to be sure it is installed correctly.
Charge the battery.
Check that the media player is properly seated in the dock.
Check the cigarette lighter adapter to be sure it’s seated in the
cigarette lighter, and connected to the vehicle dock.
The satellite antenna is not connected to the vehicle dock.
Check the satellite antenna connection to the dock.
Check that the media player is properly seated in the dock.
No satellite signal is being received.
Check that the media player is properly seated in the dock. Check
for obstacles over or around the satellite antenna.
Change the vehicle location to eliminate nearby obstacles
(bridges, overpasses, etc.).
The FM frequency contains static.
Locate a quiet FM frequency on your vehicle radio and set the FM
transmitter frequency of the Sirius S50 to match.
If using the Line Out audio connector, check the cable connections.
Trou bleshoo ting Co ntinued
Symp tom Solu tion
No sound When in the vehic le dock :
The Sirius S50 will not
start up
The Sirius S50 does
not respond to the
Media Dial or the
buttons
Check if the FM radio is set to the wrong frequency. Tune the
vehicle FM radio and the Sirius S50 to the same FM frequency.
Check if the FM transmitter in the Sirius S50 is turned off. Turn
the FM transmitter on.
If using the Line Out audio connector, check the cable connections.
When using the med ia player: Check that the ear buds are
plugged into the headphone jack securely.
The operating system files on the Sirius S50 have been deleted.
Connect the Sirius S50 to your PC using the USB cable, and use
the My Sirius Studio software to download new operating system
files. Follow the software instructions included on the software
CD.
Remove the media player from the dock, remove the battery from
the media player, wait 10 seconds, replace the battery and turn
it back on.
Page 53
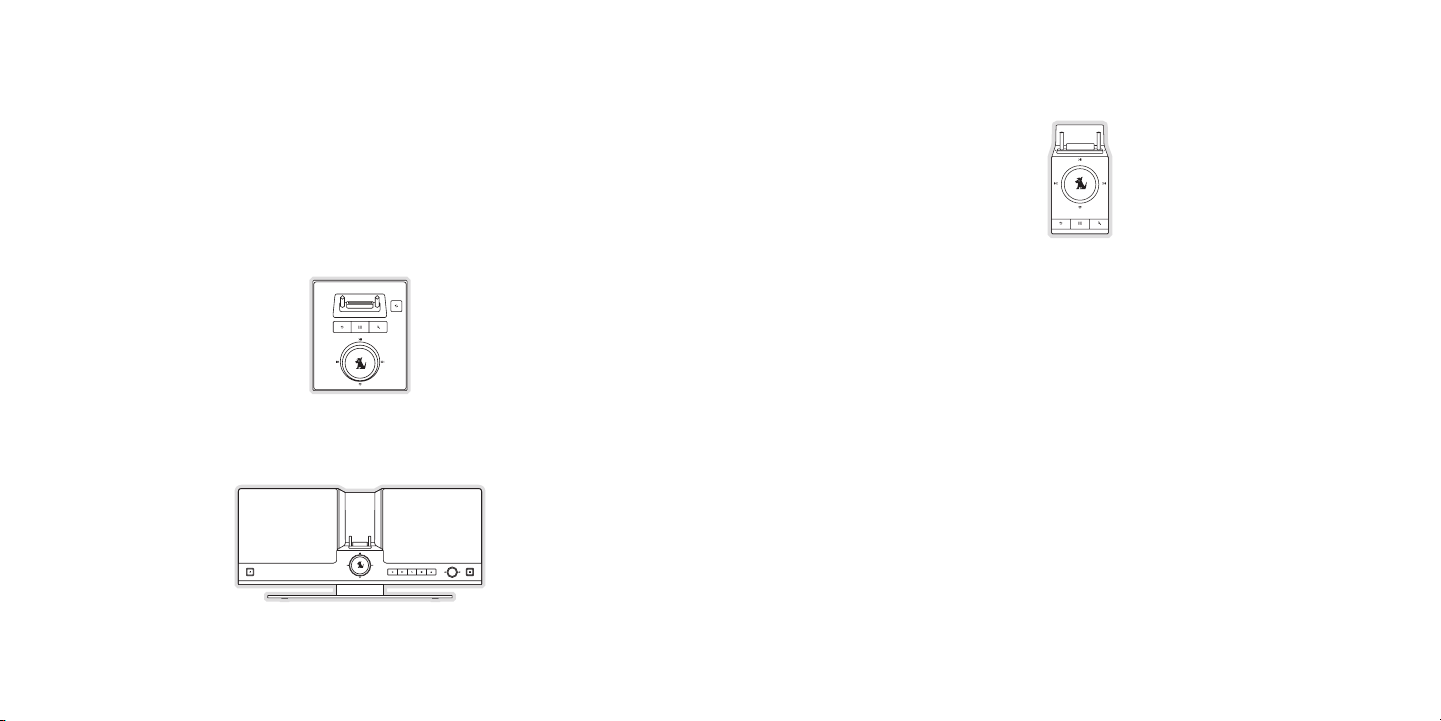
[ Optio na l Acces so ri es ]
102
[ Optio na l Acces so ri es ]
103
Optional Accessories
The following optional installation kits and replacement items are available for purchase from
your SIRIUS retailer:
Home Kit
The home dock provides full Sirius S50 functionality through your home stereo system and
quick syncing with your PC. The home kit includes a home docking cradle, a USB cable, audio
cables, an AC power adapter, and a windowsill antenna.
Exec utiv e System
The executive system provides full Sirius S50 functionality in a sleek boombox style. It includes an AC power adapter and a windowsill antenna.
Car Kit
Additional car docks will allow you to enjoy your Sirius S50 in other vehicles which you own.
The kit includes a car dock, mounting kit, cigarette lighter adapter, and magnetic antenna.
Batt ery
Replacement (or spare) battery for the Sirius S50.
Earb uds
Replacement ear buds for the media player.
Medi a Pl ayer Armban d
Armband for the media player.
Page 54

Specifications
Warranty
Satellite Frequencies . . . . . . . . . . . . . . . . . . . . . . . . . . . . . . . . . . . . . . 2322.293/2330.207 MHz
Terrestrial Frequencies . . . . . . . . . . . . . . . . . . . . . . . . . . . . . . . . . . . . . . . . . . . . 2326.250 MHz
Power Requirements . . . . . . . . . . . . . . . . . . . . . . . . . . . . . . 5 Volts, 1.5A Negative Ground, DC
Operation Temperature . . . . . . . . . . . . . . . . . . . . . . . . . . . . . . . . . -5° to +40° C (23° to 104° F)
Headphone Output . . . . . . . . . . . . . . . . . . . . . . . . . . . . 18mW Left + 18mW Right @ 16 ohms
Signal-to-noise (S/N) . . . . . . . . . . . . . . . . . . . . . . . . . . . . . . . . . . . . . . . . . . . . . . . . . 90dB (MP3)
Receiver Dimensions (Height x Width x Depth) . . . . . . . . . . . . . . . . 9.65 cm x 4.8 cm x 1.7 cm
(3.8” x 1.89” x .67”)
Media Player Weight . . . . . . . . . . . . . . . . . . . . . . . . . . . . . . . . . . . . . . . . . . . . . . . . 183g (5.9oz.)
Memory Capacity . . . . . . . . . . . . . . . . . . . . . . . . . . . . . . . . . . . . . . . . . . . . . . . . . . . . . . . . . 1 GB
Antenna Type . . . . . . . . . . . . . . . . . . . . . . . . . . . . . . . . . . . . . . . . . . . . . . . .Low Profile Magnetic
Antenna Cable Length . . . . . . . . . . . . . . . . . . . . . . . . . . . . . . . . . . . . . . 21’ (single micro-cable)
Connector Type . . . . . . . . . . . . . . . . . . . . . . . . . . . . . . . . . . . . . . . . . . . . . . . . SMB (right-angle)
Audio Interface . . . . . . . . . . . . . . . . . . . . . . . . . . . . . . . . . . . . . . . . . . 1/8” / 3.5 mm Stereo Jack
Remote Control Dimensions (Height x Width x Depth) . . . . . . . . . . . . .10.5 cm x 4.5 cm x 1 cm
(4.13” x 1.77” x .39”)
Remote Control Battery Requirements . . . . . . . . . . . . . . . . . . . . . . . . . . . . . . . . . . . . . .CR2025
[ Speci fi ca tions ]
104
12 M onth Warranty
SIRIUS Satellite Radio Inc. (the “Company”) warra nts to the original retail purchaser of this product
that should this produc t or any part thereof, und er normal use and conditio ns, be proven defective in
material or workmanship within 12 months from the date of original purchase , such defect(s) will be
repaired or replaced wi th new or reconditioned pr oduct (at the Company’s op tion) without charge for
parts and repair labor. To obtain repair or repla cement within the terms of this Warranty, the product
is to be delivered with proof of warranty coverag e (e.g. dated bill of sale ), specification of defect(s),
transportation prepaid, to the location shown bel ow under WARRANTY RETURN.
This Warranty does not extend to the elimination of externally generated st atic or noise, to correction
of antenna problems, to costs incurred for instal lation, removal or reinsta llation of the product, or to
damage to tapes, compac t discs, speakers, accesso ries, or vehicle electrica l systems.
This Warranty does not apply to any product or pa rt thereof which, in the o pinion of the Company,
has suffered or been da maged through alteration, improper installation, mis handling, misuse, neglect,
accident, or by removal or defacement of the fact ory serial number/bar code label(s). THE EXTENT
OF THE COMPANY’S LIABIL ITY UNDER THIS WARRANTY IS LIMITED TO THE REPAIR OR
REPLACEMENT PROVIDED AB OVE AND, IN NO EVENT, SHAL L THE COMPANY’S LIABILITY
EXCEED THE PURCHASE PRI CE PAID BY PURCHASER FOR T HE PRODUCT.
This Warranty is in lie u of all other express war ranties or liabilities. AN Y IMPLIED WARRANTIES, INCLUDING ANY IMPLIED WAR RANTY OF MERCHANTABILITY, SHALL BE LIMITED TO THE DU RATION OF THIS WRITTEN WA RRANTY. ANY ACTION FOR BRE ACH OF ANY WARRANTY HEREUNDER INCLUDING ANY IMP LIED WARRANTY OF MERCHANTA BILITY MUST BE BROUGHT
WITHIN A PERIOD OF 48 M ONTHS FROM DATE OF ORIGINA L PURCHASE. IN NO CASE SHA LL
THE COMPANY BE LIABLE F OR ANY CONSEQUENTIAL OR IN CIDENTAL DAMAGES FOR
BREACH OF THIS OR ANY O THER WARRANTY, EXPRESS OR IMPLIED, WHATSOEVER. No
person or representativ e is authorized to assume for the Company any liabil ity other than expressed
herein in connection wi th the sale of this produc t. Some states do not allo w limitations on how long
an implied warranty las ts or the exclusion or lim itation of incidental or c onsequential damage so the
above limitations or ex clusions may not apply to you. This Warranty gives y ou specific legal rights and
you may also have other rights which vary from st ate to state.
WARRANTY RETURN: To obt ain repair or replacement within the terms of this W arranty, please return product to an auth orized retailer or call Cu stomer Service at 1-800-86 9-5364; proof of purchase
and description of defe ct are required. Products to be returned to an appro ved warranty station must
be shipped freight prep aid.
[ Warra nt y ]
105
Page 55

SIRIUS ID
Index
Write down the SIRIUS I D (SID) of your Sirius S50 in the space provided bel ow.
SID:
[ SIRIU S ID ]
106
A
Antenna Aiming . . . . . . . . . . . . . . . 82
Audio Level, Adjusting . . . . . . . . . . . . 79
Audio Navigation
Introduction . . . . . . . . . . . . . . . . 23
Turning On/Off . . . . . . . . . . . . . . 79
Auto Dimming
Adjusting the Auto Dimm ing Brightness . 77
Enabling or Disabling A uto Dimming . . . 77
Auto Shutdown, Enabling . . . . . . . . . . 76
B
Back Button
Back Button Function . . . . . . . . 16 , 73
Jump Feature . . . . . . . . . . . . . . . 73
Backlight, Adjusting (M edia Player Only) . . 86
Battery
Charging, Media Player . . . . . . . . . . 36
Disposal . . . . . . . . . . . . . . . . . 37
Installation, Media Pla yer . . . . . . . . . 35
Installation, Remote Co ntrol . . . . . . . 36
Brightness, Adjusting . . . . . . . . . . . . 85
Broadcasts, Pausing/Pla ying
Fast-Forwarding and Rew inding a Paused
Broadcast . . . . . . . . . . . . . . . . 51
Pausing a Live Broadcas t . . . . . . . . 49
Playing a Paused Broadc ast . . . . . . . 50
Broadcasts, Tuning
Tuning by Channel . . . . . . . . . . . . 46
Tuning by Genre . . . . . . . . . . . . . 4 6
Tuning by Preset . . . . . . . . . . . . . 46
C
Channel Presets
Channel Presets, Adding . . . . . . . . . 47
Channel Presets, Moving . . . . . . . . . 48
Channel Presets, Removi ng . . . . . . . 48
Channel Up/Down Button Function . . . . . 20
Cigarette Lighter Adapt er . . . . . . . . . 6, 34
Cleaning and Maintenanc e . . . . . . . . . . 6
Computer, Connecting to . . . . . . . . . . 41
Connectors, Vehicle Doc k . . . . . . . . . . 17
Copyrighted Broadcast M aterial . . . . . . . 11
Customer/Product Servic e . . . . . . . . .110
D
Daylight Savings Time, Enabling/Disabling . 89
Deleting Songs or Shows
Deleting Audio Files fr om My Playlists . . 60
Deleting Shows from My Sirius Shows . . 60
Deleting Songs from My Sirius Channels
My Sirius Channels Setu p Menu
Option . . . . . . . . . . . . 80
Deleting Songs from My Sirius Songs . . 60
Device Information, Sir ius S50 . . . . . . . 83
Display Screen Informat ion . . . . . . . . . 21
Docking and Un-Docking the Media Player . 38
Downloading Audio Files . . . . . . . . . . 5 5
E
End User License Agreem ent (EULA) . . . . . 7
Error Messages . . . Se e also Troubles hooting
No Antenna . . . . . . . . . . . . . . . .100
[ Index ]
107
Page 56

[ Index ]
108
[ Index ]
109
No Signal . . . . . . . . . . . . . . . . .100
F
Factory Defaults (Reset Defaults) . . . . . . 83
Fast-Forward
Fast-Forward Function
Media Player . . . . . . . . . . 1 8
Vehicle Dock & Remote . . . . . . 15
How to Operate Fast-For ward . . . . . . 22
Finding Songs and Shows in Playlists . . . . 59
FM Transmitter
Changing an FM Preset . . . . . . . . . 71
Selecting an FM Frequen cy . . . . . . . 40
Selecting an FM Preset. . . . . . . . . . 7 2
Turning the FM Transmit ter On/Off . . . . 81
G
Game Alert
Adding/Removing Favorit e Teams . . . . 64
Turning Game Alerts On/ Off . . . . . . . 88
H
Hiding/Showing Channels . . . . . . . . . . 70
I
Installation
Antenna, Installing . . . . . . . . . . . . 32
Battery, Installing
Media Player . . . . . . . . . . 3 5
Remote . . . . . . . . . . . . 36
Car Dock, Installing . . . . . . . . . . . . 24
Cigarette Lighter Adapt er, Connecting . . 34
Computer, Connecting to Media Player . 41
Professional Installati on . . . . . . . . . 24
Selecting an FM Frequen cy . . . . . . . 40
Subscribing to the SIRI US Service . . . . 40
Wearable Clip, Using . . . . . . . . . . . 42
Introduction to Sirius S50 . . . . . . . . . . . 1
J
Jump Feature, Programmi ng . . . . . . . . . 73
L
Listening Environments
Live . . . . . . . . . . . . . . . . . . . . 43
Playback . . . . . . . . . . . . . . . . . 44
Lock Button, Media Play er . . . . . . . . 18, 3 9
Locks . . . . . . . . . . S ee Parental Con trols
Love . . . . . . . . . .S ee a lso Saving Cont ent
How to Operate Love. . . . . . . . . . . 2 2
Love Function . . . . . . . . . . . . . . 15
M
Media Dial
How to Operate the Medi a Dial . . . . . 22
Media Dial Function . . . . . . . . . . . 15
Memory Usage . . . . . . . . . . . . . . 52, 81
Mode Button Function . . . . . . . . . . . . 16
Mute Button Function, R emote . . . . . . . 20
My Playlists . . . . . . . . . . . . . . . . . 56
Deleting Audio Files . . . . . . . . . . . 60
Playing Audio Files . . . . . . . . . . . . 59
My Sirius Channels . . . . . . . . . . . . . 56
Deleting Songs . . . . . . . . . . . . . . 80
Playing Songs . . . . . . . . . . . . . . 58
My Sirius Shows . . . . . . . . . . . . . . . 56
Deleting Shows. . . . . . . . . . . . . . 60
Playing Shows . . . . . . . . . . . . . . 58
Saving Shows . . . . . . . . . . . . . . 54
My Sirius Songs . . . . . . . . . . . . . . . 56
Deleting Songs . . . . . . . . . . . . . . 60
Playing Songs . . . . . . . . . . . . . . 57
Saving Songs . . . . . . . . . . . . . . . 52
My Sirius Studio Softwa re . . . . .See Sof tware
N
Navigating Menus and Li sts . . . . . . . . . 44
O
Optional Accessories . . . . . . . . . . . .102
P
Package Contents . . . . . . . . . . . . . . 12
Parental Controls
Enabling or Disabling L ocks . . . . . . . 68
Locking and Unlocking C hannels . . . . . 69
Locking and Unlocking P laylists . . . . . 69
Parental Controls . . . . . . . . . . . . . 67
Password . . . . . . . . See Parental Controls
Play/Pause
How to Operate Play/Pau se . . . . . . . 22
Play/Pause Function
Media Player . . . . . . . . . . 1 8
Vehicle Dock & Remote . . . . . . 15
Playlists
Finding Songs and Shows in Playlists . . 59
Navigating Playlists . . . . . . . . . . . . 44
Playlists Button Functi on
Media Player . . . . . . . . . . . . . . . 17
Vehicle Dock & Remote . . . . . . . . . 16
Power Button Function, Remote . . . . . . . 19
Presets . . . . . . . . . . .S ee C hannel Presets
R
Recording . . . . . See Scheduled Recor dings;
S ee Saving Conte nt
Reference Guides
Remote Control Referenc e Guide . . . . 19
Remote Control Button D escriptions . 19
Sirius S50 Reference Gu ide, Buttons and
Controls . . . . . . . . . . . . . . . . . 14
Media Player Button Des criptions . . 17
Vehicle Dock Button Des criptions . . 15
Rewind
How to Operate Rewind . . . . . . . . . 22
Rewind Function
Media Player . . . . . . . . . . 1 8
Vehicle Dock & Remote . . . . . . 15
S
Safety Precautions
General Safety Precauti ons . . . . . . . . 5
Liquid Crystal Precauti ons . . . . . . . . . 5
Saving Content
Saving a Show . . . . . . . . . . . . . . 54
Saving a Song . . . . . . . . . . . . . . 52
Saving Songs or Shows w ith a Scheduled
Recording . . . . . . . . . . . . . . . . 61
Scheduled Recordings
Deleting a Program . . . . . . . . . . . . 61
Editing a Program . . . . . . . . . . . . 61
Scheduling a Program . . . . . . . . . . 61
Select Button
How to Operate the Sele ct Button . . . . 22
Select Button Function . . . . . . . . . . 16
Setup Button Function . . See als o Setup Menu
Media Player . . . . . . . . . . . . . . . 18
Vehicle Dock . . . . . . . . . . . . . . . 17
Setup Menu
Audio Settings . . . . . . . . . . . . . . 79
Audio Level . . . . . . . . . . . 79
Audio Nav On/Off . . . . . . . . 79
Startup Sounds On/Off . . . . . . 79
System Sounds On/Off . . . . . . 79
Content Management . . . . . . . . . . 80
Delete Content . . . . . . . . . 80
Memory Usage . . . . . . . . . 81
My Sirius Channels . . . . . . . . 80
Schedule Recordings . . . . . . . 80
Device Settings. . . . . . . . . . . . . . 81
Antenna Aiming . . . . . . . . . 82
Device Info . . . . . . . . . . . 83
FM Frequencies . . . . . . . . . 81
FM Transmit On/Off . . . . . . . 81
SIRIUS ID . . . . . . . . . . . 83
Display Settings . . . . . . . . . . . . . 85
Auto-Dim Brightness . . . . . . . 86
Auto-Dim Off/On . . . . . . . . . 86
Backlight (Media Player Only) . . . . 86
Brightness . . . . . . . . . . . 85
Page 57

Wallpaper On/Off . . . . . . . . 85
Jump Settings . . . . . . . . . . . . . . 87
Jumpset . . . . . . . . . . . . 87
Traffic/Weather . . . . . . . . . 87
Parental Controls . . . . . . . . . . . . . 87
Define Locks . . . . . . . . . . 87
Hide Channels. . . . . . . . . . 87
Locks Disabled/Enabled . . . . . . 87
Reset Defaults . . . . . . . . . . . . . . 83
Shut-Down Device . . . . . . . . . . . . 88
Sport Settings . . . . . . . . . . . . . . 88
Favorite Teams . . . . . . . . . 88
Game Alerts On/Off . . . . . . . 88
Sport Ticker On/Off . . . . . . . 88
Time Settings . . . . . . . . . . . . . . . 89
Auto Shutdown . . . . . . . . . 89
Sleep Timer . . . . . . . . . . . 89
Timezone . . . . . . . . . . . . 89
Setup Menu Navigation . . . . . . . . . . . 78
SIRIUS ID . . . . . . . . . . . . . . . . . . 83
Record of the Sirius S5 0 SIRIUS ID . . .106
Sleep Timer, Setting . . . . . . . . . . . . . 75
Software, My Sirius Stu dio
My Sirius Studio Softwa re . . . . . . . . . 6
My Sirius Studio Softwa re Installation . . 90
Specifications . . . . . . . . . . . . . . . .104
SIRI US Cust omer Se rvice: 1-888-539-7474
Siri us S50 Product Support: 1-800-869-5364
customercare@sirius-radio.com
SIRI US Sate llite R adio Inc.
1221 Avenue of the Americas
New York, NY 10020
1-888-539-7474
http://www.sirius.com
Sports . . . . . . . . . . . See a lso Game Alert
Game Alert Feature . . . . . . . . . . . . 64
Sports Ticker Feature . . . . . . . . . . 66
Sport Ticker, Turning O n/Off . . . . . . . . 88
Startup Sounds, Turning On/Off . . . . . . . 79
Subscribing to the SIRI US Service . . . . . 40
System Sounds, Turning On/Off . . . . . . . 79
T
Temperature, Operating . . . . . . . . . . . . 6
Timezone, Setting . . . . . . . . . . . . . . 89
Troubleshooting . . . . . . . . . . . . . . .100
Turning the Sirius S50 On and Off . . . . . 39
V
Volume Control . . . . . . . . . . . . . . . 18
W
Wallpaper, Turning On/O ff . . . . . . . . . 85
Warnings
Canadian Compliance . . . . . . . . . . . 5
Cigarette Lighter Adapt er . . . . . . . . . 6
FCC Compliance . . . . . . . . . . . . . . 4
FCC Warning . . . . . . . . . . . . . . . . 4
Warranty . . . . . . . . . . . . . . . . . . .105
Wearable Clip, Using . . . . . . . . . . . . 42
Sirius S50 (012 606a)
Page 58

USER MANUAL
Sirius-S50
PER SONA L SATE LLIT E RAD IO + CAR KIT
 Loading...