

Page 1

DETAILS
Sirius-S50
CAR KIT
Page 2

Congratulations on the purchase of your Sirius S50 Car Kit
The Car Kit will a llow you to use your Sir ius S50 in your vehicle to listen to live broadc asts
and saved content, and capture and store b oth scheduled and unsche duled SIRIUS programming.
© 2005 SIRIUS Sate llite Radio Inc.
® “SIRIUS”, My Sir ius Studio, S Series and related marks, the SIRI US dog logo, channel
names and logos ar e trademarks of SIRIUS S atellite Radio Inc. All Rights Reserved.
Page 3

Table of Contents
TABLE OF CONTENTS . . . . . . . . . . . . . . . . . . . . . . . . . . . . 2
WARNING AND SAFETY INFORMATION . . . . . . . . . . . . . . . . . . . . 3
FCC Warning . . . . . . . . . . . . . . . . . . . . . . . . . . . . . . . . . . 3
FCC Compliance . . . . . . . . . . . . . . . . . . . . . . . . . . . . . . . . 3
Canadian Compliance . . . . . . . . . . . . . . . . . . . . . . . . . . . . . . 4
General Precautions . . . . . . . . . . . . . . . . . . . . . . . . . . . . . . . 4
PACKAGE CONTENTS . . . . . . . . . . . . . . . . . . . . . . . . . . . . 6
CONTROLS. . . . . . . . . . . . . . . . . . . . . . . . . . . . . . . . . 8
Car Dock Reference Guide . . . . . . . . . . . . . . . . . . . . . . . . . . . . 8
Using the Media Dial . . . . . . . . . . . . . . . . . . . . . . . . . . . . . . 12
GETTING STARTED . . . . . . . . . . . . . . . . . . . . . . . . . . . . . 13
Installing the Car Dock . . . . . . . . . . . . . . . . . . . . . . . . . . . . . 13
Installing the Antenna . . . . . . . . . . . . . . . . . . . . . . . . . . . . . 20
Connecting the Cigarette Lighter Adapter . . . . . . . . . . . . . . . . . . . . . 23
TROUBLESHOOTING . . . . . . . . . . . . . . . . . . . . . . . . . . . . 24
SPECIFICATIONS . . . . . . . . . . . . . . . . . . . . . . . . . . . . . . 26
WARRANTY . . . . . . . . . . . . . . . . . . . . . . . . . . . . . . . .27
Warning and Safety Information
FCC Warning
This equipment may generate or use radio f requency energy. Changes or modifications to thi s
equipment may caus e harmful interference u nless the modifications are expressly approved i n
this owners guide. The user could lose the authority to operate th is equipment if an unaut horized change or mod ification is made.
FCC Compliance
This equipment has been tested and found t o comply with Part 15 of the FCC Rules. These
rules are designed to provide reasonable p rotection against harmfu l interference. This equ ipment may cause har mful interference to rad io communications if it is not installed and use d in
accordance with th ese instructions. Howeve r, there is no guarantee that interference will not
occur in a particu lar installation. If thi s equipment does cause h armful interference to r adio
reception, which c an be determined by turn ing the equipment off an d on, the user is encour aged to try to cor rect the interference by one of more of the foll owing measures:
Reorient or reloca te the receiving antenna .
•
Increase the separ ation between the other equipment and the Receiv er.
•
Connect the other equipment to a different circuit from that to wh ich the Receiver is con-
•
nected.
Consult the dealer or an experienced radio technician for help.
•
[ Table o f Co ntents ]
2
[ Warning an d Safet y In formati on ]
3
Page 4

[ Warning an d Safet y In formati on ]
4
[ Warning an d Safet y In formati on ]
5
Canadian Compliance
This Class B digit al apparatus complies wi th Canadian ICES-003.
Cet appareil numér ique de la classe B est conforme à la norme NMB- 003 du Canada.
General Precautions
Safe ty P recautions
Be sure to observe the following warnings. Failure to follow these safety instructions and
warnings may resul t in a serious accident.
Do not operate the Sirius S50 in a way tha t might divert your atte ntion from driving safel y.
•
As a driver, you a lone are responsible for safely operating your v ehicle in accordance wit h
traffic safety law s at all times.
Be sure the unit i s installed as described in the installation ins tructions in this guide. When
•
installing the uni t using a Home Kit or Ex ecutive Kit, follow the installation instruction s
included with thos e kits.
Failure to follow these safety instruction s and warnings may resul t in a serious accident.
•
To avoid short cir cuits, do not open the u nit, and never put or le ave any metallic objects
•
(coins, tools, etc .) inside the unit.
If the unit emits smoke or unusual odors, turn the power off immed iately, and disconnect
•
the unit from any power source.
Do not drop the un it or subject it to stro ng shocks.
•
If the unit doesn’ t seem to be working pro perly, turn the unit off , wait 5 – 10 seconds, t hen
•
turn it on again.
Ciga rett e Lighter A dapt er
Do not use any oth er power adapter for the Sirius S50, or connect it directly to the vehic le’s
power. Doing so wi ll damage the unit.
The car dock opera tes on 5v DC, 1.5A. Usin g anything other than th e supplied cigarette
lighter adapter to power the car dock will void the warranty.
Page 5

[ Packa ge C onten ts ]
6
[ Packa ge C onten ts ]
7
Package Contents
Anten na Ca ble
Cover /Tail
Anten na Ca ble
Cover /Tail
Alcoh ol Sw abAlcoh ol Sw ab
Parts Bag*Parts Bag*
Magne tic A ntenn a
The following item s are included with your purchase of the Car Kit :
*The parts bag con tains mounting screws an d an alcohol swab.
Car D ockCar D ock
Remot e Con trolRemot e Con trol
Vehic le Mo untsVehic le Mo unts Cigar ette Light er
Cigar ette Light er
Adapt er
Adapt er
Page 6
[ Contr ol s ]
8
[ Contr ol s ]
9
Fast Forward
Mode
Media Dial
Play/Pause
Playlists
Rewind
Select
Back
Display Screen
Setup
FM OUT
DC 5V
ANT
LINE OUT
Love
FM OUT LINE OUTDC 5V ANT
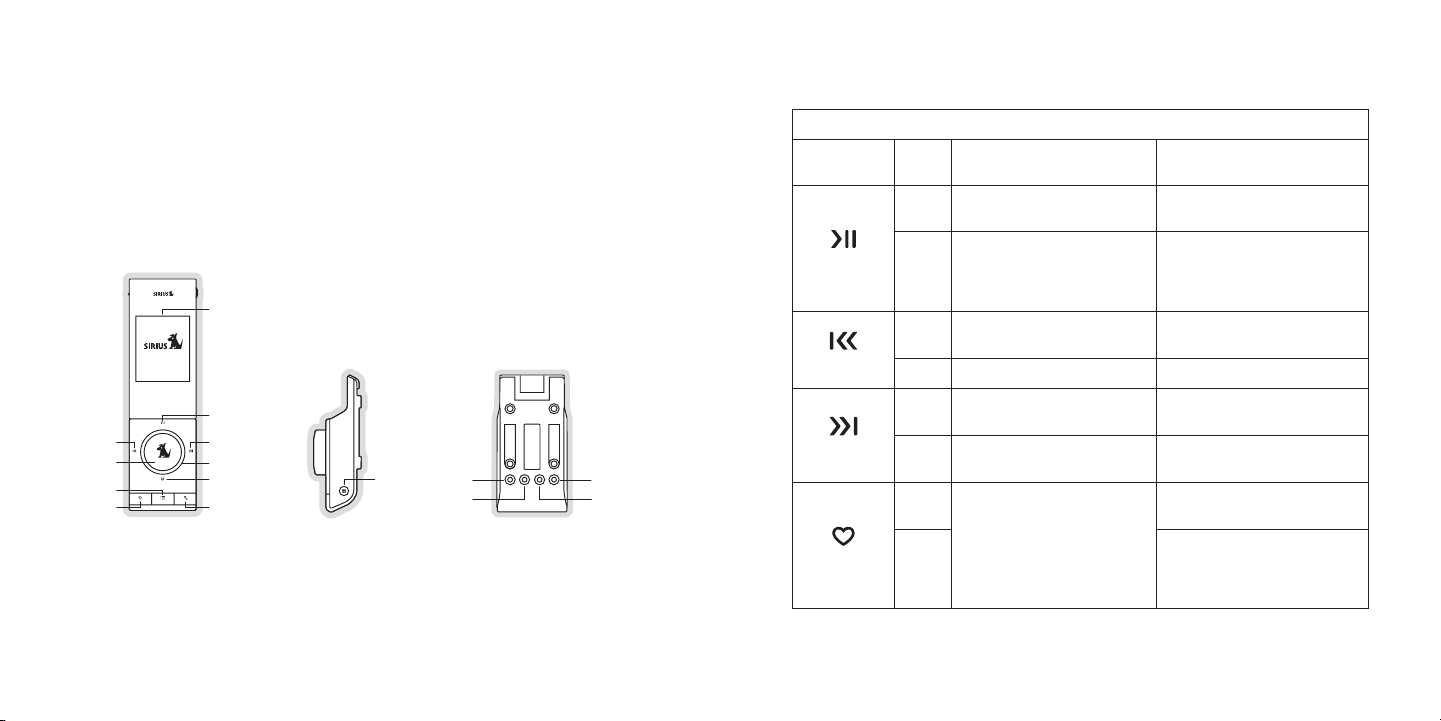
Figur e 1Figur e 1
Controls
Car Dock Reference Guide
Figure 1 identifie s the buttons, controls, and connectors of the c ar dock.
The following tabl es describe the function s of the buttons, contro ls, and connectors on th e
car dock. Please r efer to your Sirius S50 manual for more informat ion about each of these
buttons and featur es.
Car Dock Button Des crip tions
Butt on Acti on Li ve Environm ent Descrip tion
Pauses a live broa dcast or
Press
resumes playing a broadcast
Play /Pau se
Rewi nd
Fast -For ward
Love
If paused, returns to live
broadcast
Hold
If in a channel li st, plays the
highlighted channe l
Rewinds a broadcas t to previ-
Press
ous song or show
Hold Rewinds through a broadcast Rewinds through so ng or show
Fast-Forwards the replay buf-
Press
fer to the next so ng or show
Fast-Forwards thro ugh the
Hold
replay buffer
Press
Saves song or show
Cancels currently active
recording
Hold
Plays or pauses th e current
song or show
No Action
Rewinds to the pre vious song
or show
Fast-Forwards to t he next song
or show
Fast-Forwards thro ugh song
or show
If listening to My Sirius Channels, saves the co ntent
If listening to My Sirius Songs
or My Sirius Shows , displays
prompt to delete t he song or
show
Play back
Envi ronm ent Descrip tion
Page 7

[ Contr ol s ]
10
[ Contr ol s ]
11
Car Dock Button Des crip tions C onti nued
Butt on Acti on Li ve Environm ent Descrip tion
If listening to li ve broadcast,
tunes next channel
Turn
Medi a Di al
If in a list, menu , or prompt,
scrolls to next or previous item
Press Select s highlighted items in l ists, menus, or prompts
Allows you to Add/ Move/Re-
Sele ct
Play list s
Hold
move a preset
Allows you to brow se the
Press
playlists
Hold No Action No Action
If listening, retu rns to previous channel or playlist
If in a list at th e top level, exits and r eturns back to previous
Press
content
If in a list not a t the top level, moves u p one level in the list
Back
structure
Jumps to programme d traffic/weather or oth er channel
Hold
If a jump is pendi ng, cancels jump
If in a list or in Setup, exits the list o r Setup
Play back
Envi ronm ent Descrip tion
If listening to pl aylist, no action
If in a list, menu , or prompt,
scrolls to next or previous item
No Action
Goes to the most r ecent playlist
menu screen and hi ghlights the
currently selected song or show
If browsing playli sts, moves up
one level in the p laylist menu
structure
Car Dock Button Des crip tions C onti nued
Butt on Acti on Li ve Environm ent Descrip tion
First push allows you to browse live chann els according to the
current tuning mod e
Press
Second push cycles browse mode between Cha nnel, Genre, and
Presets
Mode
Cycles between cha nnel
Hold
name/artist/title when in
browse mode
Displays the Setup menu
Press
If in the S etup me nus, moves up one level in the menu structure
Setu p
First push and hol d displays the frequency of the currently selected FM preset f or 10 seconds
Hold
Second and subsequ ent push within 10 secon ds cycles through
the FM presets
Car Dock Connector Desc ription s
Conn ecto r Desc ript ion
FM O UT
DC 5 V
LINE OUT
ANT
FM output connecti on.
Connection for the Cigarette Lighter Adapt er.
Optional audio out put for connection to th e vehicle’s audio system . An
audio cable (not s upplied) is required to utilize this connection.
Connection for the Magnetic Antenna.
Play back
Envi ronm ent Descrip tion
No Action
Page 8

Using the Media Dial
Figur e 2Figur e 2
The Media Dial is a u nique multifunction cont rol which can be turned and pressed to accomplish many func tions of the Sirius S50. Turning the Media Dial clo ckwise or counterclockwise which wi ll scroll channels, genr es, presets, menus and l ists. Pressing the Media
Dial in the center (on the SIRIUS dog logo ) provides the ‘Select’ function for choosing ch annels, genres, pres ets, prompts, menu or li st items.
The Media Dial also p rovides for selecting fo ur other functions when pressed at the north,
south, east, or we st positions as shown in Figure 2 ( Play/Pause, Love, Fast-Forward,
and Rewind).
Getting Started
SIRIUS suggests pr ofessional installation of this product in your vehicle. Professional in stallation provides an experienced technician to install this product in your vehicle, advice for
selecting a suitab le mounting location, in stallation of the antenn a, and routing all the n ecessary wires and cab les. If the FM reception within your vehicle pro ves to be poor, an insta ller
will have the nece ssary accessories to ins tall an optional FM rela y switch, or an audio ca ble
to connect the aud io output of the Sirius S50 directly to your veh icle’s audio system. Ask your
SIRIUS retailer if they provide profession al installation services , or can recommend a pro fessional installatio n service.
Installing the Car Dock
When installing th e dock in your vehicle, choose a location in you r vehicle where the unit will
not block your vis ion, interfere with the vehicle controls, or obs truct the air bag. The l ocation
should be easily a ccessible and provide go od visibility of the dis play, and should not be
located where it w ill be in direct sunligh t which will affect the visibility of the displa y screen.
The mounting acces sories necessary to inst all the dock in a vehicl e are provided. Figures 3 &
4 show several exa mples of the Sirius S50 mounted in a vehicle: A is the console front mou nt
method using the a dhesive mount, B is the console side mount metho d using the adhesive
mount, and C is th e vent mount method usin g the vent mount clip.
12
[ Contr ol s ]
[ Getti ng S tarte d ]
13
Page 9

[ Getti ng S tarte d ]
14
[ Getti ng S tarte d ]
15
B.
A.
C.
Figur e 3Figur e 3
Figur e 4Figur e 4
Attach the adhesiv e foot to the mounting b racket, placing a collar in the bracket before
Adhesive
Foot
Collar
Mounting
Bracket
Vehicle
Dock
Figur e 5Figur e 5
1.
screwing the foot to the arm. The side of the collar with the hole should face the foot.
Attach the car doc k to the mounting bracke t using the provided scr ews.
2.
Before adhering th e mount to the side of t he console, be sure to s elect your mounting
3.
position carefully because once the mount has been adhered to a su rface, it will not be
possible to remove it and adhere it again.
Clean the selected mounting surface area i n the vehicle with the a lcohol swab.
4.
Unscrew the adhesi ve foot from the mount. Peel the protective mate rial off the adhesive
5.
on the foot and pr ess the foot firmly agai nst the vehicle surface.
The adhesive mount should then be allowed to adhere for a minimum of 2-4 hours before
6.
use. Best adhesion occurs after 24 hours. When the adhesive foot h as achieved sufficient adhesion, reattach the remainder o f the mount to the foot.
Depending upon the mounting location you s elect in your vehicle, c onsole front mount, console side mount, o r vent mount, the mount should be assembled as d escribed in the followin g
three sections. Ea ch type of mount method should only be installed as depicted, i.e., the console side mount me thod should only be used when installing to the side of the console, etc .
Cons ole Front Mount Met hod (A)
To mount the car d ock using the console fr ont mount method, assemb le the mount as follows,
as shown in Figure 5:
Page 10

[ Getti ng S tarte d ]
16
[ Getti ng S tarte d ]
17
Cons ole Side Mount Meth od (B)
Adhesive
Foot
Collar Collar
Extension
Arm
Mounting
Bracket
Vehicle
Dock
Figur e 6Figur e 6
To mount the car d ock using the console si de mount method, assembl e the mount as follows,
as shown in Figure 6:
Attach the adhesiv e foot to the extension arm, placing a collar in the arm before screw-
1.
ing the foot to th e arm. The side of the c ollar with the hole shou ld face the foot.
Attaching the moun ting bracket to the exte nsion arm, placing a col lar into the arm before
2.
screwing the brack et to the arm. The side of the collar with the h ole should face the
bracket.
Attach the car doc k to the mounting bracke t using the provided scr ews.
3.
Before adhering th e mount to the side of t he console, be sure to s elect your mounting
4.
position carefully because once the mount has been adhered to a su rface, it will not be
possible to remove it and adhere it again.
Clean the selected mounting surface area i n the vehicle with the a lcohol swab.
5.
Unscrew the adhesi ve foot from the mount. Peel the protective mate rial off the adhesive
6.
on the foot and pr ess the foot firmly agai nst the vehicle surface.
The adhesive mount should then be allowed to adhere for a minimum of 2-4 hours before
7.
use. Best adhesion occurs after 24 hours. When the adhesive foot h as achieved sufficient adhesion, reattach the remainder o f the mount to the foot.
Note that the cons ole side mount method sh ould not be used for mou nting to the dashboard
of the vehicle.
Page 11

[ Getti ng S tarte d ]
18
[ Getti ng S tarte d ]
19
Vent Mou nt Method ( C)
Figur e 7Figur e 7
Vent Clip
Collar
Mounting
Bracket (2)
Vehicle
Dock
Mounting
Bracket (1)
Clip Arms
Figur e 8Figur e 8
When assembling th e vent clip, note that t he lower arm may be atta ched in two different po sitions. You should assemble the vent clip i n the configuration that works best in your part icular
vehicle. Figure 7 illustrates both possibl e configurations of the vent clip.
To mount the car d ock using the vent mount method, assemble the mo unt as follows, as
shown in Figure 8:
Attach the vent cl ip to mounting bracket 1 using the hex screws an d nuts provided.
1.
Attach mounting br acket 2 to mounting brac ket 1, placing a collar into bracket 1 before
2.
screwing bracket 2 to bracket 1. The side of the collar with the h ole should face mounting bracket 2.
Attach the car doc k to mounting bracket 2 using the provided screw s.
3.
Slide the vent cli p portion of the mount i nto a vent in your vehic le, insuring that one of
4.
the vent louvers s lides between the upper and lower portions of th e two clip arms, and
hooks the rear of the louver.
Page 12

[ Getti ng S tarte d ]
20
[ Getti ng S tarte d ]
21
Figur e 9Figur e 9
Rubber Antenna
Cover/Tail
Protective
Strips
Adhesive
Strain
Relief
Cable
Figur e 10Figur e 10
Figur e 11Figur e 11
Installing the Antenna
The optimum mounti ng location for the magn etic antenna is on the r oof of the vehicle, with a
minimum unobstruct ed area of 12 inches by 12 inches, and exactly 6 ½ inches from the rear
roof edge of the v ehicle (the length of th e rubber antenna cable c over/tail). It is import ant to
avoid any obstruct ions that will block the SIRIUS signal, obstruct ions such as a roof rack ,
a sunroof, roof mo unted cargo containers, or other antennas. For c onvertible vehicles, the
antenna should be installed on the trunk l id.
For best performan ce, it is recommended th at the antenna be instal led with the rubber
antenna cable cove r/tail. This rubber ante nna cable cover/tail pro vides two benefits: firs t, it
positions the ante nna the recommended dist ance from the rear windo w, rear door/hatch, or
trunk edge to give the antenna the best vi ew of the sky. Secondly, it conceals and protect s
the exposed antenn a cable. The rubber ante nna cable cover/tail has adhesive strips that ho ld
it securely in pla ce.
The following illu strations show the recom mended mounting location s of the antenna for
several types of v ehicles. (Figure 9) Foll ow these recommendations for best performance fr om
the antenna.
Seda n/Coupe . Mount the antenna along the r ear centerline of the ve hicle roof, located at t he
rear of the roof n ear the rear window.
Pick up Truc k. Moun t the antenna along the rear centerline of the c ab roof, located at the rear
of the roof near t he rear window.
SUV/ Mini-Va n. Moun t the antenna along the rear centerline of the v ehicle roof, located at the
rear of the roof n ear the rear door/hatch.
Conv ertible . Mount the antenna along the c enterline of the trunk l id, with the rubber ante nna
cable cover/tail d irected toward the rear window.
When you have sele cted a suitable mounting location, clean the are a where the antenna and
rubber antenna cab le cover/tail will be mo unted with the supplied alcohol swab.
Connect the rubber antenna cable cover/tai l to the antenna cable, making sure that the str ainrelief on the ante nna sits into the rubber antenna cable cover/tai l groove. (Figure 10) Ro ute
the antenna cable through the wire channel in the rubber antenna c able cover/tail. Do not
remove the adhesiv e strips yet.
Temporarily positi on the antenna and rubbe r antenna cable cover/ta il in the selected mount ing
area and route the cable from the antenna to the vehicle’s interio r by tucking it undernea th the
rubber molding aro und rear window, as show n in Figure 11.
Route the cable fr om the lowest point of t he rear window into the trunk. Take advantage of
any existing cable channels or wiring cond uits. For SUVs, mini-van s and 5-door vehicles, b ring
the cable into the vehicle under the rubbe r molding for the tailga te, and continue under t he
interior trim.
From the trunk, or rear of the vehicle, ro ute the cable around the passenger compartment a nd
to the front of th e vehicle, to the receiv er. Take care not pull t he cable across sharp ed ges
that could damage it, and keep it away fro m areas where it might e ntangle feet. Coil any
Page 13

[ Getti ng S tarte d ]
22
[ Getti ng S tarte d ]
23
excess antenna cab le in a location where i t can be hidden.
Figur e 12Figur e 12
Once the antenna c able is routed through t he vehicle, and you are satisfied with the cable
routing, peel the protective material from the adhesive strips and press the rubber antenn a
cable cover/tail f irmly into place on the vehicle. Double check th at the location of the a ntenna
and rubber antenna cable cover/tail are co rrect, and continue to p ress firmly down on rubber antenna cable cover/tail for another 3 0 seconds. (Figure 12) A t room temperature (68
degrees), maximum adhesion usually occurs within 72 hours. During this period, avoid car
washes and other c ontact with the antenna and rubber antenna cable cover/tail.
Connecting the Cigarette Lighter Adapter
Connect the provid ed cigarette lighter ada pter to the DC 5V connec tion at the rear of the
vehicle dock. (Ref er to Figure 1 on page 8 for the location of thi s connector.)
Do not use any oth er power adapter for the Sirius S50, or connect it directly to the vehic le’s
power. Doing so wi ll damage the Sirius S50 . Using anything other t han the supplied cigaret te
lighter adapter to power the vehicle dock will void the warranty.
Page 14

[ Trouble sh oo ting ]
24
[ Trouble sh oo ting ]
25
Troubleshooting
Symp tom Solu tion
Sirius S50 does no t
power on
Sirius S50 display s
No A ntenna
Sirius S50 display s:
No S ignal
Audio static or lo ss of
clarity
Check the battery to be sure it is install ed correctly.
Charge the battery .
Check that the med ia player is properly se ated in the dock.
Check the cigarett e lighter adapter to be sure it’s seated in the
cigarette lighter, and connected to the ve hicle dock.
The satellite ante nna is not connected to the vehicle dock.
Check the satellit e antenna connection to the dock.
Check that the med ia player is properly se ated in the dock.
No satellite signa l is being received.
Check that the med ia player is properly se ated in the dock. Check
for obstacles over or around the satellite antenna.
Change the vehicle location to eliminate n earby obstacles
(bridges, overpass es, etc.).
The FM frequency c ontains static.
Locate a quiet FM frequency on your vehicl e radio and set the FM
transmitter freque ncy of the Sirius S50 to match.
If using the Line Out audio connector, che ck the cable connections.
Trou bleshoo ting Co ntinued
Symp tom Solu tion
No sound When in the vehicl e d ock:
The Sirius S50 wil l not
start up
The Sirius S50 doe s
not respond to the
Media Dial or the
buttons
Check if the FM ra dio is set to the wrong frequency. Tune the
vehicle FM radio a nd the Sirius S50 to the same FM frequency.
Check if the FM tr ansmitter in the Sirius S50 is turned off. Turn
the FM transmitter on.
If using the Line Out audio connector, che ck the cable connections.
When using the med ia player: Check that th e ear buds are
plugged into the h eadphone jack securely.
The operating syst em files on the Sirius S 50 have been deleted.
Connect the Sirius S50 to your PC using th e USB cable, and use
the My Sirius Stud io software to download new operating system
files. Follow the software instructions in cluded on the software
CD.
Remove the media p layer from the dock, rem ove the battery from
the media player, wait 10 seconds, replace the battery and turn
it back on.
Page 15

Specifications
Warranty
Satellite Frequenc ies . . . . . . . . . . . . . . . . . . . . . . . . . . . . . . . . . . . . . .2322.293/2330.207 MHz
Terrestrial Freque ncies . . . . . . . . . . . . . . . . . . . . . . . . . . . . . . . . . . . . . . . . . . . . 2326.250 MHz
Power Requirements . . . . . . . . . . . . . . . . . . . . . . . . . . . . . . . .5 Volts DC, 1.5A, C enter Positive
Operation Temperat ure . . . . . . . . . . . . . . . . . . . . . . . . . . . . . . . . . -5° to +40° C (23° to 10 4° F)
Signal-to-noise (S /N) . . . . . . . . . . . . . . . . . . . . . . . . . . . . . . . . . . . . . . . . . . . . . . . . . 90 dB (MP3)
Car Dock Dimension s (Height x Width x Dept h) . . . . . . . . . . . . . . . . . . 9.65cm x 4.8cm x 1. 7cm
(3.8” x 1.89” x .6 7”)
Antenna Type . . . . . . . . . . . . . . . . . . . . . . . . . . . . . . . . . . . . . . . . . . . . . . . . Lo w Profile Magnetic
Antenna Cable Leng th . . . . . . . . . . . . . . . . . . . . . . . . . . . . . . . . . . . . . . 21’ (si ngle micro-cable)
Connector Type . . . . . . . . . . . . . . . . . . . . . . . . . . . . . . . . . . . . . . . . . . . . . . . . SMB (right-angle)
Audio Interface . . . . . . . . . . . . . . . . . . . . . . . . . . . . . . . . . . . . . . . . . . . 1/8” / 3.5mm S tereo Jack
[ Speci fi ca tions ]
26
12 M onth Warranty
SIRIUS S atellite Ra dio Inc. (the “ Company”) w arra nts to the original re tail purchaser of this pro duct
that sho uld this pr oduc t or any pa rt thereof, und er normal u se and cond itions, be prov en defectiv e in
material or workman ship within 12 months from the date of or iginal purc hase, such defe ct(s) will be
repaired or replace d wi th new or r econditione d pr oduct (at t he Company’ s option) witho ut charge f or
parts an d repair la bor. To obtain repair or r epla cement with in the term s of this Warra nty, the pr oduct
is to be delivered with proof of w arranty cov erag e (e.g. dat ed bill of sale), specific ation of de fect(s),
transpor tation prep aid, to the loc ation shown bel ow under WA RRANTY RETU RN.
This War ranty does not extend to t he eliminat ion of external ly generate d static or noi se, to corr ection
of anten na problems , to costs incu rred for in stal lation, rem oval or rei nstallation of the product , or to
damage t o tapes, co mpac t discs, sp eakers, acc esso ries, or ve hicle elect rical systems.
This War ranty does not apply to an y product o r pa rt thereof which, in t he opinion of t he Company,
has suff ered or bee n da maged throu gh alterati on, improper in stallation, mishandling, m isuse, negl ect,
accident , or by rem oval or defacem ent of the fact ory serial number/bar code label(s). THE EXTENT
OF THE C OMPANY’S LI ABIL ITY UNDER T HIS WARRANT Y IS LIMITED TO THE REPAIR OR
REPLACEM ENT PROVIDE D AB OVE AND, IN NO EVENT, SHAL L THE COMPA NY’S LIABIL ITY
EXCEED T HE PURCHASE PRI CE PAID BY PURCHASER F OR T HE PRODUCT.
This War ranty is in lie u of all ot her express war ranties or liabilities . ANY IMPLIED W ARRANTIES, INCLUDING ANY IMPLIED WAR RANTY OF ME RCHANTABILI TY, SHALL BE LI MITED TO TH E DURATION OF THIS WRITTE N WA RRANTY. ANY ACTION FOR BRE ACH OF ANY WARRANTY HE REUNDER IN CLUDING ANY IMP LIED WARRAN TY OF MERCH ANTA BILITY MUST BE BROUGHT
WITHIN A PERIOD OF 48 M ONTHS FROM DATE OF ORI GINA L PURCHASE. IN NO CASE SHALL
THE COMP ANY BE LIAB LE F OR ANY CONS EQUENTIAL O R IN CIDENTAL DA MAGES FOR
BREACH O F THIS OR A NY O THER WARRAN TY, EXPRESS OR IMPLIED, WH ATSOEVER. N o
person o r represent ativ e is author ized to ass ume for the Com pany any li ability other t han express ed
herein i n connectio n wi th the sale of this pr oduc t. Some sta tes do not allow limitatio ns on how l ong
an impli ed warranty las ts or the e xclusion or lim itation of incidental or consequentia l damage so the
above li mitations o r ex clusions ma y not apply to you. This W arranty giv es you specific legal righ ts and
you may also have o ther rights whi ch vary fro m st ate to stat e.
WARR ANTY RETURN : To obt ain repair or replacem ent within the terms of th is W arranty, pl ease return pro duct to an auth orized reta iler or cal l Cu stomer Serv ice at 1-80 0-869-5590; pro of of purch ase
and desc ription of defe ct are requ ired. Produ cts to be retur ned to an a pproved warrant y station m ust
be shipp ed freight prep aid.
[ Warranty ]
27
Page 16

SIRIUS Customer Se rvice: 1-800-869-5590
Sirius S50 Product Support: 1-800-869-5364
customercare@siriu s-radio.com
SIRIUS Satellite R adio Inc.
1221 Avenue of the Americas
New York, NY 10020
1-888-539-7474
http://www.sirius. com
Sirius S50 Car Kit (1205 05a)
Page 17

USER MANUAL
Sirius-S50
CAR KIT
 Loading...