

Page 1

STC2 Car Kit
Installation Guide
Page 2
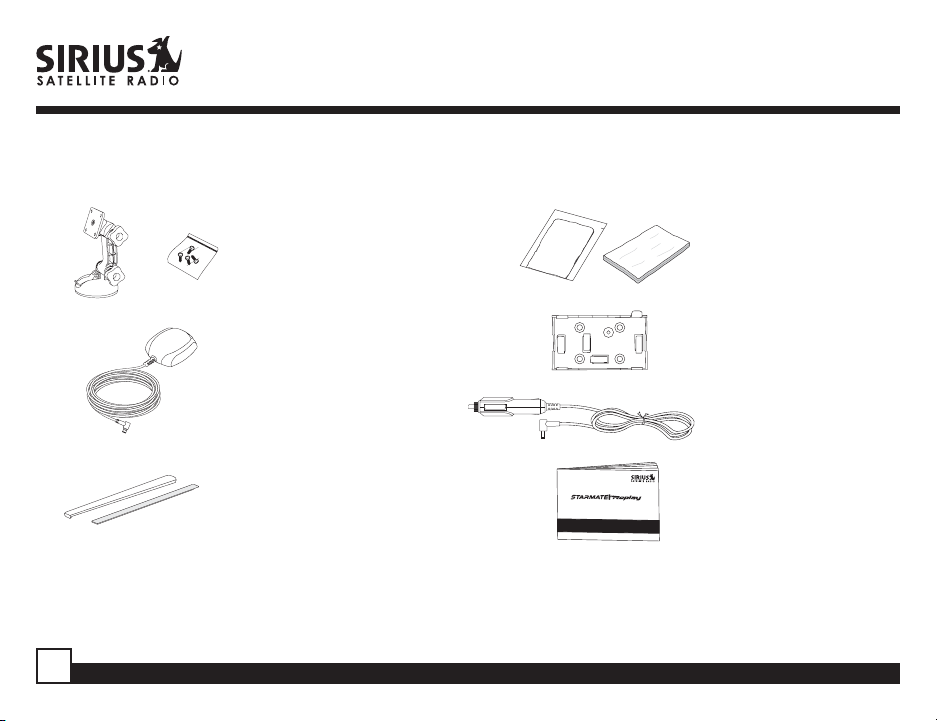
Box Contents
When you unpack your STC2 Car Kit, it should include everything as shown below:
Suction Cup Mount
& Screws
u
S
c
a
f
r
P
e
a
e
l
C
n
i
n
(To clean a surface of any
known / unknown emulsions
prior to applying adhesives.)
Alcohol Swab and
®
Velcro
Strip
n
o
i
t
a
t
r
i
a
K
p
e
g
r
Mounting Plate
Magnetic Antenna
Cigarette Lighter
Power Cord
Rubber Antenna
Cable Cover/Tail
& Adhesive Strip
S
T
C
2
C
a
r K
it
In
s
ta
lla
tio
n
G
u
id
e
User and
Installation Guide
Check the box to be all of the items are included. If any of the items are missing or damaged, please contact
the retailer where you purchased the product. It is recommended that you keep the original packaging in case
you need to ship your STC2 Car Kit in the future.
2
STC2 Car Kit Installation Guide
Page 3
Safety Precautions
Warning
Take the following precautions to prevent traffic
accidents and avoid personal injury:
• Installation must be performed according to this
installation guide. Sirius Satellite Radio is not
responsible for issues arising from installations not
performed according to the procedures in this
guide.
• Do not install the Receiver where it may obstruct
your view through the windshield or your vehicle’s
indicator displays.
• Do not install the Receiver where it may hinder the
function of safety devices such as an airbag.
Doing so may prevent the airbag from functioning
properly in the event of an accident.
• The installation and use suggestions contained in
this manual are subject to any restrictions or
limitations that may be imposed by applicable law.
The purchaser should check applicable law for
any restrictions or limitations before installing and/
or operating the Receiver.
• Failure to follow these safety precautions may
result in a serious accident.
Caution
Take the following precautions to keep the Receiver
in proper working order:
• Be sure the Receiver is connected to a 12V DC
power source with a negative ground connection.
• Do not install the Receiver where it will be
exposed to high levels of humidity, moisture, or
dust.
• When replacing the fuse, use only a new fuse with
the proper rating. Using a fuse with the wrong
rating could potentially cause damage to the
Receiver in the event of a short circuit.
STC2 Car Kit Installation Guide
3
Page 4
Installation
Installation of your ST2 Starmate Replay Receiver is
easy:
1. Choose a location in your vehicle where you will
mount the Receiver.
2. Mount the Receiver to the suction cup mount and
attach the suction cup portion of the mount to the
vehicle window, or use the velcro strip to mount the
Receiver.
3. Install the magnetic antenna on the roof of the
vehicle, and route the antenna cable to the Receiver.
4. Connect the power cord for the Receiver to your
vehicle’s cigarette lighter.
5. Subscribe to the SIRIUS service and begin enjoying
the SIRIUS entertainment!
Location
Choose a location in your vehicle where the Receiver
will not block your vision, interfere with the vehicle
controls, or obstruct the air bag. The location should
be suitable for using the suction cup mount, such as
the windshield or other flat, smooth surface, or a
surface suitable for using the velcro mounting.
The location should be easily reachable and provide
4
good visibility of the Receiver.
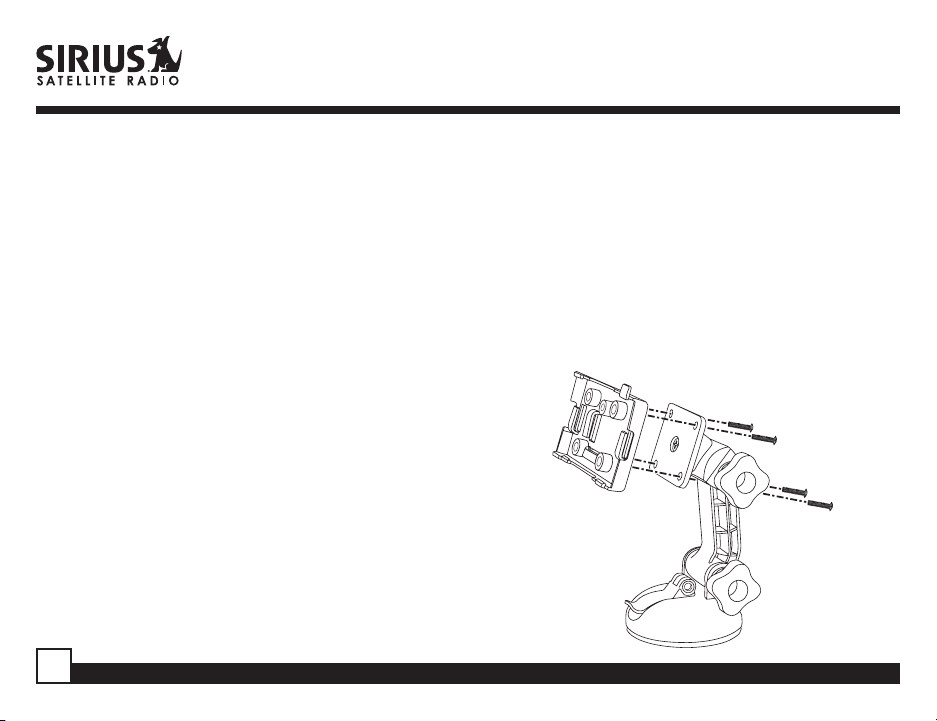
Mounting the Receiver
The Receiver may be attached to the vehicle by
using the suction cup mount, or by using the velcro
strips.
If you are using the suction cup mount, attach the
mounting plate to the suction cup mount by using
the provided bolts and hex nuts as shown below. Be
sure the large tab on the mounting plate is facing up.
STC2 Car Kit Installation Guide
Page 5

If you are using the velcro strip for mounting, attach
the velcro strip to the back of the mounting plate.
Route the cables through the mounting plate
underneath the tabs as shown. The cables may be
routed across the mounting plate, or routed down to
exit at the bottom.
STC2 Car Kit Installation Guide
Place the Receiver into the mounting plate by first
placing the bottom of the Receiver into the tabs at
the bottom of the mounting plate (1), and then
pivoting the top of the receiver into the mounting
plate until it snaps into place (2).
1
2
If you are using the suction cup mount, attach the
suction cup mount to the vehicle windshield, or other
surface, as follows:
5
Page 6

1. Clean the area where you are attaching the
suction cup with an alcohol wipe.
2. Lift up the cam lever on the suction cup mount as
shown.
3. Place the suction cup mount on the windshield, or
other area, and press the cam lever straight down
towards the suction cup to flatten the suction cup
as shown.
6
4. Lock the cam lever down as shown.
Installing the Magnetic Antenna
The optimum mounting location for the antenna is
on the roof of the vehicle, with a minimum
unobstructed area of 12 inches by 12 inches, and
exactly 6½ inches from the rear roof edge of the
vehicle (the length of the rubber antenna cable
cover/tail). It is important to avoid any obstructions
that will block the SIRIUS signal, obstructions such
as a roof rack, a sunroof, roof mounted cargo
containers, or other antennas.
The following illustrations show the recommended
mounting locations of the antenna for several types
of vehicles. Follow these recommendations for best
performance from the antenna.
STC2 Car Kit Installation Guide
Page 7

Sedan/Coupe
centerline of the vehicle roof, located at the rear of
the roof near the rear window.
: Mount the antenna along the rear
Convertible
of the trunk lid, with the rubber antenna cable cover/
tail directed toward the rear window.
: Mount the antenna along the centerline
SUV/Mini-Van:
centerline of the vehicle roof, located at the rear of
the roof near the rear door/hatch.
Pickup Truck
centerline of the cab roof, located at the rear of the
roof near the rear window.
STC2 Car Kit Installation Guide
Mount the antenna along the rear
: Mount the antenna along the rear
Clean the area where the antenna and rubber
antenna cable cover/tail will be mounted with the
supplied alcohol swab.
Connect the rubber antenna cable cover/tail to the
antenna cable, making sure that the strain-relief on
the antenna seats into the rubber antenna cable
cover/tail groove. Route the antenna cable through
the wire channel in the rubber antenna cable cover/
tail. Do not yet attach the adhesive strip.
Temporarily position the antenna and rubber
antenna cable cover/tail in the selected mounting
area and route the cable from the antenna to the
7
Page 8

vehicle’s interior by tucking it underneath the rubber
molding around rear window, as shown.
Route the cable from the lowest point of the rear
window into the trunk. Take advantage of any
existing cable channels or wiring conduits. For
SUVs, mini-vans & 5-door vehicles, bring the cable
into the vehicle under the rubber molding for the
tailgate, and continue under the interior trim.
From the trunk, or rear of the vehicle, route the cable
around the passenger compartment and to the front
of the vehicle, to the receiver. Take care not pull the
cable across sharp edges that could damage it, and
keep it away from areas where it might entangle
feet. Coil any excess antenna cable in a location
where it can be hidden.
Once the antenna cable is routed through the
vehicle, and you are satisfied with the cable routing,
peel the yellow protective material from the
adhesive strip and adhere the adhesive strip to the
rubber antenna cover/tail. Next peel the red
protective material from the adhesive strip and
press the rubber antenna cable cover/tail firmly into
place on the vehicle.
PROTECTIVE MATERIAL
(RED SIDE)
ADHESIVE
STRIP
ANTENNA
CABLE
RUBBER ANTENNA
CABLE COVER/TAIL
ANTENNA
(UNDERSIDE)
8
STC2 Car Kit Installation Guide
Page 9

Double check that the location of the antenna and
A
rubber antenna cable cover/tail are correct, and
continue to press firmly down on rubber antenna
cable cover/tail for another 30 seconds.
RUBBER ANTENNA
CABLE COVER/TAIL
VEHICLE
MOUNTING SURFACE
Note: At room temperature (68 degrees), maximum
adhesion usually occurs within 72 hours. During this
period, avoid car washes and other contact with the
antenna and rubber antenna cable cover/tail.
STC2 Car Kit Installation Guide
Connecting the Receiver
Connect the antenna and cigarette lighter power
adapter to the Receiver to complete the installation.
The illustration below shows the location of the
antenna and power connectors on the Receiver.
NTENNA
FM OUT
AUDIO OUT
POWER
Plug the cigarette lighter power adapter cord into
your vehicle’s cigarette lighter, and turn the Receiver
On by pressing the power button. Once you have
verified that Receiver has powered on, you can
proceed with activating your SIRIUS subscription, if
you have not already subscribed.
9
Page 10

SIRIUS Satellite Radio Inc. (the “Company”) warrants to the original retail purchaser of this product that should this product or any part
12 MONTH LIMITED WARRANTY
thereof, under normal use and conditions, be proven defective in material or workmanship within 12 months from the date of original
purchase, such defect(s) will be repaired or replaced with new or reconditioned product (at the Company’s option) without charge for
parts and repair labor. To obtain repair or replacement within the terms of this Warranty, the product is to be delivered with proof of
warranty coverage (e.g. dated bill of sale), specification of defect(s), transportation prepaid, to the location shown below under
WARRANTY RETURN.
This Warranty does not extend to the elimination of externally generated static or noise, to correction of antenna problems, to costs
incurred for installation, removal or reinstallation of the product, or to damage to tapes, compact discs, speakers, accessories, or
vehicle electrical systems.
This Warranty does not apply to any product or part thereof which, in the opinion of the Company, has suffered or been damaged
through alteration, improper installation, mishandling, misuse, neglect, accident, or by removal or defacement of the factory serial
number/bar code label(s). THE EXTENT OF THE COMPANY’S LIABILITY UNDER THIS WARRANTY IS LIMITED TO THE REPAIR OR
REPLACEMENT PROVIDED ABOVE AND, IN NO EVENT, SHALL THE COMPANY’S LIABILITY EXCEED THE PURCHASE PRICE PAID
BY PURCHASER FOR THE PRODUCT.
This Warranty is in lieu of all other express warranties or liabilities. ANY IMPLIED WARRANTIES, INCLUDING ANY IMPLIED
WARRANTY OF MERCHANTABILITY, SHALL BE LIMITED TO THE DURATION OF THIS WRITTEN WARRANTY. ANY
ACTION FOR BREACH OF ANY WARRANTY HEREUNDER INCLUDING ANY IMPLIED WARRANTY OF MERCHANTABILITY
MUST BE BROUGHT WITHIN A PERIOD OF 48 MONTHS FROM DATE OF ORIGINAL PURCHASE. IN NO CASE SHALL
THE COMPANY BE LIABLE FOR ANY CONSEQUENTIAL OR INCIDENTAL DAMAGES FOR BREACH OF THIS OR ANY
OTHER WARRANTY, EXPRESS OR IMPLIED, WHATSOEVER. No person or representative is authorized to assume for the
Company any liability other than expressed herein in connection with the sale of this product. Some states do not allow
limitations on how long an implied warranty lasts or the exclusion or limitation of incidental or consequential damage so the
above limitations or exclusions may not apply to you. This Warranty gives you specific legal rights and you may also have
other rights which vary from state to state.
WARRANTY RETURN: To obtain repair or replacement within the terms of this Warranty, please return product to an
authorized retailer or call Customer Service at 1-800-869-5590; proof of purchase and description of defect are required. Products to
be returned to an approved warranty station must be shipped freight prepaid.
10
STC2 Car Kit Installation Guide
Page 11

SIRIUS Customer Service: 1-888-539-7474
SIRIUS Product Support: 1-800-869-5590
customercare@sirius-radio.com
STC2 Car Kit Installation Guide
11
Page 12

SIRIUS Satellite Radio Inc.
1221 Avenue of the Americas
New York, NY 10020
1-888-539-7474
www.sirius.com
© 2006 SIRIUS Satellite Radio. ® “SIRIUS” and the SIRIUS dog logo are registered trademarks of Sirius Satellite Radio Inc.
® Velcro is a registered trademark of Velcro Industries B.V.
STC2 (011206b)
 Loading...