

Page 1

Satellite Radio Plug & Play Receiver
User Guide
Page 2

Page 3

Congratulations on the Purchase of your new SIRI US Starmate 3
Plug-n-Play Receiver
Your new SI RI US Starmate 3 Plug-n-Play Receiver lets you enjoy S IR IUS® Satellite Radio ’s
digital entertainment anywhere you’v e installed the SU PH1C SIRIUS Universal Plug and Play
Home Kit, SUPV1C S IR IUS Unive rsal Plug and Play Vehicle Kit, or the SU BX1C SIR IU S Plug
and Play Univers al B oombox (each sold separately). Use this manual to familiarize y ourself
with all of SIRI US Starmate 3 features and capabilities. For the latest information about this
and other SIRIUS St armate p roducts and accessories, visi t http://www.siriu scanada.ca.
Page 4

Table of Contents
TABLE OF CONTENTS . . . . . . . . . . . . . . . . . . . . . . . . . . . . . . 2
WARNING AND SAFETY INFORMATION . . . . . . . . . . . . . . . . . . . . .
IC Caution . . . . . . . . . . . . . . . . . . . . . . . . . . . . . . . . . . . 4
General Precautions . . . . . . . . . . . . . . . . . . . . . . . . . . . . . . . 4
COPYRIGHTS & TRAD EMARKS . . . . . . . . . . . . . . . . . . . . . . . . .
PACKAGE CONTENTS . . . . . . . . . . . . . . . . . . . . . . . . . . . . . .
GETTING STARTED . . . . . . . . . . . . . . . . . . . . . . . . . . . . . .
Maximizing Audio Quality From Your SI RI US Receiver . . . . . . . . . . . . . . . 10
Wireless Connection . . . . . . . . . . . . . . . . . . . . . . . . . . . . 10
Direct Connections . . . . . . . . . . . . . . . . . . . . . . . . . . . . . 11
Subscribing to the SIRIUS Service . . . . . . . . . . . . . . . . . . . . . . . . 14
CONTROLS . . . . . . . . . . . . . . . . . . . . . . . . . . . . . . . . .
SIRIUS Starmate 3 Reference Guide . . . . . . . . . . . . . . . . . . . . . . . 16
Remote Control Reference Guide . . . . . . . . . . . . . . . . . . . . . . . . . 18
OPERATION . . . . . . . . . . . . . . . . . . . . . . . . . . . . . . . . .
Display Screen Information . . . . . . . . . . . . . . . . . . . . . . . . . . . 20
Changing Channels and Categories . . . . . . . . . . . . . . . . . . . . . . . . 21
Display Button (DISP) . . . . . . . . . . . . . . . . . . . . . . . . . . . . . 22
Selecting Channels Directly . . . . . . . . . . . . . . . . . . . . . . . . . . . 24
Channel Presets (BAND) . . . . . . . . . . . . . . . . . . . . . . . . . . . . 24
Memory (MEMO) and Song Seek (S-Seek) Functions . . . . . . . . . . . . . . . . 27
Jump Button . . . . . . . . . . . . . . . . . . . . . . . . . . . . . . . . . 36
Game Alert . . . . . . . . . . . . . . . . . . . . . . . . . . . . . . . . . . 37
FM Preset Button . . . . . . . . . . . . . . . . . . . . . . . . . . . . . . . 38
MEN U OPTIONS . . . . . . . . . . . . . . . . . . . . . . . . . . . . . . .
Sirius ID . . . . . . . . . . . . . . . . . . . . . . . . . . . . . . . . . . . 39
FM Transmitter . . . . . . . . . . . . . . . . . . . . . . . . . . . . . . . . 40
Game Alert . . . . . . . . . . . . . . . . . . . . . . . . . . . . . . . . . . 42
Settings . . . . . . . . . . . . . . . . . . . . . . . . . . . . . . . . . . . 44
Jump Settings . . . . . . . . . . . . . . . . . . . . . . . . . . . . . . . 44
4
7
8
10
16
20
39
[ Table of Co nte nts ]
2
Page 5

Display Options . . . . . . . . . . . . . . . . . . . . . . . . . . . . . . 46
Memory Options . . . . . . . . . . . . . . . . . . . . . . . . . . . . . . 47
Audio Level . . . . . . . . . . . . . . . . . . . . . . . . . . . . . . . . . 48
Confirmation Tone . . . . . . . . . . . . . . . . . . . . . . . . . . . . . . . 49
Parental Control . . . . . . . . . . . . . . . . . . . . . . . . . . . . . . . . 49
Time Based Features . . . . . . . . . . . . . . . . . . . . . . . . . . . . . . 54
Signal Indicator . . . . . . . . . . . . . . . . . . . . . . . . . . . . . . . . 62
Factory Default . . . . . . . . . . . . . . . . . . . . . . . . . . . . . . . . 63
TROUBLESHOOTING . . . . . . . . . . . . . . . . . . . . . . . . . . . . .
OPTIONAL ACCESSOR IES . . . . . . . . . . . . . . . . . . . . . . . . . .
SPECIFICATIONS. . . . . . . . . . . . . . . . . . . . . . . . . . . . . . .
WARRANTY . . . . . . . . . . . . . . . . . . . . . . . . . . . . . . . . .
SIR IUS ID . . . . . . . . . . . . . . . . . . . . . . . . . . . . . . . . . .
65
66
68
69
70
[ Table of Co nte nts ]
3
Page 6

Warning and Safety Information
IC Caution
“Operation is subject to the following two conditions: (1) this device may not caus e interference, and (2) this device must accept any interference , including interference that may cause
undesired operation of th e device.”
“To reduce poten tial radio interference to ot her users, the antenna type a nd its gain should
be so cho sen that the equivalent isotropically radiated power ( EI RP ) is not more than that
required for successful c ommunication”.
“This dev ice has been designed to operate with an antenna havin g a maximum gain of [2] dBi.
Antenna having a higher g ain is strictly prohibited pe r regulations of Industry Can ada. The
required antenna impedanc e is 50 ohms.”
“To reduce poten tial radio interference to ot her users, the antenna type a nd its gain should
be so cho sen that the equivalent isotropically radiated power ( e.i.r.p.) is not more than that
permitted for successful communication.”
This devi ce and its antenna(s) must not be co-located or operat ing in conjunction with any
other antenna or transmit ter.
General Precautions
Liqu id Cr ysta l Precauti ons
If the LCD screen on the receiver is damaged, do not to touch the liquid crystal fluid. If any of
the following situations happen, take the act ion indicated:
If the liquid crystal fluid comes in contact with your skin, wipe the skin area with a clo th
1.
and then wash the skin th oroughly with soap and runnin g water.
If the liquid crystal fluid gets into your ey e, flush the eye with clean w ater for at least 15
2.
minutes. Seek medical car e.
[ Warning an d Safety In forma tio n ]
4
Page 7

If the liquid crystal fluid is ingested, flus h your mouth thoroughly with water. Drink large
3.
quantities of water and i nduce vomiting. Seek medical care.
Safe ty Precaut ions
Be sure to observe the fo llowing warnings. Failure to follow these safety instructions and
warnings may result in a serious accident.
Do not operate the receiv er in a way that might divert your attention from driving safely.
•
As a driver, you a lone are responsible for safely operating you r vehicle in accordance with
traffic safety l aws at all times.
Do not install t he receiver where it may obst ruct your view through the wi ndshield, or of
•
your vehicle’s indicator displays.
Do not install t he receiver where it may hind er the function of s afety devices such as an
•
airbag. Doing so may prev ent the airbag from functioni ng properly in the event of a n accident.
Be sure the receiver and accessories are inst alled as described in the ins tallation instru c-
•
tions which accompany each accessory kit. SIR IUS Satellite Radio is not responsible for
issues arising from installations which were not installed according to th e instructions.
To avoid short c ircuits, do not open the rece iver or accessories, and neve r put or leave any
•
metallic objects (coins, tools, etc.) inside the receiver.
If the receiver or access ories emits smoke or unusual odors, turn the power off imm edi-
•
ately, and disconn ect the receiver from any power source.
Do not drop the receiver or subject it to strong shocks.
•
If the receiver doesn’t s eem to be working properly, turn the receiver o ff, wait 10 seconds,
•
replace the battery and t hen turn it on again.
The installation and use suggestions cont aine d in this manual are subject to any restric-
•
tions or limitat ions that may be imposed by a pplicable law. The purchaser should check
applicable law for any re strictions or limita tions before install ing and/or operating this unit.
[ Warning an d Safety In forma tio n ]
5
Page 8

Oper ating Temper ature
The recei ver is designed to operate between -20° to +85° C (-4° to +185° F). Avoid leaving
the receiver in a vehicle or elsewhere where the tempe rature may fall outside this range. Extreme temperatures or ext reme temperature fluctuations can degrade the performance of the
LCD display screen , and possibly damage it.
Clea ning and Maintenan ce
If the receiver or access ories become dirty, turn the power off and wipe it clean with a soft
cloth. Do not use hard cl oths, strong cleaning fluids, paint thinner, al cohol, or other volatile
solvents to clean. These may cause damage to the receiver.
[ Warning an d Safety In forma tio n ]
6
Page 9

Copyrights & Trademarks
© 2006 SIRIUS Sate llite Radio Inc. All Rights R eserved.
® “S IR IUS”, the SI RI US dog logo, channel names and logos are trademarks of S IR IU S
Satellite Radio Inc. “N FL” and the NF L Shield logo, and the N FL Sunday Drive name and logo
are registered trademarks of the National Football League. “NHL” and the NH L Shield are
registered trademarks of the National Hockey League. “NBA” and the N BA silhouette logo are
registered trademarks of NBA Propert ies Inc. All other trademarks , service marks, sports t eam
names, album art, and log os are the property of their respective owners. All Rights Reserved.
“St armate” is a trademark of SIRIUS Satellite Radio.
™
Portions of the software on this receiver are licensed under th e eCos License. Distribution of
eCos requires that the eC os source code be made availa ble to Sirius Satell ite Radio customers. The eCos License and eCos source code are available to the public at http://www.sirius.
com/ecoslicense.
Sirius S atellite Radio reserves all rights to all receiver software not co vered under the eCos
license. This includes all portions of receiver software that w ere not distributed to Sirius as
part of the eCos operatin g system.
Hardware, subscription an d activation fee required. For full Terms & Conditions, vi sit
http://www.siriusc anada.ca. Prices and programming are subject to change. Not available
in H I a nd AK. Equipment and subscrip tion sold separately. Inst allation req uired with some
equipment.
[ Cop yri ghts & Tra demar ks ]
7
Page 10
Package Contents
MUTE
CATEGORY
MENU
BAND MEMO
+
1 2 3
4 5 6
7 809
DISP
1
MENU
2 3 4 5 6 7 8 9 0
147147 RoadDog TruckingRoadDog Trucking
Charlie DanielsCharlie Daniels
Road DogsRoad Dogs
Entrtain
12:00P
Entrtain
12:00P
A2A2
DISP MEMO
BAND
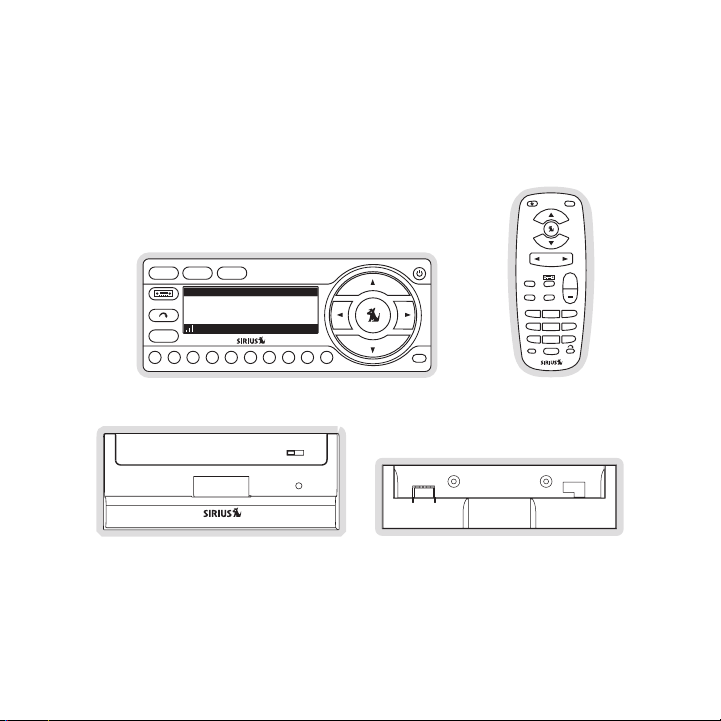
The follo wing items are included with your purchase of the SIRI US Starmate 3 receiver:
Vehicle Dockin g Stat ionVehicle Dockin g Stat ion
8
[ Pack age C ont ent s ]
Starm ate 3 Receive rStarm ate 3 Receive r
Remot e
Remot e
Contr ol
Contr ol
Dockin g Stat ion Ada pterDockin g Stat ion Ada pter
Page 11
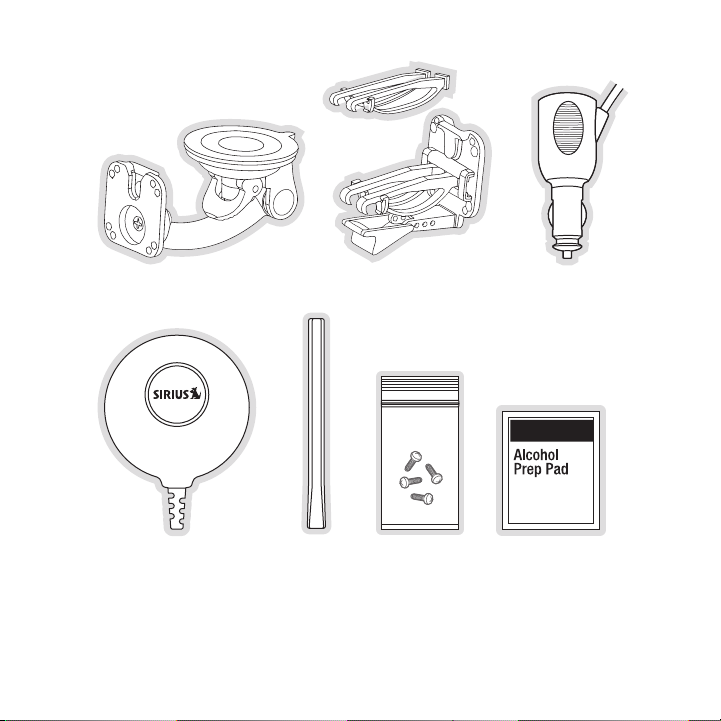
Sucti on Cup MountSucti on Cup Mount
Vent Mo unt &
Vent Mo unt &
Exten ded Ven t Hook s
Exten ded Ven t Hook s
Cigar ette L ighter
Cigar ette L ighter
Adapte r
Adapte r
Magne tic Ant ennaMagne tic Ant enna
Antenn a
Antenn a
Cover /Tail
Cover /Tail
Mount ing Sc rewsMount ing Sc rews Alcoho l SwabAlcoho l Swab
Unpack yo ur S IR IUS S tarmate 3 receiver carefully and make sure th at everything shown is
present. If anything is m issing or damaged, or if your SI RIUS Starmate 3 receiver fai ls to operate, notify your dealer i mmediately. It is recommended that you retain the original carton a nd
packing m aterials in case you need to ship your receiver in the future.
[ Pack age C ont ent s ]
9
Page 12
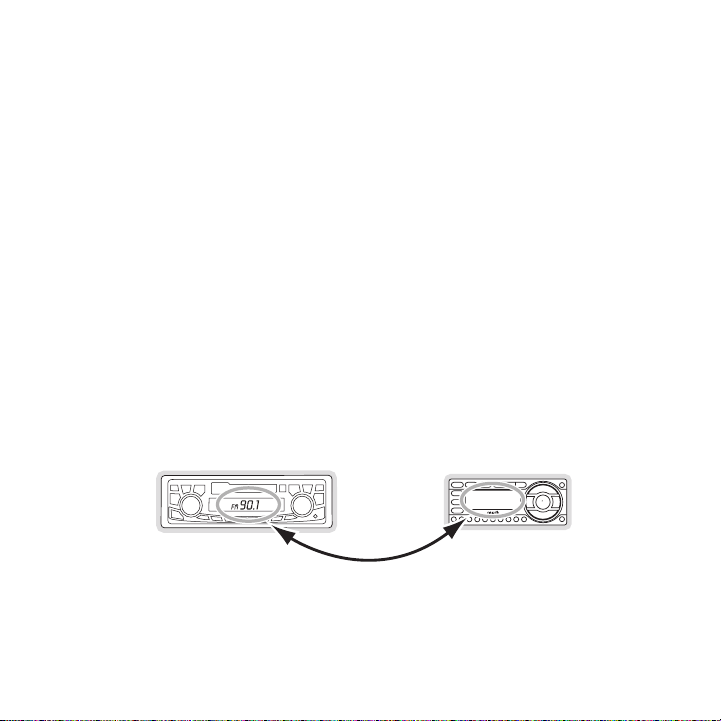
90.1
Figur e 1Figur e 1
Getting Started
SIRI US suggests professional installation of this produc t in your vehicle. Profession al installation provides an experi enced technician to install t his product in your vehicle, advice for
selecting a suit able mounting location, installation of the anten na, and routing all the n ecessary wires and c ables. An installer will have the necess ary audio connection acce ssories to
provide optimal audio out put of the S IR IUS receiver directly to y our vehicle’s audio system.
Ask your SI RI US ret ailer if they provide professional in stallation services, or can recommend a
professional installation service.
Maximizing Audio Quality From Your SIRIUS Receiver
There are two primary ways to connect your SI RI US satellite radio . The following procedures
will help you obtain the best performance.
Wir ele ss Co nne Cti on
Your SI RI US radio contains an F M transmitter. The FM transmitter send s the audio from your
SIRI US radio to your vehicle radio. (Figure 1)
To tune your tra nsmitter:
Turn off your SIR IU S radio and tune through the FM chann els on your vehicle radio to
1.
locate an FM channel that is not broadcasting in your area. If you use an FM channe l
[ Get tin g Sta rte d ]
10
Page 13

that is being used by a l ocal broadcaster, it will interfere with the pe rformance of your
SIRI US radio. Once you have located an F M channel that is not bro adcasting in your
area, save it as a preset on your vehicle rad io. This will become your SI RI US preset.
Turn on your SI RIUS radio. Press and hold the F M Preset button, which is identified b y
2.
the radio icon, to access the five FM preset lists. Se lect FM1 and tune to the channel that matches the SIRI US preset on your vehicle radio. Refer to the Men u Op tion s/
FM Tran smit ter section of this manua l for more detailed instructions on how to do this.
Note : The FM transmitter in your SIRI US radio is automatically se t to FM channel 88.1 . This
may not be the best channel in your area.
Tip: If y ou regularly travel between cities with different acti ve F M channels, you may need
to find channels that are not broadcasting in each city. Several SI RI US rece iver models can
store multiple F M transmit channels, so you can easily switch to the best F M channel for
each city. You will also wa nt to set the FM channels tha t are not broadcasting in each city as
presets on your vehicle r adio.
Dir eCt C onn eCt ion s
Direct connection provide s better audio performance th an a wireless connection and removes
the possibility of interf erence from local FM broadcasters.
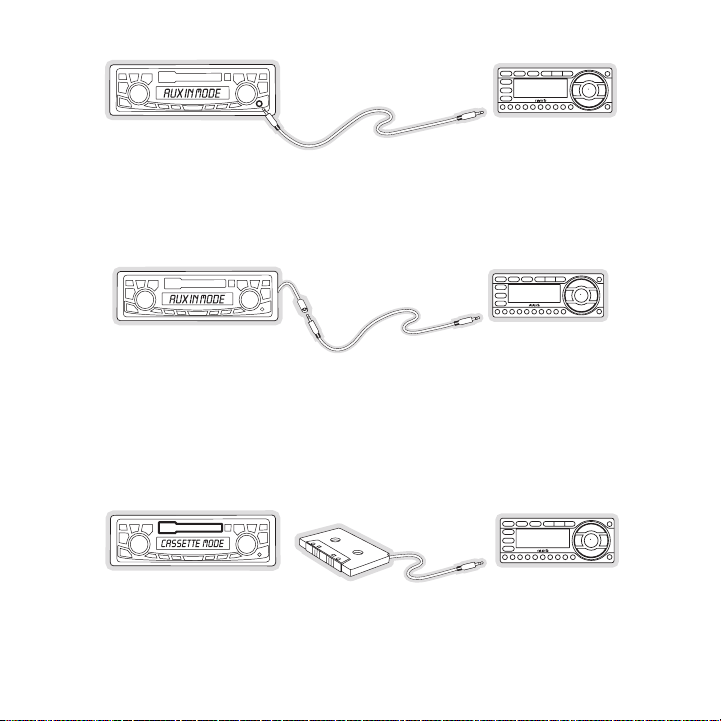
Dire ct Wi red Audio Conn ecti on
If your vehicle radio off ers an “AUX IN” or “LI NE IN” connection, it is the best audio connection available. If the “AUX IN” or “LI NE IN” co nnector is located on the fro nt of your vehicle
radio, this is also the e asiest connection. (Figure 2)
Purchase an audio cable that matches the connec tion type of your vehicle radio and
1.
your SI RI US radio at your local elec tronics retailer. Your SIRIUS radio requires a 1/ 8”
stereo male connector. Your local electronics r etailer can help you determine the proper
connection for your car r adio.
Plug one end of the cable into the “AUD IO OUT” or “LI NE OUT” jack on your SIR IU S
2.
radio. Plug the other end into your “AUX IN” or “LI NE IN” jack on your vehicle radio.
[ Get tin g Sta rte d ]
11
Page 14
FM OFF
FM OFF
FM OFF
Figur e 2Figur e 2
Figur e 3Figur e 3
Figur e 4Figur e 4
NOTE: Refer to you r vehicle radio manufacturer’ s guidelines for correct inst allation.
NOTE: If the “AUX IN” or “LIN E I N” conne ction is on the back of your vehicle r adio, you may
want to consider professi onal installation. ( Figure 3)
Cass ette Adapt er
If your vehicle radio has a cassette player:
Purchase a Cassette Adapter at your local electronics retailer.
1.
Connect the adapter betwe en the “AUDIO OUT” or “LINE OUT” on your S IR IUS radio
2.
and the vehicle radio’s c assette slot. (Figure 4)
[ Get tin g Sta rte d ]
12
Page 15

NOTE: Refer to the cassette adapter manufacture r’s guidelines for correc t use.
90.1
FM
DIRECT
ADAPTER
Figur e 5Figur e 5
SI RI US FM Direct Adap ter
If your vehicle radio doe s not have an “AUX IN” or “LI NE IN” jack, the S IR IUS F M Direct
Adaptor provides a wired connection between your SIRIUS radio and your vehicle radio, eliminating the outside static and interference yo u sometimes experience when u sing a wireless
FM connection. ( Figure 5)
Professional installation may be required. Se e your local SI RI US ret ailer.
[ Get tin g Sta rte d ]
13
Page 16

X% Completed
Updating Channels
184
News 12:00P A
To Activate CallTo Activate Call
1-888-539-SIRIUS1-888-539-SIRIUS
Preview
Figur e 6Figur e 6
Figur e 7Figur e 7
Subscribing to the SIRI US Service
Before you can listen to the SIRI US service, you need to subscrib e to the SI RI US Satellite
Radio service. To subscribe, do the following :
Be sure that the SI RI US Sta rmate 3 is correctly installed, is in the vehicle or home dock,
1.
and that the antenna is o riented to receive the SIR IU S signal.
Turn on the SI RI US Starmate 3. After the startup sequence, it will update the S IR IUS
2.
channel l ine-up. Wait until the channel updat es have completed before pres sing any
buttons. (Figure 6)
Once the channels have been updated, the display will change to
3.
To Activate Call 1-8 88-539- SI RIUS and will tune t o channel 184. (Figure 7) You will not
be able to listen to othe r channels until you activate your SI RIUS subscri ption.
Use the channel up and down buttons to tune the receiver to channel 000 to display
4.
the receiver’s unique 12- digit SIR IU S I D Number (SID). (Figure 8) You can also tune
directly to channel 000 by pressing the Se lect button, then the 0 (zero) button, and then
the Select button again. You may do this from either t he receiver or the remote con trol.
The SID number is also available on the SIRI US Starmate 3 packaging , and may also be
[ Get tin g Sta rte d ]
14
Page 17

accessed by pressing the ME NU button and selecting Sir ius ID. Write the SI D number
000
SIDSID
012345678912012345678912
12:00P
SIRIUS ID
A
001
Category 12:00P A
Artist NameArtist Name
Song TitleSong Title
Any Key to Continue
Subscription Updated
Channel Name
Figur e 8Figur e 8
Figur e 9Figur e 9
down in the space provide d near the end of this guide.
Have your credit card han dy and contact SIRIUS on the In ternet at:
5.
https://siri uscanada.ca /act ivate/
and follow the prompts to activate your subscription. You can also call SI RIUS toll-free
at: 1-888-5 39-SI RI US (1-8 88-539-7474).
When you have succ essfully subscribed to the SIR IU S servic e, and the S IR IUS Star-
6.
mate 3 has been updated w ith your subscription informa tion, an alert will be displa yed.
(Figure 9) To co ntinue, press any key on the receiver
You are now ready to begi n enjoying S IR IUS S atellite Rad io’s digital entertainment, and can
tune to other channels!
[ Get tin g Sta rte d ]
15
Page 18
Controls
1
MENU
2 3 4 5 6 7 8 9 0
147 RoadDog Trucking147 RoadDog Trucking
Charlie DanielsCharlie Daniels
Road DogsRoad Dogs
Entrtain 12:00PEntrtain 12:00P A2A2
DISP MEMO
BAND
11
32
4
1
7
5
6
8
10
9
Figur e 1Figur e 1
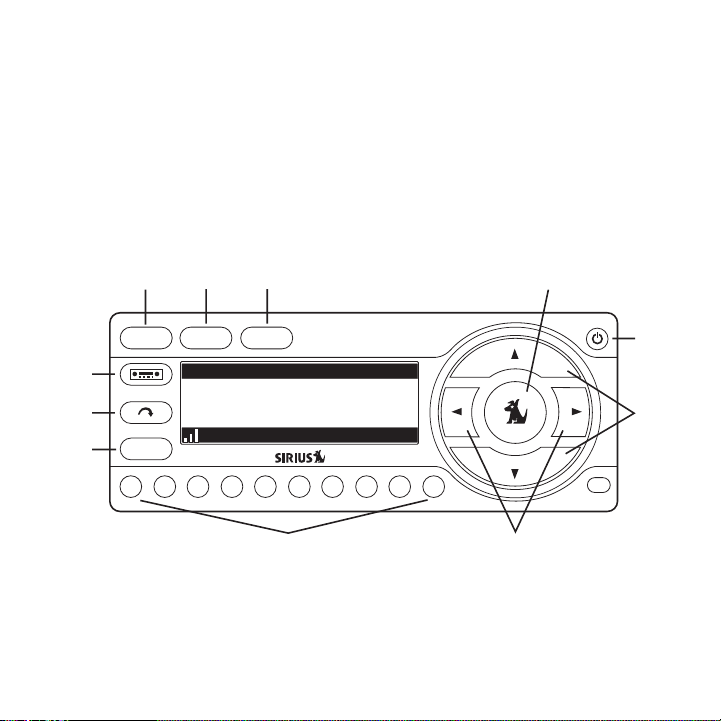
SIRIUS Starmate 3 Reference Guide
Figure 1 and the section following identify and descri be the buttons and controls o f the
SIRI US Starmate 3.
ME NU Button: Used to access m enu options to make setup and feature changes.
1.
DISP (Display) But ton: Toggles display between the default disp lay screen and large
2.
screen display mode. Pres sing and holding switches the display to the channel list
[ Con tro ls ]
16
Page 19

mode.
ME MO (Memory) Butt on ( S-Seek Fu nction): Saves a nd recalls artist names, song
3.
titles, and sports teams. Pressing and holding enters the S-Seek mode.
Sele ct Button: Selects it ems highlighted on the displa y screen. When at the default
4.
display screen, a press a nd release will display a pro mpt to enter a channel number.
Pressing and holding will return to the last channel played.
POWER Button: Turns the receiver On or Off.
5.
Chan nel Up/ Down Buttons: Navigat es through channels and display sc reens, and high-
6.
lights items on the displ ay.
Cate gory Prev ious/Ne xt B uttons: Navigates thr ough the category list screen which
7.
displays SI RI US chan nel categories.
Preset Nu mber Buttons (0-9): Sets and selects preset channels. Also used to directly
8.
tune chan nels by entering the channel number.
BAN D Bu tton : Pressing and releasing switches between the five preset banks (A, B, C),
9.
which hol d ten presets each. Pressing and holdi ng enables “Preset Tune Mode”, which
allows for viewing and li stening of stored presets wit h the cha nnel up/down buttons.
Jump Button: Used to quickly switch between the current channel and a favorite chan-
10.
nel.
FM Preset Button: Selects between preset FM f requencies used for the built -in wireless
11.
transmitter.
[ Con tro ls ]
17
Page 20
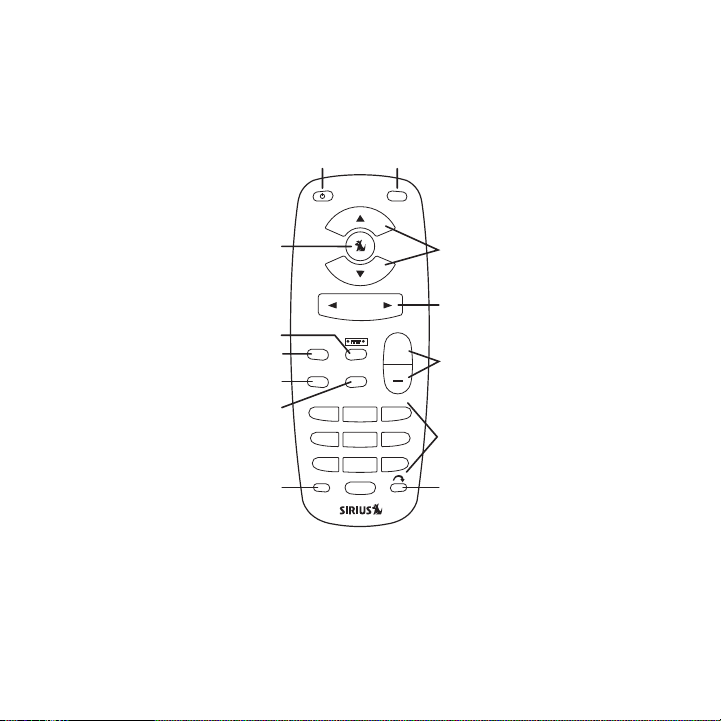
Remote Control Reference Guide
1
12
11
10
9
2
3
4
5
6
7
8
13
MUTE
CATEGORY
MENU
BAND MEMO
+
1 2 3
4 5 6
7 809
DISP
Figur e 2Figur e 2
Figure 2 and the section following identify the button s of the remote control.
Power But ton: Turns the recei ver On or Off.
1.
MUTE Bu tton : Mutes the audio.
2.
Chan nel Up/ Down Buttons: Navigat es through channels and display sc reens, and high-
3.
lights items on the displ ay.
[ Con tro ls ]
18
Page 21

Cat egory Pre vious/N ext Buttons: Navigates th rough the category list scree n which
4.
displays SI RI US chan nel categories.
+/- Volume Buttons : Adjusts the audio volume up & down.
5.
Numb er Buttons (0-9): Use d for directly selecting channels and for presets.
6.
Jump Button: Used to quickly switch between the current channel and a favorite chan-
7.
nel.
DISP (Display) But ton: Toggles display between the default disp lay screen and large
8.
screen display mode. Pres sing and holding switches the display to the channel list
mode.
ME MO (Memory) Butt on ( S-Seek Fu nction): Saves a nd recalls artist names, song
9.
titles, and sports teams. Pressing and holding enters the S-Seek mode.
BAN D Bu tton : Pressing and releasing switches between the five preset banks (A, B, C),
10.
which hol d ten presets each. Pressing and holdi ng enables “Preset Tune Mode”, which
allows for viewing and li stening of stored presets wit h the cha nnel up/down buttons.
ME NU Button: Used to access m enu options to make setup and feature changes.
11.
FM Preset Button: Selects between preset FM f requencies used for the built -in wireless
12.
transmitter.
Sele ct Button: Selects it ems highlighted on the displa y screen. When at the default
13.
display screen, a press a nd release will display a pro mpt to enter a channel number.
Pressing and holding will return to the last channel played.
Remo te Co ntro l Battery Installa tion
To inst all the remote control batter y, turn the remote control over and locate the battery cover
near the bottom edge. Ope n the battery compartment and place the battery in the com partment with the + side of t he battery facing up. Replace the battery cover on the rem ote control.
[ Con tro ls ]
19
Page 22

Operation
3-Digit Channel Number
Channel Name
Band/Preset Bank Number
8-Character
Category Name
Clock
A
uto Sizing/Scrolling Artist Name
Auto Sizing/Scrolling Song Title
SIRIUS Signal Strength Meter
001
Artist Name
Song Title
Category 12:00P A
Channel Name
Figur e 1Figur e 1
Display Screen Information
The displ ay screen of the SI RI US Starmate 3 provides information about the operation of the
receiver, such as the curre ntly tuned channel, song or show being played, artist name, time
and other information. This screen is referred to as the D efault display screen in this manual.
Figure 1 identifies the i nformation displayed when lis tening to a typical broadcast .
When the receiver is powered On, the previously selected channel will automatically begin
playing, and the artist n ame and song title of the cur rently playing song will be d isplayed.
20
[ Ope rat ion ]
Page 23
Changing Channels and Categories
Category
001 Channel Name001 Channel Name
002 Channel Name
003 Channel Name003 Channel Name
004 Channel Name004 Channel Name
Category
001 Channel Name001 Channel Name
002 Channel Name
003 Channel Name003 Channel Name
004 Channel Name004 Channel Name
Category
001 Artist Name001 Artist Name
002 Artist Name
003 Artist Name003 Artist Name
004 Artist Name004 Artist Name
Category
001 Song Title001 Song Title
002 Song Title
003 Song Title003 Song Title
004 Song Title004 Song Title
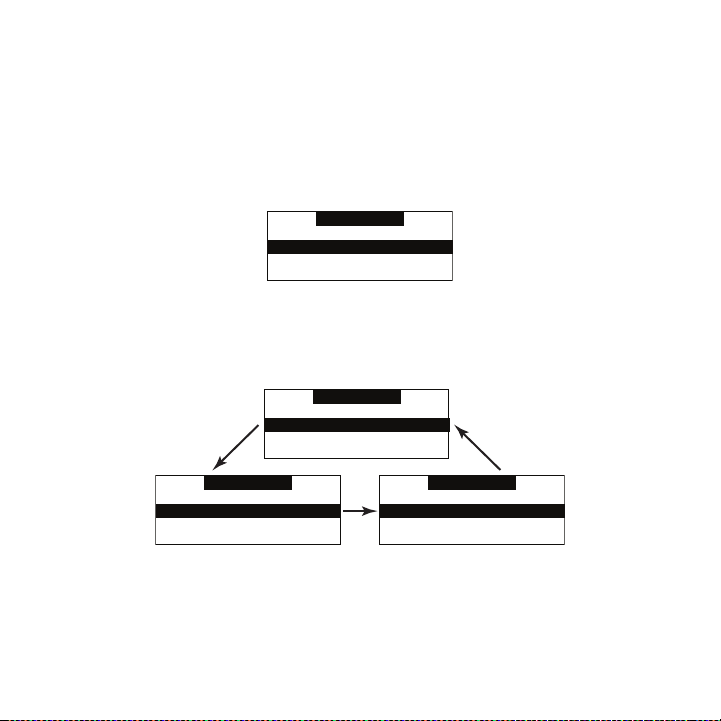
Figur e 2Figur e 2
Figur e 3Figur e 3
Pressing the channel up or down button will cause the receiver to immediately tune to the ne xt
or previous channel.
Pressing the category pre vious or next button will cau se the receiver to display a list of the
channels in the current category, highlighting the channel to whi ch you ar e currently tuned.
(Figure 2)
Repeated momenta ry pressing of the DIS P button while in the cat egory list mode will cause
the receiver to sequence the display between listings of artist names, song titles, and back to
channel n ames. (Figure 3)
Pressing the category pre vious or next button again wi ll cause the receiver to disp lay a listing
of the previous or next channel category.
Use the channel up/down buttons to highlight a channel within a category and press the
Select button to tune to the highlighted channel. When a new chan nel is selected, the display
[ Ope rat ion ]
21
Page 24

will revert to the defaul t display screen for the new channel.
001
Category 12:00P A
Artist N
Channel Name
001
Artist Name
Song Title
Category 12:00P A
Channel Name
Figur e 4Figur e 4
To exit the channel list mode without changing to a different channel, press and hold the DI SP
button for 1½ seconds, un til the default screen is dis played.
Display Button (DISP)
Momentarily pres sing and releasing the DIS P (Display) button wh ile the default screen is
displayed changes the artist name and song title to a scrolling , single line, large format d isplay
for easier viewing from a distance. (Figure 4 )
Pressing and holding the DISP button for 1½ sec onds will cause the recei ver enter the channel list mode. The channel list mode makes it e asy to quickly search for and locate music by
channel, by category, by ar tist, and by song title.
Once the receiver has ent ered the channel list mode, a listing of the channel numbers and
names is displayed. (Figu re 5) Repeated momentary pressing and releasing o f the DISP
button will sequence the display between listings of a rtist names, song titles, and back to
channel n ames.
22
[ Ope rat ion ]
Page 25

001 Channel Name001 Channel Name
003 Channel Name
005 Channel Name005 Channel Name
004 Channel Name004 Channel Name
002 Channel Name002 Channel Name
001 Artist Name001 Artist Name
003 Artist Name
005 Artist Name005 Artist Name
004 Artist Name004 Artist Name
002 Artist Name002 Artist Name
001 Song Title001 Song Title
003 Song Title
005 Song Title005 Song Title
004 Song Title004 Song Title
002 Song Title002 Song Title
Figur e 5Figur e 5
Note: If you are viewing a sports category channel list (N FL®, N BA®, NHL®, or College),
pressing the DISP button will instead toggle be tween the team names and the current score
of any live play-by-play game.
Use the category previous and next buttons to scroll t hrough the music and entertainment
categories, and the channel up and down buttons to scroll throu gh the available channels in
each cate gory to find the channel to which you want to l isten.
When you have foun d the cha nnel you wish to listen to, h ighlight the channel using the channel up and down buttons a nd press the Select button to tune to the channel. The new channel
will begin playing and th e display will revert to the default display screen for th e new cha nnel.
To exit the channel list mode without changing to a different channel, press and hold the DISP
button for 1½ seconds, un til the default screen is dis played.
[ Ope rat ion ]
23
Page 26

001
Category 12:00P A
Artist NArtist N
# ___
Enter Channel
Channel Name
Figur e 6Figur e 6
Selecting Channels Directly
A channel may be directly selected by entering the channel number using the 0 - 9 buttons on
the receiver. To enter a channel number, momentarily pre ss and release the Select but ton. At
the display prompt (Figur e 6) enter the three digit channel num ber.
Channel Presets (BAND)
You can store up to 30 of your favorite channels as pr esets for quick recall access. The preset
channels are stored in 3 bands, A, B, and C, each containing 10 channel pres ets, and are
numbered 0 to 9. The 10 channel presets in each band are accessed by pressing the appropriate number (0 to 9) on the receiver. A moment ary press an d release of the BAN D button
cycles through the 3 pres et bands (A, B, and C).
Stor ing C hann el Presets
To store a favor ite channel a s a preset, do the follow ing:
Momentarily pres s and release the BAND button until the desired preset band, A, B , or
1.
C, is displayed in the lo wer right corner of the defau lt display screen.
Tune the receive r to the chan nel you wish to store as a preset. (Refer to the secti on
2.
Chan ging Channels for spe cific instructions for tuning to a cha nnel.)
Press and hold the number ed preset button in which you wish to store your favorite
3.
channel f or 1½ seconds until you hear a beep. The band and preset number will then be
displayed in the lower ri ght corner of the display scr een to confirm that the channel has
been stored. (Figure 7)
24
[ Ope rat ion ]
Page 27

001
Category 12:00P A1
Artist NameArtist Name
Song TitleSong Title
Channel Name
Preset Stored
001
Category 12:00P A3
Artist NameArtist Name
Song TitleSong Title
Channel Name
Figur e 7Figur e 7
Figur e 8Figur e 8
Note: If the preset butto n already has a channel stored in it, the preset will be replaced b y the
newly stored channel.
Usin g Cha nnel Presets
The activ e band of presets is displayed in the lower right corn er of the default display scr een,
A, B or C. To change the acti ve band, momenta rily press and release the BA ND button t o
cycle between the preset bands.
The 10 pr eset chan nels in the active band can t hen be selected by momentarily pressing and
releasing the 0 through 9 buttons.
When you have chosen a pres et channe l, the band and preset number will be displayed in the
lower right corner of the default display screen. (Fig ure 8)
Sear ching for a Channel Pres et (P.TUN E Mode)
To quickly search through all of your presets in the P.TU NE mode, do the fol lowing:
Press and hold the BAND button for a pproximat ely 1 second to enter the P.TUN E mode.
1.
Pres et Tuning Mode will m omentarily be displa yed and the top left and lowe r right corners of the display will invert to indicate the receiv er is in the Preset Tune Mode. (Figure
9)
[ Ope rat ion ]
25
Page 28

001
Category 12:00P A1
Artist Name
Song Title
Channel Name
001
Artist NameArtist Name
Song TitleSong Title
Category 12:00P A
Preset Tune Mode
Channel Name
A-1 Channel NameA-1 Channel Name
A-3 Channel Name
A-5 Channel NameA-5 Channel Name
A-4 Channel NameA-4 Channel Name
A-2 Channel NameA-2 Channel Name
A-1 Artist NameA-1 Artist Name
A-3 Artist Name
A-5 Artist NameA-5 Artist Name
A-4 Artist NameA-4 Artist Name
A-2 Artist NameA-2 Artist Name
A-1 Song TitleA-1 Song Title
A-3 Song Title
A-5 Song TitleA-5 Song Title
A-4 Song TitleA-4 Song Title
A-2 Song TitleA-2 Song Title
Figur e 9Figur e 9
Figur e 10Figur e 10
Use the channel up and down buttons to move up or down through your channel presets
2.
and immediately tune to e ach channel. Channel p resets are grouped and displayed by
bank and preset number, i.e., A-1, A-2...B-1, B-2, etc. Empty presets a re not displayed.
To view the channel presets i n the cha nnel list mode, where you can view 4 presets at
3.
once, moment aril y press and hold the DISP button for approximately one second until
the chann el list mode is displayed. Repeated momentary pressing and releasing of th e
DISP button will s equence the display between l istings of artist names, song titles, and
back to channel na mes. (Figure 10)
Note: If you are viewing a sports category channel list (N FL®, N BA®, NHL®, or COLLEG E), pressing the DI SP button will instead toggle between the team names and the
current score of any live play-by-play game.
To exit the channel list mode , press and hold the DISP button for approximately one
4.
second, until the display reverts to the P.TUNE mode.
To exit the P.TUN E mode, pres s and hold the BAND button for approximately 1 second,
5.
until the default display screen is displayed.
[ Ope rat ion ]
26
Page 29

Memory (MEMO) and Song Seek (S-Seek) Functions
001
Artist NameArtist Name
Song TitleSong Title
Category 12:00P A
S-Seek Alert
Channel Name
001
Artist NameArtist Name
Song TitleSong Title
Category 12:00P A
Game Alert
Channel Name
Figur e 11Figur e 11
Figur e 12Figur e 12
This feat ure allows you to capture and store information in the receiver’s memory about the
currently tuned programmi ng– artist, song, or sports t eam. The receiver then continuously
searches all incoming SI RI US channels and alerts the user when a program s aved in memory
matches a selection currently being played. (Figure 11)
A total of 30 artists, songs, and sp orts teams may be stored in m emory.
If you have save d a sports team (or teams) in memory, at the ti me receiver is initially powe red
on, you will be alerted i f your sports teams are playi ng in a game being broadcast. Also, while
listening to your SI RIUS receiver, should one of your team s begin to play a game, y ou will be
alerted.
Stor ing Artist Names, S ong Titles, an d Sports Teams t o Memory
If you are listening to a song or other entertainment channel, or a sports team, an d wish to
save the artist, song, or sports team selecti on to memory for future S-See k alerts, do the
following:
For Artis t Na mes or Song Titles: If the current ly tuned channel is a music or entertain-
1.
ment chan nel, momentarily press and release the M EM O button. The receiver will displa y
a menu to choose to store the artist name or the song title. (F igure 13)
[ Ope rat ion ]
27
Page 30

100
Category 12:00P A
Artist NameArtist Name
Song TitleSong Title
Store Song?
Store Artist?Store Artist?
Channel Name
If either the artist name or song title is not availab le to save, the choice will b e displayed
100
Category 12:00P A
Artist NameArtist Name
Song TitleSong Title
Song Unavailable
Store Artist?Store Artist?
Channel Name
100
Category 12:00P A
Artist NameArtist Name
Song TitleSong Title
Artist Unavailable
Store Song?Store Song?
Channel Name
100
Category 12:00P A
Artist NameArtist Name
Song TitleSong Title
Song Stored
Store Artist?Store Artist?
Channel Name
100
Category 12:00P A
Artist NameArtist Name
Song TitleSong Title
Artist Stored
Store Song?Store Song?
Channel Name
Figur e 13Figur e 13
Figur e 14Figur e 14
Figur e 15Figur e 15
as unavailable. (Figure 1 4)
Using the channel up and down buttons, choose S tore Artist or Store Song (when available) and press the Selec t button to save the current selection to memory.
If both the artist and so ng are available to save, you will be prompted ag ain to s ave
whichever one you haven’t yet saved, song title or art ist name. (Figure 15) If you do not
wish to save, pr ess the ME MO button to exit.
For Sport s Ga mes: If the current tuned channel is an N FL, NBA, N HL, or College play-
2.
by-play sports broadcast, momentarily press a nd release the M EM O button. The receiver
will display a menu to choose which sports team should be s aved to memory. (Figure 16 )
28
[ Ope rat ion ]
Page 31

100
Category 12:00P A
Artist NameArtist Name
Song TitleSong Title
Store DAL?
Store NYG?Store NYG?
Channel Name
100
Category 12:00P A
Artist NameArtist Name
Song TitleSong Title
Team2 Unavailable
Store NYG?Store NYG?
Channel Name
Alert Type
Initial Game Alert
All Score UpdatesAll Score Updates
Figur e 16Figur e 16
Figur e 17Figur e 17
Figur e 18Figur e 18
If either of the teams is not available to sa ve, that team will be display ed as unavailable.
(Figure 17)
Using the channel up and down buttons, choose t he desired sports team (when available) and press the Selec t button to save the current selection to memory.
The next screen will ask which kind of alert yo u wish to have. (Figure 18)
Init ial Game Alert will provide an alert when the team you have chosen is playing a
game. All Score Upda tes will provide an alert when the team you have chosen is play ing
a game, and also when the scores are updated for the t eam.
Using the channel up and down buttons, choose t he desired alert and press the Select
button to save t he selection to memory.
If both teams are availab le to save, you will be prompted again to save the other team.
If you wish to s ave the team, follow the same procedure as when s aving the first team.
(Figure 19) If you do not wish to save, press the MEMO button t o exit.
[ Ope rat ion ]
29
Page 32

100
Category 12:00P A
Artist NameArtist Name
Song TitleSong Title
NYG Stored
Store DAL?Store DAL?
Channel Name
100
Category 12:00P A
Artist NameArtist Name
Song TitleSong Title
DAL Stored
Store NYG?Store NYG?
Channel Name
001
Category 12:00P
Artist NArtist N
Unable to Store
A
Channel Name
001
Artist NameArtist Name
Song TitleSong Title
Category 12:00P A
X Used/Y Empty
Channel Name
001
Artist NameArtist Name
Song TitleSong Title
Category 12:00P A
Artist Stored
Channel Name
Figur e 19Figur e 19
Figur e 20Figur e 20
Figur e 21Figur e 21
To ensure that n o duplicate entries are store d in memory, the r eceiver will check the
3.
stored memory list to ens ure that the alert about to b e stored is not already store d in
memory. If a dupli cate entry is found, an Unabl e to Store screen will be displayed for 1
second. (Figure 20) The receiver will then revert to the last a ctive display mode.
If the new alert was succ essfully stored in memory, a Artist/Song/Game Stored pop-u p
4.
screen followed by an X U sed/ Y Empty screen will be di splayed for 1 and 2 seconds
respectively. X is the tot al number of listings stored in memor y, and Y is the total number
of memory listings still available for storage. (Figur e 21)
If the M EMO button is pressed and all of the me mory spaces are full, an “S-Seek Full”
5.
screen will be displayed for 1 second. (Figure 21)
30
[ Ope rat ion ]
Page 33

001
Artist NameArtist Name
Song TitleSong Title
Category 12:00P A
Memory Full
Channel Name
001
Category 12:00P A
Artist NArtist N
Cancel
ReplaceReplace
Channel Name
Replace
Artist Name/ Song TitArtist Name/ Song Tit
Artist Name
Sports TeamSports Team
Artist Name/ Song TitArtist Name/ Song Tit
X/Y
Figur e 21Figur e 21
Figur e 22Figur e 22
Figur e 23Figur e 23
A Re place - Cancel screen will then be displayed which will all ow you to choose
whether to replace an exi sting alert stored in memory, or to cancel stor ing the alert to
memory. (Figure 22 )
Using the channel up and down buttons, choose w hether to replace an existing alert or
cancel s aving th e alert to memory. If you choos e to cancel saving the alert, the receiver
will revert to the last a ctive display mode.
If you have chosen to replace an existing alert, a listing of a ll the alerts stored in memor y
will be displayed. (Figur e 23)
Using the channel up and down buttons, highlight the alert that you would like to
overwrite and press the S elect button to store the new alert. If the new alert was successfully saved in memory, a Arti st/S ong/Game Sto red pop-up screen followe d by an
X Us ed/Y Empty screen wil l be displayed for 1 and 2 se conds respectively. (Figure 24)
X is the tot al n umber of listings stored in m emory, and Y is th e total number of me mory
listings still available for storage.
[ Ope rat ion ]
31
Page 34

001
Artist NameArtist Name
Song TitleSong Title
Category 12:00P A
X Used/Y Empty
Channel Name
001
Artist NameArtist Name
Song TitleSong Title
Category 12:00P A
Artist Stored
Channel Name
Memory
Artist NameArtist Name
Song TitleSong Title
1/30
Figur e 24Figur e 24
Figur e 25Figur e 25
The recei ver will revert to the last active display mode.
Viewi ng Stored Aler ts Stored in Memor y
To view the aler ts which have been saved to m emory, press and hold the ME MO button fo r
1½ seconds to enter S-See k mode. The alerts stored in memory wi ll be displayed one-at-atime in page format. (Fig ure 25) Use the channel up and down bu ttons to scroll through the
listings. This function allows you to review previously stored program information.
To exit this fun ction, press and release the ME MO button.
Dele ting an Al ert Store d in to Me mory
To delete an ale rt stored in memory, d o the following:
Press and hold the M EM O button for 1½ seconds t o enter S-Seek mode. The alerts
1.
stored in memory will be displayed one-at-a-time in pa ge format.
Use the channel up and down buttons to find the alert which you wish to delete and
2.
press the Select button.
A screen displaying Delete, Seek On, and Seek Off will b e displayed. (Figure 26)
3.
32
[ Ope rat ion ]
Page 35

Memory Recall
Delete
Seek OffSeek Off
Seek OnSeek On
Use the channel up and down buttons to highlight the Dele te option, and press the
Delete
Yes
NoNo
Memory
Artist NameArtist Name
Song TitleSong Title
08/29
29 Used/1 Empty
Memory
Artist NameArtist Name
Song TitleSong Title
08/29
Deleted
Figur e 26Figur e 26
Figur e 27Figur e 27
Figur e 28Figur e 28
4.
Select button. A delete c onfirmation screen will appea r. (Figure 27)
To permanently d elete the alert from the memo ry list, highlight Yes using the channel up
and down buttons and pres s the Select button to confir m.
A Deleted pop-up screen followed by an X Used /Y E mpty screen will be displ ayed for
5.
1 and 2 seconds respectiv ely. (Figure 28) X is the total number of listings saved i n
memory, and Y is t he total number of memory listings still avai lable for storage.
The recei ver will revert to the last active display mode.
[ Ope rat ion ]
33
Page 36

Activ ating the S-Seek Alert
Memory Recall
S-Seek On
S-Seek OffS-Seek Off
DeleteDelete
001
Artist NameArtist Name
Song TitleSong Title
Category 12:00P A
S-Seek Alert
Channel Name
001
Artist NameArtist Name
Song TitleSong Title
Category 12:00P A
Game Alert
Channel Name
Figur e 29Figur e 29
Figur e 30Figur e 30
To activate the S-Seek alert function to begi n receiving alerts, do the fo llowing:
Press and hold the M EM O button for 1½ seconds t o enter the S-Seek mode.
1.
Press and release the Sel ect button. A screen displayi ng S -S eek On, S-S eek Off, and
2.
Delete will be d isplayed. (Figure 29)
To enable S-Seek alerts, use the channel up and down b uttons to highlight the S-S eek
3.
On option and press the S elect button. The S-Seek function is n ow enabled.
When the S-Seek op tion is enabled, whenever the receiver is turned on, i t automatically
searches the incoming channels to determine if a match e xists with the program inform ation
stored in the S-Seek memo ry. If one or more matches are found, a pop-up screen moment arily
appears for 2 seconds and displays S- Seek Alert or Game Alert, depending upon which type
of a match was found. (Figure 30) An audible beep tone will also be heard indicatin g that a
match was found.
The recei ver then displays the SI RIUS SE EK LI ST or MY GAM E Z ONE screen, which di splays a list of the curre nt matches. (Figure 31) No alert is pr ovided for the currently sele cted
channel.
34
[ Ope rat ion ]
Page 37

SIRIUS SEEK LIST
121 Artist Name/ Song121 Artist Name/ Song
156 Artist Name
MY GAME ZONE
100 Giants @ Cowboys100 Giants @ Cowboys
123 Bulls @ Cavaliers
MY GAME ZONE
100 NFL NYG 7 DAL 3100 NFL NYG 7 DAL 3
123 NBA BUL 77 CLE 73
You can now select the ar tist, song, or sports game th at you wish to tune to by usi ng the
Figur e 31Figur e 31
channel u p and down buttons to highlight your selection from th e list, and then pressing the
Select button. If no sele ction is made within 10 secon ds, the receiver will revert to the last
active display mode. Note that play of the current sel ection will continue until a new selection
is chosen from the S-Seek or My Game Zone list.
[ Ope rat ion ]
35
Page 38

Jump Button
The recei ver has a special preset button called the Jump button , which is identified by the
icon. The Jump button is used to quickly tune t o a chann el that is accessed frequentl y
and temporarily such as a weather channel, a ne ws channe l, a sports channel, or any channel
at all. Pressing the Jump button allows you to quickly tune to the specific channel you have
programmed into the Jump button, and then tune back to the orig inal channel by pressing
the Jump button again. (R efer to the Menu Options sect ion of this manual for instru ctions for
configuring the Jump butt on.)
Pressing the Jump button again will return to the prev ious chan nel.
Note: The channel preset for the Jump button re mains the same regardless of which preset
memory bank is currently selected.
36
[ Ope rat ion ]
Page 39

Game Alert
MY GAME ZONE
100 Giants @ Cowboys100 Giants @ Cowboys
123 Bulls @ Cavaliers
001
Artist NameArtist Name
Song TitleSong Title
Category 12:00P A
Game Alert
Channel Name
Figur e 35Figur e 35
The recei ver has a feature called Game Alert which can automatically alert you when your favorite sports team is pla ying a game. When a sports game involving one o f your favorite sports
teams is found, a Game Al ert screen is displayed, foll owed by a screen displaying t uning information for the sports gam es. (Figure 35)
You can then use the channel up and do wn buttons to highlight y our favorite sports team
in the list, and then pre ss the Select button to tune to the ch annel where the game is being
broadcast.
Refer to the Gam e Al ert section in the Menu O ptio ns section of this manual for instructions
on programming your favor ite sports teams into the rec eiver. You can als o use the S-Seek feature to add Game Alerts f or sports teams. Refer to the section, Storing Ar tist Nam es, Song
Titles, a nd S ports Teams to Memory f or more information.
[ Ope rat ion ]
37
Page 40

FM Preset Button
FM Presets
FM1 88.1 MHz
FM2 <EMPTY>FM2 <EMPTY>
FM3 <EMPTY>FM3 <EMPTY>
FM4 <EMPTY>FM4 <EMPTY>
Figur e 36Figur e 36
The recei ver has a special button called the F M Preset button, which is identified by the
icon.
When the FM Preset button is pressed, the receiver turns on the built-in FM transmi tter and
begins transmitting on th e next frequency from the FM frequency preset lis t. A screen will be
displayed for 3 seconds s howing the currently selected FM frequency. When the FM transmitter is turned on, an FM radio tuned to the same FM frequ ency will receive the cur rently tuned
SIRI US broadcast. Each subsequent press of the FM Preset button a dvances to the next
frequency in the FM frequency preset list. Us ing the FM Preset bu tton, a quiet FM frequency
may be quickly tuned.
If no FM frequen cies have been preset when th e FM Preset button i s pressed, the receiver w ill
default to a frequency of 88.1 M Hz.
Pressing and holding the FM Preset button wil l cause a list of the FM presets to be displa yed.
(Figure 36)
You can use the channel up and down bu ttons to scroll through t he F M preset list an d highlight the preset you wish to change, and press the Select butto n to choose the preset. Use
the chann el up and down buttons to highlight the frequency you wish to select for the preset
and press the Select butt on. The FM frequency will the n be stored in the preset. To select the
preset and exit, press th e M EN U button.
You may also change the F M pr esets by using the FM Presets menu option of the receiver.
(Refer to the FM Transmitter section in the Menu Options section of this manual for instructions on programming the FM frequency preset list.)
38
[ Ope rat ion ]
Page 41

Menu Options
Menu Options
Sirius ID
FM Transmitter
Game Alert
Settings
Figur e 1Figur e 1
To enter the Men u Op tion s page of the receive r, press the ME NU butt on. The M enu Options
list will be displayed. ( Figure 1)
To select a menu option, use the channel up and down b uttons to highlight the optio n you
wish to adjust, and press the Select button. If a sele ction is not made within 10 s econds, the
receiver will exit the me nu options screen, and revert to the last active display m ode.
To exit the Menu Opt ions screen, or any of th e other menu option screens, repeatedly press
and release the ME NU button u ntil you are returned to the default display screen.
The follo wing sections explain each of the menu options in the order in which they ar e displayed on the Menu Option s screen.
Sirius I D
This menu option displays your 12 digit SIRIUS I D (S ID) number. (Fig ure 2) The SID is unique
to each S IR IUS recei ver, and is requir ed to activate your service. It is recommended that you
write this number in the space provided near the end o f this user guide. No adjustm ents are
allowed in this mode. To exit, press the ME NU button.
[ Men u O ption s ]
39
Page 42

Sirius ID
ESN 000492229812
FM Transmitter
FM On/OffFM On/Off
FM Presets
Figur e 2Figur e 2
Figur e 3Figur e 3
FM Transmitter
The FM Transmitter feature allows yo u to create a preset list of 5 suitable FM frequencies
which can then be accessed by using the FM Preset butt on. This option also allows you to
turn the FM tran smitter On and Off. (Figure 3 )
FM Pr esets
To create or add to a list of FM Pre set frequencies , do the foll owing:
Using the channel up and down buttons, highlight the “FM Presets” menu item and pre ss
1.
the Select button. A list of the FM presets w ill be displayed. (Figure 4) (You may also
enter this list by pressi ng and holding the F M Preset button.)
[ Men u O ption s ]
40
Page 43

FM Presets
FM1 88.1 MHz
FM2 <EMPTY>FM2 <EMPTY>
FM3 <EMPTY>FM3 <EMPTY>
FM4 <EMPTY>FM4 <EMPTY>
<EMPTY><EMPTY>
88.3 MHz
88.7 MHz88.7 MHz
88.5 MHz88.5 MHz
88.1 MHz88.1 MHz
Figur e 4Figur e 4
Figur e 5Figur e 5
Using the channel up and down buttons, highlight the F M preset you wish to set (or
2.
change) a nd press the Select button. A list of FM freq uencies will be displayed, be ginning with the currently s elected FM frequency for the preset. (Figure 5)
Use your FM radi o to locate quiet FM frequencies where there is n o interference from
3.
adjacent FM stations. These are the frequenci es which should be added to the FM
Presets list.
Using the channel up and down buttons, highlight the frequency you wish to select for
4.
the preset and press the Select button. The FM frequen cy will then be stored in the
preset. If you do not wan t a frequency for the preset, choose E MPTY from the menu and
press the Select button.
You may then continue to select F M frequencie s for other presets using the same steps.
5.
To exit the FM Presets menu, press t he M ENU button.
FM O n/Off
To turn the rece iver’s F M transmitte r On or Off, use the channel up and do wn buttons to
highlight the FM On/Off m enu item and press the Select button.
Use the channel up and down buttons to highlight FM On or FM Of f and press the Select
button. (Figure 6)
[ Men u O ption s ]
41
Page 44

FM On/Off
FM On
FM OffFM Off
To exit the FM O n/Of f menu, press the MEN U bu tton.
Figur e 6Figur e 6
Game Alert
The Game Alert feature allows you to store your favorite sports teams in memory. The receiver
will constantly scan the SI RI US channels and will sound an alert when a sports team you had
stored in memory is playi ng, or when there is a score update for a team, depending on which
option you have chosen for the sports team.
Sports teams which you have selected and which are currently playing will be displayed in a
category called My Game Z one.
You may select one sports team from each sports league and the college category using
the Game Alert option, ho wever, more teams may be chosen by using the Memory (MEMO)
function. (See the sectio n Me mory (M EMO) and So ng S eek (S-Seek) Function s for more
information about adding additional teams.)
To choose sports teams to add for game alerts, do the following:
Use the channel up and down buttons to highlight Game Aler t and press the Select
1.
button.
Use the channel up and down buttons to highlight the sports lea gue or college category
2.
of the sports team you wi sh to add, and press the Sele ct button. (Figure 7)
[ Men u O ption s ]
42
Page 45

Game Alert
NFL
NBANBA
NHLNHL
COLLEGECOLLEGE
NFL
None
Arizona CardinalsArizona Cardinals
Atlanta FalconsAtlanta Falcons
Baltimore RavensBaltimore Ravens
COLLEGE
None
AlabamaAlabama
AuburnAuburn
ColoradoColorado
Alert Type
Initial Game Alert
All Score UpdatesAll Score Updates
Figur e 7Figur e 7
Figur e 8Figur e 8
Figur e 9Figur e 9
Use the channel up and down buttons to highlight the league tea m name or college team
3.
name you wish to add, and press the Select button. (Fi gure 8)
Note that for college teams, you will rece ive an alert for all teams playing for tha t college.
Use the channel up and down buttons to highlight which type of an alert you want, and
4.
press the Select button. (Figure 9)
When the receiver is powered on, and while it is playing, Initial Game A lert will sound
an alert when the team yo u have chosen is playing a game. All S core Updates does th e
same but also so unds an alert when the scores are updated for the chosen team.
To exit the Game Ale rt menu, press t he M ENU button.
[ Men u O ption s ]
43
Page 46

Settings
Settings
Jump Setting
Display OptionsDisplay Options
Memory OptionsMemory Options
Auto SelectAuto Select
Jump Setting
Traffic: ATL
Jump Set
Jump Setting
Choose one of theChoose one of the
following options
for button
following options
for button
Figur e 10Figur e 10
Figur e 11Figur e 11
The follo wing sections explain each of settings menu options in the order in which th ey are
displayed. (Figure 10)
To select a menu option, use the channel up and down b uttons to highlight the optio n you
wish to adjust, and press the Select button.
Jum p s et tin gs
The Jump setting controls the actions of the Jump button. The Jump setting menu may also be
accessed by pressing and holding the Jump button. (Fig ure 11)
Two options are available for the Jump settin g, Traffic* and Jump Set. The currently selected
option is indicated by th e Jump icon.
* Traff ic is currently not available in Canada
To exit the Jump Settings menu, pres s the M EN U button.
[ Men u O ption s ]
44
Page 47

Jump Set
Jump Setting
Tune to desired Ch.Tune to desired Ch.
press & hold
the button
press & hold
the button
Jump Setting
Traffic: NONE
JumpSetJumpSet
Figur e 14Figur e 14
Figur e 15Figur e 15
To set the Jump button to a specific channel (other th an a traffic channel) when pressed, do
the following:
Use the channel up and down buttons to highlight the “JumpSet” option, and press the
1.
Select button.
Figure 14 will be display ed.
2.
Use the channel up and down buttons to tune to the channel you want assigned to the
3.
Jump button. When the chann el is tuned, press and hold t he Jump button for 2 seconds
until Figure 15 is displa yed.
The channel select ed is now assigned to the Jum p button.
To exit the Jump Settings menu, pres s the M EN U button.
At any time while listeni ng to a channel (other than a traffic channel), the channel may be as-
signed to the Jump button by simply pressing and holdi ng the Jump button for 2 seco nds.
[ Men u O ption s ]
45
Page 48

Dis play opt io ns
Display Options
Brightness
ContrastContrast
- +- +
Brightness
- +- +
Contrast
Figur e 16Figur e 16
Figur e 17Figur e 17
The recei ver’s display screen can be adjusted for brightness an d contrast using the Display
Opti ons. (Figure 16)
Use the channel up and down buttons to highlight the Brightness or Contrast option, and
press the Select button.
Brightness adjusts the ov erall intensity of the LCD display to help with viewing in different
lighting conditions. Cont rast adjusts the relationship between the background and the text o n
the LCD display. Use the channel up and down buttons, to adjust the bright ness/contrast. The
bar graph will move to in dicate the change. (Figure 17)
To exit the Brig htne ss/C ontrast scre en, press the M EN U button.
[ Men u O ption s ]
46
Page 49

mem ory op tio ns
Memory Options
Auto Memory Search
Clear All MemoryClear All Memory
Auto Memory Search
On
OffOff
Figur e 18Figur e 18
Figur e 19Figur e 19
The Memor y Options feature allows you to set whether the automa tic S-Seek feature is On
or Off, and also provides the a way to clear (erase) a ll the stored S-Seek alerts f rom memory.
(Figure 18)
Autom atic Memo ry Search
To turn the auto matic memory search On or Off, do the following:
1. Use the channel up and down buttons to highlight Auto Memory Search, and press the
Select button.
2. Use the channel up and down buttons to highlight either On o r Of f, and press the Select
button. (Figure 19)
To exit the Memo ry O ptio ns menu, press the M EN U button.
[ Men u O ption s ]
47
Page 50

Clea r All Memo ry
Clear All Memory?
YesYes
No
-
+-
+
Audio Level
Figur e 20Figur e 20
Figur e 21Figur e 21
To clear all the S-Seek alerts stored in memo ry, do the followi ng:
Use the channel up and down buttons to highlight Clear All Memo ry, and press the
1.
Select button.
At the confirmation scree n, use the channel up and down buttons to highlight Yes an d
2.
press the Select button. (Figure 20)
The S-See k memory is now erased.
To exit the Memo ry O ptio ns menu, press the M EN U button.
Audio Level
The Audio Level setting adjusts the level of the audio output o f the receiver.
To adjust the au dio level, use the channel up and down buttons to change the audio level. The
bar graph will move to in dicate the change. (Figure 21)
To exit the Audi o Level menu, press th e M EN U button.
[ Men u O ption s ]
48
Page 51

Confirmation Tone
Confirm. Tone
On
OffOff
Parental Control
Lock/Unlock
Edit CodeEdit Code
Figur e 22Figur e 22
Figur e 23Figur e 23
The recei ver will sound an audio tone alert when it is powered On or Off, as well as when an
S-Seek alert is activated and other alerts. The default setting is On. To change the Confirm ation Tone settin g to On or Off, use the channel up or down buttons to highlight On or O ff, and
press the Select button. (Figure 22)
To exit the Con firmation Tone menu, press the M EN U butto n.
Parental Control
The recei ver has the ability to lock out with p assword protection any channels you do not want
others to access without your permission. (Figure 23) A locked channel will not appear in the
channel l ist.
When access to a l ocked channel is a ttempted using the direct channel entr y method, the
Ente r Code scree n is displayed and the channel cannot be accessed until the correct code is
entered. (Figure 24)
[ Men u O ption s ]
49
Page 52

Enter Code
# ____# ____
Enter Code
Wrong Code
Enter Code
# ____# ____
Figur e 24Figur e 24
Figur e 25Figur e 25
Figur e 26Figur e 26
If the wrong code is ente red, a message will be displayed indicating that the wrong code has
been entered. (Figure 25)
Lock/ Unlock
To lock or unlock a channel, do the following:
Use the channel up and down buttons to highlight “Lock/ Unlock, and press the Select
1.
button.
If this is the first time that Parent al Contr ol is being used, you will be prompted to cre-
2.
ate and enter a four digi t numerical code. (Figure 26) This cod e can be any four digit
number from 0000 to 999 9.
If you should exit this p rompt without entering a code , you will be prompted to set a
code next time you enter the Lock/Unlock option.
If a code has been previo usly set, a Enter Co de prompt will be displayed. (Figure 27)
3.
Enter your four digit cod e and press the Select button to continue.
[ Men u O ption s ]
50
Page 53

Enter Code
# ____# ____
001 Channel Name001 Channel Name
002 Channel Name
003 Channel Name Lock003 Channel Name Lock
004 Channel Name004 Channel Name
Lock/Unlock
Figur e 27Figur e 27
Figur e 28Figur e 28
When the correct c ode has been entered, a listing of cha nnels will be displayed. (Figure
4.
28) Use the channel up and down buttons to navigate to the channel you wish to lock o r
unlock, a nd press the Select button. A previously locked channel will have the word Lock
displayed to the right of the channel name.
To lock or unlock a channels, use the channel up and dow n buttons to highlight a chan-
5.
nel, and press the Select button.
If you are locking a channel, the Lock will be di splayed to the right of t he channel na me.
If you are unlocking a channel, the Lock will be removed from the right of the channel
name.
To exit the Pare ntal Control menu, p ress the ME NU button.
[ Men u O ption s ]
51
Page 54

Edit Code
Enter Code
# ____# ____
Enter Code
# ____# ____
Figur e 29Figur e 29
Figur e 30Figur e 30
This sett ing allows you to change a previously selected Parental Control code.
The first time the Edit Code setting is accessed you will be pr ompted to enter a four digit
code. (Figure 29) This code can be any four digit number from 0 000 to 9 999.
If you should exit this p rompt without entering a code , you will be prompted to set a code the
next time you enter the E dit Code option.
To change the Parental Control code, do the f ollowing:
Use the channel up and down buttons to highlight Edit Code , and press the Select
1.
button.
At the prompt, enter the four digit Parental Control code. (Figure 30)
2.
If you did not enter the correct code, a mess age will be displayed alertin g you that the
3.
wrong code was entered, a nd you will be prompted again to enter the code. (Figure 3 1)
[ Men u O ption s ]
52
Page 55

Enter Code
Wrong Code
New Code
# ____# ____
Confirm Code
# ____# ____
Figur e 31Figur e 31
Figur e 32Figur e 32
Figur e 33Figur e 33
If the correct code was e ntered, the “New Code” prompt will appear. Ente r the new
4.
Parental Control code. (Figure 32)
You will then be prompted to confirm the new code by e ntering it again. (Figure 33)
5.
If you confirmed the corr ect code, the lock code is now changed and a confirmation
6.
screen is displayed. If y ou entered the wrong code at the confirmation prompt, a sc reen
will be displayed to aler t you that you have entered t he wrong code, and you will h ave to
repeat the process again. (Figure 34)
[ Men u O ption s ]
53
Page 56

Confirm Code
Wrong Code
Confirm Code
Code Saved
Time Features
Clock
AlarmAlarm
Program AlertProgram Alert
Auto ShutdownAuto Shutdown
Figur e 34Figur e 34
Figur e 35Figur e 35
To exit the Pare ntal Control menu, p ress the ME NU button.
If you have forgotten you r Parent al Control c ode, call SIRIUS Customer Service for he lp.
Time Based Features
Time base d settings (Figure 35) allow for adjustment of the fol lowing features of the receiv er:
Clock - S ets the clock format, time zone, and d aylight savings time function.
Alar m - Sets an alarm for a specific time.
Program A lert - Sets the receiver to tune to a specific channel at a specified time.
Auto Shutdown - Sets the receiver to turn off at a spe cified time.
Slee p Mode - Sets the rec eiver to turn off after a des ignated period of time.
To select a menu option, use the channel up and down b uttons to highlight the optio n you
wish to adjust, and press the Select button.
Clock
The time data for the receiver’s clock is provided via the SI RI US signal, and will update based
[ Men u O ption s ]
54
Page 57

Clock
Format
Time ZoneTime Zone
Daylight Savings TimeDaylight Savings Time
Format
12 Hour12 Hour
24 Hour
Figur e 36Figur e 36
Figur e 37Figur e 37
on the data rece ived from the signal.
You can configure the clo ck format for 12-hour or 24-hour displ ay format, set the time zone for
the clock for your location, and turn On or Off the automatic a djustment for Daylight Savings
Time (DST ) (Figure 36).
Forma t
To change the clock display format of the receiver to 12 hour or 24 hour format, do the foll owing:
Use the channel up and down buttons to highlight Clock and press the Select button.
1.
Use the channel up and down buttons to highlight either 12 hour or 24 Ho ur, and press
2.
the Select button. (Figur e 37)
To exit the Clock menu, press the ME NU button.
Time Zone
To change the time zone of th e receiver, do the following:
Use the channel up and down buttons to highlight Ti me Zone, and press the Select
1.
button.
Use the channel up and down buttons to highlight the proper tim e zone for your location,
2.
and press the Select butt on. (Figure 38)
[ Men u O ption s ]
55
Page 58

Time Zone
(GMT -6:00) Central(GMT -6:00) Central
(GMT -5:00) Eastern
(GMT -4:30) Atlantic (GMT -4:30) Atlantic
(GMT -3:30) Newfndlnd(GMT -3:30) Newfndlnd
Daylight Savings Time
DST Observed
DST Not ObservedDST Not Observed
Figur e 38Figur e 38
Figur e 39Figur e 39
To exit the Time Zone menu, p ress the ME NU button.
Dayl ight Savi ngs Time
To turn the Dayl ight Savings Time feature On or Off, do the following:
Use the channel up and down buttons to highlight Daylight Savin gs Time, and press the
1.
Select button.
2. Use the channel up and down buttons to highlight
2.
DST Obser ved or DST Not
Obse rved, and pr ess the Select button. (Figur e 39)
To exit the Dayl ight Sav ings Time menu, press the ME NU but ton.
[ Men u O ption s ]
56
Page 59

Alarm
Alarm
Set Alarm
Alarm TimeAlarm Time
Set Alarm
OnOn
Off
Figur e 40Figur e 40
Figur e 41Figur e 41
This feat ure allows you to set an alarm to sound at a specific time each day, and to turn the
alarm feature On or Off. (Figure 40)
Set Alarm
To turn the alar m On or Off, do the following :
Use the channel up and down buttons to highlight S et A larm , and press the Select bu t-
1.
ton.
Use the channel up and down buttons to highlight Alarm On or Al arm Off, and press the
2.
Select button. (Figure 41 )
To exit the Set Alarm menu, press th e M EN U button.
Alarm Time
To set the time of the alarm, do the followin g:
Use the channel up and down buttons to highlight Alarm Time, and press the Select
1.
button.
Use the channel up and down buttons to change t he minutes, and the category previous
2.
and next buttons to change the hours, to select the desired ala rm time. (Figure 42)
[ Men u O ption s ]
57
Page 60

Alarm Time
12:00 PM12:00 PM
Program Alert
Program Time/Day
ChannelChannel
Program Alert On/OffProgram Alert On/Off
Figur e 42Figur e 42
Figur e 43Figur e 43
When you have sele cted the desired alarm time, press the Select button t o set the alarm
3.
time and exit.
To exit the Alar m Time menu, press the M EN U button.
Progr am Al ert
The Progr am Alert feature allows you to program the receiver to automatically tune to a
specific channel at a specific time. The receiv er must be powered on in order for this feature
to function. (Figure 43)
Progr am Ti me/ Day
To program the t ime and day when the receiver will tune to the specified channel, d o the following:
Use the channel up and down buttons to highlight Program Time/ Day, and press the
1.
Select button.
At the Program Time/ Day screen, use the channel up and down buttons to highlight
2.
Time, and press the Select button. (Figure 44)
[ Men u O ption s ]
58
Page 61

Program Time/Day
Time
DayDay
Program Time
12:00 PM12:00 PM
Program Day
MondayMonday
Figur e 44Figur e 44
Figur e 45Figur e 45
Figur e 46Figur e 46
Use the channel up and down buttons to change t he minutes, and the category previous
3.
and next buttons to change the hours, to select the time you wi sh to tune to the specified chan nel. (Figure 45)
When you have sele cted the desired time, press the Select button to set the time and
4.
exit.
At the Program Time/ Day screen, use the channel up and down buttons to highlight Da y,
5.
and press the Select butt on.
Using the channel up and down buttons, select the day of the we ek you wish to tune to
6.
the selected channel, i.e., Monday, Tuesday, etc., and press the Select button. (Figure
46)
To exit the Prog ram Time/Day menu, p ress the ME NU button.
[ Men u O ption s ]
59
Page 62

Chan nel
A
001
Artist NameArtist Name
Song TitleSong Title
Category 12:00P
Channel Name
A
Program Alert On/Off
On
OffOff
Figur e 47Figur e 47
Figur e 48Figur e 48
To set the channel to which the receiv er will tune when the Program Alert feature is On, do the
following:
Use the channel up and down buttons to highlight Channel, and p ress the Select button.
1.
When the default d isplay screen is displayed, use the ch annel up and down buttons to
2.
navigate to the channel which you wish to selec t for the Program Alert feature. Use the
category previous and nex t buttons to navigate between categories. When the channel is
displayed, press the Sele ct button.
To exit the Chan nel menu, press the ME NU butt on.
Progr am Al ert On/Of f
To turn the Prog ram Alert feature is On or Of f, do the following:
Use the channel up and down buttons to highlight Program Alert On/Off, and press th e
1.
Select button.
Use the channel up and down buttons to highlight Program Alert On or Program Alert
2.
Off, and press the Select button. (Figure 48)
To exit the Prog ram Aler t On/Off men u, press the ME NU button.
[ Men u O ption s ]
60
Page 63

001
Artist NameArtist Name
Song TitleSong Title
Category 12:00P
A
Cancel Auto Shutdown
Channel Name
Auto Shutdown
EnabledEnabled
Disabled
Figur e 49Figur e 49
Figur e 50Figur e 50
Auto Shutdown
You can set the receiver to automatically power off af ter a 1 hour period of inacti vity, that is,
no buttons have been pres sed for 1 hour.
When the Auto Shut down feature is enabled, after 59 minutes of inactivity, a beep tone will
sound and a display promp t will appear on the screen, Canc el Auto Shutdown. (Figure 49)
At this point the auto sh utdown can be reset to 1 hour of inactivity by pressing th e Select button. If the Auto Shutdown is not reset, the receiver w ill automatically power off.
To enable or dis able the Auto Shutdo wn feature, do the following:
Use the channel up and down buttons to highlight Auto Shutdown, and press the Select
1.
button.
Use the channel up and down buttons to highlight Enabled or Dis able d, and press the
2.
Select button. (Figure 50)
To exit the Auto Shu tdown men u, press the ME NU button.
Slee p Mod e
The recei ver can be set to turn off automatically after a selec ted period of time, 15, 30, 45, or
60 minutes.
To activate or d eactivate the Sleep Mode feat ure, do the following:
Use the channel up and down buttons to highlight Sleep Mode, an d press the Select
1.
button.
[ Men u O ption s ]
61
Page 64

Use the channel up and down buttons to select the desired time, 15, 30, 45, or 60
Sleep Mode
Off
15 min15 min
30 min30 min
45 min45 min
Signal Indicator
SAT - +SAT - +
TER - +TER - +
Figur e 51Figur e 51
Figur e 52Figur e 52
2.
minutes to activate the S leep Mode feature, or choose Off to ca ncel the sleep feature,
and press the Select butt on. (Figure 51)
To exit the Slee p Mo de menu, press the M EN U b utton.
Signal Indicator
The Signa l Indicator display screen provides a visual display o f the strength of the SI RIUS
signal from the satellite antenna and also fr om terrestrial (ground) trans mitters.
To display the S ignal Indicator screen, do th e following:
Use chann el up and down buttons to highlight Signal Indicator, and press the Select
1.
button.
Two 10 segment h orizontal bar graphs will be displayed with a “-“ sign to the left and a
2.
“+” sign to the right. SAT indicates the satellite signa l strength while TER indicates the
terrestrial signal streng th, if a terrestrial signal i s available. (Figure 52)
To exit the Sign al I ndic ator menu, press the ME NU button.
[ Men u O ption s ]
62
Page 65

Factory Default
The Facto ry Default option will restore most every feature of t he receiver to the original f actory
settings. The following is a list of all features affected by t he Factory Default option:
Note that the Parental Control feature is not affected by the Factory Defa ult option. If a code
has been set for the Pare ntal Control feature , the code will not be reset by the Factory Default
feature, preventing someo ne from circumventing the Par ental Control featur e. Channels which
have been locked will remain locked.
To activate the Factory Default feature, and restore the features of the r eceiver to the factory
defaults, do the followin g:
All Prese ts are cleared
•
All Game Alerts are cleared
•
Receiver set to Normal Tuning Mode
•
Display b rightness set to 50%
•
Display C ontrast set to 50 %
•
FM Transmit ter set t o On
•
FM Frequ ency set to 8 8.1 MHz
•
All S-See k memory cleared
•
Clock set to 1 2-Hour Format
•
Time Zone set to Easter n St andard Time
•
Daylight Savings Time set to Observed
•
Auto Shut down set to Off
•
Sleep Mod e set to Off
•
Auto Sele ct set to Off
•
Program A lert cleared
•
Use the channel up and down buttons to highlight Factory D efault, and press the Sel ect
1.
button.
Use the channel up and down buttons to select Yes to r estore all settings to the se ttings
2.
from the factory, or select No to leave them as-is and return to the Men u Options menu.
(Figure 53)
[ Men u O ption s ]
63
Page 66

Restore Settings?
YesYes
No
Are You Sure?
Yes
NoNo
Are You Sure?
Yes
NoNo
Restoring
Factory Defaults
Figur e 53Figur e 53
Figur e 54Figur e 54
Figur e 55Figur e 55
If Yes is chosen, a confirmat ion is displayed. Use the channel up a nd down buttons to
3.
select Yes to re store all settings to the set tings from the factory, or select No to leave
them as-is and return to the Menu Options menu. (Figur e 54)
If Yes is chosen, the receive r will revert to the orig inal factory settings. (Figur e 55)
4.
When the Factory D efault is complete, the receiver will place you in Cha nnel 184
5.
the SIRI US preview channel and display, Ca ll 1-88 8-53 9- SIRI US to S ubscribe. The
receiver is still subscri bed to the S IR IUS service.
[ Men u O ption s ]
64
Page 67

Troubleshooting
Symp tom Solu tion
Receiver does not
power on
Receiver displays: An-
tenn a Not Detect ed
Receiver displays:
Acquiring Sig nal
Audio st atic or loss of
clarity
No sound The audio cables are not connected, or the FM radio is set to the
Blown fuse, or the power cable is not properly connect ed.
Check for a bad fuse and check power cable connection
The satellite antenna is not connected to the receiver dock.
Check the satellite antenna connection to the dock.
No s atellite sig nal is being received.
Check for obstacles over or around the satell ite antenna.
Change the vehicle locati on to eliminate nearby obstacles
(bridges, overpasses, tre ss, buildings, etc.).
The FM frequency contains st atic.
Locate a quiet F M frequency on your vehicle r adio and set the FM
transmitter frequency of the SIRI US Starmate 3 to match.
If using the AUX audio connector, check the cable connections.
wrong frequency. C heck the audio cables at the receiver dock
and the radio. Tune the FM radio to the same FM frequency the
receiver is tuned.
[ Troub les hooti ng ]
65
Page 68

Optional Accessories
The follo wing optional accessories are available for purchase from your SI RI US retailer to
maximize your SI RIUS experience:
SU BX1C S IRIUS P lug and P lay Unive rsal Boombox
The SUB X1C SI RI US Plug and Play Univer sal Boombox is a por table docking st atio n and
audio system for use with the SI RIUS Sportster receiver. With the built-in a mplifier and speakers, the boombox delivers rich powerful sound i ndoors or outdoors, and features an auxiliary
input for other audio dev ices,
Included with the boombox is an adjust able indoor/outd oor windowsill antenna with 2 0’ of
cable and an AC adapter.
SU PH1C SI RI US Univ ersal Plu g and Pla y Home Ki t
The SUP H1C SI RI US Univers al P lug and Play Home Kit is a co mpact docking cradle that
positions the receiver fo r easy viewing and operation. Designed for quick and easy self-inst allation, it includes all n ecessary cabling to connect your SI RI US receiver to your hom e audio
system.
The kit i ncludes a compact tabletop/desktop docking cradle with FM output for wirel ess
connectivity, an a udio cable for connection to any stereo bookshelf syst em, an adjustable
indoor/outdoor windowsill antenna with 20’ of cable, a nd an AC Adapter.
SU PV1C SI RI US Univ ersal Plu g and Pla y Vehi cle Kit
The SUP V1C SI RI US Univers al P lug and Play Vehicle Kit is a compact docking cradle that
positions the receiver fo r easy wiring, viewing, and o peration in a vehicle. Design ed for quick
and easy self-installation, it provides sever al mounting options and inclu des all necessar y
cabling to connect your S IR IUS recei ver to your car audio system.
The SUP V1C SI RI US Univers al P lug and Play Vehicle Kit will work with the Sportster 4 and
most new SI RI US plug and play receiv ers.
The kit i ncludes a mobile docking cradle, a suc tion cup vehicle mount, a vent mount, a cigarette lighter adapter, and a magnetic antenna with 21’ of cable.
[ Opt ion al Ac ces sorie s ]
66
Page 69

FM D irect Adap ter
The FM Direct Adapter accessory redirects your vehicle ’s F M antenna signal when listening to your SIRI US receiver using yo ur vehicle’s AM/FM radio. When the SIRI US receiver is
powered on the F M Direct Adapter automaticall y redirects the vehicle’s FM antenna signal
away from the vehicle’s A M/ FM radio, r educing any interference which might b e present from
FM radio station broadcasts. When the SI RI US receiver is turned o ff, the FM antenna s ignal
is automatically redirect ed back to the vehicle’s AM/ FM radio. (Product numb er 14100.)
[ Opt ion al Ac ces sorie s ]
67
Page 70

Specifications
Satellite Freque ncies . . . . . . . . . . . . . . . . . . . . . . . . . . . . . . . . . . . . . . 2322.29 3/2330.207 M Hz
Terrestrial Freq uencies . . . . . . . . . . . . . . . . . . . . . . . . . . . . . . . . . . . . . . . . . . . . . . 232 6.25 0MHz
Power Req uirements . . . . . . . . . . . . . . . . . . . . . . . . . . . . . . . . . . . 5 Volts, Negative Grou nd, DC
Audio Output . . . . . . . . . . . . . . . . . . . . . . . . . . . . . . . . . 2V (normal) 2.8V (max.) (Peak-to-Peak)
Total H armonic Distortion (THD) . . . . . . . . . . . . . . . . . . . . . . . . . . . . . . . . . . . . . . . . . . . . <0 .2%
Signal-to-noise (S/N) . . . . . . . . . . . . . . . . . . . . . . . . . . . . . . . . . . . . . . . . . . . .Greater tha n 73dB
Fuse Requirement . . . . . . . . . . . . . . . . . . . . . . . . . . . . . . . . . . . . . . . . . . . . . . . . . . . . . . 2A ATC
Receiver Dimensions (Leng th x Height x Depth) . . . . . . . . . . . . . . . 124.2mm x 4 8.5mm x 16mm
(4.9” x 1.9” x .0.6”)
Receiver Weight. . . . . . . . . . . . . . . . . . . . . . . . . . . . . . . . . . . . . . . . . . . . . . . . . . . . 91g (3.2 oz.)
Antenna Type . . . . . . . . . . . . . . . . . . . . . . . . . . . . . . . . . . . . . . . . . . . . . . . Low Profile Magnetic
Antenna Cable Length . . . . . . . . . . . . . . . . . . . . . . . . . . . . . . . . . . . . . . . 21’ (single micro-ca ble)
Connector Type . . . . . . . . . . . . . . . . . . . . . . . . . . . . . . . . . . . . . . . . . . . . . . . . SMB (right-angle)
Remote Control Dimensions (Width x Length x Height) . . . . . . . . . . . . 41mm x 10 4mm x 15mm
(1.61” x 4.0 9” x .59”)
Remote Control B attery Requirements . . . . . . . . . . . . . . . . . . . . . . . . . . . . . . . . . . . . . .CR2025
[ Spe cif icati ons ]
68
Page 71

Warranty
12 M onth Warra nty
SIRI US Canad a Inc. (t he “Compa ny”) warr ants to t he origin al retail purchase r of this product that
should th is product or any part thereof, under no rmal use and condi tions, be proven d efective in
material or workmanship within 12 months from the date of original purchase, such defect(s) will be
replaced with new or reconditioned produ ct (at th e Company ’s option ) without char ge for pa rts and
labor. To obt ain repla cement wi thin the terms of this Warran ty, the pr oduct is to be del ivered wi th
proof of warranty coverage (e.g. dated b ill of sale), specific ation of defect(s) , transportation prepaid,
to the lo cation shown below under WAR RANTY R ETU RN.
This Warranty do es not ex tend to t he elimin ation of externall y generat ed stati c or nois e, to cor rection
of antenn a problems, to costs incurred f or installati on, remov al or rei nstallat ion of th e product , or to
damage to tapes, compact d iscs, spe akers, ac cessories , or vehi cle elect rical sys tems.
This Warranty do es not ap ply to an y product or part thereof w hich, in the o pinion of the Comp any,
has suffe red or been damaged through alt eration, improper inst allation, mishandl ing, misuse, neglect,
accident, or by removal or defacement of the fact ory seria l number/ bar code label(s). TH E EX TEN T
OF THE COM PANY’S LIABI LITY UN DE R TH IS WARR ANTY IS LIM ITED TO THE RE PAIR OR
RE PLAC EM EN T PR OVI DED AB OVE AND, IN NO EVE NT, SH ALL THE COMPANY’ S LIABI LITY
EXCEED TH E P URCHASE PR ICE PAI D BY P UR CHAS ER FOR TH E PR ODUCT.
This Warranty is in lieu of all ot her expre ss warran ties or l iabilitie s. ANY I MP LIE D WARRANTIES,
INCLU DI NG ANY I MPLIED WARRA NTY OF M ERCHA NTABI LITY, S HALL BE LIMITED TO THE
DURATION OF THI S WRITTEN WARRANTY. ANY ACTION FOR BREAC H O F ANY WAR RANTY
HE RE UN DE R I NCLUD ING ANY IMPL IE D WAR RANTY OF MERC HANTABILI TY M UST BE
BROUG HT WITH IN A P ER IOD OF 48 MON THS FRO M DATE OF O RI GI NAL PU RCHASE. IN NO
CASE SHALL TH E COM PANY B E LIABLE FO R AN Y CO NSEQU EN TIAL OR INCID ENTAL DAMAGE S FO R B REACH O F TH IS OR ANY OT HE R WAR RANTY, EXPRE SS OR I MPLI ED, WHATSO EVE R. No per son or re presenta tive is a uthorized to assum e for the Company any liabi lity othe r than
expressed herein in connection with the sale of this product. Some sta tes do no t allow l imit ations
on how lo ng an implied warranty lasts or the excl usion or limitation of incident al or co nsequenti al
damage so the above limita tions or exclusion s may not apply to you. This Warra nty gives you spec ific
legal rig hts and you may also have other rights w hich vary from sta te to state.
WARRANTY RET UR N: To obtain a replacement wi thin the terms of this Warran ty, pl ease retu rn
product t o an authorized Sirius Canada r etai ler or ca ll Erikso n Consume r Custome r Service at (800 )
567-327 5 for an authorize d Sirius retailer near you ; proof o f purchase and descript ion of de fect are
required. Products to be returned to an approved warranty stat ion must be shippe d freight prepaid.
[ Warrant y ]
69
Page 72

SIRIUS ID
Write down the SIRIUS I D (SID) of your SI RI US Starmate 3 in the space pr ovided below.
SID: _______________________________________
70
[ SI RI US I D ]
Page 73

SI RI US Cust omer Service: 1-888-539-7474
customercare@siriuscanada .ca
SI RI US Cana da I nc.
135 Liberty Street, 4th F loor
Toronto, Ontario, M6K 1A7
1-888-5 39-7474
www.siriuscanada.c a
Page 74

SI R I US Canad a Inc .
135 Liberty Street, 4th Floor
Toronto, Ontario M6K 1A7
1-888-539-7474
www.siriuscanada.ca
SIR IUS St armate ST 3TK1C (08 0306)
 Loading...