

Page 1

Satellite Radio Plug & Play
S
tarmate
Installation & User Guide
Page 2

Page 3

Congratulations on the Purchase of your new SIRIUS Starmate
4 Plug-n-Play Radio
Your new SIRIUS Starmate 4 Plug-n-Play Radio lets you enjoy SIRIUS® Satellite Radio’s
digital entertainment any where you’ve installed the SU PH1 SIRIUS Universal Plug and Play
Home Kit, SUPV1 SIRIUS Un iversal Plug and Play Vehicle Kit, or the SUBX1 SIRIUS Plu g and
Play Universal Boombox (e ach sold separately). Use thi s manual to familiarize yours elf with all
of SIRIUS Starmate 4 feat ures and capabilities. For th e latest information about th is and other
SIRIUS Starmate products and accessories, visit http:/ /www.sirius.com.
Page 4

Table of Contents
TABLE OF CONTENTS . . . . . . . . . . . . . . . . . . . . . . . . . . . . . . 4
WARNING AND SAFETY INFORMATION . . . . . . . . . . . . . . . . . . . . . . 6
FCC Information . . . . . . . . . . . . . . . . . . . . . . . . . . . . . . . .6
Canadian Compliance . . . . . . . . . . . . . . . . . . . . . . . . . . . . . . 7
General Precautions . . . . . . . . . . . . . . . . . . . . . . . . . . . . . . . 7
Warnings . . . . . . . . . . . . . . . . . . . . . . . . . . . . . . . . . . . 8
COPYRIGHTS & TRADEMARKS . . . . . . . . . . . . . . . . . . . . . . . . 10
PACKAGE CONTENTS . . . . . . . . . . . . . . . . . . . . . . . . . . . . . 11
INSTALLATION . . . . . . . . . . . . . . . . . . . . . . . . . . . . . . . . 14
Installing the Vehicle Dock . . . . . . . . . . . . . . . . . . . . . . . . . . . 14
Installing the Antenna . . . . . . . . . . . . . . . . . . . . . . . . . . . . . 20
Connecting the Cigarette Lighter Adapter . . . . . . . . . . . . . . . . . . . . . 23
Docking the SIRIUS Radio . . . . . . . . . . . . . . . . . . . . . . . . . . . 23
Maximizing Audio Quality From Your SIRIUS Radio . . . . . . . . . . . . . . . . . . 25
Wireless Connection . . . . . . . . . . . . . . . . . . . . . . . . . . . . 25
Direct Connections . . . . . . . . . . . . . . . . . . . . . . . . . . . . . 37
Subscribing to the SIRIUS Service . . . . . . . . . . . . . . . . . . . . . . . . 40
CONTROLS . . . . . . . . . . . . . . . . . . . . . . . . . . . . . . . . . 42
SIRIUS Starmate 4 Reference Guide . . . . . . . . . . . . . . . . . . . . . . . 42
Remote Control Reference Guide . . . . . . . . . . . . . . . . . . . . . . . . . 44
Vehicle Dock Reference Guide . . . . . . . . . . . . . . . . . . . . . . . . . . 46
OPERATION . . . . . . . . . . . . . . . . . . . . . . . . . . . . . . . . . 47
Display Screen Information . . . . . . . . . . . . . . . . . . . . . . . . . . . 47
Changing Channels and Categories . . . . . . . . . . . . . . . . . . . . . . . . 47
Display Button (DISP) . . . . . . . . . . . . . . . . . . . . . . . . . . . . . 49
Selecting Channels Directly . . . . . . . . . . . . . . . . . . . . . . . . . . . 50
Channel Presets (BAND) . . . . . . . . . . . . . . . . . . . . . . . . . . . . 50
Memory (MEMO) and Song Seek (S-Seek) Functions . . . . . . . . . . . . . . . . . 53
Jump Button . . . . . . . . . . . . . . . . . . . . . . . . . . . . . . . . . 62
Game Alert . . . . . . . . . . . . . . . . . . . . . . . . . . . . . . . . . . 64
Instant Replay . . . . . . . . . . . . . . . . . . . . . . . . . . . . . . . . 64
[ Tab le of Co nte nts ]
4
Page 5

Using Instant Replay . . . . . . . . . . . . . . . . . . . . . . . . . . . . . . 66
FM Preset Button . . . . . . . . . . . . . . . . . . . . . . . . . . . . . . . 71
MENU OPTIONS . . . . . . . . . . . . . . . . . . . . . . . . . . . . . . . 72
Sirius ID . . . . . . . . . . . . . . . . . . . . . . . . . . . . . . . . . . . 72
FM Transmitter . . . . . . . . . . . . . . . . . . . . . . . . . . . . . . . . 73
Game Alert . . . . . . . . . . . . . . . . . . . . . . . . . . . . . . . . . . 75
Settings . . . . . . . . . . . . . . . . . . . . . . . . . . . . . . . . . . . 77
Jump Settings . . . . . . . . . . . . . . . . . . . . . . . . . . . . . . . 77
Display Options . . . . . . . . . . . . . . . . . . . . . . . . . . . . . . 79
Memory Options . . . . . . . . . . . . . . . . . . . . . . . . . . . . . . 80
Audio Level . . . . . . . . . . . . . . . . . . . . . . . . . . . . . . . . . 81
Confirmation Tone . . . . . . . . . . . . . . . . . . . . . . . . . . . . . . . 82
Parental Control . . . . . . . . . . . . . . . . . . . . . . . . . . . . . . . . 82
Time Based Features . . . . . . . . . . . . . . . . . . . . . . . . . . . . . . 87
Signal Indicator . . . . . . . . . . . . . . . . . . . . . . . . . . . . . . . . 95
Factory Default . . . . . . . . . . . . . . . . . . . . . . . . . . . . . . . . 96
TROUBLESHOOTING . . . . . . . . . . . . . . . . . . . . . . . . . . . . . 98
OPTIONAL ACCESSORIES . . . . . . . . . . . . . . . . . . . . . . . . . . . 99
SPECIFICATIONS . . . . . . . . . . . . . . . . . . . . . . . . . . . . . . . 101
WARRANTY . . . . . . . . . . . . . . . . . . . . . . . . . . . . . . . . . 102
SIRIUS ID . . . . . . . . . . . . . . . . . . . . . . . . . . . . . . . . . . 103
[ Tab le of Co nte nts ]
5
Page 6

Warning and Safety Information
FCC Information
This device complies with part 15 of the FCC Rules. Op eration is subject to the fol lowing two
conditions:
This device may not cause harmful interference, and
1.
This device must accept a ny interference received, inc luding interference that may cause
2.
undesired operation.
Note: This equipment has been tested and found to comp ly with the limits for
a CLASS B digital device, pursuant to Part 15 of the F CC Rules. These limits
are designed to provide r easonable protection against harmful interference
when the equipment is ope rated in a commercial environ ment. This equipment
generates, uses, and can radiate radio frequency energ y and, if not installed
and used in accordance wi th the instructions, may caus e harmful interference
to radio communications. However, there is no guarante e that interference will
not occur in a particular installation. If this equipm ent does cause harmful interference to radio or t elevision reception, which can be determined by tu rning the
equipment off and on, the user is encouraged to try to correct the interference
by one or more of the fol lowing measures:
Reorient or relocate the receiving antenna.
1.
Increase the separation b etween the equipment and the receiver.
2.
Connect the equipment int o an outlet on a circuit diff erent from that to
3.
which the receiver is con nected.
Consult the dealer or an experienced radio/TV technici an for help.
4.
WARN ING
Changes or modifications not expressly approved by the manufacturer could void the user’s
authority to operate the equipment.
[ War nin g and Sa fety Inf ormat ion ]
6
Page 7

Canadian Compliance
This Class B digital appa ratus complies with Canadian ICES-003.
Cet appareil numérique de la classe B est conforme à l a norme NMB-003 du Canada.
General Precautions
Liqu id Cr ysta l Precaut ions
If the LCD screen on the radio is damaged, do not to t ouch the liquid crystal fluid . If any of the
following situations happ en, take the action indicated :
If the liquid crystal flu id comes in contact with your skin, wipe the skin area wit h a cloth
1.
and then wash the skin th oroughly with soap and runnin g water.
If the liquid crystal flu id gets into your eye, flush the eye with clean water for at least 15
2.
minutes. Seek medical car e.
If the liquid crystal flu id is ingested, flush your mo uth thoroughly with water. Dr ink large
3.
quantities of water and i nduce vomiting. Seek medical care.
Safe ty Pr ecau tions
Be sure to observe the fo llowing warnings. Failure to follow these safety instructi ons and
warnings may result in a serious accident.
Do not operate the radio in a way that might divert yo ur attention from driving saf ely. As a
•
driver, you alone are res ponsible for safely operating your vehicle in accordance w ith traffic safety laws at all ti mes.
Do not install the radio where it may obstruct your vi ew through the windshield, or of your
•
vehicle’s indicator displ ays.
Do not install the radio where it may hinder the funct ion of safety devices such as an
•
airbag. Doing so may prev ent the airbag from functioni ng properly in the event of a n accident.
Be sure the radio and acc essories are installed as des cribed in the installation in structions
•
which accompany each acce ssory kit. SIRIUS Satellite R adio is not responsible for i ssues
arising from installation s which were not installed ac cording to the instructions.
[ War nin g and Sa fety Inf ormat ion ]
7
Page 8

Before attaching the suct ion cup mount to your windshi eld, you should check your st ate
•
and local laws for regula tions regarding mounting this device on your windshield.
To avoid short circuits, do not open the radio or acce ssories, and never put or lea ve any
•
metallic objects (coins, tools, etc.) inside the radio .
If the radio or accessori es emits smoke or unusual odo rs, turn the power off immedi ately,
•
and disconnect the radio from any power source.
Do not drop the radio or subject it to strong shocks.
•
If the radio doesn’t seem to be working properly, turn the radio off, wait 10 secon ds,
•
replace the battery and t hen turn it on again.
The installation and use suggestions contained in this manual are subject to any re stric-
•
tions or limitations that may be imposed by applicable law. The purchaser should ch eck
applicable law for any re strictions or limitations bef ore installing and/or operati ng this unit.
Do not install the FM Ext ender Antenna where it will h inder or block your view. In some
•
states it may be illegal to mount it on the windshield of your vehicle. Check appli cable
law for any restrictions or limitations before install ing the FM Extender Antenna o n your
windshield.
Do not install the FM Ext ender Antenna where it may hi nder the function of safety d evices
•
such as an airbag. Doing so may prevent the airbag fro m functioning properly in the event
of an accident.
Warnings
Noti ce To Dri vers In C alifornia and Minn esota
State law prohibits drive rs in California and Minnesot a from using suction mounts o n their
windshields while operati ng motor vehicles. Other dash board or friction mounting op tions
should be used. SIRIUS do es not take any responsibilit y for any fines, penalties, o r damages
that may be incurred as a result of disregarding this notice. (See California Vehic le Code Section 26708(a); Minnesota Statutes 2005, Section 169.71 )
Oper ating Tem perature
The radio is designed to operate between -20° to +85° C (-4° to +185° F). Avoid lea ving the
[ War nin g and Sa fety Inf ormat ion ]
8
Page 9

radio in a vehicle or els ewhere where the temperature may fall outside this range. Extreme
temperatures or extreme t emperature fluctuations can d egrade the performance of the LCD
display screen, and possi bly damage it.
Clea ning and Maintenan ce
If the radio or accessori es become dirty, turn the pow er off and wipe it clean with a soft cloth.
Do not use hard cloths, s trong cleaning fluids, paint thinner, alcohol, or other vo latile solvents
to clean. These may cause damage to the radio.
Ciga rette Lig hter Adap ter
The SUPV1 vehicle dock ca nnot be powered directly from a vehicle’s 12 VDC power sys tem.
It must be powered using the included Cigarette Lighte r Adapter only. Connecting th e SUPV1
directly to the vehicle’s 12 VDC power system may resu lt in damage to the vehicle d ock or
SIRIUS radio, or both.
[ War nin g and Sa fety Inf ormat ion ]
9
Page 10

Copyrights & Trademarks
© 2007 SIRIUS Satellite R adio Inc. All Rights Reserved .
® “SIRIUS”, the SIRIUS do g logo, channel names and log os are trademarks of SIRIUS
Satellite Radio Inc. “NFL ” and the NFL Shield logo, an d the NFL Sunday Drive name a nd logo
are registered trademarks of the National Football Lea gue. “NHL” and the NHL Shield are
registered trademarks of the National Hockey League. “ NBA” and the NBA silhouette l ogo are
registered trademarks of NBA Properties Inc. All other trademarks, service marks, s ports team
names, album art, and log os are the property of their respective owners. All Rights Reserved.
“Starmate” is a trademar k of SIRIUS Satellite Radio.
™
Portions of the software on this radio are licensed un der the eCos License. Distrib ution of
eCos requires that the eC os source code be made availa ble to Sirius Satellite Radio customers. The eCos License and eCos source code are availab le to the public at http://ww w.sirius.
com/ecoslicense.
Sirius Satellite Radio re serves all rights to all radi o software not covered under the eCos
license. This includes al l portions of radio software that were not distributed to Sirius as part
of the eCos operating sys tem.
Hardware, subscription an d activation fee required. Fo r full Terms & Conditions, vi sit
http://sirius.com. Prices and programming are subject to change. Not available in H I and AK.
Equipment and subscriptio n sold separately. Installati on required with some equipme nt.
[ Cop yri ghts & T radem ark s ]
10
Page 11
Package Contents
+
–
1 2 3
4 5 6
7 809
BAND
DISP
MENU
MUTE
MEMO
1
MENU
2 3 4 5 6 7 8 9 0
020 Octane020 Octane
Alice in ChainsAlice in Chains
No ExcusesNo Excuses
ROCK 12:00PROCK 12:00P A2A2
DISP MEMO
BAND
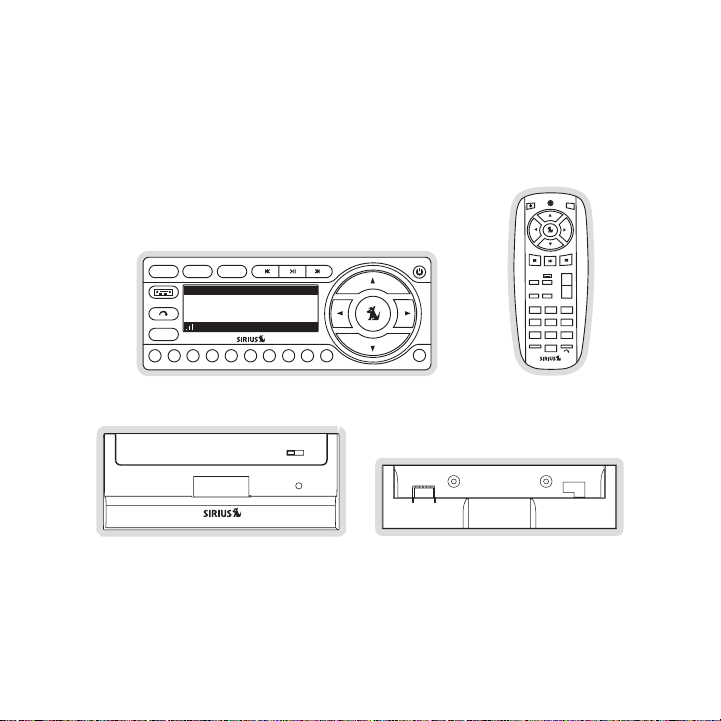
The following items are i ncluded with your purchase of the SIRIUS Starmate 4 radio:
Vehic le Doc king St ationVehic le Doc king St ation
Starm ate 4 RadioStarm ate 4 Radio
Remot e
Remot e
Contr ol
Contr ol
Docki ng Sta tion Ad apterDocki ng Sta tion Ad apter
[ Pac kag e Con ten ts ]
11
Page 12
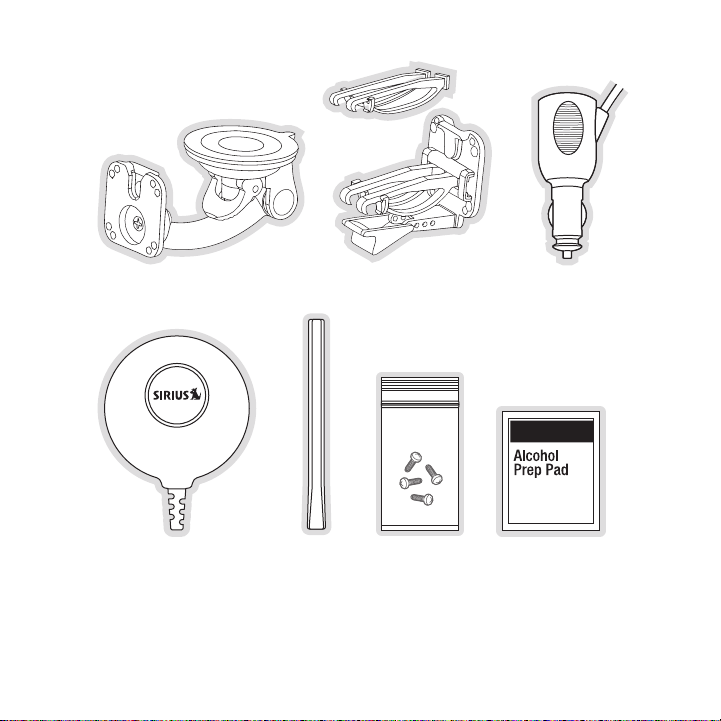
Magne tic An tennaMagne tic An tenna
[ Pac kag e Con ten ts ]
12
Sucti on Cup MountSucti on Cup Mount
Anten na
Anten na
Cover /Tail
Cover /Tail
Vent Mount &
Vent Mount &
Exten ded Ve nt Hook s
Exten ded Ve nt Hook s
Mount ing Sc rewsMount ing Scr ews Alcoh ol Swa bAlcoh ol Swa b
Cigar ette L ighter
Cigar ette L ighter
Adapt er
Adapt er
Page 13

Sucti on Cup s (2)Sucti on Cup s (2)FM Ex tender Antenn aFM Ex tender Antenn a
Self Adhesi ve
Self Adhesi ve
Cable Guide s (3)
Cable Guide s (3)
Unpack your SIRIUS Starma te 4 radio carefully and make sure that everything shown i s present. If anything is missi ng or damaged, or if your SIR IUS Starmate 4 radio fails to operate,
notify your dealer immedi ately. It is recommended that you retain the original cart on and packing materials in case you need to ship your radio in t he future.
[ Pac kag e Con ten ts ]
13
Page 14

Installation
SIRIUS suggests professio nal installation of this prod uct in your vehicle. Professi onal installation provides an experi enced technician to install t his product in your vehicle, advice for selecting a suitable mounti ng location, installation of the antenna, and routing all the necessary
wires and cables. If the FM reception within your vehi cle proves to be poor, an ins taller will
have the necessary access ories to install an optional FM Direct Adapter, or an audi o cable, to
connect the audio output of the vehicle dock directly to your vehicle’s audio syste m. Ask your
SIRIUS retailer if they p rovide professional installat ion services, or can recommen d a professional installation servi ce.
Installing the Vehicle Dock
When installing the vehic le dock in your vehicle, choo se a location in your vehicle where it
will not block your visio n, interfere with the vehicle controls, or obstruct the ai r bag. The location should be easily acc essible and provide good visi bility of the display, and sh ould not be
located where it will be in direct sunlight which will affect the visibility of the display screen.
The mounting accessories necessary to install the vehi cle dock in a vehicle are pro vided.
Figure 1 shows two exampl es of the SIRIUS radio mounte d in a vehicle: A is the suct ion cup
mount method, and B is th e vent mount method using the vent mount clip.
14
[ Ins tal latio n ]
Page 15
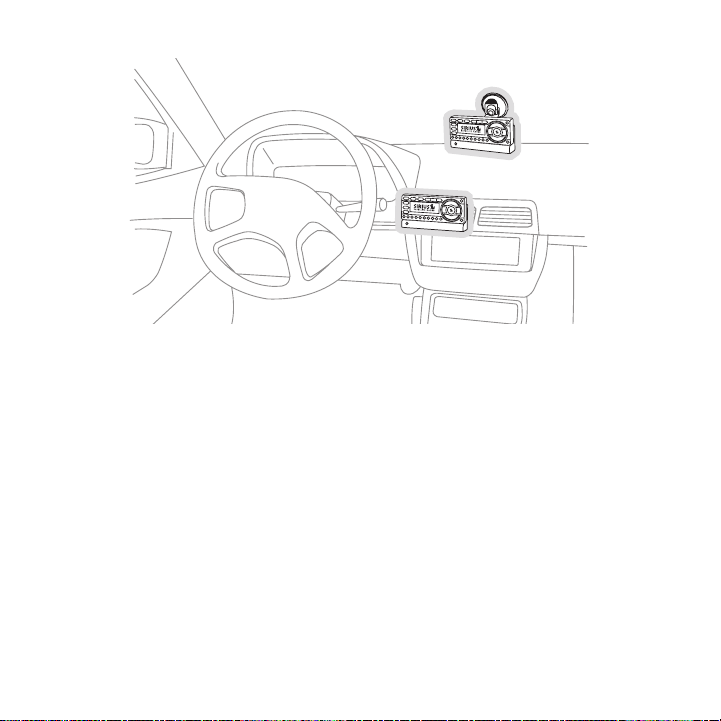
A.
B.
Figur e 1Figur e 1
Depending upon the mounti ng location you select in you r vehicle, the mount should b e attached to the vehicle doc k and installed as described in the following sections.
[ Ins tal latio n ]
15
Page 16
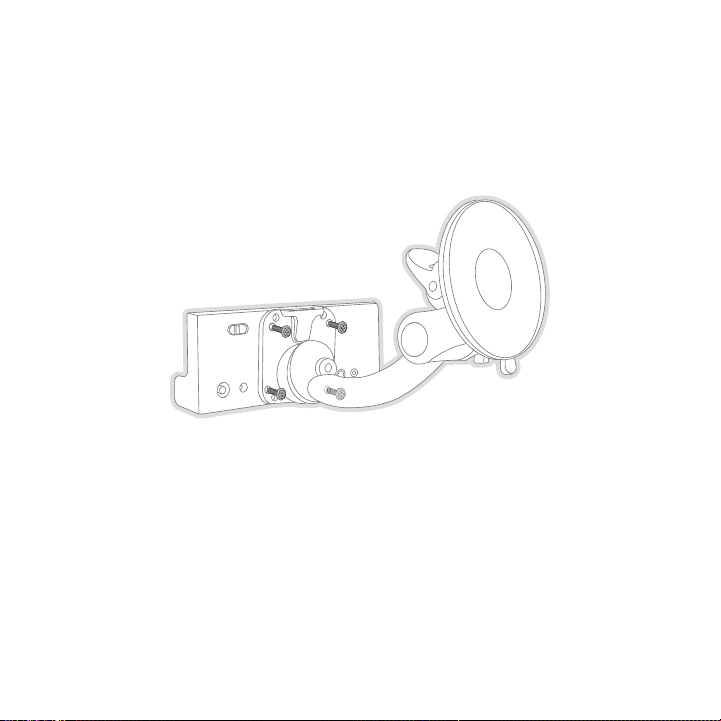
Suct ion C up M ount Meth od (A)
Figur e 2Figur e 2
The suction cup mount may be attached to any smooth su rface. Before attaching the s uction
cup mount to your windshi eld, you should check your st ate and local laws for regula tions
regarding mounting this d evice on your windshield.
To mount the vehicle dock using the suction cup mount, assemble the mount as follow s:
Attach the vehicle dock to the suction cup mount using the provided screws. (Figure 2)
1.
Clean the area where you are attaching the suction cup with an alcohol wipe.
2.
16
[ Ins tal latio n ]
Page 17

Be sure the cam lever is up (as shown in Figure 3) and position the suction cup mou nt
Figur e 3Figur e 3
3.
on the windshield or othe r location you which have cho sen. Press the cam lever all the
way down towards the base of the mount until it locks to adhere the suction cup. (T o
unlock the suction cup, l ift the lever up.)
[ Ins tal latio n ]
17
Page 18

Vent Moun t Me thod (B)
Slide Short
Vent Hooks Out
Remove
End Cap
Slide Extended
Vent Hooks In
Replace
End Cap
Figur e 4Figur e 4
Figur e 5Figur e 5
To mount the vehicle dock using the vent mount method, install the vent mount as fo llows:
If the vent louvers in yo ur vehicle are recessed, you may need to use the longer ve nt
1.
hooks with the vent mount . Refer to Figure 4 and insta ll the longer vent hooks into the
vent mount. Be sure to ob serve the orientation of the vent hooks as shown.
Attach the vent mount to the vehicle dock using the pr ovided screws. (Figure 5)
2.
18
[ Ins tal latio n ]
Page 19
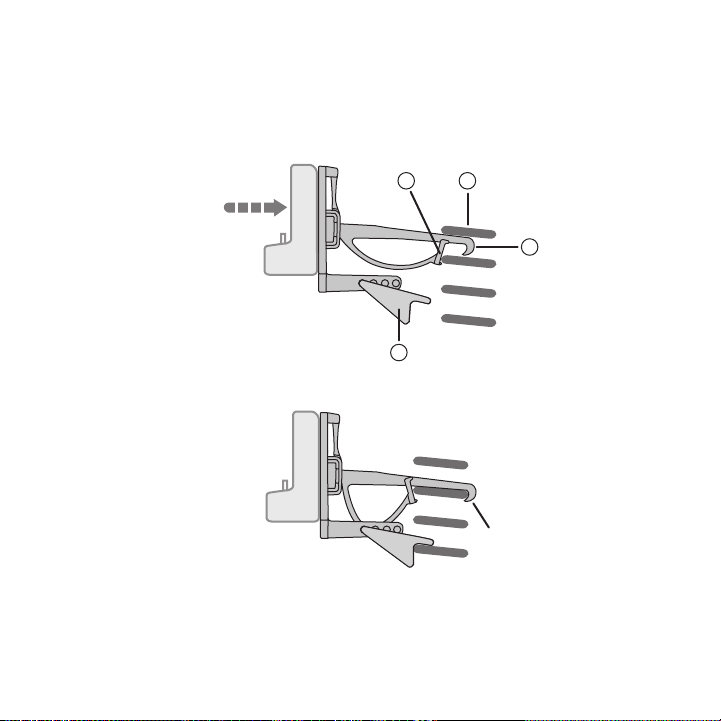
Refer to Figure 6 and att ach the vent mount to a heati ng/air conditioning vent in y our
C
B
A
D
PUSH
HOOKED
Figur e 6Figur e 6
Figur e 7Figur e 7
3.
vehicle. Position the two tension springs A against a vent louver B. Then push the vent
mount into the vent, far enough so that the hooks C dr op down and hook the rear of the
vent louver (Figure 7). O nce you are sure that the hoo ks have grasped a vent louver , the
tension springs A will ke ep the vent mount hooked to t he louver.
[ Ins tal latio n ]
19
Page 20

The angle of the vehicle dock may be changed by changi ng the position of foot D on the
A
DJUSTMENT HOLES
Figur e 8Figur e 8
4.
vent mount (Figure 6) to a different adjustment hole. (Figure 8)
Installing the Antenna
The optimum mounting loca tion for the magnetic antenna is on the roof of the vehicl e, with a
minimum unobstructed area of 12 inches by 12 inches, a nd exactly 6½ inches from the rear
roof edge of the vehicle (the length of the rubber ant enna cable cover/tail). It is important to
avoid any obstructions th at will block the SIRIUS sign al, obstructions such as a ro of rack,
a sunroof, roof mounted c argo containers, or other ant ennas. For convertible vehicl es, the
antenna should be install ed on the trunk lid.
For best performance, it is recommended that the anten na be installed with the rubb er
antenna cable cover/tail. This rubber antenna cable co ver/tail provides two benefit s: first, it
positions the antenna the recommended distance from th e rear window, rear door/hatc h, or
trunk edge to give the an tenna the best view of the sk y. Secondly, it conceals and protects
the exposed antenna cable . The rubber antenna cable co ver/tail has adhesive strips that hold
it securely in place.
The following illustratio ns show the recommended mount ing locations of the antenna for
several types of vehicles . (Figure 9) Follow these rec ommendations for best perform ance from
the antenna.
20
[ Ins tal latio n ]
Page 21
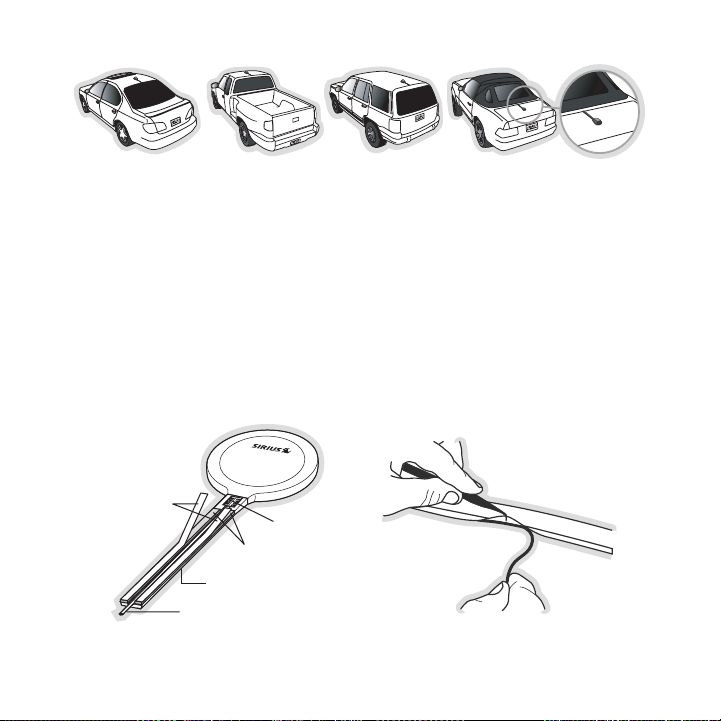
Rubber Antenna
Cover/Tail
Protective
Strips
Adhesive
Strain
Relief
Cable
Figur e 9Figur e 9
Figur e 10Figur e 10
Figur e 11Figur e 11
Seda n/Coupe. Mount the antenna along the rear center-line of the vehicle roof, located at the
rear of the roof near the rear window.
Pick up Truck. Mount the a ntenna along the rear center- line of the cab roof, located at the
rear of the roof near the rear window.
SUV/ Mini-Van. Mount the a ntenna along the rear center- line of the vehicle roof, loc ated at the
rear of the roof near the rear door/hatch.
Conv ertible. Mount the an tenna along the center-line o f the trunk lid, with the rub ber antenna
cable cover/tail directed toward the rear window.
When you have selected a suitable mounting location, c lean the area where the anten na and
rubber antenna cable cove r/tail will be mounted with t he supplied alcohol swab.
[ Ins tal latio n ]
21
Page 22
Connect the rubber antenn a cable cover/tail to the ant enna cable, making sure that the strain-
Figur e 12Figur e 12
relief on the antenna sit s into the rubber antenna cab le cover/tail groove. (Figure 10) Route
the antenna cable through the wire channel in the rubb er antenna cable cover/tail. Do not
remove the protective str ips yet.
Temporarily position the antenna and rubber antenna ca ble cover/tail in the selecte d mounting
area and route the cable from the antenna to the vehic le’s interior by tucking it u nderneath the
rubber molding around rea r window, as shown in Figure 11.
Route the cable from the lowest point of the rear wind ow into the trunk. Take advan tage of
any existing cable channe ls or wiring conduits. For SU Vs, mini-vans and 5-door vehi cles, bring
the cable into the vehicl e under the rubber molding fo r the tailgate, and continue under the
interior trim.
From the trunk, or rear o f the vehicle, route the cabl e around the passenger compar tment and
to the front of the vehic le, to the radio. Take care n ot pull the cable across shar p edges that
could damage it, and keep it away from areas where it might entangle feet. Coil any excess
antenna cable in a locati on where it can be hidden.
Once the antenna cable is routed through the vehicle, and you are satisfied with th e cable
routing, peel the protect ive material from the adhesiv e strips and press the rubber antenna
cable cover/tail firmly i nto place on the vehicle. Dou ble check that the location o f the antenna
and rubber antenna cable cover/tail are correct, and c ontinue to press firmly down on rub-
22
[ Ins tal latio n ]
Page 23

ber antenna cable cover/t ail for another 30 seconds. ( Figure 12) At room temperatur e (68
degrees), maximum adhesio n usually occurs within 72 ho urs. During this period, avoi d car
washes and other contact with the antenna and rubber a ntenna cable cover/tail.
Connect the antenna cable to the ANT connection at the rear of the vehicle dock. (R efer to
Figure 1 on page 35 for t he location of this connector .)
Connecting the Cigarette Lighter Adapter
Connect the provided ciga rette lighter adapter to the DC5V connection at the rear o f the
vehicle dock. (Refer to F igure 1 on page 35 for the lo cation of this connector.)
Docking the SIRIUS Radio
If your radio is a SIRIUS Plug and Play series ST or S V, you will need to install t he vehicle
dock adapter provided wit h the kit. Refer to Figure 13 and place the vehicle dock l ock in
the unlocked position (1) . Install the adapter into th e front of the vehicle dock, positioning it
behind the connector and against the backrest (2). Onc e the adapter is installed in the vehicle
dock, slide the lock to t he locked position (3). The r adio may now be placed into t he vehicle
dock, pressing the radio down until it is fully seated .
[ Ins tal latio n ]
23
Page 24

1
2
3
Figur e 13Figur e 13
For SIRIUS radios which d o not require the adapter, ma ke sure the lock on the vehic le dock
is set in the unlocked po sition and place the SIRIUS r adio into the vehicle dock, p ressing the
radio down until it is fu lly seated. Slide the lock in to the locked position. (Refe r to Figure 1 on
page 35 for the location of the lock.)
[ Ins tal latio n ]
24
Page 25

Maximizing Audio Quality From Your SIRIUS Radio
90.1
There are two primary way s to connect your SIRIUS radi o to your vehicle radio: Wire less
Conn ection or Direct Conn ecti on. The following section s will help you obtain the be st perfor-
mance. For the latest inf ormation go to http://www.sir ius. com/vehicleinstallation.
Wir ele ss Co nne Cti on
Your SIRIUS radio contain s an FM transmitter. The FM t ransmitter sends the audio fr om your
SIRIUS radio to your vehi cle radio. (Figure 14)
Figur e 14Figur e 14
Included with your SIRIUS radio is an FM Extender Ante nna to maximize the audio qua lity of
your SIRIUS radio when us ing a wireless audio connecti on. Should the wireless audio quality without the FM Extend er Antenna be not acceptable, you can try using the FM Ext ender
Antenna (or opt for a dir ect connection).
Wire less Audi o Connect ion Witho ut the FM Extender Antenna
To tune your vehicle’s FM radio and your SIRIUS radio to the same FM channel (Figur e 14):
Turn off your SIRIUS radi o and tune through the FM cha nnels on your vehicle’s radio
1.
to locate an FM channel t hat is not broadcasting in yo ur area. If you use an FM cha nnel
that is being used by a l ocal broadcaster, it will int erfere with the performance o f your
SIRIUS radio. Once you ha ve located an FM channel that is not broadcasting in your
area, save it as a preset on your vehicle radio. This will become your SIRIUS prese t.
Turn on your SIRIUS radio . In the Settings or Menu in your SIRIUS radio, locate the FM
2.
Freq uenc y adjustments. Se t the channel number on your SIRIUS radio to match the
SIRIUS preset on your veh icle’s radio. Refer to your user guide for detailed instr uctions
on how to do this.
[ Ins tal latio n ]
25
Page 26

Note : The FM tra nsmitter in your SIRIUS radio is aut omatically set to FM channel
88.1. This may not be the best channel in your area.
Tip: If you regularly travel between cities wit h different active FM channels, you may
need to fin d channels that are not broadcasting in each city. Several SIRIUS radio
models can store multiple FM transmit channels, so you can easi ly switch to the
best FM channe l for each city. Refer to your user guide for details on this feature.
You will also want to set the FM channels that are not broadcasting in each city a s
presets on your vehicle’s radio.
If you’re not sure which FM channels are not broadcast ing in your home or travel ci ties, you
can also go to http://www .sir ius.com/fmchannel and sea rch for a suggested FM channe l
based on your zip code.
Wire less Audi o Connect ion Using the FM E xtender A ntenna
The purpose of the FM Ext ender Antenna is to maximize the audio quality of your SIR IUS radio
when using the FM transmi tter in your SIRIUS radio to transmit the audio to your ve hicle’s FM
radio. Proper placement o f the FM Extender Antenna ins ide your vehicle in close pro ximity
to the vehicle’s own FM a ntenna will provide a strong FM signal for good reception. The FM
Extender Antenna has perm anent adhesive mounts for ins talling it on your vehicle’s window.
Because of the different kinds of FM antennas found in vehicles, and the varied loc ations of
the antenna in each vehic le, SIRIUS suggests professio nal installation of this prod uct in your
vehicle. Professional ins tallation provides an experie nced technician to install th is product in
your vehicle, knowledge o f your vehicle for locating t he vehicle’s FM antenna, inst allation of
this product, and routing the cable and connecting it to your SIRIUS radio. Ask you r SIRIUS
retailer if they provide professional installation ser vices, or can recommend a pro fessional
installation service.
26
[ Ins tal latio n ]
Page 27

The FM antennas found in vehicles are of four distinct types:
Aeri al Type Fender Mounte d FM
•
Ante nna: A fixed or retra ctable aerial
antenna located on the fr ont or rear
fender of the vehicle.
Aeri al Type Roof Mounted FM A n-
•
tenn a: A fixed aerial ant enna mounted
on the roof (often at the front or rear of
the roof, just above the window glass).
[ Ins tal latio n ]
27
Page 28

On G lass Type FM Antenna: Wires on
•
the window glass of the v ehicle, usually
near the top of the windo w. It may be
located on the windshield glass, the rear
window glass, or a rear s ide window in
some SUV and mini-van typ e vehicles
(and other vehicles). It will look similar to
the rear window defroster wires found in
many vehicles.
“Sha rk Fin” Type FM Anten na: A device
•
resembling a shark fin (o r other shape)
located on the vehicle ro of above the rear
window.
Before attempting install ation, you should verify the type and location of the FM a ntenna in
your particular vehicle. If you have trouble locating it, consult the manual which accompanied
your vehicle, consult a d ealer for your type of vehicl e, or consult a professional installer.
[ Ins tal latio n ]
28
Page 29

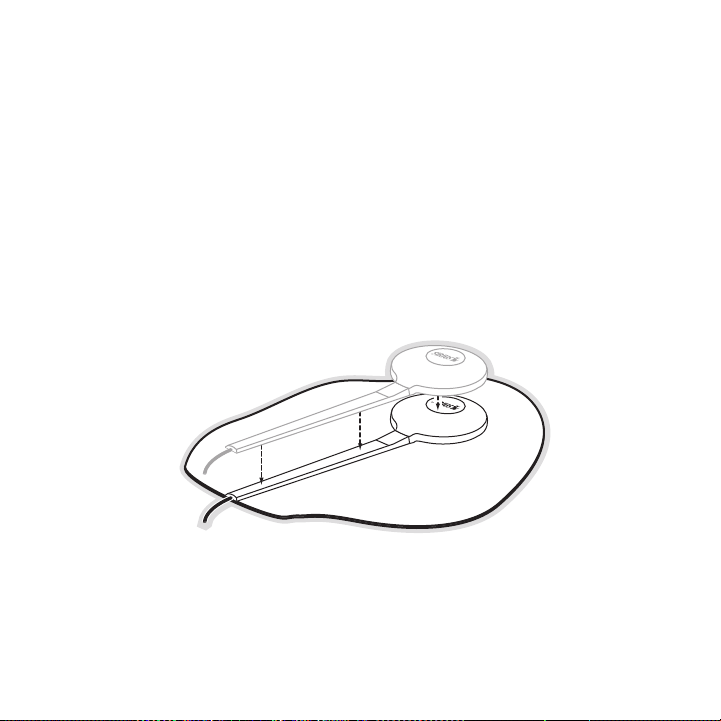
The FM Extender Antenna s hould be placed inside the ve hicle, as close as possible t o the
Suction Cups
vehicle’s FM antenna. A t est mounting should be done f irst using the included sucti on cup
mounts to test the instal lation. Once an acceptable lo cation has been found, you wi ll remove
the suction cups and perm anently adhere the FM Extende r Antenna using the adhesive
mounts.
To install the FM Extende r Antenna in your vehicle, fo llow these instructions:
Attach the suction cups t o the FM Extender Antenna in the positions shown in Figure 15.
1.
Figur e 15Figur e 15
In this step, follow the specific instructions in sub- step a, b, c, or d depending on the
2.
type of FM antenna in you r vehicle:
a. Installation Instructions for Vehicles with Aerial Type Fender Mounted FM Antenna.
For vehicles where the FM radio antenna is located on the front fender, the FM
Extender Antenna should b e mounted vertically on the f ront windshield at the edge
of the glass nearest to t he antenna. (Figure 16)
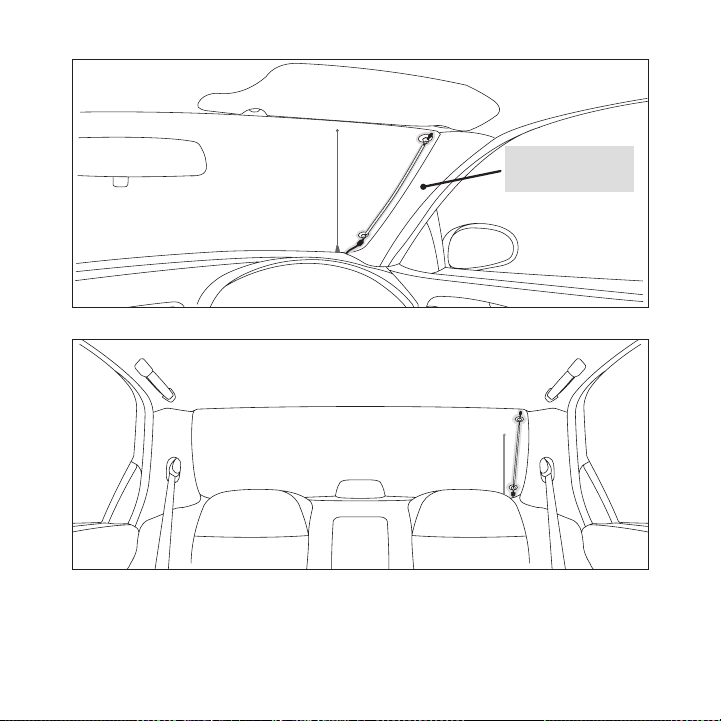
For vehicles where the FM radio antenna is located on the rear fender, the FM
Extender Antenna should b e mounted vertically on the r ear window at the edge of
the glass nearest to the antenna. (Figure 17)
Attach the FM Extender An tenna to the section of glass closest to the FM antenna
in a vertical orientation . (Figure 16 or Figure 17) Th e wire between the two suctio n
cups should be pulled tau t and as straight as possible , and should not obstruct the
driver’s view.
Impo rtant Caution: In som e states it may not be legal to put the FM Extender
Impo rtant Caution: In som e states it may not be legal to put the FM Extender
Antenna on the windshield glass. In this case, the FM Extender Antenna should be
Antenna on the windshield glass. In this case, the FM Extender Antenna should be
mounted on the A-Pillar a djacent to the FM antenna. (F igure 16)
mounted on the A-Pillar a djacent to the FM antenna. (F igure 16)
[ Ins tal latio n ]
29
Page 30
Alternate mounting
location on adjacent
A-Pillar
Figur e 16Figur e 16
30
[ Ins tal latio n ]
Figur e 17Figur e 17
Page 31

b. Installation Instructions for Vehicles with Aerial Type Roof Mounted FM Antenna.
For vehicles where the FM radio antenna is located on the front or rear of the
roof of the vehicle, the FM Extender Antenna should be mounted horizontally on
the front or rear glass b elow the FM antenna, or insta lled into the headliner of th e
vehicle under the FM ante nna.
If you are installing the FM Extender Antenna on the w indow glass, attach the
•
suction cups to the glass under the FM antenna in a ho rizontal orientation. The
wire between the two suct ion cups should be pulled tau t and as straight as possible, and should not obs truct the driver’s view. (Fig ure 18)
If you are installing the FM Extender Antenna into the headliner, remove the suc-
•
tion cups and tuck the wi re into the headliner, stretc hed taut and straight, and
centered under the FM ant enna.
Figur e 18Figur e 18
[ Ins tal latio n ]
31
Page 32

c. I nsta llation Instructions for Vehi cles with On Glass Ty pe F M An tenna.
For vehicles where the FM radio antenna is located on the window glass, the FM
Extender Antenna can be m ounted horizontally on the gl ass, directly over the FM
radio antenna, or install ed into the headliner of the vehicle directly above the FM
antenna.
If you are installing the FM Extender Antenna on the w indow glass, attach the
•
suction cups to the glass centered over the FM radio a ntenna in a horizontal
orientation. The wire bet ween the two suction cups sho uld be pulled taut and as
straight as possible, and should not obstruct the driv er’s view. (Figures 19 & 20)
If you are installing the FM Extender Antenna into the headliner, remove the suc-
•
tion cups and tuck the wi re into the headliner, stretc hed taut and straight, and
centered above the FM ant enna.
Figur e 19Figur e 19
32
[ Ins tal latio n ]
Page 33

Figur e 20Figur e 20
[ Ins tal latio n ]
33
Page 34

d. Installation Inst ruct ions for Vehicles with Sh ark Fin Type FM Antenna. For
vehicles where the FM rad io antenna is located on the rear of the roof of the vehicle, the FM Extender An tenna should be mounted horiz ontally on the glass below
the FM antenna, or instal led into the headliner of the vehicle under the FM antenna .
If you are installing the FM Extender Antenna on the w indow glass, attach the
•
suction cups to the glass below the FM antenna in a ho rizontal orientation. (Figure
21) The wire between the two suction cups should be pulle d taut and as straight
as possible, and should n ot obstruct the driver’s view .
If you are installing the FM Extender Antenna into the headliner, remove the suc-
•
tion cups and tuck the wi re into the headliner, stretc hed taut and straight, and
centered under the FM ant enna.
Figur e 21Figur e 21
34
[ Ins tal latio n ]
Page 35

Plug the FM Extender Antenna into the FM OUT connector of the vehicle dock. (Figure 22)
FM OUT
From FM
Extender Cable
90.1
3.
Figur e 22Figur e 22
Tune your vehicle’s FM ra dio and your SIRIUS radio to the same FM channel (Figure 2 3):
4.
a. Turn off your S IRIUS radio and tune through the FM channels on your vehic le’s
radio to locate an FM cha nnel that is not broadcasting in your area. If you use
an FM channel that is bei ng used by a local broadcaste r, it will interfere with the
performance of your SIRIU S radio. Once you have locate d an FM channel that is
not broadcasting in your area, save it as a preset on your vehicle radio. This will
become your SIRIUS preset .
Figur e 23Figur e 23
b. Turn on your SIRIUS radio. In the Settings or Me nu in your SIRIUS radio, locate the
FM F requ ency menu. Set th e channel number on your SIRI US radio to match the
SIRIUS preset on your veh icle’s radio. Refer to the us er guide which accompanied
your SIRIUS radio for det ailed instructions on how to do this.
[ Ins tal latio n ]
35
Page 36

Note : The FM transmitter in your SIRIUS radi o is automatically set to FM channel
Adhesive Adhesive
88.1. This may not be the best channel in your area.
Tip: If yo u reg ularly travel between cities with different active FM channels, you may
need to find channels that are not broadcasting in each city. Several SIRIUS radio
models can store multi ple FM transmit channels, so you can easily switch to the best
FM channel for each cit y. Refer to your user guide for details on this featu re. You will
also want to set the FM channels th at are not broadca sting in each city as presets
on your vehicle’s radio.
You should now hear the a udio from your SIRIUS radio o ver your vehicle’s FM radio. If
5.
the audio quality is not satisfactory, try moving the FM Extender Antenna slightly to see if
a better signal can be ob tained.
If you are mounting the FM Extender Antenna in the headliner of the vehicle, skip this
6.
step. When you are satisfie d with the mounting location, remove the suction cup mount s
and peel the backing off the adhesive mounts. Permanen tly adhere it in the same pos ition on the glass (or A-P illar), keeping it taut and a s straight as possible. (Figu re 24)
Figur e 24Figur e 24
Route the antenna cable t o your SIRIUS radio. Use the included self adhesive cable
7.
guides (if necessary) to hold the antenna wire in plac e until it reaches the weathe r
stripping or moulding at the edge of the window. Take advantage of any existing cab le
channels or wiring condui ts and route the cable around the passenger compartment to
the vehicle dock. Take ca re not pull the cable across sharp edges that could damage it,
and keep it away from are as where it might entangle fe et. Coil and secure any exces s
antenna cable in a locati on where it can be hidden and secured.
Plug the FM Extender Ante nna into the FM OUT connector of the vehicle dock (Refer t o
8.
Figure 22 on page 35.)
This completes the instal lation of the FM Extender Ant enna. If you’re not sure whic h FM
channels are not broadcas ting in your home or travel c ities, you can also go to htt p:// sirius.
com/ fmchannel and search for a suggested FM channel ba sed on your zip code.
[ Ins tal latio n ]
36
Page 37

Dir eCt C onn eCt ion s
FM OFF
FM OFF
Figur e 25Figur e 25
Figur e 26Figur e 26
Direct connection provide s better audio performance th an a wireless connection and removes
the possibility of interf erence from local FM broadcas ters.
Dire ct Wi red Audio Con nection
If your vehicle radio off ers an “AUX IN” or “LINE IN” connection, it is the best au dio connection available. If the “A UX IN” or “LINE IN” connector is located on the front of y our vehicle
radio, this is also the e asiest connection. (Figure 25 )
Purchase an audio cable t hat matches the connection ty pe of your vehicle radio and your
1.
SIRIUS radio at your loca l electronics retailer. Your SIRIUS radio requires a 1/8” stereo
male connector. Your loca l electronics retailer can he lp you determine the proper c onnection for your car radi o.
Plug one end of the cable into the “AUDIO OUT” or “LIN E OUT” jack on your SIRIUS
2.
radio. Plug the other end into your “AUX IN” or “LINE IN” jack on your vehicle radi o.
Note : Refer to your vehic le radio manufacturer’s guide lines for correct installatio n.
Note : If the “AUX IN” or “LINE IN” connection is on th e back of your vehicle radio, you may
want to consider professi onal installation. (Figure 26 )
[ Ins tal latio n ]
37
Page 38

Cass ette Adap ter
FM OFF
Figur e 27Figur e 27
If your vehicle radio has a cassette player:
Purchase a Cassette Adapt er at your local electronics retailer.
1.
Connect the adapter betwe en the “AUDIO OUT” or “LINE O UT” on your SIRIUS radio
2.
and the vehicle radio’s c assette slot. (Figure 27)
Note : Refer to the casset te adapter manufacturer’s gui delines for correct use.
38
[ Ins tal latio n ]
Page 39

SIRI US FM Dir ect Adapt er
90.1
FM
DIRECT
ADAPTER
Figur e 28Figur e 28
If your vehicle radio doe s not have an “AUX IN” or “LI NE IN” jack, the SIRIUS FM Di rect
Adapter provides a wired connection between your SIRIU S radio and your vehicle radi o, eliminating the outside static and interference you sometim es experience when using a wi reless
FM connection. (Figure 28 )
Professional installation may be required. See your lo cal SIRIUS retailer.
For the latest informatio n refer to http://www.sirius. com/ vehicleinstallation. (The SIRIUS
FM Direct Adapter is avai lable at your local SIRIUS re tailer or at http://shop.siri us.c om).
[ Ins tal latio n ]
39
Page 40

X% Completed
Updating Channels
184
News 12:00P A
To Activate CallTo Activate Call
1-888-539-SIRIUS1-888-539-SIRIUS
Preview
Figur e 29Figur e 29
Figur e 30Figur e 30
Subscribing to the SIRIUS Service
Before you can listen to the SIRIUS service, you need to subscribe to the SIRIUS Sa tellite
Radio service. To subscri be, do the following:
Be sure that the SIRIUS S tarmate 4 is correctly instal led, is in the vehicle or hom e dock,
1.
and that the antenna is o riented to receive the SIRIUS signal.
Turn on the SIRIUS Starma te 4. After the startup seque nce, it will update the SIRIU S
2.
channel line-up. Wait unt il the channel updates have c ompleted before pressing any
buttons. (Figure 29)
Once the channels have be en updated, the display will change to
3.
To A ctivate Call 1-888-53 9-SI RIUS and will tune to cha nnel 184. (Figure 30) You wil l
not be able to listen to other channels until you acti vate your SIRIUS subscription .
Use the channel up and do wn buttons to tune the radio to channel 000 to display the
4.
radio’s unique 12-digit S IRIUS ID Number (SID). (Figur e 31) You can also tune direc tly
to channel 000 by pressin g the Select button, then the 0 (zero) button, and then th e
Sele ct button again. You may do this from either the r adio or the remote control. T he
SID number is also availa ble on the SIRIUS Starmate 4 packaging, and may also be
40
[ Ins tal latio n ]
Page 41

accessed by pressing the MENU button and selecting Sir ius ID. Write the SID number
000
SIDSID
012345678912012345678912
12:00P
SIRIUS ID
A
001
Category 12:00P A
Artist NameArtist Name
Song TitleSong Title
Any Key to Continue
Subscription Updated
Channel Name
Figur e 31Figur e 31
Figur e 32Figur e 32
down in the space provide d near the end of this guide.
Have your credit card han dy and contact SIRIUS on the Internet at:
5.
https://acti vate .siriusradio.com/
and follow the prompts to activate your subscription. You can also call SIRIUS toll -free
at: 1-888-539-SIRIUS (1-8 88-539-7474).
When you have successfull y subscribed to the SIRIUS se rvice, and the SIRIUS Starmat e
6.
4 has been updated with y our subscription information, an alert will be displayed. (Figure
32) To continue, press an y key on the radio
You are now ready to begi n enjoying SIRIUS Satellite R adio’s digital entertainment, and can
tune to other channels!
[ Ins tal latio n ]
41
Page 42

Controls
1
MENU
2 3 4 5 6 7 8 9 0
020 Octane020 Octane
Alice in ChainsAlice in Chains
No ExcusesNo Excuses
ROCK 12:00PROCK 12:00P A2A2
DISP MEMO
BAND
14
5432 6
7
1
10
8
9
11
13
12
Figur e 1Figur e 1
SIRIUS Starmate 4 Reference Guide
Figure 1 and the section following identify and descri be the buttons and controls o f the
SIRIUS Starmate 4.
MENU Button: Used to acce ss menu options to make setup and feature changes.
1.
DISP (Display) Button: To ggles display between the def ault display screen and large
2.
screen display mode. Pres sing and holding switches the display to the channel list
[ Con tro ls ]
42
Page 43

mode.
MEMO (Memory) Button (S-S eek Function): Saves and reca lls artist names, song
3.
titles, and sports teams. Pressing and holding enters the S-Seek mode.
Rewi nd Button: Used to re wind through a broadcast save d in Instant Replay.
4.
Play /Pause Button: Pause Function: Used to pause a bro adcast for Instant Replay. Pl ay
5.
Function: Used to play a broadcast saved in Instant Re play.
Fast Forward Button: Used to fast forward through a br oadcast saved in Instant Repl ay.
6.
Sele ct Button: Selects it ems highlighted on the displa y screen. When at the default
7.
display screen, a press a nd release will display a pro mpt to enter a channel number .
Pressing and holding will return to the last channel p layed.
POWE R Button: Turns the r adio On or Off.
8.
Chan nel Up/Down Buttons: Navigates through channels an d display screens, and
9.
highlights items on the d isplay.
Cate gory Previous/Next Bu tton s: Navigates through the category list screen which
10.
displays SIRIUS channel c ategories.
Pres et Number Buttons (0- 9): Sets and selects preset c hannels. Also used to directl y
11.
tune channels by entering the channel number.
BAND Button: Pressing and releasing switches between t he five preset banks (A, B, C ),
12.
which hold ten presets ea ch. Pressing and holding enab les “Preset Tune Mode”, which
allows for viewing and li stening of stored presets wit h the channel up/down buttons .
Jump Button: Used to quic kly switch between the curren t channel and a favorite chan -
13.
nel.
FM P reset Button: Selects between preset FM frequencie s used for the built-in wirel ess
14.
transmitter.
[ Con tro ls ]
43
Page 44

+
–
1 2 3
4 5 6
7 809
BAND
DISP
MENU
MUTE
MEMO
1
15
14
13
12
2 3
4
5
6
7
8
9
10
11
16
Figur e 2Figur e 2
Remote Control Reference Guide
Figure 2 and the section following identify the button s of the remote control.
Powe r Button: Turns the r adio On or Off.
1.
Cate gory Previous/Next Bu tton s: Navigates through the category list screen which
2.
displays SIRIUS channel c ategories.
MUTE Button: Mutes the au dio.
3.
[ Con tro ls ]
44
Page 45

Chan nel Up/Down Buttons: Navigates through channels an d display screens, and
4.
highlights items on the d isplay.
Rewi nd Button: Used to re wind through a broadcast save d in Instant Replay.
5.
Play /Pause Button: Pause Function: Used to pause a bro adcast for Instant Replay. Pl ay
6.
Function: Used to play a broadcast saved in Instant Re play.
Fast Forward Button: Used to fast forward through a br oadcast saved in Instant Repl ay.
7.
+/- Volume Buttons: Adjus ts the audio volume up & down .
8.
Numb er Buttons (0-9): Use d for directly selecting chan nels and for presets.
9.
Jump Button: Used to quic kly switch between the curren t channel and a favorite chan -
10.
nel.
DISP (Display) Button: To ggles display between the def ault display screen and large
11.
screen display mode. Pres sing and holding switches the display to the channel list
mode.
MEMO (Memory) Button (S-S eek Function): Saves and reca lls artist names, song
12.
titles, and sports teams. Pressing and holding enters the S-Seek mode.
BAND Button: Pressing and releasing switches between t he five preset banks (A, B, C ),
13.
which hold ten presets ea ch. Pressing and holding enab les “Preset Tune Mode”, which
allows for viewing and li stening of stored presets wit h the channel up/down buttons .
MENU Button: Used to acce ss menu options to make setup and feature changes.
14.
FM P reset Button: Selects between preset FM frequencie s used for the built-in wirel ess
15.
transmitter.
Sele ct Button: Selects it ems highlighted on the displa y screen. When at the default
16.
display screen, a press a nd release will display a pro mpt to enter a channel number .
Pressing and holding will return to the last channel p layed.
Remo te Co ntro l Battery Installa tion
To install the remote con trol battery, turn the remote control over and locate the battery cover
near the bottom edge. Ope n the battery compartment and place the battery in the com partment with the + side of t he battery facing up. Replace the battery cover on the rem ote control.
[ Con tro ls ]
45
Page 46

Vehicle Dock Reference Guide
1
56
4
3
2
Figur e 3Figur e 3
Figure 3 and the section following identify and descri be the controls and connector s of the
vehicle dock.
Lock Switch: Locks and un locks the SIRIUS radio in the vehicle dock.
1.
Moun ting Holes: Mounting holes for attaching the sucti on cup mount or the vent moun t.
2.
FM O UT Connector: FM outp ut for use with the optional FM Direct Adapter.
3.
AUDI O OUT Connector: Opti onal audio output connection for connecting to your
4.
vehicle’s audio system if you are not using the FM tra nsmitter.
DC5V Power Connector: Pow er connection for the cigaret te lighter adapter.
5.
ANT Antenna Connector: Co nnection for the provided mag netic antenna.
6.
46
[ Con tro ls ]
Page 47

Operation
3-Digit Channel Number
Channel Name
Band/Preset Bank Number
8-Character
Category Name
Clock
A
uto Sizing/Scrolling Artist Name
Auto Sizing/Scrolling Song Title
SIRIUS Signal Strength Meter
001
Artist Name
Song Title
Category 12:00P A
Channel Name
Figur e 1Figur e 1
Display Screen Information
The display screen of the SIRIUS Starmate 4 provides i nformation about the operatio n of
the radio, such as the cu rrently tuned channel, song o r show being played, artist n ame, time
and other information. Th is screen is referred to as t he D efault display screen in this manual.
Figure 1 identifies the i nformation displayed when lis tening to a typical broadcast .
When the radio is powered On, the previously selected channel will automatically be gin playing, and the artist name and song title of the current ly playing song will be displ ayed.
Changing Channels and Categories
Pressing the channel up o r down button will cause the radio to immediately tune to the next or
previous channel.
[ Ope rat ion ]
47
Page 48

Category
001 Channel Name001 Channel Name
002 Channel Name
003 Channel Name003 Channel Name
004 Channel Name004 Channel Name
Category
001 Channel Name001 Channel Name
002 Channel Name
003 Channel Name003 Channel Name
004 Channel Name004 Channel Name
Category
001 Artist Name001 Artist Name
002 Artist Name
003 Artist Name003 Artist Name
004 Artist Name004 Artist Name
Category
001 Song Title001 Song Title
002 Song Title
003 Song Title003 Song Title
004 Song Title004 Song Title
Figur e 2Figur e 2
Figur e 3Figur e 3
Pressing the category pre vious or next button will cau se the radio to display a lis t of the channels in the current categ ory, highlighting the channel to which you are currently t uned. (Figure
2)
Repeated momentary pressi ng of the DISP button while i n the category list mode will cause
the radio to sequence the display between listings of artist names, song titles, an d back to
channel names. (Figure 3)
Pressing the category pre vious or next button again wi ll cause the radio to display a listing of
the previous or next chan nel category.
Use the channel up/down b uttons to highlight a channel within a category and press the
Select button to tune to the highlighted channel. When a new channel is selected, t he display
will revert to the defaul t display screen for the new channel.
To exit the channel list mode without changing to a di fferent channel, press and ho ld the DISP
button for 1½ seconds, un til the default screen is dis played.
[ Ope rat ion ]
48
Page 49

001
Category 12:00P A
Artist N
Channel Name
001
Artist Name
Song Title
Category 12:00P A
Channel Name
001 Channel Name001 Channel Name
003 Channel Name
005 Channel Name005 Channel Name
004 Channel Name004 Channel Name
002 Channel Name002 Channel Name
001 Artist Name001 Artist Name
003 Artist Name
005 Artist Name005 Artist Name
004 Artist Name004 Artist Name
002 Artist Name002 Artist Name
001 Song Title001 Song Title
003 Song Title
005 Song Title005 Song Title
004 Song Title004 Song Title
002 Song Title002 Song Title
Figur e 4Figur e 4
Figur e 5Figur e 5
Display Button (DISP)
Momentarily pressing and releasing the DISP (Display) button while the default scre en is
displayed changes the art ist name and song title to a scrolling, single line, large format display
for easier viewing from a distance. (Figure 4)
Pressing and holding the DISP button for 1½ seconds wi ll cause the radio enter the channel
list mode. The channel li st mode makes it easy to quic kly search for and locate mus ic by channel, by category, by arti st, and by song title.
Once the radio has entere d the channel list mode, a li sting of the channel numbers and names
is displayed. (Figure 5) Repeated momentary pressing a nd releasing of the DISP butt on will
sequence the display between listings of artist names, song titles, and back to channel names.
Note: If you are viewing a sports category channel lis t (NFL®, NBA®, NHL®, or Colle ge),
pressing the DISP button will instead toggle between t he team names and the current score
of any live play-by-play game.
[ Ope rat ion ]
49
Page 50

Use the category previous and next buttons to scroll t hrough the music and entertai nment
001
Category 12:00P A
Artist NArtist N
# ___
Enter Channel
Channel Name
Figur e 6Figur e 6
categories, and the chann el up and down buttons to scr oll through the available cha nnels in
each category to find the channel to which you want to listen.
When you have found the c hannel you wish to listen to, highlight the channel using the channel up and down buttons a nd press the Select button to tune to the channel. The new channel
will begin playing and th e display will revert to the default display screen for th e new channel.
To exit the channel list mode without changing to a di fferent channel, press and ho ld the DISP
button for 1½ seconds, un til the default screen is dis played.
Selecting Channels Directly
A channel may be directly selected by entering the cha nnel number using the 0 - 9 b uttons on
the radio. To enter a cha nnel number, momentarily pres s and release the Select butt on. At the
display prompt (Figure 6) enter the three digit channe l number.
Channel Presets (BAND)
You can store up to 30 of your favorite channels as pr esets for quick recall access . The
preset channels are store d in 3 bands, A, B, and C, ea ch containing 10 channel pres ets, and
are numbered 0 to 9. The 10 channel presets in each ba nd are accessed by pressing t he
appropriate number (0 to 9) on the radio. A momentary press and release of the BAND button
cycles through the 3 pres et bands (A, B, and C).
50
[ Ope rat ion ]
Page 51

Stor ing C hann el Preset s
001
Category 12:00P A1
Artist NameArtist Name
Song TitleSong Title
Channel Name
Preset Stored
Figur e 7Figur e 7
To store a favorite chann el as a preset, do the follow ing:
Momentarily press and rel ease the BAND button until th e desired preset band, A, B, or
1.
C, is displayed in the lo wer right corner of the defau lt display screen.
Tune the radio to the cha nnel you wish to store as a p reset. (Refer to the section
2.
Chan ging Channels for spe cific instructions for tuning to a channel.)
Press and hold the number ed preset button in which you wish to store your favorite
3.
channel for 1½ seconds un til you hear a beep. The band and preset number will then be
displayed in the lower ri ght corner of the display scr een to confirm that the chann el has
been stored. (Figure 7)
Note: If the preset butto n already has a channel store d in it, the preset will be r eplaced by the
newly stored channel.
Usin g Cha nnel Presets
The active band of preset s is displayed in the lower r ight corner of the default di splay screen,
A, B or C. To change the active band, momentarily pres s and release the BAND button to
cycle between the preset bands.
The 10 preset channels in the active band can then be selected by momentarily press ing and
releasing the 0 through 9 buttons.
When you have chosen a pr eset channel, the band and pr eset number will be displayed in the
lower right corner of the default display screen. (Fig ure 8)
[ Ope rat ion ]
51
Page 52

001
Category 12:00P A3
Artist NameArtist Name
Song TitleSong Title
Channel Name
Sear ching for a Channe l Preset (P.TUNE M ode)
001
Category 12:00P A1
Artist Name
Song Title
Channel Name
001
Artist NameArtist Name
Song TitleSong Title
Category 12:00P A
Preset Tune Mode
Channel Name
Figur e 8Figur e 8
Figur e 9Figur e 9
To quickly search through all of your presets in the P .TUNE mode, do the following:
Press and hold the BAND b utton for approximately 1 sec ond to enter the P.TUNE mode.
1.
Pres et Tuning Mode will m omentarily be displayed and t he top left and lower right c orners of the display will invert to indicate the radio is in the Preset Tune Mode. ( Figure 9)
Use the channel up and do wn buttons to move up or down through your channel presets
2.
and immediately tune to e ach channel. Channel presets are grouped and displayed by
bank and preset number, i .e., A-1, A-2...B-1, B-2, et c. Empty presets are not disp layed.
To view the channel prese ts in the channel list mode, where you can view 4 presets at
3.
once, momentarily press a nd hold the DISP button for a pproximately one second until
the channel list mode is displayed. Repeated momentary pressing and releasing of th e
DISP button will sequence the display between listings of artist names, song titles , and
back to channel names. (F igure 10)
52
[ Ope rat ion ]
Page 53

A-1 Channel NameA-1 Channel Name
A-3 Channel Name
A-5 Channel NameA-5 Channel Name
A-4 Channel NameA-4 Channel Name
A-2 Channel NameA-2 Channel Name
A-1 Artist NameA-1 Artist Name
A-3 Artist Name
A-5 Artist NameA-5 Artist Name
A-4 Artist NameA-4 Artist Name
A-2 Artist NameA-2 Artist Name
A-1 Song TitleA-1 Song Title
A-3 Song Title
A-5 Song TitleA-5 Song Title
A-4 Song TitleA-4 Song Title
A-2 Song TitleA-2 Song Title
Figur e 10Figur e 10
Note: If you are viewing a sports category channel lis t (NFL®, NBA®, NHL®, or COLLEGE), pressing the DISP button will instead toggle be tween the team names and the
current score of any live play-by-play game.
To exit the channel list mode, press and hold the DISP button for approximately one
4.
second, until the display reverts to the P.TUNE mode.
To exit the P.TUNE mode, press and hold the BAND butto n for approximately 1 second,
5.
until the default display screen is displayed.
Memory (MEMO) and Song Seek (S-Seek) Functions
This feature allows you t o capture and store informati on in the radio’s memory abou t the currently tuned programming– artist, song, or sports team . The radio then continuously searches
all incoming SIRIUS chann els and alerts the user when a program saved in memory mat ches a
selection currently being played. (Figure 11)
[ Ope rat ion ]
53
Page 54

001
Artist NameArtist Name
Song TitleSong Title
Category 12:00P A
S-Seek Alert
Channel Name
001
Artist NameArtist Name
Song TitleSong Title
Category 12:00P A
Game Alert
Channel Name
Figur e 11Figur e 11
Figur e 12Figur e 12
A total of 30 artists, so ngs, and sports teams may be stored in memory.
If you have saved a sport s team (or teams) in memory, at the time radio is initiall y powered
on, you will be alerted i f your sports teams are playi ng in a game being broadcast. Also, while
listening to your SIRIUS radio, should one of your tea ms begin to play a game, you will be
alerted.
Stor ing A rtis t Names, Song Titl es, and S ports Tea ms to Mem ory
If you are listening to a song or other entertainment channel, or a sports team, an d wish to
save the artist, song, or sports team selection to mem ory for future S-Seek alerts, do the following:
For Artist Names or Song Titl es: If the currently tune d channel is a music or enter tain-
1.
ment channel, momentarily press and release the MEMO b utton. The radio will display a
menu to choose to store t he artist name or the song ti tle. (Figure 13)
54
[ Ope rat ion ]
Page 55

100
Category 12:00P A
Artist NameArtist Name
Song TitleSong Title
Store Song?
Store Artist?Store Artist?
Channel Name
If either the artist name or song title is not availab le to save, the choice will b e displayed
100
Category 12:00P A
Artist NameArtist Name
Song TitleSong Title
Song Unavailable
Store Artist?Store Artist?
Channel Name
100
Category 12:00P A
Artist NameArtist Name
Song TitleSong Title
Artist Unavailable
Store Song?Store Song?
Channel Name
100
Category 12:00P A
Artist NameArtist Name
Song TitleSong Title
Song Stored
Store Artist?Store Artist?
Channel Name
100
Category 12:00P A
Artist NameArtist Name
Song TitleSong Title
Artist Stored
Store Song?Store Song?
Channel Name
Figur e 13Figur e 13
Figur e 14Figur e 14
Figur e 15Figur e 15
as unavailable. (Figure 1 4)
Using the channel up and down buttons, choose Store Ar tist or Store Song (when avai lable) and press the Selec t button to save the current selection to memory.
If both the artist and so ng are available to save, you will be prompted again to sa ve
whichever one you haven’t yet saved, song title or art ist name. (Figure 15) If you do not
wish to save, press the M EMO button to exit.
For Sports Games: If the current tuned channel is an N FL, NBA, NHL, or College play -
2.
by-play sports broadcast, momentarily press and releas e the MEMO button. The radio
will display a menu to ch oose which sports team should be saved to memory. (Figure
16)
[ Ope rat ion ]
55
Page 56

100
Category 12:00P A
Artist NameArtist Name
Song TitleSong Title
Store DAL?
Store NYG?Store NYG?
Channel Name
100
Category 12:00P A
Artist NameArtist Name
Song TitleSong Title
Team2 Unavailable
Store NYG?Store NYG?
Channel Name
Alert Type
Initial Game Alert
All Score UpdatesAll Score Updates
Figur e 16Figur e 16
Figur e 17Figur e 17
Figur e 18Figur e 18
If either of the teams is not available to save, that team will be displayed as una vailable.
(Figure 17)
Using the channel up and down buttons, choose the desi red sports team (when available) and press the Selec t button to save the current selection to memory.
The next screen will ask which kind of alert you wish to have. (Figure 18)
Init ial Game Alert will p rovide an alert when the team you have chosen is playing a
game. All Score Updates w ill provide an alert when the team you have chosen is play ing
a game, and also when the scores are updated for the t eam.
Using the channel up and down buttons, choose the desi red alert and press the Selec t
button to save the select ion to memory.
If both teams are availab le to save, you will be promp ted again to save the other t eam.
If you wish to save the t eam, follow the same procedur e as when saving the first te am.
(Figure 19) If you do not wish to save, press the MEMO button to exit.
56
[ Ope rat ion ]
Page 57

100
Category 12:00P A
Artist NameArtist Name
Song TitleSong Title
NYG Stored
Store DAL?Store DAL?
Channel Name
100
Category 12:00P A
Artist NameArtist Name
Song TitleSong Title
DAL Stored
Store NYG?Store NYG?
Channel Name
001
Category 12:00P
Artist NArtist N
Unable to Store
A
Channel Name
001
Artist NameArtist Name
Song TitleSong Title
Category 12:00P A
X Used/Y Empty
Channel Name
001
Artist NameArtist Name
Song TitleSong Title
Category 12:00P A
Artist Stored
Channel Name
Figur e 19Figur e 19
Figur e 20Figur e 20
Figur e 21Figur e 21
To ensure that no duplica te entries are stored in memo ry, the radio will check the stored
3.
memory list to ensure tha t the alert about to be store d is not already stored in me mory.
If a duplicate entry is f ound, an Unable to Store scre en will be displayed for 1 se cond.
(Figure 20) The radio wil l then revert to the last act ive display mode.
If the new alert was succ essfully stored in memory, a Arti st/Song/Game Stored pop-u p
4.
screen followed by an X U sed/ Y Empty screen will be di splayed for 1 and 2 seconds
respectively. X is the to tal number of listings stored in memory, and Y is the tota l number
of memory listings still available for storage. (Figur e 21)
If the MEMO button is pre ssed and all of the memory sp aces are full, an “S-Seek Ful l”
5.
screen will be displayed for 1 second. (Figure 21)
[ Ope rat ion ]
57
Page 58

001
Artist NameArtist Name
Song TitleSong Title
Category 12:00P A
Memory Full
Channel Name
001
Category 12:00P A
Artist NArtist N
Cancel
ReplaceReplace
Channel Name
Replace
Artist Name/ Song TitArtist Name/ Song Tit
Artist Name
Sports TeamSports Team
Artist Name/ Song TitArtist Name/ Song Tit
X/Y
Figur e 21Figur e 21
Figur e 22Figur e 22
Figur e 23Figur e 23
A Re place - Cancel screen will then be displayed which will allow you to choose
whether to replace an exi sting alert stored in memory, or to cancel storing the ale rt to
memory. (Figure 22)
Using the channel up and down buttons, choose whether to replace an existing alert or
cancel saving the alert t o memory. If you choose to ca ncel saving the alert, the ra dio will
revert to the last active display mode.
If you have chosen to rep lace an existing alert, a lis ting of all the alerts stored in memory
will be displayed. (Figur e 23)
Using the channel up and down buttons, highlight the a lert that you would like to
overwrite and press the S elect button to store the new alert. If the new alert was successfully saved in memory , a Artist/Song/Game Stored p op-up screen followed by an
X Us ed/Y Empty screen wil l be displayed for 1 and 2 se conds respectively. (Figure 2 4)
X is the total number of listings stored in memory, an d Y is the total number of me mory
listings still available for storage.
58
[ Ope rat ion ]
Page 59

001
Artist NameArtist Name
Song TitleSong Title
Category 12:00P A
X Used/Y Empty
Channel Name
001
Artist NameArtist Name
Song TitleSong Title
Category 12:00P A
Artist Stored
Channel Name
Memory
Artist NameArtist Name
Song TitleSong Title
1/30
Figur e 24Figur e 24
Figur e 25Figur e 25
The radio will revert to the last active display mode.
View ing S tore d Alerts Stored in Memory
To view the alerts which have been saved to memory, pr ess and hold the MEMO button for
1½ seconds to enter S-See k mode. The alerts stored in memory will be displayed one- at-atime in page format. (Fig ure 25) Use the channel up an d down buttons to scroll thro ugh the
listings. This function a llows you to review previousl y stored program information.
To exit this function, pr ess and release the MEMO butt on.
Dele ting an A lert Stor ed into M emory
To delete an alert stored in memory, do the following:
Press and hold the MEMO b utton for 1½ seconds to enter S-Seek mode. The alerts
1.
stored in memory will be displayed one-at-a-time in pa ge format.
Use the channel up and do wn buttons to find the alert which you wish to delete and
2.
press the Select button.
A screen displaying Delet e, S eek On, and Seek Off will be displayed. (Figure 26)
3.
[ Ope rat ion ]
59
Page 60

Memory Recall
Delete
Seek OffSeek Off
Seek OnSeek On
Delete
Yes
NoNo
Memory
Artist NameArtist Name
Song TitleSong Title
08/29
29 Used/1 Empty
Memory
Artist NameArtist Name
Song TitleSong Title
08/29
Deleted
Figur e 26Figur e 26
Figur e 27Figur e 27
Figur e 28Figur e 28
Use the channel up and do wn buttons to highlight the Dele te option, and press the
4.
Select button. A delete c onfirmation screen will appea r. (Figure 27)
To permanently delete the alert from the memory list, highlight Yes using the chann el up
and down buttons and pres s the Select button to confir m.
A De leted pop-up screen f ollowed by an X Used/Y Empty screen will be displayed for
5.
1 and 2 seconds respectiv ely. (Figure 28) X is the tot al number of listings saved i n
memory, and Y is the tota l number of memory listings s till available for storage.
The radio will revert to the last active display mode.
Acti vatin g th e S-Seek Alert
To activate the S-Seek al ert function to begin receivi ng alerts, do the following:
Press and hold the MEMO b utton for 1½ seconds to enter the S-Seek mode.
1.
Press and release the Sel ect button. A screen displayi ng S -Seek On, S-Seek Off, and
2.
Dele te will be displayed. (Figure 29)
[ Ope rat ion ]
60
Page 61

Memory Recall
S-Seek On
S-Seek OffS-Seek Off
DeleteDelete
To enable S-Seek alerts, use the channel up and down b uttons to highlight the S-See k
001
Artist NameArtist Name
Song TitleSong Title
Category 12:00P A
S-Seek Alert
Channel Name
001
Artist NameArtist Name
Song TitleSong Title
Category 12:00P A
Game Alert
Channel Name
Figur e 29Figur e 29
Figur e 30Figur e 30
3.
On option and press the S elect button. The S-Seek func tion is now enabled.
When the S-Seek option is enabled, whenever th e radio is turned on, it automatically searches
the incoming channels to determine if a match exists w ith the program information s tored in
the S-Seek memory. If one or more matches are found, a pop-up screen momentarily ap pears
for 2 seconds and display s S- Seek Alert or Game Alert, depending upon which type of a
match was found. (Figure 30) An audible beep tone will also be heard indicating tha t a match
was found.
The radio then displays t he S IRIUS SEEK LIST or MY GAM E ZO NE screen, which displays a
list of the current match es. (Figure 31) No alert is p rovided for the currently sel ected channel.
[ Ope rat ion ]
61
Page 62

SIRIUS SEEK LIST
121 Artist Name/ Song121 Artist Name/ Song
156 Artist Name
MY GAME ZONE
100 Giants @ Cowboys100 Giants @ Cowboys
123 Bulls @ Cavaliers
MY GAME ZONE
100 NFL NYG 7 DAL 3100 NFL NYG 7 DAL 3
123 NBA BUL 77 CLE 73
Figur e 31Figur e 31
You can now select the ar tist, song, or sports game th at you wish to tune to by usi ng the
channel up and down butto ns to highlight your selectio n from the list, and then pre ssing the
Select button. If no sele ction is made within 10 secon ds, the radio will revert to the last active
display mode. Note that p lay of the current selection will continue until a new sel ection is
chosen from the S-Seek or My Game Zone list.
Jump Button
The radio has a special p reset button called the Jump button, which is identified b y the
icon. The Jump button is used to quickly tune to a cha nnel that is accessed frequen tly and
temporarily such as a tra ffic channel, a weather chann el, a news channel, a sports channel, or
any channel at all. Press ing the Jump button allows yo u to quickly tune to the spec ific channel you have programmed i nto the Jump button, and then tune back to the original ch annel
by pressing the Jump butt on again. (Refer to the Menu Opti ons section of this manua l for
instructions for configur ing the Jump button.)
If the Jump button has be en preset to the traffic opti on, which will cause the radi o to access
a specific city traffic r eport, pressing the Jump butt on will immediately begin a s earch for the
city’s traffic report. Th e Jump icon will be displayed in the lower right corner of the display
screen to indicate that a Jump search is active. The s earch process may take up to 4 minutes
until the city’s traffic report found. The radio will automatically tune to the tra ffic report chan-
[ Ope rat ion ]
62
Page 63

001
Artist NameArtist Name
Song TitleSong Title
Category 12:00P
NYC Pending
Channel Name
001
Artist NameArtist Name
Song TitleSong Title
Category 12:00P
A
Jump Canceled
Channel Name
Category 12:00P
150
NYC WeatherNYC Weather
NYC WeatherNYC Weather
Channel Name
Figur e 32Figur e 32
Figur e 33Figur e 33
Figur e 34Figur e 34
nel when the traffic repo rt is found. (Figure 32)
Pressing the Jump button again while the radio is acti vely searching will cancel th e search.
(Figure 33)
Pressing the Jump button after the radio has tuned to the traffic report channel wi ll return you
to the previous channel.
If the Jump button has be en preset to the JumpSet opti on, pressing the Jump button will
immediately tune to the c hannel preset into the JumpSe t. (Figure 34) The Jump icon will be
displayed in the lower ri ght corner of the display scr een to indicate that the Jump preset channel is currently tuned.
Pressing the Jump button again will return to the prev ious channel.
Note: The channel preset for the Jump button remains t he same regardless of which p reset
memory bank is currently selected.
[ Ope rat ion ]
63
Page 64

MY GAME ZONE
100 Giants @ Cowboys100 Giants @ Cowboys
123 Bulls @ Cavaliers
001
Artist NameArtist Name
Song TitleSong Title
Category 12:00P A
Game Alert
Channel Name
Figur e 35Figur e 35
Game Alert
The radio has a feature c alled Game Alert which can au tomatically alert you when yo ur favorite
sports team is playing a game. When a sports game invo lving one of your favorite sp orts
teams is found, a Game Al ert screen is displayed, foll owed by a screen displaying t uning information for the sports gam es. (Figure 35)
You can then use the chan nel up and down buttons to hi ghlight your favorite sports team
in the list, and then pre ss the Select button to tune to the channel where the game is being
broadcast.
Refer to the Gam e Al ert s ection in the Menu Options se ction of this manual for inst ructions
on programming your favor ite sports teams into the rad io. You can also use the S-Se ek feature to add Game Alerts f or sports teams. Refer to the section, Storing Artist Name s, S ong
Titl es, and Sports Teams to M emor y for more informatio n.
Instant Replay
The radio has a feature c alled Instant Replay which st ores the audio of the channel to which
you are listening for lat er playback. Approximately 30 to 60 minutes of audio depen ding upon
the channel to which you are tuned is stored. As soon as you tune to a channel, the radio
automatically begins stor ing the audio, enabling you t o rewind at any time to repla y the audio
again. If you unable to c ontinue listening to a channe l, but do not want to miss th e broadcast,
pressing the Play/Pause b utton will cause the radio to mute the audio and mark the point in
the broadcast so you can resume listening at a later t ime.
Pause/Play button. When pressed, this places the radi o in the Instant Replay pause mode
•
which mutes the audio.
64
[ Ope rat ion ]
Page 65

REPLAY LIST
LiveLive
Artist
ArtistArtist
ArtistArtist
REPLAY LIST
LiveLive
Song Title
Song TitleSong Title
Song TitleSong Title
Figur e 36Figur e 36
Pressing and releasing th e Pause/Play button causes th e radio to begin playing the stored
�
audio from the point at w hich the radio was paused. Du ring playback, the radio will continue to store the channe l audio until you exit the In stant Replay mode.
Pressing and holding the Play/Pause button changes the display to a listing of the artist’s
�
names in the stored audio (Figure 36), from the most r ecent to the oldest, beginnin g
with an entry called “Liv e”. (Pressing the DISP button will toggle the display betw een
the artist name list and the song/program title list.) An item from the list may be chosen
and the playback will com mence from that point in the stored audio, or, “Live” may be
chosen which will exit th e Instant Replay mode, and th e radio will resume playing t he live
broadcast.
Fast Forward button. The fast forward button forwards you through the stored audio.
•
Pressing and releasing th e Fast-Forward button forward s to the start of the next so ng or
�
program in the stored aud io, and playback automaticall y begins. Repeatedly pressing and
releasing the Fast-Forwar d button causes the radio to continue to move forward in t he
stored audio to the start of each next song or program until the end of the stored audio
is reached. When the end of the stored audio is reach ed, a beep will be heard (if the
Confirmation Tone option is enabled), the Instant Repl ay mode will be exited, and t he radio
will resume playing the l ive broadcast.
Pressing and holding the Fast-Forward button for one s econd advances the playback
�
forward in 10 second int ervals, which increases to 15 and then 30 second intervals the
longer the Fast-Forward b utton remains pressed. Playba ck begins immediately when th e
button is released. When the end of the stored audio i s reached, a beep will be hea rd, the
Instant Replay mode will be exited, and the radio will resume playing the live broa dcast.
Rewind button. The rewin d button rewinds (moves you b ackwards) through the stored
•
audio.
Pressing and releasing th e Rewind button rewinds to th e start of the current song o r
�
[ Ope rat ion ]
65
Page 66

001 Ch. Name
Artist NameArtist Name
Song TitleSong Title
Paused
-00:00:03
Figur e 37Figur e 37
program in the stored aud io, and playback automaticall y begins. Repeatedly pressing and
releasing the Rewind Button causes the rad io to continue to mov e backwards in the st ored
audio to the start of eac h previous song or program un til the beginning of the stor ed audio
is reached. If the beginn ing of the stored audio is re ached, a beep will be heard (if the
Confirmation Tone option is enabled) and playback will automatically begin.
Note: Depending upon wher e in a particular broadcast t he channel was selected, the start
�
of a song or program may not be available in memory. I f this occurs, the playback w ill start
from where the audio bega n to be stored.
Pressing and holding the Rewind button for one second rewinds playback in 10 second
�
intervals, which increase to 15 and then 30 second int ervals the longer the Rewind button
remains pressed. Playback begins immediately when the button is released. If the be ginning of the stored audio is reached while rewinding, a beep will be heard and playb ack will
automatically begin.
Using Instant Replay
To begin using the Instan t Replay feature of the radio , press the Pause/Play button . This
causes the radio to enter the Instant Replay pause mod e, which mutes the audio from the
radio. A Paused message w ill be displayed for two seco nds to confirm that the radio has
entered the Instant Repla y mode. (Figure 37)
To listen to the audio th at was stored, press the Play /Pause button again and the r adio will
begin to play back the au dio stored in the Instant Rep lay memory from the point whe re you
pressed the Play/Pause bu tton.
As you are listening to t he playback of the stored aud io, you may either fast forwa rd or rewind
through the stored audio by pressing the fast-forward or rewind buttons, without ha ving to
press the Play/Pause butt on first. Refer to the previo us sections describing the Re wind and
[ Ope rat ion ]
66
Page 67

001 Ch. Name -00:00:00
Artist NameArtist Name
Song TitleSong Title
Instant Replay Mode
Play Position Indicator
Progress Bar
Instant Replay Time Position
Figur e 38Figur e 38
Fast-Forward buttons for specific instructions for the ir use.
Note: If the radio is tun ed to another channel while i n the Instant Replay mode, th e Instant Re-
play mode is exited, all the audio stored in the Insta nt Replay memory is erased, a nd the tuned
channel begins to play. A lso note that tuning to anoth er channel may automatically occur if
another feature of the ra dio has been programmed to do so.
When the Instant Replay m ode is active, status informa tion is shown at the bottom o f the
radio’s display screen. ( Figure 38)
The Instant Replay mode i con that is displayed at the bottom left of the screen ind icates the
current mode.
Paus e mode. This indicate s that the radio is paused an d muted.
Play mode. This indicates that you are in the Instant Replay playback mode, listeni ng to
stored audio.
Fast Forward mode. This i ndicates that you are fast fo rwarding through the stored I nstant
Replay audio.
Rewi nd mode. This indicat es that you are rewinding, or moving backwards, through th e
stored Instant Replay aud io.
The Progress Bar is a vis ual indicator of the status o f the Instant Replay memory. (Figure 39)
As the memory fills, Prog ress Bar begins to fill from the left side providing a vis ual indication
[ Ope rat ion ]
67
Page 68

Artist NameArtist Name
Song TitleSong Title
Progress Bar Showing
Amount of Memory Filled
001 Ch. Name -00:20:03
End of Stored Audio
Beginning of Live Broadcas
t
Play Position Indicator
Artist NameArtist Name
Song TitleSong Title
001 Ch. Name -00:20:03
Figur e 39Figur e 39
Figur e 40Figur e 40
of how much of the Instan t Replay memory is filled. Th e end of the bar indicates th e end of the
stored audio, where the l ive broadcast begins. When al l available memory has been u sed, the
bar will be completely fi lled.
A diamond-shaped Play Pos ition indicator is superimpos ed over the Progress Bar whic h provides a visual indicator of the current playback posit ion in the Instant Replay mem ory. (Figure
40)
The Play Position indicat or shows your current listeni ng position in the stored aud io. When
you press the Play/Pause button to begin playback of t he stored audio, this indicat or will
begin to move to the righ t showing the progression of the playback through the Inst ant Replay
memory, provided that the memory is not full. (Figure 41)
[ Ope rat ion ]
68
Page 69

Play Position Indicator
Artist NameArtist Name
Song TitleSong Title
001 Ch. Name -00:20:03
Figur e 41Figur e 41
The portion of the Progre ss Bar behind the Play Positi on indicator shows how much y ou can
rewind in the Instant Rep lay memory, while the filled portion ahead of the Play Ind icator shows
how much you can fast-for ward in the memory.
While you are in the play back mode, the radio continu es to store the audio from th e channel.
Obviously, you will be un able to “catch up” to the liv e broadcast during playback, as new audio is being stored at th e same rate at which you are playing back the stored audio . You can
use the Fast-Forward butt on to skip ahead or exit the Instant Replay mode, and begi n listening
to the live broadcast aga in.
Should you press the Play /Pause button to stop the pla yback, the play position indi cator will
stop moving and continue to provide a visual indicatio n of your current position in the Instant
Replay memory.
When the Instant Replay m emory is 10 seconds from beco ming full, two beeps will be heard
(if the Confirmation Tone option is enabled). When the memory is full, the radio wi ll automatically begin playback, and will continue to store the c hannel audio, overwriting the oldest
portion of the audio prev iously stored. When the memor y is full, you will be unable to rewind
through the stored audio.
If you have partially pla yed back the stored audio, an d have paused the radio again , the Play
Position indicator will b egin to move left when the In stant Replay memory becomes f ull, as it
begins overwriting the ol dest portion of the audio pre viously stored. When the Play Position
indicator reaches the lef t-most position, indicating t hat the memory is full, the r adio will automatically begin playback.
The Instant Replay Time P osition provides the exact am ount of time the Play Positio n indicator
is behind the live broadc ast, expressed as Hours:Minut es:Seconds, and displayed as a negative number. (Figure 42) For example, if -02:40 is dis played, this would indicate t hat the Play
Position indicator is 2 m inutes and 40 seconds behind the live broadcast.
[ Ope rat ion ]
69
Page 70

Artist NameArtist Name
Song TitleSong Title
Play Position Indicator
Time Position of
Play Position Indicato
r
001 Ch. Name -00:00:00
Figur e 42Figur e 42
70
[ Ope rat ion ]
Page 71

FM Preset Button
FM Presets
FM1 88.1 MHz
FM2 <EMPTY>FM2 <EMPTY>
FM3 <EMPTY>FM3 <EMPTY>
FM4 <EMPTY>FM4 <EMPTY>
Figur e 43Figur e 43
The radio has a special b utton called the FM Preset bu tton, which is identified by the
icon.
When the FM Preset button is pressed, the radio turns on the built-in FM transmitte r and
begins transmitting on th e next frequency from the FM frequency preset list. A scre en will be
displayed for 3 seconds s howing the currently selected FM frequency. When the FM tr ansmitter is turned on, an FM r adio tuned to the same FM fre quency will receive the curre ntly tuned
SIRIUS broadcast. Each su bsequent press of the FM Pres et button advances to the nex t
frequency in the FM frequ ency preset list. Using the F M Preset button, a quiet FM f requency
may be quickly tuned.
If no FM frequencies have been preset when the FM Pres et button is pressed, the rad io will
default to a frequency of 88.1 MHz.
Pressing and holding the FM Preset button will cause a list of the FM presets to be displayed.
(Figure 43)
You can use the channel u p and down buttons to scroll through the FM preset list an d highlight the preset you wish to change, and press the Sel ect button to choose the pres et. Use
the channel up and down b uttons to highlight the frequ ency you wish to select for t he preset
and press the Select butt on. The FM frequency will the n be stored in the preset. To select the
preset and exit, press th e MENU button.
You may also change the F M presets by using the FM Pre sets menu option of the radio . (Refer to the FM Transmitter section in the Menu Options section of this manual for in structions
on programming the FM fre quency preset list.)
[ Ope rat ion ]
71
Page 72

Menu Options
Menu Options
Sirius ID
FM Transmitter
Game Alert
Settings
Figur e 1Figur e 1
To enter the Menu Options page of the radio, press the MEN U button. The Menu Option s list
will be displayed. (Figur e 1)
To select a menu option, use the channel up and down b uttons to highlight the optio n you
wish to adjust, and press the Select button. If a sele ction is not made within 10 s econds, the
radio will exit the menu options screen, and revert to the last active display mode .
To exit the Menu Options screen, or any of the other m enu option screens, repeatedl y press
and release the MENU butt on until you are returned to the default display screen.
The following sections ex plain each of the menu option s in the order in which they are displayed on the Menu Option s screen.
Sirius ID
This menu option displays your 12 digit SIRIUS ID (SID ) number. (Figure 2) The SID is unique
to each SIRIUS radio, and is required to activate your service. It is recommended t hat you
write this number in the space provided near the end o f this user guide. No adjustm ents are
allowed in this mode. To exit, press the MENU button.
[ Men u O ption s ]
72
Page 73

Sirius ID
ESN 000492229812
FM Transmitter
FM On/OffFM On/Off
FM Presets
Figur e 2Figur e 2
Figur e 3Figur e 3
FM Transmitter
The FM Transmitter featur e allows you to create a pres et list of 5 suitable FM freq uencies
which can then be accesse d by using the FM Preset butt on. This option also allows y ou to
turn the FM transmitter O n and Off. (Figure 3)
FM P reset s
To create or add to a lis t of FM Preset frequencies , do the following:
Using the channel up and down buttons, highlight the “ FM Presets” menu item and pre ss
1.
the Select button. A list of the FM presets will be di splayed. (Figure 4) (You may also
enter this list by pressi ng and holding the FM Preset button.)
[ Men u O ption s ]
73
Page 74

FM Presets
FM1 88.1 MHz
FM2 <EMPTY>FM2 <EMPTY>
FM3 <EMPTY>FM3 <EMPTY>
FM4 <EMPTY>FM4 <EMPTY>
<EMPTY><EMPTY>
88.3 MHz
88.7 MHz88.7 MHz
88.5 MHz88.5 MHz
88.1 MHz88.1 MHz
Figur e 4Figur e 4
Figur e 5Figur e 5
Using the channel up and down buttons, highlight the F M preset you wish to set (or
2.
change) and press the Sel ect button. A list of FM freq uencies will be displayed, be ginning with the currently s elected FM frequency for the preset. (Figure 5)
Use your FM radio to loca te quiet FM frequencies where there is no interference fro m
3.
adjacent FM stations. The se are the frequencies which should be added to the FM
Presets list.
Using the channel up and down buttons, highlight the f requency you wish to select f or
4.
the preset and press the Select button. The FM frequen cy will then be stored in the
preset. If you do not wan t a frequency for the preset, choose EMPTY from the menu a nd
press the Select button.
You may then continue to select FM frequencies for oth er presets using the same ste ps.
5.
To exit the FM Presets me nu, press the MENU button.
FM O n/Off
To turn the radio’s FM tr ansmitter On or Off, use the channel up and down buttons t o highlight the FM On/Off menu item and press the Select but ton.
Use the channel up and do wn buttons to highlight FM On or FM Off and press the Sele ct
button. (Figure 6)
[ Men u O ption s ]
74
Page 75

FM On/Off
FM On
FM OffFM Off
To exit the FM On/Off men u, press the MENU button.
Figur e 6Figur e 6
Game Alert
The Game Alert feature al lows you to store your favori te sports teams in memory. Th e radio
will constantly scan the SIRIUS channels and will soun d an alert when a sports team you had
stored in memory is playi ng, or when there is a score update for a team, depending on which
option you have chosen fo r the sports team.
Sports teams which you ha ve selected and which are cur rently playing will be displa yed in a
category called My Game Z one.
You may select one sports team from each sports league and the college category usi ng
the Game Alert option, ho wever, more teams may be chos en by using the Memory (MEMO)
function. (See the sectio n Me mory (MEMO) and Song Seek (S- Seek ) Functions for more
information about adding additional teams.)
To choose sports teams to add for game alerts, do the following:
Use the channel up and do wn buttons to highlight Game Aler t and press the Select
1.
button.
Use the channel up and do wn buttons to highlight the s ports league or college categ ory
2.
of the sports team you wi sh to add, and press the Sele ct button. (Figure 7)
[ Men u O ption s ]
75
Page 76

Game Alert
NFL
NBANBA
NHLNHL
COLLEGECOLLEGE
NFL
None
Arizona CardinalsArizona Cardinals
Atlanta FalconsAtlanta Falcons
Baltimore RavensBaltimore Ravens
COLLEGE
None
AlabamaAlabama
AuburnAuburn
ColoradoColorado
Alert Type
Initial Game Alert
All Score UpdatesAll Score Updates
Figur e 7Figur e 7
Figur e 8Figur e 8
Figur e 9Figur e 9
Use the channel up an d down buttons to highlig ht the league team name o r college team
3.
name you wish to add, and press the Select button. (Fi gure 8)
Note that for college teams, you will rece ive an alert for all teams playing for tha t college.
Use the channel up and do wn buttons to highlight which type of an alert you want, a nd
4.
press the Select button. (Figure 9)
When the radio is powered on, and while it is playing, Ini tial Game Alert will soun d an
alert when the team you h ave chosen is playing a game. All Score Updates does the
same but also sounds an a lert when the scores are upda ted for the chosen team.
To exit the Game Alert me nu, press the MENU button.
[ Men u O ption s ]
76
Page 77

Settings
Jump Setting
Display OptionsDisplay Options
Memory OptionsMemory Options
Auto SelectAuto Select
Jump Setting
Traffic: ATL
Jump Set
Jump Setting
Choose one of theChoose one of the
following options
for button
following options
for button
Figur e 10Figur e 10
Figur e 11Figur e 11
Settings
The following sections ex plain each of settings menu o ptions in the order in which they are
displayed. (Figure 10)
To select a menu option, use the channel up and down b uttons to highlight the optio n you
wish to adjust, and press the Select button.
Jum p s et tin gs
The Jump setting controls the actions of the Jump butt on. The Jump setting menu may also be
accessed by pressing and holding the Jump button. (Fig ure 11)
Two options are available for the Jump setting, Traffi c and Jump Set. The currently selected
option is indicated by th e Jump icon.
The Traffic option sets t he function of the Jump butto n to provide a traffic report for a selected
city, while the JumpSet o ption assigns any channel to the Jump button.
Traf fic
To set the Jump button to provide a traffic report whe n pressed, do the following:
Use the channel up and do wn buttons to highlight the T raff ic option, and press the 1.
[ Men u O ption s ]
77
Page 78

Select button.
Traffic Market
Atlanta
BaltimoreBaltimore
BostonBoston
ChicagoChicago
Traffic Market
Atlanta
BaltimoreBaltimore
BostonBoston
Updating City List
Figur e 12Figur e 12
Figur e 13Figur e 13
A screen showing a list o f cities will be displayed. ( Figure 12)
2.
Use the channel up and do wn buttons to highlight the c ity for which you wish to hav e a
traffic report and press the Select button.
If the city list has not yet been updated, a message w ill be displayed indicating t hat the
3.
city list is updating. (F igure 13) Wait 10 minutes and then try again.
To exit the Jump Settings menu, press the MENU button.
Jump Set
To set the Jump button to a specific channel (other th an a traffic channel) when pr essed, do
the following:
Use the channel up and do wn buttons to highlight the “ JumpSet” option, and press th e
1.
Select button.
Figure 14 will be display ed.
2.
[ Men u O ption s ]
78
Page 79

Jump Setting
Tune to desired Ch.Tune to desired Ch.
press & hold
the button
press & hold
the button
Use the channel up and do wn buttons to tune to the cha nnel you want assigned to the
Jump Setting
Traffic: NONE
JumpSetJumpSet
Display Options
Brightness
ContrastContrast
Figur e 14Figur e 14
Figur e 15Figur e 15
Figur e 16Figur e 16
3.
Jump button. When the cha nnel is tuned, press and hold the Jump button for 2 second s
until Figure 15 is displa yed.
The channel selected is n ow assigned to the Jump butto n.
To exit the Jump Settings menu, press the MENU button.
At any time while listeni ng to a channel (other than a traffic channel), the channe l may be as-
signed to the Jump button by simply pressing and holdi ng the Jump button for 2 seco nds.
Dis play opt io ns
The radio’s display scree n can be adjusted for brightn ess and contrast using the Di spla y Option s. (Figure 16)
Use the channel up and do wn buttons to highlight the B righ tness or Contrast option, and
[ Men u O ption s ]
79
Page 80

- +- +
Brightness
- +- +
Contrast
Memory Options
Auto Memory Search
Clear All MemoryClear All Memory
Figur e 17Figur e 17
Figur e 18Figur e 18
press the Select button.
Brightness adjusts the ov erall intensity of the LCD di splay to help with viewing in different
lighting conditions. Cont rast adjusts the relationship between the background and t he text on
the LCD display. Use the channel up and down buttons, to adjust the brightness/cont rast. The
bar graph will move to in dicate the change. (Figure 17 )
To exit the Brightness/Co ntra st screen, press the MENU button.
mem ory op tio ns
The Memory Options featur e allows you to set whether t he automatic S-Seek feature i s On
or Off, and also provides the a way to clear (erase) a ll the stored S-Seek alerts f rom memory.
(Figure 18)
Auto matic Mem ory Searc h
To turn the automatic mem ory search On or Off, do the following:
1. Use the channel up and down buttons to highlight Au to M emory Search, and press t he
Select button.
2. Use the channel up and down buttons to highlight ei ther On or Off, and press the Select
button. (Figure 19)
[ Men u O ption s ]
80
Page 81

Auto Memory Search
On
OffOff
Clear All Memory?
YesYes
No
Figur e 19Figur e 19
Figur e 20Figur e 20
To exit the Memory Option s menu, press the MENU button .
Clea r All Mem ory
To clear all the S-Seek a lerts stored in memory, do th e following:
Use the channel up and do wn buttons to highlight Clear All Memory, and press the
1.
Select button.
At the confirmation scree n, use the channel up and dow n buttons to highlight Yes an d
2.
press the Select button. (Figure 20)
The S-Seek memory is now erased.
To exit the Memory Option s menu, press the MENU button .
Audio Level
The Audio Level setting a djusts the level of the audio output of the radio.
To adjust the audio level , use the channel up and down buttons to change the audio level. The
bar graph will move to in dicate the change. (Figure 21 )
[ Men u O ption s ]
81
Page 82

-
+-
+
Audio Level
Confirm. Tone
On
OffOff
Figur e 21Figur e 21
Figur e 22Figur e 22
To exit the Audio Level m enu, press the MENU button.
Confirmation Tone
The radio will sound an a udio tone alert when it is po wered On or Off, as well as w hen an
S-Seek alert is activated and other alerts. The defaul t setting is On. To change th e Confirmation Tone setting to On o r Off, use the channel up or down buttons to highlight On or O ff, and
press the Select button. (Figure 22)
To exit the Confirmation Tone menu, press the MENU but ton.
Parental Control
The radio has the ability to lock out with password pr otection any channels you do not want
others to access without your permission. (Figure 23) A locked channel will not app ear in the
channel list.
[ Men u O ption s ]
82
Page 83

Parental Control
Lock/Unlock
Edit CodeEdit Code
Enter Code
# ____# ____
Enter Code
Wrong Code
Figur e 23Figur e 23
Figur e 24Figur e 24
Figur e 25Figur e 25
When access to a locked c hannel is attempted using the direct channel entry method, the
Ente r Code screen is disp layed and the channel cannot be accessed until the correct code is
entered. (Figure 24)
If the wrong code is ente red, a message will be displa yed indicating that the wrong code has
been entered. (Figure 25)
Lock /Unlo ck
To lock or unlock a chann el, do the following:
Use the channel up and do wn buttons to highlight “Lock /Unlock, and press the Select
1.
button.
If this is the first time that Parental Control is bei ng used, you will be prompted to cre-
2.
ate and enter a four digi t numerical code. (Figure 26) This code can be any four di git
number from 0000 to 9999.
[ Men u O ption s ]
83
Page 84

Enter Code
# ____# ____
Enter Code
# ____# ____
001 Channel Name001 Channel Name
002 Channel Name
003 Channel Name Lock003 Channel Name Lock
004 Channel Name004 Channel Name
Lock/Unlock
Figur e 26Figur e 26
Figur e 27Figur e 27
Figur e 28Figur e 28
If you should exit this p rompt without entering a code , you will be prompted to set a
code next time you enter the Lock/Unlock option.
If a code has been previo usly set, a Enter Code prompt will be displayed. (Figure 2 7)
3.
Enter your four digit cod e and press the Select button to continue.
When the correct code has been entered, a listing of c hannels will be displayed. (F igure
4.
28) Use the channel up an d down buttons to navigate to the channel you wish to lock
or unlock, and press the Select button. A previously l ocked channel will have the w ord
Lock displayed to the rig ht of the channel name.
To lock or unlock a chann els, use the channel up and d own buttons to highlight a ch an-
5.
nel, and press the Select button.
If you are locking a chan nel, the Lock will be display ed to the right of the channe l name.
If you are unlocking a ch annel, the Lock will be remov ed from the right of the chan nel
name.
[ Men u O ption s ]
84
Page 85

To exit the Parental Cont rol menu, press the MENU butt on.
Enter Code
# ____# ____
Enter Code
# ____# ____
Figur e 29Figur e 29
Figur e 30Figur e 30
Edit Code
This setting allows you t o change a previously selecte d Parental Control code.
The first time the Edit C ode setting is accessed you w ill be prompted to enter a fo ur digit
code. (Figure 29) This co de can be any four digit numb er from 0000 to 9999.
If you should exit this p rompt without entering a code , you will be prompted to set a code the
next time you enter the E dit Code option.
To change the Parental Co ntrol code, do the following:
Use the channel up and do wn buttons to highlight Edit Code , and press the Select
1.
button.
At the prompt, enter the four digit Parental Control c ode. (Figure 30)
2.
If you did not enter the correct code, a message will be displayed alerting you tha t the
3.
wrong code was entered, a nd you will be prompted again to enter the code. (Figure 3 1)
[ Men u O ption s ]
85
Page 86

Enter Code
Wrong Code
New Code
# ____# ____
Confirm Code
# ____# ____
Figur e 31Figur e 31
Figur e 32Figur e 32
Figur e 33Figur e 33
If the correct code was e ntered, the “New Code” prompt will appear. Enter the new
4.
Parental Control code. (F igure 32)
You will then be prompted to confirm the new code by e ntering it again. (Figure 33)
5.
If you confirmed the corr ect code, the lock code is no w changed and a confirmation
6.
screen is displayed. If y ou entered the wrong code at the confirmation prompt, a sc reen
will be displayed to aler t you that you have entered t he wrong code, and you will h ave to
repeat the process again. (Figure 34)
[ Men u O ption s ]
86
Page 87

Confirm Code
Wrong Code
Confirm Code
Code Saved
Time Features
Clock
AlarmAlarm
Program AlertProgram Alert
Auto ShutdownAuto Shutdown
Figur e 34Figur e 34
Figur e 35Figur e 35
To exit the Parental Cont rol menu, press the MENU butt on.
If you have forgotten you r Parental Control code, call SIRIUS Customer Service for help.
Time Based Features
Time based settings (Figu re 35) allow for adjustment o f the following features of t he radio:
Cloc k - Sets the clock fo rmat, time zone, and daylight savings time function.
Alar m - Sets an alarm for a specific time.
Prog ram Alert - Sets the radio to tune to a specific c hannel at a specified time.
Auto Shutdown - Sets the radio to turn off at a specif ied time.
Slee p Mode - Sets the rad io to turn off after a design ated period of time.
To select a menu option, use the channel up and down b uttons to highlight the optio n you
wish to adjust, and press the Select button.
Cloc k
The time data for the rad io’s clock is provided via th e SIRIUS signal, and will upd ate based on
[ Men u O ption s ]
87
Page 88

the data received from th e signal.
Clock
Format
Time ZoneTime Zone
Daylight Savings TimeDaylight Savings Time
Format
12 Hour12 Hour
24 Hour
Figur e 36Figur e 36
Figur e 37Figur e 37
You can configure the clo ck format for 12-hour or 24-h our display format, set the t ime zone
for the clock for your lo cation, and turn On or Off th e automatic adjustment for Da ylight Savings Time (DST) (Figure 3 6).
Form at
To change the clock displ ay format of the radio to 12 hour or 24 hour format, do th e following:
Use the channel up and do wn buttons to highlight Clock and press the Select button.
1.
Use the channel up and do wn buttons to highlight eithe r 12 hour or 24 Hour, and pre ss
2.
the Select button. (Figur e 37)
To exit the Clock menu, p ress the MENU button.
Time Zone
To change the time zone o f the radio, do the following :
Use the channel up and do wn buttons to highlight Time Zone , and press the Select
1.
button.
Use the channel up and do wn buttons to highlight the p roper time zone for your loca tion,
2.
and press the Select butt on. (Figure 38)
[ Men u O ption s ]
88
Page 89

Time Zone
(GMT -6:00) Central(GMT -6:00) Central
(GMT -5:00) Eastern
(GMT -4:30) Atlantic (GMT -4:30) Atlantic
(GMT -3:30) Newfndlnd(GMT -3:30) Newfndlnd
Daylight Savings Time
DST Observed
DST Not ObservedDST Not Observed
Figur e 38Figur e 38
Figur e 39Figur e 39
To exit the Time Zone men u, press the MENU button.
Dayl ight Savi ngs Time
To turn the Daylight Savi ngs Time feature On or Off, d o the following:
Use the channel up and do wn buttons to highlight Dayli ght Savings Time, and press t he
1.
Select button.
2. Use the channel up and do wn buttons to highlight DST O bser ved or DST Not
2.
Obse rved, and press the S elect button. (Figure 39)
To exit the Daylight Savi ngs Time menu, press the MENU button.
Alar m
This feature allows you t o set an alarm to sound at a specific time each day, and t o turn the
alarm feature On or Off. (Figure 40)
[ Men u O ption s ]
89
Page 90

Alarm
Set Alarm
Alarm TimeAlarm Time
Set Alarm
OnOn
Off
Figur e 40Figur e 40
Figur e 41Figur e 41
Set Alarm
To turn the alarm On or O ff, do the following:
Use the channel up and do wn buttons to highlight Set A larm , and press the Select bu t-
1.
ton.
Use the channel up and do wn buttons to highlight Alarm On or Alarm Off, and press t he
2.
Select button. (Figure 41 )
To exit the Set Alarm men u, press the MENU button.
Alar m Tim e
To set the time of the al arm, do the following:
Use the channel up and do wn buttons to highlight Alarm Tim e, and press the Select
1.
button.
Use the channel up and do wn buttons to change the minu tes, and the category previou s
2.
and next buttons to chang e the hours, to select the de sired alarm time. (Figure 42)
[ Men u O ption s ]
90
Page 91

Alarm Time
12:00 PM12:00 PM
Program Alert
Program Time/Day
ChannelChannel
Program Alert On/OffProgram Alert On/Off
Figur e 42Figur e 42
Figur e 43Figur e 43
When you have selected th e desired alarm time, press t he Select button to set the a larm
3.
time and exit.
To exit the Alarm Time me nu, press the MENU button.
Prog ram A lert
The Program Alert feature allows you to program the ra dio to automatically tune to a specific
channel at a specific tim e. The radio must be powered on in order for this feature to function.
(Figure 43)
Prog ram T ime/ Day
To program the time and d ay when the radio will tune t o the specified channel, do t he following:
Use the channel up and do wn buttons to highlight Progr am T ime/Day, and press the
1.
Select button.
At the Program Time/Day s creen, use the channel up and down buttons to highlight
2.
Time , and press the Selec t button. (Figure 44)
[ Men u O ption s ]
91
Page 92

Program Time/Day
Time
DayDay
Program Time
12:00 PM12:00 PM
Program Day
MondayMonday
Figur e 44Figur e 44
Figur e 45Figur e 45
Figur e 46Figur e 46
Use the channel up and do wn buttons to change the minu tes, and the category previou s
3.
and next buttons to chang e the hours, to select the ti me you wish to tune to the sp ecified channel. (Figure 45)
When you have selected th e desired time, press the Sel ect button to set the time an d
4.
exit.
At the Program Time/Day s creen, use the channel up and down buttons to highlight Da y,
5.
and press the Select butt on.
Using the channel up and down buttons, select the day of the week you wish to tune to
6.
the selected channel, i.e ., Monday, Tuesday, etc., and press the Select button. (Fi gure
46)
To exit the Program Time/ Day menu, press the MENU butt on.
[ Men u O ption s ]
92
Page 93

A
001
Artist NameArtist Name
Song TitleSong Title
Category 12:00P
Channel Name
A
Program Alert On/Off
On
OffOff
Figur e 47Figur e 47
Figur e 48Figur e 48
Chan nel
To set the channel to whi ch the radio will tune when t he Program Alert feature is O n, do the
following:
Use the channel up and do wn buttons to highlight Chann el, and press the Select butt on.
1.
When the default display screen is displayed, use the channel up and down buttons t o
2.
navigate to the channel w hich you wish to select for t he Program Alert feature. Use the
category previous and nex t buttons to navigate between categories. When the channel
is displayed, press the S elect button.
To exit the Channel menu, press the MENU button.
Prog ram A lert On/Off
To turn the Program Alert feature is On or Off, do the following:
Use the channel up and do wn buttons to highlight Progr am A lert On/Off, and press th e
1.
Select button.
Use the channel up and do wn buttons to highlight Progr am A lert On or Program Alert
2.
Off, and press the Select button. (Figure 48)
To exit the Program Alert On/ Off menu, press the MENU button.
Auto Shut down
You can set the radio to automatically power off after a 1 hour period of inactivit y, that is, no
[ Men u O ption s ]
93
Page 94

001
Artist NameArtist Name
Song TitleSong Title
Category 12:00P
A
Cancel Auto Shutdown
Channel Name
Auto Shutdown
EnabledEnabled
Disabled
Figur e 49Figur e 49
Figur e 50Figur e 50
buttons have been pressed for 1 hour.
When the Auto Shutdown fe ature is enabled, after 59 mi nutes of inactivity, a beep t one will
sound and a display promp t will appear on the screen, Canc el Auto Shutdown. (Figur e 49)
At this point the auto sh utdown can be reset to 1 hour of inactivity by pressing th e Select button. If the Auto Shutdown is not reset, the radio will automatically power off.
To enable or disable the Auto Shutdown feature, do the following:
Use the channel up and do wn buttons to highlight Auto Shut down, and press the Selec t
1.
button.
Use the channel up and do wn buttons to highlight Enabl ed or Disabled, and press the
2.
Select button. (Figure 50 )
To exit the Auto Shutdown menu, press the MENU button.
Slee p Mod e
The radio can be set to t urn off automatically after a selected period of time, 15, 30, 45, or 60
minutes.
To activate or deactivate the Sleep Mode feature, do t he following:
Use the channel up and do wn buttons to highlight Sleep Mod e, and press the Select
1.
button.
Use the channel up and do wn buttons to select the desi red time, 15, 30, 45, or 60
2.
[ Men u O ption s ]
94
Page 95

minutes to activate the S leep Mode feature, or choose Off to cancel the sleep featu re,
Sleep Mode
Off
15 min15 min
30 min30 min
45 min45 min
Signal Indicator
SAT - +SAT - +
TER - +TER - +
Figur e 51Figur e 51
Figur e 52Figur e 52
and press the Select butt on. (Figure 51)
To exit the Sleep Mode me nu, press the MENU button.
Signal Indicator
The Signal Indicator disp lay screen provides a visual display of the strength of th e SIRIUS
signal from the satellite antenna and also from terres trial (ground) transmitters.
To display the Signal Ind icator screen, do the followi ng:
Use channel up and down b uttons to highlight Signal In dica tor, and press the Select
1.
button.
Two 10 segment horizontal bar graphs will be displayed with a “-“ sign to the left and a
2.
“+” sign to the right. SA T indicates the satellite sig nal strength while TER indica tes the
terrestrial signal streng th, if a terrestrial signal i s available. (Figure 52)
To exit the Signal Indica tor menu, press the MENU butt on.
[ Men u O ption s ]
95
Page 96

Factory Default
The Factory Default optio n will restore most every fea ture of the radio to the orig inal factory
settings. The following i s a list of all features affe cted by the Factory Default o ption:
Note that the Parental Co ntrol feature is not affected by the Factory Default optio n. If a code
has been set for the Pare ntal Control feature, the cod e will not be reset by the Fa ctory Default
feature, preventing someo ne from circumventing the Par ental Control feature. Channe ls which
have been locked will rem ain locked.
To activate the Factory D efault feature, and restore t he features of the radio to t he factory
defaults, do the followin g:
All Prese ts are cleared
•
All Game Alerts are cleared
•
Radio set to Normal Tuning Mode
•
Display b rightness set to 50%
•
Display C ontrast set to 50%
•
FM Transm itter set to On
•
FM Freque ncy set to 88.1 MHz
•
All S-See k memory cleared
•
Clock set to 12-Hour Format
•
Time Zone set to Eastern Standard Time
•
Daylight Savings Time set to Observed
•
Auto Shut down set to Off
•
Sleep Mod e set to Off
•
Auto Sele ct set to Off
•
Program A lert cleared
•
Use the channel up and do wn buttons to highlight Facto ry D efault, and press the Sel ect
1.
button.
Use the channel up and do wn buttons to select Yes to r estore all settings to the se ttings
2.
from the factory, or sele ct N o to leave them as-is and return to the Menu Options m enu.
(Figure 53)
[ Men u O ption s ]
96
Page 97

Restore Settings?
YesYes
No
Are You Sure?
Yes
NoNo
Are You Sure?
Yes
NoNo
Restoring
Factory Defaults
Figur e 53Figur e 53
Figur e 54Figur e 54
Figur e 55Figur e 55
If Y es is chosen, a confi rmation is displayed. Use the channel up and down buttons to
3.
select Yes to restore all settings to the settings fro m the factory, or select No t o leave
them as-is and return to the Menu Options menu. (Figur e 54)
If Y es is chosen, the rad io will revert to the origina l factory settings. (Figure 5 5)
4.
When the Factory Default is complete, the radio will p lace you in Channel 184 the
5.
SIRIUS preview channel an d display, Call 1-888-539-SIR IUS to Subscribe. The radio i s
still subscribed to the S IRIUS service.
[ Men u O ption s ]
97
Page 98

Troubleshooting
Symp tom Solu tion
Radio does not power onBlown fuse, or the power cable is not properly connect ed.
Radio displays: An-
tenn a Not Detected
Radio displays: Acquir ing Signal
Audio static or loss of
clarity
No sound The audio cables are not connected, or the FM radio is set to the
Check for a bad fuse and check power cable connection
The satellite antenna is not connected to the vehicle dock.
Check the satellite anten na connection to the vehicle dock.
No satellite signal is be ing received.
Check for obstacles over or around the satellite anten na.
Change the vehicle locati on to eliminate nearby obstac les
(bridges, overpasses, tre ss, buildings, etc.).
The FM frequency contains static.
Locate a quiet FM frequen cy on your vehicle radio and set the FM
transmitter frequency of the SIRIUS Starmate 4 to matc h.
If using the AUX audio co nnector, check the cable conn ections.
wrong frequency. Check th e audio cables at the SIRIUS radio
dock and the radio. Tune the FM radio to the same FM f requency
the SIRIUS radio is tuned .
[ Tro ubl eshoo tin g ]
98
Page 99

Optional Accessories
The following optional ac cessories are available for p urchase from your SIRIUS reta iler to
maximize your SIRIUS expe rience:
SUBX 1 SIR IUS Plug and Play Univ ersal Boo mbox
The SUBX1 SIRIUS Plug and Play Universal Boombox is a portable docking station and audio
system for use with the S IRIUS Sportster radio. With t he built-in amplifier and spe akers, the
boombox delivers rich pow erful sound indoors or outdoo rs, and features an auxiliary input for
other audio devices,
Included with the boombox is an adjustable indoor/outd oor windowsill antenna with 2 0’ of
cable and an AC adapter.
SUPH 1 SIR IUS Universal Plug and Play Hom e Kit
The SUPH1 SIRIUS Universa l Plug and Play Home Kit is a compact docking cradle that positions the radio for easy viewing and operation. Design ed for quick and easy self-in stallation, it
includes all necessary ca bling to connect your SIRIUS radio to your home audio syst em.
The kit includes a compac t tabletop/desktop docking cr adle with FM output for wirel ess
connectivity, an audio ca ble for connection to any ste reo bookshelf system, an adju stable
indoor/outdoor windowsill antenna with 20’ of cable, a nd an AC Adapter.
SUPV 1 SIR IUS Universal Plug and Play Veh icle Kit
The SUPV1 SIRIUS Universa l Plug and Play Vehicle Kit i s a compact docking cradle th at positions the radio for easy wiring, viewing, and operatio n in an additional vehicle. D esigned for
quick and easy self-insta llation, it provides several mounting options and includes all necessary cabling to connect y our SIRIUS radio to your vehi cle audio system.
The SUPV1 SIRIUS Universa l Plug and Play Vehicle Kit w ill work with the Sportster 4 and
most new SIRIUS plug and play radios.
The kit includes a mobile docking cradle, a suction cu p vehicle mount, a vent mount , a cigarette lighter adapter, an d a magnetic antenna with 21’ of cable.
[ Opt ion al Ac ces sorie s ]
99
Page 100

FM D irect Ada pter
The FM Direct Adapter acc essory redirects your vehicle ’s FM antenna signal when lis tening to
your SIRIUS radio using y our vehicle’s AM/FM radio. Wh en the SIRIUS radio is powere d on
the FM Direct Adapter aut omatically redirects the vehi cle’s FM antenna signal away from the
vehicle’s AM/FM radio, re ducing any interference which might be present from FM rad io station broadcasts. When the SIRIUS radio is turned off, the FM antenna signal is auto matically
redirected back to the ve hicle’s AM/FM radio. (Product number 14100.)
[ Opt ion al Ac ces sorie s ]
100
 Loading...