

Page 1
User Guide
Stiletto 2
Portable SIRIUS Radio
Page 2

Page 3

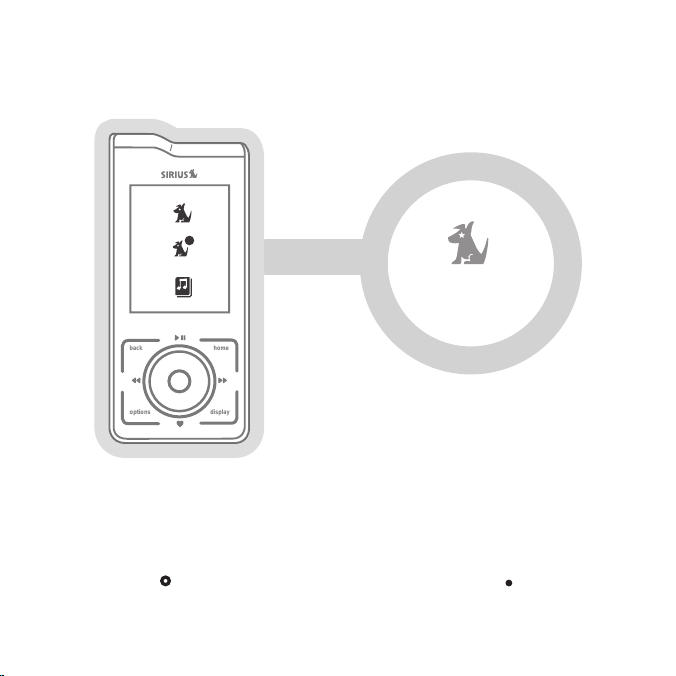
Meet the Stiletto 2
™
.
It’s a whole new breed.
Say hello to the next generation portable radio from SIRIUS.
This kit contains everything you need to listen to SIRIUS®, just about anywhere.
Stiletto 2 gives you powerful features. Like the ability to save up to 100 hours of
songs and shows. It can also download and play MP3 & WMA les you already own.
>> Listen to 110 channels of live, 100% commercial-free music, plus sports, and talk.
>> Listen live to SIRIUS Internet Radio over an accessible Wi-Fi network.
>> Save up to 100 hours of programming and store personal MP3 & WMA les. Expand
MP3 & WMA memory by adding a microSD™ card.
>> Schedule recordings up to 6 hours long – never miss your favorite shows.
>> Add music you hear to the “Wish List” and go online to purchase / download it from
almost any Windows Media® based music service.
>> My SIRIUS Studio™ software is included, which supports downloads of both purchased
and subscription based content. You can even mix it up to create your own playlists.
Page 4

Table of Contents
Table of Contents 1
Warning & Safety Information 3
FCC Information 3
FCC Interference Statement 3
FCC Radiation Exposure Statement 4
Canadian Compliance 4
General Precautions 4
Getting Started 7
Package Contents 7
Battery 9
Removable Media Cards 12
Controls 13
Layout Overview 13
The Media Dial 17
On / Off, Sleep & Lock Modes 18
Navigating Menus & Lists 20
Subscribing to SIRIUS 23
Receiving a Satellite Signal 23
Device Tour 25
1
Table of Contents
Page 5

Operation 26
Satellite Radio 27
Internet Radio 43
Library 52
Radio Replays 63
Recording 66
Settings 70
Connecting the Stiletto 2 to a PC 77
My SIRIUS Studio Software 79
Troubleshooting 80
Additional Information 85
Vehicle Dock Layout Overview 86
Vehicle Dock Installation 88
Vehicle Dock Operation 112
Specications 115
Warranty 116
End User License Agreement 118
Copyrights & Trademarks 133
Copyrighted Broadcast Material 133
Index 134
Legend
Tip
Table of Contents
2
Page 6

Warning & Safety Information
FCC Information
This device complies with part 15 of the FCC Rules. Operation is subject to the following
two conditions:
1. This device may not cause harmful interference, and
2. This device must accept any interference received, including interference that may
cause undesired operation.
FCC Interference Statement
This equipment has been tested and found to comply with the limits for a Class B digital
device, pursuant to Part 15 of the FCC Rules. These limits are designed to provide
reasonable protection against harmful interference in a residential installation. This
equipment generates, uses and can radiate radio frequency energy and, if not installed
and used in accordance with the instructions, may cause harmful interference to radio
communications. However, there is no guarantee that interference will not occur in a
particular installation. If this equipment does cause harmful interference to radio or
television reception, which can be determined by turning the equipment off and on, the
user is encouraged to try to correct the interference by one of the following measures:
>> Reorient or relocate the receiving antenna.
>> Increase the separation between the equipment and receiver.
>> Connect the equipment into an outlet on a circuit different
from that to which the receiver is connected.
>> Consult the dealer or http://www.siriuscanada.ca for help.
FCC Radiation Exposure Statement
This equipment is SAR compliant for general population/uncontrolled exposure
limits specied in ANSI/IEEE C 95.1-1999 and has been tested in accordance with the
measurement methods and procedures specied in OET Bulletin 65 Supplement C.
3
Warning & Safety
Page 7

Canadian Compliance
This Class B digital apparatus complies with Canadian ICES-003.
IC STATEMENT
Operation is subject to the following two conditions: (1) this device may not cause interference,
and (2) this device must accept any interference, including interference that may cause
undesired operation of the device. For product available in the Canada market, only channel
1~11 can be operated. Selection of other channels is not possible. This device and its antenna(s)
must not be co-located or operation in conjunction with any other antenna or transmitter. To
reduce potential radio interference to other users, the antenna type and its gain should be so
chosen that the equivalent isotropically radiated power (e.i.r.p) is not more than that permitted
for successful communication. IC Radiation Exposure Statement: This equipment complies with
IC RSS-102 radiation exposure limits set forth for an uncontrolled environment. This equipment
should be installed and operated with minimum distance 20cm between the radiator & your body.
General Precautions
SIRIUS disclaims all liability for hearing loss, bodily injury, or property damage
as a result of the use or misuse of this product.
Volume and Hearing Safety Precautions
>> Be aware of your surroundings. Use of earbuds or headphones while riding a bike or
operating a vehicle / motorcycle is not recommended, and may be against the law.
>> If you experience ringing in the ears while listening stop using Stiletto 2 and consult
a medical professional.
>> Start volume low. Gradually turn it up to a medium level which you can hear. If ambient sounds
around you are noisy or loud, do not raise volume to high level. Find a quieter location instead.
>> Permanent hearing loss can occur if volume is set too high.
>> Use of earbuds / headphones for an extended period can cause serious damage to
your ears. Do not wear them for prolonged time periods, such as while sleeping.
Warning & Safety
4
Page 8

Liquid Crystal Precautions
If the LCD screen on the Stiletto 2 is damaged, do not touch the liquid crystal uid.
If any of the following situations happen, take the action indicated:
>> If uid comes in contact with skin, wipe skin with cloth and wash thoroughly with soap
and running water.
>> If uid gets into eye, ush eye with water for at least 15 minutes. Seek medical care.
>> If uid is ingested, ush mouth thoroughly with water. Drink large quantities of water
and induce vomiting. Seek medical care.
General Safety Precautions
Observe the following warnings. Failure do so may result in a serious accident.
>> Do not expose Stiletto 2 to moisture or use near or in water. Do not handle with wet
hands, or let any liquid spill on or in it.
>> Do not operate the Stiletto 2 in a way that might distract you from driving safely. The
driver alone is responsible for safely operating a vehicle in accordance with the law.
>> Do not open the device except to change the battery or SD card. Never put any
metallic objects inside it.
>> If device emits smoke or unusual odors, turn power off immediately.
>> Do not drop device or subject it to strong shocks.
>> If device doesn’t seem to be working, turn it off, remove the battery, wait 10 seconds,
replace battery and then turn it on again.
5
Warning & Safety
Page 9

Operating Temperature
The Stiletto 2 is designed to operate between -5° to +40° C (23° to 104° F). Avoid leaving
the device in a vehicle or elsewhere where the temperature may fall outside this range.
Extreme temperatures or extreme temperature uctuations can degrade the performance
of the LCD display screen and battery and possibly damage it.
Cleaning & Maintenance
If the Stiletto 2 becomes dirty, turn power off and wipe clean with a soft, clean cloth. Do
not use hard cloths, paint thinner, alcohol, or other volatile solvents to clean. These may
cause damage to the device.
Tip
My SIRIUS Studio Software
The My SIRIUS Studio software contained on the CD-ROM should be installed before
connecting the Stiletto 2 to your computer. It allows you to connect the device to any
computer running Windows® XP with Service Pack 2 or Vista. It is critical that this software
be used to transfer / manage information on your Stiletto 2 to ensure that the device’s
operating system is not damaged.
My SIRIUS Studio also allows users to receive device software updates as they are made
available by SIRIUS. Periodically connect the Stiletto 2 to your computer to load the latest
updates. Refer to the user guide included on the CD-ROM for further information about
installing and My SIRIUS Studio.
Warning & Safety
6
Page 10
Getting Started
1 2 3 4 5
6
fm tune presetjump
7 8 9 0
Package Contents
Included in the Stiletto 2 package:
7
Battery
Vehicle Dock
Kit
Antenna HeadphonesStiletto 2
Ear Buds & Pads
Want to enjoy Stiletto 2 in your home or ofce?
Stiletto 2 Home Kit (Model SLH2C)
The Stiletto 2 Home Kit gives you everything you need to connect your Stiletto 2
to a home stereo system or powered speakers.
Getting Started
Page 11
User G uide
Sti letto 2
Satellite Radio
Getting Star ted
Sti letto 2
Satellite Radio
AC Adapter
PC Cable
User Guide, Inserts & Software CD
Want to Take Stiletto 2 on the road?
Stiletto 2 Vehicle Kit (Model SLV2C)
If you’d like to use your Stiletto in another vehicle, you can purchase an additional Stiletto 2 Vehicle Kit.
Getting Started
8
Page 12

Battery Life
When fully charged, the Stiletto 2 battery will provide a range of listening times depending
on the listening mode. The following table illustrates the approximate listening times:
Satellite Radio
Internet Radio
Library
Radio Replays
Listening Mode
10 200 5 15
Approximate Listening Time (Hours)
Tip
Certain radio settings can impact battery life
As batteries age, the amount of listening time diminishes. Replacement (or spare) batteries
are available from your SIRIUS product retailer, or at http://www.siriuscanada.ca. The
amount of listening time the battery provides is dependent upon several settings. To extend
overall listening time, try:
>> Decreasing the length of backlight time
>> Adjusting the brightness of the display screen to a less bright setting
Both of these adjustments are made through the Settings menu. Refer to Brightness
and Backlight Timer on page 74 for details about these settings.
9
Getting Started
Page 13
Battery Installation / Removal
To access the Stiletto 2 battery, slide the battery lid toward the bottom of the Stiletto 2
and remove it. The battery can then be installed or removed. Once installed, you should not
need to remove it unless installing a microSD memory card.
Battery Battery Lid
Battery Compartment
Getting Started
10
Page 14
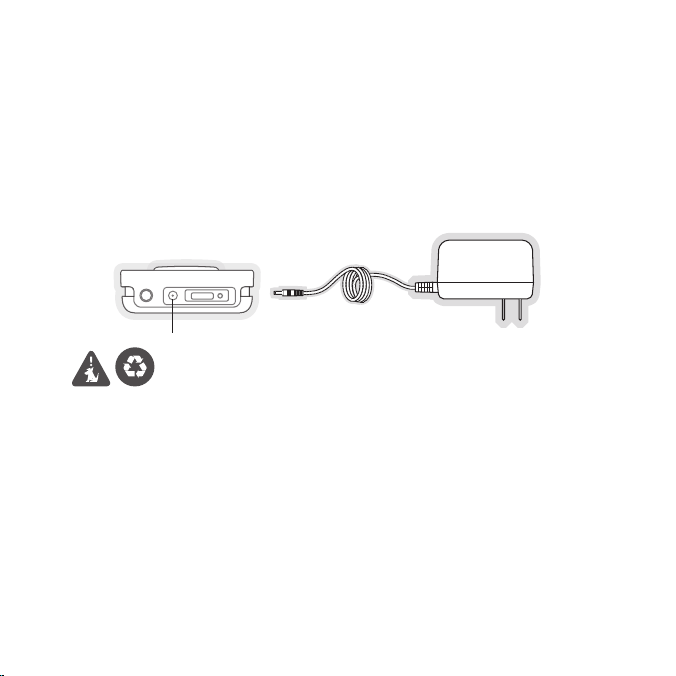
Battery Charging
>> You will want to fully charge your device before rst use. Radio batteries are shipped
with partial charge only.
>> Turn device off for fastest charging time by sliding down the power switch momentarily
and releasing.
>> Connect the AC Adapter as shown.
>> A blue LED will emit under the power on/lock switch indicating an “Off”
device is charging.
Power Connector
Battery Disposal
When disposing of batteries, do so in accordance with the local waste disposal regulations.
Batteries should not be disposed of in household waste, but should be recycled instead.
Removable Media Cards
The Stiletto 2 has 2GB of internal memory. This is sufcient to store up to 100 hours of
SIRIUS recordings or a combination of SIRIUS content and up to 800 MB of MP3/WMA
les.
>>
Removable media can be added to support storage of more MP3/WMA les.
>> Stiletto 2 is compatible with microSD memory, available from most electronic retailers.
11
Getting Started
Page 15
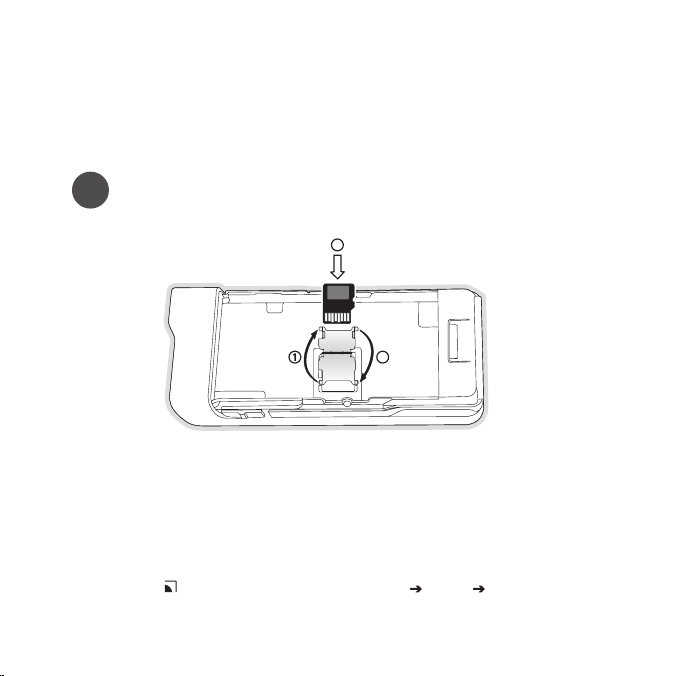
Installing / Removing microSD Cards
>> The microSD card slot is located under the battery. To install a microSD
card remove the battery. (Page 10)
>> Following battery removal, the microSD card slot will be visible. (see illustration below)
Tip
For optimal performance, use a PC to format your high capacity microSD card as FAT32
prior to use in your Stiletto 2.
To insert the card:
1. Slide metal door to the right, then lift / open the door
2. Insert the microSD card beneath both tabs as shown in the battery bay of the device
3. Close the metal door, then slide it to the left
4. Reinstall the battery and cover
You can verify that the Stiletto 2 has recognized that the microSD card is present
by pressing the Home Button and selecting Settings Device microSD Card.
2
3
Getting Started
12
Page 16
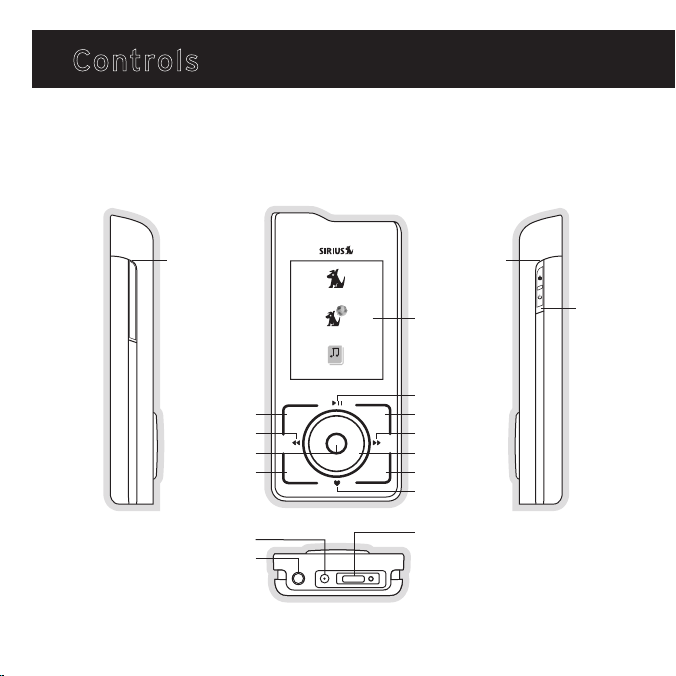
Controls
Stiletto 2 Overview
Buttons, Controls and Connection Ports
13
+
-
Controls
Volume
Up/Down
Back
Rewind
Select
Options
Power Connector
Headphone Jack
back
options
Satellite Radio
Internet Radio
Library
home
display
Power/
Lock
Display
Screen
Play/Pause
Home
Fast Forward
Media Dial
Display
Love
Antenna Headphones/
Docking Connector
Charge
Indicator
Page 17
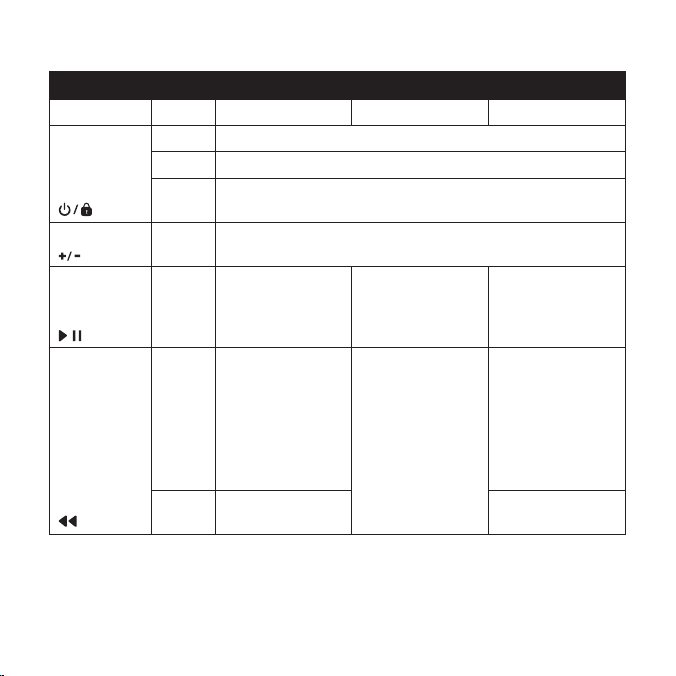
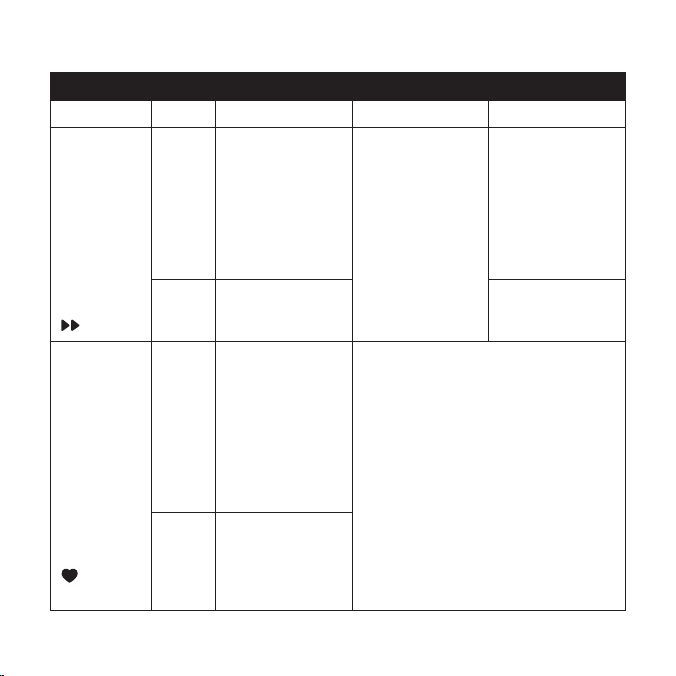
Stiletto 2 Button and Control Descriptions
Button Action Satellite Radio Internet Radio Replay/Library
Power/Lock
Volume
Play/Pause
Rewind
Slide Up Locks all buttons
Center Unlocks all buttons
Slide
Down
Press
Press
Press
Hold
Slide down / release: Power On if Off (or) Sleep if On
Slide down / hold 5 secs: Power Off
+ Increases the audio volume
— Decreases the audio volume
Pauses a broadcast
or resumes playing
a paused broadcast
If listening, skips to
the previous song
or show
If in a channel or
preset bank, moves
through categories
or preset banks
If listening, rewinds
through a broadcast
If playing, mutes
audio
If muted, resumes
playing
If listening and
muted, resumes
playing
If in a channel or
category list, moves
through channel
categories
Pauses or resumes
playing the current
song or show
Skips to the beginning of the song or
show
Rewinds through
song or show
Controls
14
Page 18
Stiletto 2 Button and Control Descriptions
Button Action Satellite Radio Internet Radio Replay/Library
Press
Hold
Press
Hold
If listening, skips
in the replay buffer
to the next song
or show
If in a channel or
preset bank, moves
through categories
or preset banks
Fast-Forwards
through the replay
buffer until live
Saves the song
or show if possible, or adds to
the Wish List when
song/show cannot
be saved
While recording,
prompts to stop
recording
Displays recording
setup screen
While recording,
prompts to stop
recording
If listening and
muted, resumes
playing
If in a channel or
category list, moves
through channel
categories
Adds the artist/song to the Wish List
15
FastForward
Love
Controls
Skips to the next
song or show
Fast-Forwards
through song or
show
Page 19
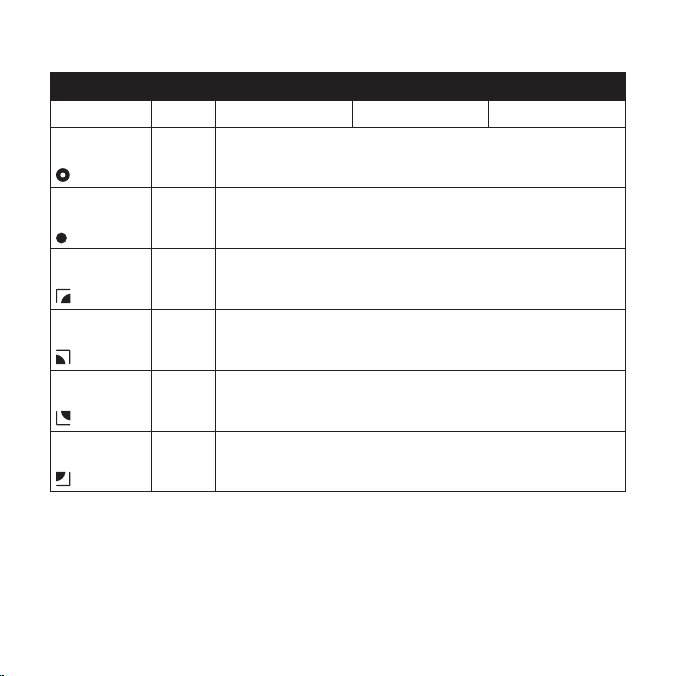
Stiletto 2 Button and Control Descriptions
Button Action Satellite Radio Internet Radio Replay/Library
Media Dial
If listening, navigates back to channel or category list
Scroll
If in a list, menu, or prompt, scrolls to next or previous item
Select
Back
Home
Options
Display
Press Selects highlighted item in a list, menu, or prompt
Returns back to the screen displayed just prior to the currently
Press
displayed screen
First press returns to the Main Menu
Press
Additional press returns to the Now Playing screen
Displays available options for the currently displayed screen
Press
If no options are available, nothing is displayed
Press Cycles between the normal/near and car/far display mode
Controls
16
Page 20
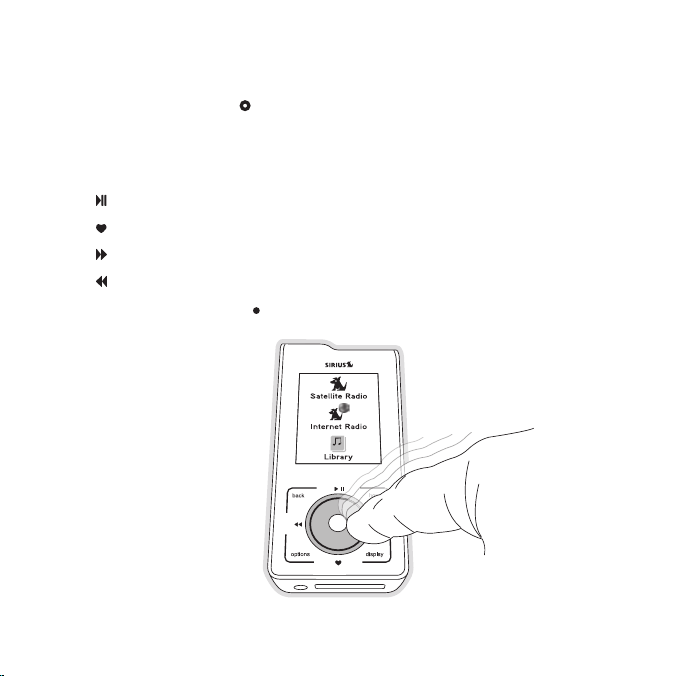
Using The Media Dial
>> Place your nger on the Media Dial.
>> Rotate the dial clockwise or counter-clockwise to scroll, highlight a channel,
genre, preset, menu item or list item.
>> Press the dial at the north, south, east and west locations for selecting
Play/Pause
Love
Fast-Forward
Rewind
>> Press the center button to Select function for a highlighted item.
17
Controls
Page 21
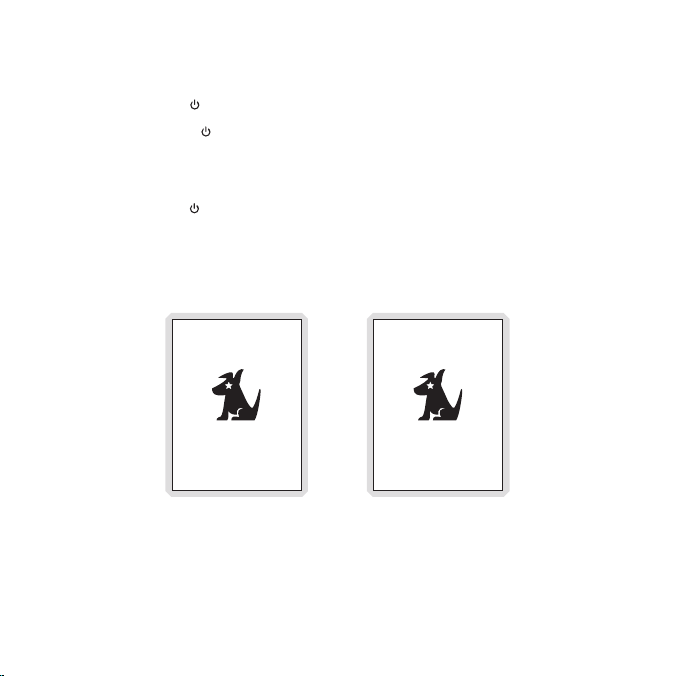
On / Off & Sleep Modes
Power On: Slide the Power/Lock switch down momentarily and release.
Sleep Mode: Slide the Power/Lock switch down momentarily and release. The Stiletto 2
will display Going to sleep. (Figure 1) Sleep mode allows the Stiletto 2 to resume operation
quickly when powered on. The Stiletto 2 can remain in sleep mode for up to 10 days on a
fully charged battery.
Power Off: Hold the Power/Lock switch down for 5 seconds. The Stiletto 2 will
display Shutting down. (Figure 2) When completely off, the battery can remain charged
for months — depending on the charge percentage. When completely off, the Stiletto 2
will take 1–2 minutes to power up.
Figure 1 Figure 2
Going to sleep Shutting down
Sleep Mode Powering Off
Controls
18
Page 22
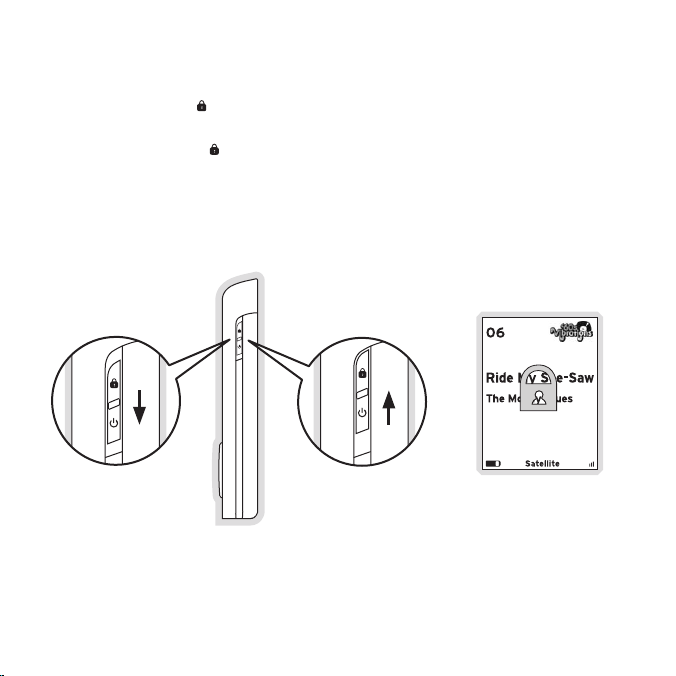
Lock Modes
Lock Mode: Slide the Power/Lock switch up to the locked position. This helps prevent
accidental button presses when you are using your Stiletto 2 in portable mode.
Unlock Mode: Slide the Power/Lock switch down to the unlocked (center) position.
If you press any button on the Stiletto 2 while it is in lock mode, the lock icon will be
displayed to remind you that the Stiletto 2 is locked.
Unlocked Locked
19
Controls
Page 23
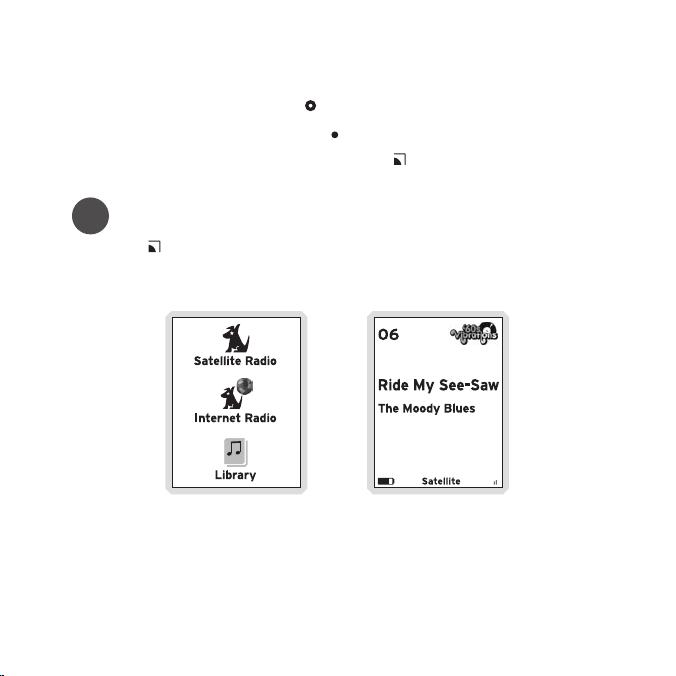
Navigating Menus & Lists
>> To scroll through a menu rotate the Media Dial.
>> To select a highlighted choice, press the Select Button.
>> To return to the Main Menu at any time, press the Home Button. (Figure 3)
Tip
Pressing the Home Button twice from any menu will return you to the Now Playing
screen if any audio is being played. (Figure 4)
Figure 3 Figure 4
Main Menu Now Playing Screen
Controls
20
Page 24
Navigating Menus & Lists
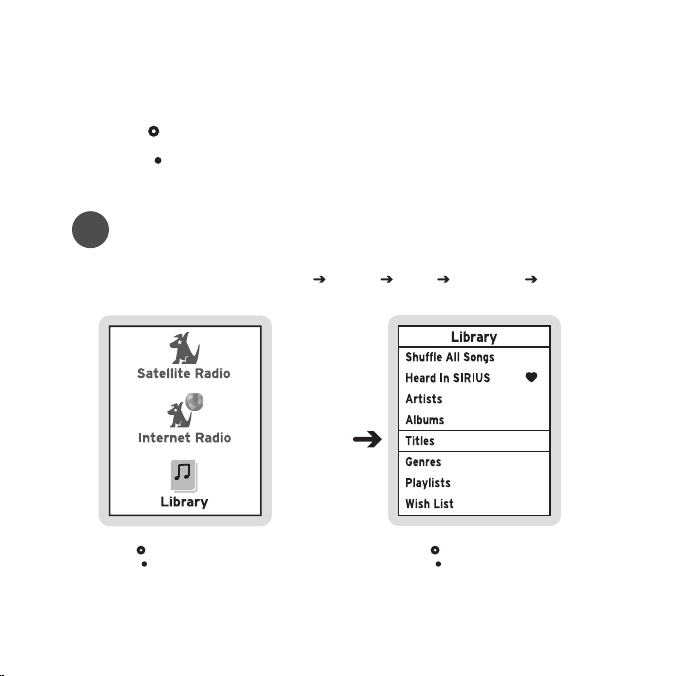
Let’s say you have saved the song Blue Moon and now you want to listen to it.
>> Turn the Media Dial to highlight your choice.
>> Press the Select Button to select each consecutive choice until you are
listening to the desired song / recording.
Tip
In this user guide, the following shorthand will quickly guide you from start to nish for
each task described. For example: Home Library Titles Blue Moon Listen.
>> Turn the Media Dial to highlight Library.
>> Press the
21
Select Button.
Controls
>> Turn the Media Dial to scroll to Titles.
>> Press the
Select Button.
Page 25
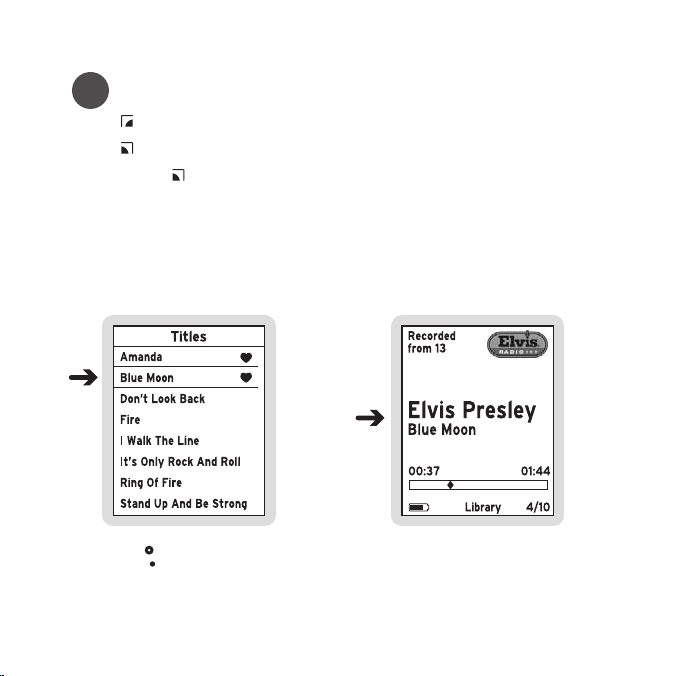
Tip
>> The Back button will move you to the previous display screen.
>> The Home Button will return you to the Main Menu.
>> Pressing the Home Button again will return you to the Now Playing screen.
>> Turn the Media Dial to scroll to Blue Moon.
>> Press the
Select Button.
>> Listen to the song.
Controls
22
Page 26
Subscribe to SIRIUS
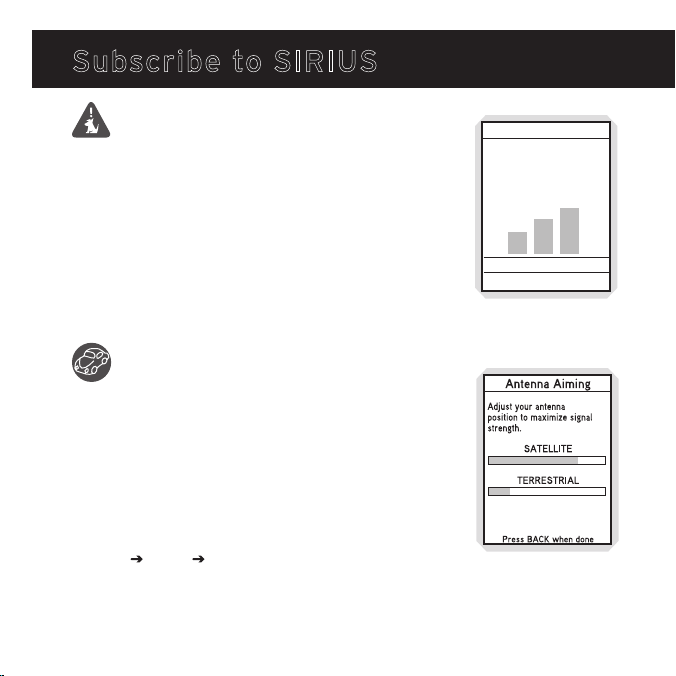
Receiving a Satellite Signal
Stiletto 2 has an internal antenna. To receive the satellite signal
your Stiletto 2 must have a clear view of the sky. Obstructions
such as buildings, trees, bridges, and high voltage power lines
can interfere with the satellite signal. In some areas, Sirius also
transmits a terrestrial signal to augment the satellite broadcast.
The terrestrial signal is identical to the satellite signal, and your
radio will switch automatically to the strongest signal.
The human body will block satellite and terrestrial signal reception if
it is placed between the Stiletto 2 and the transmission source. It is
possible to lose even a strong signal as you move and change position.
Using the Vehicle Dock
Install the vehicle dock according to the instructions on page 88.
Be sure that the vehicle dock has power, and that the magnetic
antenna is installed according to the installation instructions, is
connected to the dock, and has a clear view of the sky.
You can view Signal Strength in your location by:
1. Reading the signal strength meter in the Activation Wizard.
2. Or after activation, by navigating from the Main Menu to
Settings Device Antenna Aiming. At least one of the
signals should be greater than 50% to reliably activate and use.
23
Controls
Getting A Signal (1/3)
Make sure your radio has a
clear view of the sky so it
can find a signal. When the
bars below light up, you’re
rady to continue.
Next Screen
Previous Screen
Getting A Signal
Device Antenna Aiming
Page 27
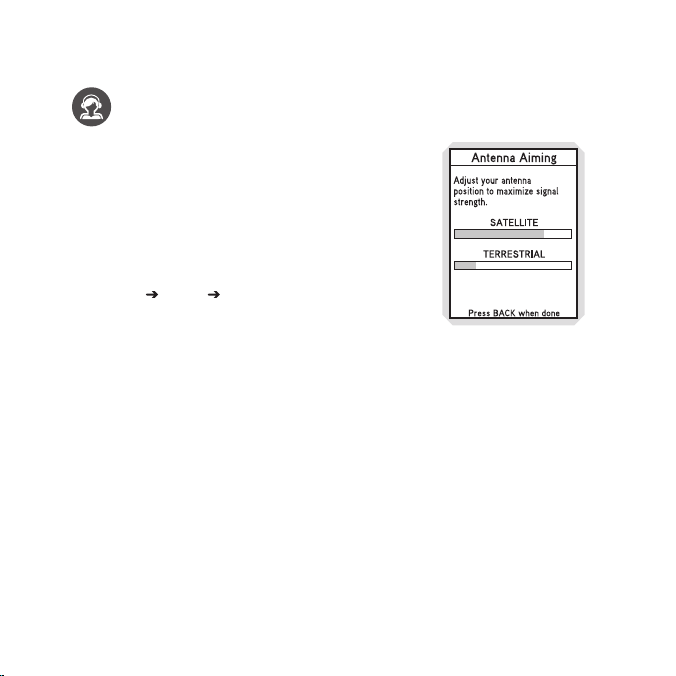
Using Antenna Headphones
The use of the antenna headphones included with your
Stiletto 2 will help to improve reception signicantly. By
placing the antenna above any interference from the body,
signal reception can be improved.
You can view Signal Strength in your location by:
1. Reading the signal strength meter in the Activation Wizard.
2. Or after activation, by navigating from the Main Menu
to Settings Device Antenna Aiming. At least one of
the signals should be greater than 50% to reliably activate
and use.
Device Antenna Aiming
Controls
24
Page 28
Device Activation
Before you can listen to SIRIUS radio, you must activate
your device.
>> The Stiletto 2 must be receiving the SIRIUS signal
throughout the activation procedure.
>> The built-in activation guide will help you through the
activation process. To subscribe your Stiletto 2, simply
follow the on-screen instructions.
>> You may also subscribe online at https://activate.
siriuscanada.ca/ or by phone: 1.888.539.7474
Device Tour
After you have activated your device, you can take a product
tour which will highlight some of the top features of the
Stiletto 2.
If you want to take the tour later do the following:
1. Press the Home Button.
2. Settings Device Settings Device Tour
3. Select Yes, show tour.
Activation Wizard
Device Tour
25
Controls
Page 29
Operation
Listening Modes
The Stiletto 2 delivers great audio entertainment in four distinct listening modes:
1. Satellite Radio
Listen live to satellite broadcasts of all SIRIUS 100% commercial-free
music channels, talk, and sports programing. (Page 27)
2. Internet Radio
Listen live to SIRIUS 100% commercial-free music and select talk channels
streamed over the Internet via a Wi-Fi network connection. (Page 43)
3. Radio Replays
Listen to SIRIUS 100% commercial-free music that has been automatically
saved from the channels you listen to most. (Page 63)
4. Library
Listen to your stored songs and shows as well as any music you have
downloaded from your PC. (Page 52)
Each of these modes are described in detail in the sections following along with:
Recording
Set up scheduled recordings to record SIRIUS broadcasts. (Page 66)
Settings
Manage a variety of device preferences from SRS audio enhancement levels
and display brightness settings to Wi-Fi access. (Page 70)
Operatio n
26
Page 30
back
home
displa
y
options
Satellite Radio
Satellite Radio
Satellite Radio allows you to listen to and record music, talk, sports, and more everywhere
you are able to receive a signal from our satellite or terrestrial transmitters. You can
browse / select SIRIUS channels and see information about the broadcast, such as song,
artist and program names or locations of trafc and weather reports. From your Main
27
Menu, use the Media Dial to highlight “Satellite Radio”, then press the Select
Button at the dial’s center.
Operatio n
Page 31

Now Playing Screen Information
The Now Playing screen is displayed whenever any audio is being played. It provides
information such as the currently tuned channel, song or show being played, mode,
recording, and other information.
Preset Number
Channel Number
Song/Show Title & Artist or
Sports Team & Game Score
Replay Buffer Time Information
Battery Charge Level Indicator
Battery Charging Indicator
Information
Channel Logo
Scroll Bar
Signal Strength Indicator
Listening Mode or Recording
Indicator or Jump Indicator,
or Clock
Operatio n
28
Page 32

Browsing and Navigating Channels
After selecting Satellite Radio, you can browse available channels in a variety of ways.
From the Satellite Radio menu, simply press Rewind or Fast-Forward to browse
the different list views.
All Channels List: all channels in numerical order
Presets List: up to 30 channels you have previously saved as presets
Genre Lists: channels by genre name, like Pop, Classical, Comedy, Sports, etc.
Channel Browse Mode Browse All Channels Browse Presets Browse by Genre
Use the Media Dial to highlight your choice, and press the Select Button.
29
Operatio n
Page 33

As you browse the lists, the channel name for the highlighted channel is spoken by
default. This setting can be changed from the Settings Audio selection. To listen
to a channel, turn the Media Dial until the desired channel is highlighted, then press
the Select Button.
The Display Button toggles the font size displayed in the Now Playing screen as
well as many list views. By default, the smaller font size will be used when the device
is not docked, and the larger font size is used when the device is placed in either the
home or vehicle dock.
Normal/Near
channel list mode
Car/Far
channel list mode
Operatio n
30
Page 34

Channel Presets
Your favorite channels can be saved as a Preset, then quickly and easily accessed from
the Preset list on the device, by car dock button, or even using the wireless remote with
a home dock. In portable mode, Presets are grouped into a single list of 30 presets; A1
thru C0. Presets are grouped into three different banks (A, B, and C) to facilitate use
in a vehicle dock.
Tuning to a Saved Preset
Saved presets may be selected by browsing the Presets category:
1. Select Presets (A, B, C) from the Satellite Radio screen.
2. Use the Media Dial to highlight a preset.
3. Press the Select Button to tune to the highlighted preset.
Tune to desired channel Navigate between presets
31
Operatio n
Page 35

Saving Channels as Presets
To save a channel as a preset:
1. Tune to the desired channel.
2. Press the Options button.
3. Highlight Save Channel as Preset and press the Select Button.
The Presets (A, B, C) Screen will be displayed. Use the
Media Dial to highlight the preset where you want the
channel saved. Press and hold the Select Button to save
the channel as a preset.
Presets can also be added quickly from the All Channels
list without tuning to each channel. Simply highlight the
desired channel and press Options Add this channel
to Presets. The device will automatically display the next
“(empty)” preset for your to use. Press and hold the
Select Button to save the channel in the highlighted slot.
To remove a channel as a preset, select the preset slot you
no long desire and press Options Remove this Preset.
Highlight and save channel
Operatio n
32
Page 36

Pausing, Rewinding, and Replaying Live Radio
While listening to satellite radio, up to the most recent 60 minutes of the broadcast is
stored in the temporary replay buffer. At any time you may press Rewind to replay
something you just heard or you may press Play/Pause to pause the live broadcast.
Resume listening from the point where the broadcast was paused by pressing Play/
Pause, or you can Fast-Forward to return to the live broadcast.
The replay buffer lls until it reaches the 60 minute limit. Then the oldest broadcast
content is deleted and replaced with the newest. The buffer empties when you change
channels or turn off the radio.
Pausing a Live Broadcast
>> Press Play/Pause to pause a live broadcast.
>> The audio will mute and a time bar will be shown near
the bottom of the display screen indicating how much
of the replay buffer is lled with the broadcast.
Playing a Paused Broadcast
>> Press Play/Pause to begin playing a paused broadcast.
>> Press Fast-Forward to jump ahead to the live broadcast.
33
Operatio n
Page 37

Tip
Fast-Forwarding and Rewinding Through Broadcasts
>> Press Fast-Forward or Rewind to navigate through the replay buffer.
Pressing and releasing moves forwards or backwards to the start of the next
or previous segment.
>> Pressing and holding Fast-Forward or Rewind moves progressively faster
forward or backwards in the buffer.
>> As you Fast-Forward or Rewind, the Diamond Indicator in the time bar will
move to show your current playback position relative to the live broadcast.
Rewinding Fast-Forwarding
Operatio n
34
Page 38

Recording Live Radio
Stiletto 2 lets you record up to 100 hours of any broadcast heard while listening to Satellite
Radio. Your device can record 3 ways: Record a total of 10 hours of individual songs, save
entire broadcasts for any length of time up to 6 hours long, or set up regular scheduled
recordings to take place even when you’re not listening.
Songs, shows, sports games and more can be recorded and saved on your Stiletto 2
by pressing Love while listening to a live broadcast in Satellite Radio.
>> Press Love once to record (save) the current song to your Library.
>> Press and hold Love to record (save) the current channel for the rest of the hour,
or to set additional recording options.
Tip
You can only Love a song, show or broadcast while listening “live” in Satellite Radio.
This functionality will not work in Internet Radio, or from the Replay Buffer if you have
paused the live broadcast.
While recording from Satellite Radio, you can listen to the channel being recorded — or any
Library content — and your device will continue recording in the background. If you try to
change channels, or if you switch to Internet Radio before the recording completes, you
will be asked if you want to “Stop recording?”.
>> Continue recording will return you to the Now Playing screen for the song or show
being recorded.
>> Stop (keep partial) will allow you to tune to a different channel or Internet Radio and
will save a portion of the recording to your Library.
>> Stop (delete partial) will allow you to tune to a different channel or Internet Radio and
discard or erase the current recording.
35
Operatio n
Page 39

Recording a Song
You can record your favorite songs to your device while listening to any Satellite Radio music
channel with a single press of Love. Because your device starts buffering (or caching) a
channel as soon as you begin listening.
To save a song as it is playing:
1. Press Love to begin saving the song.
2. While the song is being saved, the love icon will
be displayed briey, and then the Heart Icon is
displayed at the bottom center until the content has
nished saving.
3. The song is saved in the Library. Refer to the Library
section on page 52 for information on playing back the
song.
4. The Stiletto 2 will attempt to retrieve as much of the
elapsed song or show as is available in the replay buffer.
Recording song
The Stiletto 2 limits the amount of songs saved using
exceed that limit, the oldest songs “recorded from SIRIUS” will be automatically deleted to
make space for new loved songs. Display messages will appear to remind you that you may
lose older music and that you can keep tracks permanently by downloading authorized MP3
or WMA les from your personal collection or any Windows Media based online music service.
Love
to a total of 10 hours. If you
Operatio n
36
Page 40

Recording a Show
Just like you can Love a single song, you can easily start a longer recording (e.g. a
concert, talk or entertainment show) for the channel you are listening to by pressing
and holding Love. Your device will display the “Setup Recording” dialog — offering
you two choices:
>> Record this channel for the remainder of the current hour, or
>> Adjust recording options if you want to extend the recording beyond the end of the hour.
If you wish to record several hours of the channel you are listening to:
1. Press and hold Love and select Recording options
2. In the New Recording screen, turn the Media Dial to highlight Duration
3. Press the Select Button to change the recording duration.
4. Turn the Media Dial to increase or decrease the recording duration.
5. Press the Select Button again to save the new recording duration
6. Turn the Media Dial, highlight Done and press the Select Button
to save your new settings.
37
Operatio n
Page 41

The Heart Icon will be displayed at the bottom center of the screen to indicate that a
recording is in progress. (If you have selected for the recording to begin at a later time, the
recording will begin at the scheduled time. Refer to the Recording section on page 66 for
more information.)
All new recordings are saved in the Library and can be quickly listened to by selecting
Heard on SIRIUS Recently Recorded. Refer to page 56 for more information.
Change recording
parameters
Select recording
options
Operatio n
38
Page 42

Sports
Your device contains several special features to help you stay “in the game” and listening to
your favorite SIRIUS radio sports broadcasts. These features only work in Satellite Radio:
Sports Ticker: Automatically displays the current score in the Now Playing screen for any
game(s) in progress featuring team(s) you have designated as “favorites.”
Game Alert: Automatically displays a notice in the Now Playing screen before a game-ofinterest (containing a Favorite team) is about to start.
Game Zone: A special category in Satellite Radio that lists all games-in-progress for your
Favorite teams.
Sports Broadcast Now Playing Screen
While listening to any Sirius play-by-play sports
broadcasts, the Now Playing screen will display
the team names and current score along with
information on the channel number, signal strength
and supplemental information such as game period
or team logos may also be displayed.
Sports Now Playing Screen
39
Operatio n
Page 43

Adding and Removing Favorite Teams for Game Alerts and Sports Ticker
Before Sports Ticker or Game Alert will appear, you must rst mark or identify your favorite
teams. Only favorite teams will be displayed in the Sports Ticker or Game Alert.
1. From the Main Menu select Settings Sports Favorite Teams and select the desired
professional or college league you want to add or remove. (Figure 7)
2. Once viewing the correct league, turn the
3. Press the Select Button once to include the highlighted team in Sports Ticker. Press the
Select Button once again if you wish to include the team in Game Alerts as well.
You can remove teams from Ticker and/or Alerts by repeatedly pressing the
The third press removes the team from Ticker, and the fourth press removes the team from Alert.
Tip
You can quickly add or remove all teams to Sports Ticker or Game Alerts by pressing the
Options Button and selecting the appropriate option (Add all or Remove all from...).
Figure 5 Figure 6 Figure 7
Main Menu Add team for game alert Sports ticker
Media Dial
to highlight each team of interest.
Select Button.
Operatio n
40
Page 44

Figure 8
Game Zone
Game Zone
The Game Zone category lists all the sports games which are
currently playing for your favorite teams, and can be browsed
for the games scores. (Figure 8) You can scroll though the list
and select a game to tune to the channel where the game is
being broadcast.
Parental Controls
The parental controls feature sets a password for access to specic channels. This will
prevent access to these locked channels until the password is entered. (Figure 9)
No details about the current content of a locked channel will be displayed. When you
attempt to access a locked channel, you will be prompted to enter your password before
proceeding. (Figure 10) The parental control feature is accessed through the Settings
menu, as described in Parental Controls on page 78.
Hiding channels and genres, as described in the next section, can be an alternative to
locking channels.
41
Operatio n
Page 45

Figure 9 Figure 10
Locked Channels
Password Prompt
Hide Channels / Genres
The hide feature allows you to designate channels and genres to not be displayed when
browsing channel and genre lists. The hide feature differs from the parental control lock
feature in that a locked channel will be displayed while browsing a list (but is password
protected), while a hidden channel will never appear in a list.
Hidden channels are not locked, but can only be tuned by directly entering the channel
number using the numeric keypad on the remote control when the Stiletto 2 is in a docking
station. The hide feature is accessed through the Settings menu, as described in Hidden
Channels on page 75.
Operatio n
42
Page 46

Internet Radio
back
home
displa
y
options
Internet Radio
Your Stiletto 2 will allow you to listen to and enjoy all the channels available on SIRIUS Internet
Radio over any accessible Wi-Fi networks whether at home, at work, or on the go with evergrowing number of wireless networks or “hotspots” available at coffee shops, airports,
metropolitan cities, colleges, hotels, and more. All SIRIUS 100% commercial-free music
channels and select talk channels are available with your standard, SIRIUS subscription.
43
To listen to Internet Radio on your Stiletto 2, from the Main Menu turn the Media Dial
to highlight Internet Radio and press the Select Button.
Operatio n
Page 47

Getting Connected
Before you can listen to SIRIUS Internet Radio, you will need to connect to an accessible
Wi-Fi access point or hotspot. Unless the access point is unprotected or “open”, you will
need the network password (also known as the passphrase).
Stiletto 2 Wi-Fi Basics
Stiletto offers enhanced Wi-Fi functionality including the ability to work with:
>> 802.11b and 802.11g wireless networks
>> WEP and WPA encryption
>> Hidden wireless networks (SSID not broadcast)
>> Select paid wireless networks (e.g. AT&T Wi-Fi, T-Mobile, etc.)
>> Select “captive portal” networks (e.g. Google Wi-Fi, MetroFi, etc.)
Tip
Because Internet Radio is streamed and not broadcast, certain features available when
listening to Satellite Radio are not supported. It is not possible to record any material from
Internet Radio or pause and rewind live content
Operatio n
44
Page 48

Connecting to Wi-Fi for the rst time
The rst time you select Internet Radio on your device, please be sure you are in close
proximity to an Wi-Fi hotspot or access point, then:
1. Turn the Media Dial to highlight Internet Radio, then press the Select Button.
2. The “Please Wait… Finding networks” overlay will be displayed.
3. Turn the Media Dial to highlight a Wi-Fi network listed in the “Choose Wi-Fi Network”
to which you have access (Figure 11), then press Select. Open networks are displayed
without a “lock” icon; secure networks that require a password will have a “lock” icon
displayed to the right of the network name. Networks that are not supported (e.g. adhoc, WPA-Enterprise) will show a symbol instead of signal strength bars.
4. Follow the on-screen instructions to enter your user name and password for the
selected access point. (Figure 12, 13) If your access point password is a hex string,
you can press Options Use hex keyboard for faster password entry.
Figure 11 Figure 12 Figure 13
Enter Password
Wi-Fi Search Password PromptEnter Network SSID
45
Operatio n
Page 49

5. After entering your access point password, press the Options Button and select
“Connect now.”
6. Your screen may display Connecting to <name> overlay…checking overlay…
Connected to <AccessPointName> overlay.
7. Once connected, select a genre or preset to select a channel to listen to live SIRIUS
Internet Radio.
Connecting to previously-used Wi-Fi networks
Connecting to a Wi-Fi network that you have already used is as simple as selecting Internet
Radio. Your Stiletto 2 will automatically connect to any available network that is saved to
the Network List. To view the networks already saved in your list go to Settings Wi-Fi
Network List.
Hidden Networks
Some networks may be congured as “hidden”. These will appear as <Hidden Network> in
the Choose Wi-Fi network list. To connect, choose the hidden network and enter the exact
name of the Wi-Fi network. The Stiletto 2 will then attempt to connect to that network.
Operatio n
46
Page 50

Using Wi-Fi at Work
The Stiletto 2 will allow you to connect to a wide variety of Wi-Fi networks including
802.11b and 802.11g. Some corporate networks however are secured using 802.1x
(sometimes called WPA-Enterprise) security. The Stiletto 2 is not compatible with these
networks. If you are not sure what type of Wi-Fi network is available at your work or are
having problems connecting, check with you network system administrator.
Some business wireless networks block direct Internet access from Wi-Fi clients or devices
like the Stiletto 2. The Stiletto 2 needs direct, non-proxied access to HTTP and HTTPS
TCP/IP ports (80 and 443 respectively). If you are not sure what type of Wi-Fi network is
available at your work or are having problems connecting, check with your network system
administrator.
If you need to provide technical details to your network system administrator, the most
commonly-requested information can be found in the following locations:
>> MAC address: listed in Settings Wi-Fi Wi-Fi Status Wi-Fi Connection Status
>> BSSID: listed in Settings Wi-Fi Wi-Fi Status Wi-Fi Connection Status
47
Operatio n
Page 51

Using Wi-Fi on the go
The Stiletto 2 can access many paid and free Wi-Fi “hotspots” while you’re on the go. If
you have an active account with a major Wi-Fi network provider like T-Mobile or AT&T, you
can now use your login information (username and password) to connect to any of these
networks.
You can also connect your Stiletto 2 to many free Wi-Fi networks, like those you might nd
at a coffee shop or in many metropolitan areas. Depending on the Wi-Fi network provider,
you may be prompted for a username before you are allowed to connect. Try entering your
email address when prompted for a username, and anything at all when prompted for a
password. The Stiletto 2 will use this information and attempt to connect to the network.
If you are not sure if you have a valid account with a particular Wi-Fi network, you should
never enter a real password.
Operatio n
48
Page 52

Functional Differences between Internet Radio and Satellite Radio
A few notable differences exist between Satellite Radio and Internet Radio:
Channel Lineup: while most music channels are available in both Satellite and Internet
Radio, several talk and special programming channels are only available in Satellite. Visit
http://www.siriuscanada.ca/whatsonsirius for the current channel lineup.
Recording: When listening to Internet Radio, saving songs or recording programs is not
possible. Pressing the Love button will save the song title and artist information to your
Wish List. Fore more information, see Adding Songs to the Wish List later in this chapter.
Trick Play: while Satellite Radio allows you to pause/rewind/replay live SIRIUS broadcasts,
pressing “Play/Pause” will only “Mute” the audio in Internet Radio.
49
Operatio n
Page 53

Internet Radio Now Playing Screen
The Now Playing screen for SIRIUS Internet Radio provides information such as the
currently tuned channel, song or show being played, mode, and other information. The
buffering information will only be shown when a strong and consistent Wi-Fi connection
is not being maintained. To improve this, try moving to a different physical location to
improve the signal strength indicator reading.
Channel Number
Song/Show Title & Artist
Battery Condition Indicator
Battery Charging Indicator
Information
Buffer Information
Channel Logo
Signal Strength Indicator
Listening Mode (Internet or
Internet Premium) or Clock
Operatio n
50
Page 54

Browsing and Navigating Channels
When Internet Radio is selected, available SIRIUS Internet Radio channels are displayed
in groups by genre (also referred to as categories). From the All Channels or any of the
genre list views, available channels may be browsed by using Rewind and Fast-
Forward. Use the Media Dial to highlight your choice, and press the Select Button
to select a channel. It is not possible to pause Internet Radio, however, you can mute the
audio by pressing Play/Pause. When muted, press Fast-Forward, Rewind, or
Play/Pause to resume listening.
Adding Songs to the Wish List (Favorites)
Unlike Satellite Radio, pressing the Love Button when listening to Internet Radio will
save the song and artist information for the song to your Wish List.
The saved song information can be viewed on the device (Home Library Wish List),
through My SIRIUS Studio software (Stiletto 2 Playlist: Wish List) or with any other
compatible online music service when your Stiletto 2 is connected
makes it easy for you to nd more information about the song or artist, and purchase your
favorite songs. Refer to the Stiletto 2 User Guide included with your Stiletto 2 for more
details about the Wish List feature.
to a PC computer. This
Troubleshooting
For additional help, refer to page 80.
51
Operatio n
Page 55

Library
back
home
displa
y
options
Library
The Library contains all Love songs and recorded SIRIUS shows as well as MP3/WMA
music les transferred from your PC computer. All recordings of music, sports, talk shows,
news broadcasts, and talk entertainment can be browsed and played when no satellite
signal or Wi-Fi network is available (airplane ights, etc).
To access the Library on your Stiletto 2, from the Main Menu use the Media Dial to
highlight Library and press the Select Button.
Operatio n
52
Page 56

Now Playing Screen Information
When playing back content from the Library, the Now Playing screen provides information
such as the song or show title, content length, and playback position. Figure 14 identies
the information which is displayed when in the Library mode.
Figure 14
Channel Number
Channel Logo
Song/Show Title & Artist
Battery Condition Indicator
Battery Charging Indicator
Information
Time Information
Elapsed Play Time
Time Length of Content
Currently Playing Content/
Total Content
Listening Mode or Clock
Navigating Music
While listening to songs and recordings in the Library, you can pause, fast-forward, or
rewind or skip from song-to-song. Pressing Play/Pause will pause the content, or begin
playing again after a pause. Use Fast-Forward and Rewind to move through the
content: a single press will skip to the end or the beginning of the content, while pressing
and holding will move through the content.
A time bar is displayed in which a Diamond Icon indicates your current listening
position in the content. (Figure 14)
53
Operatio n
Page 57

Browsing and Navigating the Library
The music content in the Library may be browsed in several ways, by: songs heard on
SIRIUS, artist, album, title, genre, playlist. (Figure 15) If you have added a microSD card
to your Stiletto 2, all MP3/WMA music les you have downloaded to the card will also
appear in the Library. Scheduled recordings may be browsed by channel, recording date
and genre. Use the Media Dial to scroll through the lists and press the Select Button
to select a highlighted item. Locate the specic content you’d like to listen to and press
Play/Pause to begin playback.
While you are listening, the
Options Button
will allow you to turn the shufe mode on or off.
Operatio n
54
Page 58

Figure 15 Figure 16 Figure 17 Figure 18
Albums ScreenArtists ScreenRecently Recorded ScreenLibrary Navigation Screen
Figure 19 Figure 20 Figure 21 Figure 22
Wish List ScreenPlaylists ScreenGenres ScreenTitles Screen
55
Operatio n
Page 59

Browsing and Navigating the Library
Browsing Options Description
Shufe All Songs
Heard on SIRIUS
Artists
Albums
When selected, this option randomly plays songs stored in Library•
Browse for content you’ve saved from SIRIUS broadcasts
•
using Love and scheduled recordings. (Figure 16)
When selected, this option allows you to rene your search for
•
SIRIUS recorded content by browsing for Recently Recorded,
Channels, Artists, Titles, or Genres.
Search for content by a particular artist within all the songs
•
in the Library, including those saved by using Love as well
as MP3 and WMA les downloaded from your PC computer.
(Figure 17)
When selected, this option displays a list of artists in
•
alphabetical order. Pressing Play/Pause will begin
playing all the songs of the highlighted artist. Selecting an
artist displays all songs by that artist contained in the Library.
Items recorded from SIRIUS broadcasts have a Heart Icon
displayed to the right of the title. You can use Fast-Forward
or Rewind to scroll through the artists in the Library.
Search for content from a par ticular album within all the MP3
•
and WMA les downloaded from your PC computer. (Figure 18)
When selected, this option displays a list of albums in alphabetical
•
order. Pressing Play/Pause will begin playing the songs in
the highlighted album. Selecting an album displays all the songs
from that album in the Library. You can use Fast-Forward or
Rewind to scroll through the albums in the Library.
Operatio n
56
Page 60

Browsing and Navigating the Library
Browsing Options Description
Search for a particular song contained in the Library, including
Titles
Genres
•
those saved by using Love, and MP3 and WMA les downloaded
from your PC computer. (Figure 19)
When selected, this option displays a list of song and show titles
•
in alphabetical order. Items recorded from SIRIUS broadcasts will
have a Heart Icon displayed to the right of the title.
Search for songs or shows of a particular genre, including those
•
saved by using Love and scheduled recordings, as well as MP3
and WMA les downloaded from your PC computer. (Figure 20)
When selected, this option displays a list of genres in alphabetical
•
order. Pressing Play/Pause will begin playing the content in
the highlighted genre. Selecting a genre displays all the songs
or shows of that genre in the Library. Items recorded from
SIRIUS broadcasts will have a Heart Icon displayed to the
right of the title. You can use Fast-Forward or Rewind to
scroll through the genres in the Library.
57
Operatio n
Page 61

Browsing and Navigating the Library
Browsing Options Description
Select playlists for listening, and songs within a playlist.
Playlists
Wish List Whenever you press Love in Satellite Radio or Internet Radio,
•
(Figure 21) There are two kinds of playlists to choose from:
Smar t playlists are automatically created in the Li brary
—
and are listed in parentheses:
(Recently Added) is the most recent 250 t itles.
(Most Played) and (Least Played) li st titles which have
been played the most o r the least.
User playlists are playlists you create on your PC computer
—
and then transfer to th e Stiletto 2.
Selecting a playlist by pressing Play/Pause will begin playing
•
the content in the playlist. The order of the songs will depend
on the type of playlist, and whether shufe has been chosen
using the Options Button. You can use Fast-Forward
or Rewind to scroll through the playlists in the Library.
•
the song displayed is added to the Wish List. (Figure 22)
Songs are displayed in reverse chronological order (newest
•
to oldest) and includes old Loved songs that may have been
automatically deleted to make room for new Loved songs based
on the 10-hour limit for Love songs.
To delete individual items or a ll ite ms fro m the Wish List,
—
press the Options Button. Select Remove this Wish List
Track to remove the in dividual item, or Remove all Wish List
Tracks to delete all items from the Wis h List.
A star appears to the right of the song title if the song was
•
added to the Wish List, and a heart if the song had been deleted
to make room for new content.
Operatio n
58
Page 62

Adding Songs To The Wish List
Any song that you have loved or saved to the Wish List is viewable in the Library. Songs
title and artist information saved to the Wish List is available when using the My Sirius
Studio software or other compatible media management software. This makes it easy for
you to nd more information about the song or artist, and purchase the music if desired.
Refer to the user manual on the My SIRIUS Studio CD-ROM included with your Stiletto 2
for more details about the Wish List feature. To view the contents of your Wish list, select
Library Wish List.
Wish List Song
59
Operatio n
Page 63

Deleting Content from the Library
Pressing the Options Button while listening will allow you to delete the content.
(Figure 23) The Options Button may also be used when browsing the various lists to
delete the entire list. For example, when browsing by artist, highlighting an artist name and
pressing the Options Button will prompt you to remove all content by that artist from
the Library. When browsing by block recording, it will delete the entire recording, not just
a single song.
Figure 23
Deleting a song
Supported File Formats For Downloaded Content
The Stiletto 2 can store and play MP3 or WMA les from your personal Library, and
purchased or subscription content from most Windows Media (WMA) based online music
sites. For information on how to download music les, see the My SIRIUS Studio software
user guide included on the My SIRIUS Studio CD-ROM.
Operatio n
60
Page 64

Content Type
Individual songs
saved from SIRIUS
broadcasts
Scheduled Recordings
& Time Block
recordings
Downloaded MP3 &
WMA les (purchased
and subscription
content)
Stiletto 2 Memory Storage
Storage
Limitation
A maximum limit of 10 hours of individual
•
songs may be saved from live broadcasts. Once
the 10 hour limit is exceeded, older content is
automatically deleted to make space available
for recently added songs.
As saved content approaches the 10 hour limit,
10 hours
100 hours
800 MB
of Internal
Memory
•
You will be reminded that you are running low
on space. Purchase and transfer these songs
from your PC to avoid auto-deletion.
When the 10 hour limit is reached, each time
•
you use Love, you will be reminded that you
are deleting older content.
Scheduled recordings will be kept to the
•
minimum “keep” count with newer recordings
replacing older content. (Refer to the
Recording section on page 66 for more
information.)
Half of the memory available on the Stiletto 2
•
may be used for the storage of downloaded,
purchased or subscription content. Once
downloaded to the Stiletto 2, content will
remain until it is deleted by you.
Add a microSD memory card to store additional
•
MP3 and WMA les.
The microSD card cannot be used to store
•
SIRIUS content.
Notes
61
Operatio n
Page 65

Content Type
Radio Replays
Stiletto 2 Memory Storage
Storage
Limitation
Radio Replays are automatic recordings of
•
favorite SIRIUS Satellite Radio channels you
listen to most. (Refer to the Radio Replays
Available
Memory
section on page 63.) Radio Replays occupy any
unused memory and are deleted automatically
to make space available for scheduled
recordings or transferred MP3 / WMA les from
your PC computer.
Notes
Operatio n
62
Page 66

Radio Replays
back
home
displa
y
options
Radio Replays
Radio Replays are automatic recordings of your favorite SIRIUS music channels. While
listening to any SIRIUS music channel, blocks of programming may be saved for your in
unused memory as a virtual channel. This assures that you will always have SIRIUS music
to listen to, even when a Satellite Radio or Internet Radio signal is not available.
To access Radio Replays, from the Main Menu use the Media Dial to highlight Radio
Replays and press the Select Button.
63
Operatio n
Page 67

Navigating Radio Replays
Radio Replays are listed in numerical order by SIRIUS channel
along with the total time saved from each channel. (Figure 25)
Use the Media Dial to scroll through the list of channels and
the press the Select Button to choose a Radio Replay.
Figure 25
Now Playing Screen Information
Radio Replay Listing
The Now Playing screen for Radio Replays provides information such as the channel the
content was recorded from, song or show being played, mode, song length, and other
information. Radio Relays are listed by SIRIUS channel number and display the total
listening time available for each. Figure 24 identies the information which is displayed
when in the Radio Replays mode.
Figure 24
Channel Number
Song/Show Title &
Artist Information
Replay Buffer Information
Battery Condition Indicator
Battery Charging Indicator
Channel Logo
Elapsed Play Time
Time Length of Currently
Playing Content
Radio Replay Count
Listening Mode or Clock
Operatio n
64
Page 68

Play/Pause will pause and resume playback of the selected Radio Replay. Fast-
Forward and Rewind allow you to move forward and backward through the content.
The Stiletto 2 remembers the last point you paused or stopped in the Radio Replay and
resumes playback at that point when you begin listening again.
If you wish to remove a Radio Replay from the list, turn the Media Dial to select it,
then press Options Remove this Replay...
Adding Songs to the Wish List
When listening to Radio Replays, saving songs or recording programs is not possible. You
may save the song title and artist information to your Wish List by pressing Love. The
information saved in the Wish List is available when using the My SIRIUS Studio software
or any other compatible online music service when your Stiletto 2 is connected to a PC.
This makes it easy for you to nd more information about the song or artist, and purchase
the music if desired. Refer to the user manual on the My SIRIUS Studio CD-ROM included
with your Stiletto 2 for more details about the Wish List feature.
65
Operatio n
Page 69

Scheduled Recordings
back
home
display
options
Recordings
Recording allows you to schedule the Stiletto 2 to record programming at a set date
and time. Each recording session may be up to 6 hours in length, and may be set up as
a one time or repeating event. In order for a scheduled recording to occur, the Stiletto 2
must have adequate power and be able to receive the SIRIUS signal from the satellites
or terrestrial transmitters. If the Stiletto 2 is on or in sleep mode, the Stiletto 2 will
automatically turn to the correct channel and begin recording. If no signal is present
at the time the recording is scheduled to start, the recording will be skipped.
Completed scheduled recordings will be found in the Library. To access your scheduled
recordings, from the Main Menu go to Library SIRIUS Recordings.
Operatio n
66
Page 70

Scheduling a Recording
To schedule a recording, select Setup New Recording from the Recording menu. (Figure 26)
If have not already set your time zone, you will be prompted to set it. (Figure 27)
The New Recording screen allows you to set the parameters of the recording. (Figure 28)
Use the Media Dial to highlight a parameter and press the Select Button. Then use
the Media Dial to scroll the list until the correct selection is highlighted, and press the
Select Button to select it. When complete, select Done.
Figure 26 Figure 27 Figure 28
New Recording Screen Select ChannelSet Time Zone
67
Operatio n
Page 71

Stiletto 2 Scheduled Recording
Parameter Description Notes
If a channel which has been locked with the
Channel
Date
Start Time
Duration
Repeating
Any SIRIUS broadcast
channel may be selected
The date of the recording
The time of day the
recording will begin
The amount of time to
record
The recording can be set
to repeat at scheduled
intervals
•
parental control feature is selected, the
password must be entered before you can
listen to the recording
Dates may be selected from the present date
•
to 4 weeks in the future
If the date and time chosen has already
•
passed, you will receive a warning when you
attempt to save the scheduled recording
Recording times of 15 minutes to 6 hours
•
may be selected
No: The recording will take place once at the
•
specied time/date
Weekly: The recording will take place every
•
seven days at the specied time
Daily: The recording will take place every
•
day at the specied time
Mon - Fri: The recording will take place every
•
Monday through Friday at the specied time
Sat - Sun: The recording will take place every
•
Saturday and Sunday at the specied time
Operatio n
68
Page 72

Stiletto 2 Scheduled Recording
Parameter Description Notes
1,2,3,5,10 Shows: Keeps the selected number
Keep Last
For a repeating recording,
you may specify how many
previously recorded shows
to keep
•
of previous recordings
All Shows: Keeps all previous recordings
•
If any option other than All is set, the oldest
•
recordings will be automatically deleted as
new recordings are created
Editing a Scheduled Recording
Once you’ve set up a scheduled recording, you can review and edit the recording settings
by choosing Already Scheduled from the Recording menu. Selecting this option will display
a list of all recordings already scheduled. (Figure 29) Selecting a scheduled recording from
the list will take you to the Edit Recording screen and allow you to make changes to the
parameters for that recording. (Figure 30)
Figure 29 Figure 30
69
Operatio n
Edit Record
Settings Screen
Edit Setting and
Select Done
Page 73

Settings
Settings
Settings allows you to make changes to the global settings of your Stiletto 2 and
personalize your experience.
The following table describes each menu item and associated settings. The main Settings
menu items are shown in bold text.
Operatio n
70
Page 74

Stiletto 2 Settings
Menu Item Options Description
Audio (Settings Audio )
Chooses whether the channel names are
Speak Channels
System Sounds
System Volume
SRS TruBass
SRS Focus
On or Off
On or Off
0 – 100%
Off, Low,
Medium, High
Off, Low,
Medium, High
•
spoken as you browse lists of channels
Chooses whether the system sounds, beeps,
•
and other tones are audible
Adjusts the volume of the system sounds and
•
spoken channel names
Improves the perception of bass response by
•
optimizing low frequency enhancement for
different listening environments
Optimizes the stereo “sweet spot” for
•
different environments by focusing the
sound closer to the listener
Hidden Channels (Settings Hidden Channels )
Hidden Channels
Choose
Channels or
Genres
Selects (or de-selects) channels or genres to
•
be hidden in channel lists
Device (Settings Device )
Displays the SIRIUS ID (SID) number of the
•
Stiletto 2
This is a unique identication number
SIRIUS ID
71
(none)
Operatio n
•
assigned to your Stiletto 2. You’ll need
this number when you activate your
SIRIUS Satellite Radio service.
Page 75

Stiletto 2 Settings
Menu Item Options Description
Displays the strength of the SIRIUS signal
Antenna Aiming
Device Tour
Memory Usage
microSD Card
Device Info
Service Info
Legal Info
(none)
Yes or No Replays the device tour•
(none)
(none)
(none)
(none)
(none)
•
terrestrial transmitters
Displays information on how much of the
•
Stiletto 2’s memory is being used
Selecting this option provides details on
•
how the memory is allocated between all
recordings, content downloaded from your PC
computer, and content saved using Love
Displays information about the microSD card,
•
if present, including how much of the card is
being used
Displays information about the model
•
number, and software and hardware versions
of your Stiletto 2, and IP address information
when connected to a wireless network
Displays information that might be required
•
by SIRIUS Customer Service
Provides legal and copyright information for
•
the Stiletto 2
Operatio n
72
Page 76

Stiletto 2 Settings
Menu Item Options Description
Resets all the settings of the Stiletto 2 to the
Reset and Erase
Yes or No
•
factory defaults:
All presets are erased
—
Display bright ness is set to 80 %
—
FM Transmitter is set to ON
—
Hidden channels are added back
—
Favorite teams for game alerts are
—
erased
Game Alert is set to ON
—
Sports Ticker is set to ON
—
Clock is set to Easte rn time zone
—
Jump is set to none
—
Speak Channel Name is set to ON
—
System Sounds are set to ON
—
All recordi ngs scheduled are cancelled
—
Channels locked with Parental Controls
are u nlocked
Parental Controls password is cleared
—
All items in t he Li brary are erased
—
Note: If a Parental Control password has been
•
set, you’ll be prompted to enter the password
before you can proceed with the reset
73
Operatio n
Page 77

Stiletto 2 Settings
Menu Item Options Description
Display (Settings Display )
Adjusts the brightness of the display screen
Brightness
Backlight Timer
Clock
Time Zone
5 – 100%
2, 5, 10, or 30
Seconds
On or Off
Newfoundland
Atlantic
Eastern Time
Central Time
Mountain Time
Arizona
Pacic Time
•
A dimmer setting will prolong battery life
•
Adjusts how long the backlight of the display
•
screen remains on after no buttons are
pressed
A shorter setting will prolong battery life
•
Displays a clock at the bottom of the screen
•
when listening
Sets the time zone in which you reside
•
The Stiletto 2 is set to Eastern Time zone
•
by default
Dock (Settings Dock )
Selects whether the FM transmitter is turned
FM Transmit
Auto Shutdown
Dock Info
On or Off
Shut down or
Never shut
down
•
On or Off when the Stiletto 2 is in a docking
station
Selects whether the Stiletto 2 powers off
•
after 4 hours when in a vehicle dock
Displays info about dock type and software
•
version
Operatio n
74
Page 78

Stiletto 2 Settings
Menu Item Options Description
Selects whether the brightness of the display
Low Light Mode
On or Off
•
is automatically reduced when the ambient
light is low
Parental Controls (Settings Parental Controls )
Allows you to lock specic channels to
Parental Controls
Locked Channels
On or Off
Choose
Channels
•
prevent unauthorized listening by other
family members.
If On is selected, you will be prompted to
•
select a 4-digit password
Individual channels may be selected
•
(or de-selected) for locking
Locked channels will have the Lock Icon
•
displayed with the channel name
If unlocking channels, you will be prompted
•
to enter the 4-digit password before they can
be unlocked
Radio Replays (Settings Radio Replays )
Selects whether the Stiletto 2 should
Radio Replays
On or Off
•
automatically save content for Radio Replays
75
Operatio n
Page 79

Stiletto 2 Settings
Menu Item Options Description
Sports (Settings Sports )
Allows you to select your favorite teams and
Favorite Teams
Game Alerts
Sports Ticker
Choose Teams
On or Off
On or Off
•
NASCAR® for Game Alerts
Selects whether the Game Alert feature is
•
enabled or disabled
Selects whether the Sports Ticker feature is
•
enabled or disabled
Wi-Fi (Settings Wi-Fi )
Turns the Wi-Fi access for connecting to a
Wi-Fi Status
Network List
On or Off
Choose
Network
•
wireless network On or Off
Also displays the MAC address of the Stiletto 2
•
Displays a list of wireless networks to which
•
the Stiletto 2 has previously connected
Operatio n
76
Page 80

Connecting to your PC
Before connecting the Stiletto 2 to your PC computer, install the My SIRIUS Studio
software. My SIRIUS Studio is a PC application that will allow you to easily transfer MP3 /
WMA music les from your PC to your device or installed microSD card. Refer to the My
SIRIUS Studio Software Installation section on page 78 for more information.
To connect the Stiletto 2 to a PC, connect one end of the USB cable to the Stiletto 2 and
the other end to an available USB port on the PC.
Your PC computer software will recognize the Stiletto 2 and
ask you which application you want to use to manage the
content on your device. You may choose My SIRIUS Studio
or any other compatible software including Windows Media®
Player.
When you connect to the PC, the Stiletto 2 will display a
message asking you to turn off Satellite Radio and connect.
You may cancel and continue listening to Satellite Radio, or
stop Satellite Radio and connect to the PC computer.
77
Operatio n
Page 81

My SIRIUS Studio Software
The My SIRIUS Studio software included with your Stiletto 2 allows you to connect your
Stiletto 2 to your PC computer. The software requires your PC computer to be using
the Microsoft Windows XP operating system with Service Pack 2 installed, or the Vista
operating system.
Tip
The My SIRIUS Studio software must be installed before connecting the Stiletto 2 to your
PC computer.
The following list provides a few highlights of the capabilities of the software:
>> Creating playlists and adding songs to the playlists.
>> Streaming SIRIUS music channels over the Internet.
>> Checking for updates to the device software and downloading them to the Stiletto 2,
and re-installing deleted device software.
Operatio n
78
Page 82

Installing My SIRIUS Studio Software
>> Insert the My SIRIUS Studio software CD-ROM into your PC computer’s CD-ROM drive
to start the software installation.
>> If the installation does not begin automatically, double click the SIRIUS Studio Setup
icon to begin the installation.
>> Follow the prompts of the software to complete the installation.
>> When the PC computer has rebooted, the My SIRIUS Studio software will be ready to
use. Please refer to the user guide included on the software CD-ROM for instructions
on using the software.
79
Operatio n
Page 83

Troubleshooting: General
If Then
Check that battery is installed correctly
Stiletto 2 does not power on
Displays: “ACQUIRING SIGNAL”
Audio starts and stops
There is no sound
Stiletto 2 will not start up (or)
Displays: “ERROR”
Stiletto 2 isn’t responding to
Media Dial / other buttons
•
Check that battery is charged
•
Stiletto 2 is searching for a satellite signal
•
Check for obstacles above / around satellite
•
antenna
Change location / avoid obstacles to signal
•
Satellite signal is weak
•
Check for obstacles to satellite antenna
•
(see above)
Check that ear buds / antenna headphones are
•
plugged in correctly
Software is damaged
•
Connect Stiletto 2 to your PC using USB cable
•
Using My SIRIUS Studio, download new software
•
onto device
Follow instructions included on CD-ROM
•
Stiletto is locked. Unlock using Power/Lock
•
switch (or)
Slide and hold Power/Lock switch down for
•
5 seconds to turn it off (and)
Slide Power/Lock switch down and release
•
Remove battery. Wait 10 seconds.
Replace battery. (and) Slide Power/Lock switch
•
down and release.
Operatio n
80
Page 84

Troubleshooting: Internet Radio
Observed Issue What to do…•
The wireless network’s name (SSID) may be hidden.
•
A Wi-Fi network does not
appear in the scan list
Connection screen shows:
Unable to Connect
Now Playing screen
shows:
Channel Unavailable
Connection Error
Now Playing screen
shows:
Channel Unavailable
Signal Lost
Try selecting <HIDDEN NETWORK> and entering the
network name.
You may be out of range of the wireless network.
•
Try moving closer to the router and connecting again.
You may have entered an incorrect password. Try
•
entering it again. If the access point is congured for
WEP, we recommend entering your password using
the hex keyboard (available by pressing the Options
button when prompted for a password.)
Only WEP and WPA-PSK are currently supported.
•
The router may require the entry of the MAC address
•
of your Stiletto before it will allow you to connect. For
details, please see the Internet Radio section in the
Stiletto 2 User Guide.
You may have connected to an open wireless network
•
that requires additional authentication that is not
currently supported.
An unknown connection problem may have occurred.
•
Try connecting again.
You may have moved out of range of the wireless
•
network. Try moving closer to the router, and then
connect again.
The router may have been turned off or restarted.
•
Verify that the router is on and connect again.
81
Operatio n
Page 85

Now Playing screen shows
channel information, but
there is no audio
Now Playing screen
shows “Buffering” and
there is no audio
Cannot save songs and
shows using Love
Cannot use Play/
Pause, Fast-Forward
and Rewind
Your router may be having problems connecting to
•
the Internet. Check your broadband connection to the
Internet and the router’s conguration settings, or try
turning the router off and then on again.
The Stiletto 2 is streaming channel information from
•
the Internet. When completed, the buffering message
will disappear and the radio will begin playing.
Because Internet Radio is streamed and not
•
broadcasted, some Satellite Radio features (pause/
rewind/replay; Loving songs; scheduled recordings)
are not supported.
Operatio n
82
Page 86

Internet Radio Status
The Status line will often contain different messages that will help you better
understand the details around your current (or previous) Wi-Fi connection.
Status Message What it means?
Could not negotiate handshake with the access point.
•
Try to connect by being within range of a Wi-Fi access
Cannot connect to AP
•
point and selecting Internet Radio, or by selecting
Settings Wi-Fi Wi-Fi Status Options button
Choose Network…
You are connected to the listed access point
Connected
Internet check failed
IP address failed
•
Relax and enjoy SIRIUS Internet Radio
•
Failed to contact the ZING Service Center for an
•
unknown reason
Try moving to a different physical location with two or
•
three signal strength bars displayed. Ensure you can
log on to the access point and establish an Internet
connection with a laptop computer.
Bad or no DHCP available through the selected access
•
point; may indicate an access point conguration
problem.
Try connecting to a different access point
•
83
Operatio n
Page 87

Status Message What it means?
Not connected to an access point.
•
Try to connect by being within range of a Wi-Fi access
Not connected
•
point and selecting Internet Radio, or by selecting
Settings Wi-Fi Wi-Fi Status Options
button: Choose Network…
Device has moved beyond the range of the access
•
Network Lost
Network login failed
Network check failed
Off
Password failed
point or access point power interrupted.
Try moving back in range of the access point; ensure
•
you have at least two signal strength bars displayed
for the selected Wi-Fi network.
Navigated captive portal just ne, but authorization
•
failed
Enter your network login information again
•
Couldn’t navigate through the captive portal; captive
•
portal Wi-Fi network temporarily not supported.
Try connecting to a different access point.
•
The Wi-Fi radio is turned off and will not transmit or
•
receive.
Select Internet Radio from the Home menu if you
•
want to listen to Sirius Internet Radio over Wi-Fi.
Password entered (WPA/WEP) for access point is
•
incorrect.
Re-enter the access point password.
•
Operatio n
84
Page 88

Additional Information
Installing the Vehicle Dock
SIRIUS suggests professional installation of this product in your vehicle. Professional
installation provides an experienced technician to install this product in your vehicle,
advice for selecting a suitable mounting location, installation of the antenna, and routing
all the necessary wires and cables. An installer will have the necessary audio connection
accessories to provide optimal audio output of the SIRIUS radio directly to your vehicle’s
audio system. Ask your SIRIUS retailer if they provide professional installation services, or
can recommend a professional installation service.
85
Additio nal Information
Page 89

Stiletto 2 Vehicle Dock Overview
1 2 3 4 5
6
fm tune presetjump
7 8 9 0
Direct Entry Tune/
Preset Buttons
POWER
ANT
Lock
Tune
Preset
Preset Mode Indicator
Tune Mode Indicator
FM
Jump
IR Remote Receiver
FM OUT
LINE OUT
lock
Buttons, Controls and Connection Ports
Controls
86
Page 90

Stiletto 2 Vehicle Dock Button and Control Descriptions
Button Action Description
In Tune Mode: Directly selects the channel indicted by the
0 – 9
fm
jump
tune
preset
lock
fm
power
line out
ant.
Press
Press
Press
Press
Press
Toggle Secures the Stiletto 2 in the vehicle dock
This connection is used for the optional FM Direct Adapter which
directly connects to the vehicle’s FM radio antenna input
Connection for the Cigarette Lighter Adapter
Audio output for direct connection to the vehicle’s audio system. An
audio cable (not supplied) is required to utilize this connection
Connection for the Magnetic Antenna
numbers which were pressed
In Preset Mode: Selects presets 0 – 9
Displays the FM Frequency screen where the FM
transmitter frequency can be selected, or an FM preset
selected using the 0 – 9 buttons
Jumps to a preselected channel
A second press returns to the previous channel or song/
show
Changes to the direct tuning mode where channel numbers
may be entered
Changes to the preset mode and displays the list of preset
channels
The second and subsequent press cycles through the preset
banks, A, B, and C
87
Controls
Page 91

Vehicle Dock Installation
A.
o
p
t
i
o
n
s
d
i
s
p
l
a
y
b
a
c
k
h
o
m
e
1
2
3 4
5
6
f
m
t
u
n
e
p
r
es
e
t
j
u
m
p
7
8
9
0
B.
o
p
t
i
o
n
s
d
i
s
p
l
a
y
b
a
c
k
h
o
m
e
1 2
3 4
5
6
f
m
t
u
n
e
p
r
e
s
e
t
j
u
m
p
7
8
9
0
When installing the vehicle dock, choose a location in your vehicle where the radio will not
block your vision, interfere with the vehicle controls, or obstruct the air bag. The location
should be easily accessible and provide good visibility of the display, and should not be
located where it will be in direct sunlight which will affect the visibility of the display
screen. The right side of the vehicle dock which has the Lock button should also not be
obstructed.
The mounting accessories necessary to install the vehicle dock in a vehicle are provided.
The next illustration shows two examples of the Stiletto 2 mounted in a vehicle: A is the
console mount method using the adhesive mount, and B is the vent mount method.
Depending upon the mounting method you select, the mount should be assembled as
described in one of the following two sections. In choosing a mounting location, be sure
that position chosen will not block access to the Lock button on the right side of the
vehicle dock.
Additio nal Information
88
Page 92

Console Mount Method (A)
To assemble and mount the vehicle dock for the console mount method A:
Attach the adhesive foot to the vehicle dock using the provided screws.
1.
Before adhering the mount to the console, be sure to select your mounting position
2.
carefully because once the mount has been adhered to a surface, it will not be possible
to remove it and adhere it again.
Clean the selected mounting surface area in the vehicle with the alcohol swab.
3.
Unscrew the adhesive foot from the mounting bracket. Peel the protective material off
4.
the adhesive on the foot and press the foot rmly against the vehicle surface.
The adhesive mount should then be allowed to adhere for a minimum of 2-4 hours
5.
before use. Best adhesion occurs after 24 hours. When the adhesive foot has achieved
sufcient adhesion, reattach the vehicle dock to the foot.
89
Additio nal Information
Page 93

Mounting
Bracket
Vehicle
Dock
Adhesive
Foot
Unassembled
Assembled
Additio nal Information
90
Page 94

Vent Mount Method (B)
To assemble and mount the vehicle dock for the vent mount method B:
Assemble the vent mount clip as shown. Note that the lower arm may be attached in
1.
two different positions. You should assemble the vent clip in the conguration that
works best in your particular vehicle. Figure 6 illustrates both possible congurations
of the vent clip.
Attach the vent clip to the vehicle dock using the provided screws.
2.
Slide the vent clip portion of the mount into a vent in your vehicle, insuring that one of
3.
the vent louvers slides between the upper and lower portions of the two clip arms, and
hooks the rear of the louver.
Lower Position Upper Position
91
Additio nal Information
Page 95

Vent Clip
Clip Arms
Vehicle
Dock
Unassembled
Assembled
Additio nal Information
92
Page 96

Installing the Antenna
The installation of the magnetic antenna consists of two installation steps:
Mounting the magnetic antenna and cover/tail on the vehicle
•
Routing the antenna cable through the vehicle to the SIRIUS radio or vehicle dock
•
The following sections provide instructions for both installation steps.
Antenna Mounting
The SIRIUS Magnetic Mount Vehicle Antenna has a strong magnetic mount designed to
hold the antenna in place during normal driving conditions (highway/city). This also allows
for easy removal for transferring the antenna to other vehicles.
These mounting positions should be observed when installing the antenna:
Sedan/Coupe/SUV/Mini-Van: Install the antenna at the rear center of the roof, near
•
the rear window.
Pickup Truck: Install the antenna at the front center of the roof, near the windshield.
•
Convertible: Install the antenna at the front center of the trunk lid, near the rear
•
window.
The SIRIUS antenna needs to have an unobstructed area of 3 inches by 3 inches around
it. It is important to mount the antenna where no obstructions will block the antenna
from receiving the SIRIUS signal. Objects which can obstruct the antenna could be a roof
rack, a sunroof, a roof mounted cargo container, another antenna, etc. If your vehicle has
a potential obstruction, be sure that the SIRIUS antenna is mounted at least 3 inches
away from it (but no closer than 3 inches from the roof edge, or trunk lid in the case of a
convertible).
93
Additio nal Information
Page 97

Follow this procedure to mount the antenna:
Sedan/CoupeSedan/Coupe
Pickup TruckPickup Truck
SUV/Mini-VanSUV/Mini-Van
ConvertibleConvertible
Select an appropriate mounting position for your type of vehicle that has an
1.
unobstructed area of 3 inches by 3 inches around the antenna.
Attach the rubber cover/tail to the antenna, as shown in the following illustration, and
2.
press the antenna cable into the rubber cover/tail. The rubber cover/tail will help to
position the antenna the correct distance from the edge of the roof or trunk lid.
Clean the surface area of the vehicle where you will be installing the antenna with the
3.
alcohol prep pad.
Additio nal Information
94
Page 98

As shown in the following illustration, peel the protective material from the adhesive
Rubber Cover/Tail
Protective Material
Adhesive Strips
Strain Relief
Antenna Cable
Attach Rubber Cover/Tail
Remove Adhesive Strips
Attach Rubber Cover/Tail
Remove Adhesive Strips
Press Firmly in Place on Vehicle
4.
strips and press the rubber cover/tail rmly into place on the vehicle.
Double check that the location of the antenna and rubber cover/tail are correct, and
5.
continue to press rmly down on rubber cover/tail for another 30 seconds. At room
95
Additio nal Information
Page 99

temperature (68 degrees), maximum adhesion usually occurs within 72 hours. During
this period, avoid car washes and other contact with the antenna and rubber antenna
cable cover/tail.
Cable Routing
When you have successfully mounted the antenna, you can begin the cable routing portion
of the installation. Separate antenna cable routing procedures are provided for each type
of vehicle:
Sedan/Coupe on page 97
•
Pickup Truck on page 99
•
SUV/Mini-Van on page 101
•
Convertible on page 103
•
Note that additional breakout illustrations for each step of the antenna cable routing
procedures can be found on the SIRIUS website at http://www.siriuscanada.ca. Click on the
Install/Activate link and then follow the link for the Car Installation Tips.
Additio nal Information
96
Page 100

Sedan/Coupe Antenna Cable Routing Procedure
1. Feed Ca ble Under
Rubber Molding
A round Window
4. Route Cable from Trunk
Un der Interior Trim, in to
Cab in and Towards Front
of Vehicle
6. Br ing Cable Ou t To
S IRIUS
Radio
Locatio n
5. Brin g Cable out from
Trim a nd Route Unde r
Car pet to Dashb oard
or Console.
2. Route Cable Out of
Wi ndow Molding and
In to Weatherstrip ping
Aro und Trunk Openi ng
3. Route Cable Along
Trunk Wall an d Into
Cab in
To route the antenna cable in a sedan/coupe follow these detailed cable installation
instructions.
Feed the cable from the antenna underneath the rubber molding around the rear
1.
window. Use a plastic putty knife or similar object to lift the rubber molding around the
rear window and tuck the antenna cable underneath the molding. Route the antenna
cable around and down the window to the lowest point. If your rear window does not
have rubber molding, SIRIUS recommends consulting with a professional installer.
Route the antenna cable out of the window molding and into the rubber weather
2.
stripping around the trunk opening. Lift the weather stripping from the opening and
97
Additio nal Information
 Loading...