

Page 1
HON-SC1
Honda/Acura
SIRIUS Interface
Installation Guide
Page 2
FCC NOTICE:
This device complies with Part 15 of FCC rules. Operation is subject to the following conditions:
(1) This device may not cause harmful interference, and
(2) This device must accept any interference received, including interference that may cause undesired
operation. Changes or modifications not expressly approved by the party responsible for compliance could
void the user’s authority to operate this device.
Directed Electronics is not responsible for any radio or TV interference caused by unauthorized modifications to this equipment. Such modifications could void the User’s authority to operate the equipment.
2
© Directed Electronics, all rights reserved .
Page 3

Desktop Docking Station
Table of Contents
FCC Notice 2
Warning and Safety Information 4
Congratulations and Package Contents 6
Compatibility and Features 7
Installation 10
Connections 11
Mounting Instructions 13
Activating Your Installed SIRIUS Tuner 14
Operating the System 15
Examples of Factory Units 16
Troubleshooting Guide 18
Warranty 19
Copyrights & Trademarks
2007 SIRIUS Satellite Radio Inc. All Rights Reserved
“SIRIUS”, "SiriusConnect", the SIRIUS dog logo, channel names and logos
are trademarks of SIRIUS Satellite Radio Inc. All Rights Reserved
© Directed Electronics, all rights reserved.
Honda/Acura SIRIUS Interface
3
Page 4
Warning and Safety Information
Sirius-Ready, SAT Radio Ready or select OEM headunits with optional Honda Bus Compatible Translator
Headunit bus cableSiriusConnect Cable
HON-SC1
Honda Bus
Compatible
Translator
Warning
Please read these instructions carefully before proceeding. Failure to heed them can result in serious injury or death. DO
NOT OPERATE EQUIPMENT UNDER ANY CIRCUMSTANCES THAT IMPAIRS YOUR ABILITY TO DRIVE OR OPERATE YOUR
VEHICLE SAFELY.
Any function that requires your prolonged attention should only be performed after coming to a complete stop. Always stop
the vehicle in a safe location before performing these functions. Failure to do so may result in an accident.
• DO NOT OPEN, DISASSEMBLE OR ALTER THE UNIT IN ANY WAY. Doing so may result in re, electric shock or
product damage.
• DO NOT INSERT ANY OBJECTS INTO THE UNIT. Doing so may result in re, electric shock or product damage.
• USE THE CORRECT CURRENT (AMPERAGE) RATING WHEN REPLACING FUSE. Failure to do so may result in re,
electric shock or product damage.
• MAKE THE CORRECT CONNECTIONS. Failure to make proper connections may result in re or product damage.
• DO NOT SPLICE INTO ELECTRICAL CABLES. Never cut away cable insulation to supply power to other equipment.
Doing so will exceed the current carrying capacity of the wire and result in fire or electric shock.
• DO NOT INSTALL IN LOCATIONS THAT MIGHT HINDER VEHICLE OPERATION. Doing so may obstruct vision or
hamper movement which can result in a serious accident. If you are attaching the unit directly to the vehicle’s
chassis, be sure that you check to make sure the area behind the unit is clear from moving parts, fuel or break
lines, wire harnesses or any other items which may get damaged by drilling a mounting hole or using the supplied
screws.
• DO NOT EXPOSE THE UNIT TO HIGH LEVELS OF HUMIDITY, MOISTURE OR DUST. Doing so can result in electric
shock or product failure.
4
© Directed Electronics, all rights reserved .
Page 5
Desktop Docking Station
Honda/Acura SIRIUS Interface
Sirius-Ready, SAT Radio Ready or select OEM headunits with optional Honda Bus Compatible Translator
Headunit bus cableSiriusConnect Cable
HON-SC1
Honda Bus
Compatible
Translator
Warning and Safety Information
Caution
Please read these instructions carefully before proceeding. Failure to follow these safety instructions and warnings may
result in a serious accident and/or personal injury.
• HALT USE IMMEDIATELY IF A PROBLEM ARISES. Failure to do so may cause personal injury or damage to the
product. Return the unit to your authorized retailer or nearest service center for repairing..
• ENSURE THE WIRING UPON INSTALLATION IS NOT CRIMPED OR PINCHED BY SCREWS OR SHARP METAL
EDGES. Route the cables away from moving parts or sharp pointed edges. This will prevent crimping and damage
to the wiring. If the wiring must pass through a metal hole, be sure to use a rubber grommet to prevent the wire’s
insulation from being cut by the metal edge of the hole.
• USE ONLY THE SPECIFIED PARTS AND INSTALL THE PRODUCT SECURELY. Be sure to use only the specied accessory parts. Use of non-specified parts may damage this unit internally or may not securely install the unit in
place. This may cause parts to become loose, resulting in hazards or product failure.
• USE CAUTION IF or WHEN DISCONNECTING THE BATTERY TERMINAL. Please consult the vehicle’s owner’s
manual or a service technician prior to removing the battery positive or ground connection, as it may cause damage to the vehicle’s electrical system or require reprogramming of the vehicle’s computer-controlled devices.
© Directed Electronics, all rights reserved.
5
Page 6
Congratulations
ANTENNA
SC OUTPUT
Sirius-Ready, SAT Radio Ready or select OEM headunits with optional Honda Bus Compatible Translator
Headunit bus cableSiriusConnect Cable
HON-SC1
Honda Bus
Compatible
Translator
Congratulations on the Purchase of your new HON-SC1 SiriusConnect interface! Your HON-SC1 is designed to be compatible with select vehicles that support Satellite Radio operation (requires additional purchase of & connection to a
SiriusConnect tuner or dock). Your translator is designed to replace the factory XM satellite tuner in your Honda or Acura
vehicle. It is also compatible with systems that do not have the factory satellite tuner installed. For the latest information
about this and other SIRIUS products and accessories, visit http://www.directedsirius.com.
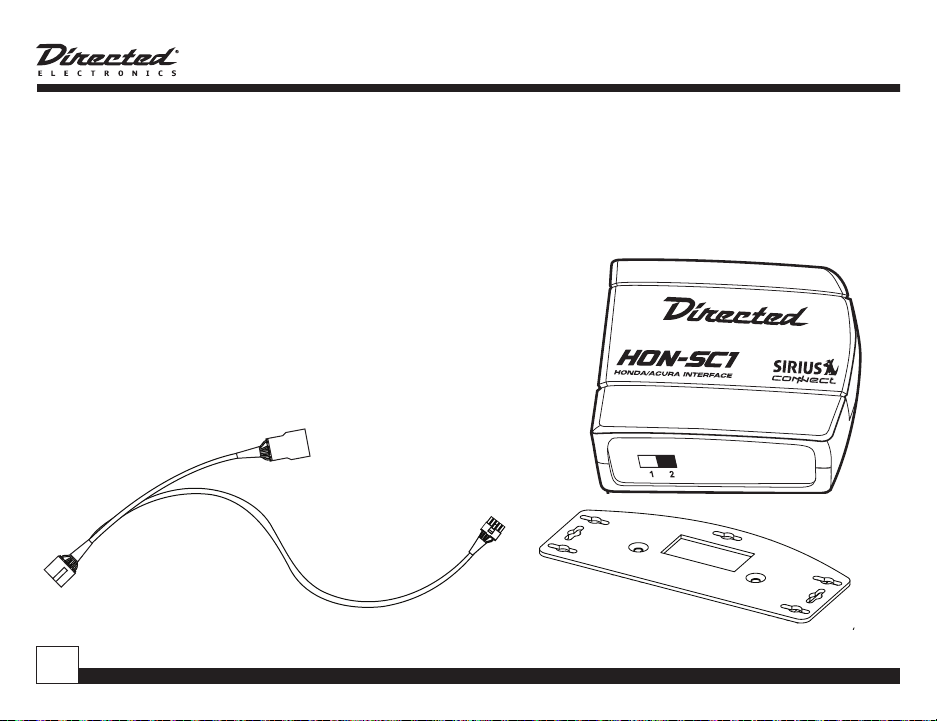
Package Contents
1 HON-SC1 interface module
1 Honda/Acura interface cable
1 Mounting bracket w/screws
This guide
6
© Directed Electronics, all rights reserved .
Page 7

Desktop Docking Station
Honda/Acura SIRIUS Interface
Compatibility
The HON-SC1 is designed to be compatible with select
Honda/Acura vehicles. Please consult table for compatibility listing.
Compatible Headunit Types:
• CD only Headunits*
• CD + Cassette Headunits*
• 6-CD changer Headunits*
• Touch Screen Monitor Headunits
• Non-Touch Screen Monitor Headunits
*Note: Radio must have a "SAT" or "XM" button to access
SIRIUS audio modes.
In addition, the HON-SC1 is compatible with most additional factory audio accessories that might be included,
such as:
• Rear Seat Audio Control Center
• Rear Seat Entertainment (DVD/Monitor) System
• Heads up display (HUD)
• Steering wheel controls
Note: Kit not recommended for vehicles with Technol-
ogy Package (Please see Acura's website for details). The
HON-SC1 is not compatible with the factory satellite radio
antenna that might be installed in the vehicle. For best
operation you must install a SIRIUS compatible antenna as
© Directed Electronics, all rights reserved.
supplied with the compatible SIRIUS Satellite Radio tuner.
List of compatible vehicle/radio types (radios must have
SAT/XM button):
MAKE MODEL YEAR
Honda Accord 2003+ w/Navigation
Honda Accord 2004+ EX-L, EX-V6
Honda Accord 2005+ Hybrid
Honda Accord 2007+ Sedan. EX LX-V6
Honda Civic 2006+ EX, Si, Nav
Honda CR-V 2005+ EX, SE
Honda CR-V 2007+ EX-L, Nav
Honda Element 2005+ EX
Honda Element 2007+ SC
Honda Odyssey 2005+ EX, EX-L, EX-L Nav
Honda Pilot 2006+ EX, EX-L Nav
Honda Ridgeline 2006+ RT, RTS, RTL, Nav
Honda Ridgeline 2007+ RTX
Honda S2000 2005+ w/Optional XM compat-
ible radio only
7
Page 8

Acura 3.5RL 2004+ w/Navigation
Acura MDX 2005+, Premium, Touring, Nav
Acura RL 2005+ All
Acura RDX 2007+ All
Acura TL 2004+ All
Acura TSX 2005+ All
Headunit Display Capability
When the HON-SC1 is installed, the following information
can be displayed on the headunit display.
• Channel Number
• Channel Name
• Category Name
• Artist Name
• Song Title Name
Features
The HON-SC1 is designed to emulate many of the factory
SDAR (Satellite Digital Audio Radio) commands found in
your vehicle.
• Channel Tune (Up and Down)
• Fast Tune (Up and Down)
• Category Search (Up and Down)
• Category Tune (Tune within a category)
• 12 presets (6 for each band)
• Preset Scan (UP)
Note about features listed: Each Honda/Acura radio type
operates differently, so consult the vehicle owners manual
for proper operation methods.
8
Note: Number of characters displayed in fields varies by
headunit type (8 ~16 Characters).
Text Scrolling Configuration
Text Scrolling and/or Paging can be enabled or disabled
during installation of the HON-SC1. Enabling scrolling will
allow radio types with limited displays to show complete
text strings for artist name or song title. Text scrolling
should be disabled for radios with large displays where it
isn't needed. The unit is set for text scrolling enabled at the
factory.
Note: Some Honda/Acura headunits will display “XM1” or
“XM2” as the display source. This information is hard coded
in the headunit design and can not be changed.
Dip Switch Settings
Two dip switches located on the side panel are used to con-
© Directed Electronics, all rights reserved .
Page 9

Desktop Docking Station
figure the unit for correct display to match your headunit.
Labeled 1 and 2 for text scroll and display length settings
respectively. Text display switch configuration:
Scroll Length/Text
Off
On
1. Set dip switch 1 to Scroll ON/ Scroll OFF as follows:
a) Radios with media or navigation displays: OFF (up
position)
b) Radios with 11 or 16 character display only set to ON
(down position). In many radios, the display refresh
rate is too slow to support smooth text scrolling. For
this reason the default setting for switch 1 is Scroll
OFF (up). If your radio supports text scrolling, set
switch 1 to ON (down).
2. Set dip switch 2 to the up position for the 16 character
setting or to the down position for the 11 character position in order to match the display of your specific radio.
Note: The default settings from the factory are scroll "Off"
and "16 characters". In order for text display configuration
switch settings to take effect, you must disconnect power
to the HON-SC1 module then reconnect and turn ignition
on again.
16 characters
11 characters
21
Honda/Acura SIRIUS Interface
© Directed Electronics, all rights reserved.
9
Page 10

Installation
Directed Electronics recommends that you have this product professionally installed. It is recommended that prior to
starting the installation, you thoroughly read this manual
and follow the guidelines listed below:
Some installations may use the factory satellite radio
tuner location. If you are using this location, please follow
the factory instructions for installing the HON-SC1 in your
vehicle. If you are not using this location, please read the
following installation guidelines.
Consider the mounting location carefully. You should make
sure that you avoid the following:
• Any location where the unit is exposed to moisture.
• Any location where the unit is exposed to extreme heat.
• Any location that would interfere with moving parts on
the vehicle or hamper driving.
Mounting the HON-SC1 Interface: Be sure that you find
a location that is flat and has clearance above the unit to
prevent any damage as well as allow for ventilation.
Do not install the HON-SC1 under the carpet or in a small
enclosed area without proper ventilation. Doing so can
result in damage to the tuner or the vehicle.
10
Use the supplied screws to securely fasten the unit.
Note: Refer to SCC1 or SC-VDOC1 manuals for additional
installation instructions needed to complete the system.
© Directed Electronics, all rights reserved .
Page 11

Desktop Docking Station
Honda/Acura SIRIUS Interface
ANTENNA
SC O
UTPUT
AUDIO
PWR
12
REWFF
PLAY/PROGNR
345 6
DISC-DISC+
11:53
XM1-1 CH-001
CH
VOL
SCAN
SOUND
AM/F
M
CD/AUX
SAT
RADIO
SEEK
SKIP
RPT
DISP-
MODE
A.SEL
RDM
TUNE
AUTO
OFF
DUAL
A/C
MODE
CATEGORY
Connects to factory XM/Satellite harness if applicable
Connects to rear of factory radio, may
connect to bottom of radio in some vehicles
Connections: When using SIRIUS Universal Vehicle Tuner.
Note: You must cycle ACC power in the vehicle on & off
once before radio will recognize the SIRIUS tuner interface.
1 For cars equipped with XM, locate tuner, disconnect it
and connect factory cable to the HON-SC1 interface using the supplied cable, provided the connectors match.
2 For vehicles not equipped with XM, remove radio and
connect the supplied cable to the rear of the radio.
3 If the radio already has a harness connected to the sat-
ellite plug, remove it and plug in the supplied harness.
Reconnect the factory harness to the extra plug on the
supplied harness.
Note: XM tuner must always be disconnected for proper
operation.
© Directed Electronics, all rights reserved.
11
Page 12

SC-VDOC1 (Detail)
To HON-SC1
SIRIUS Antenna
AUDIO
PWR
12
REW FF
PLAY/PROG NR
3456
DISC-DISC+
11:53
XM1-1 CH-001
CH
VOL
SCAN
SOUND
AM/F
M
CD/AUX
SAT
R
ADIO
SEEK
SKIP
RPT
DISP-
M
O
D
E
A.SEL
RDM
TUNE
AUTO
OFF
DUAL
A/C
MODE
CATEGORY
ANTENNA
SC O
UTPUT
AUDIO
PWR
12
REWFF
PLAY/PROGNR
3456
DISC-DISC+
11:53
XM1-1 CH-001
CH
VOL
SCAN
SOUND
AM/F
M
CD/AUX
SAT
RADIO
SEEK
SKIP
RPT
DISP-
MODE
A.SEL
RDM
TUNE
AUTO
OFF
DUAL
A/C
MODE
CATEGORY
Connects to factory XM/Satellite harness if applicable
Connects to factory XM/Satellite harness if applicable
Connects to rear of factory radio, may
connect to bottom of radio in some vehicles
Connects to rear of factory radio, may
connect to bottom of radio in some vehicles
Connections: When using SIRIUS SC-VDOC1.
12
© Directed Electronics, all rights reserved .
Page 13

Desktop Docking Station
Mounting Instructions
Mounting HON-SC1 Bracket Assembly
Mounting HON-SC1 with SIRIUS SCC1 Bracket Assembly
Honda/Acura SIRIUS Interface
© Directed Electronics, all rights reserved.
13
Page 14

Activating Your Installed SIRIUS Tuner
For systems using the permanently installed SCC1 SiriusConnect Vehicle Tuner, you must activate the tuner before
you can begin to receive the SIRIUS Satellite Radio Service.
In order to activate your radio subscription, you will need
the SIRIUS ID (SID) which uniquely identifies your tuner.
The SID can be found on a sticker located on the SCC1
packaging, or on the bottom of the SCC1 itself. When you
have located the SID, write it down in the space provided
near the end of this manual and store it for future reference.
The SID can also be recalled from your Sirius-Ready Honda
or Acura radio. Most units will display the SID on Channel
O. Please consult your vehicle owner’s manual or radio
user guide for specific details about satellite radio operation.
Power on your system and make sure that you are receiving good signal and that you are able to hear audio on the
SIRIUS Preview channel (Ch-184).
Have your credit card handy and contact SIRIUS on the
internet at https://activate.sirius.radio.com/ and follow the
prompts to activate your subscription. You can also call
SIRIUS toll-free at 1-888-539-SIRIUS (1-888-539-7474).
Once activated, you will be able to begin enjoying SIRIUS
Satellite Radio’s digital entertainment and can tune to
other channels.
14
Activating Your Dock & Play or Portable SIRIUS Radio
For systems using a Dock & Play or Portable SIRIUS radio
with the SiriusConnect Vehicle Dock, you must activate the
radio before you can begin to receive the SIRIUS Satellite
Radio Service. You can use the directions provided with
the radio for activation, or follow the directions above for
activation while the radio is docked in the SiriusConnect
Vehicle Dock attached to your factory audio system.
© Directed Electronics, all rights reserved .
Page 15

Desktop Docking Station
Honda/Acura SIRIUS Interface
Operating the system
SAT radio selection
Press the SAT button to access the Sirius interface. On
some radios this button may be labeled as XM or CD/SAT.
Pressing this button repeatedly will cycle through sources.
Operation
Use the category control buttons to change a category, if
desired.
Use the channel control buttons to change channels.
Consecutive presses engage the channel browse mode
allowing preview of a channel without tuning. Once the tune
button is disengaged channel selection takes place.
Press and hold one of the preset buttons until a beep is
heard to save a preset.
To listen to a preset station simply press the desired preset
button.
When CATEGORY tune mode is selected the button will
cycle through channels only within the current category.
The SCAN button previews a station for a few seconds before changing channel to another. Once the desired station
is reached press the SCAN again.
Advisory message
“No tuner” - displayed when connection to Sirius tuner or
Sirius dock is bad, no tuner is connected or if vehicle
ACC power is not cycled once after connecting the
© Directed Electronics, all rights reserved.
interface.
“Connecting” - displayed during the initialization of the
Sirius tuner.
“Antenna Error” - displayed when the antenna connection
is not detected.
“Acquiring Signal” - displayed while acquiring digital audio
stream or when the received signal drops below minimum required for tuner to operate.
“Unsubsc. Channel” - displayed when the selected channel
is no longer subscribed
“Subscrip. Updated” - displayed when a subscription
update received
“Invalid Channel” - indicates that a program became un-
available after an update
“Updating XX/100” - indicates Sirius channel map update
in progress
“Firmware Update” - indicates an over the air firmware
update of the tuner
“Radio id” - on CH000 - shows the Sirius ESN needed for
subscription services
The 12 digit Sirius ID is shown alternating: the first 6 digit
is followed by a “-”, the last 6 digit is preceded by a “-”
Portable receivers
You may connect or disconnect portable receivers at any
time. Upon connection the “docked portable ” message
will replace the “No tuner” followed by “Acquiring Signal”
before content becomes available.
15
Page 16

Satmode,
bank
selector
AUDIO
PWR
12
REWFF
PLAY/PROG NR
3456
DISC- DISC+
11:53
CH
VOL
SCAN
SOUND
AM/FM
CD/AUX
SAT
RADIO
SEEK
SKIP
RPT
DISP -
MODE
A.SEL
RDM
TUNE
AUTO
OFF
DUAL
A/C
MODE
Channel control
Category
Control
Text selector.
Hold for 10secto toggle
channelor category
tune
modes.
Toggles
Scan
mode
Bank and
present
indicator
Channel
and text
indicator
Preset 1-6.
Hold until beepto
savetoapreset.
CATEGORY
Tune mode
indicator
ANTENNA
SC OUTPUT
Examples of typical Honda factory units, please also refer to your specific radio owner's guide.
16
© Directed Electronics, all rights reserved .
Page 17

Desktop Docking Station
AUDIO
PWR
AUTO
OFF
DUAL
A/C
MODE
MODE
DUAL
OFF
AUTO
MAP/
GUIDE
MENU
SETUP
INFO
ZOOM
CANCEL
AUDIO
AUTO
MODE
A/C
LOAD
DISC
TAPE
AM/FM
DISP
MODE
SCAN RPT A.SEL/RDM-SEEK +
1
2
34
5
6
DISC-
DISC+
VOL
PWR
PUSH
TUNE
SOUND
PUSH
XM1-1
VOL
CH
CHANNEL
CATEGORY
NAME
TITLE
:
:
:
:
1
CH
2
CH
3
CH
6
CH
5
CH
4
CH
MODE SCAN SOUND
001-HITS1
POP
MUSICNAME
MUSIC TITLE
Channel control
Category
Control
001 014 018
040 065
115
Toggles between
channel and
category
modes
Bank and
present
indicator
Upper display
text mode
selector
Sat mode
and bank
selector
Preset 1-6.
Press until
beepto save
to a preset.
Channeland text
Indicator
fields
Toggles
Scan
mode
Tune mode
indicator
Honda/Acura SIRIUS Interface
© Directed Electronics, all rights reserved.
17
Page 18

Troubleshooting guide:
PROBLEM PROBABLE SOLUTIONS
No tuner Check for loose connections.
SL100/ SL2 does not enter
SIRIUS connect mode
Antenna Error Check that antenna is connected
Abbreviated/Truncated Text Character length varies on different display units, as a result some prompts such as
Locked/Skipped Channel This interface module does not support clearing locked or skipped channels
Note: When Channel Number is displayed, updates and error messages are hidden from view. The user must exit this
mode by using the toggle text "DIsp/Mode" switch to view messages.
Check that connector alignment/orientation is correct.
Check that cables are not pinched or damaged.
Check that fuse is not blown.
Check that the factory XM module has been disconnected.
Check for incorrect connections, some vehicles may have similar aftermarket modules
installed that utilize the same type of connector.
Check SIRIUS website for the most recent firmware updates.
Location (line of sight blocked) may not be conducive to good signal
"Acquiring Signal" may appear as "Acquiring S" or "Acquiring ", Antenna Error" may
appear as "Antenna Err", "Firmware Update" may appear as "Firmware Up" etc.
18
© Directed Electronics, all rights reserved .
Page 19

Desktop Docking Station
Honda/Acura SIRIUS Interface
Limited One Year Consumer Warranty
Directed Electronics (herein “DIRECTED”) promises to the original purchaser, to replace this product should it prove to be
defective in workmanship or material under normal use, for a period of one-year from the date of purchase from the dealer
as indicated by the date code marking of the product. During this one-year period, there will be no charge for this replacement PROVIDED the unit is returned to DIRECTED, shipping pre-paid. This warranty is non-transferable and does not apply
to any unit that has been modified or used in a manner contrary to its intended purpose, and does not cover damage to
the unit caused by installation or removal of the unit. This warranty is void if the product has been damaged by accident or
unreasonable use, neglect, improper service or other causes not arising out of defects in materials or construction. ALL
WARRANTIES, INCLUDING BUT NOT LIMITED TO EXPRESS WARRANTY, IMPLIED WARRANTY, WARRANTY OF MERCHANTABILITY, FITNESS FOR PARTICULAR PURPOSE, AND WARRANTY OF NONINFRINGEMENT OF INTELLECTUAL PROPERTY
ARE EXPRESSLY EXCLUDED TO THE MAXIMUM EXTENT ALLOWED BY LAW, AND DIRECTED NEITHER ASSUMES NOR AUTHORIZES ANY PERSON TO ASSUME FOR IT ANY LIABILITY IN CONNECTION WITH THE SALE OF THE PRODUCT. DIRECTED
HAS ABSOLUTELY NO LIABILITY FOR ANY AND ALL ACTS OF THIRD PARTIES INCLUDING ITS AUTHORIZED DEALERS OR
INSTALLERS. IN NO EVENT WILL DIRECTED BE LIABLE FOR ANY INCIDENTAL, SPECIAL OR CONSEQUENTIAL DAMAGES
(INCLUDING LOSS OF PROFITS) AND IN NO EVENT, SHALL DIRECTED’S LIABILITY EXCEED THE PURCHASE PRICE PAID
BY PURCHASER FOR THE PRODUCT. Some states do not allow the exclusion or limitation of incidental or consequential
damages, so the above limitation or exclusion may not apply to you. Some states do not allow limitations on how long an
implied warranty lasts, so the above limitation may not apply to you. Unit must be returned to DIRECTED, postage prepaid,
with bill of sale or other dated proof of purchase bearing the following information: consumer’s name, telephone number,
and address, authorized dealer’s name and address, and product description. Note: This warranty does not cover labor costs
for the removal and reinstallation of the unit. IN ORDER FOR THIS WARRANTY TO BE VALID, YOUR UNIT MUST BE SHIPPED
WITH PROOF OF PURCHASE FROM AN AUTHORIZED DIRECTED DEALER. BY PURCHASING THIS PRODUCT, THE CONSUMER AGREES AND CONSENTS THAT ALL DISPUTES BETWEEN THE CONSUMER AND DIRECTED SHALL BE RESOLVED
IN ACCORDANCE WITH CALIFORNIA LAWS IN SAN DIEGO COUNTY, CALIFORNIA. 920 0031 10-06
© Directed Electronics, all rights reserved.
19
Page 20

© 2007 Directed Electronics, all rights reserved
HON-SC1 2007-09
www.directedsirius.com
 Loading...