


ST2 STARMATE REPLAY
SIRIUS Satellite Radio Plug and Play
User and Installation Guide

CONGRATULATIONS! Your new ST2 Starmate Replay SIRIUS® Satellite Radio Plug and Play lets you enjoy SIRIUS Satellite Radio’s digital entertainment in your vehicle, home, or boat. Use this guide to familiarize yourself with all of ST2’s features and capabilities. For the latest information about this and other SIRIUS products, please visit http://www.siriusradio.com.
Table of Contents
Safety Precautions ........................................................... |
4 |
Display Button (DISP) ............................................... |
20 |
|
FCC Warning .................................................................... |
5 |
Selecting Channels Directly ...................................... |
21 |
|
Cleaning the Receiver ....................................................... |
5 |
Advanced Features ...................................................... |
21 |
|
Package Contents ............................................................ |
6 |
Channel Presets (BAND) ........................................... |
21 |
|
Installation ....................................................................... |
7 |
Storing Channel Presets ......................................... |
21 |
|
Location ....................................................................... |
7 |
Using Channel Presets ........................................... |
22 |
|
Mounting the Receiver ................................................. |
7 |
Searching for a Channel Preset (P.TUNE Mode) .... |
22 |
|
Installing the Magnetic Antenna .................................. |
9 |
Memory (MEMO) and Song Seek |
|
|
Connecting the Receiver ............................................ |
12 |
(S-Seek) Functions ................................................. |
23 |
|
Activating your SIRIUS Subscription ......................... |
13 |
Storing Artist Names, Song Titles, |
|
|
Optional Installation Kits ................................................. |
14 |
and Sports Teams to Memory .............................. |
24 |
|
Custom Vehicle Installation Kit (STV2) ..................... |
14 |
Viewing Stored Alerts Stored in Memory ................... |
27 |
|
Home Kit (STH2) ........................................................ |
15 |
Deleting an Alert Stored into Memory ..................... |
27 |
|
ST2 Starmate Replay Receiver Basic Operation ..... |
16 |
Activating the S-Seek Alert ..................................... |
28 |
|
Controls and Features ............................................... |
17 |
Jump Button ............................................................... |
29 |
|
Remote Control .......................................................... |
18 |
Game Alert ................................................................. |
31 |
|
|
Installing Batteries in the Remote Control .............. |
18 |
Instant Replay ............................................................ |
31 |
Changing Channels .................................................... |
19 |
Using Instant Replay ............................................... |
33 |
|
|
|
|
|
|
2 |
|
|
|
|
|
|
ST2 Starmate Replay User and Installation Guide |
||

Table of Contents (continued) |
|
FM Preset Button ...................................................... |
37 |
Menu Options ................................................................ |
37 |
FM Transmitter .......................................................... |
38 |
FM Presets ............................................................. |
38 |
FM On/Off ............................................................... |
39 |
Game Alert ................................................................. |
39 |
Settings ...................................................................... |
40 |
Jump Settings ............................................................ |
41 |
Traffic ....................................................................... |
41 |
JumpSet .................................................................. |
42 |
Display Options ......................................................... |
42 |
Memory Options ........................................................ |
43 |
Automatic Memory Search ..................................... |
43 |
Clear All Memory ..................................................... |
43 |
Auto Select ................................................................ |
44 |
Audio Level ................................................................. |
44 |
Confirmation Tone ...................................................... |
45 |
Parental Control ......................................................... |
45 |
Lock/Unlock ............................................................ |
45 |
Edit Code ................................................................ |
46 |
Time Based Features ................................................. |
48 |
Clock ....................................................................... |
48 |
Format ..................................................................... |
49 |
Time Zone ............................................................... |
49 |
Daylight Savings Time ............................................ |
49 |
Alarm ......................................................................... |
50 |
Set Alarm ................................................................ |
50 |
Alarm Time .............................................................. |
50 |
Program Alert ............................................................. |
50 |
Program Time/Day .................................................. |
51 |
Channel Number ..................................................... |
52 |
Program Alert On/Off ............................................... |
52 |
Auto Shutdown .......................................................... |
52 |
Sleep Mode ................................................................ |
53 |
Signal Indicator .......................................................... |
53 |
Factory Default .......................................................... |
54 |
Troubleshooting ............................................................... |
56 |
Specifications .................................................................. |
57 |
12 MONTH LIMITED WARRANTY .................................. |
58 |
♥ 2005 SIRIUS Satellite Radio Inc.
® “SIRIUS,” the SIRIUS dog logo, channel names and logos are trademarks of Sirius Satellite Radio Inc. “NFL” and the NFL Shield logo, and the NFL Sunday Drive name and logo are registered trademarks of the National Football League. “NHL” and the NHL Shield are registered trademarks of the National Hockey League. “NBA” and the NBA silhouette logo are registered trademarks of NBA Properties Inc. Velcro is a registered trademark of Velcro Industries B.V. All other trademarks, service marks and logos are the property of their respective owners. All Rights Reserved.
This receiver includes the eCos real-time operating system. eCos is published under the eCos License, which can be found at the following website:
http://www.sirius.com/ecoslicense
|
3 |
ST2 Starmate Replay User and Installation Guide |

|
|
|
|
|
|
|
|
|
|
|
|
|
|
|
|
|
|
|
|
|
|
|
|
|
|
|
|
|
|
|
|
|
|
|
Safety Precautions |
• If the LCD display on the Receiver becomes |
|||||
|
|
|
|
|
||
|
|
Warning |
damaged or broken, do not touch the liquid crystal |
|||
Take the following precautions to prevent fire and |
fluid. The fluid can be dangerous to your health. If |
|||||
avoid personal injury: |
the liquid crystal fluid contacts your body or |
|||||
• Be sure the Receiver is installed as described in |
clothing, immediately wash it off with soap and |
|||||
water. |
||||||
|
the Installation Guide. |
|||||
|
|
|||||
• The use suggestions contained in this User Guide |
Caution |
|||||
|
are subject to any restrictions or limitations that |
|||||
|
may be imposed by applicable law—the purchaser |
Take the following precautions to keep the Receiver |
||||
|
should check applicable law for any restrictions or |
in proper working order: |
||||
|
limitations before installing and/or operating this |
• Do not open the Receiver. |
||||
|
Receiver. |
|||||
|
• When replacing a fuse, use only a new one with |
|||||
• Failure to follow these safety instructions and |
||||||
the proper rating. Using a fuse with the wrong |
||||||
|
warnings may result in a serious accident. |
|||||
|
rating may cause the Receiver to malfunction. |
|||||
• To avoid short circuits, never put or leave any |
||||||
• To prevent a short circuit when replacing a fuse, |
||||||
|
metallic objects (coins, tools, etc.) inside the |
|||||
|
first disconnect the wiring harness. |
|||||
|
Receiver. |
|||||
|
Note: |
|||||
• If the Receiver emits smoke or unusual odors, turn |
||||||
If the Receiver doesn’t seem to be working properly, |
||||||
|
the power off immediately. |
|||||
|
turn the Receiver’s power off, wait 5 – 10 seconds, |
|||||
• Do not drop the Receiver, or subject it to strong |
||||||
then turn the power on again. |
||||||
|
shocks. |
|||||
|
|
|||||
|
|
|
|
|
|
|
4 |
|
|
|
|
|
|
|
|
|
ST2 Starmate Replay User and Installation Guide |
|||

FCC Warning
This equipment may generate or use radio frequency energy. Changes or modifications to this equipment may cause harmful interference unless the modifications are expressly approved in this User Guide. The user could lose the authority to operate this equipment if an unauthorized change or modification is made.
•Reorient or relocate the receiving antenna.
•Increase the separation between the other equipment and the Receiver.
•Connect the other equipment to a different circuit from that to which the Receiver is connected.
•Consult the dealer or an experienced radio technician for help.
Note: |
Warning |
|
This equipment has been tested and found to |
Do not operate the Receiver in a way that might |
|
divert your attention from driving safely. As a driver, |
||
comply with Part 15 of the FCC Rules. These |
||
you alone are responsible for safely operating your |
||
rules are designed to provide reasonable |
||
vehicle in accordance with traffic safety laws at all |
||
protection against harmful interference. This |
||
times. |
||
equipment may cause harmful interference to |
||
|
radio communications if it is not installed and |
Cleaning the Receiver |
|
used in accordance with these instructions. |
If the Receiver becomes dirty, turn its power off and |
|
However, there is no guarantee that interference |
wipe it clean with a soft dry cloth. Do not use hard |
|
will not occur in a particular installation. If this |
cloths, paint thinner, alcohol, or other volatile |
|
equipment does cause harmful interference to |
solvents to clean the Receiver. These may cause |
|
radio reception, which can be determined by |
damage to the plastic or remove indicator |
|
turning the equipment off and on, the user is |
characters. |
|
encouraged to try to correct the interference by one of |
|
|
more of the following measures: |
|
|
|
|
5 |
ST2 Starmate Replay User and Installation Guide |
|
|
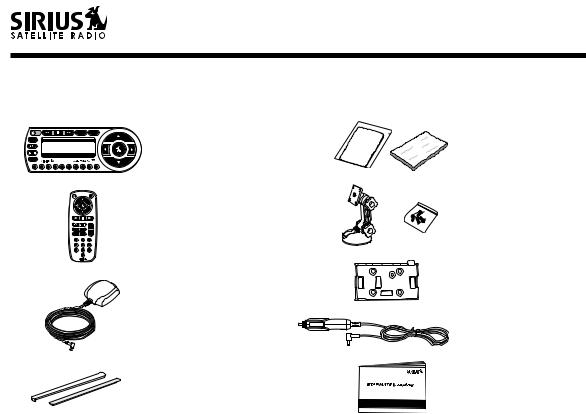
Package Contents
The following items are packaged with the ST2 Starmate Replay. Check the package to be all of the items are included. If any of the items are missing, please contact the retailer where you purchased the product.
|
MEMO |
DISP |
MENU 001 |
Sirius Hits 1 |
|
U2 |
|
|
Vertigo |
|
|
POP |
12:00P |
A |
BAND
Starmate Replay
ST2 Receiver
Surface
Preparation |
|
Cleaning |
Kit |
|
|
|
(To |
|
|
|
|
emulsionsesives |
|
|
|
|
|
of |
any |
|
.) |
|
a |
surface |
|
|
adh |
|
clean |
|
unknown |
|
|
|
|
/ |
|
applying |
|
|
||
knownprior |
to |
|
|
|
|
|
Alcohol Swab and
Velcro® Strip
1 |
2 |
3 |
4 |
5 |
6 |
7 |
8 |
9 |
0 |
+
MENU DISP
BAND MEMO |
– |
1 2 3
4 5 6
7 8 9
0
Starmate Replay
Remote Control
Magnetic Antenna
Rubber Antenna
Cable Cover/Tail
& Adhesive Strip
ST2 STARMATE REPLAY
SIRIUS Satellite Radio Plug and Play
User and Installation Guide
Suction Cup Mount
& Screws
Mounting Plate
Cigarette Lighter
Power Cord
User and
Installation Guide
6 |
|
ST2 Starmate Replay User and Installation Guide |
Installation
Installation of your ST2 Starmate Replay Receiver is easy:
1.Choose a location in your vehicle where you will mount the Receiver.
2.Mount the Receiver to the suction cup mount and attach the suction cup portion of the mount to the vehicle window, or use the velcro strip to mount the Receiver.
3.Install the magnetic antenna on the roof of the vehicle, and route the antenna cable to the Receiver.
4.Connect the power cord for the Receiver to your vehicle’s cigarette lighter.
5.Subscribe to the SIRIUS service and begin enjoying the SIRIUS entertainment!
Location
Choose a location in your vehicle where the Receiver will not block your vision, interfere with the vehicle controls, or obstruct the air bag. The location should be suitable for using the suction cup mount, such as the windshield or other flat, smooth surface, or a surface suitable for using the velcro mounting.
The location should be easily reachable and provide
good visibility of the Receiver.
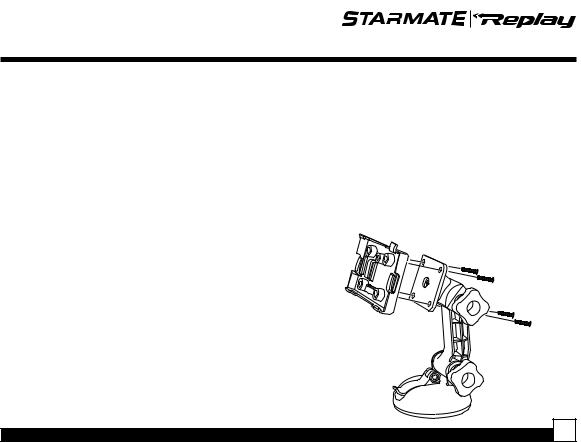
Mounting the Receiver
The Receiver may be attached to the vehicle by using the suction cup mount, or by using the velcro strips.
If you are using the suction cup mount, attach the mounting plate to the suction cup mount by using the provided bolts and hex nuts as shown below. Be sure the large tab on the mounting plate is facing up.
ST2 Starmate Replay User and Installation Guide |
7 |
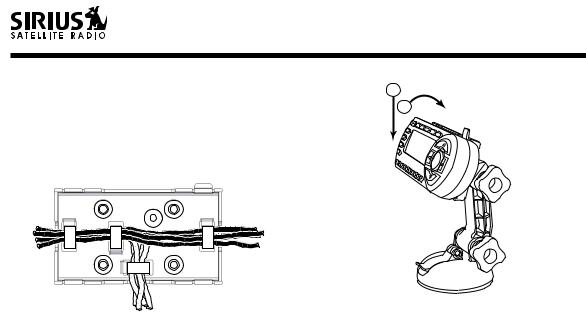
If you are using the velcro strip for mounting, attach the velcro strip to the back of the mounting plate.
Route the cables through the mounting plate underneath the tabs as shown. The cables may be routed across the mounting plate, or routed down to exit at the bottom.
Place the Receiver into the mounting plate by first placing the bottom of the Receiver into the tabs at the bottom of the mounting plate (1), and then pivoting the top of the receiver into the mounting plate until it snaps into place (2).
1
2
If you are using the suction cup mount, attach the suction cup mount to the vehicle windshield, or other surface, as follows:
1.Clean the area where you are attaching the suction cup with an alcohol wipe.
2.Lift up the cam lever on the suction cup mount as shown.
8 |
|
ST2 Starmate Replay User and Installation Guide |
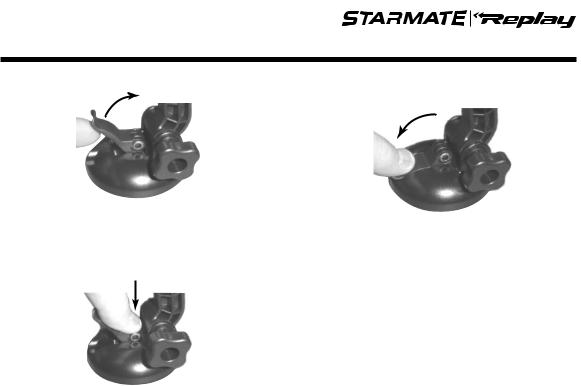
3.Place the suction cup mount on the windshield, or other area, and press the cam lever straight down towards the suction cup to flatten the suction cup as shown.
4. Lock the cam lever down as shown.
Installing the Magnetic Antenna
The optimum mounting location for the antenna is on the roof of the vehicle, with a minimum unobstructed area of 12 inches by 12 inches, and exactly 6½ inches from the rear roof edge of the vehicle (the length of the rubber antenna cable cover/tail). It is important to avoid any obstructions that will block the SIRIUS signal, obstructions such as a roof rack, a sunroof, roof mounted cargo containers, or other antennas.
The following illustrations show the recommended mounting locations of the antenna for several types of vehicles. Follow these recommendations for best
|
9 |
ST2 Starmate Replay User and Installation Guide |
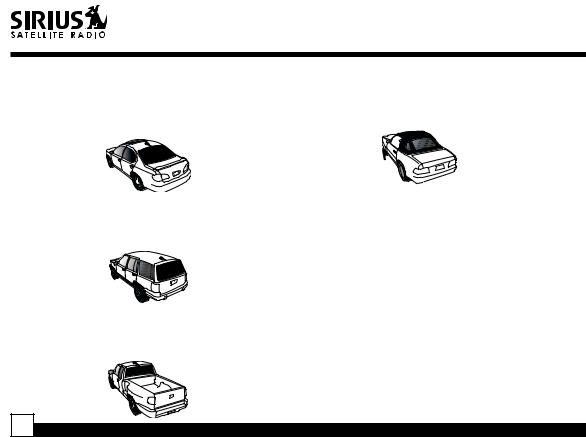
performance from the antenna.
Sedan/Coupe: Mount the antenna along the rear centerline of the vehicle roof, located at the rear of the roof near the rear window.
SUV/Mini-Van: Mount the antenna along the rear centerline of the vehicle roof, located at the rear of the roof near the rear door/hatch.
Pickup Truck: Mount the antenna along the rear centerline of the cab roof, located at the rear of the roof near the rear window.
Convertible: Mount the antenna along the centerline of the trunk lid, with the rubber antenna cable cover/ tail directed toward the rear window.
Clean the area where the antenna and rubber antenna cable cover/tail will be mounted with the supplied alcohol swab.
Connect the rubber antenna cable cover/tail to the antenna cable, making sure that the strain-relief on the antenna seats into the rubber antenna cable cover/tail groove. Route the antenna cable through the wire channel in the rubber antenna cable cover/ tail. Do not yet attach the adhesive strip.
10 |
ST2 Starmate Replay User and Installation Guide |
PROTECTIVE MATERIAL |
ANTENNA |
(RED SIDE) |
(UNDERSIDE) |
ADHESIVE |
|
STRIP |
|
ANTENNA
CABLE
RUBBER ANTENNA
CABLE COVER/TAIL
Temporarily position the antenna and rubber antenna cable cover/tail in the selected mounting area and route the cable from the antenna to the vehicle’s interior by tucking it underneath the rubber molding around rear window, as shown.
Route the cable from the lowest point of the rear window into the trunk. Take advantage of any existing cable channels or wiring conduits. For SUVs, mini-vans & 5-door vehicles, bring the cable into the vehicle under the rubber molding for the tailgate, and continue under the interior trim.
From the trunk, or rear of the vehicle, route the cable around the passenger compartment and to the front of the vehicle, to the receiver. Take care not pull the cable across sharp edges that could damage it, and keep it away from areas where it might entangle feet. Coil any excess antenna cable in a location where it can be hidden.
Once the antenna cable is routed through the vehicle, and you are satisfied with the cable routing, peel the yellow protective material from the adhesive strip and adhere the adhesive strip to the rubber antenna cover/tail. Next peel the red protective material from the adhesive strip and press the rubber antenna cable cover/tail firmly into place on the vehicle.
|
11 |
ST2 Starmate Replay User and Installation Guide |
Double check that the location of the antenna and rubber antenna cable cover/tail are correct, and continue to press firmly down on rubber antenna cable cover/tail for another 30 seconds.
RUBBER ANTENNA
CABLE COVER/TAIL
VEHICLE
MOUNTING SURFACE
Note: At room temperature (68 degrees), maximum adhesion usually occurs within 72 hours. During this period, avoid car washes and other contact with the antenna and rubber antenna cable cover/tail.
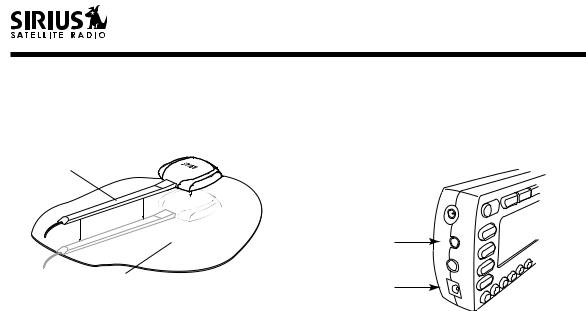
Connecting the Receiver
Connect the antenna and cigarette lighter power adapter to the Receiver to complete the installation. The illustration below shows the location of the antenna and power connectors on the Receiver.
ANTENNA 
FM OUT
AUDIO OUT 
POWER
Plug the cigarette lighter power adapter cord into your vehicle’s cigarette lighter, and turn the Receiver On by pressing the power button. Once you have verified that Receiver has powered on, you can proceed with activating your SIRIUS subscription.
12 |
|
ST2 Starmate Replay User and Installation Guide |

Activating your SIRIUS Subscription
Before you can listen to the SIRIUS service, you need to subscribe to the SIRIUS Satellite Radio service.
1.Be sure that the Receiver is correctly installed and that the antenna is oriented to receive the SIRIUS signal.
2.Press the power button to turn Receiver On. After displaying the SIRIUS logo, the Receiver will update the SIRIUS channel line up. The display will show, “UPDATING CHANNELS” and show the status of the update.
Updating Channels
X% Completed
Wait until the channel updates have completed before pressing any buttons on the Receiver.
3.Once the channels have been updated, the display will change to “Call 1-888-539-SIRIUS to Subscribe” and will place you in SIRIUS Satellite Radio’s Preview Channel, channel 184.
You will not be able to tune to any other
channels until you activate your SIRIUS subscription.
184 Preview
To Activate Call
1-888-539-SIRIUS


 News 12:00P A
4.To listen to the audio from your Receiver, you will need to tune the FM radio in your vehicle and the FM transmitter in the Receiver to the same FM frequency. The FM transmitter in the Receiver defaults to 88.1 MHz, so you can begin by tuning your FM radio to 88.1 MHz. If there is an FM station broadcasting on that frequency, you will have to search for a quiet frequency to use. Refer to the section titled, FM Transmitter in this User Manual for instructions on how to tune the FM transmitter to other FM frequencies.
5.Use the channel up and down buttons to tune the Receiver to channel 000 to display the Receiver’s unique 12-digit SIRIUS ID Number (SID). You may also directly tune to channel 000 by pressing the Select button, pressing the 0 (zero) button, and pressing the Select button
|
13 |
ST2 Starmate Replay User and Installation Guide |

again. You may do this from either the Receiver or the remote control. (This SID number is also available on the ST2 packaging.) Write the SID number down in the space provided at the end of this manual.
000 |
SIRIUS ID |
SID 012345678912
12:00P A
6.Have your credit card handy and contact SIRIUS on the Internet at:
https://activate.siriusradio.com/ and follow the prompts to activate your
subscription. You can also call SIRIUS toll-free at:
1-888-539-SIRIUS (1-888-539-7474)
7.When you have successfully subscribed to the SIRIUS service, and the Receiver has been updated with your subscription information, an alert will be displayed.
001 Channel Name
ArtistSubscriptionNameUpdated
SongAny KeyTitleto Continue


 Category 12:00P A
To continue, press any key on the Receiver. The installation of your Receiver is now complete,
and you are ready to begin enjoying SIRIUS Satellite Radio’s digital entertainment!
Optional Installation Kits
There are two optional installation kits which may be purchased for use with your ST2 Starmate Replay Receiver, a Custom Vehicle Installation Kit (Model # STV2), and a Home Kit (Model # STH2). These kits may be purchased from your SIRIUS Satellite Radio retailer.
Custom Vehicle Installation Kit (STV2)
The optional custom vehicle installation kit provides additional items for a more permanent installation in your vehicle. The kit consists of the following items:
DIN-compatible Install Plate - for installing the Receiver in the dashboard of your car or boat.
14 |
|
ST2 Starmate Replay User and Installation Guide |

Power Harness - for connecting the power for the Receiver to the vehicle’s electrical system.
FM Switching Box - for connecting the FM output of the Receiver into the FM antenna input of your vehicle’s radio. This box will automatically switch off the vehicle’s FM antenna when you turn on your SIRIUS Receiver.
Audio Cables - For connecting the audio output of the Receiver into your vehicle’s audio system.
Home Kit (STH2)
The optional home kit allows you to enjoy the SIRIUS Satellite Radio’s digital entertainment in your home, by allowing you to take your Receiver from your vehicle into your home. The kit consists of the following items:
Stand - A stand into which to snap your Receiver while being used in your home.
AC Adapter - A power adapter to power your Receiver in the home.
Audio Cables - Cables to connect the Receiver to powered speakers, or your home entertainment system.
Home Antenna - A SIRIUS antenna to connect to your Receiver while in your home.
|
15 |
ST2 Starmate Replay User and Installation Guide |

ST2 Starmate Replay Receiver Basic Operation
1 |
2 |
3 |
4 |
5 |
6 |
7 |
14
13
12
11
|
MEMO |
DISP |
|
S-SEEK |
|
MENU 001 |
Sirius Hits 1 |
|
U2 |
|
|
Vertigo |
8 |
|
POP |
12:00P |
A |
BAND
P. TUNE
1 2 3 4 5 6 7 8 9 0
10 9
16 |
|
ST2 Starmate Replay User and Installation Guide |

Controls and Features |
on the display. |
|||||
1. |
POWER Button |
|
: Turns the Receiver’s power |
|||
|
||||||
|
||||||
|
On and Off. |
|
|
9. Category Previous/Next Buttons: Navigates |
||
2. |
Rewind Button: Used to rewind through a |
through the category list screen which displays |
||||
SIRIUS channel categories. |
||||||
|
broadcast saved in Instant Replay. |
|||||
|
10. Preset Number Buttons (0-9): Sets and selects |
|||||
3. |
Play/Pause Button: Pause Function: Used to |
|||||
preset channels. Also used to directly tune |
||||||
|
pause a broadcast for Instant Replay. Play |
|||||
|
channels by entering the channel number. |
|||||
|
Function: Used to play a broadcast saved in |
|||||
|
11. BAND Button (P.Tune): Pressing and releasing |
|||||
|
Instant Replay. |
|
|
|||
4. |
Fast Forward Button: Used to fast forward |
switches between the five preset banks (A, B, C), |
||||
which hold ten presets each. Pressing and holding |
||||||
|
through a broadcast saved in Instant Replay. |
|||||
|
enables “Preset Tune Mode”, which allows for |
|||||
5. |
MEMO (Memory) Button (S-Seek Function): |
|||||
viewing and listening of stored presets with the |
||||||
|
Saves and recalls artist names, song titles, and |
|||||
|
channel up/down buttons. |
|||||
|
sports teams. Holding the button down enters the |
|||||
|
12. FM Preset Button: Selects between preset FM |
|||||
|
S-Seek mode. |
|
|
|||
6. |
DISP (Display) Button: Toggles display between |
frequencies used for the built-in wireless |
||||
transmitter. |
||||||
|
the default display screen and large screen display |
|||||
|
13. Jump Button: Used to quickly switch between the |
|||||
|
mode. Holding the DISP button down switches the |
|||||
|
display to the channel list mode. |
current channel and a favorite channel. |
||||
|
14. MENU Button: Used to access menu options to |
|||||
7. |
Select Button: Selects items highlighted on the |
|||||
|
display screen. |
|
|
make setup and feature changes. |
||
|
|
|
|
|
||
8. |
Channel Up/Down Buttons: Navigates through |
|
|
|||
|
channels and display screens, and highlights items |
|
|
|||
|
|
|
|
|
17 |
|
ST2 Starmate Replay User and Installation Guide |
|
|||||
|
|
|
|
|
|
|
|
|
|
|
|
|
|
|
|
|
|
|
|
|
|
|
|
|
|
|
|
|
|
|
|
|
|
|
|
|
|
|
|
|
|
|
|
|
|
|
|
|
|
|
|
|
|
|
|
|
|
|
|
|
|
|
|
|
|
|
|
|
|
|
|
|
|
|
|
|
|
|
|
|
|
|
|
|
|
|
|
|
|
|
|
|
|
|
|
|
|
|
|
|
|
|
|
|
|
|
|
|
|
|
|
|
|
|
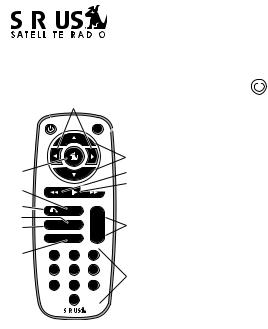
Remote Control |
1. |
Power Button |
|
: Turns the Receiver power On and Off. |
||||||||||||||||||
|
|
|
|
|
|
|
|
|
|
|
|
|
|
|
|
|
|
|
||||
|
|
|
|
|
|
|
|
|
|
|
|
|
|
|
|
|
|
|
||||
|
|
1 |
|
|
2 |
|
3 |
|
|
|
2. |
Category Previous/Next Buttons: Navigates through categories. |
||||||||||
|
|
|
|
|
|
|
|
|
|
|
|
|
|
|
|
|
|
3. |
MUTE Button: Mutes the audio. |
|||
|
|
|
|
|
|
|
|
|
|
|
|
|
MUTE |
4. |
Channel Up/Down Buttons: Navigates through channels and display screens. |
|||||||
|
|
|
|
|
|
|
|
|
|
|
4 |
5. |
Rewind Button: Used to rewind through a broadcast saved in Instant Replay. |
|||||||||
|
|
|
|
|
|
|
|
|
|
|
6. |
Play/Pause Button: Pause Function: Used to pause a broadcast for Instant |
||||||||||
16 |
|
|
|
|
|
|
|
|
|
|
5 |
|||||||||||
|
|
|
|
|
|
|
|
|
|
|
Replay. Play Function: Used to play a broadcast saved in Instant Replay. |
|||||||||||
15 |
|
|
|
|
|
|
|
|
|
|
6 |
7. |
||||||||||
|
|
|
|
|
|
|
|
|
|
|
|
|
7 |
Fast Forward Button: Used to fast forward through a broadcast saved in Instant |
||||||||
14 |
|
|
|
|
|
|
|
|
|
|
+ |
|
|
|
|
Replay. |
|
|
|
|||
13 |
|
|
|
|
|
|
|
|
|
|
|
|
|
8. |
+/- Volume Buttons:Adjusts the audio volume up & down. |
|||||||
|
|
|
|
|
|
|
|
|
|
|
|
8 |
||||||||||
12 |
|
|
|
MENU |
DISP |
|||||||||||||||||
11 |
|
|
|
BAND |
MEMO |
|
|
|
– |
9. |
Number Buttons (0-9): Used for directly selecting channels and for presets. |
|||||||||||
10 |
|
1 |
|
2 |
|
3 |
|
|
|
|
10. MEMO (Memory) Button: Saves and recalls artist names, song titles, and sports |
|||||||||||
|
|
4 |
|
5 |
|
6 |
|
|
|
|
|
teams. Holding this button down enters the S-Seek mode. |
||||||||||
|
|
|
|
|
|
|
|
|
|
|
9 |
11. BAND Button: Switches between preset bands A , B, and C. |
||||||||||
|
|
7 |
|
8 |
|
9 |
|
|
|
|
||||||||||||
|
|
|
|
|
|
0 |
|
|
|
|
|
|
|
|
12. MENU Button: Used to access menu options to make setup and feature changes. |
|||||||
|
|
|
|
|
|
|
|
|
|
|
|
|
|
|
|
|
|
13. DISP Button: Toggles display between the default display screen and large screen |
||||
|
|
|
|
|
|
|
|
|
|
|
|
|
|
|
|
|
|
|||||
|
|
|
|
|
|
|
|
|
|
|
|
|
|
|
|
|
|
|||||
|
|
|
|
|
|
|
|
|
|
|
|
|
|
|
|
|
|
|
display mode. Holding this button down switches to the channel list mode. |
|||
Installing Batteries in the |
14. Jump Button: Used to quickly switch between the current channel and a favorite |
|||||||||||||||||||||
Remote Control |
|
|
|
|
|
|
|
|
channel. |
|
|
|
||||||||||
1.Remove the battery cover. 15. FM Preset Button: Selects between preset FM frequencies used for the built-in
2.Install CR2025 battery. wireless transmitter.(+ positive side is up)
3. Replace the battery cover. 16. Select Button: Selects items highlighted on the display screen.
18 |
|
ST2 Starmate Replay User and Installation Guide |
 Loading...