


Shuttle User Guide SIR-PNP3
s.seek p.tune
001 C hannel N am e
A rtist
S ong


 C ategory 12:00P A -1
JUMP
128-7193A
1 of 32
Released: 8-6-04
Revision A: 8-10-04 Removed maximum FM frequency reference; default display mode PDT to 2 lines and font type to A.

Congratulations
You are one step closer to experiencing the latest innovation in Sirius Satellite Radio. Sirius will revolutionize your in-home or vehicle entertainment with:
•Over 120 channels of original programming, including –
65 channels of 100% commercial-free music – guaranteed,
Over 50 channels of world-class sports, news, talk and information.
Your Audiovox Shuttle receiver must be used with an adapter kit, such as the Audiovox Home kit, Boom Box or Vehicle Kit as required by your specific installation needs. These kits are available at retailers where Audiovox main units are sold.
Audiovox Home Kit: |
Part Number SIR-HK3 |
Audiovox Vehicle Kit: |
Part Number SIR-CK3 |
Audiovox Boom Box: |
Part Number SIR-BB3 |
-2-
128-7193A
2 of 32

Contents |
|
Cautions and Warnings ...................................... |
4 |
Shuttle System Components .............................. |
4 |
Introduction .......................................................... |
5 |
Enjoying Your Sirius Shuttle ................................ |
5 |
Sirius Shuttle Controls ......................................... |
6 |
Basic Operation ................................................... |
8 |
Tuning by Category .......................................... |
8 |
Content Listing Options (Look Ahead) ............ |
8 |
Direct Tuning ...................................................... |
9 |
Setting/Using Channel Preset Buttons ............. |
9 |
Preset List Mode .............................................. |
10 |
Display Button .................................................. |
10 |
Memory Button (S-Seek Function) ................... |
11 |
Menu Display Options ......................................... |
14 |
Sirius ID ............................................................ |
14 |
Jump Settings .................................................. |
14 |
Display Settings ............................................... |
18 |
FM Transmitter Options ................................... |
19 |
Add or Skip ....................................................... |
20 |
Lock Options .................................................... |
20 |
Lock/Unlock Default Code Function ................ |
20 |
Edit Code .......................................................... |
21 |
Audio Level Options ......................................... |
21 |
Antenna Aiming (Home Installation) ................ |
21 |
Memory Options ............................................... |
22 |
Time Based Features ...................................... |
22 |
Clock ................................................................. |
22 |
Format ........................................................... |
22 |
Time Zone ..................................................... |
23 |
Alarm Clock .................................................. |
23 |
Alarm Time ................................................... |
24 |
Program Alert ................................................... |
24 |
Time/Day ....................................................... |
24 |
Channel ........................................................ |
25 |
Program Alert On/Off ..................................... |
25 |
Auto Shutdown ................................................. |
25 |
Sleep Mode ...................................................... |
25 |
Factory Default ..................................................... |
26 |
Remote Control Unit ............................................ |
26 |
Troubleshooting .................................................. |
28 |
Specifications ...................................................... |
28 |
APPENDIX A ......................................................... |
29 |
Warranty ............................................................... |
31 |
-3-
128-7193A
3 of 32
Cautions and Warnings
1.Do not install the Shuttle in a position that hinders your view through the windshield, or obstructs viewing of the dashboard indicators and displays.
2.Do not install the unit where it may obstruct the operation or deployment of safety devices, such as airbags, etc.
3.Do not allow operation of the unit to detract from safe driving practices; remember that you are responsible as the vehicle operator to adhere to all safe driving and traffic regulations.
4.This device complies with Part 15 of the FCC Rules. Operation is subject to the condition that this device does not cause harmful interference.
5.By adhering to these warnings and safety considerations, serious accidents and/or personal injury can be avoided.
Introduction
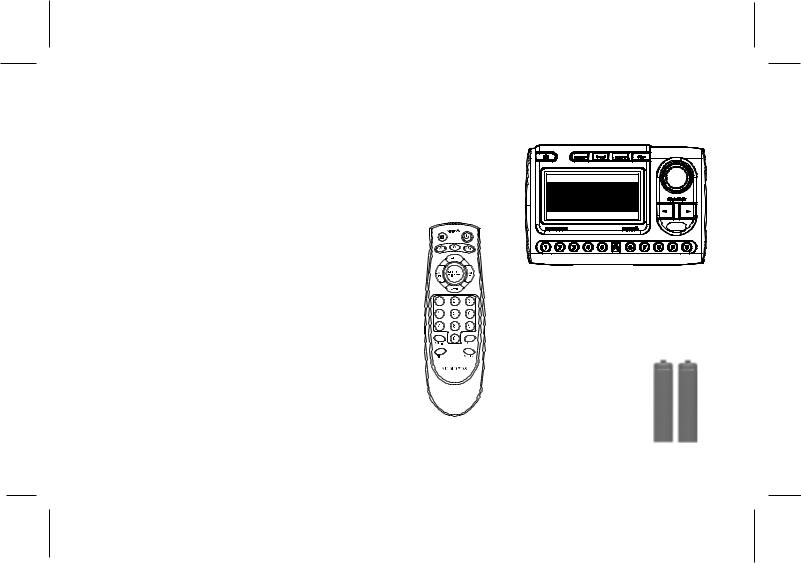
Shuttle System Components
Shuttle Unit
Model PNP3,
P/N144-2453
s.seek p.tune
001 C hannel N am e
A rtist
S ong


 C ategory 12:00P A -1
JUMP
Remote Control Unit
P/N136-3803
The Audiovox SIRIUS® Shuttle processes the satellite signals received by the externally mounted antenna (purchased separately as part of the Home, Vehicle or Boom Box Kits). The Shuttle recognizes and decodes the incoming SIRIUS® program information and provides an audio signal to your radio or other audio
output equipment.
-4-
Batteries for
Remote, (2) “AAA”,
P/N156-2215
128-7193A
4 of 32
NOTE: The SIRIUS® signal can be received and processed virtually anywhere as long as there are no obvious satellite signal obstructions such as nearby buildings, high terrain, parking garages or tunnels.
The Shuttle is typically installed in an accessible location of the vehicle (dash area), consistent with line-of-sight operation of the remote control, and/or within easy reach of the driver. For home use, situate the Shuttle close to your stereo receiving equipment.
Enjoying Your SIRIUS® Shuttle
You can begin to enjoy Sirius® Satellite Radio as soon as the Shuttle and Kit installation are complete:
1.Set up your Audiovox Shuttle using the installation instructions included in your Home Kit, Vehicle Kit or Boom Box Kit, or with the help of a profes sional installer.
NOTE: Refer to Antenna Aiming (page 21) during the installation procedure.
2.When power is available to the unit, note that the integral Power button LED icon lights red. Then press the Power button to turn on the Shuttle.
3.The Sirius logo ( 

 ) appears on the display followed by the Sirius preview channel. If this is the first time using the Shuttle, the screen will display “Updating Channels”. If not, go to channel 184 using the direct channel method, page 9, Direct Tuning.
4.To obtain the Sirius identification (ID) number, press the MENU button. The Menu Options page appears with the Sirius ID option highlighted. Press the Encoder knob and the 12 digit Sirius ID number will appear. Write the number here for future reference.
5.Activate your Sirius® radio service ---- it’s easy. You have one of two choices to activate your service:
(a) Visit the website at sirius.com and click on the “JOIN” section. You will then need to follow some simple directions and provide Sirius with some basic information in order to activate your service.
-5-
128-7193A
5 of 32
(b)Call Sirius at 1-888-539-SIRIUS (7474). One of our friendly Customer Care representatives will takethe necessary information and walk you through the activation process.
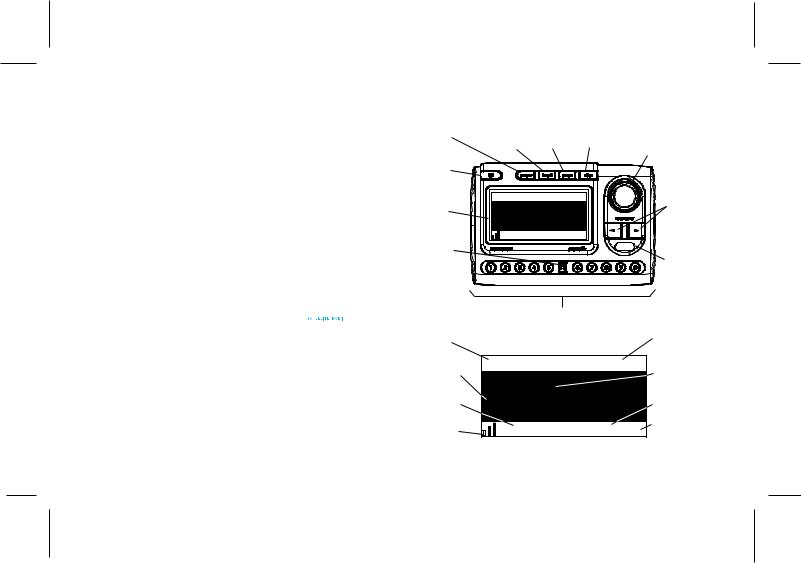
Sirius® Shuttle Controls
The Audiovox Sirius® Shuttle Unit provides eight control buttons, an Encoder knob and 10 number keys.
Power Button:
This button applies power to and removes power from the Sirius® Shuttle as follows:
1. A momentary press of the power button turns on the receiver, and is accompanied by a confirmation
beep tone. The Sirius logo/name (


 ) initially appears on the LCD display for 3 seconds, followed by the Default screen (if turned on for the first time), or by the tuning mode in effect when the unit was last powered off.
2. A momentary press of the power buttonturns off the receiver. While the unit powers down, the Audiovox logo appears for 2 seconds and the unit turns off.
MEMORY |
BAND |
|
|
ENCODER KNOB AND |
||
(s-seek) |
(p.tune) |
MENU |
DISPLAY |
|||
BUTTON |
BUTTON |
BUTTON |
BUTTON |
PUSH-TO-SELECT |
||
|
|
|
|
(ENTER) BUTTON |
||
POWER |
|
|
|
|
|
|
BUTTON |
|
s.seek p.tune |
|
|
CATEGORY |
|
|
|
|
|
|||
|
|
|
|
|
||
|
001 |
C hannelN am e |
|
SEARCH |
||
LCD |
|
(UP/DOWN) |
||||
A rtist |
|
|
||||
DISPLAY |
|
|
BUTTONS |
|||
S ong |
|
|
||||
|
|
|
|
|||
|
C ategory 12:00P A -1 |
|
|
|||
JUMP |
|
|
|
|
|
|
BUTTON |
|
|
|
|
INFRARED |
|
|
|
|
|
|
||
|
|
|
|
|
SENSOR |
|
|
|
JUMP |
|
|
|
|
|
|
PRESET (NUMBER) |
|
|
||
|
|
BUTTONS |
|
|
|
|
3-DIGIT CHANNEL |
|
Default Screen |
|
CHANNEL |
||
NUMBER |
|
|
NAME |
|||
AUTO SIZING/ |
001 |
C hannel N am e |
AUTO SIZING/ |
|||
SCROLLING |
||||||
SONG TITLE |
A rtist |
|
|
SCROLLING |
||
8-CHARACTER |
|
|
ARTIST NAME |
|||
|
|
|
|
|
||
CATEGORY |
S ong |
|
|
CLOCK |
||
NAME |
|
|
BAND/PRESET |
|||
|
|
|
|
|||
SIGNAL |
|
|
|
|
||
C ategory 12:00P A -1 |
BANK NUMBER |
|||||
STRENGTH |
||||||
INDICATOR
-6-
128-7193A
6 of 32

Encoder Knob and Select Button:
The Encoder knob is the primary control for navigating through the various lists and option menus available on the unit. In the default mode, the Encoder knob provides sequential tuning through the available program channels. Clockwise (CW) rotation tunes up one channel- per-detent, while Counterclockwise (CCW) rotation tunes down one channel-per-detent. When in the list or menu mode, turning the Encoder knob CCW and CW scrolls down and up, respectively, through the various menus and lists. The current selection from the list will be highlighted on the display. When the item is highlighted, press the Encoder knob (Select Button) to enter the selection. Pressing and holding the Encoder knob will tune to the previously selected channel.
Category Buttons:
The Up or Down category buttons allows the user to advance through the channel groups based on content category. By turning the rotary Encoder knob, the user can then scroll up or down through the channels within that category. Once a choice has been made, it can be entered by pressing the Select Button.
Memory (MEMO) Button (s-seek) Function):
This feature allows the user to capture and store the current program data information (Channel Name & Number/Artist & Song title). You can store up to 24 Artist/Song Title combinations. The Shuttle also has the capability to search the current incoming Sirius signal, and thereby alert you if it matches the Artist/Song title stored in Shuttle memory.
Display (DISP) Button:
This button allows the user to choose one of several ways of presenting the Channel Name, Artist and Song title information on the LCD screen.
Menu (MENU) Button:
The MENU Button is used to access “Menu Options” which displays the user setup menu, plus other feature/function adjustments.
BAND Button (BAND)/Preset Tune (p.tune):
Each momentary press of the BAND Button allows the user to switch between 3 bands of Channel presets (10 presets each A, B and C). Pressing and holding the BAND Button for 2 seconds initiates preset tuning (accompanied by a beep confirmation tone) that will display and tune all stored preset channels in sequence. This is indicated by the reverse image of the channel number
-7-
128-7193A
7 of 32

and band preset number on the display. Preset tuning continues until the user decides to terminate this function by pressing and holding the BAND Button for 2 seconds.
Keypad Buttons 0-9:
These buttons are used to directly enter a desired channel number. They are also used when entering and recalling preset channel numbers into memory.
Jump ( ) Button:
As an example, the  button stores a favorite memory preset to allow you to easily tune to a selected city of interest (or any other channel), and then tune back to the music/talk/sports programming you were previously listening to.
Basic Operation
With the unit properly installed, activated and connected to your home or vehicle audio system, proceed as follows:
1.Press the Power button; the Shuttle turns on and the Sirius logo appears for 3 seconds followed by the default display for the channel and tuning mode in effect prior to turnoff.
2.Rotate the Encoder knob to select and play the desired channel, or use the Category Up/Down buttons to tune and select a desired channel based on genre.
Tuning By Category
When in Category Tuning Mode, each momentary press of the Category Up/Down Button(s) advances through the available Genres:
Category List Display
|
C ategory |
|
|
001 C hannel |
N am e |
||
002 C hannel |
N am e |
||
003 C hannel |
N am e |
||
004 C hannel |
N am e |
||
1.Using the Encoder knob, select the desired channel.
2.Press the Encoder knob to select that channel.
3.Once the channel has been selected, the unit will revert to the default screen and your selection
will be played.
Content Listing Options (Look Ahead)
This feature allows you to view what is playing on other channels without having to change the current channel you are listening to. The content listing options are selected by using the DISP button. When the default screen
-8-
128-7193A
8 of 32

is displayed on the LCD, pressing and holding the DISP Button will display all the available channel numbers and channel names. The second press of the DISP button will display all currently available artists. The third press of the DISP button will display song titles.
While in the Category List menu, pressing the DISP button changes Channel List to Artist List. The available content listing now displays information by the Artist Name.
Category Artist
Name Display
C ategory
001 A rtist N am e
002 A rtist N am e
003 A rtist N am e
004 A rtist N am e
Category Song
Title Display
C ategory
001 S ong Title
002 S ong Title
003 S ong Title
004 S ong Title
The DISP button is also used during category tuning. Consecutively pressing the DISP button while tuning by category will display the Channel Name, Artist Name or Song Title within the selected category.
While the preceding screens are displayed, rotating the Encoder knob allows navigation through the list. When the desired selection is highlighted, press the Encoder knob and your selection will be played.
Direct Tuning
Channels can also be directly accessed by pressing the Encoder knob and using the 0-9 number keys to numerically enter the desired channel. Once the desired channel number has been entered, press the Encoder knob again to play.
Setting/Using Channel Preset Buttons
The unit contains 10 preset buttons. There are three banks of preset memory locations offering a total of 30 presets. These banks are designated A, B and C and can be selected using the BAND button. The display in the lower right hand side changes to show the corresponding Preset bank. Each bank will store 10 user-preferred channels.
Select the desired channel you wish to save into memory by using the Encoder knob, the direct tuning method or the category tuning method. With the desired channel playing, press and hold any of the numbered keypad buttons (0-9); the corresponding preset number will flash. A confirmation tone is heard, confirming that the preset has been stored. Continue this procedure for storing all desired streams. To retrieve a preset channel, momentarily press and release the number button corresponding to the desired channel.
-9-
128-7193A
9 of 32

|
|
001 |
|
C hannel N am e |
|
|
|
|||||
|
|
A |
|
|
|
|
|
|
|
|
||
|
|
rtistPreset |
|
|
|
|
|
|||||
|
|
S |
|
T une M ode |
|
|
|
|
|
|||
|
|
ong |
|
|
|
|
|
|||||
|
|
|
|
|
|
|
|
|
|
|
|
|
|
|
|
C ategory 12:00P A -1 |
|
|
|
||||||
|
|
|
|
|
|
|||||||
|
|
|
|
|
|
|
|
|
|
|
|
|
|
|
|
|
|
|
Press and |
|
|
|
|
|
|
001 C hannel N am e |
|
|
Hold Preset |
|
|
001 |
C hannel N am e |
|||||
A rtist |
|
|
|
|
|
|
||||||
|
|
|
|
A rtist |
||||||||
|
|
Button |
|
|
||||||||
S ong |
|
|
|
|
|
|
S ong |
|||||
|
|
|
|
Press and |
|
|
||||||
|
C ategory 12:00P A -1 |
|
|
|
|
Hold Preset |
|
|
|
C ategory 12:00P |
A -1 |
|
|
|
|
|
|
|
|||||||
|
|
|
|
|
|
Button |
|
|
|
|
|
|
|
|
|
|
|
|
|
|
|
|
|||
Preset List Mode
To search by list for a preset, press and hold the BAND button to enter Preset Tune mode. When in the Preset Tune Mode, press and hold the DISP button for 2 seconds; this exits normal preset tuning and enters a 6-line menu mode which displays the Preset number (A-1), a single space and the 20-character channel name. While in the Preset List menu, pressing the DISP button once will change to Artist List; a second press of the DISP button changes to Song List.
While the contents of the preset listing are displayed, rotate the Encoder knob to navigate through the list. When the desired selection is highlighted, press the Select Button and the channel will be played.
A -1 C hannel N am e
A -2 C hannel N am e
A -3 C hannel N am e
A -4 C hannel N am e A -5 C hannel N am e
A -1 A rtist |
N am e |
A -2 A rtist |
N am e |
A -3 A rtist |
N am e |
A -4 A rtist |
N am e |
A -5 A rtist |
N am e |
A -1 S ong Title
A -2 S ong Title
A -3 S ong Title
A -4 S ong Title A -5 S ong Title
Display Button
Pressing the Display button from the Default display toggles between the artist name/song title screen or large letter format. When the letter size changes, the field will scroll. This feature is useful when viewing the display at a distance.
001 C hannel N am e
002 C hannel N am e
003 C hannel N am e
004 C hannel N am e
005 C hannel N am e
NOTE: The field will scroll only if the length of the artist or title cannot be viewed in its entirety. Pressing and holding the Display button will enter the channel list mode. While in the Channel List mode, any subsequent press of
-10-
128-7193A
10 of 32
 Loading...