

Page 1
Owner’s Manual
Page 2

Table of Contents
1. Attention
1-1 Safety Precautions………………………………………………………………. 3
1-2 Operation Caution……………………………………………………………….. 3
1-3 Battery Information 3
1-4 Package Contents……………………………………………………………….. 3
2. Getting to Know Your Camera
2-1 Camera Components……………………………………………………………. 4
2-2 System Requirement……………………………………………………………. 4
3. Controls & Display
3-1 LED Indicators……………………………………………………………………. 5
3-2 LCD Monitor Display…………………………………………………………….. 5
3-3 Power Control……………………………………………………………………. 5
3-4 Shutter Button……………………………………………………………………. 6
3-5 Mode Dial…………………………………………………………………………. 6
3-6 Menu/OK Button…………………………………………………………………. 6
3-7 Flash Button……………………………………………………………………… 7
3-8 Mode Display Button…………………………………………………………….. 7
3-9 Macro Button……………………………………………………………………... 7
4. Mode Selection and Menus
4-1 Still Capture Mode……………………………………………………………….. 8
4-2 Playback Mode…………………………………………………………………... 8
4-3 DPOF (Digital Print Order Format) ……………………………………………. 9
4-4 Movie Mode……………………………………………………………………… 10
4-5 Setup Mode……………………………………………………………………… 10
4-6 PC Mode…………………………………………………………………………. 12
5. Getting Started
5-1 Attaching the Strap……………………………………………………………… 13
5-2 Inserting Batteries……………………………………………………………….. 13
5-3 Inserting and Removing the Memory Card…………………………………… 14
6. Using Your StyleCam Pro
6-1 Setup Mode………………………………………………………………………. 15
6-2 Still Capture Mode……………………………………………………………….. 16
6-3 Playback Mode…………………………………………………………………... 16
6-4 Movie Mode………………………………………………………………………. 16
6-5 PC Mode………………………………………………………………………….. 17
6-6 TV Output…………………………………………………………………………. 17
7. Software Installation
7-1 Software Overview………………………………………………………………. 18
7-1 Software Installation…………………………………………………………….. 18
8. Downloading Images & Video
8-1 Connecting the Camera to Your PC…………………………………………… 25
8-2 Installing Hardware Drivers…………………………………………………….. 25
8-3 Downloading Images & Video………………………………………………….. 25
8-4 Viewing Images & Video……………………………………………………….. 26
How to Take Good Digital Pictures
Product Specifications……………………………………………………………….. 30
Troubleshooting………………………………………………………………………. 31
One Year Limited Warranty – USA & Canada……………………………………. 32
Warranty Service – USA & Canada………………………………………………… 33
Technical Support – USA & Canada………………………………………………. 34
28
2
Page 3
1. Attention
Please read through this manual carefully before using the StyleCam Pro and follow the
instructions to avoid damage caused by improper operation.
1-1 Safety Precautions
The software CD-ROM packaged with the camera is designed for PC only. To play this CD-
ROM on a stereo or CD player may damage it. This camera is a precision electronic
device. Do not attempt to service this camera yourself, as opening or removing covers may
expose you to dangerous voltage points or other risks. Do not expose this camera to direct
sunlight.
1-2 Operation Caution
Please handle the camera with care, and avoid using or placing the camera in the following
locations:
- Damp and dusty places
- Sealed vehicles or places exposed to direct sunlight or places subject to extremely high
temperatures or heat
- Violently turbulent environment
- Locations full of smoke, oil fumes or steams
- Locations subject to strong magnetic field
- Raining or snowing environment
Additional Precautions
- Do not open the battery cover when the power is turned ON
- If water has entered the camera, immediately turn the power OFF and remove the
batteries
Camera Maintenance
- Clean the lens, LCD screen and viewfinder with a soft cloth, or a lens brush
- Gently wipe the dirty surface area with the soft cloth
- Do not touch the lens with your fingers
- Do not use any detergent or volatile solution when cleaning the camera
- Use a dry soft cloth only
1-3 Battery Information
• Use only AA alkaline or rechargeable NiMH batteries.
• Always replace batteries with two new or freshly charged batteries.
• Do not use batteries that are leaking, corroded, or damaged.
• Do not attempt to recharge non-rechargeable batteries
• When charging rechargeable batteries, use a battery charger specifically designed
for the type of battery. If the charger is designed to accommodate multiple battery
types, be sure to adjust its settings to match the type of battery you are recharging.
• Remove the batteries from the camera if you are going to store the camera for
extended periods.
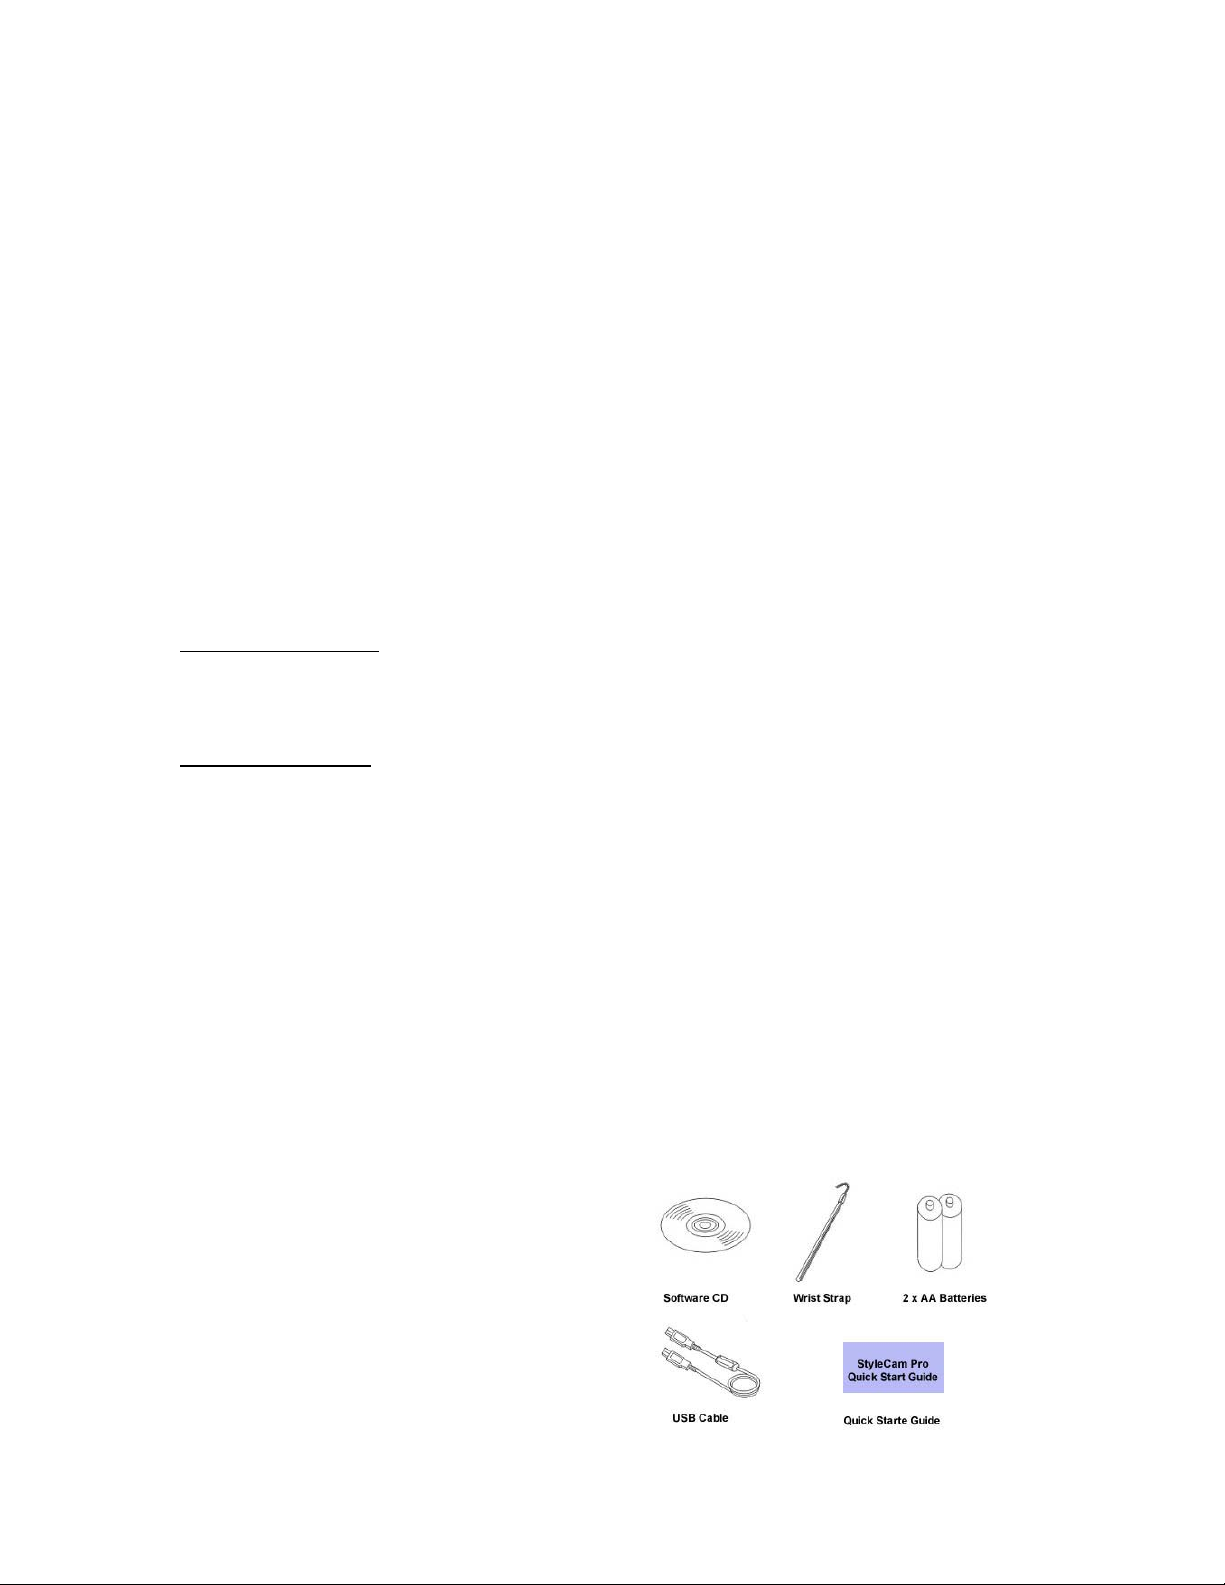
1-4 Package Contents
Please check to make sure that all items
below are included in your StyleCam Pro
package.
3
Page 4
2. Getting to Know Your Camera
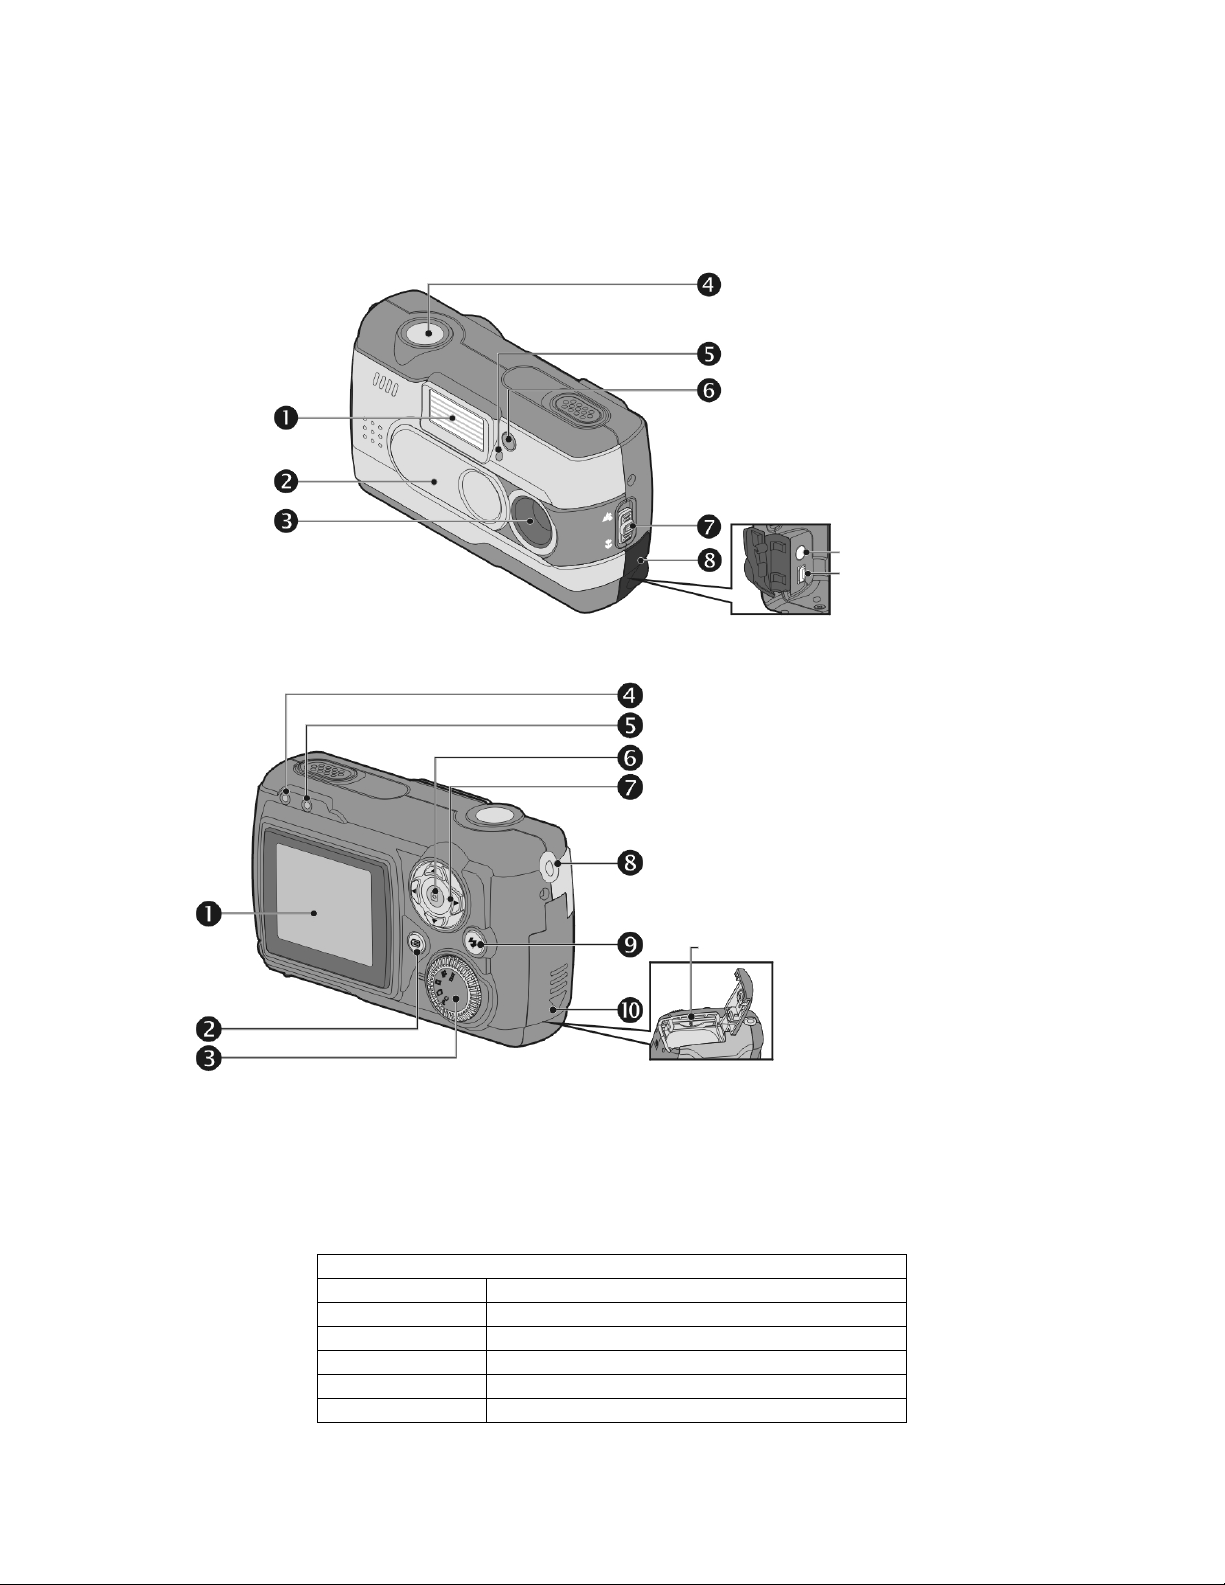
2-1 Camera Components
(1) Flash
(2) Lens cover/Power switch
(3) Lens
(4) Shutter button
(5) Self-timer LED
(6) Red-eye reduction LED
(7) Macro button
(8) Terminator cover
TV-OUT
Port
USB Port
(1) LCD screen
(2) Display button
(3) Mode dial
(4) Status LED
(5) Macro mode LED
(6) ENTER button
(7) Multi-select button
(8) Strap holder
(9) Flash button
(10) Battery/memory cover
Memory card slot
2-2 System Requirement
Please refer to the minimum system requirements for the StyleCam Pro before connecting
your digital camera to the computer. We recommend that you use a computer system that
exceeds the minimum requirements in order to utilize the camera at its optimum efficiency.
The minimum system requirements for the StyleCam Pro is as follows:
System Requirement
OS Microsoft Windows 98/98SE/ME/2000/XP
CPU Intel Pentium 166MHz or higher
RAM Minimum 64MB memory or above
CD-ROM CD-ROM drive
HDD 90MB of available hard disk space
Other USB port
2
Page 5
3. Controls & Display
Monitor 16-bit color display or higher
3-1 LED Indicators
Please refer to the follow diagram for the camera’s LED indicators located on the top of LCD
screen:
LED Status Description
Red On The camera is busy, please wait until it turns OFF and then
Green On Macro mode is ON
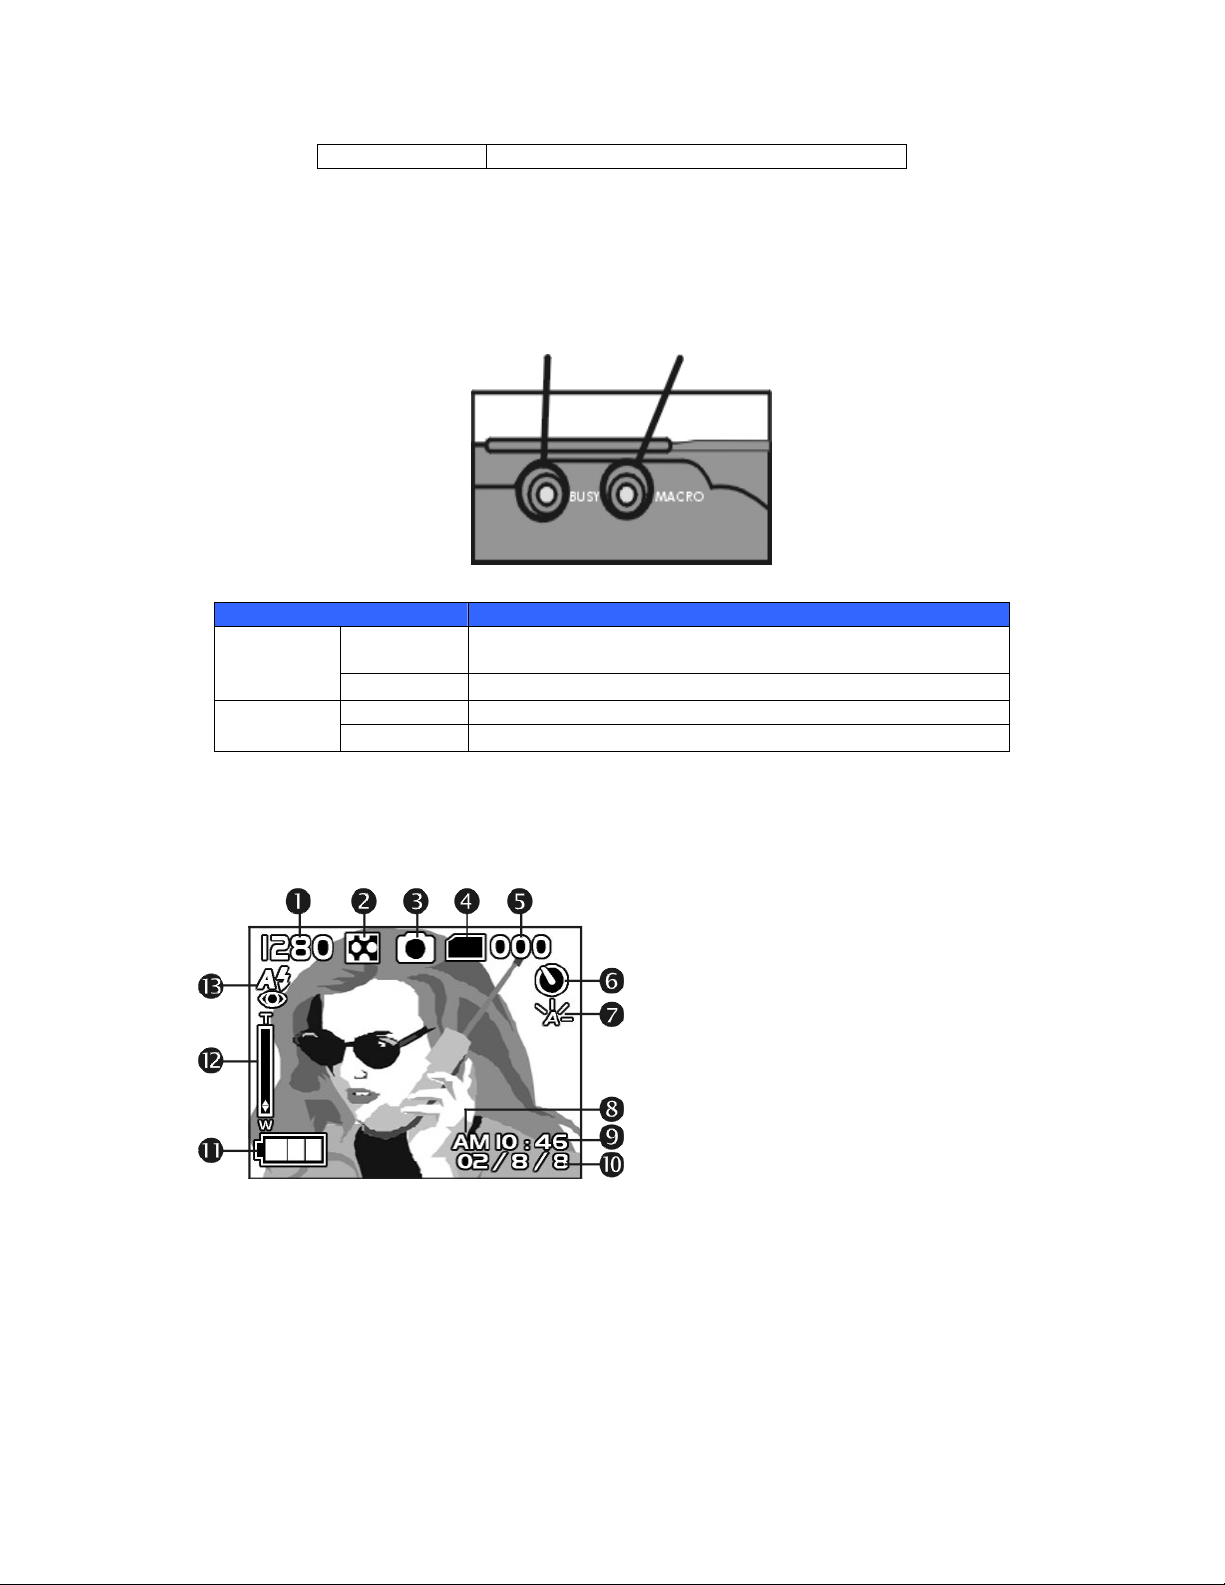
3-2 LCD Monitor Display
3-3 Power Control
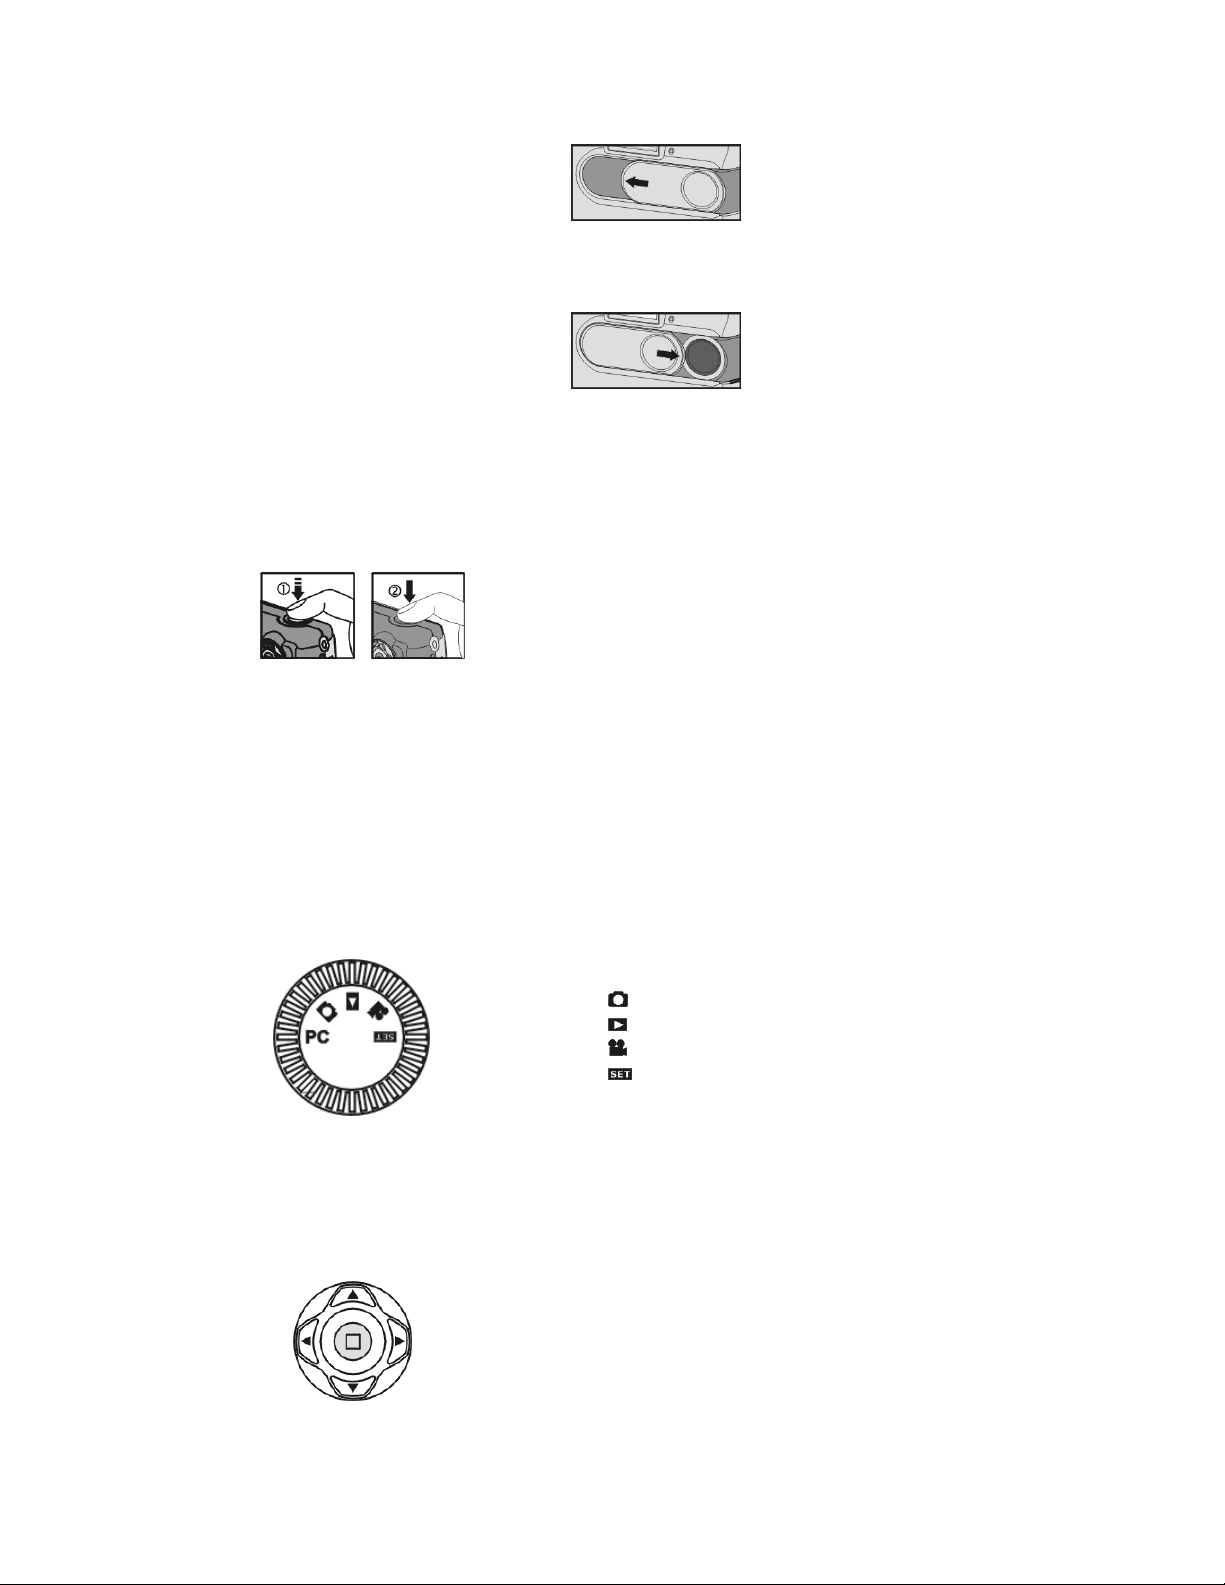
The image below shows the lens cover of the StyleCam Pro. It is also the power switch. To
turn the camera’s power to ON, slide the lens cover towards the left gently. The red LED will
blink and you will hear two beeps to confirm that the camera is ON.
Standby/Busy
(Red LED)
proceed to take a picture
Blinking Camera is powered on and is in standby mode
Off Macro mode is OFF
Macro Mode
(Green LED)
(1) Image resolution
(2) Image quality
(3) Current working mode
(4) Memory card loaded symbol
(5) Number of pictures taken
(6) Self-timer is enabled
(7) White balance status
(8) AM/PM indicator
(9) Time indicator
(10) Date display
(11) Battery power indicator
(12) Zoom level indicator
(13) Flash status
3
Page 6
•
•
To turn the camera’s power to OFF, slide the lens cover towards the right gently, and the
camera will be OFF.
Note: If you do not use the camera within one minute (60 seconds), the camera will
automatically power OFF to save power. To restart the camera, you can press the “Display”
button, located beside the LCD screen on the back of the camera.
3-4 Shutter Button
This camera is designed for 2-step shutter function. A "[ ]" mark will appear at the center of
the LCD monitor when you press and hold the Shutter button half way down. This will focus
on the subject. To take a picture, press the Shutter button down fully and then release it.
The camera will beep twice to confirm that a picture is taken. The first beep is when you
press the Shutter button all the way down. The second beep is when you release the
Shutter Button. Please wait until you hear the second beep before moving the camera.
Otherwise, your picture may be blurred.
3-5 Mode Dial
You can select the shooting mode by turning the Mode Dial shown below. There are five
modes on the StyleCam Pro that you can choose from.
PC - PC Mode
- Still Capture Mode
•
- Playback Mode
•
- Movie Capture Mode
•
- Setup Mode
•
3-6 MENU/OK/MULTI-SELECT Button You can perform different operations in the different modes by using the button shown below. (E.g. select, confirm, move forward, etc)
Arrow up
• Arrow down
• Arrow left
• Arrow right
• Center MENU/OK
4
Page 7
acro
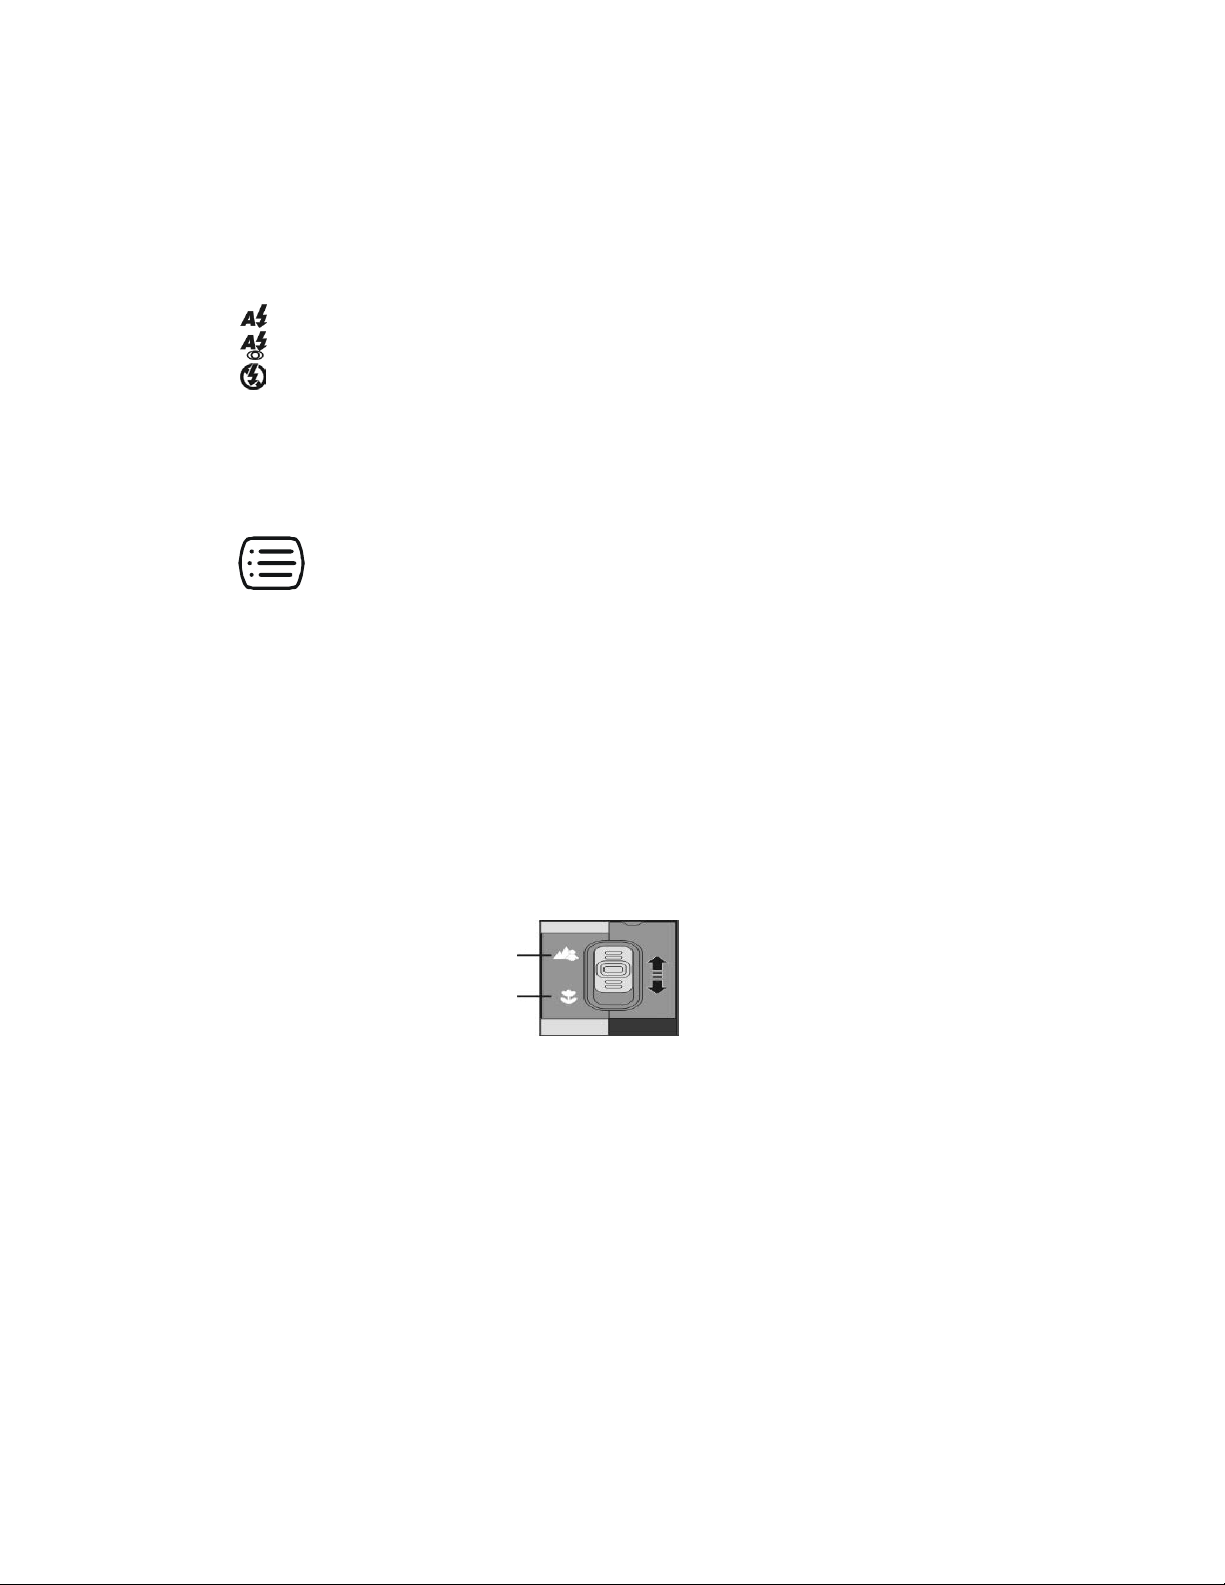
3-7 Flash Button
You can use the flash while taking still images using the Still Capture Mode. Press the Flash
button to select the desired flash mode. There are 3 modes you can choose from:
Auto → Automatic flash is enabled
Auto and red-eye reduction → Automatic flash with red-eye reduction is enabled
Forced OFF → Flash is OFF
3-8 Display Button
The Display button (shown below) will work in the Still Capture Mode. Press the Display
button to toggle through the LCD display options: Standard Æ Full Display Æ Image Only Æ
LCD Monitor Off Æ Only Operation Settings Æ Standard
The Display button also functions as a power ON button while your camera is automatically
shut off after 60 seconds of inactivity. At this stage, you don’t need to slide the lens cover
close and open again to turn on the camera’s power, you can simply press the Display button
once, and the camera will “wake up”. You can also access the Playback Mode to view your
pictures and video when the camera is switched to the OFF position.
3-9 Macro Mode Button
The macro mode allows you to take up close pictures. To access the macro mode, simply
slide the Macro Mode button (shown below) downward. The Macro Mode button is located
on the right side of your StyleCam Pro. When you select the Macro Mode, the green Macro
mode LED will flash. To switch back to the normal shooting range, slide the Macro Mode
button up to normal mode.
Normal
M
Note: The camera will automatically set the flash to OFF position when you select Macro
Mode.
5
Page 8
4. Mode Selections & Menus
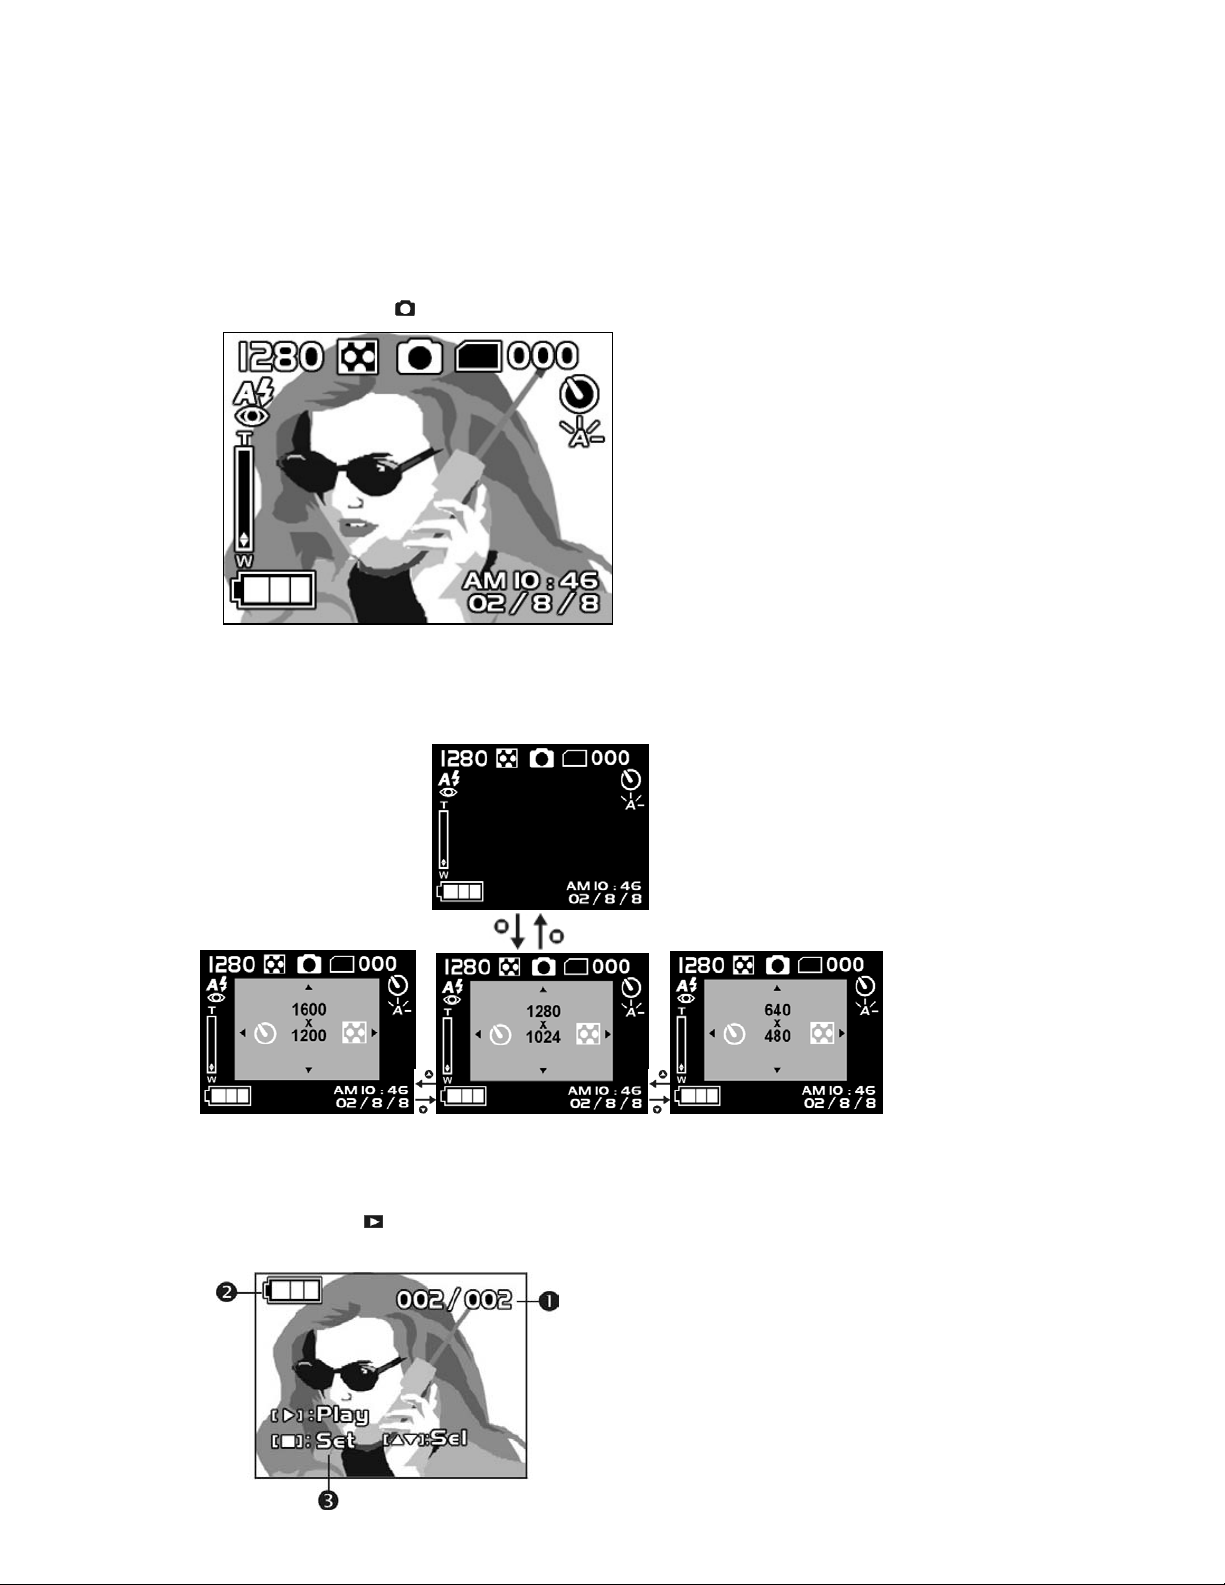
4-1 Still Capture Mode
Index for Quick Menu
Icon meaning: left to right clockwise:
• Image resolution
• Quality setting
• Still capture mode
• Memory card
• Picture counter
• Self-timer
• White balance
• Time/Date
• Battery level
• Zoom level
• Flash mode
The diagram below shows you the steps in setting the image resolution before taking your
pictures.
4-2 Playback Mode
Icon meaning:
(1) Number of pictures taken
(2) Battery power indicator
(3) Camera mode selection
6
Page 9
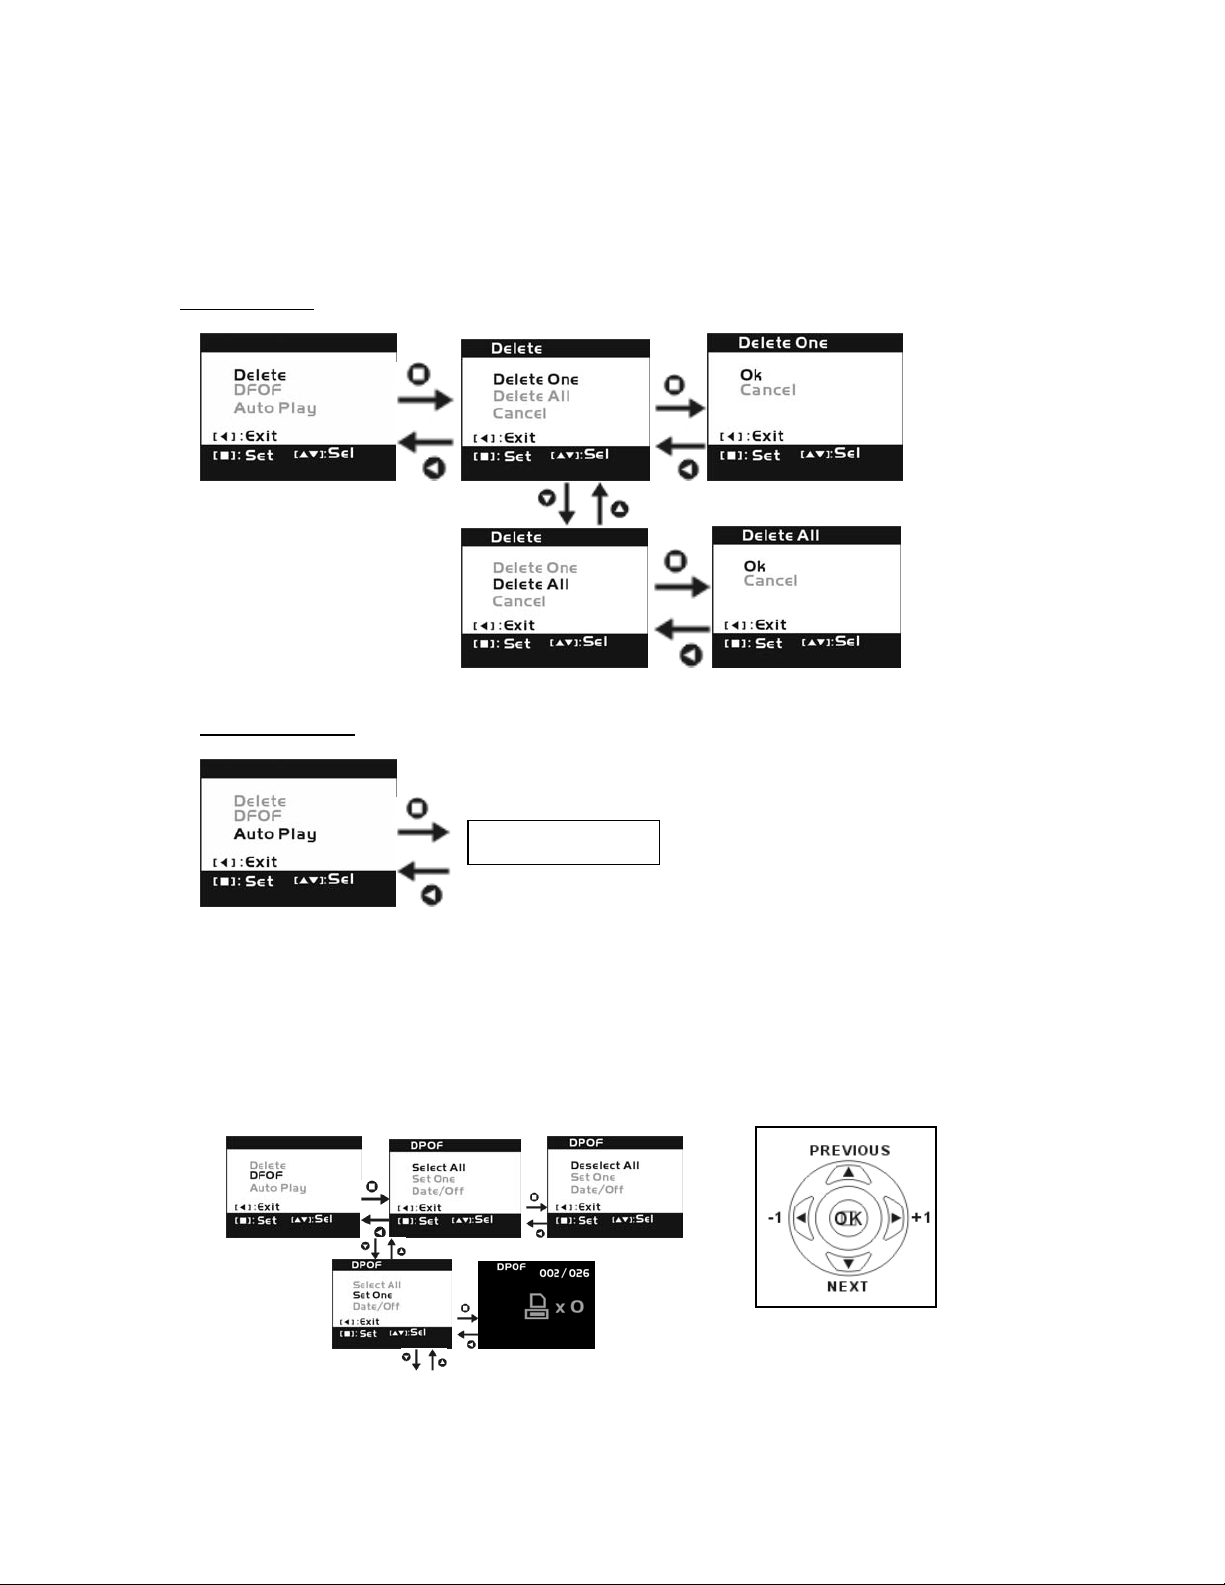
The following diagram shows you how to use the quick buttons for deleting pictures or
video and how to play a slide show of your pictures.
Delete pictures
Play a slide show
Start auto play
4-3 DPOF (Digital Print Order Format) Settings
With DPOF you can select whether to print single image, print all images, or print pictures
with or without the time/date stamp on the picture. Please note that the DPOF feature is
only for those pictures saved on a memory card. DPOF feature will not work for images
that are saved on the camera’s internal flash memory. If no memory card is inserted, the
DPOF is disabled. The following diagram shows you how to use DPOF with your StyleCam
Pro:
7
Page 10
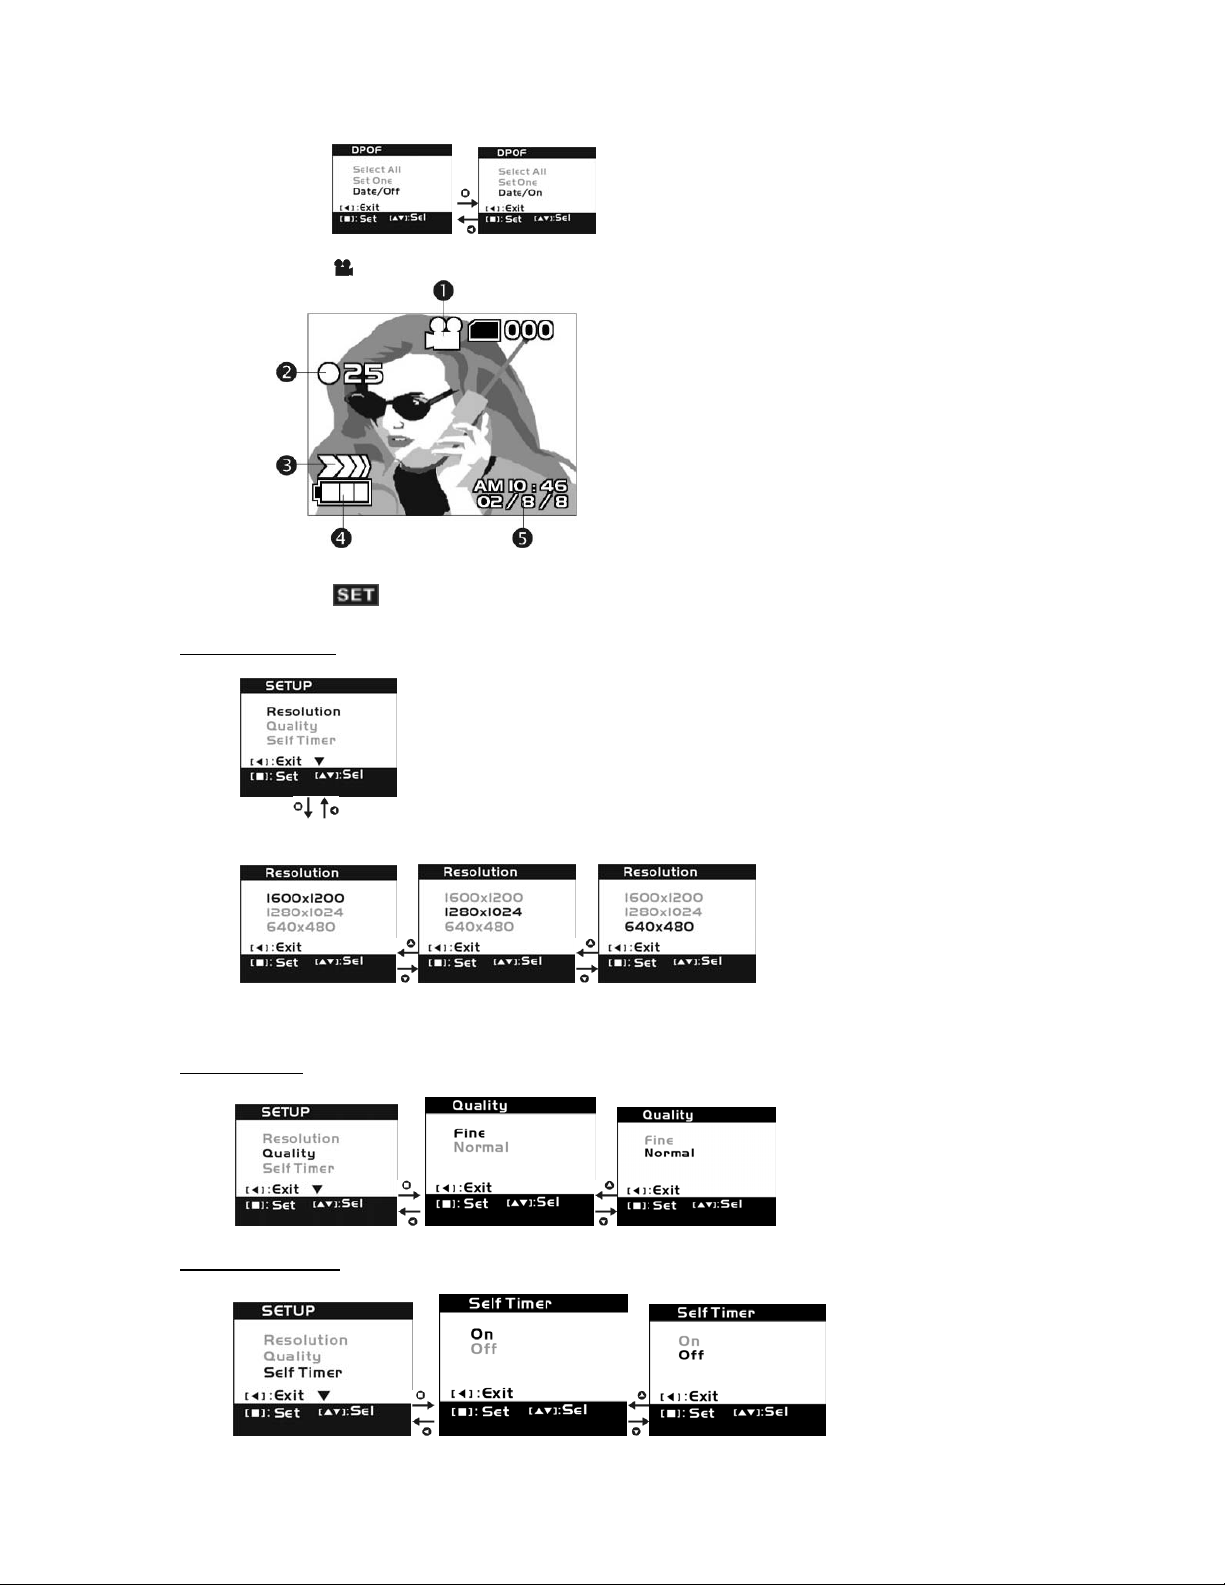
4-4 Movie Mode
4-5 Setup Mode
Image Resolution
1600x1200* 1280x1024 640x480
(1) Movie Mode
(2) Movie time elapsed (in seconds)
(3) Recording movie
(4) Battery power level
(5) Time/Date indicator
* Interpolation through camera firmware.
Image Quality
Self-timer Feature
8
Page 11
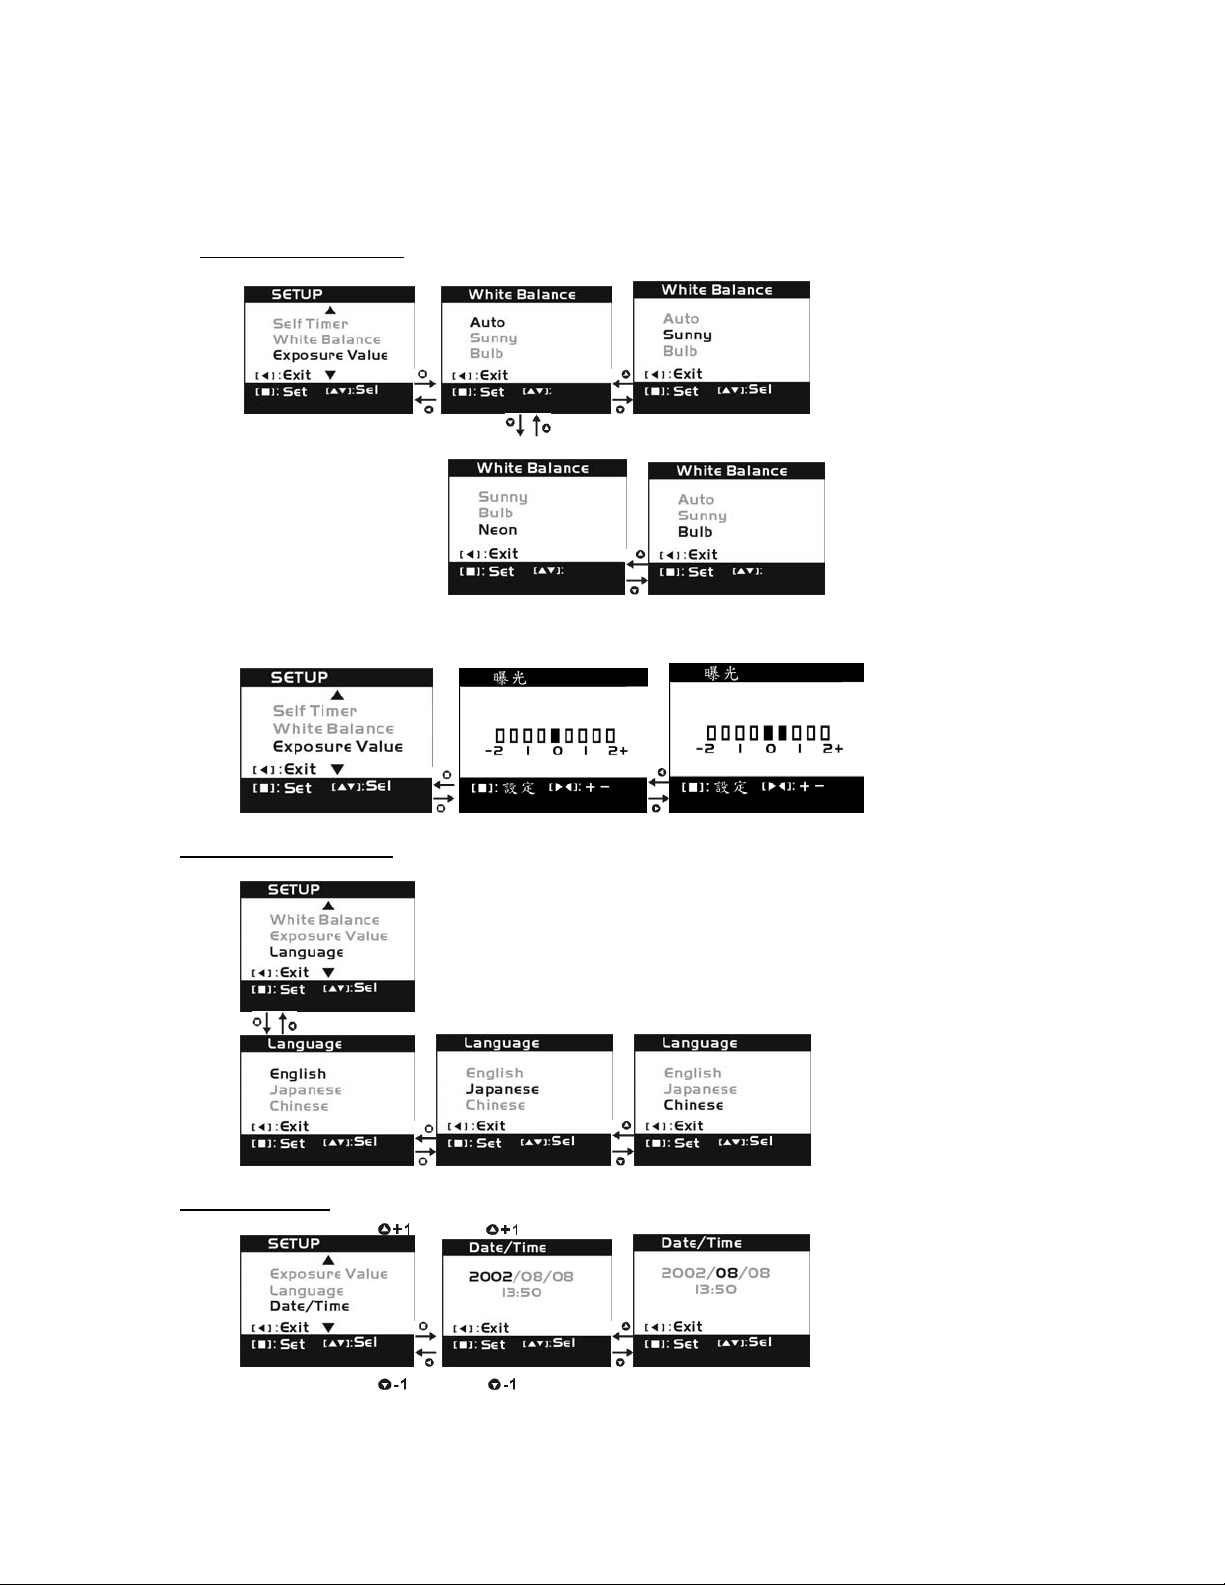
White Balance Options
Exposure Value Compensation
OSD Language Options
Date/Time Setup
9
Page 12
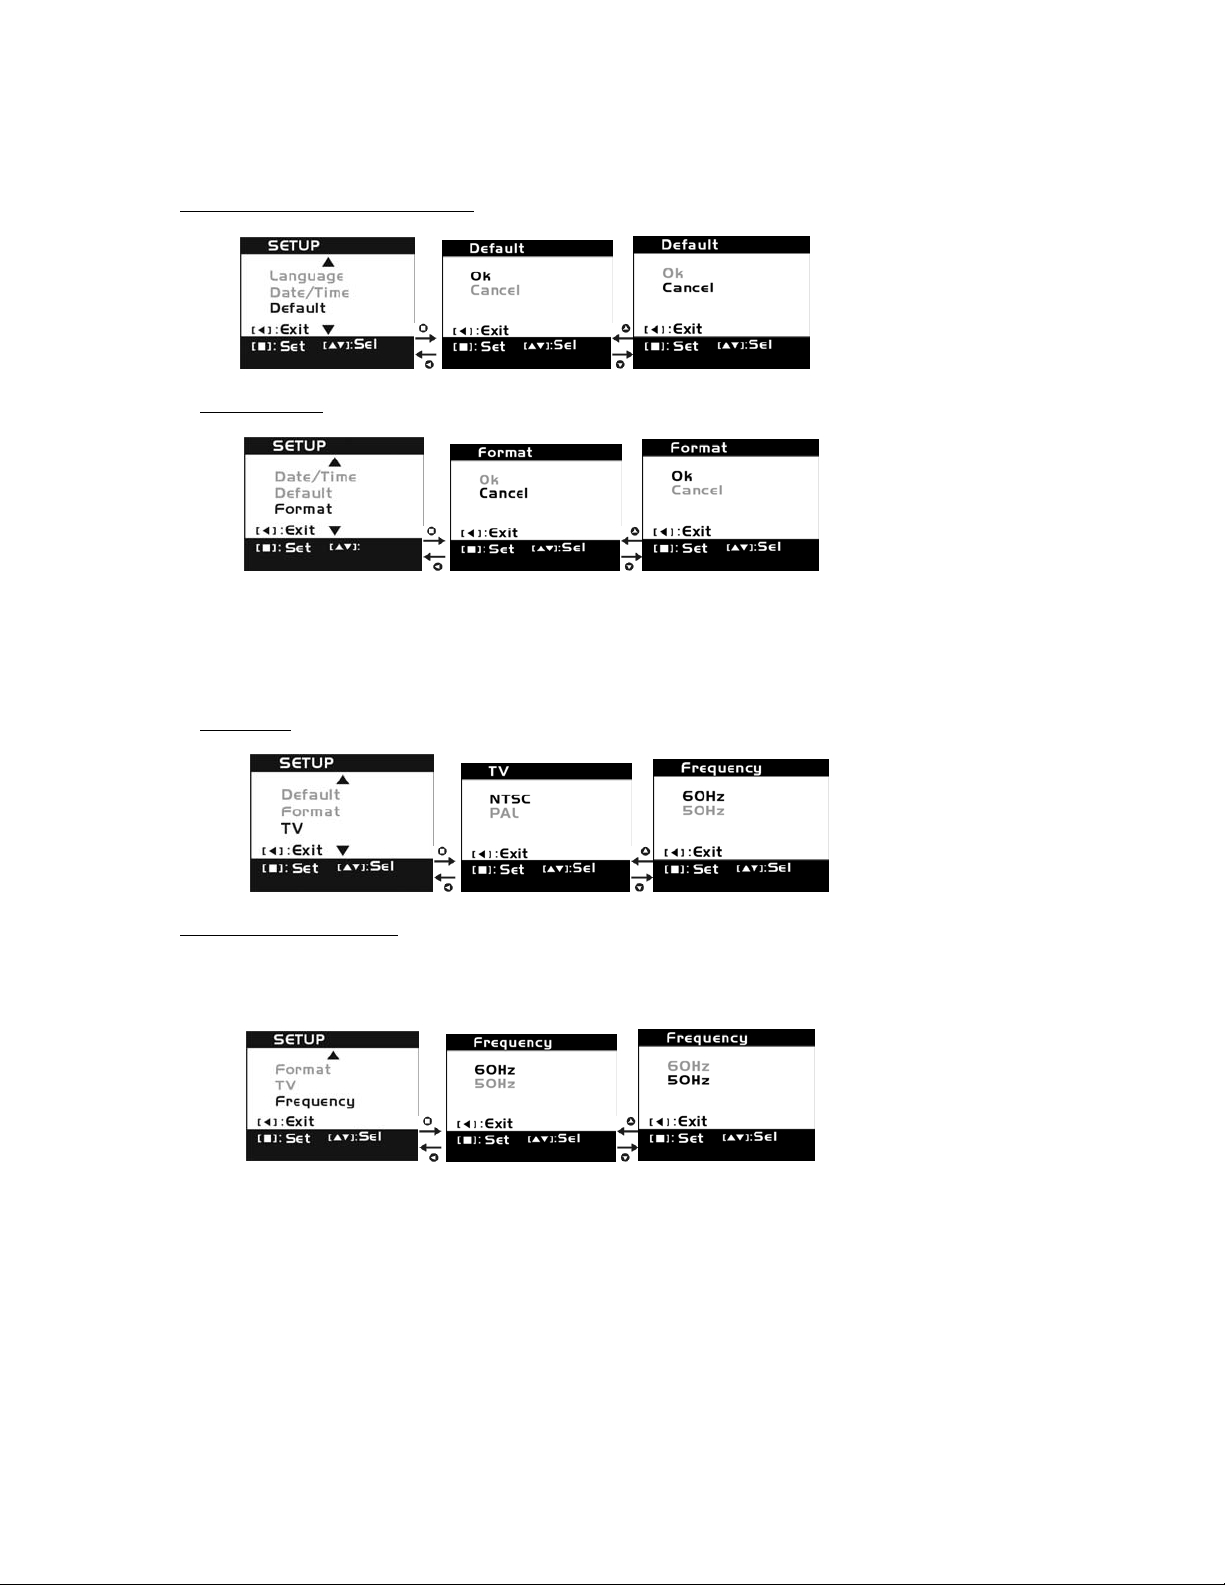
Reset to Factory Default Settings
Format Media
Note: If a memory card is inserted, the “Format Media” feature will only format the
memory, card, and not the internal memory. In order to format the internal memory,
you need to remove the memory card from the camera and select “Format Media”
again.
TV Output
Light Frequency Options
You can select the frequency type (50Hz or 60Hz) according to your region. For North America
and European countries, please set the frequency to 50Hz. For Asia Pacific countries, please
set the frequency to 50Hz.
10
Page 13
5. Getting Started
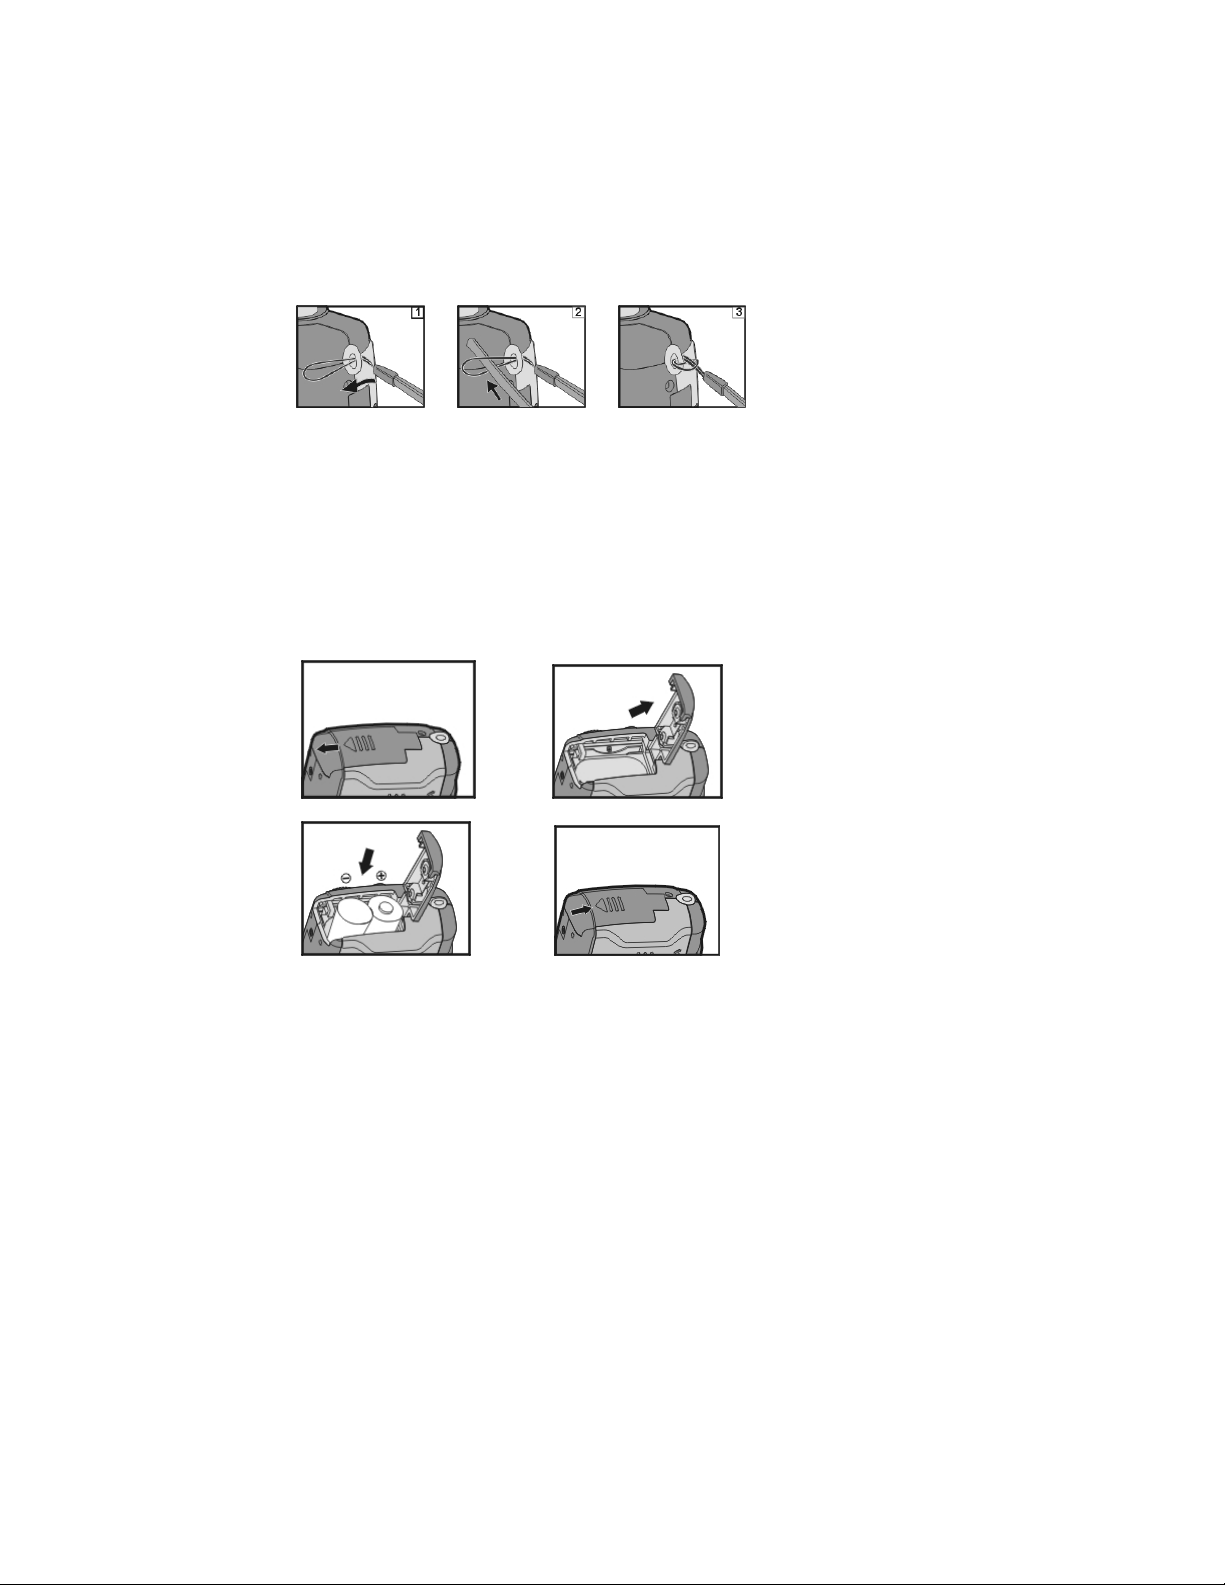
5-1 Attaching the Wrist Strap
The StyleCam Pro comes with a camera wrist strap that you can use to hook onto the camera
and carry it with you everywhere you go. Please follow the instructions and the diagrams below to
hook the strap into the strap holder.
1. Insert the small loop end of strap into the strap holder.
2. Thread the other end of strap through the loop.
3. Stretch the strap tightly.
5-2 Inserting Batteries
Please follow the instructions and diagrams below to insert batteries into your StyleCam
Pro.
1. Power OFF the camera by sliding the lens cover to the right.
2. Open the battery compartment cover by sliding the cover in the direction indicated
by the arrow.
3. Note the battery polarity indication located inside the cover, and insert 2 AA
alkaline batteries or rechargeable batteries into the slot.
4. Close the compartment cover by clicking it shut.
NOTE:
If the battery power indicator shows only one bar, this indicates that the power is low.
When the battery indicator turns red, you can no longer take still images or video. Please
change battery at this time.
5-3 Inserting and Removing the Memory Card
Please follow the instructions and diagrams below to insert and to remove the memory card into
your StyleCam Pro:
11
Page 14
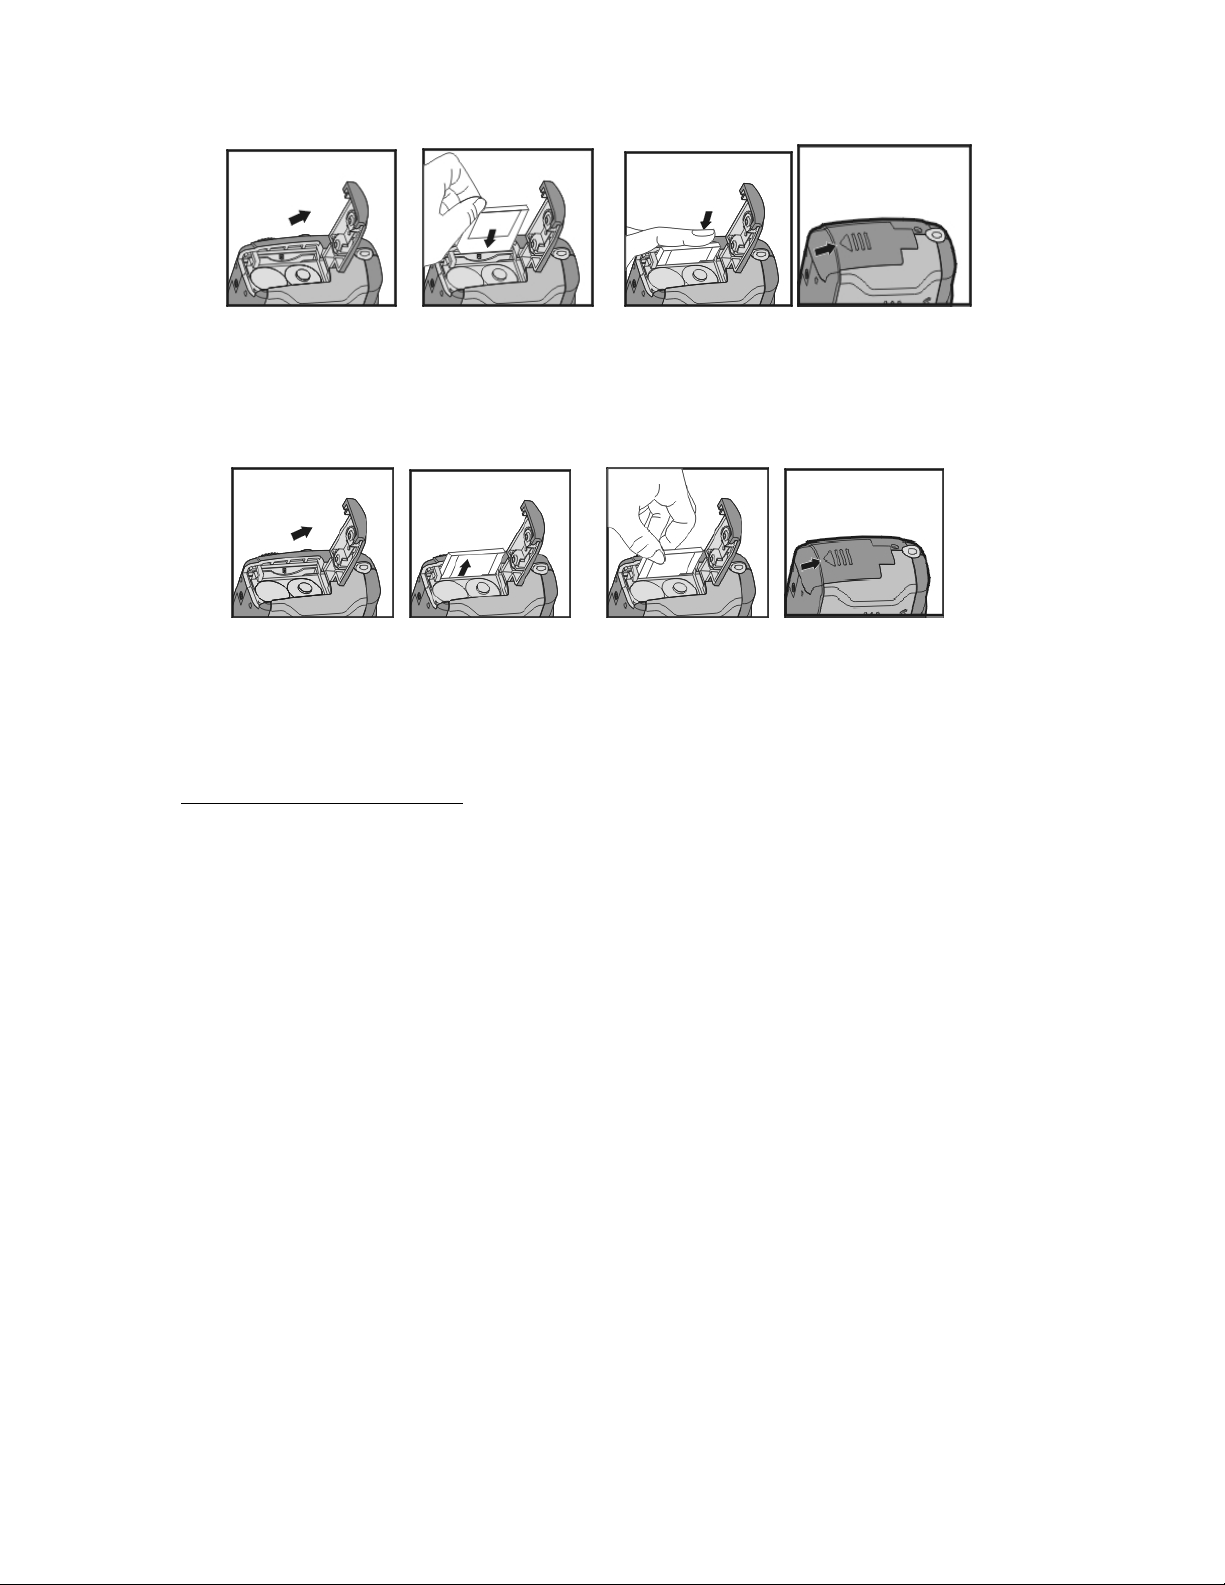
To insert the memory card:
1. Make sure your StyleCam Pro is powered to OFF.
2. Open the battery/memory cover by sliding the cover in the direction of the arrow.
3. Insert the memory card in the direction of the arrow shown on the card and press down.
To remove the memory card:
1. Make sure your StyleCam Pro is powered to OFF.
2. Open the battery/memory cover by sliding the cover in the direction of the arrow.
3. Gently press down on the memory card, and the memory card will pop up.
4. Pull the memory card out with your fingers, and then close the cover.
Special Note on Memory Cards:
• The StyleCam Pro uses Secure Digital (SD) or MultiMedia Card (MMC) memory
cards. The supported capacity is: 4MB, 8MB, 16MB, 32MB, 64MB, and 128MB.
• If you insert the memory card in the wrong orientation, the memory card will not fit
into the slot. Please remove the card and try again by inserting in the correct
direction. Forcing the card into the slot will damage your card and the camera.
• If the camera does not detect a memory card after you have inserted one, you
may need to gently wipe the metal interface of the card with a soft cloth and insert
the card again.
• Before using your digital camera, please remember to insert the memory card into
the slot. If the memory card is full, you can format the card through SETUP mode.
K There is 8MB internal flash memory built into the StyleCam Pro for saving your
images and video. However, when a memory card is inserted, the camera will store
pictures and video on the card first. If you want to store pictures and videos on the
internal memory, please remove the memory card.
K When transferring images and video from the StyleCam Pro’s internal memory to your
computer, please make sure that the memory card is removed from the camera.
12
Page 15

6. Using Your StyleCam Pro
6-1 Setup Mode
The Setup Mode allows you to configure your digital camera settings. The StyleCam Pro
includes these settings:
• Image resolution – 1600x1200, 1280x1024, 640x480
• Image quality – fine, normal
• Self-timer – on, off
• White balance – auto, sun, tungsten, fluorescent
• EV compensation - +/-2EV in ½ step
• Language – English, Japanese, Chinese
• Date/Time – set date and time
• Default – restore factory default
• Format – format memory card
• TV output – NTSC, PAL
• Frequency – 60Hz, 50Hz
Please follow the instructions below to select your desired settings.
1. Turn the Mode Dial
2. Power ON the camera by sliding the lens cover to the left side. The red LED will
blink and the setup screen will display on the LCD screen.
3. Press the multi-select arrow buttons
select the menu items.
4. Press the
make your selection.
5. To return to the main setup menu from the sub-menu, simply press the button.
6-2 Still Capture Mode
6-2a Taking Pictures
Use the Still Capture Mode to take digital still images. Please follow the instructions
below:
1. Turn the Mode Dial
2. Power ON the camera by sliding the lens cover to the left side. The red LED will
blink, and the last picture you took will display on the LCD screen. Otherwise, it will
show “No images” if there are no picture or video saved on the memory.
3. View and frame your subject through the color LCD. Hold the camera steadily in
your hand or place it on a tripod.
4. Press and hold the Shutter button half way down to focus on your subject. The
camera will process metering and a yellow "[ ]" will appears in the center of the
LCD screen. When you’re ready to take a picture, press the Shutter button all the
way down until you hear a beep, and then release it.
5. The number counter will display the number of images you have taken with the
camera.
6-2b Using the Flash
When there is insufficient lighting in a room or on a cloudy day, you should use the flash to
take digital still pictures. Please follow the instructions below on how to use the flash.
1. Turn the Mode Dial to Still Capture Mode, and press the Flash Button.
2. There are three flash modes you can chose from: Auto on, red-eye reduction, and
flash off.
6-2c Using the Macro Mode
You can take close-up shots with the StyleCam Pro’ macro mode feature. Please follow the
instructions below:
1. Turn the Mode Dial to Still Capture Mode.
2. Power ON the camera by sliding the lens cover to the left side.
to Setup Mode .
/ on the MENU/OK Button to move and
button to view a sub-menu of that item, and press the OK button to
to Still Capture Mode .
13
Page 16

3. Locate the Macro slide button on the right side of the camera, and slide it down.
4. The green LED will light indicating that macro mode is enabled.
5. View and frame your subject through the color LCD to take your picture.
6-2d Using the Still Capture Mode Menu
The Still Capture Menu allows you to select the desired resolution setting, image quality,
self-timer, white balance, etc. while you’re in Capture Mode. Please follow the instructions
below:
1. Press the MENU/OK button
in the center of the multi-select button. This will bring
up the Still Capture Mode Menu.
2. You will see three items displayed in the LCD screen. The center item is the one
that’s highlighted, and you can use the up and down arrows to select your desired
setting.
3. Use the multi-select button to move to the next item, and press MENU/OK when
you’re finished.
6-3 Playback Mode
The Playback Mode allows you to review the pictures and videos you took with the
StyleCam Pro. Please follow the instructions below to playback your photos and video:
1. Turn the Mode Dial
to Playback Mode .
2. Power ON the camera by sliding the lens cover to the left side. The last image or
video recorded with the StyleCam Pro will now appear on the LCD screen.
3. Press the multi-select arrows / to scroll through your pictures.
4. To access the Playback Mode Menu, you can press the MENU/OK button in
the center of the multi-select arrows. The Playback Mode Menu contains the
Delete and DPOF features.
5. Use the multi-select arrow and the MENU/OK button to make your selection to
delete single image, delete all images, and set print mark format in the Playback
Mode.
6. Press the left multi-select arrow
to exit the sub menu.
Special Note:
• DPOF feature will only work when a memory card is inserted into the camera, and
has pictures saved on the card.
• In the Playback Mode, if no image or video is stored on the internal memory or a
memory card, the LCD screen will display “No image”.
• You can access the Playback mode when the camera is powered to OFF. Press
the Display button
once, and the LCD will turn ON, and you can review the
images and video stored on the memory. To turn off the LCD screen, press the
Display button again.
6-4 Movie Mode
Use the Movie Mode to record digital video (excluding audio) with your StyleCam Pro. Please
follow the instructions below to capture a digital video:
1. Turn the Mode Dial
to Movie Mode .
2. Power ON the camera by sliding the lens cover to the left side. The red LED will flash
once and the LCD will turn on.
3. Press the Shutter button once to start recording. (Note: you do not need to hold the
shutter button while it’s recording video).
4. The LCD screen will show the time elapsed (in seconds) while you’re taking the video.
5. To stop recording, press the Shutter button again.
Note: the maximum recording time depends on the amount of free space you have on your
memory card, or on the internal memory.
14
Page 17
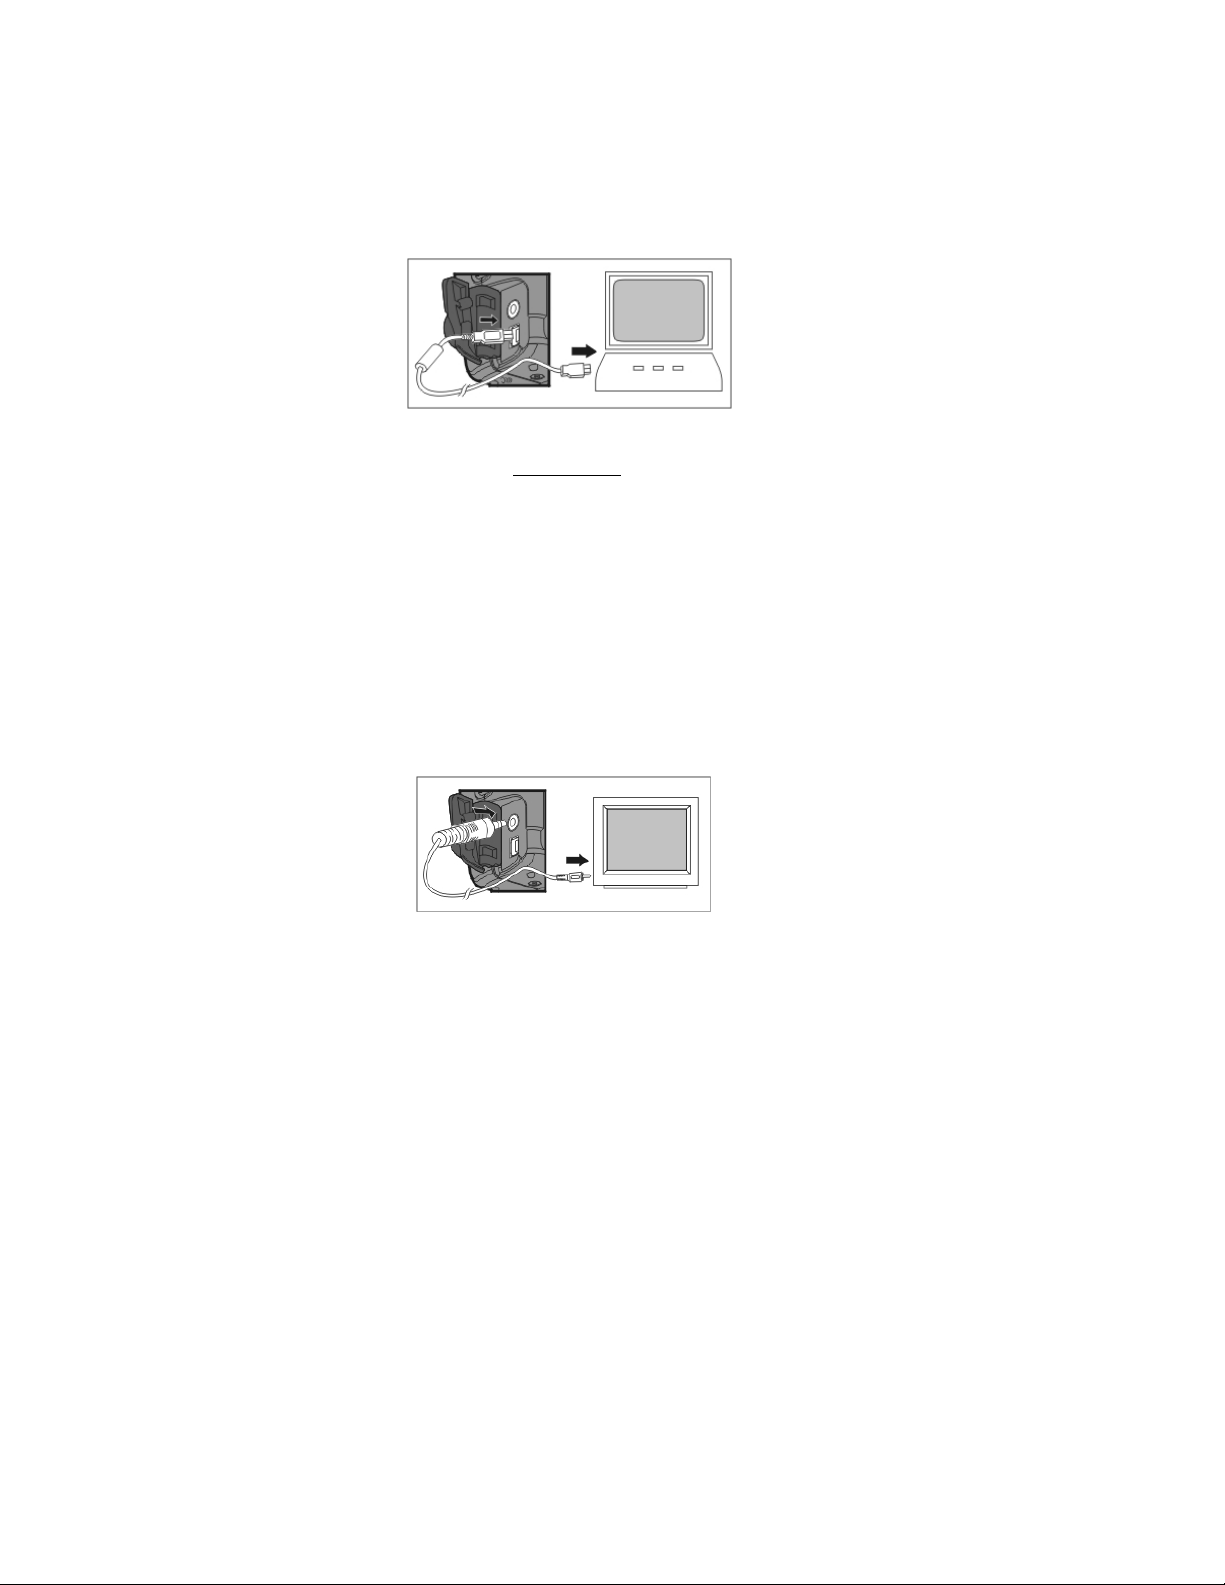
6-5 PC Mode
The PC Mode allows you to download image/video from the StyleCam Pro to your
computer.
Please follow the instructions below to download
the images:
1. Turn the Dial Mode to PC mode.
2. Power ON the camera by sliding the lens cover to the left side.
3. Connect USB will display in the LCD screen.
4. At this point, please use the supplied USB cable to connect the StyleCam Pro to
your computer. To transfer images and video, please refer to Section 8 on
Downloading Images and Video.
6-6 TV Output Feature
The TV Output function allows you to view your pictures on a big TV screen instead of a
computer monitor. Please follow the instructions below to view your pictures on a TV:
1. Select the video type designated for your region (NTSC for USA/Canada, and PAL for
Europe) in the Setup Mode. Please refer to Section 6-1 for detail. Note: you must select
the correct video output type before connecting the device to transfer the images.
2. Connect StyleCam Pro to your TV’s video output port with a video cable (not supplied
with this package).
3. Power ON the camera by sliding the lens cover to the left. Your TV screen should
display the pictures you took with the StyleCam Pro.
Note: the LCD screen will not display any image once you connect the StyleCam Pro to an
image device (e.g. TV). To restore the image on the LCD screen, you need to disconnect the
camera from the TV output.
15
Page 18
7. Software Installation
7-1 Software Overview
The StyleCam Pro bundles the following software:
• StyleCam Pro Mass Storage Driver – easily download the images and videos from the
camera to your computer.
• ArcSoft PhotoImpression – to edit and enhance your digital still images.
• ArcSoft VideoImpression – to edit and organize your digital video files.
• Adobe Acrobat Reader – to view the Owner’s Manual, or any other PDF document.
7-2 Software Installation
Please follow the instructions below to install the bundled software on your computer:
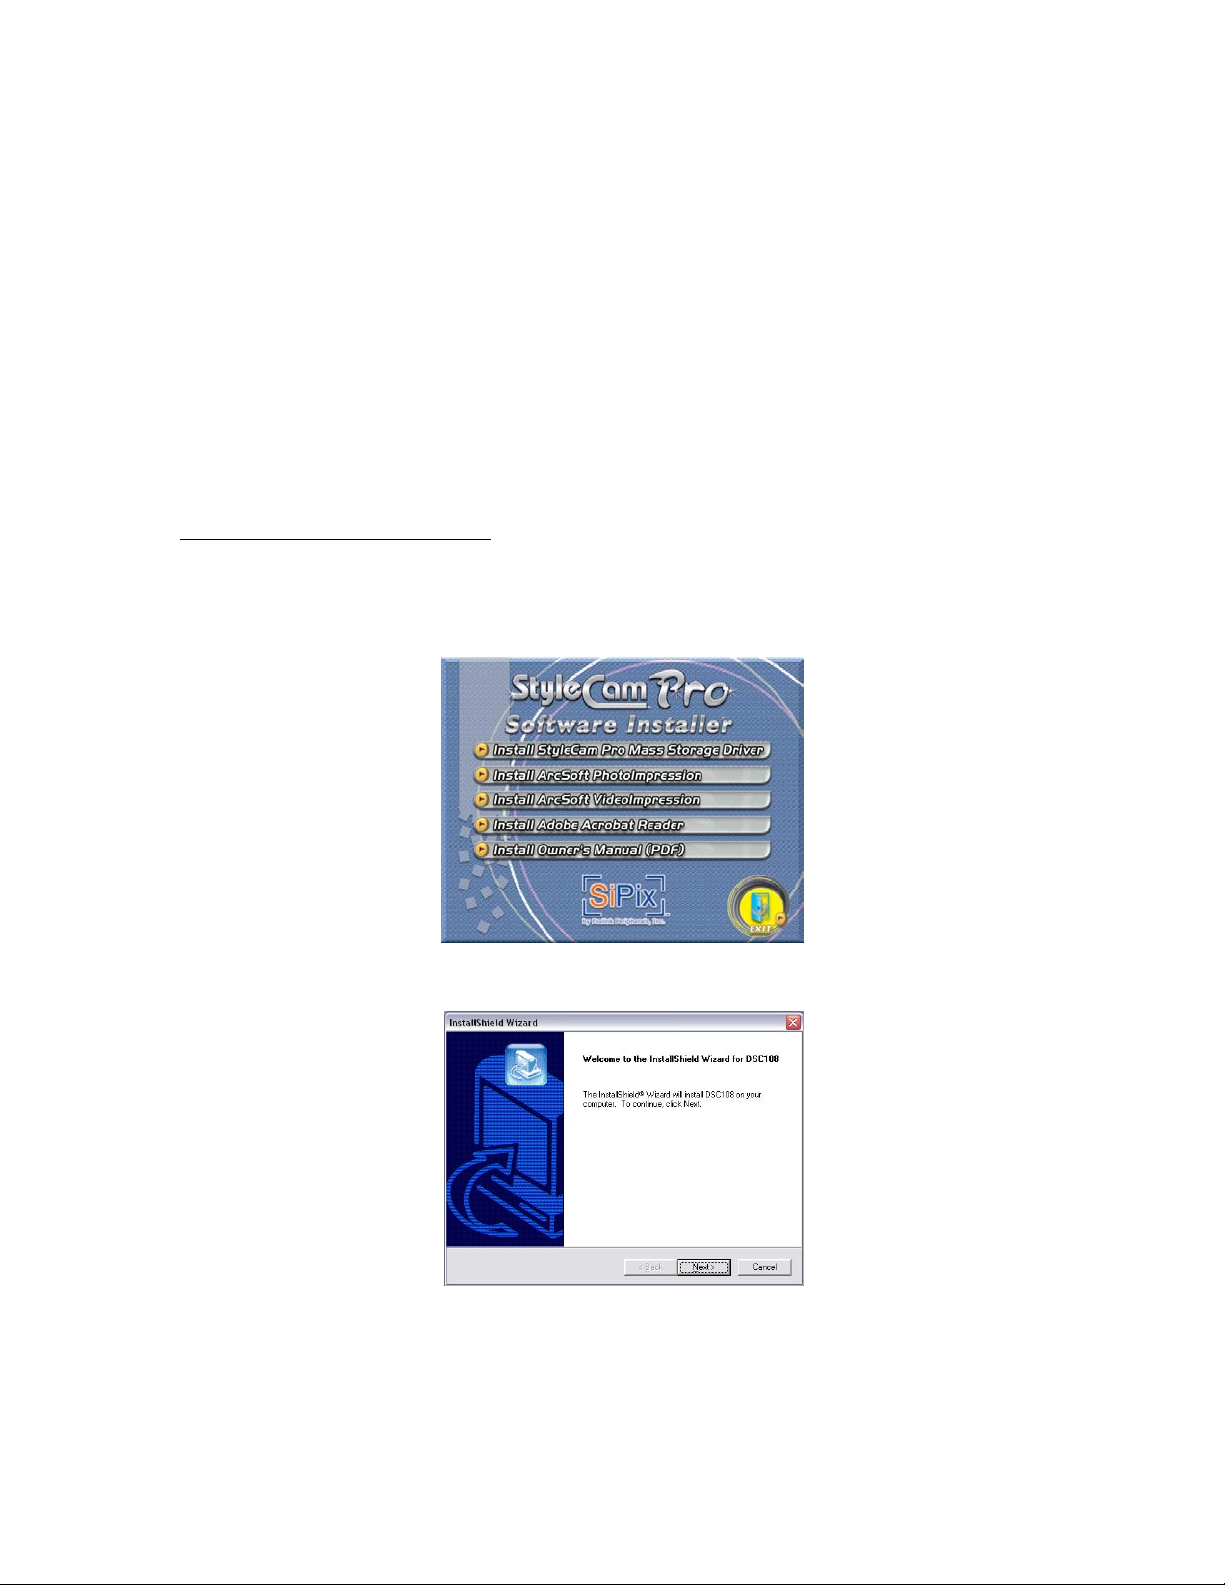
StyleCam Pro Mass Storage Driver
Insert the software CD (included with this package) into the CD-ROM drive of your computer.
The CD should auto-run. Otherwise, go to Start → Run, and type “D:\installmgr.exe” (where
D:\ is your CD-ROM drive) and click OK. The StyleCam Pro Installer screen will appear. Click on
“Install StyleCam Pro Mass Storage Driver”.
1. From the InstallShield Wizard screen, click “Next” to continue installing the driver.
2. The driver will now install and you will see a progress bar.
16
Page 19
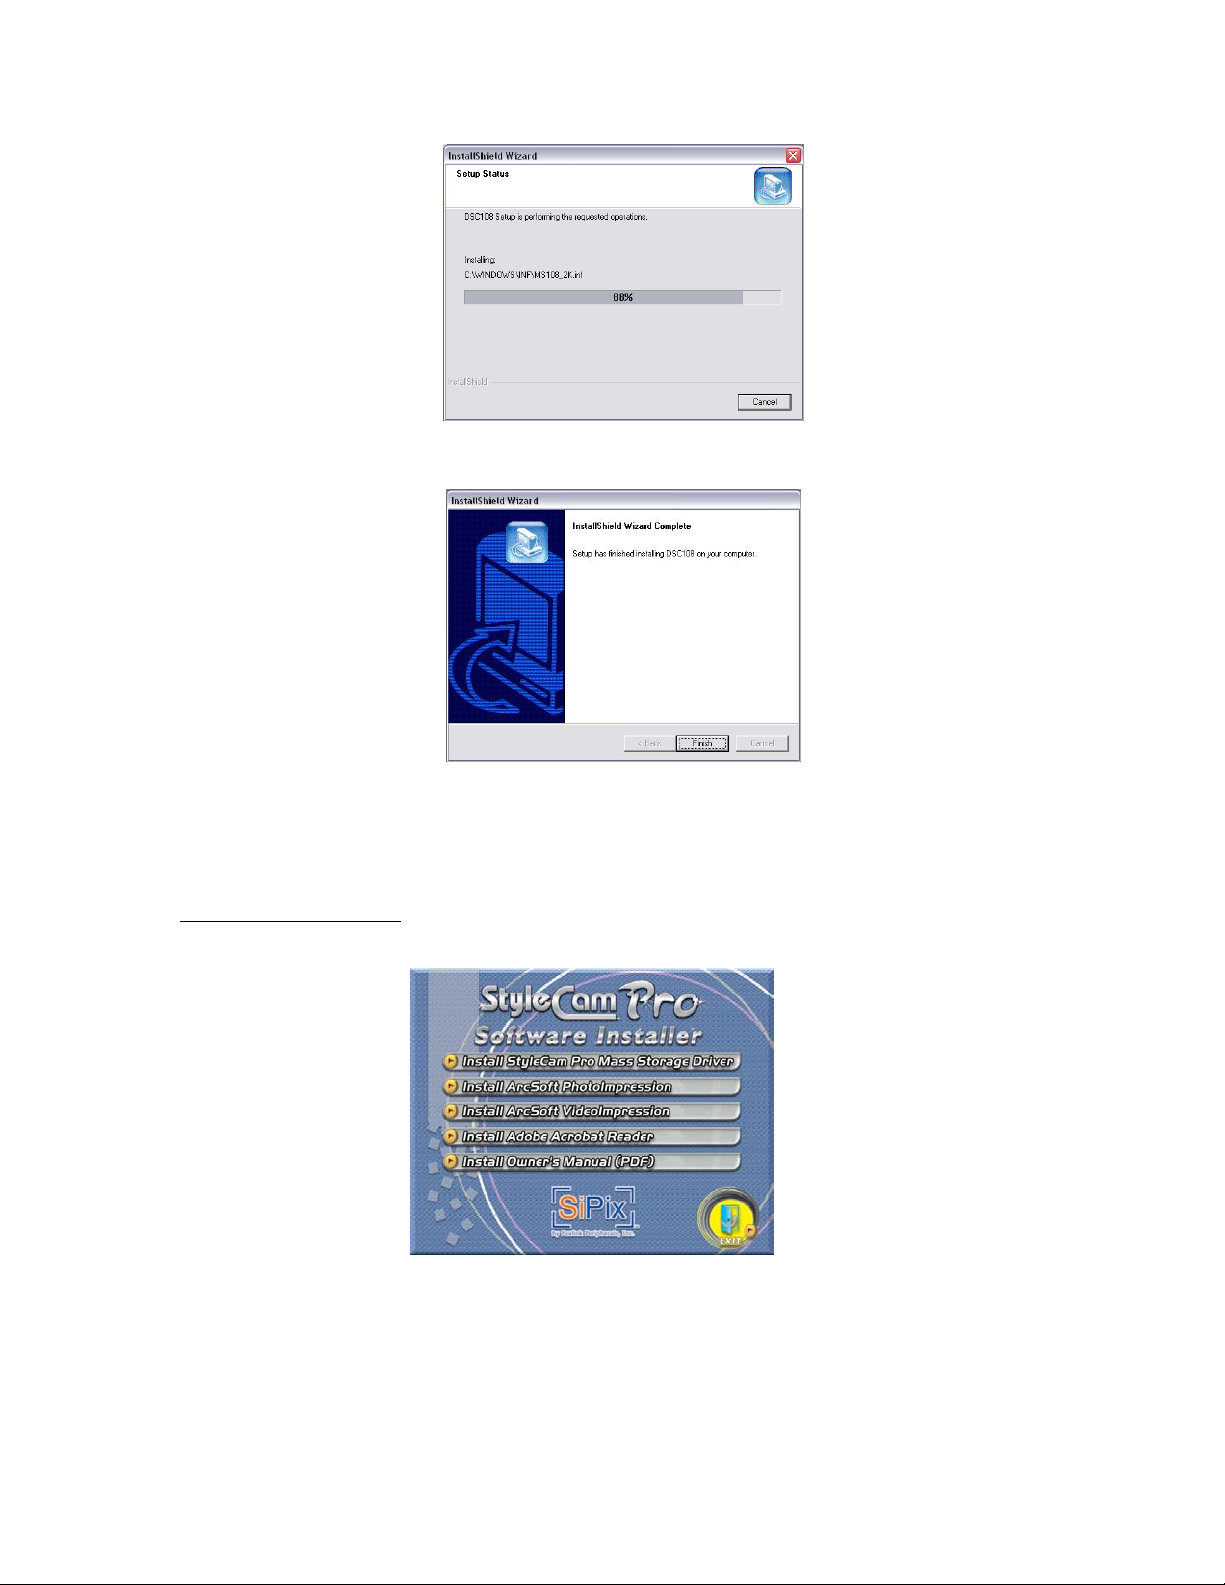
3. Click “Finish” on to complete installing the mass storage driver.
Please follow the instructions below to continue installing the ArcSoft PhotoImpression,
ArcSoft Video Impression and Adobe Acrobat Reader
ArcSoft PhotoImpression
1. From the Installer Menu, click on “Install ArcSoft PhotoImpression”
2. Select the language you want from the drop down list and click OK.
17
Page 20
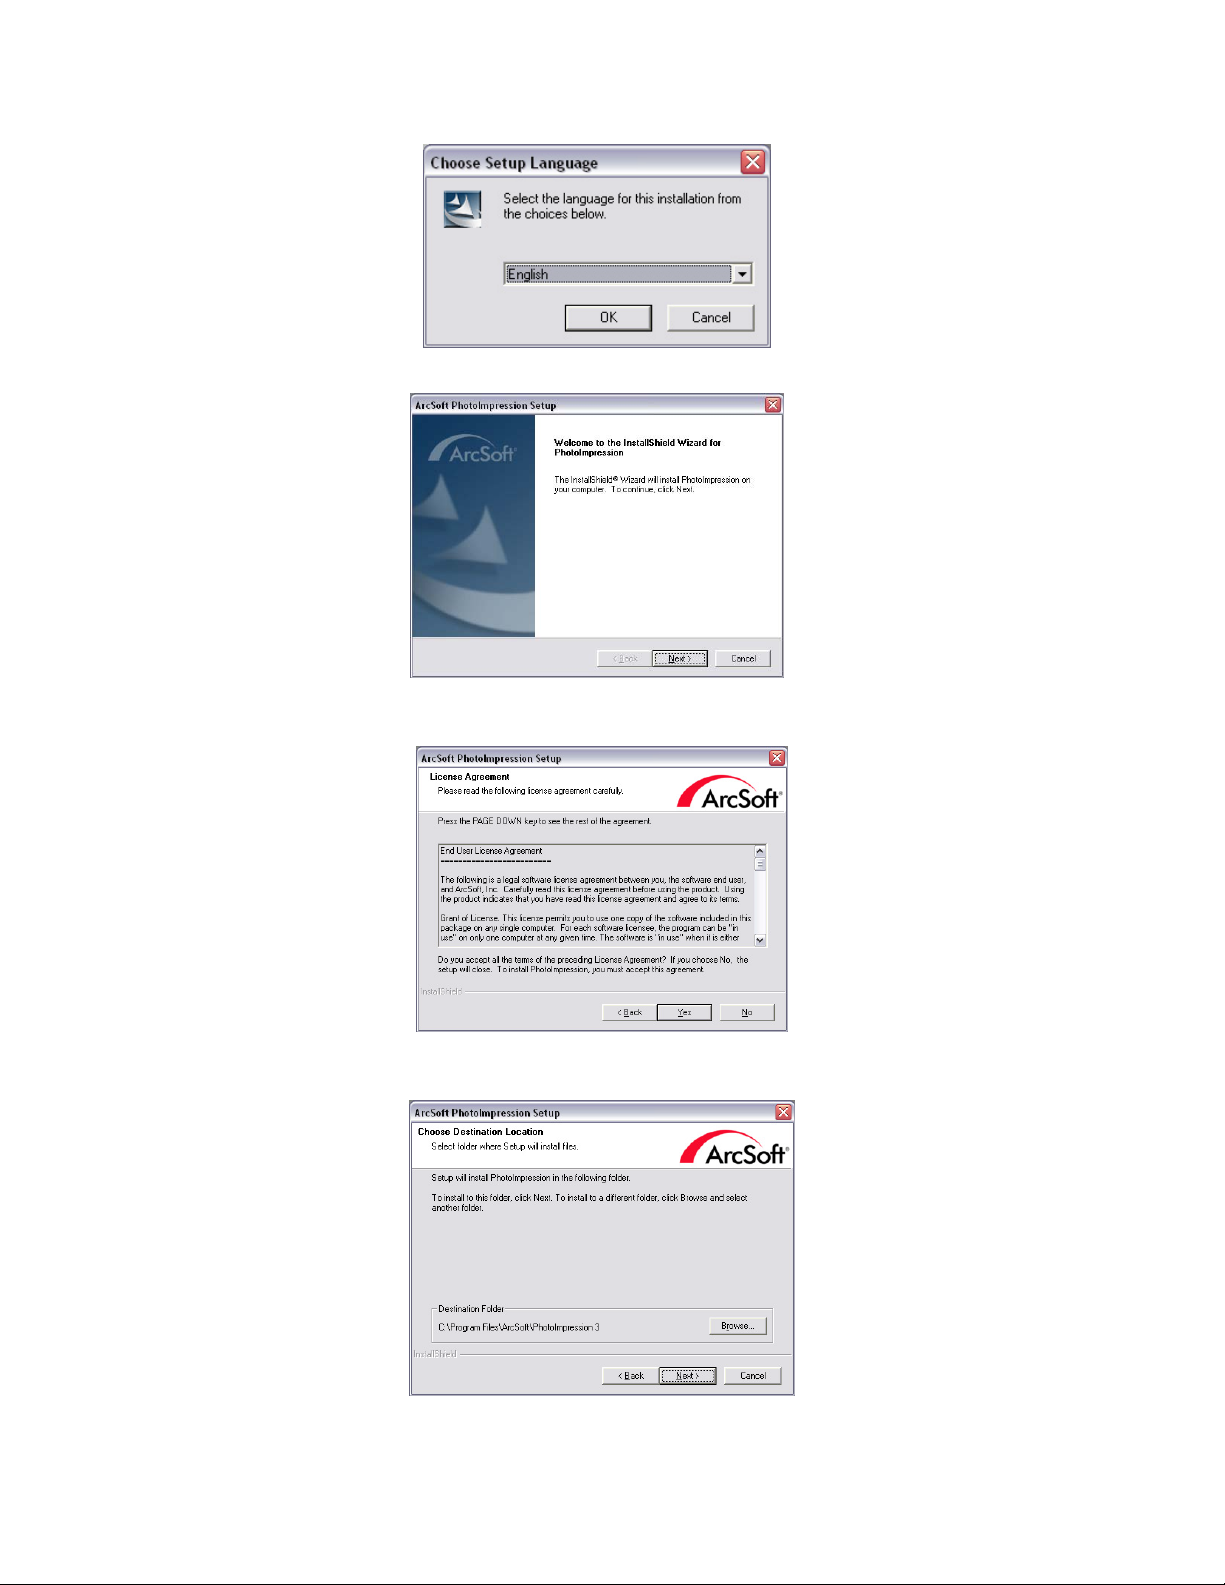
3. Click “Next” on the welcome screen to continue.
4. Click “Yes” to accept the license agreement and continue.
5. Click “Next” to install the application in your C:\ drive.
18
Page 21
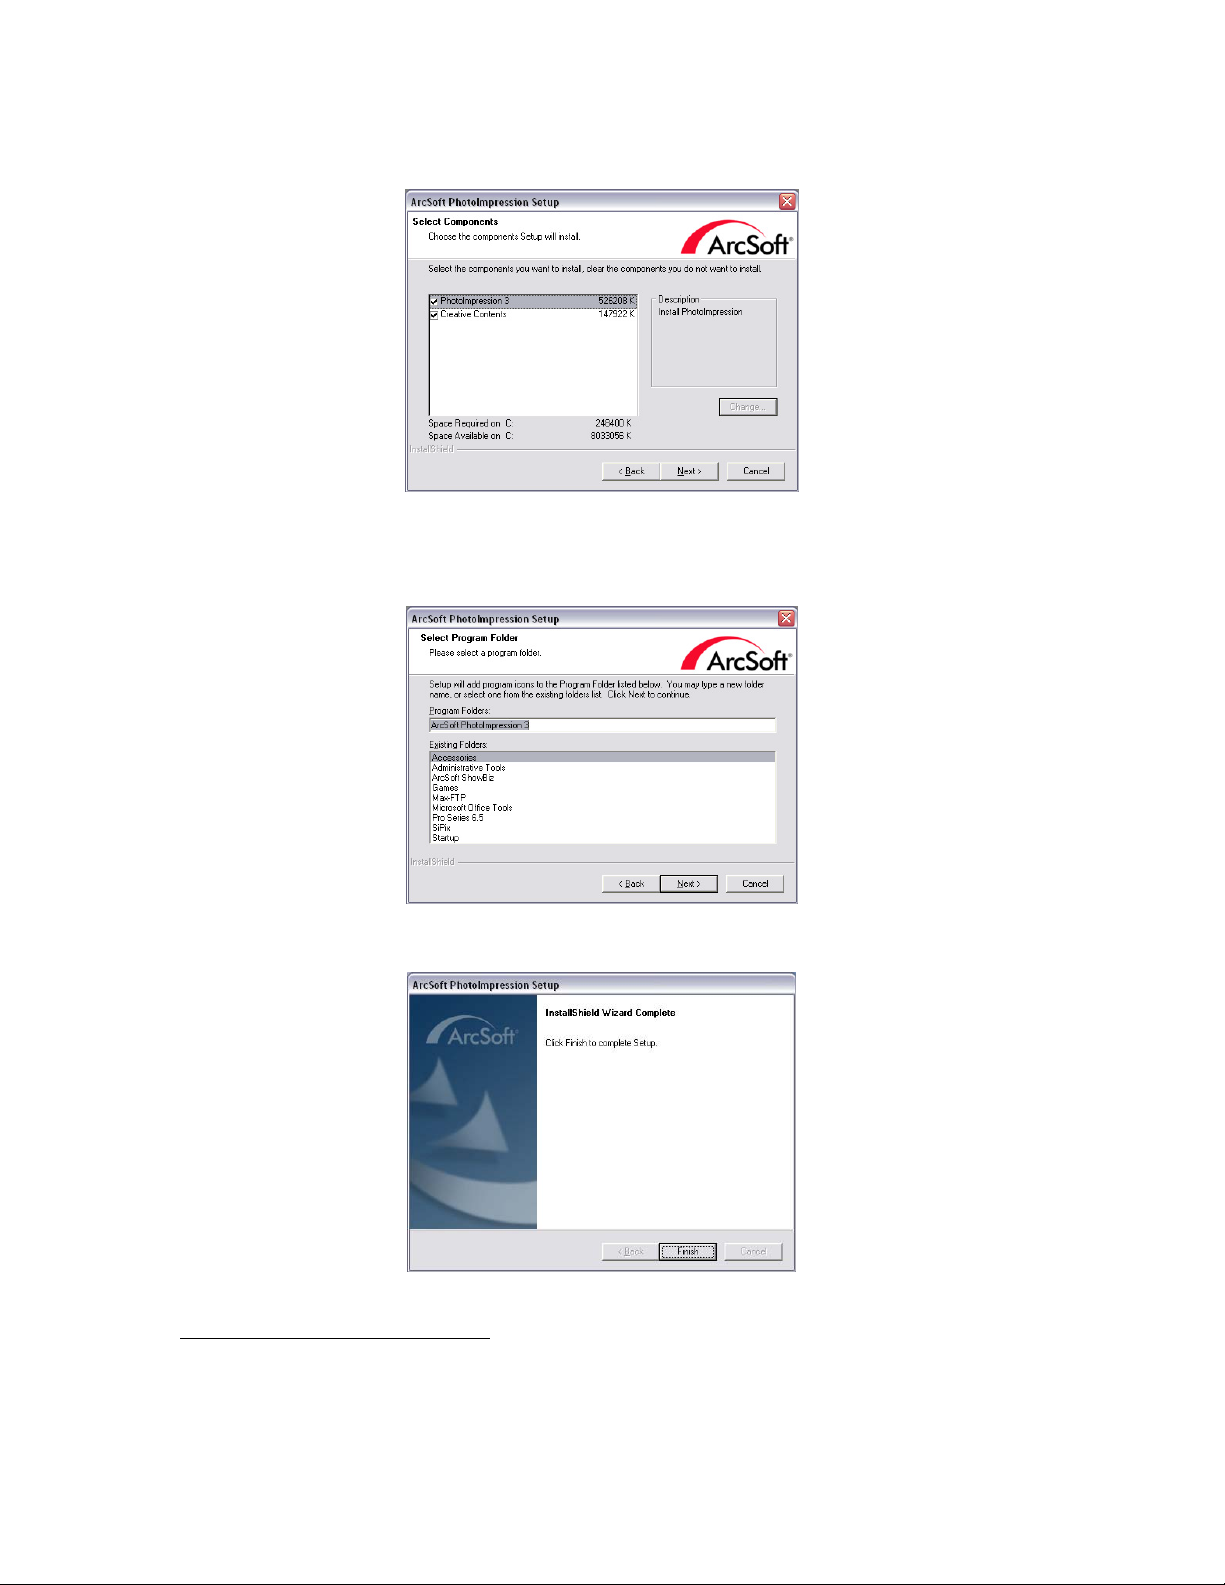
6. Select the components you want and click “Next” to continue.
7. Click “Next” to continue.
8. A progress bar will appear, and when it finishes click “Finish” to complete installation.
Note For Windows 98/98SE Users:
you may be prompted to restart your computer. If you
want to install the ArcSoft VideoImpression and Adobe applications, please ignore this
message by selecting “No, I will restart my computer later” and click “Finish”. Continue to
install ArcSoft PhotoImpression and VideoImpression, and Adobe Acrobat Reader, and
then reboot your system.
19
Page 22
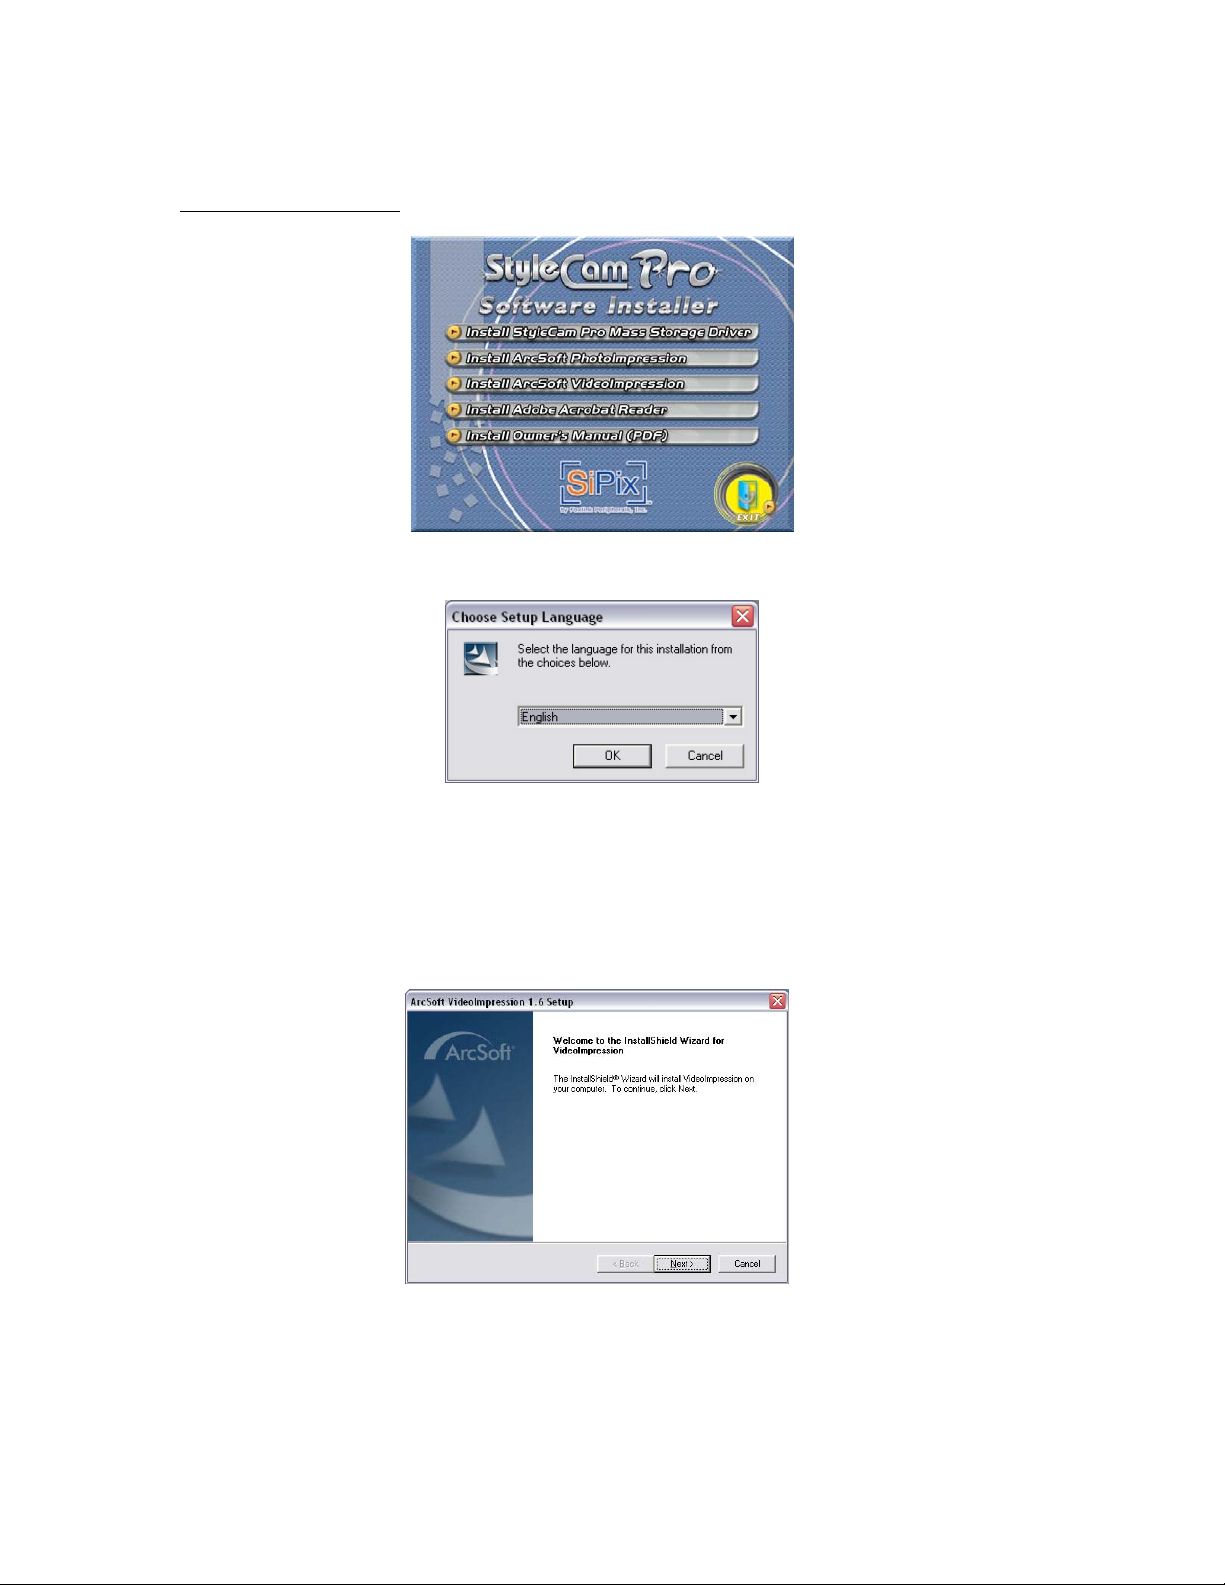
ArcSoft VideoImpression
1. From the Installer Menu, click “Install ArcSoft VideoImpression”
2. Select the language you want and click OK.
3. Click “Next” on the welcome screen to continue.
4. Click “Yes” to accept the license agreement to continue.
20
Page 23
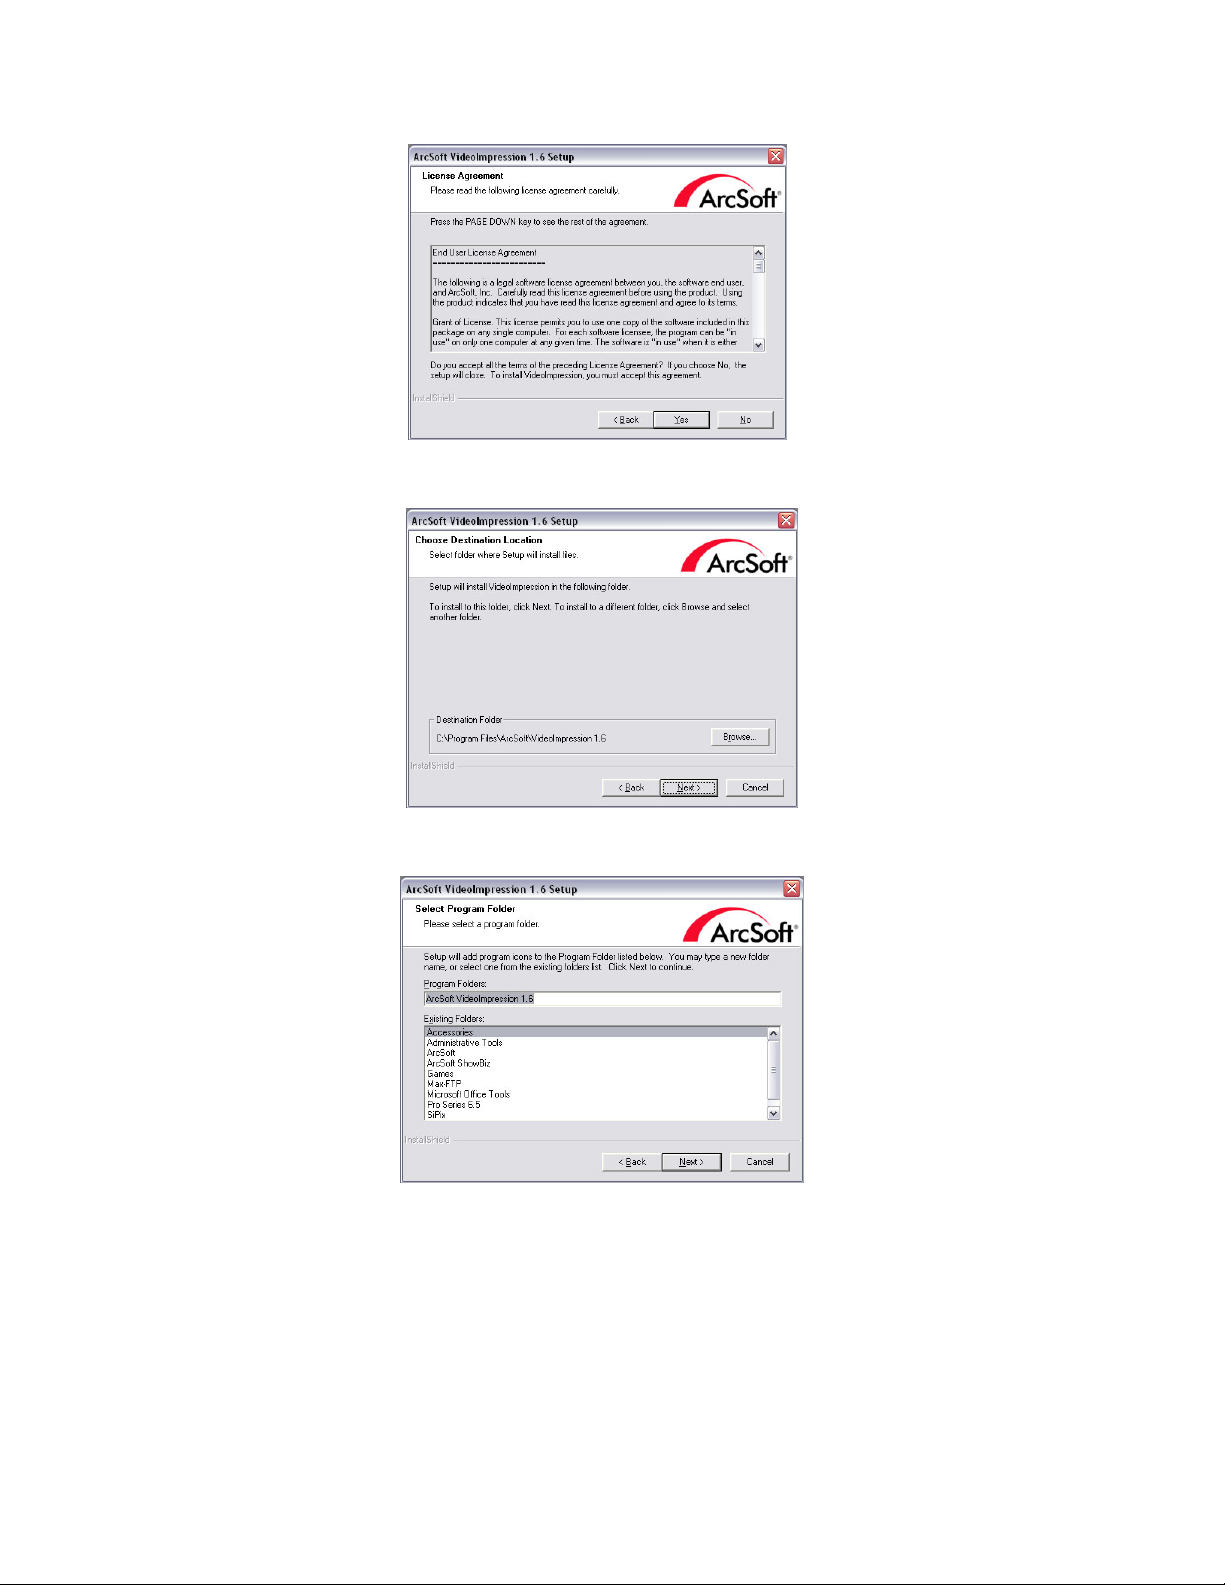
5. To install the application in your C:\ drive, click “Next” to continue.
6. Click “Next” to continue.
7. Click “Finish” to complete setup.
21
Page 24
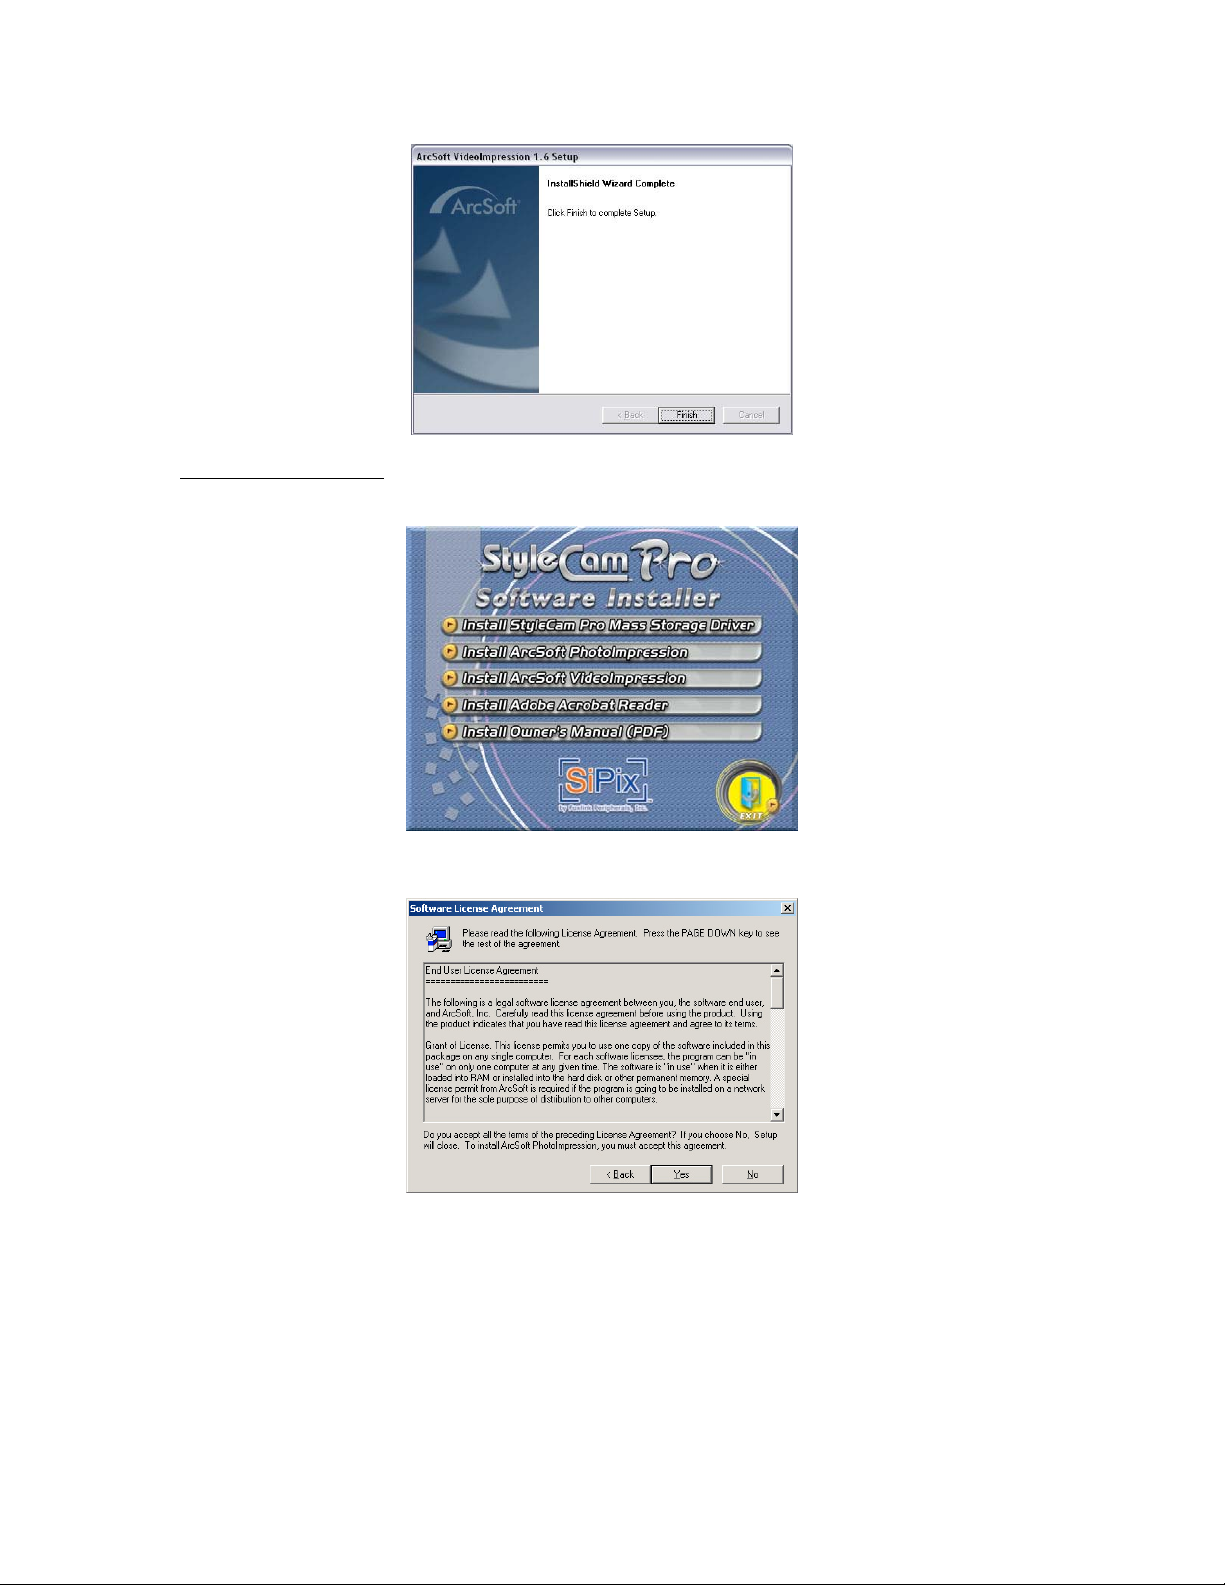
Adobe Acrobat Reader
1. From the Installer Menu, click “Install Adobe Acrobat Reader”
2. Click “Yes” to accept license agreement to continue.
3. Click “Next” to continue.
22
Page 25
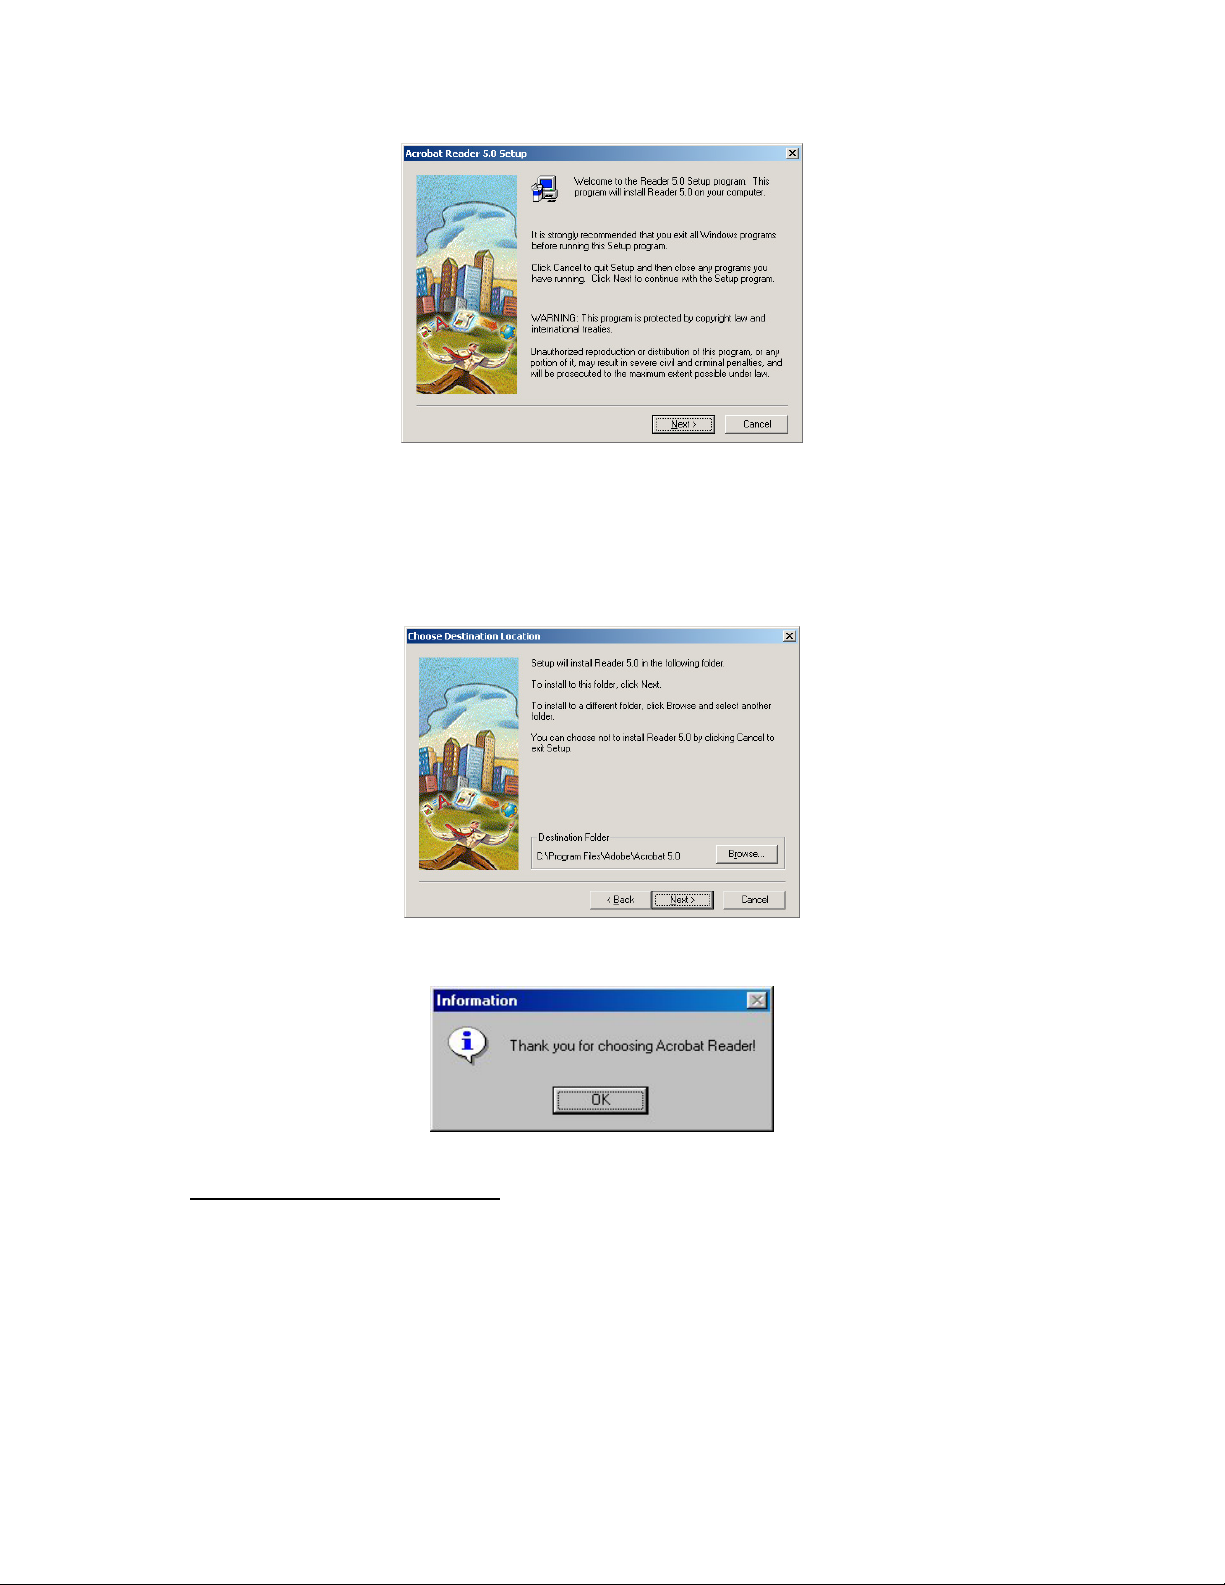
4. To install in your C:\ drive, click “Next” to continue.
5. Click “OK” to complete setup.
Note For Windows 98/98SE Users:
you may be prompted to restart your computer. Please
select “Yes, I will restart my computer now” and click “Finish”.
Note: Please save and close all running programs before restarting your computer.
23
Page 26

8. Downloading Images & Video
8-1 Connecting the Camera to Your PC
To download the pictures and video from your StyleCam Pro to your computer, you must first
connect the camera to your computer with the supplied USB cable. Please follow the
instructions below to connect your StyleCam Pro to your computer.
1. Turn the Mode Dial to PC and power ON the camera.
2. The LCD screen will display Connect USB.
3. Plug in the smaller connector to your StyleCam Pro’s USB port (located on the right
side of the camera)
4. Plug in the larger connector to the USB port located on the back of your computer.
5. Your computer will now detect a new hardware – the StyleCam Pro.
8-2 Installing Hardware Driver
When you connect the StyleCam Pro to your computer for the first time, you will need to install
hardware driver. Please follow the instructions below to install the hardware drivers.
1. Once you connect the StyleCam Pro to your computer, the computer automatically
detects a “new hardware device”.
2. Click “Next” to continue installing the hardware drivers.
3. You will need to install the “Dual Mode Still Camera” hardware driver.
4. When the hardware driver finishes installation. Select “Yes, I want to restart my
computer now” and click “Finish”.
8-3 Downloading Images & Video
After you installed both software and hardware drivers, you’re ready to download and save the
images and video to your computer. Please follow the instructions below to transfer files from
the StyleCam Pro to your computer.
1. Go to My Computer.
2. Locate the new “Removable disk (X:)” (Where X: is the new designated Removable
disk on your computer), and double click to open it. The Removable disk may be “(D)”
or “(E)” depending on how your computer is setup.
3. Double click and open the folder “DCIM”
4. Double click and open the folder “100FSCAM”
5. Your digital pictures and digital video show appear in this folder.
6. Select the image(s) and video(s) that you want to save on your computer.
7. Drag and drop these files into a designated location on your hard drive. You can also
use Copy & Paste to save the files from the camera to your computer.
8-4 Viewing Images & Playing Video
Using ArcSoft PhotoImpression
You can view your photos using ArcSoft PhotoImpression. Please follow the instructions
below to view the images.
1. Open ArcSoft PhotoImpression; go to Start → Programs → ArcSoft → ArcSoft
PhotoImpression 3 → PhotoImpression 3.
2. Click on “Get Photos” button located at the top left corner of the PhotoImpression
screen.
3. Click on “From Folders” on the bottom of the screen, and use the “Browse” button to
locate the images you have saved on your computer.
24
Page 27

4. The pictures will display in thumbnail format on the bottom of the screen. Click the
green OK button to view the picture in full size.
Using Windows Media Player
You can play your digital video with Microsoft Windows Media Player. Please follow the
instructions below to play video with the Media Player.
1. Open Media Player; go to Start → Accessories → Entertainment → Windows Media
Player.
2. Select “File → Open” from the top menu bar.
3. Locate your saved video and click OK.
4. Your video should now play in Windows Media Player.
25
Page 28

How to Take Good Digital Pictures
Taking Pictures On Sunny Days
When taking pictures on a bright sunny day, make sure your subject is facing the sunlight and
not standing back to the sunlight. Standing back against the sunlight may cause dark faces
and comparatively more exposed background.
Avoid having the sunlight to shine from the side of your subject because it may create a
shadow across your subject.
Avoid taking a picture of an area where the sunlight is being reflected (e.g. shinny metal) or
the sunlight is very strong (e.g. yellow may look white in direct sunlight).
When taking pictures in high-contrast lighting (extremely bright areas with extremely dark
shadows), the camera can only expose one of the areas properly. To ensure that the subject
receives the proper exposure, position the subject such that most of the subject is illuminated
evenly (all dark or all bright), and try to fill the picture with as much of the subject as possible.
Taking Pictures Indoors
When taking pictures indoors, make sure there is not a bright light source (sun, window,
lamp) in the picture or behind the subject. The presence of a bright light source in the image
or behind the subject may cause your subject to be improperly exposed.
Remember to use the flash when taking pictures in a setting that does not have sufficient
lighting. For example, insufficient lighting is in a room with only tungsten light, or on a dark
cloudy day.
When taking photos in low light, the camera requires more time to take a picture. Because of
this, it is possible for the image to be blurred by either camera movement or subject
movement. To avoid camera shake, place the camera on a tripod (or table using the
tilt/swivel base) when recording images of stationary subjects, or instruct your subject to
stand very still when recording images of people. The best solution, however, is to increase
the level of ambient lighting, if it is possible.
How to Avoid Blurry Pictures
Hold the camera steady when you take a photo. It helps to rest your hand or elbow on a still
object (ex: car, railing, table) to keep the camera still.
When taking still shots, make sure your subject is not moving.
When taking digital video, hold the camera steadily and move slowly to avoid blurriness and
shaking in the video.
Sufficient Lighting
The Video mode on the StyleCam Deluxe is optimized for recording video in good lighting
conditions. Make sure you have sufficient lighting in the area where you want to take a video
clip. For indoor settings, it is good to have a bright lamp to illuminate the room so that you
How to Take Great Digital Vi
26
Page 29

can capture as much detail as possible, and that your subject will not become too dark in the
video. If it is daytime, make sure there is enough natural sun light in the room. Open windows
and turn on lights to ensure adequate lighting.
Taking video in dim lighting conditions can lead to poor quality video or a decrease in frame
rate. We suggest trying different lighting levels before trying to take video that will be very
important for you to keep. This way you will know if you need more light before losing that
special clip.
Hold the Camera Steady
The StyleCam Deluxe is very compact and light-weight and it is important that you hold the
camera steady when recording a video. Jiggling the camera or moving fast with the camera
may cause the video to blur or to shake.
For better video quality, we recommend that you use a tripod and place the tripod with the
camera on a flat surface.
Change of Light Source
When capture a video, the camera needs time to adjust to new light source. The camera may
not change light metering if you move from one area to another. For example, if you want to
take a video from a darker setting (e.g. inside a room) to a brighter setting (in the backyard),
we recommend that you end the video first, and then start another clip. This would give the
camera a chance to adjust to the new light source.
Proper Use of Camera
It is important that you understand how to use the camera completely before capturing a
video. When starting the video clip, press the shutter button slowly and firmly. Pushing it fast
will lead to the first few seconds of the video to become wobbly while you adjust the camera
into the proper position.
27
Page 30

Product Specifications
Image sensor 1.3 million pixels CMOS sensor
Internal memory 8MB flash memory
Image resolution Superfine Fine Economy
1600x1200 * 1280x1024 640x480
Image capacity ** Superfine Fine Economy
14 20 80
Video resolution 320x240
Maximum video
length
Video frame rate Up to 25 fps
Lens F=8.5mm
Focus Auto focus
Lens aperture F3.5
Normal focal length 23.6” (0.6m) ~ infinity
Macro focal length 7.9” (0.2m) ~ 23.6” (0.6m)
Zoom 2X continuous digital zoom
Shutter speed ¼ ~ 1/2000 seconds
LCD 1.5” TFT color display
Flash Auto, off, red-eye reduction
Self-timer 10 seconds
Exposure
compensation
White balance Auto, sun, tungsten, fluorescent
File format JPEG (still), AVI (video)
DPOF Yes
Date/time stamp Yes
Power source 2 x AA alkaline battery (or optional rechargeable)
Video output NTSC/PAL
Computer interface USB v1.1 mass storage
Camera dimension 3.2 oz. (100g) without batteries
Camera weight 3.7”x2.2”x1.5” (93x56x38mm)
Support OS Windows 98/98SE/ME/2000/XP
* On camera interpolation from 1.3MP
** Based on 8MB internal flash memory
Dependent on available memory
+/- 2EV in ½ increment
USB BUS-powered
28
Page 31

Troubleshooting
If you encounter problems with your StyleCam Pro please refer to the following help guide
to troubleshoot your camera.
Symptoms Problems Solutions
I cannot upload images
to the PC
Connection
failure
Check to ensure that all
connections are secured.
My computer cannot
detect the StyleCam
Deluxe
USB connection
failure
Check your Device Manager in
My Computer. Or use the USB
Doctor program provided by
the SiPix Technical Support.
www.sipixdigital.com/support.
Go to
I get a blurred image
when uploading my
images to my
computer.
There may be a
momentary
delay between
pressing the
Hold your StyleCam Pro
steady to take a picture. The
second beep indicates the
exposure is completed.
shutter button
and the actual
exposure.
My computer cannot
detect the StyleCam
Pro.
USB connection
failure.
Use the USB Doctor program
provided by the StyleCam Pro
to fix USB connection failure.
Insert the software CD into
your CD-ROM drive, go to My
Computer, and double click on
D:\ (where D:\ is your CD-ROM
drive). Open a folder called
“Utilities”; the USB Doctor
program is located inside this
folder. Double-click on the USB
Doctor icon to execute the
program, and follow the on-
screen instructions to use the
application.
For further technical assistance please visit our technical support website at
www.sipixdigital.com/support
29
Page 32

One Year Limited Warranty – USA & Canada
SiPix, a Foxlink Peripherals, Inc. brand, warrants this hardware product against defects in
material and workmanship for a period of one year from the original date of purchase as identified
on the proof of purchase (your receipt). It is the end-user’s responsibility to make certain this
product is in working condition with the intended computer system within the one-year warranty
period.
These are the sole remedies and SiPix’s sole liabilities for performance or failure to perform of the
product. SiPix reserves the right to change its warranty policy at any time for all products
distributed after the date of such change in warranty. Except as set forth above, all other
warranties whether express or implied, including but not limited to, the implied warranties of
merchantability and fitness for a particular purpose are hereby excluded.
SiPix shall not be liable for incidental, special or consequential damages arising out of or related
to the use or performance of the product, including, without limitation, loss of data or use of data
processing facilities or equipment, regardless of whether SiPix may have been advised about the
possibility of such damages arising out of use of the product shall be limited to the amounts paid
by purchaser for such product.
This warranty is only valid within the boundaries and territories of the USA and Canada. SiPix is
not responsible for costs incurred due to shipping, insurance, customs, or duties. SiPix is not
responsible for non-traceable packages or packages shipped without a valid RMA number on the
outside of the package.
This warranty does not apply if the product has been damaged by an accident, electrical fault,
through misuse or abuse. If the product has been altered without written authorization from SiPix,
the warranty will be void.
This warranty applies only to hardware products manufactured by or for SiPix. Warranted
products must bear the “SiPix” brand name, trade name, or logo. The aforementioned warranty
and remedies are exclusive, and in lieu of all others, whether oral, written, expressed or implied.
SiPix specifically disclaims any and all implied warranties of merchantability and fitness for a
particular purpose.
SiPix is not responsible for incidental or consequential damages resulting from any breach of
warranty. SiPix is not responsible under any other legal theory, including, but not limited to lost
profits, and any cost of recovering reprogramming or reproducing any program or data stored in
or used with SiPix products.
30
Page 33

Warranty Service – USA & Canada
If your SiPix product needs to be returned for repair, you must contact SiPix technical support
prior to shipment for an RMA number before sending in the product. The RMA number is a
Return Merchandise Authorization number. SiPix will refuse all shipments without a
proper RMA number. The RMA number MUST be printed on the outside of the original shipping
carton in large print written in black ink next to the shipping label. Failure to properly pack
shipment could cause serious damage to the product and void the warranty.
Should any defect(s) be discovered, the product may be returned to SiPix with a valid RMA
number. If you are returning product for repair, please be sure to do the following:
1. Call SiPix Customer Support Mon-Fri during regular business hours at 510.651.9199 and
obtain an RMA (Return Merchandise Authorization) number.
2. Print your RMA number on the OUTSIDE of the original shipping carton in large print
written in black ink next to the shipping label.
3. Include a copy of the bill of sale with the returned product.
4. Unless otherwise instructed, do not return any manuals or software when returning items
for repair.
5. Ship to SiPix via a traceable shipping method and retain the tracking number.
Note: This product is intended for use only within the boundaries and territories of the United
States and Canada. If you purchased this product in Mexico or South America and need
assistance or repair, you must contact your originating reseller for service and support. SiPix,
Fremont CA, will not accept any shipments from outside the boundaries and territories of the USA
and Canada. SiPix often bundles many different third party software options with its products. If
any of these options were ordered with your SiPix product and they appear to be missing or
incorrect, contact your reseller immediately.
31
Page 34

Technical Support – USA & Canada
SiPix provides technical support at no cost during the one-year warranty period. Users with
questions or concerns of a technical nature should first refer to the product manual, as usage and
troubleshooting information is provided in detail. For additional information or assistance, users
should visit the SiPix Web-site, as tutorials, updated drivers, frequently asked questions and
news updates are available. www.sipixdigital.com/support
Should you require further assistance, you may contact SiPix technical support representatives
by calling 510.651.9199.
SiPix Technical Support is available from 8 AM to 6 PM PST, Monday through Friday, excluding
holidays.
32
 Loading...