

Page 1
Page 2

About this manual
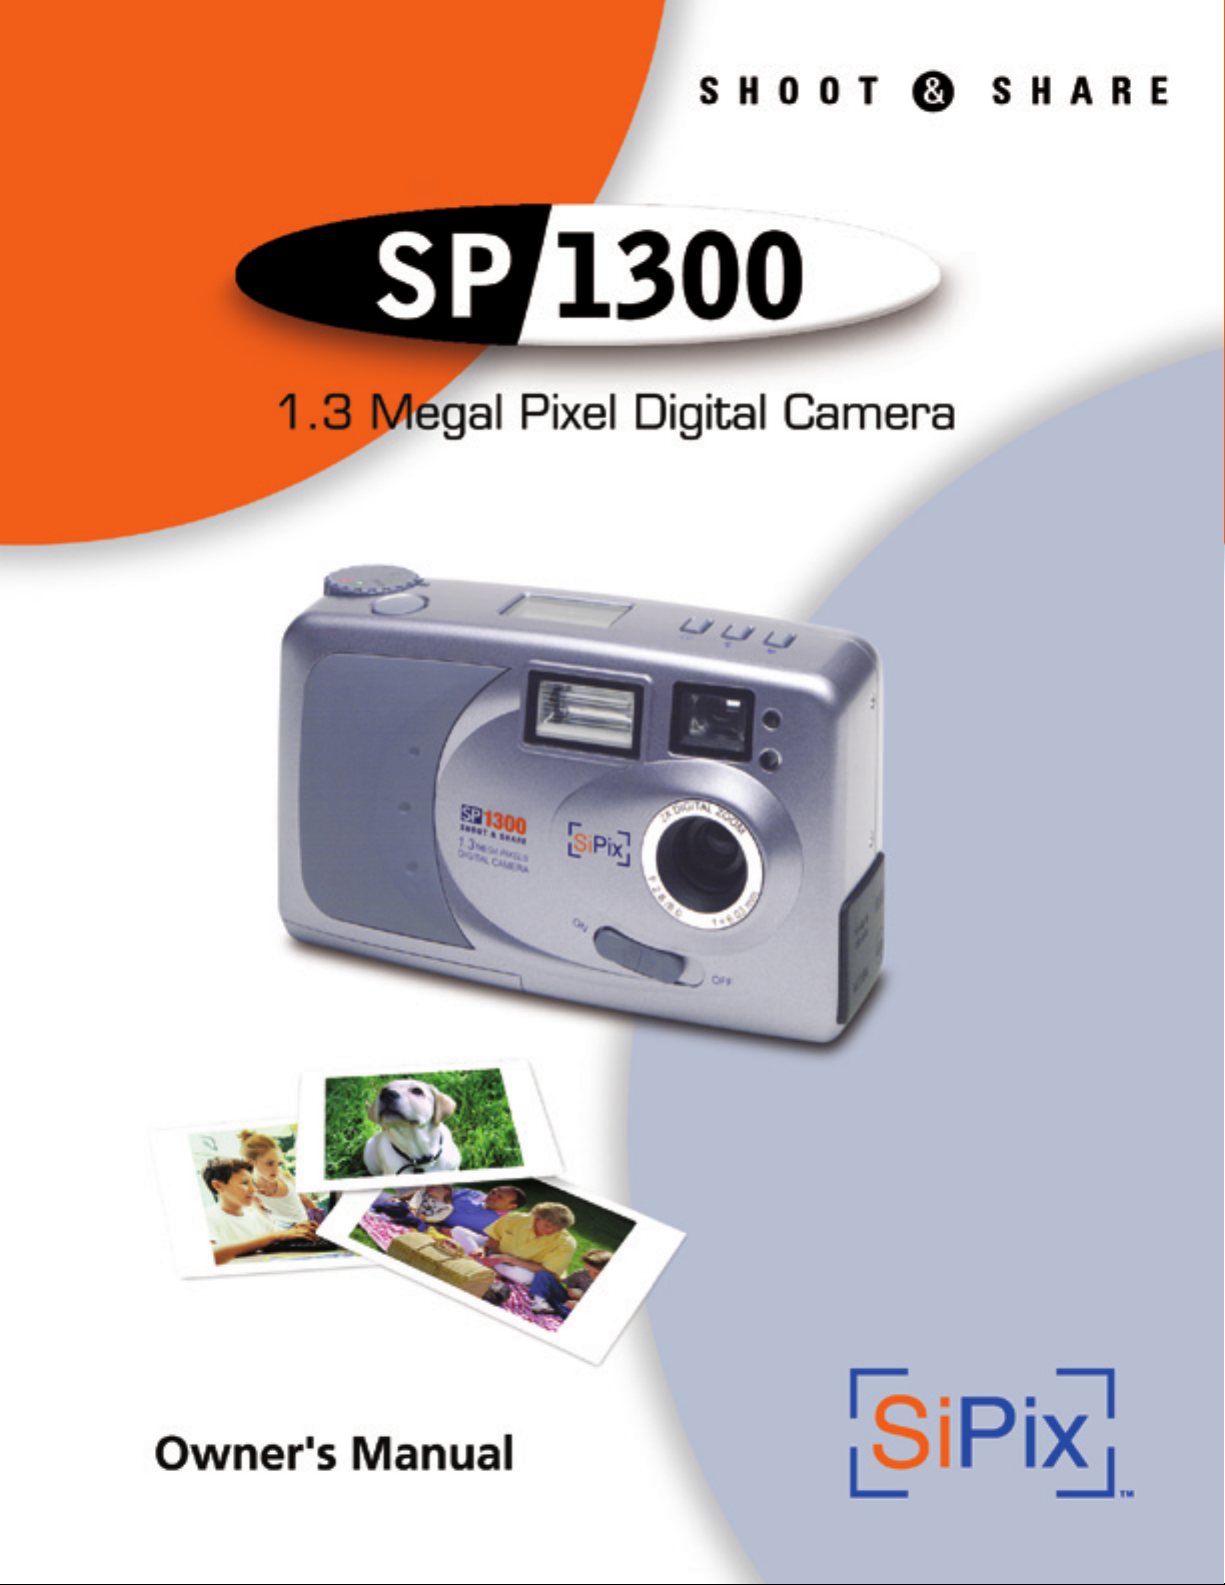
This manual is designed to assist you in using the SiPix SP-1300 digital camera. Information in this
document has been carefully checked for accuracy; however, no guarantee is given to the correctness of the
contents. The information in this document is subject to change without notice.
Edition
First Edition, July 2001
Copyright
© Copyright 2001
This document contains proprietary information protected by copyright. All rights are reserved. No part of this
manual may be reproduced by any mechanical, electronic or other means, in any form, without prior written
permission of the manufacturer.
Federal Communications Commission (FCC) Compliance
This equipment has been tested and found to comply with the limits for a Class B digital device, pursuant to
Part 15 of the FCC Rules. These limits are designed to provide reasonable protection against harmful
interference in a residential installation. This equipment generates, uses, and can radiate radio frequency
energy and, if not installed and used in accordance with the instructions, may cause harmful interference to
radio communications. However, there is no guarantee that interference will not occur in a particular
installation. If this equipment does cause harmful interference to radio or television reception, which can be
determined by turning the equipment off and on, the user is encouraged to try to correct the interference by
one or more of the following measures:
♦ Reorient or relocate the receiving antenna.
♦ Increase the separation between the equipment and the receiver.
♦ Connect the equipment to an outlet on a circuit different from that to which the receiver is
connected.
♦ Consult the dealer or an experienced radio/TV technician for help.
Warning: A shielded-type power cord is required in order to meet FCC
emission limits and to prevent interference to the nearby radio and television
reception. Use only shielded cables to connect I/O devices to this equipment.
You are cautioned that changes or modifications not expressly approved
by the party responsible for compliance could void your authority to
operate the equipment.
ii
Page 3

Declaration of conformity
This device complies with part 15 of the FCC rules. Operation is subject to the following conditions:
♦ This device may not cause harmful interference.
♦ This device must accept any interference received, including interference that may cause
undesired operation.
Canadian Department of Communications
This class B digital apparatus meets all requirements of the Canadian Interference-causing Equipment
Regulations.
Cet appareil numérique de la classe B respecte toutes les exigences du Réglement sur le matériel brouilieur
du Canada.
Trademark recognition
Microsoft MS-DOS and Windows are registered trademarks of Microsoft Corp.
Other product names used in this manual are the properties of their respective owners and hereby
acknowledged.
Safety and handling precautions
Camera information
♦ Do not take apart or attempt to service the camera yourself.
♦ Do not expose the camera to moisture, or extremes in temperature.
♦ Let the camera warm up when moving from a cold to a warm temperature.
♦ Do not touch the lenses of the camera.
♦ Do not expose the lens to direct sunlight for extended periods.
Battery information
♦ Turn off the camera before installing or removing batteries.
♦ Use only AA alkaline, lithium, or rechargeable NiMH batteries.
♦ Always replace batteries with four new or freshly charged batteries.
♦ Do not use batteries that are leaking, corroded, or damaged.
♦ Do not attempt to recharge non-rechargeable batteries.
♦ When charging rechargeable batteries, use a battery charger specifically designed for the type
of battery. If the charger is designed to accommodate multiple battery types, be sure to adjust its
settings to match the type of battery you are recharging.
♦ Remove the batteries from the camera if you are going to store it for extended periods.
iii
Page 4

Table of Contents
Getting Started ………………………………………………………………………………1
Identifying Components……………………………………………………………………. 3
Identifying Components: Mode Selector & LCD.…………………………………………4
Inserting & Removing Batteries…………………………………………………………….6
Inserting & Removing CompactFlash card………………………………………………..7
Using the LCD Monitor………………………………………………………………………8
Setup Mode Screens………………………………………………………………………...9
Camera Setup & Basic Operation…………………………………………………………13
Capture Mode Screens……………………………………………………………………..16
Playback Mode Screens……………………………………………………………………19
Photo Control………………………………………………………………………………..22
Print Mode Setup & Operation…………………………………………………………….26
Connecting to AC Adapter..………………………………………………………………..37
Installing Software…………………………………………………………………………..38
Connecting to Your PC……………………………………………………………………..43
Downloading Pictures to Your PC…………………………………………………………45
Connecting to PocketColor 100 or 200 Printer..………………..………..………………47
Troubleshooting & Specifications………………………………………………………….48
Warranty……………………………………………………………………………………...51
Warranty Service…………………………………………………………………………….52
Technical Support………………………………………………………………….…..……53
Page 5

GGeettttiinngg SSttaarrtteedd
IInnttrroodduuccttiioonn
Congratulations on your purchase of the SP-1300 Shoot & Share digital camera! Your SP-1300
camera has been ergonomically designed to allow you to quickly and easily take high-quality
digital pictures without the trouble of buying and developing film.
With a 1.3 Mega Pixel CCD image sensor you are assured of clear, high-resolution pictures that
can be printed, displayed on your web site, or sent to others through e-mail.
The supplied software and drivers enable you to easily download your pictures to your PC.
With the application software you can edit your pictures with tools such as sharpen, smooth, red
eye correction, and brightness and contrast adjustment. Other tools include special effects,
which will allow you to flip images, shear them, and turn them into cylinders. The USB cable
allows you to easily download your pictures to your computer where you can use the enclosed
software to perform image-processing tasks.
Unpacking the SP-1300 camera
Upon receiving your SP-1300 camera, open the carton and carefully remove the contents. If
anything is missing or damaged, please contact your reseller immediately. Your package should
contain the following items:
• SP-1300 Shoot & Share digital camera
• Camera hand strap
• USB cable
• Four AA alkaline batteries
• 8MB CompactFlash™ card
• Quick Start Guide
• CD-ROMs containing:
• MGI PhotoSuite III SE
• SP-1300 Camera Driver
• SP-1300 Owner’s Manual (PDF)
• Adobe Acrobat Reader
Do not throw the packaging box away. You may need it later if you ever have to ship the SP1300 camera.
1
Page 6

SP-1300 Key Features & Accessories
Features
The SP-1300 digital camera comes with the following advanced features:
• 1.3 Mega Pixel CCD image sensor
• 1.8-inch TFT (Thin Film Transistor) color LCD
• Auto exposure and flash
• Adjustable self-timer
• CompactFlash card slot
• USB mass storage interface
Accessories & optional accessories
You can purchase the following optional accessories to enhance the operation of the SP1300 camera:
• 8MB CompactFlash™ card (included)
• MGI PhotoSuite III SE photo editing software
• Tripod
• AC adapter (6 - 7V, 2A, center positive)
• CompactFlash™ card (up to 32MB)
• PocketColor 100 printer
• PocketColor 200 printer
System requirements
For optimal use with the SP-1300, your computer should have the following minimum
system requirements:
If using a computer:
• IBM PC compatible with a Pentium 200 or higher
• Microsoft Windows 98/98SE/ME/2000
• 32MB RAM
• 90MB of hard drive space
• USB port
• CD-ROM drive
• SVGA monitor (800 x 600)
If using an optional portable color printer:
• SiPix PocketColor 100
or
• SiPix PocketColor 200
2
Page 7
N
b
r
b
IIddeennttiiffyyiinngg CCoommppoonneennttss
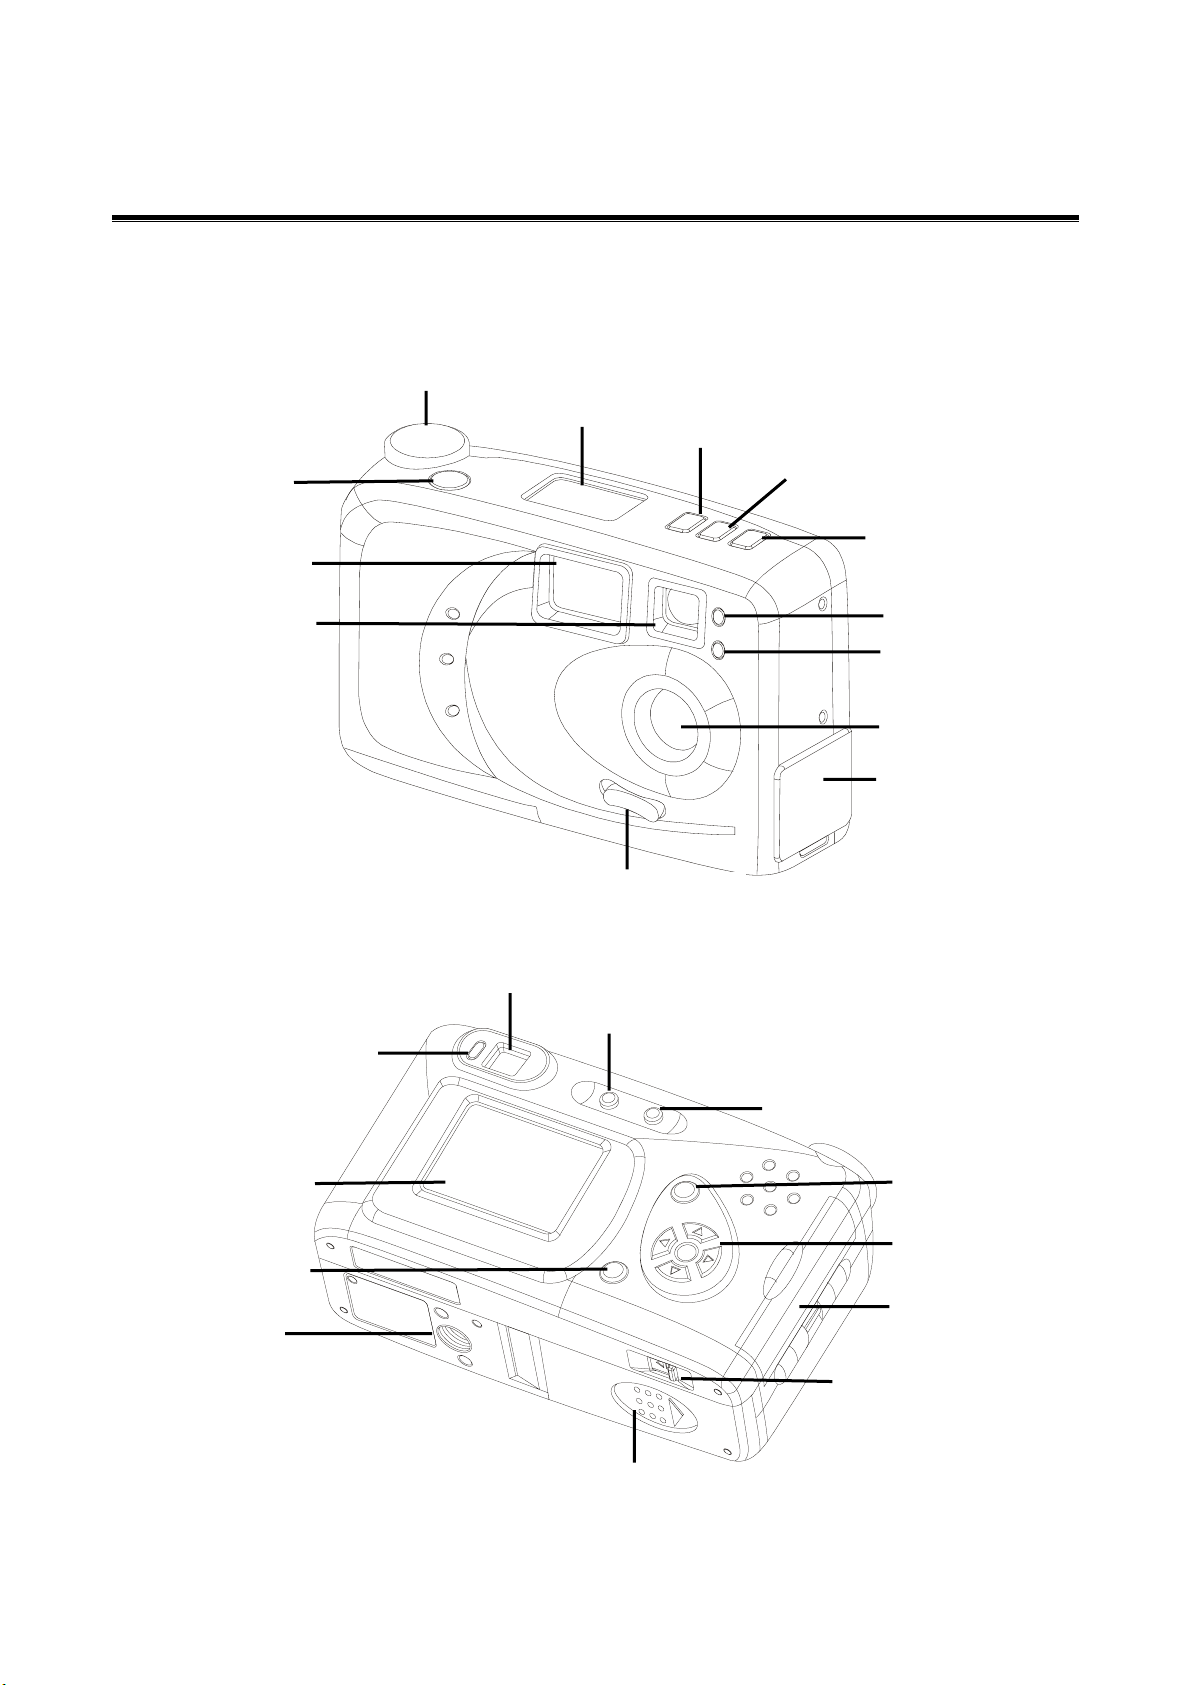
Please refer to the following illustrations to identify SP-1300 components:
Front View
Mode Switch
Shutter release
utton
Flash
Viewfinder
LCD status
display
Self-timer
button
Flash
utton
Resolution
button
Photo sensor
Self-timer
indicato
Lens
Back View
LCD color
monitor
LCD Display
button
Standby LED
Tripod
socket
Viewfinder
ON/OFF switch
(lens cover)
Print button
Connector cover
- USB cable
- AC adapter
Exposure button
MENU/OK button
avigator
buttons
CompactFlash
cover
CompactFlash
card eject switch
Battery
compartment
3
Page 8
g
IIddeennttiiffyyiinngg CCoommppoonneennttss:: MMooddee SSeelleeccttoorr && LLCCDD
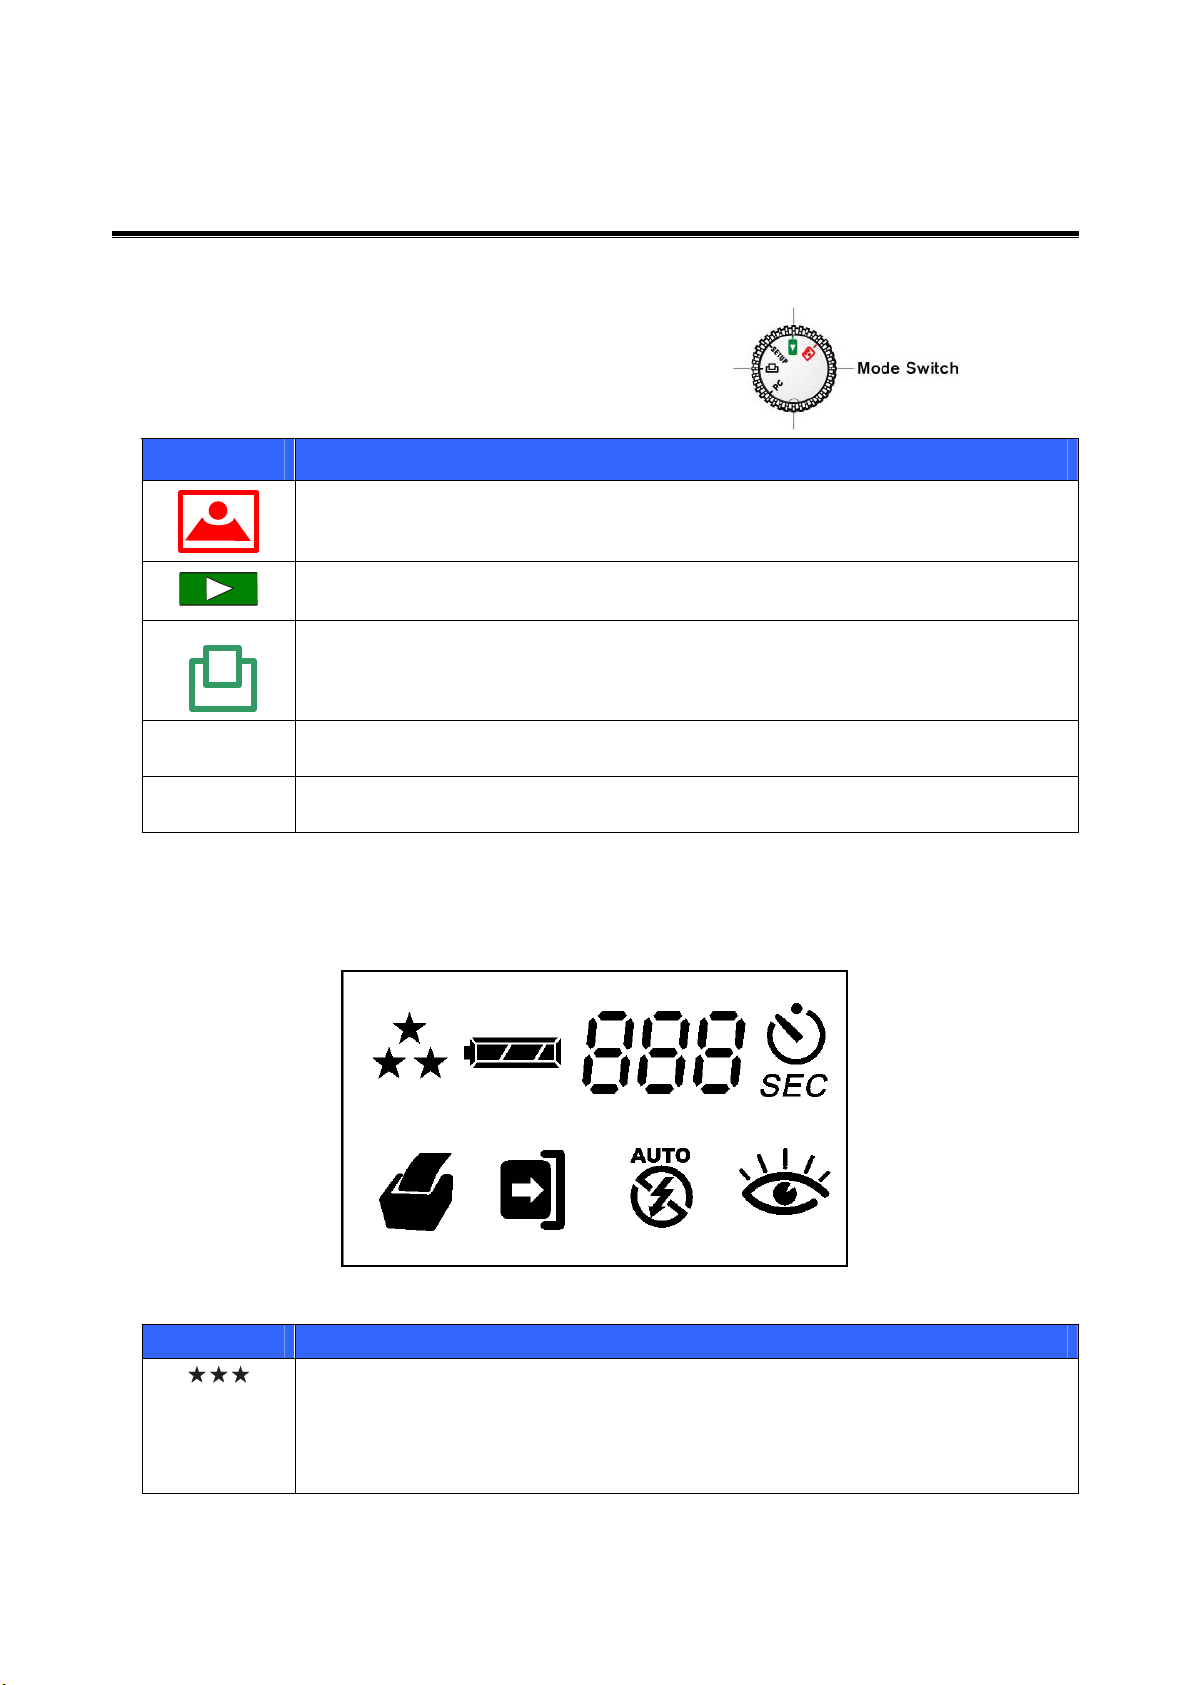
Mode Selector
There are five settings for the Mode
Switch. Refer to the following table:
Icon Description
Use the CAPTURE mode to take pictures.
SETUP
Use the
Use the
PocketColor 200 printer.
Use the
PLAYBACK
PRINT
SETUP
mode to review pictures you have taken.
mode to print directly to the SiPix PocketColor 100 or
mode to modify the camera configuration and options.
PC
Use the PC mode to download pictures to your computer or laptop.
LCD status display
The following illustration shows all LCD status icons available in the LCD status display:
Icon Meaning
Indicates the picture quality setting
• Three Stars: 1280 x 960 super-fine resolution, low compression. 10
pictures maximum. (For the included 8MB CompactFlash card)
• Two Stars: 1280 x 960 fine resolution, hi
h compression. 24 pictures
4
Page 9
maximum. (For the included 8MB CompactFlash card)
• One Star: 640 x 480 standard resolution. 110 pictures maximum. (For
the included 8MB CompactFlash card)
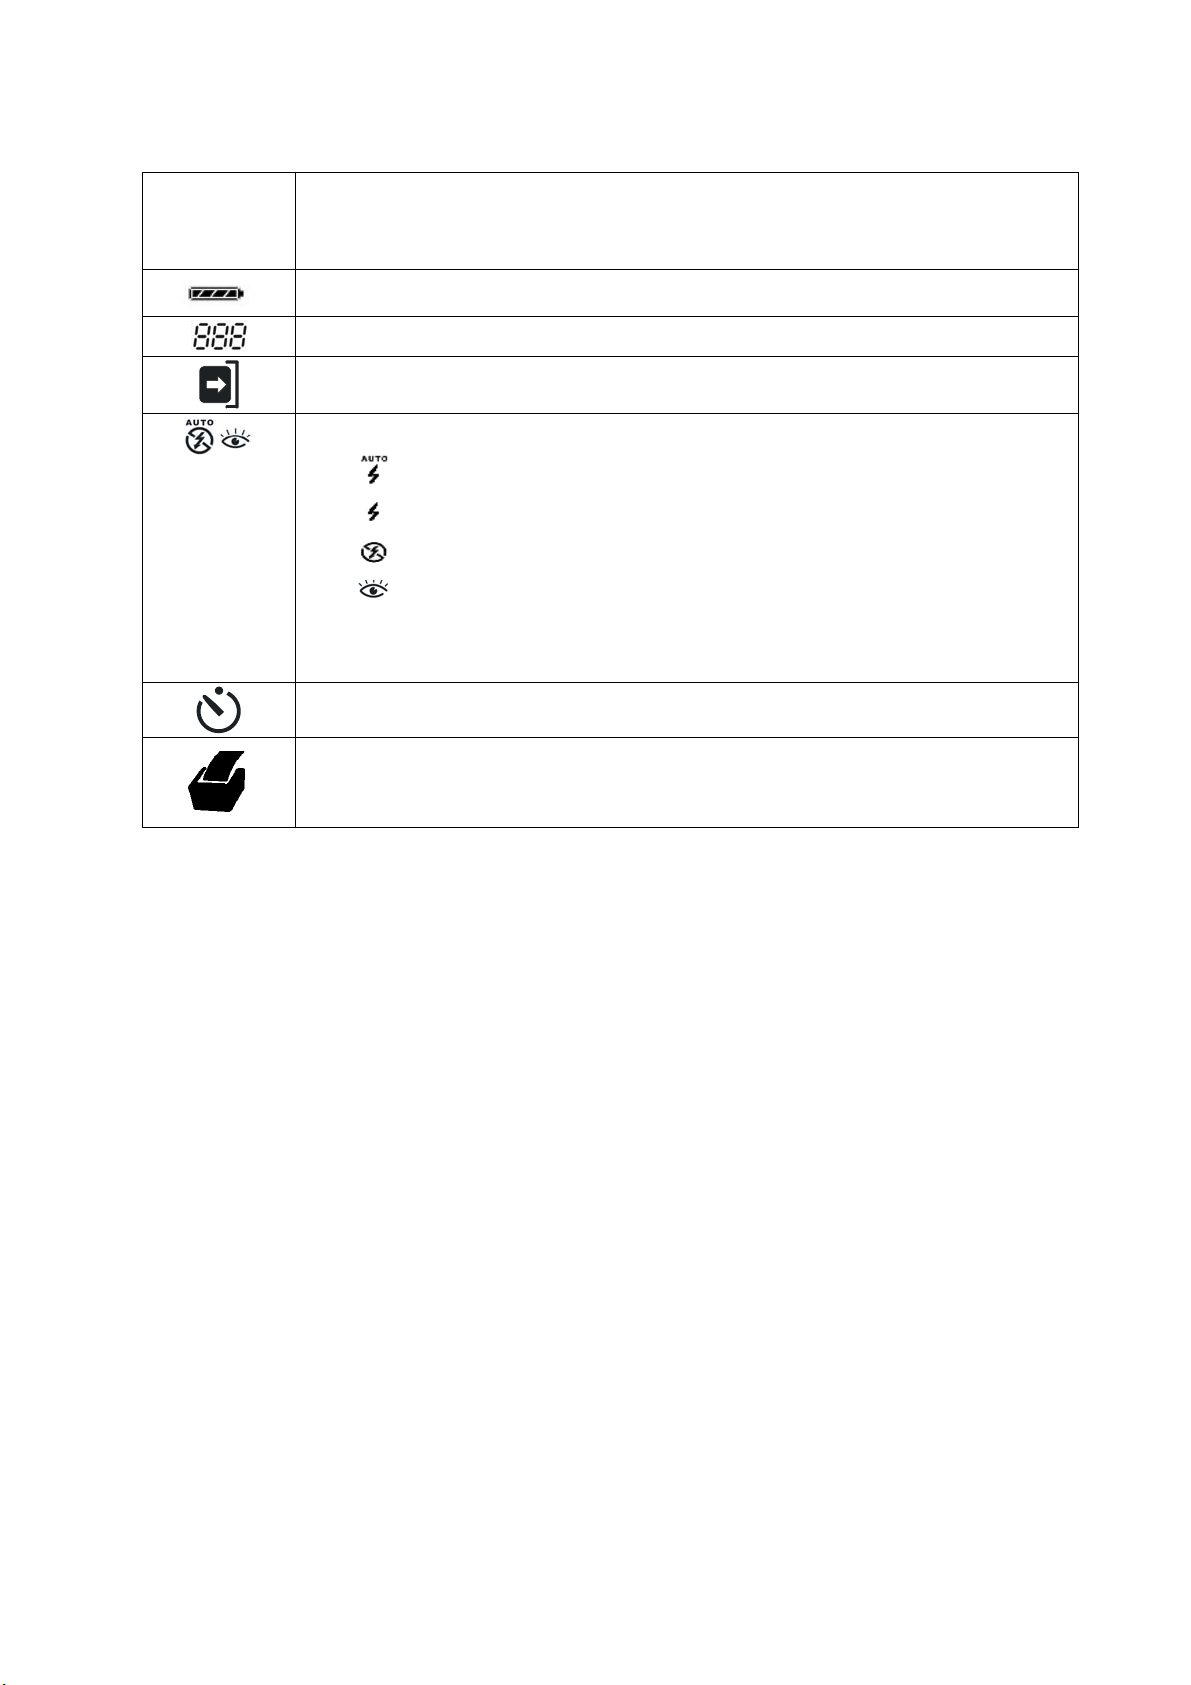
Indicates the battery charge level.
Indicates the number of pictures remaining with the available memory.
Shows that no CompactFlash card is inserted.
The following options are available by repeatedly pressing the flash button:
• Automatic Flash: The flash occurs automatically
•
•
•
Flash Always On: The flash is always on
No Flash: The flash function is disabled
Red Eye: Pre-flash to reduce red-eye effect
Note: The standby LED blinks until the flash is charged.
Indicates when the self-timer function is enabled.
Indicates the camera is in PRINT mode and printing photo(s) through a SiPix
PocketColor 100 or PocketColor 200 printer.
5
Page 10
IInnsseerrttiinngg && RReemmoovviinngg BBaatttteerriieess
1. Set the Power Switch to
2. To open the battery compartment cover on the bottom of the camera, slide the entire cover
in the direction indicated by the arrow on the cover; the cover “springs” open.
3. Note the battery polarity on the inside cover. Insert the batteries in the battery
compartment accordingly.
4. Close the battery compartment cover by pressing down and sliding it until it clicks shut.
Note: Use only AA alkaline, lithium, or rechargeable NiMH
batteries. Inserting the batteries with the incorrect polarity might
damage the camera or the batteries.
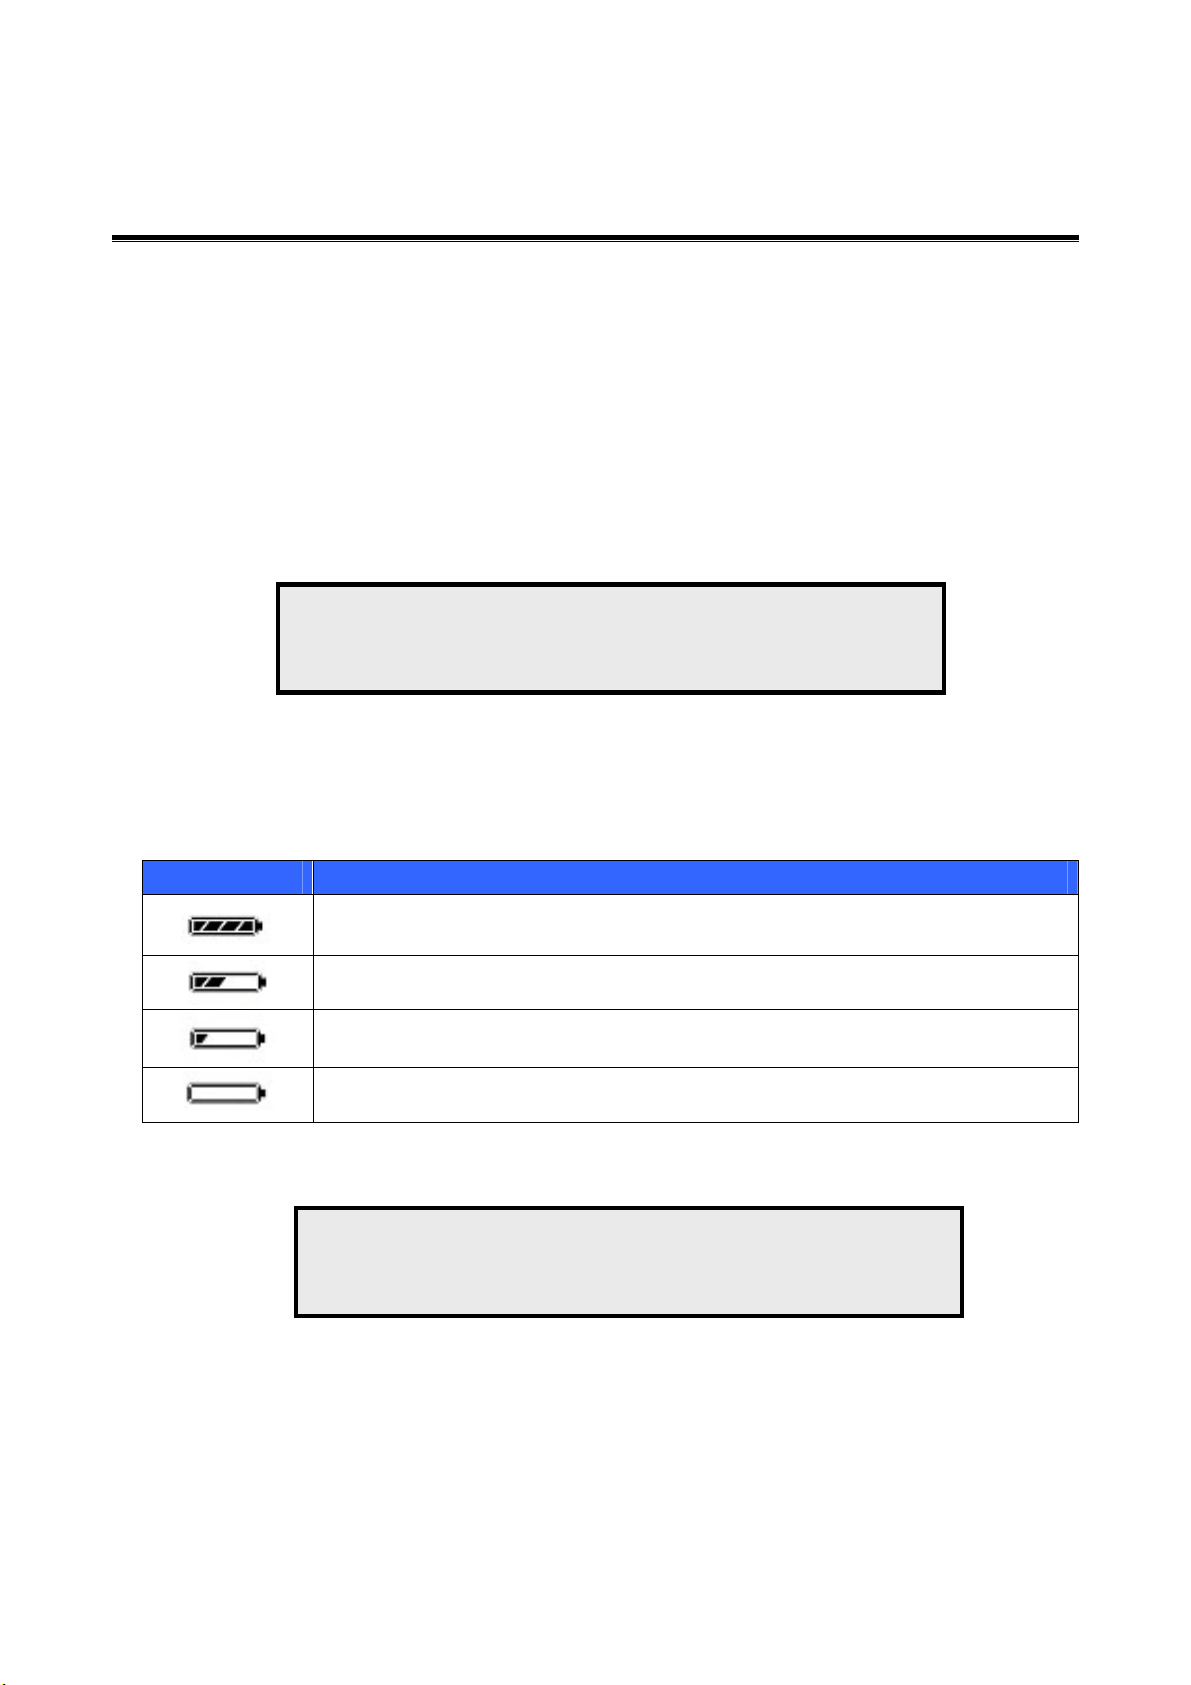
Battery display
OFF.
Battery icon Meaning
The batteries have a full charge, or the AC adapter is connected.
The batteries have approximately 50% power left.
The batteries have approximately 25% power left.
The batteries are almost empty. Replace the batteries with fresh ones.
Note: Digital Cameras place heavy loads on batteries. Use
rechargeable NiMH batteries instead of regular batteries to extend
battery life. Also, use an AC adapter whenever possible.
6
Page 11

IInnsseerrttiinngg && RReemmoovviinngg tthhee CCoommppaaccttFFllaasshh CCaarrdd
Please read the following carefully to install and to remove the CompactFlash card:
1. Set the Power On/Off switch to
2. Open the CompactFlash card cover.
3.
4. Close the CompactFlash card cover.
Installing:
Insert the CompactFlash card with the label and the arrow facing the front of the camera.
Push firmly until the card is flush with the housing.
Removal:
Slide the ejection switch on the bottom of the camera in the direction of the arrow on the
switch. The CompactFlash card will pop out, and then you may remove the card.
Note: If you feel resistance when inserting the CompactFlash card, check the
orientation of the card. The card should insert smoothly and easily when
correctly oriented.
OFF.
Inserting a CompactFlash card with the camera’s power ON may damage the
card.
7
Page 12
UUssiinngg tthhee LLCCDD MMoonniittoorr
The 1.8-inch color LCD monitor can function as a viewscreen to preview the image before taking a
picture. The monitor also allows you to review pictures you have already taken and configure
settings in the camera. The LCD monitor will not operate when the Power On/Off switch is in the
OFF position.
Capture Mode preview
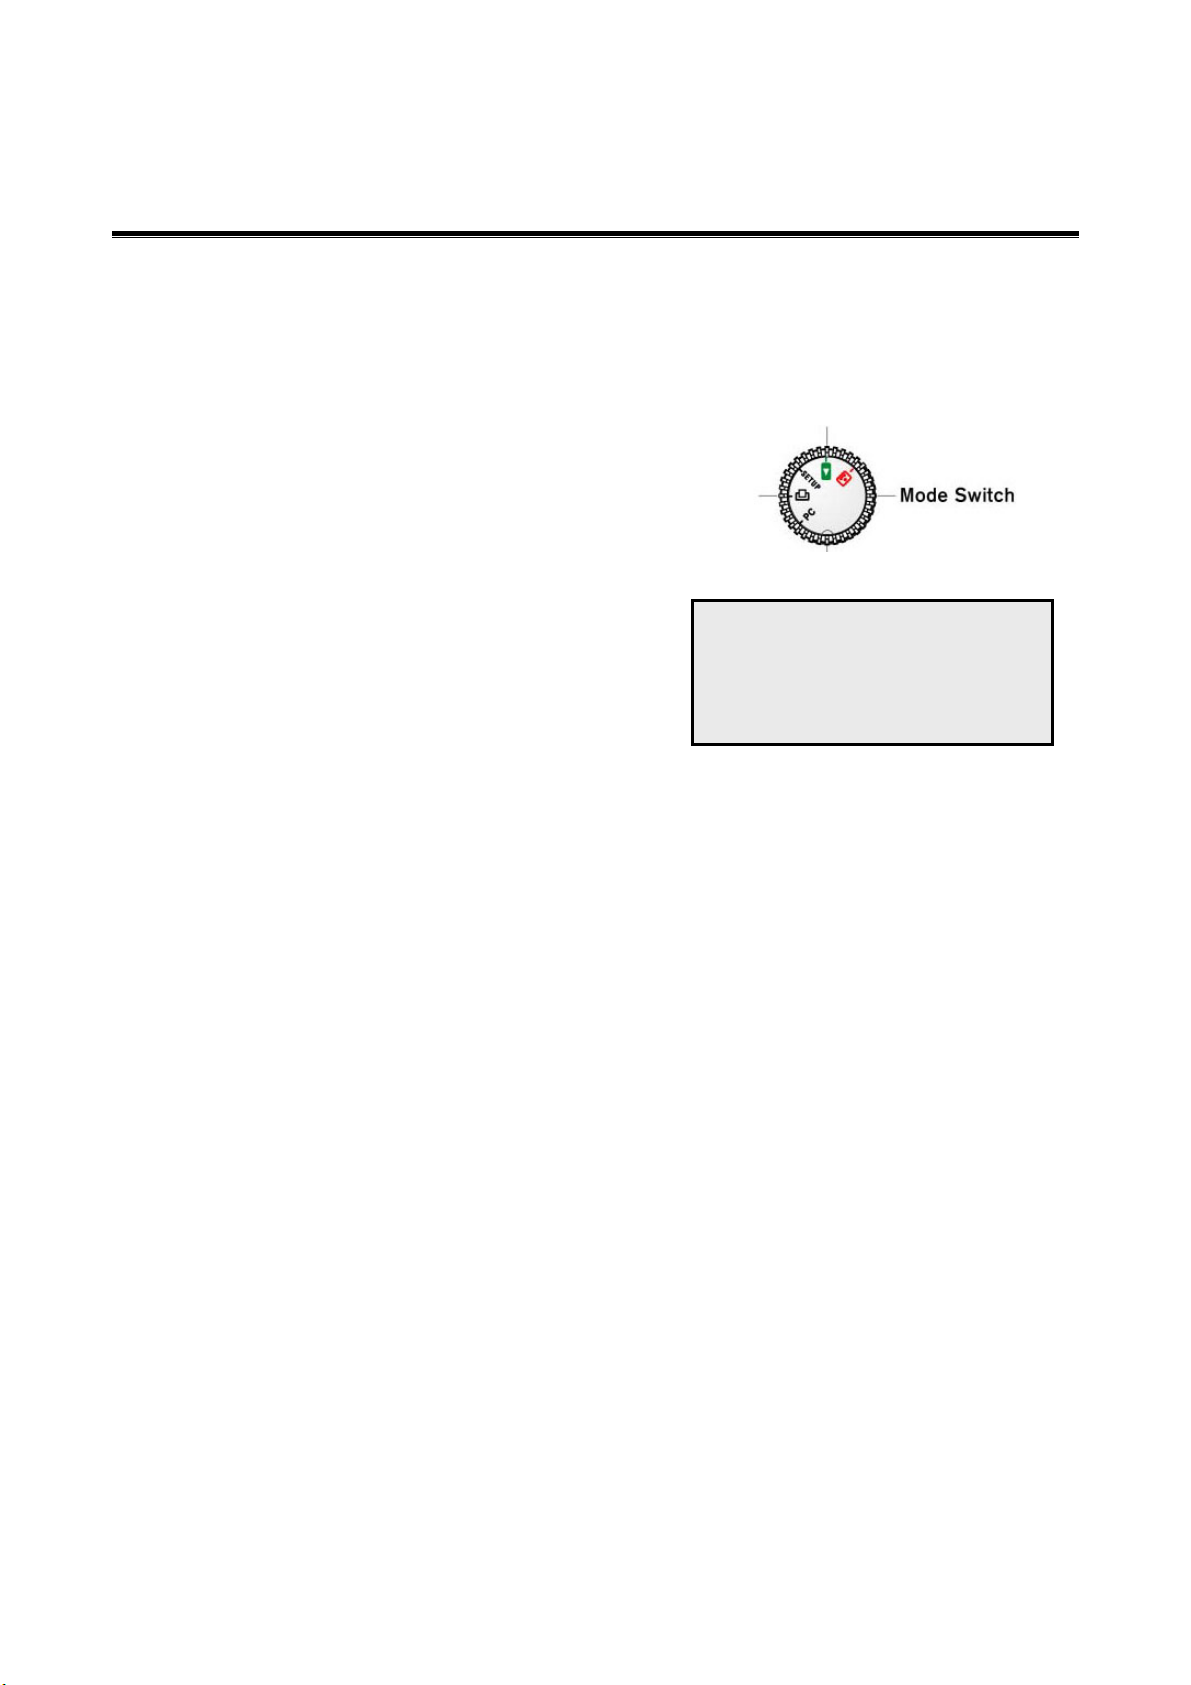
To turn the LCD monitor on in Capture
mode, turn the mode switch to
press the LCD Display button (green). See
“Identifying Components on page 3” A live
preview will appear on the screen.
The date and time are displayed in the
bottom-right corner. Check that you have set
the date and time correctly. (Please refer to
page 11 to set the date and time)
CAPTURE, and
Date: 09/13/2001
Time: 6:45
Playback review
After taking pictures, you can review them from Playback mode. You will have the option to erase
pictures that are no longer needed, and free up storage space for more pictures. You can also “lock”
images so they are not inadvertently erased.
There are two methods for reviewing pictures: Single Image display and Thumbnail Display.
Please refer to page 20 for details explaining how to set the single image or thumbnail displays.
The LCD display will automatically turn on when you switch to Playback mode.
8
Page 13
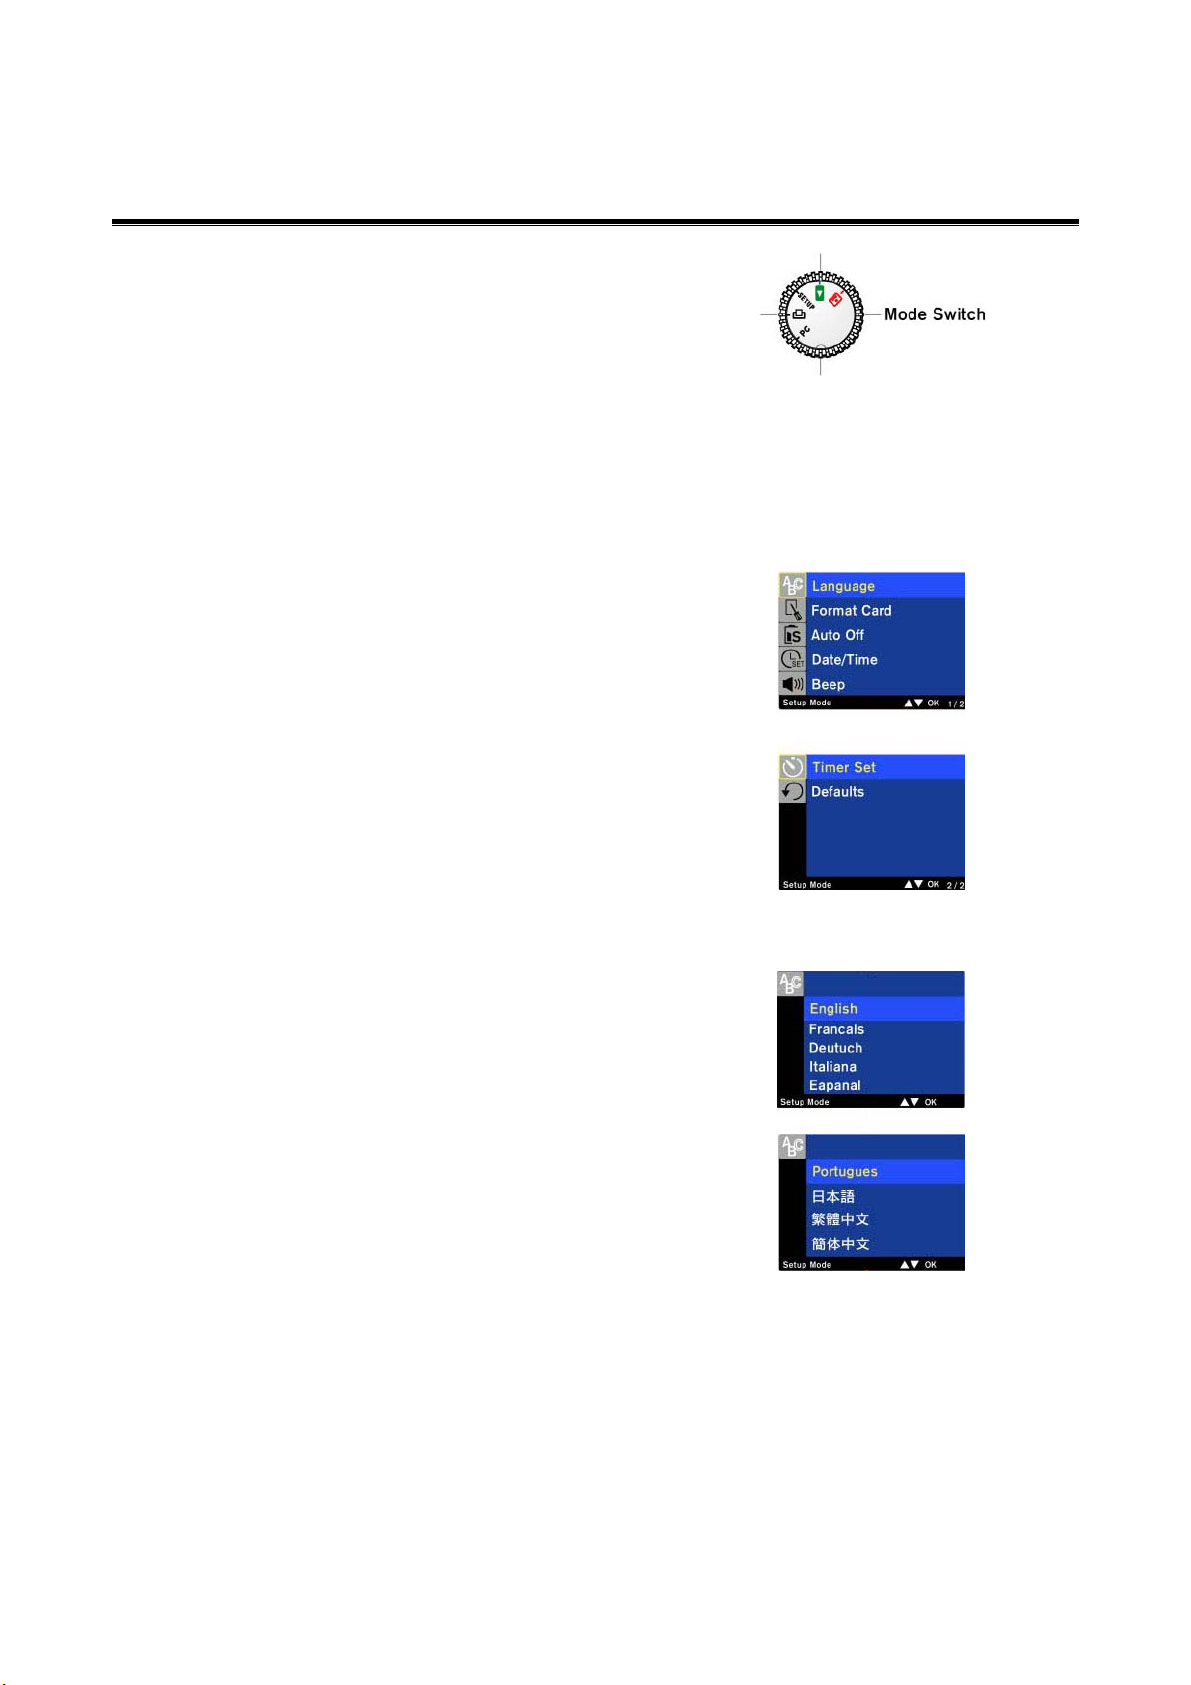
To access the Setup mode screens, set the Mode
Switch to
SETUP. The setup menu screen appears.
Use the Navigator up/down arrows to scroll
through the menus. Use the MENU/OK button to
make selections.
Setup Main Menu
The Main Menu is a list of sub-menus shown on
the right: They include options for Language,
Format Card, Auto Off, Date/Time, Beep, Timer
Set, and Defaults.
SSeettuupp MMooddee SSccrreeeennss
Language
The Language sub-menu allows you to select the
language you want to use with the SP-1300 digital
camera.
Select Language from the Main Menu. Eight
languages are available for the SP-1300 digital
camera interface. Scroll to the desired language
and press OK.
9
Page 14
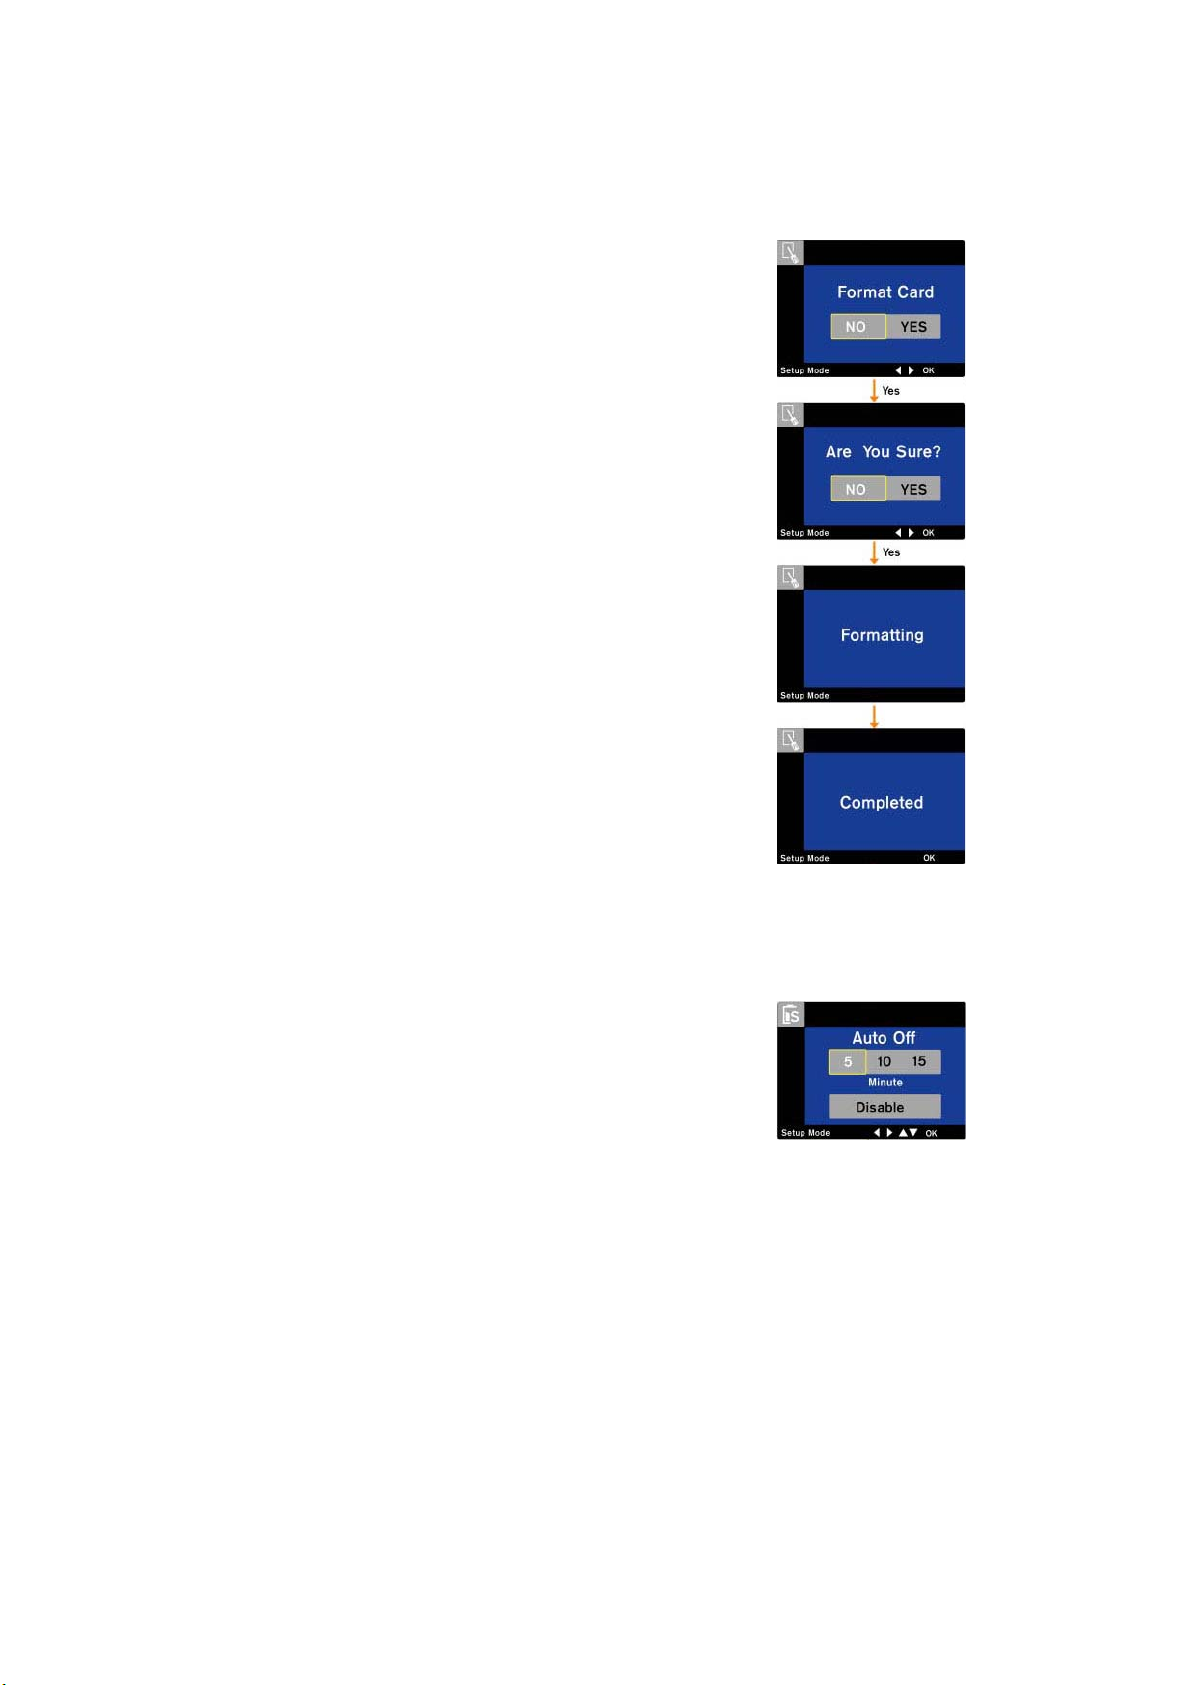
Format Card
The Format Card option will delete everything
saved on the CompactFlash card, including
locked/protected images.
Select Format Card from the Main Menu. The
screen will prompt you to “Format Card”, select
YES and press OK to format (erase all data) the
CompactFlash card. Confirm with YES/NO when
prompted “Are You Sure?” with the Navigator
left/right buttons.
The screen will display “Formatting” and
“Completed” to format the card. Or, if you chose
not to format the card, select NO and press OK,
the screen will exit to the Main Menu without
formatting the card.
Auto Off
This item determines the amount of time before
the camera automatically turns itself off.
Use the Navigator left/right buttons to scroll to
the desired setting: 5, 10, or 15 minutes and press
OK. If you do not want the camera to
automatically shut off, select Disable, and press
OK.
10
Page 15
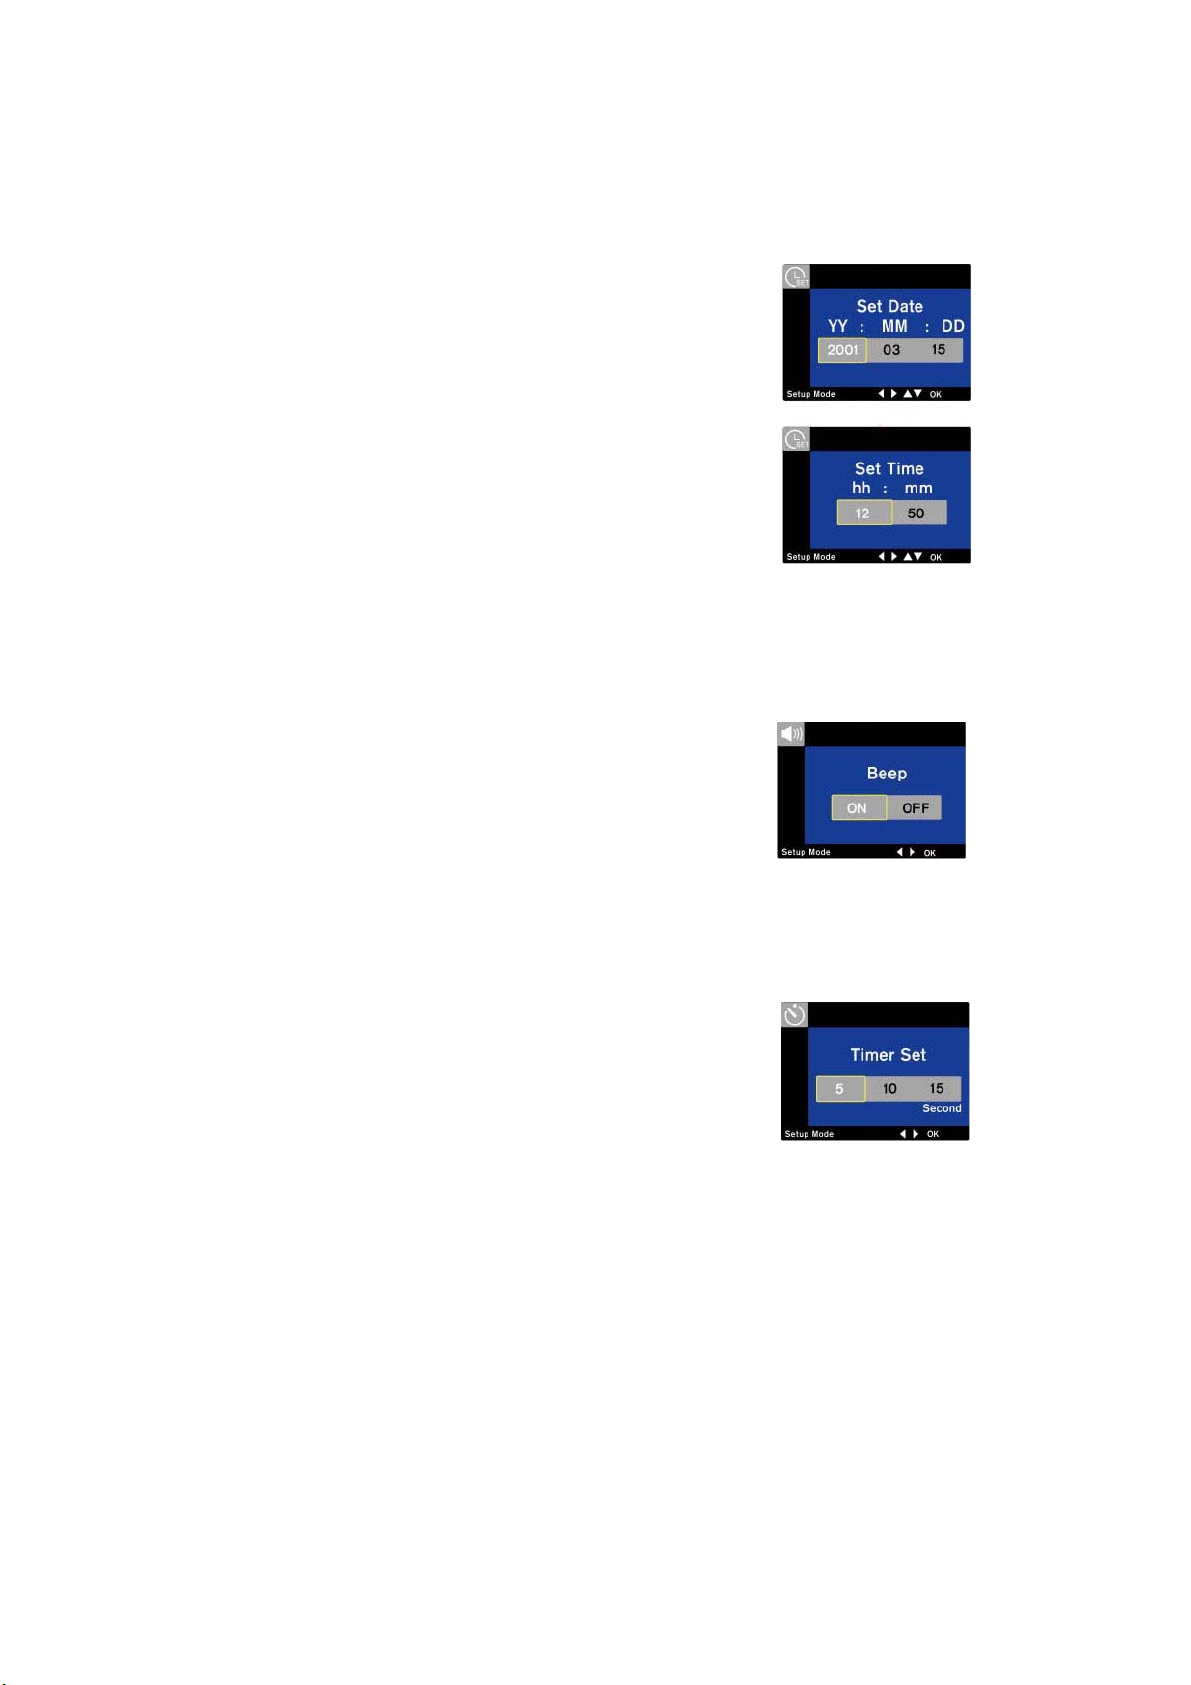
Date/Time
This item lets you adjust the time and date that
will display on your pictures
In the Main Menu, scroll to Date/Time and press
OK. Use the up/down arrows to change the value,
and then use the left/right arrows to move to the
next item.
Press OK to continue to the next screen to set the
time.
Repeat the above steps to set the time.
Beep
This setting allows you to turn off the “beep” sound
the camera makes when scrolling through menus or
changing settings.
In the Main Menu scroll to Beep and press OK.
Use the Navigator left/right buttons to scroll to the
desired setting ON or OFF and press OK.
Timer Set
This item allows you to change the time that
elapses before the self-timer activates the shutter.
Use the Navigator left/right buttons to scroll to
the desired setting 5, 10, or 15 seconds, and press
OK.
11
Page 16
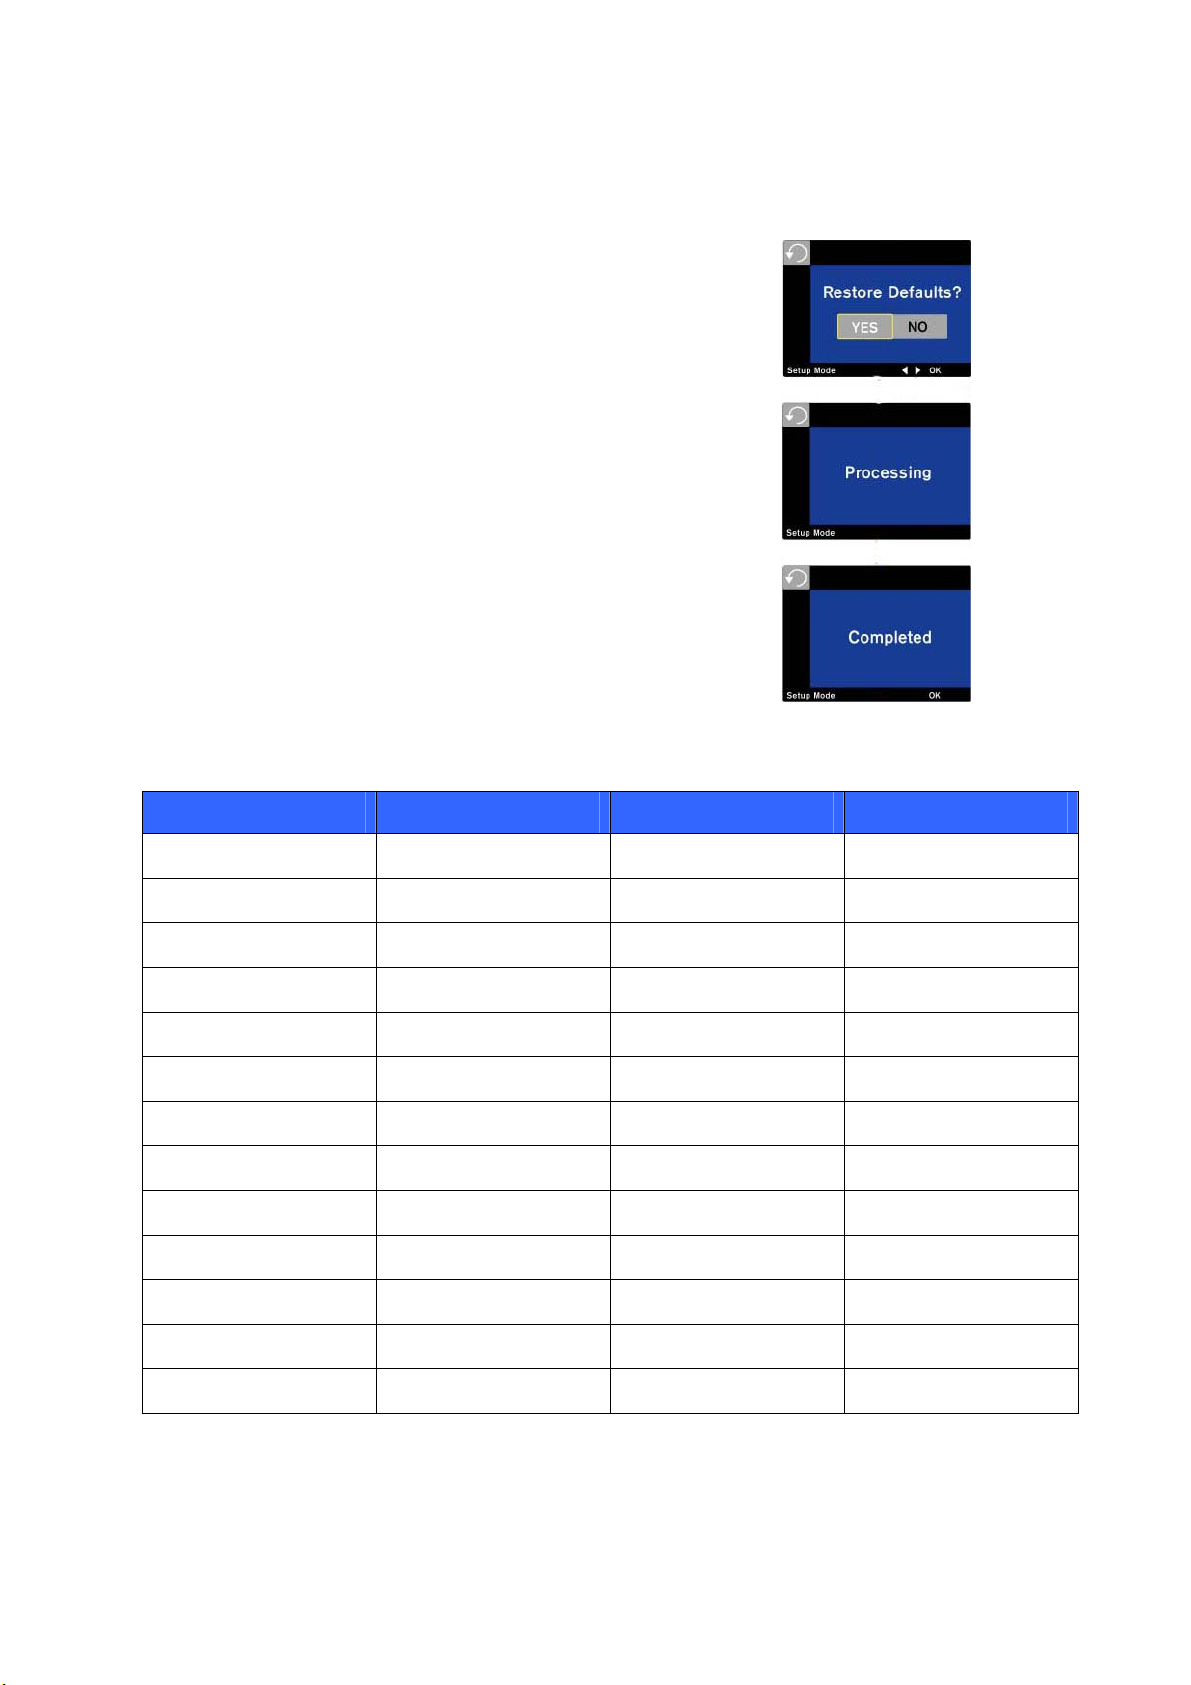
Defaults
This item lets you reset the camera settings to the
factory defaults. (See factory defaults below)
In the Main Menu scroll to Defaults and press
OK. The screen will prompt you to “Restore
Defaults?” Use the Navigator left/right buttons
to select your choice.
If YES is selected, the camera will begin resetting,
and the LCD will display “Processing” and then
“Completed”. Press OK to return to the Main
Menu.
The factory defaults are:
Item Default Settings After Power OFF After Battery Out
Capture mode type Single Default Default
Exposure value Auto (0 EV) Default Default
Special effect Color Default Default
White balance Auto Default Default
Sharpness Normal Default Default
Language Country language Save change Save change
Flash mode Auto Save change Save change
Resolution 1280 x 960 Save change Save change
Digital Zoom X1 (OFF) Default Default
Date/Time 1/1/2001 0:00 Save change Default
Beep ON Save change Save change
Timer Set 10 sec Save change Save change
Self-Timer OFF Default Default
12
Page 17

CCaammeerraa SSeettuupp aanndd BBaassiicc OOppeerraattiioonn
Turning the camera on and off
To turn the camera ON or OFF use the Power On/Off switch on the front of the camera. This is
also the lens cover. However, if you set the camera to Auto Off, the camera will turn off at the
time interval that you set. The camera may be off even when the camera’s lens cover is
(Open).
to power up.
Taking pictures
In this case, switch the Power On/Off switch to OFF (Close), and then ON (Open) again
Note: To save battery life, turn off the LCD display when you
are not using it. Press the “Display” button on the back of the
camera to turn the LCD display off.
1. Set the Mode Selector to CAPTURE.
ON
2. Check the current settings in the LCD status display.
3. Press the picture Resolution button to set the image quality.
4. Set the flash mode.
5. Ensure the standby LED has stopped flashing and align the picture through the
viewfinder.
6. Press the shutter release button half way down to focus on the subject. When you hear a
beep, the camera is ready. Press the shutter button all the way down to take the picture.
You will hear a sound beep and a click as the picture is taken. The LCD status display
indicates the number of pictures you have left.
Setting the resolution (picture quality)
1. Set the Mode Selector to
2. Press the picture Resolution button to set the picture resolution to super fine, fine, or
standard.
3. Ensure the standby LED has stopped flashing and align the picture through the
viewfinder.
CAPTURE.
4. Press the shutter release button to take the picture.
13
Page 18
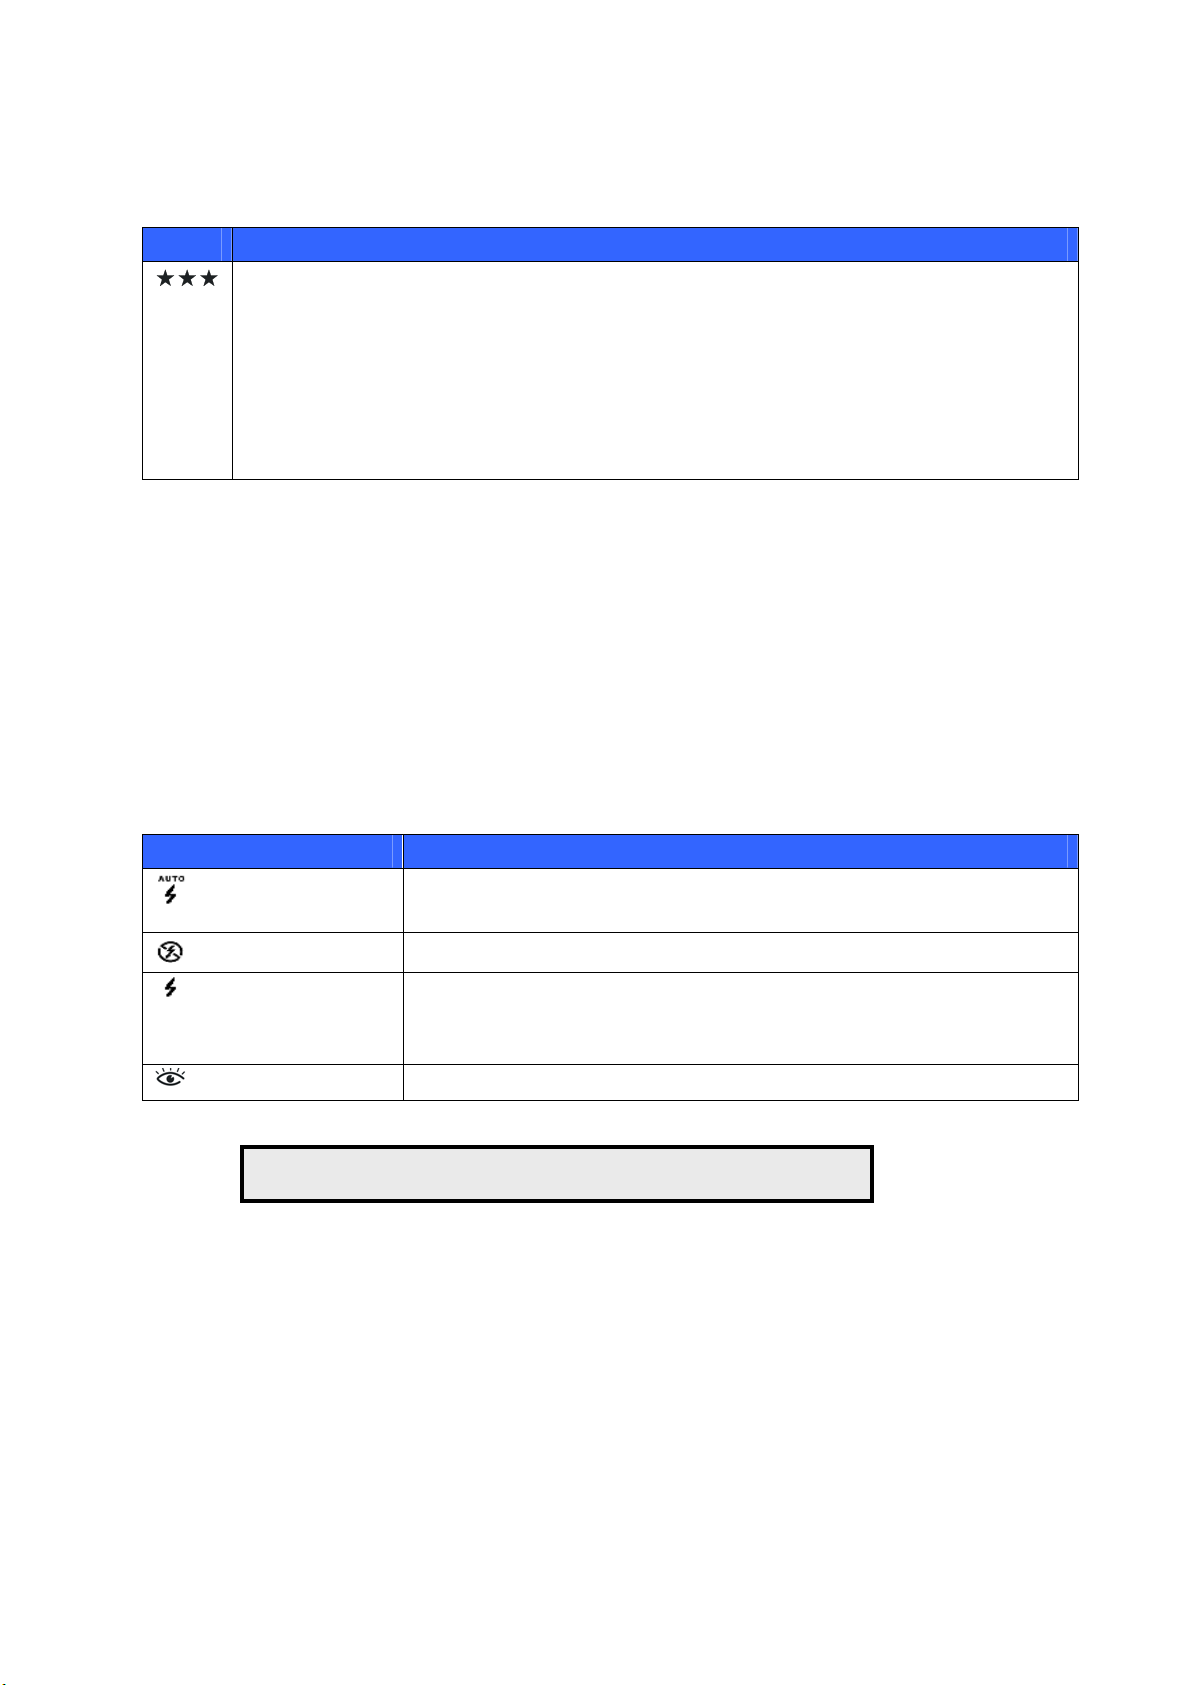
Icon Meaning
Indicates the picture quality setting:
• Three Stars: 1280 x 960 super-fine resolution, 10 pictures maximum. (8MB
CompactFlash card)
• Two Stars: 1280 x 960 fine resolution, 24 pictures maximum. (8MB
CompactFlash card)
• One Star: 640 x 480 standard resolution, 110 pictures maximum. (8MB
CompactFlash card)
Setting the flash
1. Set the Mode Selector to CAPTURE.
2. Press the Flash button and select the mode you want.
3. Ensure the standby LED has stopped flashing and align the picture through the
viewfinder.
4. Press the Shutter Release button.
Flash Modes Meaning
Automatic Flash
No Flash
Flash Always On
The flash occurs automatically when ambient lighting is
insufficient for picture capture.
The flash function is disabled.
The flash is used with every picture. Use this option when you are
trying to take pictures of dark subjects or where the area behind the
subjects is highly illuminated.
Red Eye
Note: The standby LED blinks until the flash is charged.
When taking pictures with the flash, the red-eye effect is reduced.
Setting the self-timer
The self-timer enables you to include yourself in the picture by automatically activating the
shutter release button after a delay of 5, 10 or 15 seconds.
1. Set the Mode Switch to CAPTURE.
14
Page 19

2. Press the self-timer button to enable self-timer mode.
3. The self-timer icon appears in the LCD status display.
4. Ensure the standby LED has stopped flashing and align the picture through the
viewfinder.
5. Press the shutter release button. You have X seconds (where X is the amount of time you
set in Timer Set under Setup) to move to your location for the picture.
6. The self-timer indicator light on the front of the camera will begin to blink in red. This
light will blink increasingly faster indicating that the time to exposure is becoming
progressively closer.
Note: Use a tripod with the self-timer function for optimal results.
View Images
You can view the pictures you’ve taken through the LCD monitor on the back of the digital
camera. Set the Mode Switch to
the images you’ve taken.
The SP-1300 Shoot & Share features Quick View, which allows you to scroll and view from
image to image immediately in low resolution first. If you wish to look at a picture carefully,
simply stop scrolling, and the current photo will update to high resolution and display in a clear
and detailed format.
Note: The LCD will take 2-3 seconds to update the image from low resolution to high resolution.
PLAYBACK, and use the Navigator left/right buttons to scroll
Protecting and Erasing Images
Please refer to Photo Control on page 22 for detailed instructions.
15
Page 20
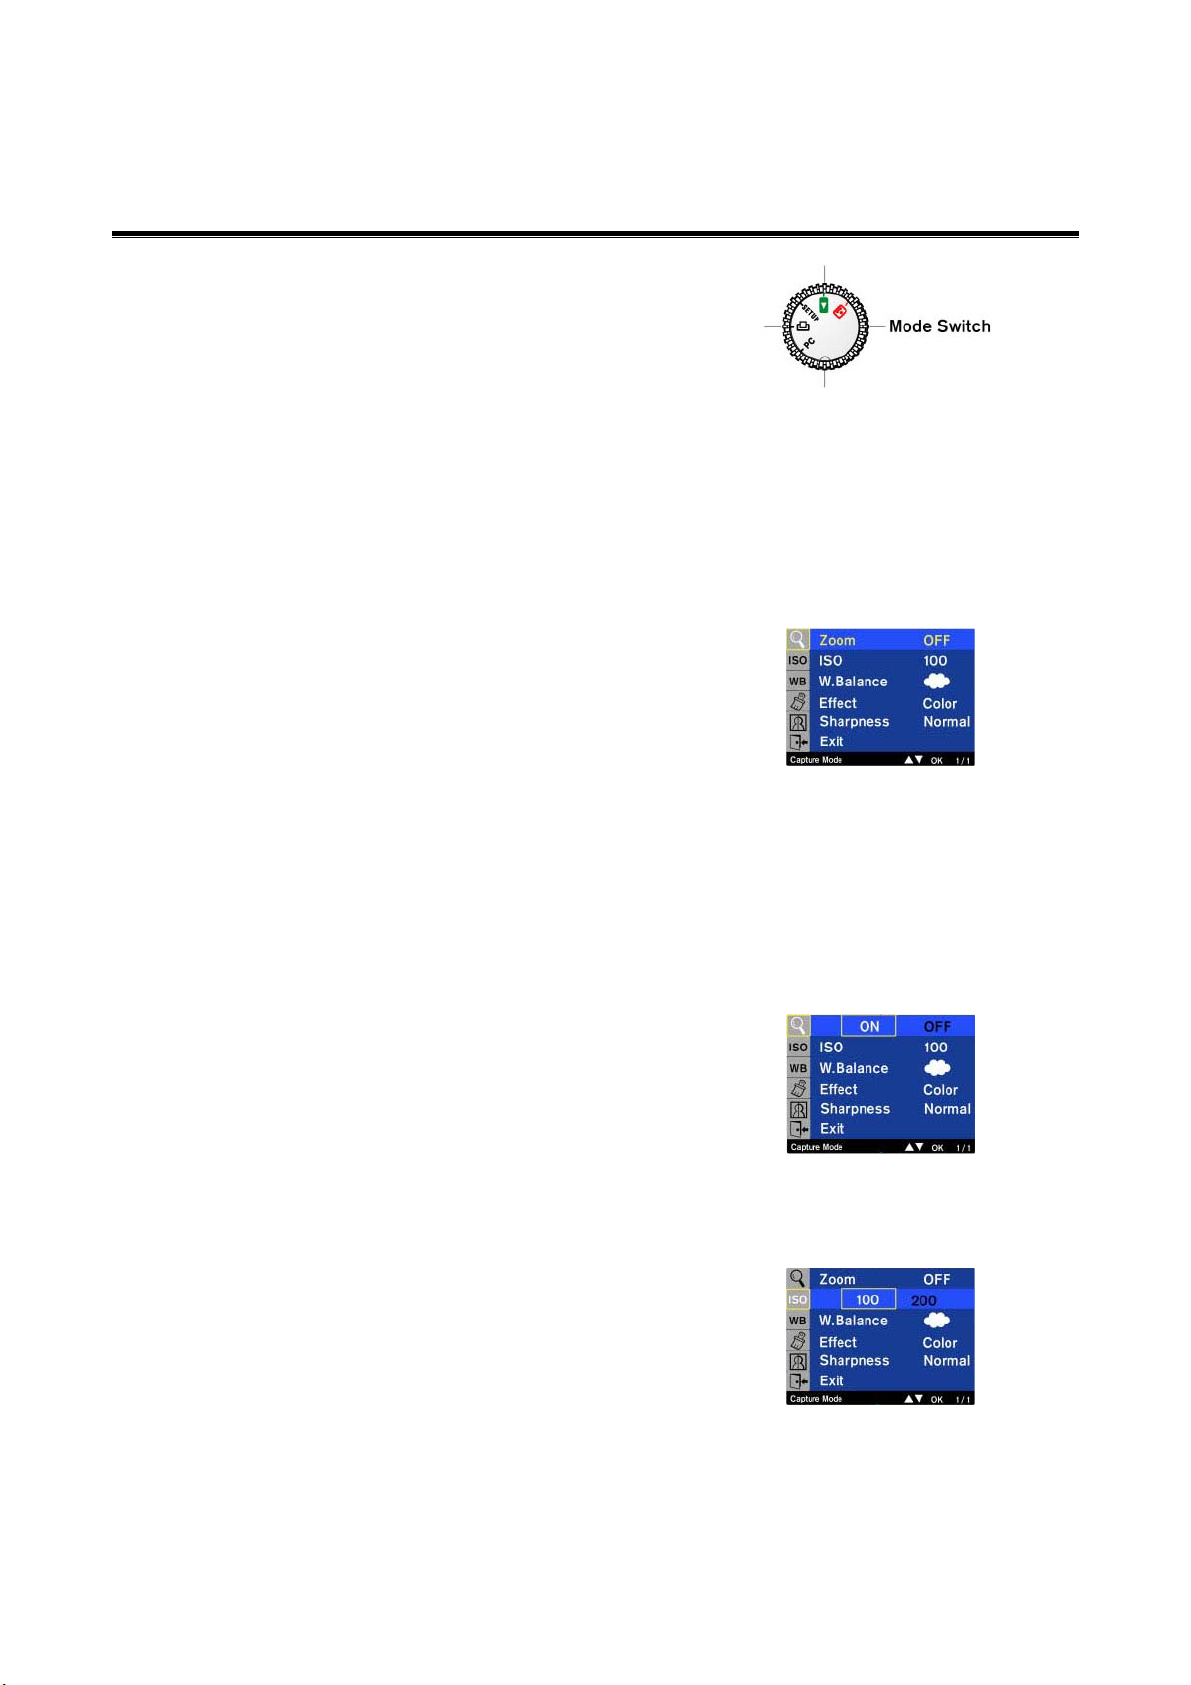
CCaappttuurree MMooddee SSccrreeeennss
To access the Capture mode screens, set the Mode
Selector to
Press the MENU/OK button. The Capture Mode
menu screen appears.
Use the Navigator up/down buttons to scroll the menus. Use the MENU/OK button to make
selections.
Capture Main Menu
The Main Menu includes a sub-menu for
configuring options in your camera:
CAPTURE.
• Zoom (OFF, ON)
• ISO (100, 200)
• White Balance (Auto, Cloudy, Daylight,
Tungsten, Fluorescent)
• Effect (Color, B&W, Sepia)
• Sharpness (Normal, Softer, Sharper)
• Exit
Zoom
This item allows you to zoom in when taking a
picture.
Select Zoom and use Navigator left/right buttons
to scroll to the desired setting
OK.
ISO
This setting is the equivalent to the conventional
film ISO or film speed. The higher the ISO number,
the more sensitive the camera will be to light,
therefore use 200 for low light situations and 100
for bright situations.
Use the Navigator left/right buttons to scroll to the
desired setting, 100 or 200, and press OK.
ON or OFF and press
16
Page 21
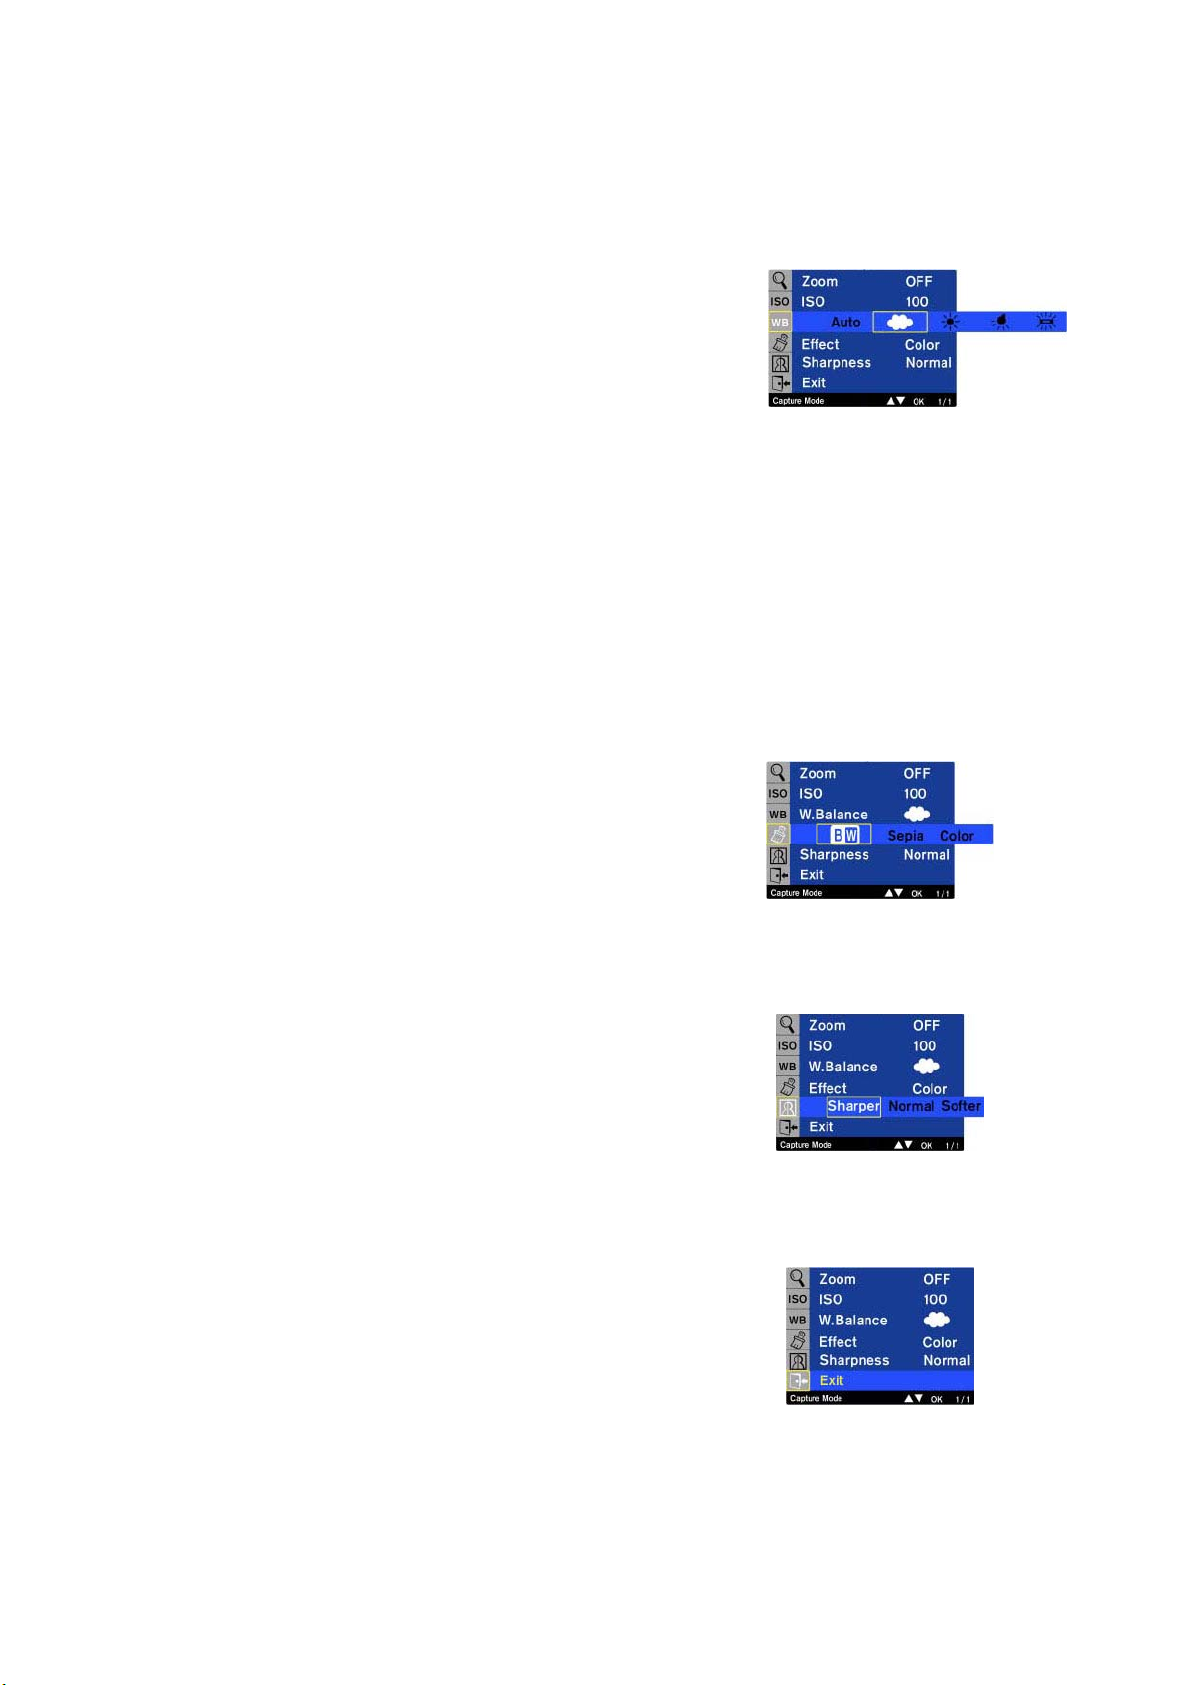
White Balance
This item lets you set the White Balance for your
pictures.
Select White Balance and press OK, and then use
the Navigator left/right buttons to select the
desired setting and press OK.
Use auto if you’re not sure which one to choose.
Select the Cloud or Sun icons for outdoor pictures,
select the Tungsten icon for images taken under
the incandescent lighting in most homes, and select
the Fluorescent Lamp icon for indoor pictures
taken under fluorescent tubes.
Effect
This item lets you take pictures in black & white or
sepia.
Select Effect and press OK, and then use the
Navigator left/right buttons to scroll to the desired
setting Color, B/W, or Sepia, and press OK.
Sharpness
This item affects the sharpness of the pictures you
take.
Select Sharpness and press OK, and then use the
Navigator left/right buttons to select the desired
setting Normal, Softer, or Sharper, and press OK.
Exit
To exit the Capture Mode menu, use the Navigator
up/down buttons to scroll to Exit, which is at the
bottom of the menu list, and press OK.
17
Page 22

Exposure Adjustment
The Exposure Control button on the back of the camera allows you to set the exposure
value before taking a picture.
The exposure value ranges from –2 to +2 in 1/3 EV steps.
Press the Exposure Control button on the back of the camera (refer to Identifying
Components on page 3). The LCD will display an indication bar of the camera’s current
setting. Use the Navigator left/right buttons to increase or decrease the exposure value, and
click OK.
18
Page 23
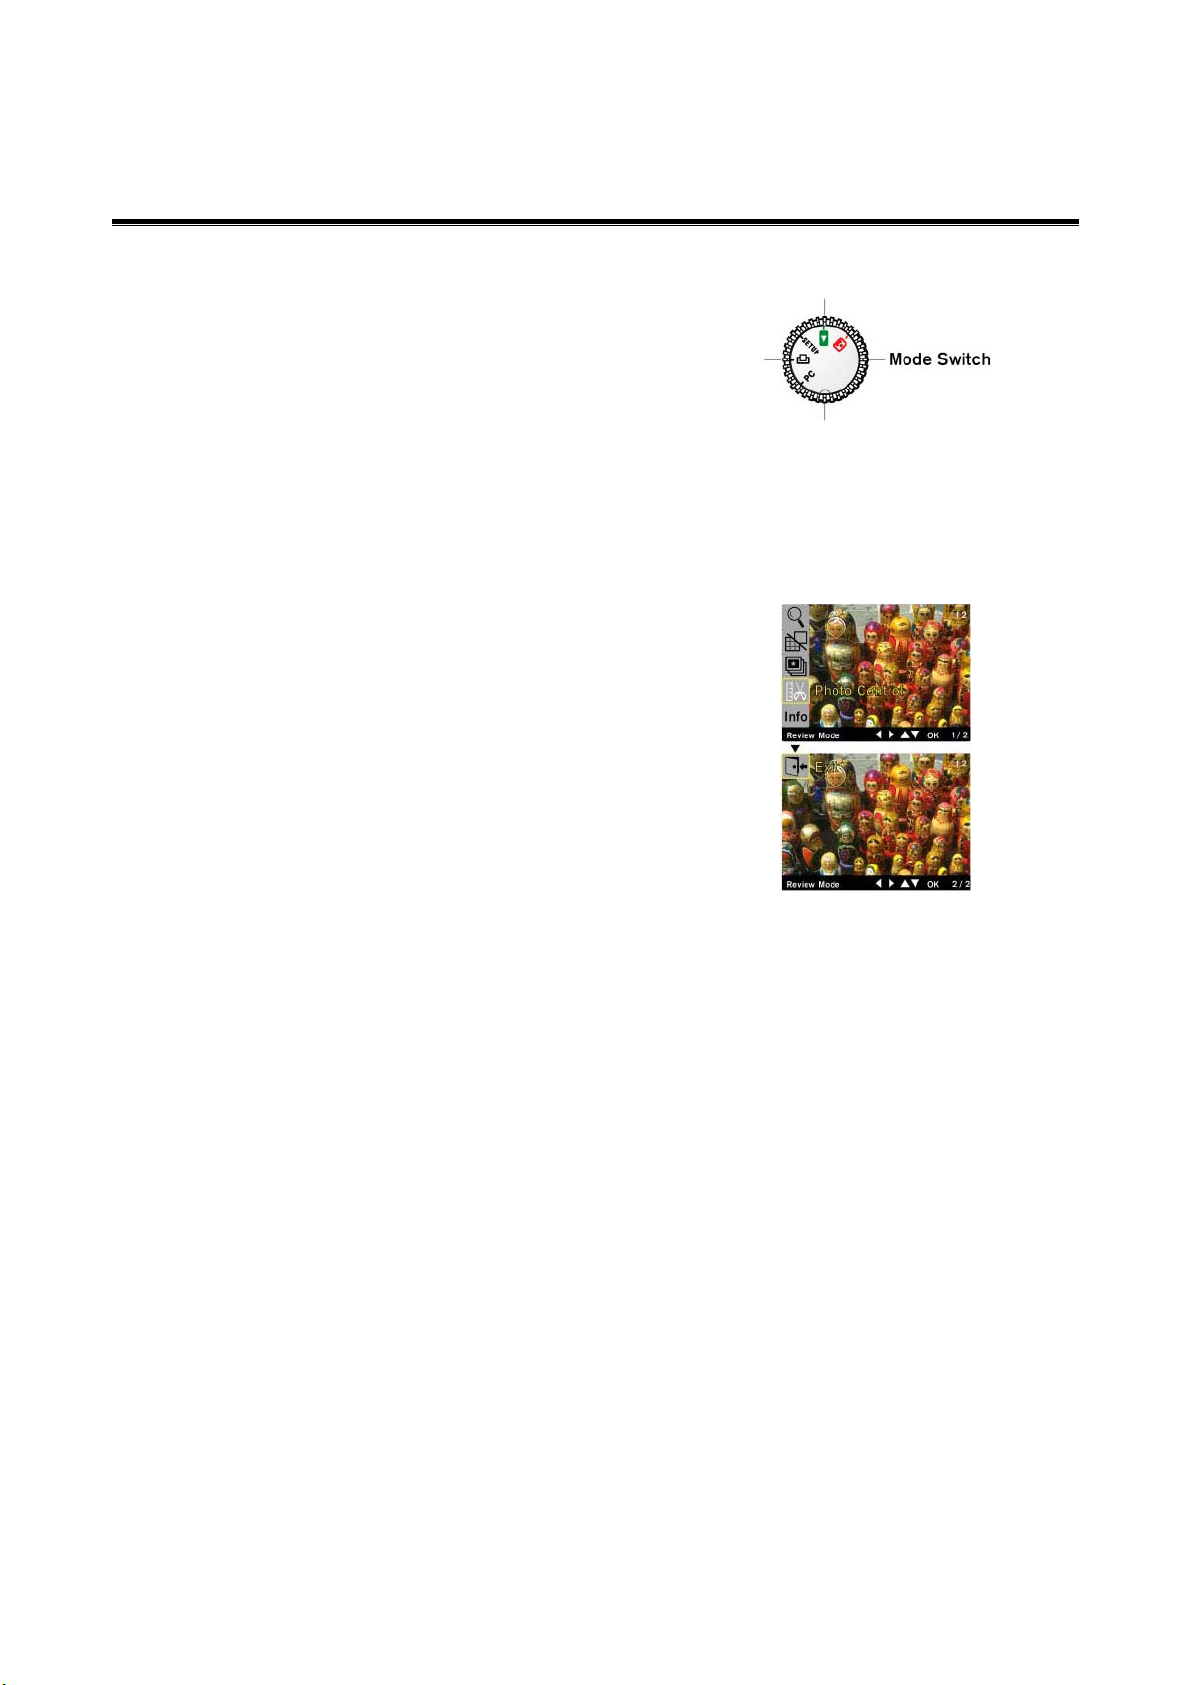
To access the Playback mode screens, set the
Mode Switch to
PLAYBACK.
The LCD will display the last image you took with
the camera.
Press the MENU button to display a list of
selections.
Playback Menu
Choices displayed in the Playback Mode Menu:
• Zoom
• Thumbnail
• Slideshow
PPllaayybbaacckk MMooddee SSccrreeeennss
• Photo Control
• Information
• Exit
Zoom
This selection allows you to zoom in for a closer view of the picture. In the Playback Menu,
select Zoom and press OK. The image in the LCD will zoom in, to return to the menu, press
OK again.
After the camera has zoomed into a section of the image, you can use the Navigator
up/down/left/right buttons to scan the rest of the picture.
Page 24
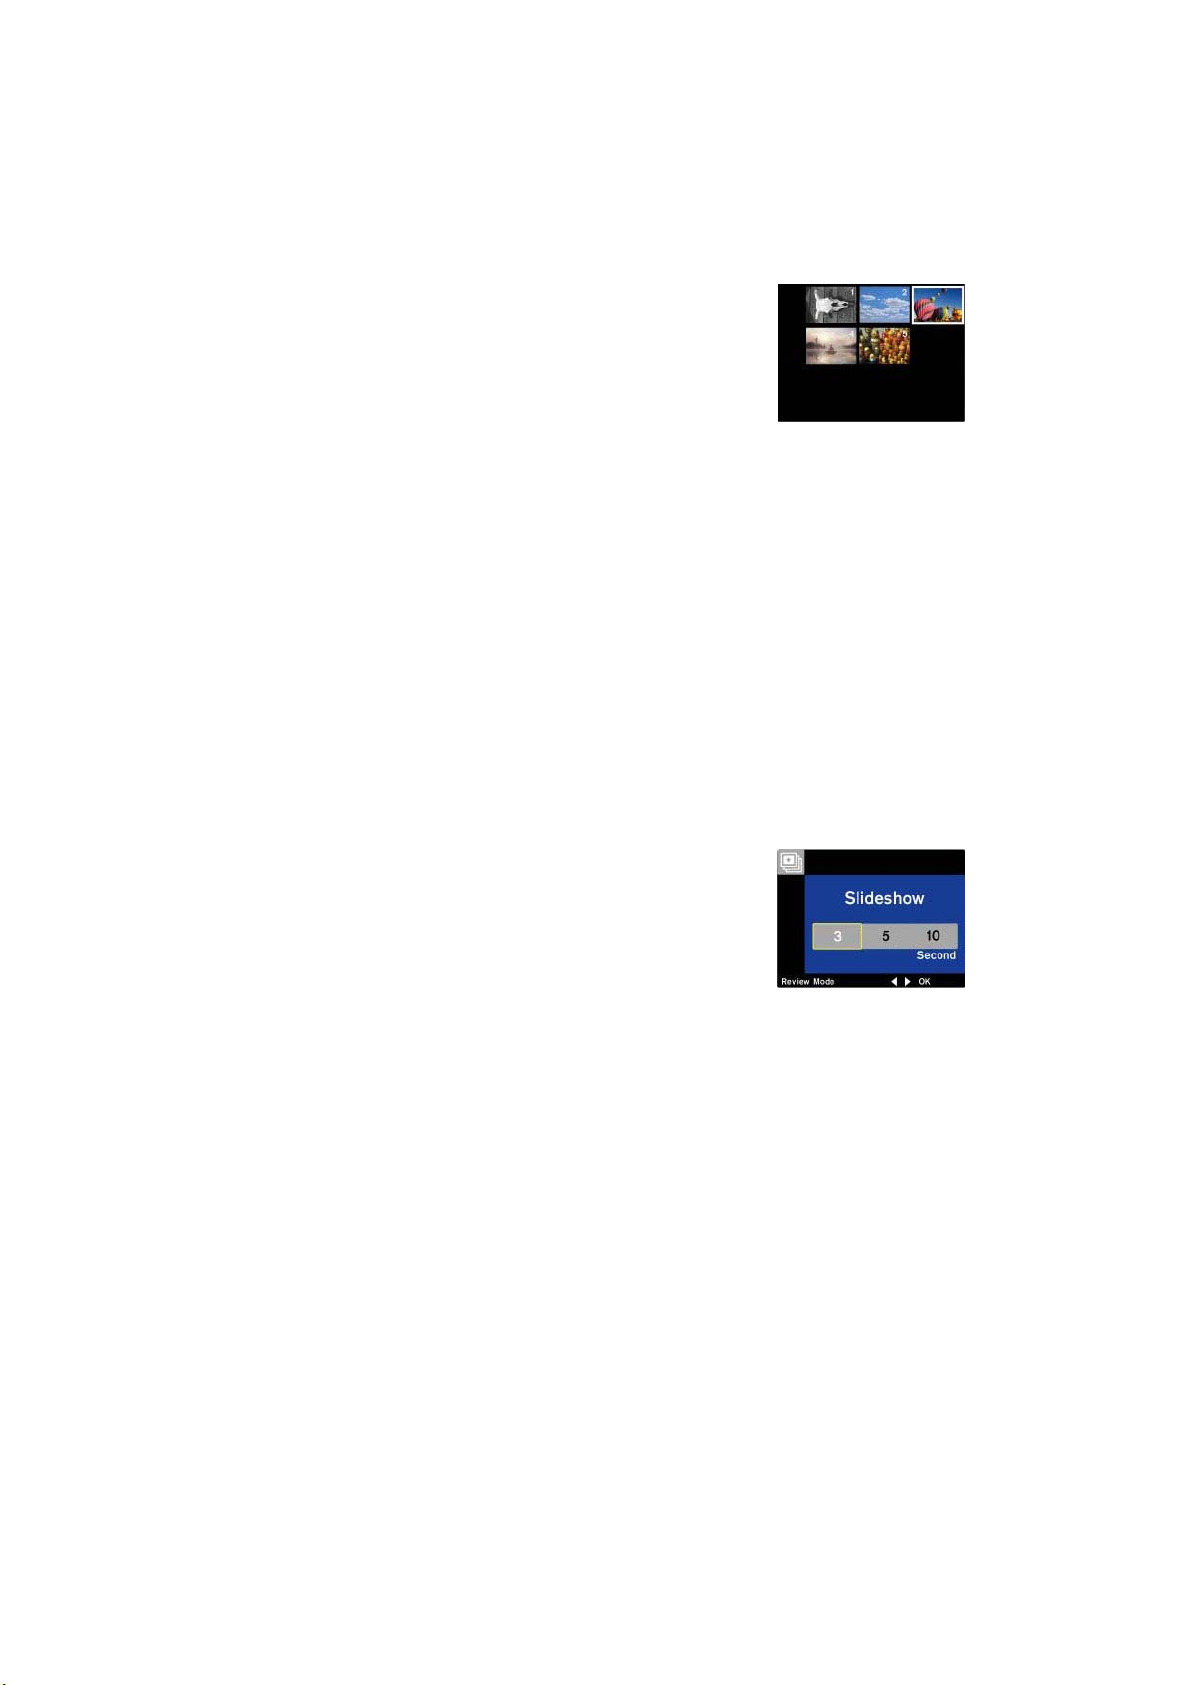
Thumbnail
This item allows you to view a maximum of 9
images simultaneously.
From the Playback menu, select Thumbnail and
press OK. The LCD will display 9 images (or the
number of pictures you took, whichever is less.)
To return to the Playback Menu, press OK again.
When you want to view one of the thumbnails at
the normal screen size, use the Navigator buttons
to scan to the appropriate picture, which will
highlight the picture border. Press the OK button
to display the picture in a normal screen size.
Use the Navigator up/down/left/right buttons to
see other pictures.
Slideshow
This function allows you watch a slideshow of the
pictures you have taken. When the Slideshow
function is enabled, this item will begin a
slideshow of all currently loaded images at three,
five or ten-second intervals.
Select Slideshow from the Playback Menu, and
press OK. Use the Navigator left/right buttons to
scroll to 3, 5, or 10 seconds and press OK to start
the slideshow. To end a slideshow and return to
the Playback menu, press OK.
Photo Control
This feature allows you to lock, erase, use DPOF (Digital Print Order Format) marking, or
view thumbnail photos. Please refer to the Photo Control section on page 22 for detailed
instructions.
20
Page 25

Information
This feature allows you to see the attributes of the
image being viewed, such as exposure value,
data/time the photo was taken, shutter speed,
aperture, size, etc.
From the Playback Menu, scroll to Information
and press OK. The LCD screen will show
information about that current photo displaying on
the LCD monitor
Use the Navigator left/right buttons to see the
information of other pictures that you took. Click
OK when you want to exit.
Exit
To exit the Playback Menu, use Navigator
up/down buttons to scroll to Exit, and press OK.
21
Page 26
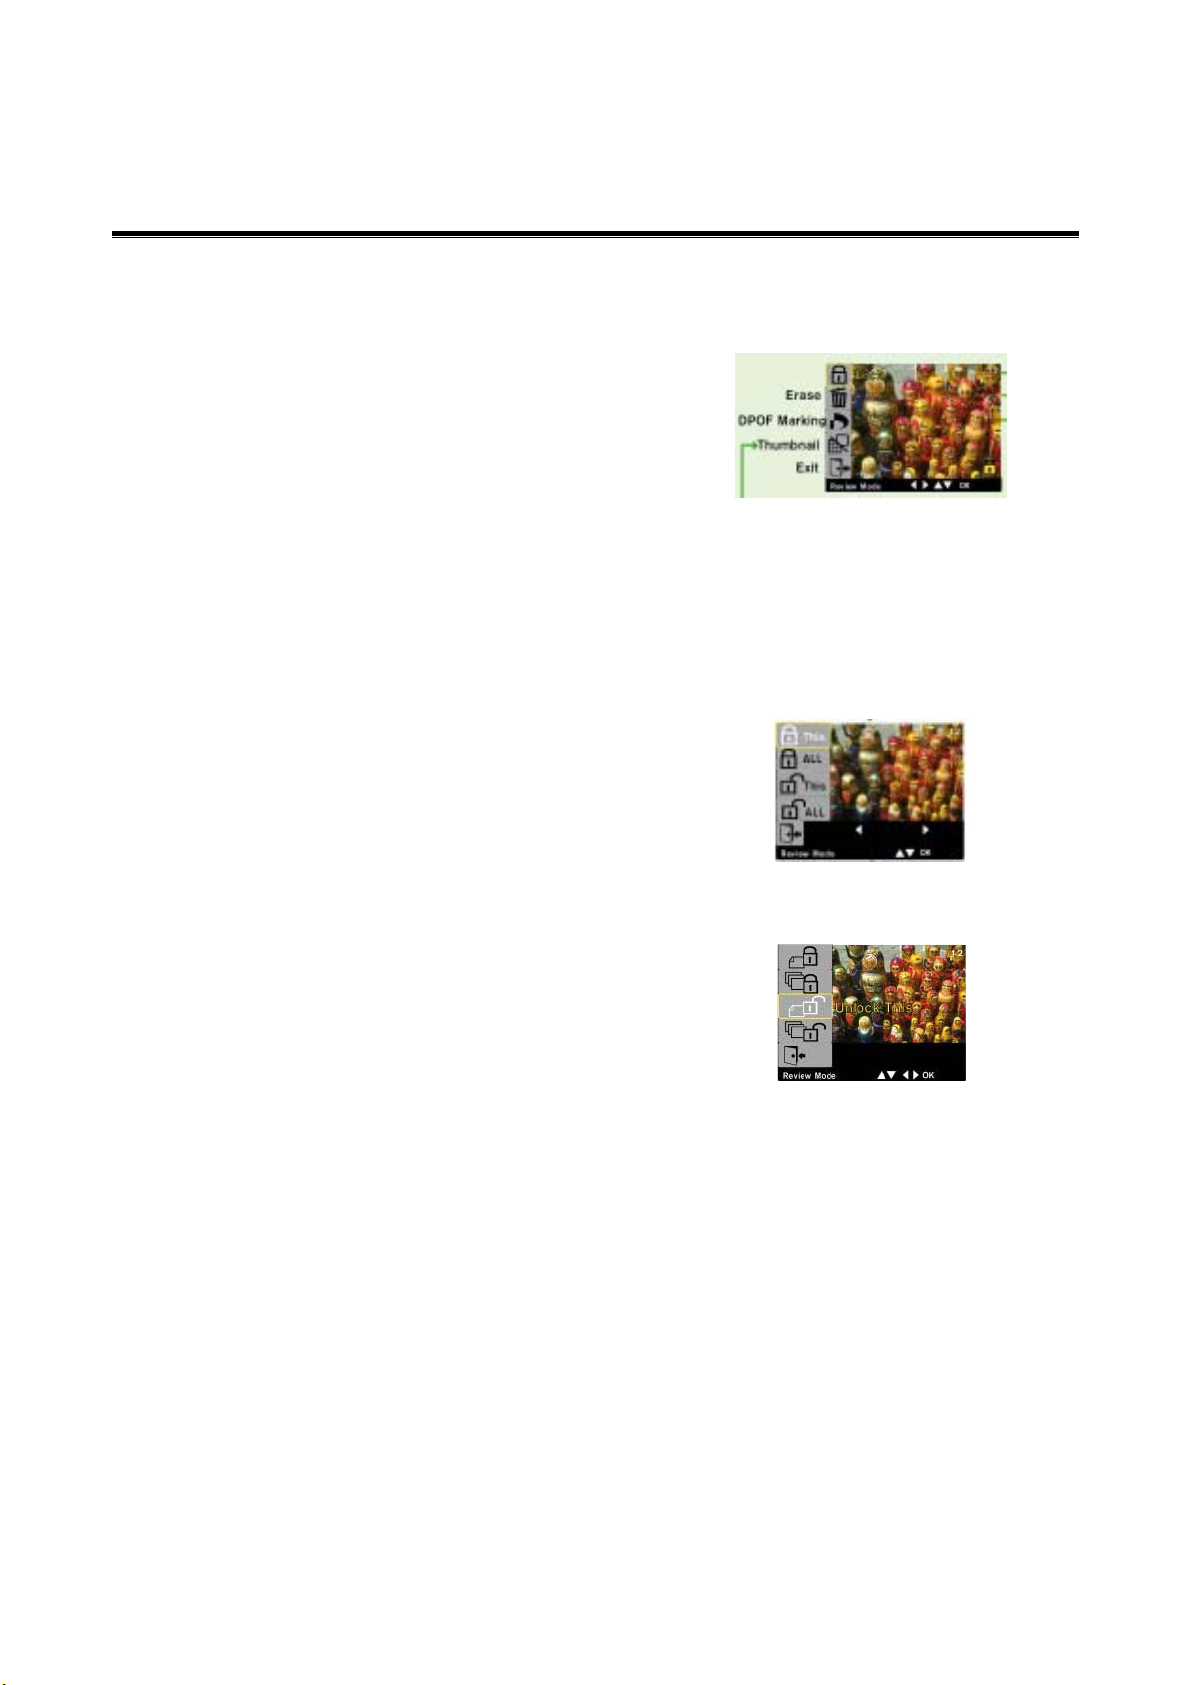
PPhhoottoo CCoonnttrrooll
In Playback mode press MENU, the Playback Menu will appear, select Photo Control and press OK.
The Photo Control Menu includes these selections:
• Lock files
• Erase files
• DPOF Marking
• Thumbnail
• Exit
Lock
This selection allows you to protect images by
locking them.
In the Photo Control Menu, select the Lock icon and
press OK. A sub-menu will appear. Use the
Navigator up/down buttons to choose Lock This
icon to lock the image showing, choose Lock All
icon to lock all the images. Once you lock an image,
a lock icon will display on the bottom right of that
image.
To unlock an image, scroll to the image with the
Navigator left/right buttons, and then use the
up/down buttons to Unlock This icon, and OK. To
unlock all the images, scroll to the Unlock-All icon
and press OK. To return to the previous menu, scroll
to the Exit icon, and press OK.
To lock or unlock other individual images, use the
Navigator left/right buttons while on the Photo
Protection menu.
22
Page 27
d
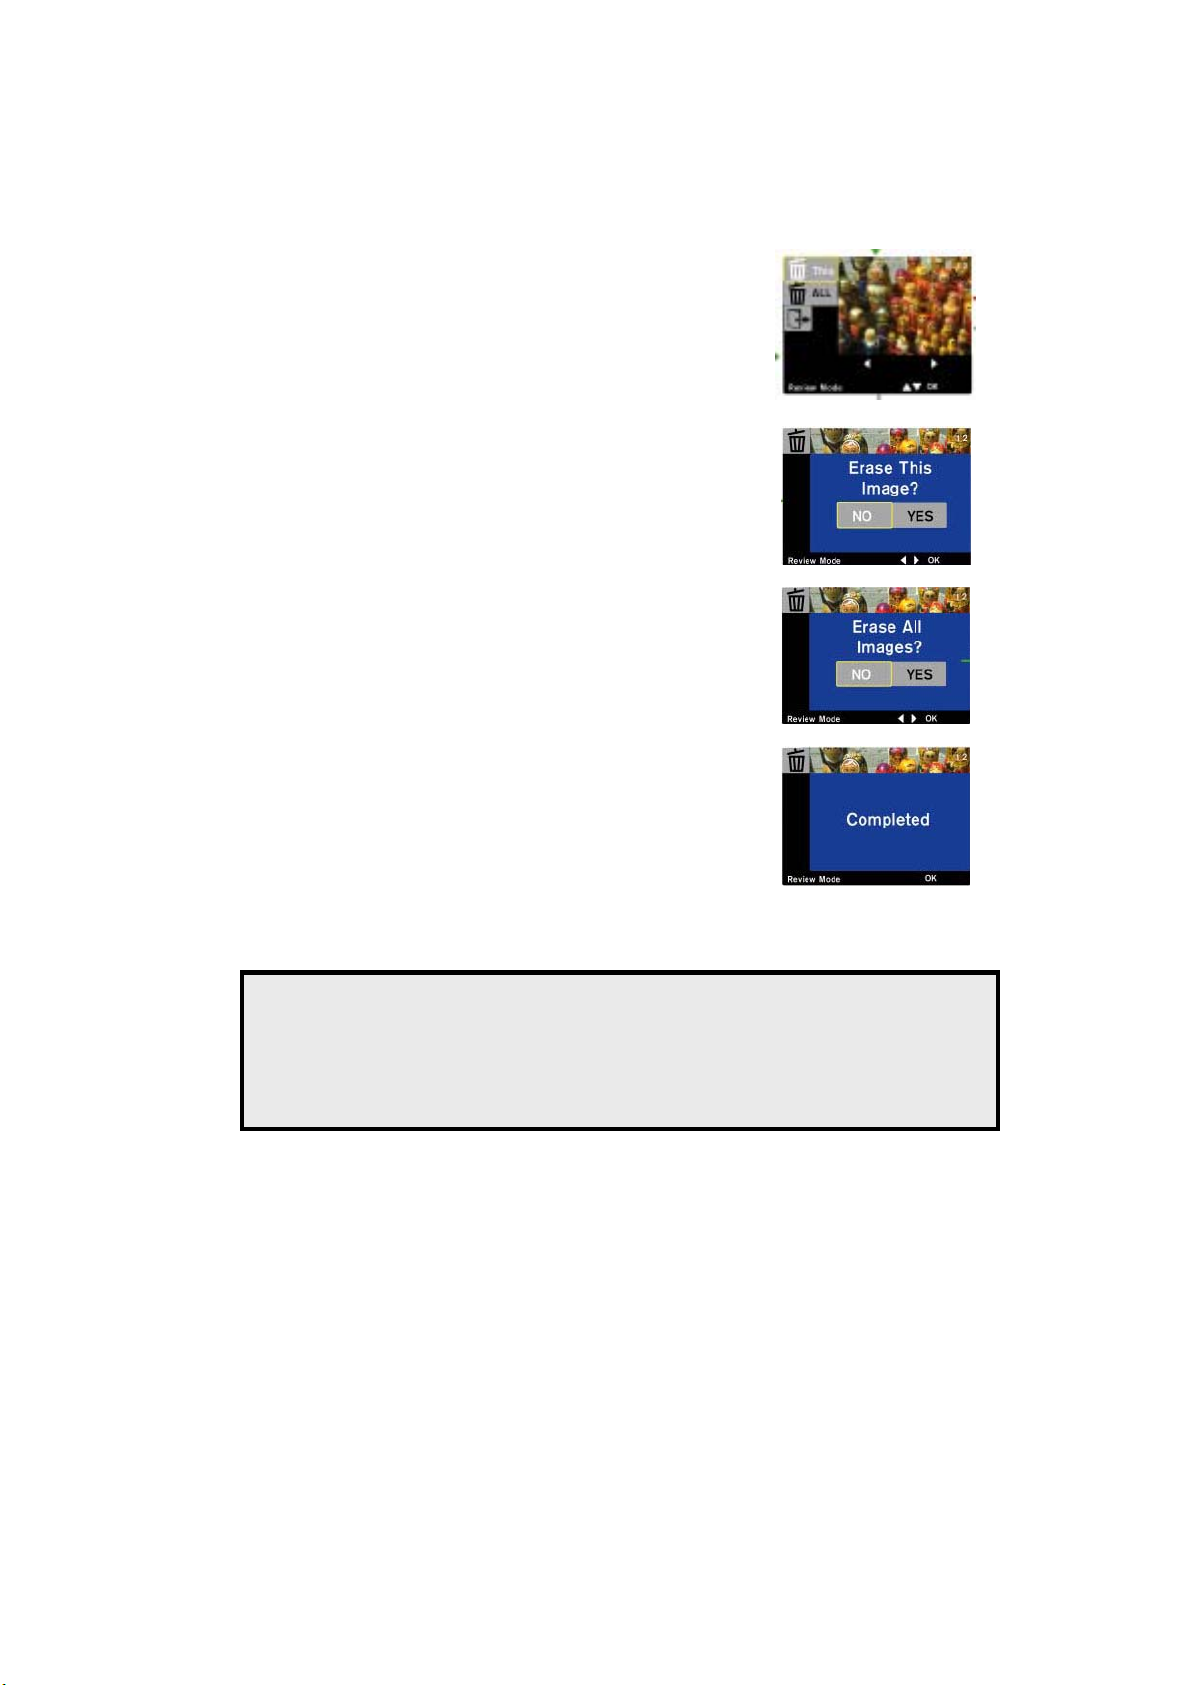
Erase
This selection allows you to erase pictures stored on
your CompactFlash card.
Select Erase from the Photo Control Menu and press
OK.
Use the Navigator up/down buttons to select Delete
This icon to delete the current image showing on the
display, and press OK. The camera will prompt you
with a confirmation “Erase this image?” use the
Navigator left/right buttons to select YES or NO
and press OK. To erase other individual images
while on the Erase sub-menu, use the Navigator
left/right buttons to select the images.
To erase all of the images, select Delete ALL icon
and press OK. The camera will prompt you with
“Erase all the images?”, select YES or NO, and press
OK.
After erasing the image(s), the screen will confirm
with “Completed”.
To exit this sub-menu, scroll to Exit icon and press
OK.
Note: To delete a locked image you must first “un-lock” the image. Refer to
Protecting Images (page 22) for instructions.
To quickly delete a large number of “locked images”, use the Format Car
(page 10) command.
23
Page 28
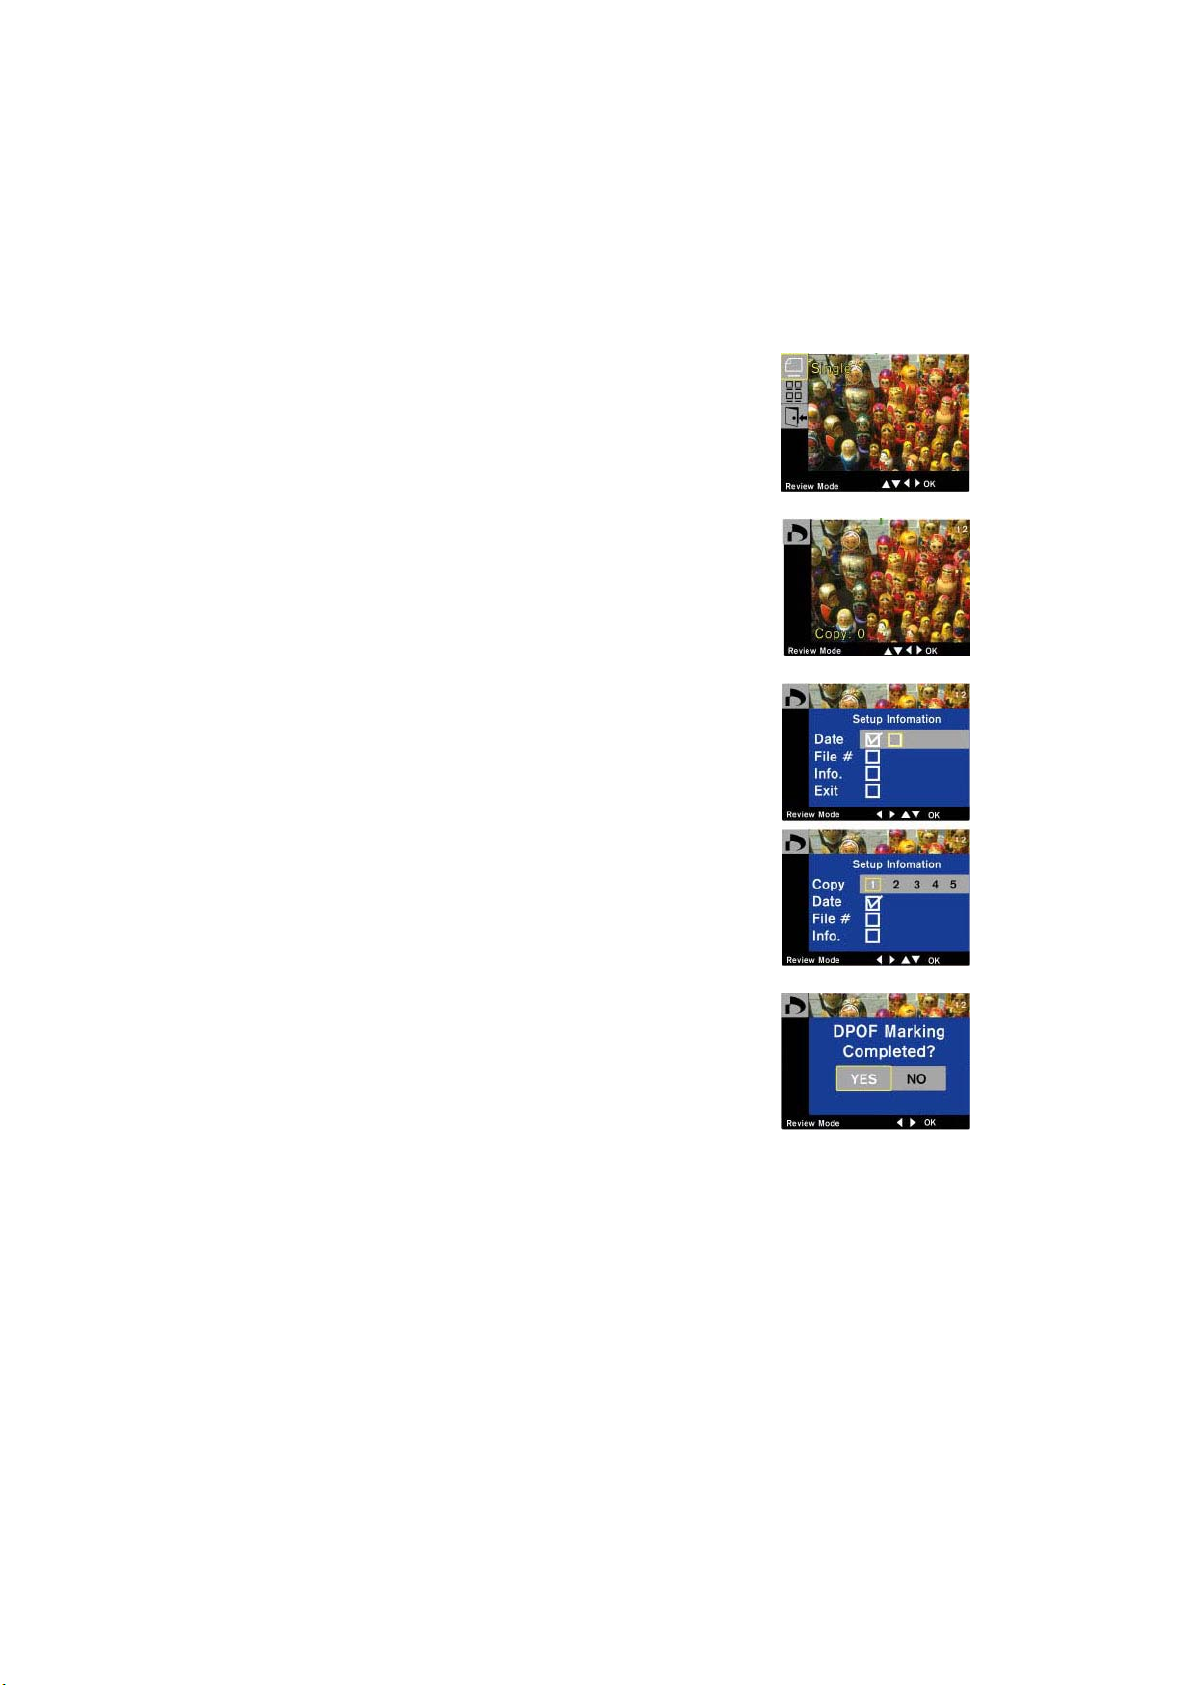
DPOF (Digital Print Order Format)
The DPOF selection allows you to format the settings of images you want to print.
Note: DPOF does not apply if you are using a SiPix
PocketColor 100 or PocketColor 200 printer, which
has a direct print function.
Select DPOF from the Photo Control Menu and press
OK. A format selection will display Single or All.
If you select Single, use the Navigator up/down
buttons to select the number of copies you want to
print, and use the left/right buttons to scroll to the
next image. When you have completed your
selection, press OK.
The screen will display a set of information for the
DPOF setup, use the Navigator left/right/up/down
buttons and the OK button to select the date stamp,
file #, information, etc.
When all the selections are made, select Exit and
press OK. The LCD will prompt “DPOF Marking
Completed?” Select YES or NO to complete your
configuration.
If you select All from the DPOF menu, a full setup
information chart will display including the number
of copies you want to print, and date stamp, etc. Make
your selection with the Navigator up/down/left/right
buttons, and press OK.
When all the selections are made, select Exit and
press OK. The LCD will prompt “DPOF Marking
Completed?” Select YES or NO to complete your
configuration.
To exit the setup information, select Exit and press
OK.
24
Page 29
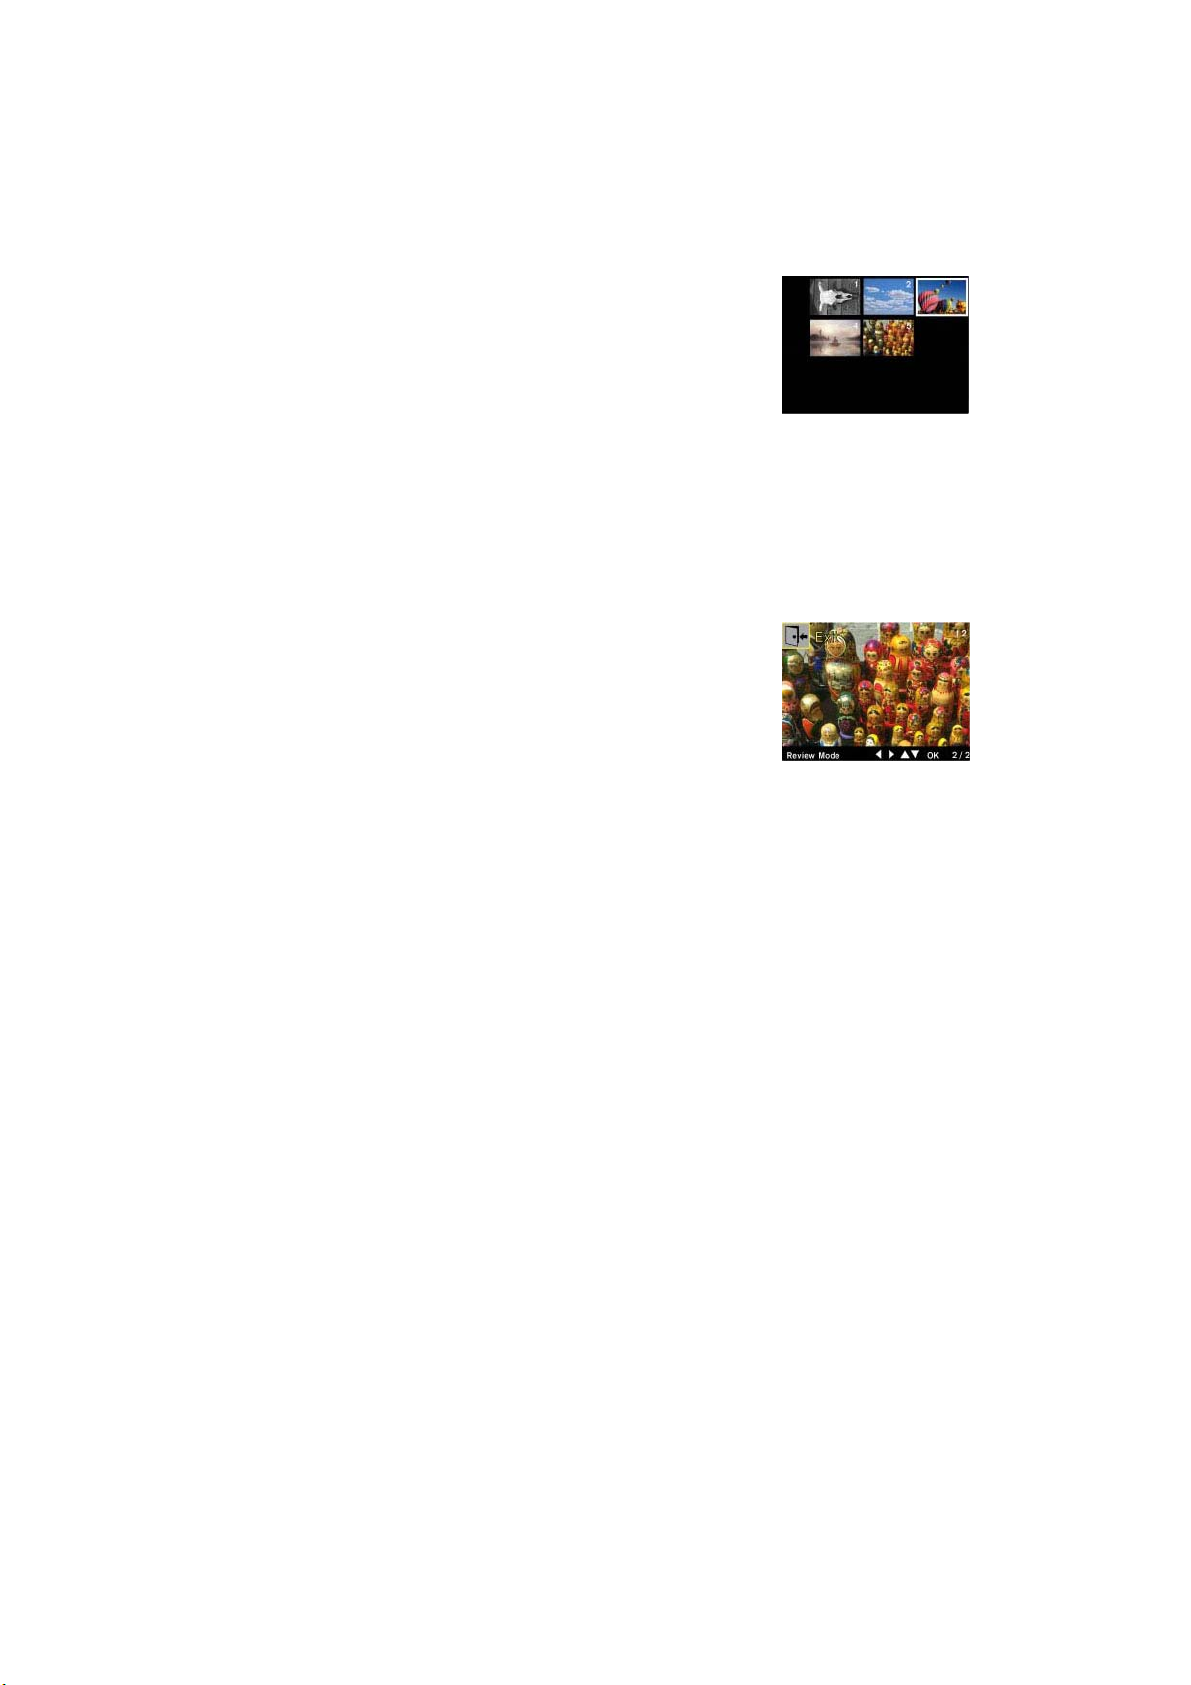
Thumbnail
Thumbnail allows you to view up to nine images at a
time.
Select Thumbnail from the Photo Control Menu, and
press OK. The LCD will display up to 9 images in
thumbnail, or the number of photos you’ve taken
(whichever is less).
Use the Navigator up/down/left/right buttons to scroll
to view the images.
Exit
To exit the Photo Control Menu, select the Exit
icon at the bottom of the list using the
Navigator up/down buttons, and press OK. The
exit icon is displayed as an open door with an
arrow pointing out.
25
Page 30
PPrriinntt MMooddee SSeettuupp && OOppeerraattiioonn
The special Direct Print function on the SP-1300 Shoot & Share allows you to print images
directly to the SiPix PocketColor 100 or the PocketColor 200 printer, without the use of a
computer.
For detailed instruction on how to hook up the SiPix portable color printer with the SP-1300
digital camera, please refer to Connecting to PocketColor 100 or 200 printers on page 44.
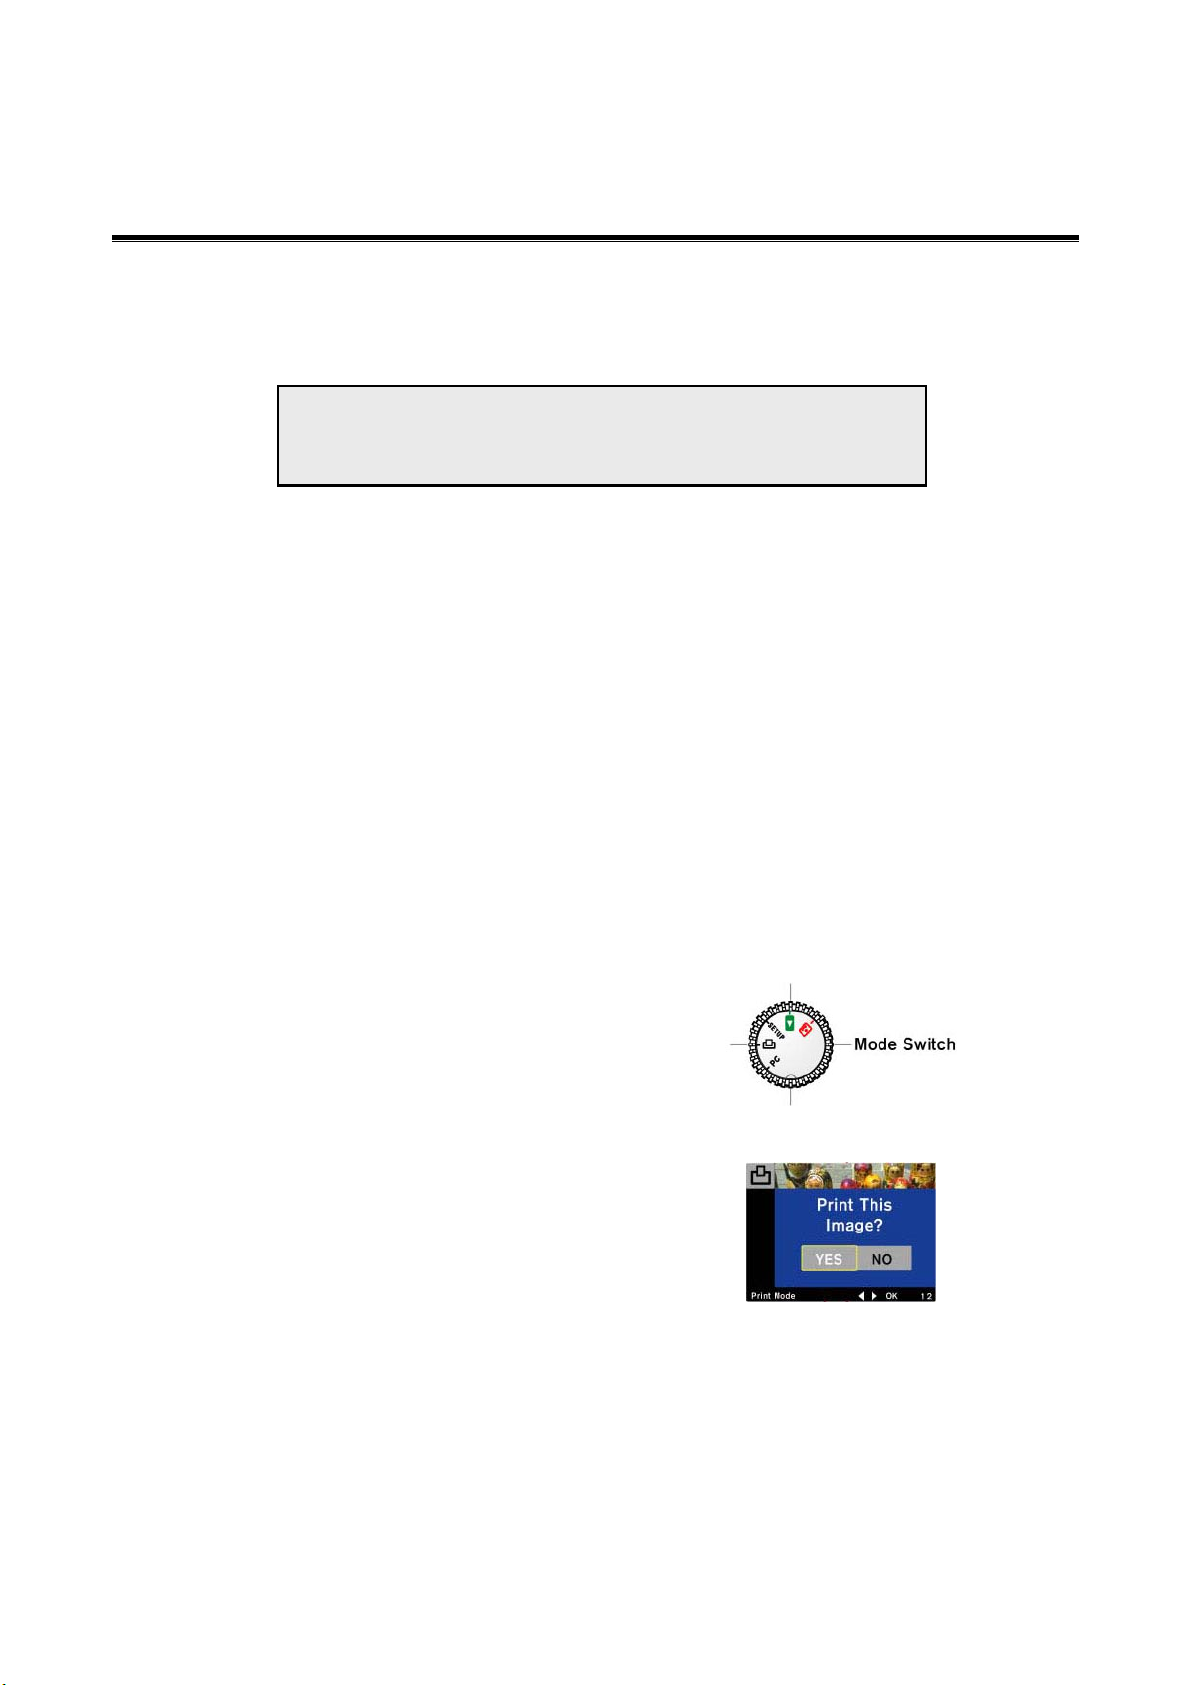
Set the Mode Switch to
the SP-1300 digital camera.
There are two ways to print:
1. Quick printing by pressing the Print button.
2. Standard printing process by selecting the available features from the Print Menu.
Note: you must have a SiPix PocketColor 100 printer or a
PocketColor 200 printer available to use this function.
PRINT mode. The LCD should display the image(s) you have taken with
Quick Print
Note: You must first setup the SiPix PocketColor 100 or the PocketColor 200 printer.
Set your camera to PRINT mode, use the
Navigator left/right buttons to select the
images you want to print, and press the Print
button.
The LCD will prompt a confirmation from you
“Print this image?” Use the Navigator left/right
buttons to select YES or NO, and press OK.
26
Page 31
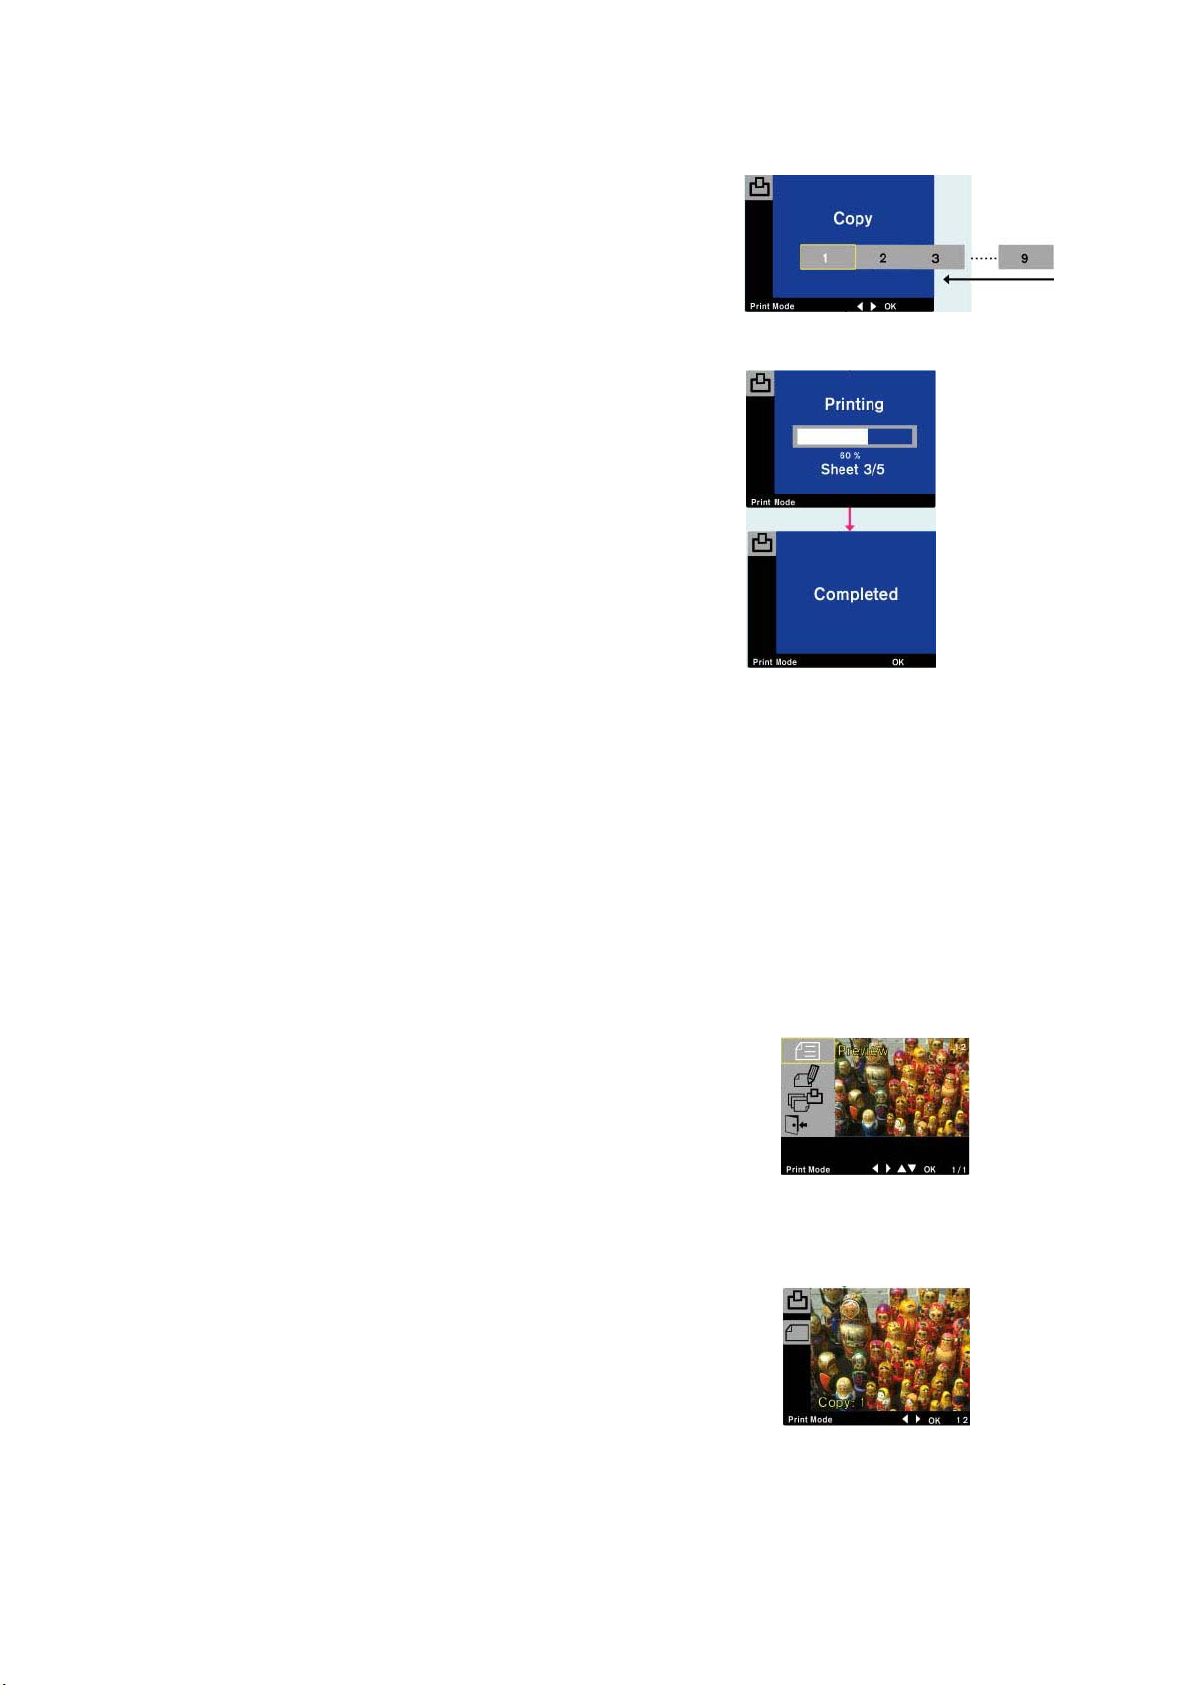
The LCD will then prompt you for the number
of copies you want to print, use the Navigator
left/right buttons to make your selection (you
can chose up to 9 copies maximum) and press
OK.
Please allow 10 seconds for the file to transfer
from camera to the PocketColor 100 or
PocketColor 200 printer.
While the printer is printing, the LCD screen
will display “Printing” and a progress bar.
When the print job is done, the LCD will display
“Completed”
Press OK to exit the Print mode.
Using the Print Menu
Note: You must first setup the SiPix PocketColor 100 or the PocketColor 200 printer.
Printing to the SiPix PocketColor 100
Set your SP-1300 digital camera to
PRINT mode, and click the MENU button. The Print Menu
will display in the LCD monitor.
• Preview
• Edit
• Print All
• Exit
Preview
Use Preview when you have already selected the
images you want to print. Preview mode will
display the layout you selected (e.g. single or
index). Press OK if you want to print these images.
27
Page 32
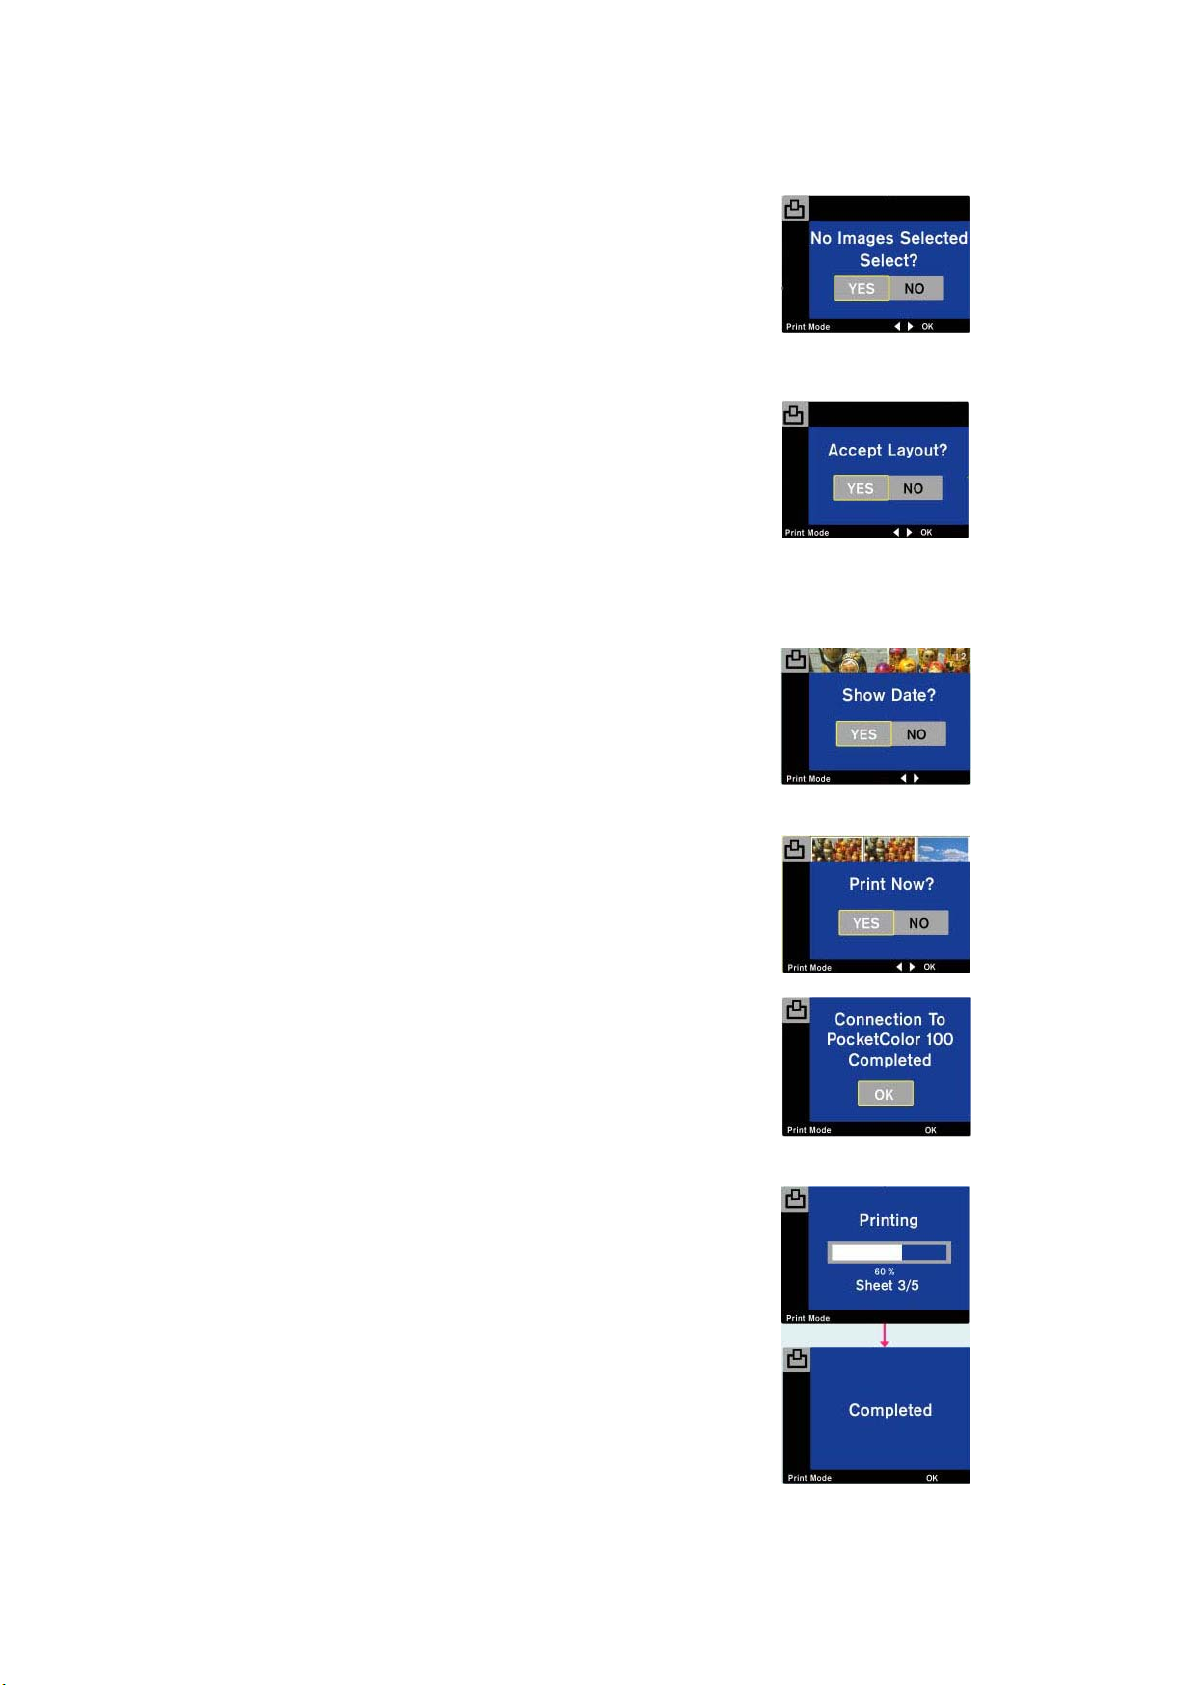
Note: If no images are selected, the screen will
prompt “No Images Selected. Select?”
If you chose YES, the camera will enter the Edit
mode. (Please refer to Edit on page 29)
If you already selected the images to print, the
screen will prompt you to “Accept Layout?” Use
the Navigator left/right buttons to select YES/NO
and press OK.
If you chose YES, the screen will prompt you with
“Show Date?” Select YES or NO and press OK.
Note: when you’re printing index, this option will
not be available.
Next, the screen prompts you with “Print Now?”
Select YES or NO and press OK.
The screen will display “Connection to
PocketColor 100 Completed”. Press OK to
continue to print.
Please allow 10 seconds for the file to transfer from
the camera to the PocketColor 100 printer.
While the printer is printing, the LCD screen will
display “Printing” and a progress bar.
When the print job is done, the LCD will display
“Completed”
Press OK to exit the Print mode.
28
Page 33
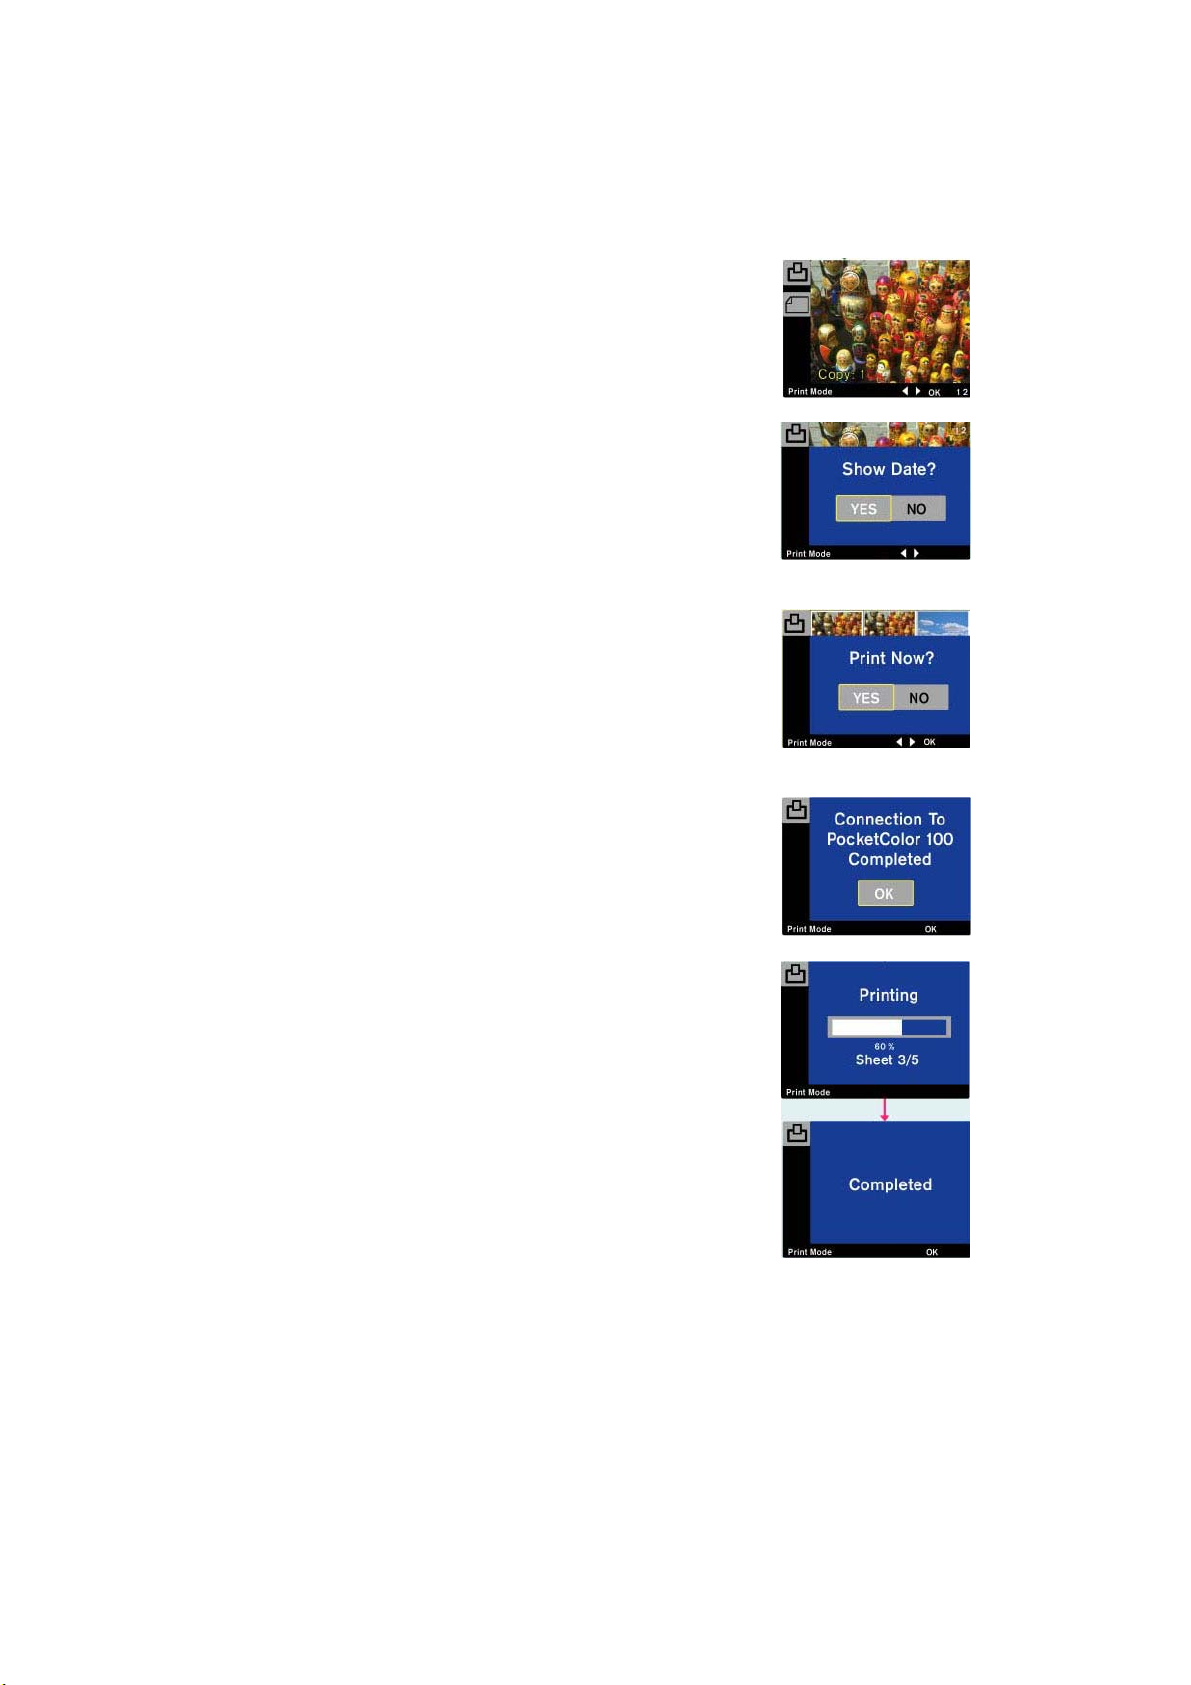
Edit
Use Edit when you haven’t selected any images to
print.
Use the left/right Navigator buttons to select an
image and the up/down buttons to select the
number of copies you want to print, and press OK.
The screen will prompt you with “Show Date?”
Make your selection and press OK.
Note: PocketColor 100 printer does not support
index prints.
Next, the screen prompts you with “Print Now?”
Make your selection and press OK.
Next, the screen will show “Connection to
PocketColor 100 Completed” Press OK to continue
to print.
Please allow 10 seconds for the file to transfer from
the camera to the PocketColor 100 printer.
While the printer is printing, the LCD screen will
display “Printing” and a progress bar.
When the print job is done, the LCD will display
“Completed”
Press OK to exit the Print mode.
29
Page 34
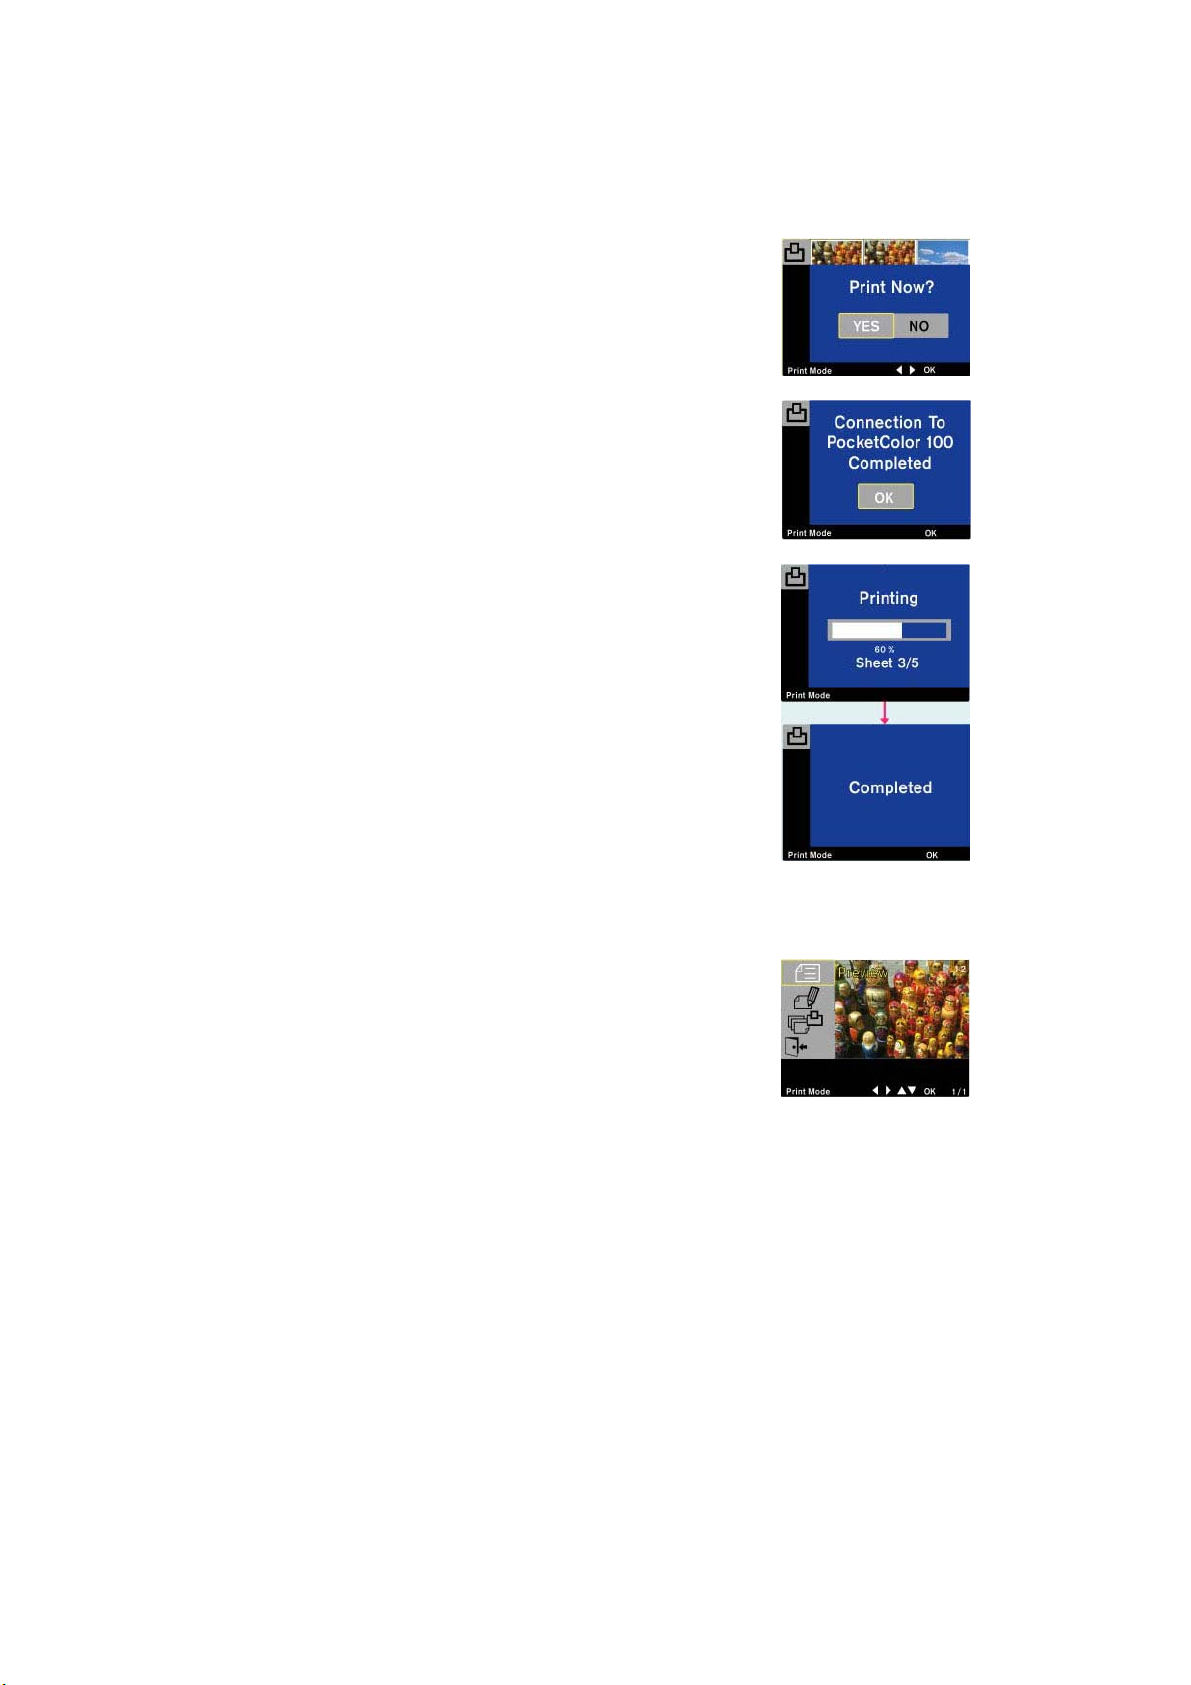
Print All
Select a layout first (e.g. single) and then selects the
Print All icon from the Print Menu, and click OK.
The LCD will prompt “Print Now?” Use Navigator
left/right buttons to select YES/NO and press OK.
If YES, the LCD will display “Connection to
PocketColor 100 Completed” Press OK to continue
to print.
Please allow 10 seconds for the file to transfer from
the camera to the PocketColor 100 printer.
While the printer is printing, the LCD screen will
display “Printing” and a progress bar.
When the print job is done, the LCD will display
“Completed”
Press OK to exit the Print mode.
Exit
To exit the Print Menu, use the Navigator
up/down buttons to select the Exit icon on the
bottom of the menu list and press OK.
30
Page 35
Error Messages
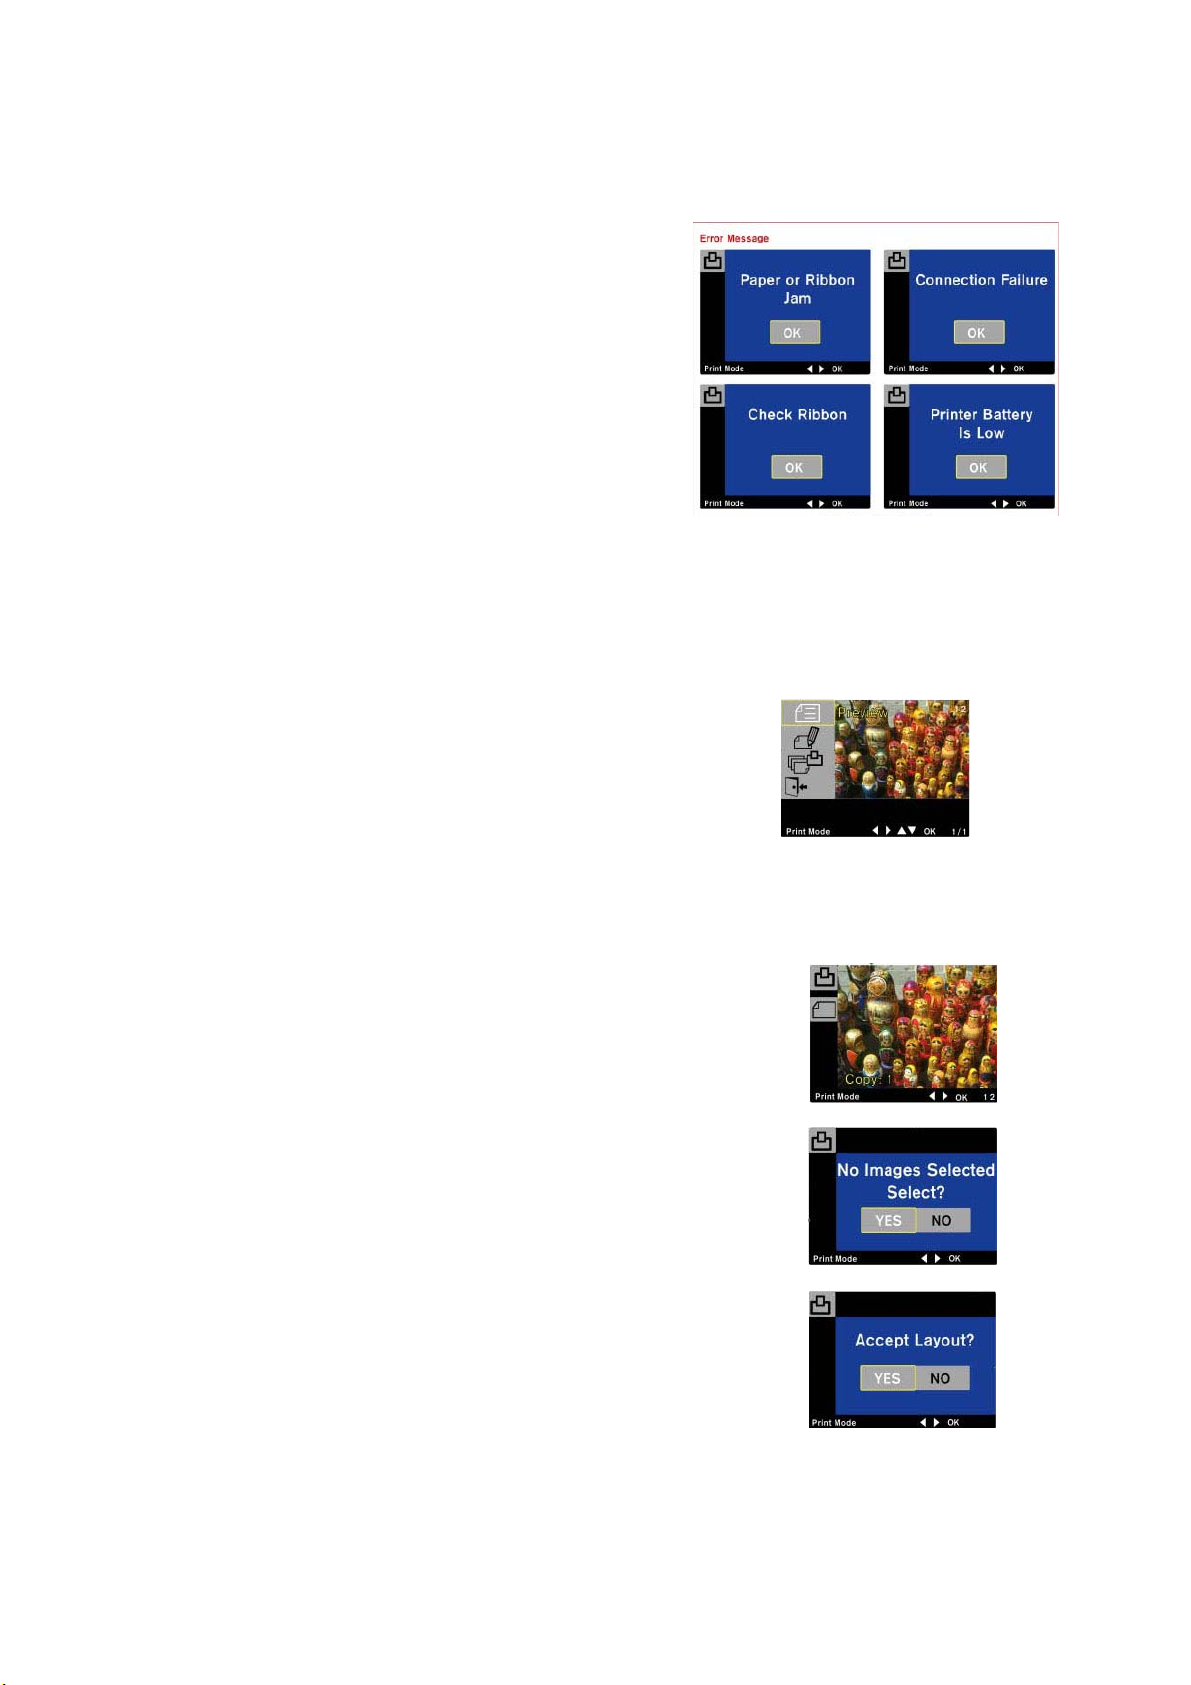
If you encounter a hardware problem, one of the
following messages will display on the LCD
monitor to warn you about the possible cause. Click
OK to exit the error message window.
Exit the print window or turn off the camera if
needed. Check the source of error and start again.
Printing to the SiPix PocketColor 200
Set your SP-1300 digital camera to PRINT mode, and click the MENU button. The Print Menu
will display in the LCD monitor.
• Preview
• Edit
• Print All
• Exit
Preview
Use preview when you already selected images to
print. The LCD will display the layout you have
chosen (e.g. single or index).
Note: If no images are selected, the screen will
prompt “No Images Selected. Select?”
Select YES, and the menu will lead you to Edit.
(Please refer to Edit on page 32)
The screen will prompt you to “Accept Layout?”
Use the Navigator left/right buttons to select YES
or NO and press OK.
31
Page 36
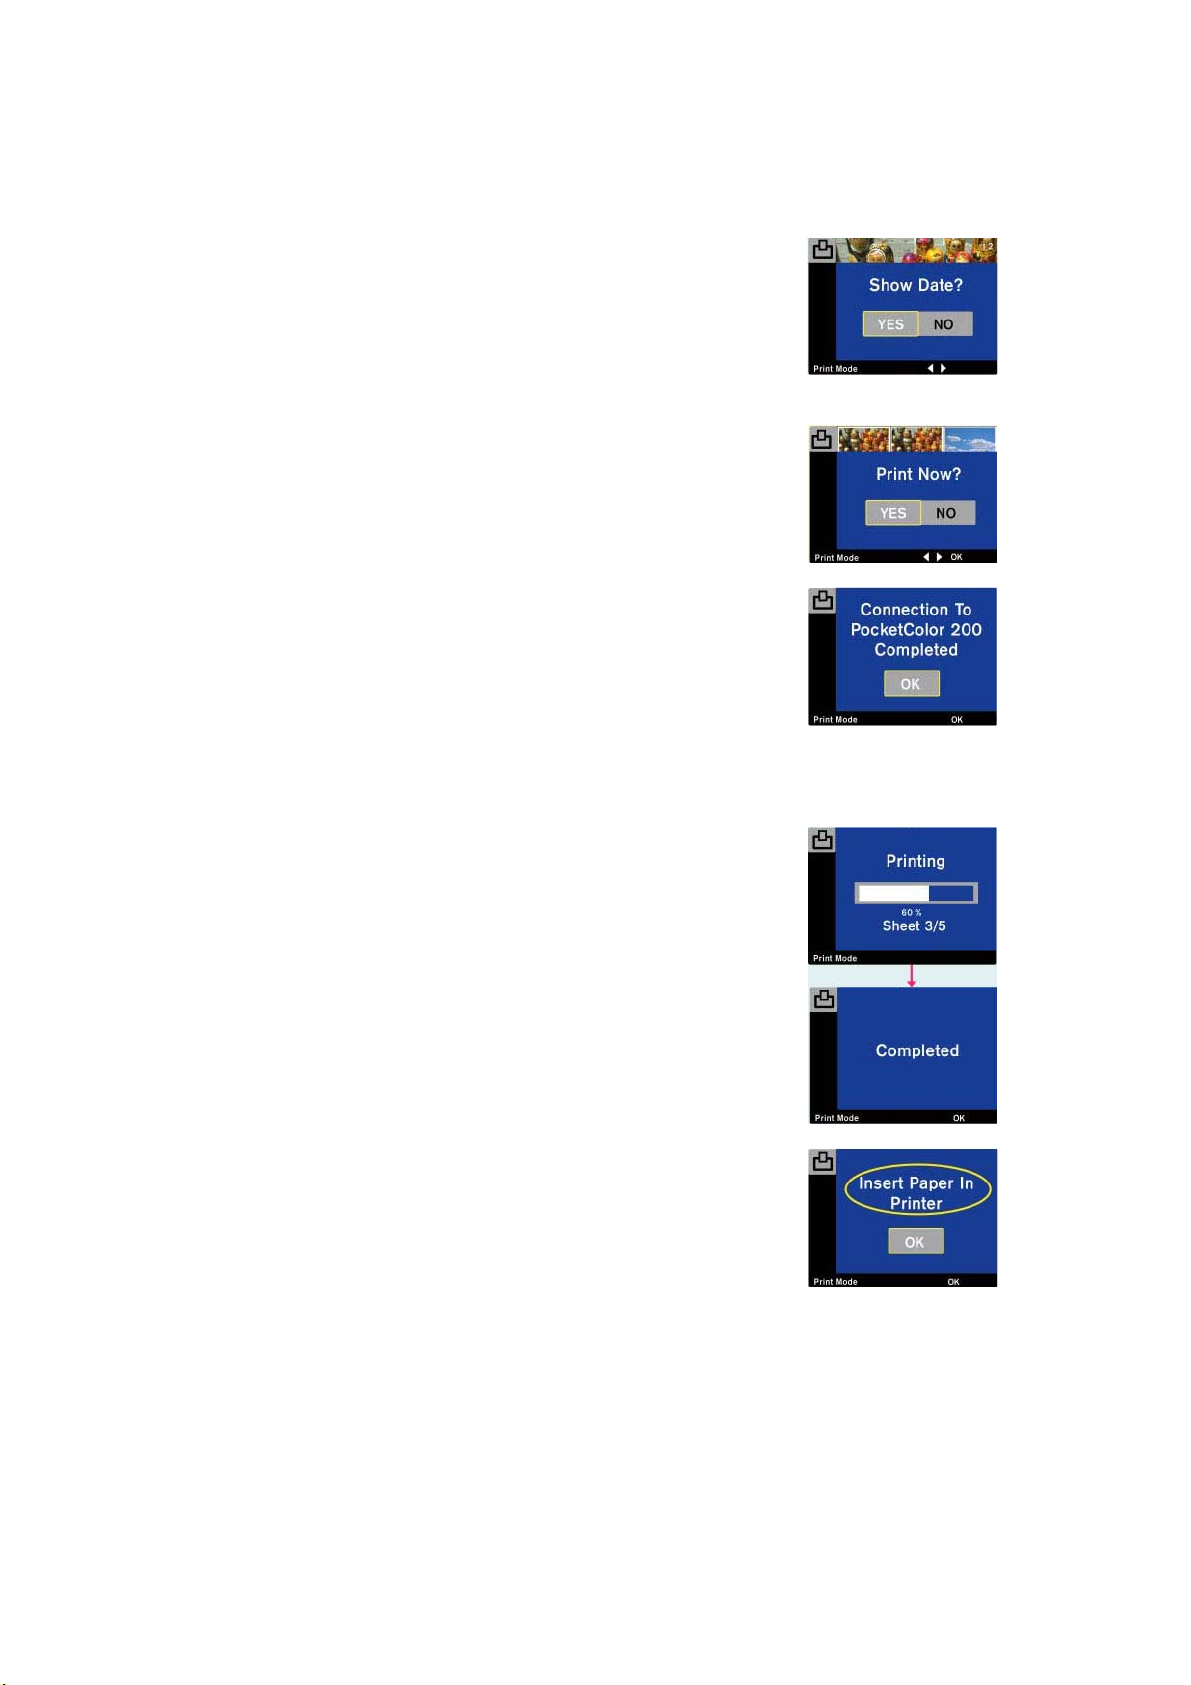
If you chose YES, the screen will prompt you with
“Show Date?” Make your selection and press OK.
Next, the screen prompts you with “Print Now?”
Make your selection and press OK.
The LCD will display “Connection to PocketColor
200 Completed” Press OK to continue to print.
Please allow 10 seconds for the file to transfer from
the camera to the PocketColor 200 printer.
While the printer is printing, the LCD screen will
display “Printing” and a progress bar.
When the print job is done, the LCD will display
“Completed”
Press OK to exit the Print mode.
Note: you need to manually feed the print paper
into the printer until all copies are printed.
The screen will display “Insert Paper in Printer”
after printing each image. This message will
appear until all the copies are printed.
32
Page 37
Edit
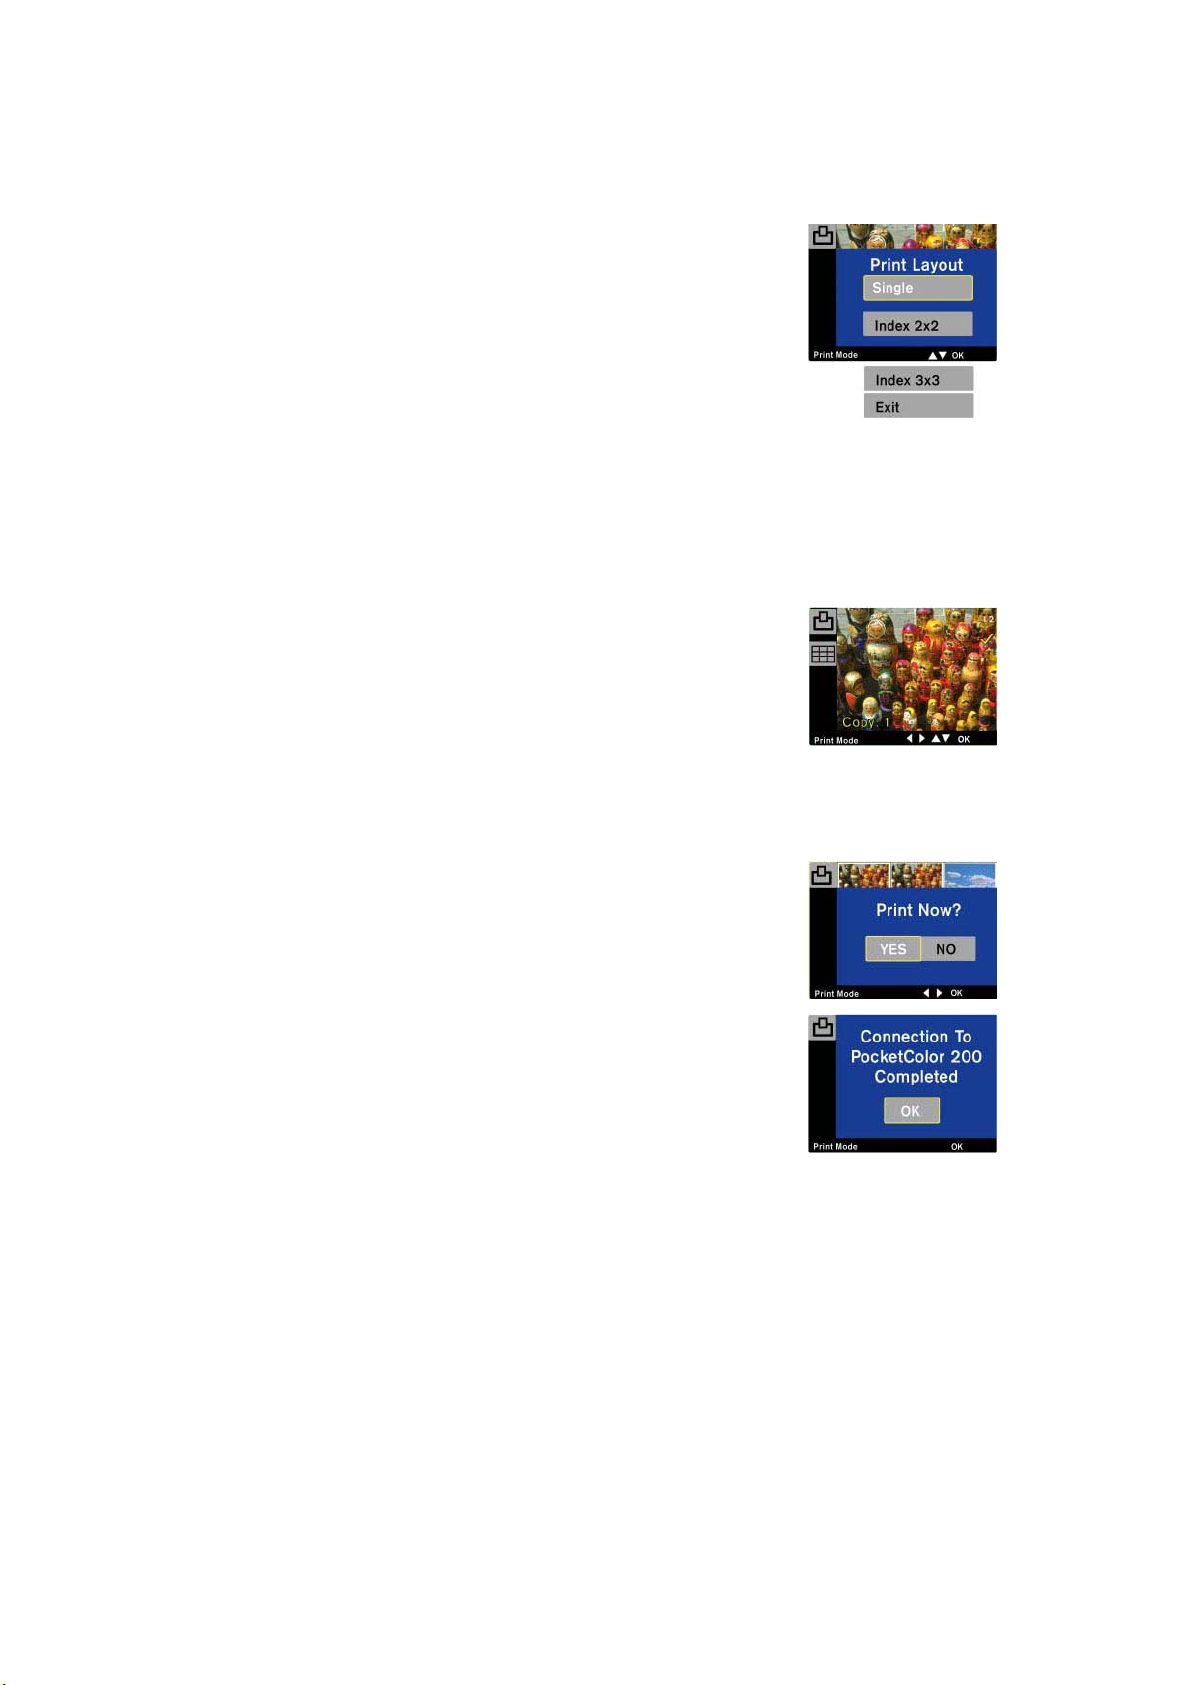
If you have not selected any images to print, choose
Edit from the Print Menu.
Use the Navigator up/down buttons to select one
of the print formats:
• Single
• Index 2 x 2 (four pictures on one print)
• Index 3 x 3 (nine pictures on one print)
•
Exit
The LCD will display an image, use the Navigator
up/down/left/right buttons to scroll the images, to
check or uncheck an image to print, and to select
the number of copies you want to print, and press
OK.
The LCD will prompt you with “Print Now?” Use
the Navigator left/right buttons to select YES or
NO, and press OK.
The LCD will display “Connection to PocketColor
200 Completed”. Press OK to continue to print.
33
Page 38
Please allow 10 seconds for the file to transfer from
the camera to the PocketColor 200 printer.
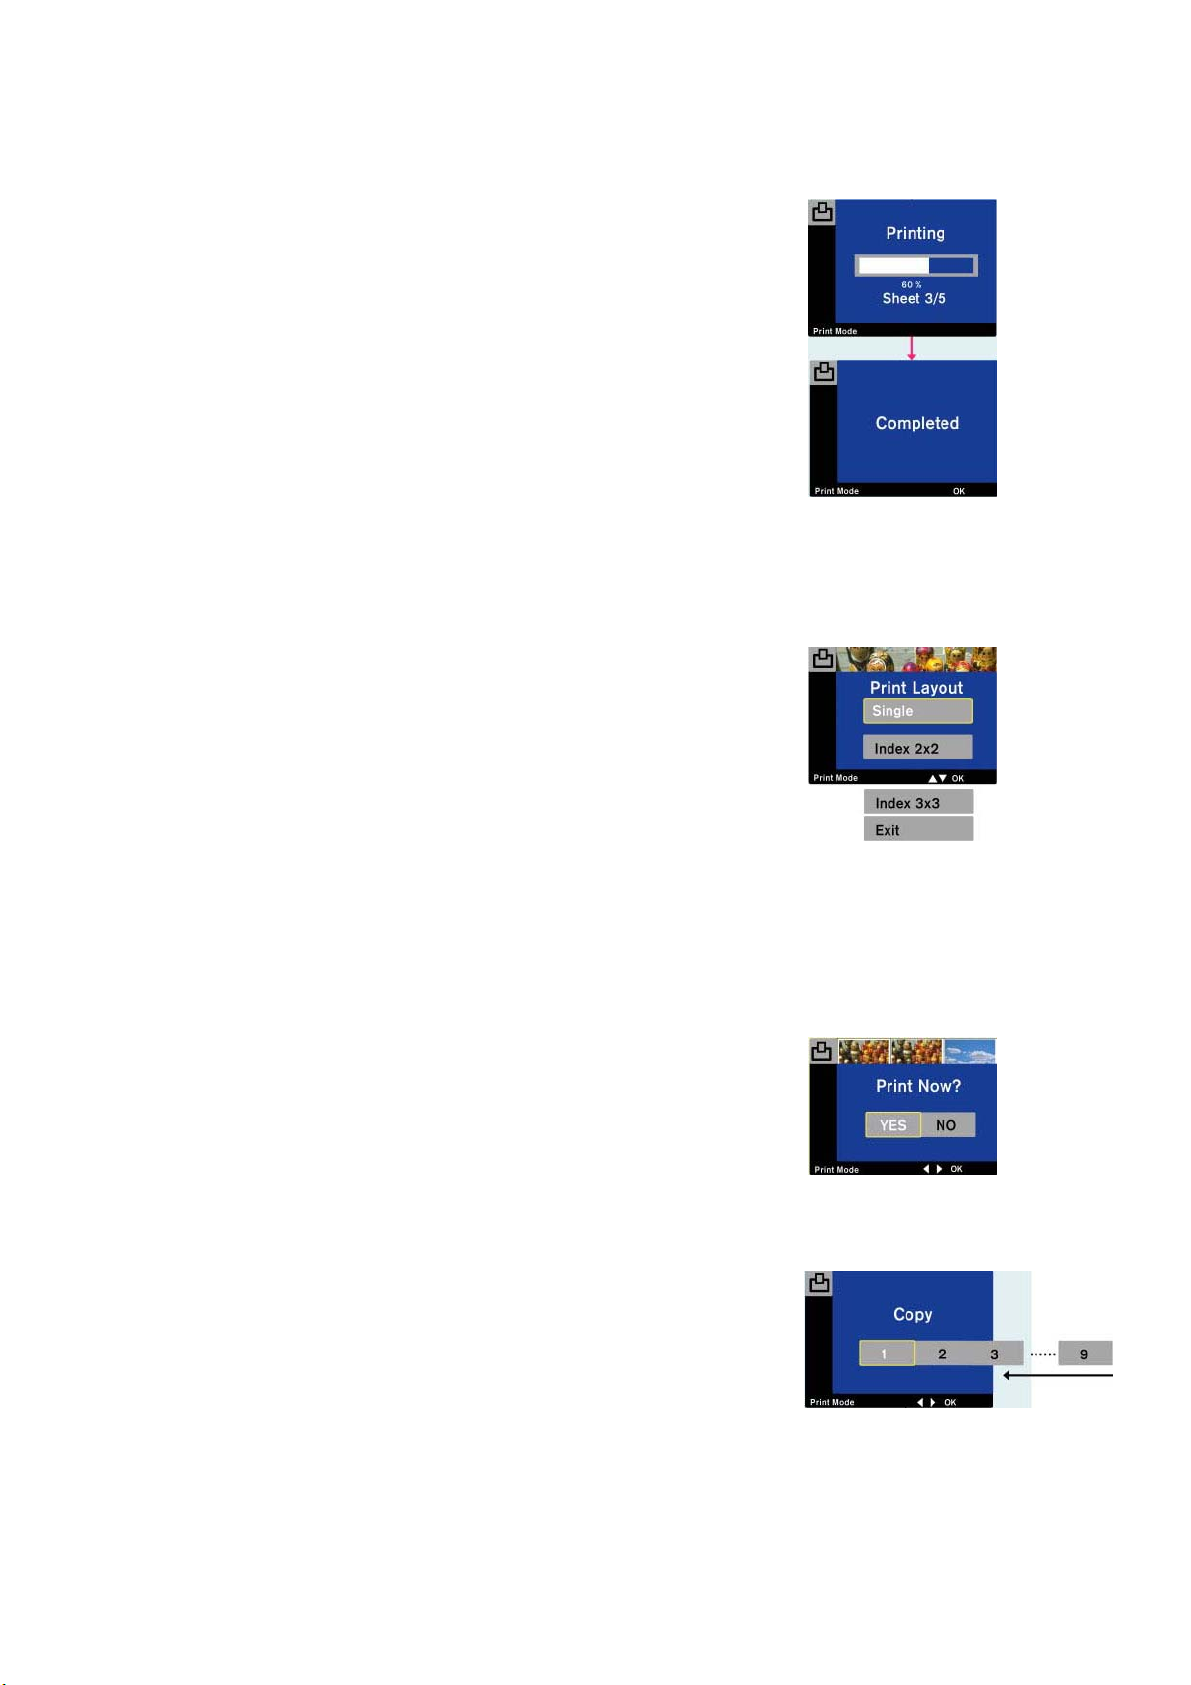
While the printer is printing, the LCD screen will
display “Printing” and a progress bar.
When the print job is done, the LCD will display
“Completed”
Press OK to exit the Print mode.
Print All
When you want to print all the images saved on the
CompactFlash card, select Print All feature on the
Print Menu.
Use the Navigator up/down buttons to select one
of the print format:
• Single
• Index 2 x 2 (four pictures on one print)
• Index 3 x 3 (nine pictures on one print)
• Exit
The LCD will prompt you with “Print Now?” Use
the Navigator left/right buttons to select YES or
NO, and press OK.
Next, the screen prompts you with “Copy” Use the
Navigator left/right buttons to select one to nine
(maximum) copies, and press OK.
34
Page 39
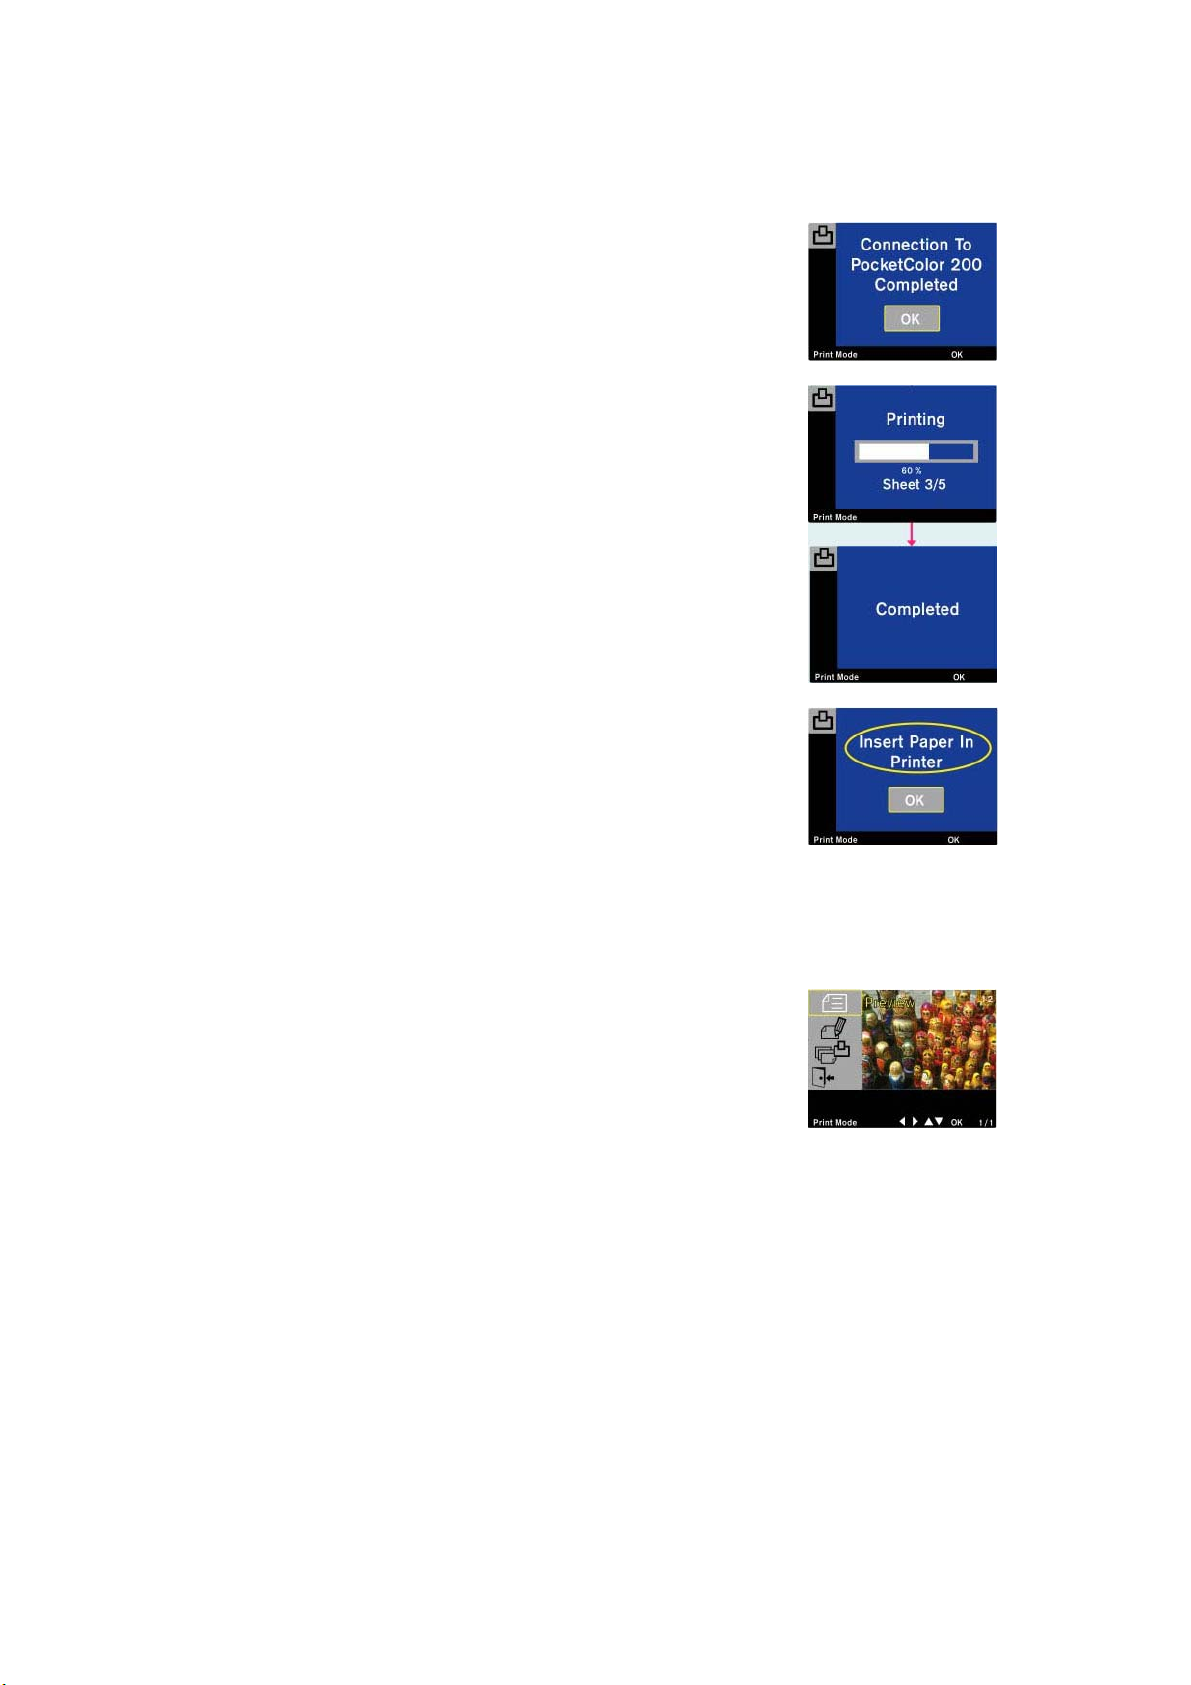
The LCD will display “Connection to PocketColor
200 Completed”. Press OK to continue to print.
Please allow 10 seconds for the file to transfer from
the camera to the PocketColor 200 printer.
While the printer is printing, the LCD screen will
display “Printing” and a progress bar.
When the print job is done, the LCD will display
“Completed”
Press OK to exit the Print mode.
Note: you need to manually feed the print paper
into the printer until all copies are printed.
The screen will display “Insert Paper in Printer”
after printing each image. This message will
appear until all the copies are printed.
Exit
To exit the print mode, use Navigator up/down
buttons to select Exit icon from the bottom of the
menu list, and click OK.
35
Page 40
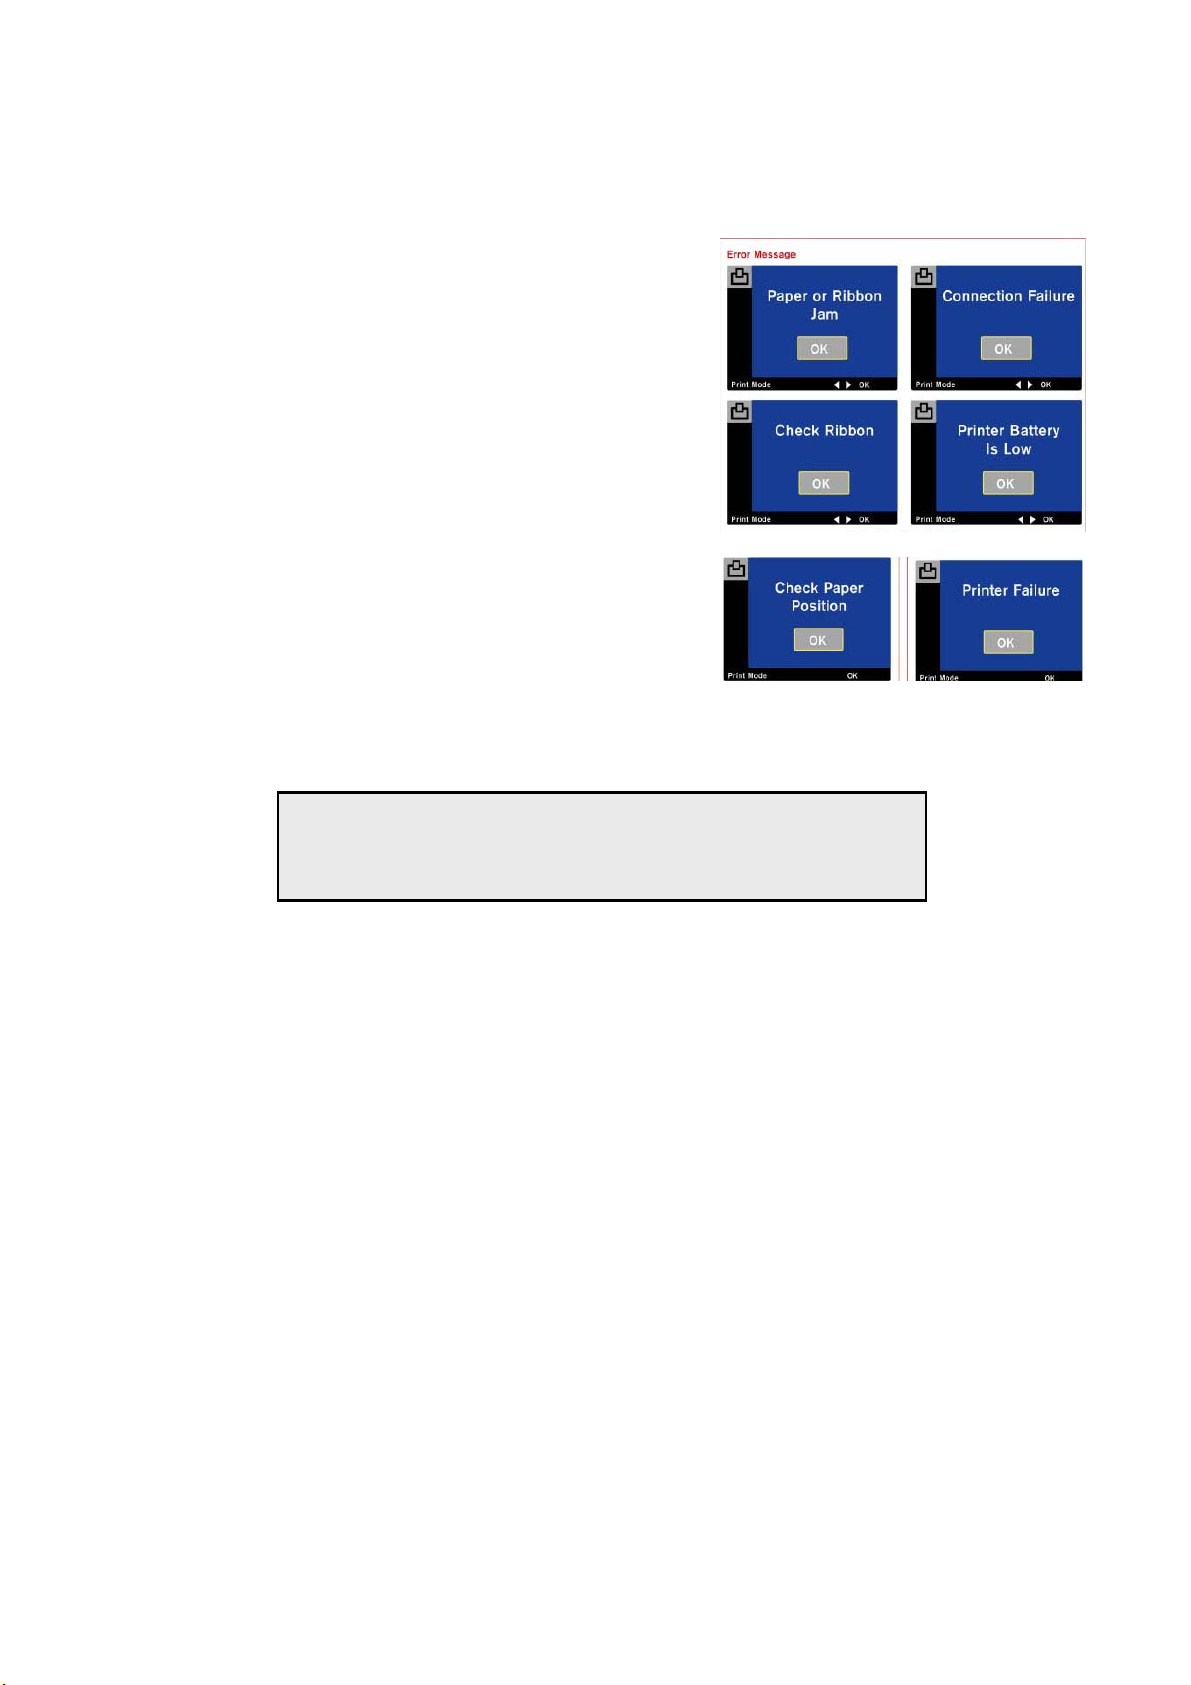
Error Messages
If you encounter a hardware problem, one of the
following messages will display on the LCD
monitor to warn you about the possible cause. Click
OK to exit the error message window.
Exit the print window or turn off the camera if
needed. Check the source of error and start again.
Note: When printing multiple copies, you need to manually
feed the paper after each print until the print job completes.
36
Page 41

r
r
CCoonnnneeccttiinngg ttoo AACC AAddaapptteerr
Connecting to an AC power source
It is recommended you use an AC adapter whenever you can to save battery life. The AC
adapter should be 6-7V, 2A center positive. Please make sure you have the correct polarity
before plugging anything into the SP-1300 digital camera.
1. Set the camera Power On/Off switch to
2. Open the connector cover. (Please refer to “Identifying Components” on page 3)
3. Insert the AC adapter jack into the AC socket.
4. Plug the AC adapter into a wall outlet
5. Turn the camera Power On/Off switch to
OFF.
ON.
Note: Using the wrong AC adapter may cause damage to you
digital camera. Ensure that the AC adapter you use matches the
electrical specifications for the camera. Refer to the Appendix fo
details.
37
Page 42
IInnssttaalllliinngg SSooffttwwaarree
Software Overview & Features
The SiPix SP-1300 Shoot & Share includes a SiPix custom USB mass storage driver that
provides fast and easy download, MGI PhotoSuite III SE photo editing software, and Adobe
Acrobat Reader for viewing the owner’s manual in PDF.
SiPix SP-1300 Driver
• Operates as a USB-connected device
• Can view images from the camera directly
• Easy download from camera to computer
Note: The SP-1300 driver is customized for Windows®
98/98SE/ME/2000 operating systems. We strongly recommend
you install this driver.
• Contains SP-1300 Owner’s Manual in PDF
Adobe Acrobat Reader
• Use this application to read PDF files
MGI PhotoSuite III SE
• Photo editing: provides useful and powerful editing tools
• Make calendars & greeting cards, invitations, flyers, and more
• Panoramas: create photo panoramas in three simple steps
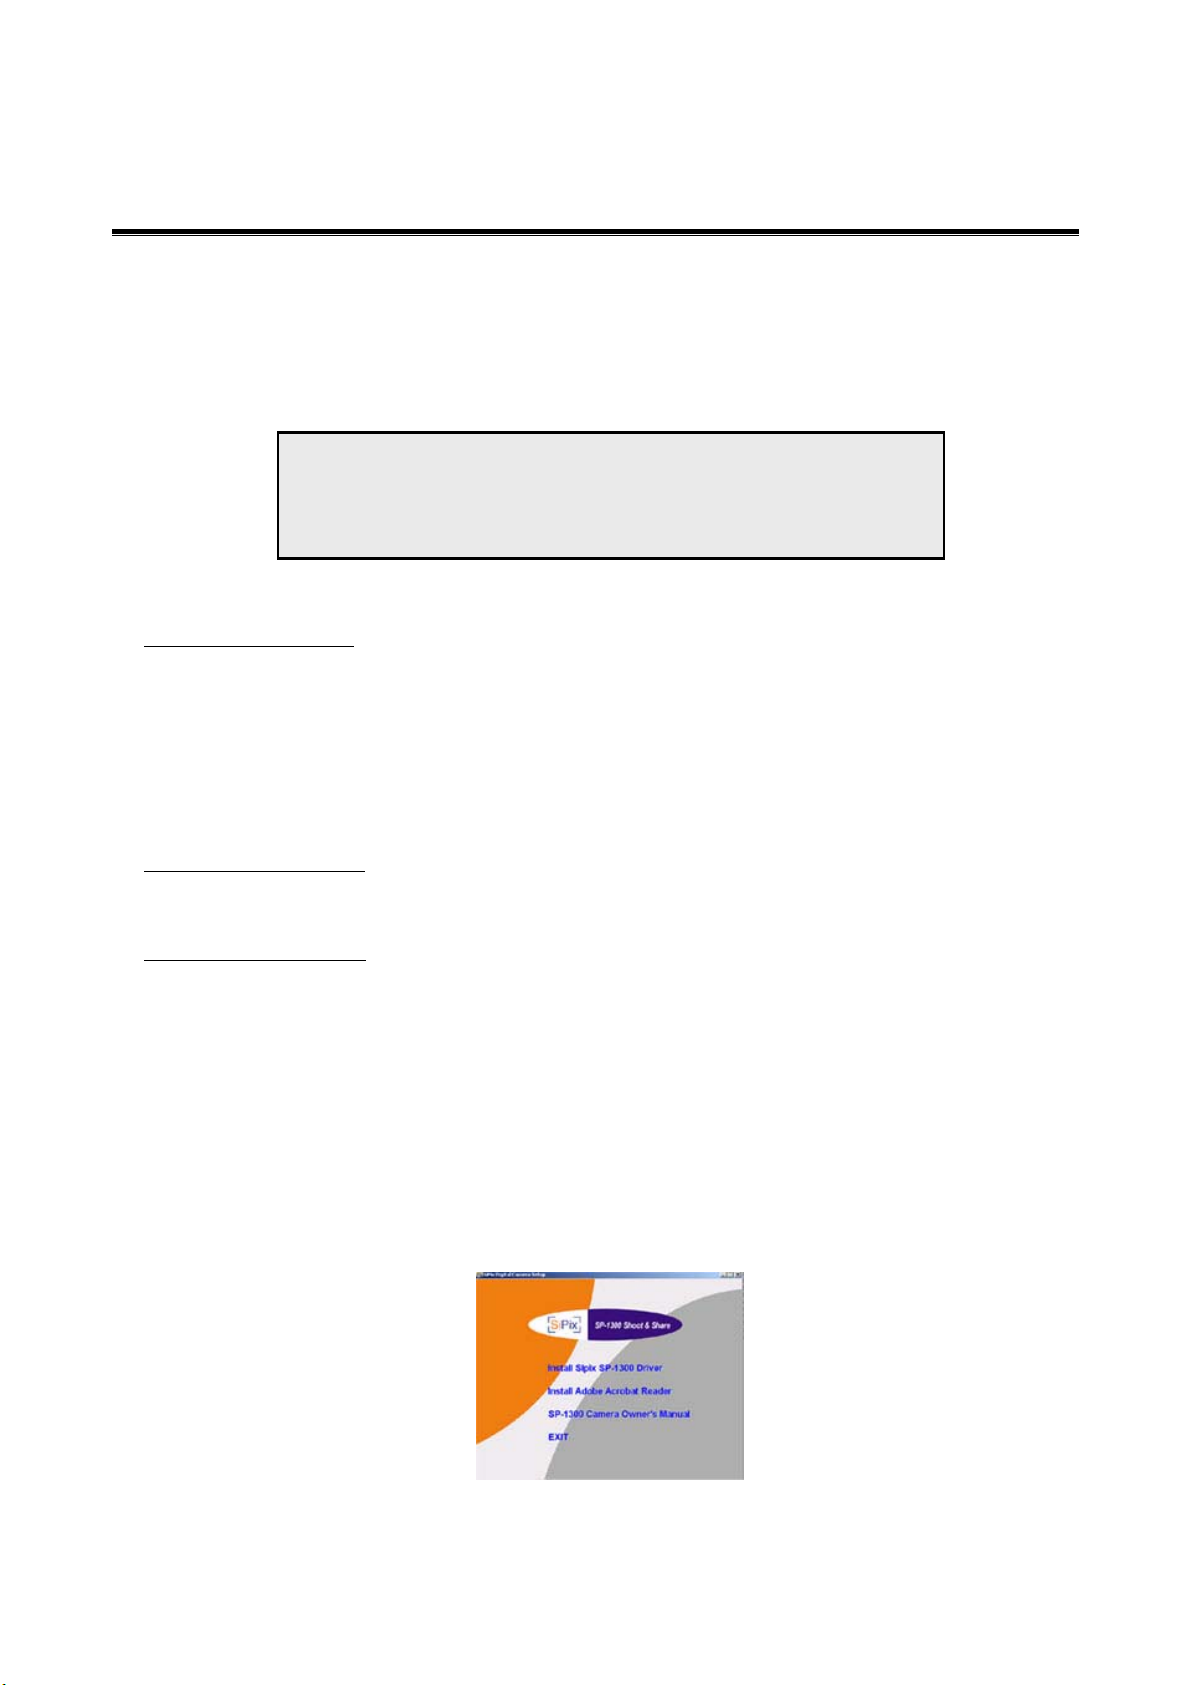
Installing SP-1300 CD
1. Insert the SP-1300 Shoot & Share CD into your CD-ROM drive. The following menu will
appear on your screen:
38
Page 43
p
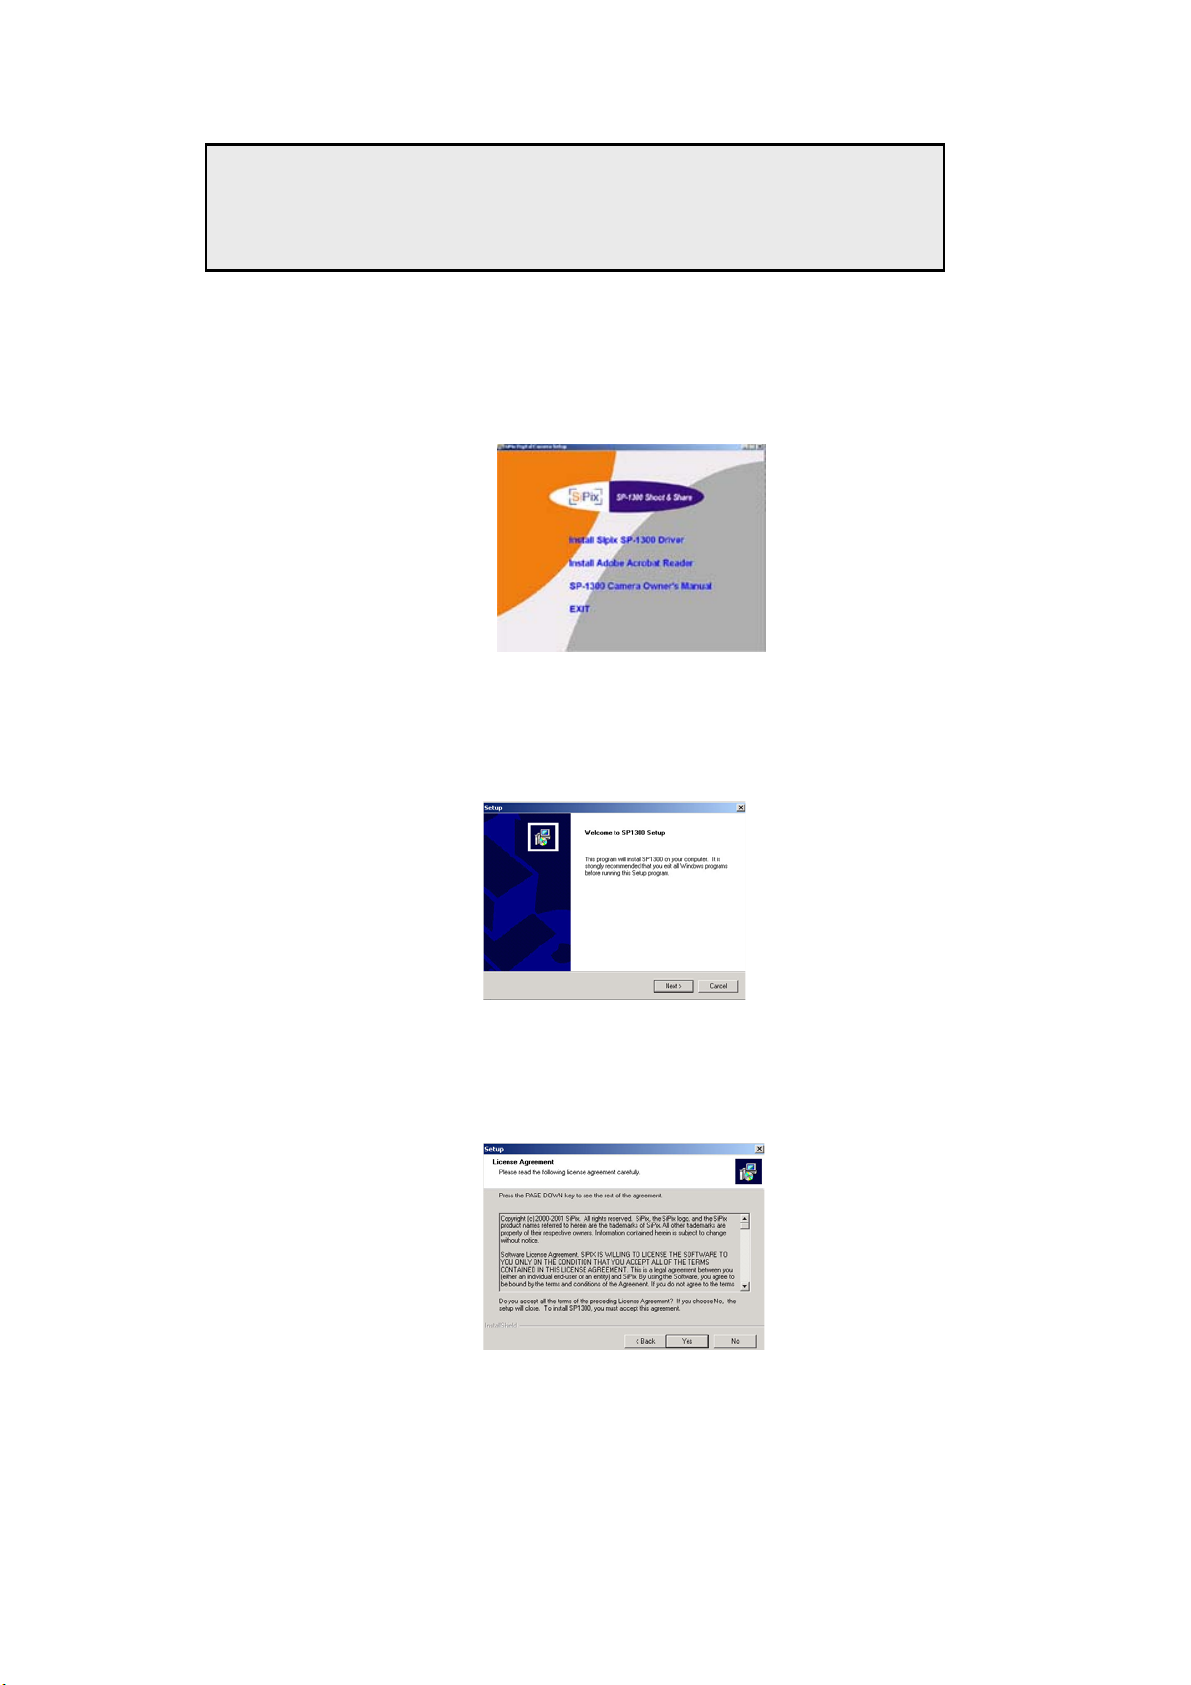
Installing SP-1300 Driver
Note: Your computer can detect whether or not you already have the
rograms installed. If your computer has the application(s), that item
will be checked and grayed out.
1. From the Installer Menu, click on Install SP-1300 Driver
2. The setup window for the SP-1300 driver will appear. Click Next to continue.
3. Please read the License Agreement carefully, and then click Yes or No to accept or
not accept the licensee agreement.
4. If you accepted the license agreement, the driver will install on your computer. Then
you will be prompted to register online, make your selection and click Next.
39
Page 44
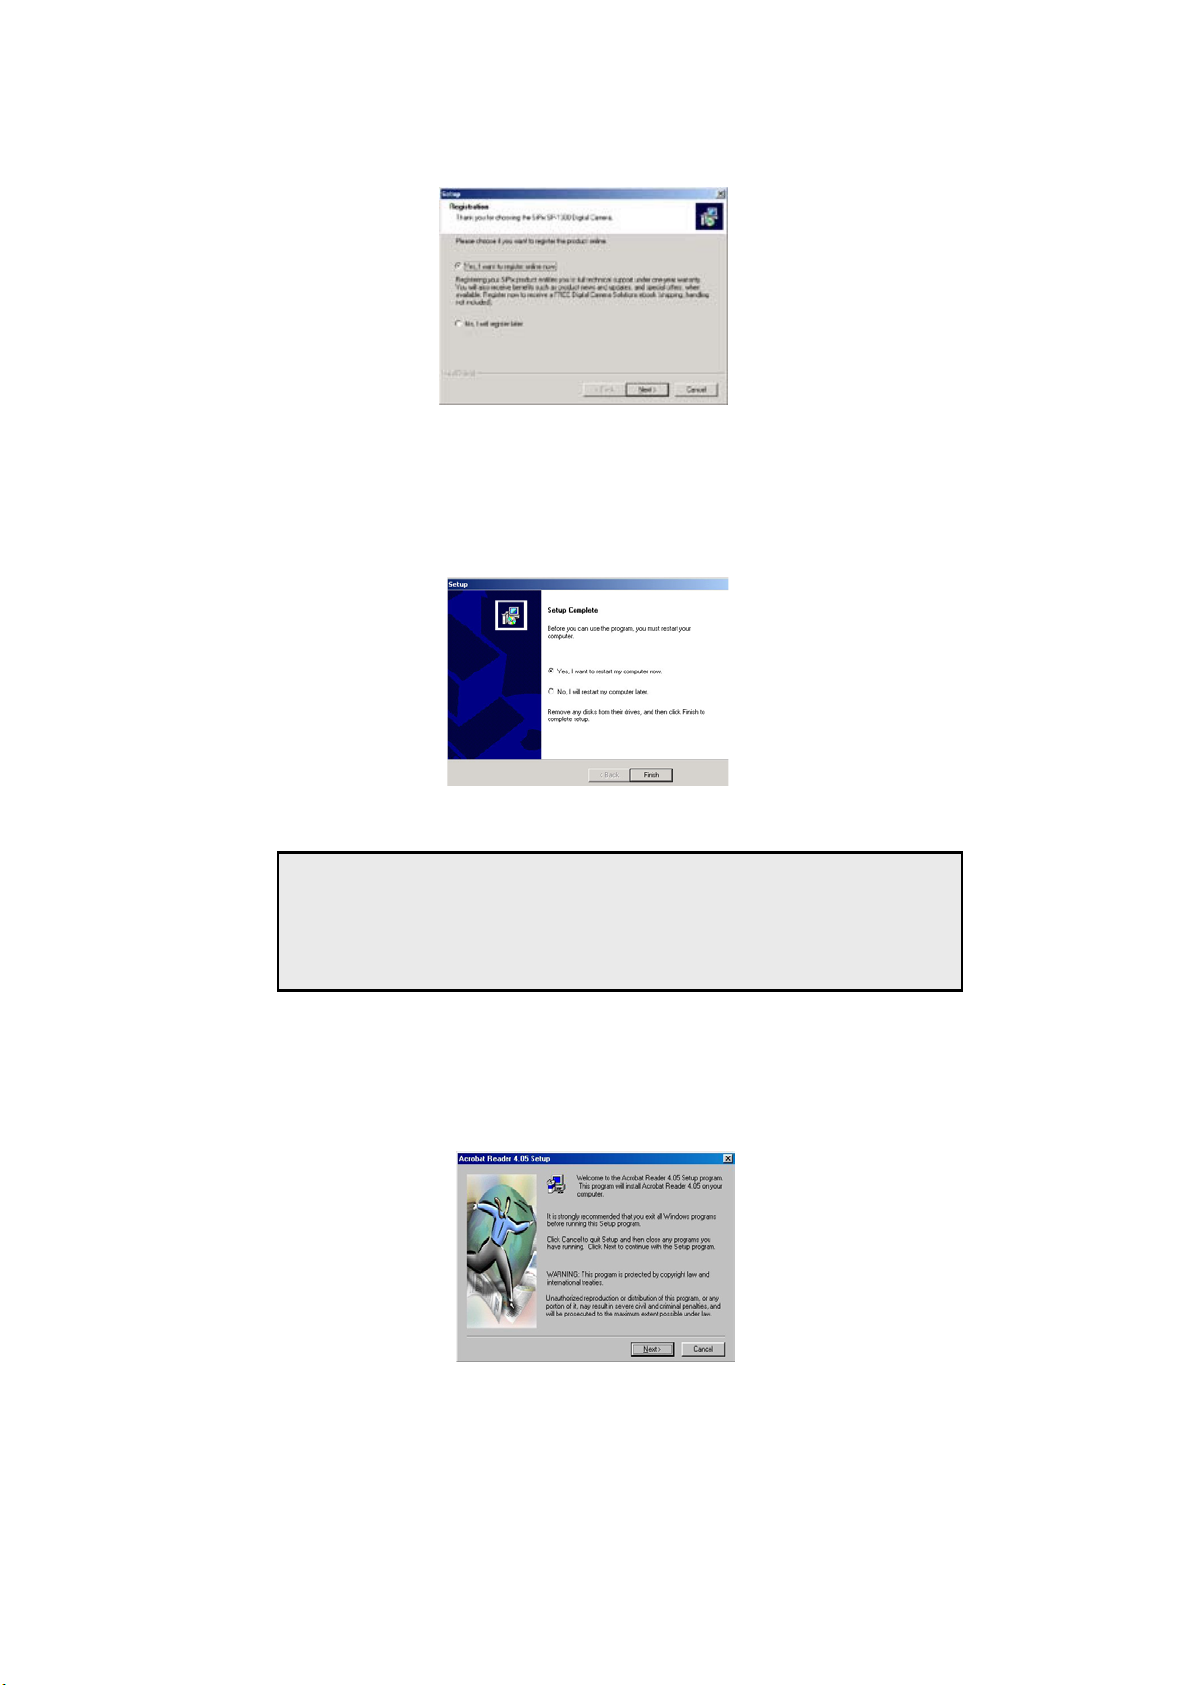
5. When setup is complete, select whether or not you want to Restart your computer
now, and click Finish.
Note: You should restart the computer before using your
camera. Restarting your computer will close all applications
running at the time. Make sure you save your work before
closing the applications.
Installing Adobe Acrobat Reader
1. To install Adobe Acrobat Reader, click Adobe Acrobat Reader from the Installer Menu
(shown above). The following screen will appear:
2. Click Next and follow the instructions on your screen to complete setup
40
Page 45
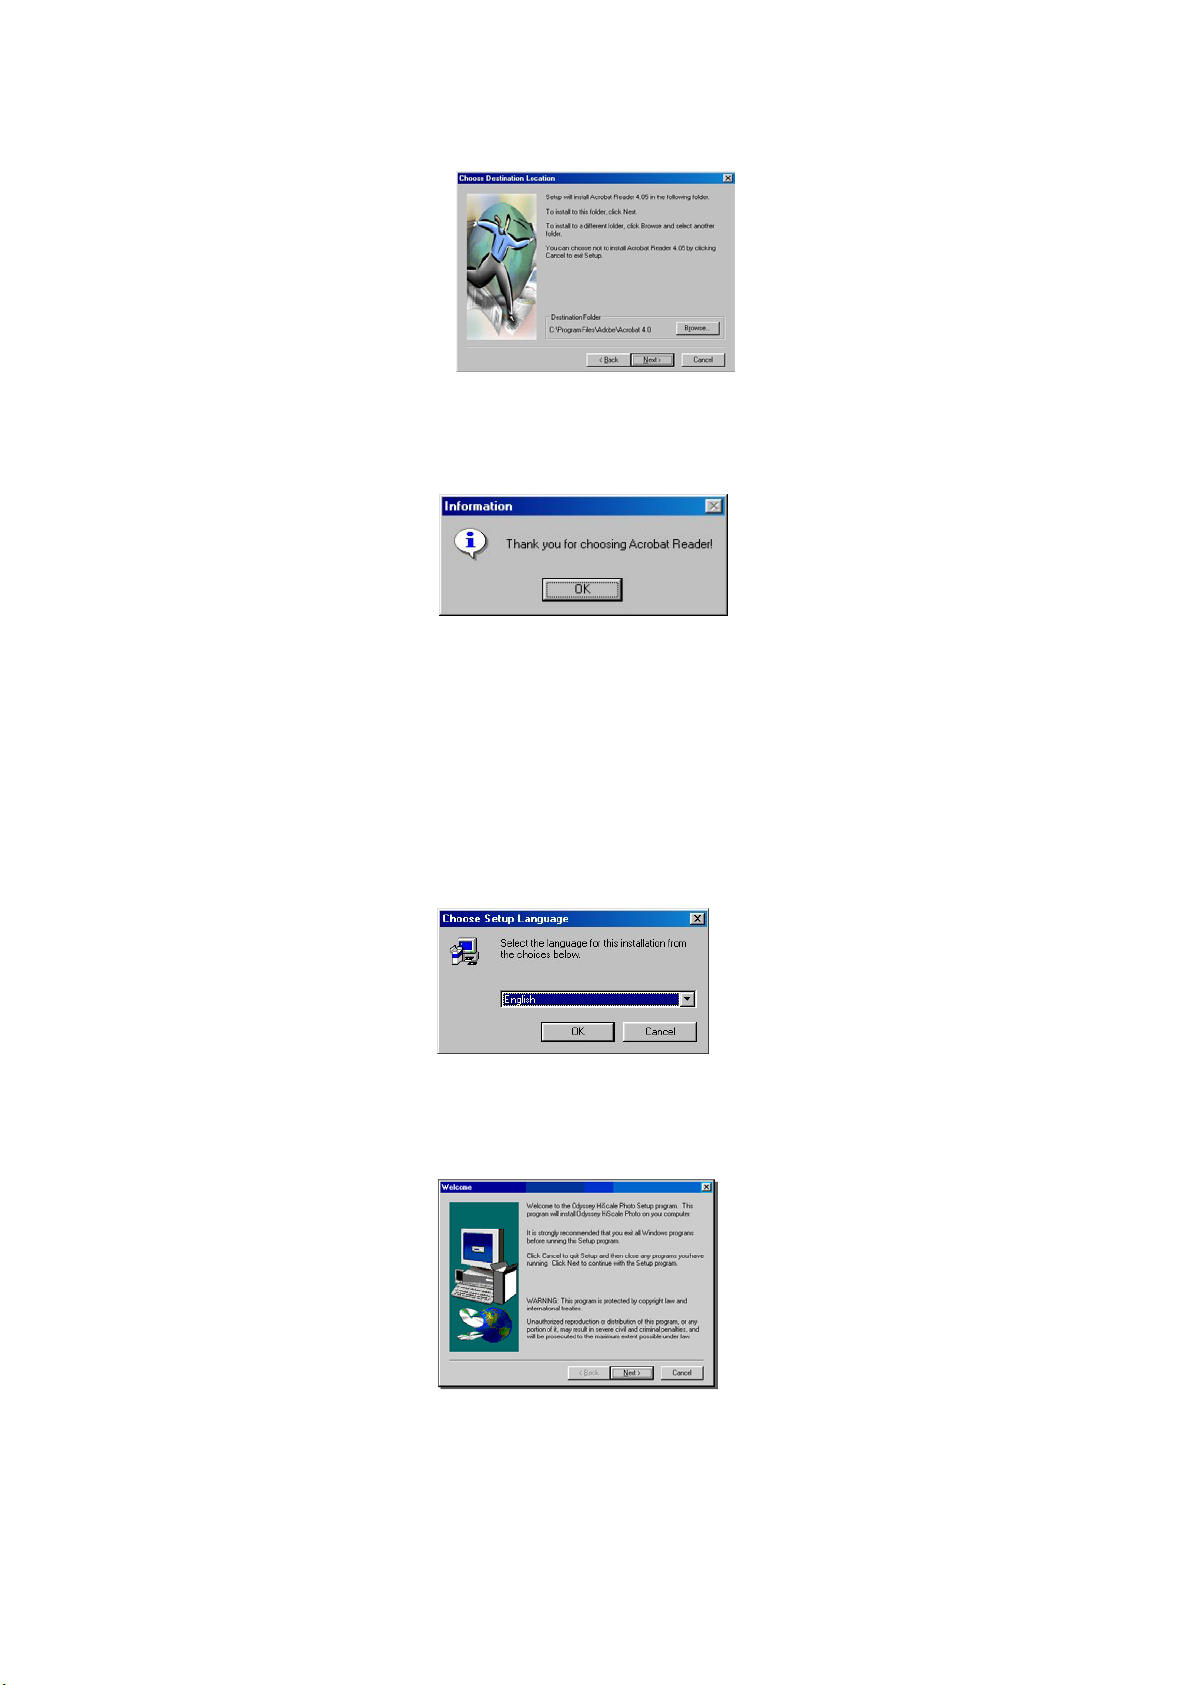
3. Click OK to complete the installation.
Installing MGI PhotoSuite III SE
1. Insert the MGI PhotoSuite III SE CD into the CD-ROM drive. Choose your preferred
language and click OK.
2. Click Next on the Welcome screen:
3. Click Yes to accept the software license agreement.
41
Page 46
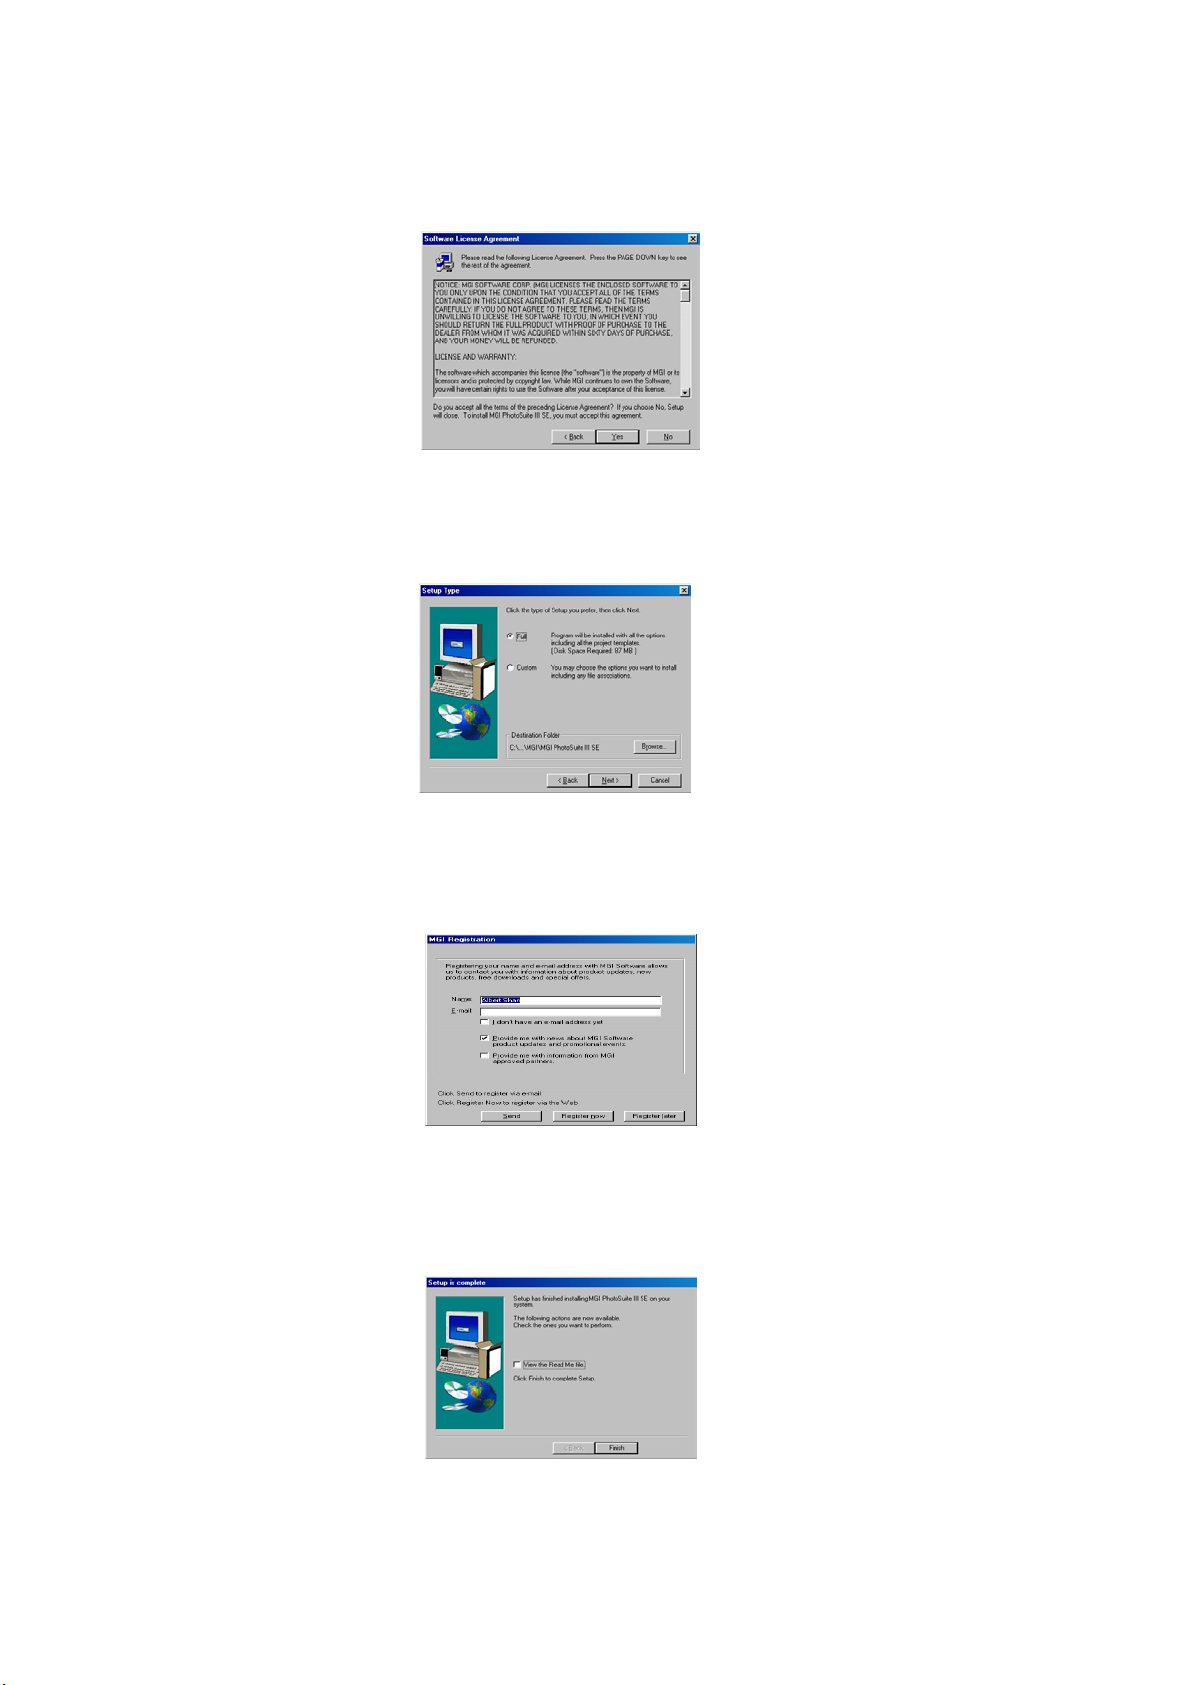
4. Select the setup type you prefer and then click Next.
5. Click Next to copy the files into the system, and the program will install on your
computer. Enter your personal information to register now, or register later.
6. Click Finish to complete the installation.
42
Page 47
N
H
CCoonnnneeccttiinngg ttoo YYoouurr PPCC
You can view and download images directly from the SP-1300 digital camera to your computer
with the supplied USB cable. For PCs with Windows 98, 98SE, you should always install the
SiPix SP-1300 driver before connecting to your PC.
For Windows 2000/ME ONLY
1. Turn the power to
2. Connect the USB cable to the camera and the PC using the USB cable
3. Turn your camera’s power to
4. Your status display should display
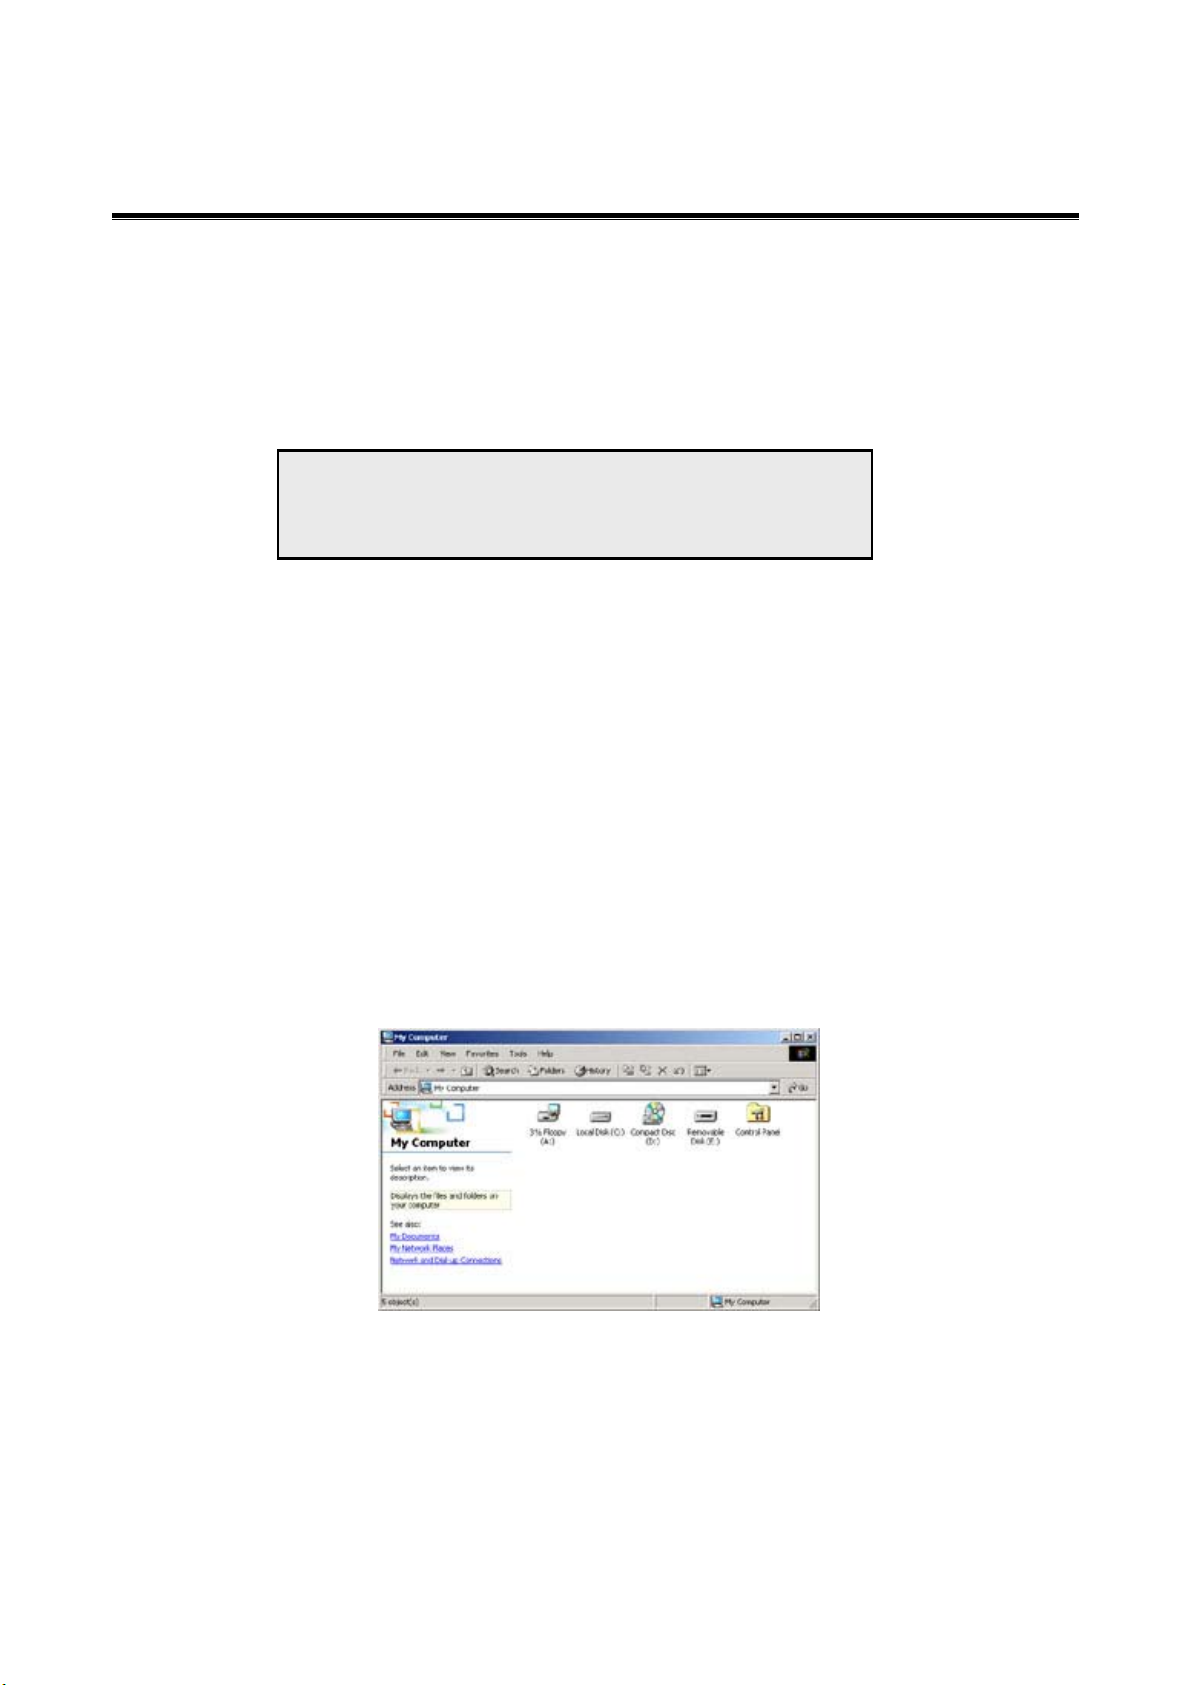
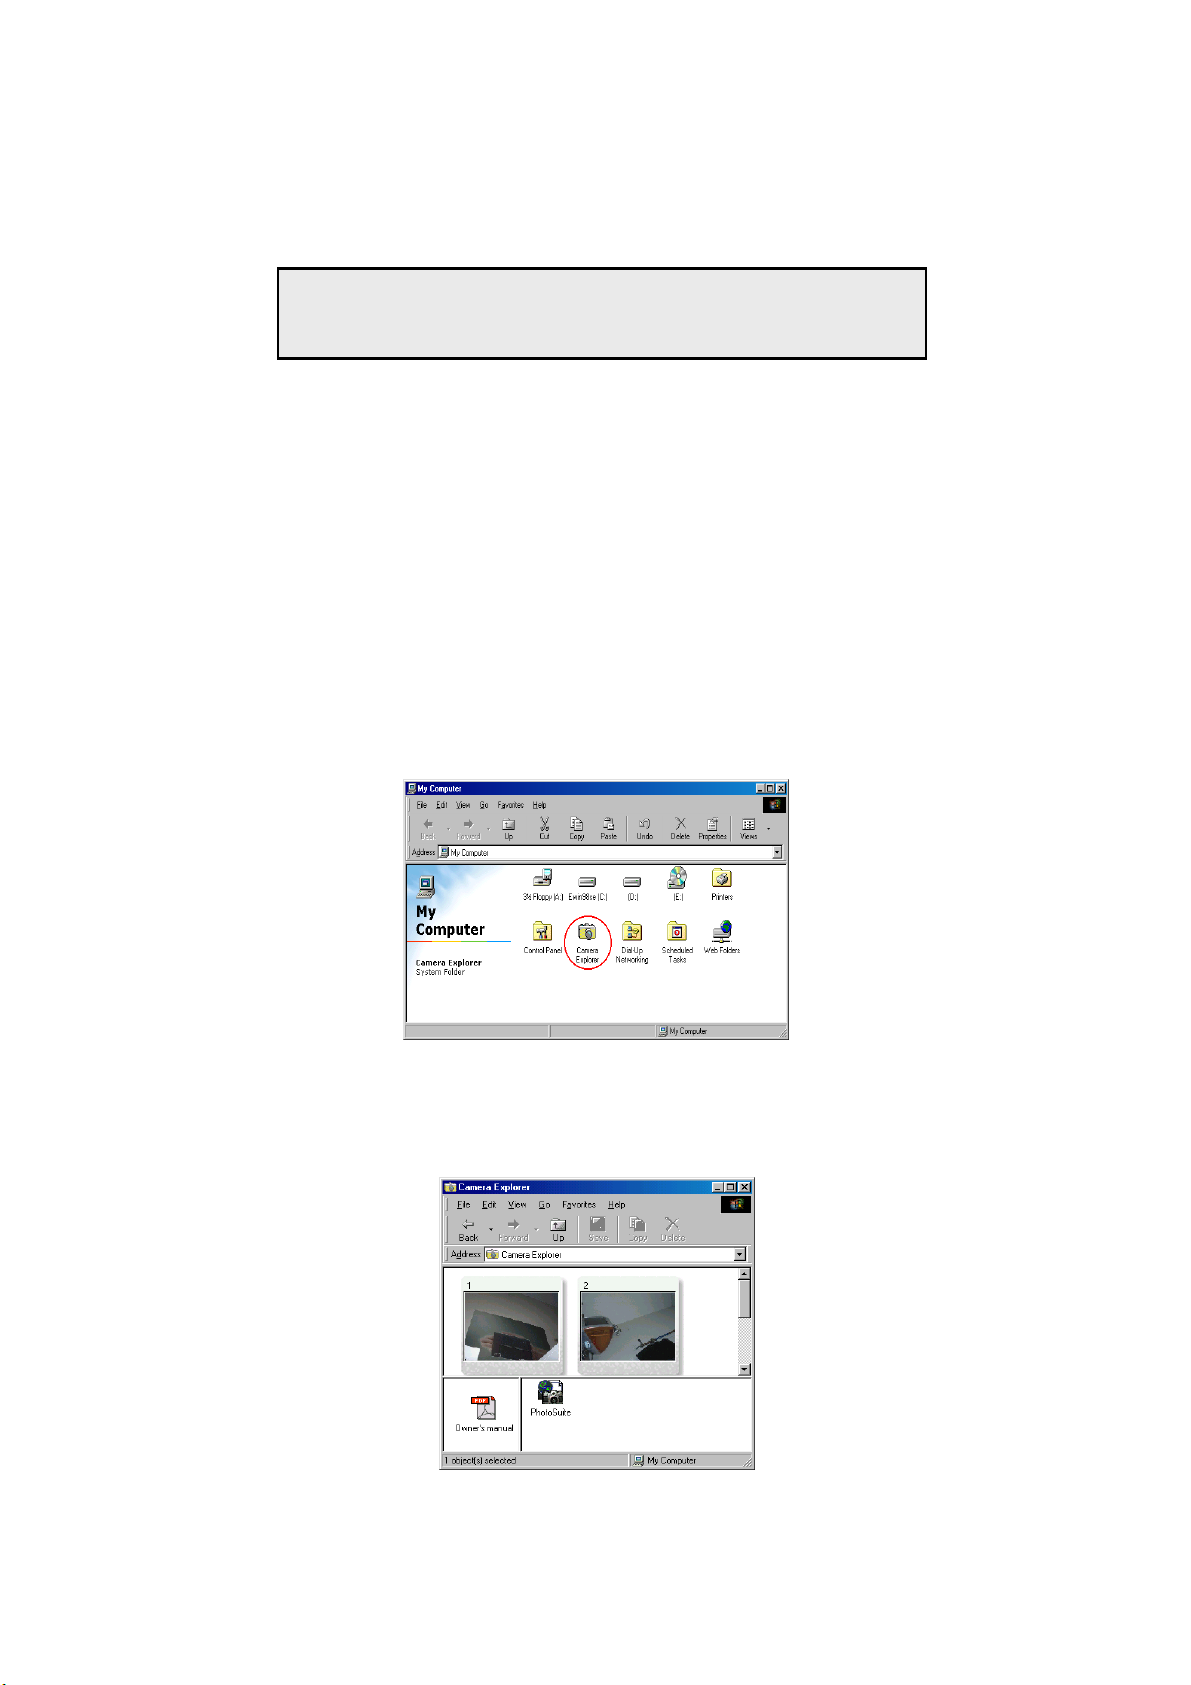
5. From your computer screen, double-click on the My Computer icon to open it.
6. Locate the Camera Explorer (or the Removable Disk if no driver was installed), this drive
contains the images saved in your digital camera.
ote: It is not necessary to install the SP-1300 driver.
owever, we strongly recommend you install the driver to
improve performance.
OFF on your SP-1300 digital camera.
ON, and set the Mode Switch to PC.
PC.
43
Page 48
For Windows 98/98SE/2000/ME
1. Turn the power to
2. Connect the USB cable to the camera and the back of your computer
3. Turn your camera’s power to
4. Your status display should display
5. From your computer screen, double-click on the My Computer icon to open it.
6. Locate Camera Explorer under My Computer. This drive contains the images saved on
your digital camera.
Note: Install the SiPix SP-1300 driver software on your PC
first. (See Software Installation on page 36)
OFF on your SP-1300 digital camera.
ON, and set the Mode Switch to PC.
PC.
7. Click open the Camera Explorer and the images will display in thumbnail, and the
available applications to view the images will display on the bottom.
44
Page 49
DDoowwnnllooaaddiinngg PPiiccttuurreess ttoo YYoouurr PPCC
Downloading pictures to your PC using the SP-1300 driver.
1. Open Windows Explorer and double-click the Camera Explorer icon (see instruction
above).
2. The image files will display as under this drive.
3. Select the image(s) you want to download to your PC.
4. Copy and paste the image(s) into the folder you want on your computer.
Viewing & saving images on your PC using the SP-1300 driver.
1. Open Windows Explorer and double-click the Camera Explorer (see instruction above).
2. The image files will display under this drive.
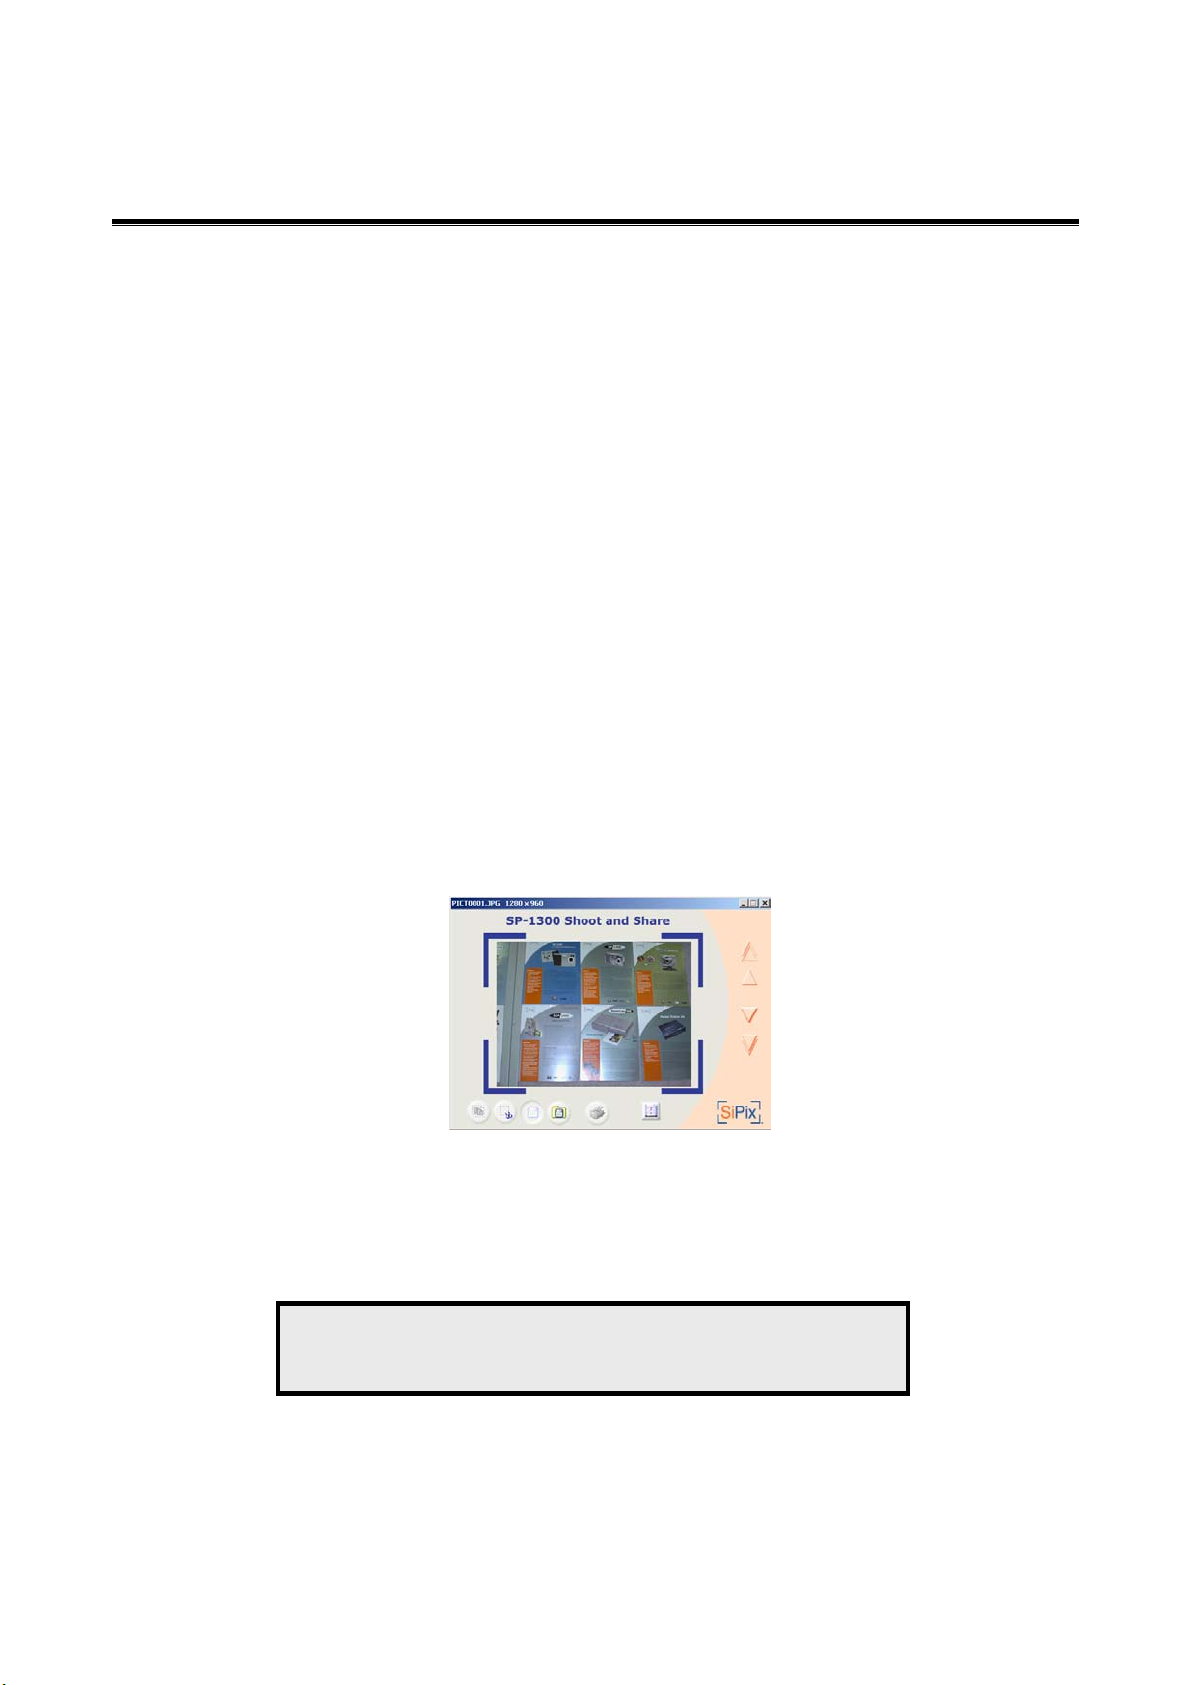
3. Select the image you want to view and double click on it.
a. The image will open in a Quick Preview window provided by the SP-1300 driver.
b. You can view the other images by clicking on the up and down arrows.
c. To save the images, click the Save File button and save the image on your computer.
Viewing images with MGI PhotoSuite III SE
Note: Before you read this section, be sure you have installed
MGI PhotoSuite III SE.
45
Page 50
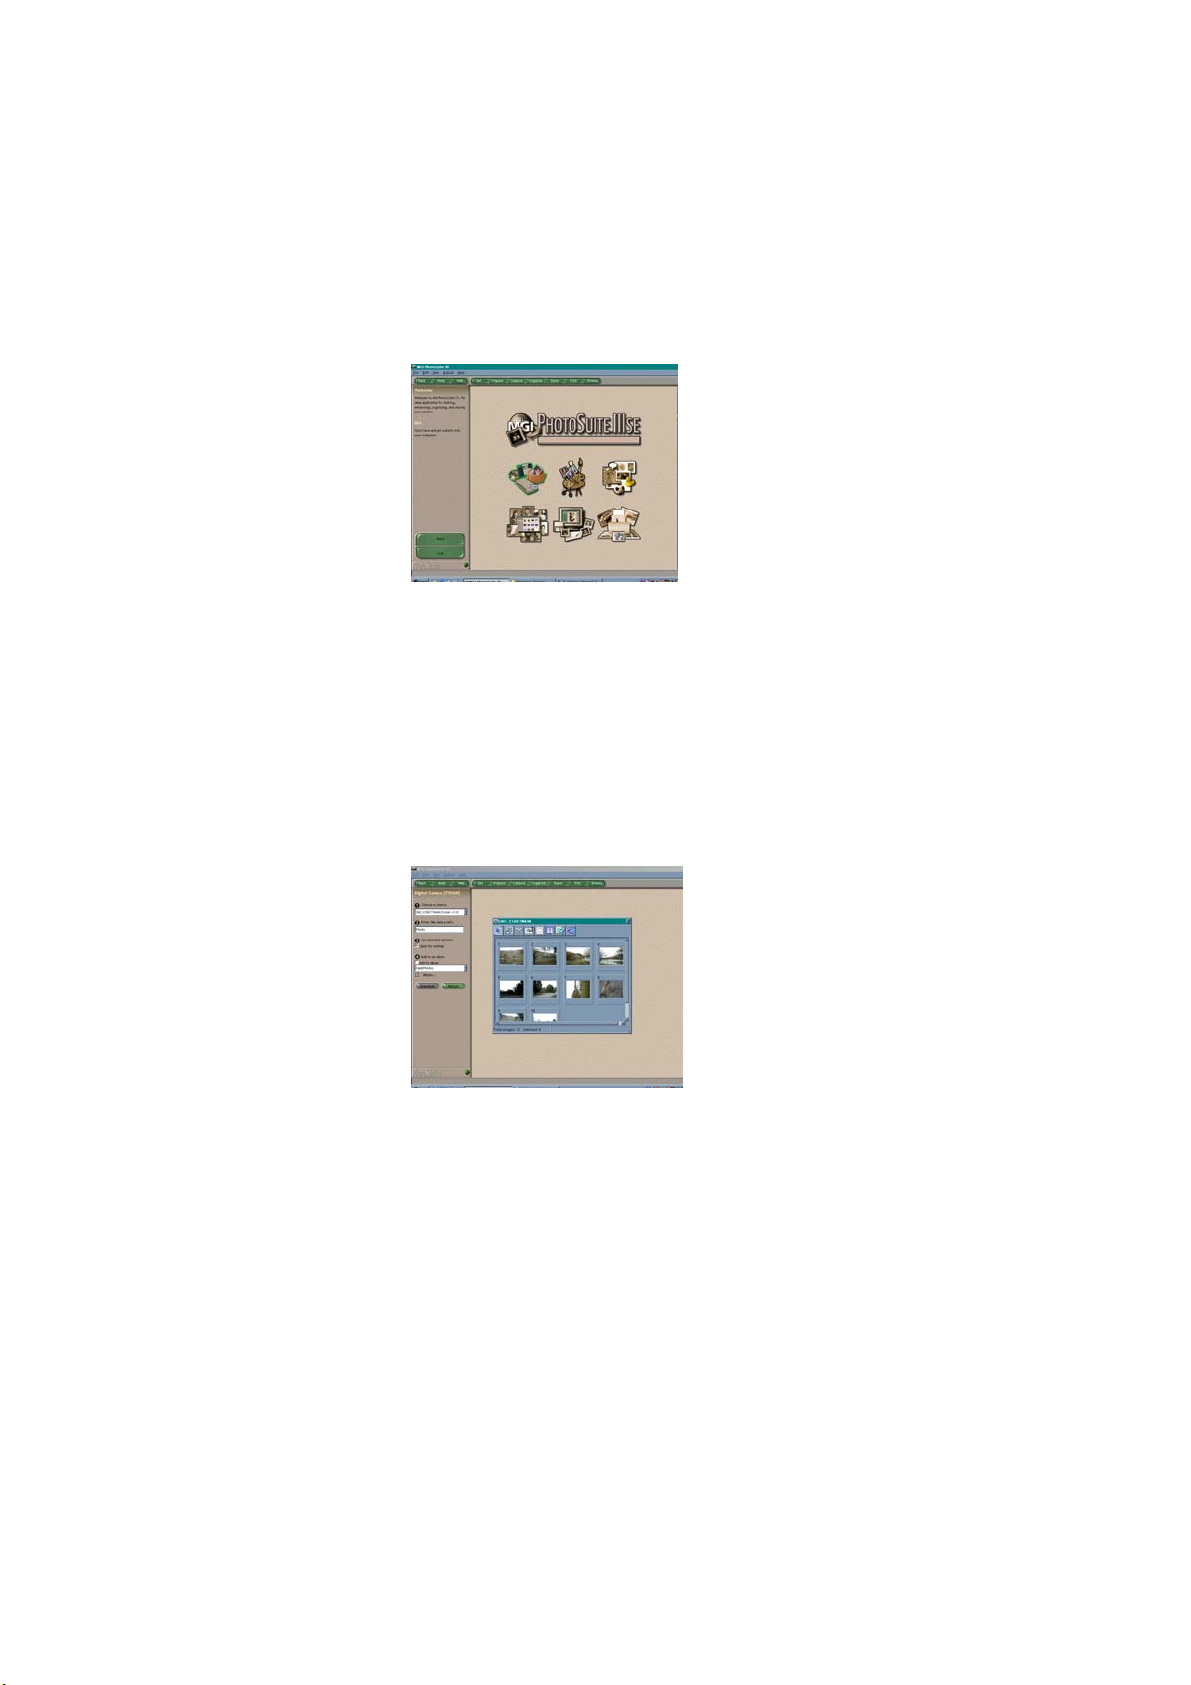
1. Click Start ÆPrograms Æ MGI PhotoSuite III SE. Then click the MGI PhotoSuite
III SE icon to open the program:
2. Click File and select Open across the top of the window.
3. Browse the Camera Explorer drive, and select the image you want to open.
4. Highlight the image you want to open, and click on OPEN.
5. A screen will display the image you selected from your camera.
6. You can now use this application to edit your images or simply print them.
46
Page 51

CCoonnnneeccttiinngg ttoo PPoocckkeettCCoolloorr 110000 oorr 220000 PPrriinntteerr
The SiPix SP-1300 Shoot & Share digital camera is specially designed to print directly with the
SiPix PocketColor 100 or the PocketColor 200 printer.
If you have already purchased a SiPix PocketColor 100 or a SiPix PocketColor 200 printer,
please follow the instructions below to print images.
1. Turn the power
2. Open the Connector Cover on the SP-1300 digital camera.
3. Plug-in the smaller USB connector (supplied with the PocketColor 100 or 200 package) to
the printer.
4. Plug-in the bigger end of the USB connector to the SP-1300 camera.
Note: Please remove all contents from the PocketColor 100 or
200 printer package, and read its instructions carefully before
operating.
OFF on the PocketColor 100 or 200 printers and the SP-1300 digital camera.
5. Turn the PocketColor 100 or 200 printer’s power
6. Turn the Mode Switch on the SP-1300 camera to PRINT mode.
7. Turn the SP-1300 camera’s power ON.
8. The camera’s LCD screen would now display images that are saved on the CompactFlash
card.
To print with the PocketColor 100 or the PocketColor 200 printer, please refer to Print Mode
Setup & Operation on page 26.
Note: Each printing job will go through four processes: three colors
(cyan/magenta/yellow) and one protective over-coat. Please wait
approximately 95 seconds for the printer to finish printing.
ON.
47
Page 52

TTrroouubblleesshhoooottiinngg aanndd SSppeecciiffiiccaattiioonnss
Troubleshooting
Problem Possible cause Solution
The camera has no
power.
The camera won’t
take a picture.
The camera is off. Make sure that the Power On/Off switch is not set to OFF.
The batteries are
discharged.
The batteries are
inserted incorrectly.
The AC adapter is
not plugged in.
Ensure that the
Standby LED is on
and is not flashing.
Is the CompactFlash
card full?
Is the CompactFlash
card inserted
correctly?
Replace the batteries with new or freshly charged ones.
Refer to page 6.
Check the battery orientation. Refer to page 6.
Ensure that the AC adapter is plugged into a working outlet.
Also, make sure that the AC adapter has the correct
specifications for the camera. Refer to page 48,
Specifications.
If the LED is flashing, wait until it emits a steady light before
taking the picture. The camera may be waiting for the flash
to charge.
If the CompactFlash card is full, you cannot take any more
pictures. Delete some pictures to free up memory, or insert
a fresh CompactFlash card. Refer to page 7.
If the CompactFlash card is inserted incorrectly, a message
is displayed in the LCD status display. Refer to page 7.
The flash doesn’t
work.
The pictures are
blurry.
The picture looks
too dark.
The picture is too
light.
Is the camera
connected to a
computer?
Is the flash on? Ensure that the flash is set correctly. Refer to page 5.
The batteries may
be weak.
The camera or
subject was moving
when the picture
was taken.
The flash is needed
for the picture.
You are facing a
bright light when
taking the picture.
The flash is set to
Flash always on.
The camera’s buttons are not functional when connected to
a PC. Disconnect the camera to take more pictures.
If the batteries are too weak, the flash is unable to recharge.
Turn the camera off and wait a few seconds before turning it
back on. If this doesn’t work, you need to replace the
batteries with fresh ones. Refer to page 6.
Hold the camera steady or put it on a tripod to take pictures.
Turn the flash on. Refer to page 5.
Change the angle of the picture so that bright lights do not
shine directly towards the camera lens.
Set the flash to Automatic flash. Refer to page 5.
48
Page 53
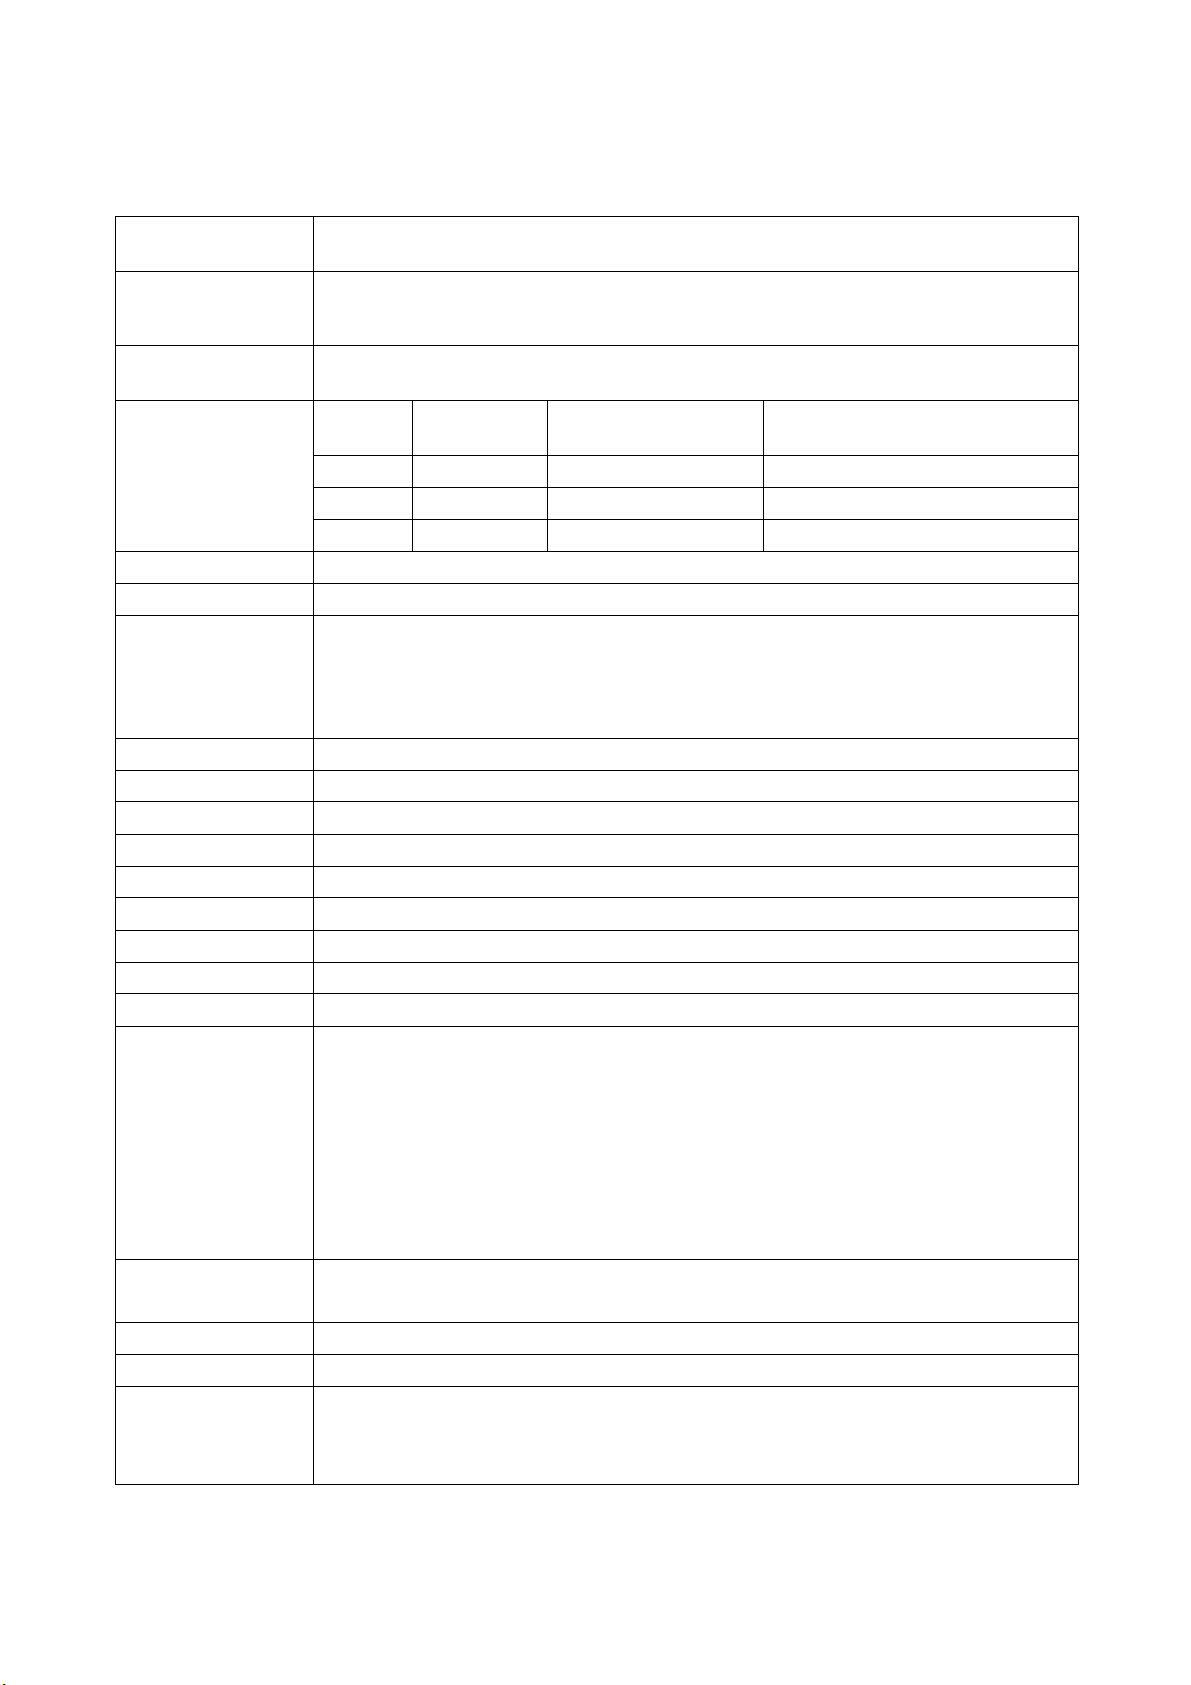
Specifications
CCD Image
Sensor
Color LCD
External storage
media
Picture modes
Color depth
Output file format
Optics system
LCD monitor
Sensitivity
Lens
Focal length
Focus distance
Lens aperture
Shutter speed
Zoom
Exposure Range
Processing time
USB
interface
AC Adapter
Battery type
LCD status
display
• Sharp 1/3.2-inch CCD
• 1.3 Mega Pixels (1280 x 960)
• 1.8-inch TFT color LCD
• 280 x 220 resolution
• 30 fps refresh rate
CompactFlash card (type I) 8MB CompactFlash card included
Status
*** 1280 x 960 4:1 10 images
** 1280 x 960 10:1 24 images
* 640 x 480 15:1 110 images
24-bit color
JPEG
• OVF: virtual magnification = 0.31X
• Lens aperture: F2.8/F8.0
• Lens effective focal length: f= 6.03 mm
• Semi-field angle: 51.38 degrees
• Distortion: < - 2.52%
1.8” TFT color LCD
ISO 100, 200 (manual)
5-element glass
f=6.03mm (35mm equivalent=46.6mm)
Auto: 0.8m - infinity (22” – infinity)
F2.8/F8.0
1/2 to 1/500 second electronic shutter
2x digital zoom
Auto, manual (-/+2EV in 1/3EV steps)
Picture to picture
• Super fine: 6 sec.
• Fine: 6 sec.
• Standard: 6 sec.
Playback
• Super fine: 5 sec.
• Fine: 3 sec.
• Standard: 2 sec.
SP-1300 baud rate USB type
Cable definition: 1.8-m Type A to Type A USB Cable
Output: 6-7 V DC @ 2A center positive (not included)
4 x AA alkaline batteries (1300 mA/hr or better rechargeable NiMH batteries)
• Resolution mode
• Battery status
• Number of pictures remaining in record mode
• No memory card warning
Image
format
Compression ratio Storage per 8 MB card
49
Page 54

Strobe light
Battery life
Compliance
White balance
Image
processing
Inserting Batteries
Environment
Image quality
Dimensions
Camera Weight
• Flash mode
• Self-timer activation
• Printer
• Range: 0.9m ~ 2.5m
• Four modes: Auto-flash
Fill-in flash (forced activation)
Red-eye reduction
Flash off (no flash)
• Color temperature: 7000°K
• Flash charge time: initial charging < 10 sec.
• Typical charging time: 8 sec.
• Sixty images under the following conditions:
• 15 sec. interval between images
• Full strobe
• Resolution setting: fine
• Temperature: 23°C.
• Erasing each image after taking the picture.
Regulatory compliance:
• EMC – tested as system defined
• Immunity – tested as system defined
• Safety – UL/CSA/CE tested to appropriate standards
EMC – define system and configuration for test
FCC – Class B
EN55022: 95 Class B (CE)
Safety – IEC950 and appropriate sections of IEC 491
• Auto white balance
• Manual white balance selection for daylight/cloudy/fluorescent/tungsten
• White balance
• Optical black subtract
• Gamma correction
• Bayer pattern interpolation and edge enhancement on lama channel
• Please read the polarity information inside the battery compartment carefully
before inserting batteries. The camera will not power on if batteries are
inserted wrong. However, inserting batteries in the wrong orientation will not
result in damage to the camera or batteries.
• Operating temperature: 0 ~ 40°C
• Storage temperature: -20 ~ 60°C
• Operating humidity: 30% ~ 90%
• Storage humidity: 10% ~ 85%
• Resolution: Center 650 ~ 680 lines; Corners: 450
• 4.8” x 2.8” x 1.9” (123 x 71 x 47mm)
• 7.9 oz. without batteries (245g)
• 10.6 oz. with batteries (330g)
50
Page 55

OOnnee YYeeaarr LLiimmiitteedd WWaarrrraannttyy
SiPix, Inc. warrants this hardware product against defects in material and workmanship for a
period of one year from the original date of purchase as identified on the proof of purchase (your
receipt). It is the end-user’s responsibility to make certain this product is in working condition with
the intended computer system within the one-year warranty period.
These are the sole remedies and SiPix’s sole liabilities for performance or failure to perform of the
product. SiPix reserves the right to change its warranty policy at any time for all products
distributed after the date of such change in warranty. Except as set forth above, all other
warranties whether express or implied, including but not limited to, the implied warranties of
merchantability and fitness for a particular purpose are hereby excluded.
SiPix shall not be liable for incidental, special or consequential damages arising out of or related to
the use or performance of the product, including, without limitation, loss of data or use of data
processing facilities or equipment, regardless of whether SiPix may have been advised about the
possibility of such damages arising out of use of the product shall be limited to the amounts paid
by purchaser for such product.
This warranty is only valid within the boundaries and territories of the USA and Canada. SiPix is
not responsible for costs incurred due to shipping, insurance, customs, or duties. SiPix is not
responsible for non-traceable packages or packages shipped without a valid RMA number on the
outside of the package.
This warranty does not apply if the product has been damaged by an accident, electrical fault,
through misuse or abuse. If the product has been altered without written authorization from SiPix,
the warranty will be void.
This warranty applies only to hardware products manufactured by or for SiPix. Warranted
products must bear the “SiPix” brand name, trade name, or logo. The aforementioned warranty
and remedies are exclusive, and in lieu of all others, whether oral, written, expressed or implied.
SiPix specifically disclaims any and all implied warranties of merchantability and fitness for a
particular purpose.
SiPix is not responsible for incidental or consequential damages resulting from any breach of
warranty. SiPix is not responsible under any other legal theory, including, but not limited to lost
profits, and any cost of recovering reprogramming or reproducing any program or data stored in or
used with SiPix products.
51
Page 56

WWaarrrraannttyy SSeerrvviicceess
If your SiPix product needs to be returned for repair, you must contact SiPix technical support prior
to shipment for an RMA number before sending in the product. The RMA number is a Return
Merchandise Authorization number. SiPix will refuse all shipments without a proper RMA
number. The RMA number MUST be printed on the outside of the original shipping carton in large
print written in black ink next to the shipping label. Failure to properly pack shipment could cause
serious damage to the product and void the warranty.
Should any defect(s) be discovered, the product may be returned to SiPix with a valid RMA number.
If you are returning product for repair, please be sure to do the following:
1) Call SiPix Customer Support Mon-Fri during regular business hours toll free at 866-888-1678 and
obtain an RMA (Return Merchandise Authorization) number.
2) Print your RMA number on the OUTSIDE of the original shipping carton in large print written in
black ink next to the shipping label.
3) Include a copy of the bill of sale with the returned product.
4) Unless otherwise instructed, do not return any manuals or software when returning items for
repair.
5) Ship to SiPix via a traceable shipping method and retain the tracking number.
Note: This product is intended for use only within the boundaries and territories of the United States and
Canada. If you purchased this product in Mexico or South America and need assistance or repair, you
must contact your originating reseller for service and support. SiPix Imaging, Milpitas CA, will not accept
any shipments from outside the boundaries and territories of the USA and Canada. SiPix often bundles
many different third party software options with its products. If any of these options were ordered with
your SiPix product and they appear to be missing or incorrect, contact your reseller immediately.
52
Page 57

TTeecchhnniiccaall SSuuppppoorrtt
SiPix provides technical support at no cost during the one-year warranty period. Users with
questions or concerns of a technical nature should first refer to the product manual, as usage and
troubleshooting information is provided in detail. For additional information or assistance, users
should visit the SiPix Web-site, as tutorials, updated drivers, frequently asked questions and news
updates are available. www.sipix.com/support
Should you require further assistance, you may contact SiPix technical support representatives by
calling:
Technical Support within one-year (in warranty) call toll free: 866-888-1678 •
• Technical Support after one-year (out of warranty) call: 408-719-5076
SiPix Technical Support is available from 8 AM to 6 PM PST, Monday through Friday, and from 9
AM to 5 PM Saturday, excluding holidays.
53
 Loading...