

Page 1
USER GUIDE v1.2
Page 2

Before you start!
· All on-screen instructions MUST be followed. Straying from the
on-screen instructions could cause damage to the machine and the
user.
· Ensure to keep transit hardware in a safe place. These will be
required should the ROTOR HDA require moving.
· During Pad Head removal, always ensure the push cylinder is
cleared before moving away from the carriage. The push cylinder
runs from the carriage arm into The Stinger/Pad Head. If either are
not pulled down far enough during removal, the cylinder will catch
and damage the ROTOR HDA.
· Always ensure the power is OFF before changing heads. Leaving
the power on can cause a hardware crash.
Page 3

4.
Anatomy and features
6.
Removables
7.
RePads
8.
Mechanical overview
10.
Initialisation routine
12.
Software overview
14.
Program overview
16.
Program completion
17.
Software icon guide
22.
Technical specifications
24.
Pinning examples
25.
Post experimental procedure
Notes
26.
™
rotor HDa™
INTRODUCTION
The Singer ROTOR HDA
ultra-fast manipulation of high-density arrays of yeast, other fungi
and bacteria. Reagent sets such as deletion mutant collections and
the complete set of cloned yeast genes can be utilised for highthroughput screens; large-scale 2-hybrid, synthetic genetic array,
phenotypic and chemical-genetic analysis. The ROTOR HDA uses
plastic replica plating pads and supports liquid pinning to and from
96 and 384-well microtitre plates and agar pinning at densities of 96,
192, 384, 768, 1536 and 6144.
USER GUIDE
Follow these instructions alongside the on-screen instructions to get
the most out of the ROTOR HDA, High Throughput Screening Robot.
This guide outlines basic operation of the ROTOR HDA as well useful
maintenance advice. Read through this guide and you’ll be ready for
the exciting world of high throughput screening!
DISCLAIMER
At Singer Instruments, we are constantly seeking to improve our
products and adapt them to the requirements of modern research
techniques and testing methods. This involves modification to
the mechanical structure and optical design of our instruments.
Therefore, all descriptions and illustrations in this user guide,
including all specifications are subject to change without notice.
™
is a compact benchtop robot for easy,
singerinstruments.com
3
Page 4
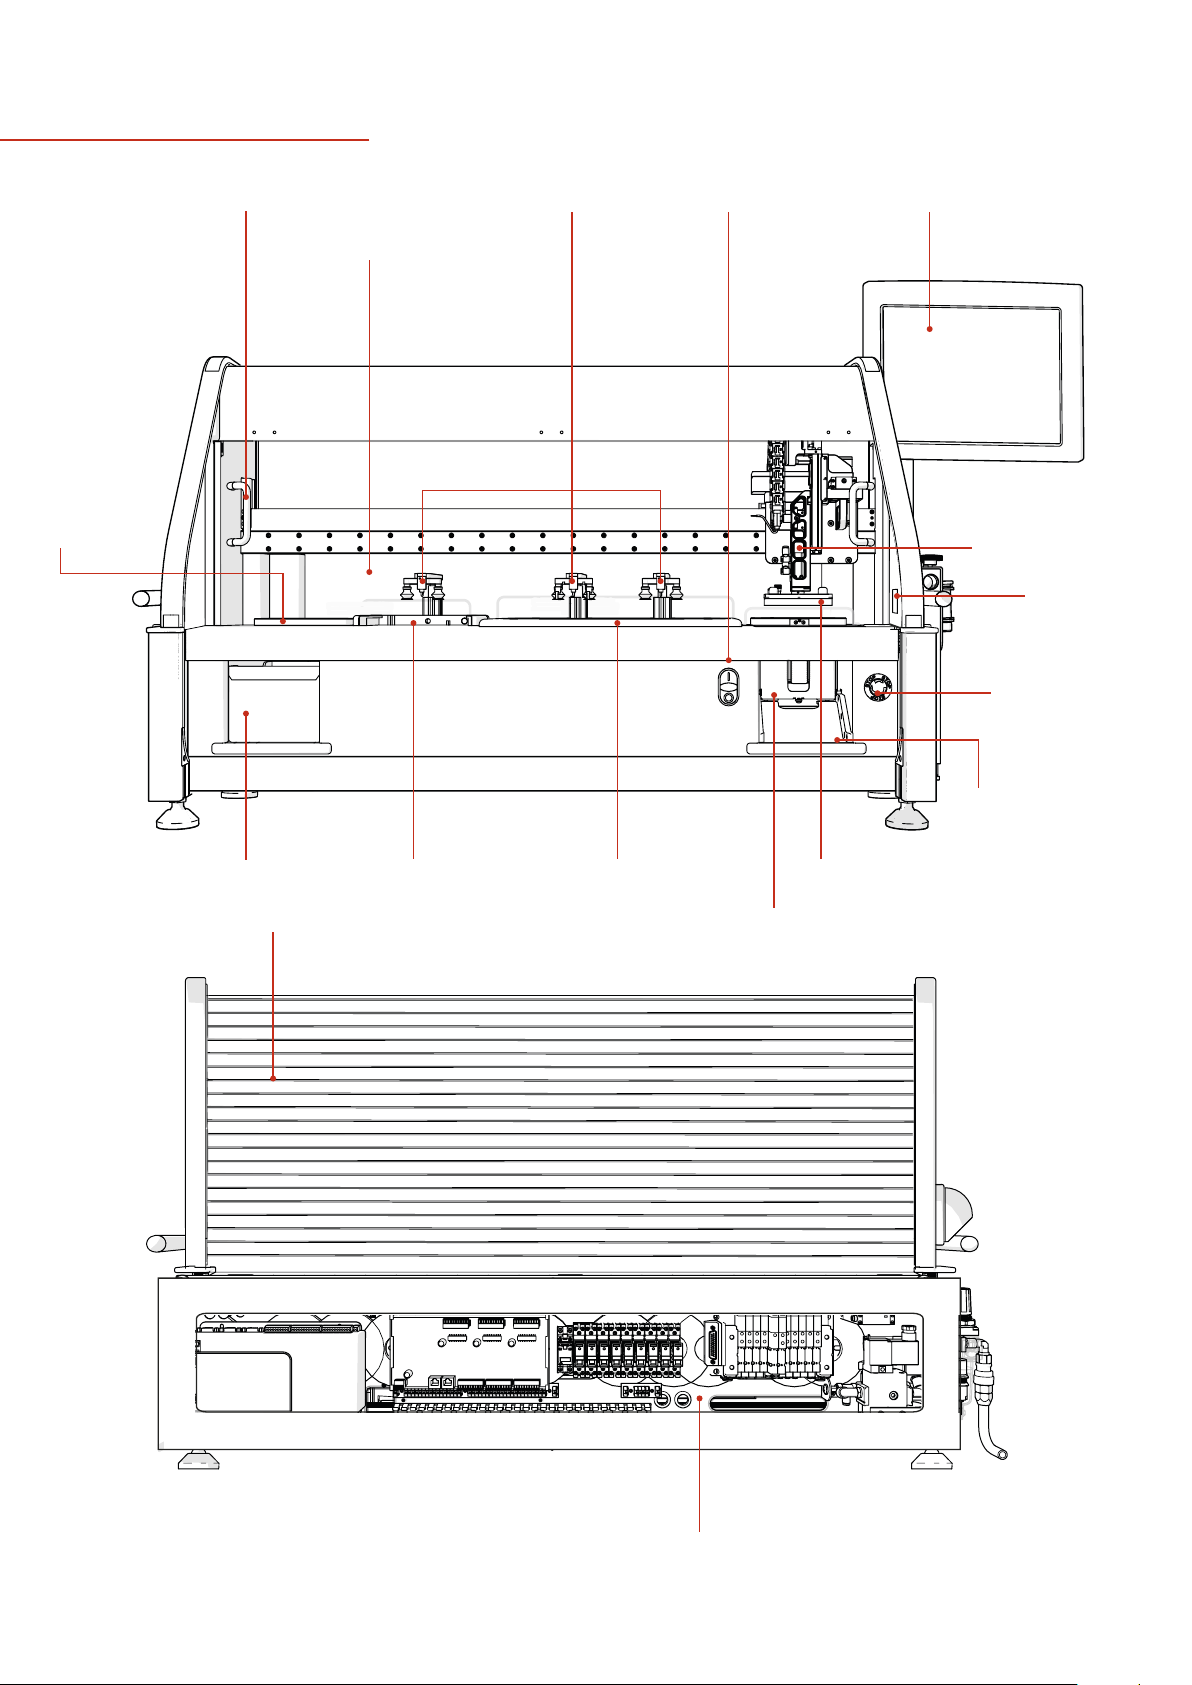
anatomy & features
Dump
Zone
Screen Handle Lid Lifters
Protective Screen
Fast Buttons
MCI Touch Screen
Carriage Arm
RS232
Shuttle
Input
Emergency
Stop
Hopper
Loading Bay
Black BayDump Drawer
UV Decontamination Roll-over Cover
Turntable
Pad Head
Hopper
Control Panel
4
Page 5
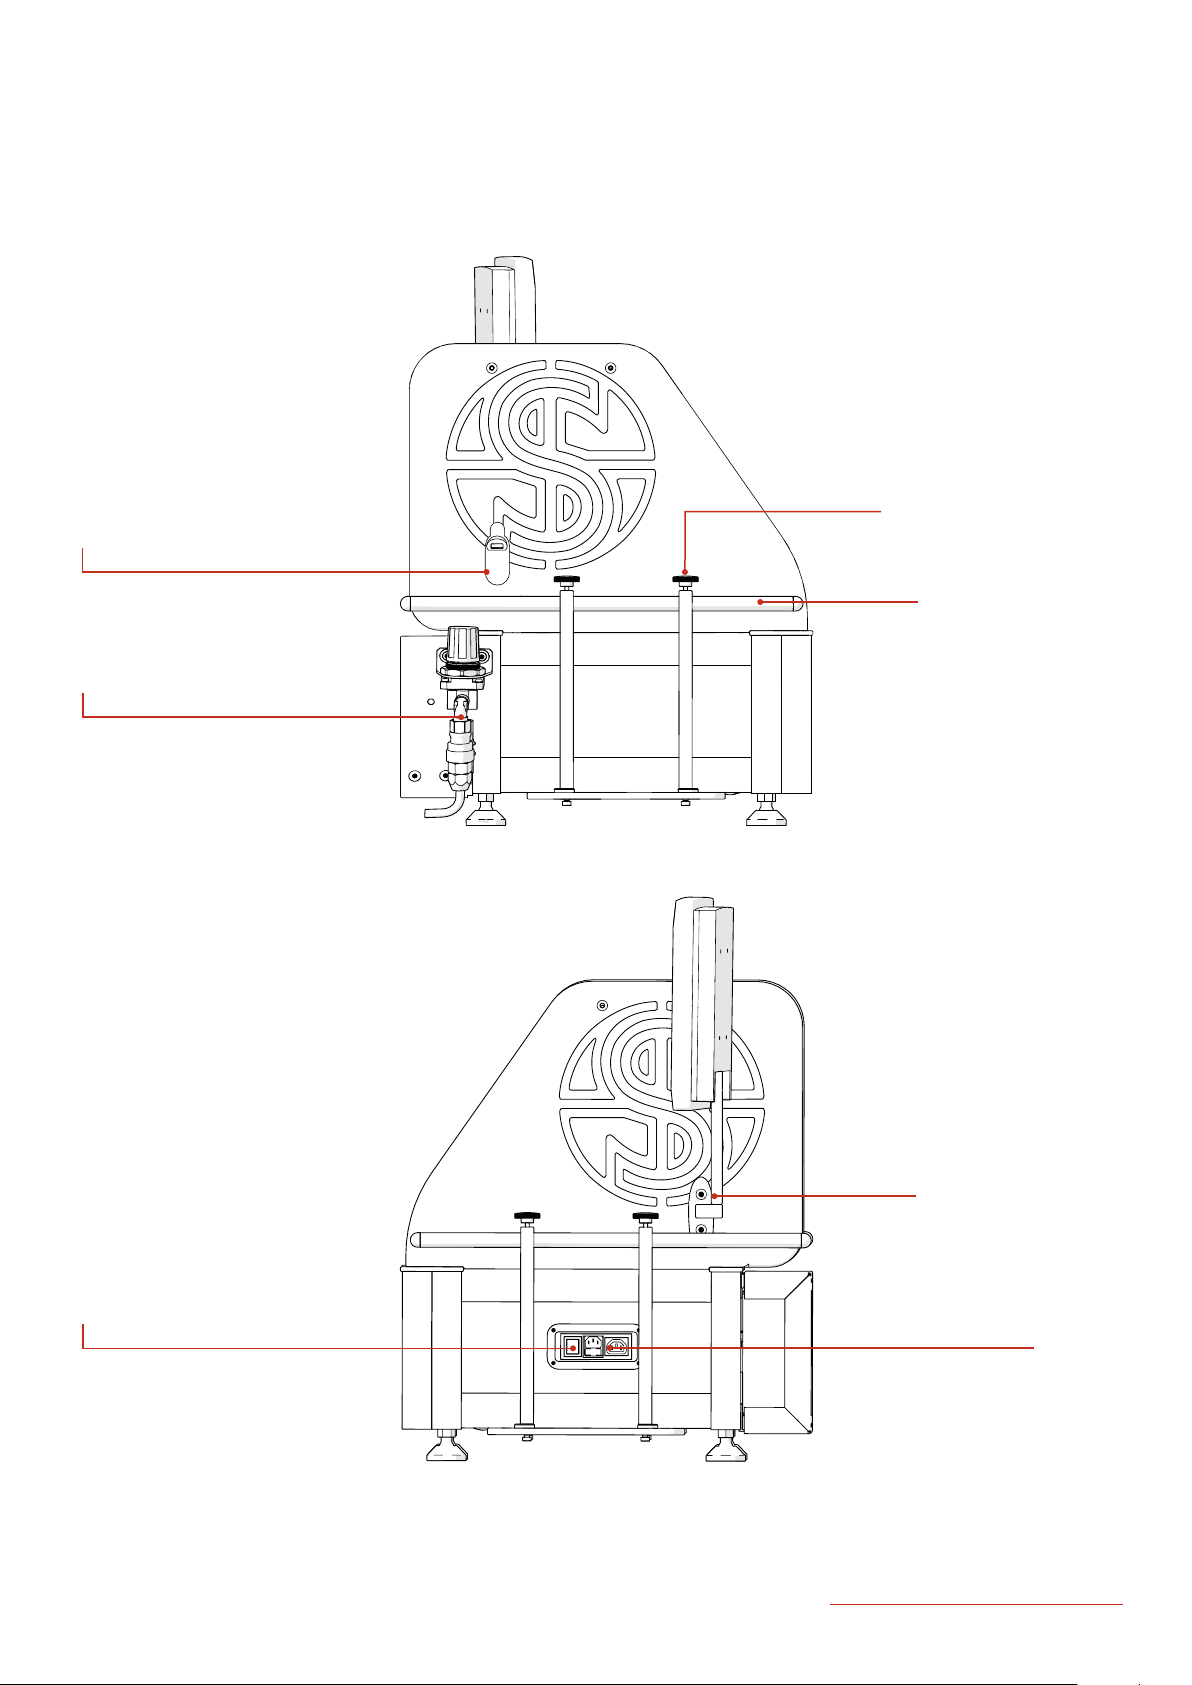
anatomy & features
Beer Bottle Opener
Air Line Connection
Removable Transit Clamps
Removable Transit Bar
NOTE: Ensure to keep transit
hardware in a safe place should
the ROTOR HDA require moving.
MCI Mounting Bracket
Power Switch
singerinstruments.com
Power In
5
Page 6
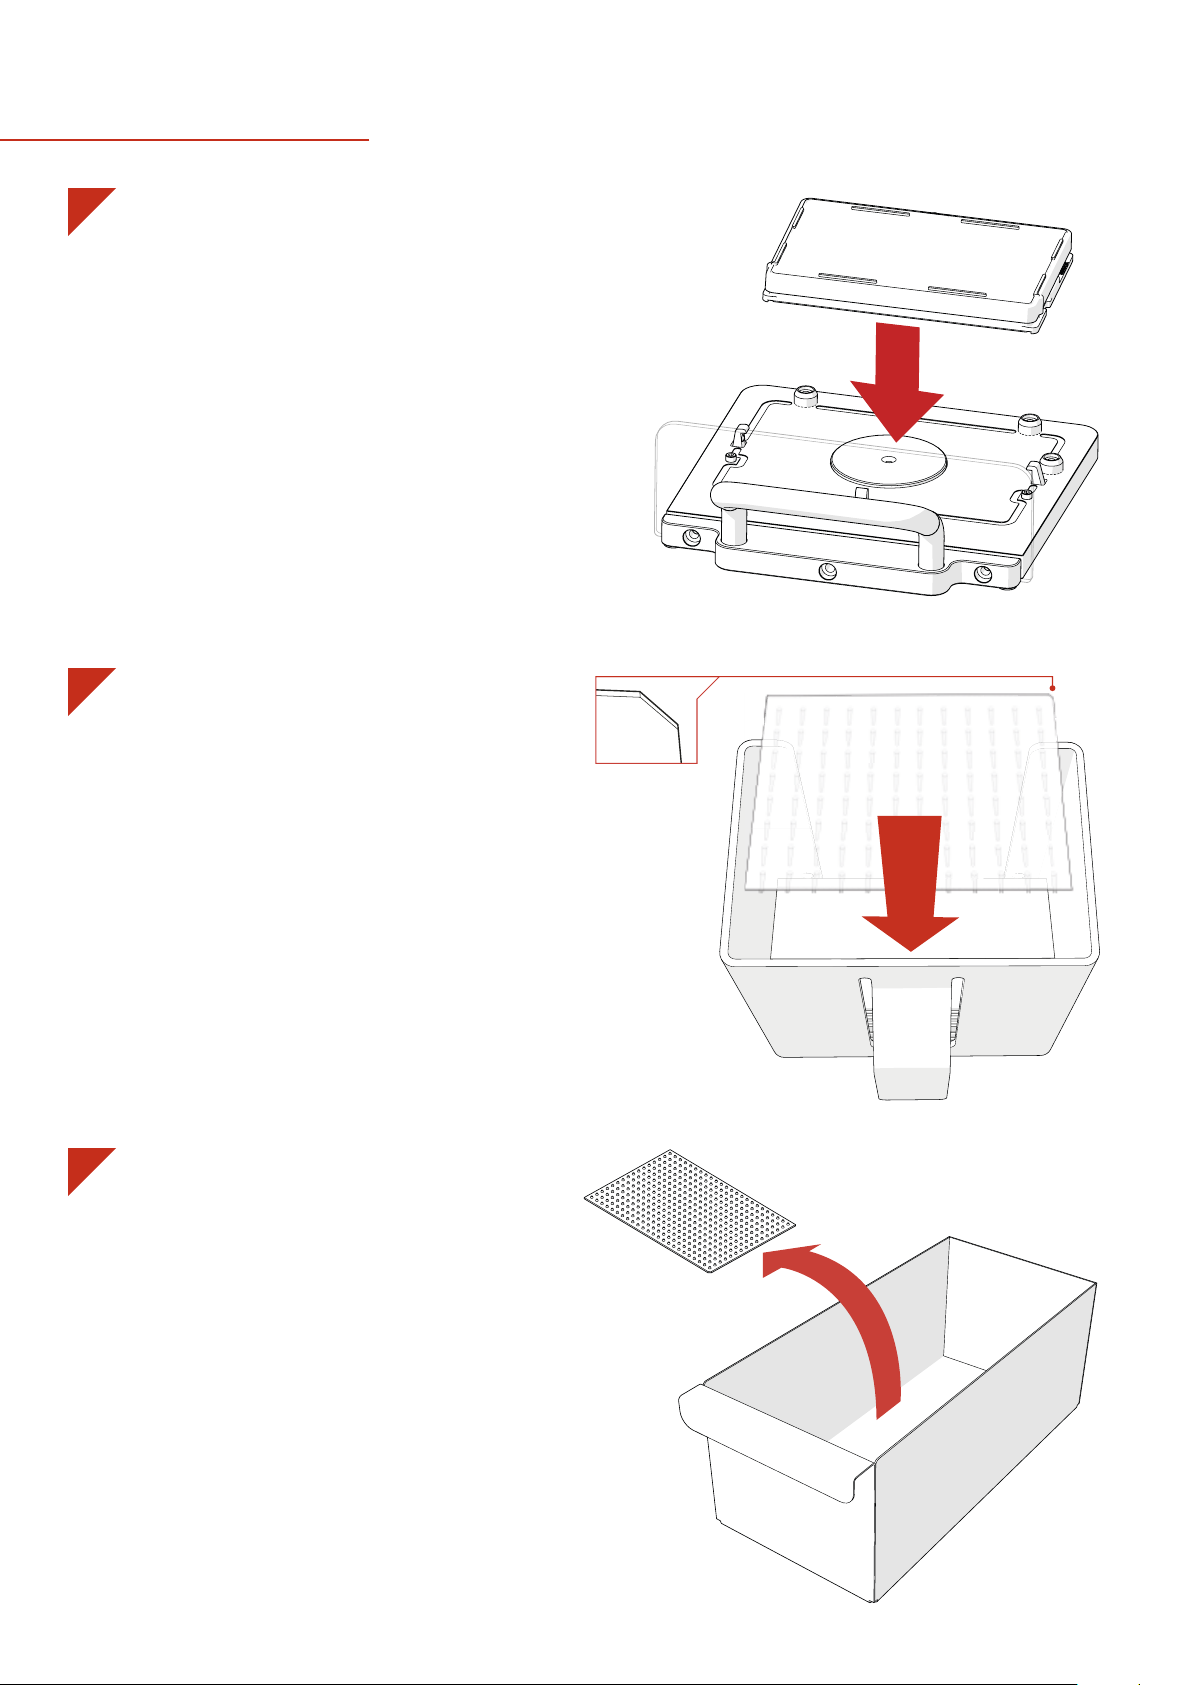
removaBles
1
BLACK BAY
· The Black Bay is a loading bay for source and target plates.
You will need to remove the Black Bay to load plates.
· If you own The Stinger single colony picker then you will
need to remove the Black Bay in order to change between
the Pad Head and The Stinger.
2
PAD HOPPER
· The Pad Hopper is where the fresh RePads™ are loaded.
· Load a stack of RePads™ (pins facing down) into the Hopper
as shown, ensuring the chamfered corner is to the top
right.
· The Pad Hopper is fully autoclavable to ensure RePads™
stay sterile. However, a pack of RePads™
protective card that means the RePads™ stay sterile
without autoclaving the Pad Hopper.
includes a
3
DUMP DRAWER
· The Dump Drawer is where used RePads™ are deposited.
· When a program is finished, the Dump Drawer can be
removed to dispose of the used RePads™.
· The Dump Drawer is fully autoclavable.
6
Page 7
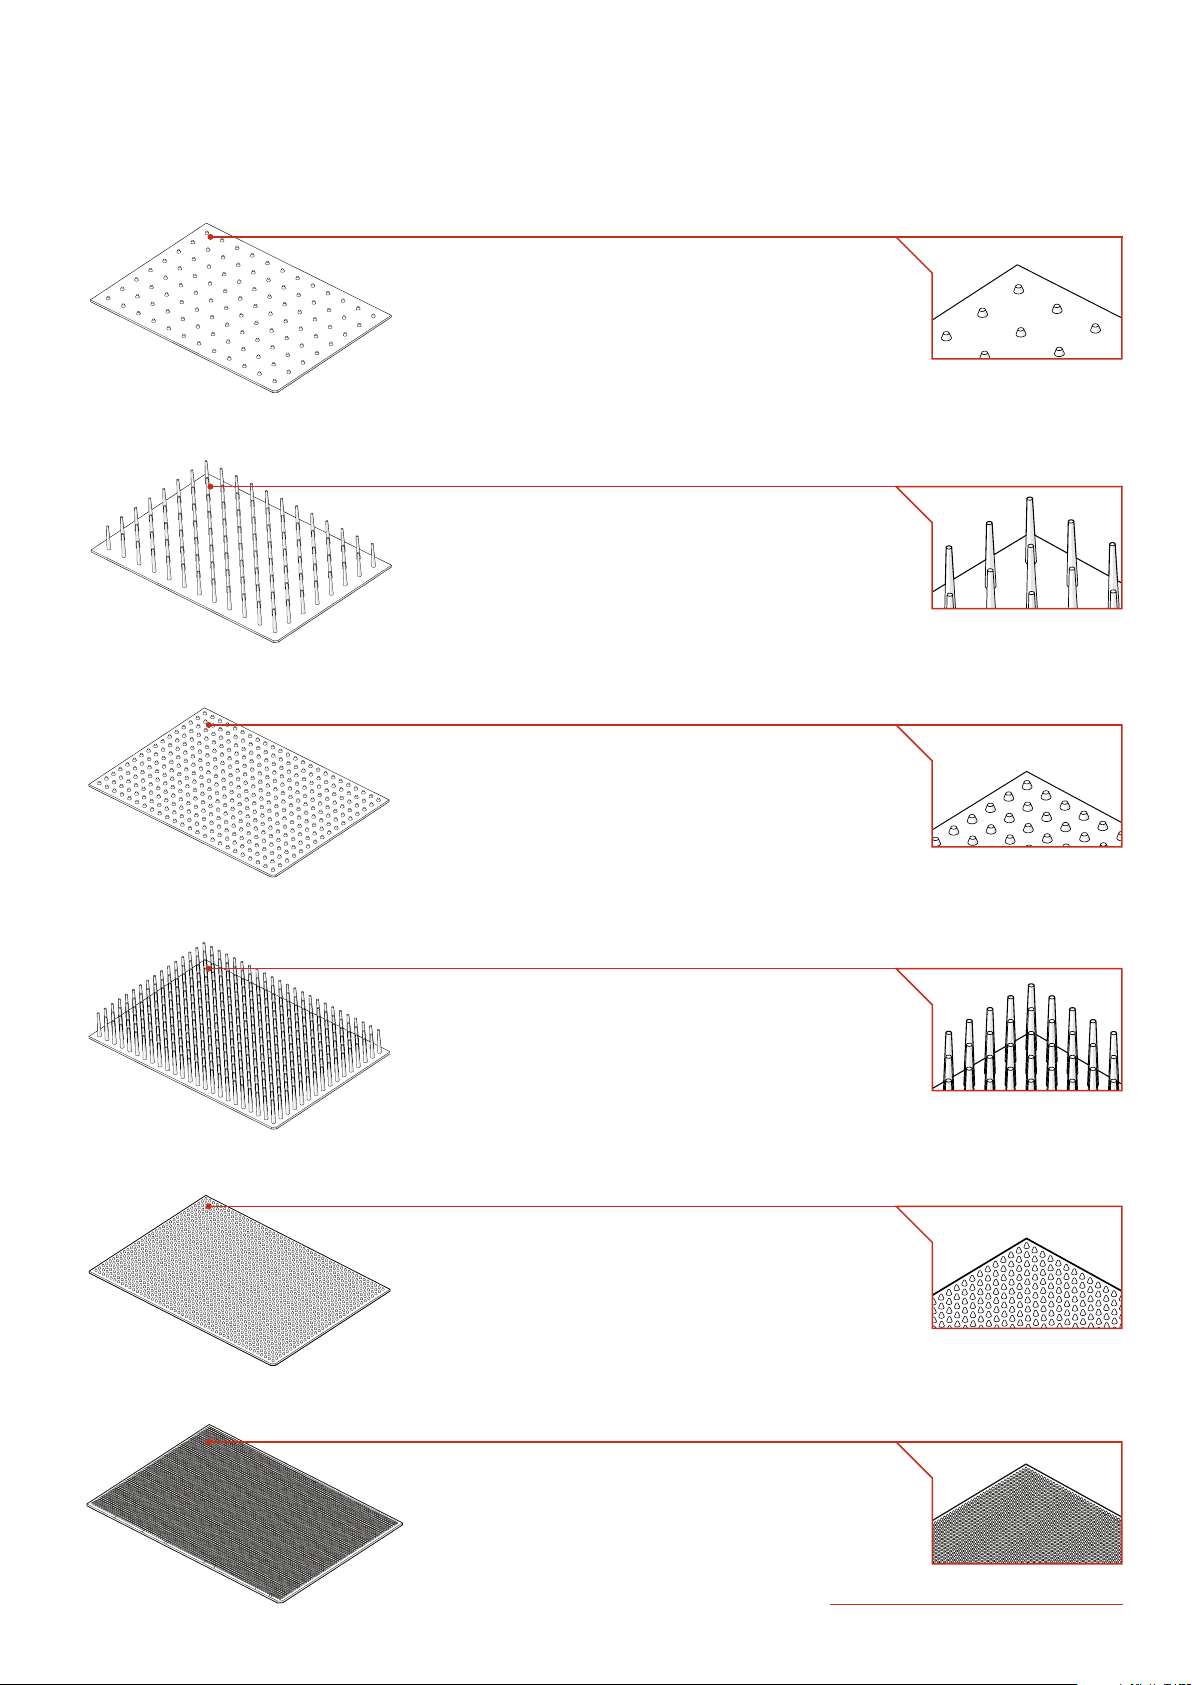
repaDs
™
96 SHORT
96 LONG
384 SHORT
COMPATIBLE MEDIA
· Solid agar
COMPATIBLE PLATES
· Liquid
· Solid agar
COMPATIBLE PLATES
· Solid agar
COMPATIBLE DENSITIES
· 96
· 192
· 384
· 1536
COMPATIBLE DENSITIES
· 96
· 192
· 384
· 1536
COMPATIBLE DENSITIES
· 384
· 768
· 1536
· 6144
384 LONG
1536 SHORT
6144 SHORT
COMPATIBLE PLATES
· Liquid
· Solid agar
COMPATIBLE PLATES
· Solid agar
COMPATIBLE PLATES
· Solid agar
COMPATIBLE DENSITIES
· 384
· 768
· 1536
· 6144
COMPATIBLE DENSITIES
· 1536
· 3072
· 6144
· 24576
COMPATIBLE DENSITIES
· 6144
· 12288
· 24576
singerinstruments.com
7
Page 8
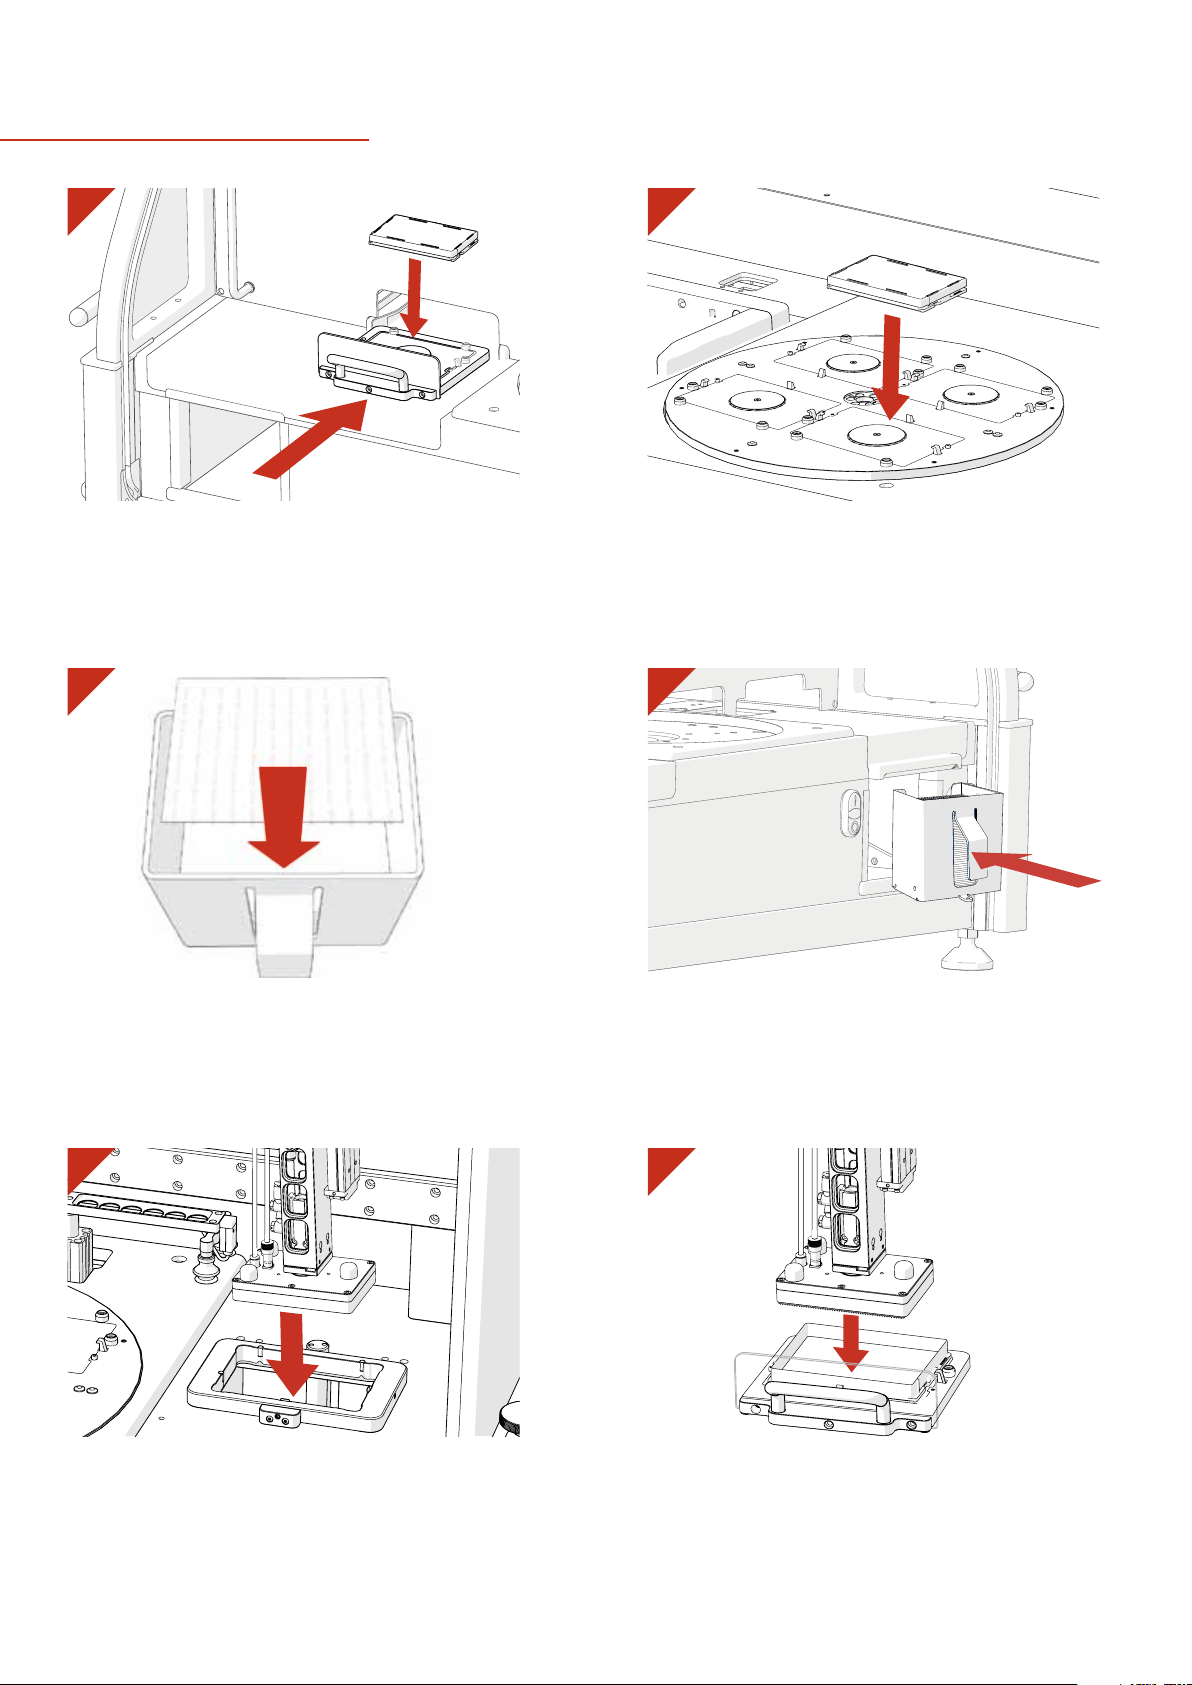
mecHanical overview
1 2
·
Source Plates or Target Plates are loaded into the Black
Bay. Source plates are the plates that already have the
desired strains on. Target plates are the plates that you
want your desired strains to grow on.
3
· RePads™ are loaded (pins facing down) into the Pad
Hopper. RePads™ come in a variety of densities and are
used to transfer strains from Source Plates to Target
Plates.
· Target Plates or Source Plates are loaded into the Turntable.
· If loading four plates, the front two plates are loaded first.
The turntable will then rotate to allow you to load the second
two.
4
· The Pad Hopper is loaded into the Hopper Loading Bay.
5
· The Pad Head lowers and picks up a RePad™.
8
6
· The Pad Head moves to the Source Plate, lowers and
collects a sample of cells.
Page 9
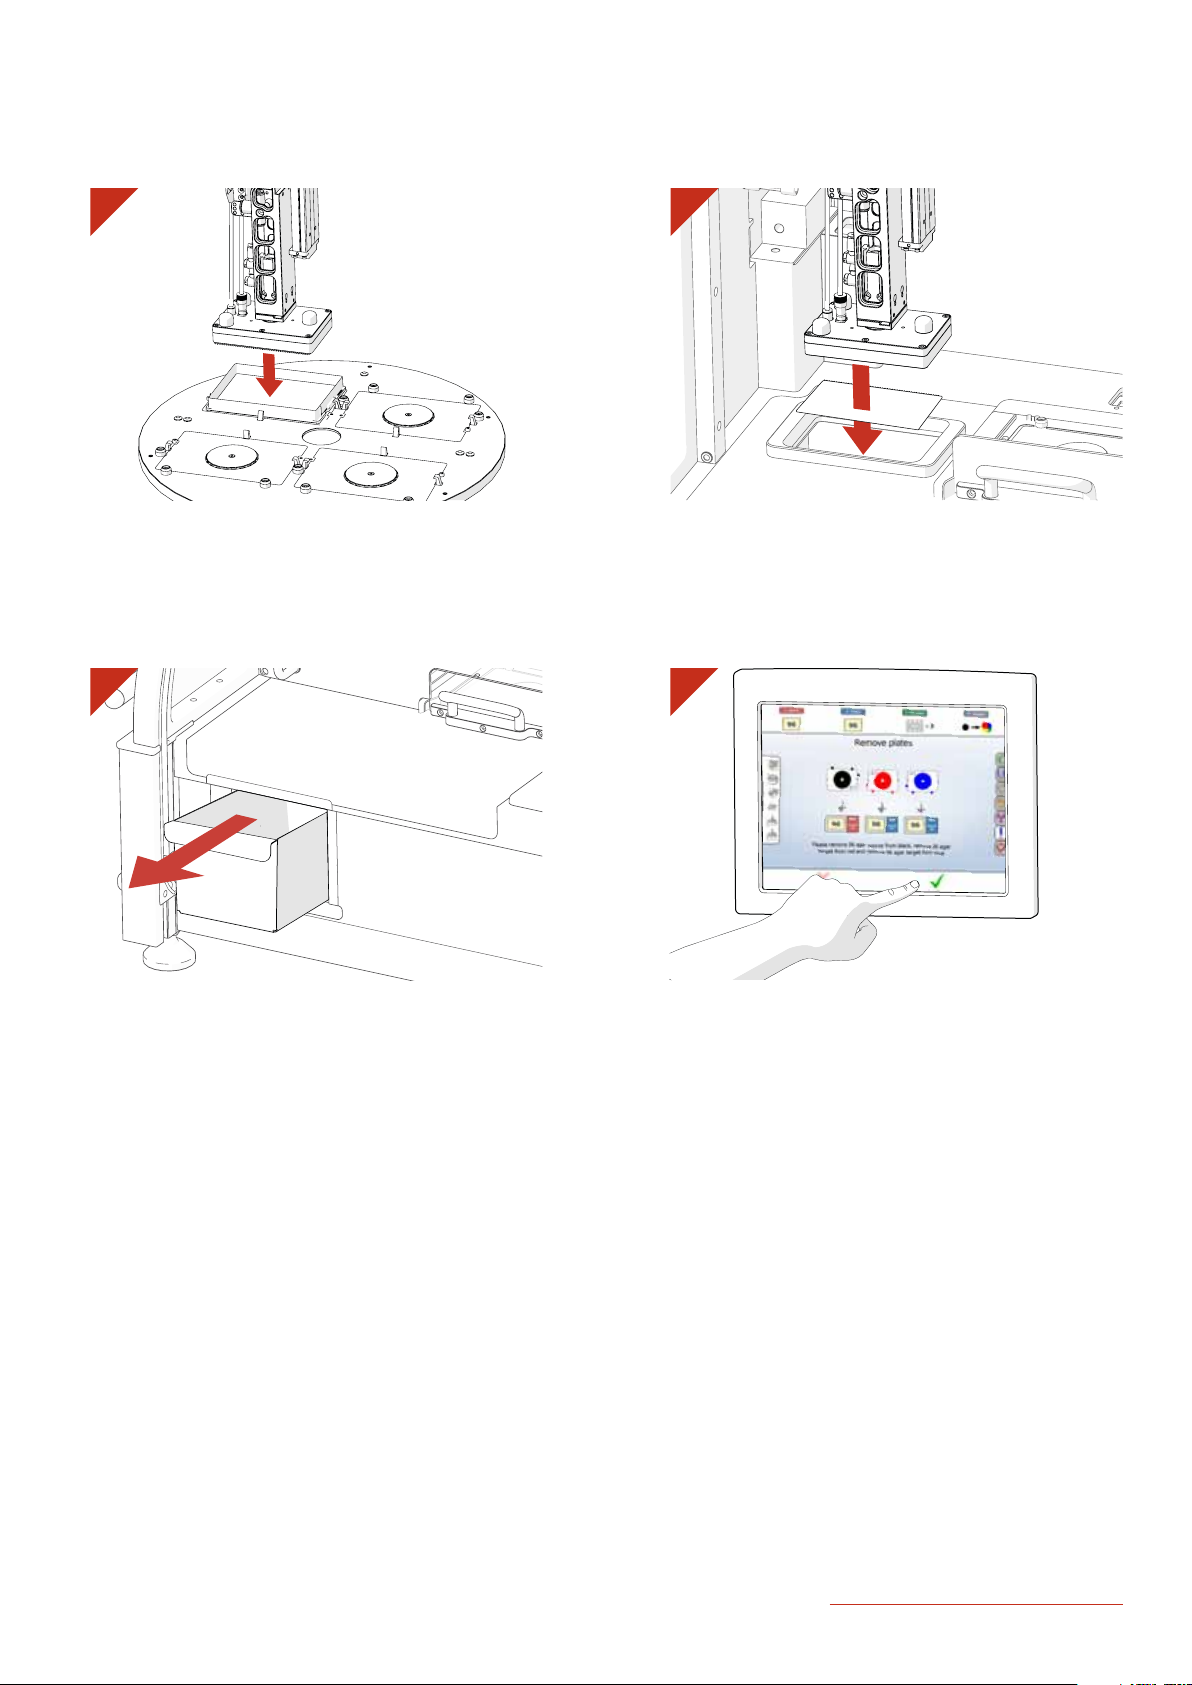
mecHanical overview
7 8
·
The Pad Head moves to a Tar get Pl ate and deposits the
sample of cells.
9 10
· Used RePads™ are collected in the Dump Drawer ready to be
disposed of.
· These steps will be repeated until your chosen protocol is
finished.
· The Pad Head moves to the Dump Zone and drops the
used RePad™.
· Follow the simple step-by-step instructions for loading/
unloading of plates and consumables. See page 14.
singerinstruments.com
9
Page 10
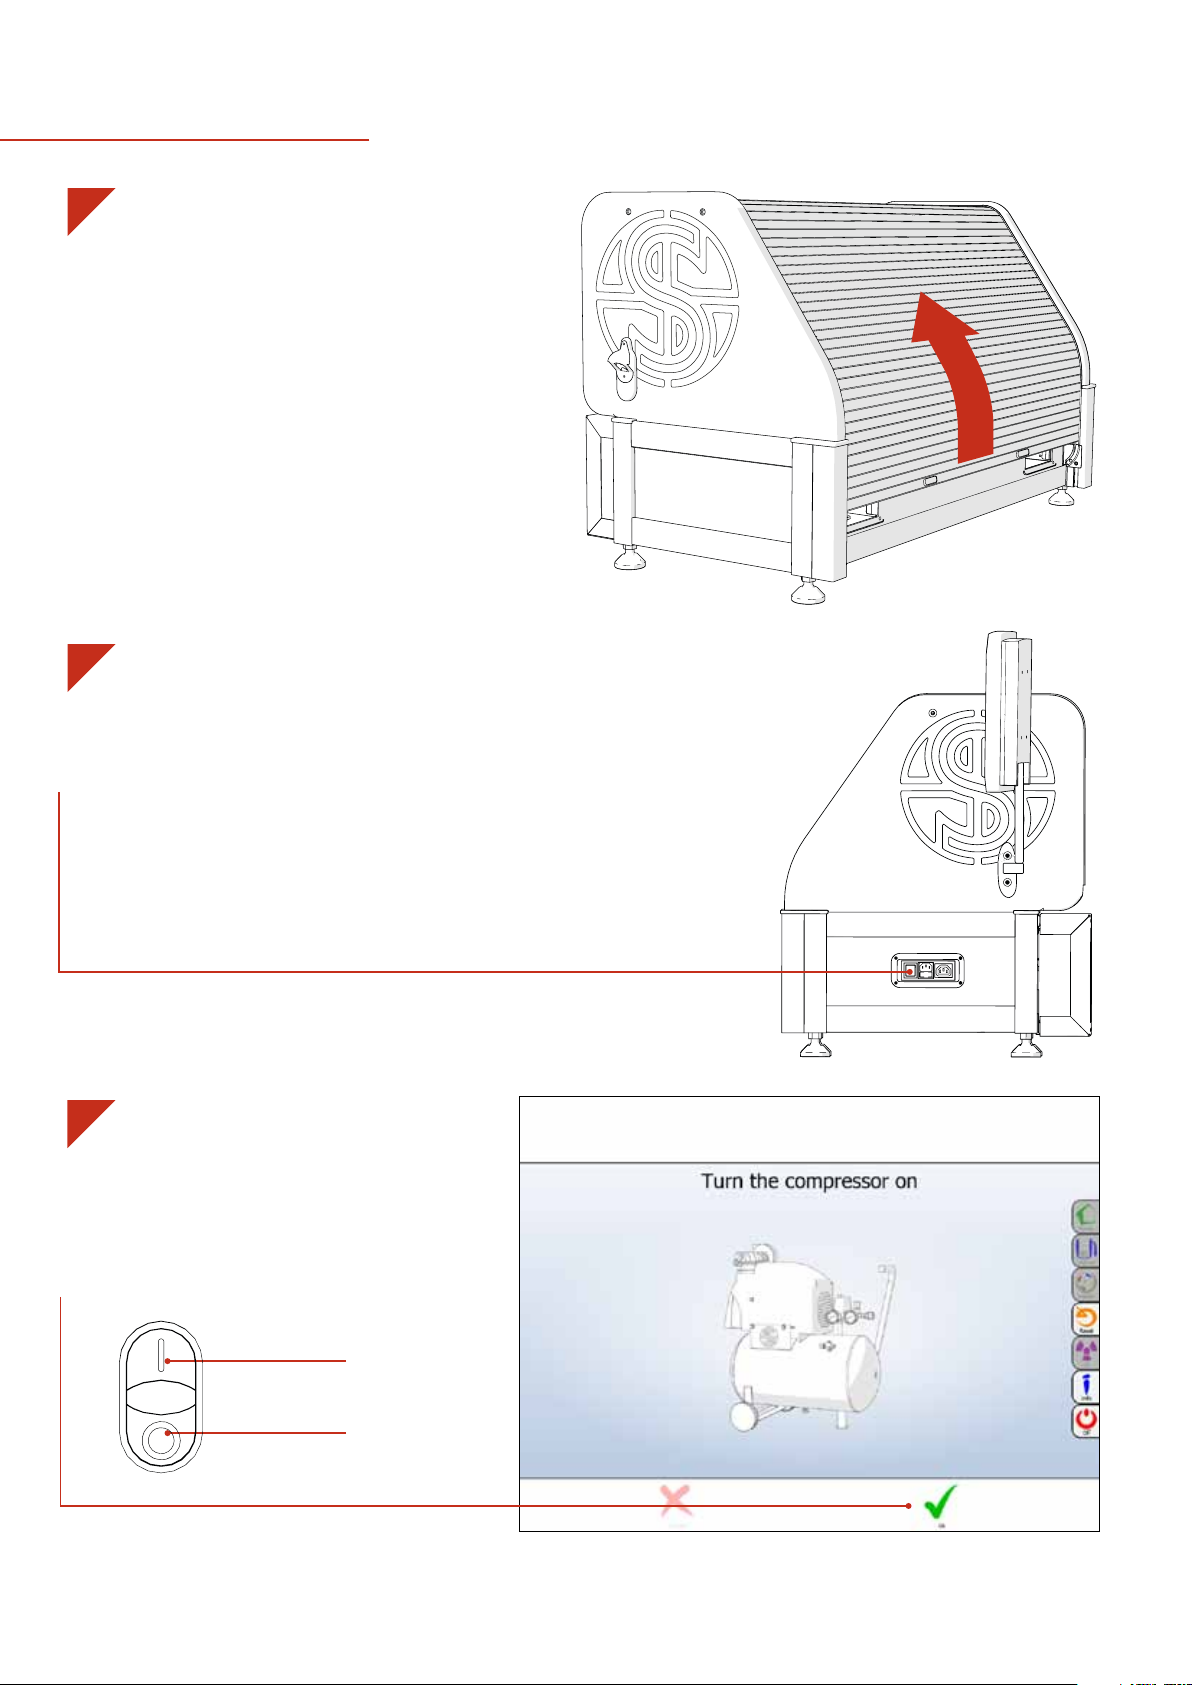
initialisation routine
1
· Open the Roll-over Cover.
2
· Insert the Power Cables into the ROTOR HDA and
switch on the mains power.
· Turn on the ROTOR HDA Power Switch.
3
· Follow the simple on-screen instructions to work
through the ROTOR HDA initialisation procedure.
· Turn on the Compressor.
· Select OK on the Touch Screen or use the Fast Buttons.
10
OK
Cancel
Page 11
initialisation routine
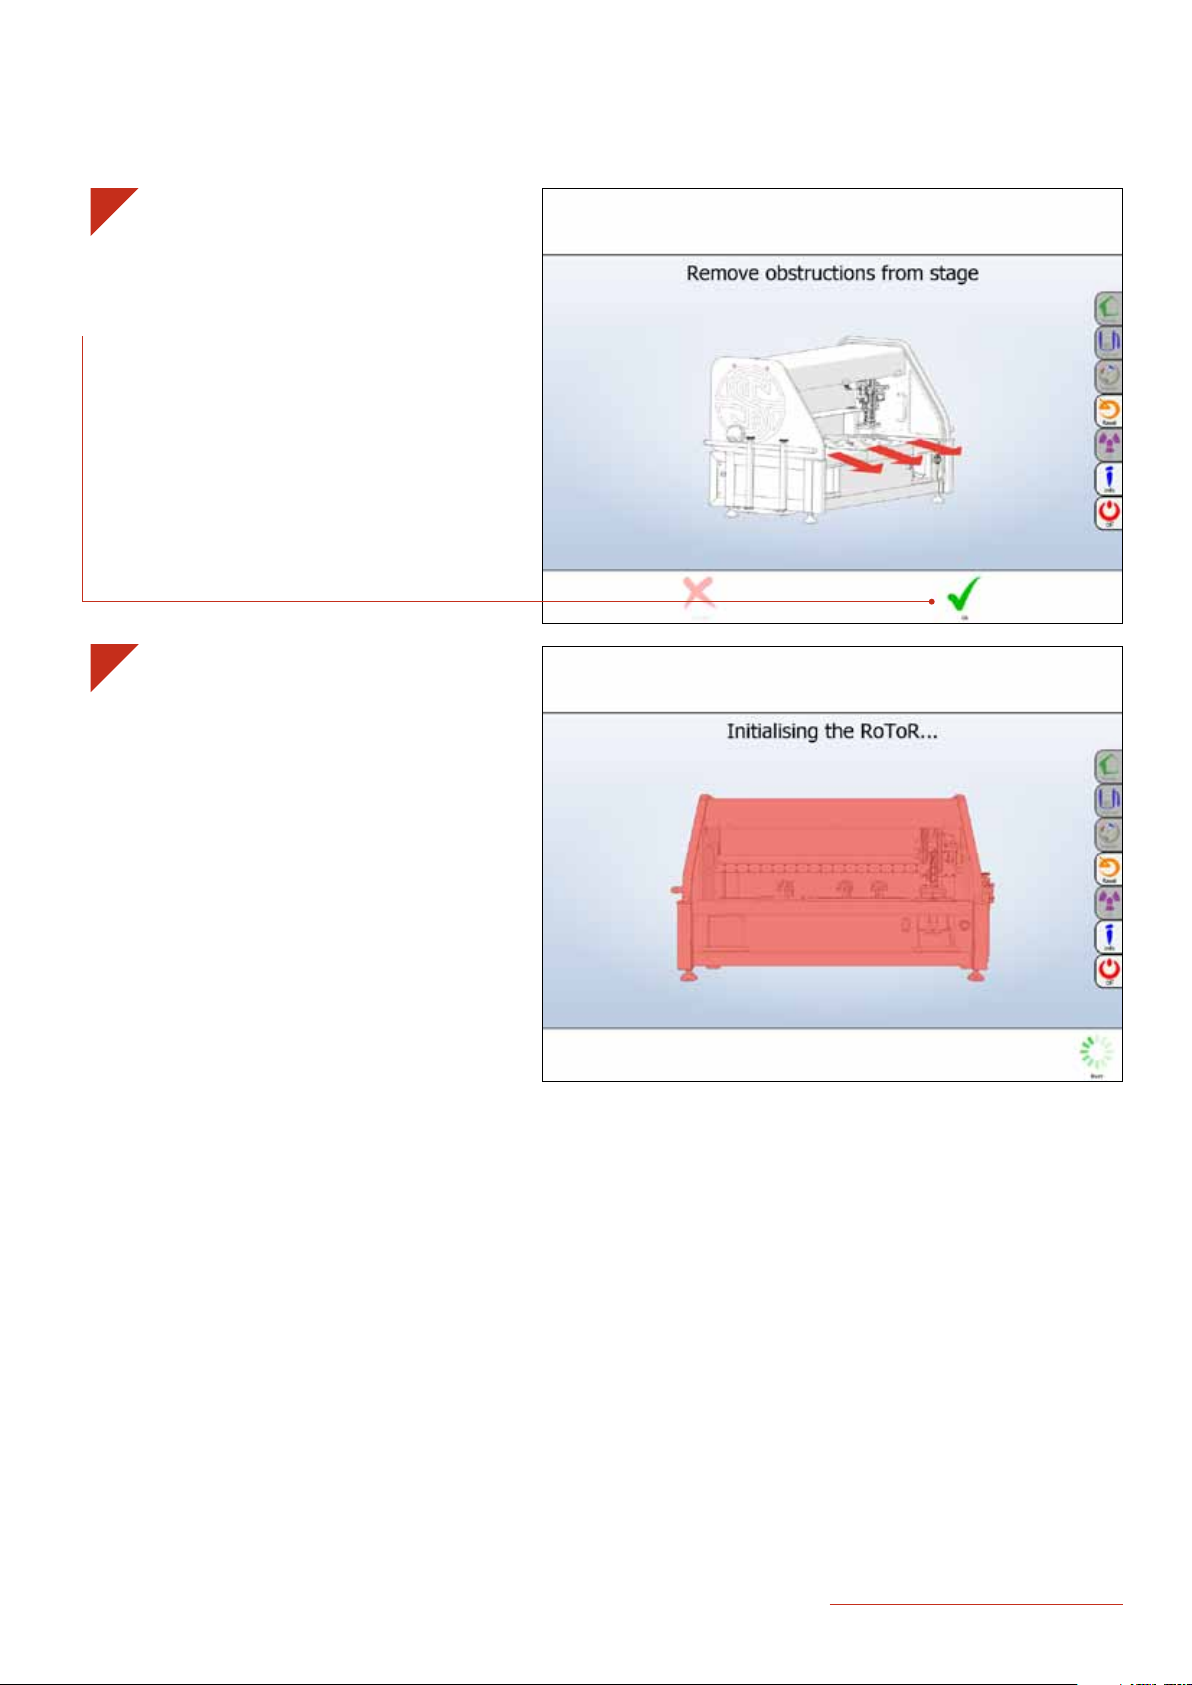
4
· Clear all objects from the ROTOR Stage, so nothing
will obstruct the initialisation routine.
· Select OK On-screen or use the Fast Buttons.
5
· The ROTOR HDA will perform a start-up routine.
singerinstruments.com
11
Page 12
software overview
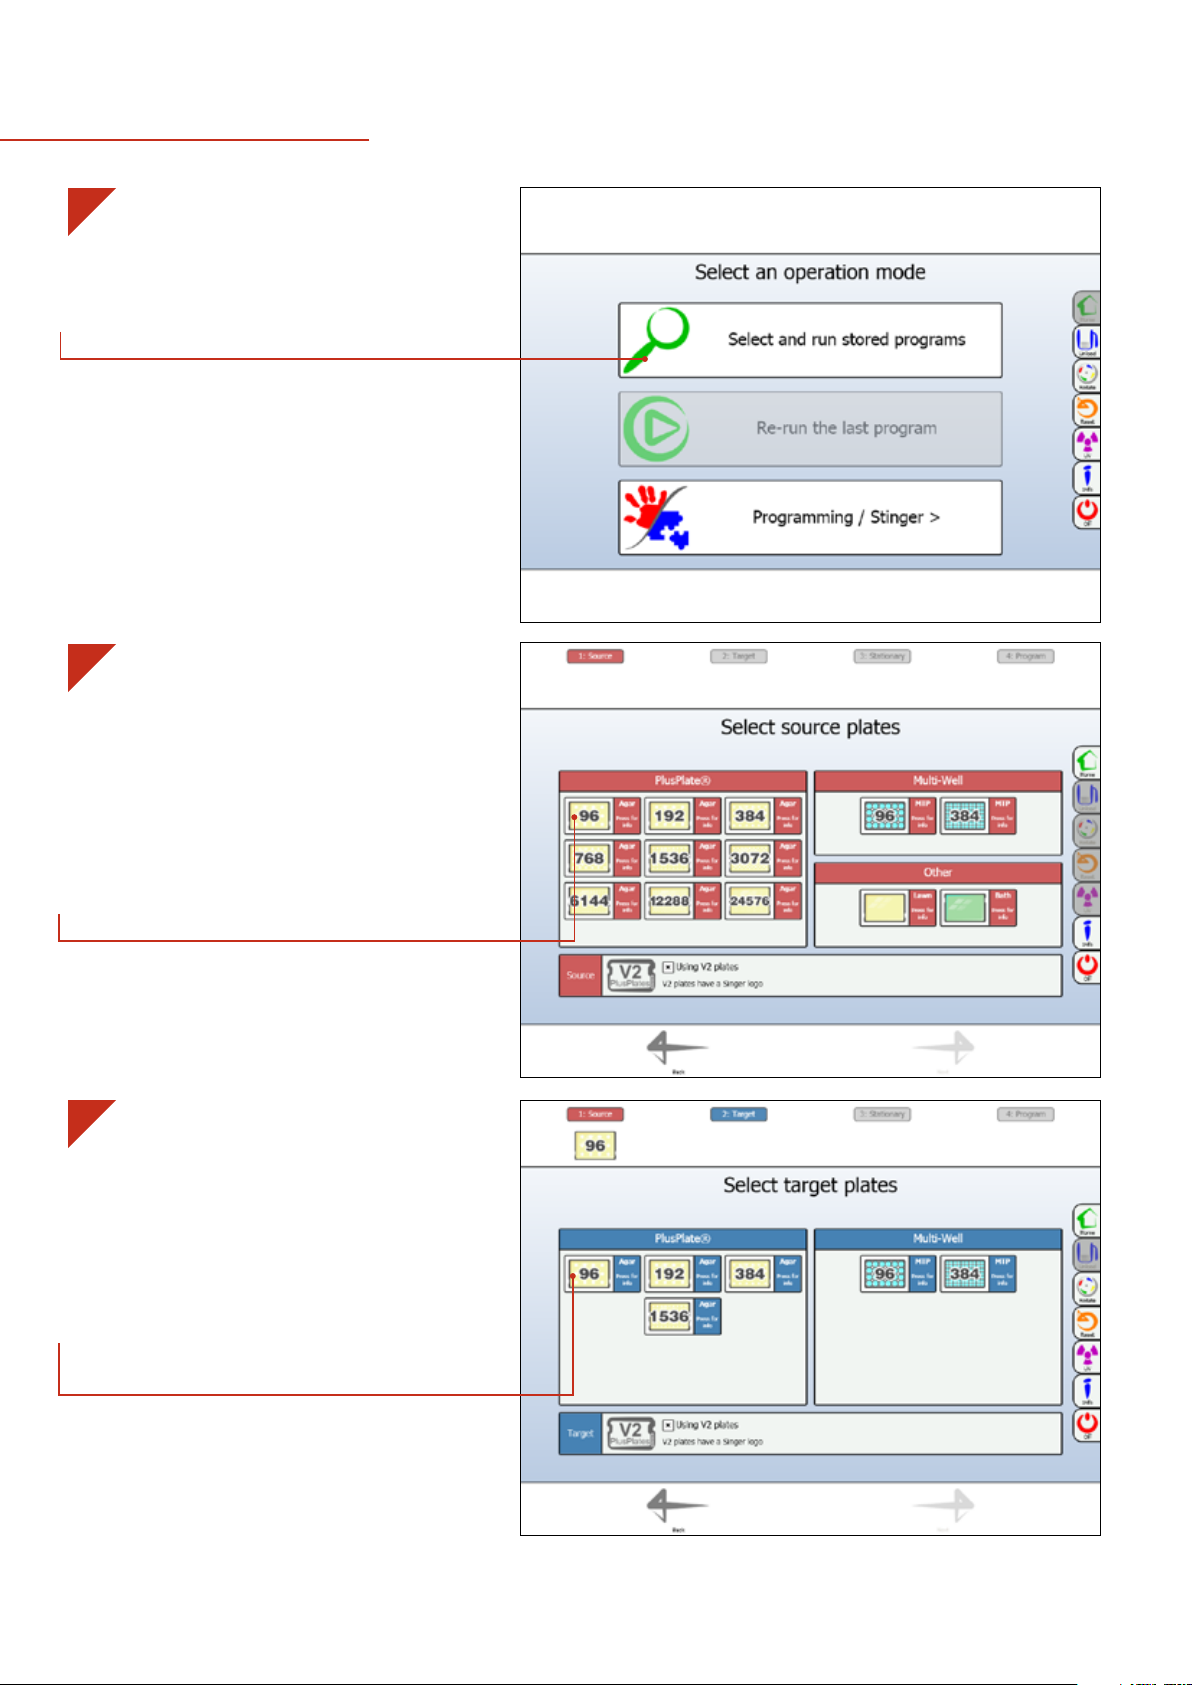
1
·
This is the ROTOR Home Menu. From here you can
choose to run pre-existing programs or create your
own programs. In this example, we click Select And
Run Stored Programs.
· NOTE: Follow the same 4 steps to select for an existing
program:
1. Choose the type of Source Plates.
2. Choose the type of Target Plates.
3. Choose the type of Pin Pads.
4. Select required Program.
These four steps are demonstrated below.
2
· Select your Source Plates. They are the plates that
already have the desired strains on. The source could
be colonies grown on solid agar, or cultures grown in
liquid media. In solid agar, the ROTOR HDA currently
supports colony density up to 24576. In liquid media,
the ROTOR HDA supports multi-well plates at 96 and
384-density.
· In this example we select 96 Agar.
3
·
Select your Target Plates. They are the plates that
you want your desired strains to grow on. The types
of target plates available are only those compatible
with your previous selection. Since we’ve selected our
source plate as 96 Agar, we won’t be able to choose
the target plate density beyond 1536.
· In this example we select 96 Agar.
· NOTE: The ROTOR software will not allow you to
make a mistake during plate and RePad™ selection.
12
Page 13
software overview
4
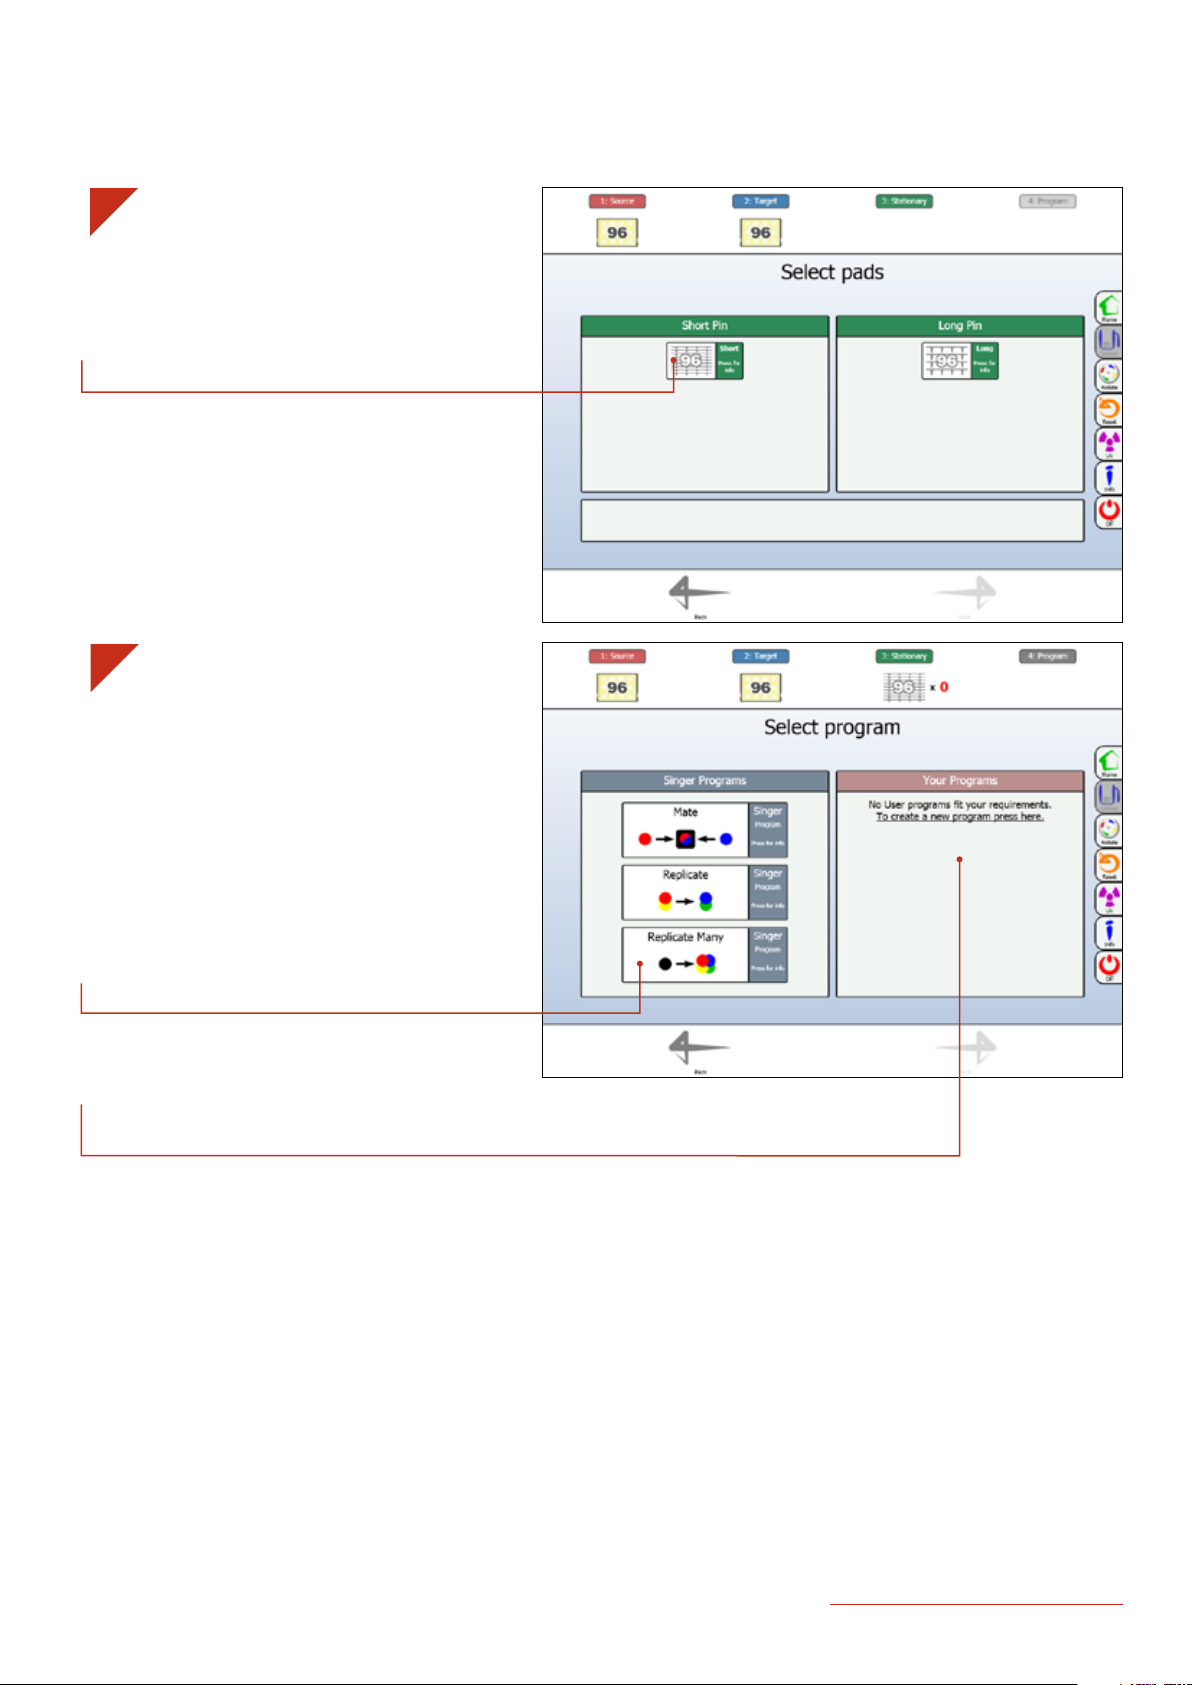
·
Select your RePad™. The types of RePads™ available
are only those compatible with your previous
selection.
· In this example we select Short Pin Pad 96-Density.
· NOTE: Short pin pads are used to pin colonies from
solid agar to solid agar. Long pin pads are used to
pin liquid media or solid agar to solid agar or liquid
media.
5
· The final step is to select the program that you want
to perform. The programs available are only those
compatible with your previous selection. In this
example, there are three available programs:
· Mate - pinning two haploid cells onto one plate.
· Replicate – pinning one source plate onto one target
plate.
· Replicate Many – pining one source plate onto multiple
target plates.
· In this example, we select Replicate Many.
· The right-hand panel will display your custom
programs. You also have the option to create new
custom programs.
singerinstruments.com
13
Page 14
program overview
1
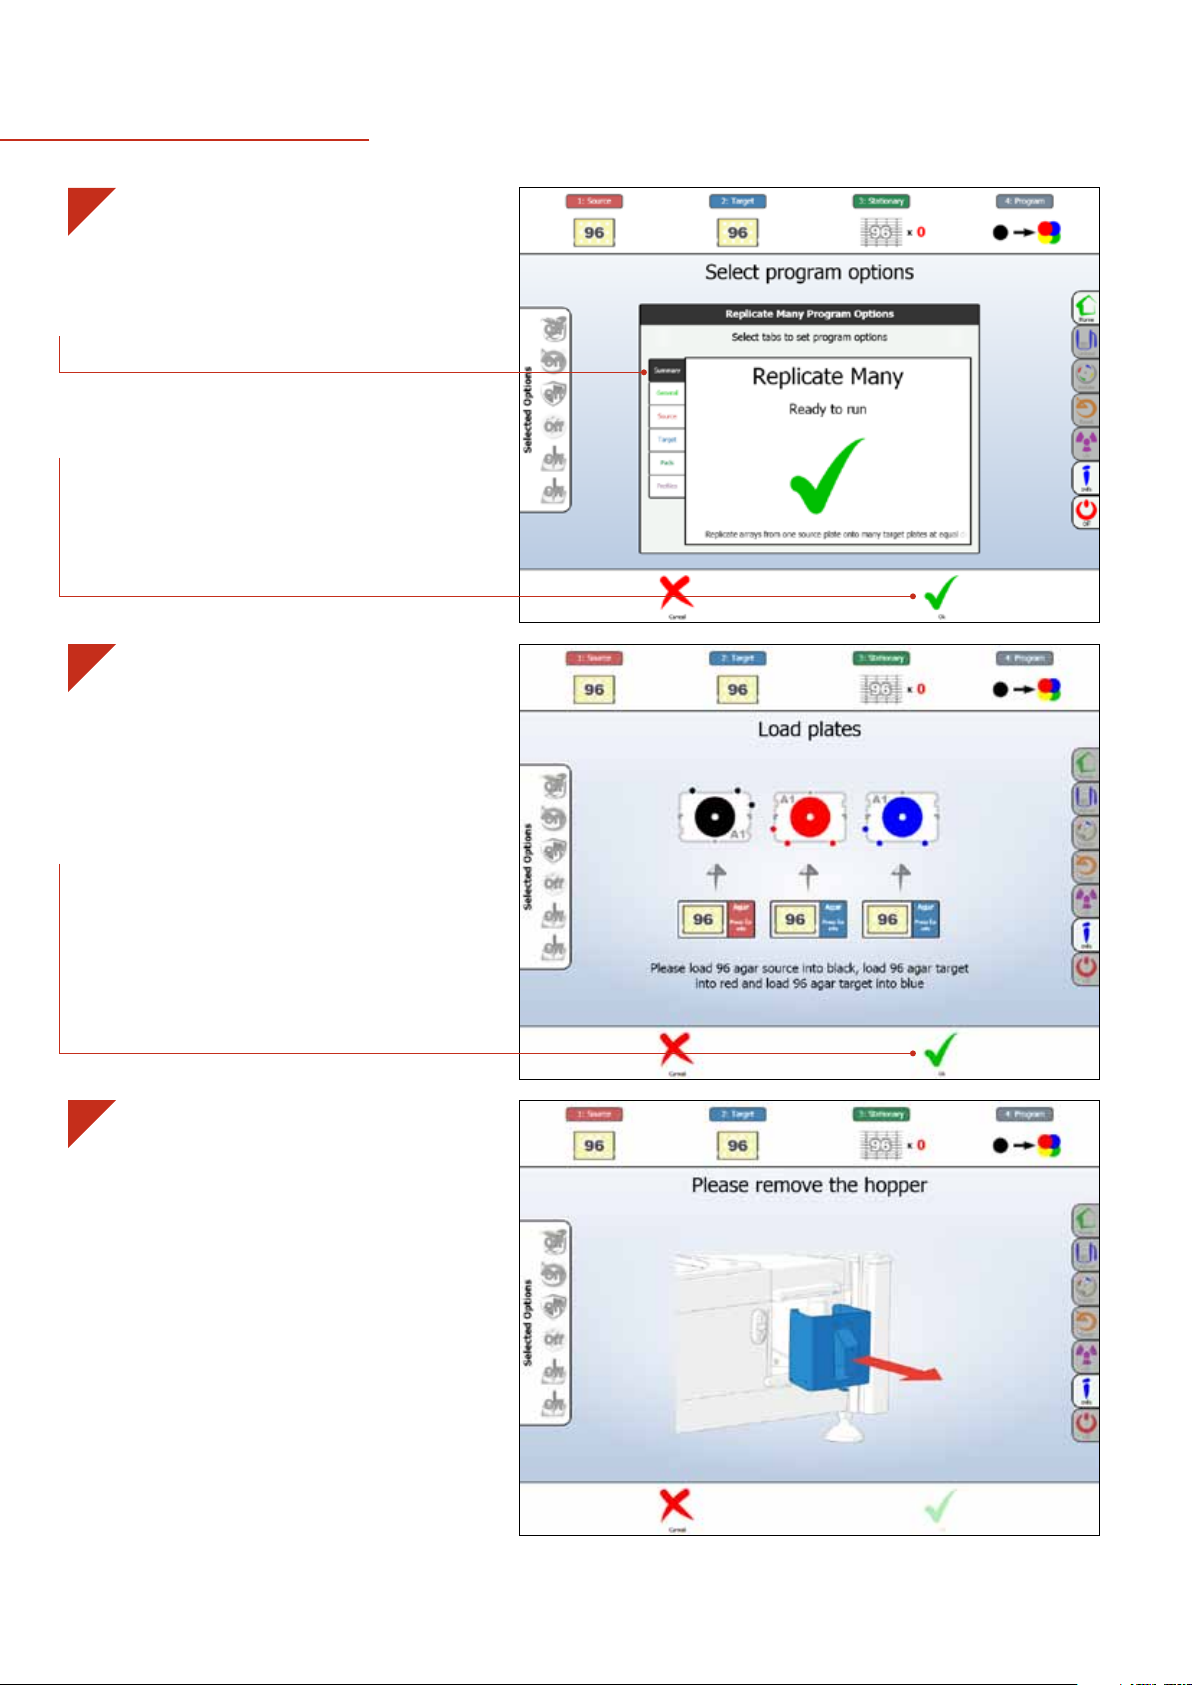
·
This is the Program Preparation Page. Here you can
fine-tune the program using the options on the left.
A detailed overview of these options can be found on
pages 18-21.
· Select OK On-screen or use the Fast Buttons to
continue.
2
NOTE: Running a program is easy. Just follow the on-screen instructions!
·
Simple, step-by-step instructions will guide you
through the program. Each plate position is colour
coded. Red, blue, yellow and green go into the ROTOR
Turntable, while black goes into the ROTOR Black Bay.
· Select OK On-screen or use the Fast Buttons when you
are done.
3
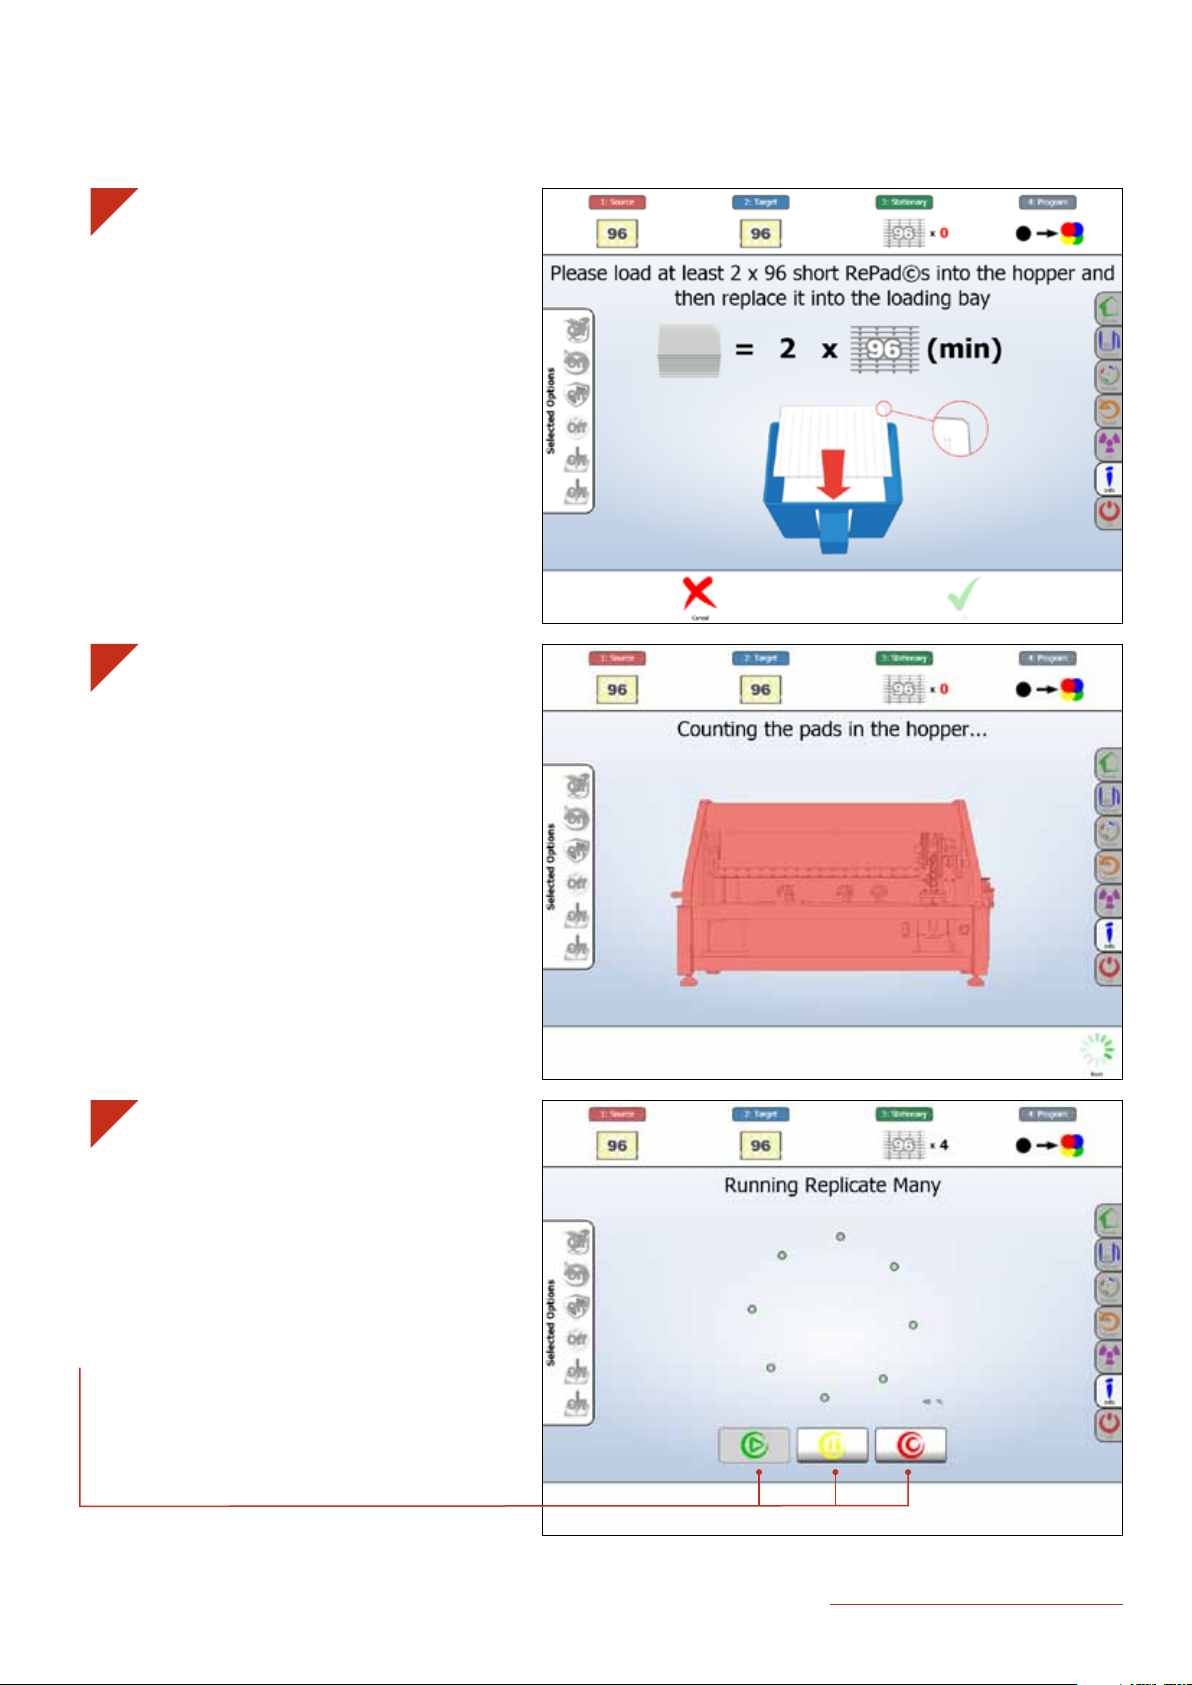
· When prompted, remove the Pad Hopper to load the
RePads™.
14
Page 15
program overview
4
Follow the instructions and load the appropriate
·
RePads™ into the Pad Hopper.
5
·
The ROTOR HDA will now count the number of Pin
Pads loaded to ensure there are enough to complete
the program.
6
· The ROTOR HDA will now start pinning the colonies for
replication.
· Live program information will be updated throughout
the operation.
· Quick button operation: Pause and Resume.
· On-screen operation: Resume, pause, stop / abort.
singerinstruments.com
15
Page 16
program completion
1
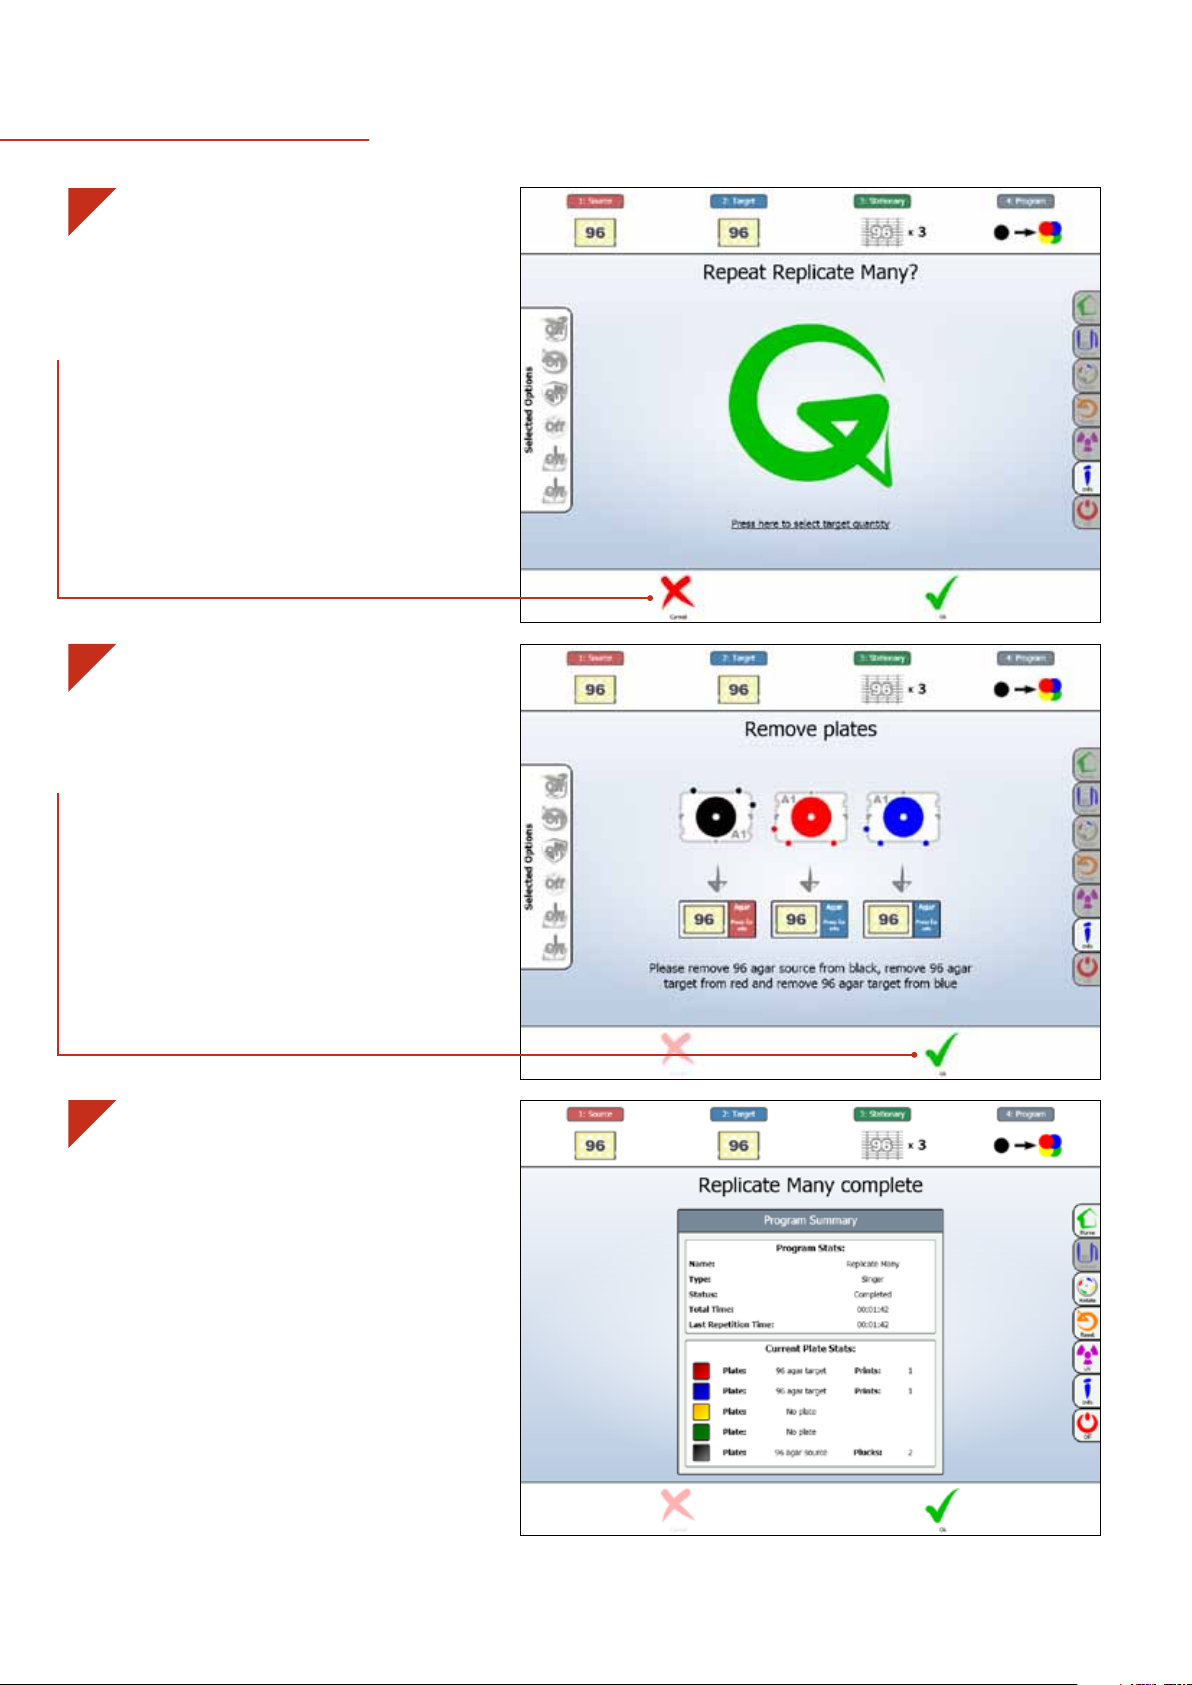
·
If you wish to generate more than 4 replicates of a
target plate, you can repeat the program with one
click.
· Make your selection.
2
· When pinning is completed, you will be instructed to
remove the Plates.
· Press OK when you are done.
3
· A Program Summary Page appears once the program
has completed.
16
Page 17
software icon guiDe
HOME SCREEN
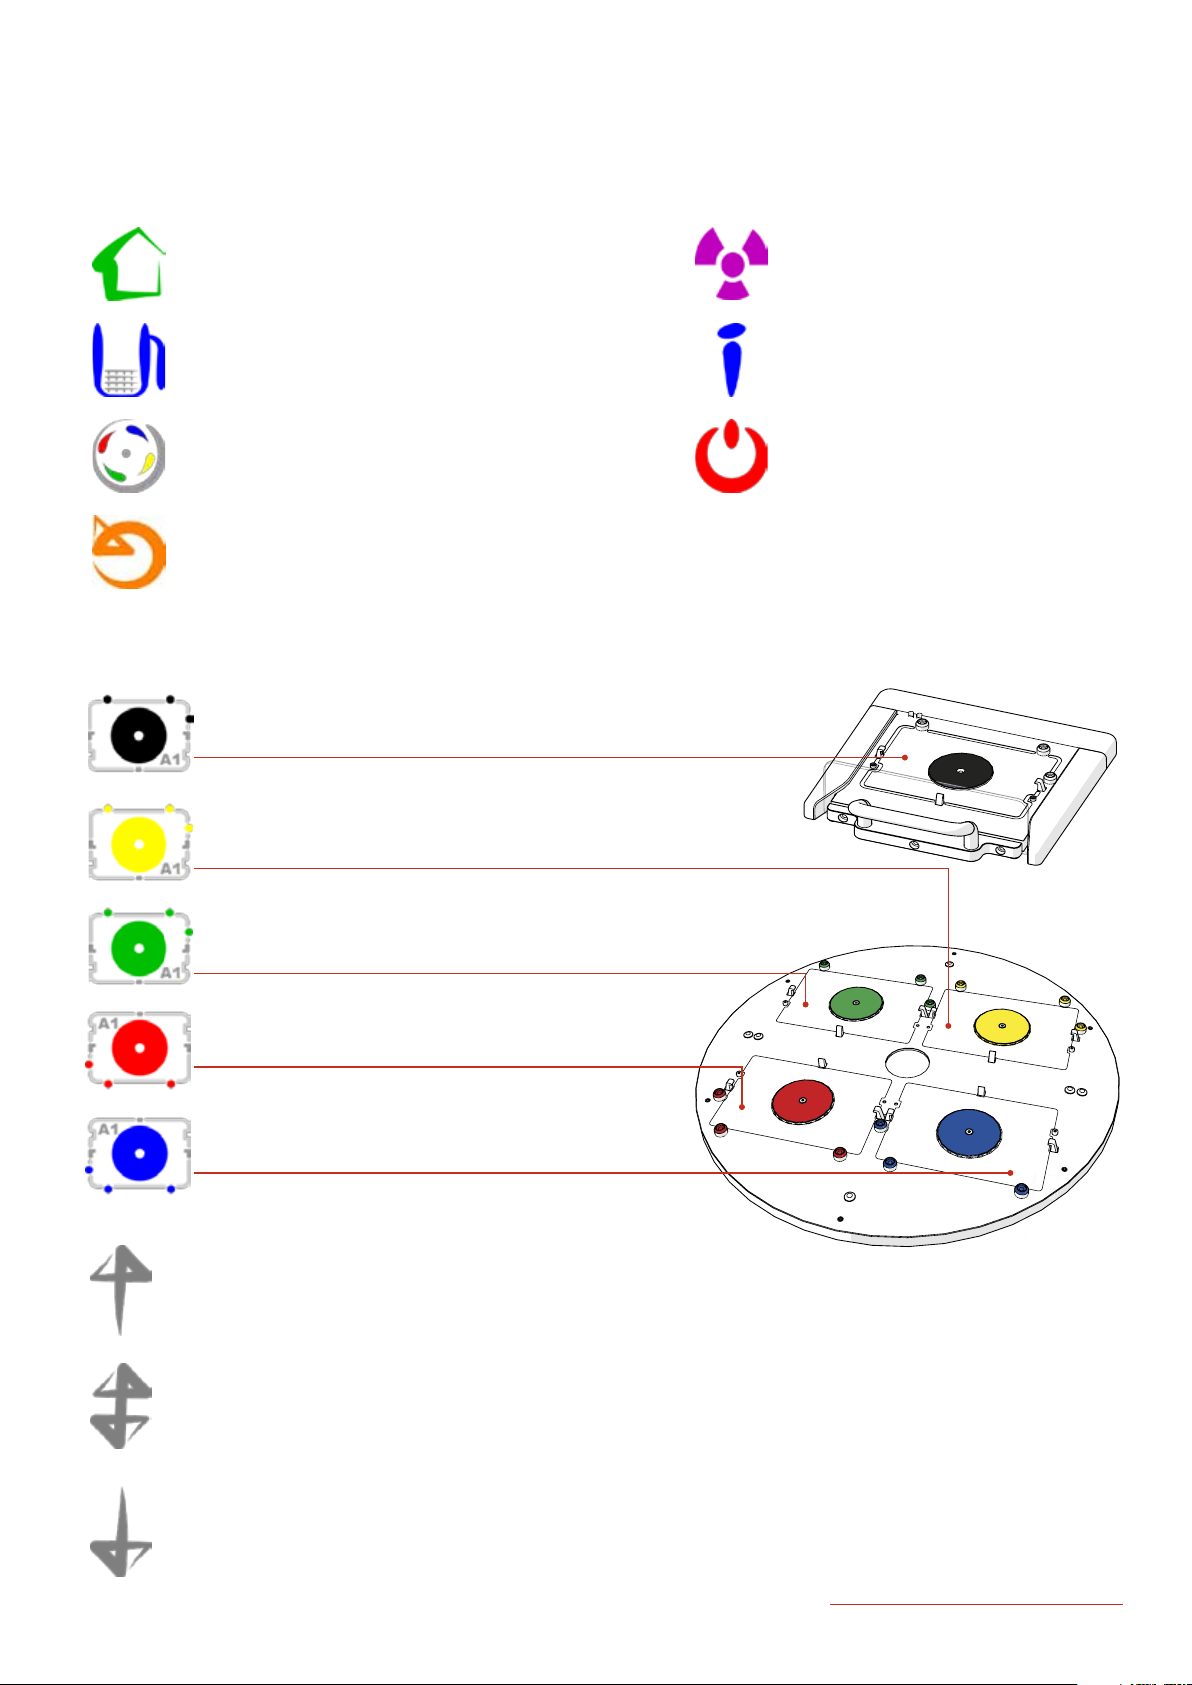
· Home: This will return you to the ROTOR Home Screen.
· Unload: This allows you to remove the Hopper from the
Home Screen.
· Rotate: This rotates the Turntable.
· Reset: This resets the ROTOR HDA.
LOADING PLATES
· UV: This opens the UV Lamp Options.
· Info: This opens the Info and Settings
Screen. Here you can access the
advanced options and online support.
· Off: Press to turn off the ROTOR HDA.
· Load Plate
· Swap Plates
· Remove Plate
singerinstruments.com
17
Page 18
software icon guiDe
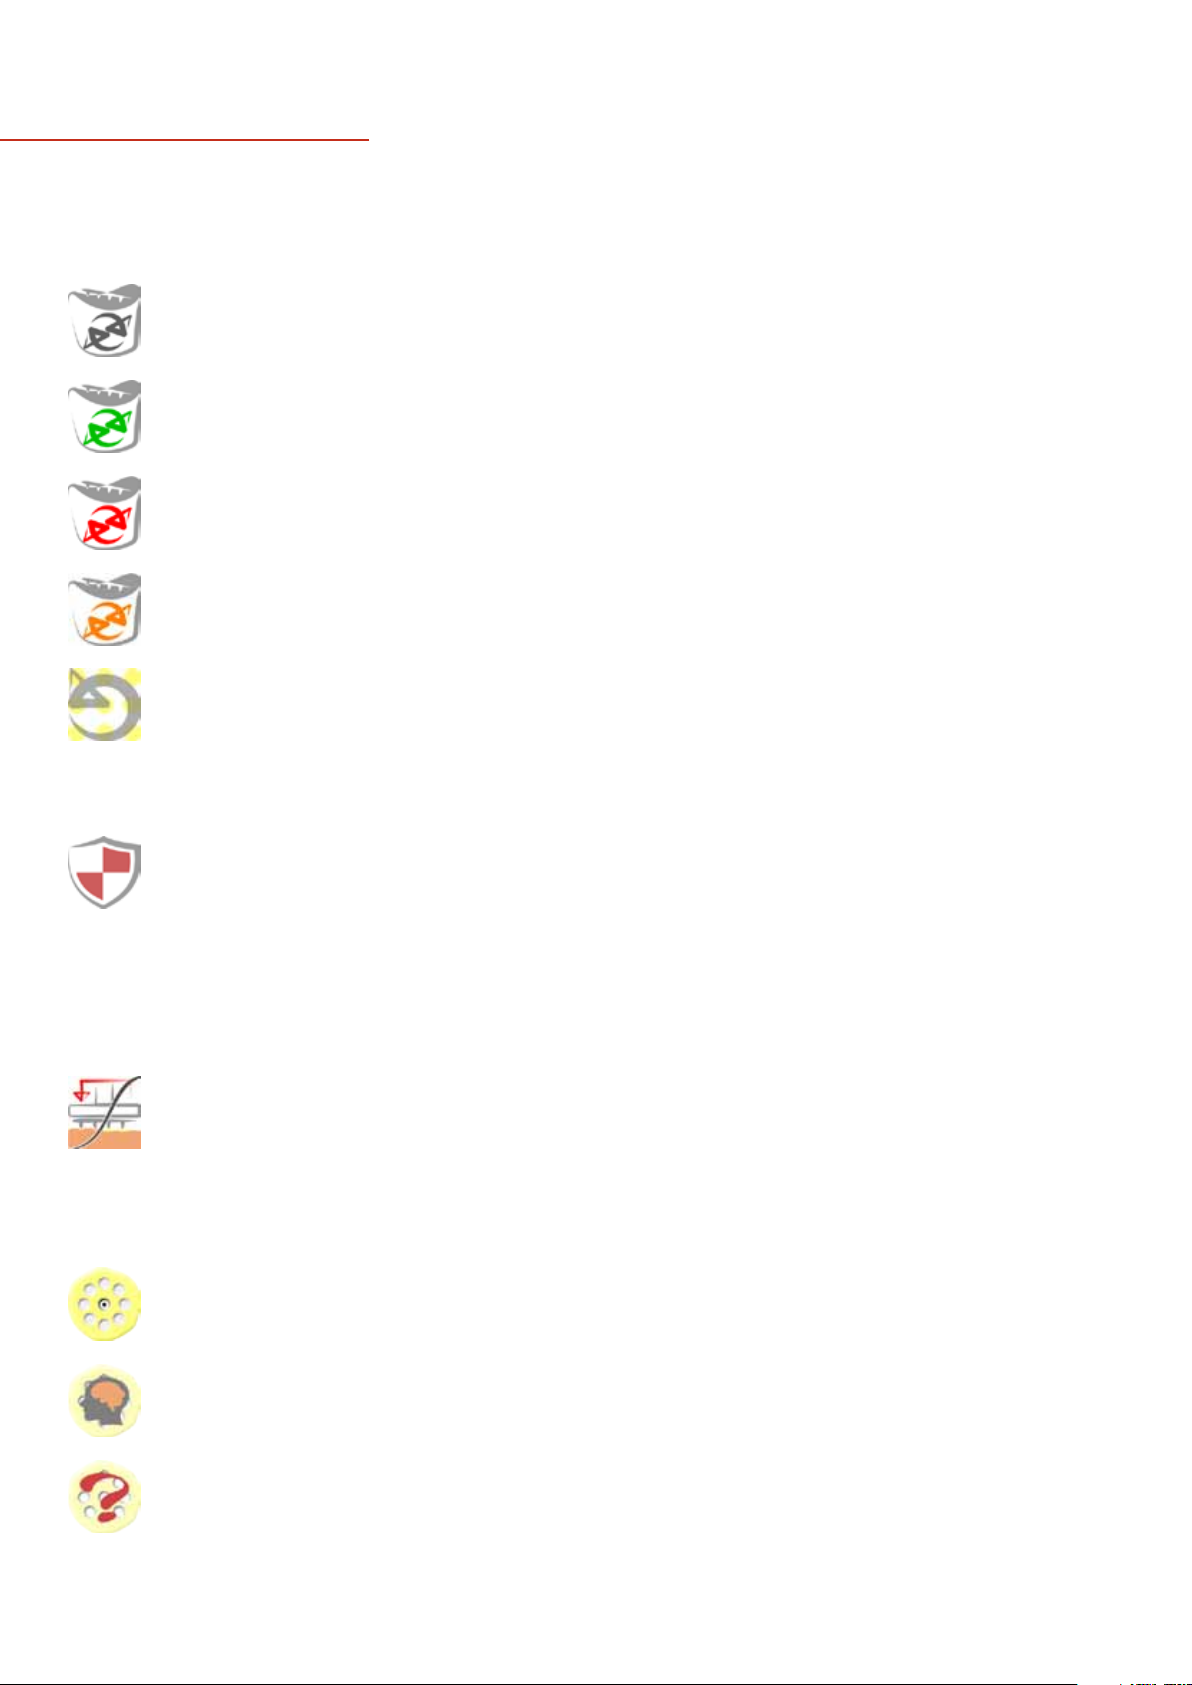
ADVANCE OPTIONS
ICON NAME SETTING DESCRIPTION TAB UNIT MIN MAX DEFAULT
Recycle
Recycle
Recycle
Recycle
Revisit
Source
Plate
Protection
Off
Full
Until
Repeat
During
Pairs
On/Off
On/Off
RePads™/pins are always dumped.
RePads™/pins are recycled for the
duration of the program.
RePads™/pins are recycled for the
duration of one cycle of the program.
RePads™/pins are recycled for the
duration of each pinning pair.
Revisit ensures that the source is
revisited for each pinning. If Revisit
Source if off, the source plate will not
be revisited unless a new position on
the source plate is being pinned.
By protecting the source plates you
can ensure that lids are only removed
when it is vital to do so. This will
increase the time it takes to run each
program, but each source plate will
be exposed for less time, and the
print head will never move over a
source plate without a lid on, unless
it is pinning from it
General>Recycle N/A
General>Recycle
General>Recycle
General>Recycle
General>Recycle
General>Plate
Protection
N/A
N/A
N/A
Boolean
Boolean
N/A
N/A
N/A
N/A
Off
Off
N/A
N/A
N/A
N/A
On
On
N/A
N/A
N/A
N/A
Off
Off
18
Repeat
Pairs
Offset
Offset
Offset
On/Off
Off
Automatic
Random
A pinning pair represents pinning
from a source plate to a target plate.
You can adjust how many times
each of these pairs are repeated.
During pair repetition, Recycle and
Revisit mode rules will be followed
as normal.
No offset is used for source pinning.
An automatic offset is used for each
source pinning.
A random offset is used for each
source pinning.
General>Pairs
Source>Offset
Source>Offset
Source>Offset
Boolean
Boolean
Boolean
Boolean
Off
Off
Off
Off
On
On
On
On
Off
Off
Off
Off
Page 19

software icon guiDe
ICON NAME SETTING DESCRIPTION TAB UNIT MIN MAX DEFAULT
Offset
Offset
Source
Pinning
Pressure
Source
Pinning
Speed
Source
Pinning
Overshoot
Repeat
Source
Pinning
Manual
Fixed
Agar
Agar
Agar
Select a manual offset before each
source pinning.
A pre-specified fixed offset is used for
selected source pins.
The pressure that the Pad Head will use
to push onto the agar.
The speed that the Pad Head will use to
connect to the agar surface.
The amount of travel that will be applied after detecting agar contact. This
is to enable operation of the pressure
cylinde r.
The number of times each source pinning will repeat.
Source>Offset
Source>Offset
Source>Pinning
Source>Pinning
Source>Pinning
Source>Pinning
Boolean
Boolean
%
mm/s
mm
Integer
Off
Off
0
1
Speed
dependant
1
On
On
100
20
Speed
dependant
10
Off
Off
Varies for
each pad
19
2
1
Source
Pinning
Speed
Source
Pinning
Backoff
Repeat
Source
Pinning
Dry Mix
Source
Dry Mix
Clearance
Dry Mix
Diameter
Liquid
Liquid
Liquid
On/Off
The speed applied to pinning to wet
source plates.
The retraction distance applied to the
Pad Head after sensing the bottom of
the plate.
The number of times each source pinning will repeat.
Skipping around on the agar surface to
select from a wider area of cells.
The distance the pins retract from the
agar surface.
The diameter of the mix.
Source>Pinning
Source>Pinning
Source>Pinning
Source>Dry Mix
Source>Dry Mix
Source>Dry Mix
mm/s
mm
Integer
Boolean
mm
mm
1
-0.5
1
Off
0
0.1
19
3
10
On
4
2
19
0.5
1
Off
0.5
1
Dry Mix
Cycles
The number of cycles (comprising of 5
steps) that the dr y mix on source plates
will be executed.
Source>Dry Mix
Integer
singerinstruments.com
1
10
1
19
Page 20
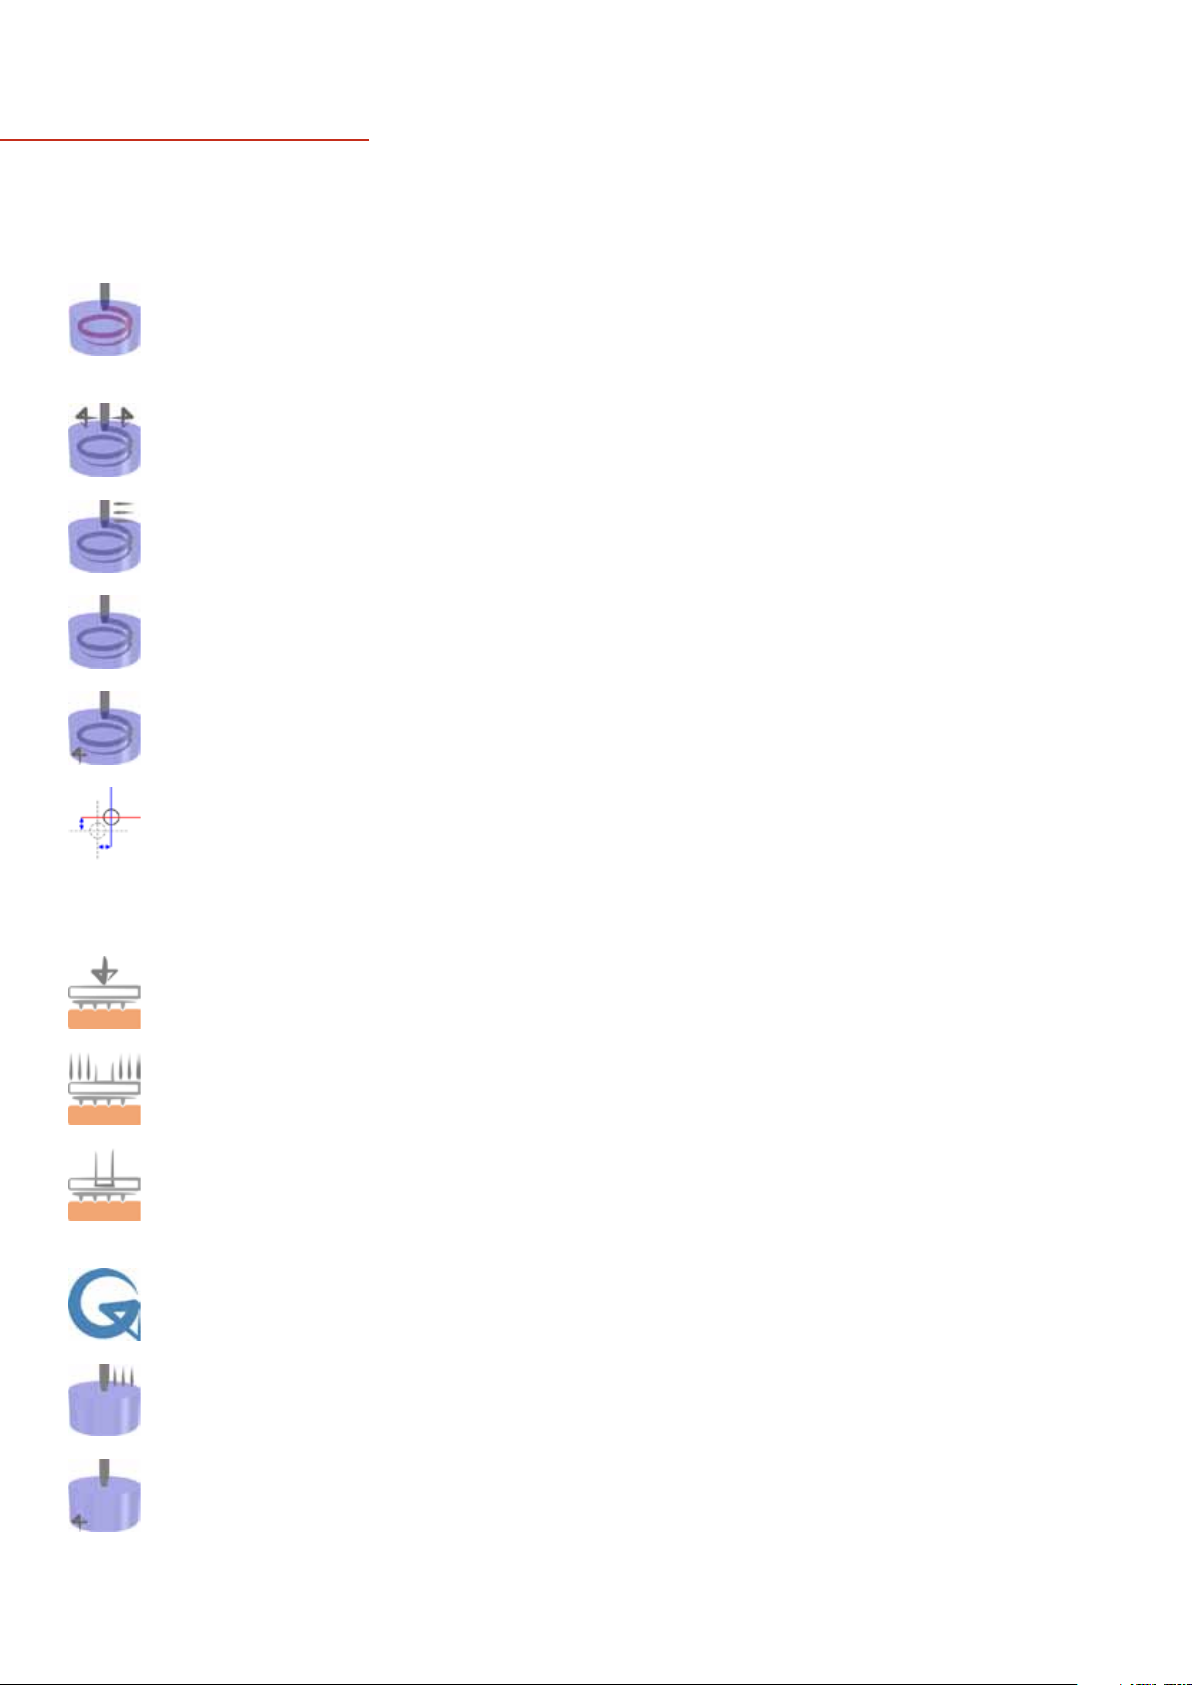
software icon guiDe
ICON NAME DESCRIPTION TAB UNIT MIN MAX DEFAULT
Wet Mix
Source
SETTING
On/Off
Liquid mixing can be used to invigorate
the cells in a liquid solution. Liquid
Source>Wet Mix
Boolean
Off
On
Off
mixing uses either a circular or helical
movement.
Source
Mixing
The diameter of the mix applied to both
the x and y axis.
Source>Wet Mix
mm
1
3
1
Diameter
Source
Mixing
The speed at which wet mixes are carried out.
Source>Wet Mix
mm/s
1
25
25
Speed
Source
Mixing
The number of cycles the mix will
include.
Source>Wet Mix
Integer
1
10
1
Cycles
Source
Mixing
The distance that the Pad Head retracts
on 3D mixes.
Source>Wet Mix
mm
0.25
15
3
Trav el
Permanent
offset
A permanent offset can be specified
to reset the nominal centre for each
Source>Permanent
Offset
Point
-3,-3
3,3
0,0
source pinning. This feature is useful
when pinning from source plates that
have been printed to a non-central
location.
Tar get
Pinning
Pressure
Tar get
Pinning
Speed
Tar get
Pinning
Overshoot
Repeat
Tar get
Pinning
Tar get
Pinning
Speed
Tar get
Pinning
Backoff
Agar
Agar
Agar
Liquid
Liquid
The pressure that the Pad Head will use
to push onto the agar.
The speed that the Pad Head will use to
connect to the agar surface.
The amount of travel that will be applied
after connection to the agar surface has
been made.
The number of times each target pinning will repeat.
The speed applied to pinning to wet
source plates.
The retraction distance applied to the
Pad Head after connection to the bottom of the plate.
Target>Pinning
Target>Pinning
Target>Pinning
Target>Pinning
Target >Pinning
Target >Pinning
%
mm/s
mm
Integer
mm/s
mm
0
1
Speed
dependant
1
1
-0.5
100
20
Speed
dependant
10
19
3
Varies for
each pad
19
2
1
19
0.5
20
Page 21
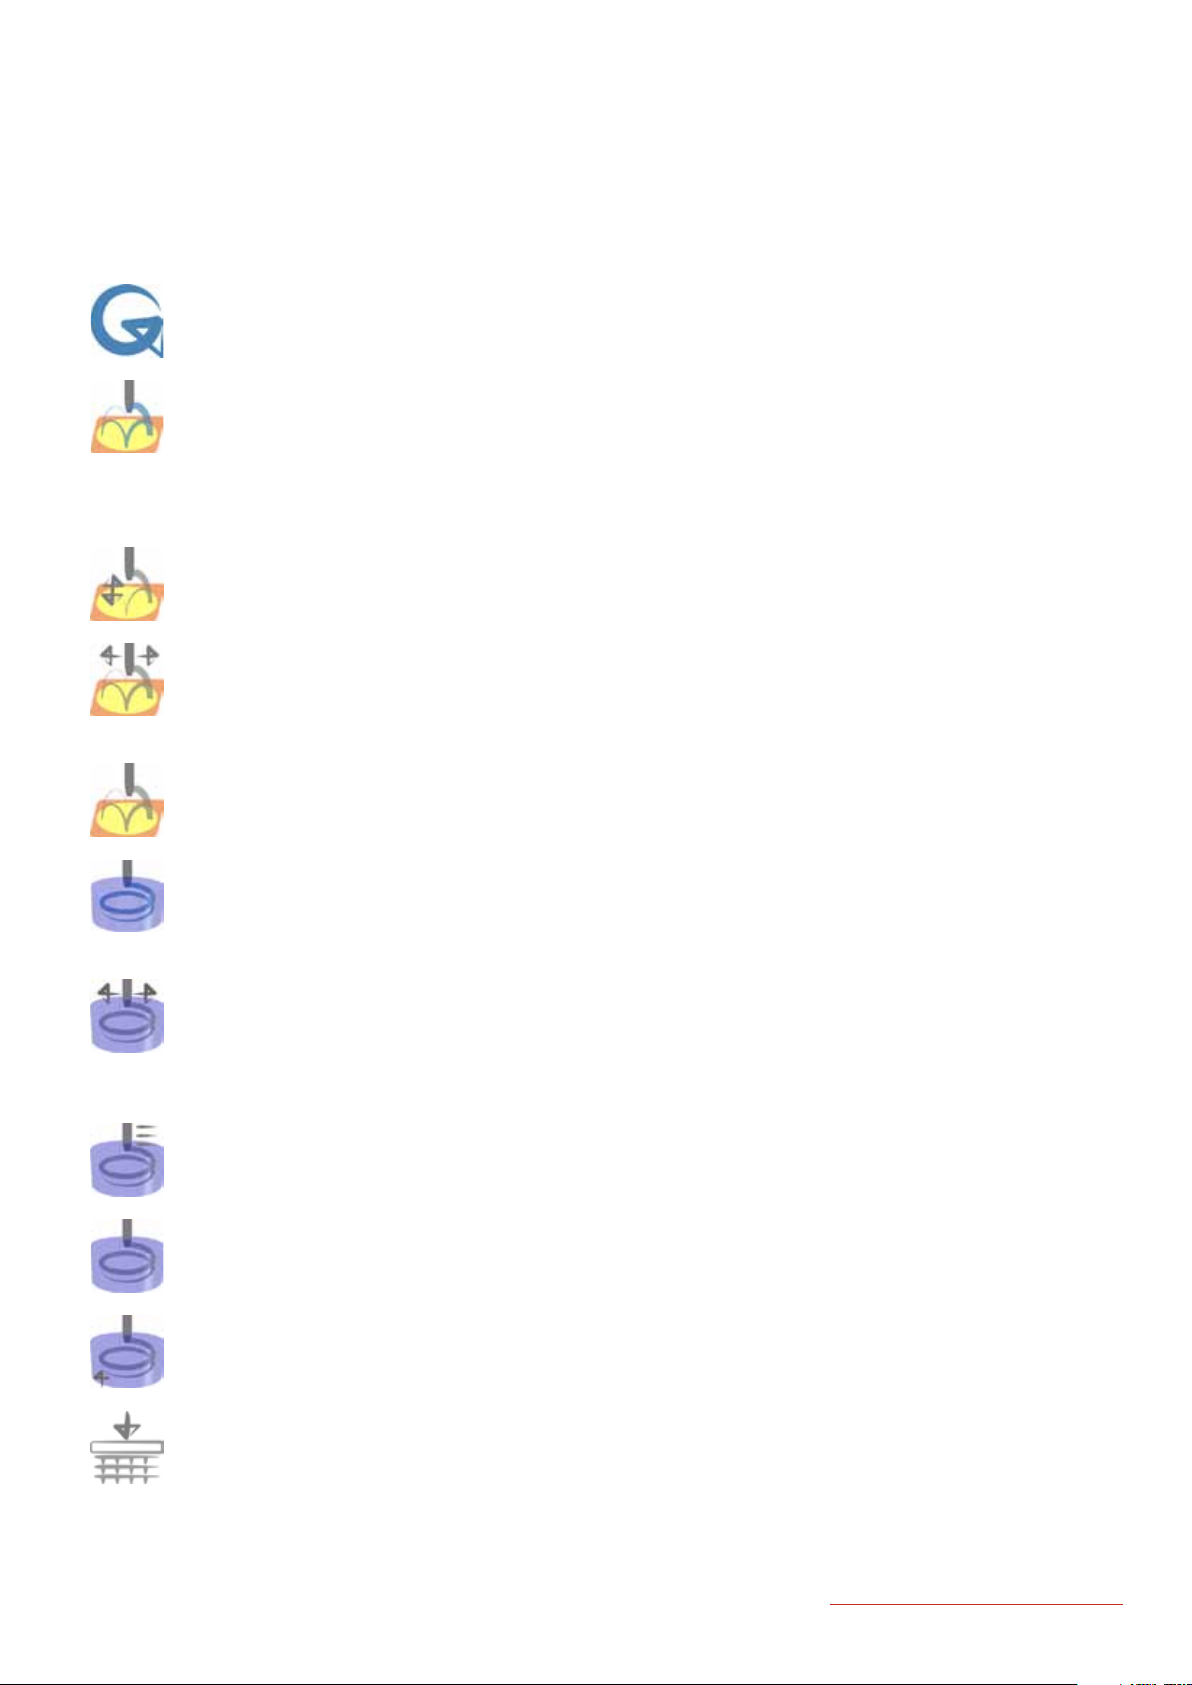
software icon guiDe
ICON NAME DESCRIPTION TAB UNIT MIN MAX DEFAULT
Repeat
Tar get
Pinning
Dry Mix
Tar get
Tar get
Mixing
Clearance
Tar get
Mixing
Diameter
Tar get
Mixing
Cycles
SETTING
Liquid
On/Off
Agar
Agar
Agar
The number of times each target pinning will repeat.
Agar mixing can be used to ensure that
a good contact with the target media is
established. Agar mixing prints multiple
times at a specified radius around the
target spot on the agar after the initial
central print has been established.
The distance the Pad Head retracts
from the agar surface at each stage of
the mix.
The diameter of the mix. Using step-in
reduces the diameter from the specified
diameter uniformly with each cycle for a
thorough mix.
The number of cycles (comprising of 5
steps) that the dr y mix on source plates
will be executed.
Target >Pinning
Target >Dry Mix
Target >Dry Mix
Target >Dry Mix
Target >Dry Mix
Integer
Boolean
mm
mm
Integer
1
Off
0
0.1
1
10
On
4
2
10
1
Off
0.5
1
1
Wet Mix
Tar get
Tar get
Mixing
Diameter
Tar get
Mixing
Speed
Tar get
Mixing
Cycles
Tar get
Mixing
Trav el
Pad Pickup
Pressure
On/Off
Liquid
Liquid
Liquid
Liquid
Liquid mixing can be used to ensure
thorough depositing of cells in the liquid
solution. Liquid mixing uses either a
circular or helical movement.
The diameter of the mix applied to both
the x and y axis. Using step-in reduces
the diameter from the specified diameter uniformly with each cycle for a
thorough mix.
The speed at which wet mixes are carried out.
The number of cycles the mix will
include.
The distance that the Pad Head retracts
on 3D mixes.
The pressure applied by the Pad Head
when picking up pads.
Target >Wet Mix
Target >Wet Mix
Target >Wet Mix
Target >Wet Mix
Target >Wet Mix
Pads
Boolean
mm
mm/s
Times
mm
%
Off
1
1
1
0.25
0
On
3
25
10
15
100
Off
1
25
1
3
80
singerinstruments.com
21
Page 22

tecHnical specifications
DIMENSIONS
· Length: 1300mm (51”)
· Width: 650mm (26”)
· Height (from bench top): 725mm (29”)
NOTE: An additional 500mm (20”) is needed at one end for
the bracket mounted MCI. This can fit at either end. The
working height of the ROTOR turntable is 300mm (12 ”)
from the benchtop.
NOTE: For servicing, the ROTOR HDA will require
reasonable free space all round.
WEIGHT
· 110kg (242 lbs)
COLOURS
· Externally: White (with red Singer logo)
· Roller Cover: Grey
· Internal: White/grey
· Stations: Red/blue/yellow/green/black
NOCOST ACCESSORIES:
· Beer bottle cap remover or Corkscrew (specify).
POWER REQUIREMENTS
· 110-240V AC 50-60Hz Power: 500W
· Power connection at Right Hand End (from front) via IEC
Cable (supplied).
COMPRESSED AIR REQUIREMENT
(FOR COMPRESSOR, SEE PAGE 23)
· Dry, oil-free, compressed air/nitrogen at min 4 bar (60 psi)
max 10 bar (15 0 psi)
· Consumption: 3 l/min ( 0 .1 CFM)
· Air connects to LH end (from front) see Compressor Section
for connection details.
HEAD
· Movement: X: 800mm
Y: 30mm
Z:90mm
· Clearance above table: 95mm
· Resolution: X: 1
Y & Z: 5
· Speed: X: up to 5,000mm/sec,
Y & Z: 25mm/sec (selectable)
· Control: X axis is closed-loop, linear motor with
linear encoder.
Y & Z are open-loop stepper motor drives
with optical data setting.
PAD HEAD
· Vacuum-operated and fully floating to comply with agar
surface.
· Programmable, variable pressure.
PAD DISPENSER
· Holds max 4 long-pin RePads™ and max 30 other types.
· Dispenser automatically counts RePads™ and flags up
shortage on GUI.
· Pad Dispenser rim fingers ensure accurate and repeatable
RePad™ positioning.
TURNTABLE
· Diameter: 360mm
· Angle of rotation: 180°
· Time: 2.5sec
· Repeatability better than 10
· Fitted with fully automatic plate positioners and latches.
· Bays are colour coded.
LID REMOVERS
· Triple, pneumatic, lift-and-turn lid removers each with
double hold-and-lift, vacuum-operated suction cups.
· Arms fitted with anti-rebound dampers.
FUNCTIONALITY
· Suspension transfer (wet/wet)
· Spotting (wet /dry)
· Colony replicating
· Array generation
· Mating
· Archive (dry/wet)
· Dry spotting (dry/dry)
DENSITIES OF MEDIA SUPPORTED
· 96, 384, 1536 and 6144 RePads™ (solid agar)
· Long-pin 96 and 384 RePads™
solid/liquid)
PL AT E
(liquid/liquid-liquid/solid -
· 96 and 384-well footprint, standard depth
· Singer PlusPlates™ (Rectangular, single extended cavity, 96-
well footprint)
MACHINE CONTROL INTERFACE
· 15” touchscreen 1224 x 788 resolution
· Intel Atom Processor
· 1GB R AM
· 1.8GHz
· 10GB hard drive
· Windows XP embedded standard
22
Page 23

tecHnical specifications
GRAPHICAL INTERFACE
· All functions controlled by simple pictograms.
Includes replication, array generation and mating
SOFTWARE
· Commands include automatic and manual offset pinning
to ensure even repeat cell pick up from colonies and
automatic stirring mode for re-suspention in microtitre
wells.
Remote access and diagnostics and other protocols are
under continuous development.
INTERFACES
· 1x Ethernet
· 2x USB
· 1x 25232
· 1x KB/MS/LAN2
LIGHTING/DISINFECTION
· White
· UVc
COMPRESSOR
· Compressor type may vary, please consult your Singer
Technician.
· Our standard compressor is very quiet and performs
optimally standing on the floor. It has a reservoir inside
it and will run only intermittently. The pipe connecting
the compressor to the ROTOR HDA is 6mm dia (1/4”). The
compressor may be sited away from the ROTOR HDA
(please let us know about this so that we can supply a long
enough pipe).
· 120V or 230V versions of our standard compressor are
available.
· Power: 500W.
AIR/GAS CONNECTION
Where we do not supply a compressor, the ROTOR HDA
is supplied with a male quick-change coupler. We will
supply, in advance, the female mating part to this, so that
you can arrange connection before installation.
PERFORMANCE
The ROTOR HDA is manually loaded and unloaded,
but very special attention has been paid to speed of
replication. The turntable, which conveys plates in and
out of the sealed operating zone of the ROTOR HDA, may
be unloaded and loaded whilst replication is in progress.
This makes the process very continuous.
Performance tests carried out for Singer by a major
yeast laboratory claim replication rates in excess of 100
PlusPlates™ per hour.
At the supported densities, this equates to:
· 96: 9,600 colonies
· 384: 38,400 colonies
· 768: 76,800 colonies
· 1536: 153,600 colonies
· 6144: 614 ,40 0 colonie s
CONSUMABLES
· Singer PlusPlates
plate with specially extended working area for RePad
compatibility and meniscus allowance.
™
: Standard footprint, single well
™
· RePads™: 96 Long
384 Long
96 Short
384 Short
1536 Short
6144 Short
All consumables are made of plastic and are gamma
irradiated and double packed.
Pack sizes:
· PlusPlates™: 10 per sleeve/ 200 per box
· Long 96: 10 per sleeve/ 200 per box
· Long 384: 10 per sleeve/ 200 per box
· Short 96: 20 per sleeve/ 1000 per box
· Short 384: 20 per sleeve/ 1000 per box
· Short 1536: 20 per sleeve/1000 per box
· Short 6411: 20 per sleeve/1000 per box
Running Costs
· Running costs of the ROTOR HDA are much lower than
those of conventional robots, particularly when speed and
density are taken into account.
· EXAMPLE: At a rate of 100 plate replications per hour
at a density of 1536, 153600 colonies can be printed. 100
PlusPlates™ and 100 RePads™ cost approximately US
$240* so cost per colony is only $0.0015.
There are no solvent or detergent costs, or costs
associated with a dedicated technician.
SAFETY AND COMPLIANCE
· Safety Interlocks on vision panel and rear control panel.
· UV lamp operation is under software control and is
interlocked with main, roller cover closure.
· CE compliance by technical file.
*Price correct at time of printing. Exchange rates fluctuate monthly.
singerinstruments.com
23
Page 24
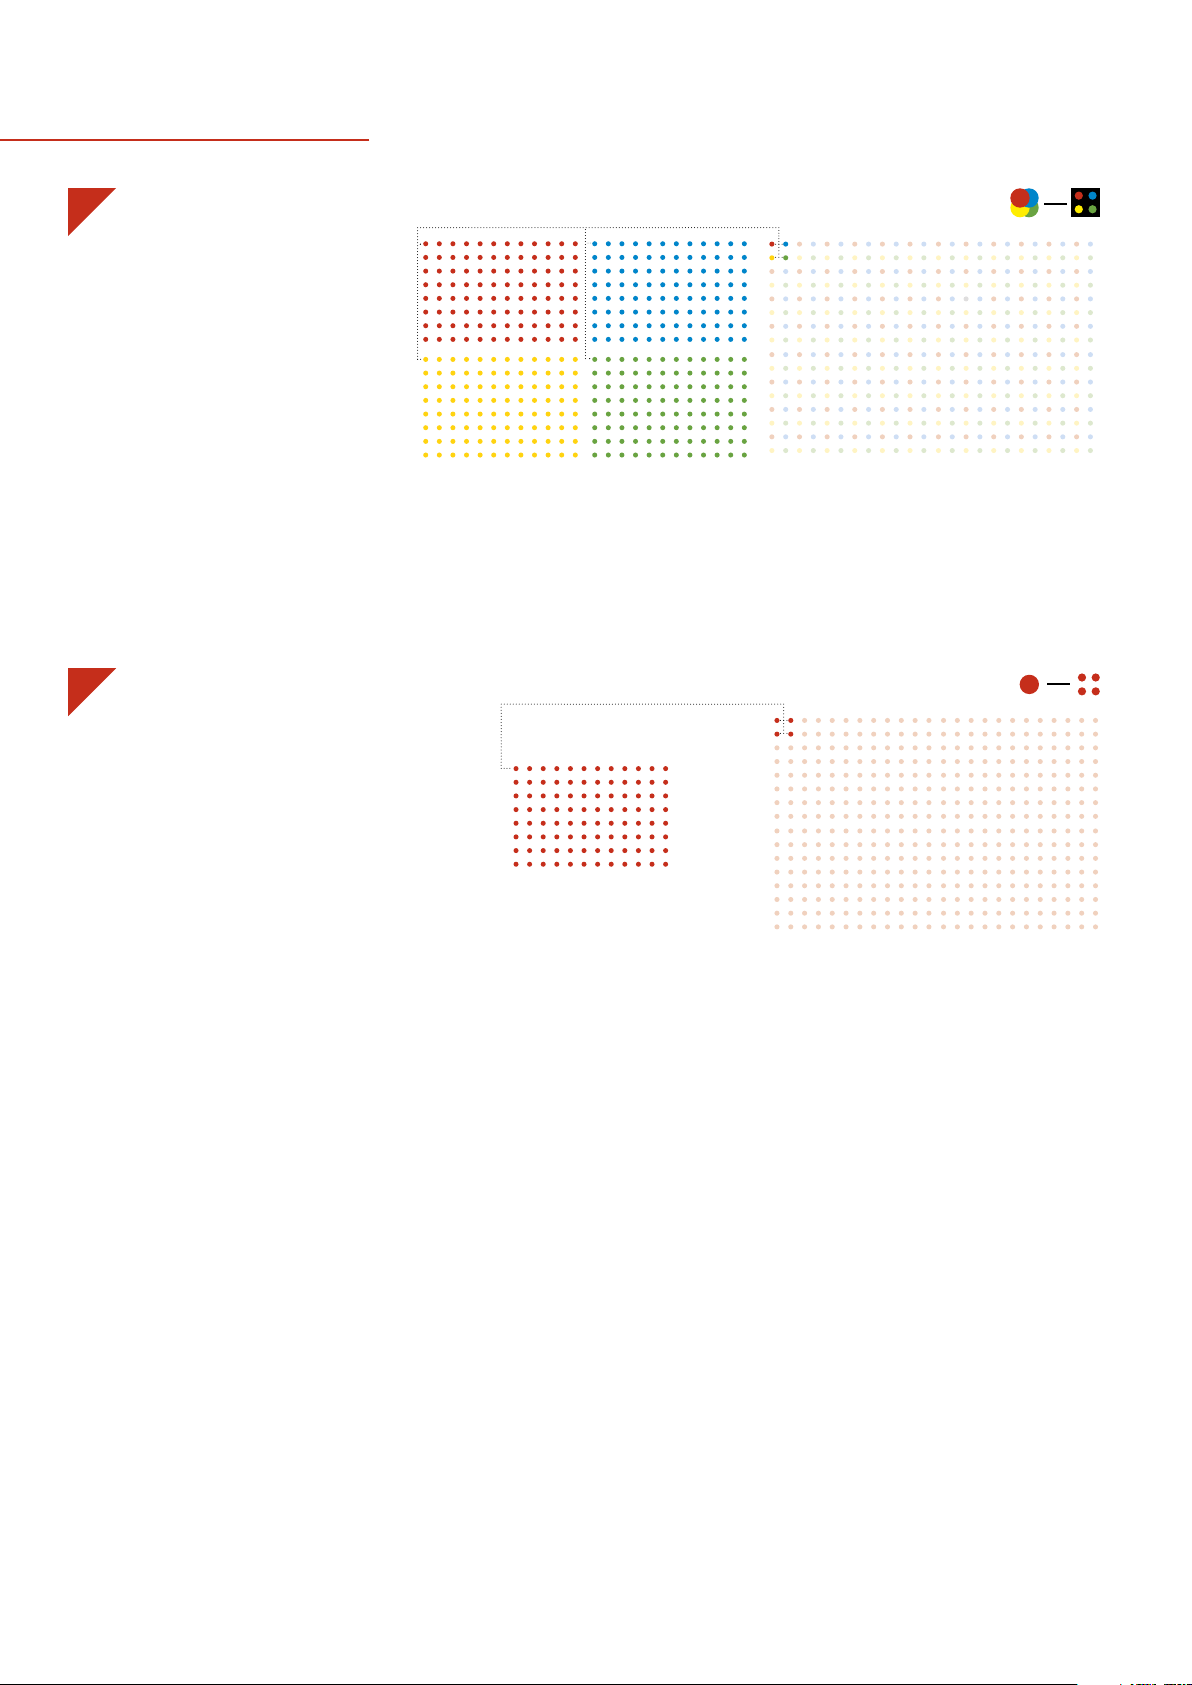
pinning examples
1
1:4 A R R AY
· 4x 96-density plates are combined onto
1x 384-density plate.
2
1:4 SINGLE SOURCE
· Each colony from a 1x 96-density plate
replicated in quadruplicate to a 1x 384density plate. These protocols can be
applied at all pinning densities.
1:4 A r r ay
1:4 Single source
24
Page 25
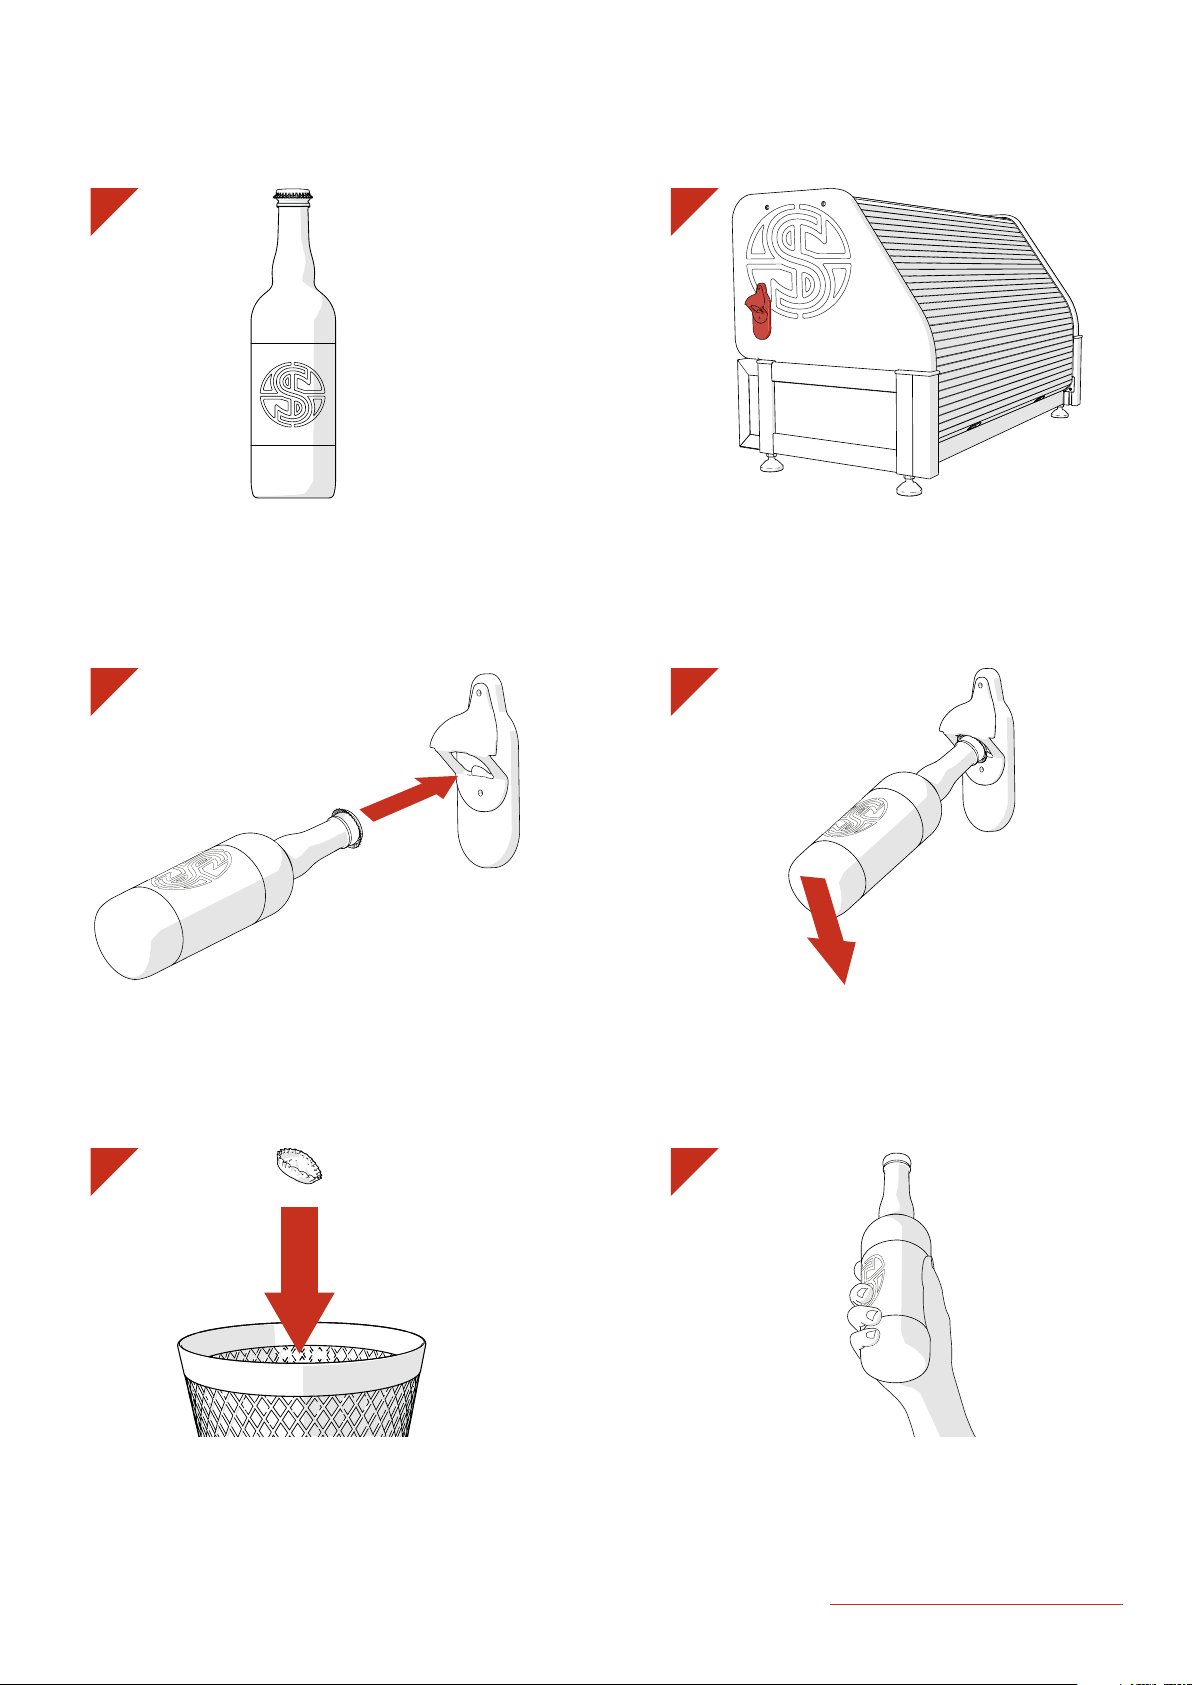
post-experimental proceDure
1 2
Select a Delicious Beer. Pick a strong one - it’s been a
·
hard day!
3
· Insert the Beer Bottle into the Bottle Opener.
· Locate the Bottle Opener on your ROTOR HDA.
4
· Lever the Beer Bottle to remove the Bottle Cap
5
· Place the Bottle Cap in the Bin. Nobody likes a litter bug!
6
· Success! Time to enjoy your Delicious Beer - you’ve
earned it!
· Repeat steps 1-6 until suitably relaxed.
singerinstruments.com
25
Page 26

notes
26
Page 27

notes
singerinstruments.com
27
Page 28

notes
28
Page 29

notes
singerinstruments.com
29
Page 30
Ro adw ater,
Watchet,
Somerset.
TA23 0RE
UK
+44 (0)1984 640226 (tel)
+44 (0)1984 641166 (fax)
contactsingerinstruments.com
singerinstruments.com
scan to vi sit we Bsite for mo re
Helpf ul tip s anD t uto ria ls!
 Loading...