

Page 1

Instructions for
the use, care, and
maintenance of your
With Create-A-Stitch
MODEL NO. 6105
JCPenney
Page 2

I’AK I I VOIIR MACIIINI
Know the Paris
I ronl View .................................
H.K k View
Accessories
Iiislalliri); Maeliirie
Needles and riireail
Needle, llireatl, I airric ( hart
Changing Neetlle
(hanging I’resser I oot
Ill reading Machine
Winding (iohhiri ................................
Ihreading llp|)er Ihread
Removing Hohhin ('ase
Inserting Hohliin Case
( onIrols
Stilt h Pattern
Create-a Stitch
Stitch Width ..............................
Stitch i.engih .............................
Reverse Stitch ..........................
lension ol Upper Ihread
lension ol l.ower Ihread
(hecking I ensions
Pressure ....................................
haliric l eed
Sewing I.ight
PART II SI ARTSi:WIN(i
Keeping Stitching Straight ........................................................... 22
Pin Hasting ................................................................................ 22
Straiglil Stitching
Straight Stitch .............................................................................. 23
'Putning a Corner
Reinl'otcing Ends of Seam ....................................................... 23
Basting .................................................................................." 24
Staystitching ................................................................................ 24
Zig-Zag Stitching
Zig-Zag Stitch .............................................................................. 25
Seam I’inishing ............................................................................ 25
Edge Pinisliing ............................................................................. 26
Interlacing Darts .......................................................................... 26
Hatlacks
Shell Stitch I dging
Satin Stitch .................................................................................. 26
Stretch Stitching
Stretch Straight Stitch
Stretch Zig-Zag Stitch .................................................................. 28
Stretch Blindstitch ........................................................................ 28
TABLE OF CONTENTS
......
......................................
....................................
..................................
...............................
............................
.....................
....................
...................
...........................
.........................
....................
...............................
.............................
.......................................................................
......................................................................................
......................................................................
................................................................
1
2
Ì
4
5
6
6
7
8
9
9 licn illl ci 1 ( Hll
10
10
11
12
13
14 1 e a 1 s
14
I 5
16
16
17
17
I 8
20
21
; Bi llio ns
...............................................................................
' Zip p ers ........................................................................ .......................................................................
llec or ali vc Sl iic liin g
l‘ip Sli ic liin g
Sire lc li Z ig -Z ,i2 S tit ch
Sire lc li H li nd slii cl i
( ica le -a -S iiic Ii ............
M< >n og r;i! iis
1 m hio id er y ................
1 m is ile s
Hem s
Hui loi ilio le s
(ord ed S c.i m
'h iid iii g an d Da rn in g
Me nd ing
Palc li es
Dar ni ng
III < A RI N( , l O K Y( )U R m, u ,|,n |,
Cle an in g .......................
Oilin g
.....................
Ail) us lin g H e ll
Mo de l N um b er
lioh len is an d Pr ob ab le C au se s
(»u ara iit ee
23
26
26
27
................................
...................
.............
Hlin ds liic li
Sire lc li H li nd slit ch
..................
................................................................
.....................
...........
..............................................................
..............
..................
.............................................................
.................................................................
........................
........................................................
..................................................
................................. 29
...............................
............................
.............................. 33
.............................
..............................
.
............
.....................
...................
31
33 . 3 5
3() . 3 7
39
■■■ ■ ^0
41
43
40
42
Hack Í over
Page 3
I lUUn IVIACHIIMt
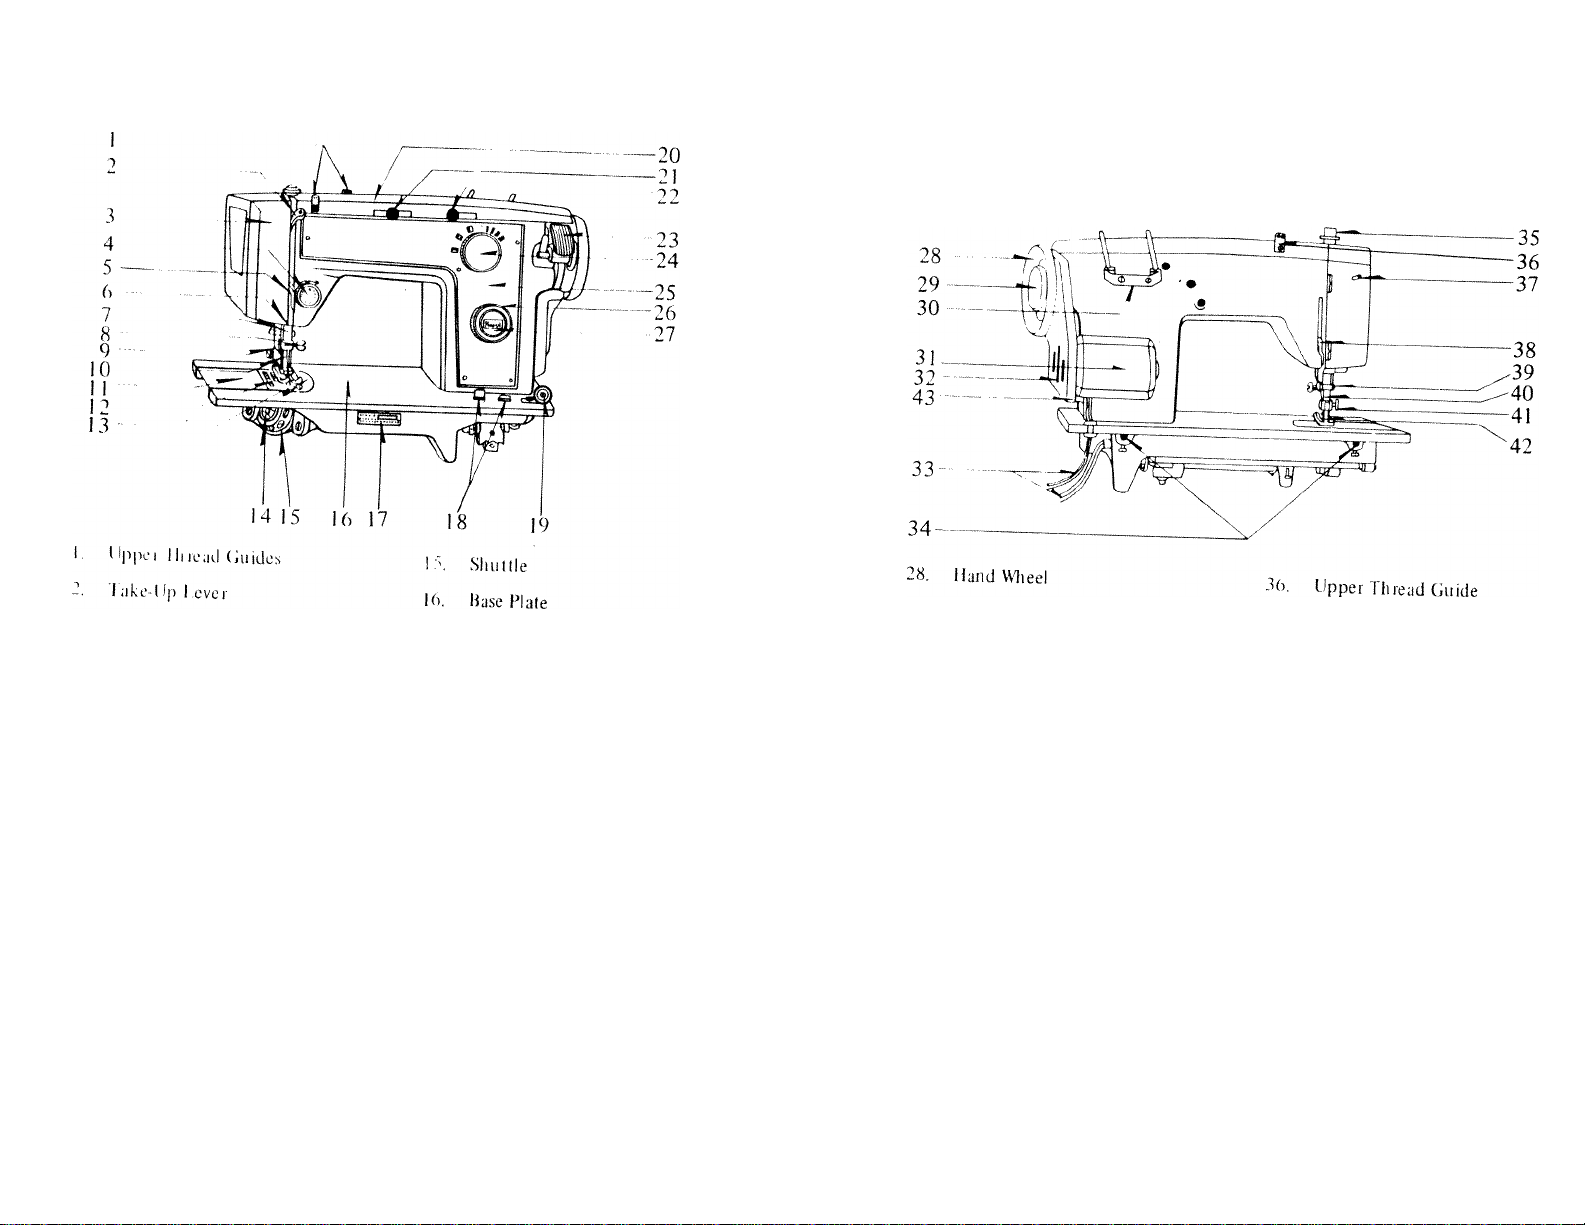
KNOW THE PARTS
FflONT VIEW
BACK VIEW
I ;ice I’lale
“t. reiision Knol)
I elision Thread Guide
lliread (iuide
Needle liar
Needle ('lamp Screw
’*■ linead (iiiide
10. Needle
11. Slide Plate
12. Fabric i-eed
13. Needle Plate
14. Bobbin ('ase
17. Model Number Plate
IH. Push Buttons Drop Feed
10. Bobbin Winder Thiead Guide
20. l op Plate
Stitch Pattern Lever
( reate-u-Stitch Lever
Bohliin Winder
24
Still h Width and Butlonhule Knob
2.S
Front Plate
26
Stitch Ungth Knob
27
Reverse Button
29. Stop Motion Knob
30. I'll read Spool Pins
31. Motor
32. Adjustable Moioi Bracket
33. Motor and Light Cords
34. Hinge Mounting Holes
35. Pressure Regulator
37, Light Switch
3S. Presser Foot Lever
3’L Thread ('lltier
40, Presser Bar
4L Presser Fool Hiniiib Screw
42, Piessei F'oot
43, Pulley Belt Cover
Page 4
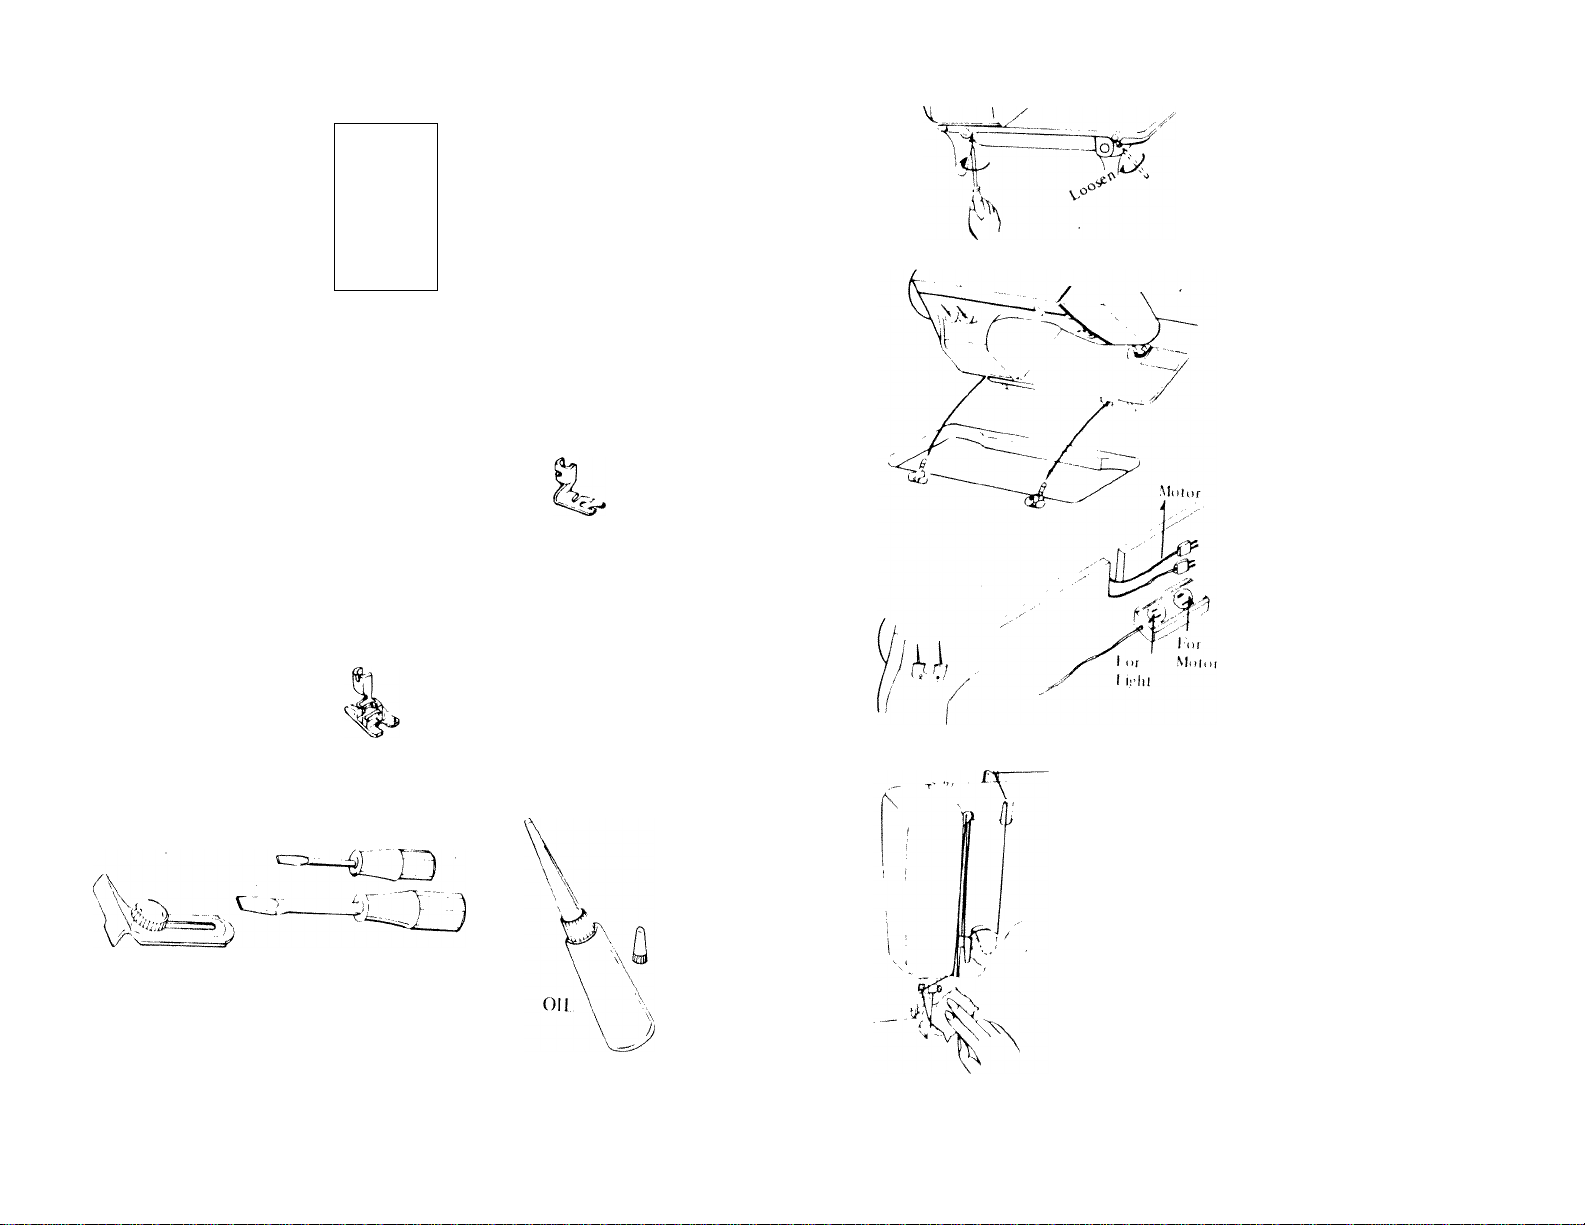
ACCESSORIES
SEWING
MACHINE
/eedleT
If 1
„T )
4 HOBHINS
(i in muchiiie)
SrRAK.in snrni
I'OOT
Zin'I KI ooi BlilTONhoUiFOOT lUITTON SI «IN,;
non I CIUDH
(HM]' [4 ]
4 NhHDUfS
Si/e 14
zk;-zag ['Oot
‘SCRFWDRIVFKS
c
/
V-,, , .4
4 f 'HLT l>AI)S (or '111 read Spool Pins
IIEMMHR foot
r-OO]-
J
INSTALLING MACHINE
^4hu new machine can be installed i,
a cabinet or portable case.
I » place in cabinet or case;
• I oosen two set screws on back ot
machine bed until lu.les are clear.
I 'll lip hinge pins located at back
'X cabinet or ba,se o| puriatile case,
• ilnld machine in a tilled back poI'Kion and carelull> lower it down
h'l'li binge pins are inserted
into the lioles.
Iigliten both set screws secmcly
wnii screw driver.
Lor portable case, insert motor and
'iglit cords through slot in partition
ol case.
• nit machine forward until it rests
tiimly in cabinet or case.
Hug electrical cords into sockets lo
cated inside cabinet or case. Cord
H entitled witli “motor” tag must be
P ugged into socket marked “motor”
11 lagged cord goes into “light” .socket,
'■'•ice foot control on (loor or pull
4>'vcn knee lever in cabinet. Place fell
P‘1 :> ocated m'' accessory bo.x over
III lead spool pins.
L'lig cord into any 110-120 volt
electric socket.
Your machine has been oiled during
manutacturing and testing Before
sewing wipe off any .surplus oil which
'»‘IV soil remain on machine, especially
‘"‘"'»‘I needle and fabric feed Sew
'’‘ivL and lorth .several times on a scrap
'‘ilHic betöre you begin sewing a
garment, ^
Page 5
NtEDLES AND THREADS
Hie needle and thread you choose depends unon thf fahri^
cl'liuirmw'ert'abiL'' "ndT’'"‘ oflig}rt'wei"ht
orsnn rLr ’ ^“‘chtng heavy
Needle
size
9
tine
light
14
medium
16
heavy
polyester
cotton covered polyester
fine mercerized cotton (70-100)
silk A
polyester
cotton covered polyester
' mercerized cotton (50-60)
silk A
• polyester
• cotton covered polyester
mercerized cotton (50)
silk A
polyester
cotton covered polyester
mercerized cotton (40-50)
heavy duty mercerized (40)
silk D (buttonhole twist for
I h read
topstitching)
Fabric
chiffon, fine sUk, tricot, lingerie
fabrics, sheer lace, net, voile,
organdy
light weight knits and jersey, silk,
batiste, taffeta, satin, lace,
crepe
double knits, linen, poplin, gingham
pique, seersucker, velveteen, light
weight wools, fine corduroy
heavy wools, corduroy, felt,
terrycloth, canvas, tapestry,
decorative fabrics
L». only No, IS X I (7051 „ecdlex in chix .„achine^
• Always osa saioc ,y,,e and so.e of ,I,read i„ bod, „aedl. and bobbn,
■ rs-di“
• Never use a bent needle.
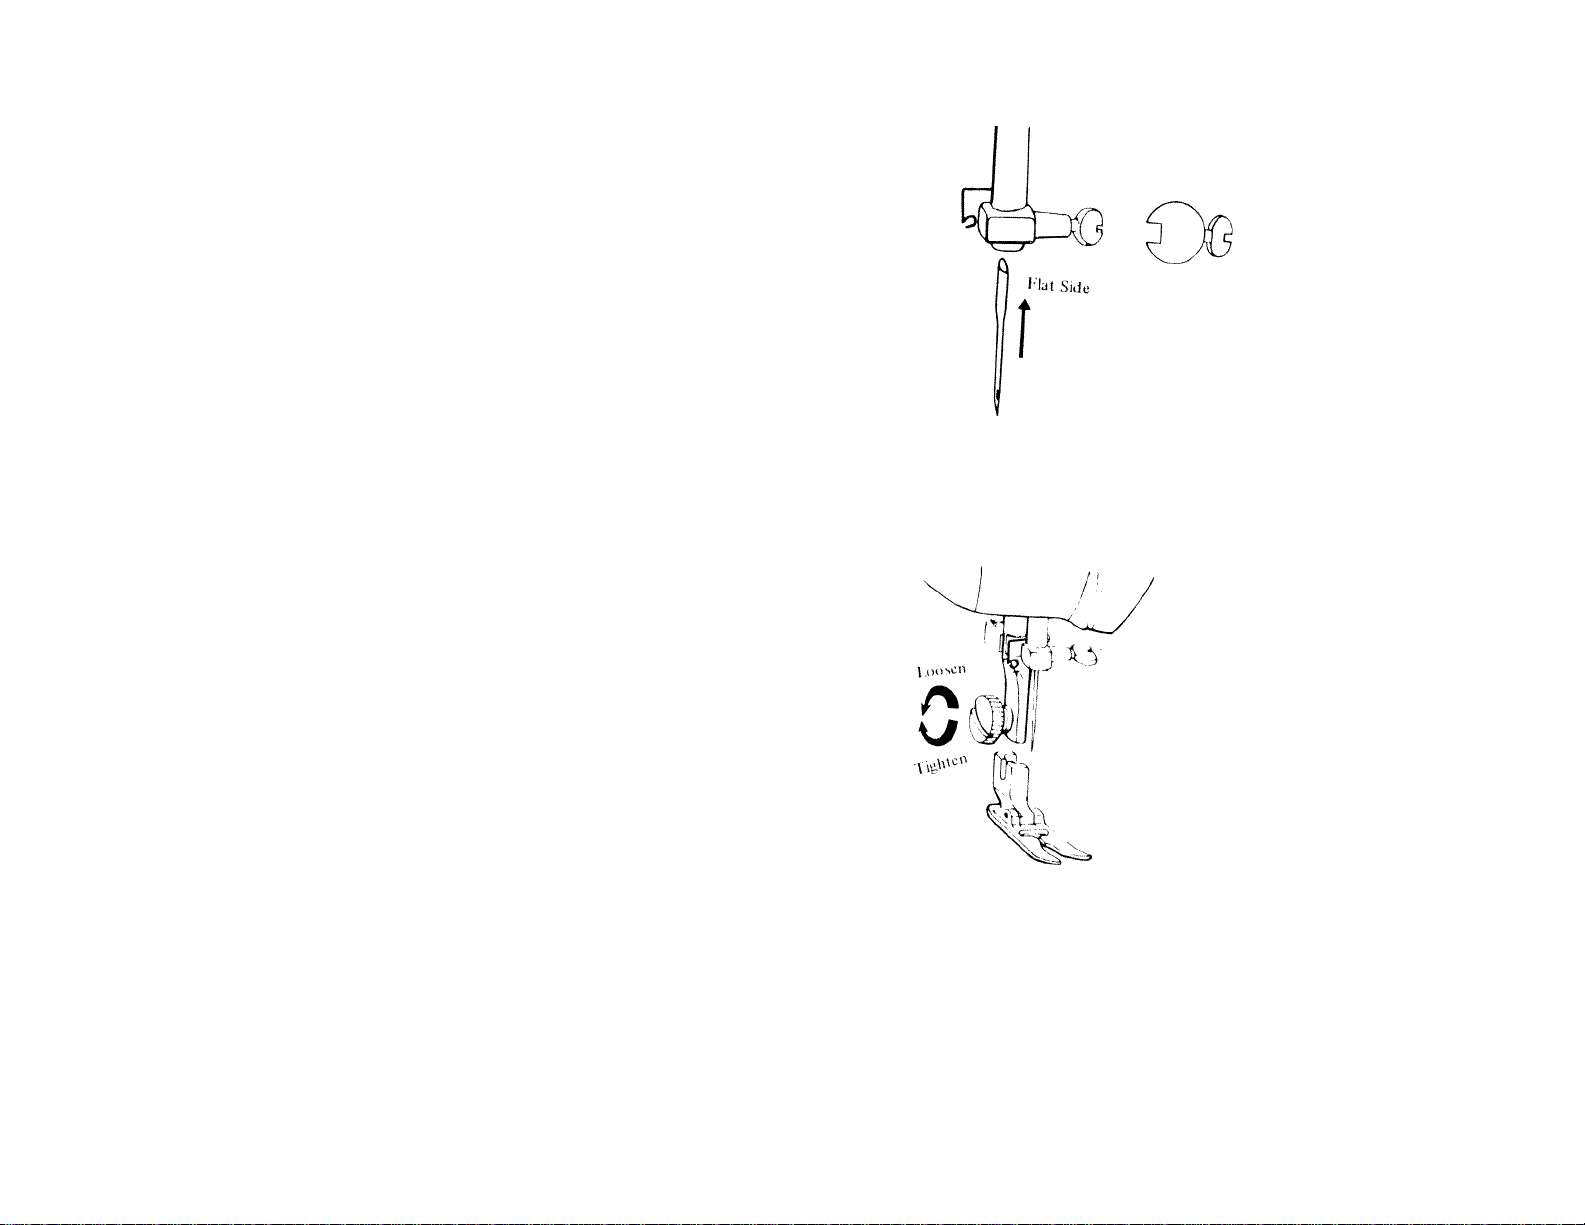
CHANGING NEEDLE
Raise needle to its higliest position
urning hand wheel toward vi
-«osen needle clamp screw and
move needle.
Insert new needle with its flji si
'‘•^■"tg right. Push up into needle'clai
far as possible. Tighten screw wi
a screwdriver.
rum hand wheel to ware you one cot
píete rotation to be sure needle
correctly positioned.
CHANGING PRESSER FOOT
Rai.se needle to its highest position In
lurning hand wheel toward you Raise
presser loot by |„„,,g p^esser too,
r loealed on back of machine
» ««.sen thumlvcrew and remove foot
I’lace grooved side o,^ selected presser
'‘’»1 apiinst presser bar. Tighten screw
seciiieiy wfiii screw-driver.
!_)« not operate machine with presser
loot lowered unless fabric is belween
presser loot and fabric feed
■ I™;,:;::,............................
...... mr
iji .„a „„
n.y danaaia iba i;!'";;;,':;:.
........
......
Page 6

I tintMUIIMU IVIACHlIMb
WINDING BOBBIN
I’lace spool ol thread on sp(K)l pin and
pass thread thiougli slots of both top
thread guides.
Bring tliiead down across machine and
under tension discs on Inrbbin winder
thread guide located on corner of
machine base.
Put thread through one of the holes in
empty bobbin from inside to outside.
I’lace bobbin on spindle of bobbin
winder, being sure notch in bobbin fils
over small pin on bobbin spindle.
Push cover of bobbin winder down
until rubber wheel touches hand wheel.
Release sewing mechanism by holding
hand wheel and turning slop motion
knob toward you. Hold end of thread
and press down on foot control as
when sewing. Release end of thread as
soon as winding starts. Run machine
slowly to wind bobbin evenly.
Bobbin winder will stop itself when
bobbin is trill. Do not wind so full that
thread extends beyond bobbin. Break
oil thread and remove bobbin from
spindle.
Tighten slop motion knob.
THREADING UPPER THREAD
Raise the needle to its higlrest po
tioii by turning hand wheel toward ;
Till pressei foot.
PI.ice thread on spool pin at back
m.ichine. Pass thread through slots
iwo lop thread guides, then down
illu'ad tension knob.
Place thread around bottom of line
tension knob, being sure it slides f
tween tension discs. Hold thre:
sialionary with right hand and pi
ihiead up with left hand until it sli
around w ire spring and into loop.
I owe I pressei fool.
PI.ice ihiead imder arm of tensii
ihieatl guide, and up through hole
l.ike-up level llnearliiig from riglil
Id I
( Ol u\ I
' —'
Winding Bobbin Evenly
It bobbin winds unevenly, adjust
bobbin winder thread guide by loosem
ly screw at base ofguide:
• it more (bread winds on right side
of bobbin move thread guide
slightly to the left.
• il more thread winds on left side
of bobbin iiKwe thread guide
sligliily to the light.
Bung thread down and place bell in
aim of linead guide located at holloi
ol opening 111 face plate. Draw tinca
down Ihmiigh small thread guide a
ladled to needle hai,
lineari needle from left to right.
Page 7
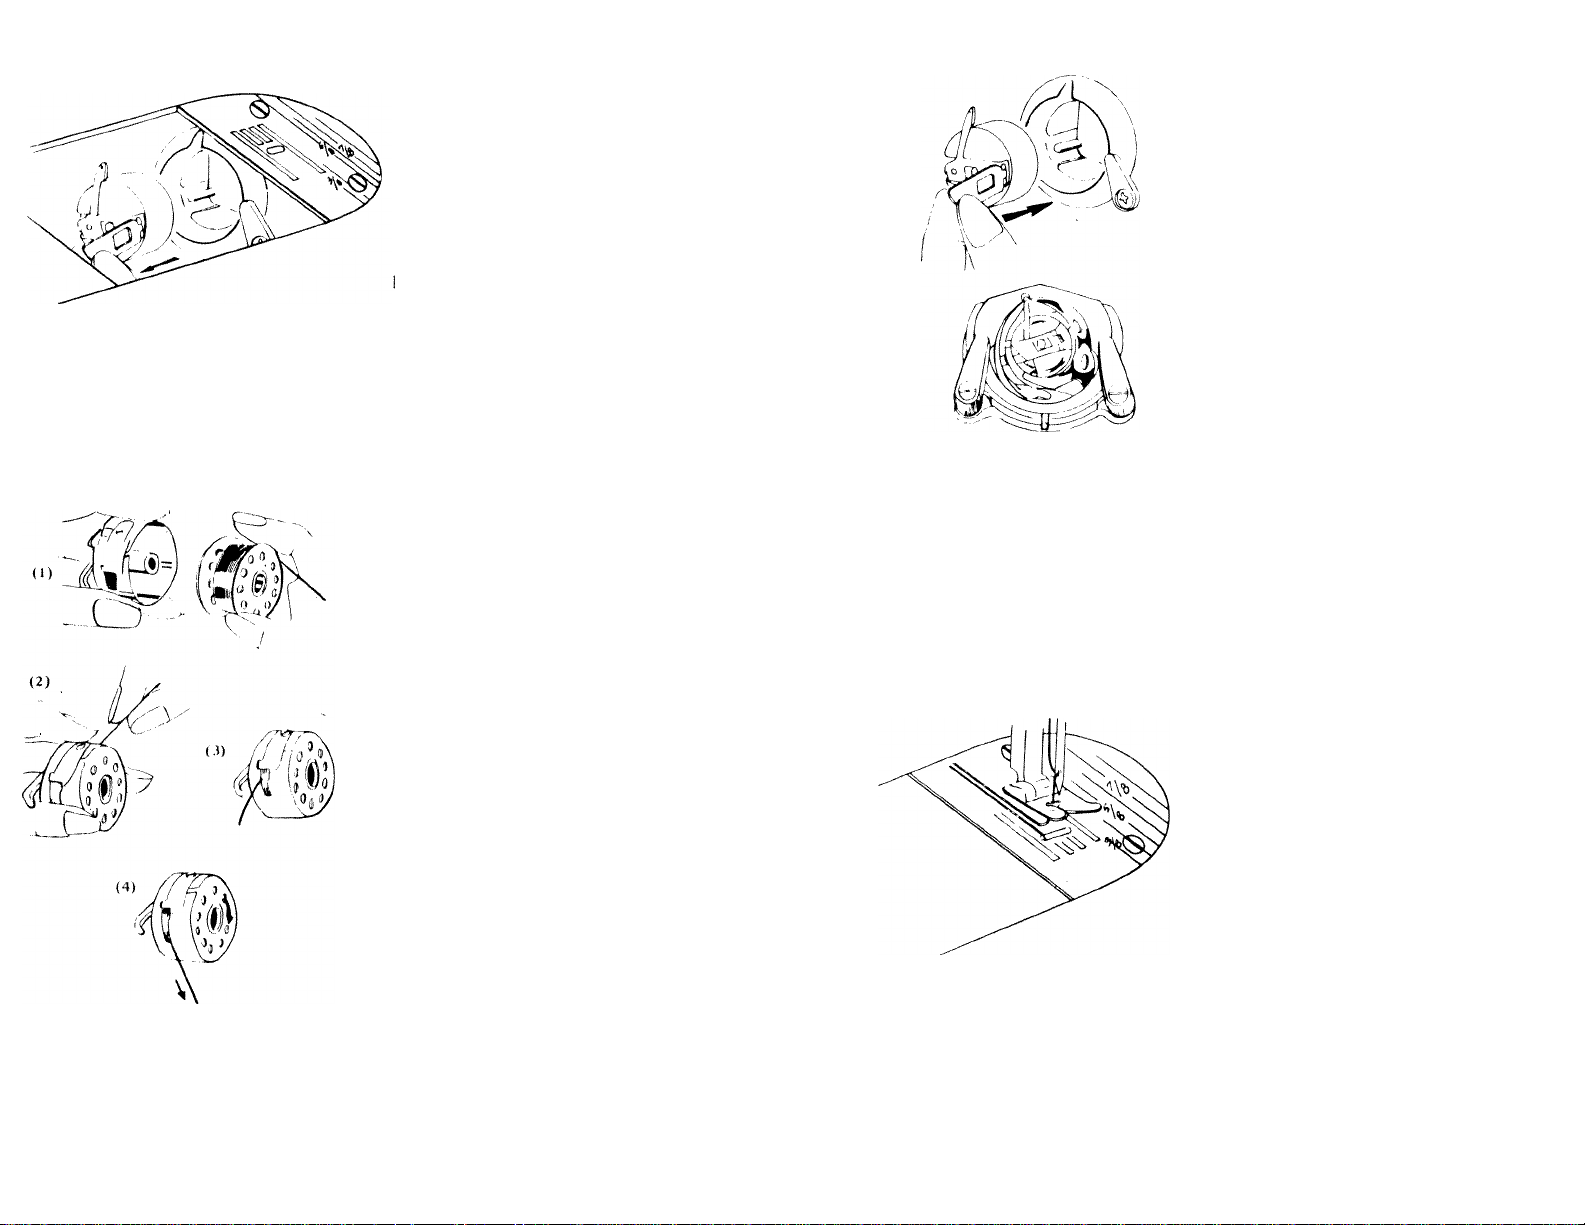
REMOVING BOBBIN CASE
K;iise needle to its highest position by
lurning hand wheel toward you. Pull
slide plate out to the left.
I,ill open hinged latch ol bobbin case
and pull case toward the left and out
of machine.
Bobbin will remain in case as long as
atch is open. 1 o remove bobbin, hold
bobbin case down, close latch and
bobbin will fall out.
THREADING BOBBIN CASE
Hold bobbin us shown in illustration
so that thread goes over top of bobbin
and away from you.
Пасе bobbin in case withoul turning
it around.
Slide tliread into slot in edge of case
and draw thread under tension spring.
Pull out thread to check that bobbin
turns clockwise.
INSERTING BOBBIN CASE
Be sure that 5 to 6 inches of thread
extends out of bobbin.
Hold bobbin case so long finger on
case points up. Open out latch.
Slip case over holder post in shuttle
and press in place until finger enters
notch. Release latch.
Close slide plate.
BRINGING UP LOWER THREAD
Raise presser foot. Hold needle thread
'1
loosely with your left hand. Turn hand
wheel toward you until needle moves
down and then up again to its higliest
irosition, catching bobbin thread and
bringing it up through hole in needle
|)late. ^
Id prevent thread from slipping out
of needle when you begin sewing, pull
both thread out about 6” and place
under presser foot toward rear of
machine.
Page 8
CONTROLS
CREATE-A-STITCH LEVER
.
..............
lilind Ivqmliir Slrelcli
■Si il til Siili h .Sllltli
STITCH PATTERN
11,0 ,ype «r,sliich.
"> чиее posaions
г
Wimi Regu'lar Si rei cl,
SliUh Slilch Stitch
Bhml Regular Streich
Silici, Siiteli Siiteli
Blirnl Regular Sire'ich
Slilch Stilch Stitch
;; he sure needle
I’leakiiig ihe needle. ^ P"-'ven| iea,,„g ||,e fabric
Creale I .
a Silici,
Si il ch Will I h
ICul lonhülc
ihsed r„r ,„,,si
-- siraiglii slilcliiiig,
■'ll'' lung, tiiicl lor making lulli(in|io|es.
' ""'""lg is loi binici stuelli,lg.
soiling is |„, ,,g,|„„g
■SIIdies - bull, ,,,eicl, sliaigbi .slilcli
mid siielcli zig-zag siiteli.
('reale-a-Si Hell
□ cz
~^:ékjìÈkJiÈ'uèk\^Ìk
é'ù'A.
«éliti,,
-MÜM-JiM АТОМШ ^
iiW-lk
Èà)^
< ic‘.iie-a-Siiieli lever moves llie neodb
Is'tt lu I,gill to,- speeial dosig,
''iiieliin».
Ills' love, IS .spiing loaded so miles
you hold ihe lever, ii will always rovci
'o llie siaiiiiig posiiioii ai iIr
Z/Vww
ic'll (siraiglil slileli).
< leme-a-.Siiteh lever enables you
oblam a zig-zag sliieh of any widil,
^"|j""> .sbieh w,ci,i,
’mid loi|uiekly reiurn loslraiglii
siik inig by simply releasing ,he love,
I’m lacking and rein forco
( leaie-a-SiiicIi lever enables you n,
meaio luimerous decorative paitoriis
"’Psnicliing. („„„mug. nioiio-
yniining, appliciuing and emhioiderim.
(See pages .U)-.12).
O'l'meni paiierns aie obiained by
"mying ihe s-jreod will, wliicli yon
inovo ilio lever and lolease ii. and by
^mynig Hie smell longll, and numbei
oi sliiclies,
l-oi III,,SI deooraiive designs, siiidi
’""ll 1 knob should be SOI fo, siraiglil
" "oiling, and smell lengib knob sol
II loi dose saiiii slilcli.
I OI besi results wlioi, making designs
iiiodeiale laie ol speed.
Wlien niadime is „01 sewing, do 1,01
'"oo-' ( leale-a-.Sliieli lever unless i|,e
noodle Is laised „m „i ,1,^ fai-,,,,..
"l'”"lil he sewing al a
Page 9

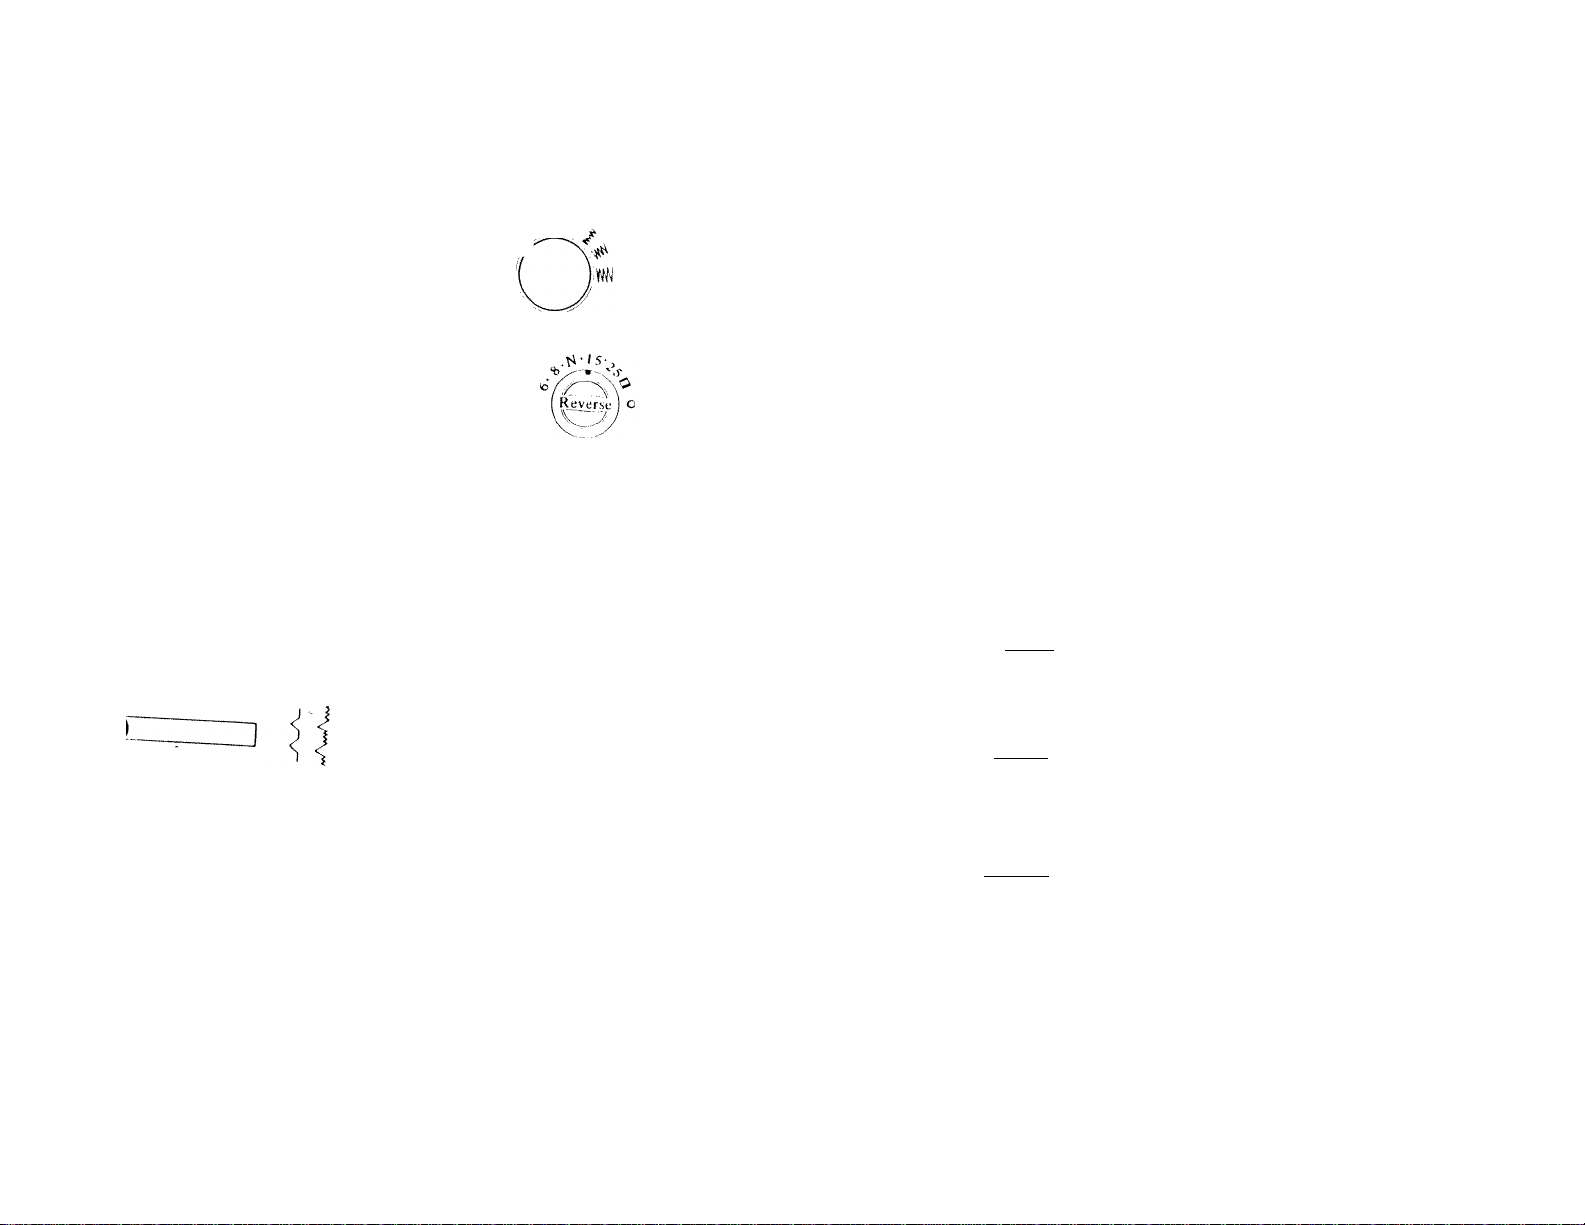
STITCH WIDTH
Stitch width knob adjusts the width
of the stitch for straight and zig-zag
'stitching, and moves the needle po
sition lor making buttonholes.
Knob niiist be set in the center for
straight stitching ( ; ). Machine has a
left position^ needle - when set for
straight stitcliing, the needle is on the
felt side of the needle plate opening.
By lurning knob to the right, you can
widen the stitch from straight to maxi
mum zig-zag width.
rhe buttonhole settings on the left
side of the knob are for dialing the
4 steps of stitching a buttonhole.
STITCH LENGTH
Stitch length knob regulates the length
of stitch - from 6 to more than ,K)
stitches per inch.
Hie numbers around the knob are the
stitch length guide. The higher the
number, the shorter the stitch. In
general, short stitches are best for
ightweight fabrics, longer ones fr)i
iieavy fabrics.
Most normal sewing is done with stitch
ength set at N - which is about 12
stitches per inch. Basting stitch is
made by using the longest possible
Stitch ** 6 stitches per inch.
A special setting is marked for button
holes. This area is used for adjust
ment of satin stitching. 0 setting is
used for embroidering and darning.
butch length can be adjusted while the
machine is running.
llie width of the stitch can be ad
justed while machine is running. If
machine is not running, raise needle
to its highest position before turning
knob.
-Set com,4,1s for a specili. siilch in the following order:
1. Stitch Pattern
2. Stitch Width
Stitch Length
1.^
reverse stitch
I’ress in center button of stitch length
knob and hold for reverse stitching
Fabrtc will immediately start feeding
backwards. Release button and
machine will resume normal forward
siilchittg.
Very useful for fastening ends of seams
and darls without having to tie threads.
I I
Page 10

TENSION OF UPPER I HREAD
TENSION OF LOWER THREAD
lensioii ()| ihe uppei iIucìrI can he
easily adiUMcd by luming dial on
lioiit ()| die leiislon discs.
It you are unable to balance the siilcli
hy adjusting lension on the upper
tbiead, you may have to make a slight
Yoiii inacliiiie has been sei al the
laciiiiv I,II even iliiead leiision al
/r-
Nunn.il selling. Ilovvevci, you may
have 1(1 adpisi die leiision when using
dittereni lliieads or sewing on labiics
ol difi'eieni iliicknesses.
adjustment in Ihe bobbin lension.
lake out bobbin case, remove brrhbin
and dean ooi any dust or lint which
iias collected around Ihe ca.se.
I urn screw on bobbin case slightly in
either direction using Ihe small screw-
Pies.sei tool should he tlowm while
J liver:
adjustmeni is being made.
To increase tension turn screw
I.oosen tension somewhai w'hen zig
zag stilching. Ihe wider Ihe zig-zag,
Ihe less lension needed. Use “Loose”
selling when sewing huitonholes,
monograming and embroidering.
slightly to the right.
lo decrease tension turn screw
slightly to the left
It stitch i.s satisfactory but the seam is
puckered, it may be necessary to
lest lension before you .scw' by stilch
ing on a scrap of the same fabric and
loosen lension on both lop and bottom
threads.
ihrough the same amouni of layers.
,os>
■'“«1 >
^lytny
i oireci lension: needle and bobbin
line ad s are locked
in cenlei of seam
*ppei ih read loo loose i increase
tension by lurning
dial loward “'fighl’
Upper thread loo liglii : icdin c
lension by luiniiig
dial lovvani “I oose’
IS
CHECKING TENSIONS
An easy test lor checking lension
balance:
bold fabric on the bias and stitch
(id siiiches/inch) U" in from fold.
Grasp stilching and pull with a snap
to make threads break.
• il both til reads break (even
though not at the same place) tensions are balanced:
• if upper thread breaks - loosen
lop tension,
• it lower thread breaks - tighten
top lension.
16
Page 11

PRESSURE
D.mi Sew
[-d
or Stitching Ordinary
Fabrics
Darn .Sew
For stitching light
weight fabrics
Darn Sew
i3 I
______
r darning embroidering
sewing on bullous
Fabric I'eed up
l-'abric teed half
way down
I'ahric Iced down
I ressuie on the presser toot must be
regulated lor different types of fabrics.
Proper pressure allows fabric to feed
smoothly and evenly with no skipped
stitches.
lo adjust pressure, push down outer
ring of pressure regulator until center
button springs up. Oien push center
button down until the suitable amount
ot pressure is obtained.
As a lule, icduce prcssuie vvlien sewing
heavy lahiic or inulli|>k' layers. Iii-
cieuse piesMire when sewing lighter
weiglii labiics. Release piessuie conn
pleiely loi embroidering, and darning,
so labile can be moved in any direc
tion by hand.
FABRIC FEED
Fabric teed or teed dog moves fabric
loiwaitl Ol backward uiidei (lie presser
tool. Ii can be raised.or lowered by
pushing (he SFW-DARN bulions h>
caied on die machine base plate.
For ordinary slraiglil or /ig-zag stiidiing press SFW Inition all (he way
down. I Ills raises tabiic feed lo ils
liighesi position. For liglitweight
tabiics, press SF.W billion down only
half way (line marked on button) to
prevent teed liom marking labric.
Foi daiiiiiig, eiribroidei ing and sewing
on billions, press DARN biiUon all die’
way down lo lower die leed. Flus
allowíj labile (o be moveil freely by
hand.
The sewing light is located directly
over the needle so as to better illumi
nate the stitching area. Turn the light
on and off by pushing the switch
located on the back ol the machine.
To replace bulb, turn light off and
open lace plate. Unscrew bulb as you
do a conventional light blub. Place
new bulb in socket and screw in place.
17
lb
Page 12
PART II START SEWING
N■11%' you should be taiiiiliar wiiJi the different
pails ()| youi niadiine and how to thread it.
Hie lollowing pages explain the various stitches
>om machine can niake. along with special
sewing techniques.
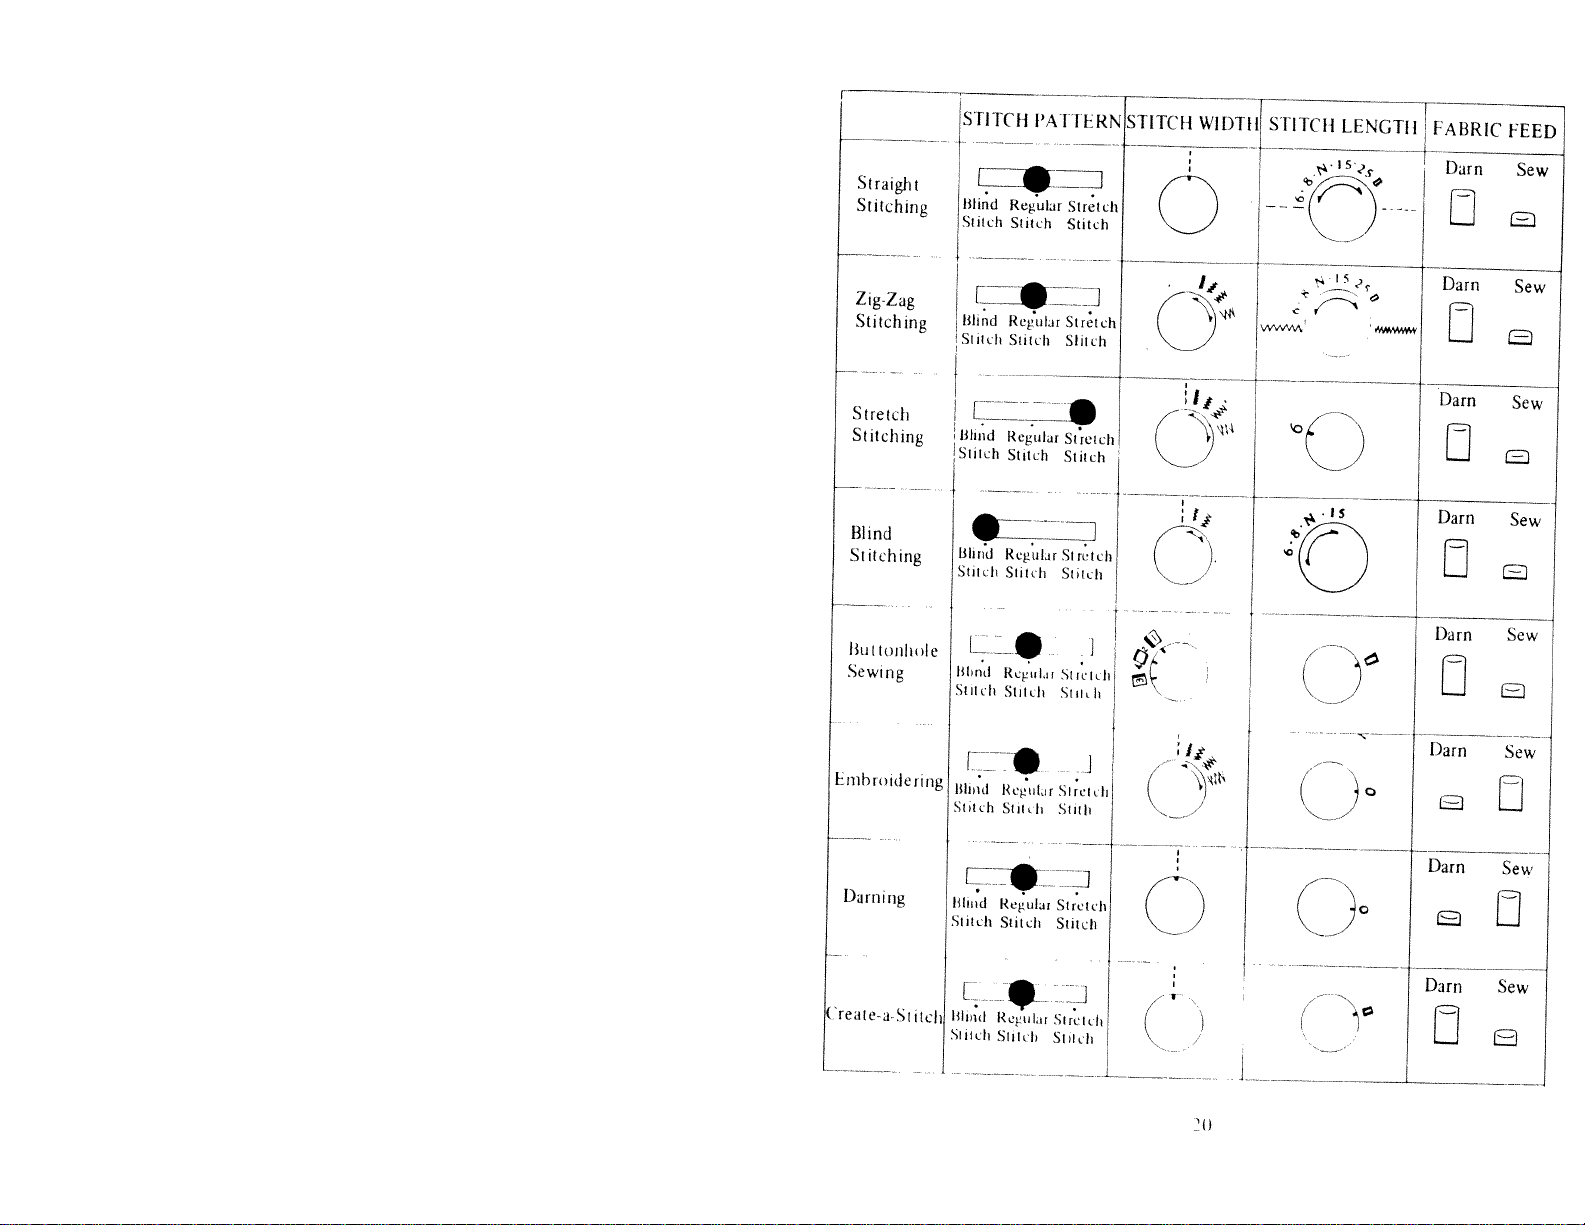
Ifse the chan on the opposite page as a handy
iclerence gimle fm making any type of stitch.
•So now you le leady to sew
..............
CHART FOR MAKING DIFFERENT TYPES OF STITCHES
19
Page 13
blHLHING UPS
Wlienever you start to sew - -
• Check tliat levers and dials are set
correctly tor the stitch you want stitch pattern, width, and length.
• Use proper needle and thread for
your fabric. Needle sliould be
straighi, sharp, and inseried pro
perly. Change your needle frequeni-
ly-
• Test machine stitch on double
thickness ot a scrap of the fabric
you plan io use. Adjust machine for
length of stitch, tension and
pressure if necessary.
• Place fabric under presser foot with
bulk of material to the left of
needle. Full thread ends behind
presser foot.
• To prevent liglitweiglit fabrics from
being drawn into needle hole when
you begin stitching, start about 'A''
from edge of fabric.
• To reinforce ends of seams, begin
and end by backstitching about '/2"
from edge of fabric.
• Regulate speed of machine by in
creasing or decreasing pressure on
loot control. Run machine at a
slow even speed.
• Allow tahiic to teed lorward with
the movement of the fabric feed.
Don’t pull 4)r hold labric back as
needle may bend or break. Instead,
guide fabric gently with your liand
in front of presser foot.
• Wlien finished stitching, turn hand
wheel toward you to raise needle to
its highest position betöre removing
labric from under pressci foot, l>u||
threads over thread culler located
at back of presser bar, and press
threads down to cut.
Keep Stitching Straight
Ir> help keep your stitching straight
whether stitching seams or doing dec-
rat ive stitching:
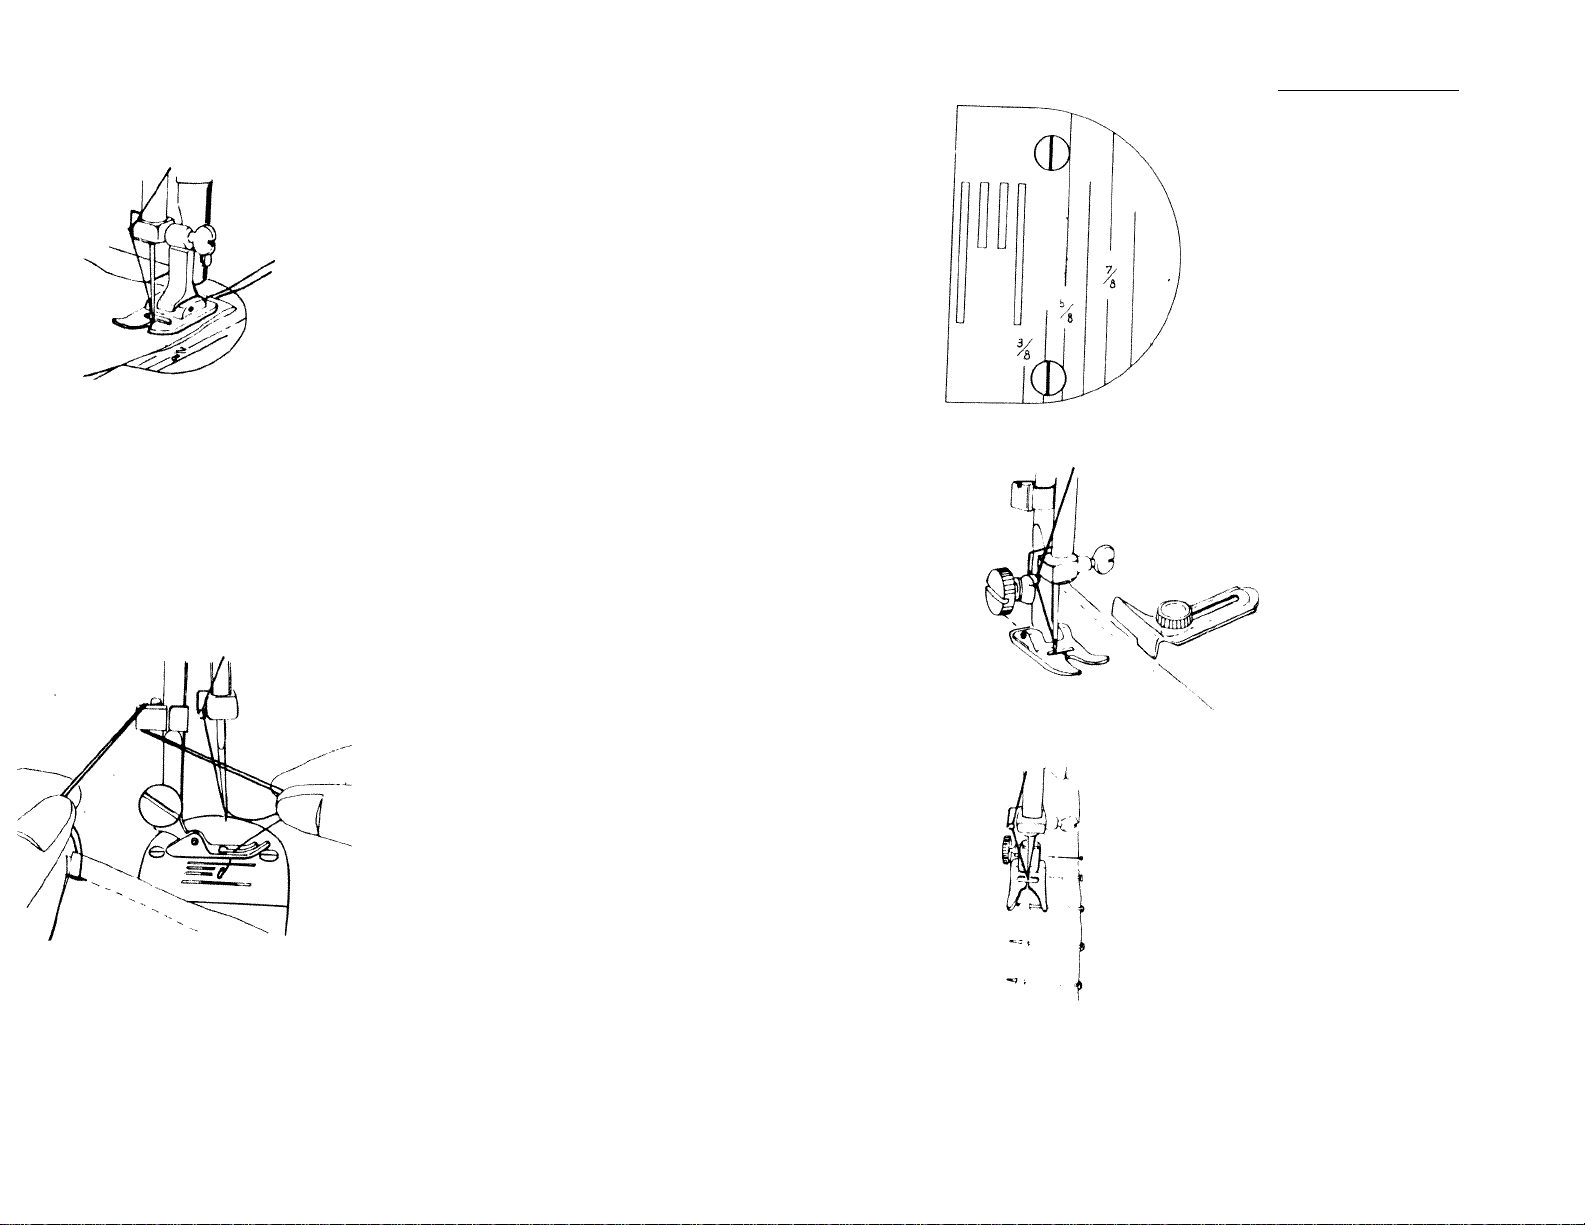
Needle Plate Use markings on needle plate as a
guide tor stitching.
Most common measurement is 5/8”
wliicti is used lor stitching seams.
Simply line edge of fabric up wiili
markings on plaie to keep stitching
straight and seam width even.
• Cloth Guide Attachment - Use as a guide for stitching seams
hlindstitching, and topstitching
Can be adjusted up to 1-5/8” fron
needle.
hasten cloth guide to machine b>
inserting ihmub screw into one ol
the two threaded holes in bed ol
machine. Adjust cloth guide to
dcMirnl distance from needle and
iigliieii ihiuiih screw.
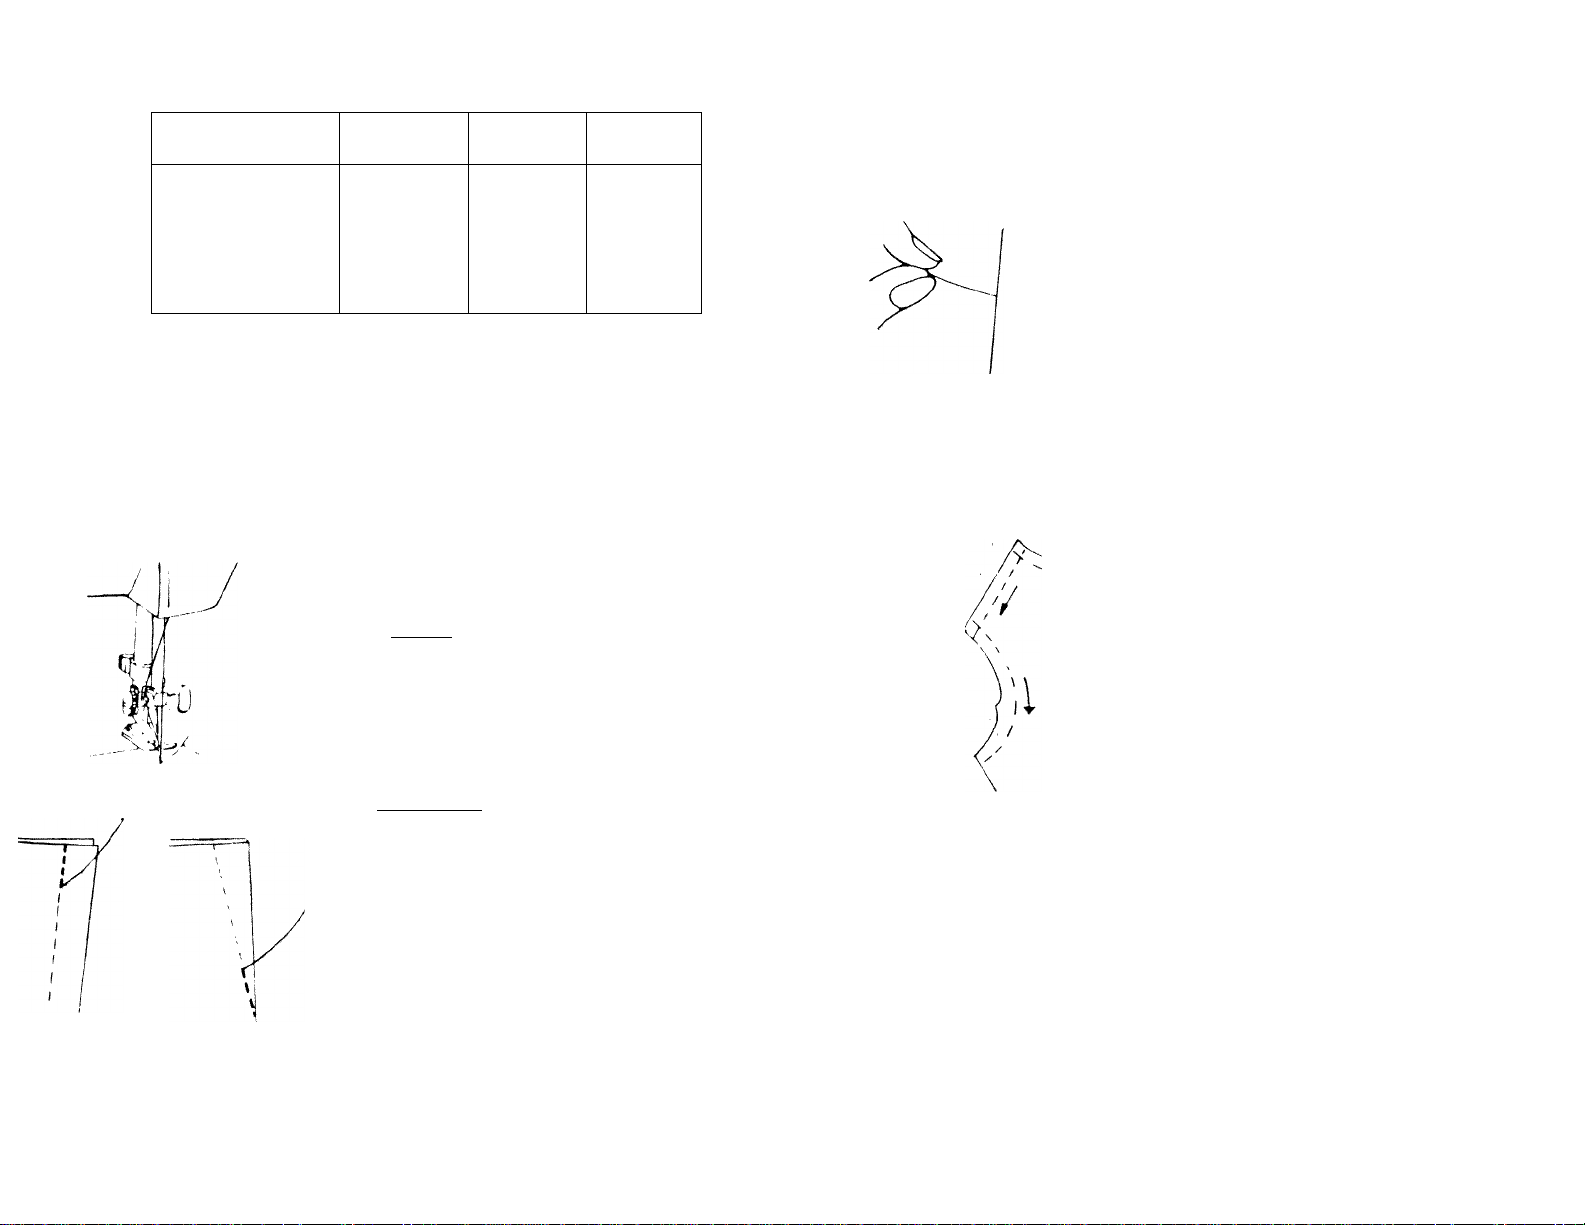
Pin Basting
I’lace pins at right angles to pres,sei
loot with pin just nipping into fabric
at stitching line. Never place pins on
underside of fabric in contact with
labric teed or so presser foot rides ovei
head of pin.
Page 14
STRAIGHT STITCHING
dchine Setting ■
I’rcsscr
loot
Str:ii(:lit Stitch
loot or
Zig /ag loot
Hliiul HcfUilar Sluicli
Stitch Stitcli Slilch
Hits IS the most usual type of stitching. Use either the straight stitch toot for
greater control or the zig-zag foot. When using the straight stitch foot,
^e sure stitch witjth knob is set for straight stitching to prevent needle'
trom hitting presser foot. F‘<=vem neeaie
Adjust stitch length according to your fabric. 12 stitches per inch (N) is used
tor most fabrics. lengthen stitch for heavier fabrics, multiple layers, and
thicker seams.
1/ 0
Stitch
I’atteni
□
Stitch
Width
\ j
Stitch
Length
Fabric
teed
Diini Sew
Rl
U Q
Turning a Comer
Slop stitching with needle down in
labric. Raise presser fooi and turn
tabric using needle as a pivot. Lower
presser loot and continue stitching in
new direction.
Reinforcing Ends of Seam
Reinlorce the beginning and end of
seams by backstitching to secure the
threads. Begin
‘A"
from fabric edge
and stitch in reverse to edge, then sew
forward to end of seam, then back
stitch again about
Yi".
Reinforce point
ot dart in same manner.
Basting
Machine basting is very useful for join
ing seams tor trial fittings, marking
consiruction guide lines, and basting
pleats and hems.
l*se longest stitch possible, setting
stitch length at 6. Loosen tension on
upper thread. Choose thread color to
contrast with your fabric so it can be
easily seen.
Basting stitches cati be removed easily
by clipping upper thread, then pulling
out lower thread.
Staystitching prevents stretching and
acts as a guideline for clipping and
joining curved edges. Staystitch any
edge that might stretch during handling
before the final stitching.
Staystitch on a single layer of fabric,
always stitchitig in the direction of the
gtain. i^lace slifches 1/8'* away from
scamline in the seam allowance. Use
12 stitches per inch (N) for most
fabrics.
Page 15

Machine Setti
''WvWwWv/^/iV^^WWWWAV.
AAWaVVVWVVX
'*'^AAAWv^MM/WAW^VVVVV
ili l iU t i i/ ii , nu m u , n u iu t ui M
■ ' V\\\\v .1
ng
zig-zag stitching
ever It machine is not running, raise
needle to its highest position before
adjusting stitch width knob.
Tension on upper thread usually needs
to he loosened. The wider the zig-zag,
the looser the tension. Stitches should
l‘e liai against the fabric without
causing any puckering.
■ Zig-zag stitching has many uses:
Seam Finishing
Use to “overcast” seam edges in fabrics
lhal tray to prevent raveling during
wear and washing. Press seam open
and siiicli each side separately.
Adjust stitch width and length to suit
fabric, (’lu)ose setting that will give (he
most open stitch and still secure (he
tabric edges. Avoid hansh, over-stitched
edges which become shff and shra
ndge on right side of fabric.
Use one of (wo methods:
• frim .seam edge evenly and place
• TIace stitching near edge of seam
25
You can make any mimhei of combi
nations by adjusting stitch width and
stitch length. Both knobs can be
turned while machine is running. How
stitching over raw edge of fabric best for firmly woven fabrics.
allowance and trim away excess
labric after stitching - best tor
labrics which fray easily, ligln-
weiglii fabrics, and knits which roll.
’ li
oir
S'
.......
«T
Wge Finishing
Use to finish hem edges and facing
edges to prevent raveling and to elimi
nate bulk ot turned-in edges. For firm
tabrics. stitch along edge of hem or
lacing. For loosely woven or soft
fihiics, stitch about
itien tn. fabric close to stitching.
Vz"
from edge
Interfacii^ Darts
Use to reduce-bulk when stitching a
dart in interfacing fabrics. Cut down
center ol dart to point; overlap cut
edges matching dart lines. Zig-zag
along dart line from wide end of dart
Ihrougli point. Trim both raw edges
close to stitching.
B^tacks
Use to reinforce points of strain such
as coiners of pockets, bell loops,
zipper openings, and lingerie straps.
Sot stitch width knob at medium zig
zag or wider and stitch length at FINE.
Shell Stitch Edging
Use lor a decorative edge treatment
lor lingerie and soft fabrics. Fold
undei edge of''fabric, lighten upper
thread tension so stitches will pull in
tabric, forming a scalloped edge, and
sew along folded edge.
Satin Stitch
Closely spaced zig-zag stitches which
form a smooth, satin-like surface are
called satin stitches. Use for mono
grams, appliques and embroidery. (See
pages .3 i-.?2).
Move stitch length knob to Q (||
loo close to 0, machine will not teed
hilt will continue sewing in one spot.)
I oosen tension of upper thread. The
widen the stitch, the looser the tension.
Page 16

i.1 Ht I CH i>l I ICHING
Wieii .sewing knitted or stretch fabrics, use a stretch stitch which allows the
seam to stretch along with he fabric, without breaking the thread. Select
polyester or cotton covered polyester thread which has an extra amount of
give and is designed for knits and stretch fabrics. Use a ball point needle,
especially on lightweight knits,.
STRETCH STRAIGHT STITCH
Machine Setting -
strength.
Use for stitching regular seams in knits
and stretch fabrics.
in woven fabrics, use for stitching
seams that receive a lot of strain when
worn such as side seams, crotch seams,
and armholes in sportswear and in
children’s clothes.
Also use for topstitching when you
want a heavier row of stitching with
out using buttonhole twisi thread.
Guide fabric gently, allow'ing machine
to make the back-and-forth stitches
that give stretch to the seam.
27
Stretch blindstitch has small zig-za
stitches between the larger zig-zag o
blind stitch. Use for hemming knii
and stretdi fabrics. (See page 34.)
Use for decorative stitching.
Page 17

SJ i i i Uf t liNÍU
A great variety ol decoralrve stitching can be created by using one or more
rows of a stitch pattern or by combining difïerent stitches - lop stitching,
decorative borders and trims, monograms, appliques and embroidery.
TOP Sin CUING
You can accent lines of a garment with
one or more rows of topslitching along
collars, lapels, yokes, lacing edges,
pockets, cuffs, seams and hems.
• Use straight stitch tor a more
tailored look, sewing with button
hole twist for added emphasis.
• Use stretch straiglit stitch for a
heavier row of stitching, even with
regular thread.
• Use satin stitch for wider row of
stitching, especially for borders.
Or use one of the following stitches,
varying the width for special effects.
STRETCH ZIG-ZAG STITCll
Stretch zig-zag stitch resembles rickrack trim. It is reversible, looking the
same on both the right and wrong
sides. (See page 28).
STRETCH BIJNDSTITCH
' I
" .Î
Stretch blindstitch is a very decorative
asymmetrical design, which can be va
ried by moving the stitch width knob.
(See page 28).
29
CREATE-A-STITCH
Machine Setting
Below ate jirst a lew ot the many patterns you can make with the Create-A-Stitch k
hot best results, sew at moderate rate of speed. Vary patterns by varying speed will
which you move lever, or by varying number of stitches made.
At even speed, move lever from left to right.
Tlien allow lever to slide back slowly while
holding it.
Move lever quickly to halfway point then more
slowly to extreme rigiri, 'flier, allow lever to
slide back slowly to halfway point, then more
quickly to extreme left.
Make patterns as above, then stitch 3 or 4
straight stitches before repeating design.
Use directions given for first design, but move
ever more slowly.
Alternate directions lor first and second designs.
Slide lever to extreme right before starting.
Hold urrtrl pattern is desired length, then quick
ly release lever and stitch 3 or 4 straiglit stitches
before repeating design.
At even speed, move lever slowly from left to
jéÊ .ji/É jjM
right, 'llien release lever quickly, allowing it to
spring back.
Slide lever to extreme right before starting, then
allow lever to slide back slowly whOe holding it.
nien immediately slide to extreme right again.
Move lever to extreme right and hold for several
slilches, then allow lever to slide back to left.
Move lever slowly from left to right. ITien re
lease lever so it III w spniig back only half way ;
hoki lor several stitches, then allow to spring
hack complete.
Page 18

MONOGRAMS
Many decorative stitches can be used
to add a personal loud: Iry inonograming a diess or blouse, v/riliiig a name
I »
i 1
'
_
I
on children’s clothes, or initialing
household Iinens.
Very simple straight-line monograms
can be made with the stretch straight
stitch. Use (’reate-u-Stitch lever for
more decorative touches at the ends
of each letter.
Use the satin stitch for script or block
letters, either alone or in combination
with other decorative stitches made
with the Creale-a-Stitch lever.
It stitching on very soft fabric, use a
backing of tissuepaper or interfacing
to eliminate puckering and to prevent
bobbin thread tVom showing on right
side ot tabric. Trim away excess after
stitching.
APPLIQUES
Appiic|ues aie cut-out designs ot one
fabric stitched to another.
Use a close zig-zag stitch or line satin
stitch. Or tiy varying the stitch with
the Creale-a-Stitch lever. However,
don t allow stitch to be too wide.
Stitch a sample first to decide which
method is best for your fabric:
• Baste applique design to fabric.
Stitch around entire edge of design,
llien trim away any excess fabric
around outer edge with embroidery
scissors,
• Baste applique design to tabric.
Stitch around entire design with
straight stitching; trim edges close
to stitching. Then overstitch edge
31
ot design with applique stitch.
EMBROIDERY
the needle in order to create your de
sign. Use either a straight stitch or a
zig-zag stitch.
Trace design on right side of fabric,
for best results, place tabric in an
embroidery hoop.
Remove all pressure from fabric:
• press DARN button all the way
down to lower tabric feed
• piess down on outer ring of pressure
icgulalor to relea.se pressure com
pletely ^
Place hoop under needle. Run machine
at medium speed, guiding hoop care-
tully so needle moves along pattern
lines.
Use straight stitch for outlining, and
zig-zag stitch for tilling in design.
Vaiy length of stitch simply by moving
hoop faster or slower under needle.
Place stitches close together tor a
smooth, satiny surface. Overlap
stitches for an irregular surface.
Page 19

i I I y iOl I L.O
Many of the finishing touches in a garment can be done by your machine hemming, making buttonholes, sewing on buttons, and inserting zippers.
HEMS
I wo type.sor hems can be made quickly and easily with no hand sewing by using
one of the blindstitches or the hemmer foot.
<! BLINDSTITCH
Machine Setting
Presser
I'OOt
Stitch
Pattern
Stitch
Width
Stitch
Length
Fabric
Feed
STRETCH BLINDSTITCH
Zig Zag foot
•
himt!
Shi. Ii
Kfpubr .Slri'llll
Sllltll SlMlll
o
Blindstitch consists of four straight stitches and one
zig-zag oi blind stitch. It provides a durable hem that
is almost invisible when using thread the same color
as the fabric. Only the blind stitches will show on
right side of garment. Best suited for straight orsliglitly
curved hems.
Turn up hem the desired width and press. Turn edge
in W\ press or baste in place.
Fold hem back against right side of garment with
top edge of hem extending about
ment fold.
Place garment under presser foot so that straight
stitches will fall on hem edge and zig-zag stitch just
catches on thread of folded edge. Guide fabric
evenly while stitching or use cloth guide as an aid.
Stitch slowly for better control.
Press hem.
For a less bulky hem in heavy fabrics, finish raw edge
with tape or lace to eliminate turning in raw edge.
Fold fabric so straight stitches will fall on lace or tape.
»4 ■ is
Darn Sew
'A"
to right of gar
Stretch blindstitch has small zig-zag
stitches between the larger zig-zag
Q
stitch. Use for hemming knits and
stretch fabrics.
Fold fabric and stitch same as for
blindstitch. However on knits, elimi
nate turning in raw edge to prevent
ridge from showing on right side ol
knit.
,^3
Page 20

Presser Fool
Hemmer Fool
Stitch Pattern
himtl Kc^uLir SiiL'iih
Snuli Snidi Shirli
O
Stitch Width
Stitch Length
l-abric Feed
Darn Sew
Narrow hems on mediiiin and ligliD
weigiii lahrics can be turned and
stilciied in a single operalion witliout
pinning or basting by using iliehemrner
foot. 'Hie loot forms a hem about 1/8"
wide. Use tor shi i and blouse hems,
curtains,rulfleedges, and lingerie.
Attach hemrner foot. Trim and
straigiiten fabric edge. For easy in
sertion of fabric in heiTimer foot, first
cut off corner of fabric. Then fold
edge of fabric over about 1/8", then
fold it over again for a length of 2".
Insert fabric fold into spiral opening of
foot. Move fabric back and forth until
die fold forms a scrolled shape. Draw
(abric toward you until beginning of
hem is underiieath needle. Lower foot.
Stitch slowly as you guide fabric into
henimer foot. Do not pusii or pull
(abric. (f edge of material lends to
slide oui of hemrner, guide it to the
right. It loo much malerial enleis
hemrner. draw fabric to llie left.
Mat Felled Seam
Use henimer foot lor making flat felled
seams on shirts and sportswear. Iliis
type of seam is strong and durable,
and provides a linished appearance on
both llie riglit and wrong sides.
Place fabric light sitles logeiher with
edge of boiiom piece exieiiding about
1/8" beyond edge of lop piece. Stiicli
fabric logeiher using henimer foot like
a regular presser fool. Ibc right edge
of foot as a guide for boliom fabtit,
and leli edge of long loe of fool as
guide for top fabric.
Open out fabric and place right sides
down, 1-old seam allow'anccs over lo
the left and insert in henimer fool
scroll. Sew' as you wouki for ordinary
heniniing. As a guide, run first row of
slitclies along left edge of long toe of
fool.
Machine Setting
H.ll I.K ks
I Hullun
I Opumi)^ ÿ
I
Hullnnhulc Bulhinhulu
Markings Sltic luiij,:
— BjîI.U Rn
BUTTONHOLES
Your iiiudime has a built-in buiton-
boler - jusi dial the slilch width knob
for the tour steps in stitching a liiitton-
liole.
• Mark position and length of button
hole on fabric. Length of the hole is
deierrnined by the width plus ihickne.ss of the button. Ihe finished
Iniilonhole should be 1/8" longer
than this measurement to allow loi
bar lacks at each end.
• Allach buttonhole fool which
allows you to see your markings
and smelling through the clear
plastic loot.
• loosen upper tension.
• When sewing biillonholes on knits
oi loosely Woven lahiic, use a piece
of interlacing between lahiic anil
lacing so hullonhole will retain its
shape.
• Guide fabric carefully so lines of
stitching will be straight and close
logeiher. but not touching.
• Always make a sample bullorihole
using the same lahiic before si itch
ing on your garnienl. Try slipping
the bution you will use ihrough the
hullonhole lo check the correct
leiigili ol (he hole.
Page 21

Slilcti
Widlh
Stitching Buttonhole
STlil’1 - Turn stitch width knob to »1 to
stitch left side of buttonhole. Place
fabric under buttonh(jle foot so needle
enters fabric on mark at end farthest
from you.
Stitch left side of buttonhole the
desired length. Raise needle to its hig
best position.
STIiP 2 - Turn stitch width knob to #2 for first
bartack. Make 5 or 7 stitches. Raise
needle to its highest position.
S'fliPi - Turn stitch width knob to to stitch
right side of buttonhole. Machine will
stitch in reverse. Stitch right side the
same length as left side. Rai.se needle to
its higlrest position.
STPP4
r
Siiteli
l.cigUli
Turn stitch width knob back to #4
for second bartack. Make 5 or 6
stitches’ to complete buttonhole.
furn stitch width knob to straighi
stitch symbol, and turn stitch length
knob to 0 so machine does not feed.
Make 2 or stitches to securely fasten
stitches. Draw upper thread through
to under side.
Machine Setting
Presser
[’’oot
Button Sewing
Foot
Stitch
Pattern
#
Blind Kcpolur Slreich
Sitivii Smth SiUch
0
BUTTONS
Stitch
Width
,4u
{ W
You can sew both two and four hole
buttons with your machine.
Change presser foot to the button
sewing foot and be sure to lower fabric
feed by pressing down DARN button.
Place button under button sewing
foot. Turn stitch width knob until zig
zag stitch is same widtli as the holes in
the button. Turn hand wheel toward
you and test carefully that the needle
goes through the center of first one
hole and then the other.
Hold both threads behind presser foot
and sew 5 to 6 stitches.
Turn stitch width knob to straight
stitching aiul take about 3 stitches to
lock the thread.
hor a four hole button, lift presser
foot slightly ami move fabric to permit
stitching the remaining two holes.
Hooks and snaps can also be sewn
following the same prcxiedure.
Stitch
Length
/ \
Fabric
Feed
Darn
Q
Sew
_
Cut buttiinhole open using embroidery
scissors or seam ripper, being careful
not to cut stitching on either side.
Place a pin acorss each end of button
hole to protect end stitching.
31
Thread Shank
Sew-through buttons on coats and
jackets should have a thread shank to
make them stand away from the fabiic.
Place a straight pin or sewing machine
needle on top of button between the
holes, and sew over the pin or needle.
Pull thread to back of button and
wind aiound stitches to form a firm
shank, lie thread ends securely.
38
Page 22

ZIPPERS
MENDING
Machine Setting
Presser
I’OOl
Zipper l'Oüt
1 t:flside ol needle
Stitch
Pattern
hluid RfguLit Sitckli
StUth Sutch Siitth
o
Stitch
Width
Stitch
Length
Darn Sew
Zipper fool allows you to stitch right
next to a raised area such as a zipper
or cording. The foot is adjustable so it
can be moved to the left or right side
of the needle without having to turn
the fabric.
Raise needle to its highest position,
attach zipper fool, and set controls for
straight stitching.
To adjust foot for left side of needle:
loosen screw at back of foot and slide
foot to the left so that needle passes
tlirougli notch on right side of fool.
Lower needle slowly to be sure it will
not hit zipper fool, and tigliten thumb
screw.
For right side of needle, slide foot to
tlie riglil.
Zipper package will contain easy to
follow instructions for stitching.
Fabric
Feed
Machine Setting
Presser
Foot
11
Zig-zag l oot
Stitch
Pattern
HliiiJ 'Kc^'ulaf Slrclth
Siiitli Siiit-h Siiich
0
Stitch
Width
//
lW
Stitch
Length
s.
W
Darn Sew
mi
dears and patclies can be stitched
easily and quickly with zig-zag stitch.
Tears
Trim ragged edges. Position tear under
needle and stitcli along tear catching
both sides of material.
Witen mending a three-cornered tear,
stitch from each end to center. For
large tears, place piece of fabric under
I car for reinforcement.
Patchy
Stitch patch into place around edge
of liole 01 worn area. Trim raw edges
close to stitcltiiig.
I'abric
Feed
Corded Seam
Cording gives a professional finish to
slipcovers, pillows, cliildren’s clothes
and lingerie.
First, make welting by covering cord
ing with bias fabric and stitcliing close
to the cord with zipper fool.
'Ilien stitch welting into seam using
zipper foot.
y)
40
Page 23

UAKIMINÜ
PAH I 111 CAHIIMG FOR YOUR MACHINE
Machine Setting
Fresser
I'oot
None
Stitch
Pattern Width Length Feed
#
llJuiil Rc^’Uiar .Sliftili
Slit.It Slilch Shkii
Stitch Stifeh Fabric
1
-
/ \
( J
( /
0
Worn spots on clothing and household
linens can be darned easily with your
machine.
Completely release pressure on fabric
by pushing down DARN button and
by pressing down on outer ring of
pressure regulator until center button
pops up.
For greater control, especially when
darning larger areas, place fabric in
embroidery hoop. For large holes,
baste a piece of mending material
underneath hole to use as a base for
stitching.
Place fabric under needle. Move fabric
back and forth with an even motion to
cover darning area with closely spaced
rows of stitching. Then turn fabric and
sew a second layer of stitching across
first layer of stitching.
Darn
O ■
Sew
__
CLEANING
Your machine will always work well
you take a few moments to keep
clean. If lint and bits of thread a«
cumulate under needle plate, aroun
fabric feed and in the shuttle, this wi
interfere with the operation of yoi
machine. Check occasionally and clea
whenever necessary.
• Before cleaning, disconnect cor
from outlet.
• Remove needle, presser foot, needl
plate and slide plate.
• To remove shuttle: raise needle be
to its highest position and remov
bobbin case. Turn levers away frot
shuttle and lift our retaining tin
and shuttle, by grasping center pin.
• Thoroughly clean under fabric feet
with a small brush. Remove lint am
thread from all parts of shuttle ani
wipe with a lightly oiled cloth.
• To reassemble: hold shuttle b;
center pin, and fit carefully bac
into shuttle race, forming perfec
circle with driver. Replace retainin
ring, polished side out, making sur
the bottom pin fits into notcl
Lock retaining ring by tumin
levers back into position until the
snap over the two small post;
Replace bobbin and case.
41
Page 24
UILINU
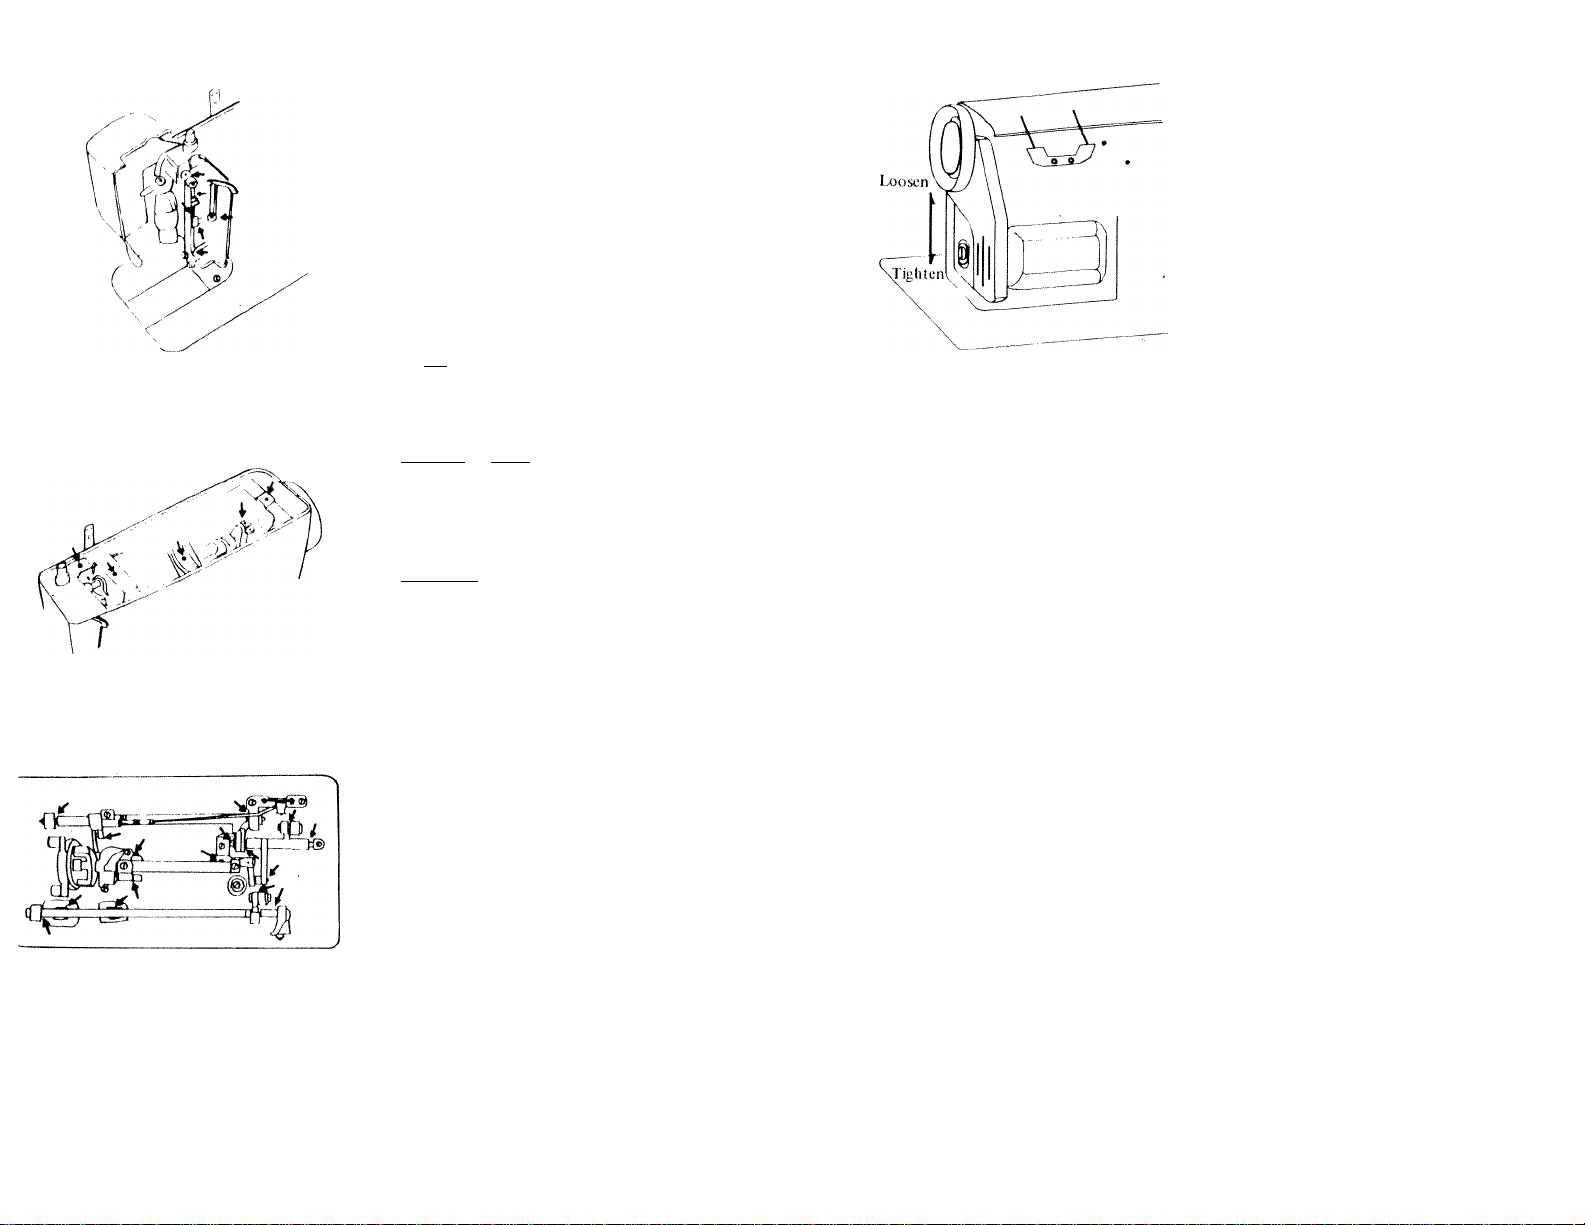
ADJUSTING BELT
Your machine needs lu be oiled once
every week if used rie(|uentJy and
every day if machine is in continual
use. If machine has not been used for
a period ol lime ihe oil will have dried^
so be sure lo oil belore you start
sewing.
Place a drop of best quality sewing
machine oil at each of the points
shown in the pictures:
Inside Face Plaje ^ swing face plate
open and oil all moving parts at
friction points.
Under Top Plate ^ remove lop plate by
unscrewing two screws located at each
end of the top plate and oil points
on top of machine head.
Underside - tilt machine head back
and oil points on underside.
It is important that you do not give
the machine too much oil which will
only run out and spot your tabric.
JC Penney Model 6105
Serial No.
When ordering replacement parts
give model no and serial no.
The tension of the motor belt can I
adjusted by moving the motor brack
located on the right side of tl
machine.
Use a screwdriver to siighily loosr
the screw securing the molor biacki
Slide bracket down to iighleii icnsh
but be careful not to tighten hr
too tiglitly. Slide bracket up toloosi
tension.
When proper adjustment is attaine
tigliten screw securely.
CATALOG NUMBER-868-2445
MODEL NUMBER 6105
When you need sereice or replacemei
parts, please be sure to give the mod
and serial numbers. They are show
on the model number plate mountc
on the front side of the machine base
After oiling machine, run Ihe iiiailmie
at high speed so that oil will peiieii.iuall moving parts. 'ITien sew a lew low's
of stitches on a scrap rrf material lo
be sure that machine sews cleanly.
Also wipe off any excess oil from lop
of niadiine.
Do not oil the motor as it has been
permanently lubricated at Ihe factory.
4.3
44
Page 25

PROBLEMS ^ AND PROBABLE CAUSES
In must cases, poor sewing results are due to a damaged needle. Always examine
needle f irst tielore checking other items.
1, SKIPPING STITCHES
l)cnl or blunt needle
wiong size needle
needle inserted incorrectly
needle threaded incorrectly
upper thread tension loo tight
pressure on presser toot too light
2. UNEVEN STITCHES
bent 01 blunt needle
wrong size needle
incorrect threading
pulling fabric while sewing
upper thread tension loo loose
|)iessurc on pressei foot tooliglit
loose presser fool
fabric feed too low
bobbin would unevenly
bobbin inserted incorrectly in case
NEEDLE BREAKS
bent needle touches needle plate or presser foot
needle inserted incorrectly
pulling fabric while sewing
loose presser fool touches needle
needle loo tine lor fabric
moving stitch ptiltern lever or stitch width
dial with needle in labric
lower THREAD breaks
• bobbin case threaded incorrectly
• bobbin case inserted incorrectly in machine
• bobbin wound unevenly
• bobbin wound too full
• bobbin tension too tiglit
• rougli edge in hole of needle plate
• bent bobbin
• poor quality thread
FABRIC PUCKERS
• bent or blunt needle
• upper thread tension too tiglrt
• botJi upper and lower tensions too tight
• using two diflerent kinds ot sizes ot thread
• fabric too sheer or soft (use tissue paper underlay)
MACHINE DOES NOT FEED FABRIC
7.
• stitch length knob set at 0
• fabric feed on DARN
• presser foot not down completely
• thread knotted under fabric
BUNCHING OF THREAD UNDER FABRIC
• upper and lower threads not drawn back under presser foot
• fabric teed on DARN
BOBBIN DOES NOT WIND PROPERLY
• incorrect threading
• bobbin winder thread guide not positioned correctly
• bobbin not positioned correctly on spindle
• bobbin winder not engaged with hand wheel
4. UPPER THREAD BREAKS
bent or blunt needle
incorrect threading
upper tension ioo tight
needle inserted incorieclly
needle touches presser foot
needle eye has sharp edges
poor quality threail
knots in thread
starling to stitch loo fast
thread jammed in shuttle
45
MACHINE RUNS SLUGGISHLY
10.
• dirt or lint between teeth of fabric feed
• dirt 01 lint in shuttle
• machine needs oiling
11. MACHINE WILL NOT SEW
• cord iu)i plugged into outlet
• cord not plugged into "Motor’’ socket in Cabinet or case
• stop motion knob not tightened
• motor licit too loose rrr broken
46
Page 26

Âccessories/Accesorios especiales
и
411 85 00-45. Presser foot for attaching
braiding, v.'hich is inserted through a guide
end Gftcched with a straight stitch in the
miedie of the oraiding,
411 as 00-45. Prensateias pera sobrecos
er cinre aecorativa. A través de ia guía, se
inrroducs ia cinta у se sobrecose ia misma
cor ei centre mediante un pespunte recto,
411 85 01—45. Tepe guide, faciütates guid
ing таре, cord етс, ¡пто braiding foot.
411 85 01—45. Guíe de cinta, fcciiitcndo ic
conducción de la cinta.
411 85 30—45. Presser foot H. The same as
presser foot A but the underside is coated
with teflon for sewing leather or plastic. 4
411 85 30—45. Ei prénsatelas H es iguai ai
prensoTelas A, pero con ia parte inferior de
teflon para coser en cuero y material sintét-
412 34 73-45. Presser foot for gathering.
The fabric is gathered as it is sewn - longer
stitch wiii produce fuller gathering. The gath
ered fabric can be sewn simultaneously tc
another ungethered fabric.
412 34 73-45. Prensateias fruncidor. Se
pone ia teia por debajo del prénsateles y
cuanto más larga sea la longitud de punta
da, mayor fruncido se obtiene.
We reserve the right to change the ma
chine equipment and the assortment of
accessories without prior notice, or make
modifications to the performance or de
sign.
Such modifications however will always
be to the benefit of the user and the prod
uct.
Nos reservamos el derecho a modificar
la máquina, el equipo ó ios accesorios
extras sin previo aviso. Tales modifica
ciones serán siempre para beneficio del
consumidor y del producto.
39
 Loading...