

SINGER W4910 User Manual
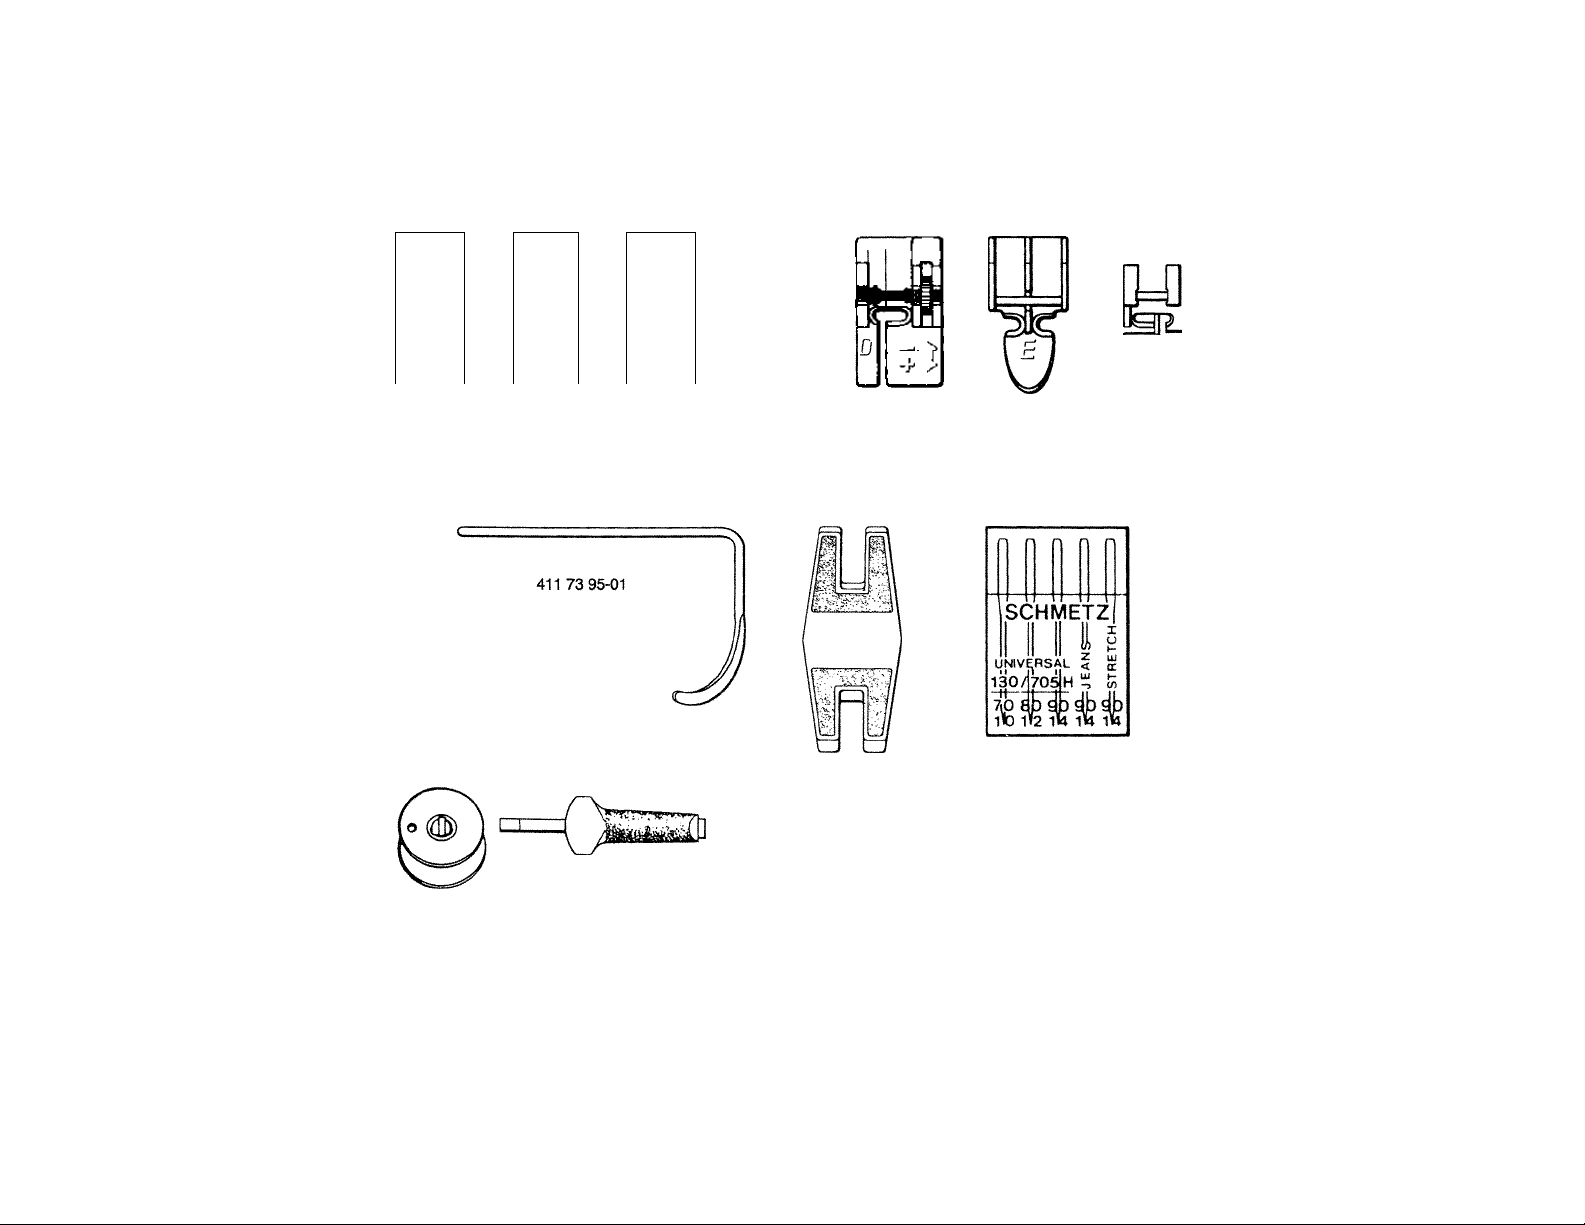
Standard accessories delivered with the machine
mg
'sx L-
f
---------
f -S
i
^q
QJ
(t
---r
h
412 03 73-01 411 77 91 -01 412 03 74-01 411 73 89-01 411 53 31 -02 411 73 93-01 411 85 27-01
411 1732-01
411 78 90-01
J
«-'V ■■'•J
;
412 0612-01
411 78 83-01
m.
401 55 55-01
401 53 99-01
Fli:-
For you and your new sewing machine
This booklet has been prepared to let you know how to
operate this sewing machine and how to make use of all
its sewing possibihties.
You will, for sure, get many pleasant hours with your
new sewing machine and be successful in obtaining many
fine results.
k
We reserve the right to change the machine equipment
and the assortment of extra accessories without prior
notice, or make modifications in the design or appearan
ce of the machine, which do not negatively affect the
function.
m m m m m

Table of contents
Instructions
Machine parts
Front and rear of the machine, names of parts
Unpacking and putting away the machine
Connecting the machine........................................................ 7
Free arm, extension table
Function switches................................................................ 8-9
Thread guide for bobbin winding main switch,
reverse feed, limiting the speed, needle stop
position
Function.................................................................................. 10
Presser bar lever, presser foot pressure
Lowering the feed dog, bobbin winding
Threading, thread tension.............................................. 12-14
Changing the needle and presser foot
Stitch settings and sewing................................................. 16
General hints......................................................................... 17
Stitches.............................................................................. 18-38
Maintenance..................................................................... 39-40
Care of the machine
Changing the light bulb
Fault-finding
Accessory box.................................................................. 43-44
Presser feet, needle and thread, etc.
Needle assortment
Extra accessories.............................................................. 46-48
Index................................................................................ 49
.....................................................................
..............
..........................
..............................
....................................................................
...............................................................
4_5
6
11
15
41-42
45
Sewing
Straight stitching............................................................... ig
Top stitching
Basting, gathering....................................................... 19
Sewing in zippers
Zig-zag stitching
Sewing on lace
Gathering, bound edges
Appliqués
Three-step zig-zag............................................................ 24
Overcasting, terry cloth............................................. 24
Mending
Overcast stitch.................................................................. 26
Blindstitching
Double-action stitch
Bridging stitch.................................................................. 30
Reinforced straight stitch
Overlock............................................................................ 32
Flatlock............................................................................. 33
Reinforced zig-zag (Ric-Rac)
Decorative stitches
Buttonholes..................................................................... 35
Ordinary buttonholes
Reinforced buttonholes
Corded buttonholes
Cutting the buttonhole
Sewing on buttons............................................................ 33
Precision setting for buttonholing
...............................................................
.................................................
...............................................................
.....................................................
.............................................
....................................................................
.....................................................................
..........................................................
........................................................
.................................................
...........................................
...........................................................
.................................................
...............................................
.....................................................
...............................................
20-21
22
27—28
18
22
23
23
25
29
31
34
34
35
36
37
37
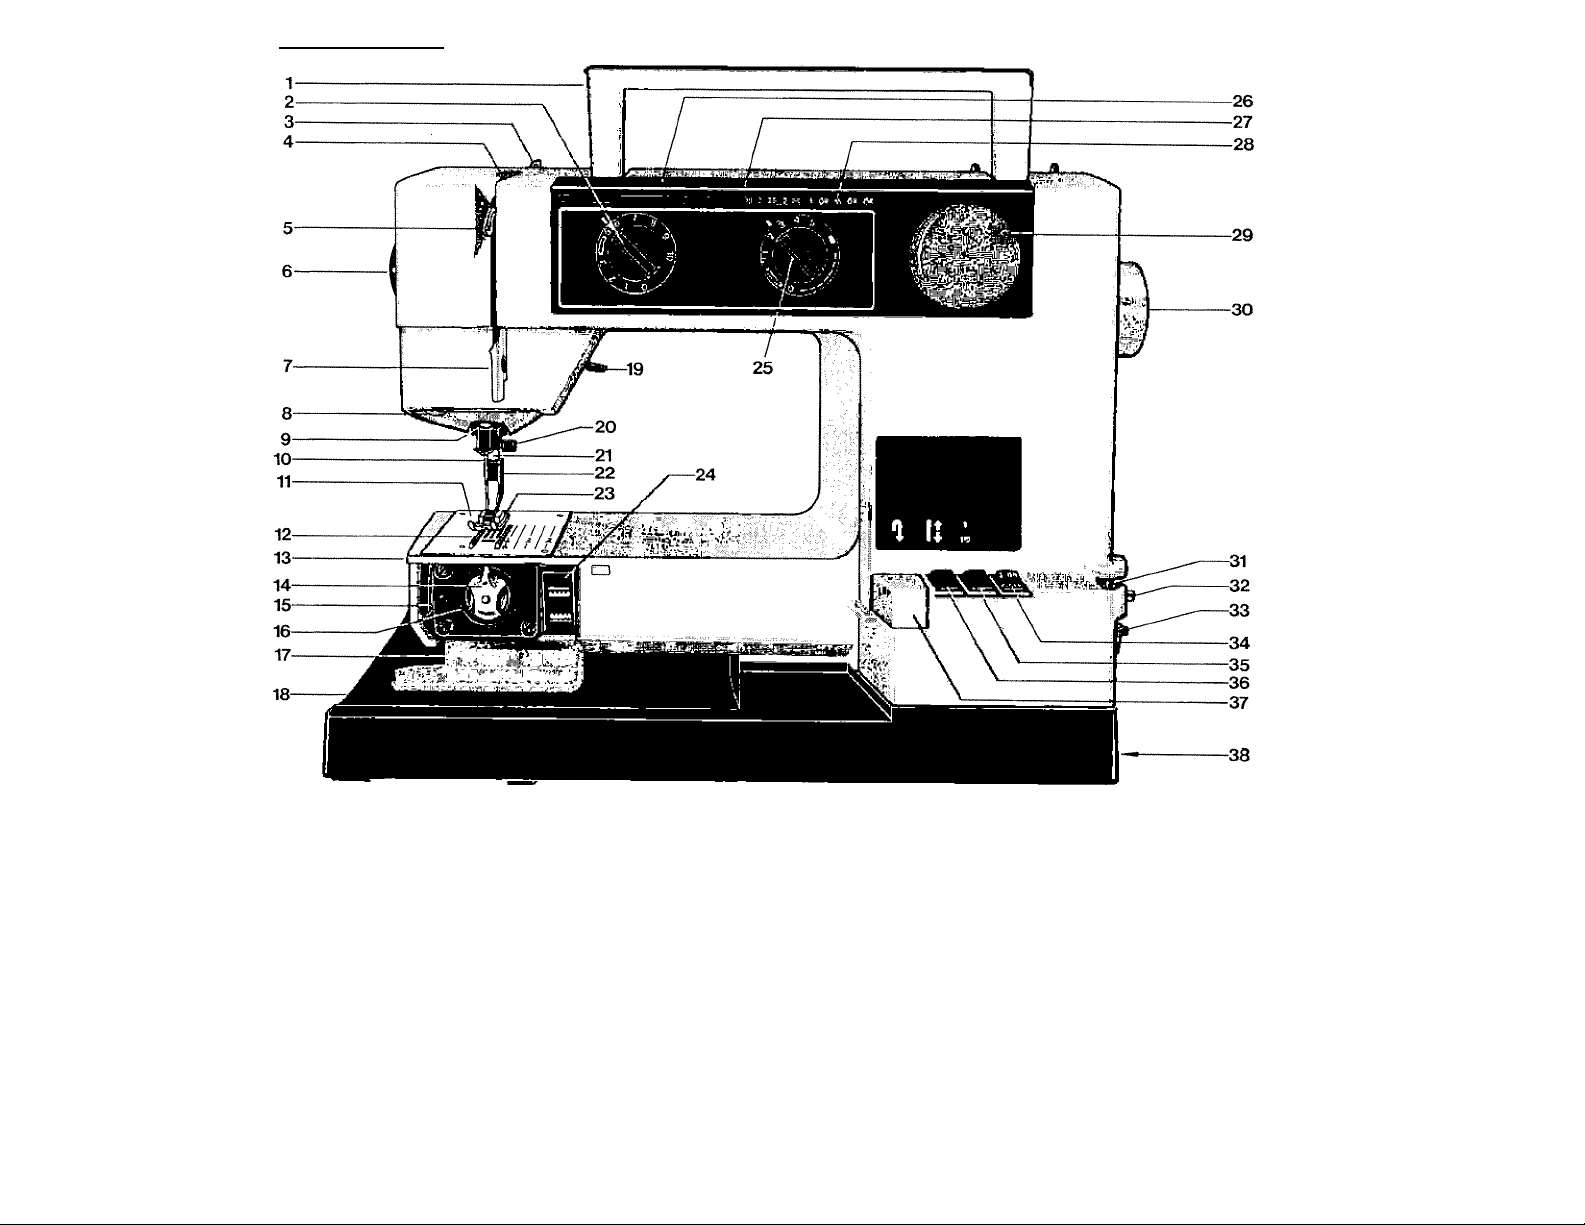
Machine parts
1. Handle
2. Thread tension dial
3. Thread guide
4. Thread tension discs
5. Thread take-up lever
6. Presser foot pressure dial
7. Front thread guide with thread
take-up spring
8. Sewing light
9. Needle bar
10. Needle
11. Needle plate (stitch plate)
12. Feed dog
13. Free arm
14. Bobbin case
15. Thread cutter
16. Shuttle (hook)
17. Door for shuttle (hook)
18. Baseplate
19. Presser bar lever
20. Needle clamp screw
21. Presser bar 35.
22. Presser foot ankle 36.
23. Presser foot
24. Drop feed button
25. Stitch length dial
26. Stitch symbols
27. Recommended presser foot
28. Recommended stitch length
29.
30. Handwheel
31.
32.
33.
34.
37.
38.
Stitch selector
Thread guide for bobbin winding
Bobbin winding spindle
Automatic bobbin winding stop
Main switch
Speed control switch
Needle position switch
Reverse feed button
Socket for foot control
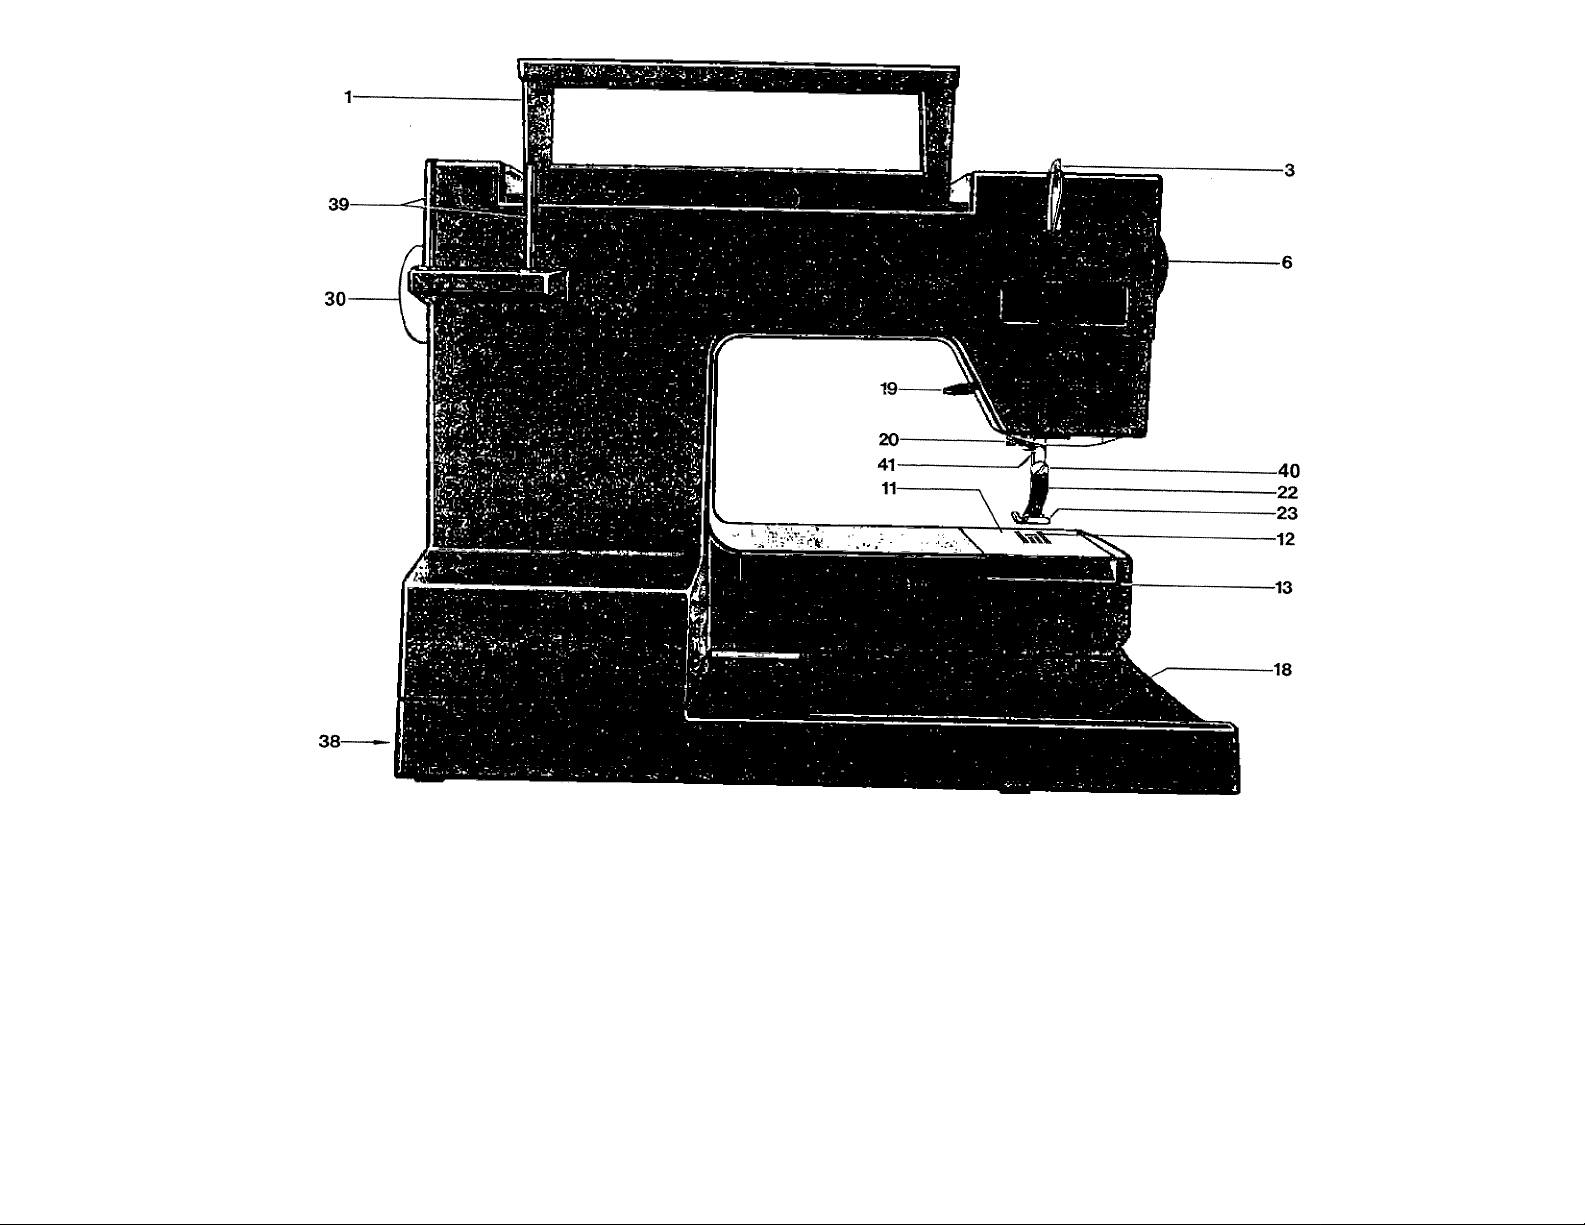
Macnme parts
1. Handle
3. Thread guide
6. Presser foot pressure dial
11. Needle plate
12. Feed dog
13. Free arm
18. Baseplate
19. Presser bar lever
20. Needle clamp screw
22. Presser foot ankle
23. Presser foot
30. Handwheel
38. Socket for foot control
39. Spool pins
40. Screw for edge guide
41. Thread cutter
Unpacking and putting away the machine
Unpacking
Place the machine on the table, with the recess for the
handle furthest away from you, and fold down the
handle. Lift off the cover and put it aside. Remove the
extension table and the foot control and slide the acces
sory box to the left from the machine.
Wipe the machine clean before you start sewing, and
be especially careful with the stitch plate and the space
around the needle. The machine is equipped with a
number of presser feet and these are packed in two
plastic bags. Regarding the placing of the accessories,
please refer to page 43 under “Accessory box”.
Putting the machine away
Pull the plugs out of the wall outlet and the socket of
the machine. Wind the cords around your hand, starting
at the foot control and push them into the control com
partment. Place the control in the rear compartment of
the accessory box, with the wider end downward. The
bottom of the foot control should be turned toward the
machine.
Lower the presser foot. Make sure that aU accessories
are correctly placed in the box. Slide the accessory box
into place and put the extension table into the box.
Fold down, the handle and put on the cover.
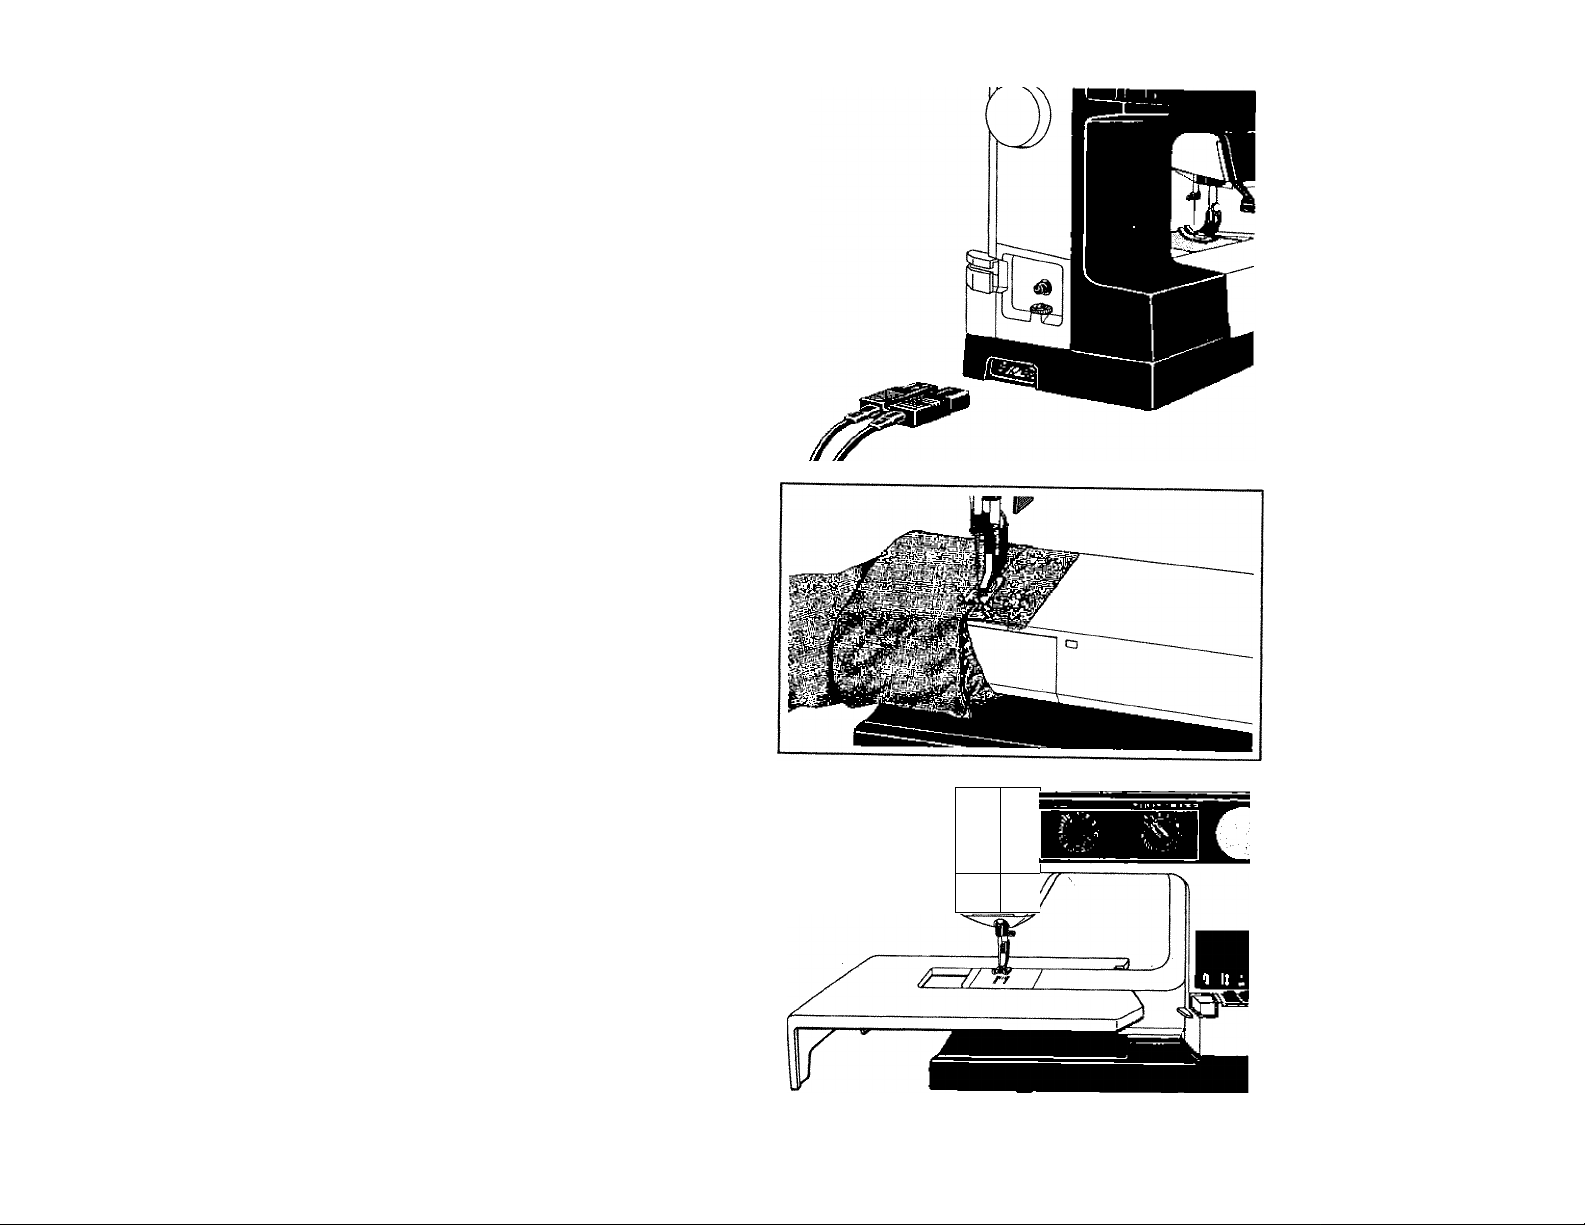
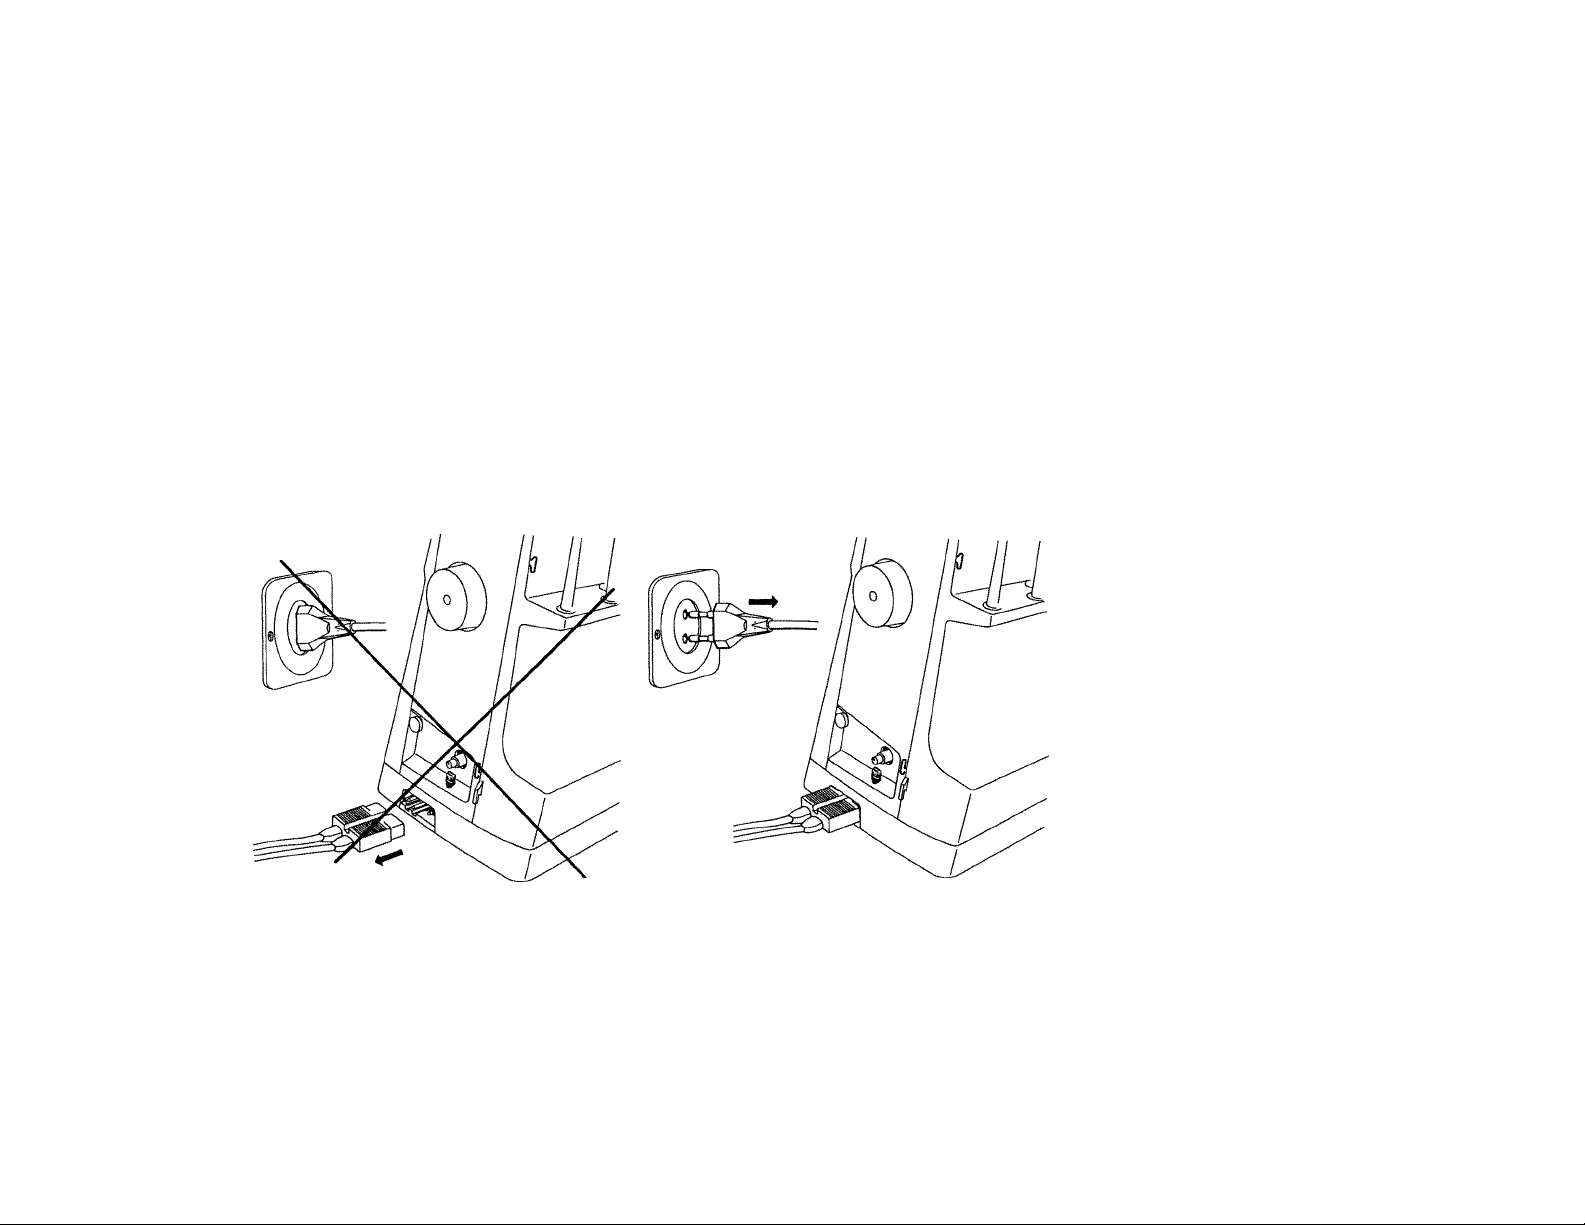
Connecting the foot control
Remove the cord from the foot control and place the
control under the table. Insert the foot control plug into
the socket on the right-hand side of the machine.
Connecting to the wall outlet
The voltage (V) and frequency (Hz) are indicated
under the base of the machine. Check that these values
correspond to those of the electricity source before
connecting the machine.
Free arm
Trouser legs and sleeves can be drawn onto the free
arm, making it easy to sew, mend or patch these parts.
The free arm also makes it much easier to attach collars
and cuffs as well as sew small children’s clothes, or dam
socks and stockings on the machine.
Connecting the machine
Extension table
When you need a larger working surface, attach the
extension table.
When positioning the extension table over the free
arm, fit the two studs into the holes at the rear of the free
ami. Pull out the catch under the front of the table and fit
it into the hole for this purpose on the free arm.
When removing the table, pull out the catch and lift
the table away.
"
L
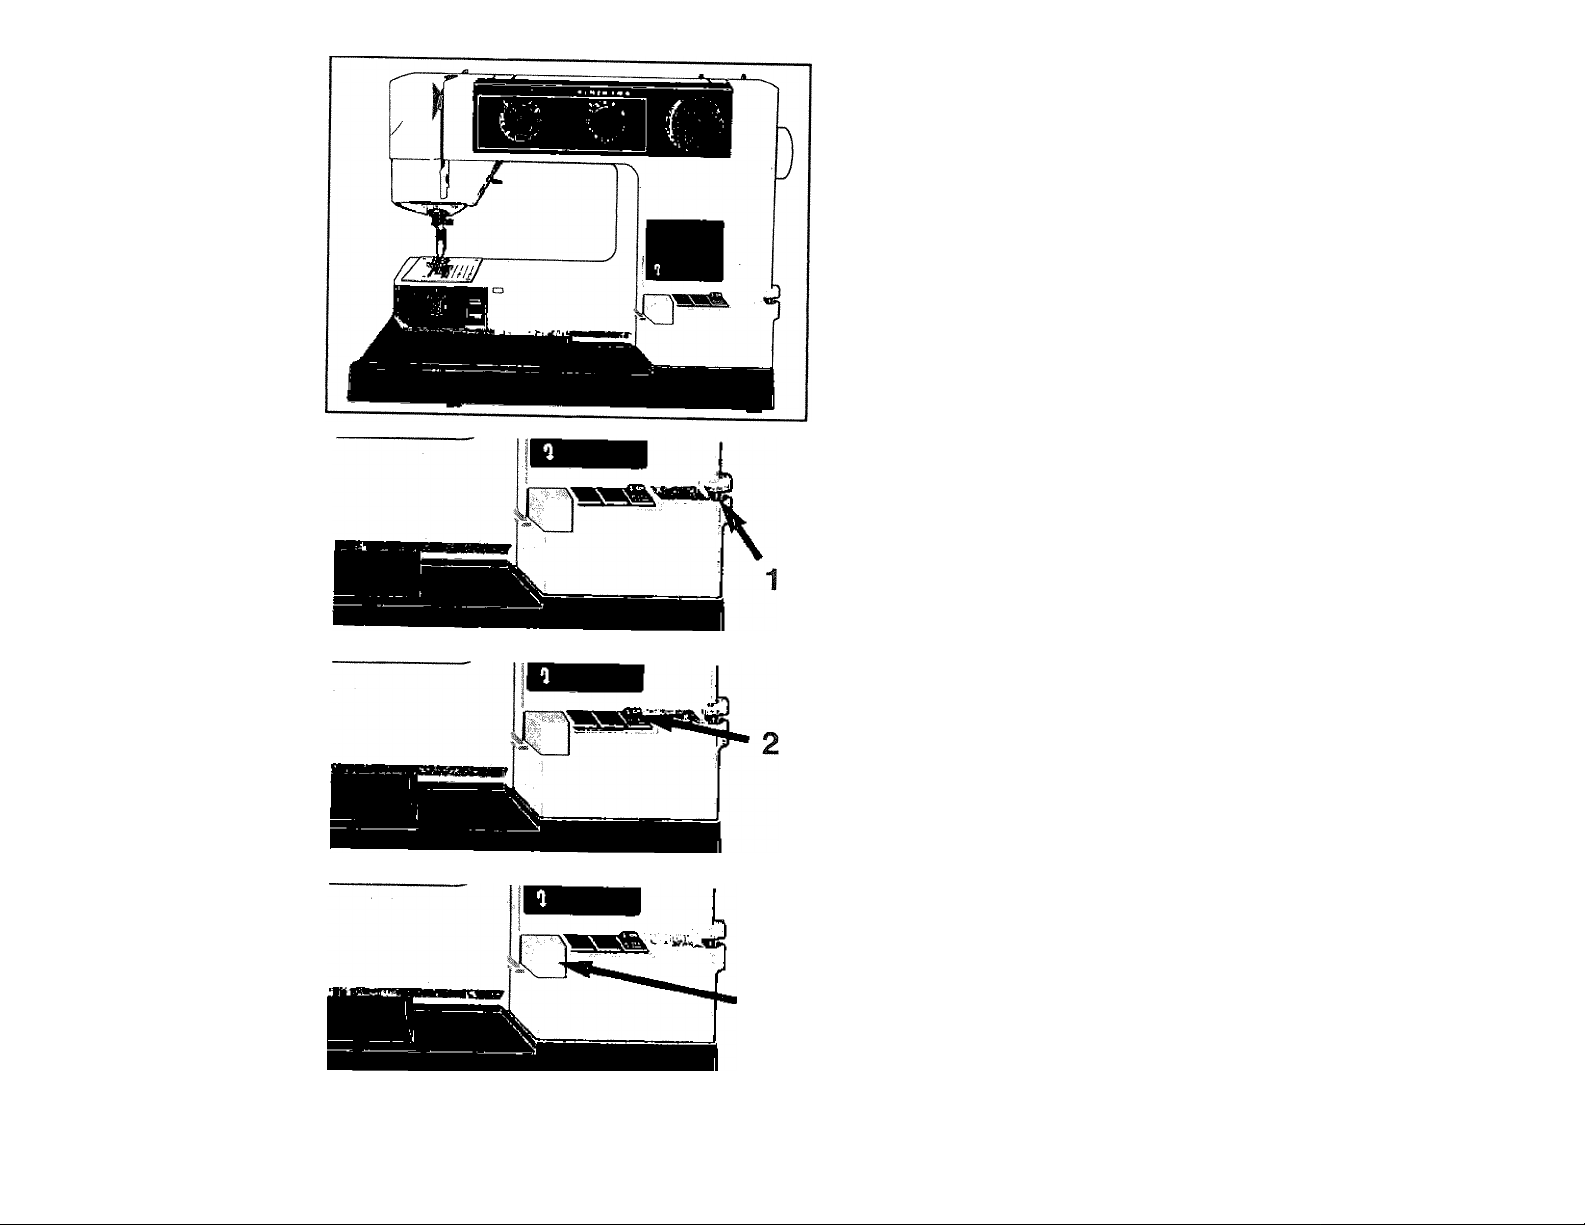
Function switches
Function switches
The thread guide for bobbin winding is located on the
front of the machine to the far right. The main switch is
located to the left of the thread guide.
The reverse feed button is located closest to the free
arm.
Thread guide for bobbin winding (1)
The thread gmde for bobbin winding is for use when
bobbin winding. Read more about bobbin winding on
page 11.
Main switch (2)
The light and the machine are turned on by pressing
the inner part of the main switch. This makes it easy to
see that the machine is ready for sewing.
Reverse feed button (3)
As long as you keep the reverse feed button depressed
the machine will sew in reverse but will revert to ordina
ry sewing as soon as you release it. Excellent for fasten
ing off.
The longest stitch length when reverse feeding is
3 mm.
K'-'
V
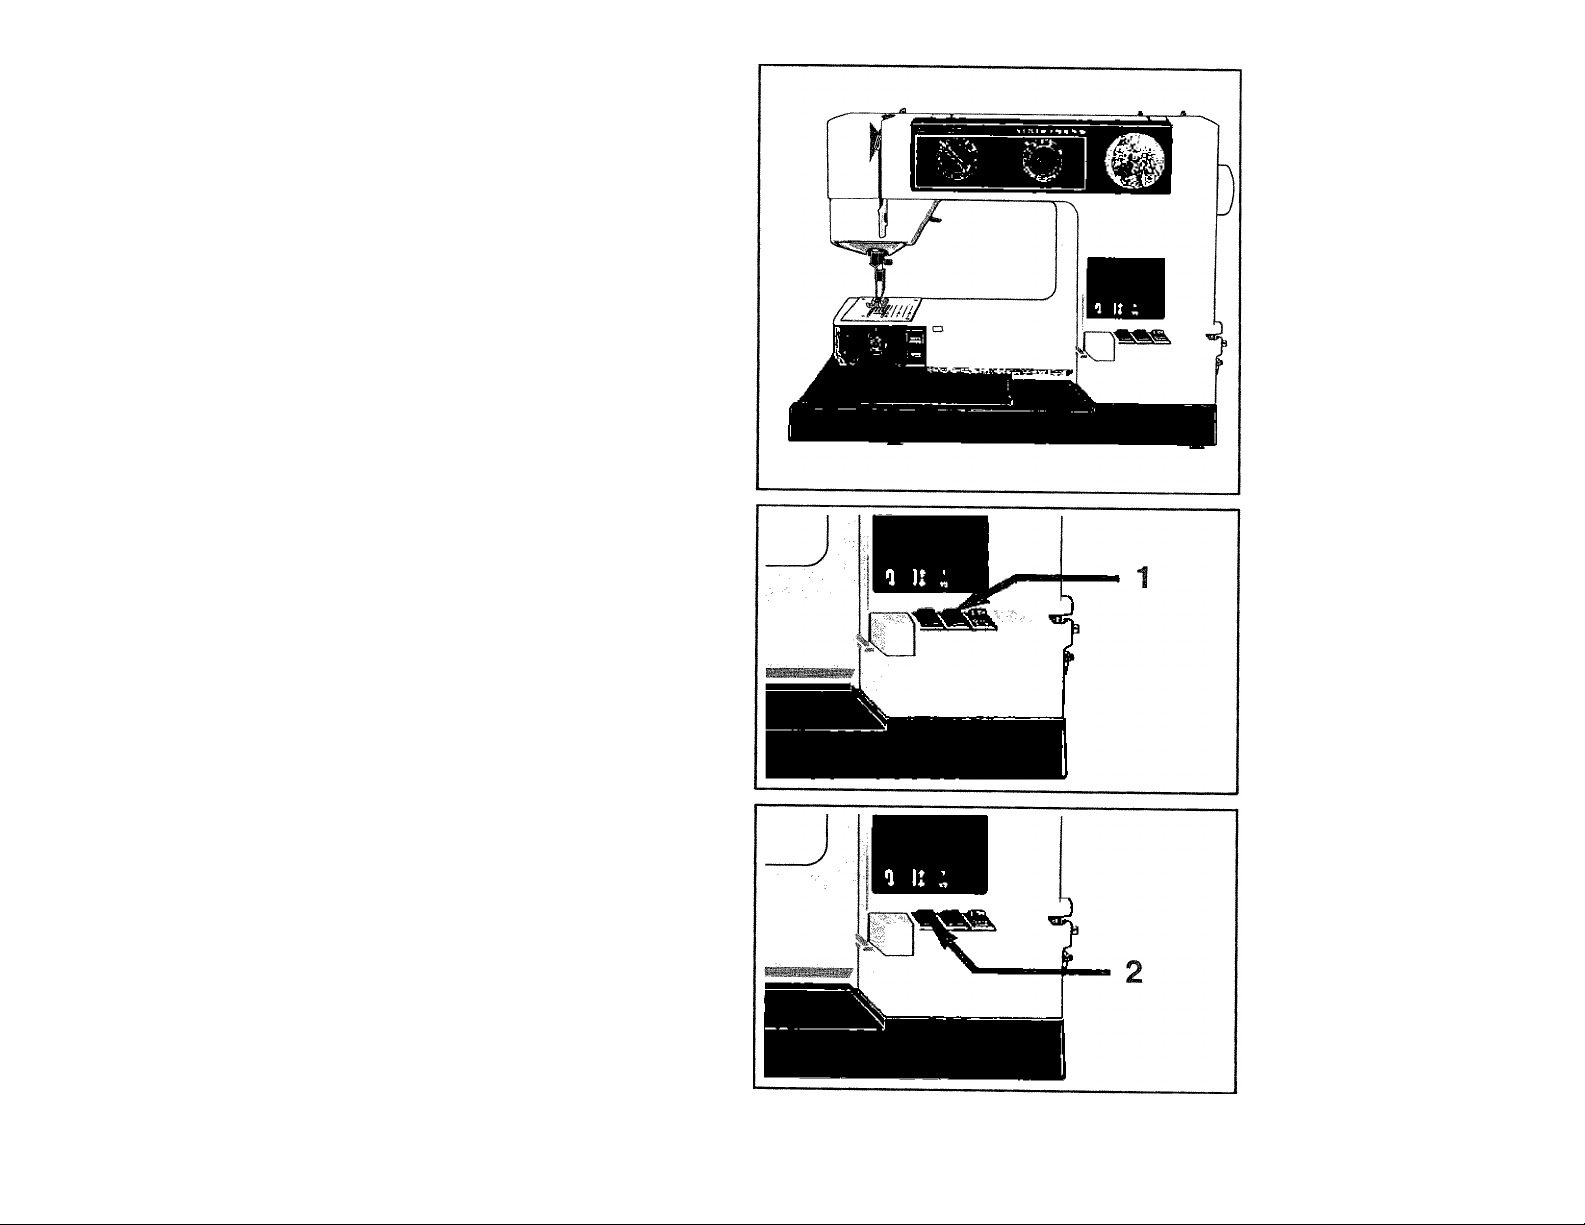
Function switches
In addition to the setting possibilities described earlier
the machine also has a switch for reducing the speed and
one for setting the needle stop-right position.
Limiting the speed (1)
When sewing with the inner part of the switch de
pressed you can regulate the speed of the machine up to
the highest speed. If you push the outer part of the switch
down and carefully press the foot control, the machine
will initially make a short pause between each stitch.
This will give you time to check that you are sewing
exactly where you want to. This is a great help for
precision sewing and when you wish to move the fabric
by hand, e.g. when basting. Remember to lower the feed
dog when basting. When you press the foot control
again, the machine will sew at an even and slow speed.
You have full needle power the whole time. With the
foot control completely depressed, the speed will be
approximately half of the maximum speed.
Function switches
Needle position switch (2)
With this switch you can choose the position at which
the needle should stop. When the iimer part of the switch
is depressed, the needle will stop at its upper position for
use when removing the fabric at the end of a seam. When
the outer part of the switch is depressed, the needle will
stop in the fabric, and hold it securely for pivoting (lifting
the presser foot and turning the fabric to sew aroimd a
corner).
When the switch is in the intermediate position the
needle will stop at any position. You can then turn the
handwheel until the needle is in the position you require.
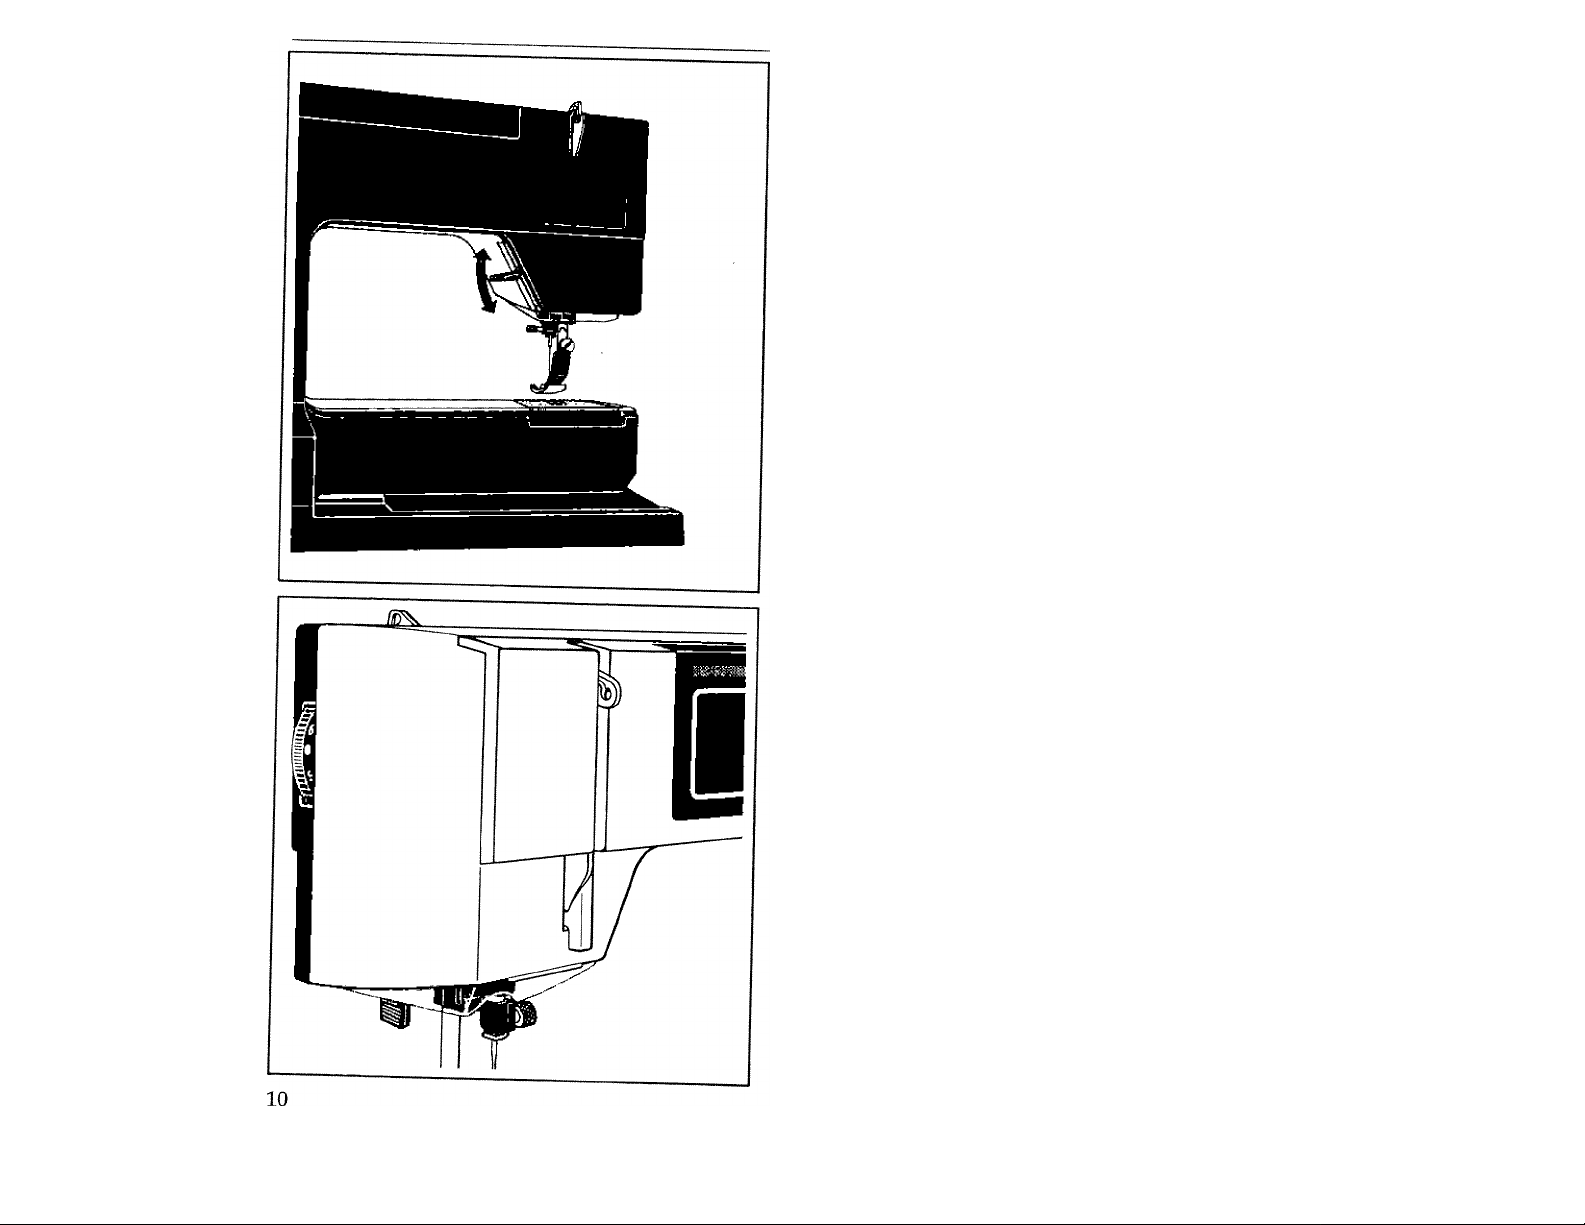
Function
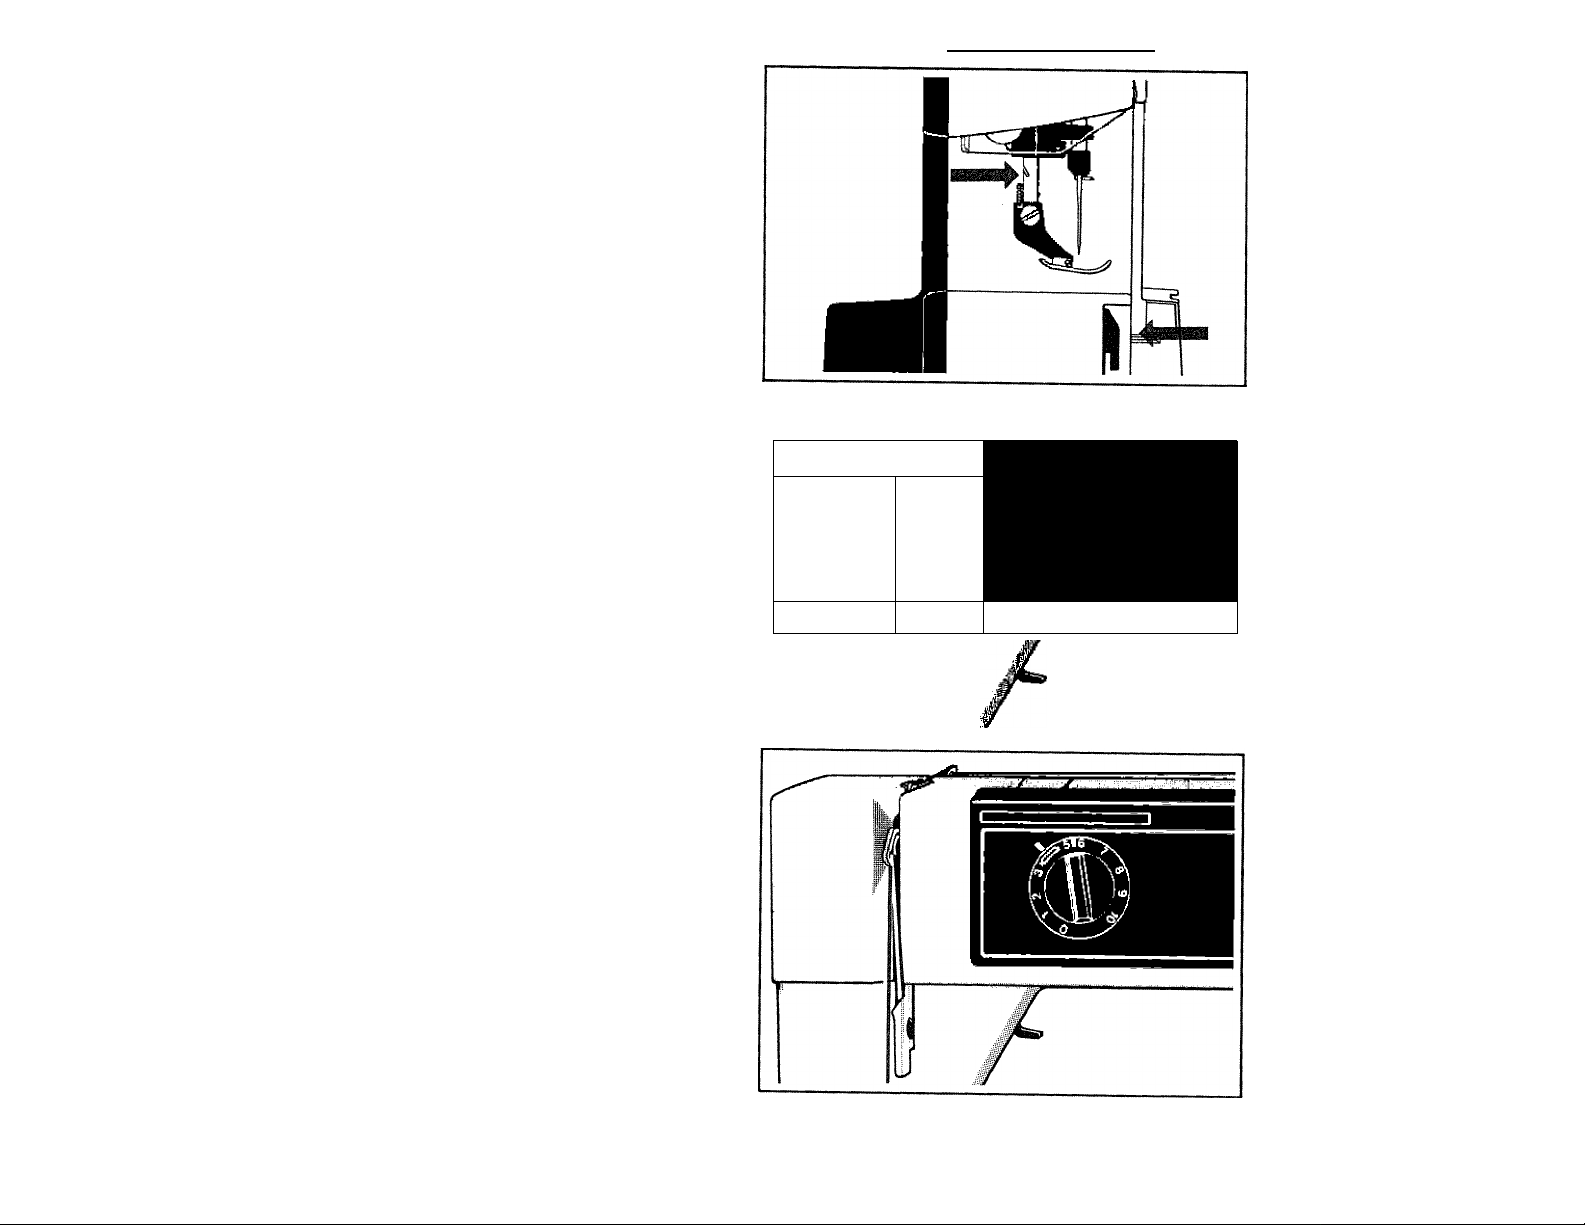
Presser bar lever
By means of the presser bar lever at the rear of the
machine, the presser foot can be raised and lowered.
When raising, the presser foot will remain in the raised
position, but the height can be increased by 1.5 mm by
pushing the presser bar lever upward and holding it in
this position. This is useful when you want to put gar
ments with thick seams under the presser foot.
The presser foot should be lowered while sewing.
f
'îc
Presser foot pressure
The presser foot pressure can be adjusted with the aid
of a marked dial on the left side of the machine. Normal
pressure is obtained by setting the dial at the white dot
but for some fabrics it may be better to reduce or in
crease the pressure. The higher the number, the greater
the pressure.
By setting the dial at the symbol ^ the presser foot
pressure is completely released. This setting should be
^ed when free-hand sewing with the darning foot, i.e.
darning, monogramming, machine embroidery and quilt
ing.
If you turn the graded dial for the pressure foot pres
sure to the lowest number, it is possible to dam with
presser foot A.
Lower the feed dog and move the fabric forward,
backward and sideways by hand.
Lowering the feed dog
You lower the feed dog by pushing in the upper part of
the push-button. In order to raise the feed dog again push
in the lower part.
The feed dog should be lowered for a certain type of
darning and when sewing on buttons. It is also easier to
get thick garments under the presser foot if the teeth of
the feed dog are not above the level of the stitch plate.
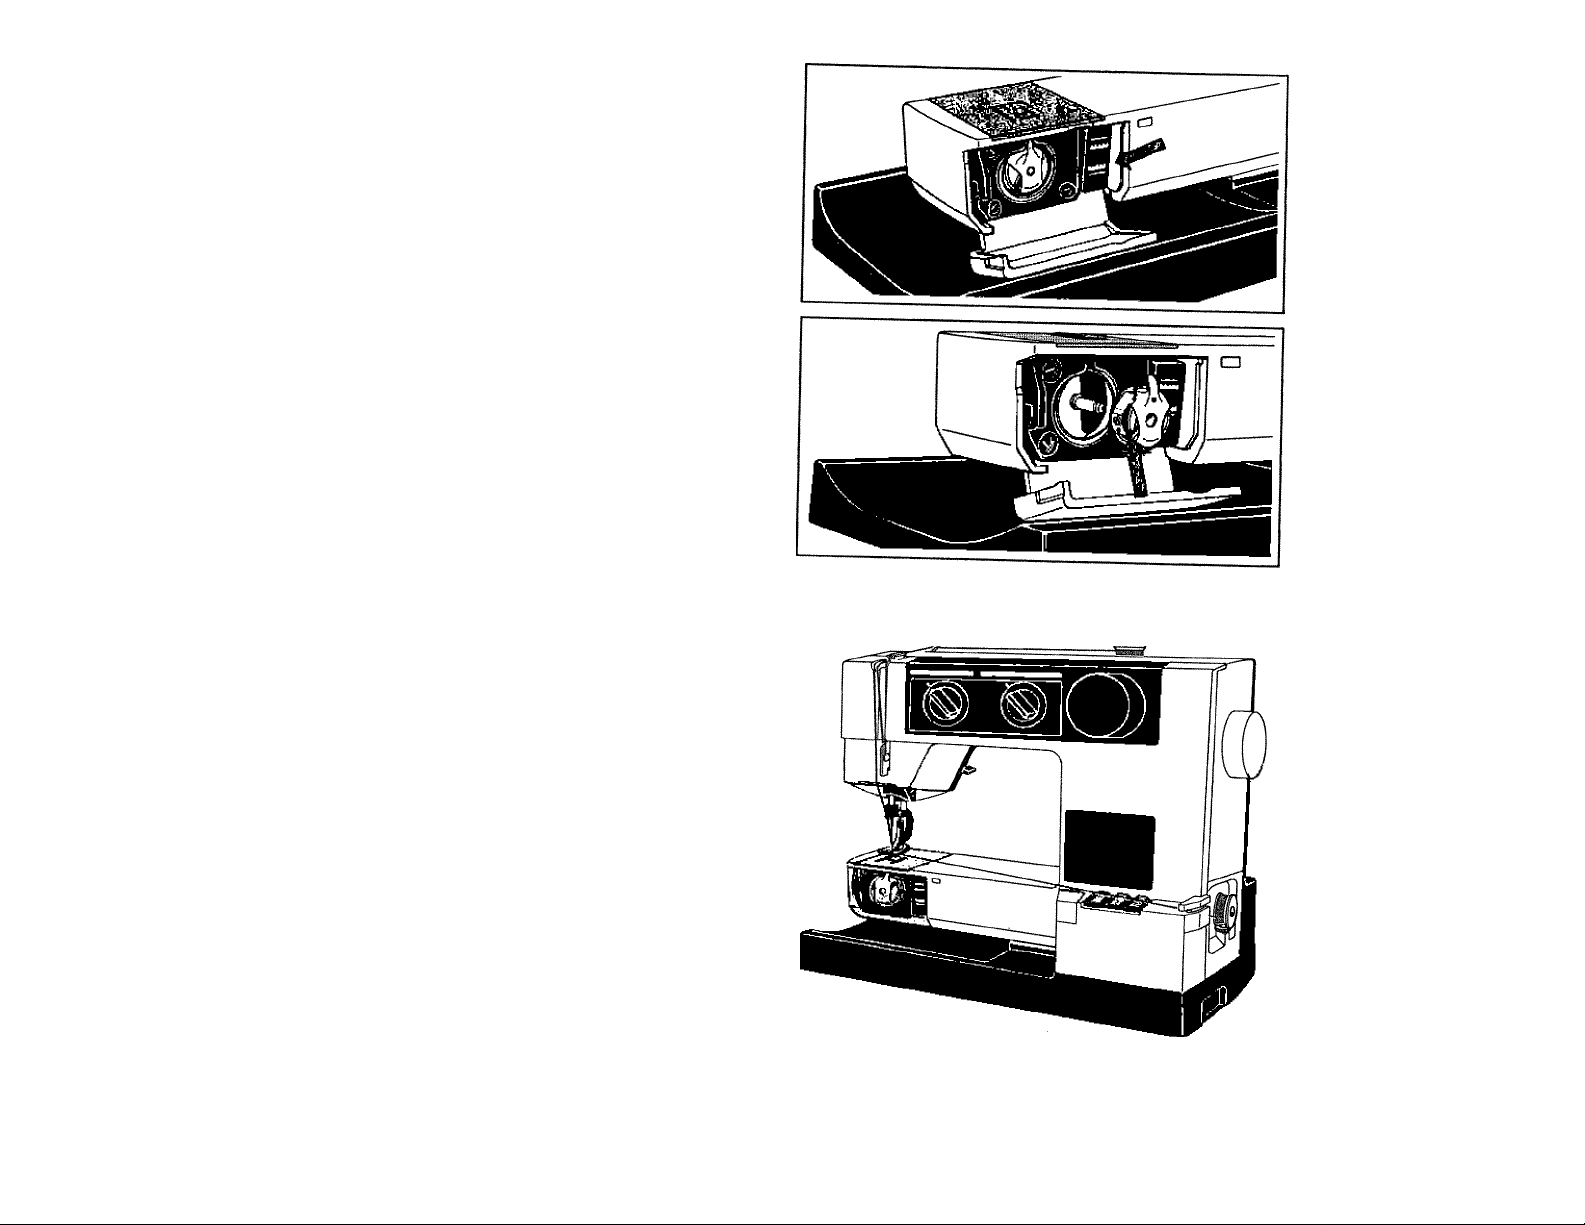
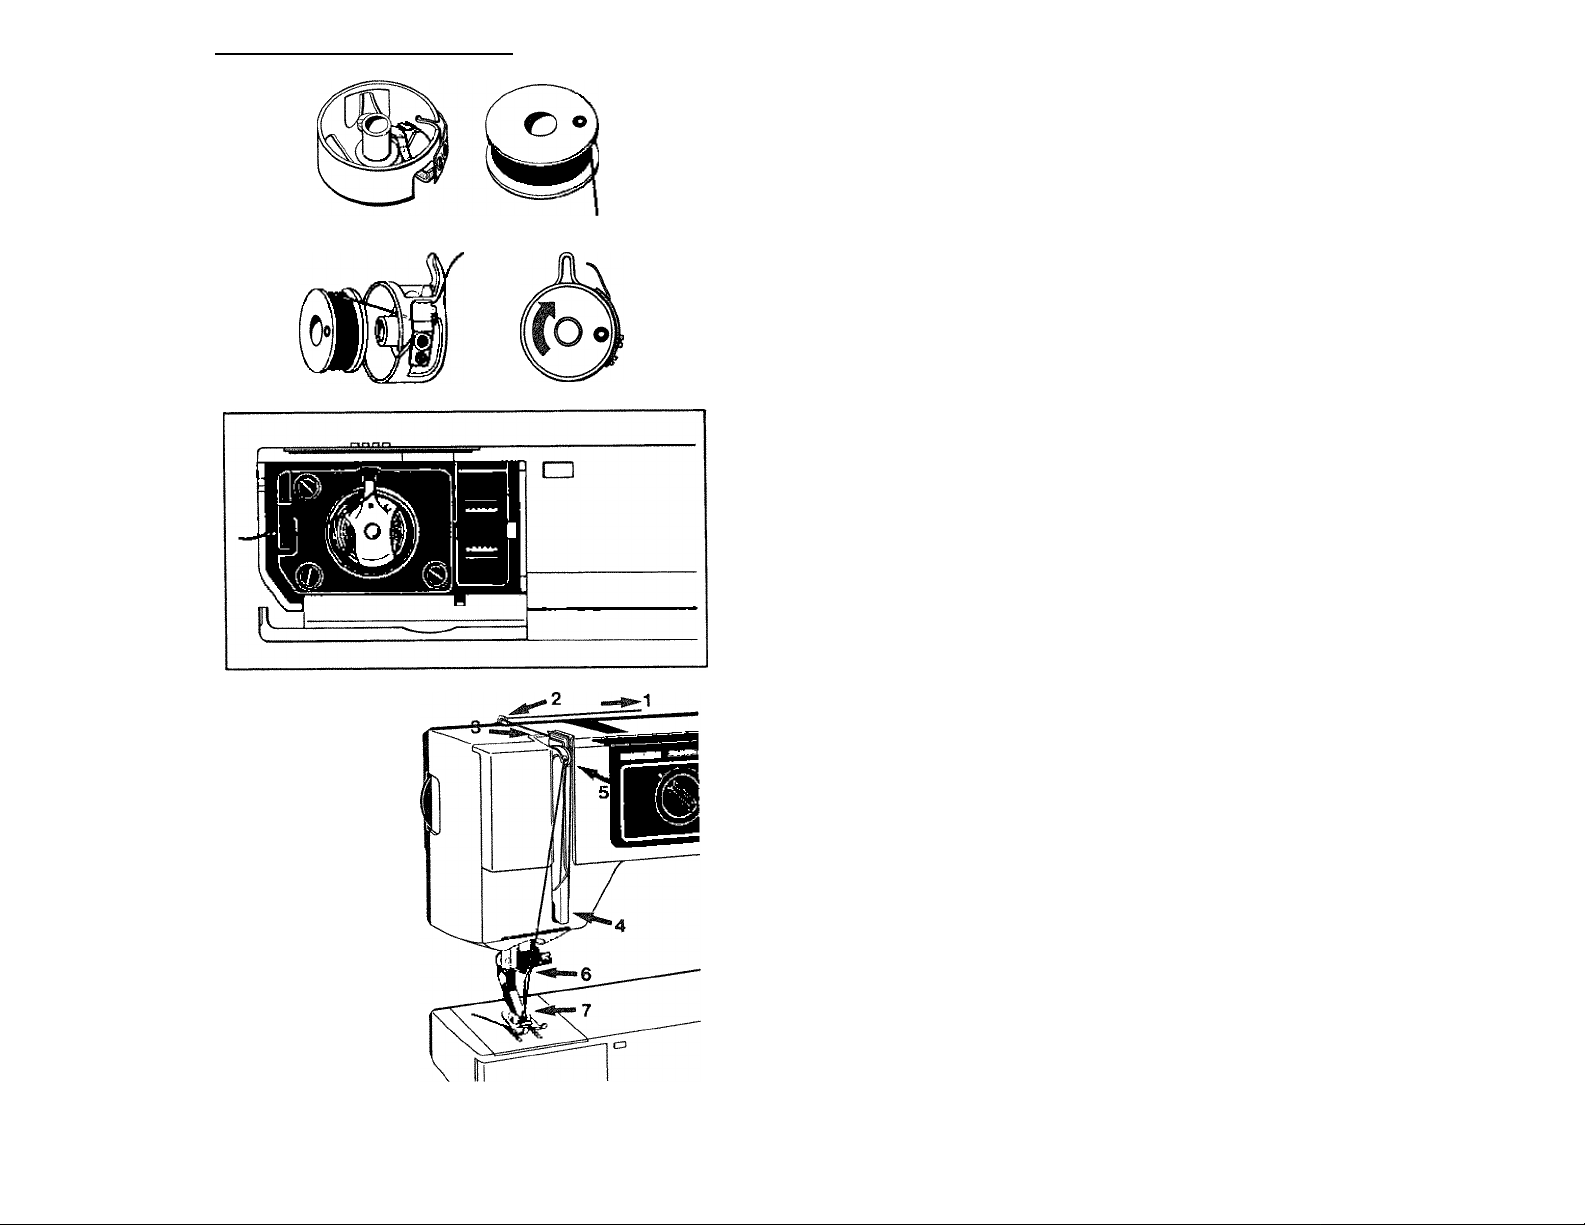
Removing the bobbin case
Open the door in front of the shuttle by means of the
small recess on the left side.
Grip the bobbin case with the thumb and index finger
so that the latch is depressed and pull the bobbin case
out. The bobbin will remain in the case as long as the
latch IS depressed. When you release the latch, the bobbin will be released.
Bobbin winding
Turn the empty bobbin until the small round mark on
one side is outward.
Slide the bobbin onto the bobbin winding spindle
located on the right side of the machine.
Raise the presser foot and pull the thread from the
thread guide by the needle clamp through the groove on
the thread guide at the right of the machine. Wind the
thread around the bobbin a couple of times, beginning
from underneath. If you are using a metal presser foot,
allow the thread to go through the eye of the needle and
under the presser foot. Never run the thread direct from
the eye of the needle to the bobbin because you will run
the risk of bending the needle. Hold the thread end and
lightly depress the foot control. As soon as winding starts
you can release the thread end.
The machine will automatically stop when the bobbin
is full. Remove the bobbin.
_LQ^^ring the feed dog, bobbin winding
11
Threading, thread tension
Threading the lower thread
When the bobbin winding is finished, place the bobbin
beside its case with the marking upward. The thread
should run as shown in the figure. Place the bobbin in its
case without turning it around.
Slide the thread into the slot on the edge of the bobbin
case. Pull the thread in under the tension spring. Check
that the bobbin rotates in the direction of the arrow
(clockwise) when the thread is pulled.
The thread must be pulled in the direction of the
spring, otherwise the spring will be overloaded.
Insertion of the bobbin case
Slide the thread behind the projection of the bobbin
case and to the right. Put the bobbin case into place.
Press the bobbin case until it clicks to ensure that it fits
properly.
The thread cutter is located to the left of the bobbin
case. Hold the thread end and draw the thread from
underneath and up toward the thread cutter. By doing so
the thread will be cut off and kept in place.
Shut the door.
r:
f
S(:
12
Threading the upper thread
Raise the presser foot. Check that the needle is at its
highest position. Place the spool of thread on the left
spool pin 1 and thread the machine for sewing.
Slide the thread into thread guide 2 on the upper arm
and draw it upward. Then draw the thread to the front
between the tension discs 3 and down around thread
guide 4. Continue threading by drawing the thread from
the right into the slot on thread take-up lever 5 and draw
it down to the needle, ensuring that it goes through
thread guide 6.
Thread the needle from the front. Due to the white
color of the presser foot ankle the needle-eye is clearly
seen and the threading of the needle, 7, is easier. Pull the
thread under the presser foot about 15 cm (6") toward
the rear.
Thread cutters
On the back of the presser bar you will find a notch,
the thread cutter, by means of which you can easily cut
off the threads when you have finished sewing. There is a
special thread cutter for the bobbin thread. See page 12
“Insertion of the bobbin case”.
Tension of the upper thread
The dial which regulates the tension of the upper
thread is graduated from 0-10. The higher the number,
the tighter the tension. Normal thread tension is ob
tained by setting the dial at the white index. Your ma
chine has been tested using the thread which accompa
nies it and with the thread tension dial at the white
index.
If using a coarser thread, it may be necessary to alter
the thread tension slightly. Also the type of fabric may
require that the tension be adjusted.
ti
------------------
y
* 1,—
Threading, thread tension
1
There is also a mark on the thread tension dial for the
tension that is suitable for making buttonholes. This set
ting is also suitable for satin stitching, decorative stitch
ing, topstitching, embroidering, etc.
13
Ihread tension
Correct and incorrect thread tension
In order to easily understand the importance of correct
thread tension, you can try different thread tensions by
sewing on a scrap of fabric. Begin by using an excessively
loose tension, i.e. set the tension dial near “0”. Look at
the fabric and you will find that the lower thread lies
straight and the upper thread is drawn underneath the
fabric. If, however, you set the dial at the highest num
ber, the opposite will occur, or the seam may pucker.
The thread tension is correct when the threads inter
lock in the middle of both layers of fabric.
Please note that even the best quality thread may vary
m thickness. When sewing in fine fabrics, the knot may
sometimes be visible.
Always check that the thread tension is correct by first
sewing on a scrap of the same fabric, folded double, that
you intend to work with.
 Loading...